

Page 1
Cordless Drill & Driver/Cordless Hammer Drill & Driver
「WARNING」は、高さ2.4mm
以上の文字で記載
単語途中での改行(「-」など
を使い単語途中で改行)
なども活用して下さい。
但し、他の言語との兼ね合
いもあると思いますので
余り、英語で詰めすぎると
他の言語で歪が生じます。
バランスとって下さい。
Destornillador y taladro sin cables/Destornillador y taladro percutor sin cables
Operating Instructions
Manual de instrucciones
Model No: HTP-HDD
IMPORTANT
This manual contains safety information. Read manual completely before first using this product and save this
manual for future use.
IMPORTANTE
Este manual contiene información de seguridad. Lea completamente este manual antes de utilizar por primera
vez este producto, y guárdelo para poder consultarlo en el futuro.
Page 2

Index/Index/Indice
(A)
(B)
(C)
Asegúrese de utilizar la cubierta de la caja de batería
• Cuando no utilice la caja de batería, guarde la batería de tal forma que las materias extrañas tales como polvo
y agua, etc. ensucien los terminales. Asegúrese de colocar la cubierta de la caja de batería de tal forma de
proteger los terminales de la batería.
• Cuando cargue la caja de batería, confirme que los terminales en el cargador de batería estén libres de
materias extrañas tales como polvo y agua, etc. Limpie los terminales antes de cargar la caja de batería si hay
materias extrañas en los terminales.
La vida de los terminales de la caja de batería puede verse afectada por materias extrañas tales como polo y
agua, etc. durante su funcionamiento.
PRECAUCIÓN: Para proteger el motor o la batería, asegúrese de observar lo siguiente cuando efectúe
esta operación.
• Si el motor o la batería se calienta, se activará la función de protección y el motor o la batería dejará de
funcionar. La lámpara de advertencia de sobrecalentamiento en el panel de control se ilumina o destella
cuando esta característica está activada.
Para un uso más seguro
• La batería está diseñada para instalarse siguiendo dos pasos por motivos de seguridad.
Compruebe que la batería está instalada correctamente en el cuerpo principal antes de utilizar la herramienta.
• Si la batería no ha quedado bien introducida, la luz de advertencia de sobrecalentamiento y la luz de aviso de
baja carga de batería parpadearán, y la broca no girará del modo habitual para alertar al operario de que la
máquina no funcionará de manera segura si se acciona algún interruptor. Introduzca la batería en el cuerpo de
la herramienta hasta que el indicador rojo desaparezca.
ES
Deleteline.
English: Page 4 Español: Página 15
FUNCTIONAL DESCRIPTION
DESCRIPCIÓN FUNCIONAL
(K)
(L)
(M)
(D)
(N)
(O)
(A) Keyless drill chuck Mandril sin llave
(B) Clutch handle Mango de embrague
(C) Speed selector switch
(D) Forward/Reverse lever Palanca de avance/inversión
(E) Alignment marks Marcas de alineación
(F)
(G) Battery pack Batería
(H)
(I)
(J) LED light on/off button Botón ON/OFF de luz LED
(K) LED light Luz indicadora
(L) Battery low warning lamp Luz de aviso de baja carga de batería
(M)
(N) Support handle Mango de soporte
(O)
(P) Battery Pack cover Cubierta de batería
V
(J) (I)
(H)
(G)
(F)
(E)
(E)
(P)
Interruptor selector de velocidad
Battery pack release
button
Control panel
Overheat warning lamp
Botón de liberación de batería
Panel de controle
Luz de advertencia de sobrecalentami-
ento
Variable speed control
Battery charger
NOTE: Not all battery packs display the alignment mark (E).
NOTA: No todas las baterías muestran la marca de alineamiento (E).
trigger
Disparador del control de velocided variable
Cargador de batería
-
2 -
Page 3
Recommendations for use / Recomendaciones par el uso
Balanced
Panasonic:3languages
Huskie:2languages
EN
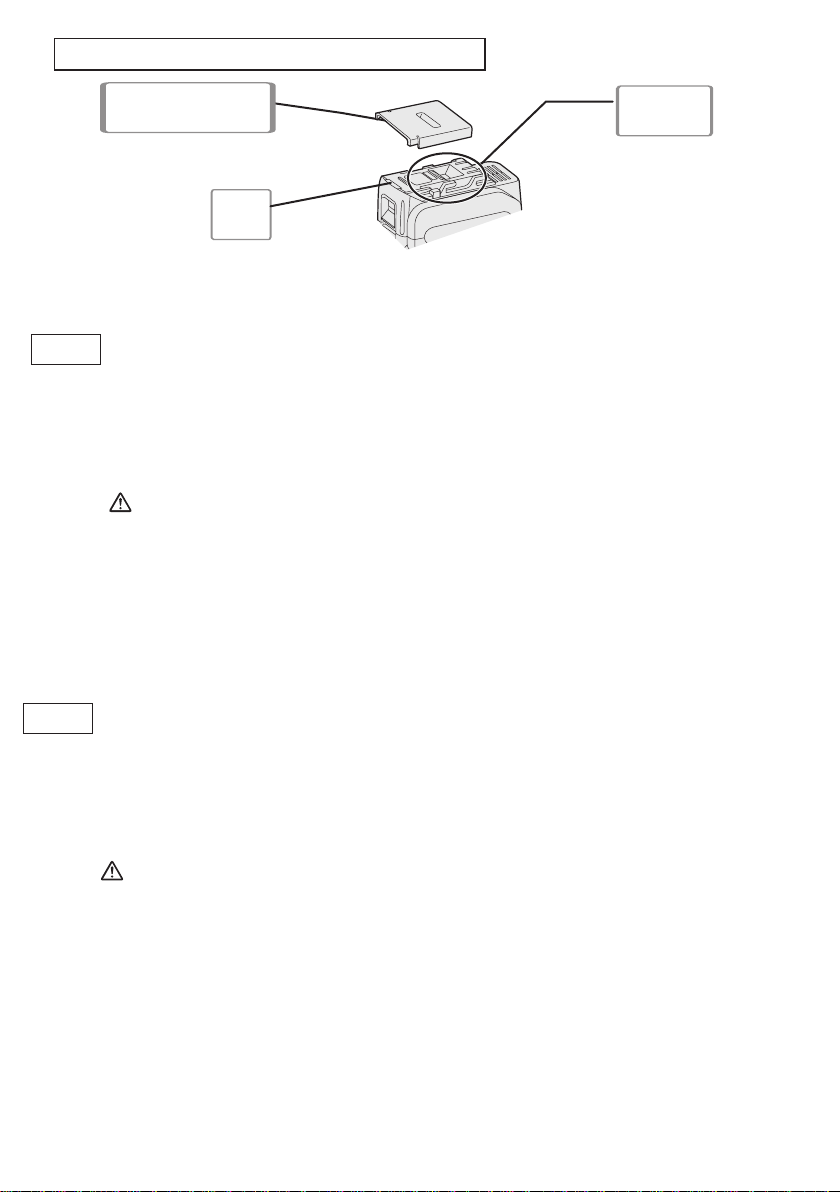
Pack cover /
Cubierta de batería
label /
rojo
Terminals /
Terminales
Be sure to use the Pack cover
• When the battery pack is not being used, store the battery in a way that foreign substances such as dust and
water etc. do not contaminate the terminals. Be sure to attach the battery pack cover to protect the battery
terminals.
• When charging the battery pack, conf rm that the terminals on the battery charger are free of foreign
substances such as dust and water etc. Clean the terminals before charging the battery pack if any foreign
substances are found on the terminals.
The life of the battery pack terminals may be affected by foreign substances such as dust and water etc.
during operation.
CAUTION: To protect the motor or battery, be sure to note the following when carrying out this operation.
• If the motor or battery becomes hot, the protection function will be activated and the motor or battery will stop
operating.
The overheat warning lamp on the control panel illuminates or f ashes when this feature is active.
For safe use
• The battery pack is designed to be installed by proceeding two steps for safety. Make sure the battery pack is
installed properly to the main body before use.
• If the battery pack is not inserted f rmly when the switch is switched on, the overheat warning lamp and the
battery low warning lamp will f ash to indicate that safe operation is not possible, and the bit will not rotate
normally. Connect the battery pack into the unit of the tool until the red or yellow label disappears.
ES
Asegúrese de utilizar la cubierta de la caja de batería
• Cuando no utilice la caja de batería, guarde la batería de tal forma que las materias extrañas tales como polvo
y agua, etc. ensucien los terminales. Asegúrese de colocar la cubierta de la caja de batería de tal forma de
proteger los terminales de la batería.
• Cuando cargue la caja de batería, confirme que los terminales en el cargador de batería estén libres de
materias extrañas tales como polvo y agua, etc. Limpie los terminales antes de cargar la caja de batería si hay
materias extrañas en los terminales.
La vida de los terminales de la caja de batería puede verse afectada por materias extrañas tales como polo y
agua, etc. durante su funcionamiento.
PRECAUCIÓN: Para proteger el motor o la batería, asegúrese de observar lo siguiente cuando efectúe
• Si el motor o la batería se calienta, se activará la función de protección y el motor o la batería dejará de
funcionar. La lámpara de advertencia de sobrecalentamiento en el panel de control se ilumina o destella
cuando esta característica está activada.
Para un uso más seguro
• La batería está diseñada para instalarse siguiendo dos pasos por motivos de seguridad.
Compruebe que la batería está instalada correctamente en el cuerpo principal antes de utilizar la herramienta.
• Si la batería no ha quedado bien introducida, la luz de advertencia de sobrecalentamiento y la luz de aviso de
baja carga de batería parpadearán, y la broca no girará del modo habitual para alertar al operario de que la
máquina no funcionará de manera segura si se acciona algún interruptor. Conecte la batería a la unidad de la
herramienta hasta que el indicador rojo o amarillo desaparezca.
esta operación.
-
3 -
Page 4

This tool, as a complete unit with a battery
pack, satisfies appropriate I Degrees of
Protection based on the IEC regulations.
Definition of IP code
IP5X: Ingress of dust is not totally prevented, but dust shall not penetrate in a quantity to interfere with satisfactory operation
of the tool or to impair safety (In case that
the talcum powder under 75 μm intrudes
inside the tool).
IPX6: Water projected in powerful jets
against the tool from any direction shall
have no harmful effects (In case that, with
a nozzle of 12.5 mm inner diameter,
approximately 100 L/min of normal
temperature water is injected to the tool
for 3 minutes from 3 meter distance).
LIMITED WARRANTY
The rating of IP56 qualifies this tool for the
minimum impact of water or dust, but not
for the assurance of performance in such
conditions. See Safety and Operating
Instructions for further details for proper
operation.
I. INTRODUCTION
These tools can be used to tight-en
screws in clutch mode and to drill
holes in wood and metal in drill mode.
Additionally, model HTP-HDD can be
used to drill holes in soft concrete and
similar materials in hammer mode.
II. General Power Tool Safety
Warnings
WARNING! Read all safety
warnings and all instructions. Failure
to follow the warnings and instructions
may
result in electric shock, fire and/or
serious injury.
Save all warnings and instructions for
future reference.The term ²power tool²
in the warnings refers to your mainsoperated (corded) power tool or
battery-operated (cordless) power tool.
Work Area Safety
Keep work area clean and well lit.
1)
Cluttered or dark areas invite
accidents.
2)
Do not operate power tools in
explosive atmospheres, such as in
the presence of flammable liquids,
Power tools create sparks which may
ignite the dust or fumes.
3) Keep children and bystanders away
while operating a power tool.
Distractions can cause you to lose
control.
Electrical Safety
1) Power tool plugs must match the
outlet. Never modify the plug in any
way. Do not use any adapter plugs
with earthed (grounded) power
tools.
Unmodified plugs and matchin
outlets will reduce risk of electric
shock.
Avoid body contact with earthed or
2)
grounded surfaces such as pipes,
radiators, ranges and refrigerators.
There is an increased risk of electric
shock if your body is earthed or
grounded.
3) Do not expose power tools to rain
or wet conditions.
Water entering a power tool will
increase the risk of electric shock.
4)
Do not abuse the cord. Never use
the cord for carrying, pulling or
unplugging the power tool. Keep
cord away from heat, oil, sharp
edges or moving parts.
Damaged or entangled cords increase
the risk of electric shock.
5) When operating a power tool
outdoors, use an extension cord
suitable for outdoor use.
Use of a cord suitable for outdoor use
reduces the risk of electric shock.
-
4 -
Page 5

6) If operating a power tool in a damp
location is unavoidable, use a
residual current device (RCD)
protected supply.
Use of RCD reduces the risk of electrical shock.
Personal Safety
1)
Stay alert, watch what you are
doing and use common sense
when operating a power tool. Do
not use a power tool while you are
tired or under the influence of
drugs, alcohol or medication.
A moment of inattention while operating power tools may result in personal
injury.
Use personal protective equipment.
2)
Always wear eye protection.
Protective equipment such as dust
mask, non-skid safety shoes, hard hat,
or hearing protection
used for appropriate conditions will
reduce personal injuries.
3)
Prevent unintentional starting. A
moment of inattention while operating
power tools may result in serious
personal injury.
4)
Remove any adjusting key or
wrench before turning the power
tool on.
A wrench or a key left attached to a
rotating part of the power tool may
result in personal
injury.
5) Do not overreach. Keep proper
footing and balance at all times. This
enables better control of the power tool
in unexpected situations.
6)
Dress properly. Do not wear loose
clothing or jewelry. Keep your hair,
clothing and gloves away from
moving parts.
Loose clothes, jewelry or long hair can
be caught in moving parts.
7)
If devices are provided for the
connection of dust extraction and
collection facilities, ensure these
are connected and properly used.
Use of dust collection can reduce dustrelated hazards.
Power Tool Use and Care
1)
Do not force the power tool. Use the
correct power tool for your
application.
The correct power tool will do the job
better and safer at the rate for which it
was designed.
2)
Do not use the power tool if the
switch does not turn it on and off.
Any power tool that cannot be
controlled with the switch is danger-ous
and must be repaired.
3)
Disconnect the plug from the
power source and/or the battery
pack from the power tool before
making any adjustments, changing
accessories, or storing power
tools.
Such preventive safety measures
reduce the risk of starting the power
tool accidentally.
Store idle power tools out of the
4)
reach of children and do not allow
persons unfamiliar with the power
tool or these instructions to
operate the power tool.
Power tools are dangerous in the
hands of untrained users.
Maintain power tools. Check for
5)
misalignment or binding of moving
parts, breakage of parts and any
other condition that may affect the
power tools operation. If damaged,
have the power tool repaired before
use.
Many accidents are caused by poorly
maintained power tools.
6)
Keep cutting tools sharp and clean.
Properly maintained cutting tools with
sharp cutting edges are less likely to
bind and are easier to control.
7)
Use the power tool, accessories
and tool bits etc. in accordance
with these instructions, taking into
account the working conditions
and the work to be performed.
Use of the power tool for operations
different from those intended could
result in a hazardous situation.
-
5 -
Page 6

Battery Tool Use and Care
余白を見直し(「-」などを使
い単語途中で改行)
できるだけ、この行に収まる
ようにしてください。
1)
Ensure the switch is in the off
position before inserting battery
pack.
Inserting battery pack into power tools
that have the switch on invites accidents.
2)
Recharge only with the charger
specified by the manufacture .
A charger that is suitable for one type
of battery pack may create a risk of
fire when used with another batter
pack.
3) Use power tools only with speci-
cally designated battery packs.
Use of any other battery packs may
create a risk of injury and fire
4) When battery pack is not in use,
keep it away from other metal
objects like paper clips, coins,
keys, nails, screws, or other small
metal objects that can make a
connection from one terminal to
another.
Shorting the battery terminals together
may cause burns, or a fire
5) Under abusive conditions, liquid
may be ejected from battery; avoid
contact. If contact accidentally
occurs, flush with wate . If liquid
contacts eyes, additionally seek
medical help.
Liquid ejected from the battery may
cause irritation or burns.
Service
Have your power tool serviced by
1)
a qualified repair person using
only identical replacement
parts.This will ensure that the safety
of the power tool is maintained.
SPECIFIC SAFETY
III.
RULES
1) Wear ear protectors. Exposure to
noise can cause hearing loss.
Use auxiliary handles supplied with
2)
the tool. Loss of control can cause
personal injury.
3)
Hold power tools by insulated grip
ping sur faces when performing an
operation where the cutting tool may
contact hid den wiring.
“live” wire will make ex posed metal
parts of the tool “live” and shock the
operator.
4)
Be aware that this tool is always in an
operating condition, since it does not
have to be plugged into an electrical
outlet.
5) If the bit becomes jammed, immediately turn the trigger switch off to
prevent an overload which can
damage the battery pack or motor.
Use reverse motion to loosen
jammed bits.
6)
Do not operate the Forward/Reverse
lever when the trigger switch is on. The
battery will discharge rapidly and
damage to the unit may occur.
7) When storing or carrying the tool, set
the Forward/Reverse lever to the
center position (switch lock).
8) Do not strain the tool by holding the
speed control trigger halfway (speed
control mode) so that the motor
stops. The protection circuit will
activate and may prevent speed
control operation. If this happens,
release the speed control trigger and
squeeze again for nor-mal operation.
e c
9) B
areful not to get dust inside the
chuck.
Do not touch the rotating parts to
10)
avoid injury.
Do not use the tool continuously for a
11)
long pe
iod of time. Stop using the tool
r
from time to time to avoid temperature
rise and heat overload of the motor.
12) Do not drop the tool.
13)
Wear dust mask, if the work causes
dust.
14)
During charging, the charger may become slightly warm. This is normal.
-
Do NOT charge the battery for a long
6
-
period.
Contact with a
Page 7
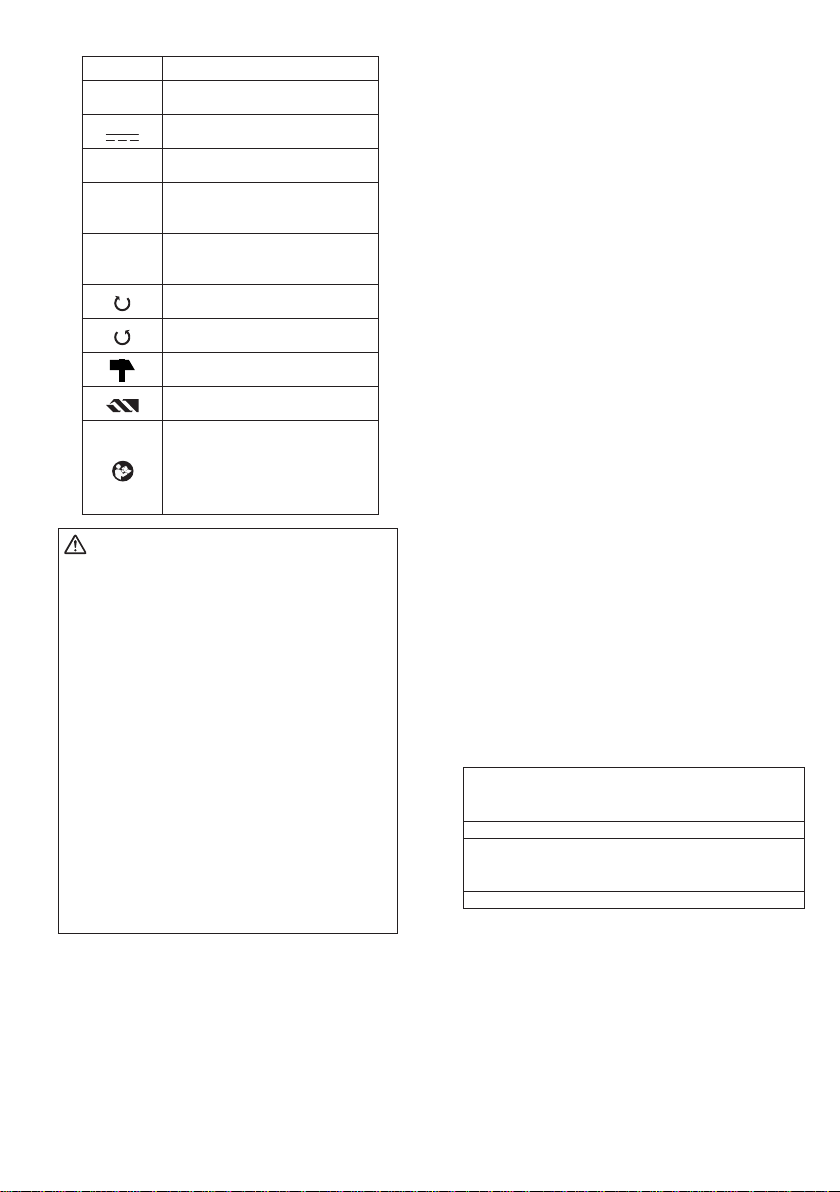
Symbol meaning
V Volts
Direct current
n
0
-1
… min
Ah
WARNING:
Some dust created by power sanding,
sawing, grinding, drilling, and other
construction activities contains chemi-
cals known to the State of California to
cause cancer, birth defects or other
reproductive harm. Some examples of
these chemicals are:
• Lead from lead-based paints
• Crystalline silica from bricks and
cement and other masonry products
• Arsenic and chromium from chemically-treated lumber.
To reduce your exposure to these chemi-
cals: work in a well ventilated area, and
work with approved safety equipment,
such as dust masks that are specially
designed to filter out microscopic part cles.
FOR BATTERY
IV.
No load speed
Revolutions or
reciprocation per minutes
Electrical capacity of
battery pack
Forward rotation
Reverse rotation
Rotation with hammering
Rotation only
To reduce the risk of
injury user must read and
understand instruction
manual.
CHARGER &
BATTERY PACK
Important Safety Instructions
1) SAVE THESE INSTRUCTIONS—This
manual contains important safety and
operating instructions for battery
charger.
2) Before using battery charger, read all
instructions and cautionary markings
on battery charger, battery pack, and
product using battery pack.
3) CAUTION—To reduce the risk of
injury, charge only Huskie Tools
Battery Pack as shown in last page.
Other types of batteries may burst
causing personal injury and damage.
4) Do not expose charger and battery
pack to rain or snow.
5) To reduce risk of damaging the electric plug and cord, pull by plug rather
than cord when disconnecting charger.
6) Make sure cord is located so that it will
not be stepped on, tripped over, or
otherwise subjected to damage or
stress.
7) An extension cord should not be used
unless absolutely necessary.
Use of improper extension cord could
result in a risk of fire and electri
shock. If extension cord must be
used, make sure that:
a. pins on plug of extension cord are
the same number, size and shape
as those of plug on charger.
b. extension cord is properly wired
and in good electrical condition.
c. wire size is large enough for
ampere rating of charger as specified belo .
RECOMMENDED MINIMUM AWG SIZE OF
EXTENSION CORDS FOR BATTERY CHAR-
AC Input Rating. Amperes AWG Size of Cord
Equal to or
greater than
0 2 18 18 18 16
8) Do not operate charger with damaged
cord or plug—replace them immedi-
ately.
9) Do not operate charger if it has
received a sharp blow, been dropped,
or otherwise damaged in any way;
take it to a qualified service personnel.
-
7
-
GERS
But less
than
Length of Cord,
Feet
25 50 100 150
Page 8

10) Do not disassemble charger; take it to
a qualified serviceman when service
or repair is required. Incorrect
reassembly may result in a risk of
electric shock or fire.
11) To reduce the risk of electric shock,
unplug charger from outlet before
attempting any maintenance or
cleaning.
12) The charger and battery pack are
specifically designed to work
together. Do not attempt to charge
any other cordless tool or battery
pack with this charger.
13) Do not attempt to charge the battery
pack with any other charger.
14) Do not attempt to disassemble the
battery pack housing.
15) Do not store the tool and battery pack
in locations where the temperature
may reach or exceed 50°C (122°F)
(such a metal tool shed, or a car in the
summer), which can lead to
deterioration of the storage battery.
16) Do not charge battery pack when the
temperature is BELOW 0°C (32°F) or
ABOVE 40°C (104°F). This is very
important.
17) Do not incinerate the battery pack. It
can explode in a fire.
18) Avoid dangerous environment. Do not
use charger in damp or wet locations.
19) The charger is designed to operate
on standard household electrical
power only. Do not attempt to use it
on any other voltage!
20) Do not abuse cord. Never carry charger by cord or yank it to disconnect
from outlet. Keep cord away from heat,
oil and sharp edges.
21) Charge the battery pack in a well
ventilated place, do not cover the
charger and battery pack with a cloth,
etc., while charging.
22) Use of an attachment not recom-
mended may result in a risk of fire,
electric shock, or injury to persons.
23) Do not short the battery pack. A battery short can cause a large current
flow, over heating and burns.
24) NOTE: If the supply cord of this appliance is damaged, it must only be replaced by a repair shop appointed by
the manufacturer, because special
purpose tools are required.
25) TO REDUCE THE RISK OF ELECTRIC SHOCK, THIS APPLIANCE HAS
A POLARIZED PLUG (ONE
WIDER THAN THE OTHER).
This plug will fit in a polarized outlet
only one way. If the plug does not fit
fully in the outlet, reverse the plug. If it
still does not fit, contact a qualified
electrician to install the proper outlet. Do
not change the plug in any way.
WARNING:
• Do not use other than the Huskie Tools
battery packs that are designed for use
with this rechargeable tool.
• Huskie Tools is not responsible for any
damage or accident caused by the use
of recycled or counterfeit battery pack.
• Do not dispose of the battery pack in a
re, or expose it to excessive heat.
• Do not allow metal objects to touch the
battery pack terminals.
• Do not carry or store the battery pack in
the same container as nails or similar
metal objects.
• Do not charge the battery pack in a
high-temperature location, such as next
to a re or in direct sunlight. Otherwise,
the battery may overheat, catch re, or
explode.
•
After removing the battery pack from
the tool or the charger, always reattach
the pack cover. Otherwise, the battery
contacts could be shorted, leading to a
risk of re.
• When the Battery Pack Has Deteriorated, Replace It with a New One.
Continued use of a damaged battery
pack may result in heat generation,
ignition or battery rupture.
• To prevent leakage, overheating,
smoke generation, fire, and rupturing
from occurring, follow these instructions
when handling our rechargeable power
tools (tool main body/battery pack/
charger).
- Do not allow material cuttings or dust
to fall onto the battery pack.
-
7
-
BLADE IS
Page 9

- When storing, remove any material
Wesetfonttypetoother
similarthings.
Deleteblank.
Deleteblank.
cuttings and dust from the battery
pack, and place the battery pack
separately from metal objects
(screws, nails, etc.) when storing in
the tool case.
• Do not handle the rechargeable power
tools in the following way.
(There is a hazard of smoke generation, re, and rupturing)
- Use or leave in places exposed to
rain or moisture
- Use submerging in water
V. ASSEMBLY
Attaching or Removing Bit
NOTE:
When attaching or removing a bit,
disconnect battery pack from tool or
place the switch in the center position (switch lock).
This tool is equipped with a keyless
drill chuck.
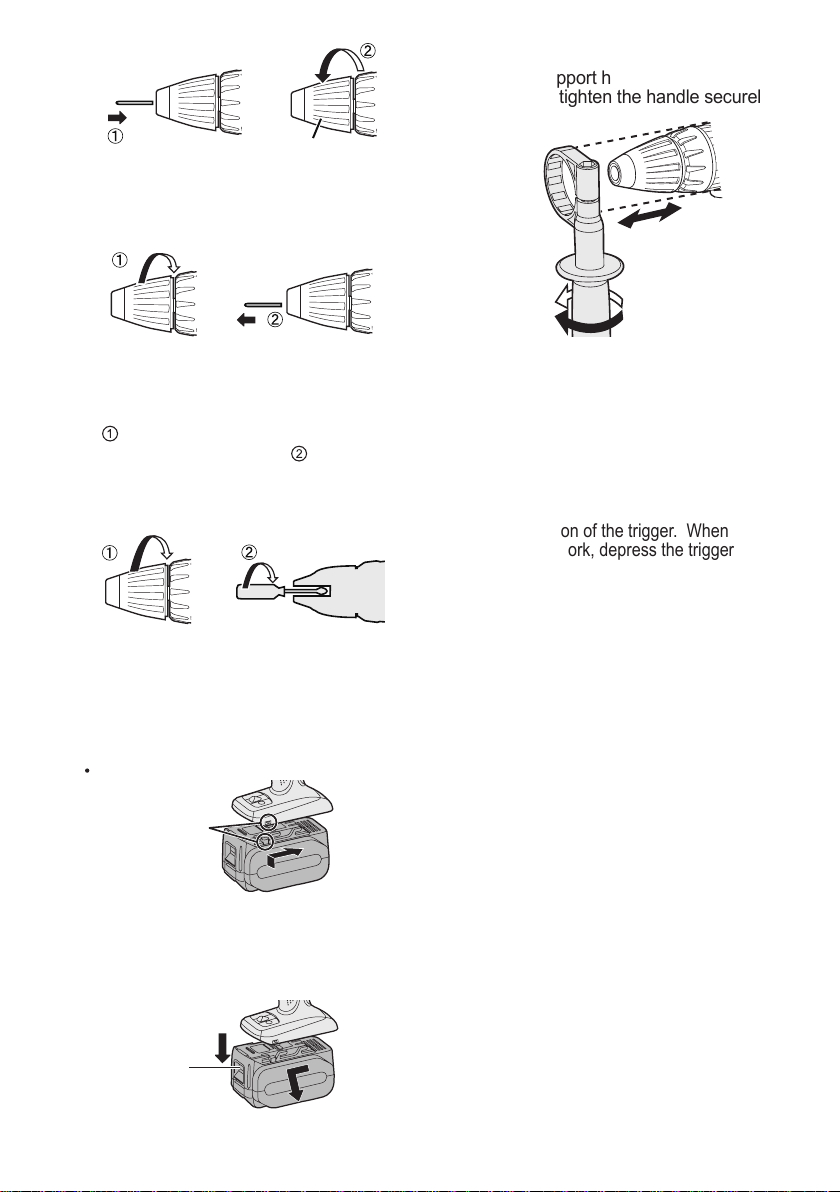
1. Attachment
Insert the bit and turn the lock collar
clockwise (looking from the front) to
tighten firmly until it stops clicking.
-
8
-
Page 10
Lock collar
Wesetfonttypetoother
similarthings.
Wesetfonttypetoother
similarthings.
2. Removal
Turn the lock collar counterclock-
wise (looking from the front), then
remove the bit.
Support handle
Place the support handle at your favorite
position and tighten the handle securely.
Tighten
Loosen
NOTE:
If excessive play occurs in the
chuck, secure the drill in place and
open the chuck jaws by turning the lock collar and
the screw (left-handed screw) with
a screwdriver by turning it counterclockwise (viewed from the front).
Attaching or Removing
Battery Pack
1.
To connect the battery pack:
Line up the alignment marks and at-tach
the battery pack.
Slide the battery pack until it locks into
position.
Alignment marks
2.
To remove the battery pack:
Pull the button from the front to release
the battery pack.
Button
tighten
Always use the support handle to ensure operating safety.
VI. OPERATION
[Main Body]
Switch Operation
1. The speed increases with the amount
of depression of the trigger. When
beginning work, depress the trigger
slightly to start the rotation slowly.
2. A feedback electronic controller is used to
give a strong torque even in low speed.
3. The brake operates when the trigger is released and the motor stops
immediately.
NOTE:
• When the brake operates, a braking
sound may be heard. This is normal.
• Sparks from the motor brush may be vis-
ible through the body vent holes on the
back of the tool during switching and
braking due to the load imposed on the
motor. This does not indicate a problem
with the tool.
CAUTION:
When operating the tool by pulling the trigger, there may be a momentary lag before
rotation starts. This does not signal a malfunction.
* This lag occurs as the tool’s circuitry starts
up when the trigger is pulled for the first time
after installing a new battery pack or after the
tool has not been used for at least 1 minute
(or at least 5 minutes when the LED is on).
Rotation will start without any lag during second and subsequent operations.
-
9
-
Page 11

Switch and Forward/Reverse
Deletedthedescriptionof
unnecessarymodel
#(EY7450).
Lever Operation
CAUTION:
Set the clutch setting at this mark ( )
before actual operation.
Forward
Switch lock
CAUTION:
To prevent damage, do not operate
Forward/Reverse lever until the bit
comes to a complete stop.
Reverse
Forward Rotation Switch
Operation
1. Push the lever for forward rotation.
2. Depress the trigger switch slightly
to start the tool slowly.
3.
The speed increases with the amount
of depression of the trigger for efficient
tightening of screws and drilling. The
brake operates and the chuck stops
immediately when the trigger is released.
4. After use, set the lever to its center
position (switch lock).
Reverse Rotation Switch
Operation
1.
Push the lever for reverse rotation. Check
the direction of rotation before use.
2. Depress the trigger switch slightly
to start the tool slowly.
3. After use, set the lever to its center
position (switch lock).
Clutch Torque Setting
Adjust the torque to one of the 18
clutch settings or " ", " "
position .
NOTE:
Always make sure to stop operation
of the tool and disengage it from the
work, when you select Hammering
mode from Drilling mode or when you
shift to Drilling mode from Hammering mode by rotating clutch handle.
If the clutch handle cannot be set at
“drilling” or “hammering” mode after drilling with clutch function, set the
clutch handle at position 1 and oper-
ate the clutch for a second.
Speed Selection
Choose a low or high speed to suit the
use.
LOW
The more the variable speed control trigger is pulled, the higher the speed becomes.
WARNING:
• Do not inhale any smoke emitted
from the tool or battery pack as it
may be harmful.
CAUTION:
• Check the speed selector switch
before use.
• Use at low speed when high torque
is needed during operation. (Using
at high speed when high torque
is required may cause a motor
breakdown.)
• Do not use the tool in a manner that
causes the motor to lock up. Doing
so may damage the tool and battery
pack, resulting in smoke or fire.
• Do not operate the speed selector
switch (LOW-HIGH) while pulling on
the speed control trigger. This can
cause the rechargeable battery to
wear quickly or damage the internal
mechanism of the motor.
*
See specifications for "MAXIMUM
RECOMMENDED CAPACITIES".
HIGH
-
10
-
Page 12

CAUTION:
• To prevent excessive temperature
increase of the tool surface, do not
operate the tool continuously using
two or more battery packs. The tool
needs cool-off time before switching
to another pack.
• Do not close up vent holes on the
sides of the body during operation.
Otherwise, the machine function is
adversely affected to cause a failure.
• Do NOT strain the tool (motor). This
may cause damage to the unit.
• Use the tool in such a way as to
prevent the air from the body vent
holes from blowing directly onto
your skin. Otherwise, you may get
burned.
Bit-locking Function
1. With the trigger switch not engaged
and a screwdriver bit locked in
place, the tool can be used as a
manual screwdriver (up to 40 N•m,
408 kgf-cm, 353 in-lbs).
There will be a little play in the
chuck, but this is not a malfunction.
2.
This feature is handy for tightening
screws that require more torque
than the maximum torque of the
driver (position on the clutch), for
confirming the tightness of a screw or
to loosen an extremely tight screw.
(1) LED light
Before the use of LED
light, always pull the
power switch once.
Press the LED light
button.
The light illuminates with
very low current, and it
does not adversely affect the performance of
the tool during use or its
battery capacity.
CAUTION:
The built-in LED light is designed
•
to illuminate the small work area
temporarily.
• Do not use it as a substitute for a
regular flashlight, since it does not
have enough brightness.
• LED light turns off when the tool has
not been used for 5 minutes.
This product has the built-in LED light.
This product is classified into “Class 1 LED
Product” to IEC (EN) 60825-1:2001.
Class 1 LED Product
Caution: DO NOT STARE INTO BEAM.
Use of controls or adjustments or performance of procedures other than those
specified herein may result in hazardous
radiation exposure.
Control Panel
(1)
(3)
(2)
(2) Overheat warning lamp
Off
(normal
operation)
Indicates operation has
been halted due to motor
or battery overheating.
To protect the motor or battery, be sure
to note the following when carrying out
this operation.
• If the motor or battery becomes hot,
the protection function will be activated
and the motor or battery will stop operating. The overheat warning lamp on
the control panel illuminates or flashes
-
11 -
when this feature is active.
Flashing:
Overheat
(battery)
Page 13

• If the overheating protection feature
Deletedthedescriptionof
unnecessarymodel
#(EY9L42).
activates, allow the tool to cool thoroughly (at least 30 minutes). The tool
is ready for use when the over-heat
warning lamp goes out.
• Avoid using the tool in a way that
causes the overheating protection feature to activate repeatedly.
• If the tool is operated continuously under high-load conditions or if it is used
in hot-temperature conditions (such as
during summer), the over-heating protection feature may activate frequently.
• If the tool is used in cold-temperature
conditions (such as during winter) or if
it is frequently stopped during use, the
overheating protection feature may not
activate.
• The performance of the EY9L42 deteriorates significantly at and below
10°C due to work conditions and other
factors.
• The ambient temperature range is between 0°C (32°F) and 40°C (104°F). If
the battery pack is used when the battery temperature is below 0°C (32°F),
the tool may fail to function properly.
• When charging a cool battery pack
(below 0°C (32°F)) in a warm place,
leave the battery pack at the place and
wait for more than one hour to warm
up the battery to the level of the ambient temperature.
(3) Battery low warning lamp
• If it is started with too little battery power
remaining, the tool may stop operating
without the battery low warning lamp
flashing first. This indicates that there is
too little battery power remaining to use
the tool, and the battery pack should be
charged before further use.
• If the tool is subject to a sudden load
during use that causes the motor to
lock up, the overdischarge prevention
sensor may be triggered, and the
battery low warning lamp may flash.
The lamp will stop flashing once you
address the cause of the motor’s
locking up and cycle the trigger.
Battery Pack Life
The rechargeable batteries have
a limited life. If the operation time
becomes extremely short after
recharging, replace the battery pack
with a new one.
Battery Recycling
ATTENTION:
A Li-ion battery that is recyclable powers
the product you have purchased. Please
call 1-800-8-BATTERY for information on
how to recycle this battery.
Off
(normal
operation)
Excessive (complete) discharging of
lithium ion batteries shortens their service life dramatically. The driver includes a battery protection feature designed to prevent excessive discharging of the battery pack.
• The battery protection feature activates immediately before the battery
loses its charge, causing the battery
low warning lamp to flash.
• If you notice the battery low warning lamp flashing, charge the battery
pack immediately.
Flashing
(No charge)
Battery protection
feature active
[Battery Charger]
Charging
CAUTION:
• If the temperature of the battery pack
falls approximately below −10°C (14°F),
charging will automatically stop to
prevent degradation of the battery.
• The ambient temperature range is
between 0°C (32°F) and 40°C (104°F).
If the battery pack is used when the
battery temperature is below 0°C (32°F),
the tool may fail to function properly.
• When charging a cool battery pack
(below 0°C (32°F)) in a warm place,
leave the battery pack at the place and
wait for more than one hour to warm up
the battery to the level of the ambient
12
-
temperature.
-
Page 14

• Cool down the charger when
charging more than two battery packs
consecutively.
• Do not insert your fingers into contact
hole, when holding charger or any other
occasions.
To prevent the risk of fire or
damage to the battery charger.
• Do not use power source from an
engine generator.
• Do not cover vent holes on the
charger and the battery pack.
• Unplug the charger when not in use.
Li-ion Battery Pack
NOTE:
Your battery pack is not fully charged
at the time of purchase. Be sure to
charge the battery before use.
How to charger
1. Plug the charger into the AC outlet.
2. Insert the battery pack firmly into the
charger.
1. Line up the alignment marks and place
the battery onto the dock on the charger.
2. Slide forward in the direction of the arrow.
Alignment marks
3. During charging, the charging lamp will be
lit.
When charging is completed, an internal
electronic switch will automatically be
triggered to prevent overcharging.
• Charging will not start if the battery pack
is warm (for example, immediately after
heavy-duty operation).
The orange standby lamp will be flashing
until the battery cools down.
Charging will then begin automatically.
4. The charge lamp (green) will flash slowly
once the battery is approximately 80%
charged.
5. When charging is completed, the charging
lamp in green color will turn off.
6. If the temperature of the battery pack is 0°C
or less, charging takes longer to fully charge
the battery pack than the standard charging
time.
Even when the battery is fully charged, it
will have approximately 50% of the power of
a fully charged battery at normal operating
temperature.
7. Consult an authorized dealer if the charging
lamp (green) does not turn off.
8. If a fully charged battery pack is inserted into
the charger again, the charging lamp lights
up. After several minutes, the charging lamp
in green color will turn off.
9. Remove the battery pack while the battery
pack release button is held up.
LAMP INDICATIONS
Charging is completed. (Full charge.)
Battery is approximately 80% charged.
Now charging.
Charger is plugged into the AC outlet. Ready to charge.
(Green) (Orange)
Turn off Illuminated Flashing
Charging Status Lamp.
Left: green Right: orange will be displayed.
Battery pack is cool.
The battery pack is being charged slowly to reduce the load on the battery.
Battery pack is warm.
Charging will begin when temperature of battery pack drops. If the temperature of the
battery pack is -10° or less, the charging status lamp (orange) will also start flashing.
Charging will begin when the temperature of the battery pack goes up"
Charging is not possible. Clogged with dust or malfunction of the battery pack.
-
13
-
Battery pack
release button
Page 15

VII. MAINTENANCE
Use only a dry, soft cloth for wiping the unit. Do not use a damp cloth, thinner, benzine,
or other volatile solvents for cleaning.
In the event that the inside of the tool or battery pack is exposed to water, drain and
allow to dry as soon as possible. Carefully remove any dust or iron filings that collect
inside the tool. If you experience any problems operating the tool, consult with a repair
shop.
VIII. ACCESSORIES
Use only bits suitable for size of drill's chuck.
IX. APPENDIX
MAXIMUM RECOMMENDED CAPACITIES
Screw
driving
Drilling
Model
Machine screw
Wood screw
Self-drilling screw
For Wood
For Metal
For Masonry
ø 10 mm (13/32") or ø 6.8 mm (9/32")
HTP-HDD
M8
ø 6 mm (1/4")
ø 36 mm (1- 13/32")
ø 13 mm (1/2")
ø 13 mm (1/2")
X. SPECIFICATIONS
MAIN UNIT
Model
Motor voltage 18 V
No load speed
Blows Rate Per Minute
Chuck capacity
Clutch torque
Overall length
Weight (with battery pack)
Low 0 - 430 min
High 0 - 1650 min
Low 1800 - 7740 min
High 6840 - 29700 min
ø 1.5 mm - ø 13 mm (1/16"- 1/2")
Approx 1.0 N·m - 6.9 N·m (10 in・lbs- 60 in・lbs)
HTP-HDD
235 mm (9-1/4")
2.25 kg (4.96 lbs)
BATTERY PACK
Model No.
Storage battery
Motor voltage
-
14
-
Li-ion Battery
18V DC (3.6V x 10 cells)
-1
-1
-1
-1
BP-185
Page 16

BATTERY CHARGER
Model No. CH-185
Electrical rating See the rating plate on the bottom of the charger
Weight 0.93 kg (2 lbs)
Charging time
BP-185
80 min
NOTE: This chart may include models that are not available in your area.
Please refer to the latest general catalogue.
NOTE: For the dealer name and address, please see the included warranty card.
Federal Communication Commission Interference Statement
This equipment has been tested and found to comply with the limits for a Class B digital
device, pursuant to Part 15 of the FCC Rules. These limits are designed to provide reasonable protection against harmful interference in a residential installation. This equipment generates, uses and can radiate radio frequency energy and, if not installed and
used in accordance with the instructions, may cause harmful interference to radio communications. However, there is no guarantee that interference will not occur in a particular installation. If this equipment does cause harmful interference to radio or television
reception, which can be determined by turning the equipment off and on, the user is encouraged to try to correct the interference by one of the following measures:
• Reorient or relocate the receiving antenna.
• Increase the separation between the equipment and receiver.
• Connect the equipment into an outlet on a circuit different from that to which the receiver is connected.
• Consult the dealer or an experienced radio/TV technician for help.
FCC Caution: To assure continued compliance, install and use in accordance with provided instructions. Use only the battery pack specified in the instructions. Any changes
or modifications not expressly approved by the party responsible for compliance could
void the user's authority to operate this equipment.
This device complies with part 15 of the FCC Rules. Operation is subject to the following two conditions: (1) This device may not cause harmful interference, and (2) this device must accept any interference received, including interference that may cause undesired operation.
This Class B digital apparatus complies with Canadian ICES-003.
X. HARMONIZED STANDARDS
MAIN UNIT
Conforms to UL Std. 60745-1 & 60745-2-2
Certified to CSA Std.C22.2 No. 60745-1 & 60745-2-2
BATTERY CHARGER
Conforms to UL Std.1310
Certified to CSA Std.C22.2 No. 223-M91
Page 17

Esta herramienta, como una unidad
completa con un paquete de pilas, satisface los grados de protección IP basados en las normas IEC.
Definición del código IP
IP5X: El ingreso de polvo no está
totalmente sellado, pero el polvo no
penetrará en cantidades que interfieran con el buen funcionamiento de la
herramienta o afecten la seguridad.
(Para el caso en que entre talco de
polvo en la herrameinta, de menos
de 75 μm).
IPX6: El agua dispersada en chorros
potentes hacia la herramienta desde
diferentes direcciones no la dañará.
(En caso de usar un aspersor de
12,5 mm de diámetro interior, aproximadamente 100 lts./min. agua a temperatura normal es inyectada hacia la
herramienta durante 3 minutos desde
3 metros de distancia).
GARANTÍA LIMITADA
La clasificación IP56 califica esta
herramienta para un mínimo impacto
del agua o polvo, pero no asegura
el rendimiento en dichas condiciones. Vea el Manual de Seguridad e
Instrucciones para una mayor información para un funcionamiento apropiado.
I. INTRODUCCIÓN
Estas herramientas se pueden usar para
apretar tornillos en el modo de acoplam-
iento y para perforar orificios de madera
y metal en el modo taladro. Además, se
puede usar el modelo HTP-HDD para per-
forar orificios en concreto suave y mate-
riales similares en modo de martillo.
II.
REGLAS DE SEGURIDAD GENERALES
¡ADVERTENCIA!
Lea todas las instrucciones.
Si no cumple con todas las siguientes
instrucciones puede recibir una
descarga eléctrica, incendio y/o
heridas graves. El término “herramienta
eléctrica” en todas las advertencias a
continuación se refiere a su herramienta
eléctrica conectada al tomacorriente
(cableado) y a la herramienta eléctrica
que funciona con batería (sin cable).
GUARDE ESTAS INSTRUCCIONES
Seguridad del lugar de
trabajo
1) Mantenga el lugar de trabajo limpio y bien iluminado.
Un área desprolija u oscura es una
causa de accidentes.
2) No haga funcionar herramientas
eléctricas en un ambiente explosivo como en lugares donde hay
líquidos inflamables cajas o polvo.
Las herramientas eléctricas producen chispas que pueden encender
el polvo o el vapor.
3) Mantenga a los niños y person-
al no relacionado lejos mientras
haga funcionar la herramienta
eléctrica.
Una distracción puede hacer que
pierda el control.
Seguridad eléctrica
1) Los enchufes de herramientas
eléctricas deben coincidir con el
tomacorriente. Nunca modifique
el enchufe. No utilice ningún
adaptador de enchufe con herramientas eléctricas con tierra
(conexión a tierra).
Un enchufe no modificado y tomacorrientes que coincidan reducirán
el riesgo de descarga eléctrica.
Page 18

2) Evite el contacto de su cuerpo
con una superficie de tierra o
conectado a una tierra tales como tubos, radiadores, microondas y refrigeradores.
Existe un mayor riesgo de descar-
ga eléctrica si su cuerpo queda
conectado a una tierra.
3) No exponga herramientas eléc-
tricas a la lluvia o condiciones
de humedad.
El agua que entra en una herrami-
enta eléctrica aumentará el riesgo
de descarga eléctrica.
4)
No abuse del cable. Nunca utilice el cable para transportar, tirar de o desenchufar la herramienta eléctrica. Mantenga el cable lejos de fuentes de calor,
aceite, bordes afilados o piezas
móviles.
Un cable dañado o enreda-
do puede aumentar el riesgo de
descarga eléctrica.
5) Cuando haga funcionar una herramienta eléctrica en exteriores, utilice un cable de extensión adecuado para uso en exteriores.
El uso de un cable adecuado para
uso en exteriores reduce el riesgo
de descarga eléctrica.
Seguridad personal
1)
Manténgase alerta, vigile lo que
haga y utilice sentido común cuando haga funcionar la herramienta
eléctrica. No utilice una herramienta eléctrica mientras está cansado
o bajo la influencia de drogas, alcohol o medicamentos.
Un descuido instantáneo mientras
hace funcionar las herramientas
eléctricas puede provocar una herida personal de gravedad.
2) Utilice equipo de seguridad. Utilice siempre gafas protectoras.
Un equipo de seguridad como
máscara antipolvo, zapatos antideslizamiento, casco duro o protección contra los oídos utilizado en condiciones adecuadas reducirá heridas personales.
3) Evite un arranque por accidente.
Asegúrese que el interruptor está en la posición de desconexión
antes de desenchufar.
El transporte de las herramien-
tas eléctricas con su dedo en el interruptor o el desenchufado de las
herramientas eléctricas que tengan
el interruptor conectado puede provocar un accidente.
4) Desmonte cualquier llave de
ajuste o llave de cubo antes de
conectar la herramienta eléctrica.
Una llave instalada en una pieza
rotatoria de la herramienta eléctrica puede provocar una herida personal.
5) No fuerce su cuerpo. Mantenga
sus pies bien apoyados en el piso y su equilibrio en todo momento.
Esto permite un mejor control de
la herramienta eléctrica en situaciones inesperadas.
6) Vístase correctamente. No uti-
lice ropa floja o joyas. Mantenga
su cabello, ropa y guantes lejos
de piezas móviles.
Una ropa floja, joyas o cabello lar-
go puede quedar atrapado en
piezas móviles.
7) Si se entregan dispositivos para
recolección y extracción de polvo, asegúrese que estén conectados y se utilicen bien.
El uso de estos dispositivos puede
reducir los peligros relacionados
con el polvo.
Uso y cuidados de herramientas eléctricas
1) No fuerce la herramienta eléctrica. Utilice la herramienta eléctrica correcta según su aplicación.
Una herramienta eléctrica correcta
hará el trabajo mejor y más seguro
a la velocidad para la que fue diseñada.
Page 19

2) No utilice la herramienta eléctrica si el interruptor no se conecta y desconecta.
Cualquier herramienta eléctrica
que no pueda controlarse con el interruptor es peligroso y debe repararse.
3) Desconecte el enchufe del tomacorriente y/o paquete de batería
de la herramienta eléctrica antes
de hacer un ajuste, cambio de
accesorios o guardado de herramientas eléctricas.
Estas medidas de seguridad pre-
ventiva reducen el riesgo de que la
herramienta eléctrica arranque por
accidente.
4) Guarde las herramientas eléc-
tricas apagadas en un lugar
fuera del alcance de los niños y
no permita que personas que no
saben el uso de la herramienta
eléctrica o estas instrucciones
hagan funcionar la herramienta
eléctrica.
Las herramientas eléctricas son
peligrosas en manos de usuarios
no entrenados.
5) Mantenga las herramientas eléctricas. Verifique por mala alineación o atascado de piezas
móviles, rotura de piezas y otras
condiciones que puedan afectar
el funcionamiento de las herramientas eléctricas. Si está dañada, haga reparar la herramienta
eléctrica antes de utilizar.
Muchos accidentes se deben a
herramientas eléctricas mal mantenidas.
6) Mantenga las herramientas de
corte afiladas y limpias.
Las herramientas de corte bien
mantenidas con bordes de corte afilados tienen menos posibilidades de atascarse y son más
fáciles de controlar.
7)
Utilice la herramienta eléctrica,
accesorios y brocas de herramienta, etc. de acuerdo con estas
instrucciones y la forma especificada para el tipo particular de
herramienta eléctrica, teniendo
en cuenta las condiciones de trabajo y el trabajo a hacer.
El uso de la herramienta eléctrica
para un funcionamiento diferente
del especificado puede traducirse
en una situación peligrosa.
Uso y cuidado de la
herramienta a batería
1) Asegúrese que el interruptor está desconectado antes de insertar el paquete de batería.
La colocación del paquete de bat-
ería en las herramientas eléctricas
que tienen el interruptor activado
es causa de accidentes.
2) Recargue sólo con el cargador
especificado por el fabricante.
Un cargador que es adecuado pa-
ra un tipo de paquete de batería
puede provocar el riesgo de incendio cuando se utiliza con otro paquete de batería.
3) Utilice herramientas eléctricas
sólo con los paquetes de batería
especificados.
El uso de otros paquetes de bat-
ería puede provocar el riesgo de
heridas e incendio.
4)
Cuando no se utilice el paquete de
batería, mantenga alejado de otros
objetos metálicos como ganchos
de papel, monedas, llaves, clavos,
tornillos u otros objetos pequeños
que puedan crear una conexión de
un terminal a otro.
El cortocircuito de terminales de
batería puede provocar quemaduras o un incendio.
5) En condiciones de uso abusivo,
el líquido puede salir de la batería; evite el contacto. Si se produce un contacto por accidente,
lave con agua. Si el líquido entra
en contacto con los ojos, solicite además ayuda médica.
El líquido que sale de la batería
puede provocar irritación o quemaduras.
Page 20

Servicio
1) Solicite el servicio de la herramienta eléctrica a un técnico cualificado utilizando sólo repuestos idénticos.
Esto mantendrá la seguridad de la
herramienta eléctrica.
III. NORMAS DE SEG-
URIDAD ESPECÍFICAS
1) Utilice protectores auditivos cuando deba usar la herramienta
por períodos prolongados.
exposición prolongada a ruidos de alta intensidad puede provocar pérdida
de audición.
2)
Utilice el mango auxiliar entregado con la herramienta. Una pérdida
de control puede provocarle heridas.
3)
Mantenga la herramienta por las
superficies de empuñadura aisladas
cuando haga una operación donde
la herramienta de corte pueda entrar
en contacto con cables ocultos.
El contacto con un cable “vivo” puede
hacer que las piezas de metal expuestas de la herramienta descarguen electricidad al operador.
4)
Recuerde que esta herramienta
puede funcionar en cualquier momento ya que no necesita enchufarse al tomacorriente para hacerlo
funcionar.
5) Si la broca se atasca, desconecte
inmediatamente el disparador para
evitar una sobrecarga que pudiera
dañar la batería o el motor.
Utilice la marcha atrás para aflojar
las brocas atascadas.
6) NO haga funcionar la palanca de
avance/marcha atrás cuando esté conectado el interruptor principal. La batería se descargará rápidamente y la unidad puede dañarse.
7) Cuando guarde o transporte la herramienta, coloque la palanca de
avance/marcha atrás en la posición
central (bloqueo del interruptor).
8) No fuerce la herramienta apretando
el gatillo de control de velocidad a
Una
la mitad (modo de control de velocidad) para que se pare el motor. El
circuito de protección se activará haciendo que deje de funcionar el control de velocidad. Si esto sucediera,
suelte el gatillo de control de velocidad y vuelva a apretar nuevamente
para que funcione normalmente.
9) Utilice la herramienta con cuidado para que no entre polvo por el
portabroca.
10) No toque las piezas giratorias para
evitar herirse.
11) No utilice la herramienta continuamente durante un largo período de
tiempo. Deje de utilizar la herramienta de vez en cuando para evitar
que suba la temperatura y se caliente excesivamente el motor.
12) No deje caer la herramienta.
13) Utilice una máscara de polvo, si el
trabajo produce polvo.
14) Puede que el cargador se caliente
ligeramente durante la operación de
carga, pero esto es normal. NO cargue la batería durante largos periodos de tiempo.
Símbolo Significad
V Voltios
Corriente continua
n
0
… min
Ah
Velocidad sin carga
Revoluciones o reciproca-
-1
ciones por minuto
Capacidad eléctrica del
bloque de batería
Rotación en avance
Rotación en inversión
Rotación con martilleo
Solo rotacion
Para reducir el riesgo
de lesiones, el usuario
deberá leer y entender el
manual de instrucciones.
Page 21

ADVERTENCIA:
Algunos tipos de polvo creados al lijar, serrar, pulir, taladrar y al hacer otras actividades de construcción contienen productos químicos
que el Estado de California sabe
que producen cáncer, defectos de
nacimiento y otros daños en la reproducción. Entre estos productos
químicos se encuentran:
* El plomo de pinturas con base de
plomo.
El sílice cristalino de ladrillos,cemento
*
y otros productos de albañilería.
* El arsénico y el cromo de la mad-
era tratada químicamente.
Para reducir la exposición a estos
productos químicos: Trabaje en un
lugar bien ventilado y con el equipo de seguridad aprobado como,
por ejemplo, máscaras contra el polvo que han sido diseñadas especialmente para no dejar pasar las
partículas microscópicas.
IV.
PARA EL CARGADOR DE BATERIA
Y LA BATERIA
Instrucciones de seguridad importantes
1)
GUARDE ESTAS INSTRUCCIONES – Este manual contiene
instrucciones de seguridad importantes y de funcionamiento para el
cargador de batería.
2) Antes de utilizar el cargador de batería, lea tods las instrucciones y
marcas de precaución en (1) el
cargador de batería, (2) la batería.
3) PRECAUCIÓN – Para reducir el
riesgo de heridas, cargue sólo la
batería de Huskie Tools indicada
en la última página.
Los otros tipos de baterías pueden
explotar provocando heridas personales y daños.
4) No exponga el cargador a la lluvia
o nieve.
5) Para reducir el riesgo de dañar el
enchufe y cable eléctrico, tire del
enchufe y no del cable cuando
desconecte el cargador.
6) Cerciórese que el cable está instalado de tal forma que nadie lo pise
o enriede en los pies o esté expuesto a otros daños o tensión.
7) No debe utilizar un cable de extensión a menos que sea absolutamente necesario.
El uso de un cable de extensión in-
correcto puede provocar un riesgo
de fuego o descarga eléctrica. Si
debe utilizar un cable de extensión,
cerciórese de que:
a. las patas en el enchufe del ca-
ble de extensión son del mismo
número, tamaño y forma que los
del enchufe en el cargador.
b. el cable de extensión está bien
enchufado y en buenas condiciones eléctricas.
c. el tamaño del cable es lo su-
ficientemente grande para las
especificaciones de amperios
del cargador, tal como se especifica a continuación.
TAMAÑO PROMEDIO MINIMO RECOMENDADO
PARA LOS CABLES DE EXTENSION DE LOS
Espec. entrada
de CA
Igual o mayor
que
0 2 18 18 18 16
8) No haga funcionar el cargador con
9) No haga funcionar el cargador si
10) No desarme el cargador, llévelo al
CARGADORES DE BATERIA
Amperios
Pero
menos de
un cable o enchufe dañado – cámbielos inmediatamente.
recibió un golpe fuerte, se cayó o
está dañado de alguna otra forma;
lleve al personal de servicio calificado.
personal de servicio calificado cuando sea necesario un servicio o
reparación. Un rearmado incorrecto puede traducirse en un riesgo
de descarga eléctrica o fuego.
Tamaño promedio de
cable
Longitud de cable Pies
25 50 100 150
Page 22

11) Para reducir el riesgo de descarga
eléctrica, desenchufe el cargador
del tomacorriente antes de proceder a un mantenimiento o limpieza.
12) El cargador de batería y la batería
fueron diseñados específicamente
para funcionar uno con el otro. No
trate de cargar cualquier otra herramienta inalámbrica o la batería
con este cargador.
13) No trate de cargar la batería con
ningún otro cargador.
14) No trate de desarmar la caja de la
batería.
15) No guarde la herramienta y la batería en ambientes donde la temperatura pueda alcanzar o superar los
50ºC (122ºF) (tales como galpón de
herramientas para metal o un coche
en verano), ya que puede deteriorar
la batería guardada.
16) No cargue la batería cuando la
temperatura está por DEBAJO de
0ºC (32ºF) o por ENCIMA de 40ºC
(104ºF). Esto es muy importante.
17) No incinere la batería. Puede explotar en el fuego.
18) Evite ambientes peligrosos. No utilice el cargador en lugares húmedos o mojados.
19) El cargador fue diseñado para funcionar sólo con la corriente eléctrica normal del hogar. ¡No trate de
utilizar con otro voltaje!
20)
No abuse del cable. Nunca transporte el cargador por el cable o tire
del cable para desconectarlo del
tomacorriente. Mantenga el cable lejos del calor, aceite y bordes agudos.
21) Cargue la batería en un lugar con
buena circulación de aire, no cubra
el cargador de batería y la batería
con un paño, etc. durante la carga.
22) No se recomienda el uso de un enchufe triple ya que puede provocar
el riesgo de fuego, descarga eléctrica o heridas personales.
23) No cortocircuite la batería. Una batería cortocircuitada puede provocar un gran flujo de corriente,
calentamiento excesivo y el riesgo
de fuego o heridas personales.
24) NOTA: Si el cable de alimentación
de este aparato está dañado debe
cambiarlo en un taller de reparaciones autorizado por el fabricante
porque son necesarias herramientas de uso especial.
25) PARA REDUCIR EL RIESGO DE
DESCARGA ELECTRICA, ESTE
APARATO TIENE UN ENCHUFE
POLARIZADO (UNA PATA ES
MAS ANCHA QUE LA OTRA).
Este enchufe entrará en el tomacor-
riente polarizado sólo de una forma. Si el enchufe no entra completamente en el tomacorriente, invierta el enchufe. Si no entra incluso de
esta forma, hable con un electricista calificado para que le instale un
tomacorriente adecuado.
No cambie el enchufe de ninguna for-
ma.
ADVERTENCIA:
• Utilice siempre las baterías Huskie Tools
diseñadas para su uso con esta herramienta recargable.
• Huskie Tools no asume ninguna responsabilidad por daños o accidentes provocados por el uso de un paquete de baterías recicladas y un paquete de baterías
no originales.
• No tire la batería al fuego ni la exponga
a temperaturas elevadas.
• No perfore la batería con clavos o similar, ni la golpee, la desmonte ni intente
modificarla.
• Evite el contacto de los terminales de la
batería con objetos metálicos.
• No transporte ni guarde la batería en el
mismo lugar que clavos u objetos metálicos similares.
• No cargue la batería en un lugar sometido a altas temperaturas, por ejemplo
cerca del fuego o bajo luz solar directa;
la batería podría sobrecalentarse, incendiarse o incluso explotar.
• Utilice siempre el cargador diseñado para tal fin para cargar la batería. De no
ser así, la batería podría presentar fugas, sobrecalentarse o incluso explotar.
Page 23

• Después de extraer el paquete de ba-
Marcas de
alineación
terías de la herramienta o el cargador, siempre reinstale la cubierta del paquete. De otra manera, los contactos de
la batería podrían ser cortados, causando el riesgo de fuego.
• Cuando el paquete de pilas se deteriora,
reemplácelo con uno nuevo.
El uso continuo de un paquete de pilas dañado puede ser causa de la generación de calor, ignición o rotura de batería.
NOTA:
Si hay un juego excesivo en la broca, asegure el taladro en su lugar
abra las garras de la broca gi-
y
rando el collar de bloqueo y
ete el tornillo (tornillo de rosca a la
izquierda) con un destornillador girando en sentido antihorario (visto
desde adelante).
apri-
V. MONTAJE
Colocación o extracción de la
broca
NOTA:
Al poner o extraer una broca o cubo, desconecte la batería de la
herramienta o coloque el interruptor en la posición central (bloqueo
de interruptor).
Esta herramienta está equipada con un
portabrocas de taladro sin llave.
1. Colocación
Inserte la broca y gire el collar de blo-
queo en sentido horario (visto desde
adelante) para apretar firmemente hasta
que deje de hacer chasquidos.
2. Desmontaje
Gire el collar de bloqueo en sentido antiho-
rario (visto desde adelante) y desmonte la
broca.
Collar de blo-
Colocación y extracción de la bat-
ería
1. Para conectar la batería:
Alinee las marcas de alineación y colo-
que las baterías.
• Deslice la batería hasta que se bloquee en su posición.
2. Para extraer la batería:
Tire del botón desde el frente para sol-
tar la batería.
Botón
Mango de soporte
Posicione el mango de soporte en la
posición que más le acomode y ajústela firmemente de manera segura.
Apriete
Afloj
Page 24

interruptor
Utilice siempre la empuñadora de
apoyo para asegurarse de que opera
la herramienta en forma segura.
VI.
FUNCIONAMIENTO
[Cuerpo principal]
Funcionamiento del interruptor
1. La velocidad aumenta de acuerdo con
la fuerza a la que presiona el disparador. Cuando empiece el trabajo, presione ligeramente el disparador para empezar una rotación lenta.
2. Se utiliza un controlador electrónico de
realimentación para darle una fuerte torsión incluso a bajas velocidades.
3. El freno funciona cuando se suelta el
disparador y el motor se para inmediatamente.
NOTA:
• Cuando el freno funciona, puede
escucharse un sonido de frenado.
Esto es normal.
• Las chispas que se generan en la
escobilla del motor se pueden ver
a través de los orificios de ventilación del cuerpo ubicados en la parte trasera de la herramienta durante
el uso del interruptor y frenado por la
carga impuesta al motor. Esto no indica que exista un problema con la
herramienta.
PRECAUCIÓN:
Cuando se opera la herramienta tirando del disparador, puede que
genere un intervalo momentáneamente antes de iniciarse la rotación. Esto no es señal de un malfuncionamiento.
* Este intervalo ocurre cuando se
inicia el sistema de circuitos de la
herramienta cuando se tira del disparador por primera vez después
de instalar un nuevo paquete de
batería o después de que la herramienta no ha sido usada por al menos 1 minuto (o al menos 5 minutos desde que el LED está encendido). La rotación se iniciará sin
ningún intervalo durante segundas
y subsiguientes operaciones.
Funcionamiento del interruptor y
de la palanca de avance/marcha atrás
Avance Marcha
Bloqueo del
PRECAUCIÓN:
Para impedir que se produzcan daños, no utilice la unidad de palanca de avance/marcha atrás; la broca se detiene del todo.
Funcionamiento del
interruptor de rotación de
avance
1. Empuje la palanca para que se produzca una rotación de avance.
2. Apriete ligeramente el gatillo del disparador para iniciar la herramienta con
lentitud.
3.
La velocidad aumenta con la fuerza con
la que presiona el disparador para un eficiente apriete de tornillos y taladrado. El
freno funciona y la broca se para inmediatamente cuando se suelta el disparador.
4.
Tras utilizarlo, coloque la palanca en su
posición central (bloqueo del interruptor).
Funcionamiento del interruptor de
rotación inversa
1.
Empuje la palanca para que se produzca
una rotación inversa. Compruebe la dirección de la rotación antes de utilizarlo.
2. Apriete ligeramente el gatillo del disparador para iniciar la herramienta con
lentitud.
3. Tras utilizarlo, coloque la palanca en su
posición central (bloqueo del interruptor).
Page 25

Ajuste de torsión del embrague
Ajuste la torsión a uno de los 18 ajustes de embrague o a la posición “
(EY7450).
Ajuste la torsión a uno de los 18 ajustes
de embrague o a la posición “
(HTP-HDD).
”, “ ”
NOTA:
Asegúrese siempre de parar el
funcionamiento de la herramienta
y desconectarlo del trabajo cuando seleccione el modo de Martilleo
con respecto al modo de taladrado
o cuando cambie al modo de taladrado del modo de Martilleo por
rotación del mando del embrague.
PRECAUCIÓN:
Realice el ajuste del embrague en esta
marca (
Si el mango de embrague no puede
ajustarse en el modo “drilling” (perforación) o “hammering” (martilleo)
después de perforar con la función de
embrague, ajuste el mango de embrague
en la posición 1 y utilice el embrague un
segundo.
) antes de usar.
Selección de velocidad
Elija una alta o baja velocidad de acuerdo al uso.
BAJA
A medida que aumenta la fuerza de
presión del disparador de control de velocidad variable, mayor es la velocidad.
ADVERTENCIA:
• No inhale el humo emitido por la
herramienta o el paquete de batería
debido a que puede ser peligroso.
ALTA
”
PRECAUCIÓN:
• Inspeccione el interruptor selector
de velocidad antes de utilizar.
• Utilice a baja velocidad cuando necesite una alta torsión durante el
funcionamiento (El uso a alta velocidad cuando se necesita una alta
torsión puede provocar una avería
del motor.)
• No utilice la herramienta de forma
que se bloquee el motor, ya que
la herramienta o el paquete de baterías podría dañarse, produciendo
humo o un incendio.
• No haga funcionar el interruptor
selector de velocidad (BAJO-ALTO)
mientras presiona el disparador de
control de velocidad. Esto puede
desgastar rápidamente la batería
recargable o dañar el mecanismo
interno del motor.
* Vea las especificaciones para “MÁXI-
MAS CAPACIDADES RECOMENDADAS”.
PRECAUCIÓN:
• Para evitar un aumento excesivo
de temperatura de la superficie de
la herramienta, no haga funcionar
la herramienta continuamente utilizando dos o más baterías. Es necesario que la herramienta tenga
un tiempo de enfriamiento antes de
poder cambiar por otra batería.
• No cierre los orificios de ventilación en
los lados del cuerpo durante el funcionamiento. De lo contrario, se ve afectado adversamente el funcionamiento de
la máquina y se produce una avería.
• No manche la herramienta (motor).
Esto puede dañar la unidad.
• Utilice la herramienta de tal forma
que se evite que el aire que sale por
los orificios de ventilación del cuerpo
sople directamente sobre su piel. De
lo contrario, puede quemarse.
Función de bloqueo de broca
1. Con el interruptor disparador no activado y una broca de destornillador bloqueada en su posición, la herramienta
puede utilizarse como un destornillador
manual (hasta 40 N·m, 408 k
pulg.-lbs.)
f-cm, 353
Page 26

Habrá un ligero juego en la broca pero
esto no es un mal funcionamiento.
2. Esta función es útil para apretar tornillos
que necesiten una mayor torsión que la
torsión máxima del destornillador (posición
en el embrague), para confirmar
el apriete de un tornillo o para aflojar un
tornillo demasiado apretado.
Producto LED de clase 1
Precaución: NO MIRE FIJAMENTE EL
HAZ DE LUZ.
El uso de controles o ajustes o la realización de otros procedimientos que no
sean los especificados puede producir
una exposición a radiación peligrosa.
(2) Luz de advertencia de sobrecalen-
tamiento
Panel de controle
(1)
(1) Luz LED
Antes de usar la luz LED,
tire siempre del interruptor de alimentación una
vez. Presione el botón de
luz LED
La luz se enciende con
muy poca corriente y no
afecta adversamente
el funcionamiento de la
herramienta durante el
uso o la capacidad de la
batería.
PRECAUCIÓN:
• La luz LED integrada se ha diseñado para iluminar la pequeña área
de trabajo temporalmente.
• No lo utilice en lugar de una linterna normal ya que no tiene suficiente brillo.
• La luz LED se apaga cuando la herramienta no se ha usado por 5 minutos.
Este producto está equipado con una
luz indicadora incorporada.
Este producto está clasificado como
“Producto LED de clase 1” para
(EN) 60825-1:2001
.
.
(3)
(2)
IEC
Apagado
(funcion-
amiento
Indica que se detuvo el
funcionamiento por un
sobrecalentamiento de la
Para proteger el motor o la batería,
asegúrese de observar lo siguiente cuando efectúe esta operación.
• Si el motor o la batería se calienta,
se activará la función de protección
y el motor o la batería dejará de funcionar. La lámpara de advertencia de
sobrecalentamiento en el panel de
control se ilumina o destella cuando
esta característica está activada.
• Si se activa la función de protección
de sobrecalentamiento, espere hasta
que la herramienta se haya enfriado
completamente (por lo menos 30 minutos). La herramienta está lista para usar cuando se apaga la luz de advertencia de sobrecalentamiento.
• Evite utilizar la herramienta de tal forma
que la función de protección de sobrecalentamiento se active repetidamente.
• Si la herramienta funciona continuamente bajo condiciones de carga pesada o si se usa en condiciones de alta
temperatura (tal como durante el verano), la protección contra sobrecalentamiento puede activarse frecuentemente.
• Si la herramienta se usa en condiciones de temperatura fría (tal como
durante el invierno) o si se detiene
con frecuencia durante el uso, la protección contra sobrecalentamiento
quizás no se active.
Destella:
Sobre-
calentami-
Page 27

• El funcionamiento de la EY9L42 se deteriora mucho por debajo de los 10 ºC
debido a las condiciones de trabajo y a
otros factores.
• La variación de temperatura ambiente es de entre 0°C (32°F) y 40°C
(104°F).
Si la batería se utiliza cuando la tem-
peratura de la batería es inferior a
0°C (32°F), la herramienta puede no
funcionar correctamente.
• Cuando se vaya a cargar una batería
fría (unos 0°C (32°F) o menos) en un
cuarto cálido, deje la batería en la habitación durante al menos una hora y
cárguela cuando se haya calentado a
la temperatura de la habitación.
(3)
Luz de advertencia de batería baja
Apagado (fun-
cionamiento
normal)
Una descarga excesiva (completa) de
las baterías de Li-ión acorta dramáticamente su vida de servicio. El destornillador contiene una función de protección de batería diseñada para evitar una
descarga excesiva de la batería.
• La función de protección de batería se activa inmediatamente antes
de que la batería se quede completamente sin carga haciendo que destelle la luz de advertencia batería baja.
• Si se da cuenta que destella la luz de
advertencia de batería baja, cargue
inmediatamente la batería.
• Si se comienza con poca batería
restante, la herramienta puede que
pare de funcionar sin que parpadee
primero la lámpara de advertencia
de batería baja. Esto indica que hay
muy poca potencia restante en la
batería para usar la herramienta, y el
paquete de batería debe ser cargada
antes de seguir usándola.
• Si la herramienta está sujeta a una
carga repentina durante su uso que
cause que el motor de bloquee,
Destella (Sin carga)
Se activó la función
de protección de la
batería
puede que se dispare el sensor
de prevención de sobrecarga, y la
lámpara de advertencia de batería
baja puede parpadear. La lámpara
parará de parpadear una vez que
se aborde la causa del bloqueo del
motor y disparo de ciclo.
Vida útil de la batería
Las baterías recargables tienen una vida útil limitada. Si el tiempo de funcionamiento se acorta mucho tras la recarga, sustituya la batería por una nueva.
Reciclado de la batería
ATENCIÓN:
La batería de Li-ión que compró es
reciclable. Llame a 1-800-8-BAT-
TERY para información sobre el
reciclado de esta batería.
Page 28

[Cargador de la batería]
Carga
Precauciones
• Si la temperatura de la caja de batería cae unos −10°C (14°F), la carga
se parará automáticamente para evitar un deterioro de la batería.
• La variación de temperatura ambiente
es de entre 0°C (32°F) y 40°C (104°F).
Si la batería se utiliza cuando la temperatura de la batería es inferior a
0°C (32°F), la herramienta puede no
funcionar correctamente.
• Cuando se vaya a cargar una batería
fría (unos 0°C (32°F) o menos) en un
cuarto cálido, deje la batería en la habitación durante al menos una hora y
cárguela cuando se haya calentado a
la temperatura de la habitación.
• Deje que se enfríe el cargador al cargar
más de dos baterías de forma consecutiva.
• No introduzca sus dedos dentro del
hueco del contacto, cuando esté sujetando el cambiador o en ninguna otra
ocasión.
Para impedir el riesgo de incendio o daños del cargador de batería.
• No utilice una fuente de alimentación de un generador motorizado.
• No tapone los orificios de ventilación del cargador y la batería.
• Desenchufe el cargador cuando
no lo utilice.
Batería de Li-ión
NOTA:
Su batería no está totalmente cargada al momento de comprarla.
Asegúrese de cargar la batería antes de utilizarla.
Cargador de batería
1. Enchufe el cargador en la fuente de alimentación de CA.
2. Meta firmemente la batería en el cargador.
1. Alinee las marcas de alineación y co-
loque la batería en el enchufe del
cargador.
2. Deslice hacia adelante en el sentido
de la flecha.
Marcas de alin-
3. La luz indicadora de carga permanecerá
encendida durante la carga.
Cuando haya terminado la carga, se accionará automáticamente un conmutador electrónico interno para impedir
cualquier sobrecarga.
• No podrá cargar la batería si ésta está todavía caliente (por ejemplo, inmediatamente después de haber trabajado mucho).
La luz de espera naranja seguirá
destellando hasta que se enfríe la batería.
La carga comenzará automáticamente.
4. La luz de carga (verde) destellará lentamente cuando la batería se haya cargado a un 80%.
5. Cuando se completa la carga, la luz de
carga de color verde se apagará.
6. Si la temperatura de la batería es de
0°C o menos, la batería demora más en
cargarse completamente que el tiempo
de carga normal.
Incluso cuando la batería esté completamente cargada, tendrá aproximadamente 50% de la carga de una batería
totalmente cargada a la temperatura de
funcionamiento normal.
7. Si no se enciende la luz (verde) de carga consulte con un concesionario autorizado.
8. Si se vuelve a colocar una batería totalmente cargada en el cargador, se encenderá la luz de carga. Luego de algunos minutos, la lámpara de carga en
verde se apagará.
9. Extraiga la batería mientras mantiene
levantado el botón de desbloqueo de la
batería.
Botón de des-
bloqueo de la
Page 29

LAMP INDICATIONS
La carga ha sido completada. (Carga completa.)
La batería se cargó en aproximadamente 80%.
Ahora cargando.
Se ha enchufado el cargador en la fuente de alimentación de CA.
Está preparado para cargar.
(Verde) (Naranja)
Apagada Encendida Parpadeando
Luz de estado de carga
Aparecerá Izquierda: verde Derecha: naranja
La batería está fría.
La batería se esta cargando lentamente para reducir la carga de la batería.
La batería está caliente.
La carga comenzará cuando baje la temperatura de la batería. Si la temperatura de la batería es de –10°C o menos, la luz de carga (naranja) también
empezará a destellar. La carga empezará cuando sube la temperatura de la
batería.
No es posible realizar la carga. Existe un bloqueo de polvo o una
falla de la batería.
VII. MANTENIMIENTO
Utilice sólo un paño suave y seco para limpiar la herramienta. No utilice paños húmedos, bencina, diluyentes u otros disolventes volátiles de limpieza.
Para el caso en que el interior de la herramienta o el paquete de pilas estén expuestos al agua, drénelo o séquelo lo antes posible. Retire cuidadosamente cualquier polvo
o restos de acero que queden dentro de la herramienta. Si experimenta problemas durante el funcionamiento de la herramienta consulte con su servicio de reparaciones.
<VIII. ACCESORIOS>
Utilice sólo brocas adecuadas al tamaño del portabrocas.
IX. ANEXO
MÁXIMAS CAPACIDADES RECOMENDADAS
Modelo
Apriete de
tornillo
Taladrado
Tornillo de máquina
Tornillo para madera
Tornillo autorroscante
Para madera
Para metal
Para albañilería
ø 10 mm o ø 6,8 mm
ø 6 mm
ø 36 mm
ø 13 mm
ø 13 mm
HTP-HDD
M8
Page 30

X. SPECIFICHE TECNICHE
APPARECCHIO PRINCIPALE
Modelo HTP-HDD
Voltaje del motor 18 V
Sin velocidad de carga
Velocidad de soplado
por minuto
Capacidad de broca ø 1,5 mm - ø 13 mm
Torsión de embrague Approx 1,0 N·m - 6,9 N·m
Longitud total 218 mm 235 mm
Peso (con batería) 2,15 kg 2,3 kg
Baja 0 - 430 min
Alta 0 - 1650 min
Baja --- 1800 - 7740 min
Alta --- 6840 - 29700 min
BATERÍA
N.º de modelo
Batería de almacenaje Li-ión
Tensión de batería
BP-185
18V DC (3,6V x 10 celdas)
CARGADOR DE BATERÍA
N.º de modelo CH-185
Régimen Vea la placa de especificaciones en la parte inferior del cargado .
Peso 0,93 kg (2 lbs)
Tiempo de carga
-1
-1
-1
-1
BP-185
80min
NOTA: Este cuadro puede contener modelos no disponibles en su país.
Consulte el más reciente catálogo general.
NOTA: Puede consultar el nombre y la dirección del concesionario en la tarjeta de
garantía que se incluye.
Page 31

Declaración de interferencias con radiofrecuencias de la Comisión Federal de
Comunicaciones
Este equipo ha sido probado y se ha determinado que cumple con las limitaciones de
un dispositivo digital de Clase B, de conformidad con el Apartado 15 de las regulaciones de FCC. Estas limitaciones están diseñadas para brindar protección razonable
contra las interferencias perjudiciales en un entorno residencial. Este equipo genera,
utiliza y puede irradiar energía de radiofrecuencia y, si no se instala y utiliza de acuerdo
a las instrucciones, puede provocar interferencias perjudiciales en las comunicaciones
de radio. Sin embargo, no existe ninguna garantía de que no se produzcan interferencias en una instalación concreta. Si este equipo provoca interferencias perjudiciales en
la recepción de radio o televisión, lo que se puede determinar apagando y encendiendo el equipo, se recomienda al usuario intentar corregir la interferencia adoptando una
de las siguientes medidas:
• Cambie la orientación o posición de la antena receptora.
• Aumente la separación entre el equipo y el receptor.
• Conecte el equipo en una toma de corriente de un circuito que no sea el mismo en el
que está conectado el receptor.
• Consulte por ayuda a un proveedor o un técnico de radio/televisión con experiencia.
Precaución de FCC: Para asegurar un cumplimiento continuo, instale y use el equipo
según las instrucciones provistas. Utilice solamente el paquete de pilas especificado
en el manual de instrucciones. Cualquier cambio o modificación no aprobada expres mente por el grupo responsable de su certificación puede anular el derecho del usuario
sobre el uso del equipo.
Este dispositivo cumple con el Apartado 15 de las regulaciones de FCC. La operación
está sujeta a las siguientes dos condiciones (1) Este dispositivo no puede ocasionar interferencias que ocasionen daños y (2) este dispositivo debe aceptar cualquier interferencia, incluida una interferencia que pueda ocasionar una operación no deseada.
Este aparato digital de Clase B cumple con la norma canadiense ICES-003.
Normas armonizadas
CARGADOR
Cumple con UL Std.1310
Certificado de CS Std.C22.2 N ° 223-M91
Page 32

Page 33

195 Internationale Blvd
Glendale Heights, IL 60139
Phone 800-860-6170
Fax 800-345-3767
www.huskietools.com
 Loading...