

Page 1
Operating Instructions / Installation instructions
Bedienungs / Installationsanleitung
Mode d’emploi / Instructions d’installation
Steam Combination Oven
Dampfkombinationsofen
Four combi-vapeur
Model No. HL-SX485S
HL-SX485B
English Deutsch Français
FOR DOMESTIC USE ONLY
NUR FÜR HAUSHALTSÜBLICHEN GEBRAUCH
POUR UN USAGE DOMESTIQUE
HL-SX485S
Page 2

IMPORTANT SAFETY INSTRUCTIONS: Before operating this appliance, please read these
instructions carefully and keep for future reference.
WICHTIGE SICHERHEITSANWEISUNGEN: Bitte sorgfältig durchlesen und zur weiteren
Bezugnahme aufbewahren.
INSTRUCTIONS DE SÛRETÉ IMPORTANTES: Avant d’utiliser l’appareil, lisez attentivement les
recommandations d’utilisation et conservez-les soigneusement.
Page 3

Thank you for purchasing this Panasonic appliance.
Contents
English
Operating Instructions ........................2-57
Safety Instructions ...................................2-6
Disposal of Waste Products .......................7
Use of Your Oven .......................................8
Important Safety Instructions .................8-10
Parts of your Oven...............................10-11
Oven Accessories ................................12-13
Control Panel ............................................14
Cooking Modes.........................................15
Combination Cooking Modes ...................16
User Settings .......................................17-19
Home Key .................................................19
Child Lock .................................................19
Microwave Cooking and Defrosting ..........20
Grilling .................................................21-22
Convection Cooking ............................23-24
Steam Cooking ....................................25-26
Steam Shot ..............................................27
Combination Cooking ..........................28-29
Using the Timer ........................................34
Multi-Stage Cooking .................................35
Memory .....................................................36
Defrosting Guidelines ...............................37
Turbo Defrost .......................................38-39
Auto Cook Programs ...........................40-44
Auto Steam Programs .........................45-48
Auto Steam Programs with
Turbo Cook ..........................................49-52
System Cleaning Programs .....................53
Cleaning the Water Tank and
Drain Tank ................................................54
Questions and Answers .......................55-56
Care of your Oven ....................................57
Installation Instructions ....................58-62
Installation and connection .......................58
Safety Instructions ...............................58-59
Dimensions ...............................................60
Installing the Appliance ........................61-62
Combination Cooking with Steam .......30-31
Turbo Cook ..........................................32-33
Specications .........................................63
1 EN
Page 4

Operating Instructions
Safety Instructions
This appliance can be used by children aged from 8
years and above and persons with reduced physical,
sensory and mental capabilities or lack of experience
and knowledge if they have been given supervision
or instruction by a person responsible for their safety
concerning the use of the appliance in a safe way and
understand the hazards involved, including escaping
steam. Children shall not play with the appliance.
Cleaning and user maintenance shall not be made by
children without supervision.
When this oven is installed, it should be easy to isolate
the appliance from the electricity supply by pulling out the
plug or operating a circuit breaker.
If the supply cord is damaged, it must be replaced by the
manufacturer or its service agent or a similarly qualied
person in order to avoid a hazard.
2 EN
Warning! The appliance should be inspected for damage
to the door seals and door seal areas and if these areas
are damaged the appliance should not be operated until
it has been repaired by a service technician trained by the
manufacturer.
Warning! Do not attempt to tamper with or make any
adjustments or repairs to the door, control panel housing,
safety interlock switches or any other part of the oven.
Warning! Do not remove the outer panels from the oven
which give protection against exposure to microwave
energy.
Repairs should only be made by a qualied service
person.
Warning! Liquids and other foods must not be heated in
sealed containers since they are liable to explode.
Page 5

Safety Instructions
Warning! Only allow children to use the oven without
supervision when adequate instructions have been given
so that the child is able to use the oven in a safe way and
understands the hazards of improper use.
When heating food in plastic or paper containers, check
the oven frequently as these types of containers can
ignite if overheated.
If smoke is emitted or a re occurs in the oven, touch On/
O and leave the door closed in order to stie any ames.
Disconnect the power cord, or shut o power at fuse or
circuit breaker panel.
This appliance is intended to be used in household
applications only.
When heating liquids, e.g. soup, sauces and beverages in
your oven, overheating the liquid beyond boiling point can
occur without evidence of bubbling. This could result in a
sudden boil over of the hot liquid.
English
The contents of feeding bottles and baby food jars are to
be stirred or shaken. The temperature has to be checked
before consumption to avoid burns.
Do not cook eggs in their shells and whole hard-boiled
eggs by MICROWAVE. Pressure may build up and the
eggs may explode, even after the microwave heating has
ended.
Clean the inside of the oven, door seals and door seal
areas regularly. When food splatters or spilled liquids
adhere to the oven walls, base of the oven, door
seals and door seal areas wipe o with a damp cloth.
Mild detergent may be used if they get very dirty. The
use of harsh detergent or abrasive cleaners is not
recommended.
DO NOT USE COMMERCIAL OVEN CLEANERS.
3 EN
Page 6

Safety Instructions
When using the GRILL, CONVECTION, STEAM or
COMBINATION modes, some foods may splatter
grease on to the oven walls. If the oven is not cleaned
occasionally, it may start to “smoke” during use.
Failure to maintain the oven in a clean condition could
lead to deterioration of surfaces that could aect the
life of the appliance and possibly result in a hazardous
situation.
Warning! The accessible parts may become hot in GRILL,
CONVECTION, STEAM and COMBINATION use. Young
children less than 8 years of age should be kept away.
Children should only use the oven under adult supervision
due to the temperatures generated.
A steam cleaner is not to be used for cleaning the
appliance.
Do not use harsh, abrasive cleaners or sharp metal
scrapers to clean the oven door glass since they can
scratch the surface, which may result in shattering of the
glass.
4 EN
Exterior oven surfaces, including air vents and the oven
door will get hot during GRILLING, CONVECTION,
STEAM, and COMBINATION modes, take care when
opening or closing the door and when
inserting or removing food and accessories.
This appliance is not intended to be operated by means
of an external timer or separate remote-control system.
Only use utensils that are suitable for use in microwave
ovens.
Warning! This appliance produces boiling hot steam.
Page 7

Safety Instructions
During and after cooking with steam function, do not
open the oven door when your face is very close to the
oven. Care must be taken when opening the door as
steam may cause injury.
Warning! Steam may billow out when you open the door.
If there is steam in the oven, do not reach in with your
bare hands! Risk of burns! Use oven gloves.
Please refer to pages 12-13 for correct installation of the
oven accessories.
Warning! The oven has four grill heaters situated in the
top of the oven and a convection heater situated in the
back of the oven. After using the GRILL, CONVECTION,
STEAM and COMBINATION functions, the inside
surfaces of the oven will be very hot. Care should be
taken to avoid touching the heating elements inside the
oven. To prevent burns, care should be taken to avoid
touching the inside surfaces of the oven.
English
This combination oven is intended for heating food
and beverages only. Take care when heating foods low
in moisture, e.g. bread items, chocolate, biscuits and
pastries. These can easily burn, dry out or catch on re if
cooked too long. We do not recommend heating foods
low in moisture such as popcorn or poppadoms. Drying
of food, newspapers or clothing and heating of warming
pads, slippers, sponges, damp cloths, wheat bags, hot
water bottles and similar may lead to risk of injury, ignition
or re.
Warning! The oven lamp must be replaced by a service
technician trained by the manufacturer. DO NOT attempt
to remove the outer panels from the oven.
5 EN
Page 8

Safety Instructions
Before using the oven, place the drain tank in position.
Refer to page 10 for correct installation.
The purpose of the drain tank is to collect excess water
during STEAM and STEAM COMBINATION mode.
It should be emptied after each STEAM and STEAM
COMBINATION operation.
Do not use the water tank if it is cracked or broken, as
leaking water could result in electrical failure and danger
of electric shock. If the water tank becomes damaged,
please contact your dealer.
This oven is intended for built-in use only. This appliance
is not designed to be used as a tabletop appliance or
inside a cupboard.
CAUTION! In order to avoid a hazard due to inadvertent
resetting of the thermal cut-out, this appliance must not
be supplied through an external switching device, such as
a timer, or connected to a circuit that is regularly switched
on and o by the utility.
6 EN
Page 9

Disposal of Waste Products
English
Information on disposal
for users of Waste
Electrical & Electronic
Equipment (private
households)
This symbol on the products and/
or accompanying documents means that
used electrical and electronic products should
not be mixed with general household waste.
For proper treatment, recovery and recycling,
please take these products to designated
collection points, where they will be accepted
on a free of charge basis. Alternatively, in
some countries you may be able to return
your products to your local retailer upon the
purchase of an equivalent new product.
Disposing of this product correctly will help to
save valuable resources and prevent
any potential negative effects on human
health and the environment which could
otherwise arise from inappropriate waste
handling. Please contact your local authority
for further details of your nearest designated
collection point.
Penalties may be applicable for incorrect
disposal of this waste, in accordance with
national legislation.
For business users in the
European Union
If you wish to discard electrical and electronic
equipment, please contact your dealer or
supplier for further information.
Information on disposal in other
countries outside the European
Union
This symbol is only valid in the European
Union.
If you wish to discard this product, please
contact your local authorities or dealer and
ask for the correct method of disposal.
7 EN
Page 10

Important Safety Instructions
Read carefully and keep for future reference
WARNING!
Important safety instructions
1. The door seals and seal areas should
be cleaned with a damp cloth. The
appliance should be inspected for
damage to the door seals and door seal
areas and if these areas are damaged
the appliance should not be operated
until it has been repaired by a service
technician trained by the manufacturer.
Use of Your Oven
1. After plugging in the oven you will be
prompted to select a language and to
set the time. These settings can be
changed at any time, see page 17.
2. Do not use the oven for any reason
other than the preparation of food and
beverages. This oven is specically
designed to heat or cook food. Do not
use this oven to heat chemicals or
other non-food products.
3. Before use, check that utensils/
containers are suitable for use in
microwave ovens.
4. When the oven is not being used, do
not store any objects inside the oven
in case it is accidentally turned on.
5. The appliance must not be operated
by MICROWAVE or COMBINATION
WITHOUT FOOD IN THE OVEN.
Operation in this manner may damage
the appliance.
2. Do not operate this appliance if it
has a damaged cord or plug, if it is
not working properly, or if it has been
damaged or dropped. It is dangerous for
anyone other than a service technician
trained by the manufacturer to perform
repair service.
Heater operation
Before using CONVECTION, STEAM,
GRILL or COMBINATION function for the
rst time, wipe excessive oil off in the oven
cavity and operate the oven without food
and accessories on GRILL 1 for 15 minutes.
This will allow the oil that is used for rust
protection to be burned off.
CAUTION! Hot surfaces
After cooking the oven
accessories will be very hot.
Fan motor operation
After using the oven, the fan motor may
rotate for a few minutes to cool the electric
components. This is normal and you can
remove food even though the fan motor
operates. You can continue using the oven
during this time.
8 EN
Page 11

Important Safety Instructions
English
Water tank
Do not use the water tank if it is cracked
or broken, as leaking water could result
in electrical failure and danger of electric
shock. If the water tank becomes damaged,
please contact your dealer.
Oven light
When it becomes necessary to replace the
oven light, please consult your dealer.
Cooking times
The cooking times given in the cookbook
are approximate. The cooking time depends
on the condition, temperature, amount of
food and on the type of cookware.
Begin with the minimum cooking time to
help prevent overcooking. If the food is not
sufciently cooked you can always cook it
for a little longer.
IMPORTANT!
If the recommended cooking
times are exceeded the food
will be spoiled and in extreme
circumstances could catch re
and possibly damage the interior
of the oven.
Meat thermometer
Use a meat thermometer to check the
degree of cooking of roasts and poultry
only when the meat has been removed
from the oven. Do not use a conventional
meat thermometer in the microwave oven
because it may cause sparking.
Small quantities of foods
Small quantities of food or foods with
low moisture content can burn, dry out or
catch on re if cooked too long. If materials
inside the oven should ignite, touch On/Off
and leave the door closed in order to stie
any ames. Disconnect the power cord,
or shut off power at fuse or circuit breaker
panel.
Eggs
Do not cook eggs in their shells and
whole hard-boiled eggs by MICROWAVE.
Pressure may build up and the eggs may
explode, even after the microwave heating
has ended.
Piercing skin
Food with non porous skins, such as
potatoes, egg yolks and sausages must be
pierced before cooking by MICROWAVE to
prevent bursting.
Liquids
When heating liquids, e.g. soup, sauces and
beverages in microwave mode, overheating
the liquid beyond boiling point can occur
without evidence of bubbling. This could
result in a sudden boil over of the hot liquid.
To prevent this possibility the following steps
should be taken:
a. Avoid using straight-sided containers
with narrow necks.
b. Do not overheat.
c. Stir the liquid before placing the
container in the oven and again halfway
through the cooking time.
d. After heating, allow it to stand in the
oven for a short time, stir again before
carefully removing the container.
Paper/plastic
When heating food in plastic or paper
containers, check the oven frequently as
these types of containers ignite if
overheated.
Do not use recycled paper products (e.g.
kitchen roll) unless the paper product is
labelled as safe for microwave oven use.
Recycled paper products may contain
impurities which may cause sparks and/or
res during use.
Remove wire twist-ties from roasting bags
before placing the bags in the oven.
9 EN
Page 12
Important Safety Instructions
Utensils/foil
Do not heat any closed cans or bottles
because they might explode.
Metal containers or dishes with metallic
trim should not be used during microwave
cooking. Sparking will occur.
If you use any aluminium foil, meat spikes or
metalware the distance between them and
the oven walls and door should be at least
2 cm to prevent sparking.
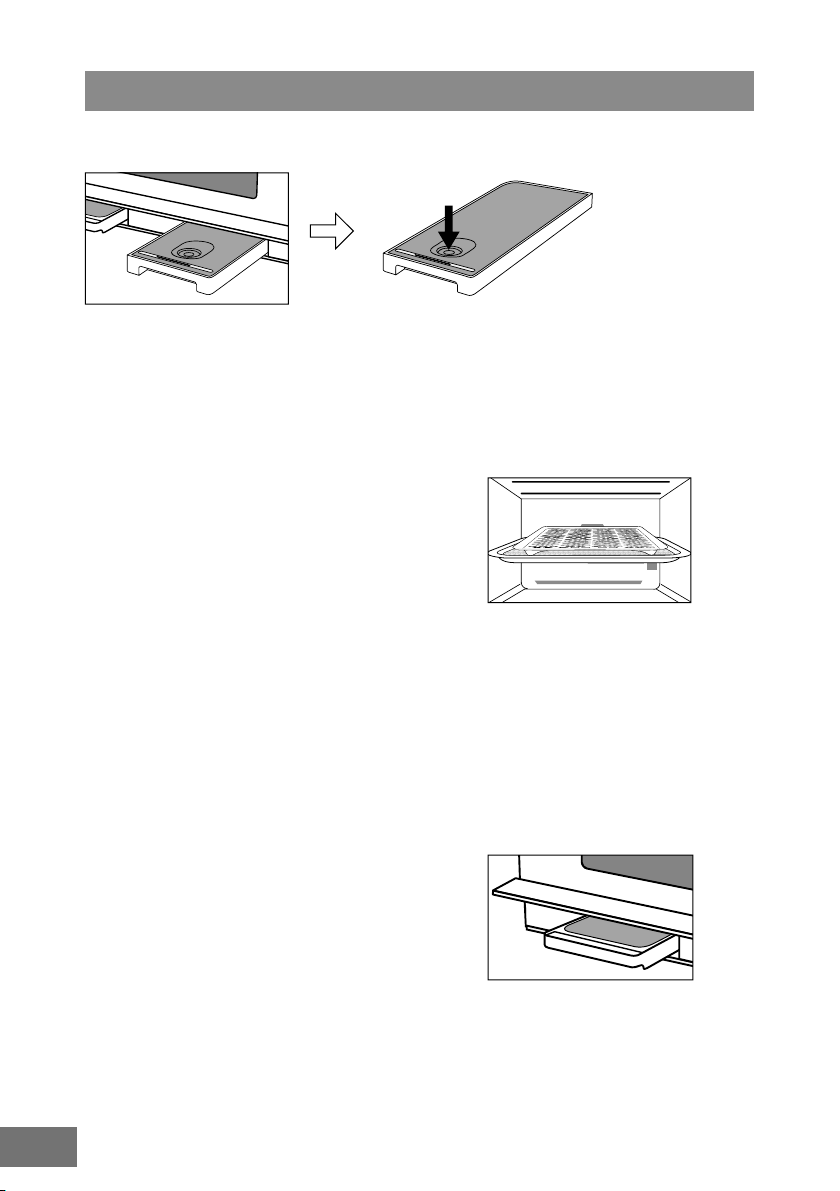
Parts of Your Oven
Water tank and drain tank
1. Before using the oven, the drain tank
must be tted as it collects excess water
during cooking. The drain tank should be
removed, emptied and cleaned after each
use.
2. Remove and re-t the water tank and
drain tank as illustrated.
3. DO NOT USE A DISHWASHER TO
CLEAN THE DRAIN TANK OR WATER
TANK. See page 54 for cleaning
instructions.
For further guidelines on using the water tank
see page 26.
Feeding bottles/baby food jars
The top and teat or lid must be removed
from feeding bottles or baby food jars before
placing in the oven.
After heating the contents of feeding bottles
and baby food jars are to be stirred or
shaken.
The temperature has to be checked before
consumption to avoid burns.
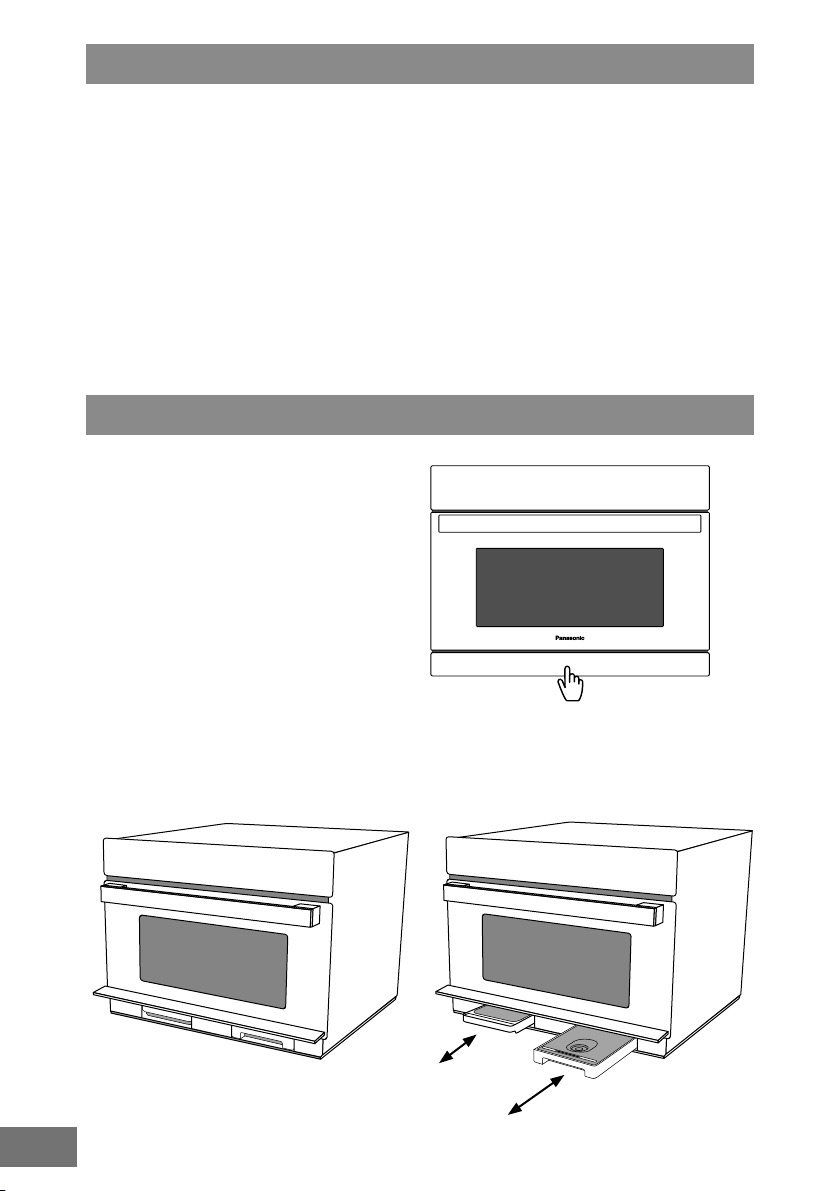
Press and release the panel below the oven
door to access the drain tank and water
tank.
10 EN
Drain tank
Water tank
Page 13
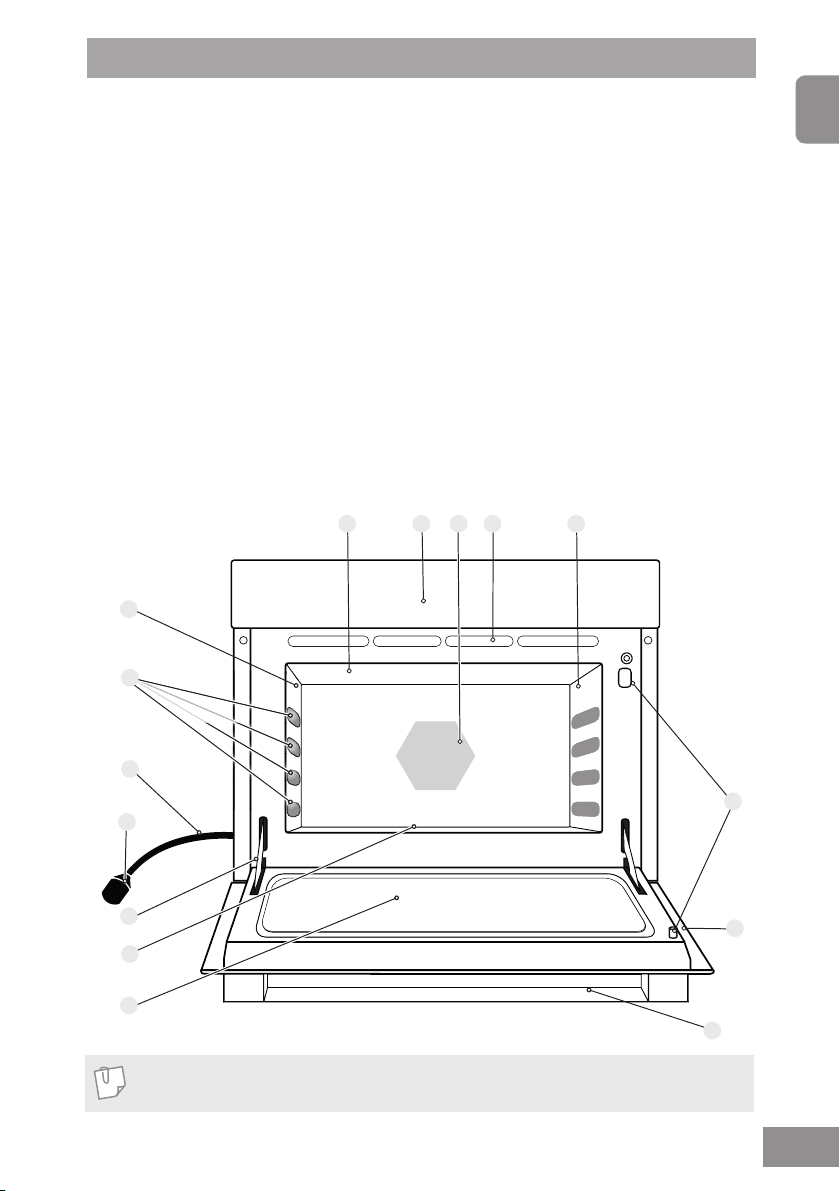
Parts of Your Oven
English
1. Control panel
2. Door handle. Pull the door handle
downwards to open. When you open
the oven door during cooking, the
cooking is stopped temporarily without
clearing earlier made settings. The
cooking is resumed as soon as the door
is closed and Stop/Start is touched. The
oven lamp lights as soon as the oven
door is opened. Open the door if the
oven has been in stand by mode. The
display will indicate ‘OPEN DOOR’. In
no word mode the accessories in the
display will blink.
3. Door safety lock system. To prevent
injury, do not insert nger, knife, spoon,
or other object into the latch hole.
5
13
6
4. Oven lamp. When the oven lamp key is
available in the display it is possible to
turn the oven lamp on and off.
5. Grill elements
6. Shelf positions. 1-4 as shown.
7. Power supply cord
8. Plug
9. Door hinges. To prevent injury when
opening or closing the door, keep
ngers away from the door hinges.
10. Bottom microwave feeding
(see page 20)
11. Oven window
12. Convection heater
13. Steam outlet
14. Rating plate
15. Air exhaust vent
12
1 15
4
4
7
3
2
8
9
10
11
1
NOTE
This illustration is for reference only.
3
14
2
11 EN
Page 14
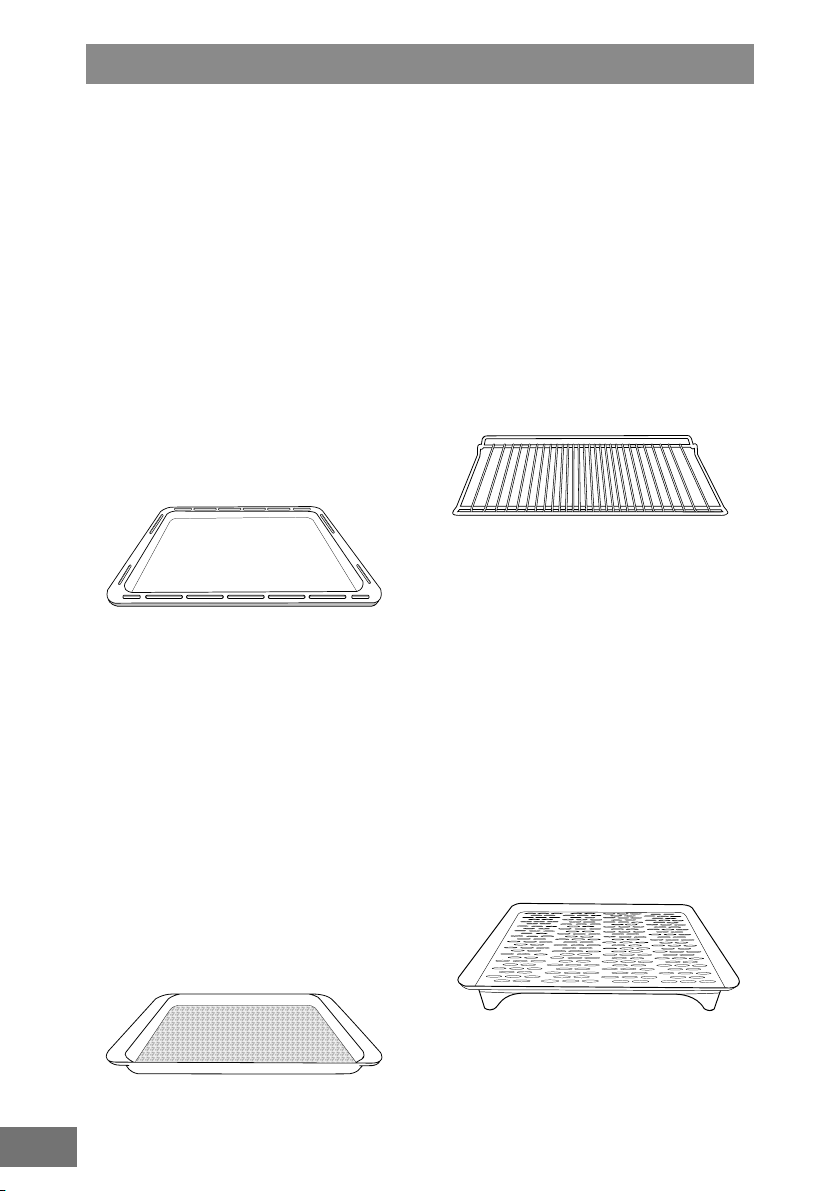
Oven Accessories
Accessories
The oven comes equipped with a variety
of accessories. Always follow the directions
given for use of the accessories.
Enamel shelf
1. The enamel shelf is for cooking on
CONVECTION or GRILL mode only.
Do not use on MICROWAVE or
COMBINATION modes. Do not use the
enamel shelf in shelf position 4 on grill
only mode.
2. For 2 level CONVECTION cooking,
the enamel shelf can be used in shelf
position 1 and the wire shelf can be used
in shelf position 3.
3. The maximum weight that can be placed
on the enamel shelf is 4 kg (this includes
total weight of food and dish).
Enamel shelf
Glass shelf
1. The glass shelf can be used in any
of the shelf positions to cook using
STEAM, MICROWAVE, GRILL,
CONVECTION or COMBINATION
modes.
2. The glass shelf is used together with the
plastic trivet for STEAM or STEAM and
MICROWAVE mode.
3. If the glass shelf is hot, allow to cool
before cleaning or placing in cold water,
as this could crack or shatter the glass.
4. The maximum weight that can be
placed on the glass shelf is 4 kg (this
includes total weight of food and dish).
Wire shelf
1. The wire shelf can be used in shelf
position 3 or 4 for GRILLING foods. It
can be used in any of the shelf positions
for CONVECTION or COMBINATION
cooking.
2. Do not use any metal container directly
on the Wire shelf in COMBINATION with
MICROWAVE.
3. Do not use the Wire shelf in MICROWAVE only mode.
4. The maximum weight that can be placed
on the wire shelf is 4 kg (this includes
total weight of food and dish).
Wire shelf
Plastic trivet
1. The plastic trivet is placed inside the
glass shelf to cook on STEAM or
STEAM and MICROWAVE mode. Food
can be placed directly on the plastic
trivet.
2. Do not use the plastic trivet for GRILL,
CONVECTION or COMBINATION
modes.
3. The plastic trivet is dishwasher safe.
12 EN
Plastic Trivet
Glass shelf
Page 15
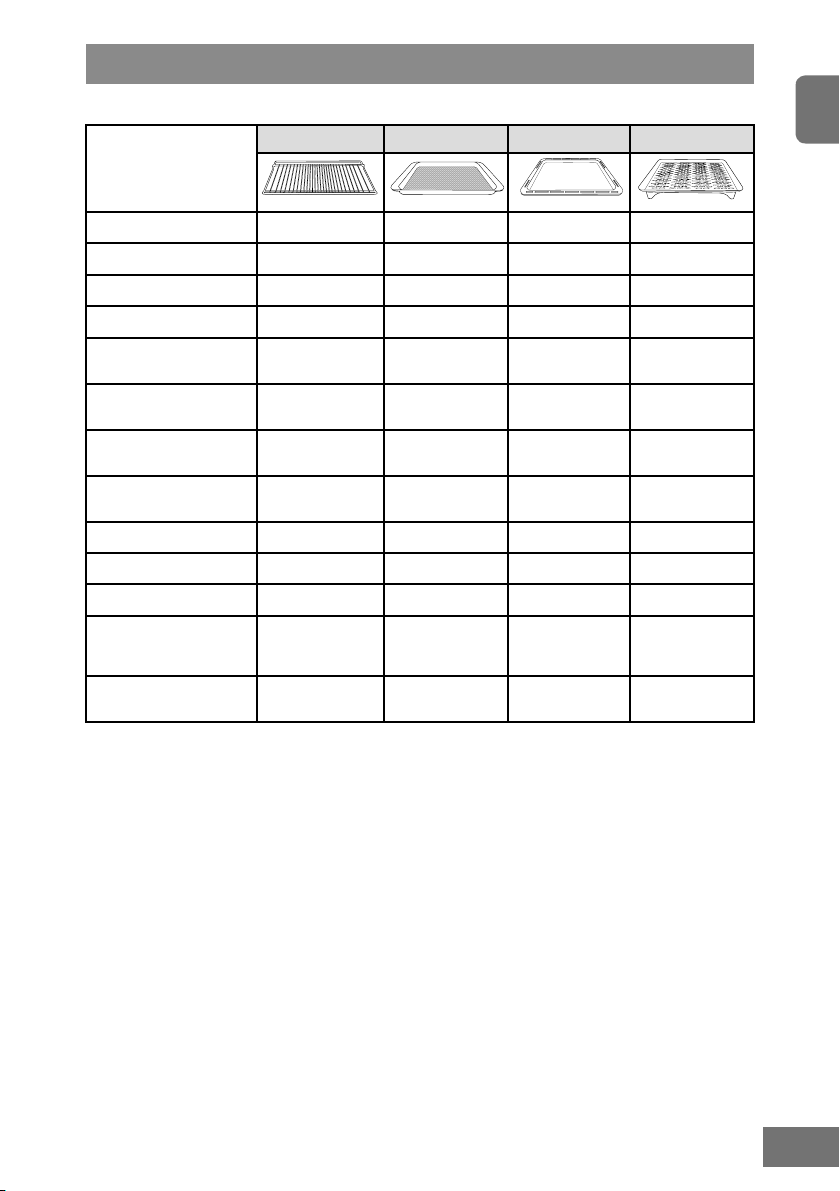
Oven Accessories
The following chart shows correct use of the accessories in the oven
Wire shelf Glass shelf Enamel shelf Plastic Trivet
English
Microwave
Grill
Convection
Steam
Grill + Convection
Grill + Microwave
Convection +
Microwave
Convection +
Microwave + Grill
Steam + Microwave
Steam + Grill
Steam + Convection
Grill or Convection
+ Microwave +
Steam
Turbo Cook
*: Metal containers can not be placed directly on the wire shelf. Either place food directly on the
wire shelf or place a glass dish directly on the wire shelf.
**: Do not use the enamel shelf or glass shelf in shelf position 4.
** **
** **
* **
*
* **
** **
* **
*
13 EN
Page 16
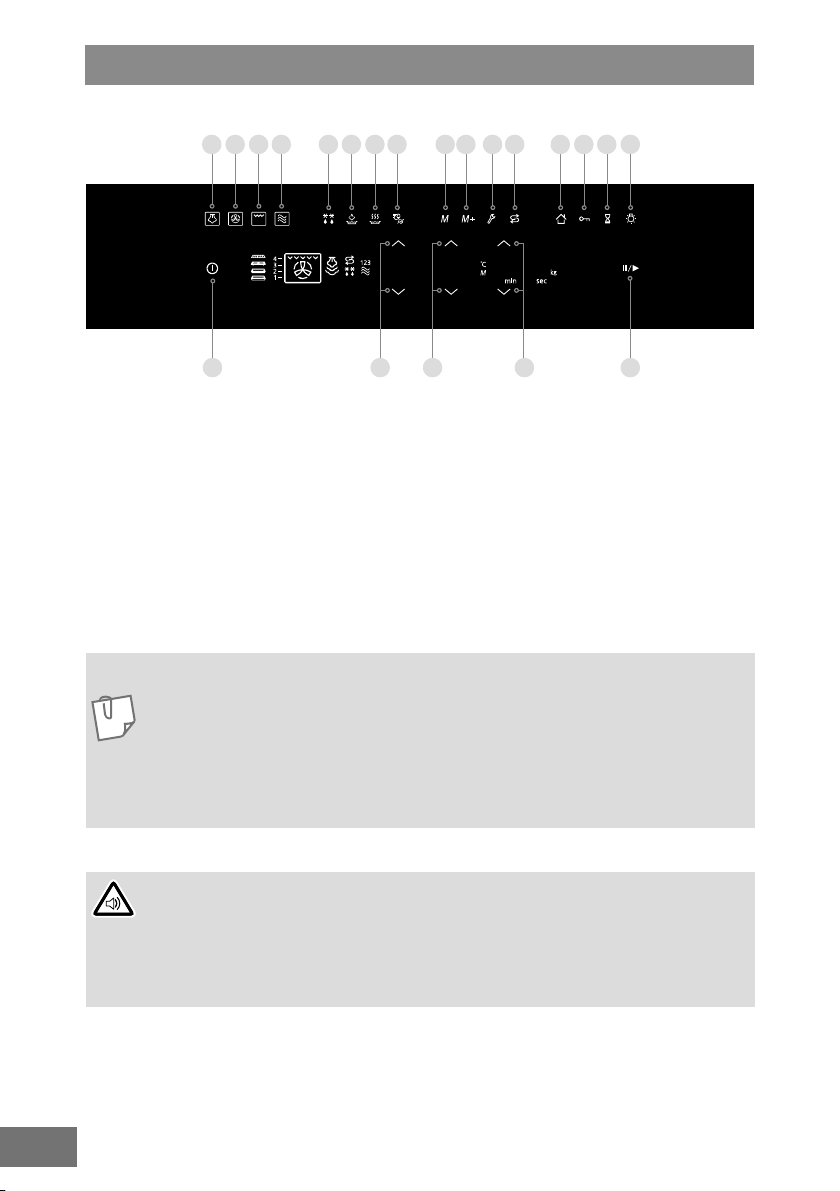
Control Panel
2 3 4 5 6 7 8 9
1 19 19 19
1. On/Off
2. Steam
3. Convection
4. Grill
5. Microwave
6. Turbo defrost
7. Steam auto programs
8. Auto cook programs
9. Turbo cook
10. Memory recall
10
11 12 13 14 15
11. Memory store
12. User settings
13. Cleaning programs
14. Home
15. Child lock
16. Timer
17. Oven lamp
18. Stop/Start
19. Up and down selection arrows
16 17
18
This oven is equipped with an energy saving function.
NOTE
The oven will enter stand-by mode after 6 minutes of no operation.
If an operation is set and Stop/Start is not touched within 6 minutes, the oven will
automatically cancel the operation. The display will revert back to stand-by mode.
When in stand-by mode, it is necessary to open and close the oven door or touch
On/Off key before operating the oven.
14 EN
BEEP SOUND
A beep sounds when a key is touched. To adjust volume of beep sounds refer to page
18. After the completion of the preheating on GRILL, CONVECTION, or COMBINATION
mode, three beeps sound. On some auto programs 3 beeps sound during cooking to stir
or turn the food (refer to pages 38-52). After completion of cooking, the oven will beep 5
times.
Page 17
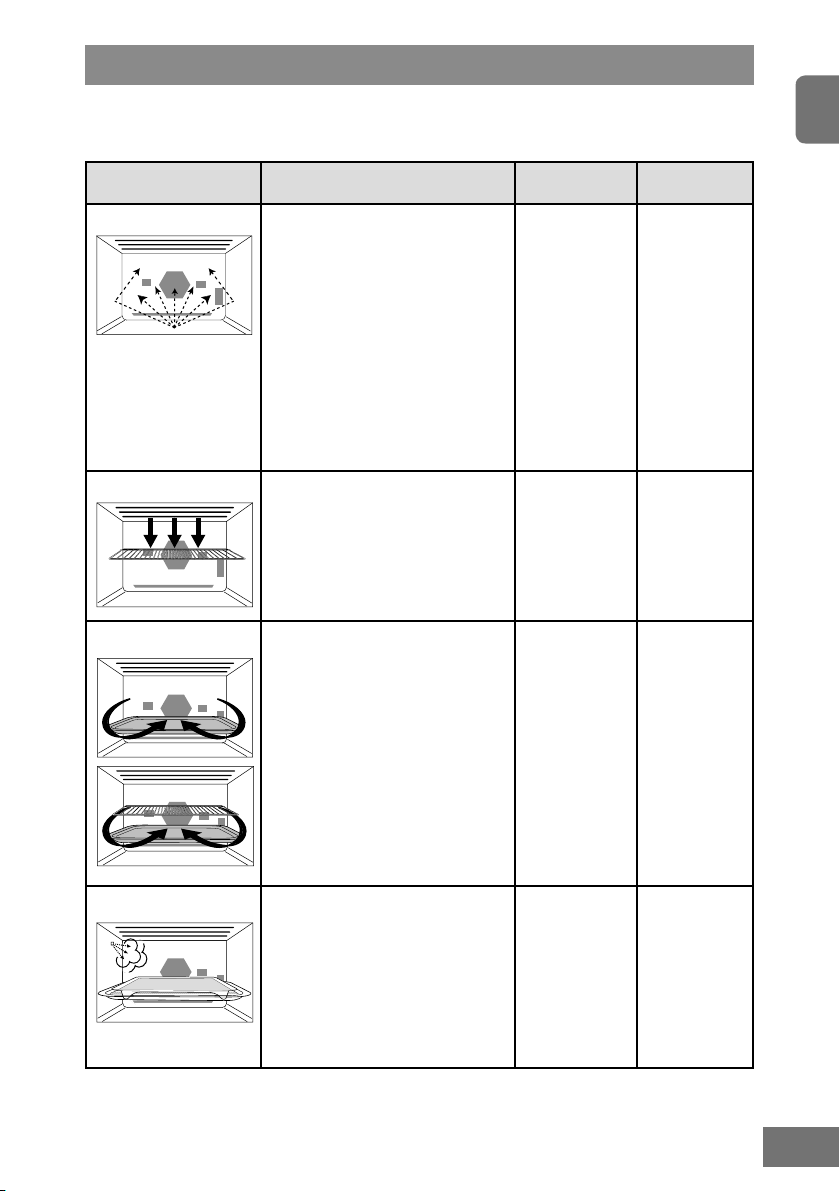
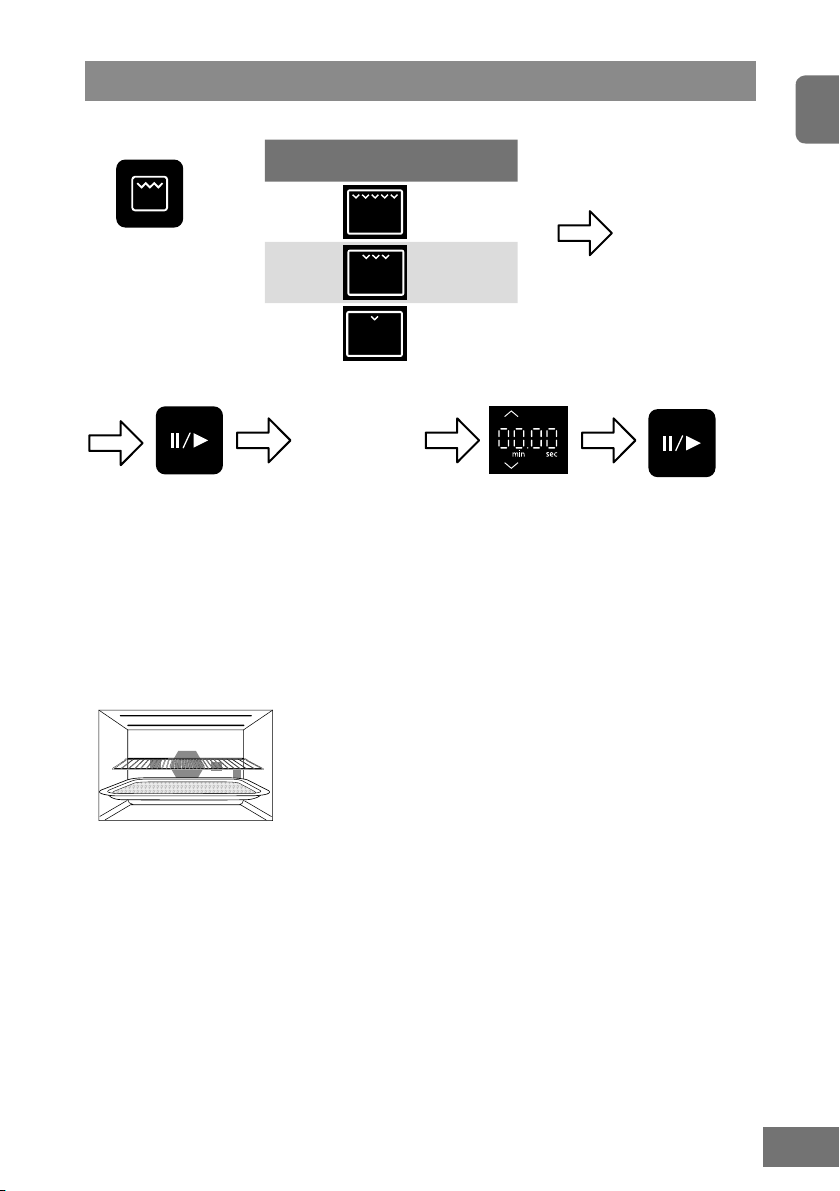
Cooking Modes
The diagrams shown below are examples of the accessories. It may vary depending on recipe/
dish used.
English
Cooking modes Uses
MICROWAVE
• Defrosting
• Reheating
• Melting: butter, chocolate, cheese.
• Cooking sh, vegetables, fruits,
eggs (except for eggs in their shell,
and whole hard-boiled eggs).
• Preparing : stewed fruits, jam,
sauces, custards, pastry, caramel,
meat, sh or vegetarian loaves.
• Baking cakes with eggs and baking
powder without colour. (Victoria
sandwich, clafoutis etc.)
GRILL
• Grilling of meat or sh.
• Toast grilling.
• Browning of gratin dishes or
meringue pies.
CONVECTION
• Baking of small pastry items with
short cooking times: puff pastry,
cookies, choux, short pastry, roll
cakes.
• Special baking: soufes,
meringues, vol-au-vent, small
loaves of bread or brioches,
sponge cake, meat pie, etc.
• Baking of quiches, pizzas and tarts.
Accessories
to use
Use your own
Pyrex® dishes,
plates or bowls,
directly on the
base of the
oven.
Wire shelf and
enamel shelf.
Do not use the
enamel shelf in
shelf position
4 on grill only
mode.
Enamel shelf,
glass shelf and
wire shelf.
Containers
Microwaveable,
no metal.
Heatproof,
metal tin / tray
can be used.
Heatproof,
metal tin / tray
can
be used.
STEAM
• Cooking sh, vegetables, chicken,
rice, potatoes and sponge
puddings.
Plastic trivet and
glass shelf.
Microwaveable.
15 EN
Page 18
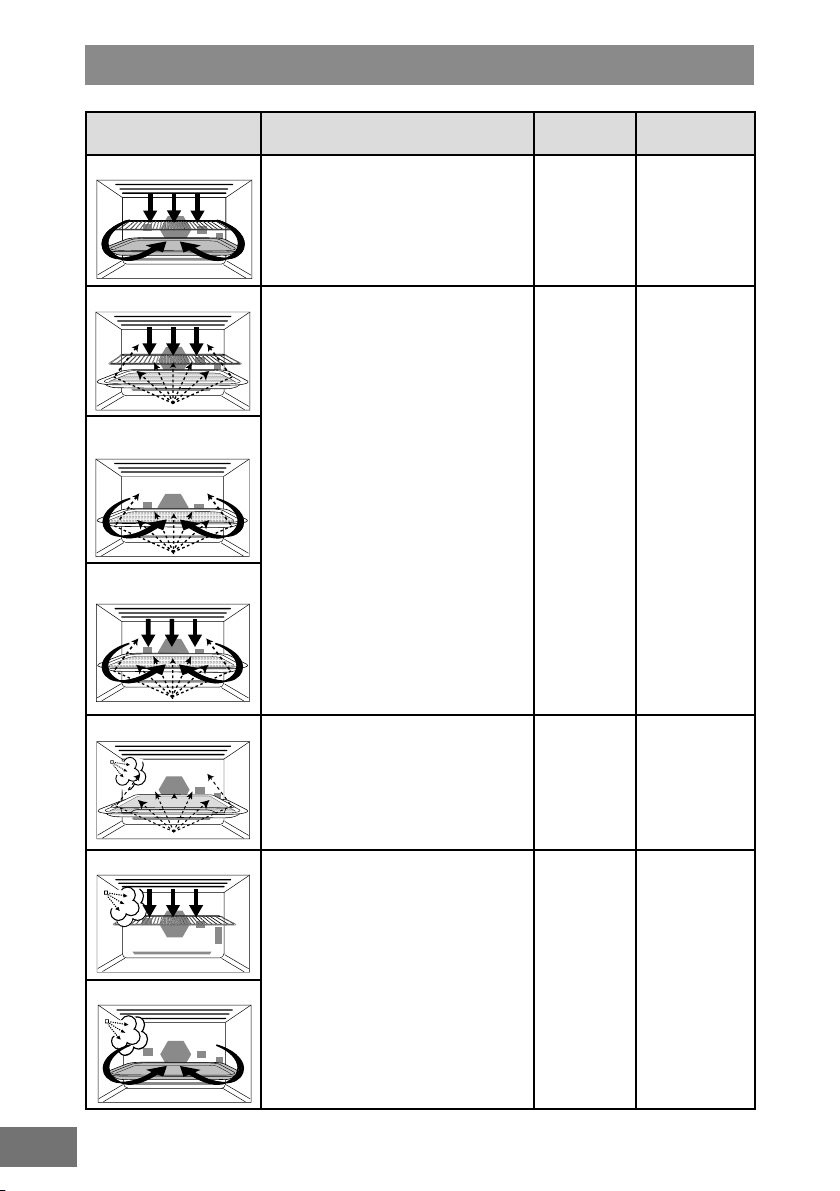
Combination Cooking Modes
Cooking modes Uses
GRILL + CONVECTION
GRILL + MICROWAVE
GRILL + CONVECTION
CONVECTION +
MICROWAVE
+ MICROWAVE
• Roasting red meats, thick steak (rib of
beef, T bone steaks)
• Cooking sh.
• Roasting meat and poultry.
• Defrosting and reheating crunchy
foods (quiche, pizza, bread,
viennoiserie, lasagne, gratin.)
• Cooking lasagne, meat, potatoes or
vegetable gratins.
• Baking cakes and puddings with eggs
or baking powder ingredients with
browning, baking of quiches, pies and
tarts.
Accessories
to use
Enamel shelf,
glass shelf
and wire
shelf.
Wire shelf
and / or
glass shelf.
Containers
Heatproof,
metal tin / tray
can be used.
Microwaveable
and heatproof.
Metal cake tin
to be used on
glass shelf only.
DO NOT USE
spring form
tins.
16 EN
STEAM + MICROWAVE
GRILL + STEAM
CONVECTION + STEAM
• Cooking sh, vegetables, chicken, rice,
and potatoes.
• Cooking gratins
• Kebabs
• Baking cakes
• Pastry tarts
• Soufes
• Whole sh
Plastic trivet
and glass
shelf.
Wire shelf or
enamel shelf.
Microwaveable.
Heatproof,
metal tin / tray
can be used.
Page 19
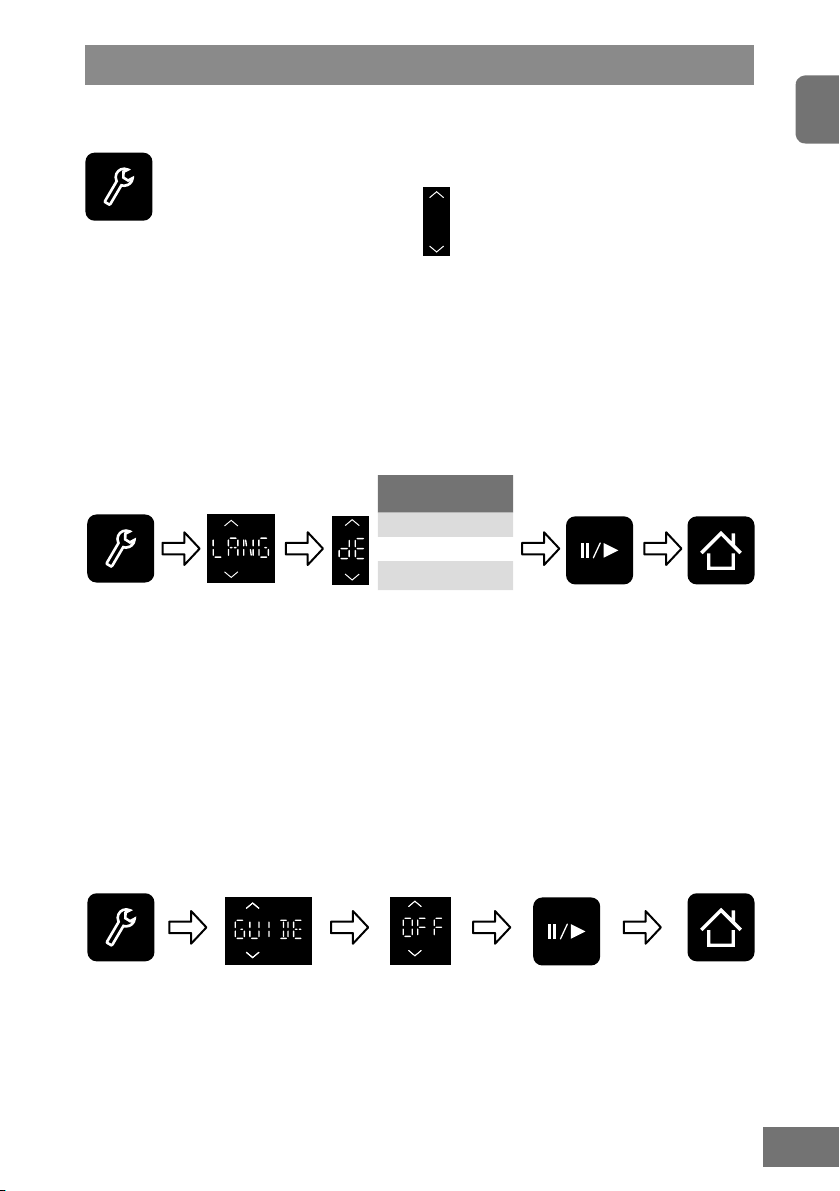
User Settings
Access the user settings menu to change the following settings.
CLOCK (1)
TIME (2)
LANG (3)
GUIDE (4)
Touch user settings
key to access the user
settings menu.
Language
These models have a unique function “Word Prompting” which guides you through the operation of your oven. As
you tap the keys, the display will scroll the next instruction reducing the opportunities for mistakes.
VOLUME (5)
BLUE (6)
WHITE (7)
DEMO (8)
English
Touch user
settings key to
access the user
settings menu.
Select “LANG” by
tapping the up and
down keys.
Tap the up and down arrows
to select a language.
Turning the user guide o and on
The user guide is on by default.
Touch user
settings key to
access the user
settings menu.
Select “GUIDE”
by tapping the
up and down
keys.
Select “OFF” to
turn the operation
guide off.
Display
Word
prompting
“dE” In German
“Fr” In French
“En” In English
“--” No Word
Touch Stop/
Start to store
this setting.
Touch Stop/Start to
store this setting.
Touch
Home key
to exit user
settings.
Touch
Home key
to exit user
settings.
17 EN
Page 20
User Settings
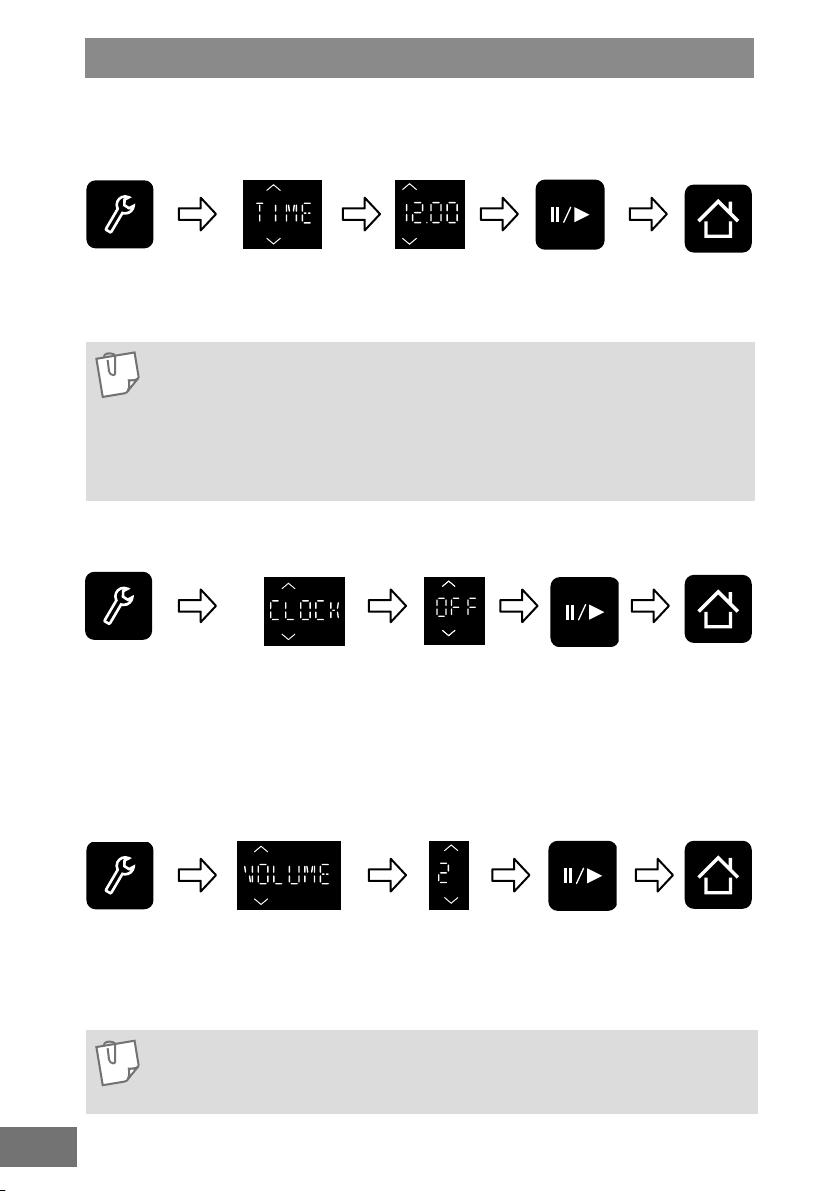
Setting the time of day
The clock can be set by accessing the user settings.
Touch user settings
key to access the
user settings menu.
Select “TIME’
using the up and
down keys.
Set the time by
tapping up and
down keys.
Touch Stop/
Start to store
this setting.
NOTE
The clock will keep the time of day as long as the oven is plugged in and electricity
is supplied.
One touch will increase or decrease the time by 1 minute, you can also adjust the
time quickly by touching and holding the up or down keys.
This is a 24 hour clock, i.e. 2 pm = 14:00 not 2:00.
The clock can be turned off in the user settings, see below.
Turning clock display o and on
To turn the clock display
on and off touch the
user settings key to
access the user settings
menu.
Select “CLOCK” by
tapping the up and
down keys.
Select “OFF” to
turn the clock
display off.
Touch
Stop/
Start to
store this
setting.
Volume
The volume can be set between 0 and 3. 0 is silent mode and 3 is the highest volume.
Touch
Home key
to exit user
settings.
Touch
Home key
to exit user
settings.
18 EN
Touch user
settings key to
access the user
settings menu.
NOTE
In silent mode the oven will still beep when cooking has ended for turn / stir prompts,
for error codes and if the On/Off key is touched.
Select “VOLUME” by
tapping the up and
down keys.
Select desired volume
settings from 0-3.
Touch
Stop/
Start to
store this
setting.
Touch
Home key
to exit user
settings.
Page 21
User Settings
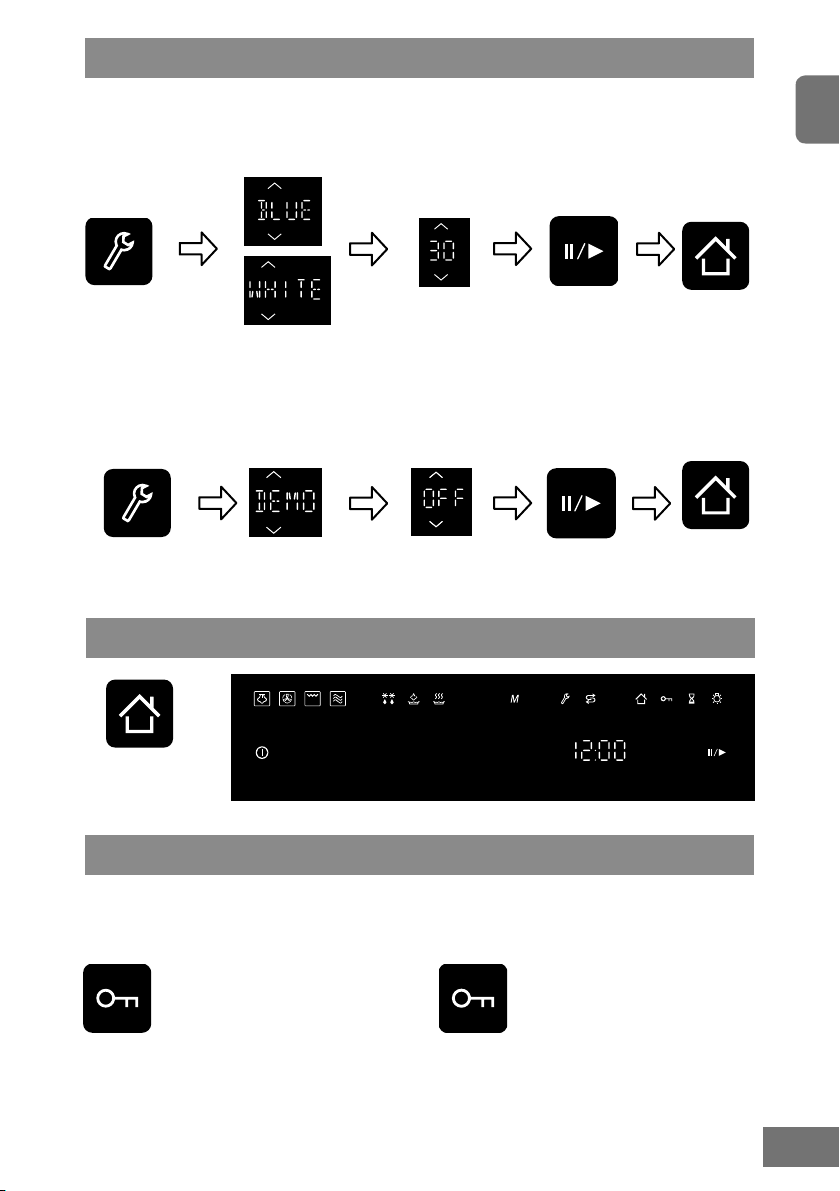
Brightness
The brightness of the blue and white display icons can be changed independently.
English
Touch user settings
key to access the
user settings menu.
Select “BLUE” or
“WHITE” by tapping
the up and down keys.
Select desired
brightness setting.
Touch Stop/
Start to store
this setting.
Touch
Home key
to exit user
settings.
Demo mode
This mode is designed for retail store display.
Touch user settings
key to access the
user settings menu.
Select “DEMO” by
tapping the up and
down keys.
Select “OFF” to turn
demo mode off.
Touch Stop/
Start to store
this setting.
Touch Home
key to exit
user settings.
Home Key
Touch home key to
return to the home
screen.
Child Lock
Using this system will make the oven controls inoperable; however, the door can be
opened.
To Set: To Cancel:
Touch and hold the child lock
key for 5 seconds to set the child
lock. The key is fully illuminated
when the child lock is on.
Touch and hold the child lock key
for 5 seconds to turn the child lock
off. The child lock key is partially
illuminated when the child lock is off.
19 EN
Page 22
Microwave Cooking and Defrosting
There are 6 different microwave power levels available (see the chart below).
Tap Microwave. Select the microwave power
Power Wattage Max time
Max 1000 Watts 30 mins
Medium 600 Watts 90 mins
Low 440 Watts 90 mins
Simmer 300 Watts 90 mins
Defrost 270 Watts 90 mins
Warm 100 Watts 90 mins
level by tapping the up and down
keys. The default power is 1000 W.
Select the cooking
time by tapping the
up and down keys.
Use of accessory:
Use your own Pyrex® dishes, plates or bowls covered
with a lid or pierced cling lm directly on the base of the
oven. Do not place food directly on the base of the oven.
NOTE
For multi-stage cooking refer to page 35.
Stand time can be programmed after microwave power and time setting. Refer
to using the timer page 34.
You can change the cooking time during cooking if required by a maximum of 10
minutes. Tap up and down keys to increase or decrease the cooking time. Touch
and hold the up or down key to increase or decrease time more quickly. Tapping
down to zero will end cooking.
Maximum time that can be set on Max power is 30 mins. On all other power
levels the maximum time that can be set is 90 mins.
DO NOT attempt to use the microwave only mode with any metal accessory in
the oven.
Touch Stop/Start.
The cooking program
will start and the time
in the display will count
down.
20 EN
Bottom feeding technology
Please note that this product uses bottom feeding technology for microwave distribution which
differs from traditional turntable side feeding methods and creates more useable space for a variety
of different sized dishes. This microwave feeding style can give a difference in heating times (in
microwave mode) when compared against side feeding appliances. This is quite normal and
should not cause any concern.
Page 23
Grilling
There are 3 different Grill settings available.
Key Taps Display Power Level
English
1 tap
Tap Grill key once,
twice or three times to
select the desired grill
power.
Touch Start to preheat. A “P” will
appear in the display window.
When the oven is preheated the
oven will beep and the “P” will
ash. Then open the door and
place the food inside. * When
preheat is not required skip this
step by setting the grilling time.
2 taps
3 taps
Use of accessory:
After preheating,
place the food in
the oven.
Grill 1 (high)
Grill 2 (medium)
Grill 3 (low)
Select the cooking time
by tapping up and down
keys. Maximum cooking
time is 90 minutes.
Touch Stop/Start.
The cooking program
will start and the time
in the display will
count down.
Place wire shelf with food in
shelf position 3 or 4.
Place glass shelf in shelf
position 2 or 3 to catch fat and
drips. Do not use the enamel
shelf in shelf position 4 on grill
only mode.
21 EN
Page 24

Grilling
NOTE
Never cover foods when grilling.
The grill will only operate with the oven door closed.
Most foods require turning halfway through cooking. When turning food, open oven
door and CAREFULLY remove wire shelf using oven gloves. After turning, return
food to the oven and close door. After closing oven door, touch Stop/Start. The oven
display will continue to count down the remaining grilling time. It is safe to open the
oven door at any time to check the progress of the food as it is grilling.
The grill will glow on and off during cooking - this is normal. Always clean the oven
after using the Grill and before using microwave or combination.
You can change the cooking time during cooking if required by a maximum of 10
minutes. Tap up and down keys to increase or decrease the cooking time. Touch
and hold the up or down key to increase or decrease time more quickly. Tapping
down to zero will end cooking.
CAUTION!
Use oven gloves when removing accessories. Never touch the outside window or
inside metal parts of the door or oven when taking food in or out due to the high
temperatures involved.
22 EN
Page 25
Convection Cooking
This key offers a choice of convection temperatures, 40 °C and 100 - 230 °C, in 5 °C increments.
For quick selection of the most commonly used cooking temperatures, the temperature starts at
150 °C and counts up and down.
English
Tap Convection key.
Touch Stop/Start to preheat. A “P” will appear in
the display window. When the oven is preheated
the oven will beep and the “P” will ash. Open the
door and place the food inside.
* Skip this step when preheating is not required.
Set the desired convection
temperature by tapping the
up and down keys.
After preheating,
place the food in
the oven.
Select the cooking time by
tapping up and down keys
(up to 9 hours).
Use of accessory:
For 1 level CONVECTION cooking use the enamel shelf or wire shelf in
any shelf position.
Touch Stop/Start.
The cooking
program will start
and the time in the
display will count
down.
For 2 level CONVECTION
cooking, the enamel shelf can
be used in shelf position 1 and
the wire shelf can be used in
shelf position 3.
NOTE
The oven cannot preheat at 40 ℃.
For two level cooking, baking times can differ. The food on the upper
level may be cooked sooner than that on the lower one.
23 EN
Page 26

Convection Cooking
NOTE on preheating
Do not open the door during preheating. After preheating 3 beeps will be heard
and the “P” will ash in the display window. If the oven door is not opened after
preheating, the oven will maintain the selected temperature. If the door is not
opened within 30 minutes of starting preheating, preheating will end.
If you want to cook without preheating, after selecting the desired temperature,
set the cooking time then touch Stop/Start.
NOTE
When the selected cooking time is less than one hour, the time counts down
second by second.
When the selected cooking time is over one hour, the time counts down minute
by minute until only “1H 00” (1 hour) remains. The display then indicates
minutes and seconds and counts down second by second.
You can change the cooking time during cooking if required by a maximum of
10 minutes. Tap up and down keys to increase or decrease the cooking time.
Touch and hold the up or down key to increase or decrease time more quickly.
Tapping down to zero will end cooking.
After touching Stop/Start, the selected temperature can be changed by tapping
the up and down keys This does not include 40 °C.
Depending on the recipe, you can preheat with or without the shelves in
position. The shelves are ideal for batch baking and when cooking in a large
dish.
24 EN
CAUTION!
Always use oven gloves when removing the food and accessories after cooking as
the oven and accessories will be very hot.
Page 27
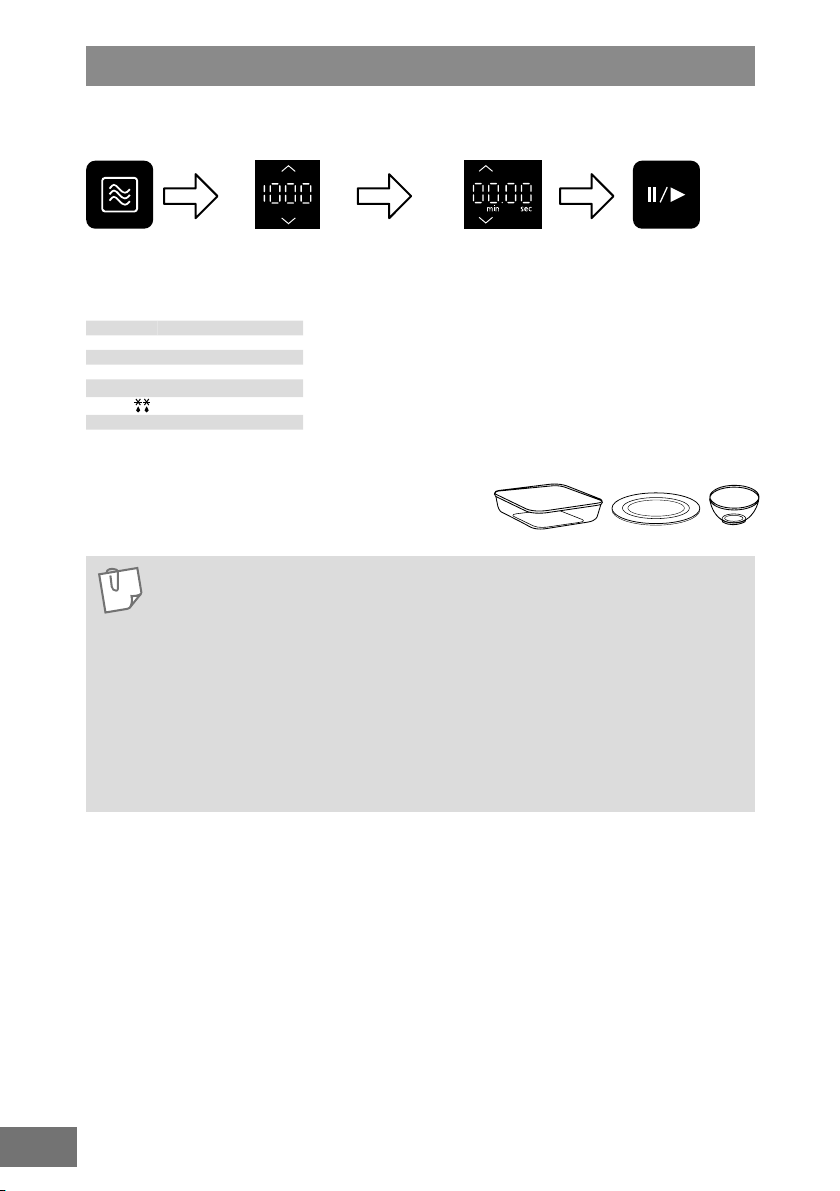
Steam Cooking
There are 3 different steam settings available. Use the steam mode to cook vegetables,
sh, chicken and rice.
English
Tap Steam until
the power you
require appears
in the display
window.
NOTE
Taps
Display
1 tap Steam 1 High
2 taps
3 taps
Power
Temp
Level
Steam 2 Med
Steam 3 Low
Select the cooking
time by tapping
and down keys.
Maximum cooking
time is 30 minutes.
up
Touch Stop/Start.
The cooking
program will start
and the time in the
display will count
down.
Fill the water tank before using the steam function.
The maximum time for cooking in this mode is 30 minutes. If required to cook
for longer than this time, re-ll the water tank and repeat the above operation
for the remaining time.
If during operation the water tank becomes empty, the oven will stop operation.
The prompt in the display will ask you to re-ll the water tank. After re-lling the
water tank and positioning back in the oven, touch Stop/Start. The oven will not
continue cooking until the water tank has been re-lled and Stop/Start touched.
You can change the cooking time during cooking if required by a maximum of
10 minutes. Tap up and down keys to increase or decrease the cooking time.
Touch and hold the up or down key to increase or decrease time more quickly.
Tapping down to zero will end cooking.
It is possible to rell water tank at any time during cooking, without having to
touch Stop/Start rst.
Wipe away excess water in the cavity and around the water tanks after cooking
with steam.
CAUTION
The accessories and surrounding oven will get very hot. Use oven gloves.
When removing the food or cooking accessories, hot water may drip from the
oven top.
Steam may billow out when you open the door. If there is steam in the oven, do
not reach in with your bare hands! Risk of burns! Use oven gloves.
Take care when removing the drain tank.
25 EN
Page 28
Steam Cooking
Guidelines for water tank
Carefully remove the water tank from the oven. Fill with tap water (do not use mineral water)
and position back in the oven. It is recommended to clean the water tank in warm water once
a week.
Oven accessories to use:
When steaming food the plastic trivet is placed
inside the glass shelf in shelf position 3. Food
can be placed directly on the plastic trivet.
Use oven gloves when removing accessories
as they will be very hot, and so will the roof
and walls of the oven.
Place food on plastic trivet,
on the glass shelf in shelf
position 3.
26 EN
Guidelines
1. Use the accessories provided, as
explained above.
2. The steam will only operate with the oven
door closed.
3. During and after cooking with steam
function, do not open the oven door when
your face is very close to the oven. Care
must be taken when opening the door as
steam may cause injury.
4. Always use oven gloves when removing
the food and accessories after steaming
as the oven and accessories will be very
hot.
5. After each steam operation carefully
remove and empty the drain tank. After
emptying, wash in warm soapy water.
Re-position the drain tank as
descibed on page 10.
Page 29
Steam Shot
This feature allows you to add steam during cooking (for 1, 2 or 3 minutes). There are
seven combinations that you can use steam shot -
MICROWAVE
GRILL
CONVECTION
GRILL + CONVECTION
GRILL + MICROWAVE
CONVECTION + MICROWAVE
GRILL + CONVECTION + MICROWAVE
Adding steam during cooking enhances the heat distribution and aids the rising process
of breads, cakes and pastries.
Set and operate the
desired program.
As required during operation,
hold steam for 2 seconds and 1
minute will be added.
NOTE
Steam shot is not available during preheating mode or at 40 °C convection.
Fill the water tank before use.
The original program still counts down when operating steam shot.
The steam shot time can not exceed the remaining cooking time.
If adding 2 or 3 minutes, steam must be tapped 2 or 3 times within a 3 second
time period.
Wipe away excess water in the cavity and around the water tanks after cooking
with steam.
()
Optional
If you want to add 2 or 3 minutes, tap
Steam 2 or 3 times within 3 seconds
after step 2.The remaining time
displayed includes steam shot time.
English
CAUTION
The accessories and surrounding oven will get very hot. Use oven gloves.
When removing the food or cooking accessories, hot water may drip from the
oven top.
Steam may billow out when you open the door. If there is steam in the oven, do
not reach in with your bare hands! Risk of burns! Use oven gloves.
Food Cooking mode Steam Shot
Pastries Convection ²/³ total time add 3 mins. Steam Shot
Breads Convection ²/³ total time add 3 mins. Steam Shot
Sponge cakes Convection ½ total time add 3 mins. Steam Shot
Part baked rolls Convection and Grill ²/³ total time add 3 mins. Steam Shot
27 EN
Page 30
Combination Cooking
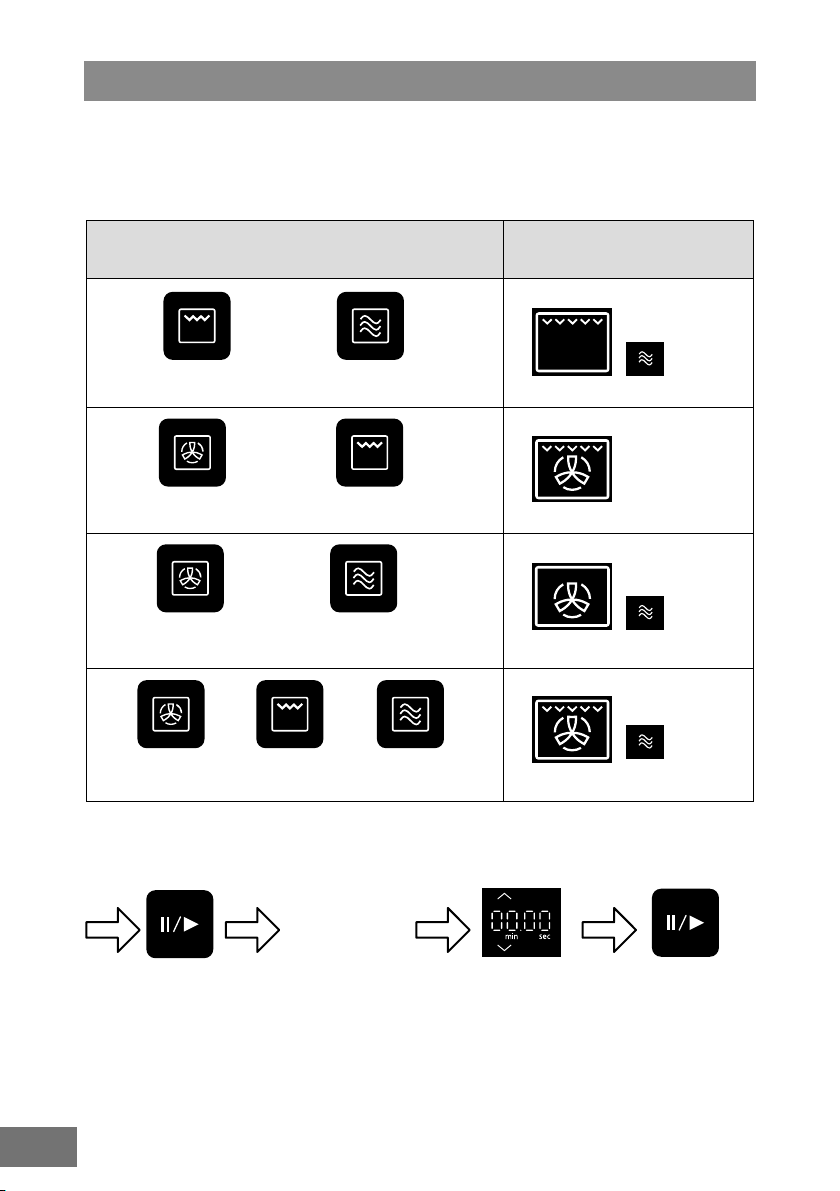
There are 4 combination settings; 1) Grill + Microwave, 2) Grill + Convection,
3) Convection + Microwave, 4) Grill + Convection + Microwave. 1000 W Microwave power level is
not available in Combination cooking. This would not be useful in normal use (the food would be
cooked before browning is achieved). 270 W Defrost can not be set in combination.
Cooking modes
Grill or convection must be selected before microwave
+
Grill + Microwave
(Maximum cooking time is 1 hour 30 minutes)
or
+
Convection + Grill
(Maximum cooking time is 9 hours)
or
+
Convection + Microwave
(Maximum cooking time is 9 hours)
or
++
Convection + Grill + Microwave
(Maximum cooking time is 9 hours)
Display
28 EN
Touch if
preheating
After preheating,
place the food in
the oven.
Select the cooking time
by tapping up or down
keys.
Touch Stop/Start.
The time counts
down in the display.
Page 31

Combination Cooking
NOTE on preheating
The oven can be preheated in Combination mode with Convection or Grill/
Convection cooking.
Touch Stop/Start before setting the cooking time and follow the NOTE ON
PREHEATING on page 24.
NO MICROWAVES ARE EMITTED DURING COMBINATION PREHEATING.
NOTE
Combination modes are not available with convection 40 °C.
Preheating is not available for Grill + Microwave mode.
When the selected cooking time is less than one hour, the time counts down
second by second.
When the selected cooking time is over one hour, the time counts down
minute by minute until only “1H 00” (1 hour) remains. The display then
indicates minutes and seconds and counts down second by second.
You can change the cooking time during cooking if required by a maximum of
10 minutes. Tap up and down keys to increase or decrease the cooking time.
Touch and hold the up or down key to increase or decrease time more quickly.
Tapping down to zero will end cooking.
1000 W or 270 W (Defrost) microwave power settings are not available in
combination.
CAUTION!
Use oven gloves when removing accessories. Never touch the outside window
or inside metal parts of the door or oven when taking food in or out due to the high
temperatures involved.
English
Use of accessories:
Use the wire shelf in any of the shelf positions.
in shelf positions 1 to 3.
Use the glass shelf
29 EN
Page 32

Combination Cooking with Steam
Steam can be used to cook foods simultaneously with microwave, grill or convection
mode. This can often reduce traditional oven cooking times and keep the food moist.
Taps
Display
1 tap Steam 1 High
Power
Level
Temp
2 taps
3 taps
Steam 2 Med
Steam 3 Low
Cooking modes
The cooking modes can be
selected in any order.
+
Steam + Microwave
or
+
Steam + Grill
or
+
Steam + Convection
Available power levels Display
Microwave power 440 W,
300 W or 100 W can be set.
Grill levels 1, 2 or 3 can be
set.
Convection 100 °C - 230 °C
can be set.
30 EN
Select the cooking time by tapping up
or down keys. Maximum cooking time is
30 minutes.
Use of accessories:
Steam + microwave
Plastic trivet on glass shelf in shelf position 3.
Touch Stop/Start.
The cooking program will
start and the time in the
display will count down.
Steam + grill or convection
Wire shelf or enamel shelf in any shelf position.
Page 33

Combination Cooking with Steam
NOTE
The maximum time for cooking in this mode is 30 minutes. If required to cook
for longer than this time, re-ll the water tank and repeat the above operation
for the remaining time.
If during operation the water tank becomes empty, the oven will stop
operation. The prompt in the display will ask you to re-ll the water tank. After
re-lling the water tank and positioning back in the oven, touch Stop/Start.
The oven will not continue cooking until the water tank has been re-lled and
Stop/Start touched.
Preheating is not available with Steam + Microwave and Steam + Grill mode.
You can change the cooking time during cooking if required by a maximum
of 10 minutes. Tap up and down keys to increase or decrease the cooking
time. Touch and hold the up or down key to increase or decrease time more
quickly. Tapping down to zero will end cooking.
It is possible to rell water tank at any time during cooking, without having to
touch Stop/Start rst.
Wipe away excess water in the cavity and around the water tanks after
cooking with steam.
Guidelines
1. During and after cooking with steam
function, do not open the oven door
when your face is close to the oven. Care
must be taken when opening the door as
steam may cause injury.
2. Always use oven gloves when removing
the food and accessories after cooking
as the oven and accessories will be very
hot.
3. After each steam operation carefully
remove and empty the drain tank. After
emptying, wash in warm soapy water.
English
CAUTION
The accessories and surrounding oven will get very hot. Use oven gloves.
When removing food or cooking accessories, hot water may drip from the
oven top.
Steam may billow out when you open the door. If there is steam in the oven,
do not reach in with your bare hands! Risk of burns! Use oven gloves.
Do not use the plastic trivet when using combination steam + grill or convection
modes.
31 EN
Page 34

Turbo Cook
The oven can be programmed to cook or reheat food more efciently by using the
Turbo Cook function to support steam, convection, grill and grill + convection cooking.
Selecting Turbo Cook after any of these cooking modes will simultaneously add 300 W
microwave power to reduce cooking time.
or
and/or
Select rst
cooking mode.
+
Touch Turbo Cook
Select the cooking time
by tapping up and down
keys.
Touch if
preheating
Touch Stop/Start.
The cooking program
will start and the time
in the display will count
down.
After preheating,
place the food in
the oven.
Cooking guidelines
Food Weight Combination Time
Croque monsieur
Frozen breaded sh llets
Beef rib (well done)
Poussin
Frozen spring rolls (chicken)
Apple Strudel (frozen, raw)
Lasagne (fresh)
Whole fresh sh
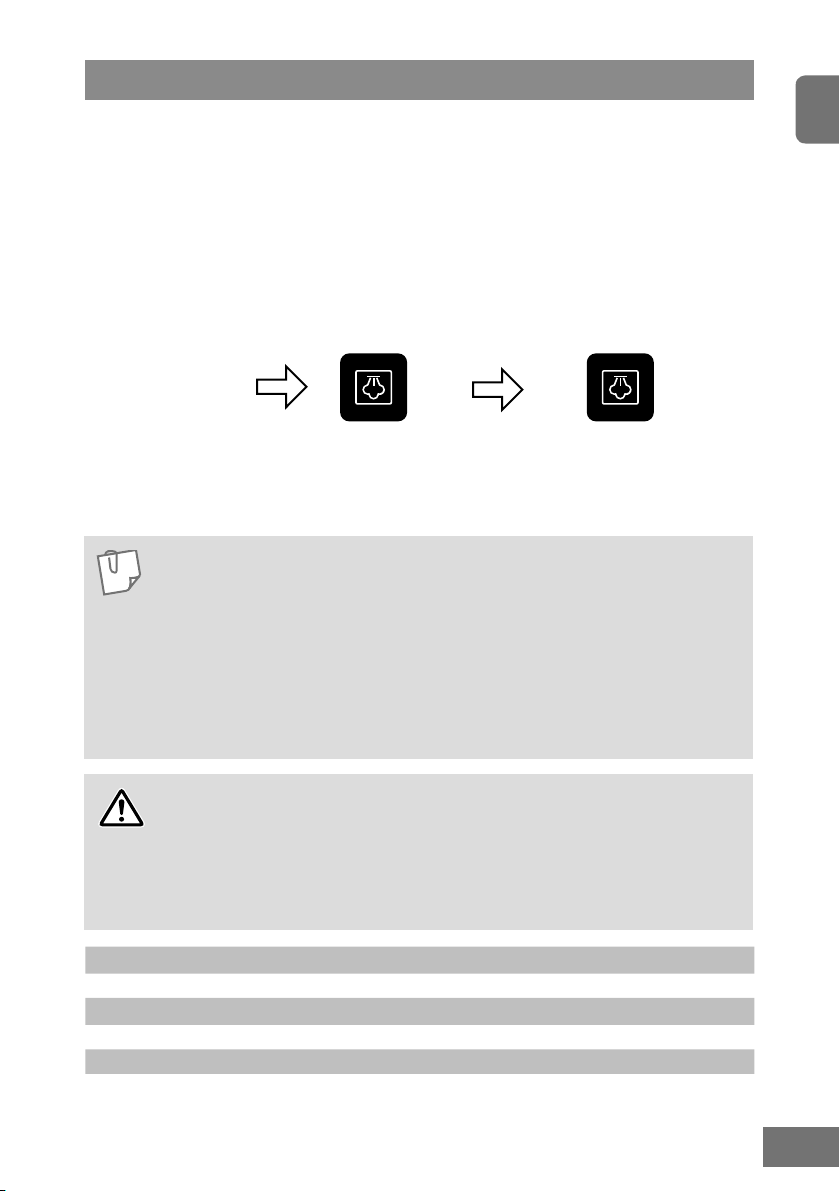
Quiche
Sausage roll 250 g (2 pcs) 200 °C Grill 1 + Turbo Cook 6 mins
g (2 pcs)
200
g (1 pce)
100
Per 400 g
Per 500
g (4 pcs)
360
300
600
300 - 400
300
g
g
g
g (1 pce)
g
Grill 1 + Turbo Cook
then Grill 1
Grill 1 + Turbo Cook 6 mins
230 °C + Grill 1 + Turbo Cook 10 - 11 mins
230 °C + Grill 1 + Turbo Cook 13 - 14 mins
200
°C
+ Grill 1 + Turbo Cook 7 - 8 mins
230 °C + Turbo Cook 11 mins
230 °C + Grill 1 + Turbo Cook 8 - 9 mins
180
°C
+ Turbo Cook 17 - 18 mins
220 °C + Turbo Cook 7 mins
4 - 5 mins
1 min
32 EN
Page 35

Turbo Cook
NOTE
Turbo cook is not available with Convection 40 °C
Preheat is only available with Turbo Cook and convection or with Turbo Cook,
grill and convection.
You can change the cooking time during cooking if required to a maximum of 10
minutes. Tap up and down keys to increase or decrease the cooking time. Touch
and hold the up or down key to increase or decrease time more quickly.
Tapping down to zero will end cooking.
CAUTION!
Always use oven gloves when removing the food and accessories after cooking as
the oven and accessories will be very hot.
English
33 EN
Page 36

Using the Timer
Delay start cooking
By using the Timer, you are able to program Delay Start cooking.
example
Touch
Timer.
Set the delay time by
tapping the up and down
keys (up to 9 hours).
Set the desired cooking program and
cooking time.
Touch
Stop/Start
NOTE
Three stage cooking can be programmed including Delay start cooking.
If the programmed delay time exceeds one hour, the time will count down
in units of minutes. If less than one hour, the time will count down in units of
seconds.
Delay start cannot be programmed before an auto program.
example
Delay Start: 1 hour Max Power (1000 W): 10 mins
Simmer Power (300 W): 20 mins
Stand time
By using the Timer, you can program stand time after cooking is completed or use to
program the oven as a minute timer.
example
Set the desired cooking
program and cooking time.
Touch
Timer
Set desired amount of
time by tapping the up
and down arrows (up to
9 hours).
Touch
Stop/Start
34 EN
NOTE
Three stage cooking can be programmed including stand time.
This feature may also be used as a kitchen timer. In this case touch the Timer,
set time and touch Stop/Start.
If the oven door is opened during the stand time or kitchen timer, the time in the
display window will continue to count down.
Stand time cannot be programmed after an auto program.
example
Max Power (1000 W): 4 mins Stand Time: 5 mins Max Power (1000 W): 2 mins
Page 37

Multi-Stage Cooking
2 or 3 stage cooking
example
English
Select desired
Microwave power
level.
Set the cooking
time.
Select desired
Microwave
power level.
Set the cooking
time.
example
To DEFROST (270 W) for 2 minutes and cook food on MAX (1000 W) power for 3 minutes.
Select Microwave
defrost power (270 W).
Set the cooking
time to 2
minutes.
Touch Microwave
Power to select max
power (1000 W).
Set the cooking
time to 3
minutes.
example
To GRILL at LOW (grill 3) for 4 minutes and cook food on LOW power (440 W) for 5 minutes.
Tap Grill Power
3 times to
select Grill
level 3 (low).
Set the cooking
time to 4
minutes.
Select Microwave
low power (440 W).
Set the cooking
time to 5
minutes.
Touch
Stop/Start.
Touch
Stop/Start.
Touch
Stop/Start.
NOTE
For 3 stage cooking, enter another cooking program before touching Stop/Start.
During operation, touching Stop/Start once will stop the operation. Touching
Stop/Start will resume the programmed operation.
Whilst not operating, touching Home will clear the selected program.
Auto programs cannot be used with multi-stage cooking.
35 EN
Page 38

Memory
Using the memory function
This feature allows you to pre-program your oven for a frequently used reheating or cooking
task. You are able to pre-program your oven for a specic power level and time that is convenient
for you. You can only pre-program one memory task with this oven.
To set a memory program
Set the desired
cooking program.
Touch and hold M+ to store
the cooking program. A beep
will sound to conrm the
program has been stored.
To use a memory program
36 EN
Touch M to recall
your stored
memory cooking
program.
NOTE
Auto programs cannot be programmed into memory.
Setting a new cooking program into memory will cancel the cooking program
previously stored.
If M+ key is not illuminated, memory cannot be stored.
If M key is not illuminated, memory cannot be recalled.
Press Stop/Start to begin
cooking.
Page 39

Defrosting Guidelines
The biggest problem when defrosting
food in a microwave is getting the inside
defrosted before the outside starts to cook.
For this reason Panasonic have made the
defrosting on the oven CYCLIC DEFROST,
just select the 270 W power level and set
the required time. The oven then divides this
time into 8 stages. These stages alternate
between defrosting (total of 4) and standing
(total of 4).
During the standing stages there is no
microwave power in the oven, although the
light will remain on. The automatic stand
times ensure a more even defrost and for
small items the usual stand time can be
eliminated.
Tips for defrosting
Check the defrosting several times, even if
you use the auto programs. Observe the
standing times.
Standing times
Individual portions of food may be cooked
almost immediately after defrosting. It is
normal for large portions of food to be frozen
in the centre. Before cooking, allow to stand
for a minimum of one hour. During this
standing time, the temperature becomes
evenly distributed and the food is defrosted
by conduction. N.B. If the food is not going
to be cooked immediately, store it in the
refrigerator. Never refreeze defrosted food
without rst cooking it.
English
Small portions of food
Chops and chicken pieces must be
separated as soon as possible so that they
defrost evenly throughout. Fatty parts and
the ends defrost more quickly. Place them
near the centre of a Pyrex® dish or protect
them with small pieces of foil.
Bread
Loaves will require a standing time of 15
- 30 minutes to allow the centre to thaw.
Standing time can be shortened if slices are
separated and rolls and loaves cut in half.
Beep Sounds
Beeps will sound during the Auto Defrost
programs. The beeps are to remind you to
check, stir, separate the pieces, or shield
small parts. Failure to do this may result in
uneven defrosting.
Joints and poultry
It is preferable to place the joints on an
upturned plate or plastic rack so that they
are not resting in the juices. It is essential
to protect delicate or projecting parts of
this food with small pieces of foil to prevent
these parts from cooking.
It is not dangerous to use small pieces
of foil in your oven, provided they do not
come into contact with the oven walls.
Minced meat or cubes of
meat and seafood
Since the outside of these foods quickly
defrosts, it is necessary to separate them,
break the blocks into pieces frequently while
defrosting and remove them when they
have defrosted.
37 EN
Page 40

Turbo Defrost
With this feature you can defrost frozen food according to the weight. For quick
selection, the weight starts from the most commonly used weight for each program.
Select the desired Turbo
Defrost program. Place food in
a suitable dish/plate on the base
of the oven.
NOTE
When the defrosting time is longer than 60 minutes, the time will appear in
hours and minutes.
The shape and size of the food will determine the maximum weight the oven can
accommodate.
Allow standing time to ensure the food is completely defrosted.
IMPORTANT!
See page 37 for defrosting guidelines.
Program
1. MINCED MEAT
2. CHOPS
3. FISH FILLETS
4. CHICKEN
WHOLE
Min./Max.
0.10 kg -
0.10 kg -
0.10 kg -
0.50 kg -
Select the cooking weight by
tapping the up and down keys.
Weight
To defrost minced beef, lamb, pork or chicken. Select
turbo defrost program 1. Enter the weight. Break up
1.20 kg
1.10 kg
1.20 kg
2.50 kg
mince at beeps. Allow to stand 20 - 30 mins. Larger
quantities may require longer stand times.
To defrost pork or lamb chops (each 100 g to 400 g).
Select turbo defrost program 2. Enter the weight. Turn
and shield at beeps. Allow to stand 20 - 30 mins. Larger
quantities may require longer standing
To defrost sh llets (each 100 g - 400 g). Select turbo
defrost program 3. Enter the weight. Turn and shield at
beeps. Allow to stand 20 - 30 mins. Larger quantities
may require longer standing.
To defrost whole poultry. Select turbo defrost program 4.
Enter the weight. Whole poultry will require turning and
shielding at beeps. Protect wings, breast and fat with
smooth pieces of aluminium foil secured with cocktail
sticks. Do not allow the foil to touch the walls of the
oven. Allow to stand 1 - 2 hours.
Touch Stop/Start. Remember
to stir or turn the food during
defrosting.
Suitable Food
38 EN
Page 41

Turbo Defrost
English
Program
5. CHICKEN
WITH BONES
6. CHICKEN
WITHOUT
BONES
7. BEEF
8. PORK
9. LAMB
Min./Max.
Weight
0.10 kg -
1.20 kg
0.10 kg -
1.20 kg
0.50 kg -
2.00 kg
0.50 kg -
2.00 kg
0.50 kg -
2.00 kg
Suitable Food
To defrost chicken pieces with bones (each 100 g 400 g). Select turbo cook program 5. Enter the weight.
Turn and shield at beeps. Allow to stand 20 - 30 mins.
Larger quantities may require longer standing.
To defrost chicken pieces without bones (each 100 g 400 g). Select turbo cook program 6. Enter the weight.
Turn and shield at beeps. Allow to stand 30-40 mins.
Larger quantities may require longer standing.
To defrost beef joints. Select turbo cook program 7.
Enter the weight. Beef joints will require turning and
shielding at beeps. Protect fat and thin edges with
smooth pieces of aluminium foil secured with cocktail
sticks. Do not allow the foil to touch the walls of the
oven. Allow to stand 1 - 2 hours.
To defrost pork joints. Select turbo cook program 8.
Enter the weight. Pork joints will require turning and
shielding at beeps. Protect fat and thin edges with
smooth pieces of aluminium foil secured with cocktail
sticks. Do not allow the foil to touch the walls of the
oven. Allow to stand 1 - 2 hours.
To defrost lamb joints. Select turbo cook program 9.
Enter the weight. Lamb joints will require turning and
shielding at beeps. Protect fat, thin edges and tip by
bone with smooth pieces of aluminium foil secured with
cocktail sticks. Do not allow the foil to touch the walls of
the oven. Allow to stand 1 - 2 hours.
10. BREAD
ROLLS
11. BREAD
SLICES
0.10 kg -
0.50 kg
0.10 kg -
0.35 kg
To defrost white, brown or multi-grain bread rolls. Place
on a large plate or shallow glass dish. Select turbo cook
program 10. Enter the weight. Turn and separate at
beeps. Allow bread rolls to stand for 10 min (white light
bread rolls) to 30 min (dense rye bread rolls).
To defrost white, brown or multi-grain bread slices.
Separate where possible and place on a large plate or
shallow glass dish. Select turbo cook program 11. Enter
the weight. Turn and separate at beeps. Allow bread to
stand for 10 - 30 mins.
39 EN
Page 42

Auto Cook Programs
A variety of food may be cooked without having to enter the cooking time or the power
level.
example
40 EN
Select the desired
Auto Cook Program.
Select the cooking weight by
tapping the up and down keys.
Touch Stop/Start.
The cooking program will start
and the time in the display will
count down.
NOTE
The auto cook programs must ONLY be used for foods described.
Only cook foods within the weight ranges described.
Always weigh the food rather than relying on the package weight information.
The temperature for frozen food is assumed to be -18 °C to -20 °C. The
temperature of chilled food is assumed to be +5 °C to +8 °C (refrigerator
temperature).
Only use the accessories as indicated on pages 40-44.
Most foods benet from a STANDING time after cooking on an auto program, to
allow heat to continue conducting to the centre.
To allow for some variations that occur in food, check that food is thoroughly
cooked and piping hot before serving.
Program Weight Accessories Instructions
For reheating, browning and crisping
the top of pre-cooked crispy top pasta
meals. This program is suitable for
12. PASTA
BAKE
13. POTATO
BAKE
14. JACKET
POTATOES
0.35 kg -
0.45 kg
0.35 kg -
0.45 kg
0.20 kg -
1.50 kg
–
–
lasagne, cannelloni and pasta bakes.
Remove all packaging and place in a
suitable sized Pyrex® dish on base of
oven. Select auto combi program 12.
Enter the weight of the crispy top pasta
and touch Stop/Start.
For reheating, browning and crisping
the top of pre-cooked crispy top potato
meals. This program is suitable for
shepherds pie, sh pie and potato
topped bakes. Remove all packaging
and place in a suitable sized Pyrex ®
dish on base of oven. Select auto combi
program 13. Enter the weight of the
crispy top pasta and touch Stop/Start.
To cook jacket potatoes with a crisper
drier skin. Choose medium sized
potatoes 200 g - 250 g per potato, for
best results. Wash and dry potatoes and
prick with a fork several times. Place on
wire rack in shelf position 2. Select auto
cook program 14. Enter the weight of the
potatoes. Touch Stop/Start.
Page 43

Auto Cook Programs
Program Weight Accessories Instructions
Peel and cut potatoes into even sized
pieces. Place on glass shelf. Add 1-3
15. ROAST
POTATOES
16. FRIES
(FROZEN)
17.
CROQUETTES
(FROZEN)
0.20 kg -
0.80 kg
0.20 kg -
0.80 kg
0.25 kg -
0.80 kg
tbsp (15-45 ml) olive oil. Place glass
shelf in shelf position 1. Select auto
cook program 15. Enter the weight of
the potatoes. Touch Stop/Start. Turn
twice during cooking at beeps.
To cook FROZEN fries/oven chips.
Spread frozen fries/oven chips out on
glass shelf and place in shelf position 2.
Select auto cook program 16. Enter the
weight of frozen fries/oven chips. Touch
Stop/Start. Turn twice during cooking at
beeps. For best results cook in a single
layer. NOTE: Fries/oven chips vary
considerably. We suggest checking a
few minutes before the end of cooking
to assess level of browning.
To cook FROZEN potato croquettes.
Spread frozen potato croquettes out on
glass shelf and place in shelf position
2. Select auto cook program 17. Enter
the weight of frozen potato croquettes.
Touch Stop/Start. Turn twice during
cooking at beeps. For best results
cook in a single layer. NOTE: Potato
croquettes vary considerably. We
suggest checking a few minutes before
the end of cooking to assess level of
browning
English
18. PIZZA
(CHILLED)
19. PIZZA
(FROZEN)
0.10 kg -
0.60 kg
0.10 kg -
0.55 kg
For reheating and browning CHILLED,
purchased pizza. Remove all packaging
and place on wire shelf in shelf position
1. Select auto cook program 18. Enter
the weight of the chilled pizza. Touch
Stop/Start. This program is not suitable
for deep pan pizzas or very thin pizzas.
For reheating and browning FROZEN,
purchased pizza and cheese baguette.
Remove all packaging and place on
wire shelf in shelf position 1. Select auto
cook program 19. Enter the weight of
the frozen pizza. Touch Stop/Start. This
program is not suitable for deep pan
pizzas or very thin pizzas.
41 EN
Page 44

Auto Cook Programs
Program Weight Accessories Instructions
To cook pre-purchased FROZEN breaded
sh. Place frozen breaded sh on glass
20. BREADED
FISH
21. ROASTED
VEGETA-
BLES
22. BEEF
RARE
23. BEEF
MEDIUM
24. BEEF
WELL DONE
25. LAMB
MEDIUM
26. LAMB
WELL DONE
0.10 kg -
0.80 kg
0.40 kg -
1.00 kg
0.50 kg -
2.00 kg
0.50 kg -
2.00 kg
0.50 kg -
2.00 kg
1.00 kg -
2.00 kg
1.00 kg -
2.00 kg
shelf in shelf position 2. Select auto cook
program 20. Enter the weight of frozen
breaded sh. Touch Stop/Start. Turn at
beeps. Thicker, heavier pieces of breaded
sh may need longer cooking.
To ROAST assorted vegetables (e.g.
peppers, mushrooms, courgettes, onions).
Cut vegetables into even sized chunks
and toss with 45 ml (3 tbsp) oil. Place
vegetables on glass shelf in shelf position
3. Select auto cook program 21. Enter the
weight of the roasted vegetables. Touch
Stop/Start. Turn twice during cooking at
beeps.
For cooking rare FRESH roast beef
(topside, rump or silverside). Place on
enamel shelf in shelf position 1. Select auto
cook program 22. Enter the weight of beef
and touch Stop/Start. Stand for 10 to 15
mins.
For cooking medium FRESH roast beef
(topside, rump or silverside). Place on
enamel shelf in shelf position 1. Select auto
cook program 23. Enter the weight of beef
and touch Stop/Start. Stand for 10 to 15
mins.
For cooking well done FRESH roast beef
(topside, rump or silverside). Place on
enamel shelf in shelf position 1. Select auto
cook program 24. Enter the weight of beef
and touch start. Stand for 10 to 15 mins.
For cooking medium FRESH leg of lamb
with bone. Place on enamel shelf in shelf
position 1. Select auto cook program 25.
Enter the weight of the lamb. Touch Stop/
Start. Turn at beeps. Stand wrapped in
aluminium foil for 10 to 15 minutes.
For cooking well done FRESH leg of lamb
with bone. Place on enamel shelf in shelf
position 1. Select auto cook program 26.
Enter the weight of the lamb. Touch Stop/
Start. Turn at beeps. Stand wrapped
in aluminium foil for 10 to 15 minutes.
Due to the seasonal variation with lamb,
irregular shaped joints may need a longer
cooking time to obtain desired end result. If
necessary return to the oven on 200 °C for
5-10 minutes.
42 EN
Page 45

Auto Cook Programs
Program Weight Accessories Instructions
For cubed meat (e.g. braising
steak, lamb, pork, not chicken) and
vegetables. Place in a suitable sized
casserole dish with stock. Use a
27. CASSEROLE
28. MEAT
SAUCE
29. PASTA
0.90 kg -
2.00 kg
0.45 kg -
2.00 kg
0.10 kg -
0.50
kg
–
–
–
minimum of 400 ml of stock. If you use
a cook-in sauce, also add the same
quantity of water. Cover with lid. Place
on base of oven. Select auto cook
program 27. Enter the weight of the
casserole. Touch Stop/Start. Stir during
cooking at beeps.
To cook raw mince beef based sauce
i.e. Bolognese sauce and also very
nely diced chicken or pork llet to be
cooked in a sauce. Ensure a minimum
quantity of 300 ml of liquid or sauce.
If using a cook-in sauce add equal
quantity of water to cook-in sauce.
Cover with a lid. Place on base of
oven. Select auto cook program 28.
Enter the weight of the meat sauce.
Touch Stop/Start. Stir during cooking
at beeps.
To cook dried pasta. Use a large
bowl. Add 1 tbsp oil and boiling water.
For 100 g - 290 g pasta add 1 litre of
boiling water. For 300 g 500 g pasta add 1.5 litre of boiling
water. ½ - 1 tsp (2.5 - 5 ml) salt may
be added if desired. Cover with a
lid. Place container on base of oven.
Select auto program number 29.
Enter the weight of the pasta. Touch
Stop/Start. Stir at beeps. For a softer
texture, stand up to 5 mins after
cooking. Drain after cooking.
English
43 EN
Page 46

Auto Cook Programs
Program Weight Accessories Instructions
To reheat a fresh pre-cooked meal.
All foods must be pre-cooked. Foods
should be at refrigerator temperature
approx. +5 ºC. Reheat in container as
purchased. Pierce covering lm with a
sharp knife once in the centre and four
times around the edge. If transferring
30. MEAL
(CHILLED)
31. MEAL
(FROZEN)
0.20 kg -
1.00
kg
0.20 kg -
0.80
kg
–
–
food to dish, cover with pierced cling
lm. Place food in container on base
of oven. Select auto cook program 30.
Enter the weight of the chilled meal.
Touch Stop/Start. Stir at beeps. Stir
again at end of program and allow a few
minutes standing time. Large pieces of
meat/sh in a thin sauce may require
longer cooking. This program is not
suitable for starchy food such as rice,
noodles or potatoes.
To reheat a frozen pre-cooked meal.
All foods must be pre-cooked and
frozen -18 ºC. Reheat in container as
purchased or in a Pyrex® dish. Meals in
irregular shaped containers may need
longer cooking. Pierce covering lm with
a sharp knife once in the centre and four
times around the edge. If transferring
food to dish, cover with pierced cling
lm. Place food in container on base
of oven. Select auto cook program 31.
Enter the weight of the frozen meal.
Touch Stop/Start. Stir at beeps and cut
the blocks into pieces. Stir again at end
of program and allow a few minutes
standing time. Check temperature and
cook further minutes if necessary before
eating. This program is not suitable for
portionable frozen foods.
44 EN
Page 47

Auto Steam Programs
This feature allows you to steam some of your favourite foods by setting the weight
only. The oven determines the steam level and the cooking time automatically. Select the
category and set the weight of the food. For quick selection, the weight starts from the
most commonly used weight for each category.
English
Select the desired
auto steam program.
Select the cooking weight by tapping
the up and down keys.
NOTE
The auto steam programs must ONLY be used for foods described.
Only cook foods within the weight ranges described.
Always weigh the food rather than relying on the package weight information.
Only use the accessories as indicated on pages 45-48.
Do not cover foods on the auto steam programs.
Most foods benet from a STANDING time after cooking on an auto program,
to allow heat to continue conducting to the centre.
To allow for some variations that occur in food, check that food is thoroughly
cooked and piping hot before serving.
Wipe away excess water in the cavity and around the water tanks after cooking
with steam.
Program Weight Accessories Instructions
To steam FRESH carrots. Fill water
tank. Place prepared carrots onto
32. CARROTS
(FRESH)
33. BROCCOLI
/ CAULIFLOWER
(FRESH)
0.20 kg -
0.32
kg
0.20 kg -
0.32
kg
plastic trivet. Place plastic trivet on
glass shelf in shelf position 3. Select
auto steam program 32. Enter the
weight of the fresh carrots. Touch
Stop/Start.
To steam FRESH broccoli or
cauliower. Fill water tank. Place
prepared broccoli or cauliower
onto plastic trivet. Place plastic trivet
on glass shelf in shelf position 3.
Select auto steam program 33. Enter
the weight of the fresh broccoli or
cauliower. Touch Stop/Start.
Touch Stop/Start.
The cooking program
will start and the time
in the display will
count down.
45 EN
Page 48

Auto Steam Programs
Program Weight Accessories Instructions
To steam potatoes with skins. Fill
water tank. Cut potatoes into even sized
34. POTATOES
WITH SKIN
35. POTATOES
0.20 kg -
0.50 kg
0.20 kg -
0.50 kg
pieces. Place prepared potatoes onto
plastic trivet. Place plastic trivet on glass
shelf in shelf position 3. Select auto
steam program 34. Enter the weight of
the potatoes. Touch Stop/Start.
To steam potatoes without skins. Fill
water tank. Peel potatoes and cut into
even sized pieces. Place prepared
potatoes onto plastic trivet. Place plastic
trivet on glass shelf in shelf position 3.
Select auto steam program 35. Enter the
weight of the potatoes. Touch Stop/Start.
36. CARROTS
(FROZEN)
37. BROCCOLI
(FROZEN)
38. PEAS /
SWEETCORN
(FROZEN)
39. COD /
HADDOCK
(FRESH)
0.20 kg -
0.32
kg
0.20 kg -
0.32 kg
0.20 kg -
0.32 kg
0.20 kg -
0.50
kg
To steam FROZEN carrots. Fill water
tank. Place frozen carrots onto plastic
trivet. Place plastic trivet on glass shelf
in shelf position 3. Select auto steam
program 36. Enter the weight of the
frozen carrots. Touch Stop/Start.
To steam FROZEN broccoli. Fill water
tank. Place frozen broccoli onto plastic
trivet. Place plastic trivet on glass shelf
in shelf position 3. Select auto steam
program 37. Enter the weight of the
frozen broccoli. Touch Stop/Start.
To steam FROZEN peas / sweetcorn.
Fill water tank. Place frozen peas /
sweetcorn onto plastic trivet. Place
plastic trivet on glass shelf in shelf
position 3. Select auto steam program
38. Enter the weight of the frozen peas
and sweetcorn. Touch Stop/Start.
To cook FRESH cod or haddock llets.
Fill water tank. Place fresh cod or
haddock onto plastic trivet. Place plastic
trivet on glass shelf in shelf position 3.
Select auto steam program 39. Enter
the weight of the fresh cod or haddock.
Touch Stop/Start.
46 EN
Page 49

Auto Steam Programs
Program Weight Accessories Instructions
To cook FRESH salmon llets. Fill water
40. SALMON
(FRESH)
41. PLAICE
(FRESH)
0.20 kg -
0.50
kg
0.20 kg -
0.50 kg
tank. Place fresh salmon onto plastic
trivet. Place plastic trivet on glass shelf
in shelf position 3. Select auto steam
program 40. Enter the weight of the
fresh salmon. Touch Stop/Start.
To cook FRESH plaice llets. Fill water
tank. Place fresh plaice onto plastic
trivet. Place plastic trivet on glass shelf
in shelf position 3. Select auto steam
program 41. Enter the weight of the
fresh plaice. Touch Stop/Start.
English
42. COD /
HADDOCK
(FROZEN)
43. SALMON
(FROZEN)
44. RICE
0.20 kg -
0.50 kg
0.20 kg -
0.50 kg
0.10 kg -
0.20
kg
To cook FROZEN cod or haddock llets.
Fill water tank. Place frozen cod or
haddock onto plastic trivet. Place plastic
trivet on glass shelf in shelf position 3.
Select auto steam program 42. Enter
the weight of the frozen cod or haddock.
Touch Stop/Start.
To cook FROZEN salmon llets. Fill
water tank. Place frozen salmon onto
plastic trivet. Place plastic trivet on glass
shelf in shelf position 3. Select auto
steam program 43. Enter the weight of
the frozen salmon. Touch Stop/Start.
For cooking rice for savoury dishes not
rice pudding (Thai, Basmati, Jasmine,
long grain). Fill water tank. Place rice in
a shallow Pyrex® bowl. Add 2.5 parts
water to 2 parts rice. Do not cover. Place
bowl on glass shelf in shelf position 3.
Select auto steam program 44. Enter
the weight of the rice only. Touch Stop/
Start.
47 EN
Page 50

Auto Steam Programs
Program Weight Accessories Instructions
For cooking risotto, 500 g or 1000 g.
0.50 kg
(2 portions)
45. RISOTTO
1.00 kg
(4 portions)
Porcini mushroom risotto
ingredients
For 1000 g (4 portions)
40 g dried porcini mushrooms
1 onion
50 g butter
250 g arborio rice
1 garlic clove
500 ml hot water with
1 vegetable stock cube
30 g parmesan
Half the ingredients for 500 g
(2 portions)
Program Weight Accessories Instructions
46. MACKEREL
(FRESH)
47. SEABASS
(FRESH)
48. CHICKEN
BREAST
0.20 kg -
0.60 kg
0.20 kg -
0.60
0.20 kg -
0.65 kg
1. Soak mushrooms as per manufacturer’s instructions
using 400 ml water for 40 g, 200 ml for 20 g.
2. Add rice, chopped onion, butter, crushed garlic glove
and chopped soaked porcini mushrooms to glass
shelf.
3. Add vegetable stock and mushroom soaking water
(150 ml for 4 portion recipe, 75 ml for 2 portion recipe).
4. Place on shelf level 3 and ensure water tank is lled.
5. Stir in parmesan at end of cooking.
kg
Prepare as outlined in the recipe below.
Fill water tank. Place on the glass shelf
in shelf position 3. Do not cover. Select
auto steam program 45. Select 500 g or
1000 g. Touch Stop/Start. Stir at beeps.
Check water tank during cooking and
re-ll as necessary.
To cook FRESH whole mackerel. Each
whole sh should weigh between 100
- 300 g each. Fill water tank. Place
whole sh directly onto plastic trivet.
Place plastic trivet on glass shelf in shelf
position 3. Select auto steam program
46. Enter the weight of the whole fresh
mackerel. Touch Stop/Start.
To cook FRESH whole seabass. Each
whole sh should weigh between 100
- 300 g each. Fill water tank. Place
whole sh directly onto plastic trivet.
Place plastic trivet on glass shelf in shelf
position 3. Select auto steam program
47. Enter the weight of the whole fresh
seabass. Touch Stop/Start.
To cook FRESH chicken breasts. Each
breast should weigh between
100 - 250 g each. Fill water tank. Place
chicken breasts onto plastic trivet. Place
plastic trivet on glass shelf in shelf
position 3. Select auto steam program
48. Enter the weight of the chicken
breasts. Touch Stop/Start.
48 EN
Page 51

Auto Steam Programs with Turbo Cook
This feature combines the benets of steam cooking with microwave power to speed up
the cooking process. By setting the weight only, the oven determines the steam level and
microwave power level and automatically calculates the cooking time. Select the category
and set the weight of the food. For quick selection, the weight starts from the most
commonly used weight for each category.
English
Select the
desired auto
steam program.
Touch the microwave
assist (turbo cook
button) once.
Select the cooking weight by
tapping the up and down keys.
NOTE
The auto steam programs with turbo cook must ONLY be used for foods
described.
Only cook foods within the weight ranges described.
Always weigh the food rather than relying on the package weight information.
Only use the accessories as indicated on pages 49-52.
Most foods benet from a STANDING time after cooking on an auto program,
to allow heat to continue conducting to the centre.
To allow for some variations that occur in food, check that food is thoroughly
cooked and piping hot before serving.
Do not cover the food for the auto steam programs with turbo cook except for
the rice program. Cover with cling lm. Pierce the cling lm with a sharp knife
once in the centre and four times around the edge.
Wipe away excess water in the cavity and around the water tanks after cooking
with steam.
Program Weight Accessories Instructions
To steam + microwave FRESH
carrots. Fill water tank. Place
32. CARROTS
(FRESH)
33. BROCCOLI /
CAULIFLOWER
(FRESH)
0.20 kg -
0.32
kg
0.20 kg -
0.32
kg
prepared carrots onto plastic trivet.
Place plastic trivet on glass shelf in
shelf position 3. Select auto steam
program with turbo cook 32. Enter
the weight of the fresh carrots.
Touch Stop/Start.
To steam + microwave FRESH
broccoli or cauliower. Fill water
tank. Place prepared broccoli
or cauliower onto plastic trivet.
Place plastic trivet on glass shelf in
shelf position 3. Select auto steam
program with turbo cook 33. Enter
the weight of the fresh broccoli or
cauliower. Touch Stop/Start.
Touch Stop/Start.
The cooking program
will start and the time
in the display will
count down.
49 EN
Page 52

Auto Steam Programs with Turbo Cook
Program Weight Accessories Instructions
To steam + microwave potatoes with
skins. Fill water tank. Cut into even
34.
POTATOES
WITH SKIN
35. POTATOES
0.20 kg -
0.50 kg
0.20 kg -
0.50 kg
sized pieces. Place prepared potatoes
onto plastic trivet. Place plastic trivet
on glass shelf in shelf position 3. Select
auto steam program with turbo cook 34.
Enter the weight of the potatoes. Touch
Stop/Start.
To steam + microwave potatoes without
skins. Fill water tank. Peel potatoes
and cut into even sized pieces. Place
prepared potatoes onto plastic trivet.
Place plastic trivet on glass shelf in shelf
position 3. Select auto steam program
with turbo cook 35. Enter the weight of
the potatoes. Touch Stop/Start.
36. CARROTS
(FROZEN)
37. BROCCOLI
(FROZEN)
38. PEAS /
SWEETCORN
(FROZEN)
0.20 kg -
0.32
kg
0.20 kg -
0.32 kg
0.20 kg -
0.32 kg
To steam + microwave FROZEN carrots.
Fill water tank. Place frozen carrots
onto plastic trivet. Place plastic trivet
on glass shelf in shelf position 3. Select
auto steam program with turbo cook 36.
Enter the weight of the frozen carrots.
Touch Stop/Start.
To steam + microwave FROZEN
broccoli. Fill water tank. Place frozen
broccoli onto plastic trivet. Place plastic
trivet on glass shelf in shelf position 3.
Select auto steam program with turbo
cook 37. Enter the weight of the frozen
broccoli. Touch Stop/Start.
To steam + microwave FROZEN peas /
sweetcorn. Fill water tank. Place frozen
peas / sweetcorn onto plastic trivet.
Place plastic trivet on glass shelf in shelf
position 3. Select auto steam program
with turbo cook 38. Enter the weight of
the frozen peas / sweetcorn. Touch Stop/
Start.
50 EN
Page 53

Auto Steam Programs with Turbo Cook
Program Weight Accessories Instructions
To steam + microwave FRESH cod or
39. COD /
HADDOCK
(FRESH)
40. SALMON
(FRESH)
41. PLAICE
(FRESH)
0.20 kg -
0.50
kg
0.20 kg -
0.50
kg
0.20 kg -
0.50 kg
haddock llets. Fill water tank. Place
fresh cod or haddock onto plastic trivet.
Place plastic trivet on glass shelf in shelf
position 3. Select auto steam program
with turbo cook 39. Enter the weight of
the fresh cod or haddock. Touch start.
To steam + microwave FRESH salmon
llets. Fill water tank. Place fresh
salmon onto plastic trivet. Place plastic
trivet on glass shelf in shelf position 3.
Select auto steam turbo cook program
40. Enter the weight of the fresh salmon.
Touch start.
To steam + microwave FRESH plaice
llets. Fill water tank. Place fresh plaice
onto plastic trivet. Place plastic trivet
on glass shelf in shelf position 3. Select
auto steam turbo cook program 41.
Enter the weight of the fresh plaice.
Touch start.
English
42. COD /
HADDOCK
(FROZEN)
43. SALMON
(FROZEN)
44. RICE
0.20 kg -
0.50 kg
0.20 kg -
0.50 kg
0.10 kg -
0.20 kg
To steam + microwave FROZEN cod
or haddock llets. Fill water tank. Place
frozen cod or haddock onto plastic trivet.
Place plastic trivet on glass shelf in shelf
position 3. Select auto steam program
with turbo cook 42. Enter the weight of
the frozen cod or haddock. Touch start.
To steam + microwave FROZEN salmon
llets. Fill water tank. Place frozen
salmon onto plastic trivet. Place plastic
trivet on glass shelf in shelf position 3.
Select auto steam program with turbo
cook 43. Enter the weight of the frozen
salmon. Touch start.
To steam + microwave rice for savoury
dishes not rice pudding (Thai, Basmati,
Jasmine, long grain). Fill water tank.
Place rice in a shallow Pyrex® bowl.
Add 4 parts water to 2 parts rice. Cover
with pierced cling lm. Place bowl on
glass shelf in shelf position 3. Select
program turbo cook 44. Enter the weight
of the rice only. Touch start.
51 EN
Page 54

52 EN
Auto Steam Programs with Turbo Cook
Program Weight Accessories Instructions
To steam + microwave risotto, 500 g
0.50 kg
(2 portions)
45. RISOTTO
1.00 kg
(4 portions)
Porcini mushroom risotto
ingredients
For 1000 g (4 portions)
40 g dried porcini mushrooms
1 onion
50 g butter
250 g arborio rice
1 garlic clove
500 ml hot water with
1 vegetable stock cube
30 g parmesan
Half the ingredients for 500 g
(2 portions)
Program Weight Accessories Instructions
46. MACKEREL
(FRESH)
47. SEABASS
(FRESH)
48. CHICKEN
BREAST
0.20 kg -
0.60 kg
0.20 kg -
0.60 kg
0.20 kg -
0.65 kg
1. Soak mushrooms as per manufacturer’s instructions
using 400 ml water for 40 g, 200 ml for 20 g.
2. Add rice, chopped onion, butter, crushed garlic glove
and chopped soaked porcini mushrooms to glass
shelf.
3. Add vegetable stock and mushroom soaking water
(150 ml for 4 portion recipe, 75 ml for 2 portion recipe).
4. Place on shelf level 3 and ensure water tank is lled.
5. Stir in parmesan at end of cooking.
or 1000 g. Prepare as outlined in the
recipe below. Fill water tank. Place on
the glass shelf in shelf position 3. Do
not cover. Select auto steam program
45. Select 500 g or 1000 g portions.
Touch Stop/Start. Stir at beeps. Check
water tank during cooking and re-ll as
necessary.
To steam + microwave FRESH whole
mackerel. Each whole sh should weigh
between 100 - 300 g each. Fill water
tank. Place whole sh directly onto
plastic trivet. Place plastic trivet on glass
shelf in shelf position 3. Select auto
steam program with turbo cook 46. Enter
the weight of the whole fresh mackerel.
Touch Stop/Start.
To steam + microwave FRESH whole
seabass. Each whole sh should weigh
between 100 - 300 g each. Fill water
tank. Place whole sh directly onto
plastic trivet. Place plastic trivet on
glass shelf in shelf position 3. Select
auto steam program with turbo cook
47. Enter the weight of the whole fresh
seabass. Touch Stop/Start.
To steam + microwave FRESH chicken
breasts. Each breast should weigh
between 100 - 250 g each. Fill water
tank. Place chicken breasts onto plastic
trivet. Place plastic trivet on glass shelf
in shelf position 3. Select auto steam
program with turbo cook 48. Enter the
weight of the chicken breasts. Touch
Stop/Start.
Page 55

System Cleaning Programs
F1. DRAIN WATER
Water is pumped through the system to clean the pipes. The water is drained into the
drain tank.
Add 200 g of water
water tank.
to the
Touch system
cleaning key.
Select “F1
DRAIN WATER”.
NOTE
Only run this program with 200 g of water in the tank.
Do not remove the drain tank during the drain water program. If the drain tank is
removed during the program, ‘INSERT DRAIN TANK’ is displayed and the
program will stop.
Empty the drain tank and rinse with running water after the program has nished.
CAUTION
If the ‘Drain water’ program is used directly after a steam cooking program, hot water
may be drained into the drain tank.
F2. SYSTEM CLEANING
The rst stage of this program cleans the system with a citric acid solution. The second
stage runs water through the system to rinse the pipes.
Make a solution of 8 g citric
acid and 200 g of water, add
the solution to the water tank.
Touch system
cleaning key.
Select “F2
SYSTEM
CLEANING”.
Remove, empty
and re-insert
drain tank
before touching
Stop/Start.
Empty the drain tank after
the program has nished.
Remove, empty
and re-insert
drain tank
before touching
Stop/Start.
English
Touch Stop/Start. The
program will run for
29 mins.
NOTE
When blinks in the display, run the ‘system cleaning’ program.
If the system cleaning program is not used regularly, the pipe will get blocked and
the steaming performance will be less effective.
Do not remove the drain tank during the system cleaning program. If the drain
tank is removed during the program, ‘INSERT DRAIN TANK’ is displayed and the
program will stop.
Empty both tanks and rinse with running water after the program has nished.
After the program has paused,
empty the drain tank. Rinse the
water tank and re-ll with 200 g
of water.
Touch Stop/Start. The program
will run for approx. 1 min.
Empty the drain tank after the
program has nished.
53 EN
Page 56

Cleaning the Water Tank and Drain Tank
Clean with a soft sponge in water.
Remove the water tank/drain tank and clean
the compartments where the tanks are
inserted.
The rubber seal can also be removed for cleaning.
Remove the lid and clean.
Removing the rubber seal
Inside
(at)
NOTE
Clean the water tank and drain tank at least once a week to prevent build up of
limescale.
Do not use a dishwasher to clean the water tank and drain tank or parts of the
water and drain tanks.
Outside
(protruding
side)
Ensure that the rubber seal is not
inside out when re-tting. If the
seal is not tted correctly the lid will
not close securely and it will leak.
54 EN
Page 57

Questions and Answers
English
Q: Why won’t my oven turn on?
A: When the oven does not turn on, check
the following:
1. Is the oven plugged in securely?
Remove the plug from the outlet, wait
10 seconds and reinsert.
2. Check the circuit breaker and the fuse.
Reset the circuit breaker or replace the
fuse if it is tripped or blown.
3. If the circuit breaker or fuse is
functioning, plug another appliance into
the outlet. If the other appliance works,
there may be a problem with the oven.
If the other appliance does not work,
there may be a problem with the outlet.
If there is a problem with the oven,
contact an authorised Service Centre.
Q: My oven causes interference with my TV.
Is this normal?
A: Some radio and TV interference might
occur when you cook with the oven.
This interference is similar to the
interference caused by small appliances
such as mixers, vacuums, blow dryers,
etc. It does not indicate a problem with
your oven.
Q: The oven won’t accept my program.
Why?
A: The oven is designed not to accept an
incorrect program. For example, the
oven will not accept a fourth stage.
Q: Sometimes warm air comes from the
oven vents. Why?
A: The heat given off from the cooking
food warms the air in the oven cavity.
This warmed air is carried out of the
oven by the air ow pattern in the oven.
There are no microwaves in the air. The
oven vents should never be blocked
during cooking.
Q: I can’t set an auto program and ‘HOT’
appears in the display. Why?
A: If the oven has previously been used
and it is too hot to be used with an
Auto Program, ‘HOT’ will appear in
the display window. After the ‘HOT’
disappears, the Auto Programs may be
used. If in a hurry, cook food manually
by selecting the correct cooking mode
and cooking time yourself.
Q: Can I use a conventional oven
thermometer in the oven?
A: Only when you are using
CONVECTION/GRILL cooking mode.
The metal in some thermometers may
cause arcing in your oven and should
not be used on MICROWAVE and
COMBINATION cooking modes.
Q: There are humming and clicking
noises from my oven when I cook by
COMBINATION. What is causing these
noises?
A: The noises occur as the oven
automatically switches from
MICROWAVE power to CONVECTION/
GRILL to create the combination
setting. This is normal.
Q: My oven has an odour and generates
smoke when using the COMBINATION
and GRILL function. Why?
A: After repeated use, it is recommended
to clean the oven and then run the
oven without food. This will burn off any
food, residue or oil which may cause an
odour and/or smoking.
Q: The oven stops cooking by microwave
and “H97” or “H98” appears in the
display. Why?
A: This display indicates a problem with
the microwave generation system.
Please contact an authorised Service
Centre.
Q The fan continues to rotate after cooking.
Why?
A After using oven, the fan motor may
rotate to cool the electrical components.
This is normal and you can continue
using the oven at this time.
55 EN
Page 58

Questions and Answers
Q “D” appears or a dot blinks in the display
and the oven does not cook. Why?
A: The oven has been programmed in
DEMO MODE. This mode is designed
for retail store display. To de-activate
demo mode see page 19.
Q. The word prompt has disappeared on my
display?
A: See user settings page 17 to re-activate
the word prompt.
Q. The oven stops cooking by steam or
combination with steam and “U14”
appears in the display
A: The water tank is empty and the
operation guide has been turned off.
Re-ll the water tank, position back
in the oven and touch Stop/Start to
resume cooking.
Q. The oven stops program and “U12”
appears in the display.
A: The drain tank is not in position, position
back in the oven. Restart program.
Q. The keys do not respond. The display is
frozen.
A: Turn the oven off and clean the control
panel. Open and close the door to re-set
the keys. Do not touch the control panel
whilst opening and closing the door.
56 EN
Page 59

Care of your Oven
English
1. Turn the oven off before cleaning.
2. Clean the inside of the oven, door
seals and door seal areas regularly.
When food splatters or spilled liquids
adhere to the oven walls, base of
the oven, door seals and door seal
areas wipe off with a damp cloth. Mild
detergent may be used if they get very
dirty. The use of harsh detergent or
abrasive is not recommended.
DO NOT USE COMMERCIAL OVEN
CLEANERS.
3. Do not use harsh, abrasive cleaners or
sharp metal scrapers to clean the oven
door glass since they can scratch the
surface, which may result in shattering
the glass.
4. The outside oven surface should
be cleaned with a damp cloth. To
prevent damage to the operating parts
inside the oven, water should not be
allowed to seep into the ventilation
openings.
5. If the Control Panel becomes dirty,
clean it with a soft, dry cloth. Do not
use harsh detergents or abrasives on
the Control Panel. When cleaning the
Control Panel set the child lock (see
page 19). After cleaning cancel the child
lock (see page 19).
6. If steam accumulates inside or
around the outside of the oven door,
wipe with a soft cloth. This may occur
when the oven is operated under high
humidity conditions and in no way
indicates a malfunction of the unit.
7. The base of the oven should be cleaned
regularly. Simply wipe the bottom
surface of the oven with mild detergent
and hot water then dry with a clean
cloth.
8. When using the CONVECTION/GRILL,
STEAM or COMBINATION mode, some
foods may inevitably splatter grease
on to the oven walls. If the oven is not
cleaned occasionally, it may start to
“smoke” during use.
9. A steam cleaner is not to be used for
cleaning.
10. This oven should only be serviced by
qualied personnel. For maintenance
and repair of the oven contact the
nearest authorised dealer.
11. Failure to maintain the oven in a clean
condition could lead to deterioration
of surfaces that could affect the life of
the appliance and possibly result in a
hazardous situation.
12. Keep air exhaust vents clean at all
times. Check that no dust or other
material is blocking the air exhaust
vents. If the air exhaust vents become
blocked this could cause overheating
which would affect the operation of the
oven and possibly result in a hazardous
situation.
13. The back of the oven cavity has a selfclean catalytic lining. It is therefore not
necessary to clean this area.
57 EN
Page 60

Installation Instructions
Installation and Connection
Please fully observe the following safety precautions.
IMPORTANT
■ Unpack the appliance, remove all packing material, and examine for any
damage. If the appliance is damaged DO NOT install and notify your dealer
immediately.
■ Install the appliance in accordance with the Installation Instructions. Otherwise,
the performance of the appliance may be affected.
■ After installation perform a test run and explain to the customer how to operate
the appliance.
■ Correct installation is the responsibility of the installer. Any malfunction or
accident resulting from the failure to follow the Installation Instructions is not
covered by the warranty.
■ The rating plate indicating the basic information of the appliance is attached to
the inside of the oven and is visible when you open the door. Do not remove.
Safety Instructions
58 EN
■ This appliance can be built above or alongside a standard
Panasonic oven.
■ When the appliance is installed with another suitable
appliance, it must be tted above a xed shelf in the
housing unit that is able to support the weight of both
appliances.
■ When built in directly above a warming drawer, an interim
shelf between the two appliances is not necessary.
Page 61

Safety Instructions
■ The appliance must be installed in a position where it can
be fully opened and the contents can be clearly viewed.
This is to avoid burns and other injuries.
■ For the appliance to function correctly, it is important that
the base of the appliance is level. A spirit level should be
used.
■ The appliance must only be operated when built-in. This is
to ensure that all electrical parts are shielded and live parts
are not exposed.
■ Ensure power is not supplied to the appliance until after
installation work has been carried out.
■ The manufacturer will not be held liable for any damages
resulting from incorrect or improper installation.
English
59 EN
Page 62

Dimensions
(measurements: mm)
60 EN
min 50 cm
2
min 50 cm
min 550
2
Page 63

Installing the Appliance
Electrical connection
• Before connection, check that the mains voltage corresponds to that indicated on
the rating label xed to the inside of the appliance. This data must correspond in
order to avoid the risk of damage to the appliance.
• Check that the domestic power supply guarantees adequate earthing.
• Once installed, it should be easy to isolate the appliance from the electricity
supply by pulling out the plug or operating a circuit breaker.
• The appliance must only be connected with the power cable provided.
• DO NOT use multi-plug adaptors power strips or extension leads. There is a risk
of re in the event of overloading.
English
61 EN
Page 64

Installing the Appliance
Installation
• Veneer or other nish of the furniture the appliance is being built into should be
processed with heat-resistant glue (100°C); otherwise, high temperatures may
cause them to deform.
• There must be no rear wall tted to appliance housing.
• There must be a gap of at least 45 mm between the wall and the back of the unit
to enable adequate air circulation.
2
• The tted cabinet must have a ventilation opening of 50 cm
achieve this, cut back the plinth or t a ventilation grille. Ventilation slots and
intakes must not be covered.
• Level the piece of furniture the appliance was built into with a spirit level.
• The piece of kitchen furniture the appliance is built into must be secured against
movement, e.g. Attached to the adjacent pieces of kitchen furniture.
• Align the appliance ush with the units and screw it in place.
• When attaching the appliance, make sure the screws are not fastened too
strongly as this may damage the furniture.
• The ventilation slots and air intake points must not be covered. To ensure that
they remain uncovered also observe the installation instructions of any appliance
installed with this oven.
NOTE
Ensure that the connector lead does not become trapped or bent.
After installation the connector lead must not be in contact with the back or the
base of the appliance.
on the front. To
62 EN
Page 65

Specications
Manufacturer Panasonic
Model
Power Supply 220-240 V ~ 50 Hz
Maximum 3000 W
Maximum Power
Consumption
Output Power 1000 W (IEC-60705)
External Dimensions 595 mm (W) 565 mm (D) 455 mm (H)
Interior Dimensions W x D x H (mm) 445 mm (W) 347 mm (D) 242 mm (H)
Uncrated Weight (approx.) 36 kg
This product is an equipment that fullls the European standard for EMC disturbances
(EMC = Electromagnetic Compatibility) EN 55011. According to this standard this product is
an equipment of group 2, class B and is within required limits. Group 2 means that radiofrequency energy is intentionally generated in the form of electromagnetic radiation for
purpose of warming or cooking food. Class B means that this product may be used in normal
household areas.
Manufactured by: Panasonic Manufacturing U.K. Ltd.
Wyncliffe Road, Pentwyn Industrial Estate, Cardiff, S.Glam. CF23 7XB U.K.
Microwave 1200 W
Grill 2100 W
Convection 2030 W
Steam 1050 W
HL-SX485S
HL-SX485B
English
REP. EU: Panasonic Testing Centre
Winsbergring 15, 22525 Hamburg, Germany
63 EN
Page 66

Page 67

Vielen Dank, dass Sie dieses Gerät von Panasonic gekauft haben.
Inhalt
Bedienungsanleitung ..........................2-57
Verwendung der Zeitschaltuhr..................34
Deutsch
Sicherheitshinweise .................................2-6
Entsorgung von Abfallprodukten ................7
Benutzung des Geräts ................................8
Wichtige Sicherheitshinweise ................8-10
Geräteteile ...........................................10-11
Gerätezubehör.....................................12-13
Bedienfeld.................................................14
Kochmodi..................................................15
Kombinationskochmodi ............................16
Benutzereinstellungen .........................17-19
Taste „Startmenü“.....................................19
Kindersicherung........................................19
Kochen und Auftauen in der Mikrowelle ...20
Grillen ..................................................21-22
Garen mit Heißluft ...............................23-24
Dampfgaren .........................................25-26
Dampfstoß ................................................27
Kombinationskochen ...........................28-29
Mehrstuges Kochen ................................35
Speicher ...................................................36
Richtlinien für das Auftauen......................37
Turboauftauen .....................................38-39
Automatische Kochprogramme ...........40-44
Automatische Dampfprogramme .........45-48
Automatische Dampfprogramme
mit Turboko..........................................49-52
Systemreinigungsprogramme ..................53
Wassertank und Auffangbehälter
reinigen .....................................................54
Fragen und Antworten .........................55-56
Pege Ihres Gerätes.................................57
Installationsanleitung ........................58-62
Installation und Anschluss ........................58
Sicherheitshinweise .............................58-59
Anmessungen...........................................60
Installation des Gerätes .......................61-62
Kombinationskochen mit Dampf ..........30-31
Turbokochen........................................32-33
Spezikationen .......................................63
1 DE
Page 68

Bedienungsanleitung
Sicherheitshinweise
Dieses Gerät kann von Kindern ab 8 Jahren und
Personen mit eingeschränkten körperlichen,
sensorischen oder geistigen Fähigkeiten oder
mangelnder Erfahrung und Kenntnis verwendet werden,
wenn sie beaufsichtigt werden oder Anleitung für die
sichere Verwendung des Gerätes von einer für ihre
Sicherheit verantwortlichen Person erhalten haben und
die diesbezüglichen Risiken verstehen, auch bezüglich
entweichendem Dampf. Kinder sollten mit dem Gerät
nicht spielen. Reinigung und Wartung sollte nicht von
Kindern durchgeführt werden, die dabei ohne Aufsicht
sind. Halten Sie das Gerät mitsamt Kabel von Kindern
unter 8 Jahren fern.
Wenn dieses Gerät installiert ist, sollte es möglich
sein, das Gerät ohne Schwierigkeiten von der
Stromversorgung zu trennen, indem der Stecker
herausgezogen oder ein Trennschalter benutzt wird.
Wenn das Stromkabel beschädigt ist, muss es vom
Hersteller, einem Servicetechniker des Herstellers oder
einer gleichermaßen qualizierten Person ersetzt werden,
um Gefahren zu vermeiden.
Warnung! Das Gerät sollte auf Beschädigungen an den
Türabdichtungen und an den Türabdichtungsbereichen
überprüft werden, und wenn diese Bereiche Schäden
aufweisen, darf das Gerät so lange nicht in Betrieb
genommen werden, bis diese von einem vom Hersteller
geschulten Kundendiensttechniker behoben wurden.
Warnung! Versuchen Sie nicht, Veränderungen oder
Reparaturen an der Tür, dem Bedienfeldgehäuse, den
Sicherheitsverriegelungs-Schaltern oder irgendeinem
anderen Teil des Geräts vorzunehmen.
Warnung! Das Außengehäuse des Geräts, das vor einem
Kontakt mit der Mikrowellenenergie schützt, darf zu
keiner Zeit abgenommen werden.
2 DE
Page 69

Sicherheitshinweise
Reparaturen dürfen nur von einem qualizierten
Kundendiensttechniker vorgenommen werden.
Warnung! Flüssigkeiten und sonstige Nahrungsmittel
dürfen nicht in versiegelten Behältern aufgewärmt
werden, da sie explodieren können.
Warnung! Gestatten Sie Kindern nur dann, das Gerät
unbeaufsichtigt zu benutzen, wenn ihnen ausreichende
Anweisungen gegeben wurden, so dass sie das Gerät
auf sichere Weise benutzen können und die Gefahren
verstehen, die durch eine unsachgemäße Benutzung
entstehen können.
Wenn Sie Nahrungsmittel in Kunststoff- oder
Papierbehältern aufwärmen, überprüfen Sie das Gerät
häug, da diese Art Behälter Feuer fängt, wenn Sie
überhitzt werden.
Sollten sich im Gerät Rauch oder Flammen bilden,
tippen Sie auf die Ein/Aus-Taste und lassen Sie die Tür
geschlossen, um eventuelle Flammen zu ersticken.
Ziehen Sie den Stecker heraus oder schalten Sie den
Strom an der Sicherung oder mit dem Trennschalter aus.
Dieses Gerät ist nur zur Benutzung zu Haushaltszwecken
ausgelegt.
Wenn Sie Flüssigkeiten wie z. B. Suppen, Saucen und
Getränke in Ihrem Gerät aufwärmen, kann ein Überhitzen
der Flüssigkeit über den Siedepunkt hinaus auftreten,
ohne dass Anzeichen von Blasenbildung sichtbar
wären. Dies kann ein plötzliches Überkochen der heißen
Flüssigkeit zur Folge haben.
Der Inhalt der Babyaschen oder Gläschen mit
Babynahrung muss geschüttelt oder umgerührt werden.
Vor dem Verzehr muss die Temperatur überprüft werden,
um Verbrennungen vorzubeugen.
Kochen Sie mit der MIKROWELLE keine Eier in der
Schale oder hartgekochte Eier. Es könnte sich Druck
bilden, welcher die Eier zum Explodieren bringt, sogar
dann noch, wenn die Mikrowellenerwärmung beendet ist.
Deutsch
3 DE
Page 70

4 DE
Sicherheitshinweise
Reinigen Sie das Innere des Geräts, die Türdichtungen
und den Türdichtungsbereich regelmäßig. Wenn
Nahrungsmittel spritzen oder verschüttete Flüssigkeiten
an den Gerätewänden, am Boden, an den Türdichtungen
und an den Türdichtungsbereichen haften, wischen
Sie diese mit einem feuchten Tuch ab. Bei starker
Verschmutzung kann eine milde Seifenlösung benutzt
werden. Die Benutzung starker Reinigungs- oder
Scheuermittel wird nicht empfohlen.
BENUTZEN SIE KEINE KOMMERZIELLEN
BACKOFENREINIGER.
Bei Benutzung der Betriebsarten GRILL, HEISSLUFT,
DAMPF oder KOMBINATIONS kann es zwangsläug zu
Fettspritzern an den Wänden des Geräts kommen. Wird
das Gerät nicht von Zeit zu Zeit gereinigt, ist während des
Betriebs eine Rauchentwicklung möglich.
Wird das Gerät nicht in sauberem Zustand gehalten,
kann dies zu einer Zerstörung der Oberächen führen,
welche die Lebensdauer des Geräts beeinträchtigen und
mögliche Gefahren für den Benutzer mit sich bringen
kann.
Warnung! Die zugänglichen Teile können bei Betrieb
in den folgenden Betriebsarten heiß werden: GRILL,
HEISSLUFT, DAMPF oder KOMBINATION. Kinder unter
8 Jahren sollen vom Gerät fern gehalten werden. Kinder
sollten das Gerät aufgrund der von ihm erzeugten hohen
Temperaturen nur unter Aufsicht eines Erwachsenen
benutzen.
Zur Reinigung des Geräts darf kein Dampfreiniger
verwendet werden.
Benutzen Sie keine aggressiven Reinigungsmittel oder
scharfen Metallspachtel, um die Glastür des Geräts zu
reinigen – dies könnte die Oberäche zerkratzen und zu
einem Zerspringen des Glases führen.
Die äußeren Ofenächen, einschließlich der
Lüftungsöffnungen am Gehäuse und die Ofentür werden
während der Betriebsarten GRILLEN, HEISSLUFT,
Page 71

Sicherheitshinweise
DAMPF und KOMBINATION heiß. Deshalb gilt beim
Öffnen und Schließen der Tür und beim Einschieben
oder Herausnehmen von Nahrungsmitteln und Zubehör
besondere Vorsicht!
Dieses Gerät ist nicht für den Betrieb mittels einer
externen Zeitschaltuhr oder eines getrennten
Fernbedienungssystems ausgelegt.
Verwenden Sie nur solche Utensilien, die für die
Verwendung in Mikrowellengeräten geeignet sind.
Warnung! Dieses Gerät erzeugt kochend heißen Dampf.
Halten Sie während und nach dem Kochen mit der
Dampffunktion das Gesicht nicht zu dicht an das Gerät,
wenn Sie die Tür öffnen. Lassen Sie beim Öffnen der Tür
Vorsicht walten, da heißer Dampf zu Verletzungen führen
kann.
Warnung! Beim Öffnen der Tür können Dampfschwaden
austreten. Wenn sich heißer Dampf im Gerät
bendet, greifen Sie nicht mit nackten Händen hinein!
Verbrennungsgefahr! Verwenden Sie Ofenhandschuhe.
Bitte lesen Sie Seite 12-13 bezüglich des korrekten
Einbaus des Ofenzubehörs.
Warnung! Das Gerät verfügt über vier Grillheizelemente
im Deckenbereich des Gerätes und einem
Heißluftelement an der Rückwand des Ofens. Nach
dem Gebrauch der Funktionen GRILL, HEISSLUFT,
DAMPF und KOMBINATION sind die Innenächen
des Ofens sehr heiß. Deshalb gilt besondere Vorsicht,
um das Berühren der Heizelemente im Gerät zu
vermeiden. Um Verbrennungen zu vermeiden, sollten
die Innenoberächen des Geräts möglichst nicht berührt
werden.
Dieser Kombiofen ist nur für das Erwärmen von
Nahrungsmitteln und Getränken vorgesehen. Seien Sie
vorsichtig, wenn Sie Nahrungsmittel mit einem geringen
Feuchtigkeitsgehalt aufwärmen, z. B. Brotprodukte,
Schokolade, Kekse und Gebäck. Diese können schnell
Deutsch
5 DE
Page 72

Sicherheitshinweise
verbrennen, austrocknen oder Feuer fangen, wenn sie zu
lange erhitzt werden. Wir raten davon ab, Nahrungsmittel
mit geringer Feuchte aufzuwärmen, z. B. Popcorn
oder Papadam. Das Trocknen von Nahrungsmitteln,
Zeitungen oder Kleidungsstücken und das Erwärmen
von Wärmekissen, Hausschuhen, Schwämmen, feuchten
Tüchern, Weizensäcken, Wärmaschen und ähnlichen
Produkten kann zu Verletzungen, Entzündung oder einem
Brand führen.
Warnung! Die Lampe des Geräts darf nur von
einem Servicetechniker ersetzt werden, der vom
Hersteller geschult wurde. Versuchen Sie NICHT, das
Außengehäuse des Geräts zu entfernen.
Bevor Sie das Gerät in Betrieb nehmen, bringen Sie
den Auffangbehälter in Position. Hinweise zur richtigen
Installation nden Sie auf Seite 10.
Der Zweck des Auffangbehälters besteht darin,
überschüssiges Wasser in den Betriebsarten DAMPF und
DAMPF-KOMBINATION aufzusammeln. Er sollte nach
jedem DAMPF- und DAMPF-KOMBINATIONS-Betrieb
geleert werden.
Verwenden Sie den Wasserbehälter nicht, wenn er
Risse oder Schäden aufweist, da Wasser auslaufen
und zu Ausfällen der Elektrik oder einem Stromschlag
führen könnte. Wenn der Wassertank Schäden aufweist,
kontaktieren Sie bitte Ihren Händler.
Das Gerät ist ausschließlich als Einbaugerät konzipiert.
Dieses Gerät dient nicht zur Aufstellung auf der
Arbeitsplatte oder in einem Schrank.
VORSICHT! Um das Risiko eines unbeabsichtigten
Zurücksetzens der thermischen Abschaltung zu
vermeiden, darf dieses Gerät nicht über einen externen
Schalter, z. B. eine Zeitschaltuhr, versorgt werden, oder
an einen Stromkreis angeschlossen werden, der vom
Energieversorger regelmäßig aus- und eingeschaltet wird.
6 DE
Page 73

Entsorgung von Abfallprodukten
Information für Benutzer
zur Entsorgung
von Elektro- und
Elektronikschrott
(Privathaushalte)
Dieses Symbol auf den Produkten
und/oder den Begleitdokumenten bedeutet,
dass benutzte elektrische und elektronische
Produkte nicht mit dem allgemeinen
Haushaltsmüll zusammen entsorgt werden
sollen.
Zur ordnungsgemäßen Behandlung,
Rückgewinnung und Recyclingverarbeitung
müssen diese Produkte an die hierfür
vorgesehenen Sammelpunkte gebracht
werden, wo sie kostenfrei angenommen
werden. In einigen Ländern ist es auch
möglich, Ihrem Einzelhändler das Produkt
beim Kauf eines entsprechenden neuen
Produkts zur Entsorgung zurückzugeben.
Die ordnungsgemäße Entsorgung
dieses Produkts trägt dazu bei, wertvolle
Ressourcen einzusparen und
potenzielle negative Auswirkungen auf die
menschliche Gesundheit und die Umwelt
zu vermeiden, die anderweitig durch eine
unangemessene Entsorgung bedingt werden
könnten. Ihre Ortsbehörde wird Sie auf
Anfrage über einen Sammelpunkt in Ihrer
Nähe informieren.
Für eine unsachgemäße Entsorgung dieses
Abfalls gelten u. U. Strafen entsprechend der
national geltenden Gesetze.
Für gewerbliche Anwender in
der Europäischen Union
Wenn Sie elektrische oder elektronische
Geräte entsorgen möchten, wenden Sie
sich bitte an Ihren Händler oder Lieferanten
bezüglich weiterer Informationen.
Informationen über die
Entsorgung in anderen Ländern
außerhalb der Europäischen
Union
Dieses Symbol ist nur in der Europäischen
Union gültig.
Wenn Sie dieses Produkt entsorgen
möchten, kontaktieren Sie Ihre Ortsbehörde
oder Ihren Händler und fragen Sie nach der
korrekten Entsorgungsmethode.
Deutsch
7 DE
Page 74

Wichtige Sicherheitshinweise
Bitte sorgfältig durchlesen und zum Nachschlagen aufbewahren.
WARNUNG!
Wichtige Sicherheitshinweise
1. Die Türabdichtungen und
Türabdichtungsbereiche sollten mit
einem feuchten Tuch gereinigt werden.
Das Gerät sollte auf Beschädigungen
an den Türabdichtungen und an
den Türabdichtungsbereichen
überprüft werden, und wenn diese
Bereiche Schäden aufweisen, darf
das Gerät so lange nicht in Betrieb
genommen werden, bis diese von
einem vom Hersteller geschulten
Kundendiensttechniker behoben
wurden.
Benutzung des Geräts
1. Benutzen Sie das Gerät zu keinem
anderen Zweck als zur Zubereitung
von Nahrungsmitteln. Das Gerät
wurde speziell dazu konzipiert,
Nahrungsmittel aufzuwärmen oder zu
kochen. Verwenden Sie dieses Gerät
nicht dazu, Chemikalien oder sonstige
Produkte, die keine Nahrungsmittel
sind, aufzuwärmen. Diese Einstellungen
können jederzeit geändert werden.
Siehe dazu Seite 17.
2. Vergewissern Sie sich vor der
Benutzung, dass Ihre Utensilien/
Behälter zur Benutzung in der
Mikrowelle geeignet sind.
3. Bewahren Sie keine Objekte im Gerät
auf, wenn dieses nicht benutzt wird, falls
es versehentlich eingeschaltet wird.
4. Das Gerät darf in den Betriebsarten
MIKROWELLE oder KOMBINATION
nicht verwendet werden, wenn
sich KEINE SPEISEN IM GERÄT
BEFINDEN, da dies zu Schäden am
Gerät führen könnte.
2. Nehmen Sie dieses Gerät nicht
in Betrieb, wenn Stromkabel oder
Stecker beschädigt sind oder wenn
das Gerät fallen gelassen oder
beschädigt wurde. Das Durchführen
von Reparaturen ist gefährlich, außer
für einen vom Hersteller geschulten
Kundendiensttechniker.
Betrieb des Heizelements
Bevor Sie die HEISSLUFT-, DAMPF,
GRILL- oder KOMBINATIONS-Funktion
zum ersten Mal nutzen, wischen Sie
überschüssiges Öl im Innenraum des
Geräts ab und nehmen Sie das Gerät
ohne Nahrungsmittel und Zubehör in der
Einstellung „GRILL 1“ für 15 Minuten in
Betrieb. Dadurch wird das als Rostschutz
verwendete Öl verbrannt.
VORSICHT! Heiße
Oberächen
Nach dem Kochen ist das
Zubehör des Gerätes sehr heiß.
Betrieb des Kühlgebläses
Nach dem Betrieb des Gerätes, kann
es sein, dass der Gebläsemotor
ein paar Minuten nachläuft, um die
Elektrokomponenten zu kühlen. Dies ist
normal und Sie können das Lebensmittel
auch bei laufendem Gebläsemotor
herausnehmen. Das Gerät kann
währenddessen weiter verwendet werden.
8 DE
Page 75

Wichtige Sicherheitshinweise
Wasserbehälter
Benutzen Sie den Wassertank nicht, wenn
er Risse aufweist oder beschädigt ist, da
das Wasser auslaufen könnte und zu einem
Ausfall der Elektrik oder einem Stromschlag
führen könnte. Wenn der Wassertank
Schäden aufweist, kontaktieren Sie bitte
Ihren Händler.
Innenbeleuchtung
Wenn es erforderlich wird, die Beleuchtung
des Geräts auszuwechseln, wenden Sie sich
bitte an Ihren Händler.
Garzeiten
Die im Kochbuch angegebenen Garzeiten
sind nur ungefähre Werte. Die Garzeit
hängt von Zustand, Temperatur, Menge
der Nahrungsmittel sowie der Art des
Kochgeschirrs ab.
Beginnen Sie mit der Mindestgarzeit, um
ein Verkochen zu verhindern. Wenn die
Nahrungsmittel nicht ausreichend gegart
sind, können Sie sie immer noch etwas
länger kochen.
WICHTIG!
Wenn die empfohlene Kochzeit
überschritten wird, können die
Nahrungsmittel ungenießbar
werden und in extremen Fällen
Feuer fangen und das Innere des
Geräts beschädigen.
Fleischthermometer
Verwenden Sie erst dann ein Thermometer
zum Überprüfen des Garzustandes von
Braten und Geügel, wenn das Fleisch
bereits aus dem Gerät genommen wurde.
Verwenden Sie im Mikrowellengerät kein
herkömmliches Fleischthermometer, da dies
Funkenbildung verursachen kann.
Kleine Nahrungsmittelmengen
Kleine Nahrungsmittelmengen oder
Nahrungsmittel mit einem geringen
Feuchtigkeitsgehalt können verbrennen,
austrocknen oder Feuer fangen, wenn
sie zu lange gegart werden. Sollten
sich Substanzen innerhalb des Geräts
entzünden, tippen Sie auf die Ein/AusTaste und lassen Sie die Tür geschlossen,
um etwaige Flammen zu ersticken. Ziehen
Sie den Stecker heraus oder schalten Sie
den Strom an der Sicherung oder mit dem
Trennschalter aus.
Eier
Kochen Sie in der MIKROWELLE keine
Eier in der Schale oder bereiten ganze
hartgekochte Eier zu. Es könnte sich Druck
bilden, welcher die Eier zum Explodieren
bringt, sogar dann noch, wenn die
Mikrowellenerwärmung beendet ist.
Haut einstechen
Nahrungsmittel mit einer nicht porösen
Haut, wie z. B. Kartoffeln, Eigelb und
Würstchen, müssen vor dem Kochen mit der
MIKROWELLE eingestochen werden, um zu
verhindern, dass sie platzen.
Flüssigkeiten
Wenn Sie Flüssigkeiten wie Suppen,
Saucen und Getränke in der Betriebsart
Mikrowelle aufwärmen, kann ein Überhitzen
der Flüssigkeit über den Siedepunkt hinaus
auftreten, ohne dass Anzeichen von
Blasenbildung sichtbar wären. Dies kann
ein plötzliches Überkochen der heißen
Flüssigkeit zur Folge haben.
Um dies zu verhindern, sollten die folgenden
Schritte unternommen werden:
a. Vermeiden Sie die Verwendung von
Behältern mit geraden Wänden und engen
Hälsen.
b. Nicht überhitzen.
c. Rühren Sie die Flüssigkeit um, bevor
Sie den Behälter in das Gerät stellen
und rühren Sie nochmals nach halber
Kochzeit.
d. Lassen Sie die Flüssigkeit nach dem
Erwärmen eine kurze Weile im Gerät
stehen, rühren Sie nochmals um und
nehmen Sie den Behälter dann vorsichtig
aus dem Gerät.
Papier/Kunststoff
Wenn Sie Nahrungsmittel in Kunststoff- oder
Papierbehältern aufwärmen, überprüfen
Sie Gerät häug, da diese Art von Behälter
Feuer fängt, wenn Sie überhitzt wird.
Verwenden Sie keine recycelten
Papierprodukte (z. B. Küchenrolle),
es sei denn, das Papierprodukt ist als
mikrowellensicher gekennzeichnet.
Recycelte Papierprodukte können
Unreinheiten enthalten, die während
der Benutzung Funken und/oder Feuer
verursachen können.
Entfernen Sie die Drahtverschlüsse von
Bratbeuteln, bevor Sie den Beutel in das
Gerät legen.
Deutsch
9 DE
Page 76

Wichtige Sicherheitshinweise
Utensilien/Folie
Erwärmen Sie keine geschlossenen Dosen
oder Flaschen, da diese explodieren können.
Metallbehälter oder Schüsseln mit
Metallverzierungen sollten beim
Mikrowellenkochen nicht benutzt werden. Es
kann zu Funkenbildung kommen.
Wenn Sie Aluminiumfolie, Fleischspieße
oder Kochgeschirr aus Metall benutzen,
muss der Abstand zwischen diesen und den
Gerätewänden mindestens 2 cm betragen,
um eine Funkenbildung zu verhindern.
Geräteteile
Wassertank und
Auffangbehälter
1. Bevor Sie das Geräte verwenden,
muss der Auffangbehälter eingesetzt
werden, da dieser während des Kochens
überschüssiges Wasser auffängt.
Der Auffangbehälter sollte nach jeder
Verwendung entfernt, geleert und
gereinigt werden.
2. Entfernen Sie Wassertank und
Auffangbehälter und setzen Sie diese wie
in der Abbildung gezeigt wieder ein.
3. REINIGEN SIE AUFFANGBEHÄLTER
UND WASSERTANK NICHT IN DER
SPÜLMASCHINE. Reinigungshinweise
nden Sie auf Seite 54.
Weitere Hinweise zur Verwendung des
Wassertanks nden Sie auf Seite 26.
Babyaschen/Gläschen mit
Babynahrung
Oberteil und Sauger oder Deckel müssen
von Babyaschen oder Gläschen mit
Babynahrung abgenommen werden, bevor
sie in das Gerät gestellt werden.
Der Inhalt der Babyaschen oder Gläschen
mit Babynahrung muss geschüttelt oder
umgerührt werden.
Vor dem Verzehr muss die Temperatur
überprüft werden, um Verbrennungen zu
vermeiden.
Drücken Sie kurz auf die Blende unter der
Gerätetür, um an den Auffangbehälter und
Wassertank zu kommen.
10 DE
Auffangbehälter
Wassertank
Page 77

Geräteteile
1. Bedienfeld
2. Türgriff. Ziehen Sie den Türgriff nach
unten, um die Tür zu öffnen. Wenn
Sie die Tür des Geräts während des
Kochens öffnen, wird der Kochvorgang
vorübergehend unterbrochen, ohne
dass die aktuellen Einstellungen
gelöscht werden. Der Kochvorgang wird
fortgesetzt, sobald die Tür geschlossen
ist und die Start/Stopp-Taste betätigt
wird. Die Beleuchtung des Gerätes
geht an, sobald die Gerätetür geöffnet
wird. Öffnen Sie die Tür, wenn das
Gerät im Standby-Modus war. In der
Anzeige erscheint „TUER OEFFNEN“
(Tür öffnen). Wenn der textlose Modus
ausgewählt ist, blinkt stattdessen das
Zubehörsymbol in der Anzeige.
3. Tür-Sicherheitssperrsystem Um
Verletzungen zu vermeiden, keine
Finger, Messer, Löffel oder andere
Gegenstände in das Türriegelloch
bringen.
13
5
4. Gerätelampe.Wenn die Taste der
Gerätelampe in der Anzeige verfügbar
ist, dann kann die Lampe ein- und
ausgeschaltet werden.
5. Grillelemente
6. Einschubpositionen. 1-4 wie in
Abbildung.
7. Stromkabel
8. Gerätestecker
9. Türscharniere. Um beim Öffnen und
Schließen der Tür Verletzungen zu
verhindern, die Finger stets von den
Türscharnieren fernhalten.
10. Untere Mikrowellenzufuhr
(siehe Seite 20)
11. Gerätefenster
12. Heißluftelement
13. Dampfauslass
14. Typenschild
15. Abluftöffnung
12
1 15
4
Deutsch
6
4
7
3
2
8
9
10
11
1
HINWEIS
Diese Abbildung dient lediglich der Information.
3
14
2
11 DE
Page 78

Gerätezubehör
Zubehör
Das Gerät ist mit einer Vielfalt an Zubehör
ausgestattet. Halten Sie sich immer an
die Anweisungen für die Verwendung des
Zubehörs.
Emailblech
1. Das Emailblech dient nur zum
Kochen in HEISSLUFT- oder GRILL-
Modus. Verwenden Sie es nicht in
der Betriebsart MIKROWELLE oder
KOMBINATION. Verwenden Sie das
Emailblech im reinen Grill-Modus nicht in
Einschubposition 4.
2. Für das HEISSLUFT-Garen auf 2
Ebenen kann das Emailblech in der
Einschubposition 1 und der Drahtrost
in der Einschubposition 3 verwendet
werden.
3. Die Höchstbelastung des Emailblechs
beträgt 4 kg (= Gesamtgewicht aus
Nahrungsmittel und Gefäß).
Emailblech
Glasablage
1. Die Glasablage kann in jeder
Einschubposition zum Garen in den
Betriebsarten DAMPF, MIKROWELLE,
GRILL, HEISSLUFT oder
KOMBINATION verwendet werden.
2. Die Glasablage wird zusammen
mit dem Dampfgareinsatz in den
Betriebsarten DAMPF oder DAMPF und
MIKROWELLE verwendet.
3. Ist die Glasablage heiß, lassen Sie sie
abkühlen, bevor Sie diese reinigen oder
in kaltes Wasser legen, da das Glas
sonst reißen oder bersten kann.
4. Die Höchstbelastung des Glasablage
beträgt 4 kg (= Gesamtgewicht aus
Nahrungsmittel und Gefäß).
Drahtrost
1. Der Drahtrost kann in den
Einschubpositionen 3 oder 4 zum
GRILLEN von Nahrungsmitteln
verwendet werden. Er kann zum
HEISSLUFT- und KOMBINATIONS-
Kochen in jeder Einschubpositionen
verwendet werden.
2. Benutzen Sie Metallbehälter in
KOMBINATION mit der MIKROWELLE
nicht direkt auf dem Drahtrost.
3. Benutzen Sie den Drahtrost nicht, wenn
Sie nur den MIKROWELLEN-Modus
verwenden.
4. Die Höchstbelastung des Drahtrosts
beträgt 4 kg (= Gesamtgewicht aus
Nahrungsmittel und Gefäß).
Drahtrost
Dampfgareinsatz
1. Der Dampfgareinsatz wird in die
Glasablage gelegt, um mit den
Betriebsarten DAMPF oder DAMPF
und MIKROWELLE zu kochen. Die
Nahrungsmittel können direkt auf den
Dampfgareinsatz gelegt werden.
2. Verwenden Sie den Dampfgareinsatz
nicht in den Betriebsarten GRILL-,
HEISSLUFT oder KOMBINATION.
3. Der Dampfgareinsatz ist
spülmaschinenfest.
12 DE
Dampfgareinsatz
Glasablage
Page 79

Gerätezubehör
Die folgende Übersicht zeigt die korrekte Verwendung des Zubehörs im Gerät.
Mikrowelle
Grill
Heißluft
Dampf
Grill + Heißluft
Grill + Mikrowelle
Heißluft +
Mikrowelle
Heißluft +
Mikrowelle + Grill
Dampf + Mikrowelle
Dampf + Grill
Dampf + Heißluft
Grill oder Heißluft +
Mikrowelle + Dampf
Turbokochen
Drahtrost Glasablage Emailblech Dampfgareinsatz
** **
** **
* **
*
* **
** **
* **
*
Deutsch
*: Metallbehälter dürfen nicht direkt auf den Drahtrost gestellt werden. Die Nahrungsmittel entweder direkt
auf den Drahtrost legen oder eine Glasform direkt auf den Drahtrost stellen.
**: Verwenden Sie das Emailblech im reinen oder eine Glasform nicht in Einschubposition 4.
13 DE
Page 80

Bedienfeld
2 3 4 5 6 7 8 9
1 19 19 19
1. Ein/aus
2. Dampf
3. Heißluft
4. Grill
5. Mikrowelle
6. Turboauftauen
7. Automatische Dampfprogramme
8. Automatische Kochprogramme
9. Turbokochen
10. Speicherabruf
10
11 12 13 14 15
11. Speicher
12. Benutzereinstellungen
13. Reinigungsprogramme
14. Startmenü
15. Kindersicherung
16. Zeitschaltuhr
17. Gerätelampe
18. Stopp/Start
19. Auswahlpfeile nach oben/unten
16 17
Dieses Gerät verfügt über eine Energiesparfunktion.
HINWEIS
Das Gerät geht nach 6 Minuten ohne Betrieb in den Standby-Modus.
Wenn eine Betriebsart eingestellt wird und die Start/Stopp-Taste nicht innerhalb
von 6 Minuten berührt wird, storniert das Gerät den Vorgang automatisch. Die
Anzeige kehrt in den Standby-Modus zurück.
Ist das Gerät im Standby-Modus, muss die Gerätetür zunächst geöffnet und
geschlossen werden oder die Ein/Aus-Taste gedrückt werden, bevor Sie das Gerät
verwenden können.
18
14 DE
AKUSTISCHES SIGNAL
Beim Antippen einer Taste ertönt ein akustisches Signal. Die Einstellung der
Lautstärke der Signaltöne nden Sie auf Seite 18. Wenn im GRILL-, HEISSLUFT- oder
KOMBINATIONS-Modus das Vorheizen abgeschlossen ist, ertönen drei Signaltöne.
In einigen Automatikprogrammen ertönen 3 Signaltöne, die anzeigen, dass etwas
umgerührt oder gedreht werden sollte (siehe dazu die Seiten 38-52). Nach dem Garen
ertönt das akustische Signal 5 Mal.
Page 81

Kochmodi
Die Darstellungen unten sind Beispiele für das Zubehör. Dies kann je nach Rezept/Gericht
variieren.
Kochmodi Verwendung
MIKROWELLE
• Auftauen
• Erwärmen
• Schmelzen: Butter, Schokolade,
Käse.
• Garne von Fisch, Gemüse, Obst,
Eier (außer von Eiern in der Schale
und ganze hartgekochte Eier).
• Zubereitung: Obstkompott,
Marmelade, Soßen, Pudding,
Karamell, Fleisch-, Fisch- oder
vegetarische Pasteten.
• Backen von ungebräunten Kuchen
mit Eiern und Backpulver . (VictoriaSandwich, Clafoutis, usw.)
Geeignete
Kochutensilien
Stellen Sie Ihr
eigenes Pyrex®-
Geschirr direkt
unten in den
Ofen.
Gefäße
Mikrowellensicher, ohne
Metall.
Deutsch
GRILL
HEISSLUFT
DAMPF
• Grillen von Fleisch oder Fisch.
• Überbacken von Toast.
• Bräunen von Gratins oder Kuchen
mit Baiser.
• Backen von Kleingebäck mit kurzen
Garzeiten: Blätterteig, Kekse,
Brandteig, Mürbteig, Biskuitrolle.
• Besonderes Gebäck: Soufé,
Meringen, Vol-au-Vents, kleine
Brotlaibe oder Brioche, Biskuit,
Meat Pie, usw.
• Backen von Quiche, Pizza und
Blechkuchen.
• Garen von Fisch, Gemüse, Hühnchen, Reis, Kartoffeln und saftigem
Puddingkuchen.
Drahtrost und
Emailblech.
Verwenden Sie
das Emailblech
im reinen GrillModus nicht in
Einschubposition
4.
Emailblech,
Glasablage und
Drahtrost.
Dampfgareinsatz
und Glasablage.
Hitzebeständig,
Metallblech
kann
verwendet
werden.
Hitzebeständig,
Metallblech
kann
verwendet
werden.
Mikrowellen-
geeignet.
15 DE
Page 82

Kombinationskochmodi
Kochmodi Verwendung
GRILL + HEISSLUFT
GRILL + MIKROWELLE
GRILL + HEISSLUFT +
HEISSLUFT +
MIKROWELLE
MIKROWELLE
• Braten von rotem Fleisch, dicken
Steaks (Ribeye vom Rind, T-BoneSteak)
• Garen von Fisch.
• Braten von Fleisch und Geügel.
• Auftauen und Aufwärmen von
knusprigen Speisen (Quiche, Pizza,
Brot, Feingebäck, Lasagne, Gratin).
• Zubereiten von Lasagne, Fleisch,
Kartoffel- oder Gemüsegratins.
• Backen von Kuchen und Auäufen
mit Eiern oder Backpulver als
Zutaten, die gebräunt werden,
Backen von Quiche, Törtchen und
Kuchen.
Zubehör
geeignet
Emailblech,
Glasablage
und
Drahtrost.
Drahtrost
und/oder
Glasablage.
Gefäße
Hitzebeständig,
Metallblech
kann verwendet
werden.
Mikrowellenge-
eignet
und hitzebestän-
dig.
Metallbackform
darf nur auf der
Glasablage verwendet werden.
KEINE
Springformen
verwenden.
16 DE
DAMPF + MIKROWELLE
GRILL + DAMPF
HEISSLUFT + DAMPF
• Garen von Fisch, Gemüse, Hühnchen, Reis und Kartoffeln.
• Backen von Gratins
• Fleischspieße
• Backen von Kuchen
• Gebäck, Torte
• Soufés
• Ganzer Fisch
Dampf-
gareinsatz
und
Glasablage.
Drahtrost
oder
Emailblech.
Mikrowellen-
geeignet.
Hitzebeständig,
Metallform/-blech
kann verwendet
werden.
Page 83

Benutzereinstellungen
Gehen Sie in das Menü "Benutzereinstellungen", um die folgenden Einstellungen zu ändern:
UHR (1)
ZEIT (2)
SPRACHE (3)
HINWEIS (4)
Tippen Sie auf die Taste
"Benutzereinstellungen", um
ins entsprechende Menü zu
gelangen.
Sprache
Diese Modelle haben eine einzigartige Laufschrift-Funktion, die Sie durch die Bedienung Ihres Gerätes führt.
Wenn Sie die Taste drücken, läuft das Display zur nächsten Anweisung und reduziert damit die Möglichkeit,
Fehler zu machen.
VOLUMEN (5)
BLAU (6)
WEISS (7)
DEMO (8)
Anzeige Laufschrift
“dE”
“Fr”
“En”
Auf
Deutsch
Auf Fran-
zösisch
Auf Eng-
lisch
“--” Textlos
Deutsch
Tippen Sie auf die
Taste "Benutzereinstellungen",
um ins entsprechende Menü zu
gelangen.
Wählen Sie
"SPRACHE" über die
Tasten nach oben
und unten aus.
Wählen Sie mit den Pfeilen
nach oben und unten eine
Sprache aus.
Benutzerführung ein- und ausschalten
Die Benutzerführung ist standardmäßig eingeschaltet.
Tippen Sie auf die
Taste "Benutzereinstellungen", um
ins entsprechende
Menü zu gelangen.
Wählen Sie
"HINWEIS" über
die Tasten nach
oben und unten
aus.
Wählen
Sie "OFF"
(Aus), um die
Benutzerführung
abzuschalten.
Betätigen
Sie die Taste
„Stopp/Start“,
um diese
Einstellungen
zu speichern.
Betätigen Sie die
Taste „Stopp/
Start“, um diese
Einstellungen zu
speichern.
Betätigen
Sie die Taste
„Startmenü“, um die
Benutzereinstellungen zu
beenden.
Betätigen
Sie die Taste
„Startmenü“, um die
Benutzereinstellungen zu
beenden.
17 DE
Page 84

Benutzereinstellungen
Uhrzeit einstellen
Die Uhr kann über die Benutzereinstellungen eingestellt werden.
Tippen Sie auf die
Taste "Benutzereinstellungen", um ins
entsprechende Menü
zu gelangen.
Wählen Sie "ZEIT"
über die Tasten
nach oben und
unten aus.
Wählen Sie die
Zeit über die
Tasten nach oben
und unten aus.
Betätigen
Sie die Taste
„Stopp/Start“,
um diese
Einstellungen
zu speichern.
Betätigen
Sie die Taste
„Startmenü“, um
die Benutzereinstellungen zu
beenden.
HINWEIS
Die Uhr behält die Zeiteinstellung solange das Gerät eingesteckt ist und mit Strom
versorgt.
Durch einmaliges Antippen wird die Zeit um 1 Minute erhöht oder verringert. Sie
können die Zeit auch schnell einstellen, indem Sie die Tasten nach oben oder
unten gedrückt gehalten.
Diese Uhr hat das 24-Stunden-Format, das heißt 2 Uhr Nachmittags ist 14:00 Uhr.
Die Uhr kann wie unten beschrieben in den Benutzereinstellungen ausgeschaltet
werden.
Uhranzeige aus- und einschalten.
Um die Uhranzeige
ein- und auszuschalten,
tippen Sie auf die Taste
"Benutzereinstellungen",
um ins entsprechende
Menü zu gelangen.
Wählen Sie "UHR"
über die Tasten nach
oben und unten aus.
Wählen
Sie "OFF"
(Aus), um die
Uhranzeige
abzuschalten.
Betätigen
Sie die Taste
„Stopp/Start“,
um diese
Einstellungen
zu speichern.
Lautstärke
Die Lautstärke kann zwischen 0 und 3 eingestellt werden. 0 ist lautlos und 3 ist die
höchste Lautstärke.
Betätigen
Sie die Taste
„Startmenü“, um die
Benutzereinstellungen zu
beenden.
18 DE
Tippen Sie auf die
Taste "Benutzereinstellungen", um ins
entsprechende Menü
zu gelangen.
HINWEIS
Auch im lautlosen Modus ertönt ein Signal, wenn der Garvorgang zum Wenden/
Rühren beendet wurde, wenn Fehlercodes angezeigt werden oder wenn die Ein-/
Aus-Taste betätigt wird.
Wählen Sie
"VOLUMEN"
(Lautstärke) über die
Tasten nach oben und
unten aus.
Wählen Sie die
gewünschte
Lautstärkeeinstellung
von 0 bis 3.
Betätigen
Sie die Taste
„Stopp/Start“,
um diese
Einstellungen
zu speichern.
Betätigen
Sie die Taste
„Startmenü“, um die
Benutzereinstellungen zu
beenden.
Page 85

Benutzereinstellungen
Helligkeit
Die Helligkeit der blauen und weißen Anzeigesymbole kann unabhängig geändert werden.
Deutsch
Tippen Sie auf die
Taste "Benutzereinstellungen", um
ins entsprechende
Menü zu gelangen.
Wählen Sie "BLAU"
oder "WEISS" über die
Tasten nach oben und
unten aus.
Wählen Sie die
gewünschte Helligkeit
aus.
Betätigen
Sie die Taste
„Stopp/Start“,
um diese
Einstellungen
zu speichern.
Demo-Modus
Dieser Modus dient nur zu Demonstrationszwecken im Einzelhandel.
Tippen Sie auf die
Taste "Benutzereinstellungen", um
ins entsprechende
Menü zu gelangen.
Wählen Sie "DEMO"
über die Tasten
nach oben und
unten aus.
Wählen Sie "OFF"
(Aus), um den DemoModus abzuschalten.
Stopp/Start
antippen.
Taste "Startmenü"
Tippen Sie auf die
Taste "Startmenü",
um zum Startmenü
zurückzukehren.
Betätigen
Sie die Taste
„Startmenü“, um die
Benutzereinstellungen zu
beenden.
Betätigen
Sie die Taste
„Startmenü“, um
die Benutzereinstellungen zu
beenden.
Kindersicherung
Durch Verwendung der Kindersicherung wird das Bedienfeld des Geräts außer Betrieb
gesetzt; die Tür kann jedoch weiterhin geöffnet werden.
Einstellen: Abbrechen:
Halten Sie die Kindersicherungstaste 5
Sekunden lang gedrückt, um die Kindersicherung
einzuschalten. Die Taste ist voll beleuchtet, wenn
die Kindersicherung eingeschaltet ist.
Halten Sie die Kindersicherungstaste 5
Sekunden lang gedrückt, um die Kindersicherung
auszuschalten. Die Taste ist teilweise beleuchtet,
wenn die Kindersicherung ausgeschaltet ist.
19 DE
Page 86

Kochen und Auftauen in der Mikrowelle
Es stehen 6 verschiedene Mikrowellen-Leistungsstufen zur Verfügung (siehe Tabelle unten).
Mikrowelle
antippen.
Einstellung Wattzahl Max. Zeit
MAX 1000 Watt 30 Min.
Mittel 600 Watt 90 Min.
Niedrig 440 Watt 90 Min.
NiedrigeGarstufe 300 Watt 90 Min.
Auftauen 270 Watt 90 Min.
Aufwärmen 100 Watt 90 Min.
Wählen Sie die Leistungsstufe
der Mikrowelle über die Tasten
nach oben und unten aus. Die
Standardleistung ist 1000 W.
Wählen Sie die
Garzeit über die
Tasten nach oben
und unten aus.
Benutzung des Zubehörs:
Stellen Sie Ihr eigenes Pyrex®-Geschirr direkt auf den
Boden des Gerätes und decken Sie dieses mit einem
Deckel oder einer perforierten Frischhaltefolie ab. Legen
Sie keine Nahrungsmittel direkt auf den Geräteboden.
HINWEIS
Informationen zum mehrstugen Kochen nden Sie auf Seite 35.
Die Ruhezeit kann nach der Mikrowellenleistung und der Zeiteinstellung
programmiert werden. Informationen zur Verwendung des Zeitschalters nden Sie
auf Seite 34.
Sie können die Garzeit bei Bedarf während des Kochens um maximal 10 Minuten
ändern. Tippen Sie auf die Tasten nach oben oder unten, um die Kochzeit zu
erhöhen oder zu senken. Halten Sie die Tasten nach oben oder unten gedrückt,
um die Zeit schneller zu erhöhen oder senken. Wenn Sie dabei bis auf Null
gehen, wird das Garen beendet.
Die maximale Zeit bei maximaler Leistung beträgt 30 Minuten. Bei allen anderen
Leistungsstufen liegt die maximale Zeit, die eingestellt werden kann, bei 90
Minuten.
VERSUCHEN SIE NICHT, das Gerät mit Metallzubehör zu verwenden, wenn nur
die Betriebsart "Mikrowelle" eingestellt ist.
Stopp/Start antippen.
Das Garprogramm
startet und die auf dem
Display angezeigte
Zeit zählt rückwärts.
20 DE
Bodeneinspeisungstechnologie
Bitte beachten Sie, dass dieses Gerät die Bodeneinspeisungstechnologie für die Verteilung
der Mikrowellen verwendet. Diese Technologie unterscheidet sich von der traditionellen
Seiteneinspeisung mit Drehteller und schafft mehr nutzbaren Raum für Gerichte unterschiedlicher
Größe. Diese Art der Mikrowelleneinspeisung kann (im Mikrowellen-Modus) zu anderen
Erhitzungszeiten als bei Geräten mit Seiteneinspeisung führen. Das ist ganz normal und sollte
keinen Grund zur Besorgnis darstellen.
Page 87

Grillen
Es stehen 3 verschiedene Grill-Einstellungen zur Verfügung.
Tastenberührungen Anzeige Leistungsstufe
Deutsch
1 Berührung
Tippen Sie auf die
Taste "Grill" einmal,
zweimal oder dreimal,
um die gewünschte
Grillstufe zu wählen.
Zum Vorheizen tippen Sie auf die
"Start"-Taste. Im Displayfenster wird ein
“P” angezeigt. Wenn der Ofen vorgeheizt
ist, ertönt ein akustisches Signal und das
“P” blinkt. Öffnen Sie die Tür und stellen
Sie die Speisen in das Gerät. *Wenn
einVorheizennichterforderlichist,
überspringenSiediesenSchrittund
stellenDieGrillzeitein.
2 Berührungen
3 Berührungen
Nach dem
Vorheizen
stellen Sie die
Nahrungsmittel
in das Gerät.
Benutzung des Zubehörs:
Grill 1 (hoch)
Grill 2 (mittel)
Grill 3 (niedrig)
Wählen Sie die Garzeit
über die Tasten nach
oben und unten aus. Die
maximale Garzeit beträgt
90 Minuten.
Stopp/Start
antippen.
Das Garprogramm
startet und die
auf dem Display
angezeigte Zeit zählt
rückwärts.
Schieben Sie den Drahtrost in
Einschubposition 3 oder 4.
Schieben Sie die Glasablage
in Einschubposition 2 oder 3,
um herunter tropfendes Fett
oder Flüssigkeiten aufzufangen.
Verwenden Sie das Emailblech
nicht in Einschubposition 4 oder
im reinen Grill-Modus.
21 DE
Page 88

Grillen
HINWEIS
Beim Grillen dürfen Speisen keinesfalls abgedeckt werden.
Der Grill funktioniert nur bei geschlossener Gerätetür.
Die meisten Lebensmittel müssen nach der Hälfte der Garzeit gewendet werden.
Wenn Sie ein Lebensmittel wenden möchten, öffnen Sie die Gerätetür und nehmen
den Drahtrost mit Topfhandschuhen VORSICHTIG heraus. Nach dem Wenden
geben Sie das Lebensmittel in das Gerät zurück und schließen Sie Gerätetür.
Nachdem Sie die Gerätetür geschlossen haben, tippen Sie auf die Stopp/StartTaste. Die Zeitanzeige des Gerätes zählt dann die verbleibende Grillzeit weiter
herunter. Sie können die Gerätetür jederzeit während des Grillvorgangs gefahrlos
öffnen, um den Garzustand zu prüfen.
Die Grillheizspirale glüht während des Garvorgangs mal mehr und mal weniger -
das ist normal. Reinigen Sie das Gerät
nach Verwendung des Grills und vor Verwendung der Mikrowelle oder des
Kombinations-Modus.
Sie können die Garzeit bei Bedarf während des Kochens um maximal 10 Minuten
ändern. Tippen Sie auf die Tasten nach oben oder unten, um die Kochzeit zu
erhöhen oder zu senken. Halten Sie die Tasten nach oben oder unten gedrückt, um
die Zeit schneller zu erhöhen oder senken. Wenn Sie dabei bis auf Null gehen, wird
das Garen beendet.
VORSICHT!
Verwenden Sie Topfhandschuhe, wenn Sie Zubehör entnehmen. Berühren Sie
aufgrund der hohen Temperaturen niemals das äußere Fenster und die innen
liegenden Metallteile der Tür oder des Geräts, wenn Sie Speisen in das Gerät stellen
bzw. entnehmen.
22 DE
Page 89

Garen mit Heißluft
Mit dieser Taste können Sie verschiedene Temperaturen im Heißluft-Modus auswählen, und zwar
40 °C sowie von 100 bis 230 °C in Schritten von 5 °C. Damit Sie die üblichsten Gartemperaturen
schnell einstellen können, ist die Temperatur standardmäßig auf 150 °C voreingestellt und kann
nach oben und unten verändert werden.
Deutsch
Tippen Sie auf die
Heißluft-Taste einmal.
Zum Vorheizen tippen Sie auf die "Stopp/Start"-
Taste. Im Displayfenster wird ein “P” angezeigt.
Wenn der Ofen vorgewärmt ist, ertönt ein
akustisches Signal und das “P” blinkt. Öffnen Sie
die Tür und stellen Sie die Speisen in das Gerät.
* Dieser Schritt wird ausgelassen, wenn ein
Vorwärmen nicht erforderlich ist.
Wählen Sie die gewünschte
Heißluft-Temperatur über
die Tasten nach oben und
unten aus.
Nach dem
Vorheizen
stellen Sie die
Nahrungsmittel
in das Gerät.
Wählen Sie die Garzeit
über die Tasten nach oben
und unten aus (bis zu 9
Stunden).
Benutzung des Zubehörs:
Für das HEISSLUFT-Garen auf 1 Ebene können Emailblech oder
Drahtrost in jeder Einschubposition eingesetzt werden.
Stopp/Start
antippen.
Das Garprogramm
startet und die
auf dem Display
angezeigte Zeit
zählt rückwärts.
Für das HEISSLUFT-Garen auf
2 Ebenen kann das Emailblech
in der Einschubposition 1
und der Drahtrost in der
Einschubposition 3 verwendet
werden.
HINWEIS
Das Gerät kann nicht bei 40 °C vorgeheizt werden.
Die Gar-/Backzeiten auf 2 Ebenen können variieren. Das Lebensmittel auf der
oberen Ebene können schneller fertig sein als auf der unteren Ebene.
23 DE
Page 90

Garen mit Heißluft
HINWEIS zum Vorheizen
Die Tür des Gerätes darf während des Vorheizens nicht geöffnet werden. Nach
dem Vorheizen ertönen 3 akustische Signale und im Anzeigefenster blinkt ein “P”.
Wird die Tür des Geräts nach dem Vorheizen nicht geöffnet, behält das Gerät die
gewählte Temperatur bei. Wenn die Tür nicht innerhalb von 30 Minuten ab Beginn
des Vorheizens geöffnet wird, wird das Vorheizen beendet.
Wenn Sie ohne Vorheizen kochen möchten, stellen Sie zunächst die gewünschte
Temperatur ein, dann die Garzeit und danach tippen Sie auf die Stopp/Start-Taste.
HINWEIS
Beträgt die gewählte Kochzeit weniger als eine Stunde, erfolgt der Countdown
Sekunde um Sekunde.
Beträgt die gewünschte Kochzeit mehr als eine Stunde, erfolgt der Countdown
Minute um Minute, bis nur noch "1H 00" (1 Stunde) verbleibt. Das Display zeigt
daraufhin Minuten und Sekunden an und führt einen Countdown Sekunde um
Sekunde durch.
Sie können die Kochzeit bei Bedarf während des Kochens um maximal 10
Minuten ändern. Tippen Sie auf die Tasten nach oben oder unten, um die
Kochzeit zu erhöhen oder zu senken. Halten Sie die Tasten nach oben oder
unten gedrückt, um die Zeit schneller zu erhöhen oder senken. Wenn Sie dabei
bis auf Null gehen, wird das Garen beendet.
Nach Antippen der Stopp/Start-Taste kann die gewählte Temperatur durch
Antippen der Tasten nach oben und unten geändert werden. Darin ist die
Temperatur von 40 °C nicht eingeschlossen.
Je nach Rezept können Sie das Gerät mit oder ohne eingesetzte Bleche oder
Roste vorheizen. Das Zubehör eignet sich ideal für das Backen größerer Mengen
und für das Garen in einem großen Gefäß.
24 DE
VORSICHT!
Tragen Sie stets Ofenhandschuhe, wenn Sie die Nahrungsmittel und das Zubehör
nach dem Kochen aus dem Gerät nehmen, da Gerät und Zubehör dann sehr heiß
sind.
Page 91

Dampfgaren
Es stehen 3 verschiedene Dampf-Einstellungen zur Verfügung. Verwenden Sie die
Betriebsart "Dampf", um Gemüse, Fisch, Hühnchen und Reis zu garen.
Leis-
Tem-
peratur
fe
Wählen Sie die
Garzeit über die
Tasten nach oben
und unten aus. Die
maximale Garzeit
beträgt 30 Minuten.
Stopp/Start
antippen.
Das Garprogramm
startet und die
auf dem Display
angezeigte Zeit
zählt rückwärts.
Drücken Sie
die Taste
"Dampf" bis die
gewünschte
Leistung auf
dem Display
erscheint.
HINWEIS
Berührungen
1
Berührung
2
Berührungen
3
Berührungen
Anzeige
tungsstu-
Dampf 1 Hoch
Dampf 2 Mittel
Dampf 3 Niedrig
Füllen Sie den Wassertank, bevor Sie die Dampffunktion verwenden.
Die maximale Kochzeit in diesem Modus beträgt 30 Minuten. Wenn eine längere
Kochzeit erforderlich ist, füllen Sie den Wassertank erneut und wiederholen Sie
den obigen Vorgang für die verbleibende Zeit.
Sollte der Wasserbehälter während des Betriebs leer werden, stellt das
Gerät seinen Betrieb ein. Die Anzeige im Display fordert Sie dann auf, den
Wasserbehälter erneut zu füllen. Stellen Sie den Wasserbehälter nach erneutem
Auffüllen zurück in das Gerät und tippen Sie auf die Stopp/Start-Taste. Das Gerät
läuft solange nicht weiter, bis der Wassertank neu gefüllt ist und die Stopp/StartTaste gedrückt ist.
Sie können die Garzeit bei Bedarf während des Kochens um maximal 10 Minuten
ändern. Tippen Sie auf die Tasten nach oben oder unten, um die Kochzeit zu
erhöhen oder zu senken. Halten Sie die Tasten nach oben oder unten gedrückt,
um die Zeit schneller zu erhöhen oder senken. Wenn Sie dabei bis auf Null
gehen, wird das Garen beendet.
Es ist möglich, den Wasserbehälter zu jedem beliebigen Zeitpunkt während des
Kochens aufzufüllen, ohne zuerst Stopp/Start drücken zu müssen.
Nach Kochen mit Dampf überschüssiges Wasser in der Vertiefung und um die
Wasserbehälter herum abwischen.
Deutsch
VORSICHT
Das Zubehör und der Geräteinnenraum werden sehr heiß. Verwenden Sie
Ofenhandschuhe.
Beim Herausnehmen von Nahrungsmitteln oder Zubehör kann heißes Wasser
von der Decke des Geräteinnenraumes herunter tropfen.
Beim Öffnen der Tür können Dampfschwaden austreten. Wenn sich heißer
Dampf im Gerät bendet, greifen Sie nicht mit nackten Händen hinein!
Verbrennungsgefahr! Verwenden Sie Ofenhandschuhe.
Seien Sie vorsichtig, wenn Sie den Auffangbehälter entnehmen.
25 DE
Page 92

Dampfgaren
Hinweise zum Wassertank
Nehmen Sie den Wasserbehälter vorsichtig aus dem Gerät. Füllen Sie ihn mit Leitungswasser
(kein Mineralwasser verwenden) und setzen Sie ihn wieder in das Gerät ein. Es wird
empfohlen, den Wasserbehälter einmal wöchentlich in warmem Wasser zu reinigen.
Geeignetes Zubehör:
Wenn Lebensmittel mit Dampf gegart
werden, stellen Sie den Dampfgareinsatz
auf die Glasablage, und zwar in der
Einschubposition 3. Die Nahrungsmittel
können direkt auf den Dampfgareinsatz
gelegt werden.
26 DE
Tragen Sie Ofenhandschuhe, wenn Sie
Zubehör aus dem Gerät nehmen, da
diese dann sehr heiß sind, ebenso wie die
Geräteinnenseiten.
Richtlinien
1. Verwenden Sie die mitgelieferten
Zubehörteile wie oben beschrieben.
2. Die Dampffunktion funktioniert nur bei
geschlossener Gerätetür.
3. Halten Sie während und nach dem
Kochen mit der Dampffunktion das
Gesicht nicht zu dicht an das Gerät, wenn
Sie die Tür öffnen. Lassen Sie beim
Öffnen der Tür Vorsicht walten, da heißer
Dampf zu Verletzungen führen kann.
4. Tragen Sie stets Ofenhandschuhe, wenn
Sie Nahrungsmittel und Zubehör nach
dem Kochen mit Dampf aus dem Gerät
nehmen, da Gerät und Zubehör dann
sehr heiß sind.
Legen Sie das Lebensmittel
auf den Dampfgareinsatz
und in die Glasablage in der
Einschubposition 3.
5. Entnehmen und leeren Sie den
Auffangbehälter nach dem Dampfbetrieb
sorgfältig. Nach dem Entleeren waschen
Sie ihn in warmem Seifenwasser.
Setzen Sie den
Auffangbehälter wie auf
Seite 10 beschreiben wieder
ein.
Page 93

Dampfstoß
Mit dieser Funktion können Sie während des Kochens Dampf zugeben (1, 2 oder 3
Minuten lang). Sie können den Dampfstoß in sieben Kombinationen verwenden -
MIKROWELLE
GRILL
HEISSLUFT
GRILL + HEISSLUFT
GRILL + MIKROWELLE
HEISSLUFT + MIKROWELLE
GRILL + HEISSLUFT + MIKROWELLE
Das Hinzugeben von Dampf beim Kochen verbessert die Wärmeverteilung und
unterstützt das Aufgehen von Brot, Kuchen und Gebäck.
Stellen Sie das
gewünschte Programm
ein und führen Sie es
aus.
HINWEIS
Der Dampfstoß steht während des Aufheizens oder bei 40 °C Heißluft nicht zur
Verfügung.
Füllen Sie vor der Verwendung den Wassertank.
Das ursprüngliche Programm zählt während des Dampfstoßes weiter herunter.
Die Dampfstoßzeit darf nicht länger als die verbleibende Garzeit sein.
Wenn Sie 2 oder 3 Minuten hinzufügen, muss die Dampftaste 2 oder 3 mal
innerhalb von 3 Sekunden angetippt werden.
Nach Kochen mit Dampf überschüssiges Wasser in der Vertiefung und um die
Wasserbehälter herum abwischen.
Je nach Bedarf beim Betrieb
halten Sie die Dampftaste
2 Sekunden lang gedrückt,
um 1 Minute hinzuzufügen.
Wenn Sie 2 oder 3 Minuten hinzufügen
möchten, drücken Sie die Dampftaste
2 oder 3 mal innerhalb von 3 Sekunden
nach Schritt 2. Die angezeigte Zeit
beinhaltet die Zeit des Dampfstoßes.
()
Optional
Deutsch
VORSICHT
Das Zubehör und der Geräteinnenraum werden sehr heiß. Verwenden Sie
Ofenhandschuhe.
Beim Herausnehmen von Nahrungsmitteln oder Zubehör kann heißes Wasser
von der Decke des Geräteinnenraumes herunter tropfen.
Beim Öffnen der Tür können Dampfschwaden austreten. Wenn sich heißer
Dampf im Gerät bendet, greifen Sie nicht mit nackten Händen hinein!
Verbrennungsgefahr! Verwenden Sie Ofenhandschuhe.
Kategorie Kochmodus Dampfstoß
Gebäck Heißluft ²/³ Gesamtzeit fügt 3 Min. hinzu. Dampfstoß
Brot Heißluft ²/³ Gesamtzeit fügt 3 Min. hinzu. Dampfstoß
Biskuitkuchen Heißluft ½ Gesamtzeit fügt 3 Min. hinzu. Dampfstoß
Vorgebackene Brötchen Heißluft und Grill ²/³ Gesamtzeit fügt 3 Min. hinzu. Dampfstoß
27 DE
Page 94

Kombinationskochen
Es gibt 4 Kombinationseinstellungen; 1) Grill + Mikrowelle, 2) Grill + Heißluft, 3) Heißluft
+ Mikrowelle, 4) Grill + Heißluft + Mikrowelle. Die Mikrowellenleistung 1000 W ist beim
Kombinationskochen nicht verfügbar. Diese wäre im normalen Gebrauch nicht sinnvoll (die
Nahrungsmittel wären gar, bevor eine Bräunung erzielt wäre). Im Kombinationsbetrieb kann die
Auftaufunktion 270 W nicht eingestellt werden.
Kochmodi
Grill oder Heißluft muss vor der Mikrowelle ausgewählt werden.
+
Grill + Mikrowelle
(Die maximale Garzeit beträgt 1 Stunde 30 Minuten).
oder
+
Heißluft + Grill
(Die maximale Garzeit beträgt 9 Stunden).
oder
+
Heißluft + Mikrowelle
(Die maximale Garzeit beträgt 9 Stunden).
oder
++
Heißluft + Grill + Mikrowelle
(Die maximale Garzeit beträgt 9 Stunden).
Anzeige
28 DE
Antippen beim
Vorheizen
Nach dem
Vorheizen
stellen Sie die
Nahrungsmittel
in das Gerät.
Wählen Sie die Garzeit
über die Tasten nach
oben und unten aus. Die
maximale Garzeit beträgt
9 Stunden.
Stopp/Start
antippen.
Auf dem Display
wird der Countdown
angezeigt.
Page 95

Kombinationskochen
HINWEIS zum Vorheizen
Das Gerät kann im Kombinationsbetrieb mit Heißluft oder Grill/Heißluft vorgewärmt
werden.
Tippen Sie auf die Stopp/Start-Taste, bevor Sie die Kochzeit einstellen und befolgen
Sie den HINWEIS ZUM VORHEIZEN auf Seite 24.
BEIM KOMBINATIONSVORHEIZEN WERDEN KEINE MIKROWELLEN
ABGEGEBEN.
HINWEIS
Heißluft 40 °C ist im Kombinationsbetrieb nicht möglich.
In der Betriebsart Grill + Mikrowelle ist kein Vorwärmen möglich.
Beträgt die gewählte Kochzeit weniger als eine Stunde, erfolgt der Countdown
Sekunde um Sekunde.
Beträgt die gewünschte Kochzeit mehr als eine Stunde, erfolgt der Countdown
Minute um Minute, bis nur noch “1H00 (1 Stunde übrig bleibt). Das Display
zeigt daraufhin Minuten und Sekunden an und führt einen Countdown Sekunde
um Sekunde durch.
Sie können die Garzeit bei Bedarf während des Kochens um maximal 10
Minuten ändern. Tippen Sie auf die Tasten nach oben oder unten, um die
Kochzeit zu erhöhen oder zu senken. Halten Sie die Tasten nach oben oder
unten gedrückt, um die Zeit schneller zu erhöhen oder senken. Wenn Sie dabei
bis auf Null gehen, wird das Garen beendet.
In der Kombination sind die Mikrowellenleistungsstufen 1000 W oder 270 W
(Auftauen) nicht möglich.
Deutsch
VORSICHT!
Verwenden Sie Topfhandschuhe, wenn Sie Zubehör entnehmen. Berühren Sie
aufgrund der hohen Temperaturen niemals das Außenfenster oder die innen
liegenden Metallteile der Tür oder des Geräts, wenn Sie Speisen in das Gerät stellen
bzw. entnehmen.
Verwendung von Zubehör:
Den Drahtrost können Sie in jeder Einschubposition
verwenden. Die Glasablage sollten Sie in den
Einschubpositionen 1 bis 3 verwenden.
29 DE
Page 96

Kombinationskochen mit Dampf
Sie können die Dampffunktion gleichzeitig mit der Betriebsart Mikrowelle, Grill
oder Heißluft verwenden. Dies hilft oft, die reguläre Garzeit zu verkürzen und das
Lebensmittel vor dem Austrocknen zu schützen.
Berührungen
1 Berührung Dampf 1 Hoch
Anzeige
Leistungsstufe Temperatur
2 Berührungen
3 Berührungen
Dampf 2 Mittel
Dampf 3 Niedrig
Kochmodi
Die Betriebsarten können in
jeder beliebigen Reihenfolge
ausgewählt werden.
+
Dampf + Mikrowelle
oder
+
Dampf + Grill
oder
+
Dampf + Heißluft
Verfügbare
Leistungsstufen
Als Mikrowellenleistung kann
440 W, 300 W oder 100 W
eingestellt werden.
Es können die Grillstufen 1,
2 oder 3 eingestellt werden.
Heißluft kann von 100 °C 230 °C eingestellt werden.
Anzeige
30 DE
Wählen Sie die Garzeit über die Tasten
nach oben und unten aus. Die maximale
Garzeit beträgt 30 Minuten.
Verwendung von Zubehör:
Dampf + Mikrowelle
Legen Sie den Dampfgareinsatz und in die
Glasablage in der Einschubposition 3.
Stopp/Start antippen.
Das Garprogramm startet und
die auf dem Display angezeigte
Zeit zählt rückwärts.
Dampf + Grill oder Heißluft
Drahtrost oder Emailblech in jeder
Einschubposition.
Page 97

Kombinationskochen mit Dampf
HINWEIS
Die maximale Kochzeit in diesem Modus beträgt 30 Minuten. Wenn eine
längere Kochzeit erforderlich ist, füllen Sie den Wassertank erneut und
wiederholen Sie den obigen Vorgang für die verbleibende Zeit.
Sollte der Wasserbehälter während des Betriebs leer werden, stellt das
Gerät seinen Betrieb ein. Die Anzeige im Display fordert Sie dann auf, den
Wasserbehälter erneut zu füllen. Stellen Sie den Wasserbehälter nach
erneutem Auffüllen zurück in das Gerät und tippen Sie auf die Stopp/StartTaste. Das Gerät läuft solange nicht weiter, bis der Wassertank neu gefüllt ist
und die Stopp/Start-Taste gedrückt ist.
In den Betriebsarten Dampf + Mikrowelle und Dampf + Grill ist Vorheizen nicht
möglich.
Sie können die Garzeit bei Bedarf während des Kochens um maximal 10
Minuten ändern. Tippen Sie auf die Tasten nach oben oder unten, um die
Kochzeit zu erhöhen oder zu senken. Halten Sie die Tasten nach oben oder
unten gedrückt, um die Zeit schneller zu erhöhen oder senken. Wenn Sie
dabei bis auf Null gehen, wird das Garen beendet.
Es ist möglich, den Wasserbehälter zu jedem beliebigen Zeitpunkt während
des Kochens aufzufüllen, ohne zuerst Stopp/Start drücken zu müssen.
Nach Kochen mit Dampf überschüssiges Wasser in der Vertiefung und um die
Wasserbehälter herum abwischen.
Richtlinien
1. Halten Sie während und nach dem
Kochen mit der Dampffunktion das
Gesicht nicht zu dicht an das Gerät,
wenn Sie die Tür öffnen. Lassen Sie
beim Öffnen der Tür Vorsicht walten, da
heißer Dampf zu Verletzungen führen
kann.
2. Tragen Sie stets Ofenhandschuhe, wenn
Sie die Nahrungsmittel und das Zubehör
nach dem Kochen aus dem Gerät
nehmen, da Gerät und Zubehör dann
sehr heiß sind.
3. Entnehmen und leeren Sie den
Auffangbehälter nach dem Dampfbetrieb
sorgfältig. Nach dem Entleeren waschen
Sie ihn in warmem Seifenwasser.
Deutsch
VORSICHT
Das Zubehör und der Geräteinnenraum werden sehr heiß. Verwenden Sie
Ofenhandschuhe.
Beim Herausnehmen von Nahrungsmitteln oder Zubehör kann heißes Wasser
von der Decke des Geräteinnenraumes herunter tropfen.
Beim Öffnen der Tür können Dampfschwaden austreten. Wenn sich heißer
Dampf im Gerät bendet, greifen Sie nicht mit nackten Händen hinein!
Verbrennungsgefahr! Verwenden Sie Ofenhandschuhe.
Verwenden Sie den Dampfgareinsatz nicht in den Betriebsarten Grill, Heißluft
oder Kombination.
31 DE
Page 98

Turbokochen
Das Gerät lässt sich zum efzienteren Garen oder Aufwärmen von Speisen unter
Verwendung der Turbo-Garfunktion programmieren, wodurch die Funktionen Dampf,
Heißluft, Grill oder Grill + Heißluft unterstützt werden. Wenn Sie Turbokochen nach
einer dieser Betriebsarten auswählen, dann wird die Mikrowellenleistung gleichzeitig
um 300 W gesteigert, um die Garzeit zu reduzieren.
oder
Nach dem
und/oder
Die erste
Garmethode
auswählen.
+
Turbokochen
antippen
Antippen beim
Vorheizen
Vorheizen
stellen Sie die
Nahrungsmittel
in das Gerät.
32 DE
Richtlinien zum Garen
Kategorie Gewicht Kombifunktion Zeit
Schinkentoast mit Käse
Tiefgekühlte panierte Fischlets
Rinderkotelett
(gut durchgebraten)
Stubenküken
Tiefgekühlte Frühlingsrollen
(Hühnchen)
Apfelstrudel
(tiefgekühlt, roh)
Lasagne
(frisch)
Ganzer frischer Fisch
Quiche
Würstchen im Schlafrock
Wählen Sie die Garzeit
über die Tasten nach oben
und unten aus.
200
g (2 St.)
100
g (1 St.)
Pro 400
Pro 500
g (4 St.)
360
300
600
300 - 400
(1 St.)
300
250 g
(2 St.)
g
g
g
g
g
g
Grill 1 + Turbokochen
Grill 1 + Turbokochen 6 Min.
230 °C + Grill 1 + Turbokochen 10 - 11 Min.
230 °C + Grill 1 + Turbokochen 13 - 14 Min.
°C
200
230 °C + Turbokochen 11 Min.
230 °C + Grill 1 + Turbokochen 8 - 9 Min.
180
220 °C + Turbokochen 7 Min.
200 °C Grill1 + Turbokochen 6 Min.
Stopp/Start antippen.
Das Garprogramm startet und die
auf dem Display angezeigte Zeit
zählt rückwärts.
dann Grill 1
+ Grill 1 + Turbokochen 7 - 8 Min.
°C
+ Turbokochen 17 - 18 Min.
4 - 5 Min.
1 Min.
Page 99

Turbokochen
HINWEIS
Turbo-Garen ist mit Heißluft 40 °C nicht möglich.
Die Vorheizfunktion ist nur im Modus Turbokochen verfügbar oder bei
Turbokochen, Grill und Heißluft.
Sie können die Garzeit bei Bedarf während des Kochens um maximal 10
Minuten ändern. Tippen Sie auf die Tasten nach oben oder unten, um die
Kochzeit zu erhöhen oder zu senken. Halten Sie die Tasten nach oben oder
unten gedrückt, um die Zeit schneller zu erhöhen oder senken. Wenn Sie dabei
bis auf Null gehen, wird das Garen beendet.
VORSICHT!
Tragen Sie stets Ofenhandschuhe, wenn Sie die Nahrungsmittel und das Zubehör
nach dem Kochen aus dem Gerät nehmen, da Gerät und Zubehör dann sehr heiß
sind.
Deutsch
33 DE
Page 100

Verwendung der Zeitschaltuhr
Verzögerung des Kochbeginns
Wenn Sie die Zeitschaltuhr verwenden, können Sie den Beginn des Kochvorgangs
verzögern.
Beispiel
Antippen der
Zeitschaltuhr.
Wählen Sie die
Verzögerungszeit über
die Tasten nach oben
und unten aus (bis zu 9
Stunden).
Stellen Sie das gewünschte Kochprogramm
und die Kochzeit ein.
Antippen
von Stopp/
Start
HINWEIS
Es kann Dreistufenkochen programmiert werden, einschließlich Verzögerung des
Kochbeginns.
Wenn die programmierte Verzögerungszeit eine Stunde überschreitet, erfolgt der
Countdown in Minuteneinheiten. Beträgt sie weniger als eine Stunde, erfolgt der
Countdown in Sekundeneinheiten.
Die Verzögerung des Kochbeginns kann nicht vor Auto-Programmen
programmiert werden.
Beispiel
Verzögerung des
Kochbeginns: 1 Stunde
Max. Leistung (1000 W): 10 Min.
Niedrige Garstufe (300 W): 20 Min.
Ruhezeit
Mit der Zeitschaltuhr können Sie die Ruhezeit nach dem Kochen einstellen oder das
Gerät als Kurzzeitwecker programmieren.
Beispiel
Stellen Sie das gewünschte
Kochprogramm und die
Kochzeit ein.
ZeitschaltuhrTaste
antippen.
Wählen Sie die gewünschte
Zeit über die Tasten nach
oben und unten aus (bis zu 9
Stunden).
Antippen
Stopp/
Start
34 DE
HINWEIS
Es kann Dreistufenkochen programmiert werden, einschließlich Ruhezeit.
Diese Funktion kann auch als Kurzzeitwecker verwendet werden. In diesem Fall
tippen Sie die Zeitschaltuhr an, stellen die Zeit ein und tippen auf die Stopp/StartTaste.
Wenn die Tür des Geräts während der Ruhezeit oder während der Kurzzeitwecker
läuft offen ist, wird der Countdown der Zeit im Display-Fenster fortgesetzt.
Nach einem Auto-Programm kann die Ruhezeit nicht programmiert werden.
Beispiel
Max. Leistung (1000 W): 4 Min.
Ruhezeit: 5 Min.
Max. Leistung (1000 W): 2 Min.
 Loading...