

PANASONIC HLDW165B, HLDW165S User Manual
English
Deutsch Français
Operating / Installation Instructions
Bedienungs / Installationsanleitung
Mode d’emploi / Instructions d’installation
Warming Drawer
Wärmeschublade
Tiroir Chauffant
Model No. HL-DW165S
HL-DW165B
FOR DOMESTIC USE ONLY
NUR FÜR HAUSHALTSÜBLICHEN GEBRAUCH
POUR UN USAGE DOMESTIQUE
HL-DW165S

IMPORTANT SAFETY INSTRUCTIONS: Before operating this appliance, please read these
instructions carefully and keep for future reference.
WICHTIGE SICHERHEITSANWEISUNGEN: Bitte sorgfältig durchlesen und zur weiteren
Bezugnahme aufbewahren.
INSTRUCTIONS DE SÛRETÉ IMPORTANTES: Avant d’utiliser l’appareil, lisez attentivement
les recommandations d’utilisation et conservez-les soigneusement.

English
Thank you for purchasing this Panasonic appliance.
Contents
Operating Instructions ��������������������������������������������������������������������������������������� 2-10
Safety Instructions .................................................................................................. 2-4
Disposal of Waste Products ...................................................................................... 4
Features and Functions .......................................................................................... 5-7
- Outline Diagram .................................................................................................... 5
- Preheating Crockery and Glassware..................................................................... 6
- Keeping Warm ....................................................................................................... 7
- Defrosting and Proong......................................................................................... 7
Power Setting Guidelines .......................................................................................... 8
Cleaning .................................................................................................................... 9
Troubleshooting ...................................................................................................... 10
Installation Instructions ����������������������������������������������������������������������������������� 11-14
Installation and Connection ......................................................................................11
Safety Instructions .............................................................................................. 11-12
English
Dimensions .............................................................................................................. 13
Installing the Appliance ............................................................................................ 14
Specications �������������������������������������������������������������������������������������������������������� 15
1 EN

Operating Instructions
Safety instructions
■ This appliance can be used by children aged from
8 years and above and persons with reduced
physical, sensory or mental capabilities or lack
of experience and knowledge if they have been
given supervision or instruction concerning use of
the appliance in a safe way and understand the
hazards involved. Children shall not play with the
appliance. Cleaning and user maintenance shall
not be made by children without supervision.
■ WARNING: In case of malfunction or breakdown,
immediately stop using the appliance. Turn o the
main power switch and the circuit breaker, and
then contact the service centre. Failure to do this
2 EN
may cause smoke, burns, and electric shock.
■ If the power cord is damaged, it must be replaced
by the manufacturer or a service tehcnician
authorised by the manufacturer in order to avoid a
hazard.
■ Do not disassemble, repair, or modify the
appliance. For repairs, contact the dealer where
you purchased the appliance.
■ WARNING: This appliance must be earthed to
prevent electric shock or re.

English
Safety instructions
■ WARNING: The appliance and its accessible parts
become hot during use. Care should be taken to
avoid touching heating elements and the heating
plate inside the appliance. Children less than 8
years of age shall be kept away unless continuously
supervised.
■ Do not use abrasive cleaners or sharp metal
scrapers to clean the appliance as they can scratch
the surface.
■ A steam cleaner is not to be used for cleaning.
■ When this warming drawer is installed, it should
be easy to isolate the appliance from the
electricity supply by operating a circuit breaker or
disconnecting from the mains.
■ If smoke is emitted or a re occurs in the appliance,
leave the drawer closed in order to stie any ames.
Disconnect the power cord, or shut o power at
fuse or circuit breaker panel.
■ Failure to maintain the appliance in a clean
condition could lead to deterioration of surfaces
that could aect the life of the appliance and may
result in a hazardous situation.
3 EN
Safety instructions
■ Exterior surfaces, including air vents on the cabinet
and the appliance will get hot during use. Take care
when opening or closing the appliance and when
placing or removing food and cookware.
■ Spray canisters, aerosols and other ammable
substances can ignite when heated. Do not store
or use such item near the appliance.
■ WARNING: The manufacturer cannot be held liable
for damage to persons or items caused by failure
to observe the safety instructions, by interference
with any part of the appliance or by the use of non
original spare parts.
Disposal of Waste Products
4 EN
Information on Disposal
for Users of Waste
Electrical & Electronic
Equipment (private
households)
This symbol on the products and/
or accompanying documents
means that used electrical and electronic
products should not be mixed with general
household waste.
For proper treatment, recovery and
recycling, please take these products to
designated collection points, where they will
be accepted on a free of charge basis.
Alternatively, in some countries you may be
able to return your products to your local
retailer upon the purchase of an equivalent
new product.
Disposing of this product correctly will help
to save valuable resources and prevent
any potential negative effects on human
health and the environment which could
otherwise arise from inappropriate waste
handling. Please contact your local authority
for further details of your nearest designated
collection point.
Penalties may be applicable for incorrect
disposal of this waste, in accordance with
national legislation.
Information on Disposal in other
Countries outside the European
Union
This symbol is only valid in the European
Union.
If you wish to discard this product, please
contact your local authorities or dealer and
ask for the correct method of disposal.
English
Features and Functions
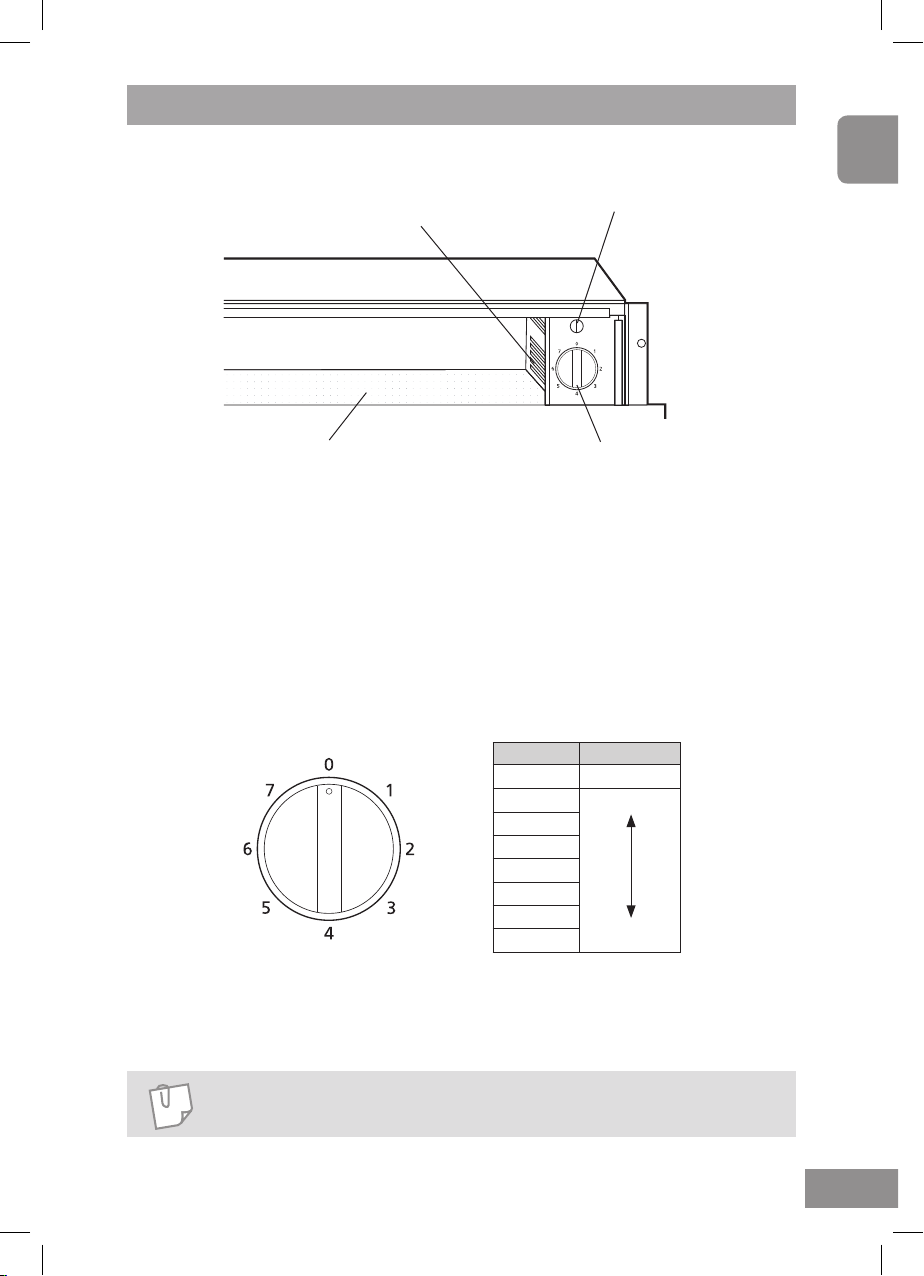
Outline Diagram
Fan and heater
Power indicator light
The indicator light ashes when the appliance is switched on.
It stops ashing when the drawer is closed.
Fan and heater
Operates when the appliance is set at 7.
Power setting dial
Turn the dial to select the required setting. See page 8 for Power Setting
Guidelines.
Power indicator light
Power setting dialHeating plate
Setting Level
0 Off
1 Low
2
3
4
5
6
7
High
Opening and closing
Push the middle of the front panel to open and close the drawer.
NOTE
The appliance will heat up only when it is fully closed.
5 EN
Features and Functions
Preheating Crockery and Glassware
Preheated crockery and glassware ensures food and drinks stay warm longer.
See page 8 for Power Setting Guidelines.
■ Maximum load: 25 kg e.g.
■ Spread the cookware over the entire surface for even heating.
■ Drinks containers must be heated with setting 4.
6 dinner plates ø 24 cm
6 soup bowls ø 10 cm
1 serving dish ø 17-19 cm
1 meat plate 32 cm
WARNING
Drinks containers heated with setting 6 or 7 will become very hot, which
may cause burning.
Method
1. Place the crockery/glassware in the drawer.
2. Turn the dial to the required setting. (See page 8 for Power Setting Guidelines.)
Power indicator light ashes.
3. Close the drawer. Power indicator light stops ashing and the appliance will
start heating up. It will take approximately 15-25 minutes to preheat crockery
for 6 people.
4. To switch off, open the drawer and turn the dial to “0”.
6 EN
NOTE
Preheating time depends on the material and thickness of crockery
and glassware.
CAUTION
Preheated crockery and glassware will be hot. Use oven gloves when
removing them from the drawer.
English
Features and Functions
Keeping Warm
Precooked food can be kept warm in the appliance.
See page 8 for Power Setting Guidelines.
WARNING
Do not place hot cookware straight from oven or hob. Heating plate
may be damaged.
■ Cover the food with a heat-resistant lid or aluminium foil if stated in the
guidelines.
■ Do not keep food warm longer than one hour.
■ DO NOT OVERFILL THE COOKWARE.
Method
1. Turn the dial to 7 to preheat for 10 minutes.
2. Place the food in the drawer.
3. Turn the dial to the required setting. (See page 8 for Power Setting Guidelines.)
Power indicator light ashes.
4. Close the drawer. Power indicator light stops ashing and the appliance will
start heating up.
5. To switch off, open the drawer and turn the dial to “0”.
CAUTION
Use oven gloves when removing the food from the drawer.
Defrosting and Proong
■ For defrosting meat, DO NOT cover.
■ For proong dough, cover with cling lm.
■ DO NOT OVERFILL THE COOKWARE.
Method
1. Place the food in the drawer.
2. Turn the dial to the required setting. (See page 8 for Power Setting Guidelines.)
3. Power indicator light ashes.
4. Close the drawer. Power indicator light stops ashing and the appliance will
start heating up.
5. To switch off, open the drawer and turn the dial to “0”.
7 EN
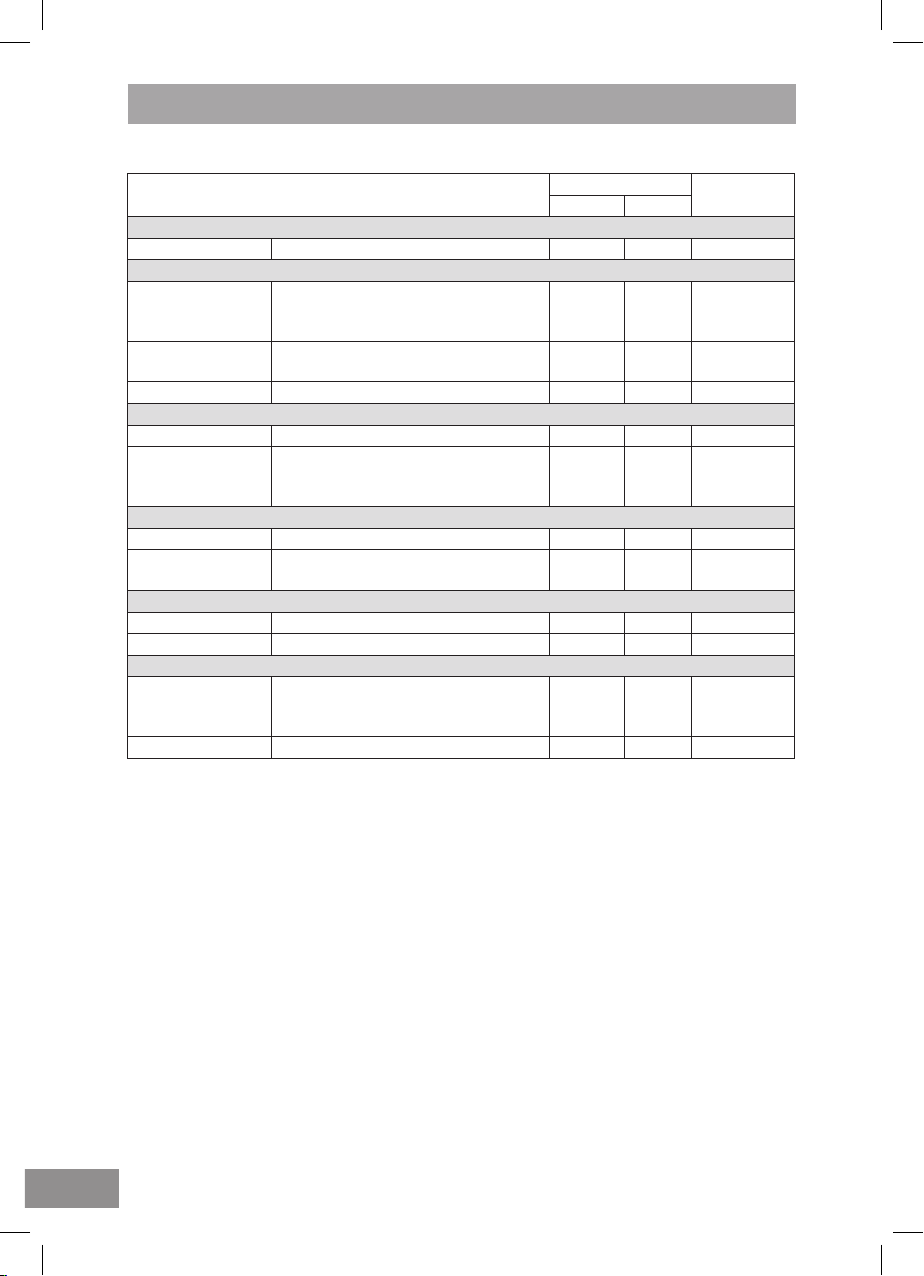
Power Setting Guidelines
Power setting
Preheat
Proong
Yeast dough Loaf, rolls - 1 Cover
Defrosting
Delicate food
items
Meat
Bread Sliced bread, rolls, baguette - 3 Cover
Reheating
Bread Rolls, baguette 7 * 4 Cover
Cakes, pastries
and wraps -
Precooked
Keeping warm
Eggs - Precooked Scrambled, fried, omelette 7 * 5-6 Cover
Food items -
Precooked
Preheating crockery and glassware
Drinks container Espresso cups, mugs - 4 See page 6
Cookware Tableware, ovenware - 7 See page 6
Baking preparation
Melting chocolate Dark, milk, white 7 * 6
Disolving gelatine Powdered, leaf - 6 Do not cover
Dairy products e.g. butter, hard
cheese
Desserts e.g. cream cakes, gateux
Sausages, chops, steaks, minced
meat
Pancakes, taco shells, tortilla wraps,
cake, croissant, individual pies
Plated meal, vegetables, tinned food,
slow cooked food
- 2 Do not cover
- 3 Do not cover
7 * 6 Cover
7 * 5-6 Cover
Note
Break into
small pieces
Do not cover
* Preheat for 10 minutes. See Keeping Warm on page 7.
8 EN
English
Cleaning
CAUTION
■ Before cleaning, turn off the main power switch. Allow to cool
before cleaning the heating plate.
■ Do not use a steam cleaner. Water may get into the electrical
components and cause damage.
Always keep the appliance in a clean condition.
Spilled food or oil scorched on the appliance may become difcult to clean.
Exterior
Wipe with a damp cloth and mild detergent.
Do not use abrasive cleaners.
Front panel - Stainless Steel
Clean the surface with a mild cleaner and a soft sponge that will not scratch the
material.
Do not use abrasive cleaners.
Greases and remains of food should be removed immediately in order to avoid
corrosion.
Front panel - Glass
Clean the surface with glass cleaner and a soft cloth.
Do not use a glass scraper.
Heating plate
Clean with a damp cloth and mild detergent.
9 EN
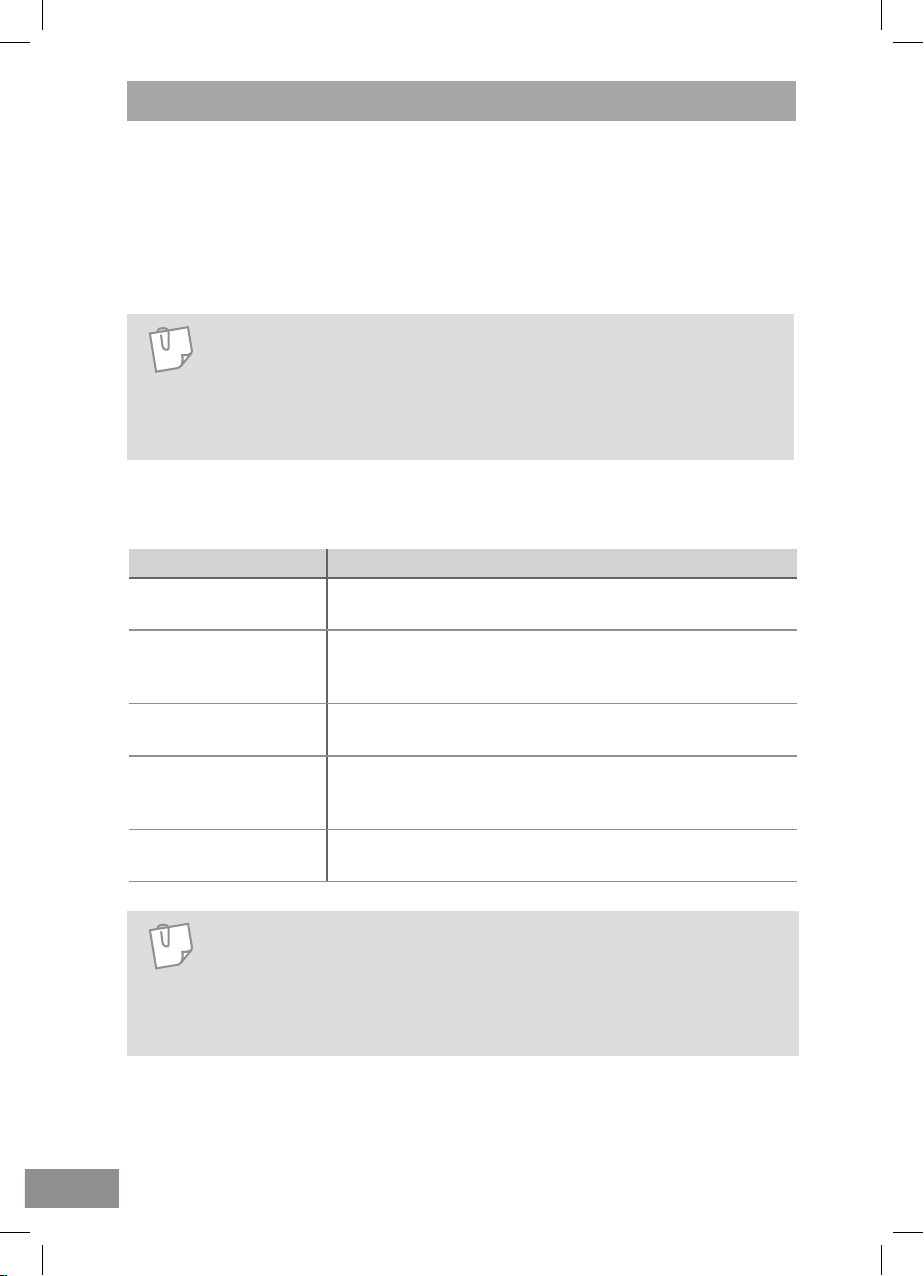
Troubleshooting
■ During the warranty period, any repairs may only be performed by service
technicians authorised by the appliance manufacturer.
■ Unauthorised repairs may cause electric shock and short circuit; do not attempt
this yourself. Consult an authorised service technician.
■ In case of minor faults or problems with the appliance operation, check the
following instructions to see whether the causes can be eliminated.
NOTE
A visit by a service technician during the warranty period will be
charged if the appliance is not functioning because of improper use.
Store these instructions in a place where they are always readily
accessible; if passing the appliance on to another person, the
instructions should also be included.
Check the following for some advice on rectifying some common problems before
calling the service centre.
Symptom Possible cause
It does not heat up. Check if the appliance is switched on and that the drawer is
fully closed.
Food and cookware
are not warm enough.
Power indicator light
ashes.
Power indicator light
ashes rapidly when
closed.
The fuse in the fuse
box has blown.
Some items may require longer time to heat up
depending on the material and thickness of cookware.
The drawer may have been left open for a long time.
Check if the drawer is fully closed.
Contact the service centre.
Disconnect the appliance at the mains and contact the
service centre.
10 EN
NOTE
■ Warranty claims that resulted from improper connection or use of
the appliance is not covered by the warranty. In such cases, the
costs of repair are borne by the user.
■ For the list of service centres, refer to the guarantee booklet.

English
Installation Instructions
Installation and Connection
Please fully observe the following safety precautions.
IMPORTANT
■ Unpack the appliance, remove all packing material, and examine for
any damage. If the appliance is damaged DO NOT install and notify
your dealer immediately.
■ Install the appliance in accordance with the Installation Instructions.
Otherwise, the performance of the appliance may be affected.
■ After installation perform a test run and explain to the customer how
to operate the appliance.
■ Correct installation is the responsibility of the installer. Any
malfunction or accident resulting from the failure to follow the
Installation Instructions is not covered by the warranty.
Safety Instructions
■ The appliance may only be installed with a
Panasonic oven.
■ When the appliance is installed with another
suitable appliance, it must be tted above a xed
shelf in the housing unit that is able to support the
weight of both appliances.
■ A combined appliance will be placed directly on
top of the warming drawer when built in, an interim
shelf is not necessary between the two appliances.
■ The appliance must be installed in a position where
it can be fully opened and the contents can be
clearly viewed. This is to avoid burns and other
injuries.
11 EN

Safety Instructions
■ For the appliance to function correctly, it is
important that the base of the drawer is clean and
level. A spirit level should be used.
■ The appliance must only be operated when built-in.
This is to ensure that all electrical parts are shielded
and live parts are not exposed.
■ Ensure power is not supplied to the appliance until
after installation work has been carried out.
■ The manufacturer will not be held liable for any
damages resulting from incorrect or improper
installation.
12 EN
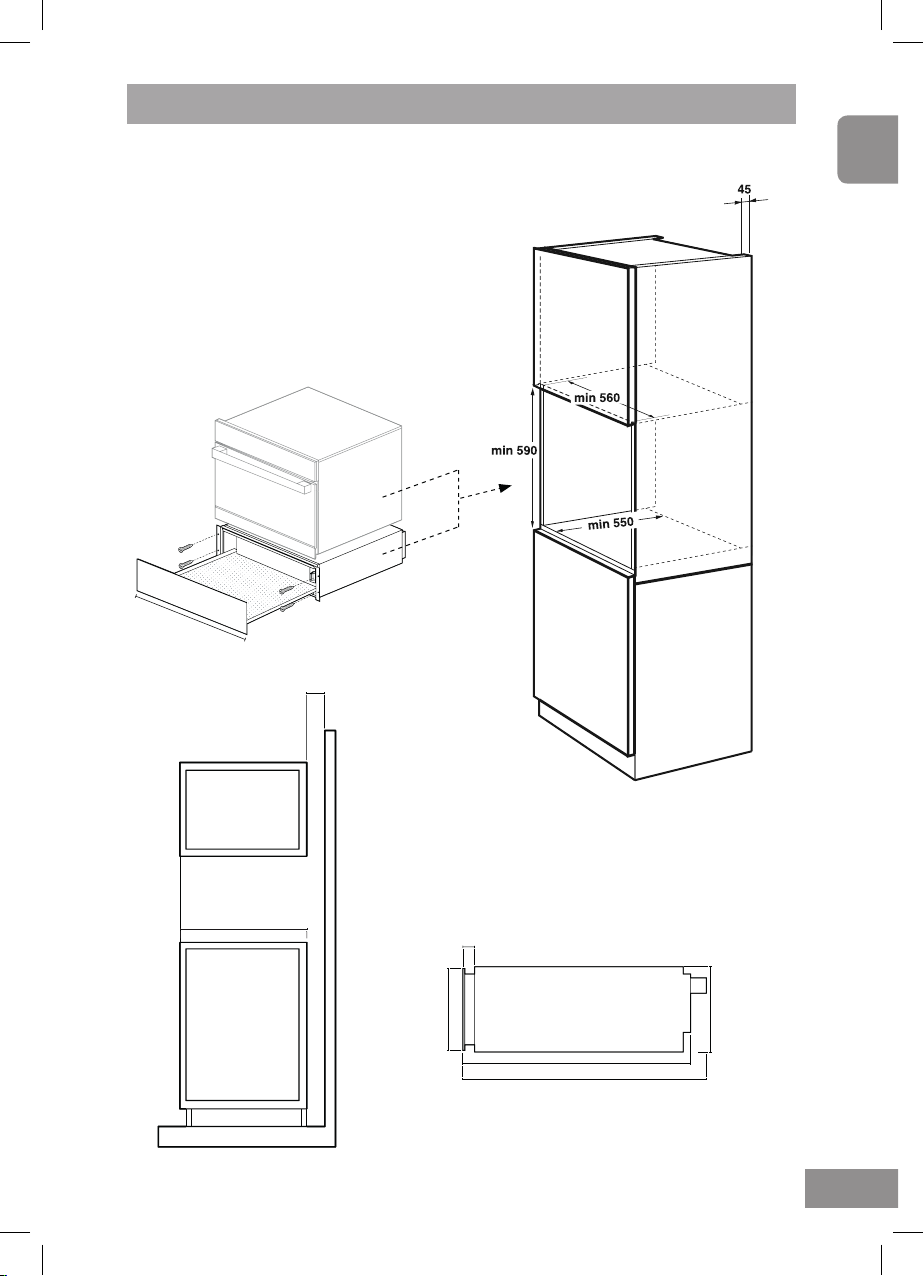
English
Dimensions
(measurements: mm)
595
45
min 550
130
20
140
539
570
13 EN
 Loading...