

Panasonic hd-wwe1.0 Operation Manual

Operating Instructions
High-definition video Management/Easy Editing Software
HD Writer WE 1.0
Thank you for using HD Writer WE.
Before use, please read these instructions completely.
© Panasonic Corporation 2013

Contents
Introduction
Read before starting operation ........................... 5
General precautions ............................................. 7
Operating environments ...................................... 8
SD cards supported for recording .................... 11
Preparation
Connect the unit to your computer ...................12
Disconnecting the unit from the computer............................ 13
Using the Smart Wizard
Feature overview ................................................ 14
Copying video to a computer ............................ 15
Copying by automatically selecting only the video not
already copied ...................................................................... 15
Copying by selecting the video yourself ............................... 16
Selecting a copy destination ................................................ 18
Advanced Features
Feature overview ................................................ 19
Opening the main window ........................... 20
Exiting the software .............................................................. 20
Updating software automatically ................ 21
Checking for update information automatically .................... 21
Changing the update information setting ............................. 21
Copying videos to a computer [Copy to PC] ... 22
About the main window ..................................... 25
Switching between window display styles ......27
Displaying videos in a folder in list view (Folder display) ..... 27
Displaying videos with the same recording date
(Calendar display) ................................................................ 28
Adding registered folders ..................................................... 29
Copying/moving videos ..................................... 30
Deleting videos ................................................... 31
Protecting videos ...............................................32
Setting as Favorites ...........................................33
[Play back from here (Add to favorites)] ............................... 34
Displaying the Playback window ...................... 35
About the Playback window ................................................. 36
Playing back slide shows .................................. 38
Playing media .....................................................41
Displaying detailed video information ..............42
2HD Writer WE

Contents
Editing videos on your computer .....................43
Editing motion pictures
(Basic operations) ........................................ 44
Creating a new motion picture editing project ...................... 44
Saving an edited project [File output] ................................... 47
Saving the edit process [Save project] ................................. 49
Opening saved edit process [Open project] ......................... 49
Deleting saved edit process [Delete project] ........................ 50
About the edit video window ................................................ 51
Editing motion pictures
(Editing from the storyboard area) ............. 53
Dividing scenes [Divide] ....................................................... 54
Trimming one selected portion in the scene [Trimming] ....... 55
Adding still pictures or color clips with a set playback time
between scenes [Still pic.] .................................................... 56
Assigning titles [Title] ........................................................... 57
Adding special effects to scenes [Effect] .............................. 58
Adding decorative effects to scenes [Decorations] .............. 59
Adjusting the balance between the sound of the motion
picture and the BGM [Volume] ............................................. 60
Adding scene transitions [Transition] ................................... 61
Merging scenes .................................................................... 62
Setting the BGM for the entire project .................................. 62
Editing motion pictures
(Editing in the timeline area) ....................... 64
Adding a scene .................................................................... 65
Adding a title ........................................................................ 66
Dividing a scene ................................................................... 67
Setting the BGM for a certain scene .................................... 68
Editing motion pictures
[Delete partially] ...........................................69
Deleting selected portions of a motion picture ..................... 69
Editing still pictures
(Retouching still pictures) ........................... 72
Editing still pictures
(Rotating still pictures) ................................ 74
Record on storage media ..................................75
Recording ...................................................... 75
Recording formats ................................................................ 75
Additional recording on media with existing content ............ 75
Recording motion pictures .......................... 76
Recording still pictures ...............................80
Copying videos to a CD or DVD using the
PC-compatibility function .................................. 81
Using convenient features................................. 84
Creating still pictures from motion
pictures .........................................................84
Creating short movie stories ....................... 85
Editing BGM ......................................................................... 89
Editing the order of motion pictures and still pictures in
the scenario and other settings ............................................ 90
Loading a saved story .......................................................... 91
Deleting stories .................................................................... 92
Advanced settings for short movie stories ........................... 93
Retouching motion pictures ........................ 95
Adding animation effects to objects ................................... 101
Loading a saved video retouch project .............................. 102
Deleting video retouch projects .......................................... 103
Advanced “Video retouch” settings .................................... 104
Uploading & Email ...................................... 105
Sending email with the URL of an uploaded video/
Online sharing .................................................................... 105
Printing still pictures .................................. 113
3HD Writer WE

Contents
Other
Setting motion picture functions .................... 114
Changing the settings for copying videos to
computer ........................................................... 116
Performing preview of thumbnail motion
pictures.............................................................. 117
Setting the operation when a still picture file
with the same name already exists................. 118
Right-click menu list ........................................ 119
Troubleshooting ............................................... 120
Trademark and License Information ...............128
4HD Writer WE

Introduction
Read before starting operation
About the contents of these instructions
●In this manual, the Panasonic wearable camera that this
software is bundled with is referred to as “the unit”.
●The description of Windows
based on the Windows
®
in these operating instructions is
®
7 screen.
●Please note that the operation screens shown in these
operating instructions may not match those actually displayed
on your PC due to differences in the operating environment or
other cause.
●For instructions on using your computer, Windows
kinds of disc drives, or this unit, please refer to their respective
Operating Instructions.
®
, various
●The usable operation items on the menu and right-click menu
depend on the operation status of this software or status of the
selection of the videos. The unusable items are displayed in
gray.
●Pages to be referred to are shown as (→00).
●The contents of these operating instructions may be subjected
to changes without prior notice.
●Reproduction of these operating instructions in part or in full
without permission is prohibited.
Steps to protect important video data
●Make a backup copy of your important data, in case any
problems occur.
●When deleting original video data, confirm that the data has
been correctly copied to your computer or an SD card etc.
before deleting the data.
●Do not modify or delete files or folders ([DCIM], or others) used
by this software.
Important
●MP4 SD cards that have been created using this software can only
be played back on this unit.
On other equipment, the cards may not be played back correctly, or
may not be playable at all, even if the equipment is MP4-compatible.
Do not insert these media into incompatible equipment. Not only will
playback be unsupported, it may not be possible to eject the media.
Additionally, valuable content may accidentally be deleted after a
message is displayed requesting you to format the media.
●The recorded and/or edited content is for personal use only and may
not be reproduced or exported without permission from the copyright
holder.
Disclaimer
●Information recorded using this software may be altered or erased
due to erroneous operation, static electricity, accident, malfunction,
or repair, etc.
Please note in advance that Panasonic is not liable in any way for
any direct or indirect damage or loss resulting from the alteration or
vanishing of information including personal information.
5HD Writer WE

Read before starting operation
Introduction
About supported videos
●Videos recorded using this unit.
●Videos recorded with other equipment cannot be copied.
●Not compatible with videos that were created or edited with
other software.
Terms
MP4 motion picture
This is a motion picture in MP4 format (MPEG-4 AVC standard).
Scene
For this software, one “scene” refers to the motion picture
recorded when the recording is started to when it is stopped on
this unit.
Project
The term “project” is used to refer to a video production edited
by combining scenes and still pictures using the motion picture
editing functions of this software.
SD cards
In these instructions, microSD memory cards, microSDHC
memory cards, SD memory cards, SDHC memory cards and
SDXC memory cards are all referred to as SD cards.
6HD Writer WE

General precautions
Introduction
General information about using the software
●Do not execute the following operations while the software is
running. Doing so may cause defects (damage to media, etc.).
- Turn off this unit or your computer, or restart your computer.
- Switch the user or log off.
- Change the screen settings.
- Use other software (especially software for writing to disc, or
recording/encoding software with high CPU utilization and large
memory requirements).
- Use the shared drive of another PC connected to the network.
●While this software is running, screen saver and power saving
functions (computer hibernation or standby when there is no
operation for a certain period of time) do not operate.
Playback and use of produced media
●SD cards created using this software can only be played
back on equipment that is compatible with the format used
(standard). Discs created using this software are recorded as
computer data and can only be used on computers.
SD cards
●Use of SDHC memory cards requires SDHC-compatible
equipment.
●Use of SDXC memory cards requires SDXC-compatible
equipment.
●When using an SDXC card in a Windows
the computer may display a message asking whether to format
the card. Be careful because if you format the card, you will
delete all your precious videos. Be sure to check the following
page before using an SDXC card.
http://panasonic.net/avc/sdcard/information/sdxc.html
®
operating system,
●Formatting SD cards or deleting card data only modifies file
management information. Data on SD cards is not completely
deleted. We recommend physically destroying SD cards or
thoroughly deleting all data on SD cards when disposing of SD
cards or transferring ownership. Use discretion in managing
data on SD cards.
7HD Writer WE

Operating environments
System requirements
Introduction
PC
OS
RAM
Display
IBM® PC/AT compatible personal computer with an Intel® Pentium® 4 2.8 GHz or higher CPU (including compatible CPU)
When using the playback function, Intel® Core™ 2 Duo 2.16 GHz or higher, or AMD Athlon™ 64 X2 Dual-Core 5200+
or higher is recommended.
When editing content, an Intel® Core™ 2 Quad 2.6 GHz processor or higher is recommended.
Microsoft® Windows® 8 (32 bit / 64 bit)
Microsoft® Windows® 8 (32 bit / 64 bit) Pro
Microsoft® Windows® 7 (32 bit) Starter or Service Pack 1
Microsoft® Windows® 7 (32 bit / 64 bit) Home Basic or Service Pack 1
Microsoft® Windows® 7 (32 bit / 64 bit) Home Premium or Service Pack 1
Microsoft® Windows® 7 (32 bit / 64 bit) Professional or Service Pack 1
Microsoft® Windows® 7 (32 bit / 64 bit) Ultimate or Service Pack 1
Microsoft® Windows Vista® (32 bit) Home Basic Service Pack 2
Microsoft® Windows Vista® (32 bit) Home Premium Service Pack 2
Microsoft® Windows Vista® (32 bit) Business Service Pack 2
Microsoft® Windows Vista® (32 bit) Ultimate Service Pack 2
Microsoft® Windows® XP (32 bit) Home Edition Service Pack 3
Microsoft® Windows® XP (32 bit) Professional Service Pack 3
Windows® 7 / Windows® 8: 2 GB or more (64 bit)
Windows® 7 / Windows® 8: 1 GB or more (32 bit)
Windows Vista®: 1 GB or more
Windows® XP: 512 MB or more (1 GB or more recommended)
High Color (16 bit) or more (32 bit or more recommended)
Desktop resolution of 1024 x 768 pixels or more (1920 x 1080 pixels or more recommended)
Windows Vista® / Windows® 7 / Windows® 8: Graphics card complying with DirectX® 9.0c (DirectX® 10 recommended)
Windows® XP: Graphics card complying with DirectX® 9.0c
DirectDraw® overlay support
PCI Express™ x 16 is recommended
Video memory of 256 MB or more recommended
Direct3D Acceleration: Enabled
*
To check the Direct3D® acceleration settings, enter “dxdiag” in the text field in the [Start] menu. (If using Windows® XP,
click [start] → [Run], and enter “dxdiag” in the [Run] window.) The [DirectX Diagnostic Tool] window appears. Select
the [Display] tab and check [Direct3D Acceleration] under [DirectX Features].
*
8HD Writer WE

Operating environments
Introduction
Hard disk
Sound
Drive
Interface
Unit connected via USB
Content
Other requirements
Ultra DMA-100 or higher
450 MB or more free space for installing software
DirectSound® support
CD-ROM drive (for installation)
When writing to DVDs, a compatible drive and media are necessary.
USB port (Hi-Speed USB (USB2.0))
The wearable camera that this software is bundled with
Videos recorded using this unit
Mouse or equivalent pointing device, an environment with Internet access
9HD Writer WE

Operating environments
●
Even if the system requirements mentioned in these operating
instructions are fulfilled, some personal computers cannot be used.
●Supplied CD-ROM is available for Windows
●This software is not compatible with Microsoft
Windows® 95, Windows® 98, Windows® 98 SE, Windows® Me,
Windows NT®, and Windows® 2000.
●Windows Operation is not guaranteed on Microsoft
Enterprise, Windows® 8 Enterprise, Windows Vista® Enterprise,
Windows® XP Media Center Edition, Tablet PC Edition.
●
For Windows® 8, this software is available only as a desktop application.
®
only.
®
Windows® 3.1,
®
Windows® 7
●When 2 or more USB devices are connected to a PC, or when
devices are connected through USB hubs or by using USB extension
cables, proper operation is not guaranteed.
●Operation on an upgraded OS is not guaranteed.
●This software does not support the multi-boot environments.
●Available only to administrator account users in Windows
Available only to administrator account or standard account users in
Windows Vista® and Windows® 7 / Windows® 8.
(Installation and uninstallation of the software requires an
administrator account.)
®
XP.
●Log on with an administrator account or standard user account
before using this software. You cannot use this software with a guest
account.
Introduction
●This software does not support the multi-monitor environments.
●For fonts and screen settings, use the standard Windows
Characters may not display properly depending on the settings.
●Operation is not guaranteed under Windows
and Windows Vista® Ultimate with the user interface set to other
languages using the Multi-language User Interface (MUI) function.
®
8, Windows® 7 Ultimate
®
settings.
●This software cannot be used simultaneously with other motion
picture editing software or video capture products. Note that other
software running background processes, timer recording in particular,
may cause this software to malfunction.
●Non-compatible files are not displayed.
●When the size of the video file is very large or the video is in a special
format, it may not be displayed.
●Before playing back high-definition motion pictures with high
resolution, check your video card for the following points. Otherwise,
the video may not be played back or displayed correctly. Frames in
the motion picture may skip, or the motion picture may not be played
back smoothly.
- Make sure that the driver software is the latest version.
- Make sure that the OS and standard graphic modules, such as
DirectX®, are updated to the video card's recommended versions.
10HD Writer WE
Introduction
MP4
MP4
MP4
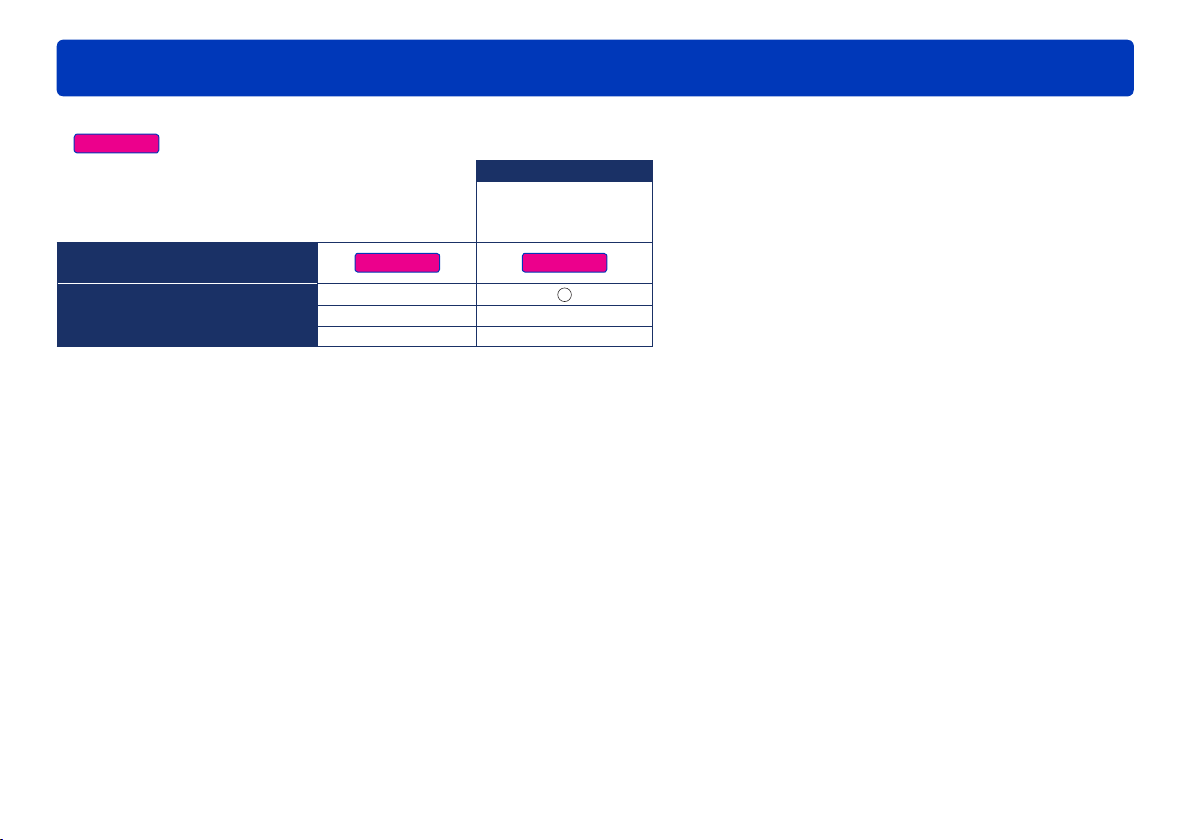
SD cards supported for recording
●Explanation of the icons
: MP4 motion picture
SD cards
SD memory card
SDHC memory card
SDXC memory card
Recording format used
with this unit
Additional recording
Others
●Only microSD memory cards and microSDHC memory cards can be used in this unit.
●When using SD cards, see “SD card connection” (→13).
●Motion pictures shorter than 2 seconds cannot be recorded on SD cards.
●Do not insert or remove SD cards when copying data from SD cards or recording data on discs. Removing SD cards during this process may cause
data corruption or SD card damage.
●SD cards must have a capacity of at least 32 MB for motion picture recording. Additionally, operation is not guaranteed when recording motion picture
to 64 MB – 256 MB SD cards. SD cards of 8 MB – 256 MB can be used to store still pictures.
●Recording requires twice the amount of free space for the work area as that being used on the media. To change the work area (→114).
Formatting Required
Still pictures JPEG(DCF)
11HD Writer WE
Preparation
Connect the unit to your computer
By connecting this unit to your computer using the USB cable supplied with the unit, you can copy videos from the SD card in the unit to your
computer.
Important
Be sure to fully charge the batteries of your laptop computer or
this unit beforehand to avoid depleting the batteries.
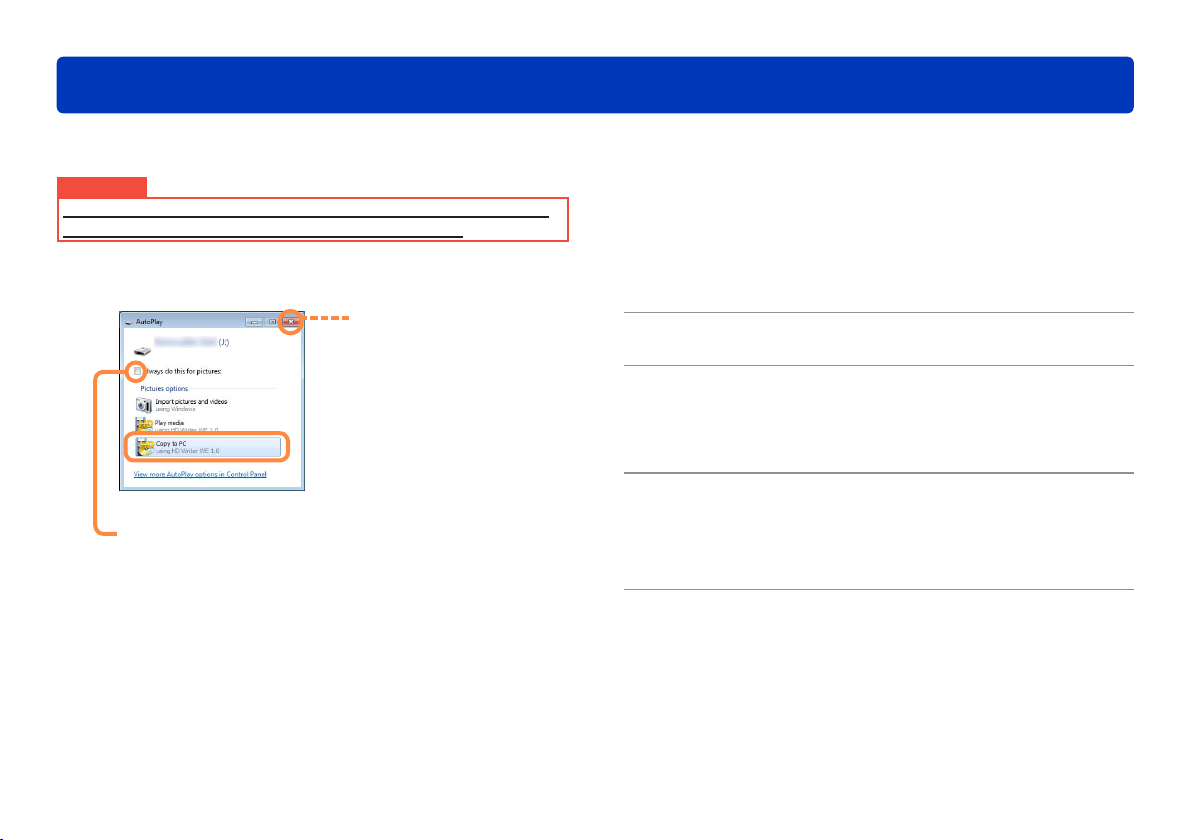
Start the computer.
1
If a window like this is
displayed, close it.
●When using an SD card
reader/writer, select the
copy function item without
closing this window.
In this example, select
[Copy to PC].
Turn on the unit.
2
Connect the unit to a computer.
3
Insert the USB cable supplied with the unit firmly into the
respective USB ports of the unit and computer.
(Example of display window)
Note that when “Always do this for pictures” is selected, the
Smart Wizard starts up each time a SD card with pictures
recorded on it is inserted thereafter.
Perform the unit settings for connection
4
to the computer.
See the Operating Instructions for the unit for details.
Confirm that the unit is recognized by
5
the computer.
The unit is correctly recognized by the computer if the unit is
added as a drive in [Computer] (or [My Computer]).
12HD Writer WE
Connect the unit to your computer
Preparation
Tips
●For further details, also refer to the Operating Instructions of the unit.
●To record to SD cards, use an SD card reader/writer. Before recording
on an SD card, fully charge the battery of the unit.
●When using an SDXC card in a Windows
computer may display a message asking whether to format the card.
Be careful because if you format the card, you will delete all your
precious videos. Be sure to check the following page before using an
SDXC card.
http://panasonic.net/avc/sdcard/information/sdxc.html
●Do not operate the unit or disconnect the USB cable during the
transfer of data in the unit. The software may malfunction, and data
may be lost.
●When connecting the unit to the computer for the first time,
processing may take some time as the OS installs the driver.
●If the unit is not recognized after it is connected, try connecting it to
a different USB connector, such as the USB connector on the rear of
the computer.
SD card connection
When using an SD card reader/writer, connect the device before
starting this software. (For connection instructions, refer to the
Operating Instructions of the computer or SD card.)
®
operating system, the
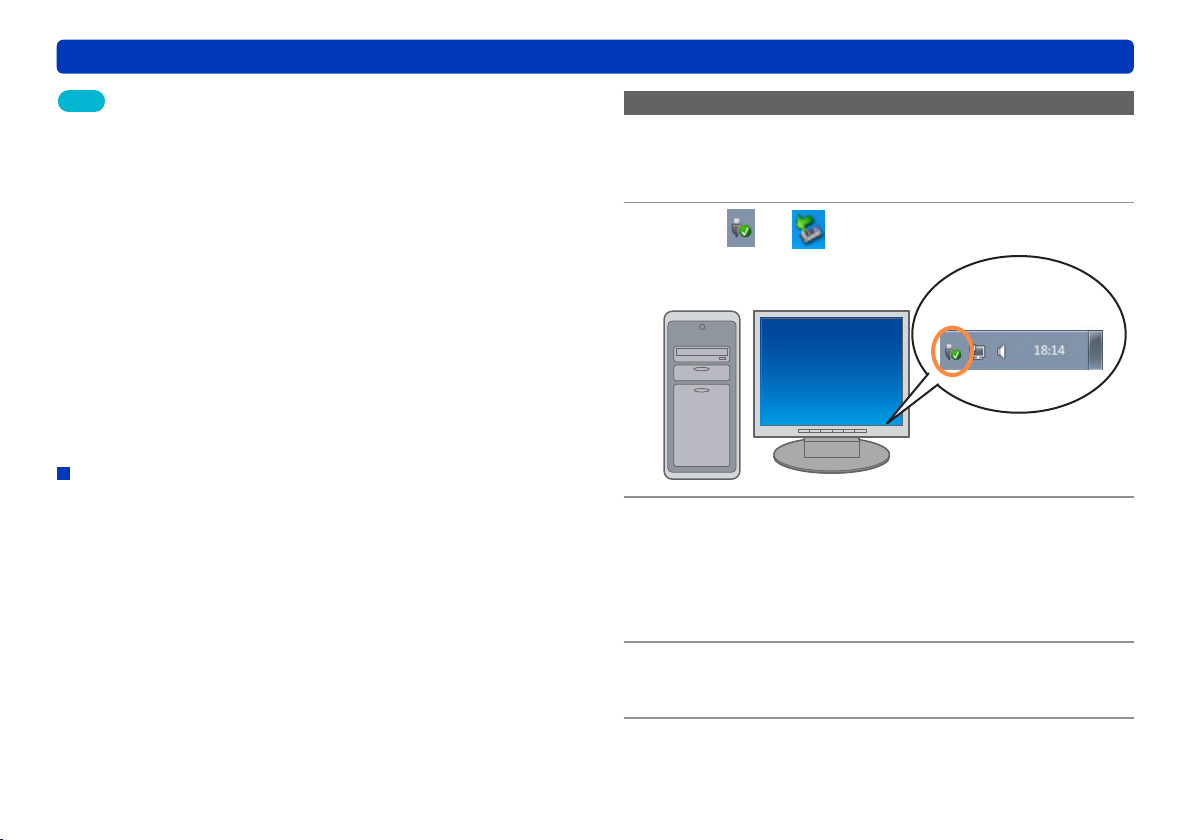
Disconnecting the unit from the computer
Confirm that the unit is not recording or
1
being accessed in any way.
Click or in the task tray.
2
Example of the
task tray icon
Safely remove the unit by selecting it
3
from the menu.
If multiple USB devices are displayed, determine which one is
the unit, for example by selecting the drive letter assigned to
the unit.
Disconnect the USB cable from the
4
computer.
Turn off the unit.
5
13HD Writer WE
Using the Smart Wizard
Feature overview
By simply following the instructions in the Smart Wizard window,
you can easily copy captured videos to your computer.
The Smart Wizard is displayed automatically when you connect the
unit to your computer.
●If the data is recorded on an SD card, insert that SD card into the
unit.
You can copy motion pictures and still pictures recorded using this
unit to your computer.
(Video captured using other devices cannot be copied.)
Tips
●When a 2GB or larger motion picture is continuously recorded using
this unit, it is divided into 2 GB increments and stored as multiple
scenes.
●When the file system of the hard disk in the copy destination
computer is FAT32, motion picture data that is larger than 4 GB
cannot be copied.
●Recording to an SD card cannot be performed with the Smart Wizard.
Important
●The Smart Wizard is not displayed if the software is already running.
Close the software before connecting the unit to the computer.
●Do not disconnect the unit from the computer while the Smart
Wizard is running.
Preparation:
●Connect this unit to the computer.
If the data is recorded on an SD card, insert that SD card into
the unit.
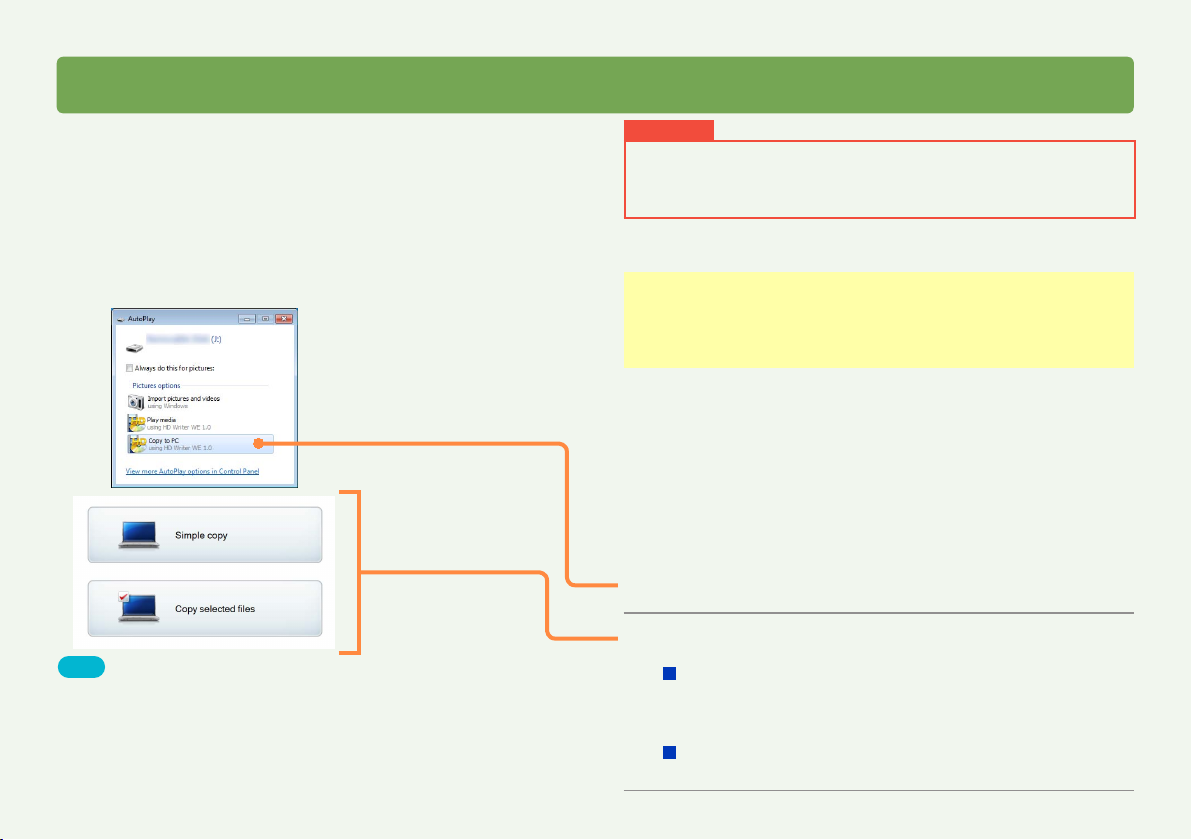
Click [Copy to PC].
1
Decide how to select the video to copy.
2
To automatically select only the video that has not
already been copied to the computer
Click [Simple copy] (→15).
To select the video yourself
Click [Copy selected files] (→16).
14HD Writer WE
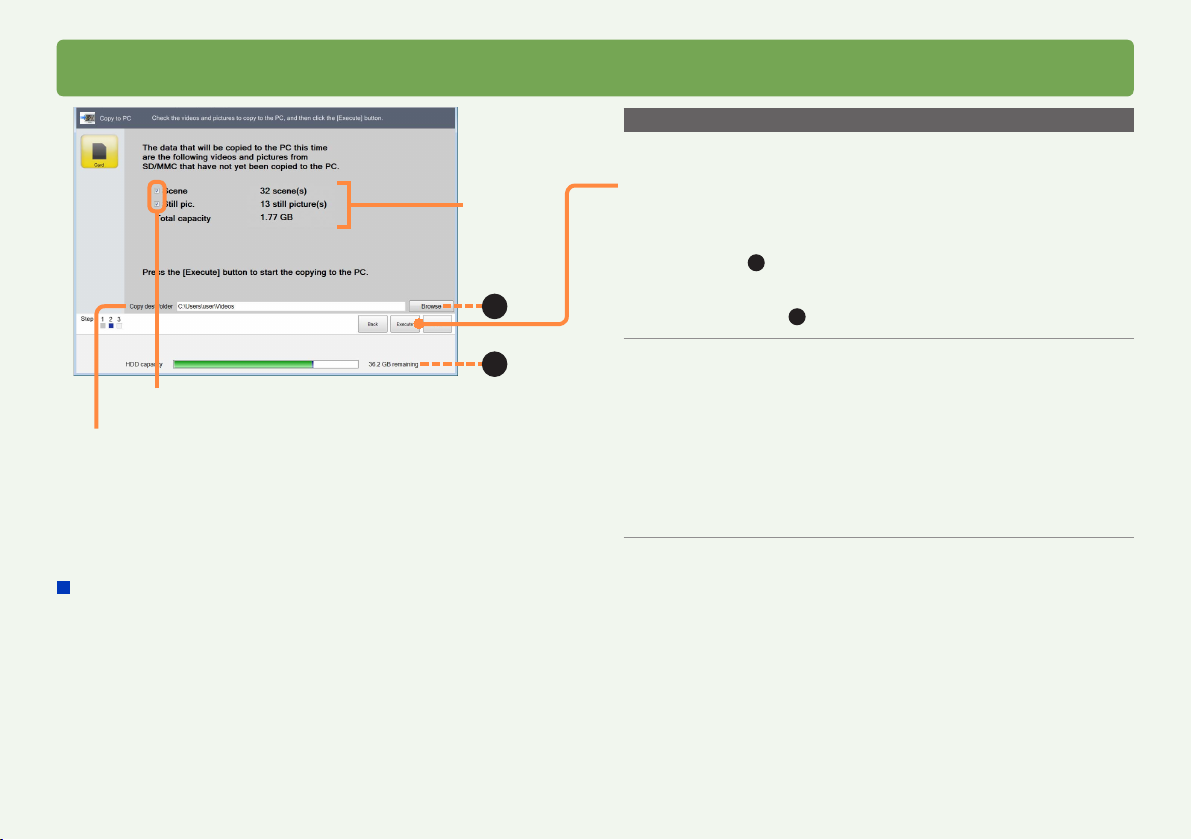
Copying video to a computer
Video to
copy
B
Using the Smart Wizard
Copying by automatically selecting only the video not already copied
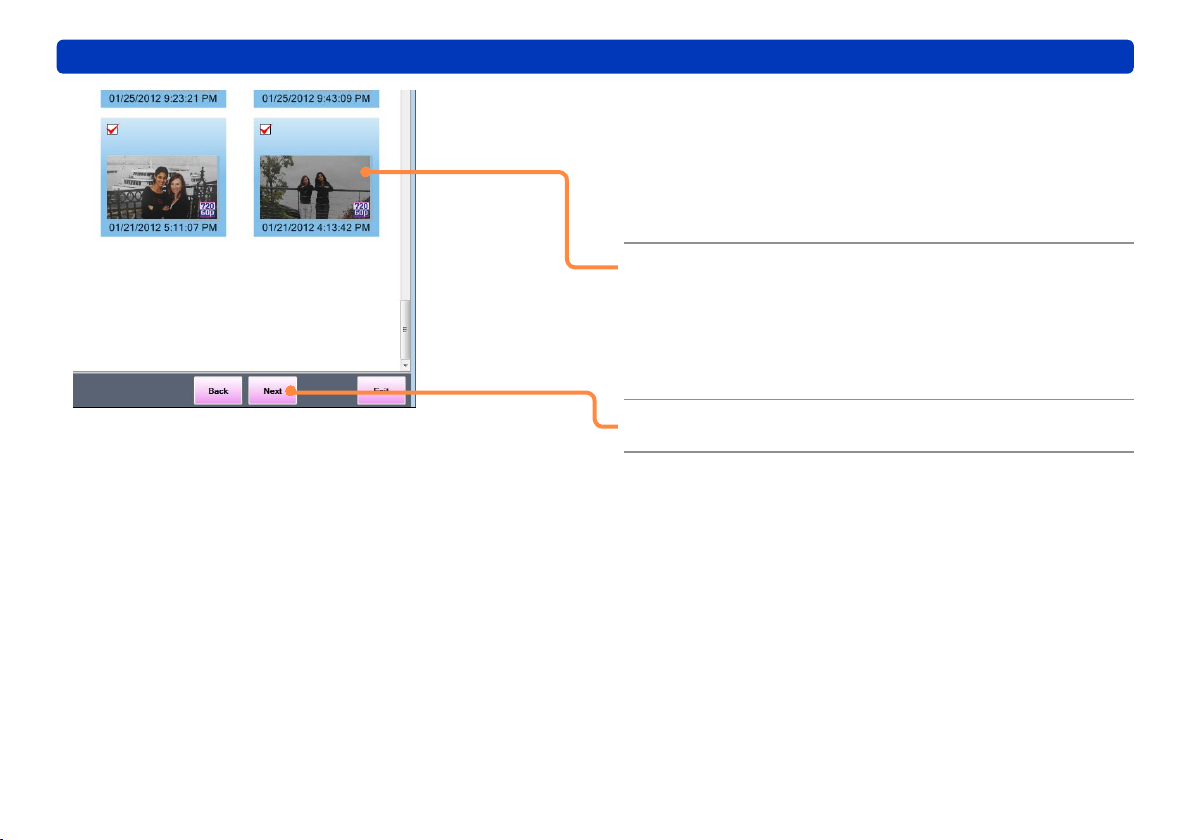
Click [Simple copy] in step 2, and then:
Confirm the video to be copied and then
3
click [Execute].
●If there is not enough free space in the copy destination, the
indicator (A) will turn red when the free space of the copy
destination reaches 0 GB. If this happens, change the copy
destination to one that has enough free space.
Click [Browse] (B) and select a copy destination (→18).
A
If you click and clear a check
box, the item will not be copied
Video copy destination
[Simple copy]
When you copy motion pictures or still pictures from an SD card*,
all content that has already been copied will automatically be
recognized by this application and only the new content will be
copied from the second time.
(*Only applies to SD cards recorded in this unit. If additional
recordings are made on the card with other equipment, this
application will be unable to recognize the new content.)
●Note that once motion pictures or still pictures have been copied,
they cannot be copied again, even if you have deleted them from
your computer.
●If the video data is large, it will take some time to display.
When the confirmation message is
4
displayed, click [Yes].
Only the video that has not already been copied to the
computer is copied. A progress indicator and thumbnails are
displayed.
●Copying the data takes time. Do not operate the computer until
copying is finished.
●To cancel copying in progress, click [Cancel].
When the completion message is
5
displayed, click [OK].
15HD Writer WE
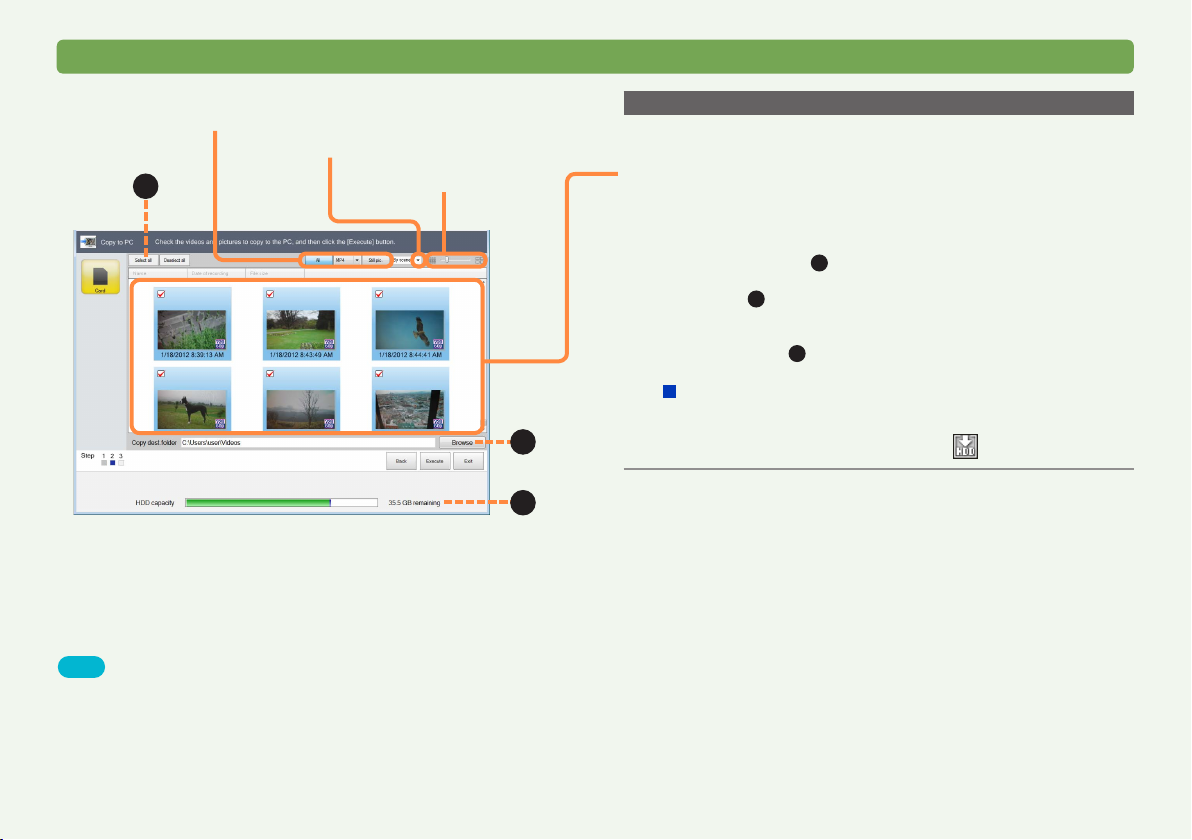
Copying video to a computer
Using the Smart Wizard
Select the type of video to display
([All], [MP4], [Still pic.])
Display By scene or By date
A
Resize thumbnail
C
B
Tips
●If the video data is large, it will take some time to display.
●If a video is not compatible (→6), “?” is displayed in the thumbnail and
the video cannot be copied.
●When a 2GB or larger motion picture is continuously recorded using
this unit, it is divided into 2 GB increments and stored as multiple
scenes. Therefore, multiple thumbnails are displayed. After copying to
PC, the video data is treated as multiple scenes.
Copying by selecting the video yourself
Click [Copy selected files] in step 2, and then:
Select the items to copy.
3
●Each time you click a thumbnail, items are selected or cleared.
●You can set the operation to perform if a still picture file with the
same name already exists in the Copy destination folder (→118).
●To select all, click (
A
).
●If there is not enough free space in the copy destination, the
indicator (B) will turn red when the free space of the copy
destination reaches 0 GB. If this happens, change the copy
destination to one that has enough free space.
Click [Browse] (C) and select a copy destination (→18).
For videos recorded using this unit
●Videos that have not already been copied to the computer are
selected as default.
●Video already copied is labeled with .
16HD Writer WE
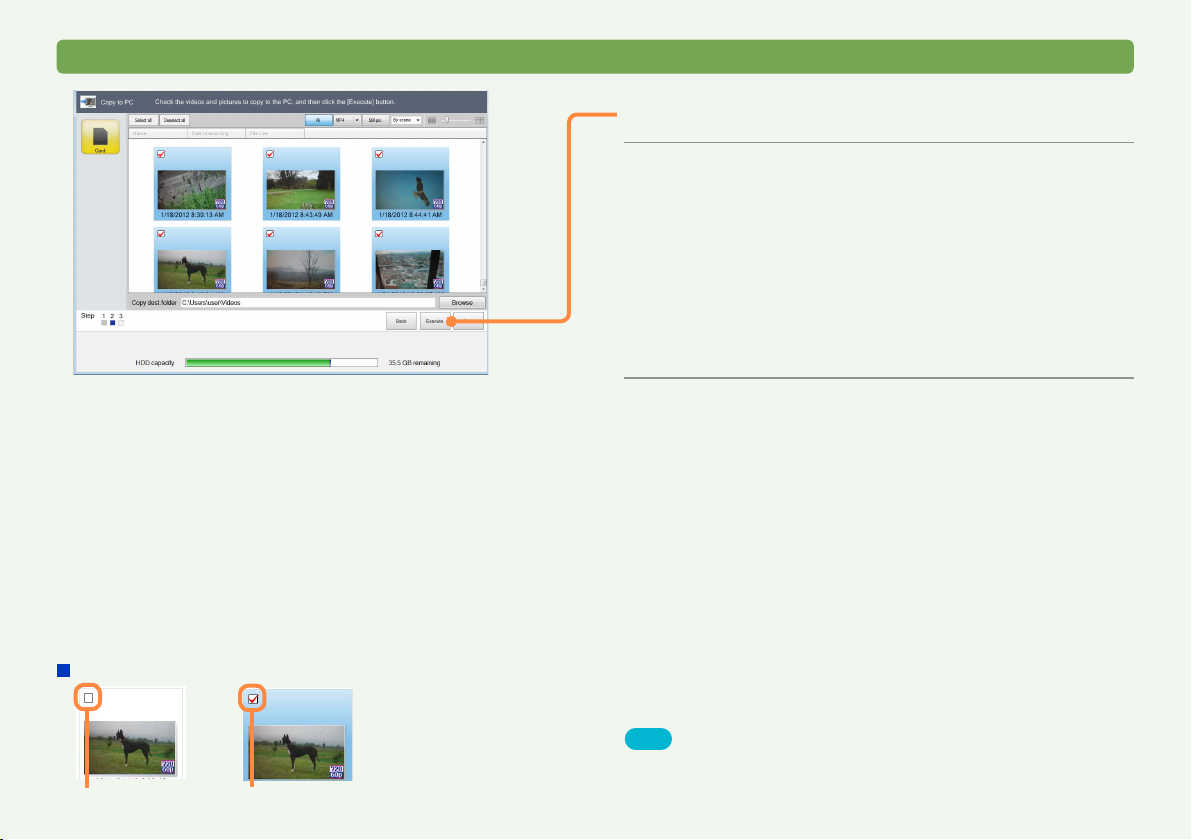
Copying video to a computer
Using the Smart Wizard
Click [Execute].
4
When the confirmation message is
5
displayed, click [Yes].
The selected video(s) is copied to the computer. A progress
indicator and thumbnails are displayed.
●Copying is not available unless you have selected at least one
motion picture or still picture.
●Copying the data takes time. Do not operate the computer until
copying is finished.
●To cancel copying in progress, click [Cancel].
When the completion message is
6
displayed, click [OK].
Thumbnail check marks
Do not copy Copy
Tips
●About saving folders (→24)
●Copying to a computer can also be performed from [Copy to PC] in
the main window.
17HD Writer WE
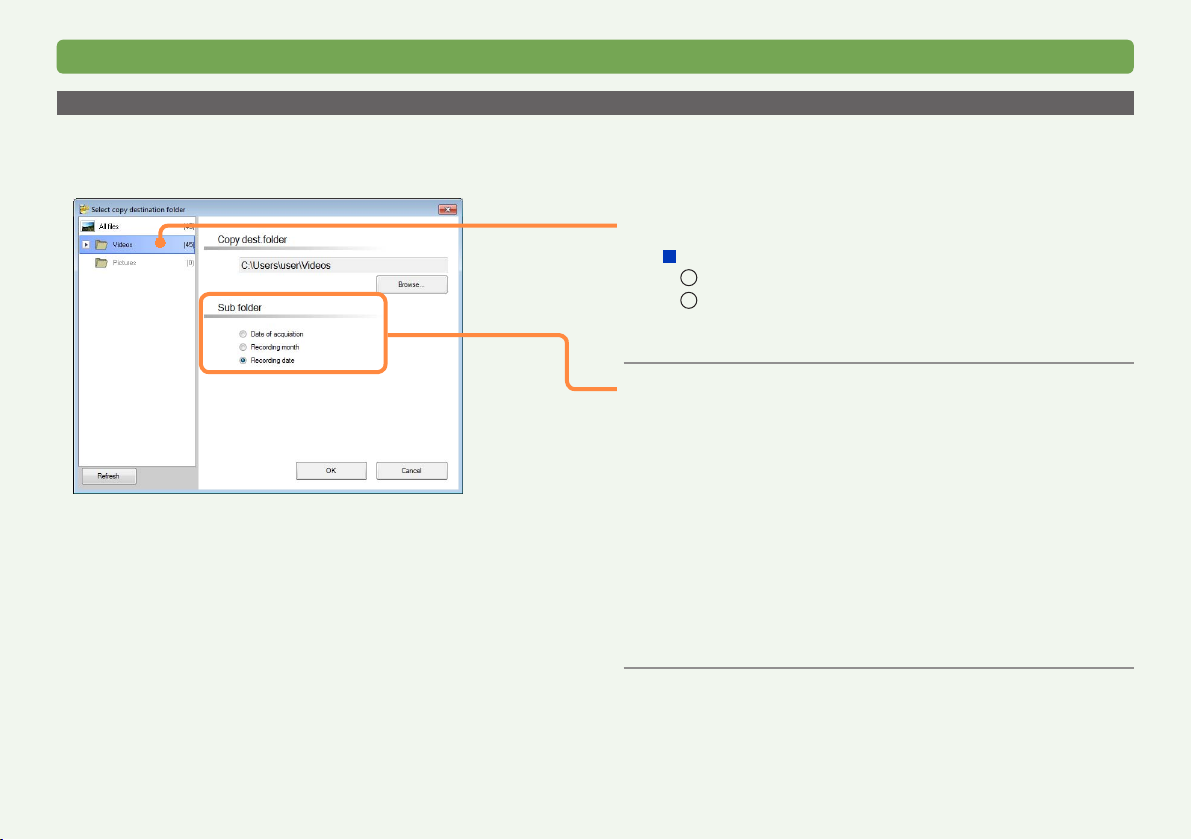
Using the Smart Wizard
Copying video to a computer
Selecting a copy destination
If you click [Browse] in the window for confirming or selecting the videos to copy, you can select the copy destination folder and subfolder in the
following window.
Select the copy destination folder.
1
To save in a folder that is not displayed
Click [Browse...].
1
Select a folder and click [OK].
2
●To copy to a new folder, click [Make New Folder], enter the
name of the new folder, and click [OK].
Select the subfolder into which to sort
2
the videos.
The sorting methods below are available.
You can understand information such as the shooting date
from the folder name.
Select your preferred sorting method.
You can set the sorting method in advance. (→116)
[Date of acquisition] : Save in a folder for the date of
[Recording month] : Save in a folder for the month of
[Recording date] : Save in a folder for the date of
importing. (Example: 2013-12-20)
recording. (Example: 2013-12)
recording. (Example: 2013-12-18)
Click [OK].
3
18HD Writer WE
Advanced Features
Feature overview
This section describes more advanced software operations. The following operations are possible.
Copy video to your computer
(→22)
To play back (→35)
To delete (→31)
To protect (→32)
To set as a favorite (→33)
To play back slide shows
(→38)
Edit video on your computer
(→43)
Editing motion pictures
• Adding effects to scenes
• Adding titles to scenes
• Dividing scenes or deleting selected
portions of a scene
• Setting the BGM
Editing still pictures
• Retouching still pictures
• Rotating still pictures
Record on storage media
(→75)
Use convenient features
(→84)
• Creating still pictures from motion pictures
• Retouching motion pictures
• Creating short movie stories
• Uploading & Email
• Printing still pictures
19HD Writer WE
Feature overview
Advanced Features
Opening the main window
Important
●Before starting, close any other software or resident programs.
●Before using the software for the first time, be sure to select [Start]
→ [All Programs] → [Panasonic] → [HD Writer WE 1.0] → [Read
this before starting] and read the supplementary explanation and the
latest information.
Tips
●An update notification may appear when the software is started.
●In an environment without an Internet connection, this software may
take some time to start up.
●The first time the software is started, it may take some time until the
window appears, because the software analyzes the videos saved on
the computer.
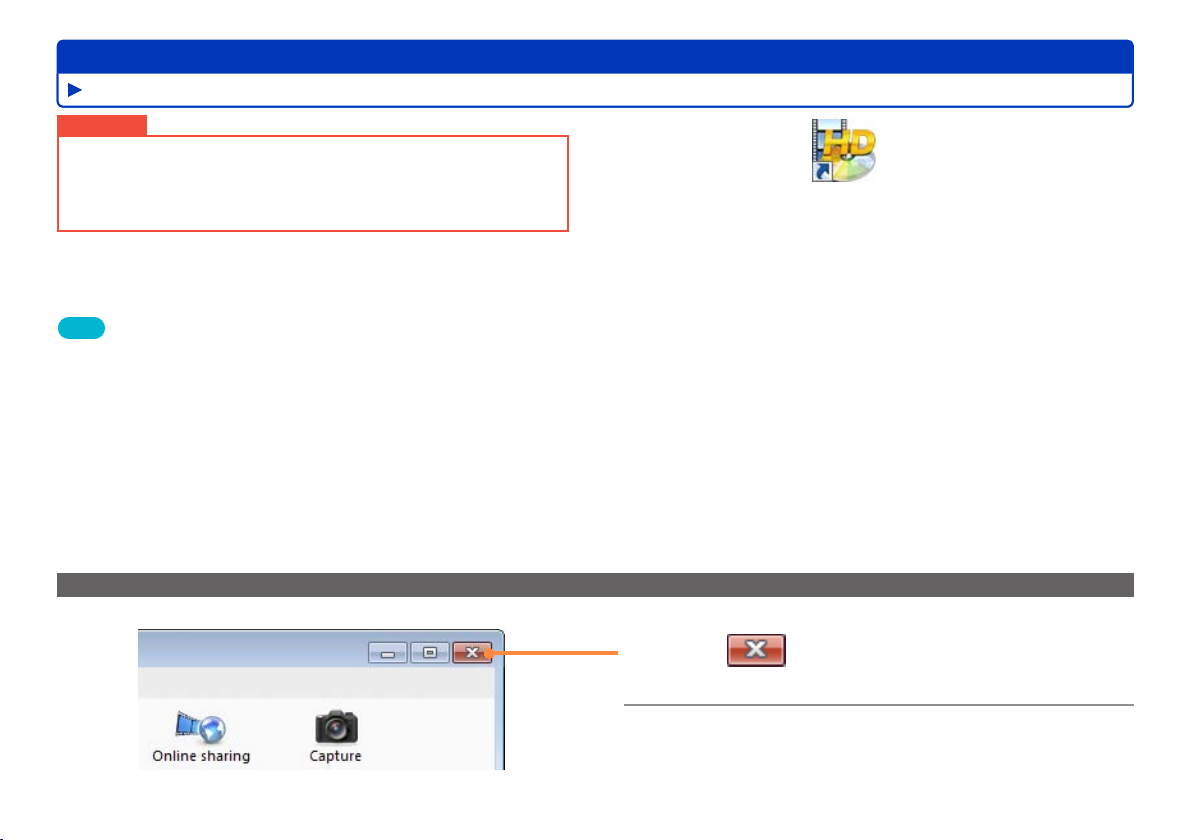
Exiting the software
Double-click on the desktop to
1
start the program.
You can also start the program by selecting [Start] → [All
Programs] → [Panasonic] → [HD Writer WE 1.0] → [HD Writer
WE 1.0].
Click on the window.
1
You can also exit by selecting [File] → [Exit] from the menu.
When the confirmation message is
2
displayed, click [OK].
20HD Writer WE
Feature overview
Advanced Features
Updating software automatically
Checking for update information automatically
The software update information is checked every time the software is started.
●You can also check for update information by selecting [Help] → [Check for application updates] from the menu.
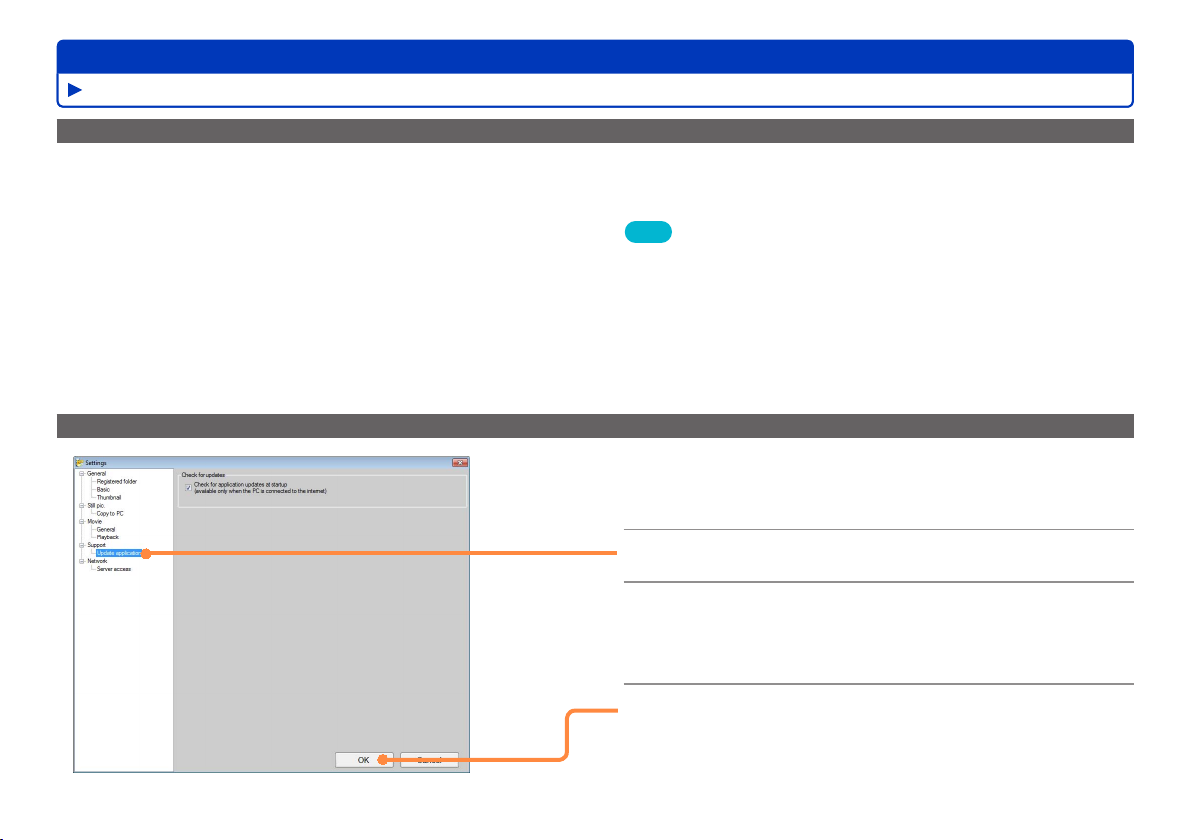
Changing the update information setting
Tips
●By default, the update information is checked every time the software
is started.
●Software update notifications are not performed while the Smart
Wizard is running.
Select [Tools] → [Settings] from the
1
menu.
Click [Support] – [Update application].
2
Change the update information setting.
3
When the check box is selected, the software update
information is checked every time the software is started.
When [OK] is clicked, the settings are
4
applied and the window is closed.
21HD Writer WE
Advanced Features
Copying videos to a computer [Copy to PC]
You can copy videos (MP4 motion pictures and still pictures) from an SD card inserted in this unit, or an SD card in an SD card slot or a device such as
SD card reader/writer to your computer. This video can also be edited after it is copied to your computer.
Important
●Do not operate the unit or disconnect the USB cable while data is
being transferred.
●Only motion pictures or still pictures can be copied to your computer
using this software. Other data cannot be copied.
●Copying requires 1.3 times more free space than the size of the
video.
●Do not use Windows Explorer or a similar method to delete, modify,
or move content (folders or files) copied to the computer using this
software. This prevents the content from being managed by this
software.
Preparation:
●Prepare the medium to copy from (by connecting the unit to your
computer, etc.).
When using SD cards, see “SD card connection” (→13).
Tips
●If a video is not compatible (→6), “?” is displayed in the thumbnail and
the video cannot be copied.
●When a 2GB or larger motion picture is continuously recorded using
this unit, it is divided into 2 GB increments and stored as multiple
scenes.
●When the file system of the hard disk in the copy destination
computer is FAT32, motion picture data that is larger than 4 GB
cannot be copied.
●Videos captured using other devices cannot be copied.
●To automatically select only the videos that have not already been
copied to the computer, use the Smart Wizard to perform the copying.
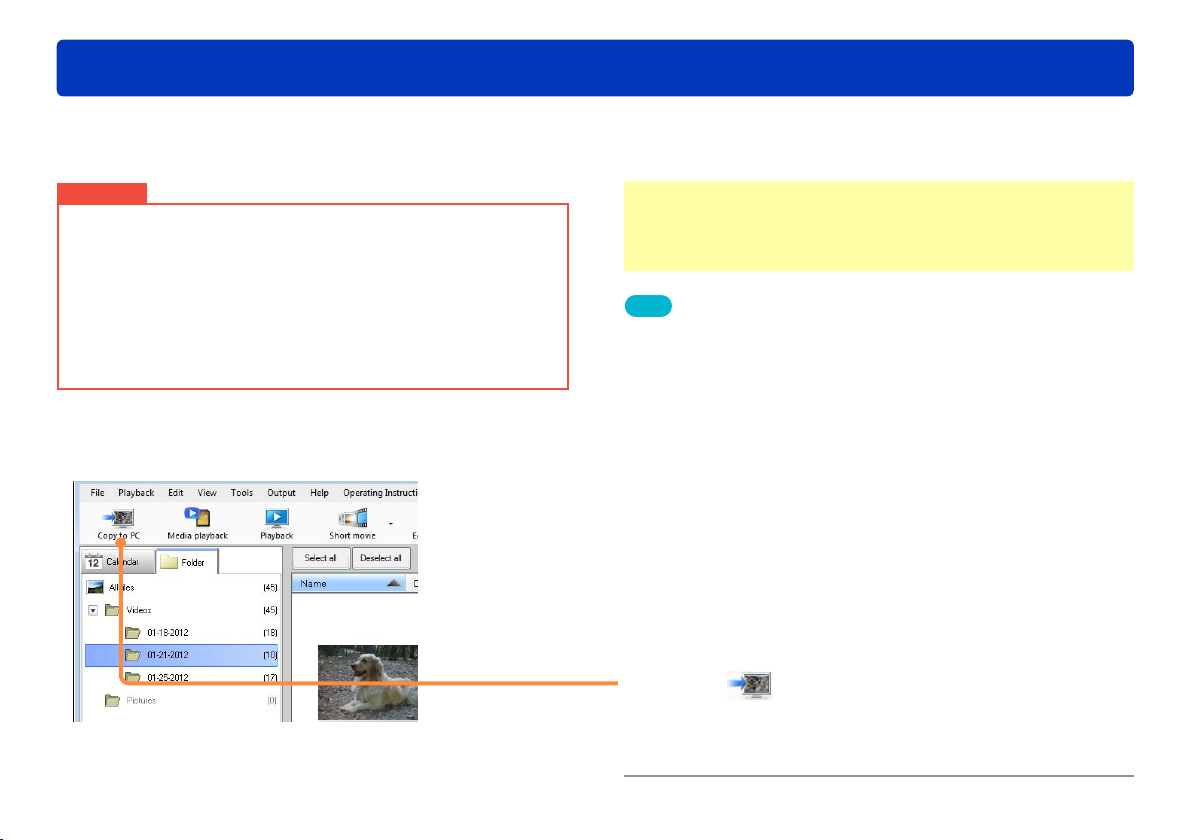
Click [Copy to PC].
1
The [Copy to PC] window is displayed.
●You can also display the window by selecting [File] → [Copy to
PC] from the menu.
22HD Writer WE
Copying videos to a computer [Copy to PC]
Advanced Features
If the selection window for the location
2
to copy from is displayed, select the
drive and click [Next].
●If the connected drive or SD card is not displayed, click
[Refresh].
Select the videos to copy to the PC.
3
Video with thumbnails with check boxes selected are copied to
the computer.
●Click a thumbnail to select or deselect it.
●Click [Select all] to select all the thumbnails.
●Click [Deselect all] to deselect all the thumbnails.
Click [Next].
4
23HD Writer WE
Copying videos to a computer [Copy to PC]
About saving folders
The following copy destinations are set by default. When
Windows is installed on drive C, the folder locations are as
follows.
For Windows 8 / Windows 7 / Windows Vista
Pictures C:\Users\(User Name)\Pictures
Videos C:\Users\(User Name)\Videos
For Windows XP
My Pictures
C:\Documents and Settings\(User Name)\My Documents
\My Pictures
My Videos
C:\Documents and Settings\(User Name)\My Documents
\My Videos
Advanced Features
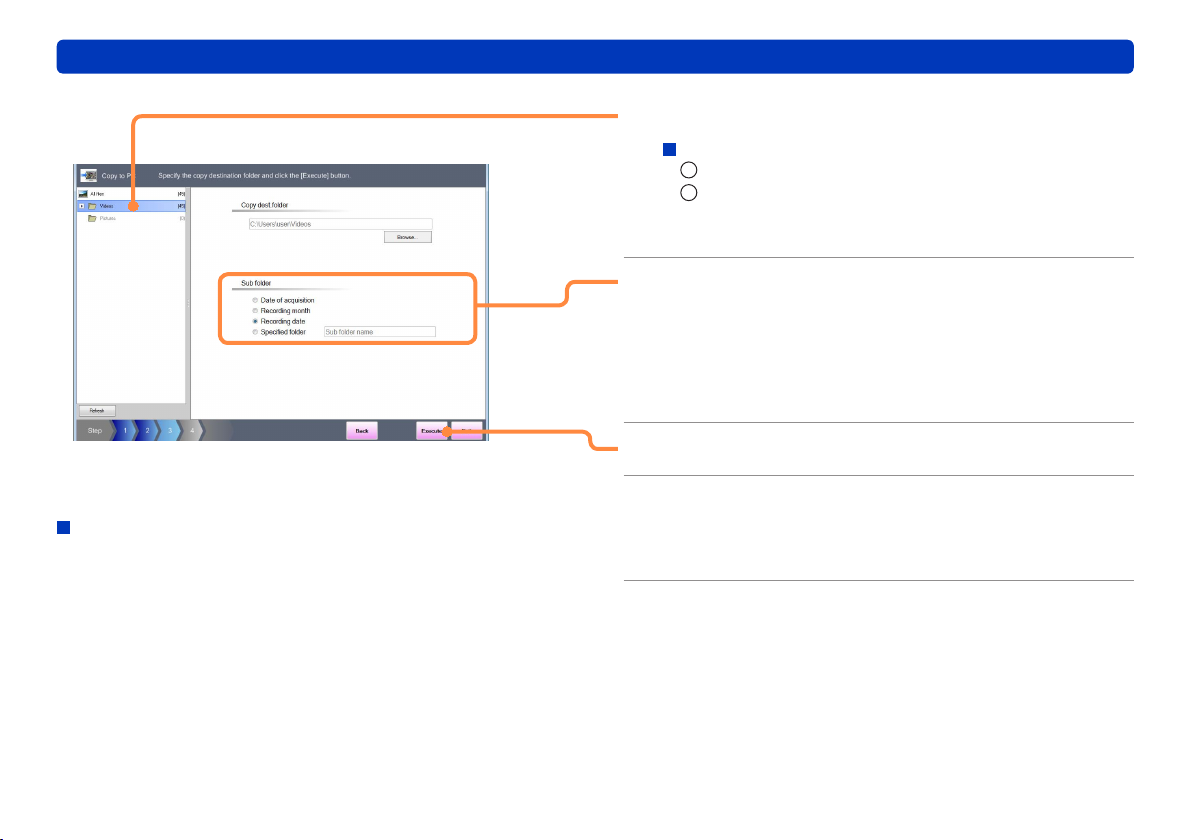
Select the copy destination folder.
5
To save in a folder that is not displayed
1
Click [Browse...].
2
Select a folder and click [OK].
●To copy the files to a new folder, click [Make New Folder],
enter the name of the new folder, and click [OK].
Select the subfolder into which to sort
6
the videos.
You can understand information such as the shooting date
from the folder name.
Select your preferred sorting method.
You can set the sorting method in advance. (→116)
Click [Execute].
7
When the confirmation message is
8
displayed, click [Yes].
The videos are sorted and copied into the set folders.
When the completion window is
9
displayed after copying, click [OK].
24HD Writer WE
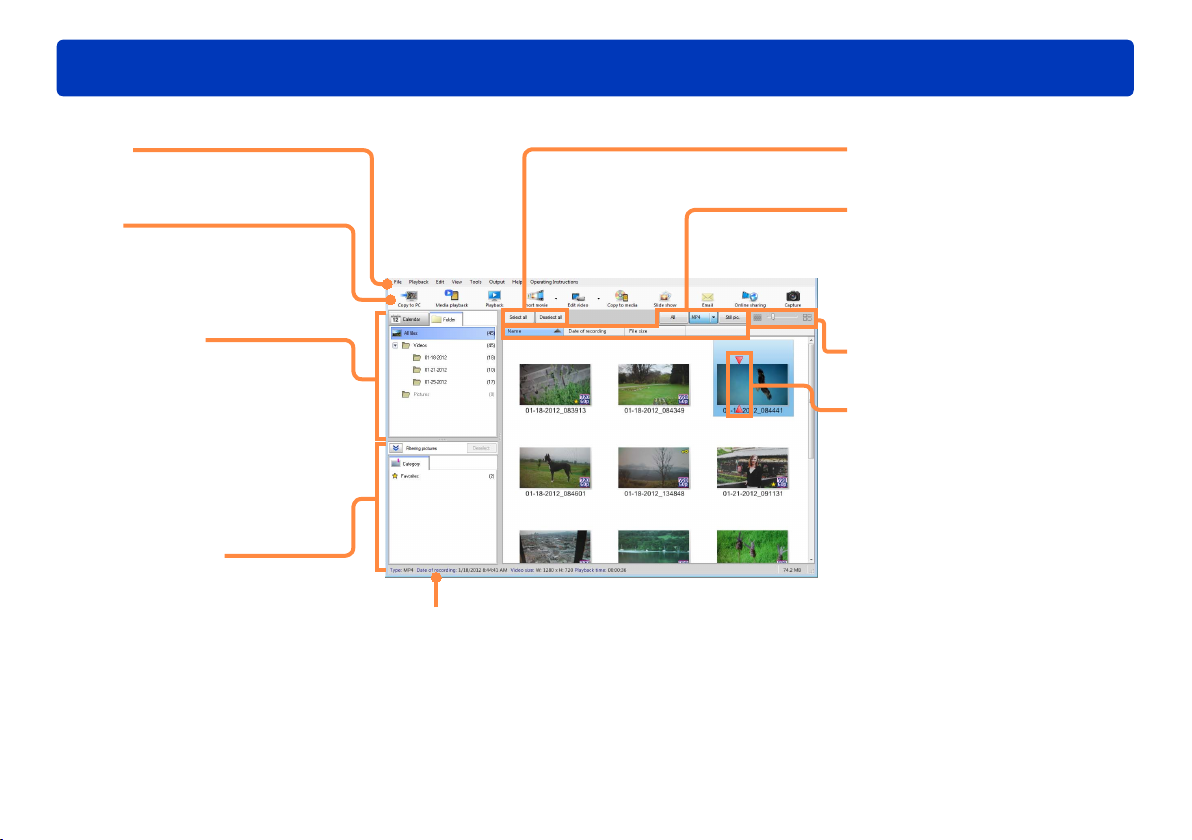
About the main window
Use the main window for general operations such as copying, playback, and editing.
Menu bar
Different functions are arranged
by item.
Tool bar
Buttons are provided for frequently
used functions.
A menu is displayed when some
of these buttons are clicked.
Folder display area
Calendar display area
The folders or calendar items are
displayed in a list. The thumbnails
of videos in the folder or recording
date that is selected here are
displayed in the display area on
the right.
The number of videos is displayed
on the right of the folder or date.
Category search area
You can search for videos that
have been set as favorites.
Information area
Displays data such as information on the thumbnail
selected in the display area and the status of the
currently executed function.
Advanced Features
You can select or deselect all the
displayed thumbnails.
You can change the order of the
thumbnail list in the display area
and specify the data format for the
thumbnails to display.
You can select and display videos
recorded in each format.
You can enlarge or reduce the
thumbnails in the display area.
Preview on thumbnails
When you hold the mouse pointer
over the thumbnail of a motion
picture, the playback marker is
displayed. You can check the
content of the motion picture by
moving the mouse.
25HD Writer WE
About the main window
●In the illustration, picture thumbnail icons for the NTSC region are
shown as an example.
Advanced Features
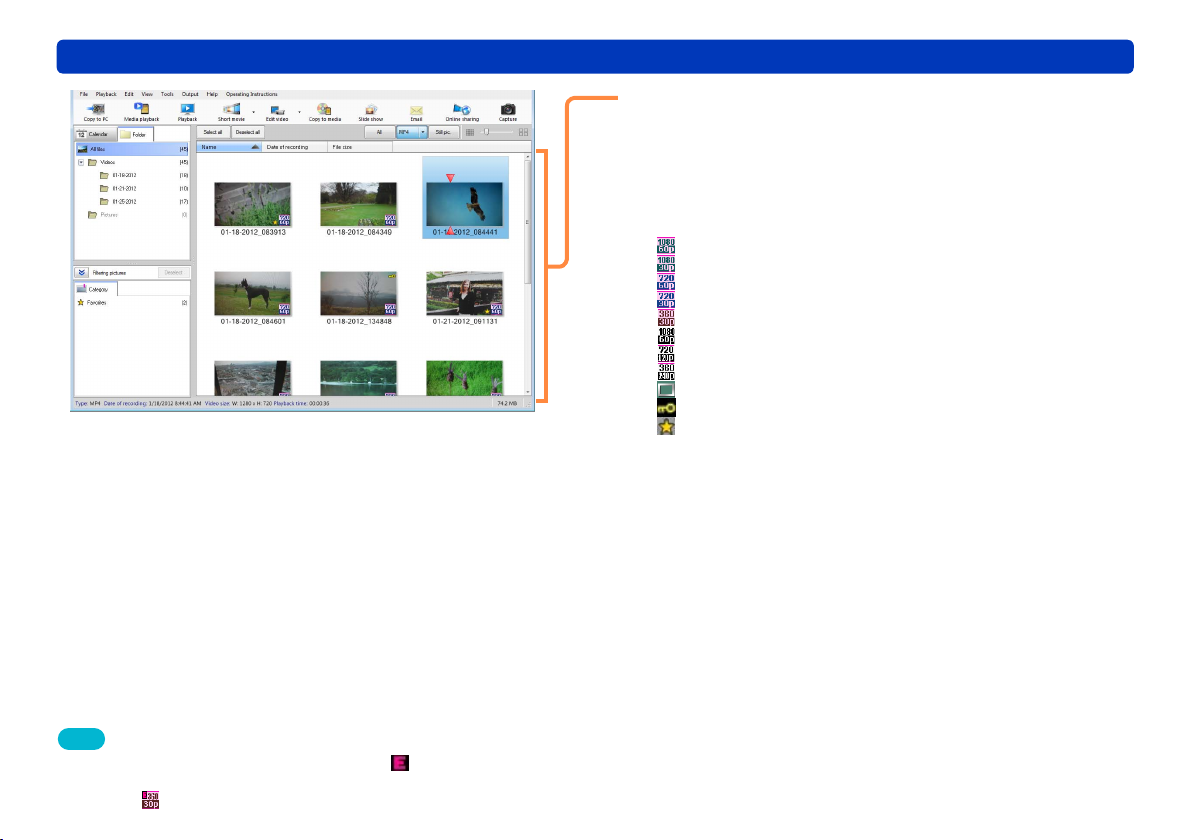
Display area
The thumbnails of the videos specified with the folder or
calendar item on the left are displayed in a list.
●Files that are not compatible are not displayed.
●Icon description
: MP4 1920×1080/60p or 1920×1080/50p motion pictures
: MP4 1920×1080/30p or 1920×1080/25p motion pictures
: MP4 1280×720/60p or 1280×720/50p motion pictures
: MP4 1280×720/30p or 1280×720/25p motion pictures
: MP4 640x360/30p or 640×360/25p motion pictures
: MP4 Slow 1920x1080/60p or 1920x1080/50p motion pictures
: MP4 Slow 1280x720/120p or 1280x720/100p motion pictures
: MP4 Slow 640x360/240p or 640x360/200p motion pictures
: Still pictures
: Protected videos (read-only)
:
Videos set to [Favorite]/[Play back from here (Add to favorites)]
Tips
●For motion pictures edited with this software, is displayed in the
thumbnail icon.
Example:
26HD Writer WE
Switching between window display styles
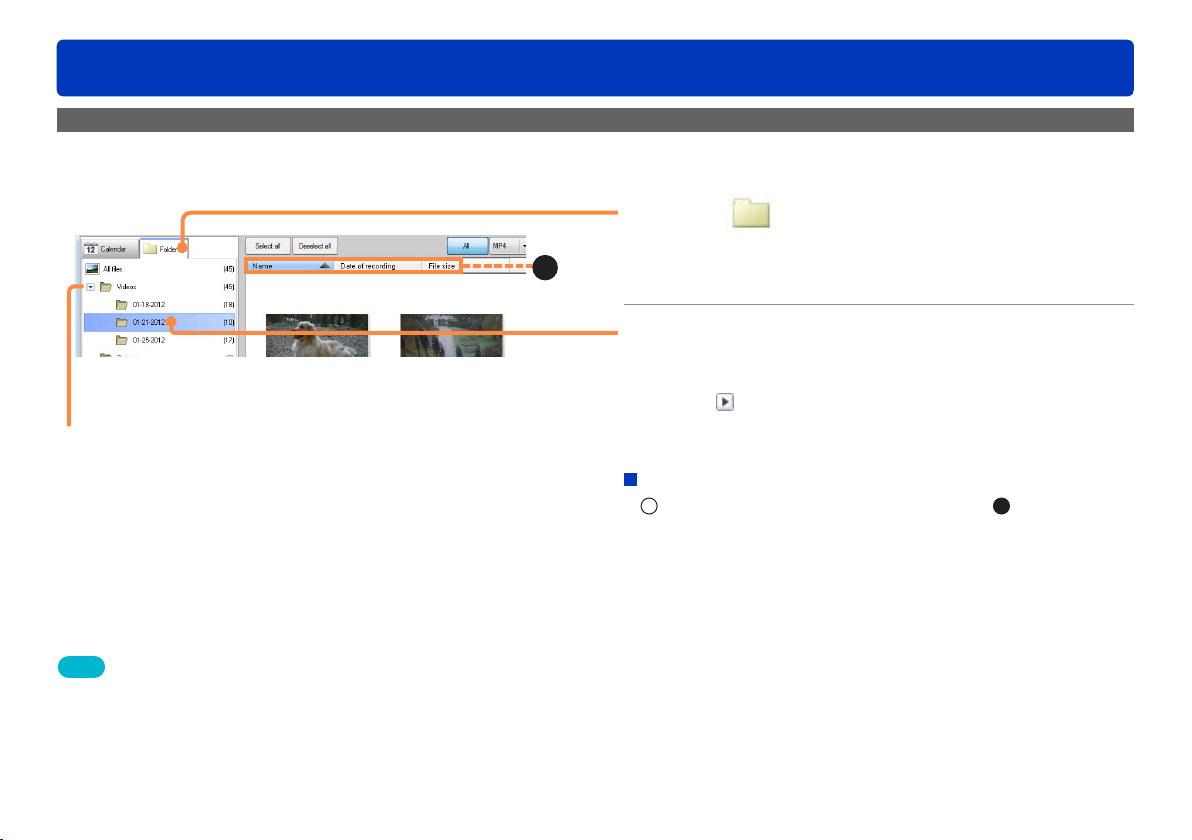
Displaying videos in a folder in list view (Folder display)
Only videos in a registered folder can be displayed.
1
A
2
Registered folder
Changing the video order
1
Advanced Features
Click [Folder].
The window display style is switched.
●You can also switch by selecting [View] → [Display mode] →
[Folder display] from the menu.
Click the folder that you want to view.
The thumbnails of the videos in the folder are displayed in a
list.
●Click or double-click the folder name to expand or hide the
subfolders.
●Double-click a thumbnail to display the Playback window.
Select an item by which to sort the data (A).
[Name]: Displays in name order.
[Date of recording]: Displays in recording date order.
[File size]: Displays in file size order.
●Click again to switch from ascending (▲) to descending (▼)
order.
●You can also change the order by selecting [View] → [Sorting
pictures] from the menu.
Tips
●Preview is performed when the mouse pointer is placed on a motion
picture thumbnail.
●In some thumbnail display sizes, there may be black lines on the right
side of the picture during preview. The display can be corrected by
enlarging or reducing the thumbnail size (→25).
●To select settings for operations such as adding or registering
registered folders (→29).
27HD Writer WE
Switching between window display styles
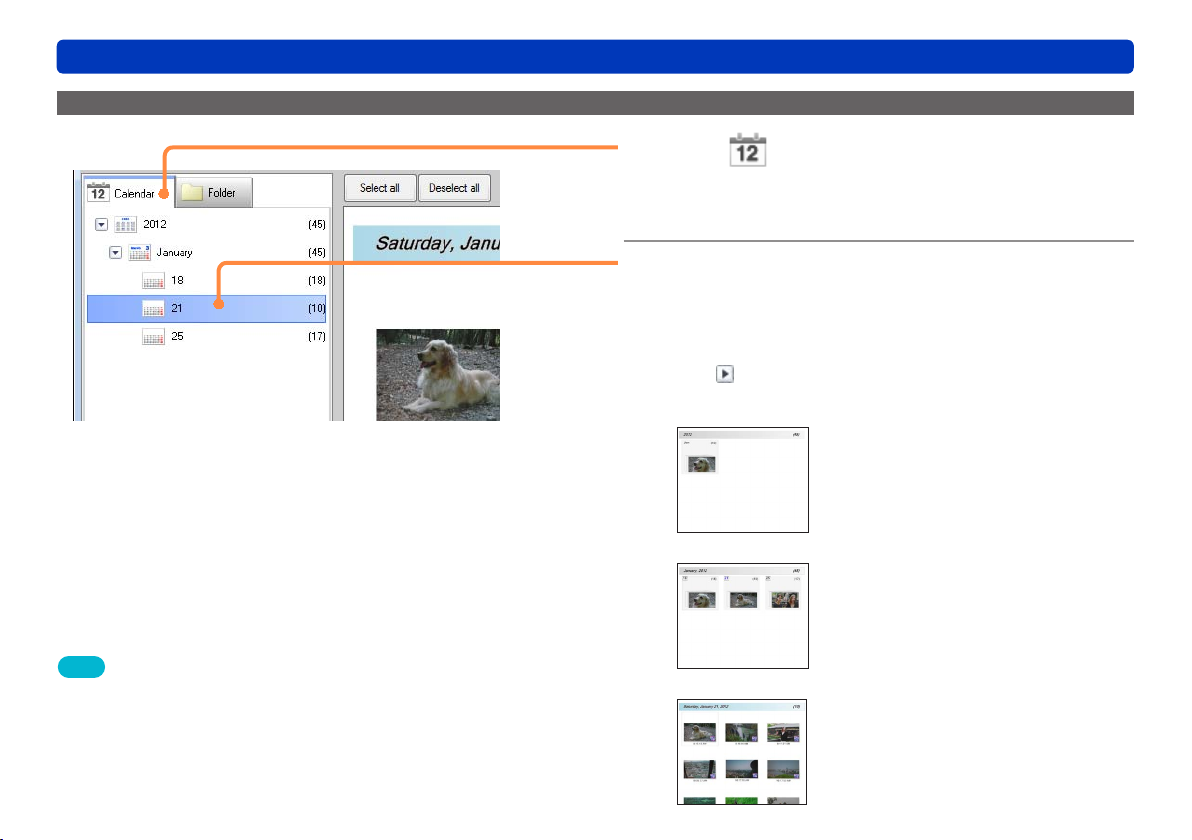
Displaying videos with the same recording date (Calendar display)
Advanced Features
1
Click [Calendar].
The window display style is switched.
●You can also switch by selecting [View] → [Display mode] →
[Calendar display] from the menu.
Click on the displayed year, month, and day.
2
The Calendar display switches to the selected year, month
and day.
●Years, months and days on which videos are not recorded are
not displayed.
●Click or double-click a year or month to expand or hide the
months or days.
●Year Calendar display
Double-click a month that displays a
thumbnail to switch to the month Calendar
display.
Tips
●The update date and time is displayed for videos that do not have
recording date and time information.
●In the year Calendar display or month Calendar display, place the
mouse pointer on a month or day for which a thumbnail is displayed to
display the videos in order that were recorded on that month or day.
●To select settings for operations such as adding or registering
registered folders (→29).
●Month Calendar display
Double-click a day that displays a thumbnail
to switch to the recording date Calendar
display.
●Recording date Calendar display
Double-click a thumbnail to display the
Playback window.
28HD Writer WE
Switching between window display styles
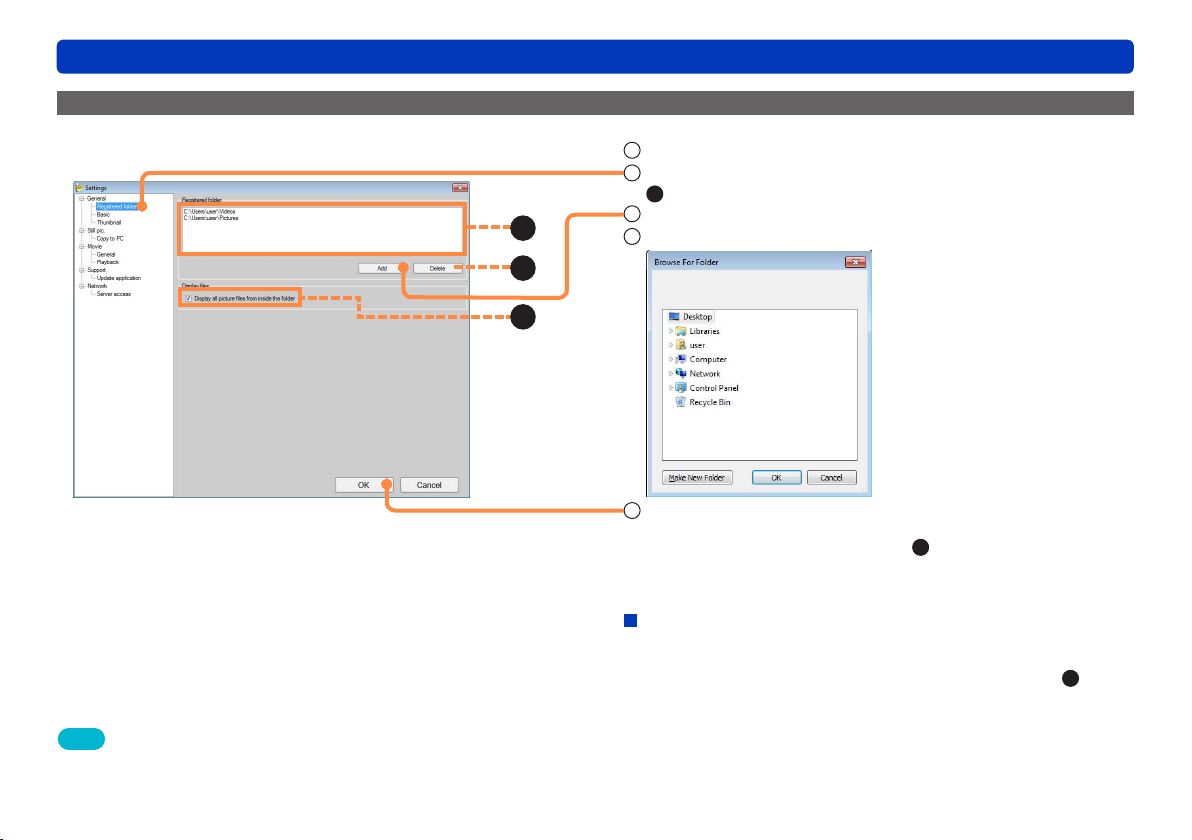
Adding registered folders
Adding or registering display folders.
C
A
B
Advanced Features
1
Select [Tools] → [Settings] from the menu.
2
Click [General] — [Registered folder].
A
: Currently registered folders
3
Click [Add].
4
Select the folder to register and click [OK].
When [OK] is clicked, the settings are applied and the
5
window is closed.
●Select the folder and click [Delete] (
folder.
B
) to delete a registered
Tips
●Even if you delete the registration folder, the folders that are saved on
the PC and the videos inside the folders are not deleted.
●A maximum of 30 registration folders can be added.
Displaying the video files of subfolders
The default setting will display all the files.
●If you do not wish to display all subfolder videos, remove the check
mark from [Display all picture files from inside the folder] (C).
29HD Writer WE
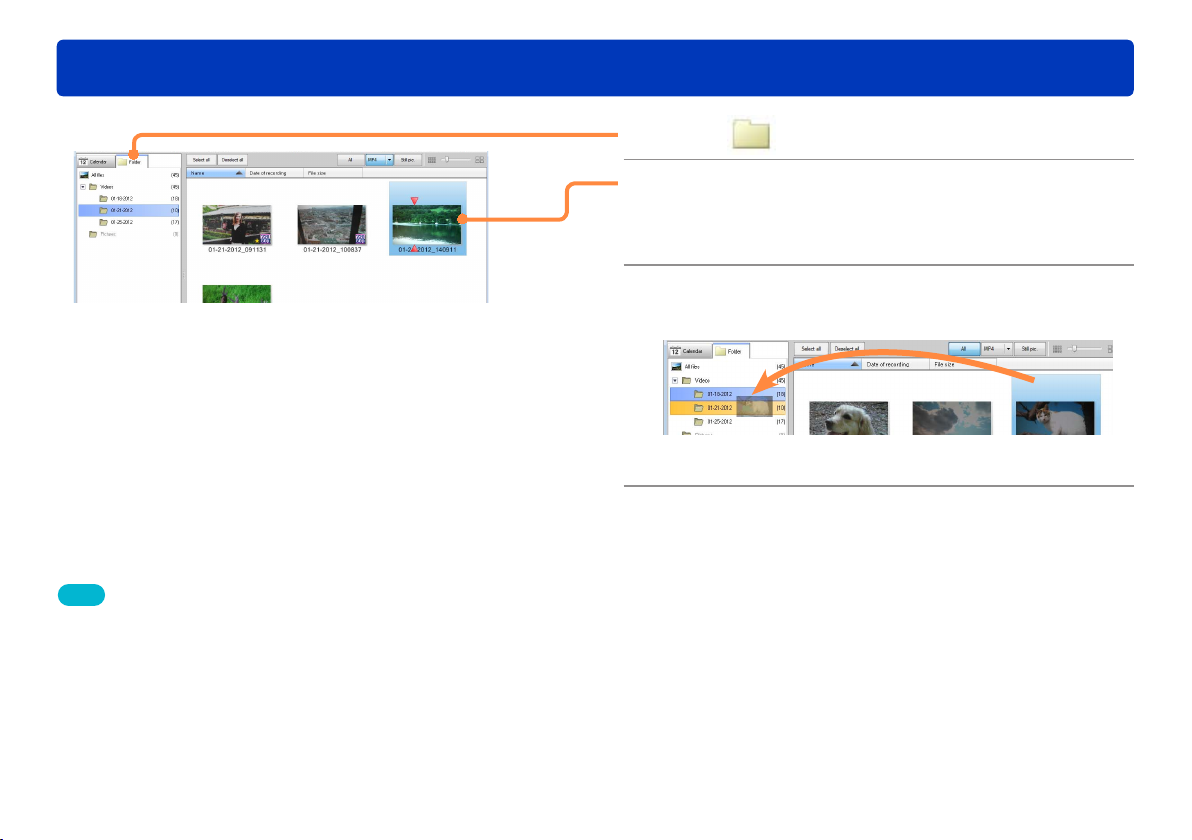
Copying/moving videos
Tips
●Videos can be selected, but they cannot be copied or moved in the
Calendar display.
●Folders can be moved by dragging and dropping subfolders into a
different folder. (To copy, hold [Ctrl] while dragging and dropping.)
●You can also copy videos by selecting a video and using the right-
click menu.
●Videos on SD cards cannot be copied with this operation. Use [Copy
to PC].
●When copying to an SD card, use [Copy to media].
●Select [View] → [Refresh] from the menu to update the display if the
operation result is not reflected.
Advanced Features
Click [Folder].
1
Select the video that you want to copy or
2
move.
●You can select multiple thumbnails.
To move, drag and drop the video to the
3
destination folder.
●To copy, drag and drop while holding down the [Ctrl] key.
When the confirmation message is
4
displayed, click [Yes].
30HD Writer WE
 Loading...