

Panasonic HDC-Z10000 User Manual
Operating Instructions
High Definition Video Camera
Model No. HDC-Z10000
Before use, please read these instructions completely.
VQT3V06

Information for Your Safety
∫ Features
This unit is a single body twin lens type 3D
high-definition video camera. With the
adoption of twin lens format, the
convergence point can be adjusted within
this unit, allowing to record natural and deep
3D video. (l 32)
∫ About the recording format for
recording motion pictures
You can record motion pictures with AVCHD
recording formats using this unit.
(l 29, 109)
≥ AVCHD 3D and AVCHD Progressive
supported.
AVCHD 3D:
It is possible to record powerful, life-like 3D
full high definition images.
A 3D compatible television compatible to the
frame sequential format is required to view
the 3D full high definition images. (l 85)
AVCHD Progressive:
It is possible to record 2D video with highest
quality (1080/50p) possible with this unit.
∫ About the 1080/24p Recording
Mode
When [24p SELECT] is set to [ON], the
images are recorded in 1080/24p. (l 110)
≥ It is not possible to use 1080/24p and
other Recording Formats on the same SD
card. When switching to 1080/24p, please
use a separate SD card.
≥ The scenes recorded in 1080/24p cannot
be played back by the PAL system
equipment.
∫ Indemnity about recorded
content
Panasonic does not accept any
responsibility for damages directly or
indirectly due to any type of problems that
result in loss of recording or edited content,
and does not guarantee any content if
recording or editing does not work properly.
Likewise, the above also applies in a case
where any type of repair is made to the unit.
∫ Cards that you can use with
this unit
SD Memory Card, SDHC Memory Card
and SDXC Memory Card
≥ 4 GB or more Memory Cards that do not
have the SDHC logo or 48 GB or more
Memory Cards that do not have the SDXC
logo are not based on SD Memory Card
Specifications.
≥ Refer to page 15 for more details on SD
cards.
∫ For the purposes of these
operating instructions
≥ The battery pack is referred to as the
“Battery”.
≥ SD Memory Card, SDHC Memory Card
and SDXC Memory Card are referred to
as the “SD card”.
≥ Function that can be used for Recording
Mode:
Function that can be used for Playback
Mode:
≥ Pages for reference are indicated by an
arrow, for example: l 00
- 2 -

Contents
Information for Your Safety...................... 2
Preparation
Names and Functions of Main Parts ....... 5
Power supply........................................... 10
Charging the battery ......................... 11
Inserting/removing the battery........... 12
Charging and recording time............. 13
Connecting to the AC outlet .............. 14
Preparation of SD cards .........................15
Cards that you can use with this
unit .................................................... 15
Inserting/removing an SD card.......... 16
Turning the unit on/off ............................ 17
Selecting a mode ....................................17
Using the LCD monitor/Viewfinder........ 18
Using the LCD monitor...................... 18
How to use the touch screen ............ 19
LCD monitor adjustment ................... 20
Viewfinder adjustment....................... 21
Recording yourself ............................ 21
Setting date and time.............................. 22
Using the menu screen ..........................23
Using with the wireless remote
control...................................................... 24
Operation of direction buttons/
OK button .......................................... 25
Recording
Before recording ..................................... 26
Formatting cards ............................... 27
Selecting a media to record ................... 28
Recording motion pictures ....................29
Convergence point adjustment ......... 32
Recording still pictures .......................... 38
Intelligent Auto Mode/Manual Mode...... 39
Using the zoom .......................................41
Ring zoom ......................................... 41
Image Stabilizer Function ......................43
Focus ....................................................... 44
White Balance ......................................... 45
Iris adjustment ........................................ 47
Manual shutter speed ............................. 49
Audio Input .............................................. 50
Microphone setup ............................. 50
Audio recording................................. 51
Switching Audio Input ....................... 51
Adjusting the audio input level.......... 54
Counter display ...................................... 56
Setting the Time Code ...................... 57
Setting the User Information ............. 58
Setting the Recording Counter ......... 59
USER button ........................................... 60
Setting the USER button................... 60
Using the USER button..................... 61
Functions of the USER button .......... 62
Useful functions ..................................... 68
Quick Start ........................................ 68
Zebra ................................................ 69
Colour Bar Screen ............................ 69
Switching the screen indications/
mode information display .................. 70
Using of Operation Icons ....................... 71
Playback
Motion picture/Still picture playback.... 72
Motion picture playback using
operation icon ................................... 75
Useful functions ..................................... 77
Creating still picture from motion
picture ............................................... 77
Repeat Playback............................... 77
Resuming the previous playback...... 77
Playback scenes by the selected
format................................................ 78
Playing back still pictures by date..... 78
Deleting scenes/still pictures ................ 79
Protecting scenes/still pictures ......... 80
Watching Video/Pictures on your TV.... 81
Connecting with a HDMI cable ......... 83
Listening in 5.1 channel sound ......... 83
Connecting with the AV multi
cable ................................................. 84
Viewing with 3D compatible TV ............. 85
- 3 -

Editing
With a PC ................................................. 87
What you can do with a PC ............... 87
End User License Agreement ........... 89
Operating environment ..................... 91
Installation ......................................... 94
Connecting to a PC ........................... 96
About the PC display ........................ 97
Starting HD Writer XE 1.0 ................. 98
Reading the operating instructions
of the software applications............... 98
If using Mac ....................................... 99
Dubbing ................................................. 100
Dubbing with a Blu-ray disc
recorder, video device, etc. ............. 100
Menu
Using the Menu ..................................... 104
Camera Setup ................................. 104
Recording Setup ............................. 109
Switch and display setting............... 116
Other Functions .............................. 121
Video Setup..................................... 125
Photo Setup .................................... 125
Display
Indications ............................................. 126
Messages ............................................... 128
Others
Troubleshooting.................................... 129
About recovery ................................ 133
Cautions for use.................................... 134
About copyright .................................... 140
Recording modes/approximate
recordable time ..................................... 141
Approximate number of recordable
pictures .................................................. 143
- 4 -

Preparation
5
2
134
6
7
8
9
10
11 12
13
14
15
16
17
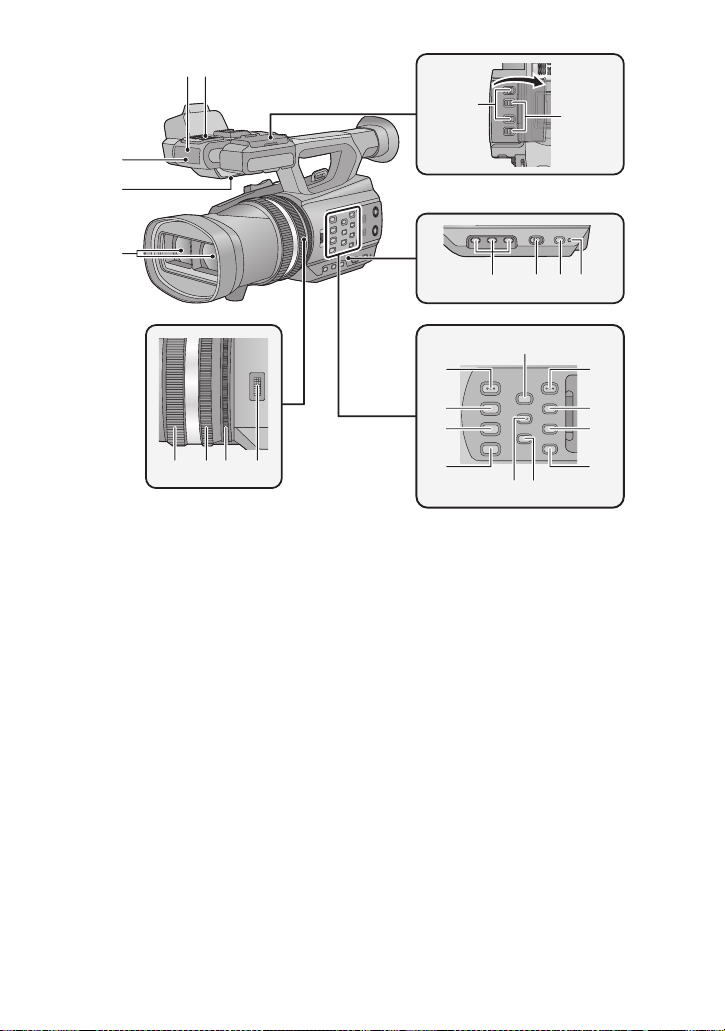
Names and Functions of Main Parts
1 Shoulder strap fixture
2 Sub zoom lever (l 41,120)
≥ This lever functions in the same manner
as the zoom lever.
3 Sub recording start/stop button
l
26, 120)
(
≥ This button functions in the same manner
as the recording start/stop button.
4 Accessory shoe
5 Microphone holder attchment part
(l 8)
6 Audio input terminals 1, 2 (XLR 3 pin)
[AUDIO INPUT1,2] (l 9, 52)
7 Zoom lever [T/W] (In Recording
Mode) (l 41)
Volume lever [rVOLs]/Thumbnail
display switch [ / ] (In Playback
Mode) (l 73)
8 Photoshot button [ ] (l 38)
9 Status indicator (l 17)
10 Power switch (l 17)
11 Recording start/stop button (l 29)
12 Grip belt (l 8)
13 Headphone terminal [ ] (l 71)
- 5 -
14 Camera remote jack [CAM REMOTE]
[CONV.] (2.5 mm super mini jack)
It is possible to adjust the covergence point
connecting with the
≥ Operations on the remote control
(optional) will be given priority.
[CAM REMOTE] (3.5 mm mini jack)
It is possible to adjust the focus or iris
connecting with the
≥ It is not possible to use the remote control
(optional) in the Intelligent Auto Mode.
[ZOOM S/S] (2.5 mm super mini jack)
It is possible to operate zoom operation or
recording start/stop connecting with the
remote control (optional).
≥ Do not connect any equipment except the
remote control (optional) to the camera
remote jack. Brightness of the image may
change or it may not focus when an
equipment other than the remote control
(optional) is connected.
15 Eyepiece corrector lever (l 21)
16 Tripod receptacle (l 9)
17 Inlet (cooling fan) (l 27)
remote
control (optional).
remote
control (optional).
18 Wireless remote control sensor
20
21
22
23
24
29 30 31 32
25 26 27 28
34
33
40
41
42
43
35
36
37
38 39
18
19
(l 25)
19 Internal microphones
20 Recording lamp (l 121)
21 Speaker
22 Lens (l 9)
23 INPUT 1, 2 (LINE/MIC) switches
(l 52)
24 INPUT 1, 2 (+48V) switches (l 52)
25 User 1, 2, 3 buttons [USER1, USER2,
USER3] (l 60)
26 Intelligent auto/Manual switch
[iA/MANU] (l 39)
27 Quick start button [QUICK START]
(l 68)
28 Quick start lamp (l 68)
29 Focus ring (l 44)
30 Zoom ring (l 41)
31 Iris ring (l 47)
32 Convergence dial [CONV.] (l 33)
33 3D guide button [3D GUIDE] (l 34)
34 Iris auto/Manual button [IRIS A/M]
(l 47)
35 Focus auto/Manual/¶ button
[FOCUS A/M/¶] (l 44)
36 Optical image stabilizer button
[O.I.S.] (l 43)
37 White balance button [W.B.] (l 45)
38 Zebra button [ZEBRA] (l 69)
39 Colour Bar Screen button [BARS]
(l 69)
40 Menu button [MENU] (l 23)
41 Display/Mode check button [DISP/
MODE CHK] (l 61, 70)
42 Counter button [COUNTER] (l 56)
43 Counter reset button [RESET]
(l 58, 59)
- 6 -
47
48
49
50
51
52
53
45
44
46
54 55
56
58 5957
60
61
62
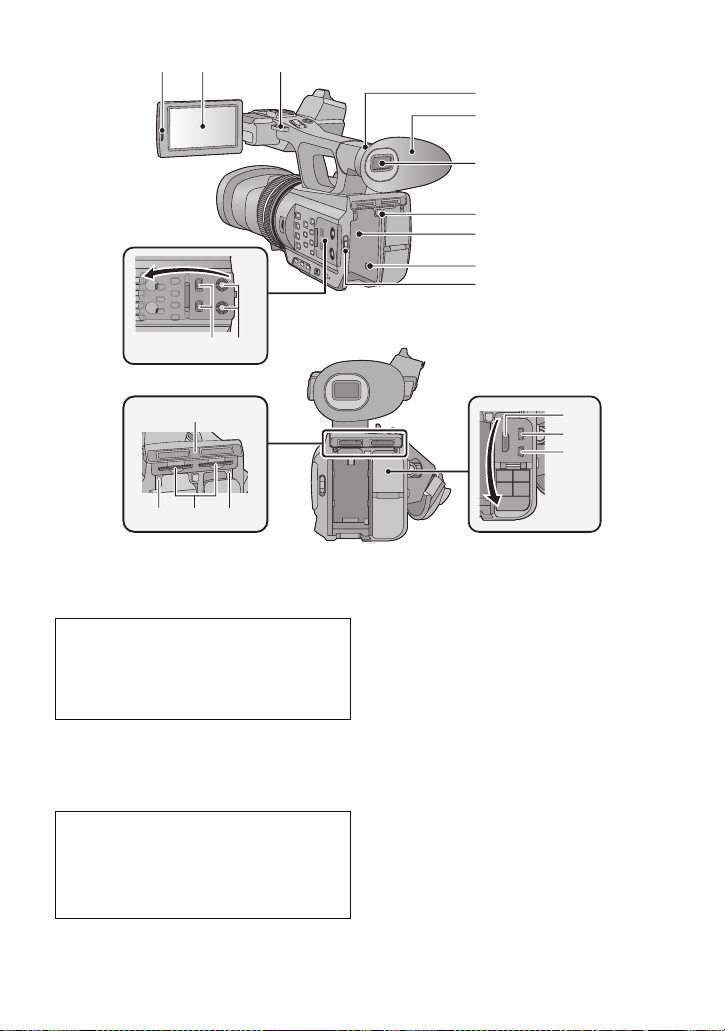
44 LCD monitor extract part [PULL]
(l 18)
45 LCD monitor (Touch screen) (l 19)
Due to limitations in LCD production
technology, there may be some tiny bright
or dark spots on the LCD monitor screen.
However, this is not a malfunction and
does not affect the recorded picture.
46 Shoulder strap fixture
47 Eye cup attachment part (l 8)
48 Eye cup (l 8)
49 Viewfinder (l 21)
Due to limitations in LCD production
technology, there may be some tiny bright
or dark spots on the viewfinder screen.
However, this is not a malfunction and
does not affect the recorded picture.
50 Battery release button [PUSH] (l 12)
51 Battery holder (l 12)
52 DC input terminal [DC IN] (l 14)
≥ Do not use any other AC adaptors except
the supplied one.
53 Mode switch (l 17)
54 CH1, CH2 switches [CH1, CH2] (l 52)
55 Audio control knobs [CH1, CH2]
(l 55)
56 SD Card slot cover (l 16)
57 Access lamp (card 1) (l 16)
58 Card slot 1 (left)/
Card slot 2 (right) (l 16)
59 Access lamp (card 2) (l 16)
60 HDMI connector [HDMI] (l 81)
61 AV multi connector [AV MULTI]
(l 81, 103)
≥ Use the AV multi cable (only the supplied
cable).
62 USB terminal [USB 2.0] (l 96, 101)
- 7 -
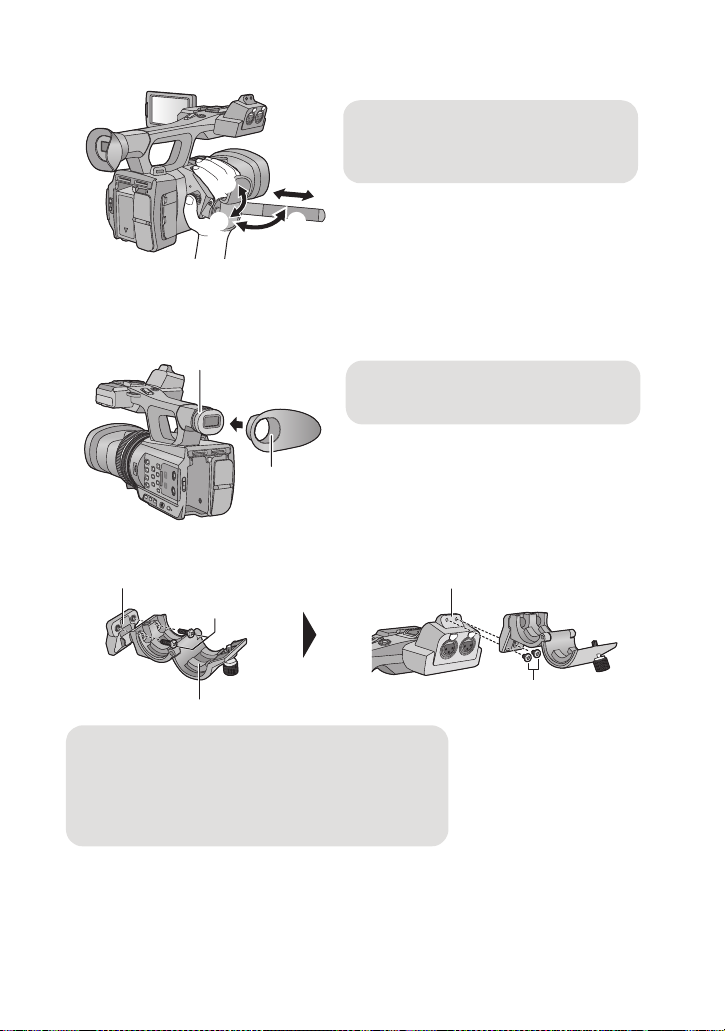
∫ Adjust the length of the grip belt so that it fits your hand.
1, 2 Flip the belt cover and the belt.
3 Adjust the length.
4, 5 Replace the belt.
A Notch
B Protrusion
C Microphone holder adaptor
D Microphone holder
E Microphone holder screws (12 mm)
F Microphone holder attchment part
G Microphone holder screws (6 mm)
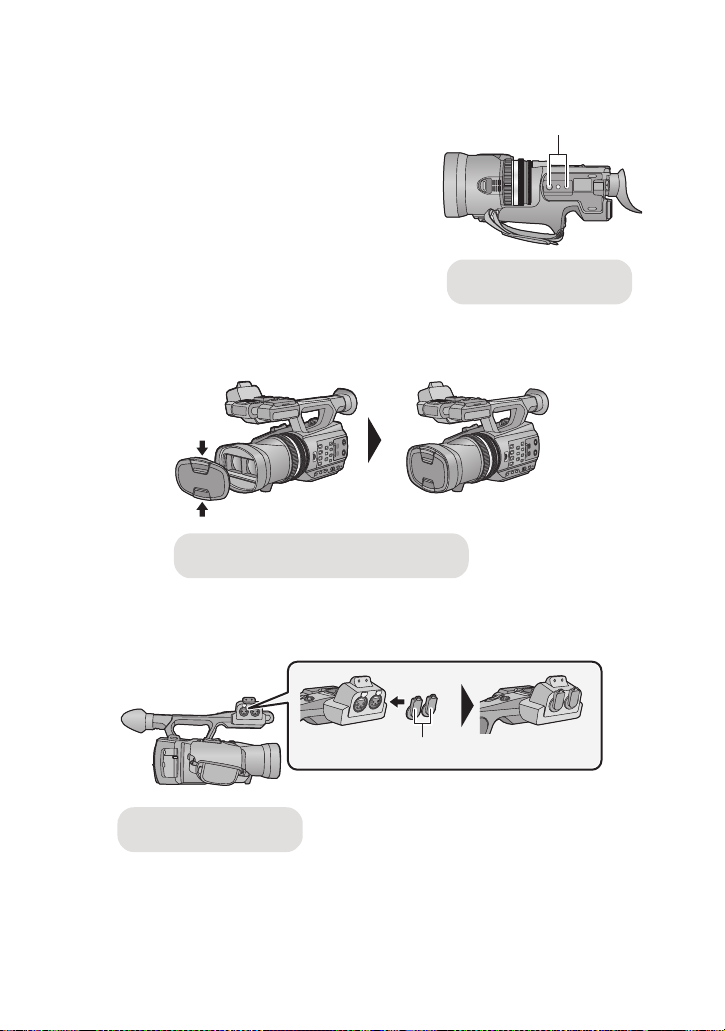
∫ Attaching the eye cup
Attach by aligning the notch of the eye cup attachment part with the protrusion at the inside of
the eye cup.
∫ Attaching the microphone holder
≥ Attach by using a commercially available screw driver.
≥ When attaching an external microphone (optional) to the microphone holder attchment
part, use the supplied microphone holder and microphone holder adaptor.
≥ The microphone holder is set up so that a 21 mm external microphone can be attached.
Check in advance whether the microphone you wish to use can be attached.
- 8 -
≥ When attaching the microphone holder and the microphone holder adaptor, be sure to
A Tripod receptacle
Attach or remove it by pinching on it.
B INPUT terminal cap
tighten the screws firmly even though you might hear a squeaking sound.
∫ Attaching the tripod
≥ There are tripod mounting holes that are
compatible with 1/4-20UNC and 3/8-16UNC
screws. Use the size that matches the diameter of
the tripod’s fixing screw.
≥ If you attach a tripod which has 5.5 mm screw or
larger, it may damage this unit.
∫ Attaching the lens cap
Protect the lens surface with the lens cap while the unit is not used.
∫ Attaching the INPUT terminal cap
Attach the INPUT terminal cap while the audio input terminals 1, 2 (XLR 3 pin) is not used.
- 9 -

Preparation
Power supply
∫ About batteries that you can use with this unit
The battery that can be used with this unit is CGA-D54s.
It has been found that counterfeit battery packs which look very similar to the
genuine product are made available to purchase in some markets. Some of these
battery packs are not adequately protected with internal protection to meet the
requirements of appropriate safety standards. There is a possibility that these
battery packs may lead to fire or explosion. Please be advised that we are not liable
for any accident or failure occurring as a result of use of a counterfeit battery pack.
To ensure that safe products are used we would recommend that a genuine
Panasonic battery pack is used.
- 10 -
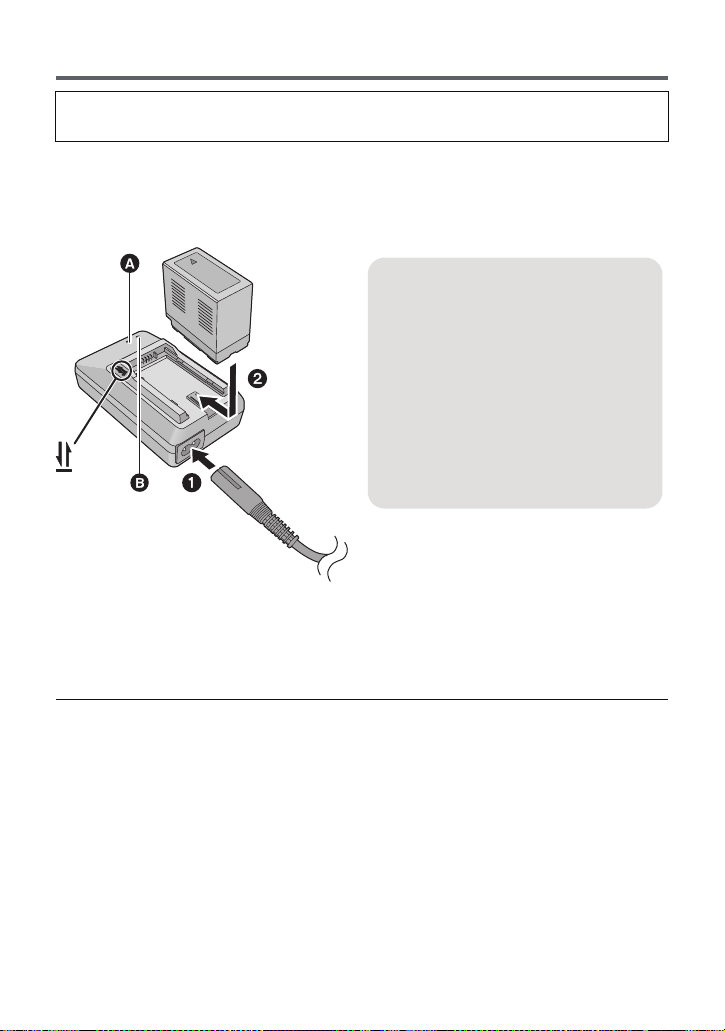
Charging the battery
Charging lamp [CHARGE] A
Lights up:
Charging (Battery charging time: l 13)
Goes off:
Charging completed
Flashing:
Be sure to connect the unit correctly
(l 136)
Power lamp B
≥ This will light up when the AC cable is
connected.
When this unit is purchased, the battery is not charged. Charge the battery fully
before using this unit for the first time.
Important:
≥ Do not use the AC cable with any other equipment as it is designed only for this unit.
Also, do not use the AC cable from other equipment with this unit.
≥ It is recommended to charge the battery in a temperature between 10 oC and 30 oC.
(The battery temperature should also be the same.)
≥ Insert the plugs as far as they will go.
1 Connect the AC cable to the battery charger and the AC outlet.
2 Insert the battery into the battery charger by aligning the arrows.
≥ We recommend using Panasonic batteries (l 13).
≥ If you use other batteries, we cannot guarantee the quality of this product.
≥ Do not heat or expose to flame.
≥ Do not leave the battery(ies) in an automobile exposed to direct sunlight for a long period
of time with doors and windows closed.
- 11 -
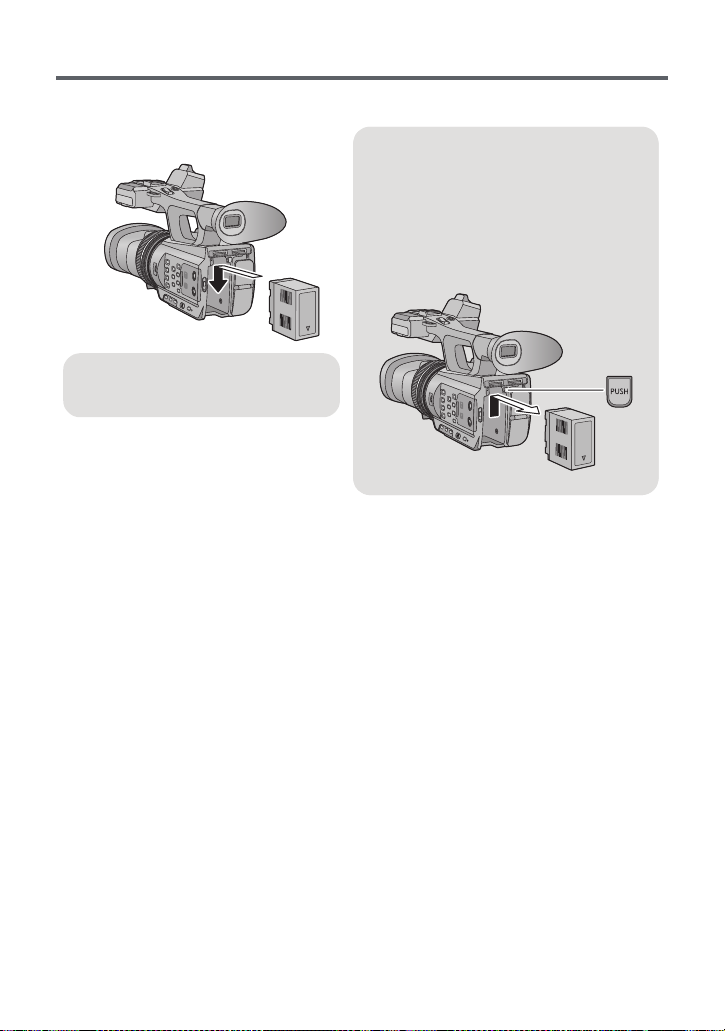
Inserting/removing the battery
Removing the battery
Make sure that the power switch is set to
OFF and the status indicator is turned off,
and then remove by holding onto it taking
care not to drop. (l 17)
While pushing the PUSH button, remove
the battery.
Insert the battery until it clicks and
locks.
Install the battery by inserting it in the direction shown in the figure.
- 12 -
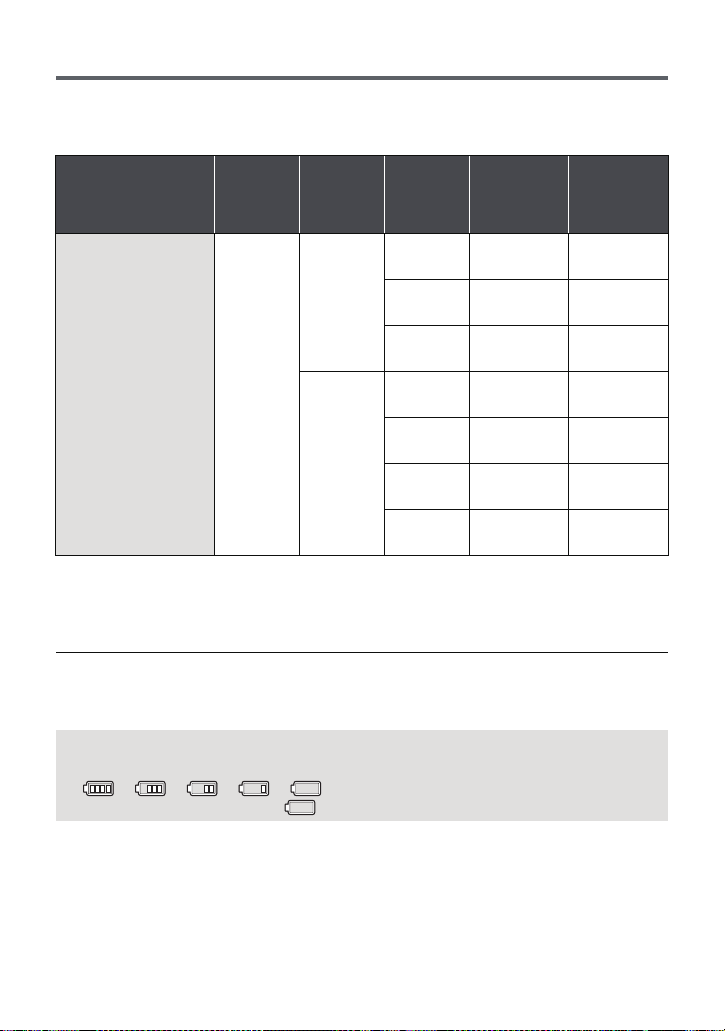
Charging and recording time
∫ Charging/Recording time
≥ Temperature: 25 oC/humidity: 60%RH
≥ When using the viewfinder (times in parentheses are when using the LCD monitor)
Battery model
number
[Voltage/Capacity
(minimum)]
Supplied battery/
CGA-D54s (optional)
[7.2 V/5400 mAh]
≥ These times are approximations.
≥ The indicated charging time is for when the battery has been discharged completely.
Charging time and recordable time vary depending on the usage conditions such as
high/low temperature.
Charging
time
5h30min
3D/2D
Recording
Mode
3D
Recording
Mode
2D
Recording
Mode
Recording
format
1080/50i
1080/25p
1080/24p
1080/50p
1080/25p
1080/24p
PH, HA, HE6h40min
Maximum
continuously
recordable
time
4h45min
(4 h 20 min)
4h50min
(4 h 20 min)3h(2h40min)
4h50min
(4 h 20 min)3h(2h40min)
6h15min
(5 h 50 min)
7h
(6 h 20 min)
7h
(6 h 20 min)
(6h5min)
Actual
recordable
time
2h55min
(2h40min)
3h55min
(3h40min)
4h20min
(3h55min)
4h20min
(3h55min)
4h10min
(3h45min)
≥ The actual recordable time refers to the recordable time when repeatedly starting/stopping
recording, turning the unit on/off, moving the zoom lever etc.
≥ The batteries heat up after use or charging. This is not a malfunction.
Battery capacity indication
≥ The display changes as the battery capacity reduces.
####
If the battery discharges, then will flashes red.
- 13 -
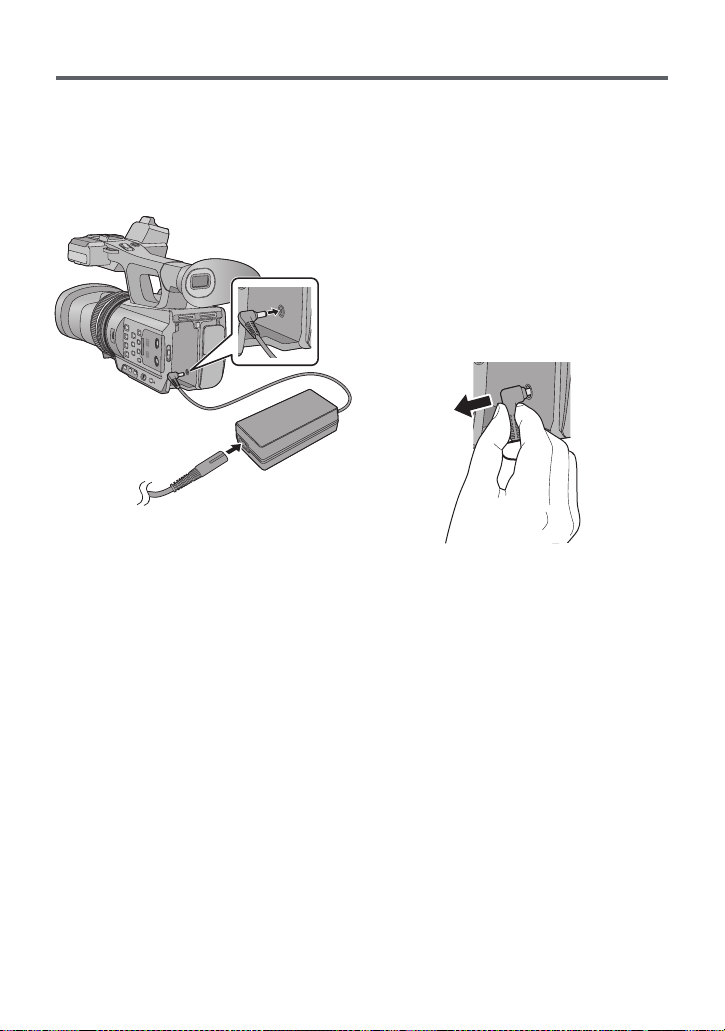
Connecting to the AC outlet
The unit is in the standby condition when the AC adaptor is connected. The primary circuit is
always “live” as long as the AC adaptor is connected to an electrical outlet.
Important:
≥ Use the supplied AC adaptor. Do not use the AC adaptor of another device.
≥ Do not use the AC cable with any other equipment as it is designed only for this unit.
Also, do not use the AC cable from other equipment with this unit.
1 Connect the AC cable to the
AC adaptor and the AC outlet.
2 Connect the AC adaptor to the
DC input terminal [DC IN].
∫ Removing the AC adaptor
≥ Insert the plugs as far as they will go.
≥ Make sure to set the power switch to OFF
and the status indicator is turned off when
disconnecting the AC adaptor.
- 14 -
Preparation
32
Preparation of SD cards
The unit can record motion pictures or still pictures to an SD card.
This unit (an SDXC compatible device) is compatible with SD Memory Cards, SDHC
Memory Cards and SDXC Memory Cards. When using an SDHC Memory Card/SDXC
Memory Card with other equipment, check the equipment is compatible with these
Memory Cards.
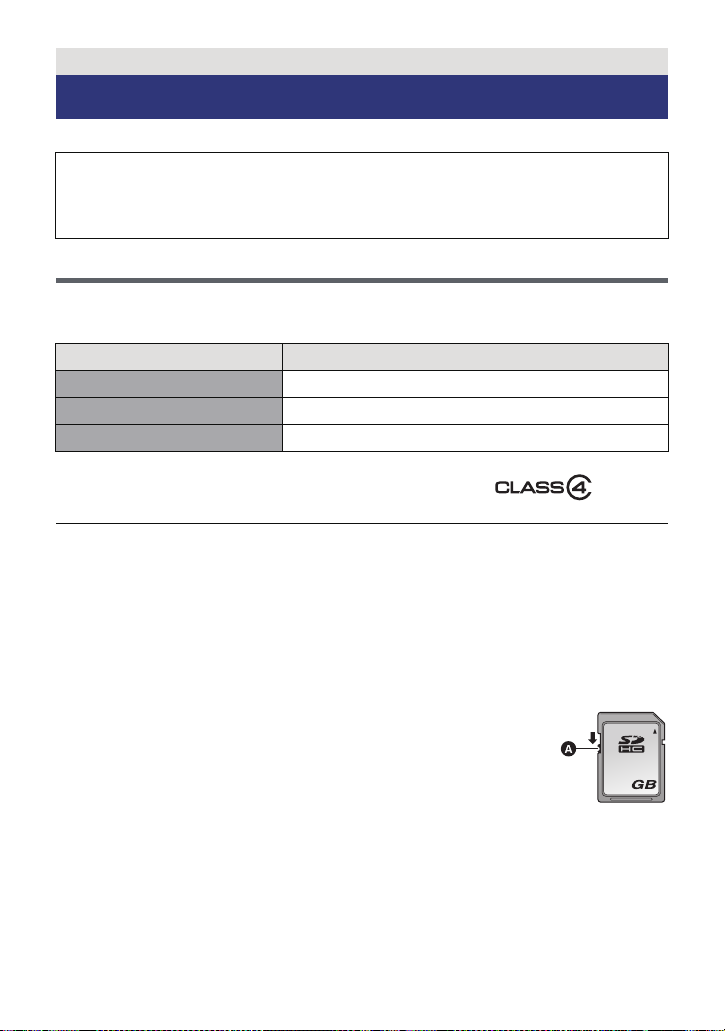
Cards that you can use with this unit
Use SD cards conforming to Class 4 or higher of the SD Speed Class Rating* for
motion picture recording.
Card type Capacity
SD Memory Card 512 MB/1 GB/2 GB
SDHC Memory Card 4GB/6GB/8GB/12GB/16GB/24GB/32GB
SDXC Memory Card 48 GB/64 GB
* SD Speed Class Rating is the speed
standard regarding continuous writing.
Check via the label on the card, etc.
≥ Please confirm the latest information about SD Memory Cards/SDHC Memory Cards/
SDXC Memory Cards that can be used for motion picture recording on the following
website.
http://panasonic.jp/support/global/cs/e_cam
(This website is in English only.)
≥ Operation of the SD Memory Cards 256 MB or less is not guaranteed. Also, the SD
Memory Card 32 MB or less cannot be used for the motion picture recording.
≥ 4 GB or more Memory Cards that do not have the SDHC logo or 48 GB or more Memory
Cards that do not have the SDXC logo are not based on SD Memory Card Specifications.
≥ When the write-protect switch A on SD card is locked, no recording,
deletion or editing will be possible on the card.
≥ Keep the Memory Card out of reach of children to prevent swallowing.
e.g.:
- 15 -

Inserting/removing an SD card
When using a non Panasonic SD card for the first time, or one which was previously used
on another equipment, it is necessary to format the SD card. (l 27) When the SD card is
formatted, all of the recorded data is deleted. Once the data is deleted, it cannot be
restored.
Caution:
Check that the access lamp has gone off.
Access lamp A
≥ When this unit is accessing the SD
card, the access lamp lights up.
1 Open the SD card slot cover
and insert (remove) the SD
card into (from) the card slot
B.
≥ One SD card can be inserted into each of
the card slot 1 and the card slot 2.
≥ Face the label side C in the direction
shown in the illustration and press it
straight in as far as it will go.
≥ Press the centre of the SD card and then
pull it straight out.
2 Securely close the SD card slot
cover.
≥ Securely close it until it clicks.
≥ Do not touch the terminals on the back of
the SD card.
≥ Do not apply strong shocks, bend, or drop
the SD card.
≥ Electrical noise, static electricity or the
failure of this unit or the SD card may
damage or erase the data stored on the
SD card.
≥ When the card access lamp is lit, do not:
jRemove the SD card
jTurn the unit off
jInsert and remove the USB cable
jExpose the unit to vibrations or shock
Performing the above while the lamp is on
may result in damage to data/SD card or
this unit.
≥ Do not expose the terminals of the SD
card to water, dirt or dust.
≥ Do not place SD cards in the following
areas:
jIn direct sunlight
jIn very dusty or humid areas
jNear a heater
jLocations susceptible to significant
difference in temperature (condensation
can occur.)
jWhere static electricity or
electromagnetic waves occur
≥ To protect SD cards, return them to their
cases when you are not using them.
≥ About disposing of or giving away the SD
card. (l 138)
- 16 -
Preparation
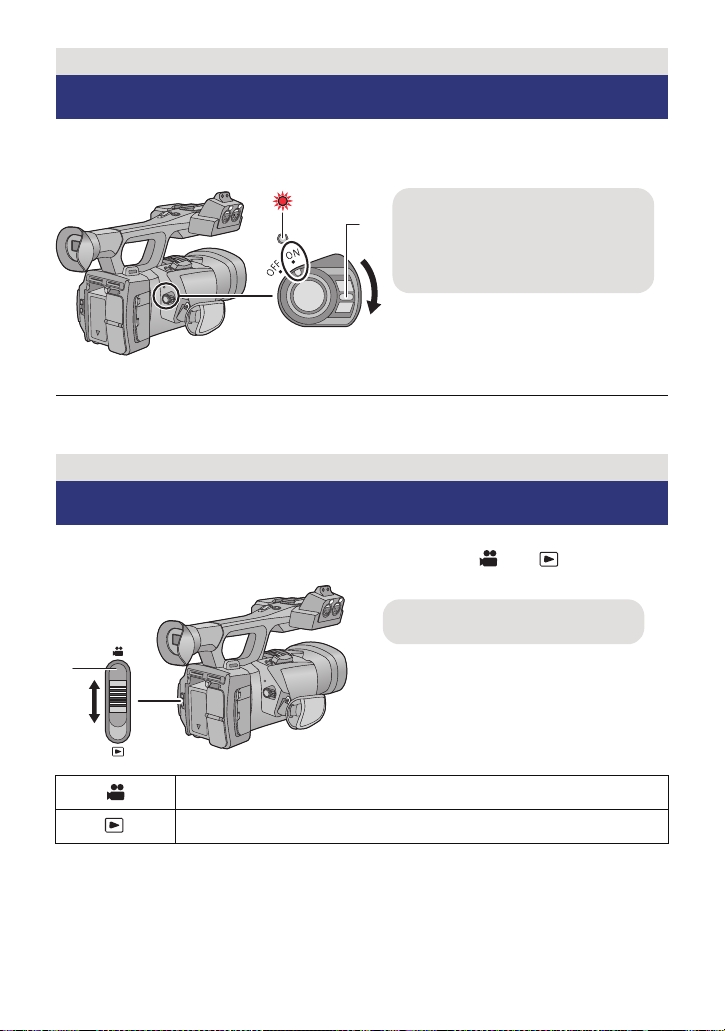
To turn off the unit
Set the power switch to OFF while
pressing the lock release button.
The status indicator goes off.
C Mode switch
Turning the unit on/off
Set the power switch to ON while pressing the lock release button B to
turn on the unit.
A The status indicator lights on.
≥ To turn on the unit again after the [ECONOMY (BATT)] or [ECONOMY (AC)] is activated,
set the power switch to OFF once, and then to ON again. (l 122)
Preparation
Selecting a mode
Change the mode to recording or playback.
Operate the mode switch to change the mode to or .
Recording Mode (l 29, 38)
Playback Mode (l 72)
- 17 -
Preparation
Using the LCD monitor/Viewfinder
The viewfinder is turned off and the LCD monitor is turned on when the LCD monitor is
extracted. The viewfinder is turned on when the LCD monitor is retracted.
It is possible to check the images recorded during 3D recording or scenes recorded in 3D as
3D when LCD monitor is used.
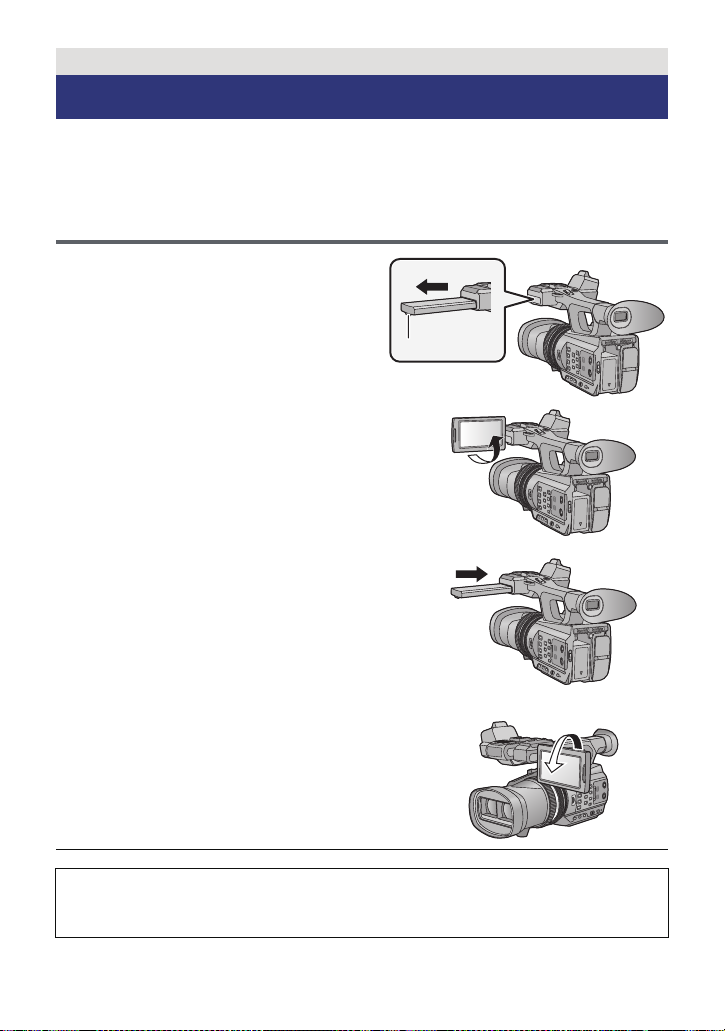
Using the LCD monitor
1 Extract the LCD monitor in the
direction as indicated in the
figure.
≥ Hold the LCD monitor extract part A when
pulling out.
2 Rotate to the position that is easy to
view.
To retract the LCD monitor
Retract as shown in the figure with the LCD facing
downward.
Range of rotation of the LCD monitor
≥ It can rotate up to 270o B towards the lens.
≥ There are differences in the way that different people experience 3D images.
Check from a position directly in front of and at around 30 cm from the LCD
monitor, where you can easily see picture.
- 18 -
How to use the touch screen
You can operate by directly touching the LCD monitor (touch screen) with your finger.
It is easier to use the stylus pen (supplied) for detailed operation or if it is hard to operate with
your fingers.
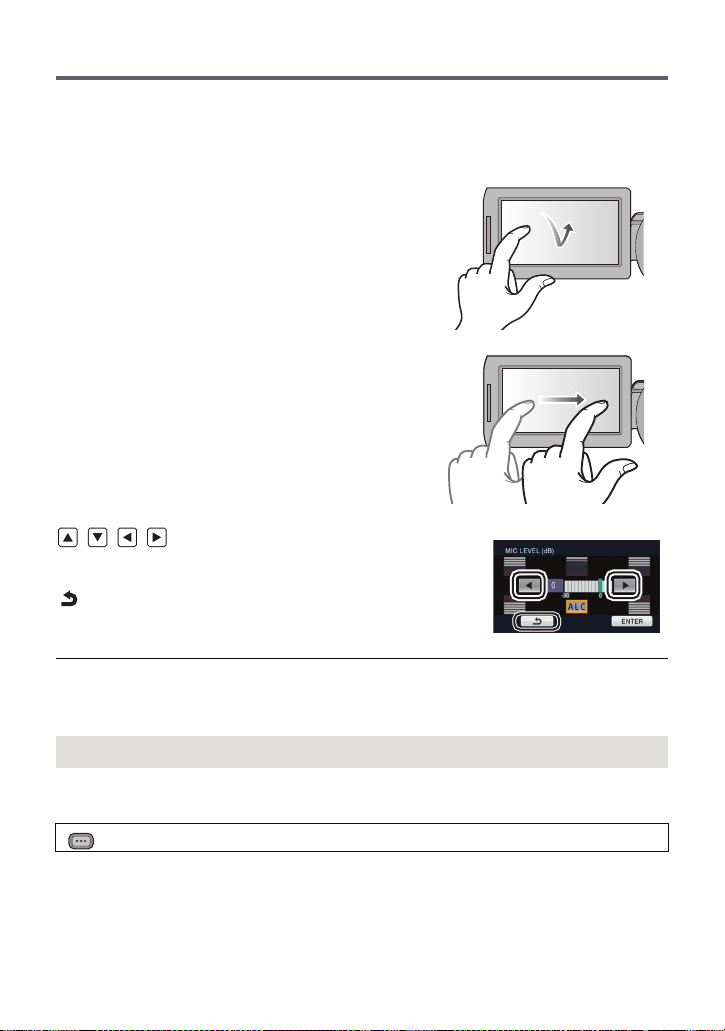
∫ Touch
Touch and release the touch screen to select icon or
picture.
≥ Touch the centre of the icon.
≥ Touching the touch screen will not operate while
you are touching another part of the touch screen.
∫ Slide while touching
Move your finger while pressing on the touch screen.
∫ About the operation icons
///:
These icons are used to switch the menu and thumbnail
display page, for item selection and setting etc.
:
Touch to return to the previous screen such as when
setting menus.
≥ Do not touch the LCD monitor with hard pointed tips, such as ball point pens.
≥ Perform the touch screen calibration when the touch is not recognised or wrong location is
recognised.
[CALIBRATION]
Perform the touch screen calibration if a different object to the one touched is selected.
1 Select the menu. (l 23)
MENU
: [OTHER FUNCTION] # [CALIBRATION] # [YES]
≥ Touch [ENTER].
2Touch the [_] that appears on the screen with the supplied stylus pen.
≥ Touch [_] in sequence (up left # down left # down right # up right # centre).
3 Touch [ENTER].
- 19 -
LCD monitor adjustment
MENU
≥ These settings will not affect the images actually recorded.
[POWER LCD]
This makes it easier to view the LCD monitor in bright places including outdoors.
Select the menu. (l 23)
MENU
: [SW & DISP SETUP] # [POWER LCD]# [ON]
≥ It cannot be set while 3D is displayed.
≥ When the AC adaptor is in use, [POWER LCD] is set to [ON] automatically.
≥ Recordable time with the battery is shortened when the LCD is made brighter.
[LCD SET]
It adjusts brightness and colour density on the LCD monitor.
1 Select the menu. (l 23)
: [SW & DISP SETUP] # [LCD SET] # [YES]
2 Touch the desired setting item.
[COLOUR]: Colour level of the LCD monitor
[BRIGHTNESS]: Brightness of the LCD monitor
[CONTRAST]: Contrast of the LCD monitor
3 Touch / to adjust settings.
4 Touch [ENTER].
≥ Touch [EXIT] to exit the menu screen.
- 20 -
Viewfinder adjustment
MENU
≥ These settings will not affect the images actually recorded.
Adjusting the field of view
It adjusts the field of view to show the image on the viewfinder clearly.
1 Adjust the viewfinder to suit your vision so
that you can see the display images clearly.
≥ Be careful not to trap your fingers when moving the
viewfinder.
≥ The viewfinder can be lifted vertically up to
approximately 90o.
≥ Retract the LCD monitor and turn on the viewfinder.
2 Adjust the focus by operating the eyepiece
corrector lever.
[EVF SET]
Brightness of the viewfinder can be switched.
Select the menu. (l 23)
: [SW & DISP SETUP] # [EVF SET] # [BRIGHT]/[NORMAL]/[DARK]
[EVF COLOUR]
The recording images or playback images on the viewfinder can be selected between colour/
black and white.
Select the menu. (l 23)
MENU
: [SW & DISP SETUP] # [EVF COLOUR]# [ON] or [OFF]
[ON]: Displayed in colour
[OFF]: Displayed in black and white
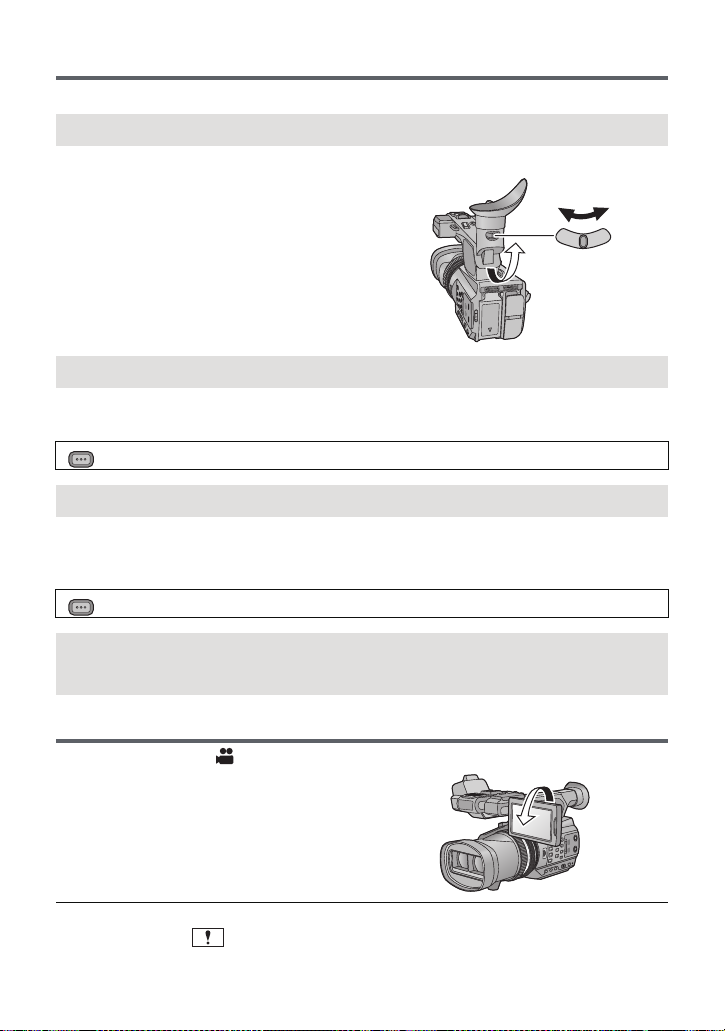
Recording yourself
≥ Change the mode to .
Rotate the LCD monitor towards the lens
side.
≥ Displaying during the recording yourself can
be switched by setting [SELF SHOOT].
(l 120)
≥ Only some indications will appear on the screen when the [SELF SHOOT] is set to
[MIRROR]. When
and check the warning/alarm indication. (l 128)
appears, return the direction of the LCD monitor to normal position
- 21 -
Preparation
MENU
Setting date and time
When the unit is turned on for the first time, a message asking you to set the date and time
will appear.
Select [YES] and perform steps 2 to 3 below to set the date and time.
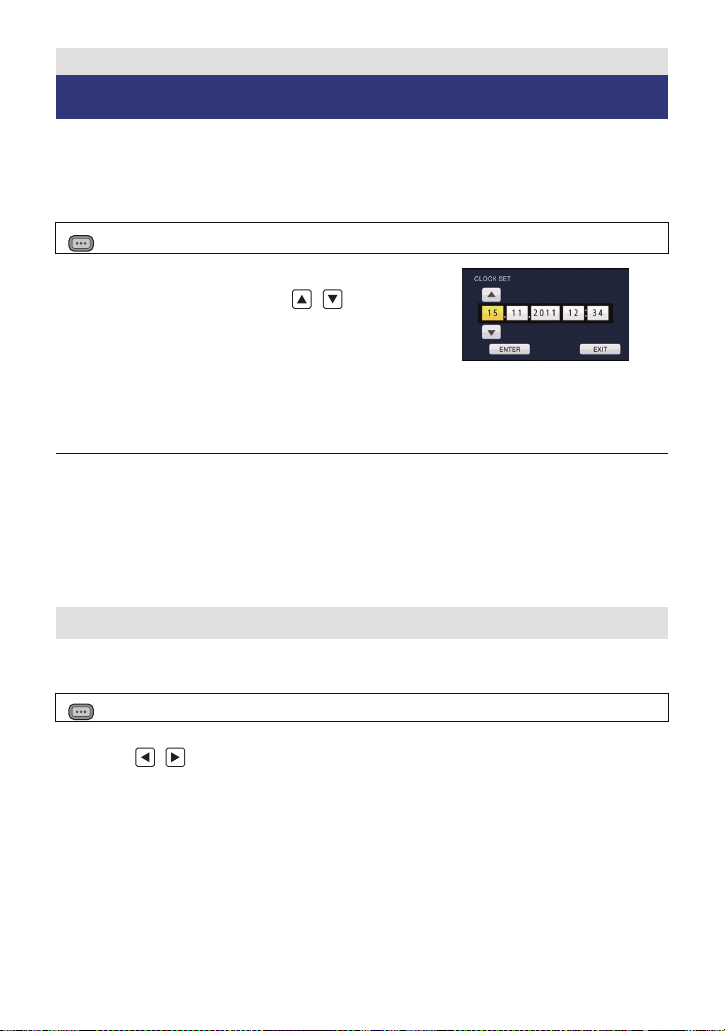
1 Select the menu. (l 23)
: [OTHER FUNCTION] # [CLOCK SET] # [YES]
2 Touch the date or time to be set, then set
the desired value using / .
≥ The year can be set between 2000 and 2039.
≥ The 24-hour system is used to display the time.
3 Touch [ENTER].
≥ The screen may switch to the setting screen for the [TIME ZONE]. Touch the screen and
set the [TIME ZONE].
≥ Touch [EXIT] to complete the setting.
≥ The date and time function is driven by a built-in lithium battery.
≥ If the time display becomes [- -], the built-in lithium battery needs to be charged. To
recharge the built-in lithium battery, connect the AC adaptor or attach a charged battery to
this unit. Leave the unit as it is for approx. 24 hours and the battery will maintain the date
and time for approx. 6 months. (The battery is still being recharged even if the unit is off.)
≥ Display method of clock can be changed by setting the [DATE/TIME] or [DATE FORMAT].
(l 118)
Time zone
Time difference from the Greenwich Mean Time can be set.
1 Select the menu. (l 23)
MENU
: [OTHER FUNCTION] # [TIME ZONE] # [YES]
≥ If the clock is not set, set the clock to current time first.
2 Touch
3 Touch [ENTER].
≥ Touch [EXIT] to complete the setting.
/ and set the region to record.
- 22 -
Preparation
MENU
MENU
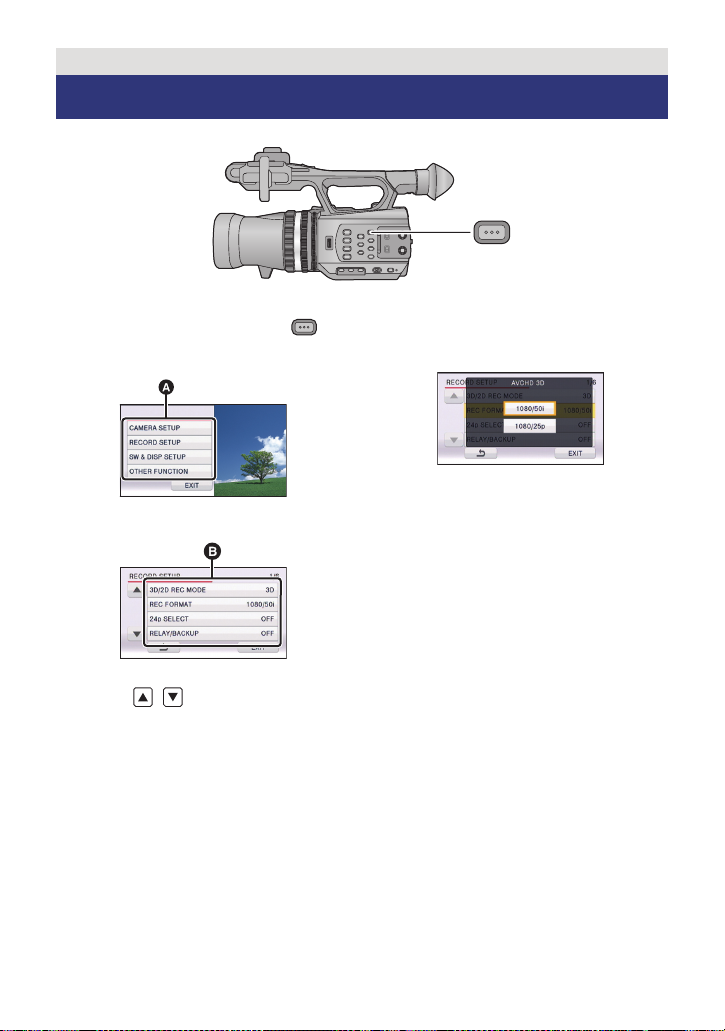
Using the menu screen
1 Press the MENU button .
2 Touch the top menu A.
3 Touch the submenu B.
≥ Next (Previous) page can be displayed by
touching / .
4 Touch the desired item to enter
the setting.
5 Touch [EXIT] to exit the menu
setting.
- 23 -
Preparation
MENU
SEARCH
STILL ADV STILL ADV
SEARCH
/VOL
DATE/TIME
START/
STOP
EXT DISPLAY
PLAY
STOP
OK
SKIP SKIP
MENU
PAUSE
2
3
4
6
5
8
7
9
10
11
1
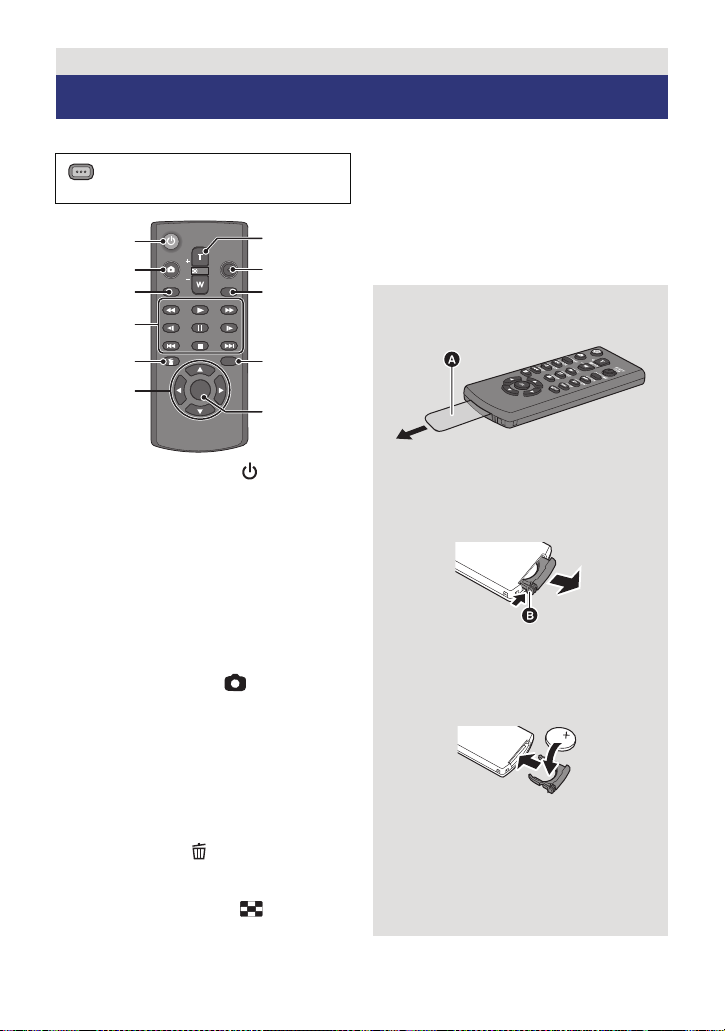
Using with the wireless remote control
Select the menu.
: [OTHER FUNCTION] #
[REMOTE CONTROL] # [ON]
8 Recording start/stop button [START/
9 Date/time button [DATE/TIME] (l118)
10 Menu button [MENU]
STOP]
*
*
11 OK button [OK] (l 25)
* means that these buttons function in the
same manner as the corresponding
buttons on the unit.
Remove the insulation sheet A before
using.
1 Power on/off button [ ]
The unit can be turned on/off when the
power switch of this unit is set to ON.
≥ It will not be possible to turn the unit on
with the wireless remote control
approximately 36 hours after turning the
unit off. To turn the unit on again, set the
power switch of this unit to OFF once, and
then to ON.
≥ Unit cannot be turned off when it is
connected to the PC.
2 Photoshot button [ ]
3 On-screen display button
[EXT DISPLAY] (l 82)
4 Playback operation buttons (l 73,
75)
These buttons function in the same manner
as the corresponding playback operation
icon being displayed on screen. [Excluding
Skip Playback (l 75)]
5 Delete button [ ] (l 80)
6 Direction buttons [3,4,2,1]
7 Zoom/volume/thumbnail display
switch buttons [T, W, /VOL]
Replace a button-type battery
1 While pressing the stopper B, pull
out the battery holder.
2 Set the button-type battery with its
*
(i) mark facing upward and then
put the battery holder back in
place.
≥ When the button-type battery runs
down, replace it with a new battery
(part number: CR2025). The battery
should normally last about 1 year,
*
however this depends on how
frequently the unit is used.
- 24 -
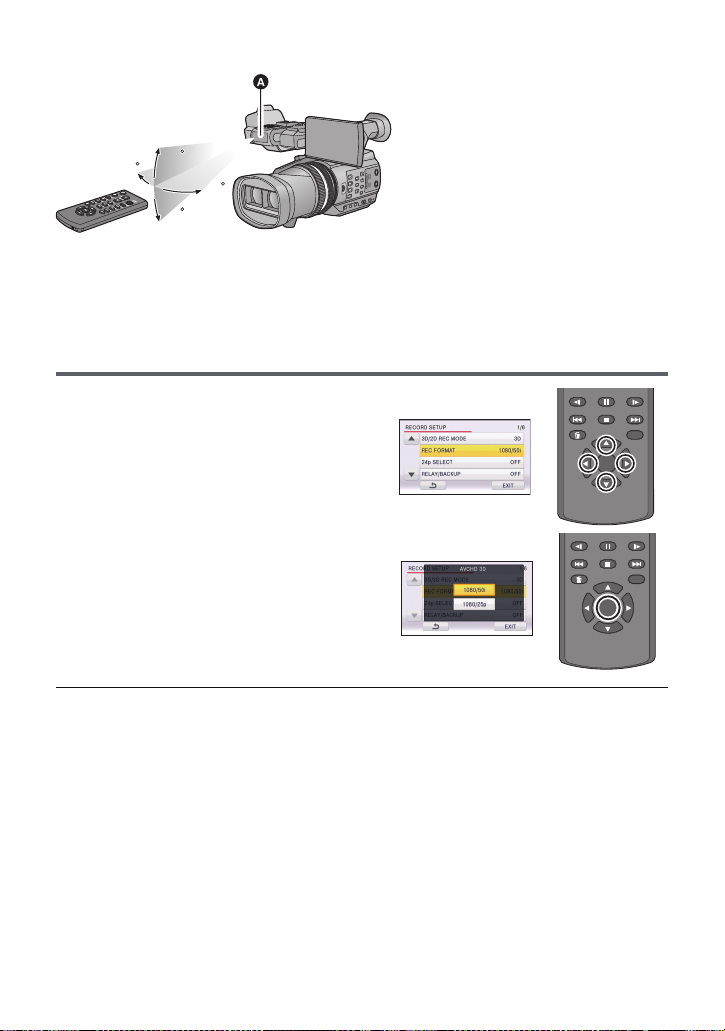
∫ Wireless remote control usable range
15
15
15
STILL ADV STILL ADV
STOP
OK
SKIP SKIP
MENU
PAUSE
15
15
15
15
A Wireless remote control sensor
Distance: Within approx. 5 m
Angle: Approx. 15o up, down, left and right
≥ The wireless remote control is intended for indoor operation. Outdoors or under strong
light, the unit may not operate properly even within the usable ranges.
Operation of direction buttons/OK button
1 Press a direction button.
≥ Selected item will become yellow.
2 Select the item with the
direction button.
PAUSE
3 Confirm the selection by
pressing the OK button.
STILL ADV STILL ADV
STOP
SKIP SKIP
OK
MENU
≥ Selection/confirmation of operation icons, thumbnail display etc. can be operated.
≥ Wherever you can touch with your finger can be operated by the wireless remote control.
(Excluding some functions)
- 25 -
Recording
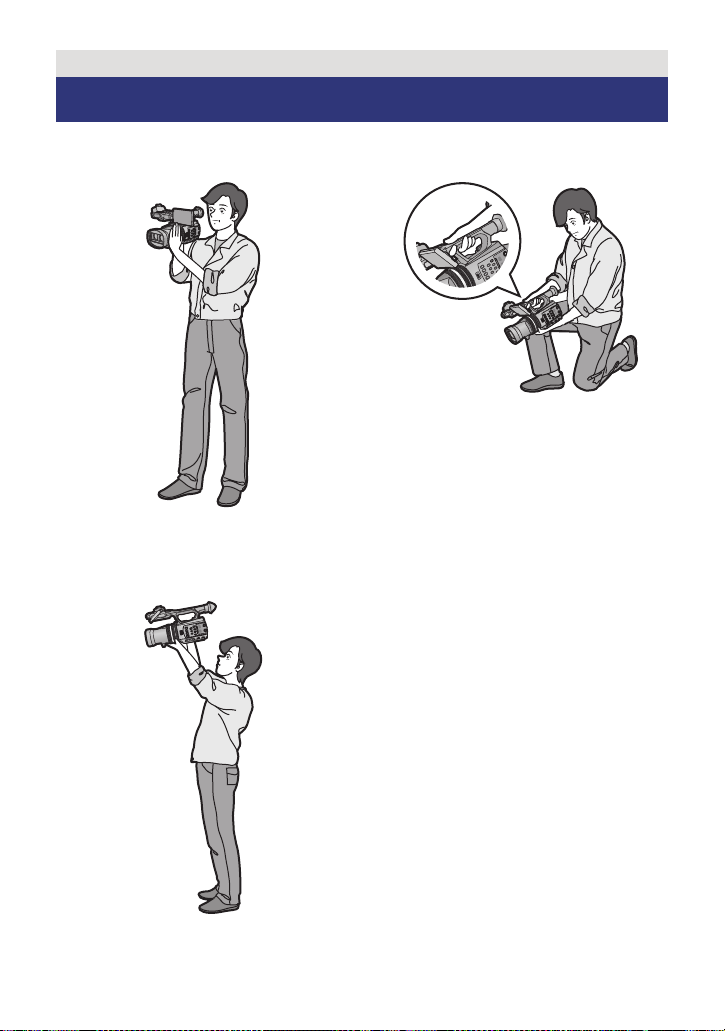
Before recording
∫ Basic camera positioning
Normal recording
≥ Put your hand through the grip belt and
hold the unit with both hands.
Recording from a high position
Low-angle recording
≥ For easier low-angle recording, the sub
recording start/stop button and the sub
zoom lever can be used.
- 26 -
≥ When recording, make sure your footing is stable and there is no danger of colliding with
MENU
another person or object.
≥ Hold the eye cup of the viewfinder as close as possible to your right eye.
≥ Adjust the angle of the LCD monitor according to the position in which the unit is held.
≥ When you are outdoors, record pictures with the sunlight behind you. If the subject is
backlit, it will become dark in the recording.
≥ Keep your arms near your body and separate your legs for better balance.
≥ For stable images, it is recommended to use a tripod whenever possible.
≥ Do not cover the cooling fan inlet with your hand etc.
Formatting cards
If you use the SD cards for the first time for recording with this unit, format the cards.
Please be aware that if a medium is formatted, then all the data recorded on the medium will
be erased and cannot be restored. Back up important data on a PC, disc etc. (l 87)
≥ When using two SD cards, format both SD cards.
1 Select the menu.
: [OTHER FUNCTION] # [FORMAT CARD]
2 Touch [SD CARD 1] or [SD CARD 2].
≥ When formatting is complete, touch [EXIT] to exit the message screen.
≥ Do not turn this unit off or remove the SD card, while formatting. Do not expose the unit to
vibrations or shock.
Use this unit to format media.
Do not format an SD card using any other equipment such as a PC. Otherwise it
may not be possible to use the card on this unit.
- 27 -
Recording
MENU
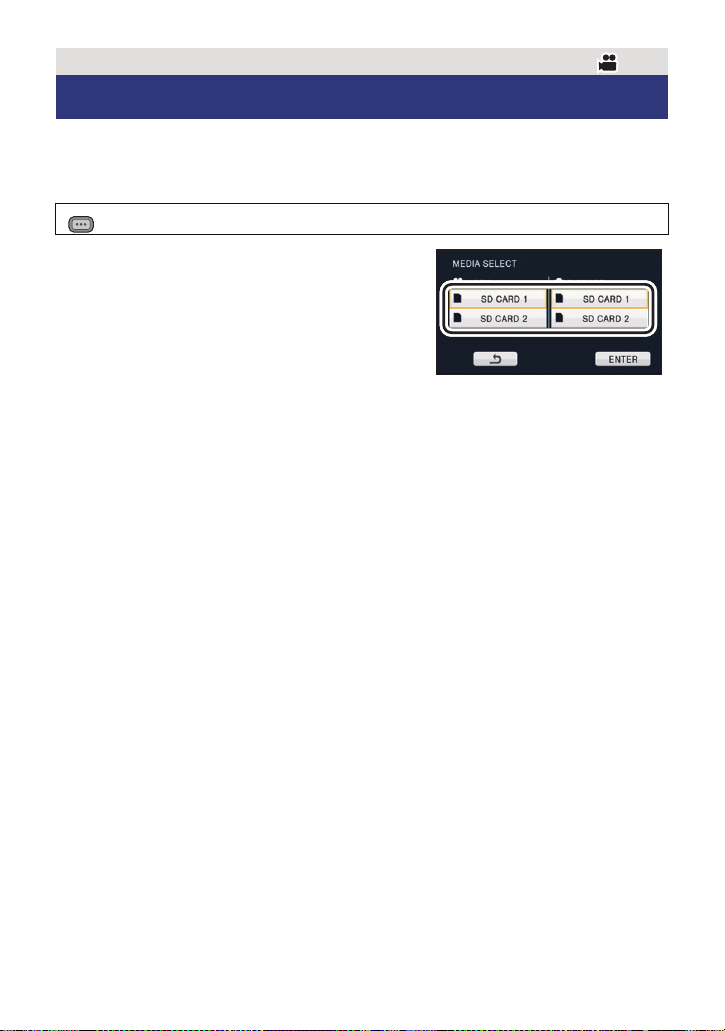
Selecting a media to record
[SD CARD 1] and [SD CARD 2] can be selected separately to record motion pictures or still
pictures.
1 Select the menu.
: [SW & DISP SETUP] # [MEDIA SELECT] # [YES]
2 Touch the media to record motion
pictures or still pictures.
≥ The media is selected separately for motion pictures
or still pictures and is then highlighted in yellow.
3 Touch [ENTER].
- 28 -
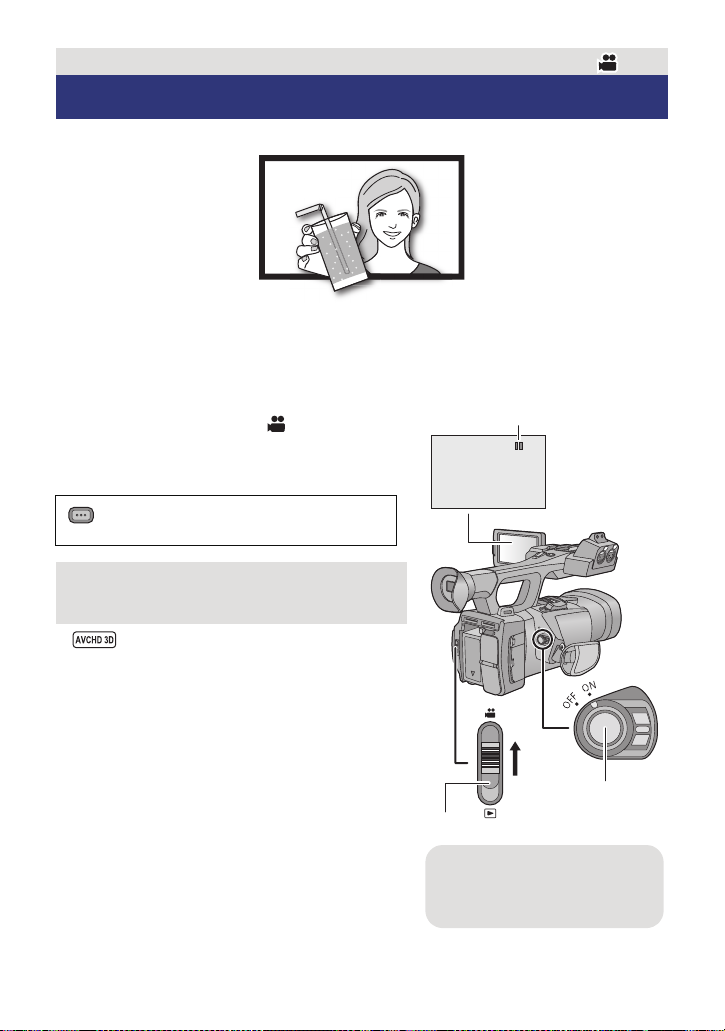
Recording
3D video
A When you begin recording,
; changes to ¥.
B Mode switch
Recording motion pictures
You can record life-like and powerful 3D full high definition quality video.
* The image is an illustration.
≥ This unit can record a 3D full high definition quality video in AVCHD 3D recording
format.
≥ Refer to page 85 if the 3D full high definition quality video is viewed with 3D compatible TV.
≥ During 3D recording the video can be viewed in 3D using the LCD monitor.
1 Change the mode to .
≥ Extract the LCD monitor.
2 Select the menu.
MENU
: [RECORD SETUP] #
[3D/2D REC MODE] # desired setting
[3D]: You can record with 3D Recording Mode.
[2D]: You can record with 2D Recording Mode.
≥ appears when [3D/2D REC MODE] is set
to [3D].
3 Press the recording start/stop button
C to start recording.
≥ Recording will stop when you press the recording
start/stop button again.
- 29 -
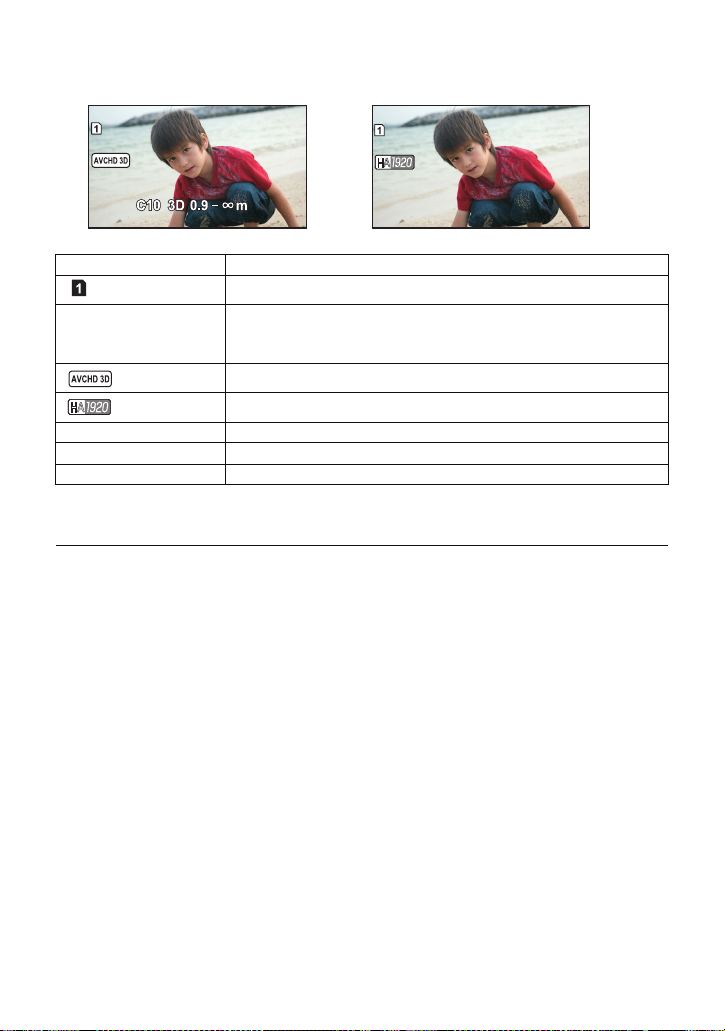
∫ Screen indications in the Recording Mode
R 1h20mR 1h20mR 1h20m
TC 00:00:00:00TC 00:00:00:00TC 00:00:00:00
50 i50
i
R 1h20mR 1h20mR 1h20m
TC 00:00:00:00TC 00:00:00:00TC 00:00:00:00
50 i50
i
(When in 3D Recording Mode) (When in 2D Recording Mode)
TC 00:00:00:00 Counter display (l 56)
(White) Media where the motion picture is recorded (l 28)
R1h20m Approximate remaining recordable time
*1
*2
50i Frame rate (l 109)
*1
C10
3D 0.9 - ¶m
*1
*1 Only displayed when 3D Recording Mode is in use.
*2 Only displayed when 2D Recording Mode is in use.
≥ To record effective image as a 3D, it is recommended to adjust the convergence point as
necessary. (l 32)
≥ The default setting of [3D/2D REC MODE] is [3D].
≥ The images recorded between pressing the recording start/stop button to start recording
and pressing it again to pause recording become one scene.
≥ Up to approximately 3,900 scenes can be recorded on single SD card.
Number of scenes that can be recorded will be less than above in following cases:
jIf you change [3D/2D REC MODE] or [REC FORMAT]
jDuring the interval recording
jIf you change [MIC SETUP] or [AUDIO REC] (l 50, 51)
≥ Please refer to page 141 about approximate recordable time.
≥ When the remaining time is less than 1 minute, R 0h00m
flashes red.
3D recording icon
Recording format (l 109)
Convergence point (l 32)
3D guide display (l 34)
- 30 -
 Loading...