

Page 1
Basic Owner’s Manual
PP
If you have any questions, visit :
U.S.A. : http://shop.panasonic.com/support
Canada : www.panasonic.ca/english/support
4K Video Camera
Model No. HC-X1500
HC-X2000
Please read these instructions carefully before using this product, and save this manual for future use.
More detailed operating instructions are available in “Owner’s
Manual (PDF format)”.
To read it, download it from the website.
https://eww.pavc.panasonic.co.jp/hdw/oi/X2000/
Register online at
http://shop.panasonic.com/support
(U.S. customers only)
DVQX2023ZA
F0120TY0
Page 2

Safety Precautions
Date of Purchase
Dealer Purchased From
Dealer Address
Dealer Phone No.
Model No.
Serial No.
Safety Precautions
Dear Customer,
Thank you for choosing Panasonic!
You have purchased one of the most
sophisticated and reliable products on the
market today. Used properly, we’re sure it
will bring you and your family years of
enjoyment. Please take time to fill in the
information on the right.
The serial number is on the tag located on
the back of your camera. Be sure to retain
this manual as your convenient camera
information source.
U.S.A./CANADA CONSUMERS: ATTENTION:
A lithium ion battery that is recyclable powers the product
you have purchased. Please call 1-800-8-BATTERY for
information on how to recycle this battery.
WARNING:
To reduce the risk of fire, electric shock or product damage,
≥ Do not expose this unit to rain, moisture, dripping or splashing.
≥ Do not place objects filled with liquids, such as vases, on this unit.
≥ Use the recommended accessories.
≥ Do not remove covers.
≥ Do not repair this unit by yourself. Refer servicing to qualified service personnel.
CAUTION!
To reduce the risk of fire, electric shock or product damage,
≥ Do not install or place this unit in a bookcase, built-in cabinet or in another confined space.
Ensure this unit is well ventilated.
≥ Do not obstruct this unit’s ventilation openings with newspapers, tablecloths, curtains, and
similar items.
≥ Do not place sources of naked flames, such as lighted candles, on this unit.
2
DVQX2023 (ENG)
Page 3

Safety Precautions
Certification and Compliance
See Camera for the certification and compliance mark specific to that device.
1
Press the <MENU> button.
2
Select the [OTHERS] menu.
3
Select the [APPROVED REGULATION] menu.
THE FOLLOWING APPLIES ONLY IN THE U.S.A.
FCC Note:
This equipment has been tested and found to comply with the limits for a Class B digital device,
pursuant to Part 15 of the FCC Rules. These limits are designed to provide reasonable protection
against harmful interference in a residential installation. This equipment generates, uses, and can
radiate radio frequency energy and, if not installed and used in accordance with the instructions,
may cause harmful interference to radio communications. However, there is no guarantee that
interference will not occur in a particular installation. If this equipment does cause harmful
interference to radio or television reception, which can be determined by turning the equipment off
and on, the user is encouraged to try to correct the interference by one or more of the following
measures:
≥ Reorient or relocate the receiving antenna.
≥ Increase the separation between the equipment and receiver.
≥ Connect the equipment into an outlet on a circuit different from that to which the receiver is
connected.
≥ Consult the dealer or an experienced radio/TV technician for help.
FCC Caution:
≥ Any unauthorized changes or modifications to this equipment would void the user’s authority to
operate this device.
≥ To assure continued compliance, follow the attached installation instructions and use only
shielded interface cables when connecting to computer or peripheral devices.
This device complies with Part 15 of the FCC Rules. Operation is subject to the following two
conditions: (1) This device may not cause harmful interference, and (2) this device must accept
any interference received, including interference that may cause undesired operation.
Supplier’s Declaration of Conformity
Trade Name: Panasonic
Model No.: HC-X1500/HC-X2000
Responsible Party: Panasonic Corporation of North America
Support Contact: http://shop.panasonic.com/support
Two Riverfront Plaza, Newark, NJ 07102-5490
THE FOLLOWING APPLIES ONLY IN CANADA.
CAN ICES-3(B)/NMB-3(B)
(ENG) DVQX2023
3
Page 4

Safety Precautions
THE FOLLOWING APPLIES ONLY IN THE U.S.A.
Contains FCC ID: VPYLB1JS955
This transmitter must not be co-located or operated in conjunction with any other antenna or
transmitter.
This equipment complies with FCC radiation exposure limits set forth for an uncontrolled
environment and meets the FCC radio frequency (RF) Exposure Guidelines as this equipment
has very low levels of RF energy.
Compliance with FCC requirement 15.407(c)
Data transmission is always initiated by software, which is the passed down through the MAC,
through the digital and analog baseband, and finally to the RF chip. Several special packets are
initiated by the MAC. These are the only ways the digital baseband portion will turn on the RF
transmitter, which it then turns off at the end of the packet. Therefore, the transmitter will be on
only while one of the aforementioned packets is being transmitted. In other words, this device
automatically discontinue transmission in case of either absence of information to transmit or
operational failure.
Frequency Tolerance: ± 20ppm
THE FOLLOWING APPLIES ONLY IN CANADA.
Contains IC: 772C-LB1JS955
This device contains licence-exempt transmitter(s)/receiver(s) that comply with Innovation,
Science and Economic Development Canada’s licence-exempt RSS(s). Operation is subject to
the following two conditions:
1. This device may not cause interference.
2. This device must accept any interference, including interference that may cause undesired
operation of the device.
The available scientific evidence does not show that any health problems are associated with
using low power wireless devices. There is no proof, however, that these low power wireless
devices are absolutely safe. Low power Wireless devices emit low levels of radio frequency
energy (RF) in the microwave range while being used. Whereas high levels of RF can produce
health effects (by heating tissue), exposure of low-level RF that does not produce heating
effects causes no known adverse health effects. Many studies of low-level RF exposures have
not found any biological effects. Some studies have suggested that some biological effects
might occur, but such findings have not been confirmed by additional research. HC-X2000/
HC-X1500 (HMN is 1JS2099) has been tested and found to comply with ISED radiation
exposure limits set forth for an uncontrolled environment and meets RSS-102 of the ISED radio
frequency (RF) Exposure rules.
4
DVQX2023 (ENG)
Page 5

Safety Precautions
IMPORTANT SAFETY
INSTRUCTIONS
Read these operating instructions carefully before using the unit. Follow the safety instructions on the
unit and the applicable safety instructions listed below. Keep these operating instructions handy for
future reference.
1) Read these instructions.
2) Keep these instructions.
3) Heed all warnings.
4) Follow all instructions.
5) Do not use this apparatus near water.
6) Clean only with dry cloth.
7) Do not block any ventilation openings.
Install in accordance with the
manufacturer’s instructions.
8) Do not install near any heat sources such
as radiators, heat registers, stoves, or other
apparatus (including amplifiers) that
produce heat.
9) Do not defeat the safety purpose of the
polarized or grounding-type plug. A
polarized plug has two blades with one
wider than the other. A grounding-type plug
has two blades and a third grounding
prong. The wide blade or the third prong
are provided for your safety. If the provided
plug does not fit into your outlet, consult an
electrician for replacement of the obsolete
outlet.
10) Protect the power cord from being walked
on or pinched particularly at plugs,
convenience receptacles, and the point
where they exit from the apparatus.
11) Only use attachments/accessories
specified by the manufacturer.
12) Use only with the
cart, stand, tripod,
bracket, or table
specified by the
manufacturer, or sold
with the apparatus.
When a cart is used,
use caution when moving the cart/
apparatus combination to avoid injury from
tip-over.
13) Unplug this apparatus during lightning
storms or when unused for long periods of
time.
14) Refer all servicing to qualified service
personnel. Servicing is required when the
apparatus has been damaged in any way,
such as power-supply cord or plug is
damaged, liquid has been spilled or objects
have fallen into the apparatus, the
apparatus has been exposed to rain or
moisture, does not operate normally, or has
been dropped.
(ENG) DVQX2023
5
Page 6
Safety Precautions
∫ Concerning the AC adaptor
AC adaptor
This AC adaptor operates on AC between 100 V and 240 V.
But
≥ In the U.S.A. and Canada, the AC adaptor must be connected to a 120 V AC power supply only.
≥ When connecting to an AC supply outside of the U.S.A. or Canada, use a plug adaptor to suit
the AC outlet configuration.
≥ When connecting to a supply of greater than AC 125V, ensure the cord you use is suited to the
voltage of the AC supply and the rated current of the AC adaptor.
≥ Contact an electrical parts distributor for assistance in selecting a suitable AC plug adaptor or
AC cord set.
The power plug is the disconnecting device. Install this unit so that the power plug can be
unplugged from the socket outlet immediately.
This unit is intended for use in moderate climates.
∫ Concerning the battery
Battery pack (Lithium ion battery pack)
≥ Use the specified unit to recharge the battery pack.
≥ Do not use the battery pack with equipment other than the specified unit.
≥ Do not get dirt, sand, liquids, or other foreign matter on the terminals.
≥ Do not touch the plug terminals (i and j) with metal objects.
≥ Do not disassemble, remodel, heat or throw into fire.
If any electrolyte should come into contact with your hands or clothes, wash it off thoroughly with
water.
If any electrolyte should come into contact with your eyes, never rub the eyes. Rinse eyes
thoroughly with water, and then consult a doctor.
Warning
Risk of fire, explosion and burns. Do not disassemble, heat above 60 oC (140 oF) or incinerate.
CAUTION
≥ Danger of explosion if battery is incorrectly replaced. Replace only with the type
recommended by the manufacturer.
≥ When disposing of the batteries, please contact your local authorities or dealer and ask for the
correct method of disposal.
∫ Product Identification Marking
Product Location
4K Video Camera Bottom
AC adaptor Bottom
6
DVQX2023 (ENG)
Page 7

Safety Precautions
∫ Cautions for use
Keep this unit as far away as possible from electromagnetic equipment (such as microwave
ovens, TVs, video games etc.).
≥ If you use this unit on top of or near a TV, the pictures and/or sound on this unit may be disrupted by
electromagnetic wave radiation.
≥ Do not use this unit near cell phones because doing so may result in noise adversely affecting the
pictures and/or sound.
≥ Recorded data may be damaged, or pictures may be distorted, by strong magnetic fields created by
speakers or large motors.
≥ Electromagnetic wave radiation generated by microprocessors may adversely affect this unit,
disturbing the pictures and/or sound.
≥ If this unit is adversely affected by electromagnetic equipment and stops functioning properly, turn
this unit off and remove the battery or disconnect AC adaptor. Then reinsert the battery or
reconnect AC adaptor and turn this unit on.
Do not use this unit near radio transmitters or high-voltage lines.
If you record near radio transmitters or high-voltage lines, the recorded pictures and/or sound may be
adversely affected.
Do not lift up this unit by the handle with the tripod still attached
≥ When the tripod is attached, its weight will also affect the unit’s handle, possibly causing the handle
to break and hurting the user.
≥ To carry the unit while the tripod is attached, take hold of the tripod.
Do not swing the unit around, shake it by, or allow it hang from the handle
≥ Do not jar, swing, or shake the unit by its handle. Any strong jolt to the handle may damage the unit
or result in personal injury.
Do not allow the cord to drag on the ground or pull a connected cord along the passage
≥ The cord will be damaged, causing fire or electrical shock, when the cord gets caught by the feet,
excite will also cause personal injury.
When this unit is turned on, do not use it in direct contact with the skin for a long period of
time.
≥ When using this unit for a long period of time, use a support such as a tripod. Low temperature
burns may result if any high temperature part of this unit or hot air from the ventilation openings on
the front side of the hand strap of this unit is in direct contact with the skin for a long period of time.
About connecting to a PC
≥ A USB2.0 cable is not supplied with this unit. Use a commercially-available generic USB cable
conforming to USB2.0.
If possible, we recommend using a cable with a length of 1.5 m (approx. 4.9 feet) or less.
About connecting to a TV
≥ Use a commercially-available High Speed HDMI cable. If possible, we recommend using a cable
with a length of 3 m (approx. 9.8 feet) or less.
About using a headphone
≥ Excessive sound pressure from earphones and headphones can cause hearing loss.
≥ Listening at full volume for long periods may damage the user ’s ears.
(ENG) DVQX2023
7
Page 8
Safety Precautions
Í
∫ Caution regarding the lens and the viewfinder
Do not aim the lens or the viewfinder at the sun or strong light. Doing so may cause the unit to
malfunction.
∫ Batteries that may be used with this product (As of January 2020)
Panasonic AG-VBR59/VW-VBD58 batteries may be used with this product.
It has been found that counterfeit battery packs which look very similar to the genuine
product are made available to purchase in some markets. Some of these battery packs are
not adequately protected with internal protection to meet the requirements of appropriate
safety standards. There is a possibility that these battery packs may lead to fire or explosion.
Please be advised that we are not liable for any accident or failure occurring as a result of
use of a counterfeit battery pack. To ensure that safe products are used we would
recommend that a genuine Panasonic battery pack is used.
∫ The symbols on this product (including the accessories) represent the
following:
AC
DC
ON
Standby
Class II equipment (The construction of the product is double-insulated.)
8
DVQX2023 (ENG)
Page 9
Trademark
≥ SDXC logo is a trademark of SD-3C, LLC.
≥ “AVCHD”, “AVCHD Progressive” and the “AVCHD Progressive”
logo are trademarks of Panasonic Corporation and Sony
Corporation.
≥ Manufactured under license from Dolby Laboratories. Dolby,
Dolby Audio, and the double-D symbol are trademarks of Dolby
Laboratories.
≥ The terms HDMI and HDMI High-Definition Multimedia
Interface, and the HDMI Logo are trademarks or registered
trademarks of HDMI Licensing Administrator, Inc. in the United
States and other countries.
≥ LEICA is a registered trademark of Leica Microsystems IR
GmbH and DICOMAR is a registered trademark of Leica
Camera AG.
≥ Screenshots are used according to Microsoft Corporation
guidelines.
≥ iPhone and iPad are trademarks of Apple Inc. registered in the
U.S. and/or other countries.
≥ Google, Android and Google Play are trademarks of Google
LLC.
™
≥ The Wi-Fi CERTIFIED
≥ The Wi-Fi Protected Setup
®
≥ “Wi-Fi
” is a registered trademark of Wi-Fi Alliance®.
≥ “Wi-Fi Protected Setup
Logo is a certification mark of Wi-Fi Alliance®.
™
Logo is a certification mark of Wi-Fi Alliance®.
™
”, “WPA™”, and “WPA2™” are trademarks of Wi-Fi Alliance®.
≥ All other names, company names, product names, etc., contained in this instruction manual
are trademarks or registered trademarks of their respective owners.
License
This product is licensed under the AVC Patent Portfolio License for the personal use of a
consumer or other uses in which it does not receive remuneration to (i) encode video in
compliance with the AVC Standard (“AVC Video”) and/or (ii) decode AVC Video that was
encoded by a consumer engaged in a personal activity and/or was obtained from a video
provider licensed to provide AVC Video. No license is granted or shall be implied for any other
use. Additional information may be obtained from MPEG LA, L.L.C.
See http://www.mpegla.com
≥ Separate license contract with MPEG-LA is required to record in a memory card with this
product and to distribute that card to end users for a profit. The end user mentioned here
indicates a person or organization that handles contents for a personal use.
(ENG) DVQX2023
9
Page 10

Software information about this product
This product incorporates the following software:
(1) the software developed independently by or for Panasonic Corporation,
(2) the software owned by third party and licensed to Panasonic Corporation,
(3) the software licensed under the GNU General Public License, Version 2.0 (GPL V2.0),
(4) the software licensed under the GNU LESSER General Public License, Version 2.1
(LGPL V2.1), and/or
(5) open source software other than the software licensed under the GPL V2.0 and/or
LGPL V2.1.
The software categorized as (3) - (5) are distributed in the hope that it will be useful, but
WITHOUT ANY WARRANTY, without even the implied warranty of MERCHANTABILITY or
FITNESS FOR A PARTICULAR PURPOSE.
For details, refer to the terms of license that are displayed using the following method:
1) Select the [OTHERS] menu → [USB DEVICE] → [SERVICE MODE] → [YES].
Select “LICENSE.TXT” in the external drive recognized by the computer.
At least three (3) years from delivery of this product, Panasonic will give to any third party who
contacts us at the contact information provided below, for a charge no more than our cost of
physically performing source code distribution, a complete machine-readable copy of the
corresponding source code covered under GPL V2.0 or LGPL V2.1, as well as the respective
copyright notice thereof.
Contact Information: oss-cd-request@gg.jp.panasonic.com
The source code and the copyright notice are also available for free in our website below.
https://panasonic.net/cns/oss/index.html
10
DVQX2023 (ENG)
Page 11

How to read this document
X1500
X2000
∫ Models described in this owner’s manual
≥ This document describes the operation of models HC-X1500 and HC-X2000.
≥ The illustrations of the products, menu screens, etc., may differ from the actual items.
Unless specifically stated otherwise, screen depictions and illustrations of the unit are of
HC-X2000.
≥ The functionalities of the models differ. Be aware that the part numbers for the models that
support the functions are shown.
≥ Not all models may be available depending on the region of purchase.
≥ Model numbers are abbreviated as follows in this owner’s manual:
Model number Abbreviation used in this owner’s manual
HC-X1500 [X1500]
HC-X2000 [X2000]
∫ Conventions used in this manual
≥ Words and phrases in [ ] brackets indicate content displayed in the LCD monitor.
≥ Words and phrases in < > brackets indicate design text used on this unit, such as button
names.
∫ Reference pages
≥ Reference pages in this document are indicated by (l 00).
∫ Terminology
≥ The battery pack is described as “battery”.
≥ SDHC memory card, and SDXC memory card are referred to as “SD card” or “memory card”
unless distinguished otherwise.
≥ Images created with one recording operation are referred to as a “clip”.
(ENG) DVQX2023
11
Page 12

Contents
Contents
Safety Precautions............................... 2
Before using the unit ......................... 13
Accessories/Optional accessories... 19
Accessories ........................................19
Optional accessories ..........................20
When turning on the power for the
first time ....................................... 21
[TIME ZONE] ......................................21
[CLOCK SETTING] ............................21
What you can do with this unit......... 22
Recording to the memory card ...........22
Linking to external devices .................22
Connecting to the network..................23
Description of parts ........................... 24
Main unit .............................................24
Handle unit ([X2000] supplied,
[X1500] optional: VW-HU1) ............29
Power supply...................................... 31
Attaching and removing the battery....31
Charging the battery ...........................32
Attaching accessories....................... 34
Adjusting the grip belt .........................34
Attaching the eye cup .........................35
Attaching the handle unit ([X2000]
supplied, [X1500] optional).............35
Preparing the memory card .............. 38
Memory cards supported by the
unit..................................................38
Inserting/removing the memory
card ................................................39
Turning on/off the power................... 40
Turning the unit on and off with the
power button...................................40
Turning the unit on and off with the
LCD monitor/viewfinder ..................40
Basic operation of the menu............. 41
Configuration of the menu ..................41
Formatting the memory card ..............42
Menu list .............................................42
Manual recording............................... 45
Rear ring function settings ..................46
Focusing (manual focus) ....................47
White balance adjustment ..................47
Gain ....................................................49
Setting the shutter speed ...................49
Playing back clips...............................50
Updating the unit’s firmware .............51
Specifications .....................................52
General ..............................................52
Camera .............................................. 52
Memory card recorder ........................ 54
Digital video ........................................55
Digital audio ....................................... 55
Streaming ........................................... 56
Wi-Fi ................................................... 56
Video output ....................................... 56
Audio input .........................................57
Audio output ....................................... 57
Other input/output .............................. 57
Monitor ...............................................57
Handle unit ([X2000] supplied,
[X1500] optional) ............................ 58
AC adaptor ......................................... 58
Battery pack (AG-VBR59) .................. 58
Limited Warranty (ONLY FOR
U.S.A.)............................................59
Warranty (For Canadian
Customers) ...................................61
Useful Information (Only For Latin
American Countries)....................62
12
DVQX2023 (ENG)
Page 13

Before using the unit
Before using the unit
∫ Before using the unit, always check if the built-in battery is not consumed, and
then set the date/time.
The date of the internal clock of the unit resets to January 1, 2020 if the built-in battery is
exhausted. This may result in the meta data of the clip not being recorded correctly, and it may
not display correctly in the thumbnail screen.
Connect the AC adaptor to the main unit or attach a battery when recharging the built-in
battery.
The date/time set on the main unit is maintained for approximately 6 months when left in this
state for approximately 24 hours.
(Recharged even when the power is on.)
For details about setting the time zone and date/time, refer to [TIME ZONE] (l 21) and
[CLOCK SETTING] (l 21).
∫ When using this product during rain or snow or when at the beach, be careful
that water does not get inside the camera.
Water causes damage to the camera and memory card. (Repair may be impossible)
∫ Take care so sand and/or dust do not get inside the camera when using it at the
beach, etc.
Sand and dust may damage the camera and memory card. (Be careful when inserting or
removing the memory card)
∫ AC adaptor and battery
≥ It may take more time to charge or may not be able to charge when the temperature of the
battery is extremely high or extremely low.
≥ Noise may be generated in radio when the unit is used close to a radio (especially when
receiving AM). Keep a distance of 1 m (approx. 3.3 feet) or more when using.
≥ Oscillating sound may generate inside the AC adaptor during the use, but this is not a
malfunction.
≥ Always disconnect the power plug from the power outlet after the use. (Power of
approximately 0.1 W is consumed by the AC power itself if kept connected)
≥ Do not get the terminal section of the AC adaptor, or the battery dirty. Install the device close
to the power outlet so the disconnection device (power plug) can be easily reached.
∫ Charging lamp during charging
When the charging lamp is flashing, the following should be considered.
Flashing with approx. 4 second period (on for approx. 2 seconds, off for approx.
2 seconds):
≥ When the battery is over discharged or the temperature of the battery is too high or low.
It can be charged, but it may take a few hours to complete the charging normally.
(ENG) DVQX2023
13
Page 14

Before using the unit
X2000
X1500
≥ Once normal charging starts, the charging lamp lights up green. However, depending on the
conditions of use, even when normal charging is taking place, the charging lamp may keep
flashing in approx. 4 second intervals until charging is completed.
Flashing with approx. 0.5 second period (on for approx. 0.25 second, off for approx.
0.25 second):
≥ The battery is not charged. Remove the battery from the unit, and try charging again.
≥ Check that the terminals of the unit or battery are not dirty or covered with a foreign object,
and connect the battery correctly once again.
If a foreign object or dirt is present, turn off the unit before removing.
≥ The battery or environment is at an extremely high or low temperature. Wait until the
temperature has returned to an appropriate level and try charging again. If you are still
unable to charge, there may be a fault in the main unit, battery or AC adaptor.
Off:
≥ Charging has finished.
≥ If the status indicator stays off despite the charging being unfinished, there may be a fault in
the unit, battery or AC adaptor.
≥ If the operating time is very short even after the battery has been recharged, the battery has
worn out. Please purchase a new battery.
∫ Memory cards
≥ The surface of this unit or the memory card may get slightly hot when used for a long period
of time, but this is not a malfunction.
≥ The amount of memory included on the label of the memory card is the total amount of
memory below.
j Capacity to protect and manage copyright
j Capacity usable as the normal memory on the unit or a PC.
≥ Do not give a strong impact to, bend, or drop the memory card.
≥ Memory card data may become destroyed or erased in the following cases.
j Electrical noise or static electricity
j Malfunction of the unit or the memory card
≥ Do not perform the following operations when accessing the memory card (the card 1
access lamp/card 2 access lamp is flashing in orange).
j Removing the memory card
j Disconnecting battery or the AC adaptor without turning off the main unit
j Apply vibration of impact
∫ Take care not to drop the main unit when carrying the camera.
≥ Strong impact will damage the main unit, and it may not operate properly.
*
≥ Hold the handle
or grip when carrying the camera, and handle it carefully.
* The handle can be used when the handle unit ( supplied, optional) is
attached.
∫ Do not apply insecticide or volatile material to the camera.
≥ The main unit may deform or the paint may peel off when insecticide or volatile material is
applied.
14
DVQX2023 (ENG)
Page 15

Before using the unit
∫ Do not allow the camera to remain in contact with a rubber or vinyl object for a
long period of time.
∫ Disconnect the battery or disconnect the AC cable from the power outlet after
the use.
∫ Battery characteristics
The battery is a rechargeable lithium-ion battery. It produces electrical energy via an internal
chemical reaction. This chemical reaction is effected by the ambient temperature and humidity.
The usable time of the battery becomes shorter when the temperature gets higher or lower.
When used in an environment with extremely low temperature, it can only be used for
approximately 5 minutes.
When the battery is in an extremely hot environment, its protective function will operate and the
unit cannot be used temporarily.
∫ After using the unit, be sure to remove the battery.
Securely remove the battery from the camera.
(Minute current is consumed even if the camera is turned off when the battery is left attached)
The battery will become over discharge and may become unusable even if it is recharged
when the battery is left attached for long period of time.
Do not remove the battery when the power is turned on.
Turn off the power and remove the battery after the operation lamp goes completely out.
∫ Take proper care of the battery terminal.
Do not allow dust or foreign objects on the battery terminal.
Confirm that the battery and its terminal section is not deformed when the battery is dropped
by mistake.
Do not mount a deformed battery to the camera. This may damage the camera.
∫ Cautions when throwing memory cards away or transferring them to others
Formatting memory cards or deleting data using the functions of the unit or a computer will
merely change the file management information: it will not completely erase the data on the
cards.
It is recommended to completely erase the data in following method when discarding/
conveying.
≥ Physically destroy the memory card itself
≥ Completely erase the data in the memory card using a commercially available data erasing
software for PC, etc.
Users are responsible for managing the data stored in their memory card.
(ENG) DVQX2023
15
Page 16

Before using the unit
∫ LCD monitor and viewfinder
≥ Condensation sometimes forms on the LCD panel of the LCD monitor in locations subject to
extreme temperature differences. If this happens, wipe with a soft, dry cloth.
≥ Do not touch the LCD monitor with your finger nails, or rub or press with strong force.
≥ The LCD monitor will be slightly darker than normal immediately after the power is turned on
when the camera is very cold. It will return to its regular brightness when the internal
temperature increases.
≥ The LCD monitor and viewfinder are managed with high precision so that at least 99.99% of
the dots are effective pixels and 0.01% or less are invalid pixels and always lit. This is not a
malfunction and it has no effect whatsoever on the recorded images.
≥ It may become difficult to see or difficult to recognize the touch when a LCD protection sheet
is affixed.
∫ About Condensation (When the lens, the viewfinder or LCD Monitor is fogged
up)
Condensation occurs when there is a change in temperature or humidity, such as when the
unit is taken from outside or a cold room to a warm room. Please be careful, as it may cause
the lens, the viewfinder or LCD monitor to become soiled, moldy, or damaged.
When taking the unit to a place which has a different temperature, if the unit is accustomed to
the room temperature of the destination for about 1 hour, condensation can be prevented.
(When the difference in temperature is severe, place the unit in a plastic bag or the like,
remove air from the bag, and seal the bag.)
When condensation has occurred, remove the battery and/or the AC adaptor and leave the
unit like that for about 1 hour. When the unit becomes accustomed to the surrounding
temperature, fogginess will disappear naturally.
∫ Caution regarding laser beams
The MOS sensor may be damaged if the MOS sensor is subjected to light from a laser beam.
Take sufficient care to prevent laser beams from striking the lens when shooting in an
environment where laser devices are used.
∫ Treatment of clips
Clips recorded with devices other than this unit are not supported by this unit.
∫ Regarding system frequencies
You can change the system frequency (59.94 Hz/50.00 Hz) for this unit by using the menu.
≥ When AVCHD clips are recorded, it is not possible to use the same memory card with
different system frequencies. When the system frequency is changed, use a different
memory card.
16
DVQX2023 (ENG)
Page 17

Before using the unit
∫ Note the following points.
≥ If you prepare to record important images, always shoot some advance test footage to verify
that both pictures and sound are being recorded normally.
≥ Panasonic will not assume liability when video or audio recording fails due to a malfunction
of the unit or the memory card during the use.
≥ Set the calendar (datetime of the internal clock) and the time zone, or check the setting
before recording. This will have an effect on the management of the recorded contents.
∫ Exemption of liability
Panasonic is not liable in any way regarding following.
1
Incidental, special, or consequential damages caused directly or indirectly by the
unit
2
Damages, breakage of the unit, etc., caused by misuse or carelessness of the
customer
3
When disassembly, repair, or modification of the unit is performed by the customer
4
Inconveniences, damnification, or damages by not being able to record and/or
display the video due to any reasons including failure or malfunction of the unit
5
Inconveniences, damnification, or damages resulting from malfunction of the
system combining with any third party equipment
6
A liability claim or any claim for a privacy violation by an individual or a group that
was the subject of the video that the customer has shot (including recording) that
became public by any reason (including using with the network user authentication
turned OFF)
7
The registered information is lost due to any reason (including initializing this unit
because the authentication information such as user name or password is
forgotten)
∫ Cautions regarding network
Since this unit is used connected to a network, following mischief may occur.
1
Leaking or divulging of information through the unit
2
Fraudulent operation of the unit by a malicious third party
3
Obstruction and/or stopping of the unit by a malicious third party
It is customer’s responsibility to take sufficient network security measures including the
following to prevent damage caused by such mischief. Please note that Panasonic is not liable
in any way for damage caused by such mischief.
≥ Use the unit on a network where safety is secured by using a firewall, etc.
≥ When using the unit on a system where a PC is connected, make sure that checking and
cleaning of infection by computer virus and malicious program is performed periodically.
≥ In order to prevent malicious attacks, use the authentication system and change the default
setting values by using 8 characters or more including 3 or more character types for the
authentication information (such as user name and password) so that a third party cannot
guess your authentication information.
(ENG) DVQX2023
17
Page 18

Before using the unit
≥ Store the authentication information (user name, password, etc.) appropriately so it is not
visible to the third party.
≥ Periodically change the authentication information (user name, password, etc.) and do not
use the same authentication information as other accounts.
≥ To prevent the setting information in the unit to leak to the network, execute measure such
as restricting the access with user authentication, etc.
≥ Do not install in a location where the unit, cable, etc., can be easily damaged.
∫ Security
Take caution so the unit or memory card is not stolen, lost, or neglected. Note that Panasonic
is not liable to leakage, falsification, or loss of information caused by them.
∫ When requesting repairs, or when transferring ownership/disposing of the
product
≥ After first taking note of personal information, make sure you delete information in this unit
that includes personal information, including the wireless LAN connection settings, etc., that
you have registered or set in this unit, using the following menu settings:
j [NETWORK] menu → [UTILITY] → [NETWORK INITIALIZE]
j [OTHERS] menu → [MENU INITIALIZE]
≥ Remove the Memory Card from this unit when requesting a repair.
≥ Settings may return to factory default when this unit is repaired.
≥ Please contact the dealer where you purchased this unit or Panasonic if above operations
are not possible due to malfunction.
≥ (For the )
When requesting a repair for the handle unit, request a repair for the video camera as well,
as the cause of the problem may be in the video camera.
X2000
18
DVQX2023 (ENG)
Page 19
Accessories/Optional accessories
Accessories/Optional accessories
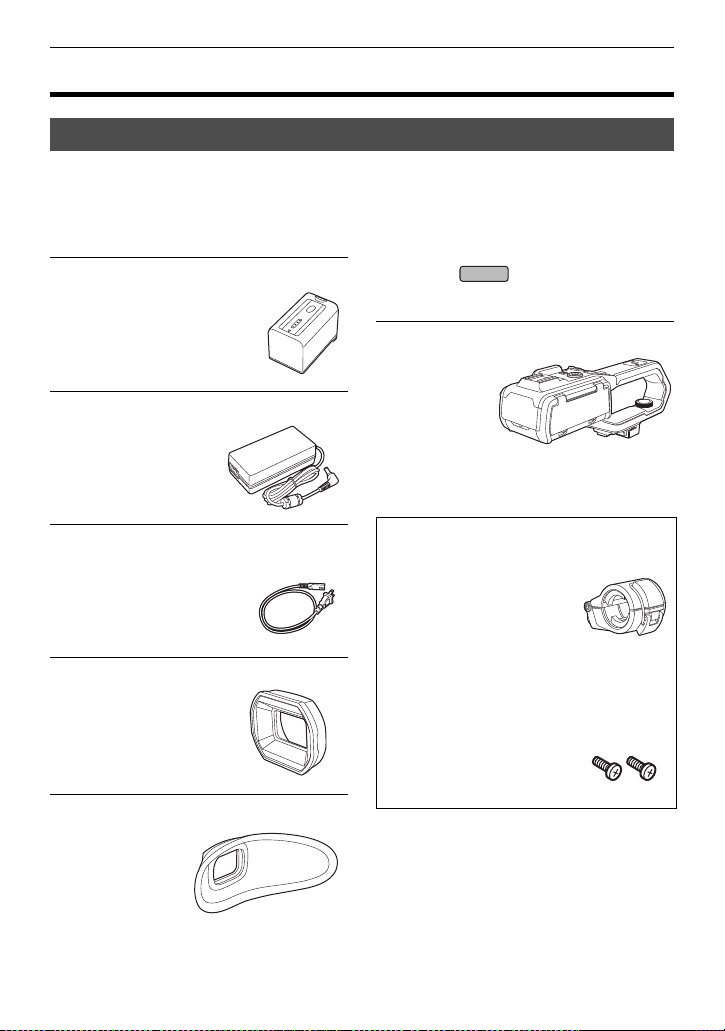
Accessories
For details about procedures such as mounting accessories, refer to the corresponding
descriptions in “Chapter 1 Overview” → “Accessories” of Owner’s Manual (PDF version).
Check the accessories before using this unit.
Product numbers correct as of January 2020. These may be subject to change.
Battery pack (l 31)
AG-VBR59
AC adaptor (l 32)
SAE0011A
AC cable (l 32)
≥For AC adaptor
K2CA2YY00259
Lens hood
DVYE1189Z
≥Pre-attached to the main
unit.
Eye cup (l 35)
DVZE1040Z
∫ For the
The following accessories are also supplied.
Handle unit (l 29)
VW-HU1
To purchase as
≥
a supplied
accessory, use
part number
1KC1VWHU1PPK
when ordering.
1AC2HCX2500Z
Microphone holder
≥The microphone holder
mounting screws are
supplied with the
microphone holder.
Microphone holder mounting screws
1PP1HCX2500Z
≥Length 12 mm (0.47 q)
(×2)
X2000
(ENG) DVQX2023
19
Page 20
Accessories/Optional accessories
@
NOTE
X2000
X1500
0 Appropriately discard the AC cable cap (if attached) and packing materials after taking the
product out.
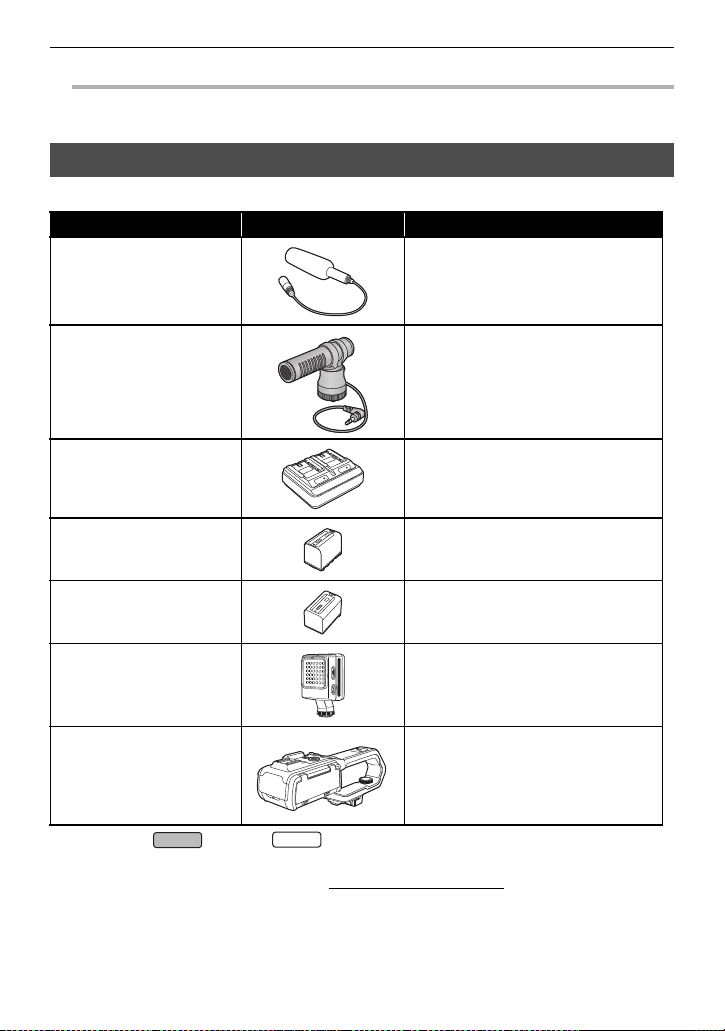
Optional accessories
Some optional accessories may not be available in some countries.
Accessory No. Figure Description
AG-MC200G
VW-VMS10PP Stereo microphone
AG-BRD50 Battery charger
VW-VBD58 Battery pack
AG-VBR59 Battery pack
*
Unidirectional microphone
VW-LED1PP LED video light
VW-HU1 Handle unit
* Handle unit ( supplied, optional (VW-HU1)) required.
(For U.S.A. only)
To order optional accessories please visit http://shop.panasonic.com
or your local Photo Specialty Dealer.
NOTE:
Accessories and/or model numbers may vary by country. Please consult your local dealer.
Product numbers correct as of January 2020. These may be subject to change.
20
DVQX2023 (ENG)
Page 21

When turning on the power for the first time
@
NOTE
@
NOTE
ヌパホパパ
When turning on the power for the first time
The time zone, date, and time are not set when the unit is shipped.
[TIME ZONE] is displayed in the LCD monitor when the power is turned on for the first time.
Follow the guidance and make the settings in the order of [TIME ZONE] and then [CLOCK
SETTING].
≥ You can do these operations either with the multidial or by touching the LCD monitor.
[TIME ZONE]
Set the time difference from the Greenwich Mean Time.
A [TIME ZONE]
1 Set the time difference.
2 Select [SET].
Once the setting for [TIME ZONE] is completed,
the [CLOCK SETTING] screen is displayed.
0 The setting for the date/time of the main unit changes together with the time zone settings.
0 This can also be set with the [OTHERS] menu → [CLOCK] → [TIME ZONE].
[CLOCK SETTING]
Set the year, month, date, and time.
A [CLOCK SETTING]
B 0 : 0 JAN. 1. 2020
1 Set the year, month, date, and time.
The year can be set between 2018 and 2037.
2 Select [SET].
Once the setting is complete, the camera image
screen is displayed.
0 This can also be set with the [OTHERS] menu → [CLOCK] → [CLOCK SETTING].
ホ
ハハ
(ENG) DVQX2023
21
Page 22

What you can do with this unit
What you can do with this unit
Recording to the memory card
Recording in following types is possible.
≥ MOV recording (UHD and FHD recording)
≥ MP4 recording (UHD and FHD recording)
≥ AVCHD recording
≥ Simultaneous recording
≥ Relay recording
≥ Interval recording
≥ Background recording
≥ Pre-recording
Linking to external devices
Connecting to TV/monitor
Connect to a TV/monitor and output images.
≥ When using use a BNC cable (<SDI OUT> terminal) to connect a TV/monitor.
X2000
A HDMI cable
B (For the )
BNC cable (<SDI OUT> terminal)
C TV/Monitor
≥ Use a commercially-available High Speed HDMI cable. If possible, we recommend using a
cable with a length of 3 m (approx. 9.8 feet) or less.
≥ (For the )
Use a commercially-available 5C-FB or equivalent double-shielded cable for the BNC cable.
When using a DVI converter, etc., to connect an HDMI cable to this unit, make sure
that you connect last to the <HDMI> terminal on this unit. Connecting first to the
<HDMI> terminal on this unit may cause a malfunction.
X2000
X2000
22
DVQX2023 (ENG)
Page 23

What you can do with this unit
Card reader mode
Data (files) for performing nonlinear editing on a computer are transferred.
≥ The unit supports USB2.0.
A Memory card
B USB2.0 cable
C Computer
*1 Memory cards are optionally available. They are not supplied with the unit.
*2 A USB2.0 cable is not supplied with the unit.
Use a commercially-available generic USB cable conforming to USB2.0. If possible, we
recommend using a cable with a length of 1.5 m (approx. 4.9 feet) or less.
The unit does not offer a bus-powered function.
*1
*2
Connecting to the network
This unit is equipped with wireless LAN. It can connect to wireless LAN devices via a network.
Available functions
When the unit is connected to a network, the following functions are available.
≥ Connecting to HC ROP app
You can remotely control this unit with the HC ROP app by connecting this unit with an iPhone/
iPad or Android terminal via wireless LAN.
≥ Streaming function
You can perform streaming of audio and video currently shot with the unit over a network
(wireless LAN).
(ENG) DVQX2023
23
Page 24

Description of parts
X2000
X1500
Description of parts
Main unit
≥ The illustrations in this document show the handle unit ( supplied, optional)
removed.
8
7
9
10
201918
21 3 4 5
1
Lens hood
2
Lens cover switching lever
Opens/closes the lens cover.
3
Focus ring (l 47)
When the <FOCUS A/M/¶> button is
pressed to set to manual focus mode
([MF]) you can focus manually.
4
Rear ring (l 46)
You can manually perform zoom
operations, adjust the iris (the lens stop),
and adjust the AE level (exposure
compensation).
≥You can switch the function to be
adjusted by setting with the menu,
pressing the USER button assigned to
[REAR RING], or touching the USER
button icon.
6
13 14 15
1211 17
16
21
22
23
24252627282930
5
<ND FILTER> switch
Selects the ND filter to suit the
illumination of the subject.
<1/64>:
Reduces the amount of light entering the
MOS sensor to 1/64.
<1/16>:
Reduces the amount of light entering the
MOS sensor to 1/16.
<1/4>:
Reduces the amount of light entering the
MOS sensor to 1/4.
<CLR>:
Does not use the ND filter.
6
<FOCUS A/M/¶> button (l 47)
Select the focus function.
24
DVQX2023 (ENG)
Page 25

7
Card slot 1 (l 39)
A slot for the memory card.
8
Card 1 access lamp
Indicates the access status for recording
and playback of the memory card
inserted in card slot 1.
9
Card slot 2 (l 39)
A slot for the memory card.
10
Card 2 access lamp
Indicates the access status for recording
and playback of the memory card
inserted in card slot 2.
11
Built-in speaker
Outputs audio during playback.
Audio is not output from the built-in
speaker when headphones are
connected to the headphone terminal.
12
<SLOT SEL> button
Selects the card slot to record to or play
back from.
13
<USER1> button
Used as a USER button (USER1).
≥[LEVEL GAUGE] is allocated at the
time of purchase.
Switches display/hide of level gauge.
14
<USER2> button
Used as a USER button (USER2).
≥[BACKLIGHT] is allocated at the time
of purchase.
Switches enable/disable of the auto iris
control function for backlight
compensation.
15
<O.I.S.>/<USER3> button
Switches enable/disable of the optical
image stabilizer function.
This is also used as the USER button
(USER3).
16
<THUMBNAIL> button (l 50)
Press the button to switch between the
camera image screen and the thumbnail
screen.
Description of parts
17
<DISP/MODE CHK> button
Switches display/hide of information
other than the time counter, time stamp,
zebra pattern, and marker.
Press and hold the button to display
information about the settings of the
various shooting functions and
information such as a list of the functions
assigned to the USER button. Each
press of the button switches the
information page in order.
18
Diopter adjustment dial
Adjusts the diopter scale so that the
viewfinder screen can be viewed clearly.
19
Eyepiece
Do not leave the eyepiece pointed
toward the sun. Doing so might damage
the devices inside.
20
Eye cup (l 35)
21
Power button (l 40)
Press the button to switch the power on/
off.
22
<WHITE BAL> button (l 47)
Selects the method for adjustment of the
white balance.
23
<AE LEVEL>/<USER4> button (l 47)
Switches enable/disable of the AE level
function.
Set the target value of the AE level in the
[SCENE FILE] menu → [AE LEVEL
EFFECT].
This is also used as the USER button
(USER4).
24
<AUTO/MANU> switch (l 45)
Selects the method to adjust the focus,
gain, iris, white balance, and shutter
speed at shooting.
<AUTO>:
Adjusts automatically. (Auto mode)
<MANU>:
Adjusts manually. (Manual mode)
25
<SHUTTER> button (l 49)
Switches the shutter mode.
(ENG) DVQX2023
25
Page 26

Description of parts
31 33
37
32
34
35
36
3938
40
41
26
<GAIN> button (l 49)
Selects the method for adjusting screen
brightness.
27
<IRIS> button (l 46)
Selects the method for adjustment of the
lens stop.
28
<MENU> button (l 41)
Displays the menu. Pressing the
<MENU> button while the menu is
displayed closes the menu.
Press the button while the thumbnail
screen is displayed to display the
operation screen of the thumbnail menu,
and clips can be deleted.
29
<EXIT> button
Returns to one level higher when the
menu is displayed. Pressing the <EXIT>
button without confirming the setting
value will not reflect the change in the
setting.
30
Multidial (l 45)
Moves, selects, and sets the menu while
the menu is displayed.
Use the multidial to also operate
thumbnails, select the multi manual
function and select/set the various
operation icons.
31
Fan inlet
Fan inlet for cooling fan. Do not block
this while the unit is being used.
32
Wireless LAN Transmitter
33
Lens hood release button
26
DVQX2023 (ENG)
34
<MIC> terminal
Connect an external microphone (stereo
mini jack).
Page 27

35
52
4342 45 46
44
47
48
49
50
51
X2000
X2000
<REMOTE> terminal
Connects the remote control unit
(commercially-available) to control some
functions remotely.
36
USB terminal
Connect to a computer with the USB2.0
cable to transfer data.
Description of parts
37
Tripod mounting holes
Attach the tripod. (bottom)
≥Mounting hole size
j 1/4-20 UNC (screw length 5.5 mm
(0.22 q) or shorter)
≥Attaching a tripod with a screw length
of 5.5 mm (0.22 q) or more may
damage the unit.
38
Grip belt (l 34)
39
Lens cover
40
Lens
41
Fan outlet
Fan outlet for cooling fan. Do not block
this while the unit is being used.
42
Status indicator (l 40)
Illuminates when power is on.
43
Battery release lever (l 31)
Used when removing the battery from
the main unit.
44
Battery mounting section (l 31)
Attaches a battery.
45
Viewfinder
46
REC button (on the grip)
Starts or stops the recording.
It is possible to directly record from the
thumbnail mode.
47
<HDMI> terminal
A terminal to output video signal by
connecting a monitor, etc.
48
Headphones terminal
Connects audio monitoring headphones.
49
Charging lamp (l 32)
Illuminates when the battery is charging.
50
<DCIN12V> terminal (l 32)
Connects the supplied AC adaptor and
supplies an external power.
51
(For the )
<SDI OUT> terminal
A terminal to output SDI signal by
connecting a monitor, etc.
(ENG) DVQX2023
27
Page 28

Description of parts
90°
180°
90°
52
LCD monitor
53
Built-in microphone
This is the built-in stereo microphone
<L>/<R>.
54
Accessory shoe (on the main unit)
Attach a video light, etc.
55
Zoom lever (on the grip)
Adjusts the zoom of an image.
<T>: Zooms in the image.
<W>: Zooms out the image.
≥Adjust the volume when playing back
clips.
56
Handle unit mounting section (l 35)
53 54 5655 57
57
<USER5> button
Used as a USER button (USER5).
≥[REC CHECK] is set at the time of
purchase.
Automatically plays back the last
approximately 3 seconds of the
previously shot clip.
28
DVQX2023 (ENG)
Page 29

Handle unit ([X2000] supplied, [X1500] optional: VW-HU1)
8
15 1214 13
1110
16
9
6 5
7
1
2
3
4
A With a microphone holder attached
1
Handle
2
Microphone holder mounting section
(l 35)
Attaches the supplied microphone
holder with the microphone holder
mounting screws.
3
Microphone holder (l 35)
Secures the external microphone in
place.
4
Buckle
Used to open and close the microphone
holder.
5
<INPUT 1> terminal (XLR, 3-pin)
Connects an audio equipment or an
external microphone.
6
<INPUT 2> terminal (XLR, 3-pin)
Connects an audio equipment or an
external microphone.
7
Microphone cable clamp
Fixes the external microphone cable.
8
<INPUT1> switch
Switches audio input signals connected
to the <INPUT 1> terminal.
9
CH1 SELECT switch
Selects the audio to be recorded on
audio channel 1.
10
11
12
13
CH2 SELECT switch
Selects the audio to be recorded on
audio channel 2.
<INPUT2> switch
Switches audio input signals connected
to the <INPUT 2> terminal.
<AUDIO LEVEL CH2> dial
Adjust the recording level of audio
channel 2.
<CH2> switch
Selects how the recording level for audio
channel 2 is adjusted.
Description of parts
(ENG) DVQX2023
29
Page 30

Description of parts
26 25 24
2120 22 23
17 18
19
14
<CH1> switch
Selects how the recording level for audio
channel 1 is adjusted.
15
<AUDIO LEVEL CH1> dial
Adjust the recording level of audio
channel 1.
17
Light cover
≥Keep the light cover out of reach of
children to prevent swallowing.
18
Built-in LED light
19
Tally lamp
Illuminates when the recording is
started. Flashes when the battery level
becomes low.
Whether or not to illuminate the lamp
can be set in the menu.
20
Accessory shoe (on the handle)
Attach a video light, etc.
21
<LIGHT> switch
Switches the built-in LED light on/off.
22
Hold lever
Disables the REC button (on the handle)
when switched to <HOLD>.
16
Handle unit mounting screw (l 35)
Secures the handle unit to the main unit.
23
REC button (on the handle)
Starts or stops the recording.
24
Accessory mounting hole
Accessories can be attached.
≥Mounting hole size
j 1/4-20 UNC (screw length 5.5 mm
25
26
(0.22 q) or shorter)
Zoom lever (on the handle)
Adjust the zoom of an image.
<T>: Zooms in the image.
<W>: Zooms out the image.
Light dimmer dial
Adjusts the brightness of the built-in LED
light.
Turn to <i> to brighten, turn to <j> to
dim.
30
DVQX2023 (ENG)
Page 31

Power supply
Power supply
A battery or the supplied AC adaptor can be used as the power supply for the unit.
≥ The unit is compatible to following batteries. (As of January 2020)
j AG-VBR59 (supplied/optional, supports quick charging)
j VW-VBD58 (optional)
≥ AG-VBR59 supports quick charging. Use a battery charger (AG-BRD50: optional) to perform
quick charging.
Attaching and removing the battery
¥ Press the power button to turn off the unit. (l 40)
Attaching the battery
1 Push the battery against the battery
mounting section on the main unit and
slide forward to attach.
Press in the battery until it clicks and gets
locked.
A Battery mounting section
Removing the battery
Be sure to hold down the power button until
the status indicator goes off. Then remove the
battery while supporting the unit to prevent it
from dropping.
B Status indicator
Move the battery release lever in the direction
indicated by the arrow and remove the battery
when unlocked.
(ENG) DVQX2023
31
Page 32

Power supply
Charging the battery
The battery is not charged at the time of purchase. Use only after charging sufficiently.
It is recommended that you have one extra battery.
≥ It is recommended to perform charging of the battery in a location with ambient temperature
of 10 °C to 30 °C (50 oF to 86 oF) (same for the battery temperature).
≥ Use the supplied AC adaptor. Do not use the AC adaptor of another device.
≥ The supplied AC cable is dedicated for this unit. Do not use with any other device. Also, do
not use AC cable from other device on this unit.
≥ The battery is not charged when the power is on.
1 Connect the AC cable to the AC
adaptor and the AC outlet.
≥Insert the plugs as far as they will go.
2 Connect the AC adaptor to the
<DC IN 12V> terminal.
≥As the charging lamp lights up green,
charging starts. It will turn off when the
charging is completed.
≥If the charging lamp flashes, refer to
page 13.
≥The DC plug of the AC adaptor,
depending on its angle, may block your
view of the charging lamp. To check the
charging lamp status, adjust the angle
of the DC plug.
∫ Connecting to the AC outlet
It is possible to use this unit with power supplied from the AC outlet by turning on the unit with
the AC adaptor connected.
Even when you use the AC adaptor for recording images, keep the battery connected.
This allows you to continue the recording even if a power failure occurs or the AC adaptor is
unplugged from the AC outlet by accident.
≥ The AC adaptor is in the standby condition when the mains plug is connected. The primary
circuit is always “live” as long as the AC adaptor is connected to an electrical outlet.
32
DVQX2023 (ENG)
Page 33

Power supply
@
NOTE
0 Do not use any other AC adaptors except the supplied one.
0 We recommend using Panasonic batteries (l 31).
0 If you use other batteries, we cannot guarantee the quality of this product.
0 Do not heat or expose to flame.
0 Do not leave the battery(ies) in a car exposed to direct sunlight for a long period of time with
doors and windows closed.
0 Do not expose to low air pressure at high altitudes.
0 Do not expose to extremely low air pressure, as this may result in explosions or leakage of
flammable liquids and gases.
(ENG) DVQX2023
33
Page 34

Attaching accessories
2
4
1
3
Attaching accessories
Adjusting the grip belt
≥ Adjust the grip belt so that it fits the size of your hand.
≥ If the buckle is difficult to tighten, move the pad forward and tighten the buckle again.
3
A Button
B Buckle
C Pad
4
1
1 Undo the button of the grip belt.
2 Open the buckle section.
3 Pull the end of the belt.
4 Do up the button of the grip belt.
2
34
DVQX2023 (ENG)
Page 35

Attaching accessories
Attaching the eye cup
1 Attach the eye cup by aligning the groove on the mounting part of the eye cup
with the inner ridge of the eye cup.
The illustration below is an example of attaching the eye cup to use it with your right eye. If
you rotate the eye cup to the left by 180° before attaching it, you can use it with your left
eye.
A Groove
B Ridge
Attaching the handle unit ([X2000] supplied, [X1500]
optional)
¥ Press the power button to turn off the unit. (l 40)
1 Open the microphone holder.
Open buckle 1, and detach fitting 2 from hook 3.
(ENG) DVQX2023
35
Page 36

Attaching accessories
2 Attach the microphone holder to the microphone holder mounting section on
the handle unit.
≥ Attach using a commercially-available screwdriver.
≥ There will be some rubbing noises with the rubber
when screwing in the microphone holder mounting
screws, but please ensure they are done up tightly.
1 Microphone holder
2 Microphone holder mounting screws
3 Push the handle unit into the handle unit
mounting section on the camera.
Match the positions of mounting mark A on the
handle unit and mounting mark B on the camera
when pushing in.
36
DVQX2023 (ENG)
Page 37

Attaching accessories
@
NOTE
4 Slide the handle unit in the direction indicated by the arrow.
Slide up to mounting mark C.
5 While pressing the handle unit mounting screw down, turn it in the direction
indicated by arrow 2 until it stops.
∫ How to remove
Remove by doing the steps for attaching in reverse.
≥ Keep the microphone holder mounting screws out of reach of children to prevent swallowing.
(ENG) DVQX2023
37
Page 38

Preparing the memory card
Preparing the memory card
Memory cards supported by the unit
The SD cards can be used with the camera.
≥ Panasonic memory cards are recommended.
≥ Keep the memory card out of reach of children to prevent swallowing.
Speed Class during shooting
The memory card to use differs depending on the file format and the recording format.
Use memory cards compatible with the Speed Class or UHS Speed Class.
The recording may stop suddenly when a memory card not compatible with the required
Speed Class is used.
Speed Class and UHS Speed Class are the speed specification regarding continuous writing.
Check the display on the label and other information on the memory card.
File format
MOV/MP4
AVCHD All ≥SD card with Speed Class 4 or better
When the file format is MOV or MP4
≥ SDXC memory cards can be used. SDHC memory cards cannot be used.
38
DVQX2023 (ENG)
Recording bit rate
or recording
function
200 Mbps,
150 Mbps,
100 Mbps,
Super slow
recording
72 Mbps,
50 Mbps
Supported memory cards and Speed
Classes
≥ SDXC memory card with UHS Speed
Class 3
≥ SDXC memory card with Speed
Class 10
Example of card
display
Page 39

Preparing the memory card
Inserting/removing the memory card
Inserting the memory card
The memory card to use with the unit should always be formatted on the unit. (l 42)
≥ Formatting the memory card will erase all of the recorded data which cannot be restored.
A Card slot cover
B Label side
1 Open the card slot cover.
2 Insert the memory card into the card slot.
≥ Card slot 1 and card slot 2 can each insert one memory card.
≥ With the label facing in the direction indicated in the diagram, push in until there is a
click.
Do not force or apply excess force when inserting the memory card.
3 Close the card slot cover.
Removing the memory card
1 Open the card slot cover.
≥ Confirm that the card access lamp is not flashing in orange.
≥ Data is being written/loaded when the card access lamp is flashing in orange, so do not
remove the memory card.
2 Press in the memory card further into the main unit and let go.
≥ Pull the memory card straight out when it is released from the card slot.
3 Close the card slot cover.
(ENG) DVQX2023
39
Page 40

Turning on/off the power
@
NOTE
Turning on/off the power
Turning the unit on and off with the power button
1 Open the LCD monitor and press the power button to turn on the unit.
A The status indicator lights on.
∫ To turn off the unit
Hold down the power button until the status indicator goes off.
0 The [TIME ZONE] screen is displayed when the power is turned on for the first time. (l 21)
Set the time zone, date, and time.
0 The built-in battery (rechargeable battery) will discharge. The setting for date/time may be
initialized when the unit is not turned on for approximately 6 months.
Set the date/time again after charging the built-in battery.
Turning the unit on and off with the LCD monitor/
viewfinder
Opening the LCD monitor or extending the viewfinder turns on the unit. Closing the LCD
monitor/viewfinder turns off the unit.
During normal use, you may find it convenient to turn the unit on/off using the LCD monitor or
viewfinder.
≥ The unit will not turn off unless the LCD monitor is closed and the viewfinder is retracted.
≥ The unit will not turn off during recording or while connected to a network even if the LCD
monitor is closed and the viewfinder is retracted.
≥ In the following cases, opening the LCD monitor or extending the viewfinder does not turn on
the unit. Press the power button to turn on the unit.
j When the unit is originally purchased
j When you have turned off the unit using the power button
40
DVQX2023 (ENG)
Page 41

Basic operation of the menu
Basic operation of the menu
The setting of the unit can be changed with the menu in accordance to the shooting scene or
recording contents.
Set data is written and saved in the main unit memory.
≥ When you press the <MENU> button, the menu is displayed.
≥ There are 2 methods of operation: a method to operate with the multidial, or a method to
touch the LCD monitor.
Configuration of the menu
[THUMBNAIL] menu
[CAMERA] menu
[SCENE FILE] menu
[AUDIO] menu Sets the input/output function of audio.
[VIDEO OUT/LCD/VF] menu
[RECORDING] menu Sets the various items in the recording function.
[NETWORK] menu Sets the setting regarding the network function.
[SYSTEM] menu
[OTHERS] menu
Performs confirmation or deleting of the recording clip.
This menu can be set when the thumbnail screen is displayed.
Sets the basic functions of the camera.
This menu cannot be set when the thumbnail screen is
displayed.
Sets the setting regarding scene file.
This menu sets the detailed image quality adjustment of the
camera video. Also, selection of the scene file, writing the
scene file data to the main unit memory, and loading from the
main unit memory can be performed.
This menu cannot be set when the thumbnail screen is
displayed.
Configures the settings for the external output, the information
to display in the LCD monitor or viewfinder and the output
format.
Configures the settings regarding the recording format of video
and audio.
Configures the settings for writing/loading/initializing user files
to the internal memory, and the basic unit settings.
(ENG) DVQX2023
41
Page 42

Basic operation of the menu
@
NOTE
X2000
X2000
Formatting the memory card
Before recording with a memory card that is to be used for the first time in this unit, format it.
All data will be deleted when the card is formatted. Save any important data to a computer, etc.
0 When using 2 memory cards, you must format both of the memory cards.
1 Select the [RECORDING] menu → [FORMAT MEDIA] → [SLOT1]/[SLOT2].
2 When the confirmation message is displayed, select [SET].
3 When the completion message is displayed, select [ ].
0 Do not turn this unit off or remove the memory card, while formatting. Do not expose the unit
to vibrations or shock.
0 This function can be operated also by touching the LCD monitor.
0 It may take few seconds after closing the completion message until it can record.
Format the cards using this unit. (Do not format using other devices, such as a
computer, etc. Doing so may make the cards unusable in this unit.)
Menu list
For details on specifications, visit the Owner’s Manual (PDF version).
*1 This can be set when the handle unit ( supplied, optional) is attached to the
unit.
*2 This can be set when the handle unit has not been attached to the unit.
*3 Available for setting when using .
X1500
[THUMBNAIL] menu [PLAYBACK] [CLIP SEL], [RESUME PLAY]
[CLIP] [PROTECT], [DELETE], [COPY], [INFORMATION]
[DISPLAY] [DATA]
[CAMERA] menu [SW MODE] [ZOOM RING], [IRIS RING], [SUPER GAIN], [AGC
[USER SW] [USER1] to [USER12]
42
DVQX2023 (ENG)
LIMIT], [
O.I.S.], [HYBRID O.I.S.], [O.I.S. MODE],
[ATW], [ATW SPEED], [ATW TARGET R], [ATW
TARGET B], [W.BAL PRESET], [W.BAL VAR],
[H.ZOOM SPEED], [i.ZOOM], [REAR RING], [AUTO
SLOW SHTR], [AF SPEED], [AREA MODE],
[IR REC], [IR REC COLOR], [FACE DETECT/
TRACKING MODE]
Page 43

Basic operation of the menu
[SCENE FILE] menu [FILE SELECT], [NAME EDIT], [LOAD/SAVE/INITIALIZE], [MASTER DTL],
[DTL CORING], [V.DTL LEVEL], [RB GAIN CONTROL SETTING],
[CHROMA LEVEL], [CHROMA PHASE], [MATRIX], [COLOR
CORRECTION], [SKIN TONE DTL.], [MASTER PED], [GAMMA MODE
SEL], [BLACK GAMMA], [KNEE MODE], [DRS], [DRS EFFECT DEPTH],
[NR CONTROL], [AE LEVEL], [AE LEVEL EFFECT]
[AUDIO] menu [HANDLE UNIT
INPUT SETTING]
[MIC SETTING]
[INPUT1 MIC LEVEL], [INPUT2 MIC LEVEL],
*1
[INPUT1 LINE LEVEL], [INPUT2 LINE LEVEL]
*2
[CH1 LEVEL], [CH2 LEVEL], [CH1 LEVEL
CONTROL], [CH2 LEVEL CONTROL]
[INPUT SETTINGS] [CH1 MIC LOWCUT], [CH2 MIC LOWCUT], [CH1
LIMITER], [CH2 LIMITER], [MIC LIMITER LINK]
[OUTPUT
[AUDIO OUT]
SETTINGS]
[ALARM] [BATTERY END], [MEDIA END], [WARNING]
[VIDEO OUT/LCD/
VF] menu
[VIDEO OUT SEL]
[SDI OUT]
*3
*3
[OUT FORMAT], [SDI AUDIO GAIN CHG],
[SDI REC REMOTE], [SDI OUT CHAR], [SDI OUT
ZEBRA]
[HDMI OUT] [OUT FORMAT], [HDMI TC OUT], [HDMI REC
REMOTE], [HDMI OUT CHAR], [HDMI OUT ZEBRA]
[LCD] [BRIGHTNESS], [COLOR LEVEL], [CONTRAST],
[BACK LIGHT], [RED TINT], [BLUE TINT], [SELF
SHOOT]
[VF] [BRIGHTNESS], [COLOR LEVEL], [CONTRAST],
[RED TINT], [BLUE TINT], [VF COLOR]
[INDICATOR] [FULL AUTO], [SLOT1/2 STATUS], [2 SLOTS
FUNC.], [STREAMING], [NETWORK], [BATTERY
REMAIN], [REC FORMAT], [FRAME RATE], [CLIP
NAME], [REC REMOTE], [REC MODE], [FBC],
[DRS], [O.I.S.], [SCENE FILE], [AREA/FACE],
[AUDIO LEVEL METER], [GAIN], [ND FILTER],
[SHUTTER], [IRIS], [AE LEVEL], [ZOOM/FOCUS],
[WHITE BALANCE], [FACE DETECTION], [DATE/
TIME], [MULTI MANUAL], [D.ZOOM], [IR REC],
[PLAYBACK STATUS]
[MARKER] [CENTER MARKER], [SAFETY MARKER], [FRAME
MARKER]
[FOCUS ASSIST] [FOCUS ASSIST SW], [EXPAND MODE], [EXPAND
VALUE], [PEAKING LEVEL], [PEAKING COLOR],
[DETAIL], [DETAIL LEVEL], [DETAIL FREQ.]
[EI ASSIST] [ZEBRA], [ZEBRA1 DETECT], [ZEBRA2 DETECT],
[ZEBRA2], [WFM MODE], [WFM TRANSPARENCE]
(ENG) DVQX2023
43
Page 44

Basic operation of the menu
[VIDEO OUT/LCD/
VF] menu
[RECORDING] menu [FORMAT MEDIA]
[NETWORK] menu [DEVICE SEL], [NETWORK FUNC]
[SYSTEM] menu [FREQUENCY], [FILE FORMAT], [REC FORMAT], [SUPER SLOW]
[OTHERS] menu [FILE] [SCENE FILE(SD CARD)], [SETUP FILE(SD
[LEVEL GAUGE] [LEVEL GAUGE], [LEVEL GAUGE RESET]
[CLIP NAME] [CAM INDEX], [NEXT CARD COUNT]
[2 SLOTS FUNC.], [PRE REC]
[REC FUNCTION] [REC MODE], [INTERVAL TIME]
[TC/UB] [TC PRESET], [UB PRESET], [FREE/REC RUN],
[REC COUNTER], [TIME STAMP]
[IP REMOTE] [ENABLE/DISABLE], [USER ACCOUNT],
[STREAMING] [STREAMING FORMAT], [START TRIGGER],
[WLAN PROPERTY] [TYPE], [SSID], [CHANNEL], [ENCRYPTION],
[WLAN IPv4
SETTING]
[INFORMATION] [STATUS]
[UTILITY] [NETWORK INITIALIZE]
[HANDLE TALLY LED]
[CLOCK] [CLOCK SETTING], [TIME ZONE], [DATE
[USB DEVICE] [CARD READER MODE], [SERVICE MODE]
[INFORMATION] [VERSION], [OPERATION TIME], [UPDATE]
[ECO MODE] [BATTERY], [AC], [NETWORK]
[APPROVED REGULATION], [LANGUAGE], [MENU INITIALIZE]
[DF/NDF], [UB MODE]
[ACCOUNT LIST]
[CONNECTION INFO.], [RECEIVER URL], [RTSP
PORT], [MULTICAST ADDRESS], [MULTICAST
PORT], [LOAD (SD CARD)], [SAVE (SD CARD)],
[START]
[ENCRYPT KEY]
[DHCP], [IP ADDRESS], [SUBNET MASK],
[DEFAULT GATEWAY], [PRIMARY DNS],
[SECONDARY DNS]
CARD)], [SETUP FILE(MEMORY)], [SLOT FOR
LOAD/SAVE]
FORMAT]
44
DVQX2023 (ENG)
Page 45

Manual recording
@
NOTE
Manual recording
A Rear ring
B Focus ring
C <ND FILTER> switch
D <FOCUS A/M/¶> button
E Multidial
F <IRIS> button
G <GAIN> button
H <SHUTTER> button
I <AUTO/MANU> switch
J <AE LEVEL>/<USER4>
button
K <WHITE BAL> button
∫ About auto mode/manual mode
Switch between auto mode and manual mode with the <AUTO/MANU> switch.
<AUTO>: auto mode
≥ Focus, iris, gain, shutter, and white balance are automatically adjusted.
<MANU>: manual mode
≥ To adjust focus, iris, gain, shutter speed, and white balance manually, set the unit to manual
mode.
0 The settings made in manual mode are not maintained for the following settings when you
switch to auto mode:
j Focus, lens stop, gain, shutter speed, white balance
∫ Camera operations that are disabled in auto mode
≥ The following camera operations are disabled in auto mode:
j <IRIS> button, <GAIN> button, <SHUTTER> button, <WHITE BAL> button, <FOCUS A/
M/¶> button, focus ring, rear ring
* When set with the [CAMERA] menu → [SW MODE] → [REAR RING] → [IRIS]
≥ The following USER button functions are disabled in auto mode:
j [AWB]/[FBC]/[ONE PUSH AF]/[ATW]/[FOCUS ASSIST]
*
(ENG) DVQX2023
45
Page 46

Manual recording
Rear ring function settings
Set the [CAMERA] menu → [SW MODE] → [REAR RING], and you can switch the function to
be adjusted by the rear ring.
≥ Zoom
≥ Manual iris adjustment
≥ AE level (exposure compensation) adjustment
Zoom
1 Select the [CAMERA] menu → [SW MODE] → [REAR RING] → [ZOOM].
2 Rotate the rear ring.
Iris
1 Select the [CAMERA] menu → [SW MODE] → [REAR RING] → [IRIS] or [IRIS/AE
LEVEL].
2 Switch to <MANU> with the <AUTO/MANU> switch to enter manual mode.
3 Press the <IRIS> button to switch to manual iris mode.
[STD] disappears.
4 Rotate the rear ring.
46
DVQX2023 (ENG)
Page 47

Manual recording
@
NOTE
AE level (exposure compensation)
1 Select the [SCENE FILE] menu → [AE LEVEL] → [ON].
2 Select the [CAMERA] menu → [SW MODE] → [REAR RING] → [IRIS/AE LEVEL].
3 When the <AUTO/MANU> switch is set to manual mode, use one of the
following operations to switch one of iris, gain, or shutter speed to auto.
≥ Press the <IRIS> button to switch to auto iris mode.
≥ Press the <GAIN> button to switch to auto gain mode.
≥ Press the <SHUTTER> button to switch to auto shutter mode.
4 Rotate the rear ring.
0 When manual iris mode is enabled, the iris is adjusted when the rear ring is turned.
Focusing (manual focus)
1 Switch to <MANU> with the <AUTO/MANU> switch to enter manual mode.
2 Press the <FOCUS A/M/¶> button to switch to manual focus mode.
[AF] and [MF] switch each time you press the button. The focal point goes to infinity after
you press and hold the button, and then the manual focus mode is engaged.
3 Rotate the focus ring.
White balance adjustment
Follow the steps below to adjust the white balance
automatically.
≥ White balance/black balance adjustment is done
using the [AWB] USER button function. Make the
settings beforehand.
It is set in the [USER6] button icon at the time of
purchase.
To display the operation icon, touch and hold the
screen for approximately 2 seconds while the camera recording screen is being displayed.
F1:
*****
AWB
AREA
FACE DETECT
ZEBRA
MENU
F2:
F3:
*****
COUNTER RESET
F4:
F5:
*****
*****
(ENG) DVQX2023
F6:
*****
47
Page 48

Manual recording
@
NOTE
@
NOTE
∫ When stored in white balance [Ach]
1 Switch to <MANU> with the <AUTO/MANU> switch to enter manual mode.
2 Set the gain value. (l 49)
Normally, set this to 0 dB. If it is too dark, set the gain to an appropriate value.
3 Press the <WHITE BAL> button to switch to [Ach].
Each time you press the button, the white balance switches in the order “Preset”, [Ach],
[Bch].
4 Change the <ND FILTER> switch settings according to the light conditions.
5 Place the white pattern at a point where the light conditions match those for the
light source for the subject, and zoom in on the white pattern so that the white
color appears in the screen.
6 Adjust the iris (the lens stop).
Adjust the iris so that the brightness of Y GET is approx. 70%.
7 Either press the USER button assigned to [AWB] or touch the USER button
icon.
Automatic adjustment of the white balance starts and the white balance adjustment value is
memorized.
0 The content previously set is maintained in [Ach] or [Bch]. Make the settings again if the
lighting conditions have changed.
When having no time to adjust the white balance
1 Press the <WHITE BAL> button to switch to “Preset”.
2 Either press the USER button assigned to [AWB] or touch the USER button
icon to switch the white balance.
[P 3200K], [P 5600K], and “VAR” (the value set in the [CAMERA] menu → [SW MODE] →
[W.BAL VAR]) change in order.
≥ When “VAR” is selected, turning the multidial can set any white balance value between
[V 2000K] and [V 15000K].
≥ The “VAR” value displayed on the camera image screen is not guaranteed to be an absolute
value.Use it for reference purposes only.
48
DVQX2023 (ENG)
Page 49

Manual recording
Gain
If the camera screen is dark, increase the gain to brighten the screen.
1 Switch to <MANU> with the <AUTO/MANU> switch to enter manual mode.
2 Press the <GAIN> button to switch to manual gain mode.
The gain display is highlighted in orange.
3 Turn the multidial to adjust, then press the multidial.
The setting changes to the value displayed and exits.
Press the <EXIT> button to exit without changing the setting.
Setting the shutter speed
1 Switch to <MANU> with the <AUTO/MANU> switch to enter manual mode.
2 Press the <SHUTTER> button to switch to manual shutter mode.
The shutter speed display is highlighted in orange.
3 Turn the multidial to select the shutter speed.
4 Press the multidial.
The setting changes to the value displayed and exits.
Press the <EXIT> button to exit without changing the setting.
(ENG) DVQX2023
49
Page 50

Playing back clips
フビパ ヒブパ
ヶラュ ブペハペフ
ラユヷヤ ビパパ
ヶラュ ブペハペフ
フビパ ヒパパ
ヶラュ ビペハペヘ
ラユヷヤ ヒブパ
ヶラュ ビペハペヘ
フビビ ヒブパ
ヶラュ ビペハペヘ
フビパ ヒパパ
ヶラュ ビピハペベ
ラユヷヤ ヒブパ
ヶラュ ビピハペベ
フビビ ヒブパ
ヶラュ ビピハペベ
フビビ ヒパパ
ョラュ ブペハペフ
0001
00:00:00.00
0002
00:00:16.00
0003
00:00:32.15
0004
00:01:00.17
0005
00:01:24.02
0006
00:01:46.02
0007
00:02:30.20
0008
00:02:53.08
0009
00:03:30.20
TCR 12:59:59:23
CH1
CH2
Playing back clips
0001
0004
0007
ヶラュ ブペハペフ
フビパ ヒブパ
00:00:00.00
ヶラュ ビペハペヘ
ラユヷヤ ヒブパ
00:01:00.17
ヶラュ ビピハペベ
ラユヷヤ ヒブパ
00:02:30.20
0002
00:00:16.00
0005
00:01:24.02
0008
00:02:53.08
ヶラュ ブペハペフ
ラユヷヤ ビパパ
ヶラュ ビペハペヘ
フビビ ヒブパ
ヶラュ ビピハペベ
フビビ ヒブパ
0003
00:00:32.15
0006
00:01:46.02
0009
00:03:30.20
ヶラュ ビペハペヘ
フビパ ヒパパ
ヶラュ ビピハペベ
フビパ ヒパパ
ョラュ ブペハペフ
フビビ ヒパパ
1 Press the <THUMBNAIL> button.
The thumbnail screen is displayed.
2 Select the clip to play back.
Playback from operation icons
Playback operation Operating procedure
Playback/pause Touch .
Fast-reverse playback Touch . Touch twice to increase the speed.
Fast-forward playback Touch . Touch twice to increase the speed.
Stop (return to thumbnail screen) Touch .
50
DVQX2023 (ENG)
Page 51

Updating the unit’s firmware
@
NOTE
Updating the unit’s firmware
Confirm the firmware version of the unit in the [OTHERS] menu → [INFORMATION] →
[VERSION], access the most current information regarding firmware in the website described
in NOTE, and download the firmware as necessary.
0 Update is completed by loading the downloaded file to the unit via the memory card. Insert
the memory card that stores the update file into card slot 1, and select the [OTHERS] menu
→ [INFORMATION] → [UPDATE].
For the latest update information, check the support website below. (As of January 2020)
https://panasonic.jp/support/global/cs/e_cam
(This website is in English only.)
0 When updating the firmware, use the AC adaptor or sufficiently charged battery.
0 Do not turn off the power while updating the firmware. Rewriting of the firmware may fail and
the unit may not be activated.
(ENG) DVQX2023
51
Page 52

Specifications
X1500
X2000
X2000
Specifications
General
Power
7.28 V (when battery is used)
12 V (when the AC adaptor is used)
Power consumption
22.9 W (Charging)
14.4 W (When the LCD monitor is used)
15.5 W (When the LCD monitor is used)
Item
Ambient operating
temperature
Ambient operating
humidity
Mass (Weight) Approx. 0.9 k] (Approx. 1.98 lbs.)
External
dimensions
(W×H×D)
0 °C to 40 °C (32 °F to 104 °F)
10% to 80% (relative humidity, no condensation)
(main unit only, excluding lens hood,
battery and supplied accessories)
Approx. 1.2 k] (Approx. 2.65 lbs.)
(including lens hood, battery and eye
cup)
129 mm×93 mm×257 mm
(5.08 q × 3.66 q × 10.1 q)
(including lens hood and eye cup,
excluding protrusions)
X1500
Approx. 0.9 k] (Approx. 1.98 lbs.) (main
unit only, excluding handle unit, lens
hood, battery and supplied accessories)
Approx. 1.5 k] (Approx. 3.31 lbs.)
(including handle unit, lens hood,
battery and eye cup)
129 mm×159 mm×257 mm
(5.08 q × 6.26 q × 10.1 q)
(including handle unit, lens hood, and
eye cup, excluding protrusions)
Camera
Pickup device 1/2.5 q MOS solid-state image sensing device for colors
Number of pixels Number of effective pixels: approx. 8,290,000 pixels
Lens Optical image stabilizer lens, motorized 24× zoom
Filter diameter 62 mm (2.44 q)
ND filter <CLR>, <1/4>, <1/16>, <1/64>
Total pixels: approx. 8,570,000 pixels
F1.8 to F4.0 (f=4.12 mm to 98.9 mm)
35 mm conversion: f=25.0 mm to 600.0 mm
52
DVQX2023 (ENG)
Page 53

Specifications
Minimum object distance (M.O.D) Approx. 0.1 m (3.93 q) (wide angle) from the lens
IR cut filter Has functionality to switch IR filter on/off (switched with [IR
Gain setting 0 dB to 30 dB
Color temperature setting ATW, ATW LOCK, Ach, Bch, preset 3200 K/preset
Shutter speed
Slow shutter speed When the [SYSTEM] menu → [FREQUENCY] → [59.94Hz] is
Approx. 1.2 m (47.2 q) (telephoto angle) from the lens
REC] USER button or menu)
≥ When [S.GAIN] is assigned to a USER button, [SUPER
GAIN]/[SUPER GAINi] can be set
5600 K/VAR (2000 K to 15000 K)
When the [SYSTEM] menu → [FREQUENCY] → [59.94Hz] is set
≥ 59.94i/59.94p mode:
1/60 sec., 1/100 sec., 1/120 sec., 1/180 sec., 1/250 sec.,
1/350 sec., 1/500 sec., 1/750 sec., 1/1000 sec., 1/1500 sec.,
1/2000 sec., 1/3000 sec., 1/4000 sec., 1/8000 sec.
≥ 29.97p mode:
1/30 sec., 1/50 sec., 1/60 sec., 1/100 sec., 1/120 sec.,
1/180 sec., 1/250 sec., 1/350 sec., 1/500 sec., 1/750 sec.,
1/1000 sec., 1/1500 sec., 1/2000 sec., 1/3000 sec.,
1/4000 sec., 1/8000 sec.
≥ 23.98p mode:
1/24 sec., 1/48 sec., 1/50 sec., 1/60 sec., 1/100 sec.,
1/120 sec., 1/180 sec., 1/250 sec., 1/350 sec., 1/500 sec.,
1/750 sec., 1/1000 sec., 1/1500 sec., 1/2000 sec.,
1/3000 sec., 1/4000 sec., 1/8000 sec.
When the [SYSTEM] menu → [FREQUENCY] → [50.00Hz] is
set
≥ 50.00i/50.00p mode:
1/50 sec., 1/60 sec., 1/100 sec., 1/125 sec., 1/180 sec.,
1/250 sec., 1/350 sec., 1/500 sec., 1/750 sec., 1/1000 sec.,
1/1500 sec., 1/2000 sec., 1/3000 sec., 1/4000 sec.,
1/8000 sec.
≥ 25.00p mode:
1/25 sec., 1/50 sec., 1/60 sec., 1/100 sec., 1/125 sec.,
1/180 sec., 1/250 sec., 1/350 sec., 1/500 sec., 1/750 sec.,
1/1000 sec., 1/1500 sec., 1/2000 sec., 1/3000 sec.,
1/4000 sec., 1/8000 sec.
set
≥ 59.94i/59.94p mode: 1/8 sec., 1/15 sec., 1/30 sec.
≥ 29.97p mode: 1/8 sec., 1/15 sec.
≥ 23.98p mode: 1/6 sec., 1/12 sec.
When the [SYSTEM] menu → [FREQUENCY] → [50.00Hz] is
set
≥ 50.00i/50.00p mode: 1/6 sec., 1/12 sec., 1/25 sec.
≥ 25.00p mode: 1/6 sec., 1/12 sec.
(ENG) DVQX2023
53
Page 54

Specifications
Super slow recording ≥ [SYSTEM] menu → [FREQUENCY] → [59.94Hz]
Minimum illuminance of subject 1.5 lx (F1.8, [SUPER GAINi] is enabled, when shutter speed
Digital zoom 2×/5×/10×/i.ZOOM (maximum 48×)
Built-in LED light
(When using the handle unit
( supplied,
X2000 X1500
optional))
Lens hood Hood with lens cover
When the number of recording pixels is 1920×1080 (FHD)
Recording frame rate 120 fps, slow motion effect 1/2 speed
(in 59.94p mode), slow motion effect 1/4 speed (in 29.97p
mode), 1/5 speed (in 23.98p mode)
≥ [SYSTEM] menu → [FREQUENCY] → [50.00Hz]
When the number of recording pixels is 1920×1080 (FHD)
Recording frame rate 100 fps, slow motion effect 1/2 speed (in
50.00p mode), slow motion effect 1/4 speed (in 25.00p mode)
is 1/30 sec.)
Illuminance: approx. 70 lx (1.0 m (approx. 3.3 feet))
Illumination angle: approx. 30°
Color temperature: approx. 4600 K
Memory card recorder
Recording media SDHC memory card (4 GB to 32 GB),
Recording slot 2 slots
System frequency 59.94 Hz/50.00 Hz
File format MOV (HEVC), MOV, MP4 (HEVC), MP4, AVCHD
Recording format ≥MOV: 4:2:0 (10bit)
SDXC memory card (exceeding 32 GB to 128 GB):
UHS-I, UHS Speed Class 3 compatible
≥ Refer to “Speed Class during shooting” (l 38).
UHD (3840×2160); HEVC LongGOP 200M (Average approx. 200 Mbps)/
HEVC LongGOP 150M (Average approx. 150 Mbps)
≥ MOV: 4:2:0 (8bit)
UHD (3840×2160); 420LongGOP 150M (Average approx. 150 Mbps)/
420LongGOP 100M (Average approx. 100 Mbps)
≥ MOV: 4:2:2 (10bit)
UHD (3840×2160); 422LongGOP 150M (Average approx. 150 Mbps)
FHD (1920×1080); 422LongGOP 100M (Average approx. 100 Mbps)/
422LongGOP 50M (Average approx. 50 Mbps)/
422ALL-I 200M (Average approx. 200 Mbps)/
422ALL-I 100M (Average approx. 100 Mbps)
54
DVQX2023 (ENG)
Page 55

Specifications
Recording format ≥MP4: 4:2:0 (10bit)
Number of
recording pixels/
Recording video
signal
Recording and
playback time
2-slot function Relay recording, simultaneous recording, background recording
Still image
recording
UHD (3840×2160); HEVC LongGOP 100M (Average approx. 100 Mbps)/
≥ MP4: 4:2:0 (8bit)
UHD (3840×2160); 420LongGOP 72M (Average approx. 72 Mbps)
FHD (1920×1080); 420LongGOP 50M (Average approx. 50 Mbps)
≥ AVCHD: 4:2:0 (8bit)
FHD (1920×1080); PS (Average approx. 25 Mbps)/PH (Average approx. 21 Mbps)/
HD (1280×720);
3840×2160/59.94p, 50.00p, 29.97p, 25.00p, 23.98p
1920×1080/59.94p, 50.00p, 29.97p, 25.00p, 23.98p, 59.94i, 50.00i
1280×720/59.94p, 50.00p
Refer to the owner’s manual (PDF) for information about the recording and
playback times.
Recording format: JPEG (DCF/Exif2.2)
≥ Refer to the owner’s manual (PDF) for information about recording methods
and the number of recording pixels.
HEVC LongGOP 72M (Average approx. 72 Mbps)
HA (Average approx. 17 Mbps)
PM (Average approx. 8 Mbps)
Digital video
Number of
quantizing bits
Video compression
format
≥ MOV: 4:2:2 (10bit)/4:2:0 (8bit)/4:2:0 (10bit (HEVC))
≥ MP4: 4:2:0 (8bit)/4:2:0 (10bit (HEVC))
≥ AVCHD: 4:2:0 (8bit)
≥ MOV/MP4:
H.264/MPEG-4 AVC High Profile, H.265/MPEG-H HEVC Main10 Profile
≥ AVCHD:
H.264/MPEG-4 AVC High Profile
Digital audio
Recording audio
signal
Audio compression
format
Headroom 12 dB
≥ MOV: 48 kHz/24bit, 2ch
≥ MP4/AVCHD: 48 kHz/16bit, 2ch
≥ MOV: LPCM
≥ MP4: AAC
≥ AVCHD: Dolby Audio
™
(ENG) DVQX2023
55
Page 56

Specifications
X2000
Streaming
Video compression format H.264/MPEG-4 AVC Main Profile
Video resolution 1920×1080 (FHD), 1280×720 (HD), 640×360, 320×180
Streaming method Unicast, Multicast
Frame rate ≥ When set to the [SYSTEM] menu
Bit rate 24 Mbps, 20 Mbps, 16 Mbps, 14 Mbps, 8 Mbps, 6 Mbps,
Audio compression format AAC-LC: 48 kHz/16-bit, 2ch
Supported protocol RTSP/RTP/RTMP/RTMPS
H.264/MPEG-4 AVC High Profile
→
[59.94Hz]: 30 fps, 60 fps
≥ When set to the [SYSTEM] menu
[50.00Hz]: 25 fps, 50 fps
4 Mbps, 3 Mbps, 2 Mbps, 1.5 Mbps, 1 Mbps, 0.7 Mbps,
0.5 Mbps
[FREQUENCY] →
→
[FREQUENCY] →
Wi-Fi
Compliance standard IEEE802.11b/g/n compliant
Frequency range used (central
frequency)
Encryption method Wi-Fi compliant WPA
Access method Infrastructure mode
2412 MHz to 2462 MHz [1 to 11ch]
™
™
/WPA2
Video output
Item
<SDI OUT>
terminal
<HDMI> terminal ≥ HDMI type A terminal ×1 (not compatible with VIERA Link)
≥ Output format
3840×2160: 59.94p, 50.00p, 29.97p, 25.00p, 23.98p
1920×1080: 59.94p, 50.00p, 59.94i, 50.00i, 29.97p, 25.00p, 23.98p
1280×720: 59.94p, 50.00p
720×480: 59.94p
720×576: 50.00p
X1500
―
≥ BNC terminal ×1
0.8 V [p-p], 75 Ω, 3G/1.5G HD-SDI
compatible
≥ Output format
1920×1080: 59.94p LEVEL-A,
50.00p LEVEL-A, 59.94i, 50.00i,
29.97PsF, 25.00PsF, 23.98PsF
1280×720: 59.94p, 50.00p
56
DVQX2023 (ENG)
Page 57

Specifications
X1500
X2000
Audio input
Built-in microphone Supports stereo microphone
<MIC> terminal 3.5 mm diameter stereo mini jack × 1
<INPUT 1>/<INPUT 2> terminal
(When using the handle unit
( supplied,
X2000 X1500
optional))
XLR×2, 3-pin
Input high impedance, <LINE>/<MIC>/<i48V> (Switched with
<INPUT1>/<INPUT2> switch)
≥ <LINE>: 4 dBu/0 dBu (switched with menu)
≥ <MIC>: j40 dBu/j50 dBu/j60 dBu (switched with menu)
Audio output
Item
<SDI OUT> terminal
―
<HDMI> terminal LPCM 2ch
Headphone terminal 3.5 mm (0.14 q) diameter stereo mini jack × 1
Speaker 15 mm (approx. 0.59 q) diameter, round ×1
LPCM 2ch
≥ Gain switching:
0dB/j6dB/j8dB (switched
with menu)
Other input/output
<REMOTE> terminal 2.5 mm (approx. 0.10 q) diameter super mini jack × 1
USB terminal (USB2.0) Micro-AB terminal, 5pin, with USB mass storage functionality (read
<DC IN 12V> terminal DC12 V, EIAJ type 4
only)
Monitor
LCD monitor 3.5 q LCD monitor (approx. 2,760,000 dots)
Viewfinder 0.24 q EVF (equivalent to approx. 1,560,000 dots)
(ENG) DVQX2023
57
Page 58

Specifications
Handle unit ([X2000] supplied, [X1500] optional)
Power consumption
Maximum approx. 3.1 W (when connected to the camera)
Mass (Weight) Approx. 305 ] (Approx. 0.67 lbs.) (main part of the handle unit
External dimensions (W×H×D) Approx. 71 mm× 89 mm× 207 mm
only, excluding microphone holder and microphone holder
mounting screws)
(Approx. 2.80 q × 3.50 q × 8.15 q) (including protrusions,
excluding microphone holder)
AC adaptor
Power source
100 V – 240 V 50 Hz/60 Hz, 1.2 A 79 VA (100 V ) – 99 VA (240 V )
Power output
12 V 3.0 A
Ambient operating temperature 0 °C to 40 °C (32 °F to 104 °F)
Ambient operating humidity 10% to 90% (relative humidity, no condensation)
Mass (Weight) Approx. 225 ] (Approx. 0.496 lbs.)
External dimensions (W×H×D) 115 mm×37 mm×57 mm (4-1/2 q × 1-7/16 q × 2-1/4 q)
(excluding the DC cable section)
Battery pack (AG-VBR59)
Voltage/capacity
7.28 V 5900 mAh 43 Wh
Charging current Maximum 4000 mA
Ambient operating humidity 0% to 80% (relative humidity, no condensation)
Mass (Weight) Approx. 230 ] (Approx. 0.507 lbs.)
External dimensions (W×H×D) 41.3 mm×51.3 mm×69.6 mm (1-5/8 q × 2 q × 2-3/4 q)
58
DVQX2023 (ENG)
Page 59

Limited Warranty (ONLY FOR U.S.A.)
Panasonic ProductsLimited Warranty
Limited Warranty Coverage (For USA Only)
If your product does not work properly because of a defect in materials or workmanship,
Panasonic Corporation of North America (referred to as “the warrantor”) will, for the length of the
period indicated on the chart below, which starts with the date of original purchase
(“warranty period”), at its option either (a) repair your product with new or refurbished parts,
(b) replace it with a new or a refurbished equivalent value product, or (c) refund your purchase price.
The decision to repair, replace or refund will be made by the warrantor.
Product or Part Name Parts Labor
1 Year 90 Days4K Video Camera
All included Accessories
(Except Non-Rechargeable Batteries)
90 Days
10 Days
Not Applicable
Only Non-Rechargeable Batteries
Not Applicable
During the “Labor” warranty period there will be no charge for labor. During the “Parts” warranty
period, there will be no charge for parts. This Limited Warranty excludes both parts and labor for
non-rechargeable batteries, antennas, and cosmetic parts (cabinet). This warranty only applies
to products purchased and serviced in the United States. This warranty is extended only to
the original purchaser of a new product which was not sold “as is”.
Mail-In Service--Online Repair Request
Online Repair Request
To submit a new repair request and for quick repair status visit our Web Site at
http://shop.panasonic.com/support.
When shipping the unit, carefully pack, include all supplied accessories listed in the Owner’s
Manual, and send it prepaid, adequately insured and packed well in a carton box. When shipping
Lithium Ion batteries please visit our Web Site at http://shop.panasonic.com/support as Panasonic
is committed to providing the most up to date information. Include a letter detailing the complaint,
a return address and provide a daytime phone number where you can be reached.
A valid registered receipt is required under the Limited Warranty.
IF REPAIR IS NEEDED DURING THE WARRANTY PERIOD, THE PURCHASER WILL BE
REQUIRED TO FURNISH A SALES RECEIPT/PROOF OF PURCHASE INDICATING DATE
OF PURCHASE, AMOUNT PAID AND PLACE OF PURCHASE. CUSTOMER WILL BE
CHARGED FOR THE REPAIR OF ANY UNIT RECEIVED WITHOUT SUCH PROOF OF
PURCHASE.
Limited Warranty Limits And Exclusions
This warranty ONLY COVERS failures due to defects in materials or workmanship, and DOES NOT COVER
normal wear and tear or cosmetic damage. The warranty ALSO DOES NOT COVER damages which
occurred in shipment, or failures which are caused by products not supplied by the warrantor, or failures which
result from accidents, misuse, abuse, neglect, mishandling, misapplication, alteration, faulty installation,
set-up adjustments, misadjustment of consumer controls, improper maintenance, power line surge, lightning
damage, modification, introduction of sand, humidity or liquids, commercial use such as hotel, office,
restaurant, or other business or rental use of the product, or service by anyone other than a Factory Service
Center or other Authorized Servicer, or damage that is attributable to acts of God.
Limited Warranty (ONLY FOR U.S.A.)
(ENG) DVQX2023
59
Page 60

Limited Warranty (ONLY FOR U.S.A.)
THERE ARE NO EXPRESS WARRANTIES EXCEPT AS LISTED UNDER “LIMITED WARRANTY
COVERAGE”.
THE WARRANTOR IS NOT LIABLE FOR INCIDENTAL OR CONSEQUENTIAL DAMAGES RESULTING
FROM THE USE OF THIS PRODUCT, OR ARISING OUT OF ANY BREACH OF THIS WARRANTY.
(As examples, this excludes damages for lost time, travel to and from the servicer, loss of or damage to media
or images, data or other memory or recorded content. The items listed are not exclusive, but for illustration only.)
ALL EXPRESS AND IMPLIED WARRANTIES, INCLUDING THE WARRANTY OF
MERCHANTABILITY, ARE LIMITED TO THE PERIOD OF THE LIMITED WARRANTY.
Some states do not allow the exclusion or limitation of incidental or consequential damages, or
limitations on how long an implied warranty lasts, so the exclusions may not apply to you.
This warranty gives you specific legal rights and you may also have other rights which vary from state
to state. If a problem with this product develops during or after the warranty period, you may contact
your dealer or Service Center. If the problem is not handled to your satisfaction, then write to:
Panasonic Corporation of North America
Consumer Affairs Department 8th Fl.
Two Riverfront Plaza
Newark NJ 07102-5490
PARTS AND SERVICE, WHICH ARE NOT COVERED BY THIS LIMITED WARRANTY, ARE
YOUR RESPONSIBILITY.
As of December 2019
60
DVQX2023 (ENG)
Page 61

Warranty (For Canadian Customers)
Panasonic Canada Inc.
5770 Ambler Drive, Mississauga, Ontario L4W 2T3
PANASONIC PRODUCT – LIMITED WARRANTY
Panasonic Canada Inc. warrants this product to be free from defects in material and workmanship under
normal use and for a period as stated below from the date of original purchase agrees to, at its option
either (a) repair your product with new or refurbished parts, (b) replace it with a new or a refurbished
equivalent value product, or (c) refund your purchase price. The decision to repair, replace or refund will
be made by Panasonic Canada Inc.
Camcorder Products - One (1) year, parts and labour
This warranty is given only to the original purchaser, or the person for whom it was purchased as a gift, of a Panasonic brand product
mentioned above sold by an authorized Panasonic dealer in Canada and purchased and used in Canada, which product was not sold
“as is”, and which product was delivered to you in new condition in the original packaging.
IN ORDER TO BE ELIGIBLE TO RECEIVE WARRANTY SERVICE HEREUNDER, A PURCHASE
RECEIPT OR OTHER PROOF OF DATE OF ORIGINAL PURCHASE, SHOWING AMOUNT PAID AND
PLACE OF PURCHASE IS REQUIRED
LIMITATIONS AND EXCLUSIONS
This warranty ONLY COVERS failures due to defects in materials or workmanship, and DOES NOT COVER
normal wear and tear or cosmetic damage. The warranty ALSO DOES NOT COVER damages which occurred in
shipment, or failures which are caused by products not supplied by Panasonic Canada Inc., or failures which result
from accidents, misuse, abuse, neglect, mishandling, misapplication, alteration, faulty installation, set-up adjustments,
misadjustment of consumer controls, improper maintenance, improper batteries, power line surge, lightning damage,
modification, introduction of sand, humidity or liquids, commercial use such as hotel, office, restaurant, or other
business or rental use of the product, or service by anyone other than an Authorized Servicer, or damage that is
attributable to acts of God.
Dry cell batteries are also excluded from coverage under this warranty. Rechargeable batteries are
warranted for ninety (90) days from date of original purchase.
THIS EXPRESS, LIMITED WARRANTY IS IN LIEU OF ALL OTHER WARRANTIES, EXPRESS OR
IMPLIED, INCLUDING ANY IMPLIED WARRANTIES OF MERCHANTABILITY AND FITNESS FOR A
PARTICULAR PURPOSE. IN NO EVENT WILL PANASONIC CANADA INC. BE LIABLE FOR ANY
SPECIAL, INDIRECT OR CONSEQUENTIAL DAMAGES RESULTING FROM THE USE OF THIS PRODUCT
OR ARISING OUT OF ANY BREACH OF ANY EXPRESS OR IMPLIED WARRANTY.
(As examples, this warranty
excludes damages for lost time, travel to and from the Authorized Servicer, loss of or damage to media or images, data or other
memory or recorded content. This list of items is not exhaustive, but for illustration only.)
In certain instances, some jurisdictions do not allow the exclusion or limitation of incidental or
consequential damages, or the exclusion of implied warranties, so the above limitations and exclusions
may not be applicable. This warranty gives you specific legal rights and you may have other rights which
vary depending on your province or territory.
WARRANTY SERVICE
For product operation, repairs and information assistance, please visit our Support page:
www.panasonic.ca/english/support
IF YOU SHIP THE PRODUCT TO A SERVICENTRE
Carefully pack and send prepaid, adequately insured and preferably in the original carton.
Include details of the defect claimed, and proof of date of original purchase.
Warranty (For Canadian Customers)
(ENG) DVQX2023
61
Page 62

Useful Information (Only For Latin American Countries)
Customer Service
Customer Service Directory
Obtain products information and operative assistant; localize the closer
distributor or Service Center; buy spare parts and accessories by our
Web Site to Latin American:
COUNTRY WEB SITE CONTACT CENTER
Panama www.panasonic.com/pa/soporte/ 800-7262
Colombia
www.panasonic.com/co/soporte/ 01-8000-947262
Ecuador www.panasonic.com/ec/soporte/ 1-800-726276
Costa Rica www.panasonic.com/cr/soporte/ 800-7262737
El Salvador www.panasonic.com/sv/soporte/ 800-7262
Guatemala www.panasonic.com/gt/soporte/ 1-801-811-7262
Uruguay www.panasonic.com/uy/soporte/ 0-800-7262
Paraguay www.panasonic.com/uy/soporte/ 0-800-11-7262
Chile www.panasonic.com/cl/soporte/ 800-390-602
022-797-5000
Peru www.panasonic.com/pe/soporte/ 0800-00726
Venezuela www.panasonic.com/ve/soporte/ 800-7262-800
Mexico www.panasonic.com/mx/soporte/ 01800-847-7262
55-5000-1200
Argentina www.panasonic.com/ar/soporte/ 0800-333-7262
0810-321-7262
Dominican Republic
www.panasonic.com/do/soporte/ 809-200-8000
Useful Information (Only For Latin American Countries)
62
DVQX2023 (ENG)
Page 63

(ENG) DVQX2023
63
Page 64

Panasonic Corporation of North America
Two Riverfront Plaza, Newark, NJ 07102-5490
Panasonic Canada Inc.
5770 Ambler Drive, Mississauga, Ontario, L4W 2T3
© Panasonic Corporation 2020
Printed in Malaysia
http://shop.panasonic.com
www.panasonic.com
Panasonic Corporation
Web site: http://www.panasonic.com
 Loading...