

Page 1
Basic Operating Instructions
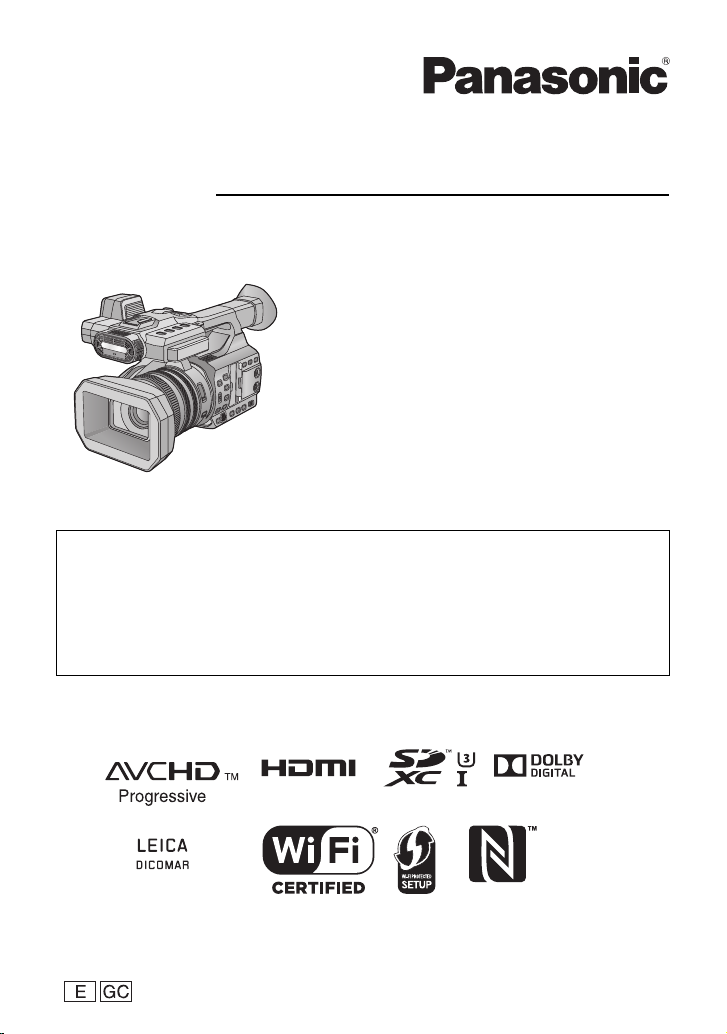
4K Video Camera
Model No. HC-X1000
Please read these instructions carefully before using this
product, and save this manual for future use.
More detailed operating instructions are available in “Operating Instructions (PDF format)”. To
read it, download it from the website.
https://eww.pavc.panasonic.co.jp/hdw/oi/X1000/index.html
≥ Click the desired language.
* You will need Adobe Reader to browse or print the Operating Instructions (PDF format).
You can download and install a version of Adobe Reader that you can use with your OS from
the following website. (As of September 2014)
http://www.adobe.com/products/acrobat/readstep2.html
SQT0478
Page 2
Information for Your Safety
For the AC mains plug of three pins
∫ Caution for AC mains lead
For your safety, please read the following text
carefully.
This appliance is supplied with a moulded three
pin mains plug for your safety and convenience.
A 5-ampere fuse is fitted in this plug.
Should the fuse need to be replaced please
ensure that the replacement fuse has a rating of
5-ampere and that it is approved by ASTA or
BSI to BS1362.
Check for the ASTA mark Ï or the BSI mark Ì
on the body of the fuse.
If the plug contains a removable fuse cover you
must ensure that it is refitted when the fuse is
replaced.
If you lose the fuse cover the plug must not be
used until a replacement cover is obtained.
A replacement fuse cover can be purchased
from your local dealer.
WARNING:
To reduce the risk of fire, electric shock or product damage,
≥ Do not expose this unit to rain, moisture, dripping or splashing.
≥ Do not place objects filled with liquids, such as vases, on this unit.
≥ Use only the recommended accessories.
≥ Do not remove covers.
≥ Do not repair this unit by yourself. Refer servicing to qualified service personnel.
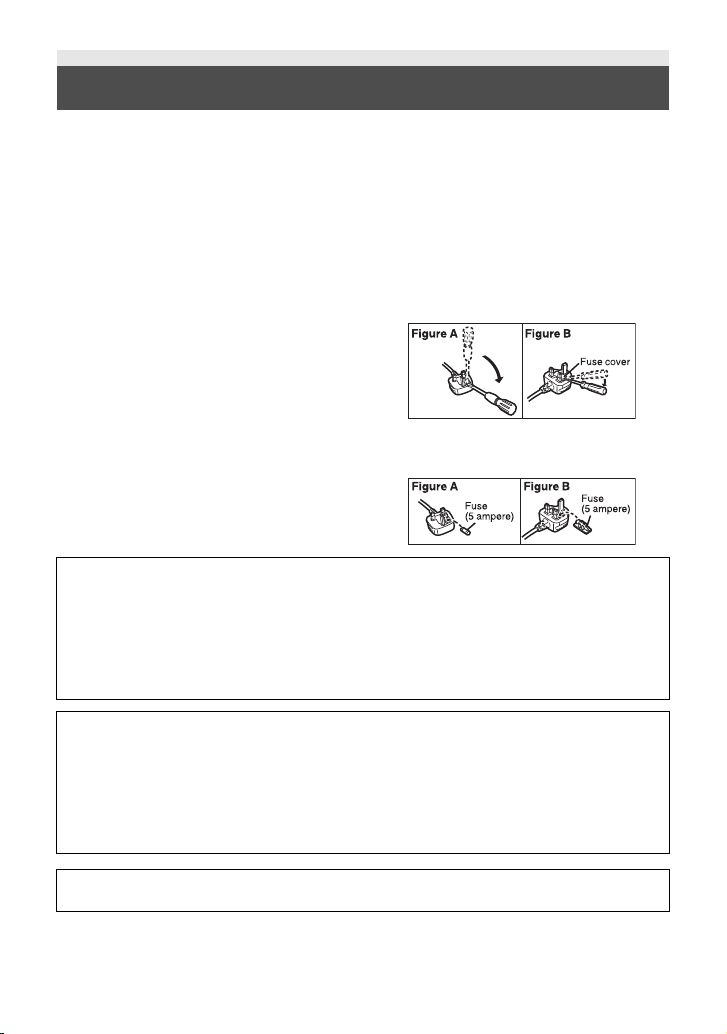
Before use
Remove the connector cover.
How to replace the fuse
The location of the fuse differ according to the
type of AC mains plug (figures A and B).
Confirm the AC mains plug fitted and follow the
instructions below.
Illustrations may differ from actual AC mains
plug.
1. Open the fuse cover with a screwdriver.
2. Replace the fuse and close or attach the
fuse cover.
CAUTION!
To reduce the risk of fire, electric shock or product damage,
≥ Do not install or place this unit in a bookcase, built-in cabinet or in another confined space.
Ensure this unit is well ventilated.
≥ Do not obstruct this unit’s ventilation openings with newspapers, tablecloths, curtains, and
similar items.
≥ Do not place sources of naked flames, such as lighted candles, on this unit.
The main plug is the disconnecting device. Install this unit so that the mains plug can be
unplugged from the socket outlet immediately.
2
SQT0478
Page 3
∫ Concerning the battery
Warning
Risk of fire, explosion and burns. Do not disassemble, heat above 60 oC or incinerate.
CAUTION
≥ Danger of explosion if battery is incorrectly replaced. Replace only with the type
recommended by the manufacturer.
≥ When disposing of the batteries, please contact your local authorities or dealer and ask for the
correct method of disposal.
For Europe only
∫ EMC Electric and magnetic compatibility
This symbol (CE) is located on the rating plate.
∫ Product identification marking
Product Location
4K Video Camera Bottom
Battery charger Bottom
AC adaptor Bottom
∫ Disposal of Old Equipment and
Batteries
Only for European Union and
countries with recycling
systems
These symbols on the
products, packaging, and/
or accompanying
documents mean that
used electrical and
electronic products and
batteries must not be
mixed with general
household waste.
For proper treatment, recovery and
recycling of old products and used
batteries, please take them to applicable
collection points in accordance with your
national legislation.
By disposing of them correctly, you will
help to save valuable resources and
prevent any potential negative effects on
human health and the environment.
For more information about collection and
recycling, please contact your local
municipality.
Penalties may be applicable for incorrect
disposal of this waste, in accordance with
national legislation.
Note for the battery
symbol (bottom symbol):
This symbol might be used
in combination with a
chemical symbol. In this
case it complies with the
requirement set by the
Directive for the chemical involved.
SQT0478
3
Page 4
For Europe only
∫ Cautions for use
The unit and the SD card become warm
during use. This is not a malfunction.
Declaration of Conformity (DoC)
Hereby, “Panasonic Corporation” declares
that this product is in compliance with the
essential requirements and other relevant
provisions of Directive 1999/5/EC.
Customers can download a copy of the
original DoC to our R&TTE products from
our DoC server:
http://www.doc.panasonic.de
Contact to Authorized Representative:
Panasonic Marketing Europe GmbH,
Panasonic Testing Centre, Winsbergring
15, 22525 Hamburg, Germany
This product is intended for general
consumer. (Category 3)
This product on purpose to connect to
access point of 2.4 GHz WLAN.
For Singapore only
Complies with
IDA Standards
DB01017
For India only
The specifications are exempted for any
licensing requirement by Ministry of
Communications and Information Technology,
G.S.R. 45 (E)., dated 28th January, 2005.
For Nigerian only
Connection and use of this
communications equipment is
permitted by the Nigerian
Communications Commission
Keep this unit as far away as possible from
electromagnetic equipment (such as
microwave ovens, TVs, video games etc.).
≥ If you use this unit on top of or near a TV, the
pictures and/or sound on this unit may be
disrupted by electromagnetic wave radiation.
≥ Do not use this unit near cell phones because
doing so may result in noise adversely
affecting the pictures and/or sound.
≥ Recorded data may be damaged, or pictures
may be distorted, by strong magnetic fields
created by speakers or large motors.
≥ Electromagnetic wave radiation generated by
microprocessors may adversely affect this
unit, disturbing the pictures and/or sound.
≥ If this unit is adversely affected by
electromagnetic equipment and stops
functioning properly, turn this unit off and
remove the battery or disconnect AC adaptor.
Then reinsert the battery or reconnect AC
adaptor and turn this unit on.
Do not use this unit near radio transmitters
or high-voltage lines.
≥ If you record near radio transmitters or
high-voltage lines, the recorded pictures and/
or sound may be adversely affected.
About connecting to a PC
≥ Do not use any other USB cables except the
supplied one.
About using a headphone
≥
Excessive sound pressure from earphones
and headphones can cause hearing loss.
≥ Listening at full volume for long periods may
damage the user ’s ears.
About using external microphones
≥ Keep the microphone holder screw and
INPU T t ermi nal c ap ou t of r each of chil dren to
prevent swallowing.
4
SQT0478
≥ Make sure to use the supplied cords and
cables. If you use optional accessories, use
the cords and the cables supplied with them.
≥ Do not extend the cords and the cables.
Page 5

≥ Do not spray insecticides or volatile
chemicals onto the unit.
≥ Before cleaning, detach the battery or pull the
AC cable from the AC outlet, and then wipe
the unit with a soft, dry cloth.
≥ If the unit is very dirty, dip a cloth in water and
squeeze firmly, and then wipe the unit with
the damp cloth. Next, dry the unit with a dry
cloth.
≥ Use of benzine, paint thinner, alcohol, or
dishwashing liquid may alter the camera body
or peel the surface finish. Do not use these
solvents.
≥ When using a chemical dust cloth, follow the
instructions that came with the cloth.
≥ When storing the unit in a cupboard or
cabinet, it is recommended that you place a
desiccant (silica gel) in with it.
≥ The battery used in this unit is a rechargeable
lithium-ion battery. It is susceptible to
humidity and temperature and the effect
increases the more the temperature rises or
falls.
≥ If the operating time is very short even after
the battery has been recharged, the battery
has worn out. Please purchase a new battery.
≥ When the card access lamp is lit, do not:
j Remove the SD card
j Turn the unit off
j Insert and remove the USB cable
j Expose the unit to vibrations or shock
∫ About the recording method
for recording motion pictures
This unit can record motion pictures using four
different recording methods, including MOV
(LPCM), MP4 (LPCM), MP4 and AVCHD
(l 27)
*1 AVCHD Progressive (1080/50p, 1080/
60p) supported.
MOV (LPCM)*2, MP4 (LPCM)
This recording method is suitable for editing
images. Audio is recorded in linear PCM.
*2, 3
*1
.
:
*2, 3
:
MP4
This recording method is suitable for playback
and editing on a PC. Audio is recorded in AAC.
*2 Those methods are not compatible with
motion pictures recorded in AVCHD
format.
*3 Those methods can record motion
pictures in formats that support 4K. 4K
motion pictures offer a resolution four
times higher than that of full highdefinition motion pictures.
AVCHD:
This recording method is suitable for playback
on a high-definition TV or storage on a disc.
Audio is recorded in Dolby
®
Digital.
∫ Regarding system frequencies
The NTSC/PAL standard setting of this unit can
be switched in [SYSTEM FREQ]. (l 26)
≥ To use this unit in regions where the TV
broadcasting system is NTSC, set it to
[59.94Hz(NTSC)]. To use this unit in regions
where the TV broadcasting system is PAL,
set it to [50Hz(PAL)]. (Playback is not
possible on TVs and other devices with a
standard that differs from the system
frequency setting of this unit.)
≥ If you record an AVCHD scene on the SD
card, it cannot be used with a different
system frequency. Use another SD card
when you change the system frequency.
∫ Indemnity about recorded
content
Panasonic does not accept any responsibility
for damages directly or indirectly due to any
type of problems that result in loss of recording
or edited content, and does not guarantee any
content if recording or editing does not work
properly. Likewise, the above also applies in a
case where any type of repair is made to the
unit.
SQT0478
5
Page 6

∫ About Condensation
(When the lens, the viewfinder
or LCD Monitor is fogged up)
Condensation occurs when there is a change in
temperature or humidity, such as when the unit
is taken from outside or a cold room to a warm
room. Please be careful, as it may cause the
lens, the viewfinder or LCD monitor to become
soiled, moldy, or damaged.
When taking the unit to a place which has a
different temperature, if the unit is accustomed
to the room temperature of the destination for
about one hour, condensation can be
prevented. (When the difference in temperature
is severe, place the unit in a plastic bag or the
like, remove air from the bag, and seal the bag.)
When condensation has occurred, remove the
battery and/or the AC adapter and leave the
unit like that for about one hour. When the unit
becomes accustomed to the surrounding
temperature, fogginess will disappear naturally.
∫ About security
Be careful about the possibility of theft or loss of
the unit, and be careful not to leave the unit
unattended. Please note that Panasonic does
not accept any responsibility for the
compromise, manipulation, and loss of
information caused by these events.
∫ Caution regarding laser beams
The lens may suffer damage if struck by a laser
beam. Make sure that laser beams do not strike
the lens when shooting in an environment
where laser devices are used.
∫ Cards that you can use with
this unit
SDHC Memory Card and SDXC Memory
Card
≥ 4 GB or more Memory Cards that do not have
the SDHC logo or 48 GB or more Memory
Cards that do not have the SDXC logo are
not based on SD Memory Card
Specifications.
≥ Refer to page 19 for more details on SD
cards.
∫ For the purposes of these
operating instructions
≥ The battery pack is referred to as the
“Battery”.
≥ SDHC Memory Card and SDXC Memory
Card are referred to as the “SD card”.
≥ The smartphone and tablet are indicated as
“smartphone”.
≥ Function that can be used for Recording
Mode:
Function that can be used for Playback
Mode:
≥ Scene(s) recorded with [REC MODE] set to
[MOV (LPCM)], [MP4 (LPCM)] or [MP4]:
"MOV/MP4 scene(s)".
≥ Scene(s) recorded with [REC MODE] set to
[AVCHD]: "AVCHD scene(s)".
≥ The correct value for 60p/60i/30p/24p is
59.94p/59.94i/29.97p/23.98p (except C4K).
≥ Pages for reference are indicated by an
arrow, for example: l 00
∫ Installing HD Writer XE 2.0
Check the website below to download/install the software.
http://panasonic.jp/support/global/cs/soft/download/f_xe20.html
6
SQT0478
Page 7

Contents
Information for Your Safety...................... 2
Accessories...............................................8
Wi-Fi
Preparation
Names and Functions of Main Parts .......9
Power supply........................................... 16
Charging the battery ......................... 16
Inserting/removing the battery........... 17
Charging and recording time ............. 17
Connecting to the AC outlet.............. 18
Preparation of SD cards ......................... 19
Cards that you can use with
this unit .............................................. 19
Inserting/removing an SD card.......... 20
Turning the unit on/off ............................ 21
Selecting a mode ....................................21
Using the LCD monitor/Viewfinder........ 22
Using the LCD monitor...................... 22
How to use the touch screen ............ 23
Viewfinder adjustment....................... 23
Setting date and time.............................. 24
Using the menu screen .......................... 25
Formatting cards ............................... 25
System frequency Selection.............. 26
Language Selection .......................... 26
Recording
Selecting a media to record ................... 26
Recording motion pictures .................... 27
Recording still pictures .......................... 27
Using the zoom ....................................... 28
Intelligent Auto Mode/Manual Mode......28
Manual Recording...................................29
Focus ................................................ 29
White Balance ................................... 29
Iris/Gain adjustment .......................... 30
Manual shutter speed ....................... 30
USER button ............................................ 31
Setting the USER button ................... 31
Using the USER button ..................... 31
Functions of the USER button .......... 32
Playback
Motion picture/Still picture playback....33
Watching Video/Pictures on
your TV ............................................. 34
Wi-Fi® function........................................ 35
Install the “Image App” ...................... 35
Using remote operation with a
direct connection............................... 36
If the Wi-Fi connection cannot be
established ........................................ 37
Others
Troubleshooting ..................................... 38
Specification ........................................... 39
About copyright ...................................... 41
Limited Warranty
(ONLY FOR AUSTRALIA) ....................... 43
For United Kingdom and Ireland
customers
∫
Sales and Support Information
Customer Communications Centre
≥
For customers within the UK: 0844 844 3899
≥
For customers within lreland: 01 289 8333
≥
Monday–Friday 9:00 am – 5:00 pm (Excluding
public holidays).
≥
For further support on your product, please visit
our website: www.panasonic.co.uk
Direct Sales at Panasonic UK
≥
Order accessory and consumable items for your
product with ease and confidence by phoning our
Customer Communications Centre
Monday–Friday 9:00 am – 5:00 pm (Excluding
public holidays).
≥
Or go on line through our Internet Accessory
ordering application at www.pas-europe.com
≥
Most major credit and debit cards accepted.
≥
All enquiries transactions and distribution
facilities are provided directly by Panasonic UK.
≥
It couldn’t be simpler!
≥
Also available through our Internet is direct
shopping for a wide range of finished products.
Take a browse on our website for further details.
.
SQT0478
7
Page 8
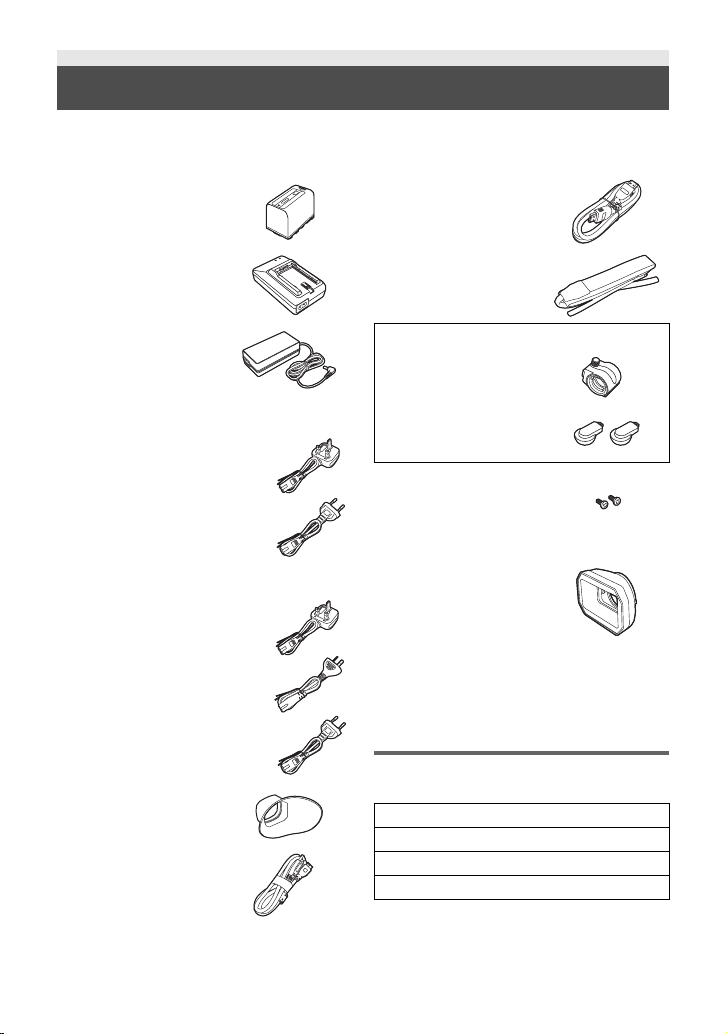
Accessories
Check the accessories before using this unit.
Keep the accessories out of reach of children to prevent swallowing.
Product numbers correct as of Sep. 2014. These may be subject to change.
Battery pack
VW-VBD58
HDMI cable
K1HY19YY0024
Battery charger
DE-A88D
AC adaptor
VSK0726
(For E)
AC cable
A K2CT2YY00095 (2 cables)
≥ The United Kingdom and
Ireland
B K2CQ2YY00117 (2 cables)
≥ Areas other than the United
Kingdom and Ireland
(For GC)
AC cable
A K2CT2YY00095 (2 cables)
≥ Saudi Arabia and Singapore
B K2CJ2YY00052 (2 cables)
≥ Australia and New Zealand
C K2CQ2YY00117 (2 cables)
≥ Areas other than Saudi
Arabia, Singapore, Australia
and New Zealand
Eye cup
SYA0019
USB cable
K2KYYYY00245
Shoulder strap
VFC4897
SYA0021
Microphone holder
VYC1146
INPUT terminal cap
*1
(2 caps)
VJF1468
Microphone holder
screws
VYC1144
12 mm length (2 screws)
Lens hood
SYK0438
*2
*1 The INPUT terminal caps are supplied
with the microphone holder.
*2 The lens hood is attached to this unit at
the time of purchase.
Optional accessories
Some optional accessories may not be
available in some countries.
Unidirectional microphone (AG-MC200G)
Battery pack (lithium/VW-VBD58)
Battery charger (AG-B23)
LED video light (VW-LED1)
8
SQT0478
Page 9
Preparation
54
8
7
11
9
10
12
13
14
15
18
17
16
22
21
19
20
23
6
1
2
3
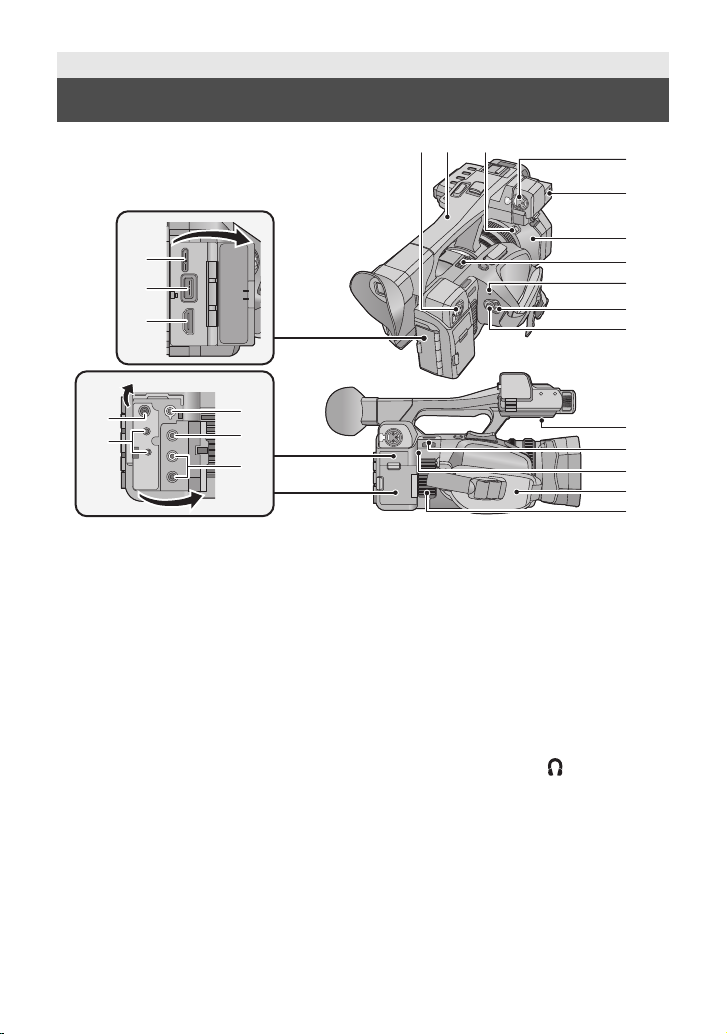
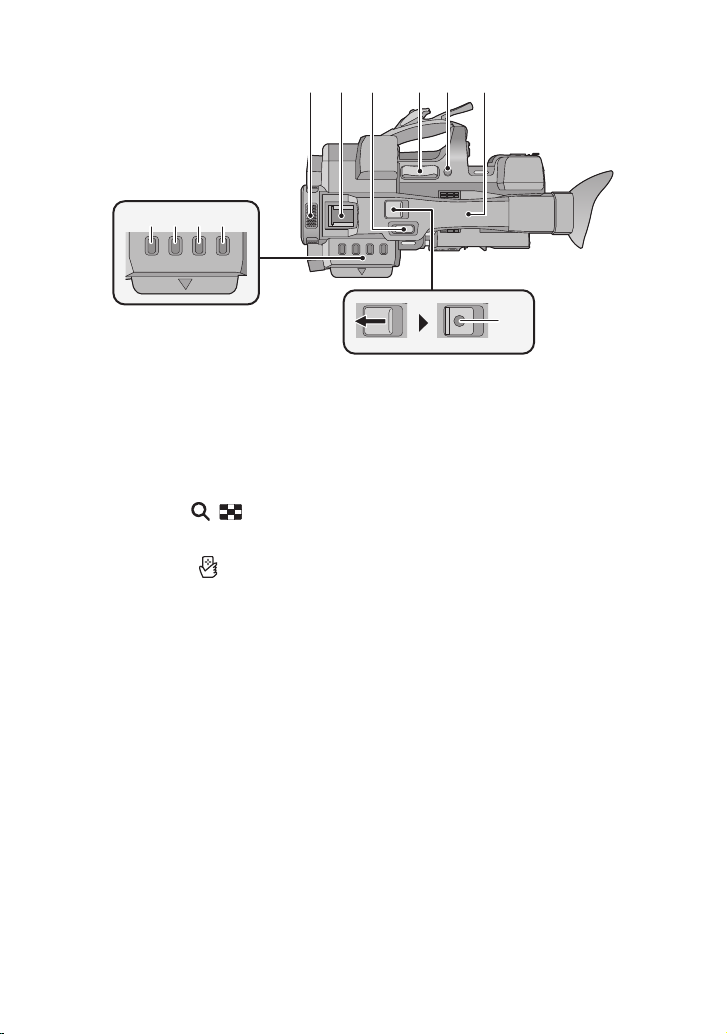
Names and Functions of Main Parts
1 USB terminal [USB 3.0 DEVICE]
2 USB terminal [USB 3.0 HOST]
3 HDMI connector [HDMI] (l 34)
4 Audio input terminals 2 (XLR 3 pin)
[AUDIO INPUT2] (l 15)
5Handle
6 Lens hood release button
7 Audio input terminals 1 (XLR 3 pin)
[AUDIO INPUT1] (l 15)
8 Microphone holder attachment part
(l 14)
9 Lens hood
10 Exhaust opening (cooling fan)
11 Status indicator (l 21)
12 Power switch (l 21)
13 Recording start/stop button (l 27)
14 DC input terminal [DC IN] (l 18)
≥ Do not use any other AC adaptors except the
supplied one.
15 Camera remote jack
[CAM REMOTE] (3.5 mm mini jack)
It is possible to adjust the focus or iris by
connecting a remote control (commerciallyavailable).
≥ It is not possible to use the remote control
(commercially-available) in the Intelligent
Auto Mode.
[ZOOM S/S] (2.5 mm super mini jack)
It is possible to operate zoom operation or
recording start/stop connecting with the remote
control (commercially-available).
≥ Do not connect any equipment except the
remote control (commercially-available) to
the camera remote jack. Brightness of the
image may change or it may not focus when
an equipment other than the remote control
(commercially-available) is connected.
16 Headphone terminal [ ]
17 Video output connector [VIDEO OUT]
(l 34)
18 Audio output connector [AUDIO OUT]
(l 34)
19 Speaker
20 Shoulder strap fixture (l 14)
21 Wi-Fi Transmitter
22 Grip belt (l 13)
23 Inlet (cooling fan)
SQT0478
9
Page 10
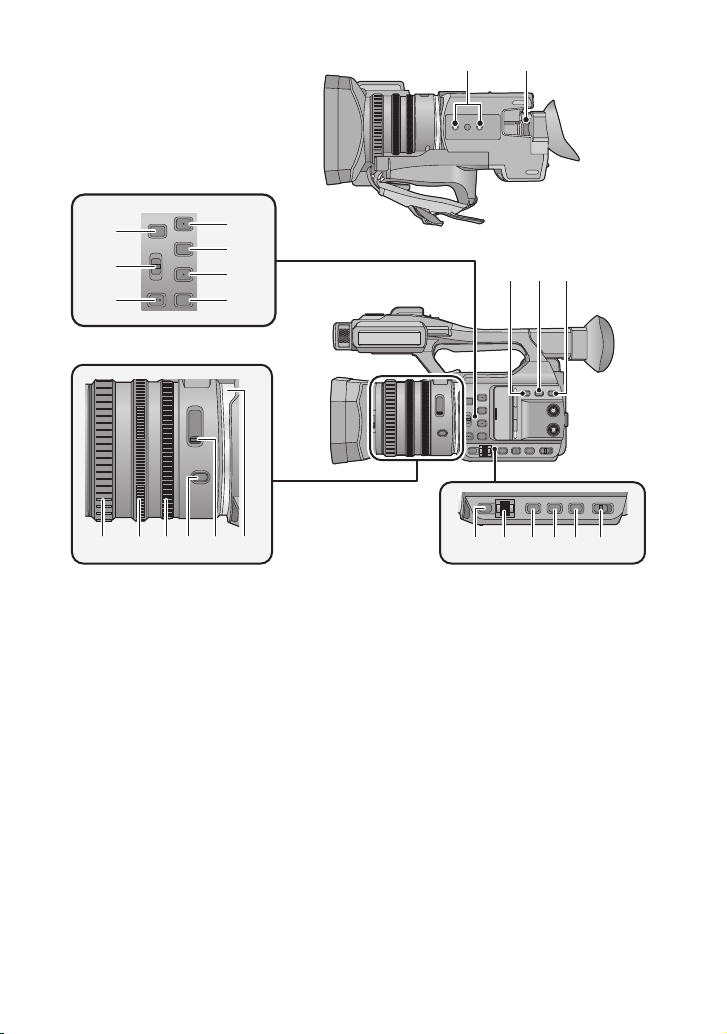
2524
40 4139
33 34 35 37 3836
4342 44 45 46 47
30
31
27
29
32
28
26
24 Tripod receptacle (l 15)
25 Eyepiece corrector lever (l 23)
26 User 5 buttons [USER5]/[FOCUS
ASSIST] (l 31)
27 Focus auto/Manual/¶ switch
[FOCUS A/M/¶] (l 29)
28 Push AF buttons [PUSH AF]
29 User 1 buttons [USER1] (l 31)
30 User 2 buttons [USER2] (l 31)
31 User 3 buttons [USER3] (l 31)
32 User 4 buttons [USER4] (l 31)
33 Focus ring (l 29)
34 Zoom ring (l 28)
35 Iris ring (l 30)
36 Iris button [IRIS] (l 30)
37 ND filter switch [ND FILTER]
38 Ring LED
39 Optical Image Stabilizer button [O.I.S.]
40 Zebra button [ZEBRA]
41 Display/Mode check button [DISP/
MODE CHK]
42 Menu button [MENU] (l 25)
10
SQT0478
43 Multi-function dial [SEL/PUSH SET]
(l 29, 30)
44 Gain button [GAIN] (l 30)
45 White Balance button [W.B.] (l 29)
46 Shutter speed button [SHUTTER] (l 30)
47 Intelligent auto/Manual switch
[iA/MANU] (l 28)
Page 11
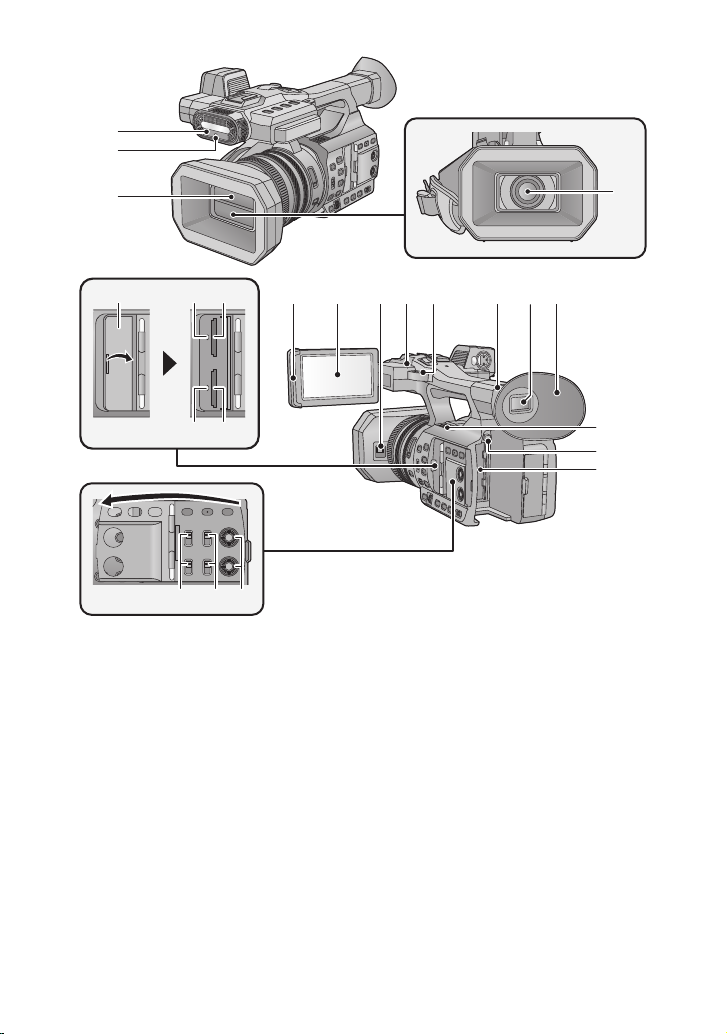
48
49
50
52
5453
60
5655
595857
48 Infrared light
49 Recording lamp (Front)
50 Lens cover (l 13)
51 Lens (LEICA DICOMAR) (l 13)
52 SD Card slot cover (l 20)
53 Access lamp (card 1) (l 20)
54 Card slot 1 (l 20)
55 Access lamp (card 2) (l 20)
56 Card slot 2 (l 20)
57 INPUT 1, 2 switches [INPUT1, INPUT2]
58 CH1, CH2 switches [CH1, CH2]
59 Audio control knobs [CH1, CH2]
60 LCD monitor extract part (l 22)
61 LCD monitor (Touch screen) (l 23)
62 Lens cover open/close lever (l 13)
63 Recording lamp (Rear)
64 Shoulder strap fixture (l 14)
65 Eye cup attachment part (l 13)
61
63 64 65 66 6762
66 Viewfinder (l 23)
67 Eye cup (l 13)
68 Exhaust opening (cooling fan)
69 Battery release button [PUSH] (l 17)
70 Battery holder (l 17)
51
68
69
70
11
SQT0478
Page 12
71 72 73 7674 75
77 78 79 80
71 Internal microphones
72 Accessory shoe
73 Sub zoom lever (l 28)
≥ This lever functions in the same manner as
the zoom lever.
74 Zoom lever [T/W] (In Recording Mode)
(l 28)
Volume lever [rVOLs]/Thumbnail
display switch [ / ] (In Playback
Mode)
75 User 6 buttons [REC CHECK] (l 31)
76 NFC touch area [ ] (l 36)
77 Thumbnail button [THUMBNAIL]
78 Counter button [COUNTER]
79 Counter reset button [RESET]
80 Colour Bar Screen button [BARS]
81 Sub recording start/stop button
≥ This button functions in the same manner as
the recording start/stop button.
81
12
SQT0478
Page 13
∫ Opening/closing the lens cover
OPEN
CLOSE
1 Open the buckle.
2 Pull the end of the belt.
A Notch
B Protrusion
You can open/close the lens cover by sliding the lens cover open/close lever.
≥ When this unit is not in use, close the lens cover to protect the lens.
≥ Do not press the lens cover hard. This may damage the lens or the lens cover.
≥ Depending on the various filters or the MC protector attached to the front side of this unit's lens,
you may not be able to open/close the lens cover or attach the lens hood.
∫ Adjust the length of the grip belt so that it fits your hand.
Adjust the grip belt according to the size of your hand.
≥ If you find it difficult to fasten the buckle B, move the pad A towards you, and fasten the buckle
B again.
∫ Attaching the eye cup
Attach by aligning the notch of the eye cup attachment part with the protrusion at the inside of the
eye cup.
≥ The illustration below is an example of attaching the eye cup to use it with your right eye. If you
rotate the eye cup to the left by 180° before attaching it, you can use it with your left eye.
13
SQT0478
Page 14
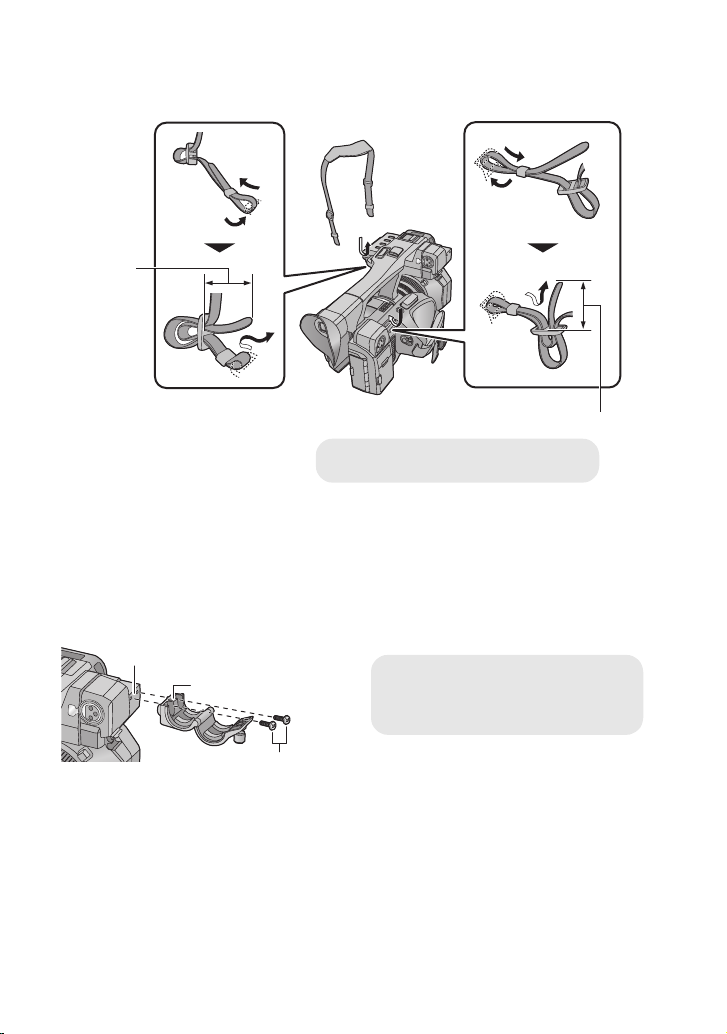
∫ Attaching the Shoulder strap
A 20 mm or longer
B Microphone holder attachment part
C Microphone holder
D Microphone holder screws
We recommend that you attach the shoulder strap (supplied) before going out of doors to record so
as to avoid dropping this unit.
∫ Attaching the front microphone
≥ The microphone holder is set up so that a 21 mm external microphone (AG-MC200G: optional)
can be attached. Check in advance whether the microphone you wish to use can be attached.
1 Attach the microphone holder to the microphone holder attachment part.
≥ Attach by using a commercially available screw driver.
≥ When attaching the microphone holder, be sure to tighten the screws firmly even though you
might hear a squeaking sound.
14
SQT0478
Page 15

2 Attach an external microphone
A Microphone cable clamper
B Microphone holder screws
C External microphone (optional)
D AUDIO INPUT1 terminal
(XLR 3 pin)
E INPUT terminal cap
F Tripod receptacle
(optional) to the microphone holder, and
tighten the microphone holder screws.
3 Connect the external microphone to the
AUDIO INPUT1 terminal (XLR 3 pin).
≥ When wiring the microphone cable, use the cable
clamper of this unit.
∫ Attaching the INPUT terminal cap
Attach the INPUT terminal cap while the audio input terminals 1, 2 (XLR 3 pin) is not used.
∫ Attaching the tripod
≥ There are tripod receptacle that are compatible with
1/4-20UNC screws.
≥ Attaching a tripod with a screw length of 5.5 mm or
more may damage the unit.
15
SQT0478
Page 16

Preparation
Charging lamp [CHARGE] A
Lights up:
Charging (Battery charging time: l 17)
Goes off:
Charging completed
Flashing:
Be sure to connect the unit correctly
Power lamp B
≥ This will light up when the AC cable is
connected.
Power supply
∫ About batteries that you can use with this unit
The battery that can be used with this unit is VW-VBD58/CGA-D54s.
It has been found that counterfeit battery packs which look very similar to the genuine
product are made available to purchase in some markets. Some of these battery packs
are not adequately protected with internal protection to meet the requirements of
appropriate safety standards. There is a possibility that these battery packs may lead to
fire or explosion. Please be advised that we are not liable for any accident or failure
occurring as a result of use of a counterfeit battery pack. To ensure that safe products are
used we would recommend that a genuine Panasonic battery pack is used.
Charging the battery
When this unit is purchased, the battery is not charged. Charge the battery fully before
using this unit for the first time.
Important:
≥ Do not use the AC cable with any other equipment as it is designed only for this unit. Also,
do not use the AC cable from other equipment with this unit.
≥ It is recommended to charge the battery in a temperature between 10 oC and 30 oC.
(The battery temperature should also be the same.)
≥ Insert the plugs as far as they will go.
1 Connect the AC cable to the battery charger and the AC outlet.
2 Insert the battery into the battery charger by aligning the arrows.
16
SQT0478
Page 17

≥ We recommend using Panasonic batteries (l 8, 16, 17).
Removing the battery
Make sure th at the power switch is set to OFF
and the status indicator is turned off, and then
remove by holding onto it taking care not to
drop. (l 21)
While pressing the battery release button,
remove the battery.
Insert the battery until it clicks and locks.
≥ If you use other batteries, we cannot guarantee the quality of this product.
≥ Do not heat or expose to flame.
≥ Do not leave the battery(ies) in a car exposed to direct sunlight for a long period of time with
doors and windows closed.
Inserting/removing the battery
Install the battery by inserting it in the direction shown in the figure.
Charging and recording time
Charging/Recording time
≥ Temperature: 25 oC/humidity: 60%RH
≥ When using the viewfinder (times in parentheses are when using the LCD monitor)
Battery model
number
[Voltage/Capacity
(minimum)]
Supplied battery/
VW-VBD58 (optional)
[7.2 V/5800 mAh]
≥ Please refer to “Operating Instructions (PDF format)” for details.
≥ “h” is an abbreviation for hour, “min” for minute and “s” for second.
Charging
time
6 h 20 min MP4 (LPCM) [4K/50p 150M]
Recording
mode
Recording
format
Maximum
continuously
recordable
time
5h
(4h40min)
Actual
recordable
time
2h35min
(2h30min)
17
SQT0478
Page 18

≥ These times are approximations.
≥ The indicated charging time is for when the battery has been discharged completely.
Charging time and recordable time vary depending on the usage conditions such as high/
low temperature. Recordable time also varies depending on the [REC FORMAT] setting.
≥ The actual recordable time refers to the recordable time when repeatedly starting/stopping
recording, turning the unit on/off, moving the zoom lever etc.
≥ The batteries heat up after use or charging. This is not a malfunction.
Battery capacity indication
≥ The display changes as the battery capacity reduces. ####
If the battery discharges, then will flash red.
Connecting to the AC outlet
The unit is in the standby condition when the AC adaptor is connected. The primary circuit is always
“live” as long as the AC adaptor is connected to an electrical outlet.
Important:
≥ Use the supplied AC adaptor. Do not use the AC adaptor of another device.
≥ Do not use the AC cable with any other equipment as it is designed only for this unit. Also,
do not use the AC cable from other equipment with this unit.
1 Connect the AC cable to the AC
adaptor and the AC outlet.
2 Connect the AC adaptor to the DC
input terminal [DC IN].
≥ Make sure to set the power switch to OFF
and the status indicator is turned off when
disconnecting the AC adaptor. (l 21)
≥ Insert the plugs as far as they will go.
≥ Even when you use the AC adaptor for recording images, keep the battery connected. This
allows you to continue the recording even if a power failure occurs or the AC adaptor is
unplugged from the AC outlet by accident.
18
SQT0478
Page 19

Preparation
Preparation of SD cards
The unit can record motion pictures or still pictures to an SD card.
This unit (an SDXC compatible device) is compatible with SDHC Memory Cards and SDXC
Memory Cards. When using an SDHC Memory Card/SDXC Memory Card with other equipment,
check the equipment is compatible with these Memory Cards.
Cards that you can use with this unit
∫ About the Speed Class ratings for recording motion pictures
≥ Depending on [REC MODE] and [REC FORMAT], the required card differs.
Use a card that meets the following ratings of the SD Speed Class or UHS Speed Class.
Use of a non-compatible card may cause recording to stop suddenly.
≥ SD Speed Class and UHS Speed Class are the speed standards regarding continuous writing. To
check the class, see the labelled side, etc. of the card.
Recording modes
Bit rates in
[REC FORMAT]
100 Mbps or more UHS Speed Class3
Speed Class ratings Label examples
MOV (LPCM)/
MP4 (LPCM)/
MP4
AVCHD All Class4 or more
≥ Keep the Memory Card out of reach of children to prevent swallowing.
50 Mbps
UHS Speed Class1 or
more
Class10 or more
19
SQT0478
Page 20

Inserting/removing an SD card
When using a non Panasonic SD card for the first time, or one which was previously used on
another equipment, it is necessary to format the SD card. (l 25) When the SD card is formatted,
all of the recorded data is deleted. Once the data is deleted, it cannot be restored.
Caution:
Check that the access lamp has gone off.
Access lamp A
≥ When this unit is accessing the SD card,
the access lamp lights up.
1 Open the SD card slot cover and
insert (remove) the SD card into
(from) the card slot B.
≥ One SD card can be inserted into each of the
card slot 1 and the card slot 2.
≥ Face the terminal side C in the direction
shown in the illustration and press it straight
in as far as it will go.
≥ Press the centre of the SD card and then pull
it straight out.
2 Securely close the SD card slot
cover.
20
SQT0478
Page 21

Preparation
ON
OFF
To turn off the unit
Set the power switch to OFF while
pressing the lock release button.
The status indicator goes off.
C THUMBNAIL button
Turning the unit on/off
Set the power switch to ON while pressing the lock release button B to turn on
the unit.
A The status indicator lights on.
≥ To turn on the unit again after the [ECONOMY (BATT)] or [ECONOMY (AC)] is activated, set the
power switch to OFF once, and then to ON again.
Preparation
Selecting a mode
Press the THUMBNAIL button to change the mode to Recording Mode or
Playback Mode.
Recording Mode (l 27) The recording screen is displayed. You can record motion
Playback Mode (l 33) The thumbnail screen for playback is displayed. You can play
≥ When you turn on this unit, it starts up in Recording Mode.
≥ If you press the recording start/stop button or sub recording start/stop button in Playback Mode,
the mode will be switched to Recording Mode and recording will start.
pictures and still pictures.
back motion pictures and still pictures.
SQT0478
21
Page 22

Preparation
Using the LCD monitor/Viewfinder
The viewfinder is turned off and the LCD monitor is turned on when the LCD monitor is extracted.
The viewfinder is turned on when the LCD monitor is retracted.
Using the LCD monitor
1 Extract the LCD monitor in the
direction as indicated in the figure.
≥ Hold the LCD monitor extract part A, and
extract the LCD monitor until it clicks into
position.
2 Rotate to the position that is easy
to view.
To retract the LCD monitor
Retract as shown in the figure with the LCD facing
downward.
Range of rotation of the LCD monitor
≥ It can rotate up to 270o B towards the lens.
22
SQT0478
Page 23

How to use the touch screen
A Eyepiece corrector lever
You can operate by directly touching the LCD monitor (touch screen) with your finger.
∫ Touch
Touch and release the touch screen to select icon or
picture.
≥ Touch the centre of the icon.
≥ Touching the touch screen will not operate while you
are touching another part of the touch screen.
∫ Slide while touching
Move your finger while pressing on the touch screen.
∫ About the operation icons
///:
Touch when changing a page or performing settings.
≥ Do not touch the LCD monitor with hard pointed tips, such as ball point pens.
Viewfinder adjustment
Adjusting the field of view
This setting will not affect the images actually recorded.
It adjusts the field of view to show the image on the viewfinder clearly.
1 Adjust the viewfinder to suit your vision so
that you can see the display images clearly.
≥ Be careful not to trap your fingers when moving the
viewfinder.
≥ The viewfinder can be lifted vertically up to
approximately 90o.
≥ Retract the LCD monitor and turn on the viewfinder.
2 Adjust the focus by operating the eyepiece
corrector lever.
23
SQT0478
Page 24

Preparation
Setting date and time
When this unit is turned on, the message [SET TIME ZONE AND DATE/TIME] may appear.
To make these settings, select [YES], and follow the instructions from Step 2-3 of the time zone
setting procedure.
1 Select the menu. (l 25)
MENU
: [OTHER FUNCTION] # [CLOCK SET]
2 Touch the date or time to be set, then set the
desired value using / .
≥ The year can be set between 2000 and 2039.
3 Touch [ENTER].
4 Touch [EXIT] to complete the setting.
≥ The date and time function is driven by a built-in lithium battery.
≥ If the time display becomes [- -], the built-in lithium battery needs to be charged. To recharge the
built-in lithium battery, connect the AC adaptor or attach a charged battery to this unit. Leave the
unit as it is for approx. 24 hours and the battery will maintain the date and time for approx.
6 months. (The battery is still being recharged even if the unit is off.)
≥ The way that time is displayed can be changed in the menu settings.
[DISP SETUP] # [DATE/TIME] or [DATE FORMAT]
Time zone
Time difference from the Greenwich Mean Time can be set.
1 Select the menu. (l 25)
MENU
: [OTHER FUNCTION] # [TIME ZONE]
2 Touch / and set the region to record.
3 Touch [ENTER].
≥ If the [CLOCK SET] screen appears, perform [CLOCK SET].
4 Touch [EXIT] to complete the setting.
≥ When the time zone setting is changed, the date/time setting of the unit also changes
automatically.
24
SQT0478
Page 25

Preparation
MENU
Using the menu screen
≥ You can select menu items by operating the multi-function dial.
MENU
1 Press the MENU button .
2 Touch the top menu A.
3 Touch the submenu B.
≥ Next (Previous) page can be displayed by touching /
.
4 Touch the desired item to enter the setting.
5 Touch [EXIT] to exit the menu setting.
Formatting cards
If you use the SD cards for the first time for recording with this unit, format the cards.
Please be aware that if a medium is formatted, then all the data recorded on the medium will be
erased and cannot be restored. Back up important data on a PC etc.
≥ When using two SD cards, format both SD cards.
Select the menu.
MENU
: [OTHER FUNCTION] # [FORMAT MEDIA] # [SD CARD 1] or [SD CARD 2]
≥ Do not format a SD card using any other equipment such as a PC. The card may not be
used on this unit.
25
SQT0478
Page 26

System frequency Selection
Set the system frequency of this unit. Change the setting when creating a motion picture that has a
broadcasting system different from that of your region.
Select the menu.
MENU
: [OTHER FUNCTION] # [SYSTEM FREQ] # [59.94Hz(NTSC)] or [50Hz(PAL)]
≥ After you have changed the system frequency, this unit will be restarted.
≥ By default, the system frequency is set to the broadcasting system of the region where this
product was purchased.
≥ This function’s default setting is [50Hz(PAL)].
Language Selection
You can select the language on the screen display and the menu screen.
1 Select the menu.
MENU
: [OTHER FUNCTION] # [LANGUAGE]
2 Touch the desired setting language.
Recording
Selecting a media to record
[SD CARD 1] and [SD CARD 2] can be selected separately to record motion pictures or still
pictures.
1 Select the menu.
MENU
: [RECORD SETUP] # [MEDIA SELECT]
2 Touch the media to record motion pictures
or still pictures.
≥ The media is selected separately for motion pictures or
still pictures and is then highlighted in yellow.
3 Touch [ENTER].
26
SQT0478
Page 27

Recording
ON
OFF
A When you begin recording, ; changes to ¥.
Recording motion pictures
≥ Before turning on this unit, open the lens cover. (l 13)
1 Change the mode to
Recording Mode. (l 21)
≥ Extract the LCD monitor.
2 Press the recording start/
stop button B to start
recording.
≥ Recording will stop when you press
the recording start/stop button again.
Recording
Recording still pictures
≥ Before turning on this unit, open the lens cover. (l 13)
≥ Register [CAPTURE] to a USER button. (l 31)
1 Change the mode to Recording Mode. (l 21)
≥ Extract the LCD monitor.
2 Press the USER button to which [CAPTURE] is registered or touch the
applicable USER button icon to record a still picture.
≥ For information on the locations of the USER buttons and information on USER button icons,
refer to page 31.
≥ When still pictures are being recorded, the remaining recordable number of still pictures and the
still picture indication are displayed.
27
SQT0478
Page 28

Recording
Zoom lever/Sub zoom lever
T side:
Close-up recording (zoom in)
W side:
Wide-angle recording (zoom out)
Ring Zoom
A side:
Wide-angle recording (zoom out)
B side:
Close-up recording (zoom in)
A Zoom ring
TT
WW
WW
TT
WW
ABA
B
iA/MANU switch
Slide the switch to change the Intelligent Auto
Mode/Manual Mode.
MANU
MNL
Using the zoom
It can be zoomed up to 20k.
≥ (When the picture size of [REC FORMAT] is 1920k1080 or below)
It can zoom up to 40k when the [i.Zoom] is set to [ON].
≥ Zoom magnification can be checked in the screen display of Z00 to Z99. The value gets larger
when zoomed in, and the value gets smaller when zoomed out. 99 is displayed during the
i.Zoom.
Recording
Intelligent Auto Mode/Manual Mode
≥ is displayed in the Manual Mode.
≥ The modes appropriate for the condition are set just by pointing the unit to what you want to
record in the Intelligent Auto Mode.
28
SQT0478
Page 29

Recording
A FOCUS A/M/¶ switch
B GAIN button
C W.B. button
D SHUTTER button
E Multi-function dial
F IRIS button
G Iris ring
H Focus ring
Manual Recording
FOCUS
A
M
∞
W.B.
Focus
Perform focus adjustments using the focus ring. If auto focusing is difficult due to the conditions,
then use Manual Focus.
≥ Switch to Manual Mode. (l 28)
1 Set the FOCUS A/M/¶ switch to [M] to enable Manual Focus.
≥ It will switch to MF from AF.
2 Adjust the focus by rotating the focus ring.
White Balance
Automatic White Balance function may not reproduce natural colours depending on the scenes or
lighting conditions. If so, you can adjust the White Balance manually.
≥ Use the multi-function dial to change the settings.
≥ Switch to Manual Mode. (l 28)
1 Press the W.B. button to switch to the Manual White Balance Mode.
≥ The White Balance mode will switch to the one you set previously.
SEL/
PUSH
SET
2 Rotate the multi-function dial to switch the White
Balance mode.
29
SQT0478
Page 30

Iris/Gain adjustment
A Iris value
B Auto iris icon
*
* It is displayed in Auto Iris Mode.
A Gain value
≥ In Auto Gain Mode, AGC is
displayed; in Manual Gain Mode,
the gain value is displayed in dB.
B [GAIN]
When recording a scene that is too dark (or bright) or a scene in a similar situation, manually adjust
the iris and gain.
∫ Iris adjustment
≥ Switch to Manual Mode. (l 28)
1 Press the IRIS button to switch to
Manual Iris Mode.
≥ disappears.
MNL
F4.0
2 Adjust the iris by rotating the iris ring.
∫ Gain adjustment
≥ Use the multi-function dial to change the settings.
≥ Switch to Manual Mode. (l 28)
1 Press the GAIN button to switch to
Manual Gain Mode.
≥ The gain value will be displayed in dB.
2 Adjust the gain by rotating the multi-function dial.
Manual shutter speed
Adjust the shutter speed when recording fast-moving subjects.
≥ Use the multi-function dial to change the settings.
≥ Switch to Manual Mode. (l 28)
1 Press the SHUTTER button to switch to Manual Shutter Mode.
2 Adjust the shutter speed by rotating the multi-function
dial.
30
SQT0478
MNL
0dB
Page 31

Recording
USER
FOCUS
ASSIST
1
2
5
3
4
USER button
Each of the USER button can register one function from the 24 available functions.
≥ There are six USER buttons (USER1 to USER6) on the main body and four USER button icons
(USER7 to USER10) displayed on the LCD monitor.
Setting the USER button
1 Select the menu.
MENU
: [SW SETUP] # [USER BUTTON SETUP]
2 Touch the USER button you wish to set.
≥ The USER button number and currently set function name
are displayed. (For example, a display of 1. [DRS] means that
[DRS] has been assigned to USER1 button.)
3 Touch the item to register.
≥ For the functions of the USER button that can be registered,
refer to page 32.
≥ Touch [INH] (Inhibit) if not registering.
≥ Next (Previous) page can be displayed by touching / .
≥ To continuously set other USER buttons, repeat Steps 2-3.
4 Touch [EXIT] to complete the setting.
Using the USER button
To use the set USER button, press USER1 to USER6 button or touch the USER7 to USER10 button
icon displayed when you touch the LCD monitor.
(When you use the USER1 to USER5 button) (When you use the USER6 button)
6
REC CHECK
31
SQT0478
Page 32

(When you use the USER7 to USER10 button)
USER7
USER8
USER9
USER10
Functions of the USER button
∫ List of USER button function
Icon Item Function
[FA] [FOCUS ASSIST] Focus Assist
[B.Light] [BACKLIGHT] Backlight Compensation
[S.Light] [SPOTLIGHT] Spotlight
[B.FD] [BLACK FADE] Black Fade
[W.FD] [WHITE FADE] White Fade
[EVF/LCD] [EVF/LCD DETAIL] EVF/LCD detail
[ATW.L] [ATW LOCK] ATW Lock
[D.ZM] [D.ZOOM] Digital Zoom
[HIST] [HISTOGRAM] Histogram
[REC.C] [REC CHECK] Recording Check
[LstDel] [LAST SCN DEL] Last Scene Delete
[DRS] [DRS] DRS
[FRZ] [FRZ FRAME] Freeze Frame
[S.Gain] [SUPER GAIN] Super Gain
[AREA] [AREA] Area Mode
[F.Tran] [FOCUS TRANS] Focus Transition
[Capture] [CAPTURE] Capture
[Wi-Fi] [Wi-Fi] Wi-Fi
[IR Light] [IR LIGHT] Infrared light
[Level] [LEVEL GAUGE] Level Gauge
[Backgr] [BACKGROUND] Background
[FBC] [FLASH BAND] Flash band compensation
[MENU] [MENU] Menu
* These functions are not available in Intelligent Auto Mode.
≥ The following USER button function can also be set from the menu.
j [HISTOGRAM]
j [DRS]
j [IR LIGHT]
*
*
*
*
*
j [LEVEL GAUGE]
j [EVF/LCD DETAIL]
j [FLASH BAND]
*
32
SQT0478
Page 33

Playback
101010 111111 121212
131313 141414 151515
161616 171717 181818
4K
4K4K4K4K4K
4K
4K 4K
C4K
4K
HD
Motion picture/Still picture playback
1 Set this unit to playback mode. (l 21)
2 Touch the play mode select icon A.
3 Select the media C you wish to play back.
4 (To set this unit to Motion Picture Playback
Mode)
Touch the desired recording mode D and
recording format E for playback.
≥ The available recording format options differ depending on
[SYSTEM FREQ] (l 26) or the recording mode option you have touched.
≥ Touch [ENTER].
≥ A recording mode icon B will be displayed on the thumbnail display. ( / / /
)
≥ (If you have touched the recording mode option [MOV (LPCM)], [MP4 (LPCM)] or [MP4])
After you have touched a recording format option, one of the following icons will be displayed on
each thumbnail. The icon to be displayed differs depending on the size of recording format.
j Scenes recorded in C4K (4096k2160):
j Scenes recorded in 4K (3840k2160):
j Scenes recorded in FHD (1920k1080):
≥ (If you have touched the recording mode option [AVCHD])
After you have touched a recording format option, one of the following icons will be displayed on
each thumbnail.
j Scenes recorded in [PS 1080/50p]/[PS 1080/60p]:
j Scenes recorded in [PH 1080/50i]/[PH 1080/60i]:
j Scenes recorded in [HA 1080/50i]/[HA 1080/60i]:
j Scenes recorded in [HE 1080/50i]/[HE 1080/60i]:
j Scenes recorded in [PM 720/50p]/[PM 720/60p]:
PS
PH
HA
HE
PM
33
SQT0478
Page 34

(To set this unit to Still Picture Playback Mode)
101010 111111 121212
131313 141414 151515
161616 171717 181818
4K
4K4K4K4K4K
4K
4K 4K
TC 00:02:30:00
VIDEO OUT
AUDIO OUT
L
R
Touch the still picture F.
5 Touch the scene or the still picture to be played
back.
≥ Next (Previous) page can be displayed by touching / .
6 Select the playback operation by touching the
operation icon.
TC 00:02:30:00
TC 00:02:30:00
G Operation icon
≥ If you touch the screen while an operation icon is being
displayed or do not touch the icon for a certain period, it
will disappear. To display again, touch the screen.
Watching Video/Pictures on your TV
Connect this unit to a TV using an HDMI cable (supplied) or an AV cable
(commercially-available).
1 HDMI connector
2 Video output connector
3 Audio output connector
≥ Do not use any other HDMI cables except the
supplied one.
34
SQT0478
Page 35

Wi-Fi
Wi-Fi® function
To provide a Wi-Fi connection example, these basic operating instructions describe the procedures
from setting up a direct connection between this unit and a smartphone to getting them ready for
remote operation.
≥ Please refer to the operating instructions (PDF format) of this unit for details about the setting/
operating of this unit.
≥ Please refer to the operating instructions of the device in use for details about the setting/
operating of the wireless access point or smartphone.
∫ This unit is NFC-compatible
Using the NFC (Near Field Communication) function, you can easily transfer data necessary for a
Wi-Fi connection between this unit and the smartphone.
This function can be used with the NFC compatible device with Android
later). (Except for some models)
Install the “Image App”
About the “Image App”
The “Image App” is an application provided by Panasonic.
™
(OS version 2.3.3 or
For Android apps For iOS apps
OS Android 2.3.3 or later
Installation
procedure
1 Connect your Android
device to a network.
2 Select “Google Play™
Store”.
3 Enter “Panasonic Image
App” into the search
box.
4 Select “Panasonic
Image App” and install
it.
≥ The icon will be added
to the menu.
* The supported OS versions are current as of September 2014 and subject to change.
≥ Use the latest version.
≥ Refer to [Help] in the “Image App” menu about function of Image App.
≥ The service may not be able to be used properly depending on the type of smartphone being
used. For information on the “Image App”, check the support website below.
http://panasonic.jp/support/global/cs/e_cam
(This Site is English only.)
≥ When downloading the app on a mobile network, high packet communication fees may be
incurred depending on the details of your contract.
*
iOS 6.0 or later
(iPhone 3GS is not supported.)
*
1 Connect your iOS
device to a network.
2 Select “App Store
SM
”.
3 Enter “Panasonic Image
App” into the search
box.
4 Select “Panasonic
Image App” and install
it.
≥ The icon will be added
to the menu.
SQT0478
35
Page 36

Using remote operation with a direct connection
MENU
∫ Preparations before using remote operation
1 Install the smartphone application “Image App” on your smartphone. (l 35)
2 Check if the smartphone is an Android (NFC-compatible), Android (non-NFC-
compatible), or iOS device.
≥ If your smartphone is NFC-compatible, a message asking you to touch the NFC mark on the
device will be displayed when starting up the “Image App”.
3 Register [Wi-Fi] to a USER button. (l 31)
∫ If the device is Android (NFC-compatible)
≥ Set the NFC function of the smartphone to ON.
1 Start up the smartphone application “Image App”.
2 Touch the smartphone on of this unit.
≥ Touch the NFC mark while a message asking you to touch the
NFC mark on the device is displayed on the smartphone
screen.
≥ If this is the first time the smartphone is connecting to this unit,
touch [YES] on the screen of this unit, and then touch the
smartphone on of this unit again.
≥ If the unit is not recognised even when touching the
smartphone, change positions and try again.
≥ When the connection is complete, the image of this unit will be displayed on the smartphone
screen.
∫ If the device is Android (non-NFC-compatible) or iOS
1 Press the USER button to which [Wi-Fi] is registered, and turn on the Wi-Fi
function.
≥ is displayed
2 Select the menu.
: [Wi-Fi Setup] # [Direct Connection]
3 Touch [Change connection type].
4 Touch [QR code].
≥ QR code is displayed on the screen of this unit.
5 Start up the smartphone application “Image App”.
6 On the smartphone, select [QR code], and scan the QR code displayed on the
screen of this unit.
≥ When using an Android device, the smartphone and this unit are connected directly, allowing you
to use remote operations.
36
SQT0478
Page 37

≥ When using an iOS device, perform the following operations:
1 Select the option that allows you to install the app on the profile screen of the “Image App”, and
follow the on-screen instructions to complete the installation.
2 Press the home button to close the displayed screen.
3 After selecting the network name (SSID) of this unit from the Wi-Fi setup of the smartphone,
start up the “Image App”.
≥ When the connection is complete, will be displayed on the screen of this unit, and the image
of this unit will be displayed on the smartphone screen.
If the Wi-Fi connection cannot be established
≥ Please refer to the operating instruction of the device in use for details about the setting of the
wireless access point or smartphone.
Problem Check points
The Wi-Fi connection is
not possible between this
unit and a smartphone.
It takes long time every
time to connect to a
smartphone.
This unit is not displayed
in the Wi-Fi setting screen
of the smartphone.
The Wi-Fi connection is
disconnected immediately.
Cannot be connected
using NFC.
≥ Make sure the smartphone is properly connected to this unit
by checking the Wi-Fi settings of the smartphone.
≥ Make sure the smartphone is not connected to the wireless
access point. If it is connected to the wireless access point,
change the Wi-Fi access point using the smartphone’s Wi-Fi
set up.
≥ It may take longer time to connect depending on the Wi-Fi
connection setting of the smartphone, but it is not a
malfunction.
≥ Try switching the on/off of the Wi-Fi function in the Wi-Fi
settings of the smartphone.
≥ If there is a setting for avoiding poor connections in the Wi-Fi
setting menu of the Android device 4.0 or later version, turn it
off.
≥ Make sure your smartphone is compatible with NFC. This unit
can be used with NFC-compatible terminals via Android (OS
version 2.3.3 or later).
≥ Make sure the NFC function of your smartphone is on.
≥ Make sure this unit is not turned off with the power switch.
≥ Some smartphones cannot be easily checked simply by
touching. If this unit is not recognised even after touching,
change positions and try again by touching slowly.
≥ Touch again if it does not connect after touch. If a connection
still cannot be established, close the Image App, turn off this
unit, and try establishing a connection again.
≥ If the amount of time this unit is in contact with the
smartphone is too short, this unit may not recognise the
smartphone. Touch and hold the smartphone.
37
SQT0478
Page 38

Others
Troubleshooting
∫ It is not a malfunction in following cases
The lens, the viewfinder or
LCD monitor fog up.
Object seems to be warped. ≥ Object seems to be warped slightly when the object moves
Problem Check points
This unit cannot be turned
on.
This unit does not stay on
long enough.
Battery runs down quickly.
This unit cannot be
operated though it is
turned on.
This unit does not operate
normally.
The unit arbitrarily stops
recording.
Colour or brightness of
the image changes, or you
may see horizontal bars in
the image.
The LCD monitor flickers
indoors.
≥ This is due to condensation. It is not a malfunction. Please
refer to page 6.
across the image very fast, but this is because the unit is using
MOS for the image sensor. This is not a malfunction.
≥ Charge the battery again to ensure it is sufficiently charged.
(l 16)
≥ In cold places, the battery using time becomes shorter.
≥ The battery has a limited life. If the operating time is still too
short even after the battery is fully charged, the battery has
worn out and needs to be replaced.
≥ Remove the battery or AC adaptor, wait about 1 minute and
then reconnect the battery or AC adaptor. Then about
1 minute later, turn on the unit again. (Conducting the above
operation while the media is being accessed may damage the
data on the media.)
≥ If normal operation is still not restored, detach the power
connected, and consult the dealer who you purchased this
unit from.
≥ Use an SD card that can be used for motion picture recording.
(l 19)
≥ The recordable time may have shortened due to the
deterioration of the data writing speed or repeated recording
and deletion. Using the unit, format the SD card. (l 25)
≥ Colour or brightness of the image may change, or you may
see horizontal bars in the image when the object is recorded
under fluorescent light, mercury light or sodium light, etc., but
this is not a malfunction.
≥ Record images in Intelligent Auto Mode or adjust the shutter
speed to 1/50, 1/60 or 1/100.
≥ Adjust the Synchro Scan shutter speed.
Please refer to “Operating Instructions (PDF format)” for details.
38
SQT0478
Page 39

Others
Specification
4K Video Camera
Information for your safety
Power source: DC 12 V (When using AC adaptor)
Power consumption: 15.4 W (When using the LCD monitor)
Recording format:
[MOV(LPCM)]/[MP4(LPCM)]/[MP4]/
AVCHD version 2.0
(AVCHD Progressive)
Motion picture compression:
MPEG-4 AVC/H.264
Audio compression:
[MOV(LPCM)]/[MP4(LPCM)]; Linear PCM
[MP4]; AAC
[AVCHD]; Dolby Digital
Recording mode and transfer rate:
[MOV(LPCM)];
(When [SYSTEM FREQ] set to [50Hz(PAL)])
[FHD/50p ]/[FHD/25p ];
Average 200 Mbps (VBR)
[FHD/50p 100M]; Average 100 Mbps (VBR)
[FHD/50p 50M]/[FHD/25p 50M];
Average 50 Mbps (VBR)
(When [SYSTEM FREQ] set to [59.94Hz(NTSC)])
[FHD/60p ]/[FHD/30p ]/
[FHD/24p ]; Average 200 Mbps (VBR)
[FHD/60p 100M]/; Average 100 Mbps (VBR)
[FHD/60p 50M]/[FHD/30p 50M]/
[FHD/24p 50M]; Average 50 Mbps (VBR)
[MP4(LPCM)];
[C4K/24p 100M]; Average 100 Mbps (VBR)
(When [SYSTEM FREQ] set to [50Hz(PAL)])
[4K/50p 150M]; Average 150 Mbps (VBR)
[4K/25p 100M]; Average 100 Mbps (VBR)
[FHD/50p ]/[FHD/25p ]/;
Average 200 Mbps (VBR)
[FHD/50p 100M]; Average 100 Mbps (VBR)
[FHD/50p 50M]/[FHD/25p 50M];
Average 50 Mbps (VBR)
DC 7.2 V (When using battery)
14.3 W (When using the viewfinder)
(When [SYSTEM FREQ] set to [59.94Hz(NTSC)])
[4K/60p 150M]; Average 150 Mbps (VBR)
[4K/30p 100M]/[4K/24p 100M];
Average 100 Mbps (VBR)
[FHD/60p ]/[FHD/30p ]/
[FHD/24p ]; Average 200 Mbps (VBR)
[FHD/60p 100M]; Average 100 Mbps (VBR)
[FHD/60p 50M]/[FHD/30p 50M]/
[FHD/24p 50M]; Average 50 Mbps (VBR)
[MP4];
(When [SYSTEM FREQ] set to [50Hz(PAL)])
[4K/25p 100M]; Average 100 Mbps (VBR)
[FHD/50p 50M]; Average 50 Mbps (VBR)
(When [SYSTEM FREQ] set to [59.94Hz(NTSC)])
[4K/30p 100M]; Average 100 Mbps (VBR)
[FHD/60p 50M]; Average 50 Mbps (VBR)
[AVCHD];
(When [SYSTEM FREQ] set to [50Hz(PAL)])
[PS 1080/50p]; Maximum 28 Mbps (VBR)
[PH 1080/50i]; Maximum 24 Mbps (VBR)
[HA 1080/50i]; Average 17 Mbps (VBR)
[HE 1080/50i]; Average 5 Mbps (VBR)
[PM 720/50p]; Average 8 Mbps (VBR)
(When [SYSTEM FREQ] set to [59.94Hz(NTSC)])
[PS 1080/60p]; Maximum 28 Mbps (VBR)
[PH 1080/60i]; Maximum 24 Mbps (VBR)
[HA 1080/60i]; Average 17 Mbps (VBR)
[HE 1080/60i]; Average 5 Mbps (VBR)
[PM 720/60p]; Average 8 Mbps (VBR)
Refer to the operating instructions (PDF
format) for the picture size and recordable time
of a motion picture.
Still picture recording format:
JPEG corresponding (Design rule for Camera
File system, based on Exif 2.2 standard)
39
SQT0478
Page 40

Refer to the operating instructions (PDF
format) for picture size of a still picture and
number of recordable pictures.
Recording media:
SDHC Memory Card/SDXC Memory Card;
UHS-I supported
Refer to page 19 for details on SD cards usable
in this unit.
Image sensor:
1/2.3 type (1/2.3z) MOS image sensor
Total; Approx. 18910 K
Effective pixels;
Motion picture/Still picture;
Approx. 8290K (16:9
Approx. 8850K (17:9
Lens:
Auto Iris optical zoom (Full range AF)
IR ON/OFF (Infrared recording supported)
F value (focal length)
F1.8 to F3.6 (Focal length; 4.08 mm to
81.6 mm)
35 mm equivalent;
Motion picture/Still picture;
30.8 mm to 626.0 mm (16:9/
29.5 mm to 600.0 mm (17:9/
Minimum focus distance;
Approx. 3.0 cm (Wide)/
Approx. 1.5 m (Tele)
Filter diameter:
49 mm
ND Filter:
OFF, 1/4, 1/16, 1/64
Zoom:
20k optical zoom, 40k i.Zoom
2k/5k/10k digital zoom
/
3840k2160),
/
4096k2160)
3840k2160
4096k2160
*1
,
)/
)
*1 When the picture size of
[REC FORMAT] is 1920k1080 or
below
Image stabilizer function:
When the picture size of [REC FORMAT] is
1920k1080 or below:
Optical (with 5-Axis Hybrid O.I.S.)
When [REC FORMAT] is set to a setting with
a size of C4K (4096k2160) or 4K
(3840k2160):
Optical (with Power O.I.S.)
Monitor:
8.8 cm (3.5z) wide LCD monitor
(Approx. 1152 K dots)
Viewfinder:
1.15 cm (0.45z) wide EVF
(Approx. 1226 K dots equivalent)
Microphone:
Stereo microphone
Minimum required illumination:
Approx. 4 lx (1/25 with super gain 30 dB)
In Infrared recording;
Approx. 0 lx
Video output:
HDMI Type A connector video output level;
™
HDMI
2160p/1080p/1080i/720p/576p/480p
AV connector video output level;
1.0 Vp-p, 75 h
Audio output:
HDMI Type A connector audio output level;
Linear PCM
AV connector audio output level (Line);
2ch
Headphone output;
3.5 mm stereo mini jack
Camera remote terminal:
2.5 mm super mini jack k1 (ZOOM S/S)
3.5 mm mini jack k1 (FOCUS/IRIS)
XLR audio input terminals:
XLR (3 pin) k2 (INPUT1/INPUT2)
LINE; 0 dBu/+4 dBu/ (switch with the menu)
MIC; j40 dBu/j50 dBu/j60 dBu (switch with
the menu)
USB:
Super Speed USB (USB 3.0),
[DEVICE]; USB terminal Type Micro B, Reader
function (No copyright protection support),
[HOST]; USB terminal Type A, USB host
function (for USB HDD
supported
*2
), bus power
*2 USB HDDs with a capacity of 32 GB or
below or a capacity above 2 TB cannot
be used
Dimensions:
160 mm (W)k170 mm (H)k315 mm (D)
(including projecting parts and eye cup)
Mass:
Approx. 1550
[without battery (supplied) and an SD card
(optional)]
g
40
SQT0478
Page 41

Mass in operation:
Approx. 1780
[with battery (supplied) and an SD card
(optional)]
Operating temperature:
0 oCto40oC
Operating humidity:
10%RH to 80%RH
Battery operation time:
See page 17
Wireless transmitter:
Compliance standard; IEEE802.11b/g/n
Frequency range used;
Central frequency 2412 MHz to 2462 MHz [11ch]
Encryption method; Wi-Fi compliant WPA™/
WPA2
Access method; Infrastructure mode
NFC:
Compliance standard; ISO/IEC 18092 NFC-F
(Passive Mode)
Others
™
g
/WEP
About copyright
AC adaptor
Information for your safety
Power source:
Power
consumption:
DC output:
Dimensions:
115 m m (W )k37 mm (H)k57 mm (D)
Mass:
Approx. 210
Battery charger
Information for your safety
Power source:
Power
consumption:
DC output:
Dimensions:
70 mm (W)k44.5 mm (H)k116 m m ( D)
Mass:
Approx. 160
AC 110 V to 240 V,
50/60 Hz
42 W
DC 12 V, 2.5 A
g
AC 100 V to 240 V,
50/60 Hz
0.4 A
DC 8.4 V, 1.2 A
g
∫ Carefully observe copyright
laws
Recording of pre-recorded tapes or discs or
other published or broadcast material for
purposes other than your own private use
may infringe copyright laws. Even for the
purpose of private use, recording of certain
material may be restricted.
∫ Licenses
≥ SDXC Logo is a trademark of SD-3C, LLC.
≥ “AVCHD”, “AVCHD Progressive” and the
“AVCHD Progressive” logo are trademarks of
Panasonic Corporation and Sony
Corporation.
≥ Manufactured under license from Dolby
Laboratories. Dolby and the double-D symbol
are trademarks of Dolby Laboratories.
≥ HDMI, the HDMI Logo, and High-Definition
Multimedia Interface are trademarks or
registered trademarks of HDMI Licensing
LLC in the United States and other countries.
≥ LEICA is a registered trademark of Leica
Microsystems IR GmbH and DICOMAR is a
registered trademark of Leica Camera AG.
≥ App Store is a service mark of Apple Inc.
≥ Android and Google Play are trademarks or
registered trademarks of Google Inc.
≥ The Wi-Fi CERTIFIED
certification mark of Wi-Fi Alliance
≥ The Wi-Fi Protected Setup
a certification mark of Wi-Fi Alliance
™
Logo is a
™
Identifier mark is
®
.
®
.
SQT0478
41
Page 42

≥ “Wi-Fi®” is a registered trademark of Wi-Fi
≥ “Wi-Fi Protected Setup
®
Alliance
.
™
“WPA2
” are trademarks of Wi-Fi Alliance®.
™
”, “WPA™”, and
≥ The N-Mark is a trademark or registered
trademark of NFC Forum, Inc. in the United
States and in other countries.
≥ QR Code is a registered trademark of
DENSO WAVE INCORPORATED.
≥ Other names of systems and products
mentioned in these instructions are usually
the registered trademarks or trademarks of
the manufacturers who developed the system
This product is licensed under the AVC patent
portfolio license for the personal and
non-commercial use of a consumer to (i)
encode video in compliance with the AVC
Standard (“AVC Video”) and/or (ii) decode AVC
Video that was encoded by a consumer
engaged in a personal and non-commercial
activity and/or was obtained from a video
provider licensed to provide AVC Video. No
license is granted or shall be implied for any
other use. Additional information may be
obtained from MPEG LA, LLC.
See http://www.mpegla.com
.
or product concerned.
This product incorporates the following software:
(1) the software developed independently by or for Panasonic Corporation,
(2) the software owned by third party and licensed to Panasonic Corporation,
(3) the software licensed under the GNU General Public License, Version 2.0 (GPL V2.0),
(4) the software licensed under the GNU LESSER General Public License, Version 2.1
(LGPL V2.1), and/or
(5) open source software other than the software licensed under the GPL V2.0 and/or LGPL V2.1.
The software categorized as (3) - (5) are distributed in the hope that it will be useful, but WITHOUT
ANY WARRANTY, without even the implied warranty of MERCHANTABILITY or FITNESS FOR A
PARTICULAR PURPOSE. For details, refer to the licence information described in the supplied
leaflet “Open Source Software Information”.
At least three (3) years from delivery of this product, Panasonic will give to any third party who
contacts us at the contact information provided below, for a charge no more than our cost of
physically performing source code distribution, a complete machine-readable copy of the
corresponding source code covered under GPL V2.0 or LGPL V2.1, as well as the respective
copyright notice thereof.
Contact Information: oss-cd-request@gg.jp.panasonic.com
The source code and the copyright notice are also available for free in our website below.
http://panasonic.net/avc/oss/index.html
42
SQT0478
Page 43

Others
Panasonic Warranty
1. The product is warranted for 12 months from the date of purchase. Subject to the conditions of this warranty
Panasonic or its Authorised Service Centre will perform necessary service on the product without charge for
parts or labour, if in the opinion of Panasonic, the product is found to be faulty within the warranty period.
2. This warranty only applies to Panasonic products purchased in Australia and sold by Panasonic Australia or
its Authorised Distributors or Dealers and only where the products are used and serviced within Australia or
it's territories. Warranty cover only applies to service carried out by a Panasonic Authorised Service Centre
and only if valid proof of purchase is presented when warranty service is requested.
3. This warranty only applies if the product has been installed and used in accordance with the manufacturer’s
recommendations (as noted in the operating instructions) under normal use and reasonable care (in the
opinion of Panasonic). The warranty covers normal domestic use only and does not cover damage,
malfunction or failure resulting from use of incorrect voltages, incorrect installation, accident, misuse, neglect,
build-up of dirt or dust, abuse, maladjustment of customer controls, mains supply problems, thunderstorm
activity, infestation by insects or vermin, tampering or repair by unauthorised persons (including unauthorised
alterations), introduction of sand, humidity or liquids, commercial use such as hotel, office, restaurant, or other
business or rental use of the product, exposure to abnormally corrosive conditions or any foreign object or
matter having entered the product.
4. This warranty does not cover the following items unless the fault or defect existed at the time of purchase:
(a) Cabinet Part(s) (e) DVD, Blu-ray or Recordable Discs
(b) Video or Audio Tapes (f) Video / Audio Heads from wear and tear in normal use
(c) SD cards or USB devices (g) Information stored on Hard Disk Drive, USB stick or SD card
(d) User replaceable Batteries (h) DTV reception issues caused by TV Aerial / Cabling / Wall socket(s)
etc
5. Some products may be supplied with Ethernet connection hardware. The warranty is limited on such products
and will not cover
(a) Internet and or DLNA connection / setup related problems
(b) Access fees and or charges incurred for internet connection
(c) The use of incompatible software or software not specifically stipulated in the product operations manual;
and
(d) Any indirect or consequential costs associated with the incorrect use or misuse of the hardware, its
connection to the internet or any other device.
6. To claim warranty service, when required, you should:
Telephone Panasonic’s Customer Care Centre on 132600 or visit our website referred to below and use
the Service Centre Locator for the name/address of the nearest Authorised Service Centre.
Send or take the product to a Panasonic Authorised Service Centre together with your proof of purchase
receipt as a proof of purchase date. Please note that freight and insurance to and / or from your nearest
Authorised Service Centre must be arranged by you.
Note that home or pick-up/delivery service is available for the following products in the major metropolitan
areas of Australia or the normal operating areas of the nearest Authorised Service Centres:
- Plasma/LCD televisions / displays (screen size greater than 103 cm )
7. The warranties hereby conferred do not extend to, and exclude, any costs associated with the installation, deinstallation or re-installation of a product, including costs related to the mounting, de-mounting or remounting
of any screen, (and any other ancillary activities), delivery, handling, freighting, transportation or insurance of
the product or any part thereof or replacement of and do not extend to, and exclude, any damage or loss
occurring by reason of, during, associated with, or related to such installation, de-installation, re-installation or
transit.
Panasonic Authorised Service Centres are located in major metropolitan areas and most regional centres of
Australia, however, coverage will vary dependant on product. For advice on exact Authorised Service Centre
locations for your product, please telephone our Customer Care Centre on 132600 or visit our website and use
the Service Centre Locator.
In addition to your rights under this warranty, Panasonic products come with consumer guarantees that cannot be
excluded under the Australian Consumer Law. If there is a major failure with the product, you can reject the
product and elect to have a refund or to have the product replaced or if you wish you may elect to keep the goods
and be compensated for the drop in value of the goods. You are also entitled to have the product repaired or
replaced if the product fails to be of acceptable quality and the failure does not amount to a major failure.
If there is a major failure in regard to the product which cannot be remedied then you must notify us within a
reasonable period by contacting the Panasonic Customer Care Centre. If the failure in the product is not a major
failure then Panasonic may choose to repair or replace the product and will do so in a reasonable period of time
from receiving notice from you.
THIS WARRANTY CARD AND THE PURCHASE DOCKET (OR SIMILAR PROOF OF PURCHASE)
SHOULD BE RETAINED BY THE CUSTOMER AT ALL TIMES
If you require assistance regarding warranty conditions or any other enquiries, please visit the
Panasonic Australia website
www.panasonic.com.au
or contact by phone on
132 600
If phoning in, please ensure you have your operating instructions available.
Panasonic Australia Pty. Limited
ACN 001 592 187 ABN 83 001 592 187
1 Innovation Road, Macquarie Park NSW 2113
PRO-031-F11 Issue: 4.0 01-01-2011
Limited Warranty (ONLY FOR AUSTRALIA)
43
SQT0478
Page 44

Panasonic Corporation
Web site: http://www.panasonic.com
© Panasonic Corporation 2014
Manufactured by: Panasonic Corporation
Kadoma, Osaka, Japan
Importer for Europe: Panasonic Marketing Europe GmbH
Panasonic Testing Centre
Winsbergring 15, 22525 Hamburg, Germany
EU
SQT0478
F0914TC0
 Loading...