

Page 1

jam-eng.book Page i Tuesday, March 9, 2004 1:06 PM
Important Information
Important Information
Thank you for purchasing this Panasonic digital cellular phone. This phone is
designed to operate on GSM networks – GSM900 or GSM1900. It also
supports GPRS for packet data connections. Ensure the battery is fully charged
before use.
i
Page 2
jam-eng.book Page ii Tuesday, March 9, 2004 1:06 PM
Important Information
Safety Considerations
The following information should be read and understood as it provides details
which will enable you to operate your phone in a manner which is both safe to
you and your environment, and conforms to any legal requirements regarding
the use of cellular phones.
This equipment should only be charged with approved charging
equipment. Other usage will invalidate any approval given to this
apparatus and may be dangerous. The use of approved charging
equipment is recommended to ensure optimum performance and
avoid damage to your phone. Ensure the voltage rating of the Fast
Travel Charger is compatible with the area of use when travelling
abroad.
A Fast Travel Charger (EB-CAG60US) is supplied with the Main
Kit. Other recommended equipment for charging – Car Charger
(EB-CDG60).
Use of a Battery pack other than that recommended by the manufacturer may result in safety hazard.
Switch off your cellular phone when in an aircraft. The use of cellular phones in an aircraft may be dangerous to the operation of the
aircraft, disrupt the cellular network and may be illegal. Failure to
observe this instruction may lead to the suspension or denial of
cellular phone services to the offender, or legal action or both.
Do not incinerate or dispose of the battery as ordinary trash. The
battery must be disposed of in accordance with local legislation
and may be recycled.
It is advised not to use the equipment at a refuelling point. Users
are reminded to observe restrictions on the use of radio equipment in fuel depots, chemical plants or where blasting operations
are in progress. Never expose the battery to extreme temperatures (in excess of 60°C, 140°F).
ii
Page 3

jam-eng.book Page iii Tuesday, March 9, 2004 1:06 PM
It is imperative that the driver exercises proper control of the
vehicle at all times. Do not hold a phone while you are driving;
find a safe place to stop first. Do not speak into a Handsfree
microphone if it will take your mind off the road. Always acquaint
yourself thoroughly with restrictions concerning the use of cellular phones within the area you are driving and observe them at all
times.
Care must be taken when using the phone in close proximity to
personal medical devices, such as pacemakers and hearing aids.
Do not leave the camera facing direct sunlight as it may impair
the camera’s performance.
If you use a feature which keeps key backlight on continuously for
a long time, such as camera, game, or browser, battery life will
become extremely short. To maintain longer battery life, set the
key backlight off. See Key Backlight On/Off, page 31.
For most efficient use hold the phone as you would any normal
phone. Your G60 cellular phone is fitted with an internal antenna,
located in the upper portion of the phone, behind the display
screen. To avoid deterioration of signal quality or antenna performance, do not touch or “cup” the antenna area while the phone is
switched on.
Important Information
This equipment should only be used with Panasonic approved
accessories to ensure optimum performance and avoid damage to
your phone. Panasonic is not responsible for damages caused by
using non-Panasonic approved accessories.
Unauthorized modifications or attachments may damage the
phone and violate applicable regulations. The use of unapproved
modification or attachment may result in the invalidation of your
guarantee – this does not affect your statutory rights.
This Panasonic mobile phone is designed, manufactured and
tested to ensure that it complies with the specifications covering
RF exposure guidelines applicable at the time of manufacture, in
accordance with EU, USA FCC, and Australian ACA regulations.
Please refer to our website for latest information/standards compliance in your country/region of use.
http://www.panasonicmobile.com
iii
Page 4

jam-eng.book Page iv Tuesday, March 9, 2004 1:06 PM
Care and Maintenance
Care and Maintenance
Pressing any of the keys may produce a loud tone. Avoid holding the
phone close to the ear while pressing the keys.
Extreme temperatures may have a temporary effect on the operation of your phone. This is normal and does not indicate a fault.
If you use the phone for a long time in temperature over 40°C, the
display quality may deteriorate.
Do not modify or disassemble the equipment. There are no user
serviceable parts.
Do not subject the equipment to excessive vibration or shock.
Do not drop the battery.
Avoid contact with liquids. If the equipment becomes wet immediately remove the power and contact your dealer.
Do not leave the equipment in direct sunlight or a humid, dusty or
hot area. Never throw the battery into a fire. It may explode.
Keep metallic items that may accidentally touch the terminals away
from the equipment. Batteries can cause property damage, injury,
or burns if terminals are touched with a conductive material (for
example, metal jewellery, keys, etc.).
Always charge the battery in a well ventilated area, not in direct
sunlight, between +5°C and +35°C. It is not possible to recharge
the battery if it is outside this temperature range.
When connecting the phone to an external source, read the operating instructions of the equipment for the correct connection and
safety precautions. Ensure the phone is compatible with the product it is being connected to.
When disposing of any packing materials or old equipment check
with your local authorities for information on recycling.
iv
Page 5

jam-eng.book Page v Tuesday, March 9, 2004 1:06 PM
Quick Reference
Quick Reference
<
5173
A
@
$ – #
C
D
E
F
Press centre of the Navigation Key to select or
enter the menu options
Direction which the user can move around the display
screen using the Navigation Key
Secondary Softkey
Primary Softkey/Back-Key
Numeric key pads
Press to answer a call or call a dialled number
Press to end a call or return to Idle screen
Press and hold to switch the phone on or off
Indicates that a function is SIM Dependent
Indicates that a function is Network Dependent
v
Page 6

jam-eng.book Page vi Tuesday, March 9, 2004 1:06 PM
Contents
Important information ................................................................................... i
Safety Consideraions ..................................................................................ii
Care and Maintenance ..................................................................................iv
Quick Reference ............................................................................................ v
Contents ........................................................................................................vi
Getting to Know Your Phone .......................................................................x
Location of Controls .............................................................................. x
Getting Started ............................................................................................. 1
Fitting the SIM ............................................... ........................................... 1
Removing the SIM ................................................................................... 2
Fitting the Battery .................................................................................... 2
Removing the Battery ............................................................................... 3
Charging the Battery ............................................................................... 4
Operation of Battery Level Indicator ..................................................... 5
Low Battery Warning ............................................................................... 5
Fitting Image-In Card ................................................................................ 5
The Display .............................................................................................. 6
Menu System Overview ........................................................................... 7
Selecting a Function.................................................................................. 8
Basic Operation ............................................... .............................................. 9
Switching On & Off .................................................................................. 9
Making a Call ............................................................................................ 9
International Dialing .............................................................................. 10
Emergency Calls ..................................................................................... 10
Ending a Call ........................................................................................... 10
Answering a Call..................................................................................... 11
Caller Identification ................................................................................ 11
Volume Control ..................................................................................... 11
Locking the Phone ............................................. ..................................... 12
Using the PIN ........................................................................................ 13
Setting Ring Volume ................................................................................ 14
Setting Silent Ring ................................................................................... 14
Phonebook ................................................................................................... 15
Browsing Phonebook ............................................................................. 16
Retrieving a Number .............................................................................. 16
Speed Dialing ......................................................................................... 17
Info Numbers or Service Dial ................................................................ 17
Editing Phonebook Entries .................................................................... 18
Synchronizing Phonebooks ................................................................... 19
Review the Phonebook Status ............................................................... 19
Grouping Phonebook Entries (Mobile Phonebook Only) ..................... 20
My Numbers ................................................................................................ 23
vi
Page 7

jam-eng.book Page vii Tuesday, March 9, 2004 1:06 PM
Personalizing Your Phone ............................................................................ 24
Changing the Language .......................................................................... 24
Adding a Start-up Greeting .................................................................... 24
Idle Screen Image (Wallpaper) .............................................................. 25
Changing Screen Saver Animation ........................................................ 26
Turning Screen Saver On & Off ............................................................. 26
Color Themes ....................................................................................... 27
Changing Sound Profiles ....................................... .................................. 27
Editing Sound Profiles ........................................................................... 28
Download Data (F) ............................................................................. 29
Media Folders ......................................................................................... 29
Composing a Melody ............................................................................ 30
Setting the Backlight Time ..................................................................... 31
Key Backlight On/Off ............................................................................. 31
Contrast ................................................................................................. 31
Operator Notice ................................................................................... 32
Restoring the Default Phone Settings ..................................................... 32
Phone Security .............................................................................................33
Enabling Key Guard ............................................................................... 34
Disabling Key Guard ............................................................................... 34
Changing the Security Codes ................................................................ 35
Restricting Calls ...................................................................................... 35
Applications ..................................................................................................37
Clock ...................................................................................................... 37
Setting Time and Date ........................................................................... 37
Clock Format .......................................................................................... 37
Setting the Alarm ................................................................................... 38
Muting the Alarm .................................................................................. 39
Setting a Power On/Off Time ................................................................ 39
Calculator .............................................................................................. 40
Messaging .....................................................................................................42
SMS/EMS: Setting Up the Phone ............................................................42
Creating a Text Message........................................................................ 44
Linked Messages .................................................................................... 46
Receiving Text Messages ........................................................................ 46
Responding to Text Messages ................................................................ 47
Chat SMS................................................................................................ 48
MMS: Setting Up the Phone................................................................... 49
Creating an MMS Message .................................................................... 50
Managing Message Lists ......................................................................... 52
Cell Broadcasts ..................................................................................... 53
Call Information ........................................................................................... 54
Recent Numbers ..................................................................................... 54
Call Duration .......................................................................................... 55
GPRS Call Duration ............................................................................... 56
Call Charges ............................................................................................ 56
Setting the Unit Price ............................................................................ 57
Setting the Maximum Unit Level ............................................................ 57
Call Identification ................................................................................... 58
vii
Page 8

jam-eng.book Page viii Tuesday, March 9, 2004 1:06 PM
Advanced Operation ...................................................................................59
Diverting Calls ........................................................................................59
Holding Calls .......................................................................................... 60
Making a Second Call .............................................................................. 60
Receiving a Second Call (Call Waiting) .................................................. 61
Accepting a Second Call ......................................................................... 61
Rejecting a Second Call .......................................................................... 61
Ending Current Call to Receive Another ............................................... 61
Operation During Two Calls .................................................................. 61
Call Transfer .......................................................................................... 62
Multi-party Calls ..................................................................................... 62
Changing to a New Network ................................................................ 64
Scheduler ..................................................................................................... 65
Creating a Reminder .............................................................................. 65
Viewing & Editing Reminders .................................................................. 65
Games .......................................................................................................... 66
Embedded Games (F) ..........................................................................66
Managing Multimedia Files ..................................... .....................................67
Displaying Pictures and Animations ........................................................ 67
Playing Melodies .................................................................................... 68
Renaming Files ................................................ ........................................ 68
Creating Mail from Files ........................................................................ 68
Deleting Files .......................................................................................... 69
Checking File Properties ........................................................................ 69
Checking Folder Properties ................................................................... 69
WAP Browser .............................................................................................. 70
Browser Settings .................................................................................... 70
Activating the Browser .......................................................................... 73
Navigating Content ................................................................................ 73
Browser Menu ....................................................................................... 74
Using Bookmarks .................................................................................. 76
Deactivating the Browser ...................................................................... 77
WAP Push Message ................................................................................ 77
Additional Features ........................................... ..........................................78
Voice Memo ........................................................................................... 78
Voice Message........................................................................................ 79
DTMF Tones ......................................................................................... 80
Desktop Handsfree ............................................................................... 81
Auto Answer .......................................................................................... 81
Plug-in Camera ............................................................................................ 82
Fitting and Removing the Plug-in Camera .............................................. 82
Taking a Picture ...................................................................................... 83
Camera Settings .................................................................................... 84
Text Entry .................................................................................................... 85
T9® Text Input ..................................................................................... 86
Other Text Modes .............................................. ................................... 86
Editing Text ............................................................................................ 86
viii
Page 9

jam-eng.book Page ix Tuesday, March 9, 2004 1:06 PM
Troubleshooting ...........................................................................................87
Important Error Messages .................................................................... 89
Glossary of Terms ........................................................................................91
Specifications ................................................................................................93
Phone (Including Battery) ..................................... .................................. 93
Personal Settings .........................................................................................94
Menu Structure ...........................................................................................95
Accessories ...................................................................................................96
Identify a Genuine Panasonic Accessory ................................................. 97
Index .............................................................................................................98
Licensing ..................................................... ................................................104
ix
Page 10
jam-eng.book Page x Tuesday, March 9, 2004 1:06 PM
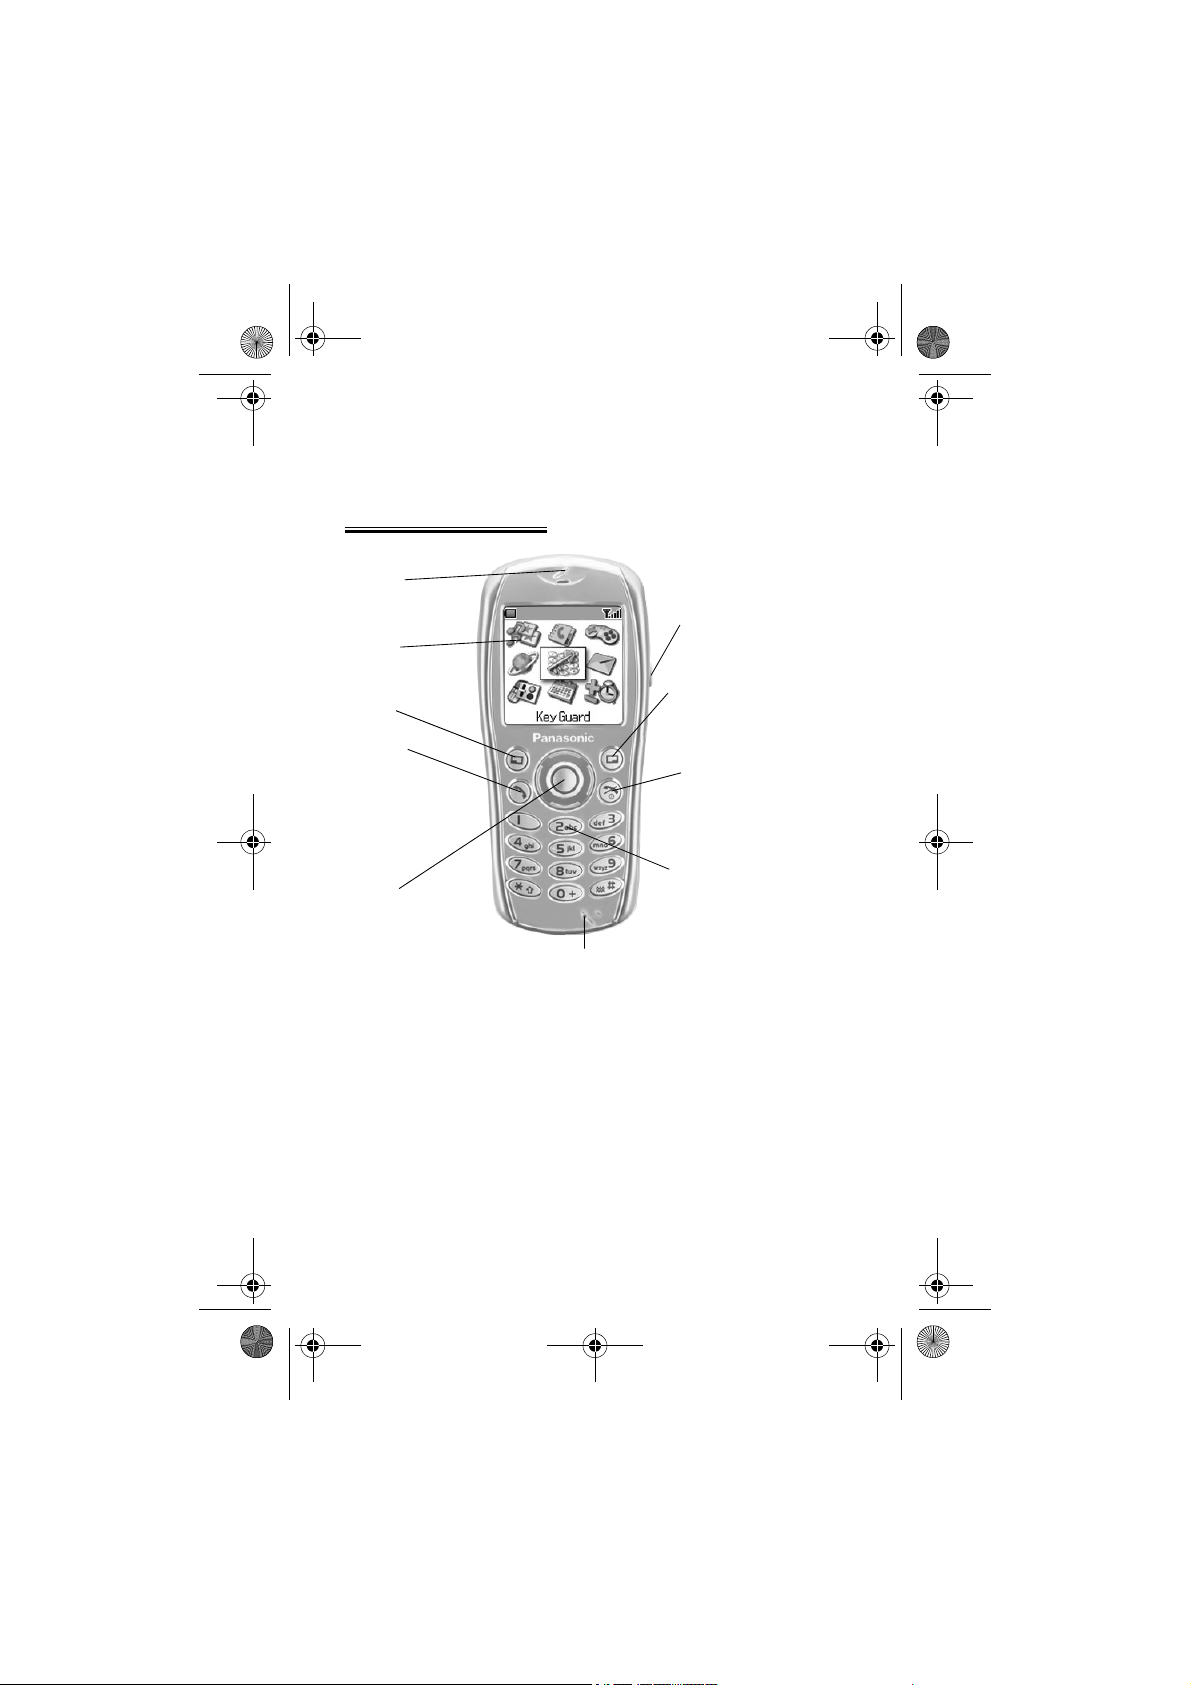
Getting to Know Your Phone
Location of Controls
Earpiece
Display
Personal Handsfree
Socket
Left Softkey
Call Key
Navigation Key
Microphone
Right Softkey/
Back-Key
Power On/Off
and End Call Key
Keypad
Keypad
x
Page 11
jam-eng.book Page 1 Tuesday, March 9, 2004 1:06 PM
Getting Started
Before operating this phone please read the Important Information section – see page i.
These operating instructions detail use of the equipment contained in the
Main Kit.
Some services detailed are network dependent (F) or may only be available
on a subscription basis. Some functions are SIM dependent (E). For more
information contact your Service Provider.
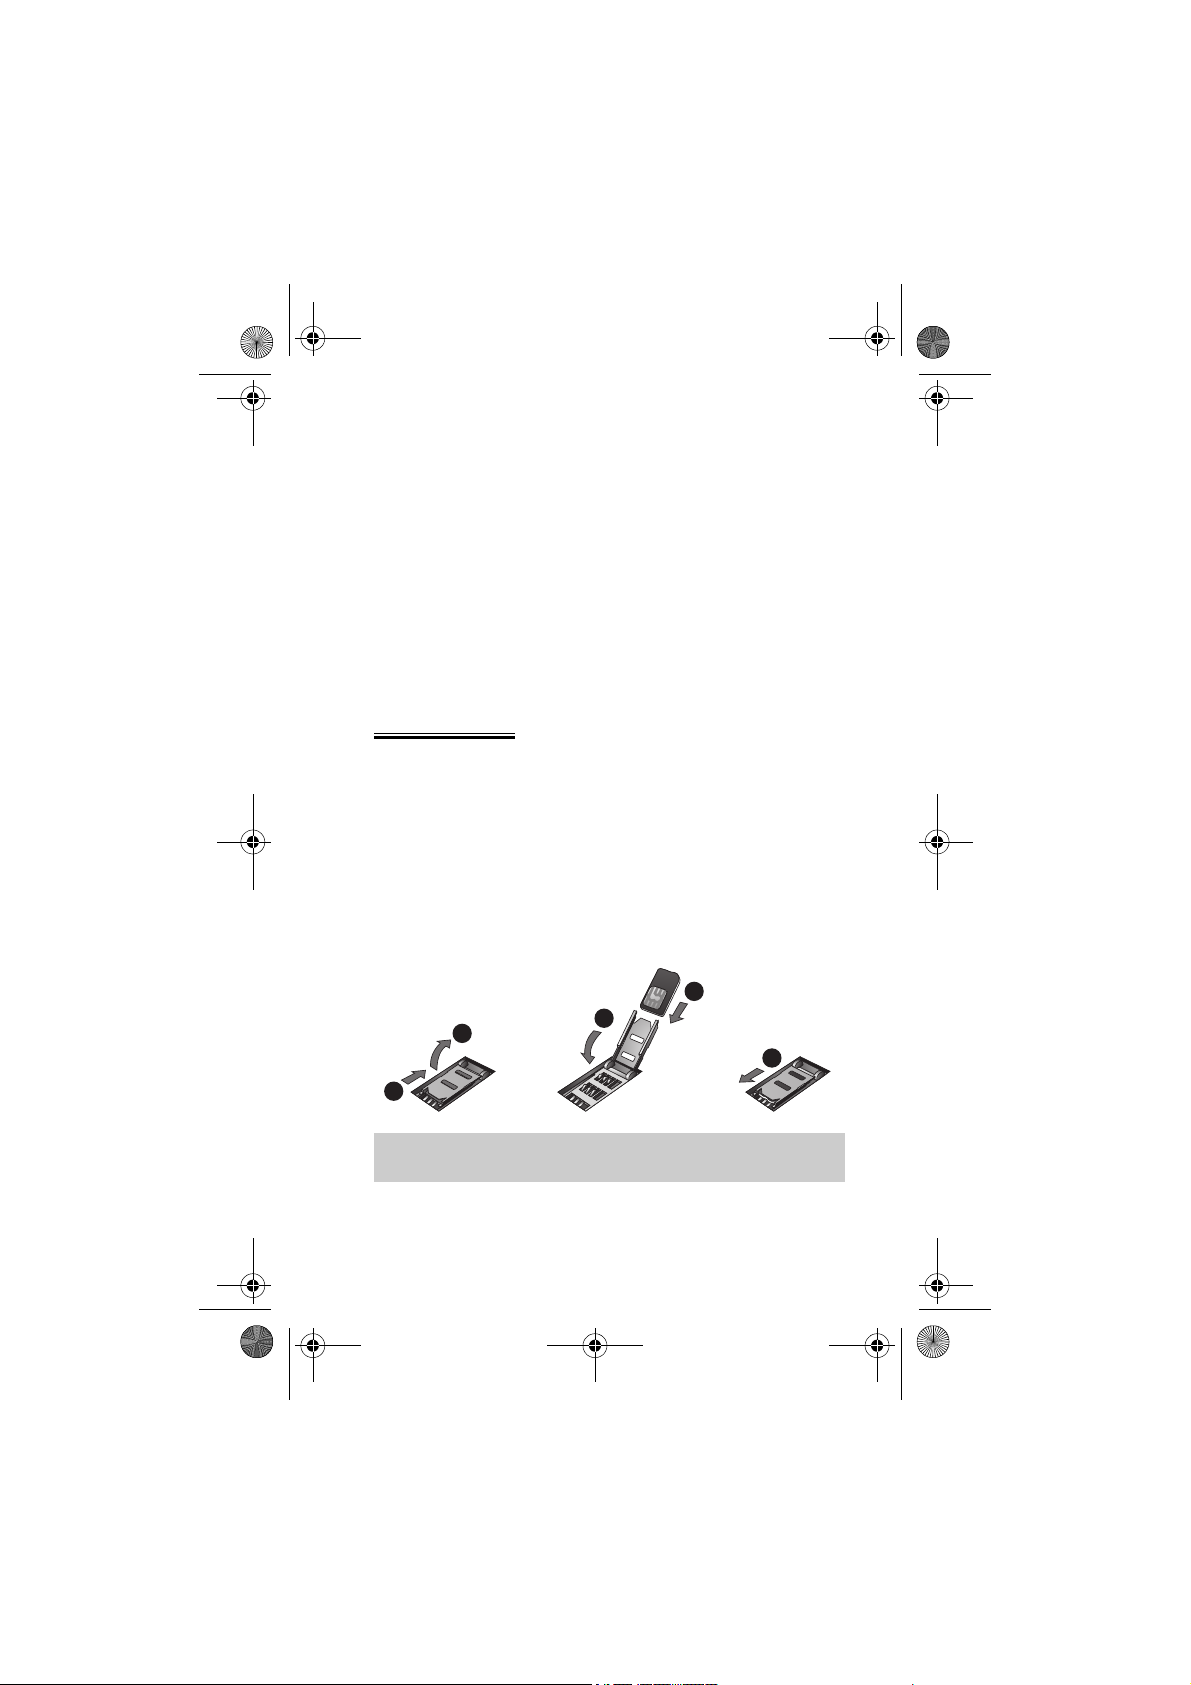
Fitting the SIM
The SIM is inserted into the back of the phone underneath the battery.
1 Remove the battery – see Removing the Battery, page 3.
2 Unlock the SIM retainer by sliding it up towards the top of the phone
(➊).
3 Gently raise the SIM retainer (➋).
4 Place the SIM into its recess, ensuring the bevelled corner is positioned
in the top right corner (➌).
5 Move the SIM retainer back into position (➍) and secure by sliding
downwards (➎). The SIM retainer is properly locked when it has clicked
into position.
3
2
1
Note: Ensure the SIM retainer is properly locked into position. Failure to
do so will prevent the fitting of the battery and the battery cover.
4
5
1
Page 12
jam-eng.book Page 2 Tuesday, March 9, 2004 1:06 PM
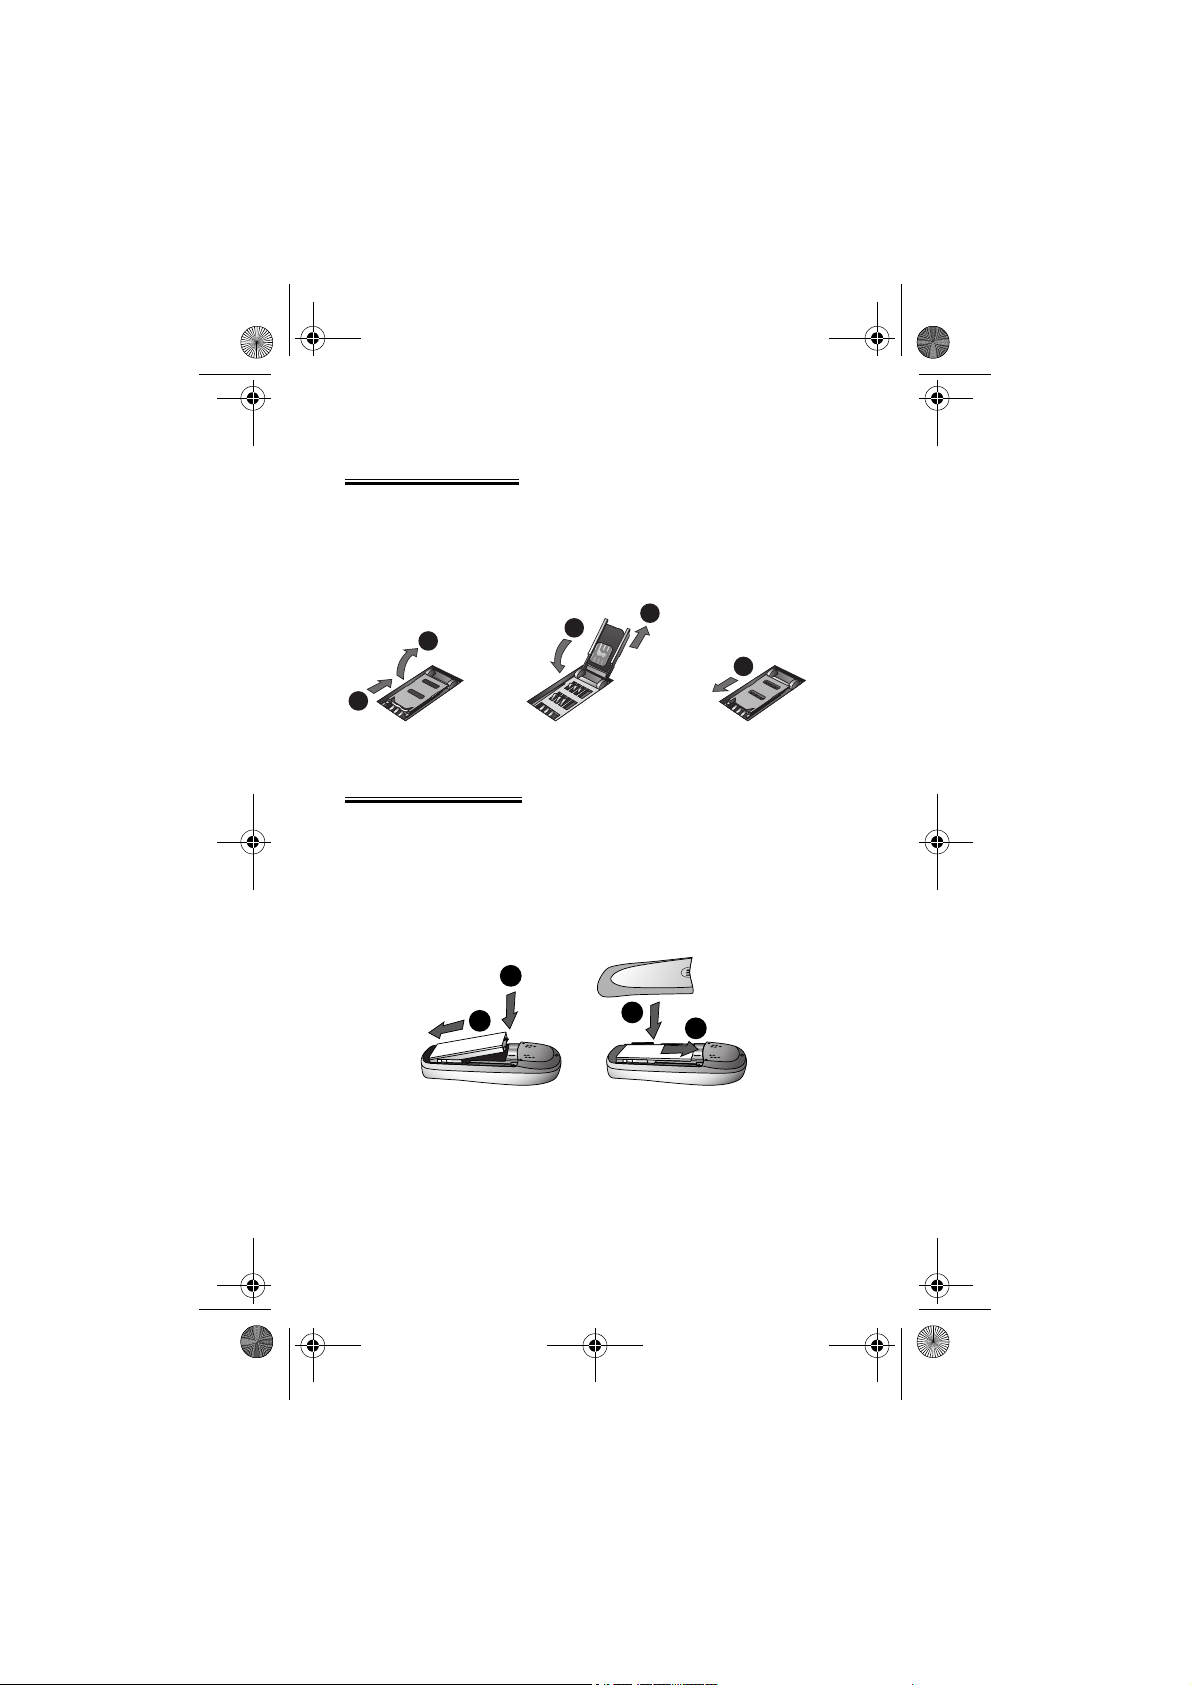
Removing the SIM
1 Unlock the SIM retainer by gently pushing towards the top of the phone
(➊).
2 Gently raise the SIM retainer (➋) and remove the SIM (➌). Return the
SIM retainer to its flat position (➍) and ensure it is correctly locked (➎)
before refitting the battery and battery cover.
2
1
4
3
5
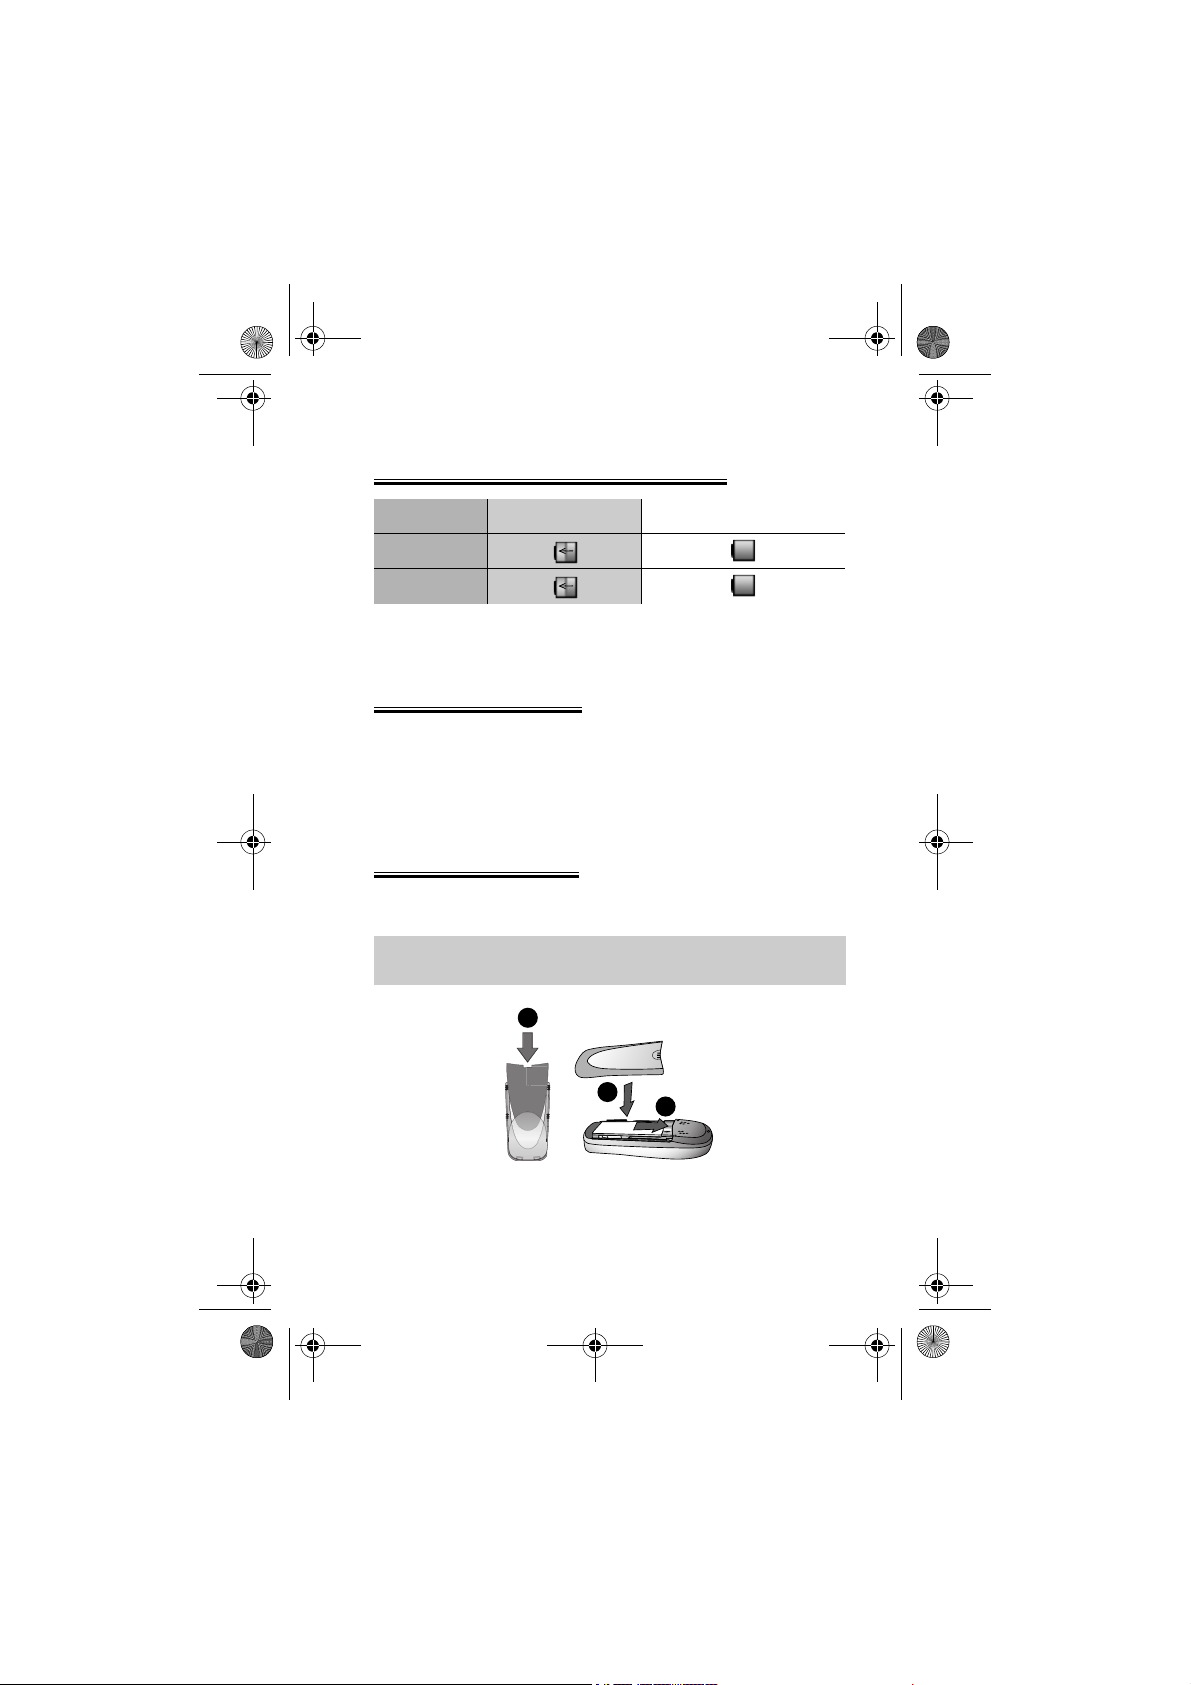
Fitting the Battery
1 Insert the battery bottom first (➊) so that the connectors touch those
on the phone.
2 Press gently downwards and simultaneously lower the top of the battery
into place (➋).
3 Replace cover on the phone (➌) and slide upwards to the top of the
phone (➍).
2
1
3
4
2
Page 13
jam-eng.book Page 3 Tuesday, March 9, 2004 1:06 PM
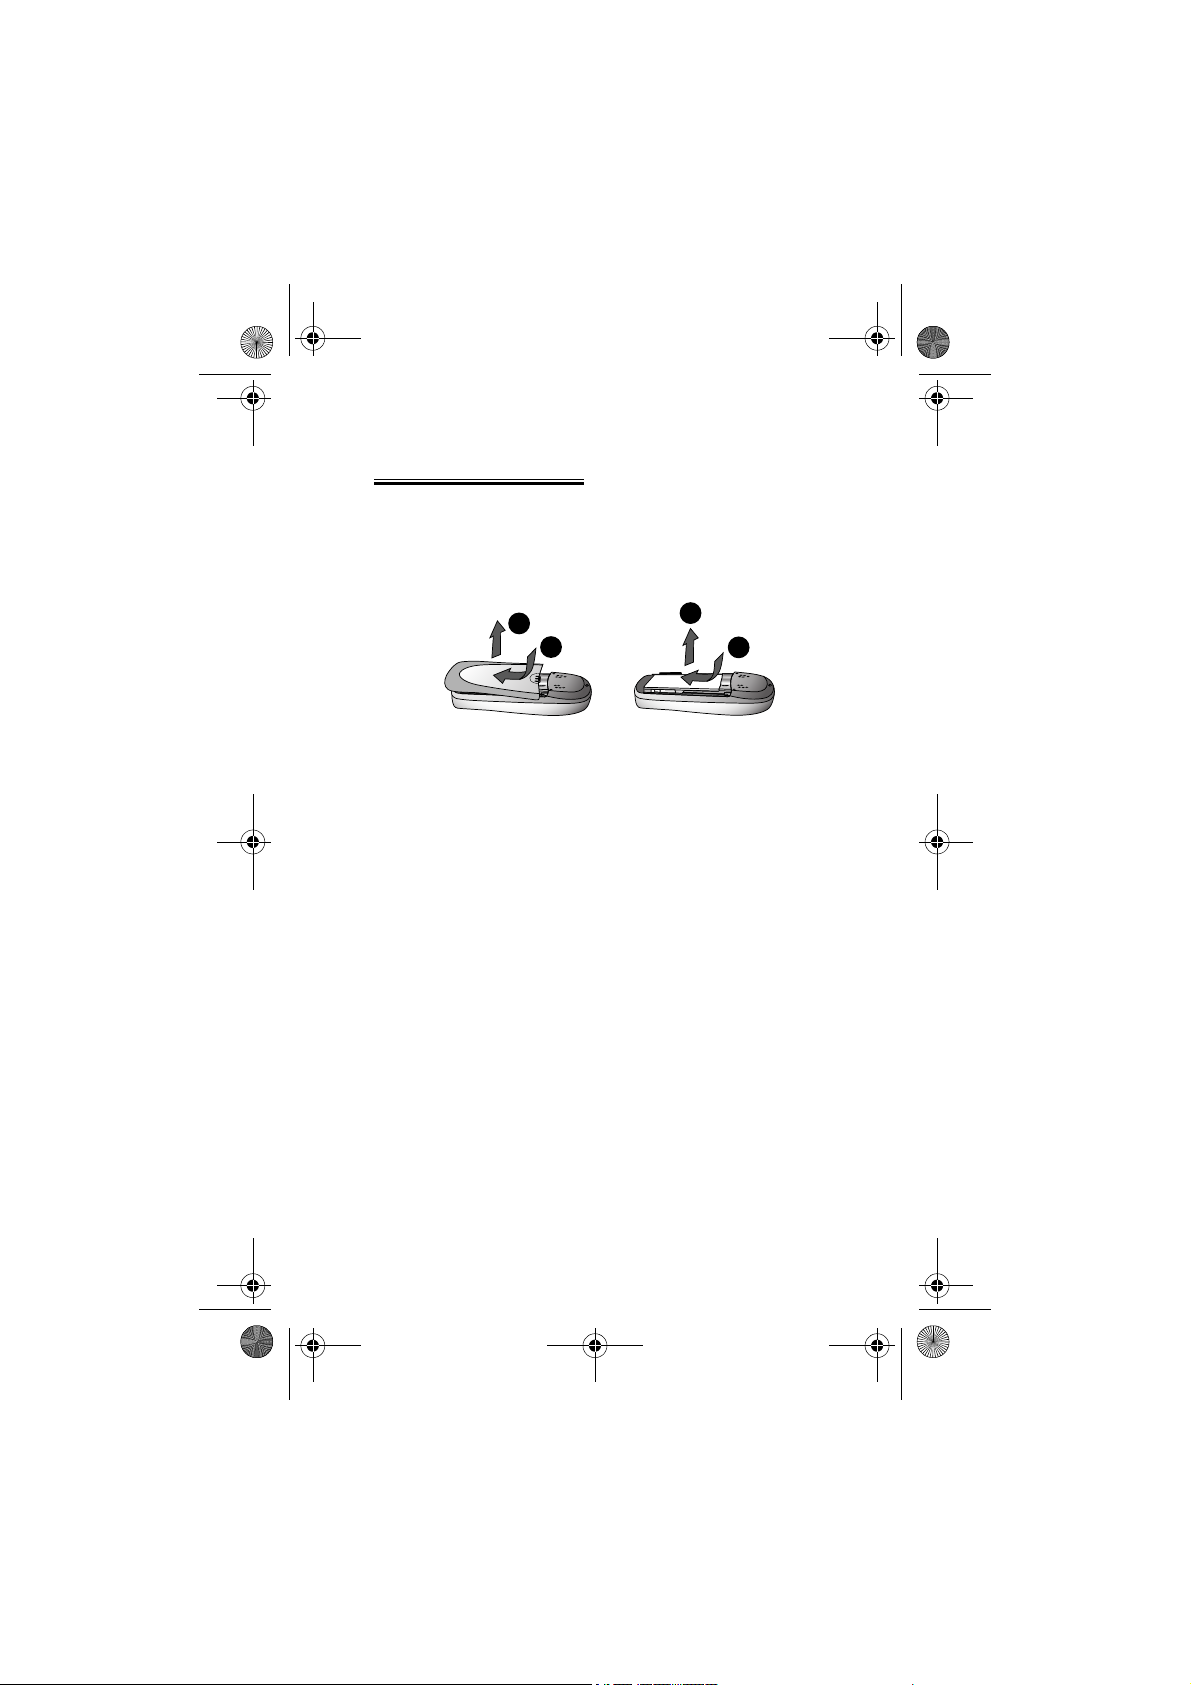
Removing the Battery
Ensure the phone is switched off and the charger is disconnected from the
phone before removing the battery.
1 Press top part of the cover (➊) and remove (➋).
2 Press the battery gently downwards (➌) and pull up from the top (➍).
2
1
4
3
3
Page 14
jam-eng.book Page 4 Tuesday, March 9, 2004 1:06 PM
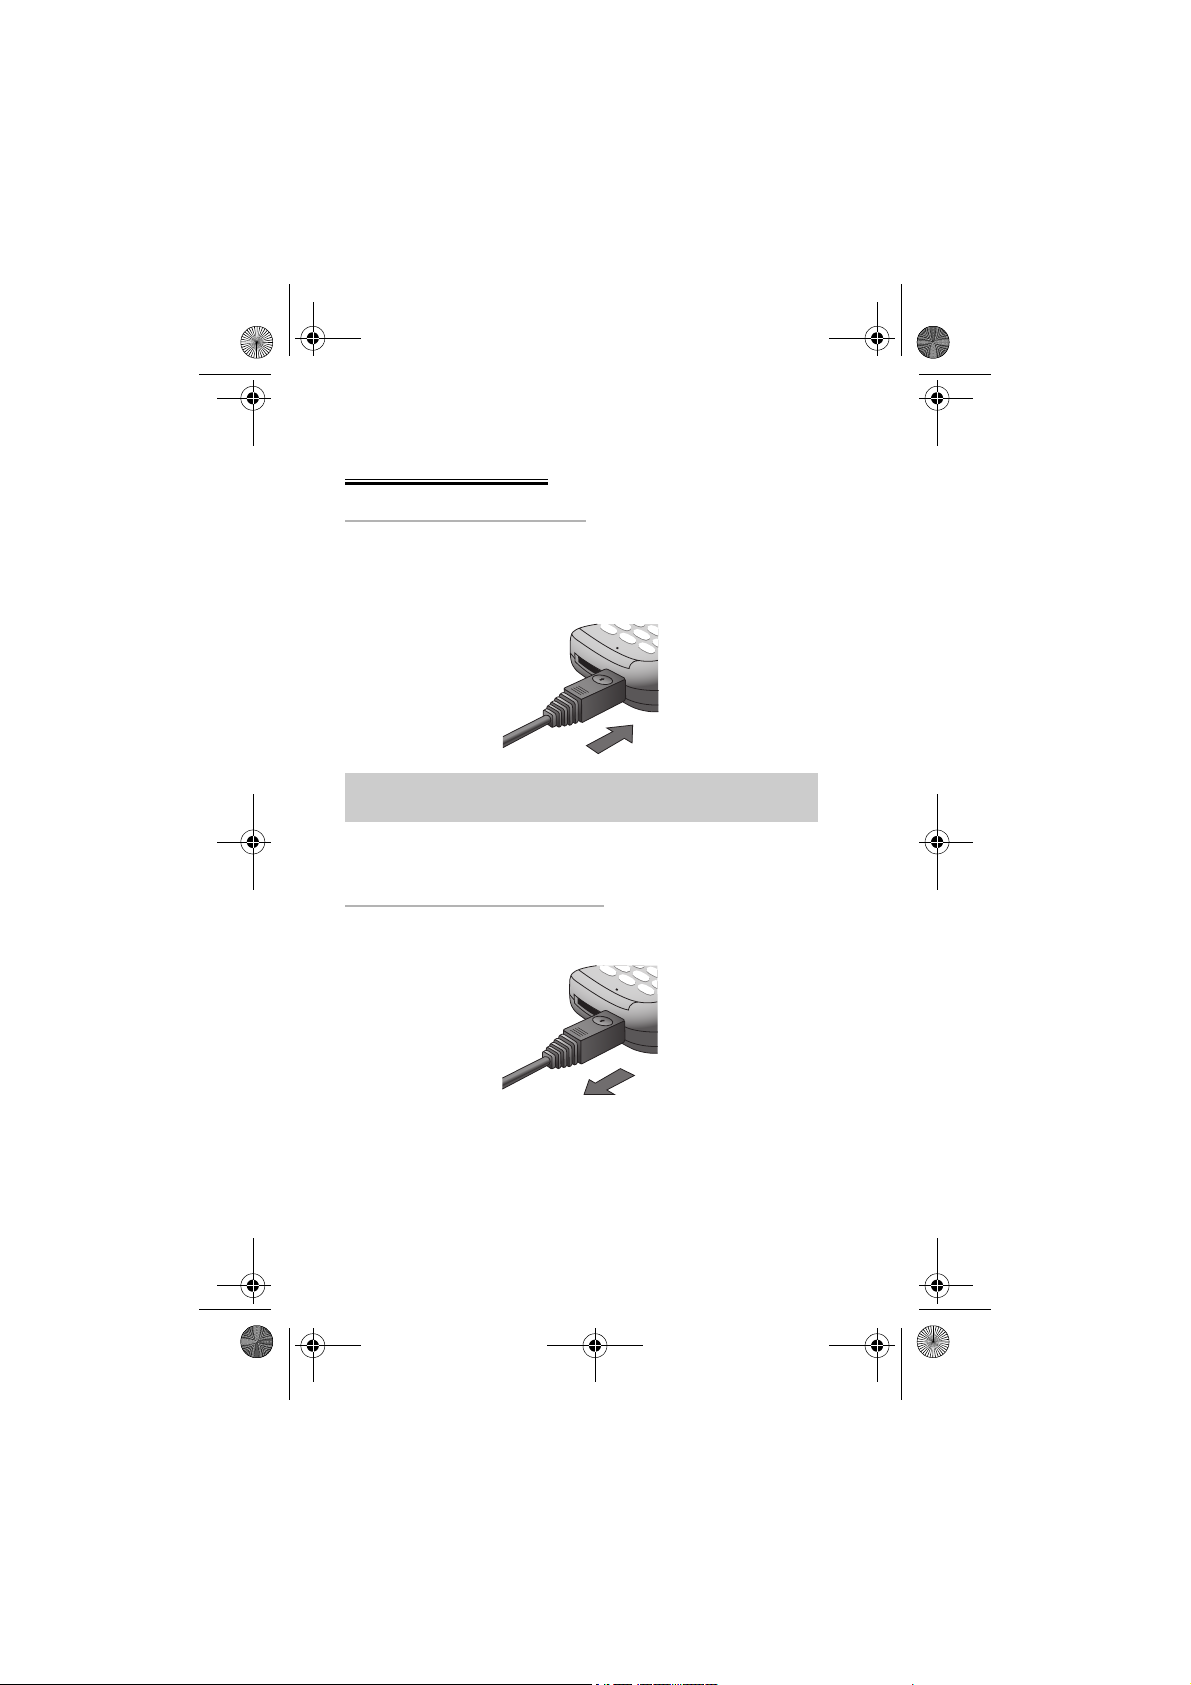
Charging the Battery
Connecting the Fast Travel Charger
The battery must be fitted in the phone before the charger is connected.
Insert the connector into the base of the phone, ensuring the arrow on the
connector is to the front of the phone.
Note: DO NOT force the connector as this may damage the phone and/
or the charger.
Plug the charger into a standard wall outlet. The battery level indicator will
scroll right to left during charging.
Disconnecting the Fast Travel Charger
When charging is complete, unplug charger from wall outlet and disconnect
the charger.
4
Page 15
jam-eng.book Page 5 Tuesday, March 9, 2004 1:06 PM
Operation of Battery Level Indicator
While charging Charging complete
Phone on
Phone off
It is recommended that the battery is fully discharged between charges to
maintain optimum battery life and performance.
Low Battery Warning
When the battery power is low, the battery indicator is red. If battery power is
critically low, a warning tone will sound. If this occurs during conversation, finish your call immediately. The power will automatically shut off after the warning tone. Fully recharge the battery. See Charging the Battery, page 4. Calls can
be made and received while the phone is charging.
Fitting Image-In Card
Customized image cards may be fitted to the rear of the phone, behind the
transparent rear cover. An Image-In template is included with your phone.
Note: DO NOT insert image cards which are thicker than attached cards
or metallic image cards.
v
1
2
3
5
Page 16
jam-eng.book Page 6 Tuesday, March 9, 2004 1:06 PM
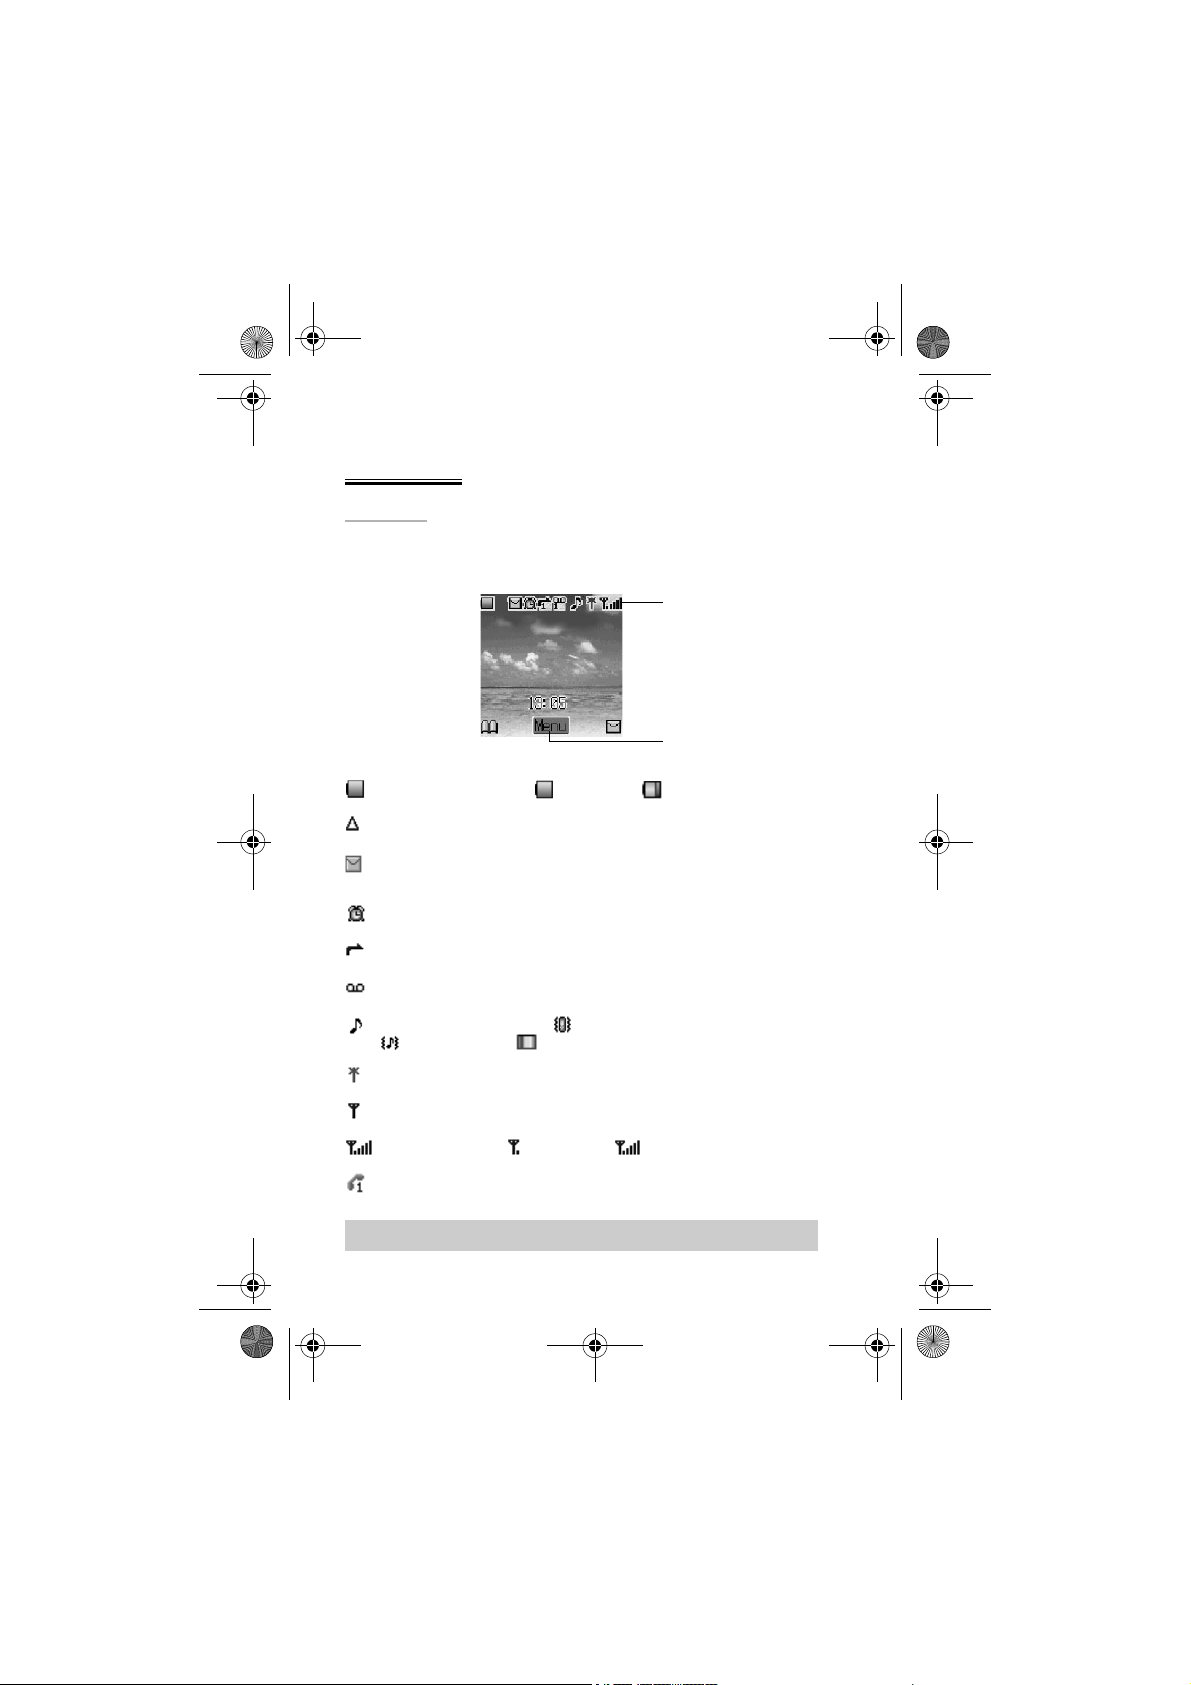
The Display
Status Icons
The status icons are displayed according to the currently activated functions.
The Antenna, Signal and Battery icons are displayed when the phone is
switched on and connected to a network.
Status Icons
(Idle Screen)
Primary Selection Area
Indicates Battery Level: (green) – full, (red) – low battery
Displayed when you are registered to a non-home network – Roaming
White icon indicates a new message has been received. Red icon
indicates the Media Folder is full.
Indicates Alarm is set
Indicates Call Divert is enabled
Vo ic em ai l activated
Indicates Ringer is enabled ( = vibration mode/
= vibrate + ring/ = flashing mode)
Indicates GPRS service available
Indicates it is possible to make emergency calls only
GSM signal strength: – weak signal, – strong signal
Phone is connected to Line 1 phone number (Availability depends on
your SIM)
Note: All screen images in the manual are simulated.
6
Page 17
jam-eng.book Page 7 Tuesday, March 9, 2004 1:06 PM
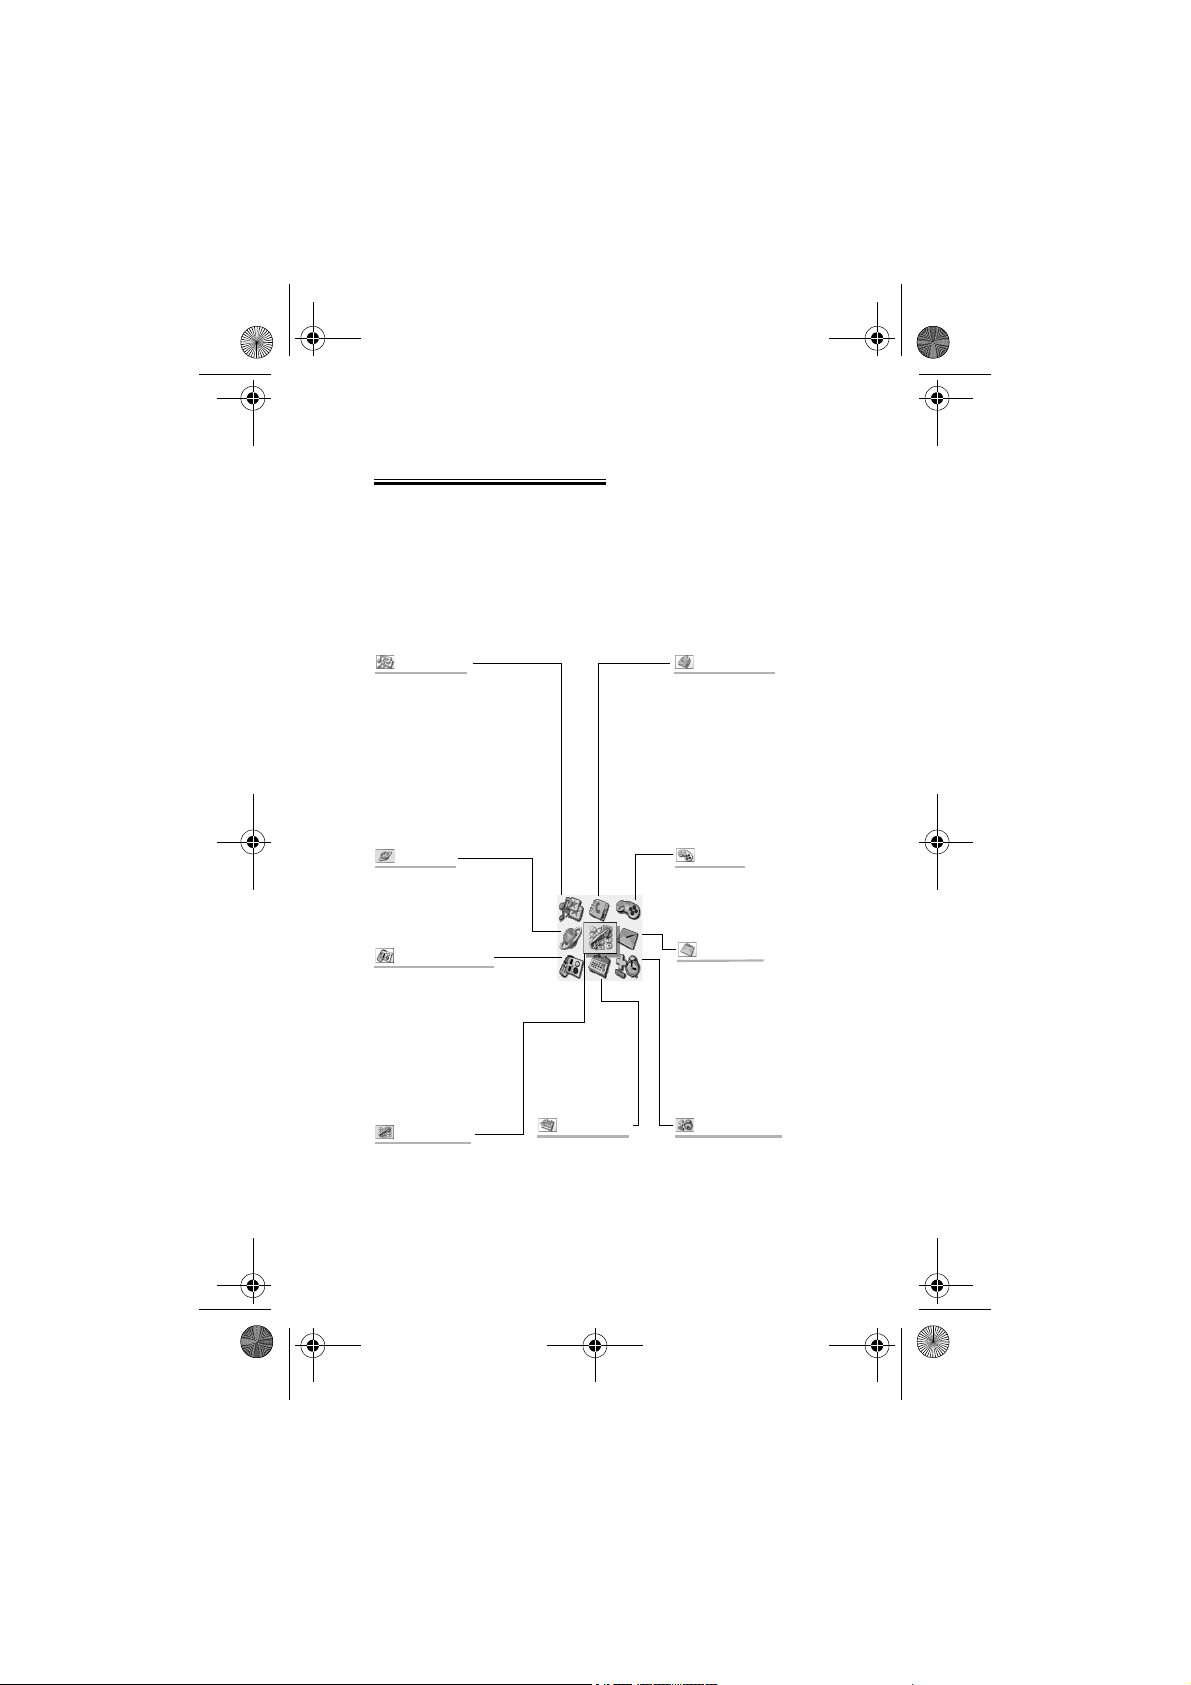
Menu System Overview
The menu system provides the means for accessing all the functions that do
not have their own dedicated buttons on the keypad. Each menu contains a list
of options. Some menus have further submenus.
The submenus and functions are selected using the five-way Navigation
key (0).
The diagram below gives an overview of the contents of the menus to help
you find your way around. This is just a summary. Keep reading to discover
everything your phone has to offer.
My Phone
Set phone language
Choose ring tones and alert
method
Customize your color scheme
Change idle screen picture and
screen saver
Phonebook
Create and manage your
phonebook
Group friends and contacts to
make their calls easy to identify
and their numbers easy to find
Put your closest friends and
contacts on your Hot Key Dial List
for instant dialing
Synchronize your SIM and Mobile
Phonebooks
Browser
Access and surf the Internet
Configure browser settings
Phone Setting
Access security features and
call services
Set up call divert
If an STK SIM card is fitted,
this menu gives access to
operator-specific functions.
The Phone Setting menu can
then be accessed from the
Applications menu
Key Guard
Prevent accidental key presses
If Plug-in Camera is attached,
this menu gives access to
camera mode
Scheduler
Add and view events in
your personal schedule
Games
Access preinstalled and/or downloaded game(s). Availability of
downloadable games is network
dependent
Messages
Compose and send text and multi
media messages
Add sounds and images to
messages
Applications
Access to game(s)
Record and listen to voice memos
Make use of built-in calculator,
com pose y our ow n ring tones and
change clock settings
7
Page 18

jam-eng.book Page 8 Tuesday, March 9, 2004 1:06 PM
Selecting a Function
Use < and 0 to move between the icons on the screen. When a particular
menu is highlighted, pressing < displays a submenu. From any submenu,
use 4 until the desired item is highlighted. Press < to select.
For example, to change Sound Settings (to switch ringtone):
1From Idle press <, select My Phone > Sound Settings. Press <
2 Select the profile you wish to activate from the list. Press <
3 Use 4 to select Activate
4 Press < to activate the profile
In detail:
1From the Idle screen, press < to display the main menu
2 Use 0 to highlight the My Phone menu
3 Press < to enter the menu
4 Use 5 once to highlight the Sound Settings menu and press < t o en ter
5 Use 5 to highlight the mode you wish to set and press < to enter
6 Use 5 to highlight Activate
7 Press < to activate your chosen mode
Following some operations the display will automatically clear after three seconds. If this is not the case press D to return to the idle screen.
Note: If SIM tool kit SIM card is fitted, Phone Setting menu can be
accessed from Applications menu.
Shortcuts (E)
When familiar with the layout of the menu, use the keypad to enter the Menu
Number, instead of navigating through the display menus. To change Sound
Setting, for example, from the Idle screen, press < to display the main menu,
then press 1 then 2 to enter the Sound Settings submenu.
8
Page 19

jam-eng.book Page 9 Tuesday, March 9, 2004 1:06 PM
Basic Operation
This section contains the information you need for the most essential phone
operations, including:
➪ How to switch on and off
➪ How to make and end a call
➪ How to answer a call
➪ How to change earpiece volume
➪ How to lock the phone
➪ How to protect the phone using a PIN
➪ How to change ring volume
Switching On & Off
To turn the phone on or off, press and hold D.
When the phone is switched on a greeting will be displayed and then the
phone will go into Idle. See Adding a Start-up Greeting, page 24.
Making a Call
Ensure that the phone is switched on, the network operator logo is displayed
and the signal strength meter shows ( ) network coverage is available in
the current area.
1From Idle enter area code and phone number
2 Press C
9
Page 20

jam-eng.book Page 10 Tuesday, March 9, 2004 1:06 PM
International Dialing
The international access code (+) and the destination country/region code
should be entered, followed by the area code and phone number.
1From Idle press and hold # until “+” is displayed
2 Enter country/region code (e.g. 44 for the UK; 81 for Japan)
3 Enter area code and phone number
4 Press C
Note: Many countries/regions include an initial “0” in the area code. This
should, in most cases, be omitted when dialing international numbers. If
you have difficulties making international calls, contact your Service Provider.
Emergency Calls
An emergency call may be made even when SIM is not fitted to the phone,
however, the antenna symbol ( ) must be present.
Enter 911 press C.
Note: Making Emergency calls without a SIM installed is country or network operator dependent.
Ending a Call
To end a call, press D
10
Page 21
jam-eng.book Page 11 Tuesday, March 9, 2004 1:06 PM
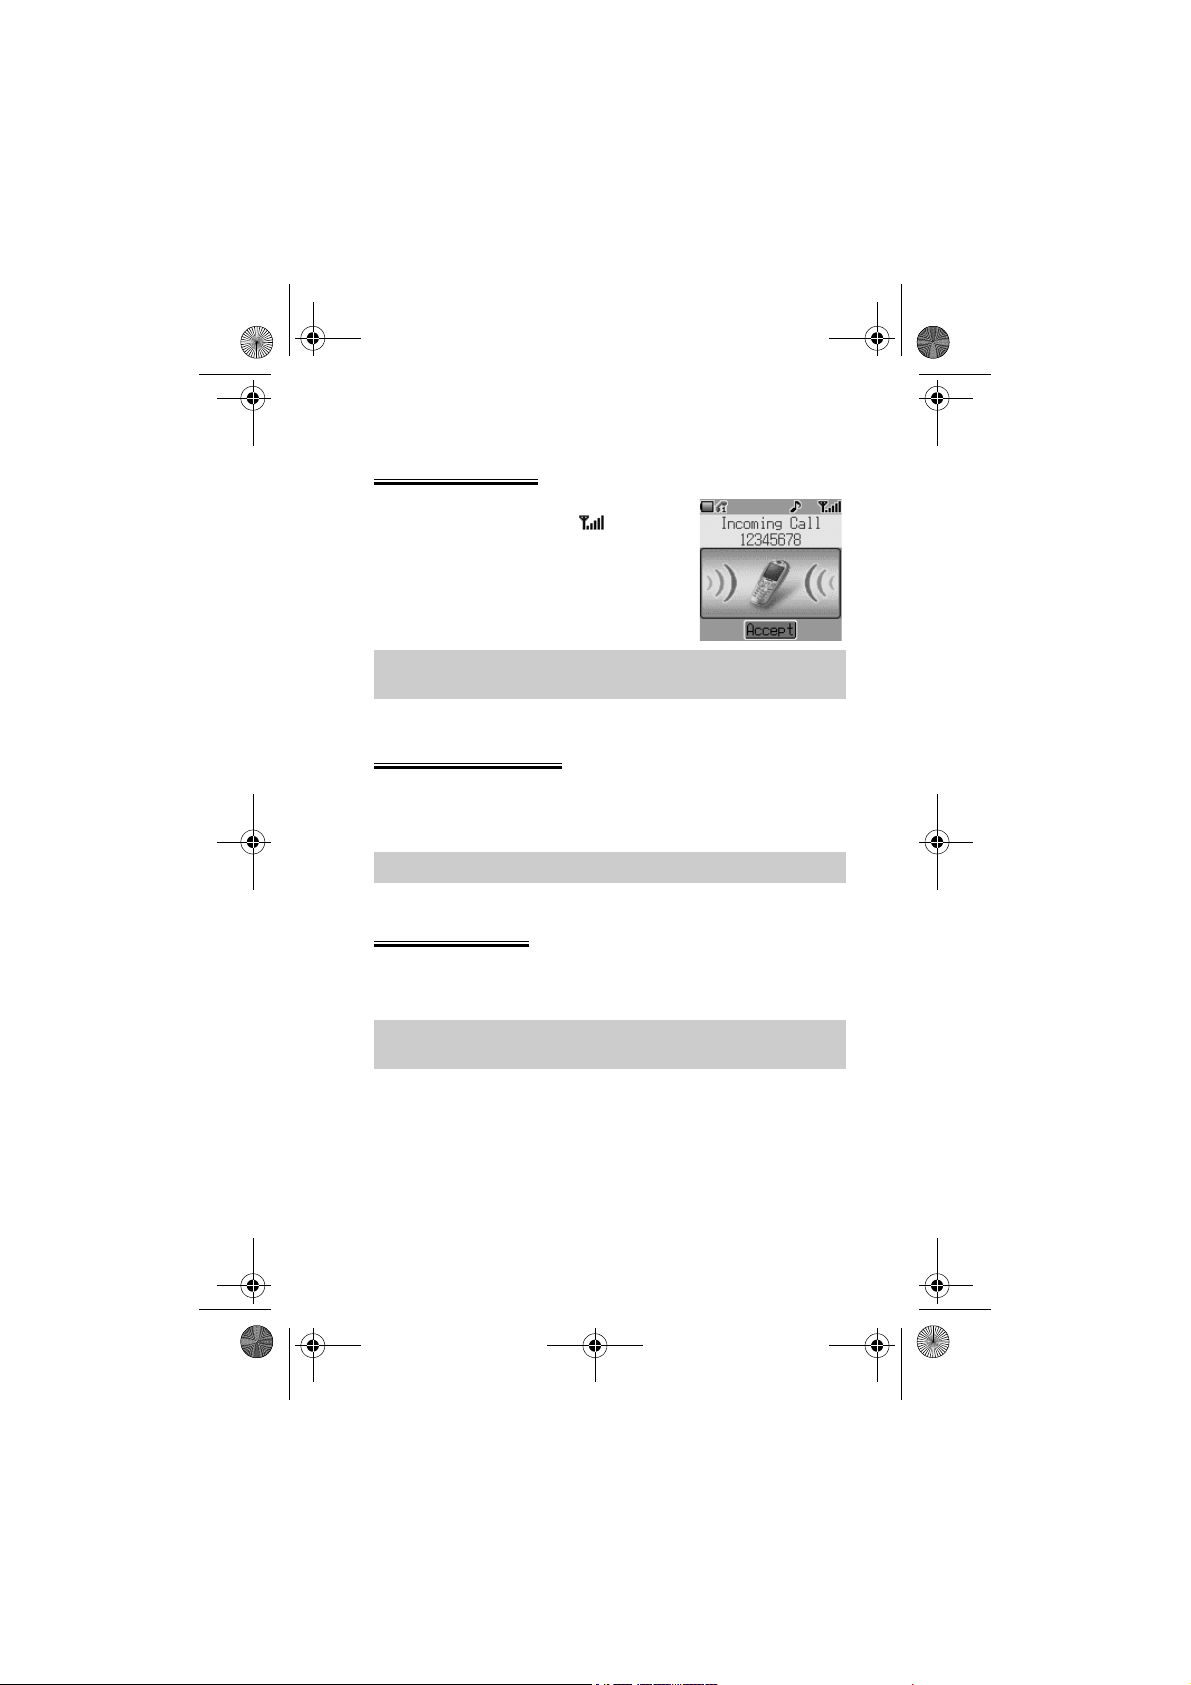
Answering a Call
To receive a call, the phone must be switched
on and the signal strength meter ( ) must be
displayed.
Press any key except D to answer a call
or
Press D to reject a call
Note: If a call is not answered or is rejected, the number of incoming calls
missed will be displayed. Press any key to clear the display.
Caller Identification
This feature allows you to identify incoming calls.
The caller’s phone number, and name if stored in the Phonebook, will be displayed during an incoming call.
Note: Caller Identification may not always be available.
Volume Control
The volume level may be adjusted during a call:
Use 5 to decrease the volume; use 1 to increase the volume
Note: Volume control for the Personal Handsfree accessory is adjusted in
the same manner.
11
Page 22

jam-eng.book Page 12 Tuesday, March 9, 2004 1:06 PM
Locking the Phone
When the phone is locked, the phone lock code must be entered each time
the phone is switched on to unlock the phone. You may be able to dial the
local emergency number and answer incoming calls while the phone is locked.
The Phone Lock Code is factory set to 0000.
1From Idle press < and select (Applications >) Phone Setting >
Security > Phone Lock. Press <
2 From the submenu select Status and press <
3 Select On and press <
4 Enter the 4-digit code and press <
The lock icon ( ) displays.
Unlocking the Phone
Enter your Lock Code. The lock icon will be replaced by OK. Press < to con-
firm.
Disabling Phone Lock
The phone must be unlocked before the phone lock can be disabled.
1From Idle press <, select (Applications >) Phone Setting >
Security > Phone Lock. Press <
2 From the submenu select Status and press <
3 Select Off and press <
4 Enter the 4-digit code and press <
Changing Phone Lock Code
You should change your phone lock code to a 4-digit number of your own
choice.
1From Idle press < and select (Applications >) Phone Setting >
Security > Phone Lock. Press <
2 From the submenu select Change Code and press <
3 Enter the old unlock code and press <
4 Enter a new unlock code and press <
5 Re-enter the new unlock code to confirm. Press < to complete the
change
12
Page 23

jam-eng.book Page 13 Tuesday, March 9, 2004 1:06 PM
Using the PIN
The PIN protects your SIM against unauthorized use. If you enable the PIN,
every time the phone is turned on you will be prompted to enter the PIN.
PIN2 controls security for the Fixed Dial Store, Call Charge metering and
Barred Dial.
If either PIN/PIN2 is entered incorrectly 3 times, (It depends on the SIM), the
phone will be locked and the user will need to enter the PUK/PUK2 code.
Contact your service provider for the PUK/PUK2 code.
Note:
– To enter PUK code for PIN, enter **05* you will then be prompted to
enter the PUK code, then follow the on-screen instructions.
– To enter PUK2 code for PIN2, enter **052* you will then be prompted
to enter the PUK2 code, then follow the on-screen instructions.
If the PUK/PUK2 code is entered incorrectly 10 times, the SIM will cease
to operate. All information stored in the SIM will be lost and the SIM will
need to be replaced. Contact your service provider for more details.
Enabling/Disabling the PIN
1From Idle press <, select (Applications >) Phone Setting >
Security > PIN. Press <
2 Select Status and press <
3 Select On or Off from the submenu and press <
4 You may be prompted to enter the PIN. On first use, enter PIN of your
choice (between 4 and 8 digits) and press <
13
Page 24

jam-eng.book Page 14 Tuesday, March 9, 2004 1:06 PM
Setting Ring Volume
With the G60, you can set up your phone in different modes depending on
your environment, allowing different ring tones and volumes in different situations.
To change ring volume for any sound profile:
1From Idle press <, select My Phone > Sound Settings. Press <
2 Select the profile you wish to adjust, press <, then select Edit > Ring
Vol u me , press <
3 Use 0 to set the volume level, press <
See Changing Sound Profiles, page 27, for more information on setting different
ring modes.
Setting Silent Ring
You may wish to set at least one mode as a silent mode. To do this, set Alerting Method for that mode to vibration or off:
1From Idle press <, select My Phone > Sound Settings. Press <
2 Select the profile you wish to adjust, press <, then select Edit >
Alerting Method, press <
3 Select Vibrate or Off and press <
Note: Once you have set the ring volume/type for a mode, you can make
that the active mode at any time by selecting My Phone > Sound Set-
tings, choosing the desired mode then choosing Activate. See Changing
Sound Profiles, page 27, for more information on setting different ring
modes.
14
Page 25

jam-eng.book Page 15 Tuesday, March 9, 2004 1:06 PM
Phonebook
Phone numbers can be stored in two locations:
In the SIM Phonebook (E) , wher e the num ber of entries and leng ths
of names and numbers are SIM dependent.
In the Mobile Phonebook, where phonebook entries can be grouped
together and additional data can be stored with numbers. This phone-
book is retained even if you change your SIM.
This section contains all you need to know about:
➪ Managing your Phonebooks
➪ Finding entries in your Phonebooks
➪ Speed Dialing
➪ Grouping Phonebook entries to make calls easier to identify and num-
bers easier to find
Note: See Te x t E n t r y, page 85, for information on text entry methods
available for making Phonebook entries.
To Store a Number in the SIM Phonebook
1From Idle enter the phone number and
press A
2 Select SIM Phonebook and press <
3 Select Name, press < and enter identi-
fying name. Press <
4 Select No. and confirm the phone num-
ber. Press < will allow you to edit. If not,
press <
5 Press A to save
15
Page 26
jam-eng.book Page 16 Tuesday, March 9, 2004 1:06 PM
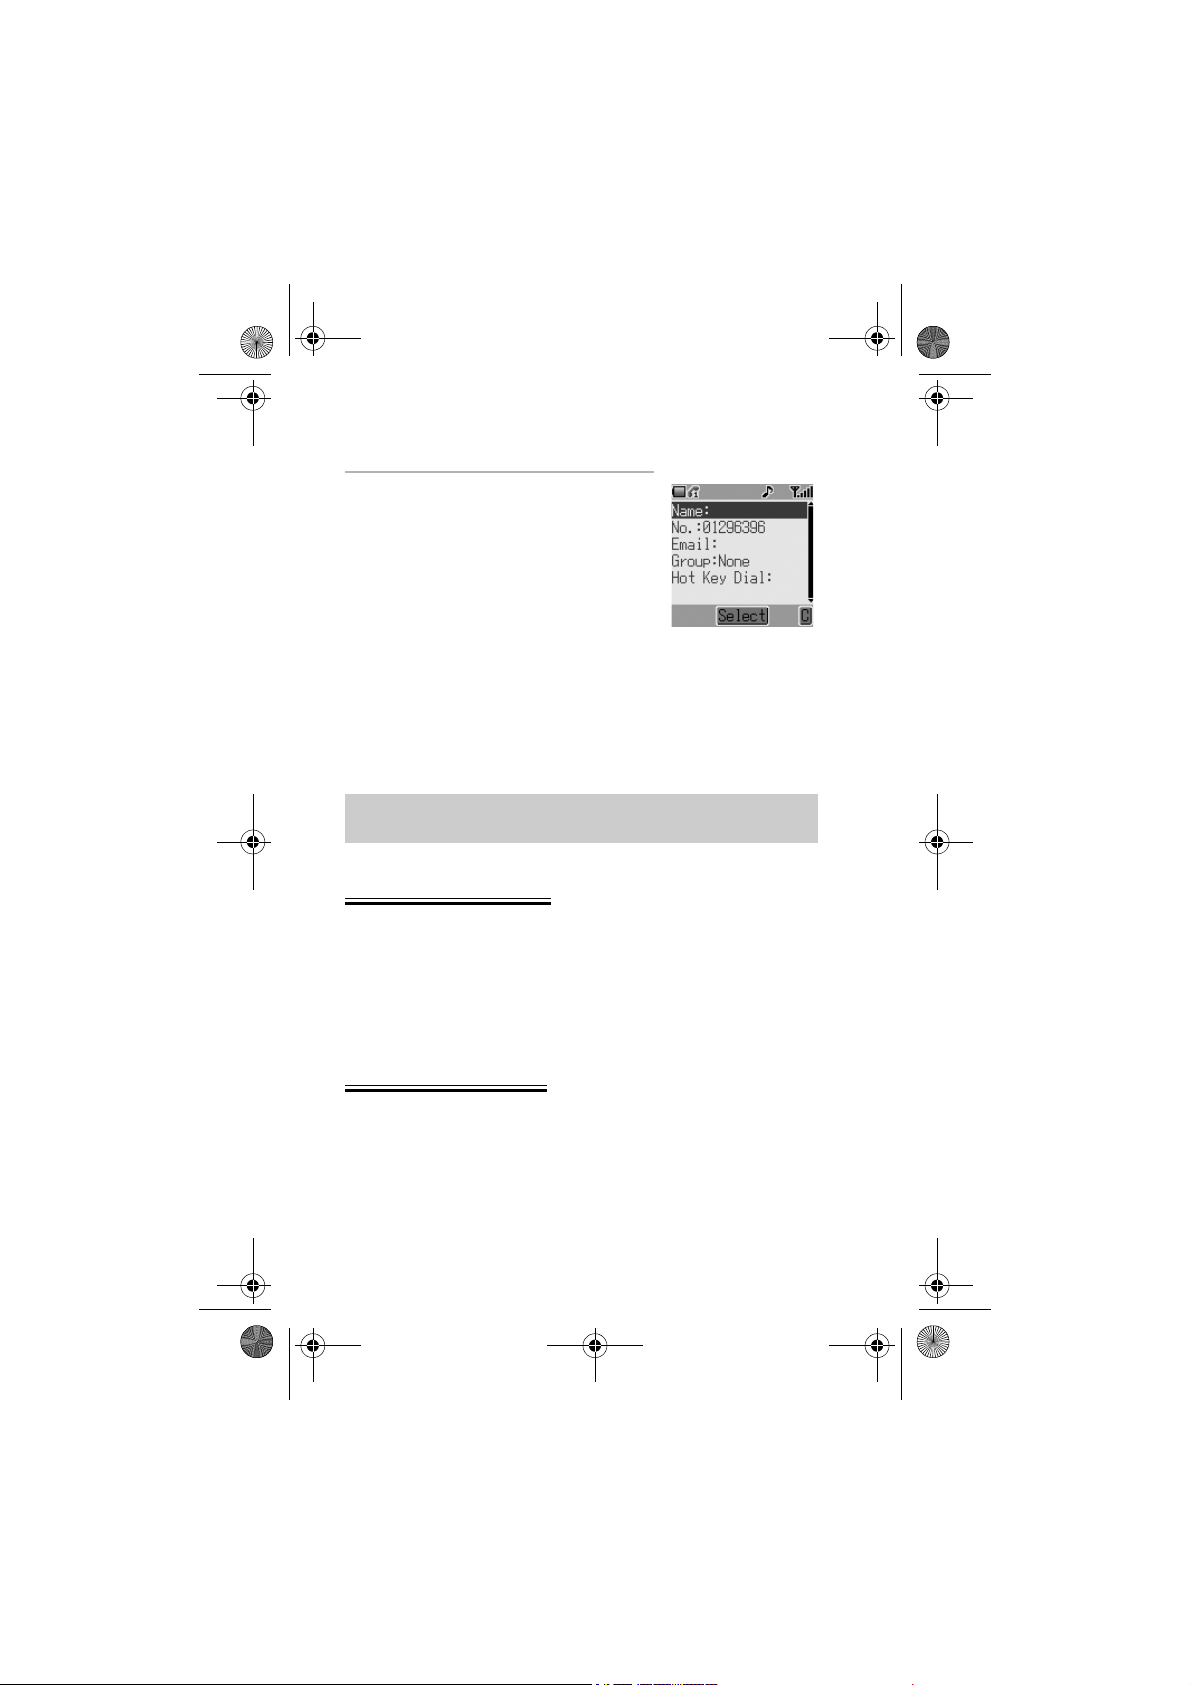
To Store a Number in the Mobile Phonebook
1From Idle enter the phone number and
press A
2 Select Mobile Phonebook and press <
3 Select Name, press < and enter identi-
fying name. Press <
4 Select No. and confirm the phone num-
ber. Press < twice
5 Select Email, press < and enter address.
Press < (optional)
6 Select Group, press < (optional)
7 Select a group, press < (optional)
8 Select Hot Key Dial, press <. Enter a
number from $ to , (optional).
Press < to assign
9 Press A to save
Note: See Grouping Phonebook Entries (Mobile Phonebook Only), page 20,
to add numbers to a group.
Browsing Phonebook
You can browse both Phonebooks simultaneously. Use the navigation keys to
move through the contact list or press a lettered key to skip to the first entry
starting with that letter.
1From Idle press A
2 Use 4 (or the lettered keys) to select the entry you wish to browse
Retrieving a Number
1 Browse to locate and highlight the desired number in the Phonebooks
2 Press C to dial the number
16
Page 27

jam-eng.book Page 17 Tuesday, March 9, 2004 1:06 PM
Speed Dialing
Last Number Called
From Idle press C twice
Hot Key Dialing (Mobile Phonebook Only)
From Idle press and hold the appropriate hot key number
To view your hot key dial list, from Idle press <, select Phonebook >
Hot Key Dial List, press <.
Assigning Hot Keys (Mobile Phonebook Only)
To assign a hot key in Mobile Phonebook to a frequently used number
1 Browse to locate and highlight the desired number in the Phonebooks.
Press <
2 Select Edit > Hot Key Dial. Press <
3 Enter the Hot Key dial number (from $ to ,) for this entry.
Press <
4 Press A to save
Note:
– If the Hot Key number is already taken, an ID used message will
appear.
– Some Hot Key Phone numbers may be reserved by the Service Pro-
vider. For example the first three Hot Key Phone numbers may be
linked to Service Dial (F).
Info Numbers or Service Dial
Your Service Provider may program some special phone numbers into your
SIM (F). It is not possible to modify these:
1 Press and hold A
2 Use 4 to browse through the Service Dial list of phone numbers
Note: If your operator does not offer these services, these spaces will be
blank.
17
Page 28
jam-eng.book Page 18 Tuesday, March 9, 2004 1:06 PM
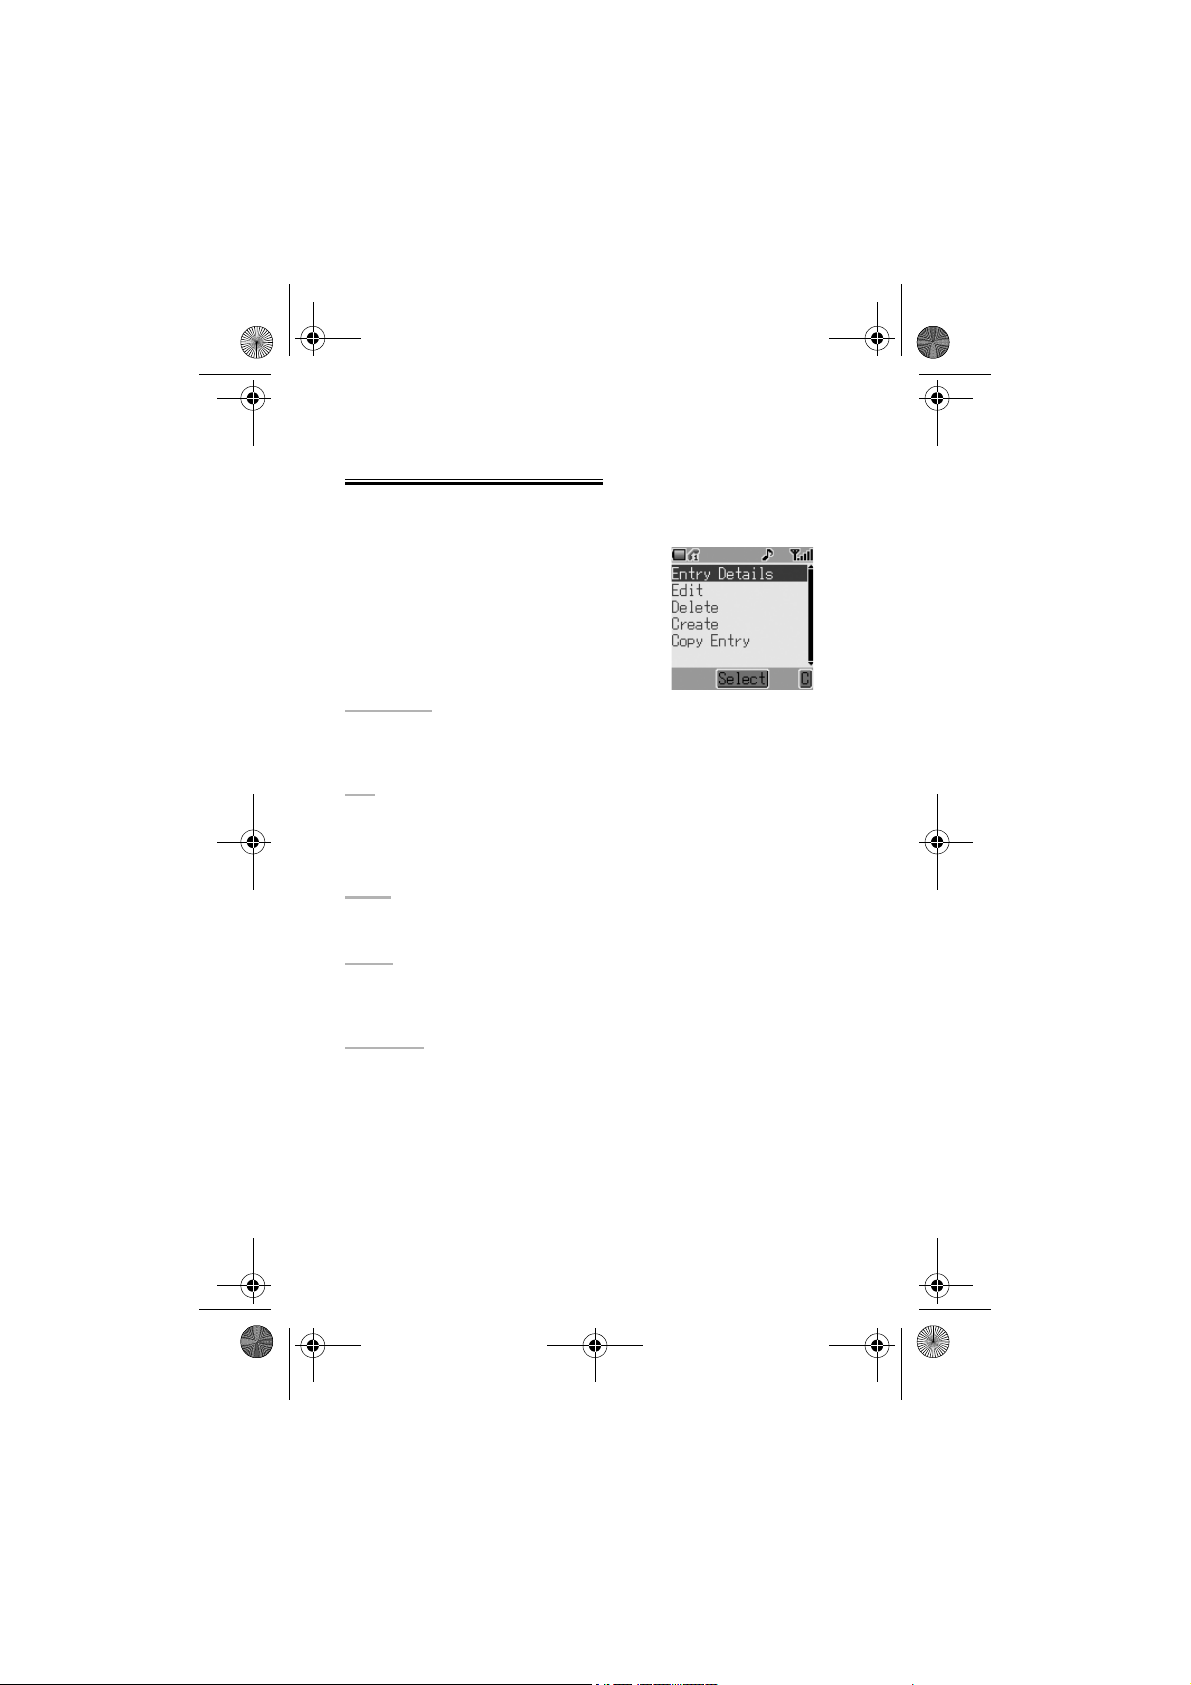
Editing Phonebook Entries
It is possible to view Entry Details, Edit, Delete, Create or Copy Entry
information from the Phonebooks. To access any of these functions:
With a phone number or name highlighted:
1 Press < to select the submenu
2 Use 4 to cycle through Entry Details,
Edit, Delete, Create or Copy Entry
3 Press < to select an option
Entry Details
Displays each element of the selected Phonebook entry: Name, number and
location of entry (SIM or Phone) etc. Press < to edit the name or number etc.
Edit
Displays the entry allowing you to make changes.
Press < to change details and enter changes. Press <. Press A when you
have completed editing.
Delete
Deletes the entry from the Phonebook. Press < to confirm deletion.
Create
Creates a new entry in the Phonebooks. Select SIM Phonebook or Mobile
Phonebook as entry location.
Copy Entry
Use to copy an entry between Phonebooks.
18
Page 29
jam-eng.book Page 19 Tuesday, March 9, 2004 1:06 PM
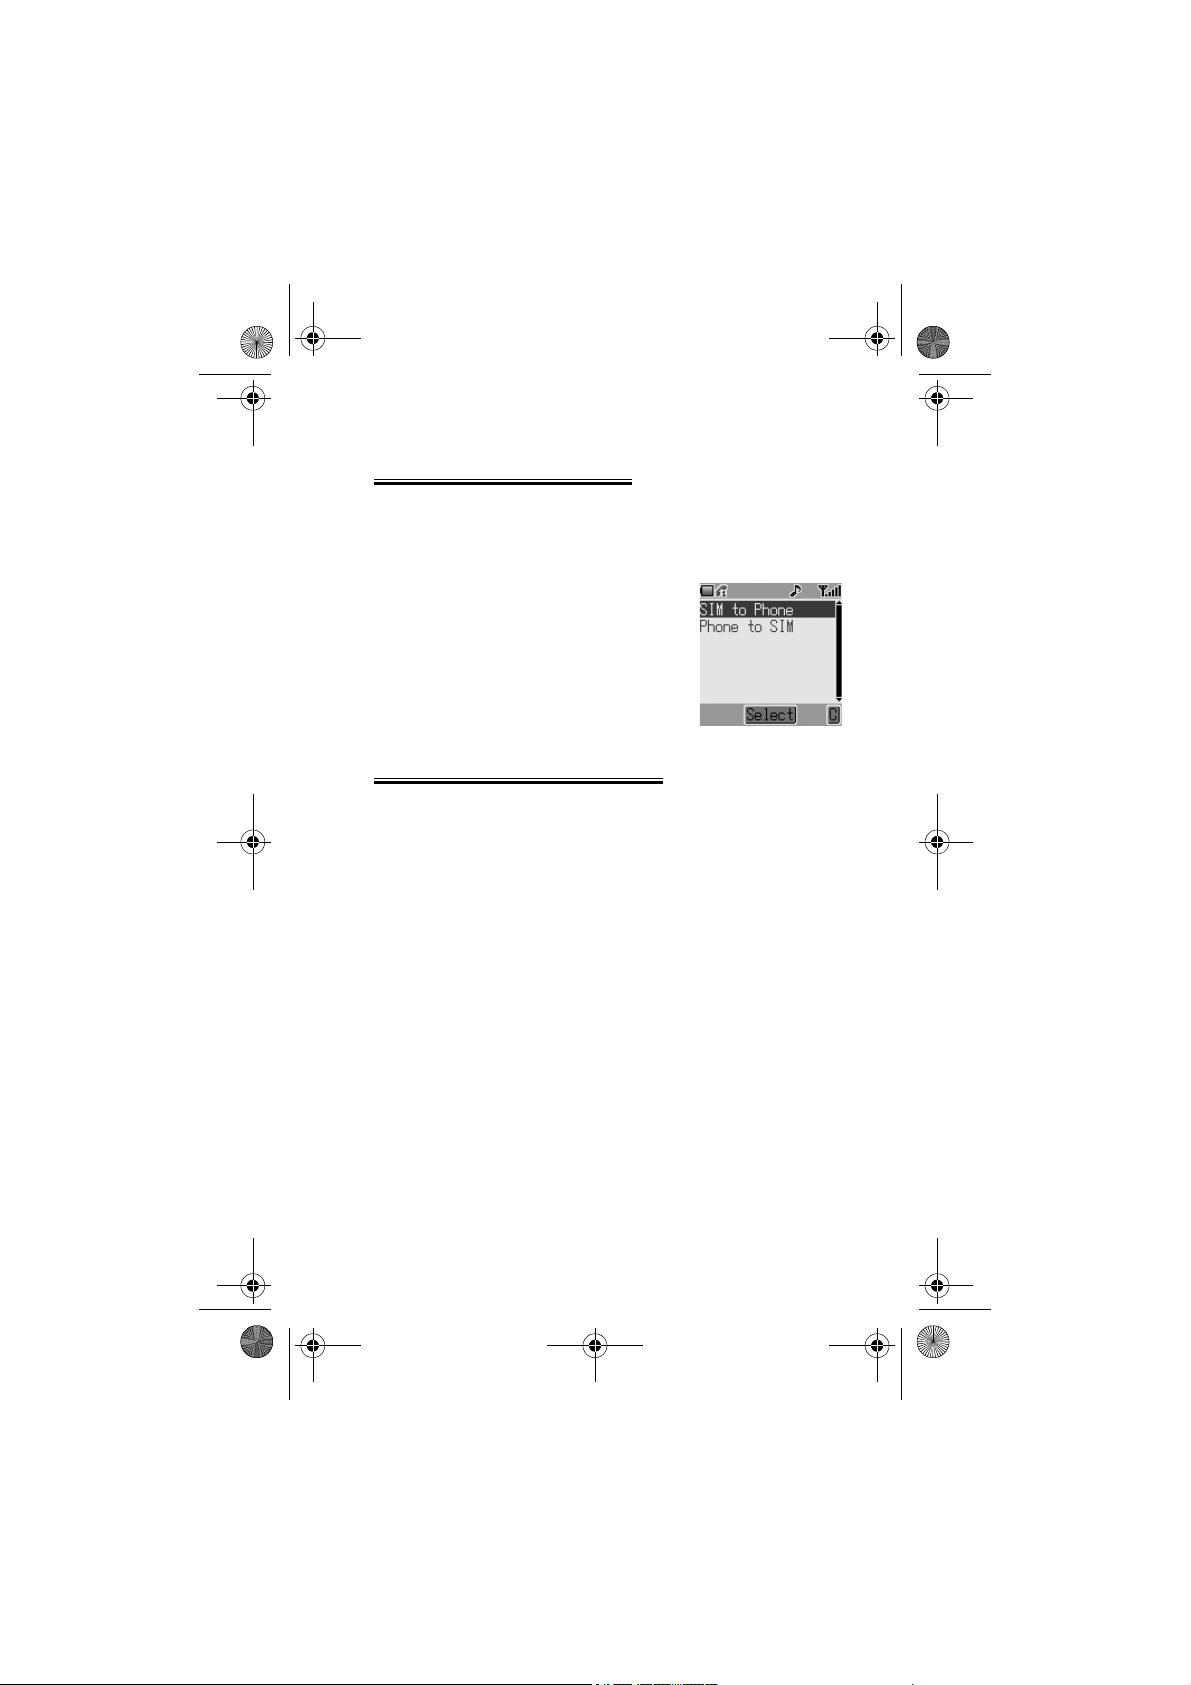
Synchronizing Phonebooks
Keep your SIM and Mobile Phonebooks in step by synchronizing their contents regularly. You can copy individual entries between phonebooks (see
Editing Phonebook Entries, page 18) or simply copy the entire contents of one
phonebook into the other. To do this:
1From Idle, press < and select Phone-
book > Copy Entries. Press <
2 Use 4 to either copy the entries of SIM
to Phone or Phone to SIM. Press <
twice to select
Review the Phonebook Status
The Review function in the Phonebook menu shows how many locations are
available in the two Phonebooks.
1From Idle press <, select Phonebook > Review. Press <
2 Use 4 to select SIM Phonebook or Mobile Phonebook and press <
A summary of the selected Phonebook will be displayed.
19
Page 30

jam-eng.book Page 20 Tuesday, March 9, 2004 1:06 PM
Grouping Phonebook Entries
(Mobile Phonebook Only)
Sort your Phonebook entries into groups, for example business and personal.
Each group can be suitably titled for quick access to the entries contained
within.
An alert profile can be assigned to groups (or individual phone numbers)
allowing incoming call alerts to indicate the type of caller.
Adding a Number to a Group
You can store numbers in up to 10 groups. To add a number from your Mobile
Phonebook to a group:
1From Idle press A
2 Use 4 (or the lettered keys) to select the
entry you wish to add. Press < to reveal
the submenu
3 Select Edit. Press <. If t he entry is stored
in the Mobile Phonebook, its group
location will be shown (Group:None is
displayed if the number does not belong
to a group)
4 Select Group and press <
5 Scroll through the list of available groups and select whichever is appro-
priate. Press <
6 Press A to save
20
Page 31

jam-eng.book Page 21 Tuesday, March 9, 2004 1:06 PM
Retrieving a Number from a Group
1From Idle press <, select Phonebook > Group Setting. Press <
2 Use 4 to select the group
3 Press <. Press < again to View the contents of the group
4 Use 4 to select the desired entry
5 Press C to dial the number or < to edit the details of the entry
Retitling Group Names
1From Idle press <, select Phonebook
> Group Setting. Press <
2 Use 4 to select the group
3Press < to enter the submenu, select
Edit and press <
4 Name is highlighted at the top of the
submenu. Press < once to start editing
the name and a second time to confirm.
Press <
5 Press A to save
Setting Group Ring Tones
Each group can be given a distinct Alert Profile so that incoming calls are recognizable from their ring tone. To set a group’s ring tone:
1From Idle press <, select Phonebook > Group Setting. Press <
2 Use 4 to select the group, press <
3 Use 4 to select Edit and press < again
4 Select Ring and press <
5 Use 4 to select Fixed Data or User Data. Press <
6 Scroll through and select the desired ring tone. Press < to select
7 Press A to save
21
Page 32

jam-eng.book Page 22 Tuesday, March 9, 2004 1:06 PM
Setting Group Call Icons
You can also attach an image to a group that will display when a call is
received. To add an image:
1From Idle press <, select Phonebook > Group Setting. Press <
2 Use 4 to select the group, press <
3 Select Edit and press <
4 Select Icon and press <
5 Scroll through and select the desired icon. Press < to select
6 Press A to save
22
Page 33

jam-eng.book Page 23 Tuesday, March 9, 2004 1:06 PM
My Numbers
My Numbers is a convenient part of the Phonebook where your own voice,
fax and data phone numbers can be stored and viewed (E).
Adding Numbers
1From Idle press < and select Phonebook > My Numbers. Press <
2 Use 4 to select an empty entry field. Press <
3 Use 4 to select Edit and press <
4 Use 4 to select Name and press <
5 Enter the name (see Te x t E n t r y, page 85) and press <
6 Use 4 to select phone No. and press <
7 Enter the phone number and press <
8 Press A to save
Viewing Stored Numbers
1From Idle press <, select Phonebook > My Numbers. Press <
2 If more than one number is available then use 4 to cycle through the
listed numbers. Press < to select
3 Select Entry Details to view entry. Press <
4 Press < again if you wish to edit the details
23
Page 34

jam-eng.book Page 24 Tuesday, March 9, 2004 1:06 PM
Personalizing Your Phone
This section contains all the information you need to adapt your phone to your
needs and personality. You can:
➪ Change the menu language
➪ Add a message to show at start-up
➪ Try a new idle screen image
➪ Change your screen saver image
➪ Use a different color theme
➪ Switch between and edit different user profiles
➪ Make use of downloaded ring tones and images
➪ Compose your own ring tone
➪ Change the backlight and contrast settings
...and more!
Changing the Language
It is possible to change the language the phone uses for display messages and/
or text entry (F).
1From Idle, press <, select My Phone > Language. Press <
2 Use 4 to select the language you wish to use
3 Press < to select the desired language
Adding a Start-up Greeting
Add a personalised greeting that will appear when the phone is switched on.
1From Idle press <, select My Phone >
Display Settings > Greeting. Press <
2 Use the text entry facility to add a greet-
ing (see Tex t E n t r y , page 85). Press < to
confirm
24
Page 35

jam-eng.book Page 25 Tuesday, March 9, 2004 1:06 PM
Idle Screen Image (Wallpaper)
The idle screen can be changed to a preinstalled or downloaded image.
To choose an image for the Idle screen:
1From Idle pres s <, select My Phone > Display Settings > Idle Screen.
Press <
2 Several images are preinstalled on your
phone in the Fixed Data folder. Down-
loaded images are stored in the User
Data folder. Navigate to the appropriate
folder, press <
3 Use 4 to select the desired image
4 Use A to view image. Press any key to
return
5 Highlight the Wallp aper No. you want and
press < to select
25
Page 36

jam-eng.book Page 26 Tuesday, March 9, 2004 1:06 PM
Changing Screen Saver Animation
The screen saver can also be changed to a preinstalled or downloaded animation.
To choose an animation for the screen saver:
1From Idle press <, select My Phone > Display Settings > Screen
Saver. Press <
2 Several animations are preinstalled on
your phone in the Fixed Data folder.
Downloaded animations are stored in the
User Data folder. Navigate to the ap propr iat e fold er. Pres s <. Use 4 t o se lect t he
desired animation
3 Use A to play animation. Press any key
to return
4 Highlight the Animation No. you want
and press < to select
Turning Screen Saver On & Off
Select My Phone > Display Settings > Screen Saver > Setting >
Status to turn the screen saver function On or Off, and to set the Idle Time
(from 1 to 5 minutes) before the screen saver is launched.
26
Page 37

jam-eng.book Page 27 Tuesday, March 9, 2004 1:06 PM
Color Themes
Color Themes provide alternative combinations of colors for the background
and text.
To use or change a Color Theme:
1From Idle press < and select My Phone > Display Settings >
Colour Themes. Press <
2 Use 4 to select the desired Color Theme. Press <
Changing Sound Profiles
You can switch between six sound profiles on your phone each with a distinct
combination of alert method, ring tone and type etc.
Profiles are set up for use in different environments – for instance you might
want to create a silent profile, a discreet profile with ring tone appropriate for
formal occasions and a party profile for loud environments.
Within each profile, distinct melodies can be set as incoming call and message
alerts.
Note: Ring tones can also be used to identify incoming calls from members of groups. If a group member calls, the Group ring tone will sound,
not the Sound Profile ring tone.
To activate a Sound Profile:
1From Idle press < select My Phone >
Sound Settings. Press <
2 Select the profile you wish to activate
from the list. Press <
3 Use 4 to select Activate
4 Press < to activate the profile
27
Page 38

jam-eng.book Page 28 Tuesday, March 9, 2004 1:06 PM
Editing Sound Profiles
To e d i t a P r o f i l e :
1From Idle press < and select My Phone
> Sound Settings. Press <
2 Select the profile you wish to edit from
the list. Press <
3 Use 4 to select Edit. Press <
For each profile, you can set and edit the following:
Ring Type Select a ring tone from the lists of preinstalled melodies
Alerting Method Select from Ring/Vibrate/Vibrate & Ring/Flashing/
Ring Pattern Select either Continuous or Once
Ring Volume Use 0 to set the volume level. To mute volume, use the
Message Tone Select a ring tone from the lists of preinstalled melodies
Keypad Tone Turn keypad tones On or Off
War ni ng To ne Turn warning tones (which sound if an inappropriate key
(Fixed Data) or downloaded melodies/ring tones that
you have written (User Data). Press <
Select desired type from Fixed Data or press A to
preview the User Data or < to confirm ring tone selection
Off
Alerting Method submenu
(Fixed Data) or downloaded melodies/ring tones that
you have written (User Data). Press <
Select required type from Fixed Data or press A to
preview the User Data or < to confirm ring tone selection
stroke is made) On or Off
28
Page 39

jam-eng.book Page 29 Tuesday, March 9, 2004 1:06 PM
Download Data (F)
The Panasonic G60 is able to use various downloaded data. The downloaded
data is stored in the Media Folder and can be acquired via MMS, EMS, SMS or
WAP. Details of this service are available on our website.
Availability of this service is dependant on your country/region, or network.
For further information visit:
http://www.panasonicbox.com
Media Folder
The Media Folder located at My Phone > Media Folder is the storage location for media files that have been downloaded from a third party source and
are saved in the phone. Some of these can be used as ring tones, Idle screen
images or attachments to text messages. See Managing Multimedia Files,
page 67, to preview these files.
Note: It is only possible to attach EMS format Animations/Pictures to text
messages.
Access these files from the Media Folder menu to rename, delete or edit
them. To select an item from the Media Folder:
1From Idle, press < select My Phone > Media Folder and press <
2 Use 4 to select the media type (either Picture, Animation or Melody).
Press <
3 Use 4 to select a file
Press A to view or play the selected file before making any changes to the
file.
4 Press < and use 4 to select Rename, Delete. Press <
29
Page 40

jam-eng.book Page 30 Tuesday, March 9, 2004 1:06 PM
Composing a Melody
1From Idle, press <, select Applications
> Edit Ringtone. Press <
2 Press < to select Notes:
Using the table below as reference, enter the
notes, set the rhythm and octave for each and
add rests to generate your composition.
Key
Note
Key
Note
3 Referring to the table above, use the keys
4 The notes appear in the format 2C4 as
➪ The first number (2 in the display on the
➪ The number of the right (4 in the first dis-
➪ In the second display on the right, the
➪ Indicate dotted notes (i.e. notes extended
➪ Add sharp values to notes by pressing !.
➪ Enter rests by pressing +.
$%^& LL'()*
C DE F GAB
+, #" !
Rest Note Set Dotted Sharp
Length Octave Note
$ to * to enter notes
shown on the right when $ is pressed
right) indicates the note octave. The
default value is 2. Press # to change
octave (range from 1 to 3).
play on the right) indicates the notes
length. The default value is 1/4. Press ,
to change note length (range from 1 to 1/
32).
octave has been left unchanged at 2 while
the note length has been shorted to 1/32.
in length) by pressing ".
30
Page 41

jam-eng.book Page 31 Tuesday, March 9, 2004 1:06 PM
Note: At any time during composing press A to play back the current
melody.
5 When the composition is complete, press < twice and enter the title.
Press < to save the name and A to save the composition
Setting the Backlight Time
The Backlight is illuminated when a key is pressed to make using your phone
easier. You may wish to reduce backlight time to increase the time your phone
will run between battery charges.
1From Idle, press <, select My Phone > Display Settings > Back-
light Time. Press <
2 Use 4 to cycle through the times available (10 Seconds/30 Seconds/
60 Seconds)
3 Press < to select the desired time
Key Backlight On/Off
Longer battery life can be maintained by setting the key backlight off.
1From Idle press < select My Phone > Display Settings > Key
Backlight. Press <
2 Use 4 to select On or Off
3 Press < to select
Contrast
Screen contrast can be altered for viewing in different lighting conditions:
1From Idle, press <, select My Phone >
Display Settings > Contrast. Press <
2 Use 0 to set the desired contrast level
3 Press < to confirm selection
31
Page 42

jam-eng.book Page 32 Tuesday, March 9, 2004 1:06 PM
Operator Notice
Operator notices appear if the phone has been left idle to remind users how
to operate selected features. To enable and disable operator notices go to My
Phone > Display Settings > Operator Notice and press < to select On/
Off.
Restoring the Default Phone Settings
Any personal settings can be swiftly returned to their factory default, with the
exception of some features, such as the Phone Lock code and the Language.
1From Idle, press <, select My Phone >
Defaults. Press <
2When prompted Use Default Settings?
press < to confirm and restore the settings
32
Page 43

jam-eng.book Page 33 Tuesday, March 9, 2004 1:06 PM
Phone Security
Your phone has a number of security features that protect against unauthorized use and allow you to restrict access to certain functions. These include:
➪ Phone Lock
➪ PIN Protection
➪ Key Guard
➪ Call Barring
➪ Fixed Dial
Note:
– For full details of the Phone Lock feature, turn to Locking the Phone,
page 12.
– For full details of PIN Protection, turn to Using the PIN, page 13.
Keep a written record of your codes in a secure place. If forgotten, contact
your dealer (for the Phone Lock Code) or Service Provider (for PIN and
PIN2).
33
Page 44

jam-eng.book Page 34 Tuesday, March 9, 2004 1:06 PM
Enabling Key Guard
The Key Guard function is used to prevent any
keys from being accidentally pressed, for
instance when the phone is being carried.
From Idle press < twice to bring up the
Guard Keypad? message and a third time to
confirm. The Key Guard icon ( ) will appear
on the Idle screen.
When Plug-in Camera is attached, press and
hold < to select Key Guard menu.
When a call is received, Key Guard will be disabled temporarily, so you can
press any key except D to answer the call. Emergency calls can still be made
– see Emergency Calls, page 10.
Note: When making emergency calls with the “Key Guard” enabled, there
will be no audible or visual indication that the number is being dialled.
Disabling Key Guard
Press < once to bring up the Free Keypad?
message and a second time to confirm.
34
Page 45

jam-eng.book Page 35 Tuesday, March 9, 2004 1:06 PM
Changing the Security Codes
1From Idle press < and select (Applications >) Phone Setting >
Security. Press <
2 Use 4 to select Phone Lock, PIN or
PIN2. Press <
3 Use 4 to select Change (Code) and
press < (for PIN2, skip to step 4)
4 Enter the current code and press <
5 Enter the new code and press <
6 Verify the new code and press <
Restricting Calls
Call Barring
The Call Bar function is used to restrict certain
outgoing and/or incoming calls. Call Barring is
controlled by a security password that is supplied by the Service Provider (this password can
be changed: see below). When updating or
checking the status of Call Barring the phone
must be registered with a network. Different
Call Bar restrictions can be used for voice and
data calls. Any combination of call restrictions
can be set.
1From Idle press < and select (Applica-
tions >) Phone Setting > Security >
Call Bar. Press <
2 Use 4 to select Bar Voice or Bar Data.
Press <
3 Follow the submenus to set the desired
restrictions
35
Page 46

jam-eng.book Page 36 Tuesday, March 9, 2004 1:06 PM
Outgoing Calls (Bar Voice)
Incoming Calls (Bar Voice)
Bar Data Select from All Calls/International Calls/International
4 Press <
5 Select On/Off and press <
6 Enter Call Bar password and press <
Note: To change Call Barring password, go to (Applications >) Phone
Setting > Security > Call Bar > Change Password.
You can change individual Call Barring settings following the instructions above
or cancel all call barring settings by selecting (Applications >) Phone
Setting > Security > Call Bar > Cancel All.
Select from All Calls/International Calls/International
Calls Except Home/Off
Select from Off/When Roaming/All Calls
Calls Except Home/Off
Fixed Dial
The Fixed Dial Store is part of Phonebook (Phonebook > Fixed Dial), but
with additional security.
When Fixed Dial is enabled it is only possible to make calls with phone numbers that are in the Fixed Dial Store. When Fixed Dial is enabled any manually
dialed phone numbers must match a phone number in the Fixed Dial Store.
To store, edit or delete a phone number in the Fixed Dial Store the Fixed Dial
function must be enabled. With Fixed Dial enabled, all phone numbers can be
added, edited or deleted as normal, but you will be prompted for PIN2.
To enable Fixed Dial:
1From Idle press < and select (Applications >) Phone Setting >
Security > Fixed Dial. Press <
2 You will be prompted to enter SIM PIN2 before proceeding
36
Page 47

jam-eng.book Page 37 Tuesday, March 9, 2004 1:06 PM
Applications
This section introduces some of the applications you’ll find installed on your
phone. These include:
➪ The clock
➪ Alarms
➪ Automated power on and power off
➪ The calculator
Clock
Your phone incorporates a clock with date/time, an alarm and an automatic
power on/off feature.
Setting Time and Date
1From Idle press < and select
Applications > Clock Function >
Clock Set. Press <
2 Press < to select the time entry
3 Use the numbered keys to enter the
correct time (using the 24-hour clock) or
use 4 to adjust the time displayed. Move
between the hour and minute fields
using 2
4 When the time is entered correctly, press < to confirm
5 Use 4 to select date entry. Press <
6 Use 0 to move around calendar to current date
7 Press < to confirm
Clock Format
1 From Idle press < and select Applications > Clock Function > Clock
Format. Press <
2 Use 4 to highlight desired clock format. Press <
37
Page 48

jam-eng.book Page 38 Tuesday, March 9, 2004 1:06 PM
Setting the Alarm
Up to three separate alarms can be set. For each alarm, you can set different
schedules (e.g. daily/weekdays only) and alarm tones as well as times.
If the clock hasn’t been set, you will be prompted to set it prior to setting an
alarm.
To set an alarm
1From Idle press < and select Applications > Clock Function >
Alarm Set. Press <
2 Use 4 to select the alarm to be set. By default the alarms are named
Alarm1, Alarm2 and Alarm3. Press <
3 You should first set the alarm time. Press
< to enter Setting Time
4 Use the numbered keys to enter the cor-
rect alarm time (using the 24-hour clock)
or use 4 to adjust the time displayed.
Move between the hour and minute fields
using 2. Press < when complete
5 Use 4 to highlight the desired schedule
for the alarm and press < to select
6 Select Melody. Press <
7 Select Fixed Data or User Data. Press <
8 Highlight and select the desired alarm
melody from the submenu. Press < to
confirm
When the alarm has been set, ( ) will be displayed.
Note: To disable an alarm setting, select Applications > Clock Func-
tion > Alarm Set > [Alarm Name] > Cancel.
38
Page 49

jam-eng.book Page 39 Tuesday, March 9, 2004 1:06 PM
Muting the Alarm
When an alarm goes off, the chosen melody will sound and the display will
flash with an alarm message. The alarm will sound for 55 seconds.
To End the Alarm
Press < or D
Adjusting the Alarm Time
To adjust an alarm time follow the steps in Setting the Alarm, page 38.
Setting a Power On/Off Time
The phone can be set to turn itself on or off automatically at a specified time
using the Power On/Off feature. To set the Power On and Off schedule:
1From Idle press < and select Applica-
tions > Clock Function
2 Select Power On Time or Power Off
Time. Press <
3 Use the numbered keys to enter the cor-
rect Power On or Power Off time or use
4 to adjust the time displayed. Move
between the hour and minute fields using
2. Press < when complete
4 Highlight Enable Once or Enable Always (powers on until disabled)
and press <. For either setting, the time is needed to select Power On
Time or Power Off Time in the Clock Function menu
Caution: Ensure that the setting of the Alarm or Power On function will
not contravene any regulations whereby it may automatically power on
when in an aircraft or medical facility etc. – see Important Information,
page i.
Note: To disable a Power On or Power Off setting select Applications >
Clock Function > Power On Time/Power Off Time > Time (ignore)
> Disable.
39
Page 50

jam-eng.book Page 40 Tuesday, March 9, 2004 1:06 PM
Calculator
The four function calculator will enable the user to perform simple arithmetic
calculations (addition/subtraction/multiplication and division).
1From Idle press < and select Applica-
tions > Calculator. Press <
2 Enter a number (maximum 8 digits) and it
will be displayed on the upper right of the
display. If a decimal point is required,
press ". Pressing C will add “–” in
front of a number
3 Use ! to scroll through and select the
ar it hm eti c o pe rat io n y ou wis h t o p erf or m
4 Enter a second number (maximum 8 digits). It will be displayed next to
the operation symbol
5 Press < to complete the calculation
40
Page 51

jam-eng.book Page 41 Tuesday, March 9, 2004 1:06 PM
Currency Converter
The currency converter enables the user to convert prices using a conversion
rate that you enter.
1 Access the calculator, see page 40, then
press A (Menu) to open the currency
converter menu
2 Use 4 and press < to select Currency
Rate then enter the appropriate conver-
sion rate to six decimal places. The con-
version rate is entered as the number of
units (dollars, pounds etc.) of the cur-
rency you want to convert to in a single
unit of the currency you want to convert
from. If, for example, there are exactly
4.5 dollars (the currency you want to con-
vert to) to one schilling (the currency you
want to convert from), enter 4.500000 as
shown.
Press < to confirm. This step can be
skipped for subsequent conversions if the
exchange rate is unchanged
3 Return to the calculator screen and enter the value in the currency you
wish to convert (schillings in the example above). Press A to open the
currency converter menu and select the second item, Conversion.
Press < to perform the conversion
41
Page 52

jam-eng.book Page 42 Tuesday, March 9, 2004 1:06 PM
Messaging
Your phone has various messaging features including SMS, MMS and EMS.
SMS/EMS – Enter the recipient’s phone number to send text and images.
MMS – Attach images and music to text messages.
This chapter is a full introduction to messaging including:
➪ Setting up your phone to enable SMS/EMS and MMS messaging
➪ Writing text messages
➪ Sending User Messages
➪ Adding attachments to text messages
➪ Reading incoming messages
➪ Managing messages in your Inbox and Outbox
➪ Chatting with SMS contacts
➪ Creating multimedia messages
➪ Receiving message broadcasts on desired topics
SMS/EMS: Setting Up the Phone
It is possible to receive, display, edit and/or send text messages to mobile
phones on your service provider’s network or any network that has a roaming
agreement (dependent on the recipient’s phone parameters).
Before a text message can be sent, you must enter the Message Center number (your Service Provider will supply the Message Center number). You
should also select the protocol via which messages are sent, the storage time
(lifetime) and pick a delivery confirmation setting.
The Message Center number may have been pre-programmed on the SIM.
Setting the Message Center Number
From Idle press <, select Messages >
Setting > SMS/EMS > Message Centre. Press <
Include the international dialing code in the
Message Center number. Press <
42
Page 53

jam-eng.book Page 43 Tuesday, March 9, 2004 1:06 PM
Life Time
The Life Time is the duration that your messages are stored at the Message
Center.
Delivery attempts will be repeated until the message has been delivered or
the Life Time expires.
From Idle press <, select Messages > Setting > SMS/EMS >
Life Time. Press <
Select from Defaults, 1 hour, 12 hours, 1 day, 1 week or Maximum to set
the time after which messages are automatically deleted. Press <
Messaging Protocol
From Idle press <, select Messages >
Setting > SMS/EMS > Protocol. Press
<
Select the appropriate protocol for sending
messages. Press <
Delivery Confirmation Setting
From Idle press <, select Messages >
Setting > SMS/EMS > Report. Press
<
Select Ye s to enable delivery confirmation for
your messages, No to disable the function and
Ask to prompt the message recipient to
acknowledge receipt. Press <
43
Page 54

jam-eng.book Page 44 Tuesday, March 9, 2004 1:06 PM
Creating a Text Message
1From Idle press <, select Messages >
Create > SMS/EMS. Press <
2 Write text message. To change text input
method (displayed in lower left corner of
display), press A. See Te x t E n t r y, page 85,
for details.
Use 0 to navigate through the message
and position the cursor to add text
Use @ to delete the character to the left
of the cursor
Press D to cancel the message
3 Press < when you have finished compos-
ing the message
4 The submenu that appears gives the
options of OK. Press <. For information
on adding attachments, see Text Attach-
ments, page 46
5When [New Entry] is displayed, select
an entry from Phonebook or enter the
destination manually.
– From Phonebook:
Press A and select desired entry. Press
<, then A to save. Press < twice
–Manual entry:
Press < twice. Enter destination number, then press < three times
6 You will be asked Send Msg Now?
1page(s). Press <
44
Page 55

jam-eng.book Page 45 Tuesday, March 9, 2004 1:06 PM
7 As the message is sent the sending mes-
sage animation will display
8 If Delivery Confirmation is enabled (see
previous section) and the message is
transmitted successfully, Send message
success! will appear
Sending User Messages
Your phone comes with several common message expressions preinstalled.
To send a user message:
1From Idle press <, select Messages > Create > SMS/EMS. Press <
2 Instead of writing the message content, press < and select User Msgs.
Press <. A list of the saved user messages will be displayed
3 Select the desired user message and press <
4 Send in the same way as for a standard text message. See page 44
Note: View your user messages at any time by going to Messages >
User Messages. You can also use this menu to compose new user mes-
sages.
45
Page 56

jam-eng.book Page 46 Tuesday, March 9, 2004 1:06 PM
Text Attachments
When creating a text message, it is possible to include attachments (copyright
permitting).
To include an attachment:
1 Follow the instructions on page 44 to write the text message then
press <. When the OK/Insert Media/User Msgs./Add Sig./Select
submenu appears (see step 4 page 44), select Insert Media. Press <
2 Use 4 to select the file to be inserted into the text body. Press <
Linked Messages
SMS messages can be made up text and attached pictures or icons. If you want
to send a larger message, your phone will automatically configure your message as a string of smaller messages and send these simultaneously. Linked
messages such as this appear as a single message.
Receiving Text Messages
When a Short Text Message is sent to your phone, the message New Mes-
sage(s)! and the message indicator ( ) will appear in the display with an alert
signal (this signal – an audible tone or vibration – is set in the My Phone >
Sound Settings menu). This indicates that a new message has been received.
Note: If the message indicator shows red the message area is full and you
will need to delete old messages in order to be able to receive new messages in the future.
46
Page 57

jam-eng.book Page 47 Tuesday, March 9, 2004 1:06 PM
Reading Immediately
When Read is displayed press < to read the message immediately. Use 4 to
navigate through the message and to identify the sender and the time the message was sent.
Reading Later
Received messages are stored in the
Inbox.
From Idle, press < and s elect Messages
> Inbox
Use 4 to sele ct a mes sage to re ad (i f there
is more than one) and press < to view
the message.
Press < to view your other options (this
submenu can also be viewed by pressing
A when the message is highlighted in the
Inbox).
Responding to Text Messages
Press < when you have read a message to
view response options. Alternatively, highlight
the message in the Inbox (Messages > Inbox)
and press A. Choose to:
Reply to the message
Call Back
Forward the message
Chat
Store Number
Delete the message
Delete All messages or
Extract Media
(if any file is attached to the message)
47
Page 58

jam-eng.book Page 48 Tuesday, March 9, 2004 1:06 PM
Chat SMS
The Chat feature enables you to read sent and received messages on one
screen when in Chat SMS mode with another party.
1 Either: When reading a previously sent
or received message, press < and select
Chat, press < and/or enter your Nick-
name (up to 10 characters) – see Tex t
Entry, page 85.
Or: Launch Chat SMS m ode f rom Idle by
pressing < and selecting Messages >
Chat SMS > Start Chat. Press <.
Enter your Nickname. Press <
It is now possible to chat with the other party,
providing they have the chat SMS facility on
their phone. Enter your message – see Te x t
Entry, page 85. Press <. Press < again and
enter the destination phone number if necessary (or browse and select from Phonebook).
Press <.
When receiving a message in chat mode, the
text will appear automatically above your previous message.
2 Press <, select OK to continue the chat
If the phone is not in chat mode when receiving a reply to a chat message, the
reply will be received as a normal SMS. If a voice call is received when in chat
mode, the phone will allow you to accept the incoming call. The chat mode
ends at this time.
Chat conversations are stored and can be
viewed in the History folder.
To open the folder from Idle, press < and
select Messages > Chat SMS > History.
Regular Chat users should clear the history regularly to free memory space.
48
Page 59

jam-eng.book Page 49 Tuesday, March 9, 2004 1:06 PM
MMS: Setting Up the Phone
Multimedia Messaging Service (MMS) Configuration must be performed
before you can send or receive an MMS message. You can create up to three
server profiles on the phone.
1From Idle press <, select Messages >
Setting > MMS > Server List. Press
<
2 Select the server and press <
3 Use 4 to select Edit and press <
4 Select Bearer Type or MMS Setting
and press < to start configuring settings
5If Bearer Type is selected as CSD, set
GPRS setting to off, see page 72
Note:
– Your MMS settings may have been pre-configured by your service pro-
vider. Contact your service provider if you are unclear how to proceed.
– Use the Messages > Setting > MMS menu to configure other MMS
settings. Contact your service provider to obtain settings.
49
Page 60

jam-eng.book Page 50 Tuesday, March 9, 2004 1:06 PM
Creating an MMS Message
Your phone supports MMS (Multimedia Messaging Service), which means you
can send digital pictures to an MMS-enabled mobile or to an email address.
Wherever you are, attach a photo, audio message or text, and send it immediately to your friends.
The following basic steps must be followed for all MMS messages. For information on multimedia additions, read the following section.
1From Idle press < and select Messages > Create > MMS. Press <
2 Compose the text part of the message (see Te x t E n t r y , page 85, for
details of entry methods)
3 When the message is complete press <
4 To attach a media file, follow the instruc-
tions on the following page. To continue
without attaching a media file, select OK
from the submenu and press <
5 Select To : , press <. When [New Entry]
is displayed, select an entry from Phonebook or enter the destination manually.
– From Phonebook:
Press A and select desired entry. Press
<, then A to save. Press < twice
–Manual entry:
Press < twice. Enter destination number, then press < three times
6 If desired, a message can be delivered as
a copy to another recipient. To do this,
use 4 to select Cc:. Press < and follow
the operation in step 5
7A Bcc: address or phone number is added in the same way. Bcc delivery
differs from Cc delivery in that the original recipient (whose address is in
the To: field) will not be informed of any copies sent to Bcc addresses
50
Page 61

jam-eng.book Page 51 Tuesday, March 9, 2004 1:06 PM
8When the To : field has been filled and any Cc or Bcc entries have been
added, add the mes sage sub ject heading. Use 4 to select Subj:, press <
and enter the subject heading. Press < to confirm, then press A
9 Use 4 to select Send or Save as appro-
priate. Press < twice
Note: Saved messages are stored in the Outbox and can be edited and
sent in the future.
Attaching Media Files
Media files such as sound files can easily be added to MMS messages.
1 C omp ose a mess age f oll owi ng s tep s 1 to 3 on the pre vious page . P res s <
2 From the submenu select Insert Media. Press <
3 Use 4 to browse and select media files available on your phone. Press <
4 When you have selected files, press <
5 When settings are completed, press < twice
6 Follow the MMS destination entry procedure from step 5 on page 50
51
Page 62

jam-eng.book Page 52 Tuesday, March 9, 2004 1:06 PM
Managing Message Lists
Selecting a stored message allows it to be read, replied to, edited or deleted.
Inbox
Messages received are stored in the Inbox and
tagged with icons:
From the Inbox, select a message. Press < to read the message or A to
view other options:
Outbox
Messages sent or edited are stored in the Outbox and tagged with icons:
indicates an unread SMS/EMS message
indicates an unread MMS message
Reply to the message
Call Back the sender
Forward the message
Chat
Store Number
Delete the message
Delete All messages from the Inbox
Extract Media files from the message
(If any file is attached to the message)
You can edit the message content before forwarding or saving
indicates an unsent SMS/EMS message
indicates an unsent MMS message
From your Outbox you can view all your Draft, Unsent and Sent messages.
Highlight a message, then press 7 to read or press < to view option:
Chat
Delete the message
Delete All messages from the Outbox
Edit the mesage
52
Page 63

jam-eng.book Page 53 Tuesday, March 9, 2004 1:06 PM
Cell Broadcasts
You need to specify the topic(s) of information you wish to receive as broadcasts before they can be received.
1From Idle press <, select Messages >
Broadcasts > To p i c s and press <
2 Select [New Channel] and press <
twice to insert a new topic
3 Enter Channel No. and press <
When a low priority broadcast has been received, will be displayed on the
Idle screen. If a high priority broadcast is received, its text content will be displayed on the idle screen
Enabling/Disabling Cell Broadcasts
1From Idle press <, select Messages >
Broadcasts and press <
2 Select Receive and press <
3 Use 4 to select Enable or Disable and
press <
Language
The language in which broadcast messages are displayed can be changed (F).
1From Idle press <, select Messages > Broadcasts > Languages and
press <
2 Select a list and press <
3 Select desired language and press <
53
Page 64

jam-eng.book Page 54 Tuesday, March 9, 2004 1:06 PM
Call Information
This section explains how you can obtain more information about your calls,
including:
➪ Recent calls made, received and missed
➪ Call duration
➪ Call charges
Recent Numbers
Recently dialed phone numbers are stored in Last Call.
If Caller Identification is available, the caller’s phone number for an answered
call will be stored in the Answered Call menu and an unanswered call will be
stored in the Unanswered Call menu.
If Caller Identification is not available then calls will still be stored but will have
the date and time attributed to them.
When the store is full the next phone number will overwrite the oldest.
1From Idle press C
2 Use 4 to select Last Call, Answered Call or Unanswered Call.
Press <
3 Use 4 t o se l ec t th e ph o ne n um b er (o r na m e) y ou w is h to r ed i al . Pr es s C
You can edit or delete the phone number before dialing – see Editing Phone-
book Entries, page 18.
If you wish to store the selected number in Phonebook, press A while the
number is displayed – see To Store a Number in the SIM Phonebook, page 15 and
To Store a Number in the Mobile Phonebook, page 16.
54
Page 65

jam-eng.book Page 55 Tuesday, March 9, 2004 1:06 PM
Calling the Last Dialed Number
To redial your last dialed phone number press C twice.
Returning an Unanswered Call
When the display shows that you have unanswered calls.
1 Press <
The last caller’s phone number will be displayed if it is available.
2 Use 4 to select the phone number you wish to dial
3 Press C
Call Duration
1From Idle press <, select (Applications
>) Phone Setting > Call Services >
Calls. Press <
2 Use 4 to select one of the features
described below, and press <
Last Call displays the duration and call charge
(if available) of the last call made. Times are
indicated as: hours (0-99), minutes (0-59), seconds (0-59) – HH:MM:SS.
All Calls displays the accumulated duration and
call charge (if available) of Incoming and Outgoing calls.
55
Page 66

jam-eng.book Page 56 Tuesday, March 9, 2004 1:06 PM
GPRS Call Duration
1From Idle press < and select (Applications >) Phone Setting >
Call Services > Connections. Press <
Note: The Connections function is SIM dependent (E).
2 Use 4 to select one of the features described below, and press <
Last Connection displays the amount of data
transferred during the last call.
All Connections displays the total amount of
data transfer.
Call Charges
To maintain control over the cost of calls that are made, the phone can be set
to restrict use to a finite number of units overall (E).
56
Page 67

jam-eng.book Page 57 Tuesday, March 9, 2004 1:06 PM
Setting the Unit Price
First, a price per unit must be entered. This is
the cost that the Service Provider charges for
one unit of call time (E).
1From Idle press <, select (Applications
>) Phone Setting > Call Services >
Service Charges > Price Unit. Press
<
2 Press < to edit the values
At this point you will be asked to enter your PIN2 or Lock code. Do so and
press <.
3 Enter a currency unit (up to three characters) e.g. GBP. Press < twice
4 Enter a price and press < twice
Setting the Maximum Unit Level
Next, enter a value which is to be the maximum cost permitted (E).
1From Idle press <, select (Applications
>) Phone Setting > Call Services >
Service Charges > Max Cost:. Press
<
2 Press < to edit the values
At this point you will be asked to enter your
PIN2 or lock code. Do so and press <
3 Enter a value (number of units) which is to be the maximum permitted,
and the corresponding cost will be displayed
4 Press < twice to accept
57
Page 68

jam-eng.book Page 58 Tuesday, March 9, 2004 1:06 PM
Note: The duration of one unit may vary during the day, and during peak
and off-peak times. Therefore, the call charge can be calculated accordingly. However, call charge information may not give an accurate reflection
of the tariffs charged by your Service Provider.
Call Identification
In the Call Services > Calls menu, the Caller’s ID and Withhold ID functions
allow you to check the status of whether a Caller’s Identification is sent or can
be received (Withhold ID F).
Note: When checking the status the phone must be registered to a network.
58
Page 69

jam-eng.book Page 59 Tuesday, March 9, 2004 1:06 PM
Advanced Operation
This section contains detailed information on call management including:
➪ Call diverting
➪ Call holding
➪ Call waiting
➪ Making and receiving a second call
➪ Transferring calls
➪ Multi-party calls
➪ Changing network
Diverting Calls
Voice, fax and data calls can be diverted according to different conditions and
to different numbers. For example you may wish voice calls to be diverted to
Voicemail when the phone is switched off. To enable call divert:
1From Idle press < and select (Applica-
tions >) Phone Setting > Call Divert.
Press <
2 Use 4 to select the type of call to divert
(you can repeat this step as necessary).
Press <
3 If diverting voice calls, use 4 to select cir-
cumstances in which to initiate the divert.
Press <
4 Enable the divert by selecting On. Press
<
5 Enter the phone number to divert to (or
press A and select the number from
your Phonebook). Press <
59
Page 70

jam-eng.book Page 60 Tuesday, March 9, 2004 1:06 PM
Note:
– To edit a call divert setting, follow the steps on page 59 and reset
according to the new settings.
– To cancel a divert setting, select Off in step 4 on page 59. To cancel all
divert settings, go to (Applications >) Phone Setting > Call Divert
> Cancel All.
When a divert situation is enabled the divert icon ( ) is displayed.
When updating or checking the status of Call Divert the phone must be registered to a network (F).
Holding Calls
Holding a Call
During a call press @. The call is then put on hold.
Resuming a Call
Press @ to resume the call.
Making a Second Call
1 Du ring an o ngoing c all, e nter pho ne numbe r (or r ecall fr om Phonebooks
– see Browsing Phonebook, page 16)
2 Press C. The first call will be placed on hold
60
Page 71

jam-eng.book Page 61 Tuesday, March 9, 2004 1:06 PM
Receiving a Second Call (Call Waiting)
A second call can be received, if Call Waiting is switched on. This is enabled
from the (Applications >) Phone Setting > Call Services > Calls menu.
It is not possible to have more than one fax or data call. All voice calls must be
ended before you can make or receive a fax or data call (E).
Accepting a Second Call
Press < to accept another incoming call. The current call will be placed on
hold.
Rejecting a Second Call
Press @ to reject the second call.
Ending Current Call to Receive Another
1 Press D when the second call is received to end the current call
2 Press any key except D or 0 to receive the new call
Operation During Two Calls
Swapping Between Calls
1 Press <
2 Use 4 select Swap Call. Press <
Ending Current Call
1 Press <
2 Use 4 to select Hang Up. Press <
The held call will remain held.
Ending Both Calls
Press D
61
Page 72

jam-eng.book Page 62 Tuesday, March 9, 2004 1:06 PM
Call Transfer
With two calls connected, Call Transfer enables you to connect them together
ending your connection, leaving the other parties to talk together (E).
When two calls are connected to your phone:
1 Press <
2 Use 4 to select Call Transfer. Press <
The two calls will be connected to each other and your call will be ended.
Note: Two call transfer cannot be activated while in Multi-party mode.
Multi-party Calls
A Multi-party call enables three to five people to be in conversation at the
same time. It is possible to swap between a Multi-party call and another call in
the same way as with two separate calls (E).
Enabling Multi-party
With two calls connected (one active, one on hold):
1 Press <
2 Use 4 to select Conference Call. Press <
All three parties should now be able to talk to each other.
Adding to Multi-party
It is possible to add parties to the Multi-party call (up to a maximum of five)
either by making a call or accepting an incoming call. The call can then be
merged into the Multi-party.
Note: If you make another call or accept an incoming call, the Multi-party
call is placed on hold. The callers in the Multi-party call can continue to
talk.
62
Page 73

jam-eng.book Page 63 Tuesday, March 9, 2004 1:06 PM
Splitting a Multi-party Call
You can have a private conversation with one of the parties.
1 Press <
2 Use 4 to select Private call. Press <
3 Use 4 to select a caller in the Multi-party
4 Press <
The selected caller will be split from the Multi-party call and the Multi-party
call will be placed on hold (the remaining Multi-party callers can still talk).
Ending Multi-party Calls
You can disconnect one party from the Multi-party call, or end the entire Mutiparty call.
If there is a call on hold or an incoming call while on a Multi-party call, you can
not disconnect individual members within the Multi-party call.
Ending a Single Connection
During a Multi-party call:
1 Press <
2 Use 4 to select Hang up. Press <
3 Use 4 to select the individual call to disconnect
4 Press <
Ending all Connections
During a Multi-party call:
Press D to end all the calls at once
63
Page 74

jam-eng.book Page 64 Tuesday, March 9, 2004 1:06 PM
Changing to a New Network
When you are not in your home country or region, you may be able to use a
network that you are not directly subscribed to. This is called roaming. Legal
restrictions may not permit roaming in your home region.
The New Network function is used to manually select a network that is avail-
able in your current location.
1From Idle press <, select (Applications
>) Phone Setting > Network >
New Network. Press <
2 Your phone will search for available net-
works
3 Use 4 to select from the list of available
networks. Press <
When the Search Mode is set to Automatic,
the phone will automatically select a new network to maintain optimum network availability.
When the Search Mode is set to Manual, you
must select a network yourself from the displayed list of available networks. If coverage is
lost another network should be selected.
64
Page 75

jam-eng.book Page 65 Tuesday, March 9, 2004 1:06 PM
Scheduler
The Scheduler helps you keep track of personal events such as meetings and
vacations.
Creating a Reminder
From Idle, press <, select Scheduler and press < again.
1 Select [New Event] and press < to cre-
ate a new schedule event
2 First move the cursor to the year entry by
using 1 then use 4 to adjust the entry if
necessary
3 Press 7 to highlight the month. Use 4 in
the same way to adjust the month entry.
Press 7 to return to date selection
4 Use 0 to place the cursor over the
appropriate date entry. Press < to select
the date
5 Enter the time for the reminder. Use the
numbered keys to enter the correct time
(using the 24-hour clock) or use 4 to
adjust the time displayed. Move between
the hour and minute fields using 2
6 When the time is entered correctly, press
< to confirm
7 Enter a name to identify this schedule
entry. Press <
Viewing & Editing Reminders
Open the Schedule menu. All scheduled reminders are listed. Use 4 to highlight the reminder you wish to view and press <. The time, data and name of
the reminder will be displayed. Press < to edit the details.
65
Page 76

jam-eng.book Page 66 Tuesday, March 9, 2004 1:06 PM
Games
Embedded Games (F)
To enter the Games menu:
1From Idle, press < and select Games. Press <
2 Select a game and press <
3 Select Start to start playing the game, press <
Select Help/Instructions to read the instruction on how to play the
selected game
Adjust Game Volume
To adjust the volume or mute the sound of games.
1 From Idle, press < and select Games. Press <
2 Select Sound Setting. Press <
3 Use 2 to adjust volume. To mute, move slider to far left. Press <
66
Page 77

jam-eng.book Page 67 Tuesday, March 9, 2004 1:06 PM
Managing Multimedia Files
The multimedia files saved in G60 are located in the Media Folder (My Phone
> Media Folder). There are four predefined folders (Picture, Animation,
Melody and Memory Status).
Note: Changing SIM does not affect the contents of stored data.
Displaying Pictures and Animations
1From Idle, press <, select My Phone > Media Folder > Picture or
Animation. Press <
2 Use 4 to select a file to display. Press <
3 Select Preview. Press <
Note: The phone cannot display a file that is not in one of the supported
formats.
67
Page 78

jam-eng.book Page 68 Tuesday, March 9, 2004 1:06 PM
Playing Melodies
1From Idle, press < and select My Phone > Media Folder > Melody.
Press <
2 Use 4 to select a file. Press A to play
Note:
– You can compose your own melodies and ringtones. Turn to Composing
a Melody, page 30, for full instructions.
– You cannot edit polyphonic ring tones, music files or files that cannot be
forwarded or saved.
Renaming Files
1From Idle, press <, select My Phone > Media Folder. Press < and
open the subfolder for the file you wish to rename. Press < twice
2 Use 4 to select the file to rename. Press <
3 Select Rename. Press <
Note: Do not use special characters in the new name.
Creating Mail from Files
You can jump in one step from a file to the create mail screen with the file as
an attachment.
1From Idle, press <, select MyPhone > Media Folder > Picture,
Animation or Melody. Press <
2 Use < to select a file. Press <
3 Select Create MMS Msg screen.
The phone will display the Create MMS Msg screen.
Note: You cannot copy a file that cannot be forwarded or saved.
You can press < to select Create Mail while the file is displayed.
68
Page 79

jam-eng.book Page 69 Tuesday, March 9, 2004 1:06 PM
Deleting Files
1From Idle, press <, select My Phone > Media Folder. Press < and
open the subfolder for the file you wish to delete. Press <
2 Use 4 to select the file to delete. Press <
3 Select Delete. Press < twice
Checking File Properties
You can view the file name, date, file size, whether the file can be forwarded
and whether it can be saved.
1From Idle, press <, select My Phone > Media Folder. Press < and
open the subfolder for the file you wish to check. Press <
2 Use 4 to select the file. Press <
3 Select Property. Press <
Note: If there is not enough memory capacity in the folder when you try
to save a file, the phone will display Capacity Full! or Memory not
enough. Press @ to keep file or < to delete file.
Checking Folder Properties
To check the status of the Media Folder, from Idle, press <, select My Phone
> Media Folder > Memory Status. Press <. A graphic display of free
space in the folder will be displayed.
69
Page 80

jam-eng.book Page 70 Tuesday, March 9, 2004 1:06 PM
WAP Browser
Your phone’s WAP (Wireless Application Protocol) Browser allows you to
access Internet services supported by the network, such as news, weather
reports and sports.
Browser Settings
Before Internet services can be accessed:
1 You must purchase a date transmission subscription from you service
provider
2 Obtain the browser profile configuration settings from your service pro-
vider and enter the configuration settings into the phone
Note:
– The configuration information may have been pre-programmed by your
service provider. Modifying these settings may cause failure of the
Browser.
– The types of services and content offered while connected to the
Browser are supplied entirely by your service provider.
–See Personal Settings table on page 94, to record your settings.
1From Idle press <, select Browser >
Browser Setting > Set Profile. Press
<. Use 4 to select a browser profile (you
can configure up to five browser profiles).
Press <
2 Select Edit. Press <
3 Select WAP Setting. Press <
70
Page 81

jam-eng.book Page 71 Tuesday, March 9, 2004 1:06 PM
A list of configuration parameters will be displayed. Select each parameter in
turn and enter the appropriate values (supplied by your service provider).
For each browser profile, set also the Bearer Type. Go to Browser >
Browser Setting > Set Profile > [Select Profile] > Edit > Bearer Type.
To configure a GPRS browser, enter User Name, Password and Apn
(Access Point Name) and Authentication.
To configure a CSD browser, enter User Name, Password, Phone Num-
ber, Line Type and Transfer Rate.
Note: Contact your service provider for setup values.
71
Page 82

jam-eng.book Page 72 Tuesday, March 9, 2004 1:06 PM
Record your WAP settings in the table at the rear of this booklet for easy reference.
After you have entered settings for a browser profile, you may wish to rename
the profile to make it easier to remember. To rename a profile, go to Browser
> Browser Setting > Set Profile > [Select Profile] > Rename. The cur-
rent profile name will be displayed. Edit this name to rename the profile.
If you have more than one profile, you need to select a profile to use to connect to the Internet. To do so, go to Browser > Browser Setting > Set
Profile > [Select Profile] > Set As Active. Press <.
If Bearer Type is selected as CSD, set GPRS setting to off. If not, set GPRS
setting to on. To do so, go to Browser > Browser Setting > Set GPRS >
Select GPRS Off/On. Press <.
72
Page 83

jam-eng.book Page 73 Tuesday, March 9, 2004 1:06 PM
Activating the Browser
To activate the Browser:
From Idle, press < and select Browser > Start Browser. Press <
The first time that the browser is activated
there will be no content. Each time the browser
is activated, the last page viewed from the previous WAP session will be recalled. At the start
of a WAP session, the browser content may be
retrieved from the cache (cache is the phone’s
memory that stores content downloaded in the
past). At this stage the phone is offline. When
data is required from the WAP server, you will
be prompted to Start data call?.
If Ye s is selected, the phone will go on line and the browser will go to the
home page.
Navigating Content
Use the Navigation key (0) to scroll through the content on the screen as follows:
Use 4 to scroll up/down on the current page
Use 7 to return to the previous object
Use 3 to return to the next selectable object
When linked text (underlined text) is highlighted, press < to load the page
represented by the link.
73
Page 84

jam-eng.book Page 74 Tuesday, March 9, 2004 1:06 PM
Browser Menu
The Browser menu is available when content is
currently being displayed (either on-line or offline).
This menu is used as follows:
Back
Return to previous page
Go To URL
Enter URL address
Home
Displays the Home URL content as defined by the network operator
Exit
Disconnects the Browser
Bookmarks
Use, view, add and delete bookmarks
Save Items
To save images or other items from the current
page
SnapShots
Take a snapshot of the current page
Reload
Reload and update the current page
74
Page 85

jam-eng.book Page 75 Tuesday, March 9, 2004 1:06 PM
Settings
You can select and set:
Homepage URL
Download parameters (enable or disable
the downloading of multimedia files)
Restart Browser
Security submenu
About
Provides information about the type of browser and security options
75
Page 86

jam-eng.book Page 76 Tuesday, March 9, 2004 1:06 PM
Using Bookmarks
Frequently accessed pages may be bookmarked to save time – you won’t have
to enter the URL each time you want to visit the page.
Adding a Bookmark
1 While viewing the page, press A
2 Use 4 to select Bookmark
3 Use 4 to select either Title or URL as the Bookmark name
Recalling Pages Using Bookmarks
Select Bookmarks from the Browser menu. Select View and use 4 to highlight the bookmark you want. Press <.
Renaming a Bookmark
Select Bookmarks from the Browser menu. Select View and use 4 to highlight the bookmark you want. Press A and select Details.
Deleting Bookmarks
Select Bookmarks from the Browser menu. Select View and use 4 to highlight the bookmark you want. Press A and select Delete.
76
Page 87

jam-eng.book Page 77 Tuesday, March 9, 2004 1:06 PM
Deactivating the Browser
The Browser can be deactivated as follows:
When browsing on-line, press D the Browser will disconnect.
When browsing off-line, press D to return to Idle mode.
WAP Push Message
WAP Push Message Icon
This icon indicates a new WAP Push message has been received.
Reading a WAP Push Message
When the icon is displayed, press and hold # then inbox to view WAP Push
message.
Note: If you are not in a WAP browse when you receive WAP Push message you will not be able to access it.
77
Page 88

jam-eng.book Page 78 Tuesday, March 9, 2004 1:06 PM
Additional Features
Voice Memo
You can record a two-way conversation during a call. The maximum length of
a recording is 16 seconds. Old recordings are overwritten; only one recording
can be stored.
Note: If a different SIM is installed any voice memos will be lost.
Caution: You are responsible for the security of a recorded message. You
MUST ask for the other party’s consent before recording, and abide by
local voice recording laws.
Record a Voice Memo
During a call, press <. Use 4 to select Memo. Press <
If you press < while recording a call, recording will stop but no tone will
sound to either party.
Play Back a Voice Memo
From Idle, press < and select Applications >
Voice Memo Play > Playback. Press <.
To stop playing, press <.
Delete a Voice Memo
From Idle, press < and select Applications > Voice Memo Play >
Delete. Press <.
78
Page 89

jam-eng.book Page 79 Tuesday, March 9, 2004 1:06 PM
Voice Message
You can record a short voice message to use as a reminder.
Record a Voice Message
From Idle, press < and select Applications > Record. Press <.
The recording will stop automatically after 10 seconds.
Play Back a Voice Message
1From Idle, press < and select My Phone > Media Folder > Melody,
press <
2 Select desired “AMR” file using 4, press A
or
Select desired “AMR” file using 4, press < twice
Delete a Voice Message
1From Idle, press < and select My Phone > Media Folder > Melody,
press <
2 Select desired “AMR” file using 4, press <
3 Select Delete using 4, press < twice
79
Page 90

jam-eng.book Page 80 Tuesday, March 9, 2004 1:06 PM
DTMF Tones
Dual Tone Multi-Frequency Tones (DTMF) tones can be sent during conversation. These are often used to access voice mail, paging and computerized
home banking services. For example, you may need to input a number to
remotely access voice mail messages. A phone number may be stored in the
Phonebook with DTMF tones, allowing the number to be dialed upon recall
and the DTMF tones to be sent automatically.
Sending DTMF Tones During a Call
Simply enter digits (# to ,, ! and ") during a call.
Pause Dial
Pause Dialing allows you to send DTMF tones automatically.
1 Enter phone number
2 Press and hold # until a “p” is displ ayed at t he end of the phon e num-
ber entered
3 Enter DTMF digits after the pau se, e.g. enter the n umber to ac cess voice
mail messages
4 Press C
After the call is connected, DTMF tones will be sent after 3 seconds.
Wait Dialing
Wait dialing requires you to press the Send Key to transmit the DTMF tones
instead of sending them automatically.
1 Enter the phone number
2 Presss and hold # until a “w” is displayed
3 Enter DTMF digits after the wait, e.g. enter the number to access voice
mail messages
4 Press C to make the call
5 After the call is connected, when prompted for password, press C to
transmit DTMF tones
80
Page 91

jam-eng.book Page 81 Tuesday, March 9, 2004 1:06 PM
Desktop Handsfree
Desktop Handsfree enables you to hold a conversation without having to hold
the phone to your ear.
Note: DO NOT hold the phone to your ear in Handsfree mode.
Swapping Between Handsfree and Handheld Calls
During a Handheld call:
1 Press <
2 Use 4 to select Hands Free. Press <
During a Handsfree call:
Press < once and select Handheld to revert to Handheld operation
Auto Answer
When Auto Answer is switched on, and Personal Handsfree accessory is connected to the phone, a call will be answered without pressing any keys. Any
call waiting should be answered in the normal way.
To enable Auto Answer, from Idle, press < and select My Phone > Auto
Answer. Choose Enable and press <.
Note: Take care when Auto Answer is selected to ensure unauthorized
listeners cannot overhear your phone conversations.
81
Page 92

jam-eng.book Page 82 Tuesday, March 9, 2004 1:06 PM
Plug-in Camera
With the Panasonic Plug-in Camera attached to your phone, you can take photos then save them or send them immediately in a MMS message. The camera
accessory plugs into the accessory connector on the base of your phone. The
camera accesory is available in selected areas.
When the camera accessory is plugged in, the
main menu changes. The Key Guard icon is
replaced by a Camera icon as shown. Select
Camera for all related functions.
Fitting and Removing the Plug-in Camera
First, remove the cap from the Camera by pressing both sides of the cap.
With the release key facing up, insert Plug-in Camera into the connector at the
bottom of the phone until it clicks into place.
To release the Plug-in Camera, press release key (➊) and pull downward (➋).
82
1
2
Page 93

jam-eng.book Page 83 Tuesday, March 9, 2004 1:06 PM
Taking a Picture
To take a picture, first ensure the camera accessory is plugged in. Then:
1From Idle, press < and select Camera. Press <
2 Position the camera to frame the desired photo in preview screen
Use 1 to zoom in,
5 to zoom out
3 When you are ready, press < to capture the photo
4 The captured photo will be displayed. Press < to store the photo in
your Media Folder. To send the photo via MMS press A to save it. See
Creating an MMS Message, page 50 to continue
5 If you wish to delete the photo press @
Camera
Indicator
Self
Portrait
mirror
Lens
Photo
Light
Preview
Screen
Note: Zoom function is not available when you choose VGA size. (See
Photo Resolution, on page 84.)
83
Page 94

jam-eng.book Page 84 Tuesday, March 9, 2004 1:06 PM
Camera Settings
First ensure the camera accessory is plugged in. Then:
1From Idle, press < and select Camera. Press <
2 Press A to open the Set menu. Select from the following options:
Photo Resolution
Choose from VGA (640 × 480), QVGA (320 × 240), QQVGA
(160 × 120) or Screen Size (128 × 96).
Note: Higher resolution pictures are of better quality but occupy a larger
share of your phone’s memory. If you want to take several high resolution
pictures, consider reducing the amount of memory taken up by other
types of media files such as ring tones and downloaded games.
Photo Light
Turn the built-in photo light On or Off.
Self Timer
Turn the Self Timer On or Off. When the Self Timer is turned on, there is a
delay after the capture button is pressed before the photo is taken.
Shutter Sound
Select from three available shutter sounds.
84
Page 95

jam-eng.book Page 85 Tuesday, March 9, 2004 1:06 PM
Te x t E n t r y
You use alphanumeric characters to enter details into the Phonebook, to create text etc. This section details the characters that can be entered and the
relevant keys to press.
®
Key
#
$
%
&
'
(
)
*
+
,
"
!
T9
Alternatives +
Punctuation .@/:;*#+-”,!¡?¿_()[]{}’&%\^~|<>=€£$¥¤§1
abc ABCabc
def DEFdef
ghi GHIghi
jkl JKLjkl
mno MNOmno
pqrs PQRSpqrs
tuv TUVtuv
wxyz WXYZwxyz
Shift/Lock* Shift/Lock* Shift/Lock* *
Space Space Space Space #
Normal
(ABC)
Te x t M o d e
Greek
ΑΒΓ
(
)
_
+_
ABΓ
∆EΖ
ΗΘΙ
ΚΛΜ
ΝΞΟ
ΠΡΣ
ΤΥΦ
ΧΨΩ
Extended
(AÄÅ)
+_ 0
AÄÅÆBCÇaäåæàbc 2
DEÉFdeèéf 3
GHIghiì 4
JKLjkl 5
MNÑOÖØmnñoöøò 6
PQRSpqrsß 7
TUÜVtuüùv 8
WXYZwxyz 9
Numeric
(0 ~ 9)
* Press " once to enter a single capital letter (subsequent characters will
be lower case). Pressing " twice acts as a keyboard CAPS LOCK function and subsequent characters will be uppercase. Press " a third time
to return to lowercase character entry.
The text entry modes are: Normal (ABC), T9 (T9), Greek (ΑΒΓ), Extended
(AÄÅ) and Numeric (0 ~ 9). To change your text entry mode, press 7 to
scro ll through the choices. The current mode icon is shown in the lower left
corner of the display.
85
Page 96

jam-eng.book Page 86 Tuesday, March 9, 2004 1:06 PM
T9® Text Input
Using this mode of text entry dramatically reduces the number of key presses
required:
Press a key once for any letter you want on that key. The desired letter may
not be displayed. Continue pressing other keys until the end of a word is
reached; then check that the word has been typed correctly before continuing
on to the next word.
If you entry has produced a word which is not the one you want, press 4
repeatedly until the correct word is displayed. Continue to the next word.
If the word you want is not in the internal dictionary (i.e. it is a proper noun or
a rarely used word) then it should be entered using the Normal (ABC) mode.
Other Text Modes
When using Normal (ABC), Greek (ΑΒΓ) or Extended (
modes, each time a key is pressed in quick succession it will display the next
character available on that key. Releasing the key, or pressing another key will
enter the currently displayed character and the cursor will move to the next
position.
) text entry
AÄÅ
Editing Text
Press 4 to move up or down one text line.
Press 2 to move left or right one character. When the cursor is moved over a
character and another key pressed this will insert the new character immediately before the selected character. Press @ to delete the character to the left
of the cursor or delete the current line when pressed and held.
86
Page 97

jam-eng.book Page 87 Tuesday, March 9, 2004 1:06 PM
Troubleshooting
Should any problem persist contact your dealer.
Problem Cause Remedy
Phone will not
switch on
Extremely short
battery life for a
new battery
Short battery life
for an old battery
Battery level
indicator does not
appear and the
phone cannot be
switched on when
charging
Battery fails to
charge
The network you are
using and the condition of
the battery can affect
battery life
Battery has worn out
Battery is not attached to
the phone, or when the
battery has been deeply
discharged there is a delay
until the indicator lights
Battery is not attached to
the phone
Battery has been
connected to the phone
after the fast travel
charger has been plugged
Battery has been deeply
discharged there is a delay
in
until indicator lights
Check that the battery is
fully charged and
correctly connected to
the phone
Replace with a new fully
charged battery
Let the battery charge for
a few minutes
Ensure the battery is
fitted to the phone
before charging
Let the battery charge for
a few minutes
87
Page 98

jam-eng.book Page 88 Tuesday, March 9, 2004 1:06 PM
The phone is locked Unlock the phone
Calls cannot be
made
Calls cannot be
made from Fixed
Dial Store
Calls cannot be
received
Emergency calls
cannot be made
Phone numbers
cannot be recalled
from Phonebook
Outgoing calls are barred
Phone is not registered to
a network
Phone is not switched on Switch the phone on
Incoming calls are barred
Phone is not registered to
a network
You are not in a GSM
coverage area
Phone is locked Unlock the phone
Phone number has been
restricted
Disable the outgoing call
barring, or barred dial
Move to a coverage area
and operate your phone
after i t has registered to a
network
Check your SIM supports
Fixed Dial
Check if Fixed Dial is
switched on
Check if the phone
number is stored in the
Fixed Dial
Disable the incoming call
barring
Move to a coverage area
and operate your phone
after i t has registered to a
network
Check that the antenna
symbol is displayed –
move to a coverage area
and operate your phone
wh en th e an tenn a sy mbol
is displayed
Switch off restriction
88
Page 99

jam-eng.book Page 89 Tuesday, March 9, 2004 1:06 PM
Important Error Messages
These are some of the most important error messages which may be displayed:
Unregistered
SIM
Invalid SIM
Insert SIM
Password
Incorrect:
Tr y A g a i n
Function
Unavailable
PIN2 Must Be
Unblocked
only for MMS:
Capacity Full!
Phone Number Too Long
(Max:20)
Capacity Full!
The network has detected an authentication failure
because your SIM is not registered to that network –
contact your service provider
The SIM is blocked because one of the PIN/PIN2
unblocking keys (PUK/PUK2) has been entered incorrectly ten times – contact your service provider
The phone has detected a problem with the SIM –
switch the p hone off and then back on; if the me ssage is
still displayed contact your service provider
The SIM has failed one or more of the SIM authentication checks – contact your service provider
The selected feature is either not supported by the SIM
or is not available with your current subscription –
contact your service provider
The PIN2 is blocked permanently because the wrong
PUK2 has been entered ten times, services controlled
by PIN2 cannot be used – contact your service
provider
A message has been received but the message store
is full – to receive messages, delete some
of the currently stored messages or set messages
The edited or newly created Phonebook number is too
long to fit in the SIM Phonebook field
The message area is full. Your messages cannot be
stored until some of the currently stored messages are
deleted
89
Page 100

jam-eng.book Page 90 Tuesday, March 9, 2004 1:06 PM
When changing the phone lock code, the second entry
Unlock Code
Incorrect.
Tr y A g a i n
is different than the first. Enter the same lock code
twice
Disabling or enabling Phonelock has failed due to incorrect entry of the lock code – re-enter lock code
Incorrect: xx
Tries Left
The entered code is incorrect – re-enter code
correctly
90
 Loading...