

Panasonic FZ-T1 User Manual

Operating Instructions - Reference Manual
RM172A_EN_RM_
Draft1.0
Tablet Computer
Model No. FZ-T1 series

Table of Contents
Table of Contents
Introduction ..............................................................................................4
About this manual .............................................................................................................4
Disclaimers ........................................................................................................................4
Handling cautions .............................................................................................................5
Trademarks ........................................................................................................................7
Getting started ..........................................................................................8
Confirming the included items ........................................................................................8
Description of parts ..........................................................................................................8
Installing and removing the battery ..............................................................................11
Installing a SIM card (certain models only) ..................................................................13
Installing an SD card .......................................................................................................14
Replacing the battery (Battery warm swap) .................................................................14
Charging the battery .......................................................................................................15
Turning the unit on and off ............................................................................................16
Screen description .................................................................................17
Home screen ....................................................................................................................17
Navigation buttons ..........................................................................................................17
Status bar .........................................................................................................................17
Notifications panel ..........................................................................................................17
Icons .................................................................................................................................18
Customizing the home screen .......................................................................................19
Input ........................................................................................................21
Typing and voice input ...................................................................................................21
Using the keyboard .........................................................................................................21
Connectivity ............................................................................................22
Mobile network (certain models only) ...........................................................................22
Wi-Fi .................................................................................................................................23
Bluetooth .........................................................................................................................25
Airplane mode .................................................................................................................26
USB connection ..............................................................................................................26
SD memory card ..............................................................................................................26
Security ...................................................................................................27
Locking the screen .........................................................................................................27
Encrypting the SD card (certain models only) .............................................................27
[DeviceManagement] app ...............................................................................................28
Settings ...................................................................................................29
[Settings] app ..................................................................................................................29
Power options menu .......................................................................................................30
[Dashboard] app ..............................................................................................................30
[UserButtonManager] app ..............................................................................................31
Touch operation settings ...............................................................................................32
Accessibility settings .....................................................................................................32
Apps ........................................................................................................33
Starting apps ...................................................................................................................33
2 Operating Instructions - Reference Manual

Table of Contents
Preinstalled apps ............................................................................................................33
Camera ....................................................................................................35
Taking pictures ................................................................................................................35
Recording videos ............................................................................................................35
Using the option menu ...................................................................................................35
Camera settings ..............................................................................................................36
Barcode reader .......................................................................................37
Configuring the barcode reader ....................................................................................37
Using the barcode reader ...............................................................................................37
NFC card reader/writer ..........................................................................38
Hardware diagnostics ............................................................................39
About hardware diagnostics ..........................................................................................39
Running hardware diagnostics ......................................................................................39
Saving or checking the system log and diagnosis results .........................................41
Supplementary items .............................................................................42
Protective Film ................................................................................................................42
Holster ..............................................................................................................................44
Troubleshooting .....................................................................................45
General information ........................................................................................................45
Starting up .......................................................................................................................45
Shutting down .................................................................................................................45
Screen ..............................................................................................................................45
Indicator ...........................................................................................................................46
Touch screen operation .................................................................................................46
Connectivity .....................................................................................................................47
Sound ...............................................................................................................................47
Other .................................................................................................................................47
Appendix .................................................................................................49
Factory data reset ...........................................................................................................49
Tips for battery usage .....................................................................................................49
Updating the software ....................................................................................................50
Regulatory information ...................................................................................................52
Specifications ..................................................................................................................54
Accessories .....................................................................................................................57
WARRANTY for U.S.A .....................................................................................................58
WARRANTY for Canada .................................................................................................62
WARRANTY for Europe ..................................................................................................66
Operating Instructions - Reference Manual 3

Introduction
Introduction
About this manual
Thank you for purchasing this Panasonic product. For optimum performance and safety, please read these
instructions carefully.
This manual describes the preparation of the unit for use, and the operations and settings of the main
features.
• Panasonic Corporation and/or its affiliates are referred to collectively as “we” or “Panasonic”.
• This product supports microSD, microSDHC, and microSDXC memory cards. In this document, the term
“SD card” is used as a generic term for any supported memory card.
• This product supports Nano SIM cards (certain models only). In this document, the term “SIM card” is
used as a generic term for any supported SIM card.
• Some illustrations in this document may look different from the actual product. Also, the details of the
descriptions may vary due to differences between the software versions or automatic updates of some
software.
• Information in this document is subject to change without notice.
• For the latest information about optional products, refer to the product catalogs, etc.
Disclaimers
• Descriptions in this document are based on models with GMS (Google Mobile Services).
• Some illustrations in this document may look different from the actual product.
• Some screen text and procedures in this document may vary from the actual product. To confirm the
OS version, swipe up the home screen, and then in the app list, tap [Settings] ® [System] ® [About
tablet] ® confirm under [Android version].
Also, the details of the descriptions may vary due to automatic updates of some software.
• Panasonic assumes no liability for damage incurred from customer misuse or use under other irregular
conditions, and damage resulting from the use or the unavailable use of the product.
• Panasonic shall not be liable for loss of data or other incidental or consequential damages resulting from
the use of this product. This product can download, store, forward, and receive additional content, such
as applications, ringtones, contact information, and media files. The use of such content may be
restricted or prohibited by the rights of third parties, including but not limited to restriction under applicable
copyright laws. You are entirely responsible for additional content that you download to or forward from
this product; Panasonic is not responsible for such content or its use. Before using such content, it is
your responsibility to verify that your intended use is properly licensed or is otherwise authorized.
Panasonic does not warrant or guarantee the accuracy, integrity or quality of any additional content or
any other third-party content. Under no circumstances will Panasonic be liable in any way for the
improper use of additional content or other third-party content by this product or its operator. This
document and any related product documentation may refer to services and applications that are
provided by third parties. The use of such services or programs may require separate registration with
the third party provider and may be subject to additional terms of use. For applications accessed on or
through a third-party web site, please review the web sites’ terms of use and applicable privacy policy
in advance. Panasonic does not warrant or guarantee the availability or performance of any third-party
web sites, services, or applications.
• The availability of some functions depends on your unit’s specifications and the locale of purchase. See
“Specifications” (page 54) for information about your unit.
• This manual is written with the display language set to US English.
4 Operating Instructions - Reference Manual

Handling cautions
General use
Introduction
• Operating environment
Temperature: Operation: -20 °C to 50 °C {-4 °F to 122 °F} (IEC60068-2-1, 2)
Storage: -30 °C to 70 °C {-22 °F to 158 °F}
Humidity: Operation: 30 % to 80 % RH (No condensation)
Storage: 30 % to 90 % RH (No condensation)
Even within the above temperature/humidity ranges, operation for a long time in extreme environments,
smoking nearby, or operation in places where oil is used or where there is a lot of dust will result in
product deterioration and will shorten the product life.
Also, when using the product in cold environments, the product may take longer to start up and battery
operation time may be reduced.
If the product is wet in temperatures of 0 °C {32 °F} or below, freeze damage may occur. Make sure to
dry off the product in such temperatures.
*1
Do not directly touch this product with your bare hands when using it in a hot or cold environment.
*1
• Do not place the product in the following areas, as doing so may damage the product.
– Near electric appliances. The image may be distorted or noise may occur.
• This product is designed to reduce physical shock applied to the LCD and internal electrical components
(camera, etc.). However, protection against malfunction due to such shock is not guaranteed. As with
any portable device, precautions should be taken to avoid any damage.
• When operating the screen using the dedicated stylus, do not firmly press it down. Doing so may damage
the dedicated stylus or result in scratches or dents on the screen.
• Do not place objects on the surface of the product or press down hard on the product with sharp objects.
The screen surface may get scratched.
• Do not damage the panels of the barcode reader, rear camera, and photo light.
• Do not use the dedicated stylus when dust or dirt (e.g., oil) is on the screen. Otherwise foreign particles
on the screen/dedicated stylus may scratch the screen surface or obstruct operation of the dedicated
stylus.
• Use the dedicated stylus only for touching the screen. Using it for any other purpose may damage the
dedicated stylus and result in scratches on the screen.
• Confirm the safety and security of software before downloading or installing it on the product. Installing
malware or viruses can cause malfunction and the disclosure of any private information stored in the
product, or may cause excessive sound volume.
• Turn off the product before removing the SIM card or SD card. Failure to do so can result in data loss
or damage to the SIM card, SD card, or product.
• Do not place the product near a television or radio receiver. This may cause television or radio
interference.
• Keep the product away from magnets. Failure to do so may cause malfunction.
• When using the product in a vehicle, it may affect electronic devices in the vehicle depending on the
vehicle type. Confirm the effects from radio waves with the vehicle manufacturer or sales dealer before
use.
• It is illegal in many areas to record a call without permission. Always ask the other party for permission
before recording a call.
• Follow these instructions and this manual to avoid any damage to the devices. Carefully read the
instruction manuals of the peripheral devices.
– Use peripheral devices that conform to the product’s specifications.
– Connect to the connectors in the correct direction.
– If a connector is hard to insert, do not try forcibly. Check its shape, direction, alignment of pins, etc.
Operating Instructions - Reference Manual 5

Introduction
Protecting your data
• To prevent accidental loss of data, we recommend that you regularly back up any important data that
you store in the product, SIM card, and SD card.
• To prevent the unintended disclosure of private information, always confirm the destination before
sending messages, file attachments, or any other communications, such as email.
• To prevent the unintended disclosure of sensitive information stored in the product or the SD card, we
recommend using the product’s encryption feature (page 27).
• Before disposing of the product or handing the product over to a third party, remove the SIM card, SD
card, and any other accessories.
• Before disposing of the product or handing the product over to a third party, perform a factory data reset
(page 49) to erase any data stored in the product.
• Before using Wi-Fi or Bluetooth features, take appropriate action to secure your data.
Waterproof/dustproof
• The product is waterproof/dustproof when the interface cover is closed, and the battery is attached.
Therefore, keep water and dust away from product’s internal components, accessories, and optional
products.
• To prevent liquids, sand, dust, or any foreign objects from entering the product, always keep the battery
cover and battery clean and make sure to firmly close the cover after opening. Take care not to get
anything caught between the cover or battery and the product.
• If the product is exposed to water droplets, wipe them off with a dry, soft cloth and shake the product to
remove the water droplets, then dry thoroughly.
• Do not leave any water droplets on the product. Water droplets may cause the micro USB port or headset
jack to short circuit, or create smears on the screen.
• If the product is wet, wipe off the moisture before connecting with peripheral devices.
• Do not dry the product with an appliance or heat source such as a microwave oven or dryer.
• Use the optional charger while dry and do not use it in places with water such as bathrooms because it
is not waterproof/dustproof.
Maintenance
• When cleaning the product, make sure to turn it off.
• When cleaning the product, wipe it with a soft, dry cloth. An alcohol-based disinfectant may be used if
necessary.
– If the product is particularly dirty, thoroughly wring a cloth soaked in water, wipe off the dirt, and then
wipe with a dry cloth.
– Do not clean the product with solvents such as benzene, thinner, or strong alkaline detergent because
they may affect the surface of the product.
Battery
• The battery is a consumable item. Depending on the usage conditions, it may swell as it reaches the
end of its life. When the typical battery life of approximately one year or about 500 charge cycles is
exceeded, the battery deteriorates. If the battery begins to swell, or the amount of time it can be used
after a full charge becomes dramatically shorter, the battery should be replaced with a new one. Contact
your technical support representative.
• Do not touch the terminals of the battery. Failure to observe this may cause poor contact.
• When the battery is left installed in the product, it discharges electricity gradually in small amounts even
if the product’s power is off. If left for a long period (several months or more), the battery will over
discharge and its performance may deteriorate.
• Store the battery in environments with an ambient temperature of -20 °C to 35 °C (-4 °F to 95 °F). If the
battery is stored in other environments, battery performance and battery life may be reduced.
• When storing or transporting the battery, make sure that the battery’s terminals do not become dirty and
that no foreign objects or debris become attached to the battery’s terminals.
6 Operating Instructions - Reference Manual

Introduction
• Do not use the battery if the gasket is damaged, deformed, or peeled off.
• If battery charging is not completed after the specified charging time has passed, remove the battery
from the product. The battery protection device may be damaged.
• You cannot charge an installed battery if it is not recognized by the product. Make sure that you use the
specified battery.
• Dispose properly in compliance with local waste regulations.
Trademarks
• The Bluetooth
use of such marks by Panasonic Corporation is under license.
®
word mark and logos are registered trademarks owned by Bluetooth SIG, Inc. and any
• microSDXC Logo is a trademark of SD-3C, LLC.
• The N-Mark is a trademark or registered trademark of NFC Forum, Inc. in the United States and in other
countries.
• Wi-Fi
®
, the Wi-Fi logo, the Wi-Fi CERTIFIED logo and Wi-Fi CERTIFIED are trademarks or registered
trademarks of Wi-Fi Alliance®.
• “FeliCa” is a contactless IC card technology developed by Sony Corporation. “FeliCa” is a trademark of
Sony Corporation.
• All other trademarks identified herein are the property of their respective owners.
Operating Instructions - Reference Manual 7
Getting started
Getting started
Confirming the included items
If any items are missing, please contact your technical support representative.
– Main unit ´ 1
– Battery (Model number FZ-VZSUT10U) ´ 1
– Operating Instructions - Read Me First ´ 1
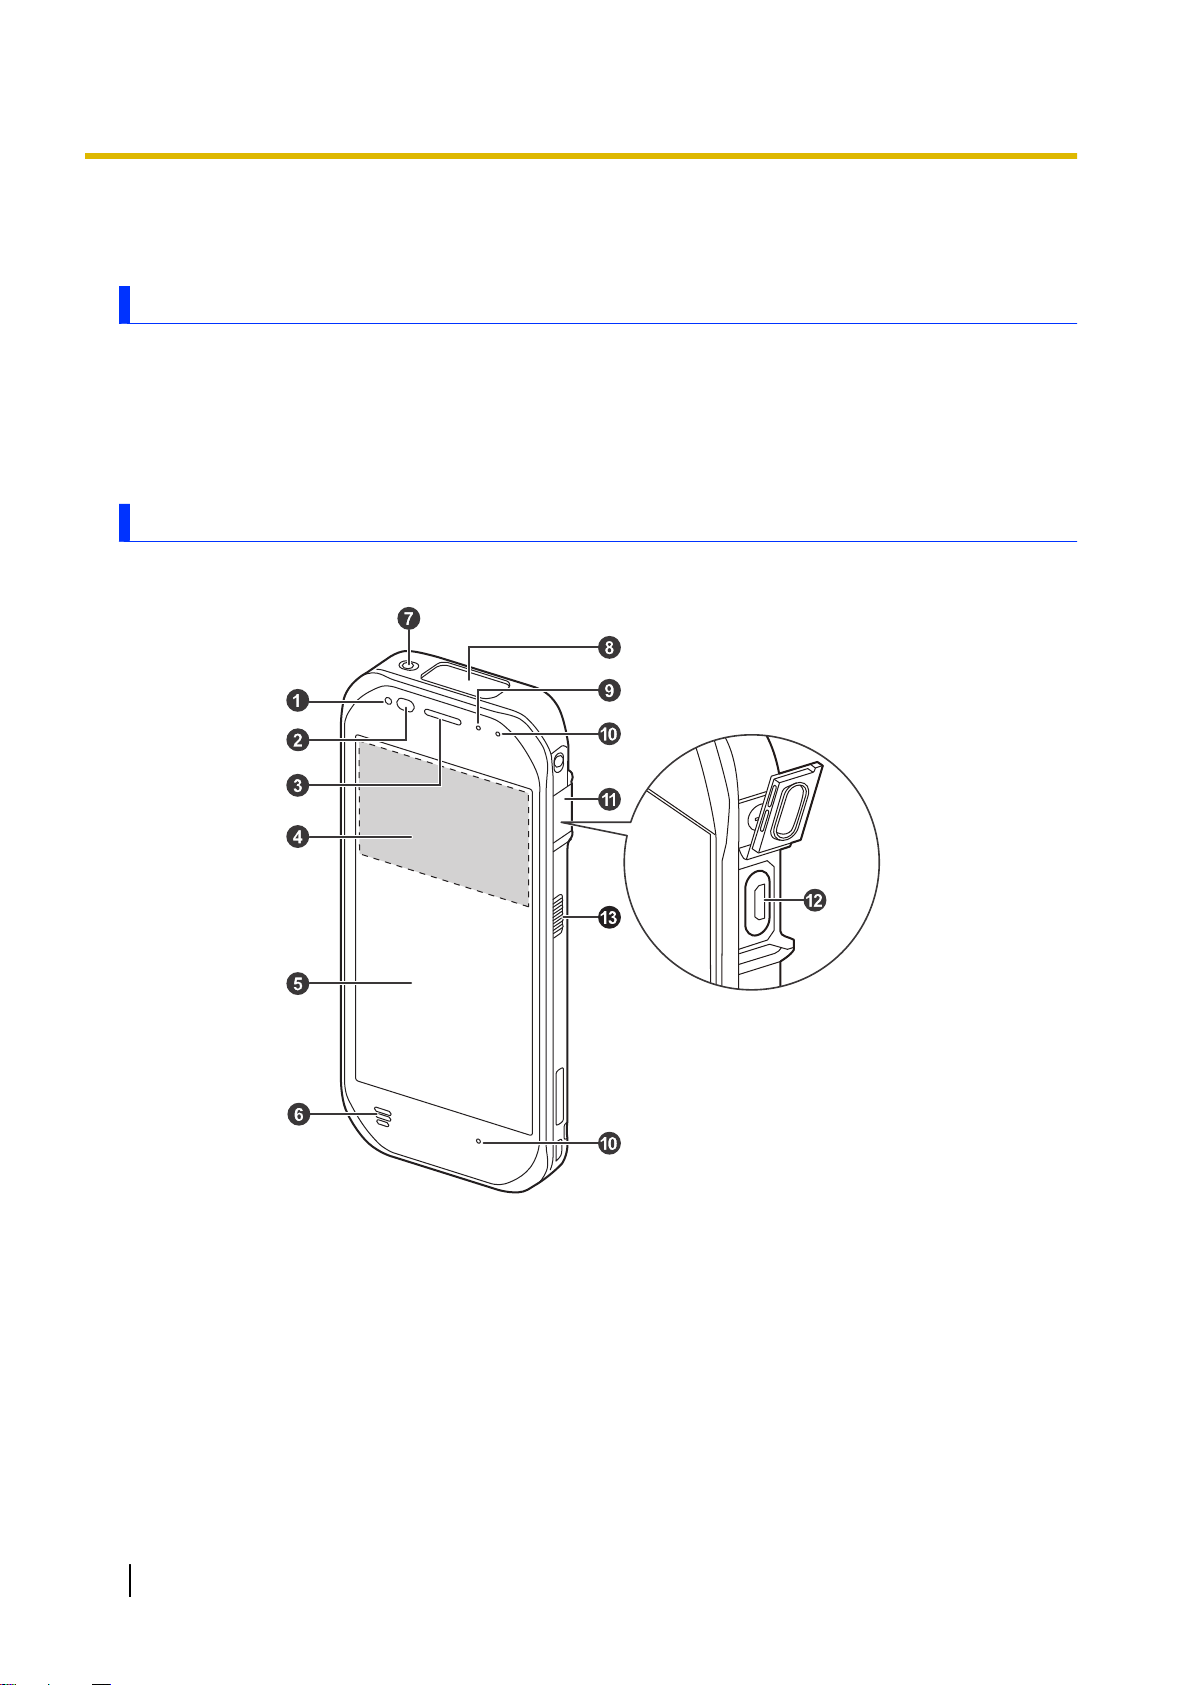
Description of parts
Front view
A Indicator
Orange, lit: Battery is charging
Green, lit: Battery charging is complete
Red, lit: Battery level is 14 % or less of a full charge
B Ambient light sensor, proximity sensor
The ambient light sensor automatically adjusts the screen brightness. The proximity sensor prevents
accidental operations on the touch panel during phone calls.
C Earpiece
D NFC antenna (internal)
When using an NFC card or other NFC device, touch the card/device to this area of the unit.
8 Operating Instructions - Reference Manual

E Display (touch panel)
Glove mode: Can be operated while using gloves.
Rain mode: Prevents misoperation in wet conditions.
F Speaker
G Headset jack
H Barcode reader
I Air vent
J Microphone
K Interface cover
L micro USB port (page 15)
M Side button
*1
The registered function can be changed (see “[UserButtonManager] app” (page 31)).
*1
IMPORTANT
• Observe the following to ensure the waterproof and dustproof performance of the unit.
– Make sure the interface cover is securely closed when the micro USB port is not being used.
– When closing the interface cover, make sure there is no debris lodged in the gasket that seals
the cover.
Getting started
Operating Instructions - Reference Manual 9
Getting started
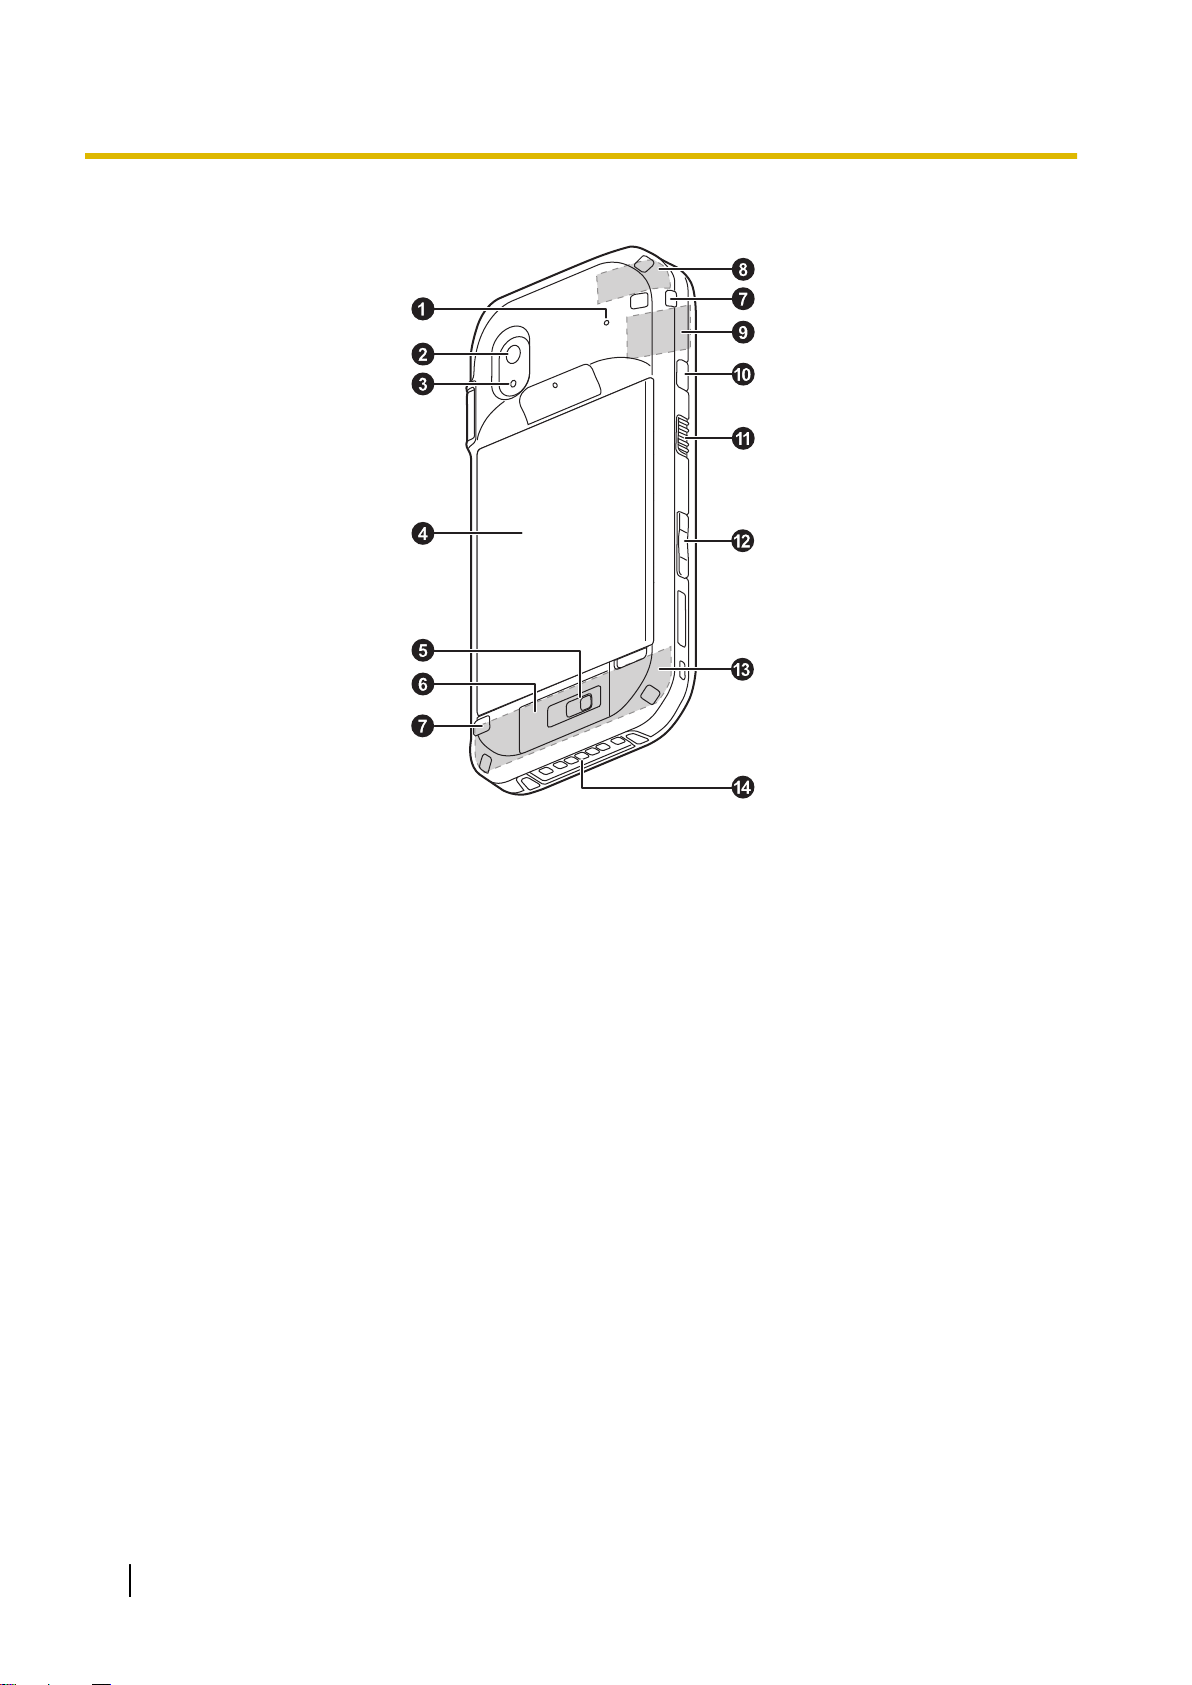
Rear view
A Microphone
B Rear camera
C Photo light
Can be used when taking pictures.
D Battery (cover integrated type)
E Cover latch lock
F Cover latch
G Strap attachment hole
H GPS antenna (internal)
I Wi-Fi, Bluetooth antenna (internal)
J Power button (page 16)
K Side button
*1
L Volume buttons
M Mobile antenna (internal)
N Expansion bus connector
Used when connecting an optional cradle, etc.
*1
The registered function can be changed (see “[UserButtonManager] app” (page 31)).
10 Operating Instructions - Reference Manual
Getting started
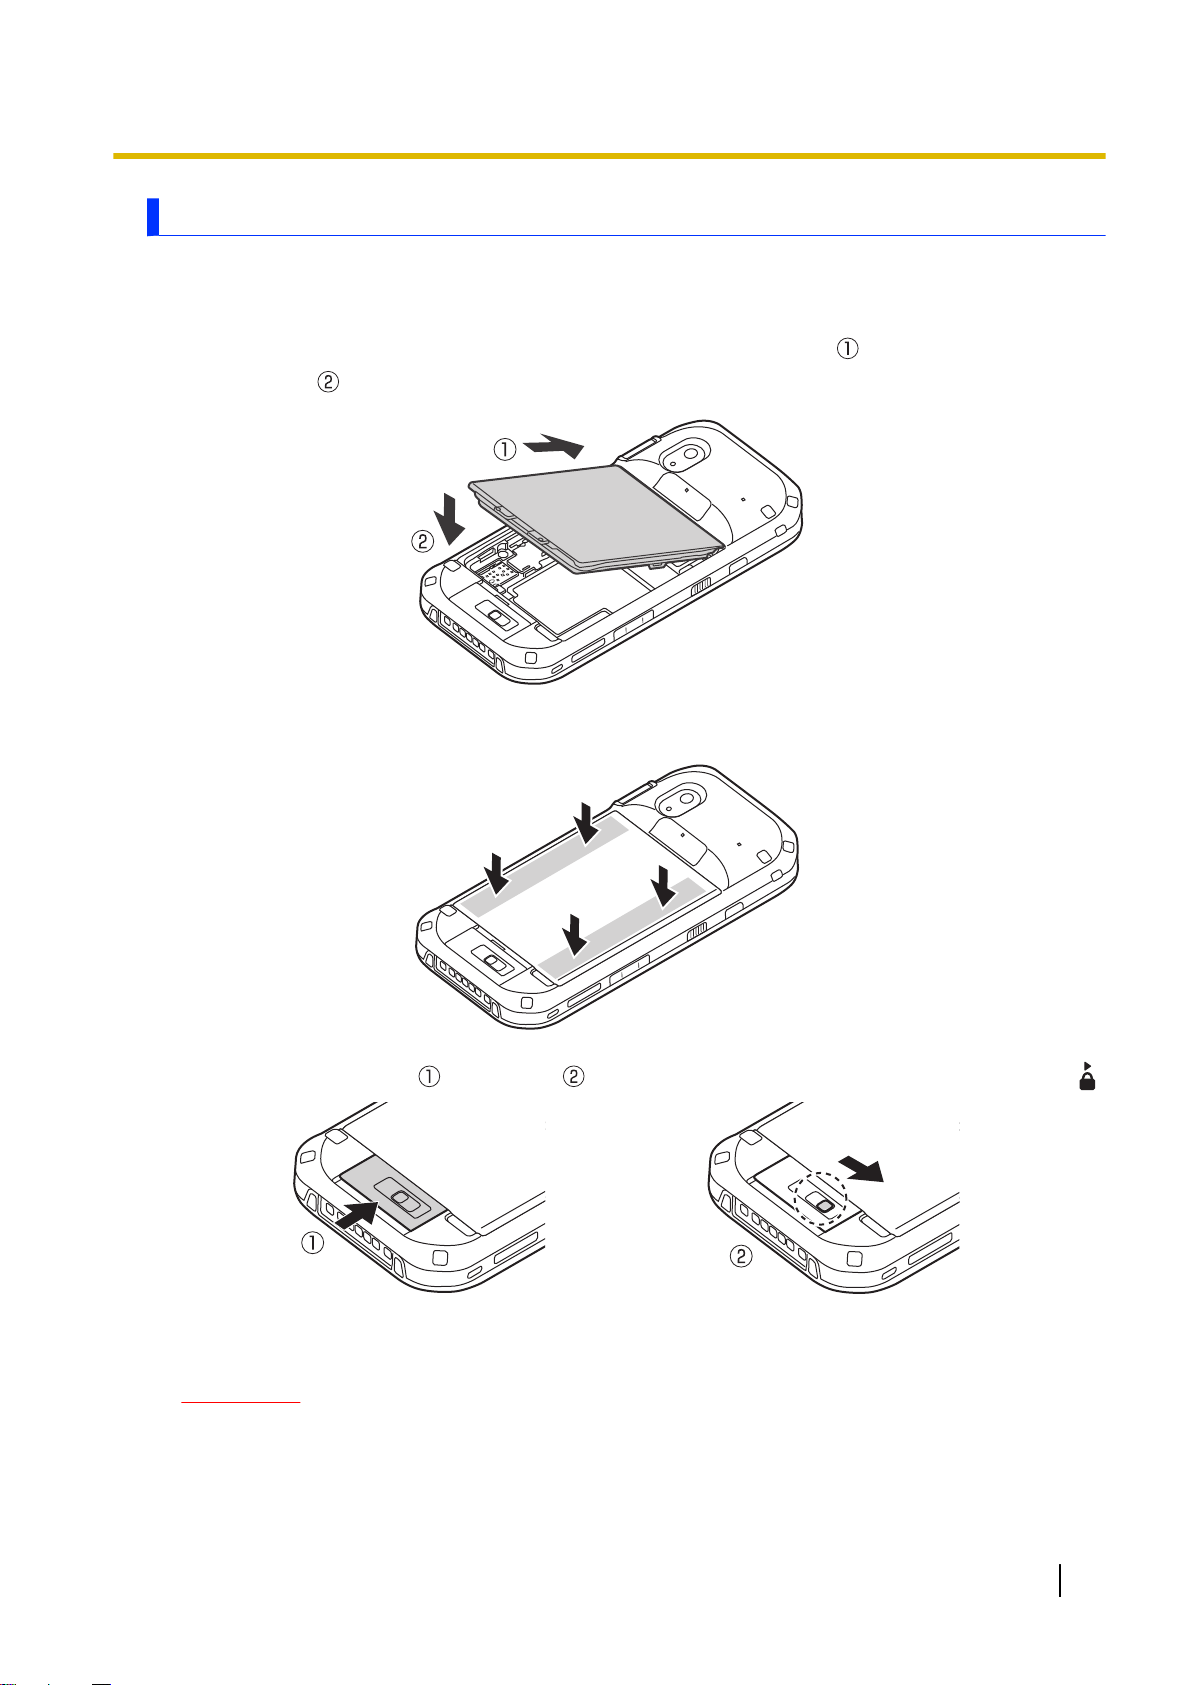
Installing and removing the battery
• If the cover latch is closed, open it (page 12).
Installing the battery
1. Insert the tabs at the battery’s terminal side into the notches of the unit ( ), and then lower the battery
into place ( ).
2. Press down firmly on the outside edges of the battery to seal it closed.
3. Close the cover latch ( ) and lock it ( ) by sliding the switch (circled in the illustration) toward .
• If the gap above the latch or the red area inside the switch is visible, the latch is not properly closed
or locked.
IMPORTANT
• Observe the following to ensure the waterproof and dustproof performance of the unit.
– When installing the battery, make sure there is no debris lodged in the gasket of the battery and
the unit.
– Make sure the gasket of the unit is not damaged, deformed, or peeled off.
Operating Instructions - Reference Manual 11
Getting started
– Always make sure the battery is securely installed and locked.
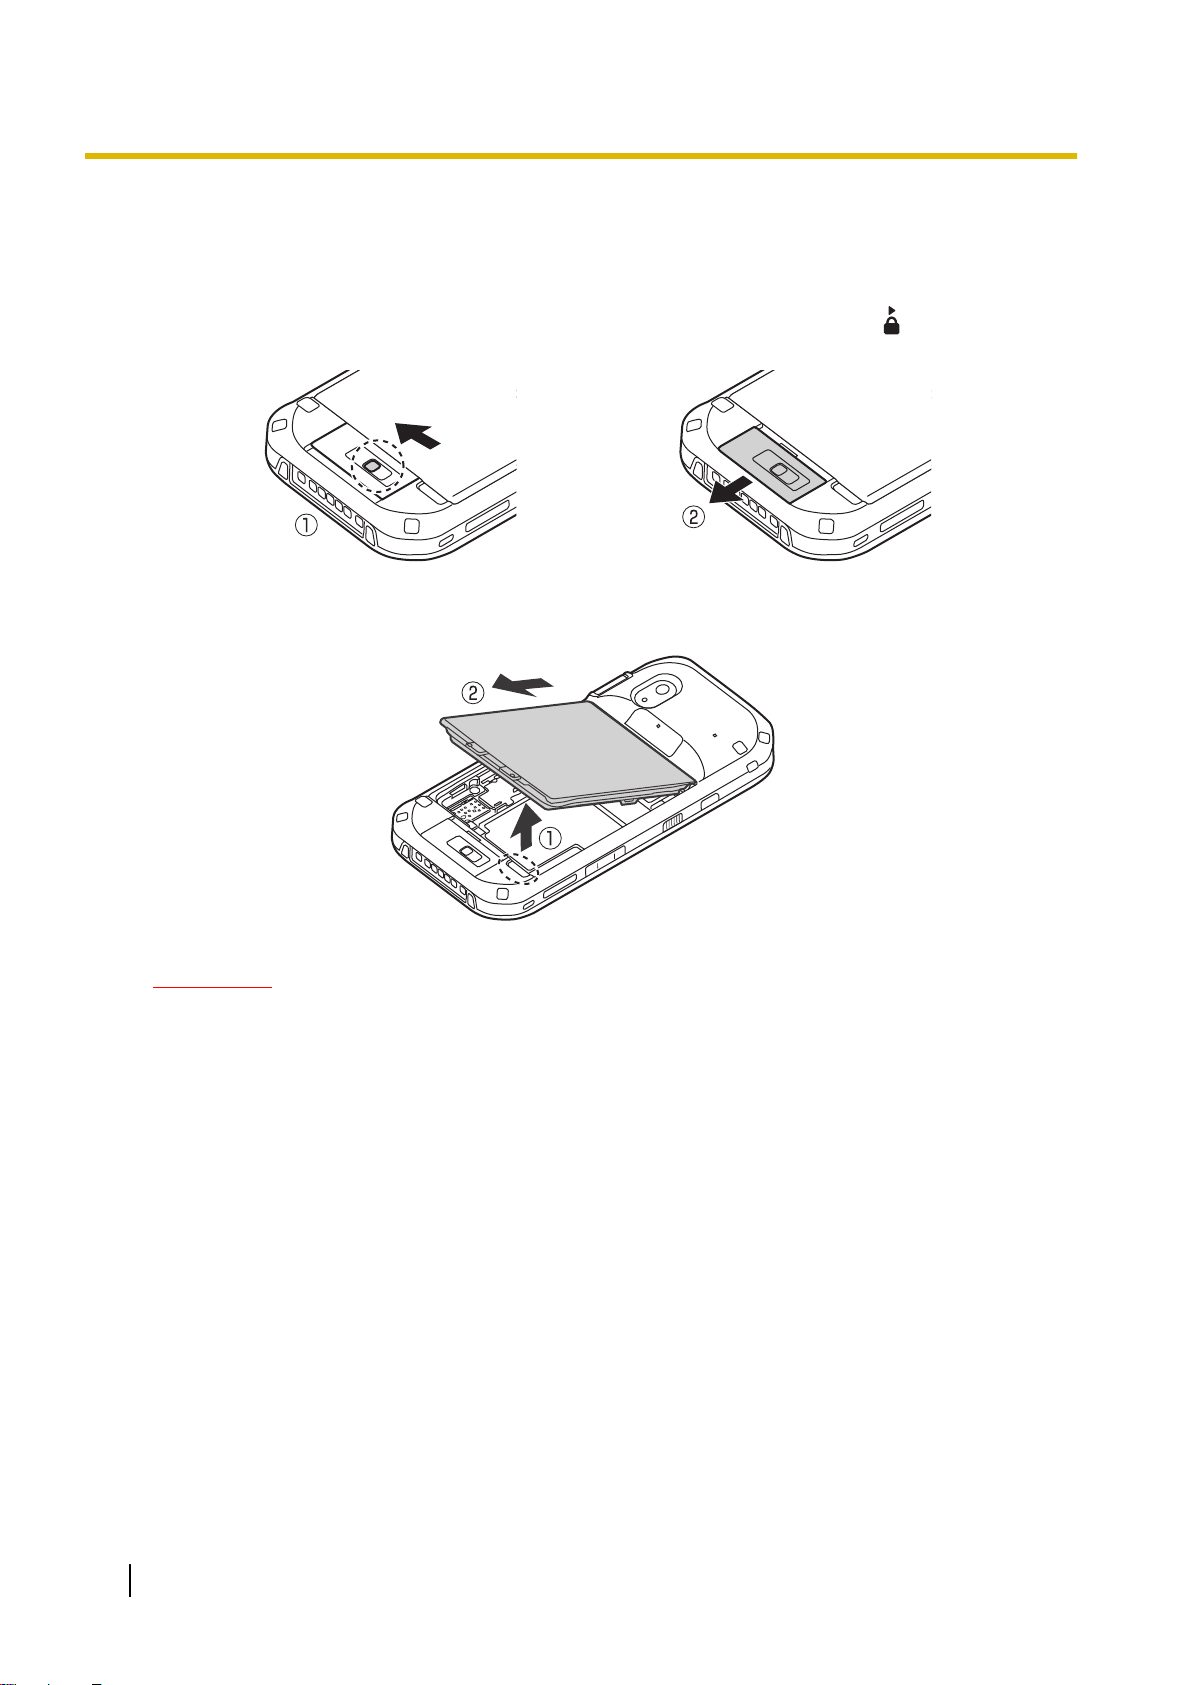
Removing the battery
• Make sure to turn off the unit before replacing the battery.
1. Unlock the cover latch by sliding the switch (circled in the illustration) away from (A), and then open
the cover latch by sliding it (B).
2. Insert your fingertip into the bottom-right groove of the battery (circled in the illustration), lift the battery
(A) and then remove it (B).
IMPORTANT
• Do not remove the battery while the unit is wet. When the unit is wet, remove the water by wiping
off the water droplets and thoroughly drying the unit before removing the battery. (See
“Waterproof/dustproof” (page 6).)
12 Operating Instructions - Reference Manual
Getting started
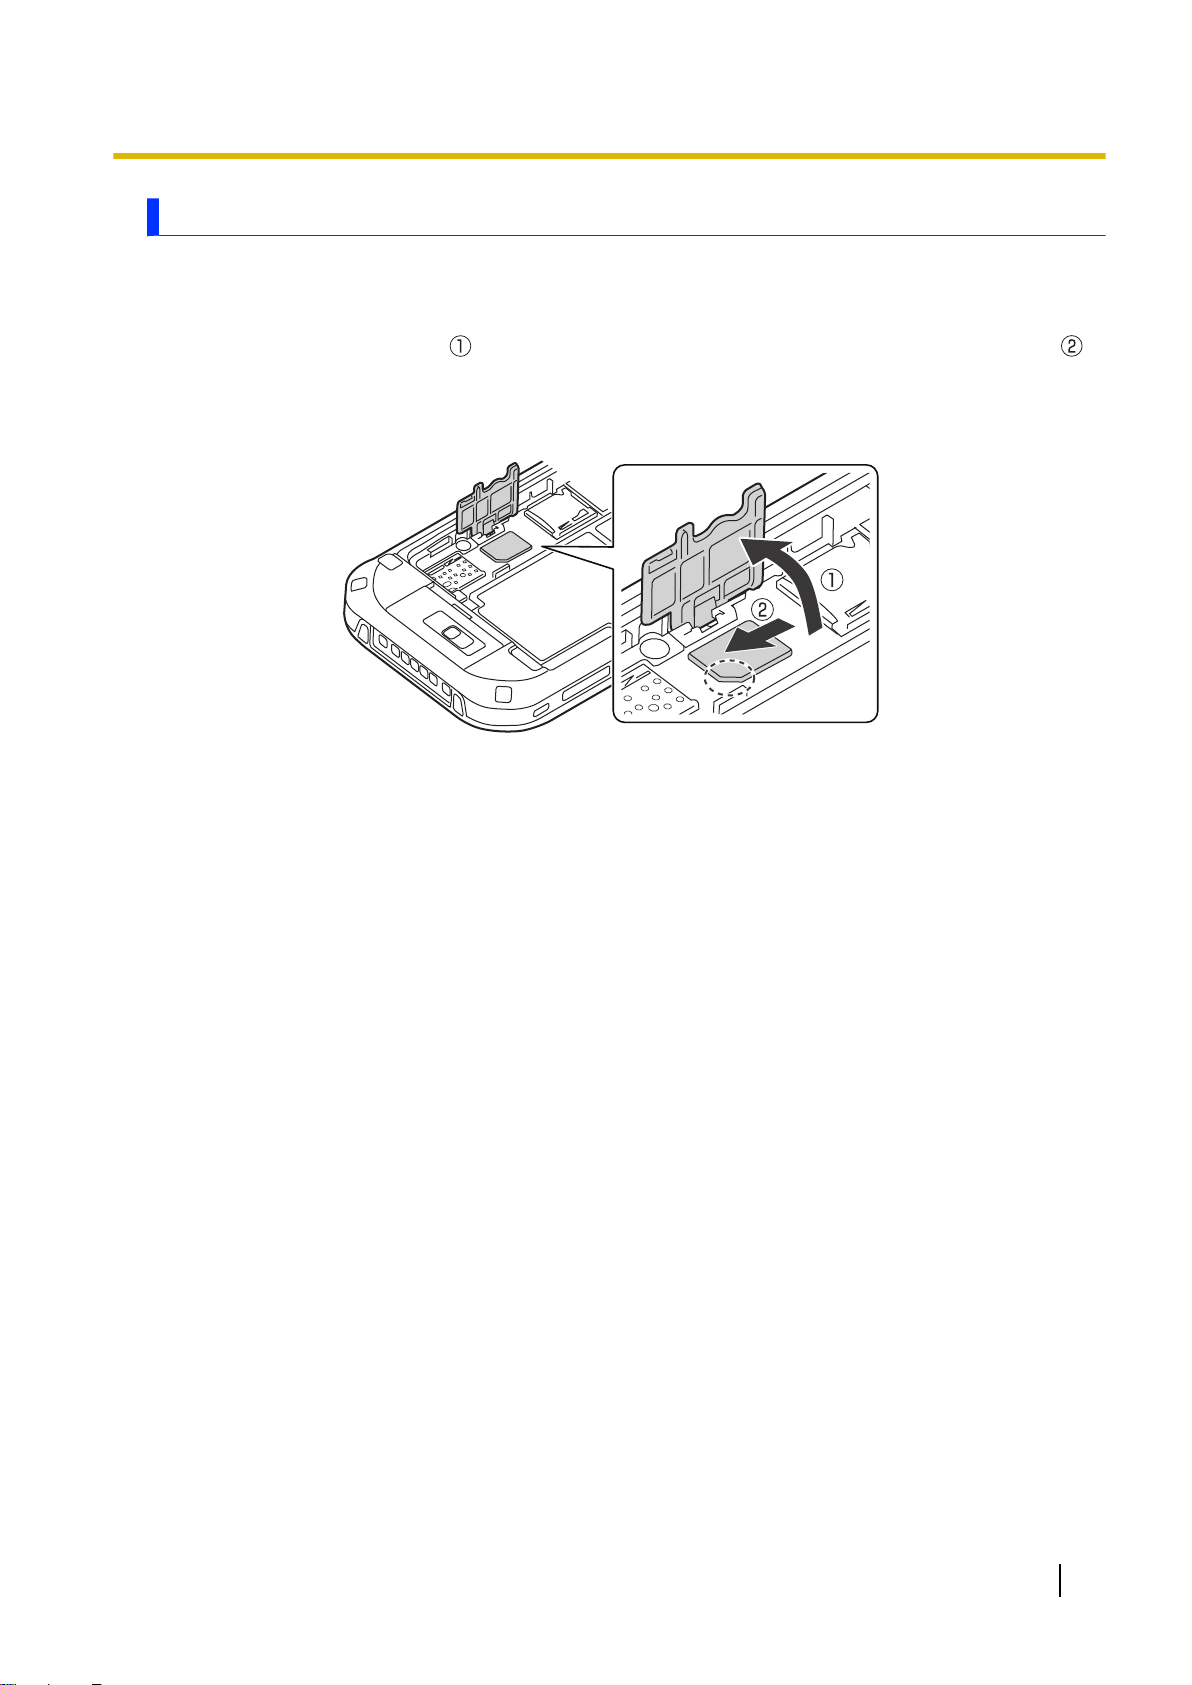
Installing a SIM card (certain models only)
• When installing or removing a SIM card, place the unit on a flat surface.
• If a battery is installed, remove it (page 12).
1. Open the card slot cover ( ), and then insert the Nano SIM card into the Nano SIM card slot ( ).
• Install only Nano SIM cards.
• Hold the SIM card so that the metal terminals are facing down, and insert with the notch facing in
the same direction of the circled area in the illustration below.
2. Slide the Nano SIM card until you hear a click.
• To remove a Nano SIM card, push it slightly into the slot to eject it.
3. Close the card slot cover until you hear a click.
Operating Instructions - Reference Manual 13
Getting started
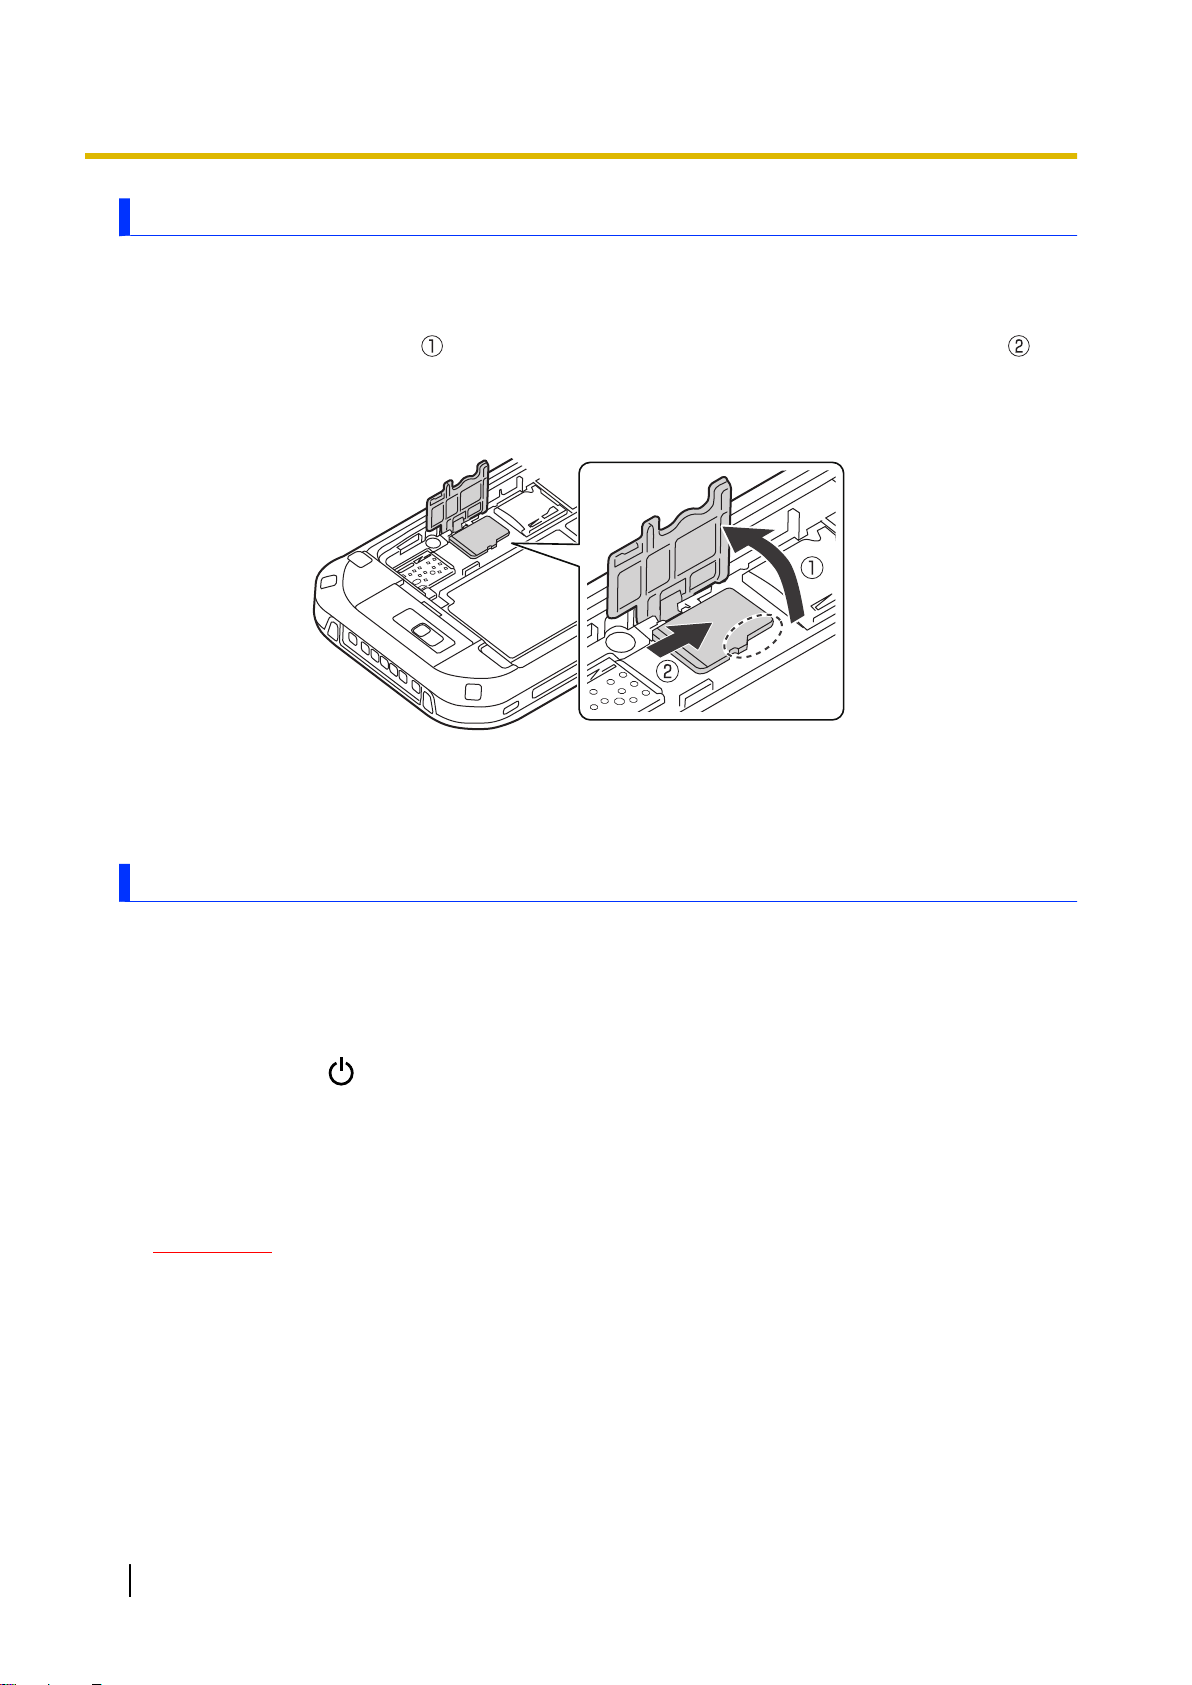
Installing an SD card
• When installing or removing an SD card, place the unit on a flat surface.
• If a battery is installed, remove it (page 12).
1. Open the card slot cover ( ), and then insert the microSD card into the microSD card slot ( ).
• Install only microSD cards.
• Hold the microSD card so that the metal terminals are facing down, and insert with the notch facing
in the same direction of the circled area in the illustration below.
2. Slide the microSD card until you hear a click.
• To remove a microSD card, push it slightly into the slot to eject it.
3. Close the card slot cover until you hear a click.
Replacing the battery (Battery warm swap)
You can replace the battery without turning the unit off.
• Replace the battery within 30 seconds. If more than 30 seconds has passed, apps that are running are
forced to close and you may lose unsaved data.
• During warm swapping, all wireless functions are turned off temporarily.
1. Press and hold (power button) until the power options dialog is displayed, and then tap [Battery
Warm Swap].
• You can also operate from [Warm Swap] in the app list.
2. Follow the on-screen instructions.
• It may take some time until the indicator turns off.
3. Replace the battery.
IMPORTANT
• Make sure the unit is not accessing the microSD card or SIM card before warm swapping the battery.
• Do not remove the SD card or SIM card while warm swapping the battery.
• Make sure you save any important data before warm swapping the battery.
14 Operating Instructions - Reference Manual
Getting started
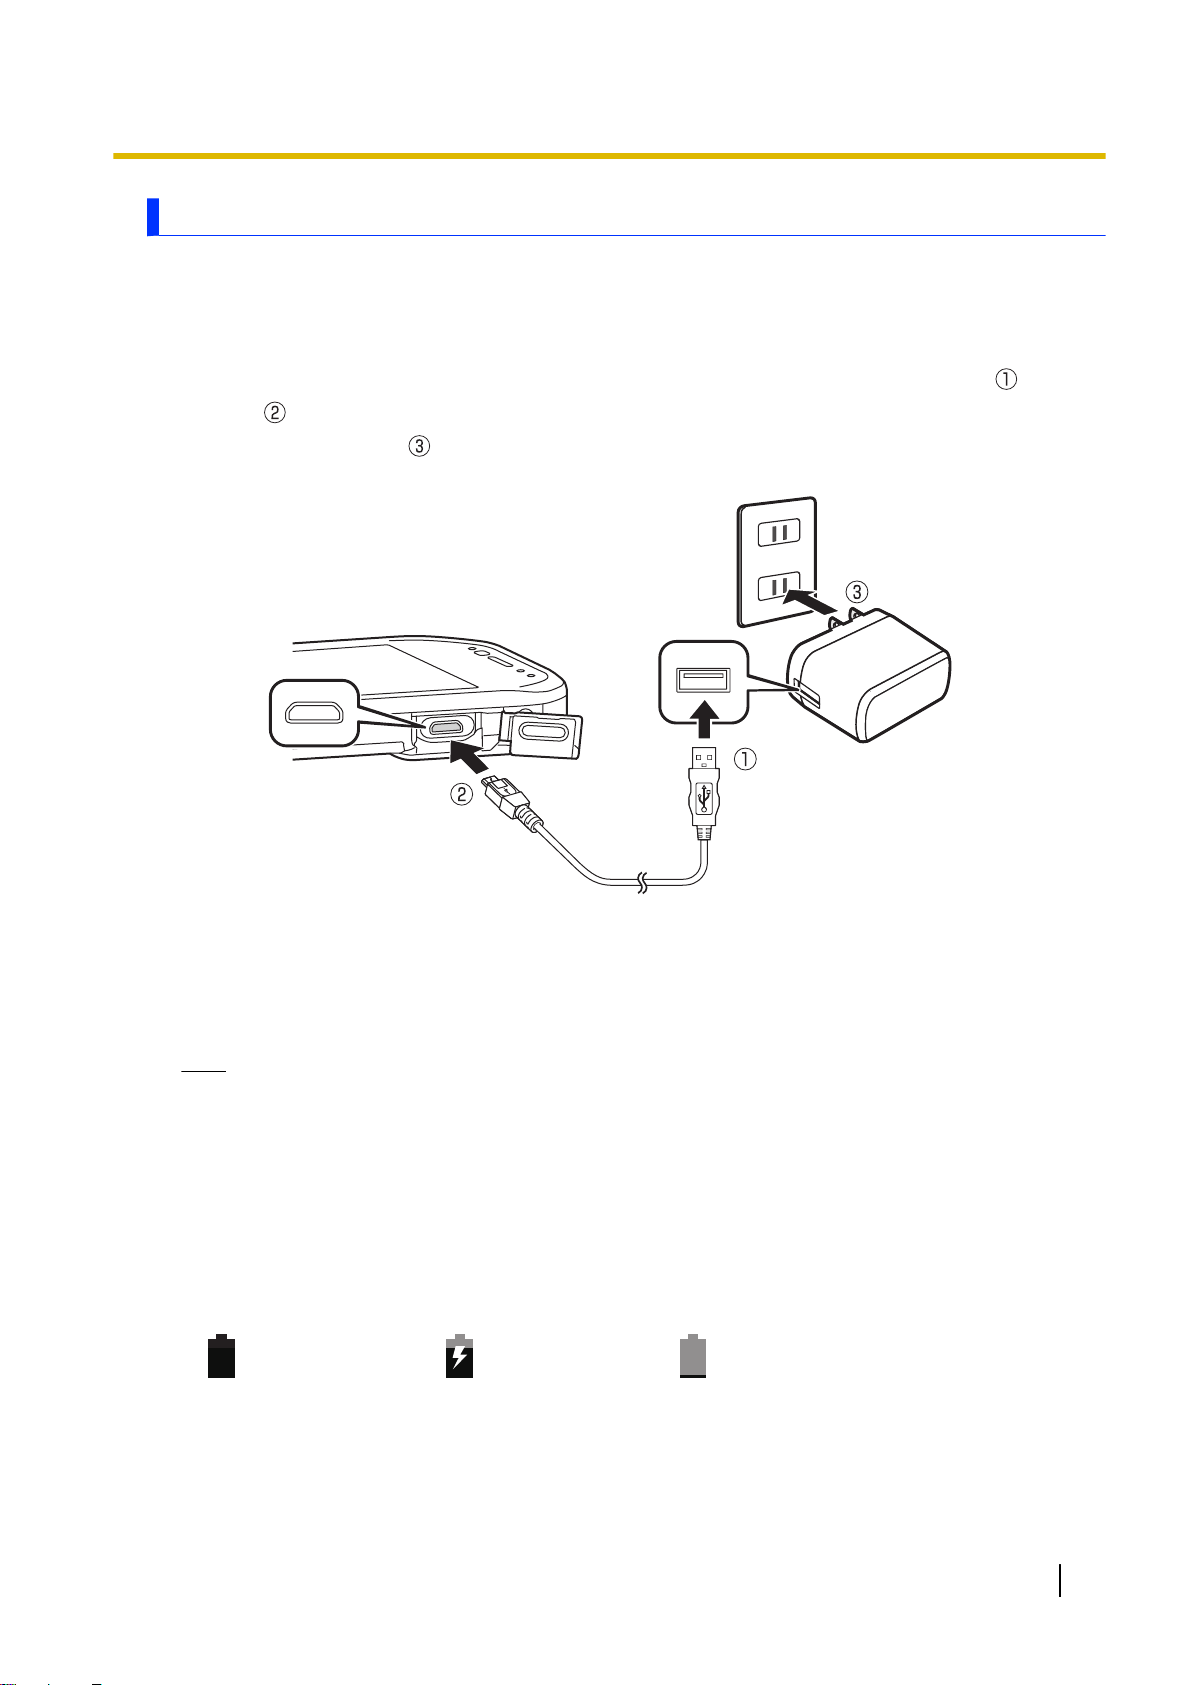
Charging the battery
The battery is not charged at the time of purchase. Charge the battery before turning on the unit for the first
time or after an extended period of storage.
• This section explains how to connect the optional AC adaptor and charge.
AC Adaptor: CF-AA6373A (USB connection cable included)
1. Face the USB mark of the USB connection cable upward, and connect the AC adaptor ( ) and the
unit ( ).
2. Plug the power plug ( ) of the AC adaptor into a power outlet.
• The shape of the power plug varies depending on your country.
• Charge the battery in environments with an ambient temperature of 10 °C to 35 °C (50 °F to 95 °F).
• The indicator lights in orange while the battery is charging, and lights in green when charging is
complete.
• The unit prevents overcharging of the battery by charging only when the remaining battery level is
less than approximately 96 % of its full capacity.
Note
• When removing the USB connection cable, make sure to remove it while holding the plug. Do not pull
by the cable.
• When connecting a USB connection cable, note the shape of the micro USB plug and the micro USB
port. Do not attempt to connect the USB connection cable upside down.
• Remove any dust or water droplets from plugs before connecting them. Do not use excessive force
when inserting plugs or insert them at an angle.
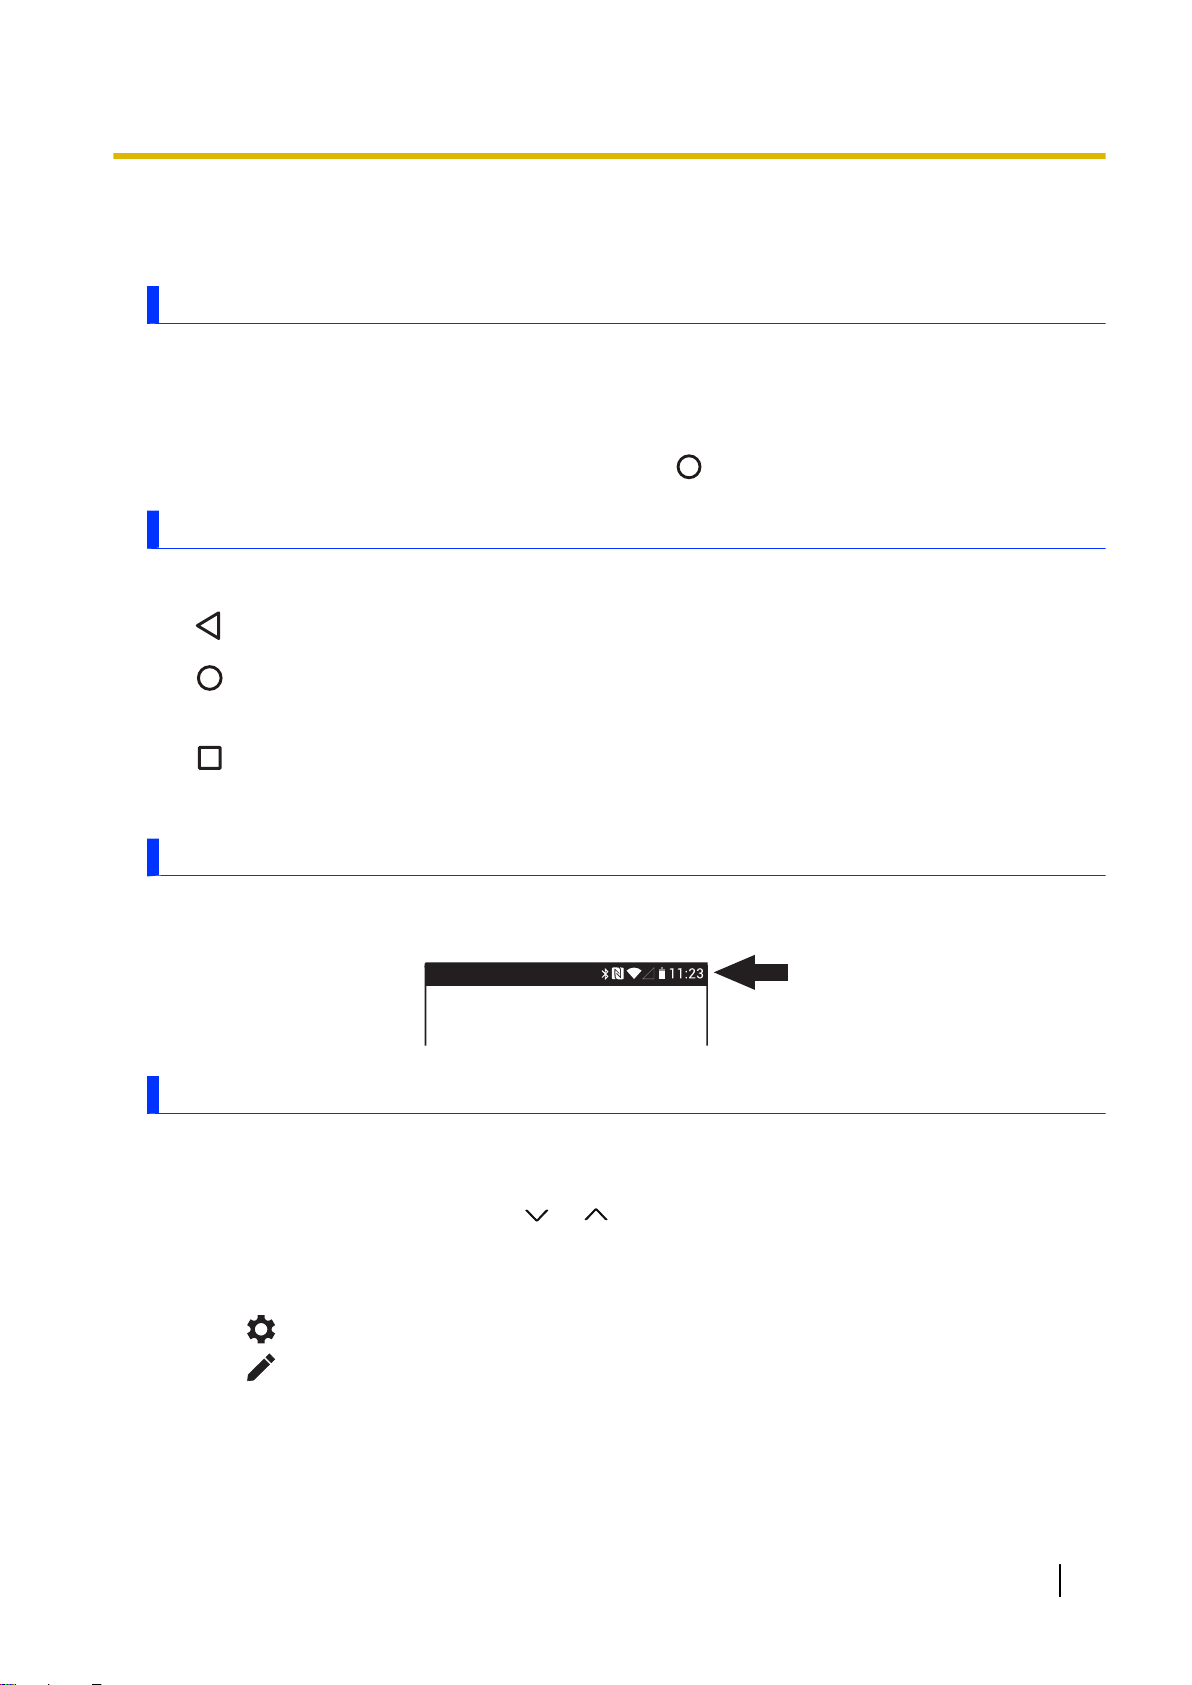
Confirming the battery level
The battery level is displayed in the upper-right corner of the screen, in the status bar.
Fully charged
You can also confirm the specific amount of battery level remaining. Swipe up the home screen, and then
in the App list, tap [Settings] ® [Battery].
Charging Very low
Operating Instructions - Reference Manual 15

Getting started
Turning the unit on and off
Turning the unit on
Press and hold (power button) until the unit briefly vibrates.
Turning the unit off
1. Press and hold until the power options dialog is displayed.
2. Tap [Power off].
• To restart the unit, tap [Restart].
Turning the screen on and off
Going into sleep mode
1. Press
.
Waking up from sleep
1. Press .
2. Swipe up the screen to release the screen lock.
Configuring the unit for the first time
The first time you turn the unit on, you will be prompted to configure the initial settings. Follow the on-screen
instructions and configure each item as needed. An internet connection is required to configure certain
items.
16 Operating Instructions - Reference Manual
Screen description
Screen description
Home screen
The home screen is the main screen from which you can launch apps, check widgets, etc. You can customize
the home screen to suit your needs by adding, moving, and removing items as desired.
(“Customizing the home screen” (page 19))
You can also view a list of all installed apps in the app list by swiping up the home screen.
You can display the home screen at any time by tapping
Navigation buttons
The navigation buttons are available in most screens and help you navigate the unit’s screens.
Returns to the previous screen or closes the current dialog box, menu, etc.
Displays the home screen.
.
Displays a list of recently used apps. Once the list is displayed, tap an app to launch it, or swipe
left or right to remove an app from the list.
You can also tap and hold this while an app is running to split the screen and display two apps
at the same time. To return to single screen, swipe the middle line up or down.
Status bar
The status bar is displayed at the top of the screen when using most apps. It displays icons that let you know
the status of the battery, network signal, and other features.
Notifications panel
The notifications panel provides detailed information about incoming email messages, app updates,
calendar events, etc. You can open the notifications panel by swiping down from the top of the screen toward
the center of the screen. To close the notifications panel, swipe up the screen. While the notifications panel
is open, you can swipe down/up or tap “ ” / “ ” to show or hide the hidden items.
While the notifications panel is open, you can tap a notification and open the corresponding app, adjust the
screen brightness, or switch the displayed apps on and off. You can also swipe a notification left or right to
delete it from the panel.
• Tap
to move to [Settings] app.
• Tap
to move or add apps, or to reset the notification panel.
Operating Instructions - Reference Manual 17
Screen description
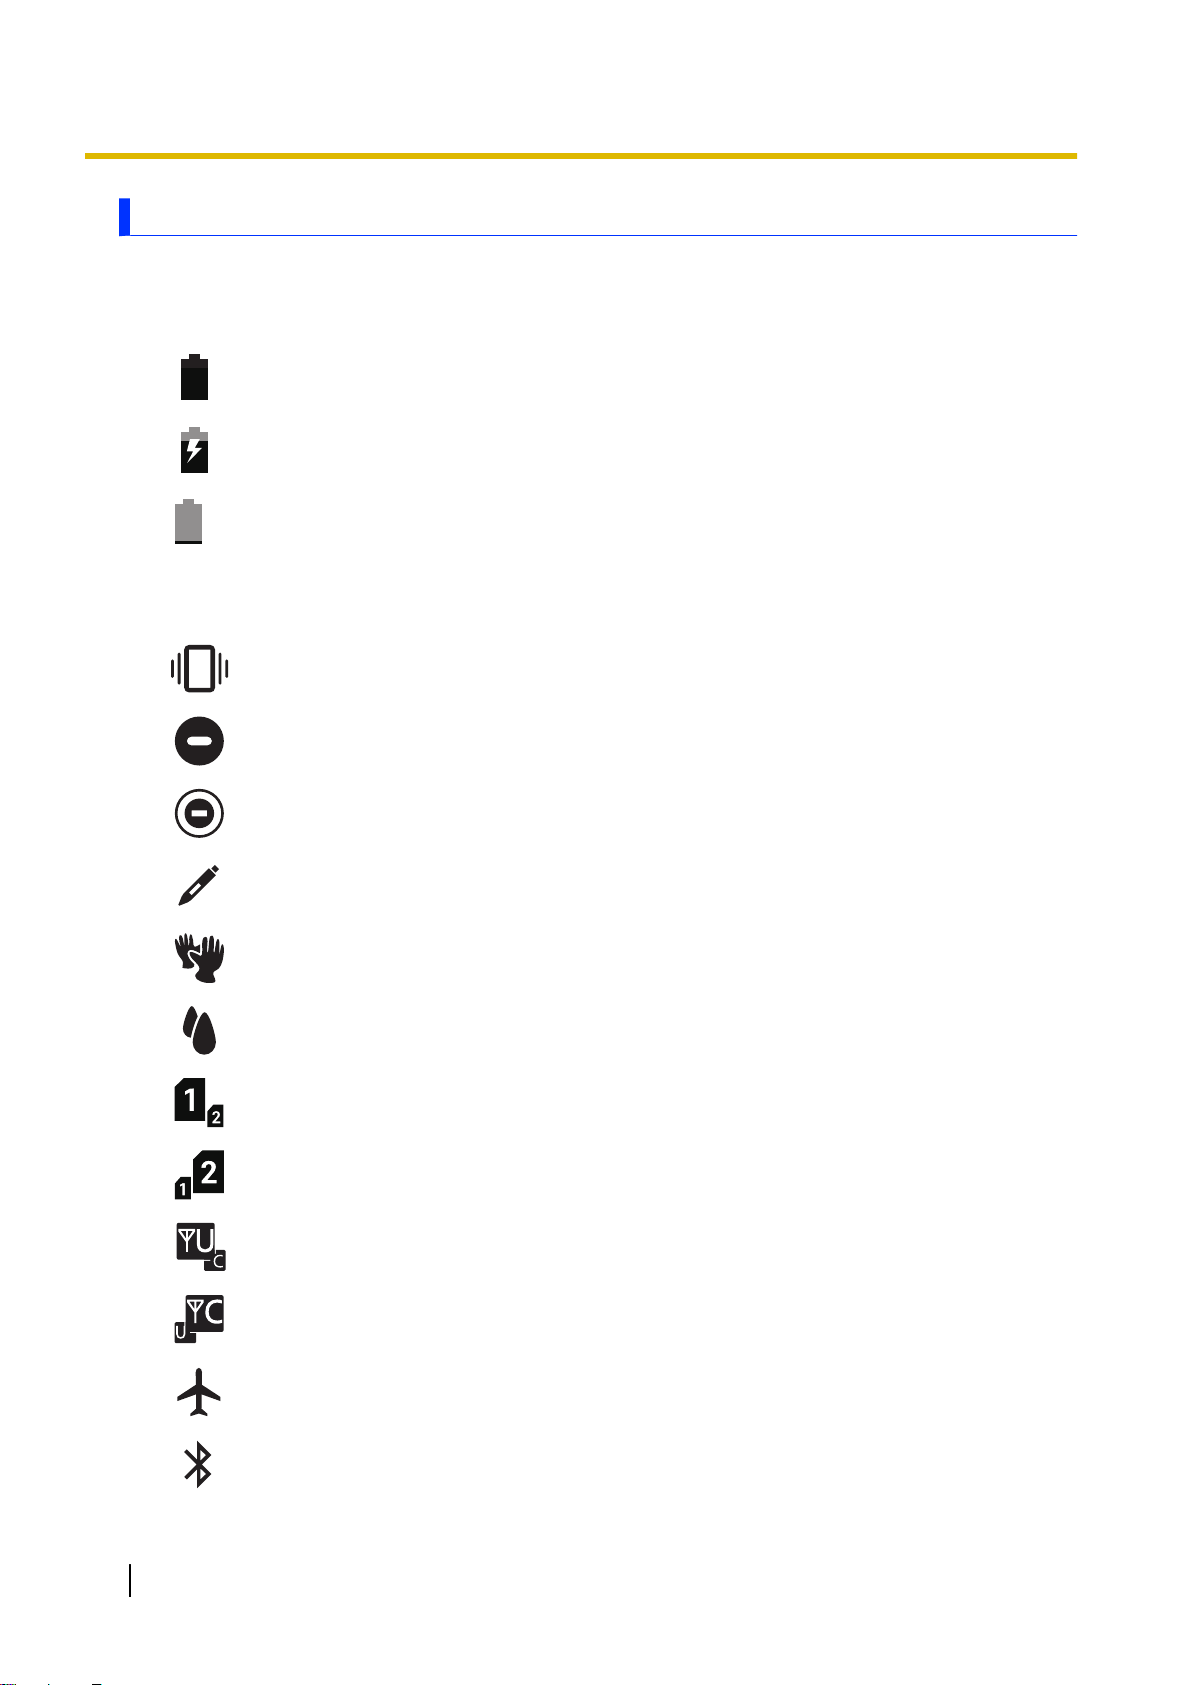
Icons
Status icons
Status icons are displayed in the right side of the status bar. Some commonly displayed icons are explained
below.
Battery is fully charged
Battery is charging
Battery level is very low
*1
You can also use the [Settings] app to view details about battery usage. Swipe up the home screen, and then in the app list,
tap [Settings] ® [Battery].
*1
*1
*1
Vibration mode is active
Do not disturb mode (alarms only/priority only) is active
Do not disturb mode (total silence) is active
Pen mode is active
Glove mode is active
Rain mode is active
SIM slot 1 is active (certain models only)
SIM slot 2 is active (certain models only)
UMTS mobile network mode is active (certain models only)
CDMA2000 mobile network mode is active (certain models only)
Airplane mode is active
Bluetooth is enabled
18 Operating Instructions - Reference Manual
Screen description
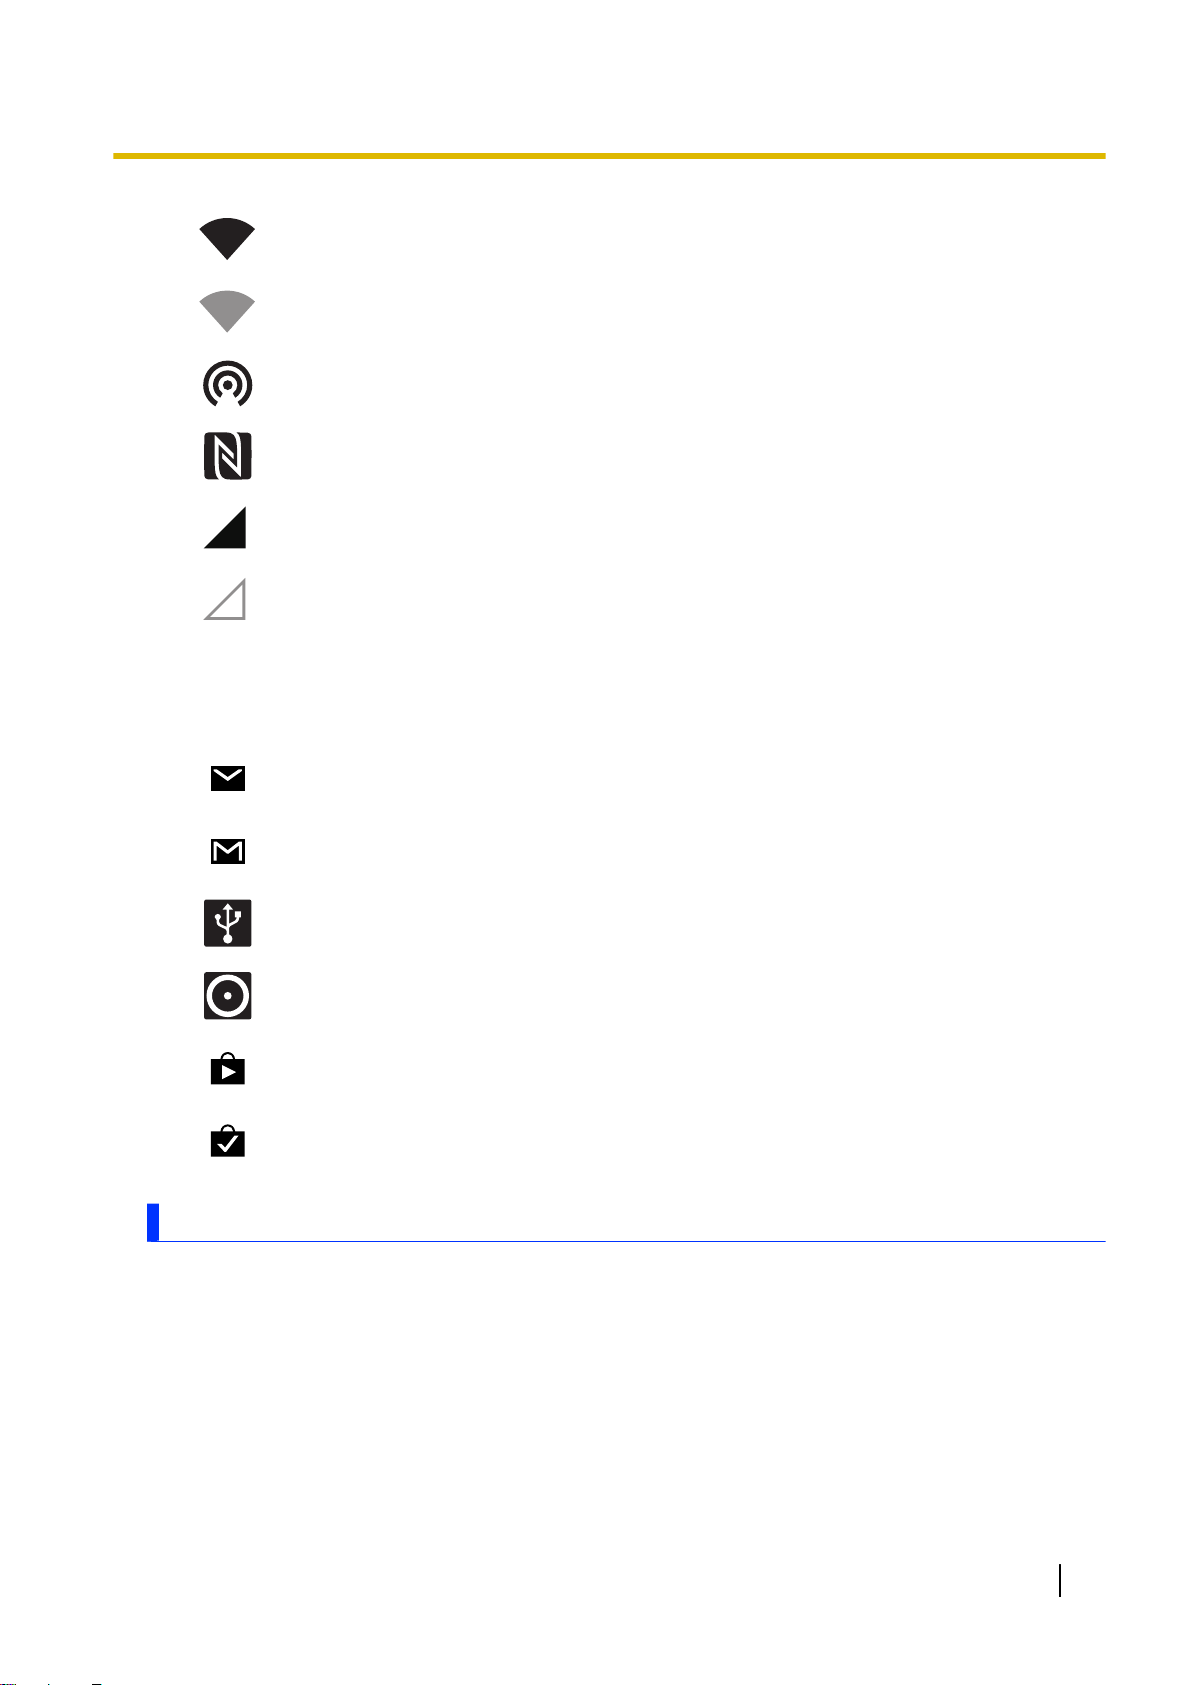
Unit is connected to a Wi-Fi network
Unit is not connected to a Wi-Fi network
Portable Wi-Fi hotspot is active
NFC is active
Unit is connected to a mobile network (certain models only)
Unit is not connected to a mobile network (certain models only)
Notification icons
Notification icons are displayed in the left side of the status bar and in the notifications panel. Some
commonly displayed icons are explained below.
New email received
New Gmail™ received (models with GMS only)
USB tethering is enabled (certain models only)
Multiple tethering methods are enabled (certain models only)
App updates are available (models with GMS only)
App was updated successfully (models with GMS only)
Customizing the home screen
Adding app shortcuts/folders to the home screen
1. Swipe up the home screen, and then in the app list, find the desired app.
2. Tap and hold the desired app, and then move it slightly.
• The screen switches to the home screen.
3. Drag the app and drop it in the home screen.
• A folder will be created if you overlap it with another app. To change the folder name, tap [Unnamed
Folder] while the folder is open.
Operating Instructions - Reference Manual 19

Screen description
Adding widgets to the home screen
1. Tap and hold a blank area in the home screen.
2. Tap [WIDGETS].
3. Scroll to find the desired widget.
4. Tap and hold the desired widget.
• The screen switches to the home screen.
5. Drag the widget and drop it in the home screen.
Moving or deleting items in the home screen
1. Tap and hold the item, and then move it slightly.
2. Drag the item to the desired location (to move) or to [Remove] at the top of the screen (to delete).
Changing the wallpaper in the home screen
1. Tap and hold a blank area in the home screen.
2. Tap [WALLPAPERS].
3. Select the app, and then tap [JUST ONCE] or [ALWAYS].
4. Select an image to set as the wallpaper, and then tap [SET WALLPAPER].
Configuring the home screen
1. Tap and hold a blank area in the home screen.
2. Tap [HOME SETTINGS].
3. Follow the on-screen instructions and configure the desired settings as necessary.
20 Operating Instructions - Reference Manual

Input
Typing and voice input
The unit’s keyboard is displayed automatically when you tap a text entry field or when you are prompted to
enter information. You can type using the on-screen keyboard; in some cases, you can also enter text by
speaking.
Using the keyboard
Changing the default keyboard
1. Swipe up the home screen, and then in the app list, tap [Settings] ® [System] ® [Language &
input].
2. Tap [Virtual keyboard], and then select the desired keyboard.
Changing the keyboard language
1. Swipe up the home screen, and then in the app list, tap [Settings] ® [System] ® [Language &
input].
2. Tap [Virtual keyboard] ® [Manage keyboards], and then select the desired keyboard.
3. Tap
settings according to your needs.
to return to the virtual keyboard list, tap the desired keyboard, and then configure the desired
Input
Using the SwiftKey keyboard (certain models only)
Tap to display the number and symbol keyboard.
Tap to display the additional symbols keyboard.
Tap to display the alphabet keyboard.
Tap to delete the character to the left of the cursor.
Tap to switch between uppercase and lowercase letter entry. Double-tap to enter all caps.
Tap to turn all caps letter entry off.
Tap to enter a comma.
Operating Instructions - Reference Manual 21
 Loading...