

Panasonic F-VXR70H Operating Instructions Manual

Operating Instructions
使用說明書
Humidifying Air Purifier
加濕空氣清新機
Model No.
F-VXR70H
型號
This product is for indoor use only.
本產品為室內專用
Contents Page
Safety precautions ……………… 2
Precautions during installation … 4
Operating conditions …………… 4
Features …………………………… 5
Parts identification ……………… 6
Preparation ……………………… 8
Operating methods ……………… 10
˙Humidification ………………… 11
˙Air volume / Airflow …………… 12
˙PM2.5 / Timer / Child Lock …… 13
˙Housekeeping Assist ………… 14
Care and maintenance ………… 15
˙When idle for a long time …… 15
˙Reference time for
the filter replacement
When the louver comes off ……… 18
When the floater comes off ……… 18
Further information ……………… 19
FAQs ……………………………… 22
Troubleshooting ………………… 24
Service parts ……………………… 25
Specifications …………………… 50
………
15,17
目錄●
安全注意事項………………………26
設置要求……………………………28
使用要求……………………………28
產品特點……………………………29
各部位名稱…………………………30
準備…………………………………32
使用方法……………………………34
●˙加濕………………………………35
●˙風量•氣流………………………36
●˙PM2.5•定時•兒童安全鎖●…37
●˙輕鬆家務…………………………38
維護保養……………………………39
●˙長期不使用時……………………39
●˙更換過濾網的參考時間…… 39,41
導風板移位時………………………42
浮子移位時…………………………42
更多訊息……………………………43
常見問題解答………………………46
故障排除……………………………48
自選配件……………………………49
規格…………………………………50
頁
確認與準備
preparation
Confirmation and
使用方法
methods
Operating
維護保養
Care and
maintenance
其他資訊
When you feel confused
Warranty Card attached
Thank you very much for purchasing this Panasonic product.
Please read these operating instructions carefully before operation and maintenance.
●
Also, be sure to read the “Safety precautions” section (P.2 to 4) before use.
●
Failure to comply with instructions could result in injury or property damage.
●
Make sure that the correct information is written on the warranty card, including the date of purchase and the name
●
of the distributor. Keep the warranty card in a safe place along with the operating instructions for future reference.
另附保證書
感謝您選購Panasonic產品。
●●使用和維護產品前,請仔細閱讀本使用說明書。
●使用前,請務必先閱讀“安全注意事項”(第26至28頁),以確保安全使用。
●●不遵照本說明書進行操作有可能導致受傷或財產損失。
●●請確認保證書中已填寫“購買日期、經銷商名稱”等信息後,將其與使用說明書一同進行妥善保管。
Safety precautions
If the supply cord is damaged, it must be replaced by the manufacturer, its service agent or similarly qualified
●
persons in order to avoid a hazard.
This product is not intended for use by persons (including children) with reduced physical, sensory or mental
●
capabilities, or lack of experiences and knowledge, unless they have been given supervision or instruction
concerning use of the product by a person responsible for their safety.
Children should be supervised to ensure that they do not play with the product.
●
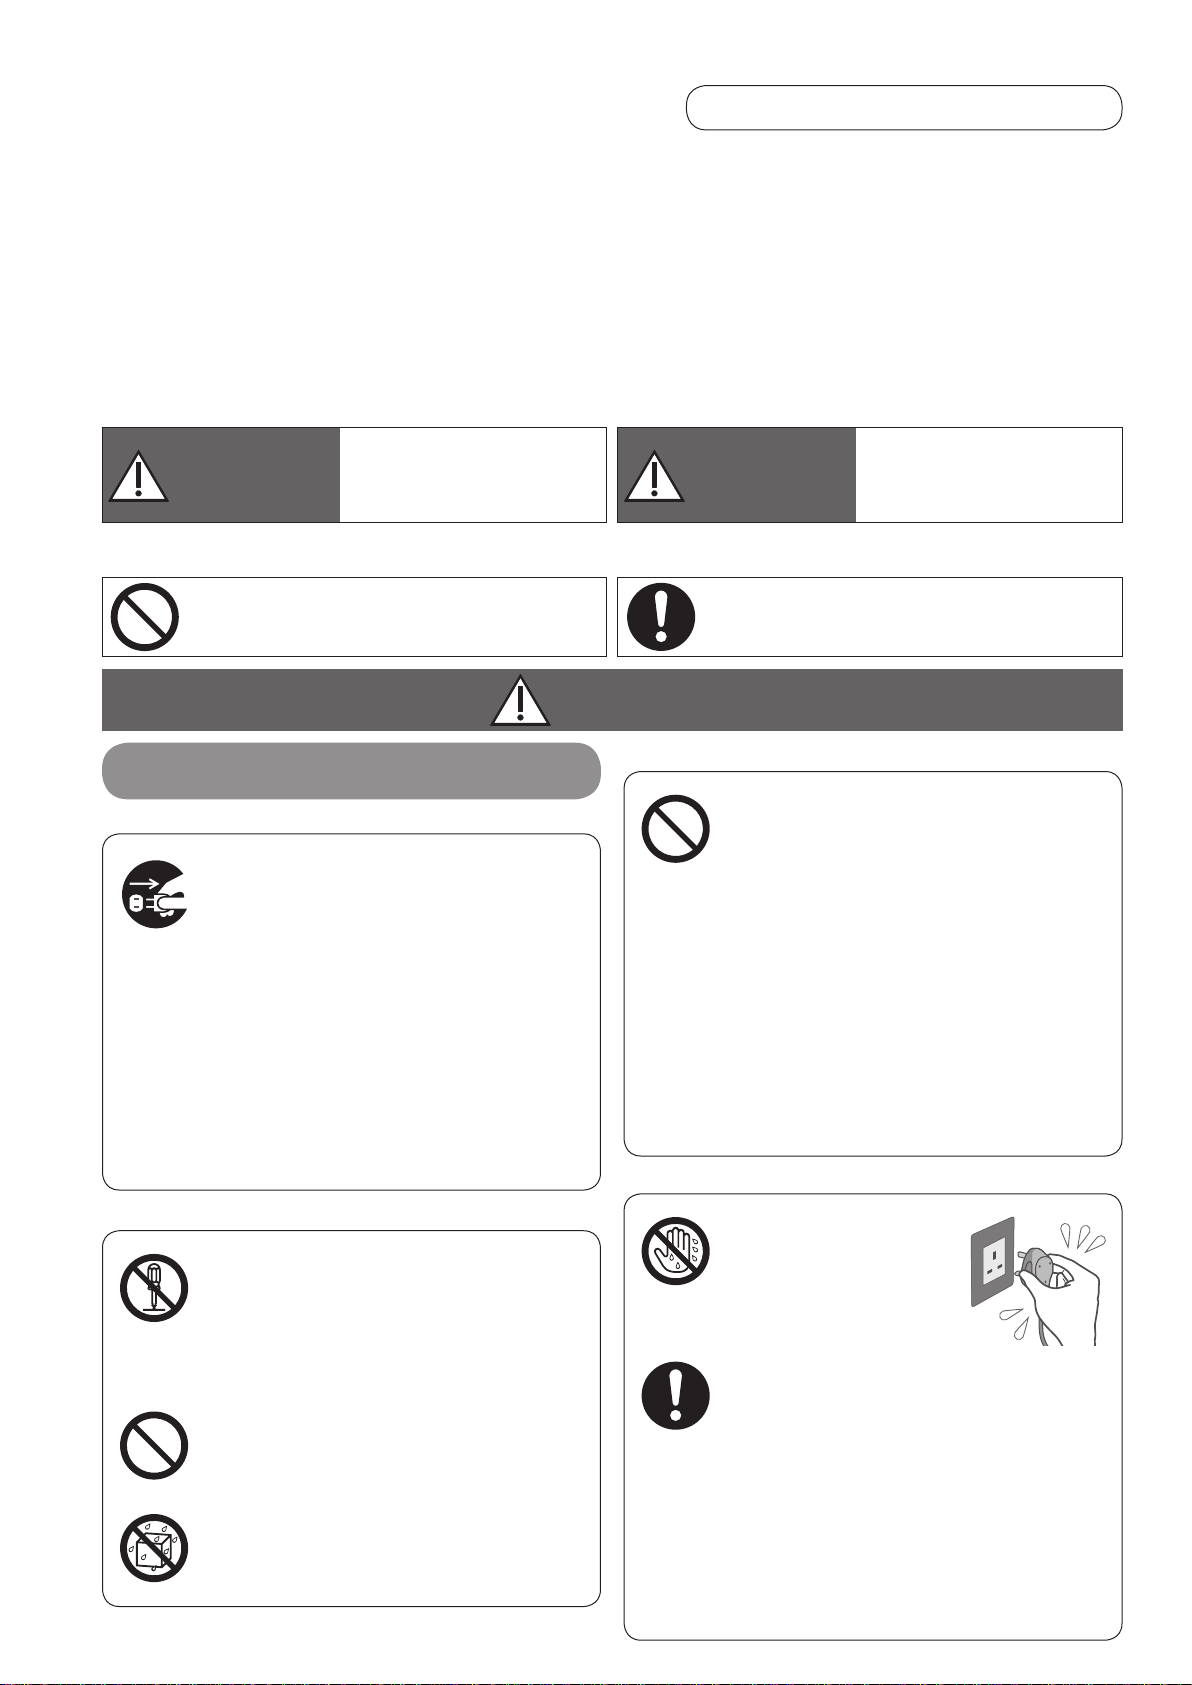
Be sure to disconnect the power plug before cleaning and water supply the product.
●
For cleaning and descaling see “Care and maintenance” and regarding filling (water supply) see “Preparation”.
●
These safety precautions are provided for your protection. Please read and follow them carefully to avoid personal
injury or damage to the product itself or other properties.
Always observe these precautions
■The following symbols differentiate the levels of danger and injury that may result if the product is not
used correctly as instructed.
This symbol indicates that
improper handling may cause a
risk of injury or damage to the
product or to your properties.
WARNING
This symbol indicates that
improper handling may cause
a risk of death or serious injury.
CAUTION
■This manual uses a number of other symbols to indicate additional information.
(The symbols given below are examples.)
This symbol indicates an action that must not
be performed.
WARNING
■Power plug or power cord
To prevent accidents such as fires and electric shocks
■In case of an abnormality or malfunction
■
In case of any problem or failure,
stop using the product immediately
and disconnect the power plug.
(Otherwise, electric shock, fire or smoke may
occur.)
<Example of problem/failure>
• Water leakage
• Moving the power cord stops operation.
• Abnormal noise or vibration is observed
during operation.
• The product becomes abnormally hot or
burning smell is observed.
→
Immediately stop operation, disconnect the
power plug and contact the dealer for a
check or repair.
■The power plug
This symbol indicates an action that must be
performed.
■Do not use in a way exceeding the
rating of the power socket or
wiring, or with power sources
other than 220 V 50 Hz.
(If the socket is overloaded, fire due to
overheating may occur.)
■
Do not do anything that may damage
the power cord or power plug.
• Power cord must not be damaged, modified,
bend excessively, twisted or pulled. Also do
not put near heating appliances, or put
anything heavy on. Do not bundle.
(Short-circuit may occur and cause electric
shock or fire.)
Please contact the dealer for repair.
2
■The product
■Do not disassemble or modify this
product.
(Disassembling or modifying the product may
result in ignition or electric shock and fire due
to malfunction.)
Please contact an authorized service center
for repair.
■Do not insert your fingers, metal
objects or others into the air inlet,
air outlet or gaps.
(May cause injury and electric shock.)
■Do not let the product get wet.
(Otherwise, a fire or electric shock may be
caused due to wire breakage or short-circuit.)
■Do not touch the
power plug with wet
hands.
(Electric shock may occur.)
■Insert the power plug thoroughly.
(If the power plug is not inserted securely, electric
shock or fire due to overheating may occur.)
•
Do not use damaged plugs or loosen sockets.
■Periodically clean the power plug.
(If dust builds up on the power plug, it may
absorb moisture causing poor insulation,
which may result in fire.)
• Disconnect the power plug and wipe it with
a dry cloth.
•
If not using the product for a long period,
disconnect the power plug.
WARNING
■Moving the product
■
Do not pull the power cord when
carrying or storing away the product.
(It may damage the power cord, short-circuit
may occur and cause electric shock or fire.)
■Do not damage the power cord
with wheels.
(The damage may cause an electric shock, power
cord overheated or a fire.)
■Installation
■Do not put the product in the
following places:
An unstable place.
●
(Otherwise it may drop down or fall over,
then cause injury, wet the furniture,
leakage, electric shock or fire.)
Where the temperature or humidity is
●
too high, or where the product is
exposed to water, such as a bathroom.
(Electric leakage may cause electric shock or fire.)
Where oil is contained in the air, such
●
as in kitchens.
(Otherwise, injury may be caused due to cracks.)
Where oil or inflammable gas is
●
present and may be leaked.
(Otherwise, ignition may occur, or the product
may suck and cause a fire or smoke.)
Where animals or plants are directly
●
exposed to the air.
(Cause of dehydration due to wind)
Where the wind from air outlet is
●
directly applied to furniture or wall.
(Stains may be caused.)
■The product
■
Be sure to always keep the water in the
tank and interior of the product clean.
If the interior is contaminated by dirt or
incrustation,
•
Water leakage may occur.
•
A foul odor may occur due to mold or bacteria.
•
Contamination may harm human health
(though it is rare).
( When you feel uncomfortable, please
consult a doctor at once.)
• Replace the water in the tank with new tap
water every day.
• Clean the interior of the product periodically.
■Removing the power plug
■When disconnecting the power
plug, grasp the power plug
instead of the power cord.
(Otherwise, a fire or electric shock may be
caused due to wire breakage or short-circuit.)
■Care and maintenance
CAUTION
■Moving the product
■Operating the product
■Be sure to disconnect the power
plug before cleaning the product.
(The product may start operating unexpectedly
and electric shock or injury may occur.)
■Stop operation, remove
the tank and dispose of
the water in the tray.
(If there is water leakage, the
furniture may be wet.)
■Hold the handles when lifting and
moving the product.
(Otherwise it could be slipped out and result
in minor injury.)
■When carrying the product, do not
hold the louvers or front panel.
(Otherwise it could be slipped out and result
in minor injury.)
Moving with wheels
■Release the fixed hook locks and
move the product slowly sideways
so that it is not at an angle.
(Moving the product
without releasing the
fixed hook locks may
cause an injury or the
product to topple over.)
“UNLOCK”
( Move the
fixed hook
up.)
Fixed hook
■Lift the product when moving it on
a thick carpet.
(Failure to do so may cause damage to the carpet.)
■Do not move in any
direction other than
sideways.
(It may cause damage to the
floor, carpet, straw mats or
other surfaces.)
■Ventilate the room if using this
product together with a
combustion equipment.
(Otherwise carbon monoxide poisoning may
occur.)
•
This product cannot remove carbon monoxide.
VXR70H
preparation
Confirmation and
3
Safety precautions
CAUTION
■Do not perform the following
■
Do not use cracked or damaged tank.
(If there is water leakage, the furniture may
be wet.)
■
Do not put chemicals, air fresheners,
or essential oil into the tank and tray.
(It may damage the tray and wet the furniture.)
■
Do not clean the product with
solvents such as benzine or thinner,
and do not apply insect sprays.
(This product may become cracked and injury
may occur. This may cause spillage and wet
the furniture, or short-circuit may occur and
cause electric shock or fire.)
(continued)
■
Do not operate this product in places
when using smoke insecticide.
(Chemical residue may build up inside the
product and be discharged from the air
outlet, resulting in a health hazard.)
• Ventilate the room well after using
insecticides before operating the product.
■
Do not sit or lean against this product.
(Otherwise, injuries may be caused.)
• Special attention should be paid when the
product is used at home with small children.
■Do not push over this product.
(A fire or electric shock may be caused if
water spills out.)
■
Do not put flammable substances
or burning items such as cigarette
or incense near the product.
(Fire may occur.)
Precautions during installation
■Do not put the product in the following places:
Where the product will be exposed to direct
●
sunlight or direct blowing/heat of air conditioner.
(Otherwise, deformation, deterioration,
discoloration or malfunction may be caused.)
Near the window or where the humidity sensor
●
area is blocked.
(It may cause of the humidity sensor not operating
correctly.)
Near a TV set or radio.
●
(Otherwise, distortion or noises may be caused.)
→
Keep 1 m or more away from such devices. If
the power plug is inserted into the same socket
as that of these devices, distortion or noises
may be caused. In this case, insert the power
plug into another socket.
It would be effective
if placed here!
■Place it low on the floor as a countermeasure
against pollen.
Since pollen and dusts are likely to float in the
air near the floor, we recommend you put the
product on the flat floor in the room.
■To circulate the air efficiently around in the
room.
To prevent the air inlet or the air outlet from
being blocked, install the product with its right,
left and the top about 30 cm or more away from
walls or furniture, curtains etc. To ensure
efficient use of the product, keep its back at
least 1 cm away from the wall.
Operating conditions
4
■Do not place any objects on the product.
(Otherwise, malfunction or failure may be caused.)
Do not place magnets, metallic objects or similar
●
objects on the product.
(Otherwise the built-in magnet detects turnover
causing the “Check indicator” to light up,
which will stop operation of the product.)
■When there is a risk of freeze, please empty the
tank and tray.
(If the product operates with water frozen, failure
may be caused.)
■When using the product in the same area for
extended periods of time
Using the product continuously in one location may
cause the wall, floor or other areas around the
product to become dirty due to the air sucked in at
the bottom of the product.
We recommend to move the product to a different
location occasionally or clean the wall, floor or other
areas regularly.
Features
“Mega catcher” and humidifying function bring clean and
moisturizing air.
■Sensors identify dirt in the air, and the front panel opens widely to suck in air intensively from
the bottom
■A “Human activity sensor” pre-starts operation and collects dust quickly to prevent dirt from
spreading around the room
■Equipped with nanoe
®
technology
■Measure against PM 2.5
Catches99%oftheparticleshavingasizeof0.1to2.5μm
New particles coming from the outdoor by ventilation etc. are not calculated.
*1 Test method:
Japan Electrical Manufacturers' Association voluntary standard
(HD-128)
Criteria: The time to remove 99% of the particles having a size of 0.1 to
2.5μminaclosedspaceof32m3 is within 90 minutes. (It is a
value converted for the test space of 32 m3.)
■About “Mega catcher”
The sensor detects dirt in the air (P.22), which
causes the front panel to open widely to suit the type
and concentration of dirt in the air, and product will
operatewithappropriateairow.
(P.20Typeofairow)
Throughout the room
Odor, smoke
Airflow for
odor, smoke
Near the floor
House dust such as
mites, dust and other
(dead bodies and excreta)
Airflow for
house dust
PM 2.5 is a generic term for fine particulate matters having a size of
●
*1
2.5μmorless.
It has not been confirmed that this product removes fine particulate matter
●
oflessthan0.1μm.Inaddition,itisnotmentionedthatthisproduct
removes all of the harmful substances in the air.
The result is of a test in closed space of 32 m3, instead of in actual
●
application space.
■“House Purifying airflow” cleans dust in the
air during absence. (P.20)
Reducesdustthatfallstotheoorbyapproximately70%*2
(It cannot clean dust that has already built up.)
*2
Product operated while placed next to the wall of an approximately 23 m3
test room. Dust is generated in the center of the room, and the weight of
dust adhered to the HEPA composite filter after 1 hour is measured and
used to calculate the weight of dust falling on the floor. Comparison of
weight of generated dust and weight of dust falling on the floor.
Operating in “House Purifying” mode with no people present. Evaluated by
the test method of Panasonic own. These values are a guided only, the
effect is different depending on the installation environment and the usage.
■“Clothes Deodor.” mode deodorizes the
clothes difficult to wash.*
The deodorizing effect differs according to the surrounding
environment (temperature / humidity), operation time, or type
of odor / textile.
*3 Testing organization:
Test method: Conduct verification using six grades odor intensity
Deodorizing method: Emitting nanoe
Test outcome:
ENVIRONMENTAL CONTROL CENTER CO., LTD.
measurement method. Located 40 cm away from
the air outlet in the test chamber of 23 m3.
Target: Attached cigarette odor, barbecue odor
<cigarette odor> odor intensity drops 2 grades within
<barbecue odor> odor intensity drops 1 grade within
3
®
in “Clothes Deodor.” mode
60 minutes. [H117249002000DA]
60 minutes. [H117249002001DA]
■“ECONAVI” mode makes electric utility
expense cheaper.
It saves power by stopping operation automatically when
the air is clean. Meanwhile, the product will operate in
advance to eliminate the dirt effectively before spreading,
thus reducing the operation time.
■About “Light sensor mode”
The product detects the indoor brightness with the “Light sensor”
and controls the brightness of indicators or the front indication of
the control panel and air volume automatically. (P.21)
preparation
Confirmation and
■About the “Human activity sensor”
The product detects movement by people and pets,
and automatically controls the air volume. It
predicts house dust floating around and starts
operation before the air in the room becomes dirty.
(With “Air volume” setting to [Auto])
(Not all pets can be detected.)
Detection image
(It detects movement in the area in front of the product.)
VXR70H
5
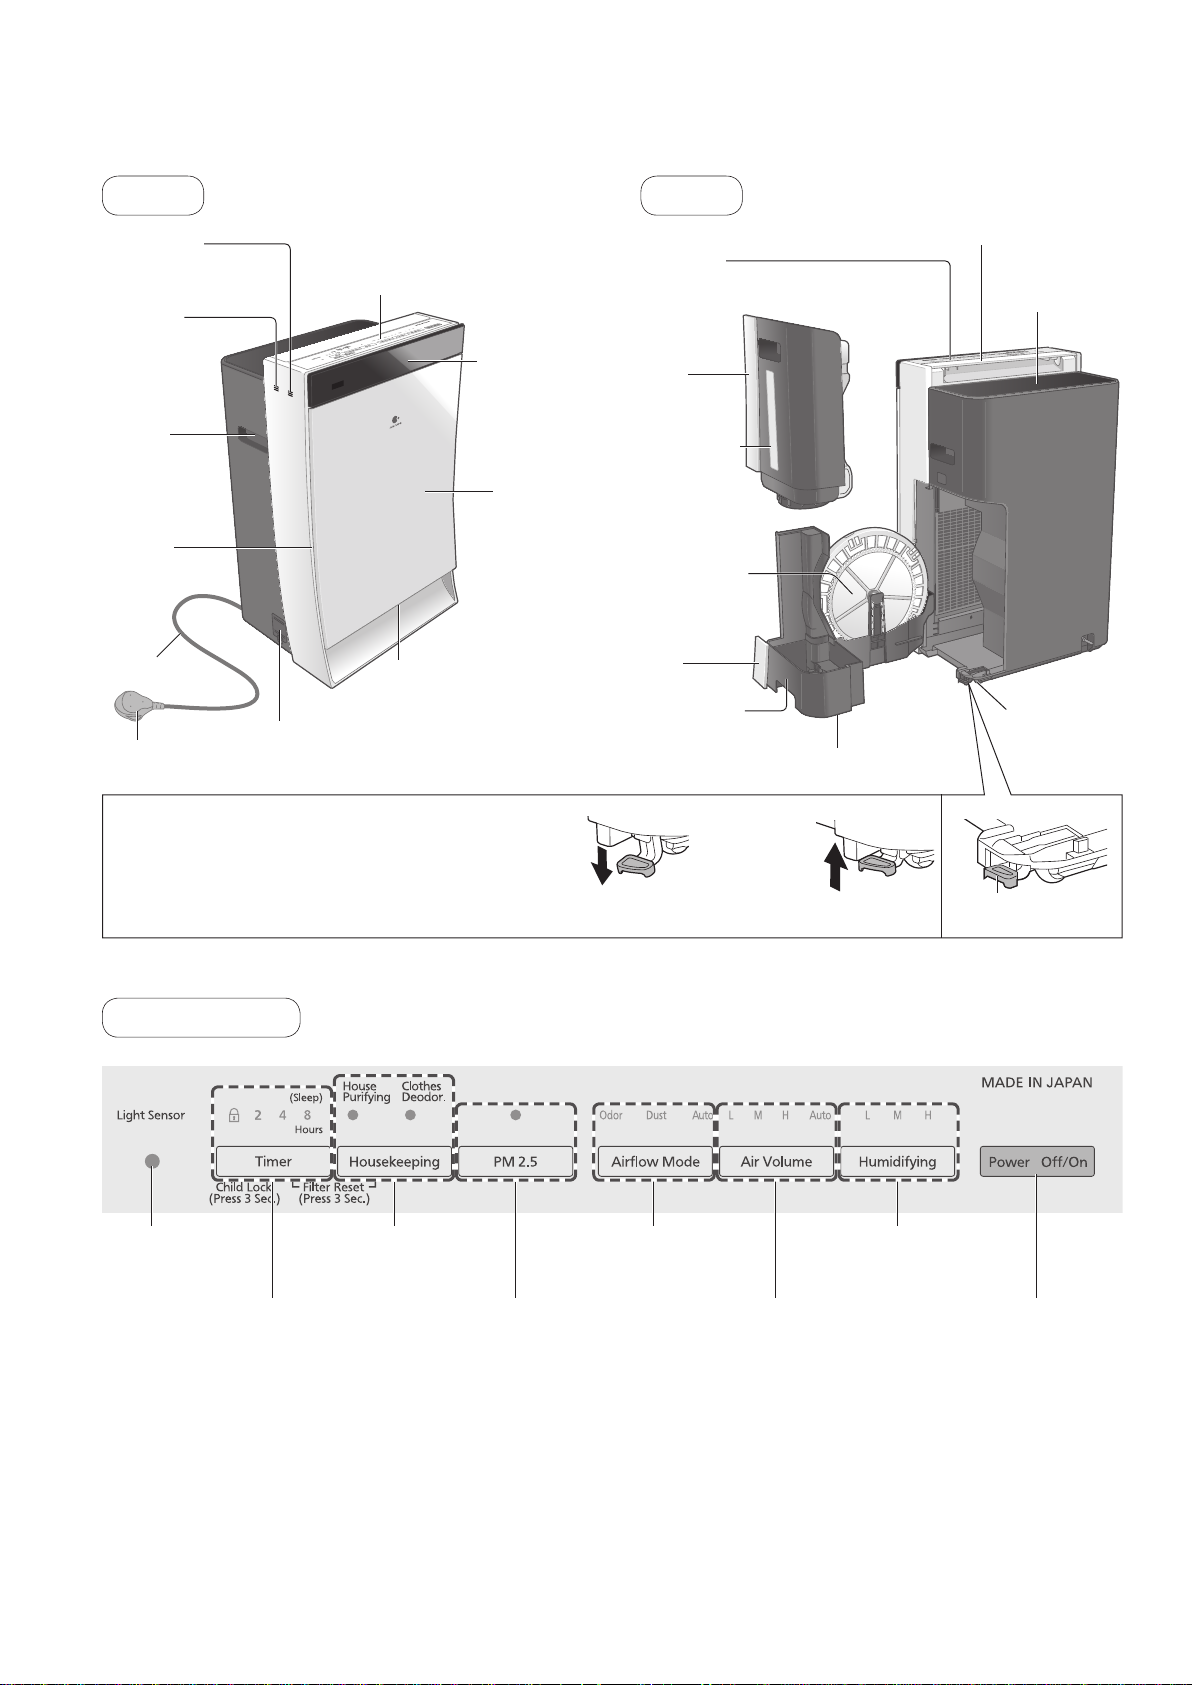
Parts identification
“LOCK”
“UNLOCK”
Front
Odor sensor
Humidity
sensor
Handle
(right and left)
Air inlet
(both sides)
Power cord
Power plug
Control panel
Dirt sensor
Front indication
(P.7)
Air inlet (front)
Front panel
Back
Air outlet
(nanoe® emission outlet)
Tank
Water-level
window
Humidifying
filter set
Tray
Anti-fungus
assembly
(inside)
Floater (inside)
Front louver
Rear louver
Wheels
(bottom: 4)
■Locking the wheels
Lower the fixed hook.:“LOCK”
●
Raise the fixed hook.:“UNLOCK”
●
(The product may move even if the wheels are locked on slippery surfaces.)
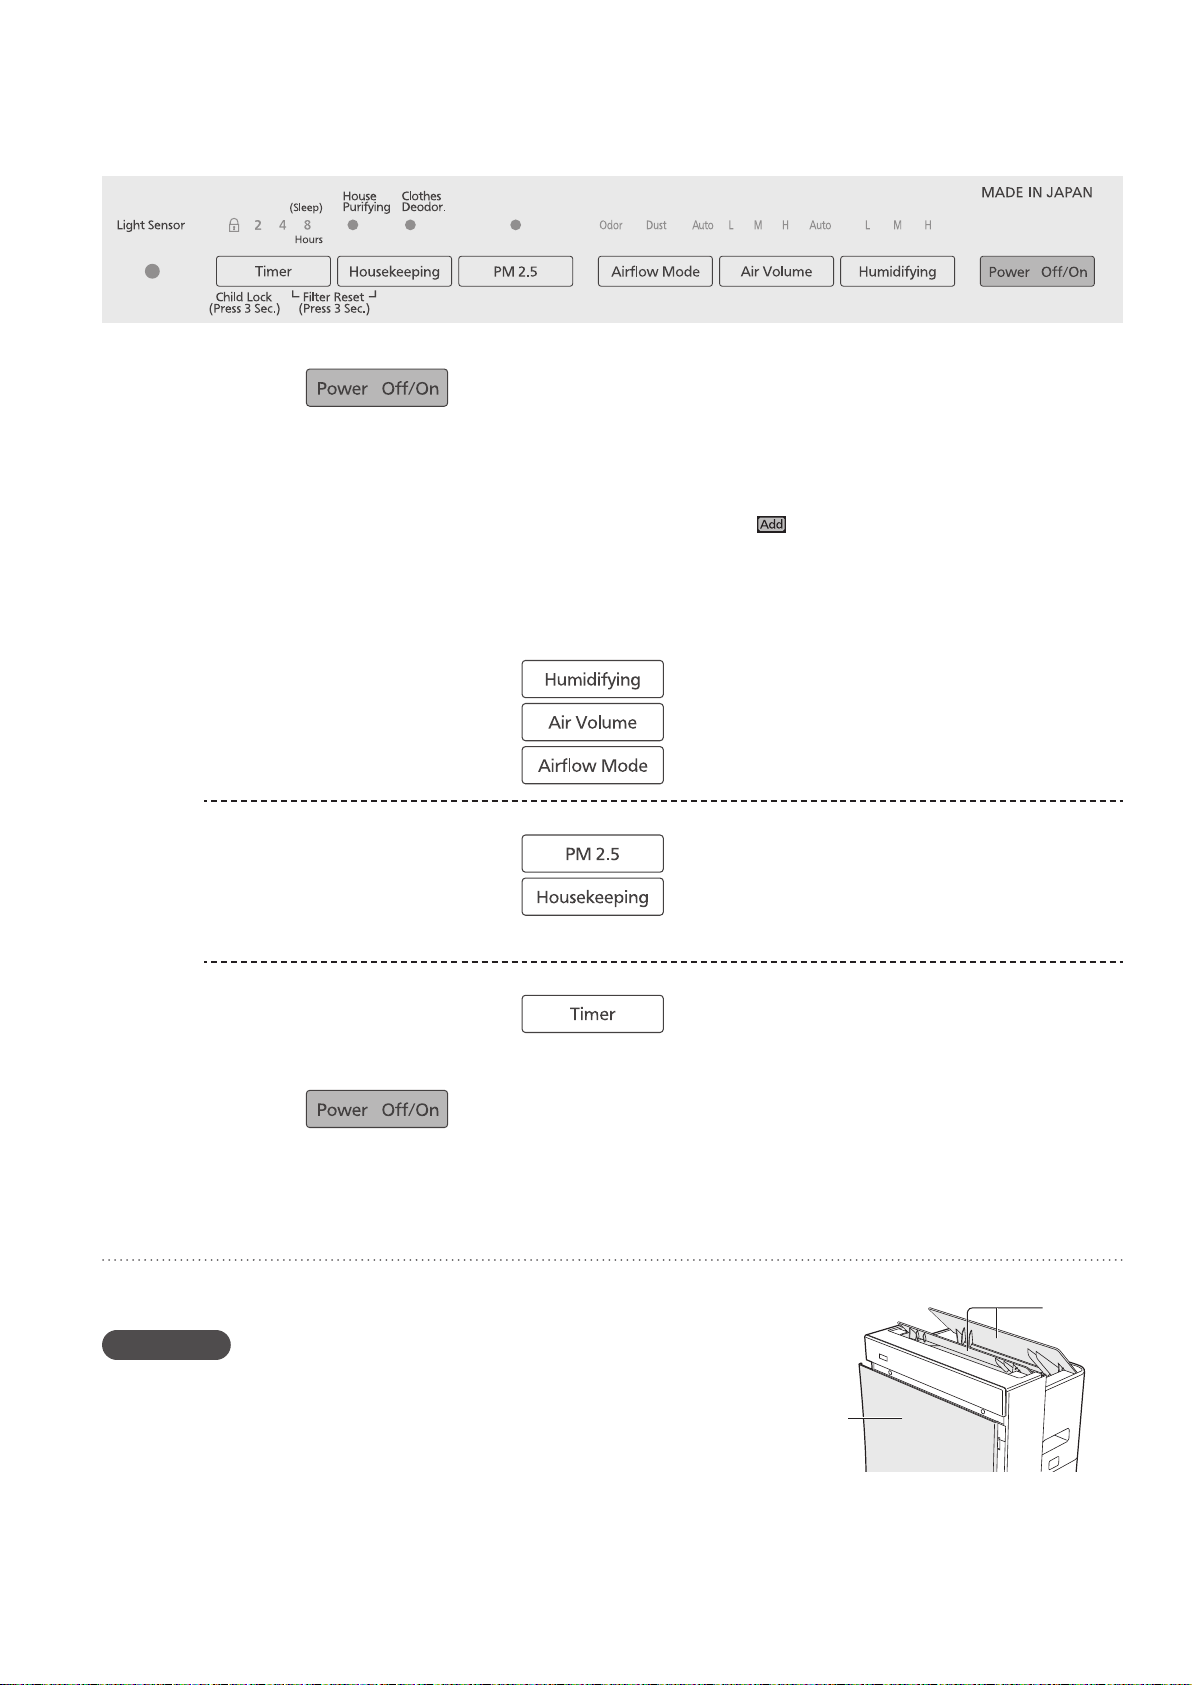
Control panel
Light sensor
button / indicator
Housekeeping Assist
button / indicator
PM 2.5 button / indicatorTimer (Child Lock)
(Move the fixed
hook down.)
Airflow button / indicator
(Move the fixed
hook up.)
Humidifying button /
indicator
Air Volume button /
indicator
Fixed hook
Power Off / On
button
6
■Light sensor
Detecting indoor brightness with the “Light sensor”, the product adjusts the brightness of indicators and the front
indication of control panel and adjusts the air volume, automatically. When the room becomes dark, for example
during sleep, the product operates “Light sensor mode”. (P.21)
(The air volume changes automatically only when the “Air volume” is set to [Auto].)
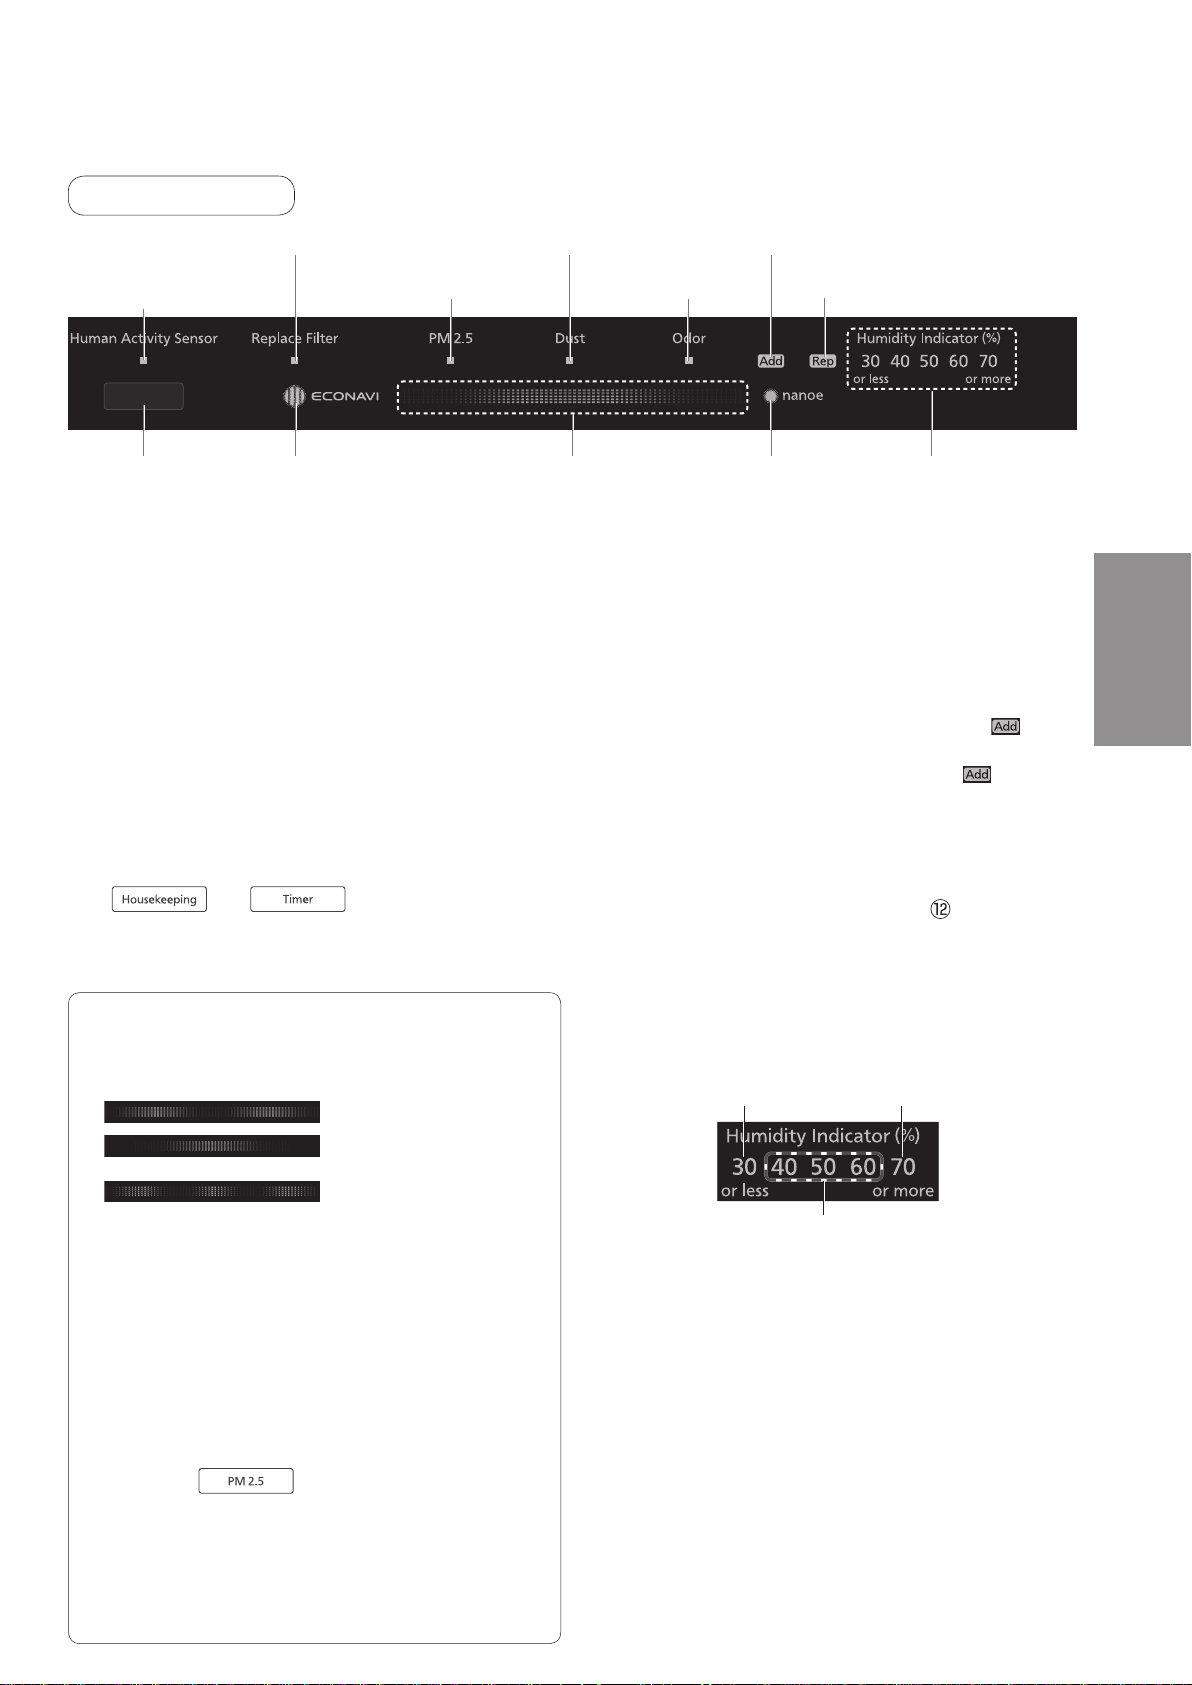
Front indication
Filter replacement notification indicator
Human activity sensor
indicator
Human activity
sensor
PM 2.5 detection indicator
Dust indicator
■Human activity sensor (P.5)
Detects and notifies the actions of people with a sign
(the indicator lit).
The sensitivity of the sensor can be changed. (P.23 Q13)
■ECONAVI indicator
The indicator is lit during ECONAVI mode (P.21).
●
ECONAVI mode can be turned off. (P.23 Q17)
●
■ Filter replacement notification indicator
The replacement timing for the HEPA composite
●
filter and deodorizing filter are notified with the
indicator lit. When the indicator turns on, it is time to
replace the HEPA composite filter and deodorizing
filter, so please replace the filters. (P.8 to 9)
After replacing the filters, press and hold
and simultaneously for
3 seconds to reset the product. (The indicator is
turned off.) If the product is not reset, it will stop
operating 1 week after the indicator turns on.
The “Clean sign” notifies how dirty the air is, and each
sign indicates the type of dirt present.
The sensitivity of the sensor can be changed. (P.22 Q8)
■ Clean sign
(Blue): indicates the air is clean.
Water supply indicator
Odor indicator
■nanoe
®
indicator
The indicator is lit when nanoe® is generated.
●
(It turns on in all operating modes.)
nanoe® operation can be turned off. (P.23 Q18)
●
Check indicator
Humidity indicatornanoe® indicatorClean signECONAVI indicator
■Water supply indicator
If there is no more water in the tank when
●
humidification is set, a beeping notification sound is
emitted and the “Water supply indicator” blinks.
→
Fill the tank with water. (P.9)
●
When the “Water supply indicator” is blinking,
the product operates without any humidification.
■Check indicator
When the abnormality occurs in the products, the
●
indicator is lit.
→
When the indicator is lit. (P.25 )
■ Humidity indicator
The indicators are lit even when operation is stopped.
●
(The displayed humidity is just an approximate value,
which may differ from the figure displayed on your
hygrometer.)
Low humidity
(Lit red)
High humidity
(Lit red)
preparation
Confirmation and
(Red·1): indicates the air is
slightly dirty.
(Red·3): indicates the air is
dirty.
■PM 2.5 detection indicator
PM 2.5 detection is indicated by the indicator
turning on or flashing.
(PM 2.5 includes cigarette smoke, dust and other
contaminantsof2.5μmorless.)
The “PM 2.5 detection indicator” turns on when
●
PM 2.5 is detected in the air in the room. If the
concentration level of PM 2.5 is high, the “PM 2.5
detection indicator” flashes, and an audible alarm
(ping ping ping) will beep during operation.
●
To immediately remove PM 2.5,
press . (P.13)
■Dust indicator
It turns on when dust is detected.
■Odor indicator
It turns on when odors are detected.
*
Depending on the dirt present, only the “Clean sign”
may turn on red without any other indicator turning on
Appropriate humidity (Lit green)
.
VXR70H
7
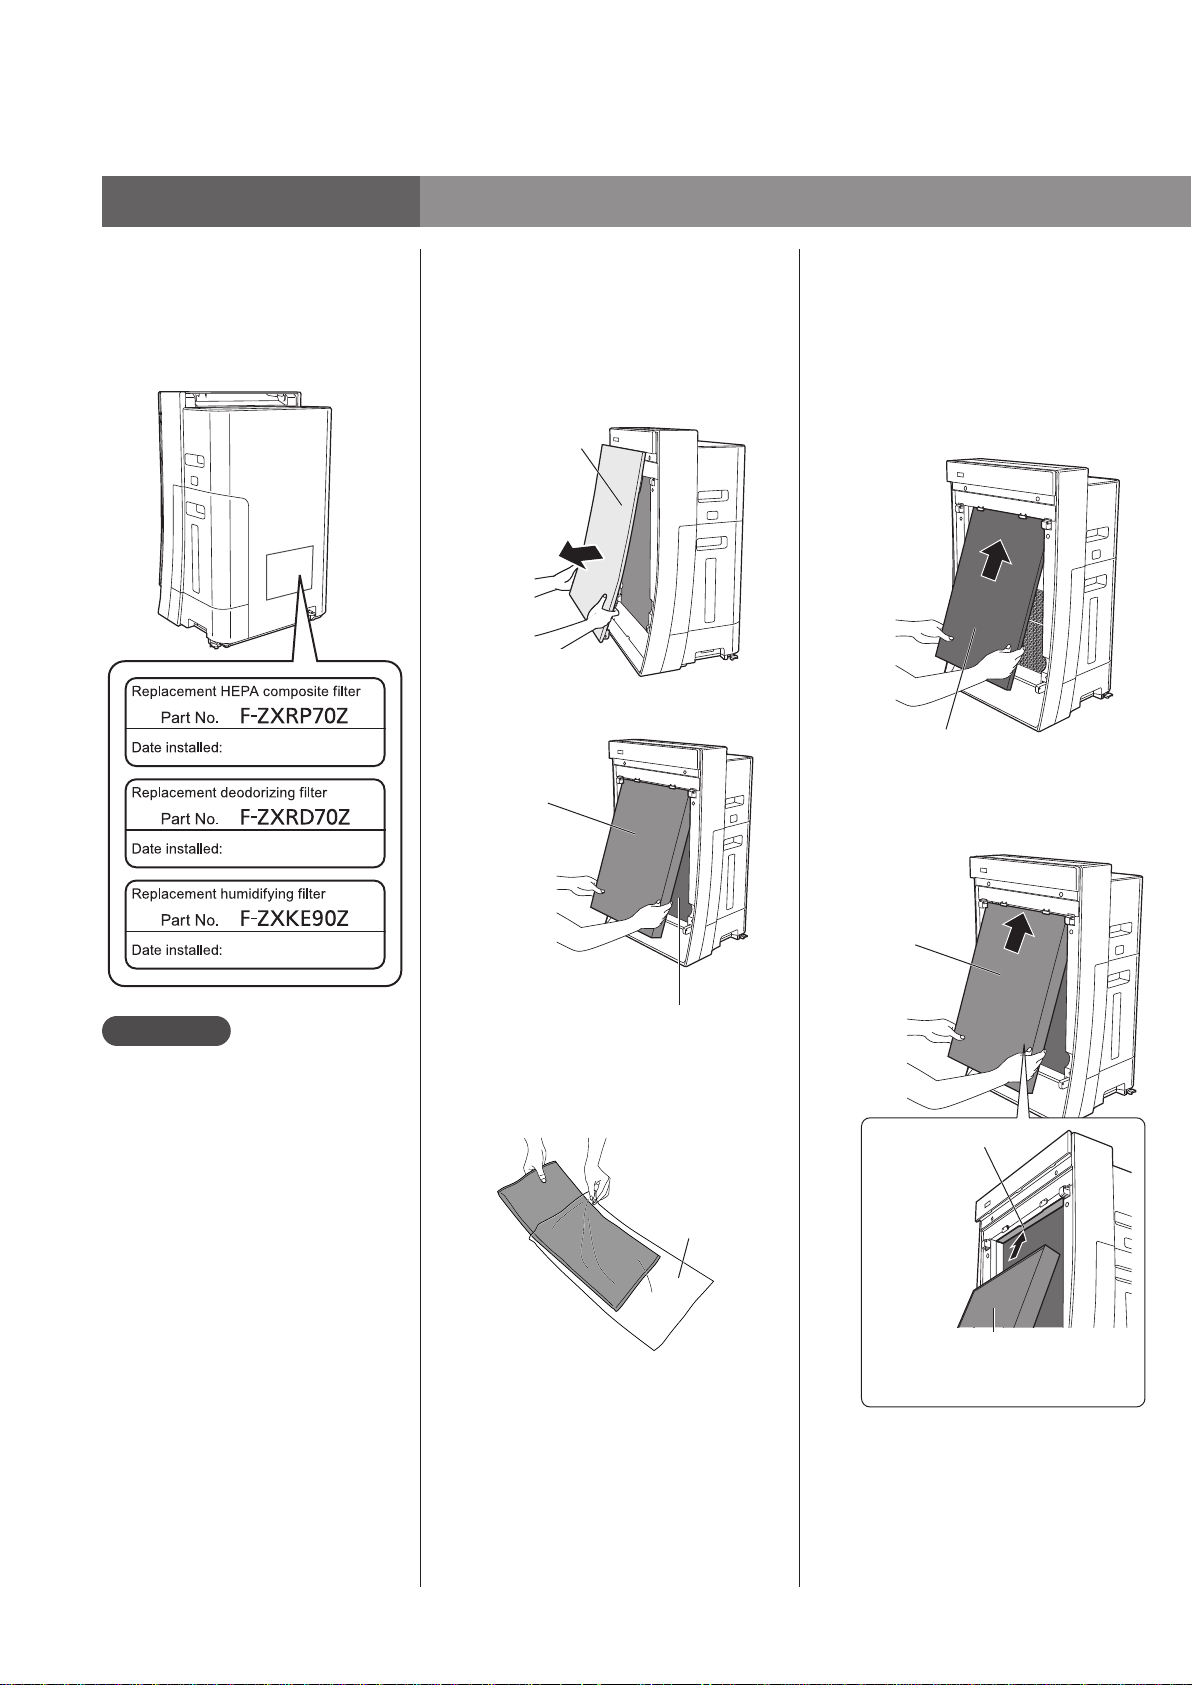
Preparation
Before startup Install the filters
1
Write down the
installation date
in the label.
Remove the
deodorizing filter
2
1
2
from the poly bag.
Remove the front panel.
Front panel
Pull it
forward
with both
hands.
Remove the filters (2 types).
HEPA
composite
filter
Install the filters
(2 types) and the
3
1
2
front panel.
Install the deodorizing filter.
(It can be installed in any direction.)
Deodorizing filter
Install the HEPA composite filter.
(Install in the correct direction.)
Attention
Be sure to read P.2 to 4
●
before installation.
Pull it forward
with both hands.
Deodorizing filter
(Wrapped in black net.)
3
Remove the deodorizing filter from
the poly bag.
Poly bag
* Do not remove the black net of the
deodorizing filter.
HEPA
composite
filter
Concave
portion
Place the “FRONT” side
forward and place into the
concave portion of the product.
8
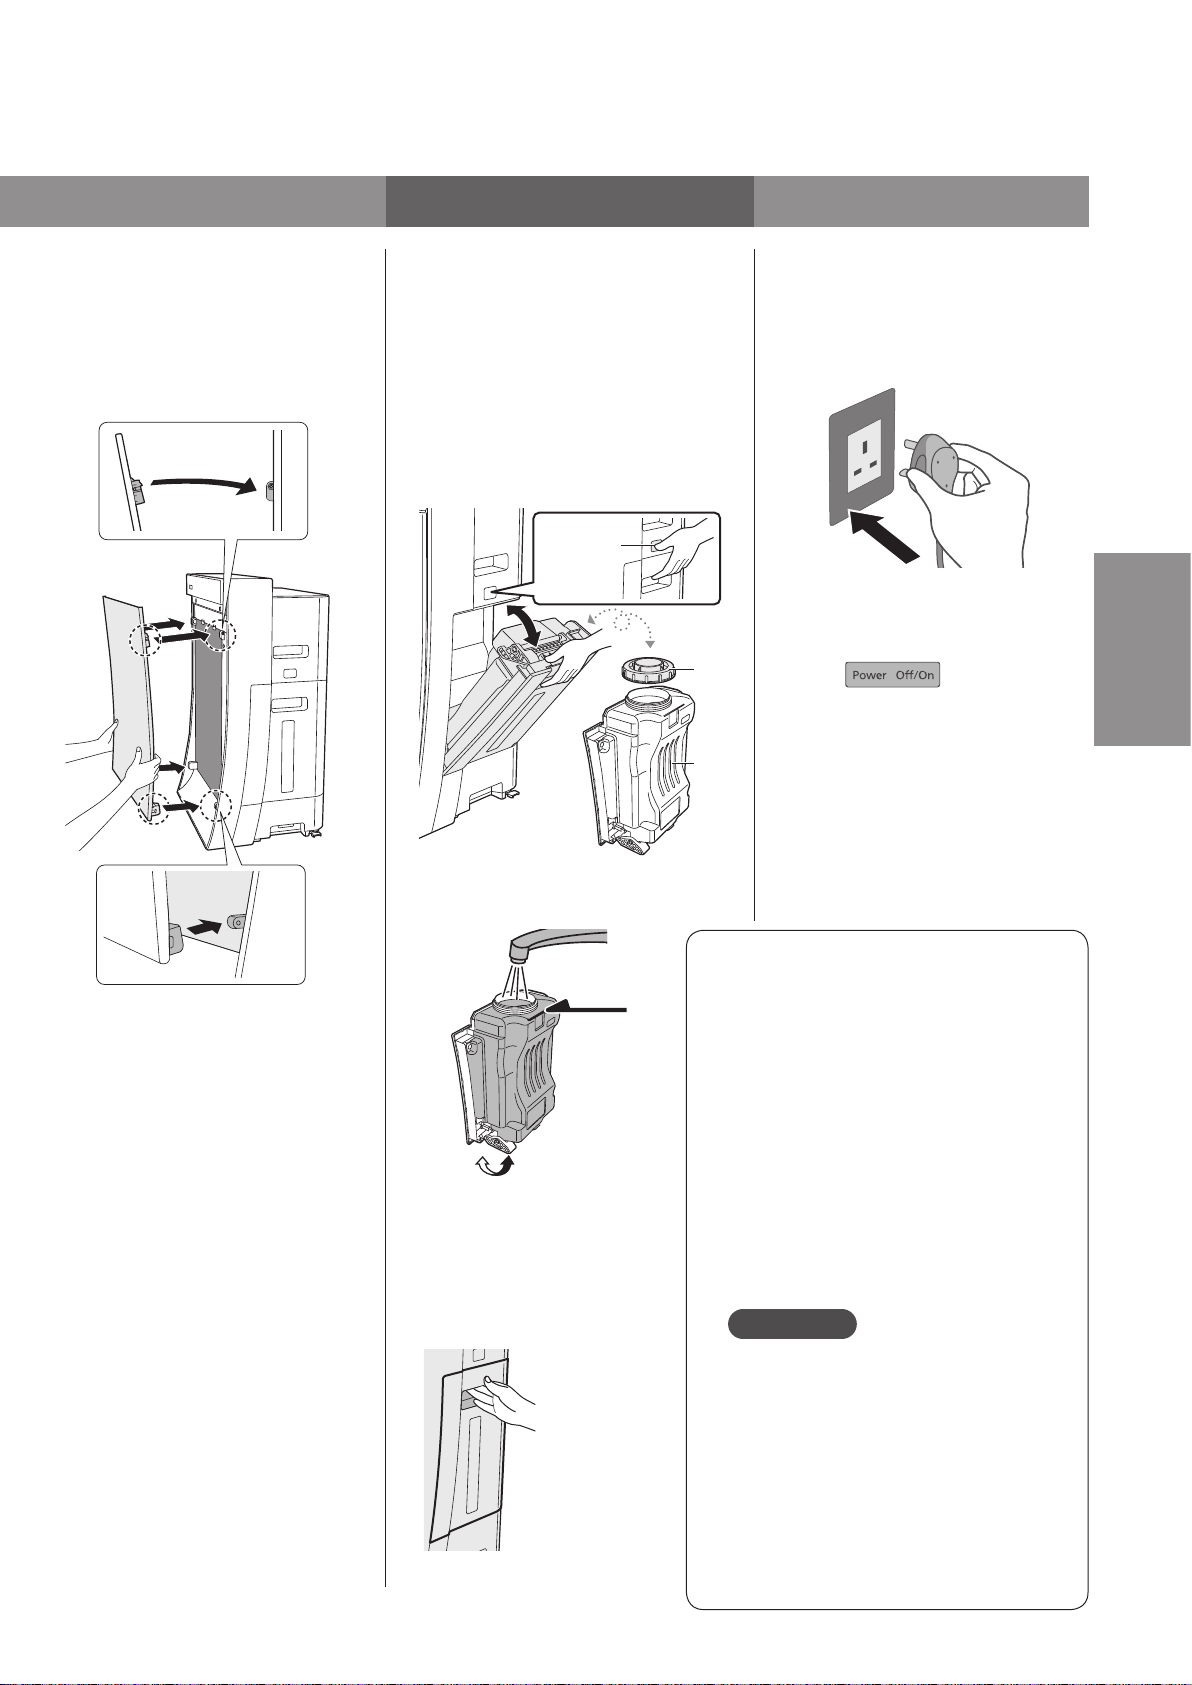
Fill the tank with water Turn on
3
Install the front panel.
Remove the tank, fill
it with water, and
4
1
Flip the tank upside down when filling
with water or returning the tank.
2
install it back.
(Not required when
humidification is not used.)
Be sure to disconnect the
●
power plug before water
supply the product.
Press the hook to remove the tank,
and remove the cap.
Press the
hook.
Cap
Tank
Fill with water.
Connect the power
plug.
5
Inserting the power plug turns on
●
the “Humidity indicator” (P.7).
Displaying the general level of
the current humidity.
Press , and the “Clean
●
sign” (P.7) blinks blue or red for
about 5 seconds. The odor sensor
takes this moment as the baseline
for the level of cleanliness, so it is
recommended when the air in the
room is clean (such as when there
is no cigarette smoke).
(The odor sensor baseline is updated
(Wipe the water off the
power plug and your
hands before inserting it.)
automatically depending on the level
of cleanliness in the room.)
preparation
Confirmation and
* Be sure to attach the front
panel before use.
Guide of full
capacity
The tank can be supported
using the tank stand.
(Rotate the tank stand.)
3
Firmly tighten the cap.
●
Hold the tank firmly to
prevent it from toppling over.
4
Return the tank to the product.
Press until the
tank makes a
“clicking” sound.
■Be sure to use the tap water
(This is because tap water is normally
chlorine-disinfected to prevent
breeding of bacteria.)
Do not use the following water:
●
●
Warm water that is 40 °C or more,
or water that contains detergent.
(Otherwise, deformation or failure
may occur.)
●
Water mixed with chemicals, air
fresheners, or essential oil.
(It may damage the tank and cause
spillageorwetthefurniture.→P.4)
●
Water from water purifier, ionized
alkaline water and well water.
(It may cause mold or bacteria.)
Attention
If you have to use the well water
●
(drinkable), please maintain and clean
the tray, the humidifying filter set, the
anti-fungus assembly more frequently.
■Continuous operation time of a
tank of water
Operates for about 4.6 hours.
●
(When the product is operating with
“Air volume” set to [H (High)], and
the room temperature is 20 °C and
humidity is 30%)
VXR70H
9
Operating methods
Start operation
1
2
Press .
Selecting
operating settings
Changing the
operating mode
When the product is used for the first time, it operates with
“Humidification” set to [M (Medium)], and “Air volume” and
“Airflow” both set to [Auto]. When using the product for the
second time onwards, operation will resume using the same
settings when it was previously turned off.
Humidification does not operate if there is no water.
●
(“Water supply indicator” is blinking.)
To enable humidification, fill the tank with water. If humidification is
not required set “Humidification” to OFF. (“Humidity indicator” is
turned off.) When there is no water in the tank or “Humidification” is
set to OFF, the product will operate in clean air mode.
: Set humidification. (P.11)
: Set the air volume. (P.12)
: Set the airflow. (P.12)
: Operate in “PM 2.5” mode. (P.13)
: Operate in “Housekeeping Assist”
mode. (P.14)
Setting the timer or
locking the product
Press to stop operation.
: Set the timer or activate the child
3
Attention
Do not move the front panel or louver with hands during operation.
●
(Doing so will change their angle or range of movement.)
→
If they have been moved with hands, stop the product operating
once.
(Resuming operation will return to normal conditions.)
lock. (P.13)
Louver
Front panel
10
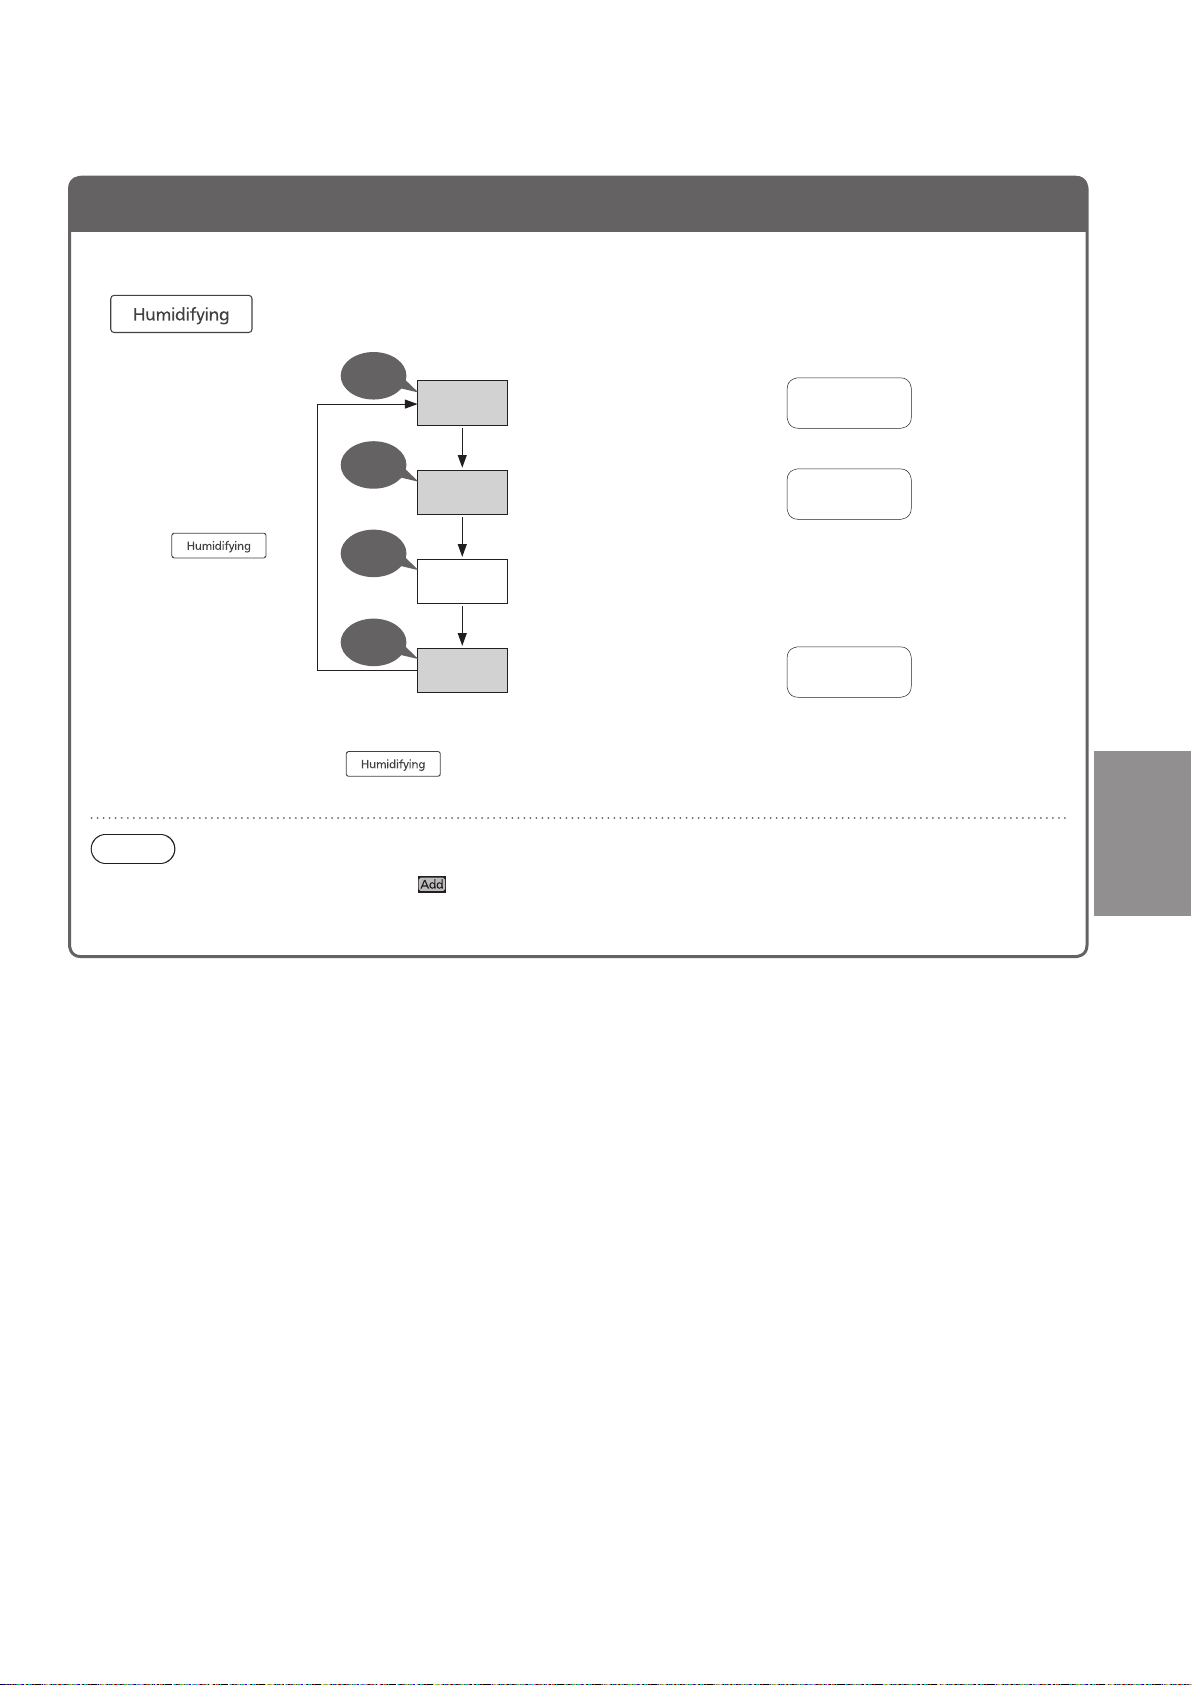
Set humidification
Humidification
Cleaning the air while humidifying
Operation when the “Air volume” is set to [Auto].
●
Operation under other conditions are *1 *2.
Each press of the
button will switch the
air volume setting.
(The indicator is lit.)
■To cancel
Press
until the indicator
turns off.
Beep
Beep
Long
beep
M
H
OFF
Maintaining a comfortable
humidity level
When dry air is a concern, or
to humidify the air quickly
Humidification is not required
(It operates in clean air mode.)
Set humidity (general level)
about 50%
about 60%
Beep
L
*1 If “Air volume” is set to [L (Low)], [M (Medium)] or [H (High)], or if the product is
operating with the “Timer” set to [8 Hours (sleep mode)], each press of
switches between [M (Medium)] and OFF.
*2 Humidification cannot operate if the product is operating in “PM 2.5” mode.
Using humidification at low
humidity levels
about 40%
Note
When the “Water supply indicator” is blinking, there is no water in the tank, so fill the tank with water.
●
If there is water in the tank, there will be slight humidification and water in the tank will decrease, even if
●
“Humidification” is set to OFF. If even slight humidification is not required, discard the water in the tank and tray.
methods
Operating
VXR70H
11
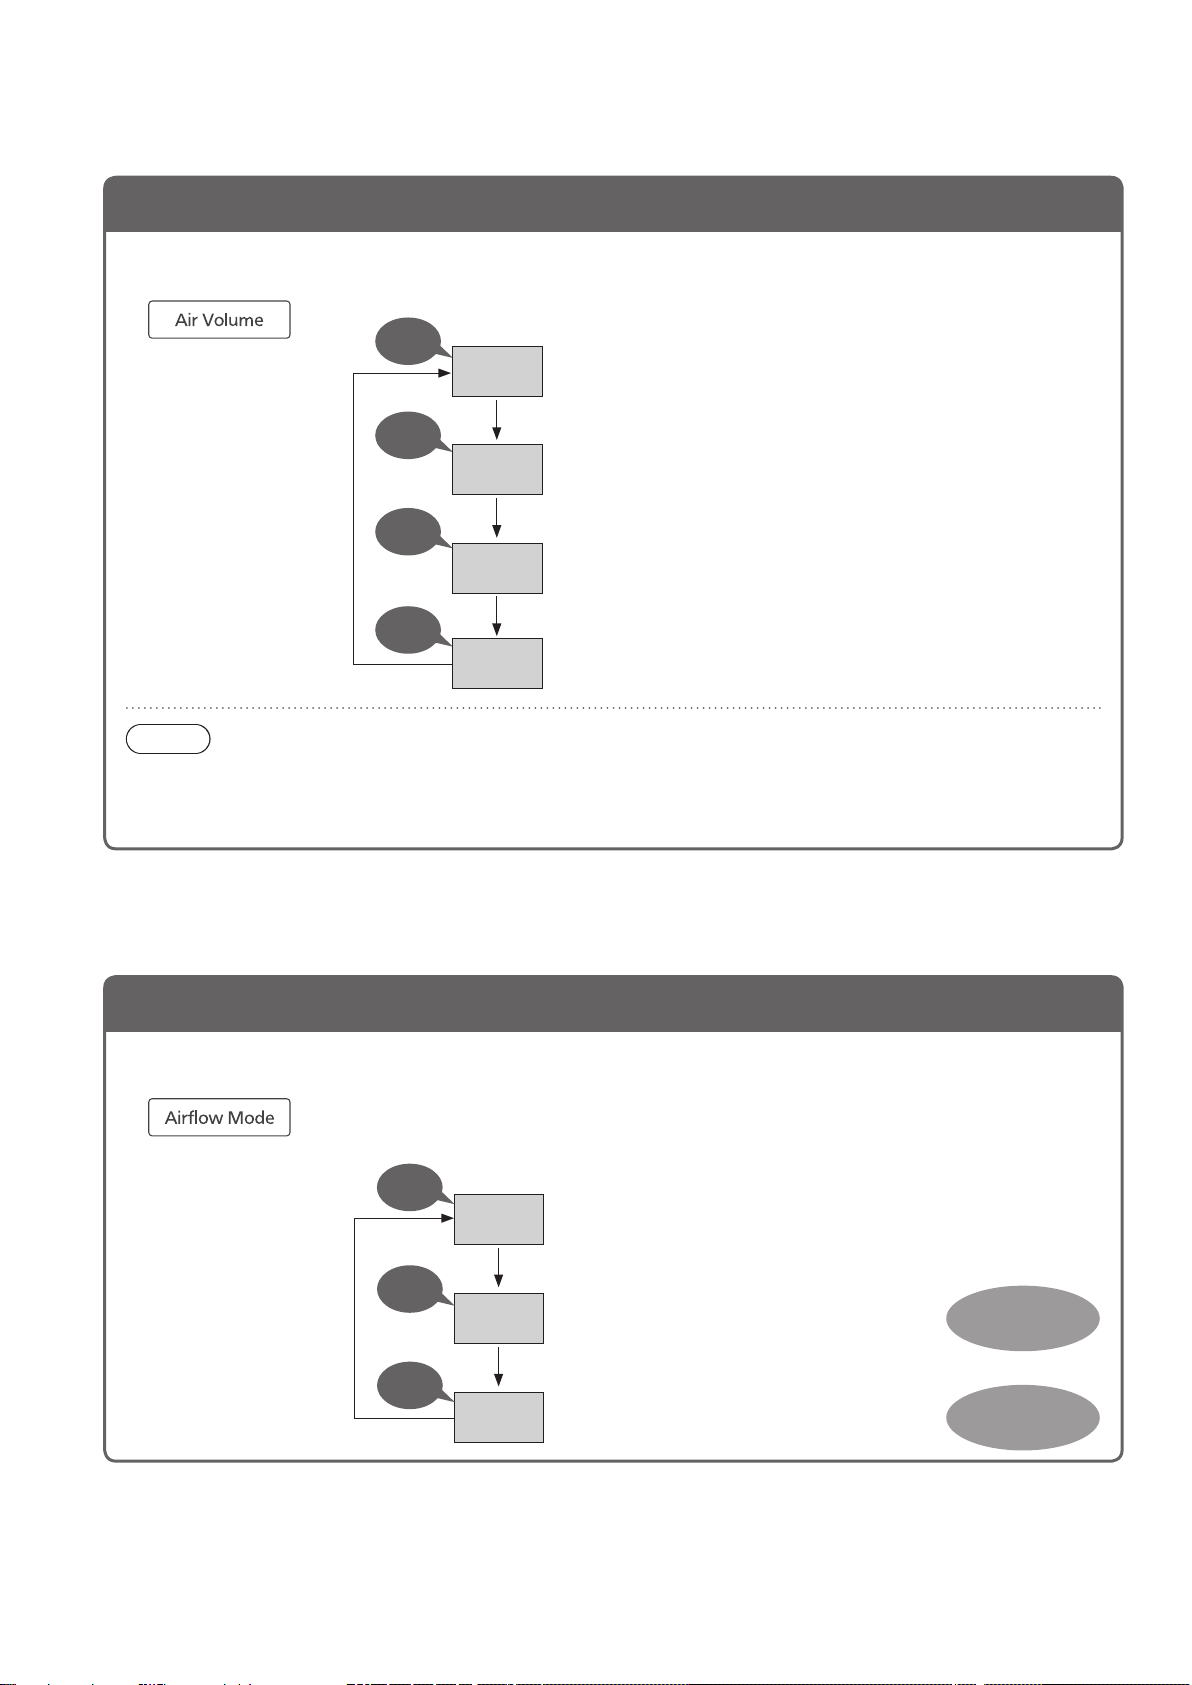
Change the air volume
Change the airflow
Operating methods
Operating the product at the desired air volume
Two short
Each press of the
button will switch the
air volume setting.
(The indicator is lit.)
beeps
Beep
Beep
Beep
Auto
L
M
H
To adjust air volume automatically
To operate quietly
(The humidification and air cleaning speed becomes slower.)
To clean the air quickly
To humidify the air quickly
(continued)
Air volume /
Airflow
Note
Setting the “Air volume” to [Auto] changes to ECONAVI mode (P.21).
●
If “Humidification” is set to [H (High)] or [L (Low)], setting the “Air volume” to [L (Low)], [M (Medium)] or [H
●
(High)] switches the “Humidification” setting to [M (Medium)]. (See P.11 *1 of “Set humidification”)
Changing the airflow depending on type of dirt
Each level of airflow is generated by movement of the front panel and the louver.
●
(P.20)
Each press of the
button will switch the
air volume setting.
(The indicator is lit.)
Two short
beeps
Beep
Auto Changing the airflow automatically
Odor
Removing odors, cigarette smoke and other dirt
Airflow for
odor, smoke
12
Beep
Dust Removing dust and pollen
Airflow for
house dust
Operate in PM 2.5 mode
Child Lock
Timer
PM 2.5 / Timer / Child Lock
Intensively removing PM 2.5
(The indicator is lit.)
Press.
■To cancel
Press again.
(The indicator is turned
off.)
Note
Humidification is not possible. Changing to “PM 2.5” mode while humidification is set will switch the
●
“Humidification” setting to OFF. (See P.11 *2 of “Set humidification”)
The “Timer” cannot be set.
●
Changing to “PM 2.5” mode while the product is operating with the “Timer” set will cancel the “Timer”.
●
Changing to “PM 2.5” mode while the product is operating in “Housekeeping Assist” mode will change to
●
“PM 2.5” mode, and then return to the operating mode before “Housekeeping Assist” mode.
The “Air volume” is set to [H (High)] until the concentration level of PM 2.5 lowers.
The “PM 2.5 detection indicator” turns on or flashes when PM 2.5 is detected.
●
Pressing while the indicator flashes will cause the “Air volume” is set to
[H (High)] until the concentration level of PM 2.5 lowers. Operation will return to
the previous state once the “PM 2.5 detection indicator” stops flashing or turns off.
( P. 23 Q16)
Pressing when the “PM 2.5 detection indicator” is not flashing will cause
●
the “Air volume” is set to [H (High)] for approximately 1 minute. Operation will then
return to the previous state if the “PM 2.5 detection indicator” is still not flashing.
The product stops operating
automatically after 2 hours,
4 hours or 8 hours (Sleep
(The indicator is lit.)
Each press of the
button will switch the
air volume setting.
mode).
With the 8 hour timer
●
(Sleep mode), the "Air
volume" is set to [L (Low)],
the front indication turns off,
and the control panel
indicator turns half on.
■To cancel
Press the until it is released (The
indicator is turned off.).
Note
If the 8 hour timer (Sleep mode) has been set, the
●
operating mode cannot be changed.
To prevent the product from
mischief operation by
children.
(The indicator is lit.)
(Press for
approximately
3 seconds.)
Pressing any button after
setting the timer emits a
“beep beep” warning sound,
and you cannot operate.
■To cancel
Press for approximately 3 seconds again.
(The indicator is turned off.)
methods
Operating
VXR70H
13
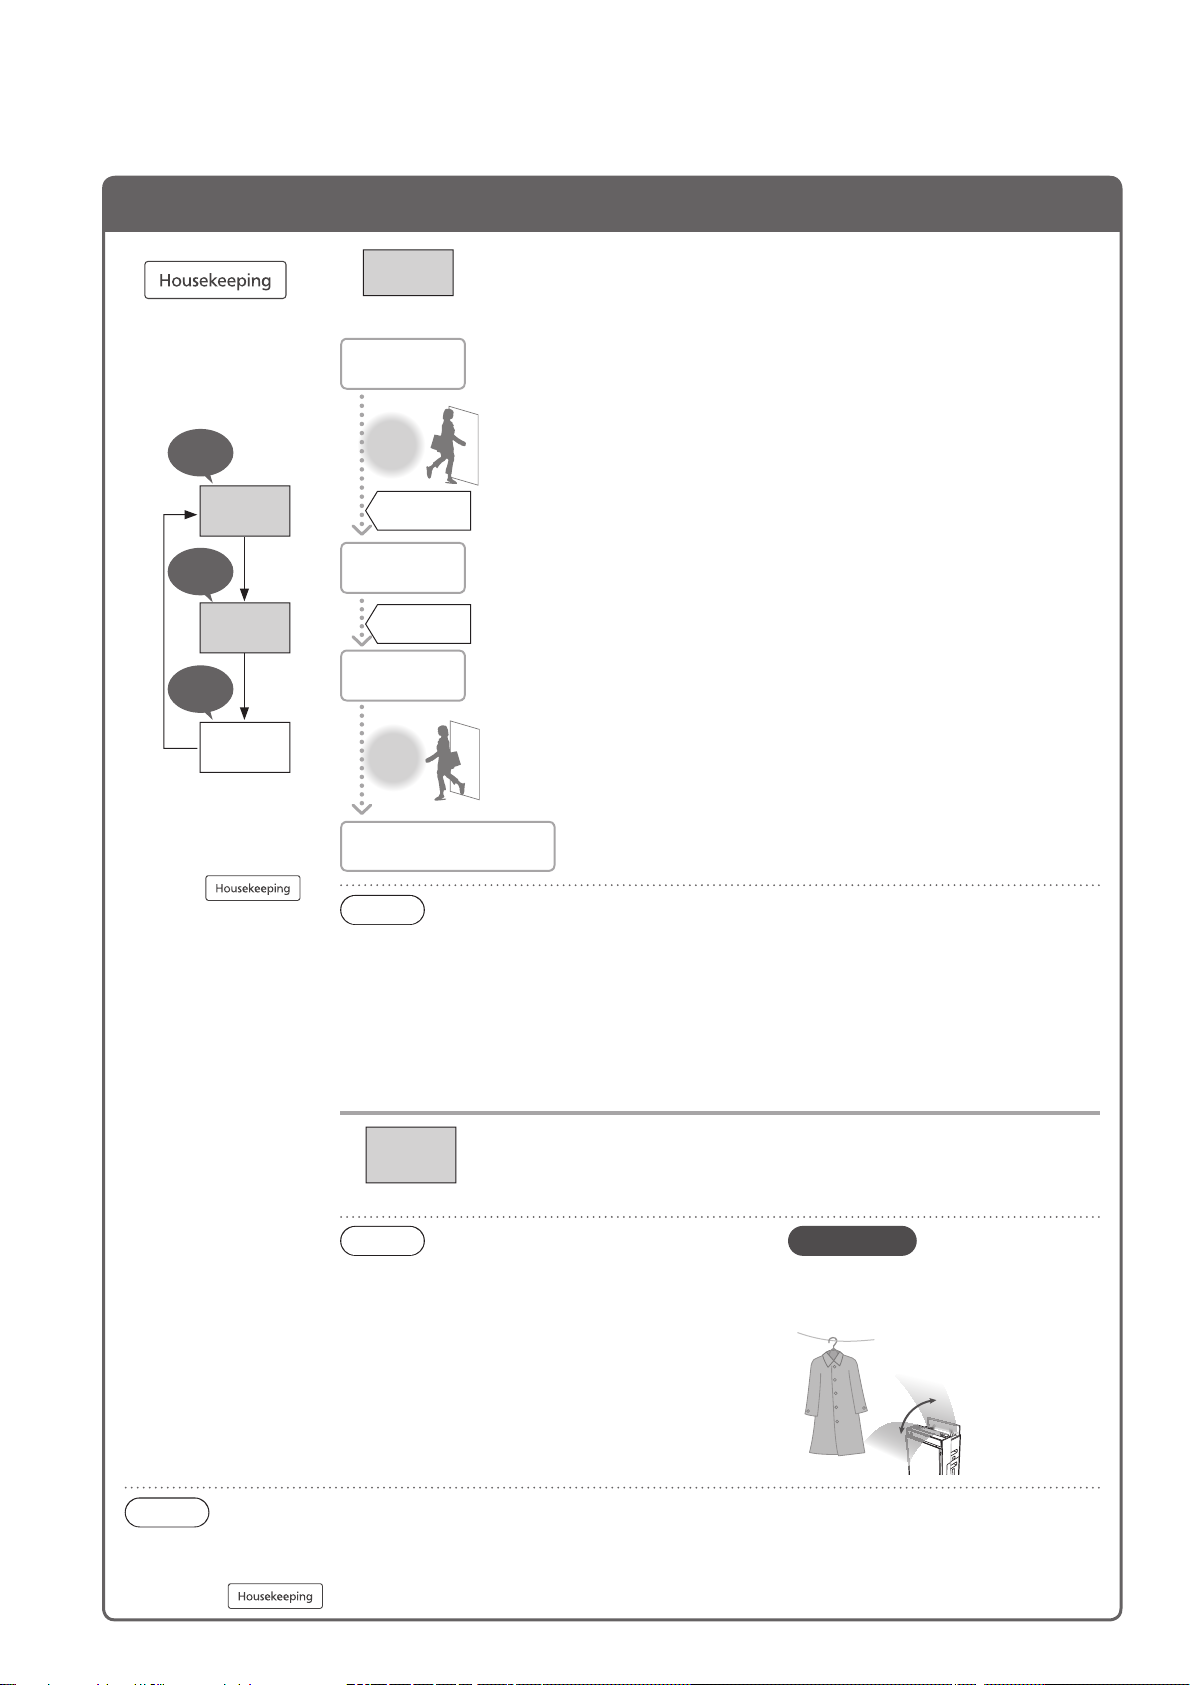
Operate in Housekeeping Assist mode
Operating methods
Enter
the
room
(continued)
Housekeeping Assist
Each press of the
button will switch the
air volume setting.
(The indicator is lit.)
Beep
House
Purifying
Beep
Clothes
Deodor.
Long
beep
OFF
■To cancel
Press
until the indicator
turns off.
House
Purifying
Preparation
mode
Leave
the
room
about
15 minutes
Cleaning
mode
about
60 minutes
Clean air
mode
Enter
the
room
Operating mode before
“House Purifying” mode
Note
If there are people in the room after [Preparation mode] has started, “House
●
Purifying” mode is canceled after approximately 60 minutes.
If people enter the room during [Cleaning mode], “House Purifying” mode will end
●
before the 60 minutes have elapses.
Pets and other objects may be detected as “People”.
●
Stopping the “Human activity sensor” allows “House Purifying” mode even while
●
people are in the room. (P.23 Q14)
Cleaning the room air when no one is present
It cleans dust in the air with House Purifying airflow (P.20).
([Preparation mode] and [Cleaning mode] are available.)
Setting “House Purifying” mode starts [Preparation mode].
●
(The air volume operates between “Air volume” settings [M
(Medium)] and [H (High)].)
[Preparation mode] continues for approximately 15 minutes after
●
people leave the room.
After [Preparation mode] is complete, the product operates in
●
[Cleaning mode]. (approximately 60 minutes*)
(The air volume operates with “Air volume” set to [H (High)].)
*
If dust is detected, the product may operate for 60 minutes or more.
After [Cleaning mode] is complete, the product switches operation
●
to clean air mode (automatic air volume and airflow). If dust is
detected during clean air mode, the product operates in [Cleaning
mode] again.
The product returns to the operating mode before
●
“House Purifying” mode.
14
Clothes
Deodor.
Note
You cannot turn off the nanoe® operation.
●
The effect varies depending on the ambient
●
environment (temperature and humidity),
operating time, or type of odor or textile.
To refresh unpleasant odor of clothes
After 1 hour operation, the product will switch to the previous
●
operation mode.
Attention
Adjust the position of the product
●
in order to expose the clothes to
the air from the product.
The rear louver
swings.
Note
“Humidification”, “Air volume” and “Airflow” settings are not available during “Housekeeping Assist” mode.
●
The “Timer” cannot be set.
●
Pressing while the product is operating with the “Timer” set cancels the “Timer”.
●
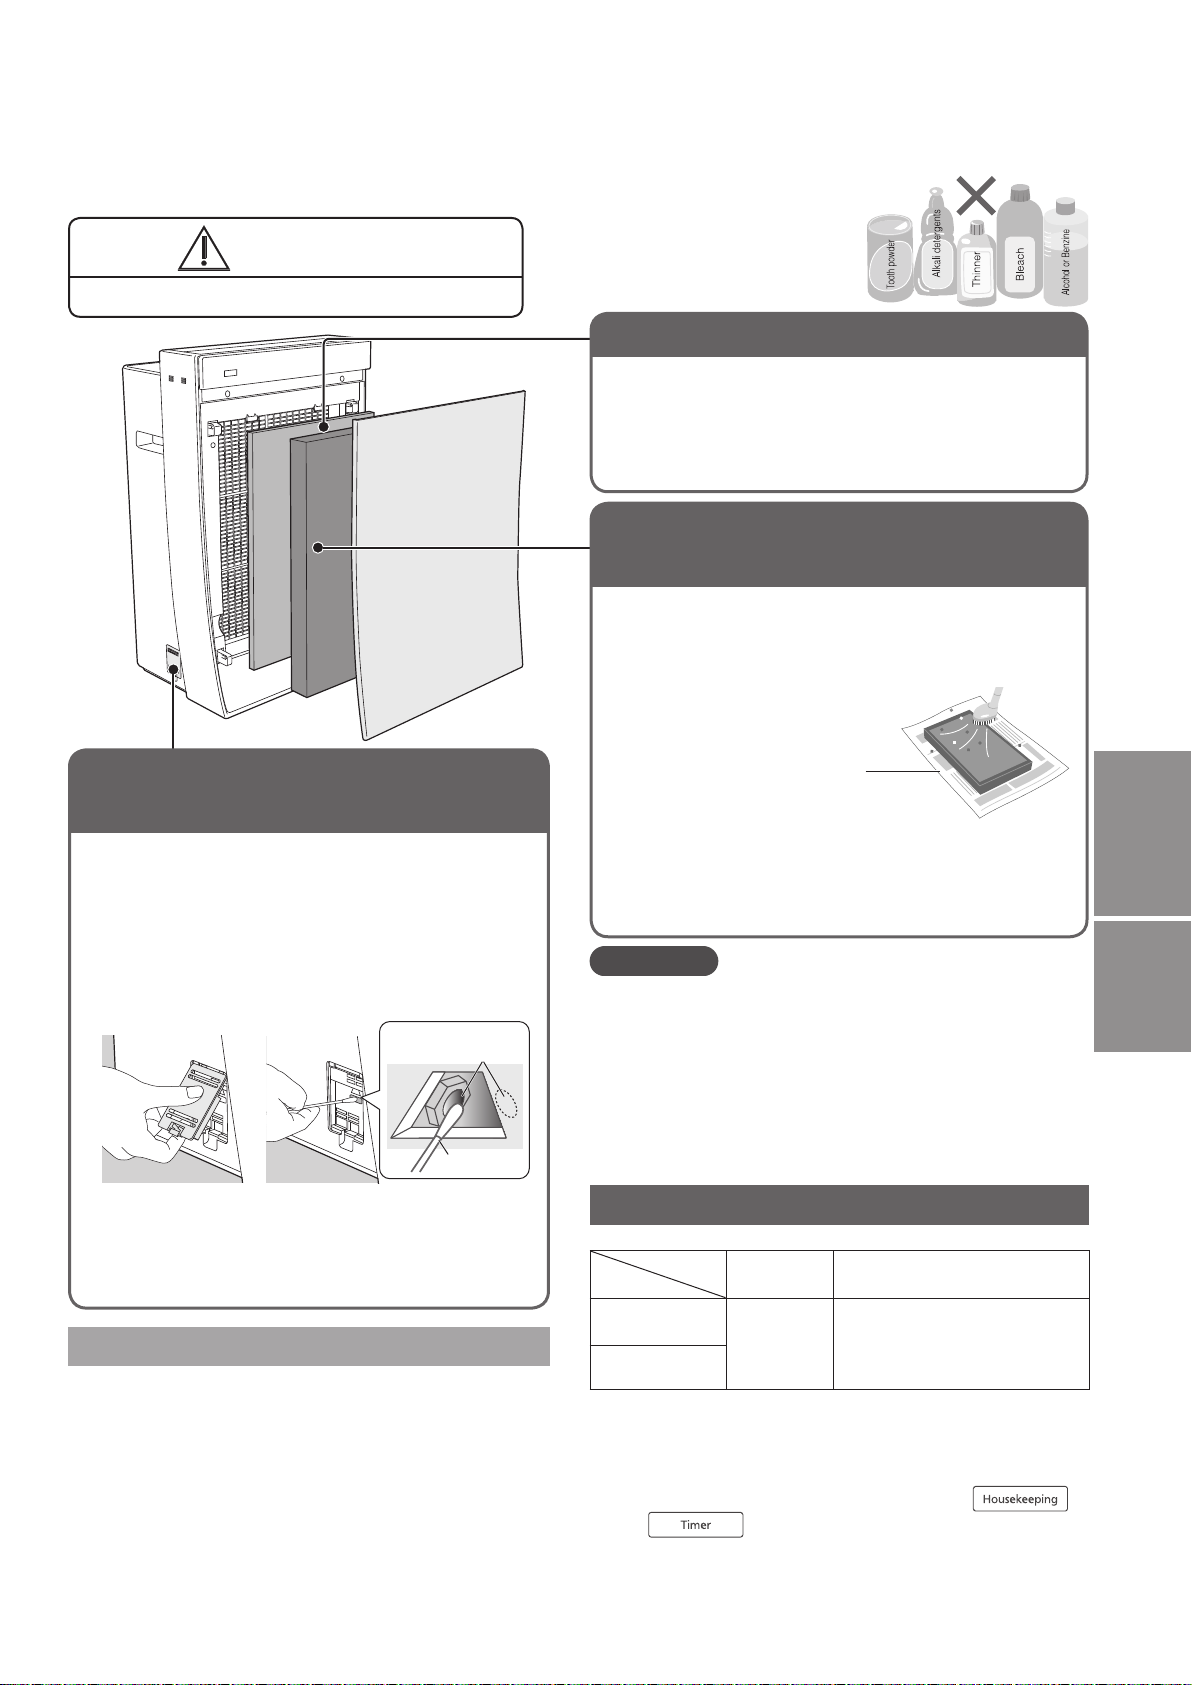
Dirt sensor
<about once every 3 months>
Deodorizing filter
HEPA composite filter
<about once every 2 weeks>
WARNING
■Be sure to disconnect the power plug.
Care and maintenance
Deodorizing filter /
HEPA composite filter /
Dirt sensor
Before cleaning
Do not use the detergents or
●
other substances on the right.
When using chemically treated
●
cloth, follow its instructions.
No maintenance required
(Installationandremoval→P.8)
If dust has accumulated around the deodorizing filter,
remove it with a vacuum cleaner or similar appliance.
Do not wash with water.
●
Remove dust on the black surface
(the front side) with a vacuum
cleaner or similar appliance.
(Installation and removal→P.8)
Laythelteron
newspaper etc.
Wipe dirt off the lens with dry
cotton swab.
Regularly wipe the lenses (2 locations).
●
(The sensor may not work normally when it is
contaminated with moisture or tar of cigarette.)
1
Remove the
sensor cover.
2
Wipe dirt off with dry cotton
swab.
Lenses (2 locations,
left and right)
Be sure to disconnect the power plug before
●
cleaning the sensor.
Do not insert the cotton swab anywhere other
●
than the lens.
Illuminate the area when you do not see clearly.
●
When idle for a long time
1
Disconnect the power plug.
(The product consumes power even at rest.)
2
Empty the tank and tray and clean all the parts.
3
Dry their interiors completely.
(Otherwise, the product may fail due to rust.)
●
Dry the humidifying filter completely in the shade.
(Otherwise, fungus may occur.)
4
Cover the product with poly-bag, and keep in dry places.
(Do not keep it laid down or upside down, otherwise,
failure may occur.)
Dry cotton swab
Do not apply excessive force because it is easy to
●
be damaged.
No maintenance is required on the white surface
●
(the rear side).
Do not wash with water.
●
Operating
Attention
Do not operate the product with the HEPA composite
●
filter removed.
(It may make it impossible to obtain the effect to clean air,
or may cause failure due to dusts entering the product.)
Do not operate the product with the deodorizing filter removed.
●
(Doing so may cause insufficient deodorizing effects.)
Safely keep the parts removed from the product when cleaning.
●
(Otherwise you may trip over them. Or the parts may
be damaged.)
Care and
Reference time for the filter replacement
(Service parts: P.25)
Replacement
period
HEPA
composite filter
Deodorizing filter
*Filter replacement period may be greatly shortened,
depending on the use environment and conditions. (For
example, smoking is frequent.) When the effect has
faded, replace the filter.
After replacing the filters, press and hold
●
and simultaneously for 3 seconds to reset
the product. (The indicator is turned off.)
After replacement, fill the date installing the filter in
●
the label and stick it on the back of the product.
Dispose of the used filter as inflammable garbage.
●
Once every
10 years*
When 6 cigarettes have been
smoked daily. (Japan Electrical
Manufacturers’ Association
standards JEM1467)
Conditions
VXR70H
15
methods
maintenance
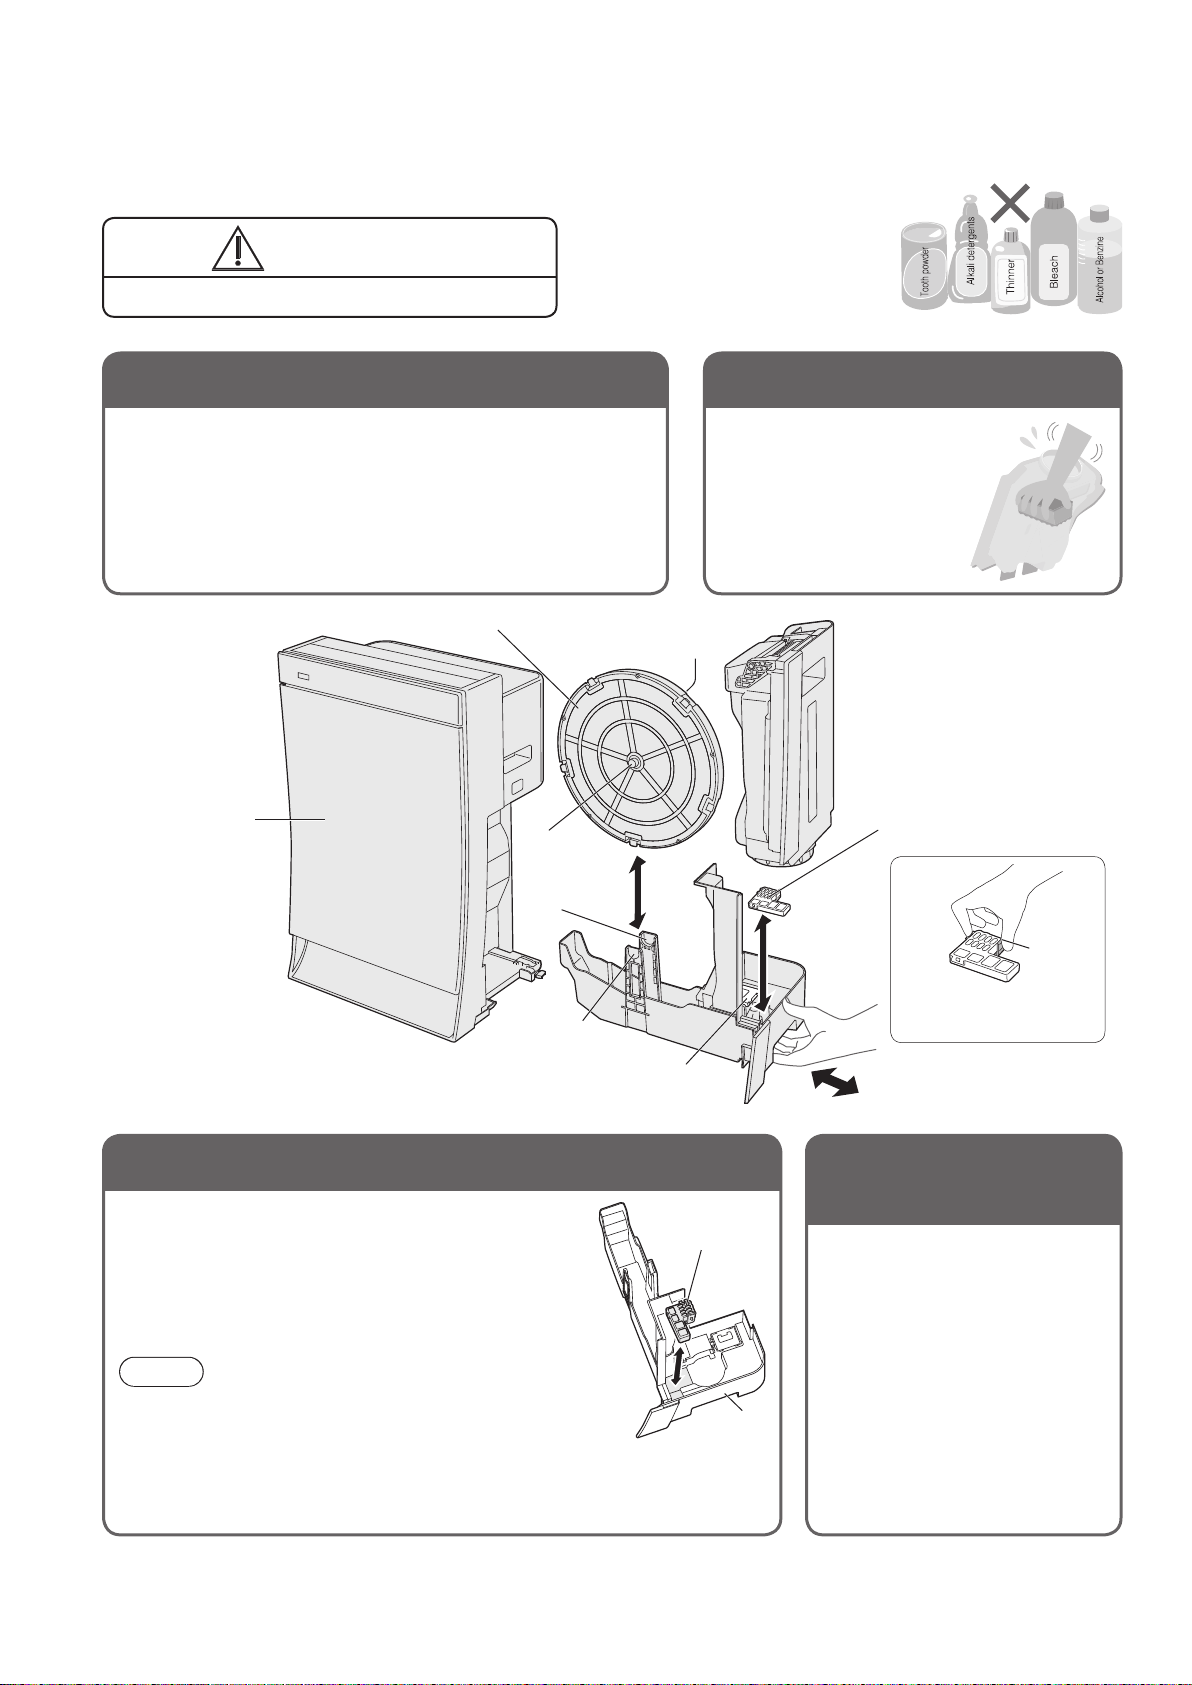
Body, Front panel
<
about once a month
>
Anti-fungus assembly
<
about once a month*1>
Tank <every day>
Tray
<about once a month*1>
Care and maintenance
WARNING
■Be sure to disconnect the power plug.
Do not use the detergents or
Before cleaning
●
other substances on the right.
You can use the oxygen-based
●
bleaching agent only when
cleaning the humidifying filter.
When using chemically treated
●
cloth, follow its instructions.
(continued)
Body / Front panel /
Tank / Tray /
Anti-fungus assembly
Wipe with a soft wrung cloth.
(Installationandremoval→P.8)
Wiping with hard cloth may scratch the surface.
Wipe the power plug with dry cloth.
●
Humidifying filter set
Front panel
Shaft: thin
Shaft mount:
thick
Shaft mount:
thin
The filter has a “thick” and “thin” shaft.
●
Take care when installing it on the tray.
Shaft (rear): thick
Floater
Wash with water.
Stubborn stains
●
→
See “To remove the
stubborn stains”.
(P.17)
Anti-fungus assembly
Remove while
●
pressing the tab.
Remove the tank, and
●
pull out the tray.
Tab
Soaking.
See “To remove the stubborn stains”. (P.17)
●
Do not scrub with a brush or disassemble
●
the anti-fungus assembly.
Install it into the tray groove so that it is level.
●
Note
The anti-fungus assembly may have powder.
●
This is normal and it performs without problem.
The anti-fungus agent will become smaller over time.
●
This is normal and it performs without problem.
The anti-fungus agent has a peculiar smell. It is not harmful.
●
*1 As the dirtiness varies depending on the water quality, maintenance may be required even within one month
after the last maintenance. If it smells unpleasant or water in the tank decreases less than before, clean the tank.
16
Anti-fungus
assembly
Tray
Remove the antifungus assembly,
wash with water.
Wipe the dirt in details with
●
cotton swab or toothbrush.
Do not remove the floater
●
(polystyrene foam).
→
If it comes off (P.18)
Stubborn stains
●
→
See “To remove the
stubborn stains”. (P.17)
 Loading...