

Page 1
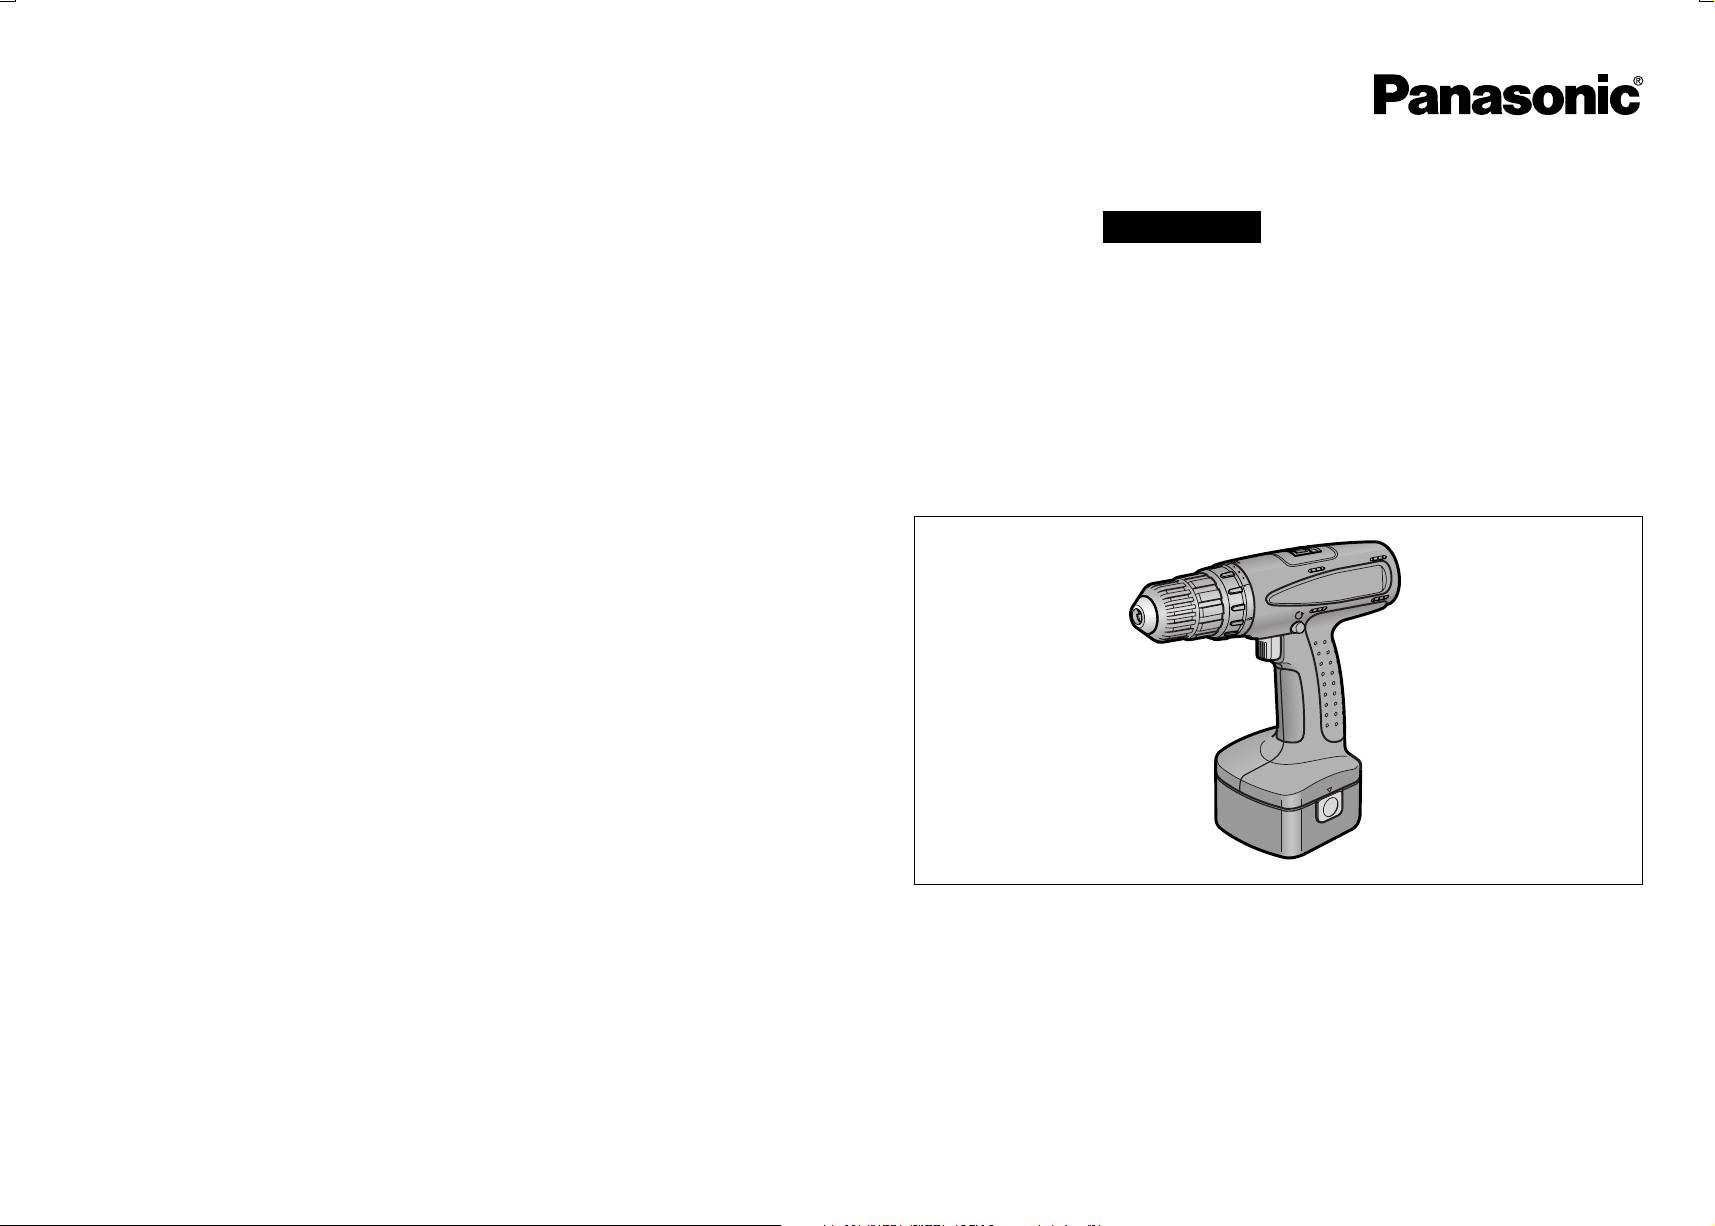
Cordless Compact Drill & Driver
Perceuse et tournevis compact
Compacto taladro y destornillador
Operating Instructions
Instructions d’utilisation
Manual de instrucciones
Model No: EY6105
No.1 EN.FR.ES
PANASONIC CONSUMER ELECTRONICS COMPANY
One Panasonic Way, Secaucus, New Jersey 07094
IMPORTANT
This manual contains safety information. Read manual completely before first using this product and
save this manual for future use.
IMPORTANT
Ce mode d’emploi contient des informations sur la sécurité. Lisez-le en entier avant d’utiliser le
produit et conservez-le pour référence.
IMPORTANTE
Este manual contiene información de seguridad. Lea completamente este manual antes de utilizar
por primera vez este producto, y guárdelo para poder consultarlo en el futuro.
Printed in JapanEY981061051 H1606
Page 2

GENERAL SAFETY
I.
RULES FOR ALL
BATTERY
OPERATED TOOLS
WARNING!
READ AND UNDERSTAND ALL INSTRUCTIONS.
• Failure to follow all instructions listed
below, may result in electric shock, fire
and/or serious personal injury.
SAVE THESE INSTRUCTIONS
Work Area
1)
Keep your work area clean and well
lit.
Cluttered benches and dark areas
invite accidents.
2)
Do not operate power tools in
explosive atmospheres, such as in
the presence of flammable liquids,
gases, or dust.
Power tools create sparks which may
ignite the dust or fumes.
3)
Keep bystanders, children, and
visitors away while operating a
power tool.
Distractions can cause you to lose
control. Make sure that no one is
beneath, or on the other side of the
area when you are working.
Electrical Safety
4)
A battery operated tool with integral
batteries or a separate battery pack
must be recharged only with the
specified charger for the battery.
A charger that may be suitable for one
type of battery may create a risk of fire
when used with another battery.
5)
Use battery operated tool only with
specifically designated battery pack.
Use of any other batteries may create a
risk of fire.
Personal Safety
6)
Stay alert, watch what you are
doing, and use common sense when
operating a power tool. Do not use
tool while tired or under the
influence of drugs, alcohol, or
medication.
A moment of inattention while
operating power tools may result in
serious personal injury.
7)
Dress properly. Do not wear loose
clothing or jewelry. Contain long
hair.
Keep your hair, clothing, and gloves
away from moving parts.
Loose clothes, jewelry, or long hair can
be caught in moving parts.
8)
Avoid accidental starting. Be sure
switch is in the locked or off position
before inserting battery pack.
Carrying tools with your finger on the
switch or inserting the battery pack into
a tool with the switch on invites
accidents.
9)
Remove adjusting keys or wrenches
before turning the tool on.
A wrench or a key that is left attached
to a rotating part of the tool may result
in personal injury.
10)
Do not overreach. Keep proper
footing and balance at all times.
Proper footing and balance enable
better control of the tool in unexpected
situations.
11)
Use safety equipment. Always wear
eye protection.
Dust mask, non-skid safety shoes,
hard hat, or hearing protection must be
used for appropriate conditions.
Tool use and care
12)
Use clamps or other practical way to
secure and support the work-piece
to a stable platform.
Holding the work by hand or against
your body is unstable and may lead to
loss of control.
13)
Do not force tool. Use the correct
tool for your application.
The correct tool will do the job better
and safer at the rate for which it is
designed.
14)
Do not use tool if switch does not
turn it on or off.
A tool that cannot be controlled with the
switch is dangerous and must be
repaired .
15)
Disconnect battery pack from tool or
place the switch in the locked or off
position before making any
adjustments, changing accessories,
or storing the tool.
Such preventive safety measures
reduce the risk of starting the tool
accidentally.
16)
Store idle tools out of reach of
children and other untrained
persons.
Tools are dangerous in the hands of
untrained users.
17)
When battery pack is not in use,
keep it away from other metal
objects like: paper clips, coins,
keys, nails, screws, or other small
metal objects that can make a
connection from one terminal to
another.
Shorting the battery terminals together
may cause sparks, burns or a fire.
18)
Maintain tools with care. Keep
cutting tools sharp and clean.
Properly maintained tools with sharp
cutting edge are less likely to bind and
are easier to control.
19)
Check for misalignment or binding
of moving parts, breakage of parts,
and any other condition that may
affect the tool's operations.
If damaged, have the tool serviced
before using.
Many accidents are caused by poorly
maintained tools.
20)
Use only accessories that are
recommended by the manufacturer
for your model.
Accessories that may be suitable for
one tool may create a risk of injury
when used on another tool.
— 3 —— 2 —
Service
21)
Tool service must be performed only
by qualified repair personnel.
Service or maintenance performed by
unqualified personnel may result in a
risk of injury.
22)
When servicing a tool, use only
identical replacement parts. Follow
instructions in the Maintenance
section of this manual.
Use of unauthorized parts or failure to
follow Maintenance Instructions may
create a risk of shock or injury.
SPECIFIC
II
.
SAFETY RULES
1)
Hold tool by insulated gripping
surfaces when performing an
operation where the cutting tool may
contact hidden wiring.
Contact with a "live" wire will also make
exposed metal parts of the tool "live"
and shock the operator.
2)
Wear ear protectors when using the
tool for extended periods.
Prolonged exposure to high intensity
noise can cause hearing loss.
3)
Be aware that this tool is always in
an operating condition, it does not
have to be plugged into an electrical
outlet.
4)
Do not operate the Forward/Reverse
lever when the Variable speed
control trigger is on.
The battery will discharge rapidly and
damage to the unit may occur.
5)
If the bit becomes jammed,
immediately turn the Variable speed
control trigger off to prevent an
overload which can damage the
battery pack or motor. Use reverse
motion to loosen jammed bits.
6)
When storing or carrying the tool,
set the Forward/Reverse lever to the
center (Neutral) position.
7)
Do not strain the tool by holding the
speed control trigger halfway (speed
control mode) so that the motor
stops.
Page 3
8)
During charging, the charger may
become slightly warm. This is
normal.
Symbol Meaning
V
0
n
.../min
Reciprocation per minutes
Volts
Direct Current
No Load Speed
Revolutions or
Forward Rotation
Reverse Rotation
Drilling Position
WARNING;
Some dust created by power sanding,
sawing, grinding, drilling, and other
construction activities contains
chemicals known to the State of
California to cause cancer, birth
defects or other reproductive harm.
Some examples of these chemicals
are:
• Lead from lead-based paints
• Crystalline silica from bricks and
cement and other masonry
products
• Arsenic and chromium from
chemically-treated lumber.
To reduce your exposure to these
chemicals:
work in a well ventilated area, and
work with approved safety equipment,
such as dust masks that are specially
designed to filter out microscopic
particles.
FOR
III
.
BATTERY CHARGER
& BATTERY PACK
IMPORTANT SAFETY
lNSTRUCTIONS
1)
SAVE THESE
INSTRUCTIONS-This
manual contains important safety and
operating instructions for battery
charger EY0005.
2)
Before using battery charger, read all
instructions and cautionary markings on
battery charger, battery pack, and
product using battery pack.
3)
CAUTION-To reduce the risk
of injury, charge only Panasonic Battery
Pack as shown in last page.
Other types of batteries may burst
causing personal injury and damage.
4)
Do not expose charger to rain or snow.
5)
To reduce risk of damaging the electric
plug and cord, pull by plug rather than
cord when disconnecting charger.
6)
Make sure cord is Iocated so that it will
not be stepped on, tripped over, or
otherwise subjected to damage or
stress.
7)
An extension cord should not be used
unless absolutely necessary.
Use of improper extension cord could
result in a risk of fire and electric shock.
If extension cord must be used, make
sure that:
a.pins on plug of extension cord are the
same number, size and shape as
those of plug on charger.
b.extension cord is properly wired and
in good electrical condition.
c.wire size is large enough for ampere
rating of charger as specified below.
RECOMMENDED MINIMUM AWG SIZE OF
AC Input Rating.
Equal to or But less Length of Cord, Feet
greater than than 25 50 100 150
0 2 18 18 18 16
8)
9)
10)
11)
12)
13)
14)
15)
16)
17)
18)
19)
EXTENSION CORDS FOR
BATTERY CHARGERS
Amperes AWG Size of Cord
Do not operate charger with damaged
cord or plug replace them immediately.
Do not operate charger if it has received
a sharp blow, been dropped, or otherwise
damaged in any way; take it to a qualified
service personnel.
Do not disassemble charger; take it to a
qualified service personnel when service
or repair is required. Incorrect reassembly
may result in a risk of electric shock or
fire.
To reduce the risk of electric shock,
unplug charger from outlet before
attempting any maintenance or cleaning.
The charger and battery pack are
specifically designed to work together.
Do not attempt to charge any other
cordless tool or battery pack with this
charger.
Do not attempt to charge the battery pack
with any other charger.
Do not attempt to disassemble the
battery pack housing.
Do not store the tool and battery pack in
locations where the temperature may
reach or exceed 50°C (122°F) (such a
metal tool shed, or a car in the summer),
which can lead to deterioration of the
storage battery.
Do not charge battery pack when the
temperature is BELOW 0°C (32°F) or
ABOVE 40°C (104°F).This is very
important in order to maintain optimal
condition of the battery pack.
Do not incinerate the battery pack. It can
explode in a fire.
Avoid dangerous environment. Do not
use charger in damp or wet locations.
The charger is designed to operate on
standard household electrical power only.
Do not attempt to use it on any other
voltage!
Do not abuse cord. Never carry charger
20)
by cord or yank it to disconnect from
outlet. Keep cord away from heat, oil and
sharp edges.
Charge the battery pack in a well
21)
ventilated place, do not cover the charger
and battery pack with a cloth, etc., while
charging.
Use of an attachment not recommended
22)
may result in a risk of fire, electric shock,
or injury to persons.
Do not short the battery pack. A battery
23)
short can cause a large current flow, over
heating and create the risk of fire or
personal injury.
NOTE: If the supply cord of this
24)
appliance is damaged, it must only be
replaced by a repair shop authorized
by the manufacturer, because special
purpose tools are required.
TO REDUCE THE RISK OF ELECTRIC
25)
SHOCK, THIS APPLIANCE HAS A
POLARIZED PLUG (ONE BLADE IS
WIDER THAN THE OTHER).
This plug will fit in a polarized outlet
only one way. If the plug does not fit
fully in the outlet, reverse the plug. If it
still does not fit, contact a qualified
electrician to install the proper outlet.
Do not change the plug in any way.
— 5 —— 4 —
Page 4
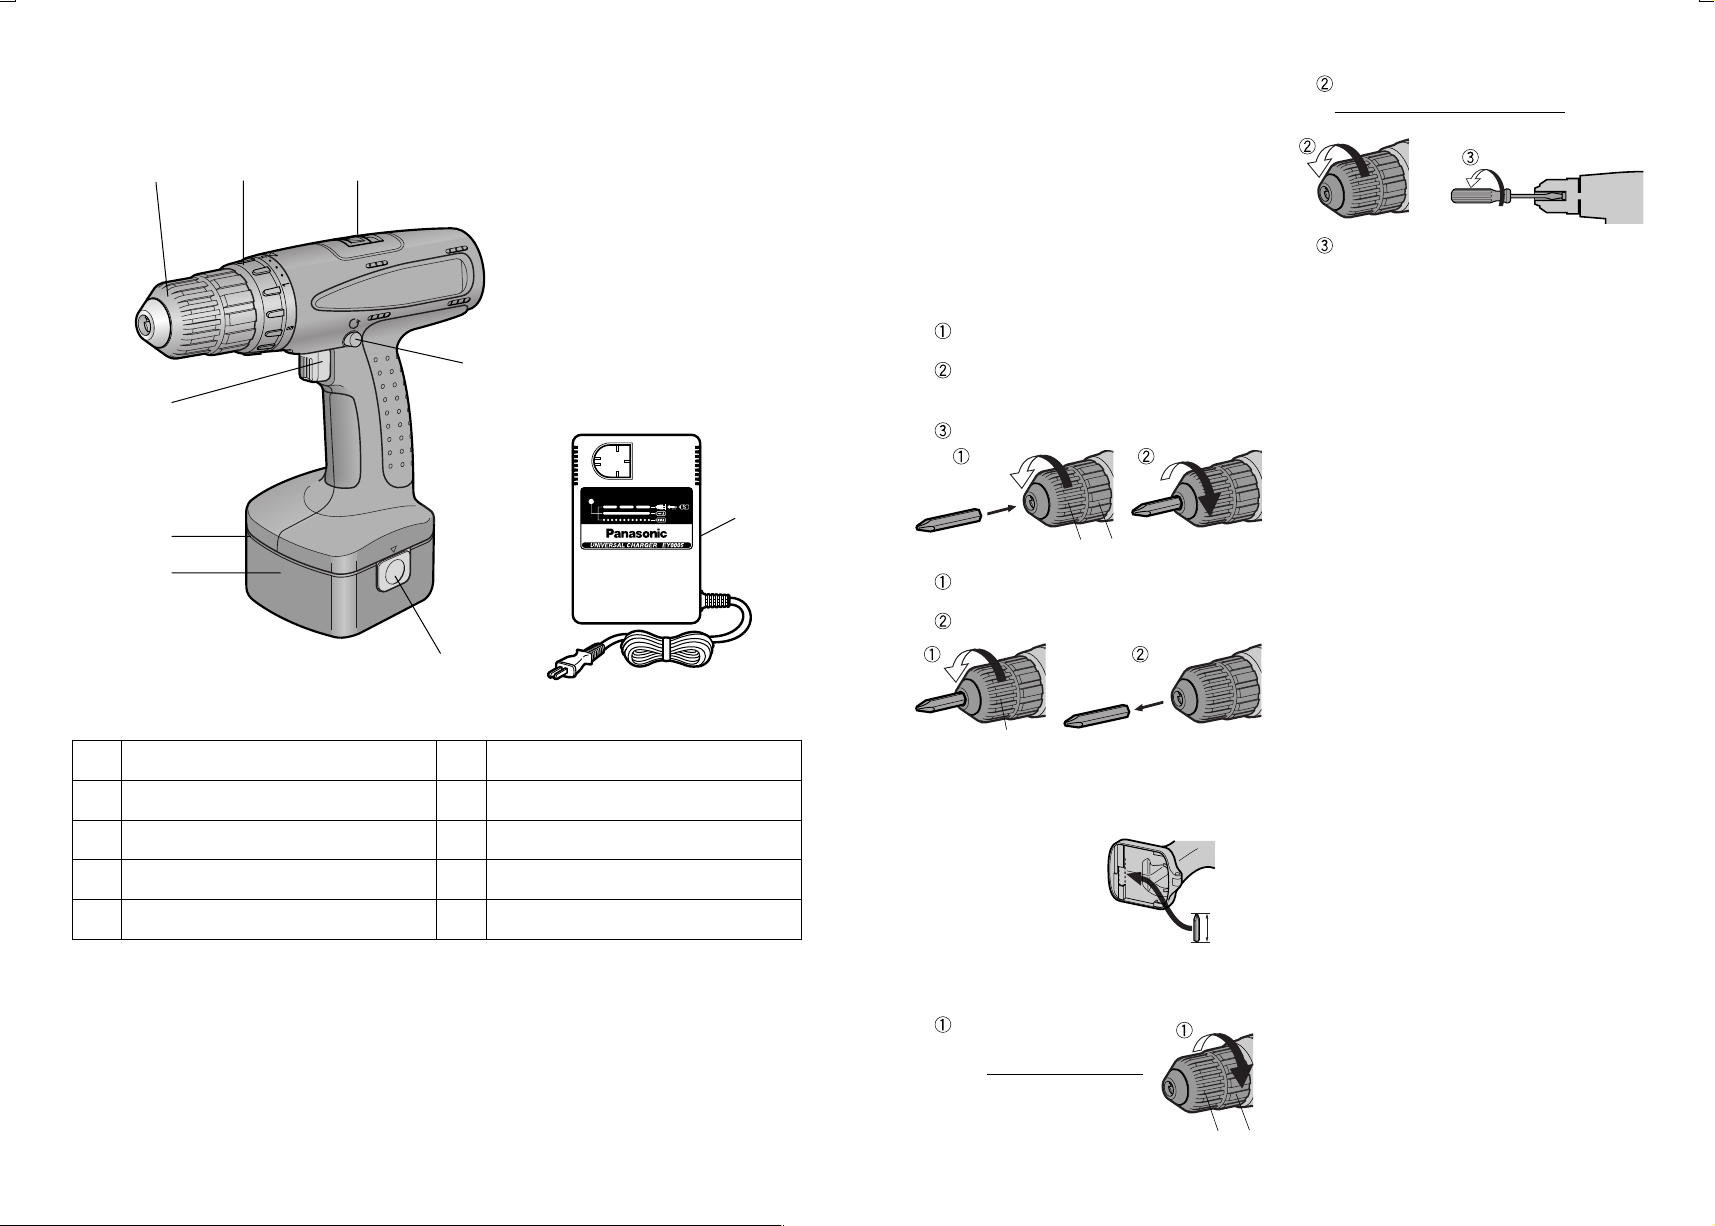
FUNCTIONAL DESCRIPTION
IV
.
(A)
(H)
(G)
(F)
(A) Keyless drill chuck
(B) Clutch handle
(C) Speed selector switch
(D) Forward / Reverse lever
(E) Battery pack release button
(B) (C)
(D)
(E)
(F) Battery pack (EY9005)
(G) Bit holder (inside of the body)
(H) Variable speed control trigger
( I) Battery charger (EY0005)
(I)
ASSEMBLY
V.
Attaching or removing bit
CAUTION:
•
Always remove battery pack when
attaching or removing a bit.
•
Drill bit blade has sharp edge.
Pay attention to handle it.
This tool is equipped with a keyless
drill chuck.
1.
Attachment
Turn the part (a) counterclockwise
(looking from the front) to insert a bit.
Hold the part (b) and turn the part (a)
clockwise (looking from the front) to
tighten firmly until it stops.
Check the bit not coming out.
2.
Removal
Turn the part (a) counterclockwise
(looking from the front).
Remove the bit.
(a)
3.
Storage
Keep the bit in bit holder when not in
use.
Remove the battery pack to store the bit
inside the handle
housing.
Bits up to 45 mm
(1-3/4 inch) long
can be stored here.
NOTE:
If the keyless drill chuck should
become loose on its mounting:
Hold the drill in place
and turn the part (b) in
the clockwise direction
(looking from the front).
(b)(a)
45 mm
(b)(a)
Hold part (b) and turn part (a) in the
counterclockwise direction (looking
from the front) to open the chuck jaws.
Use a slotted screwdriver to firmly
tighten the fastening screw (lefthanded screw) of the keyless drill
chuck in the counterclockwise
direction (looking from the front).
Attaching or removing
battery pack
CAUTION:
•
EY6105 is designed to use only
battery pack type EY9005.
•
Use with other battery pack type may
damage the tool and the battery, and
may result in the risk of fire and
personal injury.
1.
To connect the battery pack:
Insert the battery pack. It snaps into
place to indicate proper connection.
Make sure the battery is securely
connected to the tool.
2.
To remove the battery pack:
Press the two battery pack release
buttons on the sides of the battery pack.
Slide the battery pack out of the tool
body.
OPERATION
VI
.
CAUTION:
•
To reduce the risk of injury, wear safety
goggles or glasses with side shieldes.
Trigger Switch Operation
1.
The speed increases with the amount
of depression of the trigger. When
beginning work, depress the trigger
slightly to start the rotation slowly.
2.
The brake operates when the trigger is
released and the motor stops
immediately.
NOTE:
•
When the brake operates, a braking
sound may be heard. This is normal.
— 7 —— 6 —
Page 5
Forward / Reverse lever
Operation
(Forward ( ), Neutral, Reverse ( ))
CAUTION:
•
Do not operate Forward/ Reverse
lever until the chuck comes to a
complete stop. Shifting during rotation
of the chuck may damage the tool.
•
The trigger switch may not be locked,
when the lever is set to its center
position (Neutral).
•
Check the direction of rotation before
use.
Forward Rotation Switch
Operation
1.
Push the lever for forward rotation.
2.
Depress the trigger switch slightly to
start the tool slowly.
3.
The speed increases with the amount of
depression of the trigger for efficient
tightening of screws and drilling. The
brake operates and the chuck stops
immediately when the trigger is released.
4.
After use, set the lever to its center
position (Neutral).
Reverse Rotation Switch
Operation
1.
Push the lever for reverse rotation.
2.
Depress the trigger switch slightly to
start the tool slowly.
3.
After use, set the lever to its center
position (Neutral).
Clutch Torque Setting
Adjust the Motor shut off torque by
selecting one of the 18 clutch settings or
“ “ position to the application.
CAUTION:
•
Test the setting before actual operation.
Set the scale at this mark ( ).
Vent hole
Speed Selection
Choose a low or high speed to suit the
use.
The more the speed control trigger is
pulled, the higher the speed becomes.
CAUTION:
•
Check the speed selector switch
before use.
•
Use at low speed when strong force
is needed during operation. (Using at
high speed while a strong force is
applied may cause a motor
breakdown.)
*
See in SPECIFICATIONS "RECOMMENDED
SPEED SELECTION".
•
Do not operate the speed selector
switch (LOW-HIGH) while pulling on
the speed control trigger.
This can cause the rechargeable
battery to wear quickly or damage the
internal mechanism of the motor and
gears.
•
To eliminate excessive temperature
increase of the tool surface, do not
operate the tool continuously using
two or more battery packs. Tool
needs cool off time before switching
to another pack.
•
Do not cover vent holes on body
sides of the body during operation.
Otherwise, the machine function is
adversely affected to cause a failure.
•
Do not strain the tool (motor). This
may cause damage to the unit.
•
Use the machine in such a way as to
prevent the air flow out of the vent
holes from blowing directly onto your
skin. Otherwise, you may get burnt.
For Appropriate use of
Battery pack
Ni-Cd Battery pack (EY9005)
NOTE:
•
Use only battery charger EY0005 for
Ni-Cd battery pack EY9005 to
maximize its service life.
•
The ambient temperature range is
between 0°C (32°F) and 40° C
(104°F).
If the battery pack is used when the
battery temperature is below 0°C
(32°F), the tool may fail to function
properly. In that case, charge the
battery until charging is completed for
appropriate functioning of the battery.
Battery Pack Life
The rechargeable batteries have a
limited life. If the operation time becomes
extremely short after recharging, replace
the battery pack with a new one.
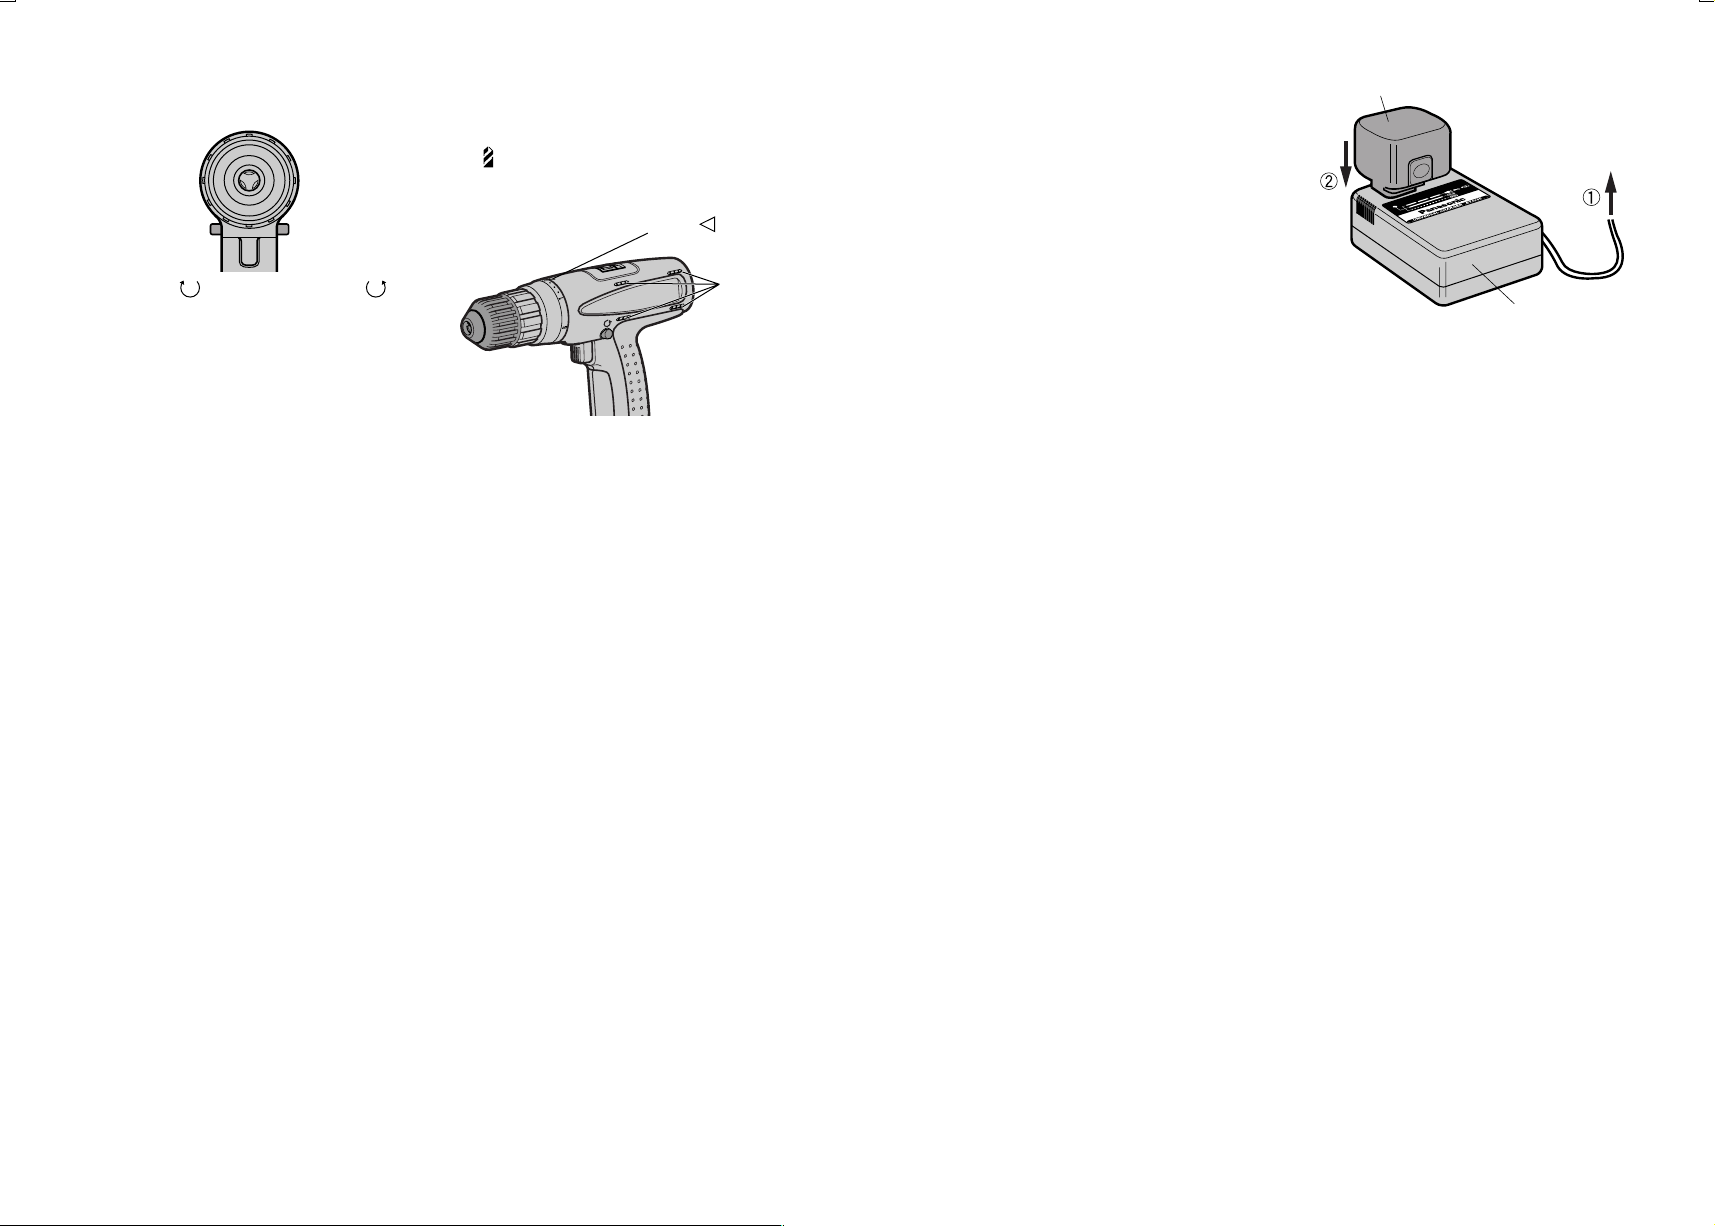
Charging: Battery charger (EY0005)
NOTE:
•
When you charge the battery pack for
the first time, or after prolonged
storage, charge it for about 24 hours
to bring the battery up to full capacity.
1.
Plug the charger into the AC outlet.
NOTE:
•
Sparks may be produced when the
plug is inserted into the AC power
supply, but this is not a problem in
terms of safety.
2.
Insert the battery pack firmly into the
charger.
Battery pack
To AC
outlet
Battery charger
3.
During charging, the charging lamp will
be lit.
When charging is completed, an internal
electronic switch will automatically be
triggered to prevent overcharging.
•
Charging will not start if the battery pack
is too warm (for example, immediately
after heavy-duty operation).
The charging lamp will be red flashing
until the battery cools down. Charging
will then begin automatically.
4.
When charging is completed, the charging
lamp will start flashing quickly.
5.
If the charging lamp does not light
immediately after the charger is plugged
in, or if after the standard charging time
the lamp does not go off, consult an
authorized dealer.
NOTE:
•
When charging a cool battery pack
(below 5°C (41°F)) in a warm place,
Ieave the battery pack at the place
and wait for more than one hour to
warm up the battery to the level of the
ambient temperature.
Otherwise battery pack may not be
fully charged.
•
Cool down the charger when charging
more than two battery packs
consecutively.
•
Do not insert your fingers into contact
hole, when holding charger or any
other occasions.
— 9 —— 8 —
Page 6

CAUTION:
•
Do not use power source from an
engine generator.
•
Do not cover vent holes on the charger.
•
Do not use the battery adapter EY0890
with battery charger EY0005.
LAMP INDICATIONS
VII
.
SPECIFICATIONS
X.
MAIN UNIT: EY6105
Model
Motor
No load speed
Chuck capacity
Cluch setting
Overall length
Weight (with battery pack)
LOW
HIGH
Stage 1 -18
EY6105
DC Motor 12 V
45 - 300 /min (rpm)
165 - 1100 /min (rpm)
ø0.8 - ø10 mm (0- 3/8")
Approx. 0.5 Nm, (5 kgf-cm, 4.3 in-lbs) -
4.4 Nm, (45 kgf-cm, 39.0 in-lbs)
For powerful driving and drilling.
199 mm (7-13/16")
1.4 kg, (3.1 Ibs)
Charger is plugged into the AC outlet.
Red Flashing
Red Lit
Red Flashing quickly
VIII
MAINTENANCE
.
Use only a dry, soft cloth for wiping the unit. Do not use a damp cloth, thinner, benzine,
or other volatile solvents for cleaning.
Ready to charge.
Battery pack is warm. Charging will begin
when temperature of battery pack drops.
Charging is not possible. Clogged with
dust or malfunction of the battery pack.
Now charging
Charging is completed.
BATTERY RECYCLING
ATTENTION:
FOR Ni-Cd Battery Packs, EY9005
A nickel cadmium battery that is recycleable powers the product you have purchased.
At the end of its useful life, under various state and local laws, it is illegal to dispose of
this battery into your municipal waste stream.
Please call 1-800-8-BATTERY for information on how to recycle this battery.
IX
ACCESSORIES
.
Use only bits suitable for size of drill's chuck.
RECOMMENDED WORK CAPACITIES AND SPEED SELECTION
Model
Screw
driving
Drilling
Wood Screw
self-drilling screw
For Wood
For Metal
EY6105
ø 5.8 mm (1/4") x 38 mm (1-1/2")
ø 6.0 mm (1/4") x 13 mm (1/2") SPC t = 2.3 mm (1/16")
ø 20 mm (13/16") Yellow pine t = 20 mm (13/16")
ø 6.5 mm (1/4") SPC t = 1.6 mm (1/16")
Speed Select
Low
High
Low
High
BATTERY PACK: EY9005
Model
Storage battery
Battery voltage
EY9005 : Only charge with battery charger EY0005.
12V DC (1.2V X 10 cells)
EY9005
Ni-Cd Battery
BATTERY CHARGER: EY0005
Model
Electrical rating
Weight
1.2 Ah
Charging time
NOTE: This chart may include models that are not available in your area.
CAUTION: • Do not use the battery adapter EY0890 with battery charger EY0005.
1.7 Ah
2.0 Ah
Please refer to the catalogue.
• Do not charge other Panasonic battery packs except for the battery packs as
shown above.
See the rating plate on the bottom of the charger.
7.2 V
EY9065
EY9066
EY0005
0.57 kg,(1.26 lbs.)
9.6 V 12 V
EY9080
EY9086
30min.
EY9180
EY9182
45 min.
EY9001
EY9005, EY9006
EY9101
EY9106
50 min.
— 11 —— 10 —
Page 7

RÈGLES DE SÉCURITÉ
I.
GÉNÉRALES POUR
TOUS LES OUTILS À
BATTERIE
AVERTISSEMENT!
VOUS DEVEZ LIRE ET COMPRENDRE
TOUTES LES INSTRUCTIONS.
•
Le non-respect, même partiel, des
instructions ci-après entraîne un risque
de choc électrique, d’incendie et/ou de
blessures graves.
CONSERVEZ CES
INSTRUCTIONS
Aire de travail
1)
Veillez à ce que l’aire de travail soit
propre et bien éclairée.
Le désordre et le manque de lumière
favorisent les accidents.
2)
N’utilisez pas d’outils électriques
dans une atmosphère explosive, par
exemple en présence de liquides, de
gaz ou de poussières inflammables.
Les outils électriques créent des
étincelles qui pourraient enflammer les
poussières ou les vapeurs.
3)
Tenez à distance les curieux, Ies
enfants et les visiteurs pendant que
vous travaillez avec un outil
électrique.
Ils pourraient vous distraire et vous
faire faire une fausse manoeuvre.
Sécurité électrique
4)
Un outil à bloc-batterie amovible ou
à batterie intégrée ne doit être
rechargé qu’avec le chargeur prévu
pour la batterie.
Un chargeur qui convient à tel type de
batterie peut présenter un risque
d’incendie avec tel autre type de
batterie.
5)
N’utilisez un outil qu’avec un blocbatterie conçu spécifiquement pour
lui.
L’emploi d’un autre bloc-batterie peut
créer un risque d’incendie.
Sécurité des personnes
6)
Restez alerte, concentrez-vous sur
votre travail et faites preuve de
jugement. N’utilisez pas un outil
électrique si vous êtes fatigué ou
sous l’influence de drogues, d’alcool
ou de médicaments.
Un instant d’inattention suffit pour
entraîner des blessures graves.
7)
Habillez-vous convenablement. Ne
portez ni vêtements flottants ni
bijoux. Confinez les cheveux longs.
N’approchez jamais les cheveux, Ies
vêtements ou les gants des pièces
en mouvement.
Des vêtements flottants, des bijoux ou
des cheveux longs risquent d’être
happés par des pièces en mouvement.
8)
Méfiez-vous d’un démarrage
accidentel. Avant d’insérer un blocbatterie, assurez-vous que
l’interrupteur de l’outil est sur
ARRÊT.
Le fait de transporter un outil avec le
doigt sur la détente ou d’insérer un
bloc-batterie alors que I’interrupteur est
en position MARCHE peut mener tout
droit à un accident.
9)
Enlevez les clés de réglage ou de
serrage avant de démarrer I’outil.
Une clé Iaissée dans une pièce
tournante de l’outil peut provoquer des
blessures.
10)
Ne vous penchez pas trop en avant.
Maintenez un bon appui et restez en
équilibre en tout temps.
Un bonne stabilité vous permet de
mieux réagir à une situation
inattendue.
11)
Utilisez des accessoires de sécurité.
Portez toujours des lunettes ou une
visière.
Selon les conditions, portez aussi un
masque antipoussière, des bottes de
sécurité antidérapantes, un casque
protecteur et/ou un appareil antibruit.
Utilisation et entretien
des outils
12)
Immobilisez le matériau sur une
surface stable au moyen de brides
ou de toute autre façon adéquate.
Le fait de tenir la pièce avec la main ou
contre votre corps offre une stabilité
insuffisante et peut amener un
dérapage de l’outil.
13)
Ne forcez pas l’outil. Utilisez I’outil
approprié à la tâche.
L’outil correct fonctionne mieux et de
façon plus sécuritaire. Respectez aussi
la vitesse de travail qui lui est propre.
14)
N’utilisez pas un outil si son
interrupteur est bloqué.
Un outil que vous ne pouvez pas
commander par son interrupteur est
dangereux et doit être réparé.
15)
Retirez le bloc-batterie ou mettez
I’interrupteur sur ARRÊT ou en
position verrouillée avant
d’effectuer un réglage, de changer
d’accessoire ou de ranger l’outil.
De telles mesures préventives
réduisent le risque de démarrage
accidentel de l’outil.
16)
Rangez les outils hors de la portée
des enfants et d’autres personnes
inexpérimentées.
Les outils sont dangereux dans les
mains d’utilisateurs novices.
17)
Lorsque le bloc-batterie n’est pas en
service, tenez-Ie à l’écart d’autres
objets métalliques (trombones,
pièces de monnaie, clés, clous, vis,
etc.) susceptibles d’établir un
contact électrique entre les deux
bornes.
La mise en court-circuit des bornes de
la batterie peut produire des étincelles
et constitue un risque de brûlures ou
d’incendie.
18)
Prenez soin de bien entretenir les
outils. Les outils de coupe doivent
être toujours bien affûtés et propres.
Des outils bien entretenus, dont les
arêtes sont bien tranchantes, sont
moins susceptibles de coincer et plus
faciles à diriger.
19)
Soyez attentif à tout désalignement
ou coincement des pièces en
mouvement, à tout bris ou à toute
autre condition préjudiciable au bon
fonctionnement de l’outil. Si vous
constatez qu’un outil est
endommagé, faites-Ie réparer avant
de vous en servir.
De nombreux accidents sont causés
par des outils en mauvais état.
20)
N’utilisez que des accessoires que
le fabricant recommande pour votre
modèle d’outil.
Certains accessoires peuvent convenir
à un outil, mais être dangereux avec
un autre.
Réparation
21)
La réparation des outils électriques
doit être confiée à un réparateur
qualifié.
L’entretien ou la réparation d’un outil
électrique par un amateur peut avoir
des conséquences graves.
22)
Pour la réparation d’un outil,
n’employez que des pièces de
rechange d’origine. Suivez les
directives données à la section
<Réparation> de ce manuel.
L’emploi de pièces non autorisées ou
le non-respect des instructions
d’entretien peut créer un risque de
choc électrique ou de blessures.
— 13 —— 12 —
Page 8

RÈGLE DE
II
.
SÉCURITÉ
PARTICULIÈRE
1)
Tenez l’outil par ses surfaces de
prise isolées pendant toute
opération où l’outil de coupe
pourrait venir en contact avec un
câblage dissimulé.
En cas de contact avec un conducteur
sous tension, les pièces métalliques à
découvert de l’outil transmettraient un
choc électrique à l’utilisateur.
2)
Portez des protections auditives si
vous utilisez l’outil pendant une
période prolongée.
Une exposition prolongée à un bruit
d’intensité élevé peut provoquer une
perte auditive.
3)
Soyez conscient que cet outil est
toujours en condition d’opération,
même sans avoir besoin d’être branché
sur une prise secteur.
4)
N’opérez pas le levier sens
normal/sens inverse si la gâchette
de commande de vitesse variable
est sur Marche.
La batterie se déchargera rapidement
et l’unité pourra être endommagée.
5)
Si la mèche s’enraye, mettez
immédiatement la gâchette de
commande de vitesse variable sur
Arrêt pour éviter une surcharge qui
pourrait endommager la batterie ou
le moteur. Faites tourner dans le
sens inverse pour dégager la mèche
enrayée.
6)
Lors du rangement ou du transport
de l’outil, placez le levier sens
normal/sens inverse sur la position
centrale (neutre).
7)
Ne forcez pas sur l’outil en tenant la
gâchette de commande de vitesse à
mi-chemin (mode commande de
vitesse) de sorte que le moteur
s’arrête.
8)
Pendant le chargement, le chargeur
peut chauffer légèrement. Ceci est
tout à fait normal.
Symbole Signification
V
n0
.../min
Tours ou mouvement
alternatif par minute
Rotation uniquement
Volts
Courant continu
Vitesse à vide
Rotation avant
Rotation arrière
AVERTISSEMENT;
La poussière résultant de ponçage,
sciage, meulage, perçage à haute
pression et de toutes autres activités de
construction, contient des produits
chimiques réputés être cause de
cancer, de malformations congénitales
ou autres problèmes reproductifs. Ces
produits chimiques sont, par exemple :
• Le plomb contenu dans les
peintures à base de plomb
• La silice cristalline, contenue dans
les briques, le ciment et autres
produits de maçonnerie; et
• L’arsenic et le chrome provenant
du bois traité chimiquement.
Pour réduire l’exposition à ces
produits chimiques, il faut travailler
dans un lieu bien aéré et porter un
équipement de sécurité approprié tel
que certains masques anti-poussière
conçus spécialement pour filtrer les
particules microscopiques.
POUR CHARGEUR DE
III
.
BATTERIE & BATTERIE
CONSIGNES DE
SÉCURITÉ
IMPORTANTES
1)
CONSERVEZ CES
INSTRUCTIONS
-Ce mode d’emploi comprend des
consignes de sécurité et d’opération
importantes pour le chargeur de la
batterie EY0005.
2)
Avant d’utiliser le chargeur de batterie,
lisez toutes les consignes et tous les
marquages d’avertissement sur le
chargeur de batterie, la batterie et
l’appareil utilisant la batterie.
3)
MISE EN GARDE
-Pour réduire les risques d’accident,
chargez uniquement les batteries
mentionnées ci-dessous.
Les autres types de batterie peuvent
éclater et provoquer des blessures
corporelles et des dommages.
4)
N’exposez pas le chargeur à la pluie ou
à la neige.
5)
Afin d’éviter d’endommager la fiche et
le cordon électrique, ne tirez pas sur le
cordon, mais sur la fiche lorsque vous
débranchez le chargeur.
6)
Assurez-vous que le cordon soit placé
de sorte qu’on ne puisse le piétiner,
trébucher dessus ou encore
l’endommager ou le tirer.
7)
N’utilisez une rallonge que si cela est
absolument nécessaire.
Un mauvais emploi de la rallonge
pourrait entraîner un risque d’incendie
ou d’électrocution. Si vous devez utiliser
une rallonge, veillez aux points suivants:
a.les broches de la fiche de la rallonge
sont au même nombre, de même
taille et de même forme que celles
sur la fiche du chargeur.
b.la rallonge est correctement raccordée
et en bonne condition électrique.
c.Le diamètre du fil doit être assez
grand pour accepter un ampérage du
chargeur comme spécifié ci-dessous.
CALIBRE AWG MINIMUM RECOMMANDÉ
DES RALLONGES POUR CHARGEUR
Tension nominale CA.
Égale ou
supérieure à
0 2 18 18 18 16
8)
N’utilisez pas le chargeur avec un
cordon ou une fiche endommagée
—remplacez-les sur-le-champ.
9)
N’utilisez pas le chargeur s’il a reçu un
coup brusque, est tombé ou a été
abîmé de toute autre façon; confiez-le
à un technicien de service qualifié.
10)
Ne démontez pas le chargeur; confiezle à un technicien de service qualifié
lorsqu’un entretien ou une réparation
est nécessaire. Un montage incorrect
peut entraîner un risque d’électrocution
ou d’incendie.
11)
Pour réduire le risque d’électrocution,
débranchez le chargeur du secteur
avant de procéder à tout entretien ou
nettoyage.
12)
Le chargeur et la batterie sont
spécifiquement conçus pour
fonctionner ensemble.
N’essayez pas de charger un autre
outil sans fil ou une autre batterie avec
ce chargeur.
13)
N’essayez pas de charger la batterie
avec un autre chargeur.
14)
N’essayez pas de démonter le
logement de la batterie.
15)
Ne rangez pas l’outil et la batterie dans
des endroits où la température peut
atteindre ou dépasser 50°C (122°F)
(comme une remise à outils en tôle, ou
une voiture l’été) et qui peuvent
entraîner la détérioration de la batterie.
16)
Ne chargez pas la batterie si la
température est INFÉRIEURE à 0°C
(32°F) ou SUPÉRIEURE à 40°C (104°F).
Ceci est très important pour préserver
les conditions optimales de la batterie.
DE BATTERIES
Ampères
Mais inférieure à Longueur du cordon, en pied
Calibre AWG du cordon
25 50 100 150
— 15 —— 14 —
Page 9

17)
N’incinérez pas la batterie. Elle peut
exploser dans le feu.
18)
Evitez tout environnement dangereux.
N’utilisez pas le chargeur dans des
endroits humides ou mouillés.
19)
Le chargeur est conçu pour fonctionner
sur le courant domestique standard
uniquement. N’essayez pas de l’utiliser
sous une autre tension !
20)
Ne forcez pas sur le cordon. Ne
transportez jamais le chargeur par le
cordon ou tirez dessus d’un coup sec
pour le débrancher de la prise secteur.
Eloignez le cordon de la chaleur, huile
ou bords tranchants.
21)
Chargez la batterie dans un endroit
bien aéré, ne recouvrez pas le
chargeur et la batterie avec un tissu,
etc., pendant le chargement.
22)
L’utilisation de fixations non
recommandées peut provoquer un
risque d’incendie, électrocution ou
blessures corporelles.
DESCRIPTION FONCTIONNELLE
IV
.
(A)
(H)
(G)
(F)
(B) (C)
23)
Ne court-circuitez pas la batterie. Un
court-circuit de la batterie peut être à
l’origine d’un grand flux de courant,
surchauffe et engendrer le risque d’un
incendie ou de blessures corporelles.
24)
REMARQUE : Si le cordon de cet
appareil est endommagé, il doit
uniquement être remplacé par un
centre de réparation autorisé par le
fabricant, car des outils spéciaux sont
nécessaires.
25)
POUR RÉDUIRE LE RISQUE
D’ÉLECTROCUTION, CET APPAREIL
EST POURVU D’UNE FICHE
POLARISÉE (UNE LAME EST PLUS
LARGE QUE L’AUTRE).
Elle ne peut s’enficher dans une prise
polarisée que d’une façon. Si elle ne
s’enfiche pas, inversez-la. Si le
problème persiste, contactez un
électricien qualifié pour installer une
prise polarisée. Ne modifiez en aucune
façon la prise existante.
(D)
(A) Mandrin à foret à serrage rapide
(B) Débrayage de sécurité
(C) Bouton de sélection de la vitesse
(D) Levier sens normal/sens inverse
(E) Bouton de dégagement de la batterie
(F) Batterie (EY9005)
(G) Porte-foret (dans le boîtier)
(E)
(H)
Gâchette de commande de vitesse variable
( I) Chargeur de la batterie (EY0005)
(I)
ASSEMBLAGE
V.
Pose ou dépose de la mèche
PRÉCAUTION:
•
Retirez toujours la batterie lors de la
pose ou dépose d’une mèche.
•
La lame de la mèche a une arête
tranchante.
Prenez garde lors de son maniement.
Cet outil est équipé d’un mandrin à foret
à serrage rapide.
1.
Pose
Tournez la pièce (a) dans le sens
horaire (vu de l’avant) pour insérer la
mèche.
Maintenez la pièce (b) et tournez la
pièce (a) dans le sens horaire (vu de
l’avant) pour serrer fermement jusqu’à
ce qu’elle s’arrête.
Vérifiez que la mèche ne sort pas.
REMARQUE:
Si le mandrin à foret à serrage rapide
se desserre à la base:
Fixez le foret en place
et tournez la pièce (b)
dans le sens horaire
(vu de l’avant).
(b)(a)
Maintenez la pièce (b) et tournez la
pièce (a) dans le sens anti-horaire (vu
de l’avant) pour ouvrir les mors du
mandrin.
Utilisez un tournevis plat pour serrer
fermement la vis de serrage (vis à
gauche) du mandrin à foret à serrage
rapide dans le sens anti-horaire (vu de
l’avant).
Pose ou dépose de la batterie
2.
Dépose
Tournez la pièce (a) dans le sens antihoraire (vu de l’avant).
Retirez la mèche.
(a)
3.
Rangement
Gardez la mèche dans le porte-foret si
vous ne l’utilisez pas.
Retirez la batterie pour ranger la mèche
dans le logement de
la poignée.
Les mèches d’une
longueur inférieure à
45 mm (1-3/4 pouce)
peuvent y être rangées.
(b)(a)
45 mm
PRÉCAUTION:
•
EY6105 est conçu pour être utilisé
uniquement avec le type de batterie
EY9005.
•
L’emploi avec un autre type de batterie
pourrait endommager l’outil et la
batterie, et présenter un risque
d’incendie ou de blessures corporelles.
1.
Pour connecter la batterie:
Insérez la batterie. Elle s’encliquette pour
indiquer une connexion adéquate.
Assurez-vous que la batterie est bien
connectée à l’outil.
2.
Pour retirer la batterie:
Appuyez sur les deux boutons de
dégagement de la batterie sur les côtés
de la batterie. Faites glisser la batterie
hors du boîtier de l’outil.
OPÉRATION
VI
.
PRÉCAUTION:
•
Pour réduire le risque de blessure,
portez des lunettes de sécurité à
coques latérales.
— 17 —— 16 —
Page 10

Opération de la détente
de gâchette
1.
La vitesse augmente avec la pression
exercée sur la gâchette. Au début de la
tâche, appuyez légèrement sur la
gâchette pour démarrer lentement la
rotation.
2.
Le frein opère quand la gâchette est
relâchée et le moteur s’arrête
immédiatement.
REMARQUE:
•
Lorsque le frein opère, un bruit de
freinage peut se faire entendre, ce qui
est normal.
Levier sens normal / sens inverse
Opération
(Sens normal ( ), neutre, sens inverse
( ))
PRÉCAUTION:
•
N’opérez pas le levier sens normal /
sens inverse avant que le mandrin ne
soit complètement arrêté. Un
changement de sens pendant la
rotation du mandrin pourrait
endommager l’outil.
•
La détente de gâchette peut ne pas
être verrouillée, si le levier est réglé
sur la position centrale (neutre).
•
Vérifiez le sens de la rotation avant
toute utilisation.
Bouton de rotation avant
Opération
1.
Appuyez sur le levier pour la rotation avant.
2.
Appuyez légèrement sur la détente de la
gâchette pour démarrer l’outil au ralenti.
3.
La vitesse augmente avec la pression
exercée sur la gâchette pour un serrage
des vis et un perçage efficaces. Le frein
opère et le mandrin s’arrête immédiatement
au relâchement de la gâchette.
4.
Après utilisation, placez le levier à sa
position centrale (neutre).
Opération du bouton de
rotation arrière
1.
Appuyez sur le levier pour la rotation
arrière.
2.
Appuyez légèrement sur la détente de la
gâchette pour démarrer l’outil au ralenti.
3.
Après utilisation, placez le levier à sa
position centrale (neutre).
Réglage du couple de
débrayage
Ajustez le couple d’arrêt du moteur en
sélectionnant un des 18 réglages du
débrayage ou la position “ ” sur
l’application.
PRÉCAUTION:
•
Testez le réglage avant d’opérer.
Réglez l’échelle sur ce repère ( ).
Sélection de la vitesse
Choisissez une vitesse lente ou rapide
convenant à votre utilisation.
Plus la gâchette de commande de vitesse
est tirée, plus la vitesse est élevée.
PRÉCAUTION:
•
Vérifiez le bouton de sélection de la
vitesse avant toute utilisation.
•
Utilisez à vitesse lente si une force
puissante est requise pendant
l’opération. (Une utilisation à grande
vitesse alors qu’une force puissante
est appliquée peut provoquer une
panne du moteur.)
*
•
N’opérez pas le bouton de sélection
de la vitesse (BAS-ÉLEVÉ) tout en
tirant sur la gâchette de commande
de vitesse sous peine d’user
rapidement la batterie rechargeable
ou d’endommager le mécanisme
interne du moteur et des engrenages.
Orifice de ventilation
Voir la FICHE TECHNIQUE pour
“SÉLECTION DE VITESSE
RECOMMANDÉE”.
•
Pour éviter une élévation excessive
de la température à la surface de
l’outil, n’opérez pas en continue l’outil
en utilisant plus de deux batteries.
L’outil a besoin de refroidir avant
d’utiliser une autre batterie.
•
Ne bouchez pas les orifices de
ventilation sur les côtés du boîtier
pendant opération sous peine
d’affecter le fonctionnement de la
machine et de provoquer une
défaillance.
•
Ne forcez pas l’outil (moteur) sous
peine d’endommager l’unité.
•
Utilisez la machine de façon à
empêcher l’air sortant des orifices de
ventilation d’être soufflé directement
sur votre peau sous peine d’être
brûlé.
Pour un emploi approprié
de la batterie
Batterie Ni-Cd (EY9005)
REMARQUE:
•
N’utilisez qu’un chargeur de batterie
EY0005 pour batterie Ni-Cd EY9005
afin d’optimiser sa durée de vie.
•
La plage de température ambiante
est entre 0°C (32°F) et 40°C (104°F).
Si la batterie est utilisée alors que la
température de la batterie est
inférieure à 0°C (32°F), l’outil risque
de ne pas fonctionner correctement.
Le cas échéant, chargez la batterie
jusqu’à ce que la charge soit
complète pour un fonctionnement
approprié de la batterie.
Durée de vie de la batterie
Les batteries rechargeables ont une
durée de vie limitée. Si la durée
d’opération est extrêmement raccourcie
après la recharge, remplacez la batterie
par une neuve.
Chargement
REMARQUE:
•
Lorsque vous chargez la batterie pour
la première fois, ou après un période
de rangement prolongée, chargez-la
pendant environ 24 heures pour la
ramener à sa pleine capacité.
— 19 —— 18 —
Chargeur de la batterie (EY0005)
1.
Branchez le chargeur dans la prise secteur.
REMARQUE:
•
Des étincelles peuvent se produire à
l’insertion de la fiche dans
l’alimentation secteur, mais ceci ne
pose pas de problème en terme de
sécurité.
2.
Mettez en place la batterie dans le
chargeur.
Batterie
Vers prise
secteur
Chargeur de batterie
3.
Pendant le chargement, le voyant de
chargement sera allumé.
Une fois le chargement terminé, un bouton
électronique interne sera automatiquement
déclenché pour empêcher la surcharge.
•
Le chargement ne démarrera pas si la
batterie est trop chaude (par exemple,
juste après une opération à grande
puissance).
Le témoin de chargement clignotera en
rouge jusqu’à ce que la batterie
refroidisse.
Le chargement démarrera alors
automatiquement.
4.
Une fois le chargement terminé, le voyant
de chargement se mettra à clignoter
rapidement.
5.
Si le voyant de chargement ne s’allume
pas immédiatement après branchement
du chargeur ou bien si après la durée de
chargement standard le témoin ne s’éteint
pas, consultez un distributeur autorisé.
Page 11

REMARQUE:
•
Lors du chargement d’une batterie
froide (en dessous de 5°C (41°F)) dans
un endroit chaud, laissez la batterie
en place et patientez plus d’une heure
pour que la batterie revienne au niveau
de la température ambiante.
Sinon, la batterie risque de ne pas
être complètement chargée.
•
Refroidissez le chargeur si vous
chargez plus de deux batteries à la
suite.
•
N’introduisez pas les doigts dans les
orifices de contact, lorsque vous tenez
le chargeur ou en toutes autres
occasions.
INDICATIONS DES VOYANTS
VII
.
Clignote rouge
Allumé en rouge
Clignote rouge rapidement
MISE EN GARDE:
•
N’utilisez pas la source d’alimentation
d’un générateur à moteur.
•
Ne recouvrez pas les orifices de
ventilation sur le chargeur.
•
N’utilisez pas l’adaptateur pour batterie
EY0890 avec le chargeur de batterie
EY0005.
Le chargeur est branché sur la prise secteur.
Prêt à charger.
La batterie est chaude. Le chargement démarrera
lorsque la température de la batterie descendra.
Le chargement n’est pas possible. Bouché avec de la
poussière ou dysfonctionnement de la batterie.
Chargement en cours
Le chargement est terminé.
FICHE TECHNIQUE
X.
UNITÉ PRINCIPALE
Modèle
Moteur
Vitesse à vide
Capacité du mandrin
Réglage du couple
de débrayage
Longueur totale
Poids (avec batterie)
BAS
ÉLEVÉ
Niveau1-18
Environ 0,5 Nm, (5 kgf-cm, 4.3 in-lbs) à
4,4 Nm, (45 kgf-cm, 39,0 in-lbs)
Pour un perçage et vissage puissant.
EY6105
Moteur CC12 V
45 - 300 /min (tr/mn)
165 - 1100 /min (tr/mn)
ø0,8 -ø10 mm (0- 3/8")
199 mm (7-13/16")
1,4 kg (3,1 lbs)
CAPACITÉS DE TRAVAIL RECOMMANDÉES ET SÉLECTION DE VITESSE
Modèle
Vissage
des vis
Perçage
Vis à bois
Vis autoforantes
Pour bois
Pour métal
EY6105
ø5,8 mm (1/4") x 38 mm (1-1/2")
ø6,0 mm (1/4") x 13 mm (1/2") SPC t = 2,3 mm (1/16")
ø20 mm (13/16") Pin de Caroline t = 20 mm (13/16")
ø6,5 mm (1/4") SPC t = 1,6 mm (1/16")
Sélection de la vitesse
Bas
Élevé
Bas
Élevé
BATTERIE: EY9005
Modèle
Accumulateur
Tension de la batterie
EY9005 : Ne chargez qu’avec le chargeur de la batterie EY0005.
12V CC (1,2V X 10 éléments)
EY9005
Batterie Ni-Cd
VIII
MAINTENANCE
.
Utilisez uniquement un chiffon doux et sec pour nettoyer l’unité. N’utilisez pas de
chiffon humide, diluant, benzène ou autres détergents volatiles pour nettoyage.
RECYCLAGE DE LA BATTERIE
ATTENTION:
Pour les batteries Ni-Cd, EY9005
Une batterie nickel métal hydride recyclable alimente le produit dont vous avez fait
l’acquisition.
Veuillez téléphoner au 1-800-8-BATTERY pour des informations sur le recyclage de
cette batterie.
IX
ACCESSOIRES
.
N’utilisez que des mèches adaptées à la taille du mandrin à foret.
CHARGEUR DE LA BATTERIE: EY0005
Modèle
Tension électrique
Poids
1,2 Ah
Durée de
chargement
REMARQUE: Ce tableau peut comprendre des modèles non disponibles dans
MISE EN GARDE: • N’utilisez pas l’adaptateur pour batterie EY0890 avec le chargeur
1,7 Ah
2,0 Ah
votre région.
Reportez-vous au catalogue.
de batterie EY0005.
• Ne chargez pas d’autres batteries Panasonic à l’exception des
batteries mentionnées ci-dessus.
Voir la plaque signalétique au bas du chargeur.
7,2 V
EY9065
EY9066
— 21 —— 20 —
EY0005
0,57 kg (1,26 lbs.)
9,6 V 12 V
EY9080
EY9086
30 min.
EY9180
EY9182
45 min.
EY9001
EY9005, EY9006
EY9101
EY9106
50 min.
Page 12

NORMAS DE SEGURIDAD
I.
GENERAL PARA TODAS
LAS HERRAMIENTAS QUE
FUNCIONAN CON BATERÍAS
¡ADVERTENCIA!
LEA Y ENTIENDA TODAS LAS
INSTRUCCIONES.
•
No seguir todas las instrucciones listadas
a continuación puede causar una
descarga eléctrica, un incendio y/o
graves lesiones a personas.
GUARDE ESTAS
INSTRUCCIONES
Área de trabajo
1)
Mantenga el área donde trabaje
limpia y bien iluminada.
Los bancos de trabajo abarrotados de
cosas y las áreas oscuras son una
invitación a los accidentes.
2)
No utilice herramientas mecánicas
en lugares donde se pueda producir
una explosión como, por ejemplo,
donde haya líquidos o gases
inflamables, ni tampoco donde haya
materiales combustibles.
Las herramientas mecánicas producen
chispas que podrían causar un
incendio.
3)
Procure que los transeúntes, los
niños y los visitantes no se
acerquen al lugar donde se utiliza
una herramienta mecánica.
Las distracciones pueden ser la causa
de que usted pierda el control de la
herramienta. Asegúrese de que no
haya nadie debajo ni al otro lado de
donde usted está trabajando.
Seguridad eléctrica
4)
La batería incorporada o una batería
separada que se emplee con la
herramienta deberá ser cargada
empleando solamente el cargador
de baterías especificado.
Un cargador que pueda ser adecuado
para cargar un tipo de batería puede
crear un riesgo de incendio si se utiliza
con otra batería.
5)
Utilice la herramienta sólo con la
batería designada específicamente
para ella.
El uso de otras baterías puede causar
un riesgo de incendio.
Seguridad de las personas
6)
Esté alerta, ponga atención a lo que
esté haciendo y use el sentido
común cuando utilice una
herramienta mecánica. No la utilice
estando cansado o bajo la influencia
de medicamentos, alcohol o drogas.
Un momento de descuido mientras
utiliza una herramienta mecánica
puede causarle graves lesiones.
7)
Póngase ropas adecuadas. No se
ponga ropas sueltas ni joyas.
Recójase el cabello si lo tiene largo.
Mantenga su cabello, ropas y
guantes alejados de las piezas que
se mueven rápidamente.
Las ropas flojas, las joyas o el cabello
largo pueden quedar atrapados en las
piezas móviles.
8)
Evite la puesta en funcionamiento
por error. Asegúrese de que el
interruptor esté en la posición de
bloqueado o desactivado antes de
introducir la batería.
Llevar las herramientas con su dedo en
el interruptor o introducir la batería en
una herramienta mientras el interruptor
está en la posición de activado es una
invitación a un accidente.
9)
Quite las chavetas o llaves de ajuste
antes de encender la herramienta.
Una llave o chaveta colocada en una
pieza giratoria de la herramienta podrá
causar una lesión.
10)
No se estire demasiado. Mantenga sus
pies en un lugar apropiado y guarde
su equilibrio en todo momento.
Mantener los pies en un lugar apropiado
y guardar el equilibrio permiten controlar
mejor la herramienta en el caso de
producirse situaciones inesperadas.
11)
Utilice equipos de seguridad.
Protéjase siempre los ojos.
Para trabajar bajo unas condiciones
apropiadas deberá ponerse una
máscara contra el polvo, zapatas de
seguridad que no resbalen, casco de
seguridad o protección para los oídos.
Uso y cuidados de la herramienta
12)
Utilice abrazaderas u otra forma
práctica de asegurar y apoyar la
pieza de trabajo en una plataforma
estable.
Sujetar la pieza de trabajo con la mano
o contra su cuerpo no proporciona
ninguna estabilidad y puede ser la
causa de que usted pierda el control
de la herramienta.
13)
No fuerce la herramienta. Utilice la
herramienta correcta para el trabajo
que vaya a hacer.
La herramienta correcta hará el trabajo
de una forma mejor y más segura
si funciona sin exceder sus
especificaciones de diseño.
14)
No utilice la herramienta si el
interruptor no puede encenderla o
apagarla.
Una herramienta que no pueda ser
controlada por el interruptor será una
herramienta peligrosa y deberá ser
reparada.
15)
Desconecte la batería de la
herramienta o ponga el interruptor
en la posición de bloqueado o
desactivado antes de hacer ajustes,
cambiar accesorios o guardar la
herramienta.
Estas medidas de seguridad reducirán
el riesgo de que la herramienta se
ponga en funcionamiento por error.
16)
Guarde las herramientas que no
utilice fuera del alcance de los niños
y otras personas que no estén
cualificadas para utilizarlas.
Las herramientas son peligrosas en las
manos de personas que no están
capacitadas para utilizarlas.
17)
Cuando no utilice la batería,
manténgala alejada de otros objetos
metálicos como, por ejemplo, clips
para papel, monedas, llaves, clavos,
tornillos u otros objetos metálicos
pequeños que podrían hacer
conexión entre los dos bornes.
— 23 —— 22 —
Cortocircuitar los bornes de la batería
puede causar chispas, quemaduras o
un incendio.
18)
Mantenga las herramientas con
mucho cuidado. Mantenga las
herramientas de corte bien afiladas
y limpias.
Las herramientas bien mantenidas,
con los bordes de corte bien afilados,
tienden a agarrotarse menos y son
más fáciles de controlar.
19)
Compruebe que no haya piezas
móviles mal alineadas o
agarrotadas, que no haya tampoco
piezas rotas, y que no exista
ninguna condición anormal que
pueda afectar el buen
funcionamiento de la herramienta.
Si se daña una herramienta,
arréglela antes de volver a utilizarla.
El motivo de muchos accidentes es el
de mantener las herramientas en
malas condiciones.
20)
Utilice solamente los accesorios
recomendados por el fabricante
para su modelo.
Los accesorios que puedan ser
adecuados para una herramienta
pueden crear peligros cuando se
utilizan con otras herramientas.
Reparaciones
21)
Las reparaciones de las
herramientas deberá correr a cargo
de personal cualificado.
Los trabajos de reparación o
mantenimiento realizados por personal
no cualificado pueden dar origen a
lesiones.
22)
Cuando repare una herramienta,
utilice solamente piezas de recambio
idénticas. Siga las instrucciones de
la sección de mantenimiento de este
manual.
El uso de piezas sin autorización o el
no seguir las instrucciones de
mantenimiento pueden crear riesgos
de que se produzcan descargas
eléctricas o lesiones.
Page 13

NORMAS DE
II
.
SEGURIDAD
ESPECÍFICAS
1)
Sujete la herramienta por las
superficies de sujeción aisladas
cuando haga trabajos en los que la
herramienta de corte pueda entrar
en contacto con cables eléctricos
ocultos.
El contacto con cables que llevan
corriente puede exponer las partes
metálicas de la herramienta a la
corriente y el operador podría recibir
una descarga eléctrica.
2)
Protéjase los oídos cuando utilice la
herramienta durante largos periodos
de tiempo.
La exposición prolongada a los ruidos
altos puede causar pérdidas en el
sistema auditivo.
3)
Tenga en cuenta que la herramienta
siempre está en condiciones de
funcionamiento, no tiene que estar
enchufada a una toma de corriente
eléctrica.
4)
No utilice la palanca de avance/
retroceso cuando el disparador de
control de velocidad variable está
activado.
La batería se descargará rápidamente
y la unidad podría dañarse.
5)
Si la punta se atasca, desactive
inmediatamente el disparador de
control de velocidad variable para
impedir la sobrecarga que podría
dañar la batería o el motor. Emplee
el movimiento de retroceso para
aflojar las puntas atascadas.
6)
Cuando guarde o transporte la
herramienta, ponga la palanca de
avance/retroceso en la posición
central (neutral).
7)
No someta a esfuerzos la
herramienta sujetando hasta la
mitad el disparador de control de
velocidad (modo de control de
velocidad) para que el motor se
detenga.
8)
Durante la carga, el cargador podrá
calentarse un poco. Esto es normal.
Símbolo Significado
V
0
n
.../min
reciprocación por minutos
Rotación de retroceso
Voltios
Corriente continua
Velocidad sin carga
Revoluciones o
Rotación de avance
Rotación solamente
ADVERTENCIA:
Algunos tipos de polvo creados al lijar,
serrar, pulir, taladrar y al hacer otras
actividades de construcción contienen
productos químicos que el Estado de
California sabe que producen cáncer,
defectos de nacimiento y otros daños
en la reproducción.
Entre estos productos químicos se
encuentran:
• El plomo de pinturas con base de
plomo.
• El sílice cristalino de ladrillos,
cemento y otros productos de
albañilería.
• El arsénico y el cromo de la
madera tratada químicamente.
Para reducir la exposición a estos
productos químicos:
Trabaje en un lugar bien ventilado y
con el equipo de seguridad aprobado
como, por ejemplo, máscaras contra
el polvo que han sido diseñadas
especialmente para no dejar pasar las
partículas microscópicas.
INSTRUCCIONES DE
III
.
SEGURIDAD
IMPORTANTES PARA EL
CARGADOR DE BATERÍAS
Y LA BATERÍA
1)
GUARDE ESTAS
INSTRUCCIONES
-Este manual contiene instrucciones de
utilización y seguridad importantes
para el cargador de baterías modelo
EY0005.
2)
Antes de utilizar el cargador de
baterías, lea todas las instrucciones y
marcas de aviso en el cargador de
baterías, la batería y el producto que
utiliza la batería.
3)
AVISO-Para reducir el riesgo de
sufrir lesiones, cargue solamente las
baterías indicadas más abajo.
Otros tipos de batería podrían explotar
causando lesiones a las personas y
otros daños.
4)
No exponga el cargador a la lluvia ni a
la nieve.
5)
Para reducir el riesgo de dañar el
enchufe y el cable eléctricos, no tire del
enchufe del cable cuando desconecte
el cargador.
6)
Asegúrese de que el cable esté
colocado donde no pueda ser pisado,
donde alguien no pueda tropezarse
con él o donde no quede expuesto a
ser dañado.
7)
No deberá utilizarse un cable de
prolongación a menos que sea
absolutamente necesario.
El uso de un cable de prolongación
inadecuado podría causar un riesgo de
incendio o sacudida eléctrica.
Si tiene que utilizarse un cable de
prolongación asegúrese de que:
a.
El número de clavijas, su tamaño y su
forma sean idénticos a los receptáculos
del enchufe hembra del cargador.
— 25 —— 24 —
b.El cable de prolongación está
cableado correctamente y esté en
buenas condiciones eléctricas.
c.El tamaño del cable sea lo
suficientemente grande para el
amperaje del cargador especificado
a continuación.
TAMAÑO AWG MÍNIMO RECOMENDADO
DE LOS CABLES DE PROLONGACIÓN
PARA LOS CARGADORES DE BATERÍAS
Entrada nominal de CA
Igual o
superior a
0 2 18 18 18 16
8)
No utilice el cargador con el cable o el
enchufe dañados; reemplácelos
inmediatamente.
9)
No utilice el cargador éste si ha
recibido un golpe fuerte, se ha caído o
se ha dañado de cualquier otra forma;
en estos casos, llévelo a un técnico de
reparaciones cualificado.
10)
No desarme el cargador; llévelo a un
técnico de reparaciones cualificado
cuando sea necesario hacer trabajos
de mantenimiento o reparación. El
montaje incorrecto puede causar una
descarga eléctrica o un incendio.
11)
Para reducir el riesgo de sufrir una
descarga eléctrica, desenchufe el
cargador de la toma de corriente antes
de intentar hacer trabajos de
mantenimiento o limpiarlo.
12)
El cargador y la batería han sido
diseñados específicamente para
trabajar juntos.
No intente cargar ninguna otra
herramienta inalámbrica o batería con
este cargador.
13)
No intente cargar la batería con ningún
otro cargador.
14)
No intente desarmar la caja de la
batería.
15)
No guarde la herramienta ni la batería
en lugares donde la temperatura pueda
alcanzar o superar los 50°C (122°F)
(en el interior de una caseta para
herramientas mecánicas o en un
automóvil durante el verano); esto
podría deteriorar la batería.
Amperios
Pero inferior a Longitud del cable, en pies
Tamaño AWG del cable
25 50 100 150
Page 14

16)
No cargue la batería cuando la
temperatura sea INFERIOR a 0°C
(32°F) o SUPERIOR a 40°C (104°F).
Esto es muy importante para mantener
la batería en condiciones óptimas.
17)
No incinere la batería porque podría
explotar en el fuego.
18)
Evite los ambientes peligrosos. No
utilice el cargador en lugares húmedos
o mojados.
19)
El cargador ha sido diseñado para
funcionar con energía eléctrica
convencional de la empleada en las
casas. No intente utilizarlo con ninguna
otra tensión.
20)
No maltrate el cable. No tome nunca el
cargador por el cable ni intente
desconectar el cargador tirando del
cable. Mantenga el cable alejado del
calor, el aceite y los bordes afilados.
21)
Cargue la batería en un lugar bien
ventilado, y no tape el cargador ni la
batería con un paño, etc. durante la carga.
22)
No se recomienda utilizar accesorios
porque pueden ser un riesgo de que se
produzca un incendio o las personas
puedan recibir una descarga eléctrica y
lesionarse.
DESCRIPCIÓN FUNCIONAL
IV
.
(A)
(H)
(G)
(F)
(B) (C)
23)
24)
25)
(D)
(A) Portabrocas o portapuntas sin chaveta
(B) Control de embrague
(C) Selector de velocidad
(D) Palanca de avance / retroceso
(E) Botón de liberación de la batería
(F) Batería (EY9005)
(G)
(H)
(E)
( I) Cargador de baterías (EY0005)
No cortocircuite la batería. Una batería
cortocircuitada puede causar un flujo
de corriente excesivo, recalentamiento
y crear un riesgo de que se produzca
un incendio o las personas puedan
lesionarse.
NOTA: El cable de alimentación de
este aparato, si se daña, deberá ser
reemplazado solamente en un taller de
reparaciones autorizado por el
fabricante, porque para su reparación
se necesita emplear herramientas
especiales.
PARA REDUCIR EL RIESGO DE QUE
SE PRODUZCA UNA DESCARGA
ELÉCTRICA, ESTE APARATO TIENE
UN ENCHUFE POLARIZADO (UNA
CLAVIJA ES MÁS ANCHA QUE LA
OTRA).
Este enchufe podrá conectarse de una
forma solamente en una toma de
corriente polarizada. Si el enchufe no
puede meterse completamente en la
toma de corriente, délo la vuelta. Si
sigue sin poder enchufarlo, póngase en
contacto con un electricista cualificado
para que éste le instale una toma de
corriente apropiada.
No cambie el enchufe de ninguna
manera.
(I)
Compartimiento de brocas/puntas (interior de la herramienta)
Disparador de control de velocidad variable
MONTAJE
V.
Colocación o extracción
de una broca/punta
AVISO:
•
Quite siempre la batería antes de
colocar o quitar una broca/punta.
•
Las brocas están afiladas, así que
tenga cuidado al manejarlas.
Esta herramienta está equipada con un
portabrocas o portapuntas sin chaveta.
1.
Colocación
Gire la parte (a) hacia la izquierda
(mirando desde la parte delantera)
para insertar una broca/punta.
Sujete la parte (b) y gire la parte (a)
hacia la derecha (mirando desde la
parte delantera) para apretar
firmemente hasta que se pare.
Compruebe que no se salga la
broca/punta.
2.
Extracción
Gire la parte (a) hacia la izquierda
(mirando desde la parte delantera).
Quite la broca/punta.
(a)
3.
Conservación
Guarde la broca/punta en el compartimiento
de brocas/puntas cuando no la utilice.
Quite la batería para guardar la broca/punta
dentro del alojamiento
del mango.
En él se pueden
guardar brocas/puntas
de hasta 45 mm (1-3/4
pulgadas).
(b)(a)
45 mm
NOTA:
Si el portabrocas o portapuntas sin
chaveta se afloja en su lugar de montaje:
Sujete el taladro/
destornillador en su
lugar y gire la parte
(b) hacia la derecha
(mirando desde la
parte delantera).
Sujete la parte (b) y gire la parte (a)
hacia la izquierda (mirando desde la
parte delantera) para abrir el
portabrocas o portapuntas.
Utilice un destornillador para apretar
firmemente el tornillo de apriete (tornillo a
izquierda) del portabrocas o portapuntas
sin chaveta hacia la izquierda (mirando
desde la parte delantera).
Colocación y extracción
de la batería
AVISO:
•
El EY6105 ha sido diseñado para ser
utilizado solamente con la batería tipo
EY9005.
•
El uso con otro tipo de batería podría
dañar la herramienta y la propia
batería, y podría ser un riesgo para la
seguridad de las personas y causar
un incendio.
1.
Para conectar la batería:
Inserte la batería. Cuando la batería se
coloca en su lugar hace un ruido seco
para indicar que la conexión está bien
hecha. Asegúrese de que la batería esté
firmemente conectada a la herramienta.
2.
Para quitar la batería:
Presione los dos botones de liberación de la
batería situados en los lados de la batería.
Deslice la batería para retirarla del cuerpo
de la herramienta.
FUNCIONAMIENTO
VI
.
AVISO:
•
Para reducir el riesgo de sufrir
lesiones, póngase gafas de seguridad
o gafas con protectores laterales.
— 27 —— 26 —
(b)(a)
Page 15

3.
Funcionamiento del interruptor
disparador
1.
La velocidad aumenta cuanto más se
presiona el disparador. Cuando empiece
a trabajar, presione suavemente el
disparador para que el comienzo de la
rotación sea lento.
2.
Cuando se suelta el disparador entra en
funcionamiento el freno y el motor se
detiene inmediatamente.
NOTA:
•
Cuando funciona el freno se oye un
sonido de frenado. Esto es normal.
Funcionamiento de la palanca
de avance / retroceso.
La velocidad aumenta según la presión
ejercida sobre el disparador, para apretar
tornillos y taladrar de una forma más
eficiente. Cuando se suelta el disparador,
el freno se activa y el portabrocas o
portapuntas se detiene automáticamente.
4.
Ponga la palanca en su posición central
(neutral) después de utilizar la
herramienta.
Funcionamiento del interruptor
de rotación en retroceso
1.
Empuje la palanca para que la rotación
se haga en el sentido de retroceso.
2.
Presione suavemente el interruptor
disparador para que la rotación empiece
lentamente.
3.
Después de utilizar la herramienta ponga
la palanca en su posición central (neutral).
Ajuste de la torsión de
embrague
Ajuste la torsión de parada del motor
Avance ( ), neutral, retroceso ( )
AVISO:
•
No utilice la palanca de avance/
retroceso hasta que el portabrocas o
portapuntas se haya detenido
completamente. El desplazamiento
durante la rotación del portabrocas o
portapuntas puede dañar la
herramienta.
•
El interruptor disparador no deberá
bloquearse cuando la palanca se
ponga en su posición central
(neutral).
•
Compruebe el sentido de rotación
antes de usar la herramienta.
Funcionamiento del interruptor
de rotación en avance
1.
Empuje la palanca para que la rotación
se haga en el sentido de avance.
2.
Presione suavemente el interruptor
disparador para que la rotación empiece
lentamente.
seleccionando uno de los 18 ajustes de
embrague o la posición " ".
AVISO:
Selección de velocidad
Elija una velocidad baja o alta que sea
adecuada para el trabajo a realizar.
Cuanto más se tire del disparador de
control de velocidad más alta será ésta.
AVISO:
•
Haga una prueba con el ajuste antes
de empezar a utilizar la herramienta.
Ponga la escala en la marca ( ).
Agujeros de ventilación
•
Compruebe el selector de velocidad
antes de utilizar la herramienta.
•
Utilice una velocidad baja cuando se
necesite una fuerza grande durante el
funcionamiento. (Usar una velocidad
alta mientras se aplica una fuerza
grande puede causar una avería en
el motor.)
*
Consulte ESPECIFICACIONES para
la “SELECCIÓN DE VELOCIDAD
RECOMENDADA”.
•
No utilice el selector de velocidad
[LOW (baja) - HIGH (alta)] mientras
tira del disparador de control de
velocidad.
Esto puede ser la causa de que la
batería se agote rápidamente o el
mecanismo interno del motor o los
engranajes se dañen.
•
Para eliminar el aumento excesivo de
la temperatura en la superficie de la
herramienta, no la utilice
continuamente con dos o más
baterías. La herramienta necesita
enfriarse antes de empezar a utilizar
otra batería.
•
No tape los agujeros de ventilación
de los costados de la herramienta
durante el funcionamiento.
De lo contrario, el funcionamiento de
la herramienta se verá afectado
adversamente y ésta podría fallar.
•
No someta la herramienta (motor) a
esfuerzos. Esto podría dañarla.
•
Utilice la herramienta evitando que el
aire que sale por los agujeros de
ventilación se dirija directamente
hacia su piel. De lo contrario podría
quemarse.
Utilización apropiada de
la batería
Batería de Ni-Cd (EY9005)
Nota:
•
Para maximizar su vida útil, utilice
solamente el cargador de baterías
EY0005 para cargar la batería de Ni-
CD EY9005.
•
La gama de temperaturas
ambientales es de entre 0°C (32°F) y
40°C (104°F).
Si la batería se utiliza cuando la
temperatura de la misma es inferior a
0°C (32°F), la herramienta tal vez no
funcione correctamente. En tal caso,
cargue completamente la batería
para que funcione apropiadamente.
Duración de la batería
Las baterías tienen una duración limitada.
Si el tiempo de funcionamiento de la
herramienta se reduce considerablemente
después de cargar una batería,
reemplace la batería por otra nueva.
Carga
NOTA:
•
Cuando cargue la batería por primera
vez, o después de haber estado
guardada durante mucho tiempo,
cárguela durante unas 24 horas para
que recupere su capacidad completa.
Cargador de baterías (EY0005)
1.
Enchufe el cargador en la toma de CA.
NOTA:
•
Cuando se inserte la clavija en la toma
de CA es posible que se produzcan
chispas, pero esto no supone ningún
problemas en cuanto a la seguridad
se refiere.
2.
Inserte firmemente la batería en el
cargador.
Batería
A una toma
de CA
Cargador de baterías
3.
La luz de carga se encenderá durante la
carga.
Cuando termine la carga, un interruptor
electrónico interno se activará
automáticamente para evitar la sobrecarga
de la batería.
•
La carga no empezará si la batería
está muy caliente como, por ejemplo,
después de haber estado funcionando
para un trabajo pesado.
La luz de carga parpadeará en rojo
hasta que se enfríe la batería. Y la carga
empezará luego automáticamente.
4.
Cuando termine la carga, la luz de carga
empezará a parpadear rápidamente.
— 29 —— 28 —
Page 16

5.
Consulte a un concesionario autorizado
si la luz de carga no se enciende
inmediatamente después de enchufar el
cargador a una toma de corriente o si la
luz no se apaga después de haber
transcurrido el tiempo de carga estándar.
NOTA:
•
Cuando cargue una batería fría
(menos de 5°C (41°F)) en un lugar
caliente, deje la batería en ese lugar
durante más de una hora para que
ésta se caliente y alcance la
temperatura ambiental. De lo contrario,
puede que la batería no se cargue
completamente.
•
Enfríe el cargador cuando cargue más
de dos batería consecutivamente.
INDICACIONES DE LAS LUCES
VII
.
Parpadeando en rojo
Encendida en rojo
Parpadeando rápidamente en rojo
VIII
MANTENIMIENTO
.
Utilice solamente un paño seco y blando para limpiar la unidad. No utilice un paño
húmedo, diluyente, bencina u otros disolventes volátiles para limpiar.
•
No meta sus dedos en el agujero de
contacto bajo ninguna circunstancia.
AVISO:
•
No utilice un generador de motor como
fuente de alimentación.
•
No tape los agujeros de ventilación
del cargador.
•
No utilice el adaptador de baterías
EY0890 con el cargador de baterías
EY0005.
El cargador se enchufa en una toma de CA.
Listo para cargar.
La batería está caliente. La carga empezará
cuando disminuya la temperatura de la batería.
No es posible cargar. La batería está obstruida
con polvo o funciona mal.
Cargando ahora
Carga terminada
RECICLADO DE LA BATERÍA
ATENCIÓN:
Para las baterías de Ni-Cd, modelo EY9005
El producto que usted ha adquirido funciona con una batería de níquel-hidruro de
metal.
Llame al 1-800-8-BATTERY para obtener información acerca de cómo reciclar esta
batería.
IX
ACCESORIOS
.
Utilice solamente las brocas/puntas del tamaño adecuado para el portabrocas o
portapuntas.
ESPECIFICACIONES
X.
UNIDAD PRINCIPAL
Modelo
Motor
Velocidad sin carga
Capacidad del portabrocas o portapuntas
Ajuste de embrague
Longitud total
Peso (con batería)
BAJA
ALTA
Etapas 1 - 18
Aproximadamente 0,5 Nm (5 kgf-cm, 4,3 pulgadas-libras) -
ø 0,8 - ø 10 mm (0 - 3/8")
4,4 Nm (45 kgf-cm, 39,0 pulgadas-libras)
Para un potente atornillado y taladrado
EY6105
Motor de 12 V CC
45 – 300/min. (rpm)
165 – 1100/min. (rpm)
199 mm (7-13/16")
1,4 kg (3,1 libras)
CAPACIDADES DE TRABAJO Y SELECCIÓN DE VELOCIDAD RECOMENDADAS
Modelo
Atornillado
Taladrado
Tornillo para madera
Tornillo autotaladrador
Para madera
Para metal
ø 6,0 mm (1/4") x 13 mm (1/2"), SPC, grosor = 2,3 mm (1/16")
ø 20 mm (13/16"), pino amarillo, grosor = 20 mm (13/16")
EY6105
ø 5,8 mm (1/4") x 38 mm (1-1/2")
ø 6,5 mm (1/4") SPC, grosor = 1,6 mm (1/16")
Selección de velocidad
Baja
Alta
Baja
Alta
BATERÍA: EY9005
Modelo
Batería de acumuladores
Tensión de la batería
EY9005: Cargue la batería con el cargador EY0005 solamente.
12 V CC (1,2 V x 10 celdas)
EY9005
Batería de Ni-Cd
CARGADOR DE BATERÍAS: EY0005
Modelo
Especificaciones eléctricas
Peso
1,2 Ah
Tiempo de
carga
NOTA: Esta tabla puede incluir modelos que no se encuentra a la venta en su zona.
AVISO: • No utilice el adaptador de baterías EY0890 con el cargador de baterías
1,7 Ah
2,0 Ah
Consulte el catálogo.
EY0005.
• No cargue otras baterías de Panasonic que no sean las indicadas más arriba.
Vea la placa del fabricante en la parte inferior del cargador.
7,2 V
EY9065
EY9066
— 31 —— 30 —
EY0005
0,57 kg (1,26 libras)
9,6 V 12 V
EY9080
EY9086
30 minutos
EY9180
EY9182
45 minutos
EY9001
EY9005, EY9006
EY9101
EY9106
50 minutos
 Loading...