PANASONIC EY45A5 User Manual

0 (0)

Operating Instructions Bedienungsanleitung Instructions d’utilisation Istruzioni per l’uso Gebruiksaanwijzing Manual de instrucciones Brugsvejledning Driftsföreskrifter Bruksanvisning Käyttöohjeet

Çalıştırma Talimatları Instrukcja obsługi

Provozní pokyny Használati utasítás Návod na obsluhu Navodila za uporabo

Instrucţiuni de utilizare

Instruções de Uso

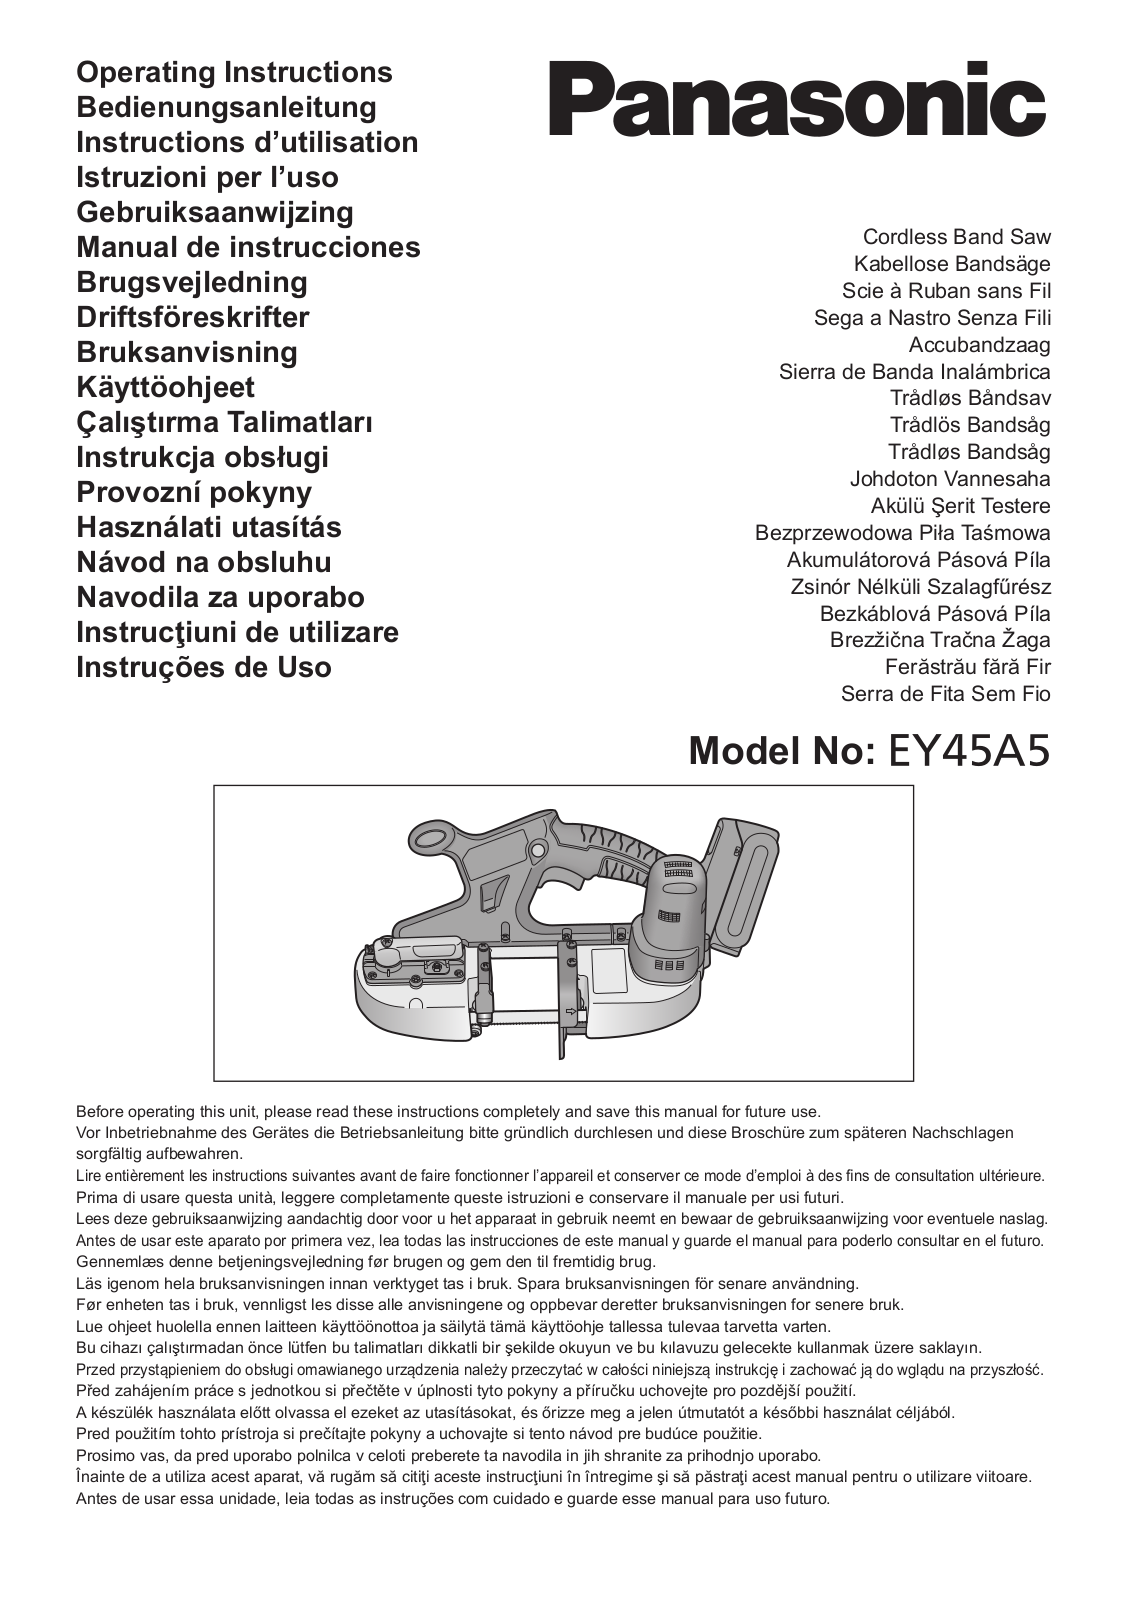
Cordless Band Saw

Kabellose Bandsäge Scie à Ruban sans Fil Sega a Nastro Senza Fili Accubandzaag

Sierra de Banda Inalámbrica Trådløs Båndsav Trådlös Bandsåg Trådløs Bandsåg Johdoton Vannesaha

Akülü Şerit Testere Bezprzewodowa Piła Taśmowa

Akumulátorová Pásová Píla

Zsinór Nélküli Szalagfűrész

Bezkáblová Pásová Píla

Brezžična Tračna Žaga Ferăstrău fără Fir

Serra de Fita Sem Fio

Model No: EY45A5

Before operating this unit, please read these instructions completely and save this manual for future use.

Vor Inbetriebnahme des Gerätes die Betriebsanleitung bitte gründlich durchlesen und diese Broschüre zum späteren Nachschlagen sorgfältig aufbewahren.

Lire entièrement les instructions suivantes avant de faire fonctionner l’appareil et conserver ce mode d’emploi à des fins de consultation ultérieure.

Prima di usare questa unità, leggere completamente queste istruzioni e conservare il manuale per usi futuri.

Lees deze gebruiksaanwijzing aandachtig door voor u het apparaat in gebruik neemt en bewaar de gebruiksaanwijzing voor eventuele naslag. Antes de usar este aparato por primera vez, lea todas las instrucciones de este manual y guarde el manual para poderlo consultar en el futuro. Gennemlæs denne betjeningsvejledning før brugen og gem den til fremtidig brug.

Läs igenom hela bruksanvisningen innan verktyget tas i bruk. Spara bruksanvisningen för senare användning.

Før enheten tas i bruk, vennligst les disse alle anvisningene og oppbevar deretter bruksanvisningen for senere bruk. Lue ohjeet huolella ennen laitteen käyttöönottoa ja säilytä tämä käyttöohje tallessa tulevaa tarvetta varten.

Bu cihazı çalıştırmadan önce lütfen bu talimatları dikkatli bir şekilde okuyun ve bu kılavuzu gelecekte kullanmak üzere saklayın.

Przed przystąpieniem do obsługi omawianego urządzenia należy przeczytać w całości niniejszą instrukcję i zachować ją do wglądu na przyszłość. Před zahájením práce s jednotkou si přečtěte v úplnosti tyto pokyny a příručku uchovejte pro pozdější použití.

A készülék használata előtt olvassa el ezeket az utasításokat, és őrizze meg a jelen útmutatót a későbbi használat céljából. Pred použitím tohto prístroja si prečítajte pokyny a uchovajte si tento návod pre budúce použitie.

Prosimo vas, da pred uporabo polnilca v celoti preberete ta navodila in jih shranite za prihodnjo uporabo.

Înainte de a utiliza acest aparat, vă rugăm să citiţi aceste instrucţiuni în întregime şi să păstraţi acest manual pentru o utilizare viitoare. Antes de usar essa unidade, leia todas as instruções com cuidado e guarde esse manual para uso futuro.

Index/Index/Index/Indice/Index/Indice/Indeks/Index/Indeks/Hakemisto/Dizin/Indeks/

Rejstřík/Tárgymutató/Obsah/Kazalo/Index/Índice

English:

Page


11

Suomi:

Sivu

120

Deutsch:

Seite


24

Türkçe:

Sayfa

132

Français:

Page


36

Polski:

Strona

144

Italiano:

Pagina


48

Česky:

Strana

156

Nederlands:

Bladzijde


60

Magyar:

Oldal

168

Español:

Página


72

Slovenčina:

Strana

180

Dansk:

Side


84

Slovenščina:

Stran

192

Svenska:

Sid


96

Română:

Pagină

204

Norsk:

Side


108

Português:

Página

216

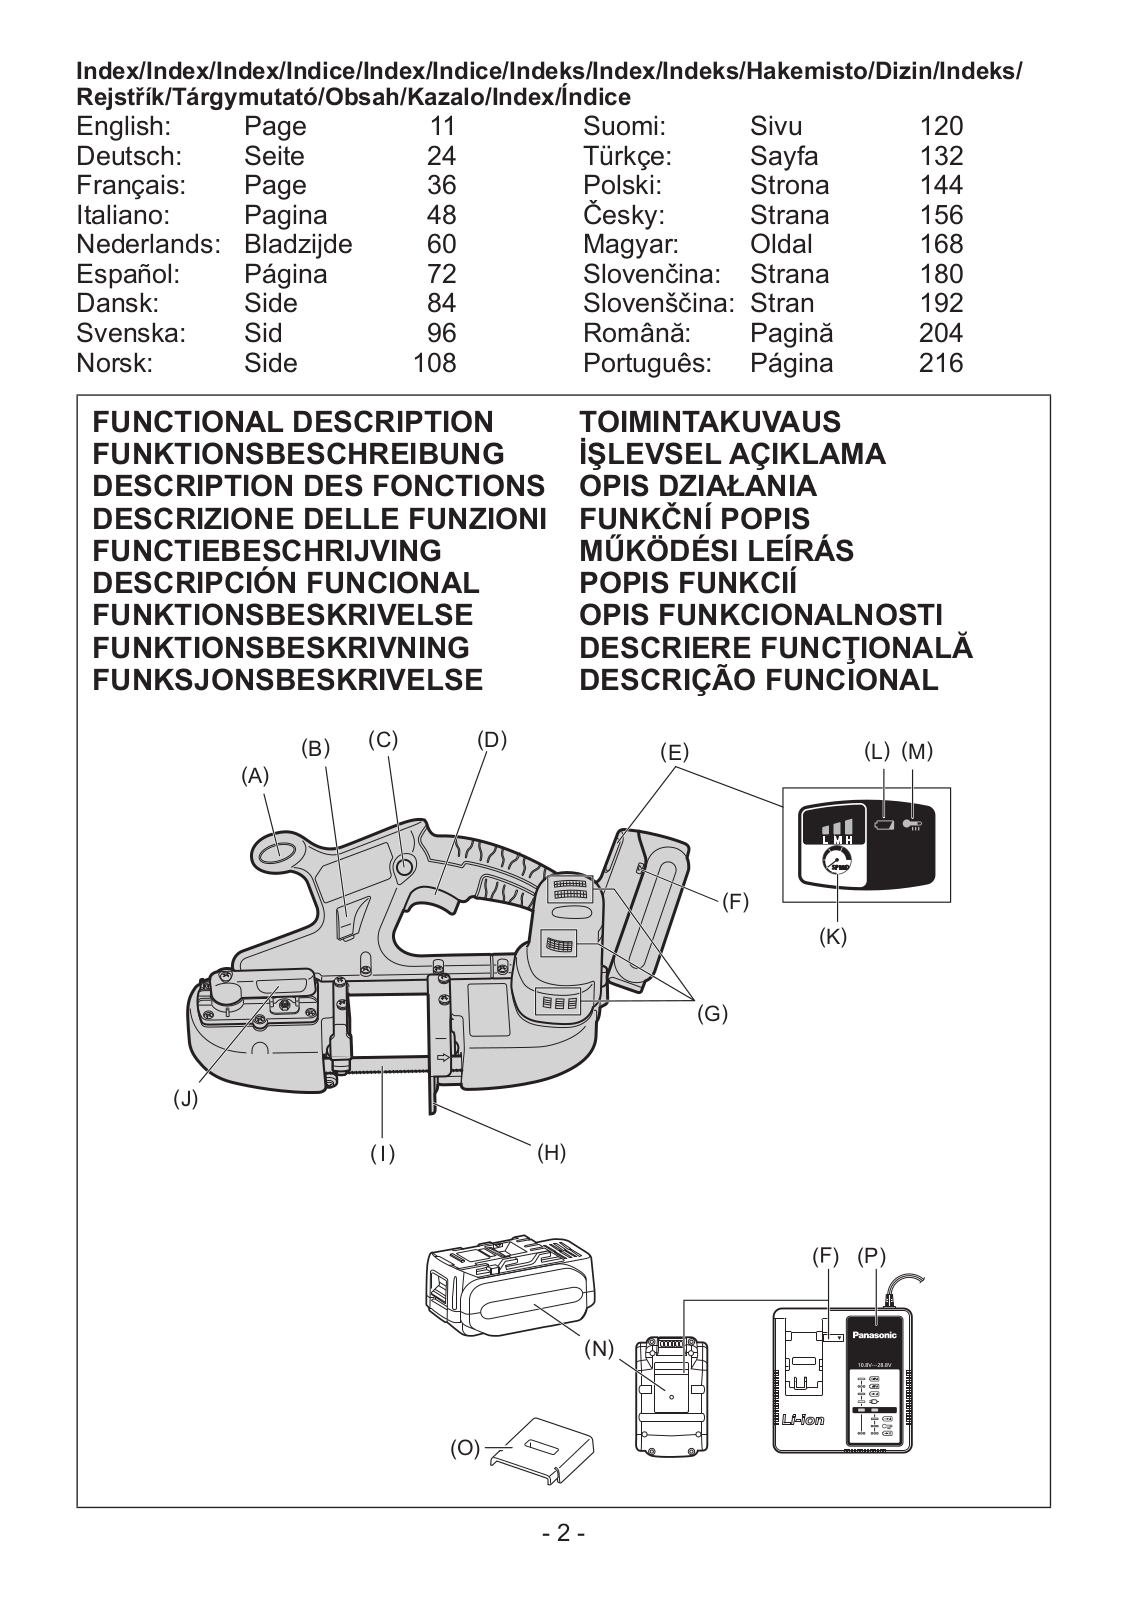
FUNCTIONAL DESCRIPTION

TOIMINTAKUVAUS


FUNKTIONSBESCHREIBUNG

İŞLEVSEL AÇIKLAMA

DESCRIPTION DES FONCTIONS

OPIS DZIAŁANIA


DESCRIZIONE DELLE FUNZIONI

FUNKČNÍ POPIS


FUNCTIEBESCHRIJVING

MŰKÖDÉSI LEÍRÁS


DESCRIPCIÓN FUNCIONAL

POPIS FUNKCIÍ


FUNKTIONSBESKRIVELSE

OPIS FUNKCIONALNOSTI

FUNKTIONSBESKRIVNING

DESCRIERE FUNCŢIONALĂ

FUNKSJONSBESKRIVELSE

DESCRIÇÃO FUNCIONAL


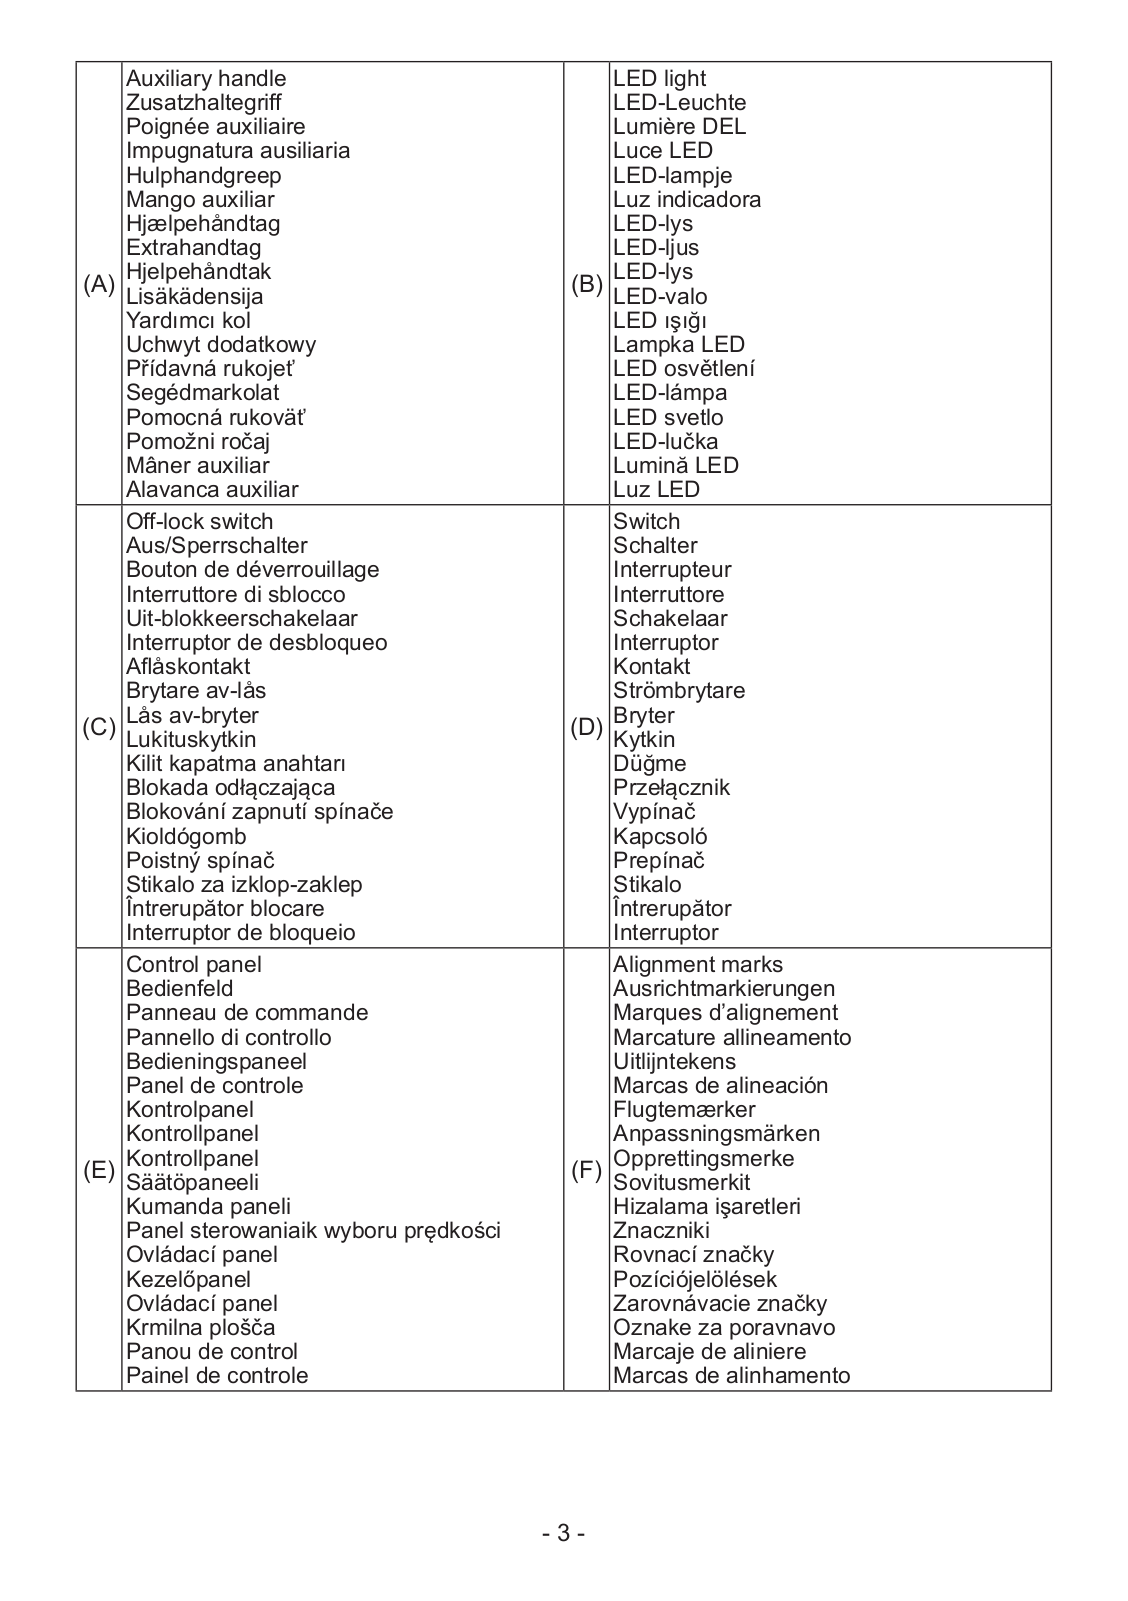
(B)

(C)

(D)

(E)


(L) (M)


(A)


(F)


(K)


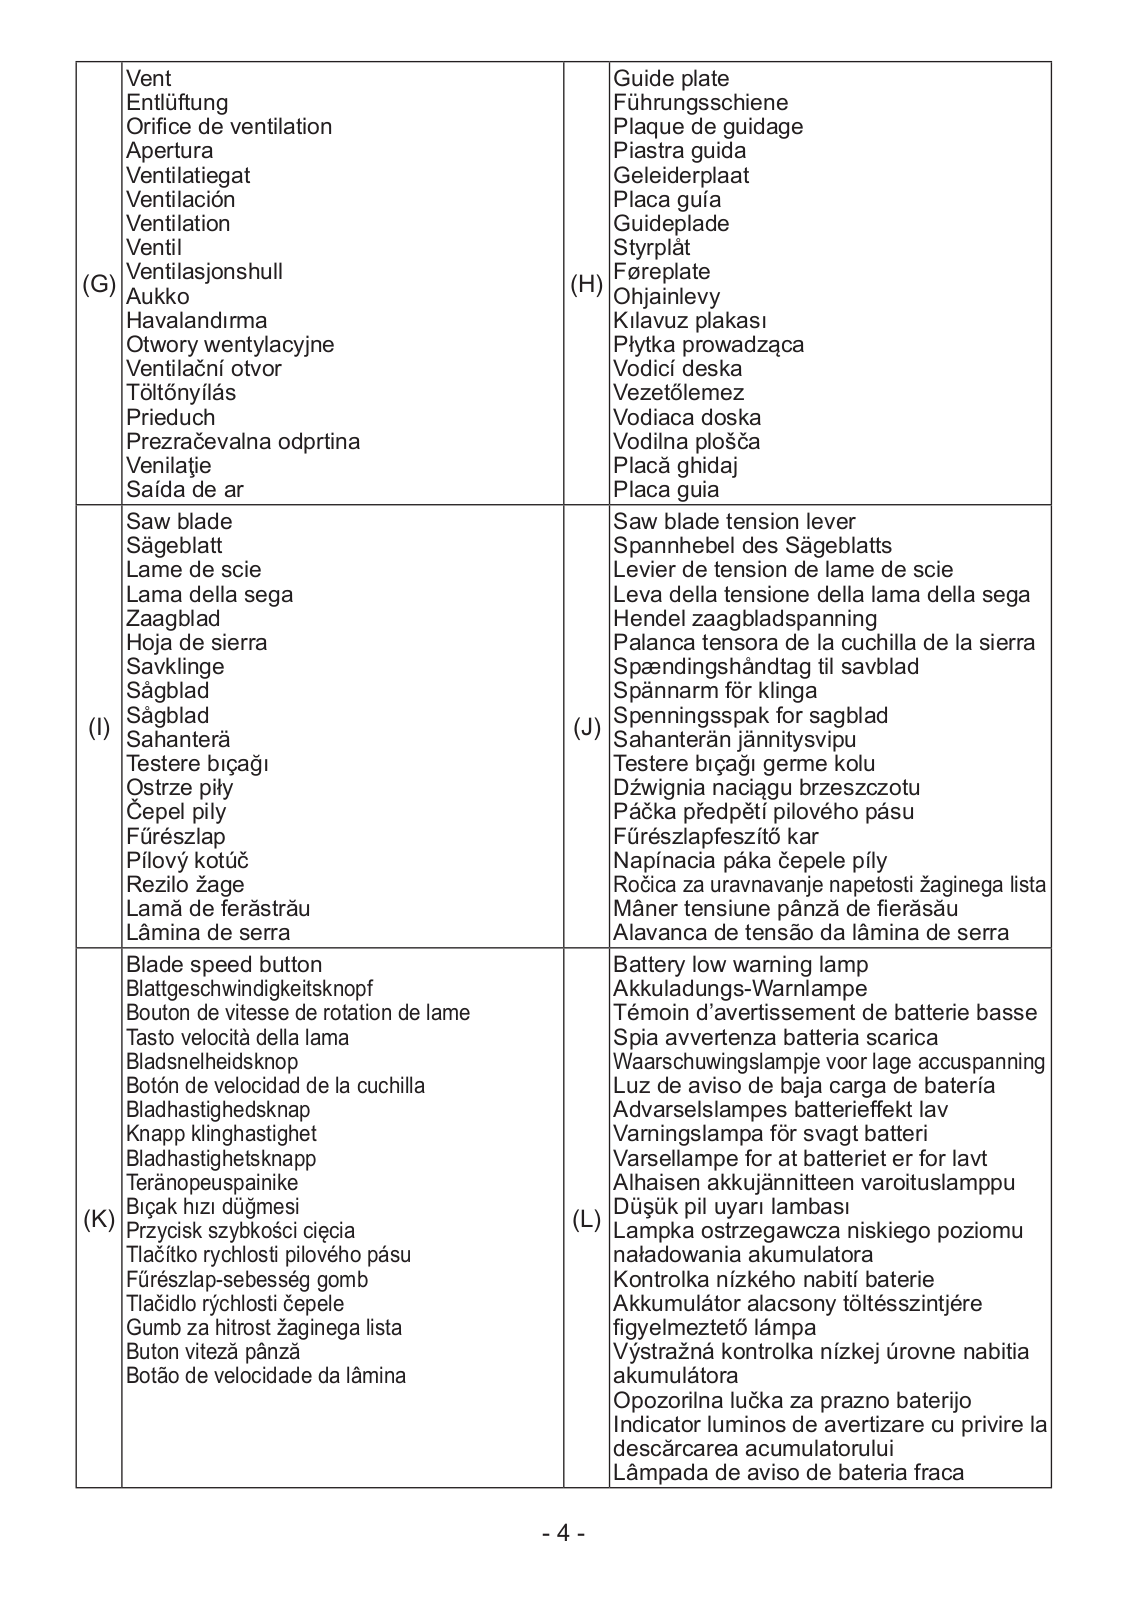
(G)


(J)


(I)

(H)


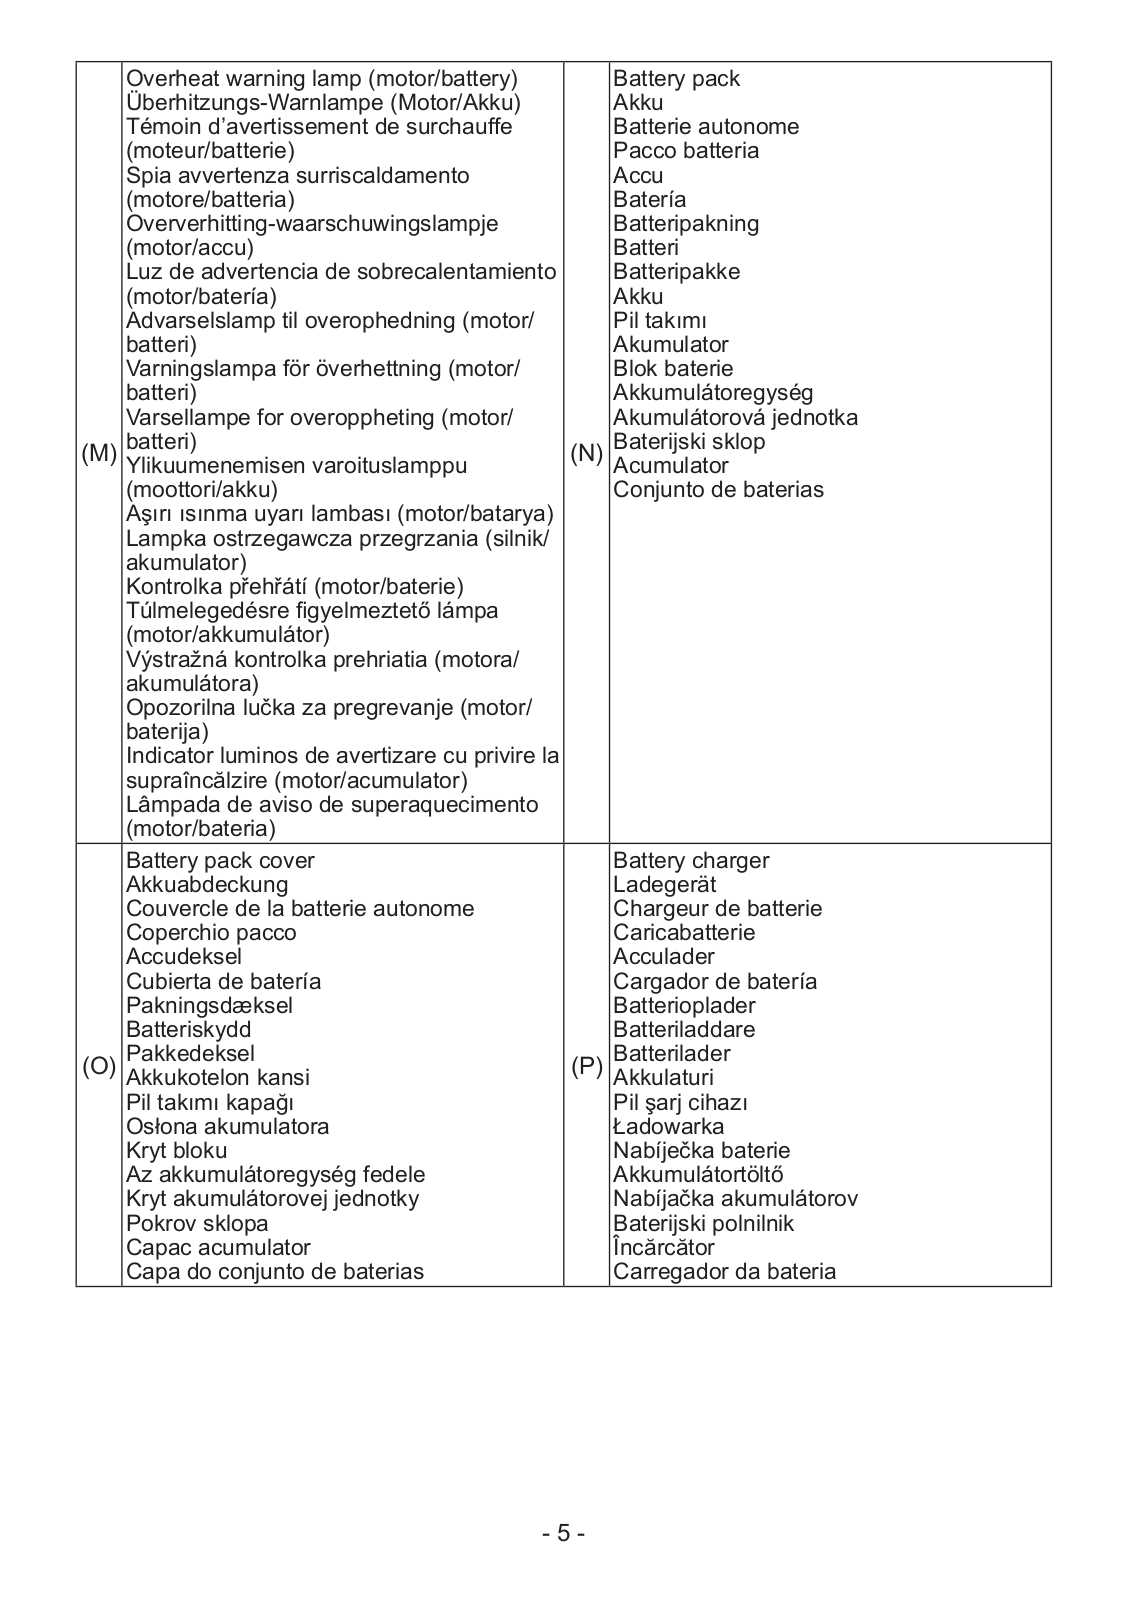
() (P)

(N)

(O)

- 2 -


Auxiliary handle


LED light


Zusatzhaltegriff


LED-Leuchte


Poignée auxiliaire


Lumière DEL


Impugnatura ausiliaria


Luce LED


Hulphandgreep


LED-lampje


Mango auxiliar


Luz indicadora


Hjælpehåndtag


LED-lys


Extrahandtag


LED-ljus

(A)

Hjelpehåndtak

(B)

LED-lys

Lisäkädensija

LED-valo


Yardımcı kol


LED ışığı


Uchwyt dodatkowy


Lampka LED


Přídavná rukojeť


LED osvětlení


Segédmarkolat


LED-lámpa


Pomocná rukoväť


LED svetlo


Pomožni ročaj


LED-lučka


Mâner auxiliar


Lumină LED


Alavanca auxiliar


Luz LED


Off-lock switch


Switch


Aus/Sperrschalter


Schalter


Bouton de déverrouillage


Interrupteur


Interruttore di sblocco


Interruttore


Uit-blokkeerschakelaar


Schakelaar


Interruptor de desbloqueo


Interruptor


Aflåskontakt


Kontakt


Brytare av-lås


Strömbrytare

(C)

Lås av-bryter

(D)

Bryter

Lukituskytkin

Kytkin


Kilit kapatma anahtarı


Düğme


Blokada odłączająca


Przełącznik


Blokování zapnutí spínače


Vypínač


Kioldógomb


Kapcsoló


Poistný spínač


Prepínač


Stikalo za izklop-zaklep


Stikalo


Întrerupător blocare


Întrerupător


Interruptor de bloqueio


Interruptor


Control panel


Alignment marks


Bedienfeld


Ausrichtmarkierungen


Panneau de commande


Marques d’alignement


Pannello di controllo


Marcature allineamento


Bedieningspaneel


Uitlijntekens


Panel de controle


Marcas de alineación


Kontrolpanel


Flugtemærker


Kontrollpanel


Anpassningsmärken

(E)

SäätöpaneeliKontrollpanel

(F)

SovitusmerkitOpprettingsmerke


Kumanda paneli


Hizalama işaretleri


Panel sterowaniaik wyboru prędkości


Znaczniki


Ovládací panel


Rovnací značky


Kezelőpanel


Pozíciójelölések


Ovládací panel


Zarovnávacie značky


Krmilna plošča


Oznake za poravnavo


Panou de control


Marcaje de aliniere


Painel de controle


Marcas de alinhamento

- 3 -


Vent


Guide plate


Entlüftung


Führungsschiene


Orifice de ventilation


Plaque de guidage


Apertura


Piastra guida


Ventilatiegat


Geleiderplaat


Ventilación


Placa guía


Ventilation


Guideplade


Ventil


Styrplåt

(G)

AukkoVentilasjonshull

(H)

OhjainlevyFøreplate


Havalandırma


Kılavuz plakası


Otwory wentylacyjne


Płytka prowadząca


Ventilační otvor


Vodicí deska


Töltőnyílás


Vezetőlemez


Prieduch


Vodiaca doska


Prezračevalna odprtina


Vodilna plošča


Venilaţie


Placă ghidaj


Saída de ar


Placa guia


Saw blade


Saw blade tension lever


Sägeblatt


Spannhebel des Sägeblatts


Lame de scie


Levier de tension de lame de scie


Lama della sega


Leva della tensione della lama della sega


Zaagblad


Hendel zaagbladspanning


Hoja de sierra


Palanca tensora de la cuchilla de la sierra


Savklinge


Spændingshåndtag til savblad


Sågblad


Spännarm för klinga

(I)

Sågblad

(J)

Spenningsspak for sagblad

Sahanterä

Sahanterän jännitysvipu


Testere bıçağı


Testere bıçağı germe kolu


Ostrze piły


Dźwignia naciągu brzeszczotu


Čepel pily


Páčka předpětí pilového pásu


Fűrészlap


Fűrészlapfeszítő kar


Pílový kotúč


Napínacia páka čepele píly


Rezilo žage


Ročica za uravnavanje napetosti žaginega lista


Lamă de ferăstrău


Mâner tensiune pânză de fierăsău


Lâmina de serra


Alavanca de tensão da lâmina de serra


Blade speed button


Battery low warning lamp


Blattgeschwindigkeitsknopf


Akkuladungs-Warnlampe


Bouton de vitesse de rotation de lame


Témoin d’avertissement de batterie basse


Tasto velocità della lama


Spia avvertenza batteria scarica


Bladsnelheidsknop


Waarschuwingslampje voor lage accuspanning


Botón de velocidad de la cuchilla


Luz de aviso de baja carga de batería


Bladhastighedsknap


Advarselslampes batterieffekt lav


Knapp klinghastighet


Varningslampa för svagt batteri


Bladhastighetsknapp


Varsellampe for at batteriet er for lavt


Teränopeuspainike


Alhaisen akkujännitteen varoituslamppu

(K)

Bıçak hızı düğmesi

(L)

Düşük pil uyarı lambası

Przycisk szybkości cięcia

Lampka ostrzegawcza niskiego poziomu


Tlačítko rychlosti pilového pásu


naładowania akumulatora


Fűrészlap-sebesség gomb


Kontrolka nízkého nabití baterie


Tlačidlo rýchlosti čepele


Akkumulátor alacsony töltésszintjére


Gumb za hitrost žaginega lista


figyelmeztető lámpa


Buton viteză pânză


Výstražná kontrolka nízkej úrovne nabitia


Botão de velocidade da lâmina


akumulátora


Opozorilna lučka za prazno baterijo


Indicator luminos de avertizare cu privire la


descărcarea acumulatorului


Lâmpada de aviso de bateria fraca

- 4 -


Overheat warning lamp (motor/battery)


Battery pack


Überhitzungs-Warnlampe (Motor/Akku)


Akku


Témoin d’avertissement de surchauffe


Batterie autonome


(moteur/batterie)


Pacco batteria


Spia avvertenza surriscaldamento


Accu


(motore/batteria)


Batería


Oververhitting-waarschuwingslampje


Batteripakning


(motor/accu)


Batteri


Luz de advertencia de sobrecalentamiento


Batteripakke


(motor/batería)


Akku


Advarselslamp til overophedning (motor/


Pil takımı


batteri)


Akumulator


Varningslampa för överhettning (motor/


Blok baterie


batteri)


Akkumulátoregység

(M)

Varsellampe for overoppheting (motor/

(N)

Akumulátorová jednotka

batteri)

Baterijski sklop


Ylikuumenemisen varoituslamppu


Acumulator


(moottori/akku)


Conjunto de baterias


Aşırı ısınma uyarı lambası (motor/batarya)


Lampka ostrzegawcza przegrzania (silnik/


akumulator)


Kontrolka přehřátí (motor/baterie)


Túlmelegedésre figyelmeztető lámpa


(motor/akkumulátor)


Výstražná kontrolka prehriatia (motora/


akumulátora)


Opozorilna lučka za pregrevanje (motor/


baterija)


Indicator luminos de avertizare cu privire la


supraîncălzire (motor/acumulator)


Lâmpada de aviso de superaquecimento


(motor/bateria)


Battery pack cover


Battery charger


Akkuabdeckung


Ladegerät


Couvercle de la batterie autonome


Chargeur de batterie


Coperchio pacco


Caricabatterie


Accudeksel


Acculader


Cubierta de batería


Cargador de batería


Pakningsdæksel


Batterioplader


Batteriskydd


Batteriladdare

(O)

AkkukotelonPakkedekselkansi

(P)

AkkulaturiBatterilader


Pil takımı kapağı


Pil şarj cihazı


Osłona akumulatora


Ładowarka


Kryt bloku


Nabíječka baterie


Az akkumulátoregység fedele


Akkumulátortöltő


Kryt akumulátorovej jednotky


Nabíjačka akumulátorov


Pokrov sklopa


Baterijski polnilnik


Capac acumulator


Încărcător


Capa do conjunto de baterias


Carregador da bateria

- 5 -

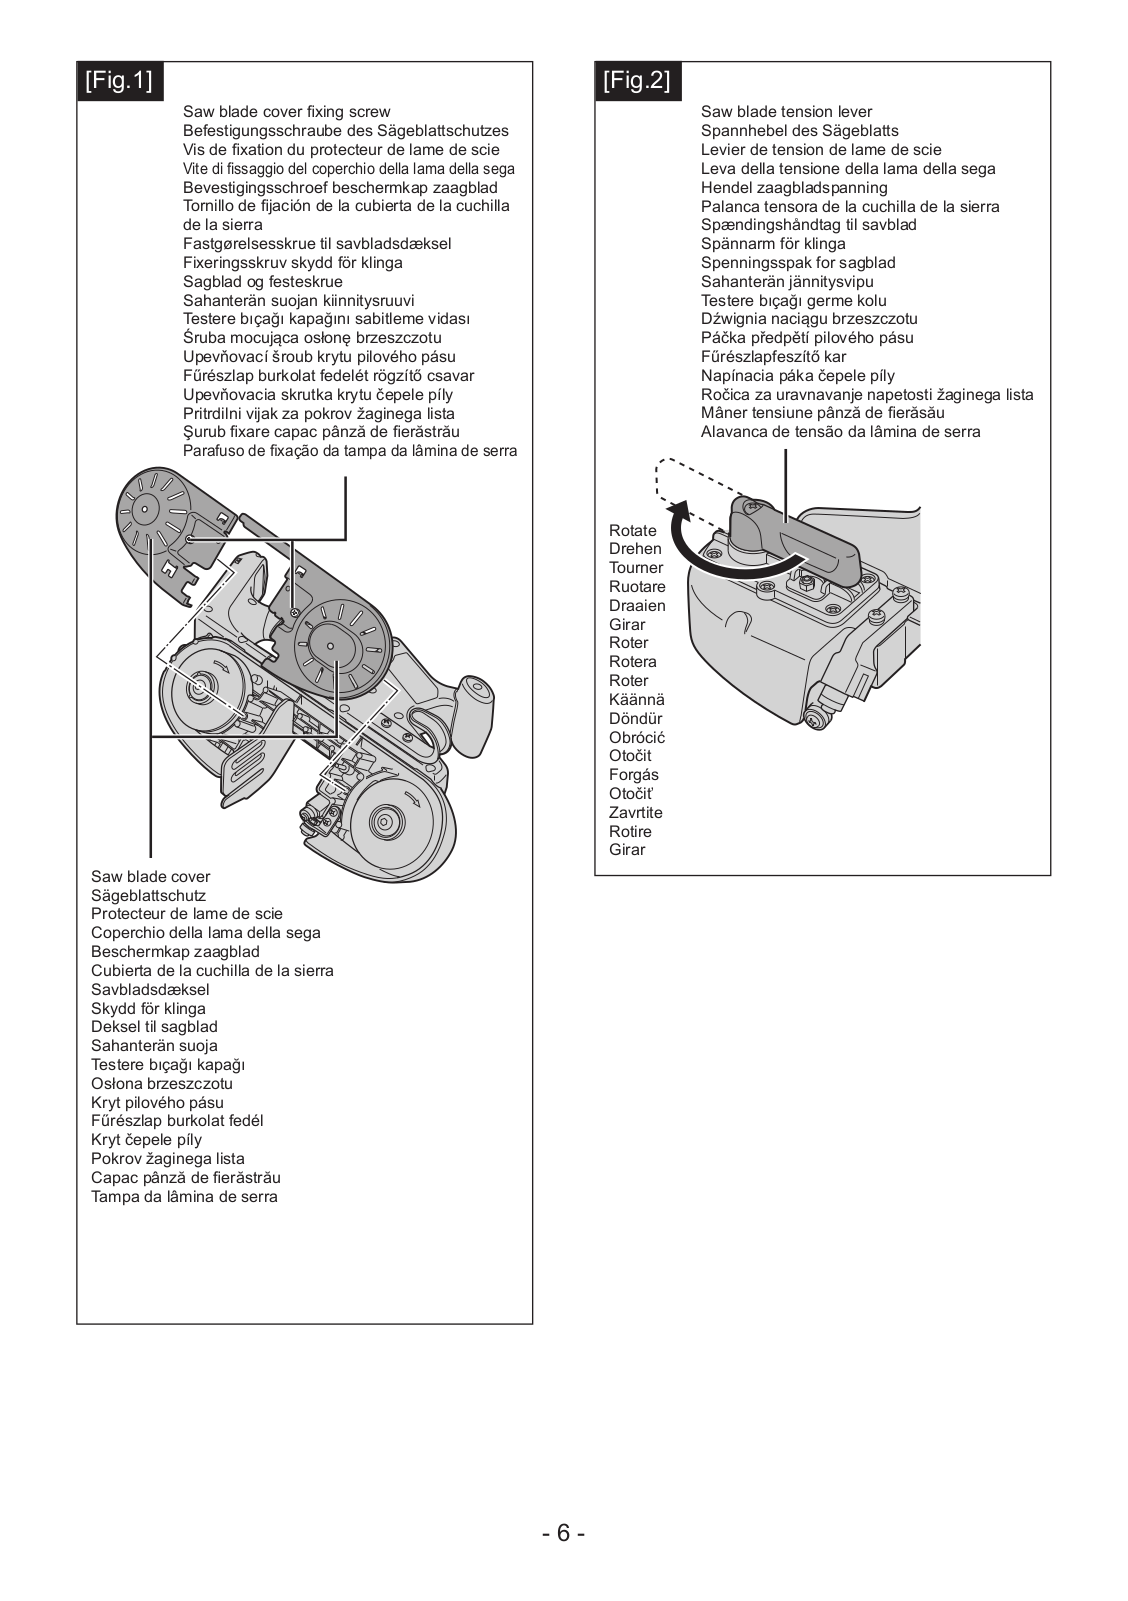
[Fig.1]

Saw blade cover fixing screw

Befestigungsschraube des Sägeblattschutzes

Vis de fixation du protecteur de lame de scie Vite di fissaggio del coperchio della lama della sega

Bevestigingsschroef beschermkap zaagblad

Tornillo de fijación de la cubierta de la cuchilla de la sierra

Fastgørelsesskrue til savbladsdæksel Fixeringsskruv skydd för klinga Sagblad og festeskrue

Sahanterän suojan kiinnitysruuvi

Testere bıçağı kapağını sabitleme vidası Śruba mocująca osłonę brzeszczotu Upevňovací šroub krytu pilového pásu Fűrészlap burkolat fedelét rögzítő csavar Upevňovacia skrutka krytu čepele píly Pritrdilni vijak za pokrov žaginega lista Şurub fixare capac pânză de fierăstrău

Parafuso de fixação da tampa da lâmina de serra

Saw blade cover

Sägeblattschutz

Protecteur de lame de scie

Coperchio della lama della sega

Beschermkap zaagblad

Cubierta de la cuchilla de la sierra

Savbladsdæksel

Skydd för klinga

Deksel til sagblad

Sahanterän suoja

Testere bıçağı kapağı

Osłona brzeszczotu

Kryt pilového pásu

Fűrészlap burkolat fedél

Kryt čepele píly

Pokrov žaginega lista

Capac pânză de fierăstrău

Tampa da lâmina de serra

[Fig.2]

Saw blade tension lever Spannhebel des Sägeblatts Levier de tension de lame de scie

Leva della tensione della lama della sega Hendel zaagbladspanning

Palanca tensora de la cuchilla de la sierra Spændingshåndtag til savblad Spännarm för klinga

Spenningsspak for sagblad Sahanterän jännitysvipu

Testere bıçağı germe kolu Dźwignia naciągu brzeszczotu Páčka předpětí pilového pásu Fűrészlapfeszítő kar Napínacia páka čepele píly

Ročica za uravnavanje napetosti žaginega lista Mâner tensiune pânză de fierăsău

Alavanca de tensão da lâmina de serra

Rotate

Drehen

Tourner

Ruotare

Draaien

Girar

Roter

Rotera

Roter

Käännä

Döndür

Obrócić

Otočit

Forgás

Otočiť

Zavrtite

Rotire

Girar

- 6 -

[Fig.3]


Saw blade bearing

Push in

Push in

Sägeblattlager

Eindrücken

Eindrücken

Roulement de lame

Enfoncer

Enfoncer

de scie

Spingere

Spingere

Cuscinetto della

Induwen

Induwen

lama della sega

Presionar

Presionar

Zaagbladlager

Skub ind

Skub ind

Cojinete de la

Tryck in

Tryck in

cuchilla de la sierra

Trykk inn

Trykk inn

Savbladsleje

Työnnä sisään

Työnnä sisään

Lager för klinga

İçeri it

İçeri it

Sagbladlager

Wepchnąć

Wepchnąć

Sahanterän laakeri

Testere bıçağı yatağı

Zatlačit

Zatlačit

Łożysko brzeszczotu

Nyomóerő

Nyomóerő

Vodicí ložisko

Vtlačiť

Vtlačiť

Potisnite noter

Potisnite noter

pilového pásu

Împinge înăuntru

Împinge înăuntru

Fűrészlap csapágy

Ložisko čepele píly

Pressionar

Pressionar

Ležaj žaginega lista


Rulment pânză de


fierăstrău


Rolamento da lâmina

Saw blade

de serra

Sägeblatt


Lame de scie


Lama della sega


Zaagblad


Cuchilla de la sierra


Savblad


Klinga


Sagblad


Sahanterä


Testere bıçağı


Brzeszczot


Pilový pás


Fűrészlap


Čepeľ píly


Žagin list


Pânză de fierăstrău


Lâmina de serra

[Fig.4]


OK

NG

OK

Nicht OK

OUI

NON

OK

NG

OK

NG

BIEN

MAL

OK

IG

Bra

Dåligt

OK

NG

OK

EI

Tamam

Yanlış

DOBRZE

ŹLE

Správně

Nesprávně

OK

NG

ÁNO

NIE

PRAV

NI PRAV

OK

NG

SIM

NÃO


Rear bearings


Hintere Lager


Roulements arrière


Cuscinetti posteriori


Lagers achter


Cojinetes traseros


Baglejer


Bakre lager


Bakre lagre


Takalaakerit


Arka yataklar


Łożyska tylne


Zadní vodicí ložiska


Hátsó csapágyak


Zadné ložiská


Zadnji ležaji


Rulmenţi spate


Rolamentos traseiros

- 7 -

PANASONIC EY45A5 User Manual

[Fig.5]


OK

NG

OK

Nicht OK

OUI

NON

OK

NG

OK

NG

BIEN

MAL

OK

IG

Bra

Dåligt

OK

NG

OK

EI

Tamam

Yanlış

DOBRZE

ŹLE

Správně

Nesprávně

OK

NG

ÁNO

NIE

PRAV

NI PRAV

OK

NG

SIM

NÃO

Guide plate


Führungsschiene


Plaque de guidage


Piastra guida


Geleiderplaat


Placa guía


Guideplade


Styrplåt


Føreplate


Ohjainlevy


Kılavuz plakası


Płytka prowadząca


Vodicí deska


Vezetőlemez


Vodiaca doska


Vodilna plošča


Placă ghidaj


Placa guia


[Fig.7]

Saw blade tension lever Spannhebel des Sägeblatts

Levier de tension de lame de scie

Leva della tensione della lama della sega Hendel zaagbladspanning

Palanca tensora de la cuchilla de la sierra Spændingshåndtag til savblad Spännarm för klinga Spenningsspak for sagblad

Sahanterän jännitysvipu

Testere bıçağı germe kolu Dźwignia naciągu brzeszczotu Páčka předpětí pilového pásu

Fűrészlapfeszítő kar Napínacia páka čepele píly

Ročica za uravnavanje napetosti žaginega lista Mâner tensiune pânză de fierăsău

Alavanca de tensão da lâmina de serra


Saw blade rotation roller


blade

Saw


Drehrolle des Sägeblatts

Sägeblatt

Rouleau de rotation de lame

Lame de scie

de scie

Lama della sega

Rullo di rotazione della lama

Zaagblad

della sega

Cuchilla de la sierra

Draairol zaagblad

Savblad

Rodillo giratorio de la

Klinga

cuchilla de la sierra

Sagblad

Rotationsrulle til savblad

Sahanterä

Rotationsrulle för klinga

Testere bıçağı

Rotasjonskontroll for sagblad

Brzeszczot

Sahanterän kääntörulla

Pilový pás

Testere bıçağı dönüş silindiri

Fűrészlap

Rolka obrotu brzeszczotu

Čepeľ píly

Kladka pilového pásu

Žagin list

Fűrészlap forgató görgő

Pânză de fierăstrău

Rotačný valec čepele píly

Lâmina de serra

Rotacijski valj žaginega lista


Rolă rotaţie pânză de fierăstrău


Rolo de rotação da lâmina


de serra


[Fig.8]

Alignment marks

Ausrichtmarkierungen

Marques d’alignement

Marcature allineamento

Uitlijntekens

Marcas de alineación

Flugtemærker

Anpassningsmärken

Opprettingsmerke

Sovitusmerkit

Hizalama işaretleri

Znaczniki

Rovnací značky

Pozíciójelölések

Zarovnávacie značky

Oznake za poravnavo

Marcaje de aliniere

Marcas de alinhamento

- 8 -

[Fig.9]

Button

Knopf

Bouton

Tasto

Knop

Botón

Knap

Frigöringsknapp

Knapp

Painike

Düğme

Przycisk

Tlačítko

Gomb

Tlačidlo

Gumb

Buton

Botão

[Fig.10]


Guide plate


Führungsschiene


Plaque de guidage


Piastra guida


Geleiderplaat


Placa guía


Guideplade


Styrplåt


Føreplate


Ohjainlevy


Kılavuz plakası


Płytka prowadząca


Vodicí deska


Vezetőlemez


Vodiaca doska


Vodilna plošča


Placă ghidaj


Placa guia

Saw blade

Workpiece

Sägeblatt

Werkstück

Lame de scie

Pièce ouvragée

Lama della sega

Pezzo da lavorare

Zaagblad

Werkstuk

Cuchilla de la sierra

Pieza de trabajo

Savblad

Arbejdsemne

Klinga

Arbetsstycke

Sagblad

Arbeidsstykke

Sahanterä

Työstökappale

Testere bıçağı

İş Parçası

Brzeszczot

Element roboczy

Pilový pás

Obrobek

Fűrészlap

Munkadarab

Čepeľ píly

Obrobok

Žagin list

Obdelovanec

Pânză de fierăstrău

Piesă de lucru

Lâmina de serra

Peça de trabalho


[Fig.11]

Off-lock switch Aus/Sperrschalter Bouton de déverrouillage Interruttore di sblocco Uit-blokkeerschakelaar Interruptor de desbloqueo

Aflåskontakt

Brytare av-lås Lås av-bryter Lukituskytkin

Kilit kapatma anahtarı Blokada odłączająca Blokování zapnutí spínače

Kioldógomb

Poistný spínač

Stikalo za izklop-

zaklep

Întrerupător blocare

Interruptor de bloqueio

Switch

Schalter Interrupteur Interruttore Schakelaar Interruptor Kontakt Strömbrytare Bryter Kytkin

Düğme

Przełącznik

Vypínač

Kapcsoló

Prepínač

Stikalo

Întrerupător

Interruptor

[Fig.12]

Saw blade rotation roller Drehrolle des Sägeblatts Rouleau de rotation de lame de scie

Rullo di rotazione della lama della sega Draairol zaagblad

Rodillo giratorio de la cuchilla de la sierra

Rotationsrulle til savblad Rotationsrulle för klinga Rotasjonskontroll for sagblad Sahanterän kääntörulla

Testere bıçağı dönüş silindiri

Rolka obrotu brzeszczotu Kladka pilového pásu

Fűrészlap forgató görgő Rotačný valec čepele píly Rotacijski valj žaginega lista Rolă rotaţie pânză de fierăstrău Rolo de rotação da lâmina de serra

Rubber belt Gummiring Courroie élastique Cintura di gomma Rubberen band Correa de goma Gummibælte Gummibälte Gummibelte Kumihihna

Kauçuk kayış

Gumowy pasek

Gumový řemen

Gumiszíj Gumový pás Gumijast trak Curea de cauciuc Correia de borracha

- 9 -

[Fig.13]

Pack cover


Akkuabdeckung


Couvercle de la


batterie autonome


Coperchio pacco


Accudeksel


Cubierta de batería


Pakningsdæksel


Batteriskydd


Pakkedeksel


Akkukotelon kansi


Pil takımı kapağı

Label

Osłona akumulatora

Etikett

Kryt bloku

Etiquette

Az akkumulátoregy-

Etichetta

ség fedele

Label

Kryt akumulátorovej

Etiqueta

jednotky

Label

Pokrov sklopa

Etikett

Capac acumulator

Etikett

Capa do conjunto

Tarra

de baterias

Etiket


Etykieta


Etiketa


Címke


Štítok


Oznaka


Etichetă


Etiqueta

Terminals

Anschlüsse Bornes Terminali Aansluitpunten Terminales Terminaler Poler

Ender

Liittimet Terminaller Styki Konektory

Érintkezők

Svorky

Priključki

Terminale

Terminais

[Fig.14]

Battery pack release button Akku-Entriegelungsknopf

Bouton de libération de batterie autonome Tasto di rilascio pacco batteria Accu-ontgrendeltoets Botón de liberación de batería

Udløserknap til batteripakning Frigöringsknapp för batteri Utløserknapp for batteripakke Akkupaketin irrotuspainike

Pil takımı serbest bırakma düğmesi

Przycisk zwolnienia blokady akumulatora

Tlačítko uvolnění bloku baterie

Akkumulátoregység kioldógombja

Tlačidlo uvoľnenia akumulátorovej jednotky

Gumb za sprostitev baterijskega sklopa Buton pentru eliberarea acumulatorului

Botão de liberação do conjunto de baterias

Alignment marks Ausrichtmarkierungen Marques d’alignement Marcature allineamento Uitlijntekens

Marcas de alineación Flugtemærker Anpassningsmärken Opprettingsmerke Sovitusmerkit

Hizalama işaretleri

Znaczniki

Rovnací značky

Pozíciójelölések

Zarovnávacie značky

Oznake za poravnavo Marcaje de aliniere Marcas de alinhamento

Attaching

Removing

Anbringen

Entfernen

Connexion

Retrait

Collegamento

Rimozione

Bevestigen

Verwijderen

Acoplamiento

Desacoplamiento

Påsætning

Aftagning

Montering

Lossdragning

Montering

Demontering

Kiinnittäminen

Irrottaminen

Takma

Çıkarma

Mocowanie

Wyciąganie

Nasazení

Sejmutí

Csatlakoztatás

Eltávolítás

Pripojenie

Odpojenie

Pritrjevanje

Odstranjevanje

Ataşare

Îndepărtare

Colocação

Remoção

- 10 -

Original instructions: English Translation of the original instructions: Other languages

Read “the Safety Instructions” booklet and the following before using.

I.INTRODUCTION

DANGER

This product is a cutting tool, designed to cut through metal and wood. It has a rotating blade which is capable of cutting you deeply, causing serious injury or death. As a result, please read this manual and the cautionary markings on the tool carefully, and obey all of the Safety Instructions to avoid such injury.

WARNING

To avoid injury, never insert your finger or any other object into any opening of the tool.

WARNING

Read all safety warnings and all instructions.

Failure to follow the warnings and instructions may result in electric shock, fire and/or serious injury.

How to Use This Manual

••Please read this manual completely before starting to cut with your tool. If you let someone else use the tool, make sure they either read this manual or are fully instructed in the proper use and all safety precautions concerning the tool.

••Please keep this manual for future reference. It contains important safety information that you must follow to use the tool safely.

••This manual and product use the following signal words:

NOTE:

Notes provide additional information that you should know about the tool.

CAUTION:


EN

Caution indicates a potentially hazardous


situation, which could result in minor or


moderate injury if not avoided. Cautions


also alert you to unsafe practices to be


avoided.


WARNING


Warning indicates a potentially


hazardous situation, which could result


in serious injury or death if not avoided.


DANGER


Danger indicates an imminent hazard


which will result in serious injury or death


if not avoided.


II.ADDITIONAL SAFETY RULES

Safety instructions for all saws

DANGER

1)Keep hands away from cutting area and the blade. Keep your second hand on auxiliary handle, or motor housing. If both hands are holding the saw, they cannot be cut by the blade.

2)Never hold piece being cut in your hands or across your leg. Secure the workpiece to a stable platform. It is important to support the work properly to minimize body exposure, blade binding, or loss of control.

3)Use saw blades recommended by Manufacture.

4)Wear a dust mask, if the work causes dust.

5)Wear ear protectors when using the tool for extended periods.

6)Never wear knitted gloves.

7)Be sure to inspect material. Avoid cutting other different material.

8)Be careful not to drop the tool.

9)Never swing the tool.

- 11 -

EN DANGER

10)Never cover the ventilation slots, and keep them free from dust or other material.

11)Do not clamp the tool in a vise. Never cut with the tool held upside down in a vise. This is extremely dangerous and can lead to serious accidents.

12)Be sure no one is below when using the tool in high locations.

13)Do not touch the blade immediately after operation. It may be hot and could burn your skin.

14)Do not touch material after it has been cut. Cut material may be very hot.

15)Do not use cutting oil. This use of cutting oil may cause a fire.

16)Do not start the blade when in contact with workpiece. Wait for blade to reach full speed before beginning cut.

17)Ensure sparks don’t strike your body. This can cause burning.

18)When attaching or removing a saw blade or preparing, inspecting or storing the device, be sure to remove the battery pack first.

Failure to do this could lead to unintended operation and injury.

19)Keep your hands and face away from the saw blade and moving parts.

Failure to do so can lead to injury.

20)Do not touch the saw blade, discharge or frame after operation as they may be hot.

This can lead to injury.

21)Fix the workpiece firmly.

Failure to fix the workpiece properly can lead to movement, damage to the saw blade, or injury.

22)To prevent accidents, be sure to switch off and remove the battery pack from the device when operation is interrupted or complete.

DANGER

23)Be sure to attach the saw blade cover to the saw blade rotation roller.

Failure to do so can lead to injury if the saw blade slips off or is damaged.

24)The saw blade, workpiece and debris can be hot immediately after cutting, so do not touch with bare hands.

25)Do not put pressure on the grip during cutting in an attempt to speed up the process.

26)Do not cut heat-mouldable plastics. The heat of cutting can cause the workpiece to melt, making the saw blade embed into the workpiece and leading to the motor locking.

27)Do not cut hard workpieces such as toughened steel.

This can cause damage to the saw blade.

28)If the saw blade locks during cutting, immediately switch off and suspend operation.

29)Be sure to hold the grip and auxiliary handle during use, holding with both hands.

30)Periodically open the saw blade rotation cover to remove debris. Debris may build up within the frame during continuous use.

31)If the device will not be used for a long time, remove the saw blade from the device before storage.

- 12 -

Symbol

Symbol Meaning

Volts

Direct current

No load speed

Revolutions or reciprocations

Amperes

To reduce the risk of injury, user must read and understand instruction manual.

For indoor use only.

WARNING

••Do not use other than the Panasonic battery packs that are designed for use with this rechargeable tool.

••Panasonic is not responsible for any damage or accident caused by the use of the recycled battery pack and the counterfeit battery pack.

••Do not dispose of the battery pack in a fire, or expose it to excessive heat.

••Do not drive the likes of nails into the battery pack, subject it to shocks, dismantle it, or attempt to modify it.

••Do not allow metal objects to touch the battery pack terminals.

••Do not carry or store the battery pack in the same container as nails or similar metal objects.

••Do not charge the battery pack in a high-temperature location, such as next to a fire or in direct sunlight. Otherwise, the battery may overheat, catch fire, or explode.

Never use other than the dedicated charger to charge the battery pack.

Otherwise, the battery may leak, overheat, or explode.

••After removing the battery pack from the tool or the charger, always reattach the pack cover. Otherwise, the battery contacts could be shorted, leading to a risk of fire.

WARNING

EN

••When the Battery Pack Has Deteriorated, Replace It with a New

One.

Continued use of a damaged battery pack may result in heat generation, ignition or battery rupture.

III. ASSEMBLY

Fitting a saw blade

CAUTION:

••Wear gloves when exchanging the saw blade.

••Immediately after operation the saw blade will be hot. Remove only after it has cooled down.

••When attaching or removing a saw blade or preparing, inspecting or storing the device, be sure to remove the battery pack first. Failure to do this could lead to unintended operation and injury.

1.Loosen the saw blade cover fixing screw and remove the saw blade cover. [Fig.1]

••The saw blade cover separates into two.

2.Rotate the saw blade tension lever 180 degrees clockwise (direction of the arrow), to release tension. [Fig.2]

••Firmly set the saw blade tension lever to maintain the saw blade tension.

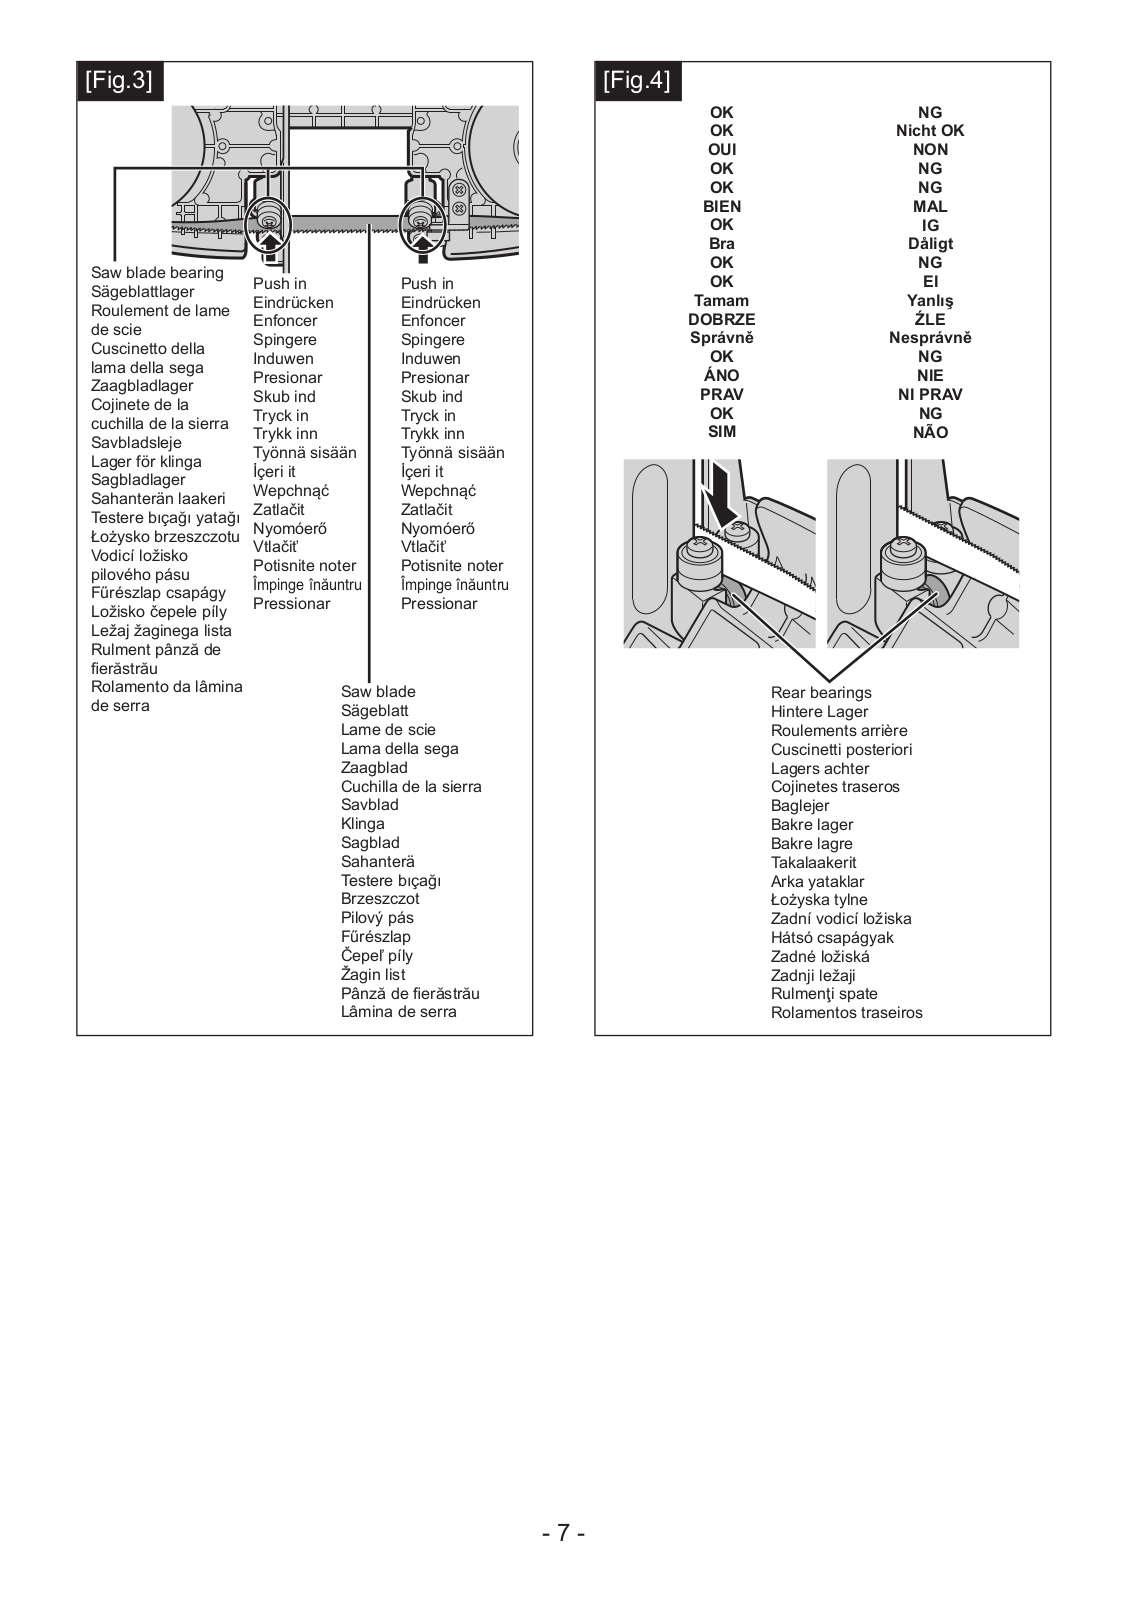
3.Insert the saw blade into the saw blade restraining bearings from the rear. [Fig.3]

••Be sure to push it home until the back of the blade contacts with the inside of the saw blade restraining bearings.

- 13 -

EN

WARNING

Inserting a saw blade

If the saw blade is not mounted correctly the blade may sit at an angle and will not cut straight, causing motor burnout or blade damage.

••Be sure to push until the back of the saw blade contacts with the rear bearings of the saw blade restraining bearings (both). [Fig.4]

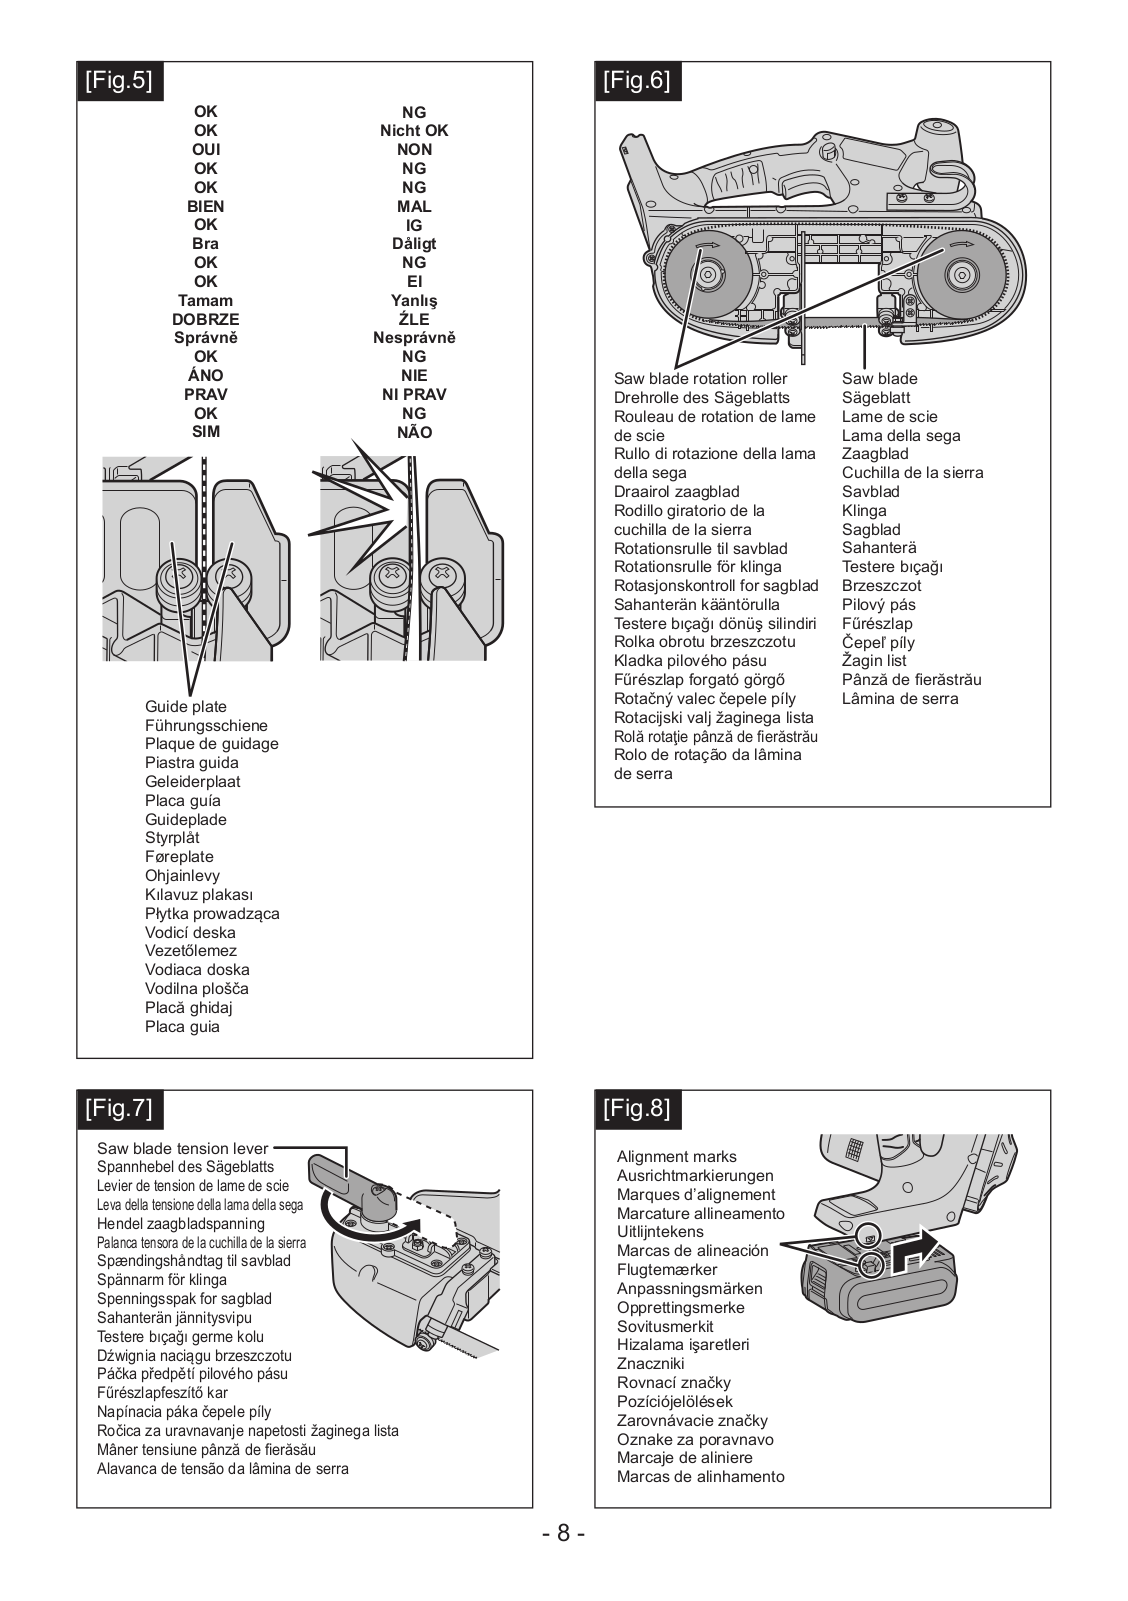
••Be sure that the saw blade is parallel to the guide plate. [Fig.5]

4.Hand the saw blade on the saw blade rotation roller, while holding the saw blade so it does not fall off. [Fig.6]

5.Rotate the saw blade tension lever 180 degrees anticlockwise (direction of the arrow), to tighten the saw blade. [Fig.7]

WARNING

Be careful not to trap your fingers in the saw blade tension lever when selecting the tension.

6.Move the saw blade in the direction of rotation manually, and check whether it hangs correctly on the saw blade rotation roller (the saw blade should not move outside the thickness of the saw blade rotation roller).

NOTE:

If it is not hanging correctly, rotate the saw blade tension lever 180 degrees clockwise to loosen the saw blade and rehang the saw blade.

7.Attach the saw blade cover and tighten the saw blade cover fixing screw.

NOTE:

Tighten the saw blade cover fixing screw while holding the saw blade cover in position so it does not rise up.

Attaching or Removing Battery Pack

CAUTION:

Before inserting battery pack, check that the power switch in the tool actuates properly and returns to the “OFF” position when released.

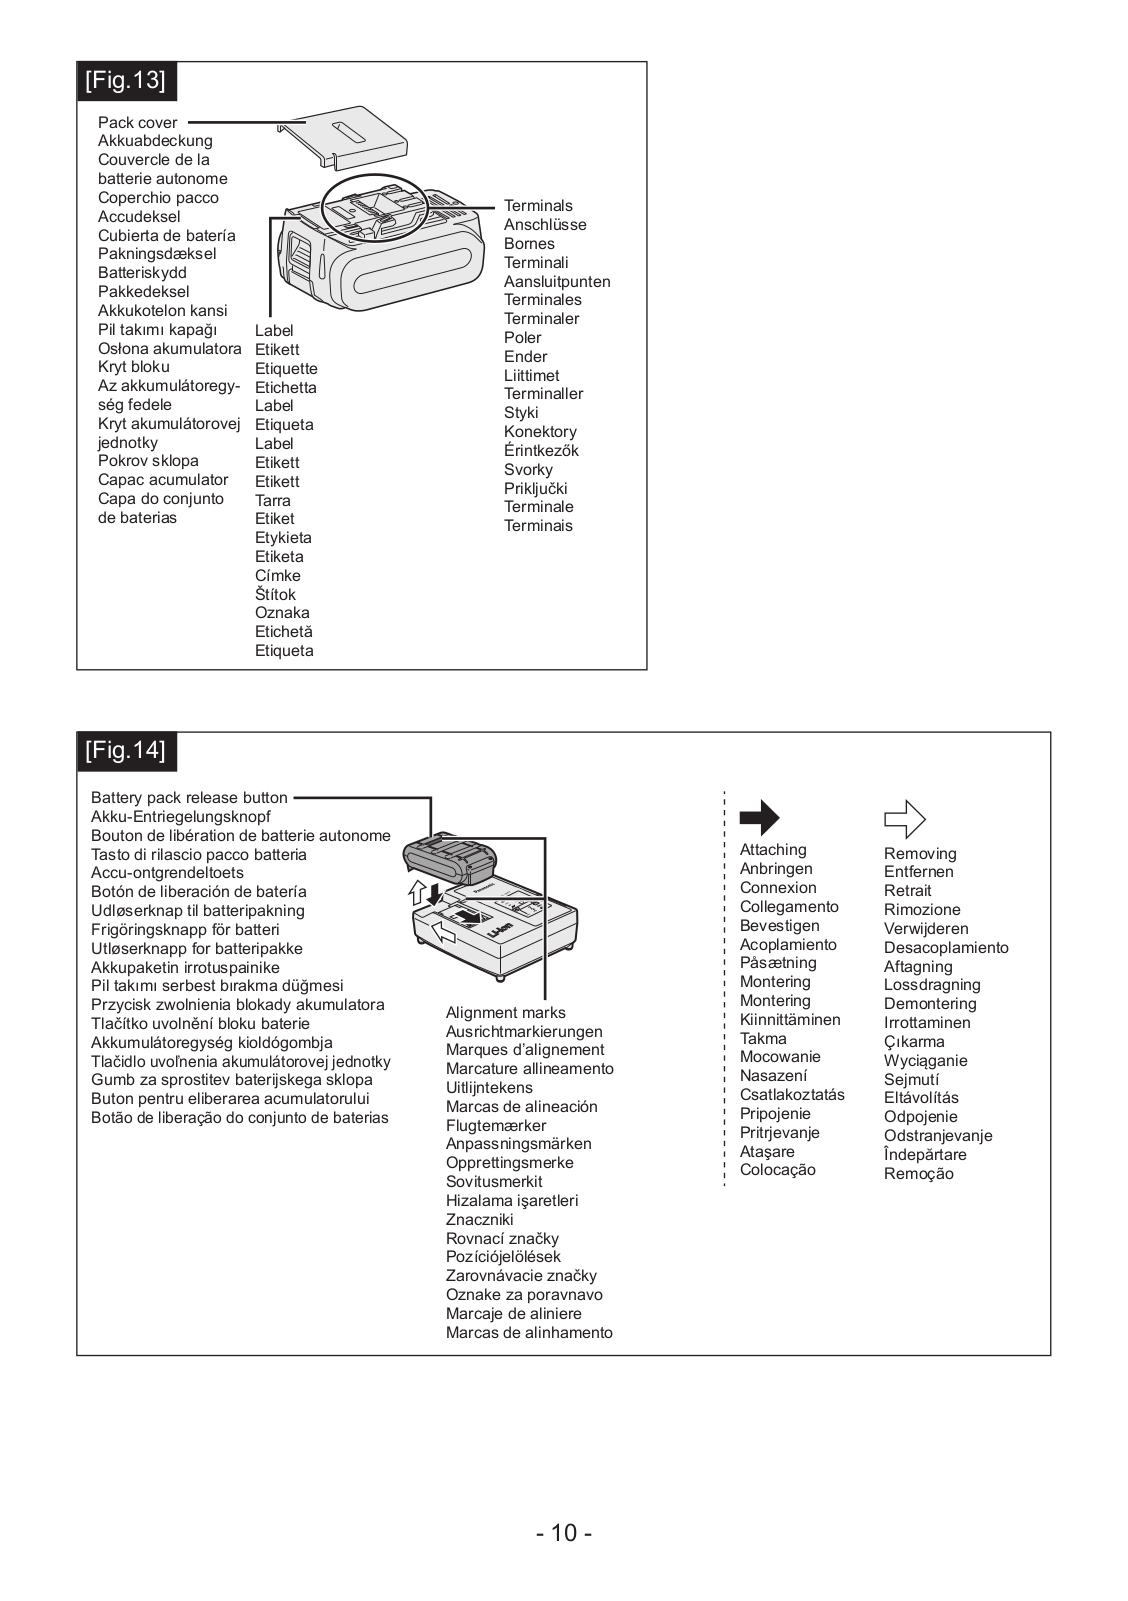
1.To connect the battery pack [Fig.8] Align the highlighted marker points and attach battery pack.

••Slide the battery pack until it locks into position.

2.To remove the battery pack [Fig.9] Push down the button and slide the battery pack forward.

- 14 -

IV. OPERATION

[Main Body]

Before Using the Tool

••Do not touch the saw blade, workpiece, or cutting chips with bare hands immediately after cutting; they may be hot and could burn skin.

Each time you use the tool, you must make sure it is in good operating condition.

1.Test operation

Cycle the device through on and off several times and check that the saw blade is mounted correctly. If the saw blade is not running smoothly, remove the saw blade and reinstall from the beginning.

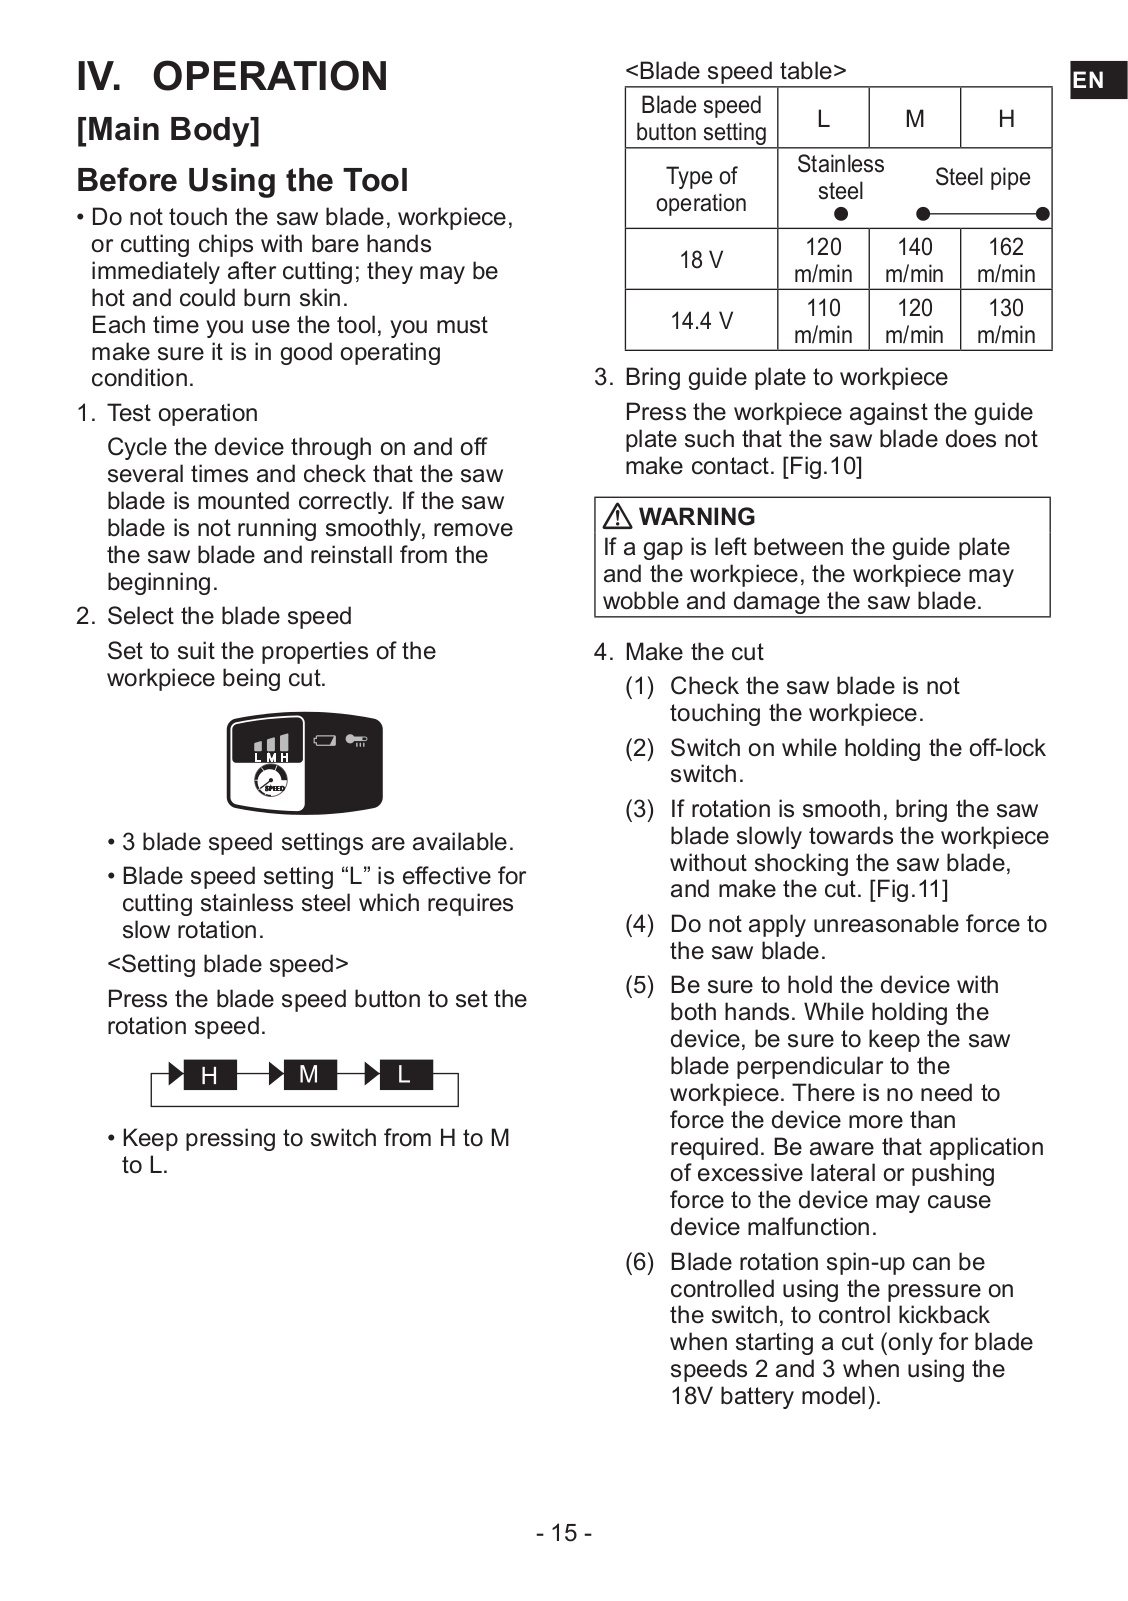
2.Select the blade speed

Set to suit the properties of the workpiece being cut.

••3 blade speed settings are available.

••Blade speed setting “L” is effective for cutting stainless steel which requires slow rotation.

<Setting blade speed>

Press the blade speed button to set the rotation speed.

••Keep pressing to switch from H to M to L.

<Blade speed table>


EN

Blade speed

L


M

H


button setting


Type of

Stainless


Steel pipe


steel


operation


18 V

120


140

162


m/min


m/min

m/min


14.4 V

110


120

130


m/min


m/min

m/min


3.Bring guide plate to workpiece

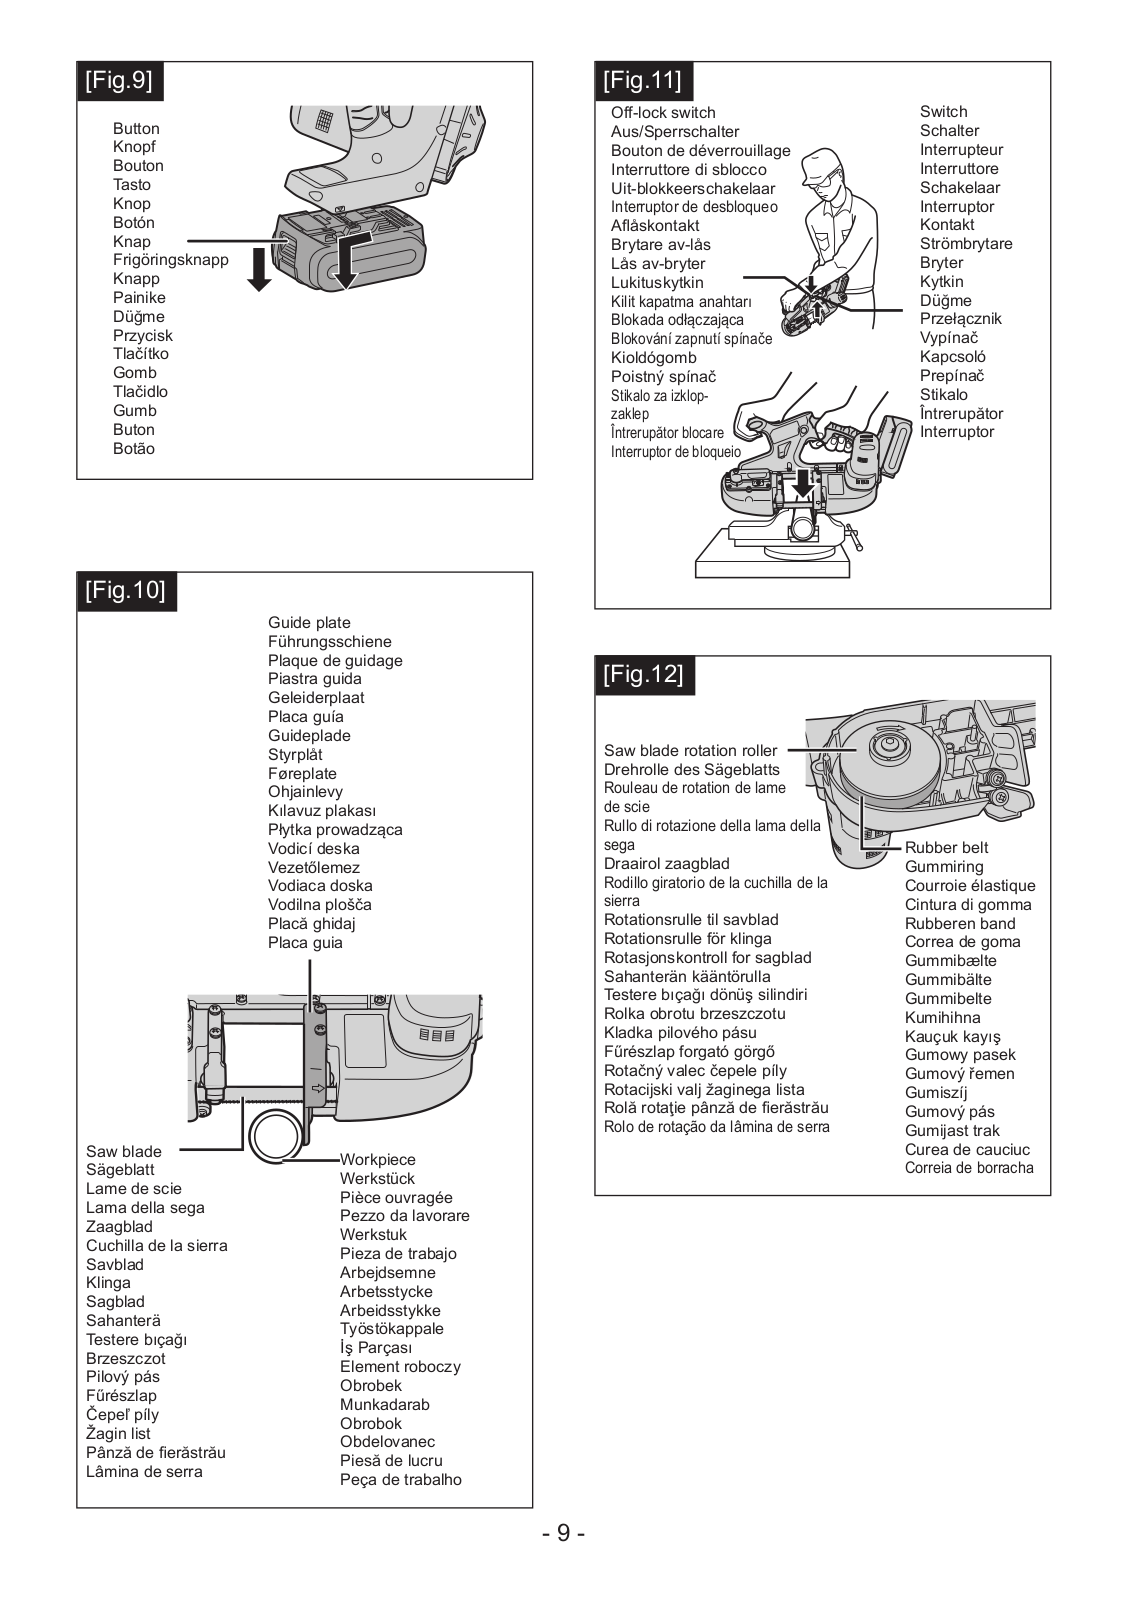
Press the workpiece against the guide plate such that the saw blade does not make contact. [Fig.10]

WARNING

If a gap is left between the guide plate and the workpiece, the workpiece may wobble and damage the saw blade.

4.Make the cut

(1)Check the saw blade is not touching the workpiece.

(2)Switch on while holding the off-lock switch.

(3)If rotation is smooth, bring the saw blade slowly towards the workpiece without shocking the saw blade, and make the cut. [Fig.11]

(4)Do not apply unreasonable force to the saw blade.

(5)Be sure to hold the device with both hands. While holding the device, be sure to keep the saw blade perpendicular to the workpiece. There is no need to force the device more than required. Be aware that application of excessive lateral or pushing force to the device may cause device malfunction.

(6)Blade rotation spin-up can be controlled using the pressure on the switch, to control kickback when starting a cut (only for blade speeds 2 and 3 when using the 18V battery model).

- 15 -

EN WARNING

••Fix the workpiece firmly.

••Be sure to attach the saw blade cover.

CAUTION:

••Attach only after checking for abnormalities such as splinters and fissures on the saw blade.

••Wipe away any debris or dirt attached to the saw blade rotation roller. Fitting an oiled or greased saw blade to the saw blade restraining bearing can cause the saw blade to slip or come loose.

••When attaching a saw blade, avoid twisting or folding at the join on the saw blade.

••Keep your face away when exchanging a saw blade as the saw blade can jump out suddenly.

<Identifying an expired saw blade>

••A ruptured saw blade will not rotate easily.

(Rotation may be accompanied by a noise)

••A worm blade edge may lead to slower cutting times.

These phenomena are indications that the saw blade requires exchange.

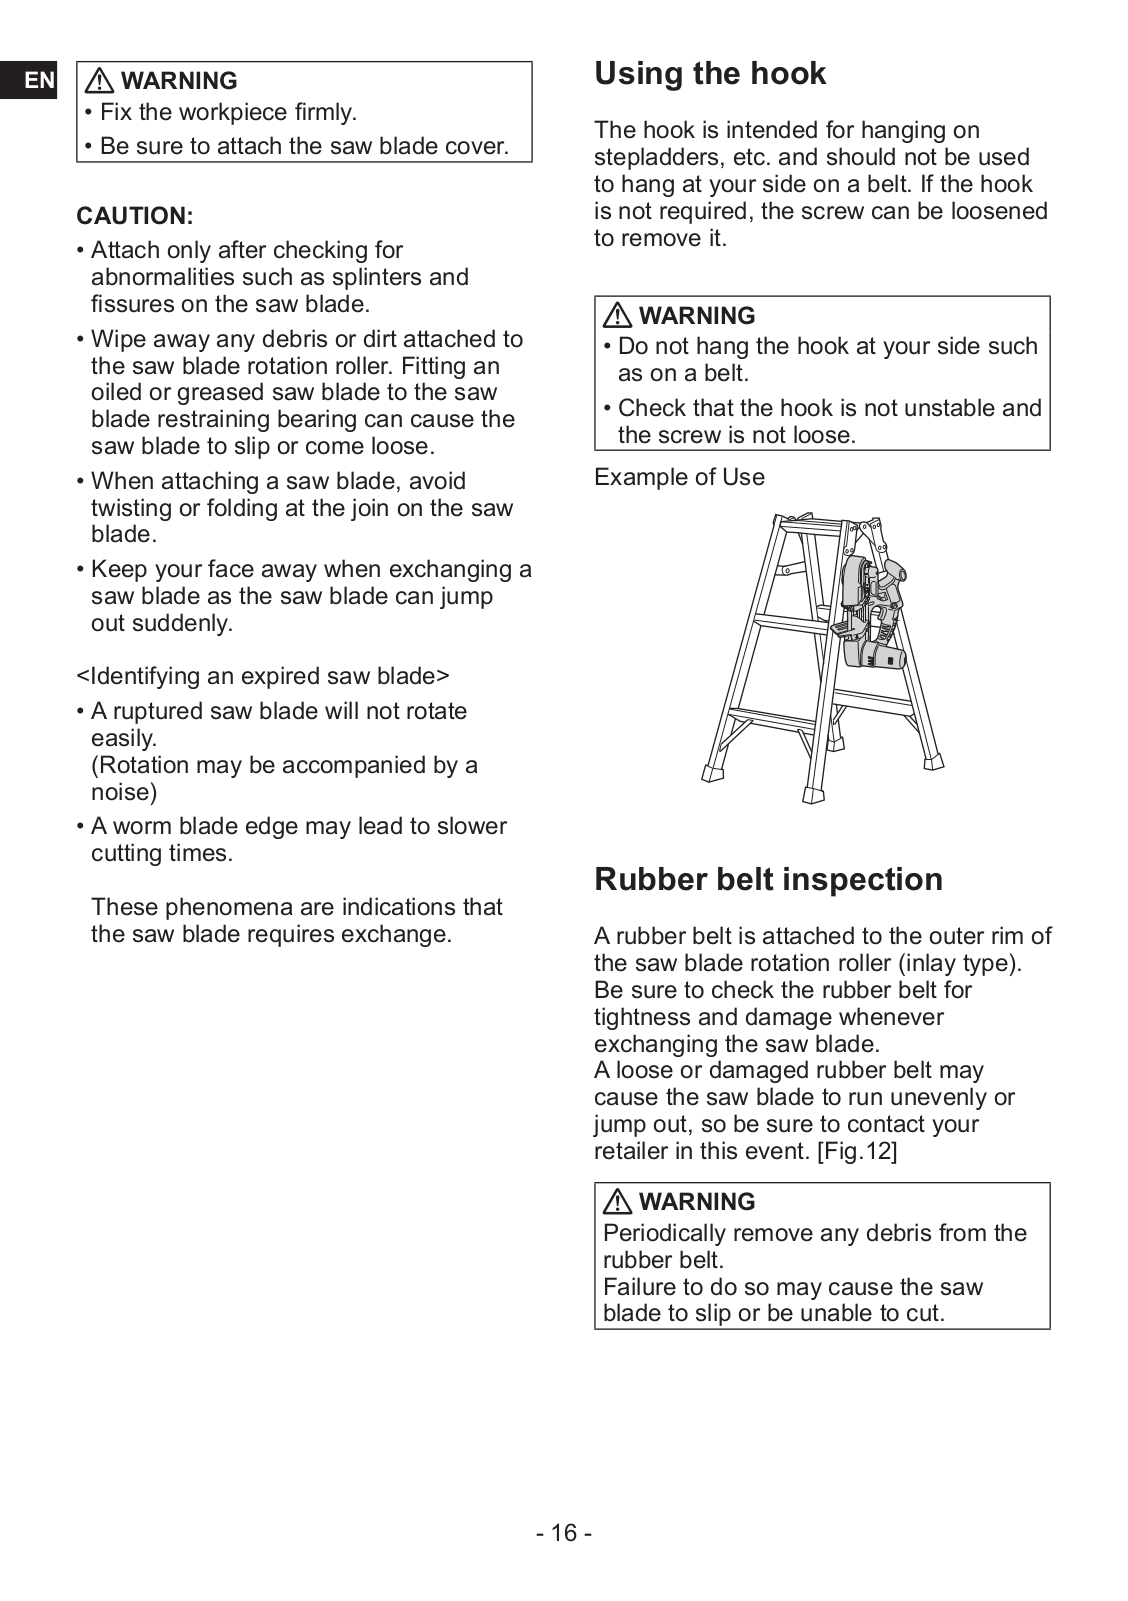
Using the hook

The hook is intended for hanging on stepladders, etc. and should not be used to hang at your side on a belt. If the hook is not required, the screw can be loosened to remove it.

WARNING

••Do not hang the hook at your side such as on a belt.

••Check that the hook is not unstable and the screw is not loose.

Example of Use

Rubber belt inspection

A rubber belt is attached to the outer rim of the saw blade rotation roller (inlay type). Be sure to check the rubber belt for tightness and damage whenever exchanging the saw blade.

A loose or damaged rubber belt may cause the saw blade to run unevenly or jump out, so be sure to contact your retailer in this event. [Fig.12]

WARNING

Periodically remove any debris from the rubber belt.

Failure to do so may cause the saw blade to slip or be unable to cut.

- 16 -

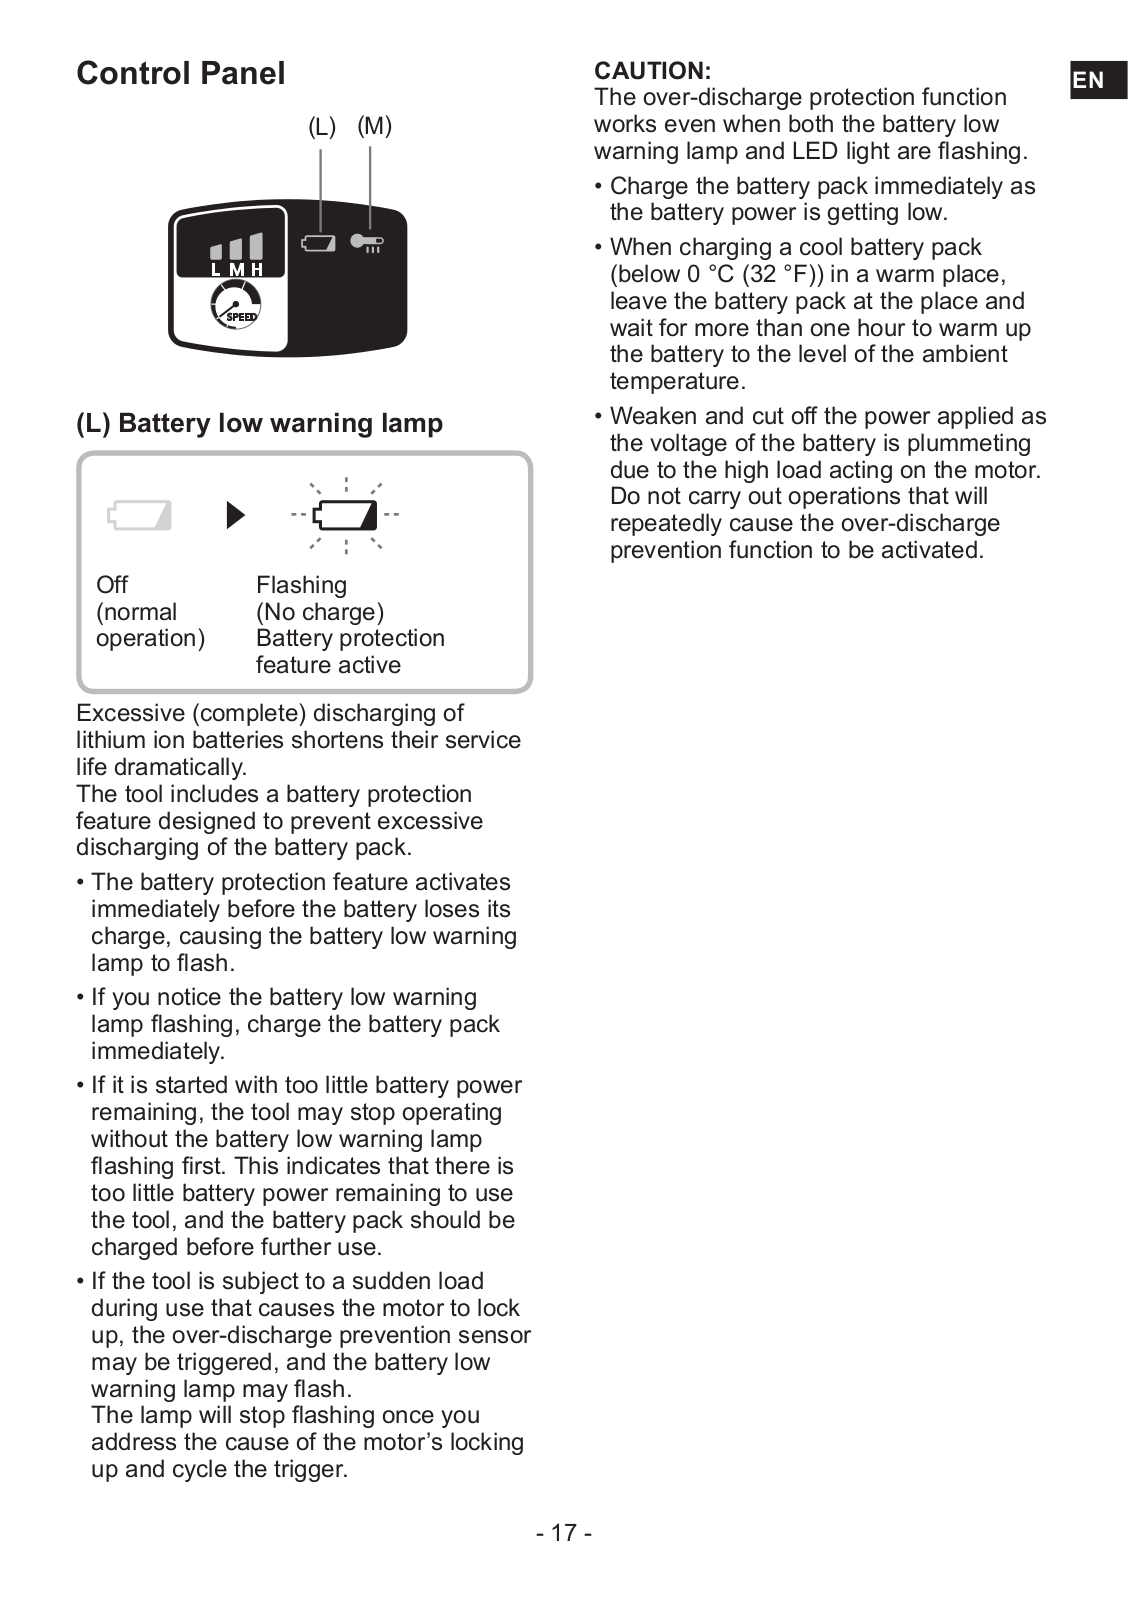
Control Panel

(L) (M)

(L) Battery low warning lamp

Off

Flashing

(normal

(No charge)

operation)

Battery protection


feature active

Excessive (complete) discharging of lithium ion batteries shortens their service life dramatically.

The tool includes a battery protection feature designed to prevent excessive discharging of the battery pack.

••The battery protection feature activates immediately before the battery loses its charge, causing the battery low warning lamp to flash.

••If you notice the battery low warning lamp flashing, charge the battery pack immediately.

••If it is started with too little battery power remaining, the tool may stop operating without the battery low warning lamp flashing first. This indicates that there is too little battery power remaining to use the tool, and the battery pack should be charged before further use.

••If the tool is subject to a sudden load during use that causes the motor to lock up, the over-discharge prevention sensor may be triggered, and the battery low warning lamp may flash.

The lamp will stop flashing once you address the cause of the motor’s locking up and cycle the trigger.

CAUTION:


EN

The over-discharge protection function


works even when both the battery low


warning lamp and LED light are flashing.


••Charge the battery pack immediately as


the battery power is getting low.


••When charging a cool battery pack


(below 0 °C (32 °F)) in a warm place,


leave the battery pack at the place and


wait for more than one hour to warm up


the battery to the level of the ambient


temperature.


••Weaken and cut off the power applied as


the voltage of the battery is plummeting


due to the high load acting on the motor.


Do not carry out operations that will


repeatedly cause the over-discharge


prevention function to be activated.


- 17 -

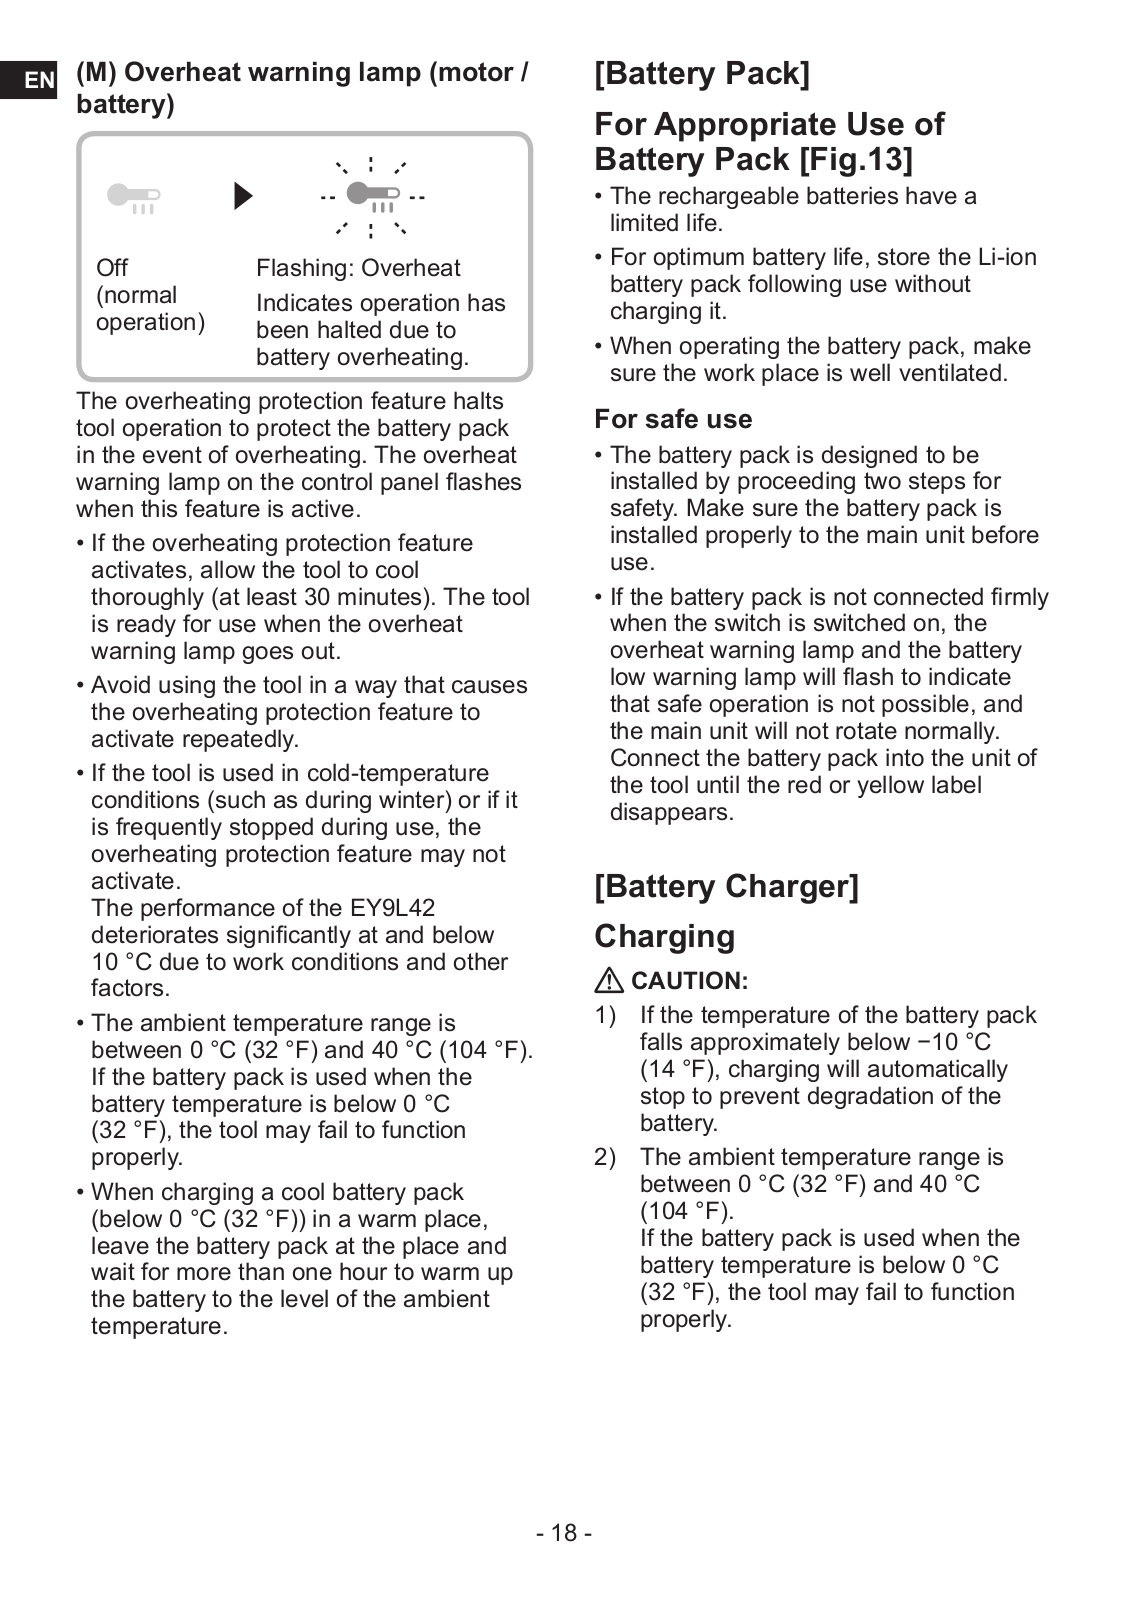
EN (M) Overheat warning lamp (motor / battery)

Off

Flashing: Overheat

(normal

Indicates operation has

operation)

been halted due to


battery overheating.

The overheating protection feature halts tool operation to protect the battery pack in the event of overheating. The overheat warning lamp on the control panel flashes when this feature is active.

••If the overheating protection feature activates, allow the tool to cool thoroughly (at least 30 minutes). The tool is ready for use when the overheat warning lamp goes out.

••Avoid using the tool in a way that causes the overheating protection feature to activate repeatedly.

••If the tool is used in cold-temperature conditions (such as during winter) or if it is frequently stopped during use, the overheating protection feature may not activate.

The performance of the EY9L42 deteriorates significantly at and below

10 °C due to work conditions and other factors.

••The ambient temperature range is between 0 °C (32 °F) and 40 °C (104 °F). If the battery pack is used when the battery temperature is below 0 °C (32 °F), the tool may fail to function properly.

••When charging a cool battery pack (below 0 °C (32 °F)) in a warm place, leave the battery pack at the place and wait for more than one hour to warm up the battery to the level of the ambient temperature.

[Battery Pack]

For Appropriate Use of

Battery Pack [Fig.13]

••The rechargeable batteries have a limited life.

••For optimum battery life, store the Li-ion battery pack following use without charging it.

••When operating the battery pack, make sure the work place is well ventilated.

For safe use

••The battery pack is designed to be installed by proceeding two steps for safety. Make sure the battery pack is installed properly to the main unit before use.

••If the battery pack is not connected firmly when the switch is switched on, the overheat warning lamp and the battery low warning lamp will flash to indicate that safe operation is not possible, and the main unit will not rotate normally. Connect the battery pack into the unit of the tool until the red or yellow label disappears.

[Battery Charger]

Charging

CAUTION:

1)If the temperature of the battery pack falls approximately below −10 °C

(14 °F), charging will automatically stop to prevent degradation of the battery.

2)The ambient temperature range is between 0 °C (32 °F) and 40 °C (104 °F).

If the battery pack is used when the battery temperature is below 0 °C (32 °F), the tool may fail to function properly.

- 18 -

3)Use the charger at temperatures between 0 °C and 40 °C, and charge the battery at a temperature similar to that of the battery itself. (There should be no more than a 15 °C difference between the temperatures of the battery and the charging location.)

4)When charging a cool battery pack (below 0 °C (32 °F)) in a warm place, leave the battery pack at the place and wait for more than one hour to warm up the battery to the level of the ambient temperature.

5)Cool down the charger when charging more than two battery packs consecutively.

6)Do not insert your fingers into contact hole, when holding charger or any other occasions.

7)To prevent the risk of fire or damage to the battery charger.

••Do not cover vent holes on the charger and the battery pack.

••Unplug the charger when not in use.

NOTE:

Your battery pack is not fully charged at the time of purchase. Be sure to charge the battery before use.

How to charge

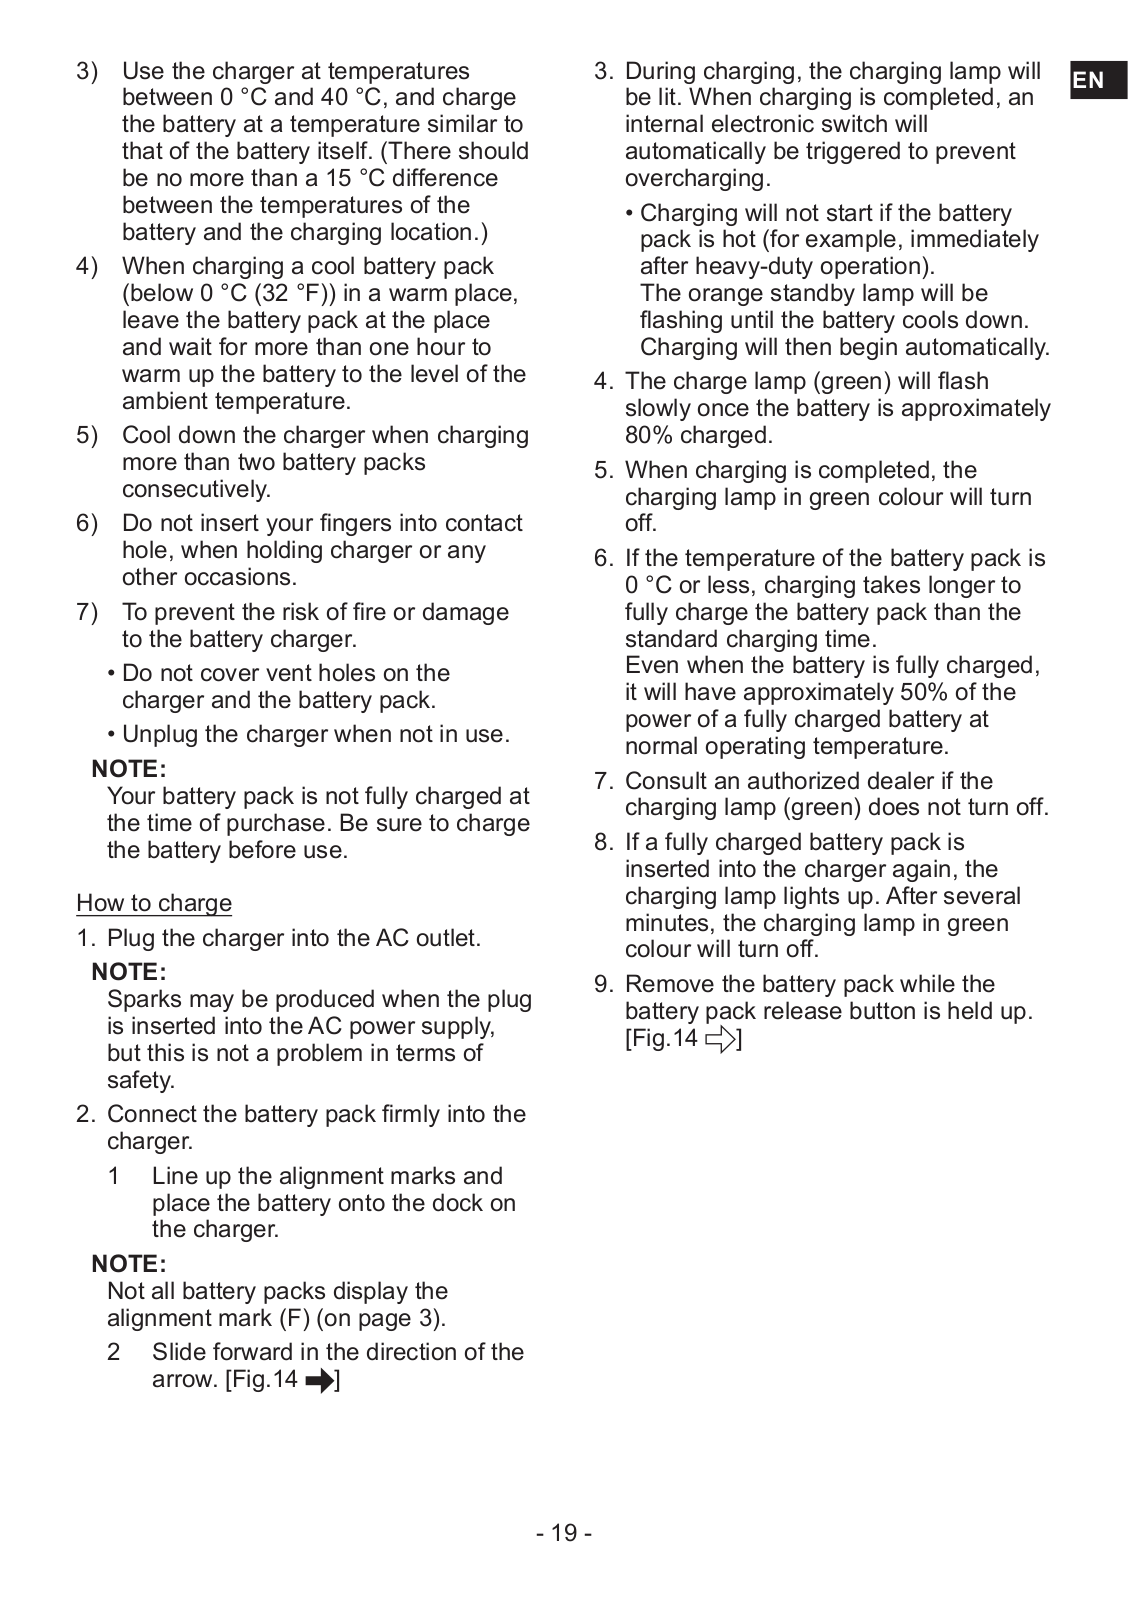
1. Plug the charger into the AC outlet.

NOTE:

Sparks may be produced when the plug is inserted into the AC power supply, but this is not a problem in terms of safety.

2.Connect the battery pack firmly into the charger.

1Line up the alignment marks and place the battery onto the dock on the charger.

NOTE:

Not all battery packs display the alignment mark (F) (on page 3).

2Slide forward in the direction of the arrow. [Fig.14 ]

3. During charging, the charging lamp will


EN

be lit. When charging is completed, an


internal electronic switch will


automatically be triggered to prevent


overcharging.


••Charging will not start if the battery


pack is hot (for example, immediately


after heavy-duty operation).


The orange standby lamp will be


flashing until the battery cools down.


Charging will then begin automatically.


4.The charge lamp (green) will flash slowly once the battery is approximately 80% charged.

5.When charging is completed, the charging lamp in green colour will turn off.

6.If the temperature of the battery pack is 0 °C or less, charging takes longer to fully charge the battery pack than the standard charging time.

Even when the battery is fully charged, it will have approximately 50% of the power of a fully charged battery at normal operating temperature.

7.Consult an authorized dealer if the charging lamp (green) does not turn off.

8.If a fully charged battery pack is inserted into the charger again, the charging lamp lights up. After several minutes, the charging lamp in green colour will turn off.

9.Remove the battery pack while the battery pack release button is held up. [Fig.14 ]

- 19 -

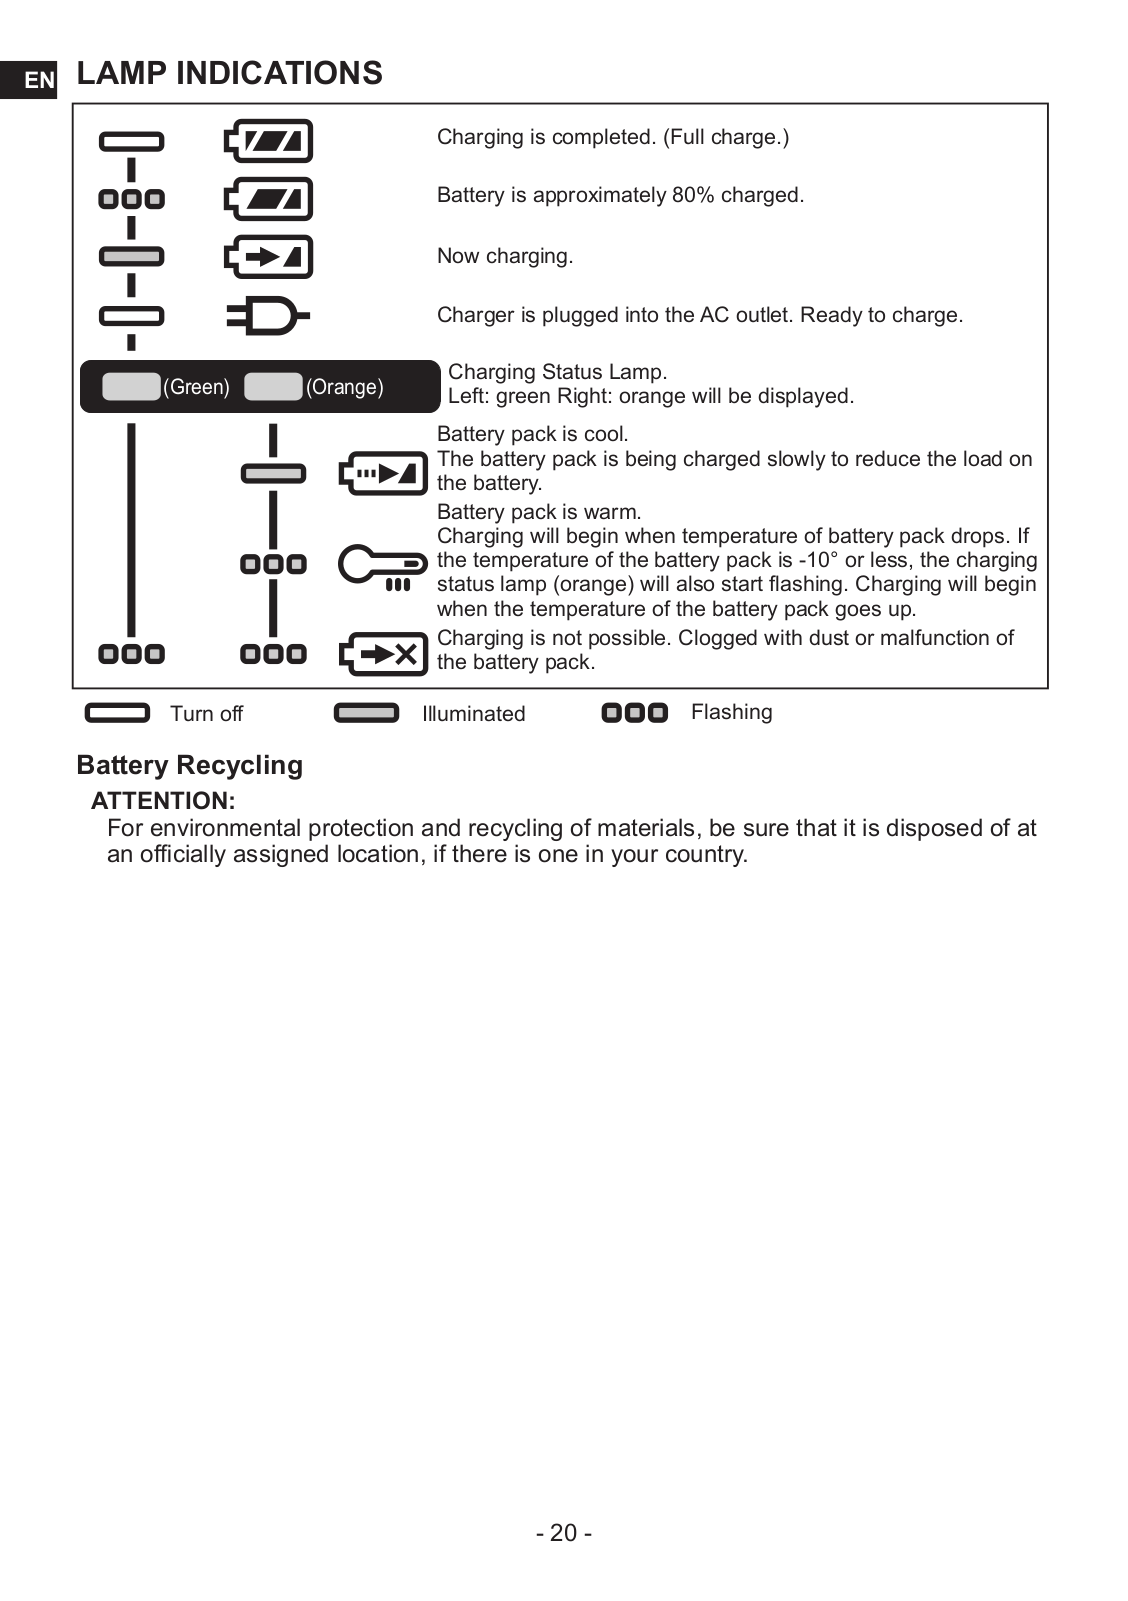
EN LAMP INDICATIONS


Charging is completed. (Full charge.)


Battery is approximately 80% charged.


Now charging.


Charger is plugged into the AC outlet. Ready to charge.


(Green)

(Orange)

Charging Status Lamp.


Left: green Right: orange will be displayed.


Battery pack is cool.


The battery pack is being charged slowly to reduce the load on


the battery.


Battery pack is warm.


Charging will begin when temperature of battery pack drops. If


the temperature of the battery pack is -10° or less, the charging


status lamp (orange) will also start flashing. Charging will begin


when the temperature of the battery pack goes up.


Charging is not possible. Clogged with dust or malfunction of


the battery pack.


Turn off


Illuminated

Flashing

Battery Recycling

ATTENTION:

For environmental protection and recycling of materials, be sure that it is disposed of at an officially assigned location, if there is one in your country.

- 20 -

Information for Users on Collection and Disposal of Old Equipment and used Batteries

EN

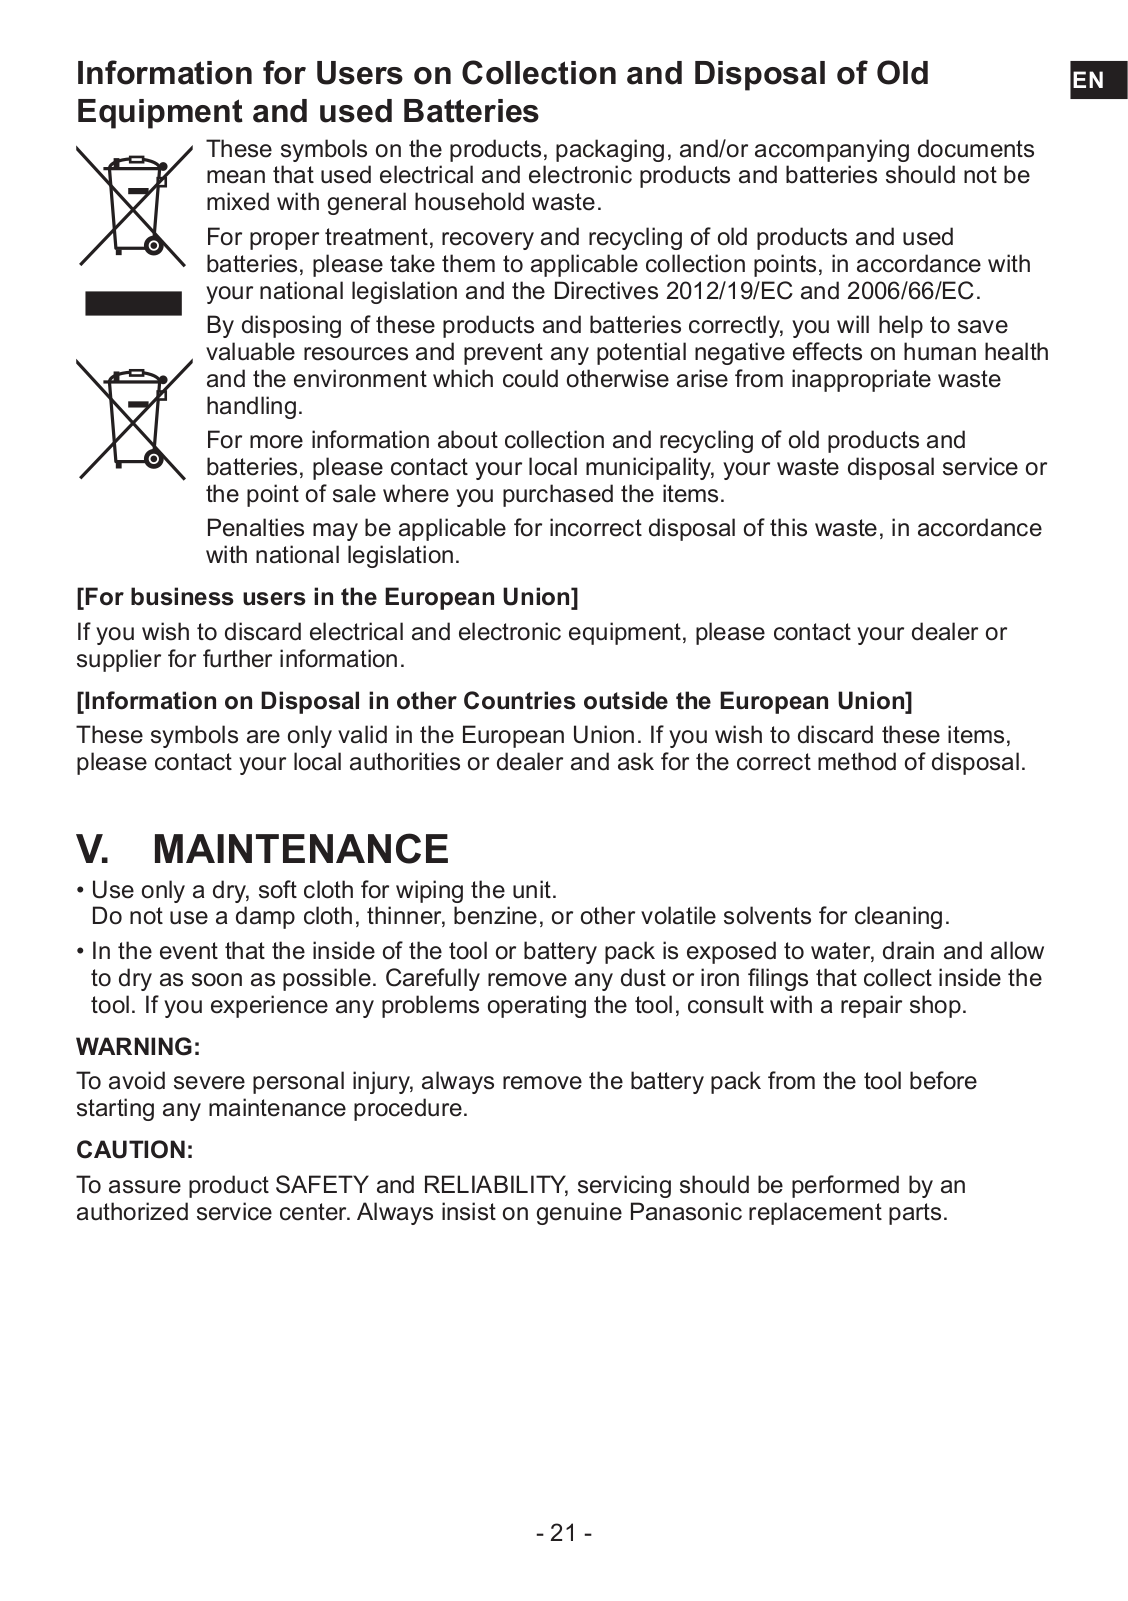
These symbols on the products, packaging, and/or accompanying documents

mean that used electrical and electronic products and batteries should not be mixed with general household waste.

For proper treatment, recovery and recycling of old products and used batteries, please take them to applicable collection points, in accordance with your national legislation and the Directives 2012/19/EC and 2006/66/EC.

By disposing of these products and batteries correctly, you will help to save valuable resources and prevent any potential negative effects on human health

and the environment which could otherwise arise from inappropriate waste

handling.

For more information about collection and recycling of old products and

batteries, please contact your local municipality, your waste disposal service or the point of sale where you purchased the items.

Penalties may be applicable for incorrect disposal of this waste, in accordance with national legislation.

[For business users in the European Union]

If you wish to discard electrical and electronic equipment, please contact your dealer or supplier for further information.

[Information on Disposal in other Countries outside the European Union]

These symbols are only valid in the European Union. If you wish to discard these items, please contact your local authorities or dealer and ask for the correct method of disposal.

V.MAINTENANCE

••Use only a dry, soft cloth for wiping the unit.

Do not use a damp cloth, thinner, benzine, or other volatile solvents for cleaning.

••In the event that the inside of the tool or battery pack is exposed to water, drain and allow to dry as soon as possible. Carefully remove any dust or iron filings that collect inside the tool. If you experience any problems operating the tool, consult with a repair shop.

WARNING:

To avoid severe personal injury, always remove the battery pack from the tool before starting any maintenance procedure.

CAUTION:

To assure product SAFETY and RELIABILITY, servicing should be performed by an authorized service center. Always insist on genuine Panasonic replacement parts.

- 21 -

EN VI. ACCESSORIES

Battery pack

Do not use other than Panasonic Li-ion battery packs (output voltage DC 14.4 V or DC 18 V) for this tool.

••EY9L45

••EY9L47

••EY9L51

••EY9L52

••EY9L53

••EY9L54

Saw blade

EY9SXMJ4

Battery charger

EY0L82

VII. SPECIFICATIONS

NOTE:


Weight indication


Greater than or equal to 1 kg:

indicated by 0.05 kg.


Less than 1 kg:

indicated by 0.01 kg.


MAIN UNIT


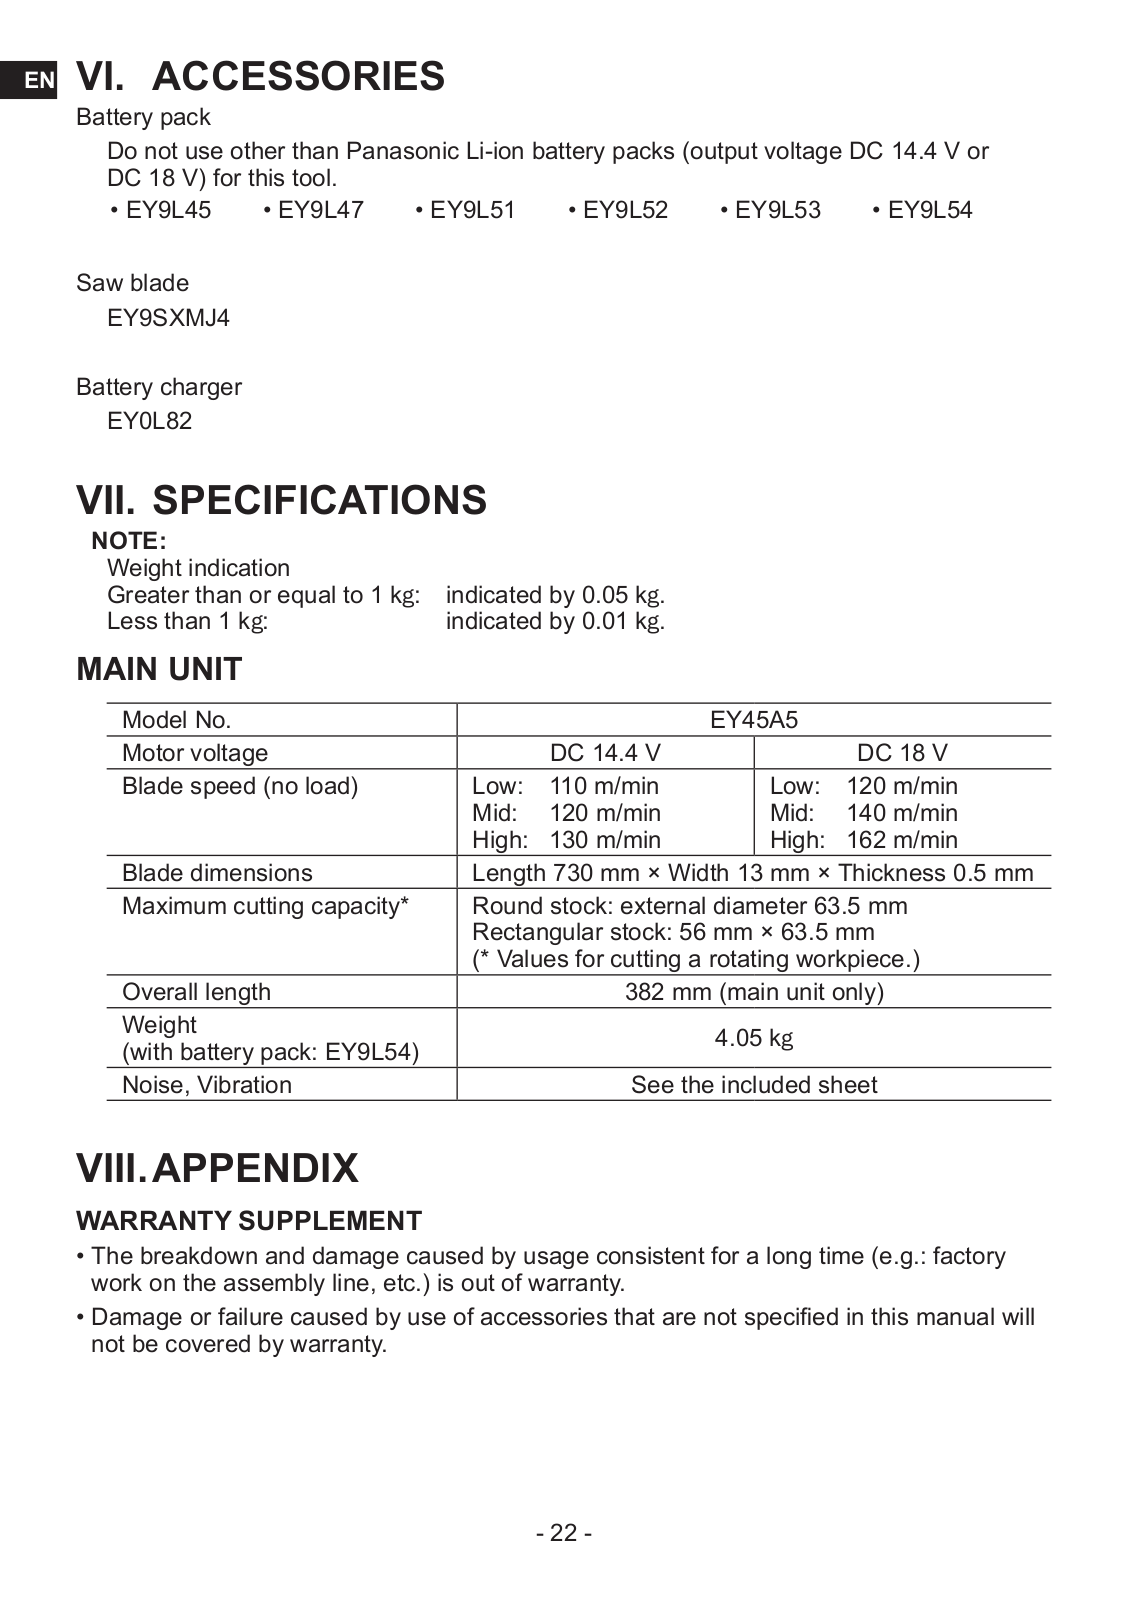
Model No.


EY45A5


Motor voltage


DC 14.4 V


DC 18 V


Blade speed (no load)


Low:

110 m/min


Low:

120 m/min


Mid:

120 m/min


Mid:

140 m/min


High:

130 m/min


High:

162 m/min


Blade dimensions


Length 730 mm × Width 13 mm × Thickness 0.5 mm


Maximum cutting capacity*


Round stock: external diameter 63.5 mm


Rectangular stock: 56 mm × 63.5 mm


(* Values for cutting a rotating workpiece.)


Overall length


382 mm (main unit only)


Weight


4.05 kg


(with battery pack: EY9L54)


Noise, Vibration


See the included sheet

VIII.APPENDIX

WARRANTY SUPPLEMENT

••The breakdown and damage caused by usage consistent for a long time (e.g.: factory work on the assembly line, etc.) is out of warranty.

••Damage or failure caused by use of accessories that are not specified in this manual will not be covered by warranty.

- 22 -

ONLY FOR U. K.

IX. CAUTION FOR AC

MAINS LEAD

FOR YOUR SAFETY, PLEASE READ THE FOLLOWING TEXT CAREFULLY

This appliance is supplied with a moulded three pin mains plug for your safety and convenience. A 5 amp fuse is fitted in this plug.

Should the fuse need to be replaced please ensure that the replacement fuse has a rating of 5 amp and that it is approved by ASTA or BSI to BS1362. Check for the ASTA mark or the BSI mark on the body of the fuse.

If the plug contains a removable fuse cover you must ensure that it is refitted when the fuse is replaced.

If you lose the fuse cover the plug must not be used until a replacement cover is obtained.

A replacement fuse cover can be purchased from your local Panasonic Dealer.

CAUTION:

IF THE FITTED MOULDED PLUG IS UNSUITABLE FOR THE SOCKET OUTLET IN YOUR HOME THEN THE FUSE SHOULD BE REMOVED AND THE PLUG CUT OFF AND DISPOSED OF SAFELY. THERE IS A DANGER OF SEVERE ELECTRICAL SHOCK IF THE CUT OFF PLUG IS INSERTED INTO ANY 13 AMP SOCKET.

How to replace the fuse


EN

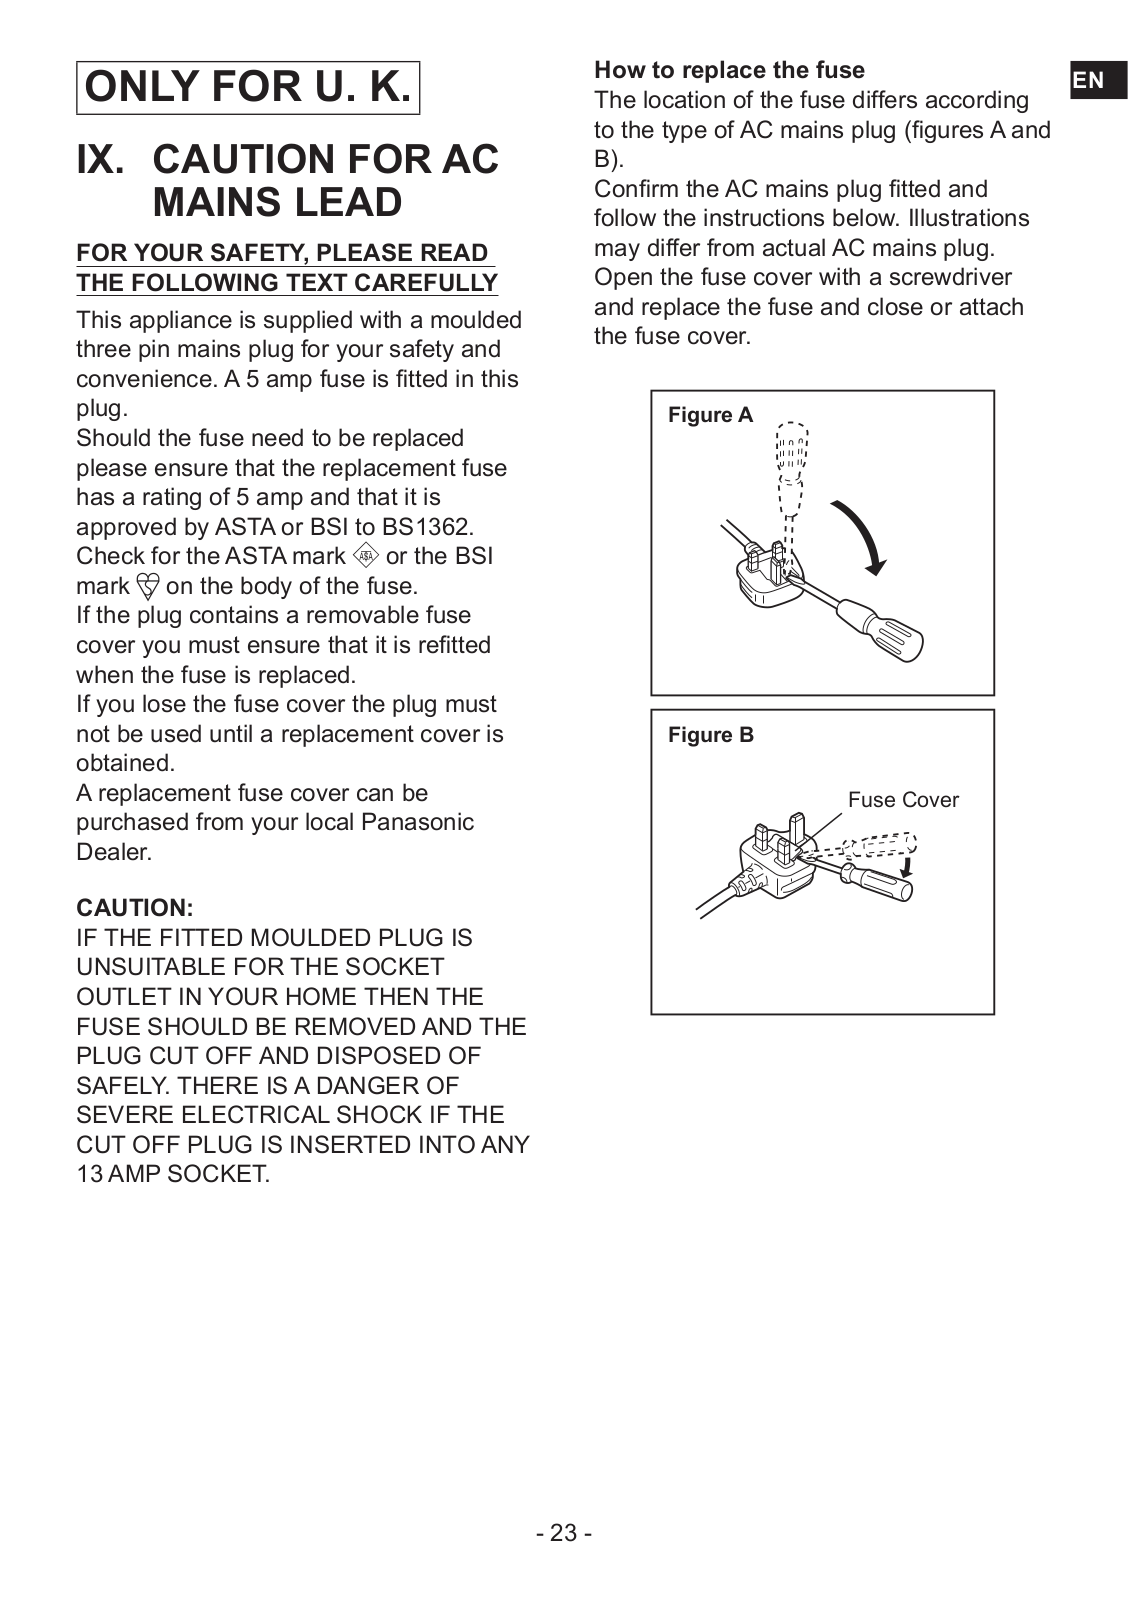
The location of the fuse differs according


to the type of AC mains plug (figures A and


B).


Confirm the AC mains plug fitted and


follow the instructions below. Illustrations


may differ from actual AC mains plug.


Open the fuse cover with a screwdriver


and replace the fuse and close or attach


the fuse cover.


Figure A


Figure B

Fuse Cover

- 23 -

Original-Anleitung: Englisch

Übersetzung der Original-Anleitung: Andere Sprachen

DE Lesen Sie bitte vor der ersten Inbetriebnahme dieses Geräts das separate Handbuch „Sicherheitsmaßregeln“ sorgfältig durch.

I.EINLEITUNG

GEFAHR

Dieses Produkt ist ein Schneidwerkzeug, das zum Durchschneiden von Metall und Holz ausgelegt ist. Sein rotierendes Blatt kann äußerst tiefe und lebensgefährliche Schnittverletzungen verursachen. Lesen Sie daher unbedingt diese Anleitung und die Vorsichtshinweise auf dem Werkzeug sorgfältig durch, und beachten Sie alle Sicherheitsvorschriften und die zusätzlichen Vorschriften, um solche Verletzungen zu vermeiden.

WARNUNG:

Um Verletzungen zu vermeiden, stecken Sie niemals Ihre Finger oder irgendwelche anderen Gegenstände in eine der Öffnungen der Maschine.

WARNUNG:

Lesen Sie alle Sicherheitswarnungen und Anweisungen durch.

Eine Missachtung der unten aufgeführten Warnungen und Anweisungen kann zu einem elektrischen Schlag, Brand und/oder schweren Verletzungen führen.

Hinweise zu dieser Anleitung

••Bitte lesen Sie diese Anleitung vollständig durch, bevor Sie mit Ihrer Maschine zu schneiden beginnen. Wenn Sie andere Personen die Maschine benutzen lassen, achten Sie darauf, dass sie diese Anleitung lesen oder mit dem korrekten Gebrauch und allen Sicherheitsvorkehrungen bezüglich der Maschine vertraut sind.

••Bitte bewahren Sie diese Anleitung für späteres Nachschlagen auf. Sie enthält wichtige Sicherheitsinformationen, die für den sicheren Gebrauch der Maschine befolgt werden müssen.

••In dieser Anleitung und auf dem Produkt finden Sie folgende Signalwörter:

HINWEIS:

Hinweise bieten zusätzliche wissenswerte Informationen über die Maschine.

VORSICHT:

Verweist auf potentielle Gefahrensituationen, die bei Missachtung der gegebenen Warnhinweise geringere Verletzungen zur Folge haben können. Solche Textstellen warnen außerdem vor gefährlichen Vorgehensweisen.

WARNUNG:

Verweist auf potentielle Gefahren, die bei Missachtung der gegebenen Warnhinweise zu schweren Verletzungen oder Tod führen können.

GEFAHR

Verweist auf eine Gefahr, die bei Missachtung der gegebenen Warnhinweise zu ernsten Verletzungen oder Tod führt.

II.WEITERE WICHTIGE SICHERHEITSREGELN

Spezielle Sicherheitsregeln

GEFAHR

1)Halten Sie Ihre Hände vom Schnittbereich und Blatt entfernt. Lassen Sie Ihre zweite Hand am Zusatzhandgriff oder am Motorgehäuse. Wenn Sie die Säge mit beiden Händen führen, können Sie sich nicht mit dem Blatt schneiden.

2)Halten Sie niemals das zu schneidende Werkstück in den Händen oder legen es Sie es auf Ihre Beine. Befestigen Sie das Werkstück auf einer stabilen Plattform. Es ist außerordentlich wichtig, dass das Werkstück einwandfrei abgestützt ist, um Körperteile möglichst wenig in Gefahr zu bringen, sowie ein Festklemmen des Sägeblattes oder Verlust der Kontrolle zu vermeiden.

3)Verwenden Sie vom Hersteller empfohlene Sägeblätter.

- 24 -

GEFAHR

4)Tragen Sie eine Staubmaske, falls bei der Arbeit Staub anfällt.

5)Tragen Sie Gehörschützer bei längerer

Benutzung des Werkzeugs.

6)Tragen Sie niemals Strickhandschuhe.

7)Überprüfen Sie das Material. Vermeiden Sie anderes Material zu zersägen.

8)Lassen Sie die Maschine nicht fallen.

9)Niemals die Maschine umherschwenken.

10)Bedecken Sie niemals die Ventilationsschlitze, und halten Sie sie frei von Staub oder einem anderen Material.

11)Die Maschine nicht in einen Schraubstock einspannen. Versuchen Sie niemals, die Maschine zum Schneiden verkehrt herum in einen Schraubstock einzuspannen. Dies ist sehr gefährlich und kann zu schweren Unfällen führen.

12)Vergewissern Sie sich bei Einsatz der Maschine an hochgelegenen Arbeitsplätzen, dass sich keine Personen darunter aufhalten.

13)Fassen Sie das Blatt nicht sofort nach dem Betrieb an. Es könnte sehr heiß sein und Ihre Haut verbrennen.

14)Berühren Sie das Material nicht nach dem Schneiden, da es noch sehr heiß sein kann.

15)Verwenden Sie kein Schneidöl. Der Gebrauch von Schneidöl kann einen

Brand verursachen.

16)Schalten Sie das Werkzeug nicht ein, wenn das Sägeblatt mit dem Werkstück in Kontakt ist. Warten Sie, bis das Sägeblatt die volle Drehzahl erreicht, bevor Sie mit dem Schnitt beginnen.

17)Achten Sie darauf, nicht von Funken getroffen zu werden. Dies kann zu Verbrennungen führen.

18)Nehmen Sie vor dem Anbringen oder Abnehmen eines Sägeblatts bzw. vor der Vorbereitung, Inspektion oder dem Lagern des Geräts zuerst den Akkublock vom Gerät ab.

Eine versehentliche Inbetriebnahme kann zu Verletzungen führen.

19)Halten Sie Hände und Gesicht vom

Sägeblatt und beweglichen Teilen entfernt.

Anderenfalls besteht Verletzungsgefahr.

GEFAHR

20) Berühren Sie Sägeblatt, Auswurf oder Rahmen nach dem Schneiden nicht, weil diese Teile dann noch heiß sind. DE

Dies kann zu Verletzungen führen.

21)Spannen Sie das Werkstück fest ein. Wenn das Werkstück nicht fest eingespannt ist, können Teile verrutschen und das Sägeblatt beschädigen oder eine Verletzung verursachen.

22)Um Unfälle zu vermeiden, schalten Sie den Akkublock bei Unterbrechung oder nach Beendigung des Gebrauchs aus und nehmen Sie ihn vom Gerät ab.

23)Bringen Sie unbedingt den Sägeblattschutz an der Drehrolle des Sägeblatts an.

Anderenfalls können Verletzungen verursacht werden, falls das Sägeblatt abrutscht oder beschädigt wird.

24)Berühren Sie Sägeblatt, Werkstück oder Rückstände unmittelbar nach dem Schneiden nicht mit bloßen Händen, weil sie dann noch heiß sind.

25)Üben Sie beim Schneiden keinen Druck auf den Griff aus, um den Vorgang zu beschleunigen.

26)Schneiden Sie keinen thermoplastischen Kunststoff.

Die beim Schneiden entstehende Hitze kann das Werkstück zum Schmelzen bringen und dazu führen, dass das Sägeblatt daran kleben bleibt und der Motor blockiert.

27)Verwenden Sie keine harten Werkstücke wie gehärteten Stahl.

Das Sägeblatt kann beschädigt werden.

28)Falls das Sägeblatt beim Schneiden klemmt, schalten Sie das Gerät sofort aus und stellen Sie den Betrieb ein.

29)Halten Sie das Gerät beim Gebrauch unbedingt mit beiden Händen am Griff und am Zusatzhaltegriff.

30)Öffnen Sie regelmäßig den Drehschutz des Sägeblatts, um die Rückstände zu entfernen.

Bei längeren Gebrauch können Rückstände im Rahmen zurückbleiben.

31)Soll das Gerät länger nicht verwendet werden, nehmen Sie das Sägeblatt vor der Lagerung ab.

- 25 -

Symbol

Symbol Bedeutung

DE

Volt

Gleichstrom

Leerlaufdrehzahl

Drehoder Hubzahl pro

Minute

Ampere

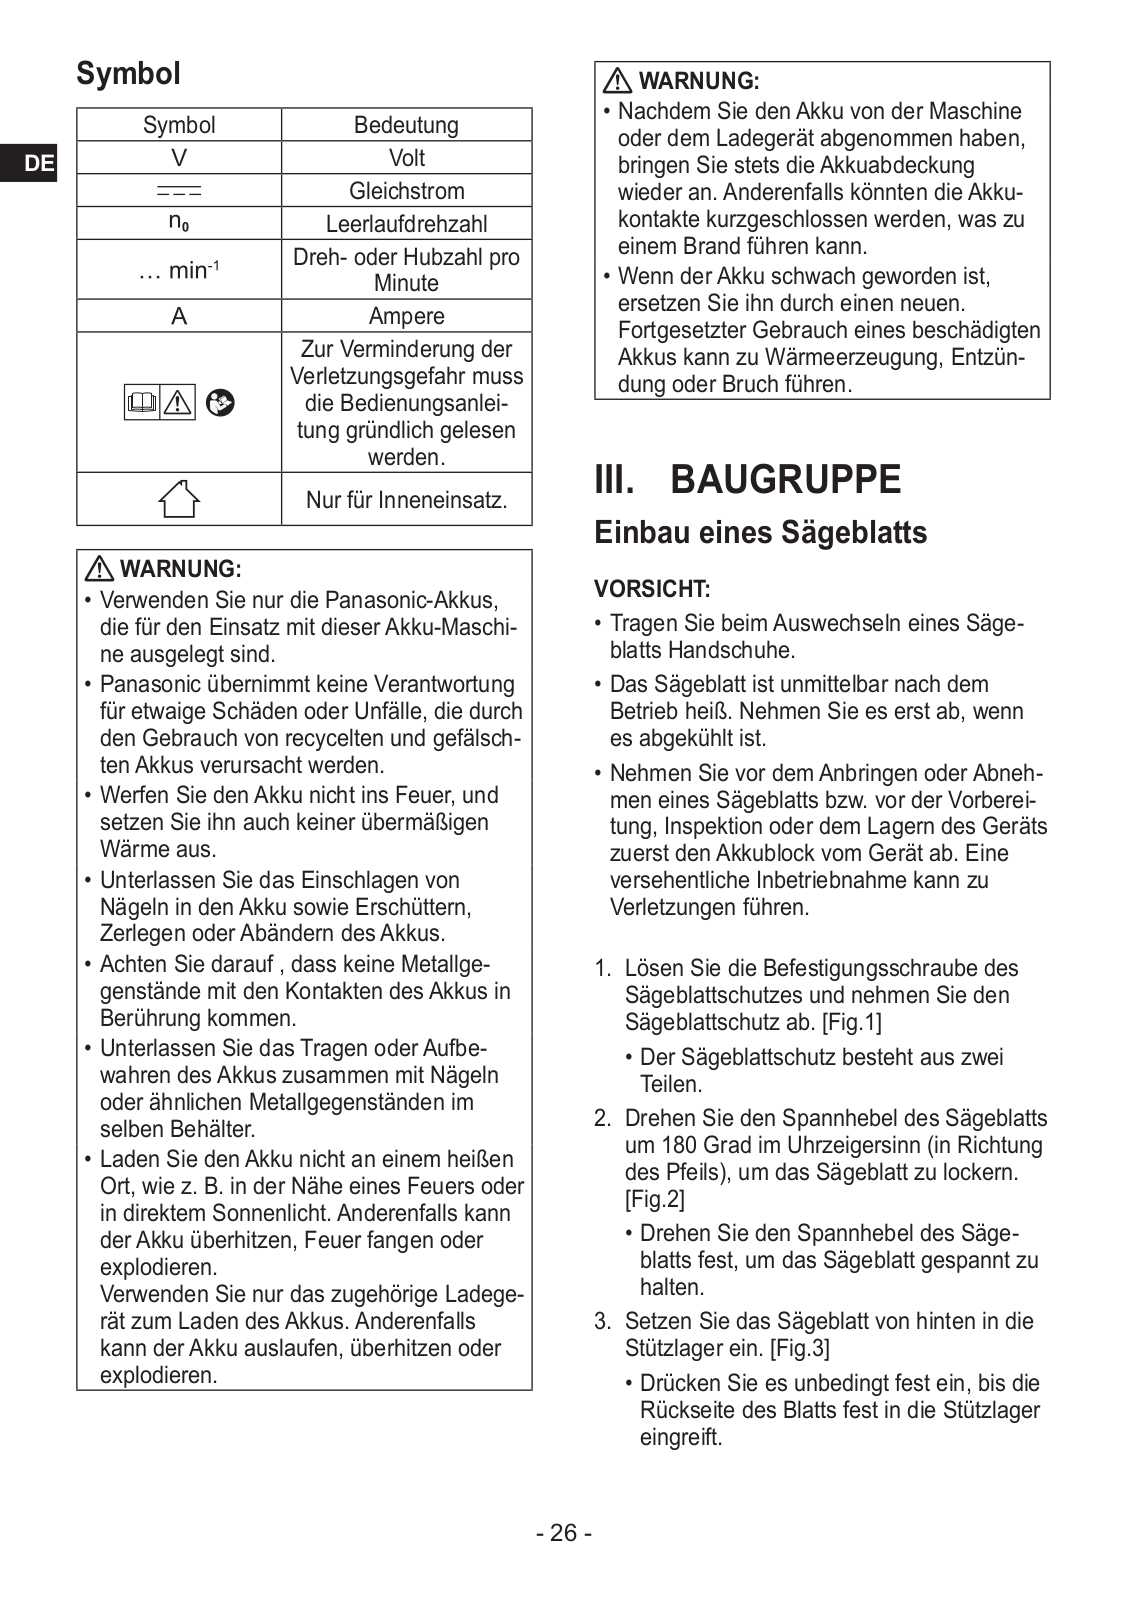
Zur Verminderung der Verletzungsgefahr muss die Bedienungsanleitung gründlich gelesen werden.

Nur für Inneneinsatz.

WARNUNG:

••Verwenden Sie nur die Panasonic-Akkus, die für den Einsatz mit dieser Akku-Maschi- ne ausgelegt sind.

••Panasonic übernimmt keine Verantwortung für etwaige Schäden oder Unfälle, die durch den Gebrauch von recycelten und gefälschten Akkus verursacht werden.

••Werfen Sie den Akku nicht ins Feuer, und setzen Sie ihn auch keiner übermäßigen Wärme aus.

••Unterlassen Sie das Einschlagen von Nägeln in den Akku sowie Erschüttern, Zerlegen oder Abändern des Akkus.

••Achten Sie darauf , dass keine Metallgegenstände mit den Kontakten des Akkus in Berührung kommen.

••Unterlassen Sie das Tragen oderAufbewahren des Akkus zusammen mit Nägeln oder ähnlichen Metallgegenständen im selben Behälter.

••Laden Sie den Akku nicht an einem heißen Ort, wie z. B. in der Nähe eines Feuers oder in direktem Sonnenlicht. Anderenfalls kann der Akku überhitzen, Feuer fangen oder explodieren.

Verwenden Sie nur das zugehörige Ladegerät zum Laden des Akkus. Anderenfalls kann der Akku auslaufen, überhitzen oder explodieren.

WARNUNG:

••Nachdem Sie den Akku von der Maschine oder dem Ladegerät abgenommen haben, bringen Sie stets die Akkuabdeckung wieder an.Anderenfalls könnten dieAkkukontakte kurzgeschlossen werden, was zu einem Brand führen kann.

••Wenn der Akku schwach geworden ist, ersetzen Sie ihn durch einen neuen. Fortgesetzter Gebrauch eines beschädigten Akkus kann zu Wärmeerzeugung, Entzündung oder Bruch führen.

III. BAUGRUPPE

Einbau eines Sägeblatts

VORSICHT:

••Tragen Sie beimAuswechseln eines Sägeblatts Handschuhe.

••Das Sägeblatt ist unmittelbar nach dem Betrieb heiß. Nehmen Sie es erst ab, wenn es abgekühlt ist.

••Nehmen Sie vor dem Anbringen oder Abnehmen eines Sägeblatts bzw. vor der Vorbereitung, Inspektion oder dem Lagern des Geräts zuerst den Akkublock vom Gerät ab. Eine versehentliche Inbetriebnahme kann zu Verletzungen führen.

1.Lösen Sie die Befestigungsschraube des

Sägeblattschutzes und nehmen Sie den Sägeblattschutz ab. [Fig.1]

••Der Sägeblattschutz besteht aus zwei

Teilen.

2.Drehen Sie den Spannhebel des Sägeblatts um 180 Grad im Uhrzeigersinn (in Richtung des Pfeils), um das Sägeblatt zu lockern.

[Fig.2]

••Drehen Sie den Spannhebel des Sägeblatts fest, um das Sägeblatt gespannt zu halten.

3.Setzen Sie das Sägeblatt von hinten in die Stützlager ein. [Fig.3]

••Drücken Sie es unbedingt fest ein, bis die Rückseite des Blatts fest in die Stützlager eingreift.

- 26 -

WARNUNG:

Einsetzen eines Sägeblatts

Wird das Sägeblatt nicht korrekt eingebaut, kann es verkanten und deshalb nicht gerade schneiden, so dass der Motor durchbrennt oder das Blatt beschädigt wird.

••Drücken Sie es daher ein, bis die Rückseite des Sägeblatts fest in die hinteren Lager der (beiden) Stützlager des Sägeblatts eingreift. [Fig.4]

••Achten Sie darauf, das Sägeblatt parallel zur Führungsschiene einzubauen. [Fig.5]

4.Setzen Sie das Sägeblatt an der Drehrolle des Sägeblatts ein und halten Sie es dabei gut fest, damit es nicht herunterfällt. [Fig.6]

5.Drehen Sie den Spannhebel des Sägeblatts um 180 Grad gegen den Uhrzeigersinn (in Richtung des Pfeils), um das Sägeblatt festzuziehen. [Fig.7]

WARNUNG:

Achten Sie bei der Einstellung der Spannung darauf, sich nicht die Finger im Spannhebel des Sägeblatts einzuklemmen.

6.Drehen Sie das Sägeblatt mit der Hand in die Drehrichtung und prüfen Sie, ob es korrekt an der Drehrolle des Sägeblatts hängt (das Sägeblatt sollte sich nicht außerhalb des Laufrings der Drehrolle des

Sägeblatts befinden).

HINWEIS:

Falls es nicht korrekt hängt, drehen Sie den Spannhebel des Sägeblatts um 180 Grad im Uhrzeigersinn, um das Sägeblatt zu lösen und hängen Sie es erneut ein.

7.Bringen Sie den Sägeblattschutz an und ziehen Sie die Befestigungsschraube des Sägeblattschutzes fest.

HINWEIS:

Halten Sie den Sägeblattschutz beim Anziehen der Befestigungsschraube des Sägeblattschutzes fest, damit er nicht hochrutscht.

Anbringen oder Abnehmen des Akkus

VORSICHT:

DE

Vergewissern Sie sich vor dem Einsetzen des


Akkus, dass der Ein-Aus-Schalter der Maschi-


ne einwandfrei funktioniert und beim Loslassen


zur Position „OFF“ zurückkehrt.


1.Anschluss des Akkus [Fig.8]

Die Ausrichtmarkierungen aufeinander ausrichten, und den Akku anbringen. ••Den Akku einschieben, bis er einrastet.

2.Zum Entfernen desAkkus [Fig.9]:

Den Knopf nach unten drücken und den Akku nach vor schieben.

- 27 -

IV. BETRIEB

[Hauptteil]

DE Vor der Benutzung der Maschine

••Berühren Sie Sägeblatt, Werkstück oder Späne unmittelbar nach dem Schneiden nicht mit bloßen Händen, weil diese Teile dann noch heiß sind und Hautverbrennungen verursachen können.

Vergewissern Sie sich vor jeder Benutzung der Maschine, dass sie in gutem Betriebszustand ist.

1.Testbetrieb

Schalten Sie das Gerät mehrmals ein und aus und vergewissern Sie sich, dass das Sägeblatt korrekt eingebaut ist. Falls das Sägeblatt nicht sauber läuft, nehmen Sie das Sägeblatt ab und bauen Sie es erneut ein.

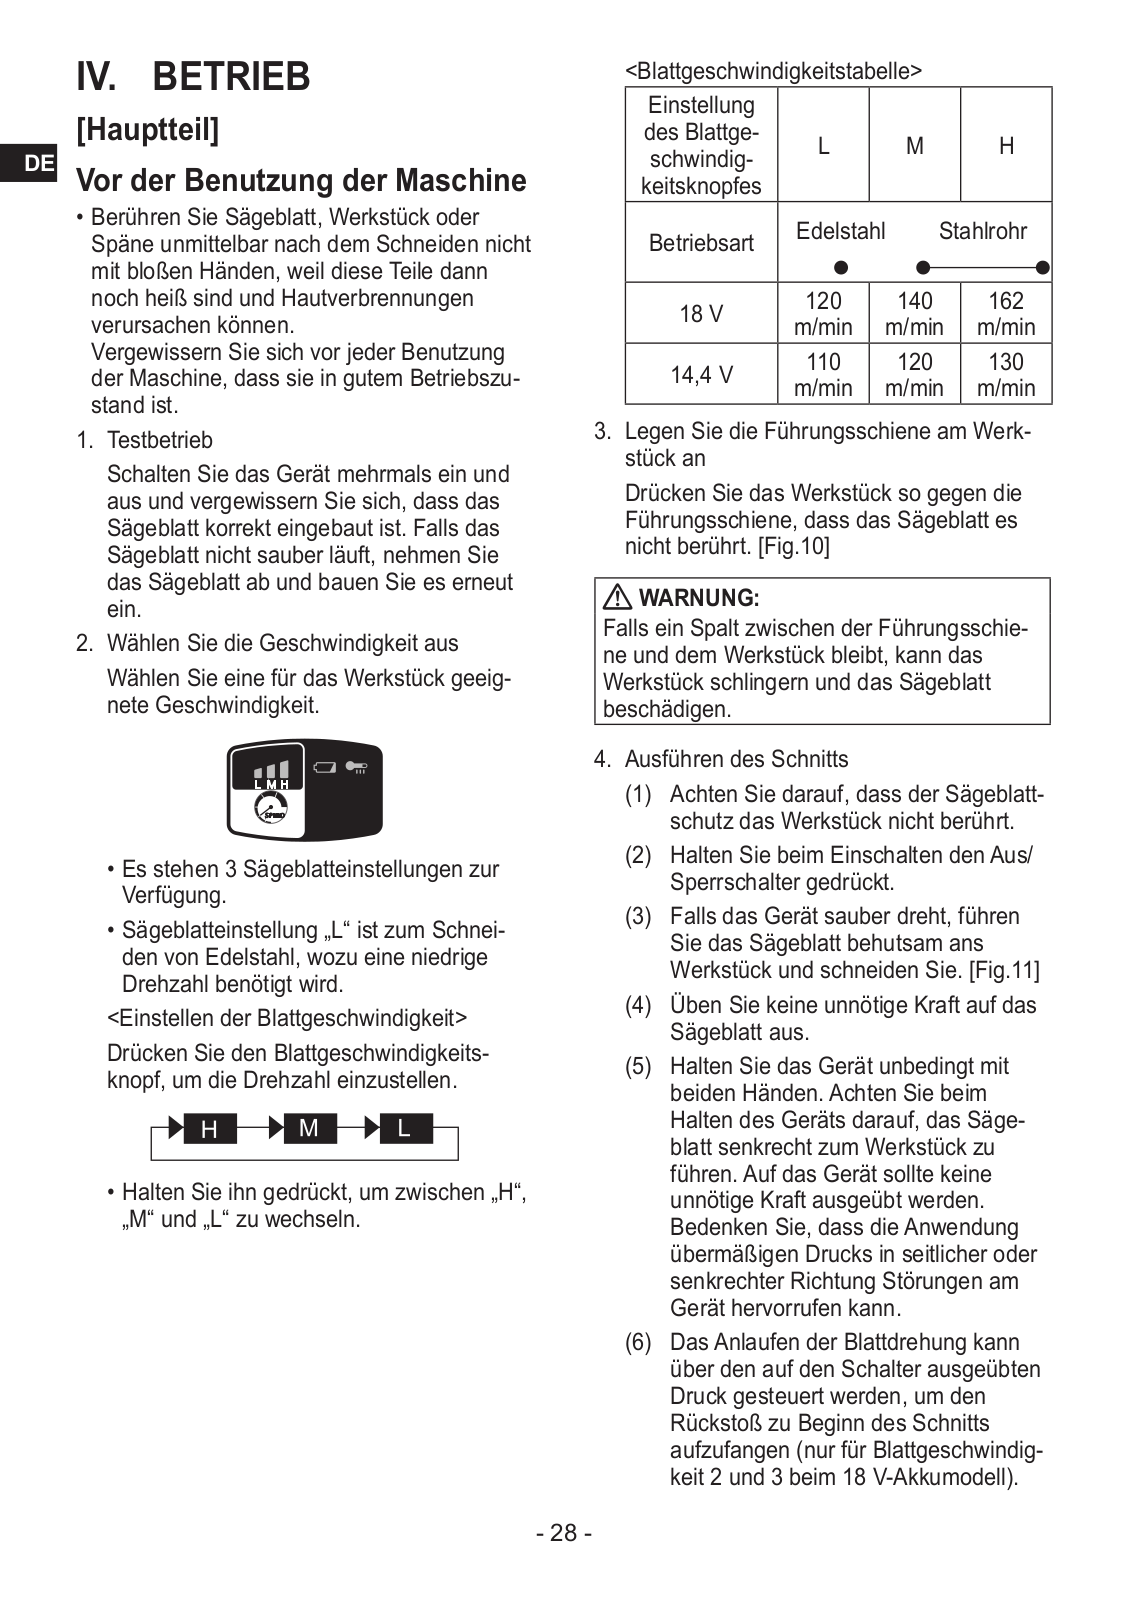
2.Wählen Sie die Geschwindigkeit aus

Wählen Sie eine für das Werkstück geeignete Geschwindigkeit.

••Es stehen 3 Sägeblatteinstellungen zur Verfügung.

••Sägeblatteinstellung „L“ ist zum Schneiden von Edelstahl, wozu eine niedrige

Drehzahl benötigt wird.

<Einstellen der Blattgeschwindigkeit>

Drücken Sie den Blattgeschwindigkeitsknopf, um die Drehzahl einzustellen.

••Halten Sie ihn gedrückt, um zwischen „H“, „M“ und „L“ zu wechseln.

<Blattgeschwindigkeitstabelle>

Einstellung


des Blattge-

L


M

H

schwindig-


keitsknopfes


Betriebsart

Edelstahl


Stahlrohr


18 V

120


140

162


m/min

m/min

m/min


14,4 V

110


120

130


m/min

m/min

m/min


3.Legen Sie die Führungsschiene am Werkstück an

Drücken Sie das Werkstück so gegen die Führungsschiene, dass das Sägeblatt es nicht berührt. [Fig.10]

WARNUNG:

Falls ein Spalt zwischen der Führungsschiene und dem Werkstück bleibt, kann das Werkstück schlingern und das Sägeblatt beschädigen.

4.Ausführen des Schnitts

(1)Achten Sie darauf, dass der Sägeblattschutz das Werkstück nicht berührt.

(2)Halten Sie beim Einschalten den Aus/ Sperrschalter gedrückt.

(3)Falls das Gerät sauber dreht, führen Sie das Sägeblatt behutsam ans Werkstück und schneiden Sie. [Fig.11]

(4)Üben Sie keine unnötige Kraft auf das

Sägeblatt aus.

(5)Halten Sie das Gerät unbedingt mit beiden Händen. Achten Sie beim Halten des Geräts darauf, das Sägeblatt senkrecht zum Werkstück zu führen. Auf das Gerät sollte keine unnötige Kraft ausgeübt werden.

Bedenken Sie, dass die Anwendung übermäßigen Drucks in seitlicher oder senkrechter Richtung Störungen am

Gerät hervorrufen kann.

(6)Das Anlaufen der Blattdrehung kann über den auf den Schalter ausgeübten Druck gesteuert werden, um den Rückstoß zu Beginn des Schnitts aufzufangen (nur für Blattgeschwindigkeit 2 und 3 beim 18 V-Akkumodell).

- 28 -

WARNUNG:

••Spannen Sie das Werkstück fest ein.

••Bringen Sie unbedingt den Sägeblattschutz an.

VORSICHT:

••Bringen Sie ihn erst an, wenn Sie das Sägeblatt auf Unregelmäßigkeiten wie Splitter und Risse untersucht haben.

••Wischen Sie alle an der Drehrolle des Sägeblatts haftenden Rückstände ab. Das Einsetzen eines geölten oder gefetteten Sägeblatts in das Stützlager kann zum Verrutschen oder Lockern des Sägeblatts führen.

••Verdrehen oder knicken Sie beim Anbringen eines Sägeblatts dessen Fügeverbindung nicht.

••Halten Sie beim Auswechseln eines Sägeblatts Ihr Gesicht vom Sägeblatt abgewandt, da dieses plötzlich herausspringen kann.

<Identifizierung eines abgenutzten Sägeblatts>

••Ein gerissenes Sägeblatt dreht nur schwergängig.

(Der Riss kann zu Geräuschbildung führen)

••Ein abgenutztes Sägeblatt kann bewirken, dass das Schneiden länger dauert.

Diese Anzeichen deuten darauf hin, dass das Sägeblatt ausgewechselt werden muss.

Benutzung des Hakens

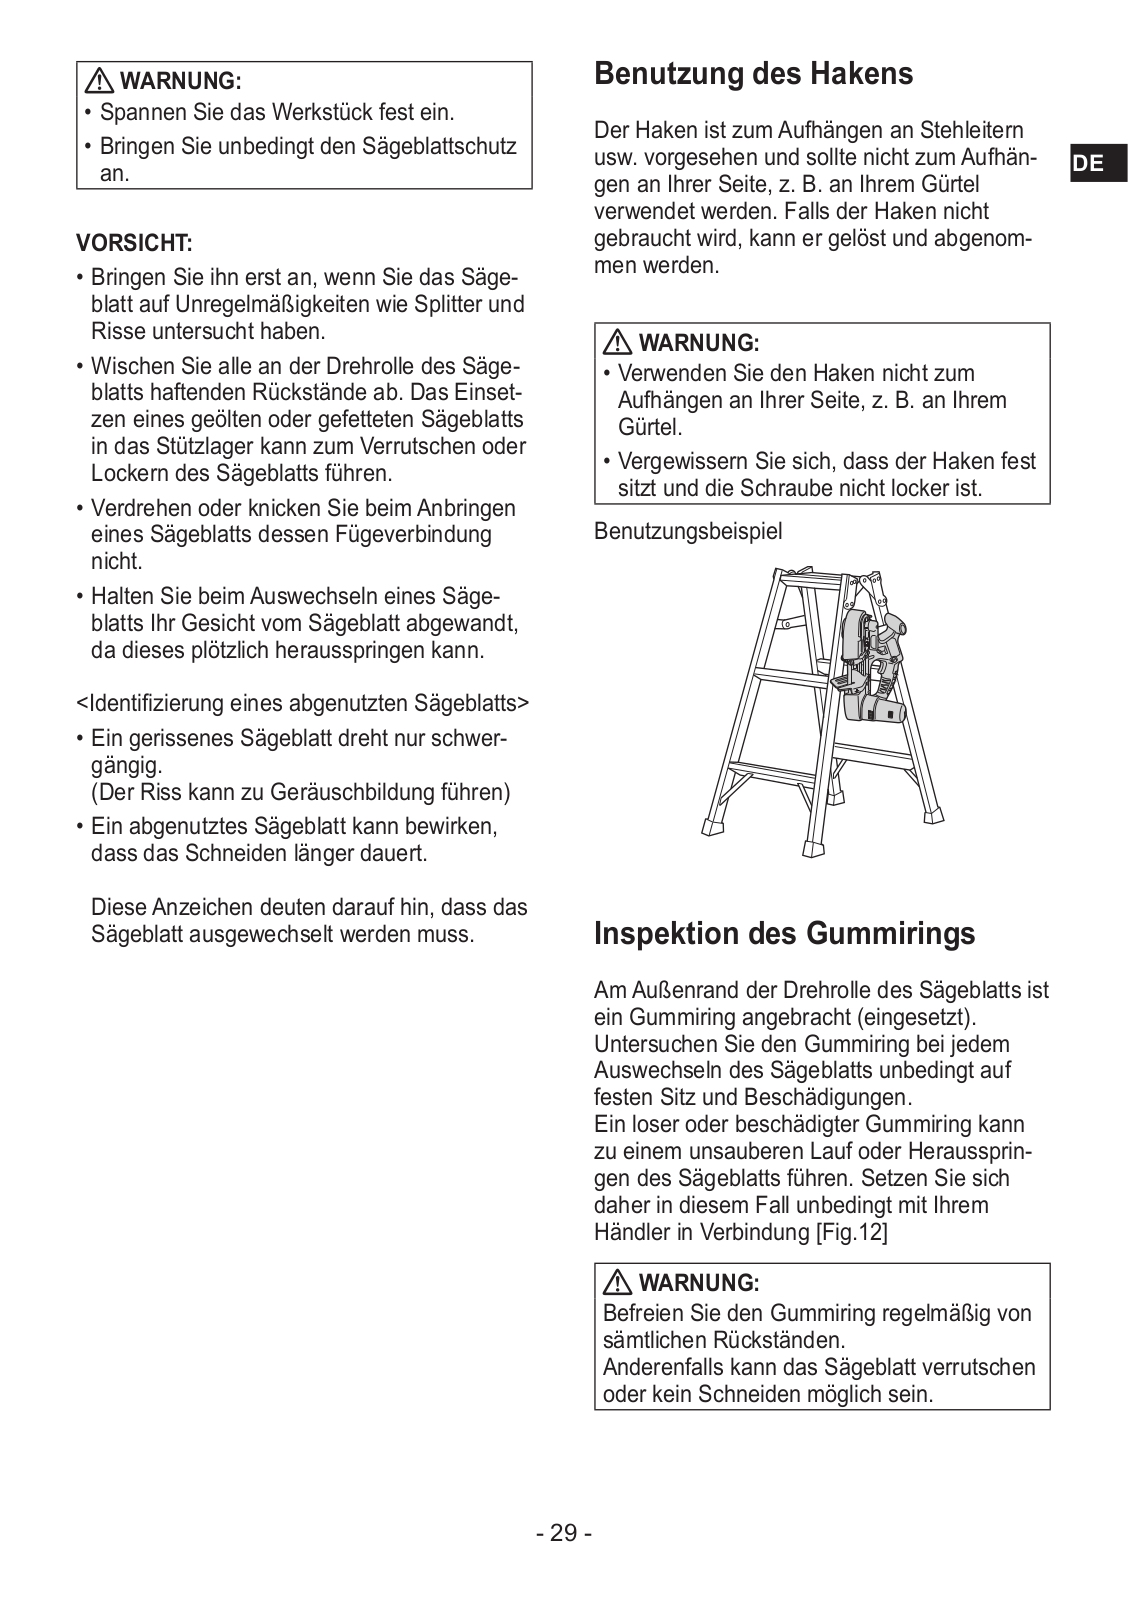
Der Haken ist zum Aufhängen an Stehleitern

usw. vorgesehen und sollte nicht zum Aufhän- DE gen an Ihrer Seite, z. B. an Ihrem Gürtel

verwendet werden. Falls der Haken nicht gebraucht wird, kann er gelöst und abgenommen werden.

WARNUNG:

••Verwenden Sie den Haken nicht zum Aufhängen an Ihrer Seite, z. B. an Ihrem Gürtel.

••Vergewissern Sie sich, dass der Haken fest sitzt und die Schraube nicht locker ist.

Benutzungsbeispiel

Inspektion des Gummirings

Am Außenrand der Drehrolle des Sägeblatts ist ein Gummiring angebracht (eingesetzt). Untersuchen Sie den Gummiring bei jedem Auswechseln des Sägeblatts unbedingt auf festen Sitz und Beschädigungen.

Ein loser oder beschädigter Gummiring kann zu einem unsauberen Lauf oder Herausspringen des Sägeblatts führen. Setzen Sie sich daher in diesem Fall unbedingt mit Ihrem Händler in Verbindung [Fig.12]

WARNUNG:

Befreien Sie den Gummiring regelmäßig von sämtlichen Rückständen.

Anderenfalls kann das Sägeblatt verrutschen oder kein Schneiden möglich sein.

- 29 -

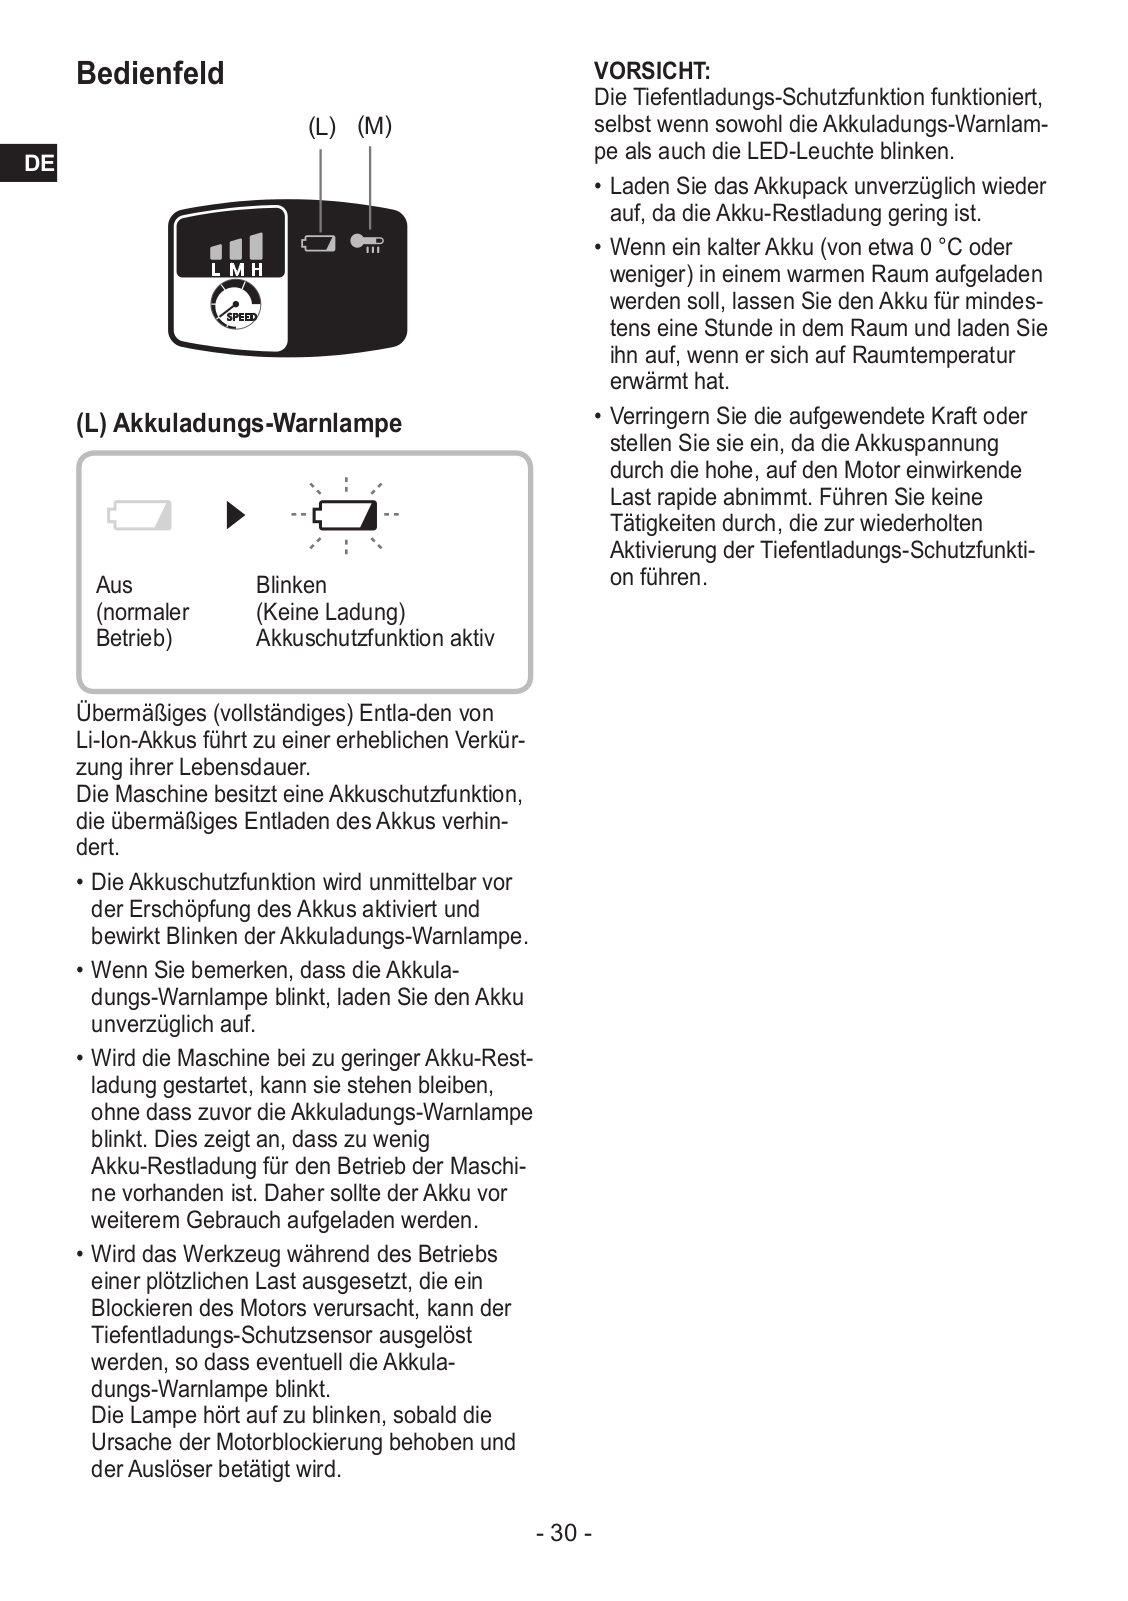
Bedienfeld

(L) (M)

DE

(L) Akkuladungs-Warnlampe

Aus

Blinken

(normaler

(Keine Ladung)

Betrieb)

Akkuschutzfunktion aktiv

Übermäßiges (vollständiges) Entla-den von Li-Ion-Akkus führt zu einer erheblichen Verkürzung ihrer Lebensdauer.

Die Maschine besitzt eine Akkuschutzfunktion, die übermäßiges Entladen des Akkus verhindert.

••Die Akkuschutzfunktion wird unmittelbar vor der Erschöpfung desAkkus aktiviert und bewirkt Blinken der Akkuladungs-Warnlampe.

••Wenn Sie bemerken, dass die Akkula- dungs-Warnlampe blinkt, laden Sie den Akku unverzüglich auf.

••Wird die Maschine bei zu geringer Akku-Rest- ladung gestartet, kann sie stehen bleiben, ohne dass zuvor die Akkuladungs-Warnlampe blinkt. Dies zeigt an, dass zu wenig Akku-Restladung für den Betrieb der Maschine vorhanden ist. Daher sollte der Akku vor weiterem Gebrauch aufgeladen werden.

••Wird das Werkzeug während des Betriebs einer plötzlichen Last ausgesetzt, die ein

Blockieren des Motors verursacht, kann der

Tiefentladungs-Schutzsensor ausgelöst werden, so dass eventuell die Akkula- dungs-Warnlampe blinkt.

Die Lampe hört auf zu blinken, sobald die

Ursache der Motorblockierung behoben und derAuslöser betätigt wird.

VORSICHT:

Die Tiefentladungs-Schutzfunktion funktioniert, selbst wenn sowohl die Akkuladungs-Warnlam- pe als auch die LED-Leuchte blinken.

••Laden Sie das Akkupack unverzüglich wieder auf, da die Akku-Restladung gering ist.

••Wenn ein kalter Akku (von etwa 0 °C oder weniger) in einem warmen Raum aufgeladen werden soll, lassen Sie den Akku für mindestens eine Stunde in dem Raum und laden Sie ihn auf, wenn er sich auf Raumtemperatur erwärmt hat.

••Verringern Sie die aufgewendete Kraft oder stellen Sie sie ein, da die Akkuspannung durch die hohe, auf den Motor einwirkende Last rapide abnimmt. Führen Sie keine

Tätigkeiten durch, die zur wiederholten Aktivierung der Tiefentladungs-Schutzfunkti- on führen.

- 30 -

Loading...
+ 198 hidden pages