

Page 1
Operating Instructions
Bedienungsanleitung
Instructions d’utilisation
Istruzioni per l’uso
Gebruiksaanwijzing
Manual de instrucciones
Brugsvejledning
Driftsföreskrifter
Bruksanvisning
Käyttöohjeet
Before operating this unit, please read these instructions completely and save this manual for future use.
Vor Inbetriebnahme des Gerätes die Betriebsanleitung bitte gründlich durchlesen und diese Broschüre zum späteren Nachschlagen
sorgfältig aufbewahren.
Lire entièrement les instructions suivantes avant de faire fonctionner l’appareil et conserver ce mode d’emploi à des fins de consultation
ultérieure.
Prima di usare questa unità, leggere completamente queste istruzioni e conservare il manuale per usi futuri.
Lees deze gebruiksaanwijzing aandachtig door voor u het apparaat in gebruik neemt en bewaar de gebruiksaanwijzing voor eventuele
naslag.
Antes de usar este aparato por primera vez, lea todas las instrucciones de este manual y guarde el manual para poderlo consultar en el
futuro.
Gennemlæs denne betjeningsvejledning før brugen og gem den til fremtidig brug.
Läs igenom hela bruksanvisningen innan verktyget tas i bruk. Spara bruksanvisningen för senare användning.
Før enheten tas i bruk, vennligst les disse alle anvisningene og oppbevar deretter bruksanvisningen for senere bruk.
Lue ohjeet huolella ennen laitteen käyttöönottoa ja säilytä tämä käyttöohje tallessa tulevaa tarvetta varten.
Cordless Jigsaw
Kabellose Stichsäge
Meule d'angle sans fil
Seghetto senza filo
Snoerloze decoupeerzaag
Sierra inalámbrica
Akku-dekupørsav
Sladdlös sticksåg
Oppladbar Stikksag
Ladattava pistosaha
Model No: EY4550
Page 2
- 2 -
Index/Index/Index/Indice/Index/Indice/Indeks/Index/Indeks/Hakemisto
English: Page 9
Deutsch: Seite 24
Français: Page 38
Italiano: Pagina 52
Nederlands: Bladzijde 65
Español: Página 79
Dansk: Side 92
Svenska: Sid 105
Norsk: Side 118
Suomi: Sivu 131
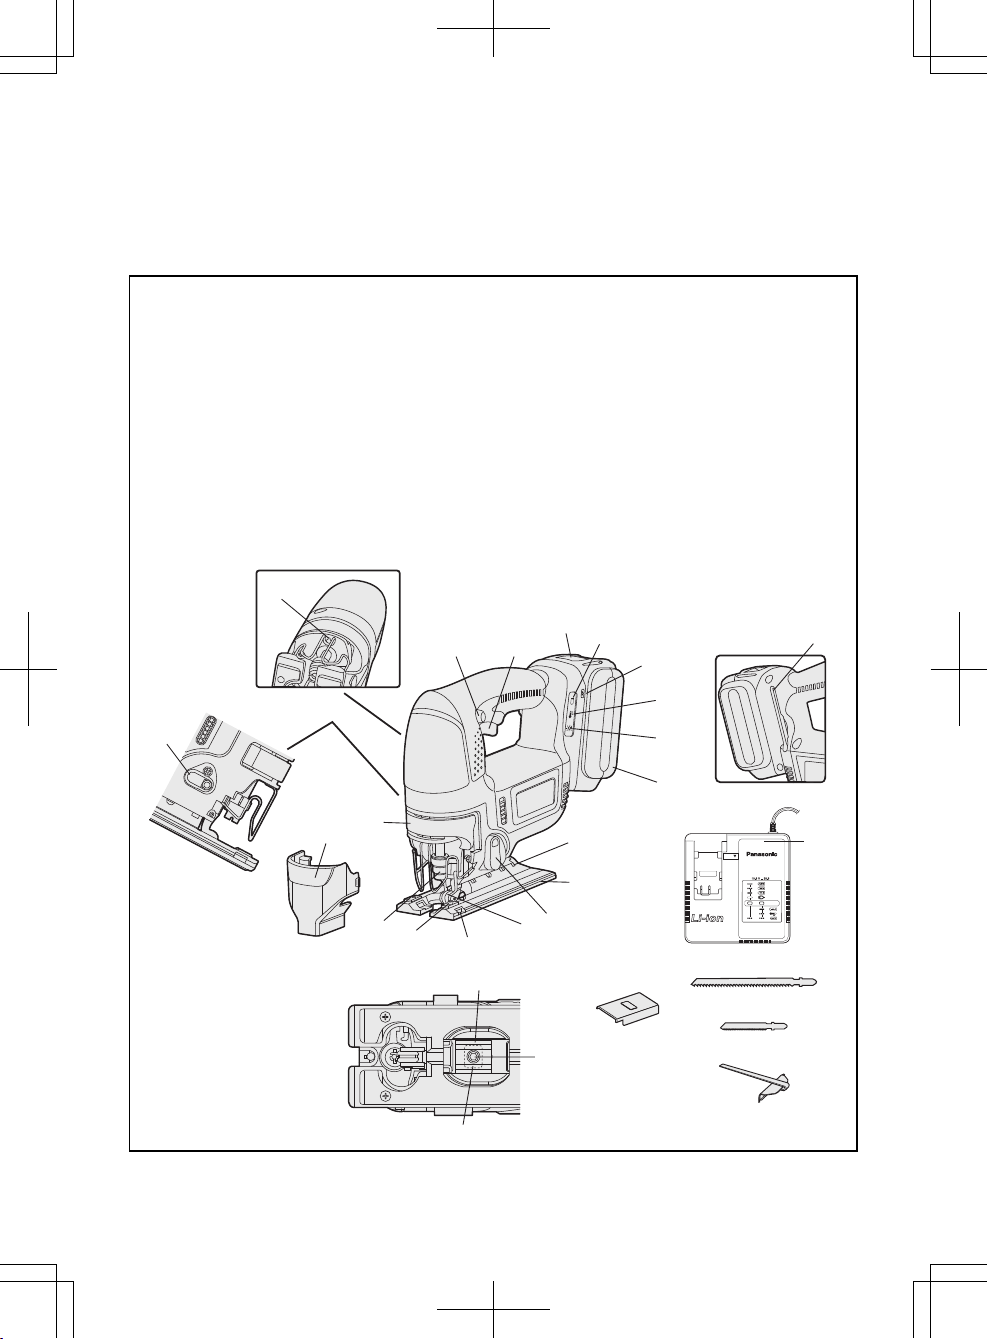
FUNCTIONAL DESCRIPTION
FUNKTIONSBESCHREIBUNG
DESCRIPTION DES FONCTIONS
DESCRIZIONE DELLE FUNZIONI
FUNCTIEBESCHRIJVING
DESCRIPCIÓN FUNCIONAL
FUNKTIONSBESKRIVELSE
FUNKTIONSBESKRIVNING
FUNKSJONSBESKRIVELSE
TOIMINTOKUVAUS
V
(1) (2)
(3)
(4)
(5)
(6)
(7)
(8)
(9)
(10)
(11)
(15)
(16)
(17)
(18)
(24)
(25)
(26)
(27)
(28)
(23)
(19)
(20)
(22)
(21)
(12)
(14)
(13)
Page 3
- 3 -
(1)
Switch lock lever
Schalterverriegelungshebel
Levier de verrouillage d’interrupteur
Levetta di blocco interruttore
Schakelaarblokkeertoets
Palanca de bloqueo del interruptor
Låsehåndtag
Strömbrytarspärr
Låsespake for bryteren
Käyttökytkimen lukitusvipu
(2)
Power switch
Netzschalter
Interrupteur d’alimentation
Interruttore di accensione
Hoofdschakelaar
Interruptor de alimentación
Afbryder
Strömbrytare
Strømbryter
Käyttökytkin
(3)
Battery pack release button
Akku-Entriegelungsknopf
Bouton de libération de batterie autonome
Tasto di rilascio pacco batteria
Accu-ontgrendeltoets
Botón de liberación de batería
Udløserknap til batteripakning
Frigöringsknapp för batteri
Utløserknapp for batteripakke
Akkupaketin irrotuspainike
(4)
Battery low warning lamp
Akkuladungs-Warnlampe
Témoin d’avertissement de batterie basse
Spia avvertenza batteria scarica
Waarschuwingslampje voor
lage accuspanning
Luz de aviso de baja carga de batería
Advarselslampes batterieffekt lav
Varningslampa för svagt batteri
Varsellampe for at batteriet er for lavt
Alhaisen akkujännitteen varoituslamppu
(5)
Alignment mark
Ausrichtmarkierung
Marque d'alignement
Marcatura di allineamento
Uitlijntekens
Marca de alineación
Flugtemærke
Anpassningsmärke
Innrettingsmerke
Sovitusmerkki
(6)
Overheat warning lamp (battery)
Überhitzungs-Warnlampe (Akku)
Témoin d’avertissement de
surchauffe (batterie)
Spia avvertenza
surriscaldamento (batteria)
Oververhitting-waarschuwingslampje (accu)
Luz de advertencia de
sobrecalentamiento (batería)
Advarselslamp til overophedning (batteri)
Varningslampa för överhettning (batteri)
Varsellampe for overoppheting (batteri)
Ylikuumenemisen varoituslamppu (akku)
(7)
LED light on / off button
LED-Leuchten-EIN/AUS-Taste
Bouton Marche/Arrêt de la lumière DEL
Tasto di accensione e
spegnimento della luce LED
Aan/uit-toets (ON/OFF) voor LED-lampje
Botón ON/OFF de luz LED
TÆND/SLUK-knap til LED-lys
Strömbrytare för LED-ljus
PÅ/AV-knapp for LED-lys
LED-valon kytkin/katkaisupainike
(8)
Battery pack
Akku
Batterie autonome
Pacco batteria
Accu
Batería
Batteripakning
Batteri
Batteripakke
Akku
(9)
Bevel index
Schrägeindex
Index de chanfrein
Scala sfalsatura
Schuinte-index
Índice de bisel
Smigvinkelindeks
Lutningsindex
Skråindeks
Kallistusasteikko
(10)
Base
Unterteil
Base
Base
Voetplaat
Base
Underdel
Bas
Sokkel
Pöytä
(11)
Orbital selector lever
Pendelhubhebel
Levier du sélecteur orbital
Leva selettore orbita
Pendelslagkeuzehendel
Palanca de selector orbital
Omløbsvælgerarm
Pendelväljarspak
Pendelvelgerspak
Pendeli
(12)
Fixing bracket
Halterung
Support de fixation
Staffa di fissaggio
Bevestigingssteun
Soporte de fijación
Holderanordning
Hållare
Festebrakett
Repimissuoja
(13)
Base fixing screw
Unterteilschraube
Vis de fixation de la base
Vite di fissaggio base
Voetplaatbevestigingsschroef
Tornillo de fijación de base
Underdelsskrue
Basskruv
Sokkelfesteskrue
Pöydän kiinnitysruuvi
(14)
Base adjustment hole
Unterteileinstellloch
Orifice d'ajustement de la base
Foro di regolazione base
Voetplaatafstelgat
Orificio de ajuste de base
Underdelsindstillingshul
Basjusteringshål
Sokkeljusteringshull
Pöydän säätöaukko
(15)
Roller guide
Rollenführung
Guidage à rouleau
Guida rullo
Rolgeleider
Guía de rodillo
Rulleguide
Rullstyrning
Rulleføring
Terän tukirulla
Page 4
- 4 -
(16)
Rip fence mount
Parallelanschlagbefestigung
Montant du guide à refendre
Attacco guida parallela
Parallelaanslagbevestiging
Montaje de alineador de aserrado
Parallelanslagsbefæstelse
Parallellanslagsfäste
Parallellanslagsmontasje
Reunaohjaimen asennusaukko
(17)
Rip fence fixing screw
Parallelanschlagschraube
Vis de fixation du guide à
refendre
Vite di fissaggio guida parallela
Parallelaanslagbevestigingsschroef
Tornillo de fijación de alineador de aserrado
Parallelanslagsskrue
Parallellanslagsskruv
Parallellanslagfesteskrue
Reunaohjaimen kiinnitysruuvi
(18)
Blade clamp bracket
Sägeblatthalterung
Support de blocage de lame
Staffa a morsetto lama
Zaagbladklemsteun
Soporte de abrazadera de
cuchilla
Savbladsholder
Sågbladshållare
Bladklemmebrakett
Avaimeton terän kiinnitys
(19)
Dust cover
Staubabdeckung
Protection anti-poussières
Copertura antipolvere
Stofkap
Cubierta anti-polvo
Støvafdækning
Dammskydd
Støvdeksel
Pölykansi
(20)
Blade Attach/Remove lever
Hebel zum Feststellen bzw.
Entfernen des Sägeblatts
Levier de fixation/retrait de lame
Leva attacco/rimozione lama
Hendel voor bevestigen/verwijderen
van zaagblad
Palanca de conexión / remoción de cuchilla
Arm til montering/afmontring af
savblad
Spak för fastsättning/borttagning av
sågblad
Spak for feste/fjerning av blad
Terän kiinnitys/irrotusvipu
(21)
LED light
LED-Leuchte
Lumière DEL
Luce LED
LED-lampje
Luz indicadora
LED-lys
LED-ljus
LED-lys
LED-valo
(22)
Hex wrench
Sechskantschlüssel
Clé hexagonale
Chiave esagonale
Zeskantsleutel
Llave hexagonal
Fastnøgle
Insexnyckel
Sekskantnøkkel
Kuusioavain
(23)
Battery charger
Ladegerät
Chargeur de batterie
Caricabatterie
Acculader
Cargador de batería
Batterioplader
Batteriladdare
Batterilader
Akkulaturi
(24)
Battery pack cover
Akkuabdeckung
Couvercle de la batterie
autonome
Coperchio batterie
Accudeksel
Cubierta de la batería
Akkuafdækning
Batteriskydd
Batteripakkedeksel
Akun liitinsuoja
(25)
Blowing lever
Abblashebel
Levier du soufflage
Leva di soffiatura
Blaashendel
Palanca de soplado
Blæsehåndtag
Blåsande spak
Sponblåser arm
Puhallusvipu
(26)
Wood blade (EY9SXWJ2)
Holzsägeblatt (EY9SXWJ2)
Lame à bois (EY9SXWJ2)
Lama per legno (EY9SXWJ2)
Houtzaagblad (EY9SXWJ2)
Cuchilla de madera (EY9SXWJ2)
Træsavblad (EY9SXWJ2)
Träsågblad (EY9SXWJ2)
Treblad (EY9SXWJ2)
Puuterä (EY9SXWJ2)
(27)
Metal blade (EY9SXMJ0)
Metallsägeblatt (EY9SXMJ0)
Lame à métal (EY9SXMJ0)
Lama per metallo (EY9SXMJ0)
Metaalzaagblad (EY9SXMJ0)
Cuchilla de metal (EY9SXMJ0)
Metalsavblad (EY9SXMJ0)
Metallsågblad (EY9SXWJ0)
Metallblad (EY9SXMJ0)
Metalliterä (EY9SXMJ0)
(28)
Rip fence
Parallelanschlag
Guide à refendre
Guida parallela
Parallelaanslag
Alineador de aserrado
Parallelanslag
Parallellanslag
Parallellanslaget
Reunaohjain
Page 5

- 5 -
Terminals
Anschlüsse
Bornes
T
erminali
Aansluitpunten
Terminales
Terminaler
Poler
Ender
Liittimet
Pack cover
Akkuabdeckung
Couvercle de la batterie autonome
Coperchio pacco
Accudeksel
Cubierta de batería
Pakningsdæksel
Batteriskydd
Pakkedeksel
Akkukotelon kansi
label
Schild
rouge
rossa
label
rojo
etikette
dekal
etikett
merkki
Recommendations for use / Gebrauchsempfehlungen / Recommandations concernant l’utilisation /
Precauzioni d’uso / Aanbevelingen voor gebruik / Recomendaciones par el uso / Anbefalinger for
brugen / Rekommendationer för användning / Anbefalt bruk / Käyttösuositukset
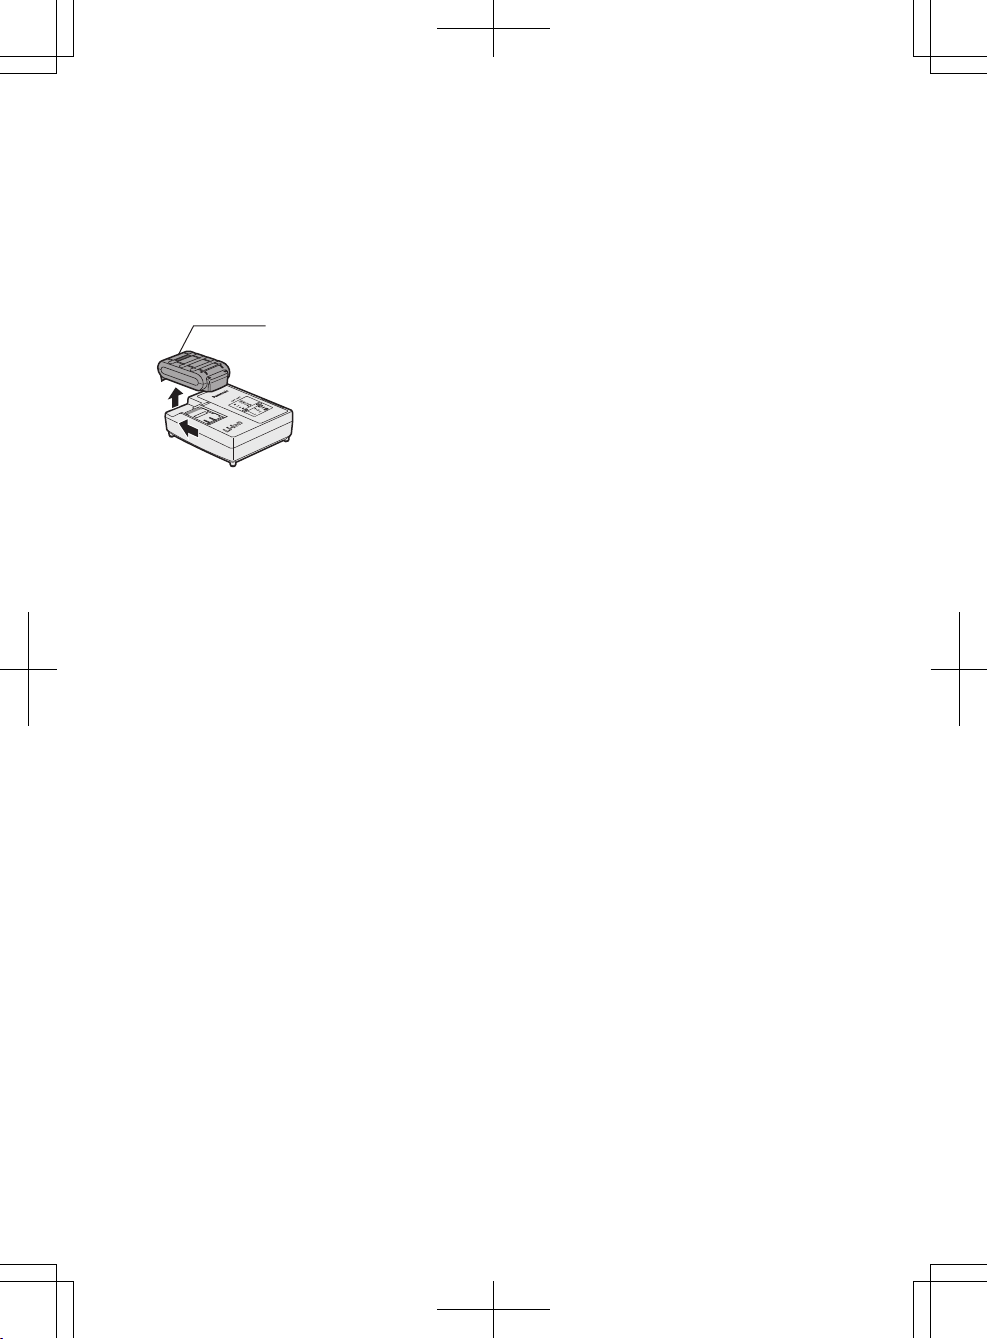
Be sure to use the Pack cover
• When the battery pack is not being used, store the battery in a way that foreign substances such as dust and
water etc. do not contaminate the terminals. Be sure to attach the battery pack cover to protect the battery
terminals.
• When charging the battery pack, confirm that the terminals on the battery charger are free of foreign
substances such as dust and water etc. Clean the terminals before charging the battery pack if any foreign
substances are found on the terminals.
The life of the battery pack terminals may be affected by foreign substances such as dust and water etc.
during operation.
CAUTION: To protect the motor or battery, be sure to note the following when carrying out this operation.
• If the motor or battery becomes hot, the protection function will be activated and the motor or battery will stop
operating.
The overheat warning lamp on the control panel illuminates or flashes when this feature is active.
For safe use
• The battery pack is designed to be installed by proceeding two steps for safety. Make sure the battery pack is
installed properly to the main body before use.
• If the battery pack is not inserted firmly when the switch is switched on, the overheat warning lamp and the
battery low warning lamp will flash to indicate that safe operation is not possible, and the bit will not rotate
normally. Insert the battery pack into the body of the tool until the red label disappears.
Unbedingt die Akkuschutzkappe verwenden
• Wenn der Akku nicht benutzt wird, bewahren Sie ihn so auf, dass die Kontakte nicht durch Fremdstoffe, wie z.
B. Staub und Wasser usw., verschmutzt werden. Bringen Sie unbedingt die Akkuschutzkappe zum Schutz der
Kontakte an.
• Achten Sie beim Laden des Akkus darauf, dass die Kontakte am Ladegerät frei von Fremdstoffen, wie z. B.
Staub und Wasser usw., sind. Reinigen Sie die Kontakte vor dem Laden des Akkus, falls Fremdstoffe auf den
Kontakten vorhanden sind.
Die Lebensdauer der Akkukontakte kann durch Anhaften von Fremdstoffen, wie z. B. Staub und Wasser usw.,
während des Betriebs beeinträchtigt werden.
VORSICHT: Zum Schutz des Motors und des Akkus müssen beim Betrieb die folgenden Punkte beachtet
werden.
• Bei einer Motor- oder Akkuüberhitzung spricht die Schutzschaltung an, um den Betrieb des Motors bzw.
des Akkus zu unterbrechen. Die Überhitzungswarnleuchte auf dem Bedienungsfeld leuchtet oder blinkt bei
aktivierter Funktion.
Für den sicheren Gebrauch
• Der Akku ist aus Sicherheitsgründen so entworfen, dass er in zwei Schritten eingesetzt werden muss.
Vergewissern Sie sich vor der Inbetriebnahme der Maschine, dass der Akku ordnungsgemäß in diese
eingesetzt ist.
• Wenn der Akku nicht fest eingesetzt ist, blinken die Überhitzungs-Warnlampe und die Akkuladungs-Warnlampe
und das Gerät dreht den Bohrer nicht wie üblich, um darauf hinzuweisen, dass das Gerät nicht betriebssicher
arbeitet, selbst wenn ein Schalter ausgelöst wird. Schieben Sie den Akku soweit in das Gerät hinein, bis das
rote Schild verschwindet.
GB
D
Page 6
- 6 -
Veillez à utiliser le couvercle de la batterie autonome
• Lorsque le couvercle de la batterie autonome n’est pas utilisé, rangez la batterie de façon à ce qu’aucun corps
étranger comme de la poussière et de l’eau ne contamine les bornes. Veillez à fixer le couvercle de la batterie
autonome afin de protéger les bornes de la batterie.
• Lors de la charge de la batterie autonome, assurez-vous que les bornes du chargeur de batterie sont libres de
tout corps étranger comme de la poussière et de l’eau, etc. Nettoyez les bornes avant de charger la batterie
autonome si des corps étrangers se trouvent sur les bornes.
La durée de vie des bornes de la batterie autonome peut être affectée par des corps étrangers comme de la
poussière et de l’eau, etc. pendant le fonctionnement.
MISE EN GARDE: Pour protéger le moteur ou la batterie, veillez à bien noter les points suivants lorsque
vous effectuez cette opération.
• Si le moteur ou la batterie deviennent chauds, la fonction de protection sera activée et le moteur ou la batterie
cesseront de fonctionner. Le témoin d'avertissement de surchauffe s'allume ou clignote sur le panneau de
commande lorsque cette caractéristique est active.
Pour un usage sans risque
• La batterie est conçue pour être installée en procédant en deux étapes pour des raisons de sécurité. Assurezvous que la batterie est mise en place correctement avant d'utiliser l'outil.
• Lorsque la batterie autonome n'est pas fermement insérée, le témoin d'avertissement de surchauffe et le témoin
d’avertissement de batterie basse clignotent et la machine ne fait pas tourner la mèche comme habituellement
pour nous signaler que la machine ne fonctionne pas en toute sécurité même si un interrupteur a été enclenché.
Insérez la batterie autonome dans le corps de l'outil jusqu'à ce que l'indicateur rouge disparaisse.
F
Assicurarsi di usare il coperchio del pacco batteria
• Quando il pacco batteria non viene usato, conservare la batteria in modo che sostanze estranee, quali
polvere, acqua, ecc non contaminino i terminali. Assicurarsi di applicare il coperchio al pacco batteria per
proteggere i terminali della batteria.
• Quando il pacco batteria viene caricato, assicurarsi che i terminali sul caricabatteria siano privi di sostanze
estranee, quali polvere, acqua, ecc. Pulire i terminali prima di caricare il pacco batteria, qualora vengano
trovate sostanze estranee sui terminali.
La durata dei terminali del pacco batteria può essere influenzata da sostanze estranee, quali polvere, acqua,
ecc. durante il funzionamento.
PRECAUZIONE:
Per proteggere il motore o la batteria, tenere presente quanto segue nell'esecuzione del lavoro.
• Se il motore o la batteria si scurriscaldano verrà attivata la funzione di protezione, che comporta l'arresto
del motore o della batteria. Quando questa funzione è attiva, sul pannello di controllo lampeggia la spia di
avvertenza da surriscaldamento.
Per un utilizzo sicuro
• Il pacco batteria è stato ideato per essere installato tramite una procedura a due fasi per motivi di sicurezza.
Prima dell'uso, verificare che il pacco batteria sia inserito correttamente nel corpo principale.
• Quando il pacco batteria non è ben inserito, la spia avvertenza surriscaldamento e la spia avvertenza batteria
scarica lampeggiano e l'apparecchio non fa ruotare la punta come di consueto per avvertire l'utente che
l'utensile non sta funzionando in modo sicuro anche se l'interruttore è bloccato. Inserire il pacco batteria
nell'alloggiamento dell'utensile fino alla scomparsa dell'etichetta rossa.
Zorg ervoor het accudeksel te gebruiken
• Wanneer de accu niet wordt gebruikt, de accu op een zodanige manier bewaren dat vreemde bestanddelen
zoals stof en water, enz. de aansluitingen niet kunnen verontreinigen.
• Kijk bij het laden van de accu of de aansluitingen op de acculader vrij zijn van vreemde bestanddelen zoals
stof en water, enz. Reinig de aansluitingen als u vreemde bestanddelen op de aansluitingen aantreft.
De levensduur van de accu-aansluitingen kan tijdens gebruik nadelig beïnvloed worden door vreemde
bestanddelen zoals stof en water, enz.
OPGELET: Let bij het gebruik van het gereedschap op deze wijze op het volgende om de motor en de accu
te beschermen.
• Als de motor of de accu oververhit raakt, wordt de beveiligingsfunctie geactiveerd en zal de motor of de accu
stoppen met werken. Het oververhittingwaarschuwingslampje op het bedieningspaneel brandt of knippert
wanneer deze beveiligingsfunctie is geactiveerd.
Voor een veilig gebruik
• Het aanbrengen van de accu moet om veiligheidsredenen in twee stappen worden uitgevoerd. Zorg dat de
accu vóór gebruik goed op het gereedschap is bevestigd.
• Als de accuset niet goed is bevestigd, gaan het oververhitting-waarschuwingslampje (accu/motor) en
het waarschuwingslampje voor lage accuspanning knipperen en draait de bit niet op het apparaat, zoals
gebruikelijk. Dit is een waarschuwing dat het apparaat niet op veilige wijze kan worden gebruikt, zelfs niet als
een schakelaar wordt bediend. Plaats de accu in het gereedschap totdat het rode label verdwijnt.
I
NL
Page 7
- 7 -
Asegúrese de utilizar la cubierta de la caja de batería
• Cuando no utilice la caja de batería, guarde la batería de tal forma que las materias extrañas tales como polvo
y agua, etc. ensucien los terminales. Asegúrese de colocar la cubierta de la caja de batería de tal forma de
proteger los terminales de la batería.
• Cuando cargue la caja de batería, confirme que los terminales en el cargador de batería estén libres de
materias extrañas tales como polvo y agua, etc. Limpie los terminales antes de cargar la caja de batería si hay
materias extrañas en los terminales.
La vida de los terminales de la caja de batería puede verse afectada por materias extrañas tales como polo y
agua, etc. durante su funcionamiento.
PRECAUCIÓN: Para proteger el motor o la batería, asegúrese de observar lo siguiente cuando efectúe
esta operación.
• Si el motor o la batería se calienta, se activará la función de protección y el motor o la batería dejará de
funcionar. La lámpara de advertencia de sobrecalentamiento en el panel de control se ilumina o destella
cuando esta característica está activada.
Para un uso más seguro
• La batería está diseñada para instalarse siguiendo dos pasos por motivos de seguridad.
Compruebe que la batería está instalada correctamente en el cuerpo principal antes de utilizar la herramienta.
• Si la batería no ha quedado bien introducida, la luz de advertencia de sobrecalentamiento y la luz de aviso de
baja carga de batería parpadearán, y la broca no girará del modo habitual para alertar al operario de que la
máquina no funcionará de manera segura si se acciona algún interruptor. Introduzca la batería en el cuerpo de
la herramienta hasta que el indicador rojo desaparezca.
E
Sørg for at anvende batteripakningsdækslet
• Når batteripakningen ikke anvendes, skal batteriet opbevares således, at uvedkommende substanser,
som for eksempel støv og vand etc., ikke kan komme til at forurene terminalerne. Sørg for at sætte
batteripakningsdækslet på for at beskytte batteriterminalerne.
• Når du oplader batteripakningen, skal du bekræfte at terminalerne på batteriopladeren er fri for
uvedkommende substanser, som for eksempel støv og vand etc. Rengør terminalerne inden du oplader
batteripakningen, hvis uvedkommende substanser observeres på terminalerne.
Levetiden for batteripakningens terminaler kan påvirkes af uvedkommende substanser, som for eksempel støv
og vand etc., under brugen.
FORSIGTIG: For at beskytte motoren og batteriet, skal man være opmærksom på følgende, når denne
operation udføres.
• Hvis motoren eller batteriet bliver varme, vil beskyttelseskredsløbet blive aktiveret og motoren eller batteriet vil
holde op med at fungere. Advarselslampen til overophedning på kontrolpanelet lyser eller blinker, når denne
egenskab er aktiveret.
For sikker brug
• Batteripakken er beregnet til at blive installeret ved at følge en fremgangsmåde med to trin for sikkerheden skyld.
Kontroller, at batteripakningen er korrekt installeret i hoveddelen før brug.
• Når batteripakningen ikke er isat korrekt, vil advarselslampe til overophedning og advarselslampen
batterieffekt lav blinke, og maskinen vil ikke dreje boret som sædvanligt, for at lade os vide at maskinen ikke
arbejder sikkert, selv om der trykkes på kontakter. Indsæt batteripakken i selve værktøjet, indtil den røde
etikette forsvinder.
Se till att använda batteriskyddet
• När batteriet inte används bör det förvaras på ett sätt som gör att främmande ämnen, såsom damm eller
vatten, inte kan hamna på batteripolerna. Var noga med att skydda batteripolerna genom att sätta på
batteriskyddet.
• Kontrollera vid laddning av batteriet att polerna på batteriladdaren är fria från främmande ämnen, såsom
damm eller vatten. Rengör polerna innan batteriet laddas, om något främmande ämne återfinns på polerna.
Batteripolernas livslängd kan vid drift påverkas av främmande ämnen, såsom damm eller vatten.
VIKTIGT: För att skydda motorn och batteriet, skall du komma ihåg följande vid denna användning.
• Om motorn eller batteriet överhettas, aktiveras skyddsfunktionen och då slutar motorn eller batteriet att
fungera. Varningslampan för överhettning på kontrollpanelen lyser eller blinkar när denna funktion har
aktiverats.
För säker användning
• Batteriet ska monteras genom vidta två säkerhetsåtgärder.
Kontrollera att batteriet är ordentligt monterat på verktyget före användning.
• När batteriet inte är ordentligt monterat kommer varningslamporna för överhettning och svagt batteri att blinka
och borrspetsen roterar inte vilket talar om att maskinen inte är säker även om en brytare aktiveras. För in
batteriet i verktyget tills du inte längre kan se den röda dekalen.
DK
S
Page 8
- 8 -
Ikke glem å bruke batteripakkedekselet
• Når batteripakken ikke er i bruk, legg batteriet på et sted der fremmedlegemer så som støv eller vann ikke
forurenser batteripolene. Ikke glem å bruke batteripakkedekselet for å beskytte batteripolene.
• Ved oppladning av batteripakken, kontroller at polene på batteriladeren er fri for fremmedlegemer så som støv
eller vann. Rens polene før du lader opp batteripakken hvis du finner fremmedlegemer på polene.
Batteripakkepolenes levetid kan bli påvirket av fremmedlegemer så som støv eller vann mens de er i bruk.
FORSIKTIG: For å beskytte motoren eller batteriet, pass på følgende når dette arbeidet utføres.
• Hvis motoren eller batteriet blir opphetet vil beskyttelsesfunksjonen tre i funksjon og motoren eller batteriet
slutter å virke. Varsellampen for overoppheting på kontrollpanelet vil lyse eller blinke når denne funksjonen er
aktiv.
For trygg og sikker bruk
• Batteripakken skal installers i henhold til en to-trinns sikkerhetsforanstaltning.
Sørge for at batteripakken er korrekt installert i verktøyet før bruk.
• Når batteripakken ikke er satt inn korrekt, lyser varsellampen for overoppheting (motor/batteri). Drillen roterer
ikke bit-en som normalt og gjør dette for å indikere at drillen ikke fungerer på trygt og sikkert vis.
Sett inn batteripakken i verktøyet inntil den røde etiketten forsvinner.
N
Käytä aina akkukantta
atsiuM .äimittiil aakil tävie .enj isev ,ylöp netuk teenia taareiv ätte ,niin nööliäs ukka enap ,ätetyäk ie aukka nuK •
panna akkukansi paikalleen suojaamaan akkuliittimiä.
soJ .ättev iat äylöp netuk atienia atiareiv elo ie ässimittiil nirutalukka ätte ,atsimrav ,naatadal ukka nuK •
liittimistä löytyy vieraita aineita, puhdista liittimet ennen akun lataamista.
Akkuliittimissä käytön aikana olevat vieraat aineet kuten pöly ja vesi saattavat heikentää akun käyttöikää.
TÄRKEÄ HUOMAUTUS: Moottorin tai akun suojaamiseksi ota huomion seuraavat seikat, kun suoritat tätä
toimenpidettä.
.atsamimiot aakkal ukka iat irottoom aj yytsinnyäk otnimiotajous ,eenemuuk ukka iat irottoom soJ •
Säätöpaneelin ylikuumenemisen varoitusvalo palaa tai vilkkuu, kun tämä toiminto on käynnissä.
Turvallisen käytön takaamiseksi
.neekläj neetipnemiot naveksok attuusillavrut nedhak iskavattennesa utletinnuus no ukkA •
Varmista ennen käyttöä, että akku on kiinnitetty kunnolla perusrunkoon.
uppmalsutiorav neettinnäjukka nesiahla aj uppmalsutiorav nesimenemuukily ,allonnuk ätetinniik ie aukka soJ •
vilkkuvat ja kone ei pyöritä kärkeä tavalliseen tapaan osoituksena siitä, että koneen toiminta ei ole turvallista,
vaikka kytkin katkaistaisiin.
Työnnä akku työkalun runkoon niin, että punainen merkki katoaa näkyvistä.
SF
Page 9

- 9 -
Original instructions: English
Translation of the original instructions:
Other languages
I. INTENDED USE
Thank you for purchasing the
Panasonic Jigsaw. This jigsaw can be
used with Panasonic rechargeable
batteries to provide excellent cutting
performance. The jigsaw is for cutting
metal, wood, and drywall only.
Read the “Safety Instructions” booklet
and the following before using.
II. ADDITIONAL
SAFETY RULES
1)
Hold tool by insulated gripping
surfaces when performing an
operation where the cutting tool
may contact hidden wiring.
Contact with a “live” wire will also
make exposed metal parts of the
tool “live” and shock the operator.
2)
Use clamps or another practical
way to secure and support the
workpiece to a stable platform.
Holding the work by hand or against
your body leaves it unstable and
may lead to loss of control.
3)
Keep hands away from cutting
area and blade. Keep your
insulated gripping surfaces.
If
both hands are holding the tool, they
cannot be cut by the blade.
4)
Never hold piece being cut in
your hands or across your leg.
It
is important to support the work
properly to minimize body exposure
or loss of control.
5)
Be aware that this tool is always
in an operating condition, since it
does not have to be plugged into
an electrical outlet.
6)
Always use safety goggles or
glasses with side shields.
Ordinary eye or sun glasses are
NOT safety glasses.
7)
When this tool is used for
woodworking in confined areas
(e.g. indoors), wear dust mask.
8)
Avoid cutting nails. Inspect
workpiece for any nails and
remove them before operation.
9)
Do not cut oversized workpiece.
10)
Check for the proper clearance
beyond the workpiece before
cutting so that the blade will not
strike the floor, workbench, etc.
11)
Hold the tool firmly.
12)
Make sure the blade is not
contacting the workpiece before
the switch is turned on.
13)
Keep hands away from moving
parts.
14)
Do not touch the blade or
workpiece immediately after
operation; they may be extremely
hot and could burn your skin.
15)
Never swing tool.
16)
Do not use blades which are
deformed or cracked.
17)
Do not use blades which do not
comply with the characteristics
specified in these instructions.
Page 10
- 10 -
18)
Remove the battery pack from the
tool body before replacement of
the blade, making adjustments,
or other maintenance work.
19)
Wear ear protectors when using
the tool for extended periods.
Symbol Meaning
V Volts
Direct current
n0
No load speed
…min
-1
Revolutions or
reciprocations per minutes
Ah
Electrical capacity of
battery pack
To reduce the risk of
injury, user must read
and understand
instruction manual.
For indoor use only.
WARNING:
• Do not use other than the
Panasonic battery packs that are
designed for use with this
rechargeable tool.
• Panasonic is not responsible for
any damage or accident caused
by the use of the recycled battery
pack and the counterfeit battery
pack.
• Do not dispose of the battery pack
in a fire, or expose it to excessive
heat.
• Do not drive the likes of nails into
the battery pack, subject it to
shocks, dismantle it, or attempt to
modify it.
• Do not allow metal objects to
touch the batter
y
pack terminals.
• Do not carry or store the battery
pack in the same container as
nails or similar metal ob
j
ects.
• Do not charge the battery pack in
a high-temperature location, such
as next to a fire or in direct
sunlight. Otherwise, the battery
may overheat, catch fire, or
explode.
• Never use other than the
dedicated charger to charge the
battery pack. Otherwise, the
battery may leak, overheat, or
explode.
• After removing the battery pack
from the tool or the charger, always
reattach the pack cover. Otherwise,
the battery contacts could be
shorted, leadin
g
to a risk of fire.
• When the Battery Pack Has
Deteriorated, Replace It with a
New One. Continued use of a
damaged battery pack may result
in heat generation, ignition or
battery rupture.
III. ASSEMBLY
WARNING:
To reduce the risk of injury, always
remove battery pack before changing
the blade.
Inspection before use
• Has the correct jigsaw blade been
attached for the object to be cut?
• Has the correct stem shape and
thickness of the blade been
mounted?
• Check if the blade is fixed securely?
• Check if the blade is cracked or broken.
• Check that there are no foreign objects
in the object to be cut.
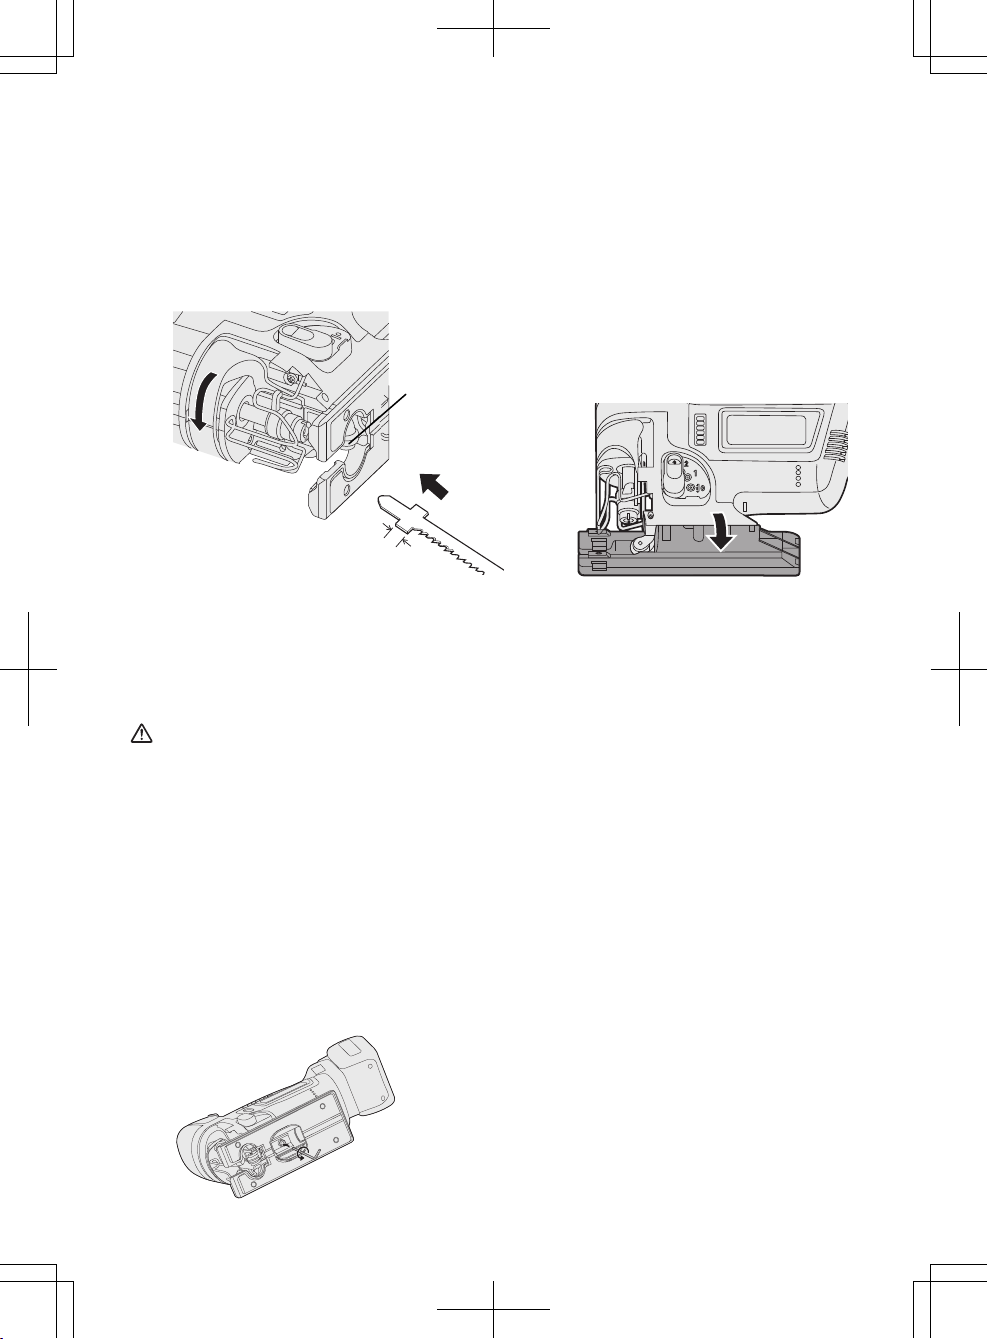
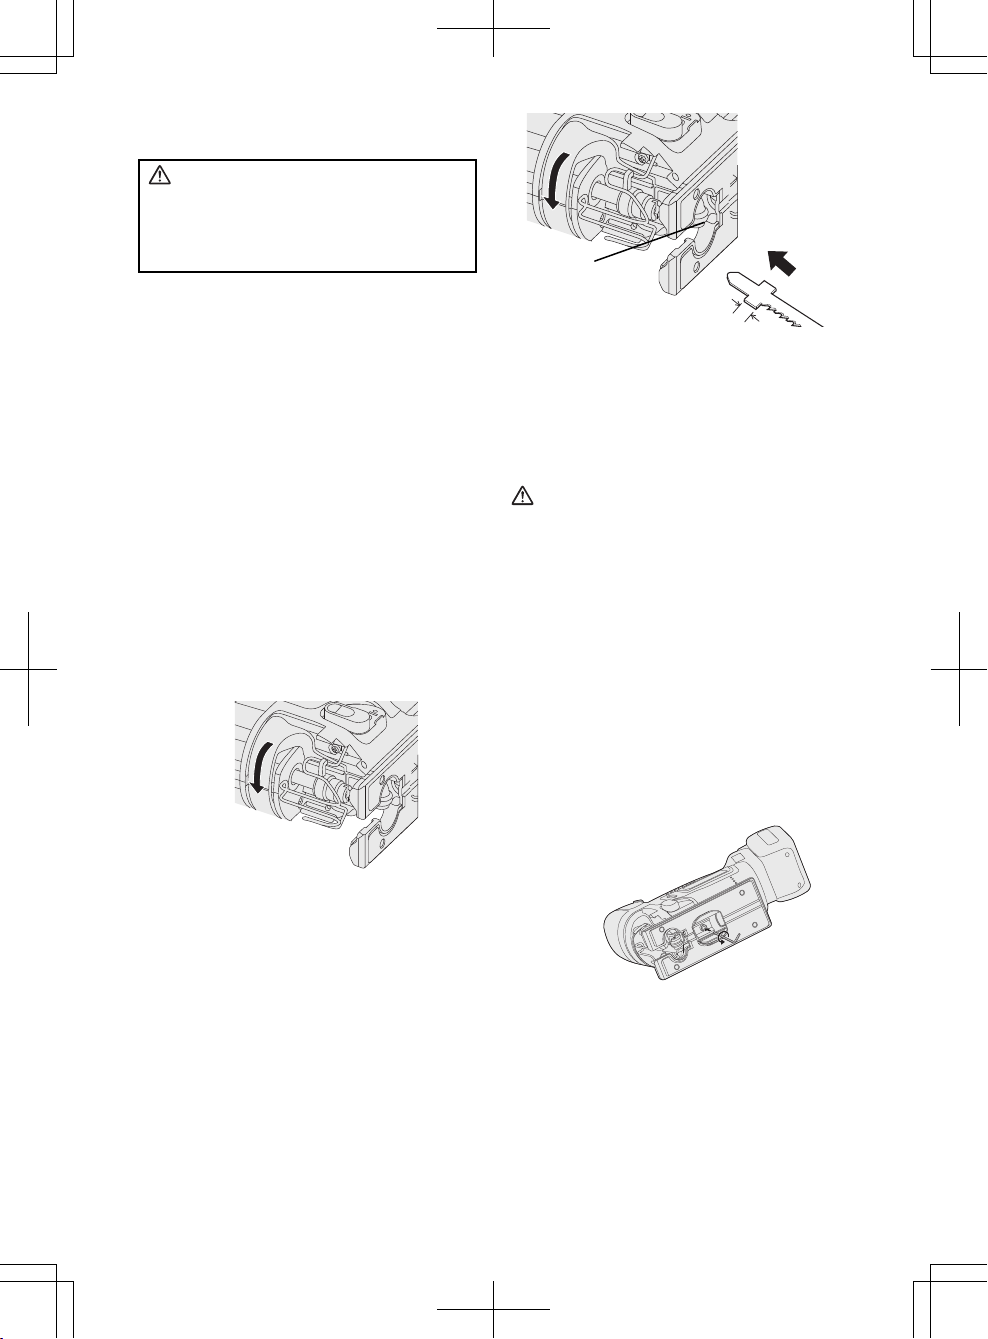
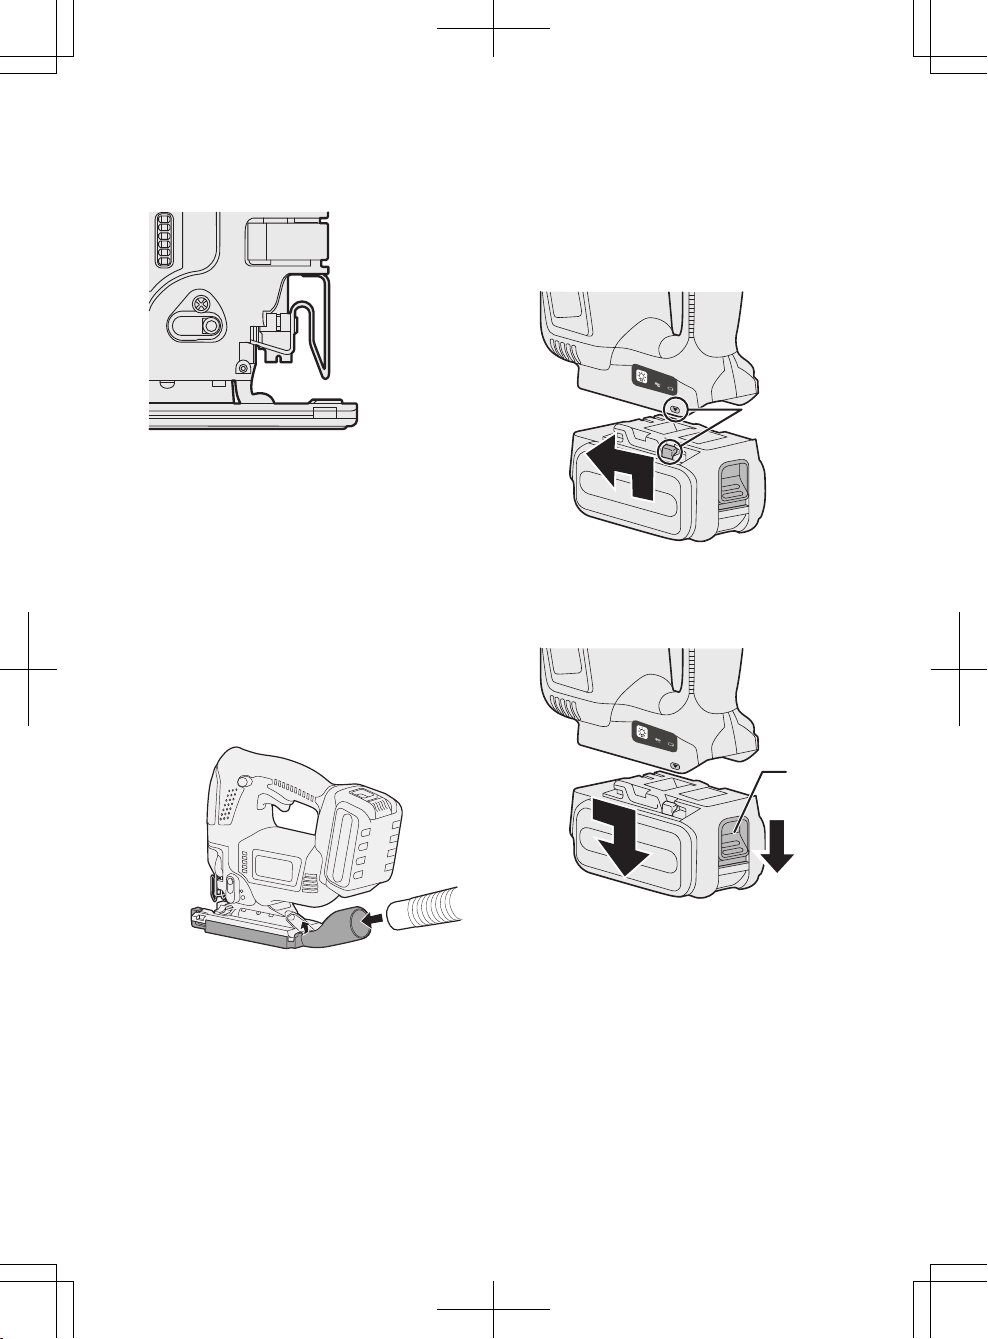
Installing and removing the blade
Installation
1. The dust cover is removed.
2. Wipe away any cutting dust from the
blade and the blade clamp bracket.
3. Pull the blade Attach/Remove lever.
Page 11
- 11 -
4. • Insert the blade into the blade
clamp bracket and set the back of
the blade along the roller guide so
that the back of the jigsaw blade
slides along the roller guide.
• Make sure the sten of blade is
deep enough inserted until the
blade projection is fixed by blade
clamp.
5. Release the blade Attach/Remove
lever.
• Check that the back of blade is along
the roller guide and set straight.
WARNING:
If you do not insert the saw blade
deep enough, the saw blade may be
ejected unexpectedly during
operation. This can be extremely
dangerous.
Removal
1. Pull the blade Attach/Remove lever.
2. Pull out the blade.
Adjusting the base
1. Use the hex wrench to loosen the
base fixing screw.
2. Move the base along the base
adjustment hole to set its position.
(See the diagram at right.)
• The base can be adjusted to between
0° and 45° sideways and the
forward/back position can also be
adjusted. If tilting the base sideways,
remove the dust cover first.
• Refer to the bevel index to determine
the angle.
• Rip fence fixing screw should be
located on the opposite side tool is
beveled.
3. Use the hex wrench to tighten the
base fixing screw.
Roller guide
Page 12
- 12 -
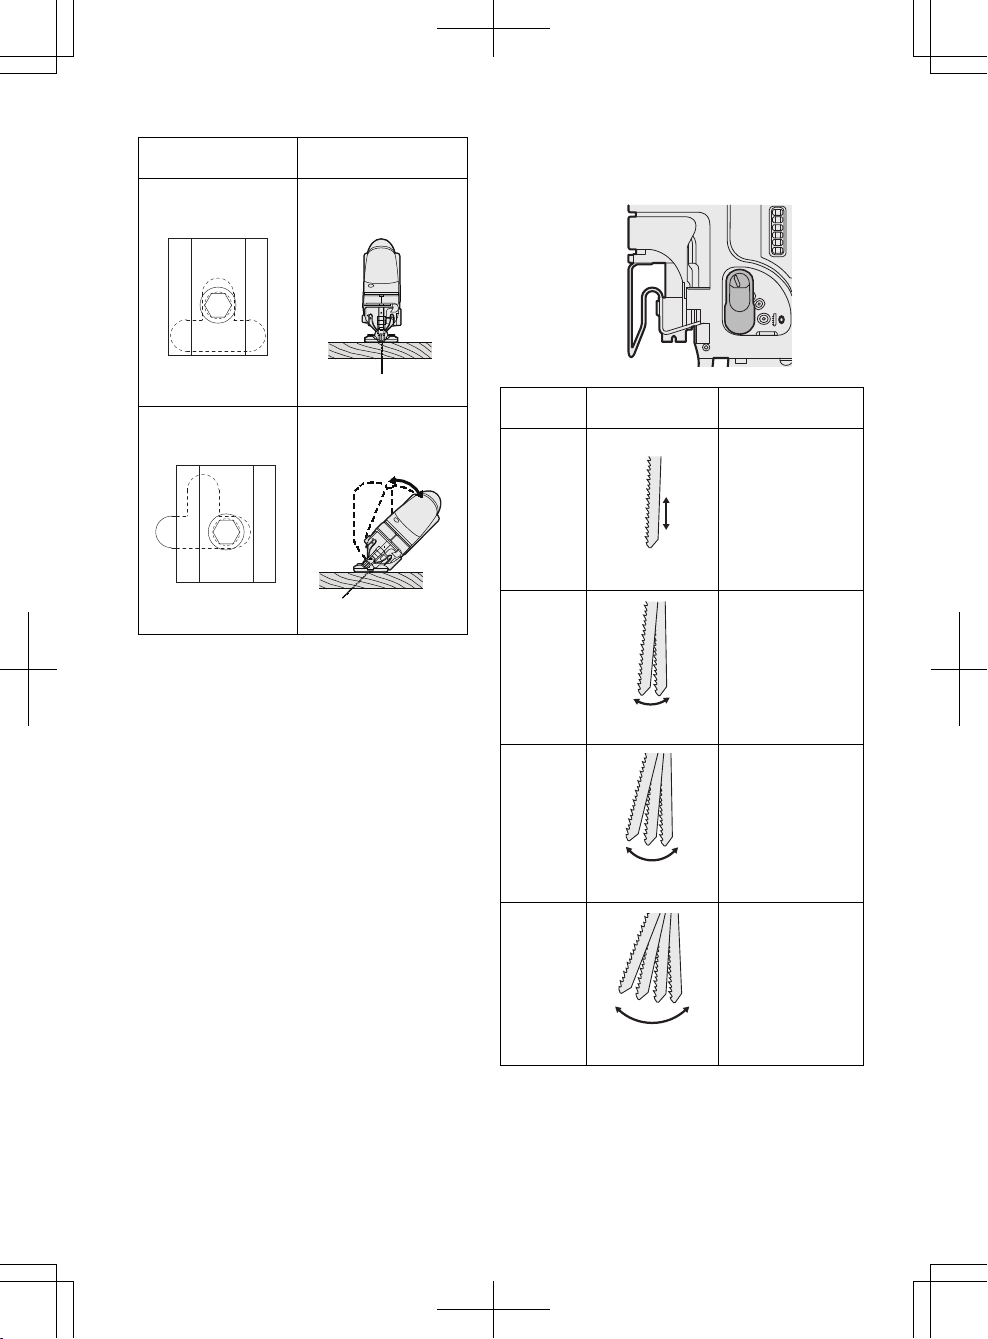
Position of base and purpose of use
Base adjustment
hole position
Purpose of use
Normal right-angled
cutting
Cutting at an angle
between 0° and 45°
NOTE:
This is only a rough guide. The
actual angle of the cut will be
affected by factors such as the way
the tool is held against the surface.
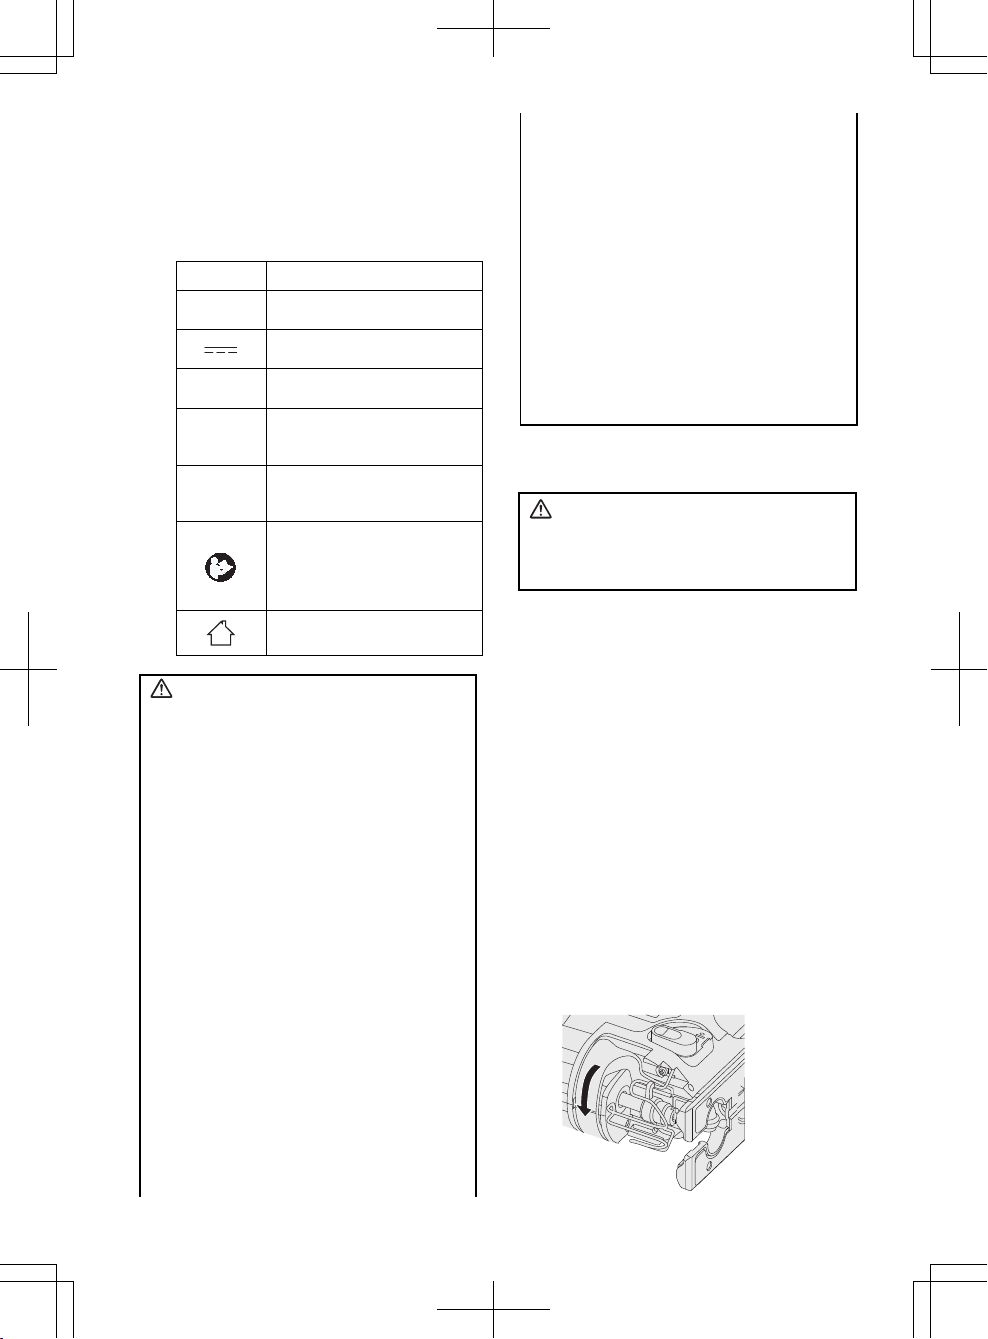
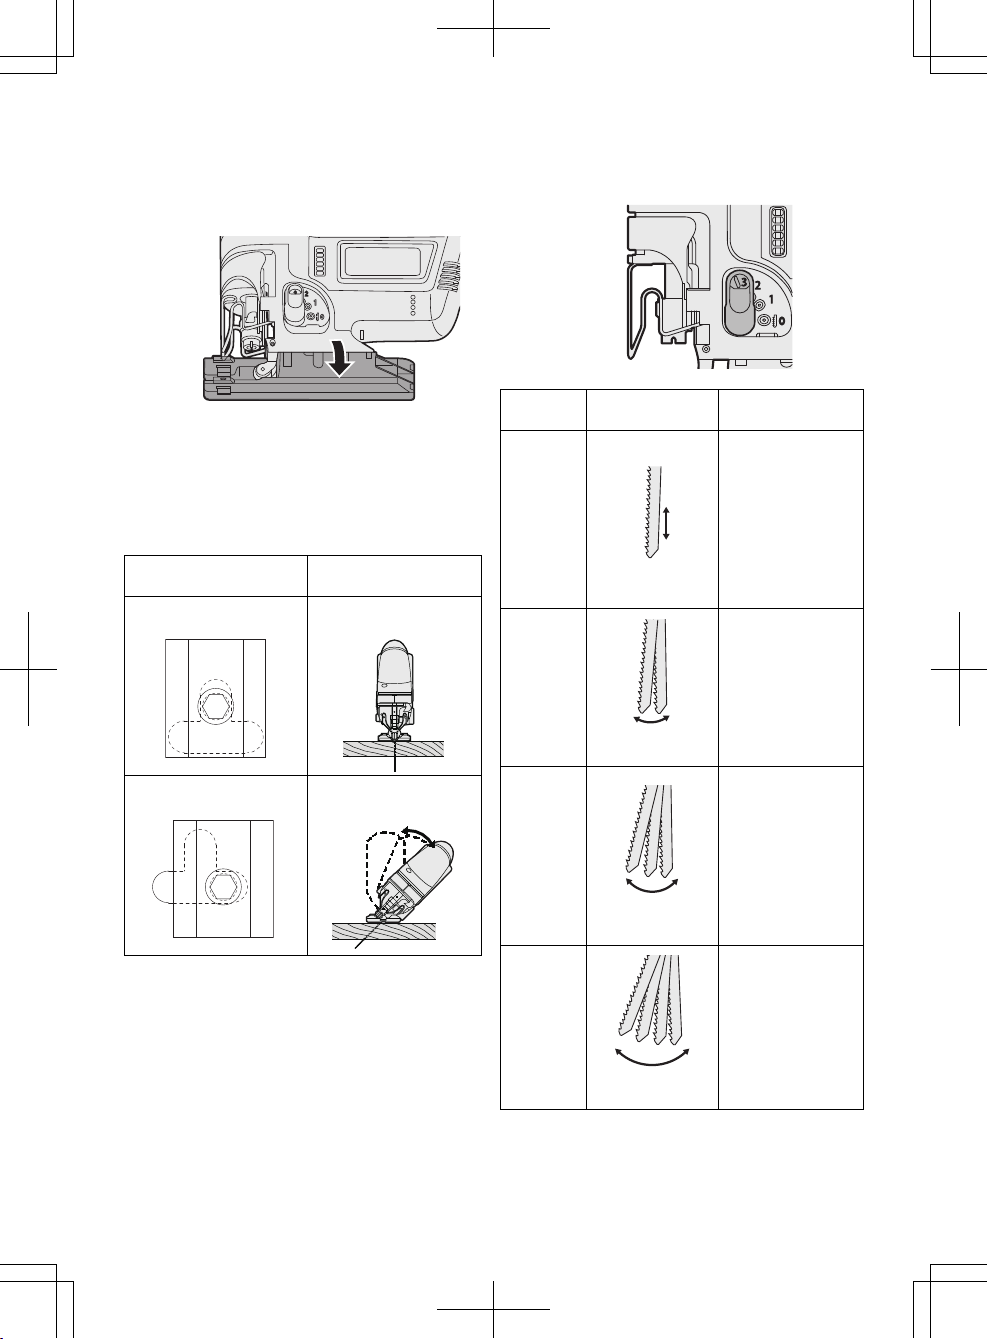
Adjusting the orbital stroke mode
• Adjust the orbital stroke mode to the
object to be cut.
1
2
3
Lever
position
Blade
movement
Main
applications
0
Vertical only
• Cutting hard
metals such as
steel
• Smooth cutting of
building materials
and plywood
boards
• Cutting around
small curves
1
Low orbital stroke
mode
• Cutting softer
metals such as
aluminum and
other non-ferrous
metals
• Cutting hardwood,
plywood boards
and plastics
2
Medium orbital
stroke mode
• Cutting fairly soft
materials
• Cutting wood and
composite boards
• High-speed
cutting of
aluminum and soft
steel
3
High orbital
stroke mode
• Cutting soft
materials
• High-speed
cutting of
materials such as
wood, composite
boards and
plastics
• If you would like to produce a cleaner
finish, set the orbital stroke mode to
a lower level.
Page 13
- 13 -
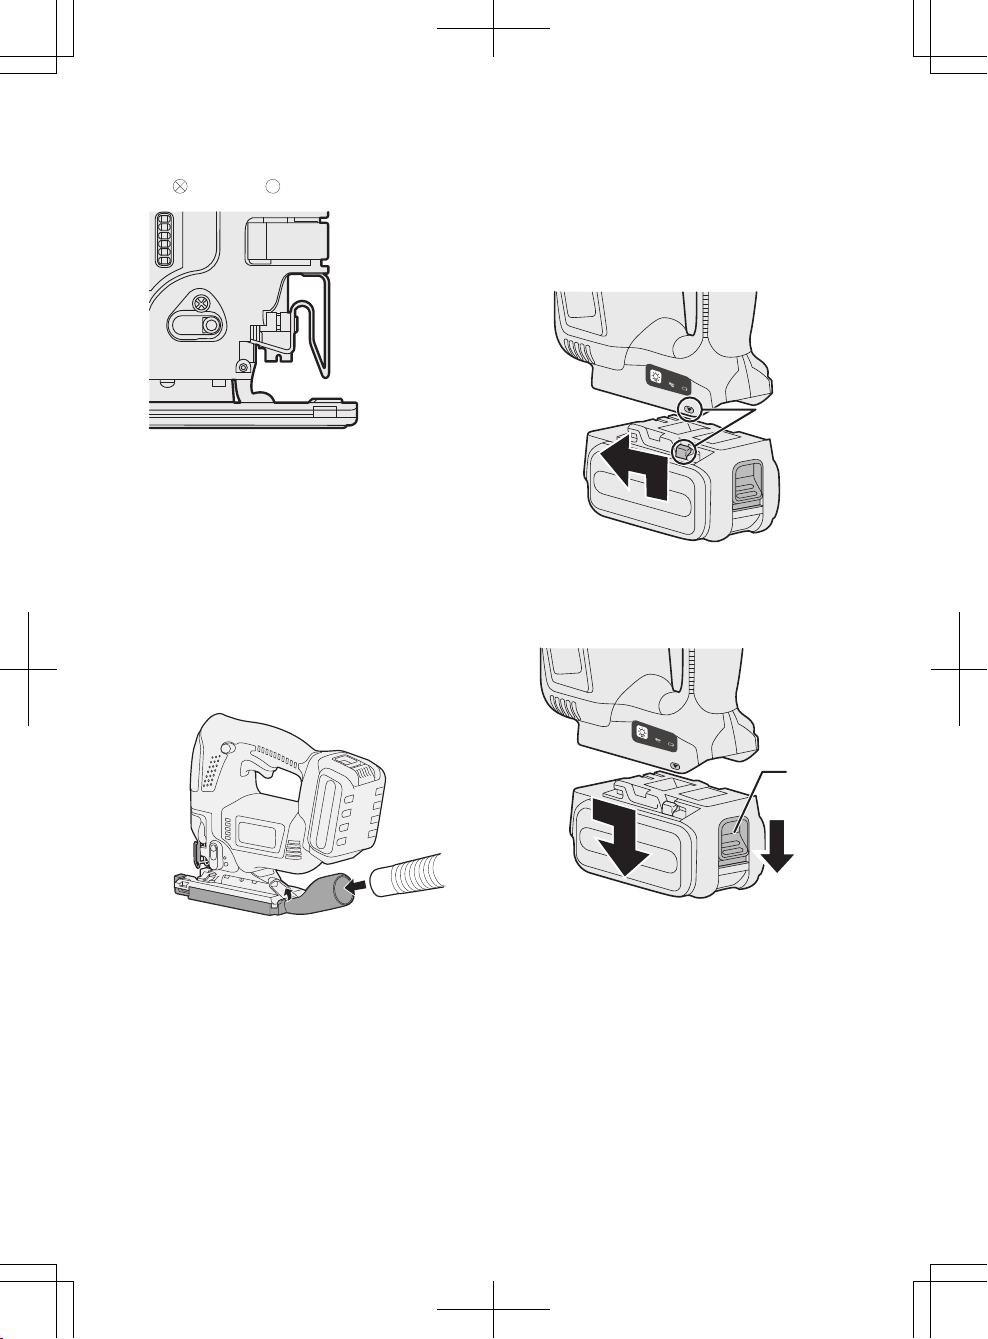
Blowing lever
Select dust blow mode.
: OFF : ON
Dust adapter for vacuum cleaner
(EY9X016) (Available as an accessory,
not included)
You can use a vacuum cleaner to
collect cutting dust while cutting.
Installation
1. Attach the hook of the dust collection
adapter to the front of the base.
2. Snap the rear to install it.
3. Attach the hose of the vacuum cleaner.
• It is recommended to use a dust adapter
for reducing the risk of damaging the
surface of the object being cut.
Attaching or Removing Battery
Pack
1. To connect the battery pack:
Line up the alignment marks and attach
the battery pack.
• Slide the battery pack until it locks
into position.
2. To remove the battery pack:
Pull the button from the front to
release the battery pack.
Button
A
lignment
marks
Page 14
- 14 -
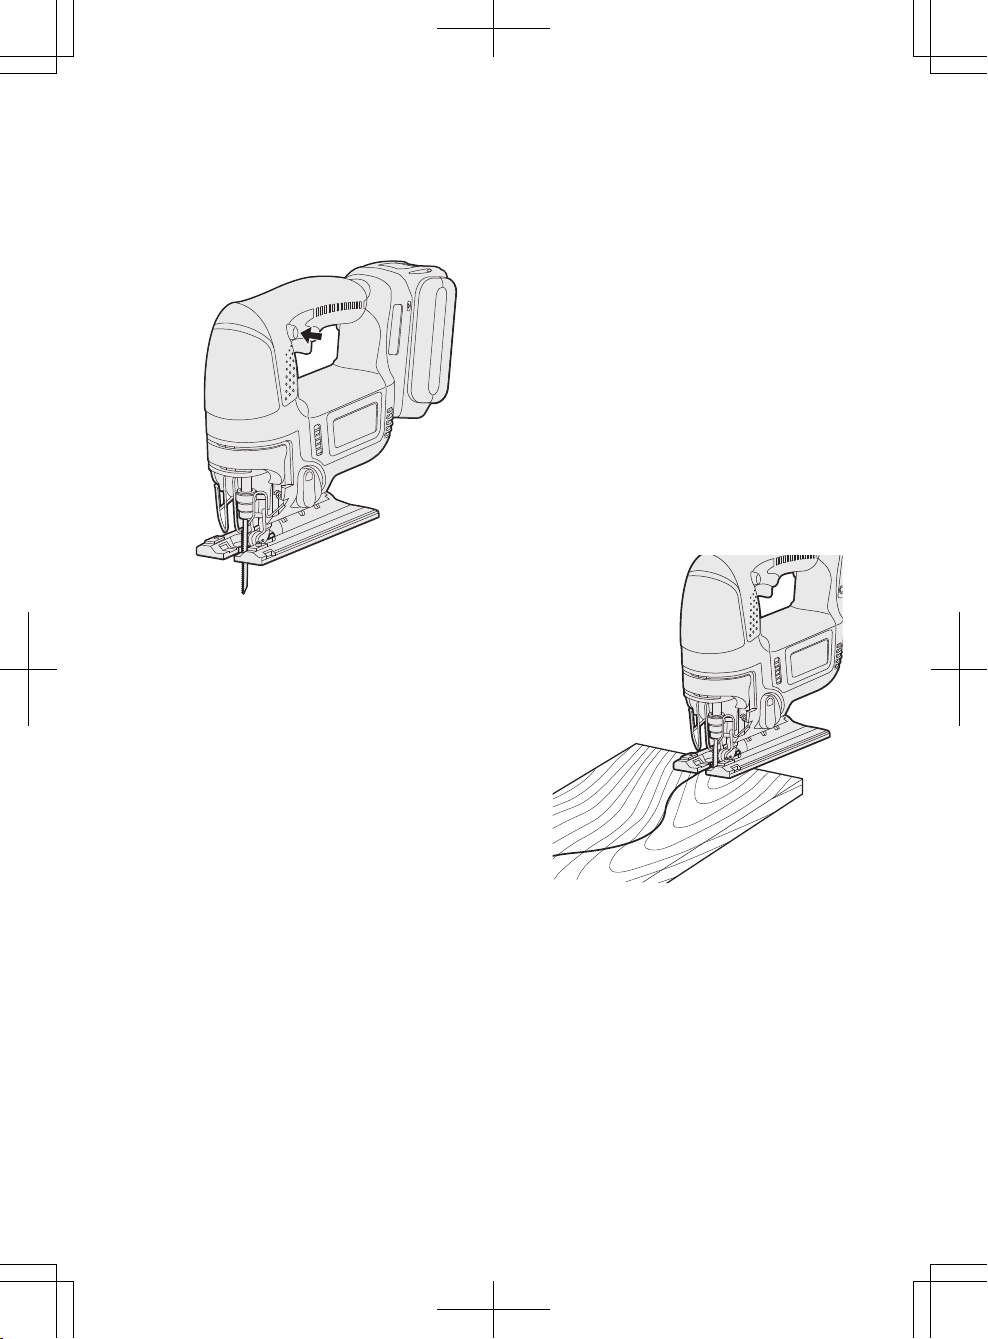
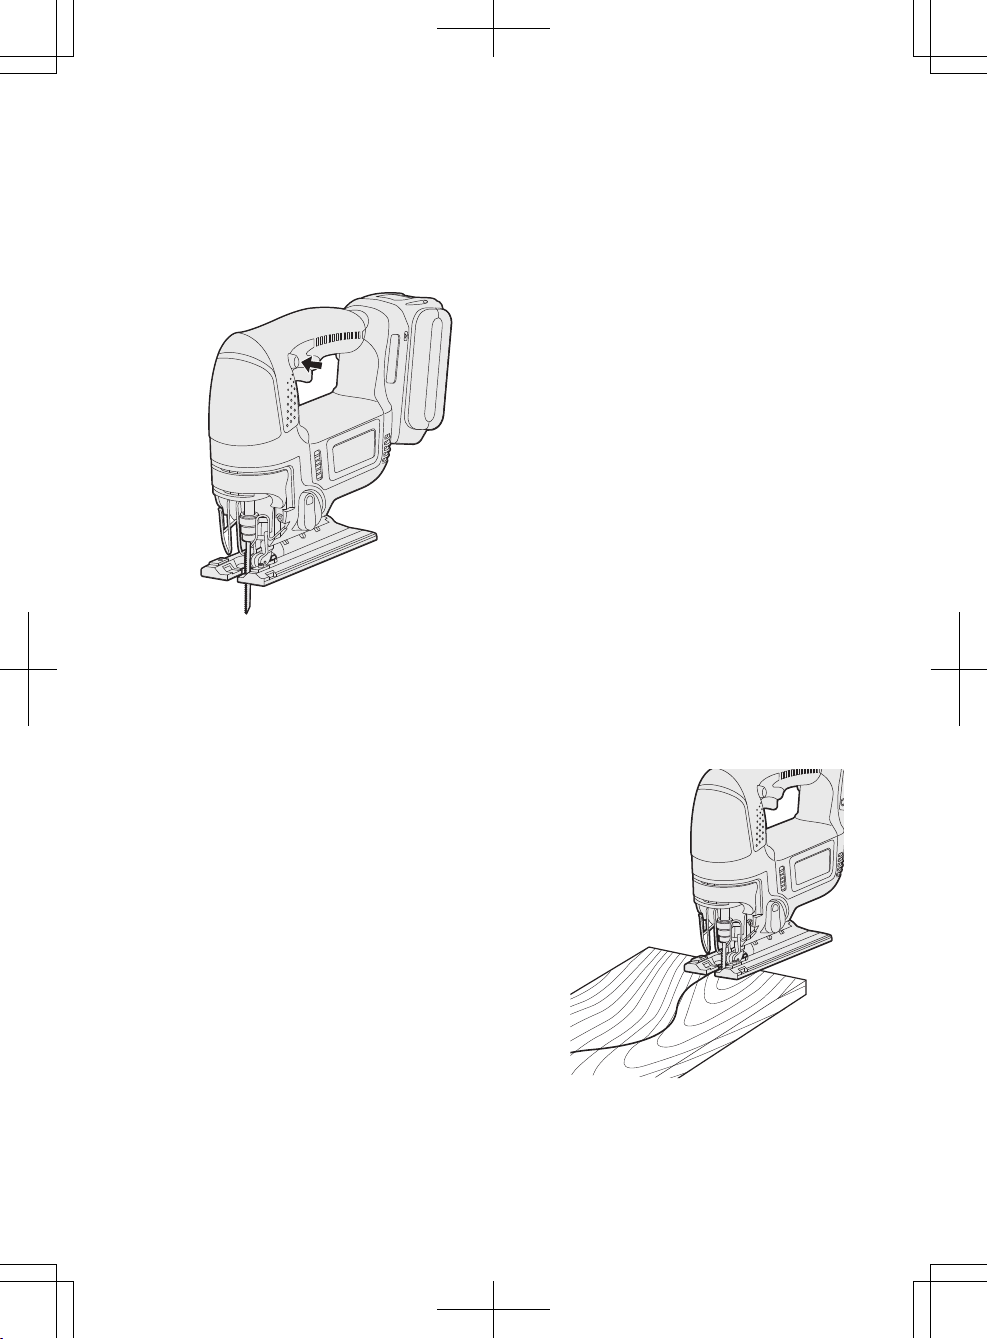
IV. OPERATION
1. Push the switch lock lever down, pull
the power switch.
• The speed increases with the amount
of depression of the power switch.
2. Once cutting is finished, release the
power switch.
3. Check that the temperature of the
blade has dropped sufficiently, and
then remove the blade.
CAUTION:
When operating the tool by pulling the
trigger, there may be a momentary lag
before rotation starts. This does not
signal a malfunction.
•This lag occurs as the tool’s circuitry
starts up when the trigger is pulled
for the first time after installing a new
battery pack or after the tool has not
been used for at least 1 minute (or at
least 5 minutes when the LED is on).
Rotation will start without any lag
during second and subsequent
operations.
Cutting
NOTE:
• Check that there are no obstacles to
cut underneath workpiece.
• Check that there are no objects such
as nails in the material to be cut.
If the blade comes into contact with any
such objects during cutting, a strong
reaction force will be generated and
severe injury may occur.
• Do not place your hand on the object
in the direction cutting is to take place.
If this is not observed, there is a risk
of injury.
• Do not touch the jigsaw blade
immediately after cutting.
If this is not observed, burns may occur.
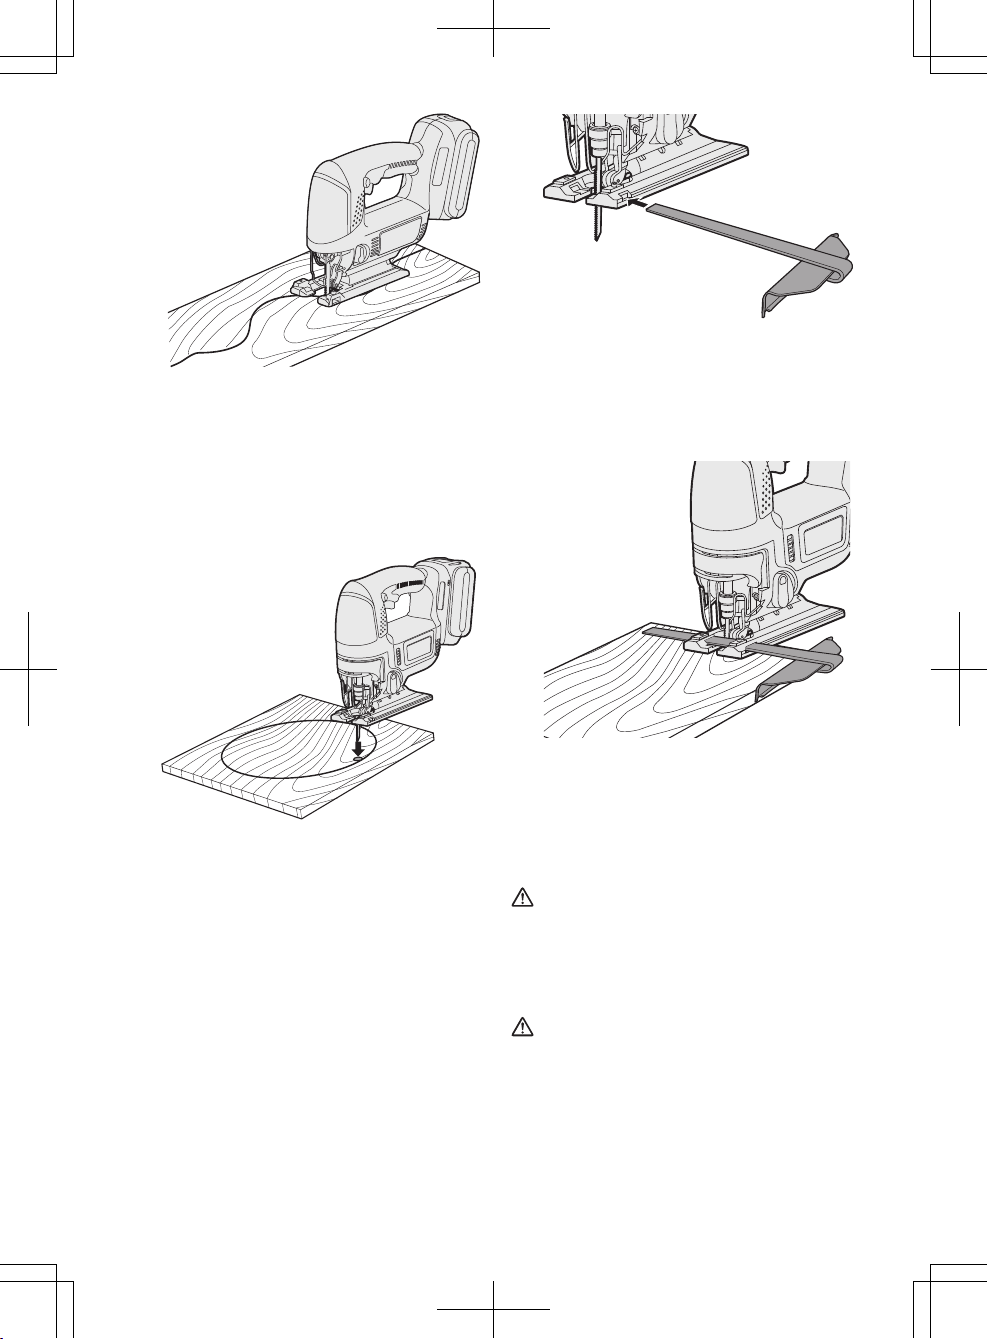
Cutting along marked lines
1. Place the object to be cut onto the
base, and align the blade with the
marked line.
• Do not touch the blade against the
object to be cut before pulling the
power switch.
2. Pull the power switch, wait until the
speed has stabilized, and then place
the base against the object to be cut
and cut along the marked lines.
• When cutting complex shapes such
as shapes with many small curves,
reduce the cutting speed and the
turning speed.
Page 15
- 15 -
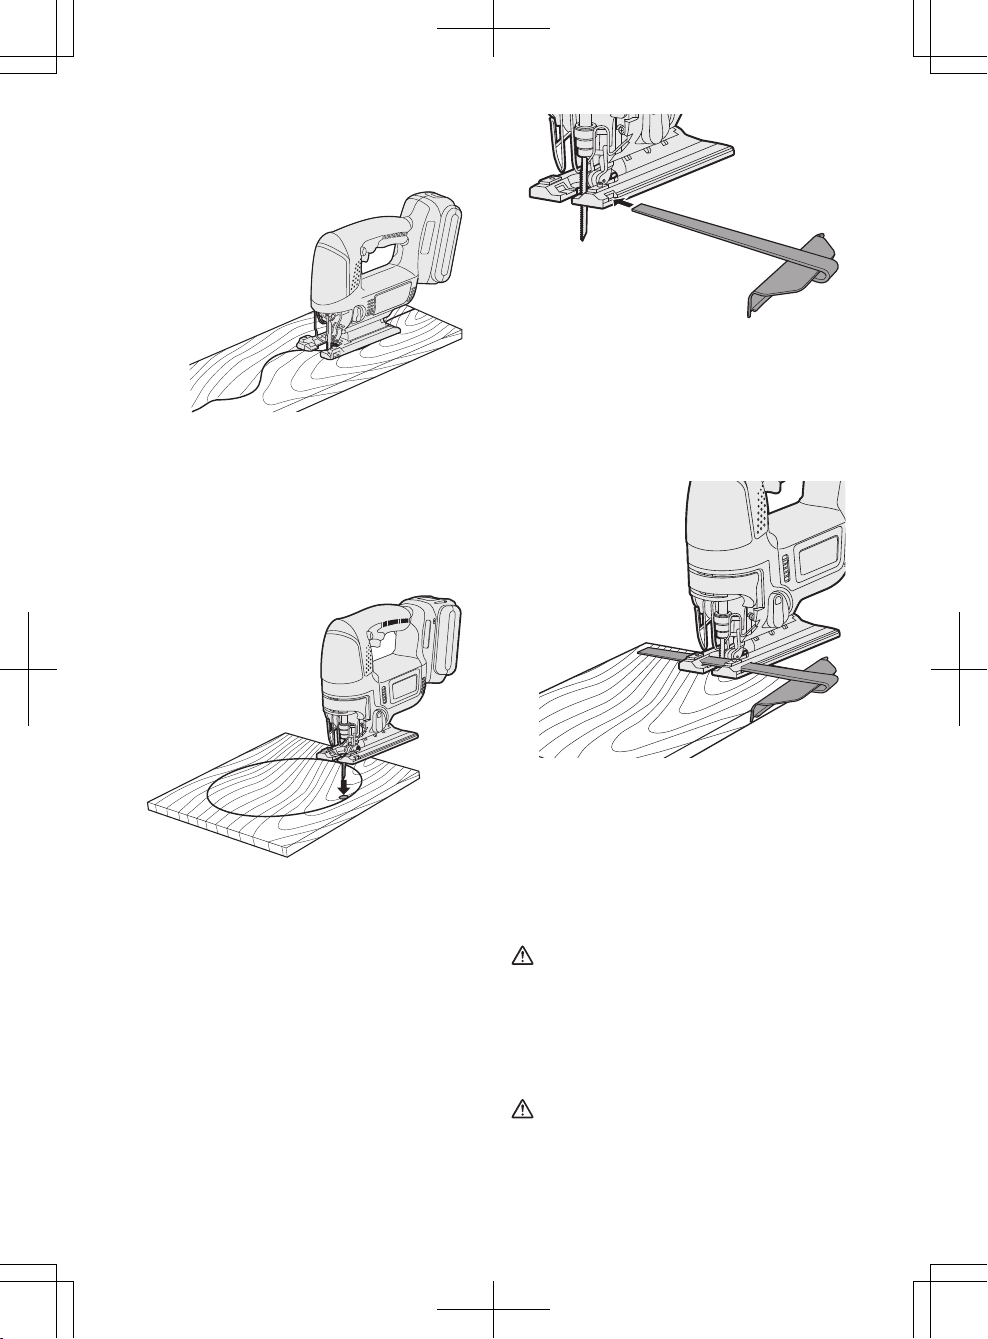
Plunge cutting
1. Make a drill hole in the section to be
plunge cut in order to let the blade
pass through.
2. Insert the blade into a hole without
touching the workpiece, and then
turn on the power switch.
3. Cut along the marked line.
Using a rip fence
A rip fence can be used for cutting
parallel lines and for cutting circles
and arcs.
Installing the rip fence
1. Loosen the rip fence fixing screw.
2.
Pass the rip fence through the mount.
3. Adjust the cutting position and then
tighten the fixing screw.
Cutting at the same width
1. Place the base onto the workpiece
so that the edge of the rip fence
and workpiece are put together.
2. Without letting the blade touch the
workpiece, turn on the power switch.
3. Face the rip fence firmly to the
workpiece to cut parallel line.
WARNING:
Do not inhale any smoke emitted
from the tool or battery pack as it may
be harmful.
CAUTION:
Do not use the tool in a manner that
causes the motor to lock up. Doing so
may damage the tool and battery
pack, resulting in smoke or fire.
Page 16
- 16 -
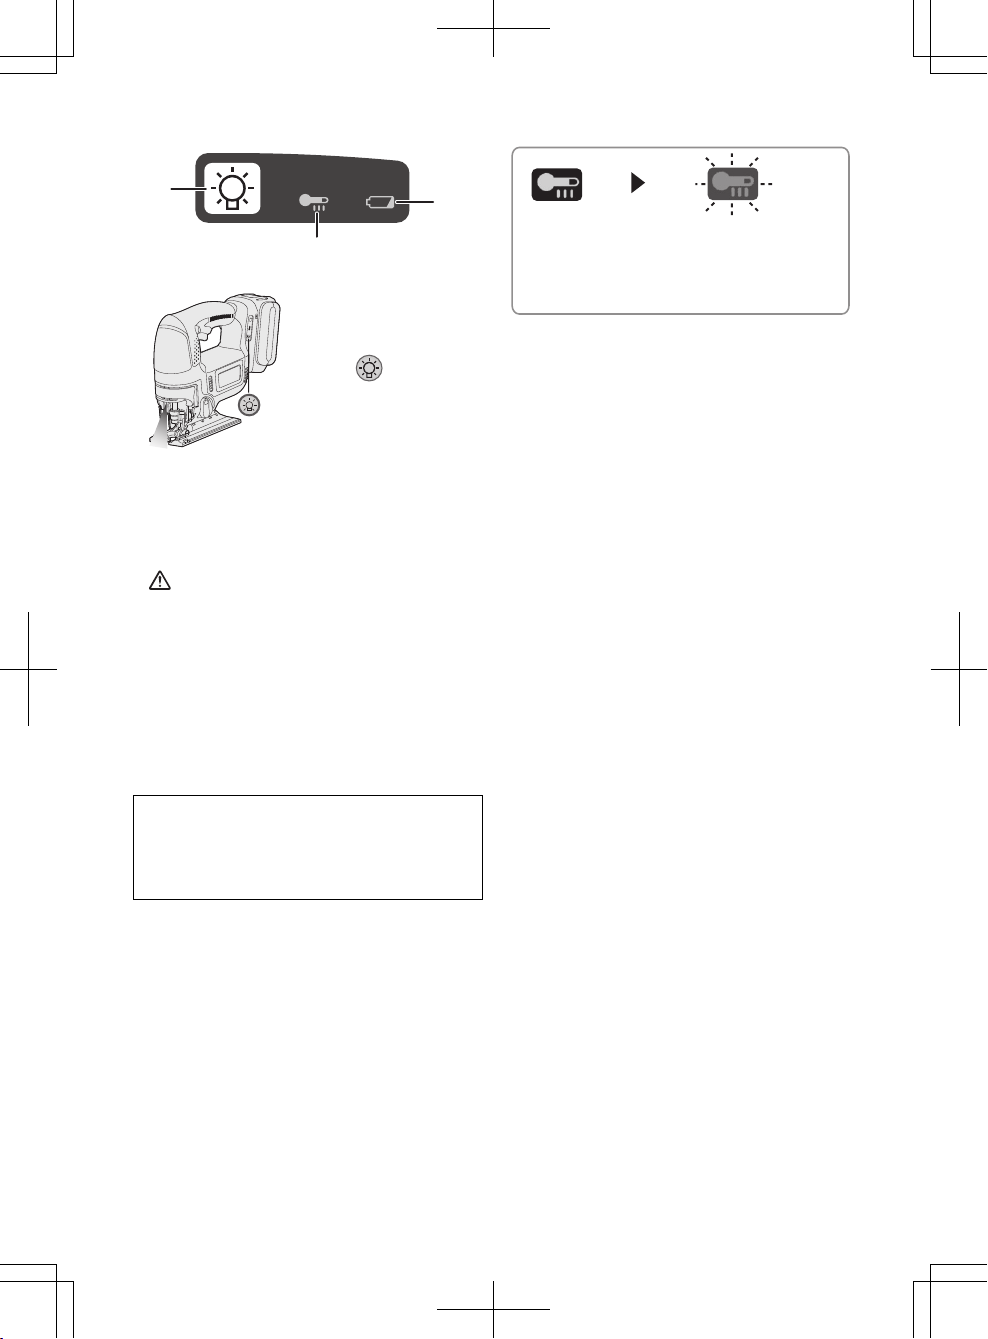
Control Panel
(1)
(3)
(2)
(1) LED light
Before the use of LED
light, always pull the
power switch once.
Press the LED
light button.
The light illuminates
with very low current,
and it does not
adversely affect the
performance of the
driver during use or
its battery capacity.
CAUTION:
• The built-in LED light is designed to
illuminate the small work area
temporarily.
• Do not use it as a substitute for a
regular flashlight, since it does not
have enough brightness.
• LED light turns off when the tool has
not been used for 5 minutes.
Caution : DO NOT STARE INTO BEAM.
Use of controls or adjustments or performance
of procedures other than those specified
herein may result in hazardous radiation
exposure.
(2) Overheat warning lamp
Off
(normal
operation)
Flashing: Overheat
Indicates operation has
been halted due to
battery overheating.
To protect the motor or battery, be
sure to note the following when carrying out this operation.
• If the motor or battery becomes hot,
the protection function will be
activated and the motor or battery will
stop operating. The overheat warning
lamp on the control panel illuminates
or flashes when this feature is active.
• If the overheating protection feature
activates, allow the tool to cool
thoroughly (at least 30 minutes). The
tool is ready for use when the overheat
warning lamp goes out.
• Avoid using the tool in a way that
causes the overheating protection
feature to activate repeatedly.
• If the tool is operated continuously
under high-load conditions or if it is
used in hot-temperature conditions
(such as during summer), the
over-heating protection feature may
activate frequently.
• If the tool is used in cold-temperature
conditions (such as during winter) or if
it is frequently stopped during use, the
overheating protection feature may not
activate.
• The ambient temperature range is
between 0°C (32°F) and 40°C (104°F).
If the battery pack is used when the
battery temperature is below 0°C
(32°F), the tool may fail to function
properly.
• When charging a cool battery pack
(below 0°C (32°F)) in a warm place,
leave the battery pack at the place and
wait for more than one hour to warm up
the battery to the level of the ambient
temperature.
Page 17
- 17 -
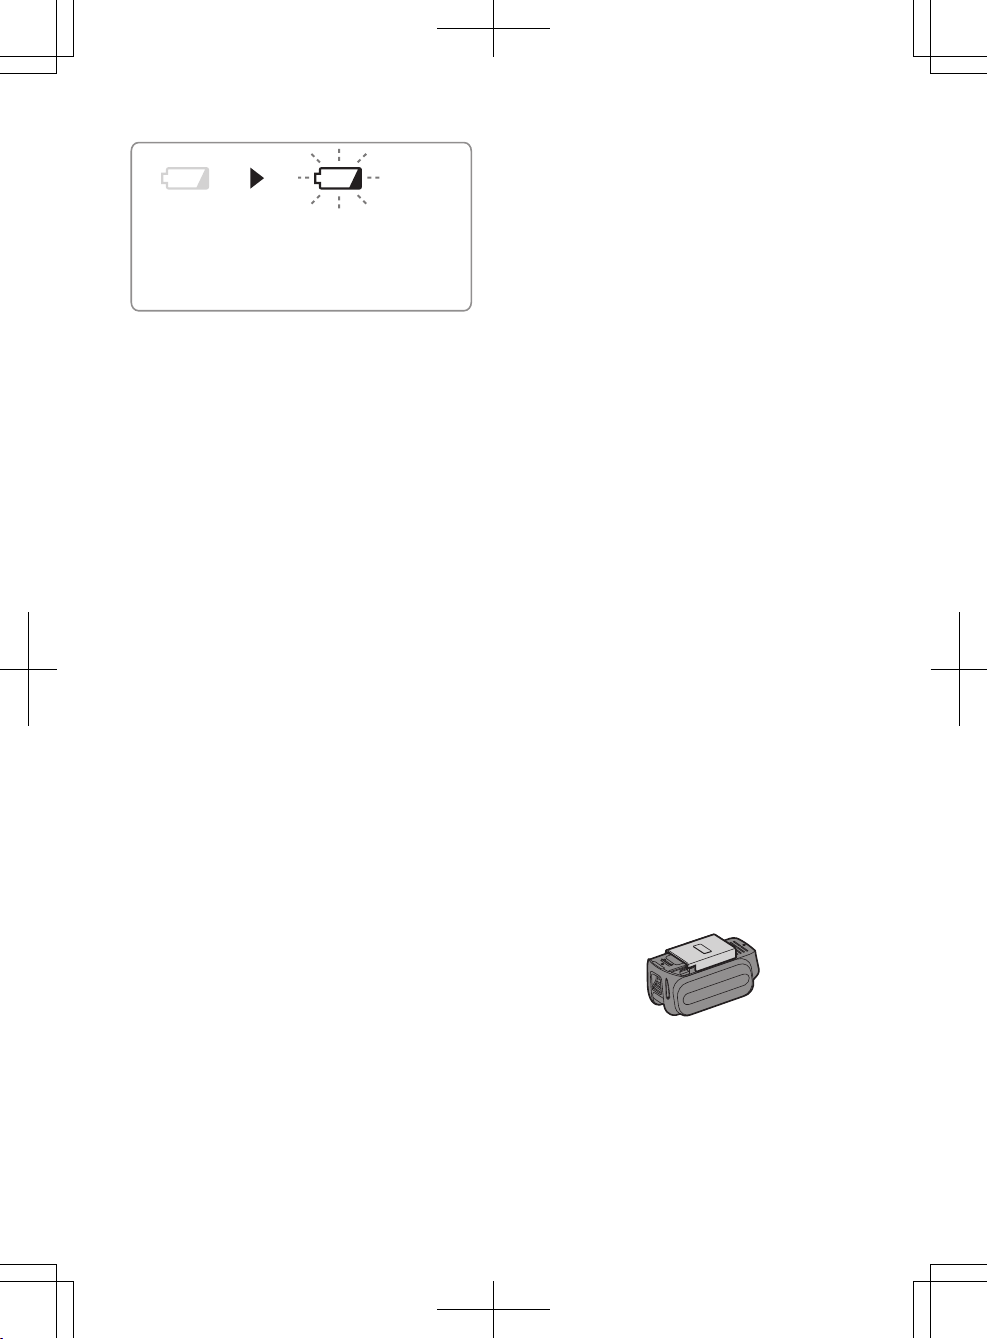
(3) Battery low warning lamp
Excessive (complete) discharging of
lithium ion batteries shortens their
service life dramatically. The tool
includes a battery protection feature
designed to prevent excessive discharging of the battery pack.
• The battery protection feature
activates immediately before the
battery loses its charge, causing the
battery low warning lamp to flash.
• If you notice the battery low warning
lamp flashing, charge the battery
pack immediately.
• If it is started with too little battery
power remaining, the tool may stop
operating without the battery low
warning lamp flashing first. This
indicates that there is too little
battery power remaining to use the
tool, and the battery pack should be
charged before further use.
• If the tool is subject to a sudden load
during use that causes the motor to
lock up, the overdischarge
prevention sensor may be triggered,
and the battery low warning lamp
may flash. The lamp will stop
flashing once you address the
cause of the motor’s locking up and
cycle the trigger.
[Battery Pack]
For Appropriate Use of
Battery pack
Li-ion Battery pack
• For optimum battery life, store the
Li-ion battery pack following use
without charging it.
• When charging the battery pack,
confirm that the terminals on the
battery charger are free of foreign
substances such as dust and water etc.
Clean the terminals before charging
the battery pack if any foreign
substances are found on the terminals.
The life of the battery pack terminals
may be affected by foreign
substances such as dust and water
etc. during operation.
• When battery pack is not in use, keep
it away from other metal objects like:
paper clips, coins, keys, nails, screws,
or other small metal objects that can
make a connection from one terminal
to another.
Shorting the battery terminals together
may cause sparks, burns or a fire.
• When operating the battery pack,
make sure the work place is well
ventilated.
• When the battery pack is removed
from the main body of the tool,
replace the battery pack cover
immediately in order to prevent dust
or dirt from contaminating the battery
terminals and causing a short circuit.
Off
(normal
operation)
Flashing
(No charge)
Battery protection
feature active
Page 18
- 18 -
Battery Pack Life
The rechargeable batteries have a
limited life. If the operation time
becomes extremely short after
recharging, replace the battery pack
with a new one.
Battery Recycling
ATTENTION:
For environmental protection and
recycling of materials, be sure that
it is disposed of at an officially
assigned location, if there is one in
your country.
[Battery Charger]
Charging
Cautions
• If the temperature of the battery pack
falls approximately below −10°C
(14°F), charging will automatically
stop to prevent degradation of the
battery.
• The ambient temperature range is
between 0°C (32°F) and 40°C (104°F).
If the battery pack is used when the
battery temperature is below 0°C (32°F),
the tool may fail to function properly.
• When charging a cool battery pack
(below 0°C (32°F)) in a warm place,
leave the battery pack at the place
and wait for more than one hour to
warm up the battery to the level of the
ambient temperature.
• Cool down the charger when
charging more than two battery packs
consecutively.
• Do not insert your fingers into contact
hole, when holding charger or any
other occasions.
To prevent the risk of fire or
damage to the battery charger.
• Do not use power source from an
engine generator.
• Do not cover vent holes on the
charger and the battery pack.
• Unplug the charger when not in use.
Li-ion Battery Pack
NOTE:
Your battery pack is not fully charged
at the time of purchase. Be sure to
charge the battery before use.
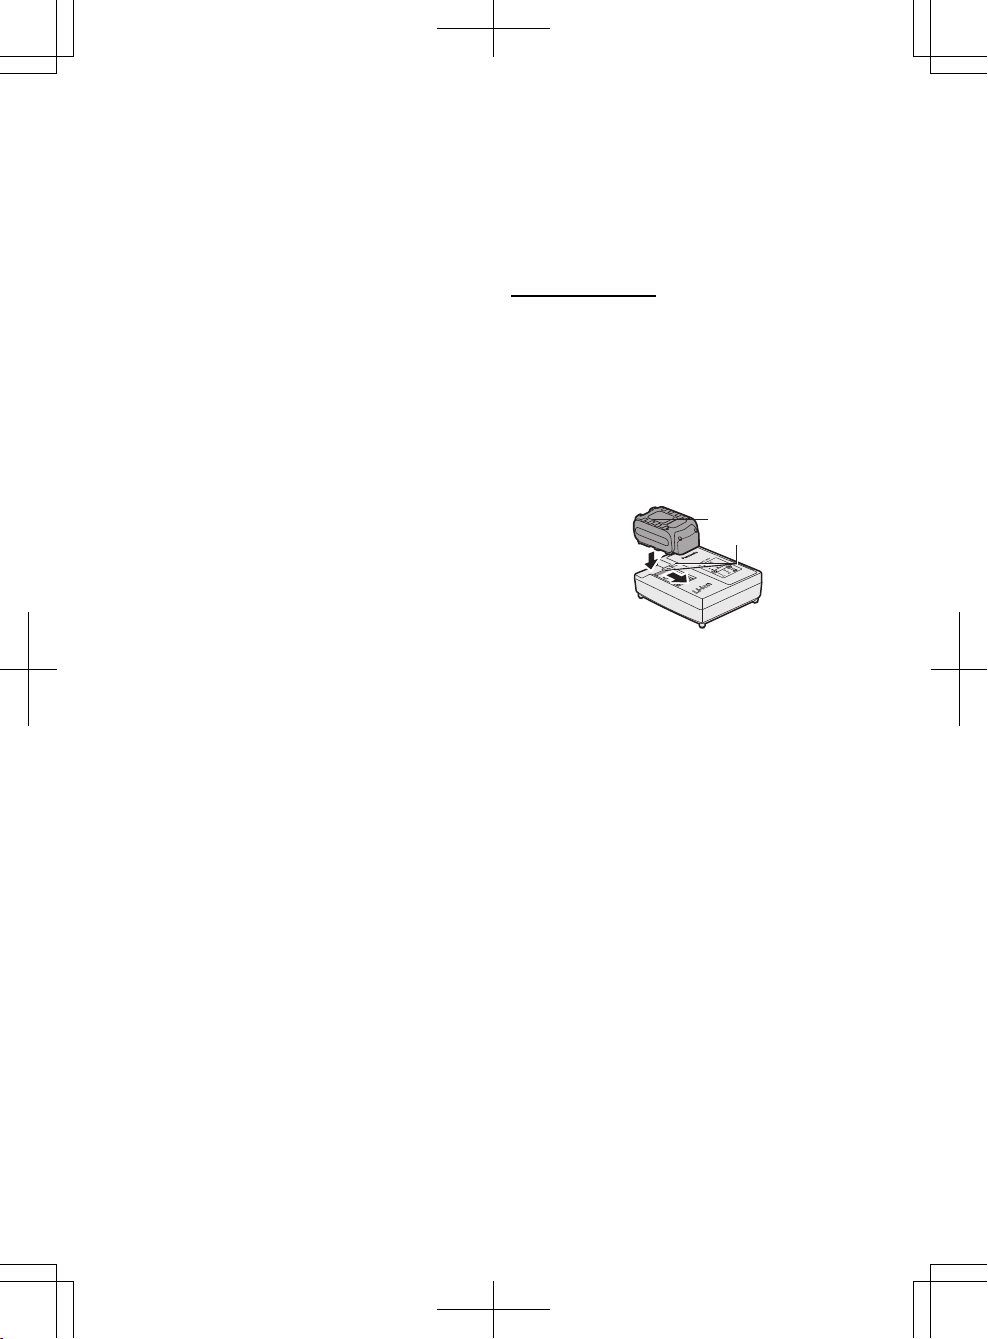
Battery charger
1. Plug the charger into the AC outlet.
2. Insert the battery pack firmly into the
charger.
1. Line up the alignment marks and
place the battery onto the dock on
the charger.
2. Slide forward in the direction of the
arrow.
3. During charging, the charging lamp
will be lit.
When charging is completed, an
internal electronic switch will
automatically be triggered to prevent
overcharging.
• Charging will not start if the battery
pack is warm (for example,
immediately after heavy-duty
operation).
The orange standby lamp will be
flashing until the battery cools down.
Charging will then begin
automatically.
4. The charge lamp (green) will flash
slowly once the battery is
approximately 80% charged.
5 When charging is completed, the
charging lamp in green color will
turn off.
6. If the temperature of the battery pack
is 0°C or less, charging takes longer
to fully charge the battery pack than
the standard charging time.
Even when the battery is fully charged,
it will have approximately 50% of the
power of a fully charged battery at
A
lignment marks
Page 19
- 19 -
normal operating temperature.
7.
Consult an authorized dealer if the
charging lamp (green) does not turn
off
.
8. If a fully charged battery pack is
inserted into the charger again, the
charging lamp lights up. After
several minutes, the charging lamp
in green color will turn off.
9. Remove the battery pack while
thebattery pack release button is held
up.
Battery pack
release button
Page 20
- 20 -
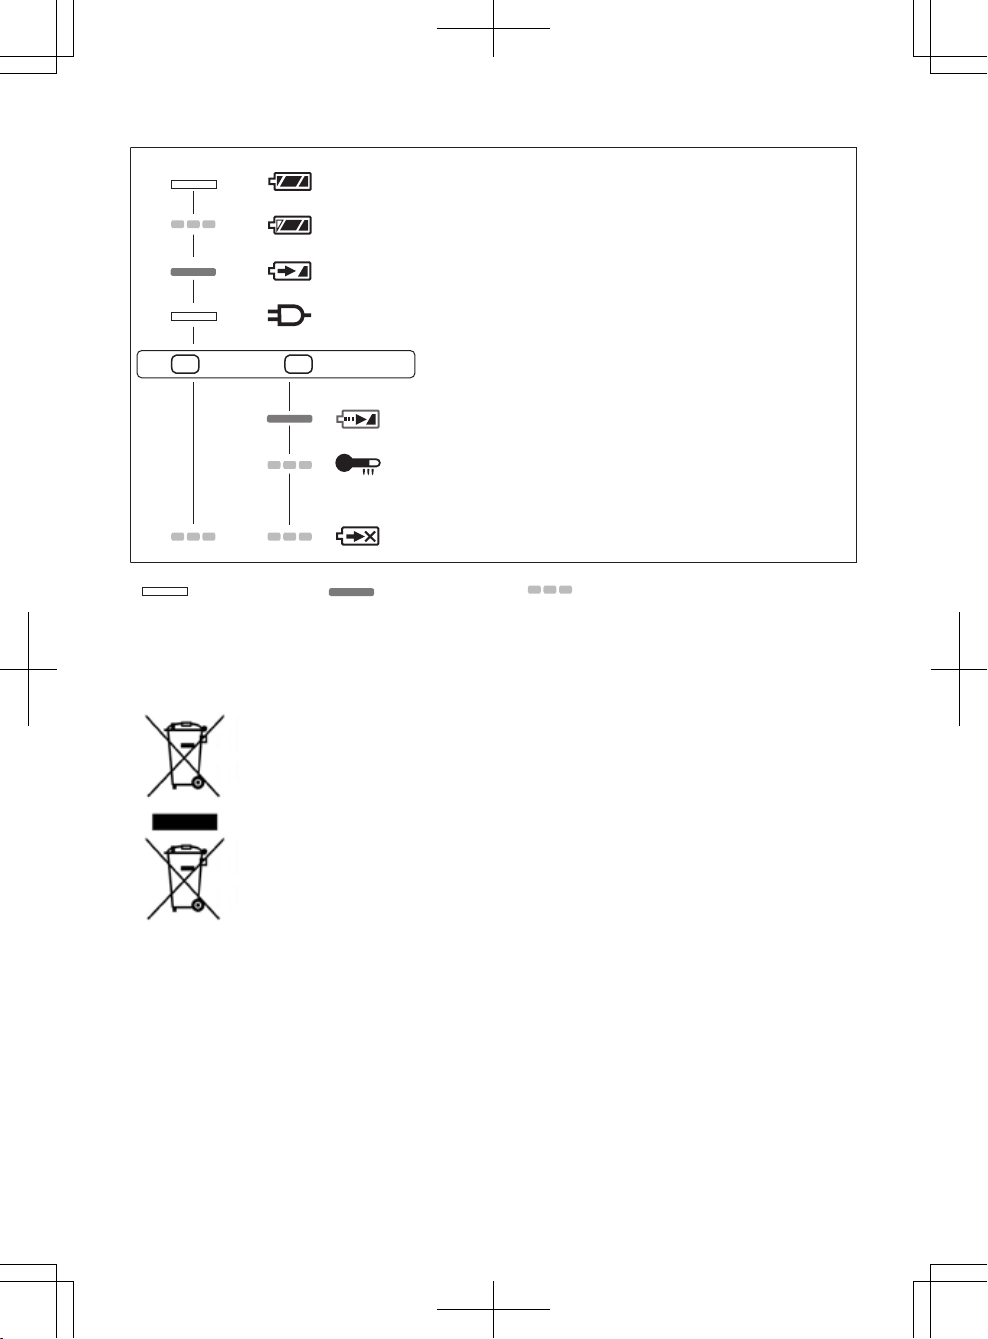
LAMP INDICATIONS
Charging is completed. (Full charge.)
Battery is approximately 80% charged.
Now charging.
Charger is plugged into the AC outlet. Ready to charge.
Charging Status Lamp.
Left: green Right: orange will be displayed.
Battery pack is cool.
The battery pack is being charged slowly to reduce the load on the battery.
Battery pack is warm.
Charging will begin when temperature of battery pack drops. If the temperature of the
battery pack is -10° or less, the charging status lamp (orange) will also start flashing .
Charging will begin when the temperature of the battery pack goes up"
Charging is not possible. Clogged with dust or malfunction of the battery pack.
Turn off
Lit Flashing
(Green) (Orange)
Information for Users on Collection and Disposal of Old
Equipment and used Batteries
These symbols on the products, packaging, and/or accompanying
documents mean that used electrical and electronic products and
batteries should not be mixed with general household waste.
For proper treatment, recovery and recycling of old products and used
batteries, please take them to applicable collection points, in accordance
with your national legislation and the Directives 2002/96/EC and
2006/66/EC.
By disposing of these products and batteries correctly, you will help to
save valuable resources and prevent any potential negative effects on
human health and the environment which could otherwise arise from
inappropriate waste handling.
For more information about collection and recycling of old products and
batteries, please contact your local municipality, your waste disposal
service or the point of sale where you purchased the items.
Penalties may be applicable for incorrect disposal of this waste, in
accordance with national legislation.
Page 21
- 21 -
For business users in the European Union
If you wish to discard electrical and electronic equipment, please contact your
dealer or supplier for further information.
[Information on Disposal in other Countries outside the
European Union]
These symbols are only valid in the European Union. If you wish to discard these
items, please contact your local authorities or dealer and ask for the correct method
of disposal.
Note for the battery symbol (bottom two symbol examples):
This symbol might be used in combination with a chemical symbol. In this case it
complies with the requirement set by the Directive for the chemical involved.
V. MAINTENANCE
• Use only a dry, soft cloth for wiping the unit. Do not use a damp cloth, thinner,
benzine, or other volatile solvents for cleaning.
• In the event that the inside of the tool or battery pack is exposed to water, drain
and allow to dry as soon as possible. Carefully remove any dust or iron filings that
collect inside the tool. If you experience any problems operating the tool, consult
with a repair shop.
VI. ACCESSORIES
CAUTION:
• The use of any accessories not specified in this manual may result in fire,
electric shock, or personal injury. Use recommended accessories only.
Metal Blade
• EY9SXMJ0
For cutting metal in general
Wood Blade
• EY9SXWJ2
For cutting wood in general
For convenience of rip cuts and
r
epeated
cut of same width.
Dust Adaptor for Vacuum Cleaner
(Optional accessory)
• EY9X016
Page 22
- 22 -
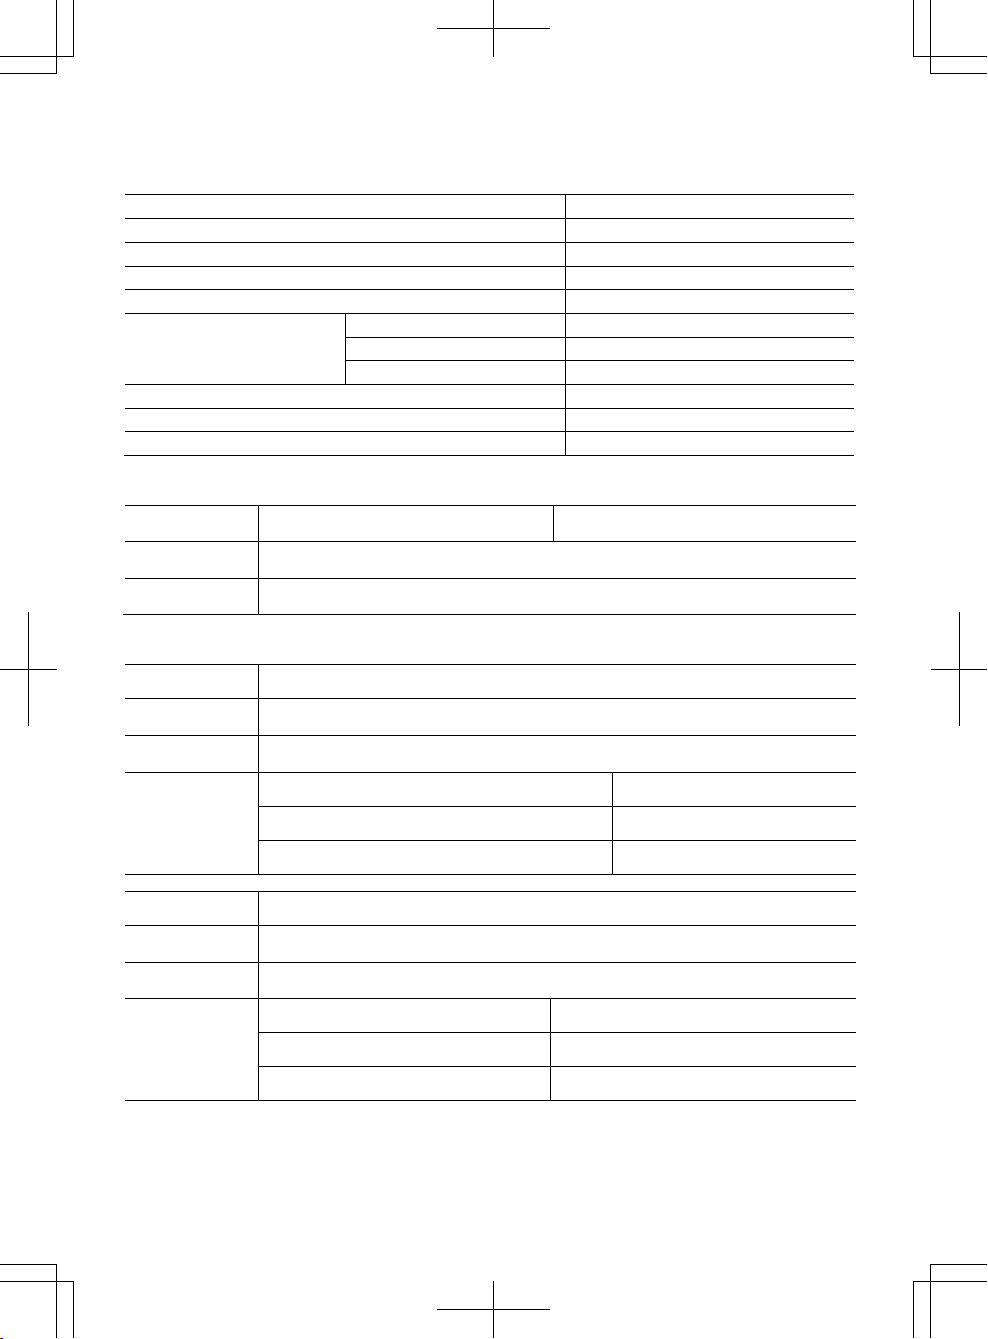
VII. SPECIFICATIONS
MAIN UNIT
Model
EY4550
Motor
18 V
Max thickness of mounting blade
1.6 mm
Length of strokes
25 mm
Strokes per minute
0 - 2500 /min
Maximum cutting
capacities
Wood
65 mm
Mild steel
6 mm
Alumium
10 mm
Overall length
292 mm
Weight (with battery pack: EY9L51)
3.35 kg
Noise, Vibration
See the uncluded sheet
BATTERY PACK
Model EY9L50 EY9L51
Storage battery
Li-ion
Battery voltage
18 V DC(3.6 V x 10 cells)
BATTERY CHARGER
Model
EY0L81
Electrical rating
See the rating plate on the bottom of the charger
Weight
0.93 kg
Charging time
EY9L50 EY9L51
Usable: 50 min Usable: 65 min
Full: 65 min Full: 80 min
Model
EY0L82
Electrical rating
See the rating plate on the bottom of the charger
Weight
0.93 kg
Charging time
EY9L50 EY9L51
Usable: 50 min Usable: 55 min
Full: 60 min Full: 70 min
NOTE: This chart may include models that are not available in your area.
Please refer to the latest general catalogue.
NOTE: For the dealer name and address, please see the included warranty card.
Page 23
- 23 -
VIII. ELECTRICAL
PLUG
INFORMATION
FOR YOUR SAFETY PLEASE READ
THE FOLLOWING TEXT CAREFULLY
This appliance is supplied with a moulded
three pin mains plug for your safety and
convenience.
A 5 amp fuse is fitted in this plug.
Should the fuse need to be replaced please
ensure that the replacement fuse has a
rating of 5 amp and that it is approved by
ASTA or BSI to BS1362.
Check for the ASTA mark
or the BSI mark
on the body of the fuse.
If the plug contains a removable fuse cover
you must ensure that it is refitted when the
fuse is replaced.
If you lose the fuse cover the plug must not
be used until a replacement cover is
obtained.
A replacement fuse cover can be purchased
from your local Panasonic Dealer.
IF THE FITTED MOULDED PLUG IS
UNSUITABLE FOR THE SOCKET OUTLET
IN YOUR HOME THEN THE FUSE
SHOULD BE REMOVED AND THE PLUG
CUT OFF AND DISPOSED OF SAFELY.
THERE IS A DANGER OF SEVERE
ELECTRICAL SHOCK IF THE CUT OFF
PLUG IS INSERTED INTO ANY 13 AMP
SOCKET.
If a new plug is to be fitted please observe
the wiring code as shown below.
If in any doubt please consult a qualified
electrician.
IMPORTANT:
The wires in this mains lead are
coloured in accordance with the
following code:
Blue: Neutral
Brown: Live
As the colours of the wire in the mains lead
of this appliance may not correspond with
the coloured markings identifying the
terminals in your plug, proceed as follows.
The wire which is coloured BLUE must be
connected to the terminal in the plug which
is marked with the letter N or coloured
BLACK.
The wire which is coloured BROWN must be
connected to the terminal in the plug which is
marked with the letter L or coloured RED.
Under no circumstances should either of
these wires be connected to the earth
terminal of the three pin plug, marked with
the letter E or the Earth Symbol
.
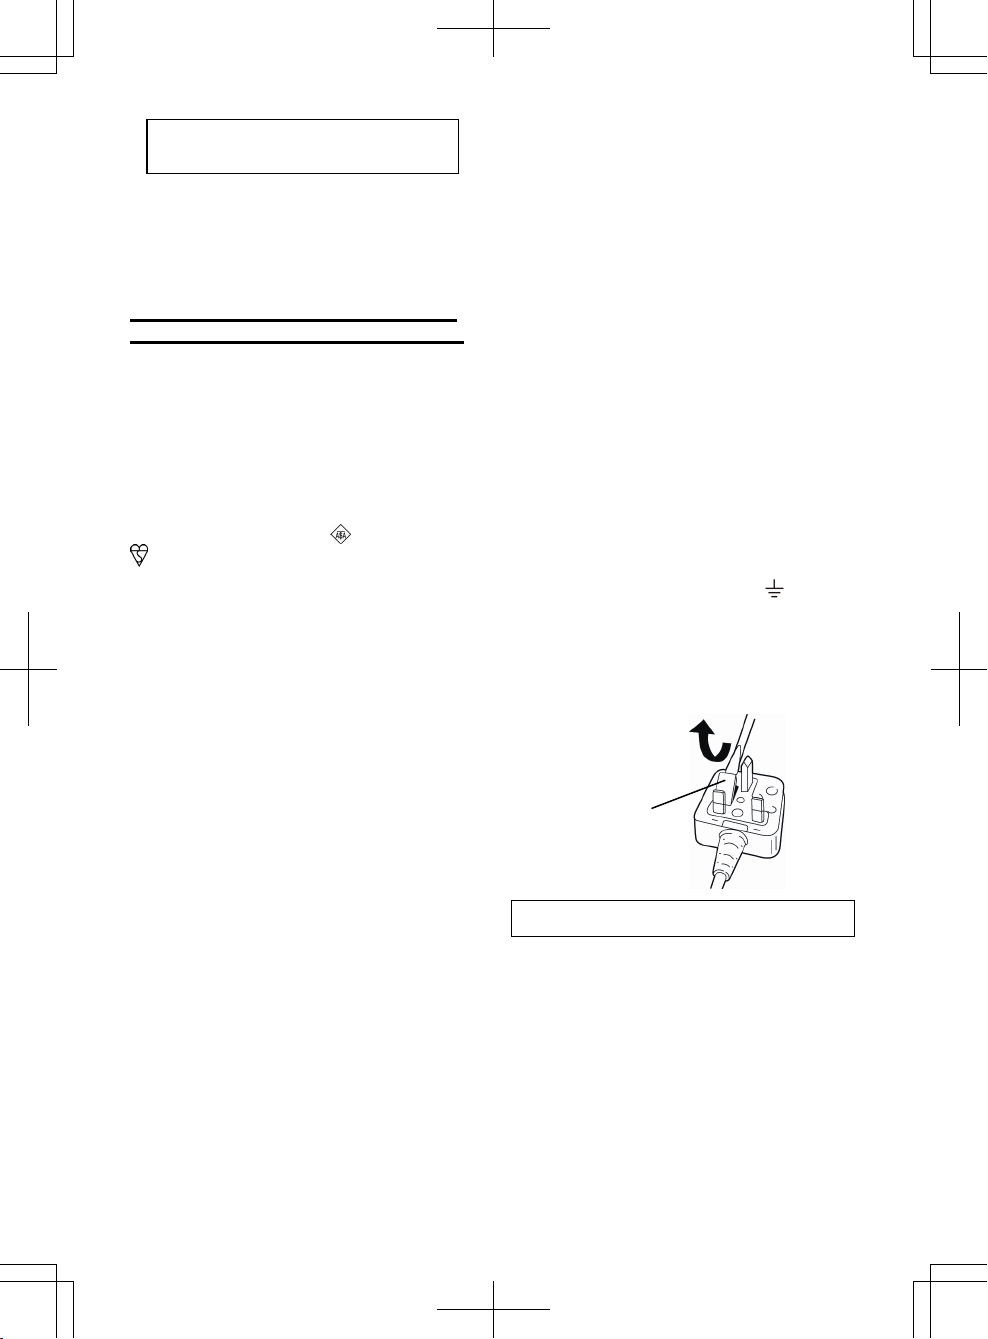
How to replace the fuse:
Open the fuse
compartment with a screwdriver and
replace the fuse and fuse cover if it is
removable.
This apparatus was produced to BS800.
ONLY FOR U. K.
Fuse Cover
Page 24

- 24 -
Original-Anleitung: Englisch
Übersetzung der Original-Anleitung:
Andere Sprachen
I.
BESTIMMUNGSGEMÄSSE
VERWENDUNG DER
MASCHINE
Vielen Dank, dass Sie sich für eine Stichsäge von Panasonic entschieden haben.
Die Stichsäge bietet eine ausgezeichnete
Leistung mit wiederaufladbaren Akkus
von Panasonic. Die Sticksäge eignet sich
nur zum Schneiden von Metall, Holz, und
Gipsplatten.
Lesen Sie bitte vor der ersten Inbetriebnahme dieses Geräts das separate Handbuch
„Sicherheitsmaßregeln“ sorgfältig durch.
II.
WEITERE WICHTIGE
SICHERHEITSREGELN
1)
Halten Sie die Maschine an den isolierten
Griffflächen, wenn Sie eine Arbeit durchführen, bei der die Gefahr von Kontakt
mit verborgenen Kabeln besteht.
Bei
Kontakt mit einem stromführenden
Kabel werden die freiliegenden Metallteile der Maschine ebenfalls stromführend, so dass der Benutzer einen elektrischen Schlag erleiden kann.
2)
Verwenden Sie Zwingen oder halten
Sie das Werkstück auf eine andere
geeignete Weise auf einer stabilen
Unterlage fest.
Beim Festhalten des
Werkstücks mit den Händen oder durch
Andrücken an den Körper kann die
Kontrolle verloren werden.
3)
Halten Sie Ihre Hände von Schnittbereich und Sägeblatt fern. Halten
Sie die Maschine an den isolierten
Griffflächen.
Halten Sie das Tool mit
beiden Händen, um Verletzungen
durch das Sägeblatt zu vermeiden.
4)
Halten Sie das zu schneidende Werkstück auf keinen Fall mit Ihren Händen oder über Ihr Bein.
Das Werkstück muss einwandfrei abgestützt werden, um die Gefahr von Körperverletzungen oder des Verlusts der Kontrolle
zu minimieren.
5)
Denken Sie daran, dass das Werkzeug ständig betriebsbereit ist, da es
nicht an die Steckdose angeschlossen werden muß.
6)
Verwenden Sie stets eine Schutzbrille mit Seitenschirmen. Gewöhnliche Brillen oder Sonnenbrillen sind
KEINE Schutzbrillen.
7)
Wenn Sie diese Maschine für Holzbearbeitung in einem begrenzten Raum (z.B.
Innenraum) benutzen, sollten Sie eine
Staubmaske tragen.
8)
Schneiden Sie keine Nägel durch.
Untersuchen Sie das Werkstück auf
Nägel, und entfernen Sie diese vor der
Bearbeitung.
9)
Schneiden Sie keine übergroßen
Werkstücke.
10)
Vergewissern Sie sich vor dem Sägen,
dass genügend Freiraum hinter dem
Werkstück vorhanden ist, damit das
Sägeblatt nicht gegen eine harte Oberfläche, wie Fußboden, Werkbank usw.
stößt.
Page 25
- 25 -
11)
Halten Sie die Maschine mit festem
Griff.
12)
Vergewissern Sie sich vor dem Einschalten der Maschine, dass das Sägeblatt nicht das Werkstück berührt.
13)
Halten Sie die Hände von beweglichen Teilen fern.
14)
Vermeiden Sie eine Berührung des
Sägeblatts oder des Werkstücks unmittelbar nach der Bearbeitung, weil sie
dann noch sehr heiß sind und Hautverbrennungen verursachen können.
15)
Unterlassen Sie das Schwingen des
Tools.
16)
Verwenden Sie keine Sägeblätter, die
Verformungen oder Risse aufweisen.
17)
Verwenden Sie keine Sägeblätter, die
nicht den hier angegebenen Spezifikationen entsprechen.
18)
Nehmen Sie den Akku von der Maschine
ab, bevor Sie das Sägeblatt auswechseln,
Einstellungen vornehmen oder andere
Wartungsarbeiten ausführen.
19)
Geeigneten Gehörschutz tragen, wenn
Werkzeug längere Zeit im Betrieb ist!
Symbol Bedeutung
V
Volt
Gleichstrom
n0
Leerlaufdrehzahl
…min
-1
Drehzahl oder Hubzahl
pro Minute
Ah
Akkukapazitat in Ampere
Stunden
Zur Verminderung der
Verletzungsgefahr muss die
Bedienungsanleitung
gründlich gelesen werden.
Nur für Inneneinsatz.
WARNUNG:
• Bitte verwenden Sie für dieses wiederaufladbare Gerät nur die von
Panasonic vorgesehenen Akkus.
• Panasonic übernimmt keine Verantwortung für etwaige Schäden oder
Unfälle, die durch den Gebrauch von
recycelten und gefälschten Akkus
verursacht werden.
• Entsorgen Sie diesen Akku niemals
im Feuer und setzen Sie ihn keinesfalls starker Hitze aus.
• Versuchen Sie niemals, Gegenstände wie Nägel in den Akku zu schlagen, dies könnte zu einem elektrischen Schlag führen. Sehen Sie außerdem davon ab, den Akku zu zerlegen oder zu verändern.
• Achten Sie darauf, dass keine metallischen Gegenstände mit den Anschlüssen des Akkus in Verbindung
kommen.
•
Der Akku darf nicht im selben Behälter wie Nägel oder ähnliche metallische Gegenstände transportiert oder
gelagert werden.
• Laden Sie den Akku niemals an einem
Ort mit hoher Temperatur, beispielsweise neben einem Feuer oder direkter
Sonneneinstrahlung. Andernfalls kann
dies zu Überhitzung, einem Brand oder
einer Explosion führen.
• Laden Sie den Akku ausschließlich
mit dem dafür vorgesehenen Ladegerät. Andernfalls kann dies zu einem
Auslaufen des Akkus, einem Brand
oder einer Explosion führen.
• Nachdem Sie den Akku von der
Maschine oder dem Ladegerät
abgenommen haben, bringen Sie stets
die Akkuabdeckung wieder an.
Anderenfalls könnten die Akkukontakte
kurzgeschlossen werden, was zu
einem Brand führen kann.
•
Wenn der Akku schwach geworden
ist, ersetzen Sie ihn durch einen
neuen. Fortgesetzter Gebrauch eines
beschädigten Akkus kann zu
Wärmeerzeugung, Entzündung oder
Bruch führen.
Page 26
- 26 -
III. BAUGRUPPE
WARNUNG:
Zur Verringerung der Verletzungsgefahr muss zum Auswechseln des
Sägeblatts immer der Akku entfernt
werden.
Prüfung vor der Inbetriebnahme
• Ist das richtige Sägeblatt für das zu
bearbeitende Werkstück eingespannt?
• Wurde die richtige Stammform und
Sägeblattdicke verwendet?
• Ist das Sägeblatt fest eingespannt?
• Kontrollieren, ob das Sägeblatt nicht
gerissen oder gebrochen ist.
• Kontrollieren, ob im zu bearbeitenden
Werkstück keine Fremdkörper vorhanden sind.
Einspannen und Entfernen des
Sägeblatts
Installation
1. Die Staubabdeckung wurde entfernt.
2. Wischen Sie den Sägestaub vom Sägeblatt und von der Sägeblatthalterung.
3. Ziehen Sie den Hebel zum
Anbringen/Entfernen des Sägeblatts.
4.
•
Setzen Sie das Sägeblatt in die
Sägeblatthalterung und stellen Sie
die Sägeblattrückseite auf die
Rollenführung ein, so dass sich die
Rückseite des Sägeblatts entlang
der Rollenführung bewegt.
•
Stellen Sie sicher, dass der
Schneidenschaft tief genug
eingesetzt wurde, bis die
Schneidenauskragung mit einer
Messerklemmvorrichtung
eingespannt wurde.
5. Lassen Sie den Hebel zum Feststellen
bzw. Entfernen des Sägeblatts los.
• Prüfen Sie, dass die Rückseite der
Schneide die Führungsrolle
entlang und gerade eingestellt
steht.
WARNUNG:
Wird das Sageblatt nicht tief genug
eingefuhrt, kann es wahrend des
Betriebs plotzlich herausgeschleudert
werden. Dies kann gefahrliche Folgen
haben.
Ausbau
1. Ziehen Sie den Hebel zum
Anbringen/Entfernen des Sägeblatts.
2. Ziehen Sie das Sägeblatt heraus.
Einstellen des Unterteils
1. Lösen Sie die Unterteilschraube mit
einem Sechskantschlüssel.
2. Richten Sie das Unterteil zum Einstellen der Position auf das Einstellloch aus. (Siehe rechts stehende Abbildung.)
• Das Unterteil kann seitlich zwischen
0° und 45° und nach vorne und hinten
eingestellt werden. Für das seitliche
Neigen des Unterteils muss zuerst die
Staubabdeckung entfernt werden.
Rollenführung
Page 27
- 27 -
• Zur Bestimmung des Winkels wird
auf den Schrägeindex verwiesen.
• Wenn die Säge geneigt wird, muss
sich die Parallelanschlagschraube auf
der Gegenseite befinden.
3. Ziehen Sie die Unterteilschraube
mit einem Sechskantschlüssel fest.
Position des Unterteils und Verwendungszweck
Position des
Unterteileinstelllochs
Verwendungszweck
Normales Schneiden im
rechten Winkel
Schneiden in einem
Winkel von 0° bis 45°
HINWEIS:
Das ist nur eine grobe Anleitung. Der
tatsächliche Schnittwinkel hängt davon
ab, wie das Tool gegen die Oberfläche
gehalten wird.
Einstellung des Pendelhubs
• Stellen Sie den Pendelhub auf das
zu bearbeitenden Werkstück ein.
Hebel-
position
Sägeblattbewegung
Hauptsächliche
Anwendungen
0
nur vertikal
• Schneiden von
Hartmetallen, wie
Stahl
• Glattes Schneiden
von Baumaterialien und
Sperrholzplatten
• Schneiden von
stark gekrümmten
Linien
1
kleiner
Pendelhub
• Schneiden von
Weichmetallen,
wie Aluminium
und andere
Nichteisenmetalle
• Schneiden von
Hartholz,
Sperrholzplatten
und Kunststoffen
2
mittlerer
Pendelhub
• Schneiden von
ziemlich weichen
Materialien
• Schneiden von
Holz- und
Spanplatten
• Schnelles
Schneiden von
Aluminium und
Weichstahl
3
hoher
Pendelhub
• Schneiden von
weichen
Materialien
• Schnelles
Schneiden von
Materialien, wie
Holz, Spanplatten
und Kunststoffe
• Für einen saubereren Schnitt muss
ein kleinerer Pendelhub eingestellt
werden.
Page 28
- 28 -
Abblashebel
Staubabblas-Betrieb auswählen.
:
AUS ○
:
EIN
Staubadapter für Staubsauger
(EY9X016) (als Sonderzubehör
erhältlich)
Beim Schneiden kann der Sägestaub
mit einem Staubsauger gesammelt
werden.
Installation
1. Bringen Sie den Haken des Staubadapters an der Vorderseite des Unterteils an.
2. Rasten Sie den hinteren Teil ein.
3.
Bringen Sie den Staubsaugerschlauch
an.
• Es wird empfohlen, den Staubadapter
zur Verringerung der Gefahr einer
Beschädigung des zu schneidenden
Materials zu verwenden.
Anbringen oder Abnehmen des
Akkus
1. Zum Anschließen des Akkus:
Die Ausrichtmarkierungen aufeinander
ausrichten, und den Akku anbringen.
• Den Akku einschieben, bis er einrastet.
2. Zum Entfernen des Akkus:
Die Taste von vorne ziehen, um die
Batteriepackung zu lösen.
Knopf
A
usricht-
markierungen
Page 29
- 29 -
IV. BETRIEB
1. Drücken Sie den Schalterverriegelungshebel nach unten und ziehen Sie den
Netzschalter.
• Die Geschwindigkeit erhöht sich mit
zunehmendem Druck auf den Netzschalter.
2. Lassen Sie den Netzschalter nach
abgeschlossenem Schneiden los.
3. Kontrollieren Sie, ob sich das Sägeblatt ausreichend abgekühlt hat und
nehmen Sie das Sägeblatt ab.
VORSICHT:
Wird die Maschine durch Betätigen des
Auslösers gestartet, kann eine
kurzzeitige Verzögerung auftreten,
bevor die Drehung beginnt. Dies ist kein
Anzeichen für eine Funktionsstörung.
• Diese Verzögerung tritt beim
Hochfahren der Schaltkreise der
Maschine auf, wenn der Auslöser
zum ersten Mal nach dem Einsetzen
eines neuen Akkus betätigt wird,
oder nachdem die Maschine
mindestens 1 Minute lang nicht
benutzt worden ist (oder mindestens
5 Minuten bei leuchtender LED). Bei
der zweiten und jeder weiteren
Betätigung läuft die Maschine ohne
Verzögerung an.
Schneiden
HINWEIS:
• Kontrollieren Sie, ob sich unter dem
Werkstück keine Hindernisse befinden.
• Kontrollieren Sie, ob sich im Werkstück keine Fremdkörper, wie Nägel
befinden.
Falls das Sägeblatt beim Schneiden auf
solche Gegenstände trifft, entstehen
große Reaktionskräfte, die schwere Verletzungen verursachen können.
• Legen Sie die Hand nicht in der
Schneiderichtung auf das Werkstück.
Bei Missachtung besteht eine Verletzungsgefahr.
• Berühren Sie das Sägeblatt unmittelbar nach dem Schneiden nicht.
Bei Missachtung können Verbrennungen auftreten.
Schneiden entlang von Markierungslinien
1. Legen Sie das Werkstück auf die
Unterlage und richten Sie das Sägeblatt auf die Markierungslinie aus.
• Drücken Sie das Sägeblatt vor dem
Ziehen des Netzschalters nicht gegen
das Werkstück.
2. Ziehen Sie den Netzschalter, warten Sie
bis sich die Geschwindigkeit stabilisiert
hat und setzen Sie das Unterteil auf das
Werkstück, das entlang der Markierungslinien geschnitten werden soll.
Page 30
- 30 -
• Beim Schneiden komplexer Formen
muss die Schneidegeschwindigkeit bei
starken Krümmungen reduziert werden.
Einstechschneiden
1. Bohren Sie ein Loch in den auszuschneidenden Teil, so dass das
Sägeblatt eingesteckt werden kann.
2. Stecken Sie das Sägeblatt in das Loch,
ohne das Werkstück zu berühren und
schalten Sie den Netzschalter ein.
3. Schneiden Sie entlang der Markierungslinie.
Verwendung des Parallelanschlags
Ein Parallelanschlag kann zum
Schneiden paralleler Linien, Kreisen
und Bogen verwendet werden.
Anbringen des Parallelanschlags
1. Lösen Sie die Parallelanschlagschraube.
2.
Stecken Sie den Parallelanschlag durch
die Befestigung.
3. Stellen Sie die Schneideposition ein
und ziehen Sie die Parallelanschlagsschraube fest.
Schneiden der gleichen Breite
1. Setzen Sie das Unterteil auf das Werkstück, so dass der Parallelanschlag auf
die Kante des Werkstücks ausgerichtet
ist.
2.
Schalten Sie den Netzschalter ein,
wenn das Sägeblatt das Werkstück
noch nicht berührt.
3.
Richten Sie den Parallelanschlag
zum Schneiden paralleler Linien
richtig auf das Werkstück aus.
WARNUNG:
Atmen Sie keinen Rauch ein, der von
der Maschine oder dem Akku
abgegeben wird, weil er
gesundheitsschädlich sein kann.
VORSICHT:
Benutzen Sie die Maschine nicht auf
eine Weise, die Blockieren des
Motors verursacht. Anderenfalls
Page 31

- 31 -
können Maschine und Akku
beschädigt werden, was zu Rauch
oder Brand führen kann.
Bedienfeld
(1)
(3)
(2)
(1) LED-Leuchte
Vor Verwendung der
LED-Leuchte muss
immer der Netzschalter einmal gezogen werden.
Drücken Sie die LED-
Leuchtentaste
.
Die LED-Leuchte verbraucht nur sehr wenig
Strom und beeinträchtigt weder die Leistung
des Werkzeugs während des Betriebs noch
die Akkukapazität.
VORSICHT:
• Die eingebaute LED-Leuchte ist für
kurzzeitige Beleuchtung eines kleinen
Arbeitsbereichs ausgelegt.
• Verwenden Sie sie nicht als Ersatz
für eine normale Taschenlampe, weil
sie nicht hell genug ist.
• Die LED-Leuchte schaltet sich aus,
wenn das Tool während 5 Minuten
nicht verwendet wurde.
V
orsicht:
SEHEN SIE NICHT IN DEN STRAHL.
Die Verwendung von Bedienelementen, Einstellungen oder Vorgängen außer den hier
beschriebenen kann zur Freisetzung gefährlicher Strahlung führen.
(2) Überhitzungs-Warnlampe
A
us
(normaler
Betrieb)
Blinken: Überhitzung
Zeigt an, dass der Betrieb
wegen Akku-Überhitzung
angehalten wurde.
Zum Schutz des Motors und des Akkus
müssen beim Betrieb die folgenden
Punkte beachtet werden.
• Bei einer Motor oder Akkuüberhitzung
spricht die Schutzschaltung an, um
den Betrieb des Motors bzw. des
Akkus zu unterbrechen. Die
Überhitzungswarnleuchte auf dem
Bedienungsfeld leuchtet oder blinkt
bei aktivierter Funktion.
• Falls die Überhitzungs-Schutzfunktion
aktiviert wird, lassen Sie das Tool
gründlich abkühlen (mindestens 30
Minuten). Das Tool ist wieder
einsatzbereit, wenn die
Überhitzungs-Warnlampe erlischt.
• Verwenden Sie das Tool so, dass die
Überhitzungs-Schutzfunktion nicht
wiederholt aktiviert wird.
• Falls das Werkzeug kontinuierlich unter
starker Belastung oder bei hoher
Umgebungstemperatur im Sommer
verwendet wird, kann die
Überhitzungs-Schutzfunktion öfters
ansprechen.
• Falls das Werkzeug bei niedriger
Umgebungstemperatur im Winter oder
jeweils nur kurzzeitig verwendet wird,
spricht die Überhitzungs-Schutzfunktion
nicht an.
• Der Umgebungstemperaturbereich liegt
zwischen 0°C und 40°C. Wenn der
Akku bei einer Akkutemperatur unter
0°C benutzt wird, funktioniert die
Maschine möglicherweise nicht
einwandfrei.
• Wenn ein kalter Akku (von etwa 0°C oder
weniger) in einem warmen Raum
aufgeladen werden soll, lassen Sie den
Akku für mindestens eine Stunde in dem
Raum und laden Sie ihn auf, wenn er
sich auf Raumtemperatur erwärmt hat.
Page 32

- 32 -
(3) Akkuladungs-Warnlampe
Übermäßiges (vollständiges) Entladen
von Li-Ion-Akkus führt zu einer erheblichen Verkürzung ihrer Lebens dauer.
Die Maschine ist mit einer Akkuschutzfunktion ausgestattet, die übermäßiges Entladen des Akkus verhindert.
• Die Akkuschutzfunktion wird unmittelbar vor der Erschöpfung des Akkus
aktiviert und bewirkt Blinken der
Akkuladungs-Warnlampe.
• Wenn Sie bemerken, dass die Akkuladungs-Warnlampe blinkt, laden Sie
den Akku unverzüglich auf.
• Wird die Maschine bei zu geringer
Akku-Restladung gestartet, kann sie
stehen bleiben, ohne dass zuvor die
Akkuladungs-Warnlampe blinkt. Dies
zeigt an, dass zu wenig
Akku-Restladung für den Betrieb der
Maschine vorhanden ist. Daher sollte
der Akku vor weiterem Gebrauch
aufgeladen werden.
• Wird die Maschine während des
Betriebs einer plötzlichen Last
ausgesetzt, die Blockieren des
Motors verursacht, kann der
Tiefentladungs-Schutzsensor
ausgelöst werden, so dass eventuell
die Akkuladungs-Warnlampe blinkt.
Die Lampe hört auf zu blinken,
sobald die Ursache der
Motorblockierung behoben und der
Auslöser betätigt wird.
[Akku]
Für richtigen Gebrauch
des Akkus
Li-Ion-Akku
• Um eine möglichst lange Lebensdauer
des Li-Ion-Akkus zu erzielen, lagern
Sie ihn nach dem Gebrauch, ohne ihn
aufzuladen.
• Achten Sie beim Laden des Akkus
darauf, dass die Kontakte am Ladegerät frei von Fremdstoffen, wie z. B.
Staub und Wasser usw., sind. Reinigen Sie die Kontakte vor dem Laden
des Akkus, falls Fremdstoffe auf den
Kontakten vorhanden sind.
Die Lebensdauer der Akkukontakte
kann durch Anhaften von Fremdstoffen, wie z. B. Staub und Wasser
usw., während des Betriebs beeinträchtigt werden.
• Wenn Sie den Akku nicht benutzen,
halten Sie ihn von Metallgegenständen fern: Büroklammern, Münzen,
Schlüssel, Nägel, Schrauben oder
andere kleine Metallgegenstände
können die Kontakte kurzschließen.
Das Kurzschließen der Akkukontakte
kann Funken, Verbrennungen oder
einen Brand verursachen.
• Sorgen Sie bei Benutzung des Akkus
für ausreichende Belüftung des
Arbeitsplatzes.
• Wenn der Akku vom Werkzeug-Hauptteil abgenommen wird,
ist die Akkuabdeckung sofort anzubringen, um zu verhüten, dass die
Akkukontakte durch Staub oder
Schmutz verunreinigt werden und
ein Kurzschluss verursacht wird.
A
us
(normaler
Betrieb)
Blinken
(Keine Ladung)
A
kkuschutzfunktion
aktiv
Page 33

- 33 -
Lebensdauer des Akkus
Der Akku hat nur eine begrenzte
Lebensdauer. Wenn auch nach einer
ordnungsgemäßen Ladung die Betriebszeit extrem kurz ist, muss der
Akku erneuert werden.
Batterie-Recycling
ACHTUNG:
Um Umweltschutz und MaterialRecycling zu gewährleisten, müssen Sie die Batterie zur örtlichen
Entsorgungsstelle bringen, falls
eine solche in Ihrem Land vorhanden ist.
[Ladegerät]
Laden
Vorsicht
• Falls die Temperatur des Akkus unter
etwa −10°C abfällt, wird der Ladevorgang automatisch unterbrochen,
um eine Schwächung des Akkus zu
verhüten.
• Der Umgebungstemperaturbereich
liegt zwischen 0°C und 40°C.
Wenn der Akku bei einer Akku-
temperatur unter 0°C benutzt wird,
funktioniert die Maschine möglicherweise nicht einwandfrei.
• Wenn ein kalter Akku (von etwa 0°C
oder weniger) in einem warmen Raum
aufgeladen werden soll, lassen Sie
den Akku für mindestens eine Stunde
in dem Raum und laden Sie ihn auf,
wenn er sich auf Raumtemperatur
erwärmt hat.
• Den Akku abkühlen lassen, wenn er
mehr als 2× hintereinander aufgeladen wurde.
• Stecken Sie Ihre Finger nicht in die
Kontaktöffnung, um das Ladegerät
festzuhalten oder bei anderen Gelegenheiten.
Um die Gefahr eines Brandes oder
Schadens am Ladegerät zu verhindern.
• Keinen Motorgenerator als Spannungsquelle benutzen.
• Decken Sie die Entlüftungsöffnungen des Ladegerätes und den Akku
nicht ab.
• Trennen Sie das Ladegerät vom
Stromnetz, wenn es nicht benutzt
wird.
Li-Ion-Akku
HINWEIS:
Beim Kauf ist Ihr Akku nicht voll
aufgeladen. Laden Sie daher den
Akku vor Gebrauch auf.
Ladegerät
1. Ladegerät an Wandsteckdose anschließen.
2. Akku fest in das Ladegerät schieben.
1.Die Ausrichtmarkierungen ausrichten,
und den Akku in den Schacht des
Ladegerätes einsetzen.
2. In Pfeilrichtung nach vorn schieben.
3. Während des Ladens leuchtet die
Ladekontrolllampe.
Mit Erreichen der vollen Ladung spricht
automatisch eine interne, elektronische
Schaltung an, die ein Überladen verhindert.
• Das Laden beginnt nicht, solange der
Akku noch heiß ist (wie z.B. unmittelbar
nach intensivem Gebrauch).
Die Bereitschaftslampe blinkt in Oran-
ge, bis der Akku abgekühlt ist.
Das Laden beginnt dann automatisch.
4. Die Ladekontrolllampe (grün) blinkt
langsam, wenn der Akku zu etwa 80%
aufgeladen ist.
5. Wenn der Ladevorgang beendet ist,
erlischt die grüne Ladekontrolllampe.
6. Falls die Akkutemperatur 0°C oder
weniger beträgt, dauert der Ladevorgang bis zur vollen Aufladung des
Akkus länger als die normale Ladezeit.
Selbst wenn der Akku voll aufgeladen
ist, hat er nur etwa 50% der Leistung
eines voll aufgeladenen Akkus bei
normaler Betriebstemperatur.
A
usrichtmarkierungen
Page 34

- 34 -
7. Wenden Sie sich an einen Vertragshändler, falls die Ladekontrolllampe
(grün) nicht erlischt.
8. Wird ein voll aufgeladener Akku
erneut in das Ladegerät eingesetzt,
leuchtet die Ladekontrolllampe auf.
Nach einigen Minuten erlischt die
grüne Ladekontrolllampe.
9. Nehmen Sie den Akku bei angehobenem
Akku-Entriegelungsknopf ab.
AkkuEntriegelungsknopf
Page 35

- 35 -
ANZEIGELAMPEN
Ladevorgang ist abgeschlossen. (Volle Ladung)
Der Akku ist zu etwa 80 % aufgeladen.
Ladevorgang läuft.
Das Ladegerät ist an eine Netzsteckdose angeschlossen.
Ladebereitschaft hergestellt.
Ladezustandslampe
Links: Grün Rechts: Orange wird angezeigt.
Akku ist kalt.
Der Akku wird langsam geladen, um seine Belastung zu reduzieren.
Der Akku ist warm geworden.
Der Ladevorgang beginnt wieder, wenn dieTemperatur des Akku
gefallen ist. Beträgt die Temperatur des Akkus –10°C oder weniger,
beginnt die Ladekontrolllampe (orange) ebenfalls zu blinken. Der
Ladevorgang beginnt, wenn die Temperatur des Akkus steigt.
Keine Ladung möglich.Verstaubt oder Defekt des Akkus.
Erlischt
Leuchtet Blinkt
(Grün) (Orange)
Benutzerinformation zur Sammlung und Entsorgung von veralteten Geräten und benutzten Batterien
Diese Symbole auf den Produkten, Verpackungen und/oder Begleitdokumenten bedeuten, dass benutzte elektrische und elektronische Produkte
und Batterien nicht in den allgemeinen Hausmüll gegeben werden sollen.
Bitte bringen Sie diese alten Produkte und Batterien zur Behandlung, Aufarbeitung bzw. zum Recycling gemäß Ihrer Landesgesetzgebung und den
Richtlinien 2002/96/EG und 2006/66/EG zu Ihren zuständigen Sammelpunkten.
Indem Sie diese Produkte und Batterien ordnungsgemäß entsorgen, helfen
Sie dabei, wertvolle Ressourcen zu schützen und eventuelle negative Auswirkungen auf die menschliche Gesundheit und die Umwelt zu vermeiden,
die anderenfalls durch eine unsachgemäße Abfallbehandlung auftreten
können.
Wenn Sie ausführlichere Informationen zur Sammlung und zum Recycling
alter Produkte und Batterien wünschen, wenden Sie sich bitte an Ihre
örtlichen Verwaltungsbehörden, Ihren Abfallentsorgungsdienstleister oder
an die Verkaufseinrichtung, in der Sie die Gegenstände gekauft haben.
Gemäß Landesvorschriften können wegen nicht ordnungsgemäßer Entsorgung dieses Abfalls Strafgelder verhängt werden.
Page 36

- 36 -
Für Geschäftskunden in der Europäischen Union
Bitte treten Sie mit Ihrem Händler oder Lieferanten in Kontakt, wenn Sie elektrische und
elektronische Geräte entsorgen möchten. Er hält weitere Informationen für sie bereit.
[Informationen zur Entsorgung in anderen Ländern außerhalb
der Europäischen Union]
Dieses Symbol ist nur in der Europäischen Union gültig. Bitte treten Sie mit Ihrer
Gemeindeverwaltung oder Ihrem Händler in Kontakt, wenn Sie dieses Produkt
entsorgen möchten, und fragen Sie nach einer Entsorgungsmöglichkeit.
Hinweis zum Batteriesymbol (unten zwei Symbolbeispiele):
Dieses Symbol kann in Kombination mit einem chemischen Symbol verwendet werden.
In diesem Fall erfüllt es die Anforderungen derjenigen Richtlinie, die für die betreffende
Chemikalie erlassen wurde.
V. WARTUNG
• Das Gerät nur mit einem trockenen, weichen Lappen abwischen. Verwenden Sie zum
Reinigen keine feuchten Lappen oder flüchtige Lösungsmittel wie Farbverdünner oder
Benzin.
• Falls Wasser in das Werkzeug oder den Akku eindringt, lassen Sie umgehend das
Wasser ablaufen und die Teile trocknen. Entfernen Sie sorgfältig jeglichen Staub oder
Eisenfeilspäne, die sich im Werkzeug angesammelt haben. Sollten Sie Probleme mit
dem Betrieb des Werkzeugs haben, konsultieren Sie eine Werkstatt.
VI. ZUBEHÖR
VORSICHT:
• Die Verwendung von anderen Zu¬behör¬teilen, die nicht in dieser An¬leitung
aufgeführt sind, kann zu Brand, elektrischen Schlägen oder Verletzungen führen.
Verwenden Sie ausschließlich das empfohlene Zubehör.
Metallsägeblatt
• EY9SXMJ0
Zum Schneiden von Metall
Holzsägeblatt
• EY9SXWJ2
Zum Schneiden von Holz
Für Längsschnitte und wiederholte
Schnitte der gleichen Breite.
Staubadapter für Staubsauge
r
(Sonderzubehör)
• EY9X016
Page 37

- 37 -
VII. TECHNISCHE DATEN
HAUPTGERÄT
Modell
EY4550
Motor
18 V
Maximal Dicke des Sägeblatts
1,6 mm
Hublänge
25 mm
Hubzahl pro Minute
0 - 2500 /min
Maximale
Schnittleistung
Holz
65 mm
Weichstahl
6 mm
Aluminium
10 mm
Gesamtlänge
292 mm
Gewicht (mit Akku: EY9L51)
3,35 kg
Geräusche, Vibration
Siehe beiliegendes Blatt
AKKU
Modell
EY9L50 EY9L51
Akku
Li-Ion
Nennspannung
18 V DC (3.6 V x 10 Zellen)
AKKU-LADEGERÄT
Modell
EY0L81
Nennleistung
Siehe Leistungsschild auf der Unterseite des Ladegerätes
Gewicht
0,93 kg
Ladezeit
EY9L50 EY9L51
Nutzbar: 50 Min Nutzbar: 65 Min
Voll: 65 Min Voll: 80 Min
Modell
EY0L82
Nennleistung
Siehe Leistungsschild auf der Unterseite des Ladegerätes
Gewicht
0,93 kg
Ladezeit
EY9L50 EY9L51
Nutzbar: 50 Min Nutzbar: 55 Min
Voll: 60 Min Voll: 70 Min
HINWEIS: Diese Tabelle kann Modelle enthalten, die möglicherweise in Ihrem Wohn-
gebiet nicht angeboten werden.
Bitte nehmen Sie auf den neusten Generalkatalog Bezug.
HINWEIS: Name und Adresse des Händlers entnehmen Sie bitte der beiliegenden
Garantiekarte.
Page 38

-
38 -
Instructions originales: anglais
Traduction des instructions originales:
Autres langues
I. USAGE PREVU
Merci d'avoir acheté la scie sauteuse
Panasonic. Cette scie sauteuse peut
être utilisée avec des batteries Panasonic rechargeables pour d'excellentes
performances de coupe. La scie sauteuse est conçue pour couper le métal, le bois et les cloisons sèches uniquement.
Lisez le livret sur les "Consignes de sécurité" et ce qui suit avant de l'utiliser.
II.
REGLES DE SECURITE ADDITIONNELLES
1) Tenez l'outil par les surfaces de
poignée isolées lorsque vous effectuez une opération pendant laquelle l'outil de coupe risque d'entrer en contact avec un fil caché.
Le contact avec un fil placé sous tension mettra aussi sous tension les
parties métalliques de l'outil, ce qui
risquerait d'électrocuter l'opérateur.
2) Utilisez des pinces ou une autre
méthode pratique pour fixer et
soutenir la pièce à travailler sur
une plateforme stable. Tenir la piè-
ce ouvragée à la main ou contre votre corps la rend instable et peut entraîner une perte de contrôle.
3) N'approchez pas les mains de la
zone de coupe et de la lame. Saisissez uniquement les surfaces de
poignée isolées. Si les deux mains
tiennent la scie, elles ne peuvent pas
être coupées par la lame.
4) Ne tenez jamais la pièce que vous
coupez dans les mains ou en travers de vos jambes. Il est essen-
tiel de supporter l'ouvrage correctement pour réduire l'exposition de votre corps ou les risques de perte de
contrôle.
5) N'oubliez pas que cette perceuse
est toujours en état de fonctionner
puisqu'elle est alimentée par batterie.
6) Utilisez toujours des lunettes ou
masques faciales de protection
avec blindages latéraux. Les lunettes de vue ou de soleil ordinaires
NE sont PAS des lunettes de protection.
7) Lorsque vous utilisez cet outil
pour couper du bois dans des zones confinées (dans une salle par
exemple), mettez un masque antipoussière.
8) Evitez de couper les clous. Avant
d'utiliser l'outil, vérifiez si la pièce ouvragée ne comporte pas de
clous; s'il y en a, retirez-les avant
d'utiliser l'outil.
9) Ne coupez pas de pièces trop gros-
ses.
Page 39

-
39 -
10) Vérifiez qu'il y ait bien suffisam-
ment d'espace autour de la pièce ouvragée avant de couper, afin
que la lame ne touche pas le plancher, l'établi, etc.
11) Tenez l'outil bien fermement.
12) Veillez à ce que la lame ne touche
pas la pièce ouvragée avant d'allumer l'outil.
13) N'approchez pas les mains des
pièces mobiles.
14) Ne touchez pas la lame ou la pièce
ouvragée tout de suite après avoir
utilisé l'outil; elles risquent d'être
très chaudes et de vous brûler la
peau.
15) Ne balancez jamais l'outil.
16) N'utilisez pas de lames déformées
ou fissurées.
17) N'utilisez pas de lames non conformes aux caractéristiques mentionnées dans le présent mode d'emploi.
18) Retirez la batterie du corps de
l'outil avant de remplacer la lame, d'effectuer des réglages ou
d'autres travaux d'entretien.
19) Portez des protections auditives
lorsque vous utilisez l'outil pendant de longues périodes.
Symbole Signifi cation
V Volts
Courant continu
n
0 Vitesse sans charge
… min
-1
Révolutions ou alternan-
ces par minute
Ah
Capacité électrique de la
batterie autonome
Pour réduire les risques
de blessures, l'utilisateur
doit lire et comprendre le
mode d'emploi.
Pour l'utilisation à l'inté-
rieur seulement.
AVERTISSEMENT:
N'utilisez que les batteries autonomes
de Panasonic car elles sont conçues
pour cet outil rechargeable.
Panasonic décline toute responsabilité en cas de dommage ou d’accident
causé par l’utilisation d’une batterie
autonome recyclée et d’une batterie
autonome de contrefaçon.
Ne mettez pas la batterie autonome
dans le feu, ne la placez pas près
d'une source de chaleur excessive.
N'enfoncez pas de clou ou autre dans
la batterie autonome, ne la secouez
pas, ne la démontez pas, n'essayez
pas de la modifier.
Ne mettez pas d'objets métalliques en
contact avec les bornes de la batterie
autonome.
Ne placez pas la batterie autonome dans le même contenant que des
clous ou des objets métalliques semblables.
Ne chargez pas la batterie autonome dans un endroit où la température est élevée, comme près d'un feu ou
au contact direct des rayons du soleil.
Sinon la batterie pourrait surchauffer,
s'enflammer ou exploser.
N'utilisez jamais un autre chargeur
pour charger la batterie autonome. Sinon la batterie pourrait fuir, surchauffer
ou exploser.
N'Après avoir retiré la batterie autonome de l’outil ou du chargeur, remettez toujours le couverclede la batterie autonome en place. Sinon, les
contacts de la batterie peuvent se mettre en court-circuit, entraînant le risque
d’un incendie.
Si la batterie autonome s’est détériorée,
la remplacer par une batterie neuve.
L’utilisation prolongée d’une batterie
autonome endommagée peut
provoquer des dégagements de
chaleur, un départ de feu ou l’explosion
de la batterie.
•
•
•
•
•
•
•
•
•
•
III. MONTAGE
AVERTISSEMENT:
Pour réduire les risques de blessures,
retirez toujours la batterie autonome
avant de changer la lame.
Page 40

-
40 -
Vérification avant emploi
Est-ce la bonne lame de scie sauteuse qui a été montée pour l'objet à découper ?
La forme de tige l'épaisseur de lame
correctes ont-elles été montées?
Vérifiez si la lame est montée de manière sécurisée ?
Vérifiez si la lame est craquée ou cassée.
Vérifiez qu'il n'y a pas d'objets étrangers dans l'objet à découper.
Installation et retrait de la
lame
Installation
1. La protection anti-poussières a été enlevée.
2. Essuyez toutes les poussières de découpe de la lame et du support de blocage de la lame.
3. Ziehen Sie den Hebel zum Anbringen/
Entfernen des Sägeblatts.
4. • Insérez la lame dans le support de bri-
de de la lame et régler l'arrière de la
lame le long du guidage à rouleau
pour que le dos de la lame de la scie
sauteuse glisse le long du guidage à
rouleau.
• Assurez-vous que la tige de la lame
est bien insérée en profondeur jusqu'à
ce que la projection de la lame soit
fixée par la bride de la lame
•
•
•
•
•
Guidage à rouleau
5. Libérez le levier de fixation/retrait de lame.
Vérifiez que le dos de la lame se trouve le long du guide à rouleaux et est
réglé droit.
AVERTISSEMENT:
Si vous n'insérez pas la lame de scie
assez profondément, la lame de scie
risquera d'être éjectée accidentellement
pendant le fonctionnement. Ceci vous
expose à graves dangers.
Retrait
1. Ziehen Sie den Hebel zum Anbringen/
Entfernen des Sägeblatts.
2. Retirez la lame.
Ajustement de la base
1. Utilisez la clé hexagonale pour desserrer la vis de fixation de la base.
2. Déplacez la base le long de l'orifice
d'ajustement de la base pour régler sa
position. (consultez le schéma à droite)
Il est possible d'ajuster latéralement la
base entre 0° et 45° et également la
position avant/arrière. Si vous inclinez
la base latéralement, retirez d'abord le
couvercle anti-poussière.
•
•
Page 41

-
41 -
Référez-vous à l'index de chanfrein
pour déterminer l'angle.
La vis de fixation du guide à refendre
doit être située sur le côté opposé de
l'outil biseauté.
3.
Utilisez la clé hexagonale pour serrer la
vis de fixation de la base.
Position de la base et utilisation pré-
vue
Position de l'ori-
fi ce d'ajustement
de la base
Utilisation prévue
Découpe normale à
angle droit
Découpe à un angle
entre 0° et 45°
REMARQUE:
Il ne s'agit que d'un guide brut. L'angle
de découpe réel sera affecté par des
facteurs comme la façon de tenir l'outil
contre la surface.
•
•
Ajustement du mode de course orbitale
Ajustez le mode de course orbitale à
l'objet à découper.
Position
du levier
Mouvement
de la lame
Principales ap-
plications
0
Vertical seule-
ment
Découpe de métaux durs comme de
l'acier
Découpe lisse de matériaux de constructions et de contreplaqué
Découpe autour de
courbes étroites
•
•
•
1
Mode de course
orbitale basse
Découpe de métaux
plus mous comme de
l'aluminium et d'autres
métaux non ferreux
Découpe de bois dur,
de contreplaqué et de
plastiques
•
•
2
Mode de course
orbitale moyenne
Découpe de matériaux relativement
mous
Découpe de bois et
de panneaux composés
Découpe haute vitesse de l'aluminium et
de l'acier doux
•
•
•
3
Mode de course
orbitale élevée
Découpe de matériaux mous
Découpe haute vitesse de matériaux comme le bois, les panneaux composés et
les plastiques
•
•
Si vous souhaitez produire une finition
plus propre, réglez le mode de course
orbitale à un niveau inférieur.
•
•
Page 42

-
42 -
Levier du soufflage
Sélectionnez le mode Soufflage de
poussière.
: ARRÊT : MARCHE
Adaptateur de poussière pour
l'aspirateur (EY9X016) (accessoire facultatif, non inclus)
Vous pouvez utiliser un aspirateur pour
ramasser la poussière de découpe durant la découpe.
Installation
1. Fixez le crochet de l'adaptateur du ramasse-poussière à l'avant de la base.
2. Enclenchez l'arrière pour l'installer.
3. Fixez le tuyau de l'aspirateur.
Il est conseillé d'utiliser un adaptateur
de poussière pour réduire les risques
d'endommagements de la surface de
l'objet durant la découpe.
•
Fixation ou retrait de la batterie autonome
1. Pour raccorder la batterie autonome:
Alignez les marques d'alignement et
fixez la batterie autonome.
Faites glisser la batterie autonome
jusqu'à ce qu'elle se verrouille en position.
Marques
d'alignement
2. Pour retirer la batterie autonome:
Tirez sur le bouton de l'avant pour libé-
rer la batterie autonome.
Bouton
•
Page 43

-
43 -
IV. UTILISATION
1. Poussez le levier de verrouillage de l'interrupteur vers le bas, tirez l'interrupteur
d'alimentation.
La vitesse augmente avec la quantité
de dépression de l'interrupteur d'alimentation.
2. Une fois que la découpe est terminée,
relâchez l'interrupteur d'alimentation.
3.
Vérifiez que la température de la lame a
suffisamment baissé et ensuite retirez-la.
MISE EN GARDE:
Lorsque vous faites fonctionner l’outil en
appuyant sur la gâchette, il peut y avoir
un décalage momentané avant le début
de la rotation. Cela ne signifie pas qu’il y
a un dysfonctionnement.
Ce décalage se produit alors que les
circuits de l’outil sont activés quand
on appuie sur la gâchette pour la
première fois après l’installation d’un
nouveau bloc batterie ou après que
l’outil n’a pas été utilisé pendant au
moins 1 minute (ou pendant au moins
5 minutes si le LED est en marche).
La rotation démarrera sans décalage
lors du second fonctionnement et des
suivants.
Découpe
REMARQUE:
Vérifiez qu'il n'y a pas d'obstacles
pour couper sous la pièce ouvragée.
Vérifiez qu'il n'y a pas d'objets tels que
des clous dans le matériau à découper.
•
•
•
•
Si la lame entre en contact avec de
tels objets durant la découpe, une
force de réaction forte sera générée
pouvant entraîner des blessures graves.
Ne placez pas votre main sur l'objet
dans le sens de la découpe.
Sinon, vous risquez de vous blesser.
Ne touchez pas la lame de la scie
sauteuse aussitôt après la découpe.
Sinon, vous risquez de vous brûler.
Découpe le long de lignes
marquées
1. Placez l'objet à découper sur la base et
alignez la lame sur la ligne marquée.
Ne placez pas la lame contre l'objet à
découper avant de tirer l'interrupteur
d'alimentation.
2. Tirez l'interrupteur d'alimentation, attendez jusqu'à ce que la vitesse soit stabilisée, puis placez la base contre l'objet
à découper et coupez le long des lignes
marquées.
Lors de la découpe de formes complexes, comme des formes avec
beaucoup de petites courbures, réduisez la vitesse de découpe et la vitesse de rotation.
•
•
•
•
Page 44

-
44 -
Sciage en plongée
1. Percez un trou dans la section à scier
en plongée afin d'y faire passer la lame.
2. Insérez la lame dans le trou sans toucher la pièce ouvragée, puis allumez
l'interrupteur d'alimentation.
3. Coupez le long de la ligne marquée.
Utilisation d'un guide à refendre
Il est possible d'utiliser un guide à refendre pour découper des lignes parallèles et des cercles et des arcs.
Installation du guide à refendre
1. Desserrez la vis de fixation du guide à
refendre.
2. Passez le guide à refendre à travers le
montant.
3. Ajustez la position de découpe, puis serrez la vis de fixation.
Découpe à la même épaisseur
1. Placez la base sur la pièce ouvragée
pour que le rebord du guide à refendre
et la pièce ouvragée soient ensemble.
2. Sans laisser la lame toucher la pièce
ouvragée, allumez l'interrupteur d'alimentation.
3. Placez le guide parallèle fermement en
face de la pièce ouvragée pour couper
une ligne parallèle.
AVERTISSEMENT:
N'inhalez pas de fumée émise par l'outil
ou par la batterie autonome, car elle
peut être nocive.
MISE EN GARDE:
N'utilisez pas l'outil d'une manière qui
cause un blocage du moteur. Ceci
pourrait endommager l'outil et la batterie autonome, causant un dégagement
de fumée ou un incendie.
Page 45

-
45 -
Panneau de commande
(1)
(3)
(2)
(1) Lumière DEL
Avant d'utiliser la lumière DEL, tirez toujours une fois l'interrupteur d'alimentation.
Appuyez sur la touche
de la lumière DEL
.
La lumière éclaire avec
un courant de très faible intensité qui n'affecte pas négativement la performance
de l'outil ou la capacité
de la batterie pendant
son utilisation.
MISE EN GARDE:
La lumière DEL incorporée est conçue
pour éclairer temporairement la petite
zone de travail.
Ne l'utilisez pas comme remplacement d'une torche normale, elle n'est
pas assez lumineuse.
La lumière DEL s'éteint quand l'outil
n'est pas utilisé pendant 5 minutes.
Mise en garde : NE REGARDEZ PAS
DIRECTEMENT LE FAISCEAU.
L'utilisation de commandes ou de réglages ou l'exécution de procédures autres
que ceux spécifi és dans ce manuel peut
entraîner l'exposition à de dangereuses
radiations.
•
•
•
(2)
Témoin d’avertissement de surchauffe
Arrêt
(fonctionnement normal)
Clignotant : Surchauffe
Indique que le fonctionnement a été arrêté à la
suite d'une surchauffe
de la batterie.
Pour protéger le moteur ou la batterie,
veillez à bien noter les points suivants
lorsque vous effectuez cette opération.
Si le moteur ou la batterie deviennent
chauds, la fonction de protection sera activée et le moteur ou la batterie
cesseront de fonctionner. Le témoin
d'avertissement de surchauffe s'allume ou clignote sur le panneau de
commande lorsque cette caractéristique est active.
Si la caractéristique de protection
contre la surchauffe s'active, laissez
l'outil se refroidir complètement (au
moins 30 minutes). L'outil est prêt à
être utilisé lorsque le témoin d'avertissement de surchauffe s'éteint.
Evitez d'utiliser l'outil d'une façon qui
activerait de façon répétée la caractéristique de protection contre la surchauffe.
Si l'outil est utilisé de façon continue sous haute charge, ou s'il est utilisé dans un environnement chaud
(en été par exemple), il est possible que la caractéristique de protection contre la surchauffe s'active fréquemment.
Si l'outil est utilisé dans un environnement froid (en hiver par exemple),
ou s'il est arrêté fréquemment pendant l'utilisation, il est possible que la
caractéristique de protection contre
la surchauffe ne s'active pas.
Le niveau de température ambiante moyenne se situe entre 0°C (32°F)
et 40°C (104°F). Si la batterie autonome est utilisée alors que sa température est inférieure à 0°C (32°F),
l'outil pourrait ne pas fonctionner correctement.
Lorsqu'une batterie autonome froi-
•
•
•
•
•
•
•
Page 46

-
46 -
de (en-dessous de 0°C (32°F)) doit
être rechargée dans une pièce chaude, laissez la batterie autonome dans
la pièce pendant une heure au moins
et rechargez-la quand elle a atteint la
température ambiante.
(3) Témoin d'avertissement de batte-
rie basse
Arrêt
(fonctionnement normal)
Clignotant
(Pas de charge)
Caractéristique de
protection de la batterie
active
Une décharge excessive (totale) des
batteries aux ions de lithium réduit leur
durée de vie de façon notable. L'outil
comprend une caractéristique de protection de la batterie conçue pour empêcher une décharge excessive de la
batterie autonome.
La caractéristique de protection de
la batterie s'active automatiquement
avant que la batterie ne perde sa
charge, entraînant le clignotement
du témoin d'avertissement de batterie basse.
Dès que vous remarquez le clignotement du témoin d'avertissement de
batterie basse, rechargez immédiatement la batterie autonome.
Si l'outil est démarré avec trop peu de
batterie restante, il pourra s’arrêter en
cours d’opération sans que le voyant
d’avertissement de batterie faible ne
clignote avant cela. Cela indiquera
qu'il y a trop peu de batterie disponible pour utiliser l'outil et que le bloc
batterie devra être rechargé avant
tout autre utilisation.
Si l'outil est sujet à une charge soudaine durant son utilisation, cela provoquera le verrouillage du moteur,
le détecteur de prévention des décharges pourrait être déclenché et le
voyant de batterie faible pourrait clignoter. Le voyant arrêtera de clignoter une fois que vous aurez géré la
raison du verrouillage du moteur et
que vous aurez activer la gâchette.
•
•
•
•
[Batterie autonome]
Pour une utilisation correc-
te de la batterie autonome
Batterie autonome Li-ion
Pour une longévité optimale de la batterie, rangez la batterie autonome Liion sans la charger après l'avoir utilisée.
Lors de la charge de la batterie autonome, assurez-vous que les bornes
du chargeur de batterie sont libres
de tout corps étranger comme de la
poussière et de l'eau, etc. Nettoyez
les bornes avant de la charger si des
corps étrangers se trouvent sur les
bornes.
La durée de vie des bornes de la
batterie autonome peut être affectée
par des corps étrangers comme de la
poussière et de l'eau, etc. pendant le
fonctionnement.
Lorsque vous n'utilisez pas la batterie autonome, éloignez-la d'autres objets métalliques tels que : trombones,
pièces de monnaie, clés, clous, vis et
autres petits objets métalliques susceptibles de connecter les bornes entre elles.
Si vous court-circuitez les bornes de
la batterie, vous risquez de causer
des étincelles, de vous brûler ou de
provoquer un incendie.
Lors de l'utilisation de la batterie autonome, assurez-vous de la bonne ventilation du lieu de travail.
Lorsque la batterie autonome est retirée du corps de l'outil, replacez immédiatement le couvercle de la batterie
autonome afin d'empêcher la poussière ou la crasse de contaminer les bornes de la batterie et de provoquer un
court-circuit.
•
•
•
•
•
Page 47

-
47 -
Longévité des batteries autonomes
Les batteries rechargeables ont une
longévité limitée. Si le temps de fonctionnement devient très court après la
recharge, remplacez la batterie autonome par une neuve.
Recyclage de la batterie autonome
ATTENTION:
Pour la protection de l'environnement
naturel et le recyclage des matériaux,
veillez à mettre la batterie au rebut à un
endroit prévu officiellement à cet effet,
s'il y en a un dans votre pays.
[Chargeur de batterie]
Recharge
Mise en garde
Si la température de la batterie autonome chute au-dessous d’environ
-10ºC, la charge s’arrête automatiquement pour empêcher la détérioration de la batterie.
Le niveau de température ambiante
moyenne se situe entre 0°C (32°F) et
40°C (104°F).
Si la batterie autonome est utilisée
alors que sa température est inférieure à 0°C (32°F), l'outil pourrait ne pas
fonctionner correctement.
Lorsqu'une batterie autonome froide (en-dessous de 0°C (32°F)) doit
être rechargée dans une pièce chaude, laissez la batterie autonome dans
la pièce pendant une heure au moins
et rechargez-la quand elle a atteint la
température ambiante.
Laissez refroidir le chargeur quand
vous rechargez plus de deux batteries autonomes à la suite.
Ne mettez pas vos doigts dans les
trous des connecteurs lorsque vous
tenez les chargeurs ou à n'importe
quelle occasion.
•
•
•
•
•
Pour éviter les risques d'incendie ou
d'endommagement du chargeur de
batterie.
N'utilisez pas de source d'alimentation provenant d'un générateur
de moteur.
Ne bouchez pas les trous d'aération du chargeur et de la batterie
autonome.
Débranchez le chargeur lorsque
vous ne l'utilisez pas.
Batterie autonome Li-ion
REMARQUE:
Votre batterie autonome n'est pas
complètement chargée au moment
de l'achat. Veillez à bien charger complètement la batterie avant son utilisation.
Chargeur de batterie
1. Branchez le cordon d'alimentation du
chargeur dans une prise secteur.
2. Introduisez soigneusement la batterie
autonome dans le chargeur.
1. Alignez les marques d'alignement et
placez la batterie dans le poste d'accueil sur le chargeur.
2. Faites glisser vers l'avant dans le
sens de la flèche.
Marques d'alignement
3. Pendant la charge, le témoin de charge
s'allume.
Lorsque la charge est terminée, un in-
terrupteur électronique s'actionne pour
protéger la batterie.
La charge ne peut pas être réalisée
si la batterie autonome est chaude
(par exemple, à la suite d'un long travail de perçage).
Le témoin d'attente orange clignote
jusqu'à ce que la batterie se soit refroidie.
La charge commence alors automatiquement.
•
•
•
•
Page 48

-
48 -
4. Le témoin de charge (vert) clignote lentement dès que la batterie est chargée à
environ 80%.
5. Lorsque le chargement est terminé, le témoin de charge de couleur verte s’éteint.
6. Lorsque la température de la batterie
autonome est de 0 ºC ou moins, la batterie autonome prend plus longtemps à
charger que la durée standard.
Même lorsque la batterie est complète-
ment chargée, elle n'aura qu'environ 50%
de la puissance d'une batterie complètement chargée à une température de fonctionnement normale.
7. Consultez un distributeur agréé si le témoin de charge (vert) ne s’éteint pas.
8. Si une batterie complètement chargée
est à nouveau insérée dans le chargeur,
le témoin de charge s’allume. Après
quelques minutes, le témoin de charge
de couleur verte s’éteindra.
Bouton de dégage
ment de la batterie
9. Retirez la batterie lorsque le bouton de
dégagement de la batterie est en position haute.
Page 49

-
49 -
INDICATION DU VOYANT
Chargement terminé. (Pleine charge)
La batterie est chargée à environ 80%.
Chargement en cours.
Le chargeur est branché dans la prise secteur.
Prêt pour la charge.
Témoin de l’état de charge
Gauche: vert Droite: orange s’affichent.
La batterie autonome est froide.
La batterie autonome est chargée lentement pour réduire l’effort de
la batterie.
La batterie autonome est chaude.
La charge commence lorsque la température de la batterie autonome descend. Lorsque la température de la batterie autonome est
de –10ºC ou moins, le témoin de charge (orange) se met également
à clignoter
. La charge commence lorsque la température de la bat-
terie autonome augmente.
Impossible de charger. Colmatage par la poussière ou mauvais
fonctionnement de la batterie autonome.
Éteint
Allumé Clignote
(Vert) (Orange)
Avis aux utilisateurs concernant la collecte et l’élimination des
piles et des appareils électriques et électroniques usagés
Apposé sur le produit lui-même, sur son emballage, ou figurant dans la documentation qui l’accompagne, ce pictogramme indique que les piles et appareils électriques et électroniques usagés doivent être séparés des ordures
ménagères.
Afin de permettre le traitement, la valorisation et le recyclage adéquats des
piles et des appareils usagés, veuillez les porter à l’un des points de collecte prévus, conformément à la législation nationale en vigueur ainsi qu’aux directives 2002/96/CE et 2006/66/CE.
En éliminant piles et appareils usagés conformément à la réglementation en
vigueur, vous contribuez à prévenir le gaspillage de ressources précieuses
ainsi qu’à protéger la santé humaine et l’environnement contre les effets potentiellement nocifs d’une manipulation inappropriée des déchets.
Pour de plus amples renseignements sur la collecte et le recyclage des piles
et appareils usagés, veuillez vous renseigner auprès de votre mairie, du service municipal d’enlèvement des déchets ou du point de vente où vous avez
acheté les articles concernés.
Le non-respect de la réglementation relative à l’élimination des déchets est
passible d’une peine d’amende.
Page 50

-
50 -
Pour les utilisateurs professionnels au sein de l’Union européenne
Si vous souhaitez vous défaire de pièces d’équipement électrique ou électronique,
veuillez vous renseigner directement auprès de votre détaillant ou de votre fournisseur.
[Information relative à l’élimination des déchets dans les pays
extérieurs à l’Union européenne]
Ce pictogramme n’est valide qu’à l’intérieur de l’Union européenne. Pour connaître la
procédure applicable dans les pays hors Union Européenne, veuillez vous renseigner
auprès des autorités locales compétentes ou de votre distributeur.
Note relative au pictogramme à apposer sur les piles (voir les 2
exemples ci-contre)
Le pictogramme représentant une poubelle sur roues barrée d’une croix est conforme à
la réglementation. Si ce pictogramme est combiné avec un symbole chimique, il remplit
également les exigences posées par la Directive relative au produit chimique concerné.
V. ENTRETIEN
Utilisez essentiellement du tissu sec et souple pour essuyer l'outil. N'utilisez pas de
tissu humide, dissolvant, benzine ou autres dissolvants volatiles pour le nettoyer.
Au cas où l’intérieur de l’outil ou du bloc batterie serait exposé à de l’eau, enlevez
l’eau et laissez sécher dès que possible. Enlevez soigneusement toutes saletés
ou limailles de fer qui s’accumulent à l’intérieur de l’outil. Si vous rencontrez des
problèmes lors de l’utilisation de l’outil, consulter un atelier de réparation.
VI. ACCESSOIRES
MISE EN GARDE:
L'utilisation d'accessoires ne figurant pas dans ce manuel peut causer un incendie, un choc électrique ou des blessures corporelles. N'utilisez que les accessoires recommandés.
Lame à métal
• EY9SXMJ0
Pour tronçonner le métal en général
Lame à bois
• EY9SXWJ2
Pour tronçonner le bois en général
Pour effectuer commodément les
coupes parallèles et les coupes répétées de même largeur.
Adaptateur de poussière pour l'aspirateur
(Accessoire en option)
• EY9X016
•
•
•
Page 51

-
51 -
VII. CARACTÉRISTIQUES TECHNIQUES
APPAREIL PRINCIPAL
Modèle EY4550
Moteur 18 V
Épaisseur maximum de la lame
montée
1,6 mm
Longueur des courses 25 mm
Courses par minute 0 - 2500 /min
Capacités maximales de découpe
Bois 65 mm
Acier doux 6 mm
Aluminium 10 mm
Longueur totale 292 mm
Poids (avec batterie: EY9L51) 3,35 kg
Bruit, Vibration Reportez-vous à la fiche incluse
BATTERIE AUTONOME
Modèle EY9L50 EY9L51
Stockage de la batterie Li-ion
Tension de la batterie 18 V CC(3,6 V x 10 piles)
CHARGEUR DE BATTERIE
Modèle EY0L81
Puissance nominale Voir la plaque signalétique se trouvant sur le côté inférieur du chargeur
Poids 0,93 kg
Durée de chargement
EY9L50 EY9L51
Utilisable: 50 minutes Utilisable: 65 minutes
Plein: 65 minutes Plein: 80 minutes
Modèle EY0L82
Puissance nominale Voir la plaque signalétique se trouvant sur le côté inférieur du chargeur
Poids 0,93 kg
Durée de chargement
EY9L50 EY9L51
Utilisable: 50 minutes Utilisable: 55 minutes
Plein: 60 minutes Plein: 70 minutes
REMARQUE: Ce tableau peut inclure des modèles non disponibles dans votre région.
Veuillez vous reporter au catalogue général le plus récent.
REMARQUE: Pour obtenir le nom et l'adresse du revendeur, veuillez consulter la carte de
garantie incluse.
Page 52

-
52 -
Istruzioni originalmente scritte in: inglese
Istruzioni originali tradotte in: altre lingue
I. USO PREVISTO
Grazie per aver acquistato il seghetto Panasonic. Questo seghetto può essere utilizzato con le batterie ricaricabili Panasonic e assicura eccellenti prestazioni di taglio. Il seghetto è destinato
esclusivamente al taglio di metallo, legno e cartongesso.
Leggere il libretto delle istruzioni di sicurezza e quanto segue prima dell’uso.
II. NORME DI SICU-
REZZA ADDIZIONALI
1) Tenere l’attrezzo mediante le su-
perfici isolanti per la presa quando
si esegue un lavoro durante il quale l’attrezzo da taglio potrebbe venire a contatto con cavi nascosti. Il
contatto con un cavo “sotto tensione”
renderà le parti metalliche esposte
dell’attrezzo “sotto tensione” e questo
potrebbe causare una scossa elettrica all’operatore.
2) Utilizzare morsetti o un altro me-
todo idoneo per assicurare e sostenere il pezzo da lavorare su una
base stabile. Se si sostiene il pezzo
da lavorare con le mani o col corpo,
esso risulterà instabile e potrà provocare perdita di controllo.
3)
Non toccare la lama e la parte da
tagliare. Stringere solo le superfici isolanti per la presa. Se si afferra
l’attrezzo con entrambe le mani, sussisterà minor rischio di tagli accidentali.
4) Non tenere mai con le mani o tra le
gambe il pezzo da tagliare. È importante sostenere bene il pezzo di lavoro per ridurre al minimo l’esposizione
del corpo o la perdita di controllo.
5) Tenere presente che questo attrez-
zo è sempre pronto a funzionare,
perché non è necessario collegarlo ad una presa di corrente.
6) Usare sempre occhiali protettivi
oppure occhiali con protezioni laterali. Lenti o occhiali da sole NON
sono occhiali di sicurezza.
7) Quando questo attrezzo viene utilizzato per eseguire lavori su legno
in uno spazio ristretto (per esempio in un luogo chiuso) mettere
una mascherina per proteggersi
dalla polvere.
8) Evitare di tagliare i chiodi. Ispezionare attentamente il pezzo di lavoro per assicurarsi che non ci siano
chiodi ed eventualmente rimuoverli prima di iniziare a lavorare.
9) Non tagliare pezzi di lavoro molto
grandi.
10) Controllare che l’area vicina e in-
torno al pezzo di lavoro sia libera
prima di iniziare a tagliare in modo che la lama non colpisca il pavimento, il banco di lavoro, ecc.
11) Tenere saldamente l’attrezzo.
12) Assicurarsi che la lama non sia in
contatto con il pezzo di lavoro prima di accendere l’attrezzo.
Page 53

-
53 -
13) Non avvicinare le mani alle parti in
movimento.
14) Non toccare la lama o il pezzo di
lavoro subito dopo l’operazione di
taglio, perché potrebbero essere
molto caldi e potreste scottarvi.
15) Non usare mai due attrezzi contemporaneamente.
16) Non utilizzare lame deformi o rotte.
17) Non utilizzare lame non conformi
alle caratteristiche specificate in
queste istruzioni.
18) Rimuovere il pacco batteria dal
corpo dell’attrezzo prima di sostituire la lama, prima di fare regolazioni oppure eseguire lavori di manutenzione.
19) Indossare delle protezioni uditive, quando si usa l’attrezzo per un
lungo periodo.
Simbolo Signifi cato
V Volt
Corrente diretta
n
0 Velocità senza carico
… min
-1
Giri o reciprocazioni per
minuto
Ah
Capacità elettrica del
pacco batteria
Per ridurre il pericolo
di lesioni, è necessario
leggere e comprendere il
manuale di istruzioni.
Solo per uso interno.
AVVERTIMENTO:
Non utilizzare pacchi batteria diversi da quelli Panasonic, appositamente
progettati per l’uso con questo utensile ricaricabile.
La Panasonic non sarà responsabile
per eventuali danni o incidenti causati dall’uso di un pacco batteria riciclato
e/o contraffatto.
Non smaltire il pacco batteria nel fuoco e non esporlo a eccessi di calore.
Non introdurre chiodi nel pacco batteria, non sottoporlo a urti, non smontarlo e non tentare di modificarlo.
Evitare che oggetti metallici entrino a
contatto con i terminali del pacco batteria.
Non trasportare né conservare il pacco batteria nello stesso contenitore in
cui sono presenti chiodi o oggetti metallici simili.
Non ricaricare il pacco batteria in un
luogo esposto ad alte temperature,
per es. vicino ad un fuoco o alla luce
solare diretta. In caso contrario la batteria può surriscaldarsi, prendere fuoco o esplodere.
Per ricaricare il pacco batteria utilizzare esclusivamente il caricabatteria dedicato. In caso contrario la batteria potrebbe perdere, surriscaldarsi o esplodere.
Dopo aver rimosso il pacco batteria
dall’attrezzo o dal caricabatteria, rimontare sempre il coperchio del pacco batteria. In caso contrario, i contatti della batteria potrebbero andare in
cortocircuito, con conseguente rischio
d’incendio.
Se il pacco batteria risulta deteriorato, sostituirlo con uno nuovo.
L’uso prolungato di un pacco batteria danneggiato può generare calore,
danni e incendi.
•
•
•
•
•
•
•
•
•
•
III. MONTAGGIO
AVVERTIMENTO:
Per ridurre il rischio di lesioni, rimuovere
il pacco batterie ogni volta che si cambia la lama.
Page 54

-
54 -
Ispezione prima dell’uso
La lama del seghetto è applicata correttamente all’oggetto da tagliare?
Sono stati montati forma e lama dello
spessore corretto?
La lama è fissata in sicurezza?
La lama è scagliata o rotta?
Nell’oggetto da tagliare sono presenti
corpi estranei?
Installazione e rimozione della
lama
Installazione
1. La copertura antipolvere è rimossa.
2. Rimuovere eventuali residui di taglio dalla lama e dalla staffa fissaggio lama.
3. Tirare la leva di attacco/rimozione della
lama.
4. • Inserire la lama nella staffa serraggio
lama e posizionare la parte posteriore
della lama lungo la guida rullo, in modo che la parte posteriore della lama
del seghetto scorra lungo la guida rullo.
Assicurare che l'albero della lama sia
inserito abbastanza profondamente
fino che la proiezione della lama è
fissata dal morsetto della lama.
Guida rullo
•
•
•
•
•
•
5. Rilasciare la leva attacco/rimozione lama
Verificare che la parte posteriore della
lama si trovi inserita correttamente sul
rullo di guida.
AVVERTIMENTO:
Se la lama non viene inserita bene in
fondo, potrebbe venire espulsa inaspettatamente durante l’operazione. Questa condizione può essere molto pericolosa.
Rimozione
1. Tirare la leva di attacco/rimozione della
lama.
2. Estrarre la lama.
Regolazione della base
1. Utilizzare il chiavino esagonale per allentare la vite di fissaggio della base.
2. Spostare la base lungo l foro di allineamento della base per fissarne la posizione. (Vedere il diagramma a destra.)
La base può essere disposta tra 0° e
45° lateralmente, inoltre è possibile regolare la posizione di avanzamento/retrocessione. Se si inclina la base lateralmente, rimuovere preventivamente
la protezione antipolvere.
Per la determinazione dell’angolazione, fare riferimento alla scal sfalsatura.
La vite di fissaggio della guida parallela dovrebbe trovarsi sul lato opposto
dello strmento.
•
•
•
•
Page 55

-
55 -
3.
Utilizzare il chiavino esagonale per serrare la vite di fissaggio della base.
Posizione della base e scopo d’uso
Posizione del foro
di regolazione
base
Scopo di uso
Taglio angolare con
angolo normale a
destra
Taglio di un angolo
compreso tra 0° e
45°
NOTA:
Questa guida è solo indicativa. L’angolo effettivo di taglio sarà influenzato
da fattori come l’impugnatura dell’attrezzo rispetto la superficie.
Regolazione della modalità di
taglio orbitale
Regolare la modalità di taglio orbitale
in base all’oggetto da tagliare
Posizio-
ne leva
Movimento
lava
Applicazioni
principali
0
Solo verticale
Taglio di metalli duri
come acciaio
Taglio senza interruzioni di materiali di
costruzione e controsoffitti
Taglio di curve di dimensioni ridotte
•
•
•
1
Modalità taglio
orbitale ridotto
Taglio di metalli non
resistenti come l’alluminio e altri materiali
non ferrosiome l’alluminio e altri materiali
non ferrosi
Taglio di legno, pannelli di compensato e
plastica
•
•
2
Modalità taglio
orbitale medio
Taglio materiali soffici
Taglio di pannelli in
legno e materiale
composito
Taglio ad alta velocità
di alluminio e acciaio
morbido
•
•
•
3
Modalità taglio
orbitale elevata
Taglio materiali soffici
Taglio ad altqa velocità di materiali come
legno, compensato e
plastica
•
•
Se si desidera che la finitura sia meglio definita, impostare la modalità di
taglio orbitale su un livello inferiore.
•
•
Page 56

-
56 -
Leva di soffiatura
Selezionare la modalità di soffiatura
della polvere.
: SPEGNERE : ACCENDERE
Protezione antipolvere per aspirapolvere (EY9X016) (disponibile come
accessorio, non incluso)
È possibile utilizzare un aspirapolvere
per raccogliere i residui del taglio.
Installazione
1. Fissare il gancio dell’adattatore raccolta
polvere alla parte anteriore della base.
2. Far scattare la parte posteriore per installarla.
3. Fissare il tubo dell’aspirapolvere.
Si consoglia di utilizzare un adattatore
aspirapolvere per nridurre il rischiio di
danneggiare la superficie dell’ogetto
da tagluare.
•
Applicazione o rimozione del
pacco batteria
1. Per collegare il pacco batteria:
Installare il pacco batteria, allineandosi
con le marcature.
Far scorrere il pacco batteria finché
non si blocca in posizione.
Marcature
allineamento
2. Per rimuovere il pacco batteria:
Tirare il pulsante dalla parte frontale per
rilasciare il pacco batterie.
Pulsante
•
Page 57

-
57 -
IV.
FUNZIONAMENTO
1. Spingere in basso la leva blocco interruttore, quindi premere l’interruttore di
accensione.
La velocità aumenta parallelamente
alla quantità di depressione dell’interruttore di accensione.
2. Dopo aver completato il taglio, rilasciare
l’interruttore di accensione
3. Verificare che la temperatura della lama sia sufficientemente bassa, quindi rimuovere la lama.
ATTENZIONE:
Quando si tira la levetta per avviare il
prodotto, possono trascorrere alcuni
istanti prima che la rotazione inizi. Ciò,
tuttavia, non è un malfunzionamento.
L'intervallo di tempo è dovuto al fatto
che il circuito del prodotto si avvia
quando la leva viene tirata per la prima
volta dopo che è stato inserito un pacco
batteria nuovo o dopo che il prodotto
non è stato utilizzato per almeno 1
minuto (o 5 minuti se la luce LED è
accesa). Dalla seconda volta in poi, la
rotazione si avvierà senza intervalli.
Taglio
NOTA:
Verificare che al di sotto della superficie del pezzo da lavorare non sussistano ostacoli al taglio.
Verificare che nel materiale da tagliare
non siano presenti corpi estranei co-
me chiodi.
Se la lama entra a contatto con ta-
li oggetti durante il taglio, si genererà
una forte forza di reazione che potrebbe provocare gravi lesioni personali.
•
•
•
•
Non porre le mani sull’oggetto nella direzione in cui deve svolgersi il taglio.
Se non si osserva questa precauzione,
sussiste il rischio di lesioni personali.
Non toccare la lama del seghetto im-
mediatamente dopo il taglio.
Se non si osserva questa precauzio-
ne, sussiste il rischio di ustioni.
Taglio lungo le marcature
1. Posizionare l’oggetto da tagliare sulla
base e allineare la lama alla marcatura.
Non fare entrare la lama in contatto
con l’oggetto da tagliare prima di aver
premuto l’interruttore di accensione.
2. Premere l’interruttore, attendere che la
velocità si stabilizzi, quindi collocare la
base contro l’oggetto da tagliare lungo
le marcature.
Se si tagliano oggetti dalle forme
complesse, ad esempio, con molte
piccole curve, ridurre la velocità del
taglio e di rotazione della lama.
•
•
•
•
Page 58

-
58 -
Taglio dal centro
1. Trapanare un foro nella sezione da tagliare dal centro per far passare la lama.
2. Inserire la lama nel foro senza che tocchi il pezzo da lavorare, quindi premere
l’interruttore di accensione.
3. Tagliare lungo la marcatura.
Uso della guida parallela
È possibile utilizzare una guida parallela per tagliare linee parallele e cerchi
ed archi.
Installazione della guida parallela
1. Allentare la vite di fissaggio della guida
parallela.
2. Far passare la guida parallela atraverso
l’attacco.
3. Regolare la posizione di taglio e quindi
serrare la vite di fissaggio.
Taglio alla stessa larghezza
1. Posizionare la base sul pezzo da lavorare in modo che il bortdo della guida parallela e il pezzo da lavorare coincidano.
2. Facendo attenzione che la lama non sia
già a contatto con il pezzo da lavorare,
premere l’interruttore di accensione.
3. Volgere con decisione la guida pezzo
verso il pezzo da lavorare per tagliare
una linea parallela.
AVVERTIMENTO:
Non inspirare eventuale fumo emesso dal prodotto o dal pacco batteria in
quanto potenzialmente pericoloso.
ATTENZIONE:
Evitare usi del prodotto che possano
determinare blocchi al motore. La mancata osservanza può comportare il danneggiamento del prodotto e del pacco
batteria con conseguente fuoriuscita di
fumo o incendio.
Page 59

-
59 -
Pannello di controllo
(1)
(3)
(2)
(1) Luce LED
Prima dell'uso della luce
LED, premere sempre
l'interruttore una volta.
Premere il pulsante della luce LED.
La luce illumina con
un consumo minimo e
non influenza negativamente la prestazione dell’avvitatore, né la
capacità della batteria.
ATTENZIONE:
La luce LED incorporata è stata realizzata per l’illuminazione temporanea
di un’area di lavoro ridotta.
Non utilizzarla in sostituzione di una
luce normale: la luminosità sarà insufficiente.
La luce LED si spegne se l’utensile
non viene utilizzato per 5 minuti.
Attenzione: NON FISSARE DIRETTA-
MENTE IL RAGGIO.
L’utilizzo di comandi, regolazioni e l’attuazione di istruzioni diverse da quelle qui
riportate potrebbero provocare un’esposizione pericolosa alle radiazioni.
(2) Spia avvertenza surriscaldamento
Spenta
(funzionamento
normale)
Lampeggiante:
surriscaldamento
Indica che il funzionamento è
stato interrotto a causa un surriscaldamento della batteria.
Per proteggere il motore o la batteria,
tenere presente quanto segue nell'esecuzione del lavoro.
Se il motore o la batteria si scurriscaldano verrà attivata la funzione di protezione, che comporta l'arresto del
•
•
•
•
motore o della batteria. Quando questa funzione è attiva, sul pannello di
controllo lampeggia la spia di avvertenza da surriscaldamento.
Se si attiva la protezione da surriscaldamento, lasciare raffreddare completamente l’utensile (per almeno 30
minuti). Quando la spia di avvertenza da surriscaldamento si spegne,
l'utensile sarà pronto per l'uso.
Evitare un uso dell’utensile che porti
all’attivazione ripetuta della protezione da surriscaldamento.
Se l'utensile viene utilizzato in modo continuato in condizioni di intenso lavoro o di temperature elevate
(ad esempio in estate), la funzione di
protezione da surriscaldamento potrebbe attivarsi di frequente.
Se l'utensile viene utilizzato in condizioni di temperature molto basse (ad
esempio in inverno) o viene utilizzato con intervalli frequenti, la funzione di protezione da surriscaldamento
potrebbe non attivarsi.
La temperatura ambientale deve essere compresa tra 0°C (32°F) e 40°C
(104°F). Se il pacco batteria è usato
quando la temperatura è al di sotto di
0°C (32°F), l’utensile smetterà di funzionare correttamente.
Per caricare un pacco batteria freddo
(al di sotto di 0°C (32°F)) in un luogo
caldo, lasciare il pacco batteria nel
locale per oltre un’ora per permettere allo stesso di raggiungere la temperatura ambiente.
(3) Spia avvertenza batteria prossima
all’esaurimento
Spenta
(funzionamento normale)
Lampeggiante:
(batteria prossima
all’esaurimento)
Funzione protezione
batteria attiva
Lo scaricarsi eccessivo (completo) delle batterie a ioni di litio riduce drasticamente la loro autonomia. L’utensile
è dotato di una funzione di protezione
della batteria realizzata per evitare lo
scaricarsi eccessivo del pacco batteria.
•
•
•
•
•
•
Page 60

-
60 -
La funzione di protezione della batteria si attiva immediatamente prima che la batteria perda la carica, così da far lampeggiare la spia di avvertenza batteria prossima all’esaurimento.
Se si nota la spia di avvertenza batteria prossima all’esaurimento, caricare
immediatamente il pacco batteria.
Se la carica residua della batteria è molto ridotta, il prodotto potrebbe smettere di funzionare senza che
la spia di avvertenza che segnala la
riduzione della carica lampeggi. Ciò
indica che l'alimentazione è insufficiente e che il pacco batteria deve
essere caricato prima di continuare
l'uso.
Se il prodotto viene sottoposto a improvviso sforzo con conseguente
blocco del motore, il sensore che previene l'eccessiva scarica potrebbe attivarsi e la spia di avvertenza che segnala la riduzione della carica potrebbe
lampeggiare. La spia smetterà di lampeggiare quando la causa del blocco
del motore sarà stata risolta e il ciclo riattivato.
[Pacco batteria]
[Pacco batteria]
Per un uso corretto del
pacco batteria
Pacco batteria Li-ion
Per una conservazione ottimale della batteria, riporre il pacco batteria
agli ioni di litio dopo l’uso senza ricaricarlo.
Quando il pacco batteria viene caricato, assicurarsi che i terminali sul caricabatteria siano sgombri da sostanze
estranee, quali polvere, acqua, ecc.
Pulire i terminali prima di caricare il
pacco batteria, qualora vengano trovate sostanze estranee sui terminali.
La durata dei terminali del pacco bat-
teria può essere influenzata da sostanze estranee, quali polvere, acqua, ecc. durante il funzionamento.
Quando il pacco batteria non viene
usato, tenerlo lontano da altri oggetti
metallici come: clip, monetine, chiavi,
chiodi, viti o altri piccoli oggetti metallici che potrebbero creare un collega-
•
•
•
•
•
•
•
mento da un terminale all’altro.
Cortocircuitare i terminali del pacco
batteria potrebbe causare scintille,
ustioni oppure un incendio.
Quando si usa il pacco batteria, assicurarsi che il luogo di lavoro sia ben
ventilato.
Quando si rimuove il pacco batteria
dall’alloggiamento principale dell’utensile, riposizionare immediatamente
il coperchio del pacco batteria, onde
evitare che polvere e sporcizia contaminino i terminali della batteria e provochino un cortocircuito.
Durata del pacco batteria
Le batterie ricaricabili hanno una durata limitata. Se il tempo di funzionamento diventa estremamente breve dopo la
ricarica, sostituire il pacco batteria con
uno nuovo.
Riciclo della batteria
ATTENZIONE:
Per ragioni relative alla protezione dell’ambiente e al riciclaggio dei materiali,
assicurarsi che lo smaltimento del prodotto avvenga in un luogo ufficialmente
preposto a tale fine.
[Caricabatterie]
Ricarica
Precauzione
Se la temperatura del pacco batteria
scende al di sotto dei −10°C (14°F)
circa, il caricamento s’interrompe automaticamente per evitare la degradazione della batteria.
La temperatura ambientale deve essere compresa tra 0°C (32°F) e 40°C
(104°F).
Se il pacco batteria è usato quan-
do la temperatura è al di sotto di 0°C
(32°F), l’utensile smetterà di funzionare correttamente.
Per caricare un pacco batteria fred-
•
•
•
•
•
Page 61

-
61 -
do (al di sotto di 0°C (32°F)) in un luogo caldo, lasciare il pacco batteria nel
locale per oltre un’ora per permettere
allo stesso di raggiungere la temperatura ambiente.
Lasciare raffreddare il caricatore
quando si caricano più di due pacchi
batterie consecutivamente.
Non infilare le dita nel foro di contatto per tenere in mano il caricabatterie
o altro scopo.
Onde evitare il rischio d’incendio o il
danneggiamento del caricabatteria:
Non utilizzare energia fornita da un
generatore a motore.
Non coprire le prese d’aria del caricabatteria e del pacco batteria.
Scollegare il caricabatteria se non
in uso.
Pacco batteria Li-ion
NOTA:
Al momento dell’acquisto, il pacco batteria non è carico. Assicurarsi di caricare la batteria prima dell’uso.
Caricabatterie
1. Collegare il caricatore alla presa di corrente.
2. Inserire saldamente il pacco batteria nel
caricabatteria.
1. Allineare le marcature e collocare la
batteria nel raccordo del caricatore.
2. Far scorrere nella direzione indicata
dalla freccia.
Marcature allineamento
3. Durante la ricarica, la spia di caricamento si accende.
Quando la ricarica è stata completata,
l’interruttore elettronico interno scatta
automaticamente per evitare la sovraccarica.
La ricarica non avviene se il pacco
batteria è caldo (per esempio, subito
dopo l’uso per un lavoro pesante).
La spia di standby arancione lampeg-
•
•
•
•
•
•
gia mentre la batteria si sta raffreddando.
La ricarica quindi comincia automaticamente.
4. La spia di carica (verde) lampeggia lentamente quando la batteria è carica per
l’80% circa.
5. A ricarica completata, la spia verde si
spegne.
6. Se la temperatura del pacco batteria
raggiunge 0°C o meno, il tempo di ricarica è maggiore rispetto al tempo di ricarica normale.
Anche a batteria completamente cari-
ca, l’utensile dispone di circa il 50% dell’energia di cui dispone una batteria carica alla temperatura di esercizio normale.
7. Se la spia di carica (verde) non si spegne, rivolgersi a un rivenditore autorizzato.
8. Se un pacco batteria completamente ricaricato viene inserito di nuovo nel caricabateria, la spia di carica si illumina.
Dopo alcuni minuti, la spia di carica verde si spegnerà.
Tasto di rilascio
pacco batteria
9. Rimuovere il pacco batteria tenendo il
pulsante di rilascio sollevato.
Page 62

-
62 -
SEGNALI SPIE
Il caricamento è completato. (Carica completa)
Batteria carica all’80% circa.
In fase di caricamento.
Il caricatore è stato collegato alla presa murale.
E’ pronto per il caricamento.
Spia stato ricarica
Sinistra: verde Destra: arancione
Pacco batteria freddo.
La ricarica del pacco batteria avviene lentamente per ridurre il peso
sulla batteria.
Il pacco batteria è caldo.
Il caricamento avrà inizio appena la temperatura del pacco batteria sarà scesa. Qualora la temperatura del pacco batteria raggiunga i -10°C o meno, anche la spia di ricarica arancione inizia a
lampeggiare. La ricarica inizia quando la temperatura del pacco batteria aumenta.
Non è possibile effettuare il caricamento. Il pacco batteria è
impolverato o guasto.
Spenta
Accesa Lampeggia
(Verde) (Arancione)
Informazioni per gli utenti sulla raccolta e l’eliminazione di vecchie apparecchiature e batterie usate
Questi simboli sui prodotti, sull’imballaggio, e/o sulle documentazioni o manuali accompagnanti i prodotti indicano che i prodotti elettrici, elettronici e le
batterie usate non devono essere buttati nei rifiuti domestici generici.
Per un trattamento adeguato, recupero e riciclaggio di vecchi prodotti e batterie usate, vi preghiamo di portarli negli appositi punti di raccolta, secondo
la legislazione vigente nel vostro Paese e le Direttive 2002/96/EC e 2006/66/
EC.
Smaltendo correttamente questi prodotti e le batterie, contribuirete a salvare importanti risorse e ad evitare i potenziali effetti negativi sulla salute umana e sull’ambiente che altrimenti potrebbero verificarsi in seguito ad un trattamento inappropriato dei rifiuti.
Per ulteriori informazioni sulla raccolta e sul riciclaggio di vecchi prodotti e
batterie, vi preghiamo di contattare il vostro comune, i vostri operatori per lo
smaltimento dei rifiuti o il punto vendita dove avete acquistato gli articoli.
Sono previste e potrebbero essere applicate sanzioni qualora questi rifiuti
non siano stati smaltiti in modo corretto ed in accordo con la legislazione nazionale.
Page 63

-
63 -
Per utenti commerciali nell’Unione Europea
Se desiderate eliminare apparecchiature elettriche ed elettroniche, vi preghiamo di contattare il vostro commerciante od il fornitore per maggiori informazioni.
[Informazioni sullo smaltimento rifiuti in altri Paesi fuori dall’Unione Europea]
Questi simboli sono validi solo all’interno dell’Unione Europea. Se desiderate smaltire
questi articoli, vi preghiamo di contattare le autorità locali od il rivenditore ed informarvi
sulle modalità per un corretto smaltimento.
Nota per il simbolo delle batterie (esempio con simbolo chimico riportato sotto il simbolo principale):
Questo simbolo può essere usato in combinazione con un simbolo chimico; in questo
caso è conforme ai requisiti indicati dalla Direttiva per il prodotto chimico in questione.
V. MANUTENZIONE
Usare solo un panno morbido asciutto per pulire l’unità. Non usare panni umidi,
solventi, benzina o altre sostanze volatili per la pulizia.
Qualora l’interno del prodotto o del pacco batteria si bagni, togliere immediatamente
l’acqua e fare asciugare il prima possibile. Rimuovere accuratamente la polvere e
le limature di ferro accumulatesi nel prodotto. Se il prodotto presenta problemi di
funzionamento, rivolgersi a un negozio di riparazioni.
VI. ACCESSORI
ATTENZIONE:
L’uso di accessori non specificati in questo manuale può provocare incendi,
scosse elettriche o lesioni personali. Utilizzare solo gli accessori consigliati.
Lama per metallo
• EY9SXMJ0
Per tagliare il metallo in generale
Lama per legno
• EY9SXWJ2
Per tagliare il legno in generale
Per riparare squarci e tagli ripetuti
della stessa larghezza.
Protezione antipolvere per aspirapolvere (Accessorio opzionale)
• EY9X016
•
•
•
Page 64

-
64 -
VII. SPECIFICHE
UNITÀ PRINCIPALE
Modello EY4550
Motore 18 V
Spessore massimo della lama 1,6 mm
Lunghezza dei colpi 25 mm
Colpi per minuto 0–2500 / min
Capacità massime di taglio
Legno 65 mm
Acciaio morbido 6 mm
Alluminio 10 mm
Lunghezza totale 292 mm
Peso (con il pacco batteria: EY9L51) 3,35 k
g
Rumore, Vibrazioni Vedere il foglio accluso
PACCO BATTERIA
Modello EY9L50 EY9L51
Accumulatore Li-ion
Tensione batteria CC 18 V (3,6 V x 10 celle)
CARICABATTERIA
Modello EY0L81
Valori Vedere la targhetta dei valori sul fondo del caricabatteria
Peso 0,93 k
g
Tempo di caricamento
EY9L50 EY9L51
Utilizzabile: 50 min Utilizzabile: 65 min
Completa: 65 min Completa: 80 min
Modello EY0L82
Valori Vedere la targhetta dei valori sul fondo del caricabatteria
Peso 0,93 k
g
Tempo di caricamento
EY9L50 EY9L51
Utilizzabile: 50 min Utilizzabile: 55 min
Completa: 60 min Completa: 70 min
NOTA:
Questa tabella può includere modelli non disponibili, a seconda dell’area geografica.
Fare riferimento al catalogo generale più recente.
NOTA: Per il nome e l'indirizzo del rivenditore, consultare la scheda di garanzia acclusa.
Page 65

-
65 -
Originele gebruiksaanwijzing: Engels
Vertaling van de originele gebruiksaanwijzing: Andere talen
I. GEBRUIKSDOEL
Dank u voor de aanschaf van de Panasonic decoupeerzaag. Deze decoupeerzaag kan gebruikt worden met Panasonic oplaadbare batterijen voor het
verkrijgen van uitstekende zaagprestaties. De decoupeerzaag is enkel geschikt voor het zagen van metaal, hout
en gipsplaat.
Lees voor gebruik het boekje “Veiligheidsinstructies” en ook de onderstaande opmerkingen.
II. AANVULLENDE
VELIGHEIDSVOORSCHRIFTEN
1) Houd het gereedschap bij de ge-
isoleerde grepen vast bij het uitvoeren van werkzaamheden waarbij het zaagblad in contact zou
kunnen komen met verborgen bedrading. Bij contact met bedrading
die onder spanning staat zullen de
blootgestelde metalen delen van het
gereedschap ook onder spanning komen te staan met een elektrische
schok voor de persoon die het gereedschap bedient tot gevolg.
2) Gebruik klemmen of een andere
praktische manier om het werkstuk vast te zetten en met een stevige ondergrond te ondersteunen.
Door het werkstuk met uw hand of tegen uw lichaam gedrukt vast te houden blijft dit onstabiel en kan dit tot
verlies van controle leiden.
3) Houd uw handen uit de buurt van
het zaaggedeelte en het zaagblad.
Pak altijd de geïsoleerde gedeelten vast. Als u met beide handen het
gereedschap vasthoudt, kunnen deze niet door het zaagblad verwond
worden.
4) Houd het werkstuk nooit in uw
handen en leg het ook niet op uw
benen. Het is belangrijk dat het werk-
stuk goed wordt ondersteund om
aanraking met het lichaam of verlies
van controle te voorkomen.
5) Houd er rekening mee dat dit ge-
reedschap altijd bedrijfsklaar is,
aangezien dit niet in een stopcontact gestoken hoeft te worden.
6) Draag altijd gezichtsbescherming
of een veiligheidsbril met zijkleppen. Een normale bril of zonnebril
is GEEN veiligheidsbril.
7) Wanneer dit gereedschap wordt
gebruikt voor het bewerken van
hout in een gesloten ruimte (binnenshuis), moet u altijd een stofmasker dragen.
Page 66

-
66 -
8) Vermijd tegen spijkers aan te sto-
ten. Controleer het werkstuk op
spijkers en verwijder deze voordat
u begint.
9) Gebruik het gereedschap niet voor
een werkstuk dat te groot is.
10) Controleer of er voldoende vrije
ruimte rondom het werkstuk is
voordat u begint, zodat het zaagblad niet tegen de vloer, werkbank
e.d. stoot.
11) Houd het gereedschap stevig vast.
12) Zorg dat het zaagblad niet in con-
tact is met het werkstuk voordat u
het gereedschap inschakelt.
13) Houd uw handen uit de buurt van
de bewegende onderdelen.
14) Raak het zaagblad en het werkstuk
niet meteen na het werken aan; de
onderdelen kunnen heet zijn en u
zou zich kunnen verbranden.
15) Beweeg het gereedschap nooit
heen en weer.
16) Gebruik geen zaagbladen die vervormd of gescheurd zijn.
17) Gebruik geen zaagbladen die niet
voldoen aan de specificaties die in
deze handleiding zijn vermeld.
18) Neem de accu uit het gereedschap
voordat u het zaagblad vervangt,
afstellingen uitvoert of andere onderhoudswerkzaamheden verricht.
19) Draag oorbeschermers wanneer
u het apparaat gedurende langere
tijd achtereen gebruikt.
Symbool Betekenis
V Volt
Gelijkstroom
n
0 Onbelast
… min
-1
Omwentelingen of toeren
per minuut
Ah
Elektrische capaciteit van
de accu
Om het risico van letsel
te verminderen, dient de
gebruiker de gebruiks-
aanwijzing te lezen en ter
kennis te nemen.
Alleen voor gebruik bin-
nenshuis.
Page 67

-
67 -
WAARSCHUWING:
Gebruik uitsluitend Panasonic-accu's
die bestemd zijn voor gebruik met dit
oplaadbare gereedschap.
Panasonic kan niet aansprakelijk worden gesteld voor beschadigingen of
ongelukken veroorzaakt door het gebruik van een gerecyclede accu of een
namaak-accu.
Accu's niet verbranden of aan extreme
hitte blootstellen.
Accu's niet doorboren met voorwerpen
als spijkers, niet blootstellen aan harde schokken, niet demonteren en niet
wijzigen.
Laat geen metalen voorwerpen in contact komen met de aansluitingen van
de accu.
De accu niet opbergen of vervoeren
in dezelfde verpakking als spijkers of
vergelijkbare metalen voorwerpen.
De accu niet opladen bij grote hitte,
zoals naast een vuur of in direct zonlicht. De accu kan hierdoor oververhit
raken, in brand vliegen of exploderen.
Gebruik uitsluitend de bijbehorende lader voor het opladen van de accu. De
accu kan anders gaan lekken, oververhit raken of exploderen.
Bevestig altijd het accudeksel nadat
u de accu van het gereedschap of de
acculader hebt losgemaakt. Het is anders mogelijk dat de accupolen kortgesloten worden met mogelijk brand
tot gevolg.
Wanneer de accu versleten is, moet deze door een nieuwe worden vervangen.
Als u een versleten of beschadigde accu blijft gebruiken, kan dit resulteren in
hitte-ontwikkeling, ontbranding of barsten van de accu.
•
•
•
•
•
•
•
•
•
•
III. MONTAGE
WAARSCHUWING:
Haal de accu altijd uit het gereedschap
alvorens het zaagblad te verwisselen
om de kans op letsel te verminderen.
Inspectie voor gebruik
Is het juiste decoupeerzaagblad bevestigd voor het voorwerp dat u wilt
zagen?
Is een zaagblad gemonteerd met de
juiste opsteekdiameter en dikte?
Controleer of het blad stevig bevestigd is.
Controleer of het blad gebarsten of
gebroken is.
Controleer of er zich geen vreemde
voorwerpen bevinden in het voorwerp
dat u wilt zagen.
Installeren en verwijderen van
het zaagblad
Installatie
1. De stofkap is verwijderd.
2. Veeg al het zaagsel van het zaagblad
en de zaagbladklemsteun.
3. Trek aan de hendel blad vastmaken/verwijderen.
4. • Steek het zaagblad in de zaagblad-
klem en plaats de achterkant van het
zaagblad zodanig langs de rolgeleider
dat de achterkant van het decoupeerzaagblad langs de rolgeleider glijdt.
Controleer of de bladsteel diep genoeg
is ingevoegd totdat de bladprojectie
door de bladbeugel wordt vastgezet.
Rolgeleider
•
•
•
•
•
•
Page 68

-
68 -
5. Laat de hendel voor het bevestigen of
verwijderen van het zaagblad los.
Controleer of het achtergedeelte van
het blad langs de rolgeleiding loopt en
recht is gezet.
WAARSCHUWING:
Als u het zaagblad niet ver genoeg naar
binnen steekt, kan het zaagblad tijdens
het gebruik plotseling naar buiten komen. Dit kan in een bijzonder gevaarlijke situatie resulteren.
Verwijderen
1. Trek aan de hendel blad vastmaken/verwijderen.
2. Trek het zaagblad naar buiten.
Afstellen van de voetplaat
1. Gebruik de zeskantsleutel om de voetplaatbevestigingsschroef los te draaien.
2. Verplaats de voetplaat langs de voetplaatafstelopening om de positie in te
stellen. (Zie schema rechts.)
De voetplaat kan tussen 0° en 45° in
zijdelingse richting afgesteld worden en
de voorwaartse/achterwaartse positie
kan ook afgesteld worden. Als de voetplaat schuin opzij wordt gezet, eerst de
stofkap verwijderen.
Zie de schuinte-index voor het bepalen van de hoek.
De parallelaanslagbevestigingsschroef moet geplaatst worden aan
de zijde tegenover welke het gereedschap schuin gezet wordt.
•
•
•
•
3.
Gebruik de zeskantsleutel om de voetplaatbevestigingsschroef vast te draaien.
Positie van voetplaat en gebruiksdoel
Positie van voet-
plaatafstelgat
Gebruiksdoel
Normaal rechthoekig zagen
Zagen met een hoek
tussen 0° en 45°
OPMERKING:
Dit is slechts een algemene richtlijn.
De werkelijke hoek van de zaagsnede
wordt beïnvloed door factoren zoals
de wijze waarop het gereedschap tegen het oppervlak wordt gehouden.
Page 69

-
69 -
Afstellen van de pendelslagstand
Stel de pendelslagstand af op het
voorwerp dat u gaat zagen.
Hendel-
positie
Beweging
van zaagblad
Hoofdtoepassingen
0
Enkel verticaal
Zagen van harde metalen zoals staal
Soepel zagen van
bouwmaterialen en
triplex platen
Zagen rond kleine
bochten
•
•
•
1
Laagste pendel-
slagstand
Zagen van zachtere
metalen zoals aluminium en overige non-ferrometalen
Zagen van hardhout, triplex platen en
kunststof
•
•
2
Middelste pendel-
slagstand
Zagen van tamelijk
zachte materialen
Zagen van hout en vezelplaten
Zagen met hoge snelheid van aluminium en
zacht staal
•
•
•
3
Hoogste pendel-
slagstand
Zagen van zachte
materialen
Zagen met hoge snelheid van materialen zoals hout, vezelplaten en
kunststof
•
•
Als u een fijnere afwerking wilt hebben, de pendelslagstand lager instellen.
•
•
Blaashendel
Selecteer de stofblazermodus.
: UIT : AAN
Stofadapter voor stofzuiger (EY9X016)
(Beschikbaar als accessoire, niet
meegeleverd)
U kunt een stofzuiger gebruiken voor
het verzamelen van zaagstof tijdens het
zagen.
Installatie
1. Bevestig de haak van de stofverzamelingsadapter aan de voorzijde van de
voetplaat.
2. Klik voor installeren de achterzijde vast.
3. Bevestig de slang van de stofzuiger.
Het wordt aanbevolen een stofadapter te gebruiken om het risico van beschadiging van het oppervlak van het
te zagen voorwerp te verminderen.
•
Page 70

-
70 -
Bevestigen of verwijderen van
de accu
1. Bevestigen van de accu:
Zet de uitlijntekens tegenover elkaar en
bevestig de accu.
Schuif de accu op het gereedschap
totdat deze op de plaats vastklikt.
Uitlijntekens
2. Verwijderen van de accu:
Trek aan de knop van voren af om de
batterij vrij te geven.
Knop
•
IV. GEBRUIK
1. Duw de schakelaarvergrendelhendel
naar beneden en trek aan de hoofdschakelaar.
De snelheid neemt toe naarmate de
hoofdschakelaar verder wordt ingedrukt.
2. Laat de hoofdschakelaar los wanneer u
met het zagen gereed bent.
3. Controleer of de temperatuur van het
zaagblad voldoende gedaald is en verwijder dan het zaagblad.
OPGELET:
Wanneer u het apparaat gebruikt door
de trekker over te halen kan er mogelijk
een opstarttijd zijn voordat de draaiing
begint. Dit is geen signaal dat op een
defect wijst.
Deze opstarttijd ontstaat wanneer
de trekker voor de eerste keer wordt
overgehaald na het installeren van
een nieuw accupack of wanneer het
apparaat minstens 1 minuut (of minstens 5 minuten wanneer het LEDlampje aan is) niet gebruikt is. De
draaiing begint zonder opstarttijd tijdens het tweede en het daaropvolgende gebruik.
•
•
Page 71

-
71 -
Zagen
OPMERKING:
Controleer of er zich geen obstakels
bevinden onder het voorwerp dat u
wilt zagen.
Controleer of er geen voorwerpen zoals spijkers zitten in het materiaal dat
u wilt zagen.
Als het zaagblad tijdens het zagen in
aanraking komt met dergelijke voorwerpen, wordt er een sterke tegenkracht opgewekt en bestaat de kans
op ernstig letsel.
Plaats uw hand niet op het voorwerp in
de richting waarin u gaat zagen.
Als dit niet in acht wordt genomen,
bestaat de kans op letsel.
Raak het decoupeerzaagblad niet aan
onmiddellijk na het zagen.
Als dit niet in acht wordt genomen,
bestaat de kans op brandwonden.
Zagen langs gemarkeerde lijnen
1. Plaats het voorwerp dat u wilt zagen op
de voet en lijn het zaagblad uit met de
gemarkeerde lijn.
Raak het voorwerp dat u gaat zagen
niet met het zaagblad aan alvorens
aan de hoofdschakelaar te trekken.
2. Trek aan de hoofdschakelaar, wacht
totdat de snelheid gestabiliseerd is en
plaats dan de voetplaat tegen het voorwerp dat u gaat zagen en zaag langs de
gemarkeerde lijnen.
•
•
•
•
•
Bij het zagen van complexe vormen
zoals vormen met veel kleine bochten, de zaagsnelheid en de draaisnelheid verminderen.
Maken van uitsnijdingen
1. Boor een gat in het gedeelte waar u de
uitsnijding wilt maken om er het zaagblad doorheen te kunnen steken.
2. Steek het zaagblad in het gat zonder
het werkstuk te raken en schakel dan de
hoofdschakelaar in.
3. Zaag langs de gemarkeerde lijn.
Gebruik van een parallelaanslag
Een parallelaanslag kan worden gebruikt voor het zagen van evenwijdige
lijnen en voor het zagen van cirkels en
bogen.
Installeren van de parallelaanslag
1. Draai de parallelaanslagbevestigingsschroef los.
2. Steek de parallelaanslag door de montagesteun.
•
Page 72

-
72 -
3. Stel de zaagpositie af en draai dan de
bevestigingsschroef vast.
Zagen met dezelfde breedte
1. Plaats de voetplaat op het werkstuk zodat de rand van de parallelaanslag en
het werkstuk bij elkaar komen te staan.
2. Let er op dat het zaagblad het werkstuk
niet raakt en zet de hoofdschakelaar
aan.
3. Zet de parallelaanslag stevig op het
werkstuk en zaag in evenwijdige lijn.
WAARSCHUWING:
Adem geen rook in die door het gereedschap of de accu wordt uitgestoten, want dit kan schadelijk zijn voor uw
gezondheid.
OPGELET:
Gebruik het gereedschap niet op een
manier waarbij de motor vast kan lopen. Dit kan resulteren in beschadiging
van het gereedschap en de accu, met
mogelijk rook of brand tot gevolg.
Bedieningspaneel
(1)
(3)
(2)
(1) LED-lampje
Alvorens het LEDlampje te gebruiken, altijd eenmaal de hoofdschakelaar aantrekken.
Druk op de LED
lampje knop.
Het lampje verbruikt erg
weinig stroom en zal de
prestatie van het gereedschap en de capaciteit van de accu niet
nadelig beïnvloeden.
OPGELET:
Het ingebouwde LED-lampje is slechts
bedoeld om het werkgebied kortstondig te verlichten.
Gebruik het lampje niet als vervanging voor een normale zaklantaarn,
want het licht is niet sterk genoeg.
Het LED-lampje wordt uitgeschakeld
wanneer het gereedschap gedurende
5 minuten niet is gebruikt.
Opgelet: KIJK NIET RECHTSTREEKS
IN DE LICHTSTRAAL.
Ander gebruik van de bedieningsorganen,
andere afstellingen of procedures dan
hier beschreven kunnen leiden tot blootstelling aan gevaarlijke straling.
(2) Oververhitting-waarschuwingslampje
Uit
(normale
werking)
Knippert: Oververhitting
De werking van het
gereedschap is gestopt
omdat de accu te heet is
geworden.
Let bij het gebruik van het gereedschap op deze wijze op het volgende
om de motor en de accu te beschermen.
•
•
•
Page 73

-
73 -
Als de motor of de accu oververhit
raakt, wordt de beveiligingsfunctie geactiveerd en zal de motor of de accu stoppen met werken. Het oververhitting-waarschuwingslampje op het
bedieningspaneel brandt of knippert
wanneer deze beveiligingsfunctie is
geactiveerd.
Wanneer de oververhitting-beveiligingsfunctie is geactiveerd, moet u
het gereedschap goed laten afkoelen (minstens 30 minuten). Het gereedschap kan weer gebruikt worden
wanneer het oververhitting-waarschuwingslampje uitgaat.
Zorg ervoor dat u het gereedschap
niet zodanig gebruikt dat de oververhitting-beveiligingsfunctie veelvuldig
in werking treedt.
Als het gereedschap continu wordt
gebruikt onder omstandigheden met
hoge belasting of bij hoge omgevingstemperaturen (zoals in de zomer), bestaat de kans dat de oververhittingbeveiligingsfunctie veelvuldig in werking treedt.
Als het gereedschap wordt gebruikt
bij lage omgevingstemperaturen (zoals in de winter) of als deze tijdens
gebruik veelvuldig wordt stopgezet,
bestaat de kans dat de oververhitting-beveiligingsfunctie niet in werking treedt.
De optimale omgevingstemperatuur
is tussen 0°C (32°F) en 40°C (104°F).
Als de accu wordt gebruikt terwijl de
temperatuur van de accu lager is dan
0°C (32°F), kan het voorkomen dat
het elektrisch gereedschap niet goed
functioneert.
Laat een koude accu (kouder dan 0°C
(32°F)), voordat deze wordt opgeladen in een warme omgeving, eerst
minimaal een uur in deze ruimte lig-
gen om op temperatuur te komen.
(3) Waarschuwingslampje voor lage
accuspanning
Uit
(normale
werking)
Knippert
(Accu is ontladen)
De accubeveiligingsfunctie is
geactiveerd.
•
•
•
•
•
•
•
Buitensporige (volledige) ontlading van
een lithium-ion accu heeft een zeer nadelige invloed op de levensduur van de
accu. Het gereedschap is uitgerust met
een accu-beveiligingsfunctie om buitensporige ontlading van de accu te voorkomen.
De accu-beveiligingsfunctie wordt geactiveerd meteen voordat de accu
ontladen is en zorgt ervoor dat het
waarschuwingslampje voor lage accuspanning begint te knipperen.
Als u ziet dat het waarschuwingslampje voor lage accuspanning knippert,
moet u de accu meteen opladen.
Als u het gebruik begint met een accu die niet voldoende is opgeladen,
dan kan het zijn dat het apparaat ineens stopt met werken zonder dat het
‘accu bijna leeg’-waarschuwingslampje eerst flikkert. Dit is een teken dat
er te weinig accuvermogen is en dat
het accupack voor verder gebruik zal
moeten worden opgeladen.
Als er plotseling te veel vermogen
wordt gevergd van het apparaat kan
de motor vergrendelen, de beveiligingssensor tegen overontlading is
mogelijk ingeschakeld en het ‘accu
bijna leeg’-waarschuwingslampje kan
flikkeren. Het lampje zal ophouden
met flikkeren wanneer u de oorzaak
van de motorvergrendeling oplost en
het apparaat opnieuw start.
[Accu]
Voor een juist gebruik van
de accu
Li-ion accu
Voor een optimale levensduur van de
Li-ion accu moet u de accu na gebruik
opbergen zonder dat u deze oplaadt.
Kijk bij het laden van de accu of de
aansluitingen op de acculader vrij zijn
van vreemde bestanddelen zoals stof
en water, enz. Reinig de aansluitingen
als u vreemde bestanddelen op de
aansluitingen aantreft.
De levensduur van de accu-aansluitingen kan tijdens gebruik nadelig beinvloed worden door vreemde bestanddelen zoals stof en water, enz.
•
•
•
•
•
•
Page 74

-
74 -
Wanneer de accu niet wordt gebruikt,
dient u deze uit de buurt van metalen voorwerpen te houden zoals paperclips, munten, sleutels, spijkers,
schroeven of andere kleine metalen
voorwerpen die de aansluitpunten van
de accu met elkaar in contact kunnen
brengen.
Wanneer de aansluitpunten van de accu worden kortgesloten, kan dit resulteren in vonken, brandwonden of zelfs
brand.
Zorg er bij gebruik van de accu voor
dat de werkplaats goed geventileerd
is.
Wanneer de accu van het gereedschap wordt losgemaakt, moet u meteen het accudeksel op de accu aanbrengen om te voorkomen dat er stof
en vuil op de accu-aansluitingen komt
waardoor er kortsluiting kan ontstaan.
Levensduur van de accu
De levensduur van oplaadbare accu's
is beperkt. U dient een nieuwe accu
aan te schaffen indien de gebruikstijd
na de accu geladen te hebben aanzienlijk korter wordt.
Recyclen van de accu
ATTENTIE:
Om het milieu te beschermen en nogmaals bruikbare materialen te recyclen,
dient u de accu naar een officiëel erkend inzamelpunt voor chemisch afval
te brengen.
Li-ion accu
Bij dit product zijn batterijen geleverd.
Wanneer deze leeg zijn, moet u ze niet
weggooien maar inleveren als KCA.
•
•
•
[Acculader]
Opladen
OPGELET
Als de temperatuur van de accu onder ongeveer −10°C komt, zal het laden automatisch stopgezet worden
om beschadiging van de accu te voorkomen.
De optimale omgevingstemperatuur
is tussen 0°C (32°F) en 40°C (104°F).
Als de accu wordt gebruikt terwijl de
temperatuur van de accu lager is dan
0°C (32°F), kan het voorkomen dat
het elektrisch gereedschap niet goed
functioneert.
Laat een koude accu (kouder dan 0°C
(32°F)), voordat deze wordt opgeladen in een warme omgeving, eerst
minimaal een uur in deze ruimte liggen om op temperatuur te komen.
Laat de lader afkoelen wanneer u meer
dan twee accu’s na elkaar oplaadt.
Steek uw vingers niet in de contactopening wanneer u de lader vastpakt.
Om brandgevaar en beschadiging
van de acculader te voorkomen.
Gebruik geen stroom van een
motorgenerator.
Voorkom dat de ventilatiegaten van
de lader en de accu worden bedekt.
Maak de acculader los wanneer deze
niet wordt gebruikt.
Li-ion accu
OPMERKING:
De accu is niet volledig opgeladen
wanneer u deze koopt. Laad de accu
daarom voor gebruik op.
Acculader
1. Steek de lader in een stopcontact.
2. Plaats de accu goed in de lader.
1. Zet de uitlijntekens tegenover elkaar
en plaats de accu in de houder op de
acculader.
2. Schuif de accu in de richting van de
pijl naar voren.
•
•
•
•
•
•
•
•
Page 75

-
75 -
Uitlijntekens
3. De laadindicator licht op tijdens het laden.
Wanneer de accu is geladen, wordt au-
tomatisch een interne elektronische
schakeling geactiveerd die voorkomt dat
de accu wordt overladen.
Wanneer de accu warm is, zal deze
niet worden opgeladen (bijvoorbeeld
direct na intensief gebruik).
De oranje standby-indicator knippert
tot de accu is afgekoeld.
Vanaf dat moment wordt de accu automatisch opnieuw geladen.
4. De laadindicator (groen) knippert langzaam wanneer de accu ongeveer 80% is
opgeladen.
5. Wanneer het opladen is voltooid, zal de
groene laadindicator uitgaan.6. Als de
temperatuur van de accu minder dan
0°C is, zal het volledig opladen van de
•
accu langer duren dan de standaard oplaadtijd.
Zelfs nadat de accu volledig is opgela-
den, zal deze in dit geval slechts ongeveer 50% van het accuvermogen hebben
in vergelijking met een accu die bij normale bedrijfstemperatuur volledig is opgeladen.
7. Als de laadindicator (groen) niet uitgaat,
moet u contact opnemen met een officiele dealer.
8.
Als een volledig opgeladen accu opnieuw
in de acculader wordt geplaatst, zal het
oplaadlampje oplichten. Na enkele minuten zal de groene laadindicator uitgaan.
Accu-ontgrendeltoets
9.
Verwijder de accu terwijl u de accuontgrendeltoets omhoog houdt.
Page 76

-
76 -
LAMPINDICATIES
Opladen voltooid. (Volledig opgeladen.)
De accu is ongeveer 80% opgeladen.
Aan het opladen.
Lader is aangesloten op een stopcontact.
Klaar om op te laden.
Laadstatusindicator
De aanduiding is Links: groen en Rechts: oranje.
De accu is koud.
De accu wordt langzaam opgeladen om de belasting van de accu te
verminderen.
De accu is warm.
Het opladen zal beginnen wanneer de temperatuur van de accu is
gedaald. Als de temperatuur van de accu minder dan -10°C is, zal
de laadindicator (oranje) ook gaan knipperen. Het opladen begint
wanneer de statustemperatuur van de accu hoger wordt.
Opladen is niet mogelijk. Stof op de accu of accu defect.
Uit
Brandt Knippert
(Groen) (Oranje)
Informatie voor gebruikers betreffende het verzamelen en verwijderen van oude uitrustingen en lege batterijen
Deze symbolen op de producten, verpakkingen, en/of begeleidende
documenten betekenen dat gebruikte elektrische en elektronische producten
en batterijen niet met het algemene huishoudelijke afval gemengd mogen
worden. Voor een correcte behandeling, recuperatie en recyclage van oude
producten en lege batterijen moeten zij naar de bevoegde verzamelpunten
gebracht worden in overeenstemming met uw nationale wetgeving en de
Richtlijnen 2002/96/EC en 2006/66/EC.
Door deze producten en batterijen correct te verwijderen draagt u uw steentje
bij tot het beschermen van waardevolle middelen en tot de preventie van
potentiële negatieve effecten op de gezondheid van de mens en op het
milieu die anders door een onvakkundige afvalverwerking zouden kunnen
ontstaan.
Voor meer informatie over het verzamelen en recycleren van oude producten
en batterijen, gelieve contact op te nemen met uw plaatselijke gemeente, uw
afvalverwijderingsdiensten of de winkel waar u de goederen gekocht hebt.
Voor een niet-correcte verwijdering van dit afval kunnen boetes opgelegd
worden in overeenstemming met de nationale wetgeving.
Page 77

-
77 -
Voor zakengebruikers in de Europese Unie
Indien u elektrische en elektronische uitrusting wilt vewijderen, neem dan contact op
met uw dealer voor meer informatie.
[Informatie over de verwijdering in andere landen buiten de
Europese Unie]
Deze symbolen zijn enkel geldig in de Europese Unie. Indien u wenst deze producten
te verwijderen, neem dan contact op met uw plaatselijke autoriteiten of dealer, en vraag
informatie over de correcte wijze om deze producten te verwijderen.
Opmerking over het batterijensymbool (beneden twee voorbeelden):
Dit symbool kan gebruikt worden in verbinding met een chemisch symbool. In dat geval
wordt de eis, vastgelegd door de Richtlijn voor de betrokken chemische producten
vervuld.
V. ONDERHOUD
Gebruik alleen een droge, zachte doek om de machine af te vegen. Gebruik geen
vochtige doek, witte spiritus, benzine of andere sterke oplosmiddelen voor het reinigen.
In het geval er water binnen in het gereedschap of de accu is terechtgekomen, zo
spoedig mogelijk het water laten uitlekken en laten drogen. Verwijder nauwkeurig alle stof of ijzervijlsel dat zich binnen in het gereedschap heeft verzameld. Neem contact op met een reparatiedienst als u bij het gebruik van het gereedschap problemen
ondervindt.
VI. ACCESSOIRES
VI. ACCESSOIRES
OPGELET:
Het gebruik van andere dan de in deze handleiding beschreven accessoires kan
leiden tot brand, elektrische schok of persoonlijk letsel. Gebruik uitsluitend de
aanbevolen accessoires.
Metaalzaagblad
• EY9SXMJ0
Voor het snijden van metaal in het
algemeen
Houtzaagblad
• EY9SXWJ2
Voor het snijden van hout in het algemeen
Voor gebruik bij parallel snijden en
herhaald maken van sneden met
dezelfde breedte.
Stofadapter voor stofzuiger (Optioneel
accessoire)
• EY9X016
•
•
•
Page 78

-
78 -
VII. TECHNISCHE GEGEVENS
HOOFDEENHEID
Model EY4550
Motor 18 V
Max. dikte van te monteren zaagblad 1,6 mm
Lengte van slag 25 mm
Aantal slagen per minuut 0–2500 / min
Maximum zaagcapaciteit
Hout 65 mm
Zacht metaal 6 mm
Aluminium 10 mm
Totale lengte 292 mm
Gewicht (met accu: EY9L51) 3,35 k
g
Geluid, Trillingen Zie het ingesloten sheet
ACCU
Model EY9L50 EY9L51
Soort accu Li-ion
Accuspanning 18 V gelijkstroom (3,6 V x 10 cellen)
ACCULADER
Model EY0L81
Toelaatbaar vermogen Zie het specifi catieplaatje op de onderkant van de acculader
Gewicht 0,93 k
g
Laadtijd
EY9L50 EY9L51
Bruikbaar: 50 min Bruikbaar: 65 min
Vol: 65 min Vol: 80 min
Model EY0L82
Toelaatbaar vermogen Zie het specifi catieplaatje op de onderkant van de acculader
Gewicht 0,93 k
g
Laadtijd
EY9L50 EY9L51
Bruikbaar: 50 min Bruikbaar: 55 min
Vol: 60 min Vol: 70 min
OPMERKING: In deze tabel zijn mogelijk modellen opgenomen die niet in de handel ver-
krijgbaar zijn.
Zie de meest recente algemene catalogus.
OPMERKING: Zie de ingesloten garantiekaart voor de naam en het adres van de dealer.
Page 79

-
79 -
Manual de instrucciones original: Inglés
Traducción del manual de instrucciones
original: Otros idiomas
I. USO PREVISTO
Gracias por comprar la sierra Panasonic. Esta sierra se puede usar con baterías recargables Panasonic para brindar un excelente rendimiento de corte.
Esta sierra sirve solamente para cortar
metal, madera y pared de yeso.
Lea el libro de “Instrucciones de seguridad” y lo siguiente antes de utilizar.
II.
REGLAS DE SEGURIDAD ADICIONALES
1) Sujete la herramienta por las su-
perficies de empuñadura aisladas
cuando haga una operación en la
que la herramienta de corte pueda
entrar en contacto con un cableado oculto. Un contacto con un cable
"con corriente" hará que las partes
de metal expuestas de la herramienta "tengan corriente" y produzca una
descarga en el operador.
2) Use abrazaderas u otros medios
prácticos para asegurar y soportar
la pieza de trabajo sobre una plataforma estable. Sujetar la pieza con
la mano o contra su cuerpo no brinda
estabilidad y puede llevar a la pérdida de control.
3) Mantenga sus manos lejos del área
de corte y de la cuchilla. Mantenga
las superficies de empuñadura aisladas. Si ambas manos sujetan la
herramienta, no podrán ser cortadas
por la cuchilla.
4) Nunca sujete la pieza que está cor-
tando con su mano ni la apoye sobre su pierna. Es importante sujetar
el trabajo correctamente para reducir
la exposición de su cuerpo o la pérdida de control.
5) Tenga en cuenta que esta herra-
mienta está siempre lista para entrar en funcionamiento, dado que
no necesita enchufarse a ninguna
toma eléctrica.
6) Utilice siempre gafas o anteojos
de seguridad con blindado lateral.
Los anteojos comunes o para sol
NO son anteojos de seguridad.
7) Cuando se utiliza esta herramienta
para trabajar en madera en un lugar cerrado (por ejemplo en interiores), utilice una máscara contra
polvo.
8) Evite cortar clavos. Inspeccione el
taller por clavos y sáquelos antes
de empezar el trabajo.
Page 80

-
80 -
9) No corte una pieza de trabajo de-
masiado grande.
10) Verifique que la separación sea la
adecuada más allá de la pieza de
trabajo antes de cortar para que la
cuchilla no golpee el piso, banco
de taller, etc.
11) Sujete firmemente la herramienta.
12) Asegúrese de que la cuchilla no
está en contacto con la pieza de
trabajo antes de activar el interruptor.
13) Mantenga sus manos lejos de piezas móviles.
14) No toque la cuchilla o pieza de trabajo inmediatamente después de
la operación; puede estar muy caliente y quemar su piel.
15) Nunca balancee la herramienta.
16) No utilice cuchillas deformadas o
partidas.
17) No utilice cuchillas que no cumplan con las características especificadas en estas instrucciones.
18) Retire la batería del cuerpo de la
herramienta antes de cambiar la
cuchilla, hacer ajustes o algún trabajo de mantenimiento.
19) Utilice protectores auditivos cuando deba usar la herramienta por
períodos prolongados.
Símbolo Signifi cado
V Voltios
Corriente continua
n
0 Velocidad sin carga
… min
-1
Revoluciones o reciproca-
ciones por minuto
Ah
Capacidad eléctrica de la
batería
Para reducir el riesgo de
lesiones el usuario debe
leer y comprender el ma-
nual de instrucciones.
Sólo para uso en interio-
res.
ADVERTENCIA:
Utilice siempre las baterías Panasonic
diseñadas para su uso con esta herramienta recargable.
Panasonic no asume ninguna responsabilidad por daños o accidentes provocados por el uso de un paquete de
baterías recicladas y un paquete de
baterías no originales.
No tire la batería al fuego ni la exponga a temperaturas elevadas.
No perfore la batería con clavos o algo
similar, ni la golpee, la desmonte ni intente modificarla.
Evite el contacto de los terminales de
la batería con objetos metálicos.
No transporte ni guarde la batería en
el mismo lugar que clavos u objetos
metálicos similares.
No cargue la batería en un ambiente con altas temperaturas, por ejemplo al lado de un fuego o bajo la luz directa del sol. De no ser así, la batería podría sobrecalentarse, incendiarse o explotar.
Utilice siempre el cargador diseñado
para tal fin para cargar la batería. De
no ser así, la batería podría presentar
fugas, sobrecalentarse o explotar.
Después de extraer el paquete de baterías de la herramienta o el cargador, siempre reinstale la cubierta del
paquete. De otra manera, los contactos de la batería podrían ser cortados,
causando el riesgo de fuego.
Cuando el paquete de pilas se deteriora, reemplácelo con uno nuevo.
El uso continuo de un paquete de pilas dañado puede ser causa de la generación de calor, ignición o rotura de
batería.
•
•
•
•
•
•
•
•
•
•
III. MONTAJE
ADVERTENCIA:
Para reducir el riesgo de lesiones, siempre remueva la batería antes de cambiar la cuchilla.
Inspección antes del uso
¿Se ha colocado la cuchilla de sierra correcta para el objeto que se va
a cortar?
•
Page 81

-
81 -
¿Se ha montado la forma y el grosor
correcto de vástago ?
Verifique si la cuchilla está fijada firmemente
Verifique si la cuchilla está fisurada
o rota.
Verifique que no hayan objetos extraños en el objeto que se va a cortar
Instalación y remoción de la
cuchilla
Instalación
1.
Se retira la cubierta anti-polvo.
2.
Elimine el polvo de corte de la cuchilla y
el soporte de la abrazadera de la cuchilla.
3. Hale la palanca para ajustar/remover la
cuchilla.
4. • Inserte la hoja en la ménsula de la
abrazadera de la hoja y coloque la
parte de atrás de la hoja a lo largo de
la guía de rodillo de manera que la
parte de atrás de la hoja de calado se
deslice a lo largo de la guía de rodillo.
Asegúrese que la sierra de la cuchilla
se encuentra insertada profundamente
hasta que la proyección de la misma
se fije con su gancho.
Guía de rodillo
•
•
•
•
•
5. Suelte la palanca de conexión / remoción de cuchilla.
Chequear que la parte posterior de la
cuchilla se encuentre alineada con el
rodillo guía y enderécela.
ADVERTENCIA:
Si no inserta la cuchilla de la sierra lo
suficientemente profunda, la cuchilla de
la sierra puede salirse inesperadamente durante el funcionamiento. Esto puede ser muy peligroso.
Remoción
1. Hale la palanca para ajustar/remover la
cuchilla.
2. Extraiga la cuchilla.
Ajuste de la base
1. Use la llave hexagonal para aflojar el
tornillo de fijación de la base.
2. Mueva la base a lo largo del orificio de
ajuste de base para ajustar su posición.
(Consulte el diagrama a la derecha.)
La base se puede ajustar entre 0° y 45°
lateralmente y también se puede ajustar la posición delantera / trasera. Si está inclinando la base lateralmente remueva primero la cubierta anti-polvo.
Consulte el índice de bisel para determinar el ángulo.
El tornillo de fijación de alineador de
aserrado se debería colocar sobre el
lado opuesto al que la herramienta está inclinada.
•
•
•
•
Page 82

-
82 -
3.
Use la llave hexagonal para apretar el
tornillo de fijación de la base.
Posición de la base y propósito de
uso
Posición del ori-
fi cio de ajuste de
base
Propósito de uso
Corte de ángulo
recto normal
Corte con un ángulo
entre 0° y 45°
NOTA:
Esta es solamente una guía aproximada. El ángulo real del corte será afectado por factores tales como el modo en que se mantiene la herramienta
contra la superficie.
Ajuste del modo de recorrido
orbital
Ajuste el modo de recorrido orbital al
objeto que desea cortar.
Posición
de la
palanca
Movimiento
de la
cuchilla
Aplicaciones
principales
0
Sólo vertical
Corte de metales duros tales como acero
Corte uniforme de
materiales de construcción y tablas de
contrachapado
Corte alrededor de
curvas pequeñas
•
•
•
1
Modo de corte
orbital bajo
Corte de metales suaves tales como aluminio y otros metales no
ferrosos.
Corte de madera dura, tablas de contrachapado y plásticos
•
•
2
Modo de recorrido
orbital mediano
Corte de materiales
bastante suaves
Corte de madera y tablas compuestas
Corte de alta velocidad de aluminio y
acero suave
•
•
•
3
Modo de recorri-
do orbital alto
Corte de materiales
suaves
Corte de alta velocidad de materiales tales como madera, tablas compuestas y
plásticos
•
•
Si desea obtener una terminación
más fina, ajuste el modo de recorrido
orbital a un nivel inferior.
•
•
Page 83

-
83 -
Palanca de soplado
Seleccione el modo del soplador de
polvo.
: Apagado : Encendido
Adaptador colector de polvo para
aspiradora (EY9X016) (Disponible
como accesorio, no incluida)
Puede usar una aspiradora para recoger el polvo de corte mientras está cortando.
Instalación
1. Coloque el gancho del adaptador colector de polvo al frente de la base.
2. Encaje la parte trasera para instalarlo.
3. Coloque la manguera de la aspiradora.
Se recomienda usar un adaptador
colector de polvo para reducir el riesgo de dañar la superficie del objeto
que está cortando.
•
Colocación y extracción de la
batería
1. Para conectar la batería:
Alinee las marcas de alineación y colo-
que las baterías.
Deslice la batería hasta que se bloquee en su posición.
Marcas de
alineación
2. Para extraer la batería:
Hale el botón de la parte frontal para li-
berar el contenedor de la batería.
Botón
•
Page 84

-
84 -
IV.
FUNCIONAMIENTO
1. Empuje la palanca de bloqueo de interruptor hacia abajo, jale el interruptor de
alimentación.
La velocidad aumenta con la presión
del interruptor de alimentación.
2. Una vez terminado el corte, suelte el interruptor de alimentación.
3.
Verifique que la temperatura de la cuchilla haya bajado lo suficiente, y luego extraiga la cuchilla.
PRECAUCIÓN:
Cuando se opera la herramienta tirando
del disparador, puede que genere un intervalo momentáneamente antes de iniciarse la rotación. Esto no es señal de
un malfuncionamiento.
Este intervalo ocurre cuando se
inicia el sistema de circuitos de la
herramienta cuando se tira del
disparador por primera vez después
de instalar un nuevo paquete
de batería o después de que la
herramienta no ha sido usada por
al menos 1 minuto (o al menos
5 minutos desde que el LED está
encendido). La rotación se iniciará sin
ningún intervalo durante segundas y
subsiguientes operaciones.
Cortado
NOTA:
Verifique que no hayan obstáculos
para cortar debajo de la pieza a trabajar.
•
•
•
Verifique que no hayan objetos extraños tales como clavos en el material
que se va a cortar.
Si la cuchilla entra en contacto con ta-
les objetos durante el cortado, se generará una reacción fuerte y podrían
ocurrir lesiones severas.
No coloque su mano en el objeto en la
dirección que va a tener lugar el corte.
Si esto no se observa, existe riesgo de
lesiones.
No toque la cuchilla de la sierra inme-
diatamente después del corte.
Si esto no se observa, podrían ocurrir
quemaduras.
Corte a lo largo de las líneas
marcadas
1. Debe colocar el objeto que va a cortar
sobre la base, y alinear la cuchilla con
la línea marcada.
No permita que la cuchilla toque el
objeto que va a cortar antes de jalar
el interruptor de alimentación.
2. Jale el interruptor de alimentación, espere hasta que la velocidad se haya estabilizado, y luego coloque la base contra el objeto que va a cortar y corte a lo
largo de las líneas marcadas.
Cuando esté cortando formas complejas tales como formas con muchas
curvas pequeñas, reduzca la velocidad de corte y la velocidad de giro.
•
•
•
•
•
Page 85

-
85 -
Corte inmerso
1. Perfore un orificio en la sección a realizar el corte inmerso a fin de permitir que
la cuchilla pase a través del mismo.
2. Inserte la cuchilla dentro del orificio sin
tocar la pieza a trabajar y luego encienda el interruptor de alimentación.
3. Corte a lo largo de la línea marcada.
Uso de un alineador de aserrado
Se puede usar un alineador de aserrado para cortar líneas paralelas y para
cortar círculos y arcos.
Instalación del alineador de aserrado
1. Afloje el tornillo de fijación del alineador
de aserrado.
2. Pase el alineador de aserrado a través
del montaje.
3. Ajuste la posición de corte y luego apriete el tornillo de fijación.
Corte con el mismo ancho
1. Coloque la base sobre la pieza a trabajar de manera que el borde del alineador
de aserrado y la pieza a trabajar queden
juntos.
2. Sin permitir que la cuchilla toque la pieza a trabajar, encienda el interruptor de
alimentación.
3.
Enfrente la guía de corte firmemente a la
pieza a cortar para hacerlo en paralelo.
ADVERTENCIA:
No inhale el humo emitido por la herramienta o el paquete de batería debido
a que puede ser peligroso.
PRECAUCIÓN:
No utilice esta herramienta de tal manera que se bloquee el motor. Si lo bloquea, puede dañar la herramienta y el
paquete de batería, ocasionando humo
o un incendio.
Page 86

-
86 -
Panel de control
(1)
(3)
(2)
(1) Luz indicadora
Antes de usar la luz
LED, tire siempre del
interruptor de alimentación una vez.
Presione el botón de
luz LED
.
La luz se enciende con
muy poca corriente y
no afecta adversamente el funcionamiento
del aparato durante el
uso o la capacidad de
la batería.
PRECAUCIÓN:
La luz LED integrada se ha diseñado
para iluminar la pequeña área de trabajo temporalmente.
No la utilice en lugar de una linterna normal ya que no tiene suficiente brillo.
La luz LED se apaga cuando la herramienta no se ha usado por 5 minutos.
Precaución: NO MIRE FIJAMENTE EL
HAZ DE LUZ.
El uso de controles o ajustes o la realización de otros procedimientos que no
sean los especifi cados puede producir
una exposición a radiación peligrosa.
•
•
•
(2) Luz de advertencia de sobrecalen-
tamiento
Apagado
(funcionamiento
normal)
Destella: Sobrecalentamiento
Indica que se detuvo el funcionamiento por un sobrecalentamiento de la batería.
Para proteger el motor o la batería,
asegúrese de observar lo siguiente
cuando efectúe esta operación.
Si el motor o la batería se calienta,
se activará la función de protección
y el motor o la batería dejará de funcionar. La lámpara de advertencia de
sobrecalentamiento en el panel de
control se ilumina o destella cuando
esta característica está activada.
Si se activa la función de protección
de sobrecalentamiento, espere hasta
que la herramienta se haya enfriado
completamente (por lo menos 30 minutos). La herramienta está lista para usar cuando se apaga la luz de advertencia de sobrecalentamiento.
Evite utilizar la herramienta de tal
forma que la función de protección
de sobrecalentamiento se active repetidamente.
Si la herramienta funciona continuamente bajo condiciones de carga pesada o si se usa en condiciones de
alta temperatura (tal como durante el
verano), la protección contra sobrecalentamiento puede activarse frecuentemente.
Si la herramienta se usa en condiciones de temperatura fría (tal como durante el invierno) o si se detiene con
frecuencia durante el uso, la protección contra sobrecalentamiento quizás no se active.
La variación de temperatura ambiente es de entre 0°C (32°F) y 40°C
(104°F). Si la batería se utiliza cuando la temperatura de la batería es inferior a 0°C (32°F), la herramienta
puede no funcionar correctamente.
Cuando se vaya a cargar una batería
fría (0°C (32°F) o menos) en un cuarto cálido, deje la batería en la habita-
•
•
•
•
•
•
•
Page 87

-
87 -
ción durante al menos una hora y cárguela cuando se haya calentado a la
temperatura de la habitación.
(3) Luz de aviso de baja carga de ba-
tería
Apagado
(funcionamiento normal)
Destella (Sin carga)
Se activó la función de
protección de la batería
Una descarga excesiva (completa) de
las baterías de Li-ión acorta dramáticamente su vida de servicio. Esta herramienta incluye una función de protección de batería diseñada para evitar
una descarga excesiva de la batería.
La función de protección de batería
se activa inmediatamente antes de
que la batería se quede completamente sin carga haciendo que destelle la luz de advertencia batería baja.
Si se da cuenta que destella la luz de
advertencia de batería baja, cargue
inmediatamente la batería.
Si se comienza con poca batería restante, la herramienta puede que pare
de funcionar sin que parpadee primero la lámpara de advertencia de batería baja. Esto indica que hay muy poca potencia restante en la batería para usar la herramienta, y el paquete
de batería debe ser cargada antes de
seguir usándola.
Si la herramienta está sujeta a una
carga repentina durante su uso que
cause que el motor de bloquee, puede que se dispare el sensor de prevención de sobrecarga, y la lámpara
de advertencia de batería baja puede parpadear. La lámpara parará de
parpadear una vez que se aborde la
causa del bloqueo del motor y disparo de ciclo.
•
•
•
•
[Batería]
Para un uso adecuado de
la batería
Batería de Li-ión
Para una vida óptima de la batería,
guarde la batería de Li-ión después
del uso sin cargarla.
Cuando cargue la caja de batería,
confirme que los terminales en el cargador de batería estén libres de materias extrañas tales como polvo y
agua, etc. Limpie los terminales antes
de cargar la batería si hay materias
extrañas en los terminales.
La vida de los terminales de la caja
de batería puede verse afectada por
materias extrañas tales como polvo y
agua, etc. durante su funcionamiento.
Cuando no se utiliza la batería, manténgala separada de otros objetos
metálicos, como: clips de papel, monedas, llaves, clavos, tornillos u otros
objetos metálicos pequeños que pueden actuar de conexión entre un terminal y el otro.
Un cortocircuito entre los terminales
de la batería puede ocasionar chispas, quemaduras o incendios.
Cuando haga funcionar con la batería, asegúrese de que el lugar de trabajo está bien ventilado.
Cuando se saca la batería del cuerpo principal de la herramienta, vuelva a cerrar inmediatamente la cubierta de batería, para evitar que el polvo
o la suciedad puedan ensuciar los terminales de batería y provocar un cortocircuito.
Vida útil de la batería
Las baterías recargables tienen una vida útil limitada. Si el tiempo de funcionamiento se acorta mucho tras la recarga, sustituya la batería por una nueva.
•
•
•
•
•
Page 88

-
88 -
Reciclado de la batería
ATENCIÓN:
Para la protección del medio ambiente
y reciclado de materiales, asegúrese de
que la desecha en un lugar especificado oficialmente, si hay uno en su país.
[Cargador de la batería]
Carga
Precaución
Si la temperatura de la caja de batería cae unos −10°C (14°F), la carga
se parará automáticamente para evitar un deterioro de la batería.
La variación de temperatura ambiente es de entre 0°C (32°F) y 40°C
(104°F).
Si la batería se utiliza cuando la tem-
peratura de la batería es inferior a
0°C (32°F), la herramienta puede no
funcionar correctamente.
Cuando se vaya a cargar una batería
fría (0°C (32°F) o menos) en un cuarto cálido, deje la batería en la habitación durante al menos una hora y cárguela cuando se haya calentado a la
temperatura de la habitación.
Deje que se enfríe el cargador al cargar más de dos baterías de forma
consecutiva.
No introduzca sus dedos dentro del
hueco del contacto, cuando esté sujetando el cargador o en ninguna otra
ocasión.
Para impedir el riesgo de incendio o
daños del cargador de batería.
No utilice una fuente de alimentación de un generador motorizado.
No tapone los orificios de ventilación del cargador y la batería.
Desenchufe el cargador cuando no
lo utilice.
Batería de Li-ión
NOTA:
Su batería no está totalmente cargada
al momento de comprarla. Asegúrese
de cargar la batería antes de utilizarla.
Cargador de batería
1. Enchufe el cargador en la fuente de alimentación de CA.
2. Meta firmemente la batería en el cargador.
1. Alinee las marcas de alineación y co-
loque la batería en el enchufe del
cargador.
•
•
•
•
•
•
•
•
2. Deslice hacia adelante en el sentido
de la flecha.
Marcas de alineación
3. La luz indicadora de carga permanecerá
encendida durante la carga.
Cuando haya terminado la carga, se ac-
cionará automáticamente un conmutador electrónico interno para impedir
cualquier sobrecarga.
No podrá cargar la batería si ésta está todavía caliente (por ejemplo, inmediatamente después de haber trabajado mucho).
La luz de espera naranja seguirá destellando hasta que se enfríe la batería.
La carga comenzará automáticamente.
4. La luz de carga (verde) destellará lentamente cuando la batería se haya cargado a un 80%.
5. Cuando se completa la carga, la luz de
carga en verde se apagará.
6. Si la temperatura de la batería es de
0°C o menos, la batería demora más en
cargarse completamente que el tiempo
de carga normal.
Incluso cuando la batería esté completa-
mente cargada, tendrá aproximadamente 50% de la carga de una batería totalmente cargada a la temperatura de funcionamiento normal.
7. Si no se enciende la luz (verde) de carga
consulte con un concesionario autorizado.
8. Si se vuelve a colocar una batería totalmente cargada en el cargador, se encenderá la luz de carga. Luego de algunos
minutos, la lámpara de carga en verde
se apagará.
Botón de desbloqueo de la batería
9. Extraiga la batería mientras mantiene levantado el botón de desbloqueo de la
batería.
•
Page 89

-
89 -
INDICACIÓN DE LA LÁMPARA
La carga ha sido completada. (Carga completa.)
La batería se cargó en aproximadamente 80%.
Ahora cargando.
Se ha enchufado el cargador en la fuente de alimentación de CA. Está
preparado para cargar.
Luz de estado de carga
Aparecerá Izquierda: verde Derecha: naranja
La batería está fría.
La batería se esta cargando lentamente para reducir la carga de la
batería.
La batería está caliente.
La carga comenzará cuando baje la temperatura de la batería. Si la
temperatura de la batería es de –10°C o menos, la luz de carga (naranja) también empezará a destellar. La carga empezará cuando sube la
temperatura de la batería.
No es posible realizar la carga. Existe un bloqueo de polvo o una
falla de la batería.
Apagada
Encendida Parpadeando
(Verde) (Naranja)
Información para Usuarios sobre la Recolección y Eliminación
de aparatos viejos y baterías usadas
Estos símbolos en los productos, embalajes y/o documentos adjuntos,
significan que los aparatos eléctricos y electrónicos y las baterías no
deberían ser mezclados con los desechos domésticos.
Para el tratamiento apropiado, la recuperación y el reciclado de
aparatos viejos y baterías usadas, por favor, observe las normas de
recolección aplicables, de acuerdo a su legislación nacional y a las
Directivas 2002/96/CE y 2006/66/CE.
Al desechar estos aparatos y baterías correctamente, Usted estará
ayudando a preservar recursos valiosos y a prevenir cualquier potencial
efecto negativo sobre la salud de la humanidad y el medio ambiente
que, de lo contrario, podría surgir de un manejo inapropiado de los
residuos.
Para mayor información sobre la recolección y el reciclado de aparatos
y baterías viejos, por favor, contacte a su comunidad local, su servicio
de eliminación de residuos o al comercio donde adquirió estos aparatos.
Podrán aplicarse penas por la eliminación incorrecta de estos residuos,
de acuerdo a la legislación nacional.
Page 90

-
90 -
Para usuarios empresariales en la Unión Europea
Si usted desea descartar aparatos eléctricos y electrónicos, por favor contacte a su distribuidor o proveedor a fin de obtener mayor información.
[Informacion sobre la Eliminación en otros Países fuera de la
Unión Europea]
Estos símbolos sólo son válidos dentro de la Unión Europea. Si desea desechar estos
objetos, por favor contacte con sus autoridades locales o distribuidor y consulte por el
método correcto de eliminación.
Nota sobre el símbolo de la bateria (abajo, dos ejemplos de
símbolos):
Este símbolo puede ser usado en combinación con un símbolo químico. En este caso,
el mismo cumple con los requerimientos establecidos por la Directiva para los químicos
involucrados.
V. MANTENIMIENTO
Para frotar la herramienta, emplee sólo un paño que sea suave y que esté seco. No
emplee paños humedecidos, disolventes, bencina, ni otros solventes volátiles para la
limpieza.
Para el caso en que el interior de la herramienta o el paquete de pilas estén
expuestos al agua, drénelo o séquelo lo antes posible. Retire cuidadosamente
cualquier polvo o restos de acero que queden dentro de la herramienta. Si
experimenta problemas durante el funcionamiento de la herramienta consulte con su
servicio de reparaciones.
VI. ACCESORIOS
PRECAUCIÓN:
El uso de cualquier otro accesorio no especificado en este manual puede causar incendios, golpes eléctricos o lesiones personales. Utilice sólo los accesorios recomendados.
Cuchilla de metal
• EY9SXMJ0
Para cortar metal en general
Cuchilla de madera
• EY9SXWJ2
Para cortar madera en general
Para realizar convenientemente cortes a lo largo y cortes repetidos del
mismo ancho.
Adaptador colector de polvo para aspiradora (Accesorio opcional)
• EY9X016
•
•
•
Page 91

-
91 -
VII. ESPECIFICACIONES
UNIDAD PRINCIPAL
Modelo EY4550
Motor 18 V
Grosor máximo de hoja de montaje 1,6 mm
Longitud del recorrido 25 mm
Recorridos por minuto 0–2500 / min
Capacidades de
corte máximas
Madera 65 mm
Acero dulce 6 mm
Aluminio 10 mm
Longitud total 292 mm
Peso (con la batería: EY9L51) 3,35 k
g
Ruido, Vibración Consulte la hoja incluida
BATERÍA
Modelo EY9L50 EY9L51
Batería de almacenaje Li-ión
Tensión de batería 18 V CC (3,6 V x 10 celdas)
CARGADOR DE BATERÍA
Modelo EY0L81
Régimen Vea la placa de especificaciones en la parte inferior del cargador
Peso 0,93 k
g
Tiempo de carga
EY9L50 EY9L51
Utilizable: 50 min Utilizable: 65 min
Completa: 65 min Completa: 80 min
Modelo EY0L82
Régimen Vea la placa de especificaciones en la parte inferior del cargador
Peso 0,93 k
g
Tiempo de carga
EY9L50 EY9L51
Utilizable: 50 min Utilizable: 55 min
Completa: 60 min Completa: 70 min
NOTA: Este cuadro puede contener modelos no disponibles en su país.
Consulte el más reciente catálogo general.
NOTA: Puede consultar el nombre y la dirección del concesionario en la tarjeta de garan-
tía que se incluye.
Page 92

-
92 -
Oprindelige instruktioner: Engelsk
Oversættelse af de oprindelige instruktioner: Andre sprog
I.
BEREGNET BRUG
Tak fordi du har købt denne Panasonic
dekupørsav. Denne dekupørsav kan
anvendes med Panasonic genopladelige batterier, således at en udmærket
skæring opnås. Denne dekupørsav er
kun beregnet til savning i metal, træ og
tørmur.
Læs hæftet med sikkerhedsinstruktionerne og nedenstående før brugen.
II. EKSTRA SIKKER-
HEDSREGLER
1) Hold værktøjet i dets isolerede gre-
bflader, når du udfører et arbejde,
hvor skæreværktøjet kan komme
i berøring med skjulte ledninger.
Berøring af en strømførende ledning
kan gøre blotlagte metaldele af værktøjet strømførende, hvorved operatøren kan få stød.
2) Anvend fastspændingsanordnin-
ger eller en anden praktisk måde
til at fastgøre arbejdsstykket til en
stabil flade. Hvis arbejdsstykket hol-
des med hånden eller mod kroppen,
kan det blive ustabilt, hvilket kan føre
til at du mister kontrollen over det.
3)
Hold hænderne væk fra skæreområdet og savbladet. Hold i de isolerede grebflader. Hvis du holder i væktø-
jet med begge hænder, kan bladet ikke komme til at skære i dem.
4) Nunca sujete la pieza que está cor-
tando con su mano ni la apoye sobre su pierna. Det er vigtigt at un-
derstøtte arbejdsstykket ordentligt for
at minimere risikoen for kropskontakt
og tab af herredømmet.
5) Vær opmærksom på, at dette værk-
tøj altid er i aktiveret stand, da det
ikke er nødvedigt at slutte det til en
stikkontakt.
6) Anvend altid beskyttelsesbriller el-
ler briller med sideskjold. Almindelige briller og solbrilller er IKKE beskyttelsesbriller.
7) Benyt støvmaske, når dette værk-
tøj anvendes til træarbejde på et
indelukket sted (f.eks. inden døre).
8) Undgå at skære søm. Inspicér ar-
bejdsstykket for søm og fjern dem
inden arbejdet påbegyndes.
9) Undlad at save arbejdsstykker i
overstørrelse.
10) Kontroller, at afstanden er korrekt
bag arbejdsstykket, inden du begynder at save, således at bladet
ikke vil ramme gulvet, skruestikken etc.
Page 93

-
93 -
11) Hold godt fast i værktøjet.
12) Sørg for, at værktøjet ikke kommer
i berøring med arbejdsstykket, inden der tændes med afbryderen.
13) Hold hænderne væk fra bevægelige dele.
14) Rør ikke ved savbladet eller arbejdsstykket umiddelbart efter brugen. De kan være meget varme og
give hudforbrændinger.
15) Sving aldrig værktøjet.
16) Benyt ikke savblade, som er defor-
merede eller revnede.
17) Benyt ikke savblade, som ikke er i
overensstemmelse med de i disse
instruktioner specificerede data.
18) Tag akkuen ud af værktøjet, inden
savbladet skiftes ud, eller der udføres justeringer eller andet vedligeholdelsesarbejde.
19) Benyt høreværn, når værktøjet anvendes i længere tidsrum.
Symbol Betydning
V Volt
Jævnstrøm
n
0 Ubelastet hastighed
… min
-1
Omdrejninger og frem- og
tilbagegående bevægelse.
Ah
Akkuens elektriske
kapacitet
For at reducere risikoen
for tilskadekomst, skal
brugeren læse og forstå
brugsvejledningen.
Kun til indendørs brug.
ADVARSEL:
Benyt ikke andre akkuer end de Panasonic-akkuer, som er beregnet til brug
med dette genopladelige værktøj.
• Panasonic kan ikke holdes ikke ansvarlig for skader eller uheld, som er
forårsaget af anvendelse af en genbrugt batteripakning eller en ikke-original batteripakning.
Smid ikke akkuen på ilden og udsæt
den ikke for ekstrem varme.
Lad være med at drive søm etc. ind i
akkuen, udsætte den for stød, adskille
den eller forsøge at ændre den.
Lad ikke metalgenstande komme i berøring med akkuens terminaler.
Undlad at transportere eller opbevare akkuen i den samme beholder som
søm eller lignende metalgenstande.
Oplad ikke akkuen på et sted med høj
temperatur, som for eksempel nær ild
eller i direkte sol. Dette kan bevirke, at
batteriet overophedes, bryder i brand
eller eksploderer.
Anvend aldrig andre end den beregnede oplader til opladning af akkuen.
Dette kan bevirke, at batteriet lækker,
overophedes eller eksploderer.
Når batteripakningen er taget af værktøjet eller opladeren, skal man altid
huske at sætte pakningsdækslet på.
Hvis dette ikke gøres, er der risiko for,
at batterikontakterne kortsluttes, hvilket kan være årsag til brandfare.
• Når batteripakningen er udtjent, skal
den skiftes ud med en ny.
Fortsat anvendelse af en beskadiget
batteripakning kan resultere i
varmedannelse, antænding og revner
i batteriet.
•
•
•
•
•
•
•
•
Page 94

-
94 -
III. MONTERING
ADVARSEL:
For at reducere risikoen for tilskadekomst, skal man altid fjerne akkuen, inden savbladet oplades.
Inspektion før brugen
Er det rigtige dekupørsavblad sat på
for det arbejdsstykke, der skal skæres?
Er den korrekte spindelform og bladtykkelse monteret?
Kontroller, om savbladet er ordentligt
fastgjort.
Kontroller, om savbladet er revnet eller brækket.
Kontroller, at der ikke er nogen fremmedgenstande i det arbejdsstykke,
der skal skæres.
Montering og afmontering af
savbladet
Montering
1. Støvafdækningen er fjernet.
2. Tør al savsmuld bort fra savbladet og
savbladsholderen.
3. Træk i klingen Fastgør/Løsn-håndtag.
4. • Sæt savbladet ind i bladfastpæn-
dingsholderen og sæt bagsiden af
savbladet langs rulleguiden således,
at bagsiden af dekupørsavens savblad glider langs rulleguiden.
Sørg for at klingens bund sidder
dybt nok til at klingens fremspring er
fastlåst af klinge-låsen.
•
•
•
•
•
•
Rulleguidea
5. Frigør armen til montering/afmontering
af savbladet op.
Tjek at bagsiden af klingen går langs
med rulle guiden og sidder lige.
ADVARSEL:
Hvis du ikke sætter savbladet langt
nok ind, kan det uventet blive stødt ud
under anvendelsen. Dette kan være
yderst farligt.
Afmontering
1. Træk i klingen Fastgør/Løsn-håndtag.
2. Træk savbladet ud.
Justering af underdelen
1. Benyt fastnøglen til at løsne underdelsskruen.
2. Flyt underdelen langs underdelsindstillingshullet for at indstille positionen. (Se
diagrammet til højre).
Underdelen kan indstilles til mellem 0°
og 45° sidelæns og fremad/tilbagepositionen kan også indstilles. Hvis underdelen vippes sidelæns, skal støvafdækningen først fjernes.
Se smigvinkelindekset angående bestemmelse af vinklen.
•
•
•
Page 95

-
95 -
Parallelanslagsskruen bør være på den
modsatte side af den, hvor værktøjet er
vinklet.
3.
Benyt fastnøglen til at stramme underdelsskruen.
Position af underdelen og brugsfo-
mål
Underdelsjuste-
ringshulposition
Brugsformål
Normal højrevinklet
skæring
Skæring i en vinkel
på mellem 0° og 45°
BEMÆRK:
Dette er kun en grov vejledning. Den
faktiske vinkel af snittet vil blive påvirket af faktorer som f.eks. den måde,
hvorpå værktøjet holdes mod overfladen.
•
Indstilling af omløbsslagfunktionen
Indstil omløbsslagfunktionen til det arbejdsstykke, der skal skæres.
Armpo-
sition
Savblads-
bevægelse
Hovedanvendel-
ser
0
Kun lodret
Skæring i hårde metaller som f.eks. stål
Jævn skæring af byggematrialer og krydsfinerplader
Skæring omkring små
kurver
•
•
•
1
Lav omløbsslag-
funktion
Skæring af bløde metaller som f.eks. aluminium og andre ikkejernholdige metaller
Skæring af hårdt træ,
krydsfinerplader og
plastic
•
•
2
Medium omløbs-
slagfunktion
Skæring af relativt
blødt materiale
Skæring af træ og
kompositplader
Høj hastigheds skæring af aluminiun og
blødt stål
•
•
•
3
Høj omløbsslag-
funktion
Skæring af bløde materialer
Høj hastigheds skæring af materialer som
f.eks. træ, kompositplader og plastic
•
•
Hvis du gerne vil have en renere finish, skal du sætte omløbsslagfunktionen til et lavere niveau.
•
•
Page 96

-
96 -
Blæsehåndtag
Vælg blæse indstilling.
: SLUK : TÆND
Støvadapter til støvsuger (EY9X016)
(fås som ekstraudstyr, medfølger
ikke)
Du kan anvende en støvsuger til at opsamle savsmuld under skæringen.
Montering
1. Sæt støvopsamlingsadapterens krog på
forsiden af underdelen.
2. Monter den ved at trykke bagdelen på
plads.
3. Monter støvsugerslangen.
Det anbefales at anvende en støvadapter for at reducere risikoen for at
beskadige overfladen på det arbejdsstykke, der skæres.
•
Isætning og udtagning af
akkuen
1. Tilslutning af akkuen:
Sæt flugtemærkerne på linje og sæt ak-
kuen på.
Skyd akkuen i stilling, indtil den klikker på plads.
Flugtemærke
2. Aftagning af akkuen:
Træk i knappen fra forsiden for at løsne
batteriet.
Knap
•
Page 97

-
97 -
IV. BETJENING
1. Tryk låsehåndtaget ned og træk i afbryderen.
Hastigheden øges i takt med styrken
af nedtrykning af afbryderen.
2. Slip afbryderen, når skæringen er fuldført.
3.
Kontroller, at savbladets temperatur er
faldet tilstrækkeligt og fjern derefter savbladet.
FORSIGTIG:
Der vil være en momentan forsinkelse,
før rotationen påbegyndes ved betjening
af værktøjet når der trækkes i triggeren.
Dette signalerer ikke en fejl.
Denne forsinkelse opstår som
værktøjets kredsløb starter op, når
triggeren er trukket for første gang
efter installation af en ny batteripakke
eller når værktøjet ikke er blevet
anvendt i mindst 1 minut (eller i det
mindste 5 minutter, hvis LED’en er
tændt). Rotation vil starte uden
nogen forsinkelse under anden og
efterfølgende operationer.
Skæring
BEMÆRK:
Kontroller, at der ikke er noget, der
forhindrer skæring, under arbejdsstykket.
Kontroller, at der ikke er nogen genstande som f.eks. søm i det materiale,
der skal skæres.
Hvis savbladet kommer i berøring
•
•
•
•
med sådanne genstande under skæringen, vil en stærk reaktionskraft blive frembragt, som kan resultere i alvorlig tilskadekomst.
Læg ikke hånden på genstanden i
den retning, som skæringen skal foregå i.
Hvis dette ikke overholdes, vil der væ-
re risiko for at kommme til skade.
Undlad at røre ved dekupørsavens
savblad umiddelbart efter skæringen.
Hvis dette ikke overholdes, vil der væ-
re risiko for forbrændinger.
Skæring langs afmærkede linjer
1. Anbring den genstand, der skal skæres,
på underdelen, og sæt savbladet ud for
den afmærkede linje.
Lad ikke savbladet røre ved den genstand, der skal skæres, inden du trykker på afbryderen.
2. Tryk på afbryderen, vent indtil hastigheden er blevet stabil, og anbring derefter
underdelen mod den genstand, der skal
skæres, og skær langs de afmærkede
linjer.
Når der skæres komplekse former
som f.eks. former med mange små
kurver, skal du reducere skærehastigheden og drejehastigheden.
•
•
•
•
Page 98

-
98 -
Indstiksskæring
1. Lav et borehul i den sektion, hvor der
skal indstikskæres, for at lade savbladet
passere igennem.
2. Sæt savbladet ind i hullet uden at berøre arbejdsstykket, og tænd derefter med
afbryderen.
3. Skær langs den afmærkede linje.
Anvendelse af et parallelanslag
Et parallelanslag kan anvendes til at
skære parallelle linjer og til at skære
cirkler og buer.
Montering af parallelanslaget
1. Løsn parallelanslagsskruen.
2. Før parallelanslaget gennem befæstelsen.
3. Indstil skærepositionen og stram derefter befæstelsesskruen.
Skæring i den samme bredde
1. Anbring underdelen på arbejdsstykket,
så kanten på parallelanslaget og arbejdsstykket går sammen.
2. Tænd med afbryderen, uden at lade
savbladet berøre arbejdsstykket.
3.
Anbring parallelanslaget fast mod arbejdsstykket for at skære en parallel linje.
ADVARSEL:
Indånd ikke røg, der kommer fra værktøjet eller batteripakningen, da det kan
være skadeligt.
FORSIGTIG:
Anvend ikke værktøjet på en måde,
som bevirker, at motoren låses. Dette kan beskadige værktøjet og batteripakningen med røgudvikling eller brand
til følge.
Page 99

-
99 -
Kontrolpanel
Kontrolpanel
(1)
(3)
(2)
(1) LED-lys
Inden anvendelse af
LED-lyset, skal der altid trækkes en gang i
afbryderen.
Tryk på
LED-lysknappen.
Lyset lyser med en meget lav strøm, og det
påvirker ikke skruetrækkerens ydelse negativt under brug eller
dens batterikapacitet.
FORSIGTIG:
Det indbyggede LED-lys er beregnet til at oplyse et lille arbejdsområde
midlertidigt.
Anvend det ikke som erstatning for
en almindelig lommelygte, da det ikke
har tilstrækkelig lysstyrke.
LED-lyset slukker, hvis værktøjet ikke
har været anvendt i 5 minutter.
Forsigtig: UNDLAD AT STIRRE IND I
STRÅLEN
Anvendelse af kontroller eller justeringer
eller udførelse af andre procedurer end
de heri specifi cerede, kan medføre farlig
udsættelse for stråling.
•
•
•
(2)
Advarselslampe for overophedning
Fra
(normal anvendelse)
Blinker: Overophedning
Betyder, at anvendelsen er
blevet stoppet på grund af
overophedning af batteriet.
For at beskytte motoren og batteriet,
skal man være opmærksom på følgende, når denne operation udføres.
Hvis motoren eller batteriet bliver varme, vil beskyttelseskredsløbet blive aktiveret og motoren eller batteriet vil holde op med at fungere. Advarselslampen til overophedning på
kontrolpanelet lyser eller blinker, når
denne egenskab er aktiveret.
Hvis overophedningsbeskyttelsesfunktionen aktiveres, skal du give
værktøjet tid til at køle helt af (mindst
30 minutter). Værktøjet er klar til brug
igen, når advarselslampen til overophedning slukker.
Undgå at anvende værktøjet på en
sådan måde, at overophedningsbeskyttelsesfunktionen aktiveres gentagne gange.
Hvis værktøjet anvendes kontinuerligt ved høj belastning eller den anvendes under forhold med høje temperaturer (som f.eks. om sommeren), kan overophedningsbeskyttelsesfunktionen blive aktiveret hyppigt.
Hvis værktøjet anvendes under forhold med lave temperaturer (som
f.eks. om vinteren) eller hvis den
stoppes hyppigt under brug, vil overophedningsbeskyttelsesfunktionen
måske ikke blive aktiveret.
Det omgivende temperaturområde
er mellem 0°C og 40°C. Hvis akkuen
anvendes, når batteritemperaturen er
under 0°C, kan der opstå problemer i
værktøjets funktion.
•
•
•
•
•
•
Page 100

-
100 -
Når man vil oplade en kold akku (under 0°C) i et varmt rum, så anbring
akkuen i rummet i mindst en time, så
dens temperatur kan komme på niveau med rummets, inden den oplades.
(3) Advarselslampes batterieffekt lav
Fra
(normal anvendelse)
Blinker
(ingen opladning)
Batteribeskyttelsesfunktionen er aktiveret
Batteribeskyttelsesfunktionen aktiveres umiddelbart inden batteriet mister
sin effekt, hvilket bevirker, at advarselslampen for lav batterieffekt begynder at blinke.
Batteribeskyttelsesfunktione aktiveres umiddelbart inden batteriet mister sin effekt, hvilket bevirker, at advarselslampen for lav batterieffekt begynder at blinke.
Hvis du bemærker, at advarselslampen for lav batterieffekt blinker, skal
du straks oplade batteripakningen.
Hvis der fra starten af var for lidt
strøm tilbage, kan værktøjet stoppe
driften uden at advarselslampen for
lavt batteri først blinker. Dette indikerer, at der er for lidt strøm tilbage til at
bruge værktøjet, og batteriet skal oplades før yderligere brug.
Hvis værktøjet udsættes for en pludselig belastning under brug, som får
motoren til at lukke ned, kan overbelastningssensoren udløses, og lampen for lavt batteri kan blinke. Lampen vil stoppe med at blinke, når du
behandler årsagen til motorens nedlukning og sætte triggeren i gang.
•
•
•
•
•
[Akku]
Korrekt brug af akkuen
Li-ion akku
Opbevar Li-ion akkuen efter brugen
uden at oplade den, således at optimal batterilevetid opnås.
Når du oplader akkuen, skal du bekræfte at terminalerne på batteriopladeren er fri for fremedlegemer, som
f.eks. støv og vand etc. Rengør terminalerne, inden du oplader akkuen,
hvis der findes nogen fremmedlegemer på terminalerne.
Levetiden for akkuens terminaler kan
påvirkes af uvedkommende substanser, som for eksempel støv og vand
etc., under brugen.
Når akkuen ikke anvendes, skal den
holdes væk fra andre metalgenstande
som: papirclips, mønter, nøgler, søm,
skruer og andre små genstande, som
kan danne en forbindelse fra en terminal til en anden.
Kortslutning af batteriterminalerne
sammen kan frembringe gnister, forbrændinger eller ildebrand.
Når du anvender akkuen, skal du sørge for, at arbejdsstedet er velventileret.
Når akkuen er taget af værktøjets hoveddel, skal akkuafdækningen straks
sættes på for at forhindre, at støv og
snavs forurener batteriterminalerne og
forårsager kortslutning.
Akkuens levetid
De udskiftbare batterier har en begrænset levetid. Hvis betjeningstiden bliver
meget kort efter opladningen, skal akkuen udskiftes med en ny.
Genbrug af batterier
OBS:
For at beskytte miljøet og genbruge materialer, skal du altid huske at bortskaffe udtjente batterier på forskriftsmæssig
vis, dvs. indlevere dem til et sted, der er
godkendt af myndighederne, hvis et sådant forefindes i dit land.
•
•
•
•
•
 Loading...