

Page 1

Operating Instructions
Bedienungsanleitung
Instructions d’utilisation
Istruzioni per l’uso
Gebruiksaanwijzing
Manual de instrucciones
Brugsvejledning
Driftsföreskrifter
Bruksanvisning
Käyttöohjeet
Çalıştırma Talimatları
Portable Radio/Speaker System
Tragbares Radio-/Lautsprecher-System
Système radio/enceinte portable
Sistema radio/altoparlante portatile
Draagbare radio/Luidsprekersysteem
Sistema de radio/altavoz portátil
Transportabelt radio-/højttalersystem
Portabelt radio-/högtalarsystem
Bærbart radio-/høyttalersystem
Kannettava radio/kaiutinjärjestelmä
Taşınabilir Radyo/Hoparlör Sistemi
Model No:EY37A2
Before operating this unit, please read these instructions completely and save this manual for future use.
Vor Inbetriebnahme des Gerätes die Betriebsanleitung bitte gründlich durchlesen und diese Broschüre zum
späteren Nachschlagen sorgfältig aufbewahren.
Lire entièrement les instructions suivantes avant de faire fonctionner l’appareil et conserver ce mode d’emploi à des
fins de consultation ultérieure.
Prima di usare questa unità, leggere completamente queste istruzioni e conservare il manuale per usi futuri.
Lees deze gebruiksaanwijzing aandachtig door voor u het apparaat in gebruik neemt en bewaar de
gebruiksaanwijzing voor eventuele naslag.
Antes de usar este aparato por primera vez, lea todas las instrucciones de este manual y guarde el manual para
poderlo consultar en el futuro.
Gennemlæs denne betjeningsvejledning før brugen og gem den til fremtidig brug.
Läs igenom hela bruksanvisningen innan verktyget tas i bruk. Spara bruksanvisningen för senare användning.
Før enheten tas i bruk, vennligst les disse alle anvisningene og oppbevar deretter bruksanvisningen for senere bruk.
Lue ohjeet huolella ennen laitteen käyttöönottoa ja säilytä tämä käyttöohje tallessa tulevaa tarvetta varten.
Bu cihazı çalıştırmadan önce lütfen bu talimatları dikkatli bir şekilde okuyun ve bu kılavuzu gelecekte kullanmak
üzere saklayın.
EY37A2.indb 1 2015-2-11 17:07:20
Page 2
Index/Index/Index/Indice/Index/Indice/Indeks/Index/Indeks/Hakemisto/Dizin
(R)
English: Page 8
Deutsch: Seite 20
Français: Page 32
Italiano: Pagina 44
Nederlands: Bladzijde 56
Dansk: Side 80
Svenska: Sid 92
Norsk: Side 104
Suomi: Sivu 115
Türkçe: Sayfa 126
Español: Página 68
FUNCTIONAL DESCRIPTION
FUNKTIONSBESCHREIBUNG
DESCRIPTION DES FONCTIONS
DESCRIZIONE DELLE FUNZIONI
FUNCTIEBESCHRIJVING
DESCRIPCIÓN FUNCIONAL
FUNKTIONSBESKRIVELSE
FUNKTIONSBESKRIVNING
FUNKSJONSBESKRIVELSE
TOIMINTAKUVAUS
İŞLEVSEL AÇIKLAMA
■
FRONT/VORDERSEITE/AVANT/FRONTE/
VOOR/DELANTERA/FORSIDE/FRONT/
FRONT/ETUOSA/ÖN
(A) (B)
(I)
(H)
(G)
(C)
(D)
(E)
(F)
■
REAR/RÜCKSEITE/ARRIÈRE/RETRO/
ACHTER/TRASERA/BAGSIDE/BAK/
BAKSIDE/TAKAOSA/ARKA
(J)
(Q)
(K)
(L)
(M)
(N)
(O)
(P)
-
2 -
EY37A2.indb 2 2015-2-11 17:07:22
Page 3
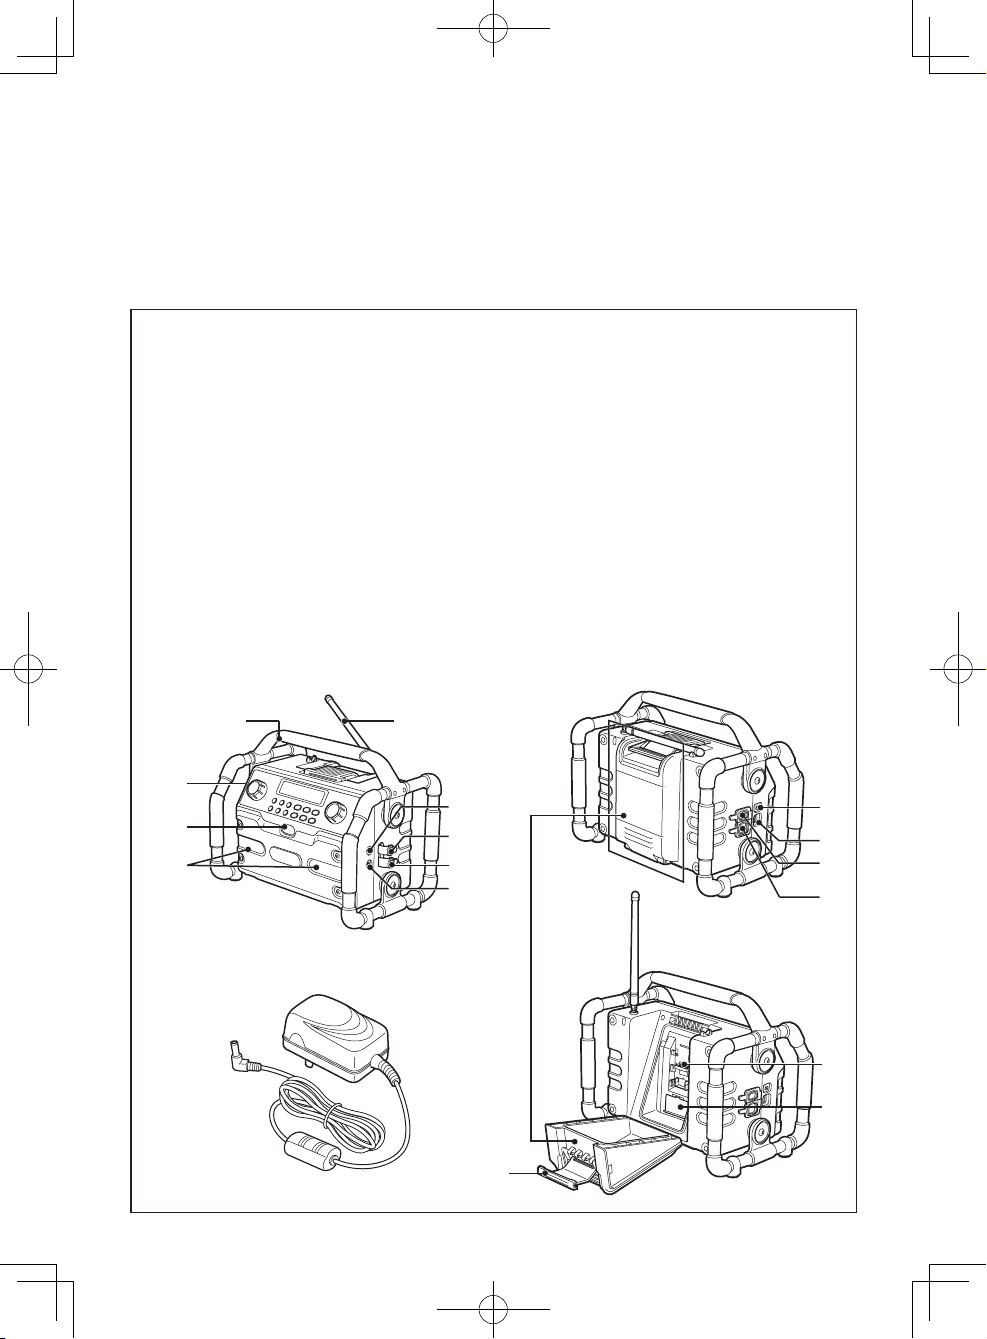
Handle
Tragegriff
Poignée
Maniglia
Handgreep
Asa
(A)
Håndtag
Handtag
Håndtak
Kahva
Sap
Headphone socket
Kopfhörerbuchse
Entrée casque
Presa per auricolari
Hoofdtelefoonaansluiting
Toma de auriculares
(C)
Hovedtelefonstik
Uttag för hörlurar
Hodetelefonkontakt
Kuulokeliitäntä
Kulaklık soketi
DC in socket cover
DC-IN-Buchsenabdeckung
Cache de l’entrée DC IN
Coperchio della presa ingresso CC
Afdekking voor gelijkstroom-ingangsaansluiting
Cubierta de la toma de entrada de CC
(E)
Jævnstrøm ind-stikdæksel
Skydd för nätadapteringång
Deksel likestrømskontakt
Virtaliitännän suojus
DC in soketi kapağı
Speaker
Lautsprecher
Enceinte
Altoparlante
Luidspreker
Altavoz
(G)
Højttaler
Högtalare
Høyttaler
Kaiutin
Hoparlör
Controls
Bedienelemente
Commandes
Controlli
Bedieningsorganen
Controles
(I)
Betjeningsknapper
Kontroller
Kontroller
Säätimet
Kumandalar
Aux in socket
AUX-IN-Buchse
Entrée AUX IN
Presa ingresso ausiliario
Aux-ingangsaansluiting
Toma de entrada auxiliar
(K)
Aux ind-stik
Aux-ingång
Ekstrainngang
Lisälaiteliitäntä
Aux in soketi
Aux in socket cover
AUX-IN-Buchsenabdeckung
Cache de l’entrée AUX IN
Coperchio della presa ingresso ausiliario
Afdekking voor aux-ingangsaansluiting
Cubierta de la toma de entrada auxiliar
(M)
Aux ind-stikdæksel
Skydd för Aux in-uttag
Deksel AUX-inngangskontakt
Lisälaiteliitännän suojus
Aux in soketi kapağı
-
Soft bended antenna
Biegbare Antenne
Antenne souple
Antenna ad asta piegata morbida
Flexibele antenne
Antena plegable blanda
(B)
Blød bøjet antenne
Mjuk böjd antenn
Myk bøyd antenne
Pehmeä, taivutettu antenni
Yumuşak eğimli anten
Headphone socket cover
Kopfhörerbuchsenabdeckung
Cache de l’entrée casque
Coperchio della presa per auricolari
Afdekking voor hoofdtelefoonaansluiting
Cubierta de la toma de auriculares
(D)
Dæksel til hovedtelefonstik
Skydd för hörlursuttag
Deksel hodetelefonkontakt
Kuulokeliitännän suojus
Kulaklık soketi kapağı
DC in socket
DC-IN-Buchse
Entrée DC IN
Presa ingresso CC
Gelijkstroom-ingangsaansluiting
Toma de entrada de CC
(F)
Jævnstrøm ind-stik
DC-ingång
DC-inngang
Tasavirtaliitäntä
DC in soketi
LED light
LED-Leuchte
Lumière LED
Luce LED
LED-lamp
Luz LED
(H)
LED-lygte
LED-lampa
LED-lys
LED-valo
LED lamba
Battery compartment
Batteriefach
Compartiment des piles
Scomparto batteria
Batterijvak
Compartimiento de las pilas
(J)
Batterirum
Batteriutrymme
Batterirom
Paristolokero
Pil bölmesi
USB socket for Smartphone charging
USB-Buchse zum Laden von Smartphones
Entrée USB pour recharge d’un smartphone
Presa USB per la ricarica di smartphone
USB-aansluiting voor opladen van smartphone
Toma USB para la carga de smartphones
(L)
USB-stik til opladning af smartphone
USB-uttag för laddning av smartphone
USB kontakt for lading av smarttelefon
USB-liitäntä älypuhelimen latausta varten
Akıllı Telefonu şarj etmek için USB soketi
USB socket cover
USB-Buchsenabdeckung
Cache de l’entrée USB
Coperchio della presa USB
Afdekking voor USB-aansluiting
Cubierta de la toma USB
(N)
USB-stikdæksel
Skydd för USB-uttag
Deksel USB-kontakt
USB-liitännän suojus
USB soketi kapağı
3 -
EY37A2.indb 3 2015-2-11 17:07:22
Page 4
Main battery terminal
Hauptbatterieanschluss
Borne pour pile principale
Terminale batteria principale
Aansluiting voor hoofdbatterijpak
(O)
Terminal de pila principal
Hovedbatteriterminal
Huvudbatteripol
Hovedbatterikontakt
Pääakkutila
Ana pil terminali
Battery compartment locker
Batteriefachverriegelung
Verrou du compartiment des piles
Dispositivo di chiusura dello scomparto batteria
Batterijvakhouder
Cierre del compartimiento de las pilas
(Q)
Lås til batterirum
Batteriutrymme
Lås batterirom
Akku- ja paristolokeron salpa
Pil bölmesi kilidi
Back up battery compartment
Reservebatteriefach
Compartiment de la pile de sauvegarde
Scomparto batteria di riserva
Vak voor reservebatterijen
(P)
Compartimiento para pilas de reserva
Backup-batterirum
Utrymme för backup-batteri
Rom for sikkerhetsbatteri
Varaparistolokero
Yedek pil bölmesi
AC power adaptor
Netzteil
Adaptateur secteur
Adattatore di alimentazione CA
Netspanningsadapter
Adaptador de alimentación de CA
(R)
Netadapter
Nätadapter
Strømadapter vekselstrøm
Verkkolaite
AC güç adaptörü
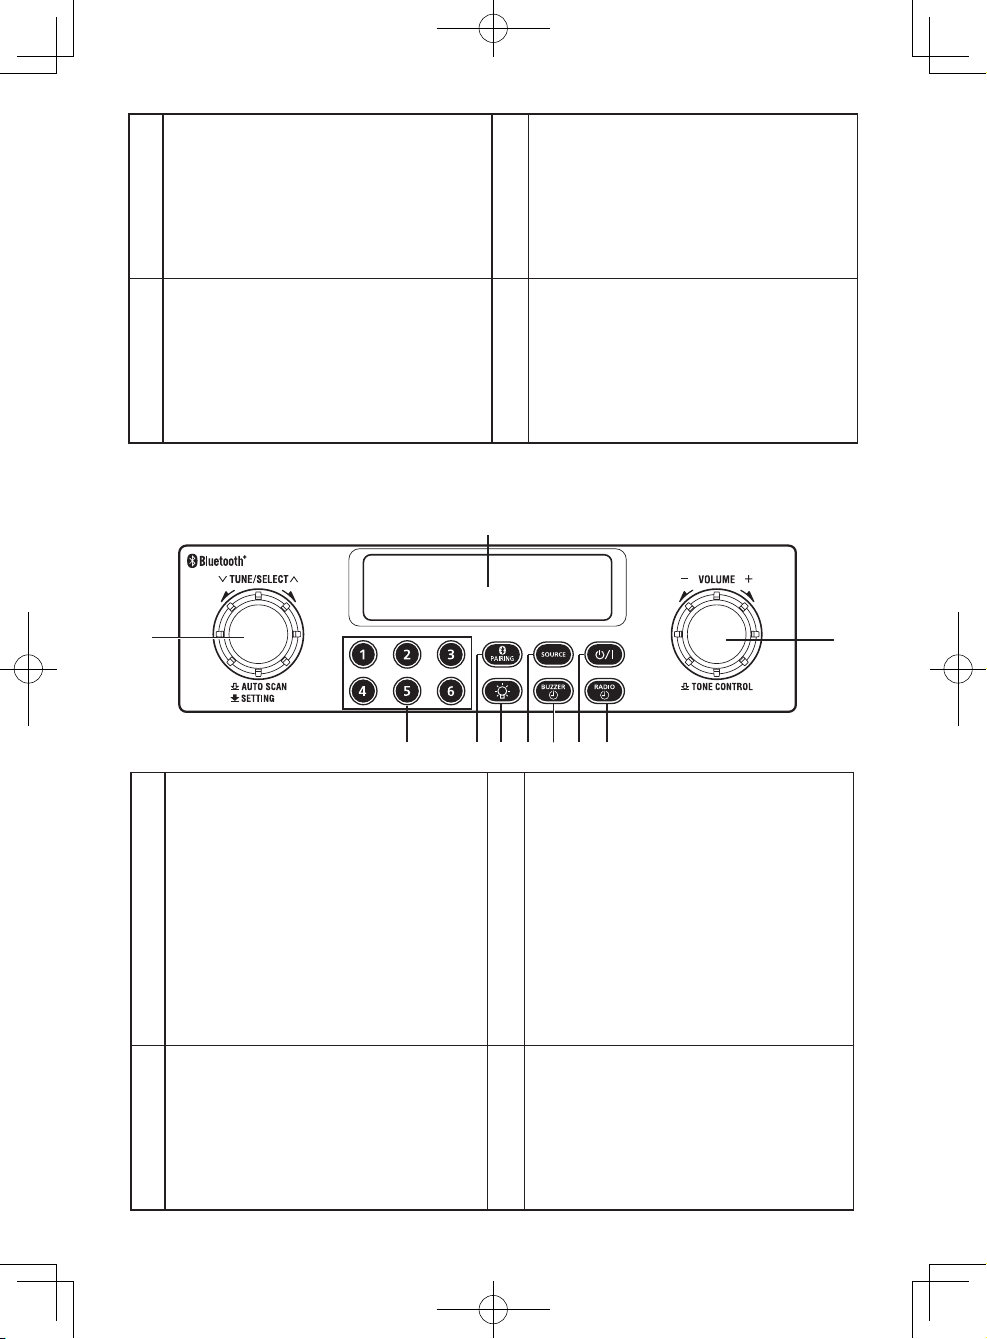
■ Controls/Bedienelemente/Commandes/Controlli/Bedieningsorganen/Controles/
Betjeningsknapper/Kontroller/Kontroller/Säätimet/Kumandalar
2
1
Tuning control knob/Select knob/Auto scan knob
Senderwahl-Regler/Auswahlregler/AutoscanRegler
Bouton de réglage de la syntonisation/Bouton de
sélection/Bouton de balayage automatique
Manopola di controllo sintonizzazione/ Manopola
di selezione/ Manopola di ricerca automatica
Afstemknop/Keuzeknop/Automatische
zenderzoekknop
Control giratorio de sintonización/Control giratorio
1
de selección/Control giratorio de búsqueda
automática
Tuningskontrolknap/Valg-knap/Autoscan-knap
Inställningsratt/Väljarratt/Ratt för automatisk
sökning
Innstillingsknott/Valgknott/Knott for automatisk søk
Viritys-/valinta-/automaattinen haku -nuppi
İnce ayar kontrolü yuvarlak düğmesi/ Ses yuvarlak
düğmesi/ Otomatik tarama yuvarlak düğmesi
Volume knob/Tone control
Lautstärkeregler/Klangregler
Bouton du volume/Commande de tonalité
Manopola volume/Controllo toni
Volumeknop/Toonregelaar
Control giratorio de volumen/Control de tono
3
Lydstyrkeknap/Tonekontrol
Volymratt/tonkontroll
Volumknott/Tonekontroll
Äänenvoimakkuus-/äänensävy-nuppi
Ses düzeyi yuvarlak düğmesi/Ton kontrolü
4567890
LCD
LCD-Display
Écran LCD
LCD
LCD
LCD
LCD
LCD
LCD
Nestekidenäyttö
2
LCD
Radio alarm button
Radiowecker-Taste
Bouton de réveil-radio
Pulsante allarme radio
Radio-alarmtoets
Botón de alarma de radio
4
Radioalarmknap
Radiolarmknapp
Radioalarm-knapp
Radioherätyspainike
Radyo alarmı düğmesi
3
-
4 -
EY37A2.indb 4 2015-2-11 17:07:22
Page 5
Power/Standby button
Ein-/Aus-/Standby-Taste
Bouton d’alimentation/de veille
Pulsante alimentazione/standby
Aan/ruststand-toets
Botón de encendido y apagado/espera
5
Tænd-sluk/standby-knap
Ström-/standbyknapp
Strøm/hvile-knapp
Virta-/valmiustilapainike
Güç/ bekleme düğmesi
Source button
Source-Taste
Bouton de source
Pulsante sorgente
Geluidsbrontoets
Botón de fuente
7
Kilde-knap
Källknapp
Kildeknapp
Lähde-painike
Kaynak düğmesi
9
®
Bluetooth
Bluetooth®-Kopplungstaste
Bouton de pairage Bluetooth
Pulsante abbinamento Bluetooth
Bluetooth®-koppeltoets
Botón de emparejamiento Bluetooth
Bluetooth®-parringsknap
Bluetooth® parningsknapp
Knapp for paring av Bluetooth
Bluetooth®-pariliitospainike
Bluetooth® eşleme düğmesi
pairing button
®
®
®
®
Buzzer alarm button
Summeralarm-Taste
Bouton de réveil-sonnerie
Pulsante allarme segnalatore acustico
Zoemer-alarmtoets
Botón de alarma de pitido
6
Brummeralarmknap
Summerlarmknapp
Alarmsummerknapp
Summeriherätyspainike
Sesli alarm düğmesi
Light button
Lichttaste
Bouton d’éclairage
Pulsante luce
Verlichtingstoets
Botón de luz
8
Lys-knap
Ljusknapp
Lysknapp
Valopainike
Işık düğmesi
Preset button
Preset-Taste
Bouton de préréglage
Pulsante preimpostazione
Voorkeurzendertoets
Botón de presintonía
0
Forudindstillingsknap
Förinställningsknapp
Forhåndsinnstillingsknapp
Esiasetuspainike
Ön Ayar düğmesi
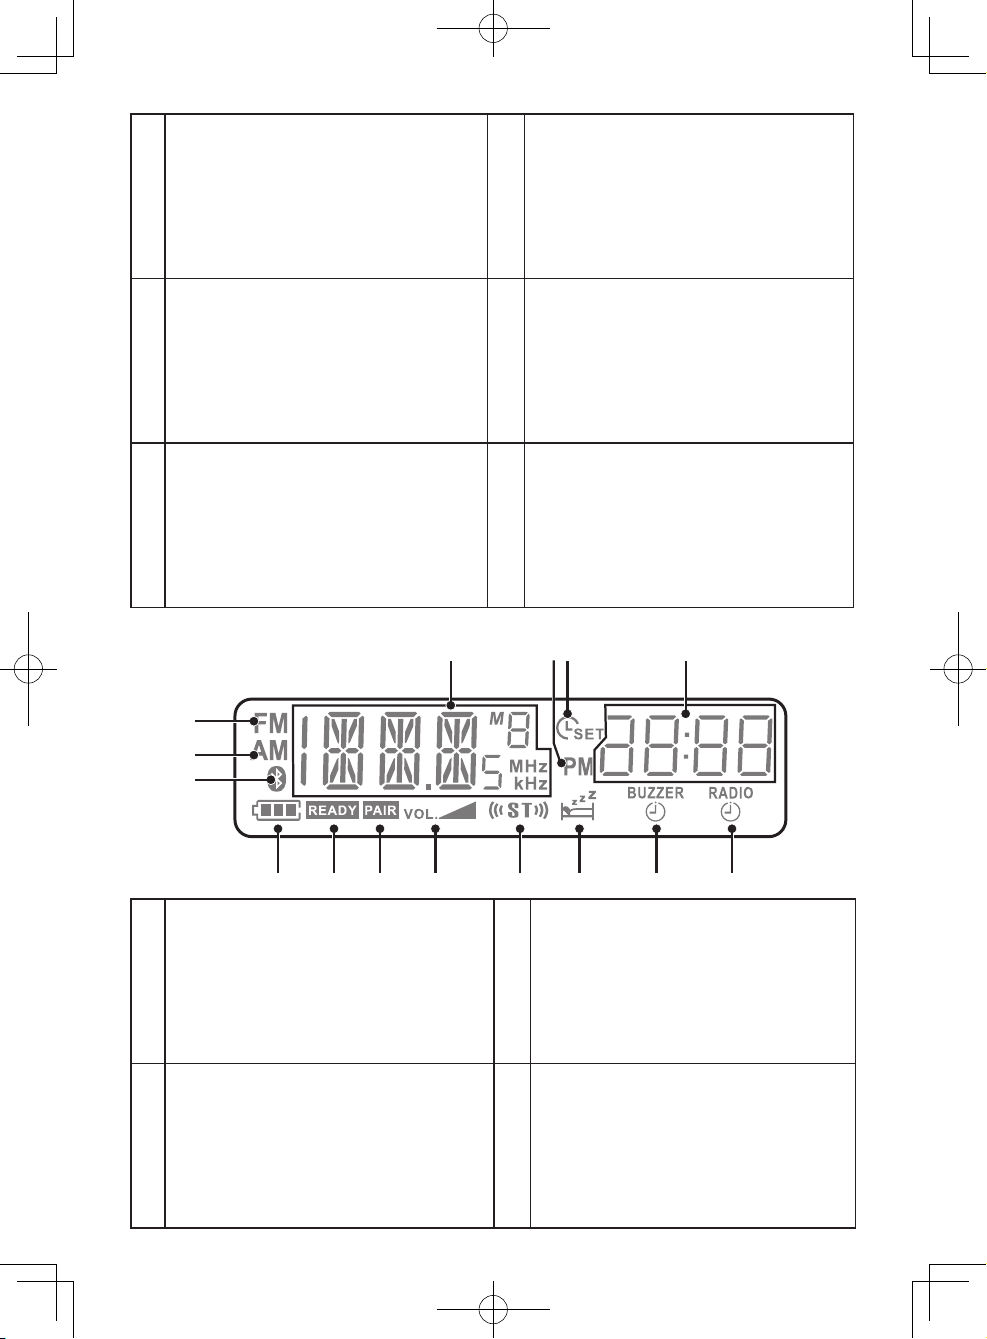
■ LCD/LCD-Display/Écran LCD/LCD/LCD/LCD/LCD/LCD/LCD/Nestekidenäyttö/LCD
4 56 7
3
2
1
®
Bluetooth
Bluetooth®-Modusanzeige
Indicateur du mode Bluetooth
Indicatore modalità Bluetooth
Bluetooth®-modusindicator
Indicador del modo Bluetooth
1
Indikator for Bluetooth®-tilstand
Bluetooth®-läge indikator
Bluetooth® funksjonsindikator
Bluetooth®-tilan ilmaisin
Bluetooth® modu göstergesi
FM mode indicator
FM-Modusanzeige
Indicateur du mode FM
Indicatore modalità FM
FM-bandindicator
Indicador del modo FM
3
Indikator for FM-tilstand
FM-lägesindikator
FM-funksjonsindikator
FM-tilan ilmaisin
FM modu göstergesi
mode indicator
890!@#$%
AM mode indicator
®
®
®
-
AM-Modusanzeige
Indicateur du mode AM
Indicatore modalità AM
AM-bandindicator
Indicador del modo AM
2
Indikator for AM-tilstand
AM-lägesindikator
AM-funksjonsindikator
AM-tilan ilmaisin
AM modu göstergesi
Frequency text line
Frequenz-Displayzeile
Ligne de texte de la fréquence
Linea testo frequenza
Frequentie-aanduiding
Línea de texto de frecuencia
4
Frekvenstekstlinje
Frekvenstextrad
Frekvenstekstlinje
Taajuusteksti
Frekans metin satırı
5 -
EY37A2.indb 5 2015-2-11 17:07:22
Page 6

PM time indicator
PM-Zeitanzeige
Indicateur d’heure PM
Indicatore ora PM
PM (namiddag) tijdindicator
Indicador de hora PM
5
Indikator for PM-tid
EM-tidsindikator
PM tidsindikator
PM (iltapäivä) -ajan ilmaisin
PM zaman göstergesi
Clock digits
Ziffernanzeige der Uhr
Chiffres de l’horloge
Cifre orologio
Klokcijfers
Dígitos del reloj
7
Cifre på ur
Klockans siffror
Klokkesifre
Kellonaika
Saat haneleri
Buzzer alarm indicator
Summeralarm-Anzeige
Indicateur du réveil-sonnerie
Indicatore allarme segnalatore acustico
Zoemer-alarmindicator
Indicador de alarma de pitido
9
Indikator for brummeralarm
Summerlarmindikator
Alarmsummerindikator
Summeriherätyksen ilmaisin
Sesli alarm göstergesi
FM stereo indicator
FM-Stereo-Anzeige
Indicateur stéréo FM
Indicatore stereo FM
FM-stereo-indicator
Indicador de FM estéreo
!
Indikator for FM-stereo
FM stereo-indikator
FM stereoindikator
FM-stereo-ilmaisin
FM stereo göstergesi
Bluetooth® PAIR indicator
Bluetooth® PAIR-Anzeige
Indicateur Bluetooth® PAIR
Indicatore ABBINAMENTO Bluetooth
Bluetooth®-koppelindicator (PAIR)
Indicador de Bluetooth® EMPAREJADO
#
Indikator for Bluetooth® PARRING
Bluetooth® Parningsindikator
Bluetooth® PARINGS-indikator
Bluetooth®-pariliitoksen ilmaisin
Bluetooth® EŞLEME göstergesi
Battery life indicator
Batteriestandsanzeige
Indicateur de capacité de la pile
Indicatore durata batteria
Indicator voor batterijgebruiksduur
Indicador de carga de las pilas
%
Indikator for batterilevetid
Indikator för batterilivslängd
Indikator for batteriets levetid
Akun keston ilmaisin
Pil ömrü göstergesi
Clock setting indicator
Uhrzeit-Einstell-Anzeige
Indicateur du réglage de l’horloge
Indicatore impostazione orologio
Klokinstellingindicator
Indicador de ajuste del reloj
6
Indikator for urindstilling
Indikator för klockinställningar
Indikator for klokkeinnstilling
Kellon asetusilmaisin
Saat ayarı göstergesi
Radio alarm indicator
Radiowecker-Anzeige
Indicateur du réveil-radio
Indicatore allarme radio
Radio-alarmindicator
Indicador de alarma de radio
8
Indikator for radioalarm
Radiolarmindikator
Radioalarmindikator
Radioherätyksen ilmaisin
Radyo alarmı göstergesi
Snooze/Sleep indicator
Snooze-/Sleep-Anzeige
Indicateur Snooze/Extinction
Indicatore Snooze/ Sleep
Sluimer/slaaptimerindicator
Indicador de repetición/suspensión
0
Indikator for snooze/sleep
Snooze-/sovindikator
Slumre/sove-indikator
Torkku-/uniajastinilmaisin
Erteleme/Uyku göstergesi
Volume indicator
Lautstärke-Anzeige
Indicateur du volume
Indicatore volume
Volume-indicator
Indicador de volumen
@
Lydstyrkeindikator
Volymindikator
Volumindikator
Äänenvoimakkuuden ilmaisin
Ses düzeyi göstergesi
®
Bluetooth
Bluetooth® READY-Anzeige
®
Indicateur Bluetooth® READY
Indicatore Bluetooth
Bluetooth®-gereedindicator (READY)
Indicador de Bluetooth® LISTO
$
Indikator for Bluetooth® KLAR
Indikator Bluetooth® KLAR
Indikator Bluetooth® KLAR
Bluetooth® VALMIS -ilmaisin
Bluetooth® HAZIR göstergesi
READY indicator
®
READY
-
6 -
EY37A2.indb 6 2015-2-11 17:07:22
Page 7
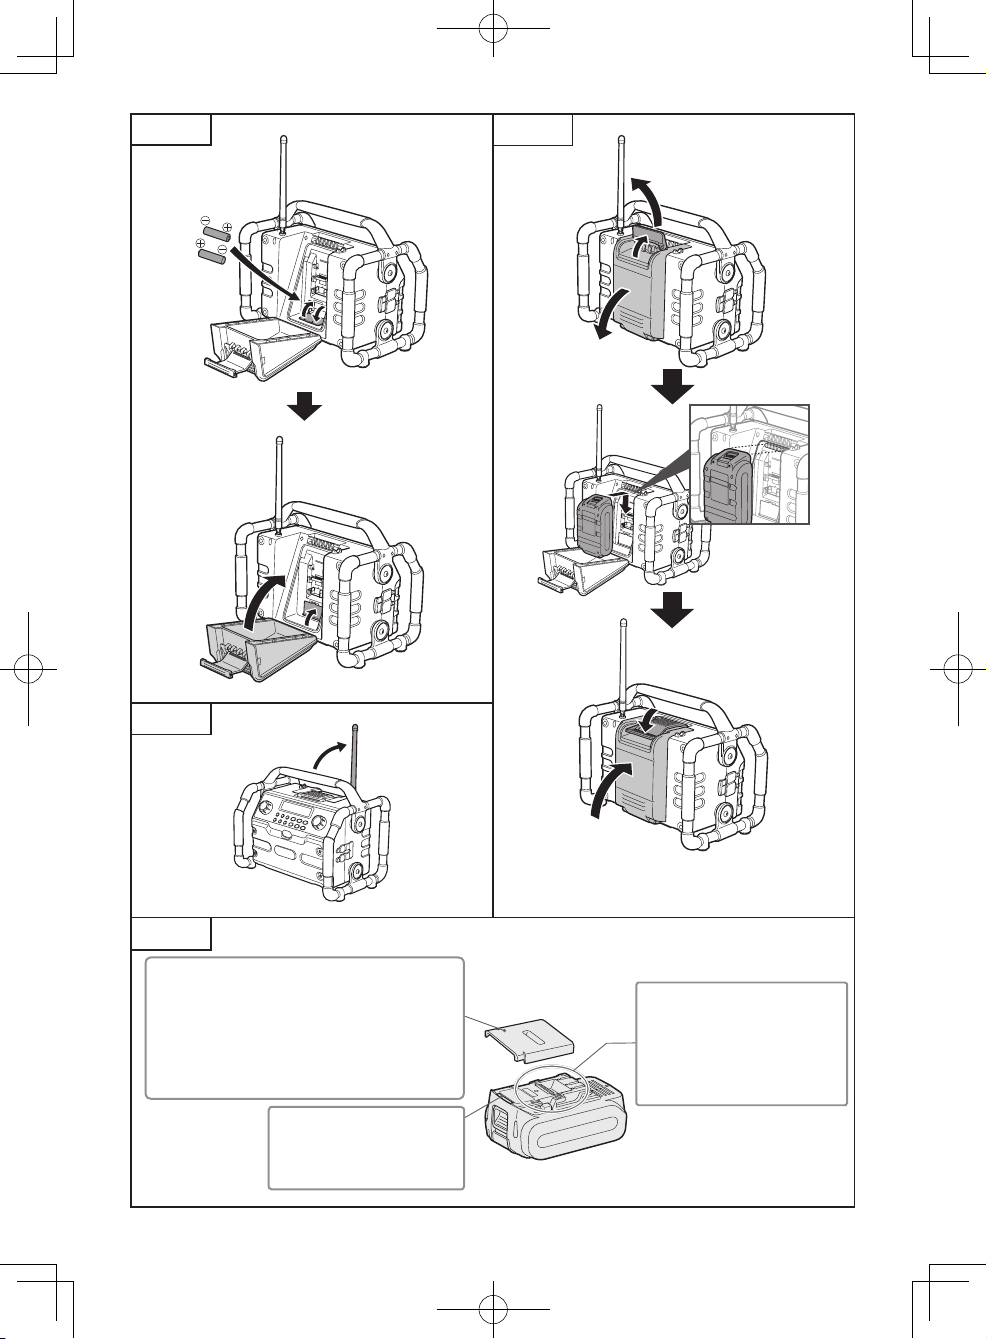
Fig. 1
[
]
Fig. 2
[
]
Fig. 3
[
[
]
Fig. 4
]
Pack cover Pakningsdæksel
Akkuabdeckung Batteriskydd
Couvercle de la batterie
autonome
Coperchio pacco Akkukotelon kansi
Accudeksel Pil takımı kapağı
Cubierta de batería
Pakkedeksel
label label etikett
Schild rojo merkki
rouge etikette etiket
rossa dekal
-
7 -
Terminals Terminaler
Anschlüsse Poler
Bornes Ender
Terminali Liittimet
Aansluitpunten Terminaller
Terminales
EY37A2.indb 7 2015-2-11 17:07:24
Page 8

Original instructions: English
EN
Translation of the original instructions:
Other languages
This unit with all covers completely closed and
operating on a battery pack satises appropriate
IP Degrees of Protection based on the IEC
regulations.
Definition of IP code
IP6X: No Ingress of dust (In case that the talcum
powder under 75μm intrudes inside the tool)
IPX4: Water splashed against the unit from any
direction shall have no harmful effects (This
unit is designed to operate when the unit is
sprayed by approximately 4.3 L/min of normal
temperature water for 10 minutes from multiple
directions using several nozzles at approximately
1 meter distance.).
NOTE:
This does not cover the included “AC
power adaptor”.
LIMITED WARRANTY
The rating of IP64 qualies this unit for the
minimum impact of water or dust, but not for the
assurance of performance in such conditions.
See Safety and Operating Instructions for further
details for proper operation.
I. IMPORTANT SAFE TY
INSTRUCTIONS
Read All Instructions
1. SAVE THESE INSTRUCTIONS -This manual
contains important safety and operating
instructions for this product.
2. Before using this product, read all
instructions and cautionary markings.
3. Do not expose this product and battery pack
to rain or snow or use in damp location.
4. Use of an attachment not recommended may
result in a risk of fire, electric shock, or injury
to persons.
5. To reduce risk of damaging the electric plug
and cord, pull by plug rather than cord when
disconnecting charger.
6. An extension cord should not be used.
7. If the supply cord is damaged, it must be
replaced by the manufacturer or its service
agent, or a similarly qualified person in order
to avoid a hazard.
8. To reduce risk of electric shock, unplug
charger from outlet before attempting any
maintenance or cleaning.
9. Make sure cord is located so that it will not
be stepped on, tripped over, or otherwise
subjected to damage or stress.
10. This product and battery pack are specifically
designed to work together.
11. Do not attempt to disassemble this product
and the battery pack housing.
12. Do not store the tool and battery pack in
locations where the temperature may reach
or exceed 50°C (122°F) (such as a metal
tool shed, or a car in the summer), which can
lead to deterioration of the storage battery.
13. Do not charge battery pack when the
temperature is BELOW 0°C (32°F) or
ABOVE 40°C (104°F).
14. Do not incinerate the battery pack. It can be
explode in a fire.
15. This product is designed to operate on
standard household electrical power only.
Use only on the voltage indicated on the
nameplate. Do not attempt to use it on any
other voltage!
16. Do not abuse cord. Never carry charger by
cord or yank it to disconnect from outlet.
Keep cord away from heat, oil and sharp
edges.
17. Charge the battery pack in a well ventilated
place, do not cover the charger and battery
pack with a cloth, etc., while charging.
18. Do not short the battery pack. A battery short
can cause a large current flow, over heating
and burns.
19. NOTE: If the supply cord of this appliance
is damaged, it must only be replaced by a
repair shop appointed by the manufacturer,
because special purpose tools are required.
20. The appliance is not a portable luminaire for
children usage.
21. Children shall not play with the appliance.
Symbol Meaning
To reduce the risk of
injury, user must read and
understand instruction manual.
For indoor use only.
Use only power supplies
listed in this instructions.
-
8 -
EY37A2.indb 8 2015-2-11 17:07:24
Page 9

WARNING:
• Do not use other than the Panasonic battery
packs that are designed for use with this
rechargeable tool.
• Panasonic is not responsible for any damage
or accident caused by the use of the recycled
battery pack and the counterfeit battery pack.
• Do not dispose of the battery pack in a fire, or
expose it to excessive heat.
• Do not drive the likes of nails into the battery
pack, subject it to shocks, dismantle it, or
attempt to modify it.
• Do not allow metal objects to touch the battery
pack terminals.
• Do not carry or store the battery pack in the
same container as nails or similar metal
objects.
• Do not charge the battery pack in a high-
temperature location, such as next to a fire or
in direct sunlight.
Otherwise, the battery may overheat, catch
fire, or explode.
• Never use other than the dedicated charger to
charge the battery pack. Otherwise, the battery
may leak, overheat, or explode.
• After removing the battery pack from this
product or the charger, always reattach the
pack cover. Otherwise, the battery contacts
could be shorted, leading to a risk of fire.
• When the Battery Pack Has Deteriorated,
Replace It with a New One.
Continued use of a damaged battery pack may
result in heat generation, ignition or battery
rupture.
• If you detect any abnormalities, discontinue
use immediately and contact the retailer from
which you purchased this product.
• Do not turn the volume up too high when using
headphones or earphones.
• Be careful not to raise the volume as your
hearing adapts.
• Do not use this product over a long period
of time, and always take a break to rest your
ears.
• If you experience any discomfort to your ears,
discontinue use and contact your physician.
• Do not place heavy objects on the radio or
climb on top of it.
• Do not place the radio on an unstable surface
or in an unstable position.
• Be sure to always back up the data saved in
the device connected to this radio to prevent
the loss of data in the event of a device failure.
II. ASSEMBLY
Battery Installation
NOTE:
If the batteries are removed from both the
main battery pack compartment and back
up battery compartment, initialization will
be performed about three minutes later.
Installing back up batteries [Fig. 1]
1. Pull out the battery compartment locker to
release battery compartment. There are
main battery pack compartment and back up
battery compartment.
2. Remove back up battery compartment cover
and insert 2 fresh UM-3 (AA sizes). Make
sure the batteries are with correct polarity as
shown inside the compartment. Replace the
battery cover.
NOTE:
• The radio can be used without connecting
the backup battery.
• Keeping back up batteries inside the
compartment prevent stored data in
preset memories from being lost.
CAUTION:
• Do not use any batteries other than those
specified (UM-3).
• Remove batteries if product is not to be
used for a long time.
• Do not mix new batteries with old ones or
use different types of batteries together.
Improper use of batteries may result in
battery leakage, heat generation, fire or
explosion.
If any fluid is leaking from the batteries,
pay careful attention to the following
safety points.
• Never touch battery fluid with your bare
hands. Doing so could result in a skin
inflammation or an injury.
• Blindness could result if the fluid gets in
your eyes.
• Completely wipe up any spilled battery
fluid.
Attaching/Removing main battery pack
[Fig. 2]
1. After back up batteries are inserted, insert
the main battery pack to the main unit.
Always insert it all the way until it locks
in place with a little click. The suitable
battery packs for this radio listed in the
Specifications.
-
9 -
EN
EY37A2.indb 9 2015-2-11 17:07:24
Page 10

2. To remove the battery pack, pull the battery
EN
off the compartment.
3. Return the battery compartment locker to the
original position.
Low battery indicator
1. Reduced power, distortion and a “stuttering
sound” or low battery sign (
appears on the display are all the signs that
the main battery pack needs to replace.
NOTE: The battery pack can’t be charged
via the supplied AC power adaptor.
2. When the main battery is removed and the
low battery sign ( ) flashes and an “E.” is
shown on the display, this indicates that it is
time to replace the back up batteries.
) that
Using the soft bended antenna [Fig. 3]
Straight up the soft bended antenna.
CAUTION:
The soft bended antenna works in one
direction only.
Forcibly bending it can cause it to break or
result in an injury.
Using Supplied AC power adaptor
Remove the rubber cover and insert the
adaptor plug into the DC socket on the right
side of the radio. Plug the adaptor into a
standard mains socket outlet. Whenever the
adaptor is connected, the battery pack is
automatically disconnected. The AC adaptor
should be disconnected from the main
supply when not in use.
NOTE:
• The sound is slightly quieter when using an
AC power adaptor than when using a battery
pack.
• When the radio has any interference in
AM band by its adaptor, please move the
radio away from its AC adaptor over
30 cm.
• When the AC adaptor and the battery
pack are used simultaneously, the AC
adaptor will take precedence in powering
the unit. In this case, the power of the
battery pack will not be consumed.
• This unit does not have a charging
function. Running the unit using both the
AC adaptor and battery pack at the same
time will not charge the battery pack.
• The AC power adaptor is for exclusive
use with this product and is not to be used
with other equipment. Also, do not use
AC adaptor for other equipment with this
product.
III. OPERATIONS
Operating the radio – Scan tuning
AM/FM
NOTE:
If the reception signal is weak, try
changing the orientation of the radio or
antenna.
1. Press and hold the Power button to switch
on the radio.
2. Press the Source button until “AM” or “FM” is
displayed.
3. Press the Tuning control knob to carry out an
auto-tune. The radio will scan up the AM/FM
band from the currently displayed frequency
and will stop scanning automatically when it
finds a station of sufficient strength.
4. After a few seconds the display will update.
The display will show the frequency of the
signal found.
5. To find other station, press the Tuning control
knob as before.
6. When the end of the waveband is reached
the radio will recommence tuning from the
opposite end of the waveband.
7. Rotate the Volume control to adjust the
sound level as required.
8. To switch off the radio, press and hold the
Power button .
Manual tuning – AM/FM
1. Press and hold the Power button to switch
on the radio.
2. Press the Source button until “AM” or “FM” is
displayed.
3. Rotate the Tuning control knob to tune to a
station.
4. When the end of the waveband is reached
the radio will recommence tuning from the
opposite end of the waveband.
5. Use the Volume control to adjust the sound
level as required.
Presetting stations in AM/FM mode
There are 6 preset stations each for AM and
FM radio. They are used in the same way for
each waveband.
1. Tune to the required radio station as
previously described.
2. Press and hold the required Preset button (1
to 6) until the radio beeps. “M1” for example
is shown next to the frequency. The station
will be stored using the preset number.
Repeat this procedure for the remaining
presets as needed. Preset stations which
have already been stored may be overwritten
-
by following the above procedure if required.
10 -
EY37A2.indb 10 2015-2-11 17:07:25
Page 11
Recalling a preset in AM/FM mode
1. Press the Source button until “AM” or “FM” is
displayed.
2. Momentarily press the required Preset button
to cause the radio to tune to one of the
stations stored in the preset memory.
FM stereo/mono
–––––––––––––––––
FM
If the FM radio station being listened to has
a weak signal some hiss may be audible. It
is possible to reduce this hiss by forcing the
radio to play the station in mono rather than
stereo.
1. Press the Source button as needed to select
the FM band and tune to the desired FM
station as previously stated.
2. Press and hold Tuning control knob to enter
the menu setting.
3. Rotate the Tuning control until “FM” shows
on the display and press the Tuning control
knob to enter the setting. If the setting is ST
(stereo) press the Tuning control to switch to
MN (mono) mode to reduce the hiss. Press
the Tuning control to select the option.
Listening to music via Bluetooth®
streaming
You need to pair your Bluetooth® device with
the radio before you can auto-link to play/
stream Bluetooth® music through the radio.
Paring creates a ‘bond’ so two devices can
recognize each other.
Pairing your Bluetooth
time
1. Press the Source button until “BT” is
displayed.
display and the Bluetooth® icon will flash
on the display.
2. Activate Bluetooth® on your device according
to the device’s user manual to allow the
paring procedure.
3. Press the Bluetooth® pairing button, then
the search of the radio on your Bluetooth®
device. Once “EY37A2” is appeared on your
Bluetooth® device, press the item in your
Bluetooth® list and it will link with the radio.
4. Once connected, the Bluetooth® icon will
remain steady on the display. You can now
play the music in your Bluetooth®-enabled
device via the radio.
NOTE:
• If ‘EY37A2’ shows on your Bluetooth
––––––––––––––––––––––
®
device for the first
BT
will be appeared on the
will show on the display. You can start
®
device list but your device cannot connect
with it, please delete the item from your
list and pair the device with the radio
again following the steps described
previously.
• The effective operation range between
the radio and the paired device is
approximately 10 meters (30 feet). Any
obstacle between the radio and the device
can reduce the operational range.
• Bluetooth
®
connectivity performance
may vary depending on the connected
Bluetooth® devices. Please refer to the
Bluetooth® capabilities of your device
before connecting to the radio. All features
may not be supported on some paired
Bluetooth® devices.
Playing previously-paired devices
This unit can memorize up to 8 sets of paired
devices, when the memory exceed this
amount, the earliest paired device will be
overwritten from the radio.
If your Bluetooth
®
device already paired with
the unit previously, the unit will memorize
your Bluetooth® device and it attempts to
reconnect automatically with a device in
memory which is last connected. If the last
connected device is not available, the radio
will try to connect to the second last device,
and so forth.
Erasing the paired device memory
®
Press and hold the Bluetooth
pairing button
for approximately 7 seconds until you hear
a double tone. The radio clears all devices
from its memory and becomes discoverable.
®
Disconnecting your Bluetooth
Press and hold the Bluetooth
device
®
pairing button
until the radio beeps to disconnect with your
Bluetooth® device. The Bluetooth® icon will
flash on the display indicating the radio is
discoverable again for pairing.
Clock and Alarms
Setting the clock format
The clock display used in stand-by mode and
on the playing mode screens can be set to
different format. The selected format is then
also used when setting the alarms.
1. Make sure the radio is powered on. Press
and hold the Tuning control to enter the
advanced menu of the current mode.
2. Rotate the Tuning control until “TIM” shows
on the display and press the Tuning control
to enter the setting.
––––––––––––––
TIM
EN
11 -
-
EY37A2.indb 11 2015-2-11 17:07:25
Page 12
3. Rotate the Tuning control to select either 12
EN
or 24 hour format. Press the Tuning control
to confirm your choice of clock format.
NOTE:
If the 12 hour clock format is chosen, the
radio will then use the 12 hour clock for
the setting of alarms and will display a
12 hour clock with PM indicator when in
standby mode.
Setting the clock time manually
1. Make sure the radio is powered on. Press
and hold the Tuning control knob to enter the
Advanced menu of the current mode.
2. Rotate the Tuning control until “CLK” shows
on the display and press the Tuning control
to enter the setting. Now the hour setting
begins flashing.
3. Rotate the Tuning control to select the
desired hour and press the Tuning control to
confirm the setting. Now the minute setting
begins flashing.
4. Rotate the Tuning control to select the
desired minute and press the Tuning control
to confirm the setting. The display will then
revert to the previous menu.
Setting the alarm clock
The radio has two alarms which can each be
set to wake you to AM/FM radio or buzzer
alarm. Ensure the clock time is set before
setting the alarms.
a. Setting radio alarm:
1. Make sure the radio is powered on.
2. Press and hold the radio alarm button, the
radio alarm symbol (
hour will flash followed by a beep.
3. When the hour digit flashes, rotate the
Tuning control to select the required alarm
hour and press the Tuning control to confirm
the hour setting.
4. Then rotate the Tuning control to select the
required alarm minute and press the Tuning
control to confirm the setting.
5. When radio alarm symbol is flashing, rotate
Tuning control to select desired wake-up
band and station, then press Tuning control
to confirm the selection.
6. Rotate Tuning control to select the desired
volume and press Tuning control to confirm
the setting. Radio alarm setting is now
completed.
NOTE:
If the selected AM/FM alarm station is not
available when the alarm is sounding, the
buzzer alarm will be used instead.
––––––
) and the display
CLK
b. Setting HWS (Humane Wake System)
buzzer alarm:
1. Make sure the radio is powered on.
2. Press and hold the buzzer alarm button, the
buzzer alarm symbol (
hour will flash followed by a beep.
3. When the hour digit flashes, rotate the
Tuning control to select the required alarm
hour and press the Tuning control to confirm
the hour setting.
4. Then rotate the Tuning control to select the
required alarm minute and press the Tuning
control to confirm the setting.
5. Rotate Tuning control to select the desired
volume and press Tuning control to confirm
the volume. Buzzer alarm setting is now
completed.
When the alarm sound
To cancel a sounding alarm, press the Power
button.
Disabling/cancelling alarms
To disable an active alarm, press the
corresponding alarm button to cancel the
alarm setting.
) and the display
Alarm sound duration –––––––––––––
1. Press and hold the Tuning control to enter
the advanced menu of the current mode.
2. Rotate the Tuning control until “ALM” shows
on the display. Press the Tuning control to
enter the setting.
3. Rotate the Tuning control to cycle through
the option of 1, 3, 5, 10, 15, 30 and 60
minutes. Stop when the desired option
appears on the display, then press the
Tuning control to confirm the setting.
Snooze –––––––––––––––––––––––––
1. When the alarm sounds, press any button
other than the Power button will silence the
alarm. Snooze symbol ( ) will appear on
the display.
2. To adjust the silence time for the snooze
timer, press and hold the Tuning control to
enter the menu setting.
3. Rotate the Tuning control until “SNZ”
appears on the display, then press the
Tuning control to enter the setting. Rotate the
Tuning control to adjust the silence time from
the options of 1, 3, 5, 10, 15 minutes or OFF
for the snooze timer.
4. To cancel the snooze timer while the alarm
is suspended, press the Power button.
-
12 -
ALM
SNZ
EY37A2.indb 12 2015-2-11 17:07:26
Page 13
To disable the snooze function, rotate the
Tuning control until “OFF” is displayed.
Sleep timer –––––––––––––––––––––
The radio can be set to turn off automatically
after a preset time has elapsed. The Sleep
Timer setting can be adjusted between OFF,
15, 30, 45, 60 and 90 minutes.
1. Press and hold the Tuning control to enter
the advanced setting menu.
2. Rotate the Tuning control until “SLP” shows
on the display. Press the Tuning control to
enter the setting.
3. Rotate the Tuning control to cycle through
the option of OFF, 15, 30, 45, 60 or 90.
Stop when the desired sleep timer setting
appears on the display. The setting will be
saved and the LCD will return to normal
display.
4. The radio will switch off automatically after
the preset Sleep Timer has elapsed. The
Sleep Timer icon ( ) will show on the
display indicating an active Sleep Timer.
5. To cancel the Sleep Timer function before
the preset time has elapsed, simply press
and hold the Power button to turn the unit
off manually. To cancel the function when
countdown is progressing, go to sleep timer
setting menu and select “OFF”.
Tone control function ––––––––––––
The sound of your sound system can be
adjusted to suit your personal taste for the
material that you are listening to. The radio
has 5 preset equalizer modes. Alternatively,
you may set the treble and bass levels to
your own preferences.
1. Press the Volume control to enter EQ menu.
2. Rotate the Volume control until “TON” is
shown on the display. Press the Volume
control to enter the setup menu.
3. Rotate the Volume control to cycle through
the 6 modes below until the desired mode is
displayed. Then press the Volume control to
confirm the setting.
a. TN 1-Flat
b. TN 2- Heavy
c. TN 3- Soft
d. TN 4- Clear
e. TN 5- Vocal
4. To revert back to the upper level menu,
rotate the Volume control until is shown
on the display. Then press the Volume
control again to return to the upper level
menu.
SLP
TON
Set my own EQ –––––––––––––––––
If you find the preset equalizer functions
not to your liking, you may set up a custom
treble and bass as following:
1. Press the Volume control to enter EQ menu.
2. Rotate the Volume control until “BAS” is
shown on the display. Press the Volume
control to enter the setup menu.
3. Rotate the Volume control to adjust the bass
level (between -5 and +3). The sound will
change as you adjust the level. Press the
Volume control again to confirm the setting.
4. Rotate the Volume control until “TRE” is
shown on the display. Press the Volume
control to enter the setup menu.
5. Rotate the Volume control to adjust the treble
level (between -5 and +3). The sound will
change as you adjust the level. Press the
Volume control again to confirm the setting.
Setting the operation sound–––––––
You can turn on or off the operation sound of
the radio.
1. Press and hold the Tuning control to enter
the menu setting of the current mode.
2. Rotate the Tuning control until “SND”
appears on the display and press the Tuning
control to enter the setting.
3. Rotate the Tuning control to choose the
required selection and press the Tuning
control to confirm the setting.
BAS
SND
Auxiliary input socket
A 3.5mm stereo Auxiliary Input sockets is
provided at the left side of the radio.
1. Connect an external audio source (for
example, smartphone, MP3 or CD player) to
the Auxiliary Input socket.
2. Press the Source button until AUX IN is
displayed.
3. Adjust the volume setting on your
smartphone, MP3 or CD player to ensure an
adequate signal level from the player, and
then use the Volume control on the radio as
needed for comfortable listening.
Headphone socket
A 3.5mm Headphone Socket located on
the right hand side of the radio is provided
for use with headphones. Inserting a plug
automatically mutes the internal loudspeaker.
Please be aware that the sensitivity of
headphones can vary widely. We therefore
recommend setting volume to a low level
before connecting headphones to the radio.
EN
13 -
-
EY37A2.indb 13 2015-2-11 17:07:26
Page 14

EN
It is also recommended to reduce the volume
before unplugging your headphones.
CAUTION:
Excessive sound pressure from
earphones and headphones can cause
hearing loss.
USB socket for Smartphone charging
NOTE:
USB devices cannot be charged while
receiving AM broadcasts.
The radio has a USB socket which is
intended only for charging a smartphone and
similar devices.
Charge time may vary and in some cases
may take longer to charge than when using
the manufacturers charging unit supplied
with the smartphone.
1. Connect your smartphone to the USB
charging socket at the left side of the radio.
2. Your smartphone will begin to charge. Please
note that charging can take place in FM/
Bluetooth®/Aux-in mode.
3. Once your smartphone has charged remove
the USB lead.
CAUTION:
Some USB devices allow charging only by a
specific method.
Be sure to check before charging your
device.
• The charger may not supply power to
some USB devices.
• When not using or after charging, remove
the USB cable and close the cover.
• Do not connect power source to USB port.
Otherwise there is risk of fire. The USB
port is only intended for charging lower
voltage device. Always place the cover
onto the USB port when not charging the
lower voltage device.
• Do not insert a nail, wire, etc. into USB
power supply port. Otherwise a circuit
short may cause smoke and fire.
• Do not connect this USB socket with your
PC USB port, as it is highly possible that it
may cause breakdown of the units.
• Never use the USB socket in rainy or
moist conditions to prevent moist from
entering the radio. Always keep the rubber
cover on the back well closed under these
conditions.
LED light
The radio is fitted with a long life LED light
located on the front panel of the radio. Press
the Light button to switch on and off the LED
light.
Caution: DO NOT STARE INTO BEAM.
NOTE:
When no operations are performed, the
lights starts blinking after 10 minutes, and
then it turns off one minute later.
IV. MAINTENANCE
Use only a dry, soft cloth for wiping the unit.
Do not use a damp cloth, thinner, benzine, or
other Volatile solvents for cleaning.
In the event that the inside of the unit or
battery pack is exposed to water, drain and
allow to dry as soon as possible. Carefully
remove any dust or iron filings that collect
inside the unit. If you experience any
problems operating the unit, consult with a
repair shop.
V. ACCESSORIES
Battery Pack
• See the Specification.
Battery Charger
• For inquiries please contact an authorized
dealer.
NOTE:
Battery pack and charger are not included
in this kit.
[Battery Pack]
For Appropriate Use of Battery Pack
Li-ion Battery Pack [Fig. 4]
• The rechargeable batteries have a limited life.
• For optimum battery life, store the Li-ion
battery pack following use without charging it.
• When charging the battery pack, confirm that
the terminals on the battery charger are free
of foreign substances such as dust and water
etc. Clean the terminals before charging the
battery pack if any foreign substances are
found on the terminals.
The life of the battery pack terminals may be
affected by foreign substances such as dust
and water etc. during operation.
• When battery pack is not in use, keep it away
from other metal objects like: pape clips,
coins, keys, nails, screws, or other small
-
14 -
EY37A2.indb 14 2015-2-11 17:07:26
Page 15
metal objects that can make a connection
from one terminal to another.
Shorting the battery terminals together may
cause sparks, burns or a fire.
• When operating the battery pack, make sure
the work place is well ventilated.
• When the battery pack is removed from the
main unit, replace the battery pack cover
immediately in order to prevent dust or dirt
from contaminating the battery terminals and
causing a short circuit.
CAUTION:
• To protect the motor or battery, be sure
to note the following when carrying out
operation.
• If the motor and battery becomes hot, the
protection function will be activated and
the motor and battery will stop operating.
For safe use
• The battery pack is designed to be installed
by proceeding two steps for safety. Make
sure the battery pack is installed properly to
the main unit before use.
[Battery Charger]
Charging
CAUTION:
1) The charger is designed to operate on
standard domestic electrical power only
as stated in the rating plate. Charge only
on the voltage indicated on the rating
plate of unit. e.g.230 V/50 Hz.
2) Do not attempt to use it on any other
voltage or frequency rating!
3) If the temperature of the battery pack
falls approximately below -10°C (14°F),
charging will automatically stop to prevent
degradation of the battery.
4) The ambient temperature range is
between 0°C (32°F) and 40°C (104°F).
If the battery pack is used when the
battery temperature is below 0°C (32°F),
the unit may fail to function properly.
5) Use the charger at temperatures between
0°C (32°F) and 40°C (104°F), and charge
the battery at a temperature similar to
that of the battery itself. (There should be
no more than a 15°C (59°F) difference
between the temperatures of the battery
and the charging location.)
6) When charging a cool battery pack
(below 0°C (32°F)) in a warm place,
leave the battery pack at the place and
wait for more than one hour to warm up
the battery to the level of the ambient
temperature.
7) Cool down the charger when
charging more than two battery packs
consecutively.
8) Do not insert your fingers into contact
hole, when holding charger or any other
occasions.
9) To prevent the risk of fire or damage to
the battery charger.
• Do not cover vent holes on the charger
and the battery pack.
• Unplug the charger when not in use.
NOTE:
Your battery pack is not fully charged at
the time of purchase. Be sure to charge
the battery before use.
How to charge
1. Plug the charger into the AC outlet.
NOTE:
Sparks may be produced when the plug
is inserted into the AC power supply, but
this is not a problem in terms of safety.
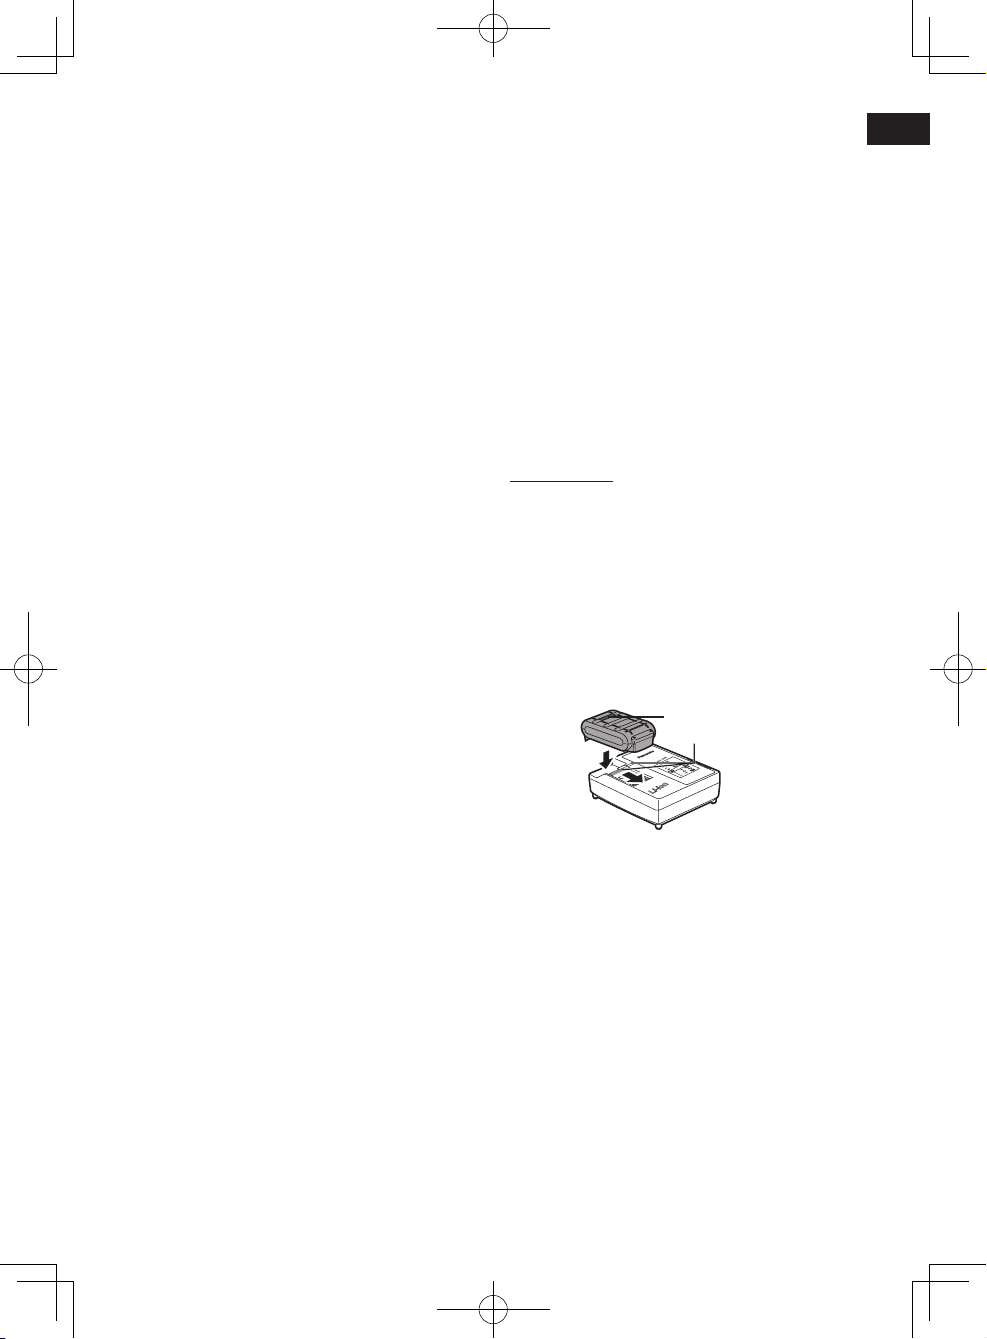
2. Connect the battery pack firmly into the
charger.
1. Line up the alignment marks and place
the battery onto the dock on the charger.
2. Slide forward in the direction of the arrow.
Alignment
marks
3. During charging, the charging lamp will be
illuminated. When charging is completed, an
internal electronic switch will automatically
be triggered to prevent overcharging.
• Charging will not start if the battery pack is
hot (for example, immediately after heavyduty operation).
The orange standby lamp will be flashing
until the battery cools down. Charging will
then begin automatically.
4. The charge lamp (green) will flash slowly
once the battery is approximately 80%
charged.
5. When charging is completed, the charging
lamp in green color will turn off.
6. If the temperature of the battery pack is 0°C
(32°F) or less, charging takes longer to fully
charge the battery pack than the standard
charging time.
15 -
-
EN
EY37A2.indb 15 2015-2-11 17:07:26
Page 16

Even when the battery is fully charged, it
EN
will have approximately 50% of the power of
a fully charged battery at normal operating
temperature.
7. Consult an authorized dealer if the charging
lamp (green) does not turn off.
LAMP INDICATIONS
8. If a fully charged battery pack is inserted into
the charger again, the charging lamp lights
up. After several minutes, the charging lamp
in green color will turn off.
Charging is completed. (Full charge.)
Battery is approximately 80% charged.
Now charging.
Charger is plugged into the AC outlet. Ready to charge.
(Green) (Orange)
Turn off Illumiuated Flashing
Charging Status Lamp.
Left: green Right: orange will be displayed.
Battery pack is cool.
The battery pack is being charged slowly to reduce the load on
the battery.
Battery pack is warm.
Charging will begin when temperature of battery pack drops. If
the temperature of the battery pack is -10°C (14°F) or less, the
charging status lamp (orange) will also start ashing. Charging
will begin when the temperature of the battery pack goes up.
Charging is not possible. Clogged with dust or malfunction of
the battery pack.
Battery Recycling
ATTENTION:
For environmental protection and recycling of materials, be sure that it is disposed of at an
officially assigned location, if there is one in your country.
Information for Users on Collection and Disposal of Old Equipment and used Batteries
These symbols on the products, packaging, and/or accompanying documents
mean that used electrical and electronic products and batteries should not be
mixed with general household waste.
For proper treatment, recovery and recycling of old products and used batteries,
please take them to applicable collection points, in accordance with your
national legislation and the Directives 2012/19/EC and 2006/66/EC.
By disposing of these products and batteries correctly, you will help to save
valuable resources and prevent any potential negative effects on human health
and the environment which could otherwise arise from inappropriate waste
handling.
For more information about collection and recycling of old products and
batteries, please contact your local municipality, your waste disposal service or
the point of sale where you purchased the items.
Penalties may be applicable for incorrect disposal of this waste, in accordance
with national legislation.
-
16 -
EY37A2.indb 16 2015-2-11 17:07:27
Page 17

For business users in the European Union
If you wish to discard electrical and electronic equipment, please contact your dealer or supplier for
further information.
[Information on Disposal in other Countries outside the European Union]
These symbols are only valid in the European Union. If you wish to discard these items, please
contact your local authorities or dealer and ask for the correct method of disposal.
VI. SPECIFICATIONS
[MAIN UNIT]
AC power adaptor DC12 V/1500 mA, center pin positive
Battery
Bluetooth
Bluetooth
Bluetooth
®
QD ID 58625
®
version 4.0
®
proles A2DP/SCMS-T
Transmission power Bluetooth
Transmission range Approximately 10 m (varies according to usage conditions)
Supported codec SBC
Compatible Bluetooth
®
prole A2DP
Frequency range
Loudspeaker 3.5 inches 8 ohm × 2
Output Power
Input terminal 3.5 mm dia./Max. 2 V/stereo (AUX IN)
Output terminal
Antenna system
Dimension (W × H × D) 344 mm × 280 mm × 239 mm
Weight 4.7 kg (with EY9L51)/4.0 kg (main unit only)
Power consumption
[BATTERY PACK]
Model No.
EY9L41 EY9L42 EY9L44 EY9L45 EY9L47 EY9L50 EY9L51 EY9L52
Storage battery
Motor voltage
Operating time
at 50 W+50 W
(FM Received)
14.4V DC
(3.6V × 4 cells)
Approx.
18 h
Approx.
9 h
14.4V DC
(3.6V × 8 cells)
Approx.
Approx.
19 h
Back up: UM-3 (AA size) × 2
Main battery: 14.4 V/18 V
®
specication power Class 2 (2.5 mW)
FM 87.5-108 MHz (0.05 MHz/step)
AM (MW) 522-1629 kHz (9 kHz/step)
When using AC power adaptor: 1.7 W × 2
When using 14.4 V battery pack: 2.6 W × 2
When using 18 V battery pack: 4.5 W × 2
USB: DC OUT 5 V/1 A
Headphone: 3.5 mm dia./3 Ω/150 mV/stereo
FM: soft beded antenna
AM: bar antenna
Max. 7 W
0.12 W (Standby mode)
Li-ion Battery
24 h
14.4V DC
(3.6V × 4 cells)
Approx. 11 h
18V DC
(3.6V × 10 cells)
Approx.
19 h
Approx.
24 h
(3.6V × 5 cells)
18V DC
Approx. 11 h
EN
17 -
-
EY37A2.indb 17 2015-2-11 17:07:27
Page 18

[BATTERY CHARGER]
EN
Model No. EY0L82
Electrical rating
See the rating plate on the bottom of the charger
Weight 0.93 kg
EY9L41 EY9L42 EY9L44 EY9L45 EY9L47 EY9L50 EY9L51 EY9L52
Charging time
Usable:
35min.
Full:
50min.
Usable:
30min.
Full:
35min.
Usable:
40min.
Full:
55min.
Usable:
50min.
Full:
60min.
Usable:
35min.
Full:
40min.
NOTE: This chart may include models that are not available in your area.
Please refer to the latest general catalogue.
For the dealer name and address, please see the included warranty card.
Usable:
40min.
Full:
55min.
Usable:
55min.
Full:
70min.
Usable:
35min.
Full:
40min.
VII. LICENSE
• The Bluetooth® word mark and logos are registered trademarks owned by Bluetooth
SIG, Inc. and any use of such marks by Panasonic Corporation is under license. Other
trademarks and trade names are those of their respective owners.
• The various names, company names and product names presented in this manual are the
trademarks or registered trademarks of their respective companies. Please note that some
TM or ® symbols are omitted in this document.
About Bluetooth
Panasonic bears no responsibility for data
and/or information that is compromised
during a wireless transmission.
Frequency band used
This system uses the 2.4 GHz frequency band.
Certication of this device
• This system conforms to frequency
restrictions and has received certification
based on frequency laws. Thus, a wireless
permit is not necessary.
• The action below are punishable by law in
some countries:
– Taking apart or modifying the unit.
– Removing specification indications.
Restrictions of use
• Wireless transmission and/or usage with
all Bluetooth
guaranteed.
• All devices must conform to standards set by
Bluetooth SIG, Inc.
• Depending on the specifications and settings
of a device, it can fail to connect or some
operations can be different.
®
®
equipped devices is not
®
• This system supports Bluetooth
security
features. But depending on the operating
environment and/or settings, this security
is possibly not sufficient. Transmit data
wirelessly to this system with caution.
• This system cannot transmit data to a
Bluetooth® device.
Range of use
Use this device at a maximum range of 10 m.
The range can decrease depending on the
environment, obstacles or interference.
Interference from other devices
• This system may not function properly and
troubles such as noise and sound jumps
may arise due to radio wave interference if
the main unit is located too close to other
Bluetooth
®
devices or the devices that use
the 2.4 GHz band.
• This system may not function properly if
radio waves from a nearby broadcasting
station, etc. are too strong.
Intended usage
• This system is for normal, general use only.
• Do not use this system near equipment or
in an environment that is sensitive to radio
frequency interference (example: airports,
hospitals, laboratories, etc.).
-
18 -
EY37A2.indb 18 2015-2-11 17:07:27
Page 19
Declaration of Conformity (DoC)
Hereby, “Panasonic
Corporation” declares
that this product is in
compliance with the essential requirements and
other relevant provisions of Directive 1999/5/EC.
Customers can download a copy of the original
DoC to our R&TTE products from our DoC
server:
http://www.doc.panasonic.de
Contact to Authorised Representative:
Panasonic Testing Centre, Panasonic Europe
Ltd. - Hamburg ofce, Winsbergring 15,
22525 Hamburg, Germany
EN
ONLY FOR U. K.
VII. ELECTRICAL PLUG
INFORMATION
FOR YOUR SAFETY PLEASE READ
THE FOLLOWING TEXT CAREFULLY
This appliance is supplied with a moulded three
pin mains plug for your safety and convenience.
A 5 amp fuse is tted in this plug.
Should the fuse need to be replaced please
ensure that the replacement fuse has a rating of
5 amp and that it is approved by ASTA or BSI to
BS1362.
Check for the ASTA mark or the BSI mark
on the body of the fuse.
If the plug contains a removable fuse cover you
must ensure that it is retted when the fuse is
replaced.
If you lose the fuse cover the plug must not be
used until a replacement cover is ob-tained.
A replacement fuse cover can be purchased
from your local Panasonic Dealer.
IF THE FITTED MOULDED PLUG IS
UNSUITABLE FOR THE SOCKET OUT-LET IN
YOUR HOME THEN THE FUSE SHOULD BE
REMOVED AND THE PLUG CUT OFF AND
DISPOSED OF SAFELY. THERE IS A DANGER
OF SEVERE ELECTRICAL SHOCK IF THE
CUT OFF PLUG IS INSERTED INTO ANY 13
AMP SOCKET.
If a new plug is to be tted please observe the
wiring code as shown below.
If in any doubt please consult a qualied
electrician.
IMPORTANT:
The wires in this mains lead are coloured
in accordance with the fol-lowing code:
Blue: Neutral
Brown: Live
As the colours of the wire in the mains lead
of this appliance may not correspond with the
coloured markings identifying the terminals in
your plug, proceed as follows.
The wire which is coloured BLUE must be
connected to the terminal in the plug which is
marked with the letter N or coloured BLACK.
The wire which is coloured BROWN must be
connected to the terminal in the plug which is
marked with the letter L or coloured RED. Under
no circumstances should either of these wires
be connected to the earth terminal of the three
pin plug, marked with the letter E or the Earth
Symbol
How to replace the fuse: Open the fuse
compartment with a screwdriver and replace the
fuse and fuse cover if it is removable.
This apparatus was produced to BS800.
.
Fuse Cover
19 -
-
EY37A2.indb 19 2015-2-11 17:07:28
Page 20
Original-Anleitung: Englisch
Übersetzung der Original-Anleitung:
Andere Sprachen
DE
Bei vollkommen geschlossenen Abdeckungen
und Betrieb über ein Batterie-/Akku-Pack erfüllt
dieses Gerät die IP-Schutzart-Anforderungen
nach den IEC-Vorschriften.
Definition des IP-Codes
IP6X: Kein Eindringen von Staub (bei Prüfung
des Geräts unter Verwendung von Talkumpuder
mit einer Korngröße von unter 75 μm.)
IPX4: Aus allen Richtungen auf das Gerät
einwirkendes Spritzwasser hat keine negativen
Auswirkungen (Prüfbedingungen: 10-minütige
Besprühung aus verschiedenen, 1 m entfernten
Düsen mit lauwarmem Wasser bei ca. 4,3 l/min
aus mehreren Richtungen.)
HINWEIS:
Dies schließt das im Lieferumfang
enthaltene Netzteil nicht ein.
EINGESCHRÄNKTE GARANTIE
Die Schutzart IP64 qualiziert dieses Gerät für
minimale Auswirkung von Wasser oder Staub,
aber nicht für die Zusicherung der Leistung unter
solchen Bedingungen.
Weitere Einzelheiten zur Funktionstüchtigkeit
nden Sie in den Sicherheits- und
Gebrauchsanweisungen.
I. SICHERHEITS HINWEISE
Lesen Sie bitte alle fol genden
Hinweise
1. BEWAHREN SIE DIESE
SICHERHEITSHINWEISE GUT AUF - Die
vorliegende Anleitung enthält wichtige
Sicherheits- und Betriebshinweise für dieses
Produkt.
2. Lesen Sie vor Gebrauch dieses Produkts alle
Anweisungen und Hinweise.
3. Setzen Sie dieses Produkt und das Batterie-/
Akkupack keinem Regen oder Schnee aus,
und vermeiden Sie feuchte Benutzungsorte.
4. Der Einsatz eines nicht ausdrücklich
empfohlenen Zusatzgeräts kann zu Bränden,
Stromschlägen oder Personenschäden
führen.
5. Fassen Sie beim Trennen des Lade geräts
vom Netz stets den Stecker, um Schäden an
Netzkabel oder -stecker aus zuschließen.
6. Verwenden Sie keinesfalls ein
Verlängerungskabel.
7. Wird das Netzkabel des Ladegeräts
beschädigt, so darf es nur vom Hersteller,
einer Vertrags- Reparaturwerkstatt des
Herstellers oder einer ähnlichen qualifizierten
Person ausgetauscht werden, um Gefahren
zu vermeiden.
8. Trennen Sie das Ladegerät vor der Wartung
oder Reinigung von der Steckdose, um
Stromschläge auszuschließen.
9. Das Netzkabel ist so zu verlengen, dass
niemand darauf treten oder darüber stolpern
kann und ander weitige Baschädigungen
oder Bela stungen des Kabels aus ges
chlossen sind.
10. Dieses Produkt und das Batterie-/Akkupack
sind speziell aufeinander abgestimmt.
11. Zerlegen Sie keinesfalls dieses Produkt und
das Batterie-/Akkupackgehäuse.
12. Werkzeug und Akku dürfen nicht an Orten
gelagert werden, wo die Temperatur auf
50°C (122°F) oder höher steigen kann
(z.B.Werkzeugs chuppen aus Metall
oder das Innere von Fahrzeugen im
Sommer). Andernfalls droht eine Leistungsbeeinträchtigung des Akkus.
13. Bei Temperaturen UNTER 0°C (32°F) oder
ÜBER 40°C (104°F) darf der Akku nicht
geladen werden.
14. Erschöpfte Akkus keinesfalls ver brennen, da
sie sonst explo dieren können.
15. Das Produkt ist für Betrieb mit der üblichen
Netzspannung ausgelegt. Die Benutzung
darf nur mit der auf dem Typenschild
angegebenen Spannung erfolgen!
16. Das Netzkabel darf nicht über mäßig belastet
werden. Tragen Sie daher niemals das
Ladegerät am Netzkabel, und ziehen Sie
das Kabel stets nur am Stecker aus der
Steckdose. Halten Sie das Netzkabel fern
von Wärme, Öl und svharfen Kanten.
17. Laden Sie den Akku an einem gut belüfteten
Ort, und decken Sie Ladegerät und Akku
während des Ladevorgangs keinesfalls mit
einem Tuch oder dgl. ab.
18. Der Akku darf keinesfalls kurz-geschlossen
werden. Ein Kurz-schluss kann zu
Überhitzung und Verbrennungen führen.
19. HINWEIS: Wird das Netzkabel des
Ladegeräts beschädigt, so darf es nur
von einer Vertrags-Reparaturwekstatt des
Herstellers ausgetaushcht werden, da für
diese Aebeit Spezialwerkzeug erforderlich
ist.
20. Das Gerät ist keine tragbare Leuchte, die für
die Verwendung durch Kinder geeignet ist.
21. Kinder dürfen nicht mit dem Gerät spielen.
Symbol Bedeutung
Zur Verminderung der
Verletzungsgefahr muss die
Bedienungsanleitung gründlich
gelesen werden.
Nur für Inneneinsatz.
Verwenden Sie ausschließlich
die in dieser Anleitung
aufgeführten Netzteile.
-
20 -
EY37A2.indb 20 2015-2-11 17:07:28
Page 21

WARNUNG:
• Bitte verwenden Sie für dieses
wiederaufladbare Gerät nur die von
Panasonic vorgesehenen Akkus.
• Panasonic übernimmt keine Verantwortung
für etwaige Schäden oder Unfälle, die
durch den Gebrauch von recycelten und
gefälschten Akkus verursacht werden.
• Entsorgen Sie diesen Akku niemals im
Feuer und setzen Sie ihn keinesfalls starker
Hitze aus.
• Versuchen Sie niemals, Gegenstände wie
Nägel in den Akku zu schlagen, und setzen
Sie ihn keinen Stößen aus. Sehen Sie
außerdem davon ab, den Akku zu zerlegen
oder zu verändern.
• Achten Sie darauf, dass keine metallischen
Gegenstände mit den Anschlüssen des
Akkus in Verbindung kommen.
• Der Akku darf nicht im selben Behälter
wie Nägel oder ähnliche metallische
Gegenstände transportiert oder gelagert
werden.
• Laden Sie den Akku niemals an einem Ort
mit hoher Temperatur, beispielsweise neben
einem Feuer oder direkter Sonneneinstrahlung. Andernfalls kann dies zu
Überhitzung, einem Brand oder einer
Explosion führen.
• Laden Sie den Akku ausschließlich mit dem
dafür vorgesehenen Ladegerät. Andernfalls
kann dies zu einem Auslaufen des Akkus,
einem Brand oder einer Explosion führen.
• Nachdem Sie das Batterie-/Akkupack
von dem Produkt oder dem Ladegerät
abgenommen haben, bringen Sie stets
die Batterie-/Akkupackabdeckung wieder
an. Anderenfalls könnten die Batterie-/
Akkukontakte kurzgeschlossen werden, was
zu einem Brand führen kann.
• Wenn der Akku schwach geworden ist,
ersetzen Sie ihn durch einen neuen.
Fortgesetzter Gebrauch eines beschädigten
Akkus kann zu Wärmeerzeugung,
Entzündung oder Bruch führen
.• Wenn Sie Unregelmäßigkeiten bemerken,
stellen Sie die Benutzung sofort ein und
wenden Sie sich an den Einzelhändler, bei
dem Sie das Produkt erworben haben.
• Drehen Sie die Lautstärke bei Verwendung
von Kopf- oder Ohrhörern nicht zu weit auf.
• Erhöhen Sie die Lautstärke nicht, wenn sich
Ihr Gehör an den Pegel gewöhnt hat.
• Verwenden Sie dieses Produkt nicht über
einen längeren Zeitraum und machen Sie
Pausen, damit sich Ihr Gehör regenerieren
kann.
WARNUNG:
• Wenn Ohrbeschwerden auftreten, stellen
Sie die Benutzung ein und suchen Sie einen
Arzt auf.
• Stellen Sie keine schweren Gegenstände
auf das Radio und steigen Sie nicht darauf.
• Stellen Sie das Radio nicht auf einer
unebenen Oberfläche bzw. in einer
instabilen Position ab.
• Fertigen Sie stets eine Sicherungskopie der
Daten an, die auf einem mit diesem Radio
verbundenen Gerät gespeichert sind, um
Datenverlust im Fall eines Geräteausfalls zu
vermeiden.
II. BAUGRUPPE
Einlegen der Batterie/des Akkus
HINWEIS:
Wenn die Batterien/Akkus aus dem
Hauptbatterie-/-akkupackfach und dem
Reservebatterie-/-akkupackfach entfernt
wurden, findet die Initialisierung ca. drei
Minuten später statt.
Einlegen der Reservebatterien [Fig. 1]
1. Ziehen Sie die Batteriefachverriegelung
heraus, um das Batteriefach zu öffnen.
Dort finden Sie das Haupt- und das
Reservebatteriefach.
2. Entfernen Sie die Abdeckung des
Reservebatteriefachs und legen Sie 2 neue
UM-3-Batterien/-Akkus (Größe AA) ein.
Beachten Sie beim Einlegen der Batterien
die im Batteriefach angezeigte Polarität.
Bringen Sie die Batteriefachabdeckung
wieder an.
HINWEIS:
• Das Radio kann ohne Reservebatterie/-
akku verwendet werden.
• Durch das Einlegen der Reservebatterien
wird der Verlust der gespeicherten
Einstellungen verhindert.
VORSICHT:
• Verwenden Sie ausschließlich die
angegebenen Batterien (UM-3).
• Entfernen Sie die Batterien, wenn das
Gerät lange nicht benutzt wird.
• Verwenden Sie neue und alte Batterien
oder Batterien unterschiedlicher Typen
nicht zusammen.
Die unsachgemäße Verwendung von
Batterien/Akkus kann zum Auslaufen der
Batterien/Akkus, Hitzeentwicklung, Feuer
oder Explosionen führen.
Wischen Sie, wenn Batterien/Akkus
ausgelaufen sind, ausgetretene Flüssigkeit
im Reservebatteriefach ab.
DE
21 -
-
EY37A2.indb 21 2015-2-11 17:07:29
Page 22
Wenn Flüssigkeit aus den Batterien/
DE
Akkus austritt, sind folgende
Sicherheitsvorkehrungen unbedingt zu
beachten:
• Berühren Sie Batterie-/Akkuflüssigkeit
nie mit bloßen Händen. Anderenfalls
können Hautreizungen oder
Verletzungen auftreten.
• Wenn die Flüssigkeit in die Augen
gelangt, kann dies zur Erblindung
führen.
• Wischen Sie ausgelaufene Flüssigkeit
vollständig ab.
Anbringen/Entfernen des Hauptbatterie-/-
akku-Packs [Fig. 2]
1. Bringen Sie nach dem Einlegen der
Reservebatterien/-akkus das Hauptbatterie/-akku-Pack am Hauptgerät an. Schieben
Sie es ganz hinein, bis es mit einem
Klickgeräusch einrastet. Die für dieses
Radiogerät geeigneten Batterie-/Akku-Packs
sind in den technischen Daten aufgeführt.
2. Ziehen Sie das Batterie-/Akku-Pack aus dem
Batteriefach, um es zu entfernen.
3. Schieben Sie die Batteriefachverriegelung in
die Ausgangsposition zurück.
Anzeige für geringen Batterieladestand
1. Reduzierte Leistung, Verzerrung und
„Stottern” oder die Anzeige des Symbols
für eine schwache Batterie (
Display sind Anzeichen dafür, dass das
Hauptbatterie-/-akku-Pack ausgetauscht
werden muss.
HINWEIS: Das Batterie-/Akku-Pack kann
nicht über das mitgelieferte Netzteil geladen
werden.
2. Wenn bei entfernter Hauptbatterie/
entferntem Hauptakku das Symbol für eine
schwache Batterie ( ) blinkt und ein
„E.” auf dem Display angezeigt wird, deutet
dies darauf hin, dass es an der Zeit ist, die
Reservebatterien/-akkus auszuwechseln.
Verwendung der biegbaren Antenne [Fig. 3]
Stellen Sie die biegbare Antenne auf.
VORSICHT:
Die biegbare Antenne ist nur in eine
Richtung biegbar.
Durch gewaltsames Verbiegen kann die
Antenne abbrechen oder Verletzungen
verursachen.
Verwendung des mitgelieferten Netzteils
Entfernen Sie die Gummiabdeckung und
stecken Sie das Steckernetzteil in die
DC-Buchse auf der rechten Seite des
Radios ein. Stecken Sie das Netzteil in eine
Standardnetzsteckdose ein. Bei Anschluss
des Netzteils wird das Batterie-/Akkupack
) auf dem
automatisch abgeklemmt. Wenn das Gerät
nicht verwendet wird, sollte das Netzteil von
der Stromversorgung getrennt werden.
HINWEIS:
• Bei Verwendung eines Netzteils ist der
Klang etwas leiser als bei Verwendung
eines Batterie-/Akkupacks.
• Wenn es durch das Netzteil im
AM-Frequenzband des Radios zu
funktechnischen Störungen kommt,
stellen Sie das Radio mindestens
30 cm vom Netzteil entfernt auf.
• Wenn Netzteil und Batterie-/Akku-Pack
gleichzeitig verwendet werden, erfolgt die
Stromversorgung des Geräts über das
Netzteil. In einem solchen Fall wird kein
Batteriestrom verbraucht.
• Dieses Gerät verfügt über keine
Ladefunktion. Der Betrieb des Geräts bei
gleichzeitiger Verwendung von Netzteil
und Akku-Pack führt nicht zur Aufladung
des Akku-Packs.
• Das Netzteil ist zur ausschließlichen
Nutzung mit diesem Produkt vorgesehen
und darf nicht mit anderen Geräten
verwendet werden. Verwenden Sie auch
das Netzteil anderer Geräte nicht mit
diesem Produkt.
III. BETRIEB
Bedienung des Radios – Automatische
AM-/FM-Sendersuche
HINWEIS:
Wenn das Empfangssignal schwach
ist, versuchen Sie, die Ausrichtung des
Radios bzw. der Antenne zu ändern.
1. Halten Sie die Ein-/Aus-Taste gedrückt, um
das Radio einzuschalten.
2. Drücken Sie die Source-Taste, bis „AM” oder
„FM” angezeigt wird.
3. Drücken Sie den Senderwahl-Regler,
um eine automatische Sendersuche
durchzuführen. Das Radio durchsucht
die AM-/FM-Frequenzbereiche oberhalb
der derzeit angezeigten Frequenz und
stoppt automatisch, wenn ein Sender mit
ausreichender Signalstärke gefunden wurde.
4. Nach einigen Sekunden wird das Display
aktualisiert. Das Display zeigt die Frequenz
des gefundenen Signals an.
5. Drücken Sie, um einen anderen Sender zu
suchen, den Senderwahl-Regler erneut.
6. Wenn das Ende des Wellenbereichs erreicht
ist, setzt das Radio die Sendersuche am
anderen Ende des Wellenbereichs fort.
7. Drehen Sie den Lautstärkeregler, um den
Lautstärkepegel bei Bedarf anzupassen.
8. Halten Sie die Ein-/Aus-Taste gedrückt, um
das Radio auszuschalten.
-
22 -
EY37A2.indb 22 2015-2-11 17:07:29
Page 23

Manuelle AM-/FM-Sendersuche
1. Halten Sie die Ein-/Aus-Taste gedrückt, um
das Radio einzuschalten.
2. Drücken Sie die Source-Taste, bis „AM” oder
„FM” angezeigt wird.
3. Drehen Sie den Senderwahl-Regler, um
einen Sender zu suchen.
4. Wenn das Ende des Wellenbereichs erreicht
ist, setzt das Radio die Sendersuche am
anderen Ende des Wellenbereichs fort.
5. Verwenden Sie den Lautstärkeregler, um den
Lautstärkepegel bei Bedarf anzupassen.
Voreinstellung von Sendern im AM-/
FM-Modus
Für den AM- und den FM-Frequenzbereich
können jeweils 6 Sender voreingestellt
werden. Die Verwendung ist für beide
Wellenbereiche identisch.
1. Suchen Sie den gewünschten Sender wie
oben beschrieben.
2. Halten Sie die entsprechende PresetTaste (1 bis 6) solange gedrückt, bis ein
Piepton zu hören ist. Neben der Frequenz
wird beispielsweise „M1” angezeigt. Der
Sender wird unter der voreingestellten
Nummer gespeichert. Wiederholen Sie
diesen Vorgang bei Bedarf für die restlichen
Sendervoreinstellungen. Mithilfe des
oben beschriebenen Verfahrens können
gespeicherte Sendervoreinstellungen bei
Bedarf auch überschrieben werden.
Aufrufen eines voreingestellten Senders
im AM- oder FM-Modus
1. Drücken Sie die Source-Taste, bis „AM” oder
„FM” angezeigt wird.
2. Drücken Sie die entsprechende Preset-Taste
kurz, um den gespeicherten voreingestellten
Sender einzustellen.
FM Stereo/Mono –––––––––––––––––
Wenn das Signal des eingestellten
FM-Radiosenders schwach ist, kann sich
dies durch ein Zischgeräusch bemerkbar
machen. Dieses Zischgeräusch lässt sich
verringern, indem Sie die Senderwiedergabe
auf Mono statt Stereo einstellen.
1. Drücken Sie ggf. die Source-Taste, um das
FM-Frequenzband auszuwählen und suchen
Sie den gewünschten FM-Sender wie oben
beschrieben.
2. Halten Sie den Senderwahl-Regler gedrückt,
um die Menüeinstellung aufzurufen.
3. Drehen Sie den Senderwahl-Regler, bis „FM”
auf dem Display angezeigt wird und drücken
Sie dann den Senderwahl-Regler, um die
Einstellung aufzurufen. Wenn ST (Stereo)
eingestellt ist, drücken Sie den SenderwahlRegler, um zum MN-Modus (Mono-Modus)
FM
zu wechseln und das Zischgeräusch zu
verringern. Drücken Sie den SenderwahlRegler, um die Option auszuwählen.
Wiedergabe von Musik mittels
Bluetooth
Ihr Bluetooth®-Gerät muss mit dem Radio
Erstmalige Kopplung mit Ihrem Bluetooth
Gerät
1. Drücken Sie die Source-Taste, bis „BT”
2. Befolgen Sie die Anweisungen im
3. Drücken Sie die Bluetooth®-Kopplungstaste.
4. Nachdem eine Verbindung hergestellt wurde,
HINWEIS:
®
-Streaming
––––––––––––
BT
gekoppelt werden, bevor Sie Bluetooth®Musik über das Radio abspielen/streamen
können. Durch die Kopplung wird eine
Verbindung zwischen zwei Geräten
hergestellt, so dass sich diese „erkennen”
können.
®
-
angezeigt wird.
angezeigt und das Bluetooth
wird auf dem Display
®
-Symbol auf
dem Display beginnt zu blinken.
Benutzerhandbuch Ihres Geräts, um
Bluetooth
®
auf dem Gerät zu aktivieren und
den Kopplungsvorgang zu ermöglichen.
wird auf dem Display angezeigt.
Nun können Sie die Suche des Radios
auf Ihrem Bluetooth®-Gerät starten. Wenn
„EY37A2” auf Ihrem Bluetooth®-Gerät
angezeigt wird, wählen Sie diesen Eintrag
in Ihrer Bluetooth®-Geräteliste aus, um eine
Verbindung zum Radio herzustellen.
leuchtet das Bluetooth®-Symbol auf dem
Display konstant. Jetzt können Sie die Musik
Ihres Bluetooth®-fähigen Geräts über das
Radio abspielen.
• Wenn „EY37A2” auf Ihrer Bluetooth
®
Geräteliste angezeigt wird, Ihr Gerät
jedoch keine Verbindung herstellen kann,
löschen Sie den Eintrag aus der Liste und
koppeln Sie das Gerät erneut mit dem
Radio, indem Sie die oben beschriebenen
Schritte ausführen.
• Der Wirkungsbereich des gekoppelten
Geräts und der maximale Abstand zum
Radio beträgt ca. 10 Meter. Hindernisse
zwischen dem Radio und dem Gerät
können den Wirkungsbereich verringern.
• Die Leistungsfähigkeit der Bluetooth®-
Verbindung variiert abhängig von den
verbundenen Bluetooth®-Geräten.
Informieren Sie sich über die Bluetooth®Fähigkeit Ihres Geräts, bevor Sie es
mit dem Radio verbinden. Bei einigen
gekoppelten Bluetooth®-Geräten werden
evtl. nicht alle Funktionen unterstützt.
DE
23 -
-
EY37A2.indb 23 2015-2-11 17:07:29
Page 24
Abspielen zuvor gekoppelter Geräte
Dieses Gerät kann bis zu 8
DE
Gerätekopplungen speichern. Werden mehr
als 8 Geräte mit dem Radio gekoppelt, wird
das erste Gerät überschrieben.
Wenn Ihr Bluetooth
®
-Gerät zuvor bereits
einmal mit dem Radio gekoppelt war, hat
das Radio Ihr Bluetooth®-Gerät gespeichert
und versucht automatisch, eine Verbindung
zum zuletzt gekoppelten Gerät herzustellen.
Wenn das zuletzt gekoppelte Gerät
nicht verfügbar ist, versucht das Radio,
eine Verbindung zum zweitletzten Gerät
herzustellen usw.
Löschen der gespeicherten gekoppelten
Geräte
Halten Sie die Bluetooth
®
-Kopplungstaste ca.
7 Sekunden lang gedrückt, bis ein Doppelton
zu hören ist. Alle Geräte werden aus dem
Radiospeicher gelöscht und das Radio wird
für andere Geräte erkennbar.
Trennen der Bluetooth
Gerät
Halten Sie die Bluetooth
®
-Verbindung zu Ihrem
®
-Kopplungstaste
solange gedrückt, bis das Radio durch einen
Piepton signalisiert, dass die Verbindung
zu Ihrem Bluetooth®-Gerät getrennt wurde.
Das Bluetooth®-Symbol auf dem Display
blinkt und weist darauf hin, dass das Radio
erneut für andere Geräte erkennbar ist und
gekoppelt werden kann.
Uhrzeit und Weckfunktion
Einstellung des Uhrzeitformats –––––––
Für die Uhrzeitanzeige im Standby- und
Wiedergabemodus können verschiedene
Formate gewählt werden. Das gewählte
Format wird dann auch bei der Einstellung
der Weckfunktionen verwendet.
1. Stellen Sie sicher, dass das Radio
eingeschaltet ist. Halten Sie den
Senderwahl-Regler gedrückt, um das
erweiterte Menü des aktuellen Modus
aufzurufen.
2. Drehen Sie den Senderwahl-Regler, bis
„TIM” auf dem Display angezeigt wird und
drücken Sie dann den Senderwahl-Regler,
um die Einstellung aufzurufen.
3. Drehen Sie den Senderwahl-Regler, um
entweder das 12- oder das 24-StundenFormat auszuwählen. Drücken Sie den
Senderwahl-Regler, um Ihre Formatwahl zu
bestätigen.
HINWEIS:
Wenn das 12-Stunden-Format gewählt
wird, verwendet das Radio dieses Format
auch bei der Einstellung der Weckzeit
und zeigt im Standby-Modus eine
12-Stunden-Uhr mit PM-Anzeige an.
TIM
Manuelle Einstellung der Uhrzeit
–––––
CLK
1. Stellen Sie sicher, dass das Radio
eingeschaltet ist. Halten Sie den
Senderwahl-Regler gedrückt, um das
erweiterte Menü des aktuellen Modus
aufzurufen.
2. Drehen Sie den Senderwahl-Regler, bis
„CLK” auf dem Display angezeigt wird
und drücken Sie dann den SenderwahlRegler, um die Einstellung aufzurufen. Die
Stundenanzeige beginnt zu blinken.
3. Drehen Sie den Senderwahl-Regler, um
die gewünschte Stunde auszuwählen, und
drücken Sie dann den Senderwahl-Regler,
um die Einstellung zu bestätigen. Die
Minutenanzeige beginnt zu blinken.
4. Drehen Sie den Senderwahl-Regler, um
die gewünschte Minute auszuwählen, und
drücken Sie dann den Senderwahl-Regler,
um die Einstellung zu bestätigen. Das
Display kehrt dann in das vorherige Menü
zurück.
Aktivieren der Weckfunktion
Das Radio verfügt über zwei
Weckfunktionen, die beide auf AM-/
FM-Radio oder Summeralarm eingestellt
werden können. Stellen Sie sicher, dass die
Uhrzeit korrekt eingestellt ist, bevor Sie die
Weckfunktionen aktivieren.
a. Aktivieren des Radioweckers:
1. Stellen Sie sicher, dass das Radio
eingeschaltet ist.
2. Halten Sie die Radiowecker-Taste gedrückt.
Das Radiowecker-Symbol (
) und die
Stundenziffern beginnen zu blinken, gefolgt
von einem Piepton.
3. Wenn die Stundenziffern blinken, drehen Sie
den Senderwahl-Regler, um die gewünschte
Weckstunde auszuwählen, und drücken
Sie dann den Senderwahl-Regler, um die
Stundeneinstellung zu bestätigen.
4. Drehen Sie dann den SenderwahlRegler, um die gewünschte Weckminute
auszuwählen, und drücken Sie dann den
Senderwahl-Regler, um die Einstellung zu
bestätigen.
5. Wenn das Radiowecker-Symbol blinkt,
drehen Sie den Senderwahl-Regler, um das
gewünschte Band und den gewünschten
Sender für den Weckruf auszuwählen, und
drücken Sie dann den Senderwahl-Regler,
um die Auswahl zu bestätigen.
6. Drehen Sie den Senderwahl-Regler, um
die gewünschte Lautstärke auszuwählen,
und drücken Sie dann den SenderwahlRegler, um die Einstellung zu bestätigen.
Die Aktivierung des Radioweckers ist damit
abgeschlossen.
-
24 -
EY37A2.indb 24 2015-2-11 17:07:30
Page 25

HINWEIS:
Wenn der für den Weckruf gewählte AM-/
FM-Sender zur eingestellten Weckzeit
nicht verfügbar ist, ertönt stattdessen der
Summeralarm.
b. Aktiveren des Summeralarms HWS
(Humane Wake System, Aufwecksystem):
1. Stellen Sie sicher, dass das Radio
eingeschaltet ist.
2. Halten Sie die Summeralarm-Taste gedrückt.
Das Summeralarm-Symbol (
Stunde beginnen zu blinken, gefolgt von
einem Piepton.
3. Wenn die Stundenziffern blinken, drehen Sie
den Senderwahl-Regler, um die gewünschte
Weckstunde auszuwählen, und drücken
Sie dann den Senderwahl-Regler, um die
Stundeneinstellung zu bestätigen.
4. Drehen Sie dann den SenderwahlRegler, um die gewünschte Weckminute
auszuwählen, und drücken Sie dann den
Senderwahl-Regler, um die Einstellung zu
bestätigen.
5. Drehen Sie den Senderwahl-Regler, um
die gewünschte Lautstärke auszuwählen,
und drücken Sie dann den SenderwahlRegler, um die Lautstärke zu bestätigen. Die
Aktivierung des Summeralarms ist damit
abgeschlossen.
Wenn der Alarm ertönt
Drücken Sie die Ein-/Aus-Taste, um einen
ertönenden Alarm auszuschalten.
Deaktivieren/Löschen des Alarms
Um einen aktiven Alarm zu deaktivieren,
drücken Sie die entsprechende Alarm-Taste,
um die Weckeinstellung zu löschen.
Dauer des Wecktons –––––––––––––
1. Halten Sie den Senderwahl-Regler gedrückt,
um das erweiterte Menü des aktuellen
Modus aufzurufen.
2. Drehen Sie den Senderwahl-Regler, bis
„ALM” auf dem Display angezeigt wird.
Drücken Sie den Senderwahl-Regler, um die
Einstellung aufzurufen.
3. Drehen Sie den Senderwahl-Regler, um die
verschiedenen Optionen (1, 3, 5, 10, 15,
30 oder 60 Minuten) anzuzeigen. Stoppen
Sie, wenn die gewünschte Option auf dem
Display angezeigt wird, und drücken Sie den
Senderwahl-Regler, um die Einstellung zu
bestätigen.
Schlummerfunktion –––––––––––––
1. Wenn der Alarm ertönt, drücken Sie eine
beliebige Taste mit Ausnahme der Ein-/AusTaste, um den Alarm stumm zu schalten.
Das Snooze-Symbol ( ) wird auf dem
Display angezeigt.
) und die
ALM
SNZ
2. Um das Intervall bis zum erneuten Ertönen
des Alarms anzupassen, halten Sie den
Senderwahl-Regler gedrückt, um die
Menüeinstellung aufzurufen.
3. Drehen Sie den Senderwahl-Regler, bis
„SNZ” auf dem Display angezeigt wird, und
drücken Sie dann den Senderwahl-Regler,
um die Einstellung aufzurufen. Drehen Sie
den Senderwahl-Regler, um für das Intervall
die gewünschte Snooze-Timer-Option (1, 3,
5, 10, 15 Minuten oder AUS) zu wählen.
4. Drücken Sie die Ein-/Aus-Taste, um den
Snooze-Timer bei stumm geschaltetem
Alarm abzustellen. Um die Snooze-Funktion
zu deaktivieren, drehen Sie den SenderwahlRegler, bis „AUS” angezeigt wird.
Sleep-Timer ––––––––––––––––––––
Das Radio kann so eingestellt werden, dass
es nach einer voreingestellten Zeitspanne
automatisch abschaltet. Für die Sleep-TimerEinstellung sind die Optionen AUS, 15, 30,
45, 60 und 90 Minuten wählbar.
1. Halten Sie den Senderwahl-Regler gedrückt,
um das erweiterte Menü aufzurufen.
2. Drehen Sie den Senderwahl-Regler, bis
„SLP” auf dem Display angezeigt wird.
Drücken Sie den Senderwahl-Regler, um die
Einstellung aufzurufen.
3. Drehen Sie den Senderwahl-Regler, um die
verschiedenen Optionen (AUS, 15, 30, 45,
60 oder 90 Minuten) anzuzeigen.
Stoppen Sie, wenn die gewünschte Sleep-
Timer-Einstellung auf dem Display angezeigt
wird. Die Einstellung wird gespeichert und
das LCD-Display kehrt zur normalen Anzeige
zurück.
4. Das Radio schaltet sich nach der
voreingestellten Sleep-Timer-Zeit
automatisch aus. Das auf dem Display
angezeigte Sleep-Timer-Symbol ( ) weist
auf eine aktive Sleep-Timer-Einstellung hin.
5. Um die Sleep-Timer-Funktion vor Ablauf
der voreingestellten Zeit abzustellen, halten
Sie einfach die Ein-/Aus-Taste gedrückt,
um das Gerät manuell auszuschalten. Um
die Funktion abzustellen, während der
Countdown läuft, rufen Sie das Sleep-TimerMenü auf und wählen Sie „AUS”.
Klangreglerfunktion
Sie können den Klang Ihrer Anlage für
das jeweilige Tonmaterial nach Ihrem
Geschmack anpassen. Das Radio verfügt
über 5 voreingestellte Equalizer-Modi.
Alternativ können Sie den Höhen- und den
Basspegel nach Ihren Vorlieben einstellen.
1. Drücken Sie den Lautstärkeregler, um das
EQ-Menü aufzurufen.
–––––––––––––
DE
SLP
TON
25 -
-
EY37A2.indb 25 2015-2-11 17:07:30
Page 26

2. Drehen Sie den Lautstärkeregler, bis „TON”
auf dem Display angezeigt wird. Drücken Sie
DE
den Lautstärkeregler, um das Einstellmenü
aufzurufen.
3. Drehen Sie den Lautstärkeregler, um
nacheinander die nachfolgenden 6 Modi
anzuzeigen und stoppen Sie bei dem
gewünschten Modus. Drücken Sie dann
den Lautstärkeregler, um die Einstellung zu
bestätigen.
a. TN 1-Flat
b. TN 2- Heavy
c. TN 3- Soft
d. TN 4- Clear
e. TN 5- Vocal
4. Wenn Sie ins übergeordnete Menü
zurückzukehren möchten, drehen Sie
den Lautstärkeregler, bis auf dem
Display angezeigt wird. Drücken Sie
dann den Lautstärkeregler erneut, um ins
übergeordnete Menü zurückzukehren.
Einstellen eigener EQ-Werte –––––
Wenn Ihnen die voreingestellten Equalizer-
Funktionen nicht zusagen, können Sie
benutzerdefinierte Höhen- und Basspegel
einstellen, indem Sie wie folgt vorgehen:
1. Drücken Sie den Lautstärkeregler, um das
EQ-Menü aufzurufen.
2. Drehen Sie den Lautstärkeregler, bis „BAS”
auf dem Display angezeigt wird. Drücken Sie
den Lautstärkeregler, um das Einstellmenü
aufzurufen.
3. Drehen Sie den Lautstärkeregler, um den
Basspegel (von -5 bis +3) anzupassen. Der
Klang ändert sich mit der Anpassung des
Pegels. Drücken Sie den Lautstärkeregler
erneut, um die Einstellung zu bestätigen.
4. Drehen Sie den Lautstärkeregler, bis „TRE”
auf dem Display angezeigt wird. Drücken Sie
den Lautstärkeregler, um das Einstellmenü
aufzurufen.
5. Drehen Sie den Lautstärkeregler, um den
Höhenpegel (von -5 bis +3) anzupassen. Der
Klang ändert sich mit der Anpassung des
Pegels. Drücken Sie den Lautstärkeregler
erneut, um die Einstellung zu bestätigen.
Einstellen der Betriebstöne –––––––
Die Betriebstöne des Radios können
wahlweise ein- oder ausgeschaltet werden.
1. Halten Sie den Senderwahl-Regler gedrückt,
um die Menüeinstellungen des aktuellen
Modus aufzurufen.
2. Drehen Sie den Senderwahl-Regler, bis
„SND” auf dem Display angezeigt wird, und
drücken Sie dann den Senderwahl-Regler,
um die Einstellung aufzurufen.
3. Drehen Sie den Senderwahl-Regler, um
die gewünschte Option auszuwählen, und
drücken Sie dann den Senderwahl-Regler,
um die Einstellung zu bestätigen.
BAS
SND
AUX-Eingangs-Buchse
Auf der linken Seite des Radios befindet sich
eine 3,5 mm-Stereo-AUX-IN-Buchse.
1. Schließen Sie eine externe Audioquelle (z.B.
Smartphone, MP3- oder CD-Player) über die
AUX-Eingangsbuchse an.
2. Drücken Sie die Source-Taste, bis AUX IN
angezeigt wird.
3. Passen Sie die Lautstärkeeinstellung an
Ihrem Smartphone, MP3- oder CD-Player
an, um einen angemessenen Signalpegel
vom Wiedergabegerät zu gewährleisten, und
nutzen Sie dann den Lautstärkeregler des
Radios, um eine angenehme Hörlautstärke
einzustellen.
Kopfhörerbuchse
Die 3,5 mm-Kopfhörerbuchse auf der rechten
Seite des Radios ist für den Anschluss von
Kopfhörern vorgesehen. Beim Einstecken
eines Kopfhörersteckers wird der interne
Lautsprecher automatisch stumm geschaltet.
Bitte beachten Sie, dass die Empfindlichkeit
von Kopfhörern stark variieren kann. Daher
empfiehlt es sich, vor dem Anschluss der
Kopfhörer an das Radio den Lautstärkepegel
auf einen niedrigen Wert einzustellen.
Zudem ist es ratsam, die Lautstärke vor
dem Herausziehen des Kopfhörersteckers
herunterzudrehen.
VORSICHT:
Ein überhöhter Schalldruck von Ohr- oder
Kopfhörern kann zu Gehörschädigungen
führen.
USB-Buchse zum Laden von
Smartphones
HINWEIS:
Während des Empfangs von AM-Sendern
ist das Laden von USB-Geräten nicht
möglich.
Das Radio verfügt über eine USB-Buchse,
die ausschließlich für das Laden von
Smartphones und ähnlichen Geräten
vorgesehen ist.
Die Ladezeit kann variieren und in einigen
Fällen mehr Zeit in Anspruch nehmen als
bei Verwendung des mit dem Smartphone
gelieferten Ladegeräts des Herstellers.
1. Schließen Sie Ihr Smartphone an die USBLadebuchse auf der linken Seite des Radios
an.
2. Der Ladevorgang bei Ihrem Smartphone
beginnt. Hinweis: der Ladevorgang kann
im FM-,Bluetooth®- und AUX-IN-Modus
durchgeführt werden.
3. Entfernen Sie das USB-Kabel, sobald Ihr
Smartphone geladen ist.
-
26 -
EY37A2.indb 26 2015-2-11 17:07:30
Page 27

VORSICHT:
Manche USB-Geräte können ausschließlich
mittels eines speziellen Verfahrens geladen
werden.
Informieren Sie sich, bevor Sie Ihr Gerät zu
laden versuchen.
• Eventuell ist das Laden einiger USB-
Geräte über das Ladegerät nicht möglich.
• Wenn die USB-Buchse nicht
verwendet wird bzw. der Ladevorgang
abgeschlossen ist, entfernen Sie das
USB-Kabel und schließen Sie die
Abdeckung.
• Verbinden Sie das Gerät nicht über die
USB-Buchse mit einer Stromquelle.
Anderenfalls besteht Brandgefahr. Der
USB-Anschluss ist ausschließlich zum
Laden von Geräten mit niedrigerer
Spannung vorgesehen. Schließen
Sie stets die Abdeckung des USBAnschlusses, wenn kein Gerät mit
niedrigerer Spannung geladen wird.
• Führen Sie keine Nägel, Drähte o.ä. in
den USB-Stromversorgungsanschluss
ein. Anderenfalls kann es durch einen
Kurzschluss zu Rauchentwicklung oder
Brandgefahr kommen.
• Verbinden Sie diese USB-Buchse nicht
mit dem USB-Anschluss Ihres PCs, da
dies höchstwahrscheinlich den Ausfall
beider Geräte zur Folge hat.
• Verwenden Sie die USB-Buchse
niemals im Regen bzw. bei feuchten
Bedingungen, um ein Eindringen von
Feuchtigkeit in das Radio zu vermeiden.
Halten Sie die Gummiabdeckung auf
der Geräterückseite unter derartigen
Bedingungen stets gut geschlossen.
LED-Leuchte
Das Radio ist auf der Vorderseite mit einer
langlebigen LED-Leuchte ausgestattet.
Drücken Sie die Lichttaste, um die LEDLeuchte ein- und auszuschalten.
Vorsicht: SEHEN SIE NICHT IN DEN
STRAHL.
HINWEIS:
Wenn das Gerät nicht betätigt wird,
beginnt die Leuchte nach 10 Minuten zu
blinken. Eine Minute später schaltet sie
sich aus.
IV. WARTUNG
Das Gerät nur mit einem trockenen, weichen
Lappen abwischen. Verwenden Sie zum
Reinigen keine feuchten Lappen oder
flüchtige Lösungsmittel wie Farbverdünner
oder Benzin.
Falls Wasser in das Gerät oder das Batterie-/
Akkupack eindringt, lassen Sie umgehend
das Wasser ablaufen und die Teile trocknen.
Entfernen Sie sorgfältig jeglichen Staub
oder Eisenfeilspäne, die sich im Gerät
angesammelt haben. Sollten Sie Probleme
mit dem Betrieb des Geräts haben,
konsultieren Sie die nächste autorisierte
Kundendienststelle.
V. ZUBEHÖR
Akku
• Siehe Technische Daten.
Akku-Ladegerät
• Für Nachfragen wenden Sie sich bitte an
Ihren Fachhändler.
HINWEIS:
Akku und Ladegerät sind in diesem Satz
nicht enthalten.
[Akku]
Für richtigen Gebrauch des Akkus
Li-Ion-Akku [Fig. 4]
• Die Akkus besitzen eine begrenzte
Nutzungsdauer.
• Um eine möglichst lange Lebensdauer des
Li-Ion-Akkus zu erzielen, lagern Sie ihn nach
dem Gebrauch, ohne ihn aufzuladen.
• Achten Sie beim Laden des Akkus darauf,
dass die Kontakte am Ladegerät frei von
Fremdstoffen, wie z. B. Staub und Wasser
usw., sind. Reinigen Sie die Kontakte vor
dem Laden des Akkus, falls Fremdstoffe auf
den Kontakten vorhanden sind.
Die Lebensdauer der Akkukontakte kann
durch Anhaften von Fremdstoffen, wie z.
B. Staub und Wasser usw., während des
Betriebs beeinträchtigt werden.
• Wenn Sie den Akku nicht benutzen,
halten Sie ihn von Metallgegenständen
fern: Büroklammern, Münzen, Schlüssel,
Nägel, Schrauben oder andere kleine
Metallgegenstände können die Kontakte
kurzschließen.
Das Kurzschließen der Akkukontakte kann
Funken, Verbrennungen oder einen Brand
verursachen.
• Sorgen Sie bei Benutzung des Akkus für
ausreichende Belüftung des Arbeitsplatzes.
• Wenn das Batterie-/Akkupack vom
Hauptgerät abgenommen wird, ist die
Batterie-/Akkupackabdeckung sofort
anzubringen, um zu verhüten, dass die
Batterie-/Akkukontakte durch Staub oder
Schmutz verunreinigt werden und ein
Kurzschluss verursacht wird.
DE
27 -
-
EY37A2.indb 27 2015-2-11 17:07:31
Page 28

VORSICHT:
• Zum Schutz des Motors und des Akkus
DE
müssen beim Betrieb die folgenden
Punkte beachtet werden.
• Wenn heiß werden, wird die
Schutzfunktion aktiviert und der Betrieb
von Akku wird eingestellt.
Für den sicheren Gebrauch
• Der Akku ist aus Sicherheitsgründen
so entworfen, dass er in zwei Schritten
eingesetzt werden muss. Vergewissern Sie
sich vor der Inbetriebnahme der Maschine,
dass der Akku ordnungsgemäß in die
Haupteinheit eingesetzt ist.
[Ladegerät]
Laden
VORSICHT:
1) Das Ladegerät ist nur für den Betrieb
mit der elektrischen Standardleistung
in Haushalten gedacht, wie auf dem
Typenschild angegeben. Laden Sie sie
nur mit der auf dem Typenschild des
Geräts angegebenen Spannung auf, z. B.
230 V/50 Hz.
2) Versuchen Sie nicht, es mit irgendeinem
anderen Spannungs- oder Frequenzwert
zu verwenden.
3) Wenn die Temperatur des Akkupacks auf
etwa unter -10°C (14°F) fällt, wird der
Ladevorgang automatisch angehalten, um
zu verhindern, dass der Akku abbaut.
4) Der Umgebungstemperaturbereich liegt
zwischen 0°C (32°F) und 40°C (104°F).
Wenn das Batterie-/Akkupack bei einer
Batterie-/Akkutemperatur unter 0°C
(32°F) benutzt wird, funktioniert das Gerät
möglicherweise nicht einwandfrei.
5) Verwenden Sie das Ladegerät bei
Temperaturen zwischen 0°C (32°F) und
40°C (104°F) und laden Sie den Akku bei
einer Temperatur ähnlich des Akkus selbst
auf. (Zwischen den Temperaturen des
Akkus und des Ortes des Aufladens sollte
kein größerer Unterschied als 15°C (59°F)
bestehen.)
6) Wenn ein kalter Akku (von etwa 0°C
(32°F) oder weniger) in einem warmen
Raum aufgeladen werden soll, lassen Sie
den Akku für mindestens eine Stunde in
dem Raum und laden Sie ihn auf, wenn er
sich auf Raumtemperatur erwärmt hat.
7) Den Akku abkühlen lassen, wenn er mehr
als 2× hintereinander aufgeladen wurde.
8) Stecken Sie Ihre Finger nicht in die
Kontaktöffnung, um das Ladegerät
festzuhalten oder bei anderen
Gelegenheiten.
9) Um die Gefahr eines Brandes oder
Schadens am Ladegerät zu verhindern.
• Decken Sie die Entlüftungsöffnungen
des Ladegerätes und den Akku nicht
ab.
• Trennen Sie das Ladegerät vom
Stromnetz, wenn es nicht benutzt wird.
HINWEIS:
Beim Kauf ist Ihr Akku nicht voll
aufgeladen. Laden Sie daher den Akku
vor Gebrauch auf.
Ladevorgang
1. Ladegerät an Wandsteckdose anschließen.
HINWEIS:
Beim Einführen des Steckers in die
Netzsteckdose kann es zu Funkenbildung
kommen. Dies stellt jedoch kein
Sicherheitsrisiko dar.
2. Setzen Sie den Akku fest in das Ladegerät
ein.
1. Die Ausrichtmarkierungen ausrichten, und
den Akku in das Dock des Ladegerätes
einsetzen.
2. In Pfeilrichtung nach vorn schie ben.
Ausrichtmarkierungen
3. Während des Ladens leuchtet die
Ladekontrolllampe. Mit Erreichen der
vollen Ladung spricht automatisch eine
interne, elektronische Schaltung an, die ein
Überladen verhindert.
• Das Laden beginnt nicht, solange das
Batterie-/Akkupack noch heiß ist (wie z.B.
unmittelbar nach intensivem Gebrauch).
Die Bereitschaftslampe blinkt in Orange,
bis der Akku abgekühlt ist.Das Laden
beginnt dann automatisch.
4. Die Ladekontrolllampe (grün) blinkt langsam,
wenn der Akku zu etwa 80% aufgeladen ist.
5. Wenn der Ladevorgang beendet ist, erlischt
die grüne Ladekontrolllampe.
6. Falls die Akkutemperatur 0°C (32°F) oder
weniger beträgt, dauert der Ladevorgang bis
zur vollen Aufladung des Akkus länger als
die normale Ladezeit.
Selbst wenn der Akku voll aufgeladen ist,
hat er nur etwa 50% der Leistung eines
voll aufgeladenen Akkus bei normaler
Betriebstemperatur.
7. Wenden Sie sich an einen Vertragshändler,
falls die Ladekontrolllampe (grün) nicht
erlischt.
8. Wird ein voll aufgeladener Akku erneut
in das Ladegerät eingesetzt, leuchtet
die Ladekontrolllampe auf. Nach einigen
Minuten erlischt die grüne Ladekontroll-
-
lampe.
28 -
EY37A2.indb 28 2015-2-11 17:07:31
Page 29

ANZEIGELAMPEN
Ladevorgang ist abgeschlossen. (Volle Ladung)
Der Akku ist zu etwa 80% aufgeladen.
Ladevorgang läuft.
Das Ladegerät ist an eine Netzsteckdose
angeschlossen. Ladebereitschaft hergestellt.
(Grün) (Orange)
Erlischt Leuchtet Blinkt
Ladezustandslampe.
Links: Grün Rechts: Orange wird angezeigt.
Akku ist kalt.
Der Akku wird langsam geladen, um seine Belastung zu
reduzieren.
Der Akku ist warm geworden.
Der Ladevorgang beginnt wieder, wenn dieTemperatur des
Akku gefallen ist. Beträgt die Temperatur des Akkus -10°C
(14°F) oder weniger, beginnt die Ladekontrolllampe (orange)
ebenfalls zu blinken. Der Ladevorgang beginnt, wenn die
Temperatur des Akkus steigt.
Keine Ladung möglich. Verstaubt oder Defekt des Akkus.
Batterie-Recycling
ACHTUNG:
Um Umweltschutz und Material-Recycling zu gewährleisten, müssen Sie die Batterie zur
örtlichen Entsorgungsstelle bringen, falls eine solche in Ihrem Land vorhanden ist.
Benutzerinformation zur Sammlung und Entsorgung von veralteten Geräten und benutzten
Batterien
Diese Symbole auf den Produkten, Verpackungen und/oder Begleitdokumenten
bedeuten, dass benutzte elektrische und elektronische Produkte und Batterien
nicht in den allgemeinen Hausmüll gegeben werden sollen.
Bitte bringen Sie diese alten Produkte und Batterien zur Behandlung,
Aufarbeitung bzw. zum Recycling gemäß Ihrer Landesgesetzgebung und den
Richtlinien 2012/19/EG und 2006/66/EG zu Ihren zuständigen Sammelpunkten.
Indem Sie diese Produkte und Batterien ordnungsgemäß entsorgen, helfen Sie
dabei, wertvolle Ressourcen zu schützen und eventuelle negative Auswirkungen
auf die menschliche Gesundheit und die Umwelt zu vermeiden, die anderenfalls
durch eine unsachgemäße Abfallbehandlung auftreten können.
Wenn Sie ausführlichere Informationen zur Sammlung und zum Recycling
alter Produkte und Batterien wünschen, wenden Sie sich bitte an Ihre örtlichen
Verwaltungsbehörden, Ihren Abfallentsorgungsdienstleister oder an die
Verkaufseinrichtung, in der Sie die Gegenstände gekauft haben.
Gemäß Landesvorschriften können wegen nicht ordnungsgemäßer Entsorgung
dieses Abfalls Strafgelder verhängt werden.
DE
Für Geschäftskunden in der Europäischen Union
Bitte treten Sie mit Ihrem Händler oder Lieferanten in Kontakt, wenn Sie elektrische und
elektronische Geräte entsorgen möchten. Er hält weitere Informationen für sie bereit.
[Informationen zur Entsorgung in anderen Ländern außerhalb der Europäischen Union]
Dieses Symbol ist nur in der Euro-päischen Union gültig. Bitte treten Sie mit Ihrer
Gemeindeverwaltung oder Ihrem Händler in Kontakt, wenn Sie dieses Produkt entsorgen möchten,
und fragen Sie nach einer Entsorgungsmöglichkeit.
29 -
-
EY37A2.indb 29 2015-2-11 17:07:31
Page 30

VI. TECHNISCHE DATEN
[HAUPTGERÄT]
DE
Netzteil DC12V/1500 mA, Kontaktstift positiver Pol
Batterie/Akku
Bluetooth
Bluetooth
Bluetooth
®
QD ID 58625
®
-Version 4,0
®
-Prole A2DP/SCMS-T
Sendeleistung Bluetooth
Sendereichweite Ca. 10 m (variiert abhängig von den Nutzungsbedingungen)
Unterstützter Codec SBC
Kompatibles Bluetooth
®
-Prol A2DP
Frequenzbereich
Lautsprecher 2 × 3,5 Zoll, 8 Ohm
Bei Verwendung des mitgelieferten Netzteils: 2 × 1,7 W
Sendeleistung
Bei Verwendung eines 14,4 V-Batterie-/Akkupacks: 2 × 2,6 W
Bei Verwendung eines 18 V-Batterie-/Akkupacks: 2 × 4,5 W
Eingangsbuchse 3,5 mm/Max. 2 V/Stereo (AUX-IN)
Ausgangsbuchse
Antennensystem
Abmessungen (B × H × T) 344 mm × 280 mm × 239 mm
Gewicht 4,7 kg (mit EY9L51)/4,0 kg (nur Hauptgerät)
Energieverbrauch
[AKKU]
Modellnr.
EY9L41 EY9L42 EY9L44 EY9L45 EY9L47 EY9L50 EY9L51 EY9L52
Akku
Akkuspannung
Betriebsdauer
bei 50 W+
50 W (FM-
14,4V DC
(3,6V × 4 Zellen)
Ca.
18 Std.
Ca.
9 Std.
14,4V DC
(3,6V × 8 Zellen)
Ca.
19 Std.
24 Std.
Empfang)
[AKKU-LADEGERÄT]
Modellnr. EY0L82
Nennwert Siehe Leistungsschild auf der Unterseite des Ladegerätes.
Gewicht 0,93 kg
EY9L41 EY9L42 EY9L44 EY9L45 EY9L47 EY9L50 EY9L51 EY9L52
Ladezeit
Nutzbar:
35min.
Voll:
50min.
Nutzbar:
30min.
Voll:
35min.
Nutzbar:
40min.
Voll:
55min.
HINWEIS: Diese Tabelle kann Modelle enthalten, die möglicherweise in Ihrem Wohngebiet nicht
angeboten werden.
Bitte nehmen Sie auf den neusten Generalkatalog Bezug.
Name und Adresse des Händlers entnehmen Sie bitte der beiliegenden Garantiekarte.
Reserve: 2 × UM-3 (Größe AA)
Hauptbatterie/-akku: 14,4 V/18 V
®
-Spezikation Leistungsklasse 2 (2,5 mW)
FM 87,5 -108 MHz (0,05 MHz/Schritt)
AM (MW) 522 -1629 kHz (9 kHz/Schritt)
USB: DC-OUT 5 V/1 A
Kopfhörer: 3,5 mm/3 Ω/150 mV/Stereo
FM: biegbare Antenne
AM: Stabantenne
Max. 7 W
0,12 W (Standby-Modus)
Li-Ionen-Batterie/-Akku
(3,6V × 4 Zellen)
Ca.
Nutzbar:
50min.
Voll:
60min.
14,4V DC
Ca. 11 Std.
Nutzbar:
35min.
Voll:
40min.
18V DC
(3,6V × 10 Zellen)
Ca.
19 Std.
Ca.
24 Std.
Nutzbar:
40min.
Voll:
55min.
Nutzbar:
55min.
Voll:
70min.
18V DC
(3,6V × 5 Zellen)
Ca. 11 Std.
Nutzbar:
35min.
Voll:
40min.
-
30 -
EY37A2.indb 30 2015-2-11 17:07:31
Page 31

VII. Lizenzen
• Die Wortmarke Bluetooth® und die Bluetooth®-Logos sind eingetragene Warenzeichen der
Bluetooth SIG, Inc. und werden von der Panasonic Corporation unter Lizenz verwendet.
Andere Markenzeichen und Markennamen sind Schutzmarken der jeweiligen Eigentümer.
• Die verschiedenen Namen, Firmen- und Produktnamen in diesem Handbuch sind Warenzeichen oder eingetragene Warenzeichen der jeweiligen Firmen. Bitte beachten Sie, dass
einige TM- oder ®-Symbole in diesem Dokument weggelassen wurden.
DE
Informationen zu Bluetooth
®
Panasonic übernimmt keinerlei
Verantwortung für während einer drahtlosen
Übertragung kompromittierte Daten und/oder
Informationen.
Verwendetes Frequenzband
Dieses System nutzt das 2,4 GHzFrequenzband.
Zertizierung dieses Geräts
• Dieses System erfüllt gewisse
Frequenzbeschränkungen und
wurde in Übereinstimmung mit den
Frequenzvorschriften zertifiziert. Daher ist
keine Funkgenehmigung erforderlich.
• Die nachfolgend aufgeführten Handlungen
sind in einigen Ländern strafbar:
– Auseinandernehmen oder Modifizieren das
Geräts
– Entfernen der Spezifikationsinformationen
Nutzungseinschränkungen
• Die Möglichkeit der drahtlosen Übertragung
von und/oder Verwendung mit allen
Bluetooth
®
-fähigen Geräten kann nicht
garantiert werden.
• Alle Geräte müssen den Standards der
Bluetooth SIG, Inc. entsprechen.
• Abhängig von den Spezifikationen und
Einstellungen eines Geräts ist eine
Verbindung evtl. nicht möglich bzw. können
einige Funktionen anders ausfallen.
• Dieses System unterstützt Bluetooth
®
Sicherheitsfunktionen. Je nach
Betriebsumgebung und oder Einstellungen
ist diese Sicherheit jedoch möglicherweise
nicht ausreichend. Gehen Sie bei der
drahtlosen Übertragung von Daten an dieses
System vorsichtig vor.
• Die Übertragung von Daten von diesem
System an ein Bluetooth
®
-Gerät ist nicht
möglich.
Verwendungsbereich
Verwenden Sie dieses Gerät in einem Radius
von maximal 10 m.
Die Sendereichweite kann abhängig von der
Umgebung, Hindernissen oder funktechnischen
Störungen geringer ausfallen.
Funktechnische Störungen von anderen
Geräten
• Dieses System funktioniert evtl. nicht
ordnungsgemäß und es können aufgrund
von Radiowelleninterferenzen Probleme wie
Störgeräusche oder Tonsprünge auftreten,
wenn sich das Hauptgerät zu dicht bei
anderen Bluetooth
®
-Geräten oder Geräten
befindet, die das 2,4 GHz-Band nutzen.
• Dieses System funktioniert evtl. nicht
ordnungsgemäß, wenn die Radiowellen
einer nahegelegenen Sendestation o.ä. zu
stark sind.
Bestimmungsgemäßer Gebrauch
• Dieses System ist ausschließlich zum
normalen, allgemeinen Gebrauch bestimmt.
• Verwenden Sie dieses System nicht in der
Nähe von Geräten bzw. in Umgebungen,
die empfindlich gegenüber Funkstörungen
sind (z.B. Flughäfen, Krankenhäuser, Labore
usw.)
Konformitätserklärung (DoC)
„Panasonic
Corporation” bestätigt
hiermit, dass dieses
Produkt den grundlegenden Anforderungen
und den weiteren zutreffenden Vorgaben der
Richtlinie 1999/5/EC entspricht.
Kunden können eine Kopie der OriginalKonformitätserklärung zu unseren R&TTEProdukten von unserem KE-Server
herunterladen:
http://www.doc.panasonic.de
Kontaktadresse des zugelassenen
Vertragsbüros:
Panasonic Testing Centre, Panasonic
Europe Ltd. - Zweigniederlassung Hamburg,
Winsbergring 15, 22525 Hamburg, Deutschland
31 -
-
EY37A2.indb 31 2015-2-11 17:07:32
Page 32

Instructions originales : anglais
Traduction des instructions originales :
Autres langues
Cet appareil avec les caches complètement
FR
fermés et fonctionnant sur bloc batterie satisfait
aux indices de protection IP adaptés basés sur
les réglementations CEI.
Définitions des codes IP
IP6X : Pas de pénétration de poussière (dans le
cas où de la poudre de talc de moins de 75 μm
pénètre à l’intérieur de l’outil)
IPX4 : L’eau projetée contre l’appareil de toutes
les directions ne doit pas avoir d’effets nuisibles
(L’appareil est conçu pour fonctionner dans le
cas où environ 4,3 l/min d’eau à température
normale est projetée dessus pendant 10
minutes depuis plusieurs directions au moyen de
plusieurs lances à environ 1 mètre de distance).
REMARQUE :
Ceci ne couvre pas l’« adaptateur
secteur » fourni.
GARANTIE LIMITÉE
Le code IP64 rend possible un impact minimum
d’eau et de poussière sur cet outil, mais il n’en
garantit pas les performances dans de telles
conditions.
Veuillez lire la notice d’utilisation et de sécurité
pour plus de détails quant à un fonctionnement
approprié.
I. CONSIGNES DE SECURITE
Lire le mode d’emploi dans son
intégralité
1. CONSERVEZ SOIGNEUSEMENT CES
INSTRUCTIONS - Ce manuel contient
des instructions de sécurité et d’utilisation
importantes concernant le produit.
2. Lisez toutes les instructions et les remarques
de sécurité avant d’utiliser le produit.
3. N’exposez pas ce produit et le bloc batterie
à la pluie ou à la neige et ne les utilisez pas
dans un endroit humide.
4. L’emploi d’un accessoire non recommandé
peut se traduire par un risque d’incendie, de
décharge électrique ou de blessure.
5. Pour réduire tout risque de dommage de la
fiche et du câble électriques, saisir la fiche
plutIôt que le cordon pour déconnecter le
chargeur.
6. N’utilisez pas de rallonge.
7. Si le cordon d’alimentation est endommagé,
il doit être remplacé par le fabricant ou son
agent agréé, ou un technicien qualifié afin
d’éviter tout risque.
8. Pour réduire les risques de décharge
élecrtique, débranchez le chargeur de la
prise avant de commencer toute procédure
de maintenance ou d’entretien.
9. Vérifiez que le cordon passe à un
emplacement où il ne sera pas foulé,
piétiné, ou soumis à d’autres dommages ou
tensions.
10. Ce produit et le bloc batterie sont
spécialement conçus pour fonctionner
ensemble.
11. N’essayez pas de démonter le produit et le
carter à batterie.
12. Ne rangez pas le chargeur et la b a tterie à
un endroit où la température peut atteindre
ou dépasser 50°C (122°F) (sous un abri
métallique, ou dans une voiture en été); cela
pourrait provoquer une détérioration de la
capacité de la batterie.
13. Ne chargez pas une batterie à MOINS DE
0°C (32°F) ou PLUS DE 40°C (104°F).
14. N’incinérez pas les batteries. Cela pourrait
provoquer un incendie.
15. Ce produit est conçu pour fonctionner
sur une puissance électrique domestique
standard. Utilisez uniquement à la tension
indiquée sur la plaque du fabricant.
N’essayez pas d’utiliser de tension différente!
16. Ne maltraitez pas le câble. Ne portez jamais
le chargeur par le câble et ne tirez pas
dessus d’un coup sec pour le débrancher
de la prise. Evitez d’approcher le câble
d’une source de chaleur, d’huile ou de bords
tanchants.
17. Chargez la batterie à un endroit bien aéré,
ne couvrez pas le char geur et la batterie
d’un tissu, etc. pendant la charge.
18. Ne court-circuitez pas la batterie. Cela
pourrait provoquer un flux de courant
important, la surchauffe et des brûlures.
19. REMARQUE : Si le câble d’alimen tation
de cet appareil est endommagé, il doit
être remplacé par un atelier de réparation
indiqué par le fabricant, parce que des outils
spéciaux sont requis.
20. L’appareil n’est pas un appareil d’éclairage
portatif pour l’utilisation des enfants.
21. Les enfants ne doivent pas jouer avec cet
appareil.
Symbole Signifi cation
Pour réduire les risques de
blessures, l’utilisateur doit
lire et comprendre le mode
d’emploi.
Pour l’utilisation à l’intérieur
seulement.
N’utilisez que les sources
d’alimentation répertoriées
dans ce mode d’emploi.
-
32 -
EY37A2.indb 32 2015-2-11 17:07:32
Page 33

AVERTISSEMENT :
• N’utilisez que les batteries autonomes de
Panasonic car elles sont conçues pour cet
outil rechargeable.
• Panasonic décline toute responsabilité en
cas de dommage ou d’accident causé par
l’utilisation d’une batterie autonome recyclée
et d’une batterie autonome de contrefaçon.
• Ne mettez pas la batterie autonome dans le
feu, ne la placez pas près d’une source de
chaleur excessive.
• N’enfoncez pas de clou ou autre dans la
batterie autonome, ne la secouez pas, ne la
démontez pas, n’essayez pas de la modifier.
• Ne mettez pas d’objets métalliques en
contact avec les bornes de la batterie
autonome.
• Ne placez pas la batterie autonome dans
le même contenant que des clous ou des
objets métalliques semblables.
• Ne chargez pas la batterie autonome dans
un endroit où la température est élevée,
comme près d’un feu ou au contact direct
des rayons du soleil. Sinon la batterie
pourrait surchauffer, s’enflammer ou
exploser.
• N’utilisez jamais un autre chargeur pour
charger la batterie autonome. Sinon
la batterie pourrait fuir, surchauffer ou
exploser.
• Après avoir retiré le bloc batterie de ce
produit ou du chargeur, remettez toujours le
couvercle du bloc batterie en place. Sinon,
les contacts de la batterie peuvent se mettre
en court-circuit, entraînant le risque d’un
incendie.
• Si la batterie autonome s’est détériorée,
la remplacer par une batterie neuve.
L’utilisation prolongée d’une batterie
autonome endommagée peut provoquer des
dégagements de chaleur, un départ de feu
ou l’explosion de la batterie.
• Si vous détectez des anomalies, cessez
immédiatement d’utiliser l’appareil et
contactez le revendeur auprès duquel vous
avez acheté le produit.
• Ne mettez pas le volume trop fort lorsque
vous utilisez un casque ou des écouteurs.
• Prenez soin de ne pas augmenter le volume
à mesure que votre ouïe s’adapte.
• N’utilisez pas ce produit pendant une
période prolongée et faites toujours des
pauses pour reposer vos oreilles.
• Si vous éprouvez une gêne dans les
oreilles, cessez d’utiliser l’appareil et
consultez un médecin.
• Ne placez pas d’objets lourds sur la radio, ni
ne montez dessus.
AVERTISSEMENT :
• Ne placez pas la radio sur une surface
instable ou dans une position instable.
• Veillez impérativement à faire une copie
de sauvegarde des données enregistrées
dans l’appareil connecté à cette radio afin
d’empêcher la perte de données en cas de
panne de l’appareil.
II. MONTAGE
Mise en place des piles
REMARQUE :
Si les piles sont retirées à la fois du
compartiment du bloc batterie principal
et du compartiment de la pile de
sauvegarde, l’initialisation aura lieu trois
minutes après.
Mise en place des piles de sauvegarde
[Fig. 1]
1. Tirez sur le verrou du compartiment des piles
pour dégager le compartiment des piles.
Vous trouverez le compartiment des piles
principales et le compartiment de la pile de
sauvegarde.
2. Retirez le couvercle du compartiment de
la pile de sauvegarde et insérez deux
piles neuves UM-3 (format AA). Respectez
la polarité des piles indiquée dans le
compartiment. Remettez le couvercle en
place.
REMARQUE :
• La radio peut être utilisée sans connecter
la pile de sauvegarde.
• Conserver des piles de sauvegarde à
l’intérieur du compartiment empêche de
perdre les données mémorisées dans les
préréglages.
ATTENTION :
• N’utilisez pas de piles autres que celles
spécifiées (UM-3).
• Retirez les piles si vous prévoyez de ne
pas utiliser le produit pendant une période
prolongée.
• N’utilisez pas ensemble des piles
neuves et usagées ou des piles de types
différents.
Une utilisation incorrecte des piles peut
être à l’origine d’une fuite des piles, d’un
dégagement de chaleur, d’un incendie ou
d’une explosion.
FR
33 -
-
EY37A2.indb 33 2015-2-11 17:07:32
Page 34

En cas de fuite du liquide des piles,
portez une attention particulière aux
mesures de sécurité suivantes.
FR
• Ne touchez en aucun cas le liquide
s’échappant des piles les mains
nues, sous peine de provoquer une
inflammation de la peau ou des
blessures.
• Si le liquide pénètre dans les yeux,
vous pourriez devenir aveugle.
• Essuyez complètement toute trace de
liquide échappé des piles.
Fixation/Retrait du bloc batterie principal
[Fig. 2]
1. Après avoir inséré les piles, mettez en
place le bloc batterie principal sur l’appareil
principal. Insérez-le à fond jusqu’à ce que
vous entendiez un déclic. Vous trouverez les
blocs batterie adaptés à cette radio dans les
Spécifications.
2. Pour retirer le bloc batterie, sortez la pile du
compartiment.
3. Ramenez le verrou du compartiment des
piles à sa position initiale.
Indicateur de faible capacité de la pile
1. Une puissance réduite, une déformation du
son et un son saccadé ou une indication de
faible capacité de la pile (
sur l’affichage sont tous des signes que le
bloc batterie principal doit être remplacé.
REMARQUE : Le bloc batterie ne peut
pas être chargé par l’intermédiaire de
l’adaptateur secteur fourni.
2. Lorsque la pile principale est retirée et que
l’indication de faible capacité de la pile
( ) clignote et qu’un « E » apparaît sur
l’affichage, cela indique que le moment est
venu de remplacer les piles de sauvegarde.
Utilisation de l’antenne souple [Fig. 3]
Redressez l’antenne souple.
ATTENTION :
L’antenne souple ne fonctionne que dans
un seul sens.
Si vous la pliez avec force, vous risquez
de la casser ou de vous blesser.
) apparaissant
Utilisation de l’adaptateur secteur fourni
Retirez le cache en caoutchouc et insérez la
fiche de l’adaptateur dans l’entrée DC sur le
côté droit de la radio. Branchez l’adaptateur
dans une prise secteur standard. Dès
que vous connectez l’adaptateur, le bloc
batterie est automatiquement déconnecté.
Débranchez l’adaptateur secteur du courant
lorsque vous ne l’utilisez pas.
REMARQUE :
• Le son est légèrement plus bas lorsque
vous utilisez un adaptateur secteur plutôt
qu’un bloc batterie.
• En cas de brouillage de la bande AM du
fait de l’adaptateur, éloignez la radio de
son adaptateur secteur de plus de 30 cm.
• Si l’adaptateur secteur et la batterie
sont utilisés simultanément, l’adaptateur
secteur aura priorité pour alimenter
l’appareil. Dans ce cas, la charge du bloc
batterie ne sera pas utilisée.
• Cet appareil ne dispose pas de fonction
de charge. Si vous faites fonctionner
l’appareil à la fois avec l’adaptateur
secteur et le bloc batterie, le bloc batterie
ne se chargera pas.
• L’adaptateur secteur est conçu
uniquement pour ce produit et ne doit pas
être utilisé avec d’autres appareils. Par
ailleurs, n’utilisez pas l’adaptateur secteur
d’un autre appareil avec ce produit.
III. FONCTIONNEMENT
Fonctionnement de la radio –
Syntonisation AM/FM par balayage
REMARQUE :
Si le signal de réception est faible,
essayez de modifier l’orientation de la
radio ou de l’antenne.
1. Appuyez longuement sur le bouton
d’alimentation pour allumer la radio.
2. Appuyez sur le bouton de source jusqu’à ce
que « AM » ou « FM » apparaisse.
3. Appuyez sur le bouton de réglage de la
syntonisation pour lancer la recherche
automatique. La radio balaiera la bande AM/
FM à partir de la fréquence actuellement
affichée et s’arrêtera automatiquement
lorsqu’elle trouvera une station ayant une
force de signal suffisante.
4. Au bout de quelques secondes, l’affichage
s’actualisera. L’affichage indiquera la
fréquence du signal trouvé.
5. Pour trouver une autre station, appuyez
à nouveau sur le bouton de réglage de la
syntonisation.
6. Une fois la fin de la gamme d’ondes atteinte,
la radio recommence la recherche depuis
l’extrémité opposée.
7. Tournez le bouton du volume pour régler le
niveau sonore à votre guise.
8. Pour éteindre la radio, appuyez longuement
sur le bouton d’alimentation.
Syntonisation manuelle – AM/FM
1. Appuyez longuement sur le bouton
d’alimentation pour allumer la radio.
-
34 -
EY37A2.indb 34 2015-2-11 17:07:33
Page 35

2. Appuyez sur le bouton de source jusqu’à ce
que « AM » ou « FM » apparaisse.
3. Tournez le bouton de réglage de la
syntonisation pour rechercher une station.
4. Une fois la fin de la gamme d’ondes atteinte,
la radio recommence la recherche depuis
l’extrémité opposée.
5. Utilisez le bouton du volume pour régler le
niveau sonore à votre guise.
Préréglage des stations en mode AM/FM
Il y a 6 stations préréglées pour chaque
bande AM et FM. Elles sont utilisées de la
même façon pour chaque gamme d’ondes.
1. Syntonisez sur la station de radio souhaitée
comme décrit précédemment.
2. Appuyez longuement sur le bouton de
préréglage souhaité (1 à 6) jusqu’à ce que
la radio émette un bip. Par exemple, « M1 »
apparaît à côté de la fréquence. La station
est mémorisée au moyen du numéro de
préréglage. Répétez cette procédure pour
les préréglages restants à votre guise.
Les stations préréglées déjà mémorisées
peuvent être remplacées en procédant
comme indiqué ci-dessus au besoin.
Rappel d’une station préréglée en mode
AM/FM
1. Appuyez sur le bouton de source jusqu’à ce
que « AM » ou « FM » apparaisse.
2. Appuyez momentanément sur le bouton de
préréglage souhaité pour que la radio se
syntonise sur une des stations mémorisées
dans les préréglages.
FM stéréo/mono
Si le signal de la station de radio FM que
vous écoutez est faible, vous pourrez
entendre un sifflement. Il est possible de
réduire ce sifflement en obligeant la radio à
lire la station en mono plutôt qu’en stéréo.
1. Appuyez sur le bouton de source souhaité
pour sélectionner la bande FM et syntonisez
sur la station FM de votre choix comme
indiqué précédemment.
2. Appuyez longuement sur le bouton de
réglage de la syntonisation pour accéder au
réglage du menu.
3. Tournez le bouton de réglage de la
syntonisation jusqu’à ce que « FM »
apparaisse sur l’affichage et appuyez
dessus pour valider le réglage. Si le réglage
est ST (stéréo), appuyez sur le bouton de
réglage de la syntonisation pour basculer
sur le mode MN (mono) afin de réduire le
sifflement. Appuyez sur le bouton de réglage
de la syntonisation pour sélectionner l’option.
––––––––––––––––
FM
Écoute de musique via le streaming
Bluetooth
Vous devez procéder au pairage de votre
Premier pairage de votre périphérique
Bluetooth
1. Appuyez sur le bouton de source jusqu’à ce
2. Activez Bluetooth® sur votre périphérique
3. Appuyez sur le bouton de pairage Bluetooth®
4. Une fois connectés, l’icône Bluetooth®
REMARQUE :
Lecture de périphériques précédemment
pairés
Cet appareil peut mémoriser un maximum
®
–––––––––––––––––––––
périphérique Bluetooth® avec la radio avant
de pouvoir les lier automatiquement pour
lire ou écouter en streaming la musique
Bluetooth® par la radio. Le pairage créé un
lien permanent entre les deux appareils pour
qu’ils puissent se reconnaître.
®
que « BT » apparaisse. apparaîtra sur
l’affichage et l’icône Bluetooth® clignotera
sur l’affichage.
conformément à son mode d’emploi pour
permettre la procédure de pairage.
et apparaîtra sur l’affichage. Vous
pouvez lancer la recherche de la radio sur
votre périphérique Bluetooth®. Une fois que
« EY37A2 » apparaît sur votre périphérique
Bluetooth®, appuyez sur l’élément dans la
liste Bluetooth® et il se liera avec la radio.
restera allumée sur l’affichage. Vous pouvez
à présent écouter la musique sur votre
périphérique Bluetooth® via la radio.
• Si « EY37A2 » apparaît dans la liste de
périphériques Bluetooth
périphérique ne peut pas se connecter
avec, supprimez l’élément de la liste et
recommencez le pairage du périphérique
avec la radio en suivant les étapes
décrites précédemment.
• La plage de bon fonctionnement entre la
radio et le périphérique pairé est d’environ
10 mètres. Tout obstacle entre la radio et
le périphérique peut réduire la plage de
fonctionnement.
• Les performances de la connectivité
Bluetooth® peuvent varier selon les
périphériques Bluetooth® connectés.
Consultez les capacités Bluetooth® de
votre périphérique avant de le connecter
à la radio. Toutes les fonctionnalités
peuvent ne pas être prises en charge sur
certains périphériques Bluetooth® pairés.
de 8 ensembles de périphériques pairés.
Lorsque la mémoire dépasse cette quantité,
le périphérique pairé en tout premier est
remplacé sur la radio.
®
, mais votre
BT
FR
35 -
-
EY37A2.indb 35 2015-2-11 17:07:33
Page 36

Si votre périphérique Bluetooth® a déjà
été pairé avec l’appareil, celui-ci le
mémorisera et essaiera de se reconnecter
automatiquement avec le dernier
FR
périphérique en mémoire connecté. Si le
dernier périphérique connecté n’est pas
disponible, la radio essaiera de se connecter
au deuxième dernier périphérique, et ainsi
de suite.
Effacement de la mémoire du périphérique
pairé
Appuyez longuement sur le bouton de
pairage Bluetooth
®
pendant environ 7
secondes jusqu’à ce que vous entendiez
une double tonalité. La radio efface tous
les périphériques de sa mémoire et devient
disponible.
Déconnexion du périphérique Bluetooth
Appuyez longuement sur le bouton de
pairage Bluetooth® jusqu’à ce que la radio
émette un bip pour se déconnecter du
périphérique Bluetooth®. L’icône Bluetooth®
clignotera sur l’affichage indiquant que
la radio est à nouveau disponible pour le
pairage.
Horloge et alarmes
Réglage du format de l’horloge
L’affichage de l’horloge utilisé en mode de
veille et sur les écrans du mode de lecture
peut être réglé selon différents formats. Le
format sélectionné est alors aussi utilisé pour
le réglage des alarmes.
1. Vérifiez que la radio est allumée. Appuyez
longuement sur le bouton de réglage de la
syntonisation pour accéder au menu avancé
du mode actuel.
2. Tournez le bouton de réglage de la
syntonisation jusqu’à ce que « TIM »
apparaisse sur l’affichage et appuyez dessus
pour valider le réglage.
3. Tournez le bouton de réglage de la
syntonisation pour sélectionner le format 12
heures ou 24 heures. Appuyez sur le bouton
de réglage de la syntonisation pour confirmer
votre choix.
REMARQUE :
Si le format 12 heures est choisi, la radio
utilisera l’horloge sur 12 heures pour le
réglage des alarmes et affichera une
horloge sur 12 heures avec l’indication
PM en mode de veille.
Réglage manuel de l’horloge
1. Vérifiez que la radio est allumée. Appuyez
longuement sur le bouton de réglage de la
syntonisation pour accéder au menu avancé
du mode actuel.
––––––––
–––––––
®
TIM
CLK
2. Tournez le bouton de réglage de la
syntonisation jusqu’à ce que « CLK »
apparaisse sur l’affichage et appuyez dessus
pour valider le réglage. À présent, l’affichage
de l’heure se met à clignoter.
3. Tournez le bouton de réglage de la
syntonisation pour sélectionner l’heure
souhaitée et appuyez dessus pour confirmer
le réglage. À présent, l’affichage des minutes
se met à clignoter.
4. Tournez le bouton de réglage de la
syntonisation pour sélectionner les minutes
souhaitées et appuyez dessus pour
confirmer le réglage. L’affichage retourne
ensuite au menu précédent.
Réglage du réveil
La radio dispose de deux alarmes réglables
pour vous réveiller avec la radio AM/FM ou
avec une sonnerie. Vérifiez que l’heure est
réglée avant de régler les alarmes.
a. Réglage du réveil-radio :
1. Vérifiez que la radio est allumée.
2. Appuyez longuement sur le bouton de réveilradio, le symbole du réveil-radio (
) et
l’heure affichée clignoteront suivis d’un bip.
3. Lorsque les chiffres de l’heure clignotent,
tournez le bouton de réglage de la
syntonisation pour sélectionner l’heure de
réveil souhaitée et appuyez dessus pour
confirmer le réglage de l’heure.
4. Puis, tournez le bouton de réglage de la
syntonisation pour sélectionner les minutes
du réveil souhaitées et appuyez dessus pour
confirmer le réglage.
5. Lorsque le symbole du réveil-radio
clignote, tournez le bouton de réglage de
la syntonisation pour sélectionner la bande
et la station souhaitées pour le réveil, puis
appuyez sur le même bouton pour confirmer
la sélection.
6. Tournez le bouton de réglage de la
syntonisation pour sélectionner le volume
souhaité et appuyez dessus pour confirmer
le réglage. Le réglage du réveil-radio est à
présent terminé.
REMARQUE :
Si la station AM/FM sélectionnée pour le
réveil-radio n’est pas disponible lorsque
l’alarme retentit, le réveil-sonnerie sera
utilisé à la place.
b. Réglage du réveil-sonnerie HWS (signal
d’alarme s’amplifiant progressivement) :
1. Vérifiez que la radio est allumée.
2. Appuyez longuement sur le bouton de réveilsonnerie, le symbole du réveil-sonnerie
(
) et l’heure affichée clignoteront suivis
d’un bip.
-
36 -
EY37A2.indb 36 2015-2-11 17:07:34
Page 37

3. Lorsque les chiffres de l’heure clignotent,
tournez le bouton de réglage de la
syntonisation pour sélectionner l’heure de
réveil souhaitée et appuyez dessus pour
confirmer le réglage de l’heure.
4. Puis, tournez le bouton de réglage de la
syntonisation pour sélectionner les minutes
du réveil souhaitées et appuyez dessus pour
confirmer le réglage.
5. Tournez le bouton de réglage de la
syntonisation pour sélectionner le volume
souhaité et appuyez dessus pour confirmer
le volume. Le réglage du réveil-sonnerie est
à présent terminé.
Lorsque l’alarme retentit
Pour annuler une alarme en cours, appuyez
sur le bouton d’alimentation.
Désactivation/Annulation des alarmes
Pour désactiver une alarme active, appuyez
sur le bouton de réveil correspondant pour
annuler le réglage d’alarme.
Durée de l’alarme
1. Appuyez longuement sur le bouton de
réglage de la syntonisation pour accéder au
menu avancé du mode actuel.
2. Tournez le bouton de réglage de la
syntonisation jusqu’à ce que « ALM »
apparaisse sur l’affichage. Appuyez sur le
bouton de réglage de la syntonisation pour
valider le réglage.
3. Tournez le bouton de réglage de la
syntonisation pour faire défiler les options
de 1, 3, 5, 10, 15, 30 à 60 minutes. Arrêtez
lorsque l’option souhaitée apparaît sur
l’affichage, puis appuyez sur le bouton de
réglage de la syntonisation pour confirmer le
réglage.
Snooze –––––––––––––––––––––––
1. Lorsque l’alarme retentit, appuyez sur
n’importe quel bouton autre que le bouton
d’alimentation pour interrompre l’alarme.
Le symbole de snooze ( ) apparaîtra sur
l’affichage.
2. Pour régler les intervalles de répétition de la
fonction snooze, appuyez longuement sur le
bouton de réglage de la syntonisation pour
accéder au menu de réglage.
3. Tournez le bouton de réglage de la
syntonisation jusqu’à ce que « SNZ »
apparaisse sur l’affichage et appuyez dessus
pour valider le réglage. Tournez le bouton de
réglage de la syntonisation pour régler les
intervalles de répétition de l’alarme parmi les
options de 1, 3, 5, 10, 15 minutes ou OFF
pour la fonction Snooze.
––––––––––––––
ALM
SNZ
4. Pour annuler la fonction Snooze pendant
l’interruption de l’alarme, appuyez sur le
bouton d’alimentation. Pour désactiver
la fonction Snooze, tournez le bouton de
réglage de la syntonisation jusqu’à ce que
« OFF » s’affiche.
Fonction Sommeil
La radio peut être réglée pour s’éteindre
automatiquement au bout d’une durée
prédéterminée. La fonction Sommeil peut
être réglée entre OFF, 15, 30, 45, 60 et 90
minutes.
1. Appuyez longuement sur le bouton de
réglage de la syntonisation pour accéder au
menu de réglage avancé.
2. Tournez le bouton de réglage de la
syntonisation jusqu’à ce que « SLP »
apparaisse sur l’affichage. Appuyez sur le
bouton de réglage de la syntonisation pour
valider le réglage.
3. Tournez le bouton de réglage de la
syntonisation pour faire défiler les options de
OFF, 15, 30, 45, 60 à 90.
Arrêtez lorsque la durée souhaitée apparaît
sur l’affichage. Le réglage sera sauvegardé
et l’écran LCD reviendra à l’affichage normal.
4. La radio s’éteindra automatiquement après
que la durée prédéterminée sera écoulée.
L’icône Sommeil ( ) apparaîtra sur
l’affichage indiquant que la fonction Sommeil
est activée.
5. Pour annuler la fonction Sommeil avant la fin
de la durée prédéterminée, il suffit d’appuyer
longuement sur le bouton d’alimentation
pour éteindre manuellement l’appareil. Pour
annuler la fonction alors que le compte à
rebours a commencé, accédez au menu
de réglage de la fonction Sommeil et
sélectionnez « OFF ».
Fonction de la commande de tonalité
–––––––––––––
––––––––––––––––––––––––––––––
Le son de votre système audio peut être
réglé selon vos préférences en fonction
du contenu que vous écoutez. La radio
comporte 5 modes d’égaliseur préréglés.
Vous pouvez également régler les niveaux
d’aigus et de basses à votre guise.
1. Appuyez sur le bouton du volume pour
accéder au menu EQ.
2. Tournez le bouton du volume jusqu’à ce que
« TON » apparaisse sur l’affichage. Appuyez
sur le bouton du volume pour accéder au
menu de réglage.
3. Tournez le bouton du volume pour faire
défiler les 6 modes ci-dessous jusqu’à ce
que le mode souhaité apparaisse. Puis
appuyez sur le bouton du volume pour
confirmer le réglage.
FR
SLP
TON
37 -
-
EY37A2.indb 37 2015-2-11 17:07:34
Page 38

a. TN 1- Neutre
b. TN 2- Dense
c. TN 3- Doux
FR
d. TN 4- Clair
e. TN 5- Voix
4. Pour revenir au menu du niveau supérieur,
tournez le bouton du volume jusqu’à ce
que apparaisse sur l’afchage. Puis
appuyez à nouveau sur le bouton du volume
pour revenir au menu du niveau supérieur.
Régler mon propre EQ
Si les fonctions d’égaliseur préprogrammées
ne vous conviennent pas, vous pouvez
configurer des aigus et des basses
personnalisés en procédant comme suit :
1. Appuyez sur le bouton du volume pour
accéder au menu EQ.
2. Tournez le bouton du volume jusqu’à ce que
« BAS » apparaisse sur l’affichage. Appuyez
sur le bouton du volume pour accéder au
menu de réglage.
3. Tournez le bouton du volume pour régler
le niveau des graves (entre -5 et +3). Le
son changera à mesure que vous réglez le
niveau. Appuyez à nouveau sur le bouton du
volume pour confirmer le réglage.
4. Tournez le bouton du volume jusqu’à ce que
« TRE » apparaisse sur l’affichage. Appuyez
sur le bouton du volume pour accéder au
menu de réglage.
5. Tournez le bouton du volume pour régler
le niveau des aigus (entre -5 et +3). Le
son changera à mesure que vous réglez le
niveau. Appuyez à nouveau sur le bouton du
volume pour confirmer le réglage.
––––––––––
Réglage du bruit de fonctionnement
––––––––––––––––––––––––––––––
Vous pouvez activer ou désactiver le bruit de
fonctionnement de la radio.
1. Appuyez longuement sur le bouton de
réglage de la syntonisation pour accéder au
menu de réglage du mode actuel.
2. Tournez le bouton de réglage de la
syntonisation jusqu’à ce que « SND »
apparaisse sur l’affichage et appuyez dessus
pour valider le réglage.
3. Tournez le bouton de réglage de la
syntonisation pour choisir la sélection
souhaitée et appuyez dessus pour confirmer
le réglage.
Prise d’entrée auxiliaire
Une prise d’entrée auxiliaire stéréo de
3,5 mm est prévue sur le côté gauche de la
radio.
1. Connectez une source audio externe
(comme un smartphone, un lecteur MP3 ou
CD) à la prise d’entrée auxiliaire.
BAS
SND
2. Appuyez sur le bouton de source jusqu’à ce
que AUX IN apparaisse.
3. Ajustez le réglage du volume sur votre
smartphone, lecteur MP3 ou CD pour
garantir un niveau de signal suffisant depuis
le lecteur, puis utilisez le bouton du volume
sur la radio au besoin pour une écoute
confortable.
Entrée casque
Une entrée casque de 3,5 mm située sur
le côté droit de la radio est prévue pour
utilisation avec un casque. Si vous insérez
une fiche, le son est automatiquement coupé
depuis le haut-parleur interne.
Sachez que la sensibilité du casque
peut grandement varier. Nous vous
recommandons donc de régler le volume
à un faible niveau avant de connecter un
casque à la radio. Il est également conseillé
de baisser le volume avant de débrancher le
casque.
ATTENTION :
Une pression sonore excessive des
écouteurs ou du casque peut provoquer
une perte auditive.
Entrée USB pour recharge d’un
smartphone
REMARQUE :
Les périphériques USB ne peuvent pas
être chargés pendant la réception des
émissions AM.
La radio est pourvue d’une entrée USB
conçue uniquement pour charger un
smartphone ou des appareils similaires.
La durée de charge peut varier et dans
certains cas peut prendre plus longtemps
que la charge avec le chargeur du fabricant
accompagnant le smartphone.
1. Connectez votre smartphone à la prise de
charge USB sur le côté gauche de la radio.
2. Votre smartphone commencera à se charger.
Veuillez noter que la charge peut s’effectuer
en mode FM/Bluetooth®/Aux-in.
3. Une fois le smartphone chargé, débranchez
le câble USB.
ATTENTION :
Certains périphériques USB n’acceptent le
chargement que par une méthode spécifique.
Pensez à vérifier ce point avant de charger
votre périphérique.
• Le chargeur peut ne pas alimenter
certains périphériques USB.
• Si vous n’utilisez pas l’entrée USB ou
après la charge, débranchez le câble USB
et refermez le cache.
-
38 -
EY37A2.indb 38 2015-2-11 17:07:34
Page 39

• Ne branchez aucune source
d’alimentation sur le port USB, sous
peine de provoquer un incendie. Le port
USB est uniquement conçu pour charger
des appareils de faible tension. Placez
toujours le cache sur le port USB lorsque
vous ne chargez pas d’appareil de faible
tension.
• N’insérez pas de clou, fil électrique, etc.,
dans le port d’alimentation USB. Un courtcircuit pourrait en résulter et dégager de la
fumée ou provoquer un incendie.
• Ne connectez pas cette entrée USB au
port USB de votre ordinateur, car cela
présente un risque élevé de panne des
appareils.
• N’utilisez jamais l’entrée USB par temps
pluvieux ou humide afin d’éviter que
l’humidité n’affecte la radio. Le cache en
caoutchouc au dos doit toujours être bien
fermé dans ces conditions.
Lumière LED
La radio est pourvue d’une lumière LED
longue durée située sur le panneau avant de
la radio. Appuyez sur le bouton d’éclairage
pour allumer ou éteindre la lumière LED.
Attention : NE REGARDEZ PAS
DIRECTEMENT LE FAISCEAU.
REMARQUE :
En l’absence d’opérations, la lumière se
met à clignoter au bout de 10 minutes,
puis s’éteint une minute plus tard.
IV. ENTRETIEN
Nettoyez l’appareil au moyen d’un chiffon
sec et propre. N’utilisez ni eau, ni solvant, ni
produit de nettoyage volatile.
Au cas où l’intérieur de l’appareil ou du bloc
batterie serait exposé à de l’eau, enlevez
l’eau et laissez sécher dès que possible.
Enlevez soigneusement toutes saletés ou
limailles de fer qui s’accumulent à l’intérieur
de l’appareil. Si vous rencontrez des
problèmes lors de l’utilisation de l’appareil,
prenez contact avec votre centre de service
agréé le plus proche.
V. ACCESSOIRES
Batterie
• Reportez-vous à la fiche technique.
Chargeur de batterie
• Pour toute demande, veuillez contacter un
revendeur agréé.
REMARQUE :
La batterie et le chargeur ne sont pas
compris dans ce kit.
[Batterie]
Pour une utilisation correcte de la batterie
autonome
Batterie autonome Li-ion [Fig. 4]
• Les batteries rechargeables ont une longévité
limitée.
• Pour une longévité optimale de la batterie,
rangez la batterie autonome Li-ion sans la
charger après l’avoir utilisée.
• Lors de la charge de la batterie autonome,
assurez-vous que les bornes du chargeur
de batterie sont libres de tout corps étranger
comme de la poussière et de l’eau, etc.
Nettoyez les bornes avant de charger la
batterie autonome si des corps étrangers se
trouvent sur les bornes.
La durée de vie des bornes de la batterie
autonome peut être affectée par des corps
étrangers comme de la poussière et de l’eau,
etc. pendant le fonctionnement.
• Lorsque vous n’utilisez pas la batterie
autonome, éloignez-la d’autres objets
métalliques tels que : trombones, pieces
de monnaie, clés, clous, vis et autres petits
objets métalliques susceptibles de connecter
les bornes entre elles.
Si vous court-circuitez les bornes de la
batterie, vous risquez de causer des
étincelles, de vous brûler ou de provoquer un
incendie.
• Lors de l’utilisation de la batterie autonome,
assurez-vous de la bonne ventilation du lieu
de travail.
• Lorsque le bloc batterie est retiré de
l’appareil principal, replacez immédiatement
le couvercle du bloc batterie afin d’empêcher
la poussière ou la crasse de contaminer les
bornes de la batterie et de provoquer un
court-circuit.
ATTENTION :
• Pour protéger le moteur ou la
batterie,veillez à bien noter les points
suivantslorsque vous utilisez la machine.
• Si le moteur électrique et la batterie
chauffent, la caractéristique de protection
s’active et le moteur électrique et la
batterie cessent de fonctionner.
Pour un usage sans risque
• La batterie est conçue pour être installée en
deux étapes pour des raisons de sécurité.
Assurez-vous que la batterie est installée
correctement dans l’unité principale avant
toute utilisation.
FR
39 -
-
EY37A2.indb 39 2015-2-11 17:07:34
Page 40

[Chargeur de batterie]
Recharge
ATTENTION :
FR
1) Le chargeur est conçu pour fonctionner
uniquement sur une alimentation
électrique domestique standard comme
indiqué sur la plaque signalétique.
Chargez seulement à la tension
indiquée sur la plaque signalétique de
l’unité.e.g.230 V/50 Hz.
2) N’essayez pas de l’utiliser sur une autre
tension ou fréquence nominale.
3) Si la température de la batterie tombe
en dessous d’environ -10°C (14°F), le
chargement s’arrête automatiquement afin
d’éviter toute dégradation de la batterie.
4) La température ambiante doit être
comprise entre 0°C (32°F) et 40°C
(104°F).
Si le bloc batterie est utilisé lorsque la
température de la batterie est inférieure
à 0°C (32°F), l’appareil peut ne pas
fonctionner correctement.
5) Utilisez le chargeur à des températures
comprises entre 0°C (32°F) et 40°C
(104°F), et chargez la batterie à une
température similaire à celle de la batterie
elle-même. (Il ne doit pas y avoir plus
de 15°C (59°F) de différence entre la
température de la batterie et celle de
l’emplacement de charge.)
6) Lorsqu’une batterie autonome froide
(endessous de 0°C (32°F)) doit être
recharge dans une pièce chaude,
laissez la batterie autonome dans la
pièce pendant une heure au moins
et rechargez-la quand elle a atteint la
température ambiante.
7) Laissez refroidir le chargeur quand
vous rechargez plus de deux batteries
autonomes à la suite.
8) Ne mettez pas vos doigts dans les trous
des connecteurs lorsque vous prenez les
chargeurs ou à n’importe quelle occasion.
9) Pour éviter les risques d’incendie ou
d’endommagement du chargeur de
batterie.
• Ne bouchez pas les trous d’aération du
chargeur et de la batterie autonome.
• Débranchez le chargeur lorsque vous
ne l’utilisez pas.
REMARQUE :
Votre batterie autonome n’est pas
complètement chargée au moment
de l’achat. Veillez à bien charger
complètement la batterie avant son
utilisation.
Procédure de recharge
1. Branchez le cordon d’alimentation du
chargeur dans une prise secteur.
REMARQUE :
Des étincelles peuvent être produites
lorsque la fiche est introduite dans la
prise d’alimentation secteur; toutefois,
ceci ne pose aucun problème de sécurité.
2. Raccorder fermement la batterie autonome
au chargeur.
1. Alignez les marques d’alignement et
placez la batterie dans le poste d’accueil
sur le chargeur.
2. Faites glisser vers l’avant dans le sens de
la flèche.
Marques
d’alignement
3. Pendant la charge, le témoin s’allume.
Lorsque la charge est terminée, un
interrupteur électronique s’actionne pour
protéger la batterie.
• La charge ne peut pas être réalisée si le
bloc batterie est chaud (par exemple, à la
suite d’un long travail de perçage).
Le témoin d’attente orange clignote
jusqu’à ce que la batterie se soit
refroidie. La charge commence alors
automatiquement.
4. Le témoin de charge (vert) clignote
lentement dès que la batterie est chargée à
environ 80%.
5. Lorsque le chargement est terminé, le
témoin de charge de couleur verte s’éteint.
6. Lorsque la température de la batterie
autonome est de 0°C (32°F) ou moins, la
batterie autonome prend plus longtemps
à charger que la durée standard. Même
lorsque la batterie est complètement
chargée, elle n’aura qu’environ 50% de la
puissance d’une batterie complètement
chargée à une température de
fonctionnement normale.
7. Consultez un distributeur agréé si le témoin
de charge (vert) ne s’éteint pas.
8. Si une batterie complètement chargée est à
nouveau insérée dans le chargeur, le témoin
de charge s’allume. Après quelques minutes,
le témoin de charge de couleur verte
s’éteindra.
-
40 -
EY37A2.indb 40 2015-2-11 17:07:35
Page 41

INDICATION DU VOYANT
Chargement terminé. (Pleine charge)
La batterie est chargée à environ 80%.
Chargement en cours.
Le chargeur est branché dans la prise secteur. Prêt pour la
charge.
(Vert) (Orange)
Éteint Allumé Clignote
Témoin de l’état de charge
Gauche : vert Droite : orange s’afchent.
La batterie autonome est froide.
La batterie autonome est chargée lentement pour réduire l’effort
de la batterie.
La batterie autonome est chaude.
La charge commence lorsque la température de la batterie
autonome descend. Lorsque la température de la batterie
autonome est de -10°C (14°F) ou moins, le témoin de charge
(orange) se met également à clignoter. La charge commence
lorsque la température de la batterie autonome augmente.
Impossible de charger. Colmatage par la poussière ou mauvais
fonctionnement de la batterie autonome.
Recyclage de la batterie autonome
ATTENTION :
Pour la protection de l’environnement naturel et le recyclage des matériaux, veillez à mettre la
batterie au rebut à un endroit prévu officiellement à cet effet, s’il y en a un dans votre pays.
Avis aux utilisateurs concernant la collecte et l’élimination des piles et des appareils
électriques et électroniques usagés
Apposé sur le produit lui-même, sur son emballage, ou gurant dans la
documentation qui l’accompagne, ce pictogramme indique que les piles et
appareils électriques et électroniques usagés doivent être séparés des ordures
ménagères.
An de permettre le traitement, la valorisation et le recyclage adéquats des piles
et des appareils usagés, veuillez les porter à l’un des points de collecte prévus,
conformément à la législation nationale en vigueur ainsi qu’aux directives
2012/19/CE et 2006/66/CE.
En éliminant piles et appareils usagés conformément à la réglementation en
vigueur, vous contribuez à prévenir le gaspillage de ressources précieuses
ainsi qu’à protéger la santé humaine et l’environnement contre les effets
potentiellement nocifs d’une manipulation inappropriée des déchets.
Pour de plus amples renseignements sur la collecte et le recyclage des piles et
appareils usagés, veuillez vous renseigner auprès de votre mairie, du service
municipal d’enlèvement des déchets ou du point de vente où vous avez acheté
les articles concernés.
Le non-respect de la réglementation relative à l’élimination des déchets est
passible d’une peine d’amende.
FR
Pour les utilisateurs professionnels au sein de l’Union européenne
Si vous souhaitez vous défaire de pièces d’équipement électrique ou électronique, veuillez vous
renseigner directement auprès de votre détaillant ou de votre fournisseur.
[Information relative à l’élimination des déchets dans les pays extérieurs à l’Union européenne]
Ce pictogramme n’est valide qu’à l’intérieur de l’Union européenne. Pour connaître la procédure
applicable dans les pays hors Union Européenne, veuillez vous renseigner auprès des autorités
locales compétentes ou de votre distributeur.
41 -
-
EY37A2.indb 41 2015-2-11 17:07:35
Page 42

VI. CARACTERISTIQUES TECHNIQUES
[UNITE PRINCIPALE]
Adaptateur secteur 12 VCC/1 500 mA, broche centrale positive
FR
Pile
ID QD Bluetooth
Version Bluetooth
Prols Bluetooth
®
®
®
Puissance de transmission Spécications Bluetooth
Plage de transmission
Codec pris en charge
Prol Bluetooth
®
compatible
Plage de fréquences
Haut-parleur 3,5 pouces 8 ohms × 2
Puissance de sortie
Borne d’entrée 3,5 mm de dia./Max. 2 V/stéréo (AUX IN)
Borne de sortie
Système d’antenne
Dimensions (L × H × P) 344 mm × 280 mm × 239 mm
Poids 4,7 kg (avec EY9L51)/4,0 kg (appareil principal uniquement)
Consommation électrique
[BATTERIE AUTONOME]
N° du modèle
EY9L41 EY9L42 EY9L44 EY9L45 EY9L47 EY9L50 EY9L51 EY9L52
Stockage de la
batterie
Tension de la
batterie
Durée de
fonctionnement
à 50 W+50 W
14,4V DC
(3,6V × 4 piles)
Environ
18 h
Environ
9 h
(3,6V × 8 piles)
Environ
19 h
(Réception FM)
[CHARGEUR DE BATTERIE]
N° du modèle EY0L82
Puissance
nominale
Voir la plaque signalétique se trouvant sur le côté inférieur du chargeur.
Poids 0,93 kg
EY9L41 EY9L42 EY9L44 EY9L45 EY9L47 EY9L50 EY9L51 EY9L52
Durée de
chargement
Utilisable :
35min.
Plein :
50min.
Utilisable :
30min.
Plein :
35min.
REMARQUE : Ce tableau peut inclure des modèles non disponibles dans votre région.
Veuillez vous reporter au catalogue général le plus récent.
Pour obtenir le nom et l’adresse du revendeur, veuillez consulter la carte de garantie
incluse.
Pile de sauvegarde : UM-3 (format AA) × 2
Pile principale : 14,4 V/18 V
58625
4,0
A2DP/SCMS-T
®
, Classe 2 (2,5 mW)
Environ 10 m (varie selon les conditions d’utilisation)
SBC
A2DP
FM 87,5 à 108 MHz (0,05 MHz/pas)
AM (MW) 522-1629 kHz (9 kHz/pas)
Lors de l’utilisation de l’adaptateur secteur : 1,7 W × 2
Lors de l’utilisation du bloc batterie 14,4 V : 2,6 W × 2
Lors de l’utilisation du bloc batterie 18 V : 4,5 W × 2
USB : DC OUT 5 V/1 A
Casque : 3,5 mm de dia./3 Ω/150 mV/stéréo
FM : antenne souple
AM : antenne barreau
Max. 7 W
0,12 W (Mode de veille)
Batterie lithium-ion
14,4V DC
Environ
24 h
Utilisable :
40min.
Plein :
55min.
(3,6V × 4 piles)
Environ 11 h
Utilisable :
50min.
Plein :
60min.
14,4V DC
Utilisable :
35min.
Plein :
40min.
18V DC
(3,6V × 10 piles)
Environ
Environ
19 h
Utilisable :
40min.
Plein :
55min.
24 h
Utilisable :
55min.
Plein :
70min.
(3,6V × 5 piles)
Environ 11 h
18V DC
Utilisable :
35min.
Plein :
40min.
-
42 -
EY37A2.indb 42 2015-2-11 17:07:35
Page 43

VII. LICENCES
• Le nom et la marque Bluetooth® ainsi que les logos sont des marques déposées propriétés
de Bluetooth SIG, Inc. et toute utilisation de ces marques par Panasonic Corporation est
effectuée sous licence. Les autres marques et noms commerciaux appartiennent à leurs
propriétaires respectifs.
• Les différents noms, noms de société et noms de produit présentés dans ce manuel sont
des marques déposées ou non de leurs sociétés respectives. Veuillez noter que certains
symboles TM ou ® peuvent être omis dans ce document.
FR
À propos de Bluetooth
®
Panasonic n’assume aucune responsabilité
pour les données et/ou informations
compromises pendant une transmission sans
l.
Bande de fréquence utilisée
Ce système utilise la bande de fréquence 2,4
GHz.
Certication de cet appareil
• Ce système est conforme aux restrictions de
fréquence et a reçu la certification basée sur
les lois relatives aux fréquences. Un permis
sans fil n’est donc pas nécessaire.
• Les actions ci-dessous peuvent être
sanctionnées par la loi dans certains pays :
– Désassembler ou modifier l’appareil.
– Retirer les étiquettes de spécifications.
Restrictions d’utilisation
• La transmission sans fil et/ou le
fonctionnement avec tous les périphériques
pourvus de la fonction Bluetooth
®
ne sont
pas garantis.
• Tous les périphériques doivent être
conformes aux normes définies par
Bluetooth SIG, Inc.
• Selon les spécifications et les réglages
d’un périphérique, la connexion peut être
impossible ou certaines opérations peuvent
être différentes.
• Ce système est compatible avec les
fonctionnalités de sécurité Bluetooth
®
.
Toutefois, en fonction de l’environnement
d’exploitation et/ou des réglages, la sécurité
intégrée peut être insuffisante. Transmettez
des données sans fil à ce système avec
précaution.
• Ce système ne peut pas transmettre de
données à un périphérique Bluetooth
Portée d’utilisation
®
.
Utilisez cet appareil dans une portée maximale
de 10 m.
La portée peut diminuer selon les obstacles ou
interférences dans l’environnement.
Interférence d’autres appareils
• Ce système peut ne pas fonctionner
correctement et des problèmes comme du
bruit ou un son saccadé peuvent se produire
en raison des interférences de la bande
fréquence si l’appareil principal est trop
près d’autres périphériques Bluetooth
®
ou
d’appareils utilisant la bande 2,4 GHz.
• Ce système peut ne pas fonctionner
correctement si les ondes radio depuis une
station de radio diffusion proche ou autre
sont trop fortes.
Utilisation prévue
• Ce système est destiné à une utilisation
régulière générale uniquement.
• N’utilisez pas ce système à proximité
d’équipements ou dans un environnement
sensible aux interférences des fréquences
radio (par exemple : aéroports, hôpitaux,
laboratoires, etc.).
Déclaration de conformité (DoC)
Par la présente,
« Panasonic
Corporation » déclare
que ce produit est en conformité avec les
exigences essentielles et les autres clauses
justicatives de la Directive 1999/5/EC.
Les clients peuvent télécharger une copie de
la Déclaration de Conformité de nos produits
R&TTE à partir de notre serveur DoC :
http://www.doc.panasonic.de
Contact du Représentant Autorisé :
Panasonic Testing Centre, Panasonic Europe
Ltd. - Hamburg ofce, Winsbergring 15, 22525
Hamburg, Allemagne
43 -
-
EY37A2.indb 43 2015-2-11 17:07:36
Page 44

Istruzioni originalmente scritte in: inglese
Istruzioni originali tradotte in: altre lingue
Questa unità con tutti i coperchi completamente
chiusi e funzionante con pacco batteria soddisfa
gli adeguati gradi di protezione IP in base alle
IT
norme CEI.
Definizione dei codici IP
IP6X: Nessun ingresso di polvere (Nel caso in
cui del borotalco sotto i 75μm penetri all’interno
dello strumento)
IPX4: L’acqua spruzzata contro l’unità da
qualsiasi direzione non avrà effetti nocivi (questa
unità è progettata per funzionare quando l’unità
viene spruzzata da circa 4,3 L/min di acqua
a temperatura normale per 10 minuti da più
direzioni utilizzando diversi ugelli a circa 1 metro
di distanza.).
NOTA:
Questo non riguarda l’“adattatore di
corrente CA” in dotazione.
GARANZIA LIMITATA
La valutazione IP64 qualica l’unità come
soggetta a impatto minimo da parte di acqua o
polvere, ma non ne assicura il funzionamento in
tali condizioni.
Per mag-giori dettagli sul corretto funzionamento,
consultare Istruzioni per la sicurezza e il
funzionamento.
I. ISTRUZIONI DI SICUREZZA
Leggete tutte le istruzioni
1. CONSERVARE QUESTE ISTRUZIONI -
Questo manuale di istruzioni contiene
importanti informazioni riguardanti la
sicurezza e la modalità di funzionamento di
questo prodotto.
2. Prima di usare questo prodotto, leggere tutte
le istruzioni e le indicazioni di avvertenza.
3. Non esporre questo prodotto e il pacco
batteria alla pioggia o alla neve e non
utilizzarli in luoghi umidi.
4. L’uso di attacchi non è consigliato in quanto
può risultare nel rischio di incendi, scosse
elettriche o feri te alle persone.
5. Per ridurre il rischio di danni alla spina o
al cavo elettrici, tirare per la spina invece
di afferrare il cavo quando si scollega il
caricatore.
6. Non si dovrebbero usare cavi di prolunga.
7. Se il cavo di alimentazione è danneggiato,
deve essere sostituito esclusivamente dal
produttore, dal suo agente di servizio o da
persone qualificate, per evitare pericoli.
8. Per ridurre il rischio di scosse elettriche,
scollegare il caricatore dalla presa di
corrente prima di eseguire qualsiasi
operazione di manutenzione o pulizia.
9. Verificare che il cavo sia situato dove non
possa essere il calpestato, strattonato o
altrimenti sottoposto a danni o forzature.
10. Questo prodotto e il pacco batteria sono
progettati specificamente per funzionare in
coppia.
11. Non tentare di smontare questo prodotto o il
rivestimento del pacco batteria.
12. Non riporre l’utensile e il blocco batteria
in luoghi dove la tempera tura possa
raggiungere o supera re i 50°C (122°F)
(come capanni metallici o auto in estate),
perché questo potrebbe causare un
deterioramento della batteria.
13. Non caricare il blocco batteria quando la
temperatura è INFERIORE a 0°C (32°F) o
SUPERIORE a 40°C (104°F).
14. Non bruciare il blocco batteria. Se gettato nel
fuoco può esplodere.
15. Il prodotto è stato progettato per funzionare
solo con la normale corrente domestica.
Utilizzare solo con la tensione indicata sulla
piastrina. Non tentare di usarlo con qualsiasi
altra tensione!
16. Non maltrattare il cavo. Non tra sportare
mai il caricatore tenendolo per il cavo e non
strattonare il cavo per scollegarlo dalla presa
di corrente. Proteggere il cavo dal calore,
dall’olio e da bordi taglienti.
17. Caricare il blocco batteria in un luogo ben
ventilato, non coprire il caricatore e il blocco
batteria con panni o simili durante la carica.
18. Non cortocircuitare il blocco batteria.
Un cortocircuito del blocco batteria può
causare un grande flusso di corrente,
surriscaldamenti e bruciature.
19. NOTA: Se il cavo di corrente di questo
apparecchio è danneggiato, deve essere
sostituito solo presso un centro riparazioni
autorizzato dal fabbricante perché sono
necessari speciali attrezzi su misura.
20. L’apparecchio non è un’illuminazione
portatile adatta all’uso da parte dei bambini.
21. I bambini non devono giocare con
l’apparecchio.
Simbolo Signifi cato
Per ridurre il pericolo di
lesioni, è necessario leggere
-
44 -
e comprendere il manuale di
istruzioni.
Solo per uso interno.
Usare solamente gli
alimentatori elencati nelle
presenti istruzioni.
EY37A2.indb 44 2015-2-11 17:07:36
Page 45

AVVISO:
• Non utilizzare pacchi batteria diversi da
quelli Panasonic, appositamente progettati
per l’uso con questo utensile ricaricabile.
• La Panasonic non sarà responsabile per
eventuali danni o incidenti causati dall’uso di
un pacco batteria riciclato e/o contraffatto.
• Non smaltire il pacco batteria nel fuoco e
non esporlo a eccessi di calore.
• Non introdurre chiodi nel pacco batteria,
non sottoporlo a urti, non smontarlo e non
tentare di modificarlo.
• Evitare che oggetti metallici entrino a
contatto con i terminali del pacco batteria.
• Non trasportare né conservare il pacco
batteria nello stesso contenitore in cui sono
presenti chiodi o oggetti metallici simili.
• Non ricaricare il pacco batteria in un luogo
esposto ad alte temperature, per es. vicino
ad un fuoco o alla luce solare diretta. In
caso contrario la batteria può surriscaldarsi,
prendere fuoco o esplodere.
• Per ricaricare il pacco batteria utilizzare
esclusivamente il caricabatteria dedicato. In
caso contrario la batteria potrebbe perdere,
surriscaldarsi o esplodere.
• Dopo aver rimosso il pacco batteria da
questo prodotto o dal caricabatteria,
rimontare sempre il coperchio del pacco
batteria. In caso contrario, i contatti della
batteria potrebbero andare in cortocircuito,
con conseguente rischio d’incendio.
• Se il pacco batteria risulta deteriorato,
sostituirlo con uno nuovo.L’uso prolungato di
un pacco batteria danneggiato può generare
calore, danni e incendi.
• Se si rilevano anomalie, interrompere
immediatamente l’uso e rivolgersi al
rivenditore presso il quale si è acquistato il
prodotto.
• Non alzare troppo il volume quando si
usano cuffie o auricolari.
• Fare attenzione a non alzare il volume man
mano che l’udito si adatta.
• Non utilizzare il prodotto per un periodo di
tempo prolungato, e fare sempre una pausa
per riposare le orecchie.
• Se si avverte un fastidio alle orecchie,
interrompere l’uso e rivolgersi al proprio
medico.
• Non collocare oggetti pesanti sulla radio e
non saltarci sopra.
• Non sistemare la radio su una superficie o in
una posizione instabile.
AVVISO:
• Assicurarsi di eseguire sempre un backup
dei dati memorizzati nel dispositivo collegato
a questa radio, per prevenirne la perdita in
caso di guasto del dispositivo.
II. MONTAGGIO
Installazione della batteria
NOTA:
Se le batterie vengono rimosse sia dallo
scomparto del pacco batteria principale
che dallo scomparto batteria di riserva,
l’inizializzazione verrà eseguita circa tre
minuti dopo.
Installazione delle batterie di riserva [Fig. 1]
1. Estrarre il dispositivo di chiusura dello
scomparto batteria per rilasciare lo
scomparto batteria. Sono presenti lo
scomparto del pacco batteria principale e lo
scomparto batteria di riserva.
2. Rimuovere lo scomparto batteria di riserva
e inserire 2 nuove batterie UM-3 (formato
AA). Assicurarsi che le batterie presentino
la polarità corretta, come indicato all’interno
dello scomparto. Riposizionare il coperchio
della batteria.
NOTA:
• La radio può essere usata senza
collegare la batteria di riserva.
• La conservazione delle batterie di riserva
all’interno dello scomparto impedisce la
perdita dei dati archiviati nelle memorie
preimpostate.
ATTENZIONE:
• Non utilizzare batterie diverse da quelle
specificate (UM-3).
• Rimuovere le batterie se il prodotto non
sarà utilizzato per un periodo di tempo
prolungato.
• Non mischiare batterie nuove con batterie
vecchie o utilizzare diversi tipi di batterie
insieme.
L’utilizzo improprio delle batterie può
causare perdite dalle batterie, generazione
di calore, incendi o esplosioni.
Se dalle batterie fuoriesce del liquido,
prestare attenzione alle indicazioni di
sicurezza riportate di seguito.
• Non toccare mai il liquido delle batterie
a mani nude. Ciò potrebbe provocare
infiammazioni cutanee o lesioni fisiche.
• Se il liquido viene a contatto con gli
occhi potrebbe dare origine a cecità.
• Raccogliere completamente con uno
straccio l’eventuale liquido fuoriuscito
da una batteria.
45 -
-
IT
EY37A2.indb 45 2015-2-11 17:07:36
Page 46

Installazione/rimozione del pacco batteria
principale [Fig. 2]
1. Una volta inserite le batterie di riserva,
inserire il pacco batteria principale nell’unità
principale. Inserirlo sempre fino in fondo
IT
finché non scatta in posizione con un piccolo
clic. I pacchi batteria adatti per questa radio
sono elencati nelle Specifiche.
2. Per rimuovere il pacco batteria, estrarre la
batteria dallo scomparto.
3. Riportare il dispositivo di chiusura dello
scomparto batteria alla posizione originale.
Indicatore batteria scarica
1. Carica ridotta, distorsione e un suono
“scattante” o un segnale di batteria scarica
( ) sul display sono tutti segni che
indicano la necessità di sostituire il pacco
batteria principale.
NOTA: non è possibile caricare il pacco
batteria tramite l’adattatore di alimentazione
CA in dotazione.
2. Quando, con la batteria principale rimossa, il
segnale di batteria scarica ( ) lampeggia
e sul display viene visualizzata una “E”, è il
momento di sostituire le batterie di riserva.
Utilizzo dell’antenna ad asta piegata morbida
[Fig. 3]
Raddrizzare l’antenna ad asta piegata
morbida.
ATTENZIONE:
L’antenna ad asta piegata morbida
funziona in una sola direzione.
Piegandola con la forza, si potrebbe
rompere o provocare lesioni personali.
Utilizzo dell’adattatore di alimentazione
CA in dotazione
Rimuovere il coperchio in gomma e inserire
la spina nella presa CC sul lato destro della
radio. Inserire l’adattatore in una presa
di corrente standard. Ogni volta che si
collega l’adattatore, il pacco batteria viene
automaticamente scollegato. L’adattatore CA
deve essere scollegato dalla rete elettrica
quando non è in uso.
NOTA:
• Quando si utilizza un adattatore di
corrente CA invece di un pacco batteria,
l’audio è leggermente più basso.
• Quando la radio presenta interferenze
nella banda AM per via dell’adattatore,
spostare la radio dal suo adattatore CA a
una distanza di oltre 30 cm.
• Quando l’adattatore CA e il pacco batteria
vengono utilizzati contemporaneamente,
l’adattatore CA avrà la precedenza
nell’alimentare l’unità. In questo caso,
l’alimentazione del pacco batteria non
sarà consumata.
• Questa unità non ha una funzione di
ricarica. Il funzionamento dell’unità
utilizzando sia l’adattatore CA che il pacco
batteria allo stesso tempo non carica il
pacco batteria.
• L’adattatore di alimentazione CA è
previsto per l’uso esclusivo con questo
prodotto e non deve essere utilizzato
con altre apparecchiature. Inoltre, non
utilizzare l’adattatore di corrente AC
di altre apparecchiature con questo
prodotto.
III. OPERAZIONI
Funzionamento della radio – Ricerca
della sintonizzazione AM/FM
NOTA:
Se il segnale di ricezione è debole,
provare a cambiare l’orientamento della
radio o dell’antenna.
1. Premere e tenere premuto il pulsante
alimentazione per accendere la radio.
2. Premere il pulsante sorgente finché non
viene visualizzato “AM” o “FM”.
3. Premere la manopola di controllo
sintonizzazione per eseguire una
sintonizzazione automatica. La radio
cercherà la banda AM/FM dalla frequenza
attualmente visualizzata e interromperà
automaticamente la ricerca quando trova
una stazione sufficientemente potente.
4. Dopo qualche secondo il display si
aggiornerà. Il display mostrerà la frequenza
del segnale rilevato.
5. Per trovare un’altra stazione, premere la
manopola di controllo sintonizzazione come
prima.
6. Quando viene raggiunta la fine della gamma
di lunghezza d’onda, la radio riprenderà la
sintonizzazione dall’estremità opposta della
gamma di lunghezza d’onda.
7. Ruotare il controllo Volume per regolare il
livello del suono, come richiesto.
8. Per spegnere la radio, premere e tenere
premuto il pulsante alimentazione.
Sintonizzazione manuale – AM/FM
1. Premere e tenere premuto il pulsante
alimentazione per accendere la radio.
2. Premere il pulsante sorgente finché non
viene visualizzato “AM” o “FM”.
3. Ruotare la manopola di controllo
sintonizzazione oer sintonizzarsi su una
stazione.
4. Quando viene raggiunta la fine della gamma
di lunghezza d’onda, la radio riprenderà la
sintonizzazione dall’estremità opposta della
gamma di lunghezza d’onda.
5. Utilizzare il controllo Volume per regolare il
livello del suono, come richiesto.
-
46 -
EY37A2.indb 46 2015-2-11 17:07:37
Page 47

Preimpostazione delle stazioni in
modalità AM/FM
Sono presenti 6 stazioni preimpostate
ciascuna per la radio AM e FM. Vengono
utilizzate allo stesso modo per ciascuna
gamma di lunghezza d’onda.
1. Sintonizzarsi sulla stazione radio desiderata
come descritto in precedenza.
2. Premere e tenere premuto il pulsante
preimpostazione desiderato (da 1 a 6) finché
la radio non emette un segnale acustico.
“M1” per esempio viene indicato accanto alla
frequenza. La stazione sarà memorizzata
utilizzando il numero preimpostato.
Ripetere questa procedura per le restanti
preimpostazioni se necessario. Le stazioni
preimpostate già memorizzate possono
essere sovrascritte seguendo la procedura di
cui sopra, se necessario.
Richiamo di una preimpostazione in
modalità AM/FM
1. Premere il pulsante sorgente finché non
viene visualizzato “AM” o “FM”.
2. Premere momentaneamente il pulsante
preimpostazione per far sì che la radio si
sintonizzi su una delle stazioni memorizzate
nella memoria di preimpostazione.
FM stereo/mono –––––––––––––––––
FM
Se la stazione radio FM in ascolto ha un
segnale debole potrebbe essere udibile
qualche sibilo. È possibile ridurre il sibilo
costringendo la radio a riprodurre la stazione
in mono anziché in stereo.
1. Premere il pulsante sorgente come
necessario per selezionare la banda FM e
sintonizzarsi sulla stazione FM desiderata
come riportato in precedenza.
2. Premere e tenere premuta la manopola
di controllo sintonizzazione per entrare
nell’impostazione del menu.
3. Ruotare il controllo Sintonizzazione
finché “FM” non viene mostrato sul
display e premere la manopola di
controllo sintonizzazione per entrare
nell’impostazione. Se l’impostazione
è ST(stereo) premere il controllo
Sintonizzazione per passare alla modalità
MN (mono) per ridurre il sibilo. Premere il
controllo Sintonizzazione per selezionare
l’opzione.
Ascolto della musica tramite
trasmissione Bluetooth
È necessario abbinare il proprio dispositivo
Bluetooth® alla radio prima di poter effettuare
il collegamento automatico per riprodurre/
trasmettere la musica Bluetooth® attraverso
la radio. L’abbinamento crea un “legame”,
che consente a due dispositivi di riconoscersi
a vicenda.
®
–––––––––––
BT
Abbinamento del dispositivo Bluetooth
la prima volta
1. Premere il pulsante sorgente finché non
viene visualizzato “BT”.
display e l’icona Bluetooth
sul display.
2. Attivare il Bluetooth
®
lampeggerà
®
sul dispositivo
seguendo il manuale d’uso del dispositivo
per consentire la procedura di abbinamento.
3. Premere il pulsante abbinamento Bluetooth®,
quindi
sarà mostrato sul display.
È possibile avviare la ricerca della radio
sul dispositivo Bluetooth® . Una volta
che “EY37A2” compare sul dispositivo
Bluetooth®, premere l’elemento nella lista
Bluetooth® e questo si collegherà alla radio.
4. Una volta connesso, l’icona Bluetooth®
rimarrà stabile sul display. Ora è possibile
riprodurre la musica nel dispositivo
Bluetooth® tramite la radio
NOTA:
• Se ‘EY37A2’ viene mostrato sull’elenco
dei dispositivi Bluetooth
®
ma il dispositivo
non è in grado di connettersi ad
esso, eliminare la voce dall’elenco e
abbinare nuovamente il dispositivo alla
radio seguendo i passaggi descritti in
precedenza.
• L’intervallo di funzionamento effettivo tra
la radio e il dispositivo abbinato è di circa
10 metri (30 piedi). Qualsiasi ostacolo
tra la radio e il dispositivo può ridurre
l’intervallo di funzionamento.
• Le prestazioni della connettività
Bluetooth® possono variare a seconda
dei dispositivi Bluetooth® connessi. Fare
riferimento alle funzionalità Bluetooth® del
dispositivo prima di connettersi alla radio.
È possibile che non tutte le funzioni siano
supportate su alcuni dispositivi Bluetooth®.
Riproduzione di dispositivi abbinati in
precedenza
Questa unità è in grado di memorizzare
fino a 8 set di dispositivi abbinati, quando la
memoria supera tale numero, il dispositivo
abbinato per primo sarà sovrascritto dalla
radio.
Se il dispositivo Bluetooth
®
è già stato
abbinato all’unità in precedenza, l’unità
memorizzerà il dispositivo Bluetooth® e
tenterà di riconnettersi automaticamente
al dispositivo in memoria con cui si era
connesso per ultimo. Se il dispositivo
connesso per ultimo non è disponibile,
la radio tenterà di connettersi al secondo
dispositivo connesso per ultimo, e così via.
47 -
-
®
per
comparirà sul
IT
EY37A2.indb 47 2015-2-11 17:07:37
Page 48

Cancellazione della memoria del dispositivo
abbinato
Premere e tenere premuto il pulsante
abbinamento Bluetooth
finché non si sente un doppio tono. La radio
IT
elimina tutti i dispositivi dalla sua memoria e
diventa rilevabile.
Scollegamento del dispositivo Bluetooth
Premere e tenere premuto il pulsante
abbinamento Bluetooth® finché la radio non
emette un segnale acustico per scollegarsi
al dispositivo Bluetooth®. L’icona Bluetooth®
lampeggerà sul display a indicare che
la radio è nuovamente rilevabile per
l’abbinamento.
®
per circa 7 secondi
Orologio e allarmi
Impostazione del formato dell’orologio ––
Il display dell’orologio utilizzato in modalità
stand-by e sugli schermi della modalità di
riproduzione può essere impostato in un
formato diverso. Il formato selezionato viene
quindi utilizzato anche per l’impostazione
degli allarmi.
1. Assicurarsi che la radio sia accesa. Premere
e tenere premuto il controllo Sintonizzazione
per accedere al menu avanzato della
modalità corrente.
2. Ruotare il controllo Sintonizzazione finché
“TIM” non viene mostrato sul display e
premere il controllo Sintonizzazione per
entrare nell’impostazione.
3. Ruotare il controllo Sintonizzazione per
selezionare il formato 12 o 24 ore. Premere
il controllo Sintonizzazione per confermare la
scelta del formato orologio.
NOTA:
Se si seleziona il formato 12 ore, la
radio utilizzerà il formato 12 ore per
l’impostazione degli allarmi e mostrerà un
orologio 12 ore con indicatore ora PM in
modalità standby.
Impostazione manuale dell’ora dell’orologio
–––––––––––––––––––––––––––––––––
1. Assicurarsi che la radio sia accesa. Premere
e tenere premuta la manopola di controllo
sintonizzazione per accedere al menu
avanzato della modalità corrente.
2. Ruotare il controllo Sintonizzazione finché
“CLK” non viene mostrato sul display e
premere il controllo Sintonizzazione per
entrare nell’impostazione. Ora l’impostazione
ora inizia a lampeggiare.
3. Ruotare il controllo Sintonizzazione per
selezionare l’ora desiderata e premere il
controllo Sintonizzazione per confermare
l’impostazione. Ora l’impostazione minuti
inizia a lampeggiare.
4. Ruotare il controllo Sintonizzazione per
selezionare il minuto desiderato e premere
®
TIM
CLK
il controllo Sintonizzazione per confermare
l’impostazione. Il display tornerà al menu
precedente.
Impostazione della sveglia
La radio ha due allarmi, ciascuno dei quali
può essere impostato come sveglia radio
AM/FM o allarme segnalatore acustico.
Assicurarsi che l’ora sia impostata prima di
impostare gli allarmi.
a. Impostazione dell’allarme radio:
1. Assicurarsi che la radio sia accesa.
2. Premere e tenere premuto il pulsante
allarme radio, il simbolo dell’allarme radio
(
) e l’ora sul display lampeggeranno
seguiti da un segnale acustico.
3. Quando la cifra dell’ora lampeggia, ruotare
il controllo Sintonizzazione per selezionare
l’ora dell’allarme desiderata e premere il
controllo Sintonizzazione per confermare
l’impostazione ora.
4. Quindi ruotare il controllo Sintonizzazione
per selezionare il minuto dell’allarme
desiderato e premere il controllo
Sintonizzazione per confermare
l’impostazione.
5. Quando il simbolo dell’allarme
radio lampeggia, ruotare il controllo
Sintonizzazione per selezionare la banda e
la stazione desiderata per la sveglia, quindi
premere il controllo Sintonizzazione per
confermare la selezione.
6. Ruotare il controllo Sintonizzazione per
selezionare il volume desiderato e premere
il controllo Sintonizzazione per confermare
l’impostazione. L’impostazione allarme radio
ora è completata.
NOTA:
Se la stazione dell’allarme AM/FM non è
disponibile quando suona l’allarme, verrà
utilizzato l’allarme segnalatore acustico al
suo posto.
b. Impostazione dell’allarme segnalatore
acustico HWS (Humane Wake System):
1. Assicurarsi che la radio sia accesa.
2. Premere e tenere premuto il pulsante
allarme segnalatore acustico, il simbolo
dell’allarme segnalatore acustico (
l’ora sul display lampeggeranno seguiti da un
segnale acustico.
3. Quando la cifra dell’ora lampeggia, ruotare
il controllo Sintonizzazione per selezionare
l’ora dell’allarme desiderata e premere il
controllo Sintonizzazione per confermare
l’impostazione ora.
4. Quindi ruotare il controllo Sintonizzazione
per selezionare il minuto dell’allarme
desiderato e premere il controllo
Sintonizzazione per confermare
l’impostazione.
5. Ruotare il controllo Sintonizzazione per
-
selezionare il volume desiderato e premere
48 -
) e
EY37A2.indb 48 2015-2-11 17:07:38
Page 49

il controllo Sintonizzazione per confermare il
volume. L’impostazione allarme segnalatore
acustico ora è completata.
Quando suona l’allarme
Per annullare un allarme che suona,
premere il pulsante alimentazione.
Disattivazione/annullamento degli allarmi
Per disattivare un allarme attivo, premere
il pulsante allarme corrispondente per
annullare l’impostazione dell’allarme.
Durata del suono dell’allarme –––––
1. Premere e tenere premuto il controllo
Sintonizzazione per accedere al menu
avanzato della modalità corrente.
2. Ruotare il controllo Sintonizzazione finché
“ALM” non viene mostrato sul display.
Premere il controllo Sintonizzazione per
entrare nell’impostazione.
3. Ruotare il controllo Sintonizzazione per
scorrere l’opzione 1, 3, 5, 10, 15, 30 e 60
minuti. Fermarsi quando l’opzione desiderata
compare sul display, quindi premere il
controllo Sintonizzazione per confermare
l’impostazione.
Snooze –––––––––––––––––––––––––
1. Quando suona l’allarme, premere un
pulsante qualsiasi diverso dal pulsante
alimentazione per silenziare l’allarme. Il
simbolo snooze ( ) comparirà sul display.
2. Per regolare il tempo di silenziamento del
timer snooze, premere e tenere premuto
il controllo Sintonizzazione per entrare
nell’impostazione del menu.
3. Ruotare il controllo Sintonizzazione finché
“SNZ” non viene mostrato sul display, quindi
premere il controllo Sintonizzazione per
entrare nell’impostazione. Ruotare il controllo
Sintonizzazione per regolare il tempo di
silenziamento dalle opzioni di 1, 3, 5, 10, 15
minuti o OFF per il timer snooze.
4. Per annullare il timer snooze mentre
l’allarme è sospeso, premere il pulsante
alimentazione. Per disattivare la funzione
snooze, ruotare il controllo Sintonizzazione
finché non viene mostrato “OFF”.
Timer Sleep ––––––––––––––––––––
La radio può essere impostata in modo
da spegnersi automaticamente dopo
che è trascorso un tempo preimpostato.
L’impostazione del timer Sleep può essere
regolata tra OFF, 15, 30, 45, 60 e 90 minuti.
1. Premere e tenere premuto il
controllo Sintonizzazione per entrare
nell’impostazione del menu avanzato.
2. Ruotare il controllo Sintonizzazione finché
“SLP” non viene mostrato sul display.
Premere il controllo Sintonizzazione per
entrare nell’impostazione.
ALM
SNZ
SLP
3. Ruotare il controllo Sintonizzazione per
scorrere l’opzione di OFF, 15, 30, 45, 60 o
90.
Fermarsi quando l’impostazione del timer
sleep desiderata compare sul display.
L’impostazione sarà salvata e l’LCD tornerà
al display normale.
4. La radio si spegnerà automaticamente
una volta passato il timer Sleep Timer
preimpostato. L’icona Timer sleep (
verrà mostrata sul display a indicare un timer
Sleep attivo.
5. Per annullare la funzione Timer sleep prima
che sia trascorso il tempo preimpostato, è
sufficiente premere il pulsante alimentazione
per spegnere manualmente l’unità. Per
annullare la funzione quando il conto alla
rovescia è in corso, andare al menu di
impostazione del timer sleep e selezionare
“OFF”.
Funzione di controllo toni ––––––––
Il suono del sistema audio può essere
regolato secondo il proprio gusto personale
in base al materiale che si sta ascoltando. La
radio dispone di 5 modalità di equalizzazione
preimpostate. In alternativa, è possibile
impostare i livelli degli alti e dei bassi in base
alle proprie preferenze.
1. Premere il controllo Volume per entrare nel
menu EQ.
2. Ruotare il controllo Volume finché “TON”
non viene mostrato sul display. Premere il
controllo Volume per entrare nel menu di
configurazione.
3. Ruotare il controllo Volume per scorrere
le 6 modalità sottostanti finché non viene
visualizzata la modalità desiderata. Quindi
premere il controllo Volume per confermare
l’impostazione.
a. TN 1-Flat
b. TN 2- Heavy
c. TN 3- Soft
d. TN 4- Clear
e. TN 5- Vocal
4. Per tornare al menu di livello superiore,
ruotare il controllo Volume finché non
viene mostrato sul display. Quindi premere
nuovamente il controllo Volume per tornare
al menu di livello superiore.
Impostazione del mio EQ ––––––––
Se le funzioni di equalizzazione preimpostate
non sono di proprio gradimento, è possibile
impostare alti e bassi personalizzati come di
seguito:
1. Premere il controllo Volume per entrare nel
menu EQ.
2. Ruotare il controllo Volume finché “BAS”
non viene mostrato sul display. Premere il
controllo Volume per entrare nel menu di
configurazione.
49 -
-
IT
)
TON
BAS
EY37A2.indb 49 2015-2-11 17:07:38
Page 50

3. Ruotare il controllo Volume per regolare
il livello dei bassi (tra -5 e +3). Il suono
cambierà man mano che si regola il livello.
Premere nuovamente il controllo Volume per
confermare l’impostazione.
4. Ruotare il controllo Volume finché “TRE”
IT
non viene mostrato sul display. Premere il
controllo Volume per entrare nel menu di
configurazione.
5. Ruotare il controllo Volume per regolare
il livello degli alti (tra -5 e +3). Il suono
cambierà man mano che si regola il livello.
Premere nuovamente il controllo Volume per
confermare l’impostazione.
Impostazione del suono di
funzionamento –––––––––––––––––
È possibile attivare o disattivare il suono di
funzionamento della radio.
1. Premere e tenere premuto il
controllo Sintonizzazione per entrare
nell’impostazione menu della modalità
corrente.
2. Ruotare il controllo Sintonizzazione finché
“SND” non viene mostrato sul display, quindi
premere il controllo Sintonizzazione per
entrare nell’impostazione.
3. Ruotare il controllo Sintonizzazione per
scegliere la selezione desiderata e premere
il controllo Sintonizzazione per confermare
l’impostazione.
Presa ingresso ausiliario
Una presa ingresso ausiliario stereo da 3,5 è
fornita sul lato sinistro della radio.
1. Collegare una sorgente audio esterna (ad
esempio, smartphone, lettore MP3 o CD) alla
presa ingresso ausiliario.
2. Premere il pulsante sorgente finché non
viene visualizzato AUX IN.
3. Regolare l’impostazione del volume sullo
smartphone o il lettore MP3 o CD per
garantire un adeguato livello di segnale dal
lettore, e quindi utilizzare il controllo Volume
della radio come necessario per un ascolto
confortevole.
Presa per auricolari
Una presa per auricolari da 3,5 mm situata
sul lato destro della radio è fornita per l’uso
con gli auricolari. L’inserimento di una spina
disattiva automaticamente l’altoparlante
interno.
Tenere presente che la sensibilità degli
auricolari può variare ampiamente. Si
consiglia pertanto di impostare il volume
ad un livello basso prima di collegare gli
auricolari alla radio. Si raccomanda inoltre
di ridurre il volume prima di scollegare gli
auricolari.
SND
ATTENZIONE:
Una pressione sonora eccessiva
esercitata dagli auricolari e dalle cuffie
può causare la perdita dell’udito.
Presa USB per la ricarica di smartphone
NOTA:
I dispositivi USB non possono essere
ricaricati durante la ricezione di
trasmissioni in AM.
La radio dispone di una presa USB destinata
esclusivamente per la ricarica di smartphone
e dispositivi simili.
Il tempo di caricamento può variare e, in
alcuni casi, può richiedere più tempo per la
ricarica rispetto a quando si utilizza l’unità
di ricarica del produttore in dotazione con lo
smartphone.
1. Collegare lo smartphone alla presa di
ricarica USB sul lato sinistro della radio.
2. Lo smartphone inizierà a caricarsi. Tenere
presente che la ricarica può avvenire in
modalità FM/Bluetooth®/Aux-in.
3. Una volta ricaricato lo smartphone,
rimuovere il cavo USB.
ATTENZIONE:
Alcuni dispositivi possono essere ricaricati
solamente mediante un metodo specifico.
Assicurarsi di verificarlo prima di ricaricare un
dispositivo.
• Il caricabatteria potrebbe non fornire
l’alimentazione ad alcuni dispositivi USB.
• Quando non viene utilizzato o dopo la
ricarica, rimuovere il cavo USB e chiudere
il coperchio.
• Non collegare la sorgente di
alimentazione alla porta USB. Altrimenti
sussiste il rischio di un incendio. La
porta USB è prevista solo per la ricarica
di dispositivi a voltaggio inferiore.
Posizionare sempre il coperchio sulla
porta USB quando non si carica un
dispositivo a voltaggio inferiore.
• Non inserire un chiodo, cavo, ecc. nella
porta di alimentazione USB. Altrimenti un
corto circuito potrebbe provocare fumo e
fuoco.
• Non collegare questa presa USB alla
porta USB del PC, in quanto è altamente
probabile che essa potrebbe causare il
guasto delle unità.
• Non usare mai la presa USB in condizioni
di pioggia o di umidità per evitare che
l’umidità penetri nella radio. Tenere
sempre il coperchio in gomma sul retro
ben chiuso in queste condizioni.
Luce LED
La radio è dotata di una luce LED a lunga
durata posta sul pannello frontale della radio.
Premere il pulsante luce per accendere e
-
spegnere la luce LED.
50 -
EY37A2.indb 50 2015-2-11 17:07:38
Page 51

Attenzione: NON FISSARE
DIRETTAMENTE IL RAGGIO.
NOTA:
Quando non vengono eseguite
operazioni, dopo 10 minuti la luce inizia a
lampeggiare, per poi spegnersi un minuto
più tardi.
IV. MANUTENZIONE
Per la pulizia dell’apparecchio, utilizzare un
panno morbido ed asciutto. NON usare un
panno bagnato, solventi, benzina od altre
sostanze volatili per la pulizia.
Qualora l’interno dell’unità o del pacco
batteria si bagni, togliere immediatamente
l’acqua e fare asciugare il prima possibile.
Rimuovere accuratamente la polvere e le
limature di ferro accumulatesi nell’unità. In
caso di problemi durante l’uso dell’unità,
contattare il più vicino centro di assistenza
autorizzato.
V. ACCESSORI
Pacco batteria
• Leggere i dati tecnici.
Caricabatteria
• Per informazioni, rivolgersi a un rivenditore
autorizzato.
NOTA:
Il pacco batteria e il caricabatteria non
sono inclusi in questo kit.
[Pacco batteria]
Per un uso corretto del pacco batteria
Pacco batteria Li-ion [Fig. 4]
• Le batterie ricaricabili hanno una durata
limitata.
• Per una conservazione ottimale della
batteria, riporre il pacco batteria agli ioni di
litio dopo l’uso senza ricaricarlo.
• Quando il pacco batteria viene caricato,
assicurarsi che i terminali sul caricabatteria
siano privi di sostanze estranee, quail
polvere, acqua, ecc. Pulire i terminali prima
di caricare il pacco batteria, qualora vengano
trovate sostanze estranee sui terminali.
La durata dei terminali del pacco batteria può
essere influenzata da sostanze estranee,
quali polvere, acqua, ecc. durante il
funzionamento.
• Quando il pacco batteria non viene usato,
tenerlo lontano da altri oggetti metallici come:
clip, monetine, chiavi, chiodi, viti o altri piccoli
oggetti metallici che potrebbero creare un
collegamento da un terminale all’altro.
Cortocircuitare i terminali del pacco batteria
potrebbe causare scintille, ustioni oppure un
incendio.
• Quando si usa il pacco batteria, assicurarsi
che il luogo di lavoro sia ben ventilato.
• Quando si rimuove il pacco batteria dall’unità
principale, riposizionare immediatamente
il coperchio del pacco batteria, onde
evitare che polvere e sporcizia contaminino
i terminali della batteria e causino un
cortocircuito.
ATTENZIONE:
• Per proteggere il motore o la batteria,
tenere presente quanto segue
nell’esecuzione del lavoro.
• In caso di surriscaldamento del motore
e della batteria, la funzione di protezione
si attiverà e il motore e la batteria
smetteranno di funzionare.
Per un utilizzo sicuro
• Il pacco batteria è stato ideato per essere
installato tramite una procedura a due fasi
per motivi di sicurezza. Prima dell’uso,
verificare che il pacco batteria sia inserito
correttamente nell’unità principale.
[Caricabatterie]
Ricarica
ATTENZIONE:
1) Il caricabatterie è progettato per
funzionare con un’alimentazione elettrica
domestica standard, esclusivamente
come indicato sulla targhetta di
classificazione. Caricare solo al voltaggio
indicato sulla targhetta di classificazione
dell’unità. Ad esempio 230 V/50 Hz.
2) Non tentare di utilizzarlo con altri voltaggi
o frequenze nominali.
3) Se la temperatura del gruppo batteria
circa scende circa al di sotto di
-10°C (14°F), la ricarica si arresta
automaticamente per evitare la
degradazione della batteria.
4) L’intervallo della temperatura ambiente è
compreso tra 0°C (32°F) e 40°C (104°F).
Se il pacco batteria viene utilizzato
quando la temperatura della batteria è
inferiore a 0°C (32°F), l’unità potrebbe
non funzionare correttamente.
5) Usare il caricabatteria a temperature
comprese tra 0°C (32°F) e 40°C (104°F)
e caricare la batteria ad una temperatura
simile a quella della batteria stessa.
(Dovrebbe esserci una differenza
massima di 15°C (59°F) tra le temperature
della batteria e della posizione di ricarica.)
6) Per caricare un pacco batteria freddo (al
di sotto di 0°C (32°F)) in un luogo caldo,
lasciare il pacco batteria nel locale per
oltre un’ora per permettere allo stesso di
raggiungere la temperature ambiente.
7) Lasciate raffreddare il caricatore quando
caricate più di due pacchi batterie
consecutivamente.
51 -
-
IT
EY37A2.indb 51 2015-2-11 17:07:39
Page 52

8) Non infilate le dita nel foro di contatto per
tenere in mano il caricabatterie o altro
scopo.
9) Onde evitare il rischio d’incendio o il
danneggiamento del caricabatteria:
IT
• Non coprite le prese d’aria di
caricabatteria e pacco batteria.
• Scollegare il caricabatteria se non in
uso.
NOTA:
Al momento dell’acquisto, il pacco
batteria non è carico. Assicurarsi di
caricare la batteria prima dell’uso.
Come ricaricare
1. Collegare il caricatore alla presa di corrente.
NOTA:
Potrebbero presentarsi delle scintille
quando la spina viene inserita
nell’alimentazione CA, ma questo non
pone un problema in termini di sicurezza.
2. Collegare saldamente il pacco batteria
all’interno del caricatore.
1. Allineare le marcature e collocare la
batteria nel raccordo del caricatore.
2. Far scorrere nella direzione indicata dalla
freccia.
Marcature
allineamento
3. Durante la ricarica, la spia di carica si
accende. Quando la ricarica è stata
completata, un interruttore elettronico interno
scatta automaticamente per evitare la
sovraccarica.
• La ricarica non avviene se il pacco
batteria è molto caldo (per esempio,
subito dopo l’uso per un lavoro pesante).
La spia di standby arancione lampeggia
mentre la batteria si sta raffreddando.
La ricarica quindi comincia
automaticamente.
4. La spia di carica (verde) lampeggia
lentamente quando la batteria è carica per
l’80% circa.
5. A ricarica completata, la spia verde si
spegne.
6. Se la temperatura del pacco batteria
raggiunge 0°C (32°F) o meno, il tempo
di ricarica è maggiore rispetto al tempo
di ricarica normale. Anche a batteria
completamente carica, l’utensile dispone di
circa il 50% dell’energia di cui dispone una
batteria carica alla temperatura di esercizio
normale.
7. Se la spia di carica (verde) non si spegne,
rivolgersi a un rivenditore autorizzato.
8. Se un pacco batteria completamente
ricaricato viene inserito di nuovo nel
caricabatteria, la spia di carica si illumina.
Dopo alcuni minuti, la spia di carica verde si
pegnerà.
SEGNALI SPIE
Il caricamento è completato. (Carica completa)
Batteria carica all’80% circa.
In fase di caricamento.
Il caricatore è stato collegato alla presa murale.
E’ pronto per il caricamento.
(Verde) (Arancione)
Spenta Accesa Lampeggia
EY37A2.indb 52 2015-2-11 17:07:39
Spia stato ricarica
Sinistra: verde Destra: arancione
Pacco batteria freddo.
La ricarica del pacco batteria avviene lentamente per ridurre il
peso sulla batteria.
Il pacco batteria è caldo.
Il caricamento avrà inizio appena la temperatura del pacco
batteria sarà scesa. Qualora la temperatura del pacco batteria
raggiunga i -10°C (14°F) o meno, anche la spia di ricarica
arancione inizia a lampeggiare. La ricarica inizia quando la
temperatura del pacco batteria aumenta.
Non è possibile effettuare il caricamento. Il pacco batteria è
impolverato o guasto.
-
52 -
Page 53

Riciclo batteria
ATTENTION:
Per ragioni relative alla protezione dell’ambiente e al riciclaggio dei materiali, assicurarsi che lo
smaltimento Del prodotto avvenga in un luogo ufficialmente preposto a tale fine (ammesso che
esista nell’area dell’utente).
Informazioni per gli utenti sulla raccolta e l’eliminazione di vecchie apparecchiature e batterie
usate
Questi simboli sui prodotti, sull’imballaggio, e/o sulle documentazioni o manuali
accompagnanti i prodotti indicano che i prodotti elettrici, elettronici e le batterie
usate non devono essere buttati nei riuti domestici generici.
Per un trattamento adeguato, recupero e riciclaggio di vecchi prodotti e batterie
usate, vi preghiamo di portarli negli appositi punti di raccolta, secondo la
legislazione vigente nel vostro Paese e le Direttive 2012/19/EC e 2006/66/EC.
Smaltendo correttamente questi prodotti e le batterie, contribuirete a salvare
importanti risorse e ad evitare i potenziali effetti negativi sulla salute umana e
sull’ambiente che altrimenti potrebbero vericarsi in seguito ad un trattamento
inappropriato dei riuti.
Per ulteriori informazioni sulla raccolta e sul riciclaggio di vecchi prodotti e
batterie, vi preghiamo di contattare il vostro comune, i vostri operatori per lo
smaltimento dei riuti o il punto vendita dove avete acquistato gli articoli.
Sono previste e potrebbero essere applicate sanzioni qualora questi riuti non
siano stati smaltiti in modo corretto ed in accordo con la legislazione nazionale.
Per utenti commerciali nell’Unione Europea
Se desiderate eliminare apparecchiature elettriche ed elettroniche, vi preghiamo di contattare il
vostro commerciante od il fornitore per maggiori informazioni.
[Informazioni sullo smaltimento rifiuti in altri Paesi fuori dall’Unione Europea]
Questi simboli sono validi solo all’interno dell’Unione Europea. Se desiderate smaltire questi
articoli, vi preghiamo di contattare le autorità locali od il rivenditore ed informarvi sulle modalità per
un corretto smaltimento.
IT
53 -
-
EY37A2.indb 53 2015-2-11 17:07:39
Page 54

VI. SPECIFICHE TECNICHE
[APPARECCHIO PRINCIPALE]
Adattatore di alimentazione CA CC12 V/1500 mA, pin centrale positivo
Batteria
IT
Bluetooth
Versione Bluetooth
Proli Bluetooth
Potenza di trasmissione
Intervallo di trasmissione
®
QD ID 58625
®
®
Classe 2 di alimentazione della specica Bluetooth
Circa 10 m (varia in base alle condizioni di utilizzo)
Codec supportato
Prolo Bluetooth
®
compatibile
Intervallo di frequenza
Altoparlante 3,5 pollici 8 ohm × 2
Potenza in uscita
Terminale di ingresso Dia. 3,5 mm/Max. 2 V/stereo (INGRESSO AUSILIARIO)
Terminale di uscita
Sistema antenna
Dimensioni (L × A × P) 344 mm × 280 mm × 239 mm
Peso 4,7 kg (con EY9L51)/4,0 kg (solo unità principale)
Consumo energetico
[PACCO BATTERIA]
Modello N°
EY9L41 EY9L42 EY9L44 EY9L45 EY9L47 EY9L50 EY9L51 EY9L52
Accumulatore
Tensione
batteria
Tempo di
funzionamento
a 50 W+50 W
14,4V DC
(3,6V × 4 celle)
Circa
18 h
Circa
9 h
14,4V DC
(3,6V × 8 celle)
Circa
19 h
(ricezione FM)
[CARICABATTERIA]
Modello N° EY0L82
Potenza Voir la plaque signalétique se trouvant sur le côté inférieur du chargeur.
Peso 0,93 kg
EY9L41 EY9L42 EY9L44 EY9L45 EY9L47 EY9L50 EY9L51 EY9L52
Tempo di
caricamento
Utilizzabile:
35min.
Completa:
50min.
Utilizzabile:
30min.
Completa
35min.
Utilizzabile:
40min.
:
Completa
55min.
NOTA: Questa tabella può includere dei modelli non disponibili nella propria area.
Fare riferimento al catalogo generale più recente.
Per il nome e l'indirizzo del rivenditore, consultare la scheda di garanzia acclusa.
Riserva: UM-3 (formato AA) × 2
Batteria principale: 14,4 V/18 V
4,0
A2DP/SCMS-T
SBC
A2DP
FM 87,5-108 MHz (0,05 MHz/incremento)
AM (MW) 522-1629 kHz (9 kHz/incremento)
Con adattatore di alimentazione CA: 1,7 W × 2
Con pacco batteria da 14,4 V: 2,6 W × 2
Con pacco batteria da 18 V: 4,5 W × 2
USB: USCITA CC 5 V/1 A
Auricolare: Dia. 3,5 mm/3 Ω/150 mV/stereo
FM: antenna ad asta piegata morbida
AM: antenna a barre
Max. 7 W
0,12 W (modalità Standby)
Batteria Li-ion
Circa
24 h
Utilizzabile:
:
Completa
60min.
14,4V DC
(3,6V × 4 celle)
Circa 11 h
Utilizzabile:
50min.
35min.
:
Completa
40min.
18V DC
(3,6V × 10 celle)
Circa
19 h
Circa
24 h
Utilizzabile:
40min.
:
Completa
:
55min.
®
(3,6V × 5 celle)
Utilizzabile:
55min.
Completa
70min.
(2,5 mW)
18V DC
Circa 11 h
Utilizzabile:
35min.
:
Completa
40min.
:
-
54 -
EY37A2.indb 54 2015-2-11 17:07:40
Page 55

VII. LICENZE
• Il marchio denominativo Bluetooth® e i loghi sono di proprietà di Bluetooth SIG, Inc. e
qualsiasi utilizzo di tali marchi da parte di Panasonic Corporation è concesso in licenza. Altri
marchi registrati e nomi di marchi sono di proprietà dei rispettivi proprietari.
• I vari nomi, nomi di società e nomi di prodotti presentati in questo manuale sono marchi o
marchi registrati delle rispettive società. Tenere presente che alcuni simboli TM o ® sono
omessi nel presente documento.
Informazioni sul Bluetooth
Panasonic non si assume alcuna
responsabilità per dati e/o informazioni
compromessi nel corso di una trasmissione
wireless.
Banda di frequenza utilizzata
Questo sistema utilizza la banda di frequenza
2,4GHz.
Certicazione di questo dispositivo
• Questo sistema è conforme alle limitazioni di
frequenza e ha ricevuto la certificazione sulla
base delle leggi sulla frequenza. Pertanto,
non è necessario un permesso wireless.
• Le azioni sottostanti sono perseguibili per
legge in alcuni paesi:
– Smontare o modificare l’unità.
– Rimuovere le indicazioni delle specifiche.
Limitazioni d’uso
• La trasmissione wireless e/o l’utilizzo con
tutti i dispositivi muniti di Bluetooth
sono garantiti.
• Tutti i dispositivi devono conformarsi agli
standard fissati da Bluetooth SIG, Inc.
• A seconda delle specifiche e delle
impostazioni di un dispositivo, la
connessione potrebbe fallire o alcune
operazioni potrebbero differire.
• Questo sistema supporta le funzioni di
protezione Bluetooth
dell’ambiente operativo e/o delle
impostazioni, questa protezione potrebbe
non essere sufficiente. Trasmettere i dati
in modalità wireless a questo sistema con
cautela.
• Questo sistema non può trasmettere dati a
un dispositivo Bluetooth
Portata di utilizzo
Utilizzare questo dispositivo a una portata
massima di 10 m.
La portata può diminuire a seconda
dell’ambiente, della presenza di ostacoli o
interferenze.
®
. Ma, a seconda
®
®
non
®
.
Interferenze da altri dispositivi
• Questo sistema potrebbe non funzionare
correttamente e potrebbero verificarsi
problemi come rumori e scatti audio a causa
dell’interferenza delle onde radio se l’unità
principale si trova troppo vicino a dispositivi
Bluetooth
®
o dispositivi che utilizzano la
banda da 2,4 GHz.
• Questo sistema potrebbe non funzionare
correttamente se le onde radio di una
stazione trasmittente vicina, ecc., sono
troppo forti.
Utilizzo previsto
• Questo sistema è previsto esclusivamente
per l’utilizzo normale e generico.
• Non utilizzare questo sistema in prossimità di
apparecchiature o in un ambiente sensibile
alle interferenze delle radiofrequenze
(esempio: aeroporti, ospedali, laboratori,
ecc.).
Dichiarazione di conformità (DdC)
“Panasonic
Corporation” dichiara
qui che questo prodotto
è conforme ai requisiti essenziali e altre relative
norme della Direttiva 1999/5/EC.
I clienti possono scaricare una copia della DdC
originale dei nostri prodotti R&TTE dal nostro
server per le DdC:
http://www.doc.panasonic.de
Contatti del Rappresentante Autorizzato:
Panasonic Testing Centre, Panasonic Europe
Ltd. - sede di Amburgo, Winsbergring 15, 22525
Amburgo, Germania
IT
55 -
-
EY37A2.indb 55 2015-2-11 17:07:40
Page 56

Originele gebruiksaanwijzing: Engels
Vertaling van de originele
gebruiksaanwijzing: Andere talen
Wanneer dit toestel wordt gebruikt met alle
panelen volledig gesloten en werkend op
een accu, voldoet het aan de vereiste IPbescherming gebaseerd op de IEC-reglementen.
NL
Definitie van de IP-code
IP6X: Geen binnendringen van stof (talkpoeder
kleiner dan 75μm kan het gereedschap
binnendringen)
IPX4: Water dat vanuit een willekeurige richting
op het toestel wordt gespat, mag geen schadelijk
effect hebben (Dit toestel is ontworpen om
te werken wanneer water van een normale
temperatuur gedurende 10 minuten met een
hoeveelheid van 4,3 l/min vanuit meerdere
richtingen met behulp van meerdere slangen op
ongeveer 1 meter afstand op het toestel wordt
gespoten.).
OPMERKING:
Dit is niet van toepassing op de
bijgeleverde “netspanningsadapter”.
BEPERKTE GARANTIE
De IP64 classicatie betekent dat dit product
bestand is tegen de minimale inwerking van
water en stof, maar er wordt geen garantie
gegeven voor de prestatie onder dergelijke
omstandigheden.
Zie Veiligheids- en gebruiksinstructies voor
verdere informatie over het juiste gebruik.
I. VEILIGHEIDSVOOR SCHRIFTEN
Lees alle aanwijzingen volledig
1. BEWAAR DEZE
VEILIGHEIDSINSTRUCTIES - Deze
handleiding bevat belangrijke veiligheids- en
gebruiksinformatie voor dit product.
2. Lees alle aanwijzingen en waarschuwingen
alvorens u het product in gebruik neemt.
3. Stel dit product en de accu niet bloot aan
regen of sneeuw en gebruik deze ook niet in
een vochtige ruimte.
4. Het gebruik van een hulpsuk wordt
afgeraden, aangezien dit zou kunnen
resulteren in brand, een elektrische schok of
lichamelijk letsel.
5. Om beschadiging aan de stekker en het
snoer te voorkomen, dient u altijd de stekker
vast te pakken wanneer u de acculader
loskoppelt. Trek niet aan het snoer.
6. Gebruik geen verlengsnoer.
7. Als het snoer beschadigd is, moet het om
risico te voorkomen vervangen worden
door de fabrikant of een door de fabrikant
erkende reparateur, of door een persoon met
vergelijkbare kwalificaties.
8. Om een elekrische schok te voorkomen,
dient u de acculader los te maken van het
lichtnet voordat onderhouds- of reinigingswerkzaamheden worden uitgevoerd.
9. Leg het snoer zodanig dat er niet over
gelopen kan worden en dat dit ook niet op
andere wijze hindert en beschadigd zou
kunnen worden.
10. Dit product en de accu zijn speciaal
ontworpen om samen te worden gebruikt.
11. Probeer dit product en de behuizing van de
accu niet te demonteren.
12. Berg het gereedschap en de accu niet op
een plaats op waar de temperatuur tot boven
50°C (122°F) kan oplopen (bijvoorbeeld in
een metalen schuur of in een auto die in de
zon geparkeerd staat). Dit kan de levensduur
van de accu nadelig beïnvloeden.
13. Laad de accu niet op bij een tempe ratuur
ONDER 0°C (32°F) of BOVEN 40°C (104°F).
14. Probeer de accu niet te verbranden. De accu
zou kunnen ontploffen.
15. Dit product kan uitsluitend gebruikt worden
op het lichtnet. Zorg dat de netspanning
hetzelfde is als de bedrijfsspanning die
vermeld staat op het plaatje met de
technische gegevens. Probeer het product
nooit op een andere netspanning te
gebruiken!
16. Wees voorzichtig dat het snoer niet
beschadigd wordt. Draag de acculader
nooit aan het snoer en trek ook niet aan
het snoer om dit los te maken van het
stopcontact. Houd het snoer uit de buurt van
warmtebronnen, olie en scherpe randen.
17. Laad de accu op een goed geventileerde
plaats op. Leg tijdens het opladen geen doek
e.d. over de acculader en de accu.
18. Veroorzaak geen kortsluiting in de accu. Bij
kortsluiting kan een zeer hoge stroomsterkte
ontstaan met oververhitting en brandgevaar
als gevolg.
19. OPMERKING: Als het netsnoer
beschadigd is, mag dit uitsluitend bij een
reparatiecentrum aanbevolen door de
fabrikant worden vervangen. Voor het
vervangen van het netsnoer zijn namelijk
speciale ge reedschappen vereist.
20. Het apparaat is geen draagbare lamp voor
kinderen.
21. Kinderen mogen in geen geval met het
toestel spelen.
-
56 -
EY37A2.indb 56 2015-2-11 17:07:40
Page 57

Symbool Betekenis
Om het risico van
letsel te verminderen,
dient de gebruiker de
gebruiksaanwijzing te lezen en
ter kennis te nemen.
Alleen voor gebruik
binnenshuis.
Gebruik het toestel alleen
op de stroombronnen die in
deze gebruiksaanwijzing zijn
vermeld.
WAARSCHUWING:
• Gebruik uitsluitend Panasonic-accu’s
die bestemd zijn voor gebruik met dit
oplaadbare gereedschap.
• Panasonic kan niet aansprakelijk worden
gesteld voor beschadigingen of ongelukken
veroorzaakt door het gebruik van een
gerecyclede accu of een namaak-accu.
• Accu’s niet verbranden of aan extreme hitte
blootstellen.
• Accu’s niet doorboren met voorwerpen
als spijkers, niet blootstellen aan harde
schokken, niet demonteren en niet wijzigen.
• Laat geen metalen voorwerpen in contact
komen met de aansluitingen van de accu.
• De accu niet opbergen of vervoeren
in dezelfde verpakking als spijkers of
vergelijkbare metalen voorwerpen.
• De accu niet opladen bij grote hitte, zoals
naast een vuur of in direct zonlicht.
De accu kan hierdoor oververhit raken, in
brand vliegen of exploderen.
• Gebruik uitsluitend de bijbehorende lader
voor het opladen van de accu. De accu kan
anders gaan lekken, oververhit raken of
exploderen.
• Bevestig altijd het accudeksel nadat u de
accu van dit product of de acculader hebt
losgemaakt. Het is anders mogelijk dat de
accupolen kortgesloten worden met mogelijk
brand tot gevolg.
• Wanneer de accu versleten is, moet deze
door een nieuwe worden vervangen.
Als u een versleten of beschadigde accu
blijft gebruiken, kan dit resulteren in
hitteontwikkeling, ontbranding of barsten
van de accu.
• Wanneer u een abnormale situatie vaststelt,
moet u meteen met het gebruik van het
toestel stoppen en contact opnemen met de
winkel waar u het toestel heeft gekocht.
• Stel het volume niet te hoog in bij gebruik
van een hoofdtelefoon of oortelefoon.
WAARSCHUWING:
• Verhoog het volume niet onnodig want uw
gehoor gaat dan aan een hoog ingesteld
volume wennen.
• Gebruik het product niet ononderbroken
gedurende een lange periode, maar neem
af en toe een pauze om uw oren rust te
geven.
• Als u merkt dat u last krijgt van uw oren,
moet u stoppen met het gebruik en contact
opnemen met een arts.
• Zet geen zware voorwerpen op de radio en
ga er ook niet op staan.
• Zet de radio niet op een onstabiele
ondergrond of op een plaats waar de radio
kan omvallen.
• Maak altijd een reservekopie van de
gegevens die zijn opgeslagen in het
apparaat dat op deze radio is aangesloten
om gegevensverlies te voorkomen in geval
het apparaat defect raakt.
II. MONTAGE
Batterijen plaatsen
Plaatsen van de reservebatterijen [Fig. 1]
OPMERKING:
Als de accu/batterijen worden verwijderd
uit het vak voor de accu en de
reservebatterijen, zal het toestel ongeveer
drie minuten later in de begintoestand
worden teruggesteld.
1. Trek de batterijvakhouder naar buiten voor
toegang tot de batterijvakken. Er is een vak
voor het hoofdbatterijpak (accu) en een vak
voor de reservebatterijen.
2. Verwijder het deksel van het batterijvak voor
de reservebatterijen en plaats 2 nieuwe
UM-3 (AA-formaat) batterijen. Zorg dat de
batterijen met de plus en min in de juiste
richting worden geplaatst, zoals aangegeven
in het batterijvak. Breng het deksel van het
batterijvak weer aan.
OPMERKING:
• De radio kan worden gebruikt zonder dat
er reservebatterijen in zijn geplaatst.
• Zorg dat er altijd reservebatterijen in het
batterijvak zijn om te voorkomen dat de
gegevens van de voorkeurzenders in het
zendergeheugen verloren gaan.
LET OP:
• Gebruik geen andere batterijen dan de
voorgeschreven batterijen (UM-3).
• Verwijder de batterijen als u het product
geruime tijd niet denkt te gebruiken.
• Gebruik geen nieuwe en oude batterijen
of verschillende typen batterijen door
elkaar.
57 -
-
NL
EY37A2.indb 57 2015-2-11 17:07:41
Page 58

Verkeerd gebruik van de batterijen kan
resulteren in batterijlekkage, warmteontwikkeling, brand of een ontploffing.
Als er batterijlekkage optreedt, moet u
eventuele batterijvloeistof in het vak voor de
reservebatterijen zorgvuldig wegvegen.
NL
Als er vloeistof uit de batterijen lekt, moet
u om veiligheidsredenen de volgende
punten goed in acht nemen.
• Raak de batterijvloeistof nooit met blote
handen aan. Dit kan resulteren in irritatie
van uw huid of ander letsel.
• Wanneer vloeistof in uw ogen
terechtkomt, kan dit zelfs leiden tot
blindheid.
• Veeg eventueel gelekte batterijvloeistof
volledig weg.
Bevestigen/verwijderen van de accu [Fig. 2]
1. Nadat de reservebatterijen zijn geplaatst,
moet de accu in het toestel worden
geplaatst. Steek de accu helemaal naar
binnen totdat deze met een klik vergrendelt.
De geschikte accu’s voor deze radio staan
vermeld in de Technische gegevens.
2. Om de accu te verwijderen, trekt u deze uit
het vak.
3. Breng de batterijvakhouder weer terug in de
oorspronkelijke positie.
Indicator voor lage accuspanning
1. Minder vermogen, vervorming, een
“happerend” geluid of de aanduiding voor
lage accuspanning (
verschijnt, zijn tekenen dat de accu moet
worden vervangen.
OPMERKING: De accu kan niet via de
bijgeleverde netspanningsadapter worden
opgeladen.
2. Wanneer de accu is verwijderd en de
aanduiding voor lage accuspanning ( ) en
een “E.” op het display worden aangegeven,
betekent dat de reservebatterijen moeten
worden vervangen.
Gebruik van de flexibele antenne [Fig. 3]
Zet de flexibele antenne rechtop.
LET OP:
De flexibele antenne werkt maar in één
richting.
Wanneer de antenne met kracht wordt
verbogen, kan deze beschadigd raken of
kunt u zich verwonden.
) die op het display
Gebruik van de bijgeleverde
netspanningsadapter
Verwijder de rubber afdekking en steek
de adapterstekker in de gelijkstroomingangsaansluiting aan de rechterkant
van de radio. Steek de adapter zelf in een
standaard stopcontact. Bij het aansluiten
van de adapter wordt de accu automatisch
uitgeschakeld. De netspanningsadapter moet
worden losgemaakt van het stopcontact
wanneer deze niet wordt gebruikt.
OPMERKING:
• Bij gebruik met de netspanningsadapter is
het geluid wat zachter dan bij gebruik op
een accu.
• Wanneer de netspanningsadapter storing
veroorzaakt in de AM-ontvangst, moet de
radio meer dan 30 cm verwijderd van de
adapter worden geplaatst.
• Wanneer de netspanningsadapter en de
accu beide zijn aangesloten, heeft de
netspanningsadapter voorrang en zorgt
deze voor de stroomvoorziening. De
stroom van de accu wordt in dit geval niet
gebruikt.
• Dit toestel heeft geen oplaadfunctie.
Wanneer zowel de netspanningsadapter
als de accu zijn aangesloten, betekent dit
niet dat de accu wordt opgeladen.
• De netspanningsadapter is alleen bedoeld
voor gebruik met dit product en mag niet
met andere apparatuur worden gebruikt.
Gebruik ook niet de netspanningsadapter
van andere apparatuur met dit product.
III. BEDIENING
Bediening van de radio – Automatische
afstemming AM/FM
OPMERKING:
Als het ontvangstsignaal zwak is, kunt u
de radio of antenne proberen te draaien
om een betere ontvangstkwaliteit te
verkrijgen.
1. Houd de aan/ruststand-toets ingedrukt om
de radio in te schakelen.
2. Druk op de geluidsbrontoets totdat “AM” of
“FM” wordt weergegeven.
3. Druk op de afstemknop om te beginnen
met automatische afstemming. De radio
doorloopt de AM/FM-afstemband vanaf de
frequentie die nu wordt aangegeven en
stopt automatisch zodra een zender wordt
gevonden met voldoende signaalsterkte.
4. Na een paar seconden wordt de aanduiding
op het display bijgewerkt. Het display toont
de frequentie van de zender waarop is
afgestemd.
5. Om een andere zender te zoeken, drukt u
opnieuw op de afstemknop.
6. Wanneer het einde van de afstemband
wordt bereikt, wordt het afstemmen hervat
vanaf het tegenovergestelde uiteinde van de
afstemband.
7. Draai aan de volumeregelaar om de
geluidssterkte naar wens in te stellen.
8. Houd de aan/ruststand-toets ingedrukt om
de radio uit te schakelen.
-
58 -
EY37A2.indb 58 2015-2-11 17:07:41
Page 59

Handafstemming – AM/FM
1. Houd de aan/ruststand-toets ingedrukt om
de radio in te schakelen.
2. Druk op de geluidsbrontoets totdat “AM” of
“FM” wordt weergegeven.
3. Draai aan de afstemknop om op een zender
af te stemmen.
4. Wanneer het einde van de afstemband
wordt bereikt, wordt het afstemmen hervat
vanaf het tegenovergestelde uiteinde van de
afstemband.
5. Gebruik de volumeregelaar om de
geluidssterkte naar wens in te stellen.
Vastleggen van AM/FM-zenders in het
geheugen
Er kunnen 6 zenders van iedere afstemband,
AM en FM, in het geheugen worden
vastgelegd. De bediening is hetzelfde voor
beide afstembanden.
1. Stem op de gewenste radiozender af zoals
hiervoor is beschreven.
2. Houd de gewenste voorkeurzendertoets
(1 t/m 6) ingedrukt totdat de radio een
pieptoon maakt. Naast de frequentie
wordt nu bijvoorbeeld “M1” aangegeven.
De zender wordt met het betreffende
voorkeurzendernummer in het geheugen
vastgelegd. Herhaal deze procedure voor de
andere zenders die u in het geheugen wilt
vastleggen. Indien er reeds een zender op
een bepaalde geheugenplaats is vastgelegd,
wordt deze overschreven bij het uitvoeren
van de bovenstaande procedure.
Oproepen van vastgelegde AM/
FM-voorkeurzenders
1. Druk op de geluidsbrontoets totdat “AM” of
“FM” wordt weergegeven.
2. Druk even kort op de gewenste
voorkeurzendertoets om af te stemmen op
de zender die met die toets in het geheugen
is vastgelegd.
FM-stereo/mono –––––––––––––––––
Als de FM-radiozender waarop is afgestemd
een zwak signaal heeft, kan er ruis hoorbaar
zijn. U kunt de ruis verminderen door over te
schakelen van stereo- naar mono-ontvangst.
1. Druk op de geluidsbrontoets om de
FM-afstemband te kiezen en stem op de
gewenste FM-zender af zoals hiervoor is
beschreven.
2. Houd de afstemknop ingedrukt voor toegang
tot het menu.
3. Draai aan de afstemknop totdat “FM” op het
display wordt aangegeven en druk dan op de
afstemknop om de instelling weer te geven.
Als de instelling ST (stereo) is, drukt u op
de afstemknop om over te schakelen naar
MN (mono) om de ruis te verminderen. Druk
op de afstemknop om de instelling vast te
leggen.
FM
-
Luisteren naar muziek via Bluetooth®
streaming ––––––––––––––––––––––
U moet uw Bluetooth® apparaat aan de
radio koppelen voordat auto-link mogelijk
is voor afspelen/streaming van Bluetooth®
muziek door de radio. Door middel van
koppelen worden twee apparaten met
elkaar ‘verbonden’ zodat ze elkaar kunnen
herkennen.
Uw Bluetooth
koppelen
1. Druk op de geluidsbrontoets totdat “BT”
wordt weergegeven.
het display en het Bluetooth® pictogram
begint te knipperen.
2. Activeer Bluetooth® op het andere apparaat
zoals beschreven in de handleiding
van dat apparaat en begin met de
koppelingsprocedure.
3. Druk op de Bluetooth®-koppeltoets zodat
radio op het Bluetooth® apparaat zoeken.
Als “EY37A2” op uw Bluetooth® apparaat
wordt weergegeven, selecteert u het item in
de Bluetooth® lijst zodat de koppeling met de
radio plaatsvindt.
4. Nadat de verbinding is gemaakt, licht het
Bluetooth® pictogram continu op het
display op. U kunt nu de muziek in uw
Bluetooth®-gekoppeld apparaat via de radio
weergeven.
OPMERKING:
• Als “EY37A2” in uw Bluetooth
• Het effectieve overdrachtbereik tussen
• De Bluetooth® connectiviteit-prestatie
Muziek afspelen van voorheen gekoppelde
apparaten
Dit toestel kan in totaal 8 sets van
gekoppelde apparaten in het geheugen
opslaan. Wanneer dit aantal wordt
overschreden, wordt het eerst gekoppelde
apparaat door de radio overschreven.
59 -
®
apparaat de eerste maal
verschijnt op
op het display verschijnt. U kunt nu uw
®
apparatenlijst wordt weergegeven,
maar u geen verbinding kunt maken,
verwijdert u het item uit de lijst en voert
dan de koppeling van het apparaat met
de radio opnieuw uit door de hierboven
beschreven stappen op te volgen.
de radio en het gekoppelde apparaat
is ongeveer 10 meter. Wanneer er een
obstakel tussen de radio en het apparaat
is, zal het overdrachtbereik korter zijn.
kan verschillen afhankelijk van het
aangesloten Bluetooth® apparaat.
Raadpleeg de Bluetooth® eigenschappen
van uw apparaat voordat u dit aan de
radio koppelt. Het is mogelijk dat niet alle
functies beschikbaar zijn op sommige
gekoppelde Bluetooth® apparaten.
BT
NL
EY37A2.indb 59 2015-2-11 17:07:42
Page 60

Als uw Bluetooth
®
apparaat reeds voorheen
met dit toestel was gekoppeld, zal het
toestel uw Bluetooth® apparaat onthouden
en proberen om automatisch verbinding
te maken met het apparaat dat het laatst
was verbonden. Als het laatst verbonden
apparaat niet beschikbaar is, probeert de
NL
radio verbinding te maken met het tweede
laatste apparaat enz.
Wissen van alle gekoppelde apparaten
Houd de Bluetooth
®
-koppeltoets ongeveer
7 seconden ingedrukt totdat u een dubbele
toon hoort. De radio wist alle apparaten
uit het geheugen en kan weer worden
opgezocht om te koppelen.
Verbreken van de verbinding met uw
Bluetooth
Houd de Bluetooth
®
apparaat
®
-koppeltoets ingedrukt
totdat de radio een pieptoon maakt om de
verbinding van het toestel met het Bluetooth®
apparaat te verbreken. Het Bluetooth®
pictogram knippert op het display om aan te
geven dat de radio kan worden opgezocht
om te koppelen.
Klok en alarmfuncties
Instellen van de weergave van de kloktijd
–––––––––––––––––––––––––––––––––––––––––
Er zijn twee mogelijkheden voor de
weergave van de kloktijd die wordt getoond
in de ruststand en tijdens muziek afspelen.
De gekozen tijdweergave wordt ook gebruikt
bij het instellen van de alarmfuncties.
1. Controleer of de radio is ingeschakeld. Houd
de afstemknop ingedrukt voor toegang tot
het geavanceerde menu van de huidige
modus.
2. Draai aan de afstemknop totdat ”TIM“ op het
display wordt aangegeven en druk dan op de
afstemknop om de instelling weer te geven.
3. Draai aan de afstemknop om de 12-uurs
of 24-uurs tijdweergave te kiezen. Druk
op de afstemknop om uw keuze voor de
tijdweergave vast te leggen.
OPMERKING:
Als de 12-uurs tijdweergave wordt
gekozen, gebruikt de radio ook de
12-uurs klok bij het instellen van de
alarmfuncties en toont deze een 12-uurs
klok met PM (namiddag) indicator in de
ruststand.
Handmatig instellen van de kloktijd –––
1. Controleer of de radio is ingeschakeld. Houd
de afstemknop ingedrukt voor toegang tot
het geavanceerde menu van de huidige
modus.
2. Draai aan de afstemknop totdat “CLK” op het
display wordt aangegeven en druk dan op de
afstemknop om de instelling weer te geven.
De uuraanduiding begint te knipperen.
TIM
CLK
3. Draai aan de afstemknop om het gewenste
uur in te stellen en druk op de afstemknop
om de instelling te bevestigen. De
minutenaanduiding begint te knipperen.
4. Draai aan de afstemknop om de gewenste
minuten in te stellen en druk op de
afstemknop om de instelling te bevestigen.
Het display keert terug naar het vorige menu.
Instellen van de wekker
De radio heeft twee wekfuncties, een voor
het wekken met de AM/FM-radio en een
voor het wekken met een zoemeralarm. Zorg
dat de kloktijd juist is ingesteld voordat u de
wekker gaat instellen.
a. Wekken met de radio:
1. Controleer of de radio is ingeschakeld.
2. Houd de radio-alarmtoets ingedrukt zodat
het radio-alarmsymbool (
) en de
uuraanduiding beginnen te knipperen en er
een pieptoon klinkt.
3. Terwijl de uuraanduiding knippert, draait u
aan de afstemknop om het gewenste uur
voor de alarmtijd te kiezen en dan drukt u
op de afstemknop om de uurinstelling te
bevestigen.
4. Draai daarna aan de afstemknop om de
gewenste minuten voor de alarmtijd in te
stellen en druk op de afstemknop om de
instelling te bevestigen.
5. Terwijl het radio-alarmsymbool knippert,
draait u aan de afstemknop om de gewenste
afstemband en de zender waarmee u gewekt
wilt worden te kiezen en dan drukt u op de
afstemknop om uw keuze te bevestigen.
6. Draai aan de afstemknop om het gewenste
volume in te stellen en druk op de
afstemknop om de instelling te bevestigen.
De instellingen voor het radio-alarm zijn
hiermee voltooid.
OPMERKING:
Als de gekozen AM/FM-zender niet
beschikbaar is wanneer de alarmtijd
wordt bereikt, hoort u het zoemeralarm.
b. Wekken met het HWS (langzaam luider
wordend weksignaal) zoemeralarm:
1. Controleer of de radio is ingeschakeld.
2. Houd de zoemer-alarmtoets ingedrukt zodat
het zoemer-alarmsymbool (
uuraanduiding beginnen te knipperen en er
een pieptoon klinkt.
3. Terwijl de uuraanduiding knippert, draait u
aan de afstemknop om het gewenste uur
voor de alarmtijd te kiezen en dan drukt u
op de afstemknop om de uurinstelling te
bevestigen.
4. Draai daarna aan de afstemknop om de
gewenste minuten voor de alarmtijd in te
stellen en druk op de afstemknop om de
instelling te bevestigen.
-
60 -
) en de
EY37A2.indb 60 2015-2-11 17:07:42
Page 61

5. Draai aan de afstemknop om het
gewenste volume in te stellen en druk op
de afstemknop om de volume-instelling
te bevestigen. De instellingen voor het
zoemeralarm zijn hiermee voltooid.
Wanneer het alarm klinkt
Om het alarmgeluid te stoppen, drukt u op
de aan/ruststand-toets.
Een alarminstelling uitschakelen/annuleren
Om een actieve alarminstelling uit te
schakelen, drukt u op de bijbehorende
alarmtoets zodat de alarminstelling wordt
geannuleerd.
Tijdsduur van het alarmgeluid ––––
1. Houd de afstemknop ingedrukt voor toegang
tot het geavanceerde menu van de huidige
modus.
2. Draai aan de afstemknop totdat “ALM” op
het display wordt aangegeven. Druk op de
afstemknop om de instelling weer te geven.
3. Draai aan de afstemknop om de opties 1, 3,
5, 10, 15, 30 en 60 minuten, te doorlopen.
Stop wanneer de gewenste optie op het
display wordt aangegeven en druk dan op de
afstemknop om de instelling te bevestigen.
Sluimerfunctie ––––––––––––––––––
1. Wanneer het alarm klinkt, kunt u op een
willekeurige toets drukken, met uitzondering
van de aan/ruststand-toets, om het
alarmgeluid stil te zetten. Op het display
verschijnt het sluimersymbool ( ).
2. Om de stiltetijd voor de sluimerfunctie in te
stellen, houdt u de afstemknop ingedrukt
voor toegang tot het menu.
3. Draai aan de afstemknop totdat “SNZ” op
het display verschijnt en druk dan op de
afstemknop om de instelling weer te geven.
Draai aan de afstemknop om de stiltetijd
voor de sluimerfunctie in te stellen op 1, 3, 5,
10, 15 minuten of op UIT.
4. Om de sluimerfunctie te annuleren wanneer
het alarm is stilgezet, drukt u op de aan/
ruststand-toets. Om de sluimerfunctie uit te
schakelen, draait u aan de afstemknop totdat
“UIT” wordt weergegeven.
Sleeptimer –––––––––––––––––––––
De radio kan automatisch worden
uitgeschakeld nadat een vooraf ingestelde
tijd is verstreken. De sleeptimer kan worden
ingesteld op UIT, 15, 30, 45, 60 en 90
minuten.
1. Houd de afstemknop ingedrukt voor toegang
tot het geavanceerde menu.
2. Draai aan de afstemknop totdat “SLP” op
het display wordt aangegeven. Druk op de
afstemknop om de instelling weer te geven.
3. Draai aan de afstemknop om de opties UIT,
15, 30, 45, 60 en 90 minuten, te doorlopen.
ALM
SNZ
SLP
Stop wanneer de gewenste instelling
voor de sleeptimer op het display wordt
aangegeven. De instelling wordt opgeslagen
en het display keert terug naar de normale
aanduidingen.
4. De radio wordt automatisch uitgeschakeld
nadat de tijd die is ingesteld voor de
sleeptimer is verstreken. Het sleeptimerpictogram (
om aan te geven dat de sleeptimer actief is.
5. Om de sleeptimer te annuleren voordat
de ingestelde tijd is verstreken, houdt u
eenvoudigweg de aan/ruststand-toets
ingedrukt om het toestel handmatig
uit te schakelen. Om de sleeptimer uit
te schakelen terwijl deze nog aan het
aftellen is, gaat u naar het menu met de
sleeptimerinstellingen en kiest dan “UIT”.
) wordt op het display getoond
Toonregelingsfunctie ––––––––––––
U kunt de klankkleur van de muziek aan
uw persoonlijke voorkeur aanpassen
overeenkomstig het soort muziek
waarnaar u luistert. De radio heeft 5 vaste
equalizerinstellingen. Het is ook mogelijk
om enkel de weergave van de hoge en lage
tonen naar eigen voorkeur in te stellen.
1. Druk op de volumeregelaar voor toegang tot
het EQ-menu.
2. Draai aan de volumeregelaar totdat “TON”
op het display wordt aangegeven. Druk op
de volumeregelaar voor toegang tot het
instellingenmenu.
3. Draai aan de volumeregelaar om de 6
instellingen te doorlopen totdat de gewenste
instelling wordt aangegeven. Druk op de
volumeregelaar om uw keuze te bevestigen.
a. TN 1-Geen bijregeling
b. TN 2- Zwaar
c. TN 3- Zacht
d. TN 4- Helder
e. TN 5- Zang
4. Om terug te gaan naar het bovenste
menuniveau, draait u aan de volumeregelaar
totdat op het display wordt
aangegeven. Druk vervolgens nog een keer
op de volumeregelaar om het bovenste
menuniveau te laten verschijnen.
Uw eigen EQ instellen –––––––––––
Als u vindt dat de vaste equalizerinstellingen
niet aan uw wensen voldoen, kunt u de lage
en hoge tonen als volgt naar eigen voorkeur
instellen:
1. Druk op de volumeregelaar voor toegang tot
het EQ-menu.
2. Draai aan de volumeregelaar totdat “BAS”
op het display wordt aangegeven. Druk op
de volumeregelaar voor toegang tot het
instellingenmenu.
NL
TON
BAS
61 -
-
EY37A2.indb 61 2015-2-11 17:07:42
Page 62

3. Draai aan de volumeregelaar om het niveau
van de lage tonen in te stellen (tussen
-5 en +3). Het geluid verandert wanneer
u het niveau wijzigt. Druk nog een keer
op de volumeregelaar om de instelling te
bevestigen.
4. Draai aan de volumeregelaar totdat “TRE”
NL
op het display wordt aangegeven. Druk op
de volumeregelaar voor toegang tot het
instellingenmenu.
5. Draai aan de volumeregelaar om het niveau
van de hoge tonen in te stellen (tussen
-5 en +3). Het geluid verandert wanneer
u het niveau wijzigt. Druk nog een keer
op de volumeregelaar om de instelling te
bevestigen.
Instellen van het bedieningsgeluid
––––––––––––––––––––––––––––––––––
U kunt het bedieningsgeluid van de radio in-
of uitschakelen.
1. Houd de afstemknop ingedrukt voor toegang
tot het menu van de huidige modus.
2. Draai aan de afstemknop totdat “SND” op
het display verschijnt en druk dan op de
afstemknop om de instelling weer te geven.
3. Draai aan de afstemknop om uw keuze te
maken en druk dan op de afstemknop om de
instelling te bevestigen.
Aux-ingangsaansluiting
Aan de linkerkant van de radio is een
3,5 mm stereo aux-ingangsaansluiting.
1. Sluit een externe geluidsbron (bijvoorbeeld
een smartphone of een MP3- of CD-speler)
op de aux-ingangsaansluiting aan.
2. Druk op de geluidsbrontoets totdat AUX IN
wordt weergegeven.
3. Stel het volume op uw smartphone of
MP3- of CD-speler op een geschikt
niveau in zodat een goed signaal door
de speler wordt afgegeven en gebruik
dan de volumeregelaar op de radio om
de geluidssterkte op een comfortabel
luisterniveau in te stellen.
Hoofdtelefoonaansluiting
Aan de rechterkant van de radio is een
3,5 mm hoofdtelefoonaansluiting om met een
hoofdtelefoon naar de muziek te luisteren.
Bij het aansluiten van een hoofdtelefoon
wordt de interne luidspreker automatisch
uitgeschakeld.
Houd er rekening mee dat de gevoeligheid
van de diverse hoofdtelefoons aanzienlijk
kan verschillen. Wij raden u daarom
aan het volume op een laag niveau in
te stellen voordat u de hoofdtelefoon op
de radio aansluit. Ook is het verstandig
om het volume te verlagen voordat u de
hoofdtelefoon weer losmaakt.
SND
LET OP:
Bij een te hoog ingesteld volume van
de hoofdtelefoon of oortelefoon kan
gehoorverlies optreden.
USB-aansluiting voor opladen van
smartphone
OPMERKING:
USB-apparaten kunnen niet worden
opgeladen tijdens ontvangst van
AM-uitzendingen.
De radio heeft een USB-aansluiting die
uitsluitend bedoeld is voor het opladen
van een smartphone of een gelijkwaardig
apparaat.
De oplaadtijd kan verschillen en in sommige
gevallen duurt het opladen langer dan
wanneer de smartphone wordt opgeladen
met de oplader die door de fabrikant bij de
smartphone wordt geleverd.
1. Sluit uw smartphone aan op de USBoplaadaansluiting aan de linkerkant van de
radio.
2. Het opladen van uw smartphone begint. Het
opladen is mogelijk in de FM/Bluetooth®/Auxin modus.
3. Maak de USB-kabel los zodra uw
smartphone is opgeladen.
LET OP:
Sommige USB-apparaten kunnen alleen op
een bepaalde manier worden opgeladen.
Controleer dit voordat u uw apparaat gaat
opladen.
• Het is mogelijk dat de oplader sommige
USB-apparaten niet van stroom kan
voorzien.
• Maak de USB-kabel los en sluit de
afdekking als de aansluiting niet wordt
gebruikt of wanneer het opladen klaar is.
• Sluit geen voedingsbron op de USB-poort
aan. Dit kan namelijk resulteren in brand.
De USB-poort is uitsluitend bedoeld voor
het opladen van een apparaat dat op lage
spanning werkt. Breng altijd de afdekking
op de USB-poort aan wanneer er geen
apparaat dat op lage spanning werkt is
aangesloten.
• Steek geen nagel, draad enz. in de
USB-poort. Dit kan nameljik resulteren in
kortsluiting met rook of brand tot gevolg.
• Verbind deze USB-aansluiting niet met
een USB-poort op uw pc, want dit kan
mogelijk resulteren in beschadiging van
de apparatuur.
• Gebruik de USB-aansluiting niet in de
regen of bij vochtige omstandigheden
om te voorkomen dat vocht in de radio
terechtkomt. Let erop dat de rubber
afdekking aan de achterkant goed dicht is
bij deze omstandigheden.
-
62 -
EY37A2.indb 62 2015-2-11 17:07:42
Page 63

LED-lamp
De radio is op het voorpanel voorzien van
een LED-lamp met lange levensduur. Druk
op de verlichtingstoets om de LED-lamp in
en uit te schakelen.
Let op: KIJK NIET RECHTSTREEKS IN
DE LICHTSTRAAL.
OPMERKING:
Als er geen bediening wordt uitgevoerd,
begint de lamp na ongeveer 10 minuten
te knipperen en gaat dan één minuut later
uit.
IV. ONDERHOUD
Maak het gereedschap met een droge,
zachte doek schoon. Gebruik nooit een
vochtige doek, witte spiritus, benzine of
andere ontvlambare middelen om het
gereedschap schoon te maken.
In het geval er water binnen in het toestel
of de accu is terechtgekomen, zo spoedig
mogelijk het water laten uitlekken en laten
drogen.Verwijder nauwkeurig alle stof of
ijzervijlsel dat zich binnen in het toestel
heeft verzameld. Neem contact op met uw
dichtstbijzijnde erkende service-centrum als
u bij het gebruik van het toestel problemen
ondervindt.
V. ACCESSOIRES
Accu
• Zie de technische gegevens.
Acculader
• Neem contact op met een officiële dealer
voor verdere informatie.
OPMERKING:
De accu en de acculader worden niet bij
deze set geleverd.
[Accu]
Voor een juist gebruik van de accu
Li-ion accu [Fig. 4]
• De levensduur van oplaadbare accu’s is
beperkt.
• Voor een optimale levensduur van de Li-ion
accu moet u de accu na gebruik opbergen
zonder dat u deze oplaadt.
• Kijk bij het laden van de accu of de
aansluitingen op de acculader vrij zijn van
vreemde bestanddelen zoals stof en water,
enz. Reinig de aansluitingen als u vreemde
bestanddelen op de aansluitingen aantreft.
De levensduur van de accu-aansluitingen
kan tijdens gebruik nadelig beïnvloed worden
door vreemde bestanddelen zoals stof en
water, enz.
• Wanneer de accu niet wordt gebruikt, dient u
deze uit de buurt van metalen voorwerpen te
houden zoals paperclips, munten, sleutels,
nagels, schroeven of andere kleine metalen
voorwerpen die de aansluitpunten van de
accu met elkaar in contact kunnen brengen.
Wanneer de aansluitpunten van de accu
worden kortgesloten, kan dit resulteren in
vonken, brandwonden of zelfs brand.
• Zorg er bij gebruik van de accu voor dat de
werkplaats goed geventileerd is.
• Wanneer de accu van het hoofdapparaat
wordt losgemaakt, moet u meteen het
accudeksel op de accu aanbrengen om
te voorkomen dat er stof en vuil op de
accuaansluitingen komt waardoor er
kortsluiting kan ontstaan.
LET OP:
• Let bij het gebruik van het gereedschap
op deze wijze op het volgende om de
motor en de accu te beschermen.
• Als de motor en de accu te warm worden,
wordt de beveiligingsfunctie geactiveerd
en stopt de werking van de motor en de
accu.
Voor een veilig gebruik
• Het aanbrengen van de accu moet om
veiligheidsredenen in twee stappen worden
uitgevoerd. Zorg dat de accu vóór gebruik
goed op het gereedschap is bevestigd.
[Acculader]
Opladen
LET OP:
1) De lader is ontworpen voor gebruik met
standaard elektrische stroom, zoals
vermeld op het typeplaatje. Laad alleen bij
de spanning aangeduid op het typeplaatje
van het apparaat, bijv. 230 V/50 Hz.
2) Probeer het apparaat niet bij een
andere spanning of frequentiewaarde te
gebruiken.
3) Als de temperatuur van de accu daalt
naar ongeveer onder -10°C (14°F) zal
opladen automatische stoppen om
verslechtering van de accu te voorkomen.
4) Het omgevingstemperatuurbereik ligt
tussen 0°C (32°F) en 40°C (104°F).
Als de accu wordt gebruikt terwijl de
accutemperatuur lager is dan 0°C
(32°F) kan het toestel mogelijk niet goed
functioneren.
5) Gebruik de lader bij temperaturen tussen
0°C (32°F) en 40°C (104°F) en laad de
accu op bij een temperatuur gelijk aan die
van de batterij zelf. (Er mag niet meer dan
een verschil van 15°C (59°F) zijn tussen
de temperaturen van de accu en de
oplaadlocatie).
6) Laat een koude accu (kouder dan 0°C
(32°F)), voordat deze wordt opgeladen
in een warme omgeving, eerst minimal
een uur in deze ruimte liggen om op
temperatuur te komen.
63 -
-
NL
EY37A2.indb 63 2015-2-11 17:07:42
Page 64

7) Laat de lader afkoelen wanneer u meer
dan twee accu’s na elkaar oplaadt.
8) Steek uw vingers niet in de
contactopening wanneer u de lader
vastpakt.
9) Om brandgevaar en beschadiging van de
NL
acculader te voorkomen.
• Voorkom dat de ventilatiegaten van de
lader en de accu worden bedekt.
• Maak de acculader los wanneer deze
niet wordt gebruikt.
OPMERKING:
De accu is niet volledig opgeladen
wanneer u deze koopt. Laad de accu
daarom voor gebruik op.
Hoe opladen
1. Steek de lader in een stopcontact.
OPMERKING:
Wanneer de stekker in het stopcontact
wordt gestoken, kunnen er vonken
ontstaan, maar dit is niet gevaarlijk.
2. Plaats de accu stevig in de lader.
1. Zet de uitlijntekens tegenover elkaar en
plaats de accu in de acculader.
2. Schuif de accu in de richting van de pijl
naar voren.
Uitlijntekens
3. De laadindicator licht op tijdens het laden.
Wanneer de accu is geladen, wordt
automatisch een interne elektronische
schakeling geactiveerd die voorkomt dat de
accu wordt overladen.
• Wanneer de accu warm is, zal deze niet
worden opgeladen (bijvoorbeeld direct na
intensief gebruik).
De oranje standby-indicator knippert tot
de accu is afgekoeld.Vanaf dat moment
wordt de accu automatisch opnieuw
geladen.
4. De laadindicator (groen) knippert langzaam
wanneer de accu ongeveer 80% is
opgeladen.
5. Wanneer het opladen is voltooid, zal de
groene laadindicator uitgaan.
6. Als de temperatuur van de accu minder
dan 0°C (32°F) is, zal het volledig opladen
van de accu langer duren dan de standaard
oplaadtijd.
Zelfs nadat de accu volledig is opgeladen,
zal deze in dit geval slechts ongeveer
50% van het accuvermogen hebben in
vergelijking met een accu die bij normale
bedrijfstemperatuur volledig is opgeladen.
7. Als de laadindicator (groen) niet uitgaat,
moet u contact opnemen met een officiële
dealer.
8. Als een volledig opgeladen accu opnieuw
in de acculader wordt geplaatst, zal het
oplaadlampje oplichten. Na enkele minuten
zal de groene laadindicator uit-gaan.
LAMPINDICATIES
Opladen voltooid. (Volledig opgeladen.)
De accu is ongeveer 80% opgeladen.
Aan het opladen.
Lader is aangesloten op een stopcontact. Klaar om op te
laden.
(Groen) (Oranje)
Uit Brandt Knippert
EY37A2.indb 64 2015-2-11 17:07:43
Laadstatusindicator
De aanduiding is Links: groen en Rechts: oranje.
De accu is koud.
De accu wordt langzaam opgeladen om de belasting van de
accu te verminderen.
De accu is warm.
Het opladen zal beginnen wanneer de temperatuur van de
accu is gedaald. Als de temperatuur van de accu minder
dan -10°C (14°F) is, zal de laadindicator (oranje) ook gaan
knipperen. Het opladen begint wanneer de statustemperatuur
van de accu hoger wordt.
Opladen is niet mogelijk. Stof op de accu of accu defect.
-
64 -
Page 65

Recyclen van de accu
ATTENTIE:
Om het milieu te beschermen en nogmaals bruikbare materialen te recyclen, dient u de accu
naar een hiervoor bestemd inzamelpunt te brengen.
Informatie voor gebruikers betreffende het verzamelen en verwijderen van oude uitrustingen en
lege batterijen
Deze symbolen op de producten, verpakkingen, en/of begeleidende
documenten betekenen dat gebruikte elektrische en elektronische producten en
batterijen niet met het algemene huishoudelijke afval gemengd mogen worden.
Voor een correcte behandeling, recuperatie en recyclage van oude producten en
lege batterijen moeten zij naar de bevoegde verzamelpunten gebracht worden
in overeenstemming met uw nationale wetgeving en de Richtlijnen 2012/19/EC
en 2006/66/EC.
Door deze producten en batterijen correct te verwijderen draagt u uw steentje bij
tot het beschermen van waardevolle middelen en tot de preventie van potentiële
negatieve effecten op de gezondheid van de mens en op het milieu die anders
door een onvakkundige afvalverwerking zouden kunnen ontstaan.
Voor meer informatie over het verzamelen en recycleren van oude producten
en batterijen, gelieve contact op te nemen met uw plaatselijke gemeente, uw
afvalverwijderingsdiensten of de winkel waar u de goederen gekocht hebt.
Voor een niet-correcte verwijdering van dit afval kunnen boetes opgelegd
worden in overeenstemming met de nationale wetgeving.
Voor zakengebruikers in de Europese Unie
Indien u elektrische en elektronische uitrusting wilt vewijderen, neem dan contact op met uw dealer
voor meer informatie.
[Informatie over de verwijdering in andere landen buiten de Europese Unie]
Deze symbolen zijn enkel geldig in de Europese Unie. Indien u wenst deze producten te
verwijderen, neem dan contact op met uw plaatselijke autoriteiten of dealer, en vraag informatie
over de correcte wijze om deze producten te verwijderen.
VI. TECHNISCHE GEGEVENS
[GEREEDSCHAP]
Netspanningsadapter DC12 V/1500 mA, middenpen positief
Accu/batterij
Bluetooth
Bluetooth
Bluetooth
®
QD ID 58625
®
versie 4,0
®
proelen A2DP/SCMS-T
Overdrachtvermogen Bluetooth
Overdrachtbereik
Ondersteunde codec SBC
Compatibel Bluetooth
®
proel A2DP
Afstembereik
Luidspreker 3,5 inch, 8 ohm × 2
Uitgangsvermogen
Ingangsaansluiting 3,5 mm dia./max. 2 V/stereo (AUX IN)
Uitgangsaansluiting
Antennesysteem
Afmetingen (B × H × D) 344 mm × 280 mm × 239 mm
Gewicht 4,7 kg (met EY9L51)/4,0 kg (alleen hoofdapparaat)
Opgenomen vermogen
Reservebatterijen: UM-3 (AA-formaat) × 2
Accu: 14,4 V/18 V
®
specicatie, vermogensklasse 2 (2,5 mW)
Ongeveer 10 m (varieert afhankelijk van de
gebruiksomstandigheden)
FM 87,5-108 MHz (stapjes van 0,05 MHz)
AM (MG) 522-1629 kHz (stapjes van 9 kHz)
Bij gebruik van de netspanningsadapter: 1,7 W × 2
Bij gebruik van een 14,4 V accu: 2,6 W × 2
Bij gebruik van een 18 V accu: 4,5 W × 2
USB: DC OUT 5 V/1 A
Hoofdtelefoon: 3,5 mm dia./3 Ω /150 mV/stereo
FM: Flexibele antenne
AM: staafantenne
max. 7 W
0,12 W (ruststand)
65 -
-
NL
EY37A2.indb 65 2015-2-11 17:07:43
Page 66

[ACCU]
EY9L41 EY9L42 EY9L44 EY9L45 EY9L47 EY9L50 EY9L51 EY9L52
Li-ion accu
14,4V gelijkstroom
(3,6V × 4 cellen)
Ca. 18
uur
Ca. 9
uur
14,4V gelijkstroom
(3,6V × 8 cellen)
Ca. 19
uur
Ca. 24
uur
14,4V gelijkstroom
(3,6V × 4 cellen)
Ca. 11 uur
18V gelijkstroom
(3,6V × 10 cellen)
Ca. 19
uur
Ca. 24
uur
18V gelijkstroom
(3,6V × 5 cellen)
NL
Modelnr.
Soort accu
Accuspanning
Gebruiksduur
bij 50 W +
50 W (FMontvangst)
[ACCULADER]
Modelnr. EY0L82
Gegevens Zie het specicatieplaatje op de onderkant van de acculader.
Gewicht 0,93 kg
EY9L41 EY9L42 EY9L44 EY9L45 EY9L47 EY9L50 EY9L51 EY9L52
Laadtijd
Bruikbaar:
35min.
Bruikbaar:
30min.
Bruikbaar:
40min.
Bruikbaar:
50min.
Bruikbaar:
35min.
Bruikbaar:
40min.
Bruikbaar:
55min.
Vol:50min. Vol:35min. Vol:55min. Vol:60min. Vol:40min. Vol:55min. Vol:70min. Vol:40min.
OPMERKING: In deze tabel zijn mogelijk modellen opgenomen die niet in de handel verkrijgbaar zijn.
Zie de meest recente algemene catalogus.
Zie de ingesloten garantiekaart voor de naam en het adres van de dealer.
Ca. 11 uur
Bruikbaar:
35min.
VII. LICENTIES
• Het woordmerk en de logo’s van Bluetooth® zijn gedeponeerde handelsmerken van Blue-
tooth SIG, Inc. en ieder gebruik van die merken door Panasonic Corporation vindt plaats
onder licentie. Andere handelsmerken en handelsnamen zijn die van de respectievelijke
eigenaren.
• De diverse namen in deze gebruiksaanwijzing, zoals namen van fabrikanten en producten, zijn de handelsmerken of gedeponeerde handelsmerken van de respectievelijke
ondernemingen. Wij willen u erop attent maken dat sommige TM of ® symbolen niet in deze
gebruiksaanwijzing worden gebruikt.
Betreffende Bluetooth
Panasonic kan niet aansprakelijk worden
gesteld voor de gegevens en/of informatie
die tijdens de draadloze gegevensoverdracht
worden gecomprimeerd.
Gebruikte frequentieband
Dit systeem maakt gebruik van de 2,4 GHz
frequentieband.
Certicatie van dit toestel
• Het systeem voldoet aan de
frequentiebeperkingen en heeft
certificatie ontvangen op basis van de
frequentiewetgeving. Een vergunning voor
draadloze informatieoverdracht is daarom
niet nodig.
• De onderstaande zaken zijn strafbaar in
sommige landen:
– Demonteren of wijzigingen aanbrengen in
het toestel.
– Verwijderen van aanduidingen met
technische gegevens.
®
Gebruiksbeperkingen
• Draadloze gegevensoverdracht en/of gebruik
met alle Bluetooth
®
-uitgeruste apparaten kan
niet worden gegarandeerd.
• Alle apparaten moeten voldoen aan de
normen opgesteld door Bluetooth SIG, Inc.
• Afhankelijk van de technische gegevens
en instellingen van een apparaat, is het
mogelijk dat verbinding niet mogelijk is of dat
sommige functies anders werken.
• Dit systeem ondersteunt de Bluetooth
®
beveiligingsfuncties. Afhankelijk van de
gebruiksomgeving en/of de instellingen is
deze beveiliging mogelijk niet voldoende.
Ga altijd met zorg te werk bij draadloze
gegevensoverdracht met dit systeem.
• Dit systeem kan geen gegevens naar een
Bluetooth
Gebruiksbereik
®
apparaat overbrengen.
Gebruik dit toestel binnen het maximumbereik
van 10 m. Afhankelijk van de omgeving,
obstakels of interferentie kan dit bereik minder
zijn.
-
66 -
EY37A2.indb 66 2015-2-11 17:07:44
Page 67

Interferentie van andere apparaten
• Het systeem werkt mogelijk niet juist en
er kunnen storingen optreden zoals ruis
en overspringen van het geluid als gevolg
van interferentie van radiogolven wanneer
het toestel te dicht bij andere Bluetooth
apparaten staat die gebruik maken van de
2,4 GHz band.
• Dit systeem werkt mogelijk niet juist als de
radiogolven van een plaatselijk radiostation
enz. te sterk zijn.
Bedoeld gebruik
• Het systeem is alleen bedoeld voor normaal
en algemeen gebruik.
• Gebruik het systeem niet in de buurt van
apparatuur of in een omgeving die gevoelig
is voor interferentie van radiofrequenties
(bijv. vliegvelden, ziekenhuizen, laboratoria
enz.).
®
Verklaring van overeenstemming
(DoC)
“Panasonic
Corporation” verklaart
hierbij dat dit product
in overeenstemming is met de essentiële eisen
en andere relevante bepalingen van Richtlijn
1999/5/EG.
Klanten kunnen een kopie van de originele
verklaring van overeenstemming (DoC) van
onze R&TTE-producten van onze DoC-server
downloaden:
http://www.doc.panasonic.de
Neem contact op met onze bevoegde
vertegenwoordiger:
Panasonic Testing Centre, Panasonic Europe
Ltd. - Hamburg ofce, Winsbergring 15, 22525
Hamburg, Duitsland
NL
67 -
-
EY37A2.indb 67 2015-2-11 17:07:44
Page 68

Manual de instrucciones original: Inglés
Traducción del manual de instrucciones
original: Otros idiomas
Esta unidad, con todas las cubiertas totalmente
cerradas y funcionando con un paquete de
batería, cumple con los niveles de protección IP
adecuados basados en la Norma internacional
IEC.
ES
Definición del código IP
IP6X: estanqueidad al polvo (en el caso de que
polvo de talco con un tamaño inferior a 75 μm
acceda al interior de la herramienta)
IPX4: las salpicaduras de agua recibidas por
la unidad desde cualquier dirección no tendrán
efectos negativos (esta unidad está diseñada
para funcionar cuando recibe aproximadamente
4,3 l/min de agua a temperatura normal durante
10 minutos procedente de varias direcciones
y utilizando varias boquillas a una distancia
aproximada de 1 metro).
NOTA:
Esto no cubre el “adaptador de
alimentación de CA” incluido.
GARANTÍA LIMITADA
La clasicación IP64 calica esta herramienta
para un mínimo impacto del agua o polvo,
pero no asegura el rendimiento en dichas
condiciones.
Vea el Manual de Seguridad e Instrucciones para
una mayor información para un funcionamiento
apro-piado.
I. INSTRUCCIONES DE
SEGURIDAD
Lea todas las instrucciones
1. GUARDE ESTAS INSTRUCCIONES - Este
manual contiene importantes instrucciones
de seguridad y de funcionamiento para este
producto.
2. Antes de utilizar este producto, lea todas las
instrucciones y marcas de precaución.
3. No exponga este producto ni el paquete
de batería a la lluvia o nieve ni utilice en un
lugar húmedo.
4. El empleo de un accesorio que no se ha
recomendado puede ocasionar el peligro
de incendio, descargas eléctricas, o daños
personales.
5. Para reducir el peligro de daños en la clavija
eléctrica, tire de la clavija y no del cable para
desenchufar la herramienta.
6. No deberán utilizarse cables de extensión.
7. Si el cable de alimentación está dañado,
debe reemplazarlo el fabricante, su agente
de servicio o una persona similar cualificada
para evitar riesgos.
8. Para reducir el peligro de descargas
eléctricas, desenchufe el cargador del
tomacorriente antes de realizar cualquier
trabajo de mantenimiento o limpieza.
9. Asegúrese de que el cable esté situa do
de modo que nadie pueda pisarlo, que no
pueda recibir tirones ni quede sujeto a daños
o esfuerzo.
10. Este producto y el paquete de batería están
diseñados específicamente para trabajar
juntos.
11. No intente desmontar este producto ni la
caja del paquete de batería.
12. No guarde la herramienta ni la bate ría en
lugares en los que la tempe ra tura pueda
exceder de 50°C (122°F) (como pueda ser
en un cobertizo metálico de herramientas ni
en un automóvil en verano), porque podría
ocasionar el deterioro de la batería.
13. No cargue la batería cuando la temperatura
sea INFERIOR a 0°C (32°F) no SUPERIOR
a 40°C (104°F).
14. No queme la batería. Podría explotar si se
tira al fuego.
15. El producto está diseñado para operar con
alimentación eléctrica doméstica normal.
Usar solo con la tensión indicada en la placa
de características. ¡No intente utilizarlo con
otras tensiones!
16. No abuse del cable. No lleve nunca el
cargador por el cable ni tire del mismo para
desenchufarlo. Mantenga el cable apartado
del calor, aceite y bordes afilados.
17. Cargue la batería en un lugar bien ventilado
y no cubra el cargador ni la batería con un
trapo, etc. durante la carga.
18. No cortocircuite la batería. Un cortocircuito
de batería puede causar una gran
circulación de corriente, sobrecalentamiento
y quemadas.
19. NOTA: Si se daña el cable de alimentación
de este aparato, deberá ser reparado sólo
en un centro de reparaciones indicado por el
fabri cante porque se requieren herra mien
tas especiales.
20. La aplicación no es una linterna de uso
portátil para niños.
21. Los niños no deben jugar con el aparato.
Símbolo Signifi cado
Para reducir el riesgo de
lesiones el usuario debe leer
y comprender el manual de
instrucciones.
Sólo para uso en interiores.
Utilice únicamente las fuentes
de alimentación indicadas en
estas instrucciones.
-
68 -
EY37A2.indb 68 2015-2-11 17:07:44
Page 69

ADVERTENCIA:
• Utilice siempre las baterías Panasonic
diseñadas para su uso con esta herramienta
recargable.
• Panasonic no asume ninguna
responsabilidad por daños o accidentes
provocados por el uso de un paquete de
baterías recicladas y un paquete de baterías
no originales.
• No tire la batería al fuego ni la exponga a
temperaturas elevadas.
• No perfore la batería con clavos o algo
similar, ni la golpee, la desmonte ni intente
modificarla.
• Evite el contacto de los terminales de la
batería con objetos metálicos.
• No transporte ni guarde la batería en el
mismo lugar que clavos u objetos metálicos
similares.
• No cargue la batería en un lugar sometido
a altas temperaturas, por ejemplo cerca
del fuego o bajo luz solar directa; la batería
podría sobrecalentarse, incendiarse o
incluso explotar.
• Utilice siempre el cargador diseñado para
tal fin para cargar la batería. De no ser así,
la batería podría presentar fugas, sobrecalentarse o incluso explotar.
• Después de extraer el paquete de batería
de este producto o el cargador, siempre
reinstale la cubierta del paquete. De otra
manera, los contactos del paquete de
batería podrían sufrir un cortocircuito,
causando el riesgo de fuego.
• Cuando el paquete de pilas se deteriora,
reemplácelo con uno nuevo.
El uso continuo de un paquete de pilas
dañado puede ser causa de la generación
de calor, ignición o rotura de batería.
• Si detecta algún tipo de anomalía, deje
de usar el dispositivo inmediatamente y
póngase en contacto con el distribuidor al
que adquirió este producto.
• No suba el volumen demasiado cuando
utilice auriculares.
• Tenga la precaución de no subir el volumen
a medida que su oído se adapta a la
escucha.
• No utilice este producto durante un periodo
de tiempo prolongado, y realice pausas para
dar descanso a sus oídos.
• Si experimenta algún tipo de incomodidad
en los oídos, deje de usar el dispositivo y
póngase en contacto con su médico.
• No coloque objetos pesados encima de la
radio ni se suba en ella.
• No coloque la radio en una superficie
inestable ni en una posición inestable.
• Asegúrese de realizar una copia de
seguridad de los datos guardados en el
dispositivo que conecta a esta radio, para
evitar la pérdida de datos en caso de
producirse un fallo del dispositivo.
II. MONTAJE
Instalación de las pilas
NOTA:
Si se extraen las baterías del
compartimiento del paquete de batería
principal y del compartimiento para pilas
de reserva, se realizará la inicialización
unos tres minutos después.
Instalación de las pilas de reserva [Fig. 1]
1. Extraiga el cierre del compartimiento de
las pilas para liberar el compartimiento de
las pilas. Hay un compartimiento para el
paquete de batería y un compartimiento para
pilas de reserva.
2. Extraiga la cubierta del compartimiento
para pilas de reserva e inserte dos pilas
UM-3 nuevas (de tamaño AA). Asegúrese
de que las pilas se introducen respetando
la polaridad correcta, indicada en el
compartimiento. Coloque de nuevo la
cubierta de las pilas.
NOTA:
• La radio puede utilizarse sin conectar las
pilas de reserva.
• Mantener las pilas de reserva en el
interior del compartimiento evita la
pérdida de datos almacenados en las
memorias de presintonía.
PRECAUCIÓN:
• No use pilas que no sean las
especificadas (UM-3).
• Si no va a utilizar el producto durante un
periodo de tiempo prolongado, extraiga
las pilas.
• No mezcle pilas nuevas con pilas viejas,
ni tampoco utilice juntas pilas de tipos
distintos.
El uso inadecuado de las pilas podría
provocar fugas de líquido de las pilas,
generación de calor, incendios o
explosiones.
Si se producen fugas de líquido de las
pilas, preste especial atención a los
siguientes puntos de seguridad.
• No toque nunca el líquido de las pilas
con las manos descubiertas. Si lo hace,
podría sufrir inflamación o lesiones
cutáneas.
• Si el líquido entra en contacto con sus
ojos, podría provocar ceguera.
• Limpie con un paño todas las posibles
fugas de líquido de pila.
ES
69 -
-
EY37A2.indb 69 2015-2-11 17:07:45
Page 70

Colocación/extracción del paquete de batería
principal [Fig. 2]
1. Una vez instaladas las pilas de reserva,
inserte el paquete de batería principal en la
unidad principal. Insértelo siempre al máximo
de su recorrido, hasta que se bloquee en
su posición emitiendo un pequeño aviso
audible. En el apartado Especificaciones
ES
de este manual se detallan los paquetes de
baterías compatibles con esta radio.
2. Para extraer el paquete de batería, saque la
batería del compartimiento.
3. Coloque el cierre del compartimiento de las
pilas en la posición original.
Indicador de poca carga de las pilas
1. La reducción de la potencia, la aparición
de la distorsión y de sonido entrecortado o
la presencia en la pantalla de la indicación
de poca carga de las pilas (
circunstancias que indican que es necesario
cambiar el paquete de batería principal.
NOTA: El paquete de batería no puede
cargarse con el adaptador de alimentación
de CA incluido.
2. Cuando se extrae la batería principal y el
indicador de poca carga de las pilas
( ) parpadea y se muestra una “E.” en
la pantalla, esto indica que ha llegado el
momento de cambiar las pilas de reserva.
Utilización de la antena plegable blanda
[Fig. 3]
Coloque recta la antena plegable blanda.
PRECAUCIÓN:
La antena plegable blanda funciona solo
en una dirección.
Forzarla para que se doble puede
provocar que se rompa o una lesión
física.
) son
Utilización del adaptador de
alimentación de CA incluido
Retire la cubierta de goma e inserte la
clavija del adaptador en la toma CC
del lateral derecho de la radio. Enchufe
el adaptador a una toma de corriente
eléctrica estándar. Siempre que se conecta
el adaptador, el paquete de batería se
desconecta automáticamente. Cuando no
se esté utilizando, el adaptador de CA debe
desconectarse del suministro eléctrico.
NOTA:
• Cuando se usa el adaptador de
alimentación de CA, el nivel de sonido es
ligeramente inferior a cuando se usa el
paquete de batería.
• Cuando la radio sufra interferencias en la
banda AM provocadas por el adaptador,
aleje la radio del adaptador de CA más de
30 cm.
• Cuando el adaptador de CA y el paquete
de batería se usan al mismo tiempo, el
adaptador de CA tendrá prioridad a la
hora de suministrar alimentación a la
unidad. En este caso, la alimentación del
paquete de batería no se consumirá.
• Esta unidad no dispone de una función de
carga. Tener la unidad en marcha con el
adaptador de CA y el paquete de batería
al mismo tiempo no cargará el paquete de
batería.
• El adaptador de alimentación de CA es
para uso exclusivo con este producto,
y no está diseñado para su uso con
ningún otro dispositivo. Del mismo
modo, no debe utilizar con este producto
adaptadores de CA destinados a otros
dispositivos.
III. OPERACIONES
Funcionamiento de la radio:
sintonización de búsqueda de AM/FM
NOTA:
Si la señal de recepción es débil, intente
cambiar la orientación de la radio o de la
antena.
1. Mantenga pulsado el botón de encendido y
apagado para encender la radio.
2. Pulse el botón de fuente hasta que se
muestre “AM” o “FM”.
3. Pulse el control giratorio de sintonización
para realizar una sintonización automática.
La radio explorará la banda AM/FM en
sentido ascendente a partir de la frecuencia
actualmente mostrada, y dejará de escanear
automáticamente cuando encuentre una
emisora que tenga la potencia suficiente.
4. Transcurridos unos segundos se actualizará
la pantalla. En la pantalla se mostrará la
frecuencia de la señal encontrada.
5. Si desea buscar otra emisora, pulse el
control giratorio de sintonización de la misma
forma que antes.
6. Cuando se llegue al final de la banda de
frecuencia, la radio comenzará a sintonizar
de nuevo desde el extremo opuesto de la
banda de frecuencia.
7. Gire el control de volumen para ajustar el
nivel de sonido según desee.
8. Para apagar la radio, mantenga pulsado el
botón de encendido y apagado.
-
70 -
EY37A2.indb 70 2015-2-11 17:07:45
Page 71

Sintonización manual: AM/FM
1. Mantenga pulsado el botón de encendido y
apagado para encender la radio.
2. Pulse el botón de fuente hasta que se
muestre “AM” o “FM”.
3. Gire el control giratorio de sintonización para
sintonizar una emisora.
4. Cuando se llegue al final de la banda de
frecuencia, la radio comenzará a sintonizar
de nuevo desde el extremo opuesto de la
banda de frecuencia.
5. Utilice el control de volumen para ajustar el
nivel de sonido según desee.
Presintonización de emisoras en el
modo AM/FM
El dispositivo cuenta con 6 presintonías
de emisoras para la banda AM y 6 para la
banda FM. Estas presintonías se utilizan
de la misma forma para cada banda de
frecuencia.
1. Sintonice la emisora de radio que desee,
tal como se ha descrito anteriormente.
2. Mantenga pulsado el botón de presintonía
que desee (del 1 al 6) hasta que la radio
emita un tono acústico. Se muestra por
ejemplo “M1” junto a la frecuencia. La
emisora se almacenará utilizando el número
de presintonía. Repita este procedimiento
con el resto de presintonías que desee. Las
emisoras presintonizadas que ya hayan sido
almacenadas pueden sobrescribirse si es
necesario; para ello siga el procedimiento
descrito anteriormente.
Recuperación de una presintonía en el
modo AM/FM
1. Pulse el botón de fuente hasta que se
muestre “AM” o “FM”.
2. Pulse brevemente el botón de presintonía
que desee para que la radio sintonice una de
las emisoras almacenadas en la memoria de
presintonía.
FM estéreo/monoaural ––––––––––––
Si la emisora de radio FM que se está
escuchando tiene una señal débil, podría
escucharse un ligero silbido. Este silbido
puede reducirse forzando la radio para que
reproduzca la emisora en monoaural en
lugar de estéreo.
1. Pulse el botón de fuente según sea
necesario para seleccionar la banda FM y
sintonizar la emisora FM deseada como se
ha explicado anteriormente.
2. Mantenga pulsado el control giratorio de
sintonización para acceder al ajuste de
menús.
FM
3. Gire el control de sintonización hasta que
aparezca “FM” en la pantalla, y pulse el
control giratorio de sintonización para
acceder al ajuste. Si el ajuste es ST
(estéreo) pulse el control de sintonización
para cambiar al modo MN (monoaural) y
reducir el silbido de este modo. Pulse el
control de sintonización para seleccionar la
opción.
Escuchar música a través de la
transmisión Bluetooth
Tendrá que emparejar su dispositivo
Bluetooth
establecer un vínculo automático para
reproducir/transmitir música Bluetooth
través de la radio. El emparejamiento crea
una unión entre los dos dispositivos que
permite a ambos reconocerse.
Primer emparejamiento del dispositivo
Bluetooth
1. Pulse el botón de fuente hasta que se
muestre “BT”. aparecerá en la
pantalla y el icono de Bluetooth®
parpadeará en la pantalla.
2. Active la conexión Bluetooth® de su
dispositivo para permitir el procedimiento
de emparejamiento (consulte para ello el
manual de usuario del dispositivo).
3. Pulse el botón de emparejamiento
Bluetooth®, y aparecerá en la pantalla.
Podrá iniciar la búsqueda de la radio en su
dispositivo Bluetooth®. Cuando “EY37A2”
aparezca en su dispositivo Bluetooth®,
pulse el elemento en su lista de dispositivos
Bluetooth® y se establecerá conexión con la
radio.
4. Una vez establecida la conexión, el icono
de Bluetooth® permanecerá fijo en la
pantalla. Ahora podrá reproducir a través de
la radio la música que tiene almacenada en
su dispositivo Bluetooth®.
NOTA:
• Si “EY37A2” aparece en la lista
• El alcance de funcionamiento efectivo
71 -
-
®
con la radio antes de poder
®
de dispositivos Bluetooth
dispositivo no puede conectarse a
él, elimine este elemento de la lista y
empareje el dispositivo con la radio de
nuevo siguiendo los pasos descritos
anteriormente.
entre la radio y el dispositivo emparejado
es aproximadamente de 10 metros
(30 pies). La existencia de obstáculos
entre la radio y el dispositivo puede
reducir el alcance de funcionamiento.
®
–––––––––––
®
pero su
ES
BT
®
a
EY37A2.indb 71 2015-2-11 17:07:45
Page 72

• El rendimiento de la conectividad
Bluetooth
®
puede variar en función de
los dispositivos Bluetooth® conectados.
Consulte las prestaciones Bluetooth® de
su dispositivo antes de conectarlo a la
radio. En algunos dispositivos Bluetooth®
emparejados podrían no estar disponibles
todas las funciones.
Reproducción desde dispositivos
ES
anteriormente emparejados
Esta unidad es capaz de memorizar hasta
ocho conjuntos de dispositivos emparejados.
Cuando la memoria supere este número, se
sobrescribirá el dispositivo emparejado más
antiguo que haya en la radio.
Si su dispositivo Bluetooth
®
ya se ha
emparejado con la unidad anteriormente,
la unidad memorizará su dispositivo
Bluetooth® e intentará conectarse de nuevo
automáticamente con el último dispositivo
almacenado en memoria con el que se
estableció conexión. Si el último dispositivo
conectado no está disponible, la radio
intentará conectarse al penúltimo dispositivo
con el que estableció conexión y, así,
sucesivamente.
Borrar la memoria de dispositivos
emparejados
Mantenga pulsado el botón de
emparejamiento Bluetooth
®
durante unos
siete segundos, hasta que escuche un tono
doble. La radio borra todos los dispositivos
de la memoria y activa la función de
detección.
Desconexión de un dispositivo Bluetooth
Mantenga pulsado el botón de
emparejamiento Bluetooth
®
hasta que
la radio emita un tono acústico para
desconectarse de su dispositivo Bluetooth
El icono de Bluetooth
®
parpadeará en
la pantalla para indicar que la radio es
detectable de nuevo para efectuar el
emparejamiento.
Reloj y alarmas
Ajuste del formato del reloj ––––––––––
La pantalla de reloj utilizada en el modo
de espera y en el modo de reproducción
pueden ajustarse de forma distinta. El
formato seleccionado también se utilizará
durante el ajuste de las alarmas.
1. Asegúrese de que la radio se encuentre
encendida. Mantenga pulsado el control
de sintonización para acceder al menú
avanzado del modo actual.
2. Gire el control de sintonización hasta que
aparezca “TIM” en la pantalla, y pulse el
control de sintonización para acceder al
ajuste.
®
TIM
3. Gire el control de sintonización para
seleccionar el formato de 12 o 24 horas.
Pulse el control de sintonización para
confirmar su elección de formato de reloj.
NOTA:
Si se elige el formato de reloj de
12 horas, la radio utilizará el reloj de
12 horas para el ajuste de las alarmas
y mostrará un reloj de 12 horas con
indicador PM cuando esté en el modo de
espera.
Ajuste manual de la hora del reloj
1. Asegúrese de que la radio se encuentre
encendida. Mantenga pulsado el control
giratorio de sintonización para acceder al
menú avanzado del modo actual.
2. Gire el control de sintonización hasta que
aparezca “CLK” en la pantalla, y pulse el
control de sintonización para acceder al
ajuste. La indicación de hora comienza a
parpadear.
3. Gire el control de sintonización para
seleccionar la hora deseada, y pulse el
control de sintonización para confirmar el
ajuste. La indicación de minutos comienza a
parpadear.
4. Gire el control de sintonización para
seleccionar los minutos deseados, y pulse
el control de sintonización para confirmar el
ajuste. La pantalla volverá al menú anterior.
Ajuste de la alarma
La radio cuenta con dos alarmas que
pueden ajustarse para despertarle con el
sonido de la radio AM/FM, o con una alarma
de pitido. Antes de ajustar las alarmas,
asegúrese de ajustar la hora del reloj.
a. Ajuste de la alarma de radio:
1. Asegúrese de que la radio se encuentre
®
.
encendida.
2. Mantenga pulsado el botón de alarma de
radio, parpadearán el símbolo de alarma
de radio (
) y la visualización de hora,
seguido de un tono acústico.
3. Cuando el dígito de hora parpadee, gire el
control de sintonización para seleccionar el
valor de hora de alarma deseado y pulse el
control de sintonización para confirmar el
ajuste de hora.
4. A continuación, gire el control de sintonización
para seleccionar el valor de minutos de
alarma deseado, y pulse el control de
sintonización para confirmar el ajuste.
5. Cuando el símbolo de la alarma de radio
parpadee, gire el control de sintonización
para seleccionar la banda de frecuencia y la
emisora de la alarma, y pulse el control de
sintonización para confirmar la selección.
-
72 -
––––
CLK
EY37A2.indb 72 2015-2-11 17:07:46
Page 73

6. Gire el control de sintonización para
seleccionar el volumen deseado, y pulse el
control de sintonización para confirmar el
ajuste. El ajuste de alarma de radio habrá
finalizado.
NOTA:
Si la emisora AM/FM de alarma no está
disponible cuando llegue la hora de la
alarma, se utilizará en su lugar la alarma
de pitido.
b. Ajuste de la alarma de pitido HWS
(Humane Wake System):
1. Asegúrese de que la radio se encuentre
encendida.
2. Mantenga pulsado el botón de alarma de
pitido, parpadearán el símbolo de alarma
de pitido (
seguido de un tono acústico.
3. Cuando el dígito de hora parpadee, gire el
control de sintonización para seleccionar el
valor de hora de alarma deseado y pulse el
control de sintonización para confirmar el
ajuste de hora.
4. A continuación, gire el control de sintonización
para seleccionar el valor de minutos de
alarma deseado, y pulse el control de
sintonización para confirmar el ajuste.
5. Gire el control de sintonización para
seleccionar el volumen deseado, y pulse
el control de sintonización para confirmar
el volumen. El ajuste de la alarma de pitido
habrá finalizado.
Cuando la alarma suene
Para cancelar el sonido de la alarma, pulse
el botón de encendido y apagado.
Desactivación/cancelación de todas las
alarmas
Si desea desactivar una alarma activa, pulse
el botón de alarma correspondiente para
cancelar el ajuste de alarma.
Duración del sonido de alarma –––
1. Mantenga pulsado el control de sintonización
para acceder al menú avanzado del modo
actual.
2. Gire el control de sintonización hasta que
se muestre “ALM” en la pantalla. Pulse el
control de sintonización para acceder al
ajuste.
3. Gire el control de sintonización para
desplazarse por las opciones 1, 3, 5, 10, 15,
30 y 60 minutos. Cuando la opción deseada
aparezca en la pantalla, deténgase y pulse
el control de sintonización para confirmar el
ajuste.
) y la visualización de hora,
ALM
Repetición ––––––––––––––––––––
1. Cuando la alarma suene, pulse cualquier
botón que no sea el botón de encendido
y apagado para silenciar la alarma. En la
pantalla aparecerá el símbolo de repetición
( ).
2. Si desea ajustar el tiempo de silencio del
temporizador de repetición, mantenga
pulsado el control de sintonización para
acceder al ajuste del menú.
3. Gire el control de sintonización hasta que
aparezca “SNZ” en la pantalla, y pulse
el control de sintonización para acceder
al ajuste. Gire el control de sintonización
para ajustar el tiempo de silencio entre
las opciones 1, 3, 5, 10, 15 minutos o
Desactivado para el temporizador de
repetición.
4. Si desea cancelar el temporizador de
repetición mientras la alarma se encuentra
suspendida, pulse el botón de encendido
y apagado. Para deshabilitar la función de
repetición, gire el control de sintonización
hasta que se muestre “Desactivado”.
Temporizador de sueño –––––––––
La radio puede ajustarse para que se
apague automáticamente cuando transcurra
un tiempo preestablecido. El ajuste del
temporizador de sueño puede ajustarse entre
Desactivado, 15, 30, 45, 60 y 90 minutos.
1. Mantenga pulsado el control de sintonización
para acceder al menú de ajuste avanzado.
2. Gire el control de sintonización hasta que
se muestre “SLP” en la pantalla. Pulse el
control de sintonización para acceder al
ajuste.
3. Gire el control de sintonización para
desplazarse por las opciones Desactivado,
15, 30, 45, 60 o 90. Deténgase cuando el
ajuste de temporizador de sueño deseado
aparezca en la pantalla. El ajuste se
guardará y la pantalla LCD mostrará de
nuevo la pantalla normal.
4. La radio radio se apagará automáticamente
cuando transcurra el tiempo establecido
en el temporizador de sueño. El icono del
temporizador de sueño ( ) se mostrará
en la pantalla para indicar que hay un
temporizador de sueño activo.
5. Si desea cancelar la función de temporizador
de sueño antes de que transcurra el tiempo
preajustado, mantenga pulsado el botón de
encendido y apagado para apagar la unidad
manualmente. Si desea cancelar la función
mientras la cuenta regresiva está en curso,
diríjase al menú de ajuste del temporizador
de sueño y seleccione “Desactivado”.
SNZ
SLP
ES
73 -
-
EY37A2.indb 73 2015-2-11 17:07:46
Page 74

Función de control de tono –––––––––
El sonido del sistema de sonido puede
ajustarse para adaptarlo a sus preferencias
personales del contenido que está
escuchando. La radio cuenta con cinco
modos de ecualizador preajustados.
Además, puede ajustar los niveles de
agudos y graves para adaptarlos a sus
ES
propias preferencias.
1. Pulse el control de volumen para acceder al
menú del ecualizador.
2. Gire el control de volumen hasta que se
muestre “TON” en la pantalla. Pulse el
control de volumen para acceder al menú de
configuración.
3. Gire el control de volumen para desplazarse
por los cinco modos que aparecen a
continuación, hasta que se muestre el modo
deseado. A continuación, pulse el control de
volumen para confirmar el ajuste.
a. TN 1- Plana
b. TN 2- Pesada
c. TN 3- Suave
d. TN 4- Nítida
e. TN 5- Voces
4. Para volver al nivel de menú superior, gire
el control de volumen hasta que se muestre
en la pantalla. A continuación, pulse el
control de volumen de nuevo para volver al
nivel de menú superior.
Ajuste de su propia ecualización ––
Si las funciones preajustadas del ecualizador
no responden a sus preferencias, puede
configurar un nivel de agudos y de graves
personalizado de la forma siguiente:
1. Pulse el control de volumen para acceder al
menú del ecualizador.
2. Gire el control de volumen hasta que se
muestre “BAS” en la pantalla. Pulse el
control de volumen para acceder al menú de
configuración.
3. Gire el control de volumen para ajustar el
nivel de graves (entre -5 y +3). El sonido
cambiará a medida que ajuste el nivel.
Pulse el control de volumen de nuevo para
confirmar el ajuste.
4. Gire el control de volumen hasta que se
muestre “TRE” en la pantalla. Pulse el
control de volumen para acceder al menú de
configuración.
5. Gire el control de volumen para ajustar el
nivel de agudos (entre -5 y +3). El sonido
cambiará a medida que ajuste el nivel.
Pulse el control de volumen de nuevo para
confirmar el ajuste.
Ajuste del sonido de operaciones ––
Puede activar y desactivar el sonido de
operaciones de la radio.
TON
BAS
SND
1. Mantenga pulsado el control de sintonización
para acceder al menú de ajuste del modo
actual.
2. Gire el control de sintonización hasta que
aparezca “SND” en la pantalla, y pulse el
control de sintonización para acceder al
ajuste.
3. Gire el control de sintonización para elegir
la selección deseada, y pulse el control de
sintonización para confirmar el ajuste.
Toma de entrada auxiliar
El lateral izquierdo de la radio presenta una
toma de entrada auxiliar estéreo de 3,5 mm.
1. Conecte una fuente de audio externa (por
ejemplo, un smartphone, un reproductor de
MP3 o de CD) a la toma de entrada auxiliar.
2. Pulse el botón de fuente hasta que se
muestre AUX IN.
3. Ajuste el nivel de volumen de su
smartphone, reproductor de MP3 o de CD
para garantizar un nivel de señal adecuado
del reproductor y, a continuación, utilice el
control de volumen de la radio según desee
para que la escucha le resulte agradable.
Toma de auriculares
La toma de auriculares de 3,5 mm situada en
el lateral derecho de la radio permite utilizar
el dispositivo con auriculares. Al insertar un
conector de auriculares, el altavoz interno se
silencia automáticamente.
Tenga en cuenta que la sensibilidad de los
auriculares puede variar considerablemente.
Por ello, le recomendamos ajustar el
volumen a un nivel bajo antes de conectar
los auriculares a la radio. Del mismo modo,
se recomienda reducir el volumen antes de
desconectar los auriculares.
PRECAUCIÓN:
Una presión sonora excesiva a través de
los auriculares puede causar pérdidas
auditivas.
Toma USB para la carga de smartphones
NOTA:
Durante la recepción de emisiones AM no
es posible cargar dispositivos USB.
La radio cuenta con una toma USB que
permite cargar smartphones y dispositivos
similares.
El tiempo de carga podría variar y, en
algunos casos, ser superior al que se
necesita para cargar utilizando el cargador
del fabricante incluido con el smartphone.
1. Conecte el smartphone a la toma de carga
USB del lateral izquierdo de la radio.
2. El smartphone empezará a cargarse. Tenga
en cuenta que la carga puede efectuarse en
el modo FM/Bluetooth®/Aux-in.
-
74 -
EY37A2.indb 74 2015-2-11 17:07:47
Page 75

3. Cuando el smartphone se haya cargado,
extraiga el conector USB.
PRECAUCIÓN:
Algunos dispositivos USB solo pueden
cargarse mediante un método concreto.
Asegúrese de comprobarlo antes de cargar
el dispositivo.
• Puede que el cargador no suministre
alimentación a determinados dispositivos
USB.
• Cuando no lo esté utilizando o haya
terminado el periodo de carga, desconecte
el cable USB y cierre la cubierta.
• No conecte una fuente de alimentación
al puerto USB. De lo contrario, podría
producirse un incendio. El puerto USB
está diseñado únicamente para la carga
de dispositivos de bajo voltaje. Coloque
siempre la cubierta del puerto USB
cuando no esté cargando dispositivos de
bajo voltaje.
• No inserte clavos, cables ni otros
elementos en la toma de suministro
eléctrico USB. De lo contrario, podría
producirse un cortocircuito y provocar
humo y fuego.
• No conecte esta toma USB al puerto
USB de su PC, ya que existen muchas
posibilidades de que esto provoque
averías en las unidades.
• No utilice nunca la toma USB en
condiciones de lluvia o humedad, para
evitar que la humedad acceda a la radio.
En estas condiciones, mantenga siempre
la cubierta de goma de la parte trasera de
la unidad bien cerrada.
Luz LED
La radio está equipada con una luz LED de
larga duración situada en el panel delantero
de la radio. Pulse el botón de luz para
encender y apagar la luz LED.
Precaución: NO MIRE FIJAMENTE EL
HAZ DE LUZ.
NOTA:
Cuando no se realizan operaciones, la luz
comienza a parpadear transcurridos 10
minutos, y se apaga un minuto después.
IV. MANTENIMIENTO
Utilice sólo un paño suave y seco para
limpiar la herramienta. No utilice paños
húmedos, bencina, diluyentes u otros
disolventes volátiles de limpieza.
Para el caso en que el interior de la unidad
o el paquete de batería estén expuestos al
agua, drénelo o séquelo lo antes posible.
Retire cuidadosamente cualquier polvo o
restos de acero que queden dentro de la
unidad. Si experimenta problemas al utilizar
la unidad, póngase en contacto con su
centro de servicio autorizado más cercano.
V. ACCESORIOS
Batería
• Vea las especificaciones.
Cargador de baterías
• Si tiene alguna pregunta, póngase en
contacto con el concesionario autorizado.
NOTA:
Con esta linterna no se incluye batería ni
cargador.
[Bloque de pilas]
Para un uso adecuado de la batería
Batería de Li-ión [Fig. 4]
• Las baterías recargables tienen una vida útil
limitada.
• Para una vida óptima de la batería, guarde la
batería de Li-ión siguiendo el uso sin carga.
• Cuando cargue la caja de batería, confirme
que los terminales en el cargador de batería
estén libres de materias extrañas tales como
polvo y agua, etc. Limpie los terminals antes
de cargar la caja de batería si hay materias
extrañas en los terminales.
La vida de los terminales de la caja de
batería puede verse afectada por materias
extrañas tales como polo y agua, etc.
durante su funcionamiento.
• Cuando no se utiliza la batería, manténgala
separada de otros objetos metálicos, como:
clips de papel, monedas, llaves, clavos,
tornillos u otros objetos metálicos pequeños
que pueden actuar de conexión entre un
terminal y el otro.
Un cortocircuito entre los terminales de
la batería pueden ocasionar chispas,
quemaduras o incendios.
• Cuando haga funcionar con la batería,
asegúrese que el lugar de trabajo está bien
ventilado.
• Cuando se saque el paquete de batería
de la unidad principal, vuelva a cerrar
inmediatamente la cubierta del paquete de
batería, para evitar que el polvo o la suciedad
puedan ensuciar los terminales del paquete
de batería y provocar un cortocircuito.
PRECAUCIÓN:
• Para proteger el motor o la batería,
asegúrese de observar lo siguiente
cuando efectúe esta operación.
ES
75 -
-
EY37A2.indb 75 2015-2-11 17:07:47
Page 76

• Si la temperatura del motor y la batería
es elevada, se activará la función de
protección y tanto el motor como la
batería dejarán de funcionar.
Para un uso más seguro
• La batería está diseñada para conectarse
siguiendo dos pasos por motivos de
ES
seguridad. Compruebe que la batería está
conectada correctamente en la unidad
principal antes de utilizar la herramienta.
[Cargador de la batería]
Carga
PRECAUCIÓN:
1) El cargador está diseñado para funcionar
con alimentación eléctrica doméstica
estándar sólo tal y como se indica en
la placa de características. Cargue
solamente en el voltaje indicado en la
placa indicadora de la unidad.
Por ej., 230 V/50 Hz.
2) No intente usarla con ninguna otra
frecuencia o voltaje nominal.
3) Si la temperatura del paquete de baterías
disminuye aproximadamente por debajo
de los -10°C (14°F), la carga se detendrá
de forma automática para evitar la
degradación de la batería.
4) El rango de temperatura ambiente es de
0°C (32°F) y 40°C (104°F).
Si se utiliza el paquete de batería cuando
la temperatura del paquete de batería es
inferior a 0°C (32°F), la unidad podría no
funcionar correctamente.
5) Utilice el cargador dentro del rango
de temperatura de 0°C (32°F) y 40°C
(104°F), y cargue la batería a una
temperatura similar a la misma. (No debe
existir más de 15°C (59°F) de diferencia
entre las temperaturas de la batería y la
ubicación de carga).
6) Cuando se vaya a cargar una batería
fría (unos 0°C (32°F) o menos) en
un cuarto cálido, deje la batería en la
habitación durante al menos una hora y
cárguela cuando se haya calentado a la
temperatura de la habitación.
7) Deje que se enfríe el cargador al
cargar más de dos baterías de forma
consecutiva.
8) No introduzca sus dedos dentro del hueco
del contacto, cuando esté sujetando el
cambiador o en ninguna otra ocasión.
9) Para impedir el riesgo de incendio o
daños del cargador de batería.
• No tapone los orifi cios de ventilación
del cargador y la batería.
• Desenchufe el cargador cuando no lo
utilice.
NOTA:
Su batería no está totalmente cargada
al momento de comprarla. Asegúrese de
cargar la batería antes de utilizarla.
Cómo cargar
1. Enchufe el cargador en la fuente de
ali-mentación de CA.
NOTA:
Se pueden producir chispas cuando se
inserta el enchufe en la alimentación
eléctrica de CA pero este no es un
problema en términos de seguridad.
2. Conecte el paquete de baterías firmemente
en el cargador.
1. Alinee las marcas de alineación y coloque
la batería en el enchufe del cargador.
2. Deslice hacia adelante en el sen tido de la
flecha.
Marcas de
alineación
3. La luz indicadora de carga permanecerá
encendida durante la carga. Cuando
haya terminado la carga, se accionará
automáticamente un conmutador electrónico
interno para impedir cualquier sobrecarga.
• No podrá cargar el paquete de batería si
este está todavía caliente (por ejemplo,
inmediatamente después de haber
trabajado mucho).
La luz de espera naranja seguirá
destellando hasta que se enfríe la batería.
La carga comenzará automáticamente.
4. La luz de carga (verde) destellará
lentamente cuando la batería se haya
cargado a un 80%.
5. Cuando se completa la carga, la luz de
carga en verde se apagará.
6. Si la temperatura de la batería es de 0°C
(32°F) o menos, la batería demora más en
cargarse completamente que el tiempo de
carga normal.
Incluso cuando la batería esté
completamente cargada, tendrá
aproximadamente 50% de la carga de una
batería totalmente cargada a la temperatura
de funcionamiento normal.
7. Si no se enciende la luz (verde) de carga
consulte con un concesionario autorizado.
8. Si se vuelve a colocar una batería totalmente
cargada en el cargador, se encenderá la luz
de carga. Luego de algunos minutos,
la lámpara de carga en verde se apagará.
-
76 -
EY37A2.indb 76 2015-2-11 17:07:47
Page 77

INDICACIÓN DE LA LÁMPARA
La carga ha sido completada. (Carga completa.)
La batería se cargó en aproximadamente 80%.
Ahora cargando.
Se ha enchufado el cargador en la fuente de
alimentación de CA. Está preparado para cargar.
(Verde) (Naranja)
Apagada Encendida Parpadeando
Luz de estado de carga
Aparecerá Izquierda: verde Derecha: naranja
La batería está fría.
La batería se esta cargando lentamente para reducir la carga
de la batería.
La batería está caliente.
La carga comenzará cuando baje la temperatura de la batería.
Si la temperatura de la batería es de -10°C (14°F) o menos, la
luz de carga (naranja) también empezará a destellar. La carga
empezará cuando sube la temperatura de la batería.
No es posible realizar la carga. Existe un bloqueo de polvo o
una falla de la batería.
Reciclado de la batería
ATTENTION:
Para la protección del medio ambiente y reciclado de materiales, asegúrese de que la desecha
en un lugar especificado oficialmente, si hay uno en su país.
Información para Usuarios sobre la Recolección y Eliminación de aparatos viejos y baterías
usadas
Estos símbolos en los productos, embalajes y/o documentos adjuntos, signican
que los aparatos eléctricos y electrónicos y las baterías no deberían ser
mezclados con los desechos domésticos.
Para el tratamiento apropiado, la recuperación y el reciclado de aparatos viejos
y baterías usadas, por favor, observe las normas de recolección aplicables, de
acuerdo a su legislación nacional y a las Directivas 2012/19/CE y 2006/66/CE.
Al desechar estos aparatos y baterías correctamente, Usted estará ayudando
a preservar recursos valiosos y a prevenir cualquier potencial efecto negativo
sobre la salud de la humanidad y el medio ambiente que, de lo contrario, podría
surgir de un manejo inapropiado de los residuos.
Para mayor información sobre la recolección y el reciclado de aparatos y
baterías viejos, por favor, contacte a su comunidad local, su servicio de
eliminación de residuos o al comercio donde adquirió estos aparatos.
Podrán aplicarse penas por la eliminación incorrecta de estos residuos,
de acuerdo a la legislación nacional.
ES
Para usuarios empresariales en la Unión Europea
Si usted desea descartar aparatos eléctricos y electrónicos, por favor contacte a su distribuidor o
proveedor a fi n de obtener mayor información.
[Informacion sobre la Eliminación en otros Países fuera de la Unión Europea]
Estos símbolos sólo son válidos dentro de la Unión Europea. Si desea desechar estos objetos,
por favor contacte con sus autoridades locales o distribuidor y consulte por el método correcto de
eliminación.
77 -
-
EY37A2.indb 77 2015-2-11 17:07:48
Page 78

VI. ESPECIFICACIONES TÉCNICAS
[UNIDAD PRINCIPAL]
Adaptador de alimentación de CA
Pilas
Bluetooth
Versión de Bluetooth
ES
Perles de Bluetooth
®
QD ID 58625
®
®
Potencia de transmisión Especicación de potencia Bluetooth
Alcance de transmisión Aproximadamente 10 m (varía según las condiciones de uso)
Códec compatible SBC
Perl de Bluetooth
®
compatible A2DP
Intervalo de frecuencia
Altavoz 2 altavoces de 3,5 pulgadas y 8 ohm
Potencia de salida
Terminal de entrada 3,5 mm diá./Máx. 2 V/estéreo (AUX IN)
Terminal de salida
Sistema de antena
Dimensiones (An × Al × La) 344 mm × 280 mm × 239 mm
Peso 4,7 kg (con EY9L51)/4 kg (solo unidad principal)
Consumo eléctrico
[BATERÍA]
N.º de modelo
EY9L41 EY9L42 EY9L44 EY9L45 EY9L47 EY9L50 EY9L51 EY9L52
Batería de
almacenaje
Tensión de
batería
14,4V CC
(3,6V × 4 celdas)
14,4V CC
(3,6V × 8 celdas)
Tiempo de
funcionamiento
a 50 W+50 W
(recepción de
Aprox.
18 h
Aprox.
9 h
Aprox.
19 h
FM)
[CARGADOR DE BATERÍA]
N.º de
modelo
Potencia
nominal
Vea la placa de especi caciones en la parte inferior del cargador.
Peso 0,93 kg
EY9L41 EY9L42 EY9L44 EY9L45 EY9L47 EY9L50 EY9L51 EY9L52
Tiempo de
carga
Utilizable:
35min.
Completa:
50min.
Utilizable:
30min.
Completa:
35min.
Utilizable:
40min.
Completa:
55min.
NOTA: Este cuadro puede contener modelos no disponibles en su país.
Consulte el más reciente catálogo general.
Puede consultar el nombre y la dirección del concesionario en la tarjeta de garantía que se
incluye.
CC 12 V/1500 mA, patilla central positiva
De reserva: 2 UM-3 (tamaño AA)
Pila principal: 14,4 V/18 V
4,0
A2DP/SCMS-T
®
de Clase 2 (2,5 mW)
FM 87,5-108 MHz (0,05 MHz/paso)
AM (MW) 522-1629 kHz (9 kHz/paso)
Al utilizar el adaptador de alimentación de CA: 1,7 W × 2
Al utilizar el paquete de batería de 14,4 V: 2,6 W × 2
Al utilizar el paquete de batería de 18 V: 4,5 W × 2
USB: SALIDA CC 5 V/1 A
Auriculares: 3,5 mm diá./3 Ω/150 mV/estéreo
FM: antena plegable blanda
AM: antena de barra
Máx. 7W
0,12 W (modo de espera)
Batería de iones de litio
Aprox.
24 h
14,4V CC
(3,6V × 4 celdas)
Aprox. 11 h
18V CC
(3,6V × 10 celdas)
Aprox.
19 h
Aprox.
24 h
(3,6V × 5 celdas)
EY0L82
Utilizable:
50min.
Completa:
60min.
-
78 -
Utilizable:
35min.
Completa:
40min.
Utilizable:
40min.
Completa:
55min.
Utilizable:
55min.
Completa:
70min.
18V CC
Aprox. 11 h
Utilizable:
35min.
Completa:
40min.
EY37A2.indb 78 2015-2-11 17:07:48
Page 79

VII. LICENCIAS
• La marca Bluetooth® y sus logos son marcas comerciales registradas propiedad de
Bluetooth SIG, Inc. y cualquier uso de dichas marcas por parte de Panasonic Corporation
se realiza bajo licencia. Otros nombres de marcas y marcas comerciales son propiedad de
sus respectivos propietarios.
• Los diversos nombres, nombres de empresas y nombres de productos contenidos en este
manual son marcas comerciales o marcas comerciales registradas de sus respectivas
empresas. En este documento se han omitido algunos símbolos de TM o ®.
Acerca del Bluetooth
Panasonic no se responsabiliza de los datos
ni la información que se pongan en riesgo
durante una transmisión inalámbrica.
Banda de frecuencia utilizada
Este sistema utiliza la banda de frecuencia de
2,4 GHz.
Certicación de este dispositivo
• Este sistema respeta las restricciones de
frecuencia y ha recibido la certificación
pertinente basada en las leyes de
frecuencia. Por ello, no es necesario un
permiso inalámbrico.
• Las acciones indicadas a continuación están
penadas por ley en algunos países:
– Desmontar o modificar la unidad.
– Eliminar las indicaciones de
especificaciones.
Restricciones de uso
• No se garantiza la transmisión inalámbrica ni
el uso con todos los dispositivos equipados
con conectividad Bluetooth
• Todos los dispositivos deben cumplir con las
normas establecidas por Bluetooth SIG, Inc.
• En función de las especificaciones y la
configuración de un dispositivo, la conexión
podría no ser posible o algunas operaciones
podrían efectuarse de forma distinta.
• Este sistema admite funciones de
seguridad de Bluetooth®. Sin embargo, en
función del entorno de funcionamiento y la
configuración, esta seguridad podría no ser
suficiente. Transmita datos a este sistema de
forma inalámbrica con cautela.
• Este sistema no puede transmitir datos a un
dispositivo Bluetooth®.
Alcance de uso
Utilice este dispositivo a un alcance máximo de
10 m.
El alcance puede disminuir en función del
entorno, los obstáculos y las interferencias.
®
®
.
Interferencias procedentes de otros
dispositivos
• Este sistema podría no funcionar
correctamente y podrían producirse
problemas como ruidos y sonido
entrecortado debido a las interferencias
de las ondas de radio si la unidad se sitúa
demasiado cerca de otros dispositivos
Bluetooth
banda de los 2,4 GHz.
• Este sistema podría no funcionar
correctamente si las ondas de radio
procedentes de una emisora cercana, por
ejemplo, son demasiado potentes.
Uso previsto
• Este sistema está pensado para un uso
normal general.
• No utilice este sistema cerca de equipos o
en un entorno sensible a las interferencias
provocadas por la frecuencia de radio
(por ejemplo: aeropuertos, hospitales,
laboratorios, etc.).
®
o de dispositivos que usen la
Declaración de conformidad (DoC,
por sus siglas en inglés)
Por la presente,
“Panasonic
Corporation” declara
que este producto se encuentra en conformidad
con los requerimientos esenciales y otras
disposiciones relevantes de la Directiva 1999/5/
EC.
Los clientes pueden descargar una copia de la
DoC original hacia nuestros productos R&TTE
desde nuestro servidor DoC:
http://www.doc.panasonic.de
Contacto con un representante autorizado:
Panasonic Testing Centre, Panasonic Europe
Ltd. - Hamburg ofce, Winsbergring 15, 22525
Hamburg, Alemania
ES
79 -
-
EY37A2.indb 79 2015-2-11 17:07:48
Page 80

Oprindelige instruktioner: Engelsk
Oversættelse af de oprindelige instruktioner:
Andre sprog
Denne enhed opfylder den samstemmende
IP-beskyttelsesgrad baseret på IECbestemmelserne, når alle dæksler er helt lukket,
og den drives af en batteripakke.
Definition af IP-kode
DA
IP6X: Ingen indtrængen af støv (i tilfælde af
talkum på under 75 μm trænger ind i værktøjet)
IPX4: Vand sprøjtet mod enheden fra en vilkårlig
retning må ikke have nogen skadelig effekt (Denne
enhed er designet til at fungere, når den påsprøjtes
med ca. 4,3 l vand med normal temperatur pr.
minut i 10 minutter fra ere retninger ved brug af
adskillige dyser fra ca. 1 meters afstand.).
BEMÆRK:
Dette gælder ikke for den inkluderede
“netadapter”.
BEGRÆNSET GARANTI
Mærkedata for IP64 kvalicerer denne enhed til
den mindste påvirkning af vand eller støv, men
ikke til sikring af ydelse under sådanne forhold.
Se sikkerhedsforskrifter og betjeningsvejledning
for yderligere detaljer om korrekt anvendelse.
I. SIKKERHEDSINSTRUKTIONER
Gennemlæs alle instruktioner
1. GEM DISSE SIKKERHEDSFORKRIFTER
- Denne brugsvejledning indeholder vigtige
sikkerhedsforskrifter og anvisninger for
brugen af dette produkt.
2. Læs alle sikkerhedsforskrifterne og
advarslerne før dette produkt tages i
anvendelse.
3. Udsæt ikke dette produkt og batteripakningen
for regn eller sne og lad være med at
anvende dem under fugtige forhold.
4. Anvendelse af ikke-anbefalede tilbehørsdele
kan medføre risiko for brand, elektrisk stød
og/eller personskade.
5. Tag opladeren ud af forbindelse ved at
trække i stikket i stedet for selve ledningen.
Det mindsker risikoen for, at såvel stik som
ledning lider overlast.
6. Der må ikke anvendes forlængerledning.
7. Hvis strømforsyningsledningen er beskadiget,
skal den udskiftes af fabrikanten, dens
serviceagent eller en lignende kvalificeret
person for at undgå en farlig situation.
8. For at mindske risikoen for elektrisk stød skal
opladeren tages ud af forbindelse, før den
underkastes vedligeholdelse eller rengøres.
9. Kontroller, at ledningen ligger således,
at man ikke kommer til at træde på den,
snuble over den eller på anden måde
udsætte den for overlast eller tryk.
10. Dette produkt og batteripakningen er specielt
beregnet til at arbejde sammen.
11. Prøv ikke at skille dette produkt og
batteripakningen ad.
12. Lad ikke værktøjet og batteripakniningen ligge
på et sted, hvor temperaturen kan overstige
50°C (122°F) (som f.ex. i et redskabsrum af
metal eller en bil om sommeren). Det kan føre
til forringelse af batteriet.
13. Oplad ikke batteripakningen, hvis
temperaturen er UNDER 0°C (32°F) eller
OVER 40°C (104°F).
14. Brænd ikke batteripakningen, da den kan
eksplodere.
15. Produktet er lavet til brug med et almindeligt
lysnet. Anvend kun med den på navnepladen
angivne spænding. Lad være med at
anvende nogen anden spændingsværdi.
16. Behandl ledningen forsigtigt. Opladeren
må aldrig bæres i ledningen eller trækkes
ud af forbindelse med et kraftigt ryk. Hold
ledningen på god afstand af varme, olie og
skarpe kanter.
17. Oplad batteripakningen på et sted med
god ventilation. Tildæk ikke opladeren og
batteripakningen med en klud el. lign. under
opladningen.
18. Pas på ikke at komme til at kortslutte
batteripakningen. Kortslutning kan medføre
stort effekttab, overophedning og brand.
19. BEMÆRK: Hvis denne komponents
strømforsyningsledning har lidt overlast,
må den kun skiftes ud af en reparatør, der
er autoriseret af fabrikanten, fordi der skal
anvendes specialværktøj.
20. Apparatet er ikke en bærbar lampe til brug
for børn.
21. Børn må ikke lege med apparatet.
Symbol Betydning
For at reducere risikoen
for tilskadekomst, skal
brugeren læse og forstå
brugsvejledningen.
Kun til indendørs brug
Brug kun strømforsyninger
nævnt i denne vejledning.
-
80 -
EY37A2.indb 80 2015-2-11 17:07:49
Page 81

ADVARSEL:
• Brug kun Panasonic batteripakninger,
som er konstrueret til brug med dette
genopladelige værktøj.
• Panasonic kan ikke holdes ikke ansvarlig
for skader eller uheld, som er forårsaget af
anvendelse af en genbrugt batteripakning
eller en ikke-original batteripakning.
• Bortskaf ikke batteripakningen ved at
brænde den, og udsæt den ikke for
overdreven varme.
• Lad være med at drive søm etc. ind i
akkuen, udsætte den for stød, adskille den
eller forsøge at ændre den.
• Lad ikke metalgenstande komme i berøring
med batteripakningens terminaler.
• Transporter ikke batteripakningen og
opbevar den ikke i samme beholder som
søm eller lignende metalgenstande.
• Oplad ikke batteripakningen på et sted
med høje temperaturer, som for eksempel i
nærheden af åben ild eller i direkte sollys.
Ellers kan batteriet overophedes, bryde i
brand eller eksplodere.
• Brug altid kun den dertil hørende oplader
til at oplade batteripakningen. Ellers
kan batteriet lække, overophedes, eller
eksplodere.
• Når batteripakningen er taget af dette
produkt eller opladeren, skal man altid
huske at sætte pakningsdækslet på.
Hvis dette ikke gøres, er der risiko for, at
batterikontakterne kortsluttes, hvilket kan
være årsag til brandfare.
• Når batteripakningen er udtjent, skal den
skiftes ud med en ny.
Fortsat anvendelse af en beskadiget bat ter
ipakning kan resul tere i varmedannelse,
antænding og revner i batteriet.
• Hvis du detekterer noget unormalt, skal du
straks ophøre med brugen, og kontakte den
forhandler som du købte dette produkt af.
• Skru ikke for højt for lydstyrken, når du
anvender hovedtelefoner.
• Pas på ikke at skrue op efterhånden som
din hørelse vender sig til lyden.
• Brug ikke dette produkt over længere tid, og
sørg for at tage en pause for at hvile ørerne.
• Hvis du oplever ubehag i ørerne, skal du
ophøre med brugen og kontakte din læge.
• Placer ikke tunge genstande på radioen og
kravl ikke op på den.
• Placer ikke radioen på en ustabil overflade
eller i en ustabil position.
• Sørg altid for at sikkerhedskopiere dataene
som er gemt på enheden, der er tilsluttet
til denne radio, for at forhindre tab af data i
tilfælde af fejl på enheden.
II. MONTERING
Isætning af batteri
BEMÆRK:
Hvis batterierne fjernes fra både
hoved-batteripakkerummet og backupbatterirummet, udføres der initialisering
ca. tre minutter senere.
Isætning af backup-batterier [Fig. 1]
1. Træk ud i låsen til batterirummet for at åbne
til batterirummet. Der er et hovedbatterirum
og et backup-batterirum.
2. Fjern backup-batterirummets dæksel og
isæt 2 nye UM-3 (AA-størrelse). Sørg for, at
batteriernes polaritet vender korrekt som vist
inde i rummet. Sæt batteridækslet tilbage på
plads.
BEMÆRK:
• Radioen kan anvendes uden tilslutning af
backup-batteriet.
• Når der er backup-batterier
inde i rummet, går data gemt i
forudindstillingshukommelserne ikke tabt.
VIGTIGT:
• Brug ikke andre batterier end dem, som er
specificeret (UM-3).
• Fjern batterier, hvis produktet ikke skal
anvendes i længere tid.
• Bland ikke nye batterier med gamle
batterier, og brug ikke forskellige typer
batterier sammen.
Forkert brug af batterier kan muligvis
medføre batterilækage, varmeudvikling,
brand eller eksplosion.
Hvis der lækker væske fra batterierne,
skal du meget opmærksom på de
følgende sikkerhedspunkter.
• Rør aldrig batterivæske med bare
hænder. Dette kan muligvis medføre
betændelse i huden eller tilskadekomst.
• Det kan medføre blindhed, hvis du får
væsken i øjnene.
• Tør alt spildt batterivæske helt op.
Isætning/udtagning af hovedbatteripakke
[Fig. 2]
1. Efter backup-batterierne er isat, skal du
isætte hovedbatteripakken i hovedenheden.
Sæt den altid helt ind, indtil den klikker
på plads med et lille klik. De egnede
batteripakker til denne radio er angivet under
Specifikationer.
81 -
-
DA
EY37A2.indb 81 2015-2-11 17:07:49
Page 82

2. Fjern batteripakken ved at trække batteriet
ud af batterirummet.
3. Sæt låsen til batterirummet tilbage på dens
oprindelige plads.
Indikator for lavt batteri
1. Reduceret effekt, forvrængning og en
“hakkende lyd” eller tegnet for lavt batteri
), som vises på displayet, er alle
(
DA
tegn på, at hovedbatteripakken behøver
udskiftning.
BEMÆRK: Batteripakken kan ikke oplades
vha. den medfølgende netadapter.
2. Når hovedbatteriet er fjernet, og tegnet for
lavt batteri ( ) blinker, og der vises et “E.”
på displayet, angiver dette, at det er tid til at
udskifte backup-batterierne.
Brug af den bløde bøjede antenne [Fig. 3]
Ret den bløde bøjede antenne ud.
VIGTIGT:
Den bløde bøjede antenne fungerer kun i
én retning.
Hvis der anvendes kraft til at bøje den,
kan den knække, eller det kan medføre
tilskadekomst.
Brug af den medfølgende netadapter
Fjern gummidækslet og sæt adapterstikket
ind i jævnstrømsstikket på den højre side
af radioen. Sæt adapterstikket ind i en
almindelig stikkontakt. Når adapteren er
tilsluttet, afbrydes batteripakken automatisk.
Netadapteren bør afbrydes fra stikkontakten,
når den ikke anvendes.
BEMÆRK:
• Lyden er en smule lavere ved brug
af netadapteren end ved brug af en
batteripakke.
• Når der er interferens på radioens
AM-bånd pga. dens adapter, skal du
flytte radioen mere end 30 cm væk fra
netadapteren.
• Når netadapteren og batteripakken
anvendes samtidigt, prioriteres
netadapteren som strømforsyning for
enheden. I dette tilfælde forbruges der
ikke strøm fra batteripakken.
• Denne enhed har ikke nogen
opladningsfunktion. Selvom enheden
anvender både netadapteren og
batteripakken på samme tid, oplades
batteripakken ikke.
• Netadapteren er udelukkende til brug
med dette produkt og må ikke anvendes
sammen med andet udstyr. Brug
endvidere ikke netadapteren til andet
udstyr sammen med dette produkt.
III. BEJENINGER
Betjening af radioen – Scanning og
tuning af AM/FM
BEMÆRK:
Hvis modtagesignalet er svagt, skal du
prøve at ændre retningen af radioen eller
antennen.
1. Tryk og hold på tænd-sluk-knappen for at
tænde for radioen.
2. Tryk på kilde-knappen indtil der vises “AM”
eller “FM”.
3. Tryk på tuningskontrolknappen for at
foretage en automatisk tuning. Radioen
scanner op ad AM/FM-båndet fra den
aktuelt viste frekvens og stopper automatisk
scanning, når den finder en station med
tilstrækkelig styrke.
4. Efter nogle få sekunder opdateres displayet.
Displayet viser frekvensen for det fundne
signal.
5. For at finde en anden station skal du trykke
på tuningskontrolknappen som før.
6. Når enden af frekvensbåndet er nået,
fortsætter radioen tuningen fra den modsatte
ende af frekvensbåndet.
7. Drej på lydstyrkeknappen for at justere
lydniveauet efter behov.
8. Tryk og hold på tænd-sluk-knappen for at
slukke for radioen.
Manuel tuning – AM/FM
1. Tryk og hold på tænd-sluk-knappen for at
tænde for radioen.
2. Tryk på kilde-knappen indtil der vises “AM”
eller “FM”.
3. Drej på tuningskontrolknappen for at tune ind
på en station.
4. Når enden af frekvensbåndet er nået,
fortsætter radioen tuningen fra den modsatte
ende af frekvensbåndet.
5. Brug lydstyrkeknappen til at justere
lydniveauet efter behov.
Forudindstilling af stationer i AM/
FM-tilstand
Der er 6 forudindstillede stationer for både
AM- og FM-radio. De anvendes på samme
måde for hvert frekvensbånd.
-
82 -
EY37A2.indb 82 2015-2-11 17:07:49
Page 83

1. Tun ind på den ønskede radiostation som
tidligere beskrevet.
2. Tryk og hold på den ønskede
forudindstillingsknap (1 til 6) indtil radioen
bipper. “M1” vises for eksempel ud for
frekvensen. Stationen gemmes vha.
forudindstillingsnummeret. Gentag denne
procedure for de resterende forudindstillinger
efter behov. Forudindstillede stationer,
som allerede er blevet gemt, kan blive
overskrevet ved at følge proceduren ovenfor
om nødvendigt.
Genkaldelse af en forudindstilling i
AM/FM-tilstand
1. Tryk på kilde-knappen indtil der vises “AM”
eller “FM”.
2. Tryk midlertidigt på den ønskede
forudindstillingsknap for at få radioen til at
tune ind på en af de stationer, som er gemt i
forudindstillingshukommelsen.
FM-stereo/mono –––––––––––––––––
FM
Hvis signalet for den FM-radiostation, der
lyttes til, er svagt, kan der muligvis høres
noget støj. Det er muligt at reducere denne
støj ved at tvinge radioen til at afspille
stationen i mono frem for stereo.
1. Tryk på kilde-knappen efter behov for at
vælge FM-båndet og tun ind på den ønskede
FM-station som tidligere angivet.
2. Tryk og hold på tuningskontrolknappen for at
komme ind i menuindstillingen.
3. Drej på tuningskontrollen indtil “FM” vises på
displayet og tryk på tuningskontrolknappen
for at komme ind i indstillingen. Hvis
indstillingen er ST (stereo) skal du trykke
på tuningskontrollen for at skifte til MN
(mono)-tilstand for at mindske støjen.
Tryk på tuningskontrollen for at vælge
valgmuligheden.
Lytning til musik via Bluetooth®streaming –––––––––––––––––––––––
Du behøver at parre din Bluetooth®-enhed
med radioen, inden du kan auto-lænke for at
afspille/streame Bluetooth®-musik gennem
radioen. Parring skaber en “forbindelse” så
de to enheder kan genkende hinanden.
®
Parring af din Bluetooth
1. Tryk på kilde-knappen indtil der vises “BT”.
vises på displayet, og Bluetooth
-ikonet blinker på displayet.
-enhed først gang
BT
®
®
2. Aktiver Bluetooth
på din enhed i
overensstemmelse med enhedens
brugervejledning for at tillade
parringsproceduren.
3. Tryk på Bluetooth®-parringsknappen, og
vises derefter på displayet. Du kan
starte søgningen efter radioen på din
Bluetooth® -enhed. Når først “EY37A2” vises
på din Bluetooth®-enhed, skal du trykke
på punktet i din Bluetooth®-liste, og den vil
lænke med radioen.
4. Når først der er oprettet forbindelse,
forbliver Bluetooth®-ikonet konstant på
displayet. Du kan nu afspille musikken på din
Bluetooth®-aktiverede enhed via radioen.
BEMÆRK:
• Hvis “EY37A2” vises på din Bluetooth
®
enhedsliste, men din enhed ikke kan
oprette forbindelse med den, skal du
slette punktet fra din liste og parre
enheden med radioen igen ved at følge de
tidligere beskrevne trin.
• Det effektive anvendelsesområde
mellem radioen og den parrede enhed
er ca. 10 meter. Enhver hindring mellem
radioen og enheden kan mindske
anvendelsesområdet.
• Bluetooth®-tilslutningsydeevnen kan
muligvis variere afhængigt af de
tilsluttede Bluetooth®-enheder. Se venligst
Bluetooth®-kompatibiliteten for din enhed
inden tilslutning til radioen. Alle funktioner
er muligvis ikke understøttet på visse
parrede Bluetooth®-enheder.
Afspilning af tidligere parrede enheder
Denne enhed kan huske op til 8 sæt parrede
enheder, og når hukommelsen overstiger
dette antal, overskrives den først parrede
enhed på radioen.
Hvis din Bluetooth
®
-enhed allerede er parret
med enheden tidligere, husker enheden din
Bluetooth®-enhed og forsøger automatisk
at genoprette forbindelse med den enhed
i hukommelsen, som var tilsluttet sidst.
Hvis den sidst tilsluttede enhed ikke er til
rådighed, forsøger radioen at tilslutte til den
anden sidste enhed og så videre.
Sletning af den parrede enhedshukommelse
®
Tryk og hold på Bluetooth
-parringsknappen
i ca. 7 sekunder, indtil du hører en dobbelt
tone. Radioen sletter alle enheder fra dens
hukommelse og bliver søgbar igen.
DA
83 -
-
EY37A2.indb 83 2015-2-11 17:07:50
Page 84

®
Afbrydelse af din Bluetooth
Tryk og hold på Bluetooth
-enhed
®
-parringsknappen
indtil radioen bipper for at afbryde
forbindelsen med din Bluetooth®-enhed.
Bluetooth®-ikonet blinker på displayet, hvilket
angiver at radioen er søgbar for parring igen.
Ur og alarmer
Indstilling af urformatet ––––––––––––
DA
Urvisningen anvendt i standbytilstand og på
afspilningstilstandsskærmene kan indstilles
til forskelligt format. Det valgte format
anvendes derefter også ved indstilling af
alarmerne.
1. Sørg for at radioen er tændt. Tryk og hold
på tuningskontrollen for at komme ind i den
avancerede menu for den aktuelle tilstand.
2. Drej på tuningskontrollen indtil “TIM” vises på
displayet og tryk på tuningskontrollen for at
komme ind i indstillingen.
3. Drej på tuningskontrollen for at vælge
enten 12- eller 24-timersformat. Tryk på
tuningskontrollen for at bekræfte dit valg af
urformat.
BEMÆRK:
Hvis 12-timers-urformatet vælges,
anvender radioen derefter 12-timersuret til indstilling af alarmer, samt viser
et 12-timers-ur med PM-indikator i
standbytilstand.
Manuel indstilling af tiden på uret
1. Sørg for at radioen er tændt. Tryk og hold
på tuningskontrolknappen for at komme ind
i den avancerede menu for den aktuelle
tilstand.
2. Drej på tuningskontrollen indtil “CLK” vises
på displayet og tryk på tuningskontrollen for
at komme ind i indstillingen. Nu begynder
time-indstillingen at blinke.
3. Drej på tuningskontrollen for at vælge den
ønskede time og tryk på tuningskontrollen for
at bekræfte indstillingen. Nu begynder minutindstillingen at blinke.
4. Drej på tuningskontrollen for at vælge det
ønskede minut og tryk på tuningskontrollen
for at bekræfte indstillingen. Displayet vender
tilbage til den forrige menu.
Indstilling af vækkeuret
Radioen har to alarmer, som hver især kan
indstilles til at vække dig med AM/FM-radio
eller en brummeralarm. Sørg for at uret er
indstillet, inden du indstiller alarmerne.
––––
TIM
CLK
a. Indstilling af radioalarm:
1. Sørg for at radioen er tændt.
2. Tryk og hold på radioalarmknappen, og
radioalarmsymbolet (
) og displayets time
blinker efterfulgt af et bip.
3. Når time-cifret blinker, skal du dreje på
tuningskontrollen for at vælge den ønskede
alarm-time og trykke på tuningskontrollen for
at bekræfte time-indstillingen.
4. Drej derefter på tuningskontrollen for
at vælge det ønskede alarm-minut og
tryk på tuningskontrollen for at bekræfte
indstillingen.
5. Når radioalarmsymbolet blinker, skal du
dreje på tuningskontrollen for at vælge det
ønskede opvågningsbånd og station, og
derefter trykke på tuningskontrollen for at
bekræfte valget.
6. Drej på tuningskontrollen for at vælge
den ønskede lydstyrke og tryk på
tuningskontrollen for at bekræfte
indstillingen. Radioalarmindstillingen er nu
gennemført.
BEMÆRK:
Hvis den valgte AM/FM-alarmstation
ikke er til rådighed, når alarmen lyder,
anvendes brummeralarmen i stedet.
b. Indstilling af HVS (humant
vækningssystem)-brummeralarm:
1. Sørg for at radioen er tændt.
2. Tryk og hold på brummeralarmknappen, og
brummeralarmsymbolet (
) og displayets
time blinker efterfulgt af et bip.
3. Når time-cifret blinker, skal du dreje på
tuningskontrollen for at vælge den ønskede
alarm-time og trykke på tuningskontrollen for
at bekræfte time-indstillingen.
4. Drej derefter på tuningskontrollen for
at vælge det ønskede alarm-minut og
tryk på tuningskontrollen for at bekræfte
indstillingen.
5. Drej på tuningskontrollen for at vælge
den ønskede lydstyrke og tryk på
tuningskontrollen for at bekræfte lydstyrken.
Brummeralarmindstillingen er nu gennemført.
Når alarmen lyder
Tryk på tænd-sluk-knappen for at annullere
en igangværende alarm.
Deaktivering/annullering af alarmer
For at deaktivere en aktiv alarm skal du
trykke på den modsvarende alarmknap for at
annullere alarmindstillingen.
-
84 -
EY37A2.indb 84 2015-2-11 17:07:50
Page 85

Varighed af alarmlyden ––––––––––
1. Tryk og hold på tuningskontrollen for at
komme ind i den avancerede menu for den
aktuelle tilstand.
2. Drej på tuningskontrollen indtil der vises
“ALM” på displayet. Tryk på tuningskontrollen
for at komme ind i indstillingen.
3. Drej på tuningskontrollen for at komme
igennem valgmulighederne på 1, 3, 5, 10,
15, 30 og 60 minutter. Stop når der vises den
ønskede valgmulighed på displayet, og tryk
derefter på tuningskontrollen for at bekræfte
indstillingen.
Snooze –––––––––––––––––––––––
1. Når alarmen lyder, vil tryk på en hvilken som
helst anden knap end tænd-sluk-knappen
afbryde for alarmens lyd. Snooze-symbol
( ) vises på displayet.
2. For at justere stille-tiden for snooze-timeren,
skal du trykke og holde på tuningskontrollen
for at komme ind i menuindstillingen.
3. Drej på tuningskontrollen indtil “SNZ”
vises på displayet og tryk derefter på
tuningskontrollen for at komme ind i
indstillingen. Drej på tuningskontrollen for at
justere stille-tiden ud fra valgmulighederne
på 1, 3, 5, 10, 15 minutter eller OFF for
snooze-timeren.
4. For at annullere snooze-timeren mens
alarmens lyd er afbrudt, skal du trykke
på tænd-sluk-knappen. For at slå
snooze-funktionen fra skal du dreje på
tuningskontrollen, indtil der vises “OFF”.
Sleep-timer ––––––––––––––––––––
Radioen kan indstilles til at slukke
automatisk, efter der er forløbet en
forudindstillet tid. Sleep-timer-indstillingen
kan justeres mellem OFF, 15, 30, 45, 60 og
90 minutter.
1. Tryk og hold på tuningskontrollen
for at komme ind i den avancerede
indstillingsmenu.
2. Drej på tuningskontrollen indtil der vises
“SLP” på displayet. Tryk på tuningskontrollen
for at komme ind i indstillingen.
3. Drej på tuningskontrollen for at komme
igennem valgmulighederne på OFF, 15,
30, 45, 60 eller 90. Stop, når der vises den
ønskede sleep-timer-indstilling på displayet.
Indstillingen gemmes, og LCD’et vender
tilbage til normal visning.
ALM
SNZ
SLP
4. Radio slukker automatisk, efter den
forudindstillede sleep-timer er forløbet.
Sleep-timer-ikonet (
hvilket angiver en aktiv sluk-timer.
5. For at annullere sleep-timer-funktionen inden
den forudindstillede tid er forløbet, skal du
blot trykke og holde på tænd-sluk-knappen
for at slukke for enheden manuelt. For at
annullere funktionen når nedtællingen er i
gang, skal du gå til indstillingsmenuen for
sleep-timeren og vælge “OFF”.
) vises på displayet,
Tonekontrol-funktion ––––––––––––
Lyden fra dit lydsystem kan justeres, så
den passer til din personlige smag for
det materiale, som du lytter til. Radioen
har 5 forudindstillede equalizer-tilstande.
Du kan også selv indstille diskant- og
basniveauerne, som du ønsker dem.
1. Tryk på lydstyrkeknappen for at komme ind i
EQ-menuen.
2. Drej på lydstyrkeknappen indtil der
vises “TON” på displayet. Tryk på
lydstyrkeknappen for at komme ind i
opsætningsmenuen.
3. Drej på lydstyrkeknappen for at komme
igennem de 6 tilstande nedenfor, indtil
den ønskede tilstand vises. Tryk derefter
på lydstyrkeknappen for at bekræfte
indstillingen.
a. TN 1- Flad
b. TN 2- Tung
c. TN 3- Blød
d. TN 4- Klar
e. TN 5- Vokal
4. For at vende tilbage til menuen på det højere
niveau, skal du dreje på lydstyrkeknappen,
indtil vises på displayet. Tryk derefter
på lydstyrkeknappen igen for at vende
tilbage til menuen på det højere niveau.
Indstilling af min egen EQ ––––––––
Hvis du ikke synes, at de forudindstillede
equalizer-funktioner passer til dig, kan du
lave en brugerindstillet diskant og bas som
følger:
1. Tryk på lydstyrkeknappen for at komme ind i
EQ-menuen.
2. Drej på lydstyrkeknappen indtil der
vises “BAS” på displayet. Tryk på
lydstyrkeknappen for at komme ind i
opsætningsmenuen.
DA
TON
BAS
85 -
-
EY37A2.indb 85 2015-2-11 17:07:51
Page 86

3. Drej på lydstyrkeknappen for at justere
basniveauet (mellem -5 og +3). Lyden
ændres, efterhånden som du justerer
niveauet. Tryk på lydstyrkeknappen igen for
at bekræfte indstillingen.
4. Drej på lydstyrkeknappen indtil der
vises “TRE” på displayet. Tryk på
lydstyrkeknappen for at komme ind i
opsætningsmenuen.
5. Drej på lydstyrkeknappen for at justere
DA
diskantniveauet (mellem -5 og +3). Lyden
ændres, efterhånden som du justerer
niveauet. Tryk på lydstyrkeknappen igen for
at bekræfte indstillingen.
Indstilling af betjeningslyden –––––
Du kan slå radioens betjeningslyd til eller fra.
1. Tryk og hold på tuningskontrollen for at
komme ind i menuindstillingen for den
aktuelle tilstand.
2. Drej på tuningskontrollen indtil “SND” vises
på displayet og tryk på tuningskontrollen for
at komme ind i indstillingen.
3. Drej på tuningskontrollen for at vælge det
ønskede valg og tryk på tuningskontrollen for
at bekræfte indstillingen.
Aux-indgangsstik
Radioen er udstyret med et 3,5 mm stereo
aux-indgangsstik på venstre side.
1. Tilslut en ekstern lydkilde (for eksempel en
smartphone, MP3- eller CD-afspiller) til auxindgangsstikket.
2. Tryk på kilde-knappen indtil der vises AUX IN.
3. Juster lydstyrkeindstillingen på din
smartphone, MP3- eller CD-afspiller
for at sikre et passende signalniveau
fra afspilleren, og anvend derefter
lydstyrkekontrollen på radioen efter behov,
så der opnås en behagelig lytning.
Hovedtelefonstik
Radioen har et 3,5 mm hovedtelefonstik
placeret på højre side til brug for
hovedtelefoner. Lyden fra den indbyggede
højttaler slås automatisk fra, når der
indsættes et stik.
Bemærk venligst at følsomheden af
hovedtelefoner kan variere meget.
Vi anbefaler derfor at indstille lydstyrken
til et lavt niveau, inden du tilslutter
hovedtelefonerne til radioen. Det anbefales
også at skrue ned for lydstyrken, inden du
tager hovedtelefonstikket ud.
SND
VIGTIGT:
Overdrevent lydtryk fra hovedtelefoner
kan forårsage hørenedsættelse.
USB-stik til smartphone-opladning
BEMÆRK:
USB-enheder kan ikke oplades under
modtagelse af AM-udsendelser.
Radioen er udstyret med et USB-stik,
som kun er beregnet til opladning af en
smartphone og lignende enheder.
Opladningstiden kan variere og i visse
tilfælde kan det tage længere tid at oplade
end ved brug af den opladeenhed, som
fulgte med fra producenten af smartphonen.
1. Tilslut din smartphone til USBopladningstikket på venstre side af radioen.
2. Din smartphone vil begynde at oplade.
Bemærk venligst at opladning kan udføres i
FM-/Bluetooth®-/Aux-ind-tilstand.
3. Når først din smartphone er opladet, skal du
fjerne USB-ledningen.
VIGTIGT:
Visse USB-enheder tillader kun opladning
vha. en specifik metode.
Sørg for at kontrollere inden du oplader din
enhed.
• Opladeren kan muligvis ikke strømforsyne
visse USB-enheder.
• Fjern USB-kablet og luk dækslet, når det
ikke anvendes eller efter opladning.
• Tilslut ikke en strømkilde til USB-porten.
Ellers er der risiko for brand. USBporten er kun beregnet til opladning af
lavspændingsenheder. Sæt altid dækslet
på USB-porten, når du ikke oplader
lavspændingsenheden.
• Indsæt ikke søm, ståltråd osv. i USB-
strømforsyningsporten. Ellers kan en
kortslutning muligvis forårsage røg og
brand.
• Tilslut ikke dette USB-stik med USB-
porten på din pc, da det er meget
sandsynligt, at det medfører sammenbrud
på enhederne.
• Brug aldrig USB-stikket i regnvejr eller
under fugtige forhold for at forhindre fugt
i at trænge ind i radioen. Sørg altid for at
gummidækslet på bagsiden er ordentligt
lukket under disse forhold.
-
86 -
EY37A2.indb 86 2015-2-11 17:07:51
Page 87

LED-lygte
Radioen er udstyret med en LED-lygte med
lang levetid på frontpanelet af radioen. Tryk
på lys-knappen for at tænde og slukke for
LED-lygten.
Vigtigt: UNDLAD AT STIRRE IND I
STRÅLEN.
BEMÆRK:
Når der ikke udføres nogen betjeninger,
begynder lygten at blinke efter 10 minutter,
og derefter slukker den et minut senere.
IV. VEDLIGEHOLDELSE
Brug kun er tør, blød klud til at tørre
apparatet af med. Brug ikke en fugtig
klud, fortynder, benzin eller andre flygtige
opløsningsmidler til rengøringen.
I tilfælde af, at indersiden af enheden eller
batteripakningen er blevet udsat for vand,
skal de tømmes for vand og lægges til tørre
så hurtigt som muligt. Fjern omhyggeligt alt
støv og alle jernspåner, som måtte have
samlet sig inden i enheden. Kontakt venligst
dit nærmeste autoriserede servicecenter,
hvis der er nogen problemer med
anvendelsen af enheden.
V. EKSTRAUDSTYR
Batteri
• Se specifikationen.
Batterioplader
• Kontakt en autoriseret forhandler, hvis du har
spørgsmål.
BEMÆRK:
Batteriet og opladeren er ikke inkluderet i
dette sæt.
[Batteripakning]
Korrekt brug af batteripakningen
Li-ion batteripakning [Fig. 4]
• De genopladelige batterier har en begrænset
levetid.
• Opbevar Li-ion batteripakningen efter brugen
uden at oplade den, således at optimal
batterilevetid opnås.
• Når du oplader batteripakningen, skal du
bekræfte at terminalerne på batteriopladeren
er fri for uvedkommende substanser,
som for eksempel støv og vand etc.
Rengør terminalerne inden du oplader
batteripakningen, hvis uvedkommende
substanser observeres på terminalerne.
Levetiden for batteripakningens terminaler
kan påvirkes af uvedkommende substanser,
som for eksempel støv og vand etc., under
brugen.
• Når batteriet ikke anvendes, skal det holdes
på god afstand af andre metalgenstande som
for eksempel papirclips, mønter, nøgler, søm,
skruer og andre mindre metalgenstande, som
kan forårsage en tilslutning fra en terminal til
en anden.
Kortslutning af batteriterminalerne kan
frembringe gnister, forbrændinger eller
ildebrand.
• Når du anvender batteripakningen, skal du
sørge for, at arbejdsstedet er velventileret.
• Når batteripakningen er taget af
hovedenheden, skal batteripakningens
dæksel straks sættes på for at forhindre,
at støv og snavs forurener batteriterminalerne
og forårsager kortslutning.
VIGTIGT:
• For at beskytte motoren og batteriet skal
man være opmærksom på følgende ved
anvendelse.
• Hvis motoren og batteriet bliver varmt,
aktiveres beskyttelsesfunktionen, og
motoren og batteriet stopper med at
fungere.
For sikker brug
• Batteripakken er beregnet til at blive
installeret ved at følge en fremgangsmåde
med to trin for sikkerhedens skyld. Kontroller,
at batteripakken er korrekt installeret i
hovedenheden inden brug.
[Batterioplader]
Opladning
VIGTIGT:
1) Opladeren er udelukkende designet til
at fungere ved almindelig, indenlandsk
elektrisk strøm som angivet på typeskiltet.
Oplad kun ved den spænding, der angives
på enhedens typeskilt, f.eks. 230 V/50 Hz.
2) Forsøg ikke at anvende den ved andre
spændinger eller frekvenser.
3) Hvis temperaturen i batteripakningen
falder til under omtrent -10°C (14°F),
stopper opladningen automatisk for at
hindre forringelse af batteriet.
4) Den omgivende temperatur ligger mellem
0°C (32°F) og 40°C (104°F).
Hvis batteripakningen anvendes, når
batteriets temperatur ligger på under 0°C
(32°F), fungerer enheden muligvis ikke
ordentligt.
87 -
-
DA
EY37A2.indb 87 2015-2-11 17:07:51
Page 88

5) Anvend opladeren ved temperaturer på
mellem 0°C (32°F) og 40°C (104°F),
og oplad batteriet ved en temperatur,
der ligger tæt på batteriets egen. (Der
bør ikke være mere end 15°C (59°F)
forskel mellem temperaturen i batteriet
og temperaturen på stedet, hvor det skal
lades op).
6) Når man vil oplade en kold batteripakning
DA
(under 0°C (32°F)) i et varmt rum, så
anbring batteripakningen i rummet mindst
en time, så dens temperatur kan komme
på niveau med rummets, inden den
oplades.
7) Lad opladeren køle ned ved genopladning
af flere end to batteripakninger efter
hinanden.
8) Sæt ikke fingrene ind i kontaktåbningen,
når ladeaggreatet holdes i hænderne eller
flyttes.
9) Forebyggelse af risiko for brand eller
skade på batteriopladeren.
• Tildæk ikke ventalitationshullerne på
ladeaggregatet og på batteripakken.
• Tag opladeren ud af forbindelse, når
den ikke skal anvendes.
BEMÆRK:
Batteripakningen er ikke fuldt opladet
på købstidspunktet. Sørg for at oplade
batteriet før brugen.
Sådan foretages opladning
1. Stik opladerens stik ind i en stikkontakt fra
lysnettet.
BEMÆRK:
Der kan opstå gnister, når stikket tilsluttes
til lysnettet, men dette er ikke noget
problem mht. sikkerheden.
2. Tilslut batteripakningen ordentligt i
batteriopladeren.
1. Sæt flugtemærkerne på linje og anbring
batteriet på dokken på opladeren.
2. Tryk fremad i pilens retning.
• Opladningen starter ikke, hvis akkuen
er varm (for eksempel, umiddelbart efter
ekstra kraftig opladning.)
Den orangefarvede standby-lampe blinker,
indtil batteriet er kølet af. Opladningen
begynder derefter automatisk.
4. Opladelampen (grøn) blinker langsomt, når
batteriet er omkring 80% opladet.
5. Når opladningen er færdig, vil den grønne
opladelampe slukke.
6. Hvis akkuens temperaturen er 0°C
(32°F) eller mindre, vil det tage længere
at oplade den helt, sammenlignet med
standardopladetiden.
Selv hvis batteriet er fuldt opladet, vil det
have omkring 50% af effekten i et fuldt
opladet batteri ved normal brugstemperatur.
7. Rådfør dig med en autoriseret forhandler,
hvis opladelampen (grøn) ikke slukker.
8. Hvis en fuldt opladet batteripakning sættes
ind i opladeren igen, vil opladelampen
begynde at lyse. Efter nogle minutter vil den
grønne opladelampe slukke.
Flugtemærker
3. Under opladningen vil opladelampen lyse.
Når opladningen er afsluttet, vil en indre
elektronisk omskifter automatisk udløses til
forhindring af overopladning.
-
88 -
EY37A2.indb 88 2015-2-11 17:07:52
Page 89

LAMPEINDIKERINGER
Opladning er afsluttet. (Fuld opladning)
Batteriet er omkring 80% opladet.
Lader.
Opladeren er sat i lysnetadapteren. Klar til opladning.
(Grøn) (Orange)
Slukket Tændt Blinker
Ændring af statuslampen
Venstre: grøn Højre: orange vil blive vist
Batteripakningen er kold.
Batterpakningen oplades langsomt for at reducere belastningen
af batteriet.
Batteripakningen er varm.
Opladningen vil begynde, så snart batteripakningens
temperatur er faldet. Hvis batteripakningens temperatur
er -10°C (14°F) eller derunder, vil opladelampen (orange)
også begynde at blinke. Opladningen vil begynde, når
batteripakningens statustemperatur stiger.
Opladning ikke mulig. Batteripakningen er tilsmudset eller defekt.
Genbrug af batterier
OBS:
For at beskytte miljøet og genbruge materialer, skal du altid huske at bortskaffe udtjente
batterier på forskriftsmæssig vis, dvs. indlevere dem til et sted, der er godkendt af
myndighederne, hvis et sådant forefi ndes i dit land.
Brugerinformation om indsamling og bortskaffelsse af elektronikskrot og brugte batterier
Disse symboler på produkter, emballage og/eller ledsagedokumenter betyder,
at brugte elektriske og elektroniske produkter og batterier ikke må smides ud
som almindeligt husholdningsaffald.
Sådanne gamle produkter og batterier skal indleveres til behandling, genvinding
resp. recycling i henhold til gældende nationale bestemmelser samt direktiverne
2012/19/ EF og 2006/66/EF.
Ved at bortskaffe sådanne produkter og batterier på korrekt vis hjælper du med
til at beskytte værdifulde ressourcer og imødegå de negative påvirkninger af
det menneskelige helbred og miljøet, som vil kunne være følgen af usagkyndig
affaldsbehandling.
Ønsker du mere udførlig information om indsamling og recycling af
gamle produkter og batterier, kan du henvende dig til din kommune,
deponeringsselskabet eller stedet, hvor du har købt produkterne.
Usagkyndig bortskaffelse af elektronikskrot og batterier kan eventuelt udløse
bødeforlæg.
DA
For kommercielle brugere i Den Europæiske Union
Når du ønsker at kassere elektriske eller elektroniske apparater, bedes du henvende dig til din
forhandler eller leverandør for nærmere information.
[Information om bortskaffelse i lande uden for Den Europæiske Union]
Disse symboler gælder kun inden for Den Europæiske Union. Ønsker du at kassere sådanne
produkter, bedes du forhøre dig hos din forhandler eller kommune med henblik på en
hensigtsmæssig bortskaffelse.
89 -
-
EY37A2.indb 89 2015-2-11 17:07:52
Page 90

VI. TEKNISKE SPECIFIKATIONER
[HOVEDENHED]
Netadapter
Batteri
Bluetooth
Bluetooth
Bluetooth
DA
Transmissionseffekt
®
QD ID
®
-version
®
-proler
Transmissionsområde
Understøttet codec
Kompatibel Bluetooth
®
-prol
Frekvensområde
Højttaler 3,5 tommer 8 ohm × 2
Udgangseffekt
Indgangsterminal 3,5 mm dia./Maks. 2 V/stereo (AUX IN)
Udgangsterminal
Antennesystem
Mål (B × H × D) 344 mm × 280 mm × 239 mm
Vægt 4,7 kg (med EY9L51)/4,0 kg (kun hovedenhed)
Strømforbrug
[BATTERIPAKNING]
Model nr.
EY9L41 EY9L42 EY9L44 EY9L45 EY9L47 EY9L50 EY9L51 EY9L52
Opbevaringsbatteri
Batterispænding
14,4V DC
(3,6V × 4 celler)
(3,6V × 8 celler)
Driftstid ved
50 W+50
W (FM-
Ca. 18 t Ca. 9 t Ca. 19 t Ca. 24 t Ca. 11 t Ca. 19 t Ca. 24 t Ca. 11 t
modtagelse)
[BATTERIOPLADER]
Model nr. EY0L82
Mærkedata Se mærkepladen på undersiden af opladeren.
Vægt 0,93 kg
EY9L41 EY9L42 EY9L44 EY9L45 EY9L47 EY9L50 EY9L51 EY9L52
Opladningstid
Brugbar:
35min.
Fuld:
50min.
Brugbar:
30min.
Fuld:
35min.
BEMÆRK: Denne oversigt kan inkludere modeller, der ikke fås i dit område.
Se venligst det nyeste, almindelige katalog.
Med hensyn til forhandlernavn og adresse henvises til det vedlagte garantikort.
12 V/1500 mA jævnstrøm, midter-ben positiv
Backup: UM-3 (AA-størrelse) × 2
Hovedbatteri: 14,4 V/18 V
58625
4,0
A2DP/SCMS-T
Bluetooth
®
-specikation strømklasse 2 (2,5 mW)
Ca. 10 m (varierer afhængigt af brugsforholdene)
SBC
A2DP
FM 87.5-108 MHz (0,05 MHz/trin)
AM (MW) 522-1629 kHz (9 kHz/trin)
Ved brug af netadapteren: 1,7 W × 2
Ved brug af 14,4 V batteripakke: 2,6 W × 2
Ved brug af 18 V batteripakke: 4,5 W × 2
USB: Jævnstrømsudgang 5 V/1 A
Hovedtelefon: 3,5 mm dia./3 Ω/150 mV/stereo
FM: blød bøjet antenne
AM: stangantenne
Maks. 7 W
0,12 W (Standby-tilstand)
Li-ion batteri
14,4V DC
Brugbar:
40min.
Fuld:
55min.
14,4V DC
(3,6V × 4 celler)
Brugbar:
50min.
Fuld:
60min.
Brugbar:
35min.
Fuld:
40min.
18V DC
(3,6V × 10 celler)
Brugbar:
40min.
Fuld:
55min.
(3,6V × 5 celler)
Brugbar:
55min.
Fuld:
70min.
18V DC
Brugbar:
35min.
Fuld:
40min.
-
90 -
EY37A2.indb 90 2015-2-11 17:07:52
Page 91

VII. LICENSER
• Bluetooth®-ordmærket og -logoer er registrerede varemærker ejet af Bluetooth SIG, Inc.
og enhver anvendelse af sådanne mærker af Panasonic Corporation er under licens.
Andre varemærker og varenavne tilhører deres respektive ejere.
• De forskellige navne, rmanavne og produktnavne præsenteret i denne vejledning er
varemærker eller registrerede varemærker tilhørende deres respektive rmaer. Bemærk
venligt at visse varemærker eller ®-symboler er udeladt i dette dokument.
Om Bluetooth
®
Panasonic påtager sig intet ansvar for data
og/eller information, som kompromitteres
under en trådløs transmission.
Anvendt frekvensbånd
Dette system anvender 2,4GHz-frekvensbåndet.
Certicering af denne enhed
• Dette system er i overensstemmelse med
frekvensrestriktioner og er blevet certificeret
på baggrund af frekvenslove. Der behøves
derfor ikke nogen trådløs tilladelse.
• Handlingen nedenfor er strafbar i henhold til
loven i visse lande:
– Adskillelse eller modificering af enheden.
– Fjernelse af specificeringsangivelser.
Brugsrestriktioner
• Trådløs transmission og/eller brug med alle
Bluetooth
®
-udstyrede enheder garanteres
ikke.
• Alle enheder skal være i overensstemmelse
med standarder sat af Bluetooth SIG, Inc.
• Afhængigt af specifikationerne og
indstillingerne af en enhed kan dens
tilslutning mislykkes, eller visse betjeninger
kan være anderledes.
• Dette system understøtter Bluetooth®-
sikkerhedsfunktioner. Men afhængigt af
anvendelsesmiljøet og/eller indstillingerne er
denne sikkerhed muligvis ikke tilstrækkelig.
Vær forsigtig ved trådløs transmittering af
data til dette system.
• Dette system kan ikke transmittere data til en
Bluetooth®-enhed.
Brugsafstand
Brug denne enhed med en maksimal afstand på
10 m.
Afstanden kan formindskes afhængigt af miljøet,
hindringer eller interferens.
Interferens fra andre enheder
• Dette system fungerer muligvis ikke
ordentligt, og der kan opstå problemer som
f.eks. støj og hop i lyden pga. radiobølgeinterferens, hvis hovedenheden er placeret
for tæt på andre Bluetooth
®
-enheder eller
enheder, som anvender 2,4 GHz-båndet.
• Dette system fungerer muligvis ikke
ordentligt, hvis radiobølger fra en station,
som sender i nærheden m.v., er for stærke.
Tilsigtet brug
• Dette system er kun til normal, almindelig
brug.
• Brug ikke dette system i nærheden af udstyr
eller i et miljø, som er følsomt over for
interferens fra radiofrekvenser (for eksempel:
lufthavne, hospitaler, laboratorier m.v.).
Overensstemmelseserklæring (DoC)
Hermed erklærer
“Panasonic
Corporation”, at
dette produkt er i overensstemmelse med
de væsentlige krav og andre relevante
bestemmelser i direktivet 1999/5/EU.
Kunder kan downloade en kopi af den
originale overensstemmelseserklæring
til vores R&TTE-produkter fra vores
overensstemmelseserklærings-server:
http://www.doc.panasonic.de
Kontakt til autoriseret repræsentant:
Panasonic Testing Centre, Panasonic Europe
Ltd. - Hamburg ofce, Winsbergring 15,
22525 Hamburg, Tyskland
DA
91 -
-
EY37A2.indb 91 2015-2-11 17:07:53
Page 92

Originalanvisningar: Engelska
Översättning av originalanvisningarna:
Andra språk
Denna enhet med samtliga luckor helt stängda
och som drivs med ett batteripaket uppfyller
lämplig IP-skyddsgrad baserat på IECbestämmelser.
Definition av IP-kod
IP6X: Inget inträngande av damm (i händelse att
talkpulver under 75 µm tränger in i verktyget)
SV
IP4X: Vatten som stänks mot enheten från alla
riktningar har ingen skadeverkning (denna enhet
är designad för att fungera när enheten sprejats
av ungefär 4,3 l/min med normalt tempererat
vatten under 10 minuter från era riktningar med
era munstycken på cirka 1 meters avstånd.).
NOTERA:
Detta avser inte den medföljande
“nätadaptern”.
BEGRÄNSAD GARANTI
Märkningen IP64 meriterar denna enhet för
minimal påverkan av vatten och damm, men
inte för garanterad prestan-da under sådan
påverkan.
Vi hänvisar till Säkerhetsföreskrifter och
Bruksanvisning angående närmare detaljer kring
korrekt hantering.
I. SÄKERHETSANVISNINGAR
Läs alla instruktionerna
1. SPARA DENNA BRUKSANVIS NING Denna bruksanvisning innehåller viktiga
säkerhets- och bruksföreskrifter för denna
produkt.
2. Läs igenom alla anvisningarna och
varningstexterna innan du använder den här
produkten.
3. Utsätt varken den här produkten eller
batteripaketet för regn eller snö eller
användning i fuktigt klimat.
4. Användning av annat än rekommenderade
tillbehör kan medföra risk för eldsvåda,
elstötar eller personskador.
5. Dra i stickproppen, aldrig i själva sladden
när Du drar ut nätsladden ur vägguttaget.
Då minskar risken för skador på kontakten
eller sladden.
6. Använd inte någon förlängningssladd.
7. Om medföljande sladd är skadad måste den
bytas av tillverkaren eller dess representant
eller motsvarande kvalificerad person för att
undvika fara.
8. Dra ut stickkontakten ur vägguttaget före
varje form av skötsel eller rengöring för att
minska risken för elstötar.
9. Se till att sladden inte ligger så att någon kan
trampa på den eller snubbla över den, eller
så att den blir sträckt eller skadad på något
annat sätt.
10. Denna produkt och det batteripaketet är
särskilt anpassade för varandra.
11. Försök inte ta isär denna produkt eller höljet
till batteripaketet.
12. Förvara inte maskinen eller batteripaketet
på platser där temperaturen kan nå upp
till eller överskrida 50°C (122°F) (t.ex. i
verktygsbodar med metalltak, eller i bilen
sommartid). Då minskar batteripaketets
livslängd.
13. Ladda inte upp batteripaketet vid
temperaturer UNDER 0°C (32°F) eller ÖVER
40°C (104°F).
14. Elda inte upp batteripaketet. Då kan det
explodera.
15. Produkten är endast avsedd att drivas
på vanlig nätström. Använd bara vid den
nätspänning som är angiven på dess
märkplatta. Försök inte använda den vid
någon annan nätspänning!
16. Hantera sladden försiktigt. Bär aldrig omkring
laddaren i sladden och drag inte i sladden
för att dra ut stickkontakten ur vägguttaget.
Håll undan sladden för värme, olja och vassa
kanter.
17. Ladda upp batteripaketet på ett ställe med
god ventilation. Täck inte över laddaren och
batteripaketet med en duk el. dyl. under upp
laddningen.
18. Kortslut inte batteripaketet.
En batterikortslutning kan orsaka ett
kraftigt strömflöde, med överhettning och
brännskador som följd.
19. NOTERA: Om laddarens anslutningsledning
blir skadad krävs specialverktyg för utbytet.
Reparationen måste därför utföras av
auktoriserad serviceverkstad.
20. Enheten är inte avsedd som bärbar
belysning för användning av barn.
-
92 -
EY37A2.indb 92 2015-2-11 17:07:53
Page 93

21. Barn får inte leka med maskinen.
Symbol Betydelse
För att minska risken för
skador måste användaren läsa
och förstå bruksanvisningen.
Endast för inomhusbruk.
Använd endast
strömförsörjning som listas i
dessa anvisningar.
VARNING:
• Använd inte andra batterier än Panasonic-
batterier som är utformade för det
laddningsbara verktyget.
• Panasonic påtar sig inget ansvar för
eventuella skador eller olyckor orsakade av
användningen av ett återvunnet batteri eller
ett oäkta batteri.
• Kasta inte batterier i eld eller utsätt dem för
hög värme.
• Slå inte in spikar i batteriet eller utsätt det för
stötar. Ta inte isär det eller försök ändra på
det.
• Låt inte metallföremål komma i kontakt med
batteripolerna.
•
Bär eller förvara inte batterier på samma
ställe som spikar eller liknande metallföremål.
• Ladda inte batteriet på en plats med hög
temperatur, t.ex. i närheten av öppen eld
eller i direkt solljus.
Det kan göra att batteriet överhettas, fattar
eld eller exploderar.
• Använd inte någon annan laddare än den
avsedda när batteriet laddas. Det kan
göra att batteriet läcker, överhettas eller
exploderar.
• Sätt alltid på batteriskyddet efter att
batteripaketet har demonterats från denna
produkt eller laddaren. Annars kan det
hända att batterikontakterna kortsluts, vilket
medför risk för eldsvåda.
• Byt ut batteriet mot ett nytt efter att batteriet
försämrats märkbart.
Fortsatt användning av ett skadat batteri kan
resultera i värmealstring, antändning eller
batterihaveri.
• Om du upptäcker något fel skall du
omedelbart sluta använda enheten och
kontakta återförsäljaren från vilken du köpte
denna produkt.
• Vrid inte upp volymen för högt när du
använder hörlurar.
VARNING:
• Var försiktig så att du inte höjer volymen
allteftersom din hörsel vänjs.
• Använd inte denna produkt under en längre
period och tag alltid en paus för att vila dina
öron.
• Om du upplever något obehag i öronen skall
du omedelbart avsluta användningen och
kontakta din läkare.
• Undvik att placera tunga föremål på radion
eller att klättra upp på den.
• Placera inte radion på en instabil yta eller i
ett ostadigt läge.
• Se alltid till att säkerhetskopiera all data
som sparats på enheten som ansluts till
denna radio för att förhindra förlust av data i
händelse av fel på enheten.
II. MONTERING
Montering av batteri
NOTERA:
Om batterierna tas bort från både
huvudbatteripaket-utrymmet och reservbatteri-utrymmet, kommer initialisering
utföras efter ungefär tre minuter.
Montering av reservbatterier [Fig. 1]
1. Drag ut batteriutrymmesfacket för att
frigöra batteriutrymmet. Det finns ett
huvudbatteriutrymme och ett utrymme för
backup-batterier.
2. Tag bort luckan för utrymmet för backupbatterier och sätt i 2 nya UM-3 (AA-storlek).
Se till att batterierna är isatta med rätt
polaritet så som visas i facket. Byt ut
batteriluckan.
NOTERA:
• Radion kan användas utan att ett
reservbatteri har anslutits.
• Att ha reservbatterier inuti utrymmet
förhindrar att lagrad data i de förinställda
minnena förloras.
OBSERVERA:
• Använd inga andra batterier än de som
anges (UM-3).
• Tag ur batterierna om produkten inte skall
användas under en längre tid.
• Blanda in nya batterier med gamla
eller använd batterier av olika typer
tillsammans.
Felaktig användning av batterier kan leda
till batteriläckage, överhettning, brand eller
explosion.
93 -
-
SV
EY37A2.indb 93 2015-2-11 17:07:53
Page 94

Om vätska läcker från batterierna
ska du vara uppmärksam på följande
säkerhetsföreskrifter.
• Rör aldrig batterivätska med bara
händer. Det kan resultera i en
hudinflammation eller en skada.
• Blindhet kan uppstå om vätskan
kommer i kontakt med dina ögon.
• Torka helt bort all spilld batterivätska.
SV
Fästa/ta bort huvudbatteripaket [Fig. 2]
1. Efter att reservbatterierna har satts in, sätt
in huvudbatteripaketet till huvudeheten. Sätt
alltid i det hela vägen tills det låses på plats
med ett litet klick. De lämpliga batteripaketen
för den här radion listas i specifikationerna.
2. Tag bort batteripaketet genom att dra ut
batteriet ur batteriutrymmet.
3. Sätt tillbaka batteriutrymmet till dess
ursprungliga position.
Indikator för svagt batteri
1. Reducerad ström, distorsion och ett
“stammande ljud” eller tecken på låg
batterinivå (
är alla tecken på att huvudbatteripaketet
behöver bytas ut.
NOTERA: Batteripaketet kan inte laddas
med den medföljande nätadaptern.
2. När huvudbatteriet tas ut och tecknet för låg
batterinivå ( ) blinkar och ett “E.” visas
på displayen, indikeras det att det är dags att
byta ut reservbatterierna.
Att använda mjuk böjd antenn [Fig. 3]
Räta upp den mjuka böjda antennen.
OBSERVERA:
Den mjuka böjda antennen fungerar
endast i en riktning.
Att använda kraft för att böja den kan
leda till att den går sönder eller resultera
i skador.
) som visas på displayen
Att använda den medföljande
nätadaptern
Tag bort gummiskyddet och sätt in
adapterkontakten i likströmsuttaget på
radions högra sida. Sätt in adaptern
i ett vanligt vägguttag. Batteripaketet
kopplas automatiskt bort när adaptern
ansluts. Nätadaptern bör kopplas bort från
vägguttaget när den inte används.
NOTERA:
• Ljudet är något tystade när en nätadapter
används jämfört med när ett batteripaket
används.
• När radion har någon störning i
AM-bandet av dess adapter, flytta bort
radion ifrån dess nätadapter över
30 cm.
• När nätadaptern och batteripaketet
används samtidigt kommer nätadaptern
att ha företräde för driften av enheten.
Batteripaketet kommer i sådana fall inte
att förbrukas.
• Den här enheten har inte en
uppladdningsfunktion. Att använda
enheten med både nätadaptern och
batteripaketet samtidigt kommer inte att
ladda batteripaketet.
• Nätadaptern är endast till för användning
med den här produkten och är inte
avsedd att användas med annan
utrustning. Använd dessutom inte
nätadaptrar avsedda för annan utrustning
med den här produkten.
III. ANVÄNDNING
Att använda radion – Avsökning AM/FM
NOTERA:
Försök ändra radions eller antennens
orientering om signalstyrkan är svag.
1. Tryck och håll in strömknappen för att slå på
radion.
2. Tryck på källknappen tills “AM” eller “FM”
visas.
3. Tryck på inställningsratten för att utföra en
auto-avsökning. Radion skannar upp AM-/
FM-bandet från den aktuella frekvensen som
visas och stoppar automatiskt skanningen
när den hittar en station med tillräcklig
styrka.
4. Displayen uppdateras efter några sekunder.
Displayen visar frekvensen för den funna
signalen.
5. Tryck på inställningsratten på samma sätt
som tidigare för att hitta en annan station.
6. När slutet på frekvensbandet har uppnåtts
kommer radion återuppta avsökningen från
frekvensbandets motsatta sida.
7. Vrid volymreglaget för att justera ljudnivån
efter behov.
8. Tryck och håll in strömknappen för att stänga
av radion.
-
94 -
EY37A2.indb 94 2015-2-11 17:07:54
Page 95

Manuell stationssökning – AM/FM
1. Tryck och håll in strömknappen för att slå på
radion.
2. Tryck på källknappen tills “AM” eller “FM”
visas.
3. Vrid inställningsratten för att ställa in en
station.
4. När slutet på frekvensbandet har uppnåtts
kommer radion återuppta avsökningen från
frekvensbandets motsatta sida.
5. Använd volymreglaget för att justera
ljudnivån efter behov.
Att förinställa stationer i AM-/FM-läge
Det finns 6 stationer förinställda för AM-
respektive FM-radio. De används på samma
sätt för varje frekvensband.
1. Ställ in den önskade radiostationen såsom
tidigare beskrivits.
2. Tryck och håll in önskad förinställningsknapp
(1 till 6) tills radion piper. Till exempel visas
“M1” bredvid frekvensen. Stationen kommer
att spara med det förinställda numret.
Upprepa denna procedur för de återstående
förinställningarna efter behov. Förinställda
stationer som redan har sparats kan skrivas
över vid behov genom att följa proceduren
ovan.
Att hämta en förinställd station i
AM-/FM-läge
1. Tryck på källknappen tills “AM” eller “FM”
visas.
2. Tryck kort på önskad förinställningsknapp
för att få radion att ställa in en av stationerna
som har sparats i förinställningsminnet.
FM-stereo/-mono ––––––––––––––––
Om FM-radiostationen som lyssnas på har
svag signal kan ett väsande ljud höras. Det
är möjligt att minska väsandet genom att
tvinga radion att spela upp stationen i mono
snarare än i stereo.
1. Tryck på källknappen vid behov för att
välja FM-bandet och ställ in den önskade
FM-station såsom tidigare angetts.
2. Tryck och håll in inställningsratten för att gå
in i menyinställningen.
3. Vrid inställningskontrollen tills “FM” visas
på displayen och tryck på inställningsratten
för att ange inställningen. Tryck på
inställningskontrollen om inställningen
är ST (stereo) för att byta till MN (mono)
för att minska väsandet. Tryck på
inställningskontrollen för att välja alternativet.
FM
Att lyssna på musik via Bluetooth®streaming ––––––––––––––––––––––
Du måste para ihop din Bluetooth®-enhet
med radion innan du kan auto-länka för att
spela upp/streama Bluetooth®-musik via
radion. Parning skapar en ‘länk’ så att två
enheter kan känna igen varandra.
®
Att para ihop din Bluetooth
gången
1. Tryck på källknappen tills “BT” visas.
visas på displayen och Bluetooth®-ikonen
visas på displayen.
2. Aktivera Bluetooth® på din enhet enligt
enhetens bruksanvisning för att möjliggöra
parningsproceduren.
3. Tryck på Bluetooth®-parningsknappen, sedan
visas på displayen. Du kan starta
sökningen av radion på din Bluetooth®-enhet.
När “EY37A2” visas på din Bluetooth®-enhet,
tryck på posten på din Bluetooth®-lista varpå
den kommer att länkas med radion.
4. När anslutningen är upprättad kommer
Bluetooth®-ikonen förbli konstant på
displayen. Du kan nu spela musik från din
Bluetooth®-aktiverade enhet via radion.
NOTERA:
• Radera posten från listan om ‘EY37A2’
visas på din Bluetooth
enheten inte kan ansluta till den och para
ihop enheten med radion igen genom att
följa stegen som beskrivits ovan.
• Största möjliga avstånd mellan radion
och den parade enheten är ungefär 10
meter. Eventuella hinder mellan radion
och den parade enheten kan minska
användningsområdet.
• Bluetooth®-anslutningsprestandan
kan variera beroende på de anslutna
Bluetooth®-enheterna. Se din enhets
Bluetooth®-möjligheter innan du ansluter
till radion. Alla funktioner kanske inte
stöds på vissa Bluetooth®-enheter.
Att spela upp från tidigare parade enheter
Denna enhet kan spara upp till 8 set av
ihopparade enheter. När minnet överstiger
detta värde kommer den först ihopparade
enheten att skrivas över från radion.
Om din Bluetooth
ihop med enheten tidigare, kommer enheten
att spara din Bluetooth®-enhet och den
kommer att försöka att automatiskt ansluta
till den enhet i minnet som senast anslöts.
Om den senast ansluta enheten inte är
®
-enhet för första
®
-enhetslista men
-enhet redan har parats
BT
SV
95 -
-
EY37A2.indb 95 2015-2-11 17:07:54
Page 96

tillgänglig kommer radion att försöka ansluta
till den näst senast anslutna enheten, och så
vidare.
Att radera parade enheter från minnet
®
Tryck och håll in Bluetooth
parningsknappen i ungefär 7 sekunder tills
du hör en dubbel ton. Radion rensar alla
enheter från dess minne och blir upptäckbar.
®
Att koppla ifrån din Bluetooth
Tryck och håll in Bluetooth
SV
parningsknappen tills radion piper för att
koppla ifrån fin Bluetooth
-enhet
®
-
®
-enhet. Bluetooth®ikonen blinkar på displayen för att indikera
att radion åter är upptäckbar för parning.
Klocka och larm
Att ställa in tidsformat –––––––––––––––
Visningen av klockan i skärmarna för
vänteläge och uppspelningsläge kan ställas
in på olika format. Det valda formatet
används sedan även när larmen ställs in.
1. Se till att radion är påslagen. Tryck och håll
in inställningskontrollen för att gå in i den
avancerade menyn för det aktuella läget.
2. Vrid inställningskontrollen tills “TIM” visas på
displayen och tryck på inställningskontrollen
för att ange inställningen.
3. Vrid på inställningskontrollen för att välja
antingen 12- eller 24-timmarsformat. Tryck
på inställningskontrollen för att bekräfta ditt
val av tidsformat.
NOTERA:
Att ställa in klockan manuellt
1. Se till att radion är påslagen. Tryck och
håll in inställningsratten för att gå in i den
avancerade menyn för det aktuella läget.
2. Vrid inställningskontrollen tills “CLK” visas på
displayen och tryck på inställningskontrollen
för att ange inställningen. Nu börjar
timinställningen blinka.
3. Vrid inställningskontrollen för att välja önskat
timtal och tryck på inställningskontrollen
för att bekräfta inställningen. Nu börjar
minutinställningen blinka.
4. Vrid inställningskontrollen för att välja önskat
minuttal och tryck på inställningskontrollen
för att bekräfta inställningen. Displayen
återgår sedan till föregående meny.
Om 12-timmarsformatet väljs kommer
radion att tillämpa 12-timmarsklocka för
inställning av larm och kommer att visa
en 12-timmarsklocka med PM-indikator i
vänteläge.
––––––––
TIM
CLK
Att ställa in larmklockan
Radion har två larm, vilka kan ställas in för
att väcka dig med antingen AM-/FM-radio
eller summerlarm. Se till att klockan är
inställd innan du ställer in larmen.
a. Att ställa in radiolarm:
1. Se till att radion är påslagen.
2. Tryck och håll in radiolarmknappen,
radiolarmsymbolen (
) och displaytimmen
börjar blinka följd av en pip.
3. Vrid inställningskontrollen när timmessiffran
blinkar för att välja önskad larmtimme och
tryck på inställningskontrollen för att bekräfta
timinställningen.
4. Vrid sedan inställningskontrollen för
att välja önskat minuttal och tryck på
inställningskontrollen för att bekräfta
inställningen.
5. Vrid inställningskontrollen när
radiolarmsymbolen blinkar för att välja
önskat uppväckningsband och station och
tryck sedan på inställningskontrollen för att
bekräfta valet.
6. Vrid inställningskontrollen för att välja önskad
volym och tryck på inställningskontrollen
för att bekräfta inställningen.
Radiolarminställningen är nu slutförd.
NOTERA:
Om den valda AM-/FM-larmstationen inte
är tillgänglig när larmet ljuder kommer
summern att användas istället.
b. Att ställa in HWS-summerlarm (Humane
Wake System):
1. Se till att radion är påslagen.
2. Tryck och håll in summerlarmknappen,
summerlarmsymbolen (
) och
displaytimmen börjar blinka följd av en pip.
3. Vrid inställningskontrollen när timmessiffran
blinkar för att välja önskad larmtimme och
tryck på inställningskontrollen för att bekräfta
timinställningen.
4. Vrid sedan inställningskontrollen för
att välja önskat minuttal och tryck på
inställningskontrollen för att bekräfta
inställningen.
5. Vrid inställningskontrollen för att
välja önskad volym och tryck på
inställningskontrollen för att bekräfta
volymen. Summerlarminställningen är nu
slutförd.
När larmet ljuder
Tryck på strömknappen för att stänga av ett
ljudande larm.
-
96 -
EY37A2.indb 96 2015-2-11 17:07:55
Page 97

Att inaktivera/avbryta larm
För att inaktivera ett aktivt larm, tryck på
motsvarande larmknapp för att avbryta
larminställningen.
Larmsignalens varaktighet ––––––––
1. Tryck och håll in inställningskontrollen för
att gå in i den avancerade menyn för det
aktuella läget.
2. Vrid inställningskontrollen tills “ALM” visas på
displayen. Tryck på inställningskontrollen för
att ange inställningen.
3. Vrid inställningskontrollen för att växla
mellan alternativen 1, 3, 5, 10, 15, 30
och 60 minuter. Stanna när det önskade
alternativet visas på displayen och tryck
sedan på inställningskontrollen för att
bekräfta inställningen.
Snooze –––––––––––––––––––––––––
1. Tryck på vilken knapp som helst förutom
strömknappen när larmet ljuder för att tysta
larmet. Snooze-symbolen ( ) visas på
displayen.
2. För att justera tystnadstiden för snoozetimern, tryck och håll in inställningskontrollen
för att gå in i menyinställningen.
3. Vrid inställningskontrollen tills “SNZ”
visas på displayen och tryck sedan
på inställningskontrollen för att ange
inställningen. Vrid inställningskontrollen för
att justera tystnadstiden bland alternativen
1, 3, 5, 10, 15 minuter eller AV för snoozetimern.
4. Tryck på strömknappen för att avbryta
snooze-timern när larmet är suspenderat.
Vrid inställningskontrollen tills “AV” visas för
att inaktivera snooze-funktionen.
Insomningstimer –––––––––––––––
Radion kan ställas in att stängas av
automatiskt efter att en förinställd tid har
förflutit. Inställningen för insomningstimern
kan justeras mellan AV, 15, 30, 45, 60 och
90 minuter.
1. Tryck och håll in inställningskontrollen för att
gå in i avancerade menyinställningen.
2. Vrid inställningskontrollen tills “SLP” visas på
displayen. Tryck på inställningskontrollen för
att ange inställningen.
3. Vrid inställningskontrollen för att växla mellan
alternativen AV, 15, 30, 45, 60 eller 90.
Stanna när den önskade inställningen
för insomningstimern visas på displayen.
Inställningen sparas och LCD:n återgår till
normal visning.
ALM
SNZ
SLP
-
4. Radion stängs av automatiskt efter att
den förinställda insomningstimern har
förflutit. Insomningstimerikonen (
visas på displayen vilket indikerar att en
insomningstimer är aktiv.
5. Stäng av enheten manuellt genom att
bara trycka och hålla in strömknappen för
avbryta insomningstimerfunktionen innan
den förinställda tiden har förflutit. Gå till
insomningstimerns inställningsmeny och
välj “AV” för att avbryta funktionen när
nedräkningen är igång.
Tonkontrollfunktion –––––––––––––
Ljudet från din ljudanläggning kan justeras
för att passa din smak för materialet som
du lyssnar på. Radion har 5 förinställda
equalizer-lägen. Alternativt kan du ställa in
diskant- och basnivåerna efter dina egna
preferenser.
1. Tryck på volymkontrollen för att gå in i
EQ-menyn.
2. Vrid volymkontrollen tills “TON” visas på
displayen. Tryck på volymkontrollen för att gå
in i inställningsmenyn.
3. Vrid volymkontrollen för att växla mellan
de 6 lägena nedan tills det önskade läget
visas. Tryck sedan på volymkontrollen för att
bekräfta inställningen.
a. TN 1- Flat
b. TN 2- Heavy
c. TN 3- Soft
d. TN 4- Clear
e. TN 5- Vocal
4. Vrid volymkontrollen tills visas på
displayen för att gå tillbaka till den övre
menynivån. Tryck sedan på volymkontrollen
igen för att återgå till den övre menynivån.
Att ställa in en egen EQ –––––––––
Om du anser att de förinställda equalizer-
funktionerna inte passar dig kan du ställa in
egen diskant och bas enligt följande:
1. Tryck på volymkontrollen för att gå in i
EQ-menyn.
2. Vrid volymkontrollen tills “BAS” visas på
displayen. Tryck på volymkontrollen för att gå
in i inställningsmenyn.
3. Vrid volymreglaget för att justera basnivån
(mellan -5 och +3). Ljudet ändras när du
justerar nivån. Tryck på volymkontrollen igen
för att bekräfta inställningen.
4. Vrid volymkontrollen tills “TRE” visas på
displayen. Tryck på volymkontrollen för att gå
in i inställningsmenyn.
97 -
)
SV
TON
BAS
EY37A2.indb 97 2015-2-11 17:07:55
Page 98

5. Vrid volymreglaget för att justera
diskantnivån (mellan -5 och +3). Ljudet
ändras när du justerar nivån. Tryck på
volymkontrollen igen för att bekräfta
inställningen.
Att ställa in funktionsljudet –––––––
Du kan slå på eller av funktionsljudet för
radion.
1. Tryck och håll in inställningskontrollen för att
SV
gå in i den menyinställningen för det aktuella
läget.
2. Vrid inställningskontrollen tills “SND” visas på
displayen och tryck på inställningskontrollen
för att ange inställningen.
3. Vrid inställningskontrollen för att välja önskat
val och tryck på inställningskontrollen för att
bekräfta inställningen.
AUX-ingång
En 3,5 mm stereo AUX-ingång är försett på
radions vänstra sida.
1. Anslut en extern ljudkälla (till exempel en
smartphone, MP3- eller CD-spelare) till AUXingången.
2. Tryck på källknappen tills AUX IN visas.
3. Justera volyminställningen på din
smartphone, MP3- eller CD-spelare för att
försäkra dig om en tillräcklig signalnivå från
spelaren och använd sedan volymkontrollen
på radion vid behov för bekvämt lyssnande.
Uttag för hörlurar
Ett 3,5 mm uttag för hörlurar som finns
placerat på radions högra sida är försett för
användning med hörlurar. Att sätta i en plugg
stänger automatiskt av de interna högtalarna.
Tänk på att hörlurars känslighet kan variera
stort. Därför rekommenderar vi att volymen
ställs in på en låg nivå innan hörlurar ansluts
till radion. Det är även rekommenderat att
volymen sänks innan hörlurarna kopplas ur.
OBSERVERA:
Överdrivet ljudtryck från hörlurar kan
orsaka hörselskador.
USB-uttag för laddning av smartphone
NOTERA:
USB-enheter kan inte laddas när
AM-sändningar mottas.
Radion har ett USB-uttag vilket endast är
avsett för att ladda en smartphone eller en
liknande enhet.
Laddningstiden kan variera och det kan
i vissa fall ta längre tid att ladda än när
SND
tillverkarens laddningsenhet som medföljer
din smartphone används.
1. Anslut din smartphone till USBladdningsuttaget på radions vänstra sida.
2. Din smartphone börjar laddas. Notera att
laddning kan ske i FM-/Bluetooth
lägena.
3. Koppla ur din smartphone från USB-sladden
när laddningen är klar.
OBSERVERA:
Vissa USB-enheter kan endast laddas med
en särskild metod.
Se till att kontrollera detta innan du laddar
enheten.
• Laddaren kanske inte förser vissa USB-
enheter med ström.
• Avlägsna USB-kabeln och stäng locket
när den inte används eller när laddning är
klar.
• Anslut inte strömförsörjning till USB-
porten. Annars föreligger en risk för brand.
USB-porten är endast avsedd för laddning
av enheter med låg spänning. Sätt alltid
tillbaka locket på USB-porten när ingen
lågspänningsenhet laddas.
• För inte in spikar, trådar etc. i USB-
strömförsörjningsporten. Annars kan en
krets kortslutas och orsaka rök och brand.
• Anslut inte detta USB-uttag till din dators
USB-port, eftersom det är sannolikt att det
kan orsaka haveri av enheterna.
• Använd aldrig USB-uttaget under regniga
eller fuktiga förhållanden för att förhindra
att fukt tränger in i radion. Håll alltid
gummiskyddet på baksidan ordentligt
stängd under sådana förhållanden.
LED-lampa
Radion är utrustad med en LED-lampa med
lång livslängd som sitter på dess frontpanel.
Tryck på ljusknappen för att slå på och av
LED-lampan.
Observera: TITTA INTE RAKT IN I
STRÅLEN.
NOTERA:
När inga åtgärder görs börjar lampan
blinka efter 10 minuter och stängs sedan
av en minut senare.
IV. SKÖTSEL
Använd endast en torr, mjuk trasa till att
torka rent verktyget med. Använd inte en
fuktig trasa, thinner, bensin eller något annat
-
flyktigt lösningsmedel vid rengöring.
98 -
®
-/Aux-in-
EY37A2.indb 98 2015-2-11 17:07:55
Page 99

Om det skulle hända att vatten tränger in i
enheten eller batteripaketet, så töm ut vattnet
och låt produkten/batteripaketet torka så fort
som möjligt. Avlägsna försiktigt eventuell
ansamling av damm eller järnfilspån från
insidan av produkten. Kontakta din närmaste
auktoriserade serviceverkstad, om något
problem vid användning av verktyget uppstår.
V. TILLBEHÖR
Batteripaket
• Se Tekniska data.
Batteriladdare
• Kontakta en auktoriserad handlare för
rådfrågning.
NOTERA:
Batteri och batteriladdare följer inte med i
detta paket.
[Batteri]
Korrekt hantering av batteri
Litiumjonbatteri [Fig. 4]
• Det laddningsbara batteriet har en begränsad
livslängd.
• Förvara litiumjonbatteriet utan att ladda upp
det efter användning för att erhålla optimal
batterilivslängd.
• Kontrollera vid laddning av batteriet att
polerna på batteriladdaren är fria från
främmande ämnen, såsom damm eller
vatten. Rengör polerna innan batteriet
laddas, om något främmande ämne återfinns
på polerna. Batteripolernas livslängd kan vid
drift påverkas av främmande ämnen, såsom
damm eller vatten.
• När batteriet inte används ska det hållas
borta från mynt, nycklar, gem, spikar, skruvar
och andra små metallföremål som kan orsaka
kortslutning genom att vidröra kontakterna.
En kortslutning av batteriets kontakter kan
orsaka gnistor, brand eller brännskador.
• Se till att arbetsområdet har god ventilation
vid användning av batteriet.
• Sätt genast på batteriskyddet igen efter
att batteripaketet har tagits loss från
huvudenheten för att förhindra ansamling
av damm eller smuts på batteripolerna och
kortslutning.
OBSERVERA:
• För att skydda motorn och batteriet,
skall du komma ihåg följande vid denna
användning.
• Om motorn och batteriet blir varmt
kommer skyddsfunktionen att aktiveras
och motorn och batteriet sluta fungera.
För säker användning
• Batteriet ska monteras genom vidta att två
säkerhetsåtgärder. Kontrollera att batteriet
är ordentligt monterat på huvudenheten före
användning.
[Batteriladdare]
Laddning
OBSERVERA:
1) Laddaren är endast konstruerad för att
fungera med vanlig hushållsel så som
anges på märkskylten. Ladda bara med
den spänning som anges på enhetens
märkskylt, t.ex. 230 V/50 Hz.
2) Försök inte att använda den med någon
annan spänning eller frekvens.
3) Om batteripackets temperatur faller under
ungefär -10°C (14°F) stoppas laddningen
automatiskt för att förhindra att batteriet
försämras.
4) Den omgivande temperaturen är mellan
0°C (32°F) och 40°C (104°F).
Om batteripaketet används när batteriets
temperatur är under 0°C (32°F) kanske
enheten inte fungerar korrekt.
5) Använd laddaren vid temperaturer mellan
0°C (32°F) och 40°C (104°F), och ladda
batteriet vid en temperatur som ligger
i närheten av själva batteriet. (Det får
inte vara mer än 15°C (59°F) skillnad
mellan temperaturen på batteriet och på
laddningsplatsen.)
6) När du ska ladda ett kallt batteri (under
0°C (32°F)) på ett varmt ställe, ska du
låta batteriet ligga på detta ställe minst
en timme i förväg så att batteriet får
rumstemperatur.
7) Kyl ner laddaren om du tänker ladda mer
än två batteri i följd.
8) Stick inte in fingrarna i kontakthålet när
du håller laddaren i handen eller vid andra
tidpunkter.
9) Iaktta följande för att förhindra brand och
andra skador.
• Täck inte över ventilationshålen på
laddaren och batteriet.
• Koppla loss batteriladdaren från
vägguttaget, när den inte ska
användas.
SV
99 -
-
EY37A2.indb 99 2015-2-11 17:07:56
Page 100

NOTERA:
Batteriet är inte helt uppladdat när det
säljs. Se till att ladda upp batteriet fore
användning.
Hur man laddar
1. Anslut laddaren till ett vägguttag.
NOTERA:
Gnistor kan uppstå när kontakten
sätts in i eluttaget men det är inget
SV
säkerhetsproblem.
2. Sätt batteriet ordentligt i laddaren.
1. Placera batteriet i dockan på lad d aren
med anpassningsmärkena placerade mot
varandra.
2. Skjut batteriet framåt i pilens riktning.
Anpassningsmärken
3. Under laddningen lyser laddningslampan.
För att förhindra överladdning kopplar
en inbyggd brytare automatiskt bort
laddningsfunktionen när laddningen är färdig.
ANZEIGELAMPEN
• Om batteripaketet är för varmt (t.ex. direkt
efter tungt arbete) startar inte laddningen.
Den orange standby-lampan blinkar tills
batteriet har svalnat. Därefter påbörjas
laddningen automatiskt.
4. Den gröna laddningslampan börjar blinka
långsamt när batteriet har nått cirka 80%
laddning.
5. När laddningen är klar slocknar den gröna
laddningslampan.
6. Om batteriets temperatur är 0°C (32°F) eller
lägre, så tar det längre tid än normalt att
ladda upp batteriet helt.
Även när batteriet har laddats upp helt
har det bara cirka 50% av den styrka som
gäller för ett batteri som laddats upp helt vid
normala temperaturförhållanden.
7. Rådgör med en auktoriserad återförsäljare,
om laddningslampan (grön) inte slocknar.
8. Vid isättning av ett fulladdat batteri i laddaren
på nytt kommer laddningslampan att tändas.
Efter ett antal minuter slocknar den gröna
laddningslampan.
Laddningen är klar (batteriet helt uppladdat).
Batteriet är uppladdat till cirka 80%.
Laddning pågår.
Laddaren är ansluten till vägguttaget. Redo för laddning.
(Grön) (Orange)
Släckt Lyser Blinkar
EY37A2.indb 100 2015-2-11 17:07:56
Laddningslampor (för laddningstillstånd)
Vänster: grön lampa; Höger: orange lampa
Batteriet är kallt.
Batteriet laddas upp långsamt för att minska belastningen på
batteriet.
Batteriet är för varmt.
Laddningen startar när batteriet har svalnat. Om batteriets
temperature är -10°C (14°F) eller lägre, så börjar den orange
laddningslampan också att blinka. Laddningen startar då efter
att batteriet har värmts upp en aning.
Laddningen kan inte starta. För mycket damm eller felaktigt
batteri.
-
100 -
 Loading...