

Page 1
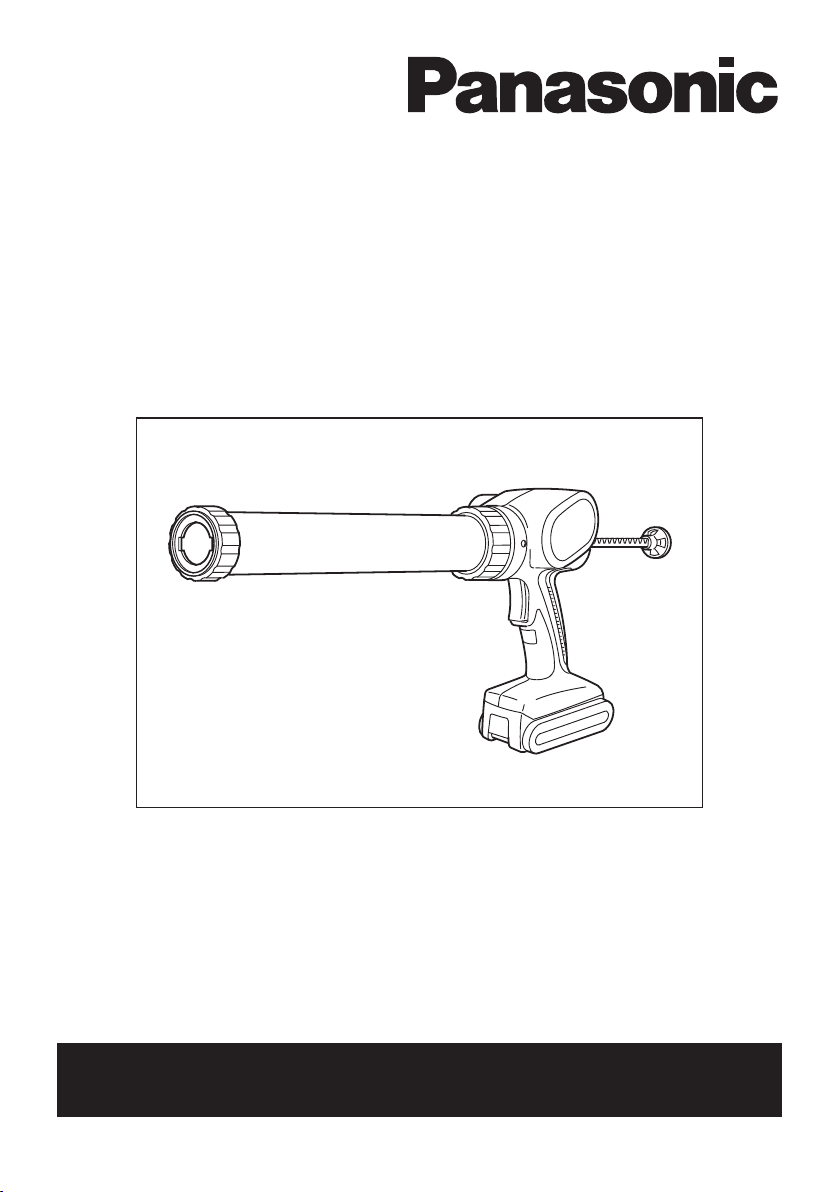
Sealing Gun
Pistolet obturateur
Pistola de sellado
Operating Instructions
Instructions d’utilisation
Manual de instrucciones
Model No: EY3640/EY3641
Pictured: EY3640
IMPORTANT
This manual contains safety information. Read manual completely before fi rst using this product and
save this manual for future use.
IMPORTANT
Ce mode d’emploi contient des informations sur la sécurité. Lisez-le en entier avant d’utiliser le produit
et conservezle pour référence.
IMPORTANTE
Este manual contiene información de seguridad. Lea completamente este manual antes de utilizar por
primera vez este producto, y guárdelo para poder consultarlo en el futuro.
Register online at www.panasonic.com/register
Page 2

Index/Index/Índice
English: Page 6
Français: Page 17
Español: Página 30
FUNCTIONAL DESCRIPTION
DESCRIPTION DES FONCTIONS
DESCRIPCIÓN FUNCIONAL
(A)
(B) (D) (E) (F) (G)
(M)
(H)
(C)
(N)
(L)
(K)
(J)
(H)
(I)
-
2 -
Page 3

Front cap
Capuchon avant
Tapa frontal
(A)
Tube holder
Support de tube
Soporte del compuesto
(B)
Screw
Vis
Tornillo
(C)
Piston joint
Joint de piston
Junta del pistón
(E)
Rack knob
Bouton de crémaillère
Perilla de la cremallera
(G)
Battery pack
Batterie autonome
Batería
(I)
Application speed control
Commande de vitesse d’application
Control de velocidad de aplicación
(K)
Battery charger
Chargeur de batterie
Cargador de la batería
(M)
Sausage pack adapter
Adaptateur de poche
Adaptador del empaque transparente
(D)
Rack
Crémaillère
Cremallera
(F)
Alignment marks
Marques d’alignement
Marcas de alineación
(H)
Battery pack release button
Bouton de libération de batterie autonome
Botón de liberación de la batería
(J)
Trigger
Gâchette
Gatillo
(L)
Pack cover
Couvercle de la batterie autonome
Cubierta de batería
(N)
NOTE: Not all battery packs display the alignment mark (H).
REMARQUE: Certaines batteries autonomes ne présentent pas de marque d’alignement (H).
NOTA: No todas las baterías muestran la marca de alineación (H).
-
3 -
Page 4
[Fig.1]
[Fig.5]
[Fig.2]
Rack knob
Bouton de crémaillère
Perilla de la cremallera
[Fig.3]
$
#
[Fig.6]
$
#
#
[Fig.7]
#$#
[Fig.4]
$
[Fig.8]
#
%
-
4 -
$
#
%
Page 5
[Fig.9]
[Fig.13]
$
[Fig.10]
[Fig.11]
Alignment marks
Marques d’alignement
Marcas de alineación
Battery pack release
button
Bouton de libération
de batterie autonome
Botón de liberación
de la batería
Attaching
Connexion
Acoplamiento
#
#
Removing
Retrait
Desacoplamiento
[Fig.14]
Terminals
Bornes
Terminales
$
Pack cover
Couvercle de la
batterie autonome
Cubierta de batería
Label (red or yellow)
Étiquette (rouge ou jaune)
Etiqueta (roja o amarilla)
[Fig.15]
Battery pack release
button
Bouton de libération
de batterie autonome
Botón de liberación de
la batería
[Fig.12]
-
5 -
Attaching
Connexion
Acoplamiento
Alignment marks
Marques d’alignement
Marcas de alineación
Removing
Retrait
Desacoplamiento
Page 6

Original instructions: English
EN
Translation of the original instructions:
Other languages
I
.
INTENDED USE
Thank you for purchasing the Panasonic
Sealing Gun. This Sealing Gun is for pushing
the sealing compounds. Sausage type and
cartridge type are applicable for this model.
The speed can be adjusted according to
work.
II.
GENERAL POWER
TOOL SAFETY
WARNINGS
WARNING
Read all safety warnings and all instructions.
Failure to follow the warnings and instructions may result in electric shock, fi re and/
or serious injury.
Save all warnings and instructions for
future reference.
The term “power tool” in the warnings
refers to your mains-operated (corded)
power tool or battery-operated (cordless)
power tool.
Work area safety
1) Keep work area clean and well lit.
Cluttered or dark areas invite accidents.
2) Do not operate power tools in ex-
plosive atmospheres, such as in the
presence of fl ammable liquids gases
or dust.
Power tools create sparks which may
ignite the dust or fumes.
3) Keep children and bystanders away
while operating a power tool.
Distractions can cause you to lose control.
Electrical safety
1) Power tool plugs must match the outlet. Never modify the plug in any way.
Do not use any adapter plugs with
earthed (grounded) power tools.
Unmodifi ed plugs and matching outlets
will reduce risk of electric shock.
2) Avoid body contact with earthed or
grounded surfaces such as pipes, radiators, ranges and refrigerators.
There is an increased risk of electric
shock if your body is earthed or grounded.
3) Do not expose power tools to rain or
wet conditions.
Water entering a power tool will increase
the risk of electric shock.
4) Do not abuse the cord. Never use the
cord for carrying, pulling or unplugging the power tool. Keep cord away
from heat, oil, sharp edges or moving
parts.
Damaged or entangled cords increase the
risk of electric shock.
5) When operating a power tool outdoors,
use an extension cord suitable for
outdoor use.
Use of a cord suitable for outdoor use
reduces the risk of electric shock.
6) If operating a power tool in a damp
location is unavoidable, use a residual
current device (RCD) protected supply.
Use of RCD reduces the risk of electrical
shock.
Personal safety
1) Stay alert, watch what you are doing
and use common sense when operating a power tool. Do not use a power
tool while you are tired or under the
infl uence of drugs, alcohol or medica-
tion.
A moment of inattention while operating
power tools may result in personal injury.
2) Use personal protective equipment.
Always wear eye protection.
Protective equipment such as dust mask,
non-skid safety shoes, hard hat, or hearing protection used for appropriate conditions will reduce personal injuries.
3) Prevent unintentional starting.
Ensure the switch is in the offposition
before connecting to power source
and/or battery pack, picking up or
carrying the tool.
Carrying power tools with your fi nger on
the switch or plugging in the power tools
that have the switch on invites accidents.
-
6 -
Page 7

4) Remove any adjusting key or wrench
before turning the power tool on.
A wrench or a key left attached to a rotating part of the power tool may result in
personal injury.
5) Do not overreach. Keep proper footing
and balance at all times.
This enables better control of the power
tool in unexpected situations.
6) Dress properly. Do not wear loose
clothing or jewelry. Keep your hair,
clothing and gloves away from moving
parts.
Loose clothes, jewelry or long hair can be
caught in moving parts.
7) If devices are provided for the connec-
tion of dust extraction and collection
facilities, ensure these are connected
and properly used.
Use of dust collection can reduce dust-related hazards.
Power tool use and Care
1) Do not force the power tool. Use the
correct power tool for your application.
The correct power tool will do the job
better and safer at the rate for which it
was designed.
2) Do not use the power tool if the switch
does not turn it on and off.
Any power tool that cannot be controlled
with the switch is dangerous and must be
repaired.
3) Disconnect the plug from the power
source and/or the battery pack from
the power tool before making any
adjustments, changing accessories, or
storing power tools.
Such preventive safety measures reduce
the risk of starting the power tool accidentally.
4) Store idle power tools out of the reach
of children and do not allow persons
unfamiliar with the power tool or these
instructions to operate the power tool.
Power tools are dangerous in the hands
of untrained users.
5) Maintain power tools. Check for mis-
alignment or binding of moving parts,
breakage of parts and any other condition that may affect the power tools
operation. If damaged, have the power
tool repaired before use.
Many accidents are caused by poorly
maintained power tools.
6) Keep cutting tools sharp and clean.
Properly maintained cutting tools with
sharp cutting edges are less likely to bind
and are easier to control.
7) Use the power tool, accessories and
tool bits etc. in accordance with these
instructions, taking into account the
working conditions and the work to be
performed.
Use of the power tool for operations different from those intended could result in a
hazardous situation.
Battery tool use and care
1) Recharge only with the charger specifi ed by the manufacturer.
A charger that is suitable for one type
of battery pack may create a risk of fi re
when used with another batter pack.
2) Use power tools only with specifi cally
designated battery packs.
Use of any other battery packs may create a risk of injury and fi re.
3) When battery pack is not in use, keep
it away from other metal objects, like
paper clips, coins, keys, nails, screws
or other small metal objects, that can
make a connection from one terminal
to another.
Shorting the battery terminals together
may cause burns or a fi re.
4) Under abusive conditions, liquid may
be ejected from the battery; avoid
contact. If contact accidentally occurs,
fl ush with water. If liquid contacts
eyes, additionally seek medical help.
Liquid ejected from the battery may cause
irritation or burns.
Service
1) Have your power tool serviced by a
qualifi ed repair person using only
identical replacement parts.
This will ensure that the safety of power
tool is maintained.
EN
-
7 -
Page 8
EN
III
.
SPECIFIC SAFETY
RULES
1) Wear ear protection. Exposure to noise
can cause hearing loss.
2) Be aware that this tool is always in an
operating condition, since it does not have
to be plugged into an electrical outlet.
3) Hold power tools by insulated gripping
surfaces when performing an operation where the cutting tool may contact
hidden wiring.
Contact with a “live” wire will make exposed metal parts of the tool “live” and
shock the operator.
4) If the bit becomes jammed, immediately
turn the trigger switch off to prevent an
overload which can damage the battery
pack or motor. Use reverse motion to
loosen jammed bits.
5) Do NOT operate the Forward/Reverse
lever when the trigger switch is on. The
battery will discharge rapidly and damage
to the unit may occur.
6) When storing or carrying the tool, set
the Forward/Reverse lever to the center
position (switch lock).
7) Do not strain the tool by holding the
speed control trigger halfway (speed
control mode) so that the motor stops.
The protection circuit will activate and
may prevent speed control operation. If
this happens, release the speed control
trigger and squeeze again for normal
operation.
8) Be careful not to get dust inside the
chuck.
9) Do not touch the rotating parts to avoid
injury.
10) Do not use the tool continuously for a long
period of time. Stop using the tool from
time to time to avoid temperature rise and
heat overload of the motor.
11) Do not drop the tool.
Symbol Meaning
V
Ah
WARNING
Some dust created by power sanding, sawing, grinding, drilling, and other construction
activities contains chemicals known to the
State of California to cause cancer, birth
defects or other reproductive harm. Some
examples of these chemicals are:
• Lead from lead-based paints
• Crystalline silica from bricks and cement
and other masonry products
• Arsenic and chromium from chemically-treated lumber.
To reduce your exposure to these chemicals: work in a well ventilated area, and
work with approved safety equipment, such
as dust masks that are specially designed
to fi lter out microscopic particles.
IV
.
FOR BATTERY
Electrical capacity of battery
To reduce the risk of injury
user must read and under-
stand instruction manual.
Volts
Direct current
pack
CHARGER &
BATTERY PACK
Important Safety Instructions
1) SAVE THESE INSTRUCTIONS - This
manual contains important safety and
operating instructions for battery charger.
2) Before using battery charger, read all
instructions and cautionary markings on
battery charger, battery pack, and product
using battery pack.
3) CAUTION - To reduce the risk of injury,
charge only Panasonic Battery pack as
shown in last page. Other types of batteries may burst causing personal injury and
damage.
-
8 -
Page 9

4) Do not expose charger and battery pack
to rain or snow or use in damp location.
5) To reduce risk of damaging the electric
plug and cord, pull by plug rather than
cord when disconnecting charger.
6) Make sure cord is located so that it will
not be stepped on, tripped over, or otherwise subjected to damage or stress.
7) An extension cord should not be used
unless absolutely necessary.
Use of improper extension cord could
result in a risk of fi re and electric shock. If
extension cord must be used, make sure
that:
a. pins on plug of extension cord are
the same number, size and shape as
those of plug on charger.
b. extension cord is properly wired and in
good electrical condition.
c. wire size is large enough for ampere
rating of charger as specifi ed below.
RECOMMENDED MINIMUM AWG SIZE
OF EXTENSION CORDS FOR BATTERY
AC Input Rating.
Equal to or
greater than
0 2 18 18 18 16
8) Do not operate charger with damaged
cord or plug — replace them immediately.
9) Do not operate charger if it has received
a sharp blow, been dropped, or otherwise
damaged in any way; take it to a qualifi ed
service agent.
10) Do not disassemble charger; take it to a
qualifi ed service agent when service or
repair is required. Incorrect reassembly
may result in a risk of electric shock or
fi re.
11) To reduce risk of electric shock, unplug
charger from outlet before attempting any
maintenance or cleaning.
12) The charger and battery pack are specifically designed to work together. Do not
attempt to charge any other cordless tool
or battery pack with this charger.
13) Do not attempt to charge the battery pack
with any other charger.
CHARGERS
Amperes
But less
than
AWG Size of Cord
Length of Cord,
Feet
25 50
100 150
14) Do not attempt to disassemble the battery
charger and the battery pack housing.
15) Do not store battery pack in locations
where the temperature may reach or
exceed 50 °C (122 °F) (such as a metal
tool shed, or a car in the summer), which
can lead to deterioration of the storage
battery.
16) Do not charge battery pack when the
temperature is BELOW 0 °C (32 °F) or
ABOVE 40 °C (104 °F).
This is very important.
17) Do not incinerate the battery pack. It can
be explode in a fi re.
18) Avoid dangerous environment. Do not use
charger in damp or wet locations.
19) The charger is designed to operate on
standard household electrical power only.
Charge only on the voltage indicated on
the nameplate. Do not attempt to use it on
any other voltage!
20) Do not abuse cord. Never carry charger
by cord or yank it to disconnect from
outlet. Keep cord away from heat, oil and
sharp edges.
21) Charge the battery pack in a well ventilated place, do not cover the charger
and battery pack with a cloth, etc., while
charging.
22) Use of an attachment not recommended
may result in a risk of fi re, electric shock,
or injury to persons.
23) Do not short the battery pack. A battery
short can cause a large current fl ow,
over heating and create the risk of fi re or
personal injury.
24) NOTE: If the supply cord of this appliance
is damaged, it must only be replaced by
a repair shop appointed by the manufacturer, because special purpose tools are
required.
25) TO REDUCE THE RISK OF ELECTRIC
SHOCK, THIS APPLIANCE HAS A POLARIZED PLUG (ONE BLADE IS WIDER
THAN THE OTHER).
This plug will fi t in a polarized outlet only
one way. If the plug does not fi t fully in the
outlet, reverse the plug. If it still does not
fi t, contact a qualifi ed electrician to install
the proper outlet. Do not change the plug
in any way.
EN
-
9 -
Page 10

EN
WARNING
• Do not use other than the Panasonic battery packs that are designed for use with
this rechargeable tool.
• Panasonic is not responsible for any
damage or accident caused by the use of
recycled or counterfeit battery pack.
• Do not dispose of the battery pack in a
fi re, or expose it to excessive heat.
• Do not allow metal objects to touch the
battery pack terminals.
• Do not carry or store the battery pack
in the same container as nails or similar
metal objects.
• Do not charge the battery pack in a
high-temperature location, such as next
to a fi re or in direct sunlight. Otherwise,
the battery may overheat, catch fi re, or
explode.
• After removing the battery pack from the
tool or the charger, always reattach the
pack cover. Otherwise, the battery contacts could be shorted, leading to a risk
of fi re.
• When the Battery Pack Has Deteriorated,
Replace It with a New One. Continued
use of a damaged battery pack may result
in heat generation, ignition or battery
rupture.
• To prevent leakage, overheating, smoke
generation, fi re, and rupturing from
occurring, follow these instructions when
handling our rechargeable power tools
(tool main body/battery pack/charger).
- Do not allow material cuttings or dust to
fall onto the battery pack.
- Before storing, remove any material
cuttings and dust from the battery pack,
fi t red plastic “terminal cover”, then place
separately from metal objects (screws,
nails, etc.) in tool case.
Damage caused by loose objects in the
case will not be covered by warranty.
• Do not handle the rechargeable power
tools in the following way.
(There is a hazard of smoke generation,
fi re, and rupturing)
- Use or leave in places exposed to rain
or moisture
- Use submerging in water
V
.
ADDITIONAL
SAFETY RULES
1) Stop using the tool if you notice something abnormal.
2) During charging, the charger may become
slightly warm. This is normal. Do NOT
charge the battery for a long period.
3) The appliance is not intended for use by
young children or infi rm persons without
supervision.
4) Young children should be supervised
to ensure that they do not play with the
appliance.
Preparing the sealing gun
For preparation of sealing compound, such
as cutting the opening to the desired diameter, follow the instructions of the cartridge /
sausage pack.
VI.
ASSEMBLY
NOTE:
When attaching or removing a sealing compound or an accessory or when storing the
main unit, place the application speed control
(See the page.2 (K)) in the lock position and
remove battery pack from the main unit.
Inserting the sealing
compound into the gun
For use with cartridges
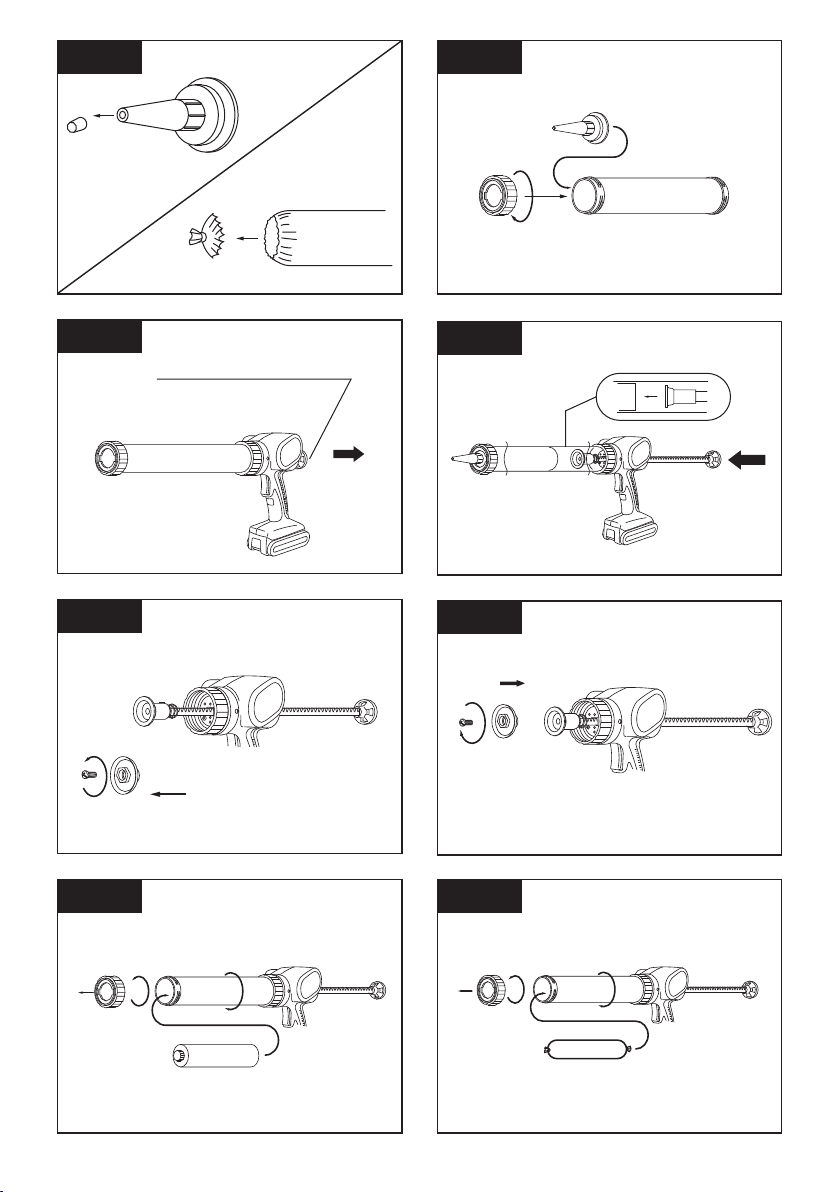
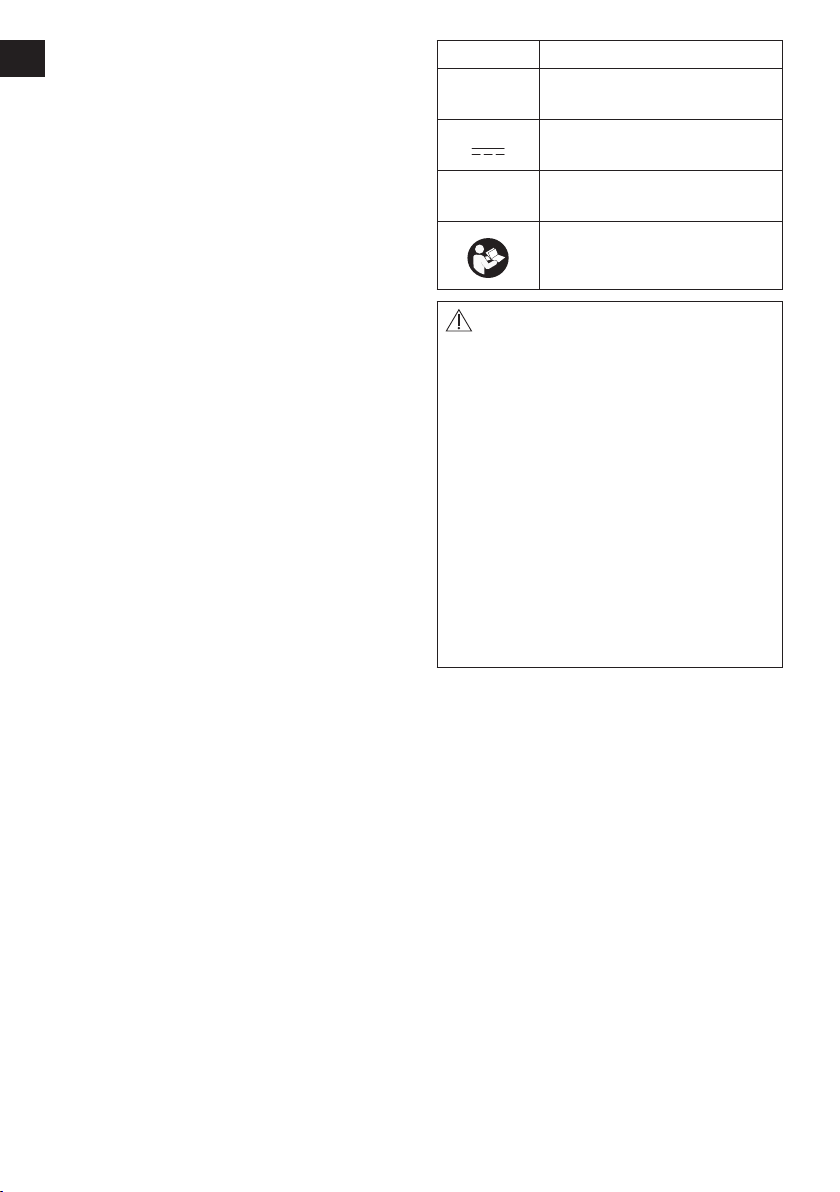
1) Cut off the tip of nozzle at a point suitable
for the job.
[Fig.1]
2) Pull the rack all the way to rear.
[Fig.2]
3) Unscrew the tube holder from the housing, and remove the sausage pack adapter from the rack.
[Fig.3]
4) Install the tube holder on the housing,
remove the front cap from the tube holder,
and insert the cartridge.
[Fig.4]
-
10 -
Page 11

5) Set the nozzle and install the front cap on
the tube holder.
[Fig.5]
6) Push the rack until touching the cartridge.
[Fig.6]
For use with sausage pack
1) Cut off the tip of nozzle at a point suitable
for the job.
[Fig.1]
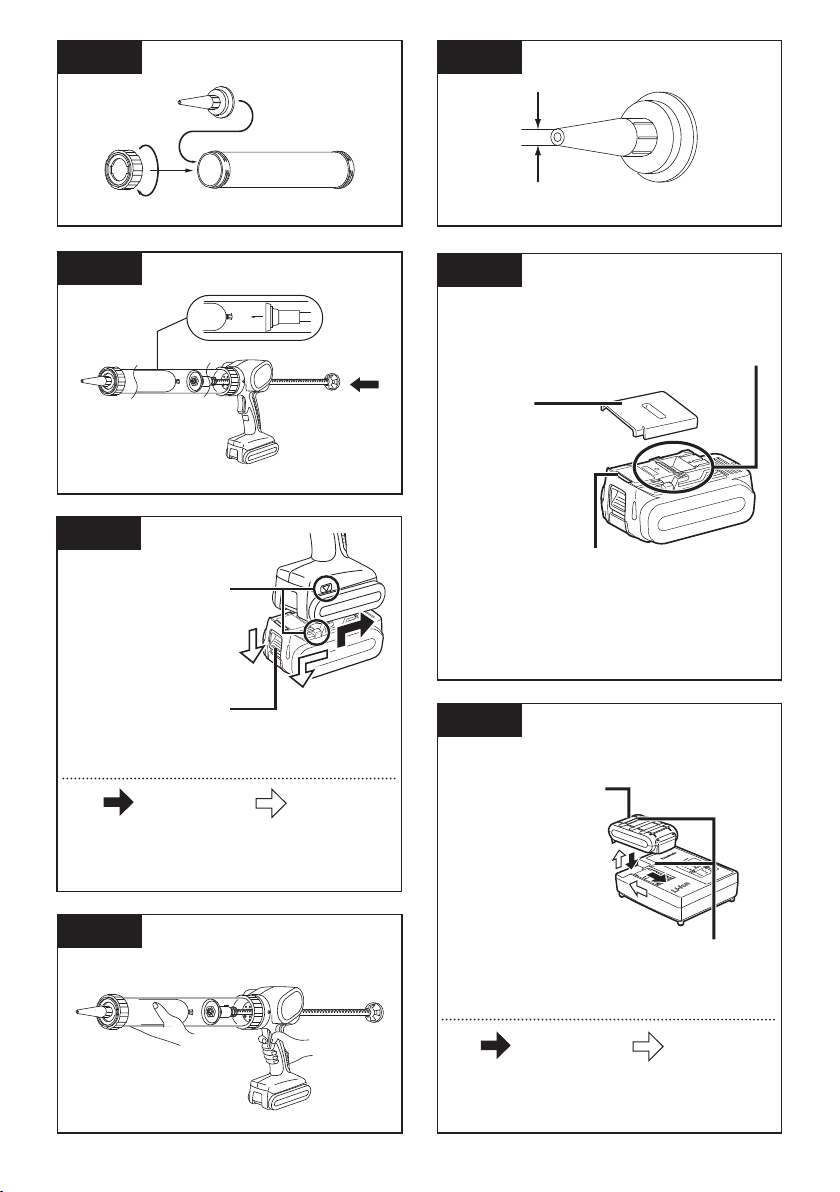
1. To attach the battery pack: [
Align the highlighted marker points and
attach battery pack.
Slide the battery pack until it locks into
position.
2. To remove the battery pack:
Push the button and slide the battery pack
forward.
V
II
.
OPERATION
[Fig.11]
[
[Fig.11]
]
]
EN
2) Pull the rack all the way to rear.
[Fig.2]
3) Unscrew the tube holder from the housing.
4) Screw sausage pack adapter on to piston
joint.
[Fig.7]
NOTE:
Make sure that the plunger rotates
smoothly.
5) Install the tube holder on the housing,
remove the front cap from the tube holder,
and insert the sausage pack.
[Fig.8]
6) Set the nozzle and install the front cap on
the tube holder.
[Fig.9]
7) Push the rack until touching the sausage
pack.
[Fig.10]
Attaching or Removing
Battery Pack
CAUTION:
Before inserting battery pack, check that
the trigger in the tool actuates properly and
returns to the “OFF” position when released.
How to use the sealing
gun
1) Hold the grip while holding the tube
holder.
[Fig.12]
2) Set the nozzle in the groove, then
squeeze the trigger (L). The rack will
move forward.
3) The tube holder can be rotated. This
makes sealing application even easier in
hard-to-work places.
4) Set rack speed according to work. You
can easily change speeds while working
by rotating application speed control (K)
by fi nger.
CAUTION:
Be sure to lock the trigger (“0” position)
when fi nished working.
Speed rate adjustment
0 1 Slow Fast 5
Lock
5) The rack will retract slightly when you
release the trigger, so as to prevent
dripping.
CAUTION:
Dripping can occur with small nozzle
openings or exceptionally soft sealing
compounds.
6) You can pull the trigger repeatedly to dispense small shots of compound. As long
as you pull the trigger within 1 second
of each shot, the rack will move forward
slowly without retracting.
-
11 -
Page 12

For hard compounds
EN
• When using a hard sealing compound, the
protection function for the battery pack and
motor may stop the operation of the tool. If
this occurs, adjust the speed dial and pull
the trigger again to continue the operation.
• Warm the sealing compounds until the compounds become soft.
• Slow down the speed by selecting the application speed control.
• Make the nozzle cut diameter bigger.
[Fig.13]
[Battery Pack]
For Appropriate Use of
Battery Pack
[Fig.14]
• The rechargeable batteries have a limited
life.
• For optimum battery life, store the Li-ion battery pack following use without charging it.
• When operating the battery pack, make sure
the work place is well ventilated.
CAUTION:
• Make sure the front cap is tightened securely when working.
• Do not touch the rack to avoid getting your
fi ngers pinched.
• Use the tool only for its intended purpose,
and do not operate it for long periods of time
without interruption, since this may damage
the sealing gun or cause the cartridge to
jam. Do not insert a cartridge if it is wet, or if
the sealing compound has hardened.
• If the tool is operated for long periods of
time, the motor may overheat.
It is therefore recommended to switch it off
from time to time.
• The use of fl ammable materials, even for
cleaning purposes, is not permitted.
• The ambient temperature range is between
0 °C (32 °F) and 40 °C (104 °F). If the battery pack is used when the battery temperature is below 0 °C (32 °F), the tool may fail
to function properly.
• When charging a cool battery pack (below
0 °C (32 °F)) in a warm place, leave the
battery pack at the place and wait for more
than one hour to warm up the battery to the
level of the ambient temperature.
• If the tool is used in cold-temperature conditions (such as during winter) or if it is frequently stopped during use, the overheating
protection feature may not activate.
For safe use
• The battery pack is designed to be installed
by proceeding two steps for safety. Make
sure the battery pack is installed properly to
the main unit before use.
• If the battery pack is not connected fi rmly
when the switch is switched on, the overheat warning lamp and the battery low
warning lamp will fl ash to indicate that safe
operation is not possible, and the main unit
will not rotate normally.
Connect the battery pack into the unit of the
tool until the red or yellow label disappears.
Battery Recycling
ATTENTION:
A Li-ion battery that is recyclable powers the product you have purchased.
Please call 1-800-8-BATTERY for information on how to recycle this battery.
[Battery Charger]
Charging
CAUTION:
1) If the temperature of the battery pack
falls approximately below −10 °C (14 °F),
charging will automatically stop to prevent
degradation of the battery.
-
12 -
Page 13

2) The ambient temperature range is between 0 °C (32 °F) and 40 °C (104 °F).
If the battery pack is used when the
battery temperature is below 0 °C (32 °F),
the tool may fail to function properly.
3) Use the charger at temperatures between
0 °C and 40 °C, and charge the battery at
a temperature similar to that of the battery
itself. (There should be no more than a
15°C difference between the temperatures of the battery and the charging
location.)
4) When charging a cool battery pack (below
0 °C (32 °F)) in a warm place, leave
the battery pack at the place and wait
for more than one hour to warm up the
battery to the level of the ambient temperature.
5) Cool down the charger when
charging more than two battery packs
consecutively.
6) Do not insert your fi ngers into contact
hole, when holding charger or any other
occasions.
7) To prevent the risk of fi re or damage to
the battery charger.
• Do not cover vent holes on the charger
and the battery pack.
• Unplug the charger when not in use.
NOTE:
Your battery pack is not fully charged
at the time of purchase. Be sure to
charge the battery before use.
3. During charging, the charging lamp will
be lit. When charging is completed, an
internal electronic switch will automatically
be triggered to prevent overcharging.
• Charging will not start if the battery pack
is hot (for example, immediately after
heavy-duty operation).
The orange standby lamp will be fl ashing
until the battery cools down. Charging
will then begin automatically.
4. The charge lamp (green) will fl ash slowly
once the battery is approximately 80%
charged.
5. When charging is completed, the charging
lamp in green color will turn off.
6. If the temperature of the battery pack is
0 °C or less, charging takes longer to fully
charge the battery pack than the standard
charging time.
Even when the battery is fully charged, it
will have approximately 50% of the power
of a fully charged battery at normal operating temperature.
7. Consult an authorized dealer if the
charging lamp (green) does not turn off.
8. If a fully charged battery pack is inserted into the charger again, the charging
lamp lights up. After several minutes, the
charging lamp in green color will turn off.
9. Remove the battery pack while the battery
pack release button is held up.
[
[Fig.15]
]
EN
How to charge
1. Plug the charger into the AC outlet.
NOTE:
Sparks may be produced when the
plug is inserted into the AC power supply, but this is not a problem in terms
of safety.
2. Connect the battery pack fi rmly into the
charger.
1 Line up the alignment marks and
place the battery onto the dock on the
charger.
NOTE:
Not all battery packs display the
alignment mark (H) (on page 2).
2 Slide forward in the direction of the
arrow. [
[Fig.15]
]
-
13 -
Page 14
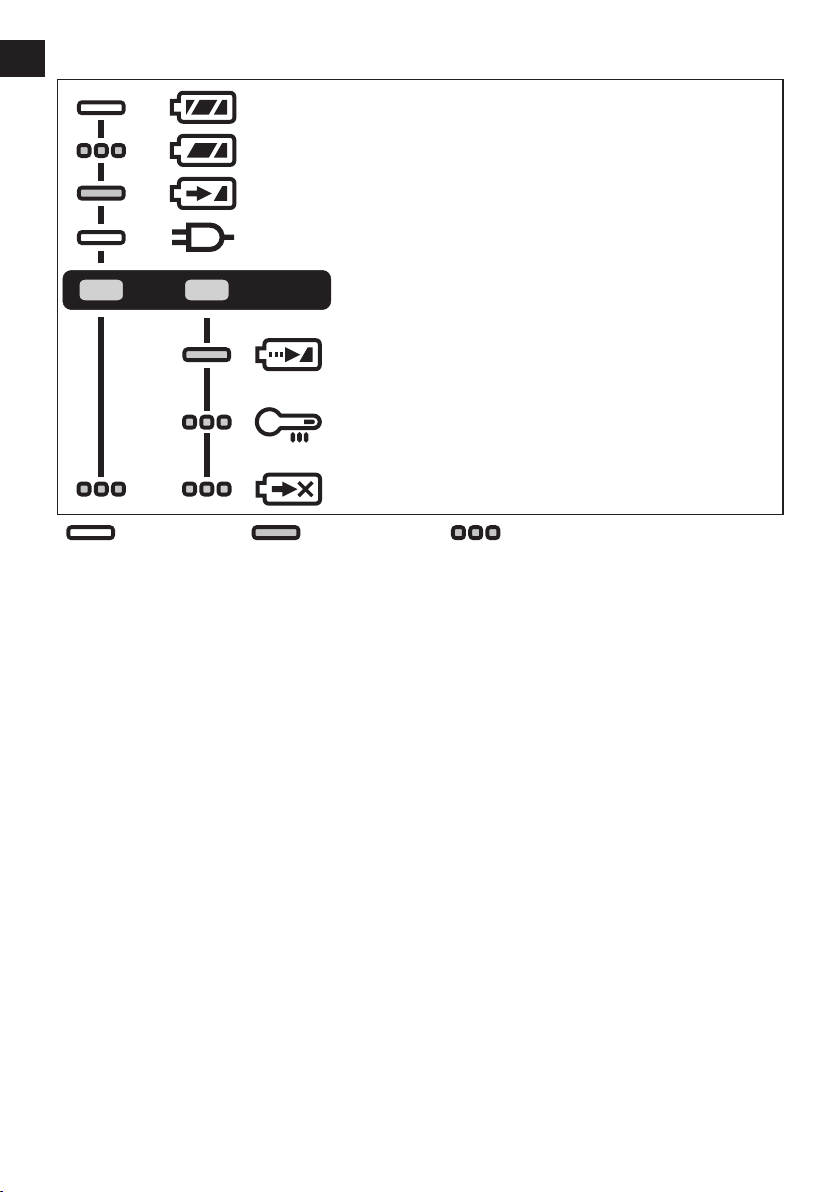
LAMP INDICATIONS
EN
Charging is completed. (Full charge.)
Battery is approximately 80% charged.
Now charging.
Charger is plugged into the AC outlet. Ready to charge.
(Green) (Orange)
Turn off Illuminated Flashing
VIII
.
MAINTENANCE
• Use only a dry, soft cloth for wiping the unit.
Do not use a damp cloth, thinner, benzine, or other volatile solvents for cleaning.
• In the event that the inside of the tool or battery pack is exposed to water, drain and allow to
dry as soon as possible. Carefully remove any dust or iron fi lings that collect inside the tool. If
you experience any problems operating the tool, consult with a repair shop.
Charging Status Lamp.
Left: green Right: orange will be displayed.
Battery pack is cool.
The battery pack is being charged slowly to reduce the load
on the battery.
Battery pack is warm.
Charging will begin when temperature of battery pack drops.
If the temperature of the battery pack is -10 °C or less,
charging status lamp (orange) will also start fl ashing. Charging
will begin when the temperature of the battery pack
Charging is not possible. Clogged with dust or malfunction of
the battery pack.
the
goes up.
-
14 -
Page 15

IX.
SPECIFICATIONS
MAIN UNIT
Model EY3640 EY3641
Motor 14.4 V DC
Ejection pressure 4410 N (450 kgf, 992 lbs)
Overall length
Weight (with battery pack:
EY9L45)
max. 615 mm (24-7/32˝)
min. 424 mm (16-11/16˝)
2.70 kg (6.00 lbs) 2.85 kg (6.30 lbs)
max. 884 mm (34-13/16˝)
min. 560 mm (22-1/16˝)
BATTERY PACK
Model EY9L45
Storage battery Li-ion Battery
Battery voltage 14.4 V DC (3.6 V × 8 cells)
BATTERY CHARGER
Model EY0L82
Electrical rating See the rating plate on the bottom of the charger
Weight 0.93 kg (2 lbs)
Full Charging time
NOTE: This chart may include models that are not available in your area.
Please refer to the latest general catalogue.
For the dealer name and address, please see the included warranty card.
EY9L45
60 min
EN
-
15 -
Page 16

Federal Communication Commission Interference Statement
EN
This equipment has been tested and found to comply with the limits for a Class B digital device, pursuant to Part 15 of the FCC Rules. These limits are designed to provide reasonable
protection against harmful interference in a residential installation. This equipment generates,
uses and can radiate radio frequency energy and, if not installed and used in accordance with
the instructions, may cause harmful interference to radio communications. However, there is
no guarantee that interference will not occur in a particular installation. If this equipment does
cause harmful interference to radio or television reception, which can be determined by turning
the equipment off and on, the user is encouraged to try to correct the interference by one of the
following measures:
• Reorient or relocate the receiving antenna.
• Increase the separation between the equipment and receiver.
• Connect the equipment into an outlet on a circuit different from that to which the receiver is
connected.
• Consult the dealer or an experienced radio/TV technician for help.
FCC Caution: To assure continued compliance, install and use in accordance with provided instructions. Use only the battery pack specifi ed in the instructions. Any changes or modifi cations
not expressly approved by the party responsible for compliance could void the user’s authority to
operate this equipment.
This device complies with part 15 of the FCC Rules. Operation is subject to the following two
conditions: (1) This device may not cause harmful interference, and (2) this device must accept
any interference received, including interference that may cause undesired operation.
This Class B digital apparatus complies with Canadian ICES-003.
X.
HARMONIZED STANDARDS
MAIN UNIT
Conforms to UL Std.60745-1
Certifi ed to CS Std.C22.2 No. 60745-1
BATTERY CHARGER
Conforms to UL Std.1310
Certifi ed to CS Std.C22.2 No. 223-M91
-
16 -
Page 17

Instructions originales: anglais
Traduction des instructions originales:
Autres langues
I
.
UTILISATION
PREVUE
Nous vous remercions d’avoir acheté le
Pistolet Obturateur de Panasonic. Ce Pistolet
Obturateur permet de pousser les matériaux
d’étanchéité. Le type saucisse et le type
cartouche sont utilisables avec ce modèle. La
vitesse peut être réglée en fonction du travail
à effectuer.
II.
AVERTISSEMENTS
GENERAUX SUR
LA SECURITE
DES OUTILS
MECANIQUES
AVERTISSEMENT
Lisez tous les avertissements de sécurité et toutes les instructions.
Le non-respect des avertissements et des
instructions peut entraîner une électrocution, un incendie et/ou des blessures
graves.
Conservez tous les avertissements et
instructions pour les consulter ultérieurement.
Le terme « outil mécanique » dans les
avertissements se réfère à votre outil mécanique alimenté par le réseau électrique
(avec cordon) ou un outil mécanique sur
batterie (sans cordon).
Sécurité de la zone de
travail
1) Gardez la zone de travail propre et bien
aérée.
Les endroits encombrés et sombres
invitent les accidents.
2) Ne faites pas fonctionner les outils
mécaniques dans des atmosphères
explosives, comme en présence de
liquides infl ammables, de gaz ou de
poussière.
Les outils mécaniques génèrent des étincelles qui peuvent enfl ammer la poussière
ou les vapeurs.
3) Gardez les enfants et les spectateurs
éloignés lors du fonctionnement d’un
outil mécanique.
Les distractions peuvent en faire perdre
le contrôle.
Sécurité électrique
1) La fi che des outils mécaniques doit
correspondre aux prises secteur.
modifi ez la fi che sous aucun prétexte.
N’utilisez pas de fi che adaptatrice avec
les outils mécaniques mis à la terre.
Des fi ches non modifi ées et des prises
secteur correspondant réduisent les
risques d’électrocution.
2) Évitez tout contact physique avec les
surfaces mises à la terre telles que
tuyaux, radiateurs, micro-ondes et
réfrigérateurs.
Il y a un risque d’électrocution supplémentaire si votre corps est mis à la terre.
3) N’exposez pas les outils mécaniques à
la pluie ou à des conditions humides.
De l’eau pénétrant dans un outil mécanique augmente le risque d’électrocution.
4) Ne malmenez pas le cordon. N’utilisez
jamais le cordon pour transporter,
pour tirer ou pour débrancher l’outil
mécanique. Gardez le cordon éloigné
de la chaleur, de l’huile, d’objets aux
bords coupants ou de pièces en mouvement.
Les cordons endommagés on emmêlés
augmentent le risque d’électrocution.
5) Lors du fonctionnement des outils
mécaniques à l’extérieur, utilisez une
rallonge adaptée à l’utilisation à l’extérieur.
L’utilisation d’un cordon adapté à l’utilisation à l’extérieur réduit les risques d’électrocution.
6) Si le fonctionnement d’un outil mé-
canique dans un endroit humide est
inévitable, utilisez une alimentation
électrique pour dispositif protégé
contre le courant résiduel (RCD).
L’utilisation d’un RCD réduit les risques
d’électrocution.
Ne
FR
-
17 -
Page 18

Sécurité personnelle
1) Restez alerte, regardez ce que vous
FR
faites et faites preuve de bon sens
lorsque vous utilisez un outil mécanique. N’utilisez pas un outil mécanique alors que vous êtes fatigué ou
sous les effets de drogue, d’alcool ou
de médicaments.
Un moment d’inattention pendant que
vous faites fonctionner l’outil mécanique
peut entraîner des blessures graves.
2) Utilisez un équipement de protection
individuelle.
Portez toujours des lunettes de protection. Un équipement de protection, par
exemple un masque anti poussières, des
chaussures de sécurité antidérapantes,
un casque ou une protection auditive,
utilisé dans des conditions appropriées
réduira les risques de blessures corporelles.
3) Empêchez le démarrage involontaire.
Assurez-vous que l'interrupteur est en
position d’arrêt avant de brancher la
source d’alimentation et/ou la batterie
autonome, de ramasser ou de transporter l’outil.
Le transport d’outils mécaniques avec le
doigt sur l’interrupteur ou le branchement
d’outils mécaniques dont l’interrupteur
est sur la position de marche invite les
accidents.
4) Retirez toute clé de réglage ou clé
avant de faire fonctionner l’outil électrique.
Une clé ou une clé de contact laissée
attachée à une partie rotative de l’outil
mécanique peut entraîner des blessures
corporelles.
5) Ne vous mettez pas en déséquilibre.
Gardez une bonne prise au sol et votre
équilibre à tout moment.
Ceci permet un meilleur contrôle de l’outil
mécanique dans des situations inattendues.
6) Habillez-vous correctement. Ne portez
pas de vêtements lâches ou de bijoux.
Gardez vos cheveux, vêtements et
gants éloignés des pièces en mouvement.
Des vêtements lâches, des bijoux ou des
cheveux longs peuvent se faire prendre
dans les pièces en mouvement.
7) Si des dispositifs pour la connexion
d’appareils d’extraction et de ramassage de la poussière sont fournis,
assurez-vous qu’ils sont connectés et
correctement utilisés.
L’utilisation d'appareil de collecte de
poussière peut réduire les risques liés à la
poussière.
Utilisation et soins de
l’outil mécanique
1) Ne forcez pas l’outil mécanique. Utilisez l’outil mécanique correct pour
votre application.
L’outil mécanique correct exécute mieux
le travail dans de meilleures conditions
de sécurité s’il est utilisé à l’allure pour
laquelle il a été conçu.
2) N’utilisez pas l’outil mécanique si l’in-
terrupteur ne le met pas en marche ou
ne l’arrête pas.
Tout outil mécanique qui ne peut pas être
contrôlé par son interrupteur est dangereux et doit être réparé.
3) Débranchez la fi che de la source
d’alimentation et/ou du bloc de batterie
avant d’effectuer tout ajustement, de
changer d’accessoire ou de ranger
l’outil mécanique.
De telles mesures de sécurité préventives
réduisent les risques de faire démarrer
l’outil mécanique accidentellement.
4) Rangez les outils mécaniques inutili-
sés hors de la portée des enfant set ne
laissez personne qui n’est pas familiarisé avec l’outil mécanique ou ses
instructions faire fonctionner l’outil
mécanique.
Les outils mécaniques sont dangereux
dans les mains des utilisateurs manquant
d’entraînement.
5) Entretenez bien les outils mécaniques.
Vérifi ez l’alignement ou l’emboîtage
des pièces en mouvement, l’intégrité
des pièces et toute autre condition
pouvant affecter le fonctionnement de
l’outil mécanique. S’il est endommagé,
faites réparer l’outil mécanique avant
de l’utiliser.
De nombreux accidents sont provoqués
par des outils mécaniques mal entretenus.
-
18 -
Page 19

6) Maintenez les outils de coupe affûtés
et propres.
Les outils de coupe bien entretenus avec
des lames bien affûtées ont moins de
chances de gripper et sont plus faciles à
contrôler.
7) Utilisez l’outil mécanique, les ac-
cessoires et les forets de l’outil, etc.
conformément à ces instructions, en
prenant en compte les conditions de
fonctionnement et la tâche à effectuer.
L’utilisation de l’outil mécanique pour des
opérations différentes de celles prévues
peut entraîner une situation dangereuse.
Utilisation et soins de la
batterie de l’outil
1) N’effectuez la recharge qu’avec le
chargeur spécifi é par le fabricant.
Un chargeur convenant à un bloc de batterie peut entraîner un risque d’incendie
lorsqu’un autre bloc de batterie est utilisé.
2) N’utilisez les outils mécaniques
qu’avec les bloc de batterie spécialement conçus pour eux.
L’utilisation de tout autre bloc de batterie
peut entraîner un risque de blessure et
d’incendie.
3) Lorsqu’un bloc de batterie n’est pas
utilisé, gardez-le éloigné d’objets
métalliques comme agrafes, pièces de
monnaie, clés, clous, vis ou tout autre
petit objet métallique pouvant établir
une connexion entre les deux bornes.
Si les bornes de la batterie sont mises
en court-circuit, cela peut entraîner des
brûlures ou un incendie.
4) Si elle est malmenée, du liquide peut
s’échapper de la batterie. Évitez tout
contact.
produit, rincez à l’eau.
entre en contact avec les yeux, consultez un médecin.
Le liquide éjecté de la batterie peut entraîner des irritations ou des brûlures.
Si un contact accidentel se
Si du liquide
Réparation
1) Faites réparer votre outil mécanique
par du personnel de réparation qualifi é
en n’utilisant que des pièces de rechange identiques.
Ceci assure le maintien de la sécurité de
l’outil mécanique.
III
.
REGLES DE
SECURITE
PARTICULIERES
1) Portez une protection auditive. L’expo-
sition prolongée à du bruit de haute densité peut entraîner la perte de l’ouïe.
2) N’oubliez pas que cet appareil est toujours prêt à fonctionner, parce qu’il ne
doit pas être branché dans une prise
électrique.
3) Tenez l’outil par les surfaces de prise
isolées lors
opération lors de laquelle l’outil découpe risque d’entrer en contact avec
des câblages
Le contact avec un fi l sous tension fera
passer le courant dans les pièces métalliques exposées et électrocutera l’opérateur.
4) Si un foret se coince, mettez immédiatement l'interrupteur de la gâchette sur arrêt
afi n d'éviter une surcharge qui pourrait
endommager la batterie autonome ou le
moteur. Utilisez le mouvement inverse
pour desserrer les forets bloqués.
5) NE manœuvrez PAS le levier d’inversion
marche avant - marche arrière lorsque le
commutateur principal est sur la position
de marche. La batterie se déchargerait
rapidement et la perceuse serait endommagée.
6) Lorsque vous rangez ou transportez
l’outil, mettez le levier d’inversion marche
avant - marche arrière sur la position centrale (verrouillage du commutateur).
7) Ne forcez pas l’outil en maintenant la
gâchette de contrôle de vitesse enfoncée
à moitié (mode de contrôle de la vitesse)
de sorte que le moteur s’arrête.
de protection s’activera et pourra empêcher le contrôle de la vitesse.
cas, relâchez la gâchette de contrôle de
la vitesse, puis serrez-la à nouveau pour
le fonctionnement normal.
8) Évitez la pénétration de poussière dans le
mandrin.
9) Ne touchez pas les pièces rotatives pour
éviter toute blessure.
que vous effectuez une
cachés.
Le circuit
Dans ce
FR
-
19 -
Page 20

10) N’utilisez pas l’outil continuellement pendant une longue période. Arrêtez d’utiliser
FR
l’outil de temps en temps pour éviter une
augmentation de la température et de surchauffer le moteur.
11) Ne laissez pas tomber l’outil.
Symbole Signifi cation
V
Ah
AVERTISSEMENT
La poussière résultant de ponçage, sciage,
meulage, perçage à haute pression et de
toute autre activité de construction, contient
des produits chimiques réputés être cause
de cancer, de malformations congénitales
ou autres problèmes reproductifs. Ces
produits chimiques sont, par exemple :
• Le plomb contenu dans les peintures à
base de plomb
• La silice cristalline, contenue dans les
briques, le ciment et autres produits de
maçonnerie; et
• L’arsenic et le chrome provenant du bois
traité chimiquement.
Pour réduire l’exposition à ces produits
chimiques, il faut travailler dans un lieu bien
aéré et porter un équipement de sécurité
approprié tel que certains masques anti
poussière conçus spécialement pour fi ltrer
les particules microscopiques.
Capacité électrique de la
Afi n de réduire le risque de
blessure, il est nécessaire que
l’utilisateur lise et comprenne
Volts
Courant continu
batterie autonome
le mode d’emploi.
IV
.
CHARGEUR DE
BATTERIE ET
BATTERIE AUTO
NOME
Instructions de sécurité
importantes
1) CONSERVEZ CES INSTRUCTIONS - La
présente notice contient des instructions
de sécurité et d'utilisation importantes
pour le chargeur de batterie.
2) Avant d’utiliser le chargeur de batterie, lisez toutes les instructions et les marques
d'avertissement fi gurant sur le chargeur
de batterie, la batterie autonome et le
produit utilisant la batterie autonome.
3) MISE EN GARDE - Pour réduire le
risque de blessures, chargez la batterie
autonome Panasonic seulement comme
indiqué à la dernière page. Les autres
types de batteries risquent d’exploser et
de causer des blessures corporelles et
des dommages matériels.
4) N’exposez pas le chargeur et le bloc de
batterie à la pluie ou à la neige et ne les
utilisez pas dans un endroit humide.
5) Pour réduire les risques de dommages à
la fi che et au cordon secteur, débranchez
le chargeur en tirant la fi che et non le
cordon.
6) Veillez à acheminer le cordon de façon
que personne ne risque de le piétiner,
de trébucher dessus, d’endommager ou
d’étirer le cordon.
7) N’utilisez une rallonge qu'en cas de nécessité absolue. Si vous utilisez une rallonge inadéquate, vous risquez de causer
un incendie ou une électrocution.
devez absolument utiliser une rallonge,
veillez à respecter les points suivants:
a. Le nombre, la taille et la forme des
broches de la fi che de la rallonge
doivent être identiques à ceux de la
fi che du chargeur de batterie.
b. La rallonge doit avoir des conducteurs
en bon état et être elle-même en bon
état d’utilisation.
Si vous
-
20 -
Page 21

c. La taille des conducteurs doit être suf-
fi sante pour les normes d’intensité en
ampères du chargeur, comme indiqué
ci-dessous.
TAILLE AWG MINIMUM RECOMMANDÉE
DES RALLONGES POUR CHARGEURS DE
Norme
d’entrée CA.
Égal ou supérieur à
0 2 18 18 18 16
8) N’utilisez pas un chargeur dont la fi che ou
le cordon est endommagé –remplacez-les
immédiatement.
9) N’utilisez pas le chargeur s'il a reçu un
choc violent, s'il a subi une chute ou s’il a
été endommagé de quelque manière que
ce soit; confi ez-le à un technicien qualifi é.
10) Ne démontez pas le chargeur; si des
travaux d’entretien ou de réparation sont
nécessaires, confi ez-le à un technicien
qualifi é.
ment, vous risquez de causer une électrocution ou un incendie.
11) Pour réduire le risque d’électrocution,
débranchez le chargeur de la prise de
courant avant d’entreprendre des travaux
d’entretien ou de nettoyage.
12) Le chargeur et la batterie autonome ont
été conçus spécifi quement pour fonction-
ner ensemble. Ne tentez pas de charger
un autre outil à batterie ou une autre
batterie autonome avec ce chargeur.
13) Ne tentez pas de charger la batterie autonome avec un autre chargeur.
14) N’essayez pas de démonter le chargeur
et le carter à batterie.
15) Ne rangez pas le chargeur et la batterie à
un endroit où la température peut atteindre ou dépasser 50 ˚C (122 ˚F) (sous
un abri métallique, ou dans une voiture en
été); cela pourrait provoquer une détérioration de la capacité de la batterie.
16) Ne chargez pas une batterie à MOINS DE
0 ˚C (32 ˚F) ou PLUS DE 40 ˚C (104 ˚F).
Ceci est très important.
BATTERIES
Ampères Taille AWG du
Mais
inférieur à
Si vous le remontez incorrecte-
cordon
Longueur du
cordon, pieds
25 50
100 150
17) N’incinérez pas les batteries. Cela pourrait provoquer un incendie.
18) Évitez toute utilisation dans un environnement dangereux.
geur à un endroit humide ou mouillé.
19) Le chargeur est conçu pour fonctionner
sur une puissance électrique domestique standard. Chargez uniquement à la
tension indiquée sur la plaque du fabricant. N’essayez pas d’utiliser de tension
différente.
20) Ne manipulez pas brutalement le cordon
secteur.
geur en le tenant par le cordon, ou ne le
tirez pas brutalement pour le débrancher
de la prise. Gardez le cordon à l’abri de la
chaleur, de l’huile et de bords coupants.
21) Chargez la batterie autonome à un
endroit bien ventilé; ne couvrez pas le
chargeur et la batterie autonome avec un
chiffon, etc., pendant la charge.
22) Si vous utilisez un accessoire non recommandé, un incendie, une électrocution,
des blessures risqueraient de s’ensuivre.
23) Ne court-circuitez pas la batterie. Un
court-circuit de la batterie risquerait de
faire passer un courant de forte intensité,
et une surchauffe, un incendie ou des
blessures risqueraient de s’ensuivre.
24) REMARQUE: Si le cordon secteur de cet
appareil est endommagé, il doit être remplacé exclusivement dans un atelier agréé
par le fabricant, car ces travaux exigent
l’utilisation d’outils spéciaux.
25) POUR RÉDUIRE LES RISQUES
D’ÉLECTROCUTION, CET APPAREIL
EST ÉQUIPÉ D’UNE FICHE POLARISÉE
(UNE LAME EST PLUS LARGE QUE
L’AUTRE).
Cette fi che ne pourra être insérée que
d'une seule façon dans une prise polarisée. Si la fi che ne peut pas être insérée
à fond dans la prise, insérez la fi che sens
dessus dessous. Si vous ne parvenez
toujours pas à insérer la fi che, adres-
sez-vous à un électricien qualifi é pour
installer une prise de courant adéquate.
Ne modifi ez la fi che en aucune façon.
Ne transportez jamais le char-
N’utilisez pas le char-
FR
-
21 -
Page 22

AVERTISSEMENT
• N’utilisez que la batterie autonome
FR
Panasonic conçue pour l’utilisation avec
cet outil rechargeable.
• Panasonic décline toute responsabilité
en cas de dommage ou d’accident causé
par l’utilisation d’une batterie autonome
recyclée ou de contrefaçon.
• Ne mettez pas la batterie autonome au
rebut dans un feu ou ne l’exposez pas à
une chaleur excessive.
• Ne laissez pas d’objets métalliques entrer
en contact avec les bornes de la batterie
autonome.
• Ne transportez pas ou ne rangez pas
la batterie autonome dans un récipient
contenant des clous ou tout autre objet
métallique.
• Ne chargez pas la batterie autonome
dans un endroit où la température est élevée comme à proximité d’un feu ou à la
lumière directe du soleil. Sinon la batterie
peut surchauffer, prendre feu ou exploser.
• Après avoir retiré la batterie autonome de
l’outil ou du chargeur, remettez toujours
le couvercle de la batterie autonome en
place.
Sinon, les contacts de la batterie
peuvent se mettre en court-circuit, entraînant le risque d’un incendie.
• Si la batterie autonome s’est détériorée,
la remplacer par une batterie neuve.
L’utilisation prolongée d’une batterie
autonome endommagée peut provoquer
des dégagements de chaleur, un départ
de feu ou l’explosion de la batterie.
• Pour éviter tout risque de fuite, surchauffe, génération de fumée, incendie et
explosion, suivez ces instructions lorsque
vous manipulez nos outils rechargeables
(corps principal de l’outil/batterie autonome/chargeur).
- Ne laissez pas les coupes de matériaux
ou la poussière se déposer sur la batterie autonome.
- Avant de ranger, retirez tous les débris
et poussière de coupe de la batterie
autonome, replacez le « cache-borne »
en plastique rouge, puis mettez dans
la case à outils, séparément des objets
métalliques (vis, clous, etc.).
Les dommages causés par des objets
en vrac dans la caisse ne seront pas
couverts par la garantie.
• Ne manipulez pas les outils rechargeables comme indiqué ci-dessous.
(Il existe un risque de production de
fumée, d’incendie et d’explosion)
- En les utilisant ou en les rangeant dans
des lieux exposés à la pluie ou à l’humidité
- En les utilisant plongés dans l’eau
V
.
RÉGLES DE SÉCURITÉ
COMPLÉMENTAIRES
1) Immédiatement arrêter l’outil s’il ne
semble pas fonctionner normalement.
2) La température du chargeur peut s’élever
en cours d’utilisation.
signe d’une anomalie de fonctionnement.
Ne chargez pas la batterie pendant une
longue période.
3) L’appareil électrique n’est pas prévu pour
être utilisé par des jeunes enfants ou des
personnes infi rmes sans surveillance.
4) Les jeunes enfants devraient être surveillé pour s’assurer qu’ils ne jouent pas avec
l’appareil.
Préparation du pistolet
obturateur
Pour la préparation du matériau d'étanchéité,
par exemple la découpe d'une ouverture au
diamètre souhaité, suivez les instructions sur
l'emballage de la cartouche/poche.
Ce n’est pas là le
-
22 -
Page 23

VI.
MONTAGE
REMARQUE:
Lorsque vous fi xez ou enlevez un matériau
d’étanchéité ou un accessoire ou bien lorsque
vous rangez l’unité principale, placez la
commande de vitesse d’application [Voir la
page.2 (K)] en position de verrouillage et retirez la batterie autonome de l’unité principale.
Insertion du matériau
d’étanchéité dans le
pistolet
Pour l’utilisation avec des
cartouches
1) Couper la pointe de la buse en un point
convenant au travail à effectuer.
[Fig.1]
2) Tirer la crémaillère à fond vers l’arrière.
[Fig.2]
3) Dévisser le support de tube du logement,
et retirer l’adaptateur de poche de la
crémaillère.
[Fig.3]
2) Tirer la crémaillère à fond vers l’arrière.
[Fig.2]
FR
3) Dévisser le support de tube du logement.
4) Visser l’adaptateur de poche sur le joint
de piston.
[Fig.7]
REMARQUE:
S’assurer que le plongeur tourne bien
régulièrement.
5) Installer le support de tube sur le logement, retirer le capuchon avant du support de tube, et insérer la poche.
[Fig.8]
6) Mettre la buse en place et installer le
capuchon avant sur le support de tube.
[Fig.9]
7) Pousser la crémaillère jusqu'à ce qu'elle
entre en contact avec la poche.
[Fig.10]
Fixation ou retrait de la
4) Installer le support de tube sur le logement, retirer le capuchon avant du support de tube, et insérer la cartouche.
[Fig.4]
5) Mettre la buse en place et installer le
capuchon avant sur le support de tube.
[Fig.5]
6) Pousser la crémaillère jusqu’à ce qu’elle
entre en contact avec la cartouche.
[Fig.6]
Pour l’utilisation avec des
poches
1) Couper la pointe de la buse en un point
convenant au travail à effectuer.
[Fig.1]
batterie autonome
MISE EN GARDE:
Avant d’insérer la batterie autonome, assurez-vous que la gâchette de l’outil fonctionne
correctement et remettez-le sur la position
d’arrêt après l’avoir relâché.
1. Pour connecter la batterie autonome :
[
[Fig.11]
Alignez les marques d’alignement mises
en valeur et fi xez la batterie autonome.
Faites glisser la batterie autonome jusqu’à
ce qu’elle se verrouille en position.
2. Pour retirer la batterie autonome:
[
[Fig.11]
Appuyez sur le bouton et faites glisser la
batterie autonome vers l’avant.
23 -
-
]
]
Page 24

V
II
.
FONCTIONNEMENT
FR
Emploi du pistolet obturateur
1) Tenir la poignée en même temps que le
support de tube.
[Fig.12]
2) Placer la buse dans la rainure, puis appuyez sur la gâchette (L). Le crémaillère
va avancer.
3) Le support de tube peut être tourné. Cela
permet d’appliquer encore plus facilement
le matériau d’étanchéité dans des endroits diffi ciles à travailler.
4) Régler la vitesse de la crémaillère en
fonction du travail à effectuer. Les vitesses peuvent être modifi ées facilement
tout en travaillant en tournant la commande de vitesse d’application (K) avec
le doigt.
MISE EN GARDE:
S’assurer de bloquer le déclencheur
(position “0”) après avoir terminé le
travail.
Ajustement de la vitesse
0 1 Lente Rapide 5
Blocage
5) La crémaillère se rétractera légèrement
lorsque vous relâcherez la gâchette, afi n
d'éviter l’égouttage.
MISE EN GARDE:
L’égouttage peut se produire avec de
petites ouvertures de buses ou des
matériaux d’étanchéité exceptionnellement mous.
6) Vous pouvez appuyer plusieurs fois sur la
gâchette pour relâcher de petites doses
de matériau. Tant que vous appuyez
sur la gâchette dans la seconde qui suit
chaque pression, la crémaillère avance
lentement sans se rétracter.
Pour les matériaux d’étanchéité
de consistance dure
• Lors de l’utilisation d’un matériau d'étanchéité dur, la fonction de protection de la
batterie autonome et du moteur peut interrompre le fonctionnement de l’outil. Si cela
se produit, régler le cadran de vitesse et
appuyer de nouveau sur la gâchette pour
continuer l’opération.
• Réchauffer les matériaux d’étanchéité
jusqu’à ce qu’ils ramollissent.
• Augmenter la vitesse en sélectionnant la
commande de vitesse d’application.
• Élargir le diamètre de coupe de la buse.
[Fig.13]
MISE EN GARDE:
• S’assurer que le capuchon avant est serré
fermement lors des travaux.
• Ne pas toucher la crémaillère afi n d’éviter
de se pincer les doigts.
• Utiliser l’outil uniquement pour l’objectif
prévu; ne pas l’utiliser pendant de longues
périodes sans interruption, cela pourrait
endommager le pistolet ou coincer la cartouche.
mide, ou à matériau d’étanchéité durci.
• Si l’outil est opéré pendant de longues
périodes, le moteur peut surchauffer. Il est
donc recommandé de le couper de temps
à autre.
• L’emploi de matériaux infl ammables, même
pour le nettoyage, est interdit.
• Le niveau de température ambiante
moyenne se situe entre 0 °C (32 °F) et
40 °C (104 °F).
utilisée alors que sa température est inférieure à 0 °C (32 °F), l’outil pourrait ne pas
fonctionner correctement.
• Lorsqu’une batterie autonome froide
(en-dessous de 0°C (32°F)) doit être rechargée dans une pièce chaude, laissez la
batterie autonome dans la pièce pendant
une heure au moins et rechargez-la quand
elle a atteint la température ambiante.
• Si l’outil est utilisé dans un environnement
froid (en hiver par exemple), ou s’il est arrêté fréquemment pendant l’utilisation, il est
possible que la caractéristique de protection
contre la surchauffe ne s’active pas.
Ne pas insérer de cartouche hu-
Si la batterie autonome est
-
24 -
Page 25

[Batterie]
[Chargeur de batterie]
Pour une utilisation correcte
de la batterie autonome
[Fig.14]
• Les batteries rechargeables ont une longévité limitée.
• Pour une longévité optimale de la batterie,
rangez la batterie autonome Li-ion sans la
charger après l’avoir utilisée.
• Lors de l’utilisation de la batterie autonome,
assurez-vous de la bonne ventilation du lieu
de travail.
Pour un usage sans risque
• La batterie est conçue pour être installée en
deux étapes pour des raisons de sécurité.
Assurez-vous que la batterie est installée
correctement dans l’unité principale avant
toute utilisation.
• Lorsque la batterie autonome n’est pas
connectée fermement à la mise sous
tension, le témoin d’avertissement de
surchauffe et le témoin d’avertissement
de faible batterie clignotent pour indiquer
qu’un fonctionnement sans danger n’est pas
possible et l’unité principale ne tourne pas
normalement. Branchez la batterie autonome dans l’unité de l’outil jusqu’à ce que
l’indicateur rouge ou jaune disparaisse.
Recyclage de la batterie
autonome
ATTENTION:
La batterie Li-ion que vous vous êtes
procurée est recyclable.
Pour des renseignements sur le recyclage de la batterie, veuillez composer
le 1-800-8-BATTERY.
Recharge
MISE EN GARDE:
1) Si la température de la batterie autonome
descend en dessous de -10 ºC (14 ºF)
environ, la charge s’arrête automatiquement afi n de prévenir la dégradation de la
batterie.
2) Le niveau de température ambiante
moyenne se situe entre 0 °C (32 °F) et
40 °C (104 °F).
est utilisée alors que sa température est
inférieure à 0 °C (32 °F), l’outil pourrait ne
pas fonctionner correctement.
3) Utilisez le chargeur à des températures
comprises entre 0 °C et 40 °C, et chargez
la batterie à une température identique à
celle de la batterie elle-même. (Il ne doit
pas y avoir plus de 15 °C de différence
entre la température de la batterie et celle
de l’endroit où vous chargez.)
4) Lorsqu’une batterie autonome froide
(en-dessous de 0 °C (32 °F)) doit être
recharge dans une pièce chaude, laissez
la batterie autonome dans la pièce pendant une heure au moins et rechargez-la
quand elle a atteint la température ambiante.
5) Laissez refroidir le chargeur quand vous
rechargez plus de deux batteries autonomes à la suite.
6) Ne mettez pas vos doigts dans les trous
des connecteurs lorsque vous prenez les
chargeurs ou à n’importe quelle occasion.
7) Pour éviter les risques d’incendie ou d’endommagement du chargeur de batterie.
• Ne bouchez pas les trous d’aération du
chargeur et de la batterie autonome.
• Débranchez le chargeur lorsque vous ne
l’utilisez pas.
REMARQUE:
Votre batterie autonome n’est pas
complètement chargée au moment de
l’achat.
tement la batterie avant son utilisation.
Si la batterie autonome
Veillez à bien charger complè-
FR
-
25 -
Page 26

Procédure de recharge
1. Branchez le cordon d’alimentation du
FR
chargeur dans une prise secteur.
REMARQUE:
Des étincelles peuvent être produites
lorsque la fi che est introduite dans la
prise d’alimentation secteur; toutefois, ceci ne pose aucun problème de
sécurité.
2. Raccorder fermement la batterie autonome au chargeur.
1 Alignez les marques d’alignement et
placez la batterie dans le poste d’accueil sur le chargeur.
REMARQUE:
Certaines batteries autonomes ne
présentent pas de marque d’alignement (H) (page 2).
2 Faites glisser vers l’avant dans le sens
de la fl èche. [
3. Pendant la charge, le témoin s’allume.
Lorsque la charge est terminée, un interrupteur électronique s’actionne pour protéger la batterie.
• La charge ne peut pas démarrer si la
batterie autonome est chaude (par
exemple, à la suite d’un long travail de
perçage).
clignote jusqu’à ce que la batterie se soit
refroidie.
automatiquement.
4. Le témoin de charge (vert) clignote lentement dès que la batterie est chargée à
environ 80%.
5. Lorsque le chargement est terminé, le témoin de charge de couleur verte s’éteint.
6. Lorsque la température de la batterie autonome est de 0 ºC ou moins, la batterie
autonome prend plus longtemps à charger
que la durée standard.
Même lorsque la batterie est complètement chargée, elle n’aura qu’environ 50%
de la puissance d’une batterie complètement chargée à une température de
fonctionnement normale.
7. Consultez un distributeur agréé si le témoin de charge (vert) ne s’éteint pas.
[Fig.15]
Le témoin d’attente orange
La charge commence alors
]
8. Si une batterie complètement chargée est
à nouveau insérée dans le chargeur, le témoin de charge s’allume.
minutes, le témoin de charge de couleur
verte s’éteindra.
9. Retirez la batterie autonome lorsque le
bouton de libération de batterie autonome
est en position haute. [
Après quelques
[Fig.15]
]
-
26 -
Page 27

INDICATION DU VOYANT
Chargement terminé. (Pleine charge)
La batterie est chargée à environ 80%.
Chargement en cours.
Le chargeur est branché dans la prise secteur. Prêt pour la charge.
(Vert) (Orange)
Éteint Allumé Clignotant
VIII
.
ENTRETIEN
• Nettoyez l’appareil au moyen d’un chiffon sec et propre.
N’utilisez ni eau, ni solvant, ni produit de nettoyage volatile.
• Au cas où l’intérieur de l’outil ou du bloc batterie serait exposé à de l’eau, enlevez l’eau et
laissez sécher dès que possible. Enlevez soigneusement toutes saletés ou limailles de fer qui
s’accumulent à l’intérieur de l’outil.
l’outil, prenez contact avec votre centre de service agréé le plus proche.
Témoin de l’état de charge.
Gauche: vert Droite: orange s’affi chent.
La batterie autonome est froide.
La batterie autonome est chargée lentement pour réduire
l’effort de la batterie.
La batterie autonome est chaude.
La charge commence lorsque la température de la batterie autonome
descend. Lorsque la température de la batterie autonome est de –10 ºC ou
moins, le témoin de charge (orange) se met également à clignoter. La charge
commence lorsque la température de la batterie autonome augmente.
Impossible de charger. Colmatage par la poussière ou mauvais fonctionnement de la batterie autonome.
Si vous rencontrez des problèmes lors de l’utilisation de
FR
-
27 -
Page 28

IX.
CARACTÉRISTIQUES TECHNIQUES
FR
UNITÉ PRINCIPALE
Modèle EY3640 EY3641
Moteur 14,4 V CC
Pression d’éjection 4410 N (450 kgf, 992 lbs)
Longueur hors-tout
Poids (avec batterie autonome:EY9L45)
max. 615 mm (24-7/32˝)
min. 424 mm (16-11/16˝)
2,70 kg (6,00 lbs) 2,85 kg (6,30 lbs)
max. 884 mm (34-13/16˝)
min. 560 mm (22-1/16˝)
BATTERIE AUTONOME
Modèle EY9L45
Stockage de la batterie Batterie Li-ion
Tension de la batterie 14,4 V CC (3,6 V × 8 cellules)
CHARGEUR DE BATTERIE
Modèle EY0L82
Puissance nominale
Poids 0,93 kg (2 lbs)
Durée de chargement
complète
REMARQUE: Ce tableau peut inclure des modèles non disponibles dans votre région.
Veuillez vous reporter au catalogue général le plus récent.
Pour obtenir le nom et l’adresse du revendeur, veuillez consulter la carte de
garantie incluse.
Voir la plaque signalétique se trouvant sur le côté inférieur du
chargeur.
EY9L45
60 min
-
28 -
Page 29

Déclaration sur le brouillage de la Commission Fédérale des
Communications
Cet équipement a été testé et déclaré conforme aux limites des appareils numériques de classe
B, conformément a la section 15 du règlement de la FCC.
fournir une protection raisonnable contre les brouillages préjudiciables dans une installation
résidentielle. Cet équipement produit, utilise et peut émettre des énergies de fréquence radio et
s’il n’est pas installé conformément aux instructions, il pourra provoquer des brouillages préjudiciables aux communications radio. Il n’y a toutefois aucune garantie que ces brouillages ne se
produisent pas lors d’une installation particulière.
préjudiciables à la réception de la radio ou de la télévision, ce qui peut être vérifi é en mettant en
marche puis en arrêtant l’équipement, l’utilisateur est encouragé à éliminer le brouillage selon
l’une des mesures suivantes :
• Réorienter ou déplacer l’antenne réceptrice.
• Augmenter l’espacement entre l’équipement et le récepteur.
• Brancher l’équipement à une prise d’un circuit différent de celui auquel le récepteur est branché.
• Consulter un distributeur ou un technicien de radio télévision expérimenté pour obtenir une
aide.
Avertissement de la FCC : afi n d’assurer la continuité de la conformité, installer et utiliser selon
les instructions données. Utiliser seulement les blocs batteries spécifi és dans les instructions.
Tout changement ou modifi cation non expressément approuvé par les parties responsables de
la conformité pourraient faire perdre à l’utilisateur le droit de faire fonctionner cet équipement.
Cet appareil est conforme au chapitre 15 du règlement de la FCC. Le fonctionnement est soumis aux deux conditions suivantes : (1) cet appareil ne peut pas provoquer de brouillage préjudiciable et (2) cet appareil doit pouvoir accepter n’importe quel brouillage reçu incluant ceux qui
pourraient provoquer un fonctionnement non désiré.
Cet appareil numérique de la classe B est conforme à la norme NMB-003 du Canada.
Si cet équipement provoque des brouillages
Ces limites ont été défi nies pour
FR
X.
AUX NORMES HARMONISÉES
UNITÉ PRINCIPALE
Conforme à la norme UL Std.60745-1
Certifi é CS Std.C22.2 No. 60745-1
CHARGEUR DE BATTERIE
Conforme à la norme UL Std.1310
Certifi é CS Std.C22.2 No. 223-M91
29 -
-
Page 30

Manual de instrucciones original: Inglés
Traducción del manual de instrucciones
original: Otros idiomas
I
.
USO
ES
Agradecemos su preferencia al comprar la
Pistola de Sellado Panasonic. Esta Pistola
de Sellado sirve para aplicar a presión los
componentes de sellado. Este modelo permite la aplicación de componentes que vengan
en cualquiera de las siguientes presentaciones: empaque transparente y cartucho. La
velocidad se puede ajustar de acuerdo con el
trabajo.
II.
ADVERTENCIAS
GENERALES DE
SEGURIDAD DE
LA HERRAMIENTA
ELÉCTRICA
ADVERTENCIA
Lea todas las advertencias de seguridad
y todas las instrucciones.
No respetar las siguientes advertencias e
instrucciones puede ocasionar una descarga eléctrica, incendios y/o lesiones graves.
Guarde todas las advertencias e instrucciones para futuras consultas.
El término “herramienta eléctrica” en las
advertencias se refi ere a su herramienta
eléctrica (por cable) operada mediante
conexión a la toma de corriente o a su herramienta eléctrica (sin cables) accionada
por batería.
Seguridad del lugar de
trabajo
1) Mantenga el lugar de trabajo limpio y
bien iluminado.
Un área desprolija u oscura es una causa
de accidentes.
2) No haga funcionar herramientas eléc-
tricas en un ambiente explosivo como
en lugares donde hay líquidos infl ama-
bles cajas o polvo.
Las herramientas eléctricas producen
chispas que pueden encender el polvo o
el vapor.
3) Mantenga a los niños y personal no
relacionado lejos mientras haga funcionar la herramienta eléctrica.
Una distracción puede hacer que pierda
el control.
Seguridad eléctrica
1) Los enchufes de herramientas eléctricas deben coincidir con el tomacorriente.
No utilice ningún adaptador de enchufe con herramientas eléctricas con
tierra (conexión a tierra).
Un enchufe no modifi cado y tomacorrien-
tes que coincidan reducirán el riesgo de
descarga eléctrica.
2) Evite el contacto de su cuerpo con una
superfi cie de tierra o conectado a una
tierra tales como tubos, radiadores,
microondas y refrigeradores.
Existe un mayor riesgo de descarga
eléctrica si su cuerpo queda conectado a
una tierra.
3) No exponga herramientas eléctricas a
la lluvia o condiciones de hume dad.
El agua que entra en una herramienta
eléctrica aumentará el riesgo de descarga
eléctrica.
4) No abuse del cable. Nunca utilice
el cable para transportar, tirar de o
desenchufar la herramienta eléctrica.
Mantenga el cable lejos de fuentes de
calor, aceite, bordes afi lados o piezas
móviles.
Un cable dañado o enredado puede aumentar el riesgo de descarga eléctrica.
5) Cuando haga funcionar una herramien-
ta eléctrica en exteriores, utilice un
cable de extensión adecuado para uso
en exteriores.
El uso de un cable adecuado para uso en
exteriores reduce el riesgo de descarga
eléctrica.
6) Si la operación de una herramienta de
poder en una localización húmeda es
inevitable, use una alimentación eléctrica protegida por un dispositivo de
corriente residual (RCD).
El uso del RCD reduce el riesgo de choques eléctricos.
Nunca modifi que el enchufe.
-
30 -
Page 31

Seguridad personal
1) Manténgase alerta, vigile lo que haga
y utilice sentido común cuando haga
funcionar la herramienta eléctrica. No
utilice una herramienta eléctrica mientras está cansado o bajo la infl uencia
de drogas, alcohol o medicamentos.
Un descuido instantáneo mientras hace
funcionar las herramientas eléctricas
puede provocar una herida personal de
gravedad.
2) Use equipo de protección personal.
Siempre use protección ocular.
Los equipos de protección, como mascarillas antipolvo, calzado de seguridad
antideslizante, casco o protección para
los oídos, utilizados para las condiciones
adecuadas reducirán las lesiones personales.
3) Evite el arranque involuntario. Asegú-
rese de que el interruptor esté en la
posición de apagado antes de conectar a la fuente de alimentación y/o
batería, al levantar la herramienta o al
transportarla.
El transporte de las herramientas eléctricas con su dedo en el interruptor o el
desenchufado de las herramientas eléctricas que tengan el interruptor conectado
puede provocar un accidente.
4) Retire cualquier llave de ajuste antes
de activar la herramienta eléctrica.
Si deja una llave instalada en una parte
giratoria de la herramienta eléctrica, podría causar lesiones personales.
5) No fuerce su cuerpo. Mantenga sus
pies bien apoyados en el piso y su
equilibrio en todo momento.
Esto permite un mejor control de la herramienta eléctrica en situaciones inespe
radas.
6) Vístase correctamente.
fl oja o joyas. Mantenga su cabello,
ropa y guantes lejos de piezas móviles.
Una ropa fl oja, joyas o cabello largo pue-
de quedar atrapado en piezas móviles.
No utilice ropa
7) Si se entregan dispositivos para recolección y extracción de polvo, asegúrese que estén conectados y se utilicen
bien.
El uso de un recolector de polvo puede
reducir los riesgos relacionados con el
polvo.
Uso y cuidados de herramientas eléctricas
1) No fuerce la herramienta eléctrica.
Utilice la herramienta eléctrica correcta
según su aplicación.
Una herramienta eléctrica correcta hará el
trabajo mejor y más seguro a la velocidad
para la que fue diseñada.
2) No utilice la herramienta eléctrica si
el interruptor no se conecta y desconecta.
Cualquier herramienta eléctrica que no
pueda controlarse con el interruptor es
peligroso y debe repararse.
3) Desconecte el enchufe del tomaco-
rriente y/o paquete de bate ría de la
herramienta eléctrica antes de hacer
un ajuste, cambio de accesorios o
guardado de herramientas eléctricas.
Estas medidas de seguridad preventiva
reducen el riesgo de que la herramienta
eléctrica arranque por accidente.
4) Guarde las herramientas eléctricas
apagadas en un lugar fuera del alcance de los niños y no permita que
personas que no saben el uso de la
herramienta eléctrica o estas instrucciones hagan funcionar la herramienta
eléctrica.
Las herramientas eléctricas son peligrosas en manos de usuarios no entrena
dos.
5) Mantenga las herramientas eléctricas.
Verifi que por mala alineación o atasca-
do de piezas móviles, rotura de piezas
y otras condiciones que puedan afectar el funcionamiento de las herramientas eléctricas. Si está dañada, haga
reparar la herramienta eléctrica antes
de utilizar.
Muchos accidentes se deben a herramientas eléctricas mal mantenidas.
ES
-
31 -
Page 32

6) Mantenga las herramientas de corte
afi ladas y limpias.
Las herramientas de corte bien mantenidas con bordes de corte afi lados tienen
ES
menos posibilidades de atascarse y son
más fáciles de controlar.
7) Utilice la herramienta eléctrica, los ac-
cesorios y las brocas, etc., de acuerdo
con estas instrucciones, teniendo en
cuenta las condiciones de trabajo y el
trabajo a realizar.
El uso de la herramienta eléctrica para
operaciones diferentes a las previstas
podría ocasionar una situación peligrosa.
Uso y cuidado de la herramienta a batería
1) Recargue sólo con el cargador especifi cado por el fabricante.
Un cargador que es adecuado para un
tipo de paquete de batería puede provocar el riesgo de incendio cuando se utiliza
con otro paquete de batería.
2) Utilice herramientas eléctricas sólo
con los paquetes de batería especifi -
cados.
El uso de otros paquetes de batería
puede provocar el riesgo de heridas e
incendio.
3) Cuando no se utilice el paquete de ba-
tería, mantenga alejado de otros objetos metálicos como ganchos de papel,
monedas, llaves, clavos, tornillos u
otros objetos pequeños que puedan
crear una conexión de un terminal a
otro.
El cortocircuito de terminales de batería
puede provocar quemaduras o un incendio.
4) En condiciones de uso abusivo, el
líquido puede salir de la batería; evite
el contacto.
to por accidente, lave con agua.
líquido entra en contacto con los ojos,
solicite además ayuda médica.
El líquido que sale de la batería puede
provocar irritación o quemaduras.
Si se produce un contac-
Si el
Servicio
1) Solicite el servicio de la herramienta
eléctrica a un técnico cualifi cado utili-
zando sólo repuestos idénticos.
Esto mantendrá la seguridad de la herramienta eléctrica.
III
.
NORMAS DE
SEGURIDAD
ESPECÍFICAS
1) Use protección auditiva. Una exposición
prolongada a ruidos de alta intensidad
puede provocar pérdida de audición.
2) Recuerde que esta herramienta puede
funcionar en cualquier momento ya que
no necesita enchufarse al tomacorriente
para hacerlo funcionar.
3) Mantenga la herramienta por las su-
perfi cies de empuñadura aisladas
cuando haga una operación donde la
herramienta de corte pueda entrar en
contacto con cables ocultos.
El contacto con un cable “vivo” puede
hacer que las piezas de metal expuestas
de la herramienta descarguen electricidad
al operador.
4) Si la broca se atasca, apague inmediatamente el gatillo para evitar una sobrecarga que pueda dañar la batería o el motor.
Use la función de marcha atrás para
afl ojar las brocas atascadas.
5) NO haga funcionar la palanca de avance/
marcha atrás cuando esté conectado el
interruptor principal. La batería se descargará rápidamente y la unidad puede
dañarse.
6) Cuando guarde o transporte la herramienta, coloque la palanca de avance/marcha
atrás en la posición central (bloqueo del
interruptor).
7) No fuerce la herramienta apretando el
gatillo de control de velocidad a la mitad
(modo de control de velocidad) para que
se pare el motor. El circuito de protección se activará haciendo que deje de
funcionar el control de velocidad. Si esto
sucediera, suelte el gatillo de control de
velocidad y vuelva a apretar nuevamente
para que funcione normalmente.
-
32 -
Page 33

8) Utilice la herramienta con cuidado para
que no entre polvo por el porta broca.
9) No toque las piezas giratorias para evitar
herirse.
10) No utilice la herramienta continuamente
durante un largo período de tiempo. Deje
de utilizar la herramienta de vez en cuando para evitar que suba la temperatura y
se caliente excesivamente el motor.
11) No deje caer la herramienta.
Símbolo Signifi cado
V
Ah
ADVERTENCIA
Algunos tipos de polvo creados al lijar,
serrar, pulir, taladrar y al hacer otras actividades de construcción contienen productos
químicos que el Estado de California sabe
que producen cáncer, defectos de nacimiento y otros daños en la reproducción.
Entre estos productos químicos se encuentran:
• El plomo de pinturas con base de plomo.
• El sílice cristalino de ladrillos, cemento y
otros productos de albañilería.
• El arsénico y el cromo de la madera tratada químicamente.
Para reducir la exposición a estos productos químicos: Trabaje en un lugar bien
ventilado y con el equipo de seguridad
aprobado como, por ejemplo, máscaras
contra el polvo que han sido diseñadas
especialmente para no dejar pasar las
partículas microscópicas.
Capacidad eléctrica del bloque
Para reducir el riesgo de
lesiones, el usuario deberá
leer y entender el manual de
Voltios
Corriente continua
de batería
instrucciones.
IV
.
PARA EL
CARGADOR DE
BATERIA Y LA
BATERIA
Instrucciones de seguridad importantes
1) GUARDE ESTAS INSTRUCCIONES -
Este manual contiene instrucciones de
seguridad importantes y de funcionamiento para el cargador de batería.
2) Antes de utilizar el cargador de batería,
lea todas las instrucciones y marcas de
precaución en el cargador de batería, la
batería y el producto que utilice la batería.
3) PRECAUCIÓN - Para reducir el riesgo de
heridas, cargue sólo la batería de Panasonic indicada en la última página. Los
otros tipos de baterías pueden explotar
provocando heridas personales y daños.
4) No exponga el cargador ni el paquete de
batería a la lluvia o nieve ni utilice en un
lugar húmedo.
5) Para reducir el riesgo de dañar el enchufe
y cable eléctrico, tire del enchufe y no del
cable cuando desconecte el cargador.
6) Cerciórese que el cable está instalado de
tal forma que nadie lo pise o enriede en
los pies o esté expuesto a otros daños o
tensión.
7) No debe utilizar un cable de extensión a
menos que sea absolutamente necesario.
El uso de un cable de extensión incorrecto puede provocar un riesgo de fuego
o descarga eléctrica.
cable de extensión, cerciórese de que:
a. las patas en el enchufe del cable de
extensión son del mismo número,
tamaño y forma que los del enchufe en
el cargador.
b. el cable de extensión está bien enchu-
fado y en buenas condiciones eléctricas.
c. el tamaño del cable es lo sufi ciente-
mente grande para las especifi ca-
ciones de amperios del cargador, tal
como se especifi ca a continuación.
Si debe utilizar un
ES
-
33 -
Page 34

TAMAÑO PROMEDIO MINIMO RECO-
MENDADO PARA LOS CABLES DE EX-
TENSION DE LOS CARGADORES DE
ES
Espec. entrada
de CA
Igual o mayor
que
0 2 18 18 18 16
8) No haga funcionar el cargador con un
cable o enchufe dañado - cámbielos
inmediatamente.
9) No haga funcionar el cargador si recibió
un golpe fuerte, se cayó o está dañado
de alguna otra forma; lleve al personal de
servicio califi cado.
10) No desarme el cargador, llévelo al personal de servicio califi cado cuando sea
necesario un servicio o reparación. Un
rearmado incorrecto puede traducirse en
un riesgo de descarga eléctrica o fuego.
11) Para reducir el riesgo de descarga eléctrica, desenchufe el cargador del tomacorriente antes de proceder a un mantenimiento o limpieza.
12) El cargador de batería y la batería fueron
diseñados específi camente para funcio-
nar uno con el otro. No trate de cargar
cualquier otra herramienta inalámbrica o
la batería con este cargador.
13) No trate de cargar la batería con ningún
otro cargador.
14) No intente desmontar el cargador de
baterías ni la caja de la batería.
15) No guarde la herramienta ni la batería en
lugares en los que la temperatura pueda
exceder de 50 ˚C (122 ˚F) (como pueda
ser en un cobertizo metálico de herramientas ni en un automóvil en verano),
porque podría ocasionar el deterioro de
la batería.
16) No cargue la batería cuando la temperatura sea INFERIOR a 0 ˚C (32 ˚F) no
SUPERIOR a 40 ˚C (104 ˚F).
Esto es muy importante.
BATERIA
Amperios
Pero menos de
Tamaño promedio
de cable
Longitud de
cable Pies
25 50
100 150
17) No queme la batería. Podría explotar si
se tira al fuego.
18) Evite ambientes peligrosos. No utilice el
cargador en lugares húmedos o mojados.
19) El cargador está diseñado para operar
con alimentación eléctrica doméstica normal.
Cargue sólo con la tensión indicada
en la placa de características. No intente
utilizarlo con otras tensiones.
20) No abuse del cable. Nunca transporte el
cargador por el cable o tire del cable para
desconectarlo del tomacorriente.
ga el cable lejos del calor, aceite y bordes
agudos.
21) Cargue la batería en un lugar con buena
circulación de aire, no cubra el cargador
de batería y la batería con un paño, etc.
durante la carga.
22) No se recomienda el uso de un enchufe
triple ya que puede provocar el riesgo
de fuego, descarga eléctrica o heridas
personales.
23) No cortocircuite la batería. Una batería
cortocircuitada puede provocar un gran
fl ujo de corriente, calentamiento excesivo
y el riesgo de fuego o heridas personales.
24) NOTA: Si el cable de alimentación de
este aparato está dañado debe cambiarlo
en un taller de reparaciones autorizado
por el fabricante porque son necesarias
herramientas de uso especial.
25) PARA REDUCIR EL RIESGO DE DESCARGA ELECTRICA, ESTE APARATO
TIENE UN ENCHUFE POLARIZADO
(UNA PATA ES MAS ANCHA QUE LA
OTRA).
Este enchufe entrará en el tomacorriente polarizado sólo de una forma. Si el
enchufe no entra completamente en el
tomacorriente, invierta el enchufe. Si no
entra incluso de esta forma, hable con un
electricista califi cado para que le instale
un tomacorriente adecuado. No cambie el
enchufe de ninguna forma.
Manten-
-
34 -
Page 35

ADVERTENCIA
• Solamente use paquetes de baterías
Panasonic que están diseñados para uso
con esta herramienta recargable.
• Panasonic no se responsabiliza de los
daños o accidentes causados por el uso
de una batería reciclada o falsifi cada.
• No elimine el paquete de baterías en el
fuego,ni lo exponga al calor excesivo.
• No permita que los objetos metálicos
toquen los terminales del paquete de
baterías.
• No transporte ni almacene el paquete
de baterías en el mismo contenedor que
clavos u otros objetos metálicos similares.
• No cargue el paquete de baterías en
un lugar a alta temperatura, como por
ejemplo cerca de una fuente de fuego o
bajo la luz solar directa. De otra manera,
la batería podría sobrecalentarse, encenderse o explotar.
• Después de extraer el paquete de baterías de la herramienta o el cargador,
siempre reinstale la cubierta del paquete. De otra manera, los contactos de la
batería podrían ser cortados, causando el
riesgo de fuego.
• Cuando el paquete de pilas se deteriora,
reemplácelo con uno nuevo. El uso
continuo de un paquete de pilas dañado
puede ser causa de la generación de
calor, ignición o rotura de batería.
• Para prevenir fugas, recalentamientos,
humos, incendios, y reventones, siga
estas instrucciones a la hora de manejar
sus herramientas eléctricas recargables
(cuerpo de la herramienta/batería/cargador).
- No deje que el polvo o los desechos de
los materiales caigan sobre la batería.
- Antes de almacenar, elimine los dese-
chos de material y el polvo de la batería,
instale la “cubierta de terminales” de
plástico roja y, a continuación, coloque
por separado de los objetos metálicos
(tornillos, clavos, etc.) en la caja de
herramientas.
Los daños causados por objetos sueltos
en la caja no estarán cubiertos por la
garantía.
• No maneje las herramientas eléctricas
recargables de la siguiente manera.
(Existe el riesgo de que se produzcan
humos, incendios y reventones)
- Usar o dejar en lugares expuestos a la
lluvia o la humedad
- Usar dentro del agua
V
.
REGLAS DE SEGURIDAD
ADICIONALES
1) Deje de utilizar inmediatamente la herramienta cuando se dé cuenta que hay algo
anómalo.
2) Durante la carga, el cargador puede
calentarse levemente. Esto es normal.
cargue la batería durante largos períodos
de tiempo.
3) Este aparato no ha sido diseñado para
ser utilizado por niños pequeños o personas disminuidas sin supervisión de un
adulto.
4) Los niños pequeños deben ser vigilados
para asegurarse de que no juegan con el
aparato.
Preparación de la pistola
de sellado
Para la preparación del compuesto de sellado, como el corte de la abertura al diámetro
deseado, siga las instrucciones del paquete
de cartucho/empaque.
VI.
MONTAJE
NOTA:
Al colocar o quitar un compuesto de sellado
o un accesorio o al almacenar la unidad
principal, coloque el control de velocidad de
aplicación (consulte la página 2 (K)) en la
posición de bloqueo y extraiga la batería de
la unidad principal.
Inserción del compuesto
de sellado dentro de la
pistola
Para utilización con cartuchos
1) Corte la punta de la boquilla en un punto
adecuado para el trabajo.
[Fig.1]
2) Tire la cremallera completamente hacia
atrás.
[Fig.2]
No
ES
-
35 -
Page 36

3) Desatornille el soporte del compuesto
desde la carcasa y saque de la cremallera el adaptador del empaque transparente.
ES
[Fig.3]
4) Instale el soporte del compuesto en la
carcasa, saque la tapa frontal del soporte
del compuesto e inserte el cartucho.
[Fig.4]
5) Instale fi rmemente la boquilla y ponga la
tapa frontal en el soporte del compuesto.
[Fig.5]
6) Impulse la cremallera hasta que tome
contacto con el cartucho.
[Fig.6]
Para utilización con los empaques transparentes
1) Corte la punta de la boquilla en un punto
adecuado para el trabajo.
[Fig.1]
2) Tire la cremallera completamente hacia
atrás.
[Fig.2]
3) Desatornille el soporte del compuesto de
la carcasa.
4) Atornille el adaptador del empaque transparente en la junta del pistón.
[Fig.7]
NOTA:
Asegúrese de que el émbolo gire sin
problemas.
5) Instale el soporte del compuesto en la
carcasa, saque la tapa frontal del soporte del compuesto e inserte el empaque
transparente.
[Fig.8]
6) Instale fi rmemente la boquilla y ponga la
tapa frontal en el soporte del compuesto.
[Fig.9]
7) Impulse la cremallera hasta que tome
contacto con el empaque transparente.
[Fig.10]
Colocación y extracción
de la batería
PRECAUCIÓN:
Antes de insertar el paquete de baterías, verifi que que el gatillo en la herramienta funciona
apropiadamente y que retorna a la posición
“OFF” cuando se libera.
1. Para acoplar la batería
Alinee las marcas de alineación resalta-
das y acople el paquete de baterías.
Deslice la batería hasta que se bloquee
en su posición.
2. Para extraer la batería: [
Presione el botón y deslice el paquete de
baterías hacia delante.
V
II
.
FUNCIONAMIENTO
: [
[Fig.11]
[Fig.11]
]
]
Forma de utilizar la pistola de sellado
1) Mantenga agarrada la pistola mientras
sujeta el soporte del compuesto.
[Fig.12]
2) Coloque la boquilla en la ranura y, en se-
guida, apriete el gatillo (L). La cremallera
se moverá hacia delante.
3) El soporte del compuesto se puede girar.
Así, se facilita el sellado en lugares difíciles de trabajar.
4) Ajuste la velocidad de la cremallera
según el trabajo. Puede modifi carla
fácilmente mientras trabaja haciendo girar
con su dedo el control de velocidad de
aplicación (K).
PRECAUCIÓN:
Cerciórese de poner el seguro al
disparador (posición “0”) al terminar el
trabajo.
Ajuste de la velocidad
0 1 Lento Rápido 5
Seguro
5) La cremallera se retraerá ligeramente
cuando suelte el gatillo para evitar goteos.
-
36 -
Page 37

PRECAUCIÓN:
Cuando las aberturas de las boquillas
son pequeñas pueden producirse
pérdidas al igual que cuando se utilizan
compuestos selladores excesivamente
blandos.
6) Puede apretar el gatillo repetidamente
para dispensar pequeñas cantidades de
compuesto. Siempre y cuando pulse el
gatillo antes de que transcurra 1 segundo
desde cada disparo, la cremallera avanzará lentamente sin retroceder.
Para componentes duros
• Al usar un compuesto de sellado duro, la
función de protección de la batería y del
motor podría detener el funcionamiento de
la herramienta. En dicho caso, ajuste el dial
de velocidad y vuelva a presionar el gatillo
para continuar con la operación.
• Caliente los componentes de sellado hasta
que se ablanden.
• Aumente la velocidad seleccionando el
control de velocidad de aplicación.
• Procure que el diámetro del corte de la
boquilla sea más grande.
[Fig.13]
PRECAUCIÓN:
• Asegúrese que la tapa frontal quede fi rme-
mente instalada antes de iniciar el trabajo.
• No toque la cremallera para evitar pellizcar-
se los dedos.
• Utilice la herramienta sólo para el propósito
para que el fue diseñado, no lo haga funcionar continuamente durante largos períodos
de tiempo, debido a que esto puede dañar
la pistola de sellado o hacer que el cartucho
se atasque.
esté mojado o cuyo compuesto de sellado
se haya endurecido.
• Si se hace funcionar la herramienta durante
un largo período de tiempo, el motor puede
calentarse excesivamente.
Se recomienda desconectarlo de vez en
cuando.
• Se prohibe el uso de materiales infl amables,
incluso para la limpieza de la pistola.
• La variación de temperatura ambiente es
de entre 0 °C (32 °F) y 40 °C (104 °F). Si la
batería se utiliza cuando la temperatura de
la batería es inferior a 0 °C (32 °F), la herramienta puede no funcionar correctamente.
No coloque un cartucho que
• Cuando se vaya a cargar una batería fría
(unos 0 °C (32 °F) o menos) en un cuarto
cálido, deje la batería en la habitación durante al menos una hora y cárguela cuando
se haya calentado a la temperatura de la
habitación.
• Si la herramienta se usa en condiciones de
temperatura fría (tal como durante el invierno) o si se detiene con frecuencia durante el
uso, la protección contra sobrecalentamiento quizás no se active.
[Batería]
Para un uso adecuado de la
batería
[Fig.14]
• Las baterías recargables tienen una vida útil
limitada.
• Para una vida óptima de la batería, guarde
la batería de Li-ión siguiendo el uso sin
carga.
• Cuando haga funcionar con la batería,
asegúrese que el lugar de trabajo está bien
ventilado.
Para un uso más seguro
• La batería está diseñada para conectarse
siguiendo dos pasos por motivos de seguridad. Compruebe que la batería está conectada correctamente en la unidad principal
antes de utilizar la herramienta.
• Si la batería no ha quedado bien conectada,
al activar el interruptor parpadearán la lámpara de aviso de sobrecalentamiento y la
lámpara de aviso de bajo nivel de carga de
batería, para indicar que no es posible un
funcionamiento seguro, y la unidad principal
no girará con normalidad.
Conecte la batería a la unidad de la herramienta hasta que el indicador rojo o amarillo
desaparezca.
ES
-
37 -
Page 38

Reciclado de la batería
ATENCIÓN:
La batería de Li-ión que compró es
ES
reciclable.
Llame a 1-800-8-BATTERY para
información sobre el reciclado de esta
batería.
[Cargador de la batería]
Carga
PRECAUCIÓN:
1) Si la temperatura del paquete de baterías cae aproximadamente bajo −10 °C
(14 °F), la carga se detendrá automáticamente para evitar la degradación de la
batería.
2) La variación de temperatura ambiente es
de entre 0 °C (32 °F) y 40 °C (104 °F). Si
la batería se utiliza cuando la temperature
de la batería es inferior a 0 °C (32 °F), la
herramienta puede no funcionar correctamente.
3) Utilice siempre el cargador a una temperatura entre 0 °C y 40 °C y cargue la
batería a una temperatura similar a la de
la propia batería.
una diferencia superior a 15°C entre la
temperatura de la batería y la del lugar
donde se realiza la carga.)
4) Cuando se vaya a cargar una batería fría
(unos 0 °C (32 °F) o menos) en un cuarto
cálido, deje la batería en la habitación
durante al menos una hora y cárguela
cuando se haya calentado a la temperatura de la habitación.
5) Deje que se enfríe el cargador al cargar
más de dos baterías de forma consecutiva.
6) No introduzca sus dedos dentro del hueco del contacto, cuando esté sujetando el
cambiador o en ninguna otra ocasión.
(Procure que no haya
7) Para impedir el riesgo de incendio o
daños del cargador de batería.
• No tapone los orifi cios de ventilación del
cargador y la batería.
• Desenchufe el cargador cuando no lo
utilice.
NOTA:
Su batería no está totalmente cargada
al momento de comprarla.
de cargar la batería antes de utilizarla.
Cómo cargar
1. Enchufe el cargador en la fuente de ali-
mentación de CA.
NOTA:
Se pueden producir chispas cuando se
inserta el enchufe en la alimentación
eléctrica de CA pero este no es un
problema en términos de seguridad.
2. Conecte el paquete de baterías fi rmemen-
te en el cargador.
1 Alinee las marcas de alineación y
coloque la batería en el enchufe del
cargador.
NOTA:
No todas las baterías muestran
la marca de alineamiento (H) (en
página 2).
2
Deslice hacia adelante en el sen tido
de la fl echa.
3. La luz indicadora de carga permanecerá
encendida durante la carga.
terminado la carga, se ac cio nará automáticamente un conmutador electrónico
interno para impedir cualquier sobrecarga.
• La carga no se iniciará si la batería está
caliente (por ejemplo, justo después de
haber sido sometida a un gran esfuerzo).
La luz de espera naranja seguirá
destellando hasta que se enfríe la
batería.
camente.
4. La luz de carga (verde) destellará lentamente cuando la batería se haya cargado
a un 80%.
5. Cuando se completa la carga, la luz de
carga en verde se apagará.
[Fig.15]
La carga comenzará automáti-
Asegúrese
]
Cuando haya
-
38 -
Page 39

6. Si la temperatura de la batería es de
0 °C o menos, la batería demora más en
cargarse completamente que el tiempo de
carga normal.
Incluso cuando la batería esté completamente cargada, tendrá aproximadamente
50% de la carga de una batería totalmente cargada a la temperatura de funcionamiento normal.
7. Si no se enciende la luz (verde) de carga
consulte con un concesionario autorizado.
8. Si se vuelve a colocar una batería totalmente cargada en el cargador, se encenderá la luz de carga. Luego de algunos
minutos, la lámpara de carga en verde se
apagará.
9. Extraiga la batería manteniendo levantado
el botón de liberación de la batería.
[
[Fig.15]
]
ES
-
39 -
Page 40

INDICACIÓN DE LA LÁMPARA
La carga ha sido completada. (Carga completa.)
ES
(Verde) (Naranja)
Apagada Iluminado Destella
VIII
.
MANTENIMIENTO
• Utilice sólo un paño suave y seco para limpiar la herramienta.
No utilice paños húmedos, bencina, diluyentes u otros disolventes volátiles de limpieza.
• Para el caso en que el interior de la herramienta o el paquete de pilas estén expuestos al
agua, drénelo o séquelo lo antes posible. Retire cuidadosamente cualquier polvo o restos de
acero que queden dentro de la herramienta.
ta, póngase en contacto con su centro de servicio autorizado más cercano.
La batería se cargó en aproximadamente 80%.
Ahora cargando.
Se ha enchufado el cargador en la fuente de alimentación de CA.
Está preparado para cargar.
Luz de estado de carga
Aparecerá Izquierda: verde Derecha: naranja
La batería está fría.
La batería se esta cargando lentamente para reducir la
carga de la batería.
La batería está caliente.
La carga comenzará cuando baje la temperatura de la batería.
Si la temperatura de la batería es de –10 °C o menos, la luz
de carga (naranja) también empezará a destellar. La carga
empezará cuando sube la temperatura de la batería.
No es posible realizar la carga. Existe un bloqueo de polvo o
una falla de la batería.
Si experimenta problemas al utilizar la herramien-
-
40 -
Page 41

IX.
ESPECIFICACIONES
UNIDAD PRINCIPAL
Modelo EY3640 EY3641
Motor
Presión para salida 4410 N (450 kgf, 992 lbs)
Longitud total
máx. 615 mm (24-7/32˝)
mín. 424 mm (16-11/16˝)
14,4 V CC
máx. 884 mm (34-13/16˝)
mín. 560 mm (22-1/16˝)
ES
Peso (con batería: EY9L45)
2,70 kg (6,00 lbs) 2,85 kg (6,30 lbs)
BATERÍA
Modelo EY9L45
Batería de almacenaje
Tensión de batería 14.4 V CC (3.6 V × 8 celdas)
Batería Li-ión
CARGADOR DE BATERÍA
Modelo EY0L82
Régimen
Peso 0,93 kg (2 lbs)
Tiempo de carga completa
NOTA: Este cuadro puede contener modelos no disponibles en su país.
Consulte el más reciente catálogo general.
Puede consultar el nombre y la dirección del concesionario en la tarjeta de garantía que
se incluye.
Vea la placa de especifi caciones en la parte inferior del cargador.
EY9L45
60 min
-
41 -
Page 42

Declaración de interferencias con radiofrecuencias de la Comisión Federal de Comunicaciones
Este equipo ha sido probado y se ha determinado que cumple con las limitaciones de un dispositivo digital de Clase B, de conformidad con el Apartado 15 de las regulaciones de FCC.
ES
Estas limitaciones están diseñadas para brindar protección razonable contra las interferencias
perjudiciales en un entorno residencial. Este equipo genera, utiliza y puede irradiar energía de
radiofrecuencia y, si no se instala y utiliza de acuerdo a las instrucciones, puede provocar interferencias perjudiciales en las comunicaciones de radio. Sin embargo, no existe ninguna garantía de que no se produzcan interferencias en una instalación concreta. Si este equipo provoca
interferencias perjudiciales en la recepción de radio o televisión, lo que se puede determinar
apagando y encendiendo el equipo, se recomienda al usuario intentar corregir la interferencia
adoptando una de las siguientes medidas:
• Cambie la orientación o posición de la antena receptora.
• Aumente la separación entre el equipo y el receptor.
• Conecte el equipo en una toma de corriente de un circuito que no sea el mismo en el que está
conectado el receptor.
• Consulte por ayuda a un proveedor o un técnico de radio/televisión con experiencia.
Precaución de FCC: Para asegurar un cumplimiento continuo, instale y use el equipo según
las instrucciones provistas.
instrucciones. Cualquier cambio o modifi cación no aprobada expresamente por el grupo respon-
sable de su certifi cación puede anular el derecho del usuario sobre el uso del equipo.
Este dispositivo cumple con el Apartado 15 de las regulaciones de FCC. La operación está sujeta a las siguientes dos condiciones (1) Este dispositivo no puede ocasionar interferencias que
ocasionen daños y (2) este dispositivo debe aceptar cualquier interferencia, incluida una interferencia que pueda ocasionar una operación no deseada.
Este aparato digital de Clase B cumple con la norma canadiense ICES-003.
Utilice solamente el paquete de pilas especifi cado en el manual de
X.
ESTÁNDARES ARMONIZADOS
UNIDAD PRINCIPAL
Cumple con UL Std.60745-1
Certifi cado de CS Std.C22.2 No. 60745-1
CARGADOR DE BATERÍA
Cumple con UL Std.1310
Certifi cado de CS Std.C22.2 No. 223-M91
-
42 -
Page 43

-
MEMO
-
-
43 -
Page 44

EN, FR, ES
Two Riverfront Plaza, Newark, NJ 07102
5770 Ambler Drive, Mississauga, Ontario, L4W 2T3
www.panasonic.ca
anihC ni detnirPEY9810364001 2017.11 S
 Loading...