

Panasonic ES-GA21-S820 User Manual [ru]
Operating Instructions
Rechargeable Shaver
Model No. ES‑GA21
Before operating this unit, please read these instructions completely.
English 2
Русский 8
Українська 14
Қазақша 20
ES-GA21_CIS.indb 1 2008/07/24 18:46:29

2
English
Important
Before use
This WET/DRY shaver can be used for wet shaving with shaving
lather or for dry shaving. You can use this watertight shaver in
the shower and clean it in water. The following is the symbol of
Wet shaver. The symbol means that the hand‑held part may be
used in a bath or shower.
Treat yourself to wet lather shaves for at least three weeks and
notice the difference. Your Panasonic WET/DRY shaver requires
a little time to get used to because your skin and beard need
about a month to adjust to any new shaving method.
Using the shaver
Caution ‑ The outer foil is very thin and can be damaged if not
used correctly. Check that the foil is not damaged before using
the shaver. Do not use the shaver if the foil etc. is damaged as
you will cut your skin.
Charging the shaver
Do not use any power cord or AC adaptor other than one
specifically designed for this model (RE7‑51). Plug in the
adaptor into a household outlet where there is no moisture and
handle it with dry hands. The shaver may become warm during
use and charging. However, this is not a malfunction. Do not
charge the shaver where it will be exposed to direct sunlight or
other heat sources. Hold the adaptor when disconnecting it from
the household outlet. If you tug on the power cord, you may
damage it. The supply cord cannot be replaced. If the cord is
damaged, the appliance should be scrapped.
Adequate ambient temperature for charging is 15‑35 °C.
If the plug symbol does not glow initially when the shaver is
plugged in, wait for a short while until it does.
Cleaning the shaver
Warning ‑ Disconnect the power cord from the shaver before
cleaning it to prevent electric shock.
Keep both the inner blades inserted. If only one of the inner
blades is inserted, the shaver may be damaged. If you clean the
shaver with water, do not use salt water or hot water. Do not
soak the shaver in water for a long period of time. Wipe it with a
cloth dampened with soapy water. Do not use thinner, benzine
or alcohol.
Storing the shaver
Disconnect the power cord when storing the shaver. Do not
bend the power cord or wrap it around the shaver. This
appliance is not intended for use by persons (including children)
with reduced physical, sensory or mental capabilities, or lack of
experience and knowledge, unless they have been given
supervision or instruction concerning use of the appliance by a
person responsible for their safety. Children should be
supervised to ensure that they do not play with the appliance.
Keep these operating instructions in a safe place.
SPECIFICATIONS
Power source: See the name plate on the product.
(Automatic voltage conversion)
Motor voltage: 3.6 V DC
Charging time: 1 hour
This product is intended for household use only.
ES-GA21_CIS.indb 2 2008/07/24 18:46:30
3
English
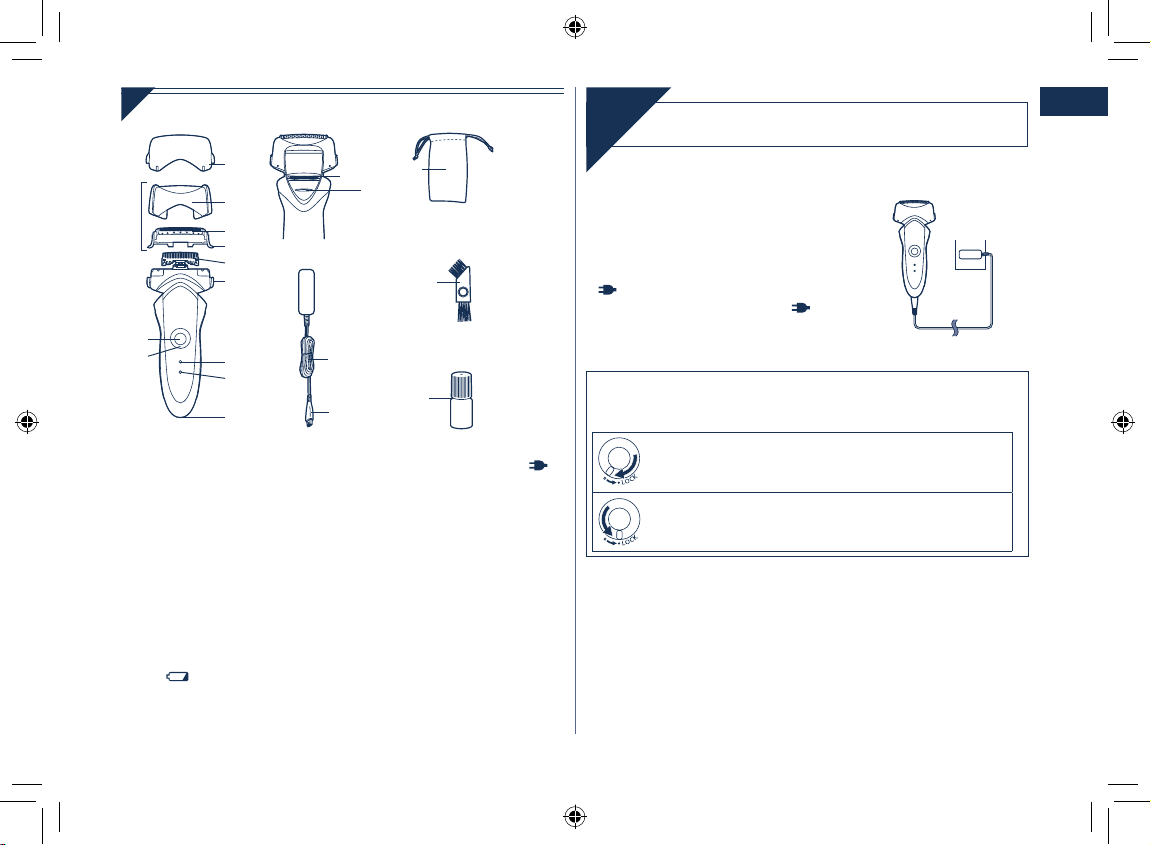
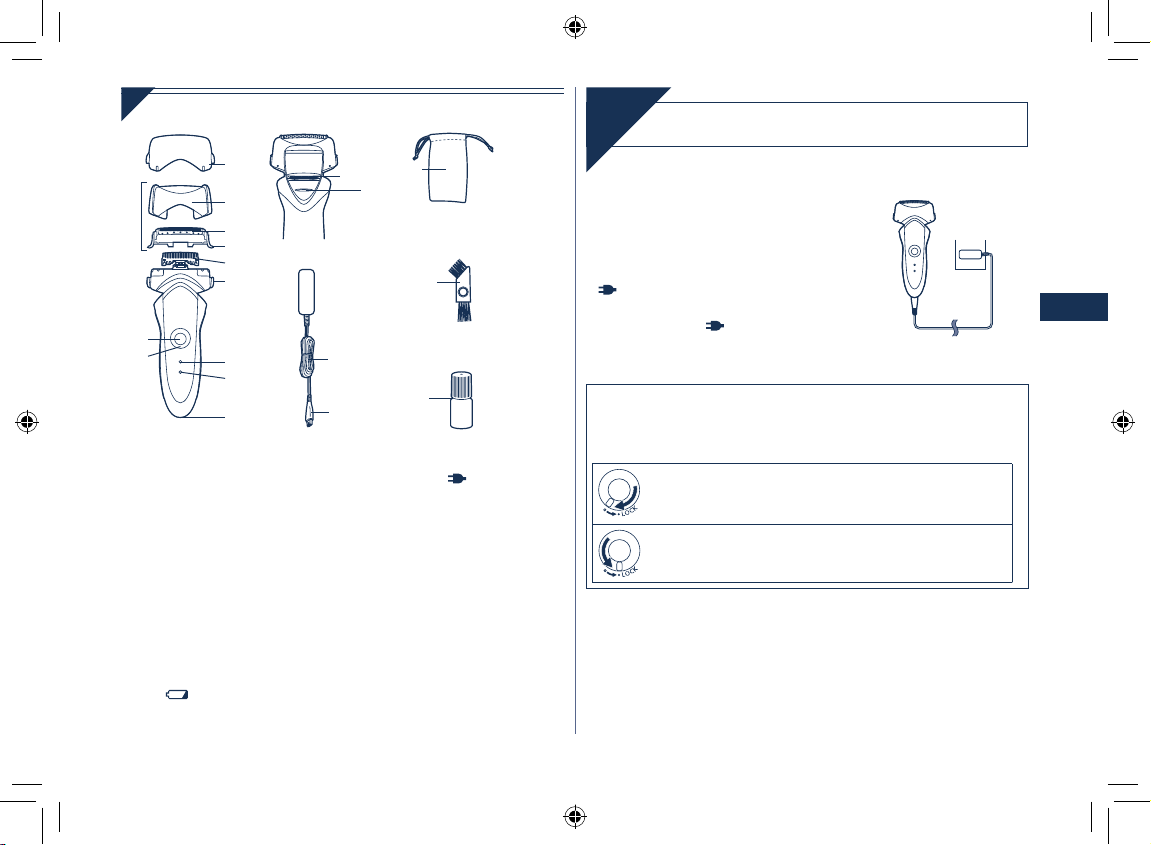
Parts identification
A Protective cap
B Outer foil section
1 Foil frame
2 System outer foil
3 System outer foil release
buttons
C Inner blades
D Main body
4 Foil frame release buttons
5 OFF/ON switch
6 Lock ring
7 Battery capacity lamp
( )
8 Charge status lamp ( )
9 Appliance socket
: Trimmer
; Trimmer handle
E Adaptor (RE7‑51)
Power cord
Appliance plug
F Travel pouch
G Cleaning brush
H Oil
Charging
Charge
1
1
Insert the appliance plug
into the shaver.
2
2
Plug in the adaptor into a
household outlet.
glows and charging starts.
Charging is completed when
blinks.
(Max. 1 hour later)
•
•
Using the lock ring
Use the lock ring to lock or unlock the OFF/ON switch.
1. Rotate the lock ring until it clicks.
Unlock the OFF/ON switch:
For when shaving, washing the shaver, lubricating the
shaver.
Lock the OFF/ON switch:
For when carrying the shaver.
ES-GA21_CIS.indb 3 2008/07/24 18:46:30
4
English
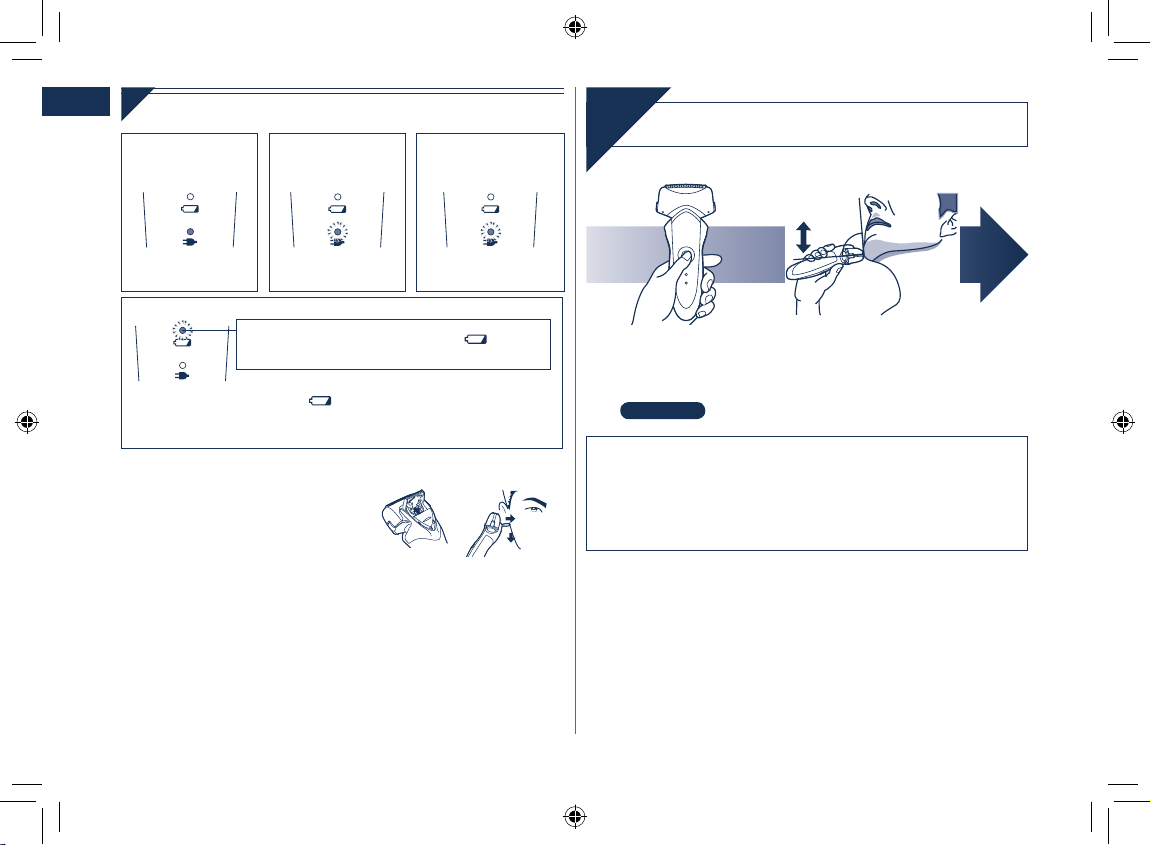
About the lamp
While charging
After charging is
completed
10 minutes after
charging is
completed
Glows red.
Blinks red once
every second.
Blinks red once
every 2 seconds.
When the battery capacity is low
You can shave 1 to 2 times after blinks.
(This will differ depending on usage.)
•
blinks.
A full charge will supply enough power for approx. 14 shaves of
3 minutes each.
•
Using the trimmer
Slide the trimmer handle up. Place
at a right angle to your skin and
move downwards to trim your
sideburns.
Using the shaver
Shave
90˚
1
1
Rotate the lock
ring and press the
OFF/ON switch.
Page 3
2
2
Hold the shaver as
illustrated above and
shave.
Start out shaving by applying gentle pressure to your face.
Stretch your skin with your free hand and move the shaver
back and forth in the direction of your beard. You may gently
increase the amount of pressure as your skin becomes
accustomed to this shaver. Applying excessive pressure does
not provide a closer shave.
•
ES-GA21_CIS.indb 4 2008/07/24 18:46:32
5
English
Caution for turbo mode
Shaving in turbo mode may damage your skin. Turn the shaver
off and then on again to cancel turbo mode.
Do not place your fingers on the OFF/ON switch while using
the shaver. This may cause the shaver to turn off or enter turbo
mode.
•
•
Lubrication
To maintain shaving comfort for a long time, it is recommended
that the oil provided with the shaver is used.
1. Switch off the shaver.
2. Apply one drop of oil to each of the outer foils.
3. Raise the trimmer and apply a drop of oil.
4. Switch the shaver on, and run it for approximately five
seconds.
5. Switch off the shaver, and wipe off any excess oil from the
outer foils with a soft cloth.
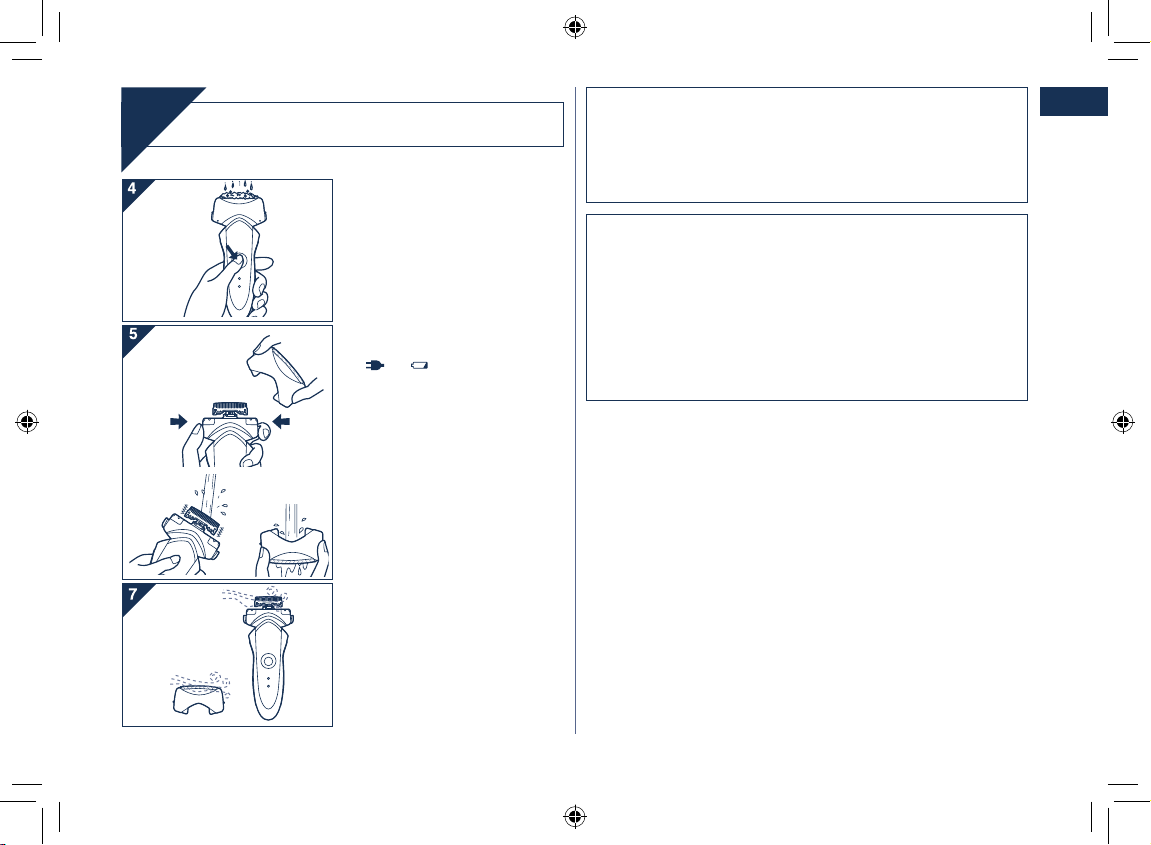
Cleaning
Clean
1. Disconnect the power cord
from the shaver.
2. Apply some hand soap and
some water to the outer foil.
3. Rotate the lock ring to unlock
the OFF/ON switch.
4. Press the OFF/ON switch for
more than 2 seconds to
activate the turbo mode for
“sonic” vibration cleaning.
or flash around
randomly.
After about 20 seconds, it
will be automatically turned
off, or you can turn it off by
pressing the OFF/ON switch.
5. Remove the outer foil section
and press the OFF/ON switch
for more than 2 seconds to
activate the turbo mode for
“sonic” vibration cleaning and
clean it with running water.
6. Wipe off any drops of water
with a dry cloth.
7. Dry the outer foil section and
the shaver completely.
8. Attach the outer foil section to
the shaver.
9. Lubricate the shaver.
•
•
ES-GA21_CIS.indb 5 2008/07/24 18:46:32

6
English
Replacing the system outer foil and the inner
blades
system outer foil once every year
inner blade once every two years
Replacing the system outer foil
1. Press the foil frame release
buttons and lift the outer foil
section upwards as illustrated.
2. Press the system outer foil
release buttons and pull down
the system outer foil as
illustrated.
3. Inser t the system outer foil until
it clicks.
Always attach the system
outer foil in proper direction.
Always insert the system
outer foil to the foil frame
when attaching to the shaver.
•
•
2
3
Replacing the inner blades
1. Press the foil frame release
buttons and lift the outer foil
section upwards as illustrated.
2. Remove the inner blades one
at a time as illustrated.
Do not touch the edges
(metal parts) of the inner
blades to prevent injury to
your hand.
3. Insert the inner blades one at
a time until they click as
illustrated.
•
2 3
Cleaning with the brush
(A) (B)
1. Clean the inner blades using
the short brush by moving it in
direction (A).
Clean the system outer foil,
the shaver body and the
trimmer using the long brush.
Do not move the short brush
in direction (B) as it will
damage the inner blades and
affect their sharpness.
Do not use the short brush to
clean the outer foils.
•
•
ES-GA21_CIS.indb 6 2008/07/24 18:46:33
7
English
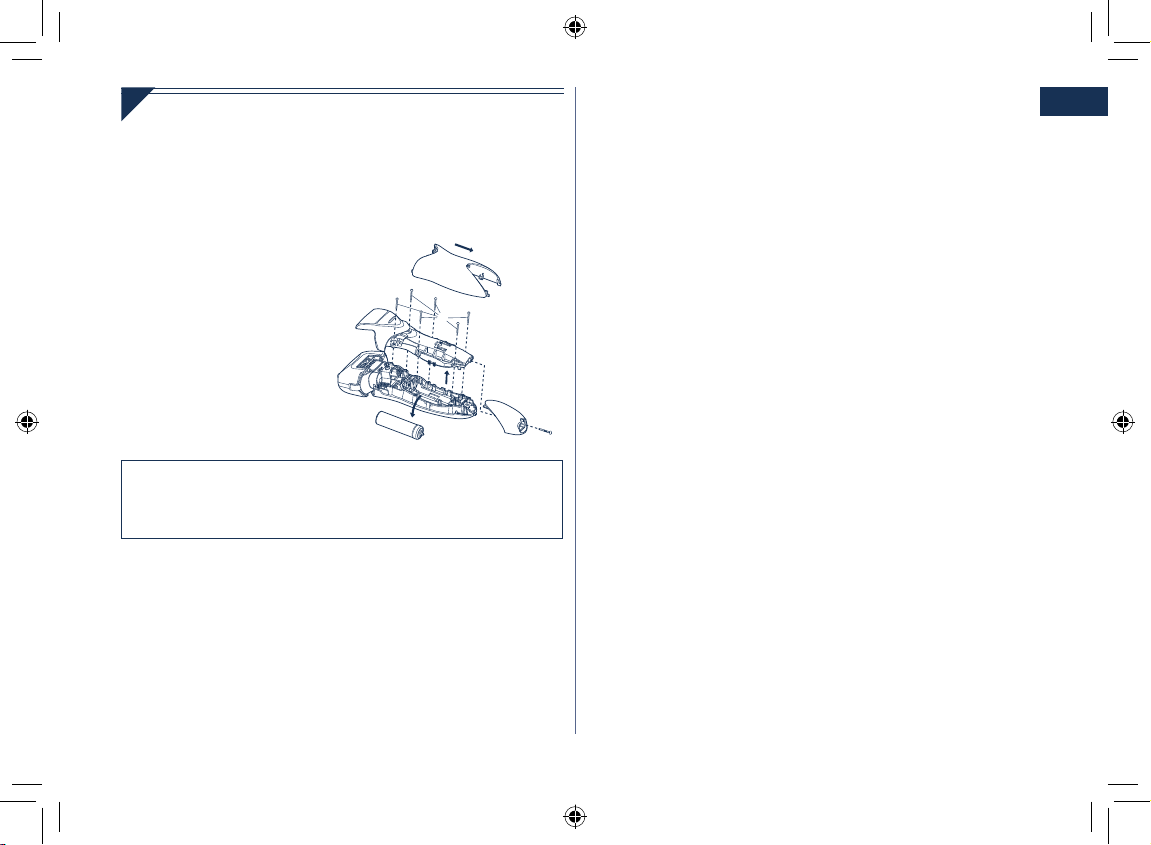
Removing the built-in rechargeable battery
Remove the built‑in rechargeable battery before disposing of the
shaver. Please make sure that the battery is disposed of at an
officially designated location if there is one. Do not dismantle or
replace the battery so that you can use the shaver again. This
could cause fire or an electric shock. Replace it at an authorized
service center.
Disconnect the power cord
from the shaver when
removing the battery.
Perform steps 1 to 5 and lift
the battery, and then remove
it.
•
•
For environmental protection and recycling of materials
This shaver contains a Lithium‑ion battery.
Please make sure that the battery is disposed of at an officially
assigned location, if there is one in your country.
ES-GA21_CIS.indb 7 2008/07/24 18:46:33
8
Русский
Важная информация
Перед началом эксплуатации
Данная электробритва может использоваться как для сухого
бритья, так и для влажного бритья с пеной. Бритвой можно
пользоваться в душе, после бритья ее необходимо промыть водой.
Знак, приведенный ниже, представляет собой символ влажного
бритья. Он означает, что ручная часть данного бритвенного станка
может использоваться в ванной или в душе.
Попробуйте использовать влажное бритье с применением пены в
течение не менее трех недель и вы заметите, насколько лучше вы
стали выглядеть. Потребуется некоторое время для того, чтобы
привыкнуть к бритве Панасоник для влажного/сухого бритья, поскольку
вашей коже и волосяному покрову всегда требуется приблизительно
один месяц, чтобы привыкнуть к любому новому методу бритья.
Как пользоваться бритвой
Внимание - Сетка - очень тонкая металлическая деталь, которая
может быть повреждена при неправильном использовании
бритвы. Перед началом бритья убедитесь, что сетка не
повреждена. Если она повреждена, бритвой пользоваться нельзя,
так как при этом можно порезаться.
Зарядка бритвы
Используйте только электрический провод и адаптер, специально
разработанные для данной модели (RE7-51). Вставьте адаптер в
бытовую розетку. Убедитесь в отсутствии влаги и не прикасайтесь
к нему мокрыми руками. Во время зарядки бритва может
нагреваться. Это не является признаком неисправности. Не
заряжайте бритву в месте воздействия прямых солнечных лучей, а
также возле других источников тепла. При извлечении из розетки
питания корпус адаптера необходимо держать в руке. Резко не
тяните за шнур питания, так как при этом вы можете повредить
его. Шнур питания не подлежит замене. Если шнур поврежден,
прибор необходимо утилизировать.
Мы рекомендуем выполнять зарядку при температуре 15 - 35 °C.
Если индикатор не горит, подождите немного, пока он не
загорится.
Чистка бритвы
Предупреждение - Перед началом очистки бритвы отсоедините от
нее шнур питания, чтобы избежать удара электрическим током.
Оба внутренних лезвия должны быть вставлены в бритву. Если
вставлено только одно лезвие, можно повредить бритву. При
очистке бритвы водой не используйте соленую или горячую воду.
Не оставляйте бритву в воде на долгое время. Очистка бритвы
выполняется куском мягкой ткани, смоченным в мыльной воде.
Не применяйте растворитель, бензин или спирт.
Хранение бритвы
Отсоедините шнур питания при хранении бритвы. Не перегибайте
шнур и не наматывайте его на бритву. Этот прибор не
предназначен для использования людьми (включая детей) с
ограниченными физическими, сенсорными или умственными
способностями или лицами без соответствующих знаний и опыта.
Использование прибора такими людьми допускается только под
наблюдением лица, отвечающего за их безопасность. Необходимо
следить, чтобы дети не играли с прибором.
Храните эту инструкцию по эксплуатации в безопасном месте.
СПЕЦИФИКАЦИИ
Источник питания: См. табличку номиналов на изделии.
(Автоматическая настройка под сетевое напряжение)
Рабочее напряжение электродвигателя: 3,6 В постоянного тока
Время зарядки: 1 час
Данное устройство предназначено только для домашнего использования.
ES-GA21_CIS.indb 8 2008/07/24 18:46:34
9
Русский
Детали электробритвы
A
Защитная крышка
B
Бритвенная головка
1
Рамка для крепления сеток
2
Сеточная система
3
Кнопки для снятия сеток
C
Внутренние лезвия
D
Корпус бритвы
4
Кнопки для снятия
бритвенной головки
5
Выключатель
6
Переключатель блокировки
от случайного включения
7
Индикатор заряда батареи
( )
8
Индикатор состояния
зарядки ( )
9
Разъем
:
Триммер
;
Переключатель триммера
E
Адаптер (RE7-51)
Шнур электропитания
Вилка прибора
F
Мягкий чехол
G
Чистящая щеточка
H
Смазка
Зарядка
Зарядка
1
1
Вставьте шнур питания в
бритву.
2
2
Вставьте адаптер в розетку
электрической сети.
Индикатор загорается, и
начинается зарядка.
Когда индикатор начнет мигать,
зарядка завершена.
(максимум через 1 час)
•
•
Использование переключателя блокировки
Используйте переключатель блокировки для блокировки или
разблокировки выключателя.
1. Вращайте переключатель блокировки пока до щелчка.
Разблокируйте выключатель:
Во время бритья, мытья и смазывания электробритвы.
Блокируйте выключатель:
Во время переноски электробритвы.
ES-GA21_CIS.indb 9 2008/07/24 18:46:34
 Loading...