

Page 1
Using the stretch massage
Warning
Make sure there are no people or pets behind the unit when the arm stretch function is turned “on.”
•
Failure to observe this precaution may result in accident or injury.
Caution
Do not use with any pre-existing condition of shoulder injury.
•
Doing so may result in injury.
When Pre-Program and Quick Massage are selected, the leg stretch is turned on and the arm stretch is turned off, respectively.
•
When Self-Program and Manual Operation are selected, the stretch massage for all parts is turned off.
•
Open the left cover.
1
Press the or buttons to turn the functions off or on.
2
Display
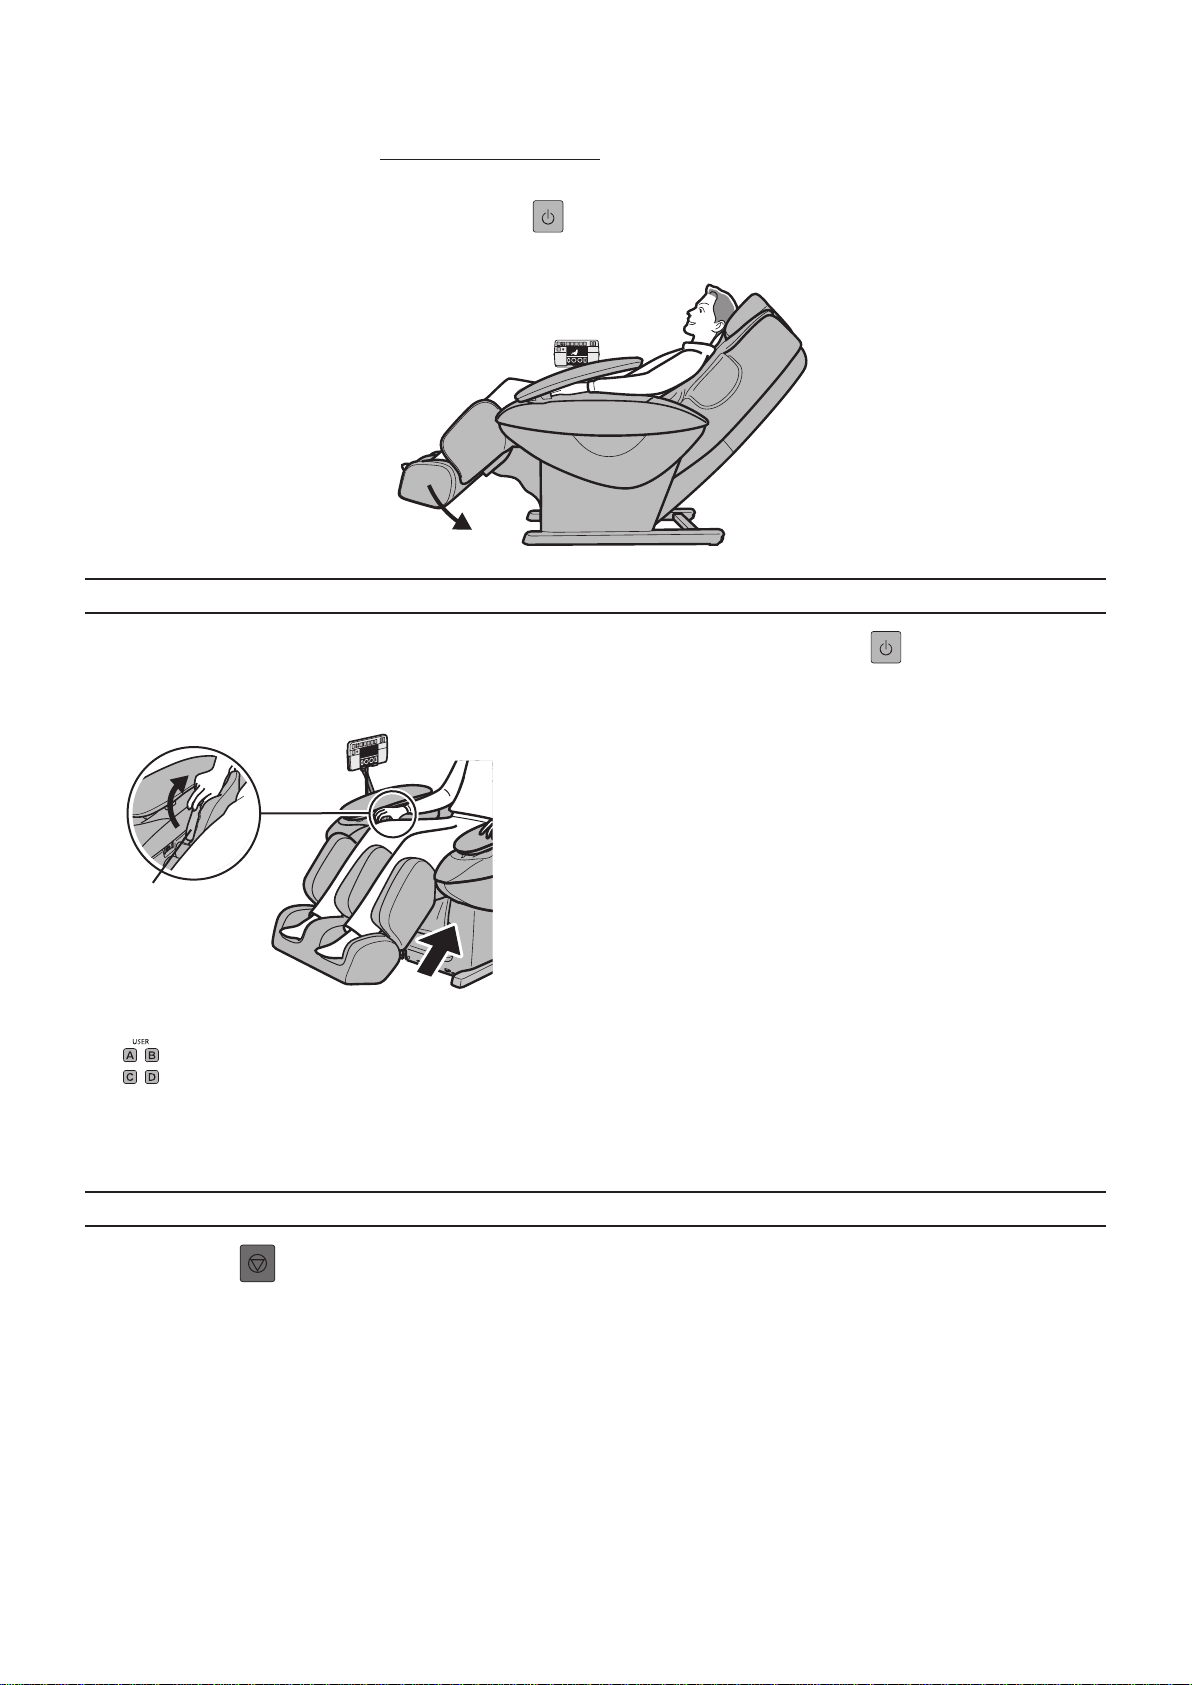
To execute the stretch massage only
After turning on the power by pressing the button,
press the
(stretch legs) or (stretch
The display will indicate if the stretch function is turned
on or off.
(The lamp is turned on: [ON], the lamp is turned off: [OFF])
arm) buttons.
The power will turn off automatically if no operation is
•
e
ecuted for 3 minutes.
x
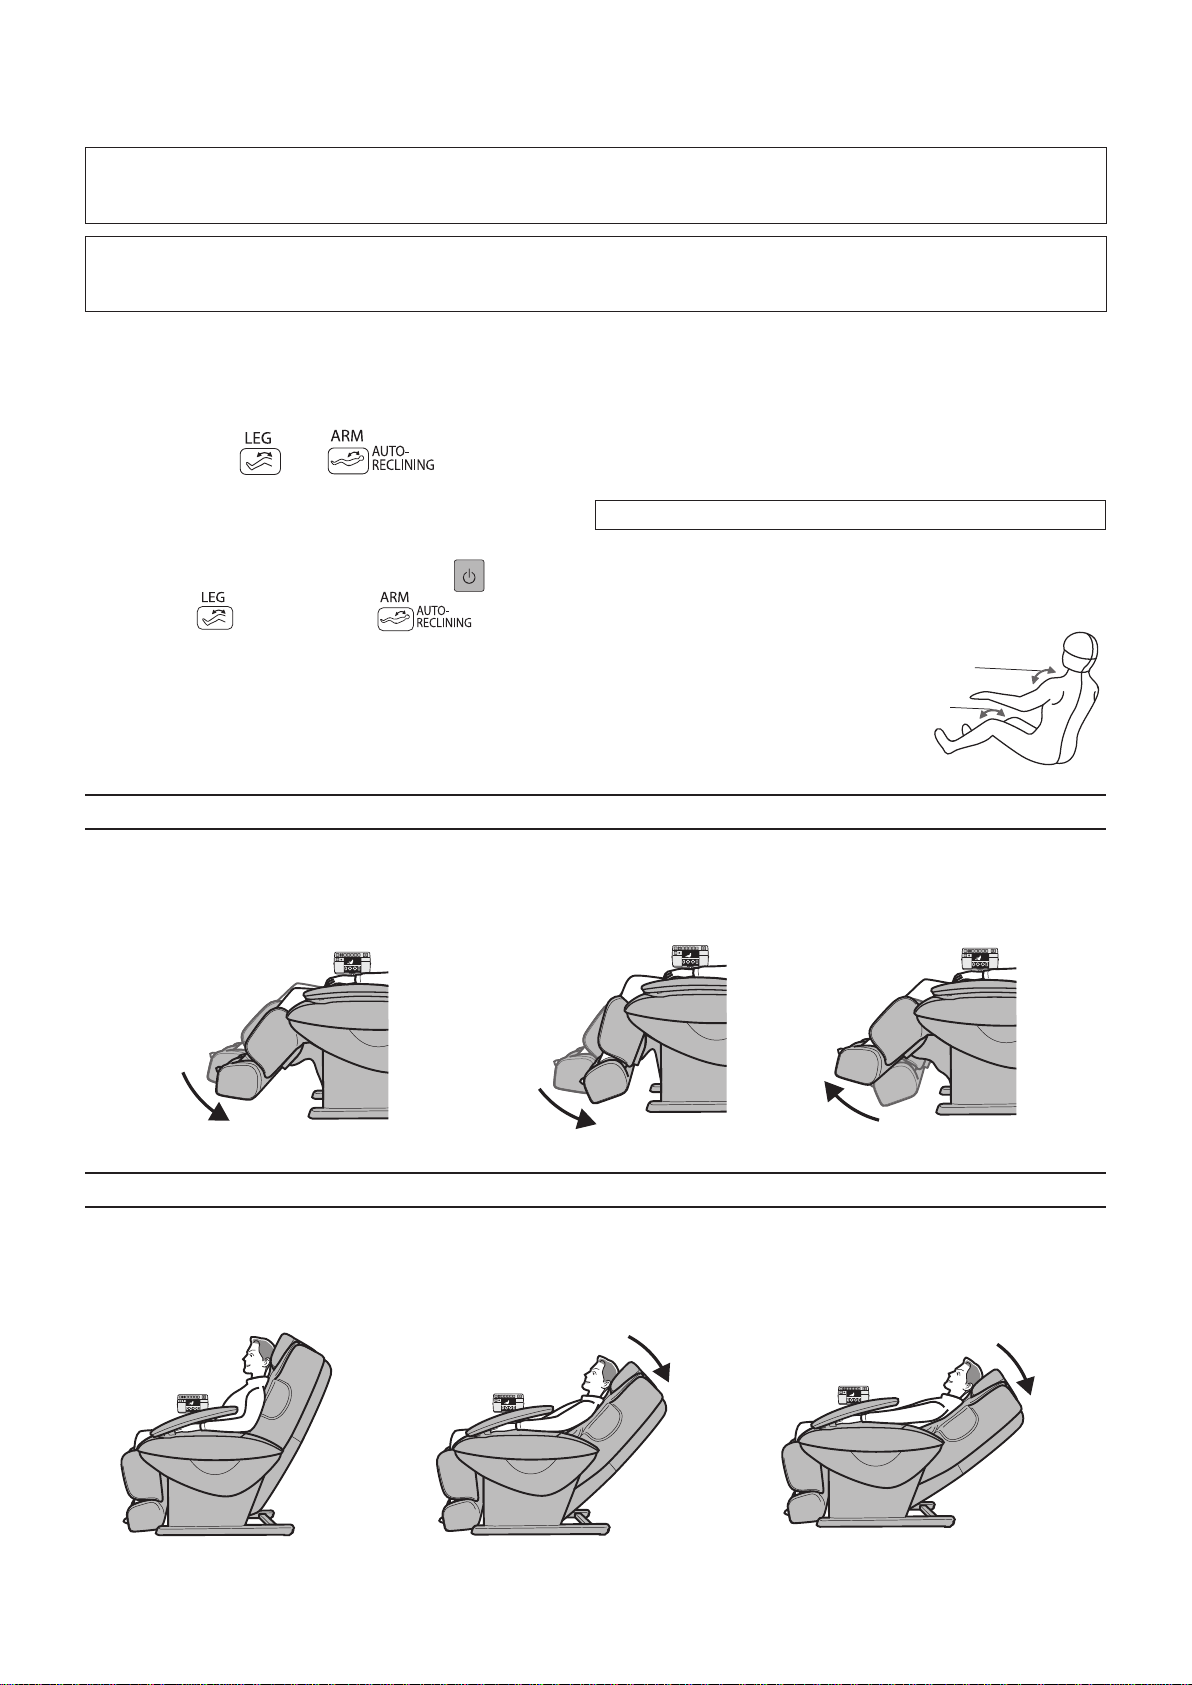
Operations of the leg stretch
2.
1. After grasping the legs with air, the
legs are stretched as the legrest is
lowered approximately 10 degrees
from the massage position.
Lowered by
approximately
10
degrees
Once the legrest returns to the original
angle, the legrest is then lowered
approximately 30 degrees to stretch
the legs further.
Lowered by
approximately
30
Operations of the arm stretch
1. The backrest will come fully up.
One arm will inflate to firmly secure
the arm/hand in place.
2.
After the backrest reclines
approximately 20 degrees to stretch
the arm, the backrest will come back
up 5 degrees.
degrees
Arm stretch
Leg stretch
3. When the operation is complete, the
legrest will return to the angle at the
time before the operation.
3.
Then, the backrest will recline approximately
10 degrees to stretch the shoulders and
arms further. When the operation is
complete, the backrest will return to the
angle at the time before the operation.
34
Page 2
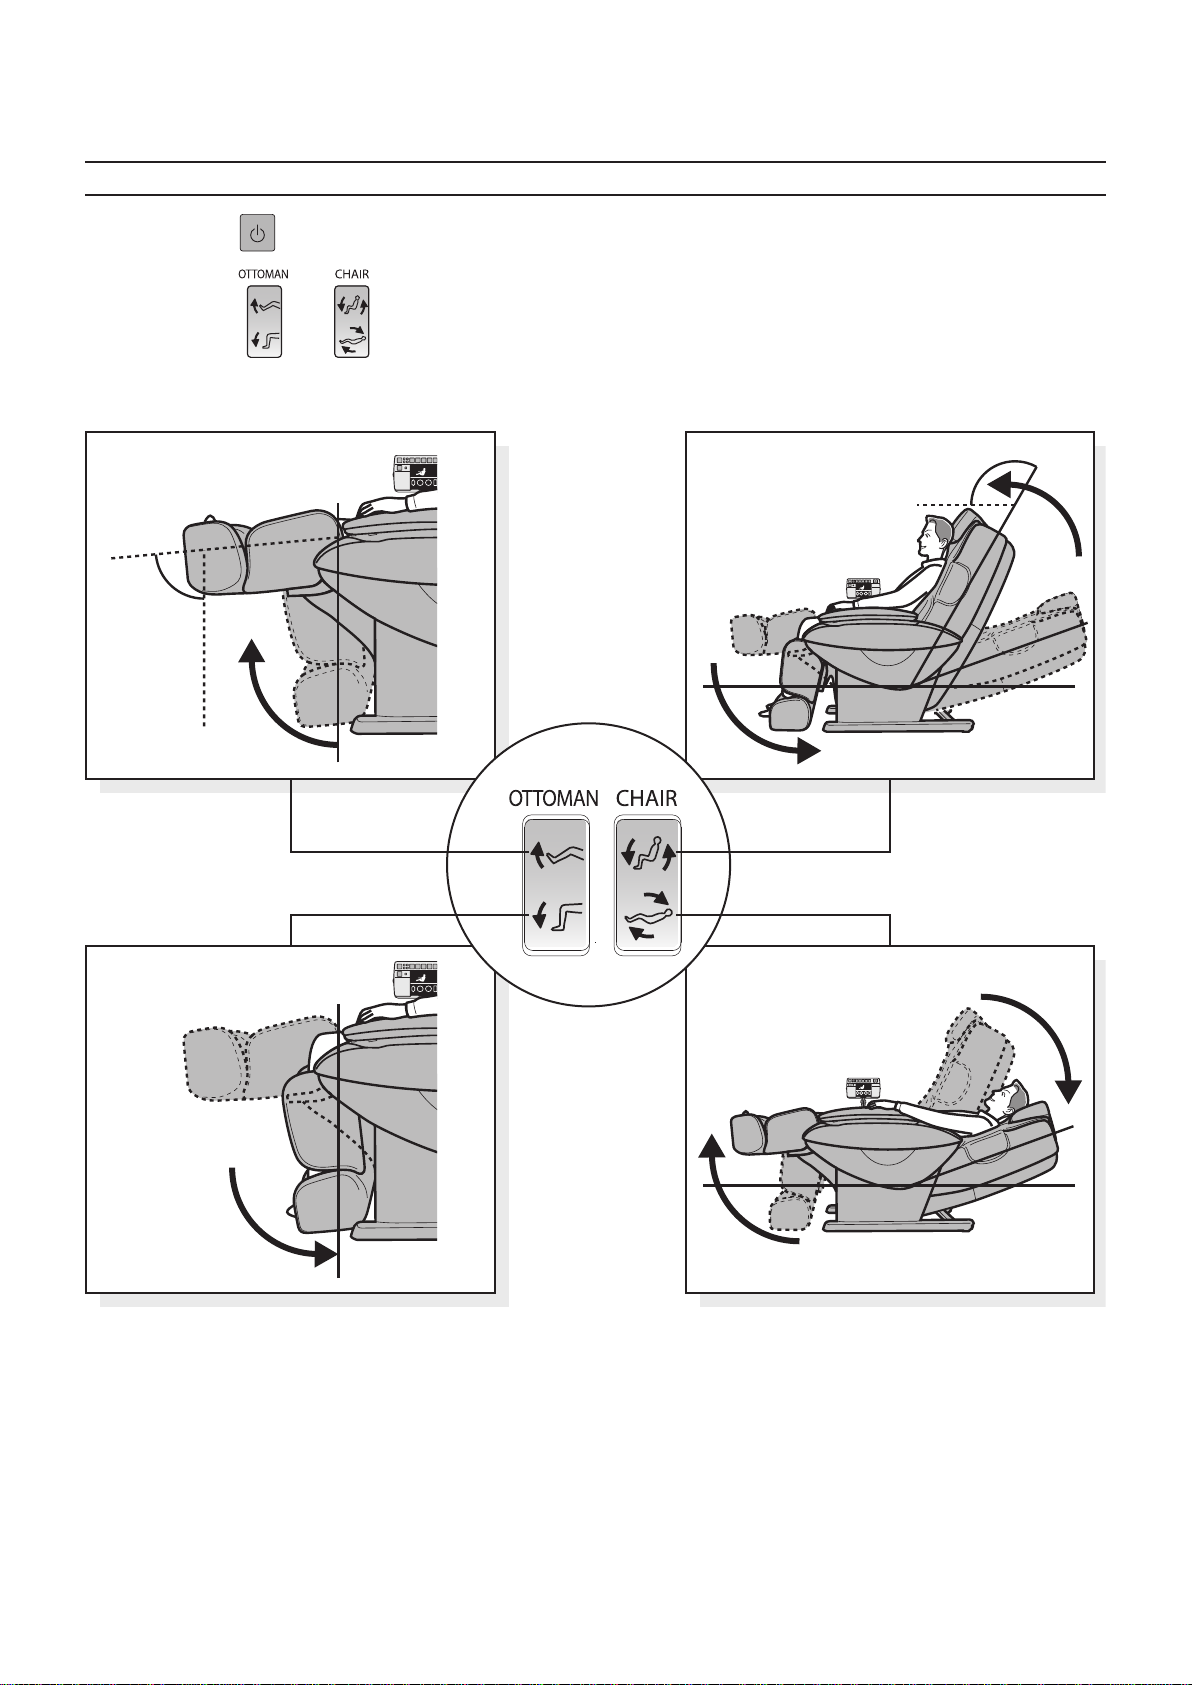
Ottoman and Backrest height adjustment
Adjusting the reclining angle and the angle of the legrest
Press the button to turn on the power.
1
Press the or button to adjust the angle.
2
•
Movement will continue until a “beep-beep-beep” sound is heard if the buttons are held down.
•
The legrest will start to move shortly after the backrest.
Approx. 120˚
Approx. 85˚
35
Approx.
170˚
Approx. 0˚
If the backrest reclines to an angle where you
cannot touch the buttons on the control panel from
the seat, hold the control panel in your hand.
Page 3
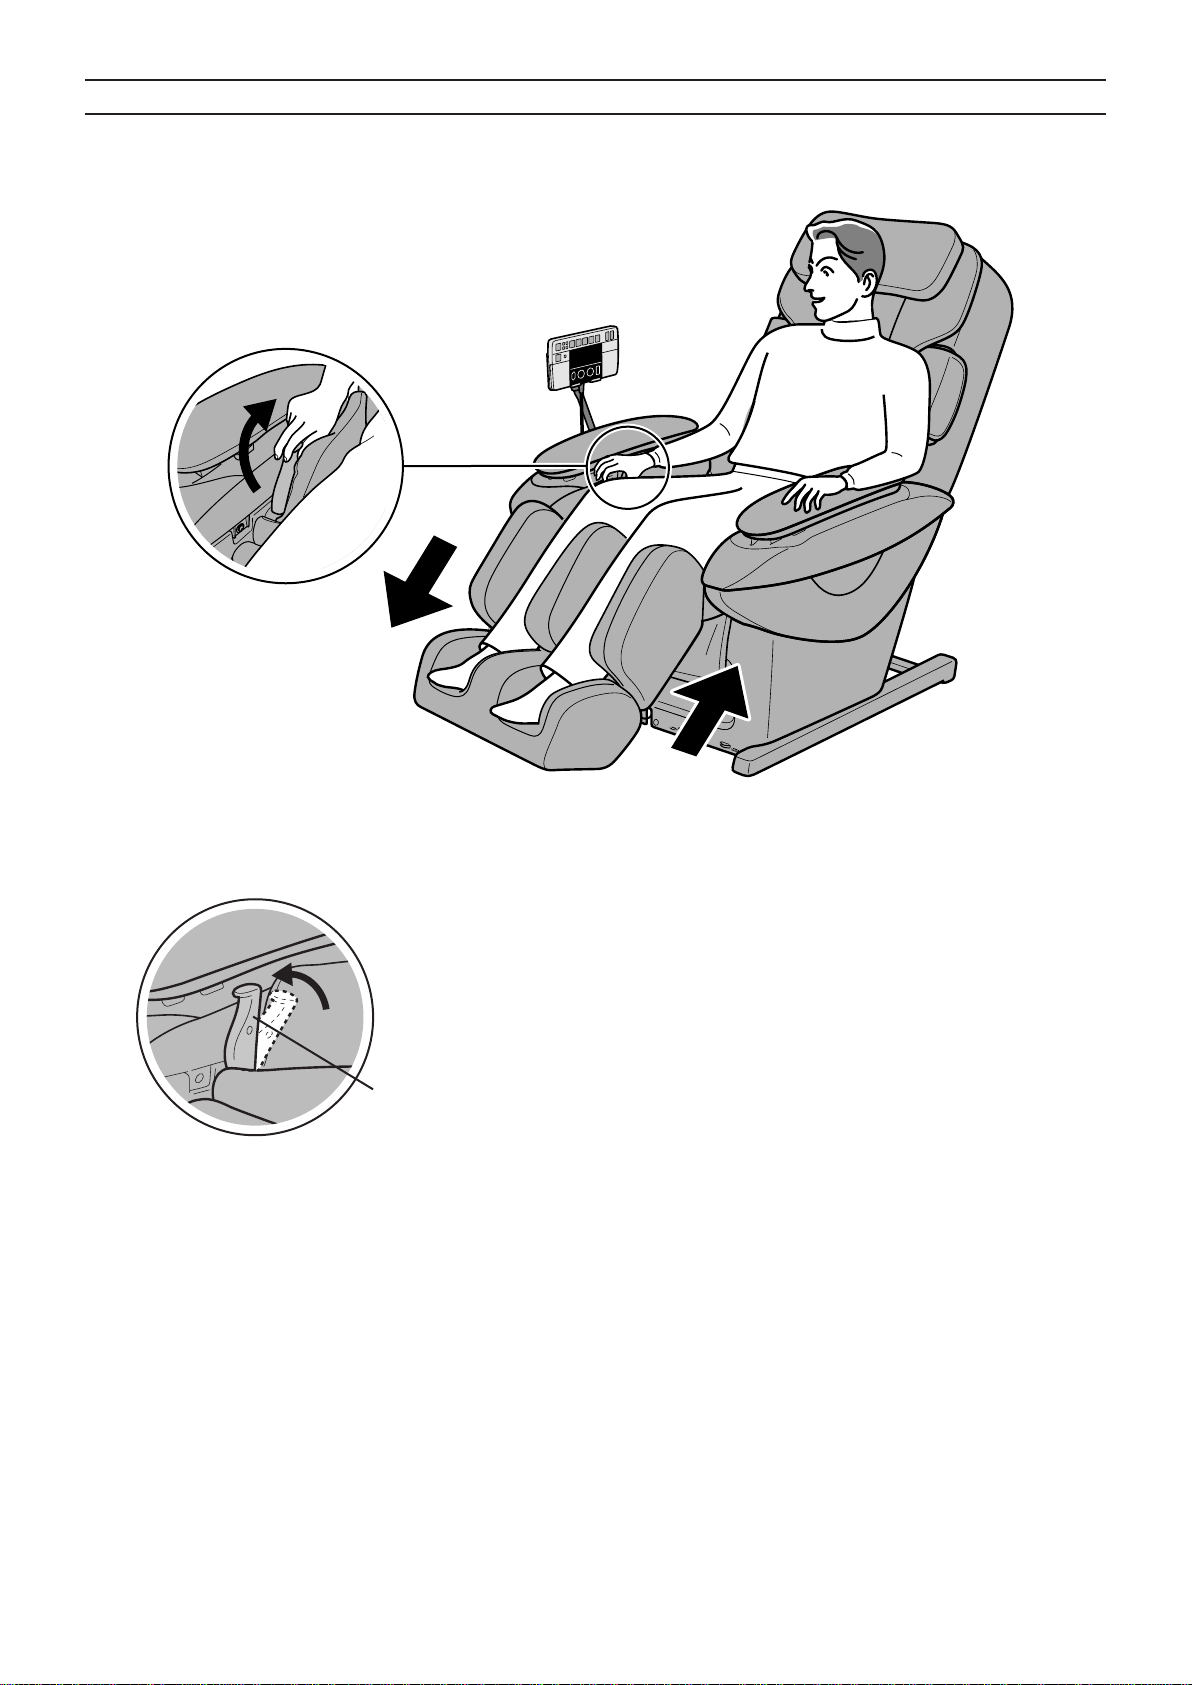
Extending out the legrest
Slide the legrest to your favorite position by pulling the legrest slide lever.
1
(The legrest will slide approximately 5" (12 cm).)
Pull the legrest slide
lever back.
Push with soles of feet and
the legrest slides out.
Raise legs slightly and legrest returns.
Release the legrest slide lever when it reaches your favorite position.
2
Legrest slide lever
36
Page 4
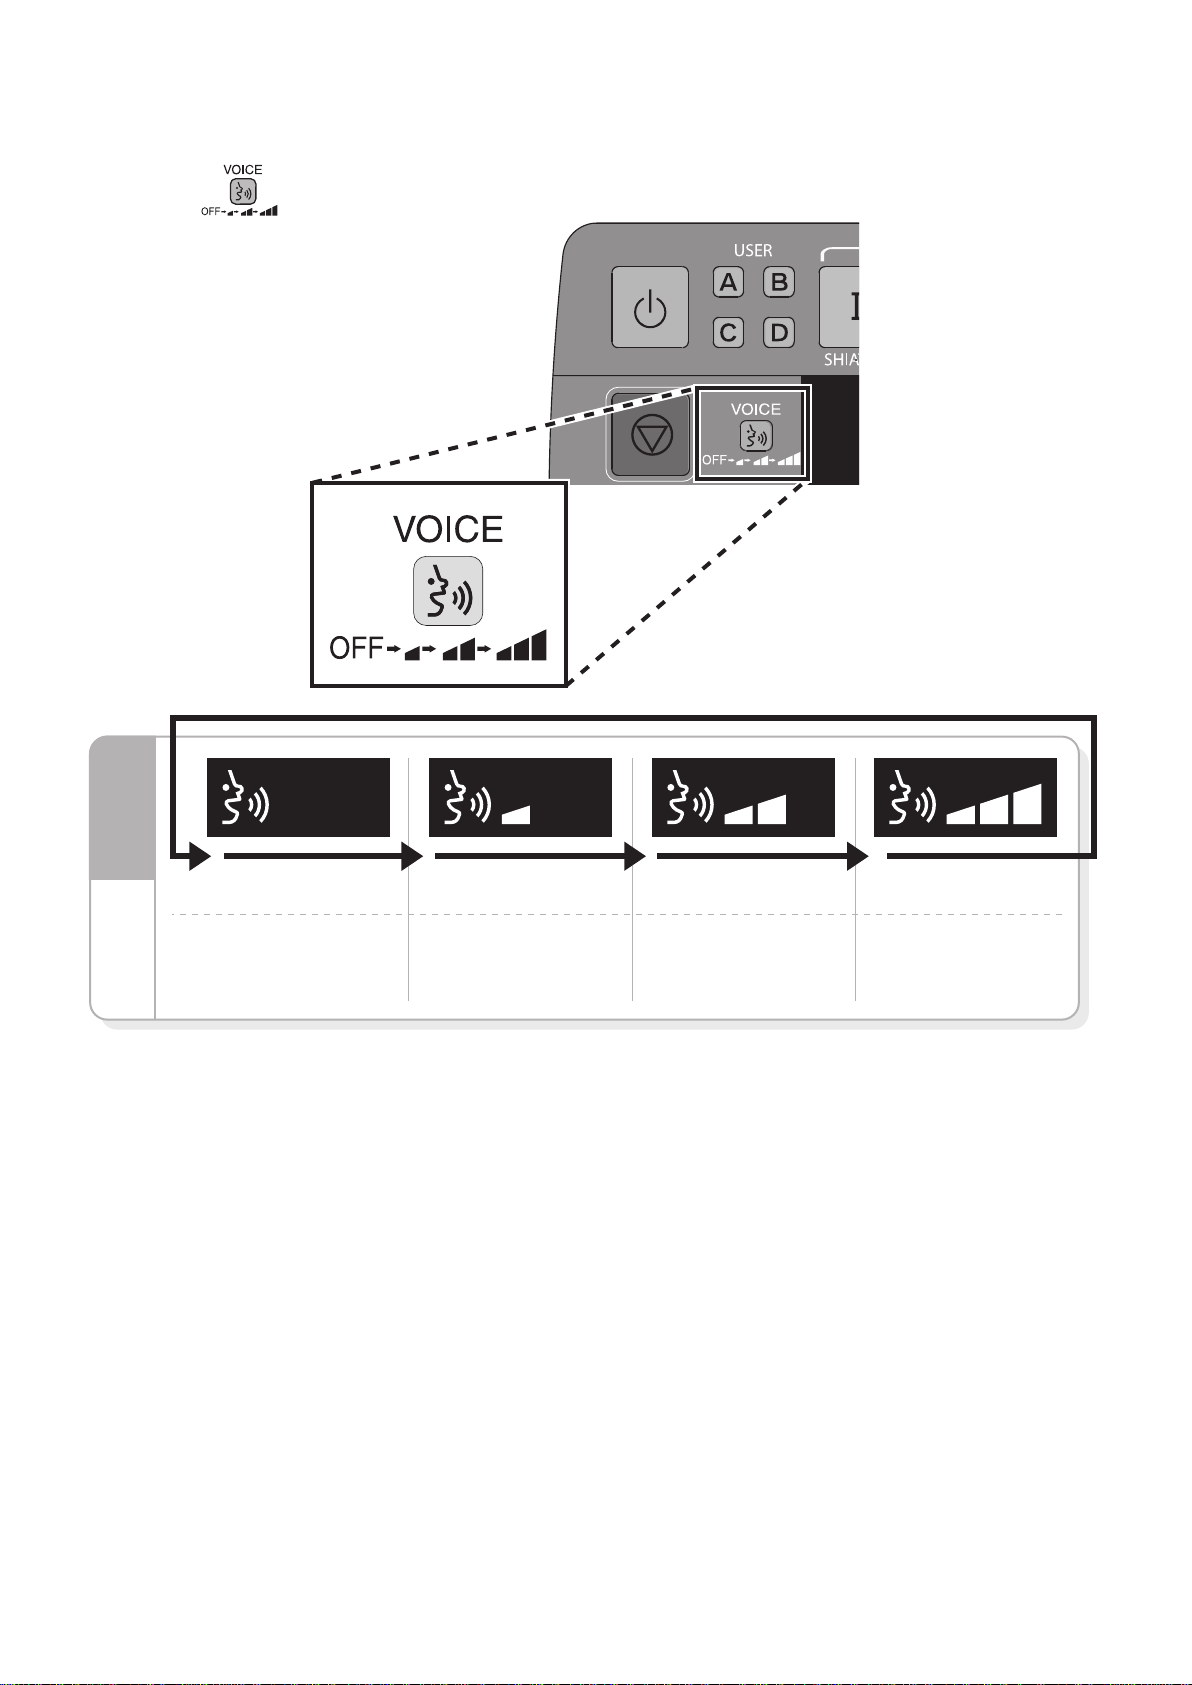
Adjusting the voice guidance volume
Press the button to adjust the volume.
Press the button to shift
the volume level by one
up/down.
VolumeDisplay
“Off” “Soft” “Medium”
The single beep (when a
button is pressed) and the
triple beep (when the
adjustable setting limit is
reached) will always be
audible.
“Loud”
Default Setting
37
Page 5
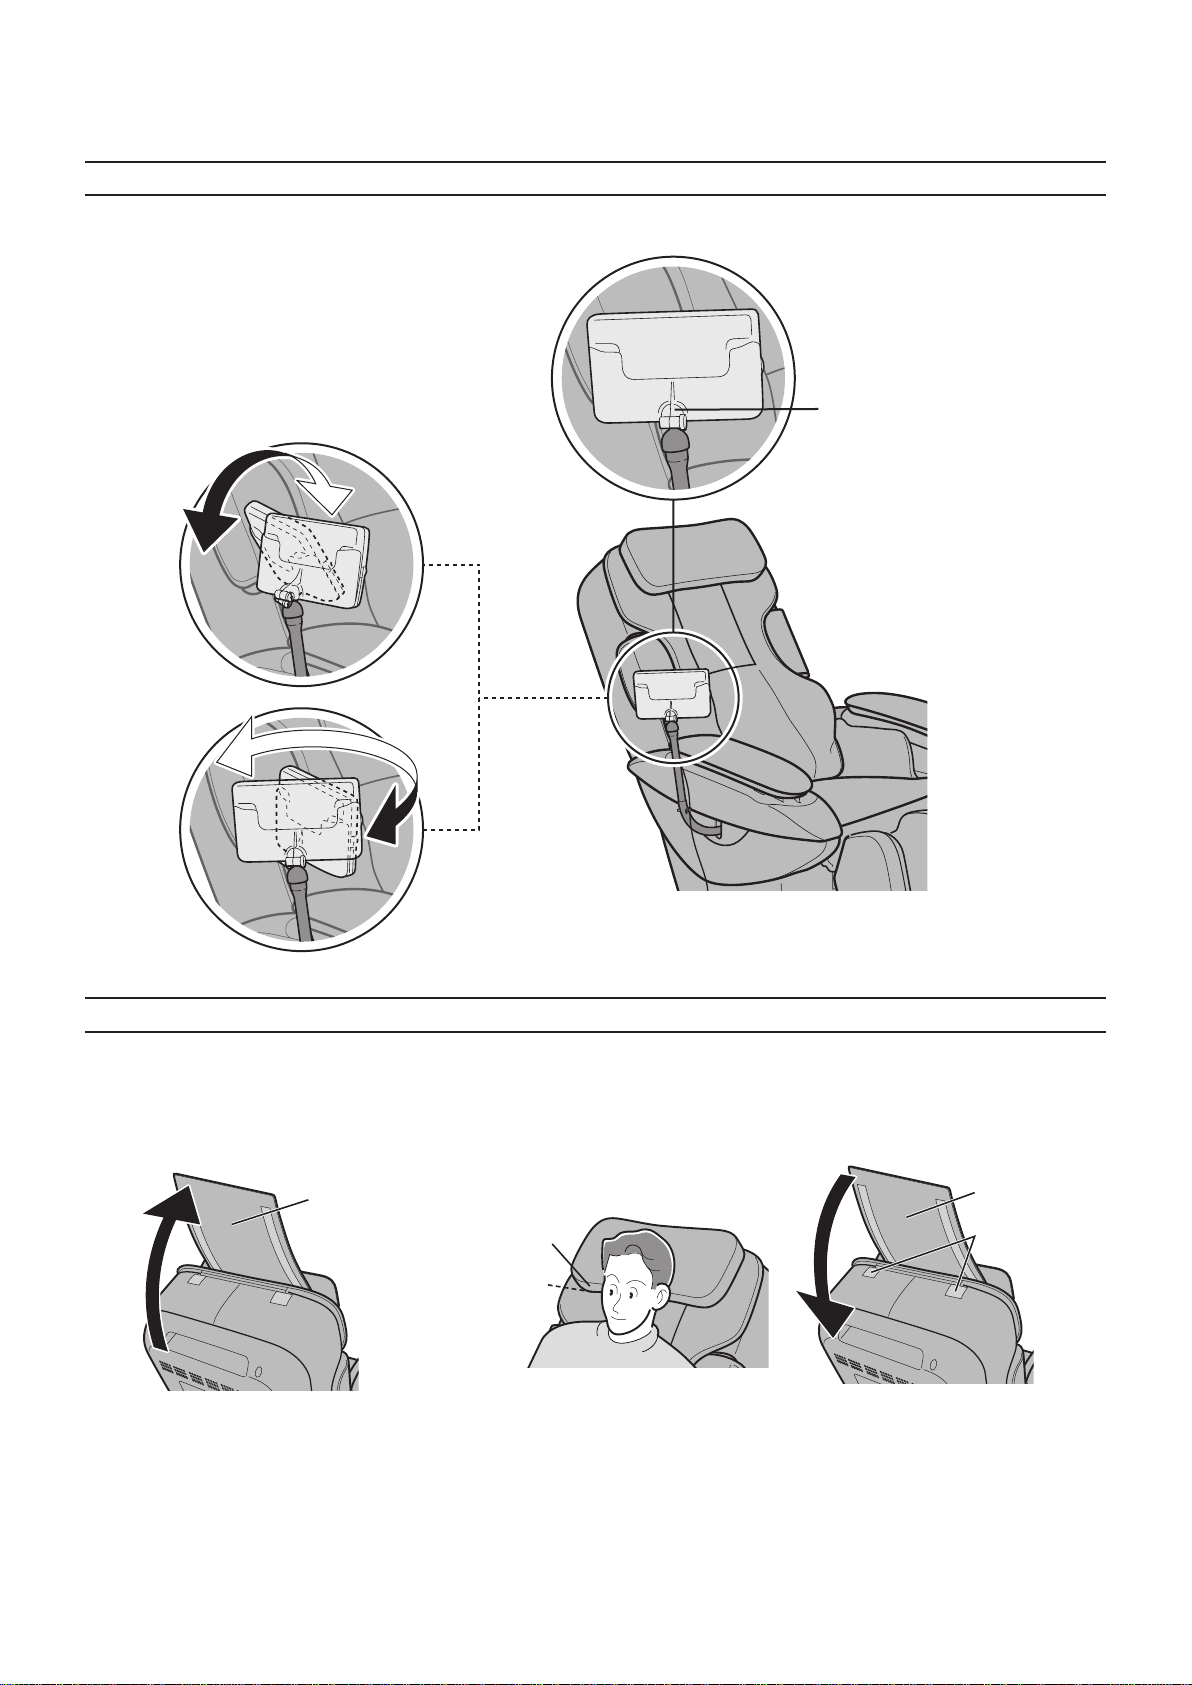
Adjusting the control panel stand and pillow
Adjusting the control panel stand
The direction of the pivoting stand can be adjusted.
Front/Back
Left/Right
Ball joint
Adjusting the pillow for correct height during a massage
1. Remove the pillow. 2. Adjust the height of the pillow so that the
bottom edge is at ear level.
•
If positioned too low, the pillow may
interfere with a massage of the area
around the neck.
Pillow
Lower edge
of the pillow
Ear level
•
When the reclining angle changes, the
position of the pillow may shift. In that
case, adjust the position again.
3.
Attach the pillow on the velcro
fasteners.
Pillow
Velcro
fasteners
38
Page 6
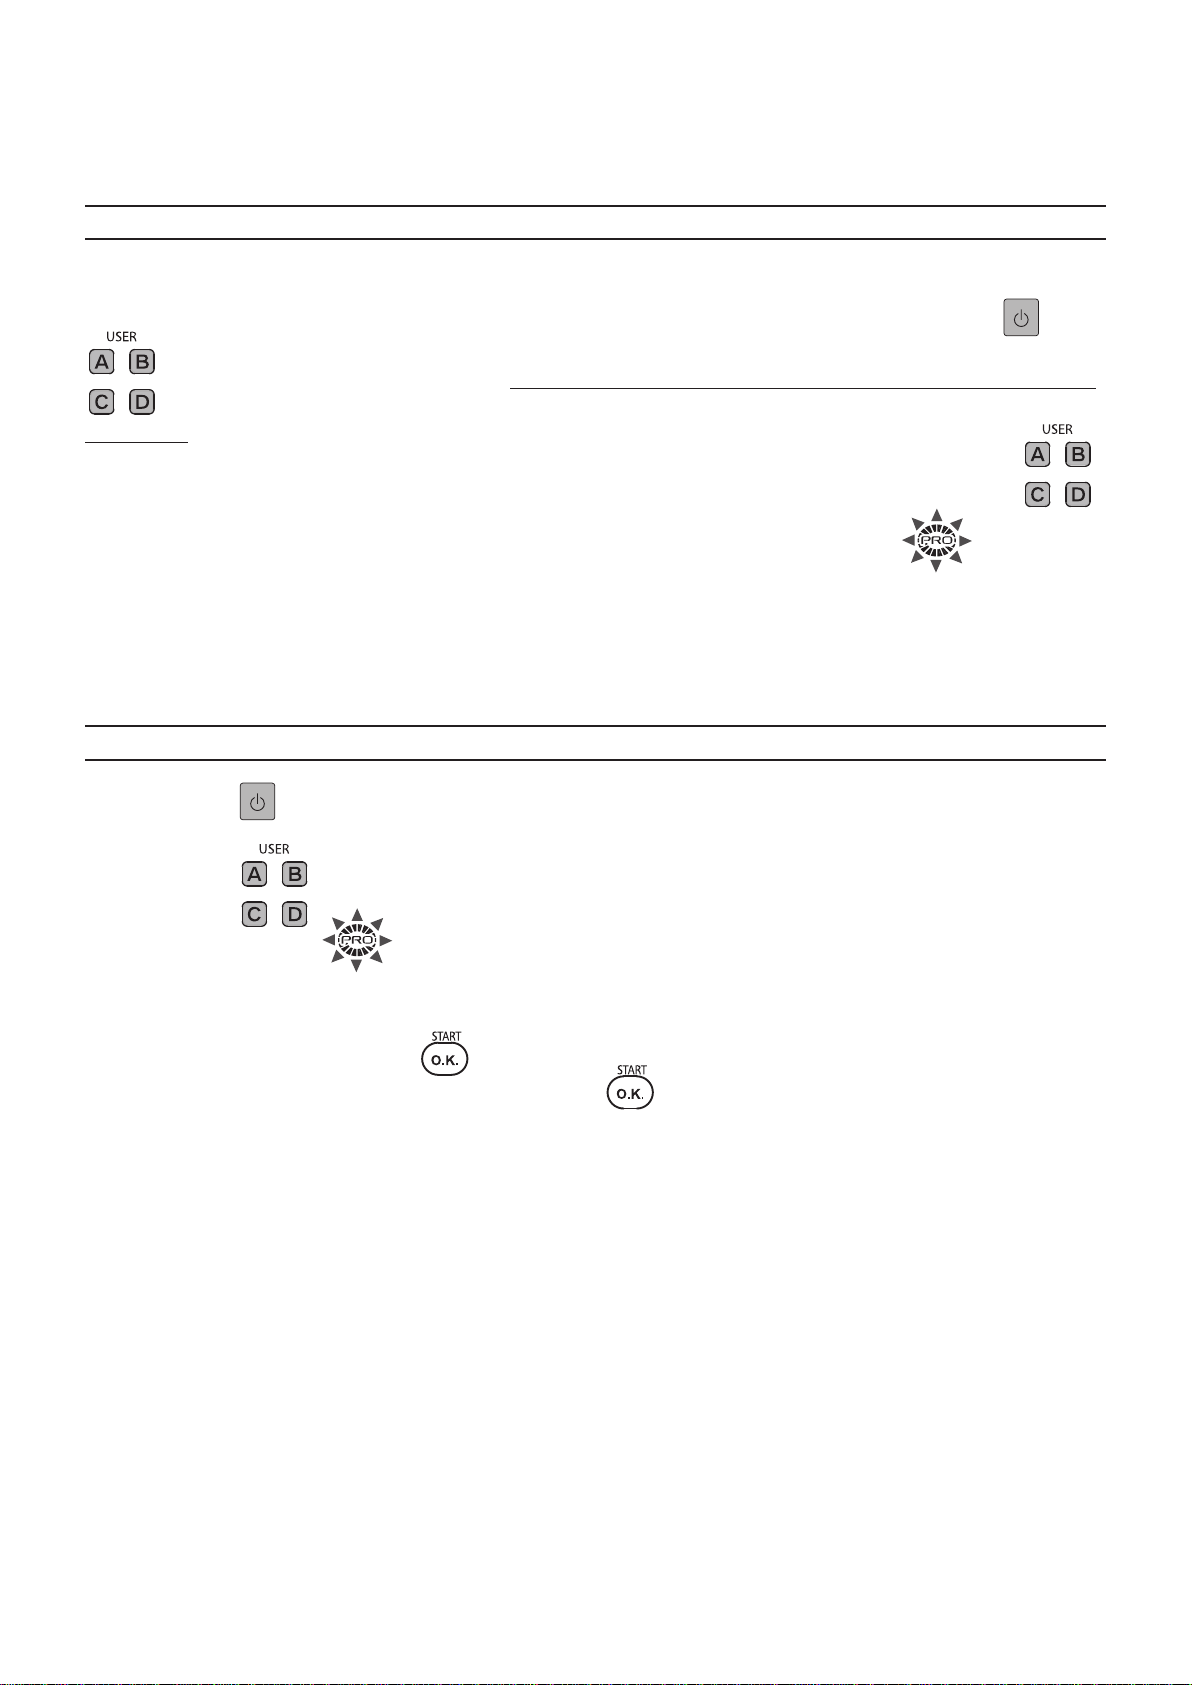
Advanced user memory function
The user memory function retains the adjustments for a massage, such as “REPEAT” function or “BACK INTENSITY,” so that the
massage will start with the saved settings.
Saving the user program settings
See page 40 for the settings that can be saved.
•
After completing the massage, or when the massage is stopped by pressing the , the
buttons will flash and the unit ready to save any settings that changed during the
massage.
Press the button for the program settings that you want to save while the
1
buttons flash (for approximately 15 seconds).
The program settings have been saved when the button you pressed and the user memory display turn on.
When the selected button starts flashing quickly
Other settings are already saved.
To update with new program settings, press the same button again.
To maintain the saved programs, press a different button.
•
The operation m
•
ust be executed within approximately 15 seconds after the button starts flashing quickly.
When you want to use your saved massage settings
Press the button to turn on the power.
1
•
The power will turn off automatically if no operation is executed for 3 minutes without performing massage.
Press the button used to save your settings.
2
The user memory display turns on.
Select from Pre-Program, Quick Massage, Self-Program, or Manual Operation.
3
•
Massage starts without pressing the button.
•
It is also possible to change the settings. In that case, press
The massage will start after body scanning is completed.
4
button after the settings are changed.
39
Page 7
Settings that can be saved
The latest settings entered by the user during programs or manual operation will be saved.
For Pre-Program, Quick Massage, and Self-Program
•
Settings other than the massage style will be saved as common settings.
Leg stretch settings
Air massage settings
Intensity of massage heads
Self-program levels
Ultra Knead/Repeat/Position
•
Settings for 8 different times for the respective programs
can be saved.
•
If the number of saved settings exceeds 8, the oldest one
will be deleted.
•
See pages 27 to 28 for detailed functions.
For Manual Operation
Leg stretch settings
Air massage settings
Style
The massage style that is selected last will be saved.
•
Settings for an entire program will be saved.
•
See pages 27 and 29 for detailed functions.
•
Massage action
settings
Note: The following will not be saved:
•
Reclining angle
•
Length of ottoman extension
•
Arm stretch settings
•
Manual operation settings
* Massage intensity
Massage style
Massage head position
Speed, tapping, regional rolling, auto width
40
Page 8
Erasing saved data
Press the button to turn on the power.
1
The power will turn off automatically if the massage does not start within 3 minutes after turning on the power.
•
Press the button corresponding to the settings you wish to delete.
2
Only the button pressed will illuminate.
Confirm the program selection buttons flash.
3
Press the same button again and hold for 3 or more seconds.
4
The pressed button will flash.
Press the button once again while it is flashing (for approximately 15 seconds).
5
The change from flashing to steady indicates that the deletion is complete.
41
Page 9
After completing the massage
The massage will be completed in approximately 15 minutes. For a quick massage, 5 minutes.
•
Since the foot section pivots, the legrest will return to a down and retracted position so that you can safely sit up. To return the
back of the chair to the original position, press the
may be resting comfortably.
Interrupting the massage
Return the legrest to the original position and then press the button.
1
•
The massage heads move to the retracted position.
•
The legrest lowers and the backrest rises automatically. The backrest will move after the massage heads retract.
button twice. The chair does not automatically come up since you
Pull the legrest
slide lever back.
Raise the legs
slightly and the
legrest returns.
When the massage is complete
The buttons will flash and the unit ready to save any settings that changed during the massage.
Not saving the settings
It is not necessary to oper
Saving the settings
See pages 39 to 41 “Advanced user memory function.”
ate. The operation will complete after approx. 15 seconds.
Emergency Stop
Press the button.
1
•
All operations will stop immediately.
The user program will not be saved in this case.
•
Get off the unit carefully to prevent the unit tipping over.
42
Page 10
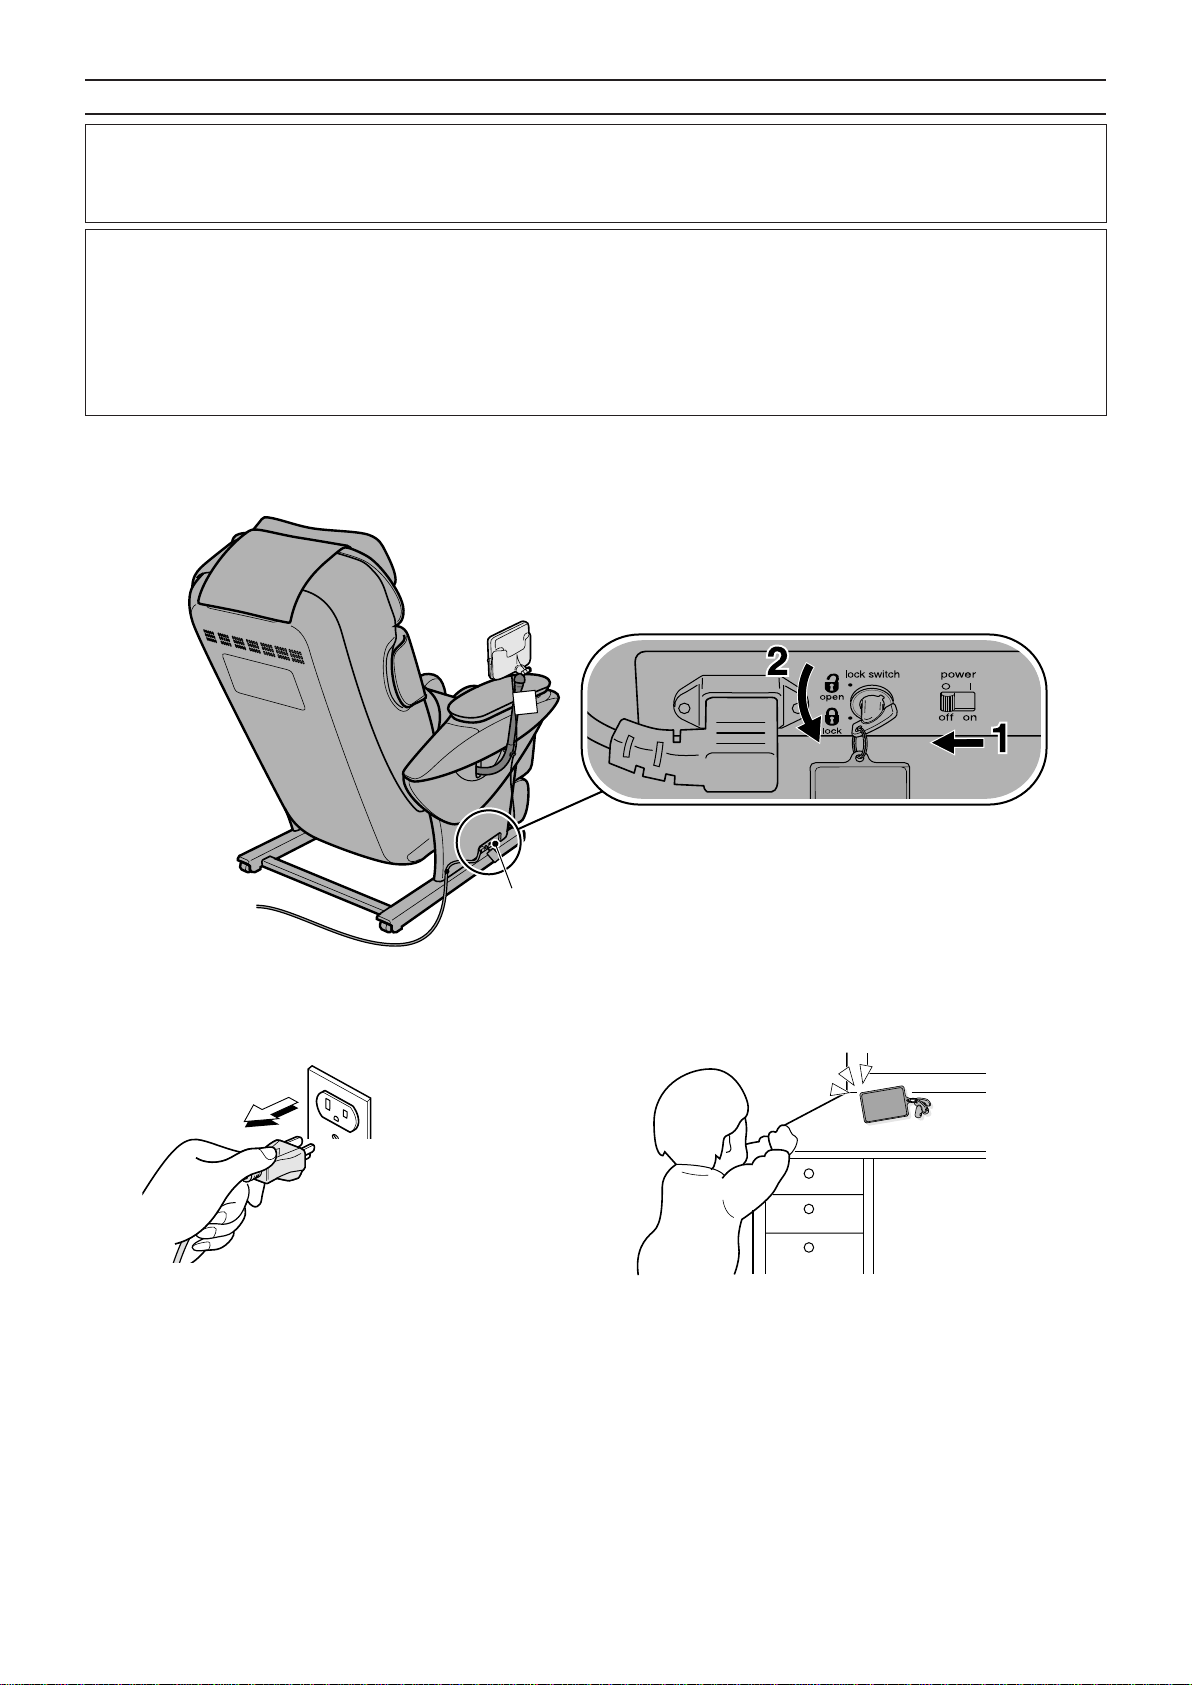
Disconnecting the power
Warning
After use, always slide the power switch to the “off” position, turn the lock switch to the “lock” position and remove
•
the lock switch key.
Failure to observe this precaution may result in accident or injury due to children playing with the controls.
Caution
•
Always hold the power plug, not the power cord, when unplugging from an outlet.
Failure to observe this precaution may result in electric shock or short-circuit.
•
Unplug the power plug from the outlet when the unit is not in use.
Failure to observe this precaution may result in electrical fire due to deterioration of insulation caused by dust and moisture.
•
Keep the lock switch key out of reach of children.
Failure to observe this precaution may result in accident or injury due to accidental ingestion or children playing with the
controls.
Slide the power switch to the “off”
1
position.
Power supply box
Remove the power plug from the
3
electrical outlet.
Turn the lock switch key to the “lock”
2
position.
The lock switch key must be stored
4
out of the reach of children.
43
Page 11

Cleaning and Maintenance
Caution
Always unplug the unit before cleaning it. Never touch a power plug with wet hands.
•
Failure to follow these instructions may lead to electrical shock or burns.
Areas covered with synthetic leather
Wipe these areas with a soft, dry cloth.
•
Do not use any leather maintenance tools that are commercially available (chemical
cloth or chemicals).
This can cause discoloration or hardening of the synthetic leather.
If the synthetic leather is particularly dirty, wipe it in the following manner.
•
1. Soak a soft c
wring it out thoroughly.
2. Dab the surface with the moistened cloth.
3. Rinse the c
remaining detergent from the surface.
4. Wipe the surfaces with a soft,
5. Allow to dry naturally.
•
Do not use a hair dryer to dry the surface more quickly.
•
Since colors may transfer from clothing to the synthetic leather surface, be careful
when using the unit with clothing such as jeans or colored clothes.
•
Do not allow these areas to come in contact with plastic for extended periods of time
as this may lead to discoloration.
•
Do not use thinners, benzine, or alcohol.
loth in water or a 3% to 5% solution of mild deter
loth in water, wring it out thoroughly, and then wipe any
y cloth.
dr
gent and
Armrest, Pipe and Plastic Area
Wipe the unit with a cloth
1
moistened with mild detergent
and thoroughly wrung out.
Do not use thinners, benzine, or alcohol.
•
Wipe the unit with a cloth
2
moistened with plain water and
thoroughly wrung out.
•
Be sure you thoroughly wring out the cloth first
when cleaning the control panel.
Allow the unit to dry naturally.
3
Seat Fabric
Wipe the seat fabric with a cloth soaked in
1
mild detergent and thoroughly wrung out.
Do not use thinners, benzine, or alcohol.
•
Use water or a mild detergent and brush
2
on areas where the seat fabric is
particularly soiled.
•
Be careful not to brush the fabric too much to avoid damage.
Wipe the unit with a cloth moistened with
3
plain water and thoroughly wrung out.
Allow the unit to dry naturally.
4
44
Page 12

45
Moving the Unit
Caution
•
Always return the legrest to its original position before moving the unit.
Failure to observe this precaution may result in injury due to the legrest returning to its original position when the unit is being
moved.
Do not move the unit while someone is seated in it.
•
Failure to do so may result in accident or injury due to the unit tipping over.
When moving the unit with the wheels, remove all obstacles from around it, make sure the backrest is in the upright
•
position,
Failure to do so may cause the unit to tip over, which may lead to damage or injury.
Lifting the Unit
Move the unit by having one person firmly hold onto the fabric section on the underside of the legrest and another person use
the groove on the back cover of the backrest.
Please hold the groove and the legrest securely to avoid dropping the unit as it may damage the floor.
•
lift it no higher than waist height (no higher than 32" (80
Fabric
section
Place your
fingers in
the groove.
cm)), and roll it slowly.
Groove
Hold onto the fabric
section on the underside
of the legrest.
Legrest Back cover
Place the control
panel on the seat.
To put the unit down on the floor
Put the unit down carefully, making sure your feet are clear of the base.
Put down the legrest by holding it with your hands until it has been set on the floor completely. If you release your hands before
the legrest is fully extended, the legrest will forcibly return to the initial position.
Page 13

Using the wheels to move the unit
Move the unit by holding onto the fabric section on the underside of the legrest and using the wheels.
Fabric section
Roll the unit slowly
Hold onto the fabric section on
the underside of the legrest
Lift it no higher than
waist height
Place the control panel
on the seat.
Place a mat on the floor to avoid damaging the floor.
Wheels
To put the unit down on the floor
Put the unit down carefully, making sure your feet are clear of the base.
•
Put down the legrest by holding it with your hands until it has been set on the floor completely. If you release your hands before
•
the legrest is fully extended, the legrest will forcibly return to the initial position.
46
Page 14

47
TROUBLE SHOOTING
Problem Cause and Remedy
Motor Noises
•
It sounds and feels like the massage heads are straining to
get over wrinkles in the cloth.
•
The motor groans when it comes under load.
•
There is excessive noise during Tapping. (The noise is
greater at the top of the massage lounger.)
•
There is a creaking noise when the massage heads are in
operation.
•
There is a rattling sound when the massage heads move up
or down.
•
The belt can be heard rotating.
•
There is a rubbing sound produced by the massage heads
rubbing on the seat fabric.
•
There is a noise when the back cushion moves over the
armrest when the seat is reclining.
•
There is a noise when I sit down.
•
There is a strange sound when the massage heads move in
and out.
•
There is operational noise when applying air pressure.
•
There is a noise of discharging air.
•
The legrest rattles.
•
There is a humming sound from the pump.
•
There is operational noise of valves under the seat.
•
There is an unstable sound when air escapes during the leg
stretch.
The massage heads stop during operation.
The massage heads do not come up to the shoulder or
neck.
The height of the left and right massage heads is
different.
These sounds are perfectly normal and will not have any effect
on the operation of the unit.
If excessive force is applied to the massage heads during
operation, in the interests of safety the massage heads may
stop moving.
If all markings and buttons on the control panel start to flash,
which is extremely unusual, turn off the power switch, wait for
appro
ximately 10
again.
If the massage heads stop again, position yourself so that your
back is not completely in contact with the backrest. (Caution
should be exercised particularly when used by persons
w
eighing 220
If your head does not contact the pillow or your back does not
contact the backrest, the shoulder position may be detected as
lower than the actual position during the body scanning. Sit on
the seat in the deepest position and put your head on the
pillow, and then repeat the operations again from the start.
An alternating tapping method is employed, which means that
this phenomenon will naturally occur. There is nothing wrong
with the unit.
seconds and then turn the power switch on
lbs (100 kg) or more.)
(See page 19)
It is not possible to recline the unit.
The legrest cannot be raised or lowered.
Reclining does not take place even though a massage is
started in pre-programs.
(The seat does not automatically recline.)
The backrest does not return to the upright position. If the unit is stopped by automatic shut-off or by pressing the
If the unit encounters an obstacle or if excessive force is
exerted on it during operation, in the interests of safety the unit
will come to a stop.
When all displays and buttons are flashing and the backrest or
the legrest has stopped, turn off the power of the unit once,
tur
“on” the power again after approximately 10 seconds, and
n
then operate the unit.
In some cases the seat may not automatically recline
depending on the position (angle) of the backrest or the
legrest.
button, it will not return automatically. (To return from the
reclined position to the original position, press the
twice.)
button
Page 15

Problem Cause and Remedy
The power cord has been disconnected. (See page 16)
The unit will not operate at all.
Upper body (neck to lower back) massage
•
Lower body (calves to seat) massage
•
Arm massage
•
Sometimes the power won’t turn on when
again when a massage has finished.
The unit has been damaged. Stop using the unit immediately.
The power cord or power plug is abnormally hot. Stop using the unit immediately.
is pressed
•
The power switch on the unit has not been turned on.
•
A Pre-Program button or Manual Operation button hasn’t
•
been pressed after pressing
Approximately 5
after a massage finishes. Wait at least 5 seconds once all
movement has stopped before pressing
seconds are required for program termination
.
.
Warning
Do not attempt to repair, disassemble or modify the unit.
•
Failure to observe this precaution may result in fire or injury due to malfunctioning.
Caution
Unplug the power plug immediately and contact a customer service center to arrange for repairs if the unit ceases to
•
function or is otherwise not working properly.
Failure to observe this precaution may result in electric shock or fire.
SPECIFICATIONS
Power supply AC 120 V 60 Hz
Power consumption 195 W
Massage area (Up-Down) Approx. 30 in. (76 cm) (The massage heads move a total of approx. 26 in. (65 cm))
Massage area (Left-Right) Distance between massage heads during operation (massage width adjustable)
Upper body massage
Massage area (Forward-back) Projected amount of massage head (Intensity adjustable)
Massage speed Tap: Approx. 250 – 450 cycles/minute (single side)
Lateral/Vertical Travel Lateral tr
Massage width Full roll, V
Air massage
Air Pressure (Calf) 5: Approx. 32 kPa
Reclining angle Backrest: Approx 120˚ – 170˚
Automatic Shut-off Automatically turns off after approx. 15 minutes (approx. 5 minutes for the quick massage)
Dimensions
When not reclined
(H × W × D)
Neck, Shoulder
Approx.
Full roll: Approx. 26 – 92 seconds (both ways)
Other than the above: approx. 6 – 50 cycles/minute
Vertical travel (Long): Approx. 30 in. (76 cm) up-down auto return
Vertical travel (Short): Approx. 4 in. (10 cm) up-down auto return
Other than the above: Same as massage area (left-right)
4: Approx. 30 kPa
3: Approx. 25 kPa
2: Approx. 19 kPa
1: Approx. 8 kPa
* It may vary with the area slightly.
Legrest: Approx 0˚ – 85˚
Approx.
, Back, Lower back: Approx. 3 – 8 in. (7 – 21 cm)
4 in. (10 cm)
avel: Approx. 1.5 in. (3.8 cm) left-right auto return
ertical Movement: Approx. 3 – 7 in. (7 – 18 cm)
47.2 × 33.1 × 50 in. (120 × 84 × 127 cm)
When reclined
(H × W × D)
Weight of Unit Approx.
Dimension of box (H × W × D) Approx.
Weight in box Approx.
Maximum user weight Approx.
Minimum distance from wall 15.7
Appro
in. (40 cm)
28.3 × 33.1 × 76.8 in. (72 × 84 × 195 cm)
x.
181 lbs. (82 kg)
28.3 × 30.7 × 65.4 in. (72 × 78 × 166 cm)
216 lbs. (98 kg)
264 lbs (120 kg)
48
Page 16

INSTRUCCIONES DE SEGURIDAD IMPORTANTES
Se deberán observar siempre las precauciones básicas durante el uso de instrumentos eléctricos, incluyendo las siguientes.
Por favor asegúrese de leer todas las instrucciones antes de utilizar el Sillón de Masaje Doméstico.
PELIGRO – Para reducir el riesgo de descargas eléctricas:
1. Siempre desenchufe esta unidad de la toma de corriente inmediatamente después de usarla y antes de
limpiarla.
ADVERTENCIA – Para reducir el riesgo de quemaduras, incendio, descarga eléctrica, o herida a personas:
1. Inserte el enchufe completamente en la toma a n de reducir el riesgo de cortocircuitos e incendio.
2. No descuide la unidad durante el tiempo que esté conectada. Desconéctela siempre que no esté siendo usada.
3. La unidad no debe ser usada por personas que no puedan moverse o comunicarse por si mismas.
4. Use la unidad únicamente para el propósito descrito en estas instrucciones.
5. No se pare sobre la unidad.
6. No utilice otros accesorios distintos a los recomendados por el fabricante.
7. Siempre regrese el asiento a la posición vertical y asegúrese de que el reposapiernas se encuentre totalmente
replegado. Tenga cuidado de que nada esté obstruyendo el reposapiernas mientras lo retrae. Mantenga a los
niños alejados del reposapiernas.
8. Nunca ponga la unidad en funcionamiento si tuviera un cable o un enchufe dañado. Devuelva la unidad al
centro de servicio autorizado más cercano si no funciona correctamente, si la ha dejado caer o dañado, o si ha
sido sumergida en agua.
9. Mantenga los cables de alimentación alejados de supercies expuestas al calor. No transporte la unidad
tomándola por el cable de alimentación.
10. Nunca bloquee las aberturas de aireación durante el funcionamiento y asegúrese de que todas las aberturas de
aireación estén libres de pelusa y pelo, etc. No deje caer ni inserte nada en cualquiera de las aberturas de la
unidad.
11. No use la unidad encima de aparatos de calefacción, tales como alfombras eléctricas, etc. No lo haga funcionar
bajo una cubierta o almohada. Puede ocurrir calor excesivo y causar incendio, choque eléctrico o herida a
personas.
12. No use la unidad en baños u otros lugares mojados o húmedos ya que esto puede causar choque eléctrico o
hacer que la unidad falle. No derrame agua, etc. sobre el panel de control.
13. No use la unidad a la intemperie.
14. No lo use u opere donde se utilicen productos de aerosol o donde se esté administrando oxígeno.
15. Cuando desenchufe la unidad, apague primero todos los controles antes de extraer el enchufe de la toma de
alimentación. No utilice transformadores con la unidad ya que ésto podría originar fallos en el funcionamiento o
descargas eléctricas.
16. Conecte esta unidad sólo a una toma de alimentación correctamente puesta a tierra. Vea las Instrucciones de
Puesta a Tierra.
CONSERVE ESTAS INSTRUCCIONES
S1
Page 17

PRECAUCIONES DE SEGURIDAD
CUIDADO: Para evitar el riesgo de herida:
1. Las personas con alguna de las condiciones listadas abajo o bajo tratamiento médico o que sufran de
condiciones médicas deberán consultar a su médico antes de usar la unidad:
a) Mujeres embarazadas, gente que está enferma, en forma física pobre.
b) Gente que sufre de dolor en la espalda, el cuello, el hombro o la cadera.
c) Gente que tiene un marcapasos, desbrilador u otros dispositivos médicos personales con tendencia a la
interferencia electrónica.
d) Gente que sufre de enfermedades cardiacas.
e) Gente a quienes su médico les ha prohibido el recibir masaje debido a una trombosis o aneurisma, venas
varicosas agudas u otros problemas de circulación.
f) Gente con curvaturas irregulares de la columna.
2. Esta unidad no debe ser usada por niños. Retire la llave cuando no la use y almacénela en algún lugar fuera
del alcance de los niños.
3. Siéntese lentamente después de comprobar la posición de las cabezas de masaje. No ponga nunca ninguna
parte de su cuerpo entre las cabezas de masaje ya que la acción de aprisionamiento de las mismas podría
causarle lesiones. No ponga nunca sus dedos o sus pies en la separación entre el respaldo y el asiento, el
respaldo y los apoyabrazos, el asiento y la cubierta bajo los apoyabrazos, o la separación entre el
reposapiernas y el reposapies. No ponga sus dedos ni niguna parte de su cuerpo en el mecanismo debajo del
reposapiernas, o entre el reposapiernas y el reposapies.
4.
No utilice la unidad en la piel desnuda. Mientras que los tejidos nos aumentan la efectividad, la exposición directa
de la piel al sillón de masaje podría irritar la piel.
No use la unidad mientras que tiene puesto algún objeto duro en la cabeza tal como un accesorio para el pelo, etc.
No use la unidad para masajear la cabeza, el abdomen, la parte frontal del cuello, los codos o las rodillas. No use
una acción de masaje excesivamente fuerte en la parte posterior del cuello.
5. Al usar la función de escaneo corporal, asegúrese siempre que la posición del hombro sea correcta. Si la
posición del hombro no es correcta, use el botón POSITION para ajustarla adecuadamente. Puede ajustar la
posición del hombro de esta forma en los modos de preprograma, masaje rápido, programa de usuario y
funcionamiento manual. El no alinear la posición de rodillo de cuello correctamente puede llevar a herida.
6.
No exceda los 15 minutos en cada sesión de masaje de espalda. Para evitar el estirar los músculos demasiado, que
puede resultar en incomodidad, no use la unidad durante más de 5 minutos la primerta vez que la use. Podrá
aumentar gradualmente la duración y la potencia del masaje según se vaya acostumbrando.
No masajee una zona durante más de 5 minutos seguidos.
Un masaje excesivo puede sobreestimular los músculos y nervios y resultar en un efecto adverso.
Para prevenir el exceso de masaje, no use el sillón de masaje durante más de 15 minutos en cada sesión.
Después de aproximadamente 15 minutos, las cabezas de masaje se retraerán y se detendrán.
El cojín del respaldo puede ser retirado si desea experimentar un masaje de espalda más fuerte. Tenga mucho
cuidado cuando use este modo a n de evitar dolor o herida en su espalda. Úselo sólo por periodos cortos de tiempo
(no más de 15 minutos). Reinstale el cojín del respaldo si desea restaurar a una intensidad de masaje normal.
7. Al usar el sillón de masaje, si se siente mal o si el masaje resulta doloroso, deje de usarlo inmediatamente. Al
usar el sillón de masaje, si la presión parece demasiado fuerte, se puede detener el movimiento de las cabezas
de masaje en cualquier momento oprimiendo el Botón de Parada Rápida.
8. No se quede dormido al usar la unidad. No use la unidad después de beber alcohol.
9. Cuando el respaldo esté en una posición reclinada, no se siente en él, ni se siente con sus piernas
descansando en el reposacabeza. No se siente en el reposapiernas, ya que la unidad podría caerse.
10.
No permita a los niños o animales domésticos jugar alrededor de la unidad, especialmente durante su funcionamiento.
11. No desenchufe la unidad durante su funcionamiento. Desenchúfela inmediatamente si se produce un corte en
la alimentación eléctrica.
12. Si usa el masajeador por primera vez, asegúrese de comenzar en el programa de masaje suave. El masaje
shiatsu es más fuerte y deberá ser disfrutado cuando uno se haya acostumbrado a la silla.
13. No permita que los niños jueguen en este mueble mecanizado ni que operen el mecanismo. El reposapiernas
se dobla al cerrar de modo que un niño podría herirse. Déjelo siempre en una posición vertical y cerrada.
Mantenga las manos y los pies lejos del mecanismo. Sólo el ocupante deberá hacerlo funcionar.
14. Sáquese objetos duros, tales como uñas falsas, relojes de pulsera o anillos, cuando masajee las manos o los
brazos. Vacíe los bolsillos de objetos duros cuando masajee el área de las posaderas o los muslos.
15. Levante siempre el cojín posterior para comprobar que el tapizado de la unidad no ha sufrido rasgaduras antes
de su uso. Además revise también otras áreas para asegurarse de que el tapizado no haya sido rasgado. Sin
importar cuán pequeña fuera la rasgadura, si encuentra una, deje de usar la unidad inmediatamente,
desenchufe el cable de alimentación y haga que reparen la unidad en un centro de servicio autorizado.
S2
Page 18

PRECAUCIONES PARA EL FUNCIONAMIENTO
ADVERTENCIA: Para evitar dañar el sillón, observe estas precauciones:
1. El asiento está deseñado para soportar un peso máximo de 264 libras (120 kgs.). Exceder el peso máximo
puede causar daño permanente al mecanismo de masaje y/o a los otros componentes de la unidad. Un daño
tal es considerado como abuso del usuario y no está cubierto bajo la Garantía Limitada.
2. No se siente encima ni deje caer el panel de control. No jale del cable del panel de control ni del de corriente.
Tenga cuidado para que el cable del panel de control no quede atrapado entre el reposabrazos y el respaldo de
la silla.
3. No trate al asiento con brusquedad, como volcándolo de lado, poniéndolo boca arriba o parándose en él.
4. No trate al tapizado con brusquedad.
Mantenga objetos alados o punzantes lejos del tapizado del asiento. Tenga cuidado de no dejar caer cenizas encendidas,
•
cigarrillos encendidos o fósforos sobre el asiento.
La exposición a la luz solar directa puede causar desteñido o cambios en el color del tapizado.
•
5. Si el sillón de masaje funciona anormalmente, apáguelo inmediatamente y llévelo a un centro de servicio
autorizado para que sea revisado.
6. No accione ningún interruptor a intervalos cortos. Tal acción puede hacer que falle el interruptor.
7. Puede que se escuche algo de ruido proveniente del sillón de masaje mientras que está en uso. Esto es debido
a su estructura y es normal.
8. Asegúrese de que no haya ningún obstáculo detrás del asiento antes de reclinarlo. El asiento se puede reclinar
hasta un ángulo máximo de 170°. Si el respaldo golpea una pared o una columna, puede fallar. Asegúrese de
dejar siempre un espacio amplio detrás del sillón. Reclínelo lentamente para evitar que entre en contacto con
un obstáculo.
9. Cuando se aplique una presión excesiva a las cabezas de masaje, puede que éstas se detengan por
seguridad. Al mover las cabezas hacia arriba de una posición inferior, el peso del cuerpo de uno puede que
detenga el movimiento de las cabezas. En tal caso, levántese ligeramente para permitir que las cabezas de
masaje suban.
10. Después de cada masaje, deslice el interruptor de alimentación, que se encuentra situado en el lado derecho
del asiento, a la posición “off” (apagado) y haga girar su interruptor de bloqueo a la posición “lock” (bloqueado).
11. No se siente con el cuerpo o el cabello mojados.
12. La unidad no debe ser usada en locales húmedos (sauna, piscina) o al aire libre.
13. No intente abrir o desensamblar cualquier parte de la unidad. Solamente un técnico de Panasonic deberá
arreglar su unidad. Llame al 1-800-338-0552 para localizar al técnico más cercano para usted.
S3
Page 19

INSTRUCCIONES DE CONEXIÓN A TIERRA
El producto debe ser conectado a tierra. Si funcionara mal o se descompusiera, la conexión a tierra proporciona el camino de
menos resistencia a la corriente eléctrica para reducir el riesgo de choque eléctrico. Este producto está equipado con un cordón
que dispone de un conductor y una clavija para conexión a tierra. La clavija debe conectarse en la toma de corriente apropiada
que disponga de una conexión a tierra según todos los códigos y ordenanzas locales.
PELIGRO
Una conexión mal hecha del conductor de conexión a tierra del equipo puede resultar en un riesgo de choque eléctrico.
Póngase en contacto con un electricista calicado si tiene alguna duda sobre si el producto está puesto a tierra adecuadamente.
No modique la clavija suministrada con el producto — si no entrara en la toma de corriente, haga que una toma de corriente
apropiada sea instalada por un electricista calicado.
Este producto ha sido diseñado para ser usado en un circuito nominal de 120 voltios y tiene una clavija de conexión a tierra
como la mostrada en la Figura A. Asegúrese de que el producto esté conectado a una toma de corriente que tenga la misma
conguración que la clavija. Ningún adaptador deberá usarse con este producto.
Figura A
TOMA DE CORRIENTE
CON CONEXIÓN A TIERRA
PATILLA DE
CONEXIÓN A TIERRA
CAJA DE TOMA DE CORRIENTE
CON CONEXIÓN A TIERRA
S4
Page 20

Nombre y función de las partes
9876543
1
2
10 11 12 13 14
Sillón de masaje
Frente
Reposapiernas
1
Sección de masaje de piernas/
2
plantas de los pies
Incluye función de masaje con
•
aire
Placas de reexología
para la planta
Removibles
•
Es posible ajustar la posición
•
Palanca de deslizamiento del
3
reposapiernas
Extensible hasta una longitud de
•
aprox. 5
Panel de control
4
Consulte las páginas S7 a S8
pulg. (12 cm)
Sección de masaje lateral de
5
glúteo/muslo
Placas de masaje del asiento/
lado del muslo (integrada)
Es posible ajustar la posición
•
Posición retraída de los
6
cabezales de masaje
Cojín de espalda
7
Almohada
8
Respaldo
9
Incluye cabezales de masaje
•
integrados
Asiento
10
Incluye función de masaje con
•
aire integrada
Reposabrazos
11
Sección de masaje de manos/
12
brazos
•
Incluye función de masaje con
aire integrada
Cubierta del soporte del panel
13
de control
•
En el lado izquierdo y derecho
Sección de masaje de hombro
14
exterior
Incluye función de masaje con
•
aire integrada
Placas para el hombro
Removibles
•
Es posible ajustar la posición
•
S5
Page 21

18 1315 16 17
2322212019
Parte posterior
Cubierta posterior
15
Soporte del panel de control
16
Etiqueta de seguridad para
17
niños
Brazo de soporte del panel de
18
control
Clavija de alimentación
19
Cable de alimentación
20
Etiqueta de precauciones de
21
seguridad
Ruedas
22
Caja de suministro de energía
23
Interruptor de bloqueo Interruptor de
alimentación
Llave del interruptor de bloqueo
Etiqueta de la llave del interruptor
de bloqueo
Para evitar que los niños ingieran
•
accidentalmente la llave
S6
Page 22

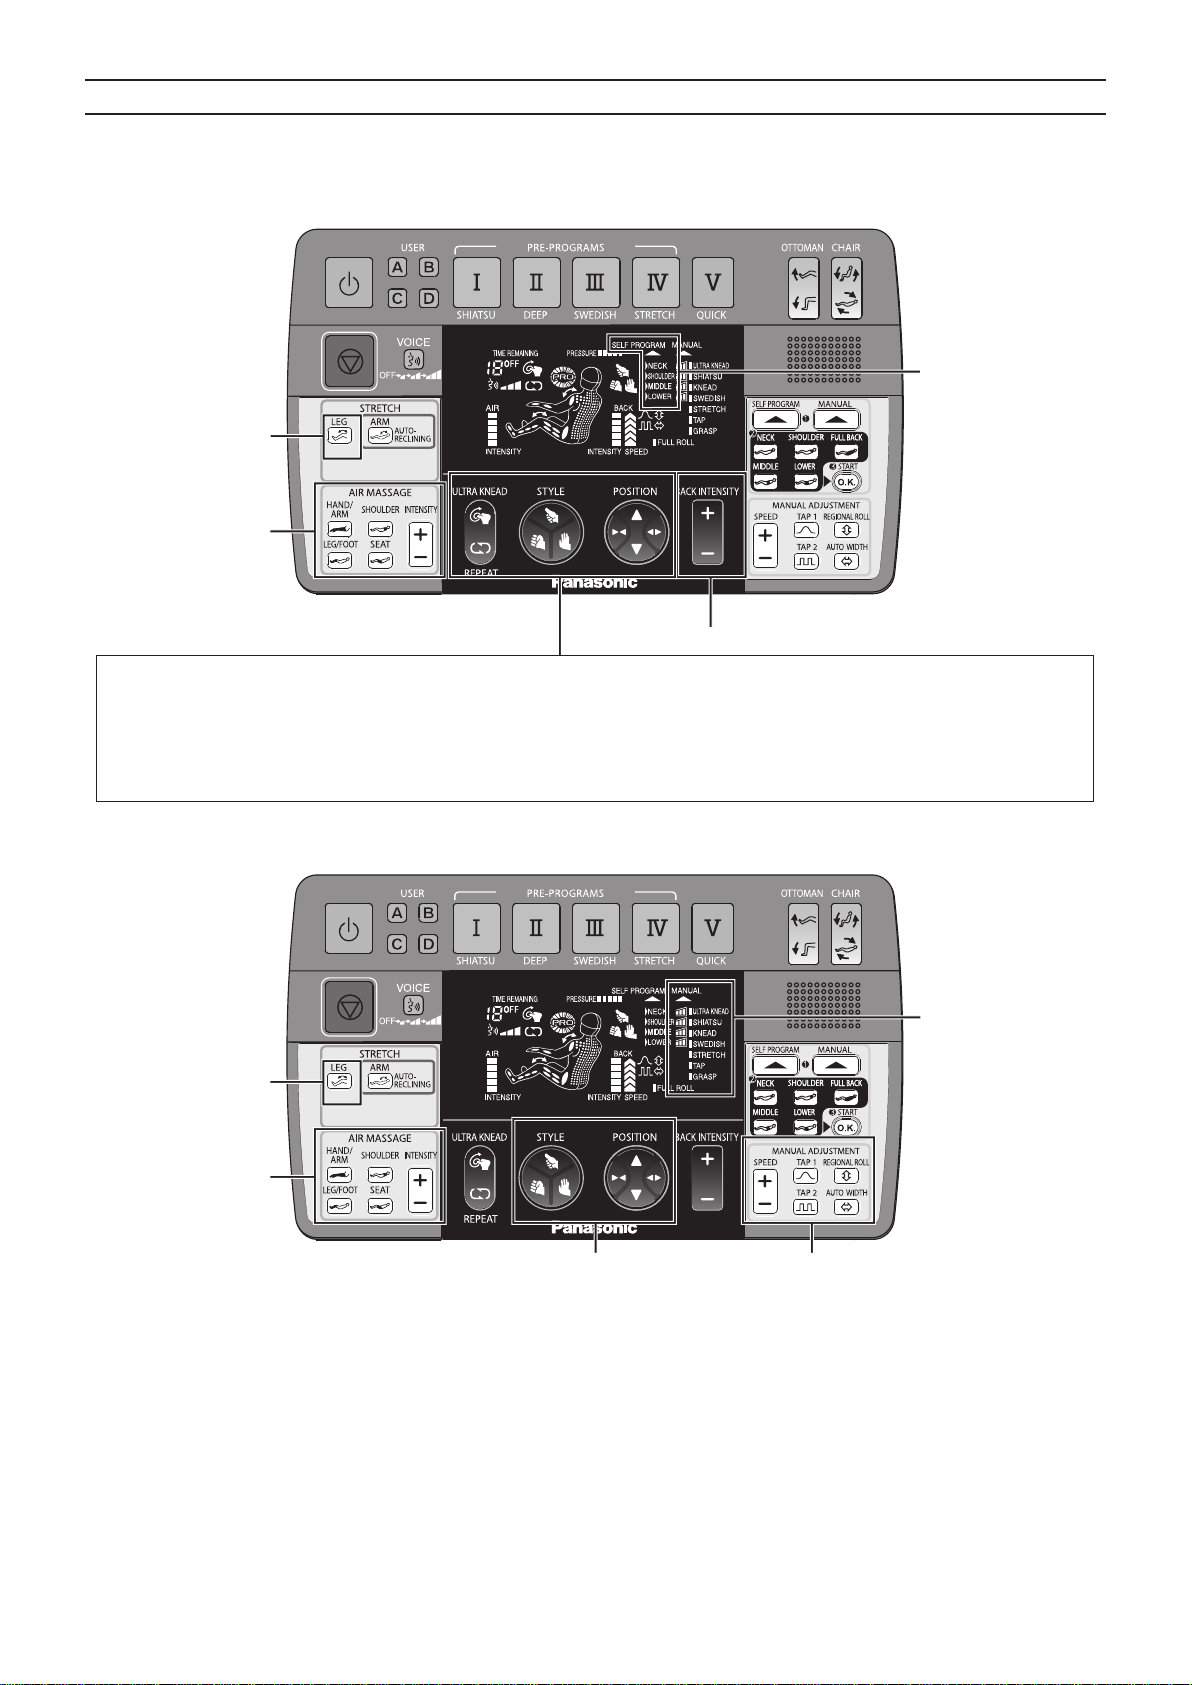
Panel de control
13
14 161715
Panel cerrado
Botón de encendido/apagado
1
Botón de parada rápida
2
•
Pulse este botón para detener el
masaje inmediatamente.
Botón de memoria de usuario
3
•
Consulte las páginas S39 a S41
Botones de selección de programa
4
•
Consulte la página S18
Botón de ajuste de ángulo de
5
Otomana
Consulte la página S35
•
Botón de ajuste de ángulo de
6
reclinación
Consulte la página S35
•
Pantalla de visualización
7
Esta ilustración muestra cuando
•
todas las luces están iluminadas.
Consulte la página S8
•
Panel abierto
Botón de volumen guiado por
8
voz
•
Consulte la página S37
Botón ULTRA KNEAD
9
•
“Ultra Knead” es el nombre de las
acciones de masaje.
•
Consulte las páginas S26 a S27
Botón de repetición
10
•
Consulte la página S27
Botones de selección de estilo
11
de masaje
•
Consulte la página S27
Botón de posición
12
•
Consulte la página S28
Botón de ajuste de intensidad en
13
respaldo
•
Ajuste de la fuerza de los
cabezales de masaje
•
Consulte la página S28
Botones de estiramiento
14
•
Consulte la página S34
Controles de masaje con aire
15
•
Selección de las áreas que
recibirán masaje con aire
•
Consulte la página S30
Controles de programa de
16
usuario/funcionamiento de
manual
•
Consulte las páginas S22 a S23
Controles de ajuste manual
17
•
Consulte las páginas S24 a S26
S7
Page 23

Pantalla de visualización
Visualización de volumen guiado por voz
1
Consulte la página S37
•
Apagado
Suave
Medio
Fuerte
Visualización de tiempo restante
2
(Durante el masaje)
(Una vez nalizado el masaje)
Visualización de “Ultra Knead”/
3
repetición
Consulte la página S27
•
(Ultra knead)
(Repetición)
Visualización de memoria de usuario
4
Se ilumina al utilizar la función
•
memoria de usuario
Consulte las páginas S39 a S41
•
* Esta ilustración muestra cuando todas las luces están iluminadas.
Visualización de presión
5
•
Indica la presión aplicada por los
cabezales de masaje
Visualización de estilo de masaje
6
•
Muestra el estilo de masaje actual
Acción de tipo pulgar
Acción de tipo palma
Acción de tipo puño
Visualización de ajuste de
7
programa de usuario
•
Consulte las páginas S22 a
Visualización del masaje manual
8
del cuerpo superior
•
Consulte las páginas S24 a
Visualización de intensidad de aire
9
•
Consulte la página S30
Visualización de estiramiento
10
•
Indica si la función de estiramiento
de piernas o brazos está activada
o desactivada
Encendida:
función activada
Apagada:
función desactivada
En funcionamiento:
parpadeando
S23
S26
Visualización de zona de masaje
11
•
Parpadea para indicar las zonas
que se están masajeando
•
En la visualización del área de
masaje, las posiciones son
estimadas. Por lo tanto, pueden
existir algunas diferencias entre la
sensación actual y la
visualización.
Visualización de intensidad
12
posterior/velocidad
•
Indica la intensidad y la velocidad
de los cabezales de masaje.
•
La velocidad sólo se indica en el
modo de funcionamiento manual.
Visualización de la operación
13
manual compleja del cuerpo
superior
•
Indica las operaciones opcionales
que se agregan a la operación
manual del cuerpo superior
Consulte la página S25
•
TAP 1 (golpeteo 1)
TAP 2 (golpeteo 2)
REGIONAL ROLL
(rodillo focalizado)
AUTO WIDTH
(anchura automática)
S8
Page 24

Instalación del sillón de masaje
Dónde usar el sillón de masaje
1
Asegúrese de que haya espacio suciente para reclinar el sillón.
Cuidado
•
No utilice el sillón de masaje en lugares de alta
humedad, tales como baños, etc., ya que esto
podría ocasionar descargas eléctricas u otros
accidentes.
Instale el sillón de masaje en una supercie
•
completamente plana.
De lo contrario, el sillón se podría volcar.
•
No exponga el sillón de masaje a la luz solar directa o a altas
temperaturas, como por ejemplo, frente a un calentador, etc., ya
que esto puede causar la decoloración o el endurecimiento de la
piel sintética.
•
Instale el sillón de masaje sobre una estera para evitar dañar el
suelo.
•
Al colocar una estera debajo del sillón de masaje, asegúrese
de que el tamaño de la estera (47 × 28 pulg. (120 × 70 cm)
como mínimo) sea suciente para cubrir las zonas en que el
sillón hace contacto con el suelo y la zona en que el reposapiernas podría tocar el suelo, como se muestra en el diagrama
de la derecha.
Instale el sillón de masaje cerca de una toma de corriente.
•
Estera
Zona en que el reposapiernas
podría tocar el suelo
Mantener una distancia de al
menos 4" (10 cm) de la pared.
Aprox. 77" (195 cm)
Anchura aproximada 33" (84 cm)
Aprox. 12"
(30 cm)
Aprox. 14"
cm)
(35
Zona en que el sillón
toca el suelo
Extracción de todos los elementos de la caja e instalación del sillón de masaje
2
•
Tenga cuidado para prevenir lesiones en la espalda inferior y otro tipo de lesiones que pudieran ocurrir al levantar objetos
pesados (aprox. 176 lbs. (80 kgs.)). (El sillón debe ser transportado por dos personas.)
•
Al utilizar las ruedas para mover el sillón de masaje, coloque una estera en el suelo para proteger su supercie.
Para colocar el sillón en el suelo
•
Coloque el sillón lenta y cuidadosamente en el suelo, teniendo cuidado de no tropezar.
•
Baje el reposapiernas sujetándolo con las manos hasta que quede completamente en contacto con el suelo. Si quita las
manos antes de que el reposapiernas esté completamente extendido, el reposapiernas volverá bruscamente a su posición
inicial.
Sección de tela
Sostenga la
sección de tela
por la parte de
abajo
Introduzca
los dedos en
el asidero
Asidero
S9
EsteraReposapiernas Cubierta posterior
Page 25

Compruebe que el sillón de masaje y los accesorios se encuentran en la caja.
Sillón de masaje
Anchura: Aprox. 27" (68 cm)
Altura: Aprox. 26" (66 cm)
Longitud: Aprox. 63" (160 cm)
Accesorios
• Reposabrazos (derecho/izquierdo)
Indicación
izquierda/derecha
Tapón de aire
Los agujeros pequeños en la tela son intencionales
y forman parte del diseño funcional.
• Llave Allen — 1
(Sección transversal)
0,2"
(4 mm)
• Placas de reexología para la planta
• Almohada
• Cubiertas del soporte del panel de control
Se instala en la sección de
masaje de plantas en la fábrica.
• Brazo de soporte del panel de
control
Soporte del
panel de control
Tornillo de
jación
Sujeción
• Placas para el hombro
• Tornillos de jación (M6 × 16) — 7
Documentos, incluidas las instrucciones de uso
•
Instrucciones de uso
•
Instrucciones de seguridad para niños (folleto amarillo)
•
Cómo transportar y mover (folleto amarillo)
•
Notas sobre el escaneo corporal (folleto rosado)
•
Manual de inicio rápido
• Llaves del interruptor de bloqueo — 2
Una de las llaves del interruptor de bloqueo se
inserta en el interruptor de bloqueo antes de
que el sillón salga de la fábrica.
La otra llave del interruptor de bloqueo es de
repuesto y debe guardarse de forma segura,
fuera del alcance de los niños.
No retire esta etiqueta.
S10
Page 26

Montaje
Instalación de los
1
reposabrazos
(En el lado izquierdo y
derecho)
1. Inserte el reposabrazos en
el sillón.
T
enga cuidado de
•
pellizcarse los dedos.
2. Asegure el reposabrazos
con los tornillos de jación.
Instale manualmente los
dos tornillos de jación
en su sitio y apriételos
rmemente con la llave
Allen.
Utilice este tornillo
Tornillo de jación (M6 ×
16)
× 4
Asegúrese de no dañar la
supercie del asiento.
(1) Alinee la
posición
Tornillo de
jación
Exterior
Ranura Reposabrazos
Indicación
derecha/izquierda
Tubo
Gire los tornillos
en el sentido de
las agujas del reloj
para apretarlos.
Llave Allen
Asegure el reposabrazos
(2)
con los tornillos de jación.
Sillón de masaje
Tornillo de
jación
Interior
Colocación de los tapones de aire
2
(En el lado izquierdo y derecho)
Inserte los tapones de aire en el sillón.
S11
Presione los tapones
de aire hasta que
encajen en su sitio
(oirá un “clic”).
Tapón de aire
Page 27

Instalación del soporte del panel de control en el lado derecho o izquierdo del sillón de masaje
2
3
(En el diagrama se muestra la instalación en el reposabrazos derecho.)
1. Inserte el tornillo de jación en el agujero inferior y
apriételo ligeramente de forma manual.
Asegure el soporte con los tornillos de jación.
2.
Primero apriete ligeramente los dos tornillos para los
dos agujeros restantes de forma manual y, a
continuación, apriételos rmemente con la llave Allen.
Soporte del panel de control
1 Inserte el tornillo de
jación en uno de los
agujeros y apriételo.
Tornillo de jación
Utilice este tornillo
Tornillo de jación (M6 × 16)
× 3
Llave Allen
Se puede seleccionar la posición del panel de control para
cuando se está sentado eligiendo el agujero apropiado para
el tornillo.
Cerca
Para asegurar el soporte del panel de control con los
tornillos de jación, apriete los tornillos hasta que queden a
ras de los agujeros, como se muestra en la siguiente gura.
Si aprieta los tornillos con cierto grado de inclinación, los
agujeros pueden deformarse y los tornillos pueden atascarse a
la mitad.
Aprox.
20˚
Lejos
Soporte del panel
de control
Soporte del
panel de control
Instalación de las cubiertas del soporte del
4
panel de control
(En el lado izquierdo y derecho)
El método de instalación de las cubiertas es el mismo para ambos
lados.
En el diagrama se muestra el lado en que se instala el soporte del
panel de control.
1.
Inserte las lengüetas superiores en las muescas
inferiores del reposabrazos.
Muescas
Agujero
Llave Allen
Apriete los tornillos
hasta que queden a ras
de los agujeros.
Cubierta para el lado
CON el soporte del
panel de control
2.
Inserte las lengüetas inferiores en las muescas del
reposabrazos.
Tornillo de jación
Agujero
Lengüetas inferiores
Tornillo de
jación
Llave Allen
No apriete el
tornillo inclinado
en el agujero.
Cubierta para el lado
SIN el soporte del
panel de control
Lengüetas superiores
Cubierta del
soporte del panel
de control
Muescas
Presione la cubierta
hasta que encaje en su
sitio (oirá un “clic”).
S12
Page 28

Al quitar la cubierta del soporte del panel de control
1. Inserte un destornillador de punta plana en la
separación que hay debajo de la marca (O).
2. Empuje la lengüeta inferior de la cubierta hacia
arriba para levantar la cubierta.
3. Repita los pasos 1 y 2 anteriores para la otra
separación.
4. T
ire de la cubierta hacia arriba en diagonal.
Si se realiza este procedimiento con una llave Allen o
•
un destornillador Phillips, el sillón podría dañarse.
Elevación del respaldo a la
5
posición vertical
1. Inserte la clavija de alimentación en la toma
de corriente.
2. Compruebe que el interruptor de bloqueo se
encuentra en la posición “open”.
3. Compruebe que el interruptor de alimentación
se encuentra en la posición “on”.
4. Pulse el botón
veces.
El respaldo se elevará automáticamente a la
posición vertical.
del panel de control dos
Separación
2
1
2
Destornillador
de punta plana
(No incluido en
la conguración
estándar)
S13
Page 29

Cambio del cable del panel de control al lado izquierdo (cuando el soporte del
panel de control está instalado en el lado izquierdo)
1. Pulse el botón del panel de control para conectar la alimentación.
Reposapiernas
2. Pulse el botón
que el reposapiernas se haya elevado hasta el límite máximo.
Siga pulsando el botón hasta oír un sonido del tipo “bip-bip-bip”.
3. Retire el cable del panel de control de la ranura de sujeción del cable.
Pase el cable del panel de control por debajo del reposapiernas hacia el
4.
lado izquierdo.
5.
Asegure el cable del panel de control en dos puntos en la ranura de
sujeción del cable.
Cable del panel de control
del panel de control y manténgalo pulsado hasta
Ranura de sujeción
del cable
Empujar
Instalación del panel de control en el
6
soporte del panel de control
1. Encaje la ranura del costado del panel de control en
el saliente de la parte interior del soporte.
Cable del panel
de control
Parte posterior del
panel de control
Saliente en el interior
del soporte
Ranura en el panel de control
S14
Page 30

2. Asegure el cable del panel de control con la sujeción.
Sujeción
Asegure el cable de modo
Cable del panel
de control
Inserción de la placa para el hombro
7
1. Inserte la placa para el hombro en el bolsillo de la
sección de masaje de hombro exterior.
•
Coja el bolsillo y jálelo ligeramente para expandirlo de
tal manera que se pueda insertar fácilmente la placa.
que la parte que está
debajo de la sujeción no
quede oja.
Placa para el hombro
Levante el panel de control para retirarlo.
2. Deslice la placa para el hombro hacia el interior
(posición recomendada).
La posición arriba-abajo y adentro-afuera de la placa
•
puede ajustarse.
La posición recomendada es aquella en que la placa
se inserta hasta el fondo y luego se mueve hacia el
extremo interior.
Coja la abertura del bolsillo con una mano, sostenga la
•
placa con la otra mano y muévala a la posición más
profunda.
Bolsillo
Instalación de la almohada
8
1. Fije la almohada a los sujetadores de velcro.
Consulte la página S38 para obtener información sobre la
•
posición de la almohada
Almohada
Sujetadores de velcro
Placa adecuada para cada hombro externo
(Para el hombro
derecho)
(Para el hombro
izquierdo)
S15
Page 31

Antes de sentarse
Compruebe los puntos siguientes antes de utilizar el sillón de masaje
Compruebe el área circundante
1
Asegúrese de que no haya objetos, personas o mascotas cerca del sillón de masaje.
Compruebe el cable de alimentación y la
2
clavija de alimentación
Advertencia
•
Quite el polvo de la clavija de alimentación periódicamente.
Hacer caso omiso de esta precaución puede traducirse en un
aislamiento defectuoso del cable debido a humedad.
Quite el polvo del cable con un paño seco.
Asegúrese de no dañar el cable de alimentación ni la clavija de
•
alimentación.
(No dañe, exponga a fuentes de calor, doble, tuerza, tire de él
con fuerza excesiva, enrolle ni coloque objetos pesados
encima del cable).
El uso de un cable de alimentación y/o una clavija de alimentación
dañados puede causar descargas eléctricas, cortocircuitos o incendios.
Solicite la reparación del cable de alimentación y/o la clavija de
alimentación a su proveedor, o póngase en contacto con un centro
de servicio al cliente.
Comprobar
Conexión del suministro eléctrico
3
1. Inserte la clavija de alimentación en una toma de corriente.
2. Gire la llave del interruptor de bloqueo a la posición “open”.
3. Deslice el interruptor de alimentación a la posición “on”.
Advertencia
•
Inserte la clavija de alimentación rmemente hasta que
se detenga por completo.
Si se hace caso omiso de esta precaución, podrían
producirse descargas eléctricas o incendios debido a la
generación de calor.
•
No exceda los valores nominales de la clavija y el cable
y no utilice ninguna tensión distinta de la tensión
nominal. (El sillón de masaje no puede utilizarse en el
extranjero ni con un transformador.)
Hacer caso omiso de esta precaución puede causar
descargas eléctricas, mal funcionamiento o incendios debido
a la generación de calor.
No manipule la clavija de alimentación con las manos
•
mojadas.
De lo contrario, podría recibir descargas eléctricas.
Compruebe el sillón de masaje
4
1. Asegúrese de que no hay roturas ni rasgaduras en la tela.
Tela
Comprobar
Advertencia
•
Levante el cojín de espalda y asegúrese de que la
tela del respaldo no está rota. (Incluso si tiene una
rotura muy pequeña, deje de utilizar el sillón de
masaje inmediatamente, desconecte la clavija de
alimentación y solicite la reparación del sillón).
El uso del sillón de masaje con la tela rota puede
causar lesiones o descargas eléctricas.
Respaldo
Cojín de
espalda
S16
Page 32

2. Asegúrese de que no existen objetos
extraños en el sillón de masaje.
Cuidado
•
Siéntese en el sillón sólo después de
conrmar que no hay materias extrañas
entre las partes de mismo. (Verique que
no existan objetos extraños en el
respaldo, en la sección de masaje de la
planta/pierna, en la sección de masaje
de la mano/brazo, en la sección de
masaje del asiento/lado del muslo, o en
la sección de masaje del hombro
externo.)
Hacer caso omiso de esta precaución
puede causar accidentes o lesiones.
3. Asegúrese de que los cabezales de masaje estén en la
posición de retracción.
Sección de masaje lateral
Sección de masaje de
Sección de masaje de
hombro exterior
Sección de masaje
de manos/brazos
de glúteo/muslo
piernas/plantas
de los pies
Cuidado
•
Siéntese en el sillón de masaje sólo después de
conrmar que los cabezales de masaje están en la
posición de retracción.
Hacer caso omiso de esta precaución puede causar
accidentes o lesiones.
Si los cabezales de masaje no están en la posición
de retracción
Pulse el botón
cabezales de masaje a la posición de retracción.
4. Asegúrese de que el reposapiernas esté completamente
abajo.
dos veces para devolver los
Palanca de deslizamiento
del reposapiernas
3. Posición de retracción
4. Comprobar
Cuidado
•
No se pare en el reposapiernas ni coloque objetos
en él si el reposapiernas no se encuentra
completamente abajo.
Si se hace caso omiso de esta precaución, la parte
del pie del reposapiernas podría girar o el sillón de
masaje se podría, causando accidentes o lesiones.
Para bajar el reposapiernas
Asegúrese de devolver el reposapiernas completamente a su posición original tirando de la palanca de deslizamiento
del reposapiernas y, a continuación, pulse el botón
dos veces.
S17
Page 33

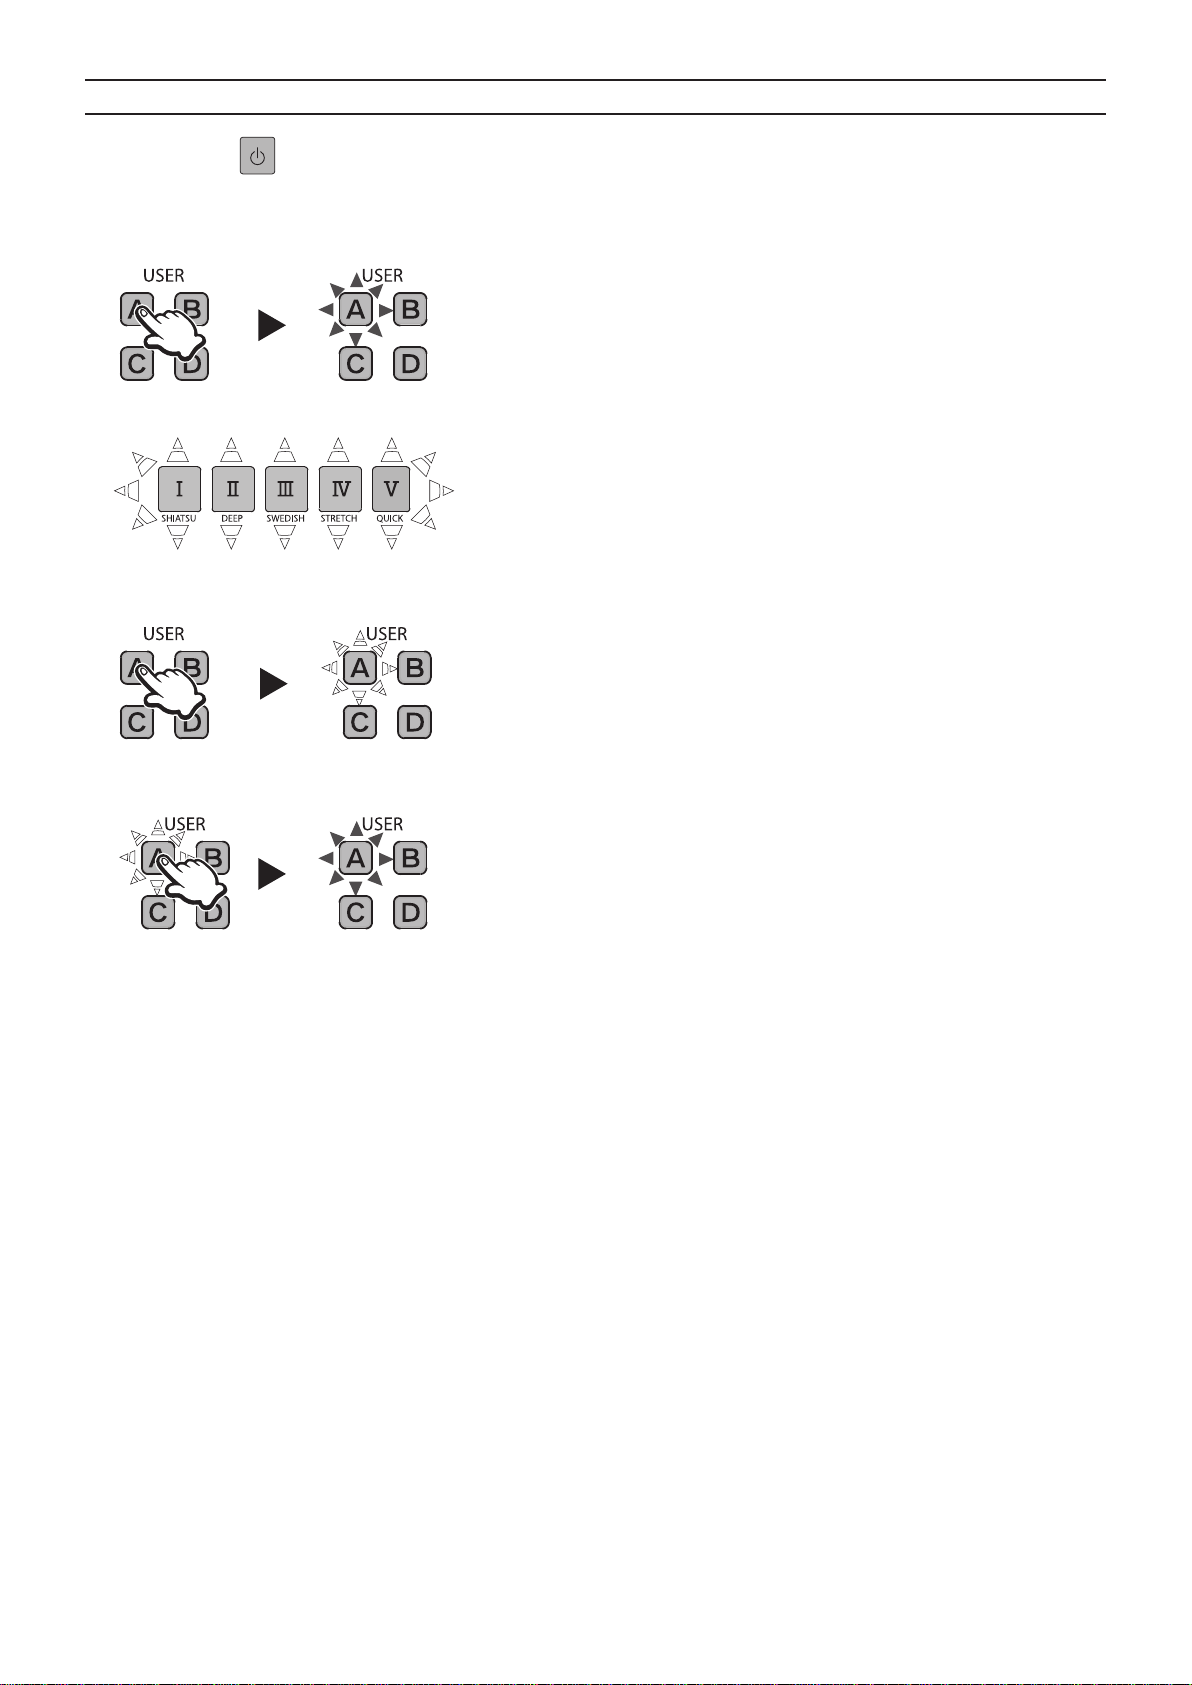
Programas de Masajes
Preprograma
Pulse el botón para empezar.
1
•
El panel de control se apagará automáticamente si no se inicia el masaje en el transcurso de 3 minutos después de
empezar.
Masaje rápido
Pulse uno de los botones que parpadean ( ) para
2
seleccionar el programa.
Características del preprograma y del masaje rápido (parte superior del cuerpo)
Consulte la página S21 para una descripción general de los programas respectivos.•
Shiatsu (“SHIATSU”): Utiliza principalmente el
masaje Shiatsu para aojar los nudos de tensión
más profundos. Recomendado para personas con
rigidez y tensión severas.
Profundo (“DEEP”): Utiliza principalmente el
amasamiento para masajear y aojar los
músculos. Recomendado para personas con
rigidez y tensión moderadas.
Sueco (“SWEDISH”): Utiliza principalmente el
masaje sueco para vigorizar suavemente y
estimular la circulación. Recomendado para
personas que experimentan fatiga y languidez.
Estiramiento (“STRETCH”): Utiliza
principalmente la compresión para estirar
lentamente los músculos y articulaciones.
Recomendado para cuando desee un estiramiento
refrescante.
Rápido (“QUICK”): Abarca todas las áreas
utilizando diversas acciones de masaje, todo en el
espacio de sólo 5
minutos.
S18
 Loading...