

Page 1
Page 2

X800 Operating Instructions
Contents
Introduction .................... 1
Safety considerations............. 1
Care and maintenance........... 5
About this manual .................. 7
About Your Phone.......... 9
Phone overview...................... 9
Key functions........................ 10
Display ................................. 13
Indicator light........................ 15
Getting Started ............. 16
Installing the SIM and
the battery ........................ 16
Charging the battery............. 18
Installing miniSD Card.......... 19
Opening/closing the phone .. 20
Switching the phone on/off... 20
Menu Navigation........... 21
Main menu structure ............ 21
Displaying the menu............. 22
Navigating the applications .. 23
Basic Operations.......... 26
Making calls ......................... 26
Answering calls .................... 28
Ending calls.......................... 30
Silent mode .......................... 30
Voice mail............................. 31
In-call operations.................. 31
Multiple calls operations....... 34
Text Entry.......................36
Settings ..........................40
Settings menu structure........40
Ringtones..............................40
Themes.................................42
Settings.................................44
Clock.....................................57
Speed dial.............................59
Voice commands ..................60
PrintBoy setup ......................65
About ....................................65
Contacts.........................66
Creating new Contacts
cards .................................66
Editing Contacts cards..........67
SIM directory.........................69
Using Contacts .....................70
Managing Contacts list .........71
Service numbers...................72
Groups..................................72
Messages .......................74
Messages menu structure ....74
Voice mail .............................74
Messages .............................75
Camera ...........................96
Media ..............................99
Media menu structure...........99
i
Page 3

Contents
Gallery ..................................99
PhotoBase .......................... 106
RealOne Player ..................110
Video Recorder...................113
Calendar ...................... 116
Tools............................ 122
Tools menu structure..........122
Calculator ...........................123
Converter............................124
Notepad.............................. 125
Recorder.............................126
miniSD Card
(memory card) ................128
To-do list.............................130
Application manager........... 131
File manager.......................133
PhotoLight ..........................135
SIM Tool Kit ....................... 135
Connectivity................ 136
Connectivity menu structure .136
Browser ..............................136
Operator menu ...................143
Modem................................144
Bluetooth
Infrared ...............................150
USB ....................................152
Connection manager ..........152
Synchronisation..................153
Device manager .................155
®
wireless
technology ......................146
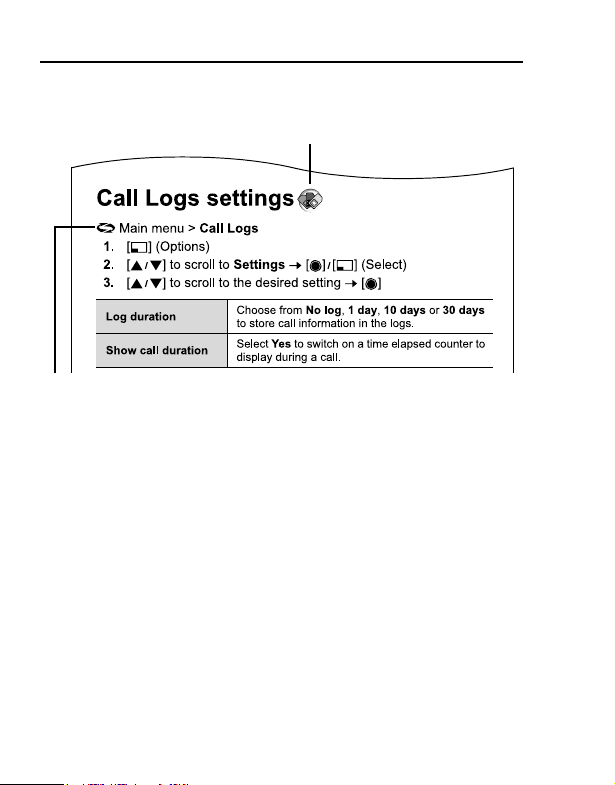
Call Logs ..................... 158
Call Logs menu structure....158
ii
Recent calls........................ 158
Call duration ....................... 159
GPRS data counter ............ 160
Call Logs settings............... 160
General Logs...................... 161
Games.......................... 162
Games menu structure....... 162
MicroGolf............................ 162
Balloon Headed Boy .......... 162
Downloading games........... 163
Quickoffice.................. 164
Viewing documents ............ 164
Quickword ..........................165
Quicksheet .........................167
Quickpoint ..........................169
Favourites ................... 171
Accessories ................ 172
Changing the X-Changeable
Cover ........................ 175
Troubleshooting ......... 176
Glossary of Terms...... 180
Specifications ............. 182
Licensing..................... 183
Index ............................ 189
Page 4

Introduction
Thank you for purchasing this Panasonic digital cellular phone. This
phone is designed to operate on GSM networks – GSM900,
GSM1800 and GSM1900. It also supports GPRS for packet data
connections. Please ensure the battery is fully charged before use.
Safety considerations
The following information should be read and understood as it
provides details, which will enable you to operate your phone in a
manner which is both safe to you and your environment, and
conforms to legal requirements regarding the use of cellular phones.
Power
This equipment should only be charged with approved
charging equipment to ensure optimum performance and
any approval given to this apparatus and may be dangerous. Ensure
the voltage rating of the Travel charger is compatible with the area of
use when travelling abroad. A Travel charger (EB-CAX800xx*) is
supplied with the Main Kit.
Note* xx identifies the charger region, e.g. CN, EU, UK, AU, US.
Battery
continuously for a long time, such as a game or browser, battery life
will become extremely short. To maintain longer battery life, set the
Key backlight to off. (See Keypad Backlight Time setting on
page 44.)
Do not use this phone without the battery cover attached.
Disposing of the Battery
avoid damage to your phone. Other usage will invalidate
Use of another battery pack than that recommended by the
manufacturer may result in a safety hazard.
If you use a feature which keeps the key backlight on
Do not incinerate or dispose of the battery as ordinary
rubbish. The battery must be disposed of in accordance
with local regulations and may be recycled.
1
Page 5
Introduction
Aircraft
Switch off your cellular phone when in an aircraft. Ensure
that the setting of the Alarm or Power on time function will
not contravene regulations whereby it may automatically
power on when in an aircraft or medical facility etc. The use of
cellular phones in an aircraft may be dangerous to the operation of
the aircraft, disrupt the cellular network and may be illegal. Failure to
observe this instruction may lead to the suspension or denial of
cellular phone services to the offender, or legal action or both.
Do Not Use
It is advised not to use the equipment at a refuelling point.
Users are reminded to observe restrictions on the use of
radio equipment in fuel depots, chemical plants or where
blasting operations are in progress. Never expose the battery to
extreme temperatures (in excess of 60°C).
Driving
It is imperative that the driver exercises proper control of
the vehicle at all times. Do not hold a phone while you are
driving; find a safe place to stop first. Do not speak into a
handsfree microphone if it will take your mind off the road. Always
acquaint yourself thoroughly with restrictions concerning the use of
cellular phones within the area where you are driving and observe
them at all times.
Electronic Devices
Care must be taken when using the phone in close
proximity to personal medical devices, such as
pacemakers and hearing aids.
Heating Equipment
When your handset, the accompanying battery or charging
accessories are wet, do not put those in any type of heating
equipment, such as a microwave oven, a high pressure
container, or a drier or similar. It may cause the battery, handset and/
or charging equipment to leak, heat up, expand, explode and/or
catch fire. Moreover, the product or accessories may emit smoke
2
Page 6
Introduction
and their electrical circuits may become damaged and cause the
products to malfunction. Panasonic is not responsible for any and all
damages, whether direct or indirect, howsoever caused by any
misuse.
Backup Copies & Security
It is recommended that you create a copy or backup, as
appropriate, of any important information and data which
you store in your phone’s memory. In order to avoid
accidental loss of data, please follow all instructions relating to the
care and maintenance of your phone and its battery.
Your phone has the capability of storing and communicating
personal information. It is recommended that you take care to
ensure that any personal or financial information is stored separately
from your phone. You should use security features, such as the SIM
lock to protect information held in your phone. Panasonic accepts no
liability for any and all losses howsoever arising from any loss of
data, including but not limited to direct and indirect losses (to
include, but not limited to consequential loss, anticipated savings,
loss of revenue).
Downloading
Your phone has the capability of downloading and storing
information and data from external sources. It is your
responsibility to ensure that in doing this you are not
infringing any copyright laws or other applicable legislation.
Panasonic accepts no liability for any and all losses howsoever
arising from any loss of data or any such infringement of copyright or
intellectual property rights, including but not limited to direct and
indirect losses (to include, but not limited to consequential loss,
anticipated savings, loss or revenues).
Efficient Use
For most efficient use, hold the phone as you would any
normal phone. To avoid deterioration of signal quality or
antenna performance, do not touch or “cup” the antenna
area while the phone is switched on. Unauthorised modifications or
3
Page 7

Introduction
attachments may damage the phone and violate applicable
regulations. The use of an unapproved modification or attachment
may result in the invalidation of your guarantee – this does not affect
your statutory rights.
Camera
You are advised to take appropriate care over the use of
the internal camera. It is your responsibility to ensure that
you have permission to take photographs of people and
objects and that you do not infringe any personal or third party rights
when using the camera. You must comply with any applicable
international or national law or other special restrictions governing
camera use in specific applications and environments. This includes
not using the camera in places where the use of photographic and
video equipment may be prohibited. Panasonic accepts no liability
for any and all losses howsoever arising from any infringement of
copyright or intellectual property rights, including but not limited to
direct and indirect losses. Do not leave the camera facing direct
sunlight, as this may impair its performance.
Other important information
The colour liquid crystal display (LCD) uses high-precision
production technology, and in certain circumstances pixels may
appear brighter or darker. This is due to characteristics of the LCD
and is not a manufacturing defect.
This phone is designed, manufactured and tested to ensure that it
complies with the specifications covering RF exposure guidelines
applicable at the time of manufacture, in accordance with EU, USA
FCC and Australian ACA regulations.
This phone should only be used with Panasonic approved
accessories to ensure optimum performance and avoid damage to
your phone. Panasonic is not responsible for damage caused by
using non-Panasonic approved accessories.
This phone must be used in compliance with any applicable
international or national law or any special restrictions governing its
4
Page 8
Introduction
use in specified applications and environments. This includes but is
not limited to use in hospitals, aircraft, whilst driving and any other
restricted uses.
Some of the contents described in this manual are subject to change
without notice.
Care and maintenance
Pressing any of the keys may produce a loud tone. Avoid
holding the phone close to the ear while pressing the keys.
Extreme temperatures may have a temporary effect on the
operation of your phone. This is normal and does not
indicate a fault. The display quality may deteriorate if the
phone is used in environments over 40°C for a long time.
Do not modify or disassemble the equipment. There are
no user serviceable parts inside.
Do not subject the equipment to excessive vibration or
shocks. Do not drop the battery.
Avoid contact with liquids. If the equipment becomes wet,
immediately remove the battery and contact your dealer.
Do not leave the equipment in direct sunlight or a humid,
dusty or hot area. Never throw a battery into a fire. It may
explode.
5
Page 9
Introduction
Keep metallic items that may accidentally touch the
terminals away from the equipment/battery.
Batteries can cause property damage, injury, or burns if
terminals are touched with a conductive material (i.e.
metal jewellery, keys, etc.).
Always charge the battery in a well ventilated area, not in
direct sunlight, between +5°C and +35°C. It is not possible
to recharge the battery if it is outside this temperature
range.
When connecting the phone to an external source, read
the operating instructions of the equipment for the correct
connection and safety precautions. Ensure the phone is
compatible with the product it is being connected to.
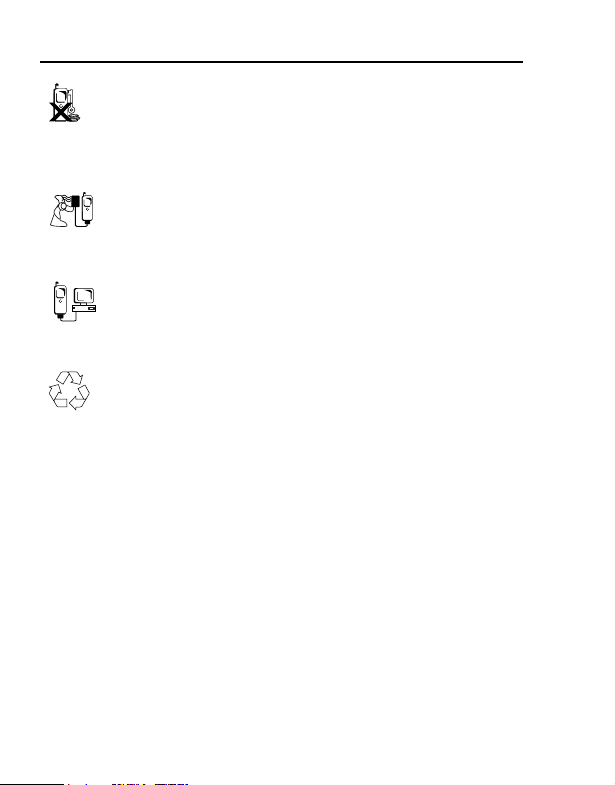
When disposing of any packing materials or old
equipment, check with your local authorities for
information on recycling.
6
Page 10
Introduction
About this manual
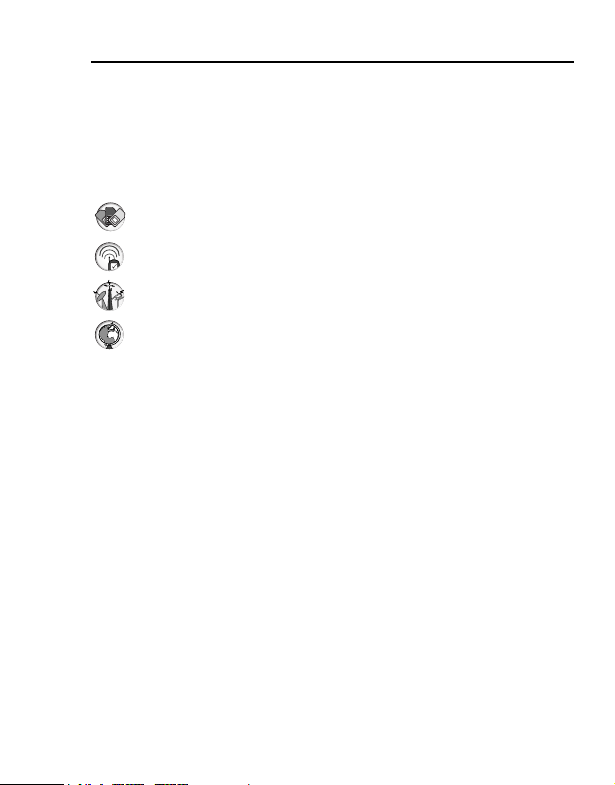
Symbols used in this manual
The following symbols are used in this manual to represent the
limited availability of the function or service.
= Depending on your SIM.
= Depending on network availability.
= Depending on your network operator. The service may only
be available on a subscription basis.
= Depending on country.
Graphics
The graphic elements in this manual are for illustrative purposes and
may differ from the actual phone and/or graphic elements displayed
on the phone. Panasonic reserves the right to change the
information in this manual without prior notice.
Keys
Keys in this manual may differ from the actual keys on your phone.
Refer to page 10 for the icons that represent the keys in this manual.
7
Page 11
Introduction
How to read this manual
<Example> Call Logs settings in Call Logs menu on page 160.
This function is SIM dependent. For other symbols, refer to page 7.
z Menu navigation
Before following the steps, you need to enter the Main menu, then
move through the sub menus, described next to the z icon.
“>” means “scroll through the menu and select”.
In the example given above:
From Main menu, press Navigation key (up/down/left/right) to scroll
to Call Logs and press Navigation key (centre).
Now you can continue onto the step 1:
1. Press Left Soft key (Options)*
2. Press Navigation key (up/down) to scroll to Settings, then
press Navigation key (centre) or Left soft key (Select)*
3. Press Navigation key (up/down) to scroll to the desired setting
in the list below, then press Navigation key (centre)
*1 The word is shown in the lower left hand corner of the display, indicating a
command that the key gives to the phone when you press it.
1
1
8
Page 12

About Your Phone
Phone overview
Earpiece
Main Display
One Push Auto
Open button
Left Soft key
Menu key
Send key
Asterisk key
Browser key
Edit key
Camera Lens
PhotoLight
miniSD Card
Slot
Multibutton
External Display/
Viewfinder
Speaker
Microphone
Infrared Port
Navigation key
Right Soft key
Clear key
End key
Silent Mode key
Power key
Indicator Light
Personal Handsfree
Connector/
Charging Connector/
Data Transmission
Connector
9
Page 13

About Your Phone
Key functions
Key name Function
Press and hold to switch the phone on/off.
Power key
Navigation
key
Left Soft key Perform action named in lower left of display. [5]
Right Soft
key
Send key Make or answer a call. [q]
End key
Menu key
Clear key
Edit key
Browser key Opens Browser. [n]
Press to switch phone off, change ringtone,
eject miniSD Card, lock keypad or lock the
phone.
Press outside edges to scroll up [1], down
[2], left [3] or right [4] to move through
menus and text.
Press centre [0] to select option or take a
picture in Camera mode.
Perform action named in lower right of display. [6]
Ends a call.
Return to standby mode.
Enter the main applications menu area.
Return to standby mode.
Erase character in edit mode.
Delete highlighted entered item.
Select Dictionary for predictive text including
insert and edit words, or Alpha mode or
Number mode.
Insert numbers or symbols.
Change writing language.
Mark multiple items in a list by holding down
[m], then [1] or [2].
Key icon*
[1] [2]
[3] [4]
1
[,]
[0]
[w]
[z]
[x]
[m]
10
Page 14

About Your Phone
Key name Function
Enter numbers and characters.
Numeric
keys
Press and hold [S] - [K] for Speed dialling.
Press and hold [L] to enter + character for
international dialling.
In edit mode, [L] to enter space.
Key icon*
[L] to [K]
In numeric and standby modes, press
repeatedly for *, +, p and w characters.
Asterisk key
In Dictionary mode, scroll to other word
choices when word is underlined.
In edit mode, press to open special character
table.
[e]
Enter # character.
Silent Mode
key
Press and hold to switch the Silent mode on/
off.
In edit mode, shift to upper and lower case
letters, or press twice briefly to turn on/off
Dictionary for predictive text.
[r]
For external display, press once to switch on
Multibutton
(on side of
phone)
backlight, then press as needed to toggle
between clock and icon views.
Turns off ringer during incoming call.
Takes a picture in Camera mode when the flip
is closed.
[t]
*1The key icons given in the table represent the actual keys on the phone.
1
11
Page 15
About Your Phone
Quick keys
You can easily access features instead of navigating through the
menus.
Key Function
In standby mode
Open preset application
(To change the application, see
“Standby mode settings” on
page 45.)
Switch between hold and unhold on
one call or switch between one active
and one held call
Short press
Long press
Combination
press
During a call
Short press
[5]9[6]
[0] Open Contacts
[q] Open Call Logs
[S] - [K] Speed Dial
[q] Activate Voice commands
[z] View currently open applications
[e] Switch PhotoLight on/off
[r] Silent mode on/off
[5] 7 [e] Lock keypad on/off
[4] Increase the volume
[3] Decrease the volume
[q]
12
Page 16
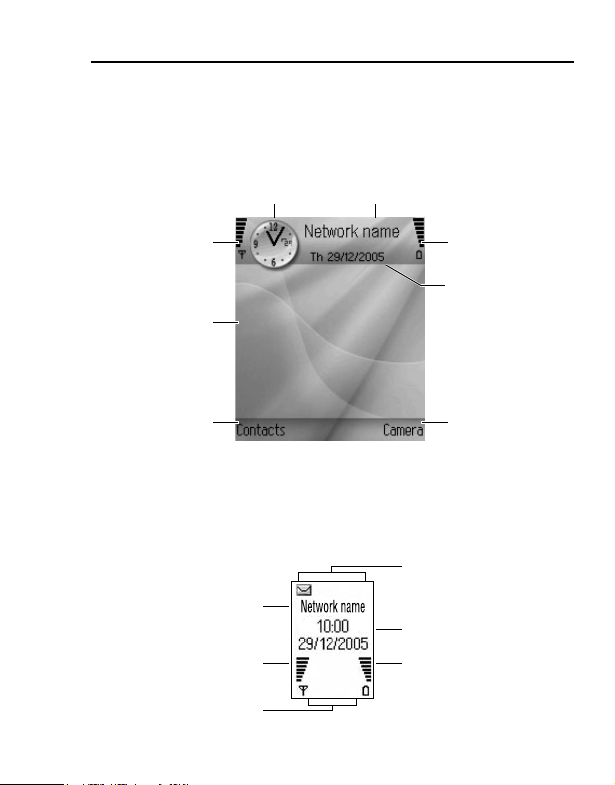
Display
Main display
(in standby mode)
Time
About Your Phone
Network that phone is
currently using
Signal strength
selection area
icon
Wallpaper
Left Soft key
Battery charge
level icon
Date
Right Soft key
selection area
External display
(in standby mode)
[t] on the side of the phone once to switch on backlight, then press
as needed to toggle between clock and icon views.
Network that phone
is currently using
Signal strength icon
Network Status
icon area
Phone Status
icon area
Time and date area
Battery charge
level icon
13
Page 17
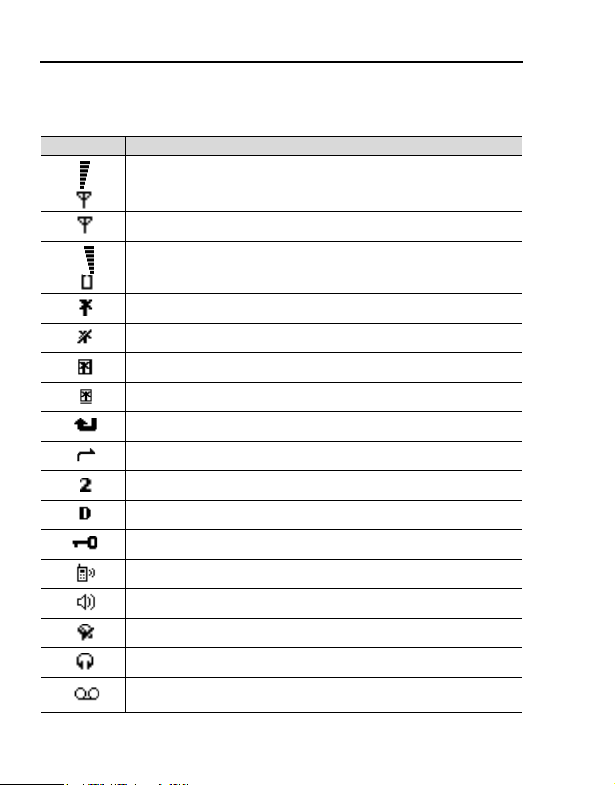
About Your Phone
Status icons
The status icons are displayed or animated according to the
currently activated functions.
Icon Meaning
Signal strength; the more bars visible, the stronger the signal
No network connection
Seven levels indicate battery charge level. Bars scroll when
battery is charging.
GPRS service is active and available
GPRS service is on hold
GPRS connection is active
Multiple GPRS connections are active
Missed call
Call divert is active (if you have 2 lines, 1 or 2 also appears)
Line selection 2 (if you have 2 phone lines) *
Data call
Keypad is locked
Earpiece sound on
Loudspeaker sound on
Alarm is set
Private handsfree headset attached
New voice mail message received (if you have 2 lines, left
circle is darkened for line 1, right circle is darkened for line 2)
1
14
Page 18
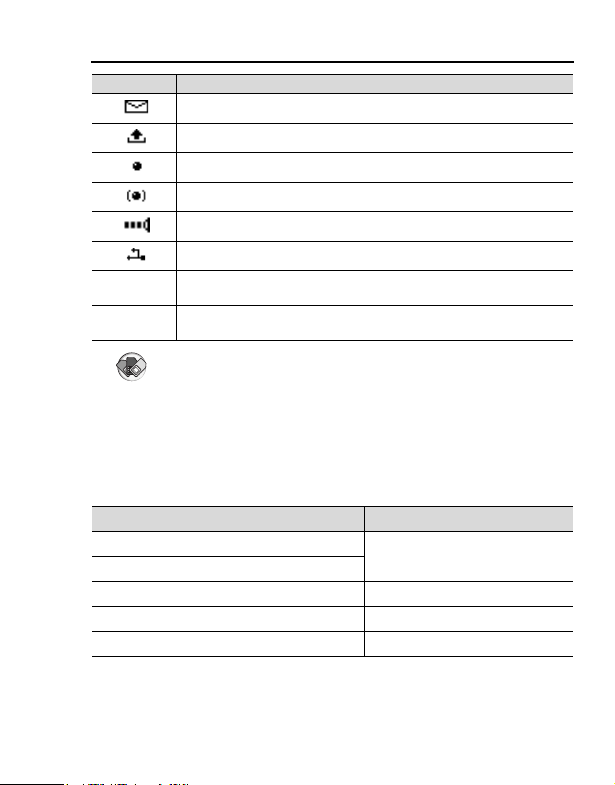
About Your Phone
Icon Meaning
New message received
Message in Outbox waiting to be sent
Bluetooth is enabled
Bluetooth is active
Infrared is enabled (flashes when active)
USB connection enabled
1
Navigation key - scroll and move up or down options
2
34
*1
Navigation key - scroll left or right, move left or right to view
tabs
Indicator light
The Indicator light flashes or beams when you receive calls/
messages, the battery is charging, the alarm sounds or you press
the keypad.
Incoming calls
Incoming messages
Battery charge Red
Battery problem Flashing Red
Camera viewfinder mode Amber
Function Colour
Flashing Green
15
Page 19
Getting Started
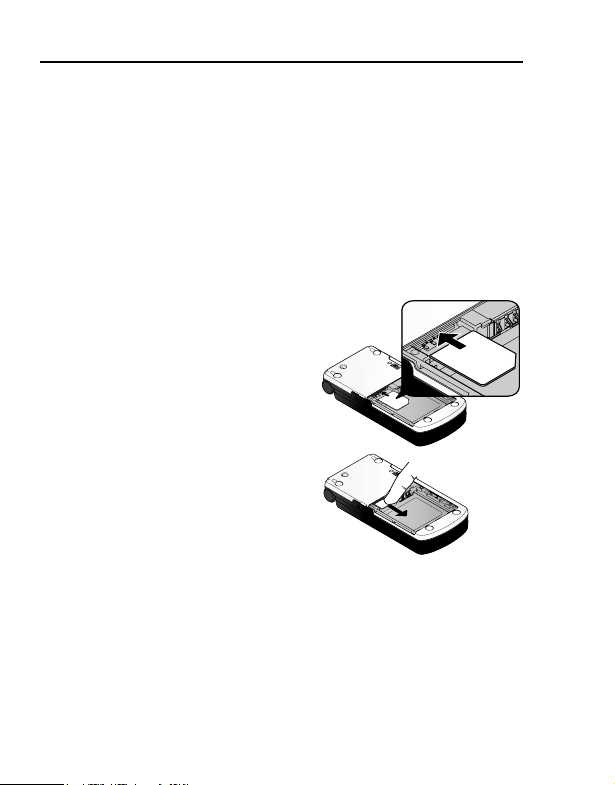
Installing the SIM and the battery
The SIM (Subscriber Identity Module) card and the battery must be
installed before using your phone.
Before handling the SIM and the battery, ensure that the phone is
switched off and the charger is disconnected from the phone before
charging.
Inserting/removing the SIM
See “Inserting/removing the battery” on page 17 to remove the
battery cover and the battery.
Inserting the SIM
Position the SIM card as shown, with
gold contacts facing down and the
notched corner turned to the right.
Carefully slide the SIM card into the
SIM card pocket until the card is all
the way seated.
Removing the SIM
Place a finger on the bottom edge of
the SIM card and gently slide out.
16
Page 20
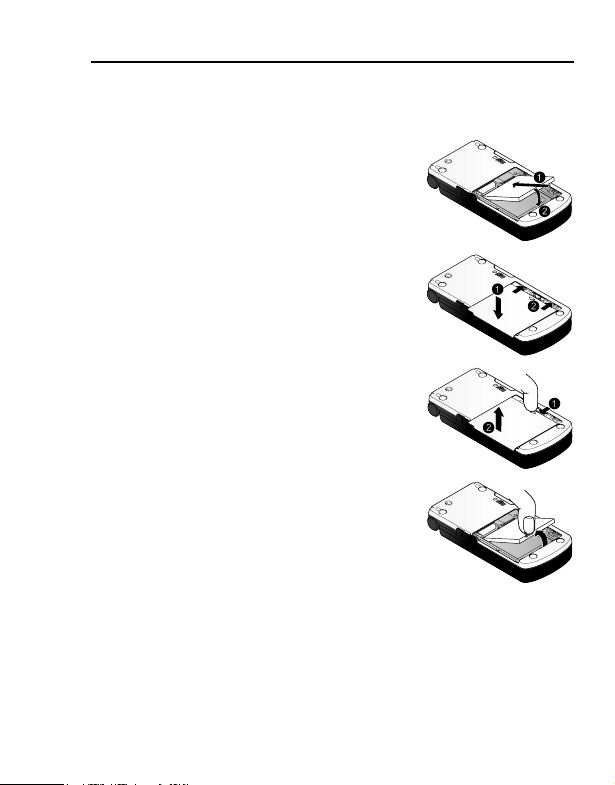
Inserting/removing the battery
Inserting the battery
1. Insert the small tab at the top of the
battery into the notch at the top of the
battery compartment. Ensure the 3 gold
contacts align with the 3 gold pins in the
phone.
2. Replace the cover on the phone. Make
sure the cover clicks into place.
Removing the battery
1. Slide the cover slightly toward the left of
the phone, using your fingernail, then
lift the cover off the phone.
2. Place your finger on the tab at the base
of the battery. Lift the battery off the
compartment.
Getting Started
17
Page 21
Getting Started
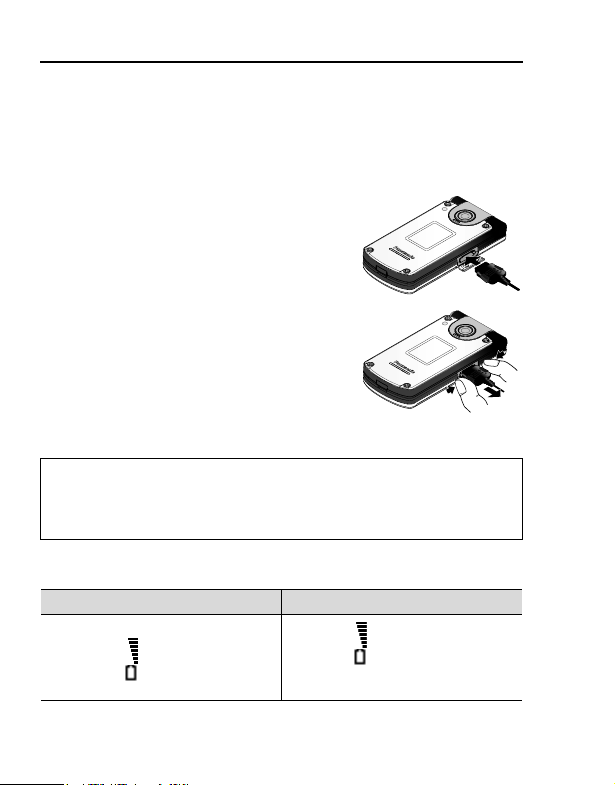
Charging the battery
Your phone can be charged either when it is switched on or off. You
can use your phone switched on even while charging.
Ensure that the battery is attached in the phone before charging.
1. Open the connector cover at the left
side of the phone as you turn over
and upside down the phone.
Connect the charger to the Charging
Connector, then connect the charger
to the mains power supply.
2. When charging is complete,
disconnect the charger from the outlet
before removing the plug from the
phone. You should press and hold the
release buttons on both side of the
connector end and pull gently to
disconnect the charger from the
phone.
Note: DO NOT force the connector as this may damage the phone and/or
the charger.
If the battery has been deeply discharged, it may take several minutes
before the Battery charge level indicator is displayed.
Battery charge level indicator
While charging Charging complete
Scrolling
18
If the phone is switched on, “Battery
full” message appears.
Not scrolling
Page 22
Getting Started
Low battery warning
When the battery power is low, a “Battery low” message will be
displayed and a warning tone will sound. The phone will
automatically switch off after the tone. Fully recharge the battery. If
you receive the low battery warning during a conversation, charge
your phone to continue the conversation.
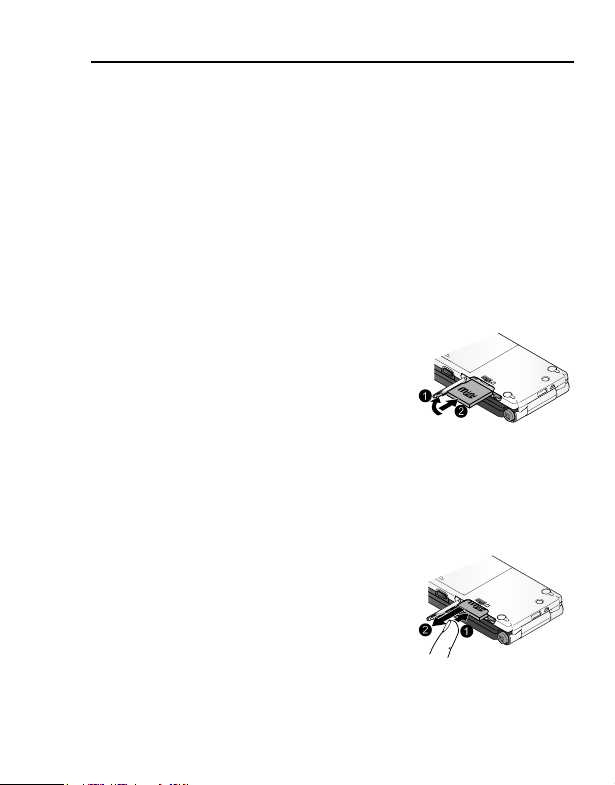
Installing miniSD Card
The miniSD Card is a memory card used to expand phone memory
and a way to transfer files to other devices.
Inserting the miniSD Card
1. On the left side of the phone as you turn
over and upside down the phone, lift up
the miniSD Card cover ;.
2. Slide the miniSD Card with notched
corner entering the phone first and the
gold contacts facing down into the
miniSD Card slot until it clicks :. Push
down the miniSD Card cover until it clicks.
Removing the miniSD Card
Before removing the miniSD Card, wait for file saving or copying
process to finish.
1. [,] 7 [192] to scroll to Eject miniSD
Card 7 [0]9[5] (OK)
2. Lift up the miniSD Card cover.
3. To release the card, gently push the
bottom edge of the card forward into the
slot ;.
4. After the card is ejected, gently remove it :. Push down the
miniSD Card cover until it clicks.
19
Page 23
Getting Started
Opening/closing the phone
You can open your phone by pressing the One
Push Auto Open button.
Clamshell setting
Opening the phone answers the incoming call
and closing the phone ends the call.
When Active clamshell setting is set to Off (see
page 46), you must answer the incoming call by
[q]. Closing the phone switches the caller’s
voice to the back loudspeaker and mutes your
voice. However, when you are using a headset,
you can continue your conversation even while the phone is closed.
One Push Auto
Open button
Switching the phone on/off
1. Press and hold [,] for 2 to 3 seconds to switch the phone on
A greeting may be displayed and the phone enters standby mode.
2. Press and hold [,] for 2 to 3 seconds to switch the phone off
OR
[,] 7 [192] to scroll to Switch off! 7 [0]9[5] (OK)
Note: If your SIM card is PIN protected, your PIN code will be requested.
Enter the PIN code and [5] (OK). See “Security settings” on page 50.
20
Page 24
Menu Navigation
Main menu structure
The 12 menus in Grid view are as follows:
Settings
Ringtones .................40
Themes ....................42
Settings ....................44
Clock ........................57
SpeedDial................. 59
Voice ........................60
PB Setup ..................65
About........................65
Calendar........... 116
Messages
Voice mail................. 74
Messages.................75
Games
MicroGolf................ 162
BalloonHeadedBoy ..162
1
*
Camera ...............96
Contacts .............66
Call Logs
Recent calls............ 158
Call duration ........... 159
GPRS counter........160
Favourites ........171
Too ls
Calculator............... 123
Converter ............... 124
Notepad ................. 125
Recorder ................ 126
miniSD ................... 128
To-Do ..................... 130
App Mgr ................. 131
File Mgr.................. 133
PhotoLight.............. 135
SIM Tool Kit*
1
......... 135
Media
Gallery ..................... 99
PhotoBase ............. 106
RealOne................. 110
Video Rec. ............. 113
Connect
Browser.................. 136
Operator................. 143
Modem................... 144
Bluetooth................ 146
Infrared .................. 150
USB ....................... 152
Conn Mgr ............... 152
SyncML.................. 153
Dev Mgr ................. 155
Quickoffice....... 164
21
Page 25
Menu Navigation
Displaying the menu
The menu system allows you to access functions which do not have
their own dedicated buttons on the keypads. The menu view can be
switched between Grid view and List view.
1. [z] (Menu)
The main menu appears with 12 menu options.
(See “Main menu structure” on page 21.)
2. [1929394] to scroll to the desired menu
7 [0]
If an or appears at the bottom of the
display, [192] to scroll to additional items.
To go back to the main menu:
1. [6] (Exit)
To change the menu view:
1. [5] (Options)
2. [192] to scroll to List view or Grid view 7 [0]9[5] (Select)
Shortcut: To jump to and open one of the first 9 application items (if you
have not yet scrolled), simply press the number key corresponding to the
desired item’s location on the grid view. The grid view numbering system is:
123
456
789
22
Page 26
Menu Navigation
Navigating the applications
Tabs
There may be more files, folders, or pages
associated with an application item, which can
be viewed by moving right and left across the
screen. This is indicated by tabs
the top of the screen. For example, if you are
viewing page 5 of 12 pages associated with a
file, 5/12 and arrows are displayed.
[394] to move through the tabs and pages.
Saving changes
In many cases when editing text or numbers, or changing a setting;
[6] (Back) to automatically save changes.
Deleting items
There are several ways to delete items:
•[x] 7 [5] (Yes)
•[5] (Options) 7 [192] to scroll to Delete 7 [0]9[5] (Select)
7 [5] (Yes)
Multitasking
You can work with more than one menu item simultaneously. For
example, you can start creating a new message, rename an image,
and begin creating a Contacts entry, all without losing the data you
have already entered.
, arrows , or numbers near
23
Page 27
Menu Navigation
To keep a menu item open:
[w] to go to the standby screen.
Note: During a phone call, [w] terminates the call instead of acting as a
shortcut to the standby screen.
Opening/closing menu items
There are several ways to open menu items:
•[0]
•[5] (Options) 7 [192] to scroll to Open 7 [0]9[5] (Select)
There are several ways to close menu items:
•[5] (Options) 7 [192] to scroll to Exit 7 [0]9[5] (Select)
•[6] (Back) until [6] (Exit) appears 7 [6] (Exit)
•[6] (Close)
Shortcut to swapping among open
items
If you have several menu items open, you can
view open items in a pop-up window.
1. Press and hold [z]
2. [192] to scroll to the desired item
3. To open: [0]9[5] (Select)
To close: [x] 7 [5] (Yes)
When you open the item, you will begin at the
point where you were previously.
Search option
In certain menu items, a magnifying glass icon
appears which allows you to search for a name, file or item.
To search, enter the first letter of the desired name or file. The phone
finds and displays matching entries. To refine the search, enter two
or more letters.
24
Page 28
Menu Navigation
Mark/Unmark
In menu items containing many files, you can mark specific files in
which to perform an action. For example, you may wish to delete
5 images from your Images folder containing 29 images.
1. [5] (Options)
2. [192] to scroll to Mark/Unmark 7 [4]
3. To place or remove a checkmark next to the desired file:
[192] to scroll to Mark or Unmark 7 [0]9[5] (Select)
To mark or Unmark all files: [192] to scroll to Mark all or
Unmark all 7 [0]9[5] (Select)
4. [5] (Options)
5. [192] to scroll to the desired action such as Delete, Send or
Move 7 [0]9[5] (Select)
Shortcut: To mark or unmark an item: Hold down [m] 7 [0]
To mark/unmark multiple items: Hold down [m] 7 Press and hold [192] to
scroll through the desired items. Release [192] to stop marking.
Shared phone memory
The phone's memory capacity is shared by all data files, such as
images, messages, ringtones, etc. If you keep more files on the
phone, then there is less memory available to store new files or run
certain applications.
To decrease the amount of phone memory used, store data on your
miniSD Card, or delete unwanted data.
To view details of the phone memory and miniSD Card use, and
amount of free memory:
1. [z] 7 [5] (Options)
2. [192] to scroll to Memory details 7 [4]
3. [192] to scroll to Phone memory or memory card (also
referred to as miniSD Card) 7 [0]9[5] (Select)
Also see “File manager” on page 133.
25
Page 29
Basic Operations
Making calls
To make a call, your phone must be within range of a network with
adequate signal strength.
Standard dialling
In standby mode:
1. Enter the area code and phone number 7 [q]
2. When the other party answers, talk into the microphone
3. [w] or close the flip to hang up
Note: To erase a digit, [x].
While on a call, you can adjust the earpiece volume by [394].
Contacts dialling
You can make calls using the numbers in Contacts stored on your
phone or SIM card.
z Main menu > Contacts
1. [394] to switch to Contacts tab or SIM directory tab
2. [192] to scroll to the desired contact 7 [q]
3. If the card has several phone numbers stored, [192] to scroll
to the desired number 7 [0]9[5] (Call)
Recent call dialling
You can make calls using the numbers in Call Logs.
In standby mode:
1. [q]
2. [394] to switch to Dialled numbers, Received calls or
Missed calls tab
3. [192] to scroll to the desired number 7 [q]
26
Page 30
Basic Operations
Speed dialling
If you assigned speed dial number keys to your frequently called
numbers, you can dial them with 2 key presses. See “Calling a
speed dial number” on page 60.
Voice dialling
You can make calls by saying the name of the person you wish to
call. See “Voice Dial” on page 60.
Automatic redial
If Automatic redial setting is set to On (see page 45), your phone
will automatically redial the number up to 10 times.
[6] (Quit) or [w] to stop automatic redialling.
International dialling
The international prefix (+) and the destination country/region should
be entered, followed by the area code and phone number.
1. Press and hold [L] until “+” is displayed
2. Enter the country/region code
3. Enter the area code and phone number 7 [q]
Note: Many countries/regions include an initial “0” in the area code. This
should, in most cases, be omitted when dialling international numbers.
For further help, contact your service provider.
27
Page 31

Basic Operations
Emergency call
To make an emergency call, the antenna ( p ) must be present.
1. Enter the local emergency number (such as [AAS]) 7 [q]
Note: You can call the local emergency number even if the keys are locked.
Most countries support the international emergency number 112. If you find
the number does not work on your phone, please call your service provider.
Making emergency calls without a SIM is country or network operator
dependent.
Sending service command to network
You can activate particular services such as mobile prepay and chat
by sending a service command, which may be called USSD
commands.
1. First, contact your service provider for the proper service
command code.
2. Enter the supplied service command code. If the phone
recognises it as a supplementary service or USSD request,
[5] (Send service comm.).
Answering calls
When there is an incoming call, the phone rings, flashes green and/
or vibrates (depending on your phone setting).
While the phone is ringing and/or vibrating:
1. When the phone is closed: Open the flip
When the phone is open: [q]
OR
If Anykey answer is on:
1. Press any key except [6], [w] or [,]
(See Anykey answer setting on page 46.)
28
Page 32

Basic Operations
Rejecting calls
While the phone is ringing and/or vibrating:
1. [w]
Muting Ringing tone
You can turn the Ringing tone and/or vibration off before answering
a call.
While the phone is ringing and/or vibrating:
1. When the phone is closed: [t]
When the phone is open: [6] (Silence)
2. [q] to answer the call
Answering a second call
While on an active call, you may receive another call.
To enable this service, Call waiting must be active. (See Call
waiting setting on page 45.)
If you hear an alert tone during a call:
1. [q]
The first call is placed on hold.
2. [6] (Swap) or [q] to switch between the two calls if required
To reject another call:
1. [6] (Reject)
To end the active call and answer the incoming call:
1. [5] (Options) 7 [192] to scroll to Replace 7 [0]9[5]
(Select)
29
Page 33

Basic Operations
Ending calls
There are several ways to end a call:
• Close the flip.
•[w]
•[6] (End call)
•[5] (Options) 7 [192] to scroll to End active call 7 [0]9[5]
(Select)
To end all calls if there are more than one:
•[5] (Options) 7 [192] to scroll to End all calls 7 [0]9[5]
(Select)
To end all calls and data connections:
• Press and hold [w]
Silent mode
To use your phone in quiet situation, you can activate the Silent
mode. You can personalise the Silent mode setting. (See
“Ringtones” on page 40.)
In standby mode:
1. Press and hold [r] to activate/deactivate the Silent mode
30
Page 34

Basic Operations
Voice mail
Voice mail is a network service which allows callers, who could not
reach you, to leave voice messages. When a new voice message is
stored, an alert sounds and ( ) appears on the display. To use this
service, you may need to subscribe to the Voice mail service through
your network operator. For further details, contact your network
operator.
To retrieve stored voice messages:
In standby mode:
1. Press and hold [A] to call your voice mailbox
2. Follow the recorded instructions
3. [w] when finished
See “Voice mail” on page 74 for details.
In-call operations
When on a call, you can put the call on hold, send touch tones for
passwords, etc.
Hold
You can put a call on hold.
During a call:
1. [5] (Options)
2. To put a call on hold: [192] to scroll to Hold 7 [0]9[5]
(Select)
To resume: [192] to scroll to Unhold 7 [0]9[5] (Select)
You can also switch between Hold and Unhold by [q].
31
Page 35

Basic Operations
Handsfree talking
To hear the caller’s voice from the handsfree loudspeaker: [6]
(Loudsp.)
To go back to the earpiece: [6] (Handset)
Loudspeaker icon -- handsfree is active.
Earpiece icon -- handsfree is not active.
To hear the caller’s voice in the Bluetooth headset when you have
activated a Bluetooth handsfree headset, car kit or other Bluetooth
accessory: [5] (Options) 7 [192] to scroll to BT Accessory 7
[0]9[5] (Select)
Note: When Active clamshell setting is set to Off (see page 46), closing
the phone switches the caller’s voice to the back loudspeaker and mutes
your voice. However, when you are using a headset, you can continue your
conversation even while the phone is closed.
Volume control
[394] to decrease or increase the volume of the phone earpiece
, phone loudspeaker , or headset if attached. Note the volume
step bars change as you adjust the volume.
To mute or unmute the microphone: [5] (Options) 7 [192] to
scroll to Mute or Unmute 7 [0]9[5] (Select)
Mute switches off the microphone of the phone and any accessory
microphones if attached. Unmute switches the microphone back on.
32
Page 36

Basic Operations
DTMF
DTMF (Dual Tone Multi Frequency) can be sent during a
conversation. These are often used to access Voice mail, paging
and computerised home banking. For example, you may need to
enter a number to remotely access Voice mail messages.
Sending DTMF during a call
1. Enter digits ([L] - [K], [e] or [r])
OR
If you stored a DTMF sequence in a Contacts card,
1. [5] (Options) 7 [192] to scroll to Send DTMF 7 [0]9[5]
(Select)
2. [5] (Find) 7 Select the desired entry
Dialling or storing DTMF sequences
1. Enter the access phone number
2. Before entering the DTMF digits, [
through *, +, p and w characters to insert:
p A short pause before the digits are transmitted.
w
+
A manual wait period that requires you to press [5]
(Send) during the call to transmit the digits.
Send a DTMF sequence stored in a speed dial location
(see “Speed dial” on page 59).
3. Enter the DTMF digits, e.g. the access codes for your voice
mailbox
4. To dial: [q] to immediately dial call,
To store in your Contacts: [5] (Options) 7 [192] to scroll to
Add to Contacts 7 [4] 7 [192] to scroll to Create new or
Update existing 7 [0]9[5] (Select)
See “Contacts” on page 66 for further operation.
e] repeatedly to scroll
33
Page 37

Basic Operations
Making a second call
You can make another call while on a call.
During a call:
1. [5] (Options) 7 [192] to scroll to New call 7 [0]9[5]
(Select) 7 Enter the second phone number
OR
[5] (Find) to select a phone number from the Contacts list
2. [q]
The first call is put on hold.
3. [q] to switch between the two calls if required
Multiple calls operations
In-call options (while on multiple calls)
While on more than one call, the following options are available by
[5] (Options).
Swap Switch between one active and one held call.
Transfer
Conference See “Conference” on page 35.
End all calls End all calls at once.
Other operations while on multiple calls
To end a held call and continue with the active call: [L] 7 [q]
To end the active call and continue with the held call: [w] OR [A] 7
[q]
To end all calls and data connections: Press and hold [w]
To switch between one active and one held call (Swap): [q]
34
Transfer an active call to a call on hold. You can
connect the two parties in to a conversation and
disconnect yourself from them.
Page 38

Basic Operations
Conference
You can have a conversation with up to 5 different parties at the
same time.
During a call (one active call and one call on hold):
1. [5] (Options)
2. [192] to scroll to Conference 7 [0]9[5] (Select)
The 2 calls are joined into a Conference call.
To add new participants:
During a Conference call:
1. Call the next person or answer an incoming call
See “Making a second call” on page 34 or “Answering a second call” on
page 29.
2. [5] (Options)
3. [192] to select Conference 7 [4]
4. [192] to scroll to Add to conference 7 [0]9[5] (Select)
Options
During a Conference call, the following options are available.
1. [5] (Options) 7 [192] to scroll to Conference 7 [4]
2. [192] to scroll to the desired option 7 [0]9[5] (Select)
Add to conference
Private
Drop participant
Add new participants or return Private call to
Conference call.
Have a private conversation with one of parties.
The remaining callers can continue with the
Conference call. Select Swap to switch between
the Private call and the Conference call. Select
Add to conference to return Private call to
Conference call.
Select the desired party to drop from the
Conference call.
35
Page 39

Text Entr y
Your phone provides three text entry modes to enter characters.
Multi-tap
Alpha
mode
Number
mode
mode
Dictionary
mode (T9
Selecting a Writing language
To change the writing language, see Writing language setting on
page 38.
Selecting a text mode
An icon on the upper right corner of the screen shows the current
text mode and letter case.
To change the letter case mode: Press [r] repeatedly until the
icon for the desired mode appears
Icon
Dictionary On Off
Letter case Auto
*1Available only after alphabetical letters.
To toggle between Alpha mode and Number mode: Press and
hold [r]
Abc abc
A traditional way to type in a letter. Press a
key several times until the required letter
appears.
A predictive text entry system. You can
®
enter a word with fewer key press.
)
You can enter numbers (0-9), e and r.
1
mAbc mabc
Auto
Lower
case
ABC*
Upper
case
Lower
case
mABC*
Upper
case
1
Auto capital change
When the letter case is auto (T9 Abc and m Abc), the first character
is input as upper case and subsequent letters as lower case. Enter
one of the following characters [. (Period) ! ? ¡ ¿], the next character
is input as upper case.
36
Page 40

Text Entry
T9® Text input method
The T9® text input method enables you to enter text faster and
easier. You only need to press a key once for any letter you require
on that key. The program searches its built-in dictionary to predict
the word that most closely matches your key presses.
1. In text entry screen, press a key once for any letter you require
on that key
2. Continue pressing other keys until the end of a word is reached
3. [e] repeatedly until the correct word is displayed
4. If the desired word is not in the dictionary, “?” is displayed after
the word.
[5] (Spell) 7 Enter the correct word 7 [0]9[5] (OK)
The word will be added to its built-in dictionary automatically.
For example, to enter “Hello!”, press keys as follows.
Key [F][D][G][G][H][A][e] x 4
Display I He Hel Hell Hello Hello. Hello!
Displaying word matches
You can also choose the desired word from all the word matches.
1. While the word is underlined, [m]
2. [192] to scroll to Dictionary 7 [4]
3. [192] to scroll to Matches 7 [0]9[5] (Select)
4. [192] to scroll to the desired word 7 [0]9[5] (OK)
Adding words to the internal dictionary
1. In text entry screen, [m]
2. [192] to scroll to Dictionary 7 [4]
3. [192] to scroll to Insert word 7 [0]9[5] (Select)
4. Enter a word 7 [0]9[5] (OK)
37
Page 41

Text Entry
Editing text
Move the cursor by pressing [1929394] to the position you want
to insert or delete a letter. To delete a character, press [x].
To cut/copy/paste text
1. [1929394] to move to the left of text you wish to cut or copy
2. While holding down [m], press [4] to highlight the text
3. [m] 7 [192] to scroll to Cut or Copy 7 [0]9[5] (Select)
4. [1929394] to move to a new desired location
5. [m] 7 [192] to scroll to Paste 7 [0]9[5] (Select)
Edit key options
When entering text, the following options are available.
1. [m]
2. [192] to scroll to the desired option 7 [0]9[5] (Select)
Select Matches to show all the word that match
your key presses. Select Insert word to add a
Dictionary >
Number/Alpha mode
Cut/Copy/Paste Cut, Copy or Paste text.
Insert symbol
Writing language Select a language you wish to write in.
highlighted/underlined word to the dictionary.
Select Edit word to correct an underlined word.
Select On/Off to turn on or off the predictive
dictionary.
Toggle between Alpha mode and Number
mode.
Show the Symbol list from which you can select
any symbol available on your phone.
38
Page 42

Text Entry
The following table shows characters available on your phone.
The characters vary depending on the Writing language setting.
Text mode (Writing language: English)
Key
[L] Space 0 (Linefeed) 0
[A]
[S]
[D]
[F]
[G]
[H]
[I]
[J]
[K]
[e]
[r]
[m] Options (See “Edit key options” on page 38.)
Dictionary (T9®)
(T9abc, T9Abc or T9ABC)
. , - ? ! ’ @ : ; / 1
A B C 2
(a b c 2)
D E F 3
(d e f 3)
G H I 4
(g h i 4)
J K L 5
(j k l 5)
M N O 6
(m n o 6)
P Q R S 7
(p q r s 7)
T U V 8
(t u v 8)
W X Y Z 9
(w x y z 9)
. , ' ? ! " - ( ) @ / : _ ; + & % * = < > £ f $ ¥ ¤ [ ] { } \ ~ ^ ¡
(Press and hold) Toggle between Alpha mode and Number mode
Alpha mode
Multi-tap
(abc, Abc or ABC)
. , ? ! 1 @ ' - _ ( ) : ; & / %
e r + < = > " $ £ § ¥ ¤ ¡ ¿
A B C 2 Ä Æ Å À Á Â Ã Ç
(a b c 2 ä æ å à á â ã ç)
D E F 3 È É Ê Ë Ð
(d e f 3 è é ê ë ð)
G H I 4 Ì Í Î Ï
(g h i 4 ì í î ï)
J K L 5 £
(j k l 5 £)
M N O 6 Ö Ø Ò Ó Ô Õ Ñ
(m n o 6 ö ø ò ó ô õ ñ)
P Q R S 7 $
(p q r s 7 ß $)
T U V 8 Ù Ú Û Ü
(t u v 8 ù ú û ü)
W X Y Z 9 Ý Þ
(w x y z 9 ý þ)
¿ § # | (Space) (Linefeed)
Changes text mode r
Number
mode
e + p w
1
2
3
4
5
6
7
8
9
Shortcut: To enter numbers while in Alpha mode, press and hold the
desired number key [L] - [K
].
39
Page 43

Settings
Settings menu structure
Ringtones........... 40
Clock ..................57
PB Setup ............65
Themes............... 42
SpeedDial ........... 59
About .................. 65
Settings ..............44
Voice...................60
Ringtones
Ringtone profiles are set up for use in different environments to alert
you to calls and messages. Choose from General, Silent, Meeting,
Outdoor, and Pager.
Note: Free contents are available for your X800 phone. For downloading
information, visit www.panasonicbox.com. Availability of this service is
dependent on your country/region or network. The downloaded contents are
free, however there will be a communication fee to download.
Activating a ringtone
z Main menu > Settings > Ringtones
1. [192] to scroll to the desired ringtone 7 [0]9[5] (Options)
2. [192] to scroll to Activate 7 [0]9[5] (Select)
40
Page 44

Settings
Changing ringtones/alert tones/volume
You can change or personalise individual settings within a ringtone.
z Main menu > Settings > Ringtones
1. [192] to scroll to the desired ringtone 7 [0]9[5] (Options)
2. [192] to scroll to Personalise 7 [0]9[5] (Select)
3. [192] to scroll to the desired setting 7 [0]
Choose the desired tone.
Ringing tone
Ringing type
Ringing volume [394] to move the volume bars.
Message alert tone Follow the operation of Ringing tone.
Vibrating alert Select On or Off.
Keypad tones Select Off, Level 1, Level 2 or Level 3.
Warning tones Select On or Off.
Alert for
Profile name
Note: Ringtones and alert tones play only when the phone’s current
ringtone is General or Outdoor. The other ringtones mute playing of ringing
tones.
To hear the tone, highlight the tone name and
wait. To stop the tone, press any key. If you have
subscribed to 2 lines, then a setting appears for
each line.
Choose Ringing, Ascending, Ring once, Beep
once or Silent.
If you have set up Contacts groups, select the
desired group name if you want the phone to ring
only when members of that group call. Other
incoming calls will have the silent alert.
Change the name of any ringtone except
General.
41
Page 45

Settings
Themes
Change the visual look of your phone screens.
Activating a theme
z Main menu > Settings > Themes
1. [192] to scroll to the desired theme 7 [0]9[5] (Options)
2. To apply: [192] to scroll to Apply 7 [0]9[5] (Select)
To preview and apply: [192] to scroll to Preview 7 [0]9[5]
(Select) 7 [5] (Apply)
3. [5] (Yes) or [6] (No)
Changing wallpaper/screen saver
Change the background image of the standby screen or Favourites
screen, the colour of bars and frame boxes, and the screen saver.
z Main menu > Settings > Themes
1. To edit a current theme: [0]9[5] (Options)
To edit a specific theme: [192] to scroll to the desired theme
7 [0]9[5] (Options)
2. [192] to scroll to Edit 7 [0]9[5] (Select)
3. [192] to scroll to the desired setting 7 [0]
Idle state wallpaper
Colour palette
Screen saver
Icons Choose from a list of theme set of icons.
Standby screen. Choose from Default, User
defined (your own image from Gallery or
downloaded), other themes, or None.
Choose from the default colour or other listed
colours for common bars, icons, and frames.
Choose Date and time (Default), or Text (write
your own text message).
42
Page 46

Settings
Favourites wallpaper
Note: When the copy option appears, you can copy themes from the phone
memory to the miniSD Card or in reverse.
Favourites. Choose from Default, User defined
(your own image from Gallery or downloaded),
other themes, or None.
Downloading new themes
You can download themes directly from predetermined web sites
without first going to the Browser application. These links are set by
agreements with contents providers who offer the themes.
z Main menu > Settings > Themes
1. [5] (Options)
2. [192] to scroll to Theme downloads 7 [0]9[5] (Select)
3. Continue with step 2 in “Downloading files from the Internet” on
page 140
Note: Free contents are available for your X800 phone. See the Note on
page 40 for further information.
Some links may be preset by contents providers and cannot be deleted.
43
Page 47

Settings
Settings
Phone settings
z Main menu > Settings > Settings > Phone > General
1. [192] to scroll to the desired setting 7 [0]
Phone
language
Writing
language
Dictionary
Welcome note
or logo
Shutdown
animation
Keypad
Backlight Time
Orig. phone
settings
Note: If Phone language and Orig. phone settings are changed while
charging, the phone will restart in charging mode after selecting Ye s. [,] to
return to standby mode.
Choose a language in which the text on the displays will
appear. Select Yes. The phone will restart in the
language selected. Automatic uses the language
dictated by the SIM card.
Choose a language in which the texts you are writing will
appear, e.g. writing a text message.
Select On to use the predictive text dictionary to speed
up text entry.
Default uses the welcome note or image supplied with
the phone, displayed when the phone is switched on.
Select Tex t to enter your own welcome note. Select
Image to place an image from Media Gallery.
Select Off to stop the animation shown after switching off
the phone.
To save battery life, select Always off for the keypad
backlight to remain off.
Used if a network operator used settings protection in a
phone, and later there is a reason to change the
protected settings. Requires lock code.
44
Page 48

Settings
Display settings
z Main menu > Settings > Settings > Phone > Display
1. [192] to scroll to the desired setting 7 [0]
Brightness [394] to adjust brightness, then [5] (OK).
Screen saver
timeout
[394] to choose from 1 minute to 30 minutes of no
activity until screen saver switches on and [5] (OK).
Standby mode settings
Choose an application name to display on the Left and Right Soft
keys in standby mode to use as shortcuts to the respective
applications.
z Main menu > Settings > Settings > Phone > Standby mode
1. [192] to scroll to Left selection key or Right selection key
7 [0]
2. [192] to scroll to the desired application 7 [0]9[5] (OK)
Call settings
z Main menu > Settings > Settings > Call
1. [192] to scroll to the desired setting 7 [0]
Send my caller
1
ID*
Call waiting
Automatic
redial
Summary after
call
Choose Set by network, Yes or No. Determines if your
mobile number is presented to the person you are
calling.
Select Check status. If needed, select Activate.
Network will send confirmation message. See
“Answering a second call” on page 29.
Select On to redial if the call is not connecting. [w] to
stop automatic redialling.
Select On to display a brief summary of duration of last
call.
45
Page 49

Settings
Speed dialling
Anykey answer
Active
clamshell
Line in use*
Line change*
1
*
*2Available if you have subscribed to Alternative Line Service.
Select On to start dialling by a press and hold of preset
number key in standby mode. First, set up Speed dial
keys (see “Speed dial” on page 59).
Select On to answer incoming calls by pressing any key
except [6], [w] or [,].
Select On to answer a call by opening the flip clamshell
and to disconnect phone calls by closing the flip
clamshell. When set to Off, you must answer the
incoming call by [q]. Closing the flip clamshell switches
the caller’s voice to the back loudspeaker and mutes
your voice.
You can have two different phone lines with the same
2
SIM card. Select Line 1 or Line 2.
You can disable selection of one of the phone lines. The
2
PIN2 code is required to return use of a previously
blocked line.
Connection settings
Access point settings
Your phone uses three main sets of access points: Multimedia
(MMS), Browser, and Internet. Access points must be set up in order
to send and receive multimedia and e-mail messages, use the
Browser, SyncML and Device Manager, and use your phone as a
modem.
Access points use data services to connect.
Some or all of your access points may be preset in the phone by
your service provider and cannot be modified, but you may be able
to add new access points. The access point configurations may be
sent to you in a smart message by your service provider.
46
Page 50

Settings
To view, edit, or add new access points, first you must obtain the
configurations from your service provider to be entered into the
phone.
Note: Types of data services your phone can support are: Data call (Circuit
switched data) and GPRS (Packet data). Contact your service provider to
find out about types of data technologies offered and subscription rates.
To view an access points list:
z Main menu > Settings > Settings > Connection > Access
points
indicates Data call, and indicates GPRS connection.
To add a new access point:
1. In the access points list, [5] (Options)
2. [192] to scroll to New access point 7 [4]
3. [192] to scroll to Use default settings or Use existing
settings 7 [0]9[5] (Select)
4. If you select Use existing settings, [192] to scroll to the
desired setting 7 [0]9[5] (Select)
5. Continue with step 3 in “To edit an access point:” on page 47
To edit an access point:
1. In the access points list, [192] to scroll to the desired access
point 7 [5] (Options)
2. [192] to scroll to Edit 7 [0]9[5] (Select)
3. [192] to scroll to the desired setting 7 [0]
4. Enter information in fields. Fields marked in the phone with a
red asterisk (*) must have an entry. The bearer type you
choose determines which fields are presented
* Connection name Enter an easy-to-recall name if not assigned.
Data bearer Select GPRS or Data call.
1
* Dial-up number*
Enter access point dial-up phone number.
47
Page 51

Settings
2
Access point name*
User name
Prompt password
Password
Enter name supplied by service provider.
Enter a user name, supplied by service provider, if
required.
To have the phone ask for the password each time
you log on, select Yes.
Enter password, supplied by service provider, if
required.
Authentication Select Normal or Secure.
Homepage Enter Internet web address of service.
Data call type*
Maximum data
1
speed*
1
Determined by your mobile and Internet service
providers.
Choose a limit for your connection speed if you
are charged more for higher speeds.
*1Available only for Data call.
2
*
Advanced settings:
1. From main fields, [5] (Options)
2. [192] to scroll to Advanced settings 7 [0]9[5] (Select)
3. [192] to scroll to the desired setting 7 [0]
Phone IP address
Primary name server
Second. name server
Proxy serv. address Enter the proxy server address for access point.
Enter IP address assigned to your phone, if static
or dynamic. Service provider determines if IP
address is static or dynamic.
Enter the primary domain name server IP
address.
Enter the secondary domain name server IP
address.
48
Page 52

Settings
Proxy port number Enter the proxy port number for access point.
Use callback*
Callback type*
1
1
Callback number*
Use PPP
compression*
1
Use login script*
Login script*
Modem
initialisation*
1
1
Select Yes to use dial back servers.
Select Use server no. for callback, or Use other
no.
Enter the phone number the callback server
1
should use.
Select Yes to use PPP (Point-to-Point Protocol)
compression.
Select Yes to use login script defined in Login
1
script field.
Enter the login script to be used.
If desired, enter a modem initialisation string (AT
command string).
*1Available only for Data call.
Note: If your service provider has protected some of your settings, you may
not be able to modify them.
GPRS settings
z Main menu > Settings > Settings > Connection > GPRS
1. [192] to scroll to GPRS connection or Access point 7 [0]
Choose When needed to connect to GPRS service only
when you open an application that uses GPRS. After you
GPRS
connection
Access point
close the application, GPRS service will disconnect.
Choose When available to stay continuously connected
when you are in a GPRS service area, in which the
GPRS icon replaces the signal strength icon p.
Choose an access point supplied by your service
provider to use the phone as a modem to enable GPRS
connection from a computer.
49
Page 53

Settings
Note: If you selected to attach to GPRS when available and are in an area
without GPRS service, then the phone will attempt to connect to GPRS
service periodically.
Data call settings
You can choose a time period to disconnect from the data call if
there is no activity.
z Main menu > Settings > Settings > Connection > Data call
1. [0] to select Online time
2. [192] to scroll to User defined or Unlimited 7 [0]
3. If User defined is selected, enter a time period 7 [0]9[5]
(OK)
Date and time settings
z Main menu > Settings > Settings > Date and time
1. Continue with step 2 in “Time and date” on page 57
Security settings
Phone and SIM
Your phone and SIM card have security codes to limit access to the
phone. Keep a written record of your codes in a secure place.
Entering PIN code to use phone
The PIN and PIN2 codes (4 to 8 digits), issued by your service
provider, protect your SIM card against unapproved use.
If you set PIN code request to On, then the PIN code must be
entered each time the phone is turned on.
The PIN2 code is required to access certain service provider
services such as Fixed dialling and Call costs. If the PIN2 code is
blocked, use the PUK2 code to unblock.
50
Page 54

Settings
z Main menu > Settings > Settings > Security > Phone and SIM
1. [192] to scroll to the desired setting 7 [0]
Activate Phone
PIN
PIN
PIN2
Note: If PIN or PIN2 code is entered incorrectly 3 times, the SIM card locks.
Contact your service provider for PUK or PUK2 code (PIN unblock key
code). If the PUK or PUK2 code is entered incorrectly 10 times, the phone
will not operate. All information stored in the SIM card is lost and the SIM
card must be replaced.
Select Yes to require entry of PIN code each time the
phone is switched on. Requires PIN code to activate.
To change PIN code, enter current PIN code, new PIN
code twice, then [5] (OK).
To change PIN2 code, enter current PIN2 code, then
new PIN2 code twice, then [5] (OK).
Entering lock code to use phone
When the phone is locked, the lock code must be entered before the
phone can be used. The phone lock icon indicates that the phone
is locked.
You may be able to dial the local emergency number and accept
incoming calls when the phone is locked.
Shortcut: To lock the phone, [,] and select Lock phone.
z Main menu > Settings > Settings > Security > Phone and SIM
1. [192] to scroll to the desired setting 7 [0]
Autolock
period
Lock code
Set the phone to lock after a time period of no activity.
Select User defined to enter time period in minutes.
Requires lock code to set.
To change the lock code, enter the current lock code,
then new lock code twice. Record the new code in a safe
place. The preset lock code is 12345.
51
Page 55

Settings
Lock if SIM
changed
Note: If you change the lock code then cannot recall it, your service
provider cannot identify the code. The phone must then be reset at an
authorised service centre.
To prevent the phone from being used if an unknown
SIM card is inserted, select Yes.
Fixed dialling and closed user group
Fixed dialling restricts outgoing calls to “fixed numbers” contained in
SIM cards that support this feature. When switched on, dialling any
number not on the Fixed dialling list is not allowed.
The PIN2 code is required to set up and use this feature.
Some service providers offer Closed user group feature, which
allows the phone to make and receive calls only from specific
groups. The groups are set up with your service provider at time of
subscription purchase.
z Main menu > Settings > Settings > Security > Phone and SIM
1. [192] to scroll to the desired setting 7 [0]
Enter PIN2 code. [5] (Options) and select New contact
Fixed dialling
Closed user
group
Confirm SIM
services
Delete server
or Add from Contacts to create the Fixed dialling list.
[5] (Options) and select Activ. fixed dialling to
activate the service.
Select Default to activate the service to the default group
previously set up with your service provider. Select On to
activate another group set up previously.
Select Yes to view confirmation messages sent between
your phone and the network when you are using SIM
application tool kit services.
Reset the current trusted provisioning server settings.
Contact the service provider to receive the new settings.
52
Page 56

Settings
Certificate management
Certificates are attachments to electronic messages used to verify
senders and recipients of data over nonsecure networks, such as email servers or the Internet.
Authority certificates are downloaded to your phone and are used to
check server certificate signatures and to guarantee that the
certificate is issued by a certification authority (CA).
Personal certificates are issued to you by a certification authority.
Certificates are valid for only a fixed time period and must be
renewed periodically. To renew, contact the certificate issuer.
Before downloading or sending confidential information, check the
digital signature and validity period of the browser gateway or server
on the certificate.
Viewing certificates
z Main menu > Settings > Settings > Security > Certif.
management
1. [192] to scroll to the desired authority certificates 7 [0]
2. [2] to scroll to view personal certificates if available
Trust settings
Check whether certain applications (Browser, Application manager,
or Internet) can use a selected certificate.
z Main menu > Settings > Settings > Security > Certif.
management
1. [192] to scroll to an authority certificate 7 [5] (Options)
2. [192] to scroll to Trust settings 7 [0]9[5] (Select)
3. [192] to scroll to the desired setting 7 [0] to select Yes or No
Note: Before you change any trust settings, be sure that you trust the
certificate owner and have verified that the certificate belongs to the listed
owner.
53
Page 57

Settings
Call divert
Divert incoming calls (voice, data) to another number.
Activating/cancelling Call divert
z Main menu > Settings > Settings > Call divert
1. [192] to scroll to All voice calls, If busy, If not answered, If
out of reach, If not available, All fax calls or All data calls 7
[0]9[5] (Options)
2. [192] to scroll to Activate or Cancel 7 [0]9[5] (Select)
(If Activate is selected, go to the next step.)
3. [192] to scroll to To voice mailbox or To other number 7
[0]9[5] (OK)
(If To other number is selected, go to the next step.)
4. Enter the phone number 7 [0]9[5] (OK)
You can go to your Contacts to select a number by pressing [5] (Find).
Network will send confirmation message.
To check the status:
[0]9[5] (Options) 7 [192] to scroll to Check status 7 [0]9[5]
(Select)
To cancel all call diverts:
[5] (Options) 7 [192] to scroll to Cancel all diverts 7 [0]9[5]
(Select)
Note: If either If not answered or If not available is selected in step 1,
then after step 3 or 4, select a Delay time from the list before calls will be
diverted.
54
Page 58

Settings
Call barring
Call barring restricts certain types of incoming and/or outgoing calls,
using a password furnished by your service provider.
Activating/cancelling Call barring
z Main menu > Settings > Settings > Call barring
1. [192] to scroll to Outgoing calls, International calls,
International calls except to home ctry., Incoming calls or
Incoming calls when abroad 7 [0]9[5] (Options)
2. [192] to scroll to Activate or Cancel 7 [0]9[5] (Select)
3. Enter Barring password 7 [0]9[5] (OK)
Network will send confirmation message.
To check the status:
[0]9[5] (Options) 7 [192] to scroll to Check status 7 [0]9[5]
(Select)
To cancel all call barrings:
[5] (Options) 7 [192] to scroll to Cancel all barrings 7 [0]9[5]
(Select) 7 Enter Barring password 7 [0]9[5] (OK)
Changing Call barring password
z Main menu > Settings > Settings > Call barring
1. [5] (Options)
2. [192] to scroll to Edit barrings passw. 7 [0]9[5] (Select)
3. Enter the password furnished by your service provider 7
[0]9[5] (OK)
4. Verify the new password 7 [0]9[5] (OK)
55
Page 59

Settings
Network settings
Selecting a network
Set your phone to automatically or manually search for another
network when roaming.
Note: National regulations may not permit roaming in your home region.
z Main menu > Settings > Settings > Network > Operator
selection
1. [192] to scroll to Automatic or Manual 7 [0]9[5] (OK)
2. If Manual is selected, select a network from the list 7 [0]
Using a micro cellular network
When the phone is using a micro cellular network (MCN), a MCN
indicator can be displayed in standby mode.
z Main menu > Settings > Settings > Network > Cell info
display
1. [0] to switch On or Off
Enhancement settings
Customise your phone to be used with a headset or Bluetooth
headset enhancement attached.
z Main menu > Settings > Settings > Enhancement > Headset
or BT Accessory
1. [192] to scroll to the desired setting 7 [0]
Default ringtones
Automatic answer Select On to answer calls automatically.
Choose the desired ringtone. (See “Ringtones” on
page 40.)
56
Page 60

Settings
Enhancement in use
Select which enhancement is attached to the phone.
z Main menu > Settings > Settings > Enhancement >
Enhancement in use
1. [192] to scroll to Headset or BT Accessory 7 [0]9[5] (OK)
When the Bluetooth setting is activated, the enhancement setting
automatically changes to BT Accessory enhancement setting. When
the BT Accessory enhancement is removed, the enhancement setting
reverts to Headset.
Clock
Time and date
z Main menu > Settings > Clock
1. [0]9[5] (Options) 7 [192] to scroll to Settings 7 [0]9[5]
(Select)
2. [192] to scroll to the desired setting 7 [0]
Time
Date Enter date using the same method as time entry.
Date format Select format where dd = date, mm = month, yyyy = year.
Date separator Choose from symbols [ . : / - ].
Time format Choose 12-hour or 24-hour.
Time separator Choose symbols [ : ] or [ . ].
Clock type Choose Analogue or Digital.
Clock alarm
tone
Either type in numbers or [192] to enter time. [394] to
move among fields.
Choose the desired tone. To hear the tone, highlight the
tone name and wait. To stop the tone, press any key.
57
Page 61

Settings
Auto time
1
update*
GMT offset*
Daylight-
2
saving*
1
*
*2Available only if Auto time update is set to Off.
Select On to update time from the network.
If the setting is changed while charging, the phone will
restart in charging mode after selecting Yes. [,] to
return to standby mode.
If Auto time update is not available, select a time zone,
2
which is offset to GMT time (e.g. +05:00 or -05:00).
Select On to add an offset of +01:00 to the current GMT
time.
Alarm
To set the alarm:
z Main menu > Settings > Clock
1. [0]9[5] (Options) 7 [0]9[5] (Select) to select Set alarm
2. Enter alarm time by either typing in numbers or [192]
[394] to move among fields 7 [0]9[5] (OK)
To reset/remove the alarm:
z Main menu > Settings > Clock
1. [5] (Options)
2. [192] to scroll to Reset alarm or Remove alarm 7 [0]9[5]
(Select)
3. If you select Reset alarm: Enter new alarm time 7 [0]9[5]
(OK)
If you select Remove alarm: [0]9[5] (Yes)
To turn off alarm:
1. [5] (Stop)
The alarm is deleted. If you wish to have an alarm for the next day, set
the alarm again.
58
Page 62

Settings
To quiet the alarm indicators for 5 minutes:
1. [6] (Snooze) or any key
The alarm rings at 5 minute interval (maximum 5 times).
Note: The alarm works even when the phone is switched off. If you press
[5] (Stop) to turn off the alarm, you are asked if you wish to switch the
phone on. Do not press Yes to switch the phone on when you are in an
aircraft, near sensitive medical equipment, at a refuelling point or when it
may cause interference of danger.
Speed dial
Set the phone to quickly dial frequently called numbers by pressing
2keys.
Assigning a speed dial number
z Main menu > Settings > SpeedDial
1. [1929394] to scroll to a number 7 [0]9[5] (Options)
2. [0]9[5] (Select) to select Assign
3. [192] to scroll to the desired Contacts card 7 [0]9[5]
(Select)
4. [192] to scroll to the desired number 7 [0]9[5] (Select)
To change/remove/view speed dial numbers:
After step 1, [192] to scroll to Change, Remove or View number
7 [0]9[5] (Select)
Note: Location number 1 may be reserved for voice mailbox number.
If a digit is replaced by an icon, then the corresponding key has been
reserved by your service provider to dial a special number, e.g. to dial the
voice mailbox number.
59
Page 63

Settings
Calling a speed dial number
In standby mode:
1. Press the corresponding number key [S] - [K] 7 [q]
OR
z Main menu > Settings > SpeedDial
[1929394] to scroll to the desired number 7 [q]
Note: If Speed dialling setting is set to On (see page 46), just press and
hold the desired speed dial number key to start dialling in standby mode.
Voice commands
You can make a call, look up contact information in your Contacts
list, or open an applications by using voice commands.
Note: If your phone is set to a language that is not available in Voice
commands, you can record voice tags to say that will dial numbers. (See
“Voice tags” on page 63.)
Voice Dial
1. Press and hold [q]
2. After hearing “Say a command”, say “Voice Dial”
3. After hearing “Say the name or number”:
To dial by name, say the full name of a person in your
Contacts list, including first name and last name.
To dial by number, say the digits of the phone number you
wish to dial, without pausing between digits.
The name or number is repeated, and the phone will begin dialling.
60
Page 64

Settings
Note: If the name has more than one number in the Contact entry, say the
title of the desired number.
If the phone is not sure of the number, it displays a list of choices and
prompts “
did you say...?” and states the first choice.
If the number is correct, say “Yes”. If the number is not correct, say “No” to
hear the next possible match, or scroll and select the correct number on the
list.
Name lookup
1. Press and hold [q]
2. After hearing “Say a command”, say “Name Lookup”
3. After hearing “Say the name”, say the full name of a person in
your Contacts list, including first name and last name
The Contact entry appears on the screen.
Opening application
1. Press and hold [q]
2. After hearing “Say a command”, say “Open”, then say the name
of the application, e.g. “Messages”
The application opens.
Voice commands settings
1. Press and hold [q]
2. After hearing “Say a command”, [5] (Settings)
3. [192] to scroll to the desired setting 7 [0]9[5] (Select)
61
Page 65

Settings
Digit Dialling
Sensitivity
Choice Lists
Sound
Language
Application
Launcher
Contacts
Update
About
To help the phone recognise the numbers you are
saying, open Select Location and choose a geographic
location for the phone to recognise only numbers that are
valid in that location. Automatic chooses a location
based on the phone language setting.
If the phone cannot consistently recognise numbers that
you are saying, select Adapt Digits to make recordings
to teach the system your voice. Select Reset Digits to
restore the original recognition software.
If the phone cannot recognise most of your commands,
change sensitivity toward Reject Less. If the phone
recognises too many mismatches, change sensitivity
toward Reject More.
Select Commands or Names. Then [192] to change
the setting.
Choose whether the phone presents choices when the
phone does not recognise your command.
Switch on or off the playback of prompts, names and
digits.
Select Name Settings to change the speed or volume of
name playback.
Choose from the list of languages that the software will
use for audio prompts, text screens, and your voice
recognition.
Check to select applications from the list to open using
Open Applications.
Each time Voice commands is opened, it checks your
Contacts list for name additions or edits, and if so,
automatically reloads the list. If the list is large, the reload
requires more time. Select Configure to choose
Automatic or Manual reloading.
Copyright information about the voice recognition
software.
62
Page 66

Settings
Voice tags
When your phone is set to a language that is not available in Voice
commands, Voice tags allows you to record names and related
phone numbers and store them in memory. That you can dial these
numbers using Voice commands.
Note: Voice tags appears only when your phone is set to a language that is
not available in Voice commands.
Recording voice tags
1. Press and hold [q]
If you are using this feature for the first time, the phone displays
a message that no voice tags are recorded.
2. [0]9[5] (OK) to select Add voice tag
3. After the text prompt to say a name, say a name that you will
say each time you wish to call this person
The phone will repeat the name.
4. To confirm: [5] (Yes)
To record it again: [6] (No)
5. After you have confirmed, enter the number to dial 7 [5] (OK)
Dialling a number using a voice tag
1. Press and hold [q]
2. After the text prompt asking who you would like to call, say a
name of a voice tag you have recorded
The phone will begin dialling the number assigned to the voice tag.
63
Page 67

Settings
Adding/editing voice tags
You can store up to 30 voice tags, and edit or erase voice tags as
needed.
To add a voice tag:
1. Press and hold [q] 7 [5] (Settings)
A list of voice tag phone numbers displays.
2. [0]9[5] (Select) to select Add voice tag
3. Continue with step 3 in “Recording voice tags” on page 63
To edit a voice tag:
1. Press and hold [q] 7 [5] (Settings)
A list of voice tag phone numbers displays.
2. [192] to scroll to the desired voice tag phone number to edit
7 [0]9[5] (Select)
3. [192] to scroll to Play, Re-record, Erase or Erase all 7
[0]9[5] (Select)
64
Page 68

Settings
PrintBoy setup
PrintBoy setup works with your Quickoffice menu to print your
Quickoffice documents wirelessly from your phone to supported
printers.
z Main menu > Settings > PB Setup
On the Drvrs tab is a list of supported printer drivers.
1. [192] to scroll to the desired printer 7 [5] (Options)
2. [192] to scroll to Configure 7 [0]9[5] (Select)
3. [192] to scroll to the desired setting 7 [0]
Communications Select the method to send data to the printer.
Paper Size Choose a paper size.
Left Margin Choose desired left margin measurement.
4. After the printer is configured, [5] (Options)
5. [192] to scroll to the desired option 7 [0]9[5] (Select)
Test Print Send a test print.
Bluetooth > Select Find Printer to pair with the printer.
To set a printer as default:
[394] to scroll to Drvrs tab 7 [192] to scroll to the desired printer
7 [5] (Options) 7 select Set As Default
About
View copyright information about the phone and software used on
the phone.
z Main menu > Settings > About
65
Page 69

Contacts
Creating new Contacts cards
z Main menu > Contacts
1. [5] (Options)
2. [192] to scroll to New contact 7 [0]9[5] (Select)
3. Enter information in main fields Last name, First name,
Company, Job title, Telephone, Mobile, Fax and E-mail
4. [6] (Done)
Options
From main fields, the following options are available by [5]
(Options).
Add thumbnail
Add detail/
Delete detail
Edit label Change the field name.
Storing contacts from Recent calls list
See Add to Contacts setting on page 159.
Place a picture from your Images folder into the
card.
Choose the desired fields and icons from the list
including Job title, Telephone, Tel. (home), Tel.
(business), 3 mobile, 3 fax, pager number, 3 Email fields, 3 Web addresses, 3 street address
fields, DTMF, Birthday, and Note.
66
Page 70

Contacts
Editing Contacts cards
z Main menu > Contacts
1. [192] to scroll to the desired Contacts card 7 [5] (Options)
2. [192] to scroll to Edit 7 [0]9[5] (Select)
3. [192] to scroll to the desired field and enter the data
To add more information, see “Options” on page 66.
4. [6] (Done)
Assigning default number to dial
You can set a particular phone number or address that the phone will
use each time you wish to call or write messages to that person.
z Main menu > Contacts
1. [192] to scroll to the desired Contacts card 7 [0]
2. [5] (Options)
3. [192] to scroll to Defaults 7 [0]9[5] (Select)
4. [192] to scroll to Phone number, Text msg. number, MMS
number/address or E-mail address 7 [5] (Assign)
5. [192] to scroll to the desired entry 7 [0]9[5] (Select)
To assign default numbers to other fields: Repeat steps 4 and 5
To remove a default assignment: Select (no default) in step 5
Assigning a ringing tone
z Main menu > Contacts
1. [192] to scroll to the desired Contacts card 7 [0]
2. [5] (Options)
3. [192] to scroll to Ringing tone 7 [0]9[5] (Select)
4. [192] to scroll to the desired tone 7 [0]9[5] (Select)
To hear the tone, highlight the tone name and wait.
67
Page 71

Contacts
Assigning Speed dial
z Main menu > Contacts
1. [192] to scroll to the desired Contacts card 7 [0]
2. [192] to scroll to the phone number you wish to assign the
speed dial key 7 [5] (Options)
3. [192] to scroll to Assign speed dial 7 [0]9[5] (Select)
4. [1929394] to scroll to the desired number key 7 [5]
(Assign)
A short beep sounds and ( ) will appear in the phone number field.
To remove an existing speed dial key:
While highlighting the speed dial phone number field in the desired
Contacts card:
1. [5] (Options)
2. [192] to scroll to Remove speed dial 7 [0]9[5] (Select)
For further details, see “Speed dial” on page 59.
Going to web address
If a Contacts card contains a web address, you can launch the
Browser and go directly to the web address.
z Main menu > Contacts
1. [192] to scroll to the desired Contacts card 7 [0]
2. [5] (Options)
3. [192] to scroll to Go to web address 7 [0]9[5] (Select)
68
Page 72

Contacts
SIM directory
The SIM directory shows you the names and numbers stored on
your SIM card. Your service provider can program their service
numbers, your mobile phone number and other numbers into your
SIM card. Unlike a Contacts entry, a SIM directory entry consists of
only one name and one phone.
Creating new SIM directory entries
z Main menu > Contacts
1. [394] to switch to SIM directory tab 7 [5] (Options)
2. [192] to scroll to New SIM contact 7 [0]9[5] (Select)
3. Enter name and number 7 [5] (Done)
Copying numbers to SIM directory
z Main menu > Contacts
1. [192] to scroll to the required card 7 [5] (Options)
2. [192] to scroll to Copy to SIM direct. 7 [0]9[5] (Select)
3. [192] to scroll to the desired phone number field to copy 7
[0]9[5] (OK)
If you select All, the phone creates a separate SIM directory entry for
each phone number stored with that Contacts entry name.
Copying SIM entries to Contacts
z Main menu > Contacts
1. [394] to switch to SIM directory tab
2. [192] to scroll to the required card 7 [5] (Options)
3. [192] to scroll to Copy to Contacts 7 [0]9[5] (Select)
Note: The first time Contacts is opened after a different SIM card is placed
in the phone, [5] (OK) if you wish to copy SIM contacts into the Contacts
memory.
69
Page 73

Contacts
Options
In SIM directory tab, the following options are available by [5]
(Options).
Call/Edit/Delete
Copy to Contacts
My numbers View your own phone numbers.
SIM details View the number of used and free SIM entries.
Call/edit/delete the highlighted entry. Numbers
stored by your service provider cannot be edited/
deleted.
Copy the highlighted SIM entry to your Contacts
list.
Using Contacts
Finding a Contacts card
z Main menu > Contacts
1. [394] to switch to Contacts tab or SIM directory tab
2. [192] to scroll to the desired entry
OR
Enter the first letter of the desired entry in
Entries beginning with that letter will be displayed. [192] to scroll to the
desired entry if required.
3. To open the entry, [0]
Dialling from a Contacts card
1. Complete the step 1-2 in “Finding a Contacts card” on page 70
2. [q]
3. If the entry contains more than one number, [192] to scroll to
the desired number 7 [0]9[5] (Call)
70
Page 74

Contacts
Managing Contacts list
z Main menu > Contacts
1. [5] (Options)
2. [192] to scroll to the desired option 7 [0]9[5] (Select)
Call/Edit/Delete/
Duplicate
Create message >
Add to group Add the highlighted Contacts entry to a group.
Belongs to groups
Mark/Unmark
Copy to SIM direct.
Send > See “Sending a Contacts card” on page 71.
Contacts info >
Settings*
*1Not available if the phone contains Chinese language.
1
Sending a Contacts card
z Main menu > Contacts
1. [192] to scroll to the desired Contact entry 7 [5] (Options)
2. [192] to scroll to Send 7 [4]
Call/edit/delete/duplicate the highlighted entry.
Select Text message, Multimedia message or
E-mail to create a new message addressed to the
highlighted Contacts entry.
See if the highlighted Contacts entry belongs to a
group.
See “Mark/Unmark” on page 25 to select more
than one entry.
Copy the highlighted Contacts entry to the SIM
directory.
View the number of cards, groups used and
amount of memory used.
Open the Name display field to sort the list either
by Last name first or First name first.
71
Page 75

Contacts
3. [192] to scroll to Via text message, Via multimedia, Via email, Via Bluetooth or Via infrared 7 [0]9[5] (Select)
See each sending feature for further operations.
Note: Before sent by messaging or to another device, the Contacts card is
converted to an electronic business card format known as vCard.
Service numbers
If your service provider has stored service numbers on your SIM
card, you can view and call the service numbers.
z Main menu > Contacts
1. [5] (Options)
2. [192] to scroll to Service numbers 7 [0]9[5] (Select)
Groups
Place Contact entries into one group. Select the group name when
addressing a new message, and your message is sent to each
member of the group.
Creating new groups
z Main menu > Contacts
1. [394] to switch to Groups tab 7 [5] (Options)
2. [0]9[5] (Select) to select New group
3. Enter a group name 7 [0]9[5] (OK)
4. [0] 7 [5] (Options)
5. [0]9[5] (Select) to select Add members
6. [192] to scroll to the desired Contacts card 7 [0]
If you wish to select more than one Contacts cards, repeat this step.
7. [5] (OK)
72
Page 76

Contacts
To remove the member from the group:
In Groups tab:
1. [192] to scroll to the desired group 7 [0]
2. [192] to scroll to the desired name 7 [5] (Options)
3. [192] to scroll to Remove from group 7 [0]9[5] (Select)
Managing Groups
z Main menu > Contacts
1. [394] to switch to Groups tab
2. [192] to scroll to the desired group 7 [5] (Options)
3. [192] to scroll to the required option 7 [0]9[5] (Select)
Open View group.
Delete Delete group.
Rename Rename group.
Ringing tone Choose the ringing tone.
Seeing if a person belongs to a group
z Main menu > Contacts
1. [192] to scroll to the desired Contacts card 7 [5] (Options)
2. [192] to scroll to Belongs to groups 7 [0]9[5] (Select)
Adding a person to a group
z Main menu > Contacts
1. [192] to scroll to the desired Contacts card 7 [5] (Options)
2. [192] to scroll to Add to groups 7 [0]9[5] (Select)
3. [192] to scroll to the desired group 7 [0]9[5] (Add)
73
Page 77

Messages
Messages menu structure
Voice mail ..........74 Messages ........... 75
Voice mail
The Voice mail service lets you access your voice mailbox. To listen
to your voice messages, you must subscribe to Voice mail service
through your service provider.
Listening to Voice messages
When you receive a new voice mail message, an alert sounds if
ringtone is not set to Silent, and the Voice mail icon displays.
In standby mode:
1. Press and hold [A]
OR
[A] 7 [q]
2. Follow the prompt to listen to your voice messages. If the
phone asks for the voice mailbox number, enter the voice mail
message centre phone number given to you by your service
provider.
Changing the voice mailbox number
z Main menu > Messages > Voice mail
1. [5] (Options)
2. [192] to scroll to Change number 7 [0]9[5] (Select)
3. Enter new voice mailbox number 7 [0]9[5] (OK)
74
Page 78

Messages
Messages
Messaging types
SMS
MMS
E-mail
Smart
messages
Before using messaging services
Your multimedia configuration settings may already be set by your
service provider. If settings are not available, contact your service
provider.
Your e-mail configuration settings are provided by an Internet
Service Provider (ISP) that supports POP3/IMAP4/SMTP protocols.
Before you can send and receive e-mail, (1) you need a subscription
for data services, (2) contract must be set up with an ISP, (3) you
must configure an Internet access point (see “Access point settings”
on page 46).
Short Message Service allows you to send and receive
short text messages to mobile phones. A small black and
white picture message can be inserted in the message.
Multimedia Messaging Service allows you to send
messages containing images, video clips, sound clips
and text. Presentation templates are available to place
media objects into prearranged layouts.
Create, send and receive e-mail messages, which can
have attachments.
Messages containing data such as electronic business
cards, ringing tones, Java. applications.
75
Page 79

Messages
Messages menu
New message Create new messages.
Inbox
My folders Stores moved messages and templates.
Mailbox Receives and stores e-mail messages.
Drafts Stores unfinished messages.
Sent Stores sent messages.
Outbox Temporarily stores messages waiting to be sent.
Reports
In some main Messages options, icons indicate the message type.
Text message Infrared
Multimedia WAP push
E-mail Unknown
Smart Attachment
Bluetooth
Stores received messages except e-mail and cell
broadcast.
Delivery status on text, multimedia, and smart
messages.
76
Page 80

Messages
Creating new messages
Before writing an e-mail message, at least one mailbox must be
configured (see “Mailbox” on page 84).
z Main menu > Messages > Messages > New message > Text
message or Multimedia message or E-mail
1. In the To field,
For text message: Enter recipient’s phone number
For multimedia message: Enter recipient’s phone number or
e-mail address
For e-mail message: Enter recipient’s e-mail address
To retrieve from Contacts card, see “To retrieve a recipient's number/
address from Contacts card:” on page 78.
To separate multiple recipients in the To field: [r] to enter a
semicolon(;)
2. Text message/Multimedia message: Go to step 3
E-mail message: [2] to move to Cc (courtesy copy) field if
required 7 Enter recipients 7 [2] to move to Subject field 7
Enter subject
3. [2] to move to text entry 7 Enter text
To insert the attachments, see “Insert options” on page 78.
4. [q] to send
77
Page 81

Messages
To retrieve a recipient's number/address from Contacts card:
1. In the To field, [0]
2. [192] to scroll to the desired name 7 [5] (OK)
3. If the entry has several numbers/addresses, [192] to scroll to
the desired number/address 7 [0]9[5] (Select)
Note: If you use more than 160 characters for a text message, a new text
message starts, but appears as one message or more at destination. You
may be charged for more than one text message.
If multimedia messages are sent to devices without multimedia or e-mail
capabilities, the recipient may receive a message containing a link to a web
page.
Insert options
While creating a message, the following items can be inserted.
[5] (Options) 7 [192] to scroll to Insert 7 [4]
For text messages:
Picture Picture msg. from Media Gallery.
Tem pl ate
For multimedia message and e-mail message:
Image Image from your Images folder.
Sound clip Sound clip from Sound clips folder.
Video clip Video clip from Video clips folder.
New image*
New sound clip*
Slide*
Note*
1
1
2
Select from a list of sentences in which you fill in
the blank.
New image from Camera.
1
New sound clip from Voice recorder.
Add new slide to message.
Note from Notepad.
78
Page 82

Messages
Tem pl ate *
*1Available only for multimedia message.
2
*
2
Available only for e-mail message.
Select from a list of sentences in which you fill in
the blank.
Common writing tasks
To cut/copy/paste text: See “To cut/copy/paste text” on page 38.
To save before sending: [6] (Close). Message is automatically
stored in Drafts folder.
To view/add/remove attachments before sending: [5] (Options) 7
[192] to scroll to Attachments 7 [0]9[5] (Select)
To match names in To and Cc fields to names in Contacts (E-mail
only): [5] (Options) 7 [192] to scroll to Check contacts 7
[0]9[5] (Select)
Creating presentation for multimedia message
Choose from four presentation templates to create an impressive
multimedia show.
1. In text entry field, [5] (Options)
2. [192] to scroll to Create presentation 7 [0]9[5] (Select)
3. [192] to scroll to the desired template 7 [0]9[5] (Select)
4. [192] to scroll to the video, text, or image region of the
template to highlight it
5. If desired, [5] (Options) 7 [192] to scroll to Insert 7 [4]
Image Image from your Images folder.
Sound clip Sound to play at start of show.
Video clip Video clip from your Video clips folder.
Note Note from Notepad (if a text region is highlighted).
New image New image from Camera.
New slide Add new slide to show.
79
Page 83

Messages
6. [5] (Options) 7 [192] to scroll to the desired option 7
[0]9[5] (Select)
Send Send completed presentation.
Full screen Edit in full screen view.
Normal screen
Edit text Start or stop text editing, change text colour.
Preview message Preview entire message before sending.
Remove >
Backgrnd. settings >
Effect settings >
Edit in normal screen view with signal icon, slide
number, and soft key labels in view.
Remove image, sound clip, video clip, or current
slide.
Set background colour, add background image to
current slide or entire presentation, remove
background image.
Set transition effect between images and between
slides.
7. [q] to send
Receiving new messages
When you receive a new message, the standby screen displays a
new message icon and a note indicating the number of new
messages.
To read the message:
1. [5] (Show)
2. If there is more than one message, [192] to scroll to the
desired message header 7 [0]9[5] (Select)
80
Page 84

Messages
Inbox
Inbox stores received text, multimedia, and smart messages.
Incoming Bluetooth, Infrared, WAP push, SIM and Voice mail, e-mail
waiting messages are also placed here.
Unread message
icon
Reading/playing Inbox messages
z Main menu > Messages > Messages > Inbox
1. [192] to scroll to the desired message header 7 [0]
2. [5] (Play) if needed for video clips, sound clips and
presentation. [394] to adjust audio volume.
Replying to/forwarding/moving Inbox message
z Main menu > Messages > Messages > Inbox
1. [192] to scroll to the desired message
2. To reply to/move: [5] (Options)
To forward: [0] 7 [5] (Options)
3. [192] to scroll to the desired option 7 [0]9[5] (Select)
Reply >
Move to folder Choose a folder to move the highlighted message.
Forward Complete the required entry, then [q].
*1Available only for multimedia messages.
Note: The phone may not allow you to copy, modify, transfer or forward
some copyrighted images, ringtones and other content.
Select To sender or To al l*
required entry, then [q].
Read message icon
1
. Complete the
81
Page 85

Messages
Saving attachment or data
z Main menu > Messages > Messages > Inbox
1. [192] to scroll to the desired message 7 [0]
2. [5] (Options)
3. [192] to scroll to Objects 7 [0]9[5] (Select)
4. [192] to scroll to the desired attatchment 7 [5] (Options)
5. [192] to scroll to Save 7 [0]9[5] (Select)
You can save data to phone memory or miniSD Card.
Note: Received applications or games can be installed directly from the
Inbox. When you open the message, the phone asks if you want to install it
now.
An attachment or object remains in the Inbox after it is saved to another
application. To save memory space, delete message from Inbox.
Finding phone number, e-mail or web address in
message
Within received messages, you can find a phone number, e-mail or
web address within message text and use it to call, write, access a
service or create a Contacts card.
z Main menu > Messages > Messages > Inbox or My folder
1. [192] to scroll to the desired message 7 [0]
2. [5] (Options)
3. [192] to scroll to Find 7 [4]
4. [192] to scroll to Phone number, E-mail address or Web
address 7 [0]9[5] (Select)
5. Text and numbers are highlighted when found. If more than one
is found, scroll to highlight the desired item.
6. [0] to Send a message, Add to Contacts to add or update
Contacts, Call a number, Go to web address or Add to
bookmarks to add web address to bookmarks
82
Page 86

Messages
My folders
Store your messages and templates in My folders.
Creating a new folder
z Main menu > Messages > Messages > My folders
1. [5] (Options)
2. [192] to scroll to New folder 7 [0]9[5] (Select)
3. Enter a name for a new folder 7 [0]9[5] (OK)
Renaming/deleting a folder
z Main menu > Messages > Messages > My folders
1. [192] to scroll to the desired folder 7 [5] (Options)
2. [192] to scroll to Rename folder or Delete 7 [0]9[5]
(Select)
3. If Rename folder is selected: Enter a name 7 [0]9[5] (OK)
If Delete is selected: [0]9[5] (Yes)
Templ ates
Use templates stored in the phone when creating a message. You
can also save frequently used text as templates.
z Main menu > Messages > Messages > My folders >
Tem plates
1. [192] to scroll to the desired template 7 [5] (Options)
2. [192] to scroll to Send 7 [4]
3. [192] to scroll to Via text message, Via multimedia or Via email 7 [0]9[5] (Select)
A new message opens with template text already placed.
4. Fill in needed information 7 [q]
To add more templates while creating a message:
At cursor, [5] (Options) 7 [192] to scroll to Insert 7 [4] 7
[192] to scroll to Temp late 7 [0]9[5] (Select)
83
Page 87

Messages
To create your own template text:
z Main menu > Messages > Messages > My folders >
Tem pla tes
1. [5] (Options)
2. [192] to scroll to New template 7 [0]9[5] (Select)
3. Enter text, numbers or symbols as desired 7 [6] (Done)
Mailbox (E-mail messages)
E-mail is received and stored in a separate mailbox. Before you can
send or retrieve e-mail, you must first set up a mailbox. You can set
up to 6 mailboxes.
Supported e-mail clients include a standard POP3, IMAP4, SMTP,
MIME client. E-mail messaging takes place over CSD and GPRS
bearer set using standard Internet e-mail protocols over TCP/IP.
Configuring Mailboxes
z Main menu > Messages > Messages
1. [5] (Options)
2. [192] to scroll to Settings 7 [0]9[5] (Select)
3. [192] to scroll to E-mail 7 [0]
4. [192] to scroll to Mailboxes 7 [0]
5. [5] (Options)
6. [192] to scroll to New mailbox 7 [0]9[5] (Select)
7. Enter information in fields. Fields marked in the phone with a
red asterisk (*) must have an entry.
Mailbox name
* Access point in use
* My e-mail address Enter your own e-mail address.
Use default name or enter a name for your
mailbox.
Choose from list of access points. (See “Access
point settings” on page 46.)
84
Page 88

Messages
* Outgoing mail
server
Send message Choose During next conn. or Immediately.
Send copy to self Select Yes or No.
Include signature
User name
Password Enter password.
* Incoming mail
server
Mailbox type Select POP3 or IMAP4.
Security
APOP secure login
(POP3 only)
Retrieve attachment
(IMAP4 only)
Retrieve headers
(IMAP4 only)
Enter SMTP mail server address.
Select Yes to enter a signature for outgoing
messages.
Enter a name to log into service provider remote
mailbox.
Enter address of incoming mail server (POP or
IMAP), supplied by service provider.
Select Off or TLS (Transport Layer Security). TLS
ensures privacy. Determined by Internet service
provider.
Select On to use authenticated POP log in,
encrypts password.
Select Yes to automatically retrieve attachment
when message is fetched.
Select All to retrieve all message headers, or
select User defined and type in a number to
retrieve only the latest headers.
To edit/delete the mailbox:
While highlighting the desired mailbox name:
[5] (Options) 7 [192] to scroll to Edit or Delete 7 [0]9[5]
(Select)
85
Page 89

Messages
Selecting mailbox name to use to send e-mail
See Mailbox in use setting on page 93.
If you have more than one mailbox and you start to write a new
message, the phone notifies you of the mailbox name that is
currently in use.
Retrieving e-mail
You can view your mailbox either online or offline. When you are
online, you see your messages stored on the remote server. When
you are offline, you see messages retrieved from the remote server
to your phone, or message headers if not yet retrieved. IMAP4
protocol allows you to retrieve messages without attachments, so
large memory files can remain in your online mailbox and not be
stored in the phone.
You can mark as read or delete messages, or copy them to another
folder and view message details when offline. Your mailbox is
synchronised to the server when you go online.
When you receive a new e-mail message, a new message notice
appears on the standby screen.
z Main menu > Messages > Messages > Mailbox
1. [5] (Options)
2. [192] to scroll to Connect 7 [0]
3. Once you are connected, [5] (Options)
4. [192] to scroll to Retrieve e-mail 7 [4]
5. [192] to scroll to New, Selected or All 7 [0]9[5] (Select)
See “Mark/Unmark” on page 25 to select more than one message.
Once messages are retrieved, you can read them offline.
6. [5] (Options) 7 [192] to scroll to Disconnect 7 [0]9[5]
(Select)
86
Page 90

Messages
Reading messages offline
z Main menu > Messages > Messages > Mailbox
1. [192] to scroll to the desired message 7 [0]
Editing an e-mail message
z Main menu > Messages > Messages > Mailbox
1. [5] (Options)
2. [192] to scroll to the desired option 7 [0]9[5] (Select)
Reply >
Copy to folder
Sort by > Sort the message list by Date, Sender or Subject.
Select To sender or To al l to reply to the
highlighted e-mail message. Complete the
required entry, then [q].
Choose from the appropriate folders to copy the
highlighted e-mail message to.
Managing e-mail messages
z Main menu > Messages > Messages > Mailbox
1. [192] to scroll to the desired message 7 [0]
2. [5] (Options)
3. [192] to scroll to the desired option 7 [0]9[5] (Select)
Attachment >
Add to Contacts >
Open, Save or Send attachment, such as
Contacts card, Calendar items, links to streaming
media, and configuration data.
Select Create new to create a new Contacts card
using the sender’s e-mail address, or Update
existing to place the sender’s e-mail address in
an existing Contacts card.
87
Page 91

Messages
Drafts
Your unfinished text (SMS), multimedia (MMS), and e-mail
messages that have not been sent are stored in the Drafts folder.
z Main menu > Messages > Messages > Drafts
1. [192] to scroll to the desired message 7 [0]
2. Enter the rest of the information 7 [q]
Options
Before sending a message, the following options are available by
[5] (Options).
Send Send message.
Add recipient Send to more than one address.
Insert >
Attachments*1
2
Objects*
Edit presentation*
Preview message*
Check contacts
Message details View details such as message size.
Sending options
Insert items such as Picture, Image, Sound clip,
Video clip or Tem pla te, depending on what type
of file the message type supports.
Open, insert, or remove attachments or objects.
2
Edit the presentation.
2
Preview message before sending.
Match names in To and Cc fields to names in
Contacts.
View or change sending options depending on
type of message.
*1Available only for E-mail messages.
2
*
Available only for multimedia messages.
88
Page 92

Messages
Sent
The last 15 messages that have been successfully sent are stored in
the Sent folder.
Moving sent messages to My folders
z Main menu > Messages > Messages > Sent
1. [192] to scroll to the desired message 7 [5] (Options)
2. [192] to scroll to Move to folder 7 [0]9[5] (Select)
3. [192] to scroll to the desired folder 7 [0]9[5] (OK)
Viewing/deleting sent messages
z Main menu > Messages > Messages > Sent
1. [192] to scroll to the desired message 7 [0]
2. [5] (Options)
3. [192] to scroll to the desired option 7 [0]9[5] (Select)
Attachments*1
2
Objects*
Delete Delete message.
Message details View details such as message size.
*1Available only for E-mail messages.
2
*
Available only for multimedia messages.
Open, save, or send attachments or objects.
89
Page 93

Messages
Outbox
Outbox stores messages waiting to be sent, and messages that
could not be sent. Messages waiting in the Outbox are automatically
resent (except e-mail set to send during next connection),
depending on network availability.
It also temporarily stores Bluetooth and Infrared messages that are
waiting for connection to the receiving device. If the connection fails,
Outbox does not keep the message.
The Outbox icon appears on the standby screen when there are
messages in the Outbox.
Status of Outbox messages
Sending Connecting to network.
Queued E-mail waiting for connection.
Deferred Suspend sending to another time.
Waiting Waiting to connect.
Resend at If sending failed, resend attempt.
Failed Sending has not been successful.
Managing Outbox messages
z Main menu > Messages > Messages > Outbox
1. [192] to scroll to the desired message 7 [5] (Options)
2. [192] to scroll to the desired option 7 [0]9[5] (Select)
Defer sending Defer sending until you manually send.
Message details View details such as message size.
Delete Delete message (cancel resending).
Send Send message now.
Move to Drafts
Move message to Drafts folder, where it can be
edited and resent.
90
Page 94

Messages
Reports
Delivery reports for text, multimedia, and smart messages can be
sent by your service provider, and stored in the Reports folder.
Delivery reports are not available for e-mail messages.
To receive delivery reports:
See Receive report setting for text message on page 91 and
multimedia message on page 92.
Viewing delivery reports
z Main menu > Messages > Messages > Reports
Message settings
z Main menu > Messages > Messages
1. [5] (Options)
2. [192] to scroll to Settings 7 [0]9[5] (Select)
3. [192] to scroll to Text message, Multimedia message, Email, Service message, Cell broadcast or Other 7 [0]
4. [192] to scroll to the desired settings 7 [0]
Text message settings
Message centres
Msg. centre in use
Receive report
Message validity
Choose from provided list of network and SIM
message centres.
Choose which message centre is used to deliver
text messages.
Select Yes to receive delivery reports in Reports
folder.
Choose a time period from 1 hour to maximum in
which text message delivery is attempted from the
message centre.
91
Page 95

Messages
Choose Paging or E-mail if you wish to convert
Message sent as
Preferred connection Choose GSM or GPRS connection.
Reply via same ctr.
your text message to one of those forms for
sending. Available only if network can perform the
conversion.
Select Yes to allow your text message recipients
to use your text message centre to reply to you
without having to subscribe to a text messaging
service.
Multimedia message settings
Field marked in the phone with a red asterisk (*) must have an entry.
* Access point in use
Multimedia reception
On receiving msg.
Allow anon.
messages
Receive adverts Select Ye s to receive advertisements.
Receive report
Deny report sending
Message validity
Image size
Default speaker
92
Choose from list of access points. (See “Access
point settings” on page 46.)
Choose Only in home net., Always on or Off for
incoming messages.
Choose Retr. immediately, Defer retrieval or
Reject message for incoming messages.
Select Yes to receive messages from anonymous
(unknown) senders.
Select Yes to receive delivery reports in Reports
folder.
Select Yes so that your phone will not send a
delivery report to confirm receipt of a new
message.
Choose a time period for the message centre to
attempt message delivery.
Select Small (default) for 160x120 (max) image
size, or Large for 640x480 (max).
Choose to play sound clips from Loudspeaker or
Handset speaker.
Page 96

Messages
E-mail message settings
Mailboxes View list of mailboxes you have set up.
Mailbox in use Select mailbox to use to send e-mail.
Service message settings
Service messages Select On to receive service messages.
Download messages
Select Manually to allow only authorised senders
to send service messages.
Cell broadcast message settings
Reception Select On to receive cell broadcast messages.
Language
Topic detection
Select All to receive cell broadcasts in all possible
languages, or Selected to choose from a list, or
Other if your preferred language is not listed.
Select On to view a list of topic indexes provided
by the network.
Other message settings
Save sent messages
No. of saved msgs.
Select Yes to save sent messages to the Sent
folder.
Type in a number to set maximum amount of
messages saved to Sent folder.
93
Page 97

Messages
SIM messages
View, copy, or delete text messages stored on the SIM card. To view
the message, first copy them to the phone memory.
z Main menu > Messages > Messages
1. [5] (Options)
2. [192] to scroll to SIM messages 7 [0]9[5] (Select)
A list of messages stored on the SIM card appears.
3. [192] to scroll to the message you wish to copy 7 [5]
(Options)
See “Mark/Unmark” on page 25 to copy more than one message.
4. [192] to scroll to Copy 7 [0]9[5] (Select)
5. [192] to scroll to the folder to place the copy 7 [0]9[5] (OK)
6. To delete messages from the SIM card after copying, [x] 7
[5] (Yes)
Cell broadcast messages
You can receive messages on specified topics, such as weather
information and traffic news, regularly from your service provider.
You need to specify the “topic(s)” of information and the language in
which you wish to receive the information.
z Main menu > Messages > Messages
1. [5] (Options)
2. [192] to scroll to Cell broadcast 7 [0]9[5] (Select)
3. [5] (Options)
4. [192] to scroll to the desired option 7 [0]9[5] (Select)
Open Open topic.
Subscribe/
Unsubscribe
Hotmark/Remove
hotmark
94
Subscribe to selected topic to receive related
messages. Select Unsubscribe to stop receiving
related messages.
When topic is hotmarked, you will receive a notice
when related messages arrive.
Page 98

Messages
Top i c >
Settings
Choose Add manually to type in a topic name or
topic number or Delete all.
See “Cell broadcast message settings” on
page 93.
Service command
You can activate particular services such as mobile prepay and chat
by sending a service command, which may be called USSD
commands. First, contact your service provider for the proper
service command code.
z Main menu > Messages > Messages
1. [5] (Options)
2. [192] to scroll to Service command 7 [0]9[5] (Select)
3. Enter the service command 7 [q]
95
Page 99

Camera
Taking a picture
z Main menu > Camera
1. The main display acts as a viewfinder.
Move the phone around to frame your
subject
2. [0] to snap the picture
The image is automatically saved to Images
folder. See “Gallery” on page 99.
Operations after taking a picture
To delete the picture: [x] 7 [5] (Yes)
To return to the viewfinder: [6] (Back)
To send the picture immediately: See “Sending pictures” on page 98.
To rename the picture: [5] (Options) 7 [192] to scroll to Rename
image 7 [0]9[5] (Select) 7 Enter a new name 7 [0]9[5] (OK)
Changing capture modes
While viewfinder is active, [394] to select the picture capture mode.
Standard: Regular size landscape pictures (640x480 pixels [VGA])
Portrait: Smaller pictures that use much less memory and can be
placed in Contacts cards (80x96 pixels)
Red number in the upper right corner indicates the amount of
pictures that can fit in phone memory.
Zoom
When viewing your subject in the viewfinder, [1] once for 2x zoom,
[1] again for 4x zoom. [2] to step back one zoom level.
96
Page 100

Camera
Self-timer
You can use the self-timer to delay the shutter.
z Main menu > Camera
1. [5] (Options)
2. [192] to scroll to Self-timer 7 [4]
3. [192] to scroll to 10 seconds, 20 seconds or 30 seconds 7
[0]9[5] (Select)
4. [5] (Activate) to start the timer
PhotoLight
Light up your subject before snapping a picture. See “PhotoLight” on
page 135.
Adding a picture to Contacts card
See Add thumbnail setting in “Creating new Contacts cards” on
page 66.
Taking a self-portrait
z Main menu > Camera
1. Close the flip. The external display acts as a viewfinder. Move
the phone around to frame your subject
2. [t] on the side of the phone to snap the picture
3. Open the flip. The image appears on the main display
The image is automatically saved to Media Gallery Images folder.
See “Operations after taking a picture” on page 96 if required.
97
 Loading...