


CONTENTS
Highlights . . . . . . . . . . . . . . . . . . . . . . . . . . . . . . . . . . . . . . . . . . . . . . .1
Important Information . . . . . . . . . . . . . . . . . . . . . . . . . . . . . . . . . . . . . .2
Getting Started. . . . . . . . . . . . . . . . . . . . . . . . . . . . . . . . . . . . . . . . . . . .6
Phone Basics and Managing Calls . . . . . . . . . . . . . . . . . . . . . . . . . . .15
Entering Text. . . . . . . . . . . . . . . . . . . . . . . . . . . . . . . . . . . . . . . . . . . .23
Navigating the Menus . . . . . . . . . . . . . . . . . . . . . . . . . . . . . . . . . . . . .25
Menu Map . . . . . . . . . . . . . . . . . . . . . . . . . . . . . . . . . . . . . . . . . . . . . .29
Contacts . . . . . . . . . . . . . . . . . . . . . . . . . . . . . . . . . . . . . . . . . . . . . . . .30
Organiser . . . . . . . . . . . . . . . . . . . . . . . . . . . . . . . . . . . . . . . . . . . . . . .40
Messages . . . . . . . . . . . . . . . . . . . . . . . . . . . . . . . . . . . . . . . . . . . . . . .47
Camera . . . . . . . . . . . . . . . . . . . . . . . . . . . . . . . . . . . . . . . . . . . . . . . .64
My Items . . . . . . . . . . . . . . . . . . . . . . . . . . . . . . . . . . . . . . . . . . . . . . .70
VODAFONE LIVE! . . . . . . . . . . . . . . . . . . . . . . . . . . . . . . . . . . . . . .75
Applications . . . . . . . . . . . . . . . . . . . . . . . . . . . . . . . . . . . . . . . . . . . .82
Settings . . . . . . . . . . . . . . . . . . . . . . . . . . . . . . . . . . . . . . . . . . . . . . .104
Games . . . . . . . . . . . . . . . . . . . . . . . . . . . . . . . . . . . . . . . . . . . . . . . .132
Accessories . . . . . . . . . . . . . . . . . . . . . . . . . . . . . . . . . . . . . . . . . . . .133
Troubleshooting . . . . . . . . . . . . . . . . . . . . . . . . . . . . . . . . . . . . . . . .135
Specifications . . . . . . . . . . . . . . . . . . . . . . . . . . . . . . . . . . . . . . . . . .137
Copyrights. . . . . . . . . . . . . . . . . . . . . . . . . . . . . . . . . . . . . . . . . . . . .139
End-user Software License Agreement. . . . . . . . . . . . . . . . . . . . . . .142
EU Warranty . . . . . . . . . . . . . . . . . . . . . . . . . . . . . . . . . . . . . . . . . . .146
Index . . . . . . . . . . . . . . . . . . . . . . . . . . . . . . . . . . . . . . . . . . . . . . . . .148
i

HIGHLIGHTS
Here are just some of the things you can do with the X701 mobile phone.
• Send colour pictures and video clips
to friends and family via Multimedia
messaging and email messaging.
• Send pictures, video, electronic
business cards, and more using
Bluetooth, Infrared, or USB
connections to other phones or devices.
• Swap content between appropriate
devices with the included miniSD Card
and adapter.
• Surf the Internet using your wireless
Internet browser.
• Add frames, text, and pop art to VGA
size images.
• Capture video clips.
• Play 40-tone polyphonic ringtones.
• No more wired headset! Use a
Bluetooth
• Synchronise your Contacts and
Calendar with your other networked
devices.
®
wireless headset.
• See who is calling with picture Caller
Line ID on the X701 external display.
• Download games, pictures, themes,
sounds, videos, and Java™ and
Series 60 applications.
• View all your media files in one place,
in My Items.
• Search for your files; including games,
pictures, install packages, and video
and sound clips.
• Receive, edit, and view Microsoft
Word, Excel, and PowerPoint
Beam documents to printers and
projectors (with appropriate accessory).
• Speak a name or number to dial the
number using Voice Commands.
• Say “open Messages” or “open
Camera” and your phone will go directly
to the menu using Voice Commands.
®
files.
®
1
IMPORTANT INFORMATION
Thank you for purchasing this Panasonic digital cellular phone. This phone is designed to operate on GSM networks –
GSM900, GSM1800 and GSM1900. It also supports GPRS for packet data connections. Please ensure the battery is fully
charged before use.
We, Panasonic Mobile Communications Development of Europe Ltd., declare that the EB-X701 conforms with the essential
and other relevant requirements of the directive 1999/5/EC. A declaration of conformity to this effect can be found at
http://www.panasonicmobile.com
This Panasonic mobile phone is designed, manufactured and tested to ensure that it complies with the specifications
covering RF exposure guidelines applicable at the time of manufacture, in accordance with EU, USA FCC and Australian
ACA regulations.
Please refer to our website for latest information/standards and compliance in your country/region of use http://
www.panasonicmobile.com
The following information should be read and understood as it provides details which will enable you to operate your phone
in a manner which is both safe to you and your environment, and conforms to legal requirements regarding the use of cellular
phones.
This equipment should only be charged with approved charging equipment to ensure optimum performance
and avoid damage to your phone. Other usage will invalidate any approval given to this apparatus and may
be dangerous. Ensure the voltage rating of the Fast Travel Charger is compatible with the area of use when
travelling abroad. A Fast Travel Charger (EB-CAX70xx*) is supplied with the Main Kit. (Note xx identifies the
Charger region, e.g. CN, EU, UK.) Other recommended equipment for charging is the Car Charger (EBCDX70)
Use of another battery pack than that recommended by the manufacturer may result in a safety hazard. If you
use a feature which keeps the key backlight on continuously for a long time, such as a game or the browser,
battery life will become extremely short. To maintain longer battery life, set the key backlight to off. Do not use
this phone without the battery cover attached.
Switch off your cellular phone when in an aircraft. The use of cellular phones in an aircraft may be dangerous
to the operation of the aircraft, disrupt the cellular network and may be illegal. Failure to observe this
instruction may lead to the suspension or denial of cellular phone services to the offender, or legal action or
both.
Do not incinerate or dispose of the battery as ordinary rubbish. The battery must be disposed of in
accordance with local regulations and may be recycled.
It is advised not to use the equipment at a refuelling point. Users are reminded to observe restrictions on the
use of radio equipment in fuel depots, chemical plants or where blasting operations are in progress. Never
expose the battery to extreme temperatures (in excess of 60°C).
It is imperative that the driver exercises proper control of the vehicle at all times. Do not hold a phone while
you are driving; find a safe place to stop first. Do not speak into a handsfree microphone if it will take your
mind off the road. Always acquaint yourself thoroughly with restrictions concerning the use of cellular phones
within the area where you are driving and observe them at all times.
Care must be taken when using the phone in close proximity to personal medical devices, such as
pacemakers and hearing aids.
.
2
Remember to disable the alarm function when in an aircraft or a medical facility to prevent the phone
automatically switching itself on.
For most efficient use hold the phone as you would any normal phone. To avoid deterioration of signal quality
or antenna performance, do not touch or “cup” the antenna area while the phone is switched on.Do not leave
the camera facing direct sunlight to avoid impairing camera performance. Unauthorised modifications or
attachments may damage the phone and violate applicable regulations. The use of an unapproved
modification or attachment may result in the invalidation of your guarantee – this does not affect your
statutory rights.
When your handset, the accompanying battery or charging accessories are wet, do not put those in any type
of heating equipment, such as a microwave oven, a high pressure container, or a drier or similar. It may
cause the battery, handset and/or charging equipment to leak, heat up, expand, explode and/or catch fire.
Moreover, the product or accessories may emit smoke and their electrical circuits may become damaged and
cause the products to malfunction. Panasonic is not responsible for any and all damages, whether direct or
indirect, howsoever caused by any misuse.
It is recommended that you create a copy or backup, as appropriate, for any important information and data
which you store in your phone’s memory. In order to avoid accidental loss of data, please follow all
instructions relating to the care and maintenance of your phone and its battery. Panasonic accepts no liability
for any and all losses howsoever arising from any loss of data, including but not limited to direct and indirect
losses (to include, but not limited to consequential loss, anticipated savings, loss of revenue).
Your phone may have the capability of storing and communicating personal information. It is recommended
that you take care to ensure that any personal or financial information is stored separately from your phone.
You should use the security features, such as Phone Lock and/or Sim Lock, provided in the handset as a
measure of protection for information held. Panasonic accepts no liability for any and all losses howsoever
arising from any loss of data including but not limited to direct and indirect losses (to include, but not limited to
consequential loss, anticipated savings, loss of revenue).
Your phone may have the capability of downloading and storing information and data from external sources.
It is your responsibility to ensure that in doing this you are not infringing any copyright laws or other
applicable legislation. Panasonic accepts no liability for any and all losses howsoever arising from any loss of
data or any such infringement of copyright or IPR, including but not limited to direct and indirect losses (to
include, but not limited to consequential loss, anticipated savings, loss of revenues).
If your phone has an integral or add-on camera, you are advised to take appropriate care over the use of it. It
is your responsibility to ensure that you have permission to take photographs of people and objects and that
you do not infringe any personal or third party rights when using the camera. You must comply with any
applicable international or national law or other special restrictions governing camera use in specific
applications and environments. This includes not using the camera in places where the use of photographic
and video equipment may be prohibited. Panasonic accepts no liability for any and all losses howsoever
arising from any infringement of copyright or intellectual property rights, including but not limited to direct and
indirect losses.
This equipment should only be used with Panasonic approved accessories to ensure optimum performance
and avoid damage to your phone.Panasonic is not responsible for damage caused by using non-Panasonic
approved accessories.
This phone must be used in compliance with any applicable international or national law or any special
restrictions governing its use in specified applications and environments. This includes but is not limited to
use in hospitals, aircraft, whilst driving and any other restricted uses.
The display layouts and screenshots within this document are for illustrative purposes and may differ from the
actual displays on your phone. Panasonic reserves the right to change the information in this document
without prior notice.
The liquid crystal display (LCD) uses high-precision production technology, and in certain circumstances
pixels may appear brighter or darker. This is due to characteristics of the LCD and is not a manufacturing
defect.
Pressing any of the keys may produce a loud tone. Avoid holding the phone close to the ear while pressing
the keys.
Extreme temperatures may have a temporary effect on the operation of your phone. This is normal and does
not indicate a fault. The display quality may deteriorate if the phone is used in environments over 40°C for a
long time.
Do not modify or disassemble the equipment. There are no user serviceable parts inside.
Do not subject the equipment to excessive vibration or shocks. Do not drop the battery.
3
Avoid contact with liquids. If the equipment becomes wet, immediately remove the battery and contact your
dealer.
Do not leave the equipment in direct sunlight or a humid, dusty or hot area.Never throw a battery into a fire. It
may explode.
Keep metallic items that may accidentally touch the terminals away from the equipment/battery. Batteries can
cause property damage, injury, or burns if terminals are touched with a conductive material (i.e. metal
jewell ery, keys, etc.).
Always charge the battery in a well ventilated area, not in direct sunlight, between +5°C and +35°C. It is not
possible to recharge the battery if it is outside this temperature range.
When connecting the phone to an external source, read the operating instructions of the equipment for the
correct connection and safety precautions. Ensure the phone is compatible with the product it is being
connected to.
When disposing of any packing materials or old equipment check with your local authorities for information
on recycling.
4

SAR
European Union – RTTE
THIS PANASONIC PHONE (MODEL EB-X701) MEETS THE EU
REQUIREMENTS FOR EXPOSURE TO RADIO WAVES.
Your mobile phone is a radio transmitter and receiver. It is designed and manufactured not to exceed the
limits for exposure to radio frequency (RF) energy recommended by The Council of the European Union.
These limits are part of comprehensive guidelines and establish permitted levels of RF energy for the
general population. The guidelines were developed by independent scientific organisations through
periodic and thorough evaluation of scientific studies. The limits include a substantial safety margin
designed to assure the safety of all persons, regardless of age and health.
The exposure standard for mobile phones employs a u nit of measureme nt known as the Specific
Absorption Rate or SAR. The SAR limit recommended by The Council of the European Union is
*2.0 W/kg. Tests for SAR have been conducted using stan dard operating positions with the phon e
transmitting at its highest certified power level in all tested frequency bands. Although the SAR is
determined at the highest certified power level, the actual SAR level of the phone while operating can be
well below the maximum value. This is because the phone is designed to o perate at multiple power levels
so as to use only the power required to reach the network. In general, the closer you are to a base station
antenna, the lower the power output of the phone.
Before a phone model is available fo r sale to the public, compliance with th e European R&TTE directive
must be shown. Thi s directive includes as one essential requirement the protection of the health and the
safety for the user and an y other person. The SAR value for this model phone, when tested f or use at the
ear** for compliance against the standard, was **0.484 W/kg, and when worn on the body, measured with
1.5 cm air gap, was 0.697 W/kg. While there may be differences between th e SAR levels of various phones
and at various positions, they all mee t the EU requirements for RF exposure.
This device was tested for typical body-worn operations using the carry case model EB-YKX700, which
provides 1.6 cm separation d istance from the body, and also tested with the back of t he phone kept
1.5 cm from the body. To maintain compliance with RF exposure requirements, use only belt-clips, holsters
or similar accessories that maintain a 1.5 cm separation distance between the user’s body and the back
of the phone, including the antenna. The use of belt-clips, holsters and similar accessories should not
contain metallic components in its assembly. The use of accessories that do not s atisfy these requirements
may not comply with RF exposure requirements, and should be avoided.
*The SAR limit for mobile phones used by the public is 2.0 watts/kilogram (W/kg) averaged over ten grams
of tissue. The limit incorporates a substantial margin of safety to give additional protection for the public
and to account for any variations in measurements. SAR values may vary depending on national reporting
requirements and the network band.
**Right side of Head (Test Position: Cheek) Measurement results for GSM900.
For SAR information in other regions please look under product information at
http://www.panasonicmobile.com/health.html
5
GETTING STARTED
The Panasonic X701 GSMTM/GPRS mobile phone operates on Global System for
Mobile Communications (GSM) networks around the world, which provide integrated
voice mail, text short message service (SMS), multimedia messaging service (MMS),
fraud protection and superior voice quality.
Feature Availability
Some features are network dependent or are available only if you subscribe to the
feature. Some functions are SIM card dependent. Note that before you can use or
activate many of the network features, you must subscribe to the desired services. For
more information, contact Vodafone.
Before Using Your Phone
The SIM card must be installed in your phone for it to operate on the cellular network.
Insert SIM card, then attach battery and fully charge it.
INSTALLING AND REMOVING SIM CARD
Caution: This product contains small parts. Keep out of reach of small children.
Take care not to scratch or bend SIM card and gold contacts.
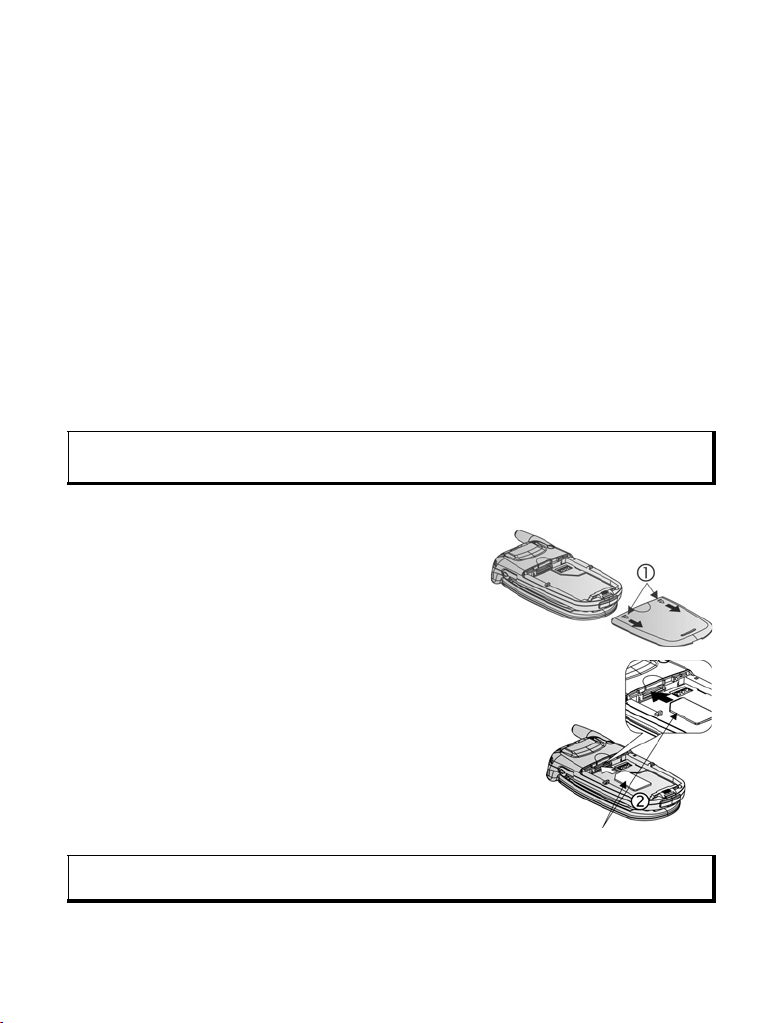
Installing SIM Card
1. Place thumbs at outer edges of battery cover,
press down, then slide off battery cover towards
bottom of phone. Remove battery (see page 7).
2. Position SIM card as shown, with gold contacts
facing phone and notched corner entering phone first.
Carefully slide the SIM card into the SIM card pocket until
it clicks.
• If SIM card is inserted incorrectly or damaged, Insert
SIM card may display. Remove SIM, card then install
again.
• If SIM card rejected message appears, contact
Vodafone.
Note: Refer to the label in the battery compartment for location of SIM card pocket and notched
corner area.
SIM Card
6
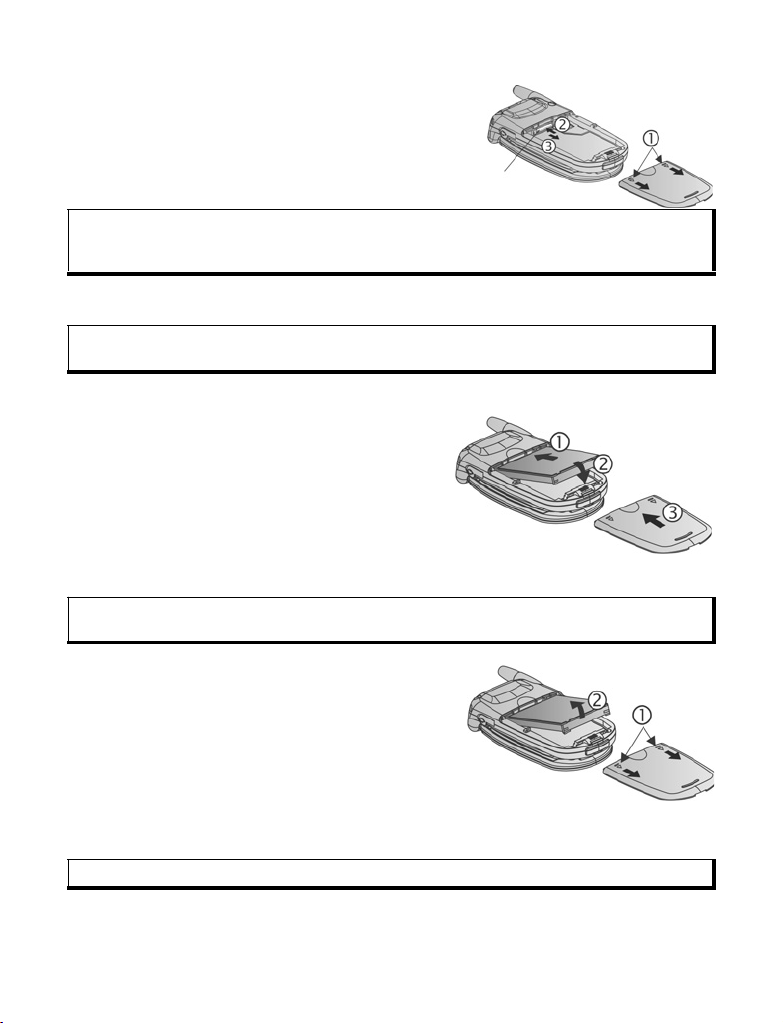
Removing SIM Card
1. Place thumbs at outer edges of battery cover,
press down, then slide off battery cover towards
bottom of phone. Remove battery (see page 7).
2. Gently push bottom edge of SIM card forward
into SIM card pocket to release SIM card.
SIM Card
3. After SIM card is ejected, gently remove it.
Note: If you are upgrading your phone an d your previous phone did not support new services,
such as MMS (Multimedia Messaging Service), you may need to insert a new SIM card.
Contact Vodafone.
INSTALLING AND REMOVING BATTERY
Caution: Using non-Panasonic accessories or accessories not recommended by Vodafone may
Installing Battery
1. Hold battery at a 45º angle; insert tabs on top
2. Push bottom of battery down until it clicks.
3. Replace battery cover by sliding cover
Removing Battery
Note: Before you remove the battery, switch off the phone and disconnect the phone from the
result in poor performance of your phone, or even cause an electrical hazard.
edge of battery into slots along top edge of
battery area.
toward the bottom of the phone. Cover
should fit snugly with no gaps.
charger or any other device.
1. Place thumbs at outer edges of battery cover,
press down, then slide off battery cover
towards bottom of phone.
2. Use tabs at bottom of battery to lift and
remove battery.
3. Replace battery cover.
CHARGING BATTERY
Note: First verify that battery is installed.
1. Open connector cover.
7
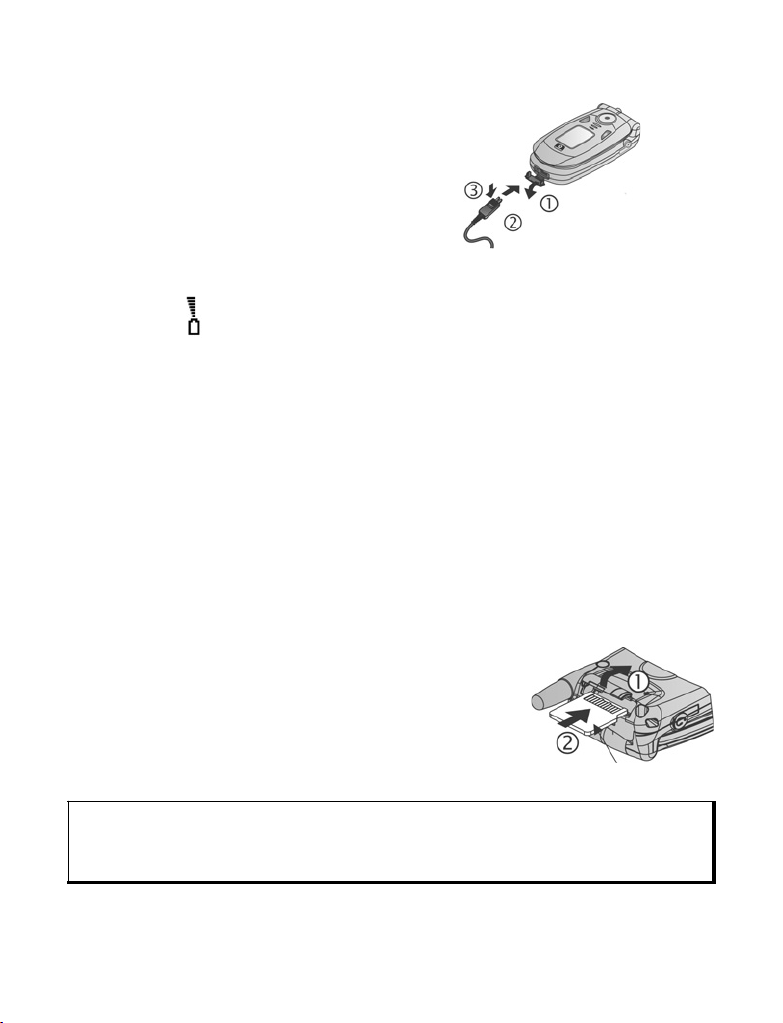
2. Insert connector into left side (2 gold contacts) of connector area at bottom end of
the phone. Connect Travel Charger into mains power socket.
3. When charging is complete, remove from
mains power socket and press release
button to disconnect the charger from the
phone.
• DO NOT force connector: it may damage
phone or Travel Charger.
Charging Icons on Main and External Display
bars scroll when charging
bars stop scrolling when charging is complete
• If the phone is switched on, Battery full message appears when charging is
complete.
Low Battery Warning
When the battery power is low, Battery low displays and a warning tone sounds; phone will
automatically switch off. Fully recharge the battery. If you receive the low battery warning
during a conversation, finish your call immediately.
INSTALLING AND REMOVING miniSD CARD
The miniSD Card is a memory card used to expand phone memory and a way to
transfer files to other devices.
Installing miniSD Card
1. On top of phone, lift up miniSD Card cover.
2. Slide miniSD Card with notched corner entering phone
first and gold contacts facing up into the miniSD Card
pocket until it clicks. Push down miniSD Card cover
until it clicks.
MiniSD Card
Note: Do not insert any object except a miniSD Card into the miniSD Card pocket.
Do not place labels, etc., onto the miniSD Card. A fine difference in card thickness may
result in insertion or removal difficulty, loss of contact or loss of data.
Take care not to scratch or bend miniSD Card and gold contacts.
8
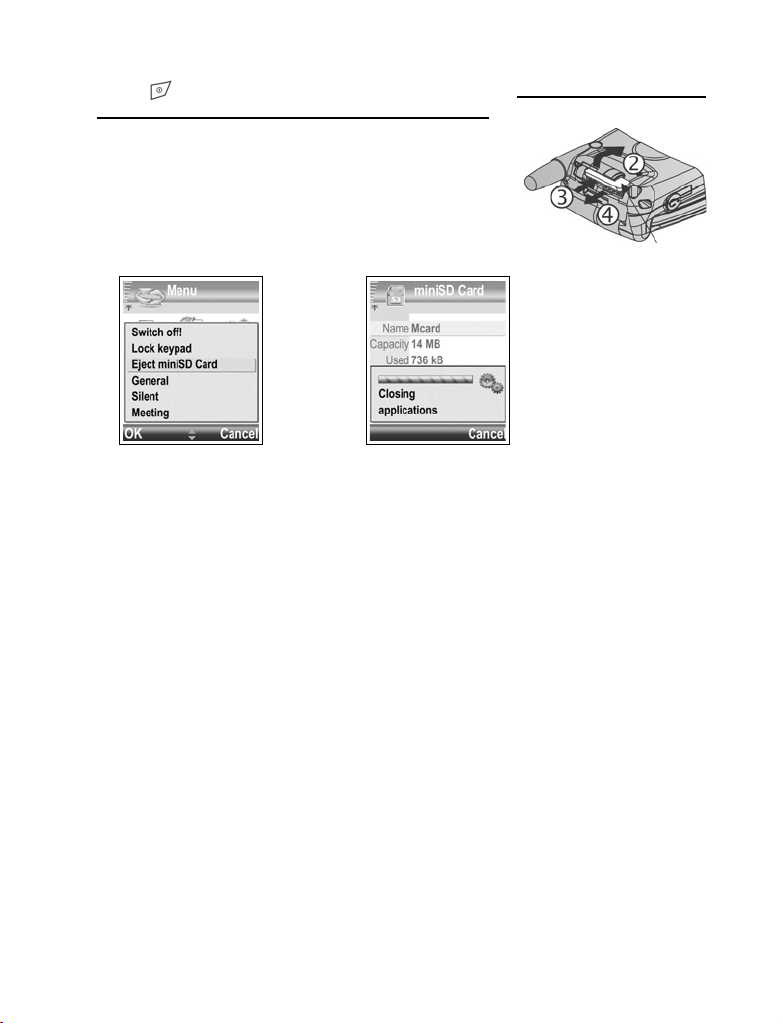
Removing miniSD Card
1. Press , scroll to Eject miniSD Card and press OK. Before removing miniSD
Card, wait for file saving or copying process to finish.
2. On top of phone, lift up miniSD Card cover.
3. To release miniSD Card, gently push bottom edge of
miniSD Card forward into pocket.
4. After miniSD Card is ejected, gently remove it. Push
down miniSD Card cover until it clicks.
MiniSD Card
9
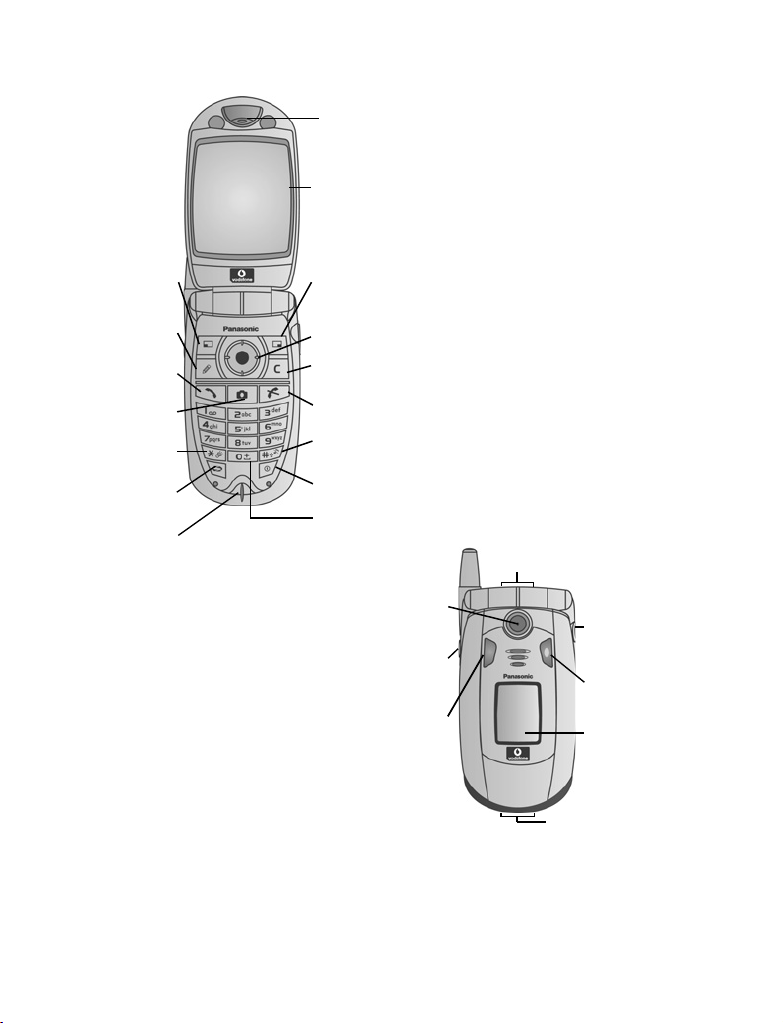
PHONE OVERVIEW
Left
Softkey
Earpiece
Main Display
Right Softkey
& shortcut to
Vodafone Live!
Edit Key
Send Key
Camera Key
Asterisk &
PhotoLight Key
Menu Key
Microphone
Navigation
Key
Clear Key
End Key
Silent Mode Key
Power Key
Zero Key
Camera Lens
Multibutton
Infrared Port
miniSD Card Pocket
Personal Handsfree
(headset)
Connector
Indicator Light and
PhotoLight
External Display
and Viewfinder
Accessory Connector
10
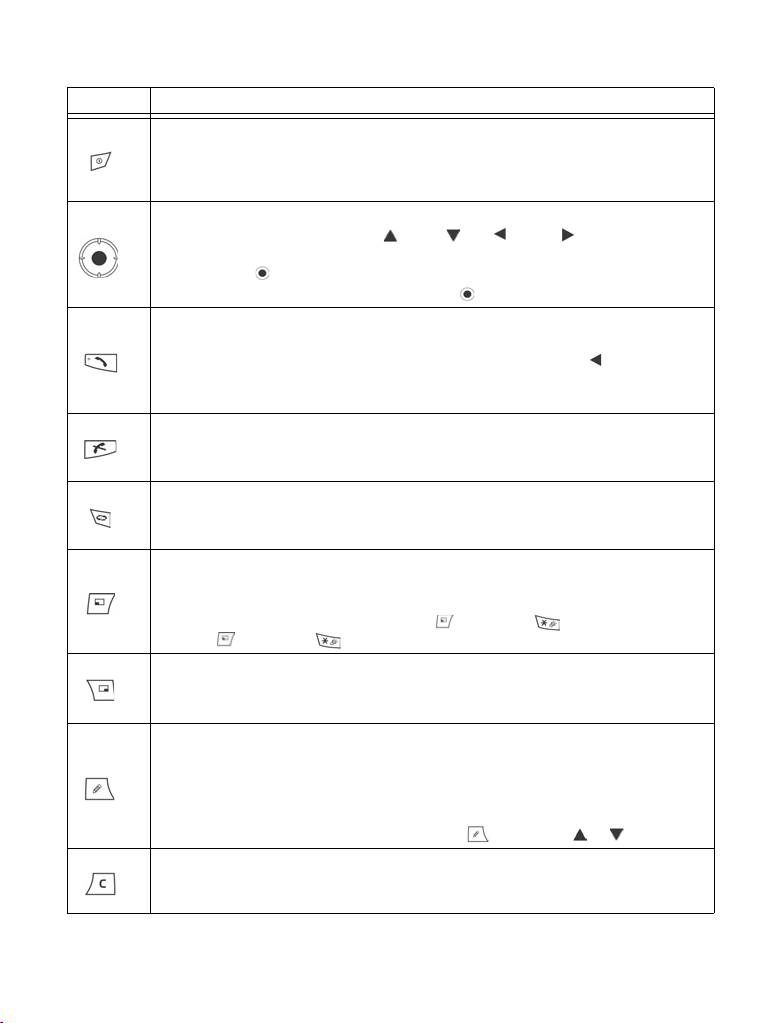
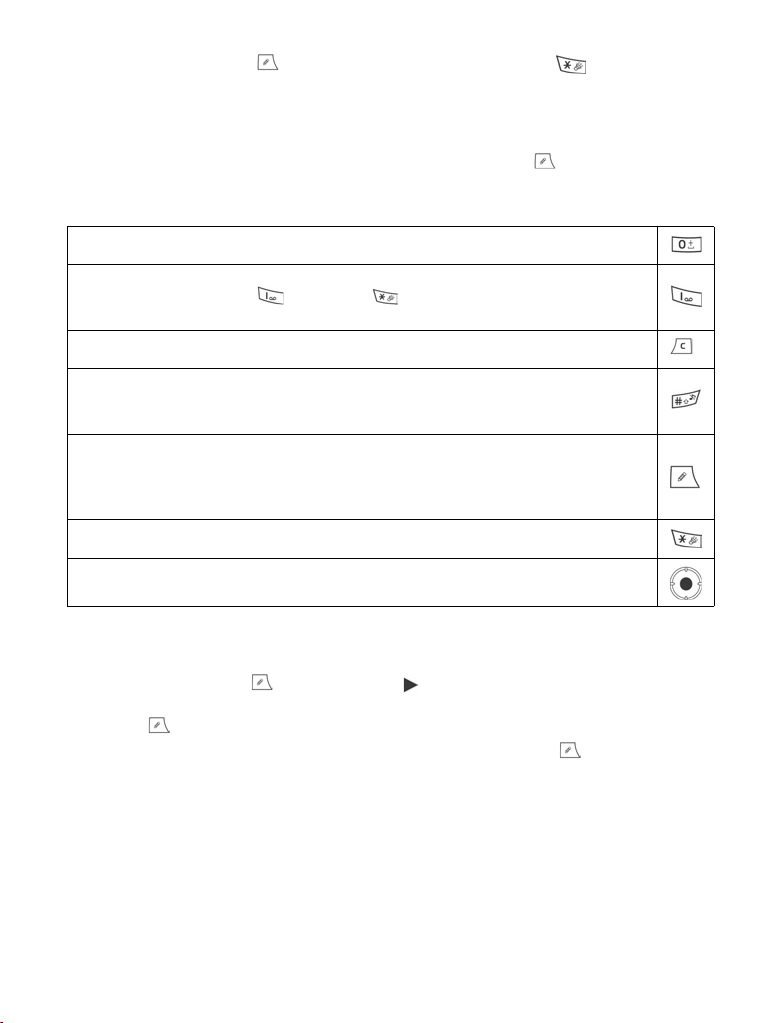
KEY FUNCTIONS
Key Function
Power Key
Press and hold to switch phone on or off.
Press briefly to choose different profiles, lock the keypad, lock the phone, or eject
miniSD Card.
Navigation Key
Press outside edges to scroll up , down , left or right to move through
menus and text.
Press centre to select optio n or from standby mode to open Main menu.
Take a picture in Camera mode by pressing .
Send Key
Make a call.
Press in standby mode to recall recently dialled numbers. Scroll to see received
and missed calls lists.
Press and hold in standby mode to activate voice commands.
End Key
Ends a call.
Return to standby mode.
Menu Key
Enter the main menu area.
Press and hold to view currently open menu items.
Left Softkey
Perform action named in lower left of display.
Shortcut to open Messages in standby mode.
To lock the keypad, in standby mode press , then press . To unlock the keypad,
press
, then press .
Right Softkey
Perform action named in lower right of display.
Shortcut to open Vodafone live! in standby mode.
Edit Key
Select Dictionary for predictive text including insert and edit words, or alpha mode
or number mode.
Insert numbers or symbols.
Change writing language.
Mark multiple items in a list by holding down
Clear Key
Erase character in edit mode.
Delete highlighted entered item.
, then scroll or .
11
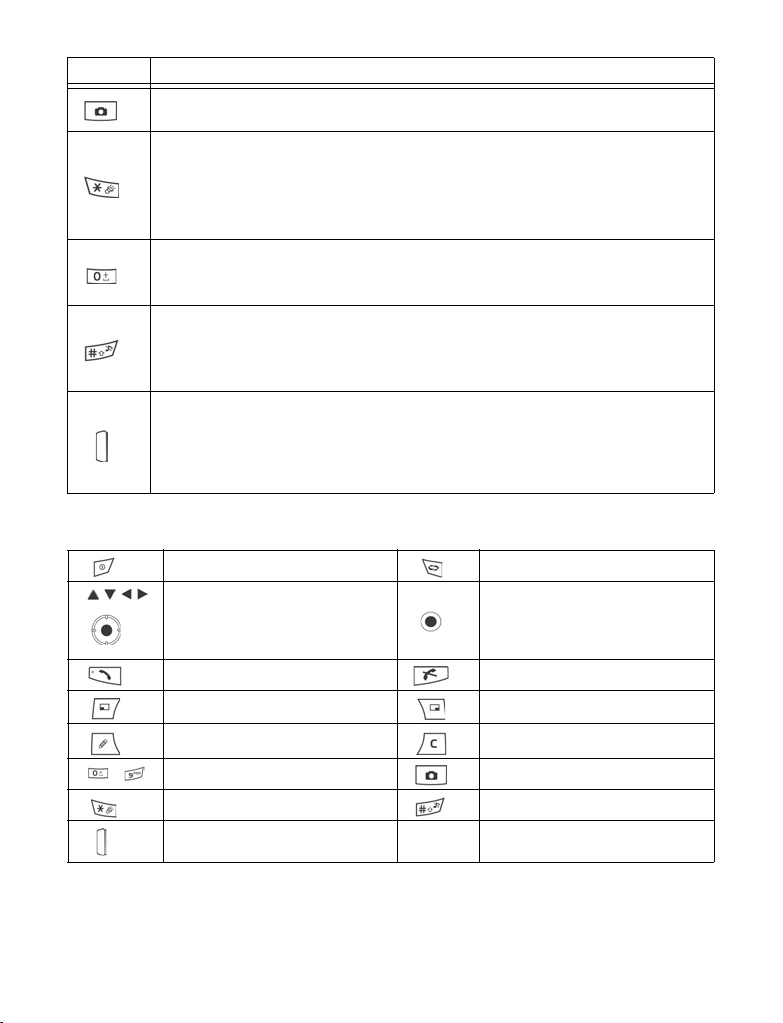
Key Function
Camera Key
Opens Camera.
Asterisk Key
In standby mode, press and hold to switch PhotoLight or flashlight on or off.
In numeric and standby mode s, press repeatedly for *, +, p, and w char acters.
In Dictionary mode, scroll to other word choices when wo rd is underlined.
In edit mode, press to open special char acter table.
Zero Key
In standby mode, press and hold to enter + character for dialling.
In edit mode, enter space.
Silent Mode Key
In standby mode, press and hold to switch Silent mode on/off.
In edit mode, shift to upper and lower case letters, or press twice briefly to turn on/
off Dictionary for predictive text.
Multibutton (on side of phone)
For external display, press once to switch on backlight, then press as needed to
toggle between clock and icon views.
Turns off ringer during incoming call.
Takes a picture in Camera mode when flip is closed.
Symbols used in this manual
Press Power Key. Press Menu key.
- Press number keys. Press Camera key.
Press outside edges of navigation
key to scroll up, down, left or right
to move through menus and text.
Press Send key. Press End key.
Press Left Softkey. Press Right Softkey.
Press Edit key. Press Clear key.
Press Asterisk key. Press Silent Mode key.
Press Multibutton key (on side of
phone).
Press Navigation key centre.
12
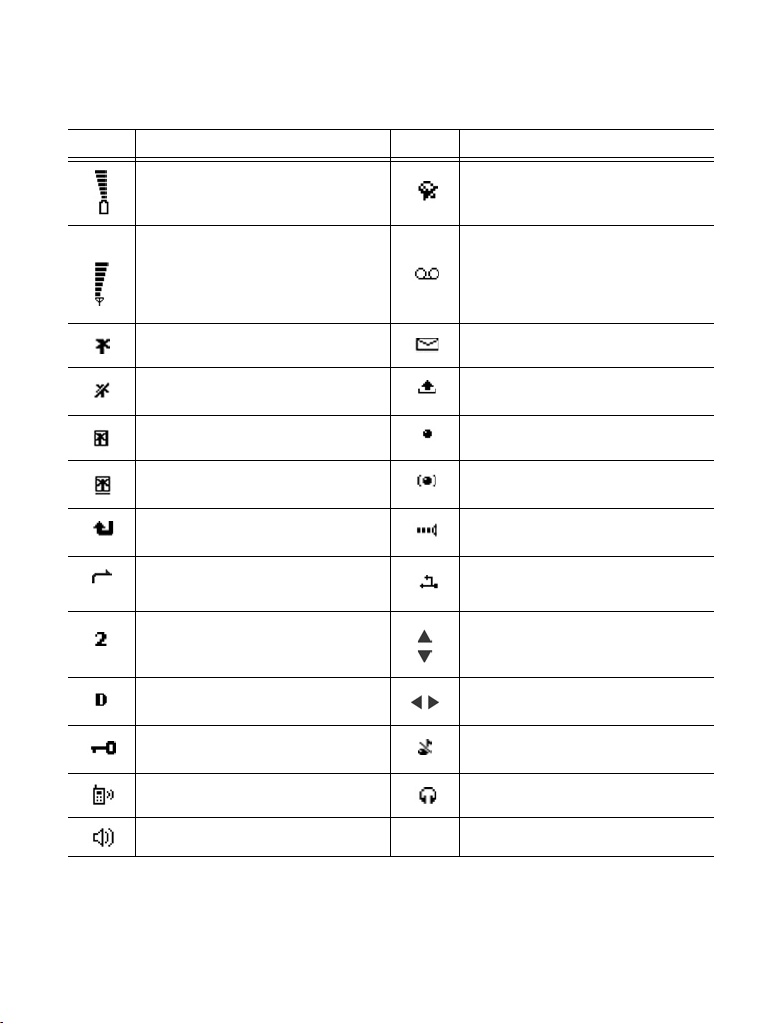
ICONS
Different icons appear depending on the features you are using and the options you
have selected.
Icon Indicates Icon Indicates
Seven levels indicate battery charge
level. Bars scroll when battery is
charging.
Alarm is set.
Seven levels indicate signal strength
from network on which phone is
currently registere d.
GPRS service is available. New message received.
GPRS service is on hold during
voice call.
GPRS connection is active. Bluetooth
Multiple GPRS connections are
active.
Missed call.
Call divert is active (if you have 2
lines, 1 or 2 also appears).
Line selection 2
(SIM card dependent, if you have 2
phone line s).
Data call.
Keypad is locked.
Earpiece sound on. Private handsfree head set attached.
New voice mail message received (if
you have 2 lines, left circle is
darkened for line 1, right circle is
darkened for line 2).
Message in Outbox waiting to be
sent.
®
is enabled.
®
Bluetooth
Infrared is enabled (flashes when
active).
USB connection enabled.
Navigation key - scroll and move up
or down options.
Navigation key - scroll left or right.
Move left or right to view tabs.
All ringing tones/ring volume are off
(Silent ringtone).
is active.
Loudspeaker sound on.
13
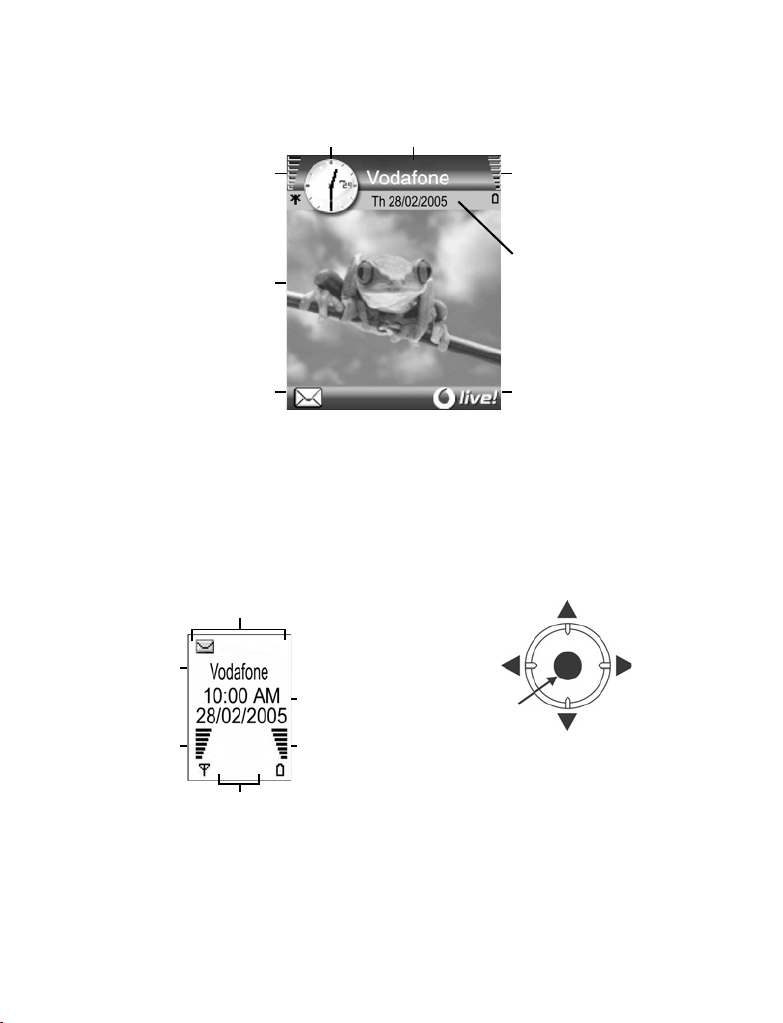
STANDBY MODE DISPLAYS AND SHORTCUTS
MAIN DISPLAY
Network that phone is
Tim e
currently using
Signal strength icon
Wallpaper
Messages
EXTERNAL DISPLAY
Press Multibutton once to switch on backlight,
then press as needed to toggle between clock
and icon views.
Phone Status
icon area
Network
that
phone is
currently
using
Signal
strength
icon
Network Status
icon area
Time
and
date
area
Battery
charge
level
icon
Battery charge
level icon
Date
Vodafone live!
NAVIGATION KEY SHORTCUTS
in standby mode
Vodafone live!
Inbox
Open
Menu
Main
Top of
Contacts list
Calendar
view
14
PHONE BASICS AND MANAGING CALLS
SWITCHING THE PHONE ON AND OFF
Press and hold .
Note: If your SIM card is PIN protected, your PIN code will be requested. Enter the PIN code
and press
MAKING CALLS
Check that phone is switched on, signal strength icon displays at least one bar , and
Vodafone logo displays before dialling a call.
Type in the Phone Number to Dial
1. From standby mode, enter the area code and phone number, and press .
2. To end the call, press
Note: To erase a digit, press .
During a call, scroll or to adjust earpiece volume.
OK. See Security Settings on page 111.
.
Warning: Closing the flip during a call will end the call
keep the call connected when you close the flip, see Open to answer/end in Call
Settings on page 108.
, when set to default. To set the phone to
Use a Contact Card to Dial
From Contacts menu:
1. Open Contacts List.
2. Scroll to desired name card, press .
• If the card has several phone numbers stored, select the one you wish to dial.
To add information to your Contacts List, see page 30.
Use a SIM Directory Entry to Dial
From Contacts menu:
1. Open Contacts List.
2. Scroll to SIM directory view.
3. Scroll to desired name, press .
To add names and numbers to your SIM directory, see page 34.
Speak the Name to Dial
To dial by saying the name of the person you wish to call:
1. Press and hold .
15
2. After the prompt to “Say a command”, say “Voice Dial”.
3. After the prompt to “Say the name or number”, say the full name of a person in
your Contact List, including first name and last name.
4. The name is repeated, and the phone will begin dialling.
See page 98 for more Voice Command options.
Speed Dialling
If you assigned speed dialling keys (see page 39) to your frequently called numbers,
you can dial them with 2 key presses.
1. From standby mode, press the preset speed dial digit key - , then press
.
• If Speed dialling is set to On (see Call Settings on page 108), just press and
hold the preset speed dial digit key to dial the assigned number.
Note: Speed dial key 1 may be reserved for voice mailbox number.
Dialled Numbers, Received, or Missed Calls List
You can quickly dial previously dialled numbers, received call numbers, or numbers of
calls you missed.
1. From standby mode, press .
2. From the list of Dialled numbers, scroll to desired entry and press to dial.
• Scroll
from either of those lists.
to move to Received calls tab and Missed calls tab to select a number
Automatic Redial
If you set Automatic redial to On in the Call Settings menu (see page 108), your
phone will automatically redial the number up to 10 times under certain conditions,
such as no answer, destination number is busy, network busy, or some connection
errors.
Press Quit or to stop automatic redialling.
Dial from Messages
If a received message contains a phone number, you can dial it from the Inbox
message. You can also call the sender of an SMS text message.
From Messages menu:
1. Open Inbox.
2. Scroll to desired message and open.
3. To find the phone number within a message, press Options and select Find >
Phone number, Email address, or Web address. When found, text and numbers
will be underlined.
16
• To call the sender of SMS text message from the open message, press to
dial the sender’s phone number.
International Calling
From standby mode, press and hold to enter +, the international prefix, which is a
shortcut for international dialling access. Then type in the country code, area code,
and phone number. Press .
Note: Many countries/regions include an initial 0 in the area code. In most cases, you should
omit this when dialling international numbers. For further help, contact Vodafone.
Emergency Calls
Dial the local emergency number used in your current location.
1. Switch on the phone if it is off.
2. Verify that the antenna icon is displayed.
3. Enter the local emergency number (such as 112) and press
Note: You can call the local emergen cy number even if the keys are locked.
Making emergency calls without SIM is country or network operator depend ent.
.
Send Service Command to Network
Ask Vodafone to activate a particular service by sending a service command. These
commands, which may be called USSD commands, can activate services such as
mobile prepay and chat.
1. First, contact Vodafone for the proper service command code.
2. Type in the supplied service command code. If the phone recognises it as a
supplementary service or USSD request, press Send service comm..
ANSWERING CALLS
When there is an incoming call, the phone rings and flashes green.
Note: If the phone is set to a ringtone with vibrating alert on, the phone flashes green an d
vibrates instead of ringing.
1. Open flip to answer a call.
• If flip is open, press to answer a call.
Mute Ringing Tone
To mute ringing tone, press if flip is closed. If flip is open, press Silence . Then
answer the call by pressing .
17
Change Answer Settings
To change the setting so a call will not be answered by opening the flip, see Open to
answer/end in Call Settings on page 108.
To answer by pressing any key except ,
, or , see Anykey answer in Call
Settings on page 108.
Divert Incoming Calls
To divert calls to your voice mailbox or another number, see Call Divert on page 114.
Then you can press
or Reject softkey and incoming calls will be diverted.
If you ignore the call by not pressing any keys, the call details appear on the Missed
calls list.
ACTIVE CALL OPTIONS
When on a call, you can put the call on hold, mute the microphone, send touch tones
for passwords, etc., and create multi-party calls, depending on network support.
Place Calls on Hold
To put a call on hold or release the call from hold, press Options and select Hold or
Unhold.
If you are connected to 2 calls (an active call and a call on hold), press Options and
select:
Swap Put active call on hold and activate held call.
Transfer Connect an active call and held call, or incoming call to active or held call,
and disconnect yourself from both calls, leaving the two callers to talk to
each other.
Shortcuts: You can also press to switch between Hold and Unhold on one call, or switch
between one active and one held call (Swap).
To end a held call and continue with the active call, press and .
To end the active call and continue with the held call, press and .
HANDSFREE TALKING
To hear the caller’s voice from the handsfree loudspeaker, press Loudsp.. Set the
phone down nearby so you and several others can have a conversation without
holding the phone.
To go back to the earpiece, select Handset.
Loudspeaker icon - handsfree is active.
18
Earpiece icon - handsfree is not active.
If you have activated a Bluetooth® handsfree headset, press Options and select BT
Accessory to hear the caller's voice in the Bluetooth
®
headset.
Volume Control
Scroll or to increase or decrease volume of phone earpiece , phone
loudspeaker , or if a headset is attached. Note the volume step bars change as you
adjust volume.
To mute or unmute the microphone, press Options and select Mute or Unmute. Mute
switches off microphone of phone and any accessory microphones if attached.
Unmute switches microphone back on.
CALL WAITING
If you activated Call waiting network service in Call Settings (see page 108), you can
answer an incoming call when on an active call.
1. During an active call, press to answer an incoming call. The active call is put
on hold.
• To switch between the calls, press Swap or .
• To end the currently active call and answer the incoming call, press Replace.
2. To end the currently active call, press . The held call becomes active.
• Or to end both calls at once, press Options and select End all calls.
• If you press and hold , all calls and data connections are ended.
To reject the incoming call, press Reject. The caller receives a busy message or goes
to voice mail.
Send DTMF Touch Tones
DTMF touch tones can be transmitted during a call just by pressing the keys (0 to 9, #,
*) on your phone. Touch tones are often used to access services such as voice
mailboxes, calling card calls, and banking.
During a call, press Options and select Send DTMF if you stored a DTMF touch tone
sequence in a Contacts card. Press Find, scroll to desired entry and select.
To dial or store touch tone sequences:
1. Type in access phone number.
2. Before entering touch tone digits, press repeatedly to scroll through *, +, p,
and w characters to insert:
• a short pause before the digits are transmitted (p character).
• a manual wait period (w character) that requires you to press Send during
the call to transmit the digits.
19
• + character to send a touch tone sequence stored in a speed dial location (see
page 39).
3. Enter the touch tone digits, for example, the access codes for your voice mailbox.
4. Press to immediately dial call, or press Options and select Add to Contacts
to store sequence in your Contacts (see page 30).
Note: You can enter multiple instances of pause, wait, and speed dial characters and touch
tone sequences.
Open Menus During a Call
During a call, open the main menu by pressing , then open the desired menu, for
example, check your Calendar for an upcoming meeting time. The active call remains
connected and is indicated by a small pop-up window. To return to the active call
window, exit the menu.
If you press , an active call will always disconnect.
Play/Record Sound Clips During a Call
To play a sound clip during a call, open the sound clip from its current location and
play.
The other person hears the sound clip.
To record the current call, see page 87.
Multi-Party Calls
In a multi-party call, you can have a conversation with up to 5 different parties at the
same time if supported by the network.
1. Call the first party.
2. After the call is connected, press Options and select New call to enter a number
or press Find to go to the Contacts List to dial a number and press . The first
call is put on hold.
3. After the new call is answered, press Options and select Conference to join the
held call and the active call together. From then on, there is only one active call,
which is the multi-party call.
4. To add another party to the call, repeat step 2, then press Options and select
Conference
> Add to conference.
5. To have a private conversation with one of the parties, press Options and select
Conference
> Private. Scroll to desired party and press Private. The separated
party becomes the active call on your phone, the multi-party call is put on hold;
however, the remaining callers can continue with the multi-party call. To return to
multi-call, press Swap. To return Private call to multi-call, press Options and
select Add to Conference.
20

6. To drop a party from the multi-party call, press Options and select Conference >
Drop participant. Scroll to desired party and press Drop.
7. To end the multi-party call, press .
Note: If you are on an active call and already have a held call, start at step 3.
ENDING CALLS
There are several ways to end a call:
• Close the flip.
•Press .
•Press End call softkey.
•Press Options and select End active call.
To end all calls if there are more than one:
•Press Options and select End all calls.
If you press and hold , all calls and data connections are ended.
For ending held calls, waiting calls, and multi-party calls, see Active Call Options
starting on page 18.
CLOSE THE PHONE DURING A CALL
Closing the flip ends the call. This is the default setting for Open to answer/end in Call
settings. If you want to close the phone and speak handsfree during a call, change the
Open to answer/end setting to Off. This setting switches the caller’s voice to the back
loudspeaker so you can speak handsfree.
To keep calls connected when you close the flip and prevent calls from being
answered while the flip is opened, see Open to answer/end in Call Settings on
page 108.
21
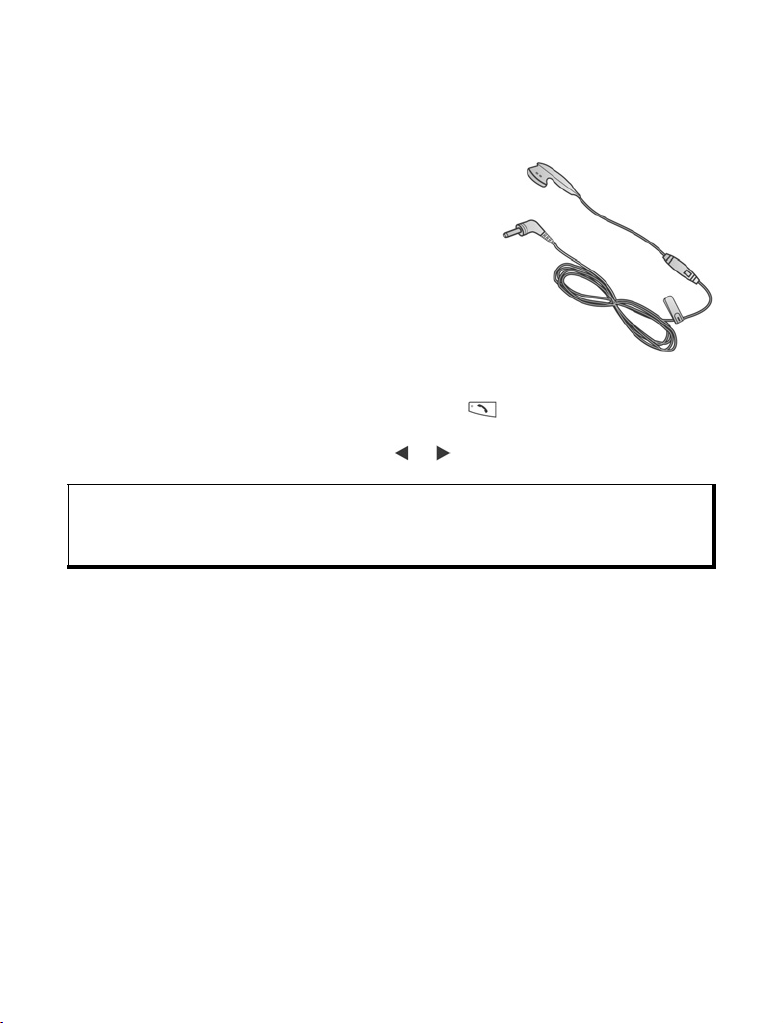
PERSONAL HANDSFREE HEADSET
If you are using a Personal Handsfree Headset, plug it into the phone to have a phone
conversation without holding the phone to your ear.
Connecting the Personal Handsfree Headset
1. Pull out the cap from the jack on the side of the
phone and securely plug in the Personal Handsfree
Headset connector. The speaker and microphone in
the phone are automatically disabled.
2. Attach the Personal Handsfree Headset clip to your
clothing.
3. Insert the earpiece into your ear.
Using the Personal Handsfree Headset
• To make a call, dial as normal, then press the Send/
End button on the headset.
• To answer and to end a call, press and hold the Send/End button on the headset.
• To dial a call by speaking a name, press and hold on the phone. See Voice
Commands on page 98.
• During a call, adjust volume by scrolling or on navigation key on the phone.
On the phone, a light indicates that a call is connected.
Warnings:Check ring volume before using handsfree device to ensure volume is not
uncomfortably loud.
Some countries do not allow the u se of an ear insert device when driving. Be sure to
check local laws before using this device.
22
ENTERING TEXT
There are two main ways to enter text: using the predictive text dictionary to quickly
enter words, or alpha mode in which each key is tapped until the planned letter
appears.
DICTIONARY FOR PREDICTIVE TEXT ENTRY
Dictionary uses a predictive text system to enter words by pressing one key per letter
to display the planned word, instead of pressing keys multiple times until each planned
letter appears.
For example, to enter “Call me.” in a message, press:
Ca l l me .
When you press the 6 key and the 3 key, the word “of” appears on screen, because
the English dictionary ranks “of” as the most common word associated with the key
presses 6 and 3. To change the word “of” to “me”, press once, and the word
changes.
DISPLAY PLANNED WORD MATCHES
If the correct word does not display, press repeatedly to scroll through an
alternate word list. To choose from all the word matches, press and select
Dictionary
ADD WORDS TO PREDICTIVE TEXT DICTIONARY
To add a word that is not already in the dictionary, press and select Dictionary >
Insert word. You can also add the word to the dictionary when Spell softkey appears.
GENERAL TEXT ENTRY
Enter text and numbers in one of three ways:
Numeric mode - enter numbers.
Shortcut: To enter numbers while in alpha or dictionary mode, press and hold desired number
> Matches.
Alpha mode - press each key repeatedly until planned letter appears.
Dictionary mode - press one key per letter for dictionary to display planned
word.
key - .
In both alpha mode and dictionary mode, choose from:
First letter capital All capitals
Lower case
23
To enter symbols, press and select Insert symbol, or press .
To enter text at a flashing cursor:
1. Press the number keys associated with the planned letters repeatedly until the
planned letters appear on screen.
• To enter text using the predictive text dictionary, press and select
Dictionary on, if it is not already active.
2. Editing actions for each key and shortcuts:
Enter space.
Enter punctuation by pressing repeatedly.
In dictionary mode, press , then press
ation.
Erase a character.
Press and hold to switch between text and number modes.
Press to scroll through upper case, lower case, and first letter capital mode.
Press twice briefly to turn Dictionary on or off.
Turn Dictionary on or off.
Switch to number mode.
Insert symbols.
Change writing language.
Scroll to other word choices in Dictionary mode.
Press outer edges to scroll up, down, left, and right through text.
repeatedly to scroll to other punctu-
Cut, Copy, and Paste Text
1. To cut, copy, and paste text, move cursor to left of text you wish to copy.
2. While holding down , press and hold to highlight text.
3. Release keys to stop highlighting.
4. Press and select Cut or Copy.
5. In message field, move cursor to new desired location, press and select
Paste.
24
NAVIGATING THE MENUS
To view the main menu window, press .
Navigation Key
Press the left, right, top and bottom edges of the navigation key to move around
the display.
Press to:
• Open a menu item;
• Select a highlighted item;
• Confirm a selection;
• Take a picture with the camera.
If an up or down arrow appears at the bottom of the display, scroll or to go to
additional items.
Shortcut: To jump to and open one of the first 9 menu items (if you
have not yet scrolled), simply press the number key
corresponding to the desired item’s location on the grid
view. The grid view numbering system is:
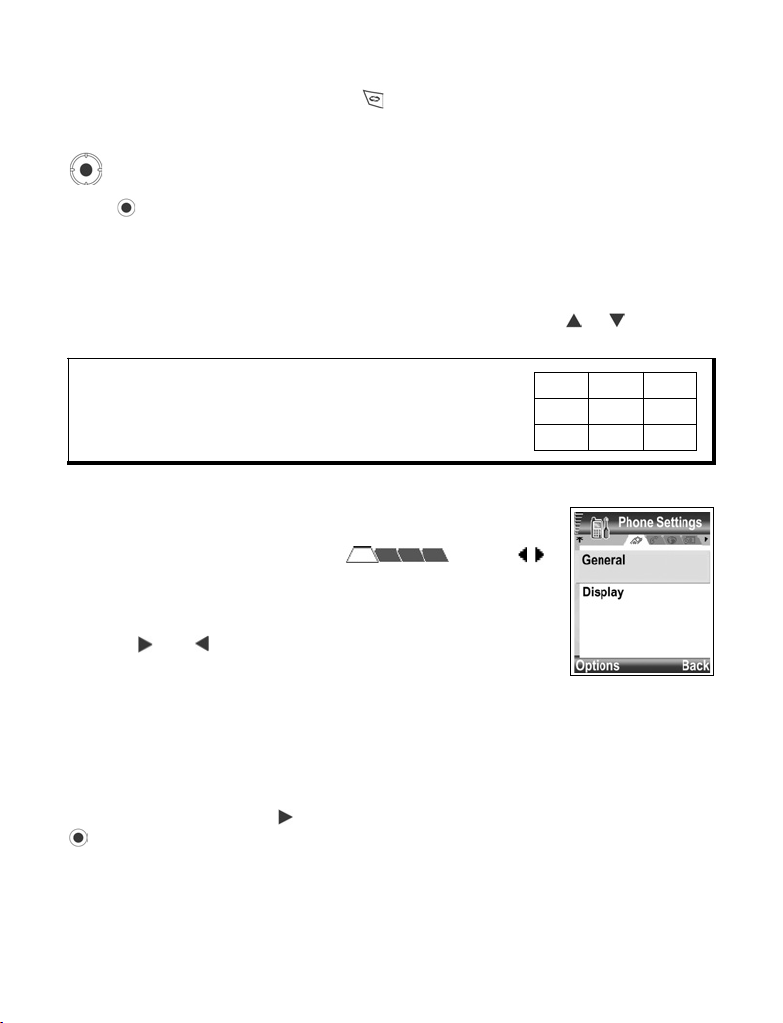
Tabs
There may be more files, folders, or pages associated with a
menu item, which can be viewed by moving right and left across
the screen. This is indicated by tabs , arrows ,
or numbers near the top of the screen. For example, if you are
viewing page 5 of 12 pages associated with a file, 5/12 and
arrows are displayed.
• Scroll and to move through the tabs and pages.
Condensed Instructions in this guide
In this guide, to condense wording, statements are used such as "Press Options and select
Open." This means to press Options, highlight Open, and press Select. You may need to
scroll within the menu to reach Open. Many menu items are available within Options menus
and other menus, thus these shortcut statements will be used throughout the guide to
indicate the same type of process.
In this guide, a statement such as 'Select Create message > Via MMS', means to scroll to
Create message, then scroll to view the pop-up menu containing Via MMS, then press
or Select softkey to select Via MMS. Within the pop-up menu, you may need to scroll to
highlight Via MMS.
123
456
789
25
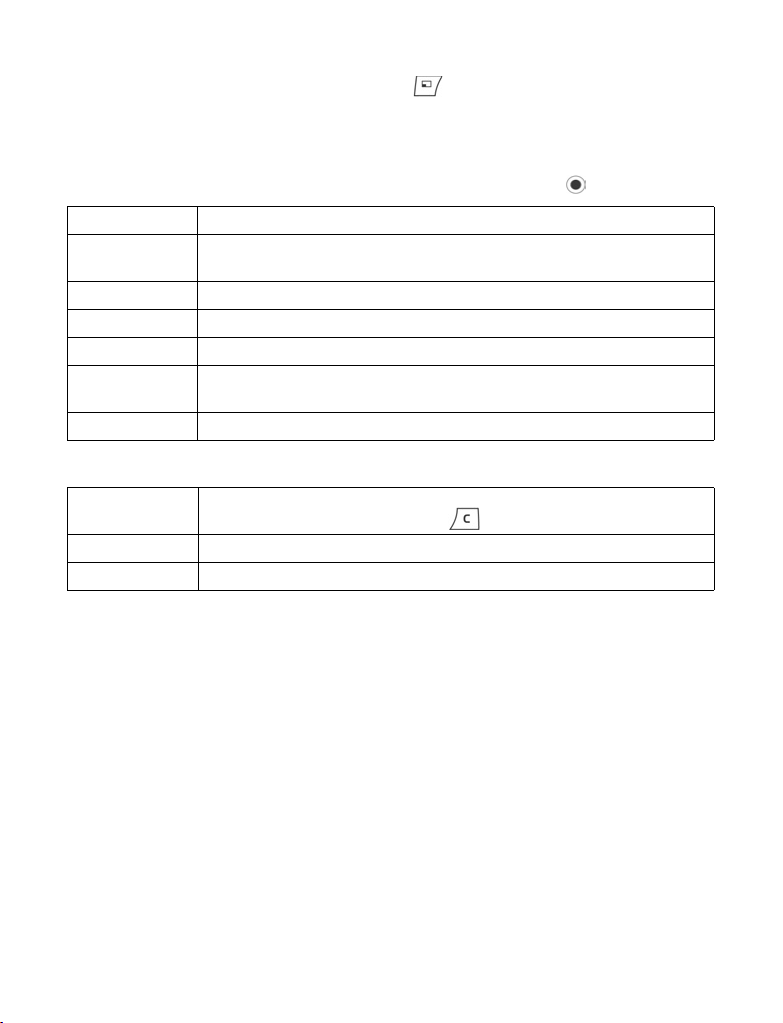
Options Softkey
At the first level of each menu item, Options appears as a way to organise or
customise the menu system. The options change depending on the menu level you
are viewing.
To open the Options menu:
•Press Options, scroll to highlight the desired action, then press or press Select.
Open Open the item.
List view View the menu items in a list form. If you select this, the option changes
Move Move the item to another place within the menu system.
Move to folder Move the menu item into a folder.
New folder Create and name a new folder.
Memory
details >
Exit Exit the menu item.
to Grid view to view the menu items in a grid form.
View information about items stored in the phone memory and memory
card (also referred to as miniSD Card).
These additional actions may be available in the Options menu:
Remove or
Delete
Rename Give a new name to the item.
Edit Change information you have already entered.
Remove or delete an item or a marked item (see Mark/Unmark on
page 26) on a list or grid, or press .
Mark/Unmark
In menu items containing many files, you can mark specific files in which to perform an
action. For example, you may wish to delete 5 pictures from your Pictures folder
containing 29 pictures.
To mark an item or items:
1. Press Options and select Mark/Unmark
> Mark to place a checkmark next to the
desired file. Scroll to mark more items as needed, or select Mark all to mark all
files.
2. Press Options, then select desired action such as Delete, Send, Move.
To unmark an item or items:
26

1. Press Options and select Mark/Unmark > Unmark on a marked file to remove the
checkmark. To unmark all files, select Unmark all.
Shortcuts: To mark or unmark an item, hold down , then press .
To mark or unmark multiple items, hold down , then press and hold or of
navigation key to scroll through desired items. Release or to stop marking.
Menus within a Menu
A pop-up menu appears when more than one choice is available.
For example, you can create a message to send a Contacts entry
several ways: via SMS message, via MMS, via Email, via
Bluetooth
®
, and via Infrared.
To enter a pop-up menu:
• Scroll , or press , or Select softkey.
To close a pop-up menu:
• Scroll , or press Cancel softkey.
Save Changes
In many cases when editing text or numbers, or changing a setting, press the Back
softkey to automatically save changes.
MULTITASKING
You can work with more than one menu item simultaneously. For example, you can
start creating a new message, rename a picture, and begin creating a Contacts entry,
all without losing the data you have already entered.
To keep a menu item open:
Press to go to the standby screen. Pressing does not close the open menu
item.
Note: During a phone call, terminates the call instead of acting as a shortcut to the
standby screen.
Opening and closing menu items
There are several ways to open menu items:
•Press .
•Press Options and select Open.
There are several ways to close menu items:
•Press Options and select Exit.
•Press Back until Exit softkey appears, then press Exit.
27
•Press Close.
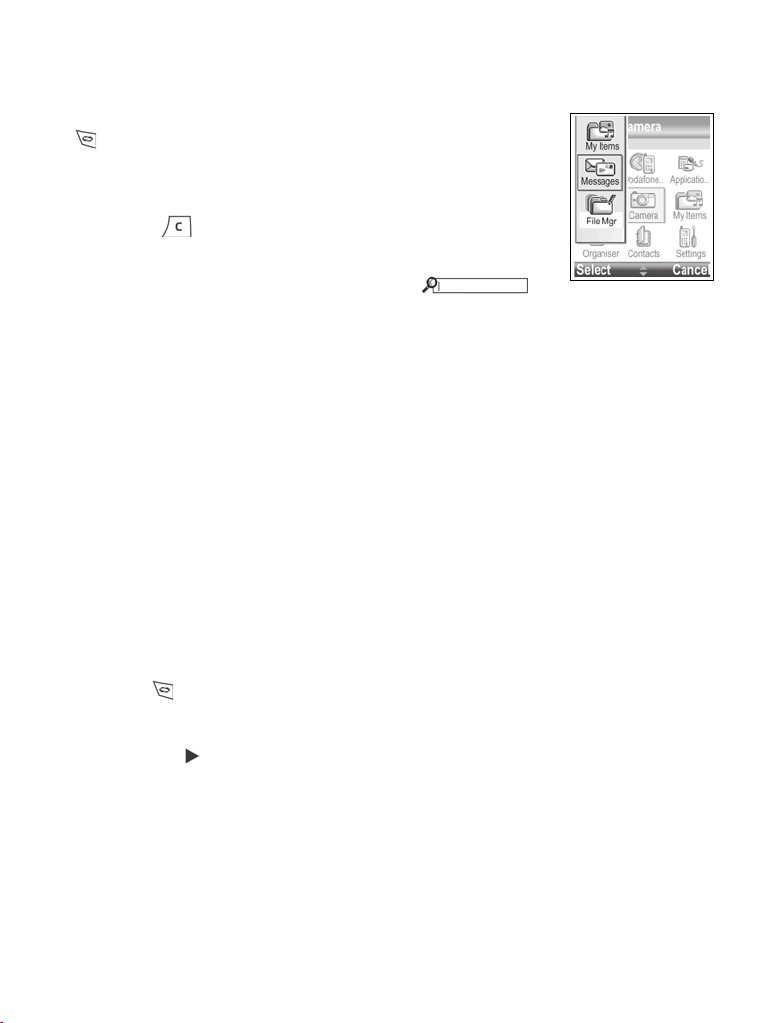
Shortcut to swapping among open items
If you have several menu items open, you can press and hold
to view a pop-up window and scroll to locate the desired
open item. When you open the item, you will begin at the point
where you were previously.
To close an open item from the pop-up window, scroll to desired
item, press and select Yes .
SEARCH OPTION
In certain menu items, a magnifying glass icon
appears which allows you to search for a name, file or item.
To search, enter the first letter of the desired name or file. The phone finds and
displays matching entries. To refine the search, enter two or more letters.
SHARED PHONE MEMORY
The phone's memory capacity is shared by all pictures; SMS, MMS and email
messages; Contacts cards; video and sound clips; ringtones; Calendar notes; Notes
and downloaded applications stored on your phone. If you keep more files on the
phone, then there is less memory available to store new files or run certain
applications.
To decrease the amount of phone memory used: (1) store data on your miniSD Card;
(2) delete data that is old, copied elsewhere or not being used; (3) delete messages
with attachments from your Inbox after saving attachments to a menu item; (4) use the
portrait format to take pictures with the Camera whenever possible. The portrait format
file size is much smaller than standard format.
To view details of the phone memory and miniSD Card use, and amount of free
memory:
1. Press .
2. Press Options.
3. Scroll to Memory details.
4. Then scroll to choose phone memory or memory card (also referred to as
miniSD Card), press Select.
Also see File Manager on page 89.
28
 Loading...