

Page 1
Page 2

VS2 Operating Instructions
Contents
Contents........................... i
Introduction .................... 1
Safety considerations............. 1
Care and maintenance........... 7
SAR........................................ 9
About this manual ................ 11
About Your Phone........ 14
Phone overview.................... 14
Key functions........................ 16
Display ................................. 19
DRM..................................... 21
Indicator/Illumination Light ... 22
Getting Started ............. 23
Installing the SIM card and
the battery ........................ 23
Charging the battery............. 25
Opening/closing the phone .. 27
Switching the phone on/off... 27
Menu Navigation........... 28
Main menu structure ............ 28
Displaying the menu............. 29
Navigating the applications .. 30
Basic Operations.......... 31
Making calls ......................... 31
Answering calls .................... 33
Silent mode .......................... 35
Voicemail.............................. 35
In-call operations ..................36
Multiple calls operations .......38
Text entry..............................40
Contacts.........................45
Contacts menu structure.......45
Viewing the Contacts list.......46
Making a call from Contacts ..47
Adding contacts ....................48
Editing a Contacts card.........50
Call log..................................51
Speed dial.............................52
Groups..................................53
Advanced..............................53
Service numbers...................56
Messages .......................57
Messages menu structure ....57
Creating a new message ......58
Receiving messages.............63
Inbox.....................................64
Archive..................................68
Web mail...............................69
Chat ......................................70
Voicemail ..............................70
Messages settings................71
Memory status ......................73
Camera ...........................74
Camera menu structure........74
Picture...................................75
Video.....................................81
i
Page 3

Contents
Browser ......................... 85
Browser menu structure .......85
Setting up your Browser .......85
Viewing the contents ............86
Browser options....................87
Settings ......................... 93
Settings menu structure........93
Phone settings......................94
Display settings ..................100
Sounds & alerts ..................102
Call settings ........................ 104
Connectivity........................ 108
Security...............................115
Tools............................ 118
Tools menu structure..........118
SIM Tool Kit ........................ 119
Alarms ................................119
Sound recorder...................121
Calculator ...........................122
Calendar ...................... 123
Browsing Calendar .............123
Creating Calendar events...125
Managing Calendar events.. 127
My Media ..................... 129
My Media menu structure ... 129
Pictures...............................130
Sounds ...............................134
Videos.................................137
Games................................ 138
Text templates.................... 139
Memory status .................... 140
Games.......................... 141
Games menu structure....... 141
Games................................ 142
Download games ............... 144
Settings ..............................145
Information .........................145
Appendix ..................... 146
Accessories........................ 146
Troubleshooting ................. 149
Glossary of terms ............... 152
Specifications ..................... 153
Licensing..................... 155
EU Warranty................ 159
Declaration of
Conformity............... 164
Index ............................ 165
ii
Page 4

Introduction
Thank you for purchasing this Panasonic digital cellular phone. This
phone is designed to operate on GSM networks – GSM900,
GSM1800 and GSM1900. It also supports GPRS for packet data
connections. Please ensure the battery is fully charged before use.
We, Panasonic Mobile Communications Development of Europe
Ltd., declare that the EB-VS2 conforms with the essential and other
relevant requirements of the directive 1999/5/EC. A declaration of
conformity to this effect can be found at http://panasonic.co.jp/
pmc/products/en/support/index.html
Safety considerations
The following information should be read and understood as it
provides details, which will enable you to operate your phone in a
manner which is both safe to you and your environment, and
conforms to legal requirements regarding the use of cellular phones.
Power
any approval given to this apparatus and may be dangerous. Ensure
the voltage rating of the Travel charger is compatible with the area of
use when travelling abroad. A Travel charger (EB-CA001xx*) is
supplied with the Main Kit.
Note* xx identifies the charger region, e.g. CN, EU, UK, AU, US.
Battery
continuously for a long time, such as a game or browser, battery life
will become extremely short. To maintain longer battery life, set the
Key backlight to off. (See “Key backlight” on page 97.)
Do not use this phone without the battery cover attached.
This equipment should only be charged with approved
charging equipment to ensure optimum performance and
avoid damage to your phone. Other usage will invalidate
Use of another battery pack than that recommended by the
manufacturer may result in a safety hazard.
If you use a feature which keeps the key backlight on
1
Page 5
Introduction
Disposing of the Battery
Do not incinerate or dispose of the battery as ordinary
rubbish. The battery must be disposed of in accordance
with local regulations and may be recycled.
Aircraft
Switch off your cellular phone when in an aircraft. Ensure
that the settings of the alarm functions will not contravene
regulations whereby it may automatically power on when in
an aircraft or medical facility etc. The use of cellular phones in an
aircraft may be dangerous to the operation of the aircraft, disrupt the
cellular network and may be illegal. Failure to observe this
instruction may lead to the suspension or denial of cellular phone
services to the offender, or legal action or both.
Do Not Use
It is advised not to use the equipment at a refuelling point.
Users are reminded to observe restrictions on the use of
radio equipment in fuel depots, chemical plants or where
blasting operations are in progress. Never expose the battery to
extreme temperatures (in excess of 60°C).
Driving
It is imperative that the driver exercises proper control of
the vehicle at all times. Do not hold a phone while you are
driving; find a safe place to stop first. Do not speak into a
handsfree microphone if it will take your mind off the road. Always
acquaint yourself thoroughly with restrictions concerning the use of
cellular phones within the area where you are driving and observe
them at all times.
Electronic Devices
Care must be taken when using the phone in close
proximity to personal medical devices, such as
pacemakers and hearing aids.
2
Page 6
Introduction
Heating Equipment
When your handset, the accompanying battery or charging
accessories are wet, do not put those in any type of heating
equipment, such as a microwave oven, a high pressure
container, or a drier or similar. It may cause the battery, handset and/
or charging equipment to leak, heat up, expand, explode and/or
catch fire. Moreover, the product or accessories may emit smoke
and their electrical circuits may become damaged and cause the
products to malfunction. Panasonic is not responsible for any and all
damages, whether direct or indirect, howsoever caused by any
misuse.
Backup Copies & Security
It is recommended that you create a copy or backup, as
appropriate, of any important information and data which
you store in your phone’s memory. In order to avoid
accidental loss of data, please follow all instructions relating to the
care and maintenance of your phone and its battery.
Your phone has the capability of storing and communicating
personal information. It is recommended that you take care to
ensure that any personal or financial information is stored separately
from your phone. You should use security features, such as the SIM
lock to protect information held in your phone. Panasonic accepts no
liability for any and all losses howsoever arising from any loss of
data, including but not limited to direct and indirect losses (to
include, but not limited to consequential loss, anticipated savings,
loss of revenue).
3
Page 7
Introduction
Downloading
Your phone has the capability of downloading and storing
information and data from external sources. It is your
responsibility to ensure that in doing this you are not
infringing any copyright laws or other applicable legislation.
Panasonic accepts no liability for any and all losses howsoever
arising from any loss of data or any such infringement of copyright or
intellectual property rights, including but not limited to direct and
indirect losses (to include, but not limited to consequential loss,
anticipated savings, loss or revenues).
Efficient Use
For most efficient use, hold the phone as you would any
normal phone. To avoid deterioration of signal quality or
antenna performance, do not touch or “cup” the antenna
area while the phone is switched on. Unauthorised modifications or
attachments may damage the phone and violate applicable
regulations. The use of an unapproved modification or attachment
may result in the invalidation of your guarantee – this does not affect
your statutory rights.
Camera
You are advised to take appropriate care over the use of
the internal camera. It is your responsibility to ensure that
you have permission to take photographs of people and
objects and that you do not infringe any personal or third party rights
when using the camera. You must comply with any applicable
international or national law or other special restrictions governing
camera use in specific applications and environments. This includes
not using the camera in places where the use of photographic and
video equipment may be prohibited. Panasonic accepts no liability
for any and all losses howsoever arising from any infringement of
copyright or intellectual property rights, including but not limited to
direct and indirect losses. Do not leave the camera facing direct
sunlight, as this may impair its performance.
4
Page 8

Introduction
Other important information
The colour liquid crystal display (LCD) uses high-precision
production technology, and in certain circumstances pixels may
appear brighter or darker. This is due to characteristics of the LCD
and is not a manufacturing defect.
This phone is designed, manufactured and tested to ensure that it
complies with the specifications covering RF exposure guidelines
applicable at the time of manufacture, in accordance with EU, USA
FCC and Australian ACA regulations.
This phone should only be used with Panasonic approved
accessories to ensure optimum performance and avoid damage to
your phone. Panasonic is not responsible for damage caused by
using non-Panasonic approved accessories.
This phone must be used in compliance with any applicable
international or national law or any special restrictions governing its
use in specified applications and environments. This includes but is
not limited to use in hospitals, aircraft, whilst driving and any other
restricted uses.
Some of the contents described in this manual are subject to change
without notice.
5
Page 9
Introduction
Information on Disposal for Users of Waste Electrical &
Electronic Equipment (private households)
This symbol on the products and/or accompanying
documents means that used electrical and electronic
products should not be mixed with general household
waste.
For proper treatment, recovery and recycling, please
take these products to designated collection points, where they
will be accepted on a free of charge basis. Alternatively, in some
countries you may be able to return your products to your local
retailer upon the purchase of an equivalent new product.
Disposing of this product correctly will help to save valuable
resources and prevent any potential negative effects on human
health and the environment which could otherwise arise from
inappropriate waste handling. Please contact your local authority
for further details of your nearest designated collection point.
Penalties may be applicable for incorrect disposal of this waste, in
accordance with national legislation.
For business users in the European Union
If you wish to discard electrical and electronic equipment, please
contact your dealer or supplier for further information.
Information on Disposal in other Countries outside the
European Union
This symbol is only valid in the European Union.
If you wish to discard this product, please contact your local
authorities or dealer and ask for the correct method of disposal.
6
Page 10
Care and maintenance
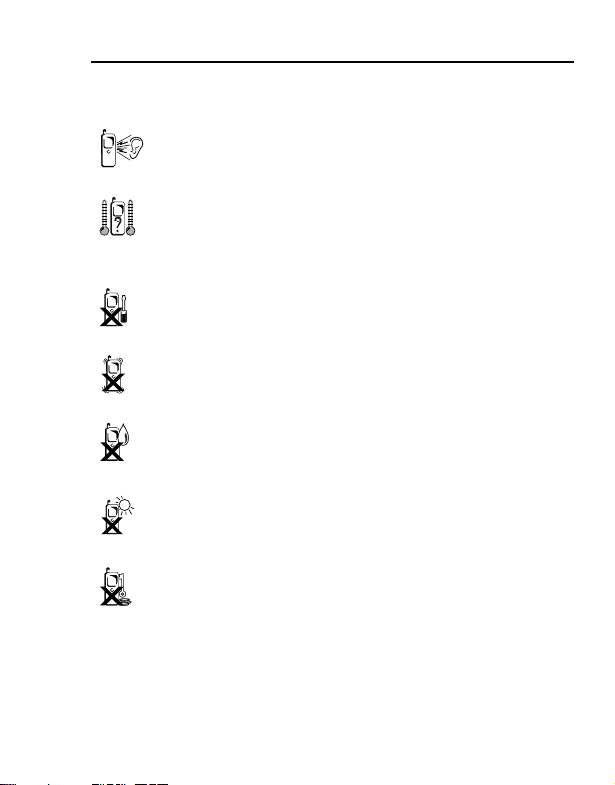
Pressing any of the keys may produce a loud tone. Avoid
holding the phone close to the ear while pressing the keys.
Extreme temperatures may have a temporary effect on the
operation of your phone. This is normal and does not
indicate a fault. The display quality may deteriorate if the
phone is used in environments over 40°C for a long time.
Do not modify or disassemble the equipment. There are
no user serviceable parts inside.
Do not subject the equipment to excessive vibration or
shocks. Do not drop the battery.
Avoid contact with liquids or moisture. If the equipment
becomes wet, immediately remove the battery and
charger. Keep the phone dry.
Do not leave the equipment in direct sunlight or a humid,
dusty or hot area. Never throw a battery into a fire. It may
explode.
Keep metallic items that may accidentally touch the
terminals away from the equipment/battery.
Batteries can cause property damage, injury, or burns if
terminals are touched with a conductive material (i.e.
metal jewellery, keys, etc.).
Introduction
7
Page 11
Introduction
Always charge the battery in a well ventilated area, not in
direct sunlight, between +5°C and +35°C. It is not possible
to recharge the battery if it is outside this temperature
range.
When connecting the phone to an external source, read
the operating instructions of the equipment for the correct
connection and safety precautions. Ensure the phone is
compatible with the product it is being connected to.
When disposing of any packing materials or old
equipment, check with your local authorities for
information on recycling.
8
Page 12

Introduction
SAR
THIS MODEL MEETS INTERNATIONAL GUIDELINES FOR
EXPOSURE TO RADIO WAVES and the requirements of the EU
Directive 1999/5/EC.
Your mobile device is a radio transmitter and receiver. It is designed
not to exceed the limits for exposure to radio waves recommended
by international guidelines. These guidelines were developed by the
independent scientific organization ICNIRP and include safety
margins designed to assure the protection of all persons, regardless
of age and health. These guidelines also form the basis of
international regulations and standards on RF Exposure.
The guidelines use a unit of measurement known as the Specific
Absorption Rate, or SAR. The SAR limit for mobile devices is 2 W/kg
and the highest SAR value for this device when tested at the ear, for
compliance against the standard, was 0.724 W/kg. As mobile
devices offer a range of functions, they can be used in other
positions, such as on the body as described in the user guide. For
body worn operation, this phone has been tested and meets the RF
exposure guidelines when used with a Panasonic accessory
designated for this product or when used with an accessory that
contains no metal and that positions the handset a minimum of
1.5cm from the body. In this case, the highest tested SAR value is
0.532 W/kg.
As SAR is measured utilizing the devices highest transmitting power
the actual SAR of this device while operating is typically below that
indicated above. This is due to automatic changes to the power level
of the device to ensure it only uses the minimum level required to
communicate with the network.
9
Page 13

Introduction
The World Health Organization has stated that present scientific
information does not indicate the need for any special precautions
for the use of mobile devices. They note that if you want to reduce
your exposure then you can do so by limiting the length of calls or
using a 'hands-free' device to keep the mobile phone away from the
head and body.
Additional Information can be found on the websites:
World Health Organization (http://www.who.int/emf)
ICNIRP (http://www.icnirp.org)
Panasonic (http://panasonic.co.jp/pmc/products/en/support/
index.html)
10
Page 14
Introduction
About this manual
Symbols used in this manual
The following symbols are used in this manual to represent the
limited availability of the function or service.
= Depending on your SIM card.
= Depending on network availability.
= Depending on your network operator. The service may only
be available on a subscription basis.
Graphics
The graphic elements in this manual are for illustrative purposes and
may differ from the actual phone and/or graphic elements displayed
on the phone. Panasonic reserves the right to change the
information in this manual without prior notice.
Keys
Keys in this manual may differ from the actual keys on your phone.
Refer to page 16 for the icons that represent the keys in this manual.
11
Page 15
Introduction
How to read this manual
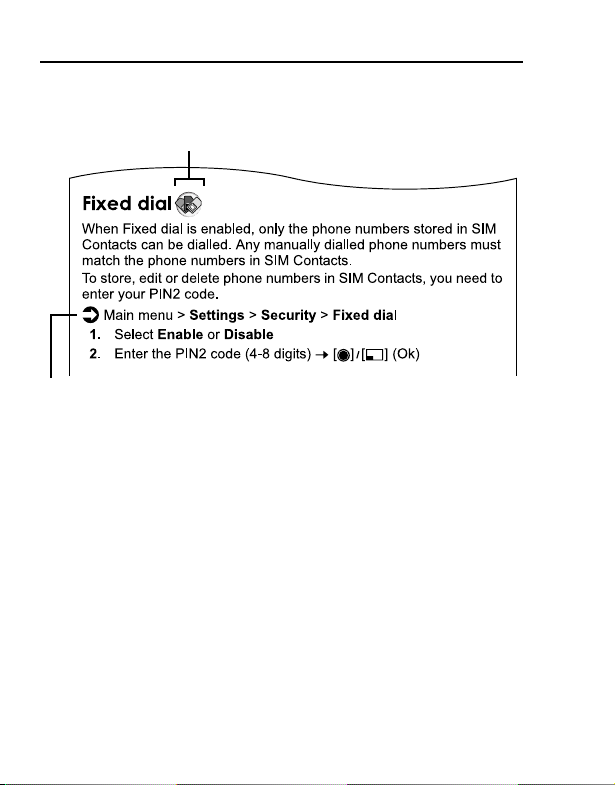
<Example> Fixed dial in Settings menu on page 116.
This function is SIM card dependent. For other symbols, refer to
page 11.
d Menu navigation
Before following the steps, you need to enter Main menu, then move
through the sub menus, described next to the d icon. “>” means
“scroll through the menu and select”.
12
Page 16

Introduction
In the example:
From Main menu, press Navigation key (up/down/left/right) to scroll
to Settings and press Navigation key (centre). Press Navigation key
(up/down) to scroll to Security and press Navigation key (centre) or
Left Soft key (Select)*
Fixed dial and press Navigation key (centre) or Left Soft key
(Select)*
1
. You can also select Fixed dial by pressing [D].
1
. Press Navigation key (up/down) to scroll to
Now you can continue onto the step 1:
1. Press Navigation key (up/down) to scroll to Enable or Disable,
then press Navigation key (centre) or Left Soft key (Select)*
2. Enter the PIN2 code (4-8 digits), then press Navigation key
(centre) or Left Soft key (Ok)*
*1The word is shown in the lower left hand corner of the display, indicating a
command that the key gives to the phone when you press it.
Note: There are several ways to select items from menu lists. See “Menu
selection method” on page 30.
1
1
13
Page 17
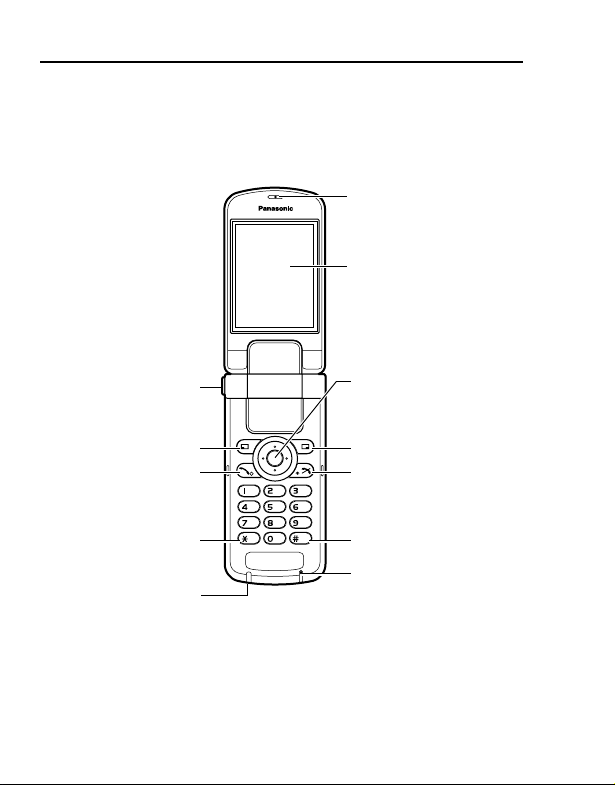
About Your Phone
Phone overview
Earpiece
Display
Left Soft key
Asterisk key
Charging Indicator
14
One Push
Auto Open
button
Call key
Navigation key
Right Soft key
Power/End key
Silent Mode key
Microphone
Page 18
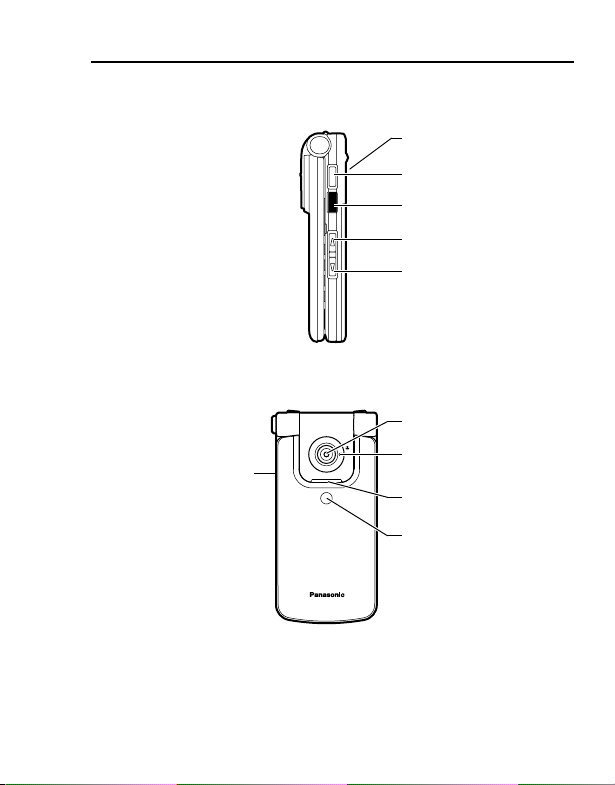
About Your Phone
Speaker
Multi Function key
Infrared Port
Side-up key
Side-down key
Camera Lens
Personal Handsfree
Charging Connector/
Connector/
Data Transmission
Connector
Macro Mode Switch
Indicator/
Illumination Light
Self-portrait Mirror
15
Page 19

About Your Phone
Key functions
Key name Function
Press outside edges to scroll up [1],
down [2], left [3] or right [4] to move
Navigation key
Left Soft key
Right Soft key
Call key Make or answer a call. [q]
Power/End key
Numeric keys
Asterisk key
Silent Mode
key
Side-up key*
Side-down
2
key*
16
through menus and text. Press centre [0]
to select option, perform Alert mute, or
take a picture or record a video clip in
Camera mode.
Perform the functions indicated by the
text shown in the lower left-hand corner of
the display.
Perform the functions indicated by the
text shown in the lower right-hand corner
of the display.
Press and hold to switch the phone on/off.
End or reject a call. Return to standby
mode.
Enter numbers and characters. Press and
hold [S]-[K] for Speed dialling. Press and
hold [L] to enter the international prefix
(+).
Enter “e”. In text entry mode, press to
change the letter case, or press and hold
to change the input method.
Enter “r”. Press and hold to switch the
Silent mode on/off. While entering a
phone number, press and hold to enter a
pause (p).
Scroll page up. Increase volume or zoom
2
level. Perform Alert mute.
Scroll page down. Decrease volume or
zoom level. Perform Alert mute.
Key icon*
[L] to [K]
[1] [2]
[3] [4]
[0]
[5]
[6]
[Y]
[e]
[r]
[O]
[P]
1
Page 20
About Your Phone
Key name Function
Multi Function
2
key*
*1The key icons given in the table represent the actual keys on the phone.
2
*
Located on the right side of the phone.
Take a picture or record a video clip in
Camera mode. Perform Alert mute.
Key icon*
[U]
Quick keys
You can easily access features instead of navigating through the
menus.
Key Function
In standby mode
[0] Open Main menu/Keyguard off
[5] Open Messages menu
Short press
Long press
[6] Open Browser
[1]9[2]9[3]9[4] Open the shortcut menu
[q] Open Call log
[O]9[P] Increase/decrease the volume
[0] Keyguard on
[A] Dial your voice mailbox
[S]-[K] Speed dial
[r] Silent mode on/off
[U] Switch to Picture mode
1
17
Page 21
About Your Phone
During a call
Short press
In Menu list
Short press
Key Function
[1]9[4]9[O] Increase the volume
[2]9[3]9[P] Decrease the volume
[U] Start/stop sound recording
[q]
[A]-[K] Select Menu A-K
[e] Select Menu e
[L] Select Menu L
[r] Select Menu r
Switch between hold and unhold on
one call or switch between one active
and one held call
18
Page 22
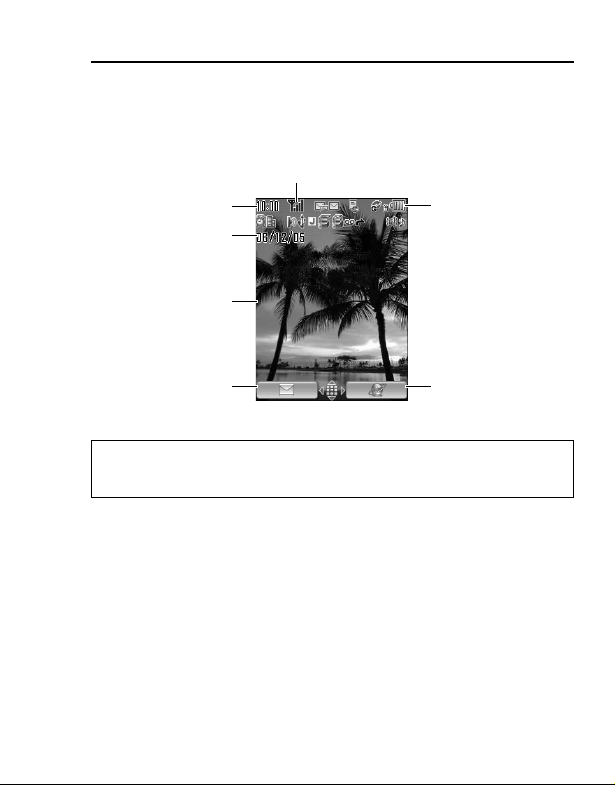
Display
Standby display
Time
Date
Wallpaper
Signal strength icon
About Your Phone
Battery charge
level icon
Left Soft key
selection area
Note: The current operator name is shown on standby display. You can
change the position of the operator name. See “Operator name” on
page 101.
Right Soft key
selection area
19
Page 23
About Your Phone
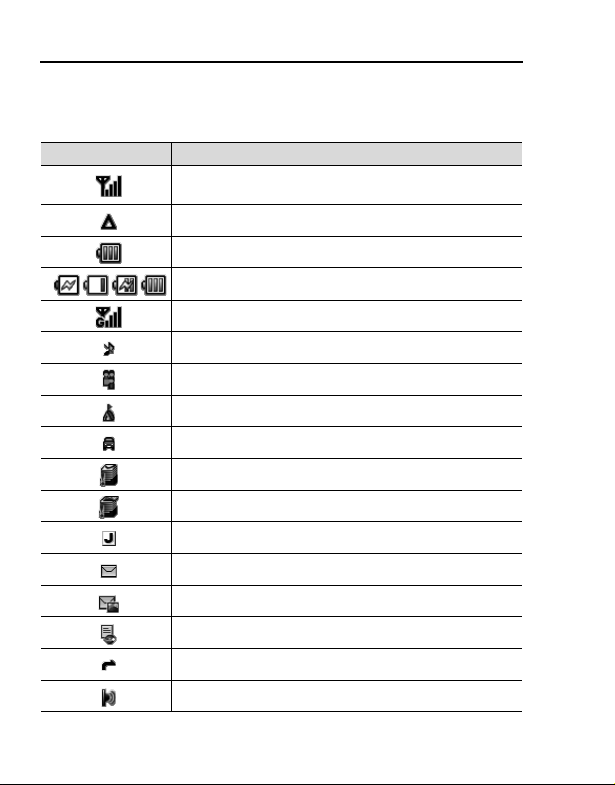
Status icons
The status icons are displayed or animated according to the
currently activated functions.
Icon Meaning
Signal strength; the more bars visible, the stronger the
signal
In roaming area
Battery charge level
Battery is charging
GPRS is available
Silent profile is active
Meeting profile is active
Outdoor profile is active
Car profile is active
SMS message storage area is full
MMS message storage area is full
TM
application is suspended
Java
Unread SMS message
Unread MMS message
Unread WAP Push message
Call diverts is on
Infrared is active
20
Page 24
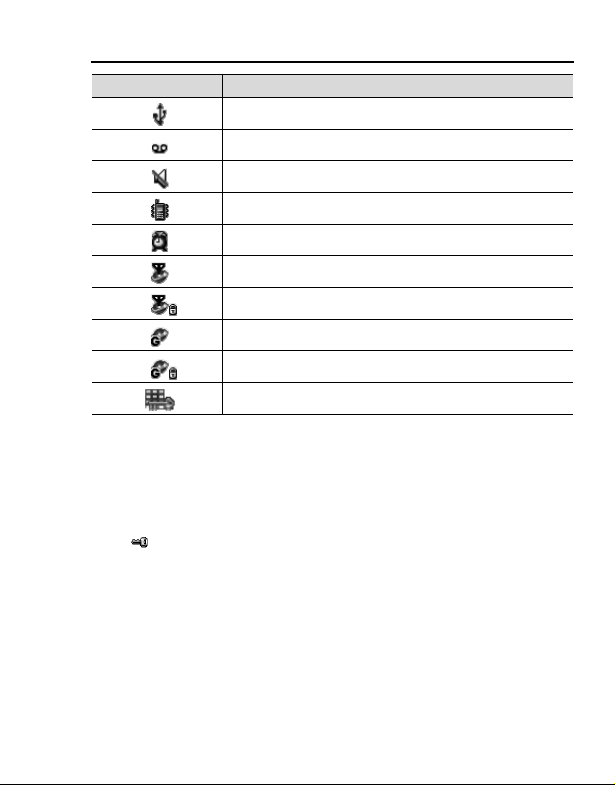
About Your Phone
Icon Meaning
USB connection is available
New voicemail received
All tones are off
Vibration alert is on
Alarm is set
Non-secure CSD connection
Secure CSD connection
Non-secure GPRS connection
Secure GPRS connection
Keyguard is on
DRM
Your phone has DRM (Digital Right Management) that is used to
control actions such as sending downloaded ringtones, graphics and
sound clips to other people. Files downloaded and indicated by the
icon ( ) can be used with restriction enforced by suppliers. The
restriction includes use of such files for a limited period of time only
or specified number of times.
To check the status of your rights, e.g. expiration date or number of
the time it can be used, see Details setting on page 131, 135 and
142. For further information, contact your service provider.
21
Page 25
About Your Phone
Indicator/Illumination Light
The Indicator/Illumination Light flashes or beams when the events in
the table below occur.
To specify the illumination colours for the events, see “Illuminations”
on page 96.
When you are receiving a call/
missed calls
When you receive an SMS/MMS
message
When you receive a WAP Push
message
When the flip is closed
When the battery is charging
When data is being transferred
Schedule notification Beam in the specified colour. See
Alarm
Note: If the Indicator/Illumination Light is set to on for battery charging and
the phone is switched on, the Indicator/Illumination Light illuminates during
charging. If the phone is switched off, the Indicator/Illumination Light will not
illuminate.
Events Description
Flash or beam in the selected
colour.
To set a different illumination colour
for respective contacts, see “Storing
a contact in your phone” on page 48.
Flash or beam in the selected
colour.When you are having a conversation
Flash in the specified colour.
“Creating Calendar events” on
page 125 or “Setting the alarm” on
page 119.
22
Page 26
Getting Started
Installing the SIM card and the battery
The SIM (Subscriber Identity Module) card and the battery must be
installed before using your phone.
Before handling the SIM card and the battery, ensure that the phone
is switched off and the charger is disconnected from the phone.
Inserting/removing the SIM card
See “Inserting/removing the battery” on page 24 to remove the
battery cover and the battery.
Inserting the SIM card
Position the SIM card as shown, with
gold contacts facing down and the
notched corner turned to the right.
Carefully slide the SIM card into the
SIM card pocket until fully inserted.
Removing the SIM card
Place a finger on the bottom edge of
the SIM card and gently slide it out.
23
Page 27
Getting Started
Inserting/removing the battery
Inserting the battery
1. Insert the small tabs at the top of the
battery into the notch at the top of the
battery compartment. Ensure the 3 gold
contacts align with the 3 gold pins in the
phone.
2. Replace the cover on the phone. Make
sure the cover clicks into place.
Removing the battery
1. Place your finger on the small tab at the
top of the cover. Slide the cover slightly
toward the bottom of the phone, then lift
the cover off the phone.
2. Place your finger on the tab at the base
of the battery. Lift the battery off the
compartment.
24
Page 28
Getting Started
Charging the battery
Your phone can be charged either when it is switched on or off. You
can use your phone even while it is charging.
Ensure that the battery is inserted into the phone before charging.
1. Open and hold the connector
cover.
Connect the charger to
Charging Connector, then
connect the charger to the
mains power supply.
2. When charging is complete,
disconnect the charger from
the outlet before removing the
plug from the phone. Then
hold the connector cover and
press and hold the release
buttons on both sides of the
connector’s end and pull
gently to disconnect the
charger from the phone.
After you have removed the Charging Connector, replace the
connector cover over the socket.
Note: DO NOT force the connector as this may damage the phone and/or
the charger.
If the battery has been deeply discharged, it may take several minutes
before the Battery charge level indicator is displayed.
25
Page 29

Getting Started
Battery charge level indicator
While charging Charging complete
Charging Indicator goes out when charging is completed.
Low battery warning
When the battery power is low, a “Battery low” message is
displayed and a warning tone sounds. The phone automatically
switches off after the tone. Fully recharge the battery. If you receive
the low battery warning during a conversation, charge your phone to
continue with the conversation.
26
Page 30

Getting Started
Opening/closing the phone
You can open your phone by
pressing One Push Auto Open
button.
Flip setting
When Active flip setting is set to On (see page 106), you can
answer a call by opening the phone and end a call by closing the
phone.
When One push SMS setting is set to On (see page 71), new SMS
messages can be displayed by opening the flip.
One Push
Auto Open
button
Switching the phone on/off
1. Press and hold [Y] for several seconds to switch the phone
on
A greeting may be displayed and the phone enters standby mode.
2. Press and hold [Y] for several seconds to switch the phone
off
Note: If your SIM card is PIN protected, your PIN code will be requested.
Enter the PIN code and [0]9[5] (Ok). See “Security” on page 115.
DO NOT switch off the phone while resetting/downloading/deleting a file or
running/terminating a Java
TM
application.
27
Page 31

Menu Navigation
Main menu structure
Games
Games ................... 142
Download*
Settings ..................145
Information .............145
1
............ 144
Camera
Picture...................... 75
Video........................ 81
Tools
SIM tool kit*2.......... 119
Alarms.................... 119
Sound recorder ......121
Calculator............... 122
28
My Media
Pictures ................. 130
Sounds .................. 134
Videos.................... 137
Games................... 138
Text templates ....... 139
Memory status....... 140
Messages
Create new .............. 58
Inbox........................ 64
Archive .................... 68
Web mail*
Chat*
Voicemail................. 70
Messages settings... 71
Memory status ......... 73
1
............... 69
1
...................... 70
Contacts
Contacts list............. 46
Add contact.............. 48
Call log .................... 51
Speed Dial list.......... 52
View groups............. 53
Advanced ................ 53
Service numbers*
1*2
56
Calendar ...........123
Browser
PANASONIC BOX ... 85
Settings
Phone settings .........94
Display settings...... 100
Sounds & alerts......102
Calls....................... 104
Connectivity ........... 108
Security.................. 115
1
*
2
*
Page 32

Menu Navigation
Displaying the menu
The menu system allows you to access functions which do not have
their own dedicated buttons on the keypad.
In standby mode:
1. [0]
Main menu appears with 9 menu options. (See
“Main menu structure” on page 28.)
2. [1929394] to scroll to the required
menu 7 [0]9[5] (Select)
To go back to Main menu:
1. [6] (Back) repeatedly until Main menu
screen appears
Shortcut: To jump to and open one of the 9 application items, simply press
the Numeric key corresponding to the required item’s location. The
numbering system is:
123
456
789
29
Page 33

Menu Navigation
Navigating the applications
Current settings
When you highlight an item in the menu list, the current setting of the
item is displayed in the bar just above the menu list.
<Example>
In the case shown to the right, the current
setting of Warning tone is “Off”.
Menu selection method
There are several ways to select items: by using Navigation key or
Left Soft key, or by entering the required number, e or r given to
the item.
<Example>
To se l ect Warning tone in the display shown above:
•[192] to scroll to Warning tone 7 [0]
•[192] to scroll to Warning tone 7 [5] (Select)
• Press the menu number [G]
Keys corresponding to the menu numbers
•[A]-[K]: Menu A-K
•[e]: Menu e
•[L]: Menu L
•[r]: Menu r
Note: Direct access keys to the menus with no menu numbers/symbols are
not available.
30
Page 34

Basic Operations
Note: There are several ways to select items from menu lists. See “Menu
selection method” on page 30.
Making calls
To make a call, your phone must be within the range of a network
with adequate signal strength.
Standard dialling
In standby mode:
1. Enter the area code and phone number 7 [q]9[0]
2. When the other party answers, talk into Microphone
3. [Y]9[6] (End) to hang up
The duration of the call is displayed.
Note: To erase a digit: [6] (Clear)
To increase the earpiece volume: [1]9[4]9[O]
To decrease the earpiece volume: [2]9[3]9[P]
If Active flip is set to On (see page 106), you can answer a call by opening
the phone and end a call by closing the phone.
Auto redial
Your phone will automatically redial the number up to 10 times under
certain conditions, such as no answer, destination number is busy,
network busy, or some connection errors.
When your call is rejected:
1. “Auto redial?” 7 [5] (Yes) to start Auto redial
2. To stop Auto redial while redialling, [Y]9[6] (Cancel)
31
Page 35

Basic Operations
Contacts dialling
You can make calls using the numbers in Contacts.
d Main menu > Contacts > Contacts list
1. [192] to scroll to the required contact
OR
Enter letters to find a contact beginning
with the specific letters
2. [q]
3. If the card has several phone numbers
stored, [192] to scroll to the required
number 7 [0]9[5] (Call)
Recent call dialling
You can make calls using the numbers in Call log.
In standby mode:
1. [q]
2. [394] to switch to Dialled numbers, Answered calls or
Missed calls screen
3. [192] to scroll to the required number 7 [q]
International dialling
The international prefix (+) and the destination country/region code
should be entered, followed by the area code and phone number.
1. Press and hold [L] until “+” is displayed
2. Enter the country/region code
3. Enter the area code and phone number 7 [q]
Note: Many countries/regions include an initial “0” in the area code. This
should, in most cases, be omitted when dialling international numbers. For
further help, contact your service provider.
32
Page 36

Basic Operations
Emergency call
To make an emergency call, your phone must be within the range of
a network.
When SIM card is inserted:
1. Enter the local emergency number 7 [q]9[0]
Note: Most countries support the international emergency number 112. If
you find the number does not work on your phone, contact your service
provider.
When SIM card is not inserted:
1. [5] (Options) 7 Select SOS
Answering calls
When there is an incoming call, the phone rings and/or vibrates
(depending on your phone setting). (See “Sounds & alerts” on
page 102.)
When the phone is ringing and/or vibrating:
1. [q]9[5] (Accept)
Note: If Any key answer is set to On (see page 105), you can answer a
call by pressing any key except [Y], [0], [6] (Cancel), [U], [O] and [P].
If Active flip is set to On (see page 106), you can answer a call by opening
the phone and end a call by closing the phone.
Rejecting calls
When the phone is ringing and/or vibrating:
1. [Y]9[6] (Cancel)
33
Page 37

Basic Operations
Missed call notification
If you cannot answer a call, Missed call notification appears on the
standby screen.
To view the Missed call list:
1. [0]9[5] (View)
2. To call back, [192] to scroll to the required log 7 [q]
Alert mute
You can turn the ringing tone and/or vibration off before answering a
call.
When the phone is ringing and/or vibrating:
1. When the phone is closed: [U]9[O]9[P]
When the phone is open: [0]
2. [q] to answer the call
Answering a second call
When on an active call, you may receive another call.
To enable this service, Call waiting must be active. (See “Call
waiting” on page 105.)
If you hear an alert tone during a call:
1. [q]9[5] (Accept)
The first call is placed on hold.
2. [q] to switch between the two calls if required
To reject another call:
1. [6] (End)
To end the active call and answer the incoming call:
1. [Y] to end the active call
2. [q] to answer the call
34
Page 38

Basic Operations
Auto answer
When you use the optional Personal Handsfree earpiece, you can
answer a call automatically. To enable this service, Auto answer
must be on. (See “Auto answer” on page 106.)
Silent mode
To use your phone in a quiet situation, you can activate the Silent
mode. You can personalise the Silent mode setting. (See “Profiles”
on page 94.)
In standby mode:
1. Press and hold [r] to activate/deactivate the Silent mode
Voicemail
Voicemail is a network service which allows callers, who could not
reach you, to leave voice messages. You may need to subscribe to
this service through your service provider. For further details, see
“Voicemail” on page 70.
Retrieving stored voice messages
When a new voice message is stored, an alert sounds and ( )
appears on the display and you receive an SMS notification.
1. Press and hold [A] to call your voice mailbox
If the number is not valid, contact your service provider.
2. Follow the recorded instructions
3. [Y] when finished
35
Page 39

Basic Operations
In-call operations
In-call options (while connected to an active
call)
When on a call, the following options are available.
1. [5] (Options) 7 Select the required option
Hold call/Resume Put or resume a call on hold.
From contacts Access the Contacts list.
Create SMS Create a new SMS message.
Inbox (SMS) Access Inbox (SMS).
Calendar Access Calendar.
Speaker mode/
Handheld mode
Record
Hold
You can put a call on hold.
During a call:
1. [q] to switch between Hold call and Resume
OR
[5] (Options) 7 Select Hold call or Resume
Handsfree talking
You can have a conversation without holding the phone to your ear.
Swapping between Speaker and Handheld mode
1. [5] (Options) 7 Select Speaker mode or Handheld mode
Switch to Speaker or Handheld talking mode.
Record the conversation. The sound clip is saved
to My Media.
36
Page 40

Basic Operations
Volume control
You can adjust the volume of the phone earpiece, speaker or
headset if attached.
To increase the volume:
1. [1]9[4]9[O]
To decrease the volume:
1. [2]9[3]9[P]
DTMF
DTMF (Dual Tone Multi Frequency) can be sent during a
conversation. These are often used to access voicemail, paging and
computerised home banking. For example, you may need to enter a
number to remotely access voicemail messages. A phone number
may be stored in the Contacts card together with a DTMF sequence,
allowing the number to be dialled upon recall and the DTMF
sequence to be sent automatically.
To send DTMF during a call:
1. Enter digits [L]-[K], [e] or [r]
Pause dial
Using pauses allows you to send DTMF automatically.
1. Enter the phone number
2. Press and hold [r] until a “p” is displayed
3. Enter the DTMF digits after the pause, e.g. enter the number to
access voicemail messages
4. [q]9[0]
When the call is connected, the DTMF sequence is sent after 3 seconds.
37
Page 41

Basic Operations
Making a second call
You can make another call while on a call.
During a call:
1. Enter the second phone number or select a phone number
from the Contacts list
To access Contacts list, see “In-call operations” on page 36.
2. [q]
The first call is put on hold.
3. [q] to switch between the two calls if required
Multiple calls operations
In-call options (while on multiple calls)
When on more than one call, the following options are available.
1. [5] (Options) 7 Select the required option
Swap Switch between one active and one held call.
Merge
From contacts Access the Contacts list.
Create SMS Create a new SMS message.
Inbox (SMS) Access Inbox (SMS).
Calendar Access Calendar.
Speaker mode/
Handheld mode
Record
Enable multi-party conversation when two calls
are connected (one active, one on hold). See
“Conference” on page 39.
Switch to Speaker or Handheld talking mode.
Record the conversation. The sound clip is saved
to My Media.
38
Page 42

Basic Operations
Conference
You can have a conversation with up to 5 different parties at the
same time.
During a call (one active call and one call on hold):
1. [5] (Options) 7 Select Merge
The 2 calls are joined into a Conference call.
To add new participants:
2. Call the next person or answer an incoming call
3. [5] (Options) 7 Select Merge
To end the Conference call:
4. [Y]
To split the caller from the Conference call and talk privately:
During a Conference call:
1. [5] (Options) 7 Select Conference call
2. [192] to scroll to the required caller you wish to talk to
3. [5] (Options) 7 Select Split
The remaining callers can continue with the Conference call.
4. To end the private call and rejoin the Conference call, [5]
(Options) 7 Select Merge
39
Page 43

Basic Operations
Text entry
Input method
Your phone provides three text input methods to enter characters.
®
T9
Multi-tap
Numeric You can enter numbers (0-9), e, r and +.
An icon on the upper left of the screen shows the current input
method and letter case.
Input method Icon Letter case
®
T9
Multi-tap
Numeric 123 -
A predictive text entry system. You can enter a
word with fewer key presses.
A traditional way to type in a letter. Press a key
several times until the required letter appears.
T9y Automatic
T9u Upper case
T9 Lower case
Abc Automatic
ABC Upper case
abc Lower case
40
Page 44

Basic Operations
Changing the input method
Press and hold [e] to cycle through the input methods as follows.
T9 (T9y) 7 Multi-tap (Abc) 7 Numeric (123)
Changing the letter case
Press [e] repeatedly until the icon for the required letter case mode
appears.
Auto capital change
When the letter case is set to Automatic (T9y and Abc), the first
character is entered as upper case and subsequent letters as lower
case.
When one of the following characters [. (Period) ! ? ] is entered, the
next character is entered as upper case.
41
Page 45

Basic Operations
T9® text input method
The T9® text input method enables you to enter text faster and
easier. You only need to press a key once for any letter you require
on that key. The program searches its built-in dictionary to predict
the word that most closely matches your key presses.
1. In text entry screen, press a key once for any letter you require
on that key
2. Continue pressing other keys until the end of a word is reached
3. Select the required word
OR
If the required word is not in the dictionary, “?” is displayed after
the word.
[5] (Spell) 7 Enter the correct word 7 [0]9[5] (Add)
The word is added to the internal dictionary automatically.
For example, to enter “Hello!”, press keys as follows.
Key [F][D][G][G][H][A][2] x 4
Display I He Gel Hell Hello Hello. Hello!
My dictionary
Words that you enter in My dictionary are added to the internal
dictionary so that they are suggested next time.
To add words to My dictionary:
1. In text entry screen, [5] (Options) 7 Select My dictionary
2. Enter a word 7 [0]9[5] (Add)
42
Page 46

Basic Operations
Editing text
Inserting/deleting text
Move the cursor by pressing [1929394] to the position you want
to insert or delete a letter. Press [6] (Clear) to delete a character.
Press and hold [6] (Clear) to delete all the characters.
Copying/cutting/pasting text
1. [5] (Options) 7 Select Copy or Cut
2. [1929394] to move to the text you wish to copy or cut
3. [0]9[5] (Start) 7 [1929394] to highlight the text 7
[0]9[5] (Stop)
4. [1929394] to move to a new required location
5. [5] (Options) 7 Select Paste
Options
When entering text, the following options may be available by
pressing [5] (Options).
Use contacts*
Copy/Cut/Paste See “Copying/cutting/pasting text” on page 43.
Add symbol
Input method Select the input method.
T9 on/off*
Input language*
My dictionary Add words to the internal dictionary.
Exit Exit the text edit mode.
1
1
Access Contacts menu to use Contacts data.
Show the Symbol list from which you can select
any symbol available on your phone.
Turn On or Off the predictive dictionary.
1
Select a language you wish to write in.
*1Depends on each application.
43
Page 47

Basic Operations
The following table shows characters available on your phone.
The characters vary depending on the Input language setting (see
page 43).
Key
T9® (T9y, T9u or T9)
[L] Space
[A] . , - ? ! ’ @ : ; / 1
[S] A B C 2 (a b c 2)
[D] D E F 3 (d e f 3)
[F] G H I 4 (g h i 4) G H I 4 Θ Í (g h i 4 η θ ι ì í) 4
[G] J K L 5 (j k l 5) J K L 5 Λ (j k l 5 κ λ µ)5
[H] M N O 6 (m n o 6)
[I] P Q R S 7 (p q r s 7)
[J] T U V 8 (t u v 8)
[K] W X Y Z 9 (w x y z 9) W X Y Z 9 Ψ Ω (w x y z 9 χ ψ ω)9
[e]
. , ? ! " - : ; @ /
[r]
Input method (Input language: English)
Multi-tap (Abc, ABC or abc)
e
. , ? 1 ! " - : ; @ /
] { } ' ¡ ¿ & % \ ^ ~ | < > f ¢ £ $
¥ ¤ § ` (Space) * (Linefeed)
( ) # + _ = [
A B C 2 Γ Á Ä Å Â Ã Æ Ç
(a b c 2 α β γ á ä å æ à â ã)
D E F 3 ∆ É Ê
(d e f 3 δ ε ζ é è ê)
M N O 6 Ξ Ñ Ó g Ö Ø Ô Õ
(m n o 6 ν ξ ó h ñ ö ø ò ô õ)
P Q R S 7 Π Σ
(p q r s 7 π ρ l σ ß)
T U V 8 Φ Ú j Ü
υ φ ú k ü ù)
(t u v 8 τ
Letter case change e
(Press and hold) Input method change
e
( ) # + _ = [ ] { } ' ¡ ¿ & % \ ^ ~ | < > f
¢ £ $ ¥ ¤ § ` (Space) * (Linefeed)
(Press and hold) Linefeed
Numeric
(123)
0
(Press and
hold) +
1
2
3
6
7
8
r
Shortcut: To enter numbers while in T9 or Multi-tap method, press and
hold the required numeric key [L]-[K].
44
Page 48

Contacts
Contacts menu structure
Contacts list ..................... 46
Add contact ...................... 48
Phone..................................... 48
SIM......................................... 50
Call log.............................. 51
Dialled numbers ..................... 51
Answered calls ....................... 51
Missed calls............................ 51
Speed Dial list .................. 52
Advanced ..........................53
Synchronisation ......................53
My number.............................. 54
Display by ............................... 55
Memory status ........................55
Copy all from SIM ................... 55
Copy all to SIM ....................... 55
Delete all................................. 56
Service numbers*1...........56
1
*
View groups ..................... 53
Note: There are several ways to select items from menu lists. See “Menu
selection method” on page 30.
45
Page 49

Contacts
Viewing the Contacts list
You can search for a phone number in the Contacts list. All the
numbers stored in the phone and SIM card are displayed.
Searching for a contact
d Main menu > Contacts > Contacts list
1. [192] to scroll to the required contact
OR
Enter letters to find a contact beginning
with the specific letters
2. To view the Contacts card, [0]
Options
In the Contacts list, the following options are available by pressing
[5] (Options).
View View the selected Contacts card.
Call Call the selected contact.
Create message
Edit
Search Search a contact by entering characters.
Add contact
Delete Delete the selected contact.
46
Create an SMS or MMS, and send it to the
selected contact. See “Creating a new message”
on page 58.
Edit the selected contact. See “Editing a Contacts
card” on page 50.
Add a new contact. See “Adding contacts” on
page 48.
Page 50

Contacts
Speed dial
Copy to phone/SIM
Send via infrared
Assign the selected contact to a Speed dial. See
“Assigning speed dial keys” on page 52.
Copy the selected contact to the phone or the SIM
card.
Send the selected contact to another device via
infrared. See “Infrared” on page 108.
Making a call from Contacts
d Main menu > Contacts > Contacts list
1. [192] to scroll to the required contact
OR
Enter letters to find a contact beginning with the specific letters
2. [q]
3. If the card has several phone numbers stored, [192] to scroll
to the required number 7 [0]9[5] (Call)
47
Page 51

Contacts
Adding contacts
Storing a contact in your phone
In the phone, you can store detailed information for each contact.
The entries are retained even if you damage your SIM card.
d Main menu > Contacts > Add contact > Phone
1. [192] to scroll to the required field 7 [0]
2. Enter information 7 [0]
To enter characters, see “Text entry” on page 40.
3. When entries are completed, [5] (Save)
1
First name*
Last name*
Mobile
1
number*
Home number*
Work number*
Mobile email*
Personal
1
email*
Work email*
Birthday Enter the contact’s birthday.
Postal address
Note Enter notes.
Enter the first name.
1
Enter the last name.
Enter the phone numbers.
1
1
1
Enter the e-mail addresses.
1
Enter Additional info, No./street, Postal
code, City, State and Country.
48
Page 52

Contacts
Select the required ringtone from
Ringtone
Message alert
Illuminations
Picture Select the required picture.
Group Select the required group.
*1The contact entry can be saved when at least one of the items is filled.
2
*
Note: If a picture in My Media is attached to a Contacts card, it appears on
the screen when the contact calls you. When the picture is set to be attached
to a Contacts card, the phone saves the picture resized for the Contacts card
if the picture is larger than the display size.
For downloading information, visit http://box.panasonic.com/
<Default> or My Media. To download a
ringtone, select Download*
Select the required Message alert from
<Default> or My Media. To download a
Message alert, select Download*
Select <Default> or the required
illumination colour.
2
.
2
.
49
Page 53

Contacts
Storing a contact in your SIM card
You can store some information for each contact in your SIM card.
d Main menu > Contacts > Add contact > SIM
1. [192] to scroll to the required field 7 [0]
2. Enter information 7 [0]
Name Enter the name.
Tel number Enter the phone number.
3. [5] (Save)
Note: The length of name and number, and the total amount of data are
SIM dependent.
Storing a contact from Call log
See “Saving a phone number from Call log” on page 51.
Editing a Contacts card
d Main menu > Contacts > Contacts list
1. Highlight the required Contacts card (See “Searching for a
contact” on page 46.)
2. [5] (Options) 7 Select Edit
3. Edit the required entry 7 [5] (Save)
50
Page 54

Contacts
Call log
Recently dialled phone numbers, answered calls and missed calls
are stored in Call log. The numbers in the Call log list can be used to
call, send a message or add to Contacts.
Viewing/Dialling from Call log
d Main menu > Contacts > Call log
1. [394] to move to Dialled numbers, Answered calls or
Missed calls
2. [192] to scroll to the required log 7 [0]
3. [0] to call
Shortcut: You can directly view the Dialled numbers list by pressing [q]
in standby mode.
Saving a phone number from Call log
d Main menu > Contacts > Call log
1. [394] to move to Dialled numbers, Answered calls or
Missed calls
2. [192] to scroll to the required phone number
3. [5] (Options) 7 Select Add to contacts
4. Select New or Add
5. If New is selected: Enter other information
If Add is selected: Highlight the required contact 7 [5]
(Select) 7 If there is no empty field, “Would you like to
replace?” 7 [0]9[5] (Yes) 7 Select the number you want to
replace in Phone Contacts
6. [5] (Save)
51
Page 55

Contacts
Options
In each Call log list, the following options are available by pressing
[5] (Options).
Call Call the selected number.
Create message
Add to contacts
Delete Delete the selected number.
Delete all Delete all the logs in the list.
Create an SMS or MMS message to the selected
number.
Store the selected number to Contacts. See
“Saving a phone number from Call log” on
page 51.
Speed dial
You can quickly dial phone numbers by pressing keys 2-9.
Assigning speed dial keys
d Main menu > Contacts > Speed Dial list
1. [192] to scroll to the required key 7 [0]
2. Enter phone number 7 [0]
To assign a speed dial key to a contact:
d Main menu > Contacts > Speed Dial list
1. [192] to scroll to the required key 7 [5] (LookUp)
2. Highlight the required contact 7 [5] (Select)
3. If the card has several phone numbers stored, [192] to scroll
to the required number 7 [0]9[5] (Select)
Using the speed dial keys
In standby mode:
1. Press and hold a speed dial key ([S]-[K]) 7 [5] (Call)
52
Page 56

Contacts
Groups
You can categorise the Contacts list stored in your phone into
20 groups.
Viewing group members
d Main menu > Contacts > View groups
1. Select the required group
The contacts in the selected group are displayed.
Renaming a group
d Main menu > Contacts > View groups
1. [192] to scroll to the required group 7 [5] (Rename)
2. Enter a new group name 7 [0]
Advanced
Synchronisation
You can synchronise your Contacts list with your network server. You
can just send changes or send all your records to the network
server. For further details, see “Synchronisation” on page 110.
To send only changes to the network server:
d Main menu > Contacts > Advanced > Synchronisation >
Modified contacts
The phone confirms completion.
To send all your records to the network server:
d Main menu > Contacts > Advanced > Synchronisation > All
contacts
The phone confirms completion.
53
Page 57

Contacts
My number
You can store your own numbers in the phone and SIM card.
Storing numbers in Mobile profile
d Main menu > Contacts > Advanced > My number > Mobile
profile
1. [0]9[5] (Create)
2. Repeat steps 1-3 in “Storing a contact in your phone” on
page 48
Storing numbers in SIM profile
d Main menu > Contacts > Advanced > My number > SIM
profile
1. When the profile is empty: [0]9[5] (Create)
When the profile has the stored number(s): [5] (Options) 7
Select Create
2. Repeat steps 1-3 in “Storing a contact in your SIM card” on
page 50
Options
When viewing My number, the following options are available by
pressing [5] (Options).
Edit Edit the profile.
1
Create*
Delete Delete the profile.
Send via infrared Send the profile via infrared.
Create a new profile.
*1Available only for SIM profile.
54
Page 58

Contacts
Displaying the Contacts list sorted by last
name/first name
You can choose to sort the Contacts list by contact’s last name or
first name.
d Main menu > Contacts > Advanced > Display by
1. Select First name or Last name
Memory status
You can see the amount of memory available in the Contacts list.
d Main menu > Contacts > Advanced > Memory status
Note: The amount of memory for SIM storage depends on your SIM card.
To decrease the amount of phone memory used, delete unwanted data or
store data on your PC (see “USB” on page 114).
Copying contacts
You can copy all the contacts from SIM card to phone, or from phone
to SIM card.
Copying all the contacts from SIM card to phone
d Main menu > Contacts > Advanced > Copy all from SIM
1. “Copy?” 7 [0]9[5] (Yes)
Copying all the contacts from phone to SIM card
d Main menu > Contacts > Advanced > Copy all to SIM
1. “Only Name and Number fields can be copied. Continue?”
7 [0]9[5] (Yes)
55
Page 59

Contacts
Deleting Phone Contacts
You can delete all the contacts stored in your phone.
d Main menu > Contacts > Advanced > Delete all
1. “Delete all contacts in phone?” 7 [5] (Yes)
2. “Are you Sure?” 7 [5] (Yes)
Service numbers
If your SIM card includes SDN (Service Dialling Number), you can
call a service number by selecting from the list.
SDN enables you to access special services provided by your
network operator, such as customer support, emergency services,
etc.
d Main menu > Contacts > Service numbers
1. [192] to scroll to the required item 7 [0]9[5] (Call)
56
Page 60

Messages
Messages menu structure
Create new........................ 58
SMS message ........................ 59
MMS message ....................... 62
Inbox ................................. 64
SMS ....................................... 65
MMS....................................... 66
Archive.............................. 68
SMS ....................................... 68
MMS....................................... 68
Voicemail...........................70
Call Voicemail......................... 70
Set mailbox number................ 70
Messages settings ...........71
SMS........................................ 71
MMS ....................................... 72
Memory status ..................73
SMS........................................ 73
MMS ....................................... 73
Web mail*1........................ 69
1
Chat*1................................ 70
Note: There are several ways to select items from menu lists. See “Menu
selection method” on page 30.
*
57
Page 61

Messages
Creating a new message
Messaging types
Short Message Service allows you to send and receive
SMS
MMS
Note: The message centre number for SMS should be preprogrammed on
the SIM card. Changing this number (see Message centre setting on
page 71) may cause failure of a text message.
Your phone may have already been set with an MMS profile when
purchased. To change the settings of the profile, see Advanced setting on
page 72.
Sending or editing of a forward locked picture/sound clip/video clip indicated
by the icon ( ) is restricted.
short text messages on any network that has roaming
agreement. (Dependent on the recipient’s phone
parameters.) With the Illumination feature, you can
express special feelings in a message.
Multimedia Messaging Service allows you to send
messages containing text, pictures, sound and video
clips from your phone to other MMS-enabled phones or
e-mail addresses. The recipient can play it as a slide
show.
58
Page 62

Messages
Creating an SMS message
d Main menu > Messages > Create new > SMS message
1. Create text message 7 [0]
See “Text entry” on page 40 for entering text.
2. To enter recipient’s phone number directly: Enter number
To select recipient’s phone number from Contacts: [0] 7
Highlight the required contact 7 [5] (Select) 7 If the card has
several phone numbers stored, [192] to scroll to the required
number 7 [0]9[5] (Select)
3. [0] to send the message
Creating an Illumination message with emoticons
With the Illumination feature, you can express special feelings in a
message. The Indicator/Illumination Light responds to the
pictographs in an Illumination message and light in combinations of
colours and light patterns when you receive and view an Illumination
message.
d Main menu > Messages > Create new > SMS message
1. Create text message
2. [5] (Options) 7 Select Tem pl ate s
3. Select Illumination templates
4. Select the required emoticon
See “Emoticon list” on page 60.
To preview the Illumination of the messages you create:
[5] (Options) 7 Select Preview illumination
Note: Only recipients who have an Illumination message capable phone
can view messages with Illumination.
59
Page 63

Messages
Emoticon list
Emoticon
Indicator
Colour
:-)
:-D (^_^)
>:-<
Colour 3
e
:
Colour 6
:-P C (
:'(
:-(
Colour 1
:-/
Colour 5
:-[ C (-_-; C
:->
8-)
Colour 2
Colour 4
:()
:-I
I-(
Colour 7
;-) Colour 8 (^_~)" Colour 8
Light
Pattern
A
B
B (;_;)
A
A (^w^)
B
C
A
Emoticon
Indicator
Colour
\^o^/
\(>o<)/
Colour 3
^3^
Colour 60:-) A (o^-^o)
e
~o~e)
(T_T)
Colour 1
(?_?)
Colour 5:-S B (>_<) B
^&^
Colour 2
(@_@)
eoe
Colour 4:-0 (
)
p(^-^)p A
(-_-)
(_ _)Zzz
Colour 7
Light
Pattern
A
B:-|| (>-<#)
A
B
A
A
B=:-)
C
A
• Pattern A: [Firefly] flickers slowly for about 4 seconds.
• Pattern B: [Flash] flickers fast for about 3 seconds.
• Pattern C: [Beam] lights for about 3 seconds.
60
Page 64

Messages
Options
When creating a text message, the following options are available by
pressing [5] (Options).
Send Send the text as an SMS message.
Send to many Send the text to more than one recipients.
Preview illumination Preview illumination message.
Tem pl ate s
Count message
Save Save the message in Unsent folder.
Use contacts Access Contacts menu to use Contacts data.
Copy/Cut/Paste Copy, cut or paste the text.
Add symbol
Input method Select the input method.
T9 on/off Turn On or Off the predictive dictionary.
Input language Select a language you wish to write in.
My dictionary Add words to the internal dictionary.
Exit Exit the text edit mode.
Select Illumination templates to create an
illumination message or User templates to use
the stored text templates.
The long message may be divided into several
messages. You can check the concatenated
message number.
Show the Symbol list from which you can select
any symbol available on your phone.
61
Page 65

Messages
Creating an MMS message
d Main menu > Messages > Create new > MMS message
1. Select Add picture, Add text, Add sound or Add video
2. If Add text is selected: Create text message 7 [0]
See “Text entry” on page 40 for entering text.
If Add picture/Add sound/Add video is selected: Select the
required item stored to My Media 7 [5] (Select)
You can also download new files, take new pictures, record new sound
or video clips for the MMS message.
3. To add more than one picture, text, sound or video clip, [192]
to scroll to Slides 7 [0] 7 [0]9[5] (Yes)
4. Repeat steps 1-3 if required
To send the message:
5. [5] (Options) 7 Select Send
6. [192] to scroll to Add subject 7 [0]
7. Enter subject 7 [0]
8. [192] to scroll to Add recipient 7 [0]
9. Select From contacts, Enter number or Enter email address
10. If From contacts is selected: Highlight the required contact 7
[5] (Select) 7 If the card has several numbers stored, [192]
to scroll to the required number 7 [0]9[5] (Select)
If Enter number/Enter email address is selected: Enter
number/email address 7 [0]
11. [192] to scroll to Send 7
Note: When you select Add video and record a new video clip in step 2,
the recording time is fixed to For MMS sending.
You cannot attach a video clip together with a picture file or sound clip to one
slide.
For downloading information, visit http://box.panasonic.com/
[0]
62
Page 66

Messages
Slide options
When Slides is highlighted, the following options are available by
pressing [5] (Options).
Add new Add a new slide.
Send
Slide duration Specify duration of the slide.
Remove slide Remove the slide from the MMS message.
Preview slide Preview the MMS message as a slide.
Send the MMS message after entering subject
and recipient number or address.
Receiving messages
Receiving SMS messages
When you receive a new SMS message, the message icon ( ) is
displayed along with a tone, illumination, and/or vibration. The SMS
notification also appears on the standby screen.
Reading SMS messages
When an SMS notification is displayed on the standby screen:
1. [0]9[5] (View)
If there is more than one notification, [192] to scroll to New SMS before
step 1.
If there is one SMS message, the message is automatically displayed.
2. If there is more than one SMS message, [192] to scroll to the
required message header in SMS Inbox 7 [0]
3. When the message is displayed, [0] to show the message
details (sender’s number, date, message centre’s number) if
required
63
Page 67

Messages
Receiving MMS messages
When you receive a new MMS message, the message icon ( ) is
displayed along with a tone, illumination, and/or vibration. The
received MMS messages are stored in Inbox.
Reading MMS messages
To read the received MMS messages, see “Inbox” on page 64.
Note: If you do not want to receive MMS messages automatically, select
Never in Auto download setting (see page 72). In this case, you will receive
a message notification first, and then you will need to receive messages
manually.
Inbox
Inbox stores received SMS and MMS messages.
d Main menu > Messages > Inbox
Numbers in brackets show the number of
unread messages and the total number of
messages in each inbox.
64
Page 68

Messages
SMS Inbox
SMS message icons
Unread message Read message
Reading SMS messages
d Main menu > Messages > Inbox > SMS
1. [192] to scroll to the required message header 7 [0]
2. [0] to show the message details (sender’s number, date,
message centre’s number) if required
Options
When viewing the list of messages or the selected message, the
following options are available by pressing [5] (Options).
Reply Create reply message in SMS or MMS.
Forward Forward the selected message.
Call Call the sender’s number.
Add to contacts Store the sender’s number to Contacts.
Use detail*
Delete Delete the selected message.
Delete all*
View illumination*
1
2
Use phone number, e-mail or web address in the
selected message to call, create message, add to
Contacts, etc.
Delete all the SMS messages.
1
Check the illumination of the message.
*1Available only when viewing the selected message.
2
*
Available only when viewing the list of messages.
65
Page 69

Messages
MMS Inbox
MMS message icons
Unread message MMS notification
Read message
Reading MMS messages
d Main menu > Messages > Inbox > MMS
1. [192] to scroll to the required message header 7 [0]
Options in the message list
When viewing the list of messages, the following options are
available by pressing [5] (Options).
Reply Create reply message by SMS or MMS.
Reply to all Create reply message to all recipients.
Forward Forward the selected message.
Call Call the sender’s number.
Add to contacts
Delete Delete the selected message.
Delete all Delete all the MMS messages and notifications.
Protect/Unprotect Protect or unprotect the selected message.
Details Show details for the selected message.
Store the sender’s number or e-mail address to
Contacts.
Note: Sending or editing of a forward locked file indicated by the icon ( )
is restricted.
66
Page 70

Messages
Options while viewing messages
When viewing the message, the following options are available by
pressing [5] (Options).
Reply Create a reply message by SMS or MMS.
Reply to all Create a reply message to all the recipients.
Play again Play the selected message.
1
Message font size*
Save picture Save the attached picture to My Media.
Save sound Save the attached sound clip to My Media.
Save video Save the attached video clip to My Media.
Use detail
Attached files Show the attached files.
1
*
Select the required font size.
Use the phone number, e-mail or web address in
the selected message to call, create message,
add to Contacts, etc.
Options for notification
When the notification is highlighted, the following options are
available by pressing [5] (Options).
Receive Receive new messages.
Forward Forward the message.
Reject
Call Call the sender’s number.
Delete all Delete all the MMS messages and notifications.
Protect/Unprotect Protect or unprotect the message.
Details Show details for the selected message.
Delete the notification from the message list and
the message from the server.
67
Page 71

Messages
Archive
Archive stores SMS and MMS messages that are sent or waiting to
be sent.
Sent Store sent SMS messages.
SMS
MMS
Unsent
Sent Store sent MMS messages.
Outbox Store undelivered MMS messages.
Drafts Store unfinished MMS messages.
Viewing messages
d Main menu > Messages > Archive > SMS or MMS
1. Select the required folder
2. [192] to scroll to the required message 7 [0]
Options for SMS
In Sent and Unsent folders, the following options are available by
pressing [5] (Options).
Send Send the selected message.
Call Call the sender’s number.
Use detail*
Delete Delete the selected message.
Delete all*
View illumination*
1
2
1
Store undelivered and unfinished SMS
messages.
Use phone number, e-mail or web address in the
selected message to call, create message, add to
Contacts, etc.
Delete all the SMS messages in the folder.
Check the illumination of the message.
*1Available only when viewing the selected message.
2
*
Available only when viewing the list of messages.
68
Page 72

Messages
Options for MMS
In Sent, Outbox and Drafts folders, the following options are
available by pressing [5] (Options).
Edit Edit the selected message.
Forward*
Send*
Delete Delete the selected message.
Delete all Delete all the messages in the folder.
Protect/Unprotect Protect or unprotect the selected message.
Details Show details for the selected message.
*1Available only in Sent folder.
2
*
1
2
Available only in Outbox and Drafts folder.
Forward the selected message.
Send the selected message.
Web mail
Web mail is an innovative service that lets you stay up-to-date with
all of your messages. You need to subscribe to this service. For
further information, contact your service provider.
Connecting to internet mail
d Main menu > Messages > Web mail
Your phone is connected to the Internet via a WAP connection to
retrieve e-mail messages.
1. Follow the screen contents
69
Page 73

Messages
Chat
Chat lets you enjoy the fun of instant messaging wherever you are.
It’s the fun way to chat on-line. For further information, contact your
service provider.
d Main menu > Messages > Chat
1. Follow the screen contents
Voicemail
Voicemail is a network service which allows callers, who could not
reach you, to leave voice messages. You may need to subscribe to
this service. For further information, contact your service provider.
Retrieving stored voice messages
When a new voice message is stored, an alert sounds and ( )
appears on the display, and you receive an SMS notification.
When an SMS notification is displayed on standby screen:
1. [0]9[5] (Call)
2. Follow the recorded instructions
OR
d Main menu > Messages > Voicemail > Call Voicemail
1. Follow the recorded instructions
Shortcut: You can also press and hold [A] in standby mode to call your
voice mailbox.
Changing the voice mailbox number
d Main menu > Messages > Voicemail > Set mailbox number
1. Enter new voice mailbox number 7 [0]9[5] (Ok)
70
Page 74

Messages
Messages settings
SMS settings
d Main menu > Messages > Messages settings > SMS
1. Select the required setting
Message lights
Message lights view
Message centre Edit the message centre number.
Message type Select the required message type.
Validity period
Delivery report Select On to receive delivery reports.
Store sent SMS
Message font size*
Bearer type Select the data bearer type.
One push SMS
1
*
Decide whether or not you want the Indicator/
Illumination Light to illuminate when receiving an
illumination message.
Decide whether or not you want the Indicator/
Illumination Light to illuminate when viewing an
illumination message.
Set a time period for the message centre to
attempt message delivery. Select 1 hour, 12
hours, 1 day, 1 week, 1 month, 3 months or
Maximum.
Select On to store sent messages to the Sent
folder.
1
Select the required font size.
Select On to display new SMS messages by
opening the flip.
71
Page 75

Messages
MMS settings
d Main menu > Messages > Messages settings > MMS
1. Select the required setting
Select Request read (check if the other party has
read the message), Send read (inform the other
Reports
Priority
Validity period
Auto download
Player mode
Message font size*
Advanced
1
*
party that you have read the message when
asked), Request delivery (check if the other party
has received the message) or Send delivery
(inform the other party that you have received the
message when asked).
Select Low, Normal or High for the message
priority level.
Set a time period for the message centre to
attempt message delivery. Select 1 day, 7 days or
Maximum.
Select Always on (messages are retrieved
automatically after receiving message
notifications), On when home (messages are
retrieved automatically in your service area) or
Never (messages are retrieved manually).
Select Auto (display MMS slides, or playback
video/sound clips automatically) or Manual
(display MMS slides, or playback video/sound
clips manually).
1
Select the required font size.
If required, edit the information on Message
server, WAP profiles, Fetch on server*
Anonymous reject*
MMS software information.
1
. Select Information to view
1
and
72
Page 76

Messages
Memory status
You can see the amount of memory available for storing messages.
d Main menu > Messages > Memory status > SMS or MMS
Note: To decrease the amount of phone memory used, delete unwanted
data or store data on your PC (see “USB” on page 114).
73
Page 77

Camera
Camera menu structure
Picture............................... 75
Video ................................. 81
Note: There are several ways to select items from menu lists. See “Menu
selection method” on page 30.
74
Page 78

Camera
Picture
You can take a picture with the built-in camera, and send them via
MMS or infrared, or use them as wallpaper. You can also attach a
picture to a contact stored in your phone.
Picture preview screen
Icons on picture preview screen
-
-
Zoom level (1-25)
Picture size (Extra large/Large/Medium/
Small/Main display)
Image quality (Super fine/Fine/Normal)
Multi shot mode
Self timer (5 or 10 seconds delay)
Night mode
Brightness level (-2, -1, 0, +1, +2)
75
Page 79

Camera
Taking a picture
d Main menu > Camera > Picture
1. The display acts as a viewfinder. Move the phone around to
frame your subject
2. [0]9[U] to capture the image
Operations after taking a picture
To save the image to My Media: [5] (Save)
To return to the preview screen without storing the image: [6 ]
(Delete)
To send the captured image via MMS: [0] 7 See “Creating an MMS
message” on page 62
Taking a self-portrait
You can take your self-portrait using Self-portrait Mirror.
d Main menu > Camera > Picture
1. Close the flip. Look at yourself in Self-portrait Mirror
2. [U] on the side of the phone
3. Open the flip. The image appears on the display. For further
operation, see “Operations after taking a picture” on page 76
Shortcut: To directly open the picture preview screen, press and hold [U]
in standby mode.
Caution: To avoid impairing camera performance, DO NOT leave the
phone with the camera facing direct sunlight.
76
Page 80

Camera
Note: To send a picture via infrared or use as wallpaper, save the image
once, and then go to My Media. (See “Pictures” on page 130.)
If the camera is left in certain conditions including the preview screen and
capture screen for 3 minutes, the phone automatically exits Picture mode. If
left in the preview screen, but with the options menu displayed, the phone
remains in this state.
If certain situations such as receiving calls occur during camera operation,
the phone exits Camera mode. If a captured image is on the screen, it is
saved to My Media.
Zoom
[1]9[O] to zoom in one level
[2]9[P] to zoom out one level
You can also press and hold the keys to quickly reach the required
zoom level.
Note: Zoom function may not be available when the picture size is set to
Extra large 1280x1024.
Adjusting the brightness level
The picture brightness indicator shows the current brightness level.
[4] to increase the brightness level
[3] to decrease the brightness level
77
Page 81

Camera
Taking close-up pictures
You can take sharp pictures from a close distance by using Macro
Mode. (Macro focus range: 10 cm)
Turn the Macro Mode switch anticlockwise to ( ) before taking
close-up pictures.
Viewing pictures
Pictures taken with the built-in camera are saved to My Media. To
view the saved pictures, see “Viewing pictures” on page 130.
Picture settings
In the preview screen, the following options are available by
pressing [5] (Options).
Picture size
Image quality
Night mode Select On to take a picture in low light conditions.
Multi shot mode
Effect
Self timer
Shutter sound Select the required sound from Pattern 1-5.
Select the required size from Extra large
1280x1024, Large 640x480, Medium 320x240,
Small 160x120 or Main display 240x320.
Select the required quality from Super fine, Fine
or Normal.
15 continuous shots is available. See “Continuous
shooting” on page 80.
Select the required colour from Normal, Sepia,
Monochrome or Negative.
Select the amount of time delay you require for
shooting from Off, 5 seconds or 10 seconds.
78
Page 82

Camera
Switch to video Switch from Picture mode to Video mode.
Show the number of files which can be saved in
the current picture size and image quality. You
Available space
Set to default Reset the current picture settings to default.
Help Show direct key operation in the preview screen.
can see the number of files which can be saved in
other image qualities by pressing [5] (Quality),
and in other picture sizes by pressing [192].
Direct key operation
You can change the picture settings by pressing one of the numeric
keys which correspond to the functions as follows. Some functions
are depicted by the icon. See “Icons on picture preview screen” on
page 75.
[A]: Switch to video
[S]: Picture size
[D]: Image quality
[F]: Multi shot mode
[G]: Self timer
[H]: Night mode
[I]: Effect
[L]: Help
Adding a picture to Contacts card
If a picture is attached to a Contact card, it appears on the screen
when the contact calls you.
To attach a picture to a contact, save the image once, and then go to
Contacts. See “Adding contacts” on page 48.
79
Page 83

Camera
Continuous shooting
In Multi shot mode, you can capture a succession of 15 images with
just one press. When you set Multi shot mode on, the picture size is
fixed to Medium 320x240 and Night mode off.
d Main menu > Camera > Picture
1. [5] (Options) 7 Select Multi shot mode
2. Select On
3. [0]9[U] to shoot
The captured images are displayed as thumbnails.
Note: You cannot take pictures in Multi shot mode when the phone is
closed. Once you close the phone, Multi shot mode is switched off.
To view the captured images:
[1929394] to scroll to the required thumbnail 7 [0]
You can view the next image by pressing [4] or [2], and the
previous image by pressing [3] or [1].
To save a captured image:
1. When the required thumbnail is highlighted or the required
image is displayed on the screen, [5] (Options) 7 Select
Save this one only
The picture is stored to My Media.
To save all the captured images:
1. In thumbnail screen or when one of the images is displayed on
the screen, [5] (Options) 7 Select Save all pictures
OR
When one of the images is displayed on the screen, [0]
All the pictures are stored to My Media.
Note: All the captured images are also saved by pressing [U] on thumbnail
screen or when one of the images is displayed on the screen.
80
Page 84

Camera
Video
You can record video clips with the built-in camera, and send them
via MMS or infrared.
Video preview screen
Icons on video preview screen
-
-
Zoom level (1-25)
Recording time
(Extended video/For MMS sending)
Self timer (5 or 10 seconds delay)
Brightness level (-2, -1, 0, +1, +2)
81
Page 85

Camera
Recording a video clip
d Main menu > Camera > Video
1. Main display acts as a viewfinder. Move the phone around to
frame your subject
2. [0]9[U] to start recording
3. Video recorder records until reaching the clip size limit or until
you press [0]9[U]9[5] (Stop)
4. Select the required action
Playback Playback the recorded video clip.
Save to My Media Save the recorded video clip to My Media.
Send as MMS
Caution: To avoid impairing camera performance, DO NOT leave the
phone with the camera facing direct sunlight.
Note: To send a video clip via infrared, save the video clip once, and then
go to My Media. (See “Videos” on page 137.)
If the video is left in the preview screen or a recorded video clip is displayed
for 3 minutes, the phone automatically exits Video mode. If left in preview
screen, but with the options menu displayed, the phone remains in this state.
If certain situations such as receiving calls occur during camera operation,
the phone exits Camera mode. The recording ends automatically, and the
already recorded video clip is saved to My Media.
Attach the recorded video clip to an MMS
message. See “Creating an MMS message” on
page 62.
82
Page 86

Camera
Zoom
[1]9[O] to zoom in one level
[2]9[P] to zoom out one level
You can also press and hold the keys to quickly reach the required
zoom level.
Note: You cannot change the zoom level while recording.
Adjusting the brightness level
The video clip brightness indicator shows the current brightness
level.
[4] to increase the brightness level
[3] to decrease the brightness level
Note: You cannot change the brightness level while recording.
Playing video clips
Recorded video clips are saved to My Media. To play the saved
video clips, see “Playing video clips” on page 137.
83
Page 87

Camera
Video settings
In the preview screen, the following options are available by
pressing [5] (Options).
Recording time
Effect
Self timer
Switch to picture Switch from Video mode to Picture mode.
Available space
Help Show direct key operation in the preview screen.
Direct key operation
You can change the video settings by pressing one of the numeric
keys which correspond to the functions as follows. Some functions
are depicted by the icon. See “Icons on video preview screen” on
page 81.
[A]: Switch to picture
[S]: Recording time
[G]: Self timer
[I]: Effect
[L]: Help
Select the video recording time from Extended
video or For MMS sending.
Select the required colour from Normal, Sepia,
Monochrome or Negative.
Select the amount of time delay you require for
recording from Off, 5 seconds or 10 seconds.
Show the number of files which can be saved in
the current recording time. You can see the
number of files which can be saved in other
recording time by pressing [5] (RecTime).
84
Page 88

Browser
Browser menu structure
PANASONIC BOX
Note: There are several ways to select items from menu lists. See “Menu
selection method” on page 30.
Setting up your Browser
Your phone’s WAP (Wireless Application Protocol) browser allows
you to access services supported by the network such as news,
weather reports, sports, etc.
Before Internet services can be accessed, you need to subscribe to
your service provider to enable the relevant configuration
information. (Your service provider may have already completed the
connection settings. To configure the WAP profile settings, see
“WAP profiles” on page 91.)
Note: Modifying the preinstalled settings without accurate knowledge may
cause a failure in connection.
85
Page 89

Browser
Viewing the contents
Opening Browser
d Main menu > Browser
The off-line menu is displayed. You will not be
connected until you choose a menu.
1. [192] to scroll to the required menu 7
[0]
The phone is connected to the web site.
Shortcut: You can directly access Browser by pressing [6] ( ) in
standby mode.
Online status icons
Non-secure CSD
connection
Secure CSD connection
Closing Browser
1. [5] (Options) 7 Select Exit browser
Non-secure GPRS
connection
Secure GPRS
connection
86
Page 90

Browser
Browser options
While Browser is on-line or off-line, the following options are
available.
d Main menu > Browser [Off-line]
OR
d Main menu > Browser > Required menu [On-line]
1. [5] (Options) 7 Select the required option
Select Select the required item.
Bookmarks Go to the bookmark list.
Enter address Go to URL entry.
Save media*1*
Set as bookmark*
Service Inbox Open Service Inbox.
Reload page*
Advanced
Settings
Exit browser*
*1Available only when the web page is displayed.
2
*
Available only when the web page has the image, melody or video
contents.
2
1
1
The image in contents is saved to My Media.
1
The displayed URL is saved to the bookmark list.
Reload this page.
Go to homepage, clear the cache, view or send
the current URL, or view the current WAP
information.
Edit WAP profiles/Push access settings or view
the security information.
Terminate the browser.
87
Page 91

Browser
Bookmarks
Once you bookmark your favourite page or a frequently accessed
page, you can jump to the page quickly. You can also categorise the
bookmarked pages into 10 folders and rename each folder.
While off-line or on-line:
1. [5] (Options) 7 Select Bookmarks
2. [192] to scroll to the required bookmark folder 7 [0]
3. [192] to scroll to the required bookmark
4. To load the URL: [0]
To select the required option: [5] (Options)
Go to page Jump to the web page.
Add bookmark Add to the bookmark list.
Edit Edit the selected bookmark name and URL.
Move to Move the selected bookmark to another folder.
Delete Delete the selected bookmark.
Send bookmark Send the bookmarked URL via SMS or MMS.
Delete all in folder Delete all the bookmarks in the folder.
Renaming a bookmark folder
[192] to scroll to the required bookmark folder 7 [5] (Options) 7
Select Rename 7 Enter a new folder name 7 [0]
Deleting all bookmarks
In the bookmark list:
[5] (Options) 7 Select Delete all 7 [5] (Yes)
All the saved bookmarks are deleted, and the folder names return to
the default.
88
Page 92

Browser
Enter address
You can directly go to the required web page by entering the URL.
While off-line or on-line:
1. [5] (Options) 7 Select Enter address
2. Enter URL 7 [0]
Save media
Images, melodies or videos on the web page can be saved to My
Media.
When the web page is displayed:
1. [5] (Options) 7 Select Save media
2. [0]9[5] (Select) to save
Note: Panasonic is not responsible for the performance of downloaded
contents or possible corruption of phone software.
Set as bookmark
You can save the URLs of your favourite pages in Bookmarks.
When the web page is displayed:
1. [5] (Options) 7 Select Set as bookmark
2. Enter title 7 [0]
3. [192] to scroll to the required folder 7 [0]9[5] (Save)
89
Page 93

Browser
Service Inbox
View WAP Push message and go to URL.
While off-line or on-line:
1. [5] (Options) 7 Select Service Inbox
2. To load the URL: [0]
To select the required option: [5] (Options)
Go to page Jump to the web page.
1
View message*
Delete Delete the message.
*1Available only when text and URL are delivered from your service
provider.
View the message.
Reload page
Current page can be reloaded.
When the web page is displayed:
1. [5] (Options) 7 Select Reload page
90
Page 94

Browser
Advanced
While off-line or on-line:
1. [5] (Options) 7 Select Advanced
2. Select the required option
Home Jump to the set-up homepage.
Clear cache Delete the contents stored in the cache.
1
View current URL*
Send current URL*
WAP information View WAP browser information.
*1Available only when the web page is displayed.
View the URL of the current page.
Send the URL of the current page via SMS or
1
MMS.
Settings
WAP pro file s
If no settings are present, contact your service provider.
You can check or edit the current WAP profile settings, or add new
WAP profile settings.
d Main menu > Browser [Off-line]
1. [5] (Options) 7 Select Settings
2. Select WAP profiles
3. [192] to scroll to the required profile
4. [5] (Options) 7 Select Activate, Edit or Delete
5. If Edit is selected, you can edit the following information:
Profile name, Homepage, Proxy IP, Proxy port, Use proxy
and Data connections
Note: You need to configure GPRS or CSD before configuring the WAP
profile settings. See “Data connections” on page 114.
91
Page 95

Browser
Push access
Set up Push access to receive WAP messages.
While off-line or on-line:
1. [5] (Options) 7 Select Settings
2. Select Push access
3. Select Service indication, Service loading or Other
messages
4. Select On or Off
Security
View security information.
While off-line or on-line:
1. [5] (Options) 7 Select Settings
2. Select Security
3. Select the required item
Certificates Select Certificate 1-20.
1
Current certificate*
Session info*
*1Available only while secure connection.
1
View the current certificate.
View session information.
92
Page 96

Settings
Settings menu structure
Phone settings ................. 94
Profiles ................................... 94
Language ...............................95
Time and date ........................ 95
Illuminations ........................... 96
Key settings............................ 97
Master reset ........................... 99
Display settings ............. 100
Wallpaper ............................. 100
Main menu icons .................. 100
Themes ................................ 101
Brightness ............................ 101
Backlight time....................... 101
Operator name ..................... 101
Calls.................................104
Call diverts............................104
Call waiting ...........................105
Any key answer .................... 105
Active flip .............................. 106
Auto answer.......................... 106
Send my number ..................106
Call duration ......................... 106
Service charge*
1*2
................ 107
Connectivity....................108
Infrared ................................. 108
Synchronisation*
Cell Broadcast ...................... 112
GSM network........................ 113
Data connections.................. 114
2
................. 110
Sounds & alerts ............. 102
Assign ringtone .................... 102
Incoming volume .................. 102
Message alert....................... 102
Message volume .................. 102
Warning tone ........................ 103
Startup tone.......................... 103
Shutdown tone ..................... 103
Vibration alert ....................... 103
Note: There are several ways to select items from menu lists. See “Menu
selection method” on page 30.
Security ...........................115
PIN entry............................... 115
Change PIN2........................ 116
Fixed dial .............................. 116
Call barring ........................... 116
1
*
2
*
93
Page 97

Settings
Phone settings
Profiles
You can switch among different profiles in your phone, each with a
distinct combination of alert method, ringtone, etc. Profiles are set up
for use in the following environments:
Normal For everyday settings.
Silent For formal occasions.
Meeting For meetings.
Outdoor For noisy environments.
Car For driving occasions.
Activating a profile
d Main menu > Settings > Phone settings > Profiles
1. [192] to scroll to the required profile
2. [0]
OR
[5] (Options) 7 Select Activate
Setting a profile
You can personalise the individual settings within a profile. For
further details about the individual settings, see “Sounds & alerts” on
page 102.
d Main menu > Settings > Phone settings > Profiles
1. [192] to scroll to the required profile
2. [5] (Options) 7 Select Edit
3. Select the required item
4. Select the required setting
94
Page 98

Settings
Language
You can change the language used for display messages and/or text
entry. Automatic uses the language dictated by the country/region
code of the SIM card.
d Main menu > Settings > Phone settings > Language >
Display language or Input language
1. Select Automatic or the required language
Time and date
You can set your Home clock and Away clock.
Home clock
You can set the current time and date on your phone.
d Main menu > Settings > Phone settings > Time and date >
Home clock
1. Select the required setting
Set date & time Enter the time 7 [2] 7 Enter the date
Home area Select your home area.
Summer time Select On to activate the summer time mode.
Away clock
You can set Away clock to display the time in the area you choose.
d Main menu > Settings > Phone settings > Time and date >
Away clock
1. Select the required setting
Set time zone Select the required area.
Summer time Select On to activate the summer time mode.
95
Page 99

Settings
Choosing clock
You can choose either Home clock or Away clock to be displayed on
your phone.
d Main menu > Settings > Phone settings > Time and date >
Select clock > Home clock or Away clock
Display format
You can select the required display format for the date and time.
d Main menu > Settings > Phone settings > Time and date >
Display format > Time or Date
1. To set Time format: Select 24 hour or 12 hour
To set Date format: Select the required format (DD=date,
MM=month, YY=year)
Illuminations
The Indicator/Illumination Light flashes or beams when you receive
calls/messages, have a conversation, the flip is closed, the battery is
charging or data is transferred.
d Main menu > Settings > Phone settings > Illuminations
1. Select the required event
Incoming
Message
In conversation
Flip close
Charging
Data transfer
Select the required colour or Off.
Select On or Off.
Note: You can check the Flip close illumination by pressing [O9P] while
the phone is in standby mode with the flip closed.
96
Page 100

Settings
Key settings
Key tone
You can change the key tone.
d Main menu > Settings > Phone settings > Key settings > Key
tone
1. Select the required tone
Key volume
You can change the key tone volume.
d Main menu > Settings > Phone settings > Key settings > Key
volume
1. [1929394] to scroll to the required volume 7 [0]9[5]
(Select)
Key backlight
If you set the key backlight to off, you can maintain longer battery
life.
d Main menu > Settings > Phone settings > Key settings > Key
backlight
1. Select On or Off
97
 Loading...