

Panasonic EBTX320 - Cell Phone ATLAS, EB-TX320 Operating Instructions Manual

EB-TX320
Digital Multi-Network Phone
Operating Instructions
®
Before operating this phone, please read these instructions completely
and save this manual for future use. Charge battery before operation.

Contents
Introduction.......................................................................... vii
About This Manual............................................................. vii
Icons Used in This Manual............................................... viii
Chapter 1: Safety First ......................................................... 1
Batteries................................................................................ 1
Charging Devices................................................................. 1
General.................................................................................. 1
Availability of Service.......................................................... 2
Emergency (911) Service .................................................... 2
Safety Tips............................................................................ 2
Chapter 2: Getting Started................. .................................. 5
Battery Use........................................................................... 5
Attaching the Battery.............................................................. 5
Charging the Battery............................... ..... ..........................5
Recharging Tips .............................................................. 6
Battery Specifications............................................................. 6
Removing the Battery............................................................. 6
Low-Battery Warning.............................................................. 7
Changing Your Phone’s Faceplate..................................... 7
Phone Description ............................................................... 8
Phone Specifications.............................................................. 8
Function Keys ...................................................................... 9
Display Icons...................................................................... 10
Master Display and Icons..................................................... 10
Phonebook Icons................................................................. 11
Powering Phone On and Off ............................................. 11
Powering ON........................................................................ 11
Powering OFF...................................................................... 11
Standby Display................................................................. 12
Moving through the Menu................................................. 12
Shortcut Keys....................................................................... 12
i

Setting Date and Time ....................................................... 13
Adjusting Date and Time Settings........................................13
Changing the Date Format ...................................................13
Selecting 24-hour or 12-hour Mode......................................13
Setting Ring Volume.......................................................... 14
Selecting a Ring Alert........................................................ 14
Vibration Alert.......................................................................14
Using the Private Handsfree Headset .............................. 15
Chapter 3: Everyday Operations ...................................... 17
Placing Calls....................................................................... 17
Dialing from the Keypad .......................................................17
Dialing from the Phonebook .................................................17
Dialing a Phonebook Entry from the Menu ....................18
Super Dial ......................................................................18
Speed Dial .....................................................................19
Answering Calls ................................................................. 19
In-Call Features .................................................................. 20
Adjusting Voice Volume........................................................20
Viewing Your Own Phone Number During a Call.................20
Muting the Mouthpiece .........................................................20
Using the Display as a Scratchpad.......................................2 1
Turning the Speakerphone On and Off.................................21
Missed Calls ....................................................................... 22
Answer Key Options.......................................................... 22
Voice Mail............................................................................ 23
Listening to New Voice Mail..................................................23
ii
Redialing Numbers ............................................................ 23
Redialing One of the Last 10 Numbers Dialed.....................23
Automatic Redial...................................................................24
Key Lock............................................................................. 24
Turning On Key Lock............................................................24
Turning Off Key Lock............................................................24
Chapter 4: Text Entry Operations..................................... 25
Letter Entry......................................................................... 25
Using Letter Entry (ABC) Mode............................................ 2 5
Word Entry (Word T9) Mode.............................................. 26
Using Word Entry (Word T9) Mode ......................................26
Numbers (NUM) Mode........................................................ 27
Symbols (SYM) Mode......................................................... 27
Key Entry Table.................................................................. 27

Chapter 5: Phonebook Features ....................................... 29
Assigning Your Own Favorite Number............................ 29
Creating a Phonebook Entry............................................. 30
Creating a Super Dial Entry ................................................. 32
Changing or Deleting a Super Dial Entry............................. 32
Programming Pauses or Waits ............................................ 33
Saving a Displayed Phone Number.................................. 33
Editing/Deleting a Phonebook Entry................................ 33
Selecting a Phonebook Search Method........................... 34
Displaying Your Own Number .......................................... 35
Deleting All Phonebook Entries ....................................... 35
Chapter 6: Additional Operations ..................................... 37
Call History......................................................................... 37
Dialed Calls.......................................................................... 37
Missed Calls......................................................................... 37
Received Calls..................................................................... 38
Call History Options ............................................................. 38
Adding a Prefix .............................................................. 38
Saving a Number ........................................................... 39
Deleting a Number ...................................... ..... ...... ....... 39
Deleting All Entries in a List ......................... .................. 39
Call Timers........................................................................... 40
Tone Settings ..................................................................... 41
Key Volume.......................................................................... 41
Message Alert............................. ...... ...... ..... ...... .................. 41
Selecting a Message Alert ............................................. 41
Warning Tone.............. ..... ...... ..... ...... ............................ ...... . 42
Phone Settings................................................................... 42
Display Settings................................................................... 42
Backlight ........................................................................ 42
Display Contrast ............................................................ 43
Date/Time Display .........................................................43
Answer Mode....................................................................... 43
Alert Mode............................................................................ 44
Time Settings....................................................................... 45
Setting the Alarm ...........................................................45
Creating a Welcome Screen................................................ 46
Selecting Another Language................................................ 46
iii

Miscellaneous Menu.............................................................47
Model Type ....................................................................47
Emergency Call ..............................................................47
TTY Mode ......................................................................47
DTMF Duration ..............................................................48
Reset Defaults ...............................................................48
Security Options ................................................................ 50
Changing Lock Code............................................................50
Call Lock...............................................................................50
Locking Incoming Calls ..................................................51
Locking Outgoing Calls ................................ ...... ..... .......51
Limiting the Number of Digits Dialed ..............................51
Power-On Lock........................................ ............................ .52
Activating the Power-On Lock ........................................52
Deactivating the Power-On Lock from Standby .............52
Disabling the Power-On Lock ........................................52
Chapter 7: Service Provider Features.............................. 53
Caller ID............................................................................... 53
Call Waiting......................................................................... 53
Three-Way Calling.............................................................. 53
Text Messaging .................................................................. 54
Composing a Text Message.................................................54
Entering the Send To Information ..................................54
Entering the Text of Your Message ...............................54
Message Options ...........................................................54
Accessing Text Messages....................................................55
Reading New Text Messages...............................................55
Replying to a Text Message (Inbox Only).............................56
Forwarding a Text Message.................................................57
Locking a Text Message.......................................................57
Deleting a Text Message......................................................5 7
Calling Back a Text Message...............................................57
Adding the Sender to your Phonebook.................................57
Viewing Outbox Messages........................... ...... ..................58
Deleting All Inbox or Outbox Messages................................58
Group Lists......................................................................... 59
Creating a Group List .....................................................59
Viewing Your Group Lists ....................................... ...... .60
Editing a Group List .......................................................60
iv

Voice Mail ........................................................................... 61
Listening to New Voice Mail................................................. 61
Saving and Deleting Voice Mail........................................... 61
Resetting the Voice Mailbox Number................................... 61
International Calls.............................................................. 62
Chapter 8: System Settings............................................... 63
Voice Privacy Mode ........................................................... 63
Selecting Your Phone Number (NAM).............................. 63
Searching for Available Systems ..................................... 64
Service Priority................................................................... 64
Appendix A: Before Requesting Help................................ 65
Problems and Solutions.................................................... 65
Appendix B: Phone Accessories ....................................... 69
EB-TX320 Accessories...................................................... 69
EB-HF300EZ Handsfree Car Kit........................................ 71
Appendix C: Consumer Update ......................................... 73
Index..................................................................................... 77
v

vi

Introduction
Congratulations on your purchase of o ne of th e w or l d’s most
technologically advanced mobile co m munications syste m s! Your new
Panasonic phone combines the advantages of digital and analog coverage
with a variety of time-saving and easy-to-use features. The result: a phone
that offers real convenien ce, dependability, and mobility—in digital
analog service areas.
About This Manual
This manu al contains co mpr eh ens iv e in st ru ct io ns for ea ch of you r pho ne’s
features. From mak i ng a call to troubleshooting a problem, the answers to
most of your questions are here.
and
Chapter 1:
Chapter 1 include s i m por t ant safety and battery inform ation. Whether you
are a novice or an exp erienced cellular user, be sure to read this s ect i on
before
operating your phone.
Chapter 2:
Chapter 2 describes the basics of setting up and operating your phone.
From connecting and charging your batt er y, describing the phone’s keys
and display icons, moving through the feature menu, and using the Private
Handsfree Headset, this is the place to turn when you are ready to get
started.
Chapter 3:
Chapter 3 covers those features you’ll use on a daily basis — placing and
ending calls, answering calls, and so on.
Chapter 4:
Chapter 4 covers the two modes of text entry: l etter-by-lett er entry a nd the
new WORD T9
sending text messages.
Chapter 5:
Chapter 5 cover s how to save names , numbe rs, and add iti onal info rma tion
in your phone’s memory.
Safety First
Getting Started
Everyday Operations
Text Entry Operations
®
entry — designed to give you rapid text entry when
Phonebook Features
Introduction
Chapter 6:
Chapter 6 describes those features that allow you to customize your
phone’s settings. You can set alarms to remind you of important events,
switch your phone to another language, or secure your phone from
unauthorized us e.
Chapter 7:
Chapter 7 describ es how to use features that m ay be offered by your
wireless service provider, such as Caller ID, Call Waiting, Three-Way
Calling, Text Messaging, Voice Mail, and so on. Check with your wireless
service provider for com plete information on available services.
Additional Operations
Service Provider Features
Introduction vii

Chapter 8: System Settings
Chapter 8 contains information about the features on the System Setting
menu. This information is provided primarily for technically knowledgeable
users.
Reference Information:
Appendix A: Before Requesting Help
As you begin to take advantage of your phon e’s feat ur es, you may
experience minor pr obl ems. However, you can easily fix most of the se
problems. This ch apter contains a detailed l i st of sol ut io ns to some of the
problems you m ay encounter.
Appendix B: Phone Accessories
Many accessories are available for your phone. Appendix B lists and
illustrates each of these accessories. Please contact your wireless service
provider to purcha se G enuine Panasonic accessories.
Appendix C: Consumer Update
Appendix C contains a recent report published by the U.S. Food and Drug
Administration about the safety of mobile ph ones.
Index
If you are looking for a specific topic and it is not listed in the Contents, the
Index may point you in the right direction.
Icons Used in This Manual
The following icon s indi cate critical and time-s avi ng information found
throughout this man ual. Please take special not i ce of inf or m at ion i ncluded
with these icons.
Caution:
phone or putting your own safety at risk. Please be sure to read
this in formation.
Note:
particular feature or function will operate.
Tip:
tips can save you val ua b le t ime.
Information that could prevent you from damaging your
Information that could have direct impact on how a
Helpful advice and time-saving shortcuts. Memorizing these
viii Introduction

Safety First
Your new phone is a convenient and effective communications tool, but it can
be hazardous when used improperly. To avoid harming yourself or anyone else,
please review the following information before using your phone.
Batteries
Batteries can cause property damage, injury, or burns if the terminals are
touched with a conductive material (for example, metal jewelry, keys, and so
on). Therefore, use caution when handling a charged battery . Additional
precautions and notes are listed below:
• Never throw a battery into a fire; it may explode.
• Fully recharge the battery if the battery is low or as soon as the low-battery
alert beeps.
• Do not drop the battery.
• Do not bridge battery contacts together with metallic objects.
• Do not remove the battery from the phone while the phone is powered on.
Settings you have changed may revert to their previous settings.
A recyclable lithium ion/polymer battery powers your phone. Please
call 1-800-8-BATTERY for information on how to recycle the battery.
Charging Devices
• Use only Genuine Panasonic charging accessories. Use of attachments not
recommended by Panasonic or your wireless service provider may result in
fire, electrical shock, or injury. Panasonic is not responsible for damage
caused by using non-Panasonic accessories.
• Do not expose charging adapters to moisture, water, or the weather.
• Do not use an adapter with a damaged cord.
• When using a DC adapter in an automobile, a small amount of electricity
flows through the adapter, even if the phone is turned off. Remove the plug
from the cigarette lighter whenever the phone will be left in the vehicle for
long periods of time.
Caution:
socket.
Do not use the adapter in a vehicle that has a positive ground system.
The cigarette lighter must have a 12V negative ground
General
• Do not use the phone in extreme temperature or humidity. The specified
operating temperature range is -4°F to +140°F (-20°C to +60°C).
• Do not expose the phone (particularly the display) to direct sunlight for
extended periods of time.
• Do not attempt to disassemble the phone. There are no user-serviceable
parts inside.
• Do not expose the phone to rain or spill liquids on it.
• Do not carry the phone by holding the antenna.
• Do not use any accessories other than those designed for use with your
phone.
• Use of attachments not recommended or sold by your wireless service
provider may result in fire, electrical shock, or injury.
• Panasonic cannot be held responsible for damages caused by using nonPanasonic accessories.
Safety First 1

Chapter 1
Availability of Service
This phone, like any wireless phone, operates using radio signals, wireless and
landline networks, and user-programmed functions. Because of this,
connection in all conditions cannot be guaranteed. Therefore, you should never
rely solely on any wireless phone for essential communications (for example,
medical emergencies). When operating in analog mode, the service area where
you can place and receive calls will be smaller than with other phones.
Emergency (911) Service
If you need to make an emergency (911) call, power the phone on, dial 911, and
press . Emergency calls can be made regardless of lock setting.
When you purchase your phone, the key is programmed
Note:
as a Super Dial key to call the emergency number 911. However, you
have to enable this key assignment before you can use it. See
“Emergency Call” on page 47
Remember, to make or receive any call, the phone must be switched on and in
a service area that has adequate signal strength. Emergency calls might not be
possible on all wireless phone networks or when certain network service and/or
phone features are in use.
.
Safety Tips
Following the suggestions in this section will help ensure safe and efficient
operation of your Panasonic phone.
This Model Phone Meets The Government's Requirements For Exposure
To Radio Waves.
Your wireless phone is a radio transmitter and receiver. It is designed and
manufactured not to exceed the emission limits for exposure to radiofrequency
(RF) energy set by the Federal Communications Commission of the U.S.
Government. These limits are part of comprehensive guidelines and establish
permitted levels of RF energy for the general population. The guidelines are
based on standards that were developed by independent scientific
organizations through periodic and thorough evaluation of scientific studies.
The standards include a substantial safety margin designed to assure the
safety of all persons, regardless of age and health.
The exposure standard for wireless mobile phones employs a unit of
measurement known as the Specific Absorption Rate, or SAR. The SAR limit
set by the FCC is 1.6W/kg.
operating positions specified by the FCC with the phone transmitting at its
highest certified power level in all tested frequency bands. Although the SAR is
determined at the highest certified power level, the actual SAR level of the
phone while operating can be well below the maximum value. This is because
the phone is designed to operate at multiple power levels so as to use only the
power required to reach the network. In general, the closer you are to a wireless
base station antenna, the lower the power output.
Before a phone model is available for sale to the public, it must be tested and
certified to the FCC that it does not exceed the limit established by the
government-adopted requirement for safe exposure. The tests are performed in
positions and locations (e.g., at the ear and worn on the body) as required by
the FCC for each model. The highest SAR value for this model phone when
*
Tests for SAR are conducted using standard
* In the Unit ed Stat es an d Cana da, th e SAR li mit f or mobile p hone s use d by t he
public is 1.6 watts/kg (W/ kg) averaged over one gram of tissue. The standard
incorporates a substantial margin of safety to give additional protection for the
public and to account for any variations in measurements.
2 Safety First

tested for use at the ear is 1.500W/kg and when worn on the body, as described
in this user guide, is 0.747W/kg. (Body-worn measurements differ among
phone models, depending upon available accessories and FCC requirements).
While there may be differences between the SAR levels of various phones and
at various positions, they all meet the government requirement for safe
exposure.
The FCC has granted an Equipment Authorization for this model phone with all
reported SAR levels evaluated as in compliance with the FCC RF emission
guidelines. SAR information on this model phone is on file with the FCC and
can be found under the Display Grant section of http://www.fcc. gov/oet /fccid
after searching on FCC ID NWJ10A007A.
Additional information on Specific Absorption Rates (SAR) can be found on the
Cellular Telecommunications Industry Association (CTIA) web-site at
http://www.wow-com.com.
Chapter 1
Caution:
with FCC RF exposure requirements. Non-Panasonic accessories
may not comply.
All Panasonic branded accessories are tested and comply
Body-worn operation
To maintain compliance with FCC RF exposure guidelines, if you wear your
wireless phone on your body while on a voice or data call, always place the
phone in a Panasonic supplied or approved carry accessory. Use of nonPanasonic approved accessories may exceed FCC RF exposure guidelines.
Antenna Care
Use only the supplied or an approved replacement antenna. Unauthorized
antennas, modifications, or attachments could damage the phone and may
violate FCC regulations.
Phone Operation
NORMAL POSITION: Hold the phone as you would any other telephone, with
the antenna pointed up and over your shoulder.
FOR EFFICIENT OPERATION: For your phone to operate most efficiently, do
not touch the antenna unnecessarily when the phone is in use. Contact wit h the
antenna affects call quality and may cause the phone to operate at a higher
power level than otherwise needed.
Driving
Important:
telephones in the areas where you drive. Always obey them. Also, if
using your phone while driving:
Check the laws and regulations on the use of wireless
• Give full attention to driving—driving safely is your first responsibility;
• Use handsfree operation, if available;
• Pull off the road and park before making or answering a call if driving
conditions so require.
Electronic Devices
Most modern electronic equipment is shielded from RF signals. However,
certain electronic equipment may not be shielded against the RF signals from
your wireless phone.
•
Pacemakers:
that a minimum separation of 6 inches (6”) or 15 centimeters (15 cm) be
maintained between a handheld wireless phone and a pacemaker to avoid
potential interference with the pacemaker. These recommendations are
consistent with independent research and recommendations of Wireless
Technology Research.
The Health Industry Manufacturers Association recommends
Safety First 3

Chapter 1
Persons with pacemakers:
• Should ALWAYS keep the phone more than six inches from their pacemaker when
the phone is turned ON;
• Should not carry the phone in a breast pocket;
• Should use the ear opposite the pacemaker to minimize the potential for
interference;
• If you have any reason to suspect that interference is taking place, turn your phone
OFF immediately.
•
Hearing Aids:
hearing aids. In the event of such interference, you may want to consult
your service provider.
•
Other Medical Devices:
consult the manufacturer of your device to determine if it is adequately
shielded from external RF energy. Your physician may be able to assist you
in obtaining this information.
Turn your phone OFF in health care facilities when any regulations posted
in these areas instruct you to do so. Hospitals or health care facilities may
be using equipment that could be sensitive to external RF energy.
•
Vehicles:
shielded electronic systems in motor vehicles. Check with the manufacturer
or its representative regarding your vehicle. You should also consult the
manufacturer of any equipment that has been added to your vehicle.
•
Posted Facilities:
notices so require.
Some digital wireless phones may interfere with some
If you use any other personal medical device,
RF signals may affect improperly installed or inadequately
Turn your phone OFF in any facility where posted
Aircraft
FCC regulations prohibit using your phone while in the air; switch off your
phone before boarding an aircraft unless otherwise advised by airline
personnel.
Blasting Areas
To avoid interfering with blasting operations, turn your phone OFF when in a
“blasting area” or in other areas posted: “Turn off t wo-way radio.” Obey all signs
and instructions.
Potentially Explosive Atmospheres
Turn your phone OFF when in any area with a potentially explosive atmosphere
and obey all signs and instructions. Sparks in such areas could cause an
explosion or fire resulting in bodily injury or even death.
Areas with a potentially explosive atmosphere are often, but not always, clearly
marked. They include fueling areas such as gas stations; below deck on boats;
fuel or chemical transfer or storage facilities; vehicles using liquefied petroleum
gas (such as propane or butane); areas where the air contains chemicals or
particles, such as grain, dust or metal powders; and any other area where you
would normally be advised to turn off your vehicle engine.
For Vehicles Equipped with an Air Bag
An air bag inflates with great force. DO NOT place objects, including both
installed or portable wireless equipment, in the area over the air bag or in the air
bag deployment area. If in-vehicle wireless equipment is improperly installed
and the air bag inflates, serious injury could result.
For U.S. Customers:
butane) must comply with t he National Fire Protecti on Standard (NFPA-58).
For a copy of this standard, contact the National Fire Protection Association,
One Batterymarch Park,
PO Box 9101, Quincy, MA 02269.
E-mail address:
Web site:
Refer to Appendix C for the FDA Consumer Update on Mobile Phones
published by the U.S. Food and Drug Administration.
www.nfpa.org
Vehicles using liquefied petroleum gas (such as propane or
Custserv@NFPA.org
.
.
4 Safety First
Getting Started
This chapter gets you started using your phone and learning its ba si c
featur es and funct ions.
Note: D o not modif y or disassemble the handse t . Do not
pull or twist the antenna as doi ng so may loosen the
connection and/or damage the antenna.
Battery Use
Note: The battery must be fully char ge d bef or e using your
phone for the first time. Your handset’s new battery will
achieve maximum performance after two or three charges.
Attach and charge the bat tery as described in this sec tion.
Attaching the Battery
o
1
Insert the top edge of t he battery along the top edg e of the phone’s
battery compa rtm ent.
2
Push the bottom of the b at te ry toward the phone until it click s int o
place.
Charging the Battery
1
With the directional ar ro w s f aci ng up, at ta ch the AC adapter to the
phone.
2
Insert the plug into an AC power outlet. The indicato r light tu rn s re d. If
the phone is on during charging, the charging time will be extended.
When the battery is charged, the indicator light turns off and (if the
phone is on) the battery icon ( ) is filled.
3
To remove the AC Adapter from the phone,
the connector and pul l gent l y
.
press in both side ta bs on
Getting Started 5
Chapter 2
Recharging Tips
• Recharge batteries in a wel l -v entilated area between 41°F (5°C) and
95°F (35°C). T emperature may slightly affect charging time. In extreme
temperature conditions, the battery will stop charging and the indicator
light and battery charg in g icon w i ll turn off. If this happens, remove the
charger, return the phone to an acce pt able temperature leve l, an d
connect the charg er to restart charging.
• It is normal for your battery to become warm to the touch while it is
being recharged .
• Fully charge the battery fo r the r ecommended time.
• You can us e th e phone during charging , bu t d oi ng so will extend the
charging time.
Battery Specifications
Mode
Analog
Digital
Battery Type
(Lithium-Ion)
EB-BS320
Standard 740 mAh
EB-BS320
Standard 740 mAh
Times shown for standby, talk, and battery charge are
Note:
approximate and may vary from actual times, depending on
network configuration, signal strength, features selected, and
customer usage patterns.
Charge time reflects using the EB-CA340 400mA AC Adapter.
Removing the Battery
Talk
Time
Up to
80 min.
Up to
140 min.
Standby
Time
Approx.
5.5 hrs.
Up to
200 hrs.
Charge
Time
Approx.
180 min.
Approx.
180 min.
Slide latch down towa rd th e bot t om end of the phone.
1
Lift and remove batt er y.
2
Caution: Always turn the phone off before remov ing th e
battery.
changes you have recently made to the settings may return to
their previous values.
6 Getting S tarted
If you remove the ba ttery while the phone is on , any
Low-Battery Warning
The phone periodi call y beeps when the battery is l ow. The battery icon
( ) flashes and the
If your p h one i s at s ta ndb y (i dl e) wh en t h e
you will not be able to pl ace or receive calls until the bat te ry has been
recharged, or until shortly after you attach an AC or DC adapter. If you are
in a call when you hea r the beep and the message appears, quickly end
your call or attach an AC or D C adapter.
Low Battery
message is displayed.
Low Battery
message appears,
Changing Your Phone’s Faceplate
Your phone comes with an extr a fa ceplate that you can easil y att ach.
Follow these steps t o re move the attached fac epl at e :
Chapter 2
Hold the phone with the antenna pointed downward. Insert the end of a
1
large paperclip int o t he sl ot above the accessory connector on the
bottom end of the pho ne.
Push upward with th e paperclip to pop off the faceplate.
2
Follow these steps to attach the extra faceplate that came with your phone:
Align the top of the faceplat e with the top of the phone.
1
Snap the rest of the faceplate into place down th e le ngth of the phone.
2
Getting Started 7
Chapter 2
Phone Description
You can enter up to 32 charact er s by pressing the number keys. The
keypad is also used to enter text as descri bed in
Operations”
Phone Specifications
Size
(with standard battery)
Weight
(with standard battery)
Maximum RF Output 600 mW
8 Getting S tarted
Chapter 4, “Text Entry
.
4.6” x 1.7” x .8”
(119 mm x 44.5 mm x 19.6 mm)
3.1 oz. (89 g)
Function Keys
The following table describes how each fu nct ion key works.
Key Function
Chapter 2
through
Left Softkey/Key Lock:
above the key.
From standby mode, press and hold to turn on Key Lock.
Right Softkey:
the key.
Navigation Key:
in the required direction. Use this key to scroll through menus,
text, and the Phonebook.
Message Key:
Press to enter the text message menu.
Clear Key:
the previous display. Press and hold to clear the display or to
return to standby.
Send Key:
and hold for voice command recognition.
PWR/End Key:
Press to end a call and return to standby, or to return to standby
from any menu.
1 through 9 Digit Keys:
hold one key for Super Dial. See
In text entry mode, press to enter text, numbers, and/or symbols.
(Note: The key is used to enter spaces.) See
“Text Entry Operations”.
Press to use the function displayed above
Press the appropriate area of this key to scroll
Press and hold to retrieve voice mail messages.
Press to delete the previous character or to return to
Press to dial the phone number on the display. Press
Press and hold to power the phone on/off.
Press to use the function displayed
Press to enter numbers. Press and
“Super Dial” on page 18
Chapter 4,
.
Home Key:
from any menu.
In text entry mode, press to switch between uppercase and
lowercase letters.
Pause Key:
“Programming Pauses or Waits” on page 33.
See
first position of a phone number, pressing and holding will
toggle between 0 and + (the international dialing prefix).
Speakerphone/Quiet Mode Key:
and hold to turn speakerphone on/off.
From standby, press and hold to turn Quiet mode on/off.
Favorite Number Key:
service for up-to-date information on weather, sports, entertainment, and much more. You can assign this key to your own
favorite number (see
page 29
Press and hold to return “home” to standby (idle)
Press and hold to enter a pause or wait time.
When in the
During conversation, press
Press to connect to AT&T Wireless #121
“Assigning Your Own Favorite Number” on
).
Getting Started 9
Chapter 2
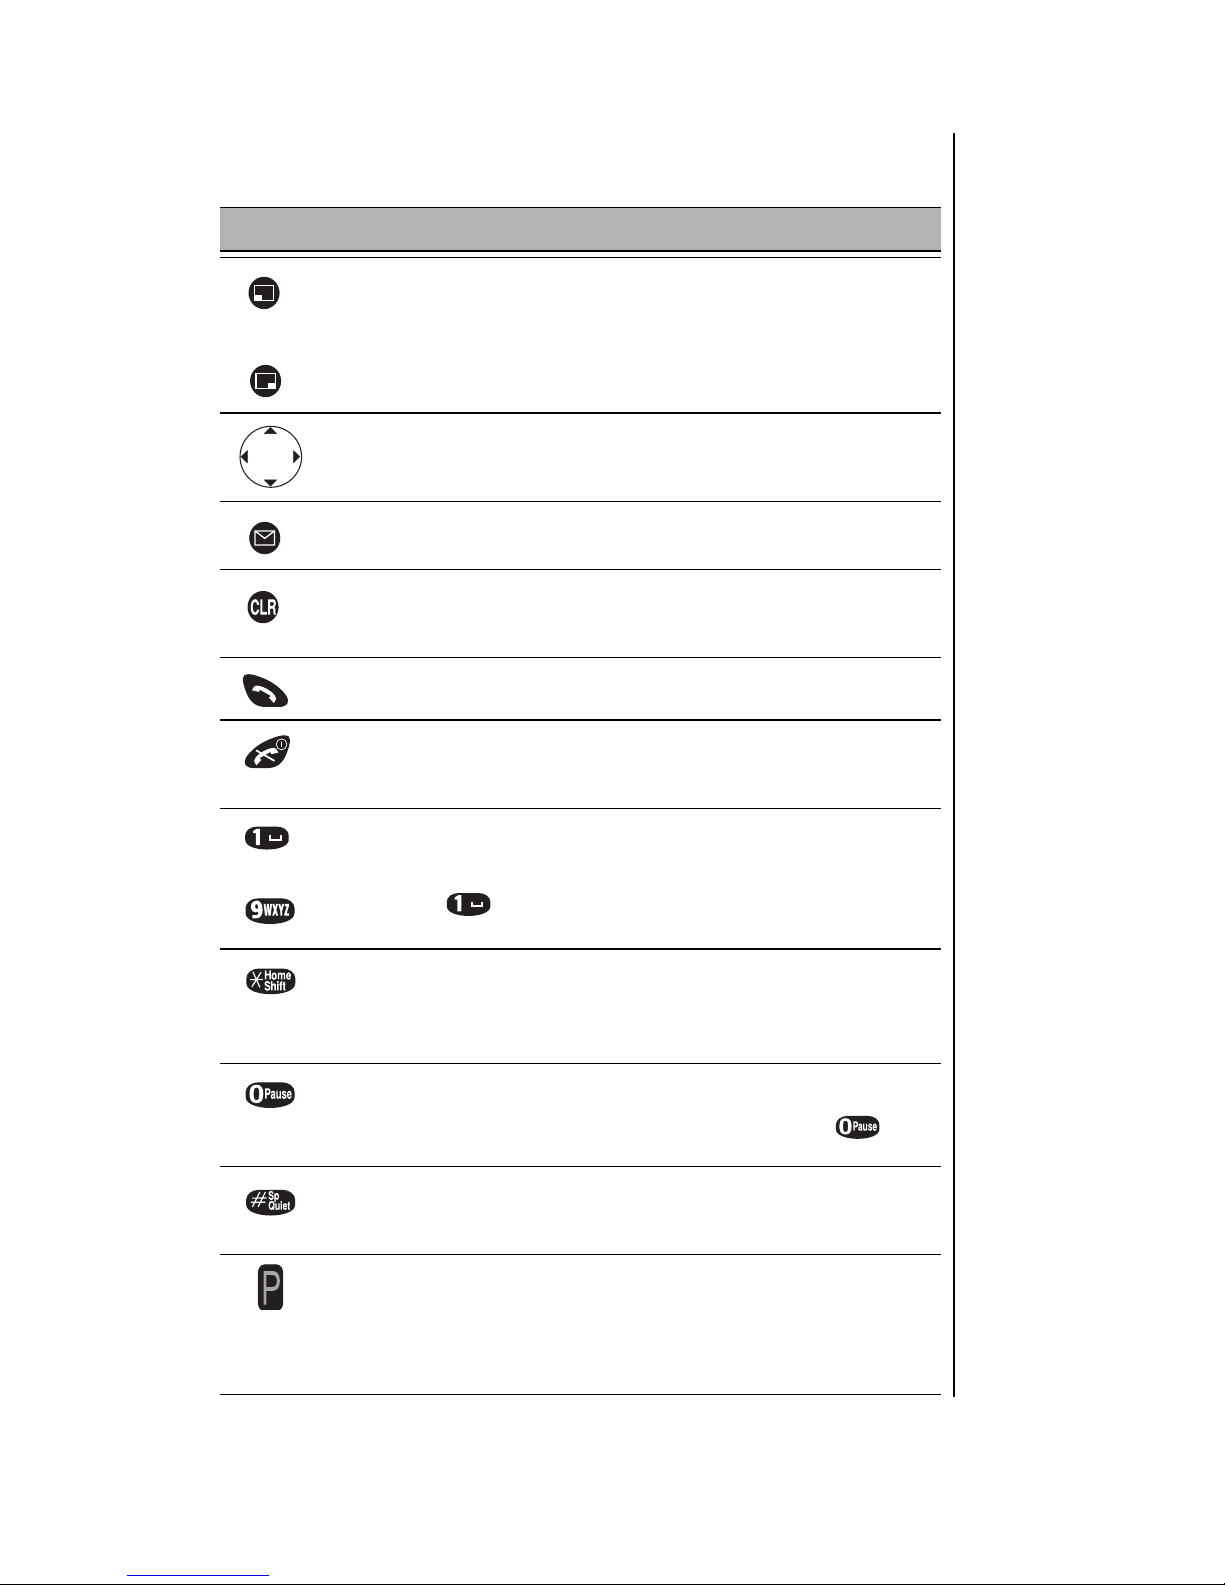
Display Icons
Icons that appea r on the displ ay depend on what featu re s you are using
and the options yo u have selected.
Master Display and Icons
Icon Indicates
Charged battery.
Low battery (flashes).
New text message received. When icon is darkened, indi-
cates that text message storage is full.
New voice mail message received.
Digital service available.
Active call is in operation. When blinking, the original call has
been put on hold.
Voice privacy feature is on.
Quiet Mode is on.
Ring volume is set to 0.
Vibration alert is on.
Incoming signal strength (varies by the number of bars
shown beside the signal icon):
Five bars indicate a strong signal.
No bars indicate a weak or no signal.
Display area (shows numbers, text, and symbols).
Softkey functions. From standby, press to enter the Main
Menu. The function changes depending on the features or
modes you are using.
Phonebook. From standby, press to access the
Phonebook. Also changes to softkey functions.
10 Getting Started
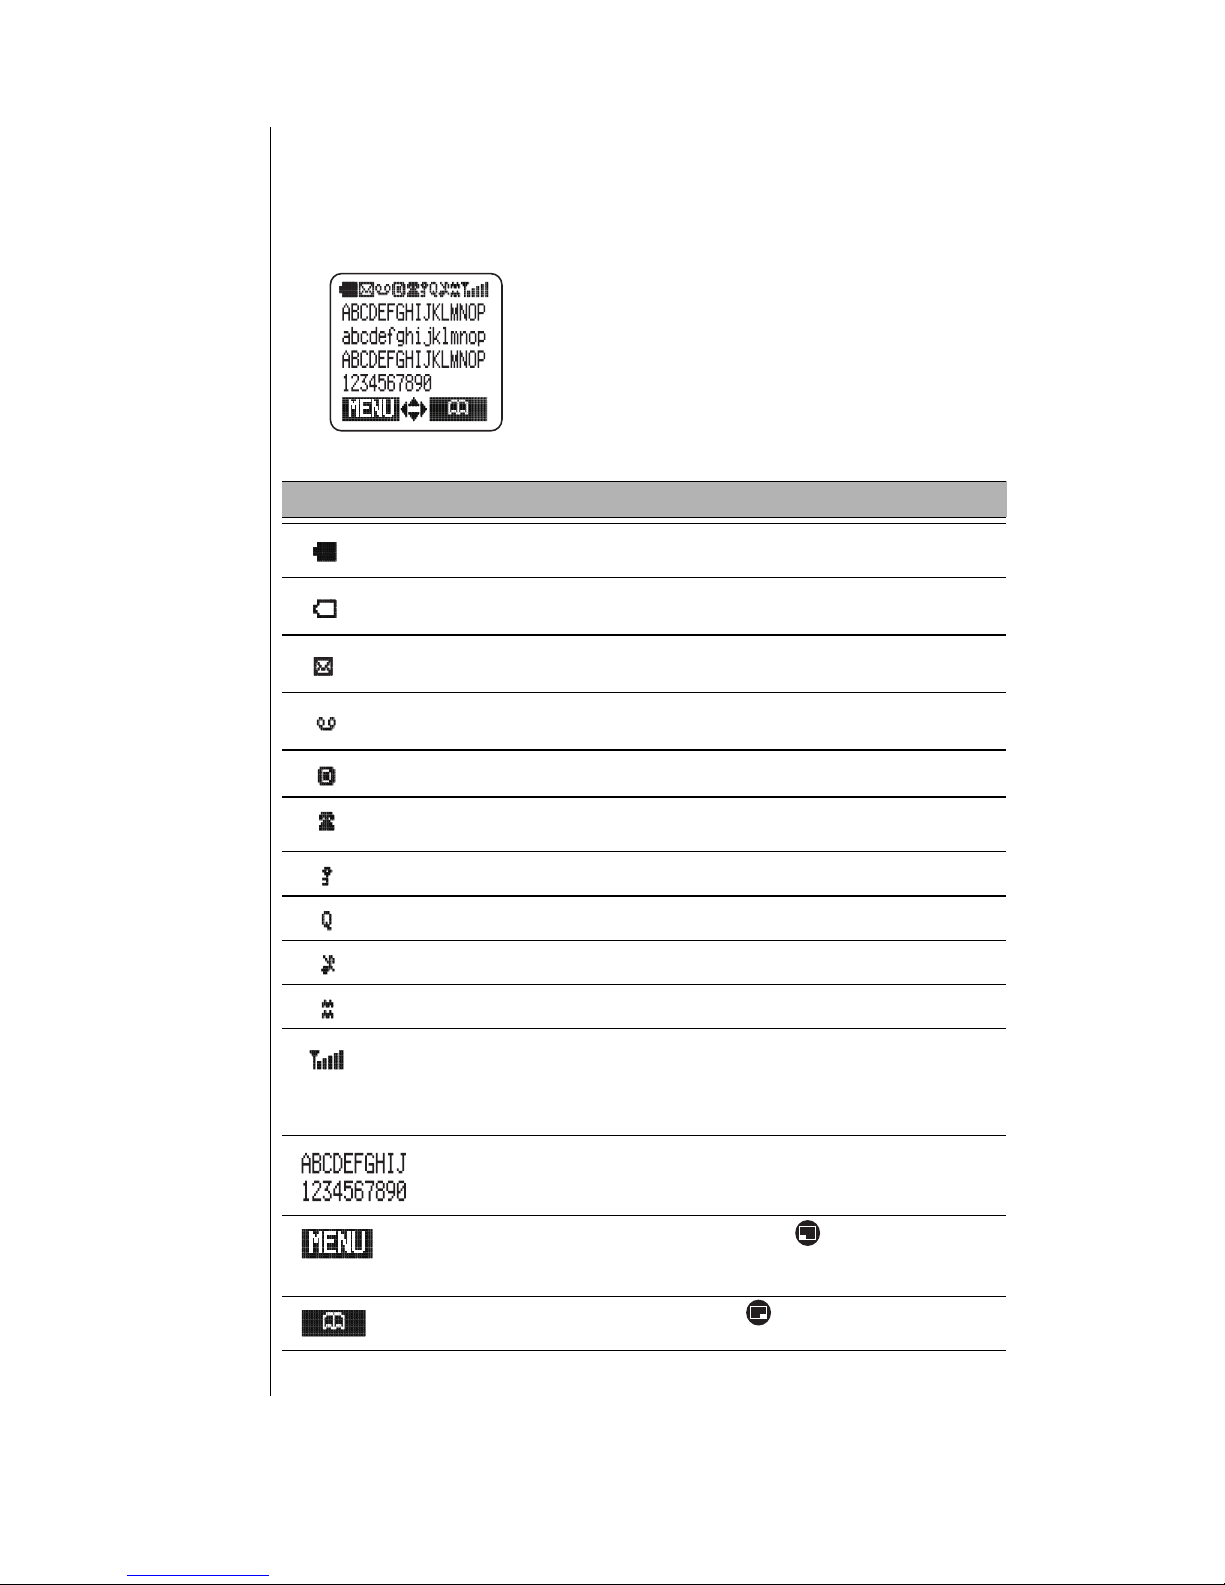
Icon Indicates
Press the Navigation key to move in the directions indicated
by the displayed arrows.
• The up arrow indicates that you can scroll up through a
menu selection list.
• The down arrow indicates that you can scroll down
through a menu selection list.
• The solid right arrow indicates that you can move forward
through a lengthy text display.
• The solid left arrow indicates that you can scroll back to
the start of a lengthy text display.
• The hollow right arrow indicates that you can move forward to the next screen.
• The hollow left arrow indicates that you can move back to
the previous screen.
In menu displays, an asterisk next to a menu item indicates
the current setting.
Phonebook Icons
The following icons appear next to Phonebook entries to indicate whether
a phone number is a wo rk num ber, home number, cell phone num ber, etc.
Chapter 2
Icon Indicates Icon Indicates
Home phone number. E-mail address.
Work phone number. Special ring.
Cell phone number. Backlight.
Other phone number. Birthday (reminder).
Location # in memory
Speed dial.
where phone number is
stored.
Powering Phone On and Off
Powering ON
Press and hold until a tone sounds and the backli ght light s.
• The battery indicator and signal icon are displayed.
• If your Welcome Screen is turned on, the message briefly appears.
• Your wireless service provider’s name is displayed if you are within the
coverage area.
Powering OFF
Press and hold to power off your phone.
Getting Started 11
Chapter 2
Standby Display
The standby display appears when your phone is on and in an “idle” state.
You can return to the standby display at any time (except during a call) by
pressing or by pressing and ho ld ing . The backli ght tu rn s on
automatically for 15 seconds when you power up the phone or wh en you
press any key.
The backlight remains on when the phone is plugged into
Note:
a DC Adapter.
Moving through the Menu
You access the Main Menu from the standby displ ay:
MENU
Main Menu, press the corresponding softkey ( ) on the keypad just
below where
either softkey ( or ) to select the option s di splayed above them .
Within the menu, the selected feature or fun ct ion i s i ndicated by an arrow
( ). Use the navigation key scroll areas
11
When an option is selected using the softkeys, the display changes to offer
another level of so ftkey options. This process continues until you have
responded to all di splay prompts and optio ns f or a par ticular softkey.
is displayed on the bottom left side of the display. To access the
MENU
.
is displayed. After entering the Main Menu, press
as described in the table on
page
Shortcut Keys
You can quickly access many of the phone’s features by pressing shortc ut
keys instead of scroll in g th ro ugh the numbered option s on the di splay. For
a complete list of the sh or tc ut keys, refer to the Menu Map on the insi de o f
the front cover. For example, you can select Key Volume by pressing
(MENU), then pre ss (Tone Settings) and (Key Volume).
12 Getting Started
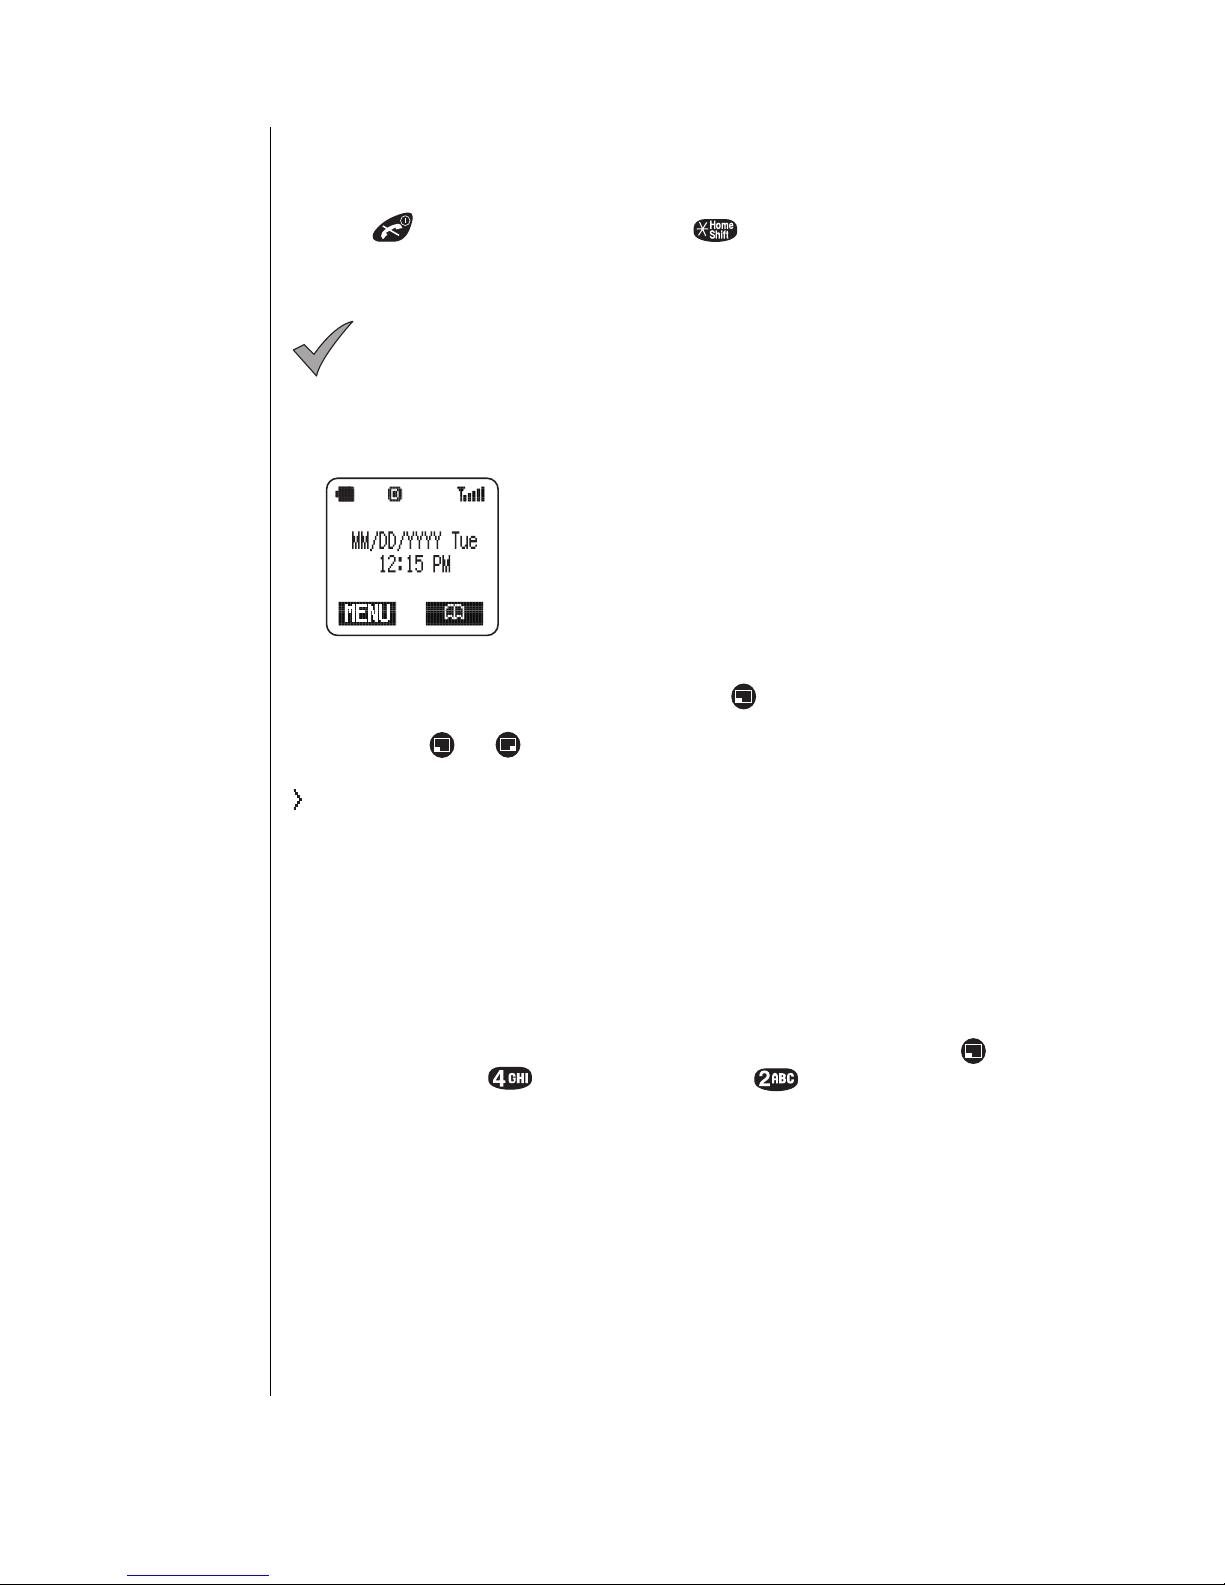
Setting Date and Time
The standby display shows the current date and time, as well as the day of
the week. You can adjust the se settings if necess ary.
Note:
You have the option of turning the Date/Time display On or
“Date/Time Display” on page 43
. See
Off
Adjusting Date and Time Settings
From standby, press (MENU) to enter the Main Men u.
1
Scroll to
2
Scroll to
3
Press (OK) to select
4
• The currently set date and time are displayed with the cursor over the
• You can change the date/time by using and to switch between
When the cursor is over a digit you want to change, press the digit key
5
for the number you want in its place.
• You can switch from AM to PM by pressing when your cursor is on
• If you enter an invalid date or time, the display prompts you to enter
When you are satisf ie d wi th th e dat e/t i m e set t ing, pr ess (OK) .
6
Phone Settings
Time Settings
first digit of the month.
date and time and and to scroll across the digits.
AM or PM on the display.
another date/time.
. Press (OK).
. Press (OK).
Date/Time
.
for information.
Chapter 2
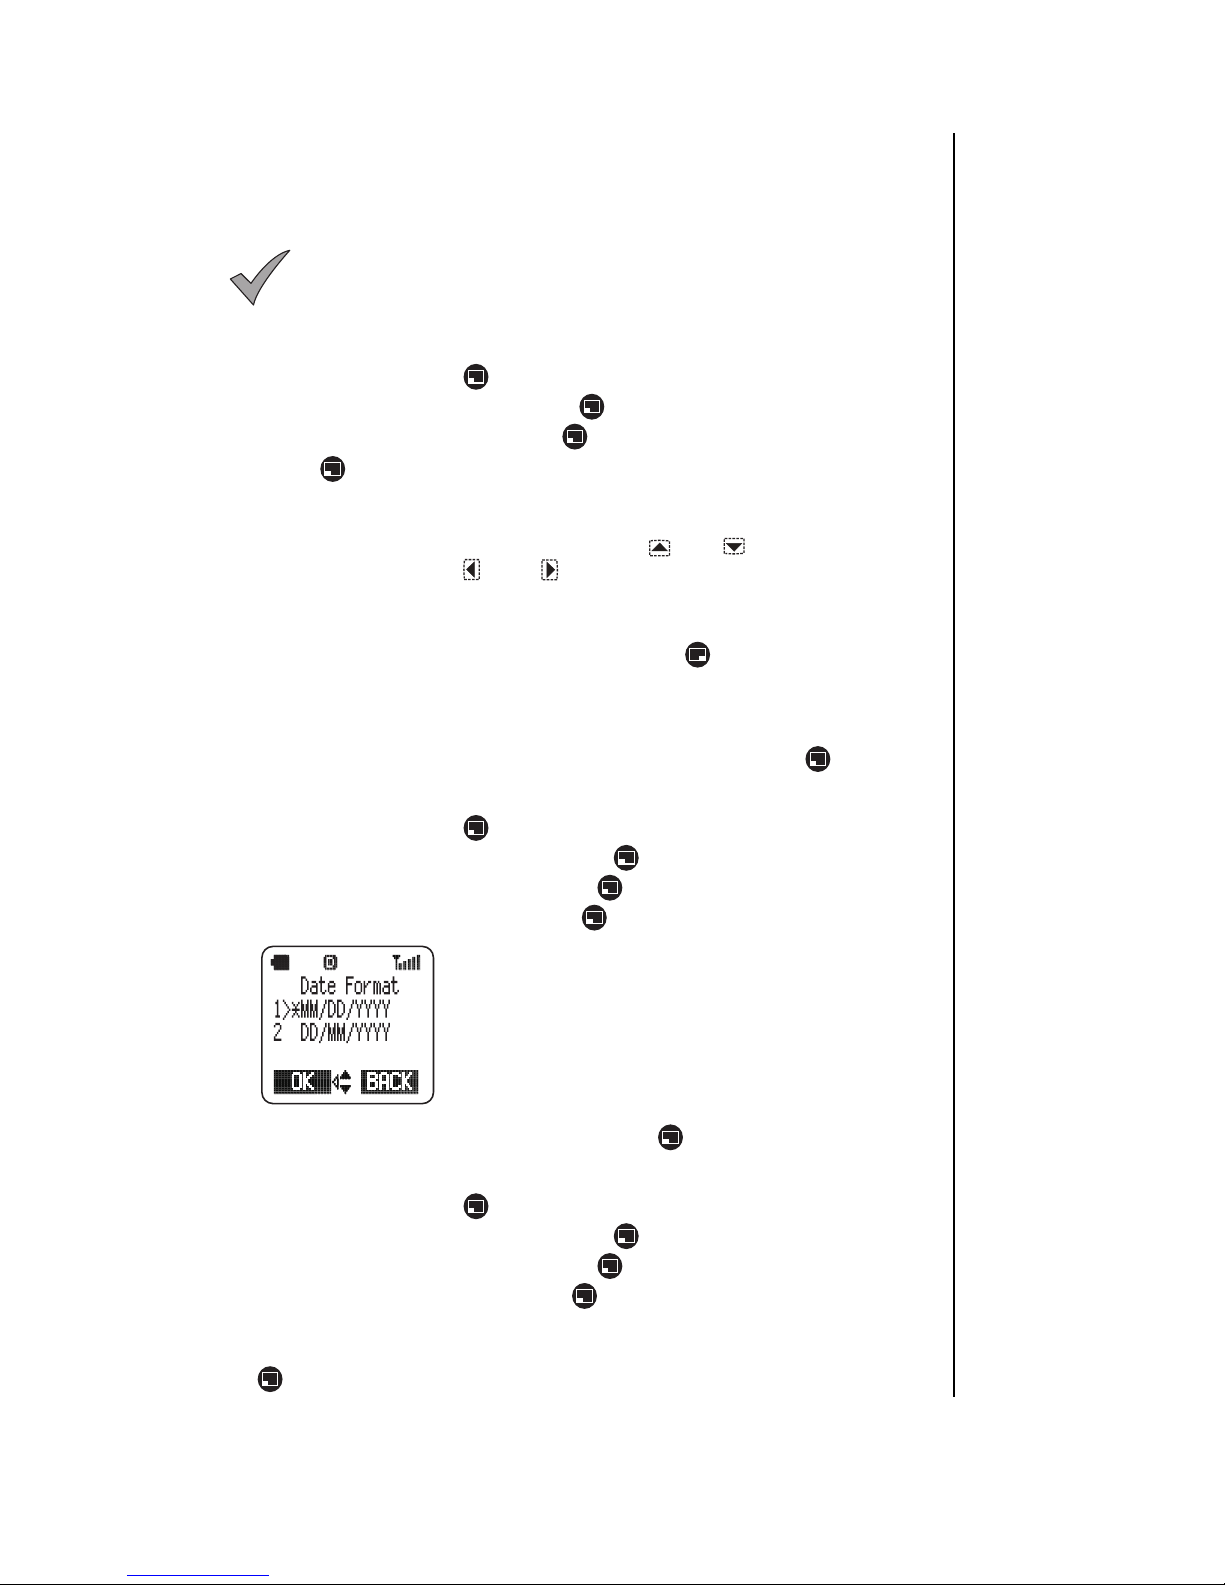
Changing the Date Format
From standby, press (MEN U) to enter the Main Men u.
1
Scroll to
2
Scroll to
3
Scroll to
4
Scroll to the format you prefer and press (OK).
5
Phone Settings
Time Settings
Date Format
and press (OK).
and press (OK).
and press (OK).
• The display lists
format) and
format).
• You can press the left arrow to go back to the
previous screen.
MM/DD/YYYY
DD/MM/YYYY
(American date
(European date
Selecting 24-hour or 12-hour Mode
From standby, press (MEN U) to enter the Main Men u.
1
Scroll to
2
Scroll to
3
Scroll to
4
• The 24/12 Mode menu is displayed
To change the current mode, scro ll to th e ot her option and press
5
Phone Settings
Time Settings
24/12 Mode
(OK).
and press (OK).
and press (OK).
and press (OK).
Getting Started 13

Chapter 2
Setting Ring Vol ume
You can adjust the volume of your phone’s ring. (
page 44
such as meeting s and theaters.)
1
2
3
4
5
for more informatio n about using your phone i n special situations
From standby, press (MEN U) to enter the Main Men u.
Scroll to
Press (OK) to select
• The display shows the current ring volume setting.
Press to increase ring volume, or to dec re ase volume.
• A sample of the current ring tone is emitted and the display indicates the
• If you select the lowest setting, the ring volume is muted (silent).
When you reach an acceptable ring volume, press (OK).
Tone Settings
current ring volume setting.
When the volume is set to muted (silent), the icon is
Note:
displayed.
and press (OK).
Ring Volume
.
See “Alert Mode” on
Selecting a Ring Alert
You have the option of select i ng f ro m several different ring alerts.
From standby, press (MEN U) to enter the Main Men u.
1
Scroll to
2
Scroll to
3
Scroll to the ring alert type you w ant to select and press (OK).
4
• If you select
• If you select
Tone Settings
Ring Alert
General Rings
you scroll through the rings, you can hear the ring associated with each
ring number. When you hear the ring you want, press (OK).
Preset Melody
scroll through the list, the melodies are played. When you hear the
melody you want, press (OK).
and press (OK).
and press (OK).
, you can choose from six different rings. As
, you can choose from ten melodies. As you
Note:
hear the sample ring or melody if ring volume has been muted or
if you are in a conversation.
Vibration Alert
In addition to alerting you with a ring, your phone can alert you to incoming
calls by vibrating. Thi s fea tu re is usef ul f or when you are in a meetin g, at
the movies, or at a conc ert, when an audible ring m ight be disturbing to
others.
To ensure tha t you do not disturb anyone, you should also mute
the ring volume of your phone (see
page 14
From standby, press (MEN U) to enter the Main Men u.
1
Scroll to
2
14 Getting Started
Tone Settings
When selecting a new ring alert, you will not be abl e to
“Setting Ring Volume” on
).
and press (OK).
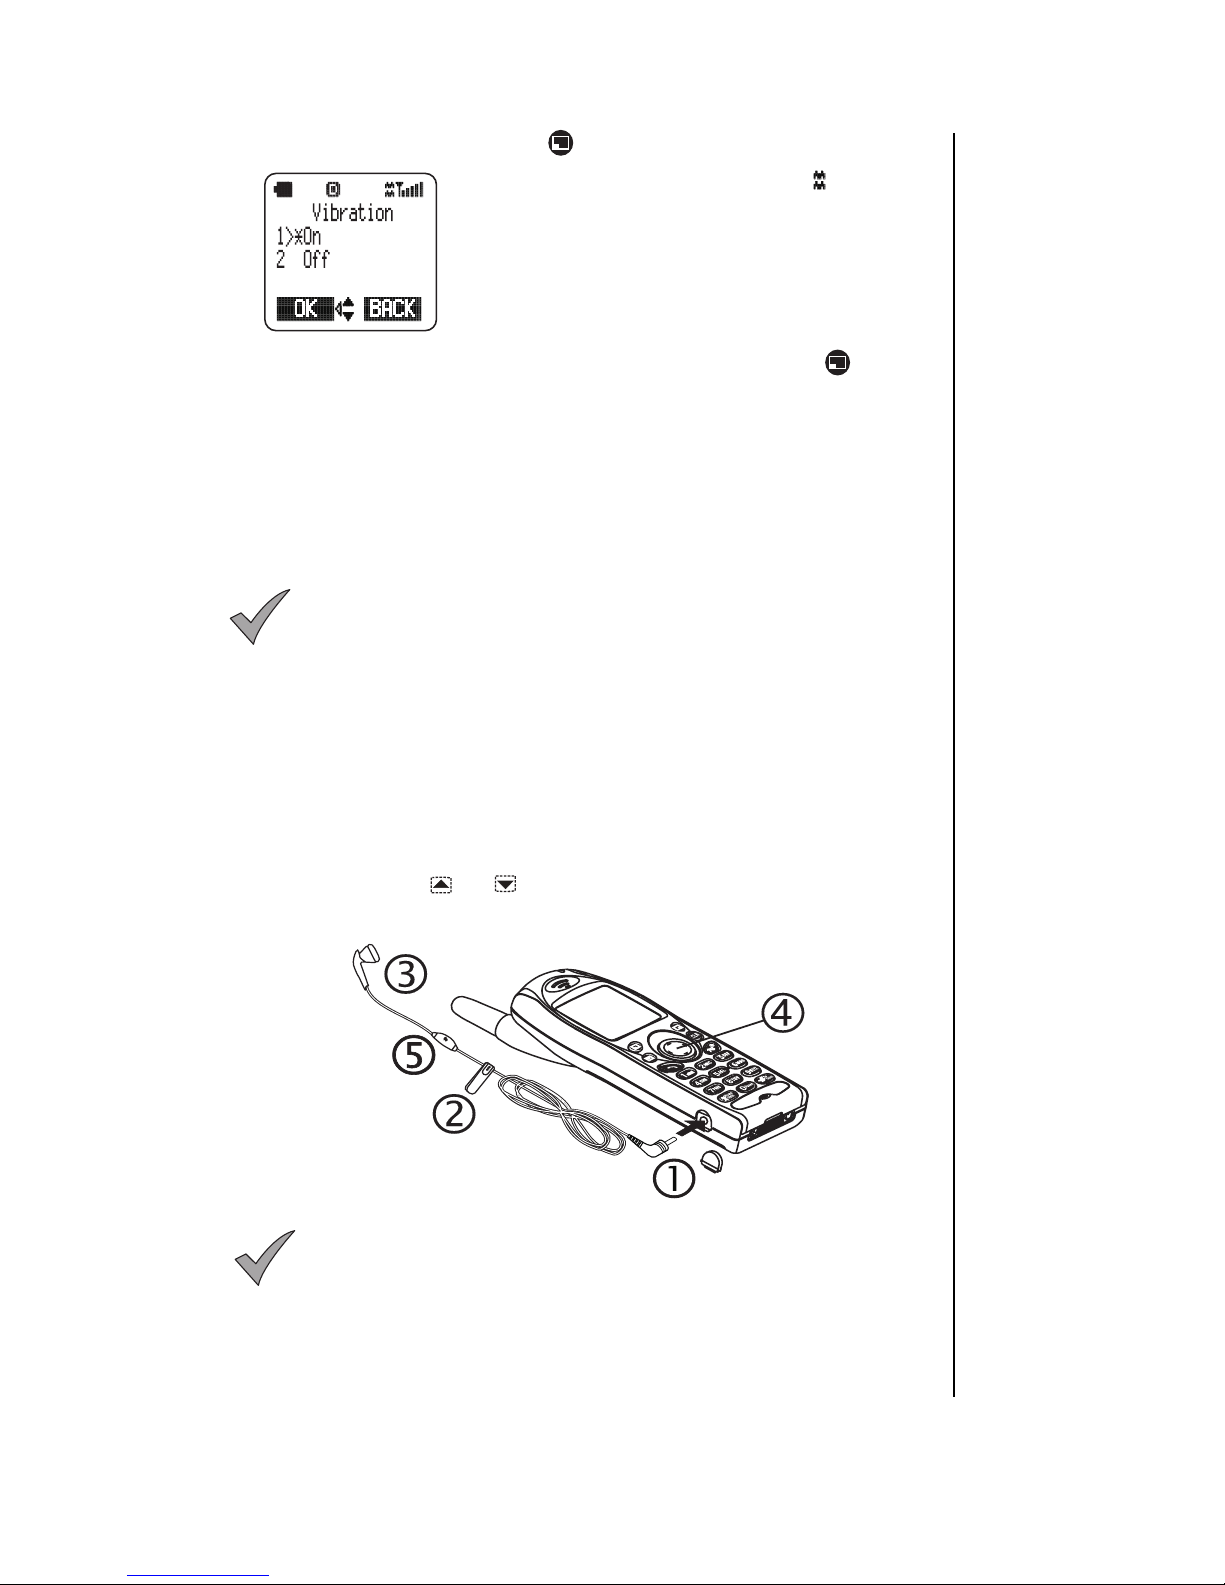
Chapter 2
Scroll to
3
To change the setting, scroll to the other option and press (OK).
4
Vibration
and press (OK).
• If selected, the vibration alert icon ( ) appears
on the display.
Using the Private Handsfree Heads et
When the Private Handsfree Headset is plugged into the phone, you can
have a phone conversation without holdi ng t he phone to your ear. The
other person’s voice is he ar d th ro ugh the Private Handsfr ee Headset’s
earpiece. When you speak, your voice is picked up by the Private
Handsfree Headset’s microphone.
Before attaching the Priv at e Handsfree Headset, remove
Note:
the plug from the headset/TTY connector at the bot t om le f t side
of your phone. Store the plug in a safe place so you will be ab le
to cover the connector when necessary.
Attach the Private H andsfree Headset to your phone as shown.
Securely plug the Priv at e Handsfree Headset jack in the side of the
1
phone. This will autom atically disable the sp eak er and microphone in
the phone.
Attach the Private Handsfree Headset clip to your clothes.
2
Insert the earpi ece into your ear.
3
During conversat i on, increase or decreas e volume to a comfortable
4
level by pressing or on the phone’s center navigation key.
The microphone pic ks up your voice from its hangin g position.
5
Once the Private Handsfree Headset is connected, you
Note:
can customize the r in g volume, key volume , an d voice volume
settings for hands free use. Ring volume an d key volume can be
changed in the Tone Settings menu. Voice volume can be
customized duri ng conversation as indicated above. When you
disconnect the Privat e H andsfree Headset, your phone will go
back to the settings pro gr am m ed for standard hand held use.
Getting Started 15

Chapter 2
Caution:
The use of an ear insert device while driving may
violate the laws of some states/provinces. Be sure to check
applicable state/p ro vi ncial laws before using thi s device.
16 Getting Started
Everyday Operations
Your phone comes with a variety of features. In most cases, however, you
will use only some of these features on a daily basis. This chapter will
familiarize you wit h m ost of th ose “everyday” opera t ions. D escriptions of
more advanced feat ur es are covered in additional chapters.
Placing Calls
To place a call , po w er on your phone and confirm th at you have a strong
signal indication . If y ou ar e in a digi t al ser vice area, the icon appear s.
Dialing from the Keypad
From standby, enter the phone number (u p to 32 di gi t s) .
1
Press to place th e call.
2
Caution:
speakerphone feature is activated. Do not hold the phone next to
your ear when the speakerphone is activated.
Note:
letters are on the display. Clear the display before trying to
activate the Speakerphone.
• If the outgoing phone number matches an entry in the Phonebook, the
corresponding name is also displayed with the number.
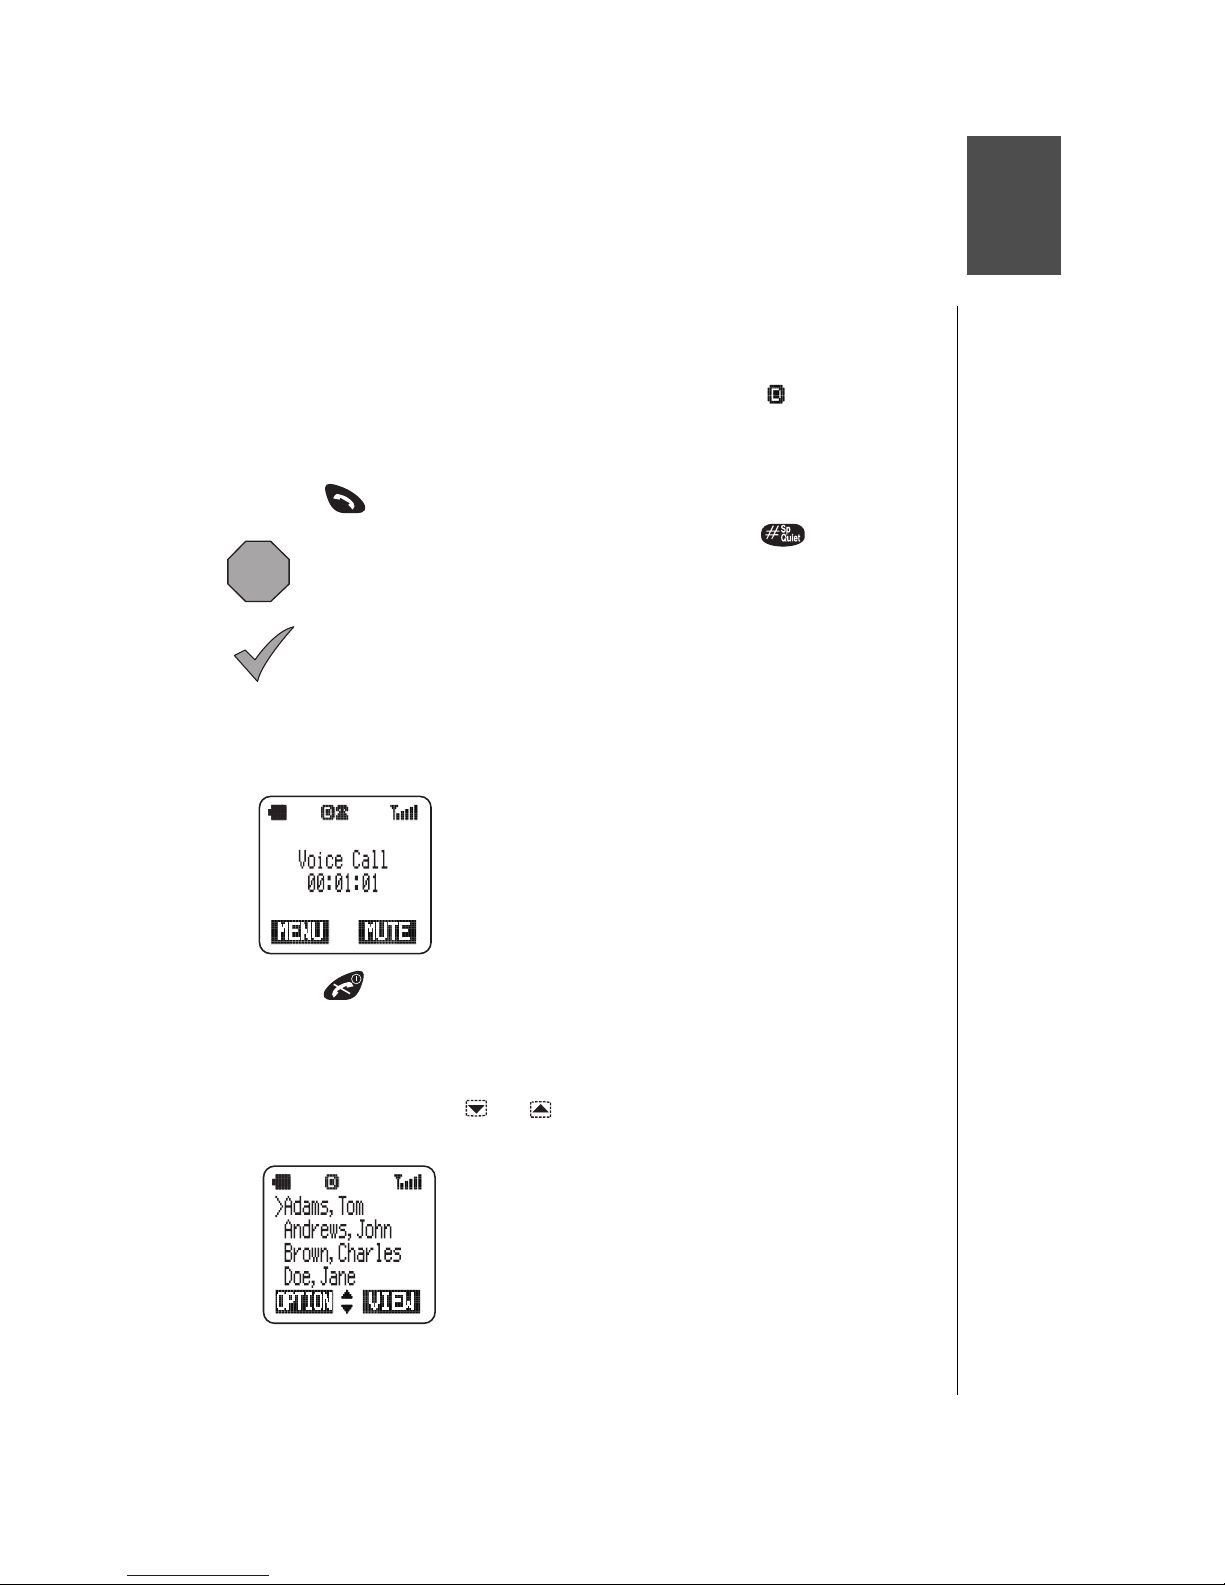
When the call connects,
3
Press to end the call.
4
During a call, if you press and hold , the
You cannot switch to the Speakerphone if any digits or
Voice Call
• The call timer is displayed if the
is on. (See
information.)
is displayed.
Current Call
“Call Timers” on page 40
timer
for more
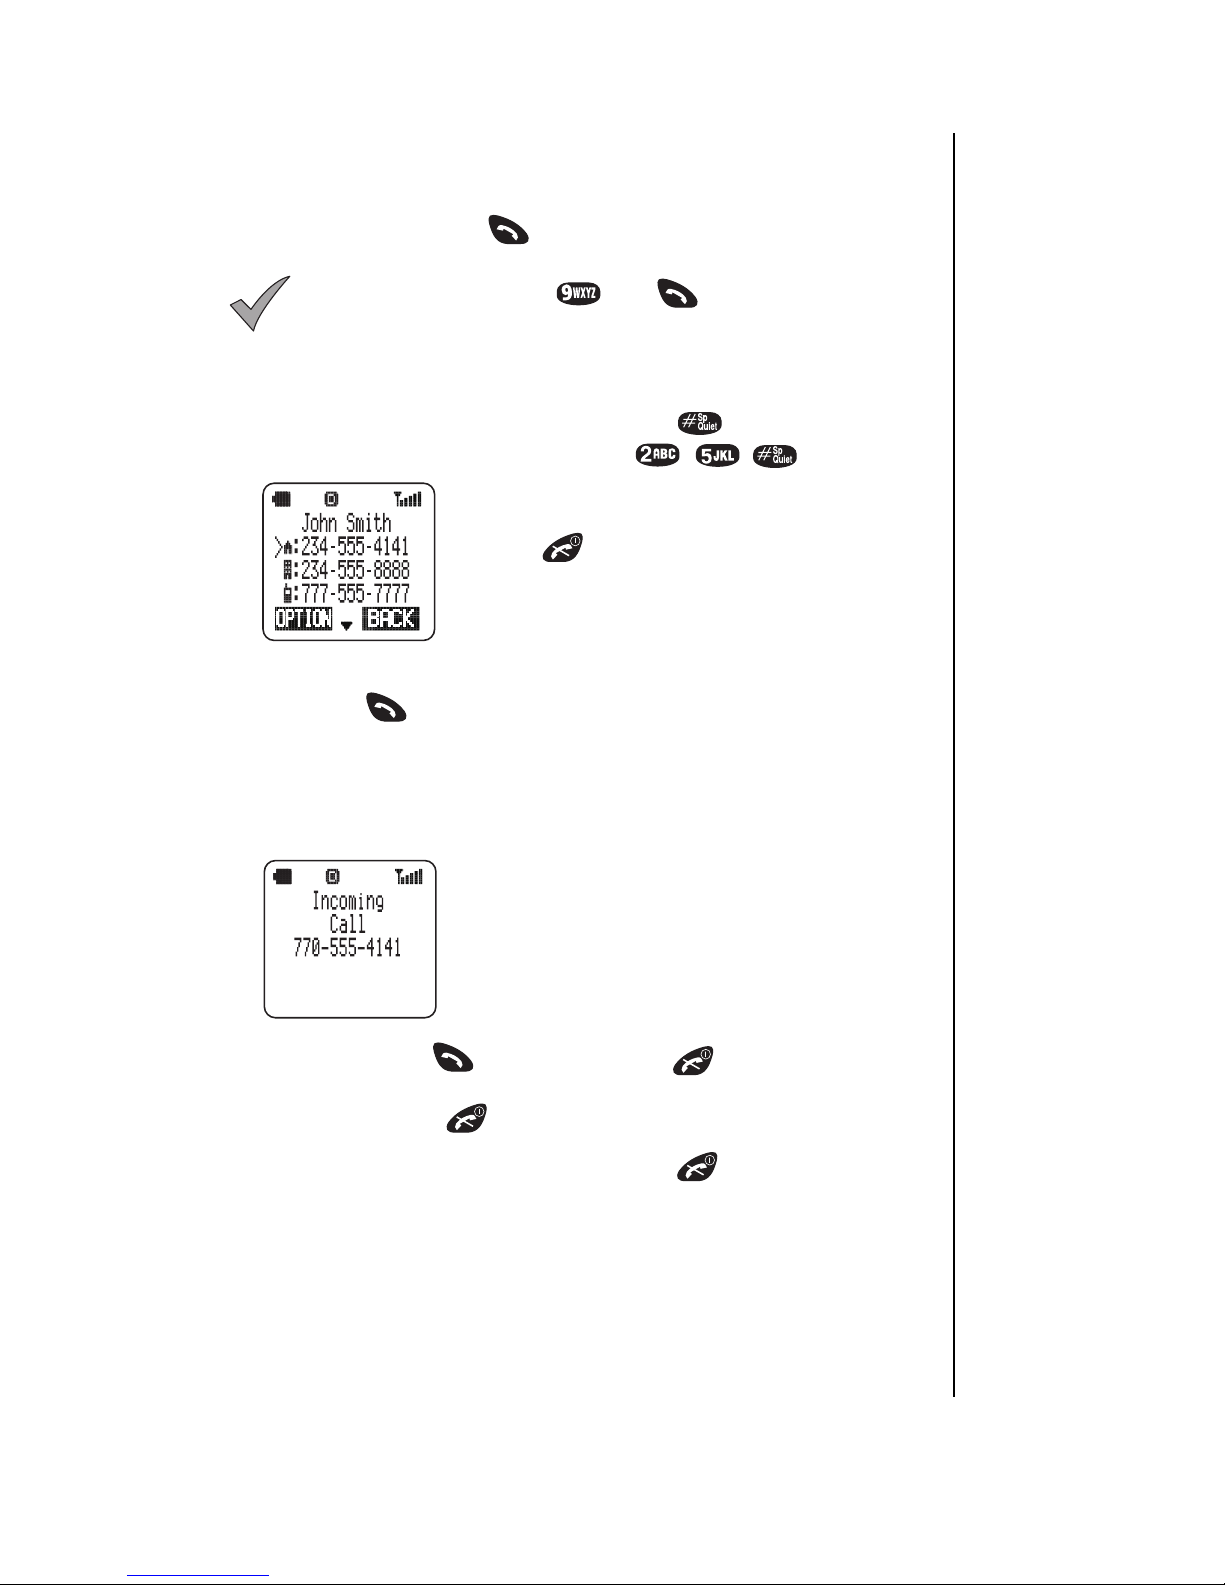
Dialing from the Phonebook
To use Supe r Di al and S peed Dial, you must first prog ra m ent ries into the
Phonebook. See
From standby, press or to scroll through the Phonebook
1
entries.
Chapter 5, “Phonebook Features”
.
• Depending on your phone’s search method
setting, the display shows entries alphabetically by
first or last name, or by memory location number.
To change, see
Method” on page 34
• To “jump” to a specific section of the alphabet,
press the number key that has the corresponding
letter on it.
“Selecting a Phonebook Search
.
Everyday Operations 17

Chapter 3
When the arrow points to the entry you want, press (VIEW) to view
2
the Phonebook en try.
Press or to scrol l to the appropriate phone num ber and press
3
to place the call.
Dialing a Phonebook Entry from the Menu
From standby, press ( ) to enter the Phon ebook.
1
Scroll to
2
• Depending on your phone’s search method setting, the display prompts
Enter the name, a portion of the name, or the memory location number
3
Search
you to enter
search method setting, see
page 34
and press (FIND or OK).
Note:
display goes to the first letter of the alphabet for which you have
a Phonebook entry.
If needed, press or t o scroll to the number you want to cal l .
4
• When the list of names appears, the following indicates there is no name
entry for a number saved in the Phonebook: "----,----".
When the arrow points to the entry of your choice, press (VIEW) to
5
view the Phonebook entry.
Press or to scrol l to the phone number you wa nt to cal l, an d
6
press to place the call.
and press (OK).
First Name, Last Name
.)
, or
Location #
“Selecting a Phonebook Search Method” on
. (To change the
If you do not enter anythi ng for th e first or las t nam e, th e
Super Dial
Super Di al lets you quickly dial a phone number by pressin g and holding a
digit key on your keyp ad. Before you can use Super D ia l, yo u m ust create
entries in your Phon ebook and then assign them to Super Dial keys. See
“Creating a Super Dial Entry” on page 3 2
When you purchas e your phone, the key is
Note:
programmed as a Super Dial key to call the emergency number
911. However, you have to enable this key assignment befo re
you can use it. See
“Emergency Call” on page 47
When Emergen cy Call is disabled (set to Off), you can assign
as a Super Dial key for a number in your Phonebook.
should always be aware of whether Emergency Call is set to
On or Off.
From standby, press and
1
the key ( - ) you have
hold
assigned to a num ber in your Phonebook.
• The number is dialed and the name is displayed as it is listed in your
Phonebook entry.
• If there is no phone number assigned to the digit key,
Assigned
is displayed.
.
.
You
Super Dial Not
18 Everyday Operations
Speed Dial
To call a Spee d Di al num ber directly from standby (without going to a
menu), enter the memory location number that contains the phone number
you want to call, and press .
Chapter 3
If Emergency Call is set to On (see
Note:
page 47
) and you press and , the emergency number
“Emergency Cal l” on
911 will be called.
To view a Spe ed D ial number before placing t he cal l , follo w th es e st eps:
From standby, enter the memory location num ber that contains the
1
phone number you want to call, then press . (For example, to dial
a number stored in location 25, press .)
• If the entered memory location is empty, the
display shows the entered digits and the # sign.
Press
Scroll to the Speed Dial number (or to another number in that location)
2
briefly to return to standby.
and press to place the call.
Answering Calls
The phone must be on to receive calls. It will not ring or vibrate when
powered off.
When a call is received, the phone rings and/or vibrates.
• If you have Caller ID, the caller’s phone number is
displayed under
• If the caller’s phone number matches an entry in
the Phonebook, the corresponding name appears
and the backlight changes color (unless the call
was placed through a PBX).
To answ er, press or any key exce pt . (See
1
Options” on page 22
• Quickly pressing will stop the ringing and/or vibration alert, but not
answer the call.
When you are ready to end the call, press to disconnect.
2
.)
Incoming Call
.
“Answer Key
Everyday Operations 19
 Loading...