

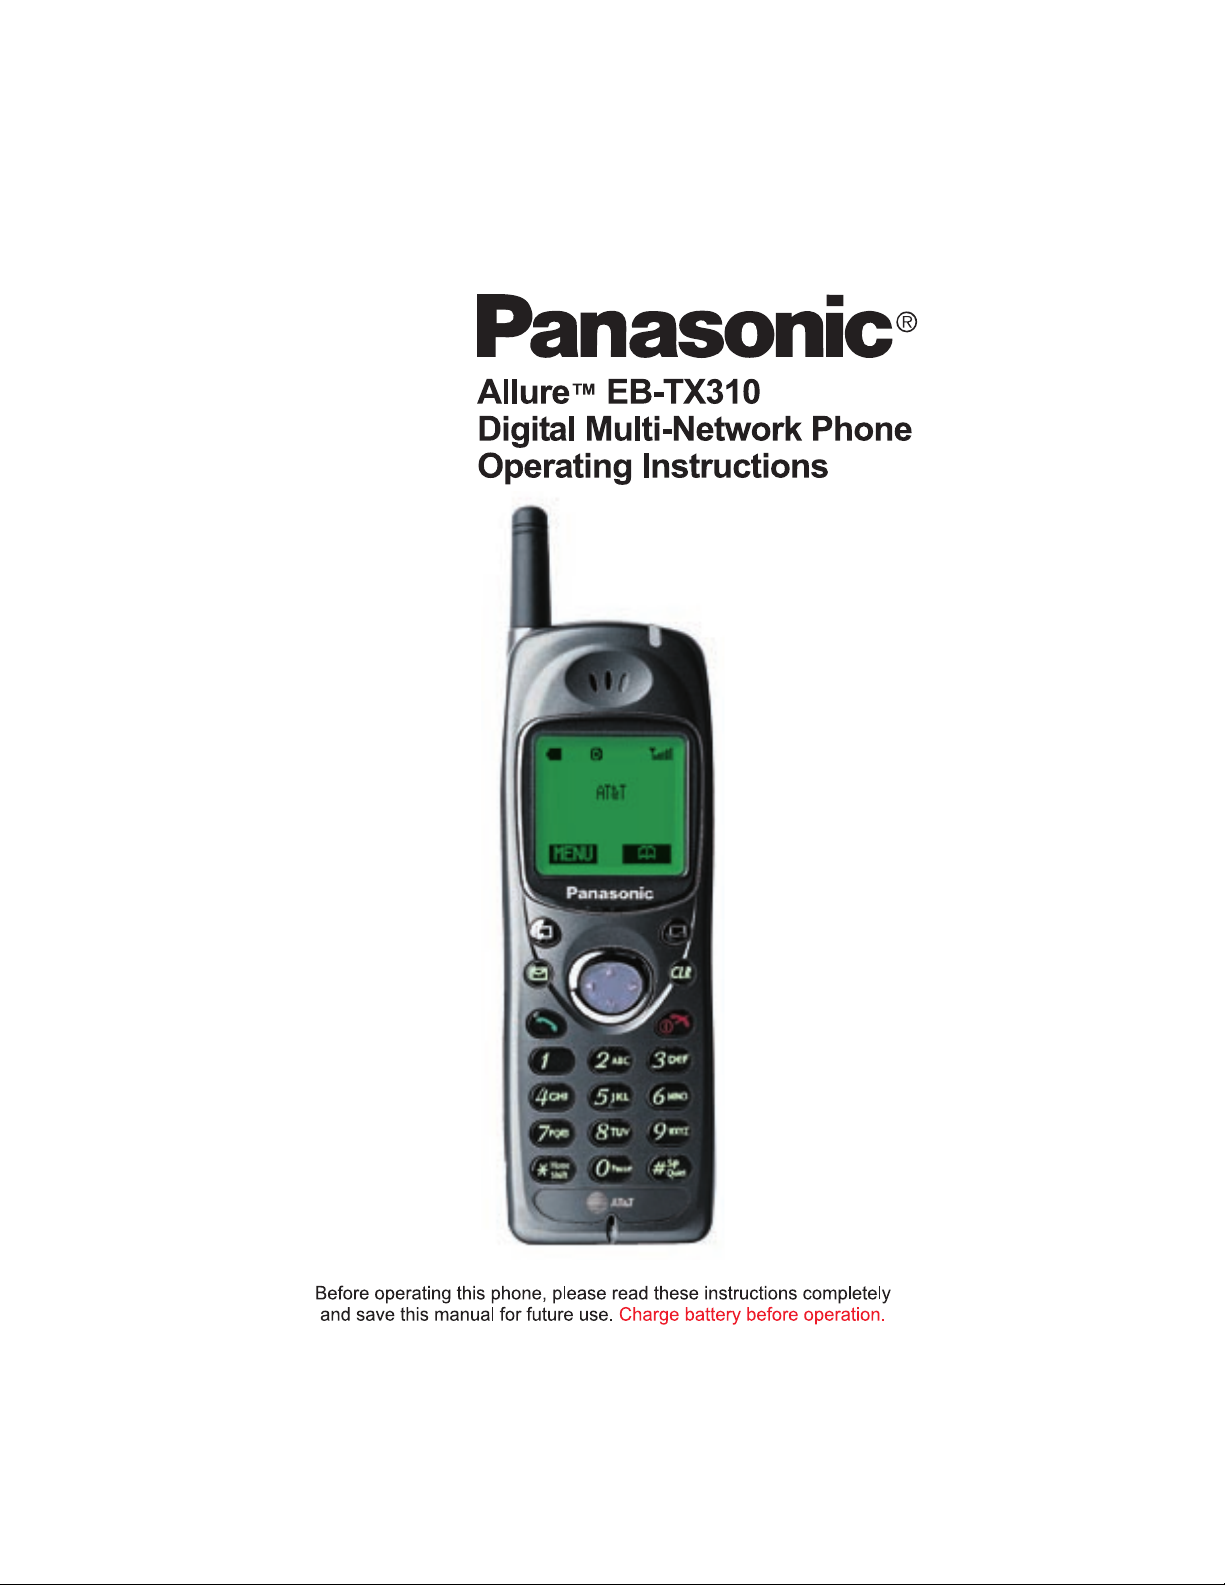
Page 1
Page 2
Page 3

Contents
Introduction.......................................................................... vii
About This Manual............................................................. vii
Icons Used in This Manual............................................... viii
Chapter 1: Safety First ......................................................... 1
Batteries................................................................................ 1
Charging Devices................................................................. 1
General.................................................................................. 1
Availability of Service.......................................................... 2
Emergency (911) Service .................................................... 2
Safety Tips............................................................................ 2
Chapter 2: Getting Started.............................. ....... ...... ....... . 5
Battery Use........................................................................... 5
Attaching the Battery..............................................................5
Charging the Battery.............................................................. 5
Recharging Tips .............................................................. 6
Battery Specifications.............................................................6
Removing the Battery.............................................................6
Low-Battery Warning.............................................................. 6
Phone Description ............................................................... 7
Phone Specifications..............................................................7
Function Keys ...................................................................... 8
Display Icons........................................................................ 9
Master Display and Icons.......................................................9
Phonebook Icons.................................................................10
Powering Phone On and Off ............................................. 10
Powering ON........................................................................10
Powering OFF...................................................................... 10
Standby Display................................................................. 11
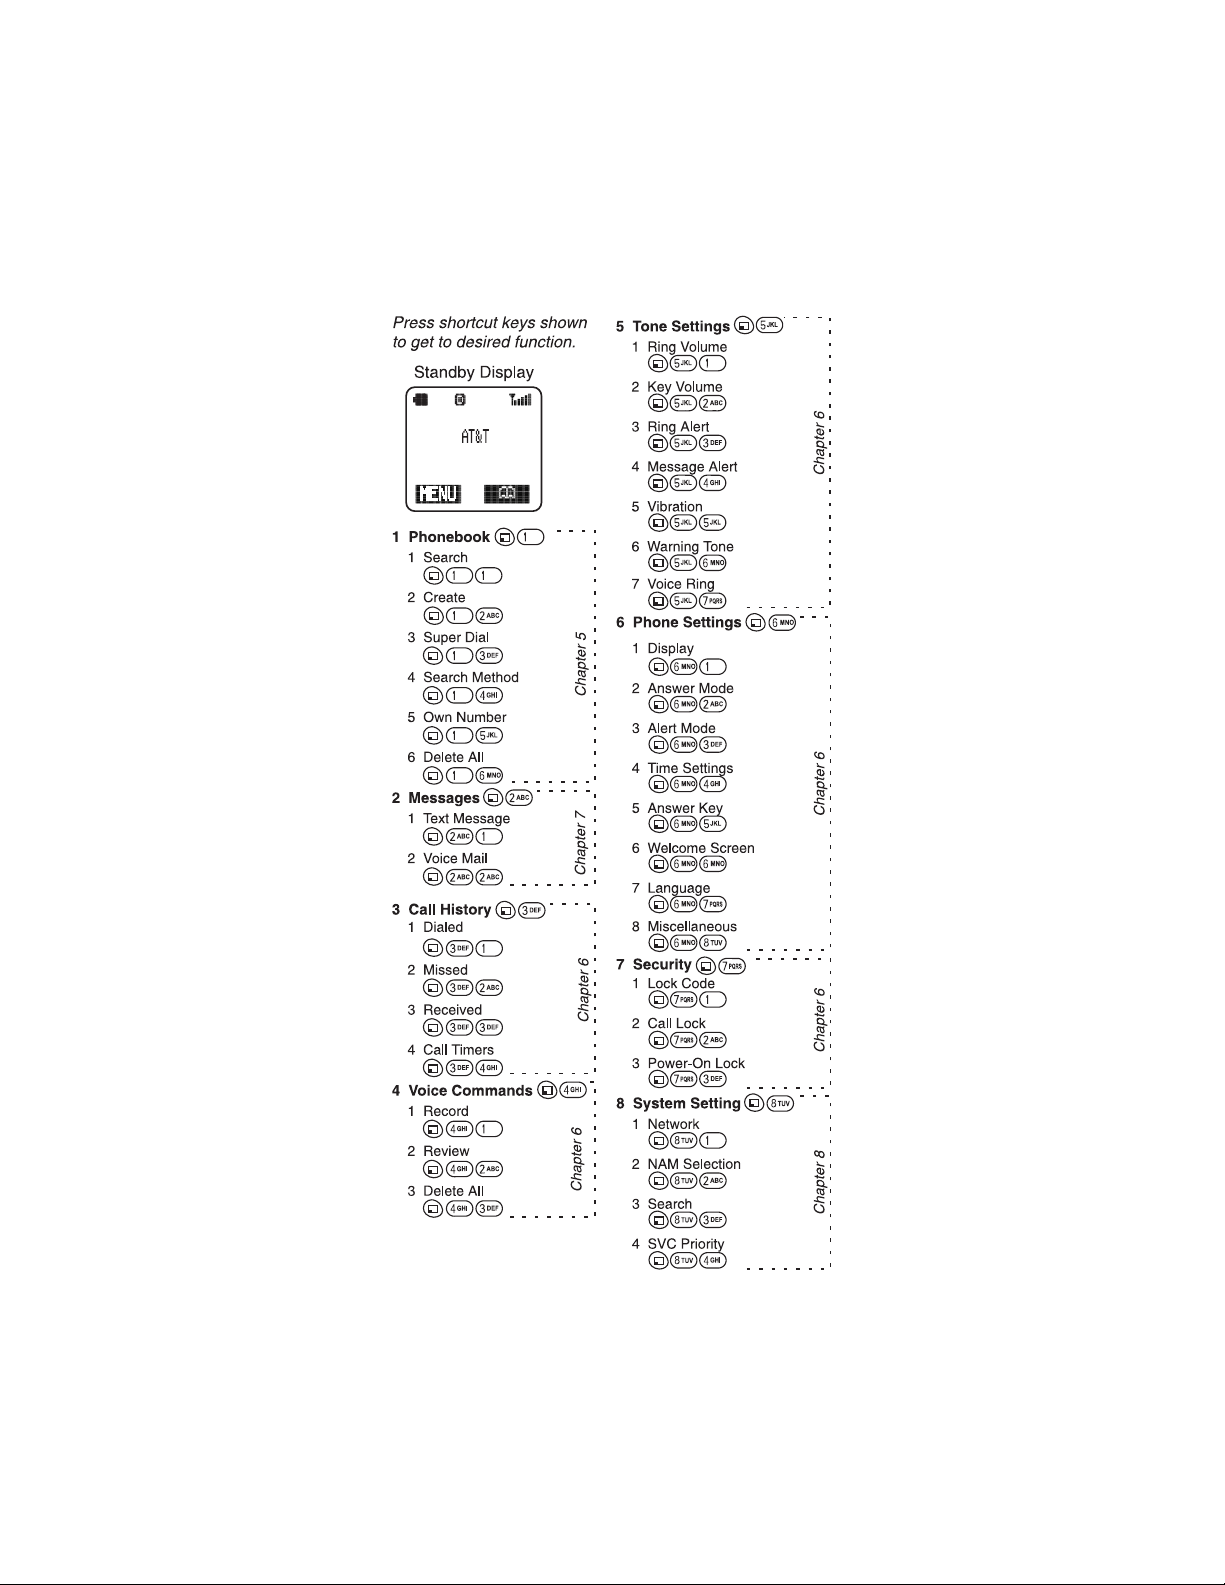
Moving through the Menu................................................. 11
Shortcut Keys....................................................................... 11
Setting Date and Time ....................................................... 12
Adjusting Date and Time Settings........................................12
Changing the Date Format...................................................12
Selecting 24-hour or 12-hour Mode..................................... 12
i
Page 4

Setting Ring Volume.......................................................... 13
Selecting a Ring Alert........................................................ 13
Vibration Alert.......................................................................14
Restoring Default Values................................................... 14
Using the Private Handsfree Headset .............................. 15
Personalizing Your Phone................................................. 16
Chapter 3: Everyday Operations ...................................... 17
Placing Calls....................................................................... 17
Dialing from the Keypad.......................................................17
Dialing from the Phonebook .................................................17
Dialing a Phonebook Entry from the Menu ....................18
Super Dial ......................................................................18
Speed Dial .....................................................................19
Answering Calls ................................................................. 19
In-Call Features .................................................................. 20
Adjusting Voice Volume........................................................20
Viewing Your Own Phone Number During a Call.................20
Muting the Mouthpiece .........................................................20
Using the Display as a Scratchpad.......................................21
Turning the Speakerphone On and Off.................................21
Missed Calls ....................................................................... 22
Answer Key Options.......................................................... 22
Voice Mail............................................................................ 23
Listening to New Voice Mail..................................................23
Redialing Numbers ............................................................ 23
Redialing One of the Last 10 Numbers Dialed.....................23
Automatic Redial...................................................................24
Key Lock............................................................................. 24
Turning On Key Lock............................................................ 2 4
Turning Off Key Lock............................................................2 4
Voice Memo........................................................................ 25
Recording a Voice Memo from Standby............................... 25
Recording a Voice Memo During a Call................................26
Playing and Deleting a Voice Memo.....................................26
ii
Page 5

Chapter 4: Text Entry Operations ..................................... 27
Letter Entry......................................................................... 27
Using Letter Entry (ABC) Mode............................................ 27
Word Entry (Word T9) Mode ............................................. 28
Using Word Entry (Word T9) Mode...................................... 28
Numbers (NUM) Mode ....................................................... 29
Symbols (SYM) Mode ........................................................ 29
Key Entry Table.................................................................. 29
Chapter 5: Phonebook Features ....................................... 31
Customizing Your Phonebook.......................................... 31
Creating a Phonebook Entry............................................. 32
Creating a Super Dial Entry................................................. 34
Changing or Deleting a Super Dial Entry............................. 34
Programming Pauses or Waits............................................ 35
Saving a Displayed Phone Number.................................. 35
Editing/Deleting a Phonebook Entry................................ 35
Selecting a Phonebook Search Method........................... 36
Displaying Your Own Number .......................................... 37
Deleting All Phonebook Entries ....................................... 37
Chapter 6: Additional Operations ..................................... 39
Call History......................................................................... 39
Dialed Calls.......................................................................... 39
Missed Calls.........................................................................39
Received Calls..................................................................... 40
Call History Options.............................................................40
Adding a Prefix ..............................................................40
Saving a Number ........................................................... 41
Deleting a Number ........................................................41
Deleting All Entries in a List .............................. ...... ...... .41
Call Timers........................................................................... 42
Voice Commands............................................................... 43
Tips for Recording Voice Commands.................................. 43
Recording a Voice Command to Call a
Phonebook Number............................................................. 43
Recording a Voice Command for a Phone Function............ 44
Using a Voice Command to Perform an Action.................... 45
Reviewing and Deleting Voice Commands.......................... 45
Deleting All Voice Commands................. ..... ...... .................. 45
iii
Page 6

Tone Settings ..................................................................... 45
Ring Volume.........................................................................45
Key Volume..........................................................................46
Ring Alert..............................................................................46
Selecting a Ring Alert ....................................................46
Message Alert.......................................................................47
Selecting a Message Alert .............................................47
Vibration................................................................................48
Warning Tone.......................................................................48
Voice Ring............................................................................48
Recording a Voice Ring .................................................49
Custom Melodies..................................................................49
Selecting a Custom Melody ...........................................49
Editing the Title of a Custom Melody .............................49
Editing or Creating a Custom Melody ............................50
Phone Settings................................................................... 52
Display Settings....................................................................52
Backlight ........................................................................52
Display Contrast .............................................................52
Standby Screen .............................................................52
Answer Mode........................................................................53
Alert Mode............................................................................53
Time Settings........................................................................54
Setting the Alarm .......................................................... .54
Answer Key...........................................................................56
Creating a Welcome Screen.................................................56
Selecting Another Language ................................................56
Miscellaneous Menu.............................................................57
Model Type ....................................................................57
Emergency Call ..............................................................57
TTY Mode ......................................................................57
DTMF Duration ..............................................................58
Reset Defaults ...............................................................58
Security Options ................................................................ 60
Changing Lock Code............................................................60
Call Lock...............................................................................60
Locking Incoming Calls ...................................... ..... .......61
Locking Outgoing Calls ................................ ...... ..... ...... .61
Limiting the Number of Digits Dialed .............................. 6 1
iv
Page 7

Power-On Lock.................................................................... 62
Activating the Power-On Lock .......................................62
Deactivating the Power-On Lock from Standby ............ 62
Disabling the Power-On Lock ........................................ 62
Chapter 7: Service Provider Features .............................. 63
Caller ID .............................................................................. 63
Call Waiting ........................................................................ 63
Three-Way Calling.............................................................. 63
Text Messaging.................................................................. 64
Composing a Text Message................................................ 64
Entering the Send To Information ................................. 64
Entering the Text of Your Message ............................... 64
Adding a Picture ............................................................64
Adding a Melody ............................................................ 65
Message Options ................................................... ...... .65
Accessing Text Messages................................................... 65
Reading New Text Messages..............................................66
Replying to a Text Message (Inbox Only)............................ 67
Forwarding a Text Message................................................. 67
Locking a Text Message...................................................... 67
Deleting a Text Message ..................................................... 68
Calling Back a Text Message............................................... 68
Adding the Sender to your Phonebook................................ 68
Viewing Outbox Messages................................................... 68
Deleting All Inbox or Outbox Messages............................... 69
Group Lists......................................................................... 69
Creating a Group List .................................................... 69
Viewing Your Group Lists .............................................. 70
Editing a Group List .......................................................71
Voice Mail ........................................................................... 71
Listening to New Voice Mail................................................. 71
Saving and Deleting Voice Mail...........................................72
Resetting the Voice Mailbox Number...................................72
International Calls.............................................................. 72
Chapter 8: System Settings............................................... 73
Voice Privacy Mode ........................................................... 73
Selecting Your Phone Number (NAM).............................. 73
Searching for Available Systems ..................................... 74
Service Priority................................................................... 74
v
Page 8

Appendix A: Before Requesting Help ............................... 75
Problems and Solutions.................................................... 75
Appendix B: Phone Accessories....................................... 79
EB-TX310 Accessories...................................................... 79
EB-HF300EZ Handsfree Car Kit ........................................ 80
Appendix C: Consumer Update......................................... 81
Index..................................................................................... 85
vi
Page 9

Introduction
Congratulations on yo ur purchase of one of the worl d’s most
technologically advanced mobile commun ic at i ons systems! Your new
Panasonic phone combines the advantages of digital and analog coverage
with a variety of time-saving and easy-to-use features. The result: a phone
that offers real convenience , de pendability, and mobility—in digital
analog service areas.
About This Manual
This manua l co nt ai ns co mpr eh e nsi ve i nst r uct i ons for ea ch of your pho n e’ s
features. From making a ca l l to troubleshooting a problem , the answers to
most of your questions ar e here.
Chapter 1:
Chapter 1 includes important safety and battery in fo rm ation. Whether you
are a novice or an experie nced cellular user, be sure to read this section
before
Chapter 2:
Chapter 2 describes the basics of setting up and operating your phone.
From connecting and ch arging your battery, describing the phone’s keys
and display icons, moving through the feature menu, and using the Private
Handsfree Headset, this is the place to turn when you are ready to get
started.
Chapter 3:
Chapter 3 covers those features you’ll use on a daily basis — placing and
ending calls, answering calls, and so on.
Chapter 4:
Chapter 4 covers the two modes of text entry: letter-by-letter entry and the
new WORD T9
sending text messages.
Chapter 5:
Chapter 5 cov ers ho w to sa ve name s, nu mbers , and ad di tion al in form ati on
in your phone’s memory.
Chapter 6:
Chapter 6 describes those features that allow you to customize your
phone’s settings. You can set alarms, record voice comm ands to perform
many phone functions , ch ange your standby screen and other display
features, and switch your phone to another language. You can also secure
your phone from unauth or iz ed use.
Chapter 7:
Chapter 7 describes how t o use features that may be offered by your
wireless service provider, such as Caller ID, Call Waiting, Three-Way
Calling, Text Messaging, Voice Mail, and so on. Check with your wireless
service provider for complete information on avail able services.
Safety First
operating your phone.
Getting Started
Everyday Operations
Text Entry Operations
®
entry — designed to give you rapid text entry when
Phonebook Features
Additional Operations
Service Provider Features
and
Introduction
Introduction vii
Page 10

Chapter 8: System Settings
Chapter 8 contains information about the features on the System Setting
menu. This information is provided primarily for technically knowledgeable
users.
Reference Information:
Appendix A: Before Requesting Help
As you begin to take advant ag e of your phone’s features, you may
experience minor probl e ms. However, you can easily fix most of these
problems. This chap te r co nt ains a detailed list of solutions to s om e of th e
problems you may encounter.
Appendix B: Phone Accessories
Many accessories are available for your phone. Appendix B lists and
illustrates each of these accessories. Please contact your wireless service
provider to purchase Genuine Panasonic acce ssories.
Appendix C: Consumer Update
Appendix C contains a recent report published by the U.S. Food and Drug
Administration about the saf et y of m obil e phones.
Index
If you are looking for a specific topic and it is not listed in the Contents, the
Index may point you in the right di re ct i on.
Icons Used in This Manual
The following icons indicate critical and time-saving information found
throughout this manua l. Please take special notice of infor m ati on i nc lu ded
with these icons.
Caution:
phone or putting your own safety at risk. Please be sure to read
this info rmation.
Information that could prevent you from damaging your
viii Introduction
Information that could have direct impact on how a
Note:
particular feature or function will operate.
Helpful advice and time-saving shortcuts. Memorizing these
Tip:
tips can save you valuabl e t ime.
Page 11

Safety First
Your new phone is a convenient and effective communications tool, but it can
be hazardous when used improperly. To avoid harming yourself or anyone else,
please review the following information before using your phone.
Batteries
Batteries can cause property damage, injury, or burns if the terminals are
touched with a conductive material (for example, metal jewelry, keys, and so
on). Therefore, use caution when handling a charged battery. Additional
precautions and notes are listed below:
• Never throw a battery into a fire; it may explode.
• Fully recharge the battery if the battery is low or as soon as the low-battery
alert beeps.
• Do not drop the battery.
• Do not bridge battery contacts together with metallic objects.
• Do not remove the battery from the phone while the phone is powered on.
Settings you have changed may revert to their previous settings.
A recyclable lithium ion/polymer battery powers your phone. Please
call 1-800-8-BATTERY for information on how to recycle the battery.
Charging Devices
• Use only Genuine Panasonic charging accessories. Use of attachments not
recommended by Panasonic or your wireless service provider may result in
fire, electrical shock, or injury. Panasonic is not responsible for damage
caused by using non-Panasonic accessories.
• Do not expose charging adapters to moisture, water, or the weather.
• Do not use an adapter with a damaged cord.
• When using a DC adapter in an automobile, a small amount of electricity
flows through the adapter, even if the phone is turned off. Remove the plug
from the cigarette lighter whenever the phone will be left in the vehicle for
long periods of time.
Caution:
socket.
Do not use the adapter in a vehicle that has a positive ground system.
The cigarette lighter must have a 12V negative ground
General
• Do not use the phone in extreme temperature or humidity. The specified
operating temperature range is -4°F to +140°F (-20°C to +60°C).
• Do not expose the phone (particularly the display) to direct sunlight for
extended periods of time.
• Do not attempt to disassemble the phone. There are no user-serviceable
parts inside.
• Do not expose the phone to rain or spill liquids on it.
• Do not carry the phone by holding the antenna.
• Do not use any accessories other than those designed for use with your
phone.
• Use of attachments not recommended or sold by your wireless service
provider may result in fire, electrical shock, or injury.
• Panasonic cannot be held responsible for damages caused by using nonPanasonic accessories.
Safety First 1
Page 12

Chapter 1
Availability of Service
This phone, like any wireless phone, operates using radio signals, wireless and
landline networks, and user-programmed functions. Because of this,
connection in all conditions cannot be guaranteed. Therefore, you should never
rely solely on any wireless phone for essential communications (for example,
medical emergencies). When operating in analog mode, the service area where
you can place and receive calls will be smaller than with other phones.
Emergency (911) Servic e
If you need to make an emergency (911) call, power the phone on, dial 91 1, and
press . Emergency calls can be made regardless of lock setting.
When you purchase your phone, the key is programmed
Note:
as a Super Dial key to call the emergency number 911. However, you
have to enable this key assignment before you can use it. See
“Emergency Call” on page 57
Remember, to make or receive any call, the phone must be switched on and in
a service area that has adequate signal strength. Emergency calls might not be
possible on all wireless phone networks or when certain network service and/or
phone features are in use.
.
Safety Tips
Following the suggestions in this section will help ensure safe and efficient
operation of your Panasonic phone.
This Model Phone Meets The Government's Requirements For Exposure
To Radio Waves.
Your wireless phone is a radio transmitter and receiver. It is designed and
manufactured not to exceed the emission limits for exposure to radiofrequency
(RF) energy set by the Federal Communications Commission of the U.S.
Government. These limits are part of comprehensive guidelines and establish
permitted levels of RF energy for the general population. The guidelines are
based on standards that were developed by independent scientific
organizations through periodic and thorough evaluation of scientific studies.
The standards include a substantial safety margin designed to assure the
safety of all persons, regardless of age and health.
The exposure standard for wireless mobile phones employs a unit of
measurement known as the Specific Absorption Rate, or SAR. The SAR limit
set by the FCC is 1.6W/kg.
operating positions specified by the FCC with the phone transmitting at its
highest certified power level in all tested frequency bands. Although the SAR is
determined at the highest certified power level, the actual SAR level of the
phone while operating can be well below the maximum value. This is because
the phone is designed to operate at multiple power levels so as to use only the
power required to reach the network. In general, the closer you are to a wireless
base station antenna, the lower the power output.
Before a phone model is available for sale to the public, it must be tested and
certified to the FCC that it does not exceed the limit established by the
government-adopted requirement for safe exposure. The tests are performed in
positions and locations (e.g., at the ear and worn on the body) as required by
the FCC for each model. The highest SAR value for this model phone when
*
Tests for SAR are conducted using standard
* In the United St at es an d Cana da, th e SAR li mit f or mobile p hone s use d by the
2 Safety First
public is 1.6 watts/kg (W/kg) averaged over one gram of tissue. The standard
incorporates a substantial margin of s afety to give add itional protection for the
public and to account for any va riations in measurements.
Page 13

tested for use at the ear is 1.51W/kg and when worn on the body, as described
in this user guide, is 0.747W/kg. (Body-worn measurements differ among
phone models, depending upon available accessories and FCC requirements).
While there may be differences between the SAR levels of various phones and
at various positions, they all meet the government requirement for safe
exposure.
The FCC has granted an Equipment Authorization for this model phone with all
reported SAR levels evaluated as in compliance with the FCC RF emission
guidelines. SAR information on this model phone is on file with the FCC and
can be found under the Display Grant section of http://www.fcc.gov/oet/fccid
after searching on FCC ID NWJ10A003A.
Additional information on Specific Absorption Rates (SAR) can be found on the
Cellular Telecommunications Industry Association (CTIA) web-site at
http://www.wow-com.com.
Caution:
with FCC RF exposure requirements. Non-Panasonic accessories
may not comply.
All Panasonic branded accessories are tested and comply
Body-worn operation
To maintain compliance with FCC RF exposure guidelines, if you wear your
wireless phone on your body while on a voice or data call, always place the
phone in a Panasonic supplied or approved carry accessory. Use of nonPanasonic approved accessories may exceed FCC RF exposure guidelines.
Antenna Care
Use only the supplied or an approved replacement antenna. Unauthorized
antennas, modifications, or attachments could damage the phone and may
violate FCC regulations.
Phone Operation
NORMAL POSITION: Hold the phone as you would any other telephone, with
the antenna pointed up and over your shoulder.
FOR EFFICIENT OPERATION: For your phone to operate most efficiently, do
not touch the antenna unnecessarily when the phone is in use. Contact with the
antenna affects call quality and may cause the phone to operate at a higher
power level than otherwise needed.
Driving
Important:
telephones in the areas where you drive. Always obey them. Also, if
using your phone while driving:
Check the laws and regulations on the use of wireless
Chapter 1
• Give full attention to driving—driving safely is your first responsibility;
• Use handsfree operation, if available;
• Pull off the road and park before making or answering a call if driving
conditions so require.
Electronic Devices
Most modern electronic equipment is shielded from RF signals. However,
certain electronic equipment may not be shielded against the RF signals from
your wireless phone.
•
Pacemakers:
recommendsthat a minimum separation of 6 inches (6”) or 15 centimeters
(15 cm) be maintained between a handheld wireless phone and a
pacemaker to avoid potential interference with the pacemaker. These
recommendations are consistent with independent research and
recommendations of Wireless Technology Research.
The Health Industry Manufacturers Association
Safety First 3
Page 14

Chapter 1
Persons with pacemakers:
• Should ALWAYS keep the phone more than six inches from their pacemaker when
the phone is turned ON;
• Should not carry the phone in a breast pocket;
• Should use the ear opposite the pacemaker to minimize the potential for
interference;
• If you have any reason to suspect that interference is taking place, turn your phone
OFF immediately.
•
Hearing Aids:
hearing aids. In the event of such interference, you may want to consult
your service provider.
•
Other Medical Devices:
consult the manufacturer of your device to determine if it is adequately
shielded from external RF energy. Y our physician may be able to assist you
in obtaining this information.
Turn your phone OFF in health care facilities when any regulations posted
in these areas instruct you to do so. Hospitals or health care facilities may
be using equipment that could be sensitive to external RF energy.
•
Vehicles:
shielded electronic systems in motor vehicles. Check with the manufacturer
or its representative regarding your vehicle. You should also consult the
manufacturer of any equipment that has been added to your vehicle.
•
Posted Facilities:
notices so require.
Some digital wireless phones may interfere with some
If you use any other personal medical device,
RF signals may affect improperly installed or inadequately
Turn your phone OFF in any facility where posted
Aircraft
FCC regulations prohibit using your phone while in the air; switch off your
phone before boarding an aircraft unless otherwise advised by airline
personnel.
Blasting Areas
To avoid interfering with blasting operations, turn your phone OFF when in a
“blasting area” or in other areas posted: “Turn off two-way radio.” Obey all signs
and instructions.
Potentially Explosive Atmospheres
Turn your phone OFF when in any area with a potentially explosive atmosphere
and obey all signs and instructions. Sparks in such areas could cause an
explosion or fire resulting in bodily injury or even death.
Areas with a potentially explosive atmosphere are often, but not always, clearly
marked. They include fueling areas such as gas stations; below deck on boats;
fuel or chemical transfer or storage facilities; vehicles using liquefied petroleum
gas (such as propane or butane); areas where the air contains chemicals or
particles, such as grain, dust or metal powders; and any other area where you
would normally be advised to turn off your vehicle engine.
For Vehicles Equipped with an Air Bag
An air bag inflates with great force. DO NOT place objects, including both
installed or portable wireless equipment, in the area over the air bag or in the air
bag deployment area. If in-vehicle wireless equipment is improperly installed
and the air bag inflates, serious injury could result.
For U.S. Customers:
or butane) must comply with the National Fire Protection Standard (NFPA-58).
For a copy of this standard, contact the National Fire Protection Association,
One Batterymarch Park,
PO Box 9101, Quincy, MA 02269.
E-mail address: Custserv@NFPA.org.
Web site:
Refer to Appendix C for the FDA Consumer Update on Mobile Phones
published by the U.S. Food and Drug Administration.
www.nfpa.org
Vehicles using liquefied petroleum gas (such as propane
.
4 Safety First
Page 15
Getting Started
This chapter gets you star te d using your phone and learni ng its basic
features and functions.
Note: Do not modify or di sassemble the handset. Do not
pull or twist the antenna as doing so may loosen the
connection and/or damage the antenna.
Battery Use
Note: The battery must be fully charged bef or e using your
phone for the first time. Your handset’s new battery will
achieve maximum performance after two or three charges.
Attach and charge the batt er y as described in this section.
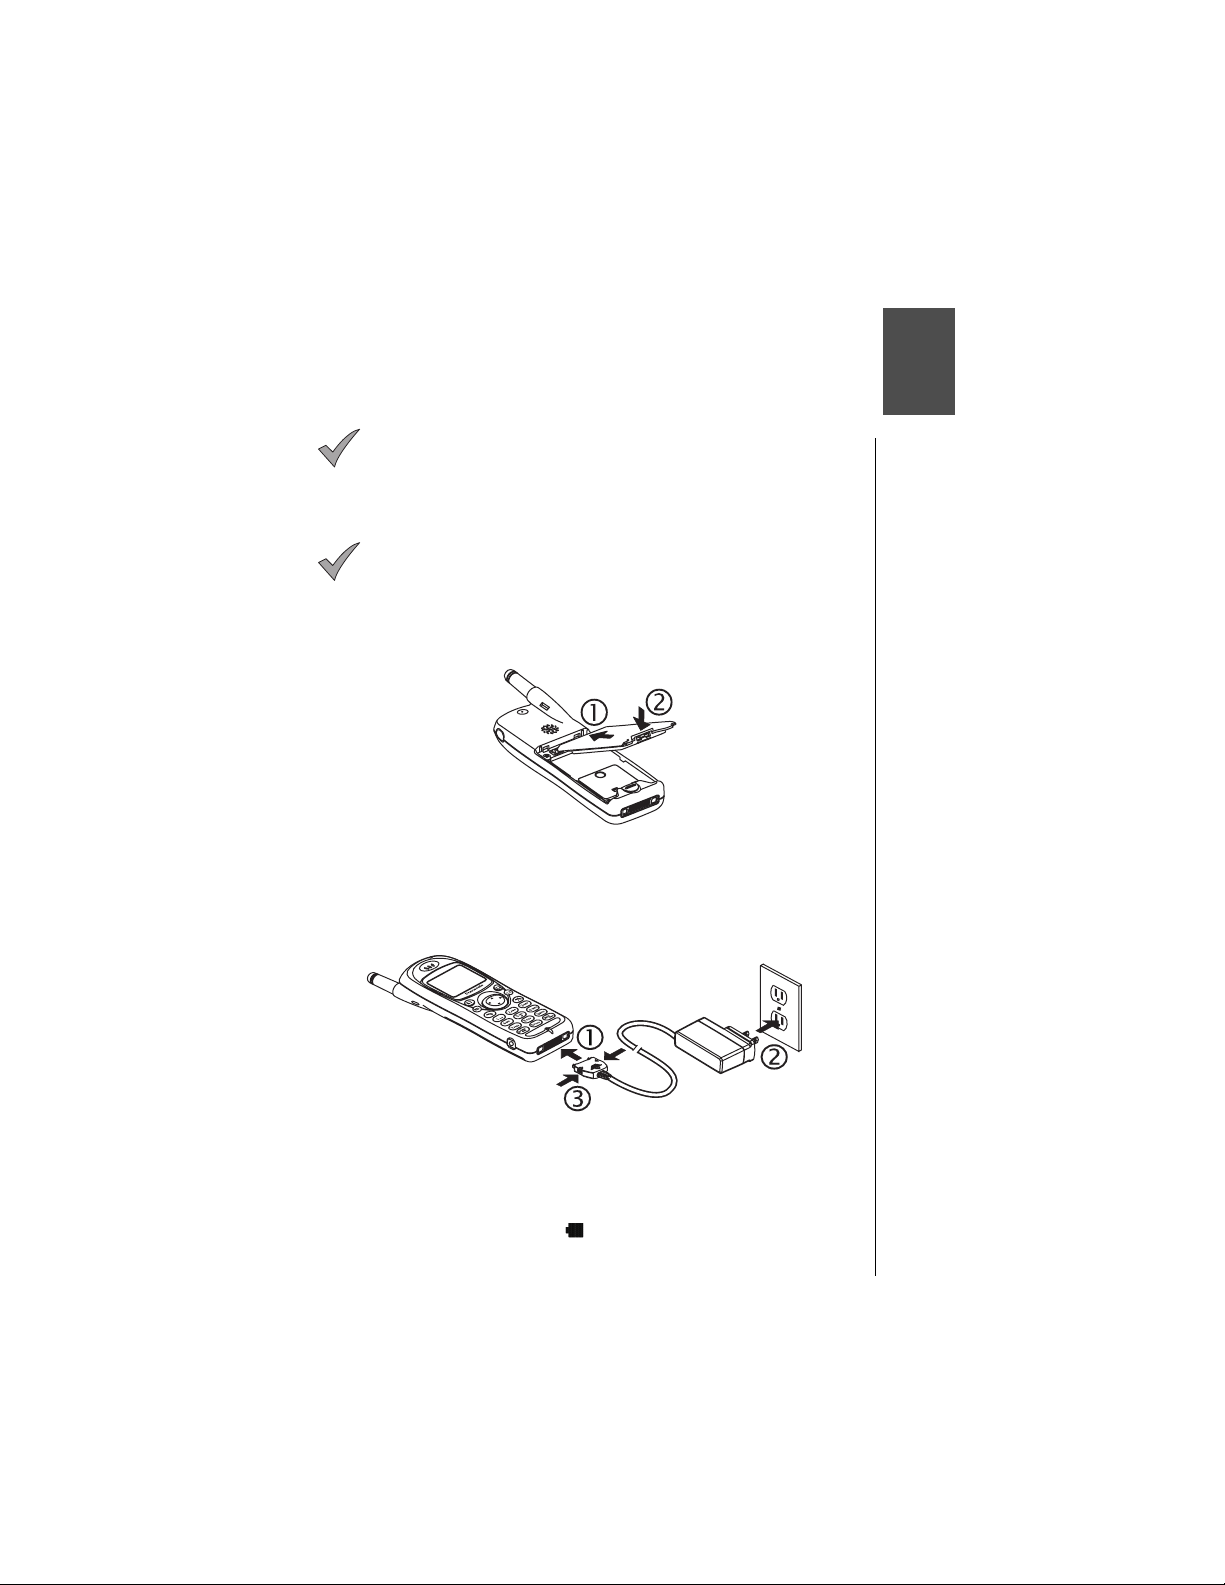
Attaching the Battery
1
Insert the top edge of the battery along the top edge of the phone’s
battery compartment.
2
Push the bottom of the batte ry tow ar d th e phone until it clicks into
place.
Charging the Battery
o
1
With the directional arro w s faci ng up, attach the AC adapter to the
phone.
2
Insert the plug into an AC pow er out let. The indicator light turns red. If
the phone is on during charging, the charging time will be extended.
When the battery is charged, the indicator light turns off and (if the
phone is on) the battery icon ( ) is filled.
3
To remove the AC Adapter from the phone,
the connector and pull g entl y
.
press in both side tabs o n
Getting Started 5
Page 16

Chapter 2
Recharging Tips
• Recharge batteries in a well-ventilated area between 41°F ( 5°C) and
95°F (35°C). Temperature may slightly affect charging time. In extreme
temperature conditions, the battery will stop charging and the indicator
light and battery charging icon w ill tu rn off. If this happe ns , re m ove the
charger, return the phone to an acceptab le temperature level, and
connect the charger to res ta rt charging.
• It is normal for your battery to become warm to the touch while it is
being recharged.
• Fully charge the battery for the rec om mended time.
• You can use the phone during chargi ng, but doing so will extend the
charging time.
Battery Specifications
Mode
Analog
Digital
Battery Type
(Lithium-Ion)
EB-BS310
Standard 740 mAh
EB-BS310
Standard 740 mAh
Times shown for standby, talk, and battery charge are
Note:
Talk
Time
Up to
80 min.
Up to
140 min.
approximate and may var y f ro m act ual t ime s, depending on
network configuration, signal strength, features selected, and
customer usage patterns.
Charge time reflects using the EB-CA340 400 mA AC Adapter.
Standby
Time
Approx.
5.5 hrs.
Up to
200 hrs.
Charge
Time
Approx.
180 min.
Approx.
180 min.
Removing the Battery
Slide latch down toward th e bott om end of the phone.
1
Lift and remove battery.
2
Low-Battery Warning
The phone periodically be eps when the battery is low. The battery icon
( ) flashes and the
If your p h on e i s at s ta nd by (i dl e) w h en th e
you may not be able to pla ce or re ceive calls until the battery ha s been
recharged, or until shortly after you attach an AC or DC adapter. If you are
in a call when you hear the be ep and the message appears, quickly end
your call or attach an AC or DC adapter.
6 Getting Started
Caution: Always turn the phone off before removing th e
battery.
If you remove the battery wh ile the phone is on, any
changes you have rec ently made to the settings m ay r et ur n to
their prev ious values.
Low Battery
message is displayed.
Low Battery
message appears,
Page 17

Phone Description
Chapter 2
You can enter up to 32 characters by pressing the number keys. The
keypad is also used to enter text as described in
Chapter 4
.
“Text Entry Operations”
Phone Specifications
Size
(with standard battery)
Weight
(with standard battery)
Maximum RF Output 600 mW
4.6” x 1.6” x .7”
(118 mm x 40.4 mm x 17.5 mm)
2.7 oz. (76.8 g)
Getting Started 7
,
Page 18

Chapter 2
Function Keys
The following table desc ribes how each function key work s.
Key Function
Press to use the function displayed
Press to use the function displayed above
Press the appropriate area of this key to scroll
Press to enter numbers. Press and
“Super Dial” on page 18
During conversation, press
“In-Call Features” on page 20
.
through
Left Softkey/Key Lock:
above the key.
From standby mode, press and hold to turn on Key Lock.
Right Softkey:
the key.
Navigation Key:
in the required direction. Use this key to scroll through menus,
text, and the Phonebook.
Message Key:
Press to enter the text message menu.
Clear Key:
the previous display. Press and hold to clear the display or to
return to standby.
Send Key:
and hold for voice command recognition.
PWR/End Key:
Press to end a call and return to standby, or to return to standby
from any menu.
1 through 9 Digit Keys:
hold one key for Super Dial. See
In text entry mode, press to enter text, numbers, and/or symbols.
(Note: The key is used to enter spaces.) See
Operations”, Chapter 4.
Home Key:
from any menu.
In text entry mode, press to switch between uppercase and
lowercase letters.
Pause Key:
“Programming Pauses or Waits” on page 35.
See
first position of a phone number, pressing and holding will
toggle between 0 and + (the international dialing prefix).
Speakerphone/Quiet Mode Key:
and hold to turn speakerphone on/off.
From standby, press and hold to turn Quiet mode on/off.
MEMO Key:
other person’s voice for up to 20 seconds.
From standby, press and hold to record your own voice for up to
20 seconds. See
Press and hold to retrieve voice mail messages.
Press to delete the previous character or to return to
Press to dial the phone number on the display. Press
Press and hold to power the phone on/off.
Press and hold to return “home” to standby (idle)
Press and hold to enter a pause or wait time.
During conversation, press and hold to record the
.
“Text Entry
When in the
8 Getting Started
Page 19

Display Icons
Icons that appear on the displ ay depend on what feature s yo u are using
and the options you have selected.
Master Display and Icons
Icon Indicates
Charged battery.
Low battery (flashes).
New text message received. When icon is darkened, indi-
cates that text message storage is full.
New voice mail message received.
Digital service available.
Active call is in operation. When blinking, the original call has
been put on hold.
Voice privacy feature is on.
Chapter 2
Quiet Mode is on.
Ring volume is set to 0.
Vibration alert is on.
Incoming signal strength (varies by the number of bars
shown beside the signal icon):
Five bars indicate a strong signal.
No bars indicate a weak or no signal.
Display area (shows numbers, text, and symbols).
Softkey functions. From standby, press to enter the Main
Menu. The function changes depending on the features or
modes you are using.
Phonebook. From standby, press to access the
Phonebook. Also changes to softkey functions.
Getting Started 9
Page 20

Chapter 2
Icon Indicates
Press the Navigation key to move in the directions indicated
by the displayed arrows.
• The up arrow indicates that you can scroll up through a
menu selection list.
• The down arrow indicates that you can scroll down
through a menu selection list.
• The solid right arrow indicates that you can move forward
through a lengthy text display.
• The solid left arrow indicates that you can scroll back to
the start of a lengthy text display.
• The hollow right arrow indicates that you can move forward to the next screen.
• The hollow left arrow indicates that you can move back to
the previous screen.
In menu displays, an asterisk next to a menu item indicates
the current setting.
Phonebook Icons
The following icons appear next to Phonebook entries to indicate whether
a phone number is a work num ber, home number, cell phone number, etc.
Icon Indicates Icon Indicates
Home phone number. Special ring.
Work phone number. Backlight.
Powering Phone On and Off
Powering ON
Press and hold until a tone sounds and the backlight lights.
• The battery indicator and signal icon are displayed.
• If your Welcome Screen is turned on, the message briefly appears.
• Your wireless service provider’s name is displayed if you are within the
coverage area.
Powering OFF
Press and hold to power off your phone.
10 Getting Started
Cell phone number. Picture alert.
Other phone number. Birthday (reminder).
Speed dial.
E-mail address.
Location # in memory
where phone number is
stored.
Page 21

Standby Display
The standby display appears when your phone is on and in an “idle” state.
You can return to the standby display at any time (except during a call) by
pressing or by pressing and ho ldi ng . The backli ght turns on
automatically for 15 sec onds when you power up the phone or when you
press any key.
For instructions on chan gi ng your standby display to a pic tu re , see
“Standby Screen” on page 52
will not be displayed unles s you are in your home service ar ea. )
The backlight remains on when the phone is plugged into
Note:
a DC Adapter.
. (If you have selected a st andby picture, it
Moving through the Menu
You access the Main Menu from the standby display :
is displayed on the bottom left side of the display. To access the
MENU
Main Menu, press the corresponding softkey ( ) on the keypad just
below where
either softkey ( or ) to select the options displayed above them .
Within the menu, the sel ected feature or function is indic at ed by an arrow
( ). Use the navigation key scroll areas
10
.
When an option is selected using the softkeys, the display changes to offer
another level of softkey options. This process con t inues until you have
responded to all display pro m pt s and options for a particular softk ey.
Shortcut Keys
You can quickly access many of the phone’s features by pressing shortcut
keys instead of scrolling th ro ugh the numbered options on the di splay. For
a complete list of the shortcut keys, refer to the Menu Map on the inside of
the front cover. For example, you can sele ct Key Volume by press in g
(MENU), then press (Tone Settings) and (Key Volume).
is displayed. After entering the M ai n M enu, press
MENU
as described in the table on
page
Chapter 2
Getting Started 11
Page 22

Chapter 2
Setting Date and Time
The standby display shows the current date and time, as well as the day of
the week. You can adjust these settings if necessary.
Note:
Y ou also have the option of turning the Date/Time display
or
On
Off
Adjusting Date and Time Settings
From standby, press (MENU) to enter th e M ai n M enu.
1
Scroll to
2
Scroll to
3
Press (OK) to select
4
• The currently set date and time are displayed with the cursor over the
• You can change the date/time by using and to switch between
When the cursor is over a digit you want to change, press the digit key
5
for the number you want in its pl ace.
• You can switch from AM to PM by pressing when your cursor is on
• If you enter an invalid date or time, the display prompts you to enter
When you are satisfied wi t h th e dat e /ti m e setting, press (OK).
6
Phone Settings
Time Settings
first digit of the month.
date and time and and to scroll across the digits.
AM or PM on the display.
another date/time.
Changing the Date Format
From standby, press (MENU) to enter th e M ai n M enu.
1
Scroll to
2
3
4
Scroll to
Scroll to
Phone Settings
Time Settings
Date Format
“Standby Screen” on page 52
. See
. Press (OK).
. Press (OK).
Date/Time
and press (OK).
and press (OK).
and press (OK).
• The display lists
format) and
format).
• You can press the left arrow to go back to the
previous screen.
.
MM/DD/YYYY
DD/MM/YYYY
for information.
(American date
(European date
Scroll to the format you prefer and press (OK).
5
Selecting 24-hour or 12-hour Mode
From standby, press (MENU) to enter th e M ai n M enu.
1
Scroll to
2
Scroll to
3
Scroll to
4
• The 24/12 Mode menu is displayed
To change the current mode , s cr oll to t he ot her option and press
5
12 Getting Started
(OK).
Phone Settings
Time Settings
24/12 Mode
and press (OK).
and press (OK).
and press (OK).
Page 23

Setting Ring Volume
You can adjust the volume of your phone’s ring. (
page 53
such as meetings and the at er s. )
1
2
3
4
5
for more information about using your phone in special si tu at i ons
From standby, press (MENU) to enter the Main Menu.
Scroll to
Press (OK) to select
• The display shows the current ring volume setting.
Press to increase ring volume, or to decrease volume.
• A sample of the current ring tone is emitted and the display indicates the
• If you select the lowest setting, the ring volume is muted (silent).
When you reach an acceptable ring volume, press (OK).
Tone Settings
current ring volume setting.
When the volume is set to muted (silent), the icon is
Note:
displayed.
and press (OK).
Ring Volume
See “Alert Mode” on
.
Selecting a Ring Alert
You have the option of select in g f ro m several different ring alerts.
If you are not yet familiar with your phone’s features or
Note:
with cell phones in general, you can choose from the gener al
rings or the preset melodi es. When you are more familiar w ith
your phone’s features, you can choose a custom melody or a
voice ring. See
information about these features.
From standby, press (MENU) to enter th e M ai n M enu.
1
Scroll to
2
3
Scroll to
Tone Settings
Ring Alert
“Selecting a Ring Alert” on page 46
and press (OK) .
and press (OK).
for
Chapter 2
Scroll to the ring alert type you w a nt to s el ect and press (OK).
4
• If you select
you scroll through the rings, you can hear the ring associated with each
Ring number.
• If you select
As you scroll through the list, the melodies are played.
General Rings
Preset Melody
, you can choose from six different rings. As
, you can choose from 10 preset melodies.
Getting Started 13
Page 24

Chapter 2
• If you select
you can customize and name. As you scroll through the list, the
melodies are played. You al so have the option of composing or editing a
melody and editing the title of the melody. See
page 49.
• If you select
played when you receive a call. See
For now, select a
5
(OK).
Note:
hear the sample ring or melody if ring volume has been muted or
if you are in a conversation. S ee
page 46
Custom Melody
Voice Ring
General Ring
When selecting a new rin g al er t, you will not be able to
for more information.
, you can choose from five melodies that
“Custom Melodies” on
, a message that you have recorded will be
“Message Alert” on page 47.
or a
Preset Melody
“Selecting a Ring Alert” on
and press
Vibration Alert
In addition to alerting you wi th a ring or a voice ring, your phone can alert
you to inc omi ng cal ls b y vi brat in g. Th is f eat ure is us eful fo r wh en you are in
a meeting, at the movies, or at a concert, when an audible ring might be
disturbing to others.
: To ensure that you do not disturb anyone, you should also
Note
mute the ring volume of you r phone when you turn Vibration on
“Setting Ring Volume” on page 13
(see
From standby, press (MENU) to enter th e M ai n M enu.
1
Scroll to
2
Scroll to
3
• If selected, the vibration alert icon ( ) appears on the display.
To change the setting, scroll to the other option and press (OK).
4
Tone Settings
Vibration
and press (OK) .
and press (OK).
).
Restoring Default Values
If, after changing several of your phone’s settings, you decide that you do
not want to ret ain the sett i ngs, you can re store the ori ginal values (that is,
all the settings that were in effect w hen you purchased your phone). Your
Phonebook entries will not be changed and any voic e commands you have
recorded w i ll b e retained. Se e
on restoring the phone’s original settings.
“Reset Defaults” on page 58
for information
14 Getting Started
Page 25

Using the Private Handsfree Headset
When the Private Handsfr ee H eadset is plugged into the phone, you can
have a phone conversat io n w ith out holding the phone to your ea r. The
other person’s voice is heard th ro ugh the Private Handsfree He adset’s
earpiece. When you speak, your voice is picked up by the Private
Handsfree Headset’s mic ro phone.
Before attaching the Private Handsfree Headset, remove
Note:
the plug from the headset/T TY connector at the bottom lef t side
of your phone. Store the plug in a saf e place so you will be able
to cover the connector when necessary.
Attach the Private Handsf re e H eadset to your phone as show n.
Securely plug the Private Handsfree Headset connector into the side of
1
the phone. This will automatically di sabl e the speak er and microphone
in the phone.
Attach the Private Handsfree Headset clip to your clothes.
2
Insert the earpie ce i nt o your ear.
3
During conversation , incr ease or decrease volum e t o a comfortable
4
level by pressing or on the phon e’s center navigation key.
The microphone picks up your voice from its hanging pos ition.
5
Chapter 2
Once the Private Handsfree Headset is connected, you
Note:
can customize the ring volume, key volume, and voice volume
settings for handsfree use. Ri ng volume and key volume can be
changed in the Tone Settings menu. Voice volume can be
customized during co nv er sat i on as indicated above. Whe n you
disconnect the Private Ha ndsfree Headset, your phone will go
back to the settings progr am m ed for standard handheld use.
Caution:
violate the laws of some sta te s/ pr ovinces. Be sure to check
applicable state/provincial laws before using this device.
The use of an ear insert device while driving may
Getting Started 15
Page 26

Chapter 2
Personalizing Your Phone
Panasonic’s website,
melodies that you can import to your PC and then download to your phone
using a data cable (see
information).
These pictures and melodies let you create unique rings and displays for
your phone. In addition to importing pictures and melodies from the
Panasonic website, yo u can access other sites on th e web w i t h gr aphics
and music files.
Note:
website before attempting to download to your phone. The
website also includes helpf ul t ro ubl es hooting information about
downloading and about th e so ftw are used to personalize your
phone.
http://www.panasonic-club.com
“EB-TX310 Accessories” on page 79
Read the complete downloading information on the
, has pictur es and
for ordering
16 Getting Started
Page 27

Everyday Operations
Your phone comes with a vari e ty of features. In most cases, however, you
will use only some of these features on a daily basis. This chapter will
familiarize you with most of th ose “everyday” operatio ns. D es criptions of
more advanced featur es are covered in additional chapters.
Placing Calls
To place a call, power on your phone and confirm that you have a strong
signal indication. If you are i n a di gi t al ser vi ce area, the icon appears.
Dialing from the Keypad
From standby, enter the phone number (up to 32 digit s) .
1
Press to place the call.
2
Caution:
Speakerphone feature is activated. Do not hold the ph one next
to your ear when the Speakerphone is activated.
Note:
letters are on the display. Clear the display before trying to
activate the Speakerphone.
• If the outgoing phone number matches an entry in the Phonebook, the
corresponding name is also displayed with the number.
When the call connect s,
3
During a call, if you press and hold , the
You cannot switch to the Speakerphone if any digits or
Voice Call
is displayed.
Press to end the call.
4
Dialing from the Phonebook
To use Super Dial and Speed Di al, yo u m ust first program entries into the
Phonebook. See
From standby, press or to scroll through the Phonebook
1
entries.
Chapter 5, “Ph on ebook Features”
• Depending on your phone’s search method
setting, the display shows entries alphabetically by
first or last name, or by memory location number.
To change, see
Method” on page 36
• To “jump” to a specific section of the alphabet,
press the number key that has the corresponding
letter on it.
“Selecting a Phonebook Search
.
.
Everyday Operations 17
Page 28

Chapter 3
When the arrow points to the entry you want, press (VIEW) to view
2
the Phonebook entry.
Press or to scroll to the appropriat e phone number and press
3
to place the ca l l.
Dialing a Phonebook Entry from the Menu
From standby, press ( ) to enter the Phonebook.
1
Press (OK) to select
2
• Depending on your phone’s search method setting, the display prompts
you to enter
search method setting, see
page 36
Enter the name, a portion of the name, or the memory location number
3
First Name, Last Name
.)
.
Search
, or
“Selecting a Phonebook Search Method” on
Location #
. (To change the
and press (FIND or O K) .
If you do not enter anything for th e f irst or las t name, the
Note:
display goes to the first letter of the alphabet for which you have
a Phonebook entry.
If needed, press or to scroll to the num ber you want to call.
4
• When the list of names appears, the following indicates there is no name
entry for a number saved in the Phonebook: "----,----".
When the arrow points to the entry of your choice, press (VIEW) to
5
view the Phonebook entry.
Press or to scroll to the phone number you want to call, and
6
press to place the ca l l .
Super Dial
Super Dial lets you quickly d i al a phone number by p r essing and holding a
digit key on your keypad. Be fo re you can use Super Dial, you mus t create
entries in your Phonebo ok and then assign them to Super D ial keys. See
“Creating a Super Dial Entry” on page 3 4
When you purchase your phone, the key is
Note:
programmed as a Super Dial key to call the emergency number
911. However, you have to enable Emerg ency Call before you
can use it. S ee
“Emergency Call” on page 57
When Emergency Ca ll is di sabled (set to Off), you can assign
as a Super Dial key for a number in your Phonebook.
should always be aware of whether Emergency Call is set to
On or Off.
From standby, press and
1
hold
assigned to a number in your Phonebook.
• If Emergency Call is set to On, pressing and holding
• The number is dialed and the name is displayed as it is listed in your
Phonebook entry.
• If there is no phone number assigned to the digit key,
Assigned
is displayed.
.
.
You
the key ( - ) yo u have
will call 911.
Super Dial Not
18 Everyday Operations
Page 29

Speed Dial
To call a Speed Dial number direc tly fro m standby (without going to a
menu), enter the memory location number that contains the phone number
you want to call, and press .
If Emergency Call is set to On (see
Note:
page 57
911 will be called.
To view a Speed Dial number bef or e pl acing the call, follow these steps:
From standby, enter the memory location number that contains the
1
phone number you want to call, then press . (For example, to dial
a number stored in locat io n 25, pr ess .)
Scroll to the Speed Dial number (or to another number in that location)
2
and press to plac e t he call.
) and you press and , the emergency number
• If the entered memory location is empty, the
display shows the entered digits and the # sign.
Press
briefly to return to standby.
“Emergency Call” on
Answering Calls
The phone must be on to receive calls. It will not ring or vibrate when
powered off.
When a call is received, the phone rings and/or vibrates.
• If you have Caller ID, the caller’s phone number is
displayed under
• If the caller’s phone number matches an entry in
the Phonebook, the corresponding name appears
and the backlight changes color (unless the call
was placed through a PBX).
Incoming Call
.
Chapter 3
To answer, press or any key except . (See
1
Options” on page 22
• Quickly pressing will stop the ringing and/or vibration alert, but not
answer the call.
When you are ready to end the call, press to disconnect.
2
.)
“Answer Key
Everyday Operations 19
Page 30

Chapter 3
In-Call Features
While you are in a call, several useful features are available:
• Adjusting Voice Volume (see below)
• Viewing Your Own Phone Number During a Call (see below)
• Muting the Mouthpiece (see bel ow)
• Using the Display as a Scratchpad ( see
• Turning the Speakerphone On and Off (see
• Recording a Voice Memo During a Call (see
Adjusting Voice Volume
During a call, press to increase the volu me of the other pe r son’s
1
voice, or pr ess to decreas e t he volume of th e other person ’s voice.
• The volume level is displayed.
Release the key when a satisfactory volume is reached.
2
Viewing Your Own Phone Number During a Call
During a call, you can view yo ur own phone number.
During a call, press (MENU) to enter the Main Menu.
1
2
3
Scroll to
Scroll to
number.
Phonebook
Own Number
and press (OK).
and press (OK) to view your phone
page 21
page 21
page 26
)
)
)
Press (OK) and the display re t u rns to standby.
4
Note:
number, only the number currently being used is displayed.
If you would like to have a second phone number programmed
for your phone, contact your wireless service provi der.
Muting the Mouthpiece
During a call, press (MUTE) to mute the mouthpiece (microphone).
1
• The display indicates when the mouthpiece is muted.
• When the mouthpiece is muted, you can still hear the person you are
talking with, but they cannot hear you.
Press (UNMUTE) to unmute and r esume conversation.
2
20 Everyday Operations
If your phone i s programmed with more than one phone
Page 31

Using the Display as a Scratchpad
This feature allows you to ent er a phone number on your phon e ’s display
during a call. You can enter up to 32 digits. After ending the call, yo u can
dial the number on the displ ay or save the entry in the Phonebook.
During a call, enter numbers by pressing the keys on your keypad.
1
After the call ends, the phone number remains on the disp la y.
2
Press to call the number on the display.
3
OR
Press (SAVE) to save the number in the Phonebook. (See
a Displayed Phone Number” on page 35
for more information.)
“Saving
Turning the Speakerphone On and Off
You can talk on your phone without having to hold the phon e to your ear.
Caution: Do not hold the phone next to your ear when the
Speakerphone is activated.
During a call, press (MENU) to ent er the Main Menu. Press
1
(OK) to select
OR
During a call, press and hol d to turn on Speakerphon e.
• The display indicates
Note:
ters are on the display. This means that when dialing a Speed
Dial number with Pauses or Waits embedded, the Spea kerphone will not turn on until the Pause or Wait commands have
completed. Always clear the display before trying to ac tivate the
Speakerphone.
To turn off the Speakerphone during a call , press (MENU) to enter
2
the Main Menu and press (OK).
OR
Press and hol d .
Ending the call also turns off the Speak er phone.
Note:
Handsfree Car Kit (EB-HF300EZ) or when in environments with
high ambient noise.
Speakerphone
You cannot switch to the Speakerphone if any digits or let-
Do not use the Speakerp hone as a substitute for the
.
Speakerphone Set to On
.
Chapter 3
Everyday Operations 21
Page 32

Chapter 3
Missed Calls
If an incoming call is not answered,
Press (VIEW) to view the phon e num ber and the time of the
1
missed call.
• If the caller’s phone number matches an entry in the Phonebook, the
corresponding name is also displayed (unless the call was placed
through a PBX).
Press or to scroll through the phone numbers of the last 10
2
missed calls.
Press to call the selected phone num ber.
3
Y ou can view the last 10 missed calls at any time, by
Note:
selecting
view your missed calls.
Phone numbers of missed calls are displayed only if you have
subscribed to Caller ID through your wireless service provider.
Call History
from the standby screen and scroll to the right or left to
Missed Call
from the Main Menu. You can also press
is displayed.
Answer Key Options
You can answer your phon e by doi ng either of the following:
• By pressing any key except (this is the default).
OR
• Only by pressing (SEND key).
From standby, press (MENU) to enter the Main Menu .
1
Scroll to
2
Scroll to
3
• You can choose
To change the setting, scroll to the other option and press (OK) to
4
select.
Phone Settings
Answer Key
Call Waiting can be answered
Note:
(ACCEPT), regardless of th e
and press (OK).
and press (OK).
Any Key
or
SEND Key
.
only
by pressing or
Answer Key
setting.
22 Everyday Operations
Page 33

Voice Mail
You must subscribe to voice mail through your wireless
Note:
service provider befor e you can retrieve voice mail m essages.
To check if voice mail has been p ro gr am m ed, press and hold
. If the display indicates th at th e Voice Mailbox num ber is
empty, voice mail has not been programmed. Contact your
wireless service provider for programming instructions. (Refer to
Chapter 7
features.)
Listening to New Voice Mail
When a new voice mail me ss age is received, an alert sounds and
1
appears on the top of the dis play.
Press (LISTEN) to automatically dial your voice mail number.
2
OR
From the standby displa y, press and hold until it calls your voi ce
mailbox.
for information about additional service provider
• The display indicates the number of new voice
mail messages.
• remains on the display until you have listened
to all your voice messages.
If the display indicates that your voice mailbox is empty
Note:
or the number i s not valid, co ntact your wireless serv i ce
provider.
Chapter 3
Follow the recorded instructions for your voice mail.
3
Press to return to standby when you ar e f in i she d retrieving your
4
voice mail message s.
Redialing Numbers
You can easily redial any of the last 10 numbers dialed from your phone.
Or, when a system busy signal occurs, your phone can automatically redial
the number you are attem pt i ng t o call.
Redialing One of the Last 10 Numbers Dialed
From standby, press to view the last 10 dialed phone numbers.
1
• If a dialed number matches an entry in the
Phonebook, the corresponding name is also
displayed.
• Press
view missed messa ges.
Press or to scroll through the num ber s.
2
Press to place the call.
3
to view received messages and to
Everyday Operations 23
Page 34

Chapter 3
Automatic Redial
If a call cannot be completed because of a system busy error (or other
system problem), you r ph one can automatically re dial the num ber for you.
If your call cannot be compl et ed because of a system erro r, wait until
1
Automatic Redial?
Note: Automatic Redial?
cannot be completed because of a system bus y er ro r or
some other system pr ob l em .
displayed if the called nu m ber is busy because the person
you are calling is using the phone.
When your phone is con nected to the Private Handsfre e
Headset or an optional H andsfree Car Kit, the phone will
automatically redial wi th out prompting for an answer to
Automatic Redial?
Press (YES) to automatically redial the number.
2
• The phone automatically redials the number up to 15 times or until the
call connects.
• An alert tone sounds when the call connects.
• You can press at any time to cancel the automatic redial.
OR
Press (NO) to return to standby.
is displayed.
.
is displayed only when you r ca ll
Automatic Redial?
is not
Key Lock
This feature lets you lock the keypad to prevent your phone’s keys from
being pressed accident ally. You can still recei ve calls by pressing any key
except or by pressing , if you have selected this as your answer
key (see
(911) calls even when the key lock is on.
Turning On Key Lock
1
2
Turning Off Key Lock
1
2
“Answer Key Options” on page 22
From standby, press and hold (MENU).
• The display indicates that the key lock is set to On.
Press any key or wait 3 seconds to return to standby.
From standby, press (UNLOCK).
When the display asks w hether you would like to
press (YES).
• The keypad is unlocked.
). You can place emergency
Unlock Keypad?
,
24 Everyday Operations
Page 35

NOTICE TO CONSUMER
This cellular telephone is equipped with a Memo Feature that allows the
user to record portions of a telephone conversation. In many states
(including California, Connecticut, Florida, Illinois, Maine, Maryland,
Massachusetts, Montana, New Hampshire, Pennsylvania, South
Carolina, and Washington), it is unlawful to record private
communications without the consent of all parties to the conversation. To
avoid violating the Wiretapping Acts, prior to invoking the Memo Feature
during a telephone call, you should obtain consent of the other party(ies),
especially for calls in, or to parties in, the aforementioned states.
Voice Memo
The Voice Memo feature lets you record spoken information (such a s a
name, a phone number, or a time and place fo r a m ee ting) to play back
later. You can have one voice memo recorded while in a call and three
voice memos recorded while in standby. Each voice memo has a time limit
of 20 seconds.
• When you record a memo while in a call, only the other person’s voice
is recorded.
• When you record a memo from st andby, your own voice is recorded.
• After 15 seconds, a warning tone notifies you that only 5 second s
remain for you to record.
• After 20 seconds, recording st ops and an end tone sounds.
• If you want to start a new recordin g, briefly press the key. A
recording startup tone sounds and a new recording starts.
Recording a Voice Memo from Standby
From standby, press (located at the to p right-hand side of your
1
phone).
• The Voice Memo menu is displayed.
Press (OK) to select
OR
From standby, press and
• If you have already recorded three Voice Memos from standby,
Memo Full
you can record a new one.
• If you have an empty memo slot, a recording startup tone sounds.
Start speaking.
2
•
Recording
• If you press or (SAVE) before 15 seconds have elapsed, the
warning tone does not sound.
Press (SAVE) to save the memo or (CANCEL) to delete it.
3
is displayed. You have to delete one of the memos before
appears on the display and a 20-second timer counts down.
Record
.
hold
.
Voice
Chapter 3
Everyday Operations 25
Page 36

Chapter 3
Recording a Voice Memo During a Call
Even though a startup tone sounds when recording starts,
Note:
you should also notify th e ot her per son that they are being
recorded.
Also, keep in mind that this feature will not work if you are in an
analog service area.
During a call, press and
1
• A recording startup tone sounds.
a 20-second timer counts down as the other person’s voice is recorded.
• Any Voice Memo previously recorded during a call is automatically
overwritten without notification.
• If you press (SAVE) before 15 seconds have elapsed, the warning
tone does not sound.
• If you press at any time while recording during a call, your call
ends; however, the voice memo is saved.
Press (SAVE) to save the memo or (CANCEL) to delete it.
2
hold
.
Recording
appears on the display and
Playing and Deleting a Voice Memo
You can play and listen to a voice m emo
Press the key on your phone.
1
• The Voice Memo menu is displayed.
Scroll to
2
• Any voice memos you have recorded are played back.
To skip the currently playing memo, press (SKIP).
3
Play/Delete
and press (OK)
OR
To repeat the currentl y playing memo , press briefly.
OR
To delete the currently playing memo, pr ess (DELETE).
• The display asks you to confirm the deletion. If you cancel the deletion,
the memo is played again. If you confirm the deletion, the memo is
deleted.
from standby.
only
.
26 Everyday Operations
Page 37

Text Entry Operations
Whenever you store an ent r y i n you r Phonebook, compose or rep ly to a
message, or create rem in ders, you use the phone’s keypad to enter the
text. There are two metho ds for entering text:
• Letter Entry (ABC)
• Word Entry (Word T9®)
To change your text entry mode, pr ess when ,
Note:
, , , , , or is displayed.
Letter Entry
Letter Entry (ABC) mode is the traditional method of entering text in mobile
phones. This method is best for names of people or places.
Using Letter Entry (ABC) Mode
You are in Letter Entry mode when or is displayed in the
bottom right corner. The default for Letter Entry is uppercase ( ). To
switch between upper case and lowercase, pres s .
When using Letter Entry mode, press a key once to enter the first letter on
the key, press the key twice to enter the second letter on the key, and so
on. For example, press once for the let t er “D”, press twice for
the lette r “E”, and so on.
• Press once to delete the last-entered
character. Press and hold to delete the entire
entry.
• Press or
move to the next character space, or to add a
blank space.
to scroll across characters, to
For a complete list of char act er s, se e th e
Key Entry Table on page 29
Text Entry Operations 27
.
Page 38

Chapter 4
Word Entry (Word T9) Mode
Word Entry (Word T9) mode allows you to quickly type text with the aid of a
built-in dictionary. When you press each key t hat corresponds to the
character needed just once, the built-in dictionary suggests probable word
choices.
Using Word Entry (Word T9) Mode
You are in Word Entry (Word T9) mode when , , or is
displayed in the bottom right corner. To select one of the Word Entry
modes, press until the appro pr i at e m ode is displayed. Once in Word
Entry mode, you can switch between initial capitals, uppercase, and
lowercase by pressing .
For example, to enter the wor d “first” in Word Entry mode:
• Press once.
• Press once.
• Press once.
• Press once.
• Press once.
The word “first” should appear on the sc re en.
Keep in mind...
• As letters are entered, the dictiona ry dis pl ay s pr obable words.
Several different words can appear on the display during the
entering process. Do n’t be distracted by the words displayed—they
may not resemble you r int ended word. Just keep typin g unt i l you
see the word you want .
• If the word displayed when you have finished entering the le t te rs
does not match your intended word, press to scroll through other
words with the same ke y sequence.
• Press (OK) to select the word; press , or to move to
the next word.
• Press once to delete the last-entered character. Press and hold
to delete the entire entry.
• The key enters a space only.
If you have changed your phone’s language option, the
Note:
Word Entry dictionary changes to agree with the selected
language.
28 Text Entry Operations
Page 39

Numbers (NUM) Mode
You are in Numbers mode w hen is displayed in the bottom right
corner. Use Numbers mode to insert numbers in a text entry. To select
Numbers mode, press until appears . Th en key in the required
number.
Symbols (SYM) Mode
You are in Symbols mode whe n is displayed in the bottom right
corner. To select Sy m bols mode, press un til appear s.
Each number key is ass oci ated with several symbols. To select a specific
symbol, enter the corresponding number on th e key pad. To scroll through
additional screens of symbols, press , , or . The following table
shows the letters, numbers, and symbols associated with each keypad
key.
Key Entry Table
Mode
Letter
Key
entry ABC
ABC2 abc2 2 , - %
DEF3ÉÈ def3éè 3;_$^
GHI4 ghi4 4 : ( < |
Letter
entry abc NUM
(space)1
*
Screen 1 Screen 2 Screen 3 Screen 4
1. =~
SYM
`
Chapter 4
JKL5 jkl5 5 ? ) > \
MNO6 mno6 6 ! {
PQRS7 pqrs7 7 @ }
TUV8 tuv8 8 / & [
WXYZ9 wxyz9 9 # + ]
000 N/A
Switches between
uppercase and lower-
case
&()@/:?
.,’
* Press to enter a space or press twice to enter a “1”.
N/A
&()@/:? N/A
.,’
Moves to next Symbol display
Text Entry Operations 29
Page 40

Chapter 4
30 Text Entry Operations
Page 41

Phonebook Features
The Phonebook has 250 memory locations. In each location you can store
a first and last name, up to fou r as sociated phone numbers, an em ail
address, picture, and a dist i nctive ring tone. You can also associate a
backlight color with the entry. If a caller’s phone number matches an ent ry
in the Phonebook, the cor r esponding name is displayed and the backlight
changes color (if you have specified a different color than the standby color
in that ca ller’s Phonebook entry.)
This chapter contains in form ation about creating, savi ng, searching, and
accessing your Phone book entries. For an overview of ho w to mo ve
through the menus and use the shortcut keys, see
Started”
and the Menu Map on the inside of t he front cover.
Chapter 2, “Getting
Customizing Your Phonebook
You may find it easier to create Phonebook entries on your PC using a
synchronization softw ar e application (such as FoneSync™) and then
download them to your phone via a data cable. (See
Accessories” on page 79
other accessories.)
From the Panasonic webs ite,
download the
alerts and special rings for Ph onebook entries. These pict ur es and
melodies let you create uni que rings and displays for yo ur phone.
Mobile Media Manager
for information on ordering a data cable and
http://www.panasonic-club.com
which provides additio nal pi cture
“EB-TX310
, you can
Phonebook Features
Phonebook Features 31
Page 42

Chapter 5
Creating a Phonebook Entry
When entering numb er s i n th e Pho nebook, do not try to
Note:
enter dashes or parentheses as generally shown in listings of
phone numbers. Enter only th e di git s.
From standby, press ( ) to enter the Phonebook.
1
Scroll to
2
• For each entry, you can enter any or all of the following information:
First:
Last:
: Home Phone
:Work Phone
:
:
:
:
:
:
:
:
: Location #
• If all memory locations are full,
delete an entry before adding another one. See
Phonebook Entry” on page 35
• If the special ring tone is set to
Ring Alert menu (see
and press (OK).
Create
(name) Enter the first name here.
(name) Enter the last name here.
Enter the home phone number here.
Enter the work phone number here.
Cell Phone
Other #
Speed Dial
Email Address
Special Ring
Backlight
Picture Alert
Birthday
Enter the cell phone number here.
Enter an alternate phone number here.
Select the source to be used as the speed dialing
number. See
Enter the Email address here. See
on page 64
Select one of the Ring Alerts for when this person
calls you. See
Select one of the backlight colors to flash when this
person calls. See
Select a picture to be displayed when this person
calls. See
find out how you can get additional pictures to
choose from.
Enter the person’s birthday, or any other special day,
here. You can also set an alarm to remind yo u of t he
birthday (or other special occasion).
The location in memory where this entry is stored.
Used for Speed Dialing.
“Speed Dial” on page 19
.
“Selecting a Ring Alert” on page13
“Backlight” on page 52
“Personalizing Your Phone” on page16
Phonebook Full
for more information.
, the phone will ring as set in the
Current
“Selecting a Ring Alert” on page 46
“Text Messaging”
is displayed. You must
“Editing/Deleting a
).
.
.
.
to
Scroll to the appropriate item an d pr ess (SELECT).
3
32 Phonebook Features
Page 43

Enter the required informa tion .
4
• To enter text or symbols, refer to
• To delete an entered character, press briefly.
• To delete an entire line, press and hold .
•“----,----” indicates that you did not enter a name for that phone number.
Press (OK) when you complete t he i nf or m ati on.
5
If you need to add more information, repeat steps 3 through 5 until the
6
Chapter 4, “Text Entry Operations”
entry is complete.
To save the entry in memory, press to scroll to
7
and press
#: [ ]
(SELECT).
Press (ANY) to save the entry in the first available location.
8
OR
Enter a number between 1 and 250 to save the entry at a specific
location number.
• To determine which location numbers are available, press (MAP). A
period “.” indicates that the location is already being used. For example,
in the following display, locations 1, 3, 9, 12, 13, 14, and 25 are being
used. The remaining location numbers are available. Press (BACK)
to enter the preferred memory location number. After entering a number,
press (OK).
Chapter 5
.
When you are finished, press (FINISH).
9
• The display asks if you want to save the entry.
Press (YES) to save.
10
• If you have not entered a memory location number, the phone
automatically assigns the first available location and displays it for you.
• If you entered a location number that is already being used, the display
asks if you want to overwrite the previously saved entry. For example,
the display shows
Press (NO) to enter a different location number. Or, press (
to overwrite (delete) the information that was previously saved in that
location.
Overwrite John Smith?
OR
Press (NO) to delete your entry an d return to standby.
Phonebook Features 33
YES
)
Page 44

Chapter 5
Creating a Super Dial Entry
Super Dial quickly dials a phone number when you pr es s and hold a digit
key that you have assigned to a number saved in your P honebook. You
can create nine Super Dial entries, one for each of t he digit keys
( – ) on your keypad.
From standby, press ( ) to enter the Phonebook.
1
Scroll to
2
• The key assignment list is displayed. The first time you do this, the keys
Super Dial
through are listed as Not Assigned.
Note:
911, you have to enable
Call” on page 57
Scroll to the digit key you want to assign and press (ASSIGN).
3
• A list of the names in your Phonebook is displayed.
• When Emergency Call is disabled, you can assign the key to a
number in your Phonebook.
Scroll to the name you want to create a Super Dial entry for and press
4
and press (OK).
To assign the key as the emergency call number
Emergency Call
for instructions on how to do this.
. See
“Emergency
(OK).
• A list of the phone numbers for that name is displayed: ( Home
phone, Work phone,
Scroll to the nu mber you wa nt t o use f or th e Sup er Di al en try an d pr ess
5
Cell phone, and so on).
(OK).
• The key assignment list is displayed showing the name and digit key
assignment you created.
3
To create another Super Dial en t ry, repeat steps
6
through 5.
OR
To return to the Phonebook menu, press (BACK).
Changing or Deleting a Super Dial Entry
From standby, press ( ) to enter the Phonebook.
1
Scroll to
2
• The key assignment list is displayed.
Scroll to the entry you want to change or delete and press
3
Super Dial
(ASSIGN).
To change the entry, press (OK).
4
• The Phonebook is displayed and you can select another phone number
for the key.
OR
To delete the entry, scroll to
Confirm the deletion by pr essing (YES), or cancel it by press in g
(NO).
and press (OK).
and press (OK).
Delete
34 Phonebook Features
Page 45

Programming Pauses or Waits
This feature is useful when you are placing a call that requir es entry of
additional digits once the call connects (for examp le , yo u m ay have to
enter a password or PIN to access your voice mail).
Enter the phone number.
1
To enter a Pause or Wai t time, press and hold unt i l a P or a W
2
appears after the entere d ph one number.
• If you program a Pause (P), the digits following it are automatically
transmitted during a call after a two-second delay.
• To program more than a two-second Pause, enter multiple Ps.
• If you program a Wait (W), the digits following it are not transmitted
during a call until you press or (SEND).
Continue to enter digits, P auses, and Waits as needed.
3
• In this sample display, the first seven digits are the
phone number to dial. The W (Wait) indicates that
4
Press
the phone will wait until you press to
transmit the digits “
that the phone will then automatically transmit
3456
“
to place the call.
” two seconds after “
901
”. The P (Pause) indicates
901
” is transmitted.
OR
Press (SAVE) to save the entry into the Phonebook. (See the
following section,
information.
“Saving a Displayed Phone Number”
, for more
)
When you dial a Speed Dial nu m ber w ith P aus es or
Note:
Waits embedded, you will not be able to tu rn on th e
Speakerphone until the Pause or Wait commands have
completed.
Saving a Displayed Phone Number
When a phone number is di splayed, press (SAVE).
1
• You can save the number as:
Scroll to the applicable phone number type and press (OK) to store
2
Other #
or
.
Home #
Work #, Cell #
,
,
the phone number.
To enter additional informat i on and t o save your phone numbe r,
3
continue with step
3
“Creating a Phonebook Entry” on page 32
in
Editing/Deleting a Phonebook Entry
From standby, press ( ) to enter the Phonebook.
1
Press (OK) to select
2
• Depending on your phone’s search method setting, the display prompts
you to enter
search method setting, see
page 36
Enter the name, a portion of the name, or the memory location number
3
First Name, Last Name
.)
and press (FIND or OK).
.
Search
Location #
“Selecting a Phonebook Search Method” on
, or
. (To change the
Chapter 5
.
Phonebook Features 35
Page 46

Chapter 5
If you do not enter anything for the first or last name, the
Note:
display goes to the first letter of the alphabet for which you have a
Phonebook entry.
Press or to scroll to the entry you want to edit or delete.
4
Press (OPTION).
5
• You have the option to
the information in that memory location (
), or
Entry
Scroll to the action you want to pe rfo rm , and pre ss (OK).
6
• If you select
to the information you want to edit, press (SELECT), and enter the
change. Press (OK).
made.
• If you select
displayed entry. Press (YES) to delete or press (NO) to cancel
the deletion.
• If you select
Press (FINISH).
7
Press (YES) to save the change.
8
• The display asks if you want to overwrite the previously stored
information. Press (YES) again to overwrite the information and
return to standby. Or, press (NO), select a new location number, and
press (OK) to return to standby.
, all stored information for the entry is displayed. Scroll
Edit
Repeat until all necessary changes have been
Delete Entry
, the display returns to standby.
Exit
, the display asks if you want to delete the
and return to standby.
Exit
the entry, delete all of
Edit
Delete
OR
Press (NO) to return to standby without saving changes.
Selecting a Phonebook Search Method
Setting the
Search Method
searches for information stored in the Phonebook. You can set your phone
to search for entries by first name, last name, or memory location number.
From standby, press ( ) to enter the Phonebook.
1
Press to scroll to
2
allows you to determine how your phone
Search Method
• You have the option of setting your phone to
search for an entry by
memory
and press (OK).
First Name, Last Name
Location #
.
, or
Press or to scroll to the appropriat e setting.
3
Press (OK) to save.
4
36 Phonebook Features
Page 47

Displaying Your Own Number
Your phone can have up to two cel lul ar phone numbers (programm e d by
your wireless service pr ovi der). You can select either phone number to
make or receive a ca l l .
From standby, press ( ) to enter the Phonebook.
1
Press to scroll to
2
Note:
phone number, only the number currently being used is
displayed. See
page 73
Own Numb e r
• Your current cellular phone number is displayed.
(NAM stands for Number Assignment Module.
This number is programmed into your phone by
your wireless service provider.)
If your phone is programmed with more than one cellular
“Selecting Your Phone Number (NAM)” on
for information on selecting your other phone numb er.
and press (OK).
Deleting All Phonebook Entries
Caution:
all your Phonebook entrie s, it cou l d be very time-consuming to
re-create them.
From standby, press ( ) to enter the Phonebook.
1
Press to scroll to
2
• Delete All Phonebook Entri e s ?
Press (YES) to delete all Phonebook entries .
3
OR
Press (NO) to cancel the deletion.
Think carefully before using this feature! If you delete
Delete All
and press (OK).
is displayed.
Chapter 5
Phonebook Features 37
Page 48

Chapter 5
38 Phonebook Features
Page 49

Additional Operations
Many features and settings are accessible only through the phone’s Menu.
This chapter will show you how to use your phone’s Menu to get the most
from these more advanced features.
For an overview of how to mo ve through the Menu and how to use t he
shortcut keys, see
Map inside the front cover.
“Moving through the M enu”
Call History
From the Call History menu you can view and delete information related to
calls you have receive d and placed. You can also reset the timer that
monitors the time you spend in conversation on the phone.
Dialed Calls
1
From standby, press (MENU) to enter the Main Menu.
2
Scroll to
3
Press (OK) to select
4
Press or to scroll through the last 10 dialed numbers.
5
When the number you want to call is displayed, press .
OR
Press (OPTION) to add a prefix, to dele te a num ber, to save a
number, or to delete all entries in the list. See
page 40
Missed Calls
1
From standby, press (MENU) to enter the Main Menu.
2
Scroll to
3
Scroll to
Call History
for instructions.
Call History
Missed
and press (OK).
• The last dialed number is displayed.
• If the number is listed in the Phonebook, the
• If you place a phone call to a number that is
•
and press (OK).
and press (OK).
• The last missed (unanswered) number is
• If the caller’s phone number matches an entry in
•
• A call from a number that has blocked caller ID is
Dialed
.
corresponding name also appears.
already in your dialed numbers list, the newer call
record will replace the older one.
Missed
pressing or .
displayed (unless the call was from a private or
unlisted number).
the Phonebook, the corresponding name appears.
Dialed
pressing or .
displayed as Private.
Received
or
Received
or
in
Chapter 2
calls can be checked by
“Call History Options” on
calls can be checked by
and the Menu
Advanced Operations
Additional Operations 39
Page 50

Chapter 6
Press or to scroll through the last 10 missed calls.
4
When the number you w ant to cal l is d isp layed, press .
5
OR
Press (OPTION) to add a prefix, to dele t e a num ber, to save a
number, or to delete all entries in the list. See
page 40
for instruction s.
“Call History Options” on
Received Calls
From standby, press (MENU) to enter the Main Menu .
1
Scroll to
2
Scroll to
3
Press or to scroll throug h th e la st 10 r eceived calls.
4
When the number you w ant to cal l is d isp layed, press .
5
OR
Press (OPTION) to add a prefix, to dele t e a num ber, to save a
number, or to delete all entries in the list. See
below for instructions.
Call History
Received
and press (OK).
and press (OK).
• The last received (answered) number is displayed.
• If the caller’s phone number matches an entry in
the Phonebook, the corresponding name appears.
• If you receive a phone call from a number that is
already in your received numbers list, the newer
record will replace the older one.
•
or
Dialed
pressing or .
calls can be checked by
Missed
“Call History Options”
Call History Options
Adding a Prefix
This feature is useful if you cal l a loc al num ber and then travel to another
location (with a di ff eren t ar ea code ) and want to call the s ame nu mber. You
have the option of adding an area code.
If the phone number was originally stored with its area
Note:
code, the 1 is automatically inserted in front of it. If only the local
(7-digit) phone number was stored, you have to add the area
code and then the 1 is automatically inserted.
From standby, press (MENU) to enter the Main Menu .
1
Scroll to
2
Scroll to
3
Scroll until the phone number you want to add a prefix to is dis played.
4
Then press (OPTION).
Press (OK) to select
5
Scroll to
6
Call History
Dialed, Missed
Edit Number
and press (OK).
, or
Received
Prefix
and press (OK).
and press (OK).
.
40 Additional Operations
 Loading...