

Page 1
DVD/CD PLAYER
DVD-S35
Operating Instructions
DVD / CD PLAYER DVD-S35
DVD-RAM VIDEO PLAYBACK
OPEN/CLOSE
For error-free handling of your appliance, please read these
operating instructions carefully. Keep this manual for future
reference.
DOWN ZOOMMODE
UP
Page 2
Contents
Page
Precautions 3-4
CAUTION 5
Front Panel 6
Rear Panel/Batteries 7
Remote control functions 8-9
Connections 10-12
Home cinema 13-14
Basic settings 15-16
SETUP menu 17-22
Ratings 18
General playback 23-29
Other functions 30-31
Programme play 32
On-screen displays 33-35
JPEG 36
MP3/WMA menu 37
DVD-RAM menu
General notes on DVDs 39
Before requesting service 40-41
Glossary of technical terms 42-43
Information 44
Language codes 45
Specifications 46-47
Index
Last page
38
Dear customer
Thank you for trusting and purchasing this high-quality product. Panasonic is one of the
leading companies of the consumer electronics industry.
We are sure that this DVD player will meet with all your expectations.
Your DVD player provides a perfect reproduction of digital images stored on DVDs.
Depending on the type of DVD, your hi-fi equipment or your stereo TV set you can play
back stereo sound or digital multi-channel sound in excellent cinema quality. DVD video
also features options for selecting the audio channel, the synchronised language, the
language of subtitles and for choosing from various camera pick-up angles.
All basic functions of your DVD player can be controlled either via the unit or by means of
the remote control. The remote control lets you make any changes to the device settings
which will be retained when you switch off the player unit.
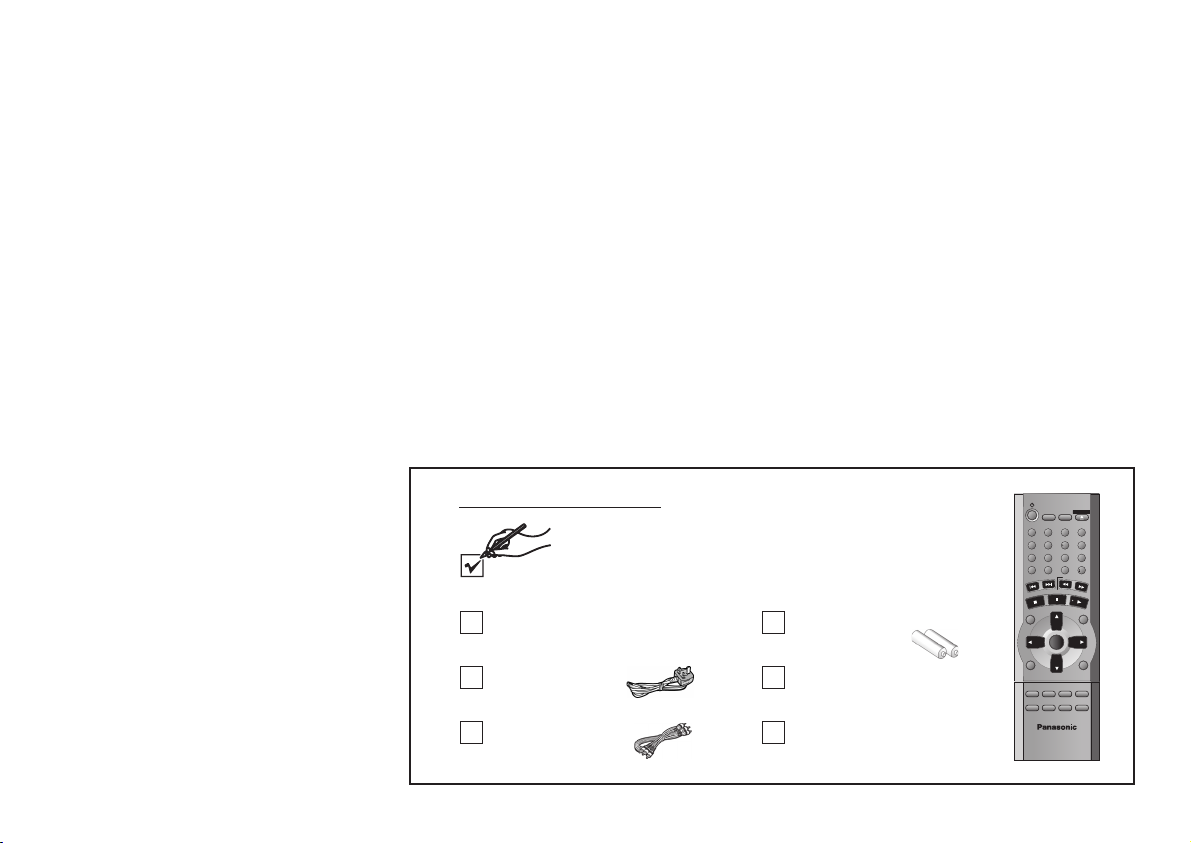
Included accessories
Remote Control
N2QAJB000069
AC Mains Lead
RJA0044-3C
Audio/Video Cable
K2KA6CA00001
Remote Control Batteries
AA, UM3 or R6
Operating Instructions
Guarantee Card
SLEEP SETUP
A.SRD
123
CINEMA
4
5
D.ENH
789
CANCEL
GROUP
0
SLOW/SEARCH
SKIP
PAUSE
STOP
DIRECTNAVIGATOR
TOP
MENU
ENTER
DISPLAY RETURN
SUBTITLE
ANGLE/PAGE
AUDIO
REPEAT
ZOOM
PLAYMODE
DVD PLAYER
N2QAJB000069
OPEN/CLOSE
PLAY
PLAYLIST
QUICKREPLAY
POSITION
MEMORY
6
10
MENU
2
Page 3

Precautions
Voltage:
Do not use high voltage power sources. This can overload the unit and cause a fire.
Do not use a DC power sources. Check the source carefully when setting the unit up on
a ship or other place where DC is used.
AC mains lead protection:
Ensure the AC mains lead is connected correctly and not damaged. Poor connection and
lead damage can cause fire or electric shock.
Service:
Do not attempt to repair this unit by yourself. If sound is interrupted, indicators fail to light,
smoke appears, or any other problem that is not covered in these instructions occurs,
disconnect the AC mains lead and contact your dealer or an authorized service center.
WARNING:
TO REDUCE THE RISK OF FIRE, ELECTRIC SHOCK OR PRODUCT DAMAGE, DO NOT EXPOSE
THIS APPARATUS TO RAIN, MOISTURE, DRIPPING OR SPLASHING AND ENSURE THAT NO
OBJECTS FILLED WITH LIQUIDS, SUCH AS VASES, SHALL BE PLACED ON THE APPARATUS.
Inside of product
CLASS 1
LASER PRODUCT
Back of product, see page 7.
3
Page 4

Precautions
CAUTION!
!
DO NOT INSTALL OR PLACE THIS UNIT IN A BOOKCASE, BUILT-IN CABINET
OR IN ANOTHER CONFINED SPACE.
ENSURE THE UNIT IS WELL VENTILATED.
TO PREVENT RISK OF ELECTRIC SHOCK OR FIRE HAZARD DUE TO
OVERHEATING, ENSURE THAT CURTAINS AND ANY OTHER MATERIALS DO NOT
OBSTRUCT THE VENTILATION VENTS.
!
DO NOT OBSTRUCT THE UNIT’S VENTILATION OPENINGS WITH
NEWSPAPERS, TABLECLOTHS, CURTAINS, AND SIMILAR ITEMS.
!
DO NOT PLACE SOURCES OF NAKED FLAMES, SUCH AS LIGHTED CANDLES, ON
THE UNIT.
!
DISPOSE OF BATTERIES IN AN ENVIRONMENTALLY FRIENDLY MANNER.
THIS UNIT IS INTENDED FOR USE IN MODERATE CLIMATES.
CAUTION!
THIS PRODUCT UTILIZES A LASER. USE OF CONTROLS OR ADJUSTMENTS OR
PERFORMANCE OF PROCEDURES OTHER THAN THOSE SPECIFIED HEREIN MAY RESULT
IN HAZARDOUS RADIATION EXPOSURE. DO NOT OPEN COVERS AND DO NOT REPAIR
YOURSELF. REFER SERVICING TO QUALIFIED PERSONNEL
.
This product may receive radio interference caused by mobile telephones
during use. If such interference is apparent, please increase separation between the
product and the mobile telephone.
4
Page 5
CAUTION
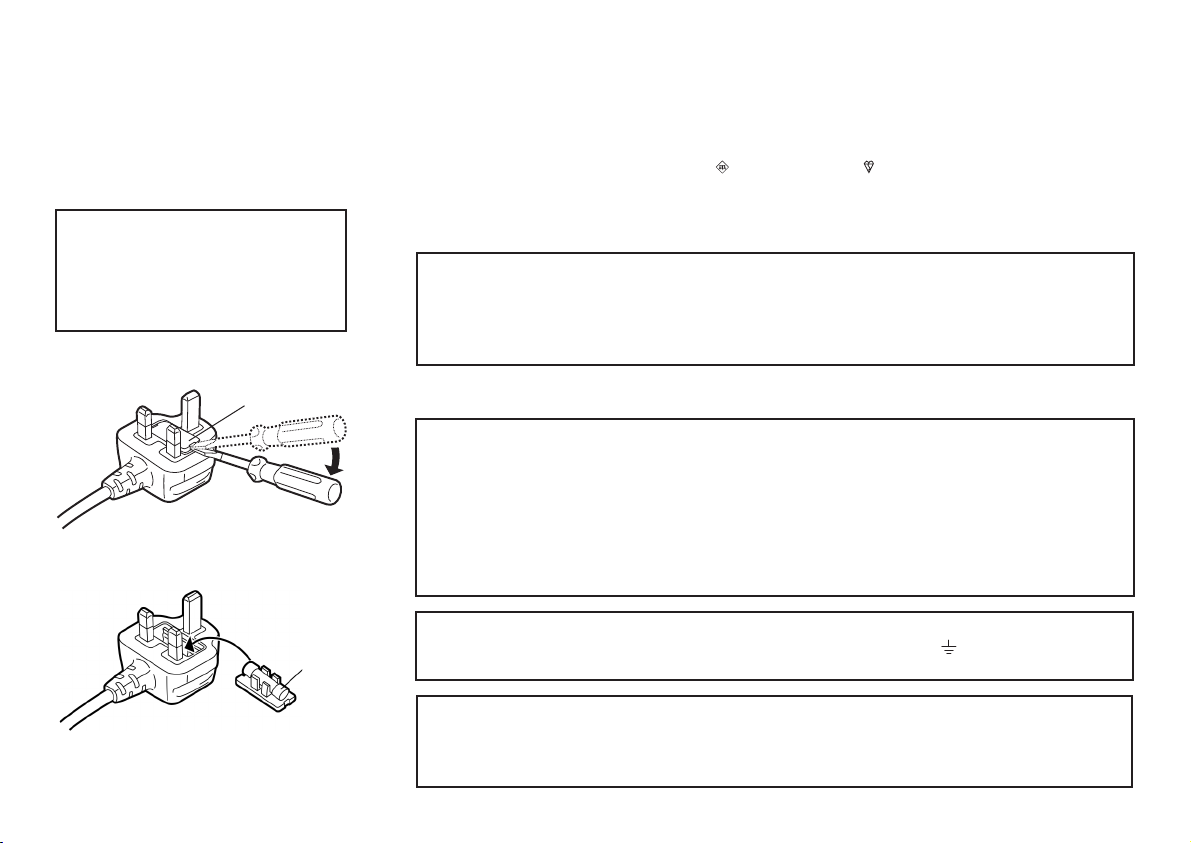
How to replace the fuse
Confirm the AC mains plug fitted
and follow the instructions below.
Illustrations may differ from actual
AC mains plug.
1. Open the fuse cover with a screwdriver.
Fuse cover
1
2. Replace the fuse and attach the fuse cover.
Caution for AC Mains Lead
For your safety, please read the following text carefully.This appliance is supplied with a
moulded three pin mains plug for your safety and convenience.
A 5-ampere fuse is fitted in this plug. Should the fuse need to be replaced please ensure
that the replacement fuse has a rating of 5-ampere and that is approved by ASTA or BSI
to BS1362. Check for the ASTA mark or the BSI mark on the body of the fuse.
If the plug contains a removable fuse cover you must ensure that it is refitted when the
fuse is replaced. If you lose the fuse cover the plug must not be used until a replacement
cover is obtained. A replacement fuse cover can be purchased from your local dealer.
CAUTION!
IF THE FITTED MOULDED PLUG IS UNSUITABLE FOR THE SOCKET OUTLET IN
YOUR HOME THEN THE FUSE SHOULD BE REMOVED AND THE PLUG CUT OFF
AND DISPOSED OF SAFELY. THERE IS A DANGER OF SEVERE ELECTRICAL
SHOCK IF THE CUT OFF PLUG IS INSERTED INTO ANY 13-AMPERE SOCKET.
If a new plug is to be fitted please observe the wiring code as stated below. If in any
doubt please consult a qualified electrician.
IMPORTANT
The wires in this mains lead are coloured in accordance with the following code: Blue:
Neutral, Brown: Live.
As these colours may not correspond with the coloured markings identifying the
terminals in your plug, proceed as follows: The wire which is coloured Blue must be
connected to the terminal which is marked with the letter N or coloured Black or Blue.
The wire which is coloured Brown must be connected to the terminal which is marked
with the letter L or coloured Brown or Red.
2
Fuse
( 5 ampere)
WARNING: DO NOT CONNECT EITHER WIRE TO THE EARTH TERMINAL WHICH
IS MARKED WITH THE LETTER E, BY THE EARTH SYMBOL OR COLOURED
GREEN OR GREEN/YELLOW. THIS PLUG IS NOT WATERPROOF - KEEP DRY.
FOR YOUR SAFETY DO NOT REMOVE OUTER COVER. To prevent electric shock,
do not remove the cover. There are no user serviceable parts inside. Refer all servicing
to qualified service personnel. For your safety, be sure not to connect or handle the
equipment with wet hands. BEFORE USE: Remove the connector cover.
5
Page 6
Front Panel
1
2
DVD-RAM VIDEO PLAYBACK
DVD / CD PLAYER DVD-S35
OPEN/CLOSE
3
DOWN ZOOM MODE
UP
5 6
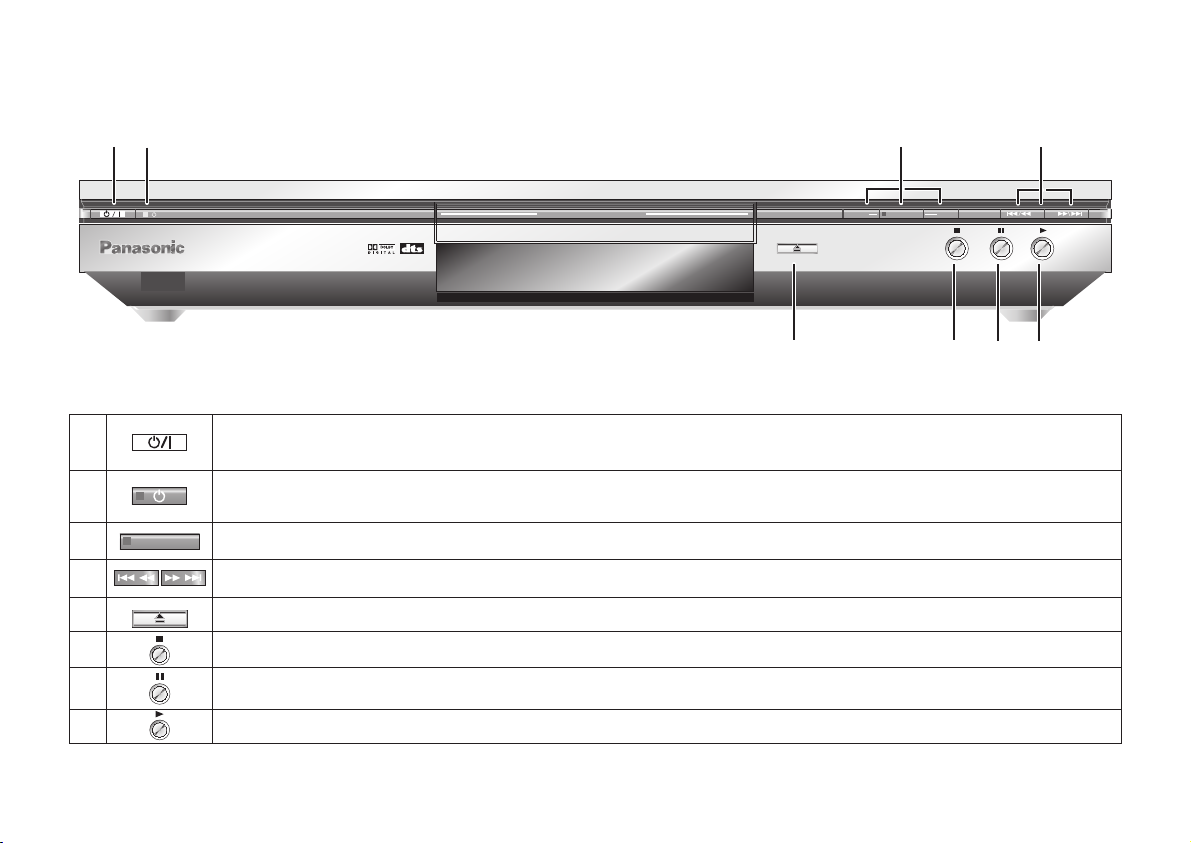
1
2
ZOOM MODE
3
/
4
OPEN/CLOSE
5
6
7
8
Standby/on switch : Press to switch the unit from on to standby mode or vice versa. In standby mode, the unit
is still consuming a small amount of power.
Stand-by indicator : When the unit is connected to the AC mains supply, this indicator lights up in standby
mode and goes out when the unit is turned on.
Sets the zoom mode for zooming into and out of the picture
/
SKIP/SEARCH : Press to skip chapters, tracks, pictures or to search ( keep button pressed )
Opens and closes the disc tray
STOP : Stops playback
PAUSE : Pauses playback
PLAY : Starts playback
4
8
7
6
Page 7

Rear Panel
Batteries
DIGITAL AUDIO OUT
(PCM/BITSTREAM)
OPTICAL
AC IN
1
1
AC INPUT socket
2
Optical Digital Out terminal
Audio Out socket
Audio Out socket
L= AUDIO output left channel
L= AUDIO output left channel
3
R= AUDIO output right channel
R= AUDIO output right channel
COMPONENTVIDEO OUT
AUDIOOUT
L
B
P
R
P
R
2
4
3
Inserting batteries into the remote control unit:
The batteries last for about a year, depending on how often you use the RC unit.
!
Do not mix old with new batteries or batteries of different types.
!
Only use batteries any harmful substances (such as lead, cadmium, mercury).
!
Do not use rechargeable type batteries.
!
Remove the batteries if the remote control unit is not used for longer periods of time.
!
Do not heat or short-circuit the batteries.
!
Immediately remove used-up batteries and replace with batteries of type AA, UM3 or R6.
!
Be sure not to confuse the polarity
Y
5
Please connect
directly to TV
VIDEOOUT
without
AV
CLASS 1
LASER PRODUCT
6
Component Video Out terminal
4
B
P =Component output blue
R
P =Component output red
Y =Component output luminance
5
Video Out terminalVideo Out terminal
AV Scart Output
6
and .
Dispose of , packaging material and the unit
statutory regulations
batteries according to
. They must not be thrown into the household refuse.
7
Page 8
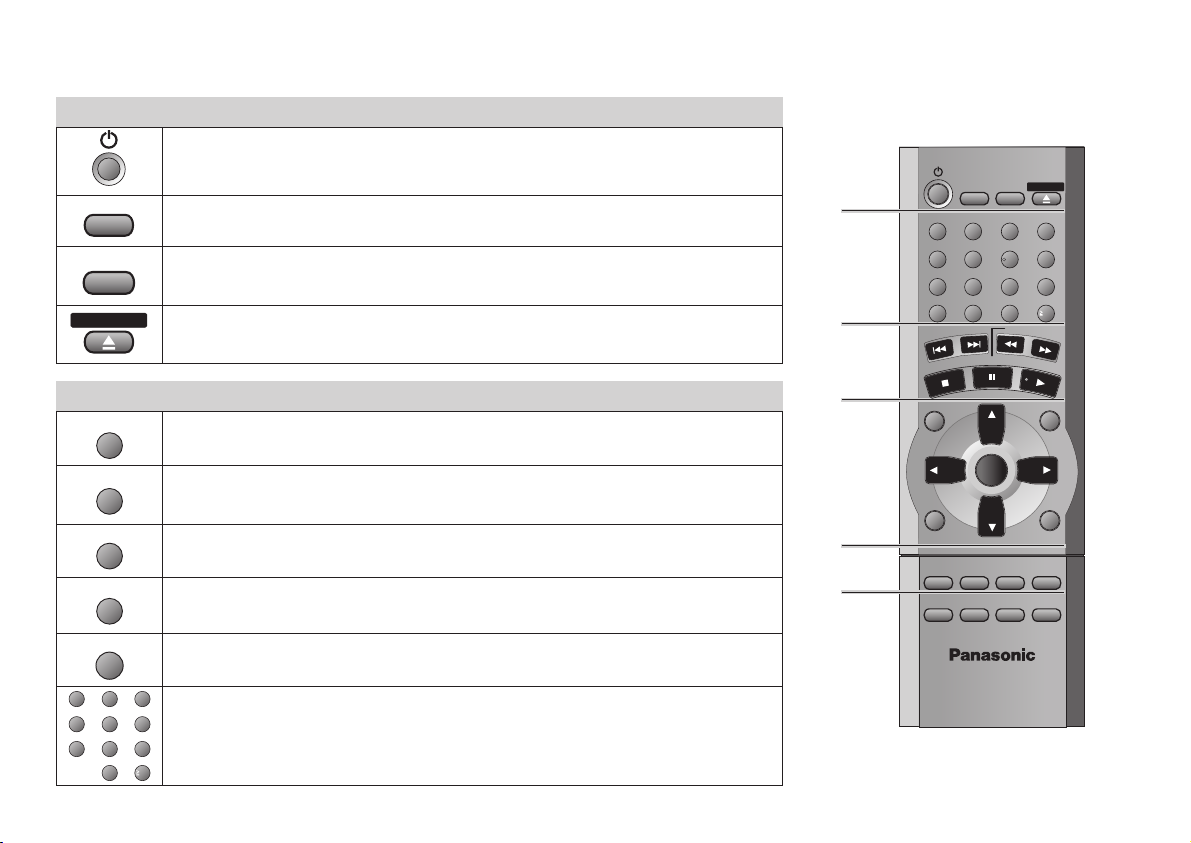
Remote control functions
Standby/on switch : Press to switch the unit from on to standby mode or
vice versa. In standby mode, the unit is still consuming a small amount of
power.
SLEEP
SETUP
OPEN/CLOSE
A.SRD
CINEMA
Switches off the unit at the set time. Page 27.
Displays the SETUP menu (DVD player settings). Page 17.
Opens and closes the disc tray. Page 23.
ADVANCED SURROUND Provides something similar to a surround effect.:
Page 30.
Enhances the contrast of the picture. Page 31.
1
OPEN/CLOSE
123
4
789
PAUSE
ENTER
6
5
10
0
0
10
SLOW/SEARCH
PLAY
PLAYLIST
MENU
A.SRD
CINEMA
D.ENH
GROUP
STOP
DIRECT NAVIGATOR
TOP
MENU
SLEEP SETUP
CANCEL
SKIP
1
2
3
2
4
D.ENH
GROUP
CANCEL
123
4
789
8
DIALOGUE ENHANCER Puts up the volume of the dialogue tone.:
Page 31.
On-screen display of groups of tracks/pictures. Page 34.
5
6
Discards entries.
6
5
0
Numeric key pad; input of two-digit numbers. Page 24.
10
DISPLAY RETURN
SUBTITLE
PLAYMODE
ANGLE/PAGE
AUDIO
REPEAT
ZOOM
DVD PLAYER
N2QAJB000069
QUICK REPLAY
POSITION
MEMORY
Page 9
Remote control functions
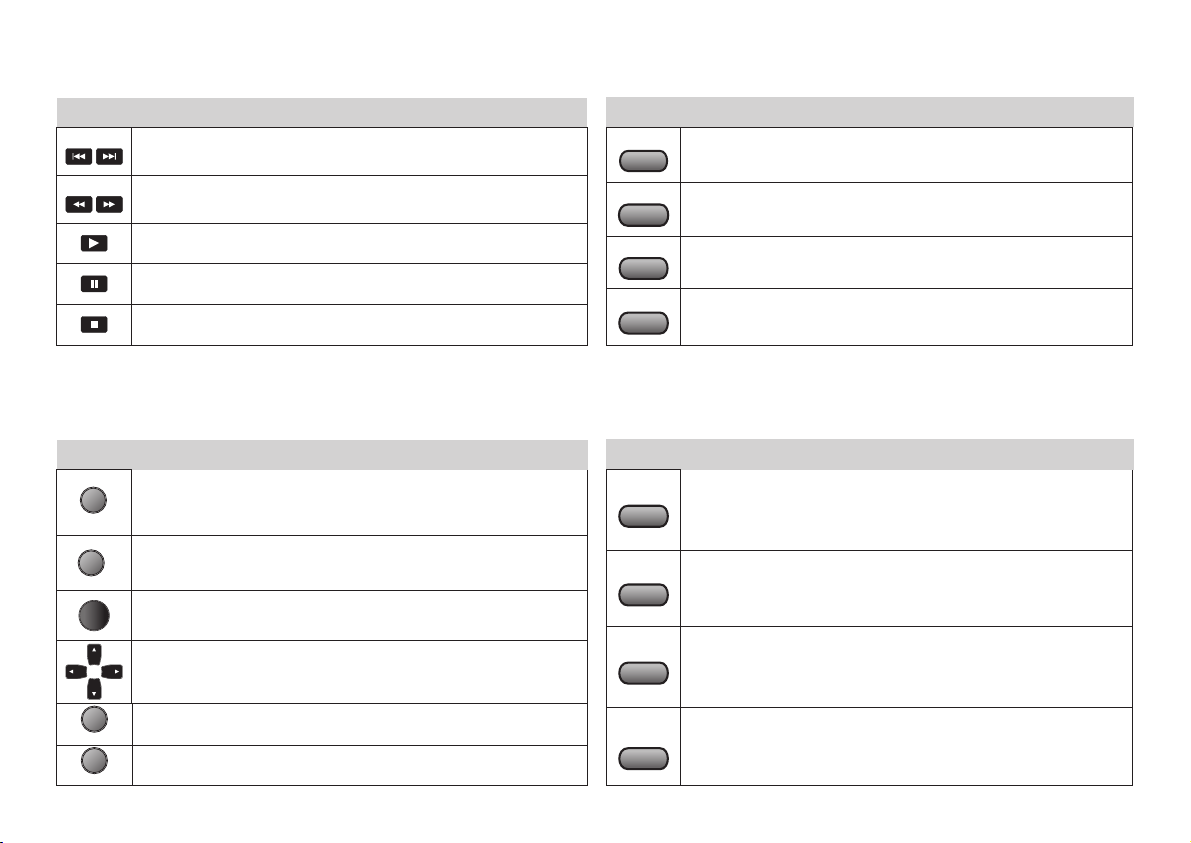
SKIP
SLOW/SEARCH
DIRECT NAVIGATOR
TOP
MENU
PLAY LIST
MENU
ENTER
3
Skips chapters, tracks or pictures. Page 25.
Slow motion and search function. Pages 23, 24.
Starts playback
Pauses playback.
Page 23.
Stops playback. Page 23.
4
Displays the main menu
Displays the menu
Accepts the menu function you selected
Cursor keys
SUBTITLE
AUDIO
ANGLE/PAGE
QUICK REPLAY
PLAY MODE
ZOOM
REPEAT
5
Selects the language of subtitles. Page 34.
Changes the audio track. Page 34.
Chooses from various camera angles; turns menu
Page 34.
pages.
Repeats the last couple of seconds of the current
playback.
Page 24.
6
Programme play/Random play.
Zoom function during playback. Page 28.
Repeat function. Page 29.
Page 32.
DISPLAY
RETURN
Enables the on-screen displays. Pages 33-36.
Quits a menu
POSITION
MEMORY
Resumes playback at stored position following an
interruption.
Page 26.
9
Page 10
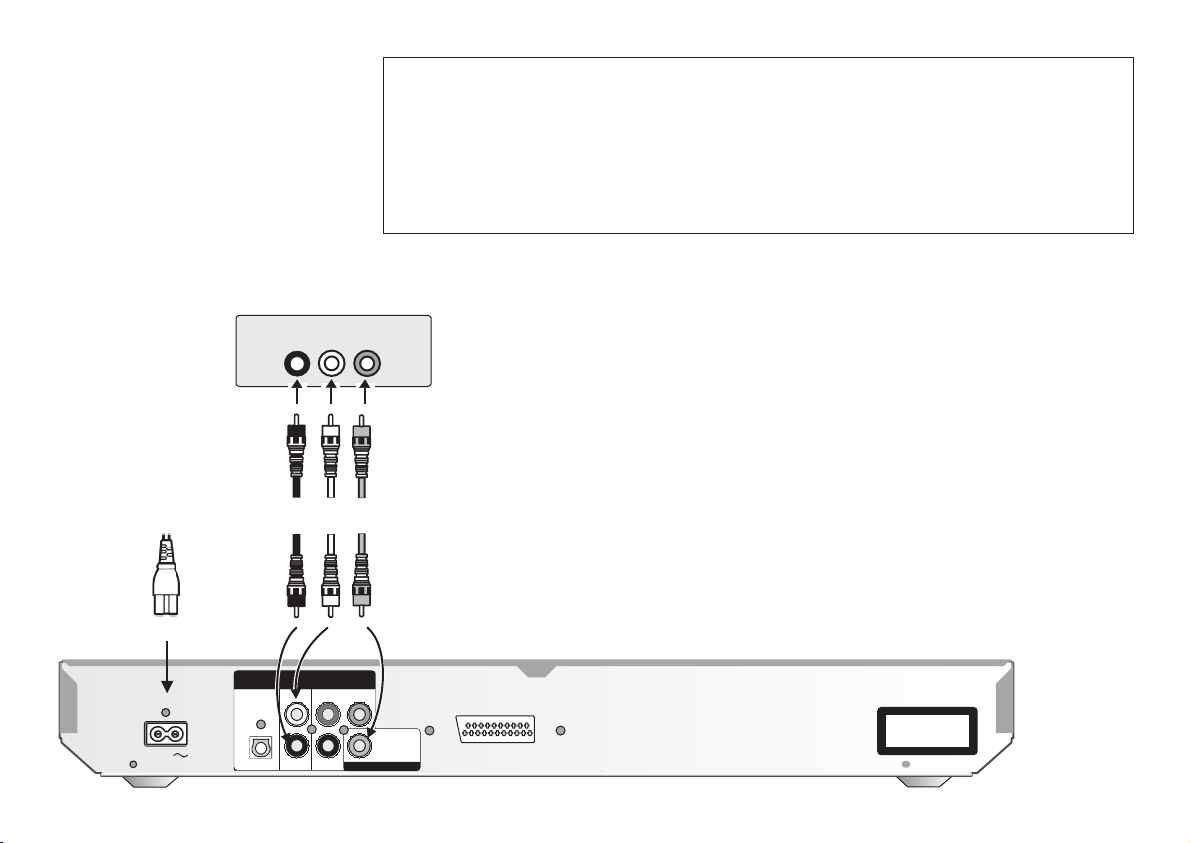
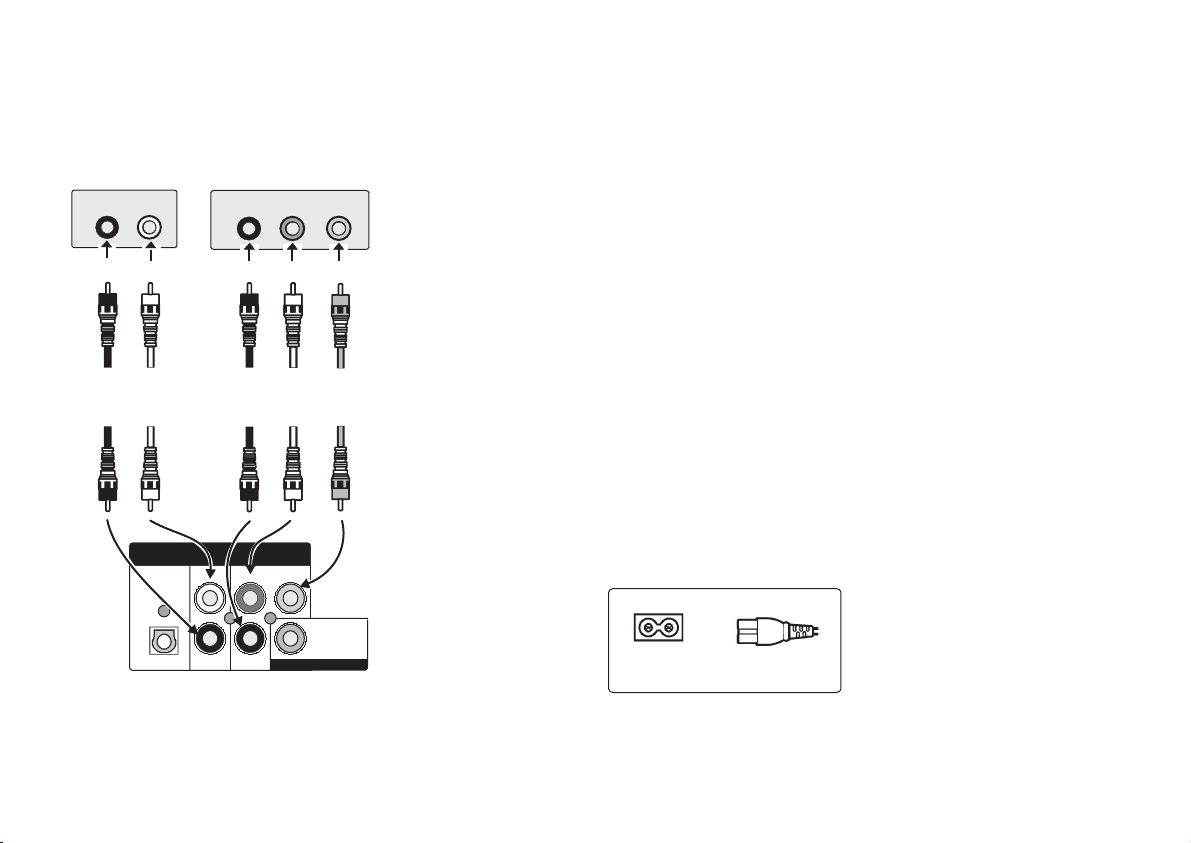
Connections
Note on all connections
!
Unplug all units from the mains.
!
Connect the unit directly to the TV set. If you let the player connection go through a
video recorder you will experience a disturbed picture when playing copy-protected
DVDs.
!
To avoid sound quality problems, deactivate function A.SRD ( Advanced Surround )
when you connect an amplifier with Dolby Pro Logic functionality.
Rear of
DVD player
10
TV set or
amplifier
AC IN
AUDIO IN VIDEO IN
R
Audio
cable
Red
Red
DIGITAL AUDIO OUT
AUDIOOUT
(PCM/BITSTREAM)
L
OPTICAL
R
L
White
COMPONENT
B
P
P
R
VIDEO OUT
Y
Video
cable
Yellow
Yellow
Please connect
directly to TV
VIDEOOUT
Connection to a TV set without a scart socket or to an
amplifier component ( home cinema ) :
1.
Read the operating instructions of your TV set.
2.
Connect
to confuse the colours or labels.
3.
When the unit is fully connected plug the AC mains cable back in.
AV
the cables as shown on the illustrations. Make sure not
CLASS 1
LASER PRODUCT
Page 11
Connections
Rear of
DVD player
AC IN
AV socket on rear
of TV set
DIGITAL AUDIO OUT
(PCM/BITSTREAM)
OPTICAL
AUDIOOUT
L
R
COMPONENT
B
P
P
R
VIDEO OUT
Y
Please connect
directly to TV
VIDEOOUT
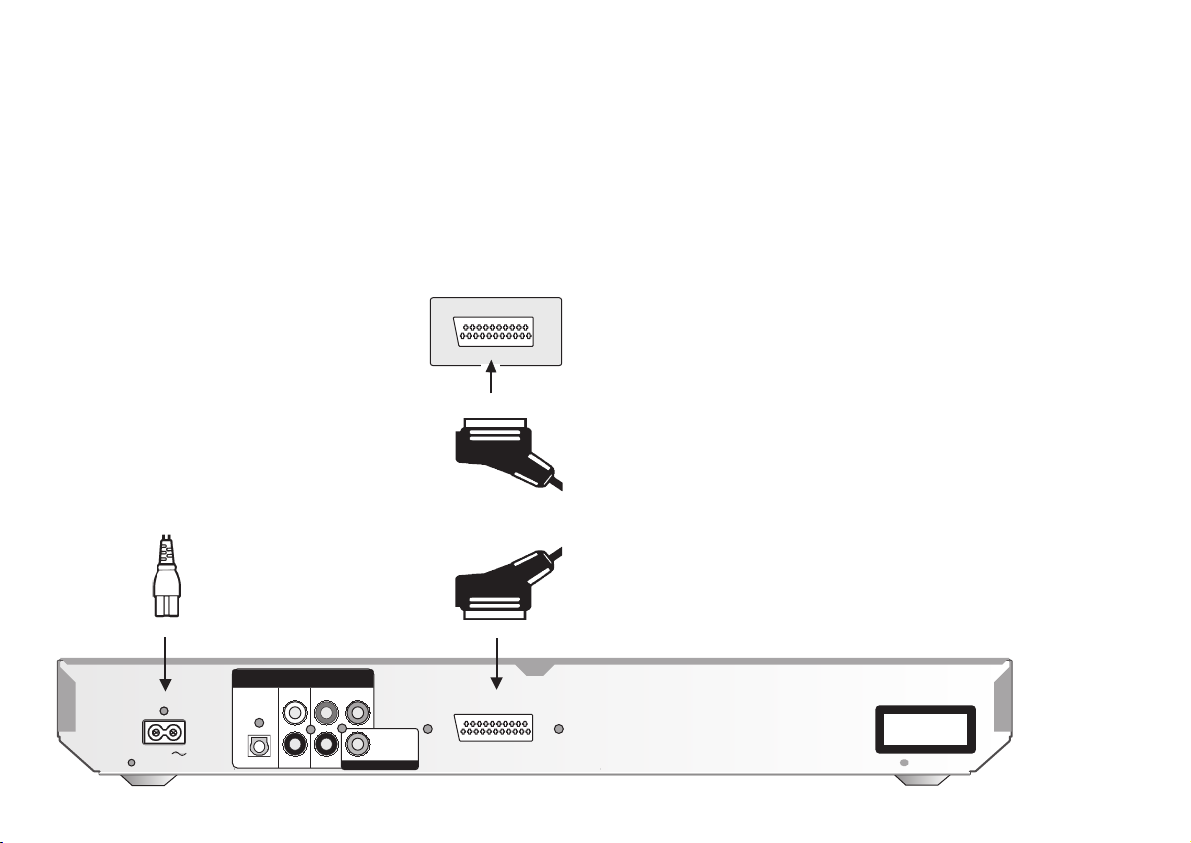
Connection to a TV set with scart socket
1.
2.
3.
AV
21-pin scart cable
AV
Read the operating instructions of your TV set.
Connect
the cables as shown on the illustrations. Make sure not
to confuse the colours or labels.
When the unit is fully connected plug the AC mains cable back in.
CLASS 1
LASER PRODUCT
11
Page 12
Connections
Rear of TV set (example)
AUDIO IN
R
COMPONENT VIDEO IN terminal
L
COMPONENT VIDEO OUT - terminal
The Component Video Out terminal separately outputs the colour difference signals
( PB/PR ) and the brightness signal Y, thus providing for an enhanced resolution and
colour response.
P
P
B
R
Y
The labelling of the Component Video In terminal may differ depending on theTV set or
monitor you use ( e.g. Y/P /P ,Y/B-Y/R-Y, Y/C /C ).
BR BR
12
Red
Red
White
White
DIGITAL AUDIO OUT
(PCM/BITSTREAM)
OPTICAL
AUDIO OUT
L
R
COMPONENT
B
P
P
R
VIDEO OUT
Y
Rear of
DVD player
Please connect
directly to TV
VIDEO OUT
Read the operating instructions of your TV set.
1.
2.
Connect
the cables as shown on the illustrations. Make sure not to
confuse the colours or labels.
3.
When the unit is fully connected plug the AC mains cable back in.
AC IN ~
Page 13
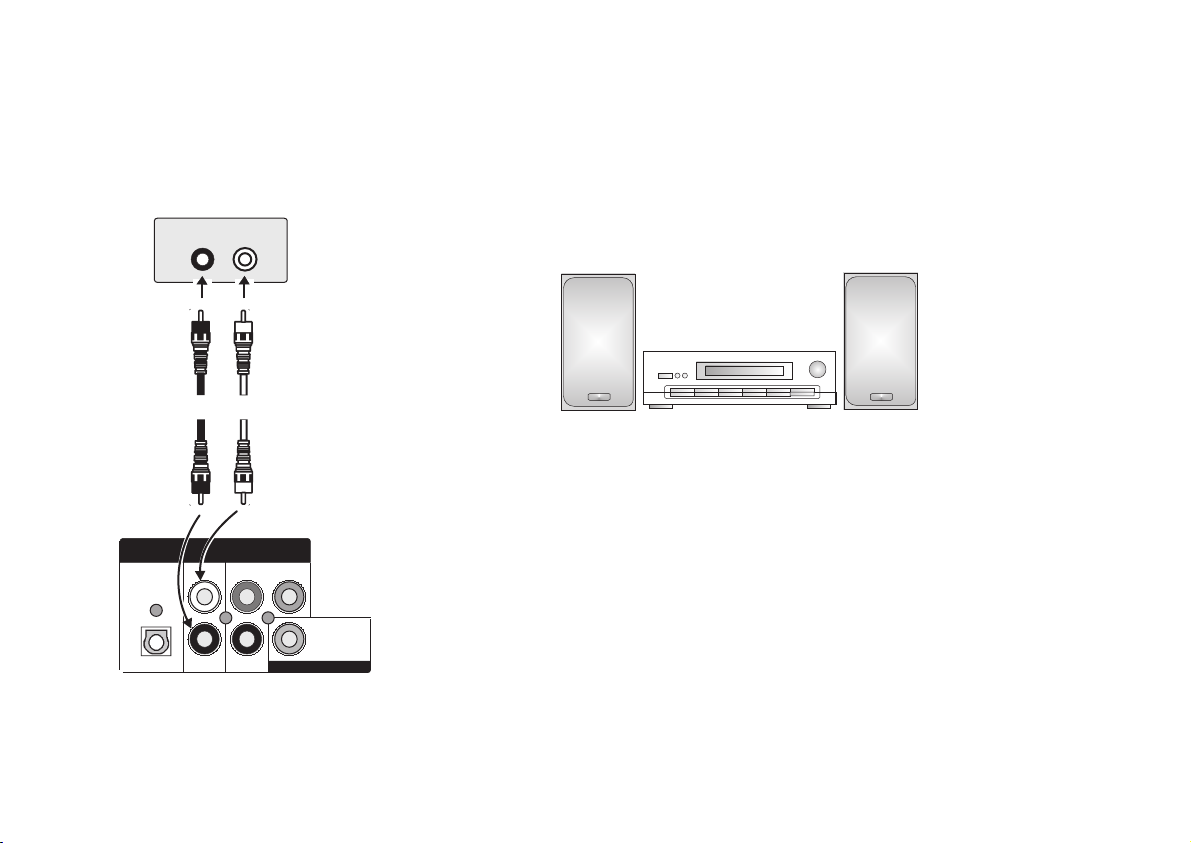
Home cinema
Amplifier (example)
AUDIO IN
R
L
Red
White
Enjoy the powerful theater sound available with multiple channel audio found on DVDs
by connecting an amplifier and speakers.
Analogue connection ( AUDIO OUT )
To be able to hear sound in stereo or Dolby Pro Logic quality, attach an amplifier or an
analogue audio component supporting these features.
Analogue amplifier or
analogue audio
component (example)
Red
DIGITAL AUDIO OUT
(PCM/BITSTREAM)
OPTICAL
AUDIO OUT
L
R
COMPONENT
B
P
P
R
White
VIDEO OUT
Y
VIDEO OUT
Rear of
DVD player
Please connect
directly to TV
!
Connect the analogue outputs ( L and R ) with a "Dolby Pro Logic amplifier", for
example ( see illustration ).
!
Connect
the audio cables as shown on the illustrations. Make sure not to confuse the
colours of cables or the labels of sockets (white/L, red/R).
!
To avoid sound quality problems deactivate function A.SRD ( Advanced Surround )
when you connect an amplifier with Dolby Pro Logic functionality.
Please refer to page 30.
13
Page 14
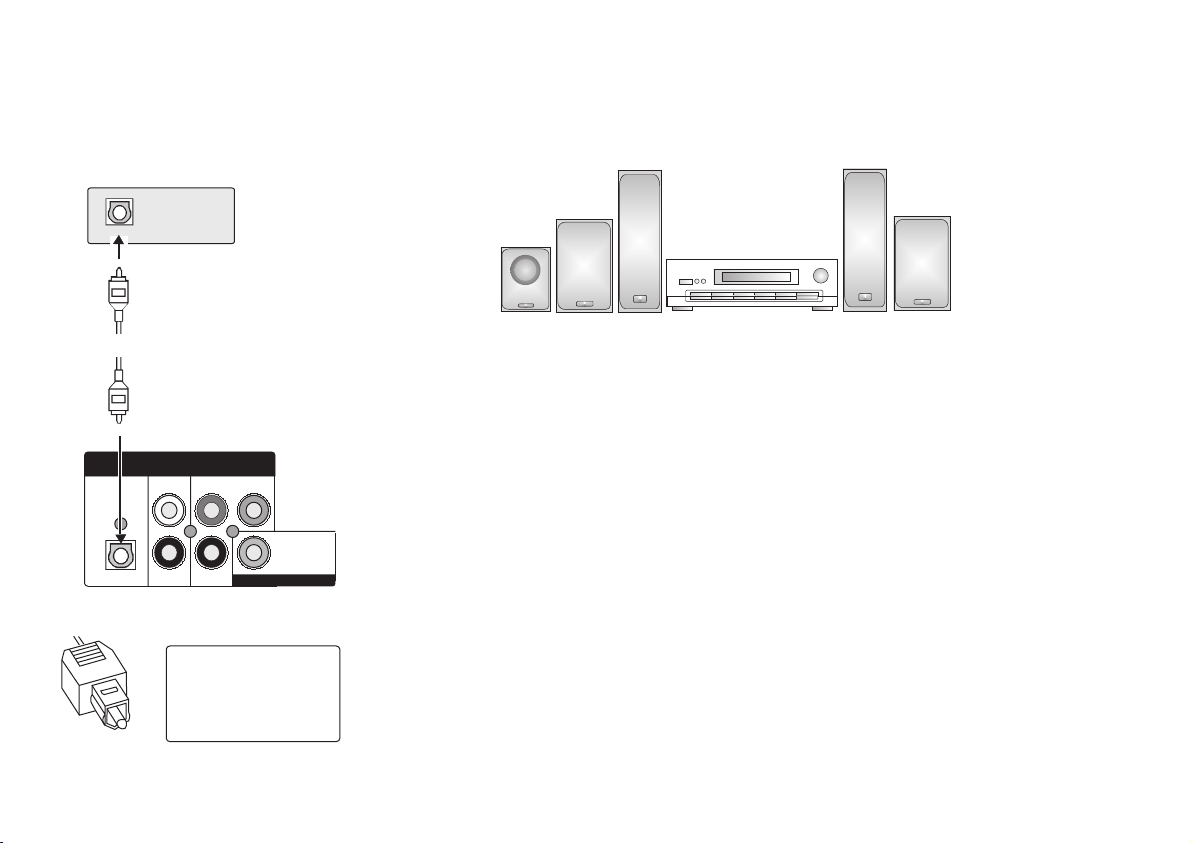
Home cinema
Amplifier (example)
Digital ( OPTICAL )connection
For optimum surround sound, connect a digital amplifier or a digital audio component.
14
Optical digital
audio cable
DIGITAL AUDIO OUT
(PCM/BITSTREAM)
OPTICAL
OPTICAL
COMPONENT
AUDIO OUT
L
R
VIDEO OUT
Y
B
P
P
R
VIDEO OUT
Push in the jack all
the way into the
socket with this side
facing up.
Rear of
DVD player
Please connect
directly to TV
Amplifier and speakers
(example)
!
To play programmes with a 5.1-channel surround sound, connect the digital audio
Connect 3 or more
speakers to produce
surround sound
output ( OPTICAL ) with an external "Multi-channel Dolby Digital Decoder", for
example.
Prerequisites for making recordings with an external digital recorder :
!
The original disc must not be copy-protected.
!
The recorder must be able to process signals with a sampling frequency of 48 kHz/16 bit.
!
You cannot make recordings from MP3/WMA.
Adapt the settings of SETUP menu ( see page 20 ) to the following:
!
PCM Down Conversion : Yes
!
Dolby Digital : PCM
!
DTS Digital Surround : PCM
!
MPEG : PCM
Audio
Deactivate function A.SRD ( Advanced Surround ) ( see page 30 ).
Page 15
Basic settings
QUICK SETUP
ENTER
SETUP
SELECT
QUICK SETUP
Die Menü-Sprache wählen
Select the menu language.
English
Deutsch
Español
Svenska
RETURN
QUICK SETUP
Use QUICK SETUP to make basic settings.
Die Menü-Sprache wählen
Do you want to use Q ?UICK SETUP
Yes
No
QUICK SETUP
Select the audio language.
Die Menü-Sprache wählen
English
German
Spanish
Swedish
Original
The primary language on the disc is played if
you select "Original".
.
Français
Italiano
Português
Nederlands
.
.
French
Italian
Portuguese
Dutch
Other
****
The items of the QUICK SETUP menu provide an easy means of making some basic
settings for your appliance.
When the appliance is properly connected press button to switch on
Stand-by/On
the unit.
Press the button on your remote control unit to display the QUICK SETUP
SETUP
menu which allows you to adapt the settings.
Navigate the user-friendly and clearly arranged on-screen menu by means of the
cursor keys on the remote control unit .
Press
!
ENTER
!
RETURN
to accept your selection.
to go back to the previous on-screen menu.
Every menu item may provide further information on the options you have.
Start by selecting a .
menu language
Select the audio language:
If the language you want is not on the list, go to item "Other" and type in the
appropriate language code ( see page 45 ) using the numeric key pad of your remote
control unit.
15
Page 16

Basic settings
16
QUICK SETUP
Select the subtitle language.
Die Menü-Sprache wählen
Automatic
French
Italian
Portuguese
Dutch
Select "Automatic" to show subtitles when the
audio language is not recorded on the disc.
.
English
German
Spanish
Swedish
Other
****
QUICK SETUP
Select your TV's aspect ratio.
4:3
16:9
QUICK SETUP
Select the output combination for the AV
and component terminals.
Video/Y PB PR
S-Video/Y PB PR
RGB/No Output
This completes the basic settings. If you want to
change any of these settings, go to Others
in the SETUP menu.
Select the subtitle language:
If the language you want is not on the list, go to menu item "Other" and type in the
appropriate language code ( see page 45 ) using the numeric key pad of your remote
control unit.
Select your TV's aspect ratio:
The picture format of TV screens is either 4:3 (standard) or 16:9 (wide-screen).
Select the aspect ratio that matches the screen format of your TV set.
Select the output combination for the AV and component terminals:
Before you proceed please check which setting is supported by your TV set.
Please refer to the operating instructions of your TV set.
Then make the appropriate settings:
AV :
To improve the quality of the picture, you can set the video signal output via the
terminal from "Video/Y P P " ( standard quality ) to either "S-Video/Y P P "
( enhanced quality ) or "RGB/No Output" ( best quality ).
S-Video RGB
and : These settings are available only if you connect the DVD player
via 21-pin scart cable ( see page 11 ).
Component Video Out :
terminal ( see page 12 ), select "Video/Y P P " or "S-Video/Y P P ".
BR BR
If the connection is made via the Component Video Out
BR BR
Page 17

SETUP menu
SETUP
SELECT
ENTER
TAB
RETURN
DISC
Disc
Audio
Subtitle
Menus
Ratings
Disc-Menüs
English
Automatic
English
Level 8
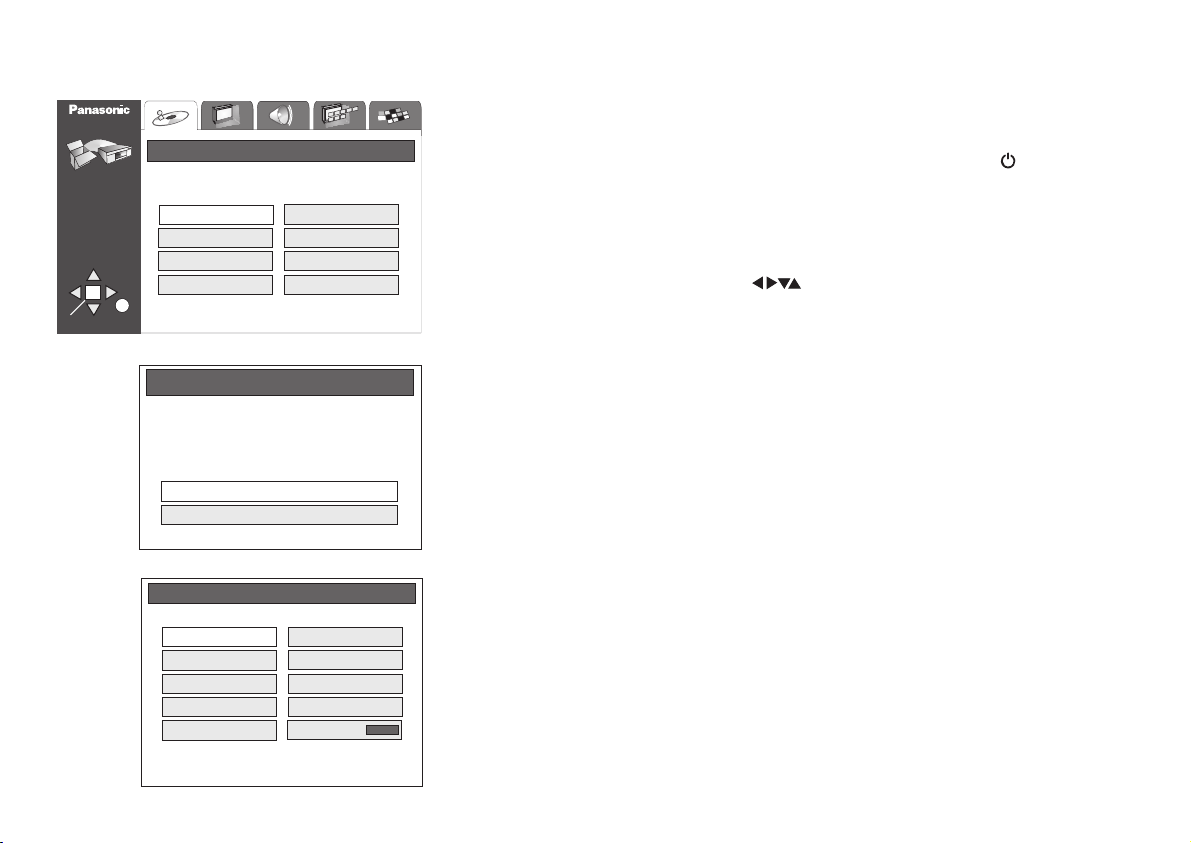
Options of the SETUP menu
The SETUP menu contains options concerning menu items " ", " ",
" ", " " and " ".
Audio Display Others
A clearly arranged on-screen menu guides you to and through the options.
!
Press.SETUP to display the SETUP screen.
!
To select one of the SETUP sub-menus ( e.g. " " ) from the tool bar, press
Disc
The selected menu will be displayed.
!
Press to select the option you wish to change ( e.g. "Audio" ).
!
!
!
ENTER
Press to confirm your choice. The available options will be shown.
To select a setting press , then press to confirm.
ENTER
This will automatically take you back to the on-screen menu of the SETUP menu item
you selected. You can now change further settings.
!
Press
!
Press
RETURN
SETUP
to return to the previous screen.
to quit the SETUP menu.
Disc Video
Audio:
Select a dialogue language as appropriate.
The menu lists eight languages for you to choose from.
"Original" : Primary language on disc is played.
If the language you want is not on the list, go to item "Other" and type in the appropriate language code ( page 45 ) using the numeric key pad of your remote control unit.
Subtitle:
Select a subtitle language as appropriate.
Select the "Automatic" display of subtitles if the disc contains no track with a dialogue
language recording. To select another language for the subtitles, proceed as described
in section "Audio".
Menus:
Select the language for the disc menus.
Proceed as described in section "Audio".
17
Page 18
SETUP menu
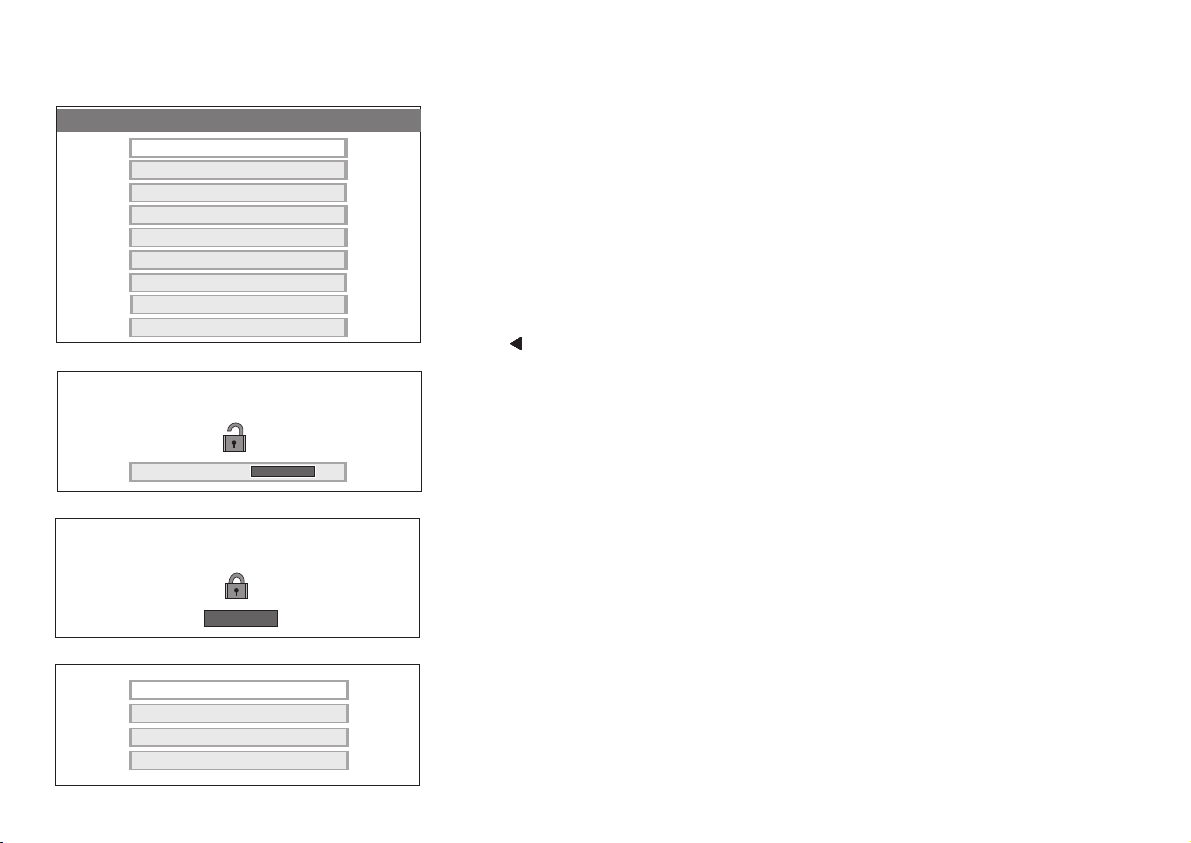
Ratings
No Limit
8
7
6
5
4
3
2
1
Lock All
0
Enter a 4-digit password,
then press ENTER.
Ratings
Assign a rating to disallow the viewing of some scenes ( 1-7 ) or the entire
DVD-Video disc(0).
This feature is not supported by all DVD-Video discs.
To select a rating
When you select a rating between 0 and 7 you will be automatically prompted for
a password.
!
Type in a 4-digit code using the numeric key pad of your remote control unit.
!
Press to confirm your entry.
ENTER
!
Press or to delete any mistakes.
The picture of a closed padlock tells you that the system is locked.
Make sure not to forget your password code.
( factory setting is "8" )
CANCEL
18
Password
The player is locked.
Remember the password.
1234
Unlock Player
Change Password
Change Level
Temporary Unlock
****
1234
To change the setting:
!
Type in your password code.
!
Press to confirm your entry.
!
!
ENTER
Select a new setting.
Press to confirm your entry.
ENTER
Page 19

SETUP menu
SETUP
Video
TV Aspect
Video Out (AV/Component)
Still Mode
TAB
SELECT
NTSC Disc Output
RETURN
ENTER
4:3 Pan&Scan
Video/Y PB PR
Automatic
PAL 6 0
TV Aspect :
The format of TV screens is either 4:3 (standard) or 16:9 (wide-screen).
Choose the 16:9 format if your player is attached to a wide-screen TV set.
If it is attached to a standard TV screen you can choose either 4:3 Pan&Scan
or 4:3 Letterbox (see illustration):
Pan&Scan:
Automatically crops a 16:9 picture and turns it into an optimum 4:3
picture producing neither black bars nor distortions.
D
This format is not supported by all DVDs.
Letterbox:
Black bars will appear at the top and bottom edge of the screen to
allow the reproduction of wide-screen video material on a standard
TV screen.
Video Out (AV/Component):
Please refer to page 16 "Basic settings" : "Select the output combination for the AV
and component terminals".
Still Mode :
Every picture frame is made up of two fields which are output to the screen one
after the other.
Automatic:
The unit automatically selects the optically better type of image.
Field:
Poorer quality than a frame-based image; however, the image is less fuzzy.
Frame:
Both fields of a picture alternate on the screen. Although the image may be
somewhat fuzzy, its quality is better than that of a field-based still image.
NTSC Disc Output :
To play a NTSC disc, select a colour rendition standard (NTSC/PAL60) that
matches the function of your TV set.
Please refer to the operating instructions of your TV set.
19
Page 20

SETUP menu
SETUP
Audio
PCM Down Conversion
Dolby Digital
DTS Digital Surround
MPEG
TAB
SELECT
ENTER
Dynamic Range Compression
Audio during Search
RETURN
No
Bitstream
PCM
PCM
Off
On
PCM Down Conversion : Pulse Code Modulation
PCM is the standard method used to record digital music signals on audio CDs.
DVD-Videos can be produced using the linear PCM method which is based on a
sampling frequency of up to 96 kHz.
For reasons of copyright protection, the digital output of PCM audio signals may be
limited to 48 kHz/16 bit.
Select "Yes" if an optical digital audio cable is used to connect your player to an
amplifier that only processes sampling frequencies of up to 48 kHz.
Dolby Digital/ :DTS Digital Surround/MPEG
Please choose the correct settings matching your audio system:
Your equipment can
not decode the signal
Your equipment can
decode the signal
20
Dolby Digital
DTS Digital Surround
MPEG
D
If the equipment you connected cannot decode the signal, the setting must be
PCM
PCM
PCM
Bitstream
Bitstream
Bitstream
changed to PCM. If not, signals that the equipment cannot process will be output by
this unit causing high levels of noise which can damage your hearing and the speakers
Dynamic Range Compression :
Available in the Dolby Digital ( DVD ) format only.
This function compresses the volume range by putting up the level of soft passages
and lowering the level of loud passages, e.g. to turn down the overall volume late at
night.
This option allows you to say whether or not the volume range is to be compressed.
Audio during Search :
Lets you decide whether or not the sound is to be on during the search.
Page 21

SETUP menu
Menu Language :
Select a menu language as appropriate.
SELECT
ENTER
SETUP
Display
Menu Language
TAB
On-Screen Messages
FL Dimmer
RETURN
English
On
Bright
On-Screen Messages :
The TV screen displays the commands you give by pressing the buttons on the
remote control unit.
Select "Off" to suppress the display of on-screen commands.
FL Dimmer :
You can set the brightness of the display panel elements to "Bright", "Dim" or "Auto".
If you choose "Auto": The display panel elements will be dimmed during playback and
their brightness increased when you press function buttons such as
or .
PAUSE
SLOW/SEARCH
21
Page 22

SETUP menu
SETUP
SELECT
ENTER
DISC
Others
Mixed Disc -Audio & Stills
DVD-Video Mode
TAB
Demo
QUICK SETUP
RETURN
Audio
(MP3/WMA)
Off
Off
No
Mixed Disc - Audio & Stills :
Your DVD player can play back/display discs in the MP3/WMA ( audio ) and JPEG
( image ) formats. Select a playback format ( JPEG or MP3/WMA ) if the disc provides
data in both formats.
DVD-Video Mode :
Playing back a DVD-Audio disc in DVD-Video mode ( "On" ) allows you to play
the DVD-Video section of the DVD-Audio disc.
This feature is not supported by all discs.
Demo:
Select "On" to start a presentation of the different displays that the player can output
to the TV screen.
Press to return to the SETUP menu.SETUP
QUICK SETUP:
This function takes you to the QUICK SETUP menu.
Please refer to pages 15-16 "Basic settings".
22
Page 23

General playback
The label
must face
up.
Example:
Group : WMA
Track : Example
Preparation
Switch on the TV set and set it to the video input that matches the connection between
player and TV set.
WMA
Playback
!
!
!
OPEN/CLOSEPress open the disc tray.
to
Place the disc on the disc tray.
Press to close the disc tray.Play back starts automatically.
PLAY
DVD-V
DVD-A
RAM
The player may take some time to read all of the disc information!
To pause playback
!
Press during playback.
!
PAUSE
Press to resume playback.
PLAY
To stop playback
!
Press twice one after the other.
STOP
See page 25 "Resume function"
MP3, WMA, CD Text :
An on-screen box will display information on the track playing.
!
SUBTITLE
Press to show or hide the information box.
VCD CD
MP3
WMA
WMA
WMA
JPEG
WMA
On-screen display
Slow motion
!
Press ( slow motion playback forwards or backwards ) in pause mode.
!
SLOW
The speed of slow playback will increase in 5 steps while the relevant button keeps
DVD-V
DVD-A
RAM VCD
being pressed.
!
Press to resume playback at normal speed.
D
PLAY
VCDs do not support reverse slow motion playback.
23
Page 24

General playback
On-screen display
WMA
WMA
Scene replay
!
QUICK REPLAY
Press during playback.
DVD-V
DVD-A
RAM
VCD CD
MP3
WMA
WMA
JPEG
WMA
Every push of the button replays a couple of seconds of the current item; on a JPEG disc
it will take you back a couple of pictures.
However, you cannot go back to before the beginning of an item.
D
QUICK REPLAY
Playing back a particular track or title
is not supported by all discs.
DVD-V
DVD-A
RAM
VCD CD
MP3
WMA
WMA
WMA
WMA
JPEG
WMA
Type in a number using the RC unit's numeric key pad.
For example, to select title 23:
>
10
2
3
DVD/RAM/VCD/CD :
Press
MP3/WMA/JPEG : Press
++.
2
3
++ .
ENTER
The unit will automatically start playing the selected track or title.
D
Certain discs may not provide this function at all or only if the appliance is in stop mode.
WMA
Search function
!
Press during playback.SEARCH
!
The speed of search will increase in 5 steps while the relevant button keeps
DVD-V
DVD-A
RAM VCD CD
MP3
WMA
WMA
being pressed.
24
Page 25

General playback
Frame-by-frame
DVD-V
DVD-A
RAM VCD
In pause mode, press remote control buttons . Every push of one of these buttons
takes the film a single frame forwards or backwards. Keeping one of these buttons
pressed continuously displays the next single frame in the chosen direction.
You can also use button to move the film forward a single frame at a time.
D
VCDs do not support a backward motion by single frames.
WMA
Resume function
DVD-V
DVD-A
RAM
VCD CD
MP3
WMA
WMA
This function allows you to interrupt the playback of a disc.
!
Press during playback to store the current position on the disc.
!
STOP
Press while " " is flashing on the display.
PLAY
Playback will be resumed at the point where you stopped it.
To cancel the Resume function
!
D
STOP
Press until " " is no longer displayed.
The resume function is available only if the elapsed time is displayed during playback.
The stored position will be cleared when you open the disc tray or when the unit goes
into stand-by mode.
WMA
JPEG
WMA
Skipping chapters, tracks or
DVD-V
DVD-A
RAM
VCD CD
MP3
pictures
!
Press during playback or in pause mode. Every push of one of these
SKIP
buttons will increment the count of chapters, tracks or pictures skipped by 1.
WMA
WMA
WMA
WMA
JPEG
WMA
25
Page 26

General playback
Position memorized
Position cleared
WMA
WMA
WMA
WMA
JPEG
WMA
POSITION MEMORY
Use the function if you wish to resume disc playback at a particular
Position Memory
DVD-V
DVD-A
RAM
VCD CD
MP3
position.
The position tag is retained when you change discs or when the unit goes into stand-by
mode.
You can tag and directly access up to 5 discs.
This function is available only if the elapsed playback time is displayed when playing the
disc.
!
!
!
!
POSITION MEMORY
Press during playback.
The "Position memorized" box will be displayed.
You can now press to go into stand-by mode or change discs.
Press to replay the disc again. Playback will be resumed at the stored position
PLAY
and the position tag will be cleared.
D
Some discs do not fully support all of this function.
26
Chapter review
DVD-V
This function lets you browse back through the chapters of a DVD-V by playing the first
couple of seconds of every chapter.
!
Press during playback.
!
!
STOP
Press . Screen "Press PLAY to Chapter Review" is displayed.
PLAY
Press . The first couple of seconds of every chapter are played back.
PLAY
Normal playback will be resumed at the point where you stopped it.
!
Do press if you do not wish to browse back through the chapters.
not
PLAY
After a couple of seconds, normal playback will be automatically resumed at the point
where it was stopped.
Page 27

General playback
WMA
WMA
Automatic switch-off
DVD-V
DVD-A
RAM
VCD CD
MP3
WMA
WMA
JPEG
WMA
This function allows you to specify a playback time ( e.g. 90 min. ) after which the unit is
to automatically switch itself off.
!
Press , the SLEEP dialogue is output to the display and the TV screen.
SLEEP
Repeatedly press the button to browse the settings:
OFF AUTO 60 min 90 min 120 min
D
AUTO : The unit switches itself off 5 minutes after the end of the playback time.
D
D
is not possible if you press , or .
AUTO STOP MENU TOP MENU
Some discs do not fully support all of this function.
To clear the setting
!
Press , then choose "OFF".SLEEP
To check the time remaining
!
SLEEP
Press .
Automatic switch-off: After approx. 30 minutes in Stop mode, the player automatically
goes into stand-by mode, irrespective of the sleep timer setting.
27
Page 28

General playback
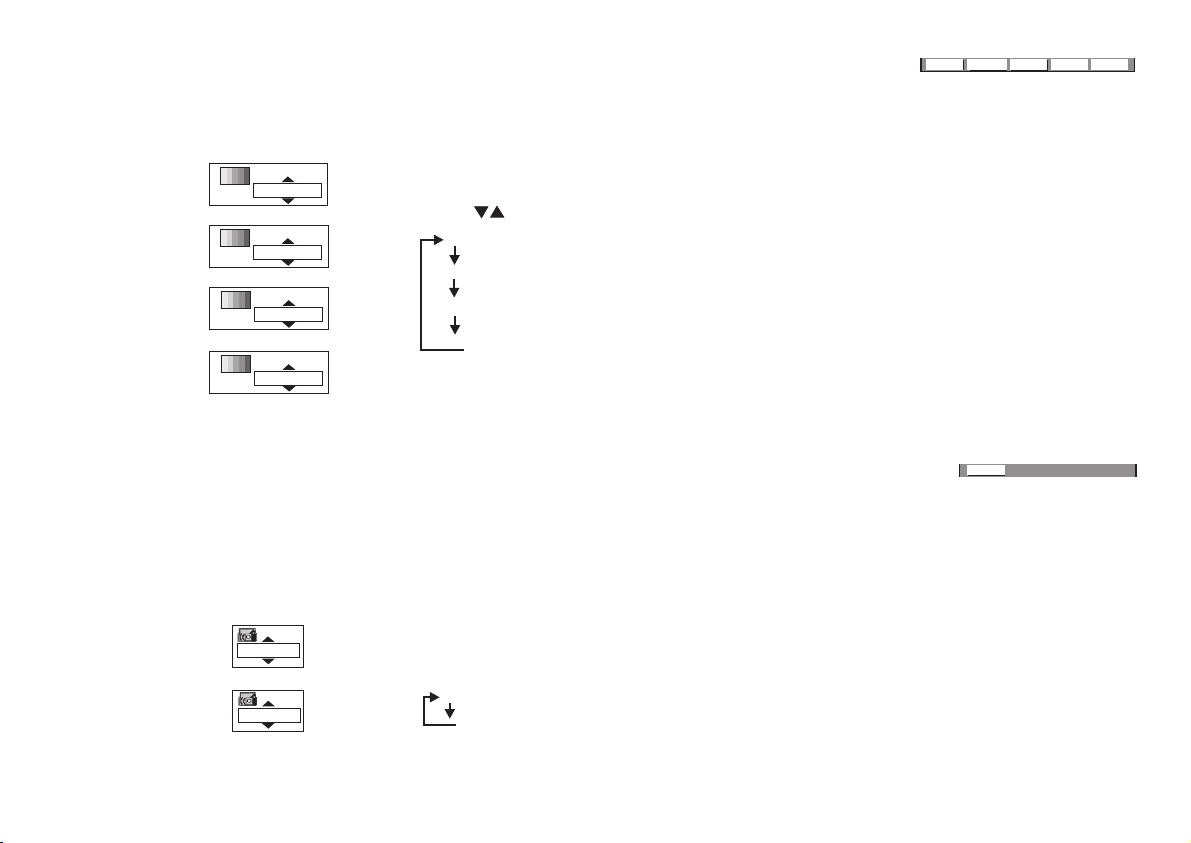
Preset Zoom Mode:
16:9 Standard
4:3 Standard
European Vista (1.66:1)
American Vista (1.85:1)
Cinemascope 1 (2.35:1)
Cinemascope 2 (2.55:1)
ZOOM
DVD-V
This function allows you to zoom into the picture to make better use of the available
screen space. The setting can be changed via the remote control unit or the appliance.
Using the remote control buttons:
!
Press during playback.
DVD-V :
ZOOM
Press to display the Subtitle Position and Brightness screen, press
D
to change the setting.
!
Press and then to change the Zoom mode setting.
!
ENTER
Repeatedly press the button to browse the settings:
4:3 Standard European Vista 16:9 Standard American Vista
Cinemascope 1 Cinemascope 2.
!
Press to fine-tune the zoom factor.
To restore the original ratio
!
Press until x 1.00 is displayed.ZOOM
.
The original ratio is also restored by opening the disc tray or when the unit goes into
stand-by mode.
An alternative way to access this function is to press the button on the
ZOOM MODE
appliance. Repeatedly press the button to browse the settings:
Manual Zoom Mode: Press the DOWN and UP buttons to manipulate the zoom
factor.
Preset Zoom Mode: Press the DOWN and UP buttons to change the Zoom mode:
4:3 Standard European Vista 16:9 Standard
American Vista Cinemascope 1 Cinemascope 2.
Zoom Mode Off
DVD-A
VCDRAM
28
D
The zoom functionality may be restricted depending on the disc format.
Page 29

General playback
DVD-V
REPEAT
!
Press during playback.REPEAT
DVD-A
Repeatedly press the button to browse the settings as follows:
RAM
VCD CD
MP3
WMA
WMA
WMA
WMA
JPEG
WMA
VCD
CHAPTER
TITLE
OFF
DVD-V
DVD-A
RAM
Chapter Title
Off
Track Group Off
Program All Off
Scene Playlist Off
VCD/CD
MP3/WMA
JPEG
D
The repeat function is available only if the elapsed time is displayed during playback.
D
There is no mode that allows you to repeatedly play back entire DVD, WMA, JPEG
Track All
Track Group Off
Group Off
Off
or MP3 discs.
Repeating a VCD using playback control ( PBC )
!
Press during playback until "PBC" disappears from the display.
STOP
!
Type in the number of the CD track using the RC unit's numeric key pad.
!
Press . The display shows "TRACK REPEAT" or "ALL REPEAT".
REPEAT
29
Page 30

Other functions
DVD-V
ADVANCED SURROUND
RAM
With 2 or more audio channels only
Produces an effect similar to surround sound at the two front speakers ( SP ) or the
headphones ( HP ).
VCD
!
Press
A.SRD
Repeatedly press the button to browse the settings.
Press and to toggle between SP and HP:
1
HP
2
HP
OFF
HP
1
SP
2
SP
OFF
SP
SP 1/HP 1 : Normal rate of effect
SP 2/HP 2 :
SP OFF/HP OFF :
D
ADVANCED SURROUND is not supported by all discs.
D
Deactivate the Advanced Surround effect if you experience distorted sound.
D
Deactivate ADVANCED SURROUND if you are also using Dolby Pro Logic.
Enhanced rate of effect
Advanced Surround effect off ( factory default )
Dolby Pro Logic will not work properly if ADVANCED SURROUND is on.
30
Page 31
Other functions
Cinema 1
Cinema 2
User
NormalNormal
CINEMA
DVD-V
DVD-A
RAM
VCD
You can manipulate the picture quality of films:
!
Press
CINEMA
Press to select the individual settings:
CINEMA 1 : Improved contrast of details of dark scenes.
CINEMA 2 : Improved brightness setting for dark scenes.
USER : User-defined contrast, brightness, sharpness, colour, and
gamma ( brightness distribution ) settings.
NORMAL : : Factory default.
Normal
DVD-V
DIALOGUE ENHANCER
Available in the Dolby Digital format and DTS with 3 or multiple channels only.
Puts up the volume of dialogue sound to make dialogues heard better in feature films:
JPEG
ON
OFF
!
Press
D.ENH
Repeatedly press the button to browse the settings:
DIALOGUE ENHANCER ON
DIALOGUE ENHANCER OFF: Factory default.
D
The D.ENH function is not supported by all discs.
31
Page 32

Programme play
PROGRAM
~
0
SELECT
NUMBER
SELECT
ENTER
Choose a title and chapter, then press ENTER.
No
T
1
9
RETURN
C
Press PLAY to start
Time
Play
Clear
Clear all
Programme play
DVD-V
DVD-A
VCD CD
You can programme up to 32 chapters/tracks to be played in any order.
!
Press in stop mode. The "PROGRAM" screen appears.
!
D
!
D
PLAY MODE
Type in the numbers using the RC unit's numeric key pad.
MP3 and WMA :
Press . Playback will start in the programmed order.
PLAY
Press to confirm your selection.
ENTER
Certain discs may not provide this function.
To select a number using the cursor keys:
!
!
!
!
To modify entries
!
!
!
!
ENTER
Press .
To select an item press
Press to store that number.
ENTER
Press Playback will start in the programmed order.
PLAY
.
.
To delete entries
To select an entry press
Press .
ENTER
.
Modify the entry as appropriate.
Press to store the modified entry.
ENTER
!
To select an entry press
!
Choose "Clear".
!
Select "Clear all" to clear all entries.
!
Press to confirm your selection.
ENTER
To quit the programme play mode
!
Press in stop mode until the programme play screen disappears.
PLAY MODE
The actual programme will be retained.
D
Switching off the player or opening the disc tray will clear the programme.
WMA
MP3
WMA
WMA
.
32
DVD- V
Random Playback
Title
1
Press PLAY to start
RND
RANDOM
DVD-A
Random playback
DVD-V
Plays all chapters/tracks once each in a random order.
!
Press in Stop mode. The "PROGRAM" screen is displayed.
!
D
PLAY MODE
PLAY MODE
Press
DVD-V/ DVD-A :
again to display the "Random Playback" screen.
Press or the numeric keys of the remote control unit to select
or specify the title/group to be played in a random order.
!
Press to start random playback.
PLAY
To cancel the random play function
!
Press in Stop mode.PLAY MODE
VCD
CD
MP3
WMA
Page 33

On-screen displays
You can display on-screen information on disc and player ( OSD ) and manipulate various
settings.
Some DVDs do not support all of the settings.
Please use the DVD menu instead.
To enable the on-screen displays
!
Press during playback
DISPLAY .
The on-screen displays will appear at the top edge of the screen.
C
1
1
!
Use the cursor keys to make or change various settings.
!
Some entries need to be confirmed by pressing .
!
Press .
DISPLAY
0:03:10
3
Digital
1 ENG 3/2. 1 ch
ENTER
OFF
1 ENG
1
1
The Progress Indicator will be displayed.
1
!
Press to change the playback speed ( DVD-V: Dolby Digital only ).
!
Press to display the current and the remaining playback time.
!
Press again.
!
!
DISPLAY
Now use the cursor keys to select any of the other menu items ( ,
Display Menu Audio Menu Picture Menu
Press to hide the on-screen displays.
RETURN
,, ).
C
2
x1.0
0:03: 10
Play Menu
33
Page 34

On-screen displays
DVD-V
DVD-A
VCD
CDRAM
MP3/WMA
JPEG
Title Track:or Allows you direct access to a title/track if the disc hosts several.
Chapter: Allows you direct access to a chapter if the disc hosts several.
C
Group:
G
provoke an on-screen display by pressing the button on your remote control unit.
Audio: Allows you to alter the pre-set language of synchronisation provided the disc gives you an
alternative. Sets the right or left audio channel.
Subtitle: Selects the language of subtitles and sets their on-screen position and brightness.
Picture
Angle: Change between camera angles of films recorded from various camera locations.
Bar Position: You can move the OSD displays around to another place on the TV screen.
Program: Programmes stored on a DVD RAM ( page 38 ).
PG
Time: Display/select playback time numeric keys
CD: MP3,WMA,SVCD:
Total: Number of track/picture selected plus total number of items in selection.
Total
MP3/WMA or DVD-A tracks or JPEG pictures defined to make up a group. You can also
GROUP
RAM/VCD:
information; FULL: Displays all information; DATE: Displays the date; OFF: No display.
(DVD-V,DVD-A,RAM: ). DVD-V, DVD-A, RAM,VCD,
Alternative display of elapsed or remaining playback time. Playback time only.
JPEG:
34
PL
Playlist: see page 38
Picture: Displays the number and name of a picture you selected from a group.
P
Type in the number to display a picture.
Page 35

On-screen displays
DVD-V
DVD-A
RAM
CD
VCD
JPEG
MP3/WMA
Zoom: Zoom function ( see page 28 ).
Bitrate Display: Displays the video image data rate per second ( Mbps ).
Bit
OSD Brightness: User-defined brightness of OSD displays.
Advanced Surround: Produces an effect similar to surround sound at the two front speakers
( SP ) or the headphones ( HP ). Deactivate the function if the sound becomes distorted ( page 30 ).
Dialogue Enhancer: Puts up the volume of the dialogue tone of feature films ( page 31 ).
Picture Mode: “Cinema 1“, “Cinema 2“, “User“, “Normal“, ( page 31 ).
Repeat Mode: Repeat function ( page 29 ).
A-B Repeat:
Press to set starting point A and end point B.
**
If you do not specify an end point, the player will assume the end of the item to be point B.
Press again to cancel the function.
Play Mode Display: "---" : normal playback, "RND" : Random play, "PGM" : Programme play.
Marker: Press to mark up to 5 ( DVD-RAM: up to 999 ) positions.ENTER
Press to delete any mistakes. During playback you can press to directly access
specific scenes. Opening the disc tray or switching off the unit clears all markers.
This function is not available in the Random or Programme modes.
Allows you to keep repeating a defined section between positions A and B of an item.
ENTER
ENTER
CANCEL
Slideshow: On-screen presentation On or Off. Set the time per picture between 0 and 30 seconds.
Page/Still Picture: Displays the selected picture during playback.
35
Page 36

JPEG
JPEG ALBUM
G1
P2
Tot a l 2
~
9
0
SELECT
NUMBER
SELECT
RETURN
ENTER
Group : 021112-1620 Picture : Flower
121
4
7
Prev Tree
2
5
8
3
6
9
Next
Your DVD player can output JPEG pictures ( Exif version 2.1 ) that were taken with
a digital camera, for example, or generated by means of any other system.
The resolution should range between 320 x 240 pixels and max. 6144 x 4096 pixels.
Note that JPEG files must be extended by ".JPG", ".jpg", ".JPEG" or ".jpeg" and
compressed in format 4:2:2 or 4:2:0.
To display the JPEG menu
!
!
!
!
!
!
MENU
Press to display the album of JPEG pictures.
Use the cursor keys and to select the pictures.
Press " " or " " and to page through the album.
Prev Next ENTER
Menu item " " controls the group directory.
Press and to take your pick.
Press or to quit the menu screen.
Tree
ENTER
RETURN MENU
ENTER
36
To rotate
!
Press while the picture is being displayed.
!
Press to select the direction of rotation.
!
Press to actually rotate the to the desired position.
!
Press to quit this menu.
pictures
ANGLE/PAGE
ENTER
RETURN
picture
To skip groups
!
Press in mode to skip forwards and backwards.picture
To activate the JPEG on-screen displays
!
Press while pictures are being displayed.
DISPLAY
The on-screen displays will appear.
G
1
148
1
P
Total
148/155
Slideshow
5 secON
OFF
Refer to pages 33-35 to learn more about how to use the on-screen displays ( OSD ).
Page 37

MP3 / WMA menu
No
G
T
Total
ENTER
MENU
0
~
SELECT
NUMBER
SELECT
1
1
1
9
RETURN
*
A
Group :
CELEBRATE
1
CHOSEN ONE
2
YOUR LOVE, OH LORD
3
I NEED YOU
4
5
CHILD OF FORGIVENESS
Prev Find Next
Find
Your DVD player can play MP3 and WMA discs
( Windows Media Audio ).
Tree
To display the MP3/WMA menu
!
!
MENU
Press to display the menu screen.
To select a track, press , then press to confirm.
The track you selected will be played.
!
Press to expand the "Tree" ( table of contents ).
Press to pick a group ( list of several tracks ) from the table of contents.
!
Press to confirm your choice of group.
ENTER
The titles of the tracks in the selected group will be shown. You can now select a track
from the new group.
!
Press " "/" "
Press
Prev Next
MENU
!
to browse the album for the previous or next group.
to quit the menu screen.
To search for tracks
!
Press to select the " " item, then press to display the text box.
!
To enter a word from the track title you are looking for, press .
!
ENTER
Press after every letter to confirm it.
To delete an entry press
!
When you are done press to select " " and to run the function.
Find ENTER
.
All entries containing the word you specified are output to the match list.
!
To select a track, press , then press to confirm.
!
To look for the first work in a title press to delete the asterisk.
All entries starting with the word you specified are output to the match list.
If there are no matching entries, you will see :
!
Press
RETURN
to change the target entry.
ENTER
Find ENTER
ENTER
"":
Not found
MP3
WMA
CD-Text
37
Page 38

DVD-RAM menu
Your DVD player can play DVD-RAM discs recorded in the video recording
format, version 1.1, by a DVD video recorder, DVD video
Camera, computer etc.
RAM
DIRECT NAVIGATOR
No Date On Program Title
1 9/12 (THU) 16:48 Friends
2 9/12 (THU) 20:00 News
Used 0:01:00
PLAY LIST
No Date Length Title
1 7/10 0:05:06 Your song
2 8/11 0:20:04 Celebrate
3 9/12 0:07:03 Chosen one
9
0
~
SELECT
NUMBER
SELECT
RETURN
ENTER
0
~
SELECT
NUMBER
To display the DVD-RAM menu
!
Press to display the menu.
DIRECT NAVIGATOR
The menu will show programme names only if they were entered when the DVD-RAM
was produced. You cannot afterwards add programme names.
!
Select a programme using the numeric keys on the RC unit or pressing .
SELECT
9
ENTER
RETURN
The programme you selected will be played in the background.
!
Press to confirm the selection and hide the on-screen display.
!
ENTER
Press to quit the menu screen.
DIRECT NAVIGATOR
To output a Playlist
This function lets you reproduce Playlists.
A is a group of scenes recorded on a DVD video recorder, for example.Playlist
To display the menu
!
!
!
!
!
PLAY LIST
Press to display the PLAY LIST screen.
Press or use the numeric keys of the RC unit to select a Playlist.
Press to start playing the list.
ENTER
Press to skip individual scenes.
Press to quit the menu screen.
PLAY LIST
38
Page 39

General notes on DVDs
DiscTop Menu
Title Title
Menu
TOP MENU
Menu
Title
Menu
MENU
DVDs can contain titles and chapters that the producer of the disc put into a specific
order.
DVDs feature a Title menu that lists the available titles and chapters.
However, you can choose to select and then play individual titles and chapters.
DVD playback can be controlled and manipulated via the menu that the DVD player
outputs to the TV screen.
The audio tracks of many DVDs contain audio material in up to 8 languages.
The DVD menu has an option for selecting the language you prefer.
Many DVDs provide subtitles in several languages.
They may contain material in up to 32 different languages.
Some DVD player functions can be controlled by the DVD itself.
DVD menu
Some DVDs have multiple menus. Pressing " " to display the main menu
may take to another menu than pressing " " to display the menu screen.
D
The functions assigned to these buttons depend on the disc.
Please refer to the disc documentation leaflet.
TOP MENU
MENU
Playing DVDs and VCDs
The producer of the programme material can define the way in which the disc is played.
Consequently, you may sometimes find that, in some cases, you cannot control the
playback the way you wish using all of the functions and operations described in these
operating instructions.
We therefore recommend that you always read the reference material delivered with
the disc.
Never play anything but circular discs with a diameter of 3"(8cm)or5"(12cm).
Discs of other shapes may damage the player hardware.
Cleaning and care: Just use a soft, dry cloth.
Do not use alcohol or benzine.
39
Page 40

Before requesting service
!
The player does not respond
to function key commands:
The remote control unit does not work:
Playback does not start after
pressing PLAY:
Unable to change audio track
or subtitle languages:
The subtitles are not shown:
The language selected from the
menu is not used for the audio
track or subtitles:
Unable to change the aspect angle:
Certain control operations are not available with some discs.
!
Interference caused by lightning or static charge. Press [ ] to put the player into stand-by mode.
Restart the player.
!
Check if the batteries are in the right way round (+ and -).
!
Point the remote control unit straight at the remote control signal sensor on the front panel.
!
Condensation has accumulated inside the player. Wait for 1 to 2 hours.
!
The player only supports DVDs with regional code "2", "All" or from a group of regional codes
containing regional code "2".
!
The disc is dirty.
!
The disc is in the wrong way round. The label of the disc you wish to play must face up.
!
You can only choose from the languages actually recorded on the disc.
!
Some discs require you to change languages via the disc menu.
!
The disc does not provide any subtitles.
!
You deactivated the display of subtitles.
!
The subtitles are output to the wrong position. Move the position of subtitles.
!
The disc does not provide the language you selected.
!
It depends on the disc whether this function is available.
GENERAL PROBLEMS
/I
Have you forgotten your password?
40
!
Stop the player and keep pressing player button together with and OPEN/CLOSE until
/
"Initialized" disappears from the screen.
This will restore all factory defaults.
When you are done switch off the unit and back on afterwards.
You will afterwards have to go to the QUICK SETUP menu ( page 15-16 ) to set up the basic settings
again.
Page 41

Before requesting service
There is no audio output and
the sound is distorted:
The loudspeakers emit
loud noise:
The picture is disturbed when
searching:
The screen outputs no picture:
The picture is cut off at its left
or right edge:
The message "NO PLAY" appears:
No messages are output to
the screen:
The OSD displays are cut off
along their top edge:
Error code " " appears: :H
!
Check the connections.
!
Deactivate the ADVANCED SURROUND effect.
!
Go to the SETUP screen and check the menu settings of "Dolby Digital","DTS Digital
Surround" and "MPEG".
!
This is a technical issue and not indicative of a malfunction.
!
Check the connections.
!
Verify that the correct video input of the TV set has been selected.
!
Go to the SETUP screen and check the "TV Aspect" setting in the menu.
!
Check whether the player is directly plugged into the TV set's "AV IN (Scart)" or whether it is going
through a video recorder between the two units.
!
Check the Zoom setting ( page 28 ).
!
The player cannot play discs of the current format.
!
The disc contains no recorded material.
!
Go to the SETUP screen and set menu option "On-Screen Messages" to "On".Display
!
Move the display position down.
!
This is indicative of a malfunction. The digits following "H" depend on what state your player is in.
!
Press [ ] to put the player into stand-by mode, then briefly unplug and re-attach the AC mains cable.
!
Contact the aftersales service if this does not remove the problem. Please state the error code displayed
by the set.
The model no. and serial no. of this product are stuck down on the rear of the appliance.
Please enter them below to serve as reference.
Model No.
Serial No.
AUDIO PROBLEMS
Audio
PICTURE PROBLEMS
Video
DISPLAY PROBLEMS
/I
41
Page 42

Glossary of technical terms
As opposed to the digital processing method which only knows two states(1or0,onoroff),analogue
Analogue:
processes consist of a multitude of values at any range of infinitely variable steps. This multiplicity is
faced by the limited range of possibilities of storing and reproducing the relevant information.
Bitstream:
Brightness signal Y:
Colour difference signals:
Digital:
Dolby Digital:
42
Multiple-channel digital audio data prior to its decoding and assignment to the different channels.
Analogue video signal which carries the picture's luminance levels ( Y signal or luminance signal )
independent of the chrominance signal(C).Theresult is an improved resolution and higher colour
fidelity. This quality can be deployed only if the entire pathway of the signal is Y/C-separated.
The three signals red, green and blue can be converted into three different signals: luminance signal Y
( luminous density ) and two chrominance signals P /P or C /C ( colour difference signals ).
Digitising is a reduction of analogue states. However, due to their limits of perception human individuals
will not notice the reduction and therefore experience hardly any or no restrictions. The benefit of
digitisation is that digital data can be reproduced in any way but without any loss.
Method of encoding digital signals, developed by Dolby Laboratories. The signals can be either
conventional ( 2-channel ) stereo signals or 5.1-channel audio signals. The signals are very much
compressed in the process to enable recordings of large volumes of data.
BR B R
Page 43

Glossary of technical terms
DTS
(Digital Theater Systems):
MP3:
Optical digital
audio cable:
RGB:
WMA:
Sound system used in cinemas or movie theaters all over the world. The system is marked by highquality sound separation ( 2-channel or 5.1-channel playback ).
MP3 or MPEG 1 Audio Layer 3 is a file compression format used for digital audio files.
It provides files of an extremely small size and may cause a consequential loss of quality.
If you connect the player with this cable, the electronic signals will be converted into optical signals
before being output to the amplifier. This method reduces the noise produced by the electronic circuitry.
Red Green Blue: The RGB values allow you to define a hue.
The actual colour results from the intensity of red, green and blue portions of every pixel.
WMA ( Windows Media Audio ) is a compression format developed by Microsoft
Corporation. It achieves the same sound quality as MP3 with a file size that is smaller
than that of MP3.
43
Page 44

Information
This product features a copyright protection implement whose technology is protected by US
patents and intellectual property rights owned by Macrovision Corporation and other copyright
proprietors. The use of this copyright protection implement is subject to permission of
Macrovision Corporation and is restricted to purely private use only. It is prohibited to examine
this appliance for the purpose of unlicensed construction.
Region codes:
This player accesses the region codes stored on DVDs.
It supports all discs assigned regional code "2" or "ALL"
UK and continental Europe: "2".
.
Decoder:
This appliance features an internal Dolby Digital decoder and a DTS decoder. You can enjoy
these systems in stereo quality without the need of a separate decoder. The display will show
"D.Mix" if you have multi-channel sound that can be mixed down to two channels.
Made under licence of Dolby Laboratories.
"Dolby", "Pro Logic" and the twin D symbol are trademarks of Dolby Laboratories.
"DTS" and "DTS Digital Surround" are trademarks of Digital Theater Systems, Inc.
44
Windows Media, and the Windows logo are trademarks or registered trademarks of Microsoft
Corporation in the United States and/or other countries.
MPEG Layer-3 audio decoding technology licensed from Fraunhofer IIS and Thomson
multimedia.
Page 45

Language codes
Abkhazian 6566
Afar 6565
Afrikaans 6570
Albanian 8381
Ameharic 6577
Arabic 6582
Armenian 7289
Assamese 6583
Aymara 6588
Azerbaijani 6590
Bashkir 6665
Basque 6985
Bengali 6678
Bhutani 6890
Bihari 6672
Breton 6682
Bulgarian 6671
Burmese 7789
Byelorussian 6669
Cambodian 7577
Catalan 6765
Chinese 9072
Corsican 6779
Croatian 7282
Czech 6783
Danish 6865
Dutch 7876
English 6978
Esperanto 6979
Estonia 6984
Faroese 7079
Fiji 7074
Finnish 7073
French 7082
Frisian 7089
Galician 7176
Georgian 7565
German 6869
Greek 6976
Greenlandic 7576
Guarani 7178
Gujarati 7185
Hausa 7265
Hebrew 7387
Hindi 7273
Hungarian 7285
Icelandic 7383
Indonesian 7378
Interlingua 7365
Irish 7165
Italian 7384
Japanese 7465
Javanese 7487
Kannada 7578
Kashmiri 7583
Kazakh 7575
Kirghiz 7589
Korean 7579
Kurdish 7585
Laotian 7679
Latin 7665
Latvian 7686
Lingala 7678
Lithunian 7684
Macedonian 7775
Malagasy 7771
Malay 7783
Malayalam 7776
Maltese 7784
Maori 7773
Marathi 7782
Moldavian 7779
Mongolian 7778
Nauru 7865
Nepali 7869
Norwegian 7879
Oriya 7982
Pashto 8083
Persian 7065
Polish 8076
Portuguese 8084
Punjabi 8065
Quechua 8185
Rhaeto-Rom. 8277
Romanian 8279
Russian 8285
Samoan 8377
Sanskrit 8365
Scots Gaelic 7168
Serbian 8382
Serbo-Croat. 8372
Shona 8378
Sindhi 8368
Singhalese 8373
Slovac 8375
Slovenian 8376
Somali 8379
Spanish 6983
Sundanese 8385
Swahili 8387
Swedish 8386
Tagalog 8476
Tajik 8471
Tamil 8465
Tatar 8484
Telugo 8469
Thai 8472
Tibetan 6679
Tigrinya 8473
Tonga 8479
Turkish 8482
Turkmen 8475
Twi 8487
Ukrainian 8575
Urdu 8582
Uzbek 8590
Vietnamese 8673
Volapük 8679
Welsh 6789
Wolof 8779
Xhosa 8872
Yiddish 7473
Yoruba 8979
Zulu 9085
45
Page 46

Specifications
Your DVD-Player can read different disc-formats:
S35
DVD-Video
D
It may not be possible to play CD-R, CD-RW, DVD-R and DVD-RAM in all cases due to the
DVD-V
DVD-R
R
R4.7
DVD-Audio
AUDIO
DVD-A
DVD-RAM
RAM
R A M 4.7
RAM
SUPER VIDEO
VCD
CDSVCD CD-R/RWVideo-CD
DIGITAL AUDIO
TEXT
DIGITAL AUDIO
CD
type of disc or condition of the recording.
This equipment complies with European conformity requirements, in accordance with the
conditions of electromagnetic compatibility and product safety.
This equipment complies with the requirements of protection class 2.
This equipment complies with the safety requirements of SEMKO.
Matsushita Electric Industrial Co., Ltd.
http://www.panasonic.co.jp/global/
---
MP3
WMA
JPEG
46
Page 47

Specifications
Power supply:
Power consumption:
220-240 Volt mains voltage,
50Hz
13 Watt
C output level: PAL/PAL 60 : 0.3 Vss;
Output socket:
NTSC : 0.286 Vss (75 Ohm)
21-pin AV Scart
(RGB/S-Video included)
Power consumption in stand-by:
Dimensions:
Weight:
Operating temp. range:
Humidity during operation:
Compatible disc formats:
WMA, MP3 : Max. 999 tracks/ 99 groups.
Compatible compression rate:
MP3 : 32 - 320 kbps
WMA : 48 - 192 kbps.
JPEG : Exif Version 2.1.
JPEG format : 4:2:2 or 4:2:0.
Compatible TV systems:
Video output:
Output level
Output socket: Female cinch
Scart output:
RGB output level: 0.7 Vss (75 Ohm)
Video output level
: 1 Vss (75 Ohm)
: 1 Vss (75 Ohm)
approx. 2 Watt
430(W) x 260(D) x 60(H) mm
2.1
kg
+41°F to +95°F(+5°C to+35°C)
5 to 90 % rel. humidity
(non-condensing)
DVD-V, DVD-A, DVD-RAM,
DVD-R, VCD, SVCD, CD-Audio
( CD-DA), CD-R/CD-RW
(discs formatted as CD-DA
or Video CD)
Max. 3000 pictures and 300
groups;
Picture resolution between
320 x 240 and 6144 x 4096 ;
PAL 625/50, PAL525/60, NTSC
Component video output:
Y output level (green): 1Vss (75 Ohm)
B
P output level (blue): 0.7 Vss (75 Ohm)
R
P output level (red): 0.7 Vss (75 Ohm)
Audio output:
Output level: 2 V eff. (1 kHz, 0 dBFs)
Output sockets: Female cinch / AV
Audio output signal ratings:
Frequency response:
DVD (linear PCM audio): 4 Hz to 22 kHz
Audio CD: 4 Hz to 20 kHz
Signal-to-noise ratio:
!
Audio CD: 115 dB
Volume range:
!
DVD (linear PCM audio): 102 dB
!
Audio CD: 98 dB
Total distortion factor:
!
Audio CD: 0.0025 %
Digital audio output:
Optical digital sound
output socket: Optical connection
Wavelength: 658 nm /790 nm
Laser classification: Class 2/Class 1
!
Technical specifications subject to change without notice.
!
Weight and dimensions are approximate values.
2 channels (L/R)
(sampling frequency 48 kHz)
4Hzto44kHz
(sampling frequency 96 kHz)
47
Page 48

Index
RQTD0063-1B
F 11C03-0
Page
A
DVANCED SURROUND 30,35
Analogue connection
Audio language 15,17,34
Automatic switch-off
AV terminals 16,19
B
asic settings 15-16
Batteries 7
Before requesting service 40-41
Bitstream 20,42
C
AUTION 5
Chapter review 26
CINEMA 31
Component terminals 16,19
COMPONENT VIDEO OUT 12
Connections
D
ecoder 44
Demo 22
DIALOGUE ENHANCER 31,35
Digital connection
Disc formats
Dolby Digital 14,20,42,44
DTS Digital Surround 14,20,42,44
menu
DVD 39
DVD-Video Mode 22
Dynamic Range Compression 20
F
ield 19
FL Dimmer 21
Frame 19
Frame-by-frame
Front Panel 6
13
27
10-12
14
46
25
Page
G
eneral Playback 23
Glossary 42-43
I
nformation 44
J
PEG 36
L
anguage codes 45
Laser radiation
Letterbox 19
M
enu Language 15,21
Menus 17
Mixed Disc-Audio&Stills 22
MP3 37,43
MPEG 14,20
N
TSC Disc Output 19
O
n-screen displays 33-35
Optical digital audio cable
P
al 60 19
Pan&Scan 19
PCM Down Conversion 14,20
Playlist 38
POSITION MEMORY 26
Precautions
Programme play
Progress Indicator 33
Q
UICK SETUP 15,16,22
R
AM 38
14,42
3-4
Random play 32
Ratings 18
Rear Panel 7
Remote control functions 8-9
REPEAT
Resume function
RGB 16,43
3
cene replay
S
Search 24
SETUP menu 17-22
Skip 25
Slow motion
Still Mode 19
Subtitle 16,17,23,34
T
V Aspect 16,19
V
ideo Out 19
W
MA 37,43
Z
OOM 28
32
Page
29
25
24
23
 Loading...