

Page 1
DVD/CD PLAYER
Operating Instructions
Model No.
D VD-RV32/D VD-RV27/DVD-RV22
Region number supported by
this player
Region numbers are allocated to DVD players
and software according to where they are sold.
For U.S.A., Canada, and units with
PX printed on the outer packaging
≥The region number of this player is “1”.
≥The player will play DVDs mar ked with
labels containing “1” or “ALL”.
Example:
1
1
For the Middle East and South
Africa
≥The region number of this player is “2”.
≥The player will play DVDs mar ked with
labels containing “2” or “ALL”.
Example:
2
ALL
ALL
2
4
2
3
5
Before connecting, operating or adjusting this product,
please read these instructions completely.
Please keep this manual for future reference.
As an ENERGY STAR® Partner, Panasonic
has determined that this product meets the
E
NERGY STAR® guidelines for energy
efficiency.
This manual was printed with soy based ink.
P PC PP PX GC
GCS
GN
For Asia
≥The region number of this player is “3”.
≥The player will play DVDs mar ked with
labels containing “3” or “ALL”.
Example:
2
3
For Australia and N.Z.
≥The region number of this player is “4”.
≥The player will play DVDs mar ked with
labels containing “4” or “ALL”.
Example:
4
[For\U.S.A.\only]
The warranty can be found on page 21.
En la página 23 hay una gu ía d e referencia rápida en español.
ALL
ALL
3
6
2
4
6
RQT6236-1P
Page 2
Dear customer
Thank you for purchasing this product. For optimum performance and
safety, please read these instructions carefully.
These operating instructions are a pplicable to models DVDRV32, DVD-RV27 and DVD-RV22.
Operations in these instructions are described mainly with
the remote cont r o l , b u t you can do t he oper at i ons o n the ma in
unit if the controls are the same.
[DVD-RV32]: indicates features applicable to DVD-RV32 only.
[DVD-RV27]:DVD-RV27 only.
[DVD-RV22]:DVD-RV22 only.
Accessories
Getting started
(Only for U.S.A.)
To order accessories contact 1 -800-332-5368 or web site (h ttp://
www.panasonic.com).
(For other areas)
To order accessories, call the deale r from whom you have made
your purchase.
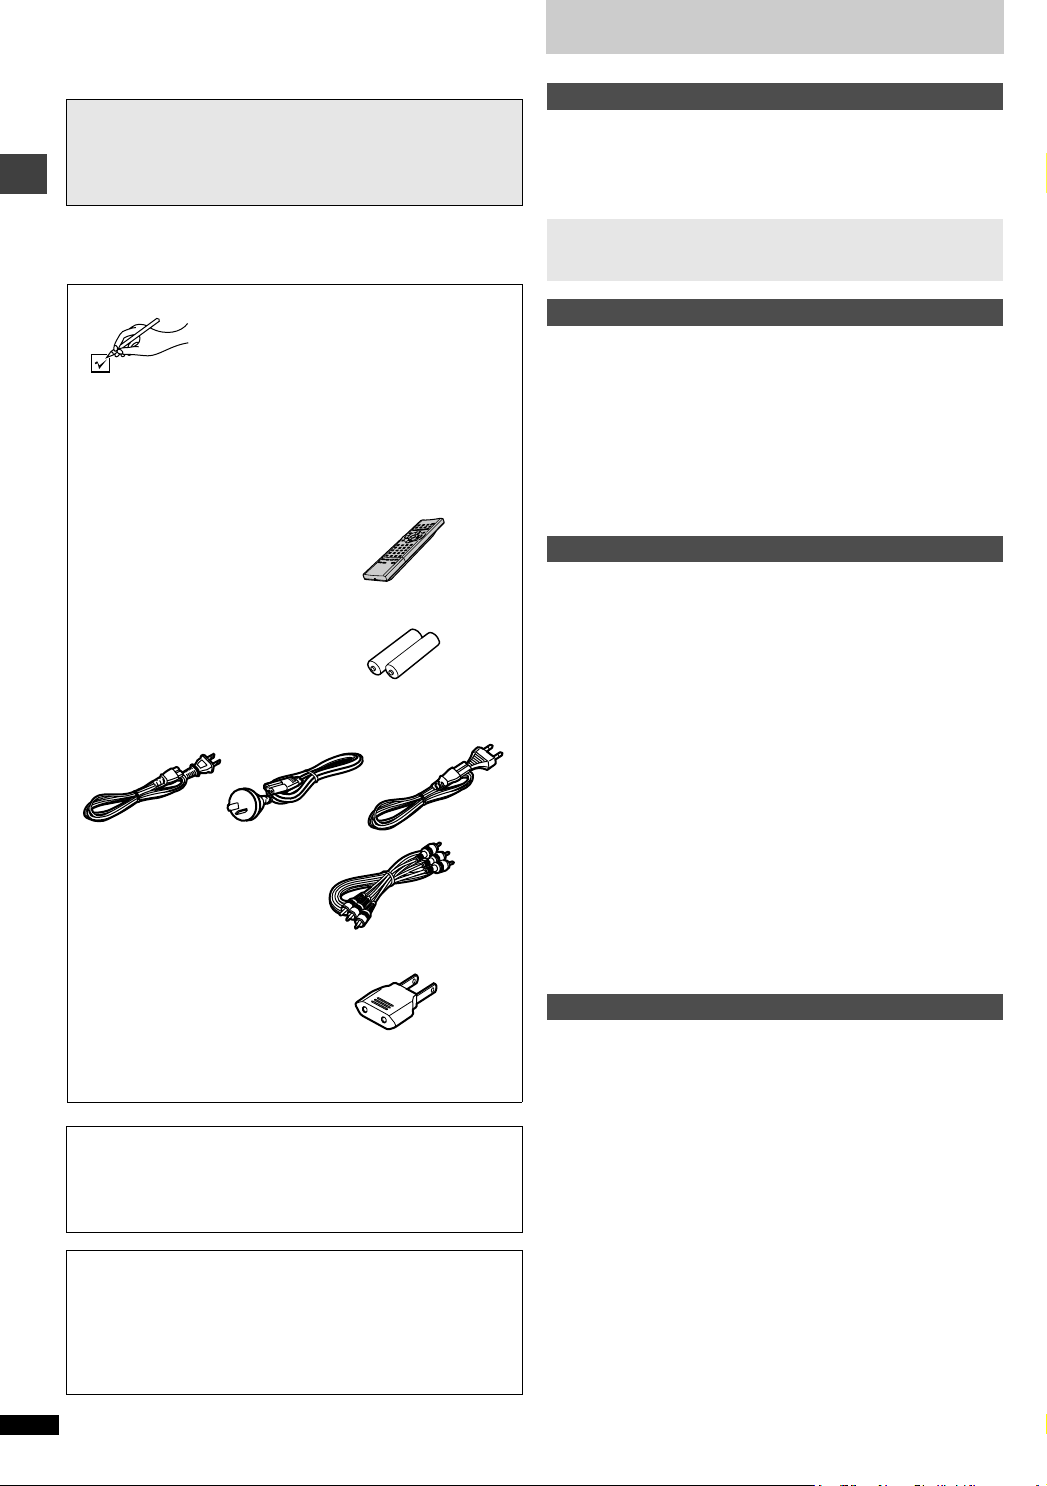
∏ 1 Remote control
[For\U.S.A.\and\Canada]
(N2QAJB000043)
[For\others]
(N2QAJB000050)
∏ 2Batteries
for remote control
∏ 1 AC power supply cord
[For\U.S.A.\and\Canada] [For\Australia\and\N.Z.] [For\others]
(RJA0065-A) (RJA0035-2X) (RJA0019-2X)
∏ 1 Audio/video cable
(VJA0788-D)
[DVD-RV32] (for units with PX printed on the outer pack aging)
∏ 1 Power plug adaptor
(VJP2974)
[Note]
The included AC power supply cord is for use with this unit only.
Do not use it with other equipment.
User memo:
DATE OF PURCHASE _________________________________
DEALER NAME _________________________ __ ___ ___ __ ___
DEALER ADDRESS ___________________________________
____________________________________________________
TELEPHONE NUMBER ________________________________
Please check and identify the supplie d acce ssor ie s.
Use numbers indicated in parentheses when asking
for replacement parts.
Table of contents
Getting started
Accessories . . . . . . . . . . . . . . . . . . . . . . . . . . . . . . . . . . . . . . . 2
IMPORTANT SAFETY INSTRUCTIONS. . . . . . . . . . . . . . . . . . 4
Maintena n c e . . . . . . . . . . . . . . . . . . . . . . . . . . . . . . . . . . . . . . . 4
Control reference guid e . . . . . . . . . . . . . . . . . . . . . . . . . . . . . 5
Disc information . . . . . . . . . . . . . . . . . . . . . . . . . . . . . . . . . . . . 5
[1] Conne c t io n to a televisio n . . . . . . . . . . . . . . . . . . . . . . . . . 6
[2] The remote c o nt r o l . . . . . . . . . . . . . . . . . . . . . . . . . . . . . . . 7
[3] Quick Se tup . . . . . . . . . . . . . . . . . . . . . . . . . . . . . . . . . . . . . 7
Basic operations
Basic play. . . . . . . . . . . . . . . . . . . . . . . . . . . . . . . . . . . . . . . . .8
Replaying a scene — QUICK REPLAY. . . . . . . . . . . . . . . . . . . . . . . . 8
Setting the unit to turn off — SLEEP timer . . . . . . . . . . . . . . . . . . . . . 8
Using menus to play MP3 discs . . . . . . . . . . . . . . . . . . . . . . . . . . . . . 9
Resume function . . . . . . . . . . . . . . . . . . . . . . . . . . . . . . . . . . . . . . . . . 9
Skipping chapters or tracks. . . . . . . . . . . . . . . . . . . . . . . . . . . . . . . . 10
Fast forward and rewind—SEARCH . . . . . . . . . . . . . . . . . . . . . . . . . 10
Slow-motion play . . . . . . . . . . . . . . . . . . . . . . . . . . . . . . . . . . . . . . . . 10
Frame-by-frame viewing . . . . . . . . . . . . . . . . . . . . . . . . . . . . . . . . . . 10
Starting play from a selected title or track . . . . . . . . . . . . . . . . . . . . . 10
4:3 TV ZOOM function . . . . . . . . . . . . . . . . . . . . . . . . . . . . . . . . . . . 10
Advanced operations
Convenie n t fe a t ures . . . . . . . . . . . . . . . . . . . . . . . . . . . . . . . 11
Repeat play . . . . . . . . . . . . . . . . . . . . . . . . . . . . . . . . . . . . . . . . . . . . 11
A-B repeat play . . . . . . . . . . . . . . . . . . . . . . . . . . . . . . . . . . . . . . . . . 11
Program play. . . . . . . . . . . . . . . . . . . . . . . . . . . . . . . . . . . . . . . . . . . 11
Random play . . . . . . . . . . . . . . . . . . . . . . . . . . . . . . . . . . . . . . . . . . . 11
Increasing your enjoyment of movies . . . . . . . . . . . . . . . . . 12
Soundtracks . . . . . . . . . . . . . . . . . . . . . . . . . . . . . . . . . . . . . . . . . . . 12
Subtitles. . . . . . . . . . . . . . . . . . . . . . . . . . . . . . . . . . . . . . . . . . . . . . . 12
Angles . . . . . . . . . . . . . . . . . . . . . . . . . . . . . . . . . . . . . . . . . . . . . . . . 12
[A] ADVANCED SURROUND . . . . . . . . . . . . . . . . . . . . . . . . . . . . . . 13
[B] BASS PLUS . . . . . . . . . . . . . . . . . . . . . . . . . . . . . . . . . . . . . . . . . 13
[C] CINEMA . . . . . . . . . . . . . . . . . . . . . . . . . . . . . . . . . . . . . . . . . . . . 13
[D] DIALOGUE ENHANCER . . . . . . . . . . . . . . . . . . . . . . . . . . . . . . . 13
ONE TOUCH CINEMA MEMORY. . . . . . . . . . . . . . . . . . . . . . . . . . . 13
Using On-S c r e e n Menu Icons . . . . . . . . . . . . . . . . . . . . . . . . 14
Common procedures. . . . . . . . . . . . . . . . . . . . . . . . . . . . . . . . . . . . . 14
Disc information. . . . . . . . . . . . . . . . . . . . . . . . . . . . . . . . . . . . . . . . . 14
Unit information . . . . . . . . . . . . . . . . . . . . . . . . . . . . . . . . . . . . . . . . . 15
Progress indicator . . . . . . . . . . . . . . . . . . . . . . . . . . . . . . . . . . . . . . . 15
Changing s e t tings . . . . . . . . . . . . . . . . . . . . . . . . . . . . . . . . . 16
Common procedures. . . . . . . . . . . . . . . . . . . . . . . . . . . . . . . . . . . . . 17
Entering a password (Ratings) . . . . . . . . . . . . . . . . . . . . . . . . . . . . . 17
Digital output . . . . . . . . . . . . . . . . . . . . . . . . . . . . . . . . . . . . . . . . . . . 17
Home Theater—Enjoyin g m o r e powerful soun d. . . . . . . . . 18
Reference
Troubleshooting guide . . . . . . . . . . . . . . . . . . . . . . . . . . . . . 19
Glossary . . . . . . . . . . . . . . . . . . . . . . . . . . . . . . . . . . . . . . . . . 20
Limited War r a nty (U.S.A.) . . . . . . . . . . . . . . . . . . . . . . . . . . . 21
Product Service (U.S.A. and Canada) . . . . . . . . . . . . . . . . . 22
Guía de referencia rápida en español . . . . . . . . . . . . . . . . . 23
(Spanish Quick Reference)
Specifications. . . . . . . . . . . . . . . . . . . . . . . . . . . . . Back cover
The model number and serial number of this product can be found
on either the back or the bottom of the unit.
Please note them in the spa c e p rovided bel ow an d keep for futur e
reference.
MODEL NUMBER _____________________________________
SERIAL NUMBER _____________________________________
RQT6236
2
Page 3
CAUTION!
THIS PRODUCT UTILIZES A LASER.
USE OF CONTROLS OR ADJUSTMENTS OR PERFORMANCE OF PROCEDURES OTHER THAN THOSE
SPECIFIED HEREIN MAY RESULT IN HAZARDOUS
RADIATION EXPOSURE.
DO NOT OPEN COVERS AND DO NOT REPAIR YOURSELF. REFER SERVICING TO QUALIFIED PERSONNEL.
W ARNING:
TO REDUCE THE RISK OF FIRE, ELECTRIC SHOCK
OR PRODUCT DAMAGE, DO NOT EXPOSE THIS
APPARATUS TO RAIN, MOISTURE, DRIPPING OR
SPLASHING AND THAT NO OBJECTS FILLED WITH
LIQUIDS, SUCH AS VASES, SHALL BE PLACED ON
THE APPARATUS.
CAUTION!
≥DO NOT INSTALL, OR PLACE THIS UNIT, IN A
BOOKCASE, BUILT-IN CABINET OR IN ANOTHER
CONFINED SPACE. ENSURE THE UNIT IS WELL
VENTILATED. TO PREVENT RISK OF ELECTRIC
SHOCK OR FIRE HAZARD DUE TO OVERHEATING,
ENSURE THAT CURTAINS AND ANY OTHER MATERIALS DO NOT OBSTRUCT THE VENTILATION
VENTS.
≥DO NOT OBSTRUCT THE UNIT’S VENTILATION
OPENINGS WITH NEWSPAPERS, TABLECLOTHS,
CURTAINS, AND SIMILAR ITEMS.
≥DO NOT PLACE SOURCES OF NAKED FLAMES,
SUCH AS LIGHTED CANDLES, ON THE UNIT.
≥DISPOSE OF BATTERIES IN AN ENVIRONMEN-
T A LLY FRIENDLY MANNER.
THE FOLLOWING APPLIES ONLY IN THE U.S.A.:
CAUTION:
This equipment has been tested and found to comply with the
limits for a Class B digital device, pursuant to Part 15 of the
FCC Rules.
These limits are designed to provide reasonable protection
against harmful interference in a residential installation. This
equipment generates, uses and can radiate radio frequency
energy and, if not installed and used in accordance with the
instructions, may cause harmful interference to radio communications. However, there is no guarantee that interference
will not occur in a particular installation. If this equipment
does cause harmful interference to radio or television reception, which can be determined by turning the equipment off
and on, the user is encouraged to try to correct the interference by one or more of the following measures:
≥Reorient or relocate the receiving antenna.
≥Increase the separation between the equipment and
receiver.
≥Connect the equipment into an outlet on a circuit different
from that to which the receiver is connected.
≥Consult the dealer or an experienced radio/TV technician
for help.
Any unauthorized changes or modifications to this equipment
would void the user’s authority to operate this device.
This device complies with Part 15 of the FCC Rules. Operation is subject to the following two conditions: (1) This device
may not cause harmful interference, and (2) this device must
accept any interference received, including interference that
may cause undesired operation.
THE FOLLOWING APPLIES ONLY IN THE U.S.A. AND CANADA:
Getting started
THE FOLLOWING AP PLIES ONLY IN THE U.S.A. AN D
CANADA:
CAUTION:
TO PREVENT ELECTRIC SHOCK MATCH WIDE
BLADE OF PLUG TO WIDE SLOT, FULLY INSERT.
For the Middle East, South Africa and Asia
THIS UNIT IS INTENDED FOR USE IN TROPICAL
CLIMATES.
For Australia, N.Z. and units with PX printed on the outer packaging
THIS UNIT IS INTENDED FOR USE IN MODERATE
CLIMATES.
This prod uct m ay receive radi o i n ter ference c au sed by mobil e te l e phones during use. If such interference is apparent, please
increase separation between the product and the mobile telephone.
-
VISIBLE AND INVISIBLE LASER RADIATION WHEN OPEN.
DANGER
AVOID DIRECT EXPOSURE TO BEAM.
-
VISIBLE AND INVISIBLE LASER RADIATION WHEN OPEN.
CAUTION
AVOID EXPOSURE TO BEAM.
-
RAY ONNEMENT LASER VISIBLE ET INVISIBLE EN CAS D’OUVERTURE.
ATTENTION
EXPOSITION DANGEREUSE AU F AISCEA U .
-
SYNLIG OG USYNLIG LASERSTRÅLING VED ÅBNING.
ADVARSEL
UNDGÅ UDSÆTTELSE FOR STRÅLING.
-
AVATTAESSA OLET ALTTIINA NÄKYVÄÄ JA NÄKYMÄTÖN
VARO !
LASERSÄTEILYLLE. ÄLÄ KATSO SÄTEESEEN.
-
SYNLIG OCH OSYNLIG LASERSTRÅLNING NÄR DENNA DEL
VARNING
ÄR ÖPPNAD. BETRAKTA EJ STRÅLEN.
-
SYNLIG OG USYNLIG LASERSTRÅLING NÅR DEKSEL ÅPNES.
ADVARSEL
UNNGÅ EKSPONERING FOR STRÅLEN.
-
SICHTBARE UND UNSICHTBARE LASERSTRAHLUNG, WENN ABDECKUNG
VORSICHT
GEÖFFNET. NICHT DEM STRAHL AUSSETZEN.
-
-
(FDA 21 CFR)
(IEC60825-1)
RQLS0233
(Inside of product)
CAUTION: TO REDUCE THE RISK OF ELECTRIC
SHOCK, DO NOT REMOVE SCREWS.
NO USER-SERVICEABLE PARTS
INSIDE.
REFER SERVICING TO QUALIFIED
SERVICE PERSONNEL.
The lightning flash with arrowhead symbol,
within an equilateral triangle, is intended to alert
the user to the presence of uninsulated
“dangerous voltage” within the product’s
enclosure that may be of sufficient magnitude
to constitute a risk of electric shock to persons.
The exclamation point within an equilateral
triangle is intended to alert the user to the
presence of important operating and
maintenance (servicing) instructions in the
literature accompanying the appliance.
[DVD-RV32]
CLASS 1
LASER PRODUCT
The laser product label has not been attached to products for U.S.A. and
Canada.
RQT6236
3
Page 4

IMPORTANT SAFETY INSTRUCTIONS
Read these operating ins tr uct ions ca refully before using the unit. Follow the safety instruct ions o n the unit a nd th e safety precautions listed below. Keep
these operating instructions handy for future reference.
Safety
1. Power source—Connect the unit to a power source of the type
described in these instructions or as marked on the unit.
2. Polarization—The unit is equipped with a polarized power plug where
one blade is wider than the other. This safety feature ensures that th e
plug fits into your household AC outlet only one way. If the plug doesn't
fit one way, try reversing it. If the plug still doesn't fit, contact an electrician to replace the obsolete o utlet. Do not attempt to defeat the safety
purpose of the plug.
3. Power cord protection —Route the AC power supply cord so that it
will not be walked on or pinched by items placed on or against it.
Never take hold of the plug or cor d with wet hand s. Always grasp the
Getting started
plug body firmly when connecting and disconnecting it.
4. Overloading—When connecting the AC power su pply co rd, be ca re-
ful not to overload the household AC outlet , extension cord, or outlet
from any other device as this can result in fire or electric shock.
5. Nonuse per iods—Turn the unit off when it i s not in use. Unplu g the
unit from the household AC outlet if it is not to be used for a long time.
Unplug the unit during lightning storms.
6. Attachments and accessories—Use only the attachments and
accessories recommended in these operating instructions.
Installation
Placement
1. Ventilation—Situate th e unit so that it recei ves proper ventilation . Do
not install in a confined space such as a bookcase or cabinet. Allow at
least 10 cm (4 inches ) clearanc e from the r ear of th e unit. To prevent
the risk of electric shock or fire due to overheating ensure curtains and
other materials do not obstruct the unit's ventilation.
2. Foreig n ma terial—Ensure objects and liquids do not get into the unit.
Avoid exposing the unit to excessive smoke, dust, mechanical vibra tion, and shock.
3. Magnetism—Si tuate the unit away from equipment and devices that
generate strong magnetic fields.
4. Stacking—Do not place heavy objects on top of this unit.
5. Surface—Place the unit on a flat, level surface.
6. Carts a nd stands—Use the unit only with carts
and stands recommended by the manufacturer.
Move carts with care. Sudden stops, excessive
force, and uneven surfaces can cause carts to
overturn.
7. Wall and ceiling mounting—Do not mount the
unit on walls or ceilings unless specified in the
instructions.
Do not place the unit
on amplifiers or
equipment that may
become hot.
The heat can damage the unit.
Environment
1. Water and moi stu r e—Do not use the unit near water, such as near a
bathtub or swimming pool. Avoid damp basements.
2. Heat—Situate the unit away from heat sources, such as radiators.
Do not situate where temperatures fall below 5 oC (41 oF) or rise above
35 oC (95 oF).
Maintenance
(See below for details.)
Unplug the unit from the household AC outlet before cleaning.
Clean with a damp cloth.
Do not use abrasive pads, scouring powders, or solvents.
Service
1. Damage requiring service—The unit should be serviced by qualified
service personnel if:
(a) The AC power supply cord or the plug has been damaged; or
(b) Objects or liquids have gotten into the unit; or
(c) The unit has been exposed to rain; or
(d) The unit does not operate normally or exhibits a marked change in
performance; or
(e) The unit has been dropped or the cabinet damaged.
2. Servicing—Do not attempt to service the unit beyond that de scribed
in these operating instructions. Refer all other servicing to authorized
servicing pe rsonnel.
3. Replaceme nt par ts—When parts n eed r eplacing ensure the servicer
uses parts specifi ed by the manufacturer or par ts that have the same
characteristics as the original parts. Unauthorized substitutes may
result in fire, electric shock, or other hazards.
4. Safety check—After repairs or service, ask the servicer to perfor m
safety checks to confirm that the unit is in proper working condition.
Item 2 in “Safety” applies only in the U.S.A. and Canada.
Maintenance
To clean this unit, wipe with a soft, damp cloth.
≥Never use alcohol, paint thinner or benzine to clean this unit.
≥Before using chemically treated cloth, read the instructions that came with the cloth carefully.
RQT6236
4
Page 5
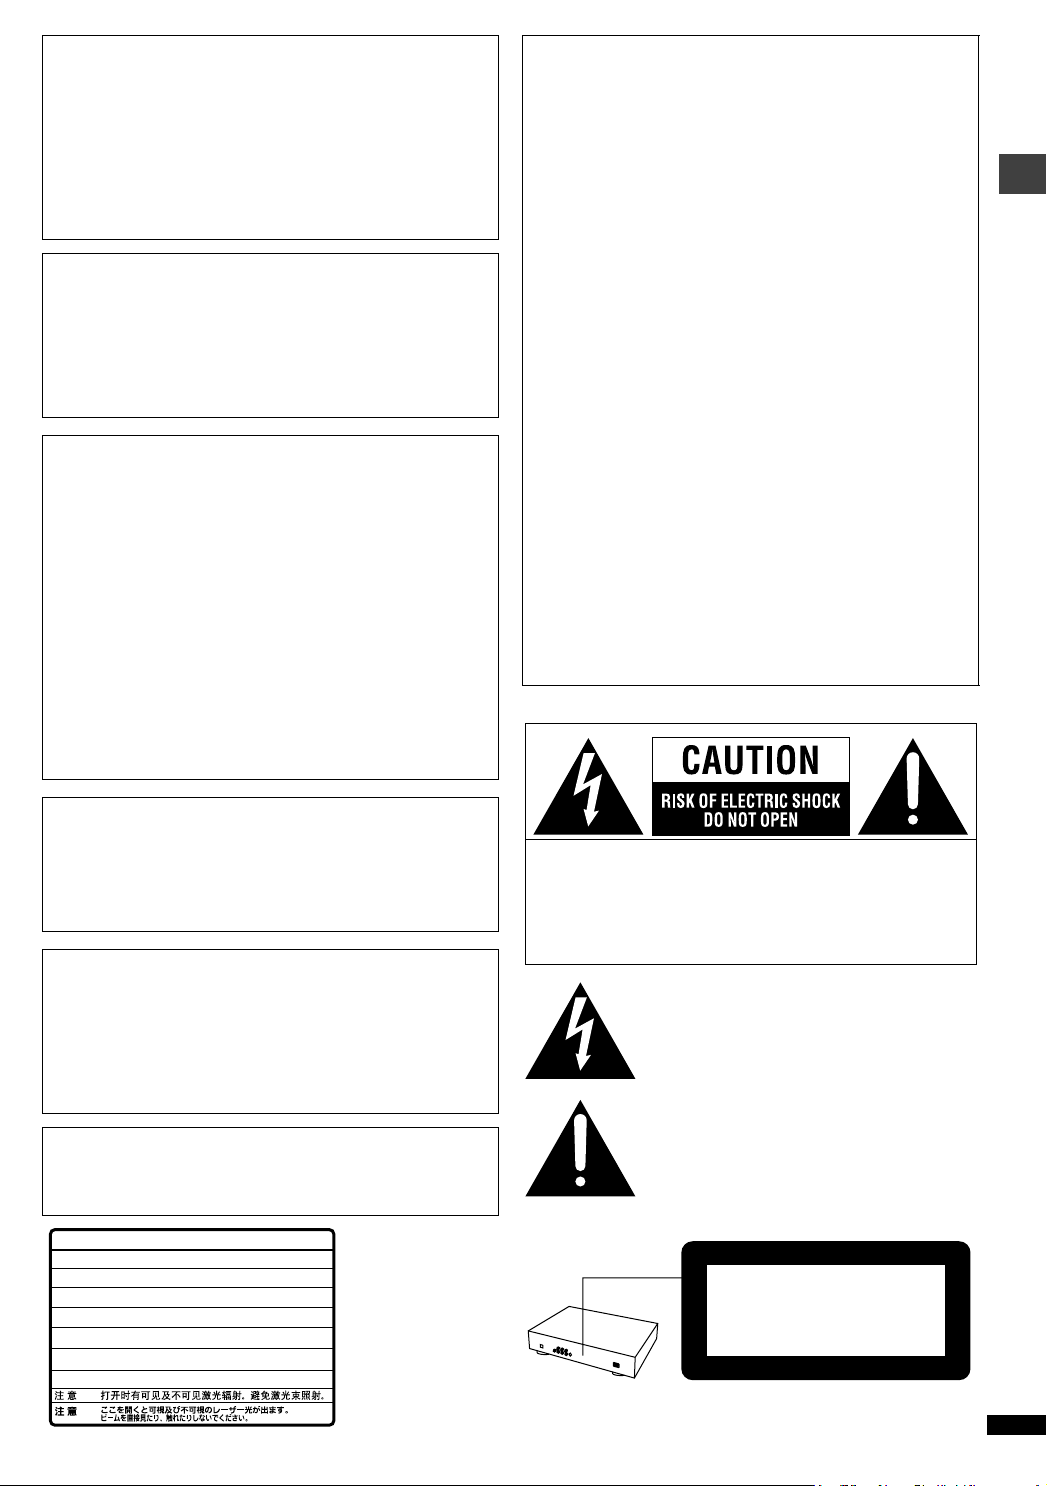
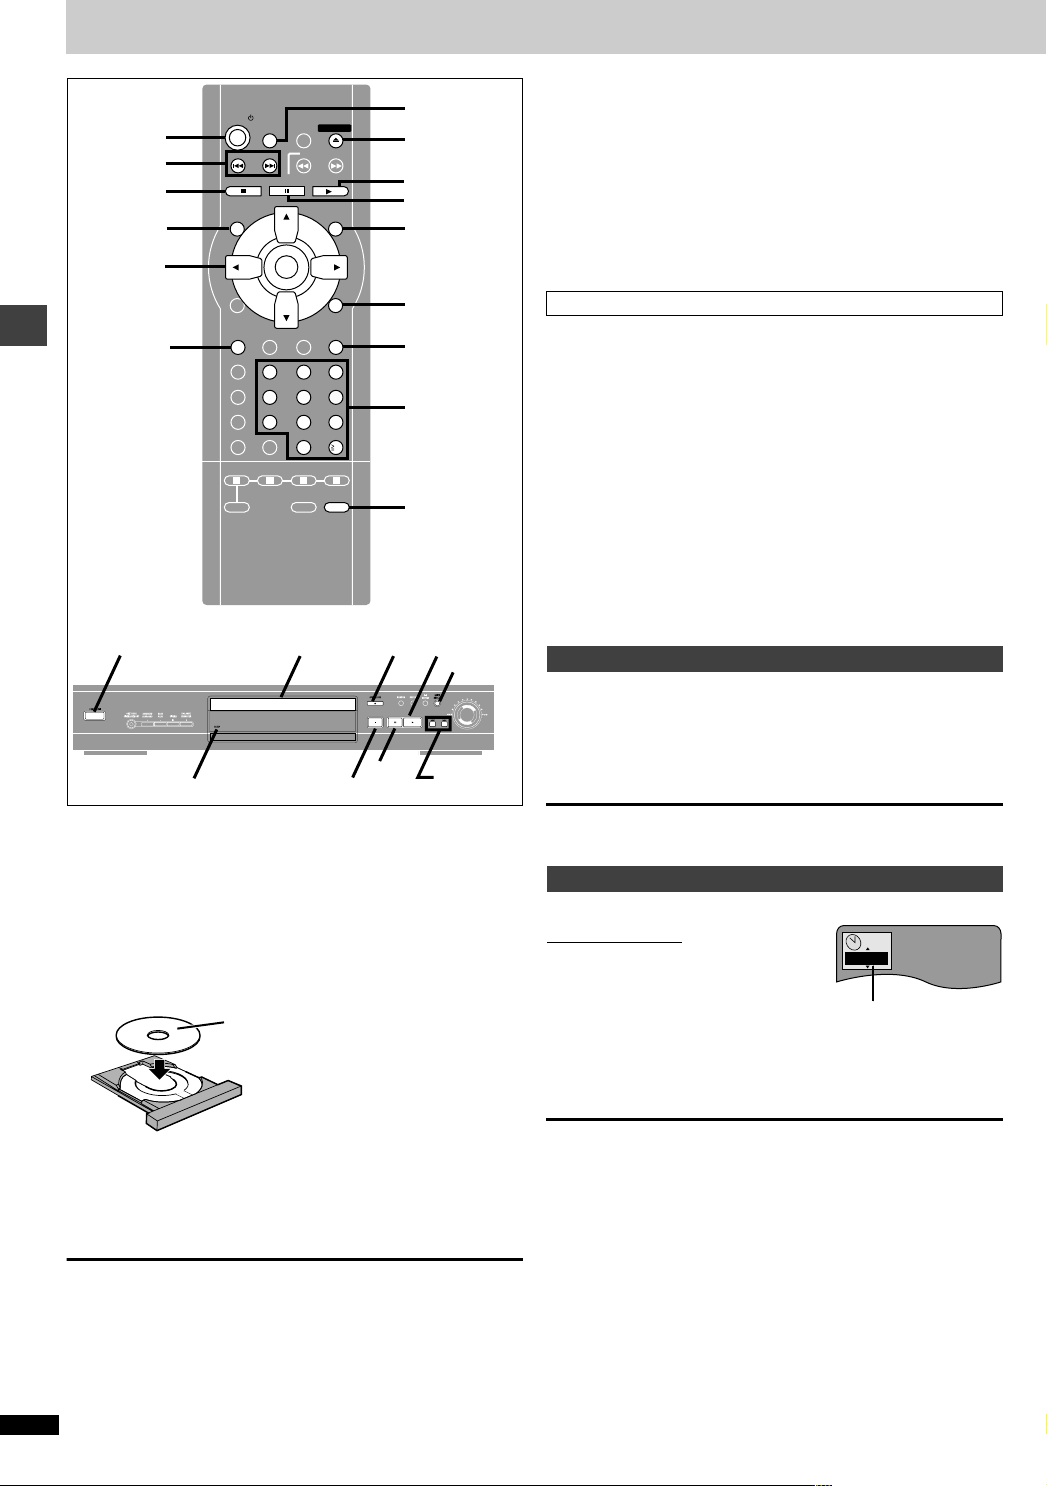
Control reference guide
Buttons such as 2 functio n the same as the con trols on the rem ote
control.
The actual marking of th e standby/on switch depends on the area.
Illustrations in these operating instructions use the markings shown
in the above illustration.
1 Standby/on switch (Í/I) . . . . . . . . . . . . . . . . . . . . . . . . . . . . . . . . . . 7
Page
Press to switch the unit from o n to standby mode or vice versa. In
standby mode, the unit is still consuming a small amount of power.
2 Skip buttons (:, 9 SKIP) . . . . . . . . . . . . . . . . . . . . . . . . . . . 10
3 Stop button (∫ STOP) . . . . . . . . . . . . . . . . . . . . . . . . . . . . . . . . . . . 8
4 Pause button (; PAUSE). . . . . . . . . . . . . . . . . . . . . . . . . . . . . . . . . 8
5 Top menu button (TOP MENU) . . . . . . . . . . . . . . . . . . . . . . . . . . 8, 9
6 Cursor buttons (3, 4, 2, 1)/Enter button (ENTER) . . . . . . . . . . 8
7 Display button (DISPLAY) . . . . . . . . . . . . . . . . . . . . . . . . . . . . . . . 14
8 Subtitle button (SUBTITLE) . . . . . . . . . . . . . . . . . . . . . . . . . . . . . . 12
9 Audio button (AUDIO). . . . . . . . . . . . . . . . . . . . . . . . . . . . . . . . . . . 12
: Program button (PROGRAM). . . . . . . . . . . . . . . . . . . . . . . . . . . . . 11
; Random play button (RANDOM) . . . . . . . . . . . . . . . . . . . . . . . . . . 11
< Repeat button (REPEAT) . . . . . . . . . . . . . . . . . . . . . . . . . . . . . . . . 11
= A-B repeat button (A-B REPEAT) . . . . . . . . . . . . . . . . . . . . . . . . . 11
> Cancel button (CANCEL) . . . . . . . . . . . . . . . . . . . . . . . . . . . . . . . . 11
? Advanced Surround button ([A] A.SRD) . . . . . . . . . . . . . . . . . . . . 13
@ Bass plus button ([B] BASS) . . . . . . . . . . . . . . . . . . . . . . . . . . . . . 13
A One touch cinema memory button (ONE TOUCH MEMORY) . . . 13
B Sleep button (SLEEP). . . . . . . . . . . . . . . . . . . . . . . . . . . . . . . . . . . . 8
C Setup button (SETUP) . . . . . . . . . . . . . . . . . . . . . . . . . . . . . . . . 7, 17
D Open/Close button (< OPEN/CLOSE) . . . . . . . . . . . . . . . . . . . . . . 8
E Slow/Search buttons (6, 5 SLOW/SEARCH) . . . . . . . . . . . . 10
F Play button (1 PLAY). . . . . . . . . . . . . . . . . . . . . . . . . . . . . . . . . . . . 8
G Menu button (MENU) . . . . . . . . . . . . . . . . . . . . . . . . . . . . . . . . . . 8, 9
H Return button (RETURN) . . . . . . . . . . . . . . . . . . . . . . . . . . . . . . . . . 7
I Angle button (ANGLE) . . . . . . . . . . . . . . . . . . . . . . . . . . . . . . . . . . 12
J Quick replay button (QUICK REPLAY) . . . . . . . . . . . . . . . . . . . . . . 8
K Numbered buttons (1–9, 0, S10) . . . . . . . . . . . . . . . . . . . . . . . . . . . 8
L Cinema butt on ([C] CINEMA) . . . . . . . . . . . . . . . . . . . . . . . . . . . . . 13
M Dialogue Enhancer button ([D] D.ENH). . . . . . . . . . . . . . . . . . . . . 13
N Position memory button (POSITION MEMORY). . . . . . . . . . . . . . . 9
O 4:3 TV ZOOM button (ZOOM). . . . . . . . . . . . . . . . . . . . . . . . . . . . . 10
P Disc tray . . . . . . . . . . . . . . . . . . . . . . . . . . . . . . . . . . . . . . . . . . . . . . 8
Q Shuttle dial (6, 5) . . . . . . . . . . . . . . . . . . . . . . . . . . . . . . . . . . 10
R Sleep indicator (SLEEP). . . . . . . . . . . . . . . . . . . . . . . . . . . . . . . . . . 8
S Remote control signal senso r
T Display
U [DVD-RV32] (For units sold outside U.S.A. and Canada)
Standby indicator (Í, STANDBY)
When the unit is connected to the AC mains supply, this indicator
lights up in standby mode and goes out when the unit is turned on.
Getting started
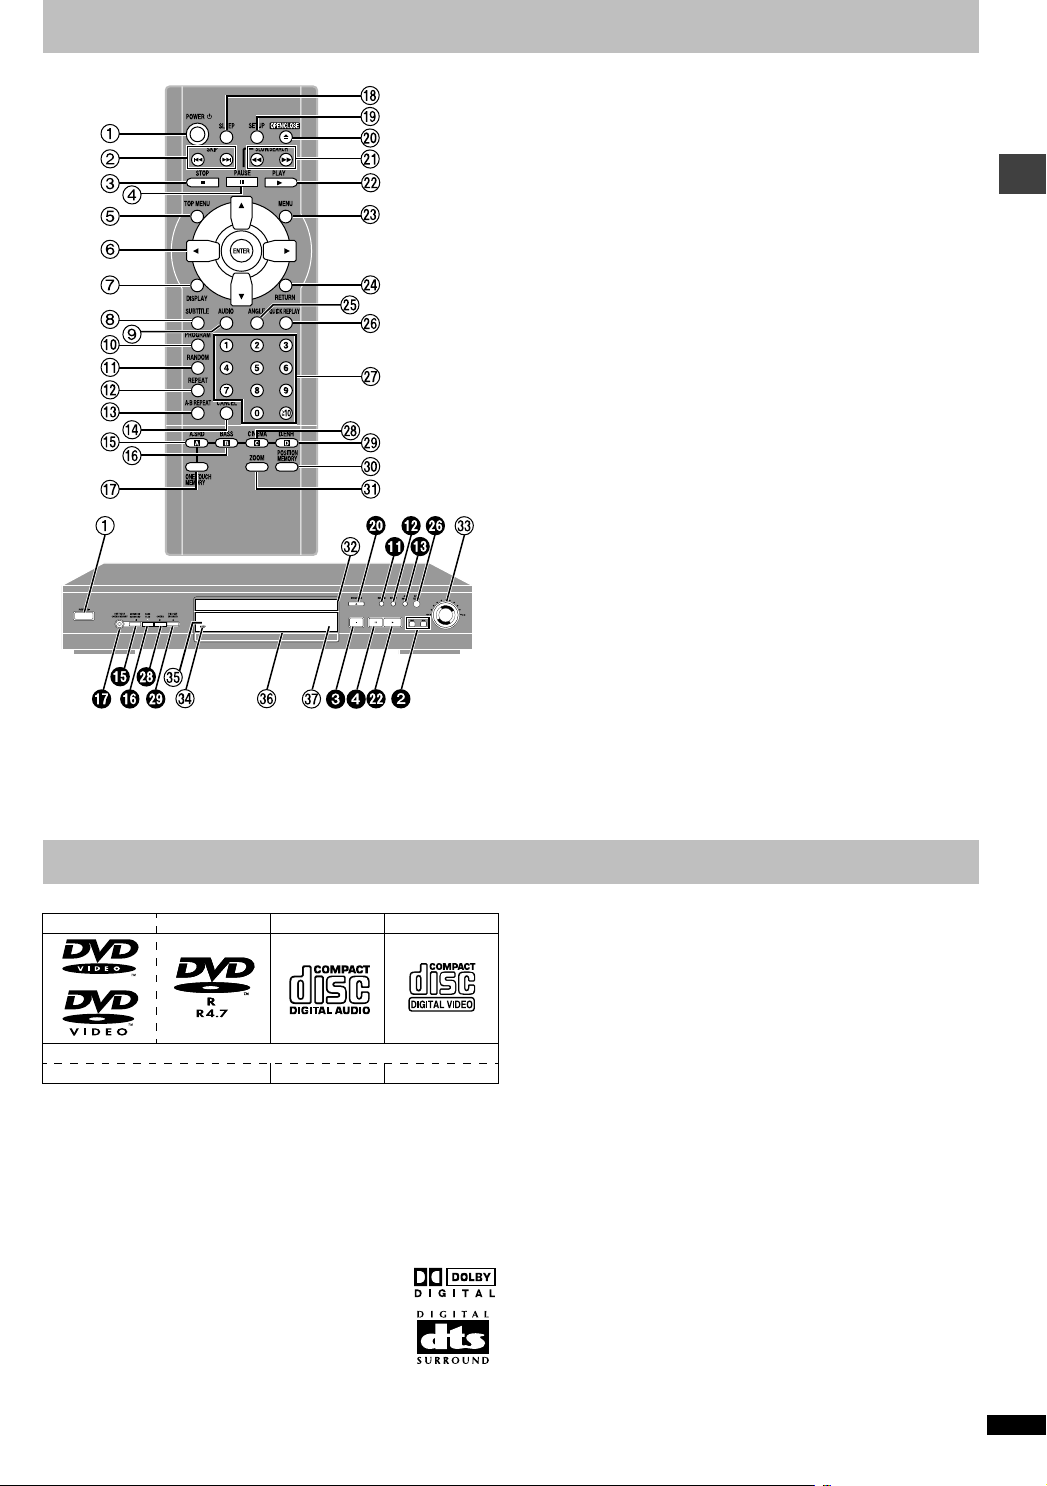
Disc information
∫ Discs that can be played
DVD-Video DVD-R Audio CD Video CD
Indication used in instructions
[DVD]
§
Including CD-R/RW and discs recorded with MP3 (and WMA for the
U.S.A., Canada and units with PX printed on the out er packaging
[DVD-RV32] [DVD-RV27]).
Do not use irregularly shaped discs (e.g. heart-shaped), as these can
damage the unit.
∫ Discs that cannot be played
DVD-Audio, PAL discs§, DVD-ROM, DVD-RAM, CD-ROM, CDV, CD-G,
iRW, DVD-RW, CVD, SVCD, SACD, Divx Video Discs and Photo CD.
§
Only for U.S.A., Canada and units with PX printed on the outer packaging
∫ DVDs that can be played
This unit has a Dolby Digital decoder so you can play
DVDs with this mark.
This unit does not have a DTS decoder. Connect this unit to
equipment that has a DTS decoder to enjoy D VDs with this mark.
∫ Playing DVDs and Video CDs
The producer of these discs can control how they are played so you may
not always be able to control play as descr ibed in th ese op erati n g inst r uctions. Read the disc’s instructions carefully.
[CD]
§
[VCD]
∫ Video systems
(For the Middle East, South Africa, Asia, Australia and N.Z.)
This unit can play both the PAL and NTSC video systems. To view PAL or
NTSC, however, your television must match the system used on the disc.
PAL discs cannot be correctly viewed on an NTSC television.
NTSC can be correctly viewed on a PAL television by converting the video
signal to PAL 60 (➡➡➡➡ page 16, Video—NTSC Disc Output).
∫ CD-R and CD-RW discs
This unit can play CD-DA (digital audio) and video CD format audio CD-R
and CD-RW that have been finalized (a pr ocess that enables CD-R an d
CD-RW players to play audio CD-R and CD-RW) upon completion of
recording. It may not be able to play some CD-R/RW due to the condition
of the recording.
∫ DVD-R discs
Panasonic DVD-R recorded and finalized on a Panasonic DVD video
recorder are played as DVD-Video on this unit.
It may not be possible to play these discs in all cases due to the type of
disc or condition of the recording.
∫ Handling precautions
≥Do not write on the label side with a ball-point pen or other writing instru-
ment.
≥Do not use record cleaning sprays, benzine, thinner, static electricity pre-
vention liquids or any other solvent.
≥Do not attach labels or stickers to discs. (Do not use discs with exposed
adhesive from tape or left over peeled-off stickers.)
≥Do not use scratch-proof protectors or covers.
≥Do not use discs printed with label printers available on the market.
RQT6236
5
Page 6
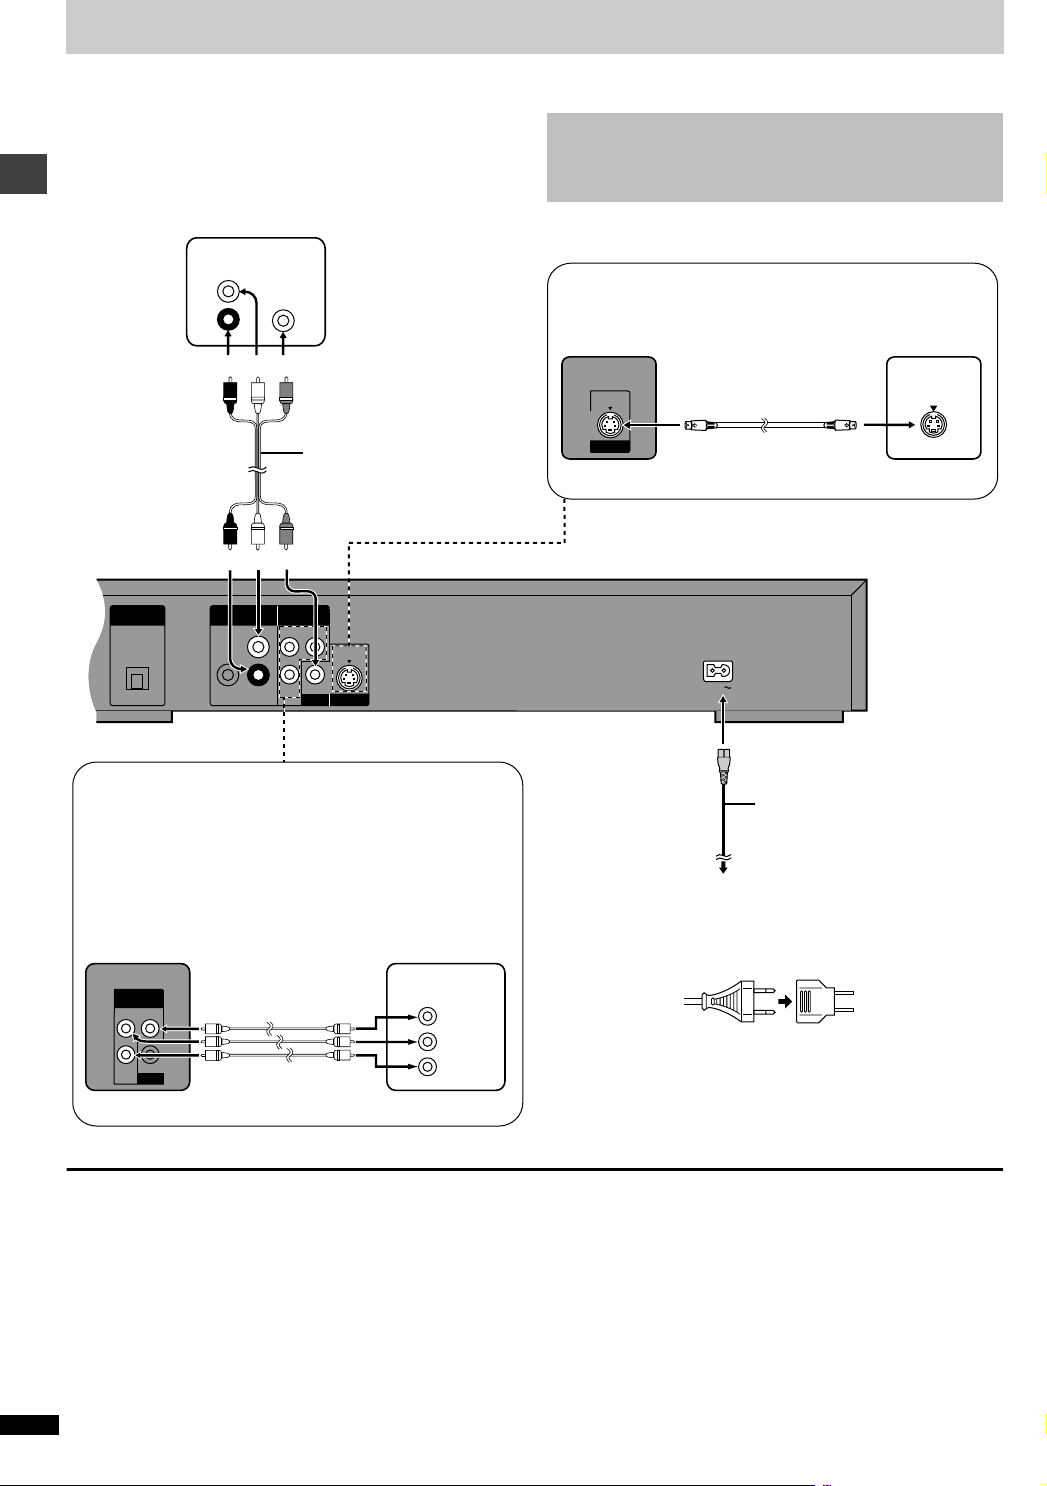
[1] Connection to a television
AC IN
OPTICAL
DIGITAL AUDIO OUT
(PCM/BITSTREAM)
LPBY
P
R
R
SUBWOOFER
AUDIO OUT
COMPONENT
VIDEO OUT
S VIDEO
OUT
VIDEO
OUT
This page explains how to connect the unit to a television and set it up so you hear the audio through the television’s speakers. To get the full benefit from
the powerful 5.1-channel audio found on DVDs, you should connect an amplifier and six speakers (➡➡➡➡ page 18).
Before connection
≥Disconnect the AC power supply cord.
≥Refer to the television’s operating instructions.
Television
AUDIO
VIDEO
IN
IN
L
Getting started
R
red white yellow
Connect your unit directly to your television.
Do not connect the unit through your video cassette recorder
when setting up your home enter tainment system, because the
picture may not be played correctly due to the copy guard.
S VIDEO OUT terminal
The S-video ter mina l ac hieves a more vi vid p ictur e tha n the VIDEO
OUT terminal by separatin g the chrominance (C) and lumin ance (Y )
signals. (Actual results depend on the television.)
Television
S VIDEO
S video cable
(not included)
IN
Audio/video cable
(included)
red white yellow
(The illustration shows the model for the U.S.A. and Canada.)
COMPONENT VIDEO OUT terminal
Connection using these terminals outputs the color difference signals (P
high fidelity in reproducing colors.
≥The description o f the component video input terminals depends
[For\U.S.A.,\Canada\and\units\with\PX\printed\on\the\outer\packaging]
≥After making this con nection, change the black level for a better
Connection to AUDIO IN also necessary (see above)
) and luminance sig nal (Y) separately in or der t o a c hieve
B/PR
on the television or monitor (e.g. Y/P
, Y/B-Y/R-Y, Y/CB/CR).
B/PR
Connect to terminals of the same color.
picture (➡➡➡➡ page 16, Video—Black Level Control).
COMPONENT
VIDEO OUT
PBY
R
P
VIDEO
OUT
Video cable
(not included)
Television
COMPONENT
VIDEO IN
Y
P
B
PR
S VIDEO
OUT
Connection to AUDIO IN also necessary (see left)
AC power supply cord
(included)
To household AC outlet
[DVD-RV32] (for units with PX print ed on the out er packagi ng )
If the power plug does not fit your AC outlet
≥Use the power plug adaptor (included).
If it still doesn’t fit, contact an electrical parts distributor for assistance.
Conservi ng power
This unit consumes a small amount of power, even when it is turned off.
[DVD-RV32]
(For U.S.A. and Canada) approx. 2 W
(For others) approx. 3 W
[DVD-RV27] [DVD-RV22] approx. 2 W
To save power when the unit is not to be used for a long time, unplug it from the household AC outlet.
RQT6236
6
Page 7
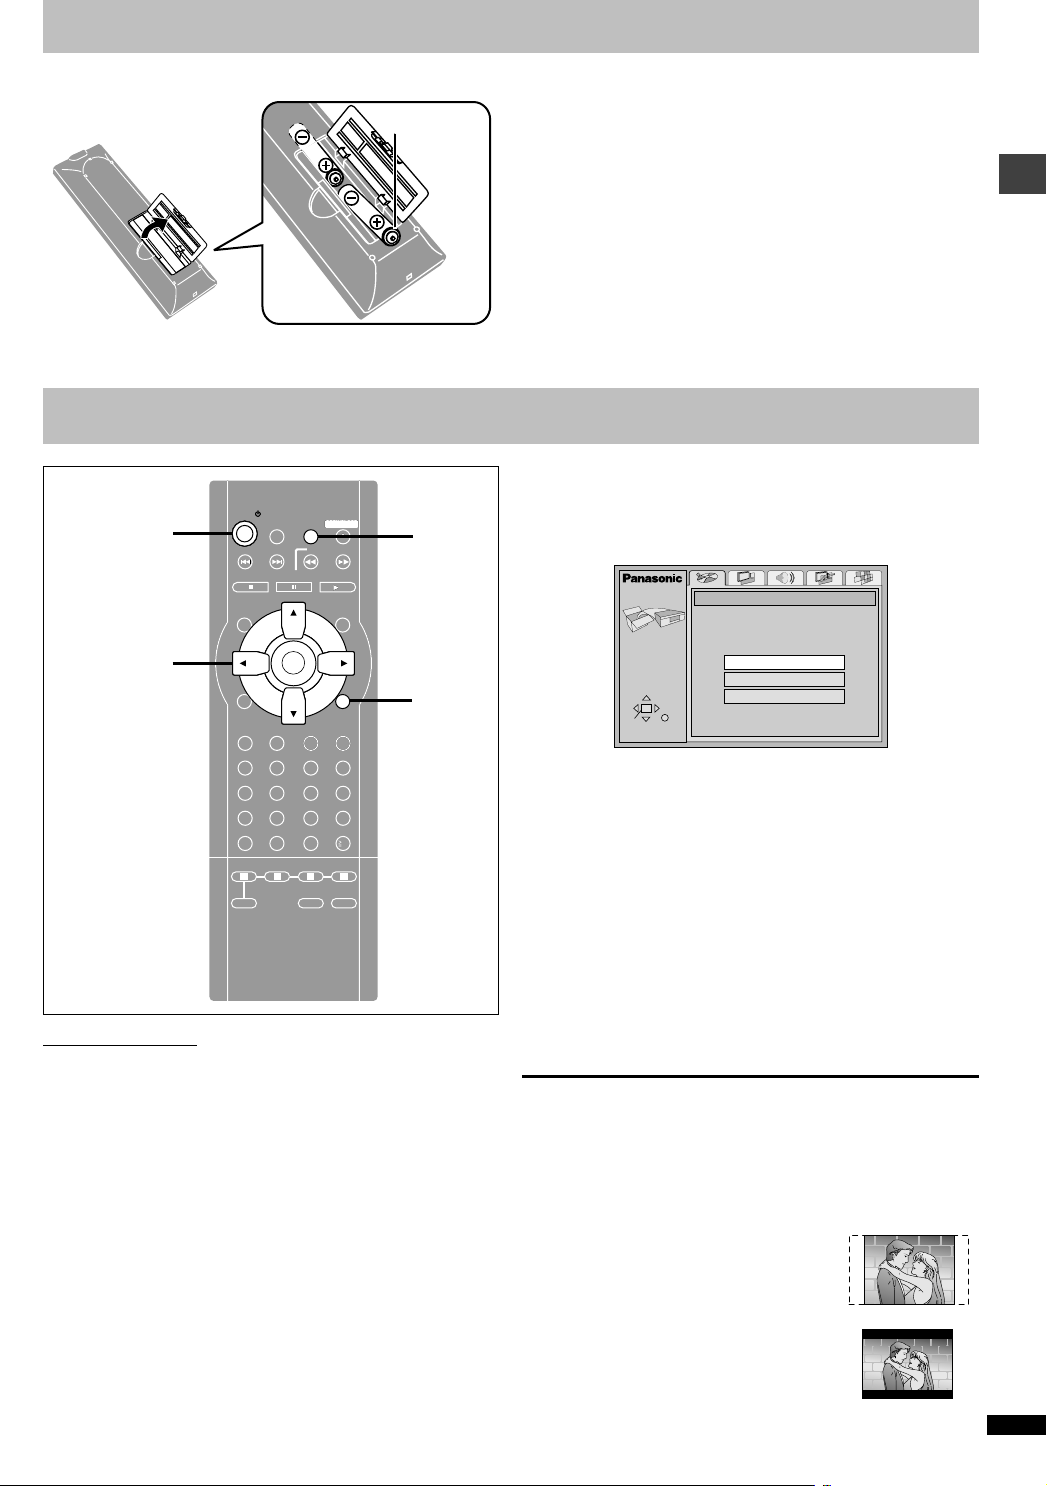
[2] The remote control
∫ Batteries
R6, AA, UM-3
≥Insert so the poles (i and j) match those in the remote control.
≥Do not use rechargeable type batteries.
[3] Quick Setup
POWER
1
3·4·5·6
DISPLAY
SUBTITLE
PROGRAM
RANDOM
REPEAT
A-B REPEAT
A.SRD
A.SRD
ONE TOUCH
MEMORY
Remote control only
The QUICK SETUP screen appears when you press [SETU P] the first
time after purchase and assists you to make necessary settings.
Preparation
Turn on the television and select the appropr iate video input on the tel evision to suit the connections for the player.
SETUP
OPEN/CLOSE
OPEN/CLOSE
OPEN/CLOSE
SLEEP
SLOW/SEARCH
SKIP
PAUSE
PAUSE
PAUSE
STOP PLAY
STOP PLAY
STOP PLAY
MENUTOP MENU
ENTER
ENTER
ENTER
RETURN
RETURN
AUDIO ANGLE
CANCEL
BASS
ABCD
ABCD
A
RETURN
QUICK REPLAY
123
123
123
456
7809
78
78
10
0
0
CINEMA
ZOOM
D.ENH
POSITION
MEMORY
BCD
2·6
RETURN
Do not:
≥mix old and new batteries.
≥use different types at the same time.
≥heat or expose to flame.
≥take apart or short circuit.
≥attempt to recharge alkaline or manganese batteries.
≥use batteries if the covering has been peeled off.
Mishandling of batteries can cause electrolyte leakage which can damage
items the fluid contacts and may cause a fire.
Remove if the remote co ntrol is not go ing to b e used for a long pe riod o f
time. Store in a cool, dark place.
∫ Use
Aim at the sensor, avoiding obstacles, at a maximum range of 7 m
(23 feet) directly in front of the unit.
1
Press [POWER Í] to turn on the unit.
2
Press [SETUP] to show the Quick Setup screen.
e.g. For U.S.A., Canada and units with PX printed on the outer packaging
SETUP
SELECT
ENTER RETURN
3
Press [3, 4, 2, 1] to select the menu language
QUICK SETUP
Select the menu language.
English
Français
Español
and press [ENTER].
4
Press [3, 4] to select “Yes” to continue and
press [ENTER].
5
Press [3, 4, 2, 1] to select the item and press
[ENTER].
≥Audio Language (For setting details ➡➡➡➡ page 16)
≥Subtitle Language (For setting details ➡➡➡➡ page 16)
≥TV Aspect (For setting details ➡➡➡➡ below)
6
Press [ENTER] and then [SETUP] to end the settings.
To return to the previous screen
Press [RETURN].
∫ TV Aspect
Select “4:3” (regular) or “16:9” (widescreen) to suit your television.
If you have a regular 4:3 te levision, you can also select how video on
some discs is shown (➡➡➡➡ page 16, Video—TV Aspect).
≥4:3 Pan&Scan (Factory preset)
The pan and scan (the original widescreen
images are converted for viewing on a regular
television) version of the video is automatically
selected if recorded on the disc.
≥4:3 Letterbox
The letterbox (the original widescreen images
appear with black bands above and bel ow) version of the video is automatically selected if
recorded on the disc.
Getting started
RQT6236
7
Page 8
Basic play
1
:, 9
∫
1
2
POWER
SETUP
SLEEP
SKIP
PAUSE
STOP PLAY
ENTER
OPEN/CLOSE
SLOW/SEARCH
MENUTOP MENU
SLEEP
2
4
;
1
[Note]
≥If “$$$$” appears on the television
The operation is prohibited by the unit or disc.
≥The disc continues to rotate while the menu is displayed even after you
finish playing an item. Press [∫] when you finish to prese rve the unit’s
motor and your television screen.
≥Volume may be lower when playing DVDs than when playing other discs
or during television broadcasts.
If you turn the volume up on the television or amplifier, be sure to reduce
the volume again before playing other sources so that a sudden increase
in output does not occur.
RETURN
QUICK REPLAY
Numbered
buttons
POSITION
MEMORY
QUICK
4
Basic operations
SUBTITLE
1
DISPLAY
AUDIO ANGLE
SUBTITLE
PROGRAM
RANDOM
REPEAT
CANCEL
A-B REPEAT
BASS
A.SRD
ABCD
ONE TOUCH
MEMORY
RETURN
QUICK REPLAY
123
456
7809
10
CINEMA
D.ENH
POSITION
ZOOM
MEMORY
32
REPLAY
;
SLEEP indicator
[DVD] [CD] [VCD]
Preparation
Turn on the television and sel e ct t he ap pro pr ia t e video in put on the television to suit the connections for the player.
1
Press [POWER Í] to turn on the unit.
2
Press [<] to open the disc tray.
3
Place the disc on the disc tray.
Label must face upward.
(With double-sided discs, load so the label for
the side you want to play is facing up.)
∫
:, 9
When a menu screen appears on the television
[DVD] [VCD]
Press the numbered buttons to select an item.
To select a 2-digit number
Example: To select item 23, press [S10] ➡➡➡➡ [2] ➡➡➡➡ [3].
≥When playing DVDs, you can also use [3, 4, 2, 1] to select items.
Press [ENTER] to confirm your selection.
Play of the selected item now begins.
Other buttons used to operate menus
Read the disc’s instructions for further details about operation.
[9]: Shows the next menu.
[:]: Shows the previous menu.
[RETURN]: Shows the menu screen. [VCD]
[TOP MENU]: Shows the first menu screen. [DVD]
[MENU]: Shows the menu screen. [DVD]
Replaying a scene — QUICK REPLAY
[DVD] [CD] [VCD]
During play
Press [QUICK REPLAY].
Play skips back a few seconds each time you press the button.
≥You cannot skip beyond the beginning of a track or title.
≥This feature doesn’t work with some discs.
Setting the unit to turn off — SLEEP timer
[DVD] [CD] [VCD]
Remote control only
For example:
Z
Z
60 min
Press [SLEEP] to select the
setting.
Each time you press the button:
OFF#AUTO
^————————————————}
§
The unit turns off 5 minutes after play finishes.
The SLEEP indicator lights when the sleep timer is on.
§
#60 min#90 min#120 min
The unit turns off after
60 minutes.
4
Press [1] (PLAY).
The disc tray closes and play begins.
[CD] (MP3 discs)
Group and track names are displayed on the television.
Press [SUBTITLE] to change the display.
To stop play
Press [∫] (➡➡➡➡ page 9, Resume function).
To pause play
Press [;] during play.
Press [1] (PLAY) to restart play.
RQT6236
8
To cancel the SLEEP timer
Press [SLEEP] to select “OFF”.
To confirm the remaining time
Press [SLEEP].
[Note]
≥AUTO also works with DVDs that show a menu after play finishes.
≥AUTO does not work if you press [∫], [MENU], or [TOP MENU]. It is acti-
vated a gain when you restart play.
≥AUTO does not work correctly with some discs (e.g., if menus appear
after playing video CDs).
∫ Auto standby
The unit switches to standby mode after about 30 minutes in the stop
mode, irrespective of the SLEEP setting.
Page 9

Using menus to play MP3 disc s
Position memorized
Press PLAY to Preview Chapters
Press PLAY to Chapter Review
[CD] (MP3 discs)
This unit can play MP3 files recorded on CD-R/RW with a computer.
Files are treated as tracks and folders are treated as groups.
1
Press [TOP MENU] or [MENU].
A file list appears. Group name
File list
No Group: 001 My Favorite Tree
1
G
1
T
1
Total
SELECT
ENTER RETURN
2
Press [3,4] to select the track and press
001 Both Ends Freezing
1
002 Lady Starfish
2
003 Life on Jupiter
3
004 Metal Glue
4
005 Paint It Yellow
5
006 Pyjamamama
6
007 Shrimps from Mars
7
008 Starperson
8
009 Velvet Cuppermine
9
010 Ziggy Starfish
10
NextPrev
[ENTER].
Play starts and continues to the last track in the last group.
“0” indicates the track currently playing.
To show other pages
Press [3, 4, 2, 1] to select “Prev” or “Next” and press [ENTER ].
After listing all the tracks in one group, the list for the next group appears.
To close the file list screen
Press [TOP MENU] or [MENU].
Using the tree screen to find a group
1 Press [1111] while a track is highlighted to display
the tree screen.
File list
G 8
T 14
Total 123
SELECT
ENTER RETURN
Tree
MP3 music
001 My Favorite
001 Brazilian pops
002 Chinese pops
003 Czech pops
004 Hungarian pops
005 Liner notes
006 Japanese pops
007 Mexican pops
008 Philippine pops
009 Swedish pops
001 Momoko
002 Standard number
001 Piano solo
002 Vocal
G 8/16
You cannot select groups that contain no compatible files.
2 Press [3,4] to select a group and press [ENTER].
The file list for the group appears.
For your reference
≥Press [2, 1] to jump layers in the tree screen.
[Note]
≥Discs must conform to ISO9 660 level 1 or 2 (except for extended for-
mats). MP3 files must have the extension “.MP3” or “.mp3”.
≥This unit is compatible with multi-session but if there are a lot of sessions
it takes more time for play to start. Keep the number of sessions to a minimum to avoid this.
≥This unit is not compatible with ID3 tags.
≥This unit is not compatible with files with a sampling rate of 32 kHz.
[DVD-RV32] [DVD-RV27]
(For U.S.A., Canada and units with PX printed on the outer packaging)
This unit can also play Windows Media Audio (WMA).
≥When creating a WMA disc, ensure the copyright feature is off.
≥WMA files must have the extension “.WMA” or “.wma”.
≥This unit can play WMA files with a compression rate of 48 kbps or more.
≥Noise may occur when playing WMA files.
≥There are some files this unit cannot play (e.g., copyright protected).
“TRACK PRO T ECTED” or “CANNOT PLAY THIS TRACK” appear on the
unit’s display to indicate such tracks.
Naming folders and files
At the time of recording, prefix folder and
file names with 3-digit numbers in the
order you want to play the m (this may
not work at times).
root
001001
003
Example: MP3
001.mp3
002.mp3
003.mp3
002
001.mp3
002.mp3
003.mp3
004.mp3
001.mp3
002.mp3
003.mp3
Windows Media, and the W indows logo are trademarks, or registered trademar ks of Microsoft Cor poration in the United States and/or other countries.
WMA is a compression format developed by
Microsoft Corporat ion. It achieves the same sound
quality as MP3 with a file size tha t is smaller than
that of MP3.
Resume function
[DVD] [CD] [VCD]
(When the elapsed play time is displayed)
The position you stopped play at is recorded by the unit when “!” is flashing on the display.
e.g. DVD
PGM
A-B
DVD
VIDEO
AUDIO
CD
VR
RND
WMA
MP3
GROUP
TITLE
TRACK
CHAP
PG
D.N.R. D.MIX
While “!” is flashing, press [1] (PLAY) to start play from where you
stopped it. (When playing DVD ➡➡➡➡ Chapter Preview below)
≥The position is cleared when the disc tray is opened or the unit is
switched to standby.
≥Press [∫] to clear the position.
Position Memory function
This function allows you to memorize a position to start from even after
switching the unit to standby or changing discs.
1. During play, press [POSITION
MEMORY].
2. Press [POWER Í] to switch the
unit to standby, or press [<] to
remove the disc.
3. When you are ready to play the disc again, press [1] (PLAY).
Play starts from the memorized position and the position is cleared.
(When playing DVD ➡➡➡➡ Chapter Preview below)
To clear the position before play
Press [∫].
≥Yo u ca n me mo r ize positio ns on up to five different discs at a time. When
you memorize another position, the earliest position is replaced.
Chapter Preview
One of these messages appears immediately after you press [1] (PLAY).
Press [1] (PLAY) while the message is displayed and the beginn ing portions of each chapter up to the current one are played. Full play resumes
from the point where you pressed [∫] or [POSITION MEMORY].
(This feature works only within a title.)
If you do not press [1] (PLAY), the message disappears and play starts
from where you pressed [∫] or [POSITION MEMORY].
[DVD]
A
-SRD
B
ASS
C
INEMA
D
-ENH
Basic operations
RQT6236
9
Page 10

Basic play
:, 9
;
POWER
SETUP
SLEEP
SLOW/SEARCH
SKIP
PAUSE
STOP PLAY
OPEN/CLOSE
MENUTOP MENU
6, 5
1
Frame-by-frame vie wi ng
[DVD] [VCD]
Remote control only
While paused
Press [2] or [1].
The frame changes each time you press the button.
2, 1
/ENTER
Basic operations
Í/I
POWER
DIALOGUE
ONE TOUCH
BASS
ADVANCED
CINEMA
ENHANCER
CINEMA MEMORY
PLUS
SURROUND
C
A
B
D
Skipping chapters or tracks
[DVD] [CD] [VCD]
ENTER
DISPLAY
AUDIO ANGLE
SUBTITLE
PROGRAM
123
RANDOM
456
REPEAT
7809
CANCEL
A-B REPEAT
BASS
A.SRD
ABCD
ONE TOUCH
MEMORY
SLEEP
CINEMA
ZOOM
RETURN
QUICK REPLAY
10
D.ENH
POSITION
MEMORY
;
6, 5
RANDOM
OPEN/CLOSE
1
Numbered
buttons
ZOOM
QUICK
A-B
REPEAT
REPLAY
REPEAT
:, 9
≥The frames change in succession if you press and hold the button.
≥Pressing [;] also activates forward frame-by-frame.
Notes
≥The speed of search and slow-motion increases up to 5 steps.
≥Press [1] (PLAY) to restart play.
≥You cannot move backwards with Video CD during slow-moti on
and frame-by-frame.
When playing Video CDs with playback control
Turning the shuttle dial or pressing buttons to perform skip, search
or slow-motion may take you to a menu screen.
Starting play from a selected title or track
[DVD] [CD] [VCD]
Press the numbered buttons to select the item.
To select a 2-digit number
Example: To select track 23, press [S10] ➡➡➡➡ [2] ➡➡➡➡ [3].
Play starts from the selected item.
[Note]
≥This works only when stopped with some discs.
≥MP3 discs
Press [ENTER] after pressing the numbered buttons. (You do not have to
press [S10].)
During play or while paused
Press [:] or [9].
≥Each press increases the number of skips.
Fast forward and rewind—SEARCH
[DVD] [CD] [VCD]
During play
Press [6] or [5].
Turn the shuttle dial [6, 5] on the main unit.
≥Play starts again when you release the shut tle dial.
≥Audio will be heard during search (except for WMA files). You can turn
this audio off if you want to (➡➡➡➡ page 16, Audio—Audio during Search).
Slow-motion play
[DVD] [VCD]
While paused
Press [6] or [5].
Turn the shuttle dial [6, 5] on the main unit.
≥The picture stills again when you release the shuttle dial.
RQT6236
10
4:3 TV ZOOM function
[DVD]
Remote control only
Widescreen software of ten ap pea rs a s a lette rbox pi ctur e wh en show n o n
a regular 4:3 aspect television. Use 4:3 TV ZOO M to expand these pictures to fill more of the television. (The sides of the picture are cut off when
you do this.)
During play
Press [ZOOM].
ON
≥Press again to cancel.
≥4:3 TV ZOOM is also canceled when you open the disc tray or switch the
unit to standby.
[Note]
≥Depending on the video for mat of the disc and c urrent play status, this
feature may not work as described.
≥Menus may act or appear differently while 4:3 TV ZOOM is on.
Page 11

Convenient features
GROUP
AUDIO
DVD
VIDEO
VR
CD
PGM
RND
A-BA-B
WMA
MP3
GROUP
AUDIO
DVD
VIDEO
VR
CD
PGM
RND
A-B
WMA
MP3
Random Playback
Press PLAY to start
GROUP
AUDIO
DVD
VIDEO
VR
CD
PGM
RND
A-BA-B
WMA
MP3
Numbered
buttons
[DVD] [CD] [VCD]
(When the elapsed play time is displayed)
Repeat play
During play
Press [REPEAT].
Each time you press the button:
[DVD]
Chapter (C)>Title (T)
§
>OFF
^--------------------------------------}
[CD] [VCD]
Track (T)>Entire disc (A)>OFF
^--------------------------------------------}
[CD] (MP3 discs)
Track (T)>Group (G)
^-------------------------------------}
§
“All (A)” during program and random play.
§
>OFF
If the Video CD has playback control
1. Press [∫] during play until “PBC PLAY” is cleared from the display.
2. Press the numbered buttons to select a track to start play (➡➡➡➡ page 10).
3. Press [REPEAT] (➡➡➡➡ above).
[Note]
You cannot use repeat play to repeat an entire DVD or an entire MP3 disc.
∫ To repeat only your favorite tracks/chapters
Start program play (see right) and press [REPEAT] to display “A”.
A-B repeat play
You can repeat a section between points A and B within a title or track.
During play
1
Press [A-B REPEAT] at the starting point (A).
2
Press [A-B REPEAT] at the finishing point (B).
A B
For example: DVD
C T
e.g. DVD
OFF
Program play
Remote control only
You can select up to 32 items to play in the order you choose.
While stopped
1
Press [PROGRAM].
e.g. CD
DVD
VIDEO
AUDIO
CD
VR
PGM
RND
WMA
MP3
A-B
GROUP
PROGRAM
SELECT
ENTER RETURN
TITLE
2 [DVD,\MP3\discs\only]
Choose a track, then press ENTER.
Track
No Time
CHAP
TRACK
Track No.
1
Total Time
Press PLAY to start
PG
D.N.R. D.MIX
0:00
Play
Clear
Clear all
B
A
ASS
-SRD
Program No.
C
INEMA
D
Press the numbered buttons to
-ENH
select a title (DVD) or group (MP3 discs).
≥Some items cannot be selected.
≥Different titles have different soundtrack and subtitles.
3
Press the numbered buttons to select a track (CD
or VCD) or chapter (DVD) (and, for MP3 discs
press [ENTER]).
≥Repeat steps 2 and 3 to program other items.
≥To select an item using the cursor buttons
Press [ENTER] and [ 3, 4] to select an item , th en press [ENTER]
again to register the number.
All the items on a disc, a ti tle or a group are selected whe n you
select “ALL”.
≥Times are not displayed when programming DVD and MP3.
4
Press [1] (PLAY).
Play now begins in the programmed sequence.
≥Some items cannot be played even if you programmed them. [DVD]
To add or change items
Press [3, 4] to select an available item, then repeat steps 2 and 3.
To move to the page before or after the one shown
Press [6] or [5].
To clear the programmed items one by one
Press [3, 4] to sel ect the ite m num ber (No) and press [CANCEL]. (Alternatively, you can select “Clear” with [3, 4, 2, 1] and press [ENTER].)
To clear the whole program
Move to “Clear all” with [3, 4, 2, 1] and press [ENTER]. The whole program is also cleared when the unit is turned off or the disc tray is opened.
To exit the program mode
Press [PROGRAM] while stopped. (The program is retained in memory.)
Random play
While stopped
1
Press [RANDOM].
e.g. CD
Advanced operations
To cancel
Press [A-B REPEAT] until “1¢¢” is displayed.
[Note]
≥Some subtitles recorded around point A or B may fail to appear. [DVD]
≥The unit automatically determines the end of a title/track as point B when
the end of the title/track is reached.
≥A-B repeat is canceled when you press [QUICK REPLAY].
2
Press the numbered b utton s to se lect a title (DVD
only) and press [1] (PLAY).
≥Some titles cannot be selected. [DVD]
Play now begins in random order.
To exit the random mode
Press [RANDOM] while stopped.
RQT6236
11
Page 12

Increasing your enjoyment of movies
3/2.1 ch
Digital
1 English
Subtitles
During play
Press [SUBTITLE].
The number changes each time you press the button.
Advanced operations
ON
1
English
I love you
ON
2
French
Je t’aime
≥In some cases, the subt itle l a ngu ag e is not changed to the sele cted on e
immediately.
[For\U.S.A.,\Canada\and\units\with\PX\printed\on\the\outer\packaging]
≥If the subtitles overlap closed captions recorded on discs, turn the subti-
tles off.
To clear/display the subtitles
1. Press [SUBTITLE].
2. Press [1].
3. Press [3, 4] to select “OFF” or “ON”.
Angles
During play
Press [ANGLE].
The number changes each time you press the button.
1
2
[DVD]
Remote control only
Some DVDs have multiple soundtracks, subtitle languages and camera
angles, and you can change these during play.
≥“–” or “– –” is displayed instead of the language number in circumstances
such as when no language is recorded on the disc.
Soundtracks
During play
Press [AUDIO].
The number changes each time you press the button.
PGM
A-B
DVD
VIDEO
AUDIO
CD
VR
RND
WMA
MP3
GROUP
TITLE
TRACK
CHAP
D.N.R. D.MIX
PG
Indicates that a multi-channel
soundtrack can be down-mixed
to two channels.
≥You can also use this button to turn the vocals on and off on karaoke
discs. Read the disc’s instructions for details.
≥Refer to [B] on page 15 for audio signal type details.
RQT6236
12
A
-SRD
C
B
ASS
INEMA
D
-ENH
Page 13

Use the [A] [B] [C] [D] buttons to contro l the following features, used to
enhance your enjoyment of movies. ONE TOUCH CINEMA MEMORY
then allows you to store the settings and recall them at a touch of a button.
[Note]
Turn Advanced Surround and BASS PLUS off when using Dolby Pro
Logic. Dolby Pro Logic will not work correctly if they are on.
A ADVANCED SURROUND
[DVD]
(Dolby Digital, 2-ch annel or ove r only)
Use ADVANCED SURROUND V.S.S. (Virtual Surround Sound) to enjoy a
surround-like effect if you are using 2 front speakers.
If you are playing a disc with surround effects recorded o n it, the effect is
broadened and sound seems to come from virtual speakers on either side.
During play
Press [ [A] A.SRD].
PGM
A-B
DVD
VIDEO
AUDIO
CD
VR
RND
WMA
MP3
GROUP
TITLE
TRACK
CHAP
Each time you press the button:
[# 1: Natural effect
l;
l 2: Emphasized effect
l;
{= OFF: Cancel (Factory preset)
Optimum seating position
Speaker
OWhen using the
television’s speakersN
Distance Al
Television’s width
PG
D.N.R.
D.MIX
A
Speaker
3 to 4 times d istance A
A
.SRD
1
C
ASS
INEMA
D
-ENH
B
C CINEMA
[DVD] [VCD]
You can change the picture quality for movie viewing.
Press [ [C] CINEMA].
PGM
A-B
DVD
VIDEO
AUDIO
CD
GROUP
RND
WMA
MP3
VR
TITLE
TRACK
CHAP
PG
D.N.R. D.MIX
A
-SRD
B
ASS
C
INEMA
D
-ENH
Each time you press the button:
[# Cin.1: Mellows images and enhances
l; detail in dark scenes.
Cin.1
l Cin.2: Sharpens images and enhances
l; detail in dark scenes.
{=Nor.: Normal mode (Factory preset)
For your reference
You can make finer adjustments to the pict ure i f de sire d (➡➡➡➡ page 15, Digital picture mode–User mode) .
D DIALOGUE ENHANCER
[DVD] (Dolby Digital, 3-channel or over, where the dialogue is
recorded in the center channel)
This mode makes the dialogue in movies easier to hear.
Press [ [D] D.ENH].
PGM
A-B
DVD
VIDEO
AUDIO
CD
VR
RND
WMA
MP3
GROUP
TITLE
TRACK
CHAP
PG
D.N.R. D.MIX
Each time you press the button:
ON (—)
(—) OFF (Factory preset)
(—) (—)
[Note]
Dialogue Enhancer will not work, or will have less effect with some discs.
A
-SRD
ON
C
ASS
INEMA
D
.ENH
B
Advanced operations
Seating posit ion
[Note]
≥Advanced Surround will not work, or will have less effect with some
discs.
≥Turn off the surround sou nd effects on the equipment you have con-
nected when using this effect.
≥Turn Advanced Surround off if it causes distortion.
B BASS PLUS
[DVD] [CD] [VCD]
Turn BASS PLUS on when you have connected an active subwoofer to the
SUBWOOFER terminal on the rear of the unit (➡➡➡➡ page 18).
Press [ [B] BASS].
PGM
A-B
DVD
VIDEO
AUDIO
CD
VR
RND
WMA
MP3
GROUP
TITLE
TRACK
CHAP
D.N.R. D.MIX
Each time you press the button:
[# OFF
l;
l 1: Natural bass effect (Factory pres et)
l;
{= 2: Emphasized bass effect
PG
A
-SRD
1
C
ASS
INEMA
D
-ENH
B
ONE TOUCH CINEMA MEMORY
This feature allows you to resele ct t he set tings you mad e for ADVANCED
SURROUND, BASS PLUS, CINEMA and DIALOGUE ENHANCER with
one button press.
[Putting\the\settings\into\memory]
After making the settings
Press and hold [ONE TOUCH MEMORY].
The button on the main unit lights.
The settings remain in the memory even if you turn the unit off.
[Recalling\the\settings]
Press [ONE TOUCH MEMORY].
The button on the main unit lights.
To cancel
Press [ONE TOUCH MEMORY] to turn it off and return the settings for the
features to the factory preset.
≥[A] ADVANCED SURROUND: OFF
≥[B] BASS PLUS: 1
≥[C] CINEMA: Nor.
≥[D] DIALOGUE ENHANCER: OFF
The button’s light also turns off if you press any of the other buttons to
change the settings.
RQT6236
13
Page 14
Using On-Screen Menu Icons
3, 4, 2, 1/
ENTER
DISPLA Y
CANCEL
POWER
DISPLAY
SUBTITLE
PROGRAM
RANDOM
REPEAT
A-B REPEAT
A.SRD
ONE TOUCH
MEMORY
SETUP
OPEN/CLOSE
SLEEP
SLOW/SEARCH
SKIP
PAUSE
STOP PLAY
MENUTOP MENU
ENTER
AUDIO ANGLE
CANCEL
BASS
ABCD
RETURN
QUICK REPLAY
123
456
7809
10
CINEMA
D.ENH
POSITION
ZOOM
MEMORY
RETURN
Numbered
buttons
For your reference
≥Depending on the con dition of the unit ( playing, stopped, etc.) and th e
type of software you are playing, there are some items that you cannot
select or change.
≥When numbers are displayed (e.g. title No.), the numb ered buttons are
also effective for setting. After entering number s, press [ENTER] to reg ister the setting.
To clear the icons
Press [RETURN] until the menus disappear.
∫ To change the position of the icons
1. Press [2, 1] to select the rightmost icon.
2. Press [3, 4] to move the icons.
(There are 5 positions.)
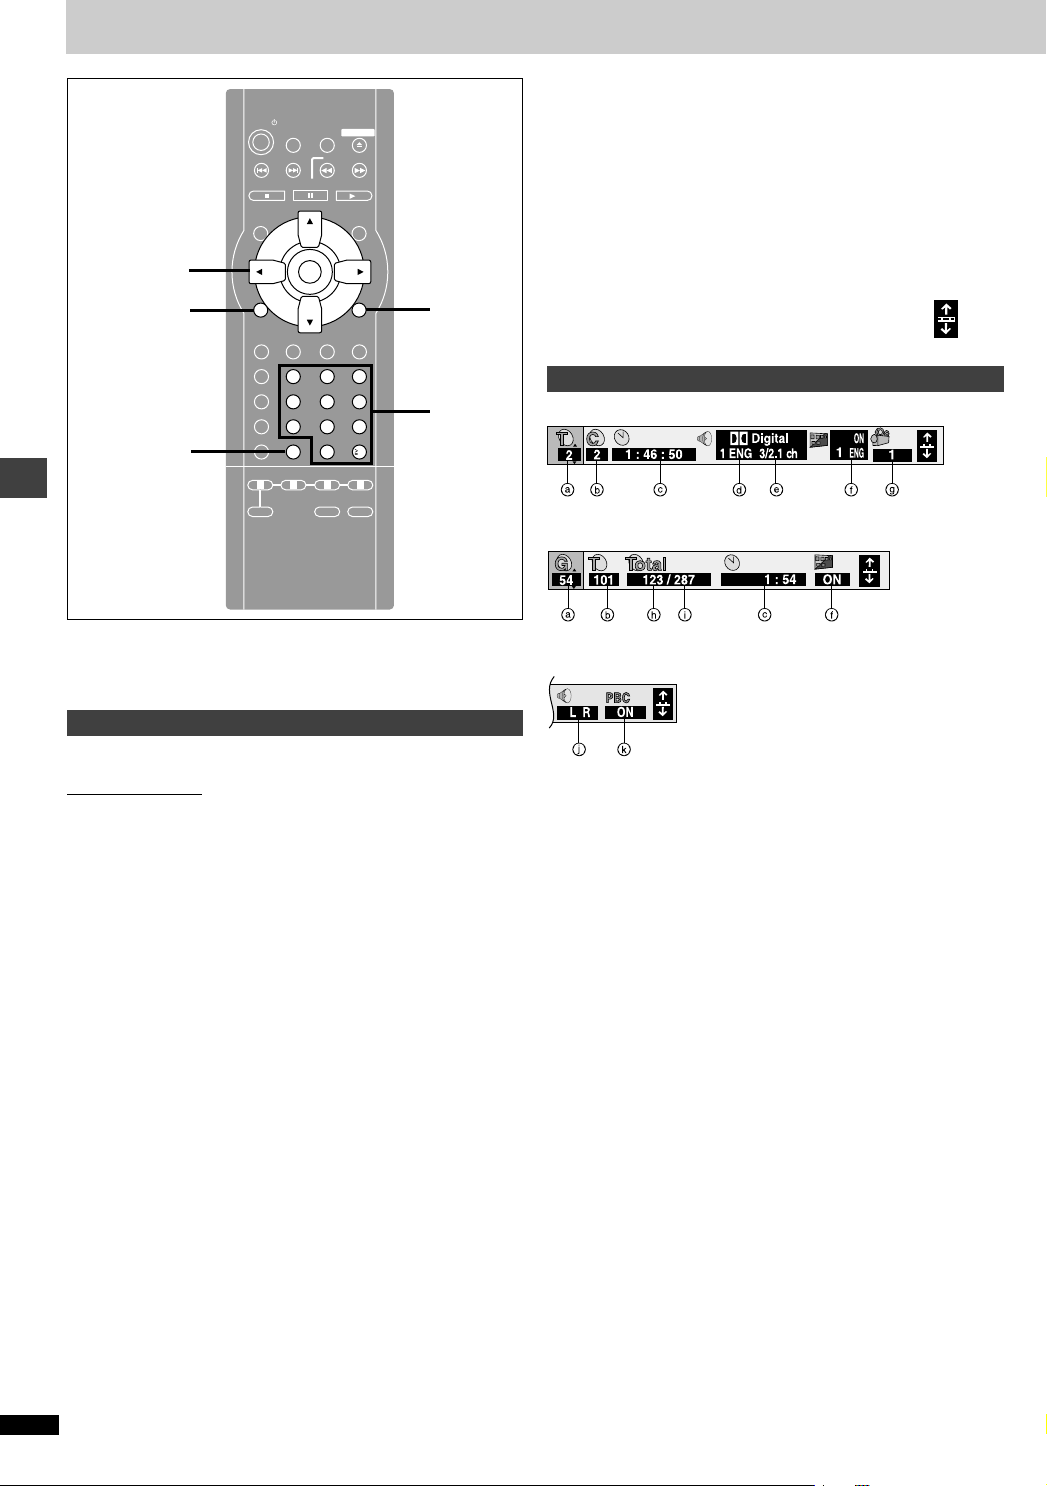
Disc information
e.g. DVD
e.g. MP3 disc
On-Screen Menu Icons are m enus tha t co nta in infor m atio n a bou t th e d i sc
or unit. These menus allow you to perform ope rations by changing this
information.
Advanced operations
Common procedures
[DVD] [CD] [VCD]
Remote control only
1
Press [DISPLAY].
Each time you press the button:
Disc information-----)Progress indicator [DVD-RV32] (➡
ev
Original display(----- Unit information (➡➡➡➡ step 2)
2 [Unit\information\only]
While the leftmost icon is hi ghlighted
Press [3, 4] to select the menu.
Each time you press the button:
Play menu(-----)Video menu
ee
uu
Display menu()Audio menu
3
Press [2, 1] to select the item.
4
Press [3, 4] to select the setting.
≥Items with “3” or “4” above and below can be changed by [3, 4].
≥Press [ENTER] if the setting does not change after pressing
[3, 4].
≥Some items require different o perat ions. Read the following expla-
nations.
RQT6236
14
➡ page 15)
➡ ➡
e.g. Video CD
a T: Title number [DVD]
G:Group number [CD] (MP3 discs)
b C: Chapter number [DVD]
T: Track number in group [CD] (MP3 discs)
T: Track number [CD] [VCD]
c Time [DVD]
≥Press [3, 4] to show the elapsed play time or remaining time for the
title (or chapter during program and random play).
≥Select a position to start play by specifying a time with the numbered
buttons.
Changing the time display [CD] [VCD]
Press [3, 4] to show the elapsed pl ay time, remaining time for the
track, or remaining time for the disc.
Elapsed play time [CD] (MP3 discs)
(display only, cannot be changed)
d Soundtrack language [DVD] (➡➡➡➡ page 12)
(See [A] on page 15 for language abbreviations.)
e Audio si gnal type [DVD] (➡➡➡➡ page 12)
(See [B] on page 15 for details.)
Karaoke vocal on/off (Karaoke DVD only) [DVD]
Solo: OFF or ON
Duet: OFF, V1iV2, V1 or V2
f Subtitle language [DVD] (➡➡➡➡ page 12)
(See [A] on page 15 for language abbreviations.)
Subtitles on/off
ON()OFF
Group/Track name display on/off [CD] (MP3 discs)
ON()OFF
g Angle number [DVD] (➡➡➡➡ page 12)
h Track number in disc [CD] (MP3 discs)
i Total number of tracks on disc [CD] (MP3 discs)
j Audio mode [VCD]
LR()L()R
^---------------------J
k Menu play [VCD] (with playback control only)
Indicates whether menu play (playback control) is on or off.
Page 15

Unit information
Play menu
a A-B repeat [DVD] [CD] [VCD] (➡➡➡➡ page 11)
[ENTER] (start point)➡➡➡➡ [ENTER] (finish point)
To cancel: [ENTER]
b Repeat play (➡➡➡➡ page 11)
[DVD] [CD] (MP3 discs)
Chapter (C)(>Title (T)
§
Track (T)(>Group (G)
^>OFF(J ^>OFF(J
[CD] [VCD]
Track (T)(>Entire disc (A)
^>OFF(J
§
“All (A)” during program and random play.
c Play mode display [DVD] [CD] [VCD]
---: Normal play PGM: Program play RND: Random play
d Marker [DVD] [CD] [VCD]
You can mark up to 5 positions to play again.
[ENTER] (The unit is now ready to accept markers.)
To mark a position: [ENTER] (at the desired point)
To mark another position: [2, 1] ➡➡➡➡ [ENTER]
To recall a marker: [2, 1] ➡➡➡➡ [ENTER]
To erase a marker: [2, 1] ➡➡➡➡ [CANCEL]
Video menu
Digital picture mode [DVD] [VCD] (➡➡➡➡ page 13)
Nor.: Normal mode
Cin.1: Mellows images and enhances detail in dark scenes
Cin.2: Sharpens images and enhances detail in dark scenes
User: User mode
The following items are also displayed when you select “User”.
a Contrast (j7 to i7)
b Brightness (0 toi15)
c Color (j7 to i7)
Audio menu
a Advanced Surround [DVD] (➡➡➡➡ page 13)
1()2()OFF
^------------------J
b Bass Plus [DVD] [CD] [VCD] (➡➡➡➡ page 13)
§
1()2()OFF
^------------------J
c Dialogue Enhancer [DVD] (➡➡➡➡ page 13)
ON()OFF
Display men u
a 4:3 TV ZOOM [DVD] (➡➡➡➡ page 10)
ON()OFF
b IPB display [DVD] (➡➡➡➡ page 20, Glossary)
ON()OFF
Displays the picture type (I/P/B) in the still picture mode.
c Display dimmer [DVD] [CD] [VCD]
Changes the brightness of the unit’s display.
Bright()Dim()Auto
^-------------------------J
§
The display is dimmed during play, but brightens when you perform oper-
§
([DVD] [VCD])
ations such as slow-motion, search, and pause.
[A] Audio/Subtitle language
ENG: English SVE: Swedish CHI: Chinese
FRA: French NOR: Norwegian KOR: Korean
DEU: German DAN: Danish MAL: Malay
ITA: Italian POR: Portuguese VIE: Vietnamese
ESP: Spanish RUS: Russian THA: Thai
NLD: Dutch JPN: Japanese ¢:Others
Advanced operations
Progress indicator
Indicates how far you have played through an item. ([DVD-RV32] only)
e.g. DVD
a Current position [DVD] [CD] [VCD]
b T: Title number [DVD]
G: Group number [CD] (MP3 discs)
c C: Chapter number [DVD]
T: Track number in group [CD] (MP3 discs)
T: Track number [CD] [VCD]
d Condition – play, pause, or slow/search [DVD] [CD] [VCD]
e Time [DVD]
≥Press [3, 4] to show the elapsed play time or remaining time for the
title (or chapter during program and random play).
≥Select a position to start play by specifying a time with the numbered
buttons.
Changing th e time display [CD] [VCD]
Press [3, 4] to show the ela psed pl ay time or re maining tim e for the
track.
Elapsed play time [CD] ( MP3 discs)
(display only, cannot be changed)
[B] Signal type/data
LPCM/Î Digital/DTS/M P EG : Signal type
k (kHz): Sampling frequency
b (bit): Number of bits
ch (channel): Number of channels
Example: 3
/2 .1ch
.1: Subwoofer signal
(not displayed if there is no subwoofer signal)
0: No surround
1: Mono surround
2: Stereo surround (left/r ight)
1: Center
2: Front leftiFront right
3: Front leftiFront rightiCenter
RQT6236
15
Page 16

Changing settings
This chart shows the settings f or this unit. C hange the settin gs to suit y our prefere nces and to suit the unit to the en vir onment in which it is being
used. These settings are retained in memory until they are changed, even if the unit is turned off. See page 17 f o r details on menu opera tion.
Menus Items Options
Disc Audio [DVD]
Choose the audio language.
Subtitle [DVD]
Choose the subtitle language.
Menus [DVD]
Choose the language for disc menus.
Ratings [DVD]
Set a ratings level to limit DVD play.
≥The password screen is shown if you choose levels 0 to 7 or if you choose
“Ratings” when levels 0 to 7 have been selected (➡➡➡➡ page 17).
≥Select Level “0” to prevent play of discs that do not have ratings levels
recorded on them.
Video TV Aspect (➡➡➡➡ page 7)
Choose the setting to suit your television and preference.
Still Mode (➡➡➡➡ page 20, Glossary)
Specify the type of picture shown when paused.
Black Level Control
§1
Change the black level of the picture if you conn ected a television through
the COMPONENT VIDEO OUT terminals.
NTSC Disc Output
§2 §3
Choose whether PAL 60 or NTSC signals are output during playback of
NTSC discs (➡➡➡➡ page 5).
Audio PCM Down Conversion [DVD] (➡➡➡➡ page 17) No
Dolby Digital [DVD] (➡➡➡➡ page 17) Bitstream
DTS Digital Surround [DVD] (➡➡➡➡ page 17) Off
§2
[DVD] (➡➡➡➡ page 17)
MPEG
Advanced operations
D. Range Compression [DVD] Dolby Digital only (➡➡➡➡ page 20, Glossary)
Change the dynamic range for late night viewing.
Audio during Search
Choose whether to have sound during search.
Display Menu Lang uag e
Choose the language for these menus and the on-screen messages.
On-Screen Message s
Choose whether to show on-screen messages or not.
Others Demo
A demonstration of the unit’s on-screen displays starts when you select “On”. Th e
demonstration stops when you press a button and the setting reverts to “Off”.
QUICK SETUP (➡➡➡➡ page 7)
Answer questions to make basic settings.
§1
For U.S.A., Canada and units with PX printed on the outer packaging.
§2
For the Middle East, South Africa, Australia and N.Z.
§3
For Asi a.
§4
The original language of each disc will be selected.
§5
Input a code number with the numbered buttons (see below).
§6
If the language selected for “Audio” is not available, subtitles of that language will automatically appear if available on that disc.
§7
Prohibits play of DVDs with corresponding ratings recorded on them.
Language code list
Abkhazian: 6566
Afar: 6565
Afrikaans: 6570
Albanian: 8381
Ameharic: 6577
Arabic: 6582
Armenian: 7289
Assamese: 6583
Aymara: 6588
Azerbaijani: 6590
Bashkir: 6665
Basque: 6985
Bengali; Bangla: 6678
Bhutani: 6890
Bihari: 6672
Breton: 6682
Bulgarian: 6671
Burmese: 7789
RQT6236
Byelorussian: 6669
Cambodian: 7577
Catalan: 6765
Chinese: 9072
Corsican: 6779
Croatian: 7282
Czech: 6783
Danish: 6865
Dutch: 7876
English: 6978
Esperanto: 6979
Estonian: 6984
Faroese: 7079
Fiji: 7074
Finnish: 7073
French: 7082
Frisian: 7089
Galician: 7176
Georgian: 7565
German: 6869
Greek: 6976
Greenlandic: 7576
Guarani: 7178
Gujarati: 7185
Hausa: 7265
Hebrew: 7387
Hindi: 7273
Hungarian: 7285
Icelandic: 7383
Indonesian: 7378
Interlingua: 7365
Irish: 7165
Italian: 7384
Japanese: 7465
Javanese: 7487
Kannada: 7578
Language options
§1
French Spanish
§2
French German Italian
Spanish Portuguese Swedish
Dutch
§3
Chinese
Kashmiri: 7583
Kazakh: 7575
Kirghiz: 7589
Korean: 7579
Kurdish: 7585
Laotian: 7679
Latin: 7665
Latvian, Lettish: 7686
Lingala: 7678
Lithuanian: 7684
Macedonian: 7775
Malagasy: 7771
Malay: 7783
Malayalam: 7776
Maltese: 7784
Maori: 7773
Marathi: 7782
Moldavian: 7779
English
Other ¢¢¢¢
Automatic
Other ¢¢¢¢
English
Other ¢¢¢¢
Setting ratings (When level 8 is selected)
8 No Limit
Changing ratings (When level 0–7 is selected)
Unlock Player Change Password
Change Level Temporary Unlock
4:3 Pan&Scan
Automatic
Lighter
Darker: when connected to a TV throug h the C OM-
PAL60
NTSC: when connected to an NTSC television.
(For Asia: “NTSC” is the factory preset.)
PCM
Off
On
§1
§2
§3
On
Off
Yes No
Mongolian: 7778
Nauru: 7865
Nepali: 7869
Norwegian: 7879
Oriya: 7982
Pashto, Pushto: 8083
Persian: 7065
Polish: 8076
Portuguese: 8084
Punjabi: 8065
Quechua: 8185
Rhaeto-Romance:8277
Romanian: 8279
Russian: 8285
Samoan: 8377
Sanskrit: 8365
Scots Gaelic: 7168
Serbian: 8382
16
(Underlined items are the factory preset.)
(Language options) Original
§5
§6
English (Language options)
§5
(Language options)
§5
§7
1 to 7
0 Lock All
4:3 Letterbox 16:9
Field Frame
: when connected to a TV through the VIDEO
OUT or S VIDEO OUT terminal.
PONENT VIDEO OUT (Y/P
B/PR
: when connected to a PAL television.
Yes
PCM
Bitstream
Bitstream
On
Off
English Français Español
English Français Deutsch Italiano
Español Português Svenska Nederlands
English
Off
On
Serbo-Croatian: 8372
Shona: 8378
Sindhi: 8368
Singhalese: 8373
Slovak: 8375
Slovenian: 8376
Somali: 8379
Spanish: 6983
Sundanese: 8385
Swahili: 8387
Swedish: 8386
Tagalog: 8476
Tajik: 8471
Tamil: 8465
Tatar: 8484
Telugu: 8469
Thai: 8472
Tibetan: 6679
Tigrinya: 8473
Tonga: 8479
Turkish: 8482
Turkmen: 8475
Twi: 8487
Ukrainian: 8575
Urdu: 8582
Uzbek: 8590
Vietnamese: 8673
Volapük: 8679
Welsh: 6789
Wolof: 8779
Xhosa: 8872
Yiddish: 7473
Yoruba: 8979
Zulu: 9085
§4
) terminals.
Page 17

3, 4, 2, 1/
ENTER
CANCEL
POWER
DISPLAY
SUBTITLE
PROGRAM
RANDOM
REPEAT
A-B REPEAT
A.SRD
ONE TOUCH
MEMORY
SETUP
OPEN/CLOSE
SLEEP
SLOW/SEARCH
SKIP
PAUSE
STOP PLAY
MENUTOP MENU
ENTER
AUDIO ANGLE
CANCEL
BASS
ABCD
RETURN
QUICK REPLAY
123
456
7809
10
CINEMA
D.ENH
POSITION
ZOOM
MEMORY
Common procedures
Remote control only
See page 16 for menu and option details.
1
Press [SETUP] to show the menus.
SETUP
SELECT
≥The QUICK SETUP sc reen a ppear s when you press [SETUP ] the
first time after purchase (➡➡➡➡ page 7).
2
Press [2, 1] to select the menu’s tab.
The screen changes to display the menu.
Disc Video Audio
Disc
Audio
Subtitle
Menus
TAB
Ratings
English
Automatic
English
Level 8
SETUP
RETURN
Numbered
buttons
Entering a password (Ratings)
[DVD]
The password screen is shown when you select levels 0 to 7.
1. Input a 4-digit password with the numbered buttons and press
[ENTER].
≥If you enter a wrong number, press [CANCEL] to erase it before you
press [ENTER].
≥The lock symbol appears closed to show the rating is locked.
≥Do not forget your password.
2. Press [ENTER] to confirm the 4 digits.
Now, when you insert a DVD that exceeds the ratings limit you set,
a message appears on the television.
Follow the on-screen instructions.
Digital output
[DVD]
Change the sett ings when you have connected equipm ent through this
unit’s DIGITAL AUDIO OUT terminal (OPTICAL).
PCM Down Conversion
Select how to output the high-quality 96-kHz audio signals on discs that do
not have copyright protection.
No (Factory preset):
Output as 96 kHz. The equipme nt you connect must be compatible with
these signals.
Yes:
Down-sampled to 48 kHz/16 bit.
Dolby Digital, DTS Digital Surround and MPEG
Bitstream (Factory preset for Dolby Digital):
Select if the equipment you connected can decode the signal.
§
PCM (Factory preset for MPEG
Select if the equipment you connected cannot decode the signal.
§
Only for the Middle East, South Africa, Australia and N.Z.
Off (Factory preset for DTS Digital Surround):
Select if the equipment you connected cannot decode the signal.
IMPORTANT
If the equipment you connected cannot decode the signal, the setting must be changed to PCM or Off. If not, signals the equipment
cannot process will be output by this unit , causing high levels of
noise which can damage yo ur hearing and the speakers.
):
§
Advanced operations
(---) (---)
::
;;
Others Display
(------------------------------------------------------)
3
Press [3, 4] to select the item you want to
change and press [ENTER].
4
Press [3, 4, 2, 1] to select the option and
press [ENTER].
The screen now shows the menu again.
To return to the previous screen
Press [RETURN].
When you are finished
Press [SETUP].
RQT6236
17
Page 18

Home Theater—Enjoying more powerful sound
OPTICAL
DIGITAL AUDIO OUT
(PCM/BITSTREAM)
LP
B
P
R
R
SUBWOOFER
AUDIO OUT
COMPO
VIDEO
This model can play Dolby Digital, but only in two channels. This model does not have a DTS decoder. You must connect a unit with a Dolby Digital or
DTS decoder to enjoy surround sound.
[Note]
≥The equipment connections described are examples.
≥Peripheral equipment and optional cables sold separately unless otherwise indicated.
≥Before connection, turn off all equipment and read the appropriate operating instructions.
Digital connection Analog connection
To enjoy 5.1-ch surround sound
Connect an amplifier with a built-in decoder
or a decoder-amplifier combination.
≥Change the settings in “Digital output” to
suit the decoder (➡➡➡➡ page 17).
– Dolby Digital decoder: set “Dolby Digi-
tal” to “Bitstream”
– DTS decoder: set “DTS Digital Sur-
round” to “Bitstream”
– MPEG decoder: set “MPEG
“Bitstream”
§
Only for the Middle East, South Africa,
§
” to
Australia and N.Z.
[Note]
You cannot use DTS Digital Surround
decoders not suited to DVD.
To enjoy stereo or Dolby Pro Logic
Connect a digital amplifier or system component.
≥Go to “Digital output” and change the
settings to “PCM” and “Off” (➡➡➡➡ page 17).
To enjoy stereo or Dolby Pro Logic
Connect an analog amplifier or system component.
Analog amplifier or
system component
AUX IN
L
L
Amplifier with built-in decoder
or a digital amplifier
Advanced operations
Speakers
You can enjoy surround sound by con-
OPTICAL IN
necting from three to six speakers.
Example: Six speakers
Optical digital audio cable
Do not bend sharply when
connecting.
Connecting an active subwoofer
You can enjoy more powerful bass by connecting an active subwoofer.
≥Place the subwoofer as close as possible to the front center.
≥Turn BASS PLUS on to boost the output from the subwoofer (➡
➡ page 13).
➡ ➡
≥Adjust the volume on the subwoofer to suit your preference.
To the subwoofer’s input terminal
∫ Recording to digital recording equipment or cassette tapes
Digital recording
≥
You can record the digital signal directly onto digital recording equipment.
The signals on DVDs will be converted to 48 kHz/16 bit linear PCM.
Ensure the following conditions are met.
≥The recording equipment can handle a sampling frequency of 48 kHz.
≥You cannot record MP3 (or WM A
printed on the outer packaging [DVD-RV32] [DVD-RV27]).
To make a digital recording
1. Connect the recording equipment with an optical digital audio cable
(➡➡➡➡ [A] above).
2. When recording DVDs, make the following settings.
ADVANCED SURROUND: OFF (➡➡➡➡ page 13)
PCM Down Conversion: Ye s (➡➡➡➡ page 17)
Dolby Digital: PCM (➡➡➡➡ page 17)
DTS Digital Surround: Off (➡➡➡➡ page 17)
§
:PCM (➡➡➡➡ page 17)
MPEG
RQT6236
18
§
Only for the Middle East, South Africa, Australia and N.Z.
for U.S.A., Canada and units with PX
R
Audio cable
Insert fully, with this
side facing up.
OPTICAL
SUB-
WOOFER
Audio cable
≥Analog recording
You can record to a digital rec ording equipment o r cassette deck. Using
analog connection means sound will be un affected by the copy guards
found on DVDs.
To make an analog recording
Connect the recording equipment with an audio cable (➡➡➡➡ [B] above).
R
Page 19

Troubleshooting guide
Before requesting serv ice, make the below che cks. If you are in doubt ab out some of t he check points, or if t he remedie s indicated in the char t do no t
solve the problem:
In the U.S.A., contact the Panasonic Customer Call Center at 1-800-211-7262, or e-mail consumerproducts@panasonic.com, or web site
(http://www.panasonic.com).
In Canada, contact Panasonic Canada Inc. Customer Care Centre at 1-800-561-5505, web site (www.panasonic.ca), or an authorized
Servicentre closest to you.
In other area s, consult y our dealer.
Power
No power.
The unit is automatically
switched to the standby mode.
≥Insert the AC power supply cord securely into the household AC outlet.
≥To conserve power, the unit automatically switches to standby after approximately 30 minutes in
the stop mode. Turn the power back to ON.
≥The unit was switched to standby by the SLEEP timer.
Operation
No response when buttons
pressed.
No operations c an be perf orme d
with the remote control.
Play fails to start even when [1111]
(PLAY) is pressed.
Play start s but then stops immediately.
Alternative languages fail to be
selected.
No menu play.
No subtitles. ≥Subtitles appear only with discs that contain them.
Soundtrack and/or subtitle language is not the one selected
with the SETUP menus.
Angle cannot be changed. ≥This function is dependent on software availability. Even if a disc has a number of angles
Dialogue Enhancer has no
effect.
You have forgotten your ratings
password.
Reset all the settings to Factory
Preset.
≥Some operations may be prohibited by the disc.
≥The unit may not be operating pr oper ly d ue to lightn ing, static e lectric ity or so me othe r exter nal
factor.
Reset procedure:
Press [POWER Í] to switch the unit to the standby mode and then back to ON.
Alternatively, press [POWER Í] to switch the unit to the standby mode, disc onnect the AC
power supply cord, and then reconnect it.
≥Check the batteries are installed correctly.
≥The batteries are depleted: Replace them with new ones.
≥Point the remote control at the remote control sensor and operate.
≥Condensation has formed: Wait 1 to 2 hours for it to evaporate.
≥This unit cannot play discs other than DVD, CD and Video CD.
≥You can only play DVD if their region number is the same or includes the same region number as
the unit or if the DVD is marked “ALL”. Confirm the region number for the unit on the rear panel.
≥The disc may be dirty and may require cleaning.
≥Ensure that the disc is installed with the label of the side to be played facing upwards.
≥An alternative language is not selected with discs which do not contain more than one language.
≥In the case of some discs, the alternative language cannot be selected with [AUDIO] or
[SUBTITLE]. Try selecting it from the disc’s menu if one is available.
≥Menus are only displayed if they are recorded on the disc.
≥Subtitles are cleared from the television. Display the subtitles.
≥The language is not recorded on the disc.
recorded, these angles may be recorded for specific scenes only.
≥This feature does not work when the unit is outputting bitstream signals.
≥While stopped, press an d hold [:] and [;] on the unit and the n also press a nd hold [<] on
the unit until “Initialized” disappears from the television. Turn the unit off and on again.
All settings will return to the default values.
Sound
No sound.
Distorted sound.
Piercing noise comes from the
speakers.
≥Check the connections.
≥Check the volume on the equipment you have connected.
≥Ensure that the input settings for the television and stereo system are correct.
≥Turn Advanced Surround off if it causes distortion.
≥If you have connected this unit to other equipme nt through the DIGITAL AUDIO OUT terminal,
ensure you have selected the correct settings for “Dolby Digital”, “DTS Digital Surround” and
§
” in the SETUP menu’s Audio menu.
“MPEG
§
Only for the Middle East, South Africa, Australia and N.Z.
Page
6
–
8
–
–
7
7
7
–
5
Cover
page
–
8
–
8
–
–
12
–
12
–
–
6, 18
–
–
13
17
Reference
RQT6236
19
Page 20

Troubleshooting guide
Picture
Picture distor ted .
No picture. ≥Ensure that the equipment is connected properly.
The picture shown on the television is not nor ma l. ( Th e side s of
the picture are cut off or black
bands appear at the top and bottom of the screen.)
Picture quality is poor. ≥Check the settings in the On-Screen Menu Icons’ Video menu.
The SETUP menus an d other
screens shown on the television
are displayed incorrectly.
Colors appear faded.
≥Some distortion is normal during SEARCH.
≥Make sure the television is on.
≥Ensure the television’s video input setting (e.g., VIDEO 1) is correct.
≥Go to the Video m enu in the SETUP screen, a nd change “TV Aspec t” to suit your television. You
may also need to change the screen mode on the television itself.
≥Ensure that the unit is connected direc tly to the television, and is not connected through a video
cassette recorder.
≥The 4:3 TV ZOOM function is on.
≥The unit and television are using different video systems.
\For\the\Middle\East,\South\Africa,\Australia\and\N.Z.\
Use a multi-system or PAL television.
\For\others\
Use a multi-system or NTSC television.
Unit displays
“NO PLAY” ≥You inserted a disc the unit cannot play; insert one it can.
“CHECK DISC”
“H∑∑”
∑∑ stands for a number.
“NO DISC”
≥Disc is dirty. Wipe the disc clean.
≥Trouble is likely to have occurred. The number following “H” depends on the status of the unit.
Reset procedure:
Press [POWER Í] to switch the unit to the standby mode and then back to ON. Alternatively, press
[POWER Í] to switch the unit to the standby mode, discon nect the AC power supply cord, and
then reconnect it.
≥If the service numbers fail to clear, note the service number and contact a qualified service person.
≥You haven’t inserted a disc; insert one.
≥You haven’t inserted the disc correctly; insert it correctly.
Televisi on displays
No on-screen display. ≥Go to Display in the SETUP menus, and select “On” for “On-Screen Messages”.
On-Screen Menu Icon s no t dis -
played or only partially dis-
Reference
played on the television.
The disc’s menu is displayed in
a different language.
≥Press [3, 4] while the rightmost icon is highlighted to move them down.
≥Go to Disc in the SETUP menus, and select the preferred language for “Menus”.
Page
–
6
–
–
7, 16
–
10
15
–
5
–
–
–
–
8
16
14
16
Glossary
Bitstream
This is the digital form of multiple ch annel audio data ( e.g., 5.1 channel)
before it is decoded into its various channels.
Decoder
A decoder restores the coded audio si gnals on DVDs to normal. This is
called decoding.
Dolby Digital
This is a method of coding digital sig nals developed by Dolby Laboratories. Apart from stereo (2-channe l) audio, these signals can also be 5.1channel audio. A large amount of audio information can be recorded on
one disc using this method.
Dolby Pro Logi c
A surround system where a 4-channel aud io track is recorded as 2 channels and then is restored to 4 channels for play. The surround channel is
monaural and can reproduce up to 7 kHz.
DTS (Digital Theater Systems)
This surround system is used in many movie theaters ar ound the world.
There is good separation betwee n the cha nne ls, so realis ti c sou nd e ffects
are possible.
Dynamic range
Dynamic range is the difference b etween the lowest level of sound that
can be heard above the noise of the eq uipment and the high est level of
sound before distortion occurs.
RQT6236
20
Frame still and field still
Frames are the still pictures that go together to make a moving picture.
There are about 30 frames shown each second.
One frame is made up of two fields. A regular television shows these fields
one after the other to create frames.
A still is shown when you pause a moving picture. A frame still is made up
of two alternatin g fields, so the picture may appear blurred, but overall
quality is high.
A field still is not blurred, but it has only half the information of a frame still
so picture quality is lower.
I/P/B
MPEG 2, the video compression standard adopted for use with DVDVideo, codes frames using these 3 picture types.
Intra coded picture (I-picture)
I:
This is the stand ard picture and is a complete picture in itself. This
means it has the best picture quality and is the best to use when
adjusting the picture.
Predictive coded picture (P-picture)
P:
This picture is calculated based on past I or P-pictures.
Bidirectionally-predictive coded picture (B-picture)
B:
This picture is calculated by comparing past and future I and P-pictures so it has the lowest volume of information.
Linear PCM (pulse code modulation)
These are uncompressed digital signals, similar to those found on CDs.
Playback control (PBC)
If a Video CD has playback control, you can select scenes and information
with menus (called menu play in these instructions).
Page 21

Limited Warranty (U.S.A.)
Panasonic Consumer Electronics Company,
Division of Matsushita Electric Corporation of America
One Panasonic Way Secaucus, New Jersey 07094
Panasonic DVD Player/Recorder
Limited Warranty
Limited Warranty Coverage
If your product does not work properly because of a defect in materials or workmanship, Panasonic Consumer Electronics Company or Panasonic Sales Company (collectively referred to as “the warrantor”) will, for the length of the period indicated on the
chart below, which starts with the date of original purchase (“warranty period”), at its
option either (a) repair your product with new or refurbished parts, or (b) replace it with
a new or a refurbished product. The decision to repair or replace will be made by the
warrantor.
Product or Part Name Parts Labor
DVD Player One (1) Year Ninety (90) Days
DVD Recorder One (1) Year One (1) Year
Rechargeable Batteries,
DVD-RAM Disc (in
exchange for defective
item)
During the “Labor” warranty period there will be no charge for labor. During the “Parts”
warranty period, there will be no charge for parts. You must carry-in or mail-in your
product during the warranty period. If non-rechargeable batteries are included, they
are not warranted. This warranty only applies to products purchased and serviced in
the United States or Puerto Rico. This warranty is extended only to the original purchaser of a new product which was not sold “as is”. A purchase receipt or other proof
of the original purchase date is required for warranty service.
Carry-In or Mail-In Service
For Carry-In or Mail-In Service in the United States call 1-800-211-PANA(7262) or visit
Panasonic Web Site: http://www.panasonic.com
For assistance in Puerto Rico call Panasonic Sales Company (787)-750-4300 or fax
(787)-768-2910.
T en (10) Days Not Applicable
Panasonic Sales Company, Division of Matsushita Electric
of Puerto Rico, Inc.
Ave. 65 de Infantería, Km. 9.5
San Gabriel Industrial Park, Carolina, Puerto Rico 00985
Limited Warran ty Limits And Exclusions
This warranty ONLY COVERS failures due to def ects i n m aterials or w orkmansh ip, and
DOES NOT COVER normal wear and tear or cosmetic damage. The warranty ALSO
DOES NOT COVER damages which occurred in shipment, or failures which are
caused by products not supplied by the warrantor, or failures which result from accidents, misuse, abuse, neglect, mishandling, misapplication, alteration, faulty installation, set-up adjustments, misadjustment of consumer controls, improper maintenance,
power line surge, lightning damage, modification, or commercial use (such as in a
hotel, office, restaurant, or other business), rental use of the product, service by anyone other than a Factory Servicenter or other Authorized Servicer, or damage that is
attributable to acts of God.
THERE ARE NO EXPRESS WARRANTIES EXCEPT AS LISTED UNDER “LIMITED
WARRANTY COVERAGE”. THE WARRANTOR IS NOT LIABLE FOR INCIDENTAL
OR CONSEQUENTIAL DAMAGES RESULTING FROM THE USE OF THIS PRODUCT, OR ARISING OUT OF ANY BREA CH OF THIS WARRANTY. (As examples, this
excludes damages for lost time, travel to and from the servicer, loss of media or
images, data or other recorded content. The items listed are not exclusive, but are for
illustration only.) ALL EXPRESS AND IMPLIED WARRANTIES, INCLUDING THE
WARRANTY OF MERCHANTABILITY, ARE LIMITED TO THE PERIOD OF THE
LIMITED WARRANTY.
Some states do not allow the exclusion or limitation of incidental or consequential
damages, or limitations on how long an implied warranty lasts, so the exclusions may
not apply to you.
This warranty gives you specific legal rights and you may also have other rights which
vary from state to state. If a problem with this product develops during or after the warranty period, you may contact your dealer or Servicenter. If the problem is not handled
to your satisfaction, then write to the warrantor’s Consumer Affairs Department at the
addresses listed for the warrantor.
PARTS AND SERVICE WHICH ARE NOT COVERED BY THIS LIMITED WARRANTY ARE YOUR RESPONSIBILITY.
Reference
For Product Information, Operatin g Assistance, Literature Reques t, Dealer Locations, and
all Customer Service inquiries please contact:
1-800-211-PANA (7262), Monday–Friday 9 am–9 pm; Saturday– Sunday 9 am–7 pm, EST.
Web Site: http://www.panasonic.com
You can purchase parts, accessories or
locate your nearest servicenter by visiting
our Web Site.
Accessory Purchases:
1-800-332-5368 (Customer Orders Only)
Panasonic Services Company 20421 84th Avenue South, Kent, WA 98032
(6 am to 5 pm Monday–Friday; 6 am to 10:30 am Saturday; PST)
(Visa, MasterCard, Discover Card, American Express, Check)
Service in Puerto Rico
Matsushita Electric of Puerto Rico, Inc. Panasonic Sales Company/Factory Servicenter:
Ave. 65 de Infanteria, Km. 9.5, San Gabriel Industrial Park, Carolina, Puerto Rico 00985
Phone (787) 750-4300 Fax (787) 768-2910
RQT6236
21
Page 22

Product Service (U.S.A. and Canada)
1. Damage requ i ri ng service—The unit shou ld be serviced by qualified
service personnel if:
(a) The AC power supply cord or AC adaptor has been damaged; or
(b) Objects or liquids have gotten into the unit; or
(c) The unit has been exposed to rain; or
(d) The unit does not operate normally or exhibits a marked change in
performance; or
(e) The unit has been dropped or the cabinet damaged.
2. Servicing—Do not attempt to ser vice the unit beyond that descr ibed
in these operating instru ctions. Refer all other ser vicing to author ized
servicing person nel.
3. Replacemen t par ts —W hen pa rts need repla cing ensure the servi ce r
uses parts specifi ed by the manufacturer or par ts tha t have the same
characteristics as the original parts. Unauthorized substitutes may
result in fire, electric shock, or other hazards.
4. Safety check—After repairs or service, ask the servicer to perfor m
safety checks to confirm that the unit is in proper working condition.
Product information
For product information or assistance with product operation:
In the U.S.A., contact the Panasonic Customer Call Center at
1-800-211-7262, or e-mail consumerproducts@panasonic.com, or web
site (http://www.panasonic.com).
In Canada, contact Panasonic Canada Inc. Customer Care Centre at
1-800-561-5505, web site (www.panasonic.ca), or an authorized
Servicentre closest to you.
Reference
22
RQT6236
Page 23

Guía de referencia rápida en español
AC IN
LPBY
P
R
R
SUBWOOFER
AUDIO OUT
COMPONENT
VIDEO OUT
S VIDEO
OUT
VIDEO
OUT
Conexión a un televisor
AUDIO
VIDEO
IN
IN
L
R
Rojo Blanco Amarillo
Rojo Blanco Amarillo
Televisor
A la toma de CA
del hogar
Cable de alimentación
de CA (suministrado)
Cable de audio/vídeo
(suministrado)
Preparación Rápida
Mando a distancia solamente
La pantalla Preparación Rápida aparece cuando usted pulsa [SETUP]
por primera vez después de adquiri r el ap arato y l e ayuda a e fectuar
los ajustes necesarios.
1 Pulse [POWER Í] para encender el aparato.
2 Pulse [SETUP] para visualizar la panta lla “QUICK SETUP”.
3 Pulse [3, 4] para seleccionar “Español” y pulse [ENTER].
4 Pulse [3, 4] para seleccionar “Sí” y pulse [ENTER].
5 Pulse [3, 4] para seleccionar el elemento y pulse [ENTER].
≥Idioma de audio
≥Idioma de subtítulos
≥Aspecto de su televisor
6 Pulse [ENTER] y luege [SETUP] para finalizar los ajustes.
≥Para volver a la pantalla anterior, pulse [RETURN].
Reproducción básica
[DVD] [CD] [VCD]
1
Pulse [<] para abrir la bandeja del disco y
coloque el disco.
2
Pulse [1] (PLAY).
La bandeja del disco se cierra y la reproducción empieza.
≥Para detener la reproducción, pulse [∫∫∫∫].
≥Para hacer una pausa, pulse [;;;;] durante la reproducción.
Cuando una pantalla de menús aparece en el televisor
[DVD] [VCD]
Mando a distancia solamente
Pulse los botones numerados para seleccionar un elemento.
Función de reanudación
Parada-reanudación
El aparato memoriza la posición en la que usted detuvo la reproducción hasta que uste d abr e la b and ej a de l di sco o po ne el apa rato en
el modo de es pera.
Para guardar una posición incluso después de abrir la bandeja
del disco o pon er el aparato en el modo de espera
Pulse [POSITION MEMORY] durante la reproducción. Puede tener
memorizadas pos iciones de hasta cinco discos d iferentes al mismo
tiempo. Cuando encienda el aparato o vuelva a insertar un disco,“!”
parpadeará en el visualizador.
Para reanudar la reproducción
Pulse [1] (PLAY) mientras parpadea “!” en el visualizador del
aparato.
ESPAÑOL
Las operaciones descritas en esta referencia rápida se llevan a
cabo con el mando a dista nci a , pe ro u sted pue de hace r ta mb ién
estas operaciones en el aparato principal si los controles son los
mismos.
Botones
numerados
Salto de capítulos o pistas
Durante la reproducción o durante la pausa
Pulse [:] o [9].
Avance rápido y rebobinado–SEARCH
Durante la reproducción
Pulse [6] o [5].
Reproducción a cámara lenta
Durante la pausa
Pulse [6] o [5].
Visión cuadro a cuadro
Durante la pausa
[DVD] [VCD]
Pulse [2] o [1].
≥Pulse [1] (PLAY) para iniciar la reproducción.
[DVD] [VCD]
RQT6236
23
Page 24

Specifications
Signal system:
[For\U.S.A.,\Canada\and\units\with\PX\printed\on\the\outer\packaging]
[For\others]
Operating temperature range : i5 to i35 oC (i41 to i95 oF)
Operating humidity range: 5 to 90 % RH (no condensation)
Discs played [8 cm (3z) or 12 cm (5z)]:
(1) DVD-Video, DVD-R (DVD-Video compatible)
(2) CD-Audio (CD-DA)
(3) Video CD
(4) CD-R/CD-RW (CD-DA, Video CD formatted discs)
(5) MP3
≥Maximum number o f tracks and group s recognizable: 999 tracks
and 99 groups
≥Compatible compression rate: between 32 kbps and 320 kbps
[DVD-RV32] [DVD-RV27]
(For U.S.A., Canada and units with PX printed on the outer packaging)
(6) WMA
Video output:
Output level: 1 Vp-p (75 ≠)
Output terminal: Pin jack (1 system)
S video output:
Y output level: 1 Vp-p (75 ≠)
C output level: NTS C; 0.286 Vp-p (75 ≠)
[For\the\Middle\East,\South\Africa,\Asia,\Australia\and\N.Z.]
Output terminal: S terminal (1 system)
Component video output:
Y output level: 1 Vp-p (75 ≠)
B output level: 0.7 Vp-p (75 ≠)
P
P
R output level: 0.7 Vp-p (75 ≠)
Output terminal: Pin jack (Y: green, P
Number of terminals: 1 system
Audio output:
Output level: 2 Vrms (1 kHz, 0 dB)
Output terminal: Pin jack
Number of terminals:
2ch: 1 system
Subwoofer output (0.1 ch): 1 system
§
NTSC
PAL 625/50, PAL525/60, NTSC
PAL; 0.300 Vp-p (75 ≠)
B: blue, PR: red)
Audio performance:
(1) Frequency response:
≥DVD (linear audio): 4 Hz–22 kHz (48 kHz sampling)
≥CD audio: 4 Hz–20 kHz
(2) S/N ratio:
≥CD audio: 115 dB
(3) Dynamic range:
≥DVD (linear audio): 102 dB
≥CD audio: 98 dB
(4) Total harmonic distortion:
≥CD audio: 0.0025 %
Digital audio output:
Optical digital output: Optical terminal
Pickup: Wave length: 658 nm/790 nm
[For\U.S.A.,\Canada\and\units\with\PX\on\the\outer\packaging]
[For\the\Middle\East,\South\Africa,\Asia,\Australia\and\N.Z.]
Power supply:
[For\U.S.A.\and\Canada] AC 120 V, 60 Hz
[For\Australia\and\N.Z.] AC 220–240 V, 50 Hz
[For\others] AC 110–240 V, 50/60 Hz
Power consumption: 14 W
Dimensions: 430 (W)k247 (D)k74.5 (H) mm
Mass: 2.4 kg (5.31 lb.)
Power consumption in standby mode:
[DVD-RV32]
(For U.S.A. and Canada) approx. 2 W
(For others) approx. 3 W
[DVD-RV27] [DVD-RV22] approx. 2 W
[Note]
§
Including WMA files. [DVD-RV32] [DVD-RV27]
(For U.S.A., Canada and units with PX printed on the outer packaging)
Specifications are subject to change without notice.
Mass and dimensions are approximate.
Laser power: CLASS IIa/CLASS I
Laser power: CLASS 2/CLASS 1
4 Hz–44 kHz (96 kHz sampling)
15
16
⁄
[16
(excluding protrusions)
z (W)k9
12
⁄
16
z (D)k2
15
16
⁄
z (H)]
Manufactured under license from Dolby Laboratories.
“Dolby”, “Pro Logic” and the double-D symbo l are trademarks of
Dolby Laboratories.
Apparatus Claims of U.S. Patent Nos. 4,631,603, 4,577,216, and 4,819,098, licensed for limited viewing uses only.
This product incor porate s copyright pro tecti on techno logy that is protec ted by method claims of certain U.S. patents and other intellectua l prop -
erty rights owned by Macrovision Corporation and other rights owners. Use of this copyright protection technology must be authorized by Macrovision Corporat ion, and is intended for home and o ther limited viewing uses only unl ess otherwise authorized by Macrovis ion Corporation.
Reverse engineering or disassembly is prohibited.
[For\U.S.A.] [For\Canada]
Panasonic Consumer Electronics
Company, Division of Matsushita
Electric Corporation of America
One Panasonic Way Secaucus,
New Jersey 07094
http://www.panasonic.com
Panasonic Sales Company ,
Division of Matsushita Elec tric of
Puerto Ri c o, Inc. (“PSC”)
Ave. 65 de Infantería, Km. 9.5
San Gabriel Industrial Park, Carolina,
Puerto Rico 00985
“DTS”, “DTS Digital Surround” and “DTS Digital Out” are registered trademarks of Digital Theater Systems, Inc.
Panasonic Canada Inc.
5770 Ambler Drive
Mississauga, Ontario
L4W 2T3
pr
www.panasonic.ca
[For\units\with\PX\printed\on\the\outer\packaging] [For\others]
Matsushita Electric Industrial Co., Ltd.
Corporate Management Division for
the Americas
Sales Office for North Americ a
Tokyo Panasonic Sales Section
32nd Floor, World Trade Center 4-1,
Hamamatsu-cho, 2-Chome, Minato- Ku,
Tokyo 105-6132, Japan
C 2001 Matsushita Electric Industrial Co., Ltd.
Panasonic Marketing Europe G.M.B.H.
Wiesbaden N. (a Division of Panasonic Marketing G.M.B.H.)
Military Sales Department
6200 Wiesbaden-Biebrich,
Hagenauerstr. 43
Germany
Matsushita Electric Industrial Co., Ltd.
Web Site: http://www.panasonic.co.jp/global/
RQT6236-1P
F1101YU2022
Printed in China
Page 25

Specifications
Signal system:
[For\U.S.A.,\Canada\and\units\with\PX\printed\on\the\outer\packaging]
[For\others]
Operating temperature range : i5 to i35 oC (i41 to i95 oF)
Operating humidity range: 5 to 90 % RH (no condensation)
Discs played [8 cm (3z) or 12 cm (5z)]:
(1) DVD-Video, DVD-R (DVD-Video compatible)
(2) CD-Audio (CD-DA)
(3) Video CD
(4) CD-R/CD-RW (CD-DA, Video CD formatted discs)
(5) MP3
≥Maximum number o f tracks and group s recognizable: 999 tracks
and 99 groups
≥Compatible compression rate: between 32 kbps and 320 kbps
[DVD-RV32] [DVD-RV27]
(For U.S.A., Canada and units with PX printed on the outer packaging)
(6) WMA
Video output:
Output level: 1 Vp-p (75 ≠)
Output terminal: Pin jack (1 system)
S video output:
Y output level: 1 Vp-p (75 ≠)
C output level: NTS C; 0.286 Vp-p (75 ≠)
[For\the\Middle\East,\South\Africa,\Asia,\Australia\and\N.Z.]
Output terminal: S terminal (1 system)
Component video output:
Y output level: 1 Vp-p (75 ≠)
B output level: 0.7 Vp-p (75 ≠)
P
P
R output level: 0.7 Vp-p (75 ≠)
Output terminal: Pin jack (Y: green, P
Number of terminals: 1 system
Audio output:
Output level: 2 Vrms (1 kHz, 0 dB)
Output terminal: Pin jack
Number of terminals:
2ch: 1 system
Subwoofer output (0.1 ch): 1 system
§
NTSC
PAL 625/50, PAL525/60, NTSC
PAL; 0.300 Vp-p (75 ≠)
B: blue, PR: red)
Audio performance:
(1) Frequency response:
≥DVD (linear audio): 4 Hz–22 kHz (48 kHz sampling)
≥CD audio: 4 Hz–20 kHz
(2) S/N ratio:
≥CD audio: 115 dB
(3) Dynamic range:
≥DVD (linear audio): 102 dB
≥CD audio: 98 dB
(4) Total harmonic distortion:
≥CD audio: 0.0025 %
Digital audio output:
Optical digital output: Optical terminal
Pickup: Wave length: 658 nm/790 nm
[For\U.S.A.,\Canada\and\units\with\PX\on\the\outer\packaging]
[For\the\Middle\East,\South\Africa,\Asia,\Australia\and\N.Z.]
Power supply:
[For\U.S.A.\and\Canada] AC 120 V, 60 Hz
[For\Australia\and\N.Z.] AC 220–240 V, 50 Hz
[For\others] AC 110–240 V, 50/60 Hz
Power consumption: 14 W
Dimensions: 430 (W)k247 (D)k74.5 (H) mm
Mass: 2.4 kg (5.31 lb.)
Power consumption in standby mode:
[DVD-RV32]
(For U.S.A. and Canada) approx. 2 W
(For others) approx. 3 W
[DVD-RV27] [DVD-RV22] approx. 2 W
[Note]
§
Including WMA files. [DVD-RV32] [DVD-RV27]
(For U.S.A., Canada and units with PX printed on the outer packaging)
Specifications are subject to change without notice.
Mass and dimensions are approximate.
Laser power: CLASS IIa/CLASS I
Laser power: CLASS 2/CLASS 1
4 Hz–44 kHz (96 kHz sampling)
15
16
⁄
[16
(excluding protrusions)
z (W)k9
12
⁄
16
z (D)k2
15
16
⁄
z (H)]
Manufactured under license from Dolby Laboratories.
“Dolby”, “Pro Logic” and the double-D symbo l are trademarks of
Dolby Laboratories.
Apparatus Claims of U.S. Patent Nos. 4,631,603, 4,577,216, and 4,819,098, licensed for limited viewing uses only.
This product incor porate s copyright pro tecti on techno logy that is protec ted by method claims of certain U.S. patents and other intellectua l prop -
erty rights owned by Macrovision Corporation and other rights owners. Use of this copyright protection technology must be authorized by Macrovision Corporat ion, and is intended for home and o ther limited viewing uses only unl ess otherwise authorized by Macrovis ion Corporation.
Reverse engineering or disassembly is prohibited.
[For\U.S.A.] [For\Canada]
Panasonic Consumer Electronics
Company, Division of Matsushita
Electric Corporation of America
One Panasonic Way Secaucus,
New Jersey 07094
http://www.panasonic.com
Panasonic Sales Company ,
Division of Matsushita Elec tric of
Puerto Ri c o, Inc. (“PSC”)
Ave. 65 de Infantería, Km. 9.5
San Gabriel Industrial Park, Carolina,
Puerto Rico 00985
“DTS”, “DTS Digital Surround” and “DTS Digital Out” are registered trademarks of Digital Theater Systems, Inc.
Panasonic Canada Inc.
5770 Ambler Drive
Mississauga, Ontario
L4W 2T3
pr
www.panasonic.ca
[For\units\with\PX\printed\on\the\outer\packaging] [For\others]
Matsushita Electric Industrial Co., Ltd.
Corporate Management Division for
the Americas
Sales Office for North Americ a
Tokyo Panasonic Sales Section
32nd Floor, World Trade Center 4-1,
Hamamatsu-cho, 2-Chome, Minato- Ku,
Tokyo 105-6132, Japan
C 2001 Matsushita Electric Industrial Co., Ltd.
Panasonic Marketing Europe G.M.B.H.
Wiesbaden N. (a Division of Panasonic Marketing G.M.B.H.)
Military Sales Department
6200 Wiesbaden-Biebrich,
Hagenauerstr. 43
Germany
Matsushita Electric Industrial Co., Ltd.
Web Site: http://www.panasonic.co.jp/global/
RQT6236-1P
F1101YU2022
Printed in Japan
 Loading...