

Panasonic DVD-P10D User Manual

r.
Panasonic
DVD/VIDEO CD/CD Player
Operating Instructions
DVD-P10D
^ N
iPIOfTAlVIPCO) oiOfTAL AUDIO
Dear Customers
May we lake this opportunity to IhnnK you for purchosing this Panasonic DVDA/IDEO
CO/CO playor.
We strongly recommend that you carefully study the Operating Instructions before attempt
ing to operate the unit and that you note the listed precautions.
Before attempting to connect, operate or adjust this product, please road these Instructions
completely. Please sove this manual.
VQT7663 I

Safety information
Note:
This unit can be used only where the
power supply is AC 120 V, 60 Hz. It
cannot be used elsewhere.
CAUTION:
DVD/VIDEO CD/CD PLAYER IS A
CLASS I LASER PRODUCT. HOW
EVER THIS DVD/VIDEO CD/CD
PLAYER USES A VISIBLE/INVISIBLE LASER BEAM WHICH COULD
CAUSE HAZARDOUS RADIATION
EXPOSURE IF DIRECTED. BE SURE
TO OPERATE THE DVD/VIDEO
CD/CD PLAYER CORRECTLY AS IN
STRUCTED.
WHEN THIS DVD/VIDEO CD/CD
PLAYER IS PLUGGED TO THE
WALL OUTLET, DO NOT PLACE
YOUR EYES CLOSE TO THE OPEN
ING OF THE DISC LID AND OTHER
OPENINGS TO LOOK INTO THE IN
SIDE OF THIS PLAYER.
USE OF CONTROLS OR ADJUST
MENT OR PERFORMANCE OF
PROCEDURES OTHER THAN
THOSE SPECIFIED HEREIN MAY
RESULT IN HAZARDOUS RADIA
TION EXPOSURE.
WARNING:
TO REDUCE THE RISK OF FIRE OR
ELECTRIC SHOCK, DO NOT EX
POSE THIS EQUIPMENT TO RAIN
OR MOISTURE.
TO REDUCE THE RISK OF FIRE OR
ELECTRIC SHOCK, AND ANNOYING
INTERFERENCE, USE ONLY THE
RECOMMENDED ACCESSORIES.
THIS DEVICE IS INTENDED FOR
CONTINUOUS OPERATION!
CAUTION: (Canada Only)
TO PREVENT ELECTRIC SHOCK,
DO NOT USE THIS (POLARIZED)
PLUG WITH AN EXTENSION CORD,
RECEPTACLE OR OTHER OUTLET
UNLESS THE BLADES CAN BE
FULLY INSERTED TO PREVENT
BLADE EXPOSURE.
CAUTION -LASER RADIATION WHEN OPEN.
DO NOT STARE INTO BEAM.
ATTENTION-RAYONNEMENT LASER EN CAS D'OUVERTURE.
NE PAS REGARDER DANS LE FAISCEAU.
(Bottom of unit)
DO NOT OPEN COVERS AND DO
NOT REPAIR YOURSELF. REFER
SERVICING TO QUALIFIED PER
SONNEL.
Marking sign is located on bottom of
the DVDA/IDEO CD/CD Player.

CAUTION
RISK OF ELECTRIC SHOCK
A
CAUTION: TO REDUCE THE RISK OF ELECTRIC SHOCK, DO NOT REMOVE
COVER (OR BACK). NO USER-SERVICEABLE PARTS INSIDE.
REFER SERVICING TO QUALIFIED SERVICE PERSONNEL.
The lightning flash with arrowhead symbol, within an equilateral tri
angle, is intended to alert the user to the presence of uninsulated
“dangerous voltage” within the product’s enclosure that may be of
A
A
sufficient magnitude to constitute a risk of electric shock to per
sons.
The exclamation point within an equilateral triangle is intended to
alert the user to the presence of important operating and mainte
nance (servicing) instructions in the literature accompanying the
appliance.
DO NOT OPEN
A
FCC NOTE: (U.S.A. Only)
This equipment has been tested and
found to comply with the limits for a
Class B digital device, pursuant to Part
15 of the FCC Rules. These limits are
designed to provide reasonable protec
tion against harmful interference in a
residential installation. This equipment
generates, uses and can radiate radio
frequency energy and, if not installed
and used in accordance with the instruc
tions, may cause harmful interference to
radio communication. However, there is
no guarantee that interference will not
occur in a particular installation. In this
equipment does cause harmful interfer
ence to radio or television reception,
which can be determined by turning the
equipment off and on, the user is en
couraged to try to correct the interfer
ence by one or more of the following
measures:
•Reorient or relocate the receiving
antenna.
•Increase the separation between the
equipment and receiver.
•Connect the equipment into an outlet
on a circuit different from that to which
the receiver is connected.
•Consult the dealer or an experienced
radio/TV technician for help.
FCC Caution: To assure continued com
pliance, follow the attached installation
instructions and use only shielded ca
bles when connecting to other devices.
Also, any changes or modifications not
expressly approved by the party respon
sible for compliance could void the
user’s authority to operate this equip
ment.
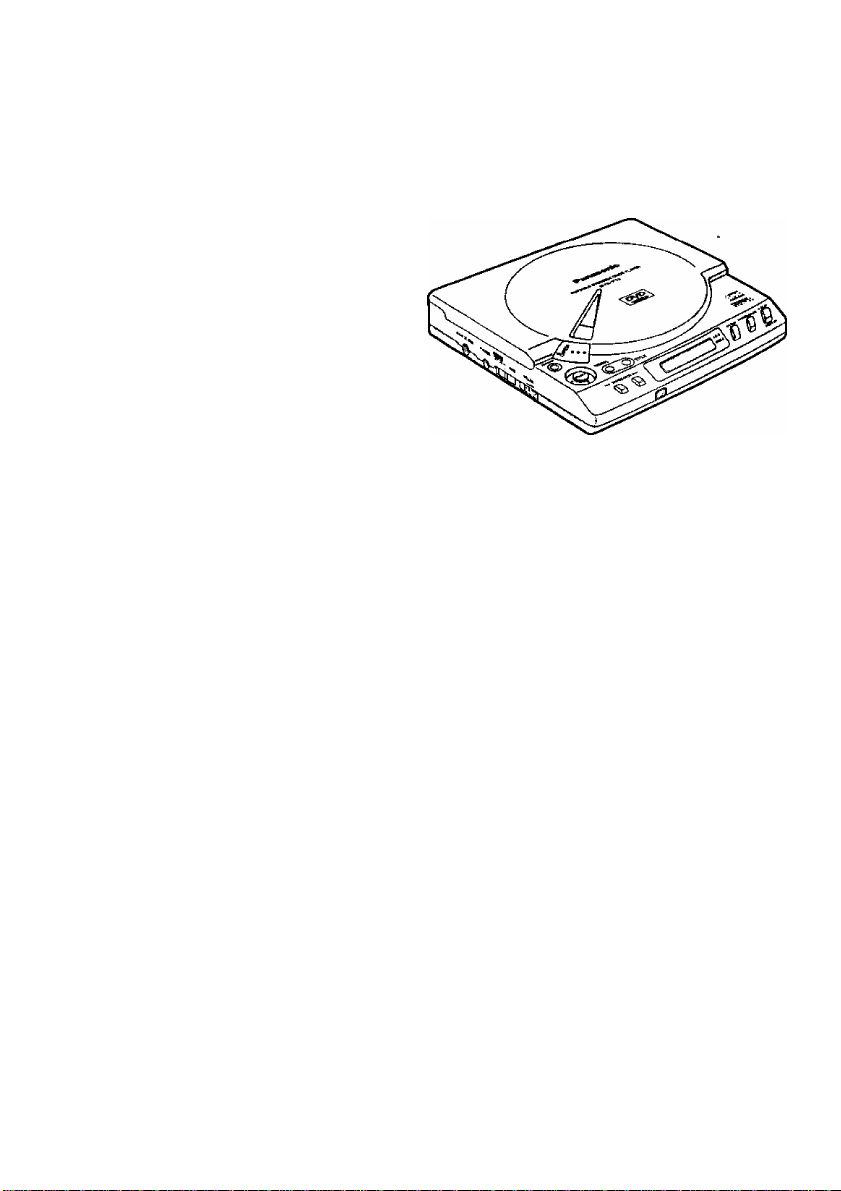
Compact Size
DVD/VIDEO CD/CD Player
Compatible with Video CD
and CD as well DVD
Compact Size
This compact, lightweight DVD/Video CD/CD player measures SVie" (160 mm) (W)x6Vi6"
(160 mm) (D)x 1Vi6" (36 mm) (H) and weights only 1.4 lbs. (620 g), making it easy to carry
around so that you can enjoy DVD wherever there is a TV set.
High-Resolution Video and High-Quality Sound
This DVD/Video CD/CD player includes a 10-bit video D/A converter for the sharp repro
duction of high-resolution DVD images. In addition, the 96 kHz/24-bit audio D/A converter
allows faithful reproduction of linear PCM 96 kHz/24-bit audio, the highest DVD audio
specifications.
Virtual Surround Sound (V.S.S.) effect (See page 50.)
This player can reproduce a virtual surround sound effect which provides a sound as if
heard from non-existent rear speakers even when only a 2-channel stereo system is con
nected [for playback of Dolby Digital (AC-3) / 5.1ch DVD software only]. (The virtual sur
round sound effect may work differently depending on the DVDs.)
On-Screen Menu Icons (See pages 32-37.)
On-Screen Menu Icons show the disc information or player information and provide access
to many major functions of the player.

Multi-audio function
(See page 45.)
The audio soundtrack can be heard in up to
8 languages. (The number of audio lan
guages depends on the software.)
Multi-subtitle function
(See page 46.)
Subtitles may be displayed in one of a max
imum of 32 languages. (The number of
subtitle languages depends on the soft
ware.)
Multi-angle function
(See page 47.)
This function allows you to choose the
viewing angle of scenes which were shot
from a number of different angles. (Limited
to DVDs recorded with multiple camera an
gles.)
Marker function
(See pages 40 and 41.)
This player can store a maximum of
5 scenes in memory, which can be recalled
when you like.
Parental lock function
(See pages 54-57.)
This can prevent the playback of DVDs that
are unsuitable for children.
Disc formats supported by this player
DVD
[5" (12 cm) disc/3" (8 cm) disc]
ntlnsip Video CD
toS 15" (12 cm) disc/3" (8 cm) disc]
nCOMRftCT CD
[5" (12 cm) disc/3" (8 cm) disc]
N Discs which cannot be played with
this player
•DVD with Region No. other than ‘T or
"ALL"
• Discs of PAL system
• DVD-ROM • DVD-R/DVD-RAM
• CD-ROM •CDV
• CD-G «Photo CD
• CD-R
Marks used in these instructions
(pages 27-50)
•This gives details on a function
which can be enjoyed with DVD.
■••This gives details on a function
which can be enjoyed with Video
CD.
••■This gives details on a function
which can be enjoyed with CD.
Region Management Information
Region Management Information: This DVD/VIDEO CD/CD player is
designed and manufactured to respond to the Region Management
Information that is recorded on a DVD disc. If the Region number de
scribed on the DVD disc does not correspond to the Region number of
this DVD/VIDEO CD/CD player, this DVD/VIDEO CD/CD player cannot
play this disc.
The Region number for this DVD/VIDEO CD/CD player is 1.
The model number and serial number of this product can be found on either the back or
the bottom of the unit. Please note them in the space provided below and retain this
booklet as a permanent record of your purchase to aid identification in the event of theft.
MODEL NUMBER ___________________________________________________________
SERIAL NUMBER ___________________________________________________________
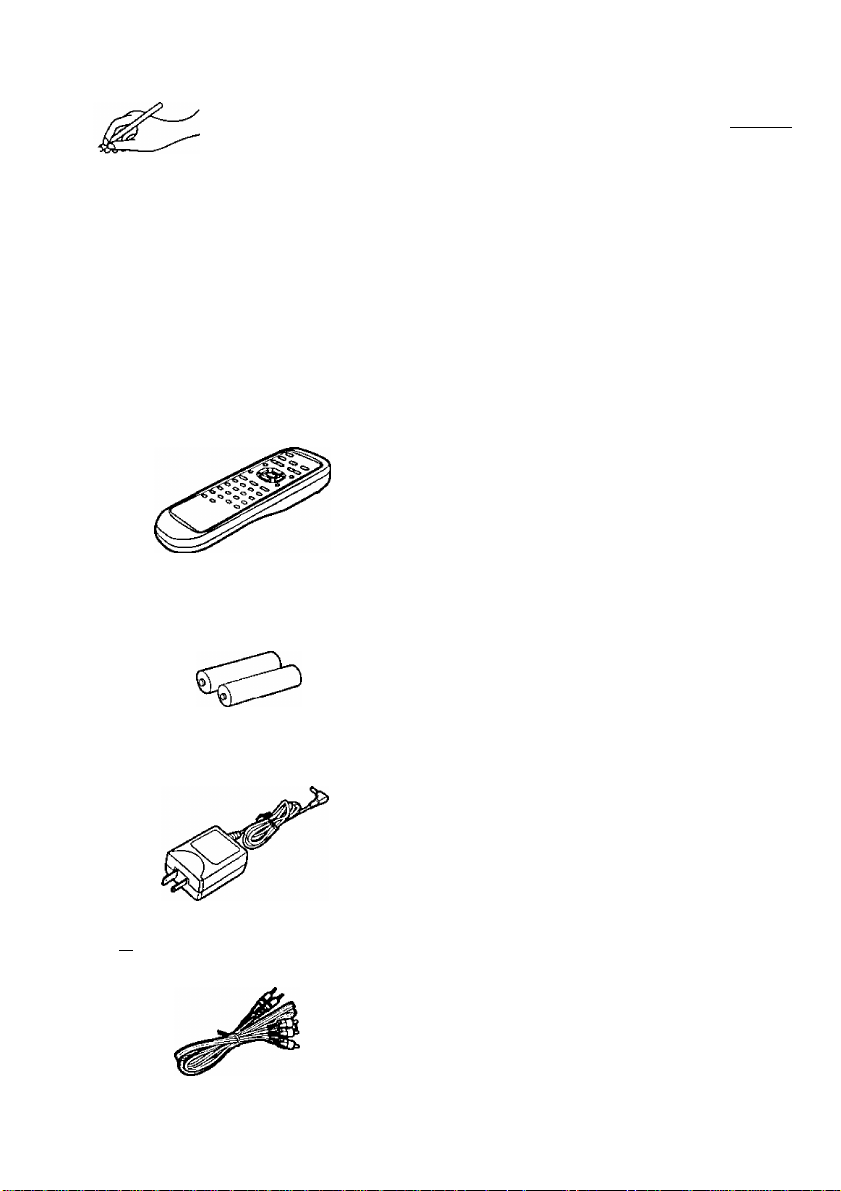
Accessories
Table of contents
Please check and
identify the supplied
El
(Only forU.S.A.)
To order accessories, call PASC
Accessory Dept. 1-888-PANA-DVD
(1-888-726-2383).
(Only for Canada)
To order accessories, call the dealer
from whom you have made your pur
chase.
I I Remote control unit
— (PartNo. VEQ2015)
Batteries
□
for remote control unit
(size “AA”)
I 1 AC adaptor
— (Part No. VSK0531)
accessories.
.............................
.............................
2
1
HiKiifPSg)
Safety information
Accessories............................................... 6
Safety precautions.................................... 8
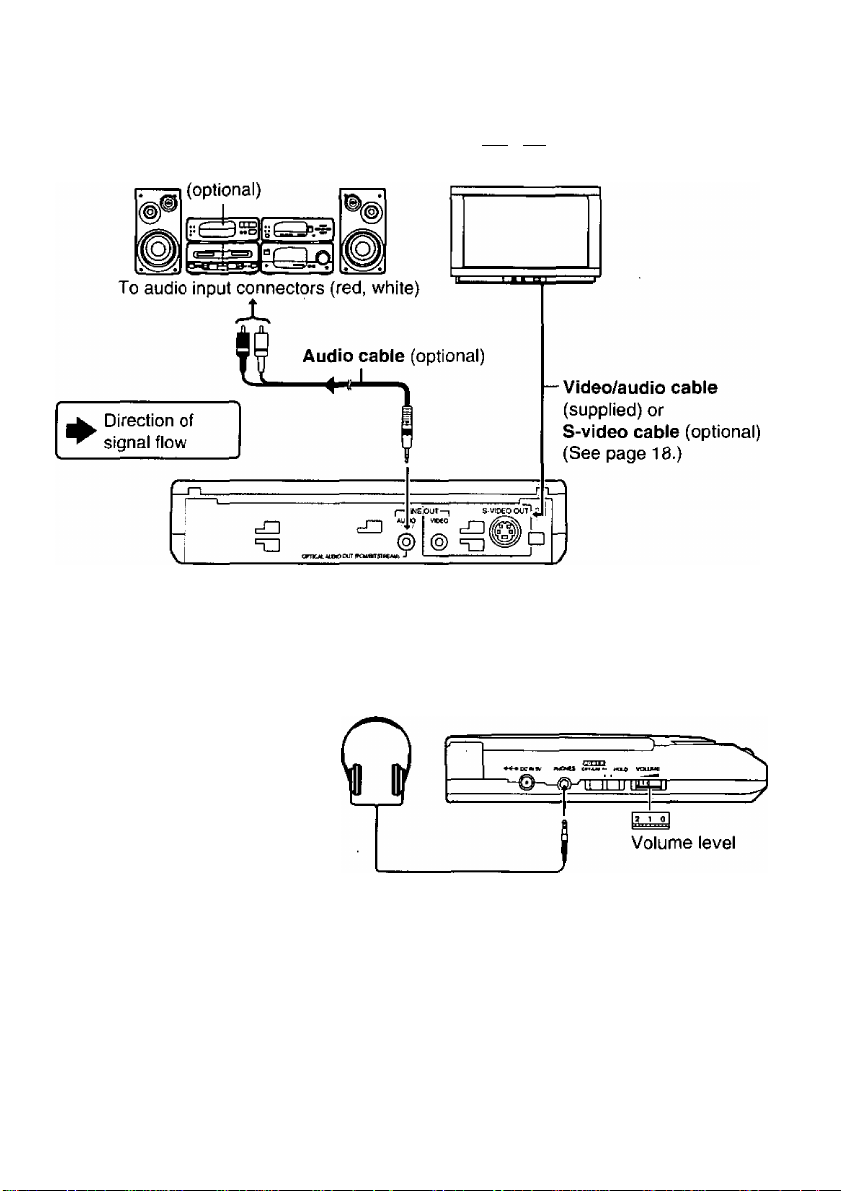
Connection
•Connecting to a stereo TV set ................ 18
•Connecting to audio equipment............... 19
Basic play
• Stopping play
• Rapid advance/Rapid reverse ................ 29
•Skipping ahead or back .......................... 29
•Still picture/Pause ................................... 30
....................................
..............................................
...............................................
........................................
18
26
28
iH
Operation using the On-Screen Menu
Icons
.......................................................
• Detailed descriptions of each icon
[Screen for disc information]
• Detailed descriptions of each icon
[Screen for player information] ............. 36
• Detailed descriptions of each icon
[Shuttle screen] ................................... 37
................
32
34
2
I I Video/audio cable
(PartNo. VJA1065)
inifcartiTi-Tn
Changing the initial settings
•When “1 Disc Languages”
is selected
•When “2 Ratings” is selected
•When “3 Menu Language”
is selected
...............................
...............................
13
51
52
54
58

Operating precautions
•Handling precautions................................. 9
•Maintenance.............................................. 10
Disc handling
Control reference guide........................... 12
...........................................
............................
9
11
•Connecting headphones
(optional)
•Connecting to a decoder with Dolby • Remote control operation range ., . . 23
Digital (AC-3) processing
• Frame advance
(DVDA/ideoCDonly)
•Slow-motion play
(DVDA/ideo CD only)
• Enjoying Video CD playback without
using menus (Video CD only)
Repeat play .............................................. 38
•Repeat viewing (listening)
•Repeating sections between language
two specific points (A-B repeat)
Storing markers in memory to be
viewed (heard) again
•Storing a marker in memory
• Recalling a marker
•Clearing a marker ..................................., 41
Program piay..........................................., 42
...............................................
......................
..............................
............................
...............
......................
.............
.............................
...................
................................
. 19
. 20
, 30
, 31
, 31
. 38
, 39
. 40
, 40
. 41
Remote control preparation
• Battery (supplied) installation
• Remote control operational notes ..
Inserting/Removing discs .................. . . 24
• Inserting discs
•Removing discs ................................... . . 25
Random play........................................
Changing audio soundtrack
Changing subtitle language
Viewing from another angle
Using a menu.......................................
•Using a title menu
•Using a DVD menu
Reproducing a Virtuai Surround
Sound (V.S.S.) effect
....................................
...........................................
...............................
..............................
..............
..............
..............
..............
..........................
.. 22
. . 22
. . 23
.. 24
.. 44
. . 45
. . 46
. . 47
. . 48
. . 49
.. 49
. . 50
•When “4 On-Screen Messages” is
selected
•When “5 TV Aspect” is selected ....
•When “6 Digital Audio Output” Index
Is selected
•When “9 Other Settings” is
seiected
..................................................
..............................................
..................................................
, 59
, 59
, 60
Language code list
Troubleshooting
Self-diagnosis display function
Definition of terms
Specifications ......................... Back cover
62
.............................
.................................
....................................................
..............................
. . 64
.. 65
. . 68
. . 69
. . 70

Safety precautions
Please read these precautions before oper
• Do not touch the AC adaptor or the
ating this player.
■ AC adaptor protection
•Do not use the player above the estab
To avoid any malfunctions of the player,
and to protect against electric shock, fire or
personal injury, please observe the follow
ing.
• Hold the plug firmly when connecting
or disconnecting the AC adaptor to
this player.
• Do not connect or disconnect the AC
adaptor when your hands are wet.
• Keep the AC adaptor away from heat
ing appliances.
• Never put any heavy objects on the AC
adaptor.
• Do not attempt to repair or reconstruct
the AC adaptor in any way.
• Remove dust, dirt, etc. on the plug at
regular intervals.
• If liquids or foreign objects have been
spilled into the player or AC adaptor,
turn off the power and disconnect the
AC adaptor.
•If the player has been dropped or oth
erwise damaged, turn off the power
and disconnect the AC adaptor.
• If smoke, malodors or noises are emit
ted from the player or AC adaptor, turn
off the power and disconnect the AC
adaptor.
• Do not scratch or mark the AC adaptor,
• Insert the power plug securely until its
• Use only the AC adaptor provided.
■ Do NOT disassemble or remodel this
■ Placement
Avoid placing the player or AC adaptor in
areas of:
•direct sunlight or heating radiators, or
•high temperature [over 95“F (35°C)j or
•excessive dust or oily smoke
•vibration, impact or where the surface is
• in a poorly ventilated location
as the internal parts may be seriously dam
aged.
metal part of the player during a thun
derstorm.
lished ratings of the power outlet and
power distributor or supply an AC volt
age other than 120 V.
rework it, place it in proximity to a
heating appliance, forcibly bend it,
twist it, pull it, place heavy objects on
top of it, bunch it together with other
wires or units, or put a cloth over it.
prongs are completely housed inside
the power outlet.
player.
closed automobiles
high humidity (over 90%)
tilted
■ No fingers or other objects inside
•Touching internal parts of this player is
dangerous, and may cause serious dam
age to the player. Do not attempt to disas
semble the player.
• Do not put any foreign object inside the
player or AC adaptor.
• Do not insert metal or inflammable objects
inside the player or AC adaptor.
•Take care not to catch your fingers when
you close the disc lid.
8

M Keep away from water and magnets.
• Keep the player or AC adaptor away from
flower vases, tubs, sinks, etc. If liquids are
spilled into the player or AC adaptor, seri
ous damage could occur,
•Keep magnetic objects such as speakers,
at a distance from this player.
M Stacking
• Place the player in a horizontal position,
and do not place anything heavy on it.
•Do not place the player on amplifiers or
other equipment which may become hot.
■ Do not use cracked or warped discs.
Operating precautions
■ If there is noise interference on the TV
while a broadcast is being received
Depending on the reception condition of the
TV, interference may appear on the TV
screen while you are watching a TV broad
cast if the player is left on. This is not a
malfunction of the player or the TV. To
watch a TV broadcast, turn off this player.
■ When installing the player
•Avoid shelves and other high locations.
■ When operating the player
• Do not expose the player to the sprays
from volatile insecticides, etc. (Doing so
may deform the external cabinet or cause
the paint to peel off.)
•After the player is used for many hours,
the surface of the player becomes hot;
this is normal, not a malfunction.
•Do not touch the pickup unit (the lens in
particular) inside the disc lid with your
hands or other objects. (Doing so may
cause a malfunction.)
• Do not insert objects into the opening hole
area of the pickup unit. (Doing so may
cause a malfunction.)
• Do not push the disc lid downward during
playback. (Doing so may damage the disc
inside.)
•Do not subject the player to impact during
playback. (Doing so may damage the disc
inside.)
• Do not set the player down on a sofa for
operation. (Doing so may increase the
temperature inside the player and cause
damage to the player.)

Operating precautions
■ Condensation
Moisture may form on the lens in the follow
ing conditions...
•immediately after a heater has been
turned on.
•in a steamy or very humid room.
•when the player is moved from a cold en
vironment to a warm one.
If moisture forms inside this player, it may
not operate properly. In this case, turn on
the power and wait about 1 to 2 hours for
the moisture to evaporate.
N When bringing the player into a hospi
tal
•The electromagnetic waves emitted by
the player may interfere with the medical
equipment in the hospital. Follow the in
structions given by the medical personnel.
■ When bringing the player inside a car
• Do not use the car’s cigarette lighter sock
et to supply power to the player. (Doing
so may cause a malfunction.)
• Do not leave the player in areas of ex
tremely high temperature [over approx.
140°F (60°C)] such as inside of the car in
hot summer or in the car trunk or of ex
tremely low temperature [under approx.
4“F (-20°C)]. (Doing so may cause cabi
net deformation.)
■ When moving or transporting the
player
•When moving the player, remove the disc
if one is inside, and disconnect the AC
adaptor and other cords.
•When transporting the player for reloca
tion, place the player in its original pack
ing carton,
• Do not drop the player or bump it into ob
jects when moving or transporting it.
■ When the player is not going to be
used for a long time
•To conserve power, turn off the power,
and disconnect the AC adaptor from the
power outlet. (Even when the player’s
power switch is turned off, power equiva
lent to about 0.8 W will be consumed un
less the AC adaptor is disconnected.)
• Be sure to close the disc lid. (Dust may
settle on the lens or other parts, which
may cause a malfunction.)
• Be sure to turn the power off and discon
nect the AC adaptor before maintaining
the player.
•Wipe this player with a dry, soft cloth.
If the surfaces are extremely dirty, wipe
clean with a cloth which has been slightly
moistened with in a weak soap-and-water
solution and wrung out thoroughly, and
then wipe again with a dry cloth.
•Never use alcohol, benzine, thinner,
cleaning fluid or other chemicals. And do
not use compressed air to remove dust.
■ Maintenance of the lens
• If dust has settled on the lens, remove
dust carefully with an air blower for cam
era lenses (optional).
Be careful not to touch the lens with your
fingers.
10
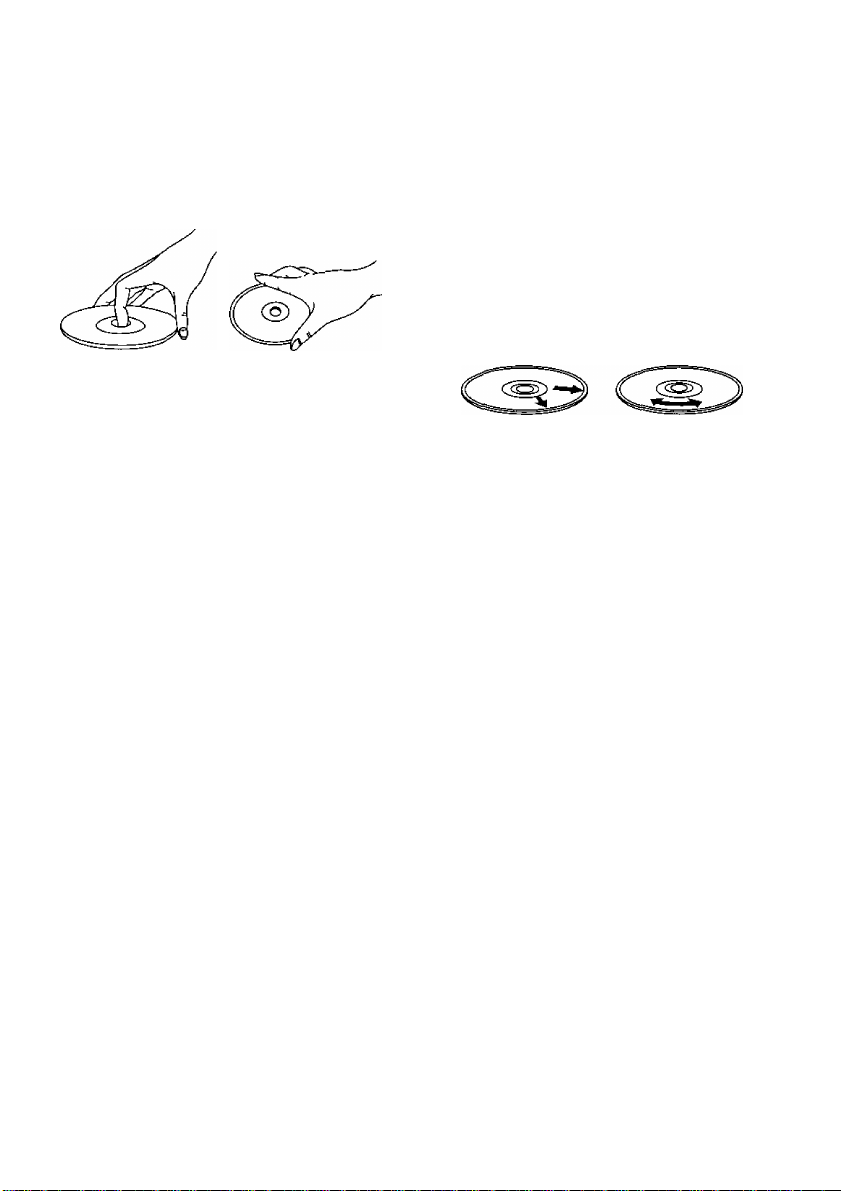
Disc handling
■ Handling precautions
•Hold the disc by the edges so the surface
will not be soiled with fingerprints.
Fingerprints, dirt and scratches can cause
skipping and distortion.
•Do not write on the label side with a ball
point pen or other writing utensils,
• Do not use record cleaning sprays, ben
zine, thinner, static electricity prevention
liquids or any other solvent.
•Be careful not to drop or bend the disc.
• Do not inserted more than 1 disc.
•Do not try to close the disc lid when the
disc is not inserted properly.
• Be sure to store the disc in its case when
not in use.
m If the surface is soiled
Wipe gently with a soft, damp (water only)
cloth.
When wiping discs, always move the cloth
from the center hole toward the outer edge.
(If you wipe the discs using a circular mo
tion, circular scratches are likely to occur,
which will cause noise.) Ensure that the
disc is dry before inserting into the player.
O
■ If the disc is brought from a cold to a
warm environment, moisture may
form on the disc
Wipe this moisture off with a soft, dry, lintfree cloth before using the disc.
■ Improper disc storage
You can damage discs if you store them in
the following places:
•Areas exposed to direct sunlight
• Humid or dusty areas
•Areas directly exposed to a heat outlet or
heating appliance
X
11
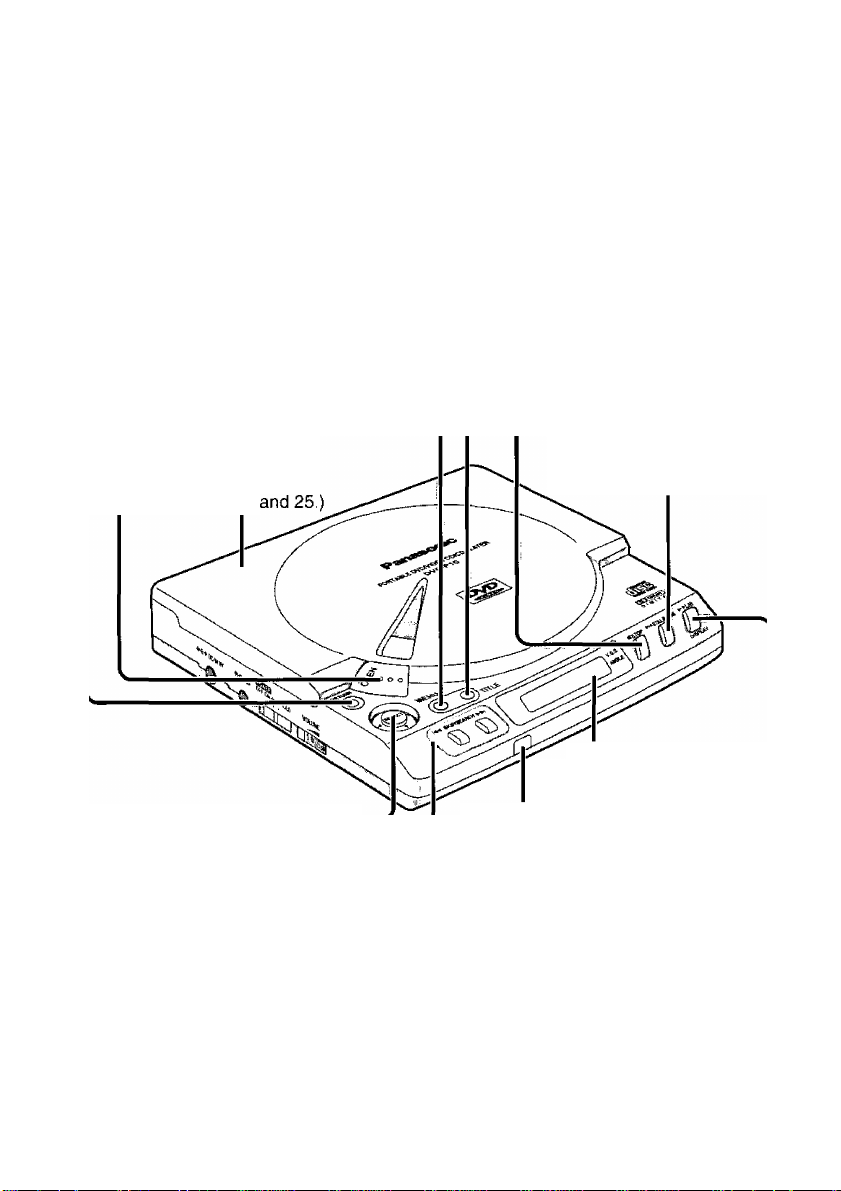
Control reference guide
Main unit (Front view)
RETURN button [RETURN]
Press to return to the previous menu. (See pages 26, 32 and 52-62.)
OPEN button [AOPEN]
Press to open the disc lid.
(See pages 24 and 25.)
MENU button [MENU]
When pressed during piay, the DVD
menu recorded on the disc wiil be
displayed. (See page 49.)
When pressed in the stop mode, the
initiai settings screen wiii be dispiayed.
(See pages 51 -62.)
Disc lid
(See pages 24
Joystick/SELECT button [SELECT]
Make the seiection by tilting the
joystick forward, backward or to the
ieft or right, and then press SELECT
to enter the selection. (See page 27.)
TITLE button [TITLE]
Press to show the title menu recorded on
the disc. (See pages 26 and 49.)
STOP button [«STOP]
Press to stop playback. (See page 28.)
STILL/PAUSE button [H^ STILUPAUSE]
Press to place the player in
the still picture/pause mode
or to advance the disc by one
frame. (See pages 29-31.)
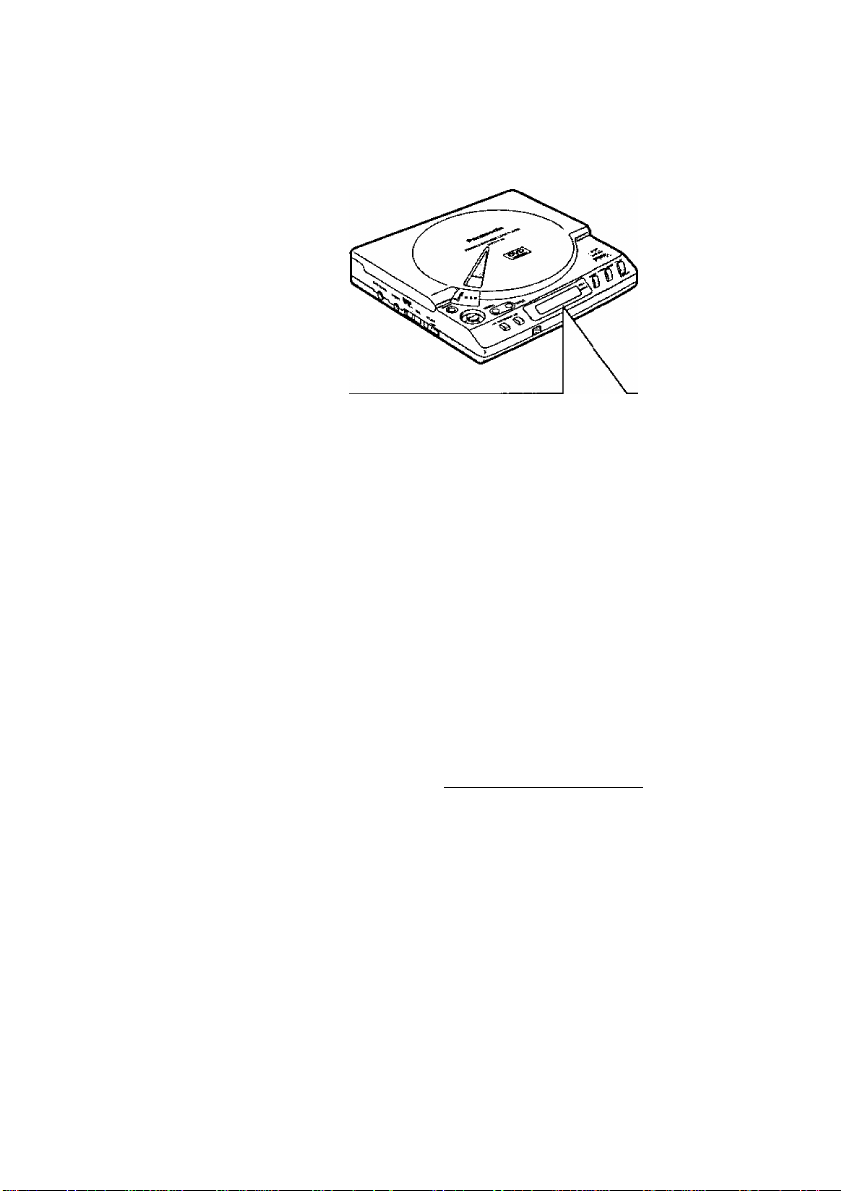
Display window
(See page 14.)
Remote control signal sensor
Point the remote control unit at the
sensor when operating the piayer.
(See page 23.)
SKIP/SEARCH buttons [h4^SKlP/SEARCH^H]
Press for rapid advance/reverse or
skipping ahead/back (see page 29) or
for siow-motion play (see page 31).
Backward
Forward
--------------------
12
PLAY/DISPLAY button [►PLAY/DISPLAY]
When pressed in the stop mode,
playback starts. (See page 27.)
When pressed during playback,
the On-Screen Menu Icons will be
displayed. (See page 33.)
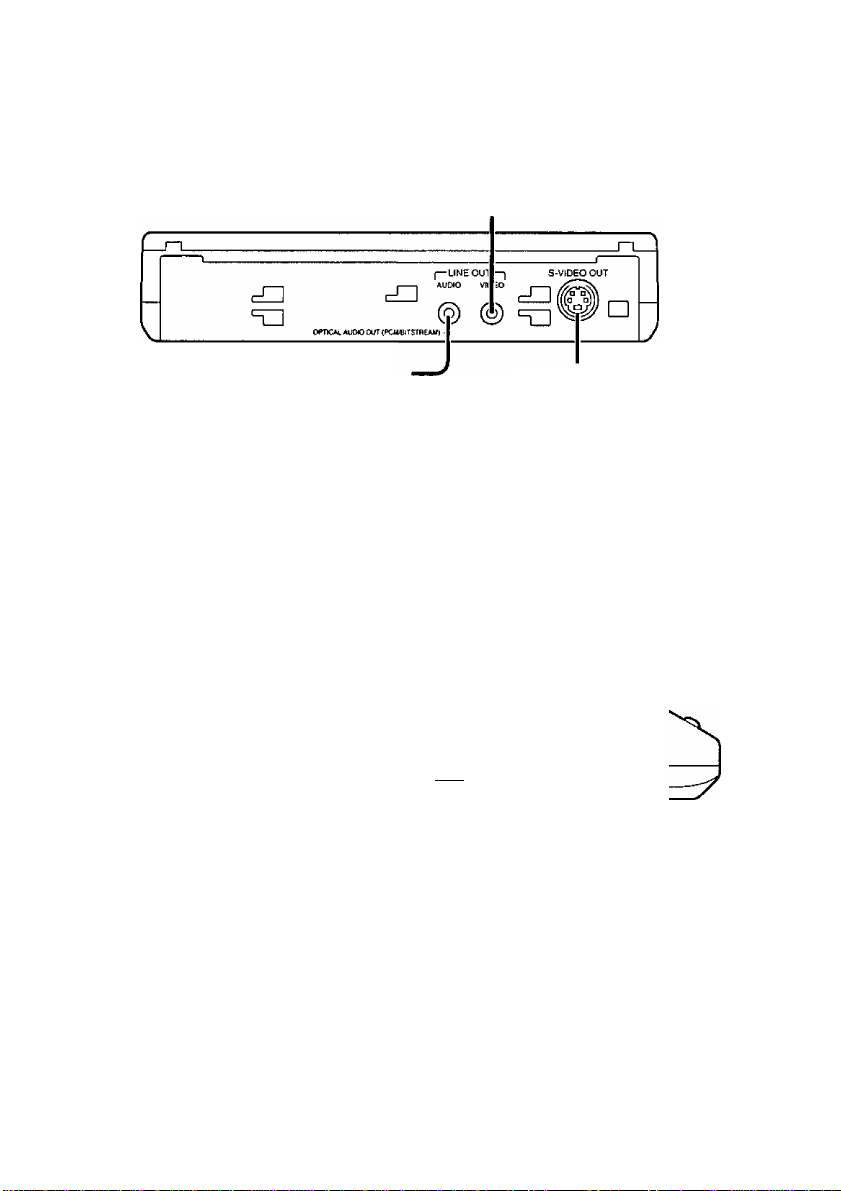
Main unit (Rear view)
Video output connector [VIDEO]
Connect the video/audio cable (supplied).
(See pages 18 and 19.)
Audio output/optical digital audio output connector [AUDIO]
Connect the video/audio cable (supplied) or
optical digital audio cable (optional). The type
of the output signal will be automatically se
lected according to the cord or cable that is
connected. (See pages 18-21.)
S-video output connector
[S-VIDEO OUT]
Connect the S-video cable
(optional). (See page 18.)
Main unit (Side view)
DC input connector [ DC IN 9V]
Connect the DC plug of the AC
adaptor (supplied).(See page 18.)
❖ •'♦OCW9V PHt
Power switch [
[HOLD]
•When this switch is slid toward the direction of [
OFF/ON for more than 1 second, the power will be
turned OFF or ON.
•The HOLD function (for preventing errors in operation) is
activated when the switch is slid to the HOLD position,
HOLD function:
The hold function ensures that even when a function button is inadvertently pressed, the
function corresponding to the button will not be acknowledged. (It prevents the function
buttons from being pressed during operation, the picture and/or sound from being terminat
ed, etc.)
When a function button is pressed while the hold function is working, “Ho ¡d" appears in
the player’s display window. (See page 15.)
POWER
OFF/ON ] / HOLD switch
Headphone jack [PHONES]
Connect the headphones (optional) with a
'/e" (3.5 mm) stereo plug. (See page 19.)
>
©
--------
(UKII iV IIIECT
Volume level [VOLUME]
Turn to adjust the volume
___________
POWER
level output from the head
phones. (See page 19.)
0: No sound is heard
10: Maximum
13
Control reference guide
Main unit (Display window)
Illuminates when a DVD is loaded
Illuminates during title repeat play
(DVD only)
Illuminates during repeat play
Illuminates during
A-B repeat play
TITLE p A-B 0 0 o. O O. O O
V CD 1 all U U u • U U • U U
■ ■
Illuminates during program
repeat ptay or disc repeat play
(Video CD/CD only)
Illuminates during chapter repeat
play or track repeat play
Illuminates when angle
switching is possible during
DVD playback
Illuminates during playback
with Virtual Surround
Sound (V.S.S.) effect
Indicates the chapter No. for DVD or
the track No. for Video CD or CD
___\___
------------------
_
1 —h
Indicates the elapsed
playing time from the
start of the tltie for DVD
or from the start of the
track for Video CD/CD
14
"VCD” illuminates when a Video CD is loaded and
"CD” illuminates when a CD is loaded

When the disc lid is open
eagjony > ;v,
gu
■''' A-B :: n. n 0. r n ^
VCD '* * '‘LI.-;
:;Cruri un •'
When no disc is loaded
When a DVD or a Karaoke DVD is
played
When an interactive DVD is played
When a Video CD is played
When a Video CD with playback
control is played
When a CD is played
When any button is pressed while
the HOLD function is activated
QVj TiT.i: .'j *.-E rt ri r*. n M. r n
VCD
^A.inuudtrOQo
EHSTTucrjiA
VCD 1ALLC:J.UGOaa=
Chapter 25 is played Elapsed playing
sagTiTLi:oA-8
^ n - OD UC
I - 1 —^
time of title
yn 00■QO'''
VCD iALL.5:.x»-od-ay-
TITLE O A-6
V CD 1 all ;, J
Track 5 is played Elapsed playing
Ti^LE o
iTriE«-S
VCD ” all
Track 5 is played Elapsed playing
C n. n n. a 0
a ■
u
0 UD.^
1
---------\----
time of track
:gn. n n •on''
:■;c n-iiD QO
'j!j
■
1 ■—1 ■
time of track
LE o
O'n
. n n.; i n ®
-
V CD " all ..; d ‘ o 0 f/ o «
When the AC adaptor (supplied) ¡s\.
connected and the power switch
of the player is turned off
(Standby mode)
When playback is impossible
[Mi! TITLE O A-3 ^ n. n n. n n ^
V cu T all c ;;;" • c ■ u u«
TriEoA-anr/ri
VCD 1 ALLI lUfJ, Cl' OQ
nn nn^
• DVDs for which playback is prohibited
by the initial settings "2 Ratings” {See
pages 54-57.)
• DVDs with Region No. other than “1” or
“ALL”
• DVDs of PAL system
15
Control reference guide
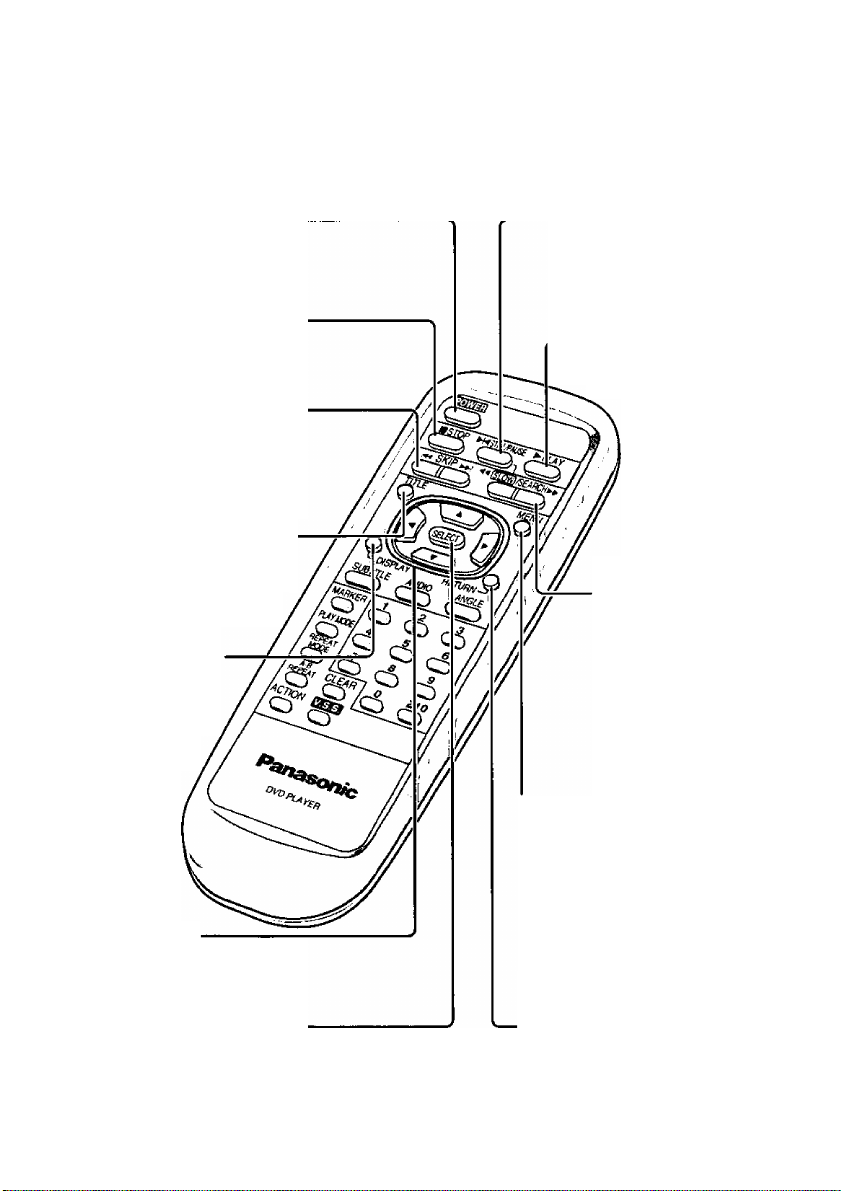
Remote control unit
Buttons used for basic operation
POWER button
Press to turn the power ON or
OFF. (See page 27.)
STOP button
Press to stop playback.
(See page 28.)
SKIP buttons
Press for skipping ahead/back.
(See pages 26 and 29.)
Backward
Forward
TITLE button
Press to show the title menu
recorded on the disc.
(See pages 26 and 49.)
DISPLAY button
Press to show the
On-Screen Menu
Icons.
(See page 33.)
STILL/PAUSE button
Press to place the player in
the still picture/pause mode or
to advance the disc by one
frame. (See pages 29-31.)
------
PLAY button
Press to start playback.
(See page 27.)
SLOW/SEARCH
buttons
Press for rapid
advance/reverse (see
page 29) or for slowmotion play (see page
31).
Backward
Forward
Cursor buttons
Press A ▼ to select
the item. (See page 27.)
SELECT button
Press to enter the item selected
by the cursor buttons (A ▼ ◄ ►).
(See page 27.)
16
MENU button
When pressed during play, the
DVD menu recorded on the disc
will be displayed. (See page 49.)
When pressed in the stop mode,
the initial settings screen will be
displayed.
(See pages 51-62.)
RETURN button
Press to return to the previous
menu. (See pages 26, 32 and
52-62.)
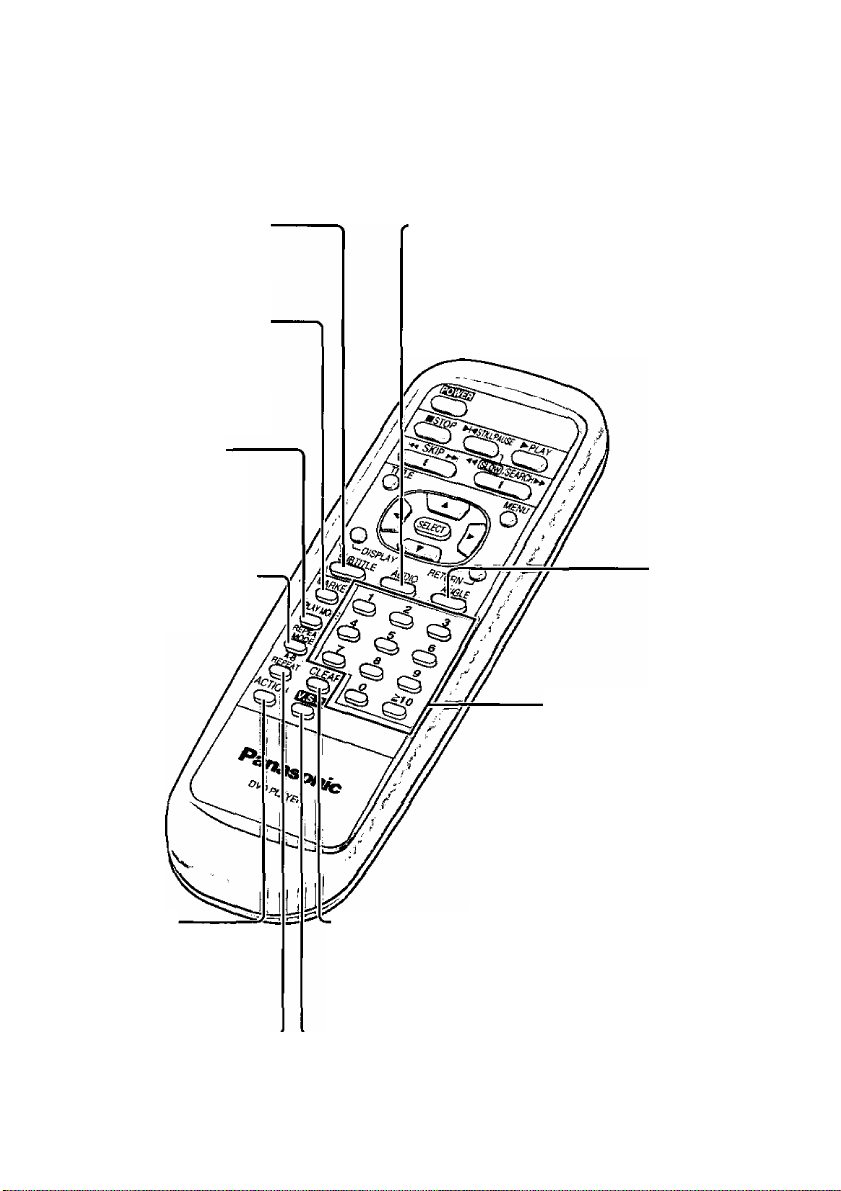
Buttons used for advanced operations
SUBTITLE button
Press to change the subtitle
language. {See page 46.)
MARKER button
Press to store markers in
memory to be viewed
(heard) again.
{See pages 40 and 41,)
PLAY MODE button
Press to select “Normal
play”. “Program play” or
“Random play”. {See
pages 43 and 44.)
REPEAT MODE button
Press for repeat play.
(See pages 38 and 39.)
AUDIO button
Press to change the audio
soundtrack language for DVD, to
switch the vocal mode for DVD
Karaoke, or to select “LR", “L” or
“R" for Video CD. (See page 45.)
ANGLE button
Press to view
from another
angle.
(See page 47.)
Numeric buttons
Press to enter numbers.
(See page 27.)
To enter a number “10” or
higher, use the o button.
Example: To enter “25”
2
O
5
o
ACTION button
Press to show the
initial settings screen.
(See pages 51-62.)
A-B REPEAT button
----------
Press to repeat sections
between two specific points.
(See page 39.)
CLEAR button
Press to clear the entered numbers.
(See pages 32,41 and 43.)
Virtual Surround Sound (V.S.S.) button
Press to activate the Virtual Surround Sound effect.
(This effect works only during playback of DVDs
recorded in Dolby Digital/5.1ch Surround Sound.)
(See page 50.)
17

Connection
• Ensure that the power of the player and other equipment to be connected is turned off be
fore commencing connection.
• Do not block ventilation holes of any of the equipment and arrange them so that air can
circulate freely.
• Read through the instructions before connecting other equipment.
• Ensure that you observe the color coding when connecting audio and video cables.
•Select the appropriate screen type at the initial setting “5 TV Aspect” according to your
TV set (4:3 or 16:9). (See page 59.)
Connecting to a stereo TV iset
• During DVD play, the TV volume may be at a lower level than during TV broadcasts, etc. H this is the
case, adjust the volume to the desired level.
• If the player is connected to the TV through a video cassette recorder, the picture may not be played
back normally with some DVDs. If this is the case, do not connect the player via the VCR.
TV set
M When connecting this player to a TV set equipped with an S-video input connector
The S (separate) video output connector separates the color (C) and luminance (Y) signals before
transmitting them to the TV set in order to achieve a sharper picture. Use the S-video cable (optional)
when connecting the player to a TV set equipped with an S-video input connector for the best picture
clarity possible. When using the S-video cable, the yellow composite video plug need not be connect
ed to the TV.
^^VCR
This player
18
Audio equipment
_
....'_
■' .
_________________
Connect the headphones.
•Headphones with a
stereo plug can be connected.
•Turn down the volume level be
fore connection, and then adjust
the level.
Caution:
•Avoid listening to the sound at levels which may be harmful to your ears.
Va"
(3.5mm)
19
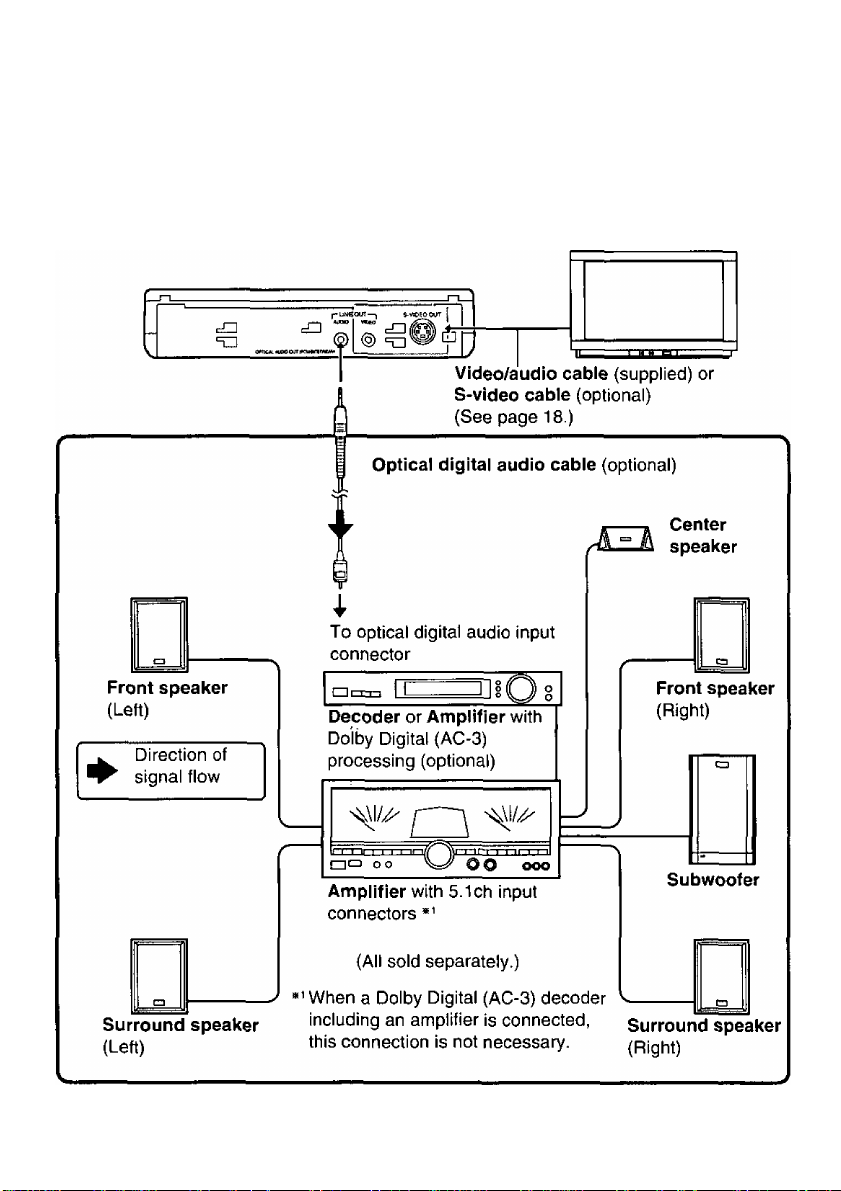
Connection
When DVDs recorded in Dolby Digital (AC-3)/5.1ch are played, Dolby Digital bitstream is
output from the player’s audio output/optical digital audio output connector. When the play
er is connected to a Dolby Digital decoder using the optical digital audio cable (optional),
you can enjoy theater-quality audio in your home.
20

Caution for the audio output/optical digital audio output connec
tor:
•When connecting an amplifier (with an optical digital input connector) which
does not contain the Dolby Digital (AC-3) decoder, be sure to select “PCM” at
“2 Dolby Digital” of the initial setting “6 Digital Audio Output”.(See page 60.)
•Otherwise any attempt to play DVDs may cause such a high level of noise that it
may be harmful to your ears and damage your speakers.
•Video CDs and CDs can be played as they would normally be played.
Concerning the audio output from the player’s audio output/opticat digital audio output connector
Disc Sound recording format Optical digital audio output from connector
DVD
Video CD MPEG 1 PCM (44.1 kHz sampling)*’
CD
The compressed audio signals are converted to PCM and then output.
The type of audio can be selected by the initial setting “Digital Audio Output’’. (See page
60.)
Dolby Digital (AC-3) • Dolby Digital (AC-3) bitstream (1-5.1ch)
• PCM (2ch) (48 kHz/16 bit)*i *2
Linear PCM
(48/96 kHz 16/20/24 bit)
• Linear PCM (2ch)
(48 kHz sampling/16 bit only)
• No output*^
Linear PCM Linear PCM (44.1 kHz sampling)
For your reference:
• Dolby Digital (AC-3) is a digital sound compression technique developed by the Dolby
Laboratories Licensing Corporation. Supporting 5.1-channel surround sound, as well as
stereo (2-channel) sound, this technique enables a large quantity of sound data to be effi
ciently recorded on a disc.
•Linear PCM is a signal recording format used in CDs. While CDs are recorded in
44.1 kHz/16 bit, DVDs are recorded in 48 kHz/16 bit up to 96 kHz/24 bit.
• If you have a Dolby Pro Logic Surround decoder, you will obtain the full benefit of Pro
Logic from the same DVD movies that provide full 5.1-channel Dolby Digital soundtracks,
as well as from titles with the Dolby Surround mark.
Manufactured under license from Dolby Laboratories. “Dolby" and the double-D sym
bol are trademarks of Dolby Laboratories. Confidential Unpublished Works. © 1992-
1997 Dolby Laboratories, Inc. All rights reserved.
21
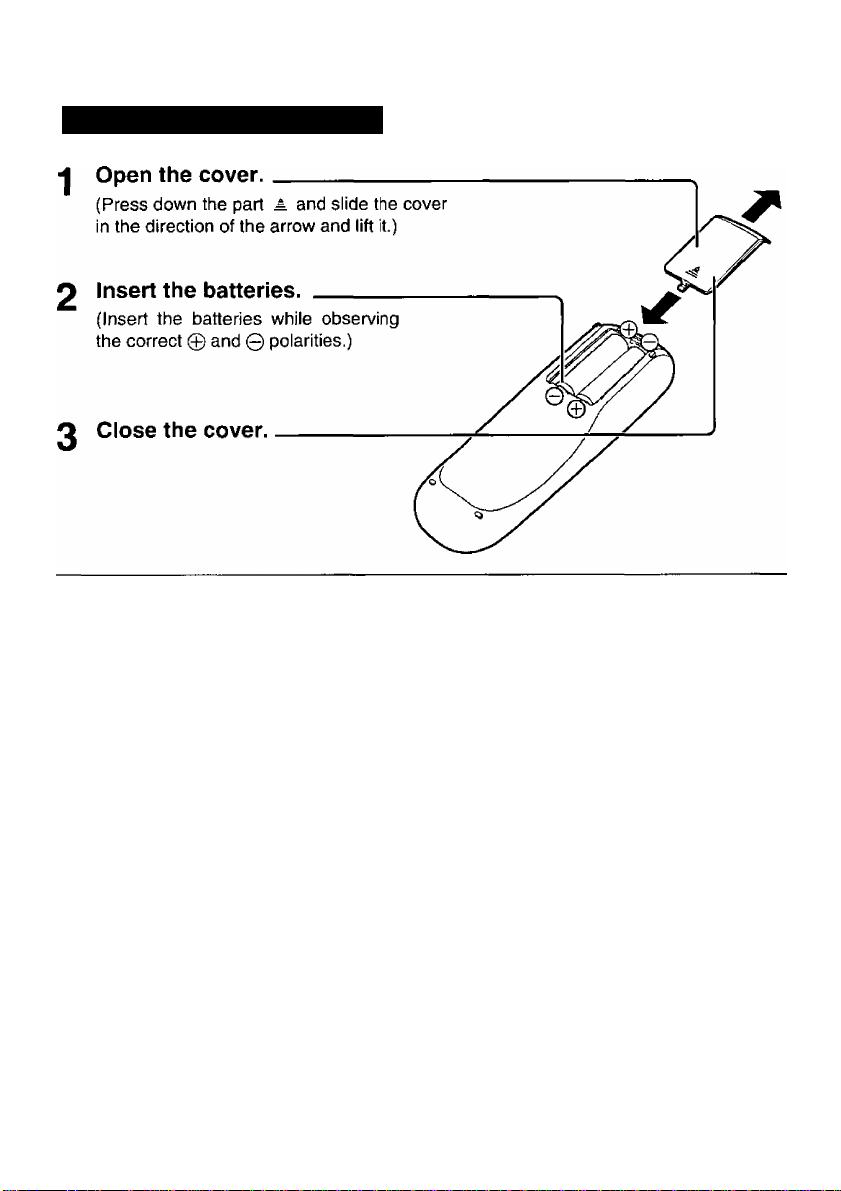
Remote control preparation
Battery (supplied) instali^^^
■ Service life of batteries
•The batteries normally last for about one year although this depends on how often, and
for what operations, the remote control is used.
• If the remote control unit fails to work even when it is operated near the player, replace
the batteries.
•Use size “AA" batteries.
22
 Loading...