

Panasonic DVD-LV70 User Manual
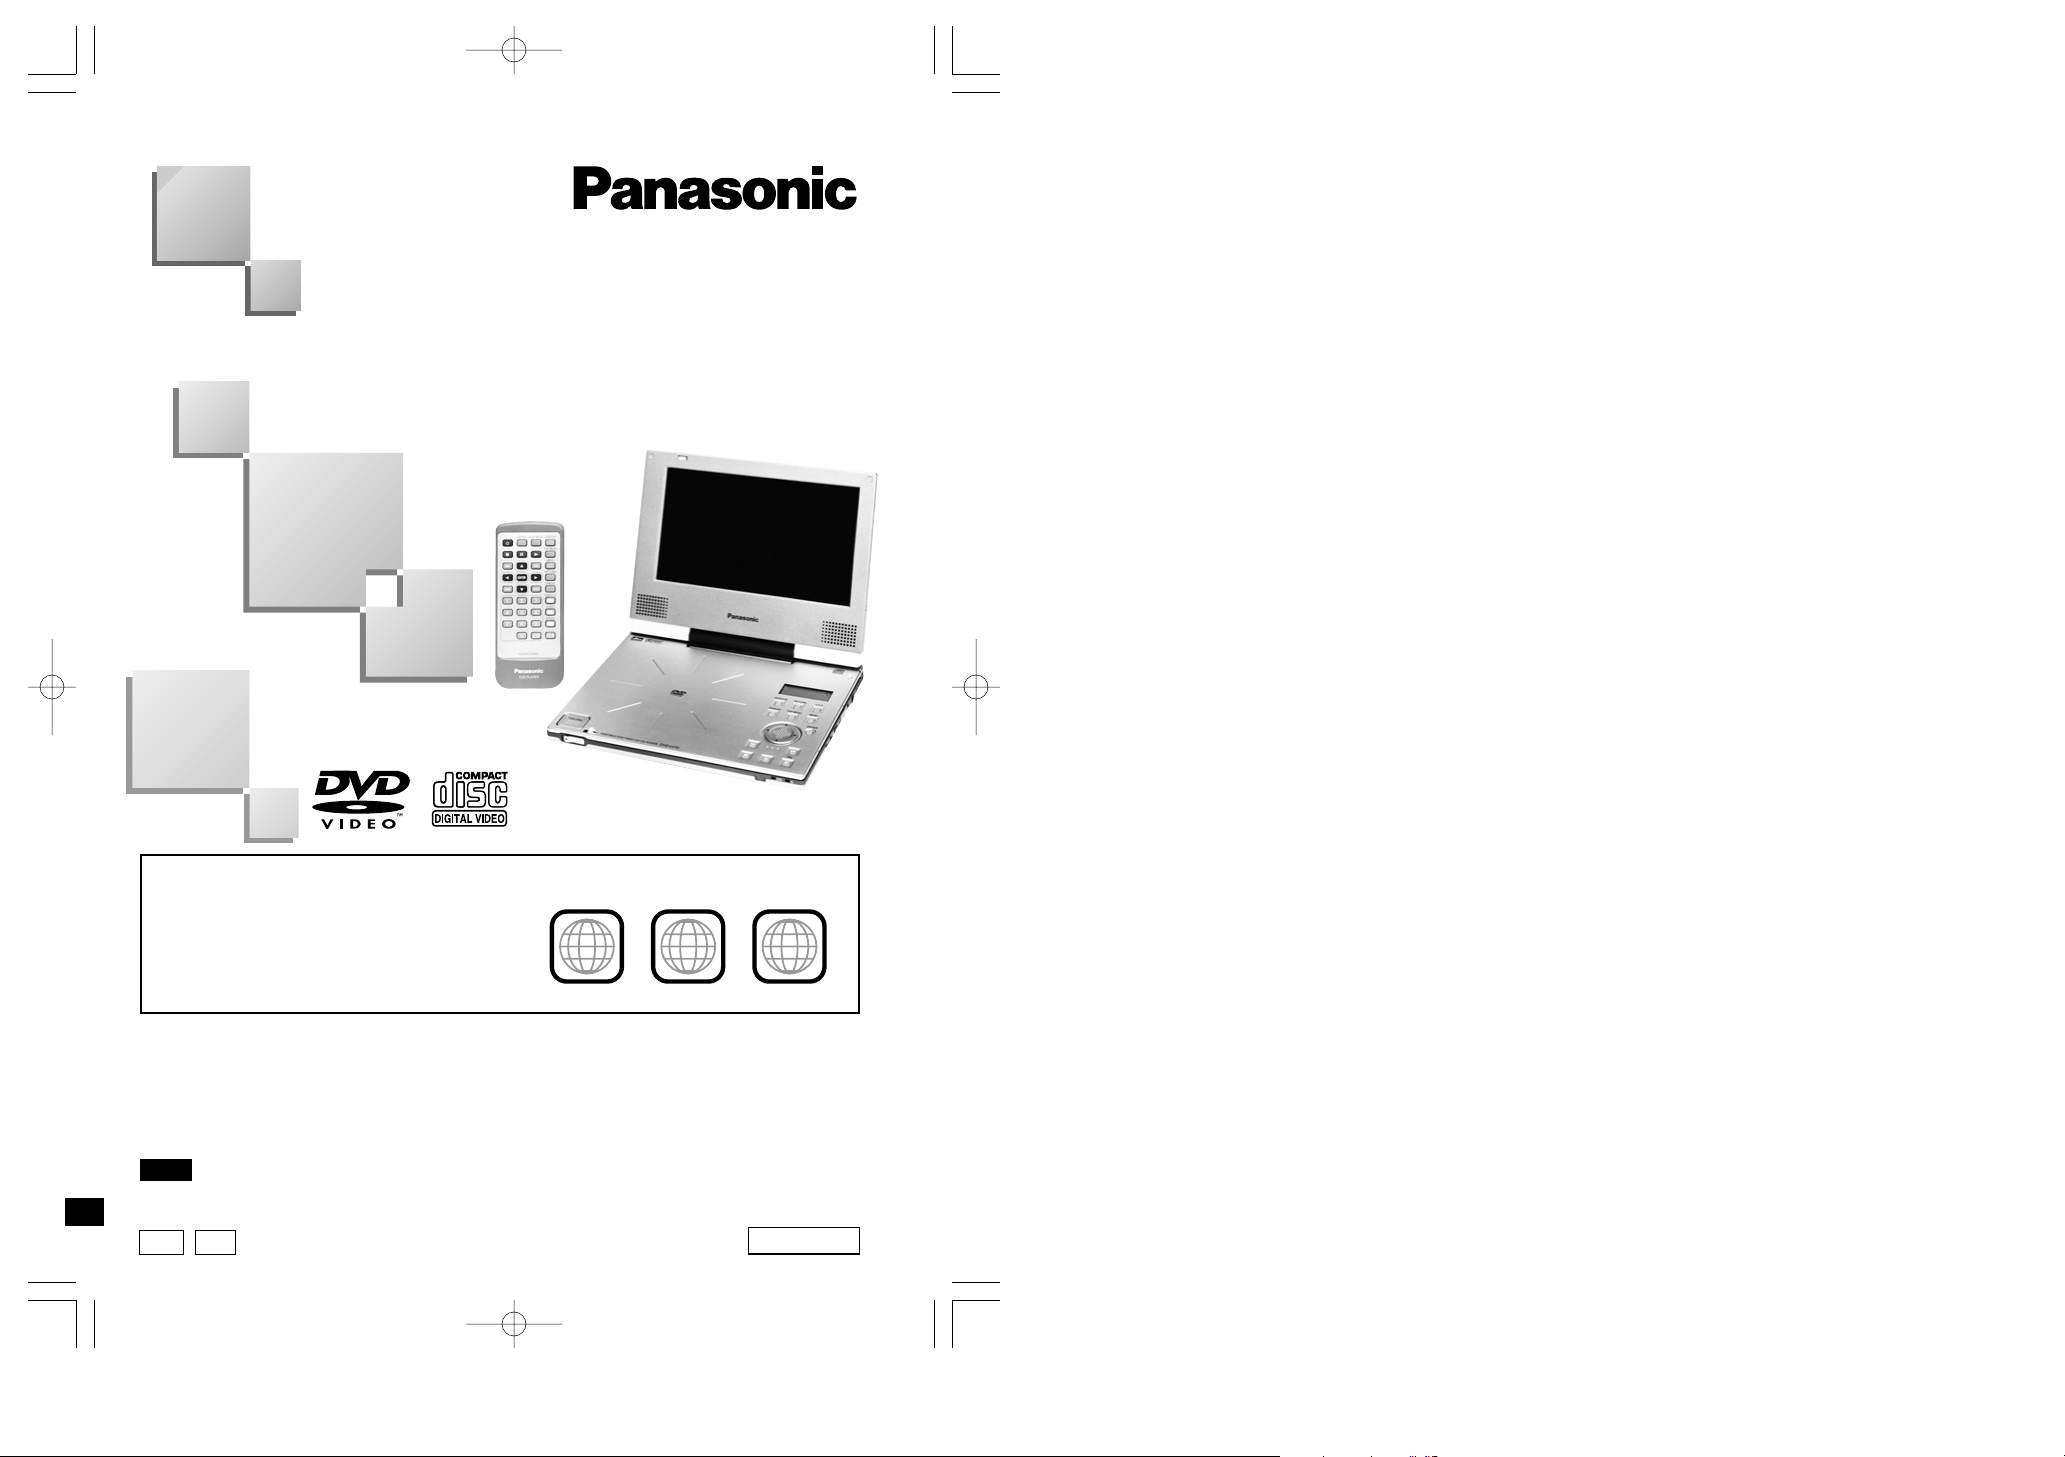
Portable DVD/Video CD/CD Player
Operating Instructions
Model No. DVD-LV70
RQT5900-B
Before connecting, operating or adjusting this product, please read these instructions completely. Please keep this manual for future reference.
Note
“EB” on the packaging indicates the United Kingdom.
EB
EG
∫ Region number supported by this unit
Region numbers are allocated to DVD players
and software according to where they are sold.
≥You can play DVDs marked with labels con-
taining the region number of this unit or
“ALL”.
Read the disc’s instructions carefully.
≥The region number of this unit is “2”.
Example:
2 ALL
2
4
1
Dear customer
Thank you for purchasing this product.
For optimum performance and safety, please read these instructions carefully.
rqt5900-Bp01.qxd01.2.86:41PMページ1
2
RQT5900
CAUTION!
THIS PRODUCT UTILIZES A LASER.
USE OF CONTROLS OR ADJUSTMENTS OR PERFORMANCE OF PROCEDURES OTHER THAN THOSE
SPECIFIED HEREIN MAY RESULT IN
HAZARDOUS RADIATION EXPOSURE.
DO NOT OPEN COVERS AND DO
NOT REPAIR YOURSELF. REFER
SERVICING TO QUALIFIED PERSONNEL.
CLASS
1
LASER PRODUCT
WARNING:
TO REDUCE THE RISK OF FIRE,
ELECTRIC SHOCK OR PRODUCT
DAMAGE, DO NOT EXPOSE THIS APPLIANCE TO RAIN, SPLASHING,
DRIPPING OR MOISTURE.
Safety Information
Marking sign is located on bottom of
the unit.
NORSK
ADVARSEL!
DETTE PRODUKTET ANVENDER EN
LASER.
BETJENING AV KONTROLLER,
JUSTERINGER ELLER ANDRE INNGREP ENN DE SOM ER BESKREVENT I DENNE BRUKSANVISNING,
KAN FØRE TIL FARLIG BESTRÅLING.
DEKSLER MÅ IKKE ÅPNES, OG
FORSØK ALDRI Å REPARERE APPARATET PÅ EGENHÅND. ALT SERVICE OG REPARASJONSARBEID MÅ
UTFØRES AV KVALIFISERT PERSONELL.
ADVARSEL:
FOR Å REDUSERE FAREN FOR
BRANN, STRØMSJOKK ELLER SKADER PÅ PRODUKTET, MÅ DETTE APPARATET IKKE UTSETTES FOR
REGN, VANNSPRUT, VANNDRÅPER
ELLER FUKTIGHET.
CAUTION
VISIBLE AND INVISIBLE LASER
–
RADIATION WHEN OPEN. AVOID EXPOSURE TO BEAM.
ATTENTION
RAYONNEMENT LASER VISIBLE ET INVISIBLE EN
–
CAS D’OUVERTURE. EXPOSITION DANGEREUSE AU FAISCEAU.
VORSICHT SICHTBARE UND UNSICHTBARE LASERSTRAHLUNG,
–
WENN ABDECKUNG GEÖFFNET. NICHT DEM STRAHL AUSSETZEN.
ADVARSEL
SYNLIG OG USYNLIG LASERSTRÅLING
–
VED ÅBNING. UNDGÅ UDSÆTTELSE FOR STRÅLING.
ADVARSEL
SYNLIG OG USYNLIG LASERSTRÅLING
–
NÅR DEKSEL ÅPNES. UNNGÅ EKSPONERING FOR STRÅLEN.
VARNING
SYNLIG OCH OSYNLIG LASERSTRÅLNING
–
NÄR DENNA DEL ÄR ÖPPNAD. STRÅLEN ÄR FARLIG.
VARO!
AVATTAESSA OLET ALTTIINA NÄKYVÄÄ JA
–
NÄKYMÄTÖN LASERSÄTEILYLLE. ÄLÄ KATSO SÄTEESEEN.
–
(Bottom of the unit)
(Bottom of the unit)
VAROITUS!
LAITTEEN KÄYTTÄMINEN MUULLA
KUIN TÄSSÄ KÄYTTÖOHJEESSA
MAINITULLA TAVALLA SAATTAA ALTISTAA KÄYTTÄJÄN TURVALLISUUSLUOKAN 1 YLITTÄVÄLLE NÄKYMÄTTÖMÄLLE LASERSÄTEILYLLE.
SUOMI
VAROITUS:
TULIPALO-, SÄHKÖISKUVAARAN
TAI MUUN VAHINGON VÄHENTÄMISEKSI EI LAITETTA SAA ALTISTAA
SATEELLE, ROISKEELLE, VESIPISAROILLE TAI KOSTEUDELLE.
LUOKAN 1 LASERLAITE
KLASS 1 LASER APPARAT
rqt5900-Bp02-03.qxd01.2.86:42PMページ2
3
RQT5900
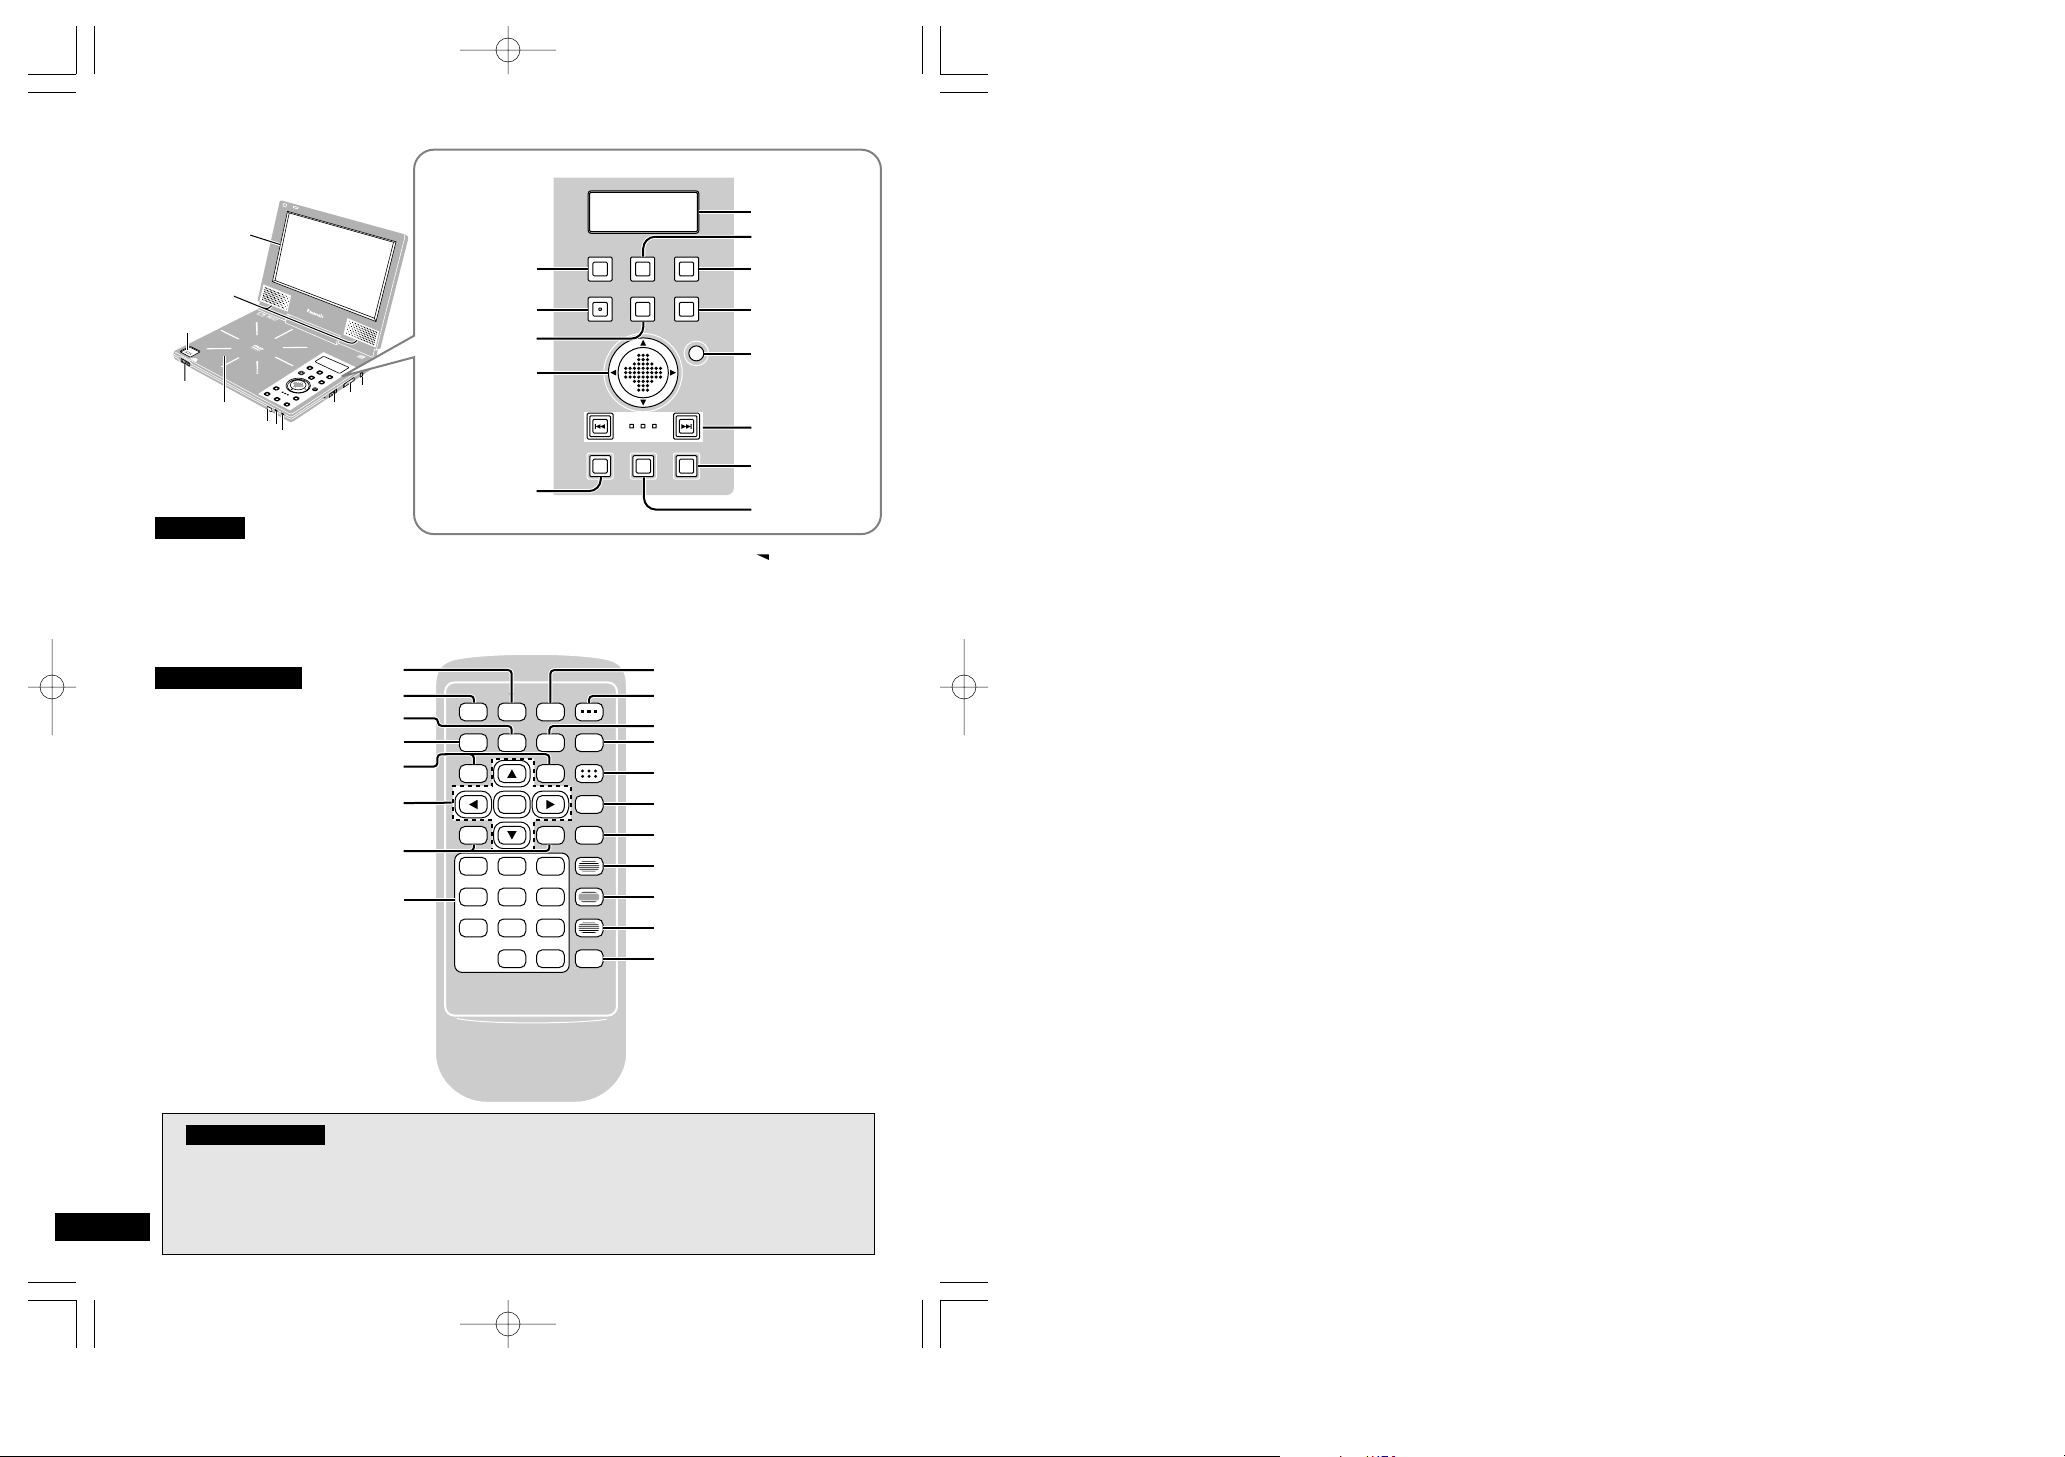
∫;1
65
:9
13
46
79
0
8
5
2
S10
SETUP
ENTER
PLAY MODE
DISPLAY
TOP MENU
MENU
RETURN
CANCEL
SUBTITLE
AUDIO
ANGLE
V.S.S.
Í
2
∫
;
1
:
9
O
N
E
N
T
E
R
M
E
N
U
T
O
P
M
E
N
U
D
IS
P
L
A
Y
V
.S
.S
.
R
E
T
U
R
N
M
O
N
IT
O
R
P
U
S
H
O
P
E
N
5
ON
/O
FF
Ë
2
1
H
O
L
D
V
O
L
Í
2
C
H
G
a
b
c
d
f
e
g
h
i
j
k
∫;1
ON
ENTER
MENUTOP MENUDISPLAY
V.S.S.RETURNMONITOR
LINE-IN
AOP
MULTI
MIX
V.S.S.
SPHP
MONITOR
MODEBRT
COLOUR
192kHz
1A B
[MONITOR]
[DISPLAY]
[TOP MENU]
[RETURN]
Display
[V.S.S.]
[MENU]
[ENTER]
[SETUP]
Pause [;]
Slow/Search
[6, 5]
Skip [:, 9]
Numeric buttons
[PLAY MODE]
[DISPLAY]
Play [1]
[TOP MENU]
[MENU]
[RETURN]
[SUBTITLE]
[AUDIO]
[ANGLE]
[CANCEL]
[V.S.S.]
Stop [∫]
Cursor jockey buttons
[3, 4, 2, 1]/[ENTER]
[Í]
Pause [;]
Play/On [1, ON]
Skip/Slow/
Search
[:, 9]
Stop [∫]
Cursor jockey
[3, 4, 2, 1]
Open this page while reading the instructions so you can see where the controls are.
Using the cursor
On the main unit: Slide the cursor jockey in the direction you want to move the cursor.
[3] up, [4] down, [2] left, [1] right.
On the remote control: Press the cursor jockey button corresponding to the direction you
want to move the cursor.
[3] up, [4] down, [2] left, [1] right.
Remote Control
Main unit
a Wide-screen LCD:7z
b Stereo speakers
c Disc lid [PUSH OPEN]
button
d Lock release
e Disc lid
f Remote control signal
sensor
g Charge [CHG] indicator
h Standby [Í] indicator
i Volume [ VOL] dial
j [ON/OFF, HOLD] select
switch
k Headphone [Ë] jack
rqt5900-Bp02-03.qxd01.2.86:42PMページ3
5
RQT5900
4
RQT5900
For your safety, please read the following
text carefully.
This appliance is supplied with a moulded
three pin mains plug for your safety and
convenience.
A 5-ampere fuse is fitted in this plug.
Should the fuse need to be replaced please
ensure that the replacement fuse has a rating of 5-ampere and that it is approved by
ASTA or BSI to BS1362.
Check for the ASTA mark Ï or the BSI
mark Ì on the body of the fuse.
If the plug contains a removable fuse cover
you must ensure that it is refitted when the
fuse is replaced.
If you lose the fuse cover the plug must not
be used until a replacement cover is obtained.
A replacement fuse cover can be purchased from your local dealer.
If a new plug is to be fitted please observe
the wiring code as stated below.
If in any doubt please consult a qualified
electrician.
IMPORTANT
The wires in this mains lead are coloured in
accordance with the following code:
Blue: Neutral, Brown: Live.
As these colours may not correspond with
the coloured markings identifying the terminals in your plug, proceed as follows:
The wire which is coloured Blue must be
connected to the terminal which is marked
with the letter N or coloured Black or Blue.
The wire which is coloured Brown must be
connected to the terminal which is marked
with the letter L or coloured Brown or Red.
WARNING: DO NOT CONNECT EITHER
WIRE TO THE EARTH TERMINAL
WHICH IS MARKED WITH THE LETTER
E, BY THE EARTH SYMBOL Ó OR
COLOURED GREEN OR GREEN/YELLOW.
THIS PLUG IS NOT WATERPROOF—
KEEP DRY.
Before use
Remove the connector cover.
How to replace the fuse
The location of the fuse differ according to
the type of AC mains plug (figures A and
B). Confirm the AC mains plug fitted and
follow the instructions below.
Illustrations may differ from actual AC
mains plug.
1
Open the fuse cover with a screwdriver.
2
Replace the fuse and close or attach
the fuse cover.
Figure A
12
Figure B
12
Caution for AC Mains Lead (For United Kingdom) (“EB”area code model only)
Open the facing page when
using the operating instructions.
Bitstream
This is the digital form of multiple channel
audio data (e.g., 5.1 channel) before it is
decoded into its various channels.
Chapter
This is the smallest division on DVDs and is
roughly equivalent to a track.
Dolby Digital
This is a method of coding digital signals
developed by Dolby Laboratories. The signals are highly compressed, enabling a
large amount of information to be recorded
on 1 disc.
Dolby Pro Logic
A surround system where a 4-channel
audio track is recorded as 2 channels and
then is restored to 4 channels for play. The
surround channel is monaural and can reproduce up to 7 kHz.
DTS (Digital Theater Systems)
This is a method of coding digital signals
developed by Digital Theater Systems. The
signals are compressed at a low ratio to
maintain sound quality.
Dynamic range
Dynamic range is the difference between
the lowest level of sound that can be heard
above the noise of the equipment and the
highest level of sound before distortion
occurs.
Field
One frame is made up of 2 fields.
A regular television shows these fields one
after the other to create frames.
Frame
Frames are the still pictures that go together to make a moving picture.
There are about 30 frames shown each
second.
Title
This is the largest division on DVDs.
Frame still and field still
A still is shown when you pause a moving
picture.
A frame still is made up of 2 alternating
fields, so the picture may appear blurred,
but overall quality is high.
A field still is not blurred, but it has only half
the information of a frame still so picture
quality is lower.
I/P/B
MPEG 2, the video compression standard
adopted for use with DVDs, codes frames
using these 3 picture types.
I: Intra coded picture (I-picture)
This is the standard picture and is a complete picture in itself. This means it has the
best picture quality and is the best to use
when adjusting the picture.
P: Predictive coded picture (P-picture)
This picture is calculated based on past I or
P-pictures.
B: Bidirectionally-predictive coded picture
(B-picture)
This picture is calculated by comparing
past and future I and P-pictures so it has
the lowest volume of information.
Linear PCM (pulse code modulation)
PCM is the usual digital method used for
music CDs. DVDs have a greater volume
so they use linear PCM, which has a higher
sampling rate.
Playback control (PBC)
This method of controlling disc play is included on version 2.0 Video CDs. You are
able to interact with the disc through
menus.
Track
This is the smallest division on Video CDs
and CDs and usually equates to a single
song.
Glossary
CAUTION!
IF THE FITTED MOULDED PLUG IS
UNSUITABLE FOR THE SOCKET OUTLET IN YOUR HOME THEN THE FUSE
SHOULD BE REMOVED AND THE
PLUG CUT OFF AND DISPOSED OF
SAFELY.
THERE IS A DANGER OF SEVERE
ELECTRICAL SHOCK IF THE CUT OFF
PLUG IS INSERTED INTO ANY 13AMPERE SOCKET.
rqt5900-Bp04-09.qxd01.2.86:42PMページ4
6
RQT5900
Table of contents
Getting Started:
Safety Information . . . . . . . . . . . . . . . . 02
Caution for AC Mains Lead. . . . . . . . . 04
Glossary . . . . . . . . . . . . . . . . . . . . . . . . 05
Accessories . . . . . . . . . . . . . . . . . . . . . 06
Basic Operations:
Basic play . . . . . . . . . . . . . . . . . . . . . . . 14
≥Stopping play. . . . . . . . . . . . . . . . . . . . 15
≥Pausing play . . . . . . . . . . . . . . . . . . . . 16
≥Skipping chapters and tracks . . . . . . . 16
Advanced Operations:
Other play modes
≥Program play . . . . . . . . . . . . . . . . . . . . 18
≥Random play . . . . . . . . . . . . . . . . . . . . 18
Changing soundtracks, subtitle
languages and angles . . . . . . . . . . . 19
Switching vocals ON or OFF for
karaoke discs . . . . . . . . . . . . . . . . . . 20
For Your Reference:
Changing initial settings
≥Common procedures. . . . . . . . . . . . . . 27
≥1 Disc Languages . . . . . . . . . . . . . . . . 28
≥2 Ratings . . . . . . . . . . . . . . . . . . . . . . . 29
≥3 Menu Language . . . . . . . . . . . . . . . . 29
≥4 On-Screen Messages. . . . . . . . . . . . 30
≥9 Other Settings . . . . . . . . . . . . . . . . . 30
Connecting other equipment . . . . . . . 32
Selecting the type of disc for the type
of connected TV . . . . . . . . . . . . . . . . 33
Enjoying a larger screen
≥Connecting to a television . . . . . . . . . . 34
≥Selecting TV screen type . . . . . . . . . . 35
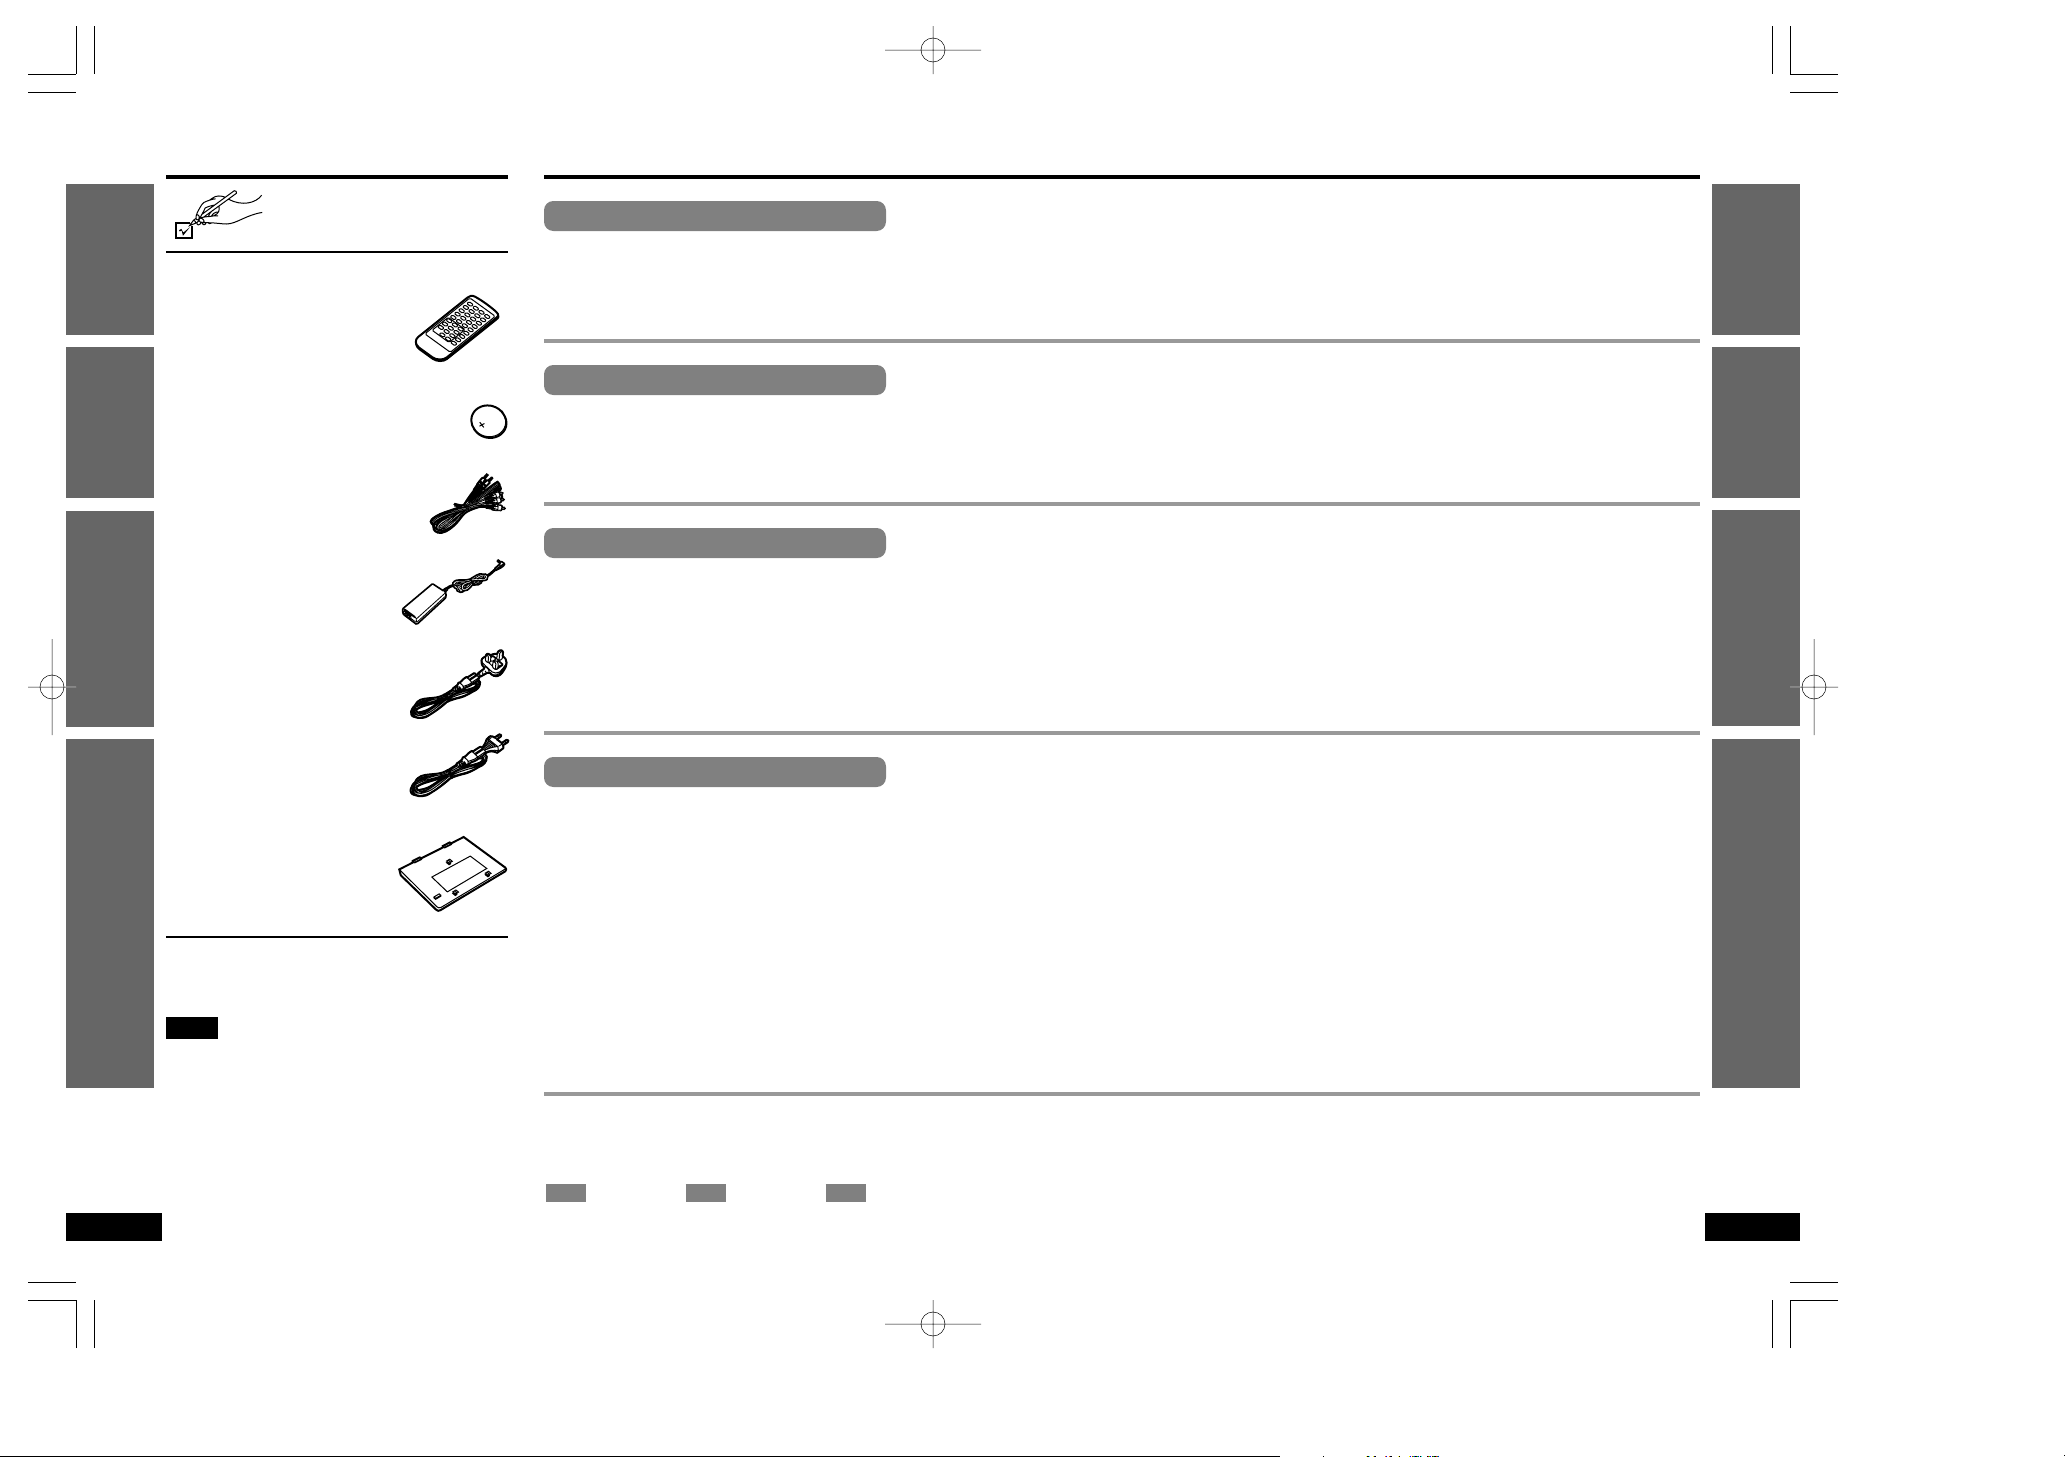
Accessories
Please check and identify the
supplied accessories.
∏ Remote control . . . . . . . . . . . . . . . . . . . 1
(N2QAHC000008)
∏ Button-type battery . . . . . . . . . . . . . . . 1
for remote control
(For replacement, ➡ page 12)
∏ Audio/video cable . . . . . . . . . . . . . . . . . 1
(RJL3X001X15)
∏ AC adaptor . . . . . . . . . . . . . . . . . . . . . . . 1
(N0JEEJ000001)
∏ AC mains lead . . . . . . . . . . . . . . . . . . . . 1
(For the United Kingdom: RJA0053-2X)
(For Continental Europe: RJA0019-1X)
∏ Battery pack . . . . . . . . . . . . . . . . . . . . . . 1
(For replacement, ➡ page 13)
Use numbers indicated in parentheses when
asking for replacement parts.
Note
The included AC mains lead and AC adaptor are
for use with this unit only. Do not use them with
other equipment.
∫ The functions depend on the disc being
played. These marks indicate the functions available.
(DVD) (Video CD) (Audio CD)
CDVCDDVD
Enjoying more powerful sound
≥Connection to an amplifier with a built-in
decoder (or an amplifier and decoder
combination) (Digital connection) . . . . 36
≥Connection to a 2-channel amplifier or
mini-system
(Analogue connection) . . . . . . . . . . . . 37
≥Connection to a 2-channel digital
amplifier or mini-system
(Digital connection) . . . . . . . . . . . . . . . 38
Digital settings . . . . . . . . . . . . . . . . . . . 39
Using headphones. . . . . . . . . . . . . . . . 40
Watching video from a video
camera. . . . . . . . . . . . . . . . . . . . . . . . 40
Troubleshooting Guide . . . . . . . . . . . . 41
Maintenance . . . . . . . . . . . . . . . . . . . . . 44
Specifications . . . . . . . . . . . . . . . . . . . 45
Changing the monitor settings. . . . . . 20
≥Changing the size of the picture . . . . . 21
≥Adjusting the brightness . . . . . . . . . . . 21
≥Adjusting colour intensity. . . . . . . . . . . 21
Enjoying Virtual Surround Sound
(V.S.S.). . . . . . . . . . . . . . . . . . . . . . . . 22
Using GUI screens
≥Basic operation . . . . . . . . . . . . . . . . . . 23
≥Screen for disc information . . . . . . . . . 24
≥Screen for unit information . . . . . . . . . 25
≥Shuttle screen . . . . . . . . . . . . . . . . . . . 26
7
RQT5900
Getting StartedBasic Operations
Advanced Operations
For Your Reference
Precautions . . . . . . . . . . . . . . . . . . . . . 08
Disc information . . . . . . . . . . . . . . . . . 10
Disc and unit handling
precautions. . . . . . . . . . . . . . . . . . . . 11
Preparing the remote control . . . . . . . 12
Power supply
≥Using the AC adaptor . . . . . . . . . . . . . 12
≥Using the battery pack. . . . . . . . . . . . . 13
≥Slow motion. . . . . . . . . . . . . . . . . . . . . 16
≥Fast forward and rewind—
SEARCH . . . . . . . . . . . . . . . . . . . . . . . 16
≥Frame-by-frame viewing . . . . . . . . . . . 16
≥Starting play from a selected title or
track. . . . . . . . . . . . . . . . . . . . . . . . . . . 17
≥Returning to a menu . . . . . . . . . . . . . . 17
Getting StartedBasic Operations
Advanced Operations
For Your Reference
rqt5900-Bp04-09.qxd01.2.86:42PMページ6
9
RQT5900
Getting Started
8
RQT5900
Getting Started
Installation
1. Water and Moisture—Do not use this unit
near water— for example, near a bathtub,
washbowl, swimming pool, or the like. Damp
basements should also be avoided.
2. Condensation—Moisture may form on the
lens in the following conditions…
≥immediately after a heater has been turned
on.
≥in a steamy or very humid room.
≥when the unit is suddenly moved from a
cold environment to a warm one. If moisture
forms inside this unit, it may not operate
properly. To correct this problem wait about
one hour for the moisture to evaporate.
3. Heat—Never use or place this unit or battery
near a heat source. Do not leave it in an automobile exposed to direct sunlight for a long
time with the doors and windows closed as
this may deform the cabinet.
4. Foreign Material—Care should be taken so
that objects do not fall into and liquids are not
spilled into the unit. Do not subject this unit to
excessive smoke, dust, mechanical vibration,
or shock.
Service
1. Damage Requiring Service—The unit
should be serviced by qualified service personnel when:
(a) The AC mains lead or AC adaptor is dam-
aged; or
(b) Objects have fallen or liquid has spilled
into the unit; or
(c) The unit has been exposed to water; or
(d) The unit does not appear to operate nor-
mally or exhibits a marked change in per-
formance; or
(e) The unit has been dropped, or the enclo-
sure damaged.
2. Servicing—The user should not attempt to
service the unit beyond that described in the
operating instructions. All other servicing
should be referred to authorized service personnel.
3. Replacement parts—When parts need replacing, ensure the servicer uses parts specified by the manufacturer or parts that have
the same characteristics as the original parts.
Unauthorized substitutes may result in fire,
electric shock, or other hazards.
4. Safety check—After repairs or service, ask
the servicer to perform safety checks to confirm that the unit is in proper working condition.
Precautions
Before using this unit, be sure to read the applicable items of the operating instructions and
these safety suggestions carefully.
Afterwards keep them handy for future reference. Take special care to follow the warnings
indicated on the unit itself as well as in the operating instructions.
Power source
1. Power Source—The unit should be connect-
ed to a power supply only of the type described in the operating instructions or as
marked on the unit. If you are not sure of the
type of power supply to your home, consult
your appliance dealer or local power company.
Do not use a car cigarette lighter socket to
power the unit.
2. Power lead Protection—AC mains lead
should be routed so that they are not likely to
be walked on or pinched by items placed
upon or against them. Never take hold of the
plug or lead if your hand is wet, and always
grasp the plug body when connecting or disconnecting it.
3. Overloading—Do not overload wall outlets
and extension cords as this can result in a
risk of fire or electric shock.
4. Nonuse Periods —If the set is not being
used for a long time, be sure to disconnect
the AC mains lead from the mains socket and
detach the battery pack to prevent potential
damage caused by battery leakage.
5. Attachments—Do not use attachments not
recommended by the unit manufacturer as
they may cause hazards.
Maintenance
Disconnect this unit from mains socket before
cleaning. Clean the cabinet, panel and controls
with a soft cloth lightly moistened with a mild detergent solution.
Do not use any type of abrasive pad, scouring
powder or solvent such as alcohol or benzine.
AC adaptor
This AC adaptor operates on AC between 100 V
and 240 V.
But
≥Obtain a suitable plug adaptor if the plug does
not fit the AC mains socket.
Batteries
1. Battery pack (Lithium ion battery pack)
≥Use this unit to recharge the battery pack.
≥Do not use the battery pack with equipment
other than the specified player.
≥Do not use, charge or leave the battery
pack in locations where there is static electricity.
≥Do not use the player outside if it is snowing
or raining. (The battery pack is not waterproof.)
≥Do not get dirt, sand, liquids, or other for-
eign matter on the terminals.
≥Do not touch the plug terminals (i and j)
with metal objects.
≥Do not disassemble, remodel, heat or throw
into fire.
≥Do not store the battery pack in temperature
over 60 oC.
2. Button-type battery (Lithium battery)
≥Insert with poles aligned.
≥Do not touch the terminals (i and j) with
metal objects.
≥Do not disassemble, remodel, heat or throw
into fire.
≥Keep out of reach of children.
If any electrolyte should come into contact with
your hands or clothes, wash it off thoroughly with
water.
If any electrolyte should come into contact with
your eyes, never rub the eyes.
Rinse eyes thoroughly with water, and then consult a doctor.
3. Disposing of the batteries
Check and follow your local regulations before disposal.
Precautions for Listening
with the Headphones or
Earphones
≥Do not play your headphones or earphones at
a high volume. Hearing experts advise against
continuous extended play.
≥If you experience a ringing in your ears, reduce
volume or discontinue use.
≥Do not use while operating a motorized vehicle.
It may create a traffic hazard and is illegal in
many areas.
≥You should use extreme caution or temporarily
discontinue use in potentially hazardous situations.
≥Even if your headphones or earphones are the
open-air type designed to let you hear outside
sounds, don’t turn up the volume so high that
you can’t hear what’s around you.
CAUTION!
DANGER OF EXPLOSION IF BATTERY IS INCORRECTLY REPLACED.
REPLACE ONLY WITH THE SAME OR
EQUIVALENT TYPE RECOMMENDED
BY THE MANUFACTURER.
DISCARD USED BATTERIES ACCORDING TO THE MANUFACTURER’S INSTRUCTIONS.
Do not rest the unit on your lap for a long
time while using it. The unit can become
hot and cause burns.
rqt5900-Bp04-09.qxd01.2.86:42PMページ8
10
11
RQT5900
Getting Started
Getting Started
RQT5900
Disc and unit handling precautions
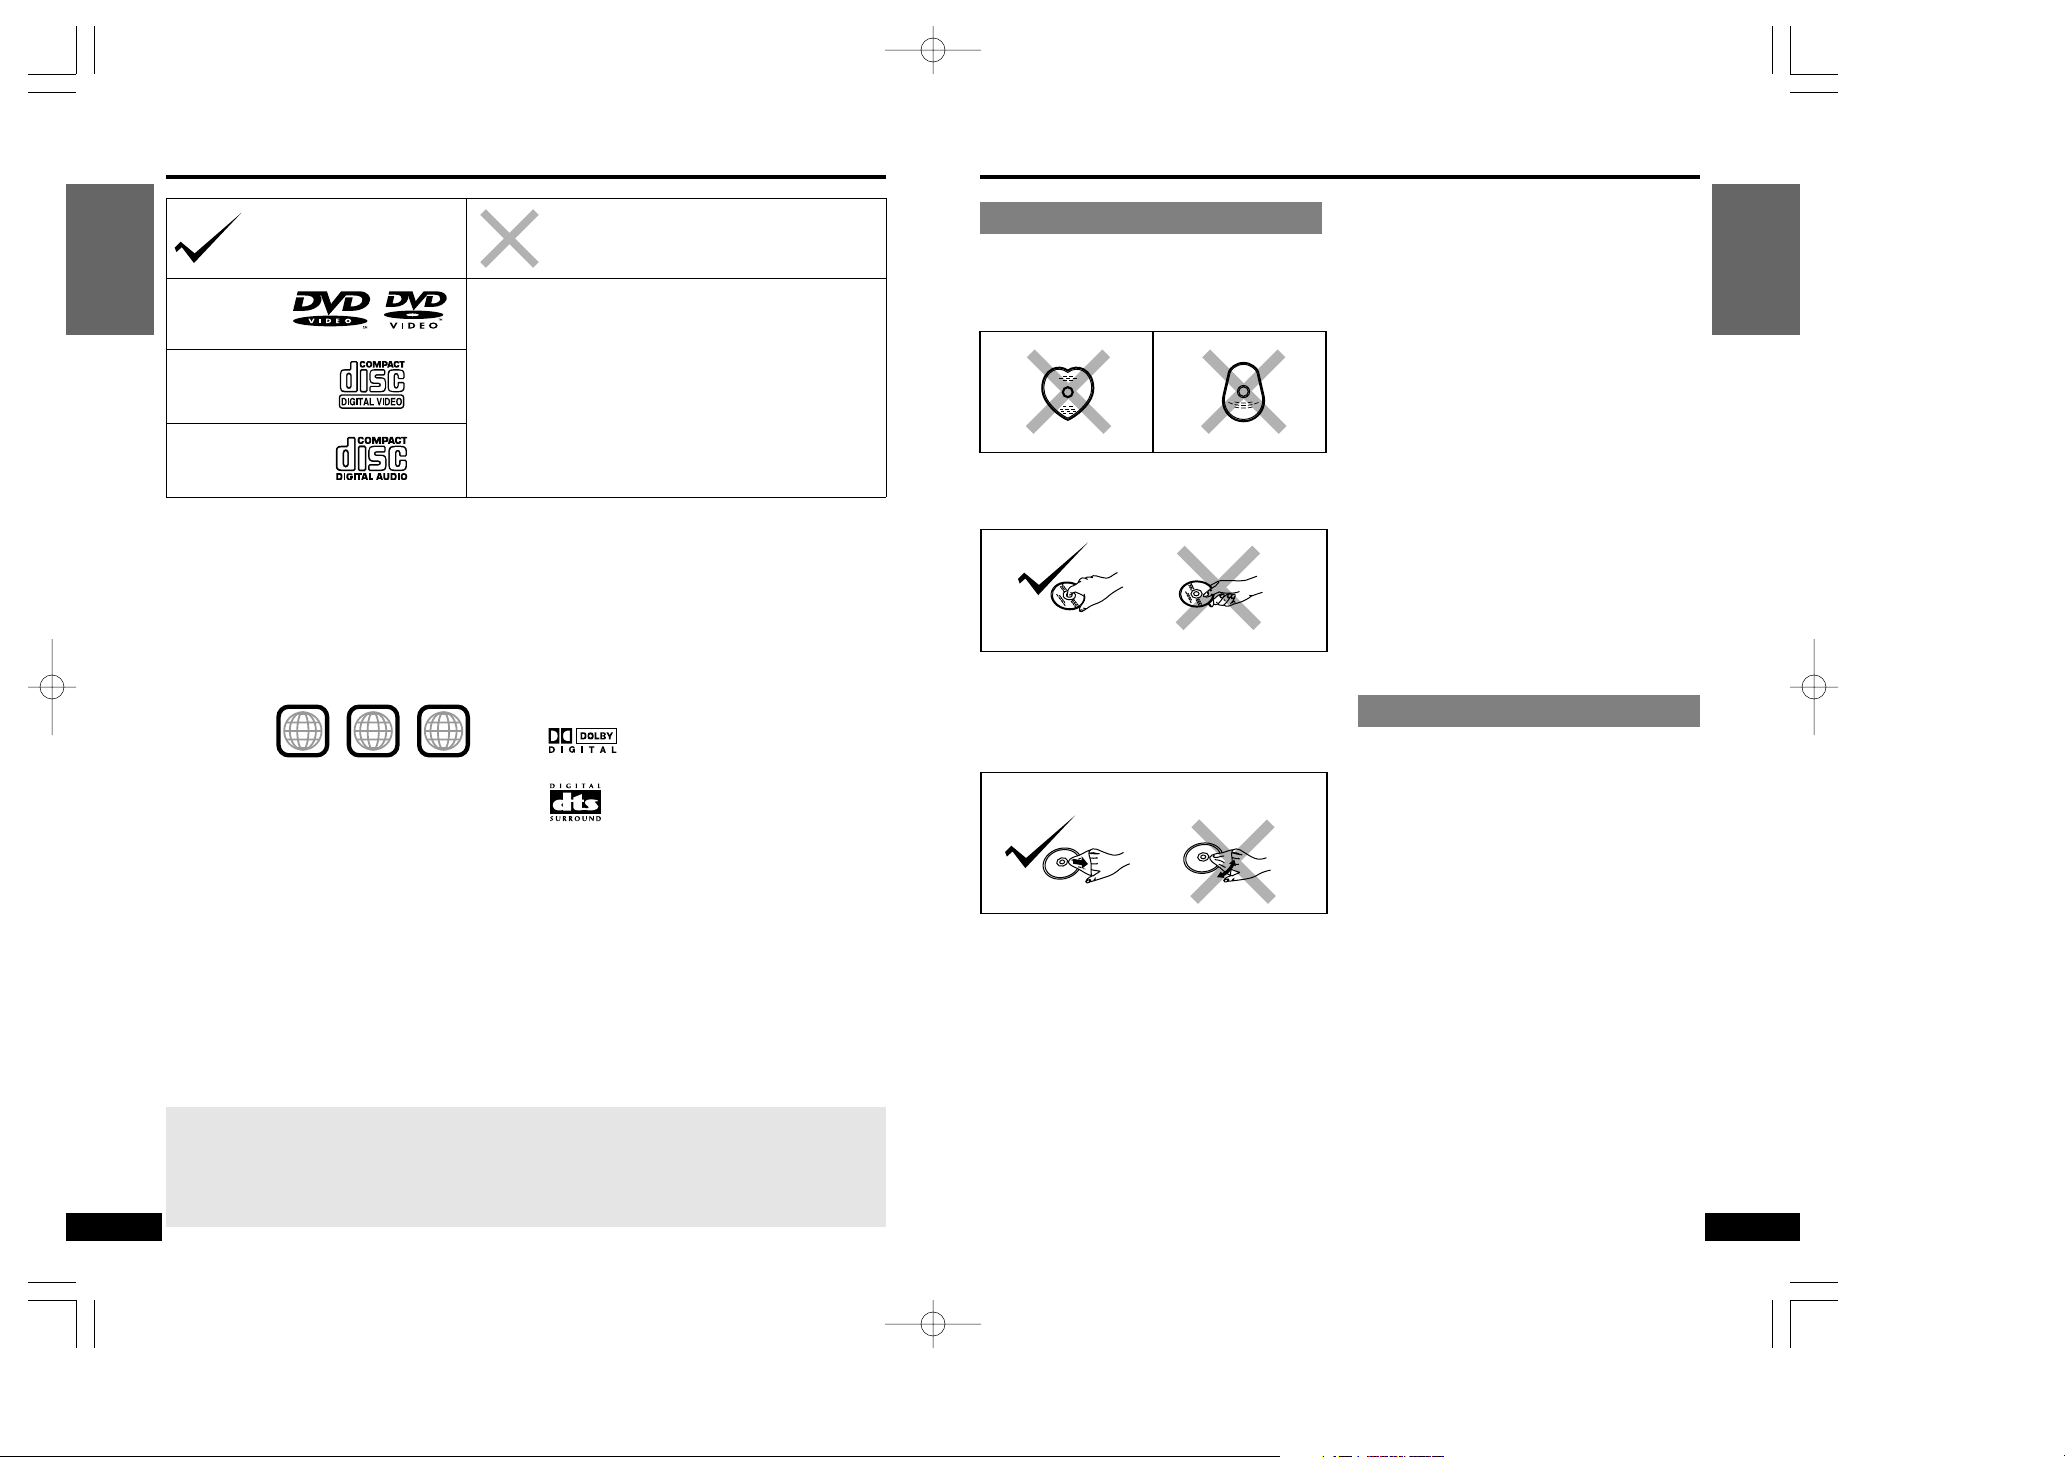
Concerning discs
Do not use irregularly shaped discs, such
as heart-shaped.
(These discs can damage the unit.)
∫ How to hold a disc
Do not touch the recorded shiny surface.
∫ If the surface is dirty
Wipe it with a damp cloth and then wipe
dry. Wipe from the center toward the circumference.
∫ If the disc is brought from a cold to a
warm environment, moisture may
form on the disc
Wipe with a soft, dry, lint-free cloth before
using the disc.
∫ Handling precautions
≥Do not write on the label side with a ball-
point pen or other writing instrument.
≥Do not use record cleaning sprays, ben-
zine, thinner, static electricity prevention
liquids or any other solvent.
≥Do not attach labels or stickers to discs.
≥Do not use discs with exposed adhesive
from tape or left over peeled off stickers.
≥Do not use scratch-proof protectors or
covers other than those specified for use
with this unit.
≥Do not use CDs printed with label printers
available on the market.
∫ Do not place or store discs in the fol-
lowing places
≥Locations exposed to direct sunlight
≥Humid or dusty locations
≥Locations directly exposed to a heat vent
or heating appliance
Avoid the following;
≥Spraying flammable insecticides near the
unit,
≥Pressing the LCD,
≥Touching the lens and other parts of the
laser pickup.
Do not use the unit in the following places;
≥Sandy places such as beaches,
≥On top of cushions, sofas, or hot equip-
ment such as amplifiers.
Disc information
Play surface (shiny surface)
Discs supported by
this unit
DVD-Video
Video CD
Audio CD
Discs not supported by this unit
DVD with a region number other than the region
number of this unit or “ALL” (See below.), Photo CD,
DVD-ROM, DVD-RW, CDV, DVD-R, iRW, CD-G,
DVD-RAM, CVD, DVD-Audio, CD-ROM, Divx Video
Disc, SVCD, CD-RW, VSD, SACD, etc.
∫ Region number supported by this unit
Region numbers are allocated to DVD players
and software according to where they are sold.
≥You can play DVDs marked with labels con-
taining the region number of this unit or
“ALL”.
Read the disc’s instructions carefully.
≥The region number of this unit is “2”.
Example:
∫ Playing DVDs and Video CDs
The producer of the material can control how
these discs are played. This means that you may
not be able to control play of a disc with some operations described in these operating instructions. Read the disc’s instructions carefully.
∫ How the picture appears on the LCD
The picture shown on the LCD depends on the
display mode and the aspect ratio recorded on
the disc (➡ page 21).
∫ Copy Protection
Some DVD discs contain copy protection signals
which can affect the video signal if the output of
the player is fed through a VCR to the TV. The
picture may become unstable or the picture contrast may change drastically. It is therefore very
important to connect this unit according to the diagram in these Operating Instructions.
∫ DVDs that can be played
This unit has a Dolby Digtal decoder
so you can play DVDs with this mark.
This unit does not have a DTS decoder. Connect this unit to equipment that has a DTS decoder to
enjoy DVDs with this mark.
∫ Playing CD-R
This unit can play CD-DA (digital audio) and
video CD format audio CD-R that has been finalized§upon completion of recording.
It may not be able to play some CD-R due to the
condition of recording.
§ Finalizing is a process that enables CD-R
players to play audio CD-R.
2 ALL
2
4
1
Before enjoying DVD/Video CD/CD
The On-Screen menu language of your player has been factory preset to English.
You can change the menu language to other languages. Refer to “3 Menu Language” on
page 29.
In these instructions, it is assumed that English has been selected as the menu language.
rqt5900-Bp10-21.qxd01.2.87:02PMページ10
≥Charge the battery pack before using it for the
first time.
≥The battery pack can only be recharged when
the unit is off (➡ page 15, “To turn the unit off”).
≥Quote the following part number when replac-
ing the battery pack.
≥CGP-H501E/1B
≥
1 Attach the battery pack.
1 Confirm that the marks match.
Fit the battery pack firmly so it
clicks into place. Ensure the
mark on the unit matches the
LOCK mark on the battery
pack.
2 Recharge the battery pack.
Connect to the household mains socket while the
battery pack is attached (➡ page 12).
Note
Refer to “Precautions” on page 8.
∫ Recharging and play times
§
When brightness is set to the lowest level (➡
page 21).
≥Times shown above depend on operating con-
ditions.
≥The charge is shown on the unit’s display dur-
ing charging. Use this indicator as a guide.
∫ Confirm the battery charge on the unit’s
display
∫ If play time dramatically reduces after
recharging
The battery pack has reached the end of its service life (it can be recharged about 300 times).
∫ If the unit is not to be used for a long time
≥Detach the battery pack. (Even if the unit is off,
it still uses some power. This can lead to over
discharging of the battery and malfunction.)
≥Recharge the battery pack when you are ready
to use it again.
∫ To detach
1 Slide and hold in
position.
Preparing the remote
control
Insert the battery
(Lithium battery)
∫ Replacing the button-type battery
The battery normally lasts for about a year.
Replace if the remote control fails to operate the
unit when used within the operation range.
Replacement: CR2025
Note
Refer to “Precautions” on page 8.
Operation range
Note
≥Do not expose the remote control signal sensor
to bright light.
≥Do not place obstacles between the remote
control signal sensor and the remote control.
≥Do not use another unit’s remote control at the
same time.
Using the AC adaptor
Note
Refer to “Precautions” on page 8.
∫ When the unit is not going to be used
for a long time
The unit consumes 1.5 W when in standby
mode. To conserve power, disconnect the AC
mains lead from the mains socket.
DC IN 9V
PORTABLE DVD/VID
LOCK UNLOCK
P
O
R
T
A
B
L
E
D
V
D
/V
ID
E
O
C
D
/C
D
P
L
A
Y
E
R
D
V
D
-
L
V
7
5
LOCK UNLOCK
1
2
DC IN 9V
PORTABLE DVD/VIDEO C
3
2
1
12
13
RQT5900
Getting Started
Getting Started
RQT5900
About 7 m in
front of the
signal sensor
To household mains
socket
The [Í] indicator lights.
Power supply
Using the battery pack (Lithium ion battery pack)
Recharging is complete when [CHG] goes
out
Disconnect the AC mains lead and AC
adaptor.
Full Low
1
2
3
30° 30°
Remote control
signal sensor
R
E
L
E
A
S
E
D
E
TA
C
H
A
T
TA
C
H
L
O
C
K
U
N
L
O
C
K
2
R
E
L
E
A
S
E
D
E
T
A
C
H
A
T
T
A
C
H
1
The unit is in the standby condition (the [Í]
indicator lights) when the AC mains lead is
connected. The primary circuit is always “live”
as long as the AC adaptor is connected to an
electrical outlet.
UNLOCKLOCK
Low Charging
complete
Flashes
Flashes
Flashes
Recharge
Front of
this unit
CHG
This unit
Battery pack
CHG
Front of this unit
The [CHG] and [Í]
indicators light.
Battery pack
This unit
Recharging
[at 20 oC]
Approx.
5 hours
LCD on
Approx.
5 hours
§
LCD off
Approx.
8 hours
Play time
FOR UNITED KINGDOM ONLY
READ THE CAUTION FOR THE AC
MAINS LEAD ON PAGE 4 BEFORE
CONNECTION.
Face + upwards.
rqt5900-Bp10-21.qxd01.2.87:02PMページ12
 Loading...