

Panasonic DVD-K33 User Manual
Operating Instructions
親
使用說明書
DVD/CD PLAYER
Dear customer
Thank you for purchasing this product.
For optimum performance and safety, please read these instructions carefully.
Before connecting, operating or adjusting this product, please read the instructions
completely. Please keep this manual for future reference.
DVD/CD 播放機
Model No./ 型號 DVD-K33
Region number
The player plays DVD-Video marked with labels containing the region number “3” or
“ALL”.
地區號碼
此播放機可播放標籤上含有地區號碼 “3” 或 “ALL” 字樣的 DVD-Video (DVD 影音光碟)。
Example:
範例:
GCS
3
ALL
愛的客戶
感謝您購買本產品。
為獲得最佳效能及使用安全,請仔細閱讀相關使用說明。
連接、操作或調整本產品前,請先詳細閱讀這些說明。請妥善保存此說明書,以便日後
參考。
中文
CHINESE
2
3
5
RQTC0126-K

Table of contents
Getting started
Accessories. . . . . . . . . . . . . . . . . . . . . . . . . . . . . . . . . . . . . . . . . . . . . . . . . 2
Discs that can be played . . . . . . . . . . . . . . . . . . . . . . . . . . . . . . . . . . . . . . 4
STEP 1 Connection . . . . . . . . . . . . . . . . . . . . . . . . . . . . . . . . . . . .6
STEP 2 The remote control . . . . . . . . . . . . . . . . . . . . . . . . . . . . . .7
STEP 3 Quick setup . . . . . . . . . . . . . . . . . . . . . . . . . . . . . . . . . . . .7
Operations
Basic play . . . . . . . . . . . . . . . . . . . . . . . . . . . . . . . . . . . . . . . . . . . . . . . . . . 8
Enjoying Karaoke . . . . . . . . . . . . . . . . . . . . . . . . . . . . . . . . . . . . . . . . . . . . 9
Convenient functions . . . . . . . . . . . . . . . . . . . . . . . . . . . . . . . . . . . . . . . . 10
Displaying current playback condition/Repeat play/Changing play speed/
Skipping about 30 seconds forward/Quick replay/Enjoying virtual surround/
Making the dialogue easier to hear. . . . . . . . . . . . . . . . . . . . . . . . . . . . . . . . . . . . .10
Changing subtitles/Changing soundtracks/Angle select/Still picture rotation/
Zoom/Transfer mode/Changing picture mode/Smoothing block noise . . . . . . . . . .11
Playing audio (WMA/MP3), picture (JPEG) and video (DivX/MPEG4)
discs . . . . . . . . . . . . . . . . . . . . . . . . . . . . . . . . . . . . . . . . . . . . . . . . . . . . 12
Changing the play sequences . . . . . . . . . . . . . . . . . . . . . . . . . . . . . . . . . 13
Program play/Random play . . . . . . . . . . . . . . . . . . . . . . . . . . . . . . . . . . . . . . . . . . . .13
Using on-screen menus . . . . . . . . . . . . . . . . . . . . . . . . . . . . . . . . . . . . . . 14
On-screen menu 1/On-screen menu 2 . . . . . . . . . . . . . . . . . . . . . . . . . . . . . . . . . . .14
On-screen menu 3/On-screen menu 4 . . . . . . . . . . . . . . . . . . . . . . . . . . . . . . . . . . .15
Changing the player settings . . . . . . . . . . . . . . . . . . . . . . . . . . . . . . . . . 16
About DivX VOD content . . . . . . . . . . . . . . . . . . . . . . . . . . . . . . . . . . . . . 18
Reference
Table of contents/Accessories
Glossary/Safety precautions . . . . . . . . . . . . . . . . . . . . . . . . . . . . . . . . . . 19
Troubleshooting guide . . . . . . . . . . . . . . . . . . . . . . . . . . . . . . . . . . . . . . . 20
Maintenance/Specifications. . . . . . . . . . . . . . . . . . . . . . . . . . . . . . . . . . . 22
Index . . . . . . . . . . . . . . . . . . . . . . . . . . . . . . . . . . . . . . . . . . . . . Back cover
Accessories
Please check and identify the supplied accessories.
Use numbers indicated in parentheses when asking for replacement
parts. (Product numbers correct as of February 2007. These may be
subject to change.)
∏ 1 Remote control (EUR7631260)
∏ 1 Audio/video cable
∏ 2 Remote control batteries
RQTC0126
2
2
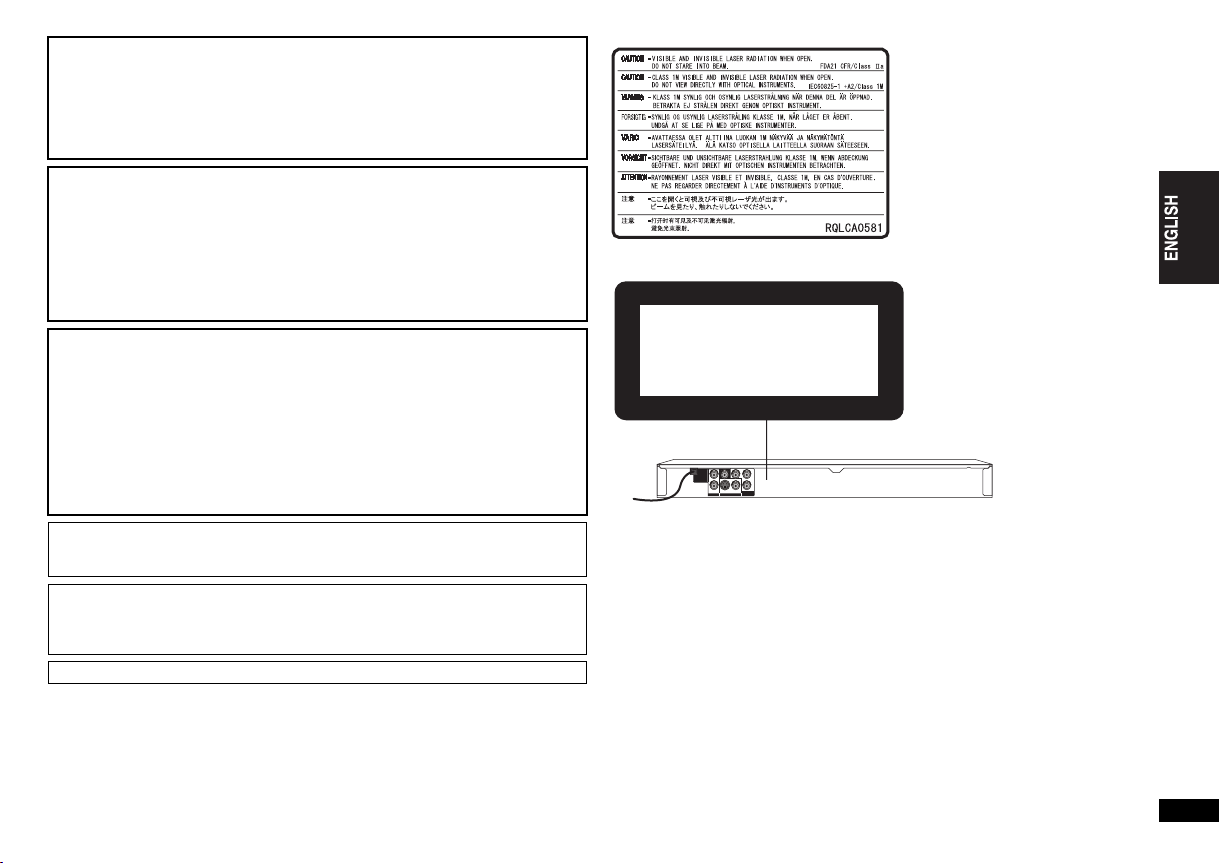
CAUTION!
THIS PRODUCT UTILIZES A LASER.
USE OF CONTROLS OR ADJUSTMENTS OR PERFORMANCE OF
PROCEDURES OTHER THAN THOSE SPECIFIED HEREIN MAY RESULT IN
HAZARDOUS RADIATION EXPOSURE.
DO NOT OPEN COVERS AND DO NOT REPAIR YOURSELF. REFER SERVICING
TO QUALIFIED PERSONNEL.
WARNING:
TO REDUCE THE RISK OF FIRE, ELECTRIC SHOCK OR PRODUCT DAMAGE,
≥DO NOT EXPOSE THIS APPARATUS TO RAIN, MOISTURE, DRIPPING OR
SPLASHING AND THAT NO OBJECTS FILLED WITH LIQUIDS, SUCH AS
VASES, SHALL BE PLACED ON THE APPARATUS.
≥USE ONLY THE RECOMMENDED ACCESSORIES.
≥DO NOT REMOVE THE COVER (OR BACK); THERE ARE NO USER
SERVICEABLE PARTS INSIDE. REFER SERVICING TO QUALIFIED SERVICE
PERSONNEL.
CAUTION!
≥DO NOT INSTALL OR PLACE THIS UNIT IN A BOOKCASE, BUILT-IN CABINET
OR IN ANOTHER CONFINED SPACE. ENSURE THE UNIT IS WELL
VENTILATED. TO PREVENT RISK OF ELECTRIC SHOCK OR FIRE HAZARD
DUE TO OVERHEATING, ENSURE THAT CURTAINS AND ANY OTHER
MATERIALS DO NOT OBSTRUCT THE VENTILATION VENTS.
≥DO NOT OBSTRUCT THE UNIT’S VENTILATION OPENINGS WITH
NEWSPAPERS, TABLECLOTHS, CURTAINS, AND SIMILAR ITEMS.
≥DO NOT PLACE SOURCES OF NAKED FLAMES, SUCH AS LIGHTED
CANDLES, ON THE UNIT.
≥DISPOSE OF BATTERIES IN AN ENVIRONMENTALLY FRIENDLY MANNER.
This product may receive radio interference caused by mobile telephones during use.
If such interference is apparent, please increase separation between the product and
the mobile telephone.
The socket outlet shall be installed near the equipment and easily accessible.
The mains plug of the power supply cord shall remain readily operable.
To completely disconnect this apparatus from the AC Mains, disconnect the power
supply cord plug from AC receptacle.
THIS UNIT IS INTENDED FOR USE IN TROPICAL CLIMATES.
(Inside of product)
CLASS 1
LASER PRODUCT
RQTC0126
3
3
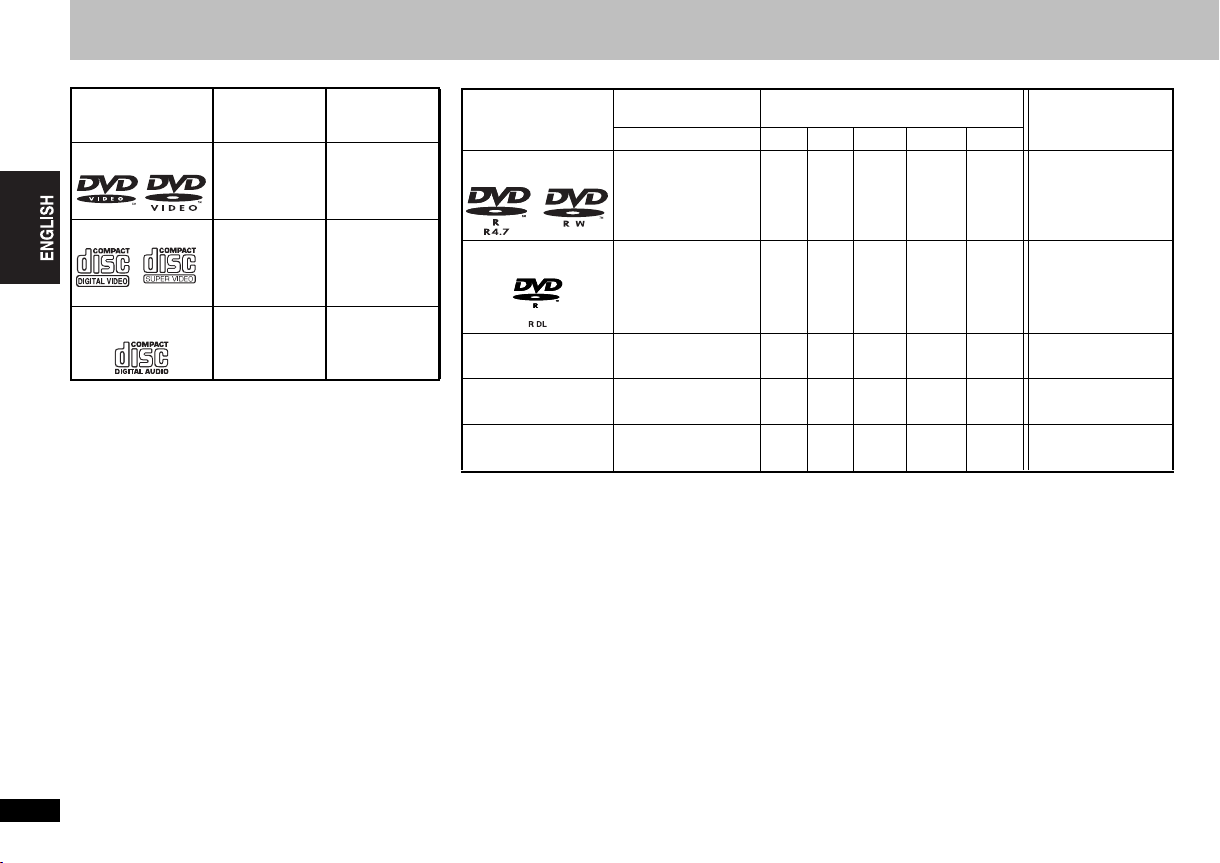
Discs that can be played
Commercial discs
Disc Indicated in
Logo
DVD- Vide o
Video CD
CD
∫ Discs that cannot be played
Blu-ray, HD DVD, DVD-Audio, DVD-RAM, Version 1.0 of
DVD-RW, DVD-ROM, CD-ROM, CDV, CD-G, SACD, Photo
CD and “Chaoji VCD” available on the market including
CVD, DVCD and SVCD that do not conform to IEC62107.
Discs that can be played
∫ Handling precautions
≥ Do not attach labels or stickers to discs (This may cause
disc warping, rendering it unusable).
≥ Do not write on the label side with a ball-point pen or other
writing instrument.
≥ Do not use record cleaning sprays, benzine, thinner, static
electricity prevention liquids or any other solvent.
≥ Do not use scratch-proof protectors or covers.
≥ Do not use the following discs:
–Discs with exposed adhesive from removed stickers or
labels (rented discs etc).
–Discs that are badly warped or cracked.
–Irregularly shaped discs, such as heart shapes.
these
instructions by
[DVD-V]
[VCD]
[CD]
Remarks
High quality
movie and music
discs
Music discs with
video
Including SVCD
(Conforming to
IEC62107)
Music discs
Recorded discs (Y:Available, t:Not available)
§1
Recorded on a DVD
recorder, etc.
§2
Y
Y
§3
(Y)
§3
(Y)
—
Recorded on a personal computer, etc.
[WMA] [MP3] [JPEG] [MPEG4] [DivX]
YY Y Y
t
tt t t
t
tt t t
t
tt t t
t
YY Y Y Y
Finalizing
Necessary
Necessary
Necessary
Necessary
Necessary
§4
§5
Disc
Logo [DVD-V]
DVD-R/RW
DVD-R DL
iR/iRW
—
iR DL
—
CD-R/RW
—
≥ It may not be possible to play the above discs in some cases due to the type of discs, the condition of the
recording, the recording method and how the files were created (➜ 5, Tips for making WMA, MP3, JPEG, MPEG4
and DivX discs).
§1
This unit can also play CD-R/RW recorded with CD-DA or Video CD format.
§2
Discs recorded on DVD recorders or DVD video cameras using DVD-Video Format.
§3
Recorded using a format different from DVD-Video Format, therefore some functions cannot be used.
§4
A process that allows play on compatible equipment. To play a disc that is displayed as “Necessary” on this unit,
the disc must first be finalized on the device it was recorded on.
§5
Closing the session will also work.
RQTC0126
4
4
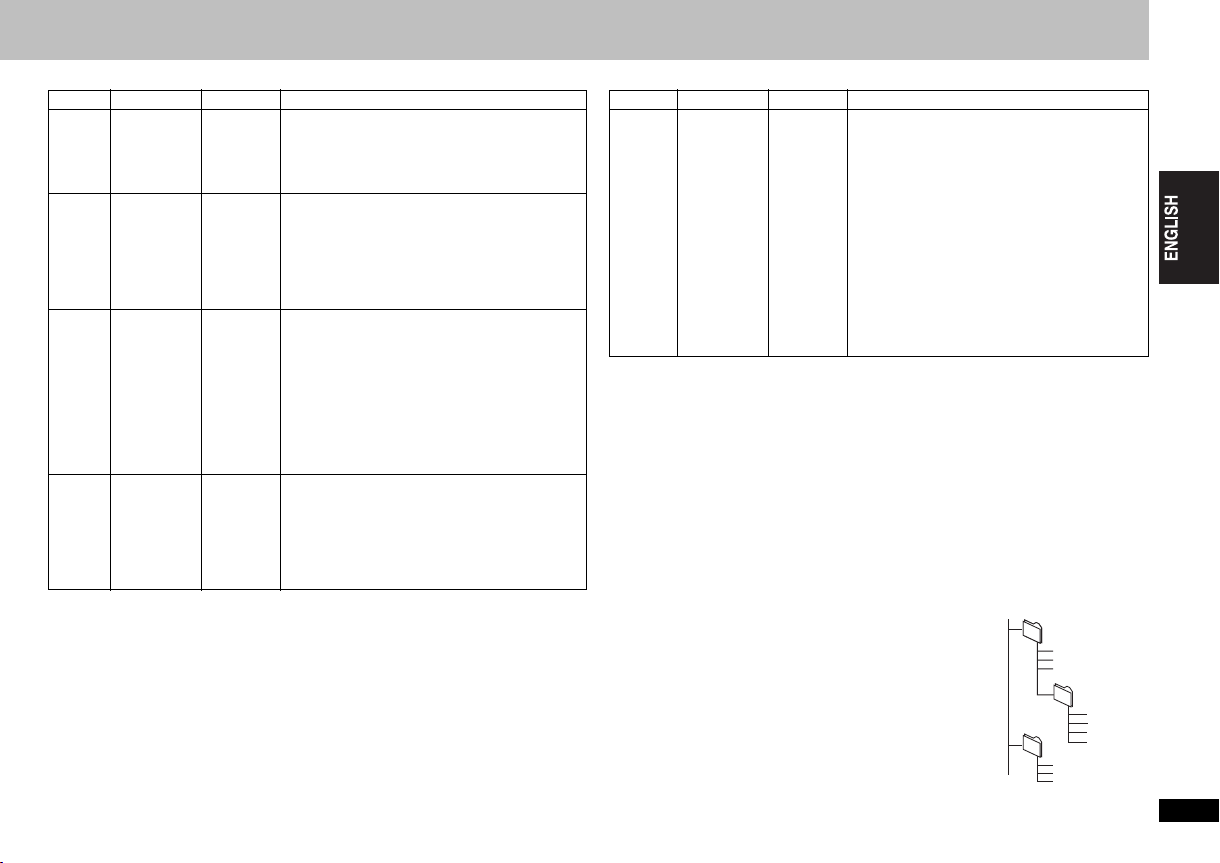
∫ Tips for making WMA, MP3, JPEG, MPEG4 and DivX discs
Format Disc Extension Reference
[WMA]
[MP3]
CD-R/RW
DVD-R/RW
CD-R/RW
[JPEG]
DVD-R/RW
CD-R/RW
[MPEG4]
DVD-R/RW
CD-R/RW
§1
§1
§1
§1
§2
§2
§2
“.WMA”
“.wma”
“.MP3”
“.mp3”
“.JPG”
“.jpg”
“.JPEG”
“.jpeg”
“.ASF”
“.asf”
≥ You cannot play WMA files that are copy
protected.
≥ This unit is not compatible with Multiple Bit
Rate (MBR: a file that contains the same
content encoded at several different bit rates).
≥ Sampling frequency:
DVD-R/RW
11.02, 12, 22.05, 24, 44.1 and 48 kHz
CD-R/RW:
8, 11.02, 12, 16, 22.05, 24, 32, 44.1 and 48
kHz
≥ This unit is not compatible with ID3 tags.
≥ JPEG files taken on a digital camera that
conform to DCF Standard Version 1.0 are
displayed.
– Files that have been altered, edited or saved
≥ This unit cannot display moving pictures,
MOTION JPEG and other such formats, still
pictures other than JPEG (e.g. TIFF) or play
pictures with attached audio.
≥ You can play MPEG4 data [conforming to SD
VIDEO specifications (ASF standard)/MPEG4
(Simple Profile) video system/G.726 audio
system] recorded with the Panasonic SD multi
cameras or DVD recorders with this unit.
≥ The recording date may differ from that of the
actual date.
:
with computer picture editing software may
not be displayed.
Format Disc Extension Reference
[DivX]
DVD-R/RW
CD-R/RW
§1
§2
“.DIVX”
“.divx”
“.AVI”
“.avi”
≥ Plays all versions of DivX video (including
®
6) [DivX video system/MP3, Dolby
DivX
Digital or MPEG audio system] with standard
playback of DivX
Functions added with DivX Ultra are not
supported.
≥ GMC (Global Motion Compensation) is not
supported.
≥ DivX files greater than 2GB or have no index
may not play properly on this unit.
®
media files.
≥ This unit supports all resolutions up to
maximum of 720
(PAL).
≥ You can select up to 8 types of audio and
k480 (NTSC)/720 k576
subtitles on this unit.
§1
CD-R/RW
≥ Discs must conform to ISO9660 level 1 or 2 (except for extended formats).
≥ This unit is compatible with multi-session but if there are a lot of sessions it takes
more time for play to start. Keep the number of sessions to a minimum to avoid this.
§2
DVD-R/RW
≥ Discs must conform to UDF bridge (UDF 1.02/ISO9660).
≥ This unit is not compatible with multi-session. Only the default session is played.
≥There may be differences in the display order on the menu screen and computer
screen.
≥This unit cannot play files recorded using packet write.
Naming folders and files (Files are treated as contents
and folders are treated as groups on this unit.)
At the time of recording, prefix folder and file names. This
should be with numbers that have an equal number of digits,
and should be done in the order you want to play them (this
may not work at times).
e.g. MP3
root
001 group
001
001 track.mp3
002 track.mp3
003 track.mp3
002 group
Discs that can be played
003 group
001 track.mp3
002 track.mp3
003 track.mp3
004 track.mp3
001 track.mp3
002 track.mp3
003 track.mp3
RQTC0126
5
5
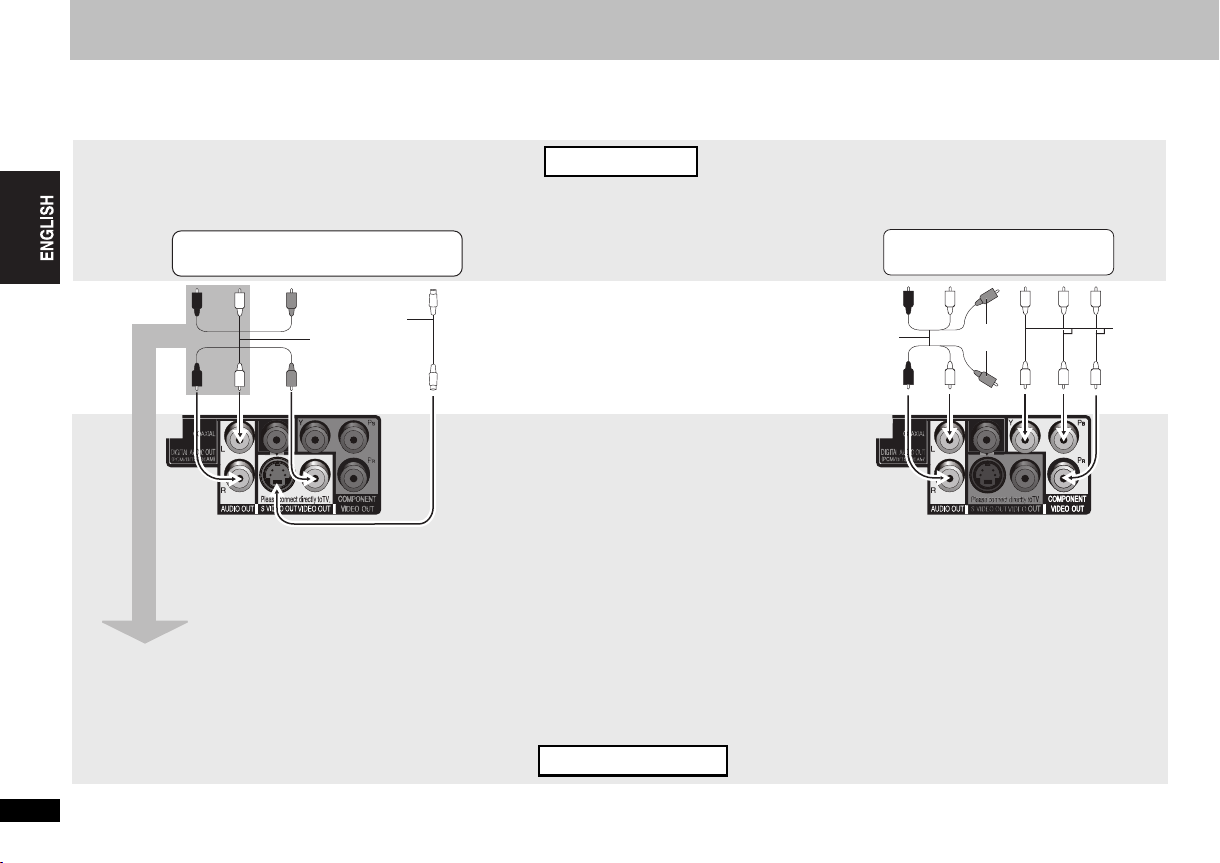
STEP 1 Connection
≥ Do not place the unit on amplifiers or equipment that may become hot. The heat can damage the unit.
≥ Do not connect through the video cassette recorder. Due to copy guard protection, the picture may not display properly.
≥ Turn off all equipment before connection and read the appropriate operating instructions.
≥ Connect the terminals of the same colour.
Television
With VIDEO IN or S VIDEO IN
AUDIO IN
R L
VIDEO
IN
or
S video cable
Audio/video
cable (included)
S VIDEO
IN
§
Audio/video
cable (included)
With COMPONENT VIDEO IN
AUDIO IN
R L
Not used
COMPONENT
VIDEO IN
Video
cables
STEP 1 Connection
§
When using this connection, the audio cable (red
and white plugs) should also be connected.
You can connect the audio cable to the 2channel audio input terminals of an analog
amplifier or system component to enjoy
stereo sound.
To enjoy progressive video
Connect to a progressive output compatible television.
Set “VIDEO OUT (I/P)” to “PROGRESSIVE”, then
follow the instructions on the menu screen (➜ 16,
“VIDEO” menu).
Back of the unit
RQTC0126
6
6
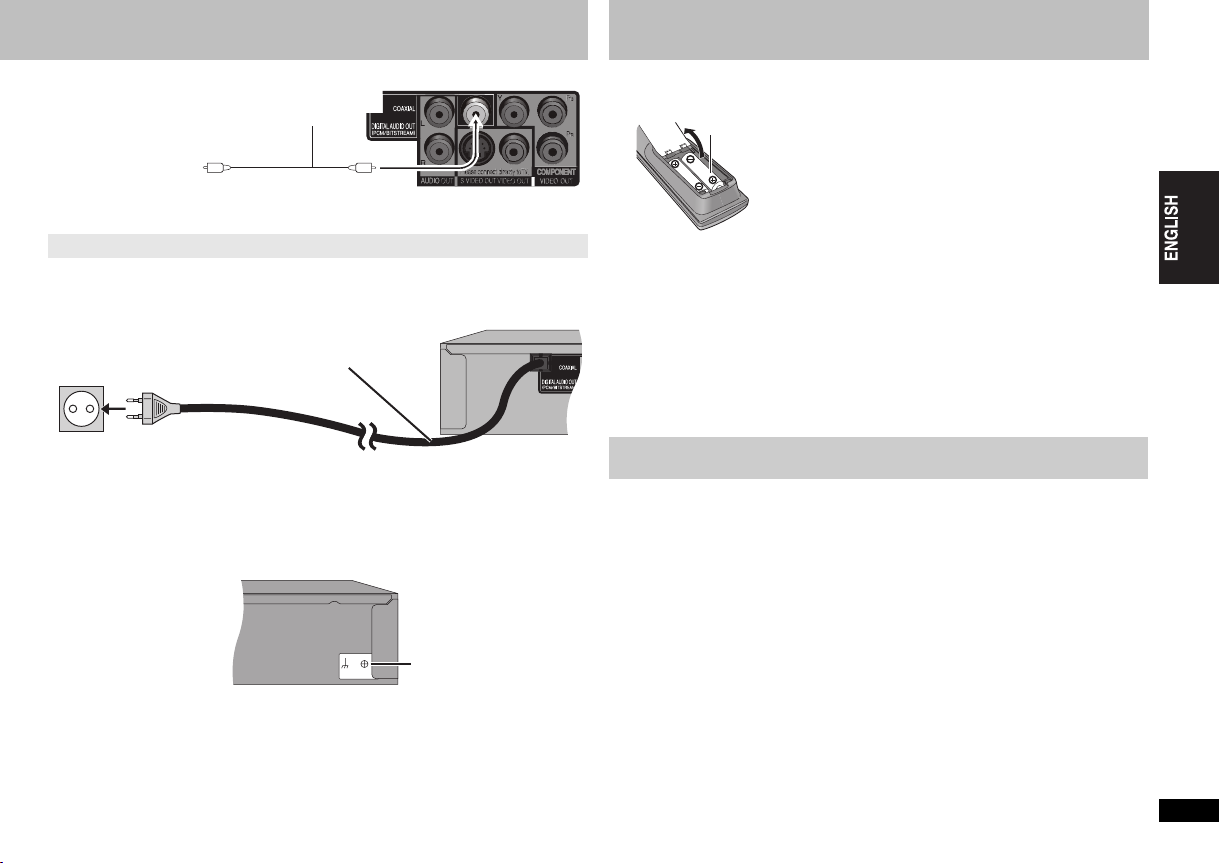
∫ Enjoying multi-channel surround sound
EARTHSIGNAL
Amplifier with a built-in
decoder or a decoderamplifier combination
COAXIAL IN
≥ You cannot use DTS Digital Surround decoders not suited to DVD.
Change “PCM OUTPUT”, “DOLBY DIGITAL” and “DTS” (➜ 17, “AUDIO” menu).
Coaxial cable
Back of the unit
STEP 2 The remote control
∫ Batteries
R6/LR6, AA
≥ Insert so the poles (i and j) match those in the
remote control.
≥ Do not use rechargeable type batteries.
Do not:
≥ mix old and new batteries.
≥ use different types at the same time.
≥ heat or expose to flame.
≥ take apart or shor t circuit.
≥ attempt to recharge alkaline or manganese
batteries.
≥ use batteries if the covering has been peeled off.
Quick setup
STEP 3
∫ Connect the AC mains lead last
AC mains lead
To household mains socket
∫ Connect to the ground terminal
Ground the unit by connecting a copper wire to the screw on the back of the unit and the
ground terminal to prevent static electricity buildup caused by the karaoke microphone.
To the ground terminal
Mishandling of batteries can cause electrolyte leakage which can damage items the
fluid contacts and may cause a fire.
Remove if the remote control is not going to be used for a long period of time. Store
in a cool, dark place.
∫ Use
Aim at the remote control sensor (➜ 8), avoiding obstacles, at a maximum range of
7 m directly in front of the unit.
STEP 3 Quick setup
Preparation
Turn on the television and select the appropriate video input on the television.
1 Press [Í].
2 Press [SETUP].
QUICK SETUP screen appears.
3 Follow the on-screen instructions and select the settings with [3 4]
and [ENTER].
≥ Press [RETURN] to return to previous screen.
4 Press [ENTER] to finish setting.
5 Press [SETUP] to exit the setup menu.
≥ To change these settings later, select “QUICK SETUP” (➜ 17, “OTHERS” menu).
STEP 1 Connection/STEP 2 The remote control
RQTC0126
7
7
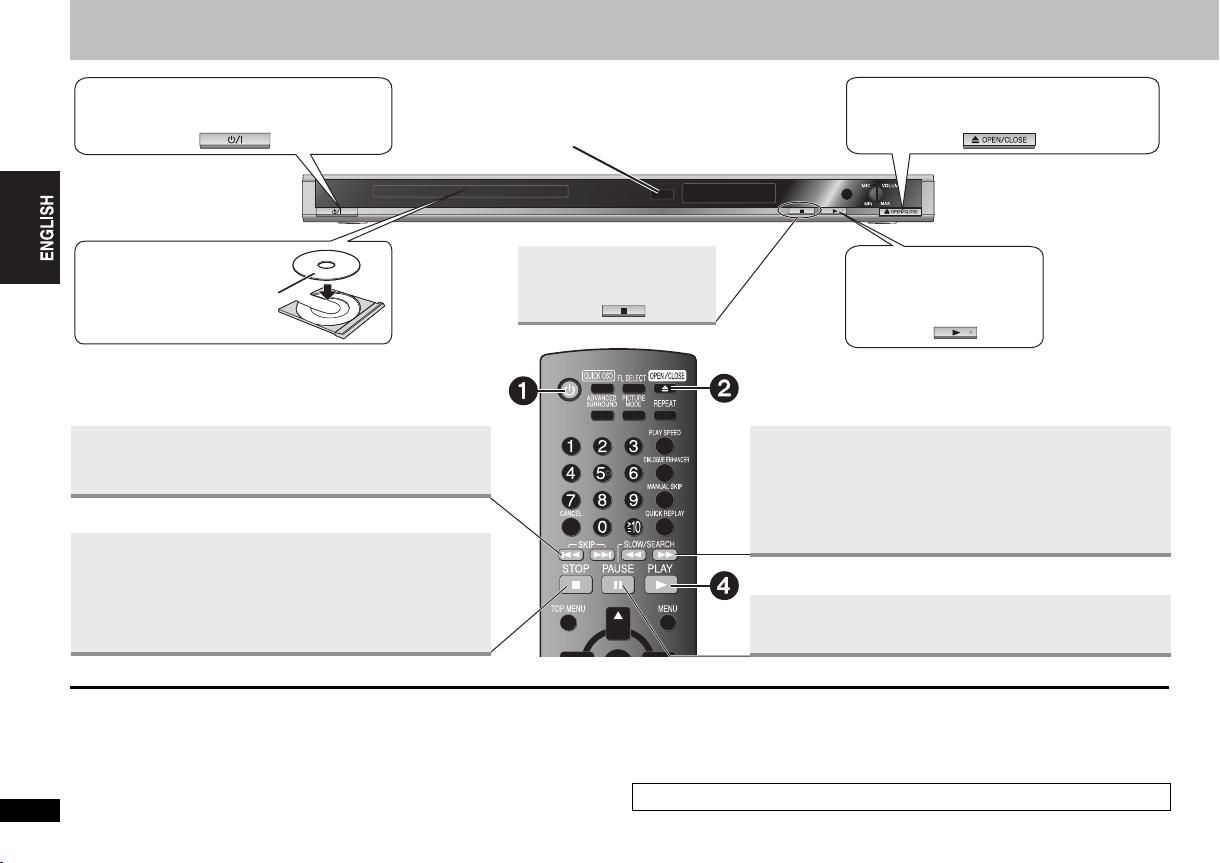
Basic play
1Power ON.
3Load the disc.
≥ Load double-sided discs so
the label for the side you
want to play is facing up.
Basic play
Skip
≥ Press [:9] to skip chapters, tracks, etc.
Stop
The position is memorized when “!” flashes on the display.
≥ Press [1] (PLAY) to resume. (Resume play)
≥ Press [∫] to clear the position.
Remote control sensor
Stop
2Open the disc tray.
4Start play.
Search (during play)
Slow-motion (during pause)
≥ Up to 5 steps
≥ Press [1] (PLAY) to restart play.
≥ [VCD] Slow-motion: forward direction only
≥ [MPEG4] [DivX] Slow-motion: Does not work.
Pause
≥ Press [1] (PLAY) to restart play.
Standby/on switch (Í/I)
Press to switch the unit from on to standby mode or vice versa. In standby mode, the unit
is still consuming a small amount of power.
RQTC0126
8
8
[Note]
≥DISCS CONTINUE TO ROTATE WHILE MENUS ARE DISPLAYED. Press [∫]
when you finish to preserve the unit’s motor and your television screen.
≥ Total title number may not be displayed properly on iR/iRW.
If you are experiencing problems, refer to troubleshooting guide (➜ 20, 21).
 Loading...