

Page 1
Operatin g Instru ctio ns
2
4
1
ALL
1
PP
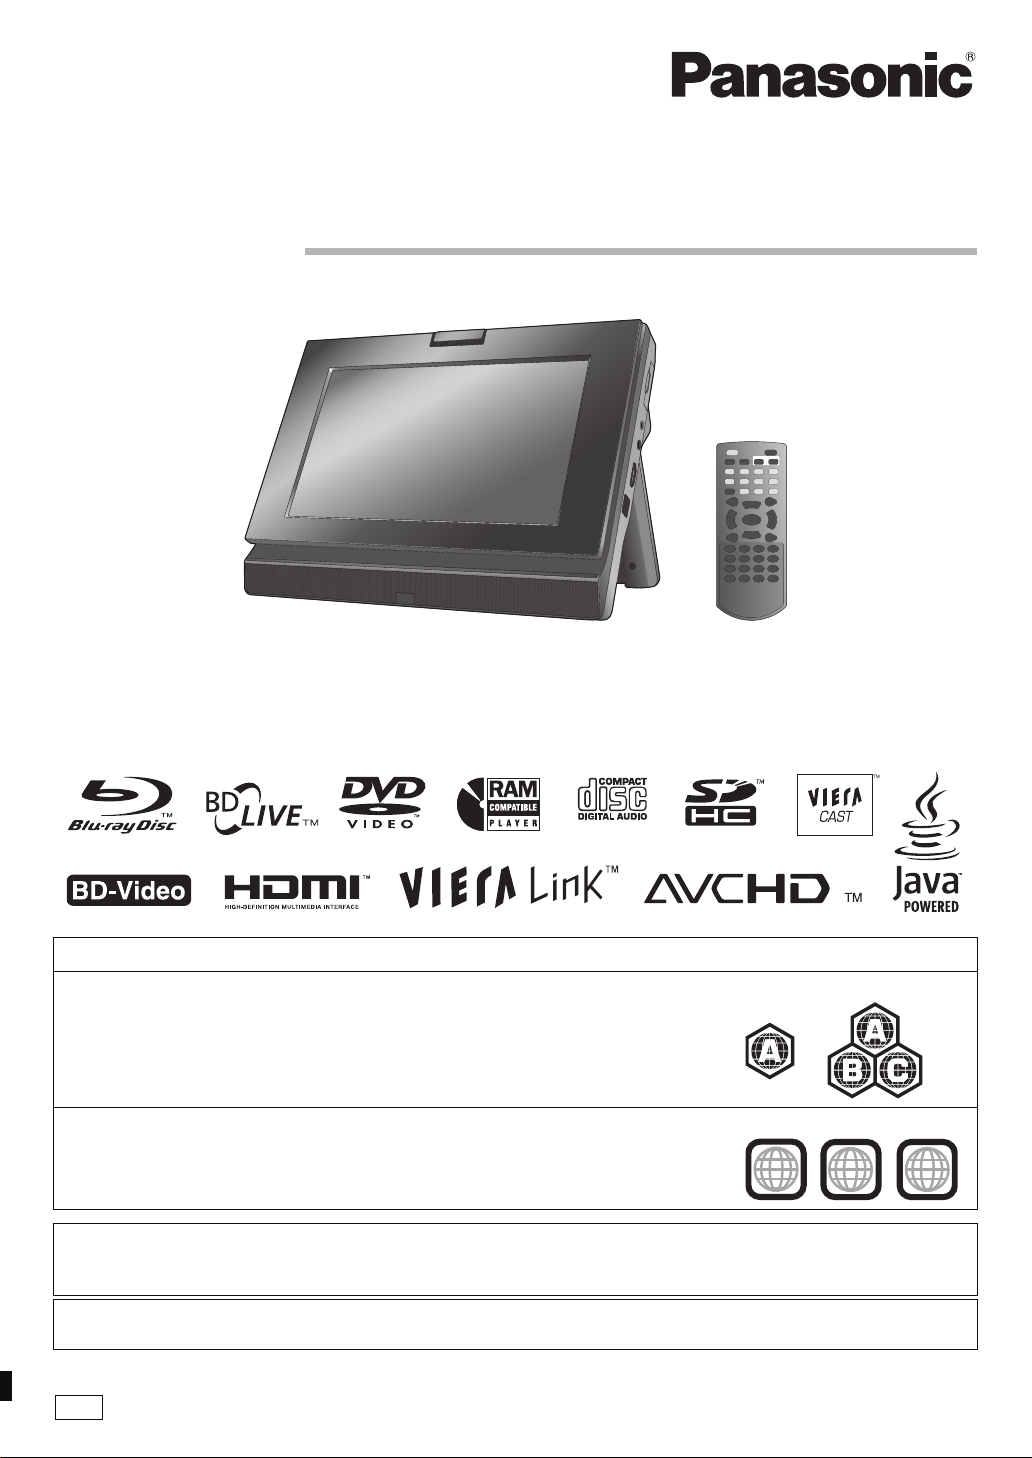
Portable Blu-ray Disc Player
Model No. DMP-B15
Dear customer
Thank you for purchasing this product.
For opti mum performance and sa fety, please read these in structions carefully.
Before connecti ng, operating or adj usting this product, please re ad the instructions completely. Please keep this manual for future
reference.
Region management information
BD-Video
This un it pl ay s B D- Vid eo marked wi th la be ls containing the region code “A”.
DVD-Video
This uni t plays DVD-Video marked with labels containing the region number “1” or “ALL”.
If you have any questions contact
[U.S.A.[and[Puerto[Rico]:1-800-211-PANA(7262)
[Canada]:1-800-561-5505
[Only[for[U.S.A.[and[Puerto[Rico]:The warranty can be found on page 50.
[Canada]:The warranty can be found on page 51.
Example:
Example:
RQT9334-Y
Page 2

Getting started
RISK OF ELECTRIC SHOCK
DO NOT OPEN
CAUTION
(Rear of product)
IMPORTANT SAFETY INSTRUCTIONS
Read these operating instr uctions carefully before using the
unit. Follow the safety instructions on the unit and the
applicable safety instructions listed below. Keep these
operating instructions handy for future reference.
1) Read these instructions.
2) Keep these instructions.
3) Heed all warnings.
4) Follow all instructions.
5) Do not use this apparatus near water.
6) Clean only with d ry cloth.
7) Do not block any ventilation openings.
Install in ac c or d an ce wi th t he ma nu f ac tu r er’s instructions .
8) Do not install near any heat sources such as radiators, heat
registers, sto v es, or other apparatus (including amplifiers)
that produce heat.
9) Do not defeat the safety pur pose of the polarized or
grounding-type plug. A polarized plug has two blades with
one wider than the other. A grounding-type plug has two
blades and a third grounding prong. The wide blade or the
third prong are provided for your safety. If the provided plug
does not fit into your outlet, consul t an electrician for
replacement of the obsolete outlet.
10)Protect the power cord from being walked on or pinched
particularly at plugs, convenience receptacles, and the point
where they exit from the apparatus.
11 )Only use attachments/accessories speci fied by the
manufacturer.
12)Use only with t he cart, stand, tripod, bracket,
or table spec ified by the manuf acturer, or sold
with the appara tus. When a cart is used, use
caution when moving the cart/apparatus
combi na tio n t o av oi d inj ur y from t ip- ov er.
13)Unplug this apparatus during lightning storms
or when unused for long periods of time.
14)Refer all servicing to qualified service personnel. Servicing
is required when the apparatus has been damaged in any
way, such as power-supply cord or plug is damaged, liquid
has been spilled or objects have fallen into the apparatus,
the apparatus has been exposed to rain or moisture, does
not operate normally, or has been dropped.
WARNING:
TO REDUCE THE RISK OF FIRE, ELECTRIC SHOCK OR
PRODUCT DAMAGE,
≥ DO NOT EXPOSE THIS APPARATUS TO RAIN,
MOISTURE, DRIPPING OR SPLASHING AND THAT NO
OBJECTS FILLED WITH LIQUIDS, SUCH AS VASES,
SHALL BE PLACED ON THE APPARATUS.
≥ USE ONLY THE RECOMMENDED ACCESSORIES.
≥ DO NOT REMOVE THE COVER (OR BACK); THERE
ARE NO USER SERVICEABLE PARTS INSI DE. REFER
SERVICING TO QUALIFIED SERVICE PERSONNEL.
CAUTION!
DO NOT INSTALL OR PLACE THIS UNIT IN A
BOOKCASE, BUILT-IN CABINET OR IN ANOTHER
CONFINED SPACE. ENSURE THE UNIT IS WELL
VENTILATED. TO PREVENT RISK OF ELECTRIC SHOCK
OR FIRE HAZARD DUE TO OVERHEATING, ENSURE
THAT CURTAINS AND ANY OTHER MA TE RIALS DO NOT
OBSTRUCT THE VENTILATION VENTS.
CAUTION!
THIS PRODUCT UTILIZES A LASER.
USE OF CONTROLS OR ADJUSTMENTS OR
PERFORMANCE OF PROCEDURES OTHER THAN
THOSE SPECIFIED HEREIN MA Y RESULT IN
HAZARDOUS RADIATION EXPOSURE.
DO NOT OPEN COVERS AND DO NOT REPAIR
YOURSELF. REFER SERVICING TO QUALIFIED
PERSONNEL.
The following mark and symbols are located on rear of the unit.
CAUTION: TO REDUCE THE RISK OF ELECTR IC SHOCK,
The sock et outlet shall be installed near the equipment and
easily accessible. The mains plug of the power supply cord
shall remain readily operable.
T o completely disconnect this apparatus from the AC Mains,
disconn ect the powe r supply cord plug from AC receptacle.
RQT9334
(ENG)
2
DO NOT REMOVE SCREWS.
NO USER-SERVICEABLE PARTS INSIDE.
REFER SERVICING TO QUALIFIED SERVICE
PERSONNEL.
The lightning flash with arrowhead symbol, within
an equilateral triangle, is intended to alert the
user to the pr es e nc e of uninsula ted “danger o us
voltage” within the product’s enclosure that may
be of sufficient magnitude to constitute a risk of
electric sh oc k t o pe rsons.
The exclamation point within an equilateral
triangle is intended to alert the user to the
presence of important operating and
mainte na nc e ( se rv ic ing) instru c tio ns i n the
literat u re ac co mpanying the applianc e.
THE FOLLOWING APPLIES ONLY IN THE U.S.A.
FCC Note:
This equipment has been test ed and found to comply with
the limits for a Class B digital device, pursuant to Part 15 of
the FCC Rules.
These l imits are designed to provide reasonable protection
against harmfu l interfer ence in a r esidential installation. This
equipment generates, uses and can radiate radio frequency
energy and, if not installed and used in accordance with the
instructions, ma y cause harmful interference to radio
communi cations. However, there is no guarantee that
interference will not occur in a particular installation. If this
equipment does cause harmful interference to radio or
telev ision rec eption, which can be determined by turning the
equipm en t of f and on , t he use r is encou r age d to t ry t o co rr ect
the interferen ce by one or more of the following m easures:
≥Reorient or relocate the receiving antenna.
≥
Increase the separation between the equipment and receiver.
≥Connect the equipment into an outlet on a circuit different
from that to which the receiver is connected.
≥Consult the dealer or an experienced radio/TV technician
for help.
Any unauthorized changes or modifications to this equipment
would void the user’s authority to operate this device.
This device complies with Part 15 of the FCC Rules.
Operation is subject to the following two conditions: (1) This
device may not cause harmful interference, and (2) this
device must accept any interference received, including
interference t hat may cause undesire d operation.
Responsible P arty:
Panasonic Corporation of North Americ a
One Panasonic Way Secaucus, NJ 07094
Support Contact:
Panasonic Consumer Electronics Company
Telephone No.: 1-800-211-PANA (7262)
Page 3
THE FOLLOWING APPLIES ONLY IN CANADA
Listening caut ion
This Class B digital apparatus complies with Canadian ICES-
003.
.
Batteries
1
Battery p ac k (Lith ium io n b atter y p a ck)
≥ Use the specified unit to recharge the battery pack.
≥ Do not use the battery pack with equipment other than
the specified unit.
≥ Do not use the player outside if it is snowing or raining.
(The battery pack is not wate rp roo f.)
≥ Do not get dirt, sand, liquids, or other foreign matter on
the terminals.
≥ Do not touch the plug terminals (i and j) with metal
objects.
≥ Do not disas s em bl e, remodel, heat or throw int o fir e .
≥ Do not heat or expose to flame.
≥ Do not leave the battery(ies) in an automobile exposed
to dir ect sunl i gh t fo r a lon g p eri od of time w ith do ors an d
windows closed.
2 Button-type battery (Lithium battery)
≥ Insert with poles aligned.
≥ Do not touch the terminals (i and j) with metal
objects.
≥ Do not rech ar ge, disass em bl e, remodel, he at or thro w
into fire.
≥ Keep out of reach of children
≥ Do not heat or expose to flame.
≥ Do not leave the battery(ies) in an automobile exposed
to dir ect sunl i gh t fo r a lon g p eri od of time w ith do ors an d
windows closed.
If any electrolyte should come into contact with your hands or
clothes, wash it off thoroughly with water.
If any electrolyte should come into contact with your eyes,
never rub the eyes.
Rinse eyes thoroughly with water, and then consult a doctor.
3 Disposing of the batteries
Check and follow your local regulations before disposal.
AC adaptor
This AC adaptor operates on AC between 110 V and 240 V.
But
≥ In the U.S.A. and Canada, the AC adaptor must be
conne ct ed to a 12 0 V AC po w er su pply only.
≥ When co nnecting to an AC supply outsid e of the U.S.A .
or Canada, use a plug adaptor to suit th e AC outlet
configuration.
≥ When connecting to a supply of greater than AC 125 V,
ensure t he cord yo u us e i s sui ted to t he vol t a ge of t he AC
suppl y and the rated current of the AC adaptor.
≥ Contact an electrical parts distributo r for assistance in
selecting a suitable AC plug adaptor or AC cord set.
WARNING
DRIVER MUST NOT OPERATE OR VIEW THIS UNIT
WHILE OPERATING THE VEHICLE.
Doing so will distract the driver and could cause a collision
resulting in serious injury or property damage.
Do not rest the unit on your lap for a long time while
using it. The unit can become hot and cause burns.
To prevent damage
Avoi d the following:
≥ Spray in g flammabl e ins e cticides nea r the un it .
≥ Pressing the LCD.
≥ Touching the lens and other parts of the laser pickup.
Do not use the unit in the following places:
≥ Sa ndy places such as beaches.
≥ On top of cushions, sofas, or hot equipment such as
amplifiers.
Do not leave in an unventilated automobile or exposed to
direct sunlight and high temperatu res .
Getting started
Warning
Risk of fire, expl osion and burns. Do not disassemble.
Do not heat the batteries above the following temperatures
or incinerate.
Button-type battery 100
Battery pack 60 xC (140 xF)
x
C (212 xF)
CAUTION
Danger of explosion if battery is incorrectly replaced.
Replace only with the same or equivalent type
recommended by the manufacturer. Dispose of used
batteries according to the manufacturer’s ins tructions.
A lithium ion battery that is recyclable powers
the product you have purchased. Please call 1800-8-BATTERY for information on how to
recycle this battery.
For USA-California Only
This product contains a CR Coin Cell Lithium Battery which
contains Perchlorate Material – special handling may apply.
See
www.dtsc.ca.gov/haz ard ou sw a ste/pe rchlorate .
Product Identification Marking is located on the rear of unit.
Product Identification Marking is located on the bottom of
AC adaptor.
RBRC
Li-ion
I
N
C
D
I
U
N
S
O
T
R
R
T
I
C
E
E
S
L
E
•
EST. 1924
A
•
S
N
S
O
I
O
T
C
A
I
Do not play your headphones or earphones at a high volume.
Hearing experts advise against continuous extended play.
If you experience a ringing in your ears, reduce v olume or
discontinue use.
Do not us e wh il e o pe rat in g a mot o rize d v eh ic le . It may crea t e
a traffic hazard and is ill egal in many areas.
You shoul d use extreme caution or tempora rily discontinue
use in potential ly hazardous situations.
Even if your headphones or earphones are the open-air type
design ed to let you hear outside sounds, don’t turn up the
TM
volume so high that you can’t hear what’s around you.
Sound can be deceiving. Over time your hearing “comfort
level” adapts to higher volumes of sound. So what sounds
“normal” can actually be loud and harmful to your hearing.
Guard against this by setting your equipment at a safe level
BEFORE your heari ng adapts.
T o establish a safe level:
≥ Start your volume control at a low setting.
≥ Sl owly increase the sound until you can hear it comfortably
and clear ly, and with ou t dis t o rt io n.
Once you have established a comfortable sound level:
≥ Leave it there.
RQT9334
(ENG)
3
Page 4

Table of contents
Getting started
IMPORTANT SAFETY INSTRUCTIONS ...................2
Accessories .............................................................. 4
Unit a nd m e d ia car e .... ... .......... ......... ... .......... ......... .5
Media (Disc and card) information .........................6
Over view ... .......... ......... ........ ......... .......... .......... ....... . 8
Install at io n of the u n it ......... ......... ... .......... ......... ....10
Preparing the Power Supply ........... ............. .. .. .. ...11
Turning on/o ff the unit ............... .......... .......... .. ......12
Showing FUNCTIONS menu .............. .. .. ...............12
Adjusting the pictures on the LCD scre en ..........13
Loading the disc or SD card .................................13
Playback
Basic play (Playing video contents) ..................... 14
Enjoy in g BD-L iv e or BO NUSVIEW in BD-Video ...... 17
Playing still pictures ..............................................18
Playing DivX
Playing music .........................................................22
Changing settings with the on-screen menu ......23
Using this unit with other equipment ...................25
Linked operations with the TV
(VIERA Link
Broa d ban d network con n e c ti on ..................... .. ....28
Netwo rk se t ti n gs ...................... ......... ... .......... ........28
Enjoying VIERA CAST
Firmware updates ..................................................31
®
videos .............................................20
Connection
TM
“HDAVI ControlTM”).........................26
Network
TM
....... .......... .......... ....... ...... 30
Accessories
Please check and i dentify the supplied
accessories. Use numbers indicated in
parentheses when asking for replacement parts.
(Product numbers correct a s of March 2009.
These may be subjec t to change.)
(For U.S.A. and Puert o Rico) To order accessories, refer to
“Accessory Purchases (United States and Puerto Rico)”
on page 50.
(For Canada) To order accessories, call the dealer from
whom you have made your purc ha se .
∑ 1
Remote control (N2QAJC000015)
∑ 1
Button-type battery for remote control
(for replacement D page 9)
∑ 1
Audio/Video cable (K2KC4CB00026)
∑ 1
AC adaptor (RFEA219W)
∑ 1
AC power supply cord (K2CB2CB00020)
≥For use with this unit only. Do not use it with other
equipment. Also, do not use cords for other equipment
with this unit.
∑ 1
Car DC Adaptor* (RFEC206P-Y)
∑ 1
Headrest Mountin g Bracket* (RXQ1706)
∑ 1
Safety belt* (RFC0150-K)
∑ 1
Rechargeable battery pack (DY-DB15)
≥ DY-DB15 is avai lable as option.
∑ 1
Cle a ning cloth (RFE0215)
* For installation and handling methods, refer to the operating
instruc t i on s “ Enj oy ing in a car”.
(Only for U.S.A. and Puerto Rico)
Please register via the Internet at:
http://www.prodreg.com/panasonic/
(ONLY FOR CANADA)
The enclosed Canadian French label sheet corresponds to
the English display on the unit.
Settings
Changing the unit’s settings .................................32
Reference
Audio and video information ................................37
About MP3/JPEG/DivX files ..................................38
Indicators and screen messages .........................40
Troubleshooting guide .................... ............. .........42
Specification s .. .......... .. .......... .......... .......... ......... ... .46
Licenses .................................................................47
Glossary .................................................................48
Limited Warrant y
(For U.S.A. and Puerto Rico Only) ........................50
Limited Warranty (For Canada Only) ...................51
Product Service .............. ............................. ..........51
Index ........................................................Back cover
RQT9334
(ENG)
4
Page 5

Unit and media care
DO NOT
DO NOT
DO
DO NOT
Disc and card handling
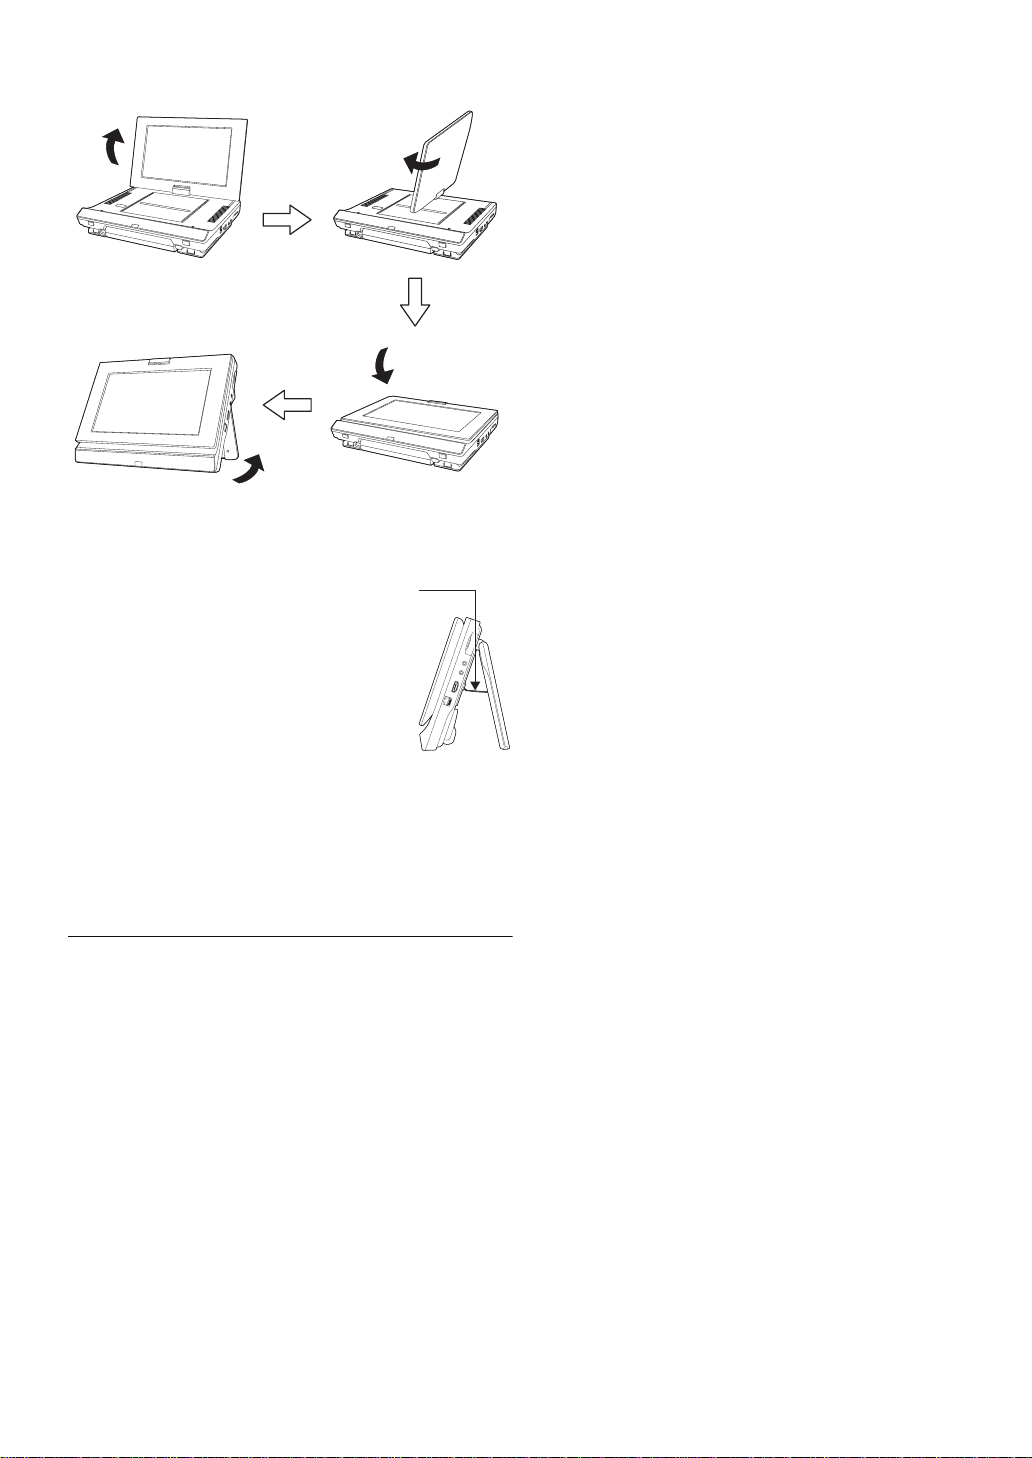
Rotating the screen
When rotatin g the scr een, rota te it afte r ope ni ng it to 90°as
shown below. Rotating the screen without opening t he angle
enough or opened to 180° may scratch the area arou nd the
scree n an d t he mai n un it so take ca r e .
1 Open the screen approximately 90°.
2 Rotate the screen slowly.
Applying excessive force when rotating the screen, or rotating
the screen forcibly in the opposite direction to the rotating
direction may cause malfunction.
∫Caution
≥Do not insert a finger between the screen and the main unit
when rotating the screen. Doing so may result in fingers
getting caught between the main unit and the screen and
cause injuries. Especial ly keep an eye on children.
∫Clean discs
Wipe with a damp cloth and then wipe dry.
∫Disc and card handling precautions
≥Handle discs by the edges t o avoid inadvertent scratches or
fingerprints on th e di sc .
≥Do not attach labels or stickers to discs (This may cause disc
warping, rendering it unusable).
≥Do not write on the label side with a ball-point pen or other
writin g in strument.
≥Do not use record cleaning sprays, benzine, thinner, stat ic
electr icity prevention liquids or any ot h er solvent.
≥Do no t us e sc ratch-p roo f protector s or co ve r s .
≥Clean any dust, water, or foreign matter from the terminals on
the rear side of the card.
≥Do not use the following discs:
j Discs with exposed adhesive from removed stickers or
labels (rented discs etc).
j Discs that are badly warped or cracked.
j Irregularly shaped discs, such as heart shapes.
Maintenance
∫To clean this unit, wipe with a soft, dry cloth.
≥Wipe gently with the cleaning cloth (included).
≥To remove stubborn dirt, wet the cleaning cloth, wring well,
and then wipe. Afterwards, wipe gently with dry soft cloth.
≥Do not use a microfiber dust cloth on the LCD screen.
Follow the cautio n when wipi ng the outer casing.
≥Never use alcohol, paint thinner or benzi ne to clean this unit.
≥The LCD and around the LCD are specially-processed.
Wiping them with a hard cloth or rubbing them strongly may
scratch the surfaces.
Getting startedReference Settings PlaybackConnectionNetwork
Holding the unit
Hold the unit with the stand closed.
∫Caution
≥Do not insert a finger between the main unit and the stand
when installing or moving this unit. Doing so may result in
fingers getting caught between the unit and the stand and
cause injuries. Especial ly keep an eye on children.
∫Maintenan ce of the lens
≥Remove dust carefully with an ai r blower for camera lenses
(optional).
≥Recommended product:
Lens cleaner kit (S ZZP1038C) (Available from Panasonic
dealers.)
≥You cannot use a CD type lens cleaner.
≥Be careful not to touch the lens with your fingers.
To dispose or transfer this unit
This unit may record information of your operating procedures.
If you discard this unit either by disposal or transfer, then follow
the pr oc edu res t o re tu rn a ll t he se tt ing s t o the f a ct ory pres et s t o
delete the recorded information. (> 42, “To return all settings
other than some settings to the factory preset.”)
≥When BD-Vi deo is played back, the opera tion history may be
recorded in the memory of this unit. The recorded contents
differ depending on the disc.
RQT9334
(ENG)
5
Page 6

Media (Disc and card)
Finalized
Finalized
Finalized
Finalized
Finalized
information
Commercially sold discs
This chart shows the different type of retail/commercial discs
you can u se, a nd al so incl ud es th e ind us try - st and ar d l ogos t ha t
should appear on the discs and/or packaging.
Type of media
and logo
BD-Video
Features
This format supports High
Definition video and audio
content including:
≥BD-Live (BD-ROM Profile 2).
This format provides
interactive features when
this player is connected to
the Inter n et via a broad ba nd
connection.
Indicat ed
as
[BD-V]
User recorded media
This chart shows the different type of discs recorded with other
device s that yo u ca n us e.
This mark means you must finalize the disc
with the DVD recorder, etc. before playback. For details about
finalizing, refer to the operating instructions for your equipment.
Type of media
and logo
BD-RE ≥Version 3 of the BD-RE
Recording Format
≥JPEG format
BD-R ≥Version 2 of the BD-R
Recording Format
Formats
Indicated
as
[BD-V]
[JPEG]
[BD-V]
≥BONUSVIEW allows picture-
in-picture functions to be
viewed.
DVD-Video This format supports high
quali ty vide o an d audio
playback.
[DVD-V]
Compact Discs (CD’s) that
CD
contain audio and music
≥Operation and sound qu ality
of CDs that do not conform
to CD-DA specifications
(copy control CDs, etc.)
cannot be guaranteed.
[CD]
Note about using a DualDisc
≥The digital audio content side of a DualDisc does not meet
the technical specifications of the Compact Disc Digital Audio
(CD-DA) format so play may not be possible.
≥Do not use a DualDisc in this unit as it may not be possible to
insert it correctly and it may get scratched or scraped.
DVD-RAM ≥Version 1.1 of the DVD
DVD-R/RW ≥DVD-Video Format
DVD-R DL ≥DVD-Video Format
rR/rRW/rRDL
CD-R/RW
≥It may not be possi bl e to pl ay t he abo ve di sc s in so me cas es
due to the type of discs, the condition of the recording, the
recording method and how the files were created.
≥When a disc recorded in the AVCHD format is being played,
the video may be pa used for a few seconds at portions
splice d, du e to deletion or edi ti n g .
Video Recording Format
≥JPEG format
≥AVCHD format
≥Version 1.1 of the DVD
Video Recording Format
≥AVCHD format
≥DivX format
(DVD- RW is not su pported )
≥MP3 format
(DVD- RW is not su pported )
≥JPEG format
(DVD- RW is not su pported )
≥Version 1.2 of the DVD
Video Recording Format
≥AVCHD format
≥DivX format
≥MP3 format
≥JPEG format
≥+VR (+R/+RW Video
Recording) Format
≥AVCHD format
≥CD-DA format
≥MP3 format
≥JPEG format
≥DivX format
]DVD-VR]
[JPEG]
[AVCHD]
[DVD-V]
]DVD-VR]
[AVCHD]
[DivX]
[MP3]
[JPEG]
[DVD-V]
]DVD-VR]
[AVCHD]
[DivX]
[MP3]
[JPEG]
[DVD-V]
[AVCHD]
[CD]
[MP3]
[JPEG]
[DivX]
RQT9334
(ENG)
6
Page 7

SD cards
This cha rt sh ows th e di ff er ent t ype of car d s rec or de d wi th ot he r
devices that you can use.
Type of media Formats Indicated as
SD Memory Card*
(from 8 MB to 2 GB)
SDHC Memory Card
(from 4 GB to 32 GB)
* Includes miniSD Card, microSD Card and microSDHC Card
The card types mentioned above will be re ferred to as “SD
card” in these operating instructio n s.
≥MiniSD Cards, microSD Cards and
microSDHC Cards can be used, but must
be used with an adaptor card. These are
usuall y supplied with such cards, or
otherwise customer provided.
≥We rec om m end using a Pan as onic SD
card. Please confirm the latest information
on the following website.
http://panasonic.co.jp/pavc/global/cs
(This site is in English only.)
≥This unit is compatible with SD Memory Cards that meet SD
Card Specifi c ations FAT12 and FAT16 forma ts, as well as
SDHC Memory Cards in FAT32 format.
≥When using cards from 4 GB to 32 GB, only SD cards using
the SDHC logo can be used.
≥Useable memory is slightly less than the card capacity.
≥If the SD card you are attempting to use was formatted on a
PC, it is possible that the card may not work properl y.
≥Keep the Memory Card out of reach of children to prevent
swallowing.
≥When a card recorded in the AVCHD format is being played,
the vide o ma y momentar i ly paus e, es pe c ia lly wh er e one
recording ends and the next one begins. This is normal and
does not indicat e a problem.
≥To protect the card’s contents, move the record prevention
tab (on the SD card) to “LOCK”.
≥JPEG format
≥AVCHD format
≥MP E G 2 format
[JPEG]
[AVCHD]
[MPEG2]
ADAPTER
Getting started
Discs that cannot be played in this
unit
≥BD-RE discs (with cartridge)
≥2.6 GB and 5.2 GB DVD-RAM
≥DVD-RAM that cannot be removed from cartridge
≥3 .95 GB and 4. 7 GB DVD- R (A uthoring)
≥DVD-R, DVD-R DL, DVD-RW, +R, +R DL recorded on
anoth er unit and not finalized
≥BD-Video with a region code other than “A”
≥DVD-Video with a region number other tha n “1” or “ALL”
≥Version 1.0 DVD-RW
≥DVD-ROM, CD-ROM, CDV, CD-G, CVD, SACD, Photo CD,
MV-Disc and PD
≥DVD-Audio
≥Video CD and SVCD
≥WMA discs
≥PAL Discs
≥HD DVD
≥BD-Video discs recorded at a rate of 50
≥Any other disc that is not specifically supported
fields/sec
RQT9334
(ENG)
7
Page 8
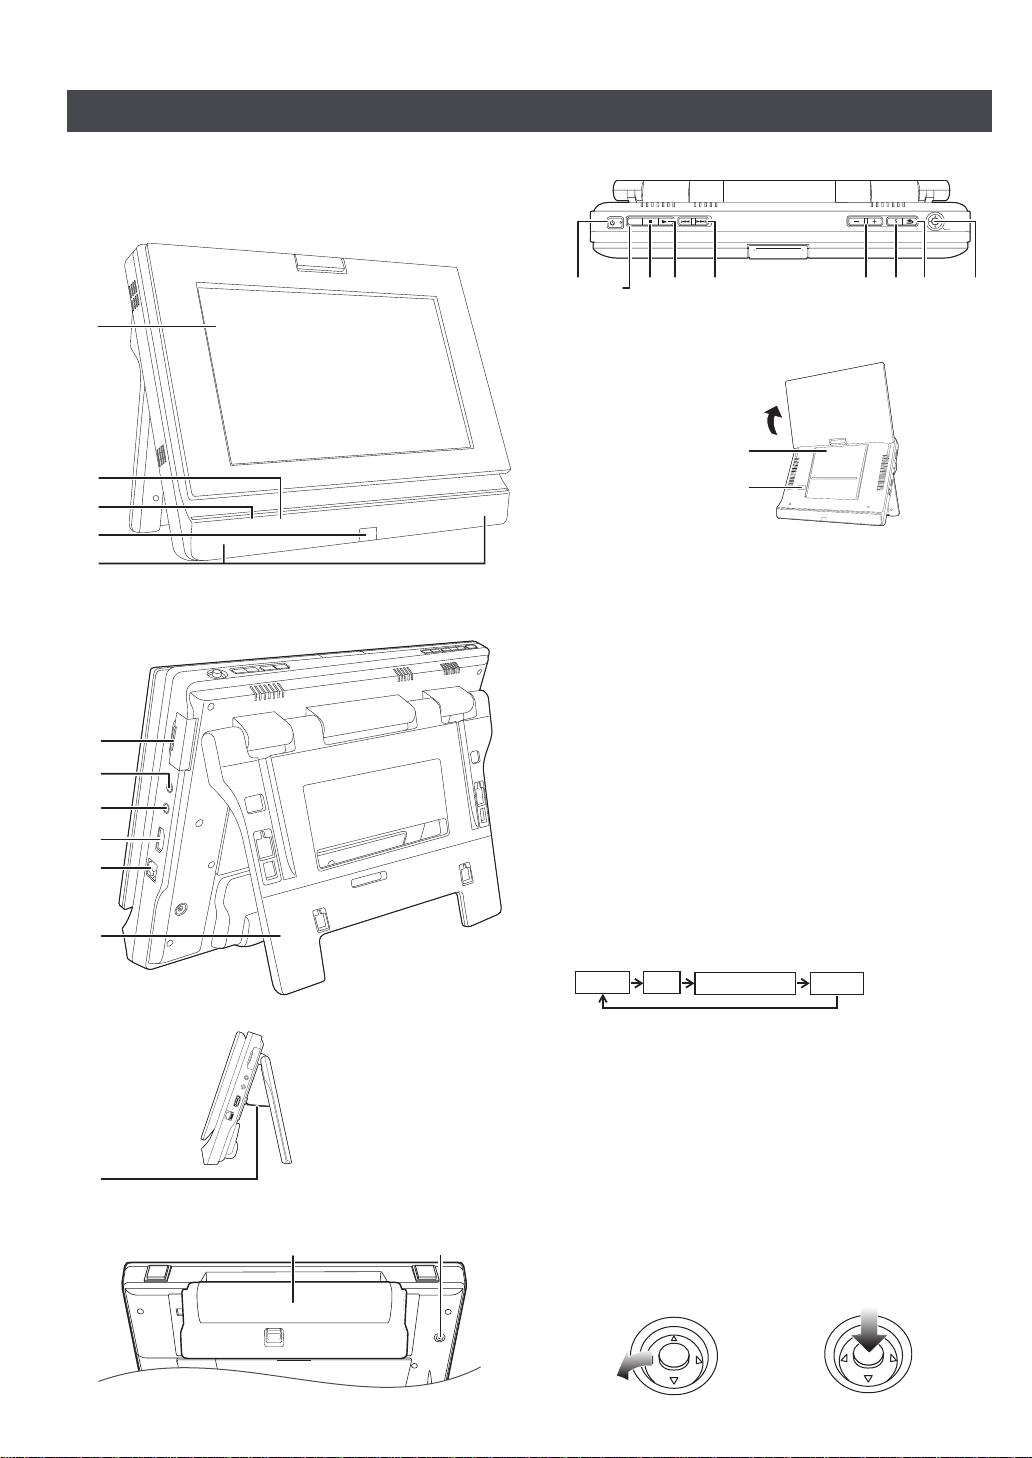
Overview
1
2
3
4
5
Front View
6
8
9
7
Rear View
Side View
13
Battery pack (included)
Bottom View
VOLUME
POWER
AV SELECT
PUSH:OK
SUB MENU
/I
RETURN
Top View
Disc lid
[OPEN]
When the screen is opened
The Unit
Instructions for operations are generally described using the
remote control in these operating instructions.
1 LCD screen
2 [CHARGE] indicator (> 11)
While recharging the battery pack, this indicator lights up.
3[Í] indicator (> 11)
When the unit is connected to the AC mains supply, this
indicator lights up in standby mode and goes out when the
unit is turne d on .
4 Remote control signal sensor (> 9)
5 Speaker
6 SD card slot (> 13)
7 Audio/video inpu t/ output terminal (> 25)
8 Headphone terminal [Ë]
(3.5 mm stereo mini jack)
9 HDMI AV OUT ter min a l (> 25)
10 LAN terminal (> 28)
11 Stand (> 10)
12 Stopper wire (> 10)
13 DC IN term inal (> 11)
14 Turn the unit on and off (> 12)
15 Switch the media to playback
It will switch every time it is pressed.
RQT9334
(ENG)
8
DISC SD
AUXNETWORK
16 Stop (> 15)
17 Playback (> 14)
18 Skip title numbers, etc. (> 15)
19 Adjust the volume (> 14)
20 Show the sub menu (> 18)
21 Return to previous screen
22 Selection/OK
T o select:
Tilt up, down, left, or
right (
[
3, 4, 2, 1])
Example:
To select left item
To enter :
Press st raight in
Example:
To enter the operation
Page 9
Remote control
1
2
3
4
5
6
7
8
9
10
11
12
13
14
15
16
17
18
DISC SD
AUXNETWORK
Bottom
Pull out while pressing here
_
facing up
Lithium ba tte ry : CR2025
Remote control
signal sensor
Within 20 degrees angle
either up or down
Within 30 degrees angle
either left or right
Remote control transmitter
Within approx. 7 m (23 ft.) in front
1 Turn the unit on and off (> 12)
2 Select audio (> 16)
3 Show the Home screen of the VIERA CAST
(> 30)
4 Use according to the instructions on the screen
5 Basic operations for playback (> 14–15)
6 Show Pop-up menu (> 14)
7 Show Top menu/Direct Navigator (> 14)
8 Selection/OK, Frame-by-frame
≥To select: Press up, down, left, or ri ght
(
[
3, 4, 2, 1])
≥To enter: Press [OK]
≥Frame forward / Frame backw ard:
(While paused) press left or right ([2;][;1])
9 Show the sub menu (> 18)
10 Select title num bers, etc./Enter numbers (> 16)
or characte rs (> 30)
11 Switch the media to playback (> 14)
It will switch every time it is pressed.
12 Adjust the volume (> 14)
13 Show FUNCTIONS menu (> 12)
14 Return to previous screen
15 Show on-screen menu (> 23)
16 Show stat us mes sages (> 16)
17 Turn the u n it off auto matically (> 12)
18 Change the screen setti ngs (> 13)
Getting started
∫Insert the button-type battery (included)
1 Pull out the holder.
2 Insert the battery and return the holder.
≥Keep the button-type battery out of reach of children to
prevent swallowing.
∫Range of use
RQT9334
(ENG)
9
Page 10
Installation of the unit
1 Open the screen.
3 Turn the screen
outwards and close.
2 Rotate the screen.
4 Open the st and and
set the unit verti ca ll y.
Open the stand and set the unit on a horizontal and stable level
surface.
≥Open the stand until the stopper wire is fully
stretched.
≥If the screen is rotated when the unit is
turned on, the display on the screen will
disappear and the unit will be automatically
turned off. (> 12)
≥The unit cannot be turned on in situations
other than 3 or 4 above or when the screen
is rotated. (> 12)
≥Rotating the screen without opening the angle enough
may scratch the area around the LCD etc. (> 5, “Rotating
the screen”)
≥The unit’s speakers do not have magnetic shi elding. Do not
place the unit near televisions, personal computers or other
device s easi ly in flu en ce d b y magn et is m. Do n ot ke ep thi s un i t
and magn etized cards (bank car ds, commut er passes, etc.)
close t ogether.
When moving the unit:
≥Turn the unit off.
≥Close the screen and the stand.
≥Do not ho ld on to th e sc ree n or the stan d.
About the LCD screen
There may be 0.01% or less chance of missing or constantly
turned on pixels, but this is not a malfunction.
Attention
Do not place the unit with the LCD display-side down when the
scree n is ope n.
Doing so may scratch the surface of the LCD as the display
and the area around the display are specially-pr ocessed.
RQT9334
(ENG)
10
Page 11
Preparing the Power
AC adaptor
(included)
T o a hou sehold
AC outlet
AC power supply cord
(included)
1
23
RELEASE
DETACH ATTACH
RELEASE
DETACH ATTACH
Bottom side of this unit
Battery pack
(included)
Clicks into place.
Check to make sure it is securely fastened.
2 Slide in to the right.
1 Bring in from the
left, aligning the
grooves.
RELEASE
DETACH AT TACH
Bottom side of this unit
2 Slide.
1 Press and hold.
[CHARGE] indicator
(Yellow light)
(screen)
(flashing)
Recharge
Appears automatically when there is only
a few minutes of charge remaini ng.
Supply
Using the unit connected to the
AC adaptor
∫Detaching the battery pack
The unit is in the standby condition (the [Í] indicator lights)
when the A C power supply cord is connected. The primar y
circuit is always “live” as long as the AC ada ptor is connected
to an ele c trical outlet.
≥When connecting the AC adaptor, use the unit after setting it
vertically. Placing the unit with the stand closed
(e.g.:D 10, 3 in “Installation of the unit”) may cause damage
to or malfunction with the AC adaptor.
To conserve power
This unit consumes 0.5 W (Approximately 5 W when Quick
Start is set t o “On”) of power even when turne d off. When the
unit is not going to be used for a long time, disconnect the AC
power sup ply cord from the household AC outlet.
Using the battery pack
This unit can be used in places without an AC outlet, such as
outdoors, by attaching the included battery pack.
≥The battery is not charged at the time of purchase. Charge
before initial use.
≥The battery is designed only for use with this unit. It cannot be
used with other equipment.
∫Attaching the battery pack
Turn the unit off before attaching or detaching the battery pack.
≥Attach the battery after closing with the LCD screen facing
inwards and the stand open.
When not using for long periods of t ime
≥Detach the battery pac k (D above).
(Even when the uni t is turned off, the re is a small amount of
voltag e running thr ou gh the un it , an d this may resu lt in a
malfunction.)
≥Recharge the battery for re-use.
∫Recharg in g the battery pack
Attach the battery pack and connect the AC
adaptor (> left).
≥The [CHARGE] ind icat or lig hts while ch arging the ba ttery, and
the [CHARGE] indicator turns off when battery charging is
finished.
∫Approximate recharging and play times (Hours)
2
Play*
Recharging*
*1 When the unit is off [at 20oC (68oF)]
*2 At room temperature using headphones [at 20
≥
The times indicated on the above may differ depending on use.
≥To change the LC D bri gh t ne s s (> 13, “Adjusting the pic tures
on the LCD screen”).
1
7 2.5 2.25 2
LCD brightness level
j5 0 +5
o
C (68oF)]
∫Checking the remaining battery charge
When the unit is on (> 12, “Tur ning on/o ff the unit”) and
powere d by the ba tt e ry pac k
Press [SUB MENU] to check on the LCD
(displays for a few seconds).
Getting started
RQT9334
(ENG)
11
Page 12

Turning on/off the unit
e.g., 30 min.
Off
1:000:30 2:00 3:00 6:00
12:00
OK
RETURN
Playback
DISC
Other Functions
SD card
Network
AUX
Blu-ray Disc Player
e.g.,
Showing FUNCTIONS
Press [POWER Í] (approx. 0.5 sec.).
The unit is turned off when [POWER Í] is pressed again.
≥If the screen is rotated when the unit is turned on, the display
on the screen will disappear and the unit will be automatically
turned off. (> 10)
≥The unit cannot be turned on in situations other than the
following or when the screen is rotated. (> 10)
≥When the “Auto P owe r Of f” i s set to “ On” (in it i ally s et to “ On”) ,
the unit will be turned off automatically after 15 minutes
(5 minutes when the battery pack is used) when it is in
stopped status (> 36).
≥The startup will take time. The operation relate d to startup of
the unit after turning on this unit can be quic k en ed by setting
the initi al setup “Q ui ck Start” (> 36) to “On” (initially set to
“Off”). (Th e po w er co ns umption w ill inc r ea s e)
≥You may hear operational sounds when the unit is turned on,
but this is due to the initialization of the pickup unit, and it is
not a malfunction.
Easy Setting
After i nstallat io n o f t he u nit an d pres si ng [PO WE RÍ], a screen
for the basic settings will appear.
Follow the on-screen instruction s and make
the settings with [3, 4] and [OK].
“On-screen Language” is set. (> 34)
≥You can per form this setup anytim e by selectin g “ Eas y
Setting” in the Setup menu. (> 36)
≥You can also change this setting individually. (> 34)
Turn the unit off automatically
The unit is turned off automatically after set time has passed.
Switch by pressing the [OFF TIMER].
menu
Some functions of this unit can be operated from the
FUNCTIONS menu.
1 Press [FUNCTIONS].
≥Functions disp l aye d de pend on th e me dia an d op er ati ng
conditions.
≥The FUNCTIONS menu cannot be displayed on the unit
when selecting “AUX” with [AV SELECT].
When connecting to a TV (VIERA) with an HDMI cable,
the unit’s FUNCTIONS menu can be displayed on the
TV screen.
(> 27, “Using the FUNCTIONS menu to operate this
unit”)
2 Press [3, 4] to select the item and press
[OK].
≥Playback (> 14, 30)
Show the Home screen of the VIERA CAST when selecting
“NETWORK” with [AV SELECT].
≥Top Menu (> 14)
≥Menu (> 14, 18, 22)
≥Viewing Picture (> 18)
≥Other Functions
j “Playlists”:
You can play playlists created on DVD-VR.
Press [3, 4, 2, 1] to select the playlist and press [OK].
j “Setup” (> 32)
j “Card Ma na ge ment” (> 17)
≥Disc (> 14) Switches to the disc drive.
≥SD card (> 14) Switches to the SD drive.
≥Network (> 30) Show the Home screen of the
VIERA CAST.
≥AUX (> 25)
It will switch every time it is pressed.
RQT9334
(ENG)
12
Off Timer
0:30
Page 13
Adjusting the pictures on
LCD Menu
Picture
Dynamic
Monitor On
Brightness
Color
RETURN
SUB
MENU
OPEN
Label si de up
(Double-sided disc:
place the label side
up that you want to
play back)
Clicks
into place.
Lens (> below)
Lens
Label si de
Insert the card with
the corner cut-side
up.
Loading the disc or SD
the LCD scr een
Press [LCD].
1
≥
It is also possible to display with the following procedures.
1 Press [SUB MENU].
2
Select “Other Functions” with
[OK].
3 Select “LCD Menu” with [3, 4], an d se le ct
[3,4], and select
[OK].
2 Select the item with [3, 4].
3 Change the setting with [3, 4, 2, 1].
≥Underlined items are the factory presets.
∫ When selecting other settings than “AUX” wit h
[AVSELECT]
Picture:Adjusting i ma ge quali ty
≥Standard: Standard
≥Dynamic
≥Night: Picture suitable for viewing in dark places
≥User j Brightness :j5 to +5
Monitor:Displaying images
≥On
≥Off:
: Picture with high contrast
j Color :j5 to +5
:
Image display
No image
card
Disc
Open the screen and press [OPEN].
1
2 Set the disc holding the unit with your hand
and close the lid.
3 Close the screen.
≥Some discs may s tart playing when it is loaded with the unit
turned on.
≥About discs with a cartridge
j BD-RE with a cartridge: It cannot be used with this unit. (It
cannot be used even if the disc is taken out from the
cartridge.)
j DVD-RAM , 8 cm dis c: R em o ve th e di sc fro m the cartridg e
and set the disc in the tray
j Plac e t he disc ba ck int o the ca r tri dg e for sto ra ge to pr ev ent
dirt and scratches after use.
≥Do not touch the lens as it may
make it dir ty .
Getting started
∫ When selecting “AUX” with [AVSELECT] (> 25)
PICTURE:Adjusting image quality
≥STANDARD: Standard
≥DYNAMIC
≥NIGHT: Picture suitable for viewing in dark places
≥USER j BRIGHTNESS :j5 to 5
MONITOR:Displaying images
≥NORMAL
≥FULL:
≥OFF:
≥If you are not using the LCD on this unit, select “Off (OFF)” to
conserve power. (The [Í] indicator flashes. )
≥If the settings in “PICTURE” are changed when “AUX” is
selected, the settings in “Picture” will also change.
The settings will change in the same way even when
something other than “AUX” is selected.
To exit the screen
Press [LCD] or [RETURN].
To displ ay images w hen t he “Monitor ( MONIT OR)” i s
set to “Off (OFF)”
Press [LCD] or [SUB MENU]
: Picture with high contrast
j COLOR :j5 to 5
When y ou want to view 4:3 images
:
When y ou want to view 16:9 images
No image
SD card
1 Open the cover at the side of the unit.
2 Insert the SD card into the SD card slot.
≥Press on the center of the card until it clicks into place.
3 Close the cover.
To remove the card
In step 2 abo ve, p ress th e c en ter of the c ar d unti l it “ cl ic ks” , an d
pull the card out straight .
RQT9334
(ENG)
13
Page 14
Playback
DIRECT NAVIGATOR Title View
Video
Picture
01
02
03
04
05
06
07
08
09
10
9/ 5
9/ 5
9/ 5
9/ 6
9/ 6
9/ 6
9/ 7
9/ 7
9/ 7
9/ 7
Wed
Wed
Wed
Thu
Thu
Thu
Fri
Fri
Fri
Fri
IN 2
IN 2
VHS
VHS
IN 2
IN 2
10:00AM
11:30AM
11:59PM
10:00AM
11:30AM
11:59PM
10:00AM
10:30AM
11:30AM
11:59PM
Rec. Length
No.
Date Day
Channel
Start
Title Name
DVD-RAM(VR)
R G
SUB
MENU
Play
Previous Next
RETURN
Video Picture
Page 01/02
0:15 (SP)
e.g., DVD-RAM
SD Card
Play Video (AVCHD)
Select an action or press [RETURN].
Play Pictures (JPEG)
Play Video (MPEG-2)
OK
RETURN
SUB
MENU
e.g.,
DIRECT NAVIGATOR
Video (MPEG-2)
Video
001
002
003
004
005
006
007
008
009
010
9/ 5
9/ 5
9/ 5
9/ 6
9/ 6
9/ 6
9/ 7
9/ 7
9/ 7
9/ 7
Wed
Wed
Wed
Thu
Thu
Thu
Fri
Fri
Fri
Fri
10:00AM
11:30AM
11:59PM
10:00AM
11:30AM
11:59PM
10:00AM
10:30AM
11:30AM
11:59PM
Rec. Length
No.
Date Day
Start
Title Name
SD CARD
SUB
MENU
Play
Previous Next
RETURN
Page 01/02
0:15.47
e.g.,
Basic play (Playing video
Playing HD Video or SD Video
contents)
Instructions for operations are generally described using the
remote control in these operating instructions.
Preparation
Insert a disc or SD card (> 13).
Press [AV SELECT] to select “DISC” or “SD”.
Play starts.
≥If play does not start, press [1](PLAY).
≥If a media with data in different file formats is inserted, the file
selection menu is displayed. Press [3, 4] to select the
desired file for mat and press [OK].
≥If the menu is displayed, press [3, 4, 2, 1] to select the
item an d press [OK].
≥If the screen prompt ing you to use the co lor buttons appears,
continue to operate with the color buttons on the remote
control.
≥DISCS CONTINUE TO ROTATE WHILE MENUS ARE
DISPLAYED. Press [∫] when you finish to preserve the
unit’s motor.
≥The producer s of the disc can control how discs ar e played.
So you m ay no t a lwa ys be a bl e to co ntr ol pl ay as de scr i bed i n
these operating instructions. Read the disc’s instructions
carefully.
≥When playing a set of two or mo re BD-Vi deo discs, the menu
screen may continue to display even if the disc has been
ejected.
≥The start of playba ck may tak e time depending on the disc or
SD card.
≥The sound of rotation may be audible during disc playback,
but this is not a malfunction.
[AVCHD] [MPEG2]
It is possible to playback the HD (High Definition) video
recorded on the Panasonic High definition Vi deo Camera o n
the DVD-RAM/R/RW/R DL/+R/+RW/+R DL or SD card, and S D
(Standard Defini tion) Video recorded on the Panasonic SD
Video Camera on the SD card.
Preparation
Insert a disc or SD card (> 13).
1 Press [AV SELECT] to select “DISC” or
“SD”.
≥“Video (AVCHD)” or “Video (MPEG-2)” screen is
displayed.
≥If a media containing data in different file formats is
inserted, the file selection menu may be displayed.
Press [3, 4] to select “Play Video (AVCHD)” or “Play
Video (MPEG-2)” and press [OK].
2 Press [3, 4, 2, 1] to select the title and
press [OK].
≥Total title number may not be displayed properly on +R/
+RW.
To adjust the volume
Press [j VOL] or [i VOL].
≥When using headphones, turn down the volume before
connection.
To sh ow m enu s
[BD-V] [AVCHD] ]DVD-VR] [DVD-V] [DivX]
Press [TOP MENU/DIRECT NAVIGATOR].
≥Total title number may not be displayed properly on +R/+RW.
To show Pop-up menu
[BD-V]
The Pop-u p menu is a special feature avail able with some BDVideo discs. This menu may vary with discs. For the operating
method, refer to the instructions for the disc.
1 Press [POP-UP MENU].
RQT9334
14
(ENG)
2 Press [3, 4, 2, 1] to select the item and press [OK].
≥Pop-up menu also appears by pressing [SUB MENU] and
selecting “Pop-up Menu”.
≥Press [POP-UP MEN U] to exit the screen.
T o return to the menu screen
Press [DIREC T NAVIGATOR].
T o exit the menu screen
Press [RETURN].
To switch from other menus to AVCHD or
MPEG2 menu
(If th e media contains dat a in different fi le formats)
1 Press [FUNCTIONS].
2 Press [3, 4] to select “Menu” and pr ess [OK].
3 Press [3, 4] to select “Play Video (AVCHD)” or “Play Video
(MPEG-2)” and press [OK].
≥It may pause for a few seconds on the break of images when
editing such as partial deletion is performed.
≥High definition video (transfer rate of 18
cannot be played back correctly if it was r ecorded on a DVD
compatible to double speed or slower.
Mbps or faster)
Page 15
Chapter playback
DIRECT NAVIGATOR Title View
Video
Picture
01
02
03
04
05
06
07
08
09
10
9/ 5
9/ 5
9/ 5
9/ 6
9/ 6
9/ 6
9/ 7
9/ 7
9/ 7
9/ 7
Wed
Wed
Wed
Thu
Thu
Thu
Fri
Fri
Fri
Fri
IN 2
IN 2
VHS
VHS
IN 2
IN 2
10:00AM
11:30AM
11:59PM
10:00AM
11:30AM
11:59PM
10:00AM
10:30AM
11:30AM
11:59PM
Rec. Length
No.
Date Day
Channel
Start
Title Name
DVD-RAM(VR)
R G
SUB
MENU
Play
Previous Next
RETURN
Video Picture
Page 01/02
0:15 (SP)
e.g.,
Properties
View Chapters
To picture
To display the title properties
(recor din g da te , etc .)
Playing still pictures (> 18)
To select the chapter
DIRECT NAVIGATOR
Chapter View
DVD-RAM(VR)
Video
Picture
Play
RETURN
Page 001/001
002 003
Play01
0:00.20
---
---
You are now in ‘‘Chapter View.’’
Please select the chapter you
would like to start playback.
Press [RETURN] for ‘‘Title View.’’
001
0:00.00
e.g.,
Other operations during play
]DVD-VR]
Preparation
Insert a dis c (> 13).
1 Press [AV SELECT]
to select “DISC”.
≥“Title View” screen is
displayed.
2 Press [3, 4] to
select the title and
press [SUB MENU].
3 Press [3, 4] to select “View Chapters”
and press [OK].
4 Press [2, 1] to select the chapter and
press [OK].
These functions may not work depending on the media.
Stop
The stopped position is memorized.
Resume play function
Press [1] (PLAY) to restart from this position.
≥The memorized position is cleared in the following instances:
j [∫] is pr essed several times.
j The disc or SD car d is removed.
j The unit is turned off due to such occurrences as power
outage, the removal of the AC adaptor or waste of the
battery pack’s remaining power when the unit is turned on.
≥[BD-V]: On BD-Video discs including BD-J (> 48), the resume
play fu nction does not work.
≥[CD] [MP3] [DivX] [MPEG2]: The position is cleared if the unit is
turned off.
Pause
≥Pres s [;] again or [1] (P LAY) to restar t play.
Search/Slow-motion
Playback
The speed increases up to 5 steps.
≥Pres s [1] (PLAY) to revert to norm al playback speed.
≥For some discs, the speed ma y not change.
Search
While playing, press [6] or [5].
≥]DVD-VR] [DVD-V]:
Audio is heard during the first level of forward search.
≥[BD-V] [AVCHD] [DivX] [MPEG2]: Audio is not heard during all
levels of search.
≥[CD] [MP3]: The speed is fixed to a single step.
Slow-motion
While paused, press [6] or [5].
≥[BD-V] [AVCHD]: Forward direction [5] only.
≥]DVD-VR]: If continued for approx. 5 minutes, slow-motion play
pauses automatically.
Skip
Skip to the title, chapter or track you want to play.
≥Each press increases the number of skips.
≥[DivX]: Backward direction [:] only.
RQT9334
(ENG)
15
Page 16
Basic play (Playing video contents)
Play
BD-Video
T1 C1 0:05.14
0:20.52
T: Tit le
C: Chapter
PL: Playlist
Items change
depending on the
disc played.
No display
Curre nt po si ti o n
Type of disc Play status
Elapsed tim e in the title
e.g., [BD-V]
Depending on the kind of disc or the playback status, this
displ ay may not app ear.
Total time
Soundtrack
1 ENG
Digital 3/2.1ch
Englis h is sele c ted .
e.g., [DVD-V]
Play
DVD-RAM(VR)
AudioLR
“AudioLR”
is selected
e.g.,
(continued)
Status messages
Direct Play
During pl ayba ck , yo u ca n ac ces s spe cif ic re cord in gs or scen es
through direct entry of the numbered buttons.
Play starts fro m the selected title or chapter.
[BD-V] [AVCHD]
e.g., 5: [0] B [0] B [5]
15: [0] B [1] B [5]
[DVD-V]
e.g., 5: [0] B [5]
15: [1] B [5]
≥While stopped (the image on the right is
displa yed on the sc reen), the title is
designated. While playing, the chapter is
designated.
Frame-by-frame
While paused, press [2] (2;) or [1] (;1).
Each press shows the next frame.
≥Press and hold to change in forward or backward succession.
≥Pres s [1] (PLAY) to revert to norm al playback speed.
≥[BD-V] [AVCHD] : Forward direction [1] (;1) only.
Screen Aspect
The status messages give you information about wha t is
currently being played . Each time you press [STATUS], the
informa tio n displaye d will change.
≥It is also possible to display with the following procedures:
1 Press [SUB MENU].
2 Select “Status” with [3, 4], and select [OK].
Changing audio during play
When black bars are shown at the top, bottom, left, and right
side s of the screen, you can enla r ge the im age to fill the
screen.
1 Press [SUB MENU].
2 Press [3, 4] to select “Other Functions” and press [OK].
3 Press [3, 4] to sele ct “Screen Aspect” and press [OK].
4 Press [2, 1] to select “Side cut” or “Zoom”.
Normal: Normal output
Side cut: The black bars on the right and left sides of the 16:9
image disappear and the image is enlarged. Please
note that the right and left sides of the image are cut
off when the black bar is not displayed.
Zoom: The black bars o n the top and bottom side s of the 4:3
image disappear and the im age is enlarged. Please
note that the top and bottom sides of the image are
cut off when the black bar is not displayed.
≥Please note that the top, bottom and sides of the image will
be cut off in imag es with no black bars.
≥
Screen aspect will return to “Normal” in the following instances:
j Playback of images starts/ends
j The unit is tu rned on/off
≥[BD-V] [DVD-V]: “Side cut” does not have any effect.
≥When “TV Aspect” (> 34) is set to “4:3 Pan & Scan” or “4:3
Letterbox”, the “Zoom” effect is disabled.
RQT9334
(ENG)
16
≥It is also possible to display with the following procedures:
1 Press [SUB MENU].
2 Select “Other Function s” with [3, 4], and select [OK].
3 Select “Audio” with [3, 4], and select [OK].
[BD-V] [DVD-V]
You can ch ange the audio channe l number each time you
press [ AU D IO ] or [ 3, 4]. This allo w s yo u to change the
soundtrack language (> 23, Soundtrack), etc.
]DVD-VR] [DivX] [MPEG2]
AudioLR>AudioL>Audio R
^---------- -----------------------}
You can change soundtracks each time you press [AUDIO] or
[OK].
Page 17

Enjoying BD-Live or
Primary video
Secondary video
Card Management No. of Files 6
Free space 300 MB
SD card
Format this SD Card.
OK
RETURN
BD-Video Data Erase
Format SD Card
e.g.,
BONUSVIEW in BD-Video
[BD-V]
What is BONUSVIEW?
BONUSVIEW allows you to enjoy functions such as picture-inpicture or secondary audio etc., with BD-Video supporting BDROM Profile 1 version 1.1/ Final Standard Profile.
What is BD-Live?
In addition to the BONUSVIEW function, BD-Video supporting
BD-ROM Pr ofi le 2 that ha s a ne tw ork e xt en si on fun ct i on allow s
you to en j oy mo re f unct i on s s uch as su btit l es , ex cl usi ve i mage s
and onli ne games by connecting this unit to the Internet. In
order to use the Int ernet feature, you must have this unit
connected to a broadband network (> 28).
≥These discs may not be on sale in certain regions.
≥The usable f un ct io ns an d t h e o per at ing met h od may va r y wi t h
each disc, please refer to the instruct ions on the disc and/or
visit their website.
Playing secondary video (picturein-picture) and secondary audio
Enjoyin g B D-Li ve di scs w ith Int ern et
Many BD-Live compatible discs require content to be
downloaded onto an SD card (> 49, Local storage) in
order to access the avail able BD-Live featur es.
≥An SD card with 1 GB or mo re of fr ee spa ce (SD Speed Cl a ss
Rating 2 or higher) needs to be inserted prior to inserting the
BD-Live compatible disc.
Some BD-Live content available on the Blu-ray discs may
require an Internet account to be created in order to access
the BD-Live content. Follow the screen display or instruction
manual o f the disc for information on acquiring an account.
Preparation
≥Connect to the network. (> 28)
1 Insert an SD card (> 13).
≥If the SD card menu screen is displaye d,
press [RETURN] to clear the screen.
2 Insert th e disc (> 13).
3 Press [AV SELECT] to select “DISC”.
≥
For operation method, refer to the instructions on the disc.
To use the ab ove functions, it is recommende d th at you forma t the
card on this unit. Format the card us ing the following proced ures:
Playback
To turn on/off secondary video
Set “Video” in “Secondary Vide o” to “On” or
“Off” (> 23, Press [DI SPL AY] > “Disc” >
“Signa l Type”)
The secondary video is played.
To turn on/off secondary audio
Set “Soundtrack” in “Secondary Video” to
“On” or “Off” (> 23, Press [DISPLAY] >
“Disc” > “Signal Type”)
The secondary audio is played.
≥Du r in g se arch/slow -m o tion or frame -by - frame, only the
primary video is displayed.
≥When “BD-Video Secondary Audio” in “Digital Audio Output”
is set to “Off”, secondary audio will not be played even if you
set “Sou ndtrack” in “Secondary Video” to “On”. Please ch eck
that “B D-Video Secondary Audio” is set to “On” (> 33).
≥The playback method determined by the disc will take priority,
so it may not play back in the manner specified with this unit.
≥When the secondary video is turned off, t he secondary audio
will not be played.
Formatting SD ca rds/Deletin g data
≥If the SD card you use is formatted, all data on the card will be
erased. It cannot be recovered.
1 Insert an SD card (> 13).
2 Press [AV SELECT] to
select “SD”.
3 Press [FUNCTIONS].
4 Press [3, 4] to selec t
“Other Functions” and
press [OK].
5 Press [3, 4] to selec t
“Card Man ag em ent” and pre ss [OK ] .
6 Press [3, 4] to select “BD-Video Data Erase” or “Format
SD Card” and press [OK].
7 Press [2, 1] to select “Yes” and press [OK].
8 Press [2, 1] to select “Start” and press [OK].
≥If you experience any problems, first, try formatting the SD
card in this unit.
≥A message may be di sp la ye d whe n the SD c ar d doe sn' t have
enough storage ca pacity for BD-Liv e content.
Please make space available on the current SD card, or
insert another SD card.
≥While using this feature, do not open the cover at the side of
the unit or t ou c h the SD ca r d.
≥While using this featu re, do not remove th e SD card. Doing so
will caus e playbac k to stop.
≥The unit must be connected to the Internet and set up (> 28)
to use the BD-Live functions. “BD-Live Internet Access” may
need to be changed for certain discs (> 32).
≥When discs sup porting BD- Live are played back, the play er
or disc ID s may be sent to the content provid er via the
Internet. You can restrict Internet access (> 32).
≥The playback may be paused depending on the
communication environment. Some functions may be
disabl ed to prevent skipping to sect ions that have not been
downloaded, etc.
RQT9334
(ENG)
17
Page 18

Playing still pictures
SD Card
Play Video (AVCHD)
Select an action or press [RETURN].
Play Pictures (JPEG)
Play Video (MPEG-2)
OK
RETURN
SUB
MENU
e.g.,
ᧂ
R G
Total 8
106_DVD
Total 13
12/9/2006
SUB
MENU
DIRECT NAVIGATOR
Album View
DVD-RAM(VR)
Video
Picture
OK
Press [OK] to go to Picture View.
Previous Next Slideshow
RETURN
Video Picture
Page 02/02
e.g.,
SUB
MENU
DIRECT NAVIGATOR
Picture View
DVD-RAM(VR)
Play
RETURN
2006 9 12
Page 001/001
0001
0005
0009
0006 0007 0008
0002 0003 0004
Vidéo
Image
e.g.,
[JPEG]
Playback of the BD-RE, DVD-RAM/R/R DL or CD-R/RW with
still pictures recorded. This unit can also play s till pictures
recorded on the SD card.
(About structure of folders D 39, “Structure of folders that can
be played in this unit”)
Preparation
Insert a disc or SD card (> 13).
1
Press [AV SELECT] to select “DISC” or “SD”.
∫BD-RE, DVD-RAM
“Album View” screen is displayed.
≥When the “Title View” screen is displayed, press the [G]
button to switch to the “Album View” screen.
≥
If the DVD- RAM conta in i ng both JPEG and AVCHD format
is inserted, the file selection menu may b e displa yed.
∫DVD-R/R DL, CD-R/RW , SD card
≥If the media containing data in different file formats is
inserted, the file selection menu may b e displaye d.
Press [3,4] to select “Play Pictures (JPEG)” and p ress
[OK].
To switch from other menus to JPEG menu
(If th e media contains dat a in different fi le formats)
1 Press [FUNCTIONS].
2 Press [3, 4] to select “Menu” and pr ess [OK].
3 Press [3, 4] to select “Play Pictures (JPEG)” and press
[OK].
Useful functions during still
picture play
Start Slideshow
You can di splay still pictures one by one at a constant interv al.
∫ BD-RE, DVD-RAM
1 While the “Album View” screen is displayed
Press [3, 4, 2, 1] to select the album
and press [SUB MENU].
≥You can also start slideshow by pressing [1](PLAY)
after selecting the album.
2 Press [3, 4] to select “Start Slideshow”
and press [OK].
“Picture View” screen is displayed.
B Go to step 3
2 Press [3, 4, 2, 1] to select the album
and press [OK].
3 Press [3, 4, 2, 1] to select the still
picture and press [OK].
≥Pres s [2, 1] to display the previous or next still picture.
≥Pres s [:, 9] to show oth er pages.
≥Playback is not possible for pictures other than JPEGs.
≥Black bars may be displayed on the top, bottom or sides
depending on the picture aspect ratio.
To return to the previous s c reen
Press [RETURN].
To exit the screen
RQT9334
(ENG)
Press [DIRECT NAVIGATOR].
18
∫ DVD-R/R DL, CD-R/RW, SD card
1 While the “Pict ure View ” scree n is dis pla ye d
Press [SUB MENU].
2 Press [3, 4] to select “Start Slideshow”
and press [OK].
To stop slideshow
Press [∫].
Slideshow settings
In step 2 in Start Slid es h ow (D above)
1 Press [3, 4] to select “Slideshow
Settings” and press [OK].
2 To change the display interval
Press [3, 4] to s el ect “ Di spl a y Int erv al ” an d pr ess [ 2, 1]
to select the interval (“Long”, “Normal” or “Short”).
≥When a still picture with a large nu mber of pixels is
played, the display interval may become longer. Even if
the setting is changed, the display interval may not
become shorter.
To set display method
Press [3, 4] to select “Transition Effect” and press
[2, 1] to select “Fade”, “Motion” and “Random”.
“Fade”: Pictures are changed by fading out and
fading in.
“Motion”: Pictures are changed by fading out and
fadi ng in, while they are enlarged, reduced,
or moved up or down.
“Rando m ”: In additio n to the “M o tio n” , pic tur e s are
changed by various methods.
Page 19

To repeat slideshow
\JPEG\DCIM001
OK
RETURN
Select Root folder
Change the Album folder to be accessed.
Press [OK] to confirm
e.g.,
Pictures
Folder selection
CD(JPEG)
001
002
003
004
005
006
007
008
009
010
103
104
105
021216_0026
F 2/25
OK
RETURN
e.g.,
Photo 11/12/2009 Total 3/9
e.g., JPEG on DVD-RAM
Shootin g date
Pres s [3, 4] to select “Repeat Play” and press [2, 1] to
select “On” or “Off”.
T o lis ten to a Background Music (SD card only)
The music CD can be played back as Background Music
during the slideshow.
Press [3, 4] to select “Soundtrack” and press [2, 1] to
select “On” or “Off”.
≥You cannot search or skip the music.
≥When the slideshow stops, the playback of the music
also stops.
3 Press [3, 4, 2, 1] to select “Set” and
press [OK].
Rotate
1 While playing ( except for slidesho w)
Press [SUB MENU].
2 Press [3, 4] to select “Rotate Right” or
“Rotate Left” and press [OK].
≥The rotation infor mation will be stored until the unit is turned
off or the media is removed.
Zoom out
This function is only available for small-sized still pictures.
∫ DVD-R/R DL, CD-R/RW
1 While the “Pictu re View ” scree n is dis pla ye d
Press [SUB MENU].
2 Press [3, 4] to select “Select Folder” and
press [OK].
3 Press [3, 4] to select a folder and press
[OK].
Playback
To show the picture properties
While playing
Press [STATUS] twice.
≥It is also possible to display with the following procedures:
1 Press [SUB MENU].
2 Select “Status” with [3, 4], and select [OK].
1 While playing ( except for slidesho w)
Press [SUB MENU].
2 Press [3, 4] to select “Zoom out” and
press [OK].
≥To cancel “Zoom out”, press [3, 4] to select “Zoom in” in
step 2 and press [OK].
≥The zoom-out information will not be stored.
To select the still pictures in another folder
∫ BD-RE, DVD-RAM
To switch to another higher folder
(Only if there is a multiple number of higher folders
recognizable)
1 While the “Album View” screen is displayed
Press [SUB MENU].
2 Press [3, 4] to select “Select Root folder”
and press [OK].
3 Press [2, 1] to select the higher folder
and press [OK].
To exit, press [STATUS].
RQT9334
(ENG)
19
Page 20

Playing DivX® videos
e.g.,
CD
Select an action or press [RETURN].
OK
RETURN
SUB
MENU
Play Pictures (JPEG)
Play Video (DivX)
Play Music (MP3)
CD (DivX)
Play
RETURN
SUB
MENU
DIRECT NAVIGATOR
No
Name of Title
From SUB MENU you can select a folder.
Page 01/01
001 ABC.divx
DivX
e.g.,
Selected folder No. /
Total folders
If the folder has no
title,
“– –” is displayed as
folder number.
CD (DivX)
DIRECT NAVIGATOR
Folder selection
Page 01/01
F 1/21
OK
RETURN
Image001
Image002
Image003
Image004
Image005
Image006
Image007
Image008
Image009
Image010
12_02_2004
e.g.,
DivX Registration
DivX® Video On Demand
Your registration code is : XXXXXXXX
To learn more visit www.divx.com/vod
8 alphanumeric
characters
[DivX]
ABOUT DIVX VIDEO:
DivX® is a digital video format created by DivX, Inc. This is an
official DivX Certified device that plays DivX video.
You can play DVD-R/R DL and CD-R/RW discs which contain
DivX vide o contents that have been recorded on a per sonal
computer.
(About structure of folders D 39, “Structure of folders that can
be played in this unit”)
≥Because DivX format can use many different codecs,
there is no guarantee that all DivX files will play. (> 38,
“About MP3/JPEG/DivX files”)
Preparation
Insert a dis c (> 13).
1 Press [AV SELECT] to select “DISC”.
≥If the media containing data in different file formats is
inserted, the file selection menu may b e displaye d.
Press [3, 4] to select “Play Video (DivX)” and press
[OK].
Playing a title in another folder
1 While the “DIRECT NAVIGATOR” is displayed
Press [SUB MENU].
2 Press [3, 4] to select “Select Folder” and
press [OK].
3 Press [3, 4] to select a folder and press
[OK].
≥You cannot select folders that contain no compatible files.
To return to the previous screen
Press [RETURN].
Regarding DivX VOD content
2 Press [3, 4] to select the title and press
[OK].
Play starts on the selected title.
≥The picture si zes set for recording may prevent the unit from
showing pictures in the proper aspect. You may be able to
adjust the aspect through th e TV.
≥Successive play is not possible.
≥You can use se ar c h an d sk ip fu nc ti ons. (> 15)
≥Pres s [:, 9] to show oth er pages.
To switch from other menus to DivX menu
(If the me dia cont ains data in different file formats)
1 Press [FUNCTIONS].
2 Press [3, 4] to select “Menu” and press [OK].
3 Press [3, 4] to select “Play Video (DivX)” and press [OK].
RQT9334
(ENG)
20
ABOUT DIVX VIDEO-ON-DEMAND:
This DivX® Certified device must be registered in order to play
DivX Video-on-Demand (VOD) content.
First ge ne r at e th e DivX VO D re gi stration cod e fo r yo ur de vi ce
and submit it during the registration process.
[Important: DivX VOD content is protected by a DivX DRM
(Digital Rights Management) system that restricts playback to
registered DivX Certified devices. If you try to play DivX VOD
content not authorized for your device, the message
“Auth ori za tion Err o r . ” wil l be di sp laye d an d yo ur co nt en t wi ll no t
play.] Learn more at www.divx.com/vo d.
Display the unit’s registration code.
(> 36, “DivX Registration” in “Others”)
≥After playing DivX VOD content for the first time, another
registration code is then displayed in “DivX Registration”. Do
not use this registration code to purchase DivX VOD con tent.
If you use this code to purchase DivX VOD content, and then
play th e cont en t o n thi s un it , you wi ll no longe r be a ble t o pl ay
any content that you purchased using t he previous code.
≥If you purchase DivX VOD content using a registration code
different from this unit’s code, you will not be able to play this
content. (“Authorization Error.” is displayed.)
Page 21

Regarding DivX VOD content that can only be
played a set number of times
Some DivX VOD content can only be played a set number of
times. When you play this content, the remaining number of
plays is displayed. You cannot play this content when the
number of remaining plays is z ero. (“Rental Expired.” is
displayed.)
The remaining number of plays decreases each time a
program is played. However, when playing from the point
where play was previously stopped, the remaining number of
plays does not decrease due to the resume play function.
Displaying subtitles text
You can dis play subtitles text onto the DivX video disc on this
unit.
This function has no relation to the subtitles specified in DivX
standard specifications and has no clear standard.The
operation might be different or it may not operate properly
dependi ng on the way t he file was ma de or the st a te of th is unit
(play in g, st op ped, etc.).
1 While playing
Press [DISPLAY].
2 Press [3, 4] to select “Disc” and press
[1].
3 Press [3, 4] to select “Subtitle” and press
[1].
4 Press [3, 4] to select “On” and press [1].
5 Press [3, 4] to select “Text”.
≥DivX video files that do not display “Text” do not contain
subtitles text.
Subtitles text cannot be displayed.
Playback
To exit the screen
Press [DISPLAY].
≥If the subtitles text are not displayed correctly, try changing
the language settings. (> 32)
RQT9334
(ENG)
21
Page 22

Playing music
CD
Select an action or press [RETURN].
OK
RETURN
SUB
MENU
Play Pictures (JPEG)
Play Video (DivX)
Play Music (MP3)
e.g.,
0.09 4.30
01
02
03
04
05
DIRECT NAVIGATOR
Music list
CD
No
Track Name Play Time
Track1
Track1
4min30sec
3min41sec
4min30sec
3min11sec
5min 2sec
Track2
5 Tracks / Total Play Time 20min54sec
Track3
Track4
Track5
Play
RETURN
“ ” indicates the track currently playing.
e.g., [CD]
DIRECT NAVIGATOR
Select Folder
CD(MP3)
001 My favorite
002 Brazilian pops
003 Chinese pops
004 Czech pops
005 Hungarian pops
006 Liner notes
007 Japanese pops
008 Mexican pops
009 Philippine pops
010 Swedish pops
011 Momoko
012 Standard number
013 Piano solo
014Vocal
MP3 music
F 6/25
OK
RETURN
Selected folder No.
/Tot a l folders
If the folder has no
track, “– –” is
displa yed as fold er
number.
e.g.,
[CD] [MP3]
You can play generally available music CDs or MP3 files
recorded onto a DVD-R/R DL and CD-R/RW.
(About structure of folders D 39, “Structure of folders that can
be played in this unit”)
Preparation
Insert a dis c (> 13).
1 Press [AV SELECT] to select “DISC”.
“Music list” screen is displayed.
≥If the media containing data in different file formats is
inserted, the file selection menu may b e displaye d.
Press [3, 4] to select “Play Music (MP3)” and press
[OK].
2 Press [3, 4] to select the track and press
[OK].
Play starts on the selected track.
≥Playback for some discs may start automatically.
To switch from other menus to MP3 menu
(If th e media contains dat a in different fi le formats)
1 Press [FUNCTIONS].
2 Press [3, 4] to select “Menu” and pr ess [OK].
3 Press [3, 4] to select “Play Music (MP3)” and press [OK].
Playing a track in another folder
[MP3]
1 While the “Music list” is displayed
Press [SUB MENU].
2 Press [3, 4] to select “Select Folder” and
press [OK].
3 Press [3, 4] to select a folder and press
[OK].
≥You cannot select folders that contain no compatible tracks.
≥You can use se ar c h an d sk ip fu nc ti ons. (> 15)
≥When the television is connected and the “Screen Saver
Function” is set to “On” (> 34), the screen switches to Screen
Saver mode if there is no operation for 10 minutes after
starting playback. (Playback continues.)
Playing music continuously even after turning off
power to the television
When the unit is con nected to a Panasonic TV (VIERA) that
supports HDAVI Contr ol 2 or later and other device supports
VIERA Link, the unit is turned off if the power to the television is
turned off, sinc e “Power off link” (> 26) operates.
The following ope rations make it possible to keep the pow er of
the unit ON and to play music continuously.
1 While playing music
Press [SUB MENU].
2 Press [3, 4] to select “TV Power” and press [OK].
≥Sound may be discontinued for several seconds when the
power to the television is turned off.
RQT9334
22
≥If the operation mentioned above is executed while audio is
output from the television, the sound may not be output from
the device. It is recommended to set the device beforehand
so that audio will be output from the device.
(ENG)
To return to the previous screen
Press [RETURN].
Page 23

Changing settings with
Video
Audio
Play
Signal Type
Subtitle
Subtitle Style
Off Main
-
Angle
-
1ENG
Disc
Menus Items Settings
e.g., BD-Video
the on-screen menu
On-screen menu operations
Press [DISPLAY].
1
≥It is also possible to display with the following procedures:
1 Press [SUB MENU].
2 Select “Other Functions” with [3, 4], and sele ct [OK].
3 Select “Settings for Playback” with [3, 4], and se le ct [OK].
≥Depending on the condition of the unit (playing, stopped,
etc.) and media contents, there may be some items that
you cann ot select or change.
2 Press [3, 4] to select the menu and press
[1].
3 Press [3, 4] to select the item and press
[1].
4 Press [3, 4] to select the setting.
≥Some items can be changed by pressing [OK].
To exit the on-screen menu
Press [DISPLAY].
What you can change with the
on-screen menu
∫Disc menu
Signal Type
[BD-V]
≥ Primary Video
Video: The original video recording method
appears. (D right, Video attribute)
Soundtrack: Select the type of audio or language.
(D right, Language, Audio att ribute)
≥ Secondary Video
Video: Select on/ off of images.
Soundtrack: Select on/off of audio and the language.
Video
[AVCHD]
The original video recording method appears. (D right, Vi deo
attribute)
The original video recording method
appears. (D right, Video attribute)
(D right, Language, Audio att ribute)
Soundtrack
[AVCHD] [DVD-V]
Select the type of audio or language. (D below, Lang uage,
Audio attribute )
]DVD-VR] [MPEG2]
The audio attributes appear. (D below, Audio attribute)
[DivX]
Select the soundtrack number.
≥Soundtra ck numbers are displayed even when there is only
one audi o typ e.
Subtitle
[BD-V] [AVCHD] [DVD-V]
Turn the subtitle on/off and select the language. (D below,
Language)
]DVD-VR] (Only discs tha t contain subtitle on/off information)
Turn the subtitle on/off.
[DivX]
Turn the subtit le on/off and select “Text” or the subtit le
number.
≥Subtitle number is displayed even if there are not multiple
subtitles.
Subtitle Style
[BD-V]
Select the subtitle style.
Audio channel
]DVD-VR] [DivX] [MPEG2]
(> 16, Changing audio during play)
Angle
[BD-V] [DVD-V]
Select the number of the angle.
Some items may be changed only on the disc specific men u.
(> 14)
Language
ENG: English
FRA: French
DEU: German
ITA: Italian
ESP: Spanish
NLD: Dutch
SVE: Swedish
NOR: Norwegian
DAN: Danish
POR: Portuguese
RUS: Russian
JPN: Japanese
CHI: Chinese
KOR: Korean
MAL: Malay
VIE: Vietnamese
THA: Thai
POL: Polish
CES: Czech
SLK: Slovak
HUN: Hungarian
FIN: Finnish
¢:Others
Audio attri bu te
LPCM/ Digital/ Digital+/
TrueHD/DTS/DTS 96/DTS-HD
HI RES/DTS-HD MSTR/MPEG
ch (cha nnel) Number of channels
k (kHz) Sampl in g f req ue ncy
b (bit) Number of bits
bps (bit per second) Transfer rate of bit
Signal type
Video attribute
MPEG-2/MPEG-4 AVC/VC-1 Video recording method
480/576/720/1080 Video Format
24p/50i/60i/50p/60p Video Frame rate
YCbCr4:2:2/YCbCr4:4:4/RGB Color Space
bps (bit per second) Transfer rate of bit
RQT9334
(ENG)
23
Playback
Page 24

Changing settings with the on-screen
menu (continued)
∫Play menu
Repeat Play
(Only when the elapsed time is being displayed on the unit’s
display.)
Select the item wh ich you want to repeat. The items
displayed differ depending on the type of media.
≥All tracks All tracks
≥Chapter Chapter
≥Playlists Playlist
≥Title Title
≥One track Track
≥Off
Select “Off” to cancel.
Random
[CD] [MP3]
While pl ay in g, pre s s [ 3, 4] to select “On”.
Random playback starts from the next track.
≥On ≥Off
∫Video menu
Picture
[BD-V] [AVCHD] ]DVD-VR] [DVD-V] [DivX] [MPEG2]
Select the picture quality mode during play.
≥Normal: Default setting
≥Soft: Soft picture with smoother video
≥Fine: Details are sharper
≥Cinema: Mellows movies, enhances detail in dark
scenes.
≥Us er : You can mak e f urther adju s tm en ts.
(> below)
1 Press [1] to select “Pictur e Adjustment” and press [OK].
2 Select the i tem using [3, 4] and adjust it with [2, 1].
Contra st: Increases th e con t rast betw ee n ligh t and
dark part s of th e p ic tu r e (j7 to i7).
Bright ness: Brightens t he picture (0 to i15).
Sharpne ss: Adjusts the sharpness of the edges of
the horizontal lines (j6 to i6).
Color: Adjusts th e shade of the picture’s color
(j7 to i7).
Gamma: Adjust s t he br i ghtn es s of da rk p or tio ns of
the screen (0 to i5).
3D NR: Reduces the rough noise in the
background to give a greater feeling of
depth (0 to i4).
When “24p Output” is set to “On”, this
function may not operate. (> 34)
Integra ted NR: Smooths block noise and reduces the
smudging that appears around
contrasting sections of the picture (0 to
i3).
24p
[DVD-V]
≥On ≥Off
Only when you have selected “On” in “24p Output” (> 34)
∫Au di o m e nu
Dialog Enhancer
[BD-V] [AVCHD] ]DVD-VR] [DVD-V] [DivX] [MPEG2] (3 channels or
more only, including a center channel)
The volume of the center channel is raise d to make dialog
easier to hear.
≥On ≥Off
This function is effec tive fo r audio fro m the HDMI AV OUT
terminal only when “Dolby D/Dolby D +/Dolby TrueHD” or
“DTS/DTS-HD” is set to “PCM”.
Progressive
Select the method of conversion for progressive output to suit
the type of material being played (> 48, Film and video).
≥Auto: Automatically detects the film and video
≥Video: Select when using “Auto”, and the
RQT9334
(ENG)
content, and appropriately converts it.
content is distorted.
24
Page 25

Connection
AV出力
A
V
力
AV OUT
HDMI IN
Television
HDMI cable
(not included)
AV
IN/OUT
VIDEO IN
AUDIO IN
(Yellow)*
(White)
(Red)
L
R
Television or projector
Audio/Video cab le
(included)
e.g. VCR
Audio/Video cabl e
(included)
Using this unit with other equipment
Connection with the Audio/Video
cable
It is possible to enjoy the video and audio of this unit on the TV
and ampli fie r, or to enjo y th e vi deo fr o m other vi de o devic es on
the LCD sc reen of this unit.
≥Turn off all equipment before connecting and read the
appropria te ope rating instruction s.
≥Do not connect video sign als through a video recorder. Due
to copy gu ard protec tio n t h e pic ture may no t be di sp layed
properly.
Connection with the HDMI cable
It is poss ible to enjoy the high quality video and audio of this
unit on the large screen by connecting this unit with the TV
using a si ngle cabl e.
≥Linked operation is possible by connecting to a
Panasonic TV (VIERA) or amplifier that is compatible with
the VIERA Link (HDMI) function. (> 26)
≥Non-HDMI-compliant cables cannot be utilized.
≥Please u se Hi g h S pe ed H DMI Cab l es tha t ha ve t he H DMI
logo (as shown on the cover ) . It is recom me nd ed tha t
you use Panasonic’s HDMI cable. When outputting
1080/24 p signal (> 34, “HDMI Resolution”), please use
HDMI cables 5.0 meters (16.4 ft.) or less.
Recommended part number:
RP-CDHG10 (1.0 m/3.3 ft.), RP-CDHG15 (1.5 m /4.9 ft.),
RP-CDHG20 (2.0 m/6.6 ft.), RP-CDHG30 (3.0 m /9.8 ft.),
RP-CDHG50 (5.0 m/16.4 ft.), etc.
≥
This unit incorporates HDMI (x.v.ColorTM, High Bit rate Audio)
technology. (
Preparation
Connect the devices to the unit.
>
49)
Enjoy video and audio on other devices
Preparation
Connect a TV or a projector to this unit.
* The video input (yellow ) p lug o n the Au dio/V ideo cable (include d)
is not u s ed when connecting to a n amplifier or similar .
1 Turn on the power of the connected device,
and switch the input.
Example: Set the input to “Video 2” or similar (the name of
input may be different depending on the connected device).
2 Start playback on this unit.
Enjoy video and audio from other devices on
this u nit
Preparation
Connect the video device to this unit.
Connection Playback
You can enjoy the high quality surround audio in Dolby Digital
Plus, Dolby TrueHD, and DTS-HD by connecting this unit to the
HDMI compatible multi-channel amplifier. (> 37) (Only when
connected to an amplifier compatible with each audio)
1 Turn on the power of the connected device
(TV, etc.), and switch the input.
Exampl e: Set the input to “HDMI” or simi lar (the name of
input may be different depending on the connected
device).
2 Start playback on this unit.
Video and audio are output from the connected device.
≥The quality of video will lower on the screen of this unit when
HDMI is c onnected , but it is not a malfunction.
AV
IN/OUT
VIDEO OUT
AUDIO OUT
(Yellow)
(White)
(Red)
L
R
Pre s s [AV SELEC T ] to sw itch to “A U X”.
≥Operate playback using the connected equipment. (Please
read the operating instru ctions for the connected equipment)
≥
The unit doe s not turn off automatically even wh en “Auto Power Off” is
set to “On” (
≥To adjust the pictures on the LCD scr een (> 13)
≥Audio/Video cable (included) is designed only for use with
this un it. Video and audio may not playback correctly if it is
used with other equipment.
≥If you raise the volume on the television while playing this
unit, the volume may abruptly become very loud when you
switch to a television broadcast. Return the volume to its
normal level before changing.
>
36). Turn the unit off whe n you have finished using it.
RQT9334
(ENG)
25
Page 26

Linked operations with
the TV
(VIERA LinkTM “HDAVI ControlTM”)
What is VIERA Link “HDAVI Control”?
VIERA LinkTM is a new name for EZ SyncTM.
VIERA Link “HDAVI Control” is a convenient function that
offers linked operations of this unit, and a Panasonic TV
(VIERA) or amplifier/receiver under “HDAVI Control”.
Y ou can use this function by connecting the equipment
with an HDMI cable. See the operating instructions for
connected equipment for operational details.
≥VIERA Link “HDAVI Control”, bas ed on the co nt rol fu ncti on s
provided by HDMI which is an industry standard kn own as
HDMI CEC (Consumer Electronics Control), is a unique
functio n t ha t we hav e de ve lo ped and adde d. As suc h, it s
operation with other man ufacturers’ equipment that
supports HDMI CE C cannot be guaranteed.
≥Thi s unit su ppo rts “HDAVI Control 4” functio n.
“HDAVI Control 4” is the newest standard (current as of
Decembe r, 2008 ) fo r Pa nas on ic ’ s HDAVI Control com pat ib le
equipm en t. T h is stand ard is compat i bl e w ith Pa na so n ic’s
conventional HDAVI equipment.
≥Please refer to indivi dual manual s for other manufactur ers’
equipment supporting VIERA Link function.
Preparation
1 Connect this unit to your TV or amplifier/receiver with an
HDMI cable (> 25).
2 Set “VIERA Link” to “On” (> 34). (The default setting is
“On”.)
3 Set the “HDAVI Control” operations on the connected
equipment (e.g ., TV).
4 Turn on all “HDAVI Cont rol” compatible equipment and
select this unit’s input channel on the connected TV so that
the “HDAVI Control” function works properly.
Also when the connection or settings are changed,
repeat this procedure.
When you want to leave the TV on and set only this
unit to standby mode
Press [POWERÍ] on this unit’s remote control and set to
standby mode.
Automatic input switching
When t he f ollo w ing op er ati on s are pe r for me d, t h e t ele vi si on wi ll
automatically switch the input channel and display the
corresponding action.
j When play starts on the un it
j When an action that uses the display screen is performed
(e.g., Direct Navigator screen)
j When the HDMI is connected, with the unit turned on (first
time only)
Power on link
When the television is off and the following operations are
performed, the television will automatically turn on and display
the corresponding action.
j When play starts on the un it
j When an action that uses the display screen is performed
(e.g., Direct Navigator screen)
Power off link
All connected equipment compatible with “HDAVI Control”,
including this unit, automatically turns off when you switch the
television off.
≥This unit automatically turns off even during playback or any
other operation.
≥When [1] (PLAY) is pressed on this unit for “Automatic input
switching” or “Power on link”, the playback image is not
immedia tely displayed on the screen and it may not be
possible to watch the contents from where playback started.
In this case, press [:] or [6] to go back to where
playback started.
Playing music continuously even after turning off
power to the television (> 22)
When not using “HDAVI Control”
Set “VIERA Link” in the Setup menu to “Off”. (> 34)
RQT9334
(ENG)
26
Page 27

Easy control only with VIERA
e.g.,
OK
RETURN
Playback
DISC
Other Functions
SD card
Network
AUX
Blu-ray Disc Player
e.g.,
remote control
If you connect this unit to the TV that supports “HDAVI Control
2” or later with an HDMI cable, you can enjoy using more
convenient functions.
You can ope rate this unit using buttons on the TV remote
control.
The buttons that you can use for this unit vary depending on
the TV. For details , refer to the operating instructions of the TV.
Use the r em ot e co nt r ol supplied wit h this unit if you ca nnot
operate this unit using buttons on th e TV remote control.
≥The operati on of this unit may be interrupted when you press
incompatible buttons on the TV remote control.
Using the FUNCTIONS menu to operate this
unit
By using the TV remote control, you can play media using the
FUNCTIONS menu.
Using the sub menu to operate this unit
By using the TV remote control, you can play discs using the
“Cont rol Panel” and display the Top Menu (for BD-Video and
DVD-V ideo) or Pop-up Menu (for BD-Video) .
1 Press [SUB MENU].
≥
This can also be displayed by using the VIERA menu screen.
≥You cannot use the sub menu while the Top Menu for
BD-Video or DVD-Video is displayed.
2 Select an item, then press [OK].
1 Press the button for VIERA Link on the
remote con trol .
2 Select the player.
≥The FUNCTIONS menu is displayed.
When the AC adaptor is connected while the unit is turned off
and the unit is closed with the screen facing outward (
3
or 4 in “Installation of the unit”), the u nit will autom at ically
turn on. For details, please refer to the TV user manual.
≥When the unit’s AC adaptor is connected, the unit will
turn on w ith the above opera tions.
Notice
≥Please leave the unit with the screen facing outward and
closed.
(
> 10
, 3 or 4 in “
The unit c an no t be op er ate d wit h the TV re mo te co nt ro l i n an y
other condition.
≥When using only the battery pack, operate a fter turning the
unit on .
Installation of the unit
>
”)
10,
Control Panel Control Panel is displayed. Follow
Top Menu
[BD-V] [AVCHD] [DVD-V]
Menu [DVD-V] Menu is displayed.
Pop-up Menu [BD-V] Pop-up menu is displayed.
Status (> 16)
Rotate Right [JPEG] Rotate the still pi cture.
Rotate Left [JPEG]
Zoom in [JPEG] Enlarge or reduce the still picture.
Zoom out [JPEG]
Other Functions j LCD Menu (> 13)
the indications on the screen.
T op menu is displayed.
j Audio (> 16)
j Settings for Playb a ck (> 23)
j Screen Aspect (> 16)
j Setup (> 32)
Connection
RQT9334
(ENG)
27
Page 28

Network
LAN
(
10/100
)
Telecommunications
equipment ( m od em , etc . )
Straight LAN cable
(not included)
Broadband router, etc.
The uni tInternet
IP Address/DNS Settings
Connection Test
OnOn
OnOn
OnOn
㪄㪄㪄㪅㩷㪄㪄㪄㪅㩷㪄㪄㪄㪅㩷㪄㪄㪄㪄㪄 㪄 㪅㩷 㪄㪄 㪄 㪅㩷 㪄 㪄㪄 㪅㩷 㪄 㪄㪄
㪄㪄㪄㪅㩷㪄㪄㪄㪅㩷㪄㪄㪄㪅㩷㪄㪄㪄㪄㪄 㪄 㪅㩷 㪄㪄 㪄 㪅㩷 㪄 㪄㪄 㪅㩷 㪄 㪄㪄
㪄㪄㪄㪅㩷㪄㪄㪄㪅㩷㪄㪄㪄㪅㩷㪄㪄㪄㪄㪄 㪄 㪅㩷 㪄㪄 㪄 㪅㩷 㪄 㪄㪄 㪅㩷 㪄 㪄㪄
㪄㪄㪄㪅㩷㪄㪄㪄㪅㩷㪄㪄㪄㪅㩷㪄㪄㪄㪄㪄 㪄 㪅㩷 㪄㪄 㪄 㪅㩷 㪄 㪄㪄 㪅㩷 㪄 㪄㪄
㪄㪄㪄㪅㩷㪄㪄㪄㪅㩷㪄㪄㪄㪅㩷㪄㪄㪄㪄㪄 㪄 㪅㩷 㪄㪄 㪄 㪅㩷 㪄 㪄㪄 㪅㩷 㪄 㪄㪄
IP Address Auto Conguration (DHCP)
IP Address
Subnet Mask
Default Gateway
DNS Auto Conguration (DHCP)
Primary DNS
Secondary DNS
Auto Detect Connection Speed
Connection Speed Setting
RETURN
OK
RETURN
Network
IP Address/DNS Settings
Proxy Server Settings
Network Service
MAC Address: xx-xx-xx-xx-xx-xx
OK
Broadband network connection
The follo w ing se rv ic es can be us ed wh en t hi s un it is con ne ct ed
to the internet via a broadband connection.
≥Firmware can be updated
≥You can enjo y t he BD-L ive (> 17)
≥You can enjoy the VIERA CAST (> 30)
(> 31)
Network settings
These settings are used if you connect this unit to the Internet.
≥The connection to the Internet may take time or the Internet
may not be connected depending on the connection
environment. (> 29)
It is requir e d th at yo u us e a broadband con nection.
Preparation
≥Connect to a broadband network. (D left)
Testing of “IP Address/DNS
Settings”
Always test the connection when a LAN cable is connected.
1 Press [SETUP] .
2 Press [3, 4] to select “Network” and
press [OK].
3 Press [3, 4] to select “IP Address/DNS
Settings” and press [OK].
4 Press [3, 4] to select “Connection Test”
and press [OK].
≥Use shielded LAN cables when connecting to peripheral
devices.
≥With installation where your broadband modem is connected
directly to your PC, a router must be inst alled.
≥Us e a router that supports 10BASE-T/ 10 0B ASE-T X.
≥In case all available co nnection on your router is being used,
a hub or swi tc h ca n be in st a lle d to pr o v ide additional
connections.
≥When operating the VIERA CAST, use high-s peed inte rnet
service no less than 1.5 Mbps for SD (Standar d Definition)
and 6 Mbp s for HD (High Definition) picture quality by your
local b roadband company.
j If using slow Internet connection, the video may not be
displa ye d co r rec t l y.
≥Depending on a contract with your local broadband company,
it may be generating communication charges.
≥After physically conn ecting this unit to your broadband
connection, some configuration is required. (D right)
≥Inserting any cable other than a LAN cable in the LAN
terminal can damage the unit.
RQT9334
(ENG)
28
“Testing”: The test is in progress.
“Pass”: The connection is completed.
Press [RE TURN] to exit .
“Fail”: Please check the connection and settings.
(> 29)
≥Perform the “Connection Test” also when any change was
made to the “IP Address/DNS Settings”.
≥If the connection test fails, it may be necessary to set the
MAC addre ss o f t his un it at t he rou te r si de . The MA C ad dre ss
can be displayed by pressing [SETUP] and selecting
“Network”.
Page 29

Setting the IP address
192
.
.
.
1
Primary DNS
Please input Primary DNS and press
[OK]. Press [CANCEL] to delete the selected
character. To clear this setting, delete all
characters and press [OK].
Number
0
-
9
RETURN
Proxy Server Settings
Reset to factory preset
Proxy Address
Proxy Port Number
OK
0
Connection Test
In most cases, default settings can normally be used
without making any changes.
Set the IP address only when the router has no DHCP
server functions or when the router’s DHCP server
function is disabled.
After performing steps 1 – 3 (> 28)
4 Press [3, 4] to select “IP Address Auto
Configuration (DHCP)” and press [2, 1] to
select “Off”.
≥Generall y le av e “ On” se le cted.
≥When “Off” is selected, “DNS Auto Configuration
(DHCP)” (> below) is also automatically “Off”.
5 Press [3, 4] to select “IP Address”,
“Subnet Mask” or “Default Gateway” and
press [OK].
6 Enter numbers with the numbered buttons
and press [OK].
≥If a wrong number is entered, then press [CANCEL].
7
Press [2,1] to select “Yes” and p ress [OK].
≥
After checking the specifications for your broadband router ,
enter each number. If the number is unknown, then ch eck the
number of other devices such as personal computers connected
via a LAN cable. Assign a different number from those of other
devices for the “IP Address” and the same number for others.
≥The numeric input range is between 0 and 255.
Setting the DNS-IP
In most cases, default settings can normally be used
without making any changes.
When setting an assigned DNS server fro m your Internet
service prov ide r, perform the follow in g set tings.
After performing steps 1 – 3 (> 28)
4 Press [3, 4] to select “DNS Auto
Configuration (DHCP)” and press [2, 1] to
select “Off”.
5 Press [3, 4] to select “Primary DNS” or
“Secondary DNS”and press [OK].
6 Enter numbers with the numbered buttons
and press [OK].
≥Follow the inst r uc tio ns g iv en by your I nter n et ser v ic e pro vi de r
and enter t he num be rs . If th e nu mber is unk no wn, then che ck
the number of other devices such as personal computers
connected via a LAN cable and assign the same number.
≥The numeric input range is between 0 and 255.
Setting the connection speed
When the connection test results in “Fail” after the IP and DNSIP addresses are assigned, perform the following settings.
After performing steps 1 – 3 (> 28)
4 Press [3, 4] to select “Auto Detect
Connection Speed” and press [2, 1] to
select “Off”.
5 Press [3, 4] to select “Connection Speed
Setting ” and press [2, 1] to select a
connection speed.
≥Select a connection speed in accordance with the
environment of the network connected.
≥When the setti ngs are changed, the network connection may
be slower or disab led depend ing on the device.
Testing of “Proxy Server Settings”
Always test the c onnection when new “Proxy Server Settings”
have been made.
1 Press [SETUP] .
2 Press [3, 4] to select “Network” and
press [OK].
3 Press [3, 4] to select “Proxy Server
Settings” and press [OK].
4 Press [3, 4] to select “Connection Test”
and press [OK].
“Testing”: The test is in prog res s.
“Pass”: The connection is compl eted.
Press [RE TU RN] to exit.
“Fail”: Please check the connection and settings.
Setting the proxy server
In most cases, default settings can normally be used
without makin g any changes.
Please us e thi s se tt ing when inst ru ct ed t o by yo ur I nte r net
service p rovider.
After performing steps 1 – 3 (D above)
Network
≥If a wrong number is entered, then press [CANCEL].
7
Press [2,1] to select “Yes” and p ress [OK].
4 Press [3, 4] to select “Proxy Address”
and press [OK].
(Continued on the next page)
RQT9334
(ENG)
29
Page 30

Network settings (continued)
_
Proxy Address
Space
Finish
Delete
OK
RETURN
1
2
3
4
5
6
7
8
9
0
1234567890
ABC
DEF
abc
def
ghi
jkl
/=
%
+-*
#$&
<>@
mno
[]_
pqrs
()
tuv
{}
\ I
wxyz
“’:;
` ^
.,
?!
JKL
MNO
PQRS
TUV
WXYZ
0 -- 9
GH
~
I
0
Proxy Port Number
Please input Proxy Server Port Number and
press [OK]. Press [CANCEL] to delete the
selected character. The number will be set to
"0" if all characters are deleted and [OK] is
pressed.
Num
ber
0
-
9
Settings
Panasonic Select
Featured Videos
Bloomberg
XXX
XXX
XXX
7465.95
778.94
1442.82
-89.68
-9.47998
-25.15
TELEVISION
15min. delay
Weather
28°
New York, NY
WNW7
mph
Web Albums
TM
After you access
YouTube or Picasa
Web Albums from th e
VIERA CAST Home
screen and add your
favorite videos or
albums to VIERA
CAST, you can
choose them easily
from the Home
screen.
5 Press [3, 4, 2, 1] to select a character
and press [OK].
Te xt fi eld: show s the text you have entered
Using the numbered buttons to enter characters
e.g., entering the letter “F”
1
1
2
A
3
D
4
G
1 Press [3] to move to the 3rd row.
2 Press [3] twice to highlight “F”.
3 Press [OK].
Repeat this step to enter other charact ers.
≥Press [;] to delete.
2
B
E
H
34
C
F
I
6 Press [∫] when you complete the entry .
7 Press [3, 4] to select “Proxy Port
Number” and press [OK].
8 Enter numbers with the numbere d bu ttons
and press [OK].
Enjoying VIERA CAST
TM
You can access a s election of Internet services from the Home
screen with VIERA CAST, for example YouTube, Picasa Web
Albums. (Current as of March 2009)
≥VIERA CAST requires a broadband Internet connection. Dial-
up Internet connections cannot be used.
Preparation
≥Network connecti on (> 28)
≥Ne two r k setti ng (> 28)
1 Press [VIERA CAST].
≥
Message is displayed. Please read these instructions
caref ully an d th e n pre ss [O K ] to sta rt VIE R A CA S T fun c tio n.
Welcome to Network Service
Your Panasonic Network Service allows you to access web-based content on your Player/Recorder. Some
web content may be inappropriate for some viewers. You may disable the Network Service feature by
following the instructions found in your Operating Instructions.
Some web content may only be available from within select countries and may be presented in languages
different than the one selected in your On-screen Language settings menu.
It's recommanded your player/recorder is connected to Full HD display with HDMI. The display of the
contents may be truncated, depending on your TV. You may reduce to screen size by following the
instructions found in your Operating Instructions.
Don’t show this message again
ENTER
Images are for illustration purposes, message may
change without notice.
2 Press [3, 4, 2, 1] to select the item and
press [OK].
≥You c an operate VIERA CAST using the following
buttons on the unit’s remote control:
[3, 4, 2, 1], [OK], [RETURN], colored buttons and
numbered buttons
≥To access more features on YouTube or Picasa Web
Albums site, enter your user ID and password that you
have previously set up with these sites through the
Internet on your PC . Howe ve r, not all features ma y be
accessible through VIERA CAST.
VIERA CAST Home screen;
9 Press [2, 1] to select “Yes” and press
[OK].
≥The specified ports may be blocked and not be able to be
used depending on the network environment.
In order to restore the default settings
After performi ng ste ps 1 – 3 (> 29)
1 Press [3, 4] to select “Reset to factory preset” and press
[OK].
2 Press [2, 1] to select “Yes” and press [OK].
RQT9334
(ENG)
30
Images are f or ill us t ra t i on pur p os e, contents may change
without notice.
Regarding “Se ttin gs ”
Set VIERA CAST Home screen.
≥My Account: You can remove your account from the unit.
≥Lock: Password can be used to lock YouTube and
Picasa Web Albums.
≥Notices
≥Depending on the usage conditions, it may take a while to
load th e page.
≥The connection to the Internet may take time or the Internet
may not be connected depending on the connection
environment.
Page 31

To return to VIERA CAST Home screen
Firmware Update
The latest rmware is available.
Latest Online Version:
x.x
Current Installed Version: x.x
Do you want to start rmware update?
For the update information, please visit the
following website:
http://panasonic.net/support/
Yes No
The rmware was updated.
Current Installed Version: x.x
RETURN
OK
The latest firmware is available.
Please update firmware in Setup.
Press [VIERA CAST].
To exit from VIERA CAST
≥Press [FUNCTIONS], then press [RETURN] to cancel the
menu.
≥Set the “Network Lock” to “On” to restrict using VIERA CAST.
(> 35)
≥If the audio is distorted while using the VIERA CAST fe ature
set the “Audio Auto Gain Control” to “Off” (> 35)
≥When the entire picture cannot be displayed on the screen,
set the “Reduce to Scr een Siz e” to “On”. (> 35)
≥Set the “On-s c reen Language”, to switch the language for
Home screen. (> 34)
≥Set the “Time Zone” or “DST” when wrong time is displayed
on the screen. (> 35)
≥VIERA CASTTM home screen is subject to chan ge without
notice.
≥The services through VIERA CAST
respective service providers, and service may be
discon tinued eith er temp orari ly or pe rman entl y with out not ice.
Theref ore , Pa na so nic w i ll ma ke no war ra nt y fo r the co nten t or
the cont inuity of the ser vi ce s.
≥All features of websites or content of the service may not be
available.
≥Some content may be inappropriate for some viewe rs.
≥Some content may only be available for specific countries
and may be presented in specif ic languages.
TM
are operated by their
After the firmware is updated and the system is restarted, the
following screen indicates that the firmware update has been
completed.
≥Other operations are not possible during firmware updates.
Additionally, do not perform the following operations as they
may damage the unit:
j Turn the unit off
j Remo ve the A C pow er sup pl y cord fr om the ho use ho ld AC
outlet
j Open the disc lid
≥Downloading will require sev eral minutes. It may take longer
or the Internet may not be connected depending on the
connection environment. It is required that you use a
broadb and connec ti on.
≥When the unit is connected to the Int ernet, communication
charges may be genera ted.
≥If you do not want to check for the latest firmware version
when the unit is turned on, set “Automatic Update Check” to
“Off”. (> 36)
≥If downloading on this unit fails or this unit is not
connected to the Internet, then you can download the
latest firmware from the following website and burn it to
a CD-R to update the firmware.
http://panasonic.net/support/
(This site is in Englis h only.)
Firmware updates
Occasionally, Panasonic releases firmware updates for this
Portable BD player. Firmware is embedded software that
controls this unit’s microprocessor. These updates may add or
improve a feature of this unit. Firmware updates may also be
releas e d t o co rr ec t op er a tin g ir re gularit ies tha t are di sc ov ered
with certain movies. These updates are available at no charge.
Automatically check the firmware
≥Only when connecting the AC adaptor
This unit is capable of auto firmware check if it is connected to
the Inter net via a b roadband connecti on.
When latest firmware version is available, the following screen
is disp la yed:
Press [2, 1] to select “Yes” and press [OK].
Follow the on-screen instructions to proceed.
After the latest firmware is downloaded, the firmware will be
updated.
≥If “No” is selected, then manually update the firmware later.
(D right)
Manually updating the firmware
If the firmware update is not carried out when the unit is turned
on, a message is displayed when displaying the FUNCTIONS
menu.
1 Press [SETUP].
2 Press [3, 4] to select “Others” and press [OK].
3 Press [3, 4] to sele ct “Firmware Update” and press [OK].
4 Press [3, 4] to select “Update Now” and press [OK].
5 Press [2, 1] to select “Yes” and press [OK].
RQT9334
(ENG)
31
Network
Page 32

Settings
Changing the unit’s settings
Change the unit’s settings if necessary. The settings remain intact even if you switch the unit to standby.
Setup menu operations
1 While stopped
Press [SETUP].
2 Press [3, 4] to se lect the men u and pr ess [O K].
3 Press [3, 4] to select the item and press [OK].
If there are any other items, repeat these steps.
4 Press [3, 4, 2, 1] to select the option and press [OK].
≥There may be differences in operation methods. If this happens, follow the on-screen instructions for the operation.
Setup menu is also poss ible to d isp lay with the following proced ure s.
To return to the previous screen
Press [RETURN].
To exit the screen
Press [SETUP].
≥
1 While stoppe d, press [SUB MENU]
2 Select “Other Function s” with [3, 4], and select [OK]
3 Se lec t “S et up ” with [ 3, 4], and select [OK]
Setup
Disc
Video
Audio
Display
TV Aspect/HDMI Function Settings
Network
Others
OK
RETURN
Summary of settings
Underlined items are the factory presets.
“Disc”
DVD-Video Ratings
Set a ratings level to
limit DVD-Video play.
BD-Video Ratings
Set an age limit of
BD-Video play.
Audio Language
Subtitle Language
Menu Language
Follow the on-screen instructions. Enter a
4-digit password with the numbered
buttons when the password screen is
shown. It will be the com mon pa sswo rd for
“DVD-Video Ratings”, “BD-Video Ratings”
and “Network Lock”.
≥Do not forget your password.
Choose the language for audio, subtit le
and disc menus.
[BD-V] [DVD-V]
≥Some discs start in a certain language
despite any changes you make here.
≥
When the selected language is not
available on the disc, the default
language is played. There are discs
where you can only switch the language
from the menu screen. (
≥
Enter a code (>36) w ith th e numbered
buttons when you select “Other
>
BD-Live Internet Access [BD-V] (> 17)
You can restrict Internet access when BD-Live functions are used.
DivX Su bt it le Te x t [DivX]
Select a suitable item according to the language used for DivX
subtitles text (> 21).
≥This item i s d is pl ay ed on ly whe n pre ssi ng [S ETU P] af te r play in g
back a file.
RQT9334
(ENG)
32
14)
¢¢¢¢
≥8 No Limit
≥1 to 7: Prohibits play of DVD-Video with
≥0 Lo ck All: Pro hi bit s pla y of al l DVD-Video.
Changing settings (When level 0 to 7 is selected)
≥Unlock Player ≥Change Password
≥Change Level ≥Tempo rary Unlock
≥No Limit
≥0 to 254 ye ar ( s) : Prohi bits pla y of B D- Vid eo wit h
Changing settings (When 0 to 254 year(s) is selected)
≥Unlock Player ≥Change Password
≥Change Level ≥Tempo rary Unlock
≥English ≥French ≥Spanish
≥
Original: The original language of each disc will be selected.
≥Other ¢¢¢¢
≥Automatic:
If the language selected for “Audio Language” is not
available, subtitles of that language will automatically appear
if available on that disc.
≥English ≥French ≥Spanish ≥Other ¢¢¢¢
≥English ≥French ≥Spanish ≥Other ¢¢¢¢
”.
≥Allow (ALL): Internet access is permitted for all BD-Live
≥Allow (Limited)
≥Prohibit: Internet access is prohibited for all BD-Live
≥Latin1
≥Latin2 Polish, Czech, Hungarian, etc.
≥Cyrillic Russian, etc.
: All DVD-Video can be played.
corresponding ratings recorded on them.
: All BD-Video can be played.
corresponding ratings recorded on them.
contents.
:
Internet access is permitted only for BD-Live
contents which have content owner
certificates.
Internet access is prohibited for all BD-Live
contents without a certificate.
contents.
English, German, Spanish, etc.
Page 33

“Video”
Still Mode (paused video) [BD-V] [AVCHD] [DVD-V]
Select the type of picture shown when you pause playback
(> 48, Frames and fields).
Seamless Play ]DVD-VR]
Select the play m ode between playlist chapter segments and
partiall y de let ed titles.
“Audio”
Dynamic Range Compression [BD-V] [AVCHD] [DVD-V] [DivX]
(Dolby Digital, Dolby Digital Plus and Dolby TrueHD only)
Change the dynamic range (> 48) for late night viewing.
Digital Audio Output
≥Press [OK] to show the following settings.
≥For details on digital output (> 37)
Dolby D/Dolby D +/
Dolby TrueHD
DTS/DTS-HD
BD-Video Secondary Audio
Turn on/off the button click sound on the menu and audio with
second ary video in pic t u r e -in-pict ure mode. ( > 17)
Downmix
Switch the downmix system for pl aying back multi-chann el
surround sound.
≥When “Dolby D/Dolby D +/Dolby TrueHD” or “DTS/DTS-HD” is
set to “Bitstream”, there are no downmix effects for the
outputte d audio.
≥The audio will be outputted in “Stereo” in the following cases:
j AVCHD playback
j Playback of button click sound on the menu and audio with
second ary video in picture-in-pictu re mode
Select whether Dolby Digital,
Dolby Digital Plus, Dolby TrueHD,
DTS Digital Surround,
DTS-HD High Resolution Audio or
DTS-HD Master Audio is output in
“Bitstream” or “PCM” format.
≥Not making the proper set tings
may result in noise.
≥If the unit is connected with the
HDMI AV OUT terminal, the
specifications of the connected
equipm e nt tak e pr ec e de nc e ov er
this unit and audio selected in
these items may not be output
(e.g., when a television is
connec t ed, t he HDMI aud io ou tp ut
of this unit is limited to downmixed 2c h.)
[BD-V]
≥Auto
≥Field: Select if jittering occurs when “Auto” is selected.
≥Frame: Select if small text or fine patterns cannot be seen
≥On
≥Off : The poin ts w he re chapter s in pl ay li sts change are
≥On ≥Off
≥Bitstream
Select “Bitstream” when the connec ted equipment can
decode the respective audi o format.
j Connect equipment supporting HDMI (High Bit rate Audio)
and use a High Speed HDMI Cable in order to output high
bit rate audio such as Dolby Digital Plus, Dolby TrueHD,
DTS-HD High Resolution Audio or DTS-HD Master Audio.
≥PCM:
Select “PC M” wh en th e co nn ecte d eq ui pme nt ca nno t decod e
the respective audio format.
Refe r to th e op er a tin g instruc ti ons for conn ec te d devices to
verify whether or not they can decode each of the audio
formats.
≥On
≥Off: The button click sound on the menu and secondary
≥Stereo
≥Su r rou nd encoded :When connected to equipmen t t ha t
(The picture is coarser.)
clearly when “Auto” is selected.
(The picture is clearer and finer.)
: The chapters in playlists are played seamlessly. This
does not work while searchi ng or when th ere are
several audio types included on the playlist.
Additionally, the positioning of chapter seg m en ts ma y
change slightly.
played accurate ly, but the picture may fr eeze for a
moment.
:
: The primary audio and seco ndary audio are mixed
and output. The sampling frequency is co nverted to
48 kHz.
audio are not output.
: Whe n co nnected to eq uipment that does
not support the virtual surround funct ion.
supports the virtual surround function (to
convert 2-channel to multi channel
surround).
Settings
RQT9334
(ENG)
33
Page 34

Changing the unit’s settings (continued)
“Display”
Status Messages
Choose whether to show status messages automatically.
On-screen Language
Choose the language for these menus and on-screen messages.
Screen Saver Function
This is to prevent burn-in on the television screen.
License Information about the software used by this unit is displayed.
≥Automatic
≥English
≥On:
j No activity has occurred for 10 minutes or longer, the
screen swtiches to the other states automatically.
j When playing the 4:3 image, the masked-off area on the
scree n be come gray.
[Only when connecting with an HDMI cable, “TV Aspect”
(> below) is set to “16:9” and “HDMI Resolution”
(> below) is set to any mode other than “480p”.]
≥Off
“TV Aspect/HDMI Function Setti ng s ”
TV Aspect
“TV Aspect” operates on the screen of the unit or th e connected
TV.
HDMI Connection
≥Press [OK] to show the following settings.
HDMI Resolution
The item s sup po rte d by th e conne ct e d de vic es ar e in di cate d on
the sc reen as “¢”. When any item without “¢” is selected, the
images may be distorted.
≥If the image is distorted, set to “480p” or set again correctly.
24p Output [BD-V] [DVD-V]
This unit displays each frame at 1/24 second intervals – the
same interval originally shot with the film camera.
≥Only when this uni t is connected to a TV supporting 1080/24p
output via an HDMI cable, you can set to “On”.
≥If this unit is connected to an HDTV through other equipment,
it must also be 1080p compatible.
HDMI RGB Output Range
Effective when connecte d to a device that only supports R GB
output.
HDMI Audio Output
Set whether or not to output audio fr om the HDMI AV OUT
terminal.
VIERA Link
Set to use “HDAVI Control” function when connected with an
HDMI cable to a dev ice that supports “HDAVI Control”.
RQT9334
(ENG)
To view an image connected to a 4:3 TV:
≥4:3 Pan & Scan : Video recorded for a widescreen is played
≥4:3 Letterbox: Video recorded for a widescreen is played
T o view an image on the unit or connected to a 16:9
widescreen TV:
≥16:9
: Video recorded for 4:3 aspect screen is
≥16:9 Full: Video recorded fo r 4:3 aspect screen is
≥Auto
: Automatically selects the output resolution
≥480p ≥720p
≥1080i
j When th e u nit i s co nn ec ted to a n ampl i fi er/ re cei ve r t ha t do es
not support the resolution set on the unit, the video cannot
be output properly.
* 1080/24p can only be output in the conditions below when
“24p Output” (> below) is set to “On”.
j [BD-V] Playing back 24p images
j [DVD-V] Playing back with the settings for playback “24p”
(> 24) “On”
≥On: Images in 1080/24p are output in 24p as they are.
j When outputting 1080/24p signal, we recommend using
High Speed HDMI Cables that have the HDMI logo ( as
shown on t h e c over ) and a r e l ess tha n 5 . 0 m eter s (16. 4 ft .)
to prevent video distortion etc.
≥Off
≥Standard
≥Enhanced:
≥On
≥Off
≥On
≥Off: Select when you do not want to use “HDAVI Control”.
34
≥Off
≥Français ≥Español
as Pan & Scan (unless prohibited by the
producer of the disc). When playing B DVideo, video is output as “4:3 Letterbox”.
in the let te r bo x style.
displayed as a 4:3 ratio image in the center
of the screen.
displayed as a horizontally stretched 16:9
image.
best suited to the connected televis ion
(1080/24p*, 1080i, 720p or 480p).
: The video is ou tput as it is.
When the black and w hite contrast of a video is low,
the signal is enhanced to reproduce clear video.
Page 35

“Network”
IP Address/DNS Settings (> 28)
Proxy Server Settings (> 29)
Network Service (> 30) (VIERA CAST)
≥Press [OK] to show the following settings.
Network Lock
You can restrict using VIERA CAST.
≥F oll ow the on- s c reen instr uc tio ns . E nt er a 4-di git passwor d
with the numbered buttons when the password screen is
shown. It will be the common password for “DVD-Video
Ratings”, “BD-V ideo Ratings” and “Network Lock”.
≥Do not forget your password.
Audio Auto Gain Control
Volume tha t is different depending o n the conte nts is
adjusted automatically to the standard volume whil e using the
VIERA CAST.
≥Depending on contents, this function effect will not work.
≥Select “Off” when the audio is warped.
Reduce to Screen Size
The screen is displayed reduced so the displayed screen of the
conte nt does not get truncated.
Time Zone
By selecting the time zone, it is possible to set the unit’s time to
match yo ur lo ca t io n.
≥Some VIERA CAST contents require the time zone to be set.
Set the time zone if necessary.
DST
Select “On” when using Daylight Saving time.
≥On ≥Off
Changing settings (When “On” is selected)
≥Change Passw ord
≥On
≥On ≥Off
≥GMT s12 to r12
(The initial setting is “s5”.)
GMT s5 l
GMT s6 l CST (Cen tr a l Standa rd Time)
GMT s7 l
GMT s8 l PST (Pacific Standard Time)
GMT s9 l AKST (Alaska Standard Time)
GMT s10 l HST (Hawaii Standard Time)
≥On ≥Off
≥Off
EST (Eastern Standa rd Time)
MST (Mountain Standard Time)
RQT9334
(ENG)
35
Settings
Page 36

Changing the unit’s settings (continued)
“Others”
Auto Power Off
≥During disc or SD card operation only
Selec t w hether the unit is automati c ally turned off when about
15 minutes (about 5 minutes when using the battery pack) have
elapsed while stopped.
Quick Start
Speed of startup from power off is increased.
≥Quick Start only functions when the AC adaptor is connected.
Easy Setting
You can execute basic settings
(“On-screen Language”).
Restore Default Settings
This returns all values in the Setup menu and the on-screen
menu, except for “O n-screen Language”, “IP Address/DNS
Settings”, “Proxy Server Settings”, “Network Service”, “DVDVideo Ratings” and “BD-Video Ratings” to the default settings.
DivX Registration [DivX] (> 20)
You need this registration code to purchase and play DivX
Video-on-De mand (VOD) c ontent.
Firmware Update (> 31)
≥Press [OK] to show the following settings.
Automatic Update Check
When this equipm e nt rema in s conn ec te d to the Inte r net, it w ill
check for the latest firmware version when it is turned on and
you can up da te it if ne cessary.
Update Now
You can update the firmware manually.
≥Only when connectin g the AC adaptor
≥On
≥Off: Select when you do not want to use this function.
≥On: Since internal control unit will be powered, power
consump tion in standby mode (> 46) will increase in
comparison to when “Off”.
≥Off
≥Yes ≥No
≥Yes ≥No
≥On
≥Off
≥Yes ≥No
Language code list Enter the code with the numbered buttons.
Abkhazian: 6566
Afar: 6565
Afrikaans: 6570
Albanian: 8381
:
Amharic
Arabic: 6582
Armenian: 7289
Assamese: 6583
Aymara: 6589
Azerbaijani: 6590
Bashkir: 6665
Basque: 6985
Bengali; Bangla:
Bhutani: 6890
Bihari: 6672
Breton: 6682
Bulgarian: 6671
Burmese: 7789
Byelorussian: 6669
Cambodian: 7577
Catalan: 6765
Chinese: 9072
Corsican: 6779
Croatian: 7282
6577
Czech: 6783
Danish: 6865
Dutch: 7876
English: 6978
Esperanto: 6979
Estonian: 6984
Faroese: 7079
Fiji: 7074
Finnish: 7073
6678
French: 7082
Frisian: 7089
Galician: 7176
Georgian: 7565
German: 6869
Greek: 6976
Greenlandic: 7576
Guarani: 7178
Gujarati: 7185
Hausa: 7265
Hebrew: 7387
Hindi: 7273
Hungarian: 7285
Icelandic: 7383
Indonesian: 7378
Interlingua: 7365
Irish: 7165
Italian: 7384
Japanese: 7465
Javanese: 7487
Kannada: 7578
Kashmiri: 7583
Kazakh: 7575
Kirghiz: 7589
Korean: 7579
Kurdish: 7585
Laotian: 7679
Latin: 7665
Latvian, Lettish: 7686
Lingala: 7678
Lithuanian: 7684
Macedonian: 7775
Malagasy: 7771
Malay: 7783
Malayalam: 7776
Maltese: 7784
Maori: 7773
Marathi: 7782
Moldavian: 7779
Mongolian: 7778
Nauru:7865
Nepali: 7869
Norwegian: 7879
Oriya: 7982
Pashto, Pushto: 8083
Persian: 7065
Polish : 8 07 6
Por tuguese: 8084
Punjabi: 8065
Quechua: 8185
Rhaeto-Romance:
Romanian: 8279
Russian: 8285
Samoan: 8377
Sanskrit: 8365
Scots Gaelic: 7168
Serbian: 8382
Serbo-Croatian: 8372
Shona: 8378
Sindhi: 8368
Singhalese: 8373
Slovak: 8375
Slovenian: 8376
Somali: 8379
Spanish: 6983
Sundanese: 8385
Swahili: 8387
Swedish: 8386
Tagalog: 8476
Tajik: 8471
Tamil: 8465
8277
Ta ta r : 8 4 84
Te lugu: 8469
Thai: 8472
Tibetan: 6679
Tigrinya: 8473
Tonga: 8479
Turkish: 8482
Turkmen: 8475
Twi: 8487
Ukrainian: 8575
Urdu:8582
Uzbek: 8590
Vietnamese: 8673
Volapük: 8679
Welsh: 6789
Wolof: 8779
Xhosa: 8872
Yiddish: 7473
Yo r uba: 8979
Zulu:9085
RQT9334
(ENG)
36
Page 37

Audio and video information
About audio from audio output terminals
Before connecting, read the table below, and confirm the desired audio type and necessary settings (“BD-Video Secondary Audio”,
“Dolby D/Dolby D +/Dolby TrueHD” or “DTS/DTS-HD”). (> 33)
≥The number of channels listed is the maximum possible number of output channels.
HDMI AV OUT
Terminal HDMI AV OUT
“Dolby D/Dolby D +/Dolby
TrueHD”/“DTS/DTS-HD”
“BD-Video Secondary Audio” “On”*
Dolby Digital/
Dolby Digital EX*
4
Dolby Digital Plus
Dolby TrueHD
DTS Digital Surroun d/
DTS-ES*
4
DTS-HD High Resolution Audio
Dolby Digital/
Dolby Digital EX*
Dolby Digital
DTS Digital Surround/
DTS-ES*
DTS Digital Surround
“Bitstream”*
3
5
5
DTS-HD Master Audio DTS-HD Master Audio
7.1ch LPCM
≥Also, depending on the specifications or the settings of the amp lifier/receiver, the results of the output may vary.
*1 When the connected equipment is not supported with these audio formats, the audio is output as Dolby Digital bitstream, DTS
Digital Surround bitstream or do wn-mixed 2ch PCM (e.g., TV).
*2 When the connected equipment is not supported with multi channel surround, the audio is output as down-mixed 2ch PCM.
*3 [BD-V]: When playing BD-Video without secondary audio or button click sound, the audio is output as the same format as if “BD-
Video Secondary Audio” was set to “Off”.
*4 With PCM output, Dolby Dig ital EX and D TS-ES will be PCM a u dio decoded as Do lb y Digita l and D TS Digital Su rround respectively.
*5
[BD-V]
: When “ B D-Video Se condary Audio” is set to “On”, Dolby Digital EX is outpu t a s Dolby Digital and DTS-ES is output as DTS
Digital Surround, however if pla ying BD-Video w itho ut secondary audio or button click sound, the audio is output as the original format.
*6 The o utp ut is PCM audio decoded as Dolby Digital for Dolby Digital Plus o r Dolby TrueH D, and as DTS Digital Surround for DTS-HD
High Resolution Audio an d DTS-HD Master Aud io.
*7 [BD-V]: When the connecting equipment supports 7.1 channel surroun d, output w ill be exte nded from 5.1 ch or 6.1 ch to 7.1 ch
according to the specification of DTS, Inc.
Down-mixed 5.1ch
PCM
1
“PCM”*
“Off” “On” “Off”
Dolby Digital/
Dolby Digital EX
Dolby Digital Plus
Dolby TrueHD
DTS Digital Surround/
DTS-ES
DTS-HD High
Resolution Audi o
7.1ch PCM
Down-mixed 5.1ch
PCM*
5.1ch PCM*
[DVD-V] 5.1ch
[BD-V] 7.1ch
[BD-V] 7.1ch*
3
2
6
*7
6, *7
7.1ch PC M
Enjoying High Bit rate Audio of BD-Video
[BD-V]
This unit supports high bit rate audio (Dolby Digital Plus, Dolby TrueHD, DTS-HD High Resolution Audio and DTS-HD Master Audio) adopted in
BD-Video. In order to enjoy these audio formats, the following conditions are necessary. (Part shown in the shaded area of table given above)
NECESSARY CONNECTIONS
≥HDMI AV OUT terminal: (> 25)
NECESSARY SETTINGS
≥Se t “B D -Vi de o Sec ondary Au di o” t o “O ff” . (> 33)
≥Set “HDMI Audio Output” to “On”. (> 34)
≥HDMI AV OUT terminal: Set “Dolby D/Dolby D +/Dolby TrueHD” or “DTS/DTS-HD” to “Bitstream” or “PCM”. (> 33)
≥The button click sound on the menu and audio with secondary video in picture-in-picture mode (> 17) is not output.
Regarding 24p output
[BD-V]
Many BD-Video movie contents are recorded in 24 frames/second in accordance with the film materials. However, they will normally
be output in 60 frames/second in accordance with the display format. These can be output in 24p as the original. Therefore, highquality video can b e enjoyed, such as the i m proved clarity, enhanced perspective, etc.
NECESSARY CONNECTIONS
≥Connect to a TV supporting 1080/24p input via an HDMI cable.
NECESSARY SETTINGS
≥“24p Output” and “HDMI Audio Output”: “On” (> 34)
RQT9334
(ENG)
37
Reference Settings
Page 38

About MP3/JPEG/DivX files
MP3
File format MP3
1
Playable
media
Extension Files must ha ve the extension “.mp3” or
Compression
rate
Sampling
rate
Reference ID3 tags: version 1, 2.2, 2.3, 2.4
JPEG
File format JPEG
Playable
media
Extension Files must have the extension “.jpg” or “.JPG”.
Picture
resolution
Reference JPEG conforming DCF*
DivX
File format DivX
Playable
media
Extension Files must have t he exte nsi o n “.DI VX ”, “ .di vx” ,
Picture
resolution
RQT9334
(ENG)
38
, CD-RW*1, DVD-R*1,, DVD-R DL*
CD-R*
“.MP3”.
32 kbps to 32 0 kb ps
44.1 kHz/48 kHz
ID3 is a t ag e mbe dd ed in MP3 tra ck t o pro vi de
information about the tra ck.
This un it supports the versions listed above
but only titles and the names of artist s can be
displayed.
≥If there is a large amount of still picture data
etc. within a MP3 file, play may not be
possible.
1
, CD-RW*1, DVD-RAM*2, DVD-R*1,
CD-R*
DVD-R DL*
between 34k34 and 8192k8192 pixels
(sub sampling is 4:2:2 or 4:2:0)
Thawing Time: approx. 2 sec. (7 M pixels)
≥MOTION JPEG and Progressive JPEG is
not supported
CD-R*
“.AVI” or “.avi”.
between 32k32 and 720k576 pixels
1
, BD-RE*3, SD card
4
is supported.
1
, CD-RW*1, DVD-R*1, DVD-R DL*
Reference ≥Certified to the DivX Home Theater Profile.
Video
j Number of stream: Up to 1
j Codec: DIV3, DIV4, DIVX, DV50, DIV6
j FPS (Frame Per Second): Up to 30 fps
Audio
j Number of stream: Up to 8
j Format: MP3, MPEG, Dolby Digital
1
j Multi channel: Dolby Digital is possible.
MPEG multi is 2 ch conversion.
≥GMC (Global Motion Compensation) is not
supported.
≥Picture may stop if the DivX files are greater
than 2 GB.
Subtitles text file of DivX
File format Subtitles text file of DivX
1
Playable
media
File format MicroDVD, SubRip, or TMPlayer
Extension Files must have the extension “.SRT”, “.srt”,
Reference ≥The DivX video file and subtitles text file are
1
≥En gl is h alphabet an d A rab ic num erals are dis pla y ed
corr ec tly. Other ch ar a c ters may not be dis p la yed correc tly.
≥The display ord er on thi s un it may dif fe r fr om how th e ord er is
displa yed on a compu ter.
≥
Dependin g on how you create the media (writing software) , files
and folders m ay not play in the or der you numbe re d t hem.
≥This unit is not compatible with packet-write format.
≥
Dependin g on the recording conditions, the me dia m ay not play.
≥
Operation may take time to complete whe n there are many file s
and/or folders and some files m ay not display or b e playable.
, CD-RW*1, DVD-R*1, DVD-R DL*
CD-R*
“.SUB”, “.sub”, “.TXT”, or “.txt”
inside the same fo lder, and the file names
are the same except for the file extensions.
≥If there are more than one subtitles text files
inside the same folder, they are displayed in
the following or der of pri ority: “.srt”, “.sub”,
“.txt”.
≥In the following situations, the subtitles
cannot be displa yed as recorded.
Furthermore, depending on the methods
used to create the f ile or the state of t he
recording, only parts of the subtitles may be
displayed, or the subtitles may not be
displayed at all.
j When special text or characters are
included in the subtitles text.
j When the file size is larger than 256 KB.
j When characters with specified styling
are included in the subtitle data.
j Codes that specify the character style
with in fil es ar e di sp la yed as subtit le
characters.
j When data with a different format exists
within the subtitle data.
≥If the file nam e of the Di vX video fil e is not
displayed correctly on the menu screen (the
file name is displayed as “_”), the subtitles
text may not be displayed correctly.
≥Depending on the disc, the subtit les text
cannot be displa yed when search and other
such operations are being performed.
1
Page 39

*1 ISO9660 level 1 or 2 (except for extended formats), Jo liet
001
010
XXXX
.mp3
011
XXXX
.mp3
012
XXXX
.mp3
003
XXXX
.mp3
004
XXXX
.mp3
005
XXXX
.mp3
006
XXXX
.mp3
007
XXXX
.mp3
008
XXXX
.mp3
009
XXXX
.mp3
001
XXXX
.mp3
002
XXXX
.mp3
Root
Folder A
Folder B
Folder C
P0000010.divx
P0000011.divx
P0000012.divx
P0000003.divx
P0000004.divx
P0000005.divx
P0000001.divx
P0000002.divx
P0000006.divx
P0000007.divx
P0000008.divx
P0000009.divx
Root
Folder A
Folder B
Folder C
Root
Folder A
Folder B
Folder C
Root
Root
Folder A
This unit is compatible with multi-session.
This unit is not compatible with packet writing.
*2 Discs must conform to UDF 2.0.
*3 Discs must conform to UDF 2.5.
*4 Design rule for Camera Fi le system: unified standard
esta blished by Japan Electronics and Infor mation
Technology Industries Association (JEITA).
Structure of folders that can be
played in this unit
Y ou can play files on this unit by structure of folde rs as
shown below. However depending on the method of
writing data (writing software), play may not be in the order
you numbered the folders.
Folder which can be displayed w ith this unit
¢¢¢: Numbers
XXX: Letters
*1 ¢¢¢: from 001 to 999
*2 ¢¢¢: from 100 to 999
XXX: up to 5 figures
*3 ¢¢¢¢: from 0001 to 9999
Structure of MP3 folders
in DVD-R/DVD-R DL/CD-R/CD-RW
Prefix the file names with 3-digit numbers in the order you
want to play them.
e.g.,
Structures of still picture (JPEG) folders
in DVD-R/DVD-R DL/CD-R/CD-RW
Files inside a fol der are displayed in the order they were
updated or taken.
e.g.,
P0000001.jpg
P0000002.jpg
P0000003.jpg
P0000004.jpg
P0000005.jpg
P0000006.jpg
P0000007.jpg
P0000008.jpg
P0000009.jpg
P0000010.jpg
P0000011.jpg
P0000012.jpg
in BD-RE/DVD-RAM
≥Folder structure is not displayed.
e.g.,
P0000001
.jpg
P0000002
.jpg
JPEG
DCIM
DCIM
XXXX
XXXX
*1
XXXXX
XXXXX
*2
.JPG
*2
.JPG
*3
*3
Structure of DivX folders
in DVD-R/DVD-R DL/CD-R/CD-RW
Files in si de a folder are di splayed in th e ord er they were
updated or taken.
e.g.,
in SD card
Displays JPEG files in all folders.
≥Folder structure is not displayed.
e.g.,
P0000001
.jpg
P0000002
.jpg
DCIM
P0000003
P0000004
XXXXX
XXXX
.jpg
.jpg
*2
.JPG
*3
RQT9334
(ENG)
39
Reference
Page 40

Reference
Indicators and screen messages
Indicators
The [Í] indicator flashes
rapidly.
The
[Í] indicator flashes
slowly.
The [CHARGE] indicator
flashes rapidly.
The [CHARGE] indicator
flashes slowly.
Screen messages
Cannot read. Please check the
disc.
ERROR U580 ≥A problem has occurred with the battery pack. Consult yo ur dealer.
ERROR U581 ≥The battery pack ha s be en rec ha rg ing b ut h as fa il ed to r ec ha rge fo r som e r easo n. Rec ha rge
ERROR U582 ≥You are recharging in a location that is too hot or too cold. Recharge at normal temperature
PLEASE WAIT ≥The unit is starting up. Wait until the display disappears.
F99 ≥The unit is not operating correc tly. Press [POWER Í/I] on the unit for 3 seconds or longer
U72
U73
U76 ≥BD-RE, BD-R, BD-Video or DVD Video with copyright protection cannot be played back
U77 ≥Video cannot be output since the copyright protection information on the BD-RE, B D-R, BD-
F ∑∑
H ∑∑
(∑∑ stands for a number.)
Authorization Error.
This unit is not authorized to
play this title.
Cannot play. ≥You inserted an incompatible disc (Discs recorded in PAL video, etc.). ( > 6)
Cannot display on this unit. ≥You tried to play a non-compatible imag e. ( > 38)
No disc is inserted. ≥The disc may be upside down.
Rental Expired. ≥[DivX]: The DivX V O D content h as zero remaining plays. Y ou cannot play it. (> 20)
$ This operation is not
available.
$ This operation is prohibited
by this disc.
Cannot connect.
Please check the connection of
the LAN cable.
IP address is not set. ≥The “IP Address” in “IP Address/DNS Settings” is “---. ---. ---. ---”. Set the “IP Address”,
Cannot obtain IP address using
DHCP.
Please check the connection or
router settings.
RQT9334
(ENG)
40
≥The unit has malfunctioned. Consult your dealer.
≥“Monitor” on LCD Menu is “Off” (no image). Turn the unit off when no image is being played.
≥There is a pr oblem with t he battery pack. Turn the unit on and check the messa ge on the
LCD. (D below, 41)
≥Battery pack charge is low. The unit will turn off automatically after a few minutes.
≥Clean the disc. (> 5)
≥You inserted a disc that has not been finalized. (> 6)
again.
[i5 to i35 oC (i41 to i95 oF)].
and turn off the unit. Then , turn on the unit again by pressing [POWER Í/I].
≥There was a problem when connecting the HDMI.
j Connected device is not compatible with HDMI.
j Use a cable with an HDMI log o.
j The HDMI cable is damag ed .
since t he device co nnected to the HDMI terminal is no t compatible with the copyright
protection.
Video or DVD Video being played back is not vali d.
≥A problem has oc cu rre d. (Numb er s foll ow ing th e “F ” o r th e “H ” wi ll be di f fer e nt de pe nd in g on
the status of the unit) Turn off the unit once, and turn it back on. Alternatively, turn off the
unit, disconnec t the AC adaptor and the battery pack, and attach them back again.
≥[DivX]: You are trying to play the DivX VOD content that was pur c hased with a different
registration code. You cannot play the content on this unit. (> 20)
≥Re-insert the SD card.
≥Some operations are unsupported by the unit. For exa mple;
j [BD-V]: During playback, reverse slow-motion or reverse frame-by-frame is not possible.
≥Depending on the disc, you may not be able to perform search or skip when film previews
and warning screens are bein g played back.
≥When a hub is used but its Link lamp does not light up, check the cable connection, LAN
terminal connection, cable itself (a crossover cable may have been used by mistake), etc.
(> 28)
“Subnet Mask”, and “Default G ateway”. (Select the automatic address acquisition if
necessary.) (> 29)
≥If you use a hub, then check the connection between the hub and the router.
j Use the UPLINK port of the hub to connect to a router. (> 28)
j Check whether or not the hu b’s Link lamp lights up. If i t does not light up, then check the
cable connection, LAN terminal connection, cable itself (a crossover cable may have
been used by mistake), etc.
≥If the above conditions are OK, then the router may not operate in DHCP mode. Check the
router settings and operation. You may reset the router to restore it to normal. (> 29)
Page 41

This IP address is already in
use.
Please check the IP address
setting.
Unable to perform Connection
Test.
Please try again.
IP addres s n ot set cor re ct ly.
Conne ction Test was
unsuccessful. No reply
from host.
Please check the connection or
router settings.
Network conne ction refused.
Please confirm S etup “BD-Live
Internet Access.”
Unable to check for latest
firmware version.
Please try again later.
≥This unit’s IP address is used by another device. Check the IP addresses of this unit,
personal computers, and routers, etc. If necessary, r econfigure them to avoid IP addresses
from being duplicated.
≥Turn the unit off. Disconnect the power source (the AC adaptor or battery pack) and
reconnect it and try again. If the same symptom persists, then consult your dealer.
≥If you use a hub, then check the connection between the hub and the router. (> 28)
j Use the UPLINK port of the hub to connect to a router.
j If the hub’s Link lamp does not lig ht up, then check the cable connection, LAN terminal
connection, cable itself (a crossover cable may have been used by mistake), etc.
≥Check the “IP Address”, “Subnet Mask”, and “Default Gateway” in the “IP Address/DNS
Settings”. (> 29)
≥If the MAC address information is required, then press [S ETUP] to di splay the “N etwork”
menu. (> 28)
≥When you set “BD-Live Internet Access” to “Allow (Limited)” and play BD-Live contents
which do not have a content own er certif icate, the Internet access of t he content is not
allowed. If you allow the content to connect to Internet, set “BD-Live Internet Access” to
“Allow (ALL)”. (> 32)
≥Th e fir m w a re do w nl oad server is cu rr e ntly unavai la bl e. Ple as e try again late r.
RQT9334
(ENG)
41
Reference
Page 42

Troubleshooting guide
Before requesting service, make the following ch ecks. If you are in doubt about some of the check points, or if the solutions
indicated in the c hart do not solve the problem, re fer to “Customer Services Dire ctory (United States and Puerto Rico)” on page50
if you reside in the U .S.A. and Puerto Rico, or refer to “Product information” on page 51 if you reside in Canada.
The following do not indicate malfunction.
≥Sound from t he AC adaptor during recharging.
≥The batter y pack warming up when rechargi ng or during use.
≥The surface and area around the unit becoming warm when used for long periods.
Move the unit after waiting for 3 minutes after unplugging the AC adaptor when it needs to be moved or maintained.
≥Operatin g noises wh en the uni t is turned on.
Safety devices may be operating when the unit does not respond to operations.
1 Press [POWER Í/I] on the unit to turn it off.
If the unit is not turned off, hold down for approximately 3 seconds to force the power off.
2 Press [POWER Í/I] on the unit to turn it on.
If operation is still not possible after performing the above operations, consult the dealer where the unit was purchased.
To reset this unit
To restore the unit if it freezes
due to one of the safety devices
being activated.
To return all settings other than
some settings to the factory
preset.
To return all settings to the
factory preset
≥Pr e s s an d hold [POWE R Í/I] on the unit for 3 seconds.
(The settings remain unchanged.)
≥Select “Yes” in “Restore Default Settings” in the Setup menu.
This returns all values in the Setup menu and the on-screen menu, except for “On-screen
Language”, “IP Address/DNS Settings”, “Proxy Server Settings”, “DVD-Video Ratings”, “BDVideo Ratings” and “Network Service” to the default settings. (> 36)
≥Reset the unit as follows:
1 Press [POWER Í/I] on the unit to turn off the unit.
2 Press and hold [POWER Í/I] and [RETURN ] on the unit at the same time for more
than 5seconds unt il “PLEASE WAIT” is displaye d on the LCD.
3 The power will turn on an d then turn off.
Power
No power. ≥Check connections to the AC adaptor or battery pack. (> 11)
≥The unit has pr otection circuitr y that is activated if it becomes too hot or too cold. The unit
will not work if this occurs. Use the unit between 5
≥Hold down [POWER Í/ I] for so me tim e.
≥The unit may not come on immediately after it is turned off. Once the “BYE” display
disappears, press [POWER Í/I] an d turn the unit on.
≥The unit can be turned on only when the unit is closed with the screen facing outwards
(> 10, 3 or 4 in “Installation of the unit”).
Unit turns off automatically. ≥The unit turns off after it has been stopped for about 15minutes (about 5 minutes when the
unit is powered by the battery pack) to conserve power (only when “Auto Power Off” in the
Setup menu is set to “On”). (> 36) Turn the unit on again.
≥Press [OFF TIMER] and the unit will be turned o ff automatically. (> 12)
≥Safety devices may be operating. Press [P O WER Í/I] and turn the unit on.
≥
When using VIERA Link (HDMI), the unit will be automatically turned off if the TV is turned off.
If VIERA Link (HDMI) is not being used, set “VIERA Link” settings to “Off”. (
≥If the screen is rotated when the unit is turned on, the display on the screen will disappear
and the unit will be automatically turned off. (> 10)
Cannot charge or the [CHARGE]
indicator fails to light.
Play ti me dramati cally reduced
after recharging.
≥The charging time increases when the temperature is too hot or too cold, and charging may
not be possible und er some circumstances.
≥Check connections to the AC adaptor or battery pack. (> 11)
≥The battery pack has reached the end of its service life (It can be recharged about 300
times).
o
C (41 oF) and 35 oC (95 oF).
>
34)
RQT9334
(ENG)
42
Page 43

Operation
The unit is on but cannot be
operated.
Play fails to start even w hen
[1] (PLAY) is pressed.
Play starts but then stops
immediately.
No response when remote
control buttons pressed.
Start up is slow.
It takes time before play starts.
Played back image is distor ted
or does not playbac k corre ctly.
([AVCHD])
Cannot set “On” in “24p Output”.
≥The unit can be operated only when closed with the screen facing outwards. (> 10, 3 or 4
in “Installation of the unit”)
≥Is the incorrect playback media or operation function selected?
≥The unit may not be operating properly due to lightning, static electricity or some other
external factor. Turn the unit off and then back to ON. Alternatively, turn the unit off,
disconnect the power source (AC or battery pack), and then reconnect it.
≥Condensation has formed. Wait 1 to 2 hours for it to evaporate.
≥Insert the media correctly with the label facing up. (> 13)
≥The media is dirty. (> 5)
≥You tried to pl ay a blan k me dia or unpl ay ab le med ia on th is uni t. ( > 6)
≥[DivX]: If playing DivX VOD content, refer to the homepage where you purchased it. (> 20)
≥The unit can be operated only when closed with the screen facing outwards. (> 10, 3 or 4
in “Installation of the unit”)
≥Ch eck that the battery is inst al le d co r rectly. (> 9)
≥The battery is depleted: Replace it with new one. (> 9)
≥Point the re mote control at the remote contr ol sensor and operate. (> 9)
≥Make sure that “Quick Start” is set to “On”. (> 36)
≥Start up takes time in the following situations.
j Immediately after a power failure or the AC adaptor is connected.
j When the unit is connected with an HDMI cable.
≥High definition video (transfer rat e of 18 Mbps or faster) cannot be played back correctly if it
was reco rded on a DVD co mpatible to double speed or slower.
≥Only when this unit is connected to a TV supporting 1080/24p output via an HDMI cable, you
can set to “On”. (> 34)
LCD
No picture on the LCD. ≥Check connections. (> 11)
≥Select “On” in “Monitor”. (> 13)
≥The LCD screen is turned off automatically when the LCD screen is rotated. (> 10)
≥The LCD screen can be turned on only when the unit is closed with th e screen facing
outwar ds. (> 10, 3 or 4 in “Installation of the unit”)
≥[DivX]: Images may not be output due to how file s were created. (> 38)
The LCD is dark. ≥Select the appropriate picture quality mode. (> 13)
LCD pi xels tur n bl ack or ra diat e
different co lors .
≥The LCD is co nst ruc t ed wit h p rec isi o n t echn ol og y so 99 .99% of the pi xel s a re a ct iv e, bu t of
the remaining of 0.01 %, there are pixels that may be black or emit light constantly. This
phenomenon is not a malfunction.
Picture is distorted. ≥The quality of video will lower on the screen of this unit when HDMI is connected. (> 25)
There is a lot of after-image
≥Turn “3D NR” or “Integrated NR” off if it is on. (> 24)
when playing video.
The 4:3 aspect ratio picture
expands left and right.
≥Check the setting for “TV Aspect”. (> 34)
≥Check the setting for “Screen Aspect”. (> 16)
Screen size is wrong.
Still pictures (JPEG) do not
play back normally.
≥The images that were edited on the PC, such as Progressive JPEG, etc., may not play
back. (> 38)
Sound
No sound from the unit’s
speaker.
Cannot hear the desired audio
type.
Cannot switch audio. ≥There are discs for whic h audio cannot be changed becaus e of how the di sc was creat ed.
≥The speaker is off if headphones are connected.
≥Turn up the volume. (> 14)
≥Press [AUDIO] to select the audio. (> 16)
≥[DivX]: Audio may not be output depending on how files were created. (> 38)
≥
When connecting an a m plifier/receiver using an HDMI cable, yo u cannot switch the audio if
“Dolby D/Dolby D +/Dolby TrueHD” or “DTS/DTS-HD” is set to “Bitstream”. Set “Dolby D/Dolby
D +/Dolby TrueHD” or “DTS/DTS-H D ” to “PCM” or connect using
A V IN/OUT terminal
. (>33)
Reference
RQT9334
(ENG)
43
Page 44

Troubleshooting guide (continued)
Connection
The images from this unit do
not appear on the television.
Picture is distorted.
Jittering occurs.
The scr ee n changes
automatically.
Video is not output in high
definition.
Audio is not output in
bitstream.
The 4:3 aspect ratio picture
expands left and right.
Screen size is wrong .
No sound from other speakers. ≥C h ec k all co nnection s and settings. (> 25)
Cannot hear the desired audio
type.
Cannot switch audio. ≥
The sub tit l es over l ap clo sed
captions recorded on discs.
≥Make sure that the television is connected to the AV IN/OUT terminal or HDMI AV OUT
terminal on this unit. (> 25)
≥Make sure that the television’s input setting (e.g., VIDEO 1) is correct.
≥If “24p Output” is set to “On” when the unit is connected to a TV through any terminal other
than HDMI, images may not display properly. In this case, set “24p Output” to “Off”. (> 34)
≥When “24p Output” is set to “On”, HDMI authentication takes place where 24p images
switch to other images, and a black screen is displa yed. (> 34)
≥When “24p Output” is set to “On”, jittering may occur while playing DVD-Video other than
24p images. In this case, turn “24p Output” to “Off”. (> 34)
≥
An incorrect resolution is selected in “HDMI Resolution”, when the television is connected to HDMI
AV OUT terminal. Set the item again.
≥Picture may not be seen when more than 4 devices are connected with HDMI cables.
Reduce th e number of connected devices.
≥
When the “Screen Saver Function” in the Setup menu is set to “On”, the display may return to
the screen saver mode automatically if there is no operation for 10 minutes or more. (
≥High definition video cannot be output through the AV IN/OUT terminal.
≥Confirm that the “HDMI Resolution” in the Setup menu is set properly. (> 34)
≥
Dolby Digital Plus, Dolby TrueHD, and DTS-HD audio are not output in bitstream. To output the
bitstream, select “Restore Default Settings” to restore the factory presets and make proper settings.
≥Use the television to change the aspect. Refer to your television’s operating instructions.
≥When using an HDMI cable, change “TV Aspect” type to “4:3 Pan & Scan”. (> 34)
≥Audio may not be heard when more than 4 devices are connect ed with HDMI cables.
Reduce th e number of connected devices.
When connecting an amplifier/receiver using an HDMI cable, you cannot switch the audio if
“Dolby D/Dolby D +/Dolby TrueHD” or “DTS/DTS-HD” is set to “Bitstream”. Set “Dolby D/Dolby
D +/Dolby TrueHD” or “DTS/DTS-HD” to “PCM” or connect using
≥Turn off the subtitles or turn off the closed caption setting on the TV. (> 23)
A V IN/OUT terminal
>
34)
. (>33)
Card
The capacity of the SD card
decreased.
Music on an SD ca rd ca nno t be
played.
The con te nts of the ca r d
cannot be read.
≥When a BD-Video that supports BD-Live is used, and an SD card is in the slot, data may be
written to the SD card. (> 17)
≥Data that can be played from an SD card are AVCHD, MPEG2 and JPEG data. (> 7)
≥The card is not compatible or the contents o n the card may be damaged. (> 7)
≥Turn off and then turn on the unit again.
Network
I can’t co nnect to the ne tw or k. ≥Are you subscribed to high speed internet connection? Check that the LAN cable is
properly connected. (> 28)
≥Have you plugged a telephone cord into the LAN termina l on this un it? Connect with a
straight LAN cable. (> 28)
≥Confirm the power for the modem or broadband router is turned on.
≥Confirm the network settings. Follow any instructions you may have received from your ISP
(Internet Service Provid er) and make changes to the settin gs.
≥
Are the broadband router settings correct? Read the operating instructions for the broadband router.
≥Is the broadband router and/or modem connected correctly? Check the operating
instructions for each device and connect accordingly.
≥Check the “Network” and “BD-Live Internet Access” settings. (> 28, 32, 35)
VIERA CAST does not operate
or conne ct .
≥Is the network connection corre ct? (> 28)
≥Image of the video contents may be incomplete or may not display depending on how busy
the environment or the connected line i s .
RQT9334
(ENG)
44
Page 45

Other difficulties with playback
Audio and video mo me ntar ily
pause.
BD-Video or DVD-Video is not
played.
Picture-in-picture is not played
with BD-Video.
BD-Live is not play e d with BDVideo.
Alternative soundtrack and
subtitles cannot be selected.
No subtitles. ≥Subtitles are not recorded on the media.
Angle cannot be changed. ≥Angles can only be changed during scenes where different angles are recorded.
The resume play function does
not work.
You have forgotten your ratings
password.
The VIERA Link does not work. ≥Is the unit screen facing outward and closed? (> 10, 3 or 4 in “Installation of th e uni t”)
When a re corder or p layer etc.
is operated with a remote
control, the unit is also
simultaneou sly operated.
≥This occurs between playlist chapters or scenes ([AVCHD]).
≥When playing a title recorded on both layers, the unit automatically switches between
layers and plays the title in the same way as a normal program. However, video and audio
may momentarily cut out when the unit is switching layers .
≥Ensure the disc is for the correct BD-Video region code or DVD-Video region number, and
is not defective. (> cover)
≥You have set a rat ing s lev el t o li mi t BD-Video or DV D -Vi de o pl ay. Chang e t hi s setting.
(> 32)
≥Some BD-Vi deo can only be output with HDMI.
≥Confirm whe ther the disc supports picture-in-picture.
≥Confirm whether the disc supports BD-Live. (> 17)
≥The inserted SD card does not have sufficient available capacity. (> 17)
≥The SD card is write-protected. (> 7)
≥Sub contents copied to an SD card are provided by the disc producer as a part of the BD-
Video content. E v en if you record images and audi o onto an SD card, it cannot be played
as a BD-Live. (> 17)
≥The languages are not recorded on the media.
≥You may not be able to use the o n-screen menu to change the soundtrack and subtitles on
some discs. Use the disc’s menus to make changes. (> 14)
≥Turn the subtitles on. Set “Subtitle” on the on-screen menu to “On”. (> 23)
≥When progressive output is on, closed captions cannot be displayed.
≥The memorize d position is cleared in the following inst ances:
j [∫] is pressed several times.
j The disc or SD card is removed.
j The unit is turned off during CD or SD card playback.
j The unit is turned off due to such occurrences as power outage, the removal of the AC
adaptor or waste of the battery pack’s remaining power when the unit is turned on.
≥The resume play function may not work depending on the media.
≥[BD-V]: On BD-Vi deo discs i ncluding BD -J, the resume play fu nction doe s not work.
≥While the d is c a nd SD card are r em oved, p ress an d h ol d [SK IP :] an d [
SUB MENU
the unit at the same time for more than 5 seconds. Turn the unit off. “DVD-Video Ratings”,
“BD-Video Ratings” and “Network Service” will return to the default settings.
The unit cannot be operated with the TV remote control in any other condition.
≥When using the unit with only the battery pack, operate after turning the unit on. (> 12)
≥Change the remote control codes on the Panasonic recorders or players.
] on
When the unit’s remote control
is operated, other Panasonic
recorders or players etc. are
also simultan eously operated.
RQT9334
(ENG)
45
Reference
Page 46

Specifications
Power supply: DC 12 V (DC IN terminal)/
Power consumption (using included AC adaptor):
Play Mode: Approx. 22W (Unit only Approx. 1 8W)
Recharge mode: Approx. 12 W
Standby mode (Quick Start “Off”)
Standby mode (Quick Start “On”):Approx. 5W
AC adaptor:
Power so u r ce : AC 110 to 240 V, 50/60 Hz
Power consumption: 36 W
DC output: 12 V, 2000 mA
Car DC Adaptor:
DC output: 12 V, 2 A (Vehicle with 12 V battery only)
Battery pack (lithium ion): DY-DB15 (included)
Voltage: 7.2 V
Capacity (Minimum): 4200 mAh
Dimensions (WkHkD) (excluding protrusions and battery):
Mass (Weight):
(including
(without
battery
battery
Operating temperature range:i5 to i35 oC (i41 to i95 oF)
Operating humidity range:
Signal system: NTSC
LCD screen:
8.9
q
α-Si, TFT wide-screen LCD (1024k600kRGB)
HDMI AUDIO/VIDEO output:
Number of terminals: 1 system
LAN:
Number of terminals:
AUDIO/VIDEO output/input:
Output/input terminal : ‡ 3.5 mm (1/8
Number of terminals: 1 system (output/input selectable)
Composite-video:
Output /input level: 1 Vp-p (75
Audio:
Output/input level: 1.5 Vr ms (1 kHz, 0 dB, 10 k≠)
Audio performance:
Frequency response:
≥DVD (linear audio): 4 Hz to 22 kHz (48 kHz sampling)
≥CD audio: 4 Hz to 20 kHz
S/N ratio: 100 dB
Dynamic range: 90 dB
Total har monic dist or ti on: 0.015 %
Speaker:
Output: 0.5 W
Headphone outp ut:
Output: ‡ 3.5 mm (1/8
Number of terminals: 1 system
RQT9334
(ENG)
46
DC 7.2 V (Exclusive battery terminal)
: Approx. 0.5 W
256 mm (W)k202 mm (H)k58.7 mm (D )
(10
5
/
qk
64
) Approx. 1688 g (59.54 oz)
) Approx. 1455g (51.32 oz)
10 to 80 % RH (no condensation)
1 system (10BASE-T/100BASE-TX)
4 Hz to 44 kHz ( 96 kHz sampli ng)
i
q
) stereo mini jack
7 31/
qk
32
q
) mini jack
0.5 W (8 ≠)
2 5/
Pickup:
Wave length:
405 nm/661 nm/783 nm (BD/DVD/CD)
Laser power:
CLASS II/CLASS II/CLAS S
III
b (BD/DVD/CD)
HHS/for USA
CLASS 2/CLASS 2M/CLASS 3B (BD/DVD/CD) IEC/for Canada
Playable disc:
BD-Video
BD-ROM: Version 2
BD-RE: Version 3 (Single Layer, Dual Layer),
JPEG
BD-R: Version 2 (Single Layer, Dual Layer)
DVD-RAM: DVD Video Recording format,
AVCHD format, JPE G
DVD-R/DVD-R DL: DVD-Video format*
Recording format*
2,*3
DivX*
, JPEG*2, MP3*
DVD-RW: DVD-Video format*1, DVD-Video
Recording format*
+R/+RW/+R DL: Video*1, AVCHD format*
1
, DVD-Video
1
, AVCHD f ormat*1,
2
1
, AVCHD format*
1
1
DVD-VIDEO: DVD-Video format
CD-Audio: CD-DA
CD-R/CD-RW: CD-DA, JPEG*
q
)
16
SD card:
SD Memory Car d*
4
formatted FAT12, FAT16, FAT32*5:
2
, MP3*2, DivX*2,*
3
JPEG, AVCHD format, MPEG-2
6
JPEG*
:
Playable media: BD-RE, DVD-RAM, DVD-R, DVD-R DL,
CD-R, CD-RW, SD card
Pixels: 34
k
34 to 8192 k 8192
Sub Sampling: 4:2:2, 4:2:0
Maximum n umbers of folders
≥CD-R, CD-RW: 99
≥BD-RE, DVD-RAM, DVD-R,
DVD-R DL,
SD card: 300
Maximum n umbers of files
≥CD-R, CD-RW: 999
≥BD-RE: 9999
≥DVD-RAM, DVD-R, DVD-R DL, SD card: 3000
MP3:
Playable media: DVD-R,
DVD-R DL
, CD-R, CD-RW
Compression rate: 32kbps to 320 kbps
Sampling rate: 44.1 kHz, 48 kHz
≠
)
A VCHD (H.264):
Playable media: DVD-RAM, DVD-R, DVD-R DL, DVD-RW,
+R, +RW, +R DL, SD card
File format: AVCHD format V1.0
HDMI:
480p(525p) / 720p(750p) / 1080i(1125i) / 1080/ 24p
TM
HDMI
(x.v.ColorTM, High Bit rate Audio)
This unit su pp orts “HDAVI Contro l 4” fun ct ion.
Page 47

Specifications are subject to change without notice.
*1 Finalizing is necessary.
*2 ISO9660 le vel 1 or 2 (except for extended fo rmats),Joliet
This unit is compatible with multi-session.
This unit is not compatible with packet writing.
*3 Certified to the DivX Home Theater Profile.
GMC (Global Motion Compensation) is not supported.
Maximum number of folders recognizable: 300 folders.
(including the root folder)
Maximum number of files recognizable: 200 files.
*4 includes SDHC card
inclu des miniSD Cards (need a miniSD Adaptor.)
includes microSD/microSDHC Cards (need a microSD
Adaptor.)
*5 Not support long file name
*6 Motion JPEG not supported
≥Useable capacity will be less. (SD Card)
Licenses
Java and all Java-based trademarks and logos are
trademarks or registered trademarks of Sun Microsystems,
Inc. in the United States and other countries.
Manufactured under license from Dolby Laboratories. Dolby
and the double-D symbol are trademarks of Dolby
Laboratories.
Manufactured under license under U.S. Patent #’s:
5,451,942; 5,956,674; 5,974,380; 5,978,762; 6,226,616;
6,487,535 & other U.S. and worldwide patents issued &
pending.
DTS is a registered trademark and the DTS logos, Symb ol,
DTS-HD and DTS-HD Advanced Digital Out are trademarks
of DTS, In c.
© 1996-2008 DTS, Inc. All Rights Reserved.
This product inc orporates copyright protection technology
that is protected by U.S. patents and other intellectual
property rights. Use of this copyright protection technology
must be authorized by Macrovision, and is intended for home
and other limited viewing uses only unless otherwise
authorized by Macrovision. Reverse engineering or
disass em bl y is proh ib ited.
HDMI, the HDMI logo and High-Definition Multimedia
Interface are trademark s or registered trademarks of HDMI
Licensing LLC.
This product is licensed under the AVC patent portfolio
licens e and V C- 1 p aten t po rt fol io l i cen se f or th e pe rson al a nd
non-commercial use of a consumer to (i) encode video in
compliance with the AVC Standard and VC-1 Standard
(“AVC/VC-1 Video”) and/or (ii) decode AVC/VC-1 Video that
was encoded by a consumer engaged in a personal and
non-commercial activity and/or was obtained from a video
provider licens ed to provide AVC/VC-1 Video. No license is
granted or shall be implied for any other use. Additional
information may be obtained from MPEG LA, LLC.
See http://www.mpegla.com
HDAVI Control™ is a trademark of Panasonic Corporation.
“x.v.Color™” is a trademark.
VIERA Link™ is a trademark of Panasonic Cor poration.
VIERA CAST™ is a trademark of Pan asonic Corporation.
EZ Sync™ is a trademark of Panasonic Corporation.
“AVCHD” and the “AV CHD” logo are trademarks of
Panasonic Corporation and Sony Corporation.
SDHC Logo is a trademark.
Porti on s of thi s pro du c t ar e pro tected unde r cop y rig ht la w
and are provided under lic ense by ARIS/SOLANA/4C.
®
Plays DivX
DivX
video
®
is a registered trademark of
DivX, Inc., and is used under license.
.
“Blu-ray Disc” is trademark.
“BD-LI VE ” logo is trademark of Blu-ray Disc Association.
“BONUSVIEW” is trademark of Blu-ray Disc Association.
YouTube and Picasa are trademarks of Google, Inc.
RQT9334
(ENG)
47
Reference
Page 48

Glossary
u
r
AVCHD
AVCHD is a new format (standard) for high definition video
cameras that can be used to record and play high-resolution
HD images.
BD-J
Some BD-V ideo disc s contain Java applications, and these
applications are called BD-J. You can enjoy various interactive
features in addition to playing nor mal video.
BD-Live
This is a BD-Video (BD-ROM Profile 2) that supports the new
functions such as Internet connection, etc. in addition to the
BONUSVIEW function.
DTS-HD
DTS-H D is a high-quality, sophistica ted audio format used in
movie the a t ers . P rev ious DTS Di gi tal S ur r ou nd - co m pat ibl e
equipment can play DTS-HD as DTS Digital Surround audio.
BD-Video sup ports up to 7.1 channel output.
DTS-HD High Resolution Audio
This is a signal format achieved by improving the previous
DTS, DTS-ES and DTS96/24 formats. It is compatible with
sampling frequency 96 kHz/48 kHz. BD-Video supports up to
7.1 channel out put.
DTS-HD Master Audio
This is a lossless audio format and compatible with 96 kHz/
7.1ch or less. In addition, faithful reproduction of the master
audio is enabled using lossless audio encoding technology.
BD-Video sup ports up to 7.1 channel output.
Bitstream
This is the digital form of multi-channel audio data (e.g., 5.1
channel) before it is decoded into its various channels.
BONUSVIEW (Final Standard Profile)
This is a BD-Video (BD-ROM Profile 1 version 1.1) that
supp orts the new func tions such as P ic tu r e-i n -p ic t u re and
Secondary Audio, etc.
DivX
DivX is a popular med ia technology crea ted by DivX, Inc. DivX
media files contain highly compressed video wit h high visual
quality that maintains a relatively small file size.
DNS Server
A server which acts like a telephone directory and translates
Internet domain nam e s into IP addresses.
Dolby Digital
This is a me thod of coding digital signals developed by Dolby
Laboratories. A part fro m s tereo (2-c hannel) audio, these
signals can also be multi-channel audio.
Dolby Digital Plus
Multi-channel audio and hi gher audio quality is made possible
using Dolby Digit al Plus. BD-Video supports up to 7.1 channel
output.
* This unit allows audio to be decoded to a maximum of 5.1 ch
of PCM au dio an d ou t pu t fr om the H DMI term in al . Al so , audi o
can be ou tput with “Bitstream” to an AV amplifier that
supports it.
Dynamic range
Dynamic range is the diffe rence between the lowest level of
sound that can be heard above the noise of the equi pment and
the highest level of sound before distortion occurs.
Dynami c rang e com pr essi on mea ns red uc in g the ga p be twe en
the loudest and softest sounds. This means you can listen at
low volumes but still hear dialog clearly.
Film and video
DVD-Video are recorded using either film or video. This unit
can determ ine whic h typ e ha s been used, then uses the mos t
suitable method of progressive output.
Film: Recorded at 24 frames per second. (Recorded at
30 frames per sec ond as well). Generally
appropriate for mo t i on picture film s .
Video: Recorded at 30 fram es/60 fields per sec ond.
Generally appropriate for TV drama programs or
animation.
Folder
This is a pl ac e on the dis c or SD ca rd w her e grou p s of da ta ar e
stored together. Additional folders ca n be created w ithin
folders, and you can make detailed classifications depending
on the folder str ucture. (> 39)
Frames and fields
Frames refer to the single images that constitute the video you
see on your television. Each frame consists of two fields.
Dolby TrueHD
Dolby TrueHD is a very high quality audio format that
reproduces the studio master audio. BD -Video supports up to
7.1 channel outpu t.
* This unit allows audio to be decoded to a maximum of 5.1 ch
of PCM au dio an d ou t pu t fr om the H DMI term in al . Al so , audi o
can be ou tput with “Bitstream” to an AV amplifier that
supports it.
Down-mixing
This is the pr o ce s s of r em ix in g the multi- ch an ne l audio found
on som e dis c s in to f ewer channels.
DTS (Digital Theater Systems)
This surround system is used in many movie theaters. There is
good separation between the channels, so realistic sound
effects are possi ble.
RQT9334
(ENG)
48
Frame Field Field
≥A frame still shows two fields, so there may be some blurring,
but picture quality is generally better.
≥A field still shows less picture information so it may be
rougher, but there is no blurring.
Gateway
IP address of the electronic device providing Internet access.
Usually called a router IP address. ( e.g., 192.168.0.1)
HDMI (High-Definition Multimedia Interface)
HDMI is a digital interface for consumer electronic products.
Unlike conventional connections, it transmits uncompressed
digi tal video and audio signals on a single cabl e.
Hub
Used for connecting more than one device to the network.
Page 49

IP address
A set of numb ers whi ch di stin gu is h ea ch device on t he net wor k
when, for example, connected to the Internet. When using a
PC in a LAN to a cc ess a P C o r devic e t h at is not in cl ud ed in th e
LAN, the IP address is called the local IP address. (e.g.,
192.168.0.10)
JPEG (Joint Phot ogra phi c Exp erts Grou p)
This is a system used for compressing/decoding color still
pictures. If you select JPEG as the storage system on digital
cameras, etc., the data will be compressed to 1/10–1/100 of its
original size. The benefit of JPEG is less deterioration in picture
quality considering the degree of compr ession.
LAN (Local Area Network)
A group of linked devices in a company, school or home.
Indic at es the boundaries of a partic ula r network.
Local storage
This storage area is used as a destination for sub contents for
playin g BD-Live on BD-Vid eo.
LPCM (Linear PCM)
This is a type of PCM format.
These a re uncompressed digital signals, similar to those found
on CDs.
MPEG2 (Moving Picture Experts Group)
A standard for eff iciently compressing and expanding color
video.
MPEG2 is a compressi on standa rd used for DVD and satellite
based di gital broadcasti ng.
MP3 (MPEG Au dio Layer 3)
An audio compression method that compresses audio to
approximately on e tenth of its size without any s ignific ant loss
of audi o quality.
Pan&Scan/Letterbox
In gen eral , DV D- Vi de o are pr o duced w i th th e in tent i on tha t t he y
be viewed on a widescreen television (16:9 aspect ratio), so
images often don’t fit regular (4:3 aspect ratio) televisions. Two
styles of picture, “Pan & Scan” and “Letterbox”, deal with this
problem.
Pan&Scan: The sides are cut off so the
pictu r e fil ls th e sc re en.
Letter bo x: Black ban ds ap pe ar a t the to p
and bottom of the picture so
the picture itself appears in an
aspect ratio of 16:9.
PCM (Pulse Code Mo dul atio n)
This is o ne f or ma t fo r conv er t ing an al og au di o in to d ig it al au di o,
enabling you to enjoy digital audio with no hassle.
Picture-in-picture
This is a function of BD-Video that plays the primary video and
secondary video simultaneously. For instance, the function is
capabl e of pl ay in g th e o ri g inal mov ie as t he pr i mary vi de o wh il e
playin g video comme ntary from the film director on a small
screen as a secondary video.
Progressive/Interlace
The video signal standard of NTSC has 480 interlaced (i) scan
lines , w her ea s pro gre ssi ve ( p) sc an ni ng us es t wi ce th e numb er
of sca n li nes, an d t his is refe rr ed to as 480p . Usin g pr o gres si ve
output, you can enjoy watching high resolution video.
Router
Distinguishes the IP address assigned to each device, such as
the PC, and relays the flow of data within the network.
Sampling freque ncy
Sampling is the process of converting the heights of soun d
wave (a nalog sig nal) samples taken at set periods into digits
(digital encoding). Sampling frequency is the number of
sampl es taken per second, so larger numbers mean mor e
faithful reproduction of the original sound.
Subnet ma sk
Enables efficient network use. A set of numbers which identify
which part of the IP address allocated to every device
connected to the router is the network portion.
VIERA CAST
TM
An information service unique to Panasonic where specific
Web sites can be viewed on this unit by connecting to the
Internet wit h ou t us in g a PC.
x.v.Color
TM
x.v.ColorTM is a name for devices that are compatible with the
xvYCC format, an international standard for expanded color in
motion pi ctures, and th at fol low the rules fo r sig nal
transmission.
You can enjoy vivid colors of wider color ranges for a more
realistic pic ture when connected to a TV that supports the
x.v.Color
TM
with HDMI cable.
1080i (1125i)
In one high definition image, 1080 (1125) alternating scan lines
pass to crea t e an inte r la ce d im ag e. Becaus e 10 80 i ( 1125i)
more than do ub le s cu r rent telev is io n br o ad c as ts of 48 0i , th e
detail is much clearer and creates a more realistic and rich
image.
1080p (1125p)
In one high definition image, 1080 (1125) scan lines pass at the
same t ime to create a progressive image. Since progr essive
video does not alternate scan lines like interlace, there is a
minimal amount of screen flicker.
* This unit can only outp ut 1080/24p.
24p
This is a progressive image recorded at a rate of 24 frames per
second.
720p (750p)
In one high definition image, 720 (750) scan lines pass at the
same t ime to create a progressive image. Since progr essive
video does not alternate scan lines like interlace, there is a
minimal amount of screen flicker.
Reference
RQT9334
(ENG)
49
Page 50

Limited Warranty (For U.S.A. and Puerto Rico Only)
Panasonic Consumer Electronics Company,
Division of Panasonic Corporation of North America
One Panasonic Way, Secau cus, New Jersey 07094
Panasonic Portable Blu-ray Disc Player Limited Warranty
Limited Warranty Coverage (For U.S.A. and Puerto Rico Only)
If your product does not work properly because of a defect in materials
or workmanship, Panasonic Co nsumer Electronics Company (referred to
as “the warrantor”) will, for the length of the period indicated on the chart
below, which starts with the date o f original purchase (“Limited Warranty
period”), at its option either (a) repair your product with new or
refurbished parts, or (b) replace it with a new or a refurbished product.
The decision to repair or replace will be made by the warrantor.
Product or Part Name Parts Labor
Portable Blu-ray Disc Player One (1) Year One (1) Year
Rechargeable Batteries
(in exchange for defective item)
Headrest mounting bracket,
Headphones, Accessories
(in exchange for defective item)
During the “Lab or” Limited Warranty period there will be no charge for
labor. During the “Parts” warranty period, there will be no charge for
parts. You must mail-in your product dur ing the warranty period. If
non-rechargeable batteries are included, they are not warranted. This
Limited Warranty only applies to products purchased and serviced in the
United States or Puerto Rico. This Limited Warranty is extended only to
the original purchaser and only covers product purchased as new. A
purchase receipt or other proof of original purchase date is required for
Limited Warranty ser vice.
Mail-In Service
For assistance in the U.S.A. and Puerto Rico in obtaining repairs please
ship the product prepaid to:
Centralized Factory Se rvice Center
Panasonic Service and Technology Company
410B Airport Road
Elgin, IL 60123-9333
Attention: BD/DVD Repair
Please carefully pack and ship, prepaid and insured, to Elgin Centralized
factory Service Center.
When shipping the unit carefully pack, include all accessories, and send
it prepaid, adequa tely insured and preferably in the original carton.
Include a letter detailing the complaint, a return address and provide a
day time phone number where you can be reached. A valid registered
receipt is required under the Limited Warranty.
IF REPAIR IS NEEDED DURING THE LIMITED WARRANTY PERIOD
THE PURCHASER WILL BE REQUIRED TO FURNISH A SALES
RECEIPT/PROOF OF PURCHASE INDICATING DATE OF
PURCHASE, AMOUNT PAID AND PLACE OF PURCHASE.
CUSTOMER WILL BE CHARGED FOR THE REPAIR OF ANY UNIT
RECEIVED WITHOUT SUCH PROOF OF PURCHASE.
Limited Warranty Limits And Exclusions
This Limited Warranty ONLY CO VERS failures due to d efects in
materials or workmanship, and DOES NOT COVER normal wear and
tear or cosmetic damage. The Limited Warranty ALSO DOES NOT
COVER damages which occurred in shipment, or failures which are
caused by products not supplied by the warrantor, or failures which
result from accidents, misuse, abuse, neglect, mishandling,
misapplication, alteration, faulty installation, set-up adjustments,
misadjustment of consumer controls, improper maintenance, power line
surge, lightning damage, modification, or commercial use (such as hotel,
office, restaurant, or other business), rental use of the product, or
service by anyone other than a Factory Service Center or other
Authorized Servicer, or damage that is attributable to acts of God.
Ninety (90)
Days
Ninety (90)
Days
Not Applicable
ot Applicable
N
THERE ARE NO EXPRESS WARRANTIES EXCEPT AS LISTED
UNDER “LIMITED WARRANTY COVERAGE”. THE WARRANTOR IS
NOT LIABLE FOR INCIDENTAL OR CONSEQUENTIAL DAMAGES
RESULTING FROM THE USE OF THIS PRODUCT, OR ARISING OUT
OF ANY BREACH OF THIS WARRANTY. (As examples, this excludes
damages for lost time, cost of having someone remove or re-install an
installed unit if applicable, travel to and from the servicer, loss of or
damage to media or images, data or other recorded content. The items
listed are not exclusive, but are for illustration only.)
ALL EXPRESS AND IMPLIED WARRANTIES, INCLUDING THE
WARRANTY OF MERCHANTABILITY, ARE LIMITED TO THE
PERIOD OF THE LIMITED WARRANTY.
Some states do not allow the exclusion or limitation of incidental or
consequential damages, or limitations on how long an implied Limited
Warranty lasts, so the exclusions may not apply to you.
This Limited Warranty gives you specific legal rights and you may also
have other rights which vary from state to state. If a problem with this
product develops during or af ter the Limited Warranty period, you may
contact your dealer or Service Center. If the problem is not handled to
your satisfaction, then write to the warrantor’s Consumer Affairs
Department at th e addresses listed for the warrantor.
PARTS AND SERVICE, WHICH ARE NOT COVERED BY THIS
LIMITED WARRANTY, ARE YOUR RESPONSIBILITY.
Customer Services Directory
(United States and Puerto Rico)
Obtain Product Information and Operating Assistance; locate
your nearest Dealer or Service Center; purchase Parts and
Accessories; or make Customer Service and Literature requests
by visiting our Web Site at:
http://www.panasonic.com/help
or, contact us via the web at:
http://www.panasonic.com/contactinfo
You may also contact us directly at:
1-800-211-PANA (7262),
Monday-Friday 9 am-9 pm; Saturday-Sunday 10 am-7 pm, EST.
For hearing or speech impaired TTY users, TTY: 1-877-833-8855
Accessory Purchases
(United States and Puerto Rico)
Purchase Parts, Accessories and Instruction Books online for
all Panasonic Products by visiting our Web Site at:
http://www.pstc.panasonic.com
or, send your request by E-mail to:
npcparts@us.panasonic.com
You may also contact us directly at:
1-800-332-5368 (Phone) 1-800-237-9080 (Fax Only)
(Monday – Friday 9 am to 9 pm, EST.)
Panasonic Service and Technology Company
20421 84th Avenue South, Kent, WA 98032
(We Accept Visa, MasterCard, Discover Card, American
Express, and Personal Checks)
For hearing or speech impaired TTY users, TTY : 1-866-605-1277
As of October 2008
User memo:
DATE OF PURCHASE _________________________
DEALER NAME_______________________________
DEALER ADDRESS ___________________________
____________________________________________
TELEPHON E NUMBER ________________________
RQT9334
(ENG)
50
The model number and serial number of this product can be found
on the rear of the unit.
Please note them in the space provided below and keep for future
reference.
MODEL NUMBER DMP-B15
SERIAL NUMBER _____________________________________
Page 51

Limited Warranty (For Canada Only)
Panasonic Canada Inc.
PANASONIC PRODUCT – LIMITED WARRANTY
Panasonic Canada Inc. warrants this product to be free from defects in material and workmanship and agrees to remedy any such defect for a period
as stated below from the date of original purchase.
Technics Audio Product One (1) year, parts and labour
Panasonic Portable/Clock Radio (without Tape, CD, MD) One (1) year, parts and labour
Panasonic Audio/SD Audio Product One (1) year, parts and labour
Panasonic BD/DVD Product One (1) year, parts and labour
Panasonic Combination DVD Player/VCR One (1) year, parts and labour
Panasonic Combination DVD Recorder/VCR One (1) year, parts and labour
Accessories including rechargeable batteries Ninety (90) days
LIMITATIONS AND EXCLUSIONS
This warranty does not apply to products purchased outside Canada or to any prod uct which has been improperly installed, subjected to usage for
which the product was not designed, misused or abused, damaged during shipping, or which has been altered or repaired in any way that affects the
reliability or detracts from the performan ce, nor does it cover any product which is used commercially. Dry cell batteries are also excluded from
coverage under this warranty.
This warranty is extended to the original end user purchaser only. A purchase receipt or other proof o f date of original purchase is required before
warranty service is performed.
THIS EXPRESS, LIMITED WARRANTY IS IN LIEU OF ALL OTHER WARRANTIES, EXPRESS OR IMPLIED, INCLUDING ANY IMPLIED
WARRANTIES OF MERCHANTABILITY AND FITNESS FOR A PARTICULAR PURPOSE.
IN NO EVENT WILL PANASONIC CANADA INC. BE LIABLE FOR ANY SPECIAL, INDIRECT OR CONSEQUENTIAL DAMAGES.
In certain instances, some jurisdictions do not allow the exclusion or limitation of incidental or consequential damages, or the exclusion of implied
warranties, so the above limitations and exclusions may not be app licable.
WARRANTY SERVICE
FOR PRODUCT OPERATION ASSISTANCE, please contact:
Our Customer Care Centre: Telephone #: (905) 624-5505
FOR PRODUCT REPAIRS, please locate your nearest Authorized Servicentre at www.panasonic.ca
Link : “Servicentres
TM
locator” under “Customer support”
1-800 #: 1-800-561-5505
Fax #: (905) 238-2360
Email link: “Customer support” on www.panasonic.ca
:
Carefully pack and send prepaid, adequately insured and preferably in the original carto n.
Include details of the defect claimed, and proof of d ate of original purchase.
IF YOU SHIP THE PRODUCT TO A SERVICENTRE
Product Service
1 Damage requiring service—The unit should be serviced by qualified service personnel if:
(a)The AC power supply cord or AC adaptor has been damaged; or
(b)Objects or liquids have gotten into the unit; or
(c)The unit has been exposed to rain; or
(d)The unit does not o perate normally or exhibits a marked change in performance; or
(e)The unit has been d ropped or the cabinet damaged.
2 Servicing—Do not attempt to service the unit beyond that described in these operating instructions. Refer all other servicing to authorized
servicing personnel.
3 Replacement parts—When parts need replacing ensure the ser vicer uses par ts specified by the manufacturer or parts that have the same
characteristics as the original parts. Unauthorized substitutes may result in fire, electric shock, or other hazards.
4 Safety check—After repairs or service, ask the servicer to perform safety checks to confirm that the unit is in proper working condition.
Product information
For product information or assistance with product operation:
In the U.S.A. and Puerto Rico, refer to “Customer Ser vices Directory (United States and Puerto Rico)” on page 50.
In Canada, contact the Panasonic Canada Inc. Customer Care Centre at 1-800-561-5505, or visit the website (www.panasonic.ca), or an authorized
Servicentre closest to you.
Reference
RQT9334
(ENG)
51
Page 52

Index
p
A AC adaptor . . . . . . . . . . . . . . . . . 11
Angle . . . . . . . . . . . . . . . . . . . . . . 23
Audio
Attribute . . . . . . . . . . . . . . . . . . 23
Changing audio . . . . . . . . . . . . 16
Channel . . . . . . . . . . . . . . . . . . 23
Language . . . . . . . . . . . . . . 23, 32
AVCHD. . . . . . . . . . . . . . . . . . . . . 48
B BD-J. . . . . . . . . . . . . . . . . . . . . . . 48
BD-Live . . . . . . . . . . . . . . . . . 17, 48
BD-Video Ratings. . . . . . . . . . . . 32
BONUSVIEW (Final Standard
Profile). . . . . . . . . . . . . . . . . . 17, 48
C Chapter . . . . . . . . . . . . . . . . . . . . 15
Cleaning
Disc . . . . . . . . . . . . . . . . . . . . . . 5
Lens . . . . . . . . . . . . . . . . . . . . . . 5
Main unit. . . . . . . . . . . . . . . . . . . 5
Connection
HDMI . . . . . . . . . . . . . . . . . . . . 25
D Dialog Enhancer. . . . . . . . . . . . . 24
Direct Navigator . . . . . . . . . . . . . 14
Disc and card handling . . . . . . . . 5
Discs that cannot be played . . . . 7
DivX . . . . . . . . . . . . . . . . 20, 38, 48
DNS Server . . . . . . . . . . . . . . 28, 48
Dolby Digital . . . . . . . . . . 33, 37, 48
Dolby Digital Plus. . . . . . 33, 37, 48
Dolby TrueHD . . . . . . . . . 33, 37, 48
DTS . . . . . . . . . . . . . . . . . 33, 37, 48
DTS-HD . . . . . . . . . . . . . . 33, 37, 48
F Finalize . . . . . . . . . . . . . . . . . . . . . 6
Firmware . . . . . . . . . . . . . . . . . . . 31
Format . . . . . . . . . . . . . . . . . . . . . 17
Frame-by-frame . . . . . . . . . . . . . 16
H HDMI . . . . . . . . . . . . . . . . . . . 25, 48
I IP address . . . . . . . . . . . . . . . 28, 49
J JPEG . . . . . . . . . . . . . . . . 18, 38, 49
L LAN . . . . . . . . . . . . . . . . . . . . 28, 49
Language
Audio . . . . . . . . . . . . . . . . . 23, 32
Code list . . . . . . . . . . . . . . . . . .36
Menu. . . . . . . . . . . . . . . . . . . . .32
On-screen. . . . . . . . . . . . . . . . . 34
Soundtrack . . . . . . . . . . . . . . . . 23
Subtitle . . . . . . . . . . . . . . . . 23, 32
Local storage . . . . . . . . . . . . . . . 49
LPCM . . . . . . . . . . . . . . . . . . . . . . 49
M Maintenance . . . . . . . . . . . . . . . . . 5
Menu
On-screen. . . . . . . . . . . . . . . . . 23
Pop-up . . . . . . . . . . . . . . . . . . . 14
Setup . . . . . . . . . . . . . . . . . . . .32
MPEG2. . . . . . . . . . . . . . . . . . . . . 49
MP3 . . . . . . . . . . . . . . . . . 22, 38, 49
N Noise redu cti on ( NR)
Integrated NR . . . . . . . . . . . . . . 24
3D NR. . . . . . . . . . . . . . . . . . . . 24
O Off Timer . . . . . . . . . . . . . . . . . . . 12
On-screen
Language . . . . . . . . . . . . . . . . . 34
Menu. . . . . . . . . . . . . . . . . . . . .23
Status messages . . . . . . . . . . .16
P Picture-in-picture . . . . . . . . . . . 17
Playlist . . . . . . . . . . . . . . . . . . . . . 12
Pop-up Menu. . . . . . . . . . . . . . . .14
Product Disposal . . . . . . . . . . . . .5
Progressive. . . . . . . . . . . . . . 24, 49
Properties
Chapter. . . . . . . . . . . . . . . . . . .15
Still picture . . . . . . . . . . . . . . . .19
Proxy Server . . . . . . . . . . . . . . . .29
Q Quick Start. . . . . . . . . . . . . . . . . .36
R Ratings level . . . . . . . . . . . . . . . .32
Remote control . . . . . . . . . . . . . . .9
Repeat play . . . . . . . . . . . . . . . . . 24
Restore Default Settings . . . . . .36
Resume play function . . . . . . . . 15
S SD card . . . . . . . . . . . . . . . . . 13, 17
Search . . . . . . . . . . . . . . . . . . . . .15
Selected playback . . . . . . . . . . .16
Setup menu . . . . . . . . . . . . . . . . .32
Skip . . . . . . . . . . . . . . . . . . . . . . .15
Slideshow . . . . . . . . . . . . . . . . . . 18
Slow-motion . . . . . . . . . . . . . . . .15
Soundtrack . . . . . . . . . . . . . . . . .23
Status Message. . . . . . . . . . . . . .16
Still pictures . . . . . . . . . . . . . . . .18
Subtitle . . . . . . . . . . . . . . . . . . . . 23
V VIERA CAST
VIERA LinkTM
“HDAVI Control
X x.v.ColorTM. . . . . . . . . . . . . . . . . . 49
TM
. . . . . . . . . . . . . .30
TM
” . . . . . . . . . . . . . . 26
Panasonic Consumer Electronics
Company, Division of Panasonic
Corporation of North America
One Pan asonic W ay, Secaucus ,
New Jersey 07094
http://www.panasonic.com
C Panaso nic Co rp or a tio n 20 09
Printed in China
-If yo u see this symbolInf ormation on Disposal in other Countries outside the
European Unio n
This s y mbol is onl y valid in the European Union.
If you wish to discard this product, please contact
your local authorities or dealer and ask for the correct
metho d of dispos al.
Panasonic Canada Inc.
5770 Ambler Drive
Mississauga, Ontario
L4W 2T3
www.panasonic.ca
24p. . . . . . . . . . . . . . . . . . . . . . . . 24, 34
RQT9334-Y
F0309BL0
 Loading...