

Page 1
≥ Do not leave the unit on a surface that may become hot such as
EG EE
a dashboard. The unit is not heat-resistant so may malfunction.
≥ DRIVER MUST NOT OPERATE OR VIEW THIS UNIT WHILE
OPERATING THE V EHICLE .
Doing so will distract the driver and could cause a collision resulting
in serious injury or property damage.
≥ Stellen Sie das Gerät nicht auf Oberflächen, die warm werden
können, wie z.B. das Armaturenbrett. Das Gerät ist nicht
hitzeresistent, und es kann zu Fehlfunktionen kommen.
≥ WÄHREND DER FAHRT DARF DER FAHRER WEDER DIESES
GERÄT BEDIENEN NOCH DESSEN ANZEIGE BEOBACHTEN.
Dies würde den Fahrer ablenken und könnte zu einem Unfall mit
schweren Personen- oder Sachschäden führen.
≥ Ne pas poser cet appareil sur une surface susceptible de
dégager de la chaleur telle qu’fun tableau de bord. L’fappareil
n’fest pas réfractaire. Son fonctionnement peut être entravê.
≥ LES CONDUCTEURS DE VEHICULE NE DOIVENT NI FAIRE
FONCTIONNER CET APPAREIL, NI L’AFFICHER PENDANT LA
CONDUITE.
S’ils le font, ils seront distraits et cette imprudence peut provoquer une
coll ision entraînant ainsi une blessure grave et un dommage des biens.
≥ No coloque la unidad sobre una superficie que pueda
calentarse como, por ejemplo, el salpicadero. Esta unidad no es
resistente al calor y podría averiarse.
≥ NO DEBE UTILIZARSE MIENTRAS SE CONDUCE UN
VEHIICULO MOTORIZADO.
Si lo hace, podría di straer al conductor y podría provocar un accidente
con consecuencias graves para personas y obje tos.Non attaccare o
staccare l’unità o il supporto poggi atesta mentre l’auto è in movimento.
≥ Non lasciare l’unità su una superficie che potrebbe riscaldarsi,
ad esempio un cruscotto. L’unità non è resistente al calore,
pertanto si potrebbero verificare problemi di funzionamento.
≥ L’AUTISTA NON DEVE FAR FUNZIONARE IL DISPOSITIVO O
GUARDARE FILM MENTRE SI TROVA ALLA GUIDA.
Una di queste operazioni potrebbe distrarre l’autista e provocare un
incidente, il che avrebbe come risultato ferite gravi o danni.
≥ Не кладите устройство на поверхности, которые могут
нагреться, например, на приборную панель. Это может
привести к неполадкам, поскольку устройство не обладает
теплостойкостью.
≥ Водитель не должен управлять или видеть данный блок
при управлении автомобилем.
Это отвлекает водителя и может привести к столкновению, что
может стать причиной травмы или повреждения имущества.
≥ Не залишайте апарат на поверхні, яка може нагріватись,
наприклад, на панелі приладів. При сильному нагріванні
апарат може неправильно працювати.
≥ Водій не повинен управляти або бачити даний блок при
управлінні автомобілем.
Це відволікає водія i може привес ти до зіткнення, що може стати
причиною травми або пошкодження майна.
Operating Instructions
“Enjoying in a car”
Bedienungsanleitung
“Verwendung in einem Fahrzeug”
Mode d’emploi
“Utilisation dans un véhicule”
Instrucciones de funcionamiento
“Reproducción de vídeo en un vehículo”
Istruzioni per l’uso
“Utilizzo in auto”
Инструкция по эксплуатации
“Использование в автомобиле”
Інструкція з експлуатації
“Використання в автомобілі”
Portable Blu-ray Disc Player
Tragbarer Blu-ray Disc-Player
Lecteur portable de Blu-ray Disc
Reproductor de Blu-ray Disc
Lettore Blu-ray Disc portatile
Портативный Blu-ray Disc плеер
Портативний Blu-ray Disc плеєр
Model No. DMP-B15
РУССКИЙ ЯЗЫК
УКРАЇНСЬКА
RQCA1922
Page 2

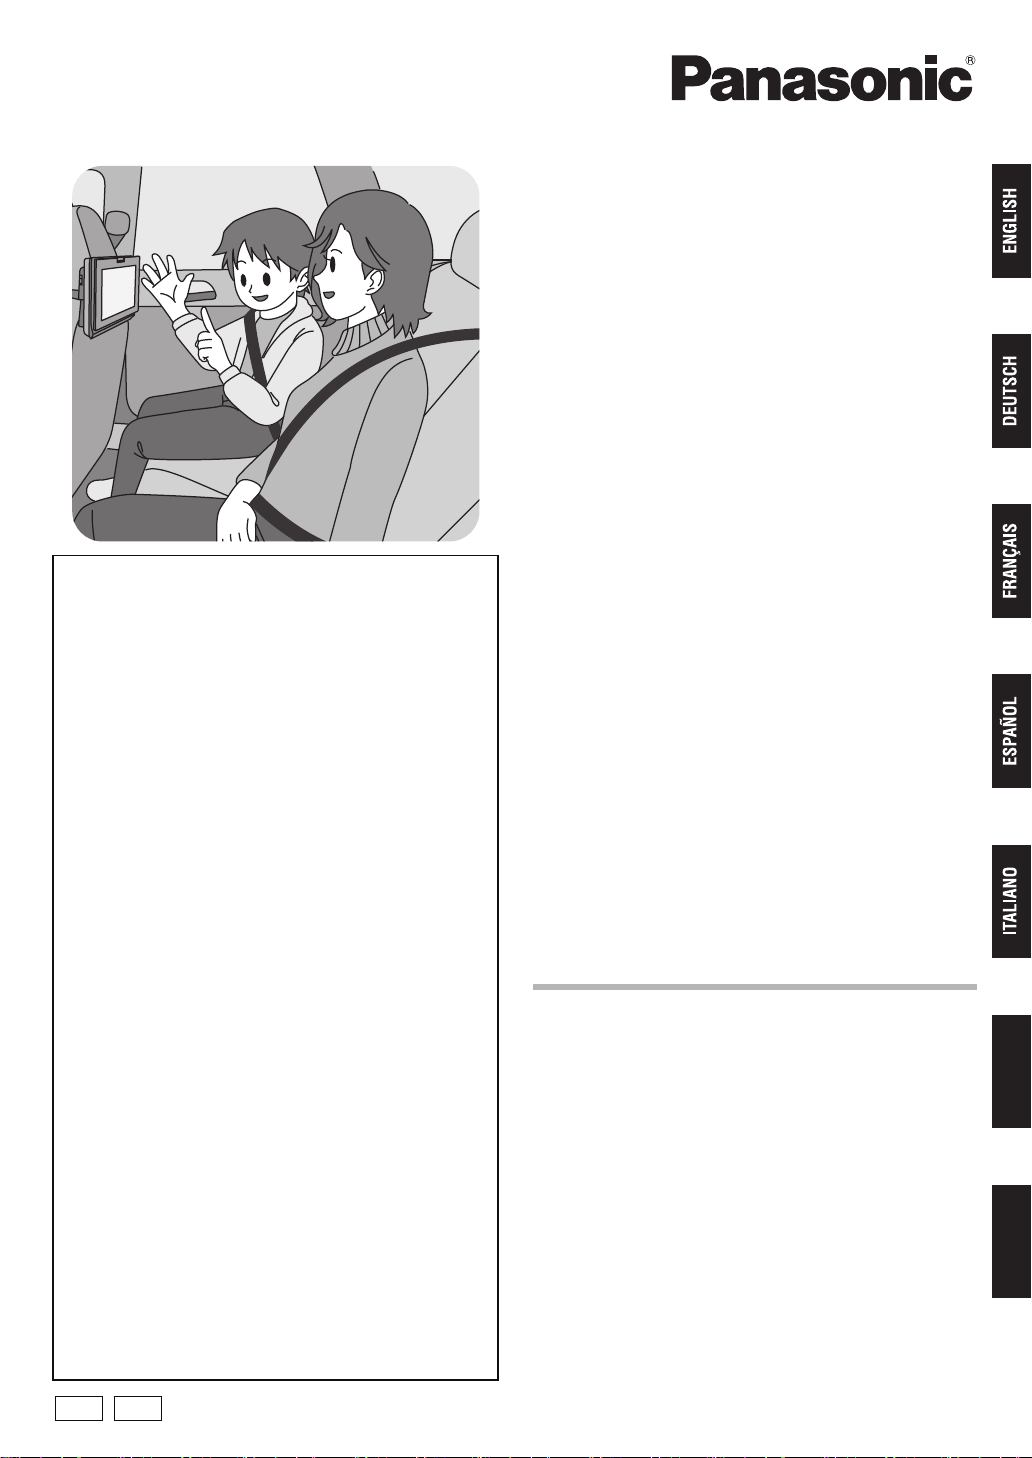
Enjoying video in the back
3 cm
DO NOT
FALSCH
ÉVITEZ
NO
NO
НЕ ДЕЛАТЬ
НЕ РОБИТИ
click!
Klick!
déclic !
¡clic!
scatto!
Щелчок!
Клац!
seat with the Headrest
Mounting Bracket
Video vom Rücksitz aus
betrachten mit der
Kopfstützen-Halterung
Utilisation des vidéos sur
le siège arrière à l’aide du
support de montage de
l’appui-tête
1
1
Headrest Mount ing Bracket (included)
Kopfstützen-Halterung (mitgeliefert)
Support de fixation pour appui-tête (inclus)
Soporte para instalación en reposacabezas
Kit di montaggio su poggiatesta (in dotazione)
Кронштейн подголовника
(входит в комплект поставки)
Кронштейн підголовника
(входить до комплекту постачання)
(incluido)
Visionado de vídeo en el
asiento trasero con el
soporte para montaje en
reposacabezas
Visione di filmati sul sedile
posteriore con la staffa di
montaggio
all’appoggiatesta
Держатель для монтажа
на подголовнике
позволяет смотреть
видео, сидя на заднем
сиденье
2
2
1
2
RQCA1922
Перегляд відео на
задньому сидінні з
використанням
кроншейна на
підголівнику
2
4~5 mm
Page 3

3
Release button
Der Freigabe-knopf
Bouton de libération
El botón de liberación
Tasto di rilascio
Кнопка освобождения
Спускова кнопка
1
2
A
DO
RICHTIG
FAITES
SÍ
OK
ДЕЛАТЬ
РОБИТИ
DO NOT
FALSCH
ÉVITEZ
NO
NO
НЕ ДЕЛАТЬ
НЕ РОБИТИ
23 cm or less
23 cm oder weniger
23 cm ou moins
23 cm o menos
Max 23 cm
не более 23 см
23 см або менше
3
4
B
3
RQCA1922
РУССКИЙ ЯЗЫК
УКРАЇНСЬКА
Page 4
C
125 V/250 V, 3.0 A type
Typ 125 V/250 V, 3,0 A
type 3,0 A, 125 V/250 V
Tipo 125 V/250 V, 3,0 A
tipo da 125 V/250 V, 3,0 A
тип 125 В/250 В, 3,0 A
125 В/250 В, 3,0 A
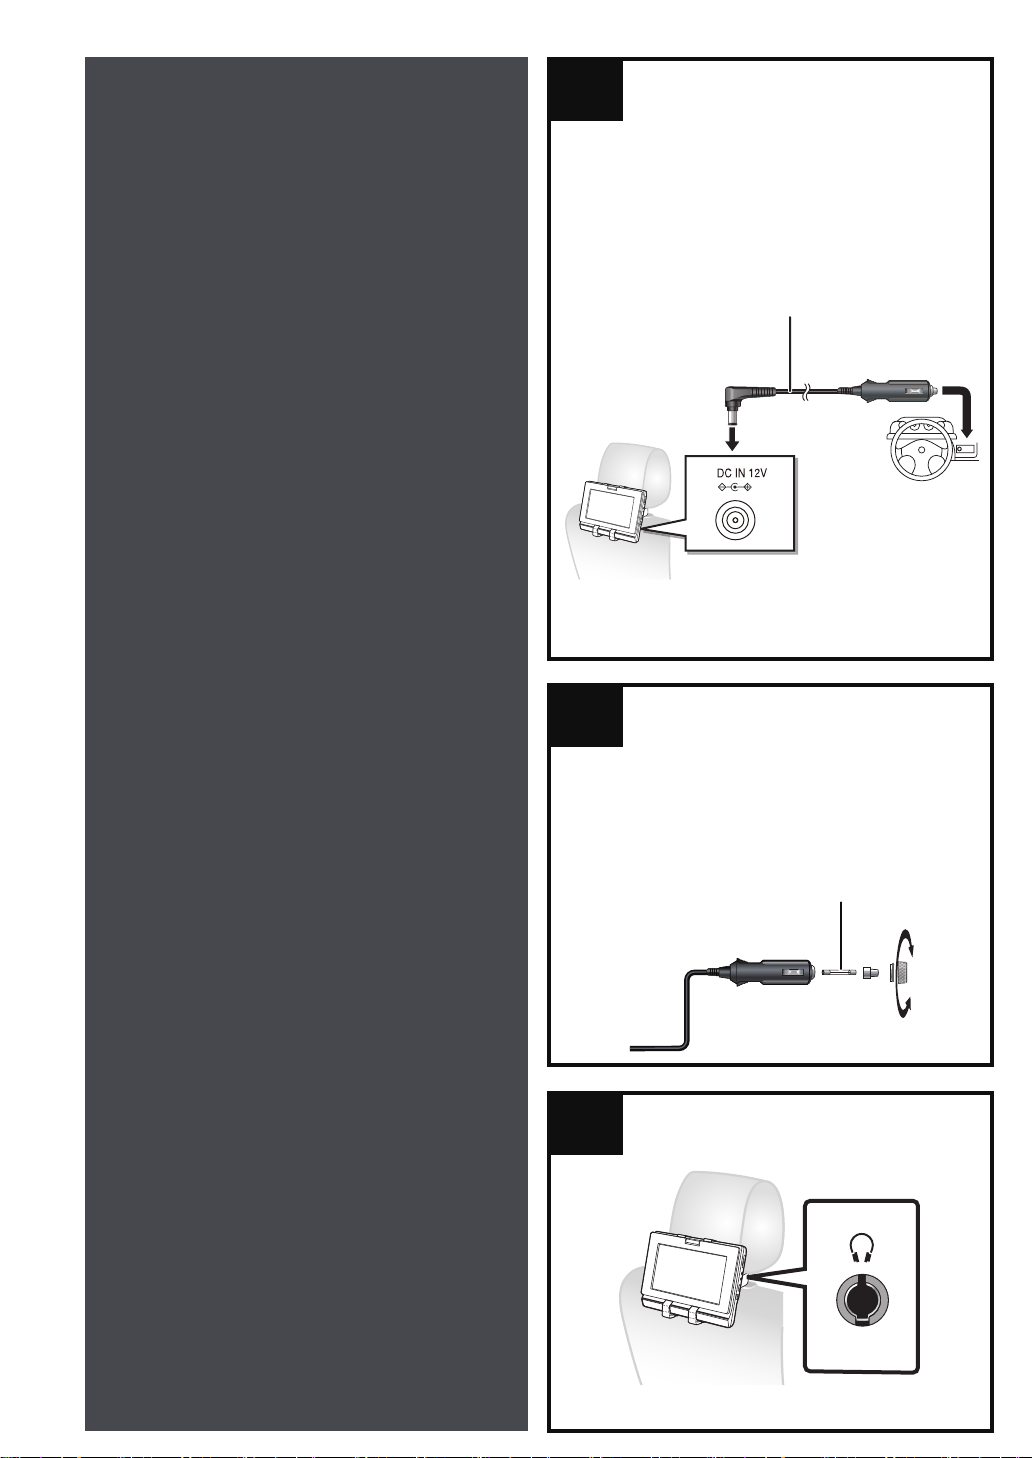
Connecting the included
Car DC Adaptor
Schließen Sie den
mitgelieferten Adapter für
Zigarettenanzünder an
Raccordement de
l’adaptateur CC du
véhicule
Conexión del adaptador de
Car DC Adaptor (included)
KFZ-DC-Adapter (mitgeliefert)
Adaptateur CC pour véhicule (inclus)
Adaptador de CC para vehículo (incluido)
Adattatore CC per auto (compreso)
Автомобильный DC-адаптер
(входит в комплект поставки)
Автомобільний DC-адаптер
(входить до комплекту постачання)
12
CC para vehículo
Collegamento
dell’adattatore CC per auto
in dotazione
Подключение
автомобильного
адаптера постоянного
тока
Підключення
автомобільного адаптера
D
E
RQCA1922
постійного струму
4
Page 5

Enjoying video in the back seat with
ENGLISH
the Headrest mounting bracket
3 Close the safety belt buckle and fasten the unit to the
bracket.
≥
Adjust the length of the safety belt so that there is no
slack.
4 Turn the screen outwards and close.
You can enjoy video in the back seat attaching the unit to the
back of the front seat.
≥
Do not attach or detach the unit or the bracket while
the car is moving.
≥
Do not attach the unit in the following locations:
– anywhere other than the back of the front seat
– where it can be viewed or operated by the driver
– where it interferes with the driver’s operation of the vehicle
– where it interferes with the operation of an airbag
≥
Ensure that th e bracket belt is securely fastened and
check the lock on the unit. Refer to installation
instructions.
In the event of an accident, sudden acceleration or
braking, the unit could become loose and cause injury or
property damage.
≥
Only use the Panasonic bracket supplied to attach the
unit to the car seat.
≥
Using this unit safely in a car.
In the event of an accident, there is a slight possibility that
the unit could become detached from the Headrest Mounting
Bracket. Therefore, use the safety belt (included) together
with the Headrest Mounting Bracket to secure the unit.
≥
Refer to the illustration on page 2 and 3 as well.
Attach the Headrest mounting bracket to
the front seat.
≥
Adjust the headrest so there is an open space of about
3 cm. If this space is larger than 3 cm, the unit could
become loose and cause injury in the event of an
accident etc.
≥
Attach the bracket to the seat so that the label side of the
bracket can be seen from the rear of the seat.
1 Close the bracket belt buckle.
≥
Leave the belt somewhat loose.
2 Pass the safety belt (included) through the space between
the front seat and the bracket.
≥
Adjust the length of the bracket belt and tighten so that
there is no slack.
Attach the unit to the bracket.
≥
To avoid damaging the screen, attach the unit to the
bracket with the screen turned inwards and closed.
1 While holding the unit with both hands, push it in so that
the protruding marks (A) on the bracket fit into the slots on
the rear of the unit.
2 Press the unit down about 4 to 5 mm.
≥
Please check the following points before use.
– The bracket is securely fastened to the unit.
– The unit is not loose and cannot be lifted upwards.
≥
When correctly attached, you will hear a locking sound.
Fasten the unit to the bracket with the
safety belt.
≥
Put the disc into the unit before attaching the safety belt.
≥
Unfasten the safety belt buckle before exchanging
discs. Close the safety belt buckle again after
exchanging discs.
1 Open the screen and rotate it.
2 Pass the safety belt through the gap between the screen
and the unit body from the left and right of the unit.
≥
To avoid damaging the unit, attach the belt so that the
fabric part (B) covers the top of the unit.
≥
The angle of the LCD may shift while driving due to vibration, etc.
Depending on the type of headrest, you may not be able to
attach the bracket. In the event of an accident etc., the unit
could become loose and cause injury.
Detach the unit from the bracket.
≥
Remove the safety belt from the unit and the bracket.
≥
Rotate the screen and then close it with the screen
turned inwards.
1 Press the release buttons (left and right) in towards the
center of the bracket.
2 While holding the unit with both hands, lift it up about 4 to 5
mm and pull forward to remove it.
≥
Do not press the release buttons any time other than
when detaching the unit from the bracket.
Connecting the included Car DC
Adaptor
≥
Refer to the illustration on page 4 as well.
Before connection, consult your car owner’s manual or your
dealer.
≥
Connect to the cigarette lighter socket of a vehicle that has a
12 V battery. It is not compatible with a vehicle that has a
24 V battery.
≥
This is a special negative grounded Car DC Adaptor. Using
this Car DC Adaptor with a plus grounded car can cause
malfunction and lead to fire.
1 Connect the car DC adaptor to the unit.
2 Connect the car DC adaptor to the
cigarette lighter socket.
≥
Place the unit on a stable surface.
Replacing the fuse
Replace only with the specified 125 V/250 V, 3.0 A fuse.
Use of any other type can cause fire.
1 Open the socket.
2 Replace the fuse.
3 Close the socket.
Cautions
≥
To avoid draining your car battery
– Disconnect the Car DC Adaptor from the cigarette lighter
after use. The Car DC Adaptor continues to consume
some power even if it is not being used, and if a battery
pack is attached to this unit, it will start recharging which
uses more power.
– Do not use the Car DC Adaptor for long periods when the
engine is not running.
≥
Turn the unit off before stopping the engine while using Car
DC Adaptor, otherwise resume play may not work.
≥
Leave some slack in the cord.
≥
No responsibility will be taken for damage that occurs due to
faulty installation.
You can enjoy audio through your car audio system by
connecting a car stereo cassette adaptor (not included) to
the headphone jack on the left side of this unit.
5
RQCA1922
РУССКИЙ ЯЗЫК
УКРАЇНСЬКА
Page 6

Sie können Video vom Rücksitz aus genießen, indem Sie das Gerät an der
DEUTSCH
Rückseite des Vordersitzes anbringen.
≥
6
RQCA1922
Video vom Rücksitz aus betrachten mit der
Kopfstützen-Halterung
≥
Nehmen Sie das Gerät nicht von der Halterung ab und bringen Sie
es nicht an, während das Fahrzeug in Bewegung ist.
≥
Bringen Sie das Gerät nicht an folgenden Stellen an:
– an irgendwelchen anderen Stellen mit Ausnahme des Rücksitzes
– wo es vom Fahrer eingesehen oder bedient werden kann
– wo es die Bedienung und Steuerung des Fahrzeugs durch den
Fahrer stören würde
– wo es die Wirkung eines Airbags beeinträchtigen könnte
≥
Stellen Sie sicher, dass der Haltegurt sicher befestigt ist und die
Verriegelung am Gerät fest sitzt. Siehe dazu die Montagehinweise.
Bei einem Unfall, bei schneller Beschleunigung oder
plötzlichem Bremsen könnte sich das Gerät lösen und
Personen- oder Sachschäden verursachen.
≥
Verwenden Sie ausschließlich die migelieferte PanasonicHalterung, um das Gerät am Autositz zu befestigen.
≥
Sichere Verwendung des Geräts in einem Fahrzeug.
Bei einem Unfall besteht die geringe Möglichkeit, dass sich das Gerät
von der Kopfstützen-Halterung löst. Verwenden Sie deshalb zur
sicheren Befestigung des Geräts zusammen mit der KopfstützenHalterung den Haltegurt (mitgeliefert).
Siehe auch die Abbildungen auf Seite 2 und 3.
Befestigen Sie die Kopfstützen-Halterung am
Vordersitz.
≥
Stellen Sie die Kopfstütze so ein, dass etwa 3 cm Platz sind. Wenn
dieser Abstand größer als 3 cm ist, kann sich das Gerät lösen und bei
einem Unfall usw. Verletzungen verursachen.
≥
Befestigen Sie die Halterung so am Sitz, dass die Etikettenseite der
Halterung von der Rückseite des Sitzes aus sichtbar ist.
1
Schließen Sie den Haltegurtverschluss.
≥
Lassen Sie den Gurt ein wenig locker.
2
Ziehen Sie den Haltegurt (mitgeliefert) durch den Spalt zwischen
Vordersitz und Halterung.
≥
Befestigen Sie das Gerät an der Halterung mit geschlossenem und
nach innen gedrehtem Bildschirm, damit dieser nicht beschädigt wird.
Stellen Sie den Monitor ein.
≥
Befestigen Sie das Gerät an der Halterung mit geschlossenem und
nach innen gedrehtem Bildschirm, damit dieser nicht beschädigt wird.
1 Halten Sie das Gerät mit beiden Händen fest und drücken
Sie es so ein, dass die erhabenen Markierungen (A) an
der Halterung in die Vertiefungen an der Rückseite des
Geräts eingepasst werden.
2
Drücken Sie das Gerät um etwa 4 bis 5 mm nach unten.
≥
Überprüfen Sie bitte vor der Verwendung die folgenden Punkte.
– Ist die Halterung sicher am Gerät befestigt.
– Sitzt das Gerät fest und kann es nicht nach oben gehoben werden.
≥
Bei korrekter Anbringung hören Sie ein Schließgeräusch.
Befestigen Sie das Gerät mit dem Haltegurt an der
Halterung.
≥
Legen Sie die Disc ein, bevor Sie den Haltegurt
befestigen.
≥
Lösen Sie vor dem Wechseln von Discs den
Haltegurtverschluss. Schließen Sie nach dem
Wechseln von Discs den Haltegurtverschluss.
1
Öffnen Sie den Bildschirm und drehen Sie ihn.
2
Ziehen Sie den Haltegurt durch den Spalt zwischen Bildschirm und
Gehäuse auf der linken und rechten Seite des Geräts.
≥
Achten Sie bei der Befestigung des Haltegurts darauf, dass das
Gewebeteil (
Beschädigungen zu vermeiden.
B
) an der Oberseite des Geräts aufliegt, um
3
Schließen Sie den Haltegurtverschluss und befestigen Sie das Gerät an
der Halterung.
≥
Regeln Sie die Länge des Haltegurts und ziehen sie ihn straff fest.
4
Drehen Sie den Bildschirm nach außen drehen und schließen sie ihn.
≥
Durch Vibrationen usw. kann sich der Winkel des Monitors während der
Fahrt verändern.
Je nach Art der Kopfstütze kann die Halterung u.U. nicht angebracht
werden. Bei einem Unfall usw. könnte sich das Gerät sonst lösen und
Verletzungen verursachen.
Lösen des Players aus der Halterung.
≥
Entfernen Sie den Haltegurt vom Gerät und der Halterung.
≥
Drehen Sie den Bildschirm und schließen Sie ihn mit der
Bildschirmseite nach innen.
1
Drücken Sie die Freigabeknöpfe (links und rechts) nach innen zur Mitte
der Halterung.
2
Halten Sie das Gerät mit beiden Händen fest, heben Sie es etwa 4 bis 5
mm hoch und schieben Sie es dann nach vorne, um es
herauszunehmen.
≥
Drücken Sie die Freigabeknöpfe nur, wenn Sie das Gerät aus der
Halterung lösen.
Schließen Sie den mitgelieferten Adapter für
Zigarettenanzünder an
≥
Siehe auch die Abbildung auf Seite 4.
Bitte beachten Sie vor dem Anschluss auch die Bedienungsanleitung des
Fahrzeugs oder wenden Sie sich an Ihren Autohändler.
≥
Schließen Sie das Gerät an den Zigarettenanzünder an; das Fahrzeug
muss über eine 12 V-Batterie verfügen. Das Gerät kann in Fahrzeugen mit
einer 24 V-Batterie nicht verwendet werden.
≥
Hierbei handelt es sich um einen speziellen, negativ geerdeten KFZ-DCAdapter. Die Verwendung dieses KFZ-DC-Adapters in Fahrzeugen mit
positiver Erdung kann Fehlfunktionen verursachen und zu Bränden
führen.
1 Schließen Sie den KFZ-DC-Adapter an das Gerät
an.
2 Schließen Sie den KFZ-DC-Adapter an den
Zigarettenanzünder an.
≥
Gerät auf stabiler Oberfläche aufstellen.
Ersetzen der Sicherung
Austausch nur gegen die angegebene 125 V/250 V, 3,0 A-Sicherung.
Die Verwendung anderer Typen kann einen Brand verursachen.
1
Sicherungshalter öffnen.
2
Sicherung ersetzen.
3
Sicherungshalter schließen.
Vorsichtsmaßnahmen
≥
Entleeren der Autobatterie vermeiden
– Trennen Sie den KFZ-DC-Adapter nach der Verwendung wieder vom
Zigarettenanzünder. Der KFZ-DC-Adapter verbraucht ansonsten weiter
Strom, auch wenn er nicht verwendet wird. Außerdem beginnt er den
Ladevorgang, wenn ein Batteriepack mit dem Gerät verbunden ist, was
der Autobatterie noch mehr Strom entzieht.
– Verwenden Sie den KFZ-DC-Adapter nicht über längere Zeit, wenn der
Motor des Fahrzeugs nicht läuft.
≥
Schalten Sie das Gerät bei Verwendung des KFZ-DC-Adapters ab, bevor
Sie den Motor abstellen; andernfalls arbeitet unter Umständen die
Funktion Wiedergabe fortsetzen nicht.
≥
Spannen Sie das Kabel nicht.
≥
Für durch fehlerhaften Einbau oder Anschluss des Geräts verursachte
Schäden übernehmen wir keine Haftung.
Sie können das Audiosignal über die KFZ-Anlage hören, indem Sie
einen Stereo-Kassettenadapter (nicht mitgeliefert) an die
Kopfhörerbuchse auf der linken Seite des Geräts anschließen.
Page 7

Utilisation des vidéos sur le siège arrière à
FRANÇAIS
l’aide du support de montage de l’appuitête
Vous pouvez visualiser des vidéos sur le siège arrière en fixant l’appareil
au dos du siège avant.
≥
Evitez d’attacher ou de détacher l’appareil ou encore le support
pendant le déplacement du véhicule.
≥
Evitez d’attacher l’unité aux emplacements suivants:
– Des endroits autres que le siège arrière
– où il peut être vu ou manipulé par le conducteur
– à l’endroit où il interfère avec la manipulation du véhicule par le
chauffeur
– à l’endroit où il interfère avec le fonctionnement d’un sac gonflable
≥
Veillez à ce que la ceinture du support soit bien attachée et
vérifiez la clé sur l’appareil. Reportez-vous aux instructions
relatives à l’installation.
En cas d’accident, d’accélération soudain ou de freinage, l’appareil
pourrait lâcher et provoquer ainsi une blessure ou un dommage des
biens.
≥
Utilisez uniquement le support Panasonic fourni pour relier
l’appareil au siège du véhicule.
≥
Utiliser l’appareil en toute sécurité dans une voiture.
En cas d’accident, il existe une faible probabilité que l’appareil se
détacge du support de l’appui-tête. Par conséquent, utilisez la
sangle de sécurité (incluse) avec le support de l’appui-tête pour
assurer l’appareil.
≥
Voir l’illustration page 2 et 3 également.
Fixation du support de l’appuie-tête du siège
avant.
≥
Réglez l’appui-tête de sorte qu’il y ait un espace d’environ 3 cm. Si
cet espace est supérieur à 3 cm, l’appareil risque de se détacher
et d’occasionner des blessures en cas d’accident, etc.
≥
Fixez le support au siège de telle sorte que le côté étiquette du
support soit visible depuis l’arrière du siège.
1
Fermez la boucle de la sangle du support.
≥
Laissez la sangle un peu desserrée.
2
Faites passer la sangle (incluse) de sécurité par l’espace présent
entre le siège avant et le support.
≥
Réglez la longueur de la sangle du support et serrez-la de telle
sorte qu’elle ne soit pas relâchée.
Reliez l’appareil au support.
≥
Pour éviter d’abîmer l’écran, fixez l’appareil au support avec
l’écran tourné vers l’intérieur et fermé.
1 Tout en tenant l’appareil des deux mains, poussez-le de
telle sorte que les maques saillantes (A) présentes sur le
support entrent dans les fentes présentes à l’arrière de
l’appareil.
2
Poussez l’appareil vers le bas de 4 à 5 mm environ.
≥
Veuillez vérifier les points suivants avant utilisation.
– Le support est fermement fixé sur l’appareil.
– L’appareil n’est pas desserré et ne peut être déplacé vers le haut.
≥
Un déclic indique que le lecteur est correctement fixé.
Attachez l’appareil au support au moyen de la
sangle de sécurité.
≥
Mettez le disque dans l’appareil avant de fixer la sangle
de sécurité.
≥
Détachez la boucle de la sangle de sécurité avant de
changer de disque. Fermez la boucle de la sangle de
sécurité après avoir changé de disque.
1
Ouvrez l’écran et faites-le tourner.
2
Faites passer la sangle de sécurité par l’espace présent entre l’écran
et le corps de l’appareil depuis la gauche et la droite de l’appareil.
≥
Pour éviter d’endommager l’appareil, fixez la sangle de telle sorte
que la partie en tissu (
B
) couvre le haut de l’appareil.
3
Fermez la boucle de la sangle de sécurité et attachez l’appareil au
support.
≥
Réglez la longueur de la sangle de sécurité de telle sorte qu’elle
ne soit pas relâchée.
4
Tournez l’écran vers l’extérieur et fermez.
≥
L’angle de l’écran peut être modifié durant la conduite à cause des
vibrations, etc.
Selon le type d’appui-tête, vous ne pourrez pas toujours fixer le
support. En cas d’accident, etc., l’appareil pourrait se détacher et
provoquer des blessures.
Libération du lecteur du support.
≥
Enlevez la sangle de sécurit de l’appareil et du support.
≥
Faites tourner l’écran puis fermez-le, tourné vers l’intérieur.
1
Appuyez sur les boutons de libération (gauche et droite) vers le
centre du support.
2
Tout en tenant l’appareil des deux mains, soulevez-le de 4 à 5 mm et
tirez en avant pour le sortir.
≥
N’appuyez sur les boutons de libération que pour détacher
l’appareil du support.
Raccordement de l’adaptateur CC du
véhicule
≥
Voir l’illustration page 4 également.
Avant tout branchement, consultez le manuel d’utilisation de votre
véhicule ou rendez vous dans le magasin où vous l’avez acheté.
≥
Branchez à la prise du briquet d’un véhicule disposant d’une batterie
de 12 V. Il n’est pas compatible avec un véhicule de 24 V de batterie.
≥
Il s’agit ici d’un adaptateur CC pour véhicule, relié à la terre, spécial et
négatif. L’utilisation de cet adaptateur CC pour véhicule avec un certain
type de véhicule peut entraîner un dysfonctionnement et mener droit à
l’incendie.
1 Branchez l’adaptateur CC de la voiture à
l’appareil.
2 Branchez l’adaptateur CC de la voiture à l’allume-
cigare.
≥
Placez l’appareil sur une surface stable.
Remplacement du fusible
Seul le fusible 3,0 A, 125 V/250 V peut être utilisé. Tout autre type de
fusible peut provoquer un incendie.
1
Ouvrez le support.
2
Remplacez le fusible.
3
Fermez le support.
Précautions à prendre
≥
Pour éviter de faire sécher la batterie de votre véhicule
– Débranchez l’adaptateur CC de votre véhicule du briquet après
utilisation. L’adaptateur CC du véhicule continue de consommer de
l’énergie même si cette énergie n’est pas utilisée, et si un bloc
batterie est lié à cet appareil, elle recommencera la recharge qui
utilise plus d’énergie.
– Évitez d’utiliser l’adaptateur CC du véhicule pendant de longues
périodes lorsque le moteur ne fonctionne pas.
≥
Éteignez l’appareil avant d’en arrêter le moteur lors de l’utilisation de
l’adaptateur CC ; si vous ne procédez pas ainsi, la reprise de la lecture
peut ne pas fonctionner .
≥
Laissez une certaine marge dans le cordon.
≥
Nous déclinons notre responsabilité en cas de dommage dû à une
installation défectueuse.
Vous pouvez utiliser la fonction audio grâce au système audio de
votre véhicule en branchant un adaptateur de cassette stéréo pour
voiture (non inclus) à la prise du casque sur le côté gauche de cet
appareil.
7
RQCA1922
Page 8

Para ver vídeo en el asiento trasero, puede instalar la unidad en el
ESPAÑOL
respaldo del asiento delantero.
≥
8
RQCA1922
Visionado de vídeo en el asiento trasero con
el soporte para montaje en reposacabezas
≥
No monte o desmonte durante la conducción.
≥
No realice el montaje en los siguientes lugares:
– en cualquier lugar que no sea el respaldo del asiento
– en un lugar donde el conductor pueda verlo o manejarlo
– en un lugar donde impida el manejo del vehículo
– en un lugar donde interfiera con el despliegue de un airbag
≥
Asegúrese de que el cinturón del soporte esté perfectamente
ceñido y compruebe el cierre de la unidad. Consulte el manual
de instalación.
En caso de accidente o aceleración o frenada bruscas, la unidad
podría desprenderse y provocar lesiones.
≥
Utilice sólo el soporte Panasonic incluido para instalar la
unidad en el reposacabezas del vehículo.
≥
Cómo utilizar esta unidad dentro de un vehículo de manera
segura.
En caso de accidente, existe una pequeña posibilidad que la unidad
se desenganche del soporte para montaje en reposacabezas. Por lo
tanto, utilice el cinturón de seguridad (incluido) junto al soporte para
montaje en reposacabezas para sujetar bien la unidad.
Remítase también a la ilustración en la página 2 y 3.
Montaje del soporte para reposacabezas en el
asiento delantero.
≥
Ajuste el reposacabezas de manera que quede un espacio abierto
de unos 3 cm. Si este espacio tiene más de 3 cm, la unidad podría
desprenderse y provocar lesiones en caso de accidente, etc.
≥
Sujete el soporte al asiento de modo que el lado de la etiqueta del
soporte pueda verse desde la parte trasera del asiento.
1
Cierre la hebilla del cinturón de soporte.
≥
Deje el cinturón un poco flojo.
2
Pase el cinturón de seguridad (incluido) a través del espacio que hay
entre el asiento delantero y el soporte.
≥
Regule la longitud del cinturón del soporte y apriete para que no
resulte flojo.
Instalación del reproductor en el soporte.
≥
Para evitar daños en la pantalla, sujete la unidad al soporte con la
pantalla girada hacia dentro y cerrada.
1
Mientras sujeta la unidad con las dos manos, presiónela de
manera que las partes salientes (
las ranuras situadas en la parte trasera de la unidad.
2
Presione la unidad unos 4 ó 5 mm hacia abajo.
≥
Revise los siguientes puntos antes del uso.
– El soporte está bien sujeto a la unidad.
– La unidad no queda suelta y no puede elevarse.
≥
Si la instalación se ha realizado correctamente, al montar el
reproductor en el soporte se percibirá un chasquido.
Sujete la unidad al soporte con el cinturón de
seguridad.
≥
Inserte el disco dentro de la unidad antes de enganchar
el cinturón de seguridad.
≥
Desenganche la hebilla del cinturón de seguridad
antes de cambiar de disco. Enganche de nuevo la
hebilla del cinturón de seguridad después de
cambiar de disco.
1
Abra la pantalla y gírela.
2
Pase el cinturón de seguridad a través del hueco que hay entre la
pantalla y el cuerpo de la unidad desde la izquierda y la derecha de
la unidad.
≥
Para evitar daños en la unidad, sujete el cinturón de forma que la
parte de tela (
B
) cubra la parte superior de la unidad.
A
) del soporte encajen en
3
Cierre la hebilla del cinturón de seguridad y sujete la unidad al
soporte.
≥
Regule la longitud del cinturón del soporte y apriete para que no
resulte flojo.
4
Gire la pantalla hacia fuera y ciérrela.
≥
El ángulo del monitor puede variar debido a las vibraciones de la
conducción, etc.
La instalación del soporte no es posible según el tipo de
reposacabezas. En caso de accidente etc., la unidad podría
desprenderse y provocar lesiones.
Liberación del reproductor del soporte.
≥
Quite el cinturón de seguridad de la unidad y del soporte.
≥
Gire la pantalla y luego ciérrela girada hacia dentro.
1
Presione los botones de liberación (derecho e izquierdo) hacia la
parte central del soporte.
2
Agarrando la unidad con las dos manos, levántela de unos 4-5 mm y
tire hacia delante para extraerla.
≥
No presione los botones de liberación a menos que vaya a
desmontar la unidad del soporte.
Conexión del adaptador de CC para
vehículo
≥
Remítase también a la ilustración en la página 4.
Antes de la conexión, consulte el manual del propietario o póngase en
contacto con el concesionario del vehículo.
≥
Conecte al enchufe del encendedor de cigarrillos de un vehículo que
tenga una batería de 12 V. No es compatible con vehículos cuya
batería sea de 24 V.
≥
Éste es un adaptador de CC especial para automóvil con conexión a
tierra negativa. El uso de este adaptador de CC para vehículo con un
vehículo con conexión a tierra positiva puede provocar averías o un
incendio.
1 Conecte el adaptador de CC para automóvil a la
unidad.
2 Conecte el adaptador de CC para automóvil a la
toma del encendedor.
≥
Coloque la unidad en una superficie estable.
Sustitución del fusible
Sustituya solamente por un fusible 125 V/250 V, 3,0 A. El uso de
cualquier otro tipo de fusible puede originar un incendio.
1
Abra la toma.
2
Sustituya el fusible.
3
Cierre la toma.
Precauciones
≥
Para evitar el agotamiento de la batería del vehículo
– Después del uso, desconecte el adaptador de CC para vehículo del
enchufe del encendedor de cigarrillos. El adaptador de CC para
vehículo continúa consumiendo un poco energía aunque no se
utilice y, si además, esta unidad tiene conectada una batería, el
proceso de carga se iniciaría aumentando el consumo de energía.
– No utilice el adaptador de CC para vehículo durante mucho tiempo si
el motor del vehículo no está en marcha.
≥
Cuando se utiliza el adaptador de CC para vehículo, apague la unidad
antes de parar el motor del vehículo ya que, de lo contrario, la
reanudación de la reproducción no funcionará.
≥
Deje el cable un poco suelto.
≥
No se asumirá ninguna responsabilidad por los daños producidos a
raíz de una instalación defectuosa.
Es posible escuchar el audio a través del sistema de audio del
vehículo conectando un adaptador de casete estéreo para vehículo
(no incluido) al conector para auriculares situado en el lado izquierdo
de esta unidad.
Page 9

Visione di filmati sul sedile posteriore con
ITALIANO
la staffa di montaggio all’appoggiatesta
È possibile vedere filmati sul sedile posteriore agganciando l’unità sul
retro del sedile anteriore.
≥
Non attaccare o staccare l’unità o il supporto poggiatesta
mentre l’auto è in movimento.
≥
Non collocare l’unità nelle seguenti posizioni:
– in nessun’altra posizione che non sia il sedile posteriore
– dove possa essere vista o fatta funzionare dall’autista
– dove potrebbe interferire con la guida dell’autista
– dove potrebbe interferire con il funzionamento di un airbag
≥
Accertarsi che la fascia protetti va del di spositivo sia ben
salda e verificare il blocco del dispositivo stesso.
Consultare le istruzioni di installazione.
Qualora si verificasse un incidente, ci fosse un’improvvisa
accelerazione o frenata, l’unità potrebbe muoversi e causare
lesioni o danni.
≥
Dovrebbe essere usato solo il kit Panasonic in dotazione per
fissare l’unità al sedile dell’auto.
≥
Utilizzare in modo sicuro l ’unità all’ interno dell’auto.
In caso di incidente, vi è una minima possibilità che l’unità si
stacchi dalla staffa di montaggio all’appoggiatesta. Per fissare
bene l’unità alla staffa di montaggio all’appoggiatesta utilizzare
quindi la cinghia di sicurezza (in dotazione).
≥
Vedere anche l’illustrazione a pagina 2 e 3.
Fissare il kit di montaggio del dispositivo al
sedile anteriore.
≥
Regolare l’appoggiatesta in modo da lasciare uno spazio
aperto di circa 3 cm. Se lo spazio è maggiore di 3 cm, in caso di
incidente, ecc. l’unità potrebbe staccarsi e causare lesioni.
≥
Fissare la staffa al sedile in modo che il lato dell’etichetta della
staffa sia visibile dal lato posteriore del sedile.
1
Chiudere la fibbia della cinghia della staffa.
≥
Lasciare la cinghia leggermente allentata.
2
Far passare la cinghia di sicurezza (in dotazione) attraverso lo
spazio compreso fra il sedile anteriore e la staffa.
≥
Regolare la lunghezza della cinghia della staffa e stringerla in
modo che non vi sia gioco.
Collegare l’unità al supporto.
≥
Per evitare di danneggiare lo schermo, fissare l’unità alla staffa
con lo schermo rivolto verso l’interno e chiuso.
1 Tenendo l’unità con entrambe le mani, spingere l’unità in
modo che i segni sporgenti (A) della staffa possano
entrare nelle apposite fessure sul lato posteriore dell’unità.
2
Spingere l’unità verso il basso per circa 4-5 mm.
≥
Prima dell’uso verificare che:
– la staffa sia fissata saldamente all’unità.
– l’unità non sia allentata e non possa essere sollevata verso l’alto.
≥
Quando il collegamento è corretto, è possibile udire un suono di
blocco.
Fissare l’unità alla staffa tramite la cinghia di
sicurezza.
≥
Inserire il disco nell’unità prima di fissare la cinghia
di sicurezza.
≥
Prima di cambiare i dischi sganciare la fibbia della
cinghia di sicurezza. Dopo aver cambiato i dischi
chiudere di nuovo la fibbia della cinghia di
sicurezza.
1
Aprire lo schermo e farlo ruotare.
2
Far passare la cinghia di sicurezza attraverso lo spazio fra lo
schermo e il corpo dell’unità dalla sinistra e destra dell’unità.
≥
Per evitare di danneggiare l’unità, fissare la cinghia in modo
che la parte in tessuto (
B
) copra la parte alta dell’unità.
3
Chiudere la fibbia della cinghia di sicurezza e fissare l’unità alla
staffa.
≥
Regolare la lunghezza della cinghia di sicurezza in modo che
non vi sia gioco.
4
Ruotare lo schermo verso l’esterno e chiudere.
≥
L’angolazione del monitor può cambiare durante la guida a causa
delle vibrazioni, ecc.
Secondo il tipo di appoggiatesta, potrebbe non essere possibile
fissare la staffa. In caso di incidente, ecc. l’unità potrebbe
staccarsi e provocare lesioni.
Rilascio del lettore dalla staffa.
≥
Rimuovere la cinghia di sicurezza dall’unità e dalla staffa.
≥
Ruotare lo schermo e chiuderlo con lo schermo rivolto verso
l’interno.
1
Premere i tasti di rilascio (sinistro e destro) verso il centro della
staffa.
2
Tenendo l’unità con entrambe le mani, sollevarla di circa 4-5 mm
e tirare in avanti per rimuoverla.
≥
Non premere mai i tasti di rilascio, a meno che non si intenda
staccare l’unità dalla staffa.
Collegamento dell’adattatore CC per
auto in dotazione
≥
Vedere anche l’illustrazione a pagina 4.
Prima di collegare, consultare il manuale dell’auto o il rivenditore.
≥
Collegare alla presa accendisigari di un’auto dotata di una batteria a
12 V. Non compatibile con auto dotate di batteria a 24 V.
≥
Si tratta di un adattatore CC speciale per auto con messa a terra
negativa. L’utilizzo di questo adattatore CC per auto in auto con
messa a terra positiva potrebbe causare malfunzionamenti e
portare a incendi.
1 Collegare l’adattatore CC per auto all’unità.
2 Collegare l’adattatore CC per auto all’ingresso
dell’accendisigari.
≥
Collocare l’unità su una superficie stabile.
Sostituzione del fusibile
Per la sostituzione, utilizzare solamente il fusibile specificato da
125 V/250 V, 3,0 A. L’utilizzo di un altro tipo di fusibile può
provocare incendi.
1
Aprire l’accesso ai fusibili.
2
Sostituire il fusibile.
3
Chiudere l’accesso ai fusibili.
Attenzione
≥
Per evitare di esaurire la batteria dell’auto
– Scollegare l’adattatore CC per auto dall‘accendisigari dopo averlo
utilizzato. L’adattatore CC per auto continua ad assorbire energia
anche se non viene utilizzato, è se è collegato un pacco batterie a
questa unità, inizierà a ricaricare utilizzando così più energia.
– Non utilizzare l’adattatore CC per auto a lungo quando il motore
non è in funzionamento.
≥
Quando si sta utilizzando un adattatore DC per auto, spegnere
l’unità prima di spegnere il motore, altrimenti la funzione di ripresa
riproduzione potrebbe non funzionare.
≥
Lasciare il cavo leggermente allentato.
≥
Non si assumono responsabilità in merito a danni causati da
un’installazione non effettuata in modo corretto.
È possibile ascoltare musica tramite l’impianto audio dell’auto
collegando un adattatore cassette stereo (non in dotazione) alla
presa delle cuffie ubicata sul lato sinistro del dispositivo.
9
RQCA1922
Page 10

Держатель для монтажа на подголовнике
РУССКИЙ ЯЗЫК
позволяет смотреть видео, сидя на
заднем сиденье
Закрепив устройство с задней стороны переднего сиденья, можно
смотреть видео, сидя на заднем сиденье.
≥
Не устанавливайте и не демонтируйте устройство при
движении автомобиля.
≥
Не устанавливайте устрой ство в следующих местах:
– Нигде кроме заднего сиденья
– Где оно может просматриваться или управляться водителем
– Где оно мешает управлению автомобилем
– Где оно мешает работе воздушной подушки
≥
Убедитесь, что ремень надежно закреплен, а также проверьте
блокировку уст ройства. См. инструкции по установке.
В случае аварии, внезапного ускорения или торможения
крепление устройства может ослабнуть и привести к травме или
повреждению имущества.
≥
Используйте только предоставляемый кронштейн Panasonic
для крепления устройства к сиденью автомобиля.
≥
Безопасное использование в автомобиле.
В случае аварии существует небольшая вероятность
отсоединения устройства от кронштейна подголовника. Чтобы
обезопасить устройство, используйте предохранительный ремень
(входит в комплект поставки) вместе с кронштейном подголовника.
≥
Смотрите также иллюстрации на страницах 2 и 3.
1
2
1 Удержи вая аппарат обеими руками, протолкните его
2
1
2
10
RQCA1922
Прикрепите подголовник к переднему сиденью.
≥
Отрегулируйте подголовник так, чтобы до спинки сиде нья
оставался зазор около 3 см. Если это расстояние будет более,
чем 3 см., устрой ство будет зафиксировано ненадежно, что
может привести к травме в случае аварии и т.д.
≥
Прикрепите кронштейн к переднему сидению таким образом,
чтобы промаркированная сторона кронштейна была видна с
заднего сидения.
Застегните предохранительный ремень.
≥
Не затягивайте ремень до упора.
Пропустите предохранительный ремень (входит в комплект
поставки) в зазор между передним сиденьем и кронштейном.
≥
Отрегулируйте длину ремня и затяните его так, чтобы он не
провисал.
Прикрепите устройство к подголовнику.
≥
Чтобы не повредить экран, прикрепите устройство к кронштейну
так, чтобы экран смотрел вовнут рь, и закройте его.
так, чтобы выступы (
A) на кронштейне вошли в пазы,
находящиеся в тыльной части аппарата.
Придавите устройство вниз примерно на 4-5 мм.
≥
Перед использованием выполните проверку по следующим
пунктам.
– Убедитесь, что держатель надежно закреплен на устройстве.
– Убедитесь, что устро йство установлено без люфта и не
сдвигается вверх.
≥
Правильная фикс ац ия сопровождается щелчком.
Закрепите устройство к кронштейну
предохранительным ремнем.
≥
Установите диск в устройство, прежде чем закрепить его
предохранительным ремнем.
≥
Если требуется заменить диск, расстегните ремень.
После замены диска снова пристегните ремень.
Откройте экран и поверните его.
Пропустите предохранительный ремень через зазор между
экраном и корпусом устройства слева и справа устройства.
≥
Чтобы не повредить устройство, закрепите ремень так, чтобы
B
тканевая часть (
) покр ывала верх устройства.
3
Застегните предохранительный ремень и прикрепите устройство к
кронштейну.
≥
Отрегулируйте длину ремня так, чтобы он не провисал.
4
Переверните экран наружу и закройте его.
≥
Во время езд ы угол наклона монитора может измениться из-за
вибрации и т.п.
Держатель невозможно смонтировать на подголовник ах некоторых
типов. В случае аварии и т.д. крепление устройства может
ослабнуть, что приведет к травме.
Снятие устройства с держателя.
≥
Снимите предохранительный ремень с устройства и кронштейна.
≥
Поверните экран и закройте его так, чтобы экран смотрел
вовнутрь.
1
Вдавите кнопки освобождения (слева и справа) в направлении
центра держателя.
2
Удерживая устройство обеими руками, приподнимите его на 4 - 5
мм и выдвиньте вперед для извлечения.
≥
Нажимайте эти кнопки только тогда, когда хот ите снять
устройство с держателя.
Подключение автомобильного адаптера
постоянного тока
≥
Смотрите также иллюстрацию на странице 4.
Перед подк лючением обратитесь к руководству по эксплуатации
автомобиля или своему дилеру.
≥
Подключайтесь к разъему прикуривателя с батареей 12 В. Устро йство
не совместимо с автомобилями с бата реей 24 В.
≥
Это специальный отрицательный заземленный автомобильный
адаптер DC. Использование данного автомобильного адаптера DC с
положительно заземленным автомобилем может привести к пожару.
1 Прикрепите к устройству автомобильный
адаптер.
2 Прикрепите автомобильный адаптер к гнезду
для прикуривания.
≥
Поместите устройство на устойчивую поверхность .
Замена предохранителя
Для замены используйте только предохранитель на 3,0 А для
напряжения 125 В/250 В. Использо вание других типов
предохранителей может привести к пожару.
1
Откройте гнездо.
2
Замените предохранитель.
3
Закройте гнездо.
Меры предосторожности
≥
Чтобы предотвратить утечку батареи
– Откоючите автомобильный адаптер DC от прикуривателя после
использования. Автомобильный адаптер DC продолжает
потреблять определенную энергию, даже если он не используется,
и если батарея подключена к данному устройст ву, она начнет
заряжаться, что при ведет к увеличению потребления энергии.
– Не используйте автомобильный адаптер DC в течение
продолжительного времени, когда двигатель не работает.
≥
Выключите устройст во перед остановкой двигателя при
использовании автомобильного адаптера DC, иначе возобновление
воспроизведения может не работать.
≥
Оставьте небольшой зазор для шнура .
≥
Компания не несет ответственности за повреждения, обусловленные
неправильные установкой .
Вы можете наслаждаться аудио через автомобильную
аудиосистему посредством включения стереокассетного адаптера
(не входит в комплект поставки) к разъему наушников с левой
стороны устройства.
Page 11

Перегляд відео на задньому сидінні з
УКРАЇНСЬКА
використанням кроншейна на
підголівнику
Можна переглядати відеофільми, сидячи на задньому сидінні,
прикріпивши апарат до спинки переднього сидіння.
≥
Не встановлюйте i не демонтуйте пристрій при русі
автомобіля.
≥
Не встановлюйте пристрій в наступних місцях:
– Ніде окрім заднього сидіння
– Де воно може бути видимим або управлятися водієм
– Де воно заважає управлінню автомобілем
– Де воно заважає роботі повітряної подушки
≥
Переконаєтеся, що ремінь надійно закріплений, а також
перевірте блокування пристрою. Див. інструкції по
установці.
У разі аварії, раптового прискорення або гальмування
кріплення пристрою може ослабіти i привести до травми або
пошкодженню майна.
≥
Використовуйте кронштейн Panasonic, що тільки
надається, для кріплення пристрою до сидіння
автомобіля.
≥
Безпечне використання в автомобілі.
В разі аварії існує невелика вірогідність від'єднання пристрою
від кронштейна підголовника. Щоб убезпечити пристрій,
використовуйте запобіжний ремінь (входить до комплекту
постачання) разом з кронштейном підголовника.
≥
Дивіться також ілюстрації на сторінках 2 і 3.
Прикріпите підголовник до переднього сидіння.
≥
Відрегулюйте підголівник так, щоб він був на відстані приблизно 3
см. Якщо ця віддаль становить більш ніж 3 см, у випадку аварії
тощо, апарат може випасти та спричинити травмування, та ін.
≥
Прикріпіть кронштейн до переднього сидіння так, щоб
промарковану сторону кронштейна було ви дно з заднього
сидіння.
1
Застебніть запобіжний ремінь.
≥
Не затягуйте ремінь до упору.
2
Пропустіть запобіжний ремінь (входить до комплекту
постачання) в проміжок між переднім сидінням і кронштейном.
≥
Відрегулюйте довжину ременя і затягніть його так, щоб він не
провисав.
Прикріпите пристрій до кронштейна.
≥
Щоб не пошкодити екран, прикріпіть пристрій до кронштейну
так, щоб екран дивився усередину, і закрийте його.
1 Утримуючи апарат обома руками, проштовхніть його
так, щоб виступи (
що знаходяться позаду апарату.
2
Придавіть пристрій униз приблизно на 4-5 мм.
≥
Перед використанням перевірте, чи.
– Кронштейн міцно прикріплений до апарата.
– Апарат зафіксова ний і не піднімається догори.
≥
Коли фіксування правильне, буде чутно звук клацання.
Закріпите пристрій до кронштейна запобіжним
ременем.
≥
Перш ніж закріпити пристрій запобіжним ременем,
вставте в нього диск.
≥
Якщо необхідно замінити диск, відстебніть ремінь.
Після заміни диску знову пристебніть ремінь.
1
Відкрийте екран і поверніть його.
2
Прикріпіть запобіжний ремінь, пропустивши його в проміжок між
екраном і корпусом пристрою ліворуч і праворуч пристрою.
≥
Щоб не пошкодити прист рій , закріпите ремінь так, щоб
тканева ділянка (
A) на кронштейні увійшли до пазів,
B
) покривала пристрій зверху.
3
Застебніть запобіжний ремінь і прикріпите пристрій до
кронштейна.
≥
Відрегулюйте довжину ременя так, щоб він не провисав.
4
Переверніть екран назовні й закрийте його.
≥
При русі автомобіля кут монітора може змінюватися внаслідок
вібрації тощо, та ін.
Залежно від типу підголівника, кріплення кронштейна буває
неможливим. У випадку аварії тощо, апарат може випасти та
спричинити травмування.
Знімання апарата з кронштейна.
≥
Зніміт ь запобіжний ремінь з пристрою і кронштейна.
≥
Оберніть екран і закрийте його так, щоб екран ди вив ся
усередину.
1
Натисніть спускові кнопки (справа і зліва) до цетру кронштейна.
2
Утримуючи пристрій обома рук ами, підведіть його на 4 - 5 мм і
потягніть вперед для виймання.
≥
Натискайте на спускові кнопки лише тоді, коли від’єднуєте
апарат від кронштейна.
Підключення автомобільного адаптера
постійного струму
≥
Дивіться також ілюстрації на сторінках 4.
Перед підключенням звернетеся до керівництва по експлуатації
автомобіля або своєму ділерові.
≥
Підключайтеся до роз'єму прікурівателя з батареєю 12 В.
Пристрій несумісний з автомобілями з батареєю 24 В.
≥
Це спеціальний негативний заземлений автомобільний адаптер
DC. Використання даного автомобільного адаптера DC з
позитивно заземленим автомобілем може привести до пожежі.
1 Прикріпіть до пристрою автомобільний
адаптер.
2 Прикріпіть автомобільний адаптер до
гнізда для прикурювання.
≥
Розт аш уй те апарат на стійкій поверхні.
Заміна запобіжника
Замінюйте тільки на рекомендовані запобіжники 125 В/250 В,
3,0 A. Викори стання інших типів запобіжників може призвести
до виникнення пожежі.
1
Відкрийте гніздо.
2
Замініть запобіжник.
3
Закрийте гніздо.
Запобіжні засоби
≥
Щоб запобігти витоку батареї
– Відключите автомобільний адаптер DC від прікурівателя після
використання. Автомобільний адаптер DC продовжує
споживати певну енергію, навіть якщо він не використовується,
i якщо батарея підключена до даного пристрою, вона почне
заряджат и, що приведе до збільшення споживання енергії.
– Не використовуйте автомобільний адаптер DC протягом
тривалого часу, коли двигун не працює.
≥
Вимкнете пр истрій перед зупинкою двигуна при використанні
автомобільного адаптера DC, іна кше відновлення відтворення
може не працювати.
≥
Залиште невеликий зазор для шнура.
≥
Компанія не несе відповідальності за пошкодження, обумовлені
неправильні установкою.
Ви можете насолоджуватися аудio через автомобільну
аудioсистему за допомогою включення стереокассетного
адаптера (не входить до комплекту постачання) до роз'єму
навушників з лівої сторони пристрою.
11
RQCA1922
РУССКИЙ ЯЗЫК
УКРАЇНСЬКА
Page 12

Panasonic Corporation
Web Site: http://panasonic.net
ptvruyp
Ur
EU
Pursuant to at the directive 2004/108/EC, article 9(2)
Panasonic Testing Centre
Panasonic Marketing Europe GmbH
Winsbergring 15, 22525 Hamburg, Germany
RQCA1922
F0409BL0
 Loading...