

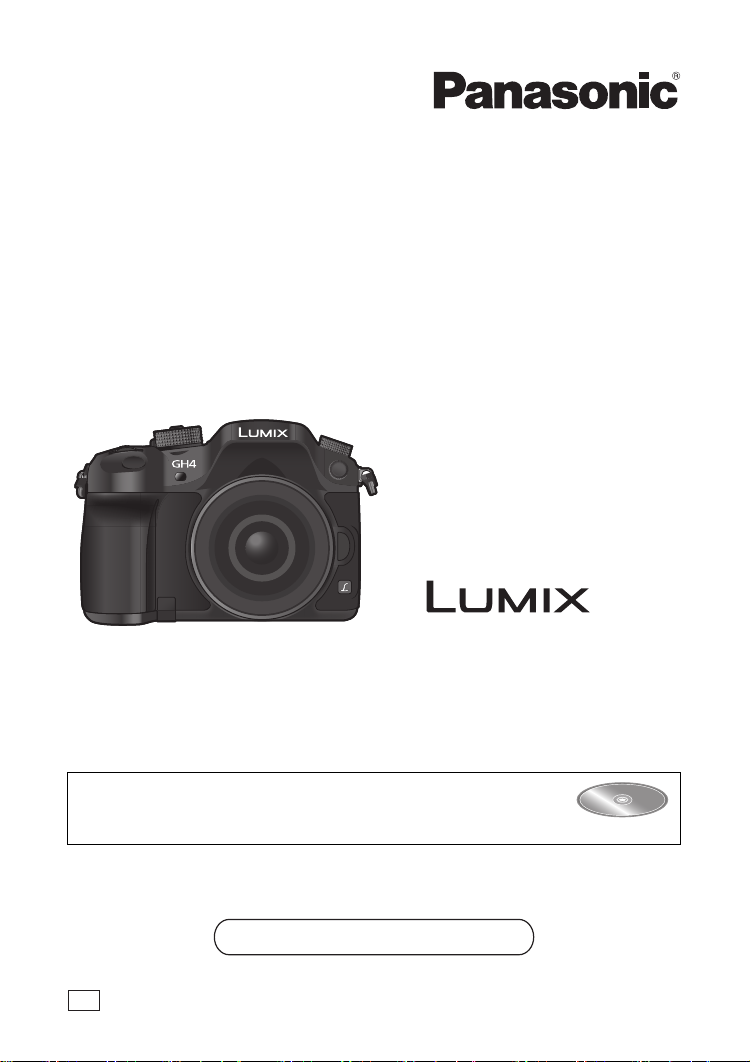
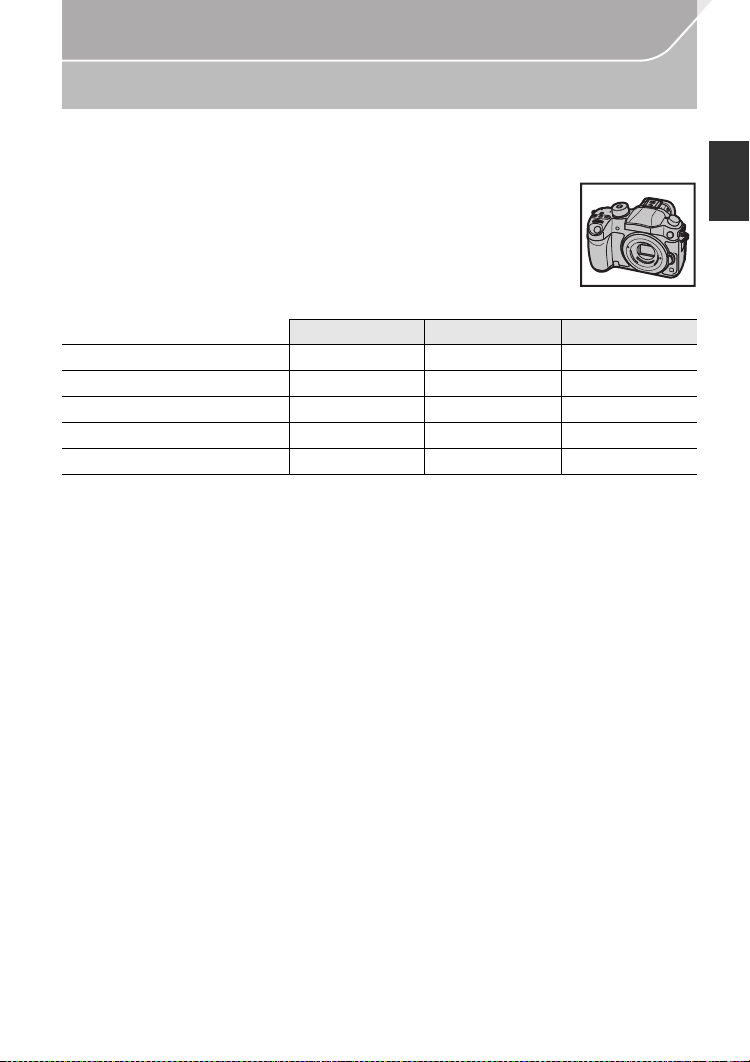
Basic Operating Instructions
Digital Camera/
Lens Kit/Body
Model No. DMC-GH4A/DMC-GH4H
DMC-GH4
Please read these instructions carefully before using this product, and
save this manual for future use.
More detailed instructions on the operation of this camera are
contained in “Operating Instructions for advanced features (PDF
format)” in the supplied DVD. Install it on your PC to read it.
Web Site: http://www.panasonic.com
Model number suffix “EB” denotes UK model.
EB
VQT5H82
F0414WT0

Dear Customer,
We would like to take this opportunity to thank you for purchasing this Panasonic Digital
Camera. Please read these Operating Instructions carefully and keep them handy for
future reference. Please note that the actual controls and components, menu items, etc. of
your Digital Camera may look somewhat different from those shown in the illustrations in
these Operating Instructions.
Carefully observe copyright laws.
•
Recording of pre-recorded tapes or discs or other published or broadcast material for purposes
other than your own private use may infringe copyrigh t laws. Even for the purpose of private
use, recording of certain material may be restricted.
Information for Your Safety
WARNING:
To reduce the risk of fire, electric shock or product damage,
•
Do not expose this unit to rain, moisture, dripping or splashing.
• Use only the recommended accessories.
• Do not remove cove rs.
• Do n ot repair this unit by yourself. Refer servicing to qualified service personnel.
The socket outlet shall be installed near the equipment and shall be easily accessible.
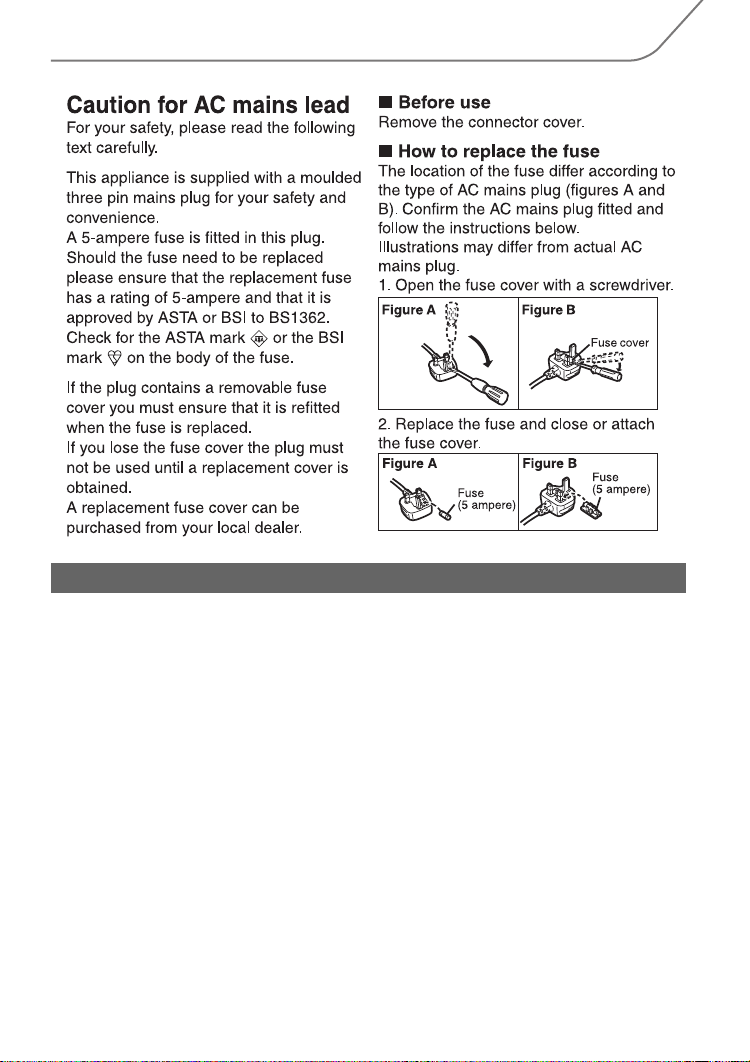
∫ Product identification marking
Product Location
Digital Camera Bottom
Battery charger Bottom
VQT5H82 (ENG)
2
Declaration of Conformity (DoC)
Hereby, “Panasonic Corporation” declares that this product is in compliance with the
essential requirements and other relevant provisions of Directive 1999/5/EC.
Customers can download a copy of the original DoC to our R&TTE products from our
DoC server:
http://www.doc.panasonic.de
Contact to Authorized Representative:
Panasonic Marketing Europe GmbH, Panasonic Testing Centre, Winsbergring 15,
22525 Hamburg, Germany
This product is intended for general consumer. (Category 3)
This product on purpose to connect to access point of 2.4 GHz WLAN.
∫ About the battery pack
CAUTION
Danger of explosion if battery is incorrectly replaced. Replace only with the type
•
recommend ed by the manufacturer.
• When disposing of the batteries, please contact your local authorities or dealer and ask for
the correct method of disposal.
Do not heat or expose to flame.
•
• Do not leave the battery(ies) in a car exposed to direct sunlight for a long period of time with
doors and windows closed.
Warning
Risk of fire, explosion and burns. Do not disassemble, heat above 60 xC or incinerate.
∫ About the battery charger
CAUTION!
To reduce the risk of fire, electric shock or product damage,
Do not install or place this unit in a bookcase, built-in cabinet or in another confined
•
space. Ensure this unit is well ven tilated.
The battery charger is in the standby condition when the AC power supply cord is connected.
•
The primary circuit is always “live” as long as the power cord is connected to an electrical
outlet.
(ENG) VQT5H82
3
Cautions for Use
• Do not use any other USB connection cables except the supplied one or a genuine Panasonic
USB connection cable (DMW-USBC1: optional).
• Use a “High Speed HDMI micro cable” with the HDMI logo.
Cables that do not comply with the HDMI standards will not work.
“High Speed HDMI micro cable” (Type D– Type A plug, up to 2 m (6.6 feet) long)
• Always use a genuine Panasonic AV cable (DMW-AVC1: optional).
• Always use a genuine Panasonic remote shutter (DMW-RSL1: optional).
• Do not use the synchro cables with the length of 3 m (9.8 feet) or more.
Keep this unit as far away as possible from electromagnetic equipment (such as
microwave ovens, TVs, video games etc.).
If you use this unit on top of or near a TV, the pictures and/or sound on this unit may be
•
disrupted by electromagnetic wave radiation.
• Do not use this unit near cell phones because doing so may result in noise adversely affecting
the pictures and/or sound.
• Recorded data may be damaged, or pictures may be distorted, by strong magnetic fields
created by speakers or large motors.
•
Electromagnetic wave radiation may adversely affect this unit, disturbing the pictures and/or sound.
• If this unit is adversely affected by electromagnetic equipment and stops functioning properly,
turn this unit off and remove the battery or disconnect AC adaptor (DMW-AC10E: optional).
Then reinsert the batter y or reconnect AC adaptor and turn this unit on.
Do not use this unit near radio transmitters or high-voltage lines.
If you record near radio transmitters or high-voltage lines, the recorded pictures and/or sound
•
may be adversely affected.
VQT5H82 (ENG)
4
• Before cleaning the camera, remove the battery or the DC coupler (DMW-DCC12:
optional), or disconnect the power plug from the outlet.
• Do not press the monitor with excessive force.
• Do not press the lens with excessive force.
• Do not spray the camera with insecticides or volatile chemicals.
•
Do not keep rubber or plastic products in contact with the camera for a long period of ti me.
• Do not use solvents such as benzine, thinner, alcohol, kitchen detergents, etc., to clean
the camera, since it may deterior ate the external case or the coating may peel off.
• Do not leave the camera with the lens facing the sun, as rays of light from the sun may
cause it to malfunction.
• Always use the supplied cords and cables.
• Do not extend the cords or the cables.
• During access (image writing, reading and deleting, formatting etc.), do not turn this unit
off, remove the battery, card or disconnect the AC adaptor (DMW-AC10E: optional).
Furthermore, do not subject the camera to vibration, impact or static electricity.
• The data on the card may be damaged or lost du e to electromagnetic waves, static electricity or
breakdown of the camera or the card. We recommend storing important data on a PC etc.
• Do not format the card o n your PC or othe r equipment. Format it on the camer a only to ensure
proper operation.
• The battery is not charged when the camera is shipped. Charge the battery before use.
• The battery is a rechargeable lithium ion battery. If the temperature is too high or too
low, the operating time of the battery will become shorter.
• The battery becomes wa rm after using and during and after charging. The camera also
becomes warm during use. This is not a malfunction.
• Do not leave any metal items (such as clips) near the contact areas of the power plug or
near the batteries.
• Store the battery in a cool and dry place with a relatively stable temperature: [Recommended
temperature: 15 o C to 25 oC (59 oF to 77 oF), Recommended humid ity: 40%RH to 60%RH]
• Do not store the battery for a long time while fully charged. When storing the battery for a
long period of time, we recommend charging it once a year. Remove the battery from the
camera and store it again after it has completely discharged.
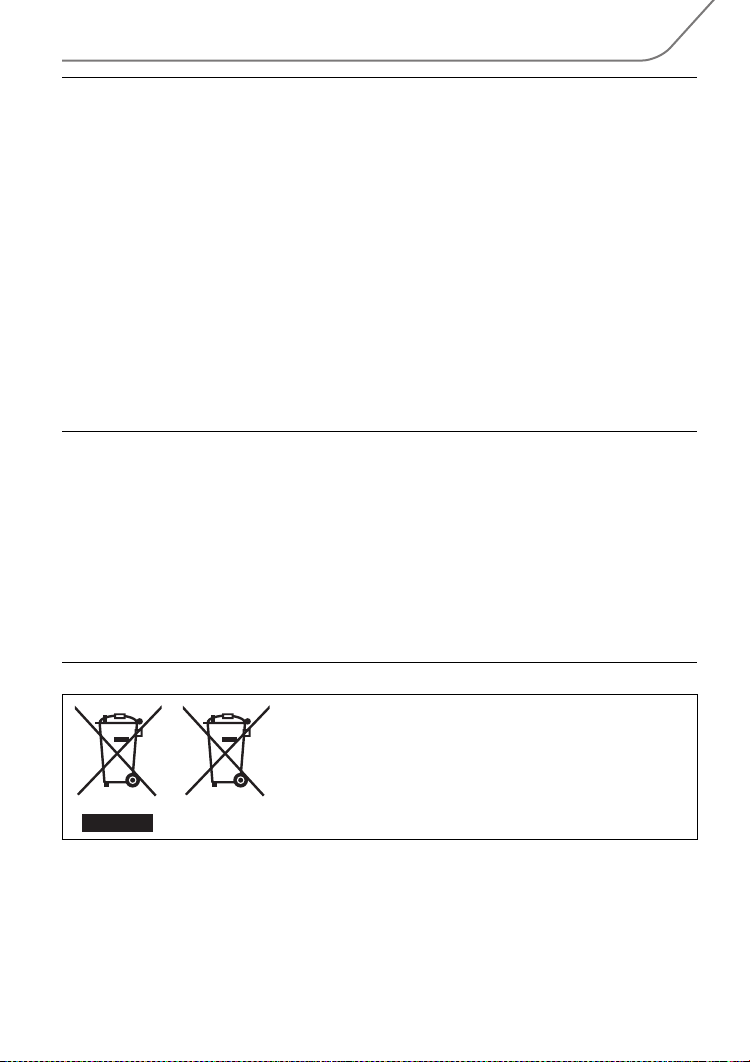
These symbols indicate separate collection of waste
electrical and electronic equipment or waste batteries.
More detailed information is contained in “Operating
Instructions for advanced features (PDF format)”.
(ENG) VQT5H82
5

Contents
Information for Your Safety ................. 2
• Cautions for Use ..............................4
Preparation
Care of this Camera ..............................8
Accessories ..........................................9
Names and Functions of
Components........................................11
About the Lens ...................................14
• About the firmware of your
interchangeable lens .....................14
Cards Compatible with this unit ........15
Preparation .......................................... 16
• Attaching the Shoulder Strap .........16
• Charging the Battery...................... 16
• Inserting/Removing the Battery......17
• Inserting/Removing the Card
(Optional).......................................17
• Changing the Lens .........................18
• Opening the Monitor ......................18
• Setting Date/Time (Clock Set) .......19
• Diopter adjustment.........................19
Basic Operations ................................20
• Tips for taking good pictures ..........20
• Zoom operations ............................ 20
• Shutter button (Taking pictures) ..... 21
• Motion picture button
(Recording motion pictures) ..........21
• Mode dial
(Selecting a Recording Mode) .......22
• Rear Dial/Front Dial .......................23
• Control Dial ....................................23
• Cursor buttons/[MENU/SET] button ..... 23
• [DISP.] button (Switching the
displayed information) ................... 24
• [LVF] button (Switching the Monitor/
Viewfinder) .....................................25
• Touch panel (Touch operations).....26
Optical Image Stabiliser .....................27
Calling frequently-used menus
instantly (Quick Menu) .......................27
Setting menu items ............................28
Configur ing basic settings of this unit
(Setup Menu) ..........................................29
• Formatting the card (initialisation)..... 29
• Restoring the default settings
([Reset]) .........................................29
• Conserving the battery life
([Economy]) ...................................29
VQT5H82 (ENG)
6
Easy Recording
Taking Pictures using the Automatic
Function (Intelligent Auto Mode)...... 30
• Recording night scenes
([iHandheld Night Shot])................ 31
• Combining pictures into a single picture
with rich gradation ([iHDR]) ................. 32
• Taking a picture with a blurred
background (Defocus Control) ...... 32
• Recording images by changing the
brightness or colour tone .............. 32
Taking Pictures with different image
effects (Creative Control Mode) ........ 33
Taking Pictures Using the Touch
Function .............................................. 34
• Taking pictures using the Touch
Shutter function ............................. 34
• Easily Opti mising the Br ightness for a
Specified Area (Touch AE)................35
Recording
Taking Pictures with Auto Focus...... 36
• Selecting the Focus Mode
(AFS/AFF/AFC)............................. 36
• Selecting the Auto Focus Mode .... 37
• Setting up position of the AF area/
changing size of the AF area ........ 38
• Setting the AF area position with the
Touch Pad.........................................39
Taking Pictures with Manual Focus......40
Select a Drive Mode ........................... 41
Taking Pictures using Burst Mode........41
Taking Pictures using Auto Bracket........ 42
Taking Pictures with the Self-timer.......... 42
Taking Pictures Aut omatically at Set
Intervals ([Time Lapse Shot])............ 43
Creating Stop Motion Pictures
([Stop Motion Animation]) ................. 45
Setting the Picture Quality and Size........ 47
• Setting the aspect ratio of pictures....... 47
• Setting the number of pixels ......... 47
• Setting the compression rate of
pictures ([Quality]) ......................... 48
Setting the Light Sensitivity.............. 49
Adjusting the White Balance ............ 50
Taking Pictures with Your Favourite
Settings (Programme AE Mode) ....... 51
Taking Pictures by Specifying the
Aperture/Shutter Speed ..................... 52
• Aperture-Priority AE Mode ............ 52
• Shutter-Priority AE Mode............... 52
• Manual Exposure Mode ................ 52
• Confirm the Effects of Aperture and
Shutter Speed (Preview Mode) ..... 53

Compensating the Exposure ............ 54
Selecting the Method for Measuring
Brightness ([Metering Mode]) ........... 54
Fixing the Focus and the Exposure
(AF/AE Lock)....................................... 55
Disabling Operational Sounds and the
Output of Light at once
([Silent Mode]) .................................... 56
Taking Pictures with No Shutter Sound
([Electronic Shutter]) ......................... 56
Taking pictures by using the flash .......57
• Changing Flash Mode ................... 57
Motion Picture
Recording Motion Picture ................. 58
• Recording motion pictures in 4K .......60
• Setting the format, size and recording
frame rate..........................................60
• How to set focus when recording a
motion picture ([Continuous AF])....... 64
Recording motion pictures with
manually set aperture value/shutter
speed (Creative Video Mode) ............ 64
• Minimising operational sounds during
motion picture recording ...................65
Using Advanced Settings and Recording
Functions for Motion Pictures.................. 66
• [Luminance Level] ......................... 66
• Checking areas that may be white
saturated ([Zebra Pattern])............ 66
• Recording while monitoring camera
images........................................... 67
• Reducing flickering and horizontal stripes
on images ([Synchro Scan]) ................ 68
• Recording in Slow or Fast Motion
([Variable Frame Rate]) ................. 68
• Changing the system frequency .... 69
Playback/Editing
Playing Back Pictures........................ 70
Playing Back Motion Pictures ........... 70
Switching the Playback Method ....... 71
• Using the Playback Zoom ............. 71
• Displaying multiple screens
(Multi Playback)............................. 71
• Displaying Pictures by Recording
Date (Calendar Playback) ............. 71
Deleting Pictures................................ 72
Using the [Playback] Menu ............... 73
• [RAW Processing] ......................... 73
• [Video Divide] ................................ 74
Wi-Fi/NFC
Wi-FiR function/NFC function............ 75
What you can do with the Wi-Fi
function ............................................... 77
Controlling with a Smartphone/Tablet..... 78
• Installing the smartphone/tablet app
“Image App ” ..................................78
• Connecting to a smartphone/tablet ...... 78
• Taking images via a smartphone/
tablet (remote recording) ...............82
• Playing back images in the camera...... 82
• Saving images stored in the camera.... 82
• Sending images in the camera to an
SNS.................................................. 83
• Adding location information to images
stored in the camera from a
smartphone/tablet.............................84
Setting up a connection to a PC via a
wireless access point............................ 85
Customisation
Change the Quick Menu to your
preferred item .....................................87
Assigning frequently used functions to
the buttons (function buttons) ...............87
Registering your preferred settings
(Custom Mode) ................................... 88
• Registering Personal Menu Settings
(Registering custom settings) ........88
• Recording using registered custom
set.................................................. 88
Others
Playing Back Pictures
on a TV Screen....................................89
Saving still pictures and motion
pictures on your PC ...........................90
• About the supplied software ..........90
Monitor Display/Viewfinder Display..... 94
Message Display.................................99
Menu list ............................................ 101
• [Rec] ............................................ 101
• [Motion Picture] ............................ 103
• [Custom] ...................................... 104
• [Setup] ......................................... 106
• [Playback] ....................................108
Troubleshooting ...............................109
Cautions for Use............................... 115
Specifications ................................... 118
Digital Camera Accessory System......... 125
Reading the Operating Instructions
(PDF format) ...................................... 126
(ENG) VQT5H82
7

Preparation
Care of this Camera
To avoid damaging your camera and to experience the maximum enjoyment you
should exercise the following precautions.
• The lens, monitor and the camera body can sustain da mage if the camera body is drop ped or
subjected to excessive temperature, moisture, water or dust.
• The monitor can be damaged if excessive pressure is applied to the screen surface, durin g
actual use or while cleaning.
∫ Splash Proof
Splash Proof is a term used to describe an extra level of protection this camera offers
against exposure to a minimal amount of moisture, water or dust. Splash Proof does not
guarantee that damage will not occur if this camera is subjected to direct contact with
water.
In order to minimise the possibility of damage please be sure the following precautions are
taken:
–
The Splash Proof feature works in conjunction with the H-HS12035 and H-HS35100 lenses
that were specifically designed to support this feature.
– Make sure the built-in flash is closed.
– Make sure that all doors, socket caps and terminal covers are securely closed.
– Make sure that you are in a dry and secure place when changing the battery, lens or memory
card. After changing, make sure their protective doors are securely closed.
– If this camera is exposed to water, sand or any other foreign material clean it as soon as
possible, taking the ne cessary precautions that the foreign substance does not get inside the
camera.
– Under no circumstances should you touch or place any foreign objects within the camera or
in close proximity of the camera’s image sensor.
∫ Condensation
•
Condensation may occur on the lens, monitor or in the viewfinder when the room temperature
or humidity changes rapidly. This may cause the image to temporarily become hazy. If this
occurs, turn the camera off and allow the camera to sit in a temperature stable environment for
several minutes. It will clear by itself.
• If you know that you will be moving between areas where there will be a large change in
temperature or humidity, you can help prevent condensation forming on the camera by placing
the camera in a large plastic zipper bag, so condensation will form on the bag, not the camera.
Allow the temperature to stabilise before removing the camera from the bag.
VQT5H82 (ENG)
8
Preparation
Accessories
Check that all the accessories are supplied before using the camera.
Product numbers correct as of March 2014. These may be subject to change.
Digital Camera Body
(This is referred to as
(±: Included, —: Not included)
1 Interchangeable Lens
2Lens Hood ±±—
3Lens Cap ±
4 Lens Rear Cap ±
5Body Cap ±
6 Battery Pack
(Indicated as battery pack or battery in the text)
Charge the battery before use.
7 Battery Charger
(Indicated as battery charger or charger in the text)
8 AC Mains Lead
9 USB Connection Cable
10 DVD
•
Softwa re:
Use it to install the software to your PC.
• Operating Instructions for advanced features:
Use it to install to your PC.
11 Shoulder Strap
12 Hot shoe cover
13 Eye Cup
14 Flash synchro socket cap
15 Cover for the battery grip connector
16 Cover for the interface unit connector
¢3
¢1 This is referred to as lens in these operating instruction s.
¢2 This is attached to the interchangeable lens at the time of purchase.
¢3 This is attached to the camera body at the time of purchase.
¢4 The interchangeable lens (H-HS12035) included in DMC-GH4A is dust- and splash-proof.
¢5
The interchangeabl e lens (H-FS14140) included in DMC-GH4H is not dust- a nd splash-proof.
•
SD Memory Card, SDHC Memory Card and SDXC Memory Card are indi cated as
• The card is optional.
• Description in these operating Instructions is based on the interchangeable lens (H-HS12035).
[The lens kit that includes the interchangeable lens (H-HS12035) is not commercially
available in some regions.]
Consult the dealer or Panasonic if you lose the supplied accessories. (You can purchase the
•
accessories separately.)
¢3
camera body
in these operating Instructions.)
DMC-GH4A DMC-GH4H DMC-GH4
¢1
± (H-HS12035)¢4± (H-FS14140)
¢2
¢2
¢3
¢3
¢3
¢3
¢5
¢2
±
¢2
±
¢3
±
—
—
—
¢3
±
card
in the text.
(ENG) VQT5H82
9

Preparation
DMC-GH4A
1
H-HS12035
2
VYC1084
3
VYF3480
4
VFC4605
5
VKF4971
DMC-GH4H DMC-GH4
H-FS14140
VYC1119
VYF3514
VFC4605
VKF4971
VKF4971
6
DMW-BLF19E
789
DMW-BTC10E
K2CT3YY00034
K1HY08YY0031
10 11 12 13
VFC5122VFW0107
VYF3522 VYK6T25
14 15 16
VKF5108 VKF5289VKF5104
VQT5H82 (ENG)
10
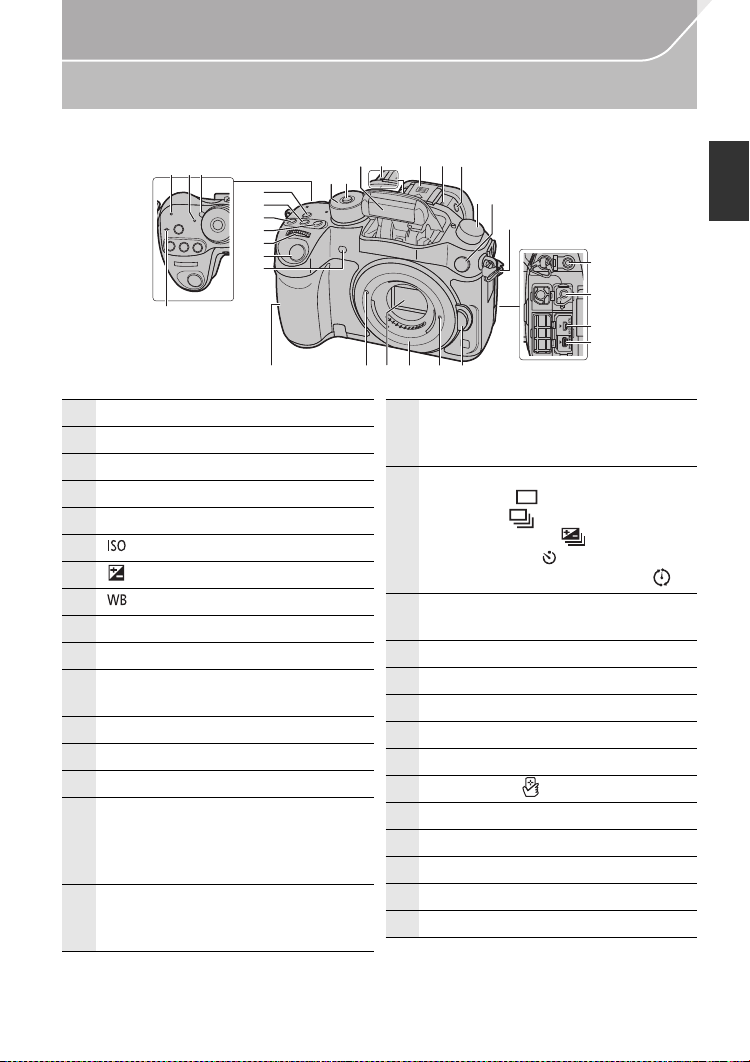
Names and Functions of Components
1 Wi-Fi® connection lamp
2 Status indicator (P19)
3 Camera ON/OFF switch (P19)
4 Focus distance reference mark
5 [Wi-Fi] button (P76)/[Fn1] button (P87)
6 [ ](ISO sensitivity) button (P49)
7
[ ](Exposure Compensation) button (P54)
8 [ ](White Balance) button (P50)
9 Front dial (P23)
10 Shutter button (P21)
11
Self-timer indicator (P42)/
AF Assist Lamp (P105)
12 Mode dial (P22)
13 Mode dial lock button (P22)
14 Flash (P57)
15
Stereo microphon e (P104)
• Be careful not to cover the microphone
with your finger. Doing so may make
sound diffic ult to record.
16
Hot shoe (Hot shoe cover)
• Keep the Hot Shoe Cover out of reach
of children to prevent swallowing.
17
Flash open button (P57)
• The flash opens, and recording with the
flash becomes possible.
18
Drive mode dial
Single (P41):
Burst (P41):
Auto Bracket (P42):
Self-timer (P42):
Time Lapse/Animation (P43, 45):
19
Flash synchro socket
(Flash synchro socket cap)
20 Shoulder strap eyelet (P16)
21 [MIC] socket
22 Headphone socket (P104, 107)
23 [AV OUT/DIGITAL] socket (P89, 92)
24 [HDMI] socket (P89)
25 NFC antenna [ ] (P83)
26 Lens fitting mark (P18)
27 Sensor
28 Mount
29 Lens lock pin
30 Lens release button (P18)
∫ Camera body
1
2 3
5
6
7
8
9
10
11
4
15 16 1514
12
13
17
1819
29 302625 2827
Preparation
20
21
22
23
24
(ENG) VQT5H82
11
Preparation
31 Touch screen/monitor (P26)
32 [(] (Playback) button (P70)
33 [LVF] button (P25)/[Fn5] button (P87)
34 Eye sensor (P26)
35
Eye Cup (P116)
• Keep the eye cup out of reach of
children to prevent swallowing.
36 Viewfinder (P25)
37 Diopter adjustment dial (P19)
38 Motion picture button (P58)
39
[Q.MENU] button (P27)/[Fn2] button (P87)
40
[ ] (Auto Focus Mode ) button (P36)/
[Fn3] button (P87)
41 Rear dial (P23)
42
Speaker (P106 )
• Be careful not to cover the speaker with
your finger. Doing so may make sound
difficult to hear.
43
[DISP.] button (P24)
• Each time this is pressed, the display
on the monitor is switched.
44 [AF/AE LOCK] button (P55)
45 Focus mode lever (P36, 40)
46 [REMOTE] socket
47 Cursor buttons ( P23)
48 Control dial (P23)
49 [MENU/SET] button (P23, 28)
50 Card door (P17)
51
[ ] (Delete/Cancel) button ( P72)/
[Fn4] button (P87)
52
Tripod mount
• A tripod with a screw length of 5.5 mm
(0.22 inch) or more may damage this
unit if attached.
53
Cover for the interface unit connector
• Keep the cover for the interface unit
connector out of reach of children to
prevent swallowing.
54
Cover for the battery grip connector
• Keep the cover for the battery grip
connector out of reach of children to
prevent swallowing.
55
DC coupler cover
• When using an AC adaptor,
ensure that the Panasonic DC
coupler (DMW-DCC12: optional)
and AC adaptor (DMW-AC10E:
optional) are used.
•
Always use a genuine Panasonic AC
adaptor (DMW-AC10E: optional).
• When using an AC adaptor, use
the AC mains lead supplied with
the AC adaptor.
•
It is recommended to use a fully
charged battery or AC adaptor when
recording motion pictures.
•
If while recording motion pictures
using the AC adaptor and the power
supply is cut off due to a power
outage or if the AC adaptor is
disconnected etc., the motion
picture will not be recorded.
56 Battery door (P17)
57 Release lever (P17)
32
33
36
34 35 37
38 40
42
4339 41
44
45
31
53 55 56 5754
52
VQT5H82 (ENG)
12
50
51
47
48
49
46
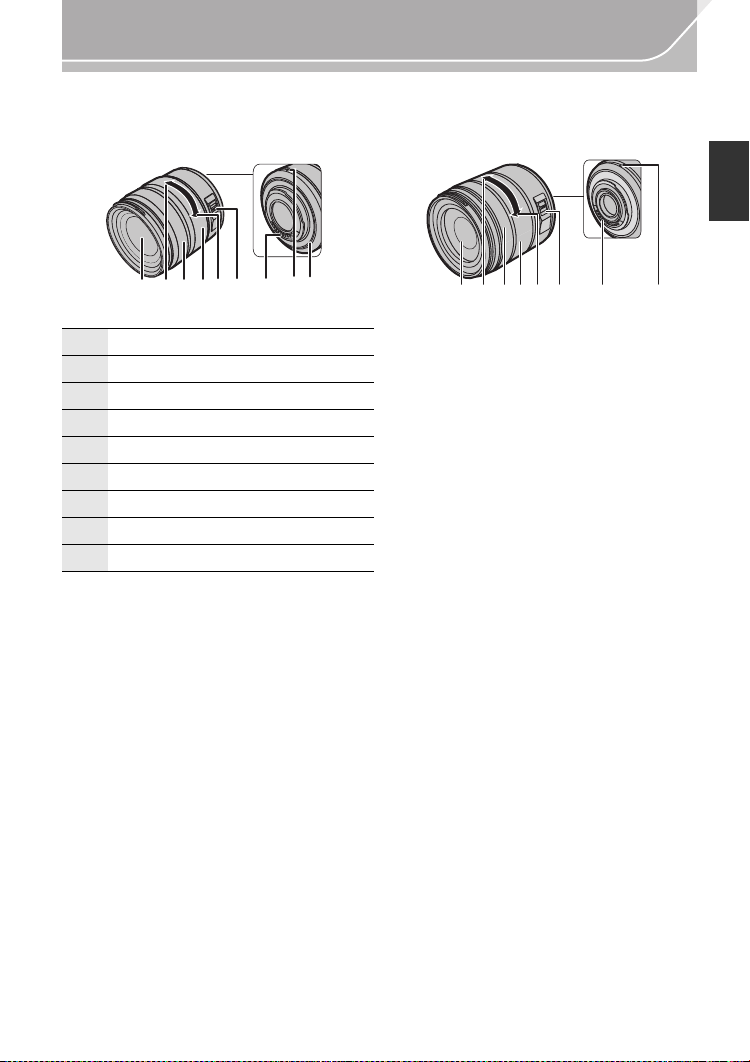
∫ Lens
H-HS12035 H-FS14140
Preparation
3241 65 789
1 Lens surface
2 Te l e
3 Focus ring (P40)
4 Zoom ring (P20)
5 Wide
6 [O.I.S.] switch (P27)
7 Contact poin t
8 Lens fitting mark (P18)
9 Lens mount rubber
132 465 78
(ENG) VQT5H82
13

Preparation
About the Lens
∫ Micro Four Thirds™ mount specification lens
This unit can use the dedicated lenses compatible with the Micro Four Thirds System lens
mount specification (Micro Four Thirds mount).
∫ Four Thirds™ mount specification lens
Lens with the Four Thirds mount specification can be used by using the mount adaptor
(DMW-MA1: optional).
∫ Leica mount specification lens
When you use the M mount adaptor or R mount adaptor (DMW-MA2M, DMW-MA3R:
optional), you can use Leica M Mount or Leica R Mount interchangeable lenses.
For certain lenses, the actual distance at which the subje ct is in focus may differ slightly from
•
the rated distance.
• When using a Leica lens mount adaptor, set [Shoot w/o Lens] (P106) to [ON].
For details on the lens used, refer to the website.
Refer to catalogues/Web pages for most current information regarding compatible lenses.
http://panasonic.jp/support/global/cs/dsc/
(This Site is English only.)
The available flash range etc. differs depending on the aperture value of the lens you are using.
•
• The focal length noted on the lens in use is equivalent to double wh en converted to the 35 mm
film camera.
(It will be equivalent to 100 mm lens when a 50 mm lens is used.)
Refer to the website for details about the 3D interchangeable lens.
About the firmware of your interchangeable lens
For smoother recording, we recommend updating the firmware of the interchangeable lens
to the latest version.
•
To view the latest information on the firmware or to download the firmware, visit the
support site below:
http://panasonic.jp/support/global/cs/dsc/
(This Site is English only.)
• To check the firmware version of the intercha ngeable lens, attach it to the came ra body and
select [Version Disp.] in the [Setup] menu.
VQT5H82 (ENG)
14

Preparation
Cards Compatible with this unit
The following cards which conform to the SD standard can be used with this unit.
(These cards are indicated as card in the text.)
SD Memory Card
(8 MB to 2 GB)
SDHC Memory Card
(4 GB to 32 GB)
SDXC Memory Card
(48 GB, 64 GB)
∫ About the motion picture recording and speed class
According to the [Rec Format] (P60) and [Rec Quality] (P60) of a motion picture, the
required card differs. Use a card that meets the following ratings of the SD Speed Class or
UHS Speed Class.
SD Speed Class and UHS Speed Class are the speed standards regarding continu ous writing.
•
To check the class, see the labelled side, etc. of the card.
[Rec Format]
[AVCHD] All Class 4 or higher
[Rec Quality]
• SDHC Memory Cards and SDXC Memory Cards can be
used only with their compatible devices.
• Check that the PC and other equipment are compatible when
using the SDXC Memory Cards.
http://panasonic.net/avc/sdcard/information/SDXC.html
• This unit is compatible with UHS-I UHS Speed Class 3
standard SDHC/SDXC memory cards.
• Only the cards with capacity listed left can be used.
Bit rate in
¢
Speed class Label example
100 Mbps UHS Speed Class 3
[MP4]
28 Mbps or lower Class 4 or higher
100 Mbps or higher UHS Speed Class 3
[MP4 (LPCM)]/
[MOV]
¢ Bit rates vary depending on the item selected in [Rec Quality] in the [Motion Picture] menu.
For details, refer to P60.
50 Mbps
UHS Speed Class 1 or
higher
Class 10
• Please confirm the latest information on the following website.
http://panasonic.jp/support/global/cs/dsc/
(This Site is English only.)
(ENG) VQT5H82
15

Preparation
Preparation
• Check that the camera is turned off.
Attaching the Shoulder Strap
•
We recommend attaching the shoulder strap when using the camera to prevent it from dropping.
1 2 3
• Perform steps 1 to 4 and then attach the other side of the shoulder strap.
• Use the shoulder strap around your shoulder.
– Do not wrap the strap around your neck.
– It may result in injury or accident.
• Do not leave the shou lder strap where an infant can reach it.
– It may result in an accident by mistakenly wrapping around the neck.
4
Charging the Battery
The battery that can be used with this unit is DMW-BLF19E.
1 Connect the AC mains lead.
2 Attach the battery paying attention to the direction of the battery.
The [CHARGE] indicator A lights up and charging begins.
•
∫ About the [CHARGE] indicator
The [CHARGE] indicator turns on:
The [CHARGE] indicator is turned on during charging.
The [CHARGE] indicator turns off:
The [CHARGE] indicator will turn off once the charging has completed without any probl em.
(Disconnect the charger from the electrical socket and detach the battery after charging is completed.)
∫ Charging time
Charging time Approx. 220 min
•
The indicated charging time is for when the battery has been discharged completely.
The charging time may vary depending on how the battery has been used. The charging
time for the battery in hot/cold environments or a battery that has not been used for a
long time may be longer than normal.
VQT5H82 (ENG)
16
Preparation
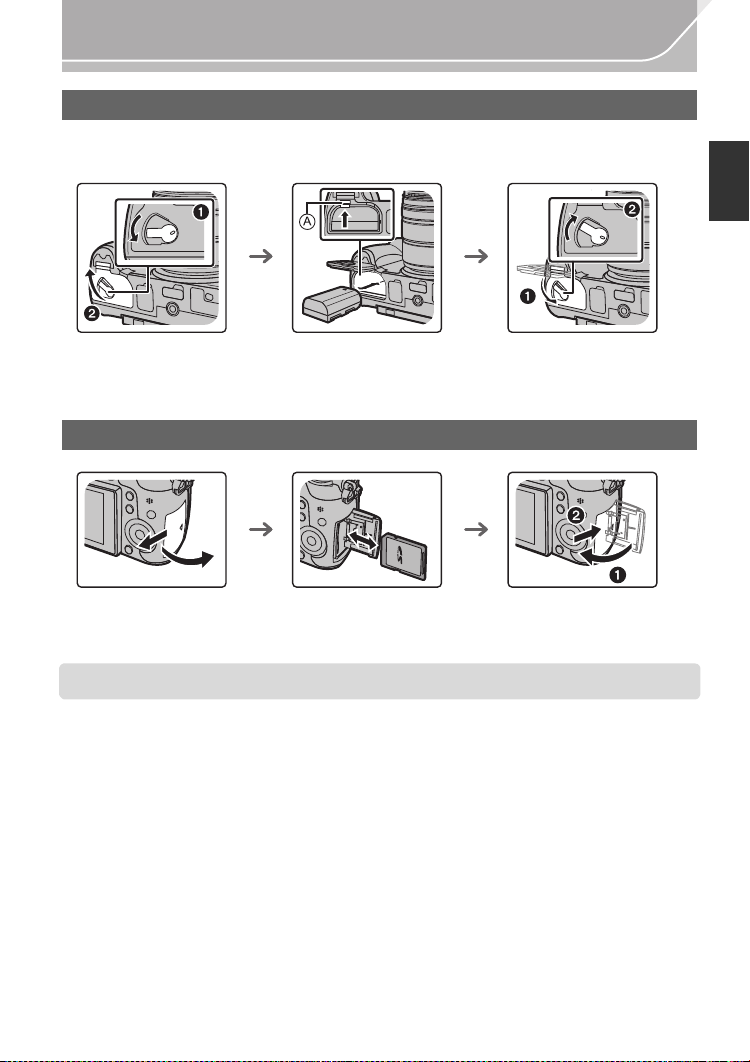
Inserting/Removing the Battery
• Always use genuine Panasonic batteries (DMW-BLF19E).
• If you use other batteries, we cannot guarantee the quality of this product.
ヰヱユワ
ヰヱユワ
ロヰヤレ
ロヰヤレ
ヰヱユワ
ロヰヤレ
• Being careful about the battery orien tation, insert all the way until you hear a locking sound an d
then check that it is locked by lever A.
Pull the lever A in the direction of the arrow to remove the battery.
Inserting/Removing the Card (Optional)
• Push it securely all the way until you hear a “click” while being careful about the direction in
which you insert it.
To remove the card, push the card until it clicks, then pull the card out upright.
• Keep the Memory Card out of reach of children to prevent swallowing.
(ENG) VQT5H82
17

Preparation
Changing the Lens
• Change lenses where there is not a lot of dirt or dust.
• Do not press the lens release button A when you attach a lens.
∫ Detaching the lens
1 Attach the lens cap.
2 While pressing on the lens release button B,
rotate the lens toward the arrow until it stops and
then remove.
Opening the Monitor
At the time when this camera is purchased, the monitor is stowed in the camera body.
Bring out the monitor as shown below.
1 Open the monitor. (Maximum 180o)
2 It can be rotated 180o forward.
3 Return the monitor to its original position.
Only rotate the monitor after opening it wide enough, and be careful not to use
•
excessive force as it may be damaged.
VQT5H82 (ENG)
18
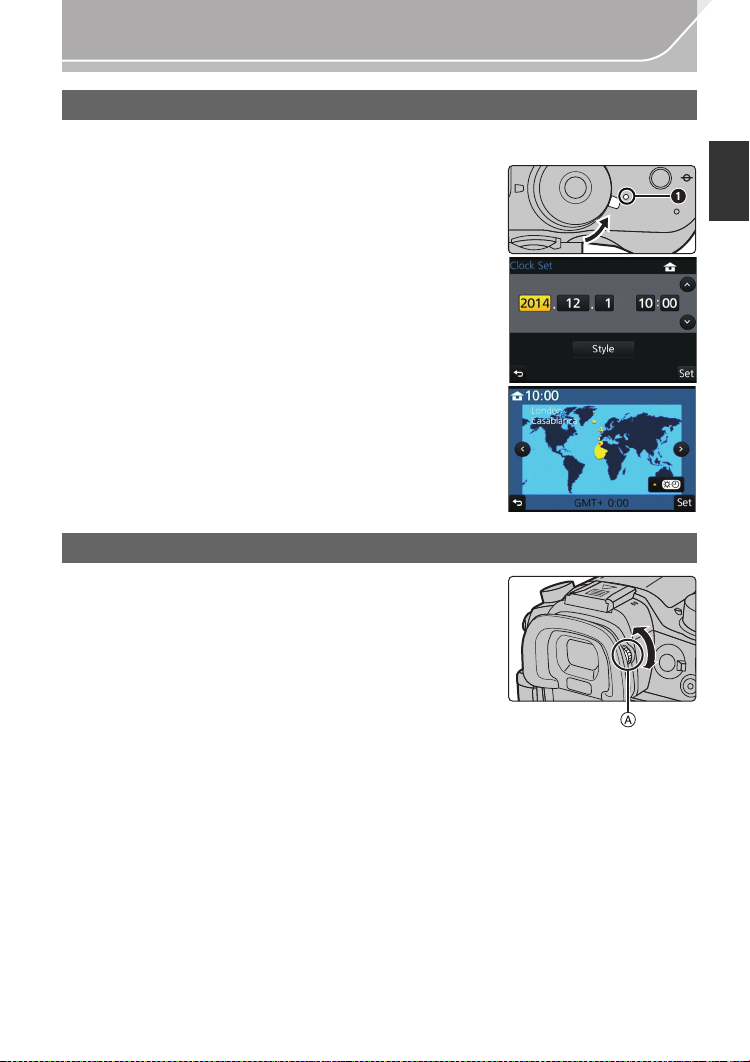
Setting Date/Time (Clock Set)
• The clock is not set when the camera is shipped.
1 Turn the camera on.
•
The status indicator 1 lights when you turn this unit
on.
2 Press [MENU/SET].
3 Press 2/1 to select the items (year, month, day, hour,
minute), and press 3/4 to set.
4 Press [MENU/SET].
•
Confirmation screen is displayed. Press [MENU/SET].
• A message prompting you to set [Home] in [World Time] will
be displayed. Press [MENU/SET].
5 Press 2/1 to select the home area, and then press
[MENU/SET].
Diopter adjustment
Adjust the diopter to suit your vision so that you can see
the characters displayed in the viewfinder clearly.
A Diopter adjustment dial
Preparation
OFF
ON
(ENG) VQT5H82
19
Preparation
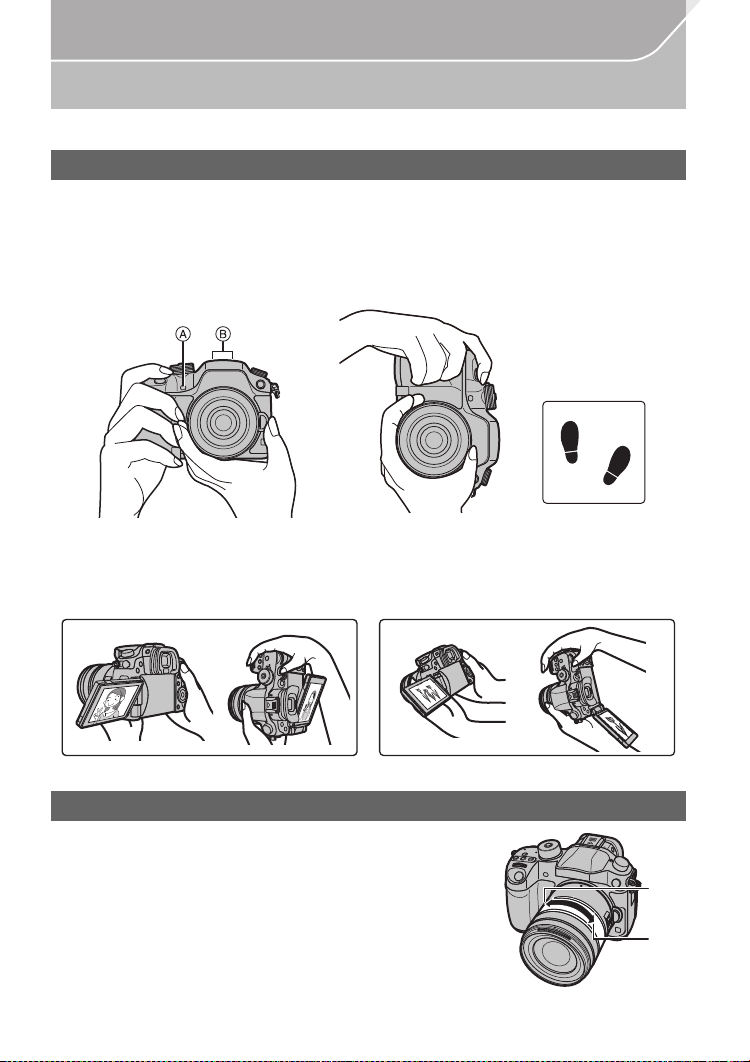
Basic Operations
Tips for taking good pictures
Hold the camera gently with both hands, keep your arms still at your side
and stand with your feet slightly apart.
• Do not cover the flash, the AF assist lamp A, speaker or the microphone B (P11) with
your fingers or other objects.
• Be careful not to move the camera when you press the shutter button.
• Be sure to remove the lens cap when recording.
∫ Free angle shooting
The monitor can be rotated to suit your needs. This is convenient as it allows you to take
pictures from various angles by adjusting t he monitor.
Taking pictures at a high angle Taking pictures at a low angle
Zoom operations
When using the interchangeable lens (H-HS12035, H-FS14140)
Rotate the zoom ring of the lens.
A Te l e
B Wide
VQT5H82 (ENG)
20
Preparation
2.8
C
AB
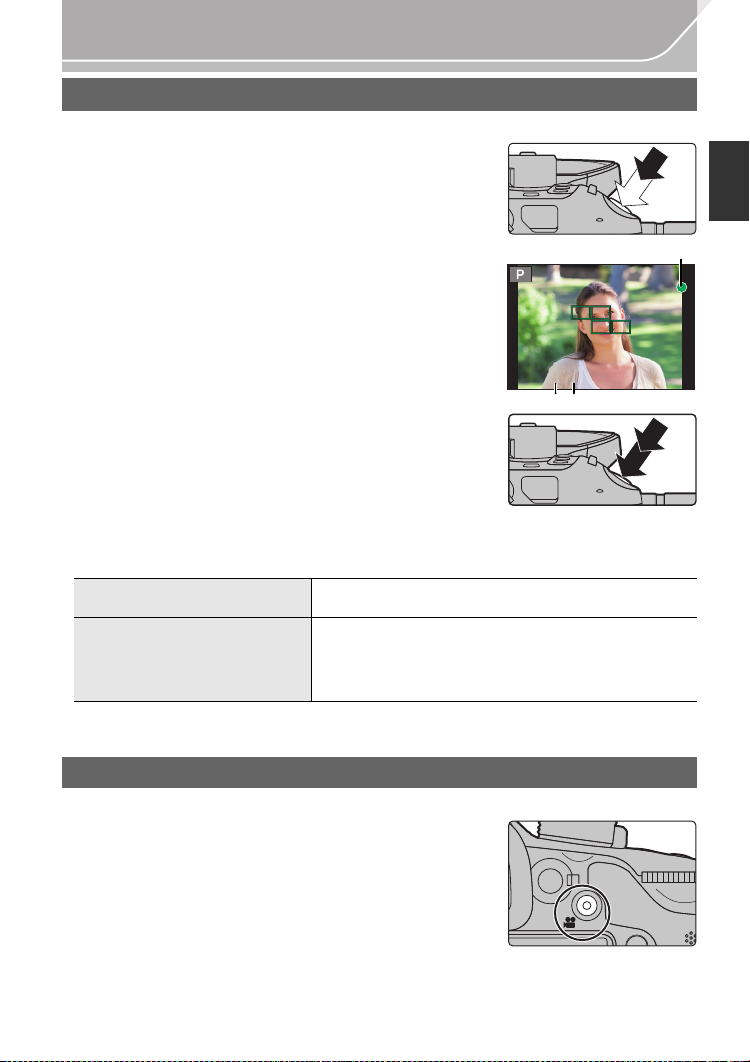
Shutter button (Taking pictures)
The shutter button works in two steps. To take a picture, press it.
Press the shutter button halfway to focus.
A Aperture value
B Shutter speed
C Focus indication
• Aperture value and shutter speed are displayed.
(It will flash in red if the correct exposure is not achieved, except
when set to flash.)
• Once the subject is in focus, the focus indication is displayed.
(When the subject is not in focus, the indication flashes)
6060602.8
2.8
Press the shutter button fully (push it in further),
and take the picture.
• When the image is correctly focused, the picture will be taken, since the [Focus/Release
Prior ity] (P105) is set initially to [FOCUS].
• The focus range is different depending on the lens used.
When the interchangeable lens
(H-HS12035) is used
When the interchangeable lens
(H-FS14140) is used
• Even during menu operation or image playback, if you press the shutter button halfway, you
can instantly set the camera ready for recording.
0.25 m (0.82 feet) to ¶ (from the focus distance reference line)
0.3 m (0.98 feet) to ¶ (from the focus distance reference line)
(focal length 14 mm to 21 mm)
0.5 m (1.6 feet) to ¶ (from the focus distance reference line)
(focal length 22 mm to 140 mm)
Motion picture button (Recording motion pictures)
Press the motion picture button to start and stop recording a motion picture.
Start recording by pressing the motion picture button.
• Release the motion picture button right after you p ress it.
Stop the recording by pressing the motion picture
button again.
• Since motion picture recording stops only after you pre ss the
motion picture button, the sound of the operation may be
noticeable. (P59)
(ENG) VQT5H82
21

Preparation
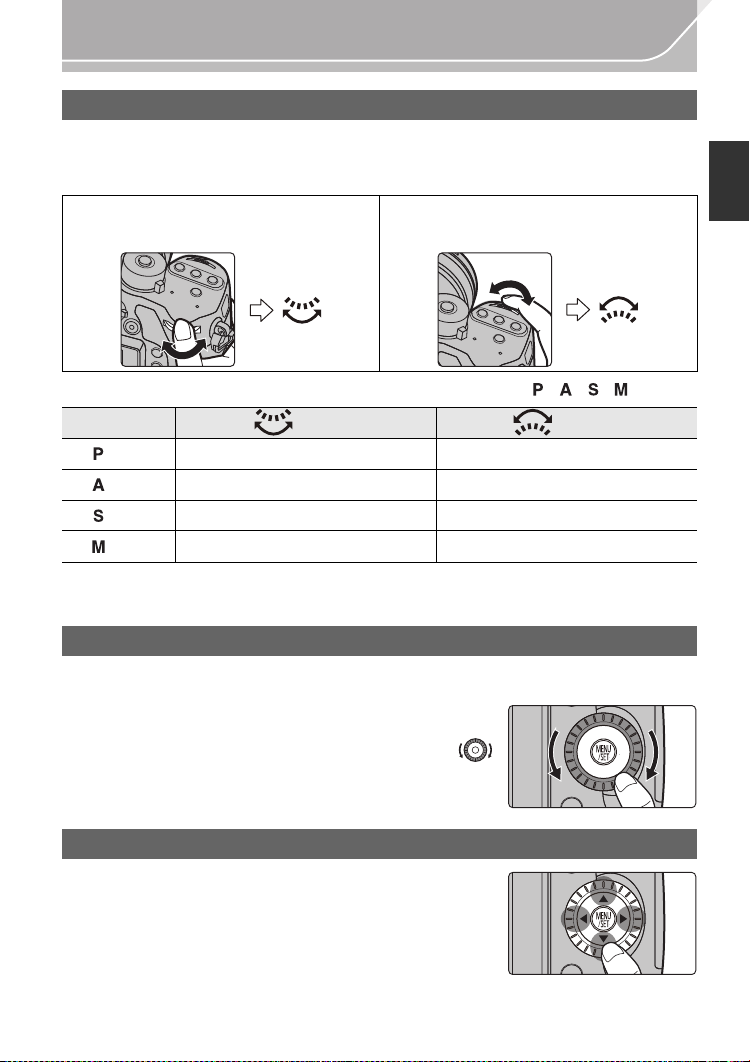
Mode dial (Selecting a Recording Mode)
Rotate the mode dial to switch the Recording Mode.
Press the mode dial lock button 1 to
release the lock.
• The dial is locked if the mode dial lock button is
depressed. Each press locks/unlocks the dial.
Rotate the mode dial 2 and adjust the
recording mode.
• After adjusting the recording mode, press the
mode dial lock button to lock the dial.
Intelligent Auto Mode (P30)
The subjects are recorded using settings automatically selected by the camera.
Intelligent Auto Plus Mode (P31)
Allows you to adjust the brightness and colour hue when in Intelligent Auto
Mode.
Programme AE Mode (P51)
Records at the aperture value and shutter speed set by the camera.
Aperture-Priority AE Mode (P52)
The shutter speed is automatically determined by the aperture value you set.
Shutter-Priority AE Mode (P52)
The aperture value is automatically determined by the shutter speed you set.
Manual Exposure Mode (P52)
The exposure is adjusted by the aperture value and the shutter speed which are
manually adjusted.
Creative Video Mode (P64)
Records a motion picture with the aperture value and the shutter speed you
specify. In this recording mode, all the motion picture functions become
available. For example, you can record motion pictures in 4K (motion pictures
with their size set to [4K] or [C4K] in [Rec Quality]).
¢ You cannot take still pictures.
Custom Mode (P88)
Use this mode to take pictures with previously registered settings.
Creative Control Mode (P33)
Record while checking the image effect.
VQT5H82 (ENG)
22
Preparation
Rear Dial/Front Dial
Rotating:
Selection of items or setting of values is performed during the various settings.
•
These operating Instructions describe operations of the rear dial/front dial as follows:
e.g.: When rotating the rear dial to the left
or right
e.g.: When rotating the front dial to the left
or right
Allows you to set the aperture, shutter speed, and other settings when in / / / modes.
Mode dial Rear Dial Front dial
(P51) Programme Shift Programme Shift
(P52) Aperture value Aperture value
(P52) Shutter speed Shutter speed
(P52) Shutter speed Aperture value
• In [Dial Set.] in the [Custom] menu, you can change the operation methods of the front dial and
rear dial. (P106)
Control Dial
Rotating the control dial:
Selection of items or setting of values etc., is performed.
•
The operation of rotating the control dial is illustrated as below in
these operating Instructions.
Example: When rotating the control dial to the left or right:
Cursor buttons/[MENU/SET] button
Pressing the cursor button:
Selection of items or setting of values etc., is performed.
Pressing [MENU/SET]:
Confirmation of setting contents, etc., is performed.
• These operating Instructions express the up, down, left, and
right of the cursor button as 3/4/2/1.
(ENG) VQT5H82
23
Preparation
ュリヴヱハ
AFS
AFS
AFSAFS
98
AWB
0 0
0
Fn
ISO
AUTO
Wi-Fi
L
4:3
Even when the camera is operated using the touch screen, it is
possible to operate with the cursor button and [MENU/SET]
button if a guide like the one shown on the right is displayed.
Even on menu screens etc. on which the guide is not displayed,
you can make settings and selections by operating the buttons.
By assigning [Cursor Button Lock] to a function button, you can disable the cursor buttons, the
•
[MENU/SET] button, and the control dial. (P87)
[DISP.] button (Switching the displayed information)
Press [DISP.] to switch the information displayed on the
screen.
In Recording Mode
•
Screen will switch as follows:
(Example of monitor display)
With information
MOV
4:3
p
L
24
FHD
AFS
Without
information
With information
(tilt sensor
display)
MOV
4:3
p
L
24
FHD
AFS
Without
information (tilt
sensor display)
0
989898
0
989898
On-monitor
Tur ne d of f
information
¢1 It is displayed when the [Monitor Info. Disp.] of the [Custom] menu is set to [ON]. (P105)
Settings can be adjusted directly by touching each of the items displayed on the screen.
• If you set [Guide Line] in the [Custom] menu, the guide lines are displayed. (P105)
• If no operation is performed, part of the information on the screen will gradually become darker
after approximately 10 seconds has passed, and will no longer be displayed after
approximately 1 minute has passed. Pressing the [DISP.] button or touching the monitor will
make the display reappear. This operation is to prevent screen burn-in and is not a malfunction .
24
VQT5H82 (ENG)
recording
¢1

Preparation
AWB
98
WB
ISO
STD.
ロヷョ
Fn5
In Playback Mode
• Screen will switch as follows:
Without
information
(Highlight
¢1, 2
display)
With
information
0
2
60F3.5
Detailed
¢1
4:3
L
1/98
1/98
AWB
00
information
display
60
F3.5
0
WB
AWB
ISO
200
AFS
P
2014.12. 1 10:00
s
4:3
L
RGB
STD.
STD.
100-0001
Histogram
display
1/98
F3.5
60
ISO
0
100-0001
200
Without
information
¢1 If no operation is performed, part of the information on the screen will grad ually become
darker after approximately 10 seconds has passed, and will no longer be displayed after
approximately 1 minute has passed. Pressing the [DISP.] button or touching the monitor will
make the display reappea r. This operation is to prevent screen burn-in and is not a
malfunction.
¢2 This is displayed if [Highlight] (P105) in the [Custom] menu is set to [ON].
[LVF] button (Switching the Monitor/Viewfinder)
Press [ LVF] to switch between the Monitor and Viewfinder.
A Eye sensor
Press [LVF].
ロヷョ
• The monitor/viewfinder will switch as follows:
Automatic viewfinder/
monitor switching
¢3
Viewfinder display
¢3 If [Eye Sensor AF] in the [Custom] menu is set to [ON], the camera automatically adjusts the
focus as the eye sensor is activated. (P104)
¢3
Monitor display
(ENG) VQT5H82
25

Preparation
Fn7
2.0X
∫ Using the eye sensor to switch between the Monitor and Viewfinder
Automatic viewfinder/monitor switching enables the eye
sensor to switch the display to the viewfinder automatically
when you bring your eye or an object near it.
•
When the viewfinder surface becomes dirty, remove the eyecup,
blow away the dust with a blower (commercially available), and
wipe the surface lightly with a dry, soft cloth.
Touch panel (Touch operations)
Touch panel of this unit is capacitive. Touch the panel directly with your bare finger.
∫ Touch
To touch and release the touch screen.
• When selecting features using the touch screen, be sure to
touch the centre of the desired icon.
∫ Drag
A movement without releasing the touch screen.
This can also be used to move to the next image during
playback, etc.
-5 0 +5
DISP.カスタム登録
6WDQGDUG
Fn6
Fn7
Fn7
Fn8
Fn9
Fn10
±0
S
±0
±0
±0
±0
∫ Pinch (enlarge/reduce)
Pinch the touch panel apart (enlarge) or together
(reduce) with two fingers.
VQT5H82 (ENG)
26
2.0X2.0X
2.0X
Preparation
AFS
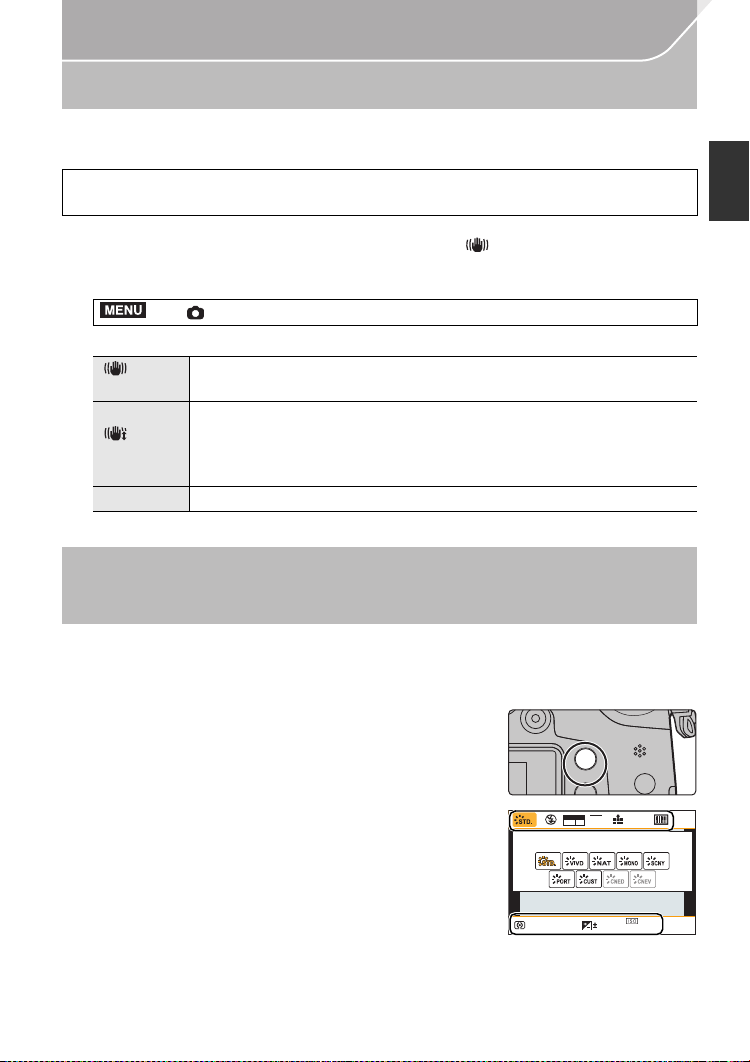
Optical Image Stabiliser
The camera detects jitter during recording and automatically corrects it, so you can record
images with reduced jitter.
A lens which supports the stabiliser function is required.
–
The interchangeable lens (H-HS12035, H-FS14140) supports the stabiliser function.
•
When using an interchangeable lens with O.I.S. switch (such as H-HS12035, H-FS14140), stabiliser
function is activated if the O.I.S. switch of the lens is set to [ON]. ([ ] is set at the time of purchase)
∫ Setting the Stabiliser in the [Rec] menu
1 Select the menu. (P28)
MENU
> [Rec] > [Stabilizer]
2 Press 3/4 to select the item and then press [MENU/SET].
[]
([Normal])
[]
([Panning])
[OFF] [Stabilizer] does not work.
Exit the menu a fter it is set.
•
Vertical and horizontal shake are compensated for.
Camera shake is corrected for up/down movements.
This mode is ideal for panning (a method of taking pictures which involves
turning the camera to track the movements of a subject which continues to
move in a fixed direction).
Calling frequently-used menus instantly
(Quick Menu)
By using the Quick Menu, some of the menu settings can be easily found.
•
The features that can be adjusted using Quick Menu are determined by the mode or a display
style the camera is in.
Press [Q.MENU] to display the Quick Menu.
1
Fn2
ヲハヮユワヶ
MOV
4:3
L
p
AFS
24
Rotate the front dial to select the menu item.
2
Rotate the rear dial to select the setting.
3
Press [Q.MENU] to exit the menu once the
4
setting is complete.
FHD
0
603.5
AU
TO
(ENG) VQT5H82
AWB
27
Preparation
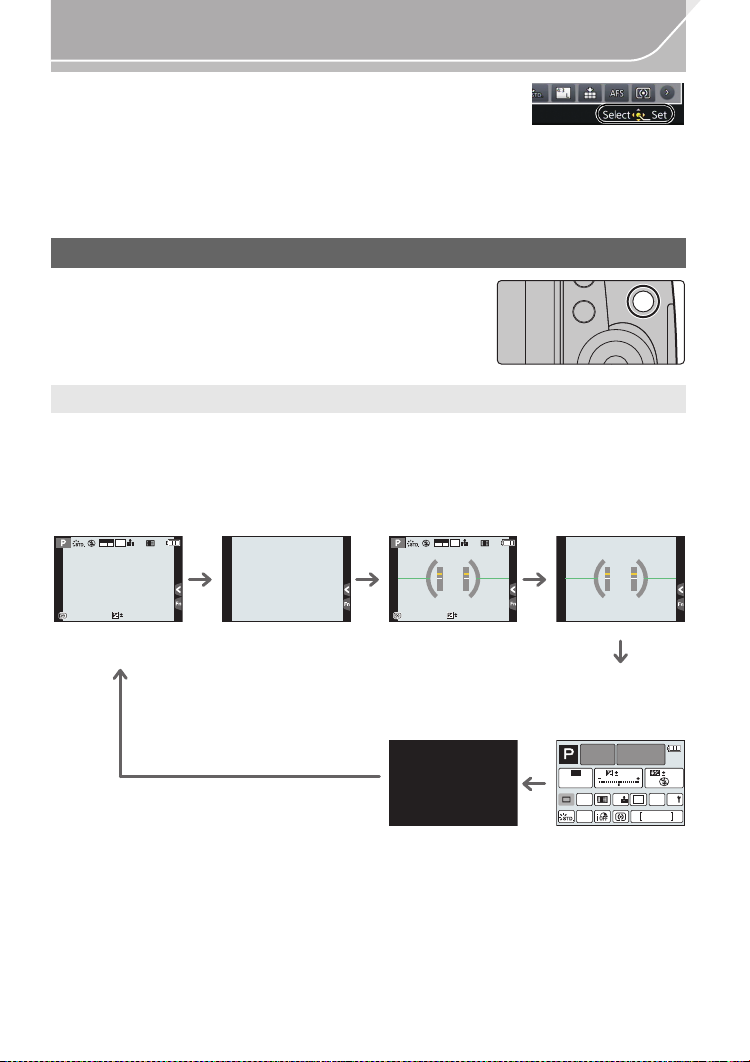
Setting menu items
Press [MENU/SET].
1
[Rec] (P101)
[Motion Picture]
(P103)
[Custom] (P104)
[Setup] (P106)
[Playback] (P108)
Press 3/4 of the cursor button to select the
2
This menu lets you set the aspect ratio, number of pixels
and othe r aspects of the pictures you are recording.
This menu lets you set the [Rec Format], [Rec Quality], and
other aspects for motion picture recording.
Operat ion of the unit, such as displaying of t he screen and
button operations, can be set up according to your preferences.
Also, it is possible to register the modified settings.
This menu lets you perform the clock settings, select the
operating beep tone settings and set other settings which
make it easier for you to operate the camera.
You can also configure the settings of Wi-Fi related functions.
This menu lets you set the Protection, Cropping or Print
Settings, etc. of recorded pictures.
menu item and press [MENU/SET].
Press 3/4 of the cursor button to select the
3
setting and press [MENU/SET].
• Depending on the menu item, its setting may not appear
or it may be displayed in a different way.
∫ Close the menu
Press [ ] or press the shutter button halfway.
∫ Switching to other menus
e.g.: Switching to the [Setup] menu from [Rec] menu.
1 Press 2.
2 Press 3/4 to select [ ] or another of the menu
toggle icons.
•
You can also select the menu toggle icons by rotating the
front dial.
3 Press [MENU/SET].
•
Select a menu item next and set it.
VQT5H82 (ENG)
28

Preparation
Configuring basic settings of this unit (Setup Menu)
The [Setup] menu contains some important settings relating to the camera’s clock and power.
Check the settings of this menu before proceeding to use the camera. (P106)
Formatting the card (initialisation)
Format the card before recording a picture with this unit.
Since data cannot be recovered after formatting, make sure to back up necessary
data in advance.
Select the menu. (P28)
MENU
> [Setup] > [Format]
Confirmation screen is displayed. It is executed wh en [Yes] is selected.
•
Restoring the default settings ([Reset])
The recording or setup/custom settings are reset to the default.
Select the menu. (P28)
MENU
> [Setup] > [Reset]
•
Confirmation screens are displayed in the sequence of the [Rec] settings and the [Setup]/
[Custom] settings. It is executed when [Yes] is selected.
• The folder number and the clock setting are not changed.
Conserving the battery life ([Economy])
The unit can be set up to prevent unnecessary battery consumption.
Select the menu. (P28)
MENU
> [Setup] > [Economy]
[Sleep Mode]
[Auto LVF/Monitor
Off]
•
Press the shutter button halfway or turn the camera off and on to cancel [Sle ep Mode].
• To turn the monitor/viewfinder on again, press any button or touch the monitor.
The camera is automatically turned off if the camera has not been
used for the time selected on the setting.
[10MIN.]/[5MIN.]/[2MIN.]/[1MIN.]/[OFF]
The monitor/viewfinder is automatically turned off if the camera
has not been used for the time selected on the setting.
[5MIN.]/[2MIN.]/[1MIN.]
(ENG) VQT5H82
29
Easy Recording
4
Taking Pictures using the Automatic Function
(Intelligent Auto Mode)
Recording Mode:
In this mode, the camera makes the optimal settings for the subject and scene, so we recommend it
when you wish to leave the settings to the camera and record without thinking about them.
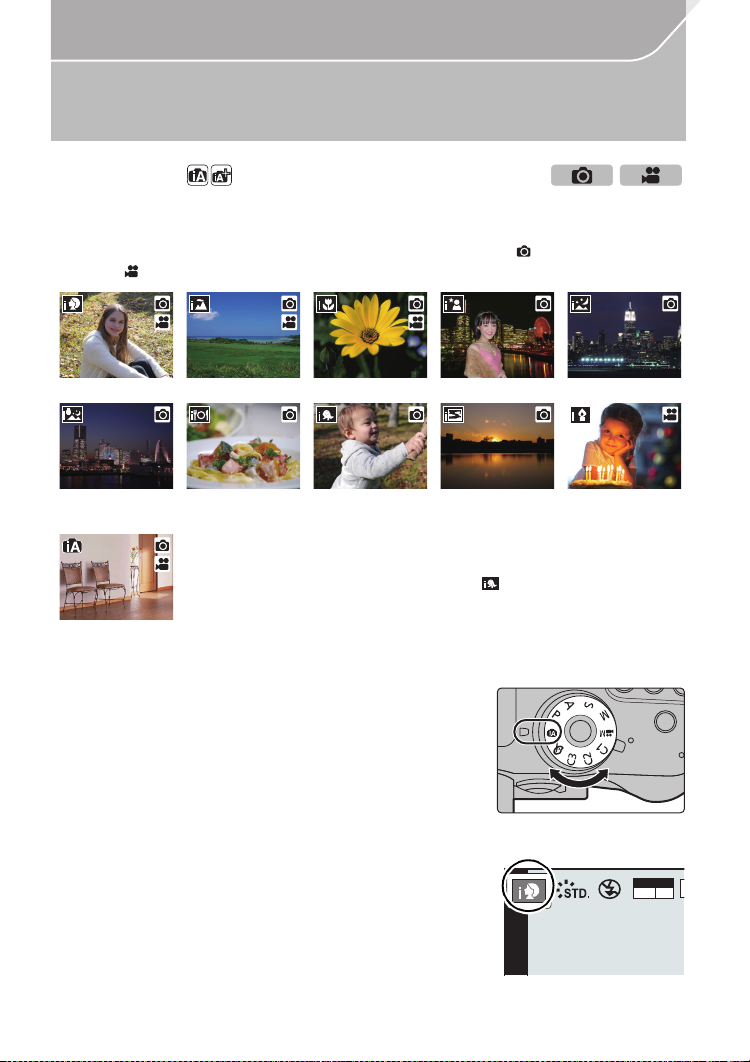
The camera detects scenes automatically (Scene Detection) ( : When taking
pictures, : When recording motion pictures)
[i-Portrait] [i-Scenery] [i-Macro] [i-Night Portrait]¢1[i-Night Scenery]
[iHandheld Night
1
¢2
Shot]
¦
Set the mode dial to [¦].
[i-Food] [i-Baby]
¢1 Only displayed when the built-in flash is open.
¢2 Only displayed when [iHandheld Night Shot] is set to [ON]. (P31)
¢3 When [Face Recog.] is set to [ON], [ ] will be displayed for
• [¦] is set if none of the scenes are applicable, and the standard
settings are set.
birthdays of registered faces already set only when the Face/Eye of
a person 3 years old or younger is detected.
¢3
• The camera will switch to either the most recently used
of Intelligent Auto Mode or Intelligent Auto Plus Mode.
At the time of purchase, the mode is set to Intelligent
Auto Plus Mode. (P31)
Align the screen with the subject.
2
• When the camera identifies the optimum scene, the icon
of the scene concerned is displayed in blue for 2 seconds,
after which its colour changes to the usual red. (Automatic
scene detection)
VQT5H82 (ENG)
30
[i-Sunset] [i-Low Light]
MOV
FHD
p
24

Easy Recording
∫ Functions that work automatically
•
The following functi ons are performed automatically to allow the camera to make the optimal settings.
–
Scene Detection – [i.Resolution]
– Backlight Compensation – [i.Dynamic]
– [Face/Eye Detection] – [Long Shtr NR]
– Auto White Balance – [Shading Comp.]
– Intelligent ISO sensitivity control – [Quick AF]
– [Red-Eye R emova l] – [AF Assist Lamp]
∫ Auto Focus, Face/Eye Detection , and Face Recognition
The Auto Focus Mode is automatically set to [š]. If you touch the subject, the AF tracking
function will work. The AF tracking function will also work if you press [ ] and then press
the shutter button halfway.
• When [ ], [ ], or [ ] is set, an eye closer to the camera will be in focus, while the exposure
will be optimised for the face. In Intelligent Auto Plus Mode or Intelligent Auto Mode, you cannot
change the eye in focus. ([Face/Eye Detection])
∫ About the flash
Flash mode is set to [Œ] when the flash is closed, and [ ] (AUTO) when it is open.
When the flash is open, the camera automatically sets [ ], [ ] (AUTO/Red-Eye
Reduction), [ ] or [ ] to match the type of subject and brightness.
•
Open the flash when the flash is to be used. (P57)
∫ Switching between Intelligent Auto Plus Mode and Intelligent Auto Mode
The Intelligent Auto Mode adjusts the settings of the main functions automatically, allowing
you to record images without having to make advanced settings. When you want to record
images easily, use Intelligent Auto Mode.
1 Press [MENU/SET].
2 Press 2.
3 Press 3/4 to select the [ ] or [ ] tab.
4 Press 2/1 to select [ ] or [ ] and then press
[MENU/SET].
If [DISP.] is pressed, the description of the selected mode
•
will be displayed.
Recording night scenes ([iHandheld Night Shot])
When [iHandheld Night Shot] is set to [ON] and [ ] is detected while taking handheld
night shots, pictures of the night scenery will be taken at a high burst speed and composed
into a single picture.
This mode is useful if you want to take stunning night shots with minimal jitter and noise,
without using a tripod.
MENU
> [Rec] > [iHandheld Night Shot] > [ON]/[OFF]
(ENG) VQT5H82
31

Easy Recording
F
A
B
Combining pictures into a single picture with rich gradation ([iHDR])
When [iHDR] is set to [ON] and there is, for example, strong contrast between the
background and the subject, multiple still pictures are recorded with differing exposures
and combined to create a single still picture rich in gradation.
[iHDR] works automatically as needed. When it does, [ ] is displayed on the screen.
MENU
> [Rec] > [iHDR] > [ON]/[OFF]
Taking a picture with a blurred background (Defocus Control)
Recording Mode:
You can easily set the blurriness of the background while checking the screen.
1 Press [Fn4] to display the setting screen.
2 Set the blurriness by rotating the rear dial.
•
If you press [MENU/SET], you can return to the recording
screen.
• Pressing [Fn4] on the blurriness setting screen will cancel
the setting.
SSSSSS
250500
F
4.02.8 5.6 8.0
3060125
Recording images by changing the brightness or colour tone
Recording Mode:
This mode enables you to change the brightness and colour tone to your preferred
settings from the ones set by the camera.
Setting brightness
1 Press [ ].
2 Rotate the rear dial to adjust brightness.
•
Press [ ] again to return to the recording screen.
Setting colour
1 Press [ ].
2 Rotate the rear dial to adjust colour.
•
This will adjust the colour of the image from a reddish
colour to a bluish colour.
• Press [ ] again to return to the recording screen.
VQT5H82 (ENG)
32
-5-5-4-4-3-3-2-2-1-
AB
+1+1 +2+2 +3+3 +4+4 +5+5
100
000
+5+5+5
B

Easy Recording
A
Normal display Guide display List display
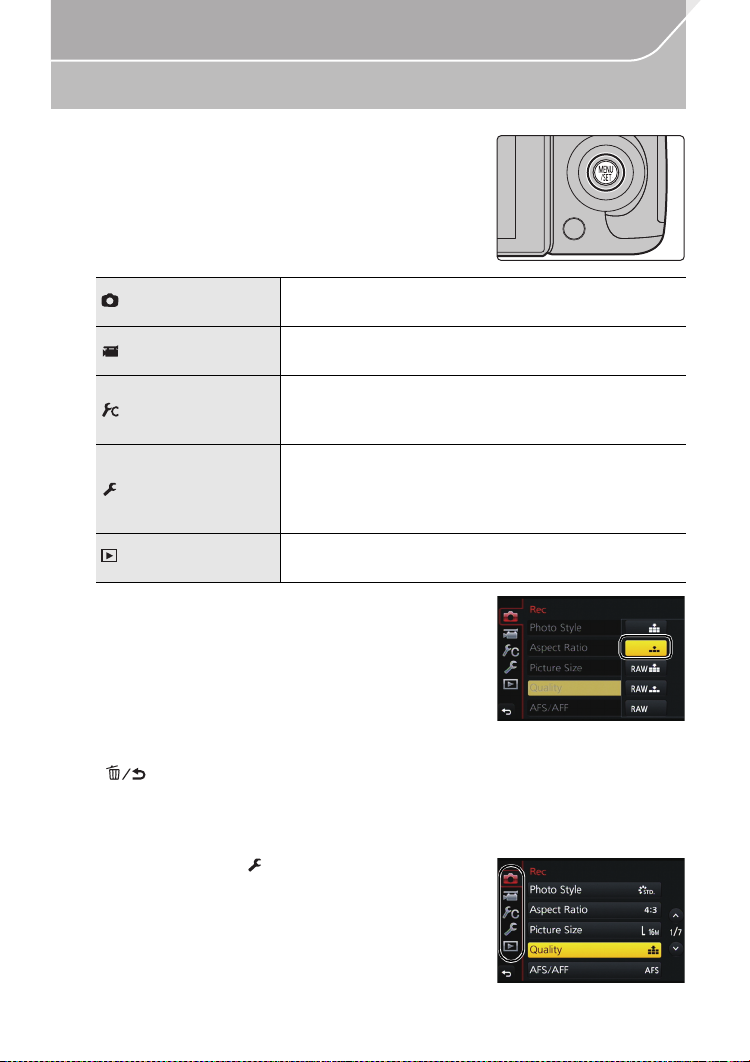
Taking Pictures with different image effects
(Creative Control Mode)
Recording Mode:
This mode records with additional image effects.
You can set the effects to add by selecting example images and checking them on the screen.
Set the mode dial to [ ].
1
Press 3/4 to select the image effects (filters).
2
[Expressive] [High Dynamic]
[Retro] [Cross Process]
[Old Days] [Toy Effect]
[High Key] [Toy Pop]
[Low Key] [Bleach Bypass]
[Sepia] [Miniature Effect]
[Monochrome] [Soft Focus]
[Dynamic Monochrome] [Fantasy]
[Rough Monochrome] [Star Filter]
[Silky Monochrome] [One Point Color]
[Impressive Art] [Sunshine]
• The image effect of the selected example image will be applied in a preview display A.
• You can also select the image effects (filters) by touching the example images.
Press [MENU/SET] to set.
3
∫ Switching the image effect (filter) selection screen display
Press [DISP.] to switch the monitor screen.
• When the image effect selection screen display is set to the guide display, description of the
selected image effect is displayed.
• To change Creative Control Mode, select the [ ] tab on the menu screen, select [Filter
Switch] , and then press [MENU/SET]. You can return to step
2.
(ENG) VQT5H82
33

Easy Recording
Taking Pictures Using the Touch Function
Taking pictures using the Touch Shutter function
Applicable modes:
Just by touching the subject you want as your point of focus, the camera will focus on the
subject and take the picture automatically.
Touch [ ].
1
Touch [ ].
2
• Icon will change to [ ], and taking a picture with the
Touch Shutter function becomes possible.
Touch the subject you wish to focus on, and then take a picture.
3
• The picture is taken when the focus is achieved.
∫ To cancel the Touch Shutter function
Touch [ ].
×
AE
VQT5H82 (ENG)
34

Easy Recording
Easily Optimising the Brightness for a Specified Area (Touch AE)
Applicable modes:
You can easily optimise the brightness for a touched position. When the face of the subject
appears dark, you can brighten the screen according to the brightness of the face.
Touch [ ].
1
Touch [ ].
2
• The setting screen for the brightness optimisation position
is displayed.
Touch the subject you want to optimise the
3
AE
brightness for.
• Touching [Reset] will bring the brightness optimisation
position back to the centre.
Touch [Set].
4
∫ Cancelling the Touch AE function
Touch [ ].
ュリヴヱハ
AE
6HW5HVHW
(ENG) VQT5H82
35

Recording
Taking Pictures with Auto Focus
Applicable modes:
By setting the optimum Focus Mode or Auto Focus Mode for the subject or recording
condition, you can let the camera automatically adjust focus in various scenes.
Selecting the Focus Mode (AFS/AFF/AFC)
Applicable modes:
The method for achieving focus when the shutter button is
pressed halfway is set.
Set the focus mode lever to [AFS/AFF] or [AFC].
MF
AFS/
AFC
AFF
The movement of the subject and the scene
(recommended)/Description of settings
[AFS/AFF]
Item
[AFS]
(Auto
Focus
Single)
[AFF]
(Auto
Focus
Flexible)
Subject is still
(Scenery, anniversary photograph, etc.)
Focus is set automatically when the shutter
button is pressed halfway. Focus will be fixed
while it is pressed halfway.
Movement cannot be predicted
(Children, pets, etc.)
In this mode, focusing is performed automatically
when the shutter button is pressed halfway.
If the subject moves while the shutter button is
pressed halfway, the focus is corrected to match the movement
automatically.
Subject is moving
(Sport, trains, etc.)
[AFC]
(Auto Focus
Continuous)
In this mode, while the shutter button is pressed
halfway, focusing is constantly performed to
match the movement of the subject. When the
subject is moving, the focusing is performed by predicting the subject
position at the time of recording. (Movement prediction)
[MF] Set the focus manually. (P40)
∫ About [AFS/AFF] of the focus mode lever
In [AFS/AFF] in the [Rec] menu or the [Motion Picture] menu, you can assign [AFS] or
[AFF] to [AFS/AFF] of the focus mode lever.
VQT5H82 (ENG)
36

Recording
Selecting the Auto Focus Mode
Applicable modes:
This allows the focusing method that suits the positions and number of the subjects to be selected.
Press [].
1
Press 2/1 to select AF Mode and then press
2
Fn3
[MENU/SET].
The camera automatically detects the person’s face
and eyes.
An eye closer to the camera will be in focus, while
([Face/Eye
Detection])
([Tracking])
([49-Area])
, etc
([Cus tom Multi])
([1-Area])
the exposure will be optimised for the face. (When
[Metering Mode] is set to [ ])
• Up to 15 faces can be detected. Eyes that can be
detected are only those of the face that is in focus.
• You can change the eye to be in focus. (P38)
• Position and size of the AF area can be changed. (P38)
The camera focuses on the subject you specify. The
exposure will be optimised for the subject. (When
[Metering Mode] is set to [ ].)
Focus and exposure will keep on following the
subject even if it moves. (Dyna mic tracking) (P38)
Up to 49 AF areas can be focused.
This is effective when a subject is not in the centre
of the screen.
• You can select areas to be in focus. (P39)
From among 49 AF areas, you can freely set the
optimum shape of the AF area for the subject.
Please also refer to the “Operating Instructions for
advanced features (PDF format)”, which describes
more detailed information.
The camera focuses on the subject in the AF area
on the centre of the screen.
•
Position and size of the AF area can be changed. (P38)
([Pinpoint])
You can achieve a more precise focus on a point
that is smaller than [Ø].
If you press the shutter button halfway, the screen
that lets you check the focus will be enlarged.
•
The focus position can be set on an enlarged screen.
Please also refer to the “Operating Instructions for
advanced features (PDF format)”, which describes more detailed
information.
(ENG) VQT5H82
37

Recording
A
∫ Changing the eye to be in focus
Touch the eye to be in focus.
• Touch the eye in the yellow frame. If you touch any other
location, the AF area setting screen will be displayed. (P38)
• If you touch [ ] or press [MENU/SET], the eye focus setting
will be cancelled.
∫ Locking the subj ect to be tracked ( [Tracking])
Aim the AF tracking frame over the subject, and press
the shutter button halfway.
A AF tracking frame
• AF area will turn green when the camera detects the subject.
• The AF area turns yellow when the shutter button is released.
• Lock is cancelled when [MENU/SET] is pressed.
Setting up position of the AF area/changing size of the AF area
Applicable modes:
When [š], [ ], [Ø], or [ ] in Auto Focus Mode is selected, you can change the
position and size of the AF area.
Please also refer to the “Operating Instructions for advanced features (PDF format)”,
which describes more detailed information.
When selecting [š], [Ø]
Position and size of the AF area can be changed.
1 Press [].
2 Select [š] or [Ø] and press 4.
•
AF area setting screen is displayed.
• You can also display the AF area setting scre en by
touching the screen.
3 Change the position and size of the AF area.
Button
operation
3/4/2/1 Touching Moves the AF area.
/ s
[DISP.] [Reset]
•
If you set the AF area over an eye in the yellow frame when [š] is selected, the eye to be
in focus will be changed. (P38)
VQT5H82 (ENG)
38
Touch
operation
Pinching in/
out
Description of operation
Enlarges/reduces the AF
area in small steps.
Enlarges/reduces the AF
area in large steps.
Resets the AF area back to
the centre.
• If you press the button
again, the frame size will be
reset to the default setting.

Recording
Examples of group
4 Press [MENU/SET] to set.
AF area with the same function as [Ø] is displayed in the touched position, when the [š] is selected.
•
Setting of the AF area is cleared when [MENU/SET] is pressed or [ ] is touched.
When selecting [ ]
The 49 AF areas are divided into groups, each consisting of 9
areas (on the edge of the screen, 6 or 4 areas).
1 Press [].
2 Select [ ] and press 4.
•
AF area setting screen is displayed.
3 Press 3/4/2/1 to select an AF area group.
•
You can also select a group by touching the screen.
4 Press [MENU/SET] to set.
•
Only [i] display (centre point of selected group) will remain on
the screen.
• Setting of the AF area frame is cleared when [MENU/SET] is
pressed or [ ] is touched.
Setting the AF area position with the Touch Pad
Applicable modes:
By setting [Touch Pad AF] in [Touch Settings] (P106) in the
[Custom] menu, you can move the AF area displayed on the
viewfinder by touching the monitor.
•
If you touch the monitor when the Auto Focus Mode is set to
[Custom Multi] such as [ ], the AF area setting screen will be
displayed.
MENU
> [Custom] > [Touch Settings] > [Touch Pad AF]
Moves the AF area of the Viewfinder
[EXACT]
[OFFSET]
[OFF] —
by touching a desired position on the
Touch Pad.
Moves the AF area of the viewfinder
according to the distance you drag the
touch pad (P26).
• Press the shutter button halfway to determine the focus position.
If you press [DISP.] before determining the focus position, the AF area frame returns to the
centre position.
• To cancel the AF area frame when the Auto Focus Mode (P36) is set to [š] ([Face/Eye
Detection]), [ ] ([Tracking]) or [ ] ([49-Area]), press [MENU/SET].
(ENG) VQT5H82
39

Recording
AFS/
AFF
B
DA C
Taking Pictures with Manual Focus
Applicable modes:
Use this function when you want to fix the focus or when the distance between the lens
and the subject is determined and you do not want to activate Auto Focus.
When using the interchangeable lens (H-HS12035, H-FS14140) having a focus ring
Rotate to A side:
Focuses on nearby subject
Rotate to B side:
Focuses on faraway subject
Set the focus mode lever to [MF].
1
Press [].
2
Press 3/4/2/1 to determine the area to be
3
enlarged, and press [MENU/SET].
• The assist screen is displayed, enlarging the area. (MF Assist) (P105)
• If you press [DISP.], the area to be enlarged will be reset to the centre.
Adjust the focus.
4
A Indicator for ¶ (infinity)
B MF Assist (enlarged screen)
C Peaking
D MF Guide
•
The in-focus portions will be highlighted. (Peaking) (P105)
• You can check whether the point of focus is to the near
side or to the far side. (MF Guide) (P105)
You can perform the following operations:
Button operation Touch operation Description of operation
3/4/2/1 Dragging Moves the enlarged area
Pinching in/out Enlarges/reduces the screen (by steps of 0.1k)
AFC
A
B
MF
s Enlarges/reduces the screen (by steps of 1.0k)
[DISP.] [Reset]
Press the shutter button halfway.
5
• The assist screen will close. The recording screen will be displayed.
• You can also close the assist screen by pressing [MENU/SET].
VQT5H82 (ENG)
40
Switches the enlarged display (windowed/full screen)
Resets the area to be enlarged back to the centre.

Recording
AFS
Select a Drive Mode
Applicable modes:
You can change what the camera will do when you press the shutter button.
Rotating the drive mode dial.
[Single]
[Burst] (P41)
[Auto Brack et] (P42)
[Self Timer] (P42)
[Time Lapse/
Animation ] (P43, 45)
When the shutter button is pressed, only one picture is recorded.
Recordings are made in succession while the shutter button
is pressed.
Each time the shutter button is pressed, recordings are made
with different exposure settings according to the Exposure
Compensation range.
When the shutter button is pressed, recording takes place
after the set time has elapsed.
Pictures are recorded with Time Lapse Shot or Stop Motion
Animation.
Taking Pictures using Burst Mode
Applicable modes:
• Pictures taken with a burst speed of [SH] will be recorded as a single burst group.
MOV
Set the drive mode dial to [ ].
1
Focus on the subject and take a picture.
2
•
Hold down the shutter button fully to activate the Burst Mode.
∫ Changing the burst speed
1 Select the menu. (P28)
MENU
> [Rec] > [Burst Rate]
2 Press 3/4 to select the burst speed and then press [MENU/SET].
¢
[SH]
(Super high
speed)
Burst speed
(pictures/second)
Live View during Burst Mode None None Available Available
¢ The electronic shutter will operate.
40
[H]
(High
speed)
12 (AFS)
7 (AFC)
4:3
p
L
24
FHD
[M]
(Middle
speed)
72
(ENG) VQT5H82
AFS
H
[L]
(Low speed)
41

Recording
AFS
Taking Pictures using Auto Bracket
Applicable modes:
Set the drive mode dial to [ ] .
1
MOV
Focus on the subject and take a picture.
2
• If you press and hold the shutter button, the number of
pictures that you set is taken.
• The Auto Bracket indication blinks until the number of
pictures that you set is taken.
∫
Changing the settings for [Single/Burst Settings], [Step] and [Sequence] in Auto Bracket
4:3
p
L
24
FHD
AFS
1 Select the menu. (P28)
MENU
> [Rec] > [Auto Bracket]
2 Press 3/4 to select [Single/Burst Settings], [Step] or [Sequence] and then
press [MENU/SET ].
3 Press 3/4 to select the setting and then press [MENU/SET].
•
Exit the menu after it is set.
Taking Pictures with the Self-timer
Applicable modes:
Set the drive mode dial to [ ] .
1
Press the shutter button halfway to focus and
2
then press it fully to take the picture.
• Focus and exposure will be set when the shutter button
is pressed halfway.
• After the self-timer indicator flashes, recording starts.
∫ Changing the time setting for the self-timer
1 Select the menu. (P28)
MENU
> [Rec] > [Self Timer]
2 Press 3/4 to select the mode and then press [MENU/SET].
Picture is taken 10 seconds after shutter is pressed.
After 10 seconds the camera takes 3 pictures at about 2 seconds intervals.
Picture is taken 2 seconds after shutter is pressed.
• When using a tripod, etc., this setting is a convenient way to avoid the jitter
caused by pressing the shutter button.
•
Exit the menu after it is set.
VQT5H82 (ENG)
42

Recording
AFS
Taking Pictures Automatically at Set Intervals
([Time Lapse Shot])
Applicable modes:
If you set the start time of recording, the recording interval and the number of pictures, the
camera can automatically take pictures of subjects such as animals or plants as time
elapses and create a motion picture.
Set the date and time settings in advance. (P19)
•
• Pictures taken with Time Lapse Shot are displayed as a set of group pictures.
1 Set the drive mode dial to [ ].
2 Press [MENU/SET].
•
The screen selected with [Time Lapse/Animation] in the
recording menu will be displayed. (The screen will be
displayed only when you press [MENU/SET] for the first
time after switching the drive mode dial to [ ]. In other
cases, the camera operates as usual, displaying the menu
screen.)
3 Press [MENU/SET].
4 Select [Mode] with 3/4, and then press [MENU/SET].
5 Select [Time Lapse Shot] with 3/4, and then press [MENU/SET] .
6 Press 3/4 to select the item and then press [MENU/SET].
[Now] Starts the recording by fully-pressing the shutter button.
You can set the time to start recording.
[Start Time]
[Shooting
Interval]/
[Image
Count]
[Start Time
Set]
The recording interval and the number of pictures can be set.
2/1: Select the item (minute/second/number of pictures)
3/4: Setting
[MENU/SET]: Set
7 Press the shutter button halfway.
•
The recording screen will be displayed. You can also
perform the same operation by pressing an d holding
[ ] until the recording screen is displayed.
Any time up to 23 hours 59 minutes ahead can be set.
Select the item (hour or minute) by pressing 2/1, set
the start time by pressing 3/4, and then press
[MENU/SET].
MOV
4:3
p
L
24
FHD
AFS
(ENG) VQT5H82
43

Recording
8 Press the shutter button fully.
•
The recording starts automatically.
• During recording standby, the power will turn off automatically if no opera tion is performed
for a certain period. The Time Lapse Shot is continued even with the power turned off.
When the recording start time arrives, the power turns on automatically.
To turn on the power manually, press the shutter button halfway.
• If [Fn1] is pressed or [ ] is touched while this unit is turned on, a selection screen
asking you to pause or end will be displayed. Ope rate in accordance with the screen.
Also, if [Fn1] is pressed or [ ] is touched during the pause, a selection screen asking
you to resume or end will be displayed. Pressing the shutter button fully will also enable
you to resume from the pause.
• Confirmation screen for creating a motion picture is displayed next, so select [Yes].
9 Select the methods for creating a motion picture.
•
The recording format is set to [MP4 ].
[Rec Quality] Sets the quality of a motion picture.
[Frame Rate]
[Sequence]
Sets the number of frames per second.
The larger the number is, the smoother the motion picture will be.
[NORMAL]:
Splices pictures together in recording order.
[REVERSE]:
Splices pictures together in reverse recording order.
10 Select [OK] with 3/4, and then press [MENU/SET].
•
Confirmation screen is displayed. It is executed when [Yes] is selected.
∫ Changing the Time Lapse Shot settings
You can change the settings in [Time Lapse/Animation] in the [Rec] menu.
VQT5H82 (ENG)
44

Recording
AFS
Creating Stop Motion Pictures ([Stop Motion Animation])
Applicable modes:
A stop motion picture is created by splicing pictures together.
•
Set the date and time settings in advance. (P19)
• Pictures taken with [Stop Motion Animation] are displayed as a set of group pictures.
1 Set the drive mode dial to [ ].
2 Press [MENU/SET].
•
The screen selected with [Time Lapse/Animation] in the
recording menu will be displayed. (The screen will be
displayed only when you press [MENU/SET] for the first
time after switching the drive mode dial to [ ]. In other
cases, the camera operates as usual, displaying the menu
screen.)
3 Press [MENU/SET].
4 Select [Mode] with 3/4, and then press [MENU/SET].
5 Select [Stop Motion Animation] with 3/4, and then p ress [MENU/SET] .
6 Press 3
7 Press the shutter button halfway.
•
8 Press the shutter button fully.
9 Move the subject to decide on the composition.
•
• If the camera is turned off during recording, a message for resuming the recording is
/
4 to select the recording method, and then press [MENU/SET].
[Auto
Shooting]
[Shooting
Interval]
[ON]
[OFF] This is for taking pictures manually, frame by frame.
(Only when [Auto Shooting] is set to [ON])
Sets the interval for automatic recording. A value between 1 and 60 seconds
can be set in 1 second intervals.
Press 2/1 to select the recording interval (seconds), press 3/4
Takes pictures automatically at a set recording interval. When the
shutter button is pressed fully, recording starts.
to set it, and press [MENU/SET].
MOV
4:3
p
L
24
The recording screen will be displayed. You can also
perform the same operation by pressing an d holding
[ ] until the recording screen is displayed.
Repeat recording in the same way.
displayed when the camera is turned on. Selecting [Yes] allows you to resume the
recording from the interruption point.
FHD
AFS
(ENG) VQT5H82
45

Recording
10 Touch [ ] to end the recording.
•
It can also be ended by selecting [Time Lapse/Animation]
from the [Rec] menu and then pressing [MENU/SET].
• When [Auto Shooting] is set to [ON], select [End] on the
confirmation screen.
(If [Pause] has been selected, press the shutter button fully
to resume the recording.)
• Confirmation screen is displayed. It is ended when [Yes] is selected.
• Confirmation screen for creating a motion picture is displayed next, so select [Yes].
11 Select the methods for creating a motion picture.
•
The recording format is set to [MP4 ].
[Rec Quality] Sets the quality of a motion picture.
[Frame Rate]
[Sequence]
Sets the number of frames per second.
The larger the number is, the smoother the motion picture will be.
[NORMAL]:
Splices pictures together in recording order.
[REVERSE]:
Splices pictures together in reverse recording order.
12 Press 3/4 to select [OK] and then press [MENU/SET].
•
Confirmation screen is displayed. It is executed when [Yes] is selected.
∫ Changing the settings of Stop Motion Animation
You can change the settings in [Time Lapse/Animation] in the [Rec] menu.
∫ Adding pictures to the Stop Motion Animation group
Selecting [Add to Picture Group] in step
Motion Animation].
Select a set of group pictures, press [MENU/SET], and then select [Yes] on the
confirmation screen.
6 will display group pictures recorded with [Stop
30
VQT5H82 (ENG)
46

Recording
Setting the Picture Quality and Size
Setting the aspect ratio of pictures
Applicable modes:
This allows you to select the aspect ratio of the pictures to suit printing or the playback method.
MENU
> [Rec] > [Aspect Ratio]
[4:3] [Aspect Ratio] of a 4:3 TV
[3:2] [Aspect Ratio] of a 35 mm film camera
[16:9] [Aspect Ratio] of a high-definition TV, etc.
[1:1] Square aspect ratio
• The ends of the recorded pictures may be cut at printing so check before printing.
Setting the number of pixels
Applicable modes:
Set the number of pixels. The higher the numbers of pixels, the finer the detail of the
pictures will appear even when they are printed onto large sheets.
MENU
> [Rec] > [Picture Size]
When the aspect ratio is [4:3]. When the aspect ratio is [3:2].
Settings Image size Settings Image size
[L] (16M) 4608k3456 [L] (14M) 4608k3072
[M] (8M) 3264k2448 [M] (7M) 3264k2176
[S] (4M) 2336k1752 [S] (3.5M) 2336k1560
When the aspect ratio is [16:9]. When the aspect ratio is [1:1].
Settings Image size Settings Image size
[L] (12M) 4608k2592 [L] (12M) 3456k3456
[M] (8M) 3840k2160 [M] (6M) 2448k2448
[S] (2M) 1920k1080 [S] (3M) 174 4k1744
When [Ex. Tele Conv.] (P102) is set, [ ] is displayed on the picture sizes of each aspect ratio
•
except for [L].
• The picture size will be fixed to [S] when [Burst Rate] is set to [SH].
(ENG) VQT5H82
47

Recording
Setting the compression rate of pictures ([Quality])
Applicable modes:
Set the compression rate at which the pictures are to be stored.
MENU
> [Rec] > [Quality]
Settings File format Description of settings
[A]
[›]
[]
[]
JPEG
RAWiJPEG
[] RAW
¢1 If you delete a RAW file from the camera, the corresponding JPEG image will also be
deleted.
¢2 It is fixed to maximum recordable pixels ([L]) for each image aspect ratio.
A JPEG image in which image quality was given priority.
A standard image quality JPEG image.
This is useful for increasing the number of shots without
changing the number of pixels.
You can record a RAW image and a JPEG image ([A] or
[›]) simultaneously.
You can only record RAW imag es.
¢1
¢2
[ ] images are recorded with a smaller data volume than
[] or [].
VQT5H82 (ENG)
48

Recording
AUTO
ISOISOISO
AUTO
Setting the Light Sensitivity
Applicable modes:
This allows the sensitivity to light (ISO sensitivity) to be set. Setting to a higher figure
enables pictures to be taken even in dark places without the resulting pictures coming out
dark.
Press [ ].
1
Select the ISO sensitivity by rotating the rear
2
dial or the front dial.
Press [ ] to set.
3
• You can also press the shutter button halfway to set.
ISO
ISOISOISOISOISOISOISO
AUTO
ISO
AUTO
2002004040
AUTO
(Intelligent)
100¢/200/400/800/1600/
3200/6400/12800/25600
¢ Only available when [Extended ISO] is set.
The ISO sensitivity is automatically adjusted according to the
brightness.
The camera detects movement of the subject and then
automatically sets the optimum ISO sensitivity and shutter
speed to suit the movement of the subject and brightness of
the scene to minimise the jitter of the subject.
The ISO sensitivity is fixed to various settings.
• Setting items below will be selectable in Creative Video Mode.
[AUTO]/[200] to [64 00]
• When [Electronic Shutter] is set to [ON], the lSO sensitivity can be set up to [ISO3200].
(ENG) VQT5H82
49

Recording
WBWBWB
AWB
Adjusting the White Balance
Applicable modes:
In sunlight, under incandescent lights or in other such conditions where the colour of white
takes on a reddish or bluish tinge, this item adjusts to the colour of white which is closest
to what is seen by the eye in accordance with the light source.
Press [ ].
1
Rotate the rear dial or front dial to select the
2
White Balance.
WB
Press [ ] to set.
3
• You can also press the shutter button halfway to set.
[AWB] Automatic adjustment
[V] When taking pictures outdoors under a clear sky
[Ð] When taking pictures outdoors under a cloudy sky
[î] When taking pictures outdoors in the shade
[Ñ] When taking pictures under incand escent lights
¢
[]
1 2 3 4
[]/[]/[]/[ ]
[] When using the preset colour temperature setting
¢ It will operate as [AWB] during motion picture recording.
When tak ing pictures with the flash only
The manually set value is used
WBWBWBWBWBWBWB
AWB
VQT5H82 (ENG)
50

Recording
2.8
BA
4.0
F
C
Taking Pictures with Your Favourite Settings
(Programme AE Mode)
Recording Mode:
The camera automatically sets the shutter speed and the aperture value according to the
brightness of the subject.
You can take pictures with greater freedom by changing various settings in the [Rec]
menu.
Set the mode dial to [ ].
1
Press the shutter button halfway and display
2
the aperture value and shutter speed value
on the screen.
A Aperture value
B Shutter speed
• If the exposure is not adequate when the shutter button is pressed halfway, the aperture
value and shutter speed turn red and blink.
Programme Shift
In Programme AE Mode, you can change the preset aperture value and shutter speed
without changing the exposure. This is called Programme Shift.
1 Press the shutter button halfway and display the aperture value and shutter
speed value on the screen.
2 While the values are displayed (about 10 seconds),
perform Programme Shift by rotating the rear dial or
front dial.
C Programme Shift indication
• To cancel Programme Shift, turn off this unit or rotate the
front/rear dial until the Programme Shift indication
disappears.
250 15
SSSSSS
F
2.8
4.0
6060602.8
6060604.0
0
2
00
3060125
4.02.8 5.6 8.0
0
2
00
989898
989898
(ENG) VQT5H82
51

Recording
S
F
8.0
A
250
B
CA B
Taking Pictures by Specifying the Aperture/
Shutter Speed
Recording Mode:
• The effects of the set aperture value and shutter speed will not be visible on the recording
screen. To check on the recording screen, please use [Preview]. (P53)
•
Rotate the front/rear dial to display the Exposure Meter. Unsuitable areas of the range are displayed in red.
• If the exposure is not adequate, the aperture value and the shutter speed turn red and blink
when the shutter button is pressed halfway.
Aperture-Priority AE Mode
When you set the aperture value, the camera automatically optimises the shutter speed
for the brightness of the subject.
Set the mode dial to [ ].
1
Set the aperture value by rotating the rear
2
dial or the front dial.
A Aperture value
Shutter-Priority AE Mode
When you set the shutter speed, the camera automatically optimises the aperture value
for the brightness of the subject.
Set the mode dial to [ ].
1
60 4
SSS
4.0 5.6 8.0 11 16
F
8.0
8.0
81530
Set the shutter speed by rotating the rear dial
2
or the front dial.
B Shutter speed
SSSSSS
F
60
5.6 4.0 2.8
250
250
Manual Exposure Mode
Determine the exposure by manually setting the aperture value and the shutter speed.
The Manual Exposure Assistance appears on the lower portion of the screen to indicate
the exposure.
Set the mode dial to [ ].
1
Rotate the rear dial to set the shutter speed,
2
and rotate the front dial to set the aperture
value.
A Aperture value
B Shutter speed
C Manual Exposure Assistance
VQT5H82 (ENG)
52
SSSSSS
F
3030305.6
250 500125
603015
5.64.02.8 8.0 11
00
+3
1000
1258

Recording
+
30
−
3
Optimising the ISO sensitivity for t he shutter speed and aperture value
When the ISO sensitivity is set to [AUTO], the camera sets the ISO sensitivity automatically so
that the exposure will be appropriate for the shutter speed and aperturer value.
Manual Exposure Assistance
The exposure is adequate.
000
+
+
30
Set to faster shutter speed or larger aperture value.
000
−
3
Set to slower shutter speed or smaller aperture value.
∫ About [B] (Bulb)
If you set the shutter speed to [B], the shutter stays open while the shutter button is
pressed fully (up to approximately 60 minutes).
The shutter closes if you release the shutter button.
Use this when you want to keep the shutter open for a long time to take pictures of
fireworks, a night scene etc.
If you set the shutter speed to [B], [B] is displayed on the screen.
•
• The Manual Exposure Assistance does not app ear.
• This cannot be used when [Electronic Shutter] is set to [ON].
• It can only be used with Manual Exposure Mode.
Checking/not checkin g the effects of aperture and shutter speed on the
recording screen
MENU
> [Custom] > [Constant Preview] > [ON]/[OFF]
•
Close the flash.
• It can only be used with Manual Exposure Mode.
Confirm the Effects of Aperture and Shutter Speed (Preview Mode)
Applicable modes:
1 Set a function button to [Preview]. (P87)
•
The following step is an example in which [Preview] is assigned to [Fn4].
2 Switch to confirmation screen by pressing [Fn4].
•
Screen is switched every time [Fn4] is pressed.
Aperture effect preview
Normal recording screen
Shutter speed effect: —
screen
Aperture effect: ±
Shutter spe ed effect: ±
Shutter speed e ffect
preview screen
Aperture effect: ±
(ENG) VQT5H82
53

Recording
Compensating the Exposure
Applicable modes:
Use this function when you cannot achieve appropriate exposure due to the difference in
brightness between the subject and the background.
Press [ ].
1
Rotate the rear dial or the front dial to
2
compensate the exposure.
• When not adjusting the setting, select [n0]
Press [ ] to set.
3
• You can also press the shutter button halfway to set.
-5-5-4-4-3-3-2-2-1-
+1+1 +2+2 +3+3 +4+4 +5+5
100
000
+5+5+5
Selecting the Method for Measuring Brightness
([Metering Mode])
Applicable modes:
Type of optical measurement to measure bright ness can be changed.
MENU
> [Rec] > [Metering Mode]
[]
(Multiple)
[]
(Centre weighted)
[]
(Spot)
VQT5H82 (ENG)
54
This is the method in which the camera measures the most suitable
exposure by judging the allocation of brightness on the whole screen
automatically. Usually, we recommend using this method.
This is the method used to focus on the subject on the centre of the
screen and measure the whole scre en evenly.
This is the method to measure the subject in the spot
metering target A.

Recording
0
AELAEL
0
A
Fixing the Focus and the Exposure (AF/AE Lock)
Applicable modes:
This is useful when you want to take a picture of a subject outside the AF area or the
contrast is too strong and you cannot achieve appropriate exposure.
Align the screen with the subject.
1
Press and hold [AF/AE LOCK] to fix the focus
2
or exposure.
• If you release [AF/AE LOCK], AF/AE Lock is cancelled.
• Only the exposure is locked in the default setting.
While pressing [AF/AE LOCK], move the
3
camera as you compose the picture and then
press shutter button fully.
A AE Lock indication
• When [AE LOCK] is set, after pressing the shutter button halfway to focus, press the
shutter button fully.
Setting the functions of [AF/AE LOCK]
MENU
> [Custom] > [AF/AE Lock]
AF/AE
LOCK
AEL
AEL
2.8
60
0
2
0
Only the exposure is locked.
[AE LOCK]
[AF LOCK]
[AF/AE LOCK]
[AF-ON] Auto Focus is performed.
• When the exposure is set, [AEL], the aperture value, and the shutter speed
are displayed.
Only the focus is locked.
• When the subject is focused, [AFL], the focus indication, the aperture value,
and the shutter speed are displayed.
Both focus and exposure are locked.
• [AFL], [AEL], the focus indication, aperture value and shutter speed are
displayed when the focus and the exposure are optimised.
Maintaining/not maintaining the lock when [AF/AE LOCK] is released
MENU
> [Custom] > [AF/AE Lock Hold] > [ON]/[OFF]
(ENG) VQT5H82
55

Recording
Disabling Operational Sounds and the Output of
Light at once
Applicable modes:
This function is useful for recording images in a quiet environment, public facility, etc. or
recording images of subjects such as babies or animals.
Select the menu. (P28)
MENU
> [Custom] > [Silent Mode]
Settings: [ON]/[OFF]
Operational sounds are muted, and the flash and the AF Assist lamp are forced off.
•
The following settings are fixed.
– [Electronic Shutter]: [ON]
– [Flash Mode]: [Œ] (forced flash off)
– [AF Assist Lamp]: [OFF]
– [Beep Volume]: [s] (OFF)
– [E-Shutter Vol]: [ ] (OFF )
– [Speaker Volume]: 0
• Even when [ON] is set, the following functions light up/flash.
– Status indicator
– Self-timer indicator
– Wi-Fi connection lamp
• Sounds that are produced by the camera regard less of your operations, such as the lens
aperture sound, cannot be muted.
• Be sure to pay special attention to the privacy, the likeness rights, etc. of the subject
when you use this function. Use at your own risk.
([Silent Mode])
Taking Pictures with No Shutter Sound
([Electronic Shutter])
Applicable modes:
The shutter sound can be turned off for recording in a quiet environment. The mechanical
shutter is disabled, making it easier to take pictures with minimised blur.
We recommended making a trial recording in advance because distorted subjects and
horizontal stripes may be recorded depending on the recording conditions.
Select the menu. (P28)
MENU
> [Rec] > [Electronic Shutter]
Settings: [ON]/[OFF]
• Flash is fixed to [Œ] (forced flash off).
•
Under fluorescent or LED lighting, etc., horizon tal stripes may appear on recorded pictures. In
such cases, lowering the shutter speed may reduce the effect of the horizontal stripes.
• If a subject is moving, the subject may appear distorted on the picture taken.
VQT5H82 (ENG)
56

Taking pictures by using the flash
Applicable modes:
Taking a picture using the flash becomes possible by opening
the built-in flash.
A To open the flash
Turn the camera on, and press the flash open button.
B To close the flash
Push the top part of the built-in flash from directly above.
•
Forcibly closing the flash can damage the camera.
• Make sure to close the built-in flash wh en it is not in use.
• The flash setting is fixed to [Œ] while the flash is closed.
• Be careful not to catch a finger when closing a flas h bulb.
• In the following cases, the flash is fixed to [ Œ] (forced flash off).
– When recording motion pictures
– When [Ele ctronic Shutter] is s et to [ON]
– When [HDR] is set to [ON]
– When [Silent Mode] is set to [ON]
Changing Flash Mode
Recording
Applicable modes:
Set the built-in flash to match the recording.
1 Select the menu. (P28)
MENU
> [Rec] > [Flash] > [Flash Mode]
2 Press 3/4 to select the item and then press [MENU/SET].
‰ ([Forced Flash On])
([Forced On/Red-Eye])
([Slow Sync.])
([Slow Sync./Red-Eye])
The flash is activated every time regardless of the recording
conditions.
• Use this when your subject is back-lit or under
fluorescent light.
When taking pictures against a dark background landscape,
this feature will slow the shutter speed when the flash is
activated. Dark background landscape will appear brighter.
• Use this when you take pictures of people in front of a
dark background.
• Using a slower speed can cause motion blur. Using a
tripod can enhance your photos.
(ENG) VQT5H82
57

Motion Picture
3
s
R1m
37
s
C
B
A
Recording Motion Picture
Applicable modes:
This can record full high definition motion pictures compatible with the AVCHD format or
motion pictures recorded in MP4, MOV.
The functions available when recording motion pictures differ according to the lens you are
using, and the operational sound of the lens may be recorded.
Start recording by pressing the motion
1
picture button.
A Elapsed recording time
B Available recording time
• Recording of motion picture appropriate for each mode is
possible.
• The recordin g state indicator (red) C will flash while
recording motion pictures.
• If no operation is performed, part of the information on
the screen will gradually become darker after
approximately 10 seconds has passed, and will no longer
be displayed after approximately 1 minute has passed.
Pressing the [DISP.] button or touching the monitor will
make the display reappear. This operation is to prevent
screen burn-in and is not a malfunction.
• Release the motion picture button right after you press it.
Stop the recording by pressing the motion picture button again.
2
• Still picture recording is also possible during the motion picture recording by fully
pressing the shutter button.
3
s
3
s
37
R1m37s
VQT5H82 (ENG)
58

Motion Picture
About the operation sound that is produced when you stop recording
Since motion picture recording stops only after you press the motion picture button, the
sound of the operation may be noticeable. If the sound bothers you, try the following:
–
Divide the last part of the motion picture using [Video Divide] (P74) in the [Playback]
menu.
The motion picture may not be divided near the very end of it. To avoid this, record
approximately 3 seconds lo nger.
– Set the camera to Creative Video Mode, and use a shutter remote control (optional) to
record motion pictures.
• Maximum time to record motion pictures continuously with [AVCHD] is 29 minutes 59 seconds.
• When the motion picture size is set to [FHD], [HD] or [VGA] in [MP4], you can continuously
record a motion picture up to 29 minutes 59 seconds or until the file size rea ches 4 GB. You
can check the re cordable time on the scree n.
– Since the file size becomes larger with [FHD], recording with [FHD] will stop before 29
minutes 59 seconds.
• When the motion picture size is set to [4K] in [MP4], the maximum time to record motion
pictures continuously is 29 minutes 59 seconds.
You can continuously record a motion picture with its size set to [4K] in [MP4] without a pause
even if the motion picture exceeds 4 GB. However, the recorded content has to be played ba ck
as multiple files.
• Maximum time to record motion pictures continuously with [MP4 (LPCM)]/[MOV] is 29 minutes
59 seconds.
Though a [MP4 (LPCM)]/[MOV] motion picture can be recorded continuously without a pause
even when its file size exceeds 4 GB, the recorded content is played back with multiple files.
(ENG) VQT5H82
59

Motion Picture
A
C
D
B
Recording motion pictures in 4K
Applicable modes:
You can create finely-detailed motion pictures in 4K by recording motion pictures with their
size set to [4K] or [C4K] in [Rec Quality].
• You can record motion picture s in 4K only in Creative Video Mode.
•
The angle of view of moti on pictures in 4K i s narrower than th ose of motion pictures in other sizes.
• When recording motion pictures in 4K, use a card rated as UHS Speed Class 3. (P15)
To record motion pictures in 4K:
1 Set the mode dial to [ ]. (P22)
2 Set [Rec Format] in the [Motion Picture] menu to [MP4], [MP4 (LPCM)] or [MOV].
3
Set the motion picture size to [4K] or [C4K] in [Rec Quality] in the [Motion Picture] menu.
Setting the format, size and recording frame rate
Applicable modes:
Select the menu. (P28)
1
MENU
> [Motion Picture] > [Rec Format]
Press 3/4 to select the item and then press [MENU/SET].
2
[AVCHD]
[MP4] The MP4 data format is suitable for playback on a PC, etc.
[MP4 (LPCM)] The MP4 data format for imag e editing.
[MOV] Data format for image editing.
•
When [MP4 (LPCM)] or [MOV] is selected, confirmation screen is displayed. Select [Yes] to execute.
Press 3/4 to select [Rec Quality] and then press [MENU/SET].
3
Press 3/4 to select the item and then press [MENU/SET].
4
• Available items differ depending on [Rec Format] and [System Frequency] (P69).
• Exit the menu after it is set.
∫ Indication of the icon
A Size
B ALL-lntra
C Bit rate
D Recording frame rate (Sensor output)
•
“ALL-Intra” refers to a data compression method
in which each frame is compressed. The file size
of motion pictures recorded in this method becomes larger, but this method can prevent the
loss of image quality because editing does not require re-encoding.
• What is bit rate
This is the volume of data for a definite period of time, and the quality becomes higher
when the number gets bigger.
• Depending on the [Rec Format] and [Rec Quality] of a motion picture, the speed
class rating required for the card differs. Use a card that mee ts the rating. For details,
refer to
VQT5H82 (ENG)
60
This data format is suitable for when playing back on a high-definition
TV, etc.
FHD
ALL-I
p
24
200
M
“About the motion picture recording and speed class” on P15.

Motion Picture
When [AVCHD] is selected
(±: Available, —: Not available)
Item
[FHD/28M/60p]
[FHD/28M/50p]
System frequency
Size
¢
1
¢
1
59.9 4Hz
(NTSC)
50.00Hz
(PAL)
24.00Hz
(CINEMA)
± ——1920k1080 59.94p 59.94 28 Mbps
— ± — 1920k1080 50.00p 50.00 28 Mbps
Recording
frame rate
Sensor
output
¢2
Bit rate
[FHD/17M/60i] ± ——1920k1080 59.94i 59.94 17 Mbps
[FHD/17M/50i] — ± — 1920k1080 50.00i 50.00 17 Mbps
[FHD/24M/30p] ± ——1920k1080 59.94i 29.97 24 Mbps
[FHD/24M/25p] — ± — 1920k1080 50.00i 25.00 24 Mbps
[FHD/24M/24p] ± ——1920k1080 23.98p 23.98 24 Mbps
¢1 AVCHD Progressive
¢2 Frames/second
• Maximum time to record motion pictures continuously with [AVCHD] is 29 minutes 59 seconds.
(ENG) VQT5H82
61

Motion Picture
When [MP4] is selected
(±: Available, —: Not available)
System freq uency
Item
[4K/100M/30p]
59.94Hz
(NTSC)
¢1
50.00Hz
(PAL)
24.00Hz
(CINEMA)
± ——3840k2160 29.97p 29.97
Size
[4K/100M/25p]¢1— ± — 3840k2160 25.00p 25.00
Recording
frame rate
Sensor
output
¢2
Bit rate
100 Mbps
100 Mbps
[FHD/28M/60p] ± ——1920k1080 59.94p 59.94 28 Mbps
[FHD/28M/50p] — ± — 1920k1080 50.00p 50.00 28 Mbps
[FHD/20M/30p] ± ——1920k1080 29.97p 29.97 20 Mbps
[FHD/20M/25p] — ± — 1920k1080 25.00p 25.00 20 Mbps
[HD/10M/30 p] ± ——1280k720 29.97p 29.97 10 Mbps
[HD/10M/25 p] — ± — 12 80k720 25.00p 25.00 10 Mbps
[VGA/4M/30p]
[VGA/4M/25p]
¢3
± ——640k480 29.97p 29.97 4 Mbps
¢3
— ± — 640 k480 25.00p 25.00 4 Mbps
¢1 These can be set only in Creative Video Mode.
¢2 Frames/second
¢3 If you use the HDMI output during recording, these items are not available.
• When the motion picture size is set to [FHD], [HD] or [VGA] in [MP4], you can continuously
record a motion picture up to 29 minutes 59 seconds or until the file size reaches 4 GB. You
can check the recordable time on the screen.
– Since the file size becomes larger with [FHD], recording with [FHD] will stop before 29
minutes 59 seconds.
• When the motion pictu re size is set to [4K] in [MP4 ], the maximum time to record motion
pictures continuously is 29 minutes 59 seconds.
You can continuously record a motion picture with its size set to [4K] in [MP4] without a pause
even if the motion picture exceeds 4 GB. However, the recorded content has to be played back
as multiple files.
VQT5H82 (ENG)
62

Motion Picture
When [MP4 (LPCM)], [MOV] is selected
(±: Available, —: Not available)
System frequency
Item
[C4K/100M/24p]
[4K/100M/30p]
[4K/100M/25p]
[4K/100M/24p]
[FHD/ALL-I¢2/
200M/60p]
¢
1
¢
1
¢
1
¢
1
59.9 4Hz
(NTSC)
50.00Hz
(PAL)
24.00Hz
(CINEMA)
——± 4096k2160 24.00p 24.00
± ——3840k2160 29.97p 29.97
— ± — 3840k2160 25.00p 25.00
——± 3840k2160 24.00p 24.00
± ——3840k2160 23.98p 23.98
± ——1920k1080 59.94p 59.94
Size
[FHD/100M/60p] ± ——1920k1080 59.94p 59.94
Recording
frame rate
Sensor
output
¢3
Bit rate
100 Mbps
100 Mbps
100 Mbps
100 Mbps
100 Mbps
200 Mbps
100 Mbps
[FHD/50M/60p] ± ——1920k1080 59.94p 59.94 50 Mbps
[FHD/ALL-I¢2/
200M/50p]
— ± — 1920k1080 50.00p 50.00
[FHD/100M/50p] — ± — 1920 k1080 50.00p 50.00
200 Mbps
100 Mbps
[FHD/50M/50p] — ± — 1920k1080 50.00p 50.00 50 Mbps
[FHD/ALL-I¢2/
200M/30p]
[FHD/100M/30p] ± ——1920k1080 29.97p 29.97
± ——1920k1080 29.97p 29.97
200 Mbps
100 Mbps
[FHD/50M/30p] ± ——1920k1080 29.97p 29.97 50 Mbps
[FHD/ALL-I¢2/
200M/25p]
— ± — 1920k1080 25.00p 25.00
[FHD/100M/25p] — ± — 1920 k1080 25.00p 25.00
200 Mbps
100 Mbps
[FHD/50M/25p] — ± — 1920k1080 25.00p 25.00 50 Mbps
[FHD/ALL-I¢2/
200M/24p]
[FHD/100M/24p]
[FHD/50M/24p]
¢1 These can be set only in Creative Video Mode.
¢2 ALL-lntra
¢3 Frames/second
• Maximum time to record motion pictures continuously with [MP4 (LPCM)]/[MOV] is 29 minutes
59 seconds.
Though a [MP4 (LPCM)]/[MOV] motion picture can be recorded continuously without a pause
even when its file size exceeds 4 GB, the recorded content is played back with multiple files.
——± 1920k1080 24.00p 24.00
± ——1920k1080 23.98p 23.98
——± 1920k1080 24.00p 24.00
± ——1920k1080 23.98p 23.98
——± 1920k1080 24.00p 24.00 50 Mbps
± ——1920k1080 23.98p 23.98 50 Mbps
(ENG) VQT5H82
200 Mbps
200 Mbps
100 Mbps
100 Mbps
63

Motion Picture
How to set focus when recording a motion picture ([Continuous AF])
Applicable modes:
Focusing changes depending on the Focus Mode setting (P36) and the [Continuous AF]
setting in the [Motion Picture] menu.
[Focus Mode]
[AFS]/[AFF]/
[AFC]
[MF] [ON]/[OFF] You can focus manually. (P40)
•
When the focus mode is set to [AFS], [AFF] or [AFC], if you press the shutter button halfway
while recording a motion picture, the camera will re-adjust the focus.
[Continuous
AF]
[ON]
[OFF]
Description of settings
The camera automatically keeps focusing on subjects
during recording. (P36)
The camera maintains the focus position at the start of
recording.
Recording motion pictures with manually set
aperture value/shutter speed
Recording Mode:
It is possible to manually change the aperture and shutter speed and record motion
pictures.
(Creative Video Mode)
Set the mode dial to [ ].
1
Select the menu. (P28)
2
MENU
> [Motion Picture] > [Exposure Mode]
Press 3/4 to select [P], [A], [S] or [M], and then press [MENU/SET].
3
• The operation for changing the aperture value or shutter speed is the same as the
operation for setting the mode dial to , , or .
Start recording.
4
• Press the motion picture button or the shutter button to start recording a motion picture.
(Still pictures cannot be taken.)
Stop recording.
5
• Press the motion picture button or the shutter button to stop recordin g a motion picture.
VQT5H82 (ENG)
64

Motion Picture
Minimising operational sounds during motion picture recording
The operational sound of the zoom or button operation may be recorded when it is
operated during the recording of a motion picture.
Using touch icons allows silent operation while recording motion pictures.
Set [Silent Operation] in the [Motion Picture] menu to [ON].
•
Start recording.
1
Touc h [ ].
2
Touch icon.
3
Zoom (When an interchangeable lens compatible with power
zoom is used)
Aperture value
F
SS
ISO
Drag the slide bar to set.
4
• The speed of the operation varie s depending on the
position you touch.
[ ]/[ ] changes the setting slowly
[ ]/[ ] changes the setting quickly
Shutter spee d
Exposure Compensation
GAIN
/ ISO sensitivity/Gain (dB) (P104)
Mic level adjustment
Stop recording.
5
(ENG) VQT5H82
65

Motion Picture
Using Advanced Settings and Recording
Functions for Motion Pictures
[Luminance Level]
Applicable modes:
You can set the luminance range for motion pictures. When you combine multiple
materials into a single motion picture, set a range that covers all materials.
MENU
> [Motion Picture] > [Luminance Level]
Settings: [0s255]/[16s235]/[16s255]
•
This function works only for motion pictures. Still pictures (including those you take during
motion picture recording) will be taken with [0s255].
•
When [Rec Format] is set to [AVCHD] or [MP4], [0-255] in [Luminance Level] will switch to [16-255].
Checking areas that may be white saturated ([Zebra Pattern])
Applicable modes:
You can check areas that may be white saturated by displaying areas above a certain
luminance level in a zebra pattern. You can also set the minimum luminance level
(brightness) to be pr ocessed as a zebra pattern.
MENU
> [Custom] > [Zebra Pattern]
Displays areas above a certain luminance level by a
[ZEBRA1]
right-leaning zebra pattern.
Displays areas above a certain luminance level by a
[ZEBRA2]
[OFF] —
left-leaning zebra pattern.
Sets the minimum brightness level for each zebra pattern.
[Zebra 1]/[Zebra 2]
Press 3/4 to select the brightness, and press [MENU/SET].
[SET]
If there are any white saturated areas, we recommen d compensating the exposure towards
•
negative (P54) referring to the histogram (P105) and then taking the picture.
• Displayed zebra patterns will not be recorded.
VQT5H82 (ENG)
66
•
You can sele ct a bright ness value between [50%] and [105%]. In [Zebra 2], you
can select [OFF]. If you select [100%] or [105%], only the areas that are
already white saturated are displayed i n a zebra pattern. The smaller the value
is, the wi der the brightness range to be processed as a zebra pattern will be.

Motion Picture
Recording while monitoring camera images
Applicable modes:
During HDMI output, you can record while monitoring motion
pictures on the TV, etc.
Refer to P89 on how to connect with TV by using HDMI micro cable.
•
• The [Rec Quality] setting in the motion picture recording menu
will be applied to screens that are output through the HDMI
connection during recording.
∫ Setting the output method of the HDMI connection
MENU
> [Motion Picture] > [HDMI Rec Output]
Sets the picture quality for the HDMI output.
[4:2:2 8bit]:
Allows you to record the image being outp ut through the HDMI connection
as a motion picture. This option is ideal for monitoring the image on the
[Bit Mode]
[Info Display]
[4K Down
Convert]
Do not use the headphone cables with the length of 3 m (9.8 feet) or more.
•
• Excessive sound pressure from earphones and headphones can cause hearing loss.
• Listening at excessive volume for long periods may damage the user ’s ears.
• When you use HDMI output during recording, the imag e may be displayed with a time lag.
external monitor while recording it.
[4:2:2 10bit]:
Allows you to output the image through the HDMI connection in high picture
quality. This option is ideal for saving the image on the external device.
• You can select [4:2:2 10bit] only in Creative Video Mode.
• If you output the image through the HDMI connection when [Bit Mode] is
set to [4:2:2 10bit], motion pictures cannot be recorded.
Shows or hides the displays of information.
[ON]:
Outputs the displays on the camera as they are.
[OFF]:
Outputs only the image.
• If you output the image through the HDMI connection when [Bit Mode] is
set to [4:2:2 10bit], this setting is fixed to [OFF].
Switches the picture quality according to the connected device.
[AUTO]:
When the motion picture size is set to [4K] or [C4K] in [Rec Quality] and the
connected device is not responding, the HDMI output picture quality
automatically switches to [1080p].
[1080p]:
When the motion picture size is set to [4K] or [C4K] in [Rec Quality], the
HDMI output picture quality switches to [1080p].
[OFF]:
Outputs the image through the HDMI connection with the picture quality set
in [Rec Quality].
(ENG) VQT5H82
67

Motion Picture
Reducing flickering and horizontal stripes on images ([Synchro Scan])
Applicable modes:
•
This function is available when [Exposure Mode] is set to either [S] or [M] in Creative Video Mode.
1 Select the menu. (P28)
MENU
> [Motion Picture] > [Synchro Scan]
2 Select [ON] with 3/4, and then press [MENU/SET].
3 Select Shutter Speed with 2/1, and then press [MENU/SET] .
You can fine-adjust the shutter speed.
•
• Adjust the shutter speed while looking at the screen so that flickering and horizontal
stripes will be minimised.
• If you press and hold 2/1, the shutter speed will be adjusted faster.
• You can a lso adjust the shutter spe ed setting on the recording screen in increments finer
than the normal adjustment method.
∫ Cancelling [Synchro Scan]
Select the [OFF] setting in step
2.
Recording in Slow or Fast Motion ([Variable Frame Rate])
Applicable modes:
•
This function is available only when the camera is set to Creative Video Mode.
•
Recording with a variable frame rate is possible with the following settings in [Rec Format] and [Rec Qualit y].
When [System Frequency] is set to [59.94 Hz (NTSC)]
[AVCHD]
[MP4 (LPCM)]/
[MOV]
¢ When [Rec Format] is set to [MP4], recording with a variable frame rate is not possible.
• Auto Focus does not work.
• Aud io is not recorded.
• [FHD/24M/30p]/[FHD/24M/24p]
When [System Frequency] is set to [50.00 Hz (PAL)]
• [FHD/24M/25p]
When [System Frequency] is set to [59.94 Hz (NTSC)]
• [FHD/100M/30p]/[FHD/100M/24p]
When [System Frequency] is set to [50.00 Hz (PAL)]
• [FHD/100M/25p]
When [System Frequency] is set to [24.00 Hz (CINEMA)]
• [FHD/100M/24p]
1 Select the menu. (P28)
MENU
> [Motion Picture] > [Rec Quality]
2
Press 3/4 to select an item and then press [MENU/SET].
• Items available for recordin g with a variable frame rate are
indicated as [VFR available] on the screen .
3 Select [Variable Frame Rate] with 3/4, and then
press [MENU/SET ].
4 Select [ON] with 3/4, and then press [MENU/SET].
5 Press 2/1 to select the frame rate you will record the item with.
You can select a value between [2 fps] and [96 fps].
•
6 Press [MENU/SET].
Exit the menu after it is set.
•
VQT5H82 (ENG)
68

Motion Picture
∫ To cancel [Variable Frame Rate]
Select the [OFF] setting in step
4.
∫ To change the frame rate
Select the [SET] setting in step
•
When [Rec Format] is set to [AVCHD], you cannot set a frame rate with a number of fra mes
greater than 60fps.
• When you play back a motion picture recorded with [Variable Frame Rate], the recording time
display for motion picture s on the top righ t of the screen will look different from the one that
appears during normal motion picture playback.
[ ]: Actual playback time
XXmXX
XXmXX
s
s
[ ]: Actual elapse of time during which you recorded the motion picture
4.
Changing the system frequency
Applicable modes:
You can change the system frequency of the motion pictures you record and play back.
When creating a motion picture that has a broadcasting system different from your region
or when recording a motion picture for a film, change the system frequency.
1 Select the menu. (P28)
MENU
> [Setup] > [ System Frequen cy]
2 Press 3/4 to select an item and then press [MENU/SET].
[59.94 Hz (NTSC)] For regions where the TV broadcasting system is NTSC
[50.00 Hz (PAL)] For regions where the TV broadcasting system is PAL
[24.00 Hz (CINEMA)]
A message prompting you to restar t the camera will be displayed. Turn off and on the camera.
•
• By default, the system frequency is set to the broadcasting system of your purchase region,
[59.94 Hz (NTSC)] or [50.00 Hz (PAL)].
• When [System Frequency] is set to a broadcasting system different from that of your
region, images may not be played back correctly on the TV.
• If you are not familiar with broadcasting systems or will not be creating any motion
pictures for films, we recommend that you use the default setting.
• If you changed the setting but are not sure about the system frequency for the broadcasting
system of your region, perform [Reset] in the [Setup] menu (P29).
∫ Once you change the system frequency
After changing the [System Frequency] setting, motion pictures may not be recorded or
played back if you continue to use the card that was inserted in the camera. We
recommend that you replace the card with another one and format (P29) it on the camera.
If you continue to use the card that was inserted in the camera before you changed the setting,
•
the camera will operate as follows:
[Rec Format] [Rec] [Playback]
[AVCHD]
[MP4]/[MP4 (LPCM)]/[MOV] Recording is possible
This system frequency is for creating films
Recording is not
possible
You cannot play back motion pictures
recorded before you changed the set ting.
• Motion pictures record ed with a
different [System Frequency] setting
cannot be played back.
(ENG) VQT5H82
69

Playback/Editing
1/98
12s
A
Playing Back Pictures
Press [(].
1
Press 2/1.
2
2: Play back the previous picture
1: Play back the next picture
• If you press and hold 2/1, you can play back the
pictures in succession.
∫ To finish playback
Press [(] again, press the shutter button halfway or press the motion picture button.
1/981/98
1/98
Playing Back Motion Pictures
This unit was designed to play motion pictures using the AVCHD, MP4 and MOV formats.
•
Motion pictures are displayed with the motion picture icon
([ ]).
Press 3 to play back.
A Motion picture recording time
∫ Operations during Motion Picture Playback
Button
operation
3 Play/Pause 4 St op
2
¢ The fast forward/rewind speed increases if you press 1/2 again.
•
If you press [MENU/SET] during a pause, you can create a picture from a motion picture.
70
Touch
operatio n
VQT5H82 (ENG)
Description of
operation
Fast rewind
Frame-by-frame
rewind
(while pausing)
Reduce volume level
¢
Button
operation
1
Touch
operation
Description of
operation
Fast forward
Frame-by-frame
forward
(while pausing)
Increase volume
level
12s12s
12s
¢

Playback/Editing
2.0X
A
Switching the Playback Method
Using the Playback Zoom
Rotate the rear dial right.
1k 2k 4k 8k 16k
•
If the rear dial is rotated to the left after the image is enlarged,
the magnification will be reduced.
• You can move the enlarged part by pressing 3/4/2/1 of the
cursor button or dragging the screen. (P26)
• You can also en large (2k) the image by doub le-touching the
part you want to enlarge. If you double-touch the enlarged
image, the magnification is reset to 1k.
• You can forward or rewind the image while maintaining the same
zoom magnification and zoom position for the Playback Zoom
by rotating the control dial during Playback Zoom.
A Zoom position indication
Displaying multiple screens (Multi Playback)
Rotate the rear dial left.
1 screen 12 screens 30 screens Calendar screen display
• If the rear dial is rotated to the right, the previous playback
screen will be displayed.
• It is possible to switch the playback screen by touching the
following icons.
– []: 1screen
– [ ]: 12 screens
– [ ]: 30 screens
CAL
– [ ]: Ca lendar screen display
• The screen can be switched gradually by dragging the screen up or down.
∫ To return to Normal Playback
Press 3/4/2/1 to select a picture and then press [MENU/SET].
2.0X2.0X
2.0X
1/98
Displaying Pictures by Recording Date (Calendar Playback)
1 Rotate the rear dial left to display the Calendar screen.
2 Press 3/4/2/1 to select the date to be played back.
3 Press [MENU/SET] to display the images that are
recorded in selected d ate.
4 Press 3/4/2/1 to select a picture and then press
[MENU/SET].
(ENG) VQT5H82
6HW
71

Playback/Editing
Fn4
'HOHWH6LQJOH
'HOHWH0XOWL
'HOHWH$OO
Deleting Pictures
Once deleted, pictures cannot be recovered.
To delete a single picture
In Playback Mode, select the picture to delete
1
and then press [ ].
• The same opera tion can be performed by touching
[].
Press 3 to select [Delete Single] and then
2
press [MENU/SET].
• Confirmation screen is displayed.
Picture is deleted by selecting [Yes].
To delete multiple pictures (up to 100¢) or all the pictures
¢ Picture groups are treated as a single picture.
(All the pictures in the selected picture group will be deleted.)
In Playback Mode, press [ ].
1
Press 3/4 to select [Delete Multi] or [Delete All] and then press
2
[MENU/SET].
• [Delete All] > Confirmation screen is displayed.
Pictures are deleted by selecting [Yes].
• It is possible to delete all pictures excep t the ones set as favourite wh en [All Delete
Except Favorite] is selected with the [Delete All] set.
(When [Delete Multi] is selected)
3
Press 3/4/2/1 to select the picture, and then
press [MENU/SET] to set.
• [‚] appears on the selected pictures.
If [MENU/SET] is pressed ag ain, the setting is cancelled.
(When [Delete Multi] is selected)
4
Press 2 to select [OK], and then press [MENU/SET] to execute.
• Confirmation screen is displayed.
Pictures are deleted by selecting [Yes].
VQT5H82 (ENG)
72
(Repeat this step.)
2.

Playback/Editing
WBWBWBWBWBWBWBWBWBWBWB
AWB
AWB
DISP.
Using the [Playback] Menu
[RAW Processing]
You can process the pictures taken in RAW format. The processed pictures will be saved in JPEG format.
1 Select the menu. (P28)
MENU
> [Playback] > [RAW Processing]
2 Select RAW images with 2/1, and then press [MENU/
SET].
3 Press 3/4 to select an item.
[White Balance] [Contrast] [Hue]/[Filter Effect]
[Exposure Comp.] [Highlight] [Noise Reduction]
[Photo Style] [Shadow] [i.Resolution]
[i.Dynamic]
4 Press [MENU/SET] and set.
The setting method differs according to the item.
•
5 Press [MENU/SET].
This operation returns you to the screen in step 3. To set other items, repeat steps 3 through 5.
•
6 Select [Begin Processing] with 3/4, and then press [MENU/S ET] .
A confirmation screen will be displayed. Selecting [Yes] will execute the operation.
•
After the operation, exit the menu.
[Saturation]/
[Color Tone]
[Sharpness]
∫ How to set each item
When you select an item, the setting screen will be displayed.
Button
operation
2/1
/
3
Touch
operation
Description of operation
Dragging Selects a s etting.
Displays the screen that lets you set
[WB K Set]
the col our tempe rature. (Onl y when
DISP.
-1-
1 00
[White Balance] is set to [ ])
Displays the screen that lets you
4 [Adjust.]
fine-adjust the White Balance.
(only when [White Balance] is set)
[DISP.] [DISP.] Displays the comparison screen.
[MENU/SET] [Set]
When [Noise Reduction], [i.Resolution] or [Sharpness] is selected, the comparison screen
•
cannot be displayed.
• If you touch the picture twice, the picture will be enlarged. If you touch the picture twice when it
Sets the adjusted level and returns
you to the item selection screen.
is enlarged, it will be reduced to the original size.
(ENG) VQT5H82
[Setup]
([Reinstate
Adjustments]/
[Color Space]/
[Picture Size])
+1+1
AWB
AWB
73

Playback/Editing
A
On the comparison screen, you can use the following operations to make adjustments:
A Current setting
Button
operation
2/1
/
[DISP.] [DISP.] Returns you to the setting screen.
[MENU/SET] [Set]
If you touch the picture at the centre, it will be enlarged. If you touch [ ], the picture will be
•
reduced to the original size.
Touch
operation
Dragging Selects a setting.
Description of operation
Sets the adjusted level and returns
you to the item selection screen.
0
DISP.
[Setup] setting
When you select an item, the screen that asks you to select [Reinstate Adjustments],
[Color Space], or [Picture Size] will be displayed.
1 Press 3/4 to select an item, and press [MENU/SET].
• If you select [Reinstate Adjustments], a confirmation screen will be displayed. Selecting
[Yes] will execute the operation and return you to the item selection screen.
2 Press 3/4 to select a setting, and press [MENU/SET].
•
This operation will apply the setting and return you to the item selection screen.
[Video Divide]
Recorded motion picture can be divided in two. It is recommended for when you want to
divide a part you need with a part you do not need.
Dividing a motion picture is permanent. Decide before you divide!
1 Select the menu. (P28)
MENU
> [Playback] > [Video Divide]
2 Press 2/1 to select the motion picture to divide, and then press [MENU/SET].
3 Press 3 at the location to divide.
You can finely adjust the location for division by pressing
•
2/1 while the motion picture is paused.
4 Press 4.
•
Confirmation screen is displayed. It is executed when [Yes] is selected.
Exit the menu after it is executed.
Avoid trying to divide motion picture near the very beginning or end of the motion picture.
•
• You cannot use [Video Divide] for the following pictures.
– Motion pictures with a short recording time
VQT5H82 (ENG)
74

Wi-Fi/NFC
Wi-FiR function/NFC function
∫ Use the camera as a wireless LAN device
When using equipment or computer systems that require more reliable security than wireless
LAN devices, ensure that the appropriate measures are taken for safety designs and defects
for the systems used. Panasonic will not take any responsibility for any damage that arises
when using the camera for any purpose other than as a wireless LAN device.
∫ Use of the Wi-Fi function of this camera is presumed to be in countries where this
camera is sold
There is the risk that the camera violates the radiowave regulations if used in countries other
than those where this camera is sold, and Panasonic takes no responsibility for any violations.
∫ There is the risk that data sent and received via radio waves may be intercepted
Please note that there is the risk that data sent and received via radio waves may be
intercepted by a third party.
∫ Do not use the camera in areas with magnetic fields, static electricity or
interference
•
Do not use the camera in areas with magnetic fields, static electricity or interference, such as
near microwave ovens. These may cause the interruption of the radio waves.
• Using the camera near devices such as microwave ovens or cordless telephones that use the
2.4 GHz radio wave band may cause a decrease in performance in both devices.
∫ Do not connect to the wireless network you are not authorised to use
When the camera utilises its Wi-Fi function, wireless networks will be searched
automatically. When this happens, wireless networks that you are not authorised to use
¢
(SSID
) may be displayed, however do not attempt to connect to the network as it may be
considered as unauthorised access.
¢ SSID refers to the name that is used to identify a network over a wireless LAN connection. If
the SSID matches for both devices, transmission is possible.
∫ Before Use
To use the Wi-Fi function on this unit, a wireless access point or a destination device
equipped with the wireless LAN function is required.
∫ This unit is compatible with NFC
Using the NFC “Near Field Communication ” function, you
can easily transfer data necessary for a Wi-Fi connection
between this camera and the smartphone/tablet.
(ENG) VQT5H82
75

Wi-Fi/NFC
∫ About the Wi-Fi connection lamp
Lit blue: The Wi-Fi connection is on standby
Blinking blue: Sending/receiving data through the Wi-Fi
connection
•
The camera cannot be used to connect to a public wireless LAN connection.
ヸㄊノョㄊ
• Use a IEEE802.11b, IEEE802.11g or IEEE802.11n compatible device when using a wireless
access point.
• It is recommended to use a fully charged battery when sending images.
• When sending images on a mobile network, high packet communication fees may be incurred
depending on the details of your contract.
• Do not remove the memory card or battery or move to an area without any reception
while sending images.
• The monitor display may become distorted for an instant while connected to the service,
however this will not affect the image being sent.
• If you use the HDMI output during recording with [Bit Mode] in [HDMI Rec Output] set to
[4:2:2 10bit], the Wi-Fi function will be disabled.
∫ About the [Wi-Fi] button
Pressing and holding [Wi-Fi] before connecting to Wi-Fi
(When connecting to a smartphone/tablet)
•
The information required for connecting the smartphone/tablet to
this unit (QR code, SSID and password) is displayed. (P78)
ョㄏヒ
ヸㄊノョㄊ
Pressing [Wi-Fi] before connecting to Wi-Fi
•
Following items can be sele cted.
[New Connection] —
Connects with the same settings as the previous ones.
Registering records as favourites
[Select a destination from History]
1 Select the item you want to register to favourites,
and then press 1.
2 Enter a registration name.
[Select a destination from Favorite]
VQT5H82 (ENG)
76
Connects with settings registered as favourites.

What you can do with the [Wi-Fi] button when connected to Wi-Fi
•
Following items can be selected.
[Terminate the Connection]
[Change the Destination]
[Change Settings for Sending Images]
[Register the Current Destination to Favorite ]
[Network Address]
What you can do with the Wi-Fi function
Controlling with a Smartphone/Tablet (P78)
•
Recording with a smartphone (P82)
• Playing back pictures in the camera (P82)
• Saving images stored in the camera (P82)
• Sending images to an SNS (P83)
• Writing location information on images stored in the
camera (P84)
Displaying pictures on a TV
Printing Wirelessly
When sending images to AV device
When sending images to PC (P85)
Using Web services
Wi-Fi/NFC
• These operating instructions refer to both smartphones and tablets as “smartphones” from this
point on unless noted otherwise.
• Please also refer to the “Operating Instructions for advanced features (PDF format)”, which
describes more detailed information.
(ENG) VQT5H82
77

Wi-Fi/NFC
Controlling with a Smartphone/Tablet
Installing the smartphone/tablet app “ Image App”
The “ Image App” is an application provided by Panasonic.
OS(As of March 2014)
•
App for AndroidTM: Android 2.3.3 or higher
App for iOS: iOS 5.0 or higher
¢ Connecting to this unit with [Wi-Fi Direct] requires Android OS 4.0 or higher and Wi-Fi
Direct
TM
support.
¢
1 Connect the smartphone to a network.
2 (Android) Select “Google Play
(iOS) Select “App Store
SM
TM
Store”.
”.
3 Enter “Panasonic Image App” into the search box.
4 Select “ Panasonic Image App ” and install it.
• Use the latest version.
• Read the [Help] in the “Image App ” menu for further details on how to operate.
• The screen differs depending on the OS.
•
The screens and procedures described from this point on are those at the time when the model first
became available for pu rchase. The screens and procedures may change with versi on updates.
•
The service may not be able to be used properly depending on the type of smartphone being used.
For information on the “Image App”, refer to the support site below.
http://panasonic.jp/support/global/cs/dsc/
(This Site is English only.)
• When downloading the app on a mobile network, high packet communication fees may be
incurred depending on the details of your contract.
Connecting to a smartphone/tablet
If you are using an iOS
device
[iPhone/iPod touch/iPad]
Using the QR code to set
up a connection
≠ P79
•
You can also set up a connection by ent ering a password directly. For de tails, refer to P81.
• When terminating the connection, refer to P81.
VQT5H82 (ENG)
78
If you are using an Android device
Is your device compatible with the NFC function?
Yes No
Setting up a connection
using the NFC function
≠ P80
Using the QR code to set
up a connection
≠ P80

If you are using an iOS device [iPhone/iPod touch/iPad]
A
IMAGE APP
Panasonic Corporation
Wi-Fi
Using the QR code to set up a connection
1 Press and hold [Wi-Fi] on the camera.
2 Start “ Image App ” on your smartphone/tablet.
3 Select [QR code], and then select [OK] .
4 Using “Image App ”, scan the QR code
displayed on the screen of the camera.
A QR code
• If you press [MENU/SET] on the camera, the QR code will
be enlarged. When it is difficult to scan the QR code, try
enlarging it.
5 Install the profile of “IMAGE APP ”.
•
A message will be displayed on the browser.
• If the smartph one/tablet is locked with a passcode, enter
the passcode to unlock the smartphone/tablet.
Wi-Fi/NFC
ョㄏヒ
ヸㄊノョㄊ
6 Press the home button to close the browser.
7 Turn on the Wi-Fi function in the setting menu of the smartphone/tablet.
8 Select the SSID displayed on the screen of the camera.
9 Return to the home screen, and then start “ Image App ”.
•
Steps 2 through 6 are not required from the second time on.
(ENG) VQT5H82
79

Wi-Fi/NFC
A
When using an Android device
Setting up a connection using the NFC function
• If [ ] is not displayed on the smartphone, the NFC function of the smartphone is disabled.
Read the operating instructions of your smartphone and enable it.
• This function can be used with the NFC compatible device with Android (OS version 2.3.3 or
higher). (excluding some models)
1 Launch “Image App” on your smartphone/
tablet.
2 While [ ] is displayed on the screen of
the smartphone, touch the smartphone to
[ ] of the camera.
3 When the connection confirmation screen
is displayed o n the camera, select [Yes].
4 Touch the smartphone to [ ] of the
camera again.
Ste ps 3 through 4 are not r equired from the second
•
time on.
• For information on the operation and settings of
NFC-compatible smartphones, refer to the operating
instructions of your device.
When using an Android device
Using the QR code to set up a connection
1 Press and hold [Wi-Fi] on the camera.
ョㄏヒ
ヸㄊノョㄊ
2 Start “ Image App” on your smartphone/tablet.
3 Select [QR code].
4 Scan the QR code displayed on the screen of
the camera.
A QR code
• If you press [MENU/SET] on the camera, the QR code will
be enlarged. When it is difficult to scan the QR code, try
enlarging it.
VQT5H82 (ENG)
80

For both iOS devices (iPhone/iPod touch/iPad) and Android devices
ョㄏヒ
ヸㄊノョㄊ
A
Wi-Fi
0123456789ABC
Entering a password to set up a connection
1 Press and hold [Wi-Fi] on the camera.
2 Turn on the Wi-Fi function in the setting menu of the
smartphone/tablet.
3 Select the SSID displayed on the screen of the
camera.
A SSID and password
4 Enter the password displayed on the screen of the
camera.
•
If you are using an Android device, marking the box for password
display will allow the device to display the password as you enter it.
5 On the smartphone/tablet, start “Image App”.
For both iOS devices (iPhone/iPod touch/iPad) and Android devices
Terminating the connection
After use, terminate the connection to the smartphone.
1 Press [Wi-Fi] on the camera. (P77)
2 On the smartphone, close “ Image App ”.
If you are using an iOS device
On the screen of “ Image App ”, press the home button to clos e the app.
If you are using an Android device
On the screen of “ Image App ”, press the return button twice to close the app.
Wi-Fi/NFC
(ENG) VQT5H82
81

Wi-Fi/NFC
Taking images via a smartphone/tablet (remote recording)
1 Connect to a smartphone. (P78)
2 Operate the smartphone.
1 Select [ ].
2 Record an image.
•
The recorded images are saved in the camera.
• Some settings are not available.
A
Playing back images in the camera
1 Connect to a smartphone. (P78)
2 Operate the smartphone.
1 Select [ ].
•
You can switch the images to be
displayed by selecting the icon (A)
on the top left of the screen. To
display images stored in the camera,
select [LUMIX].
2 Touch the image to enlarge it.
Saving images stored in the camera
1 Connect to a smartphone. (P78)
2 Operate the smartphone.
1 Select [ ].
You can switch the images to be
•
displayed by selecting the icon (A)
on the top left of the screen. To
display images stored in the camera,
select [LUMIX].
2 Touch and hold an image, and drag
it to save it.
•
The function can be assigned to the top, bottom,
left or right according to your preference.
•
Pictures in RAW format and motion pictures of
[AVCHD], [MP4] (only when the motion picture size is
set to [4K] in [Rec Quality]), [MP4 (LPCM)] and [MOV]
cannot be saved.
• 3D pictures (MPO format) will be saved as 2D pictures (JPEG format).
VQT5H82 (ENG)
82

Wi-Fi/NFC
Saving images in the camera using the NFC function
The NFC function is not available for iOS devices (iPhone/iPod touch/iPad).
1 Play back an image on the camera.
2 Launch “Image App ” on the smartphone.
3 While [ ] is displayed on the connection
screen of the “ Image App ”, touch the
smartphone to [ ] of the camera.
If a connection a ttempt by touch ing fails, restart
•
the “Image App ”, and then display the screen in
2 again.
step
• To transfer more than one image, repeat steps
1 and 3.
(They cannot be transferred as a batch.)
• After you set up a connection with the smartphone using the NFC function, the image will be
saved via the Wi-Fi connection.
Sending images in the camera to an SNS
1 Connect to a smartphone. (P78)
2 Operate the smartphone.
1 Select [ ].
•
You can switch the images to be
displayed by selecting the icon (A)
on the top left of the screen. To
display images stored in the camera,
select [LUMIX].
2 Touch and hold an image, and drag
it to send it to an SNS, etc.
The image is sent to a web service
•
such as an SNS.
•
The function can be assigned to the top, bottom,
left or right according to your preference.
(ENG) VQT5H82
83

Wi-Fi/NFC
Adding location information to images stored in the camera from a
smartphone/tablet
You can send location information acquired with a smartphone to the camera. After
sending the information, you can also write it on images stored in the camera.
1 Start recording location
information
GPS
2 Start recording images
3 Finish recording the location
information
4 Sending and writing location
information
•
Location information different from that
at the time of recording may be written.
Keep the following points in mind:
– Set the camera’s [Home] setting in [World Time] to your region.
– Once you start recording location information with your smartphone, do not chang e the
camera’s [Home] setting in [World Time].
•
Location information cannot be written on images that were recorded when the clock was not set.
∫ Start recording location information
Operate the smartphone.
1 Select [ ].
2 Select [Geotagging].
3 Select [ ].
∫ Finish recording the location information
Operate the smartphone.
1 Select [ ].
2 Select [Geotagging].
3 Select [ ].
∫ Sending and writing location information
1 Connect to a smartphone. (P78)
2 Operate the smartphone.
1 Select [ ].
2 Select [Geotagging].
3 Select [ ].
Follow the on-screen messages to operate the smartphone.
•
• Location information is not written onto the images recorded when [Rec Forma t] is set
to [AVCHD].
• When the card in the camera lacks sufficient free space, writing location informa tion
may not be possible.
Cautions for Use:
•
Be sure to pay special attention to the privac y, the likeness rights, etc. of the subject
when you use this function. Use at your own risk.
• (When using “ Image App” for iOS)
If you press the Home or On/Off button of the smartphone while location information is being
recorded, the recording will stop.
VQT5H82 (ENG)
84

Wi-Fi/NFC
Setting up a connection to a PC via a wireless
access point
To create a folder that receives images
Prepare folders for receiving images on the PC before sending a picture to the PC.
•
Create a PC user account [account name (up to 254 characters) and password (up to 32
characters)] consisting of alphanumeric characters. An attempt to create a receive folder may
fail if the account includes non-alphanumeric characters.
∫ When using “ PHOTOfunSTUDIO ”
1 Install “ PHOTOfunSTUDIO ” to the PC.
•
For details on hardware requirements and installation, read “About the supplied software” (P90).
2 Create a folder that receives images with “ PHOTOfunSTUDIO”.
•
To create the folder automatically, select [Auto-create]. To specify a folder, create a new
folder, or set a password to the folder, select [Create manually].
• For details, refer to the operating instructions of “PHOTOfunSTUDIO” (PDF).
∫ When not using “PHOTOfunSTUDIO”
(For Windows)
Supported OS: Windows XP/Windows Vista/Windows 7/Windows 8/Windows 8.1
Example: Windows 7
1 Select a folder you intend to use for receiving, then right-click.
2 Select [Properties], then enable sharing of the folder.
•
For details, refer to the operating instructions of your PC or Help on the OS.
(For Mac)
Supported OS: OS X v10.5 to v10.9
Example: OS X v10.8
1 Select a folder you intend to use for receiving, then click on the items in the
following order.
[File] [Get Info]
2 Enable sharing of the folder.
•
For details, refer to the operating instructions of your PC or Help on the OS.
When sending images to PC
You can send pictures and motion pictures recorded with this unit to a PC.
The connection methods described in this manual are examples. For details on other
connection methods, refer to “Operating Instructions for advanced features (PDF format)”.
Preparations:
If the workgroup of the destination PC has been changed from the standard setting, you also
•
need to change the setting of this unit in [PC Connection].
(ENG) VQT5H82
85

Wi-Fi/NFC
1 Press [Wi-Fi ].
2 Select [New Connection].
3 Select the connection method.
Sending an image each time a recording is made
([Send Images While Recording])
Available file format: JPEG/RAW/MPO
Select and send the images
([Send Images Stored in the Camera])
Available file format: ALL format
ョㄏヒ
ヸㄊノョㄊ
4 Select [PC].
5 Select the connection method.
Example: Selecting [WPS (Push-Button)] to set up a connection
1Select [Via Network].
2Select [WPS (Push-Button)].
3Press the wireless access point WPS button until it switches to
WPS mode.
6 On the camera, perform the operation that matches your
purpose.
Sending an image each time a recording is made
([Send Images While Recording])
1 Select the PC you want to connect to and the destination
2 Take a picture with the camera.
Select and send the images
([Send Images Stored in the Camera])
1 Select the PC you want to connect to and the destination
2 Select [Single Select] or [Multi Select], and then select
¢ When the PC you want to connect to is not displayed, select [Manual Input], and enter the
computer name of the PC (NetBIOS name for Apple Mac computers).
• To change the setting or disconnect, press [Wi-Fi]. (P77)
¢
folder.
¢
folder.
the images you want to send.
• Folders sorted by the sent date are created in the specified folder, and pictures are saved in
those folders.
• If the screen for a user account and password entry appears, enter the one you set on your PC.
• When the computer name (NetBIOS name for Apple Mac computers) contains a space (blank
character), etc., it may not be recognised correctly.
If a connection attempt fails, we recommend that you change the computer name (or NetBIOS
name) to the one consisting of only alphanumeric characters, with a maximum of
15 characters.
VQT5H82 (ENG)
86

Customisation
A
B
Change the Quick Menu to your preferred item
When [Q.MENU] (P106) in the [Custom] menu is set to [CUSTOM], the Quick Menu can
be changed as desired.
Up to 15 items can be set to the Quick Menu.
1 Press [Q.MENU] to display the Quick Menu.
2 Press 4 to select [ ] and then press [MENU/SET].
4:3
L
AFS
3 Press 3/4/2/1 to select the menu item in the top
row and then press [MENU/SET].
4 Press 2/1 to select the empty space in the bottom
row and then press [MENU/SET].
A Items that can be setup as Quick Menus.
B Items that can be displayed in the Quick Menu screen.
• You can also set the menu item by dragging it from the top
row to the bottom row.
([LW
4:3
L
• If there is no empty space in the bottom row, you can
replace an existing item with a new select item by selecting
the existing item.
• To cancel the setting, move to the bottom row by pressing 4 and select an item to cancel,
and then press [MENU/SET].
5 Press [ ].
•
It will return to screen of step 1.
Press [MENU/SET] to switch to the recording screen.
12345
AFS
Assigning frequently used functions to the
buttons
You can assign frequently-used functions to particular buttons or icons.
1 Select the menu. (P28)
MENU
2 Press 3/4 to select [Setting in REC mode] or [Setting in PLAY mode] and then
press [MENU/SET].
3 Press 3/4 to select the function button you want to
assign a function to and then press [MENU/SET].
4 Press 3/4 to select the function you want to assign
and then press [MENU/SET].
Some functions cannot be assigned depending on the
•
function button.
(function buttons)
> [Custom] > [Fn Button Set]
(ENG) VQT5H82
87

Customisation
Registering your preferred settings (Custom Mode)
You can register the current camera settings as custom settings.
If you then record in Custom Mode, you can use the registered settings.
Initial setting of the Programme AE Mode is registered as the custom settings initially.
•
Registering Personal Menu Settings (Registering custom settings)
To allow recording using the same settings, up to 5 sets of current camera settings can be
registered using [Cust.Set Mem.]. (
Preparations: Set in advance the Recording Mode you wish to save and select the
desired menu settings on the camera.
Select the menu. (P28)
1
MENU
> [Custom] > [Cust.Set Mem.]
Press 3/4 to select the custom set to register and then press
2
[MENU/SET].
• Confirmation screen is displayed. It is executed when [Yes] is selected.
Exit the menu after it is executed.
Recording using registered custom set
You can easily call up the settings you have registered using [Cust.Set Mem.].
, , , , )
Set the mode dial to [ ], [ ] or [ ]
• The custom set will be called up. If you set the mode dial to [ ], the custom set you used last
time ([ ], [ ], or [ ]) will be called up.
∫ To change a custom set in [ ]
Set the mode dial to [ ].
1
Press [MENU/SET] to display the menu.
2
Press 2/1 to select the custom setting you want to use, and then
3
press [MENU/SET].
∫ Changing the settings
Registered contents do not change when the menu setting is changed temporarily w ith the
mode dial set to , or . To change the registered settings, overwrite the
registered content using [Cust.Set Mem.] on the custom settings menu.
VQT5H82 (ENG)
88

Playing Back Pictures on a TV Screen
Preparations: Turn this unit and the TV off.
Connect the camera and a TV.
1
• Check the direction of the terminals and plug in/out straight holding onto the plug.
(It may result in malfunction by the deforming of the terminal if it is plugged in obliquely
or in wrong direction.)
Do not connect devices to incorrect terminals. Doing so may cause malfunction.
To connect with an HDMI micro cable
Use a “High Speed HDMI micro cable” with the HDMI logo.
•
Cables that do not comply with the HDMI standards will not work.
“High Speed HDMI micro cable” (Type D–Type A plug, up to 2 m (6.6 feet) long)
A Align the marks, and insert.
B HDMI micro cable
To connect with an AV cable (optional)
C HDMI socket
Others
Always use a genuine Panasonic AV cable (DMW-AVC1: optional).
•
• When [System Frequency] is set to [24.00 Hz (CINEMA)], you cannot play back images on a
TV connected with an AV cable.
D Align the marks, and insert.
E AV cable (optional)
F [AV OUT/DIGITAL] terminal
• The colour of the terminal is gold.
Turn on the TV and select the input to match the connector in use.
2
Turn the camera on and then press [(].
3
• Input of the TV will switch automatically and playback screen is displayed when
connected to a VIERA Link compatible TV using an HDMI micro cable with the [VIERA
Link] set to [ON].
• When [System Frequency] is set to a broadcasting system different from that of your region,
images may not be played back correctly.
• Read the operating instructions for the TV.
G Yellow: to the video input socket
H White: to the audio input socket
(ENG) VQT5H82
89

Others
Saving still pictures and motion pictures on your
PC
∫ PC that can be used
The unit can be connected to any PC capable of recognising a mass storage device.
• Windows support:
• Mac support: OS X v10.5 to v10.9
AVCHD motion pictures may not be imported correctly when copied as files or
folder
•
With Windows, always import AVCHD motion pictures using “PHOTOfunSTUDIO”, one of the
programmes on the DVD (supplied).
• With a Mac, AVCHD motion pictures can be imported using “iMovie”.
Please note that importing is not p ossible depending on the picture qua lity.
(For details about iMovie, please contact Apple Inc.)
About the supplied software
The supplied DVD includes the following software.
Install the software on to your computer before use.
PHOTOfunSTUDIO 9.5 PE (Windows XP/Windows Vista/Windows 7/Windows 8/Windows 8.1)
•
This software allows you to manage images. For example, you can send pictures and motion
pictures to a PC and sort them by recording date or model name. You can also perform operations
such as writing images to a DVD, processing and correcting images, and editing motion pictures.
• SILKYPIX Developer Studio 4.1 SE
(Windows XP/Windows Vista/Windows 7/Windows 8/Windows 8.1, Mac OS X v10.5/
v10.6/v10.7/v10.8/v10.9)
This is software to edit RAW format images.
Edited images can be saved in a format (JPEG, TIFF, etc.) that can be displayed on a personal computer.
For details on how to use the SILKYPIX Developer Studio, refer to the “Help” or the
Ichikawa Soft Laboratory’s support website:
http://www.isl.co.jp/SILKYPIX/english/p/support/
Windows XP/Windows Vista/Windows 7/Windows 8/Windows 8.1
• LoiLoScope 30 day full trial version (Windows XP/Windows Vista/Windows 7/
Windows 8/Windows 8.1)
LoiLoScope is a video editing software where that draws out the full power of your PC. Creating
videos is as easy as organizing cards on top of a desk. Use your music, picture and video files
to create videos to share with your friends and family by burning it to a DVD, uploading it to
websites, or simply share your videos with your frien ds via e-mail.
– This will only install a shortcut to the trial version download site.
For more information on how to use LoiLoScope, read the LoiLoScope manual
available for download at the link below.
Manual URL: http://loilo.tv/product/20
VQT5H82 (ENG)
90

Others
∫ Installing supplied software
Before inserting the DVD, close all running applications.
•
1 Check the environment of your PC.
•
Operating environment of “PHOTOfunSTUDIO”
– OS:
– CPU:
R
Windows
Windows Vista
Windows
Windows
Windows
Pentium
Pentium
Pentium
XP (32bit) SP3,
R
7 (32bit/64bit) or SP1,
R
8 (32bit/64bit),
R
8.1 (32bit/64bit)
R
III 500 MHz or higher (WindowsR XP),
R
III 800 MHz or higher (Windows VistaR),
R
III 1 GHz or higher (WindowsR 7/WindowsR 8/WindowsR 8.1)
R
(32bit) SP2,
– Display:
1024k768 pixels or more (1920k1080 pixels or more recommended)
– RAM:
512 MB or more (Windows
1 GB or more (Windows
2 GB or more (Windows
R
XP/Windows VistaR),
R
7 32bit/WindowsR 8 32bit/WindowsR 8.1 32bit),
R
7 64bit/WindowsR 8 64bit/WindowsR 8.1 64bit)
– Free hard disk space:
450 MB or more for installing software
•
Refer to the operating instructions of “PHOTOfunSTUDIO ” (PDF) for further op erating environment.
• For details on “ SILKYPIX Developer Studio ”, please read the suppo rt site given on P90.
2 Insert the DVD with the supplied software.
3 Click on the [Applications] on the install menu.
•
If the automatic playback screen is displayed, you can display the menu by selecting and
executing [Launcher.exe].
• In Windows 8/Windows 8.1, you can display the menu by clicking a message that is
displayed after inserting the DVD and then selecting and executing [Launcher.exe].
• You can also display the menu by double-clicking [VFFXXXX] in [Computer] (XXXX differs
depending on the model).
4 Click on the [Recommended Installation].
•
Proceed with installation according to messages appe aring on the screen.
• The software compatible with your PC will be installed.
• On the Mac, SILKYPIX can be installed manually.
1 Insert the DVD with the supplied software.
2 Double-click the application folder on the DVD.
3 Double-click on the automatically displayed folder.
4 Double-click the icon in the application folder.
Not available in these cases:
•
“PHOTOfunSTUDIO” and “LoiLoScope ” are not compatible with Mac.
(ENG) VQT5H82
91

Others
∫ Transferring pictures to a PC
Preparations: Install “PHOTOfunSTUDIO” to the PC.
Connect the computer and camera with the USB connection cable
1
(supplied).
• Please turn this unit on and your PC before connecting.
• Check the dire ction of the terminals and plug in/out straight holding onto the plug.
• Do not use any other USB connection cables except the supplied one or a genuine
Panasonic USB connection cable (DMW-USBC1: optional).
A Align the marks, and insert.
B USB connection cable (supplied)
C [AV OUT/DIGITAL] terminal
• The colour of the terminal is gold.
Press 3/4 to select [PC], and then press [MENU/SET].
2
• If [USB Mode] (P107) is set to [PC] in the [Setup] menu in advance, the camera will be
automatically connected to the PC without displaying the [USB Mode] selection screen.
Copy the images to a PC using “PHOTOfunSTUDIO”.
3
• Do not delete or move copied files or folders in Windows Explorer.
When viewing in “PHOTOfunSTUDIO ”, you will not be able to play back or edit.
VQT5H82 (ENG)
92

Others
∫ Copying to a PC without using “PHOTOfunSTUDIO”
If you are not able to install “ PHOTOfunSTUDIO”, you can copy files and folders to your
PC by dragging and dropping files from this unit.
•
The content (folder structure) on the card of this unit is as follows.
For Windows: A drive ([LUMIX]) is displayed in [Computer]
For Mac: A drive ([LUMIX]) is displayed on the desktop
• Card
DCIM: Images
DCIM
100_PANA
P1000001.JPG
P1000002.JPG
P1000999.JPG
101_PANA
999_PANA
MISC
PR IVATE
1 Folder number
2 Colour space P: sRGB
_: AdobeRGB
3 File number
4 JPG: Still pictures
MP4: [MP4] Motion pictures
MOV: [MOV] Motion pictures
RW2: Pictures in RAW files
MPO: 3D pictures
MISC: DPOF print
Favourite
AVCHD: [AVCHD] Motion pictures
AVCHD
(ENG) VQT5H82
93

Others
1
Recording Mode (P22)
Custom settings (P88)
Photo Style (P101)
Creative control adjustment
display
‰ŒFlash Mode (P57)
Flash
Extra Tele Conversion
(when recording motion
pictures) (P102)
Recording quality (P60)
2
00200
3.5
AFS
0
AEL
LMT
OFF
BKT
AWB
ラュン
EXPS
Recording format/
Recording quality
¢1
(P60)/
Variable Frame Rate
¢1
(P68)
Picture size/Aspect Ratio
(P47)
Extra Tele Conversion
(when taking still pictures)
(P102)
Card (displayed only during
recording)
Elapsed recording time¢2
(P58)
Simultaneous recordin g
indicator
Automatic viewfinder/
monitor switching (P25)
Peaking (P105)
Highlight Shadow (P101)
HDR (P101)/iHDR (P32)
Multi expo sure (P102)
Digital Zoom (P102)
Electronic shutter (P102)
Variable Frame Rate (P68)
MOV
100
M
FHD IPB
12/24.00
p
Monitor Display/Viewfinder Display
• The following images are examples of when the display screen is set to [ ] (monitor
style) in the monitor.
• Please also refer to the “O perating Instructio ns for advanced features (PDF format)”, which
describes more detailed information.
In recording
MOV
4:3
p
L
AFS
AFS
24
LMT
LMT
OFF
OFF
3.5
FHD
6060603.5
ラュン
4:3
L
BKT
BKT
0
00
2
00
AWB
AWB
989898
4:3
EXM
AEL
AEL
C3-1
P
EXPS
WL
MOV
p
24
FHD
MOV
p
24
FHD
VQT5H82 (ENG)
94
8m30
s
ラュン
100%

In recording
2
A › Quality (P101)
Focus Mode (P37, 40)
š
Ø
AF Mode (P36)
Face Recognition (P102)
AF Lock (P55)
Burst (P41)
Auto Bracket (P42)
Self-timer (P42)
Time Lapse Shot (P43)
Stop Moti on Animation (P45)
Battery indication
2
00200
3.5
AFS
0
AEL
LMT
OFF
BKT
AWB
ラュン
AFL
Battery Grip
Picture Mode (Still picture
priorities) (P103)
Optical Image Stabiliser
¢
3
(P27)
Jitter alert
Recording state (Flashes
red.) (P58)/
Focus (Lights green.) (P21)
Focus (Under low illumination)
Connected to Wi-Fi
Histogra m (P105)
3
Name
¢
4
(P102)
Number of days that have passed since the
departure date
¢5
(P106)
Age
¢
4
(P102)
Location
¢
5
(P106)
Current date and time/Travel destination
setting
¢5
: “ (P106)
AEL
AEL
LMT
LMT
OFF
OFF
3.5
6060603.5
FHD
ラュン
Others
MOV
4:3
p
L
AFS
AFS
24
BKT
BKT
0
00
2
00
AWB
AWB
989898
AFS AFF AFC
MF
LOW
(ENG) VQT5H82
95

Others
4
AF area (P38 )
Spot metering target (P54)
Self-timer¢6 (P42)
Silent Mode (P104)
External Microphone
Mic level display (P104)
Mic Level Limiter (OFF) (P104)
TC 00:00:00:00 Time Code (P103)
AE Lock (P55)
Metering Mode (P54)
Programme Shift (P51)
3.5 Aperture value (P21)
60 Shutter speed (P21)
11d
Shutter speed (angle) (P104)
2
00200
3.5
AFS
0
AEL
LMT
OFF
BKT
AWB
ラュン
T
AEL
Exposure compensation
value (P54)
Brightness (P32)
Manual Exposure
Assistance (P53)
ISO sensitivity (P49)
0dB Gain (dB) (P104)
5
White Balance Bracket
White Balance Fine Adjustmen t
VÐîÑ
White Balance (P50)
Colour (P32)
98
Number of recordable pictures
r20
Maximum number of pi ctures
that can be taken continuousl y
Available recording time
¢1, 2
Touch tab
¢7
Touch tab¢7 (P87)
Touch tab
¢7
Touch tab
¢7
Touch tab¢7 (P64)
6
Exposure meter (P105)
Focal distance display
Step zoom
In recording
MOV
4:3
p
L
AFS
AFS
24
FHD
ラュン
LMT
LMT
OFF
OFF
AEL
AEL
3.5
6060603.5
BKT
BKT
0
00
2
00
AWB
AWB
989898
BKT
AWB
1
LM
OFF
R8
m30s
¢
1 This is displayed only when [Video-Priority Display] (P106) in the [Custom] menu is set to [ON].
¢2 m: minute, s: sec ond
¢3 Only available when a lens that supports the Stabiliser function is attached.
¢4 This is displayed for about 5 seconds when the camera is turned on if the [Profile Setup]
¢5 This is displayed for about 5 seconds when the camera is turned on, after setting the clock
¢6 This is displayed during countdown.
setting is set.
and after switching from Playback Mode to Recording Mode.
¢7 Only displayed in the monitor.
VQT5H82 (ENG)
96

In recording
×
Fn9
Fn10
Fn7
Fn6
Fn8
ISO
F
Touch zoom
Touch Shutter (P34)
Touch AE (P35)
Peaking (P105)
Fn6 (Function button) (P87)
Fn7 (Function button) (P87)
Fn8 (Function button) (P87)
Fn9 (Function button) (P87)
Fn10 (Function button) (P87)
Colour (P32)
Defocus control function (P32)
Brightness (P32)
Type of defocus ([Miniature Effect])
One point colour
Position of the light source
Creative control adjustment
Aperture value (P21)
Shutter spee d (P21)
ISO sensitivity (P49)
Gain (dB) (P104)
Microphone level adjustment (P104)
• Only displayed in the monitor.
×
AE
Fn6
Fn7
Fn8
Fn9
Fn10
Others
Fn6
Fn6Fn6
Fn7
Fn7Fn7
×
Fn8
Fn8Fn8
Fn9
Fn9Fn9
Fn10Fn10
Fn10
F
SSSSSS
ISO
F
SS
ISO
GAIN
(ENG) VQT5H82
97

Others
1
Recording Mode (P22)
F2.8 Aperture value (P21)
1/60
Shutter speed (P21)
11d
Shutter speed (angle) (P104)
Battery indication
2
ISO sensitivity (P49)
0dB Gain (dB) (P104)
Exposure compensation
value (P54)
Brightness (P32)
Manual Exposure
Assistance (P53)
‰ŒFlash Mode (P57)
Flash
AFS
EXPS
3
Single (P41)
Burst (P41)
Auto Bracket (P42)
Self-timer (P42)
Time Lapse Shot (P43)
Stop Motion Animation
(P45)
Focus Mode (P36, 40)
š
Ø
AF Mode (P36)
A › Quality (P101)
Picture size/Aspect Ratio
(P47)
Wi-Fi Wi-Fi (P76)
Function button setting
(P87)
4
Photo Style (P101)
VÐîÑ
White Balance (P50)
Intelligent Dynamic Range
Control (P101)
Metering Mode (P54)
98
Number of recordable
pictures
r20
Maximum number of
pictures that can be taken
continuou sly
Available recording time
In recording
On-monitor recording information
AUTO
C1
EXPS
F 2.8
ISO
AFS
AWB
1/60
0 0
0
ISO
AUTO
0
0
WL
VQT5H82 (ENG)
98
4:3
Fn
Wi-Fi
L
98
AFS AFF AFC MF
4:3
L
Fn
AWB
1
R8
m30s

Others
Message Display
Confirmation messages or error messages will be displayed on the screen in some cases.
The major messages are described below as examples.
Please also refer to the “Operating Instructions for advanced features (PDF format)”, which
•
describes more detailed information.
[Some pictures cannot be deleted]/[This picture cannot be deleted]
This featur e can only be used with pictures that comply with the DCF stand ard.
•
Perform formatting (P29) on this unit after saving necessary data on a PC, etc.
[Memory Card Error
Format this card?]
It is a format that cannot be used with this unit.
•
– Insert a different card.
– Format the card again with the camera after saving necessary data on a PC etc. (P29)
Data will be deleted.
[The lens is not attached properly. Do not push lens release button while lens is
attached.]
•
Detach the lens once, and then attach it again without pressing the lens release button. (P18)
Turn this unit on again, and if it is still displaying, contact the dealer.
[Memory Card Error]/[This memory card cannot be used]
•
Use a card compatible with this unit. (P15)
[Insert SD card again]/[Try another card]
An error has occurred accessing the card.
•
Insert the card again.
• Insert a different card.
[Read Error/Write Error
Please check the card]
It has failed to read or write data.
•
Remove the card after turning this unit off. Insert the card again, turn this unit on, and try to
read or write the data again.
• The card may be broken.
• Insert a different card.
[Motion recording was cancelled due to the limitation of the writing speed of the card]
• Depending on the [Rec Format] and [Rec Quality] of a motion picture, the speed class rating
required for the card differs. Use a card that meets the rating. For details, refer to
motion picture recording and speed class
•
If the recording stops even when you are using a card that meets the speed class rat ing, the data
writing speed is too slow. We recommend making a backup and then format the card (P29).
Depending on the type of the card, motion picture recording may stop in the middle.
” on P15.
“About the
(ENG) VQT5H82
99

Others
[This battery cannot be used]
Use a genuine Panasonic battery. If this message is displayed even when a genuine
•
Panasonic battery is used, contact the dealer or Panasonic.
• If the battery terminal is dirty, clean it and re move any obje cts.
[Failed to connect wireless access point]/[Connection failed]/[No destination
found]
•
Check following regarding the wireless access point.
– The wireless access point information set on this unit is wrong.
Check the authentication type, encryption type, and encryption key.
– Power of the wireless access point is not turned on.
– Setting of the wireless access point is not supported by this unit.
• Check the network setting of the destination.
• Radio waves from other devices may block the connection to a wireless access point.
Check other devices that are connected to the wireless access point and devices that use the
2.4 GHz ban d.
[No picture to send]
•
This is displayed when there is no image to transmit due to the restriction of the destination.
Check the file format of the image to send.
[Connection failed. Please retry in a few minutes.]/[Network disconnected. Transfer
stopped.]
•
Radio waves from the wireless access point are getting weak.
Perform the connection closer to the wireless access point.
• There is no reply from the server or it has exceeded the communication processing time.
Try again after a while.
• Depending on the wireless access point, connection may be automatically disconnected after
specific time has passed.
Reconnect the connection again.
[Connection failed]
•
Check following regarding the smartphones/tablet you intend to connect.
– The smartphone/tablet does not operate.
– Change the access point to connect to in the smartphone/tablet Wi-Fi settings to this
camera.
– There is no free storage space on the smartphone/tablet.
100
VQT5H82 (ENG)
 Loading...