

Page 1
PP
Operating Instructions
For USA assistance, please call: 1-800-211-PANA(7262) or, contact us via the web at: http://www.panasonic.com/contactinfo
For Canadian assistance, please call: 1-800-99-LUMIX (1-800-995-8649) or
send e-mail to: lumixconcierge@ca.panasonic.com
Digital Camera/Lens Kit
Model No. DMC-G1K
Before connecting, operating or adjusting this product,
please read the instructions completely.
VQT1U32
Page 2
Before Use
RBRC
Li-ion
TM
Before Use
Dear Customer,
Thank you for choosing Panasonic!
You have purchased one of the most sophisticated and reliable products on the market
today. Used properly, we’re sure it will bring you and your family years of enjoyment.
Please take time to fill in the information on the below.
The serial number is on the tag located on the underside of your Camera. Be sure to
retain this manual as your convenient Camera information source.
A lithium ion battery that is recyclable powers the product you have
purchased. Please call 1-800-8-BATTERY for information on how to
recycle this battery.
Information for Your Safety
WARNING:
TO REDUCE THE RISK OF FIRE, ELECTRIC SHOCK OR PRODUCT DAMAGE,
DO NOT EXPOSE THIS APPARATUS TO RAIN, MOISTURE, DRIPPING OR
•
SPLASHING AND THAT NO OBJECTS FILLED WITH LIQUIDS, SUCH AS VASES,
SHALL BE PLACED ON THE APPARATUS.
•USE ONLY THE RECOMMENDED ACCESSORIES.
•DO NOT REMOVE THE COVER (OR BACK); THERE ARE NO USER SERVICEABLE
PARTS INSIDE. REFER SERVICING TO QUALIFIED SERVICE PERSONNEL.
Carefully observe copyright laws.
Recording of pre-recorded tapes or discs or other published or broadcast material
for purposes other than your own private use may infringe copyright laws. Even for
the purpose of private use, recording of certain material may be restricted.
•
Please note that the actual controls and components, menu items, etc. of your Digital
Camera may look somewhat different from those shown in the illustrations in these
Operating Instructions.
•G MICRO SYSTEM is a lens exchange type digital camera system of LUMIX
based on a Micro Four Thirds System standard.
•Micro Four Thirds is a trademark.
•Four Thirds™ is a trademark.
•SDHC Logo is a trademark.
•HDMI, the HDMI Logo and the High-Definition Multimedia Interface are the
registered trademarks or trademarks of HDMI Licensing LLC.
•VIERA Link™ is a trademark of Panasonic Corporation.
•EZ Sync™ is a trademark of Panasonic Corporation.
•HDAVI Con trol™ is a trademark of Panasonic Corporat ion.
•Adobe is a trademark or registered trademark of Adobe Systems Incorporated in the United
States and/or other countries.
VQT1U32
2
Page 3

Before Use
DMC-G1
•Microsoft product s creen shot(s) reprinted with permission from Microsoft Corporation.
•Other names, company names, and product names printed in these instructions are
trademarks or registere d trademarks of the companies concerned.
THE SOCKET OUTLET SHA LL BE INSTALLED NEAR THE EQUIPMENT AND
SHALL BE EASILY ACCESSIBLE.
Product Identification Marking is located on the bottom of units.
THE FOLLOWING APPLIES ONLY IN CANADA.
This Class B digital apparatus complies with Canadian ICES-003.
THE FOLLOWING APPLIES ONLY IN THE U.S.A.
FCC Note:
This equipment has been tested and found to comply with the limits for a Class B digital
device, pursuant to Part 15 of the FCC Rules. These limits are designed to provide
reasonable protection against harmful interference in a residential installation. This
equipment generates, uses, and can radiate radio frequency energy and, if not installed
and used in accordance with the instructions, may cause harmful interference to radio
communications. However, there is no guarantee that interference will not occur in a
particular installation. If this equipment does cause harmful interference to radio or
television reception, which can be determined by turning the equipment off and on, the
user is encouraged to try to correct the interference by one or more of the following
measures:
•
Reorient or relocate the rece iving antenna.
•Increase the separation between the equipment and receiver.
•Connect the equipment into an ou tlet on a circuit diff erent from that to which the receiver is
connected.
•Consult the dealer or an experienced radio/TV technic i an for help.
FCC Caution:To assure continued compliance, follow the attached installation
instructions and use only shielded interface cables with ferrite core when
connecting to computer or peripheral devices.
Any changes or modifications not expressly approved by the party responsible for
compliance could void the user’s authority to operate this equipment.
Declaration of Conf or m ity
Trade Name: Panasonic
Model No.: DMC-G1
Responsible party:Panasonic Corporat ion of North America
One Panasonic Way, Secaucus, NJ 07094
Support Contact: Panasonic Consumer Electronics Company 1-800-211-PANA (7262)
This device complies with Part 15 of the FCC Rules. Operation is subject to the
following two conditions: (1) This device may not cause harmful interference, and (2)
this device must accept any interference rec eived, including interference that may
cause undesired operation.
VQT1U32
3
Page 4
Before Use
-If you see this symbolInformation on Disposal in other Countries outside the European Union
This symbol is only valid in the European Union.
If you wish to discard this product, please contact your local
authorities or dealer and ask for the correct method of disposal.
∫ About the battery pack
CAUTION
Danger of explosion if battery is incorrectly replaced. Replace only with the same or
equivalent type recommended by the manufacturer. Dispose of used batteries
according to the manufacturer’s instructions.
Warning
Risk of fire, explosion and burns. Do not disassemble, heat above 60 xC (140 oF) or
incinerate.
CAUTION
Battery pack (Lithium ion battery pack)
•
Use the specified unit to recharge the battery pack.
•Do not use the battery pack with equipment other than the specified unit.
•Do not get dirt, sand, li quids, or other foreign matter on the terminals.
•Do not touch the plug terminals (i and j) with metal objects.
•Do not disassemble, remodel, heat or throw into fire.
If any electrolyte should come into contact with your hands or clothes, wash it off
thoroughly with water.
If any electrolyte should come into contact with your eyes, never rub the eyes. Rinse
eyes thoroughly with water, and then consult a doctor.
Do not heat or expose to flame.
•
•Do not leave the battery(ies) in an automobile exposed to direct sunlight for a long period of
time with doors and windows closed.
VQT1U32
4
Page 5

Before Use
∫ About the battery char ge r
CAUTION!
DO NOT INSTALL OR PLACE THIS UNIT IN A BOOKC ASE, BUILT-IN CABINET OR IN
•
ANOTHER CONFINED SPACE. ENSURE THE UNIT IS WELL VE NTILATED. TO PREVENT
RISK OF ELECTRIC SHOCK OR FIRE HAZARD DUE TO OVERHEATING, ENSURE THAT
CURT AIN S A ND ANY OTHER MATERIALS DO NOT OBSTRUCT THE VENTILATION
VENTS.
•DO NOT OBSTRUCT THE UNIT’S VENTILATION OPENINGS WITH NEWSPAPERS,
TABLECLOTHS, CURTAINS, AND SIMILAR ITEMS.
•
DO NOT PLACE SOURCES OF NAKED FLAMES, SUCH AS LIGHT ED CANDLES, ON THE
UNIT.
•DISPOSE OF BATTERIES IN AN ENVIRONMENTALLY FRIENDLY MANNER.
Battery charger
This battery charger operates on AC between 110 V and 240 V.
But
•
In the U.S.A. and Canada, the battery charger must be connected to a 120 V AC power
supply only.
•When connecting to an AC supply outside of the U.S.A. or Canada, use a plug adaptor to
suit the AC outlet configuration.
•When connecting to a supply of greater than AC 125V, ensure the cord you use is suited to
the voltage of the AC supply and the rated current of the battery charger.
•Contact an electrical part s distributor for ass istance in select ing a suitable AC plug adapto r or
AC cord set.
•The battery charger is i n the standby condition whe n the AC power supply cord is connected .
The primary circuit is always “live” as long as the power cord is connected to an electrical
outlet.
∫ Care of the camera
•
Do not strongly shake or bump the camera by dropping it etc.
This unit may malfunction, recordin g pict ures may no longe r be po ssib le or the le ns or th e LCD
monitor may be damaged.
•Be particu larly careful in the following places as they may cause this u nit to
malfunction.
– Places with a lot of sand or dust.
– Places where water can come into contact with this unit such as when using it on a rainy day
or on a beach.
•Do not touch the lens or the sockets with dirty hands. Also, be careful not to allow
liquids, sand and other foreign matter to get into the space around the lens, buttons etc.
•If water or seawater splashes on the camera, use a dry cloth to wipe the camera body
carefully.
•Do not place your hands inside the mount of the digital camera body. Since the sensor
unit is a precision apparatus, it may cause a malfunction or damage.
∫ About Condensation (Whe n the lens or the Viewfinder is fogged up)
•
Condensation occurs when th e ambient temperature or humidity changes. Be careful of
condensation since it causes lens stains, fungus and camera malf unction.
•If condensation occur s, turn the camera off and leave it for about 2 hours. The fog will
disappear naturally when the temperature of the camera becomes close to the ambient
temperature.
∫ Read together with the “Cautions for Use”. (P137)
VQT1U32
5
Page 6

Contents
Before Use
Information for Your Sa fety................... ....2
Standard Accessories...............................8
Names of the Components.....................10
Rotating th e L C D mo n i tor........... ............ 13
About the Lens........................................14
Preparation
Attaching/Detaching the Lens . ................ 15
Attaching the Strap........................ .........17
Attaching the Lens Hood ........................ 18
Charging the Battery...............................19
About the Battery (charging/number of
recordable pictures)................................ 20
Inserting/Removing th e Battery ..............22
Inserting/Removing the Card (Optional) .....23
About the Card........................................24
Setting Dat e /T i m e ( C l o ck Set) ........ .. ...... 25
• Changing the clock setti n g ............... ... ..25
Setting the Menu.....................................26
• Setting menu items................................27
Setting the Quick Menu ..........................29
About the Setup Menu............................30
About LCD monitor/Viewfinder ...............35
• LCD Monitor ..........................................35
• Direction detection function...................36
• Switching th e LCD monitor/
Viewfinder .............................................37
Selecting th e [R EC] Mode ...................... 38
Basic
Taking pictures using the automatic
function (Intelligent Auto Mode)..............40
• Scene detection.....................................41
• AF Tracking Function ............................42
• Compensating the Exposure .................42
• About the flash................. .................... ..42
• Settings in Intelligent auto mode...........43
Taking pictures with your favorite
settings (Program AE mode) ..................44
• Fix the focus by pressing the s hutter
button halfway (AFS) ............................45
• Continuously focusing on a subject
(AFC) ....................................................45
• Take a picture with manual focus
(MF) ......................................................45
• Focusing................................................46
• When the subject is not in focus............46
VQT1U32
6
• Preventing jitter (camera shake)............46
• Program shift.........................................47
Taking Pictures with the Zoom ............... 48
• Using the Optical Zoom/
Using the Extended Optical Zoom (EZ)/
Using the Digital Zoom..........................48
Playing back Pictures .............................49
• Changing the Information Display ed on
the playback screen..............................50
• Displaying Multiple Screens
(Multi Playback).....................................50
• Displaying Pictures by Recording Date
(Calendar Playback)..............................51
• Using the Playback Zoom......................51
Deleting Pictures.....................................52
• To delete a single picture ......................52
• To delete multiple pictures (up to 50) or
all the pictures.......................................53
Advanced (Recording pictures)
Switching the display of the LCD
Monitor/Viewfinder..................................54
• Switching the displayed information......54
Taking Pictures using the Built-in
Flash.......................................................58
• Switching to the appropriate flash
setting....................................................58
• Adjust the flash output...........................61
• Setting to the 2nd Curtain Sync hro...... ..62
Compensating the Exposure ..................63
Taking Pictures using Burst Mode.......... 64
Taking Pictures using Auto Bracket........66
Taking Pictures with the Self-timer .........68
Setting the method used to focus
(AF mode)...............................................69
• Setting up [ ] (AF Tracking) ...............70
• Setting the AF area................................71
Taking Pictures with Manual Focus........ 72
Fixing the Focus and the Exposure
(AF/AE Lock)..................................... .....74
Adjusting the White Balance...................76
• Setting the white balance manu ally.......77
• Setting the color temperature................77
• Finely adjusting the white balance.........77
• White balance bracket...........................78
Setting the Light Sens itivity............ .........79
Change tone of the color for the picture
to be taken (Film mode)..........................81
• Adjusting each film mode to the
desired setting.......................................82
• Multi film bracket....................................83
Taking pictures by specifying the
aperture/shutter speed............................84
Page 7
• Aperture-prio ri ty AE ................. ... .......... 84
• Shutter-prior ity AE............ ... .................. 84
Taking picture by setting the exposure
manually .................................................85
Confirm the effects of aperture and
shutter speed (Preview mode)................87
• Confirm the effects of aperture ............. 87
• Confirm the effects of shutter speed.....87
Taking expressive portraits and landscape
pictures (Advanced scene mode)............... 88
• [PORTRAIT]......... .. ... .................... ... ....89
• [SCENERY]. .................... ................... .. 89
• [SPORTS] ............ .. .................... .......... 90
• [CLOSE-UP] ... ... ... ................... ............. 90
• [NIGHT PORTRAIT]..... .................... ....91
Taking pictures that match the scene
being recorded (Scene mode) ................92
• ï [SUNSET] .......................................92
• 2 [PARTY] .......................................... 93
• : [BABY1]/; [BABY2]...................... 93
• í [PET]............................................... 94
Taking pictures while adjusting color
(My color mode)......................................95
Registering Personal Menu Settings
(Registering custom settin g s).................96
Taking pictures in Custom mode ............97
Using the [REC] Mode Menu..................98
• ? [ASPECT RATIO].................. .......... 98
• @ [PICTURE SIZE]............. .. ... ............. 98
• A [QUALITY]............... ... ................... .. 99
• C [METERING MODE]........... ........... 100
• [STABILIZER] .............................. 100
• [FLASH]........................................ 101
• [D.RED-EYE]................................101
• [FLASH SYNCHRO].....................101
• [FLASH ADJUST.]........................ 102
•
[I.EXPOSURE] .............................102
• [EX. OPT. ZOOM] ........................102
• ) [DIGITAL ZOOM] ..........................102
• [BURST RATE]............................. 103
• [AUTO BRACKET] ....................... 103
• [SELF-TIMER] .............................. 103
• [COLOR SPACE].........................103
• [LONG SHTR NR]........................ 104
• [ISO LIMIT SET]........................... 104
• [ISO INCREMENTS] ....................104
Using the [CUSTOM MENU] ................105
Advanced (Playback)
• O [DPOF PRINT]............................... 113
• P [PROTECT] ...................................114
• Q [RESIZE]....................................... 115
• [TRIMMING] .................................116
• ? [ASPECT CONV.] .........................117
Connecting to other equipment
Connecting to a PC...............................118
Printing the Pictures................... ...........120
• Single picture ..................... ... ... .. .........1 2 1
• Print Settings.............. .. ... .................... 121
• DPOF picture . ... .................... ..............123
Playing Back Pictures on a TV Screen.....124
• Playing back pictures using the Video
cable (supplied).................................. 124
• Playing back pictures on a TV with an
SD Memory Card slot .. ... ... ................. 124
• Playing back on the TV with HDMI
socket .................................................125
Others
Using the External Flash (optional).......128
Using the Protector/Filter (optional)......130
Using the Remote Shutter (optional).....131
Using the AC Adaptor...........................132
Recording Dates/Times at Overseas
Travel Destinations (World Time).........133
Screen Display......................................134
Cautions for Use...................................137
Message Display ..................................141
Functions that cannot be set or will not
work under some conditions.................143
Troubleshooting....................................146
Number of recordable pictures..............153
Specifications........................................ 156
Digital Camera Accessory System........159
Digital Camera Accessory Order Form
(For USA Customers)...........................160
Request for Service Notice
(For USA Only)................................... ..161
Limited Warranty (For USA Only).........162
Customer Services Directory
(For USA Only)................................... ..164
Index..................................................... 165
Useful Information
(For Latin American Countries Only) ....167
Using the [PLAYBACK] mode menu.....110
• [SLIDE SHOW] ............................. 110
• Ü [FAVORITE] ................................... 111
• N [ROTATE]/M [ROTATE DISP.] ... 112
VQT1U32
7
Page 8

Before Use
Before Use
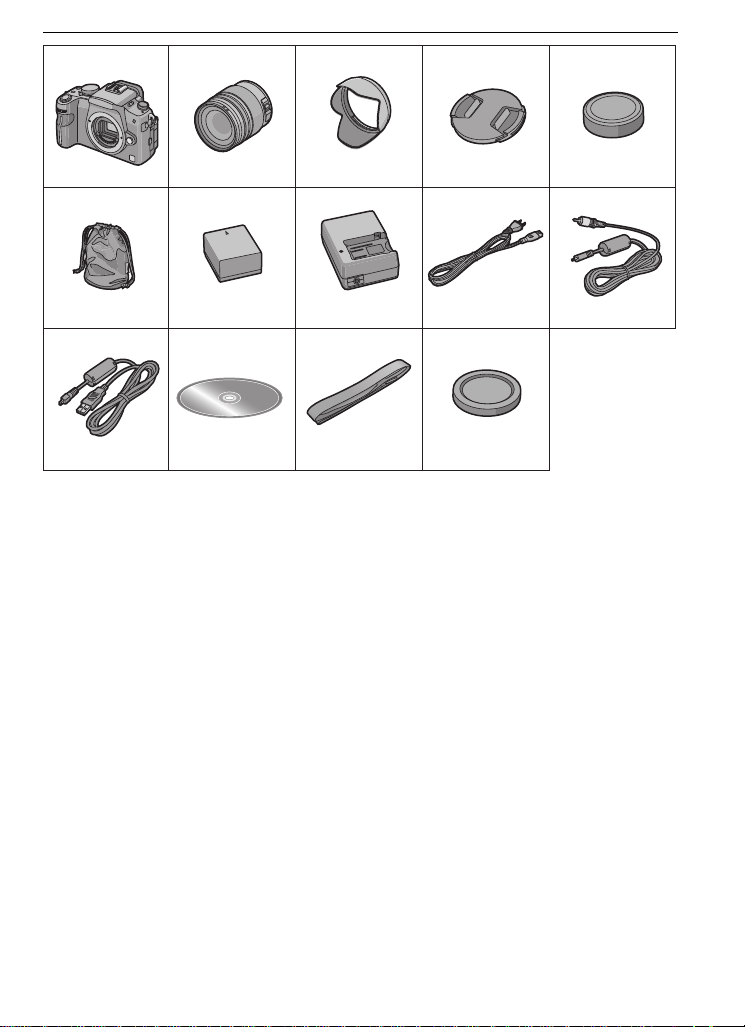
Standard Accessories
Check that all the accessories are included before using the camera.
1 Digital Camera Body
(This is referred to as camera body in these operating instructions.)
2 Interchangeable Lens
“LUMIX G V ARIO 14–45 mm/F3.5–5.6 ASPH./MEGA O.I.S.”
(This is referred to as lens in these operating instructions.)
3 Lens Hood
4 Lens Cap
(This is attached to the interchangeable lens at the time of purchase.)
5 Lens Rear Cap
(This is attached to the interchangeable lens at the time of purchase.)
6 Lens Storage Bag
7Battery Pack
(This is referred to as battery in these operating instructions.)
Charge the battery before use.
8 Battery Charger/AC Adaptor
(This is referred to as charger in these operating instructions. )
9 AC Cable
10 Video Cable
11 USB Connection Cable
12 CD-ROM
•
Software:
Use it to install the software to yo ur PC.
13 Strap
14 Body Cap
(This is attached to the camera body at the time of purchase.)
•
SD Memory Card, SDHC Memory Card and MultiMediaCard are indicated as card in the text.
•The card is optional.
•Description in these operating instructions i s based on the 14–45 mm/F3.5–5.6 lens
included in the DMC-G1K.
•For information about option al accessories, refer to the “Digital Camera Accessory System”.
(P159)
•If any accessories ar e los t, cus tomer s in th e US A should con t act Panas o nic’ s p a rt s dep ar tment
at 1 800 833-9626 and customers in Canada should contact 1 800 99-LUMIX
(1-800-995-8649) for further information about obtaining replacement parts.
VQT1U32
8
Page 9
Before Use
VFC4315
VFC4357
VYC0981
H-FS014045 VYF3201
1
6
2
DMW-BLB13PP
K1HA08CD0021K2CA2EA00002
DE-A49B
K1HA08CD0019
7
3
8910
11 12 13 14
VFC4355 VKF4385
45
VQT1U32
9
Page 10
Before Use
23
76 5 4
1
8
11 13
16 17
9
10 12 14 15
2018 19
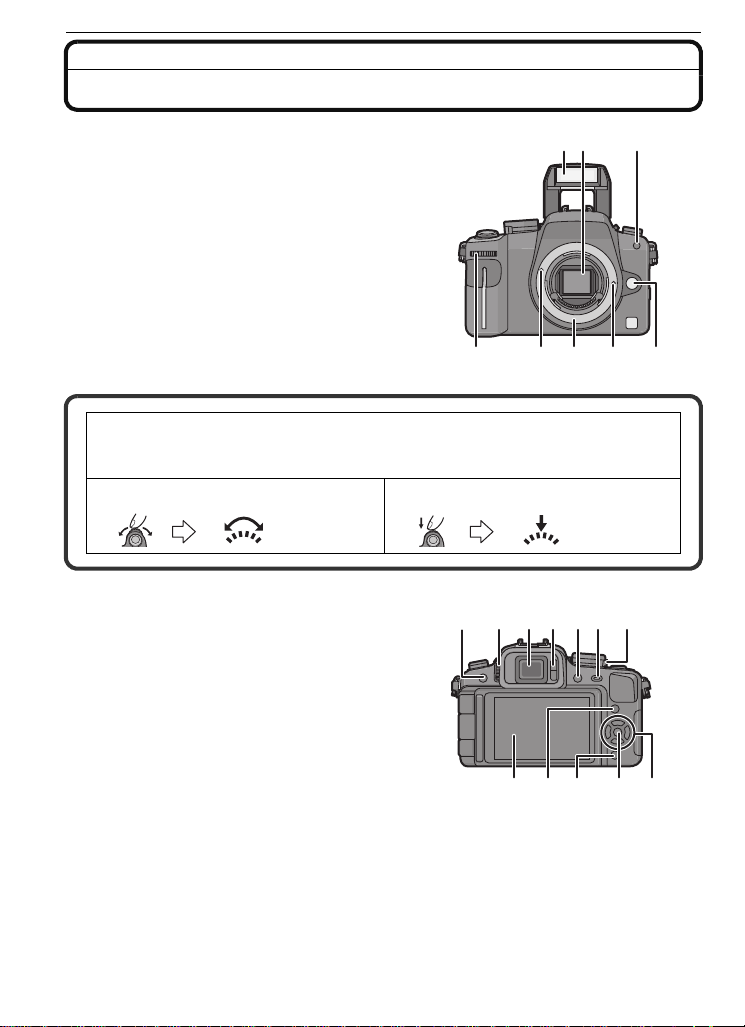
Names of the Components
∫ Camera body
1 Flash (P58)
2 Sensor
3 Self-timer indicator (P68)
AF assist lamp (P107)
4 Lens release button (P16)
5 Lens lock pin
6 Mount
7 Lens fitting mark (P15)
8 Front dial (P27, 42, 47, 50, 51, 63, 84, 85)
There are 2 ways to operate the front dial, rotating left or right, and deciding by
pressing.
Front dial is described as following in these operating instructions.
e.g.: Rotating left or right e.g.: Pressing the front dial
9 [LVF/LCD] button (P37)
10 Diopter adjustment dial (P37)
11 Viewfinder (P37, 55, 134)
12 Eye sensor (P37)
13 Playback button (P49, 52, 124, 125)
14 [AF/AE LOCK] button (P74)
15 Camera ON/OFF switch (P25)
16 LCD monitor (P35, 50, 54, 134)
17 [DISPLAY] button (P50, 54, 87)
18 Delete button (P52)/
Preview button (P87)
19 [MENU/SET] button (P25)
20 Cursor buttons
3/ISO (P79)
2/AF mode (P69)
4/Function button (P30)
Assign Menu to 4 button. It is convenient to register Menu that is used often.
[ASPECT RATIO]/[QUALITY]/[METERING MODE]/[I.EXPOSURE]/[GUIDE LINE]
1/WB (White balance) (P76)
VQT1U32
10
Page 11
Before Use
MENU
/SET
25 26
22
21
23
24
30292827
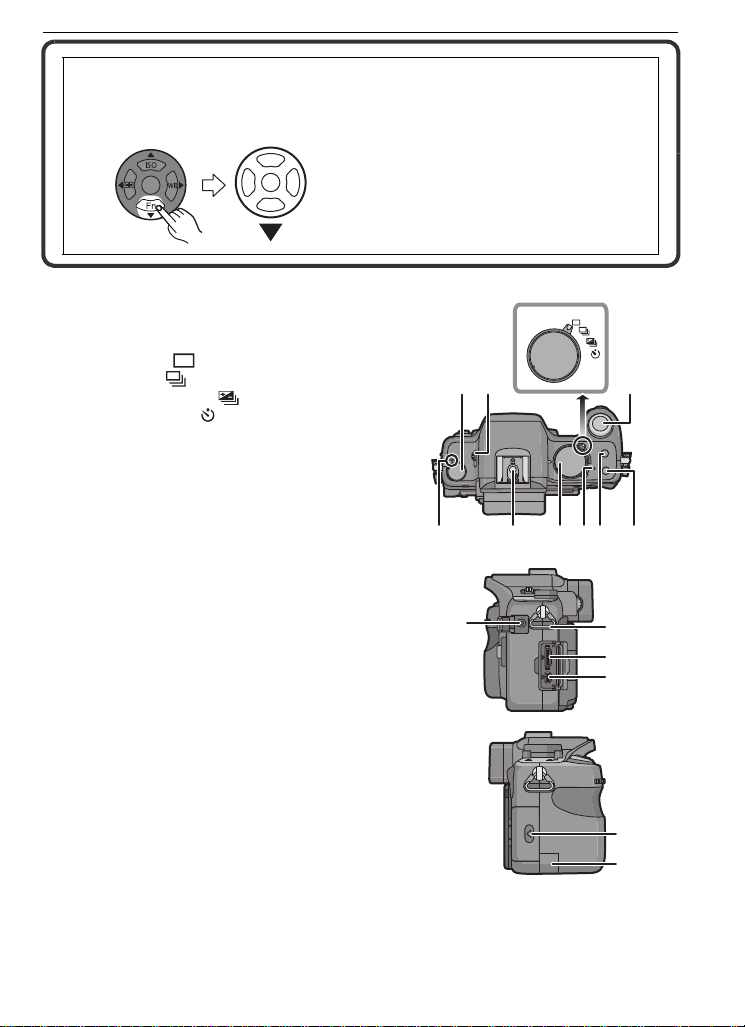
In these operating instructions, the cursor buttons are described as shown in the
figure below or described with 3/4/2/1.
e.g.: When you press the 4 (down) button
21 Focus mode dial (P40, 44, 69, 72)
22 Flash open lever (P58)
23 Drive mode lever
Single (P44):
Burst (P64):
Auto bracket (P66):
Self-timer (P68):
24 Shutter button (P40)
25 Focus distance reference mark (P73)
26 Hot shoe (P128)
27 Mode dial (P38)
28 Status indicator (P40)
29 [Q.MENU] button (P29)
30 [FILM MODE] button (P81)
31 [REMOTE] socket (P131)
32 Strap eyelet (P17)
•
Be sure to attach the strap when using the
camera to ensure that you will not drop it.
33 [HDMI] socket (P125, 126)
34 [DIGITAL/V.OUT] socket (P1 18, 120, 124)
35 Card door (P23)
36 DC cable cover (P132)
or
31
Press 4
32
33
34
35
36
VQT1U32
11
Page 12
Before Use
393837
42 43
46 47
45
44
40 41
5049
48
51
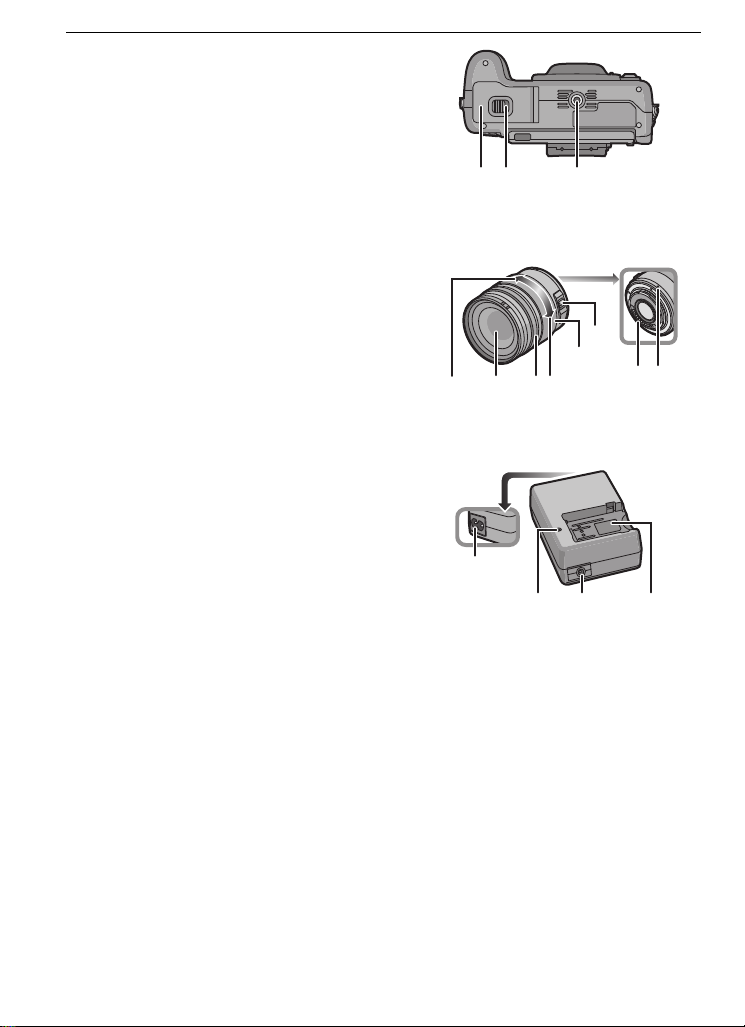
37 Battery door (P22)
38 Release lever (P22)
39 Tripod receptacle
•
When you use a tripod, make sure the tripod
is stable when the camera is att ached to it.
∫ Lens
H-FS014045 (LUMIX G VARIO 14–45 mm/F3.5–5.6 ASPH./MEGA O.I.S.)
40 Tele
41 Lens surface
42 Focus ring (P72)
43 Wide
44 Zoom ring (P48)
45 [O.I.S.] switch (P16)
46 Contact point
47 Lens fitting mark (P15)
∫ Battery charger/AC adaptor (P19, 132)
48 Power input socket [AC IN]
49 [CHARGE] indicator
50 Power output socket [DC OUT]
51 Battery holder
12
VQT1U32
Page 13
Before Use
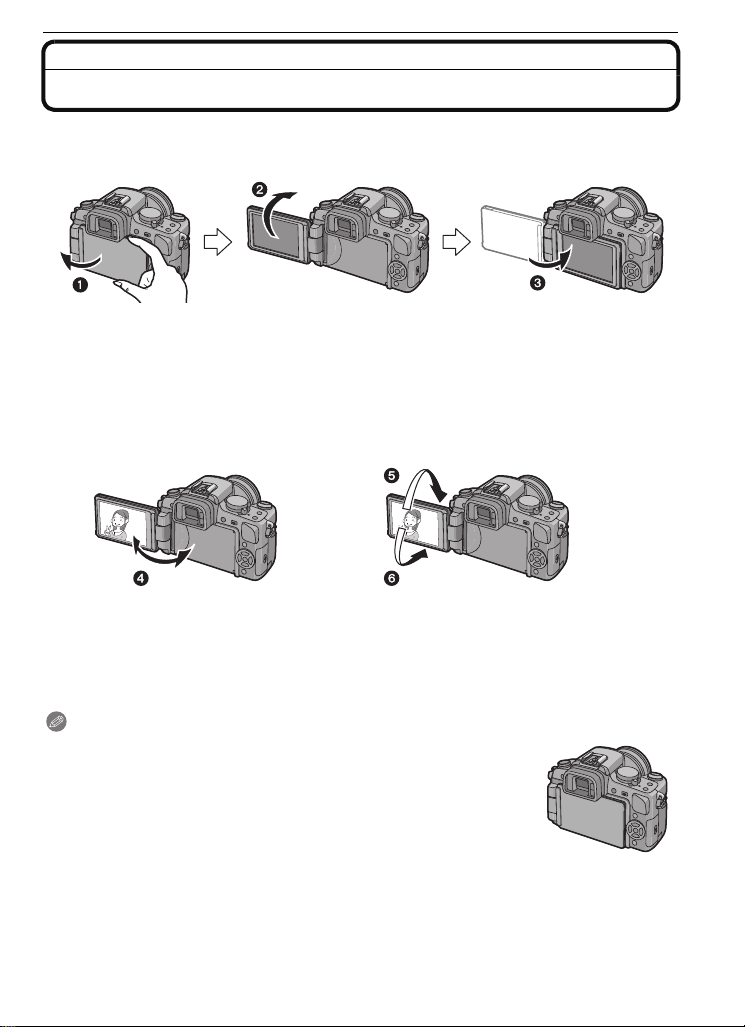
Rotating the LCD monitor
At the time when this camera is purchased, the LCD monitor is stowed in the camera body.
Bring out the LCD monitor as shown below.
1 Open the LCD monitor. (Maximum 180o)
2 It can be rotated 180o forwards.
3 Return the monitor to its original position.
Rotation range of the LCD monitor
∫ Horizontal opening direc tion ∫ Vertical rotating direction
4 Maximum 180o
5 180o
It can be rotated 180o forwards.
•
6 90o
•
It can only be rotated 90 o towards you.
Note
Only rotate the LCD monitor after opening it wide enough, and be
•
careful not to use excessive fo rce as it may be damaged.
•When holding the edge of the LCD monitor, there may be some
distortion, however this is not a malfunction. Moreover, this has no
effect on the tak en pictures or playback.
•When not using the LCD monitor it is recommended that you close it
with the screen facing inwards to prevent dirt and scratch es.
VQT1U32
13
Page 14
Before Use
About the Lens
This unit can use the dedicated lenses compatible with the Micro Four Thirds System lens
mount specification (Micro Four Thirds mount) such as the lens included in DMC-G1K.
Select a lens that matches the scene being recorded and your use of the pictures.
If you use a lens other than a dedicated interchangeable lens, auto focus cannot be
activated and accurate metering is not possible. Also, some functions will not work.
∫ “Micro Four Thirds Mount”
This is the lens mount standard for the
“Micro Four Thirds System”.
This was newly developed as
interchangeable lens dedicated for digital
cameras.
∫ When using lenses other than the lens included in DMC-G1K
•
Depending on the type of lens, you may n ot be a ble to us e some fu ncti ons such a s th e directi on
detection function (P36), [STABILIZER] (P100), Quick AF (P106) and Continuous AF (P106).
•The available flash ran ge e tc. differs depending on the a pert ur e value of th e len s you are using .
•Take some test pictures with the lens you are using.
•Lens with the Four Thirds™ mount
specification can be used by using the mount
adaptor (DMW-MA1; optional). However,
[AFC] mode (P45) and c ontin uous A F fun c tio n
(P106) cannot be used. Only manual focus is
possible when using a lens that is not
compatible with the Contrast AF. There are
some restrictions to some other functions too.
Because of its structure, Micro Four Thirds mount specification lenses cannot be used on
the Four Thirds mount specification cameras. It can only be used on the Micro Four Thirds
mount specification cameras.
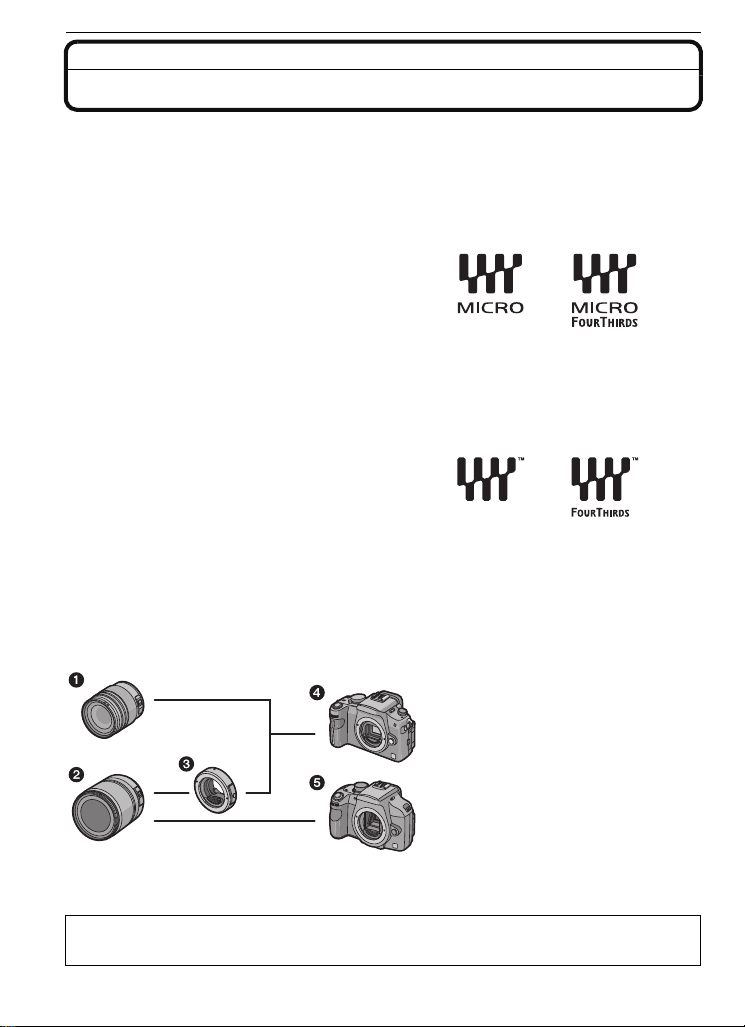
Lens Installa tion Combination Diagram
1 Micro Four Thirds mount
specification lens
2 Four Thirds mount
specification lens
3 Mount adaptor (DMW-MA1)
4 Micro Four Thirds mount
specification camera
(DMC-G1)
5 Four Thirds mount
specification camera
It cannot be mounted on the Four
¢
Thirds mount specification camera.
¢
Refer to catalogs/Web pages for most current information regarding compatible lenses.
http://panasonic.co.jp/pavc/global/cs (This Site is English only.)
VQT1U32
14
Page 15
Preparation
Attaching/Detaching the Lens
•Check that the camera is turned off.
•Close the flash.
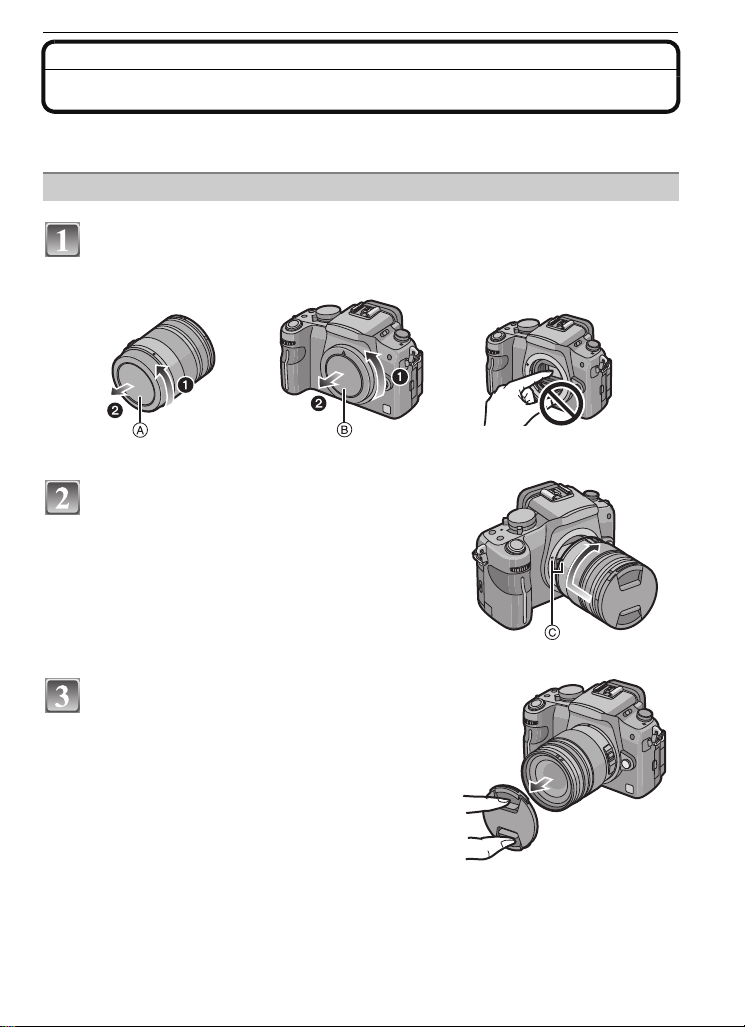
Attaching a lens to the camera body
Turn the lens rear cap A and the body cap B in the direction of the
arrow to detach them.
• Do not put your hands inside the mount.
Align the lens fitting marks C (red
marks) on the camera body and the lens
and then rotate the lens in the direction
of the arrow until it clicks.
• Do not press the lens release button when you
attach a lens.
• Do not try to attach the lens when holding it at an
angle to the camera body as the lens mount may
get scratched.
• Check that the lens is attached correctly.
Preparation
Detach the lens cap.
• Detach the lens cap before taking pictures.
VQT1U32
15
Page 16
Preparation
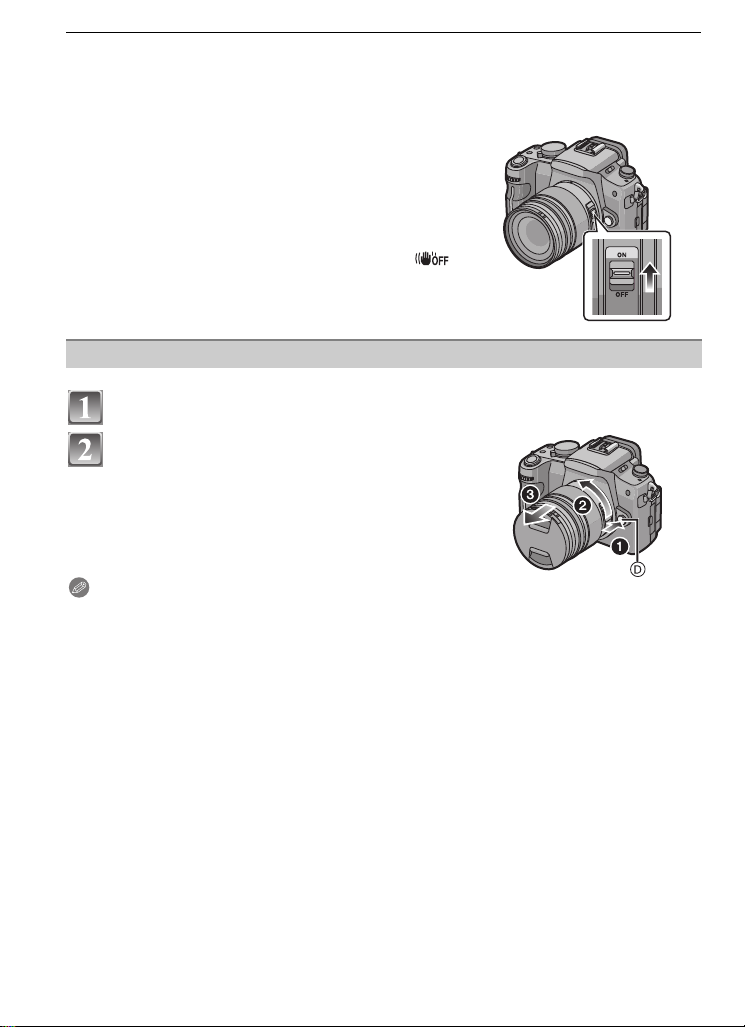
∫ Optical image stabilizer
Lens included in the DMC-G1K has a stabiliser function.
The optical image stabilizer function is set for activation when the lens is attached to the
camera body.
Set the [O.I.S.] switch to [ON].
•You can change the optical image stabilizer mode to
[MODE1], [MODE2] or [MODE3] using [STABILIZER] in
the [REC] mode menu. (P100) It is set to [MODE1] at the
time of purchase.
•We recommend setting the [O.I.S.] switch to [OFF] when
using a tripod. If the [O.I.S.] switch is set to [OFF], [ ]
is displayed on the LCD monitor/Viewfinder.
Detaching a lens from the camera body
Attach the lens cap.
Press the lens release button D while
turning the lens as far as possible in the
direction of the arrow to detach it.
• Always attach the body cap to the camera body so
that dirt or dust does not get inside.
• Attach the lens rear cap so that the lens cont act
point does not get scratched.
Note
Change lenses where there is not a lot of dirt or dust. Refer to P138 whe n dirt or dust gets on
•
the lens.
•When you turn the camera off or carry th e camera, att ach t he lens c ap to protec t the s urfac e of
the lens.
•Be careful not to lose the lens cap, the lens rear cap and the body cap.
16
VQT1U32
Page 17
Preparation
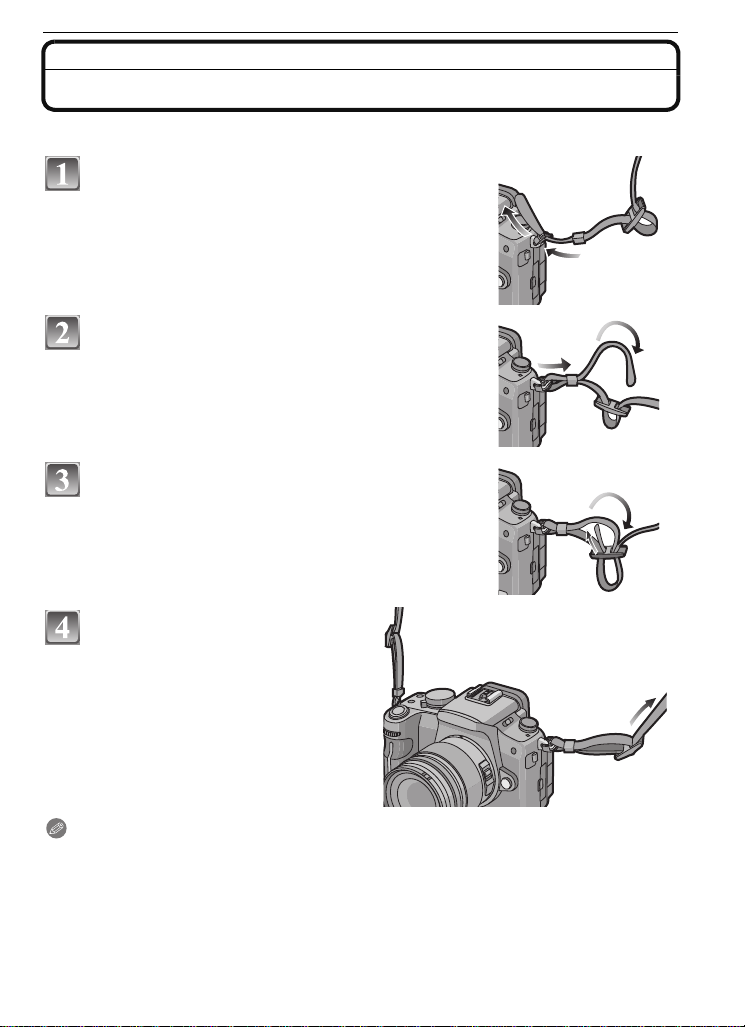
Attaching the Strap
•We recommend attaching the strap when using the camera to prevent it from dropping.
Pass the strap through the strap eyelet on
the camera body.
Pass the end of the strap through the ring in
the direction of the arrow and then pass it
through the stopper.
Pass the end of the strap through the hole
on the other side of the stopper.
Pull the other side of the strap
and then check that it will not
come out.
• Perform steps 1 to 4 and then attach
the other side of the strap.
Note
Be sure to follow the steps and attach the strap correctly.
•
•Check that the strap is firmly attached to the camera.
•Attach the strap so that the “LUMIX” LOGO is on the outside.
•Use the strap around your shoulder.
– Do not wrap around your neck.
– It may result in injury or accident.
•Do not leave the strap where an infant can reach it.
– It may result in accident by mista kenly wrapping around the neck.
VQT1U32
17
Page 18
Preparation
Attaching the Lens Hood
In bright sunlight or backlight, the lens hood will minimize lens flare and ghosting. The lens
hood cuts off excess lighting and improves the picture quality.
•
Check that the camera is turned off.
•Close the flash.
•Check the part number on the le ns hood before attaching it to the lens.
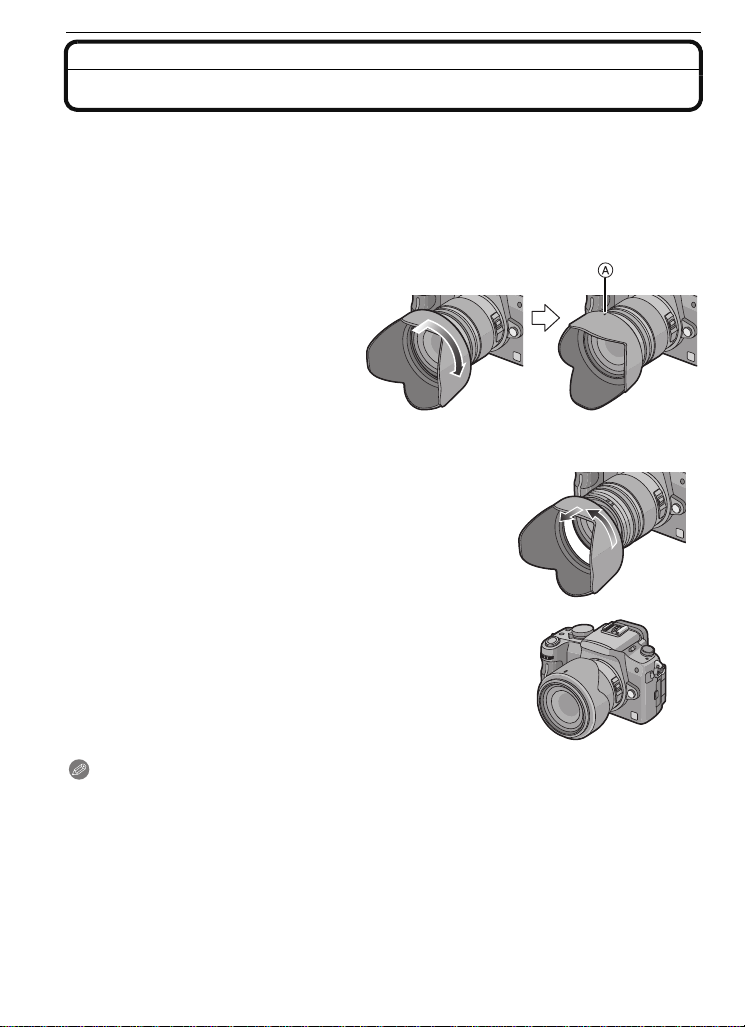
To attach the lens hood (flower shape) that came with the 14 – 45 mm/F3.5–5.6 lens
included in the DMC-G1K
Insert the lens hood into the lens
with the short sides at the top
and bottom, and turn in the
direction of the arrow until it
stops.
A Fitting to the mark.
∫ Temporarily storing the lens hood
1 Turn the lens hood in the direct ion of the arrow to
detach it.
2 Reverse the lens hood and then attach it in the
same way as shown previously.
Attach the lens cap.
•
• When temporarily storing the lens hood, check that it is
firmly attached and that it does not appear in the
picture.
Note
•
Hold the short sides of the flower shape lens hood when attaching or detaching it.
•When taking pictures with f lash wit h t he lens hood at t ache d, the lower portion of t he phot o ma y
turn dark (vignetting effect) and the control of the flash may be disabled because the photo
flash may be obscured by the lens hood. We recommend detaching the lens hood.
•When using the AF assist lamp in the dark, detach the lens hood.
VQT1U32
18
Page 19
Preparation
Charging the Battery
∫ About batteries that you can use with this unit
The battery that can be used with this unit is DMW-BLB13PP.
It has been found that counterfeit battery packs which look very similar to the
genuine product are made available to purchase in some markets. Some of these
battery packs are not adequately protected with internal protection to meet the
requirements of appropriate safety standards. There is a possibility that these
battery packs may lead to fire or explosion. Please be advised that we are not
liable for any accident or failure occurring as a result of use of a counterfeit
battery pack. To ensure that safe products are used we would recommend that a
genuine Panasonic battery pack is used.
Use the dedicated charger and battery.
•
•The battery is not charged when the camera is shipped. Charge the battery before use.
•Charge the battery with the c harger indoors.
•Charge the battery in a temperature between 10 oC to 35 oC (50 oF to 95 oF). (The ba tt er y
temperature should also be the same.)
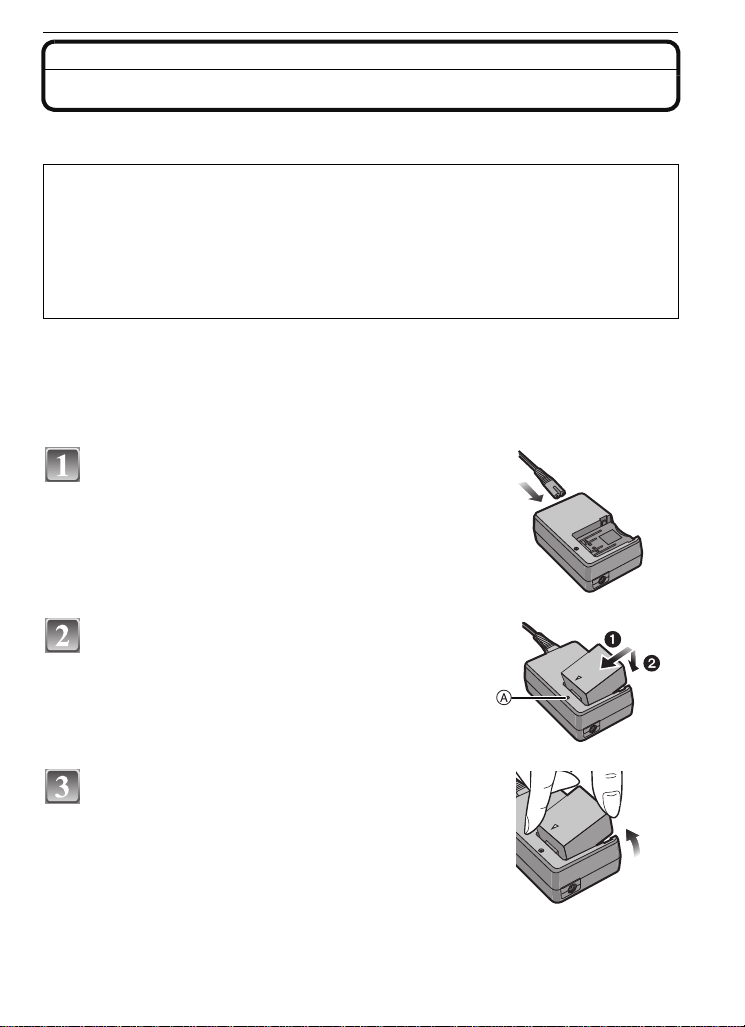
Connect the AC cable.
• The battery cannot be charged when the DC cable
(DMW-DCC3; optional) is connected to the AC adaptor.
Attach the battery with attention to the
direction of the battery.
• Charging starts when the [CHARGE] indicator A lights
green.
Detach the battery after charging is
completed.
• Charging is complete when the [CHARGE] indicator A
turns off (after approx. 155min maximum).
VQT1U32
19
Page 20
Preparation
∫ When the [CHARGE] indicator flashes
•
The battery temperature is excessively high or low. The charging time will be longer than
normal. Also, charging may not be completed.
•The terminals of the charger or the battery are dirty. In this case, wipe them with a dry cloth.
Note
•
Do not use any other AC cables exc e p t the supplied one.
•After charging is completed, be sure to disconnect the power supply device from the electrical
outlet.
•The battery becomes warm after using it and during and after charging. The camera also
becomes warm during use. This is not a malfunc tion.
•The battery will be exhausted if left for a long period of time after being charged.
•The battery can be recharged even when it still has some charge left, but it is not
recommended that the batte ry charge be frequently topped up while the battery is fully
charged. (The battery has characteristics that will reduce its operating duration and cause the
battery to swell up.)
•When the operating time of the camera becomes extremely short even after properly charging
the battery, the life of the battery may have expired. Bu y a new battery.
•Do not leave any metal item s (such as clips) near t he contact areas of the power plug.
Otherwise, a fire and/or electric shocks may be caused by short-circuiting or the
resulting heat generated.
About the Battery (charging/number of recordable pictures)
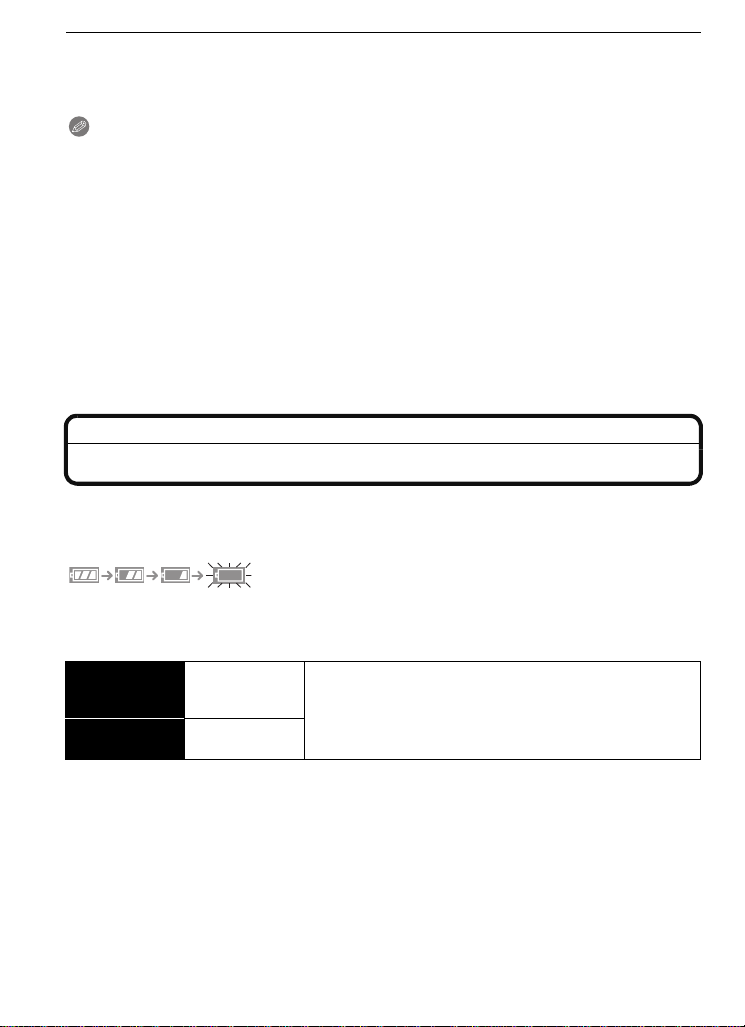
∫ Battery indication
The battery indication is displayed on the LCD monitor/Viewfinder.
[It does not appear when you use the camera with the AC adaptor
The indication turns red and blinks if the remaining battery power is exhausted. (The status
•
indicator also blinks) Recharge the battery or replace it with a fully charged battery.
∫ The battery life
Number of
recordable
pictures
Recording time
Approx.
330 pictures
Approx.
165 min
(By CIPA st andard in Program AE mode)
Recording conditions by CIPA standard
•
CIPA is an abbreviation of [Camera & Imaging Products Association].
•Temperature: 23 oC (73.4 oF)/Humidity: 50% when LCD monitor is on.
•Using a Panasonic SD Memory Card (512 MB).
•Using the supplied battery.
•Use the 14–45 mm/F3.5–5.6 lens included in DMC-G1K.
•Starting re cordin g 30seconds after the camera is turned on . (When t he opt ical imag e stab ilizer
function is set to [MODE1].)
•Recording once every 30 seconds with full flash every second recording.
•Turning the camera off every 10 recordings and leaving it until the temperature of the battery
decreases.
¢ The number of rec ordable pictures decreases in Auto power LCD mode or Power LCD
mode. (P31)
VQT1U32
20
(P132) connected.]
¢
Page 21
Preparation
The number of recordable pictures varies depending on the recording interval time.
If the recording interval time becomes longer, the number of recordable pictures
decreases.
[e.g. When recording once every 2 minutes, the num ber of recordable pictures
decreases to about 82.]
When using the viewfinder
Number of
recordable
pictures
Recording time
Approx.
350 pictures
Approx.
175 min
(By CIP A standard in Program AE mode)
Playback time when using the LCD monitor
Playback time Approx. 330 min
The number of recordable pictures and playback time will vary depending on the
operating conditions and storing condition of the battery.
∫ Charging
Charging time Approx. 155 min maximum
Charging time and number of recordable pictures with the optional battery pack
(DMW-BLB13PP) are the same as above.
The charging time will vary slightly depending on the status of the battery and the
conditions in the charging environment.
When the charging has been completed successfully, the [CHARGE] indicator turns off.
Note
•
The battery may swell and its operating time may become shorter as the number of times it is
charged increases. Fo r lon g term batte ry use, we rec ommen d you do not f requent ly c har ge the
battery before it is exhaus ted.
•The performance of the bat tery may temporarily deteriorate and the operating time may
become shorter in low temperature conditions (e.g. skiing/snowboarding).
VQT1U32
21
Page 22
Preparation
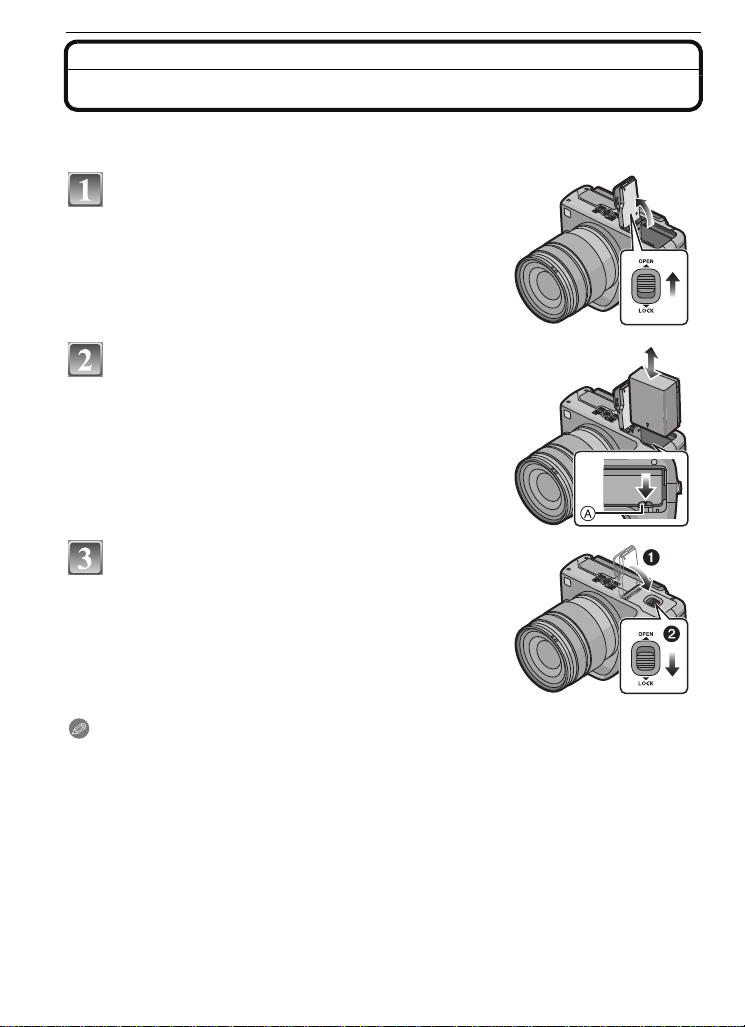
Inserting/Removing the Battery
•Check that this unit is turned off.
•Close the flash.
Slide the release leve r in the d ir ect ion of the
arrow (OPEN side) and then open the battery
door.
• Always use genuine Panasonic batteries
(DMW-BLB13PP).
• If you use other batteries, we cannot guarantee the
quality of this product.
Insert it fully being careful about the
direction you insert it. Pull the lever A in the
direction of the arrow to remove the battery.
1:Close the battery door.
2:Slide the release lever in the direction of
the arrow (LOCK side) and then close it
firmly.
Note
Remove the battery after use.
•
•Do not remove the battery while the power is on as the settings on the camera may not be
stored properly.
•The supplied battery is designed only for the camera. Do not use it with any othe r equipment.
•Before removing the battery, turn the camera off, and wait until the status indicator has gone off
completely. (Otherwise, this unit may no longer operate normally and the card itself may be
damaged or the recorded pictures may be lost.)
VQT1U32
22
Page 23
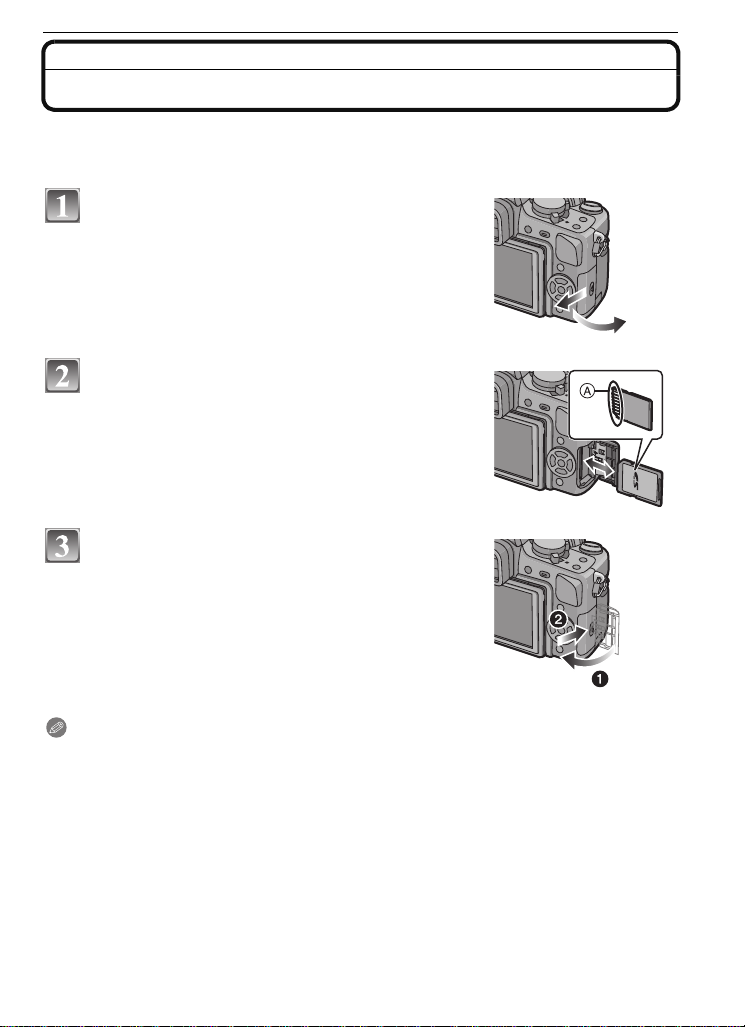
Inserting/Removing the Card (Optional)
•Check that this unit is turned off.
•Close the flash.
•We recommend using a Panasonic card.
Slide the card door to open it.
Push it fully until it clicks being careful
about the direction you insert it. T o remov e
the card, push the card until it clicks, then
pull the card out upright.
A:Do not touch the connection terminals of the card.
The card may be damaged if it is not fully inserted.
•
1:Close the card door.
2:Slide the card door to the end and then
close it firmly.
• If the card door cannot be completely closed, remove
the card and insert it again.
Preparation
Note
•
Always turn the camera off before opening the card door.
•Before removing th e card, turn the camera off, and wait until the status indicator has gone off
completely. (Otherwise, this unit may no longer operate normally and the ca rd itself may be
damaged or the recorded pict ures may be lost.)
VQT1U32
23
Page 24
Preparation
2
A
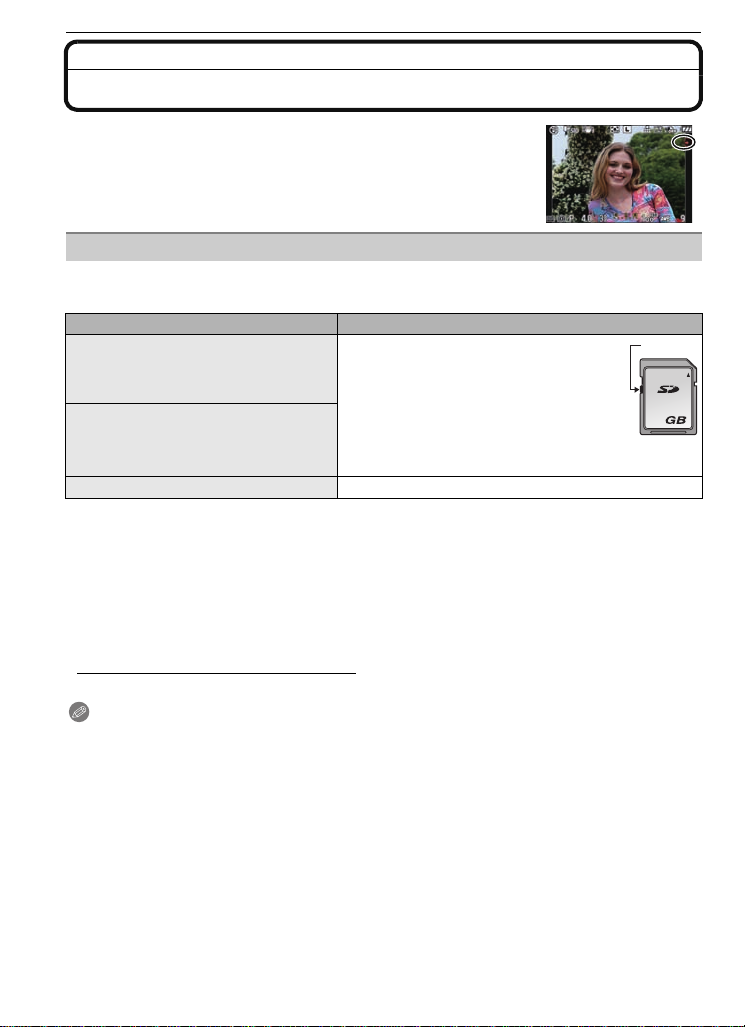
About the Card
Access to the card
The access indication lights red when pictures are being recorded
on the card.
Card
The following types of cards can be used with this unit.
(These cards are indicated as card in th e text.)
Type of card Characteristics
SD Memory Card (8 MB to 2 GB)
(Formatted using the FAT12 or FAT16
format in compliance with th e SD
standard)
SDHC Memory Card (4 GB, 6 GB,
8 GB, 12 GB, 16 GB, 32 GB)
(Formatted using the FAT32 format in
compliance with the SD standard )
MultiMediaCard
¢ The SDHC Memory Card is a memory card standard de cided by t he SD Ass ociat ion in 2006
for high capacity memory cards more than 2 GB.
¢ You can use an SDHC Memory Card in equipment that is compatible with SDHC Memory
Cards however you cannot use an SDHC Memor y Card in equip ment t hat is o nly comp atib le
with SD Memory Cards. (Always read the operating instructions for the equipment being
used.)
¢
•Y ou can only use cards with SDHC logo (indicating compliance with the SD standard) if using
cards with 4 GB or more capacity.
•Please confirm the latest in fo r m a ti on on the followin g w e bs i t e.
http://panasonic.co.jp/pavc/global/cs
(This Site is English only.)
Note
Do not turn off the power or remove the battery, card, or the DC cable (DMW-DCC3;
•
optional) (when the AC adaptor is in use), while the access indicator is lit, while reading
or deleting the picture, format (P34), etc. Also, do not appl y vibration or shock to the
unit.
The card or the data on the card may be damaged, and this unit may no longer operate
normally.
•The data on the card ma y be damag ed or lost due to ele ctromagne tic wave s, st atic elect ricity or
breakdown of the camera or the card. W e recommend storing important data on a PC etc.
•Do not format the card on your PC or other equipment. Format it on the camera only to en sure
proper operation. (P34)
•Keep the Memory Card out of reach of children to prevent swallowing.
•Fast recording and writing speed
•Write-Protect switch A provided (When
this switch is set to the [LOCK] position,
no further data writing, deletion or
formatting is possible. The ability to
write, delete and format dat a is rest ored
when the switch is returned to its
original position.)
—
VQT1U32
24
Page 25
Setting Date/Time (Clock Set)
MENU
/SET
:
:
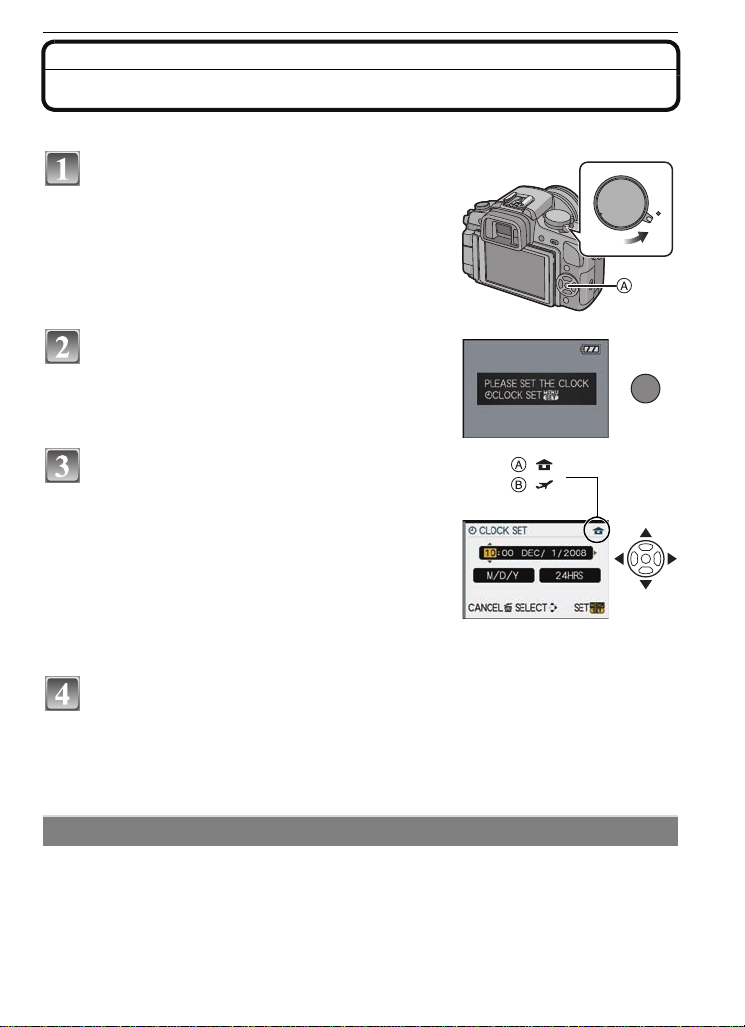
•The clock is not set when the camera is shipped.
Tu rn the camera on.
A [MENU/SET] button
Press [MENU/SET].
Press 2/1 to select the items (year , month,
day , hour, minute, display sequence or time
display format), and press 3/4 to set.
A: Time at the home area
B: Time at the travel destination (P133)
‚: Cancel without setting the clock.
•
Select either [24HRS] or [AM/PM] for the time disp lay
format.
• AM/PM is displayed when [AM/PM] is selected.
• When [AM/PM] is selected as the time display format, midnight is display ed as AM
12:00 and noon is displa y ed as PM 12:0 0. This dis play format is commo n in th e US and
elsewhere.
Press [MENU/SET] to set.
• Turn the camera off after finishing setting the clock. Then turn it on and check that the
clock setting is correct.
• When [MENU/SET] has been pressed to co mplete t he set ti ngs wit hout t he cl ock hav in g
been set, set the clock correctly by following the
procedure below.
“Changing the clock setting”
Preparation
ON
OFF
Changing the clock setting
Select [CLOCK SET] in the [SETUP] menu, and press 1. (P27)
•
It can be changed in steps 3 and 4 to set the clock.
•The clock setting is maintained for 3 months using the built-in clock battery even
without the battery. (L eave the charged battery in the unit for 24 hours to charge the
built-in battery.)
VQT1U32
25
Page 26
Preparation
Note
•
The clock is displayed when [DISPLAY] is pressed several times during recording.
•You can set the year from 2000 to 2099.
•If the date is not set in the came ra it will not be printed correctly when you use a photo printing
service, even if the store provides a date printing option for your photographs.
•If the clock is set, the corre c t dat e can b e p rinted ev en if t he dat e is no t displa yed on the sc ree n
of the camera.
Setting the Menu
The camera comes with menus that allow you to set the settings for taking pictures and
playing them back just as you like and menus that enable you to have more fun with the
camera and use it more easily.
In particular, the [SETUP] menu contains some important settings relating to the camera’s
clock and power. Check the settings of this menu before proceeding to use the camera.
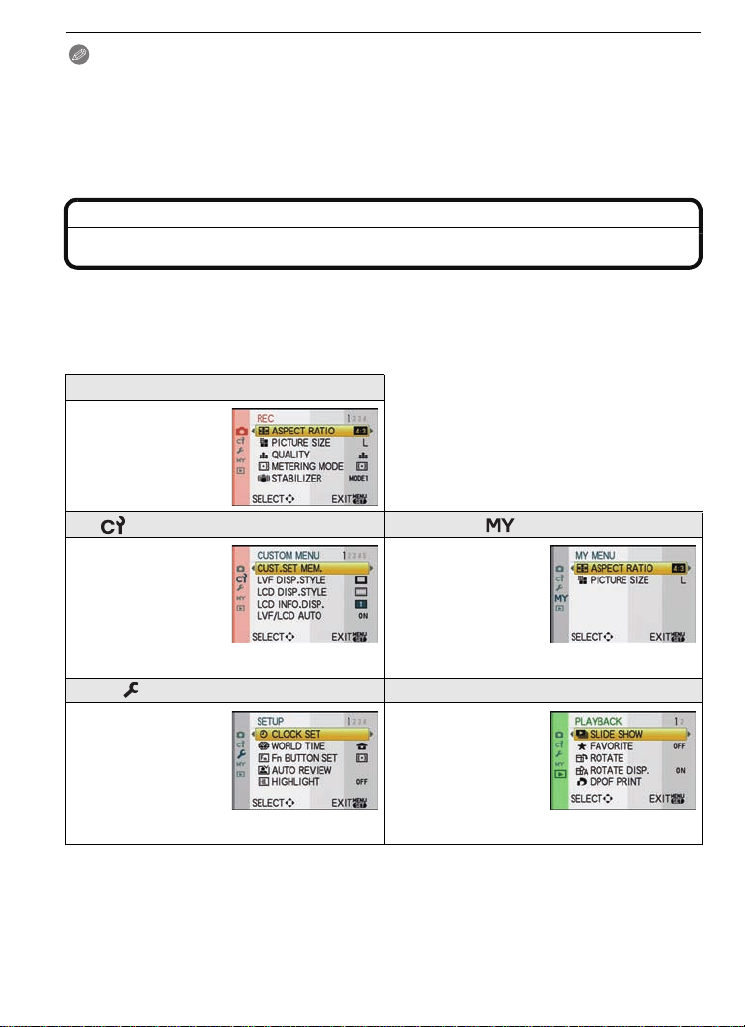
! [REC] mode menu (P98 to 104)
•This menu lets you
set the aspect ratio,
number of pixels and
other aspects of the
pictures you are
recording.
[CUSTOM MENU] (P105 to 109) [MY MENU]
•Operation of the unit,
such as displaying of
the screen and
button operations,
can be set up
according to your
preferences. Also, it
is possible to register the modified settings.
[SETUP] menu (P30 to 34) ( [PLAYBACK] mode menu (P110 to 117)
•This menu lets you
perform the cl ock
settings, select the
beep tone settings
and set other
settings which make
it easier for you to
operate the camera.
∫ Functions that cannot be set or will not work under some conditions
Due to the camera’s specifications, it may not be possible to set some of the functions or
some functions may not work in some of the conditions under which the camera is used.
For details, refer to P143.
•Up to 5 menu items
used recently can be
memorized. Items
used a lot can b e
recalled easily.
•This menu lets you
make the rotation,
protection, trimming
or DPOF settings,
etc. of recorded
pictures.
26
VQT1U32
Page 27
Preparation
ON
OFF
or
Setting menu items
This section describes how to select the [REC] mode menu settings, and the same setting
can be used for the [CUSTOM MENU] menu, [SETUP] menu, [MY MENU] menu and
[PLAYBACK] mode menu as well.
•
If you set [MENU RESUME] (P109) in the [CUSTOM MENU] menu to [ON], the screen shows
the last selected menu item when the camera was turned off.
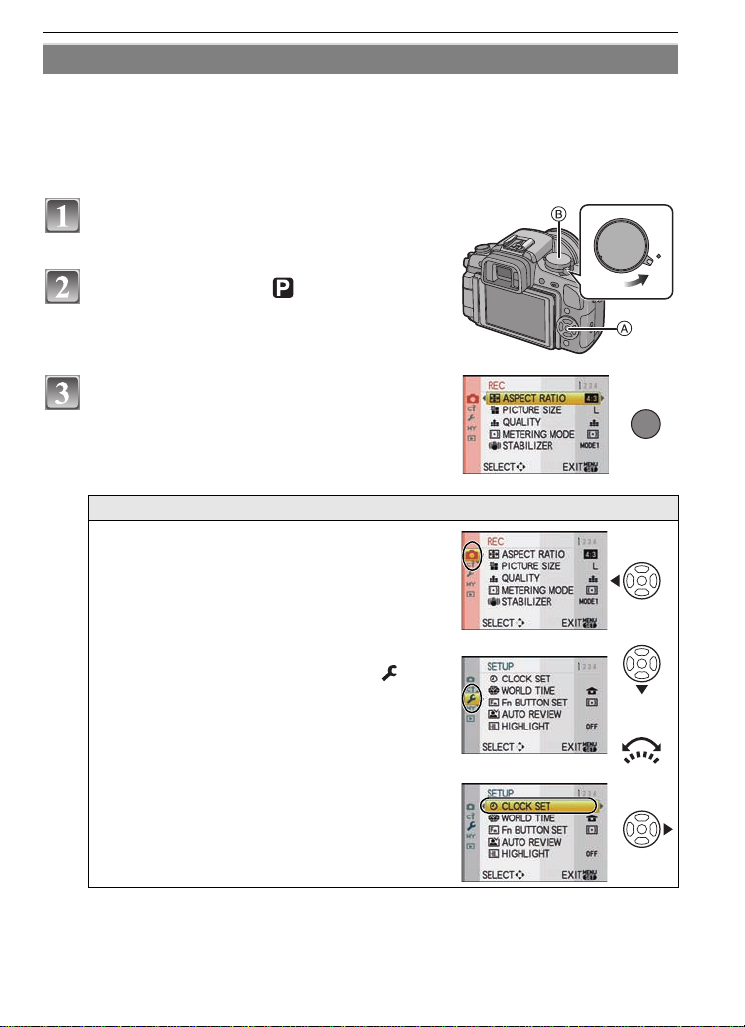
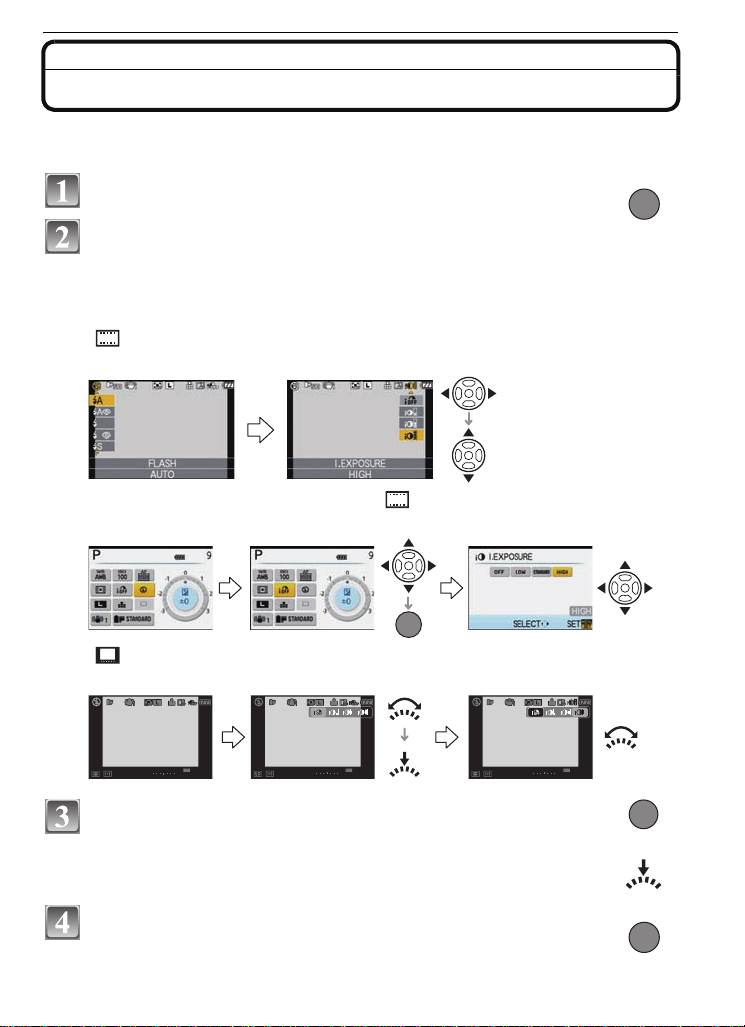
Example: Setting [I.EXPOSURE] from [OFF] to [HIGH] in the Program AE mode
Tu rn the camera on.
A [MENU/SET] button
B Mode dial
Set the mode dial to [ ].
Press [MENU/SET] to display the menu.
MENU
/SET
Switching to other menus
e.g.: Switching to the [SETUP] menu
1Press 2.
2Press 4 or rot ate the front dial
to select the [SETUP] menu icon [ ].
3Press 1.
Select a menu item next and set it.
•
VQT1U32
27
Page 28
Preparation
or
or
or
MENU
/SET
or
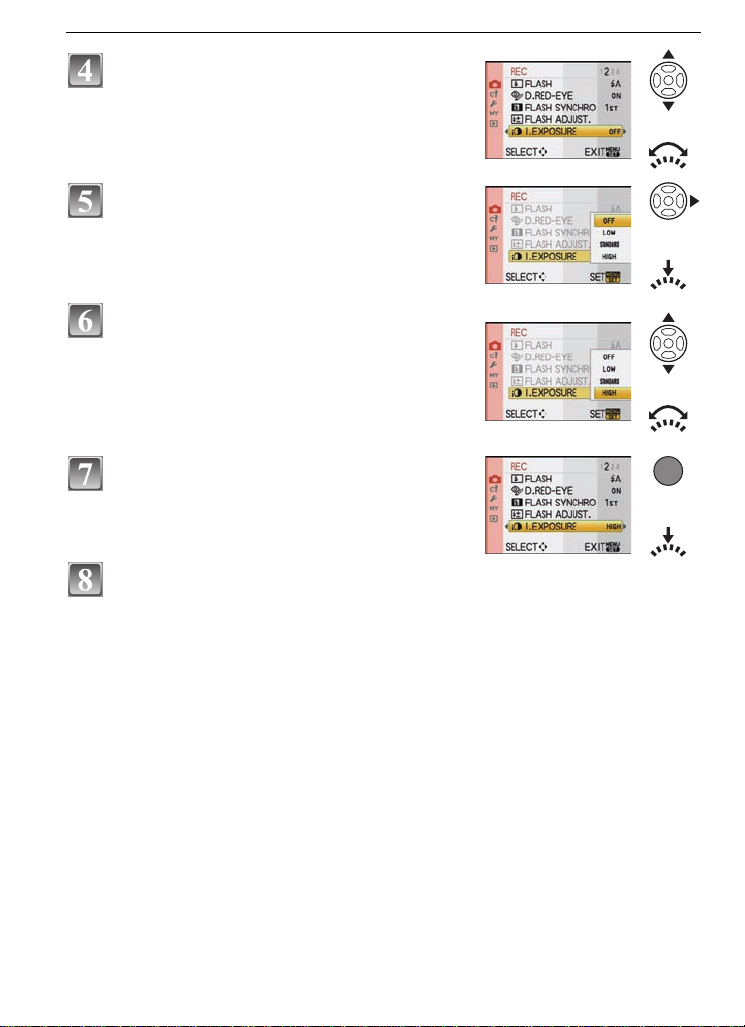
Press 3/4 or rotate the front dial to select
[I.EXPOSURE].
• Select the item at the very bottom, and press 4 or
rotate the front dial right to move to the second
screen.
Press 1 or the front dial.
• Depending on the item, its setting may not appea r or it
may be displayed in a different way.
Press 3/4 or rotate the front dial to select
[HIGH].
Press [MENU/SET] or the front dial to set.
Press [MENU/SET] to close the menu.
• You can also press the shutter button halfway to close the menu.
28
VQT1U32
Page 29
Setting the Quick Menu
Q.MENU
MENU
/SET
9
PPP
AWB
STDSTDSTD
1001001
00
−
3+30−3+30
9
PP
AWB
STDSTDSTD
1001001
00
−
3+30−3+30
9
PP
AWB
STDSTDSTD
1001001
00
−
3+30−3+30
MENU
/SET
or
Q.MENU
By using the quick menu, some of the menu settings can be easily found.
Some of the menu items cannot be set by the modes.
•
Press [Q.MENU] to display the quick menu.
Press 3/4/2/1 or rotate the front dial to select the menu
item and the setting.
• Menus that can be setup are displayed in orange when selected.
• Setup method is different as following depending on the displayed screen during
recording. Refer to P54 about the dis played screen.
[ ] (LCD monitor style)
•
Proceed to step 4 below after selecting the item and settings.
LCD recording information window in [ ] (LCD monitor style)
•
Select the item, press [MENU/ SET], and then select the settings.
Preparation
[ ] (Finder style)
•
Select the item, press the front dial, and then select the setting.
Press [MENU/SET] or the front dial to set the menu.
Press [Q.MENU] to close the quick menu.
• You can also pre ss the shutter button halfway to close the quick menu.
VQT1U32
29
Page 30
Preparation
Perform these settings if you need to.
About the Setup Menu
[CLOCK SET], [AUTO REVIE W] and [ECONOM Y] are important items. Check their
settings before using them.
•
In the Intelligent auto mode, only [CL OCKSET], [WORLD TIME], [BEEP] and [LANGUAGE]
can be set.
For details on how to select the [SETUP] menu settings, refer to P27.
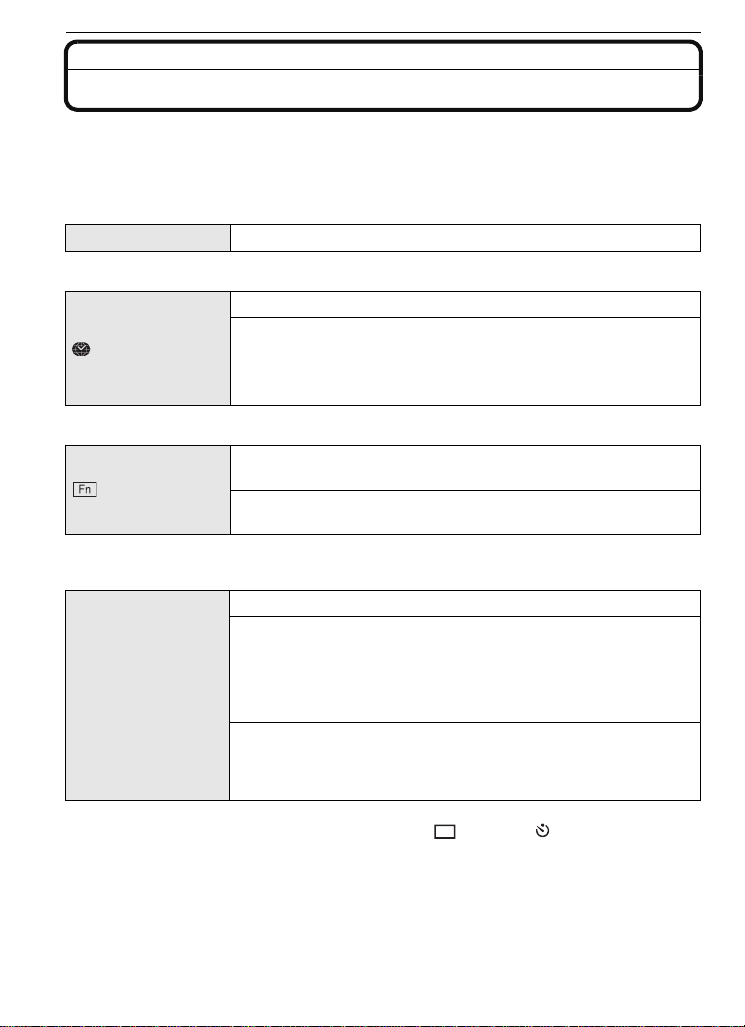
U [CLOCK SET]
Refer to P25 fo r details.
•
Setting Date/Time.
Set the time in your home area and travel destination.
“ [DESTINATION]:
[WORLD TIME]
Travel destination area
– [HOME]:
Your home area
•Refer to P133 for details.
Assign [REC] mode menu or [CUSTOM MENU] menu to 4
[Fn BUTTON SET]
button. It is convenient to register functions that are used often.
[ASPECT RATIO]/[QUALITY]/[METERING MODE]/
[I.EXPOSURE]/[GUIDE LINE]
•Refer to P98 for det ails about [REC] mode menu.
•Refer to P106 for details about [GUIDE LINE].
Set the length of time that the picture is displayed after taking it.
[REVIEW]:
[OFF]/[1SEC.]/[3SEC.]/[5SEC.]
[HOLD]:
o [AUTO REVIEW]
The pictures are displayed until shutter button is pressed
halfway.
[ZOOM]:
The picture enlarged 4k is displayed.
[OFF]/[1SEC.]/[3SEC.]/[5SEC.]
•If [REVIEW] is set t o [HOLD] , the playb ack screen d is play c an be swit ched durin g Auto Rev iew
when taking pictures with the dr ive mode lever set to [ ] (P44) or [ ] (P68).
•When [HOLD] has been selected, the zoom time cannot be set.
•The Auto Review function is activ ated regar dless of it s s ettin g when u sing Bu rst Mod e (P6 4) or
Auto Bracket (P66). (Will not enlarge/hold) Also, you cannot set the Auto Review function.
•If [HIGHLIGHT] (P31) is set to [ON], whit e saturated areas appear blink i ng in black and white
when the Auto Review function is ac tivated.
30
VQT1U32
Page 31

Preparation
[ON] [OFF]
LCD
When the Auto Review function is activated or when playing back,
[HIGHLIGHT]
white saturated areas appear blinking in black and white.
[OFF]/[ON]
•If there are any white saturated areas, we
recommend compensating the exposure towards
negative (P63) referring to the histogram (P56) and
then taking the picture aga in. It may result in a better
quality picture.
•There may be white saturated areas if the distance
between the camera and the subject is too close
when taking pictures with the flash.
If [HIGHLIGHT] is set to [ON] in this case, the area directly illuminated by the photo flash will
become white saturated and appe ar blinking in black and white.
You can conserve the battery life by setting these menus.
Also, it will turn off the LCD monitor automatically when not in use
to prevent discharge of the battery.
p [POWER SAVE]:
The camera is automatically turned off if the camera has not been
q [ECONOMY]
used for the time selected on the setting.
[OFF]/[1MIN.]/[2MIN.]/[5MIN.]/[10MIN.]
[AUTO LCD OFF]:
The LCD monitor is automatically turned off if the camera has not
been used for the time selected on the setting.
[OFF]/[15SEC.]/[30SEC.]
•Press the shutter button halfway or turn the camera off and on to cancel [POWERSAVE].
•[POWER SAVE ] is set to [5MIN.] in the Intelligent auto mode.
•[POWER SAVE] is fixed to [2MIN.] when [AUTO LCD OFF] is set to [15SEC.] or [30SEC.].
•Press any button to turn on the LCD monitor again.
[MONITOR]/
[VIEWFINDER]
Brightness and color of the LCD monitor/viewfinder can be
adjusted in 7 steps.
•Adjust the brightness of the screen with 3/4, contrast and saturation
with 2/1 or the front dial.
•It will adjust the LCD monit or when the LCD monitor is in use, and the
viewfinder when the viewfinde r is in use.
These menu settings make it easier to see the LCD monitor when
you are in bright places.
[OFF]
[LCD MODE]
„ [AUTO POWER LCD]:
The brightness is adjusted automatically depending on how bright
it is around the camera.
… [POWER LCD]:
The LCD monitor becomes brighter and easier to see even when
taking pictures outdoors.
VQT1U32
31
Page 32

Preparation
•The brightness of the pictures displayed on the LCD monitor is increased so some sub j ects
may appear differently from actuality on the LCD monitor. However, this does not affec t the
recorded pictures.
•The LCD monitor automatically returns to normal brightness after 30seconds when recording
in Power LCD mode. Press any button to make the LCD monit or bright again.
•If the screen is difficult to see because of light from the sun etc. shining on it, use your hand or
another object to block the ligh t.
•The number of recordable pictures decreases in Auto power LCD and Power LCD modes.
v [NO.RESET] Reset the file number of the next recording to 0001.
•The folder number is updated and the file number starts from 0001. (P119)
•A folder number between 100 and 999 can be assigned.
When the folder number reaches 999, the number c annot be reset. We recommend formatting
the card (P3 4) afte r s a vi n g th e data on a PC or elsewh e re .
•To reset the folder number to 100, format the card first and then use this functi on to reset the
file number.
A reset screen for the folder number will then appear. Select [YES] to reset the folder number.
w [RESET]
•When [SETUP] menu settings are reset, the following setti ngs are also reset. In addition,
[FA VORITE] (P111) in [PLAYBACK] mode menu is set to [OFF], and [ROTATE DISP.] (P112) is
set to [ON].
–Film mode (P81)
–The birthday settings for [BABY1]/[BA BY2] (P93) and [PET] (P94) in scene mode.
The [REC] or [SETUP]/[CUSTOM MENU] menu settings are reset
to the initial settings.
–The [WORLD TIME] (P133) setting.
•The folder number and the clock s etting are not changed.
Set the focus confirmation beep, the self-timer beep and the
alarm beep.
[BEEP]
[s] (Muted)
[t] (Low)
[u] (High)
Set to match the type of TV.
[TVASPECT]
[W]: When connecting to a 16:9 screen TV.
[X]: When connecting to a 4:3 screen TV.
•This will work when the video cable is connected.
32
VQT1U32
Page 33

Preparation
Set the format for the HDMI output when playing back on the
HDMI compatible high definition TV connected with this unit using
the HDMI mini cable (optional).
[AUTO]:
The output resolution is automatically set based on the
[HDMI MODE]
information from the connected TV.
[1080i]:
The interlace method with 1080 available scan lines is used for
output.
[480p]:
The progressive method with 480 available scan lines is used for
output.
•Interlace method/pr ogressive method
i= interlace scanning is s canning the screen with half of the effective s canning lines every 1/60
seconds, where p= progressive scanning is a high density image signal that is scanning the
screen with all the effective scanning lines every 1/60 seconds.
The [HDMI] terminal on this unit is comp atibl e with h igh def inition ou tp ut [1080 i]. It is ne cessar y
to have a compatible TV to enjoy progressive and high definition images.
•If the images a re not o utp ut on t he TV whe n the s ettin g is [A UT O], mat ch wit h the imag e f orma t
your TV can display, and select number of effective scanning lines. (Please read the operating
instructions for the TV.)
•This will work when the HDMI mini cable (optional) is connected.
•Refer to P125 for de tai l s.
Setup so this unit can be controlled by the remote control of the
VIERA by automatically coupling this unit with the VIERA Link
compatible equipment using HDMI mini cable (optional).
[VIERA Link]
[OFF]: Operation is performed with the buttons on this unit.
[ON]: Remote control operation of the VIERA Link
compatible equipment is enabled. (Not all operations
are possible)
Button operation of the main unit will be limited.
•This will work when the HDMI mini cable (optional) is connected.
•Refer to P126 for de tai l s.
~ [LANGUAGE]
Set the language displayed on the screen.
[ENGLISH]/[FRANÇAIS]/[ESPAÑOL]/[PORTUGUÊS]
•If you set a different language by mistake, s elect [~] from the menu icons to set the desired
language.
[VERSION DISP.]
This enables the firmware versions of the camera and lens to be
checked.
•[–. –] is displayed as the lens firmware when the lens is not mounted.
VQT1U32
33
Page 34

Preparation
Set the screen that is displayed when the mode dial is set to ,
, , , and .
[OFF]: The recording screen in the currently selected
} [SCENE MEN U]
advanced scene mode (P88) or scene mode (P92)
appears.
[AUTO]: The advanced scene mode or scene mode menu
screen appears.
Select the USB communication system after or before connecting
the camera to your PC or your printer with the USB connection
cable (supplied).
y [SELECT ON CONNECTION]:
x [USB MODE]
Select either [PC] or [PictBridge(PTP)] if you connected the
camera to a PC or a printer supporting PictBridge.
z [PC]:
Set after or before connecting to a PC.
{ [PictBridge(PTP)]:
Set after or before connecting to a printer supporting PictBridge.
•When [PC] is selected, the camera is connected via the “USB Mass Storage” communication
system.
•When [PictBridge(PTP)] is selected, the camera is connected via the “PTP (Picture Transfer
Protocol)” communication system.
[FORMAT]
Formatting irretrievably deletes all the data so check the data
carefully before formatting.
The card is formatted.
•Use a battery with sufficient battery power or the AC adaptor (P132) when formatting. Do not
turn the camera off during form atting.
•If the card has been formatted on a PC or other equipment, format it on the camera again.
•If the card cannot be formatted, consult your nearest Service Center.
For USA assistance, please call:
1-800-211-PANA(7262) or, contact us via the web at:
http://www.panasonic.com/contactinfo
VQT1U32
34
For Canadian assistance, please call:
1-800-99-LUMIX (1-800-995-8649) or
send e-mail to: lumixconcierge@ca.panasonic.com
Page 35

Preparation
About LCD monitor/Viewfinder
LCD Monitor
This is convenient as it allows you to take pictures from various angles by adjusting the
LCD monitor. (P13)
∫ Taking pictures at a normal angle
∫ Taking pictures at a high angle
Open the LCD monitor 180o toward you,
and adjust the angle.
This is convenient when there is someone in
•
front of you and you cannot get close to the
subject.
∫ Taking pictures at a low angle
Open the LCD monitor 180o toward you,
and adjust the angle.
This is convenient when taking pictures of
•
flowers et c. th at ar e i n a l ow po s i t io n .
VQT1U32
35
Page 36

Preparation
∫ Taki ng pictures with the camera held vertically
Open the LCD monitor and rotate it to an angle that makes it easy to see.
Do not cover the AF assist lamp (P10) with your fingers or other objects .
•
Taking pictures at a normal angle
Taking pictures at a high angle Taking pictures at a low angle
Direction detection function
Pictures recorded with the camera held vertically are played back vertically (rotated). (Only
when [ROTATE DISP.] (P112) is set to [ON])
•
Pictures ma y no t be di s p l a y e d vertically if the y w e re tak e n w it h the ca m e r a ai m e d up or do w n .
•You can only use the direction detection function when using a compatible lens. (P14)
(Refer to the catalog, website etc. for compatible lenses.)
36
VQT1U32
Page 37

Preparation
9
P
AWB
1001
00
−
3+30−3+30
Switching the LCD monitor/Viewfinder
∫ About the eye sensor automatic switching
Eye sensor is active when the [LVF/LCD AUTO] (P105) in the [CUSTOM MENU] menu is
set to [ON], switching automatically to viewfinder display when an eye or object is moved
closer to the viewfinder, and to LCD monitor display when it is moved away.
A AF assist lamp
•When the LCD monitor turns on, the
Viewfinder turns off (and vice versa).
•Eye sensor mig ht not work prop erly d epending
on the shape of your eyeglasses, the way you
hold the camera, or bright light shining around
the eyepiece. Switch manually in t hat case.
Press [LVF/LCD] to switch the
monitor screen.
•It is possible to switch betwee n the LCD (LCD
monitor) and LVF (viewfinder) display
manually.
“LV F” is a bbre viat ion of “L ive View Finder” and
it represents the viewfinder display.
B Viewfinder
C Eye sensor
D LCD monitor
E [LVF/LCD] button
∫ Diopter adjustment
Adjust the diopter to suit your vision so that
you can see the Viewfinder clearly.
Look at the display o n the Viewfinder and
rotate the diopter adjustment dial to
where the screen is clearest.
AWB
AWB
P
9
1
00
VQT1U32
37
Page 38

Preparation
Mode switching
Selecting the [REC] Mode
When the [REC] mode is selected, the camera can be set to the Intelligent auto mode in
which the optimal settings are established in line with the subject to be recorded and the
recording conditions, or to the scene mode which enables you to take pictures that match
the scene being recorded.
Turn the camera on.
ON
OFF
Switching the mode by rot ating the mode
dial.
Align a desired mode with part A.
•
Rotate the mode dial sl owly and surel y to adjust
to each mode. (
∫Basic
Intelligent auto mode (P40)
The subjects are recorded using settings automatically selected by the camera.
Program AE mode (P44)
The subjects are recorded using your own settings.
The mode dial rotat e s 360o)
38
VQT1U32
Page 39

Preparation
∫Advanced
Aperture-priority AE mode (P84)
The shutter speed is automatically determined by the aperture value you set.
Shutter-priority AE mode (P84)
The aperture value is automatically determined by the shutter speed you set.
Manual exposure mode (P85)
The exposure is adjusted by the aperture value and the shutter speed which are
manually adjusted.
Custom mode (P97)
Use this mode to take pictures with previously registered settings.
My color mode (P95)
Easily check the color of light, brightness, and vividness of color when the picture is
taken.
Scene mode (P92)
This allows you to take pictures that match the scene being recorded.
∫Advanced scene mode
Portrait mode (P89)
Use this mode to take pictures of people.
Scenery mode (P89)
Use this mode to take pictures of scenery.
Sports mode (P90)
Use this mode to take pictures of sporting events, etc.
Close-up mode (P90)
Use this mode to take picture of close-by subject.
Night portrait mode (P91)
Use this mode to take pictures of night scenes and people with night time scenery.
VQT1U32
39
Page 40

Basic
ON
OFF
[REC] mode: ñ
Basic
Taking pictures using the automatic function
(ñ: Intelligent Auto Mode)
The camera will set the most appropriate settings to match the subject and the recording
conditions so we recommend this mode for beginners or those who want to leave the
settings to the camera and take pictures easily.
•
The following functions are activated automatically.
–Scene detection/[D.RED-EYE]/Face detection/Intelligent ISO sensitivity control/
[I.EXPOSURE]/[LONG SHTR NR]/[QUICK AF]/[FOCUS PRIORITY]/
Backlight Compensation
•The status indicator 3 lights when you turn this
unit on 2. (1: Shutter button)
Set the mode dial to [ ].
Set the focus mode dial to [AFS] or [AFC].
• Refer to
P45
for [AFS] and [AFC].
40
Hold this unit gently with both han ds, keep your
arms still at your side and stand with your feet
slightly apart.
A AF assist lamp
VQT1U32
Page 41

Basic
2
1
Press the shutter button halfway to focus.
• The focus indication 1 (green) lights when the subject
is focused.
• The AF area 2 is displayed around the subjec t’ s face
by the face detection function. In other cases, it is
displayed at the point on the subject which is in focus.
• The focus indication blinks when the subject is not
focused. In this case, a picture is not taken. Press the
shutter button halfway to focus on the subject again.
• The focus range is different dependin g on used lens.
–When 14–45 mm/F3.5–5.6 lens included in
DMC-G1K is used: 0.3 m (0.99 feet) to
¶
Press the shutter button fully (push it in
further), and take the picture.
• A picture is not taken until the subject is br ought into
focus.
• The access indication (P24) lights red when pictures
are being recorded on the card.
Note
•
Be careful not to move the camera when you press the shutter button.
•Do not cover the flash or the AF assist lamp with your fingers or other objects.
•Do not touch the fron t of the lens.
•When taking pictures, make sure your footing is stable and there is no danger of colliding with
another person, a ball etc.
∫ When taking pictures using the flash (P58)
∫ When taking pictures using the zoom (P48)
∫ When taking pictures with manual focus (P72)
Scene detection
When the camera identifies the optimum scene, the icon of the scene concerned is
displayed in blue for 2 seconds, after which its color changes to the usual red.
>
¦
[¦] is set if none of the scenes are applicable, and the standard settings are set.
•
•If a tripod is used, for in st an ce, an d the c amer a has jud ged tha t came ra shak e is min imal whe n
the scene mode has been identified as [ ], the shutter speed will be sl ower than nor mal. Take
care not to move the camera while taking pictures.
•An optimum scene for the specified subject will be chosen when set to AF tracking (P70).
∫ Face detection
When [ ] or [ ] is selected, the camera automatically detects a person’s face, and it will
adjust the focus and exposure (P70).
[i-PORTRAIT]
[i-SCENERY]
[i-CLOSE-UP]
[i-NIGHT PORTRAIT]
[i-NIGHT SCENERY ]
•
Only when [‡] is selected
Only when [Œ] is selected
•
VQT1U32
41
Page 42

Basic
Note
•
Due to conditions such as the ones below, a different scene may be identified for the same
subject.
–Subject conditions: When the face is bright or dark, The size of the subject, The distance to
the subject, The contrast of the subject, When the subj ect is moving
–Recording conditions: Sunset , Sunrise, Und er low brightness conditions, When the camera is
shaken, When zoom is used
•To take pictures in an in tended scene, it is recommende d that you take pictures in the
appropriate recording mode.
∫ The Backlight Compensation
Backlight refers to when light comes from the back of a subject.
In this case, the subject will become dark, so this function compensates the backlight by
brightening the whole of the picture automatically.
Backlight compensation is automatically applied in Intelligent auto mode.
AF Tracking Function
It is possible to set the focus and exposure to the specified subject. Focus and exposure
will keep following the subject automatically even if it moves.
1 Press 2.
•
[ ] is displayed in the lower left of the screen.
• AF Tracking frame is displayed in the cent er of the
screen.
• Press 2 again to cancel.
2 Place the subject in the Tracking frame, and
press the shutter button halfway to lock the
subject.
AF tracking frame will turn yellow.
•
• An optimum scene for the specified subject will be chosen.
• Press 2 to cancel.
Compensating the Exposure
You can compensate the exposure.
Refer to P63 for details.
1 Press the front dial to switch to exposure
compensation operation.
2 Rotate the front dial.
The exposure compensati on value appears on the
•
lower portion of the screen.
• Select [0] to return to the original exposure.
About the flash
•Open the flash when the flash is to be used. (P58)
•[ ], [ ], or [ ] will appear depending on the type and brightness of the subject.
•Flash is activated twice. Especially with [ ] or [ ], digital red-eye reduction (P59) is
executed, and the time until the second flash is longer, so subject should not move until the
second flash is activated.
•Flash modes cannot be switched using the menu in the Intelligent auto mode.
VQT1U32
42
Page 43

Settings in Intelligent auto mode
•Only the following functions can be set in this mode.
[REC] mode menu
– [ASPECT RATIO] (P98)/[PICTURE SIZE] (P98)/[QUALITY] (P99)/[STABILIZER]¢ (P100)
¢ Only [MODE1] or [MODE 2 ] ca n be s et .
[CUSTOM MENU] menu
– [CUST. SET MEM.] (P105)/[GUIDE LINE] (P106)
[SETUP] menu
– [CLOCK SET]/[WORLD TIME]/[BEEP]/[LANGUAGE]
•Only [STANDARD] and [STANDARD] ( ) in film mode (P81) can be selected.
•The settings of the following items are fixed.
Item Settings
[ECONOMY]
([POWER SAVE]) (P31)
[FLASH SYNCHRO]
(P101)
[BURST RATE] (P64) [H] (High speed)
[AUTO BRACKET] (P66)
[SELF-TIMER] (P 68)
[AF MODE] (P69) š (Set to [ ] when a face cannot be detected)
[WHITE BALANCE] (P76) [AWB]
[SENSITIVITY] (P79) (Intelligent ISO)
[METERING MODE]
(P100)
[D.RED-EYE] (P101) [ON]
[I.EXPOSURE] (P102) [STANDARD]
[COLOR SPACE] (P1 03) [sRGB]
[LONG SHTR NR] (P104) [ON]
[PRE AF] (P106)
[FOCUS PRIORITY]
(P107)
[AF ASSIST LAMP] (P107) [ON]
[5MIN.]
[1ST]
[STEP]: [3•1/3]
[SEQUENCE]: [0/`/_]
(The maximum ISO sensitivity: ISO800)
C
[ON]
Basic
•The following functions cannot be used.
– [HIGHLIGHT]/ AF / AE lock/White balance fi n e ad ju stm e n t/W h i te bal an ce bra cke t/M u l ti fi lm
bracket/Flash ou tput adjustment/[EX . OPT. ZOOM]/[DI GI TAL ZOOM]/[ISO LIMIT SET]/
[AF/AE LOCK]/[AF/AE LOCK HOLD]/[DIRECT AF AREA]/[SHOOT W/O LENS]
•The other items on the [SETUP] menu and [CUSTOM MENU] menu can be set in a mod e s uch
as the Program AE mode. What is set will be reflected in the Intelligent auto mod e.
VQT1U32
43
Page 44

Basic
[REC] mode: ³
Taking pictures with your favorite settings
( : Program AE mode)
Many more menu items can be set and you can take pictures with greater freedom than
when you take pictures in the Intelligent auto mode (P40).
•
Set the drive mode lever to [ ].
Set the mode dial to [ ].
• To change the setting whil e taking pictures, refer to
“Using the [REC] Mode Menu” (P98) o r “Using the
[CUSTOM MENU]
Set the focus mode dial to [AFS] or
[AFC].
• Refer to
P45
Press the shutter button halfway to focus.
• The focus indication blinks when the subject is not
focused. In thi s case , a p ic tu re is no t taken. Press the
shutter button halfway to focus on the subject again.
• The focus range is different depending on used lens.
–When 14–45 mm/F3.5–5.6 lens included in
DMC-G1K is used: 0.3 m (0.99 feet) to
•
If the [SENSITIVITY] is set to [ISO100] and the
aperture value is set to F3.5 (when 14–45 mm/
F3.5–5.6 lens included in DMC-G1K is attached), the
shutter speed is automatically s et between about
8 seconds and 1/4000th of a second.
” (P105).
for [AFS] and [AFC].
¶
Press the halfway pressed shutter button
fully to take a picture.
• A picture is not taken until the subject is brought into
focus.
• If you want to press the shutter butto n fully to take a
picture even when the subject is not focused, set
[FOCUS PRIORITY] in the [CUSTOM MENU] menu
to [OFF]. (P107)
• The access indication lights (P24) red when pic tures
are being recorded on the card.
∫ To adjust the exposure and take pictures at times when the image appears too
dark (P63)
∫ To adjust the colors and take pictures at times when the image appears too red
(P76)
VQT1U32
44
Page 45

Basic
Fix the focus by pressing the shutter button halfway (AFS)
Set the focus mode dial to [AFS].
•“AFS” is an abbrev iation of “Auto Focus S i ngle”. The focus is
fixed when you press the shutter button halfway.
•Normally use the [AFS].
•Focus during the burst is fixed at the first pictur e. Refer to
P64 for details.
Continuously focusing on a subject (AFC)
This mode allows you to compose a picture more easily by continuously focusing on the
movement of the subject while the shutter button is pressed halfway.
When taking pictures of a moving subject, the camera predicts the movement of the
subject and focuses on it. (motion prediction)
Set the focus mode dial to [AFC].
•“AFC” is an abbreviation of “Auto Focus Continuous”. The
camera is continuously focusi ng on the subject while the
shutter button is pressed halfway.
•It may take time to f ocus on the s ubject if you rot ate the zo om
ring from Wide to Tele or suddenly change the subject from a
distant one to a nearby one.
•Press the shutter but ton halfway again when it is difficult to
focus on the subject.
•Focusing will continue even after th e shutter but ton is pressed d uring the burst. Refer t o P64 for
details.
•Refer to the [PRE AF] of [CUSTOM MENU] menu item (P106) to adjust the focus before
pressing the shutte r button halfway.
•When the subject is dark, the operation, in which focus is adjusted only once, is performed.
Take a picture with manual focus (MF)
Set the focus mode dial to [MF].
•For details, refer to P72.
VQT1U32
45
Page 46

Basic
Focusing
Align the subject to the screen, and then press the shutter button halfway.
Focus
Focus indication On Blinks
AF area Green
Sound Beeps 2 times
A Focus indicatio n
B AF area (normal)
C AF area (when using the digital zoom or when it is dark)
D Aperture value
E Shutter speed
F ISO sensitivity
It will flash in red when appropriate exposure is not achieved.
¢
(Except when flash is activated)
•When the AF mode is set to [ ], an d multiple AF areas (up t o 23 areas ) have tur ned on, all t he
AF areas that have turned on are focused. I f y ou would like to take a picture focused to certain
area, switch the AF mode to [Ø]. (P69)
¢
¢
When the su b je c t is
focused
When the su b j e c t
is not focused
—
—
When the subject is not in focus
If the subject is not in the center of composition when the AF mode is set to [Ø], it is
possible to move the AF area.
∫ Take picture with different focus modes depending on the subject (P69)
∫ Subjects and recording conditions which are difficult to focus
Fast-moving subjects , extremely bright subjects or subjects with out contrast
•
•When recording subjects throu gh windows or near shiny objects
•When it is dark or when jitter occurs
•When the camera is too close to the subject or when tak ing a picture of both dis tant and near
subjects
(P71)
Preventing jitter (camera shake)
When the jitter alert [ ] appears, use [STABILIZER] (P100), a tripod, the self-timer
(P68) or the remote shutter (DMW-RSL1; optional)
Shutter speed will be slower particularly in the following cases. Keep the camera still from the
•
moment the shutter button i s pressed until the picture appears on the screen. We reco mmend
using a tripod.
–Slow sync.
–Slow sync./Red-eye reduction
–[NIGHT PORTRAIT] and [NIGHT SCENERY] in the advanced scene mode (P88)
–In [PARTY] in s cene mode (P92)
–When you set to a slow shutter speed
VQT1U32
46
(P131).
Page 47

Basic
(A)
(B)
4 2 1 1
/
2
1
/
4
1
/
8
1
/
15
1
/
30
1
/
60
1
/
125
1
/
250
1
/
500
1
/
1000
1
/
2000
1
/
4000
15
16
17
18
19
20
(Ev)
2
2.8
4
5.6
8
11
16
22
1
0 1 2 3 4 5 6 7 8 9 10 11 12 13 14
Program shift
In Program AE mode, you can change the preset aperture
value and shutter speed without changing the exposure.
This is called Program shift.
You can make the background more blurred by
decreasing the aperture value or record a moving subject
more dynamically by slowing the shutter speed when
taking a picture in Program AE mode.
1 Press the shutter button halfway and display the aperture value and shutter
speed value on the screen.
2 While the values are displayed (about 10 seconds), perform the Program shift
by rotating the front dial.
•
It will switch between Program shift operation and exposure compensation operation (P63)
every time the front dial is pres sed while the values are displayed.
•The Program shift indication A appears on the screen when Program shift is activated.
•To cancel Program shift, turn the camera off or rotate the front dial until the Program shift
indication disappears.
∫ Example of Program shift
When 14–45 mm/F3.5–5.6 lens included in DMC-G1K is used
(A): Aperture value
(B): Shutter speed
1 Program shift amount
2 Program line chart
Note
How the exposure compensati on is switched can be changed by [EXPO.SETTINGS] (P108) in
•
the [CUSTOM MENU] menu.
•If the exposure is not adequate when the shutter button is pressed halfway, the aperture value
and shutter speed turn red and blink.
•Program shift is canceled and the camera returns to normal Program AE mode if more than
10 se cond s pass after Program shift is activated. Howeve r, the Program shift setting is
memorized.
•Depending on the brightness of the subject, Program shift may not be activated.
VQT1U32
47
Page 48

Basic
[REC] mode:
Taking Pictures with the Zoom
Using the Optical Zoom/Using the Extended Optical Zoom (EZ)/Using
the Digital Zoom
You can zoom-in to make people and objects appear closer or zoom-out to record
landscapes in wide angle.
To make subjects ap pear closer use (Tele)
Rotate the zoom ring towards Tele. (P12)
To make subjects ap pear further away use (Wide)
Rotate the zoom ring towards Wide. (P12)
To enlarge further, set the [EX. OPT. ZOOM] in the [REC] mode menu to [ON], or set the
[DIGITAL ZOOM] to [2k] or [4k] for further enlargement.
When the [EX. OPT. ZOOM] (max. 2 times) is used, set the aspect ratio (X/Y/W) to
numbers of recordable pixels other than [L].
∫ Types of zooms
Feature Optical zoo m
Focus range/
Maximum
magnification
Picture
quality
Conditions None
¢1This is the equivalent value for a 35 mm film camera.
¢2 The magnification level dif fers dependin g on [PICT URESIZE] and [ASPECT RATIO] sett ing .
When 14–45 mm/F3.5– 5.6 lens included in DMC-G1K is used
14 mm to 45 mm
(28 mm to
¢1
90 mm)
No deterioration No deteriorati on
∫ Extended optical zoom mechanism
Example: When it is set to [ ] (equal to 3.1 million pixels), it will take the picture using
the 3.1 m illion pixels in the center out of the 12 million pixels of the imaging device,
resulting to be more of a telephoto picture.
Note
•
The extended optical zoom and digital zoom cannot be set in the Intelligent auto mode.
•The digital zoom cannot be set in the advanced scene mode and scene mode.
•“EZ” is an abbreviation of “Extended optical Zoom”.
•If you use the zoom functi on after focusing on the subject, focus on the subject again.
•When using the digital zoom, [STABILIZER] may not be effective.
•
When using the digital zoom, we recommend using a tripod and the self-timer (P68) for taking pictures.
•The [AF MODE] is fixed to [Ø] when using the digital zoom.
VQT1U32
48
Extended optical zoom (EZ)
¢2
2k
(55 mm to 178 mm)
Set the [EX.OPT. ZOOM] in
[REC] mode menu (P102) to
[ON], and then select
number of recordable pixels
with [ ] (P98)
¢1
Digital zoom
12.8k [including optical zoom
3.2k]
25.4k [including extended
optical zoom 2k]
The higher the magnification
level, the greater the
deterioration.
[DIGITAL ZOOM] ( P1 0 2) on
the [REC] mode menu is set to
[2k] or [4k].
Page 49

Playing back Pictures
Press [(].
A [(] button
Press 2/1 to select the picture.
2: Play back the previous picture
1: Play back the next picture
• Speed of picture forwarding/rewinding changes
depending on the playback status.
• If you press and hold 2/1, you can play back the pictures in succession.
∫ To finish playback
Press [(] again or press the shutter button halfway.
Note
This camera complies with the DCF standa rd “Design rule for Camera File system” established
•
by JEITA “Japan Electronic s and Information Technology Industries Association” and with Exif
“Exchangeable Image File Format”. Files which do not comply with the DCF standard cannot
be played back.
Basic
VQT1U32
49
Page 50

Basic
ISO
30
P
STD
F4.0
1/9
1001
00
0
AWB
WB
A
Changing the Information Displayed on the playback screen
Press [DISPLAY] to switch the monitor screen.
A [DIS PLAY] button
•The [DISPLA Y ] butt on is not acti vated when the menu screen
is displayed. You can only select Normal display or No
display in playback zoom (P51) and during a slide show
(P110).
•Refer to P56 for informat ion about the histogram D.
STD
STD
30
F4.0
30
F4.0
P
1/9
1/9
STANDARD
P
1
00
AWB
AWB
0
10:00 DEC. 1.2008
B Normal display
C Detailed information display
D Histogram display
E Highlight display
F No display
¢ This is displayed if [HIG HL IGHT] (P31) in the [SET UP] me nu is set to [ON ].
¢
30
F4.0
0
WB
AWB
ISO
100
AFS
s
RGB
100-0001
F4.0
1/9
30
ISO
0
100
100-0001
Displaying Multiple Screens (Multi Playback)
Rotate the front dial left.
1 screen>12 screens>30 screens>Calendar screen
display
A Number of the selected picture and the total number of
recorded pictures
•Rotate the front dial ri ght to return to the previous screen.
•Pictures are not rotated f or display.
∫ To return to normal playback
1 Press 3/4/2/1 to select a picture.
An icon will be displayed depending on the recorded picture and the settings.
•
2 Press [MENU/SET] or the front dial.
•
The picture that was selected will appear.
VQT1U32
50
Page 51

Basic
MENU
/SET
or
A
Displaying Pictures by Recording Date (Calendar Playback)
You can display pictures by recording date.
Rotate the front dial left to display the
calendar screen.
Press 3/4/2/1 to select the date to be played back.
3/4: Select the month
2/1: Select the date
•
If there were no pictures recorded during a month, the month is not displayed.
Press [MENU/SET] or the front dial to
display the pictures that were recorded on
the selected date.
• Rotate the front dial left to return to the calendar
screen display.
Press 3/4/2/1 to select a picture and then press [MENU/SET].
• The picture that was selected will appear.
Note
The recording date of the pict ure selected in the playback screen becomes the date selected
•
when the calendar screen is first displayed.
•If there are multiple pictures with the same recordin g date, the fir st picture record ed on that day
is displayed.
•You can display the calendar between January 2000 and December 2099.
•If the date is not set in the camera, the recording date is set as January 1st, 2008.
•If you take pictur es after setting the travel destination in [WOR LDTIME], the pictures are
displayed by the dates at the travel destination in calendar playback.
Using the Playback Zoom
Rotate the front dial right.
1k>2k>4k>8k>16k
When you rotate the fron t dial left after enlarging the picture,
•
the magnification becomes lower.
•When you change the magnifi cation, the zoom position
indication A appears for about 1 second, and the position of
the enlarged section can be moved by pressing 3/4/2/1.
•The more a picture is enlarged, the more its quality
deteriorates.
•When you move the position to be displayed, the zoom
position indication appears for about 1 second.
VQT1U32
51
Page 52

Basic
MENU
/SET
∫ Switching the displayed image while maintaining the playback zoom
You can switch the displayed image while maintaining the same zoom magnification and
zoom position for the playback zoom.
Switch to picture select operation by pressing
the front dial during playback zoom, and select
pictures with 2/1.
•It will switch between picture select operation and move
zoom position operation every time the front dial is pressed
during playback zoom.
Note
You can also delete the recording inf ormation etc. on the LCD monitor/Viewfinder during
•
playback zoom by pressing [DISPLA Y].
•If you want to save the enlar ged picture, use the trimming function. (P116)
•The playback zoom may not operate if pictures have been recorded with other equipment.
•The zoom magnification and the z oom position are canceled when the camera is turned off
(including power save mode).
•The zoom position returns to the center in the following images.
–Images with different aspect ratios
–Images with different numbers of recorded pixels
–Images with a different rotation directio n (when [ROTATEDISP.] is set to [ON])
Deleting Pictures
Once deleted, pictures cannot be recovered.
Press [(].
52
To delete a single picture
Select the picture to be deleted, and then
press [‚].
A [(] button
B [DISPLAY] button
‚] button
C [
Press 2 to select [YES] and then press
[MENU/SET].
VQT1U32
Page 53

Basic
MENU
/SET
DISPLAY
To delete multiple pictures (up to 50) or all the pictures
Press [‚].
Press 3/4 to select [DELETE MULTI] or [DELETE ALL] and then
press [MENU/SET].
• [DELETE ALL] > step 5.
Press 3/4/2/1 to select the picture,
and then press [DISPLAY] to set. (Repeat
this step.)
• [‚] appears on the selected pictures. I f [D ISPL AY]
is pressed again, the setting is canceled.
Press [MENU/SET].
Press 3 to select [YES] and then press [MENU/SET] to set.
∫ When [DELETE ALL] has been selected with the [FAVORITE] (P111) setting
The selection screen is displayed again. Select [DELETE ALL] or
[ALL DELETE EXCEPTÜ], press 3 to select [YES] and delete the pictures.
([ALL DELETE EXCEPTÜ] cannot be selected if no pictures have been set as
[FAVORITE].)
Note
•
Do not turn the camera off while d elet ing (while [‚] is dis played ). Us e a bat t ery with a sufficient
power or the AC adaptor (P132).
•If you press [MENU/SET] while deleting pictures using [DELETEMULTI], [DELETE ALL] or
[ALL DELETE EXCEPT Ü], the deleting will stop halfway.
•Depending on the number of pictures to be deleted, it may take some time to delete them.
•If pictures do not conform to the DCF standa rd or are prot ected (P114), they will not be deleted
even if [DELETEALL] or [ALLDELETE EXCEPTÜ] is selected.
VQT1U32
53
Page 54

Advanced (Recording pictures)
9
P
STANDARD
AWB
WB AF
100
ISO
0
0
−
3
−
2
−
11
2
3
99
PP
AWBAWBAWB
STDSTDSTD
1001001
00
−
3+30−3+30
DISPLAY
9
P
STANDARD
AWB
WB AF
100
ISO
0
0
−
3
−
2
−
11
2
3
9
9
PP
AWBAWB
AWB
STDSTDSTD
1001001
00
9
9
PP
AWBAWB
AWB
1001001
00
−
3+30−3+30
−
3+30−3+30
DISPLAY
Advanced (Recording pictures)
Switching the display of the LCD Monitor/
Viewfinder
Switching the displayed information
Press [DISPLAY] to change.
•When the menu screen appears, the [DISPLAY] button is not activated.
LCD monitor display
With the [LCD DISP.STYLE] (P105) of the [CUSTOM MENU] menu, you can choose the
displayed screen on the LCD monitor to display in [ ] (LCD monitor style) or [ ]
(viewfinder style).
When [ ] is set
A Normal display
B No display
C [LCD INFO.DISP.]
D Turned off
¢1, 2
¢1
¢3
When [ ] is set
E Normal displayidetailed
information
F Normal display
G [LCD INFO.DISP.]
H Turned off
54
VQT1U32
¢1, 2
¢1
¢3
Page 55

Advanced (Recording pictures)
9
9
PP
AWBAWB
AWB
STDSTDSTD
1001001
00
9
9
PP
AWBAWB
AWB
1001001
00
−
3+30−3+30
−
3+30−3+30
DISPLAY
99
PP
AWBAWBAWB
STDSTDSTD
1001001
00
−
3+30−3+30
DISPLAY
Viewfinder display
With the [LVF DISP.STYLE] (P105) of the [CUSTOM MENU] menu, you can choose the
displayed screen on the viewfinder to display in [ ] (viewfinder style) or [ ] (LCD
monitor style).
When [ ] is set
A Normal display
B Normal displayidetailed
information
¢1
¢1, 2
When [ ] is set
C No display
D
Detailed information
¢1
¢1, 2
¢1 Guide lines are display ed when the [GUIDE LINE] of the [CUSTOM MENU] menu is set to
anything except [OFF].
It is possible to move the position of the guide line using the quick menu when it is set to
[ ]. (P56)
¢2 Histograms are displaye d wh en the [HISTOGRAM] of the [CUST OM MENU] menu is set to
[ON].
It is possible to move the position of the histogram using the quick menu. (P57)
¢3 It is displayed when the [ LCDINFO.DISP.] of the [CUSTOM MENU] menu is set to anything
except [OFF]. Color o f the sc reen can be select ed fr om 3 co lors o f
blue, red or black. (P105)
Note
In [NIGHT PORTRAIT] (P91), the guide line is gray.
•
∫ Recording guide line
When you align the subject on the horizontal and vertical guide lines or the cross point of
these lines, you can take pictures with well-designed composition by viewing the size, the
slope and the balance of the subject.
A []:This is used when dividing the entire screen into 3k3 for taking pictures with a
well-balanced composition.
B []:This is used when you want to position the subject at the exac t center of the
screen.
C []:Position of the guide line can be set. It is used to take well balanced pictures of
subjects off the center of the image.
VQT1U32
55
Page 56

Advanced (Recording pictures)
999
PP
AWBAWBAWB
STDSTDSTD
−
3+30−3+30
1001001
00
99
PP
AWBAWBAWB
STDSTDSTD
−
3+30−3+30
1001001
00
99
PP
AWBAWBAWB
STDSTDSTD
−
3+30−3+30
1001001
00
4.04.04.0
4.04.04.0
4.04.04.0
100100100
200200200
505050
∫ Set the position of the guide line with [ ]
•
Set the [GUIDE LINE] in the [C USTOM MENU] menu to [ ]. (P106)
1 Press [Q.MENU] to display the quick menu. (P29)
2 Press 2/1 to select guide line, and then press [MENU/
SET].
You can also use the front dial to se t.
•
• Selected item will be displayed in orange in the quick menu
screen, and the guide line itself will be displayed in orange when
the guide line is selected.
3 Press 3/4/2/1 to set the position.
4 Press [MENU/SET] to finish the setting.
5 Press [Q.MENU] to close the quick menu.
You can also press the shutter button halfway to close the quick
•
menu.
• Position of the guide line can be set from the [CUSTOM MENU]
menu too.
∫ About the Histogram
A histogram is a graph that displays brightness along the horizontal axis (black to white)
and the number of pixels at each brightness level on the vertical axis.
It allows you to easily check a picture’s exposure.
1 Dark area, mid-tone, and bright area are balanced out evenly, making it suitable to take
a picture.
2 The picture will become underexposed with more dark area. The pictures with mostly
dark area, such as night scenery, will also have a histogram like this.
3 The picture will become overexposed with more bright area. The pictures with mostly
white area will also have a histogram like this.
Examples of his t ogram
1 Properly Exposed
2 Under Exposed
3 Overexposed
¢ Histogram
56
VQT1U32
Page 57

Advanced (Recording pictures)
∫ Set the position of the histogram
•
Set the [HISTOGRAM] in the [CUSTOM MENU] menu to [ON]. (P 105)
1 Press [Q.MENU] to display the quick menu. (P29)
2 Press 2/1 to select histogram, and then press [MENU/
SET].
You can also use the front dial to set.
•
• Selected item will be displayed in orange in the quick menu
screen, and the histogram itself will be d i splayed in orange when
the histogram is selected.
3 Press 3/4/2/1 to set the position.
4 Press [MENU/SET] to finish the setting.
5 Press [Q.MENU] to close the quick menu.
You can also press the shutter button halfway to close the quick
•
menu.
• Position of the histogram can be set from the [CUSTOM MENU]
menu too.
Note
•
When the recorded picture and the histogram do not match each other under the
following conditions, the histogram is displayed in orange.
– When the manual exposure assi stance is other than [n0EV] during exposure compensation
or in the manual exposure mode
– When the flash is activated
– When the flash is closed
• When the brightness of the screen is not correctly displayed in dark places
• When the exposure is not adequately adjus ted
•The histogram is an approximation in recording mode.
•The histogram displayed in this camer a does not mat ch histogr ams displayed by pictu re editin g
software used in PCs etc.
VQT1U32
57
Page 58

Advanced (Recording pictures)
[REC] mode:
Taking Pictures using the Built-in Flash
A To open the flash
Slide the flash open lever.
B To close the flash
Press the flash until it clicks.
Be sure to close the flash when not in use.
•
•The flash setting is fi xed to [ Œ] while the flash is
closed.
Switching to the appropriate flash setting
Set the built-in flash to match the recording.
Open the flash.
•
Select [FLASH] in the [REC] mode menu. (P27)
Press 3/4 to select a mode and press [MENU/
SET].
• For information about flash settings that can be selected, refer
to
“Available flash sett i ngs by recording mode”. (P59)
Press [MENU/SET] to close the menu.
• You can also press the shutter button halfway to close the menu.
Item Description of settings
‡: AUTO
( ):
AUTO/Red-eye
reduction
‰: Forced flash ON
():
Forced ON/Red-eye
reduction
: Slow sync.
The flash is automati ca lly ac ti vate d when th e recor ding condit ion s mak e
it necessary.
The flash is automati ca lly ac ti vate d when th e recor ding condit ion s mak e
it necessary.
It is activated once be fore the actual recording to reduce the red-eye
phenomenon (eyes of the subject appearing red in the picture) and then
activated again for the act ual recording.
•Use this when you take pictures of people in low lighting
conditions.
The flash is activated ev ery time regardless of the reco rding conditions.
•Use this when your subject is back-lit or under fluorescent light.
The flash is activated ev ery time regardless of the reco rding conditions.
Simultaneously it re duces the red-eye phenomenon.
•Use this when your subject is back-lit or under fluorescent light.
If you take a picture with a dark background landscape, this feature will
slow the shutter speed when the flash is activated so that the dark
background landscape will become bright.
•Use this when you take pictures of people in front of a dark
background.
58
VQT1U32
Page 59

Advanced (Recording pictures)
If you take a picture with a dark background landscape, this feature will
():
Slow sync./Red-eye
reduction
Œ:
Forced flash OFF
¢ The flash is activated twice. The interval between the first and second flash is longer
when [ ], [ ] or [ ] is set. The subject should not move until the second
flash is activated.
Flash interval depends on th e brightness of the subject.
slow the shutter speed when the flash is activated so that the dark
background landscape will be come br ight. Si multaneo usly it red uces the
red-eye phenomenon.
•Use this when you take pictures of people in front of a dark
background.
The flash is not activated in any reco rding conditions.
•Use this when you take pictures in places where th e use of the
flash is not permitted.
∫ About the digital red-eye correction
When the flash is used with the Red-eye reduction ([ ], [ ], [ ]) selected, it will
automatically detect and correct the red-eye in the image data.
It may not be able to correct the red- eye depending on the recording conditions. It may also
•
correct objects other than red-eye.
•It can be set to [OFF] ([ ], [ ], [ ]) with the [D.RED-EYE] in the [REC] mode menu
(P101).
∫ Available flash settings by recording mode
The available flash settings depend on the recording mode.
(±: Available, —: Not available, ¥: Initial setting of advanced scene mode and scene
mode)
‡ ‰ Œ ‡ ‰ Œ
¢
ñ
—————±
±
±±±±±±± ¥— ± ———±
±±±±±±± ¥— ± ———±
±±±±——±
——±±——±
——————±
±¥±———±
±¥±———±
¥
± ———±
○
¥ — ± ———±
¥ — ± ———±
¥ — ± ———±
1
¥ — ± ———±
¥ — ± ———±
—————¥±
——————¥
±¥±———± ——————¥
±¥±——±±
——————¥
——————¥
——————¥
——————¥
¥ — ± ———±
¢ When [‡] is selected, [ ], [ ] or [ ] is set depending on the type of subject and
brightness.
——————¥
——————¥
ï
—————¥±
2
±¥±———±
:
±¥±———±
;
¥ — ± ———±
í
VQT1U32
59
Page 60

Advanced (Recording pictures)
•The flash setting may change if the recording mode is changed. Set the flash setting again if
necessary.
•The flash setting is memorized even if the camera is turned off. However, the advanced scene
mode or the scene mode flash setting is reset to the initial setting whe n the advanced scene
mode or the scene mode is changed.
∫ The available flash range to take pictures
•
The available flash range is an approximation.
When 14–45 mm/F3.5–5.6 lens included in DM C- G1 K is use d
ISO sensitivity
Available flash range
Wide Tele
AUTO
45 cm (1.48 feet) to 6.2 m
(20.3 feet)
¢
30 cm (0.99 feet) to 3.9 m
(12.8 feet)
¢
ISO100 45 cm (1.48 feet) to 3.1 m (10.2 feet) 30 cm (0.99 feet) to 1.9 m (6.23 feet)
ISO200 45 cm (1.48 feet) to 4.4 m (14.4 feet) 30 cm (0.99 feet) to 2.7 m (8.85 feet)
ISO400 45 cm (1.48 feet) to 6.2 m (20.3 feet) 30 cm (0.99 feet) to 3.9 m (12.8 feet)
ISO800 60 cm (1.97 feet) to 8.8 m (28.9 feet) 30 cm (0.99 feet) to 5.5 m (18.0 feet)
ISO1600
ISO3200
60 cm (1.97 feet) to 12.5 m
(41.0 feet)
90 cm (2.95 feet) to 17.7 m
(58.1 feet)
60 cm (1.97 feet) to 7.8 m (25.6 feet)
75 cm (2.46 feet) to 11.1 m
(36.4 feet)
¢ When the [ISO LIMIT SET] (P104) is set to [OFF]
•At the time of flash photogra phy, when distance with the subject is near, the flash light is
interrupted with lens and a part of picture being taken bec omes dark. Check the distan ce
between the camera and the subject when taking a picture. The distance with subject from
which the flash light is interrupted differs according to the lens used.
–When 14–45 mm/F3.5–5.6 lens included in DMC-G1K is at ta ch ed: 45 cm (1.48 feet) or less
(Wide)/30 cm (0.99 feet) or less (Tele).
∫ Shutter speed for each flash setting
Flash setting Shutter speed (Sec.) Flash setting Shu t ter speed (Se c.)
‡
‰
¢1
to 1/4000th 1 to 1/4000th
1/30
¢2
to 1/160th Π60 to 1/4000th
1/30
¢1 This becomes 60seconds in Shutter-priority AE mode
¢2 This becomes 60 seconds in Shutter-priority AE mode and B (Bulb) in the manual exposure
mode.
•When the flash is activated, the shutter speed cannot be set to faster than 1/160th of a second.
•In Intelligent auto mode, shutter speed changes depending on the identified scene.
VQT1U32
60
Page 61

Advanced (Recording pictures)
Note
Do not bring the flash too close to objects or close the flash wh ile it is activated. The
•
objects may be discolored by its heat or lighting.
•Do not close the flash soon after the flash is activated prior to taking pi ctures due to AUTO/
Red-eye reduction etc. It causes a malfunction.
•When you take a picture beyond the available flash range, the exposure may not be adjusted
properly and the picture may become bright or dark.
•When the flash is being charged, the flash icon blinks red, and you cannot take a picture even
when you press th e shutter button ful l y.
•The white balance may not be properly adjusted if the flash level is insufficient for the subject.
•When taking a picture with the flash, we recommend removing the lens hood. In some
cases it may not allow the scene to be illuminated properly.
•It may take time to ch arge the flash if you repeat taking a picture. Take a picture after the
access indication disappears.
•The red-eye reduction effect differs between people. Also, if the subject was far away from the
camera or was not looking at the firs t flash, the effec t may not be evident.
•When you attach an ext ernal flash, it takes priority over the built-in flas h. Refer to P128 for the
external flash.
Adjust the flash output
Applicable modes:
Adjust the flash output when the subject is small, or the reflectivity is very high or low.
Select [FLASH ADJUST.] in the [REC] mode menu. (P27)
Press 2/1 to set the flash output and then press
[MENU/SET].
• You can adjust from [j2 EV ] to [i2 EV] in steps of [1/3 EV].
• Select [0 EV] to return to the original flash output.
• You can also us e the front dial to set.
Press [MENU/SET] to close the menu.
• You can also pre ss the shutter button halfway to close the menu.
Note
[i] or [j] is displayed on the flash icon in the LCD monitor/viewfinder when the flash level is
•
adjusted.
•The flash output setting is memorized even if the camera is turned off.
VQT1U32
61
Page 62

Advanced (Recording pictures)
Setting to the 2nd Cu rtain Synchro
Applicable modes:
2nd curtain synchro activates the flash just before the shutter closes when taking pictures
of moving objects such as cars using a slow shutter speed.
Select [FLASH SYNCHRO] in the [REC] mode
menu. (P27)
Press 4 to select [2ND] and then press [MENU/
SET].
Press [MENU/SET] to close the menu.
• You can also press the shutter button halfway to close the menu.
Item Effect
The normal method when taking
1st curtain synchro
2nd curtain synchro
pictures with the flash.
The light source appears behind the
subject and picture becomes
dynamic.
Note
Set it to [1ST] normally.
•
•[2nd] is displayed in the flash icon on the LCD monitor/Vi ewfinder if you set
[FLASH SYNCHRO] to [2ND].
•The flash sync. settings are also effective when using an external flash. (P128)
•When a fast shutter speed is set, the effect of [FLASH SYNCHRO] may deteriorate.
•Y ou cannot set [ ], [ ] or [ ] when [FLASHSYNCHRO] is set to [2ND].
VQT1U32
62
Page 63

Advanced (Recording pictures)
[REC] mode :
Compensating the Exposure
Use this function when you cannot achieve appropriate exposure due to the difference in
brightness between the subject and the background. Look at the following examples.
Under exposed
Properly
exposed
Overexposed
Compensate the exposure
towards positive.
Compensate the exposure
towards negative.
Press the front dial to switch to exposure compensation operation.
Rotate the front dial to compensate the
exposure.
A Exposure compensation value
• Select [0] to return to the original exposure.
Ta ke a pictur e.
Note
•
EV is an abbreviation of [Exposure Value]. It refers to the amount of light given to the CCD by
the aperture value and the shutter speed.
•The set exposure value is memorized even if the camera is turned off. However, the exposure
value during the Intelligent auto mode is not memorized.
•The compensation range of the exposure will be limited depending on the brightness of the
subject.
•Rotate the dial slowly but surely.
•When the aperture and shutter speed values are displayed in the screen in the Program AE
mode, Program shift operation and exposure compensation operation is switched every time
the front dial is pressed.
•In the aperture-p riority AE mod e, aperture setting op eratio n (P84) and exposure compen sation
operation is switched every time the front dial is pres sed.
•In the shutter-priority AE mode, shutter speed setting operation (P84) and exposure
compensation operation is switched every time the front dial is pressed.
•Operation method can be changed with [EXPO. SETTINGS] in the [CUSTOM MENU]
menu. (P108)
•
In quick menu
display using
•In quick menu in [ ] (Finder st yle), after selecting the exposure compensation display usin g
the front dial or 2/1, pressing the front dial or [MENU/SET] will allow you to compensate the
exposure with the front di al or 2/1.
(P29)
in [ ] (LCD monitor style), after selecting the exposure compensation
2/1
or the front dial, you can compensate the exposure with 3/4.
VQT1U32
63
Page 64

Advanced (Recording pictures)
A
[REC] mode:
Taking Pictures using Burst Mode
Pictures are taken continuously while the shutter button is pressed.
Select the ones you really like from among the pictures you have taken.
Set the drive mode lever to [ ].
Focus on the subject and take a picture.
A When burst mode is set to high speed [H].
• Hol d down th e sh ut te r but to n ful ly to ac ti va te the
burst mode.
∫ Changing the burst speed
1 Select [BURST RATE] in the [REC] mode menu. (P27)
2 Press 3/4 to select the burst speed and then press
[MENU/SET].
3 Press [MENU/SET] to close the menu.
You can also press the shutter button halfway to close the menu.
•
[H] (High speed) [L] (Low speed)
Burst speed (pictures/second) 32
¢
1
¢1 Number of recordable pictures
¢2 Pictures can be taken until the capacity of the card becomes full. However the burst speed
will become slower halfway. The exact timing of this depends on the picture size, the setting
for the quality and the type of card used.
With RAW files max. 7
Without RAW files
Depends on the remaining capacity of the card
¢2
•First burst speed has no relation with the transfer speed of t he card.
•The burst speed values given above apply when the shutter speed is 1/ 60 or faster and when
the flash is not activated.
•The burst mode speed may become slower depending on the following settings.
–[SENSITIVITY ] ( P7 9 ) /[PICTURE SIZE] (P98)/[QUALITY] (P 99 )/[ F OC US PR I OR ITY] (P107)/
Focus mode
•Refer to P99 for informat ion about RAW files.
VQT1U32
64
Page 65

Advanced (Recording pictures)
∫ Focusing in burst mode
The focus changes depending on the setting for [FOCUS PRIORITY] (P107) in the
[CUSTOM MENU] menu and the focus mode setting.
Focus mode F ocus Priority Focus
AFS
AFC
¢1
ON
OFF
ON
OFF
At the first picture
Normal focusing
Predicted focusing
¢2
¢3
MF — Focus set with manual focus
¢1 When subject is dark, the focus is fixed on the first pic ture.
¢2 The burst speed may become slower because the camera is continuously focusing on th e
subject.
¢3 Burst speed take s priority, and focus is estimated within possible range.
Note
We recommend using the remot e shutter (DMW-RSL1; optional) when you want to keep the
•
shutter button pressed fully while taking pictures in burst mode. Refer to P131 for information
about the remote shutter.
•When the burst speed is set to [H], the exposure and whit e balance are fixed at the settings
used for the first pic ture fo r the subs eque nt pi ctur es as well. Whe n th e burst speed is set t o [L ],
they are adjusted each time you take a picture.
•If you are following a moving subject while taking pictures in a place (landscape) indoors,
outdoors etc. where there is a large difference between the light and shade, it may take time
until the exposure is st able. If burst is used at this time, the exposure may not become optimal.
•Since the shutte r speed bec omes slower in dark pla ces, the bu rst spee d (picture s/secon d) may
become slower.
•The auto review function is activated regardl ess of the auto review setting. (Will not enlarge/
hold) You cannot set the aut o review function in the [SETUP] menu.
•When the flash is ac tivated, you can take on l y 1 picture .
•White balance bracket (P78) will record 3 pictures at 1 recording, so it will take longer to
be able to take next pict ure.
•Maximum of 3 films will be recor d ed depending on the multi film bracke t setting during
the multi film bracket recording (P83).
VQT1U32
65
Page 66

Advanced (Recording pictures)
[REC] mode:
Taking Pictures using Auto Bracket
Maximum of 7 pictures will be recorded with different exposure settings following the
exposure compensation range every time the shutter button is pressed.
You can select the picture with the desired exposure among different exposures.
With auto bracket
[STEP]: [3•1/3], [SEQUENCE]: [0/s/r]
1st picture 2nd picture 3rd picture
d0EV j1/3 EV i1/3 EV
Set the drive mode lever to [ ].
Focus on the subject and take a picture.
• If you press and hold the shutter button, the number
of pictures that you set is taken.
• The auto bracket indication bl inks un til t he number of
pictures that you set is taken.
• The picture count is reset to [0] if you change the
auto bracket setting, change the setting on the drive
mode lever or turn the camera off before all the
pictures that you set are taken.
∫ Changing the settings for [STEP] and [SEQUENCE] in auto bracket
1 Select [AUTO BRACKET] in the [REC] mode menu. (P27)
2 Press 3/4 to select [STEP] or [SEQUENCE] and then
press 1.
66
VQT1U32
Page 67

Advanced (Recording pictures)
3 Press 3/4 to select the setting and then press [MENU/SET].
Item
[STEP]
Settings
[3•1/3] (3 pictures)
[3•2/3] (3 pictures) [`/0/_]
[5•1/3] (5 pictures)
[5•2/3] (5 pictures)
[7•1/3] (7 pictures)
[7•2/3] (7 pictures)
Item
[SEQUENCE]
Settings
[0/`/_]
4 Press [MENU/SET] twice to close the menu.
•
You can also press the shutter button halfway to close the menu.
Note
When taking pictures using auto bracket after setting the exposure compensation range, the
•
pictures taken are bas ed on the selected exposure compe nsation range.
•The exposure may not be compensated with auto bracket depending on the brightn ess of the
subject.
•The auto review function is activated regardl ess of the auto review setting. (Will not enlarge/
hold) You cannot set the aut o review function in the [SETUP] menu.
•When the flash is ac tivated, you can take on l y 1 picture .
•Set number of picture s can not be re corded if t he rec ordable nu mber o f pict ures is les s t han set
number of pictures.
•Settings for multi film bracket have priority during the multi film bracket recording (P83).
VQT1U32
67
Page 68

Advanced (Recording pictures)
A
[REC] mode:
Taking Pictures with the Self-timer
Set the drive mode lever to [ë].
Press the shutter button halfway to focus
and then press it fully to take the picture.
A When self-timer is set to [ ].
• A picture is not taken until the subject is brought into
focus.
• If you want to press the shutter button fully to take a
picture even when the subject is not focused, set
[FOCUS PRIORITY] in the [CUSTOM MENU] menu to [OFF]. (P 107)
• The self-timer indicator B blinks and the shutter is activated after
10 seconds (or 2 seconds).
• If you press [MENU/SET] while taking a p ictu re wit h the s elf-t imer, it is
canceled.
• When [ ] is selected, the self-timer indicator blinks again after the
first and the second pictu r es are taken and the shutter is activated
2 seconds after it blinks.
∫ Changing the time setting for the self-timer
1 Select [SELF-TIMER] in the [REC] mode menu. (P27)
2 Press 3/4 to select the mode and then press [MENU/SET].
Item Settings
10 seconds
10 seconds/3 pict ures
2 seconds
• If you set [ ], after 10 seconds the camera takes 3 pictures at about 2 second intervals.
3 Press [MENU/SET] to close the menu.
•
You can also press the shutter button halfway to close the menu.
Note
When using a tripod etc., setting the self-timer to 2 seconds is a convenient way to avoid the
•
jitter caused by pressing the shutter button.
•We recommend using a tripod when recording with the self-timer.
•Depending on the recording conditions, the recording interval may become more than
2 seconds when [ ] is selected.
•The flash output may not be constant when [ ] is set.
•Operation will be same as [ ] even if it is set to [ ] while multi film bracket reco rding (P83).
•Self-timer cannot be set to [ ] or [ ] in Intelligent auto mode.
68
VQT1U32
Page 69

Advanced (Recording pictures)
[REC] mode :
Setting the method used to focus (AF mode)
This allows the focusing method that suits the positions and number of the subjects to be
selected.
Select the mode that matches the recording conditions and the composition.
Set the focus mode dial to [AFS] or [AFC].
Press 2 ( ) and then press 2/1 to select AF
mode.
• You can also us e the front dial to selec t.
Item
[š]: Face detection
[ ]: AF Tracking
[]:
23-area-focusing
[Ø]: 1-area-focusing
The camera automatically detects the person’s face. The
focus and exposure can then be adjusted to fit that face no
matter what portion of the picture it is in. (max. 15 areas)
Focus and exposure can be adjusted to a specified subject.
Focus and exposure will keep on following the subject even
if it moves.
(Dynamic tracking)
Up to 23 points for each AF area can be focused. This is
effective when the subject is not in the center of the screen.
(AF area frame will be same as image aspect ratio setting)
The camera focuses on the subject in the AF area on the
screen.
Position and size of the AF area can be changed.
Effect
Press [MENU/SET] to close.
• You can also pre ss the shutter button halfway to close.
Note
When the subject is not in the center of the composition in [Ø], you can bring the subject into
•
the AF area, fix the focus and exposure by pressing the shutter button halfway, move the
camera to the composition y ou want wit h the s hutt er but ton pr es sed half way, and then take the
picture. (Only when the focu s mode dial is set to [AFS])
•The camera is focusing on all t he AF ar eas us ing [ ] when mu lti ple AF ar eas (max . 23areas)
light at the same time. If you want to determine the focus position to take pictures, switch the
AF mode to [Ø].
•If the AF mode is set to [š] or [ ], the AF area is not displayed until the picture is brought into
focus.
•The camera may detect the s ubjects other than a person as the face. In this case, switc h the
AF mode to any modes other than [š] and then take a picture.
•It is not possible to set [š] in the following cases.
–In [FOOD] in [CLOSE-UP]
–In [NIGHT SCENERY] and [ILLUMINATIONS] in [NIGHT PORTRAIT]
VQT1U32
69
Page 70

Advanced (Recording pictures)
A
B
∫ About [š]
When the camera detects a person’s face, the following color AF area is displayed.
Yellow:
When the shutter button is pressed halfway, the frame turns green when the camera is
focused.
White:
Displayed when more than one face is detected. Other faces that are the same distance
away as faces within the yellow AF areas are also focused.
•
When [š] is selected and [METERING MODE] is set to multiple [C], the camera will adjust
the exposure to suit the person’s face.
•Under certain picture-taking conditions including the following cases, the facial recognition
function may fail to work, making it impossible to detect faces. [AF MODE] is switched to [ ].
–When the face is not facing the camera
–When the face is at an angle
–When the face is extremely bright or dark
–When there is little contrast on the faces
–When the facial features are hidden behind sunglasses, etc.
–When the face appears small on the screen
–When there is rapid movement
–When the subject is other than a human being
–When the camera is shaking
•The face detection function is not activated when using the digital zoom.
Setting up [ ] (AF Tracking)
Bring the subject to the AF
Before locking Locked
tracking frame, and press the
shutter button halfway to lock
the subject.
A AF tracking frame (White)
B AF tracking frame (Yellow)
• AF area will continuously focus and
exposure on the subject’s movement
once the subject is recognized.
(Dynamic tracking)
• AF tracking is canceled when [MENU/
SET
] or 2 is pressed.
• Once it is locked, it will keep on dynamic
tracking even if you release the shutter
button.
Take the picture.
Note
•
If it fails to lock, AF area will flash in red, and disappear. Try to lock again.
•AF Tracking will not operate when it has failed to AF trac k. AF mode will be switched to [Ø] in
that case.
•[ ] will operate as [Ø] in the [STANDARD] ( ), [DYNAMIC] ( ) or [SMOOTH]
( ) in film mode.
•Dynamic tracking function may not work in the following cases:
–When the subject is too small
–When the recording location is too dark or bright
VQT1U32
70
Page 71

Advanced (Recording pictures)
A
B DC
–When the subject is moving too fast
–When the background has the same or similar color to the subject.
–When jitter is occurring
–When zoom is operated
•The AF tracking function does not work while using the digital zoom.
Setting the AF area
AF area can be moved when [Ø] is selected. The size of AF area can also be changed.
You can also set from the quick menu. (P29)
•
Select [Ø] and then press 4.
• AF area setting screen is displayed. It will return to previous
screen by pressing [ D ISPLA Y].
Press 3/4/2/1 to move the AF area.
• You can set to arbi tra ry posit ion of the scre en. (I t cann ot be set
to edge of the screen)
Rotate the front dial to change the size of AF area.
Front dial clockwise: Enlarge
Front dial counter clockwise: Shrink
•
It can be changed to 4 different sizes of “spot” A, “normal” B,
“large” C, and “extra large” D.
Press [MENU/SET] to set.
∫ Move the AF area easily while taking pictures
When the [DIRECT AF AREA] (P107) in the [CUSTOM MENU] menu is set to [ON] while
[Ø] is selected, it is possible to move the AF area directly with 3/4/2/1.
It is also possible to change the size of AF area by rotating the front dial in the screen to
set the position.
•
[SENSITIVITY] (P79), [Fn BUTTON SET] (P30), [AF MODE] (P69), or [WHITE BALANCE]
(P76) cannot be set with 3/4/2/1. Make the setting with the quick menu (P29).
Note
•
The spot metering target can also be moved to match the AF area when usin g [Ù].
•Set the size of AF area to “normal”, “large”, or “extra large” when it is hard to focus using the
“spot”.
VQT1U32
71
Page 72

Advanced (Recording pictures)
[REC] mode:
Taking Pictures with Manual Focus
Use this function when you want to fix the focus or when the distance between the lens
and the subject is determined and you do not want to activate auto focus.
Set the focus mode dial to [MF].
• [ ] is displayed on a screen for about 5 seconds.
Rotate the focus ring to focus on the subject.
• Screen will be enlarged about 5 times as MF assist.
• The enlarged area can be moved by pressing 3/4/2/1.
• MF assist disappears about 10 seconds after you stop
pressing 3/4/2/1 or rotating the focus ring.
• MF assist is enlarged from 5 times to 10 times when the front
dial is rotated clockwise. It will return to 5 times by rotating the front dial counter
clockwise.
Take the picture.
∫ MF ASSIST
If [MF ASSIST] (P108) of [CUSTOM MENU] menu is set to [OFF], an enlarged screen will
not be displayed as MF assist, even if focus ring is rotated. T o display t he MF assist, press
2 and then press [MENU/SET] for enlarged display.
1 Press 2 to display the MF assist screen.
2 Press 3/4/2/1 to change the position of the MF assist
screen.
The following will return the MF assistance to the original
•
position.
–Switching the focus mode dial to [AFS] or [AFC].
–Changing [ASPECT RATIO] or [PICTURESIZE].
–Turning the camera off.
3 Press [MENU/SET] to magnify the MF assist screen.
•
Rotate the focus ring to focu s on th e subj e ct.
4 Press [MENU/SET] to close MF assist.
•
The screen returns to the pre vious screen.
∫ Technique for Manual focus
1 Rotate the focus ring to focus on the
subject.
2 Rotate it a little more.
3 Finely focus on the subject by rotating the
focus ring slowly in reverse.
VQT1U32
72
Page 73

Advanced (Recording pictures)
∫ About the focus distance reference mark
The focus distance reference mark is a mark
used to measure the focus distance.
Use this when taking pictures with manual focus
or taking close-up pictures.
A Focus distance reference mark
B Focus distance reference line
C 0.3 m (0.99 feet) (When 14–45 mm/F3.5–5.6
lens included in DMC-G1K is used)
•If you are taking close-up pictures
– We recommend using a tripod and the self-timer (P68).
– The effective focus range (depth of field) is significantly narrowed. Therefore, if the distance
between the camera and t he sub ject is cha nged aft er focusin g on t he su bject , it may bec o me
difficult to foc us on it again.
– The resolution of the periphery of the picture may decrease slightly. This is not a malfunction.
Note
•
If you use the zoom function after focusing on the subject, focus on the su bject again.
•The MF assistance does not appear when using the digital zoom.
•Even if 2 is pressed in My Color mode, the MF assist screen is not displayed.
•After canceling Power save mode, focus on the subject again.
VQT1U32
73
Page 74

Advanced (Recording pictures)
[REC] mode:
Fixing the Focus and the Exposure
(AF/AE Lock)
This is useful when you want to take a picture of a subject outside the AF area or the
contrast is too strong and you cannot achieve appropriate exposure.
∫ Fixing the exposure only
Align the screen with the subject.
Press and hold [AF/AE LOCK] to fix the
exposure.
A [AF /AE LOCK] button
• The aperture value and the shutter speed light.
• If you release [AF/AE LOCK], AE Lock is canceled.
While pressing [AF/AE LOCK], move the
camera as you compose the picture.
B AE lock indication
Press the shutter button halfway to focus
on the subject and then press it fully.
∫ Fixing the focus or the focus/the exposure
1 Select [AF/AE LOCK] in the [CUSTOM MENU] menu. (P27)
2 Press 3/4 to select [AF] or [AF/AE] and then press
[MENU/SET].
3 Press [MENU/SET] to close the menu.
You can also press the shutter button halfway to close the menu.
•
Taking pictures when [AF] or [AF/AE] is set
1 Aim the screen at the subject.
2 Press and hold [AF/AE LOCK] to fix the focus and the exposure.
•
When [AF] is selected, the fo cus indication lights when the s ubject is focused.
• When [AF/AE] is selected, the focus indication, aper tur e value and the shut ter s peed light
when the subject is focused and the exposure is set.
• If you release [AF/AE LOCK], AF/AE Lock is c anceled.
3 While pressing [AF/AE LOCK], move the camera to the composition you would like to
take and then press the shutter button fully.
VQT1U32
74
Page 75

Advanced (Recording pictures)
Note
If you set [AF/AE LOCK HOLD] in the [CUSTOM MENU] menu to [ON], you can fix the focus
•
and the exposure even if you release the [AF/AE LOCK] button after pressing it. (P106)
•AE Lock only is effective when taking pictures with manual focus.
•The exposure is set, ev en if the brightness of the subject changes.
•The subject can be focused again by pressing the shutter button halfway even when AE is
locked.
•Program shift can be set even when AE is locked.
VQT1U32
75
Page 76

Advanced (Recording pictures)
[REC] mode:
Adjusting the White Balance
In sunlight, under incandescent lights or in other such conditions where the color of white
takes on a reddish or bluish tinge, this item adjusts to the color of white which is closest to
what is seen by the eye in accordance with the light source.
Press 1 ().
Press 2/1 to select the white balance and then
press [MENU/SET] to set.
• You can also use the f r ont dial to set.
• You can also press the s hutter button halfway to set.
Item Settings
[AWB] Automatic adjustment
[V] When taking pictures outdoors under a clear sky
[Ð] When taking pictures outdoors under a cloudy sky
[î] When taking pictures outdoors in the shade
[Ñ] When taking pictures under incandescent lights
[] When taking pictures with the flash only
1 2
[]/[]
[] When using the preset color temperature setting
When
using the prese t w hi te balance
∫ Auto white balance
Depending on the conditions prevailing when pictures are taken, the pictures may take on
a reddish or bluish tinge. Furthermore, when a multiple number of light sources are being
used or there is nothing with a color close to white, auto white balance may not function
properly. In a case like this, set the white balance to a mode other than [AWB].
1 Auto white balance will work within this range.
2 Blue sky
3 Cloudy sky (Rain)
4 Shade
5 TV screen
6 Sunlight
1)
2)
3)
4)
6)
7)
7 White fluorescent light
8 Incandescent light bulb
9 Sunrise and sunset
10 Candlelight
8)
9)
10)
KlKelvin color Temperature
VQT1U32
76
5)
Page 77

Advanced (Recording pictures)
2
1
2
Note
The optimal white balance will differ depending on the type of halogen lighting being recorded
•
under so use [AWB], [ ] or [ ].
•The white balance might no t be adjusted for the subject where the flash does not reach whe n
the flash is used.
1
•The white balance is memorize d even if the camera is turned off, but [WHITE BALANCE] for
the advanced scene mode or the scen e mode is set to [AWB] when the advanced scene mode
or the scene mode is changed.
Setting the white balance manually
•You can also set from the quick menu. (P29)
Select [ ] or [ ] and then press 3.
Aim the camera at a sheet of white paper etc. so
that the frame in the center is filled by the white
object only and then press [MENU/SET].
Note
You may not be able to set a new white bala nce if the subject is too bright or too dark. In this
•
case, adjust the subject to an appropriate brightness and then reset the white balance.
Setting the color temperature
You can set the color temperature manually for taking natural pictures in different lighting
conditions. The color of light is measured as a number in degrees Kelvin. As the color
temperature becomes high the picture becomes bluish and as the color temperature
becomes low the picture becomes reddish.
•
You can also set from the quick menu. (P29)
Select [ ] and then press 3.
Press 3/4 to select the color temperature and
then press [MENU/SET].
• You can set a color temperature from [2500K] to [10000K].
• You can also us e the front dial to set.
Finely adjusting the white balance [ ]
You can finely adjust the white balance when you cannot acquire the desired hue by
setting the white balance.
•
You can also set from the quick menu. (P29)
VQT1U32
77
Page 78

Advanced (Recording pictures)
1
2
Select the white balance and then press 4.
Press 3/4/2/1 to adjust the white balance and
then press [MENU/SET].
A (AMBER: ORANGE)
2 :
B (BLUE: BLUISH)
1 :
3 : G_ (GREEN: GREENISH)
4 : M` (MAGENTA: REDDISH)
Note
If you finely adjust the whit e ba l a nce to A (amber), the w hi t e ba l a nce icon on the LCD m on i to r /
•
Viewfinder will change to orange. If you finely adjust the white balance to B (blue), the white
balance icon on the LCD monitor/Viewfinder will change to blue.
•If you finely ad j u s t th e w hi t e balance to G_ (green) or M` (magenta), [_] (gre en) or [`]
(magenta) appears beside the white balance icon on the LCD monitor/Viewfinder.
•Press [‚] to return to the center point.
•Select the center point if you are not finely adjusting the white balance.
•The white balance fine adjustment s etting is reflected in the picture when using the flash.
•You can finely adjust the white balance independently for each white balance item.
•The white balance fine adjustment s etting is memorized even if the camera is tu rned off.
•The white balance fine adjustmen t level returns to the standard setting (center point) in the
following cases.
–When you reset the white balance in [ ] or [ ]
–When you reset the color temperature manually in [ ]
White balance bracket
Bracket setting is performed based on the adjustment values for the white balance fine
adjustment, and 3 pictures with different colors are automatically recorded when the
shutter button is pressed once.
Finely adjust the white ba lanc e w ith a bove step 2,
and rotate the front dial to set the bracket.
Front dial clockwise: Horizontal (A to B)
Front dial counter-clockwise: Vertical (Gi to Mj)
Press [MENU/SET].
• You can also use the f r ont dial to set.
Note
[ ] is displayed in white balance icon in the LCD monitor/viewfinder when the white balance
•
bracket is set.
•The white balance bracket setting is released when the power has been turned off (including
power save mode).
•Pictures can be taken with white balance bracket regardless of the drive mode settings.
•Y ou will only hear the shutter sound once.
VQT1U32
78
Page 79

Advanced (Recording pictures)
[REC] mode :
Setting the Light Sensitivity
This allows the sensitivity to light (ISO sensitivity) to be set. Setting to a higher figure
enables pictures to be taken even in dark places without the resulting pictures coming out
dark.
Press 3 ().
Press 3/4/2/1 to select the ISO sensitivity and
then press [MENU/SET] to set.
• You can also us e the front dial to set.
• You can also pre ss the shutter button halfway to set.
ISO sensitivity
Recording location
(recommended)
Shutter sp eed Slow Fast
Noise Less Increased
ISO sensitivity
¢
AUTO
¢
(Intelligent)
100/200/400/800/1600/3200
¢ When the [ISO LIMIT SET] of [REC] mode menu (P104) is set to anything except [OFF],
it is set automatically within the value set in [ISO LIMIT SET].
It is set as following when the [ISO LIMIT SET] is set to [OFF].
• When setting to [AUTO], ISO sensitivity will adjust automatically depend ing on brightness
within the maximum setting of [ISO400].
• When setting to [ ], ISO sensitivity will adjus t automatically depending on brightness
within the maximum setting of [ISO800]. ([ISO400] when the flash is used)
When it is light (outdoors) When it is dark
The ISO sensitivity is automaticall y adjusted accor ding to the
brightness.
The ISO sensitivity is adjuste d accor ding to the movement of
the subject and the brightnes s.
The ISO sensitivity is fixed to vario us settings.
(When the [ISO INCREMENTS] in [REC] mode menu
(P104) is set to [1/3 EV], items of ISO sensi tivi ty t hat ca n
be set will increase.)
100 3200
Settings
∫ About [ ] ( Int elligent ISO sensit ivity control)
The camera automatically sets the optimum ISO sensitivity and shutter speed to suit the
movement of the subject and brightness of the scene to minimize the jitter of the subject.
The shutter speed is not fixed when the shutter button is press ed halfway. It is continuously
•
changing to match the movemen t of the sub ject unt il the shutter button is pressed fu lly. Confirm
the actual shutter speed on the information display for the picture being played back.
VQT1U32
79
Page 80

Advanced (Recording pictures)
Note
•
The higher the value set for th e ISO sensit ivit y, the more the jitter is re duced but t he gr eater th e
amount of picture noise.
•Refer to P60 for the flash range.
•Depending on the bright ness a nd how fas t the su bject is moving, jitter may not be avoided e ven
if [ ] is selected.
•Movements may not be detected when a moving subject is small, when a moving subject is at
the edge of the screen or when a subject has moved at the very moment when the s hutter
button was pressed fully.
•The setting is fixed to [ ] in the following cases.
–In [BABY1]/[BABY2] and [PET] in sce ne mode
–In [INDOOR PORTRAIT], [NORMAL SPORTS], [OUTDOOR SPORTS] and [INDOOR
SPORTS] in advanced scene mode
•Program shift cannot be activated when the ISO sensitivity is set to [ ].
•You cannot select [ ] in shutter-priority AE mode and manual exposure mode. Also, you
cannot select [AUTO] in manual exposure mode.
•To avoid picture noise, we recommend reducing the ISO sensitivity, setting [NOISE RED.] in
[FILM MODE] towards [_] or setting the item s except [NOISE RED.] towards [`] to take
pictures. (P82)
80
VQT1U32
Page 81

Advanced (Recording pictures)
[REC] mode :
Change tone of the color for the picture to be
taken (Film mode)
[Y ou ca n only select [STANDARD] and [STANDARD] ( ) in [ ], [¿], [ ], [ ], [ ],
[ ] and [ ] mode.]
Every type of film for film cameras has its own color tone and contrast characteristics. In
film mode, you can select the color tone of the pictures from 9 types in the same way as
you would select different films for film cameras.
Select different settings in film mode to match the recording situation and your picture of
the recording.
Press [FIL M MODE].
A [FILM MODE] button
Press 2/1 to select an item.
• You can also us e the front dial to selec t.
• When you press [DISPLA Y] on the screen shown right,
explanations about eac h film mode are displayed. (When you
press [DISPLAY] again, the screen returns to the previous
screen.)
Press [MENU/SET] to set.
• You can also pre ss the shutter button halfway to set.
Item Effect
[STANDARD] (COLOR)
[DYNAMIC] (COLOR)
[NATURE] (COLOR)
[SMOOTH] (COLOR)
[NOSTALGIC] (COLOR) Lower saturation and contrast. Reflecting passage of time.
[VIBRANT] (COLOR)
[STANDARD] ( )
[DYNAMIC] ( ) The contrast is increased.
[SMOOTH] ( )
[MY FILM 1]/[MY FILM 2]
[MULTIFILM]
This is the standard setting.
The saturation and contrast of the stored colors are
increased.
Brighter red, green and blue. Enhanced beauty of nature.
The contrast is lowered for smoother and clearer color.
Higher saturation and contrast than dynamic.
This is the standard setting.
Smooths the picture without losing the skin texture.
The saved setting is used.
It will take pictures changing the type of film in accordance
with the setting every time the shutter button is pressed. (Up
to 3 pictures)
VQT1U32
81
Page 82

Advanced (Recording pictures)
Note
•
In film mode, the c amera may d o somethin g equivale nt to pull pro cessing o r push processin g to
create a picture wit h particular characte ris tics. Th e sh utt er s pe ed may b ecome very slo w a t th is
time.
Adjusting each film mode to the desired setting
•You can also set from the quick menu. (P29)
Press 2/1 to select a film.
Press 3/4 to select an item and 2/1 to adjust.
• You can also use the f r ont dial to adjust.
• Registered settings are memorized even if the camera is
turned off.
Press [FILM MODE], press 3/4 to select an item,
and then press [MENU/SET].
• You can register 2settings. ([MY FILM 1] and [MY FILM 2])
(After registering, the film mode name that was registered
previously is displayed.)
• [STANDARD] is registered in [MY FILM 1] and [STANDARD]
( ) is registered in [MY FILM 2] at the time of purchase.
Item Effect
Increases the dif ference between the brig htness and the
[r]
[CONTRAST]
[SHARPNESS]
[SATURATION]
[NOISE RED.]
darkness in the picture.
Decreases the difference between the brightness and the
[s]
darkness in the picture.
[r] The picture is sharply de fined.
[s] The picture is softly focus ed.
[r] The colors in the picture be come vivid.
[s] The colors in the picture be come natural.
The noise reduction effect is enhanced. Picture reso lution may
[r]
deteriorate slightly.
The noise reduction effect is reduced. You can obtain pictures
[s]
with higher res o l u ti on .
Note
Noise may become visible when you take pictures in dark places. To avoid picture noise, we
•
recommend setting [NOISE RED.] towards [_] or setting the items exce pt [NOISE RED.]
towards [`] to take pictures.
•If you adjust a film mode, [_] is displayed beside the film mode name on the LCD monitor/
Viewfinder.
•You cannot adjust [SATURATION] in the black and white set tings in film mode.
•Film mode cannot be adjusted in the Intelligent auto mode, advanced scene mode an d scene
mode.
VQT1U32
82
Page 83

Advanced (Recording pictures)
Multi film bracket
It will take pictures changing the type of film in accordance with the setting every time the
shutter button is pressed. (Up to 3 pictures)
•
You can also set from the quick menu. (P29)
Press 2/1 to select [MULTI FILM].
Select either [MULTI FILM 1], [MULTI FILM 2], or
[MUL TI FILM 3] with 3/4, and then select the film
to be set for each with 2/1.
• You can also us e the front dial to set.
• [OFF] can be selected only for [MULTI FILM 3].
Press [MENU/SET] to set.
• You can also pre ss the shutter button halfway to set.
Note
[STANDARD] is registered in [MULTIFILM 1], [STANDARD] ( ) is registered in
•
[MULTI FILM 2] and [OFF] is registered in [ M ULTI FILM 3] at the time of purchase.
•White balance bracket will be disabled when the multi film bracket is set.
•It will be 1 picture per each film when recording single picture. Up to 3 pictures for set
film are recorded every time the shutter button is pressed when set to burst or
self-timer.
•Self-timer [ ] will operate as [ ] during the multi film bracket recording.
VQT1U32
83
Page 84

Advanced (Recording pictures)
[REC] mode: ±´
Taking pictures by specifying the aperture/
shutter speed
[ ] Aperture-priority AE
Set the aperture value to a higher number when you want a sharp focus background. Set
the aperture value to a lower number when you want a soft focus background.
Set the mode dial to [ ].
Rotate the front dial to set the aperture
value.
• It will switch between aperture setting operation and
exposure compensation operation every time the
front dial is pressed.
Take a picture.
[ ] Shutter-priority AE
When you want to take a sharp picture of a fast moving subject, set with a faster shutter
speed. When you want to create a trail effect, set to a slower shutter speed.
Set the mode dial to [ ].
Rotate the front dial to set the shutter
speed.
• It will switch between shutter speed se tting op eration
and exposure compensation ope ration every time the
front dial is pressed.
Take a picture.
Note
•
How the exposure compensation is switch ed can be cha nged by [EXPO.SETTINGS] (P108) in
the [CUSTOM MENU] menu.
•The brightness of the LCD monitor/Viewfinder and the recorded pictures may differ. Check the
pictures on the Playback scr een.
•Set the aperture value to a high er numb er when th e su bject is too br ight in Aper tur e-pri ority AE
mode. Set the aperture value to a lower number when the subject is too dim.
•When you use a lens with an aperture ring, th e setting f or the fro nt dial becomes eff ective if you
rotate the aperture ri ng to the [A] position and the aperture ring setting takes priority if you
rotate the apertu re rin g to a posi ti o n oth e r than [A ] in Ap er tu re -p r ior i ty AE mode.
•The aperture value and the shutter speed displayed on the s creen turn red and blink when the
exposure is not adequate.
•We recommend using a tripod when the shutter speed is slow.
VQT1U32
84
Page 85

Advanced (Recording pictures)
•When the flash is activated, the shutter speed cannot be set to faster than 1/160th of a second
in Shutter-priority AE mode. (P60)
•If you press the shutter button fully when the shutter speed is slow, the shutter speed on the
screen counts down in Shutter-priority AE mode.
•[ ] and [ ] cannot be set for Shutter-priority AE mode.
•The [SENSITIVITY] is aut o m at ical ly set to [A U TO] whe n yo u sw itch the recording mode to
Shutter-priority AE mode while the [SENSITIVITY] is set to [ ] (Intelligent).
[REC] mode : ²
Taking picture by setting the exposure manually
Determine the exposure by manually setting the aperture value and the shutter speed.
Set the mode dial to [²].
Rotate the front dial to set the aperture
and shutter speed.
• It will switch between aperture setting operation and
shutter speed setting operation every time the front
dial is pressed.
• You can also set the focus manually by rotating the
focus mode dial to [MF]. (P45)
Press the shutter button halfway.
• The manual exposure assistance A appears on the
lower portion of the screen to ind i cate the exposure.
• Set the aperture value and the shutter speed again
when the exposure is not adequate.
Ta ke the pictur e .
∫ Manual Exposure Assistance
The exposure is adequate.
Set to faster shutter speed or larger aperture value.
Set to slower shutter speed or smaller aperture value.
•
The manual exposure assistance is an approximati on. We recommend checking the pictures
on the playback screen.
∫ About [B] (Bulb)
If you set the shutter speed to [B], the shutter stays open while the shutter button is
pressed fully (up to about 4 minutes).
The shutter closes if you release the shutter button.
Use this when you want to keep the shutter open for a long time to take pictures of
fireworks, a night scene etc.
VQT1U32
85
Page 86

Advanced (Recording pictures)
•If you set the shutter speed to [B], [B] is dis played on the screen.
•When you take pictures with the shutter speed set to [B], use a sufficiently charged battery.
(P20)
•We recommend using a tripod or the remote shutter (DMW-RSL1; optional) when you take
pictures with the shutter speed set to [B]. Refer to P131 for information about the remote
shutter.
•When you take pictures with the shutter speed set to [B], noise may become visible. To avoid
picture noise, we recommend set ting [LONG SHTR NR] in the [REC] mode menu to [ON]
before taking pictures. (P104)
•The manual exposure assistance does not appear.
Note
It is possible to change the switching method of aperture and shutt er speed settings with the
•
[EXPO. SETTINGS] (P108) in the [CUSTOM MENU] menu.
•The brightness of the LCD monitor/V iewfinder may diff er from the brightness of the actual
pictures. Check the pictures using the playback screen.
•If the exposure is not adequat e, the aperture value and the shutter speed turn red and blink
when the shutter button is pressed halfway.
•[‡], [ ], [ ] and [ ] for flash cannot be set.
•The [SENSITIVITY] is automatically set to [ISO100] when you switch the recording mode to
Manual exposure while the [SENSITIVITY] is set to [AUTO] or [ ] (Intelligent).
•If you press the shutter button fully when the shutter speed is slow , the shutter speed on the
screen counts down.
•When you use a lens with an aperture ring, the aperture ring setting takes priority.
86
VQT1U32
Page 87

Advanced (Recording pictures)
DISPLAY
[REC] mode :
Confirm the effects of aperture and shutter speed
(Preview mode)
Confirm the effects of aperture
You can check the depth of field (effective focus range) before taking a picture by closing
the leaf shutter to the aperture value you set.
Press [ ] A (preview button).
•Preview screen is displayed. It will return to
previous screen when [ ] is pressed.
∫ Depth of field properties
Aperture value Small Large
¢1
Depth of field (effective focus range) Shallow (Narrow)
¢1 Recording conditions
¢2 Example: When you want to take a picture with a blurred background etc.
¢3 Example: When you wan t to t ake a p ictur e with e ver ythi ng in f ocus inc ludin g the back ground
etc.
Focus length of the lens Tele Wide
Distance to the subject Near Distant
¢2
Deep (Wide)
¢3
Confirm the effects of shutter speed
Movement can be confirmed by displaying the actual picture that will be taken with that
shutter speed.
When the shutter speed is set for high speed, display in the shutter speed preview will be
displayed like a time-release film. It is used in cases such as stopping the movement of
running water.
Press [DISPLAY] while displaying the preview screen.
•Shutter speed preview screen is
displayed. It will return to previous
screen by pressing the [DISPLAY]
again.
Note
Operation method of [ ] can be changed with [PREVIEW HOLD] of [CUSTOM MENU] menu
•
(P106).
•It is possible to record while in preview mode.
VQT1U32
87
Page 88

Advanced (Recording pictures)
[REC] mode:
Taking expressive portraits and landscape
pictures
You can take high-quality pictures of such subjects as people, scenery, sporting events
and activities, flowers and people in night scenes in accordance with the surrounding
conditions.
Set the mode dial.
Press 2/1 to select the advanced scene mode.
• You can also use the fr ont dial to select.
Press [MENU/SET] to set.
• The menu screen is switched to the recording screen in the
selected advanced scene mode .
∫ About the information
•
If you press [DISPLAY] when selecting an advanced scene mode in
step
2, explanations about each ad v anced s cene mode are display ed .
(If you press [DISPLAY] again, the screen returns to the s cree n shown
2.)
in step
Note
•
To change the advanced s cene mode, press [MENU/SET], and return to above step 2 by
pressing 1, while selecting the advanced scene mode menu [ ] by pressing 3/4/2/1.
•The advanced scene mode flash setting is reset t o the initial setting when the advanced scene
mode is changed and then used.
•When you take a p ictur e wit h a ad va nced sce ne mode tha t is not a dequat e f or the p urpo se, th e
hue of the picture may differ from the actual scene.
•The following items cann ot be set in advanced scene mode because the camera automatically
adjusts them to the optimal s etting.
–[SENSITIVITY]/Items other than [STANDARD] and [STANDARD] ( ) in film mode/
[METERING MODE]/[FLASH SYNCHRO]/[I.EXPOSURE]/[DIGITALZOOM]/[ISO LIMIT SET]
∫ About the aperture value and the shutter speed when you select a creative setting
•
You can change the aperture value and the shutter speed if you select
a creative setting in advanced scene mode. If you cannot get an
adequate exposure when you rotate the front dial, the aperture value
and the shutter speed or the selection cursor will turn red.
•You can also press 2/1 to set.
•It will switch between aperture setting or shutter speed setting
operation and exposure compensation operation every time the front
dial is pressed.
(Advanced scene mode)
88
VQT1U32
Page 89

Advanced (Recording pictures)
[PORTRAIT]
The person stands out from the background and has a healthier complexion.
[NORMAL PORTRAIT]
Shades the background and photographs skin color beautifully.
[SOFT SKIN]
Makes the skin surface appear especially smooth.
•
When [SOFT SKIN] is selected, if a part of the background etc. is a color close to skin
color, this part is also smoothed.
•When [SOFT SKIN] is selected, this mode may not be effective when there is insufficient
brightness.
[OUTDOOR PORTRAIT]
Prevents faces from appearing dark when photographing outside.
[INDOOR PORTRAIT]
Sets the ISO sensitivity setting to the appropriate setting to prevent blurring of photo
subject for indoor photography.
[CREATIVE PORTRAIT]
You can change the amount of background blurring by changing the aperture value
(P84).
∫ Technique for Portrait mode
To make this mode more effective:
1 Rotate the zoom ring as far as possible to Tele.
2 Move close to the subject to make this mode more effective.
Note
•
In [INDOOR PORTRAIT], the Intelligent ISO sensitivity control operates, and the maximum ISO
sensitivity level becomes [ISO400].
•The initial setting for [AF MODE] is [š].
[SCENERY]
This allows you to take pictures of a wide landscape.
[NORMAL SCENERY]
The focus adjusts onto far away subjects as a priority.
[NATURE]
The best setting for photographing natural scenery.
[ARCHITECTURE]
This setting takes sharp photographs of architecture. The guide lines are displayed.
(P55)
[CREATIVE SCENERY]
The shutter speed (P84) can be changed in the [NORMAL SCENERY] setting.
VQT1U32
89
Page 90

Advanced (Recording pictures)
[SPORTS]
Set here when you want to take pictures of sports scenes or other fast-moving events.
[NORMAL SPORTS]
Controls the ISO sensitivity while stopping movement with a high shutter speed.
[OUTDOOR SPORTS]
Fast shutter speed for stopping movement when taking photographs outdoors in good weather.
[INDOOR SPORTS]
Increases the ISO sensitivity and increases the shutter speed to prevent blurring for
indoor photography.
[CREATIVE SPORTS]
The shutter speed (P84) can be changed in the [NORMAL SPORTS] setting.
[CLOSE-UP]
This mode allows you to take close-up pictures of a subject, e.g. when taking pictures of flowers.
(The distance from the subject that you can take close-up pictures differs depending on
the lens you are using.)
[FLOWER]
Flowers outdoor are recorded with natural colors in macro settings. The guide lines
are displayed. (P55)
[FOOD]
You can take pictures of food with a natural hue without being affected by the ambient
light in restaurants etc.
[OBJECTS]
You can take clear and vivid pictures of accessories or small objects in a collection.
[CREATIVE CLOSE-UP]
You can change the degree of blurring of the background by changing the aperture
value in the macro settings. (P84)
Note
•
We recommend using a tripod and the self-timer.
•We recommend setting the flash to [Œ] when you take pictures at close range.
•The focus range is different depending on used lens. refer to “About the focus distance
reference mark
” P73 for details.
•When a subject is close to the camera, the effective focus range is significantly narrowed.
Therefore, if the dist a nce be twee n the c ame ra and t he sub jec t i s cha nged after focusing on the
subject, it may become difficult to focus on it again.
•Close-up mode gives prior ity t o a subj ect c lo se t o the c a mera, s o i t t akes longe r t o foc us on th e
further subjects.
•When you take pictures at close range, the resolution of the periphery of the picture may
decrease slightly. This is not a malfunction.
•If the lens becomes dirty wi th fingerprints or dust, the lens may not be able to focus on the
subject correctly.
VQT1U32
90
Page 91

Advanced (Recording pictures)
[NIGHT PORTRAIT]
This allows you to take pictures of a person and the background with near real-life
brightness.
[NIGHT PORTRAIT]
Uses when taking photographs of people with night scenery as a background.
•
Open the flash.
(You can set to [ ].)
The initial setting for [AF MODE] is [š].
•
[NIGHT SCENERY]
Night scenery is vividly photographed with a slow shutter.
[ILLUMINATIONS]
Illuminations are photographed beautifully.
[CREATIVE NIGHT SCENERY]
The aperture value (P84) can be changed in the [NIGHT SCENERY] setting.
∫ Te chnique for Night portra it mode
•
Since the shutter speed becomes slower , we recommend using a tripod and the self-timer for
taking pictures.
•When [NIGHT PORTRAIT] is selecte d, ke ep the s ubject sti ll for a bout 1second after taking the
picture.
•When [NIGHT PORTRAIT] is selected, we recommend rotating the zoom ring to Wide (1k)
and being about 1.5 m (4.92 feet) from the subject when taking a picture.
Note
Noise may become visible when you take pictures in dark places.
•
•The shutter may remain clo sed after taking the picture. This is due to signal processi ng and is
not a malfunction.
VQT1U32
91
Page 92

Advanced (Recording pictures)
[REC] mode: ¿
Taking pictures that match the scene being
recorded
When you select a scene mode to match the subject and recording situation, the camera
sets the optimal exposure and hue to obtain the desired picture.
Set the mode dial to [ ].
Press 2/1 to select the scene mode .
• You can also use the fr ont dial to select.
Press [MENU/SET] to set.
• The menu screen is switched to the recording screen in the
selected scene mode.
∫ About the information
•
If you press [DISPLAY] when selecting a scene mode in step 2,
explanations about each scene mode are displayed. (If you press
[DISPLAY] again, the screen returns to the scene mode menu.)
Note
To change the scene mode, press [MENU/SET], and return to above step 2 by pressing 1,
•
while selecting the scene mode menu [ ] by pressing 3/4/2/1.
•The scene mode flash set ting is rese t to the initial se tting when the sc ene mode is changed a nd
then used.
•When you take a pict ure wit h a sc ene mo de th at is n ot adequa te f or th e purp ose, the hue of the
picture may differ fro m the actual scene.
•The following items cannot be set in scene mode because the camera automatically adjusts
them to the optimal setting.
–[SENSITIVITY]/Items other than [STANDARD] and [STANDARD] ( ) in film mode/
[METERING MODE]/[FLASH SYNCHRO]/[I.EXPOSURE]/[DIGITALZOOM]/[ISO LIMIT SET]
( : Scene mode)
ï [SUNSET]
Select this when you want to take pictures of a sunset view. This allows you to take vivid
pictures of the red color of the sun.
VQT1U32
92
Page 93

Advanced (Recording pictures)
2 [PARTY]
Select this when you want to take pictures at a wedding reception, an indoor party etc.
This allows you to take pictures of people and the background with near real-life
brightness.
∫ Technique for Party mode
•
Open the flash. (Y ou can set to [ ].)
•We recommend using a tripod and the self-timer for taking pictures.
•We recommend rotating the zoom ri ng to Wide (1k) a nd being a bout 1 .5m (4.92 feet) from the
subject when taking pictures.
Note
The initial setting for [AF MODE] is [š].
•
: [BABY1]/; [BABY2]
This takes pictures of a baby with a healthy complexion. When you use the flash, the light
from it is weaker than usual.
You can set different birthdays in [BABY1] and [BABY2]. You can then display the ages
when playing back the pictures.
∫ Age display setting
•
To have the age displayed, first set the birthday and then be sure to
set [WITH AGE] before taking the pictures.
∫ Birthday setting
1 Press 3/4 to select [BIRTHDAY SET.] and then press
[MENU/SET].
2 Press 2/1 to select items (Year/Month/Day) and then
press 3/4 to set them.
If [WITH AGE] is set when the birthday has not been reg i stered, the setting screen
•
appears automatically.
3 Press [MENU/SET] to set.
•
You can also use the front dial to set.
∫ To cancel [AGE]
[WITHOUT AGE] in step 1 of “Birthday setting”.
Set to
Note
The age can be printed out using the “PHOTOfunSTUDIO-viewer-” bundled software on the
•
CD-ROM (supplied).
•If the camera is set to [WITHOUTAGE], the age is not recorded even if the time and birthday
are set. This means the age cannot be displayed even if camera is set to [WITH AGE] after
taking the pictures.
•Intelligent ISO sensitivity control is activated, and maximum ISO sensitivity level becomes
[ISO400].
•If the camera is turned on with [BABY1]/[BABY2] set, the age is displayed at the lower left of
the screen for about 5 seconds, along with the current date and time.
•If the age is not properly displayed, check the clock and birthday settings.
•The birthday setting can be reset with [RESET].
•The initial setting for [AF MODE] is [š].
VQT1U32
93
Page 94

Advanced (Recording pictures)
í [PET]
Select this when you want to take pictures of a pet such as a dog or a cat.
You can set the birthday of your pet. You can then display the age when playing back the
pictures.
Refer to [BABY1]/[BABY2] for information about the age display setting and the birthday
setting.
Note
•
The initial setting for the AF assist lamp is [OFF].
•Intelligent ISO sensitiv ity control is activated, and maximum ISO sensitivity level becomes
[ISO800].
•The initial setting for [AF MODE] is [ ].
•Refer to [BABY1]/[BABY 2] for other information about this mode.
94
VQT1U32
Page 95

Advanced (Recording pictures)
[REC] mode :
Taking pictures while adjusting color
( : My color mode)
Easily confirm the subject on the LCD monitor or viewfinder (Live View) and adjust the
color, brightness, or saturation before taking a picture.
Set the mode dial to [ ].
Press 3/4 to select an item and press 2/1 to
adjust the item.
• You can also us e the front dial to set.
Item Adjustment contents
[COLOR]
[BRIGHTNESS]
[SATURATION]
[RESET] Return all settings to default
• Description of adjustment is displayed by pressing [DISPLAY]. (It will return to selection
screen when it is pressed again.)
Press [MENU/SET] to set.
• You can also pre ss the shutter button halfway to set.
• Recording screen is displayed.
Hue of the color of the screen
(11 steps in n5)
Brightness of the screen
(11 steps in n5)
Depth of color
(11 steps in
n5)
∫ Return My color settings to default
1 Select [RESET] in above step
2 Press 2 to select [YES] and press [MENU/SET].
Adjusted value for each item returns to standard (center point).
•
∫ Readjust the My color settings
Return to above step 2 by pressing front dial or one of 3/4/2/1.
•[SENSITIVITY] (P79), [Fn BUTTON SET] (P30) or [AFMODE] (P69) cannot be set with 3/4/
2. Make the setting with the quick menu (P29).
Note
•
Adjustments made with My color mode are not in effect in ot her recording modes.
•My color setting set is memorized even if the camera is turned off.
•Icons for the adjusted it ems are displayed in the LCD monitor/viewfinder when the My Color
settings are adjusted. Displ ayed icon is the one for direction of adjustment.
•Auto bracket cannot be used in My color mode.
2.
VQT1U32
95
Page 96

Advanced (Recording pictures)
[REC] mode:
Registering Personal Menu Settings (Registering
custom settings)
It is possible to register up to 3 sets of current camera settings as custom sets.
Set to the mode dial to the desired mode and select the desired menu settings in advance.
•
Select [CUST. SET MEM.] in the [CUSTOM MENU] menu. (P27)
Press 3/4 to select the custom set to register
and then press [MENU/SET].
Press 3 to select [YES] and then press [MENU/
SET].
• When [YES] is selected, the settings that were previously
stored are overwritten.
• You cannot save the following menu it ems because they affect
other recording modes.
–[C LOC K SET], [NO .R E S ET], [RESET] and [SCE NE MENU]
–[BABY1]/[BABY2] or [PET] birthday settings in Scene mod e
Press [MENU/SET] to close the menu.
• You can also press the shutter button halfway to close the menu.
96
VQT1U32
Page 97

Advanced (Recording pictures)
[REC] mode :
Taking pictures in Custom mode
You can select one of your own custom settings saved with [CUST. SET MEM.] to suit the
picture-taking conditions.
Initial setting of the Program AE mode is registered as the custom settings initially.
Set the mode dial to [ ].
A Display custom settings
Press [MENU/SET] to display the menu.
Press 3/4 to se lect the custom setting s you want
to use.
• Press 1 or the front dial to display th e settings for each menu
item. (Press 2 to return to the selection screen.)
• Only some of the menu items are displayed. (Refer to th e
following for the menu items that are displayed.)
[AF/AE LOCK] [PRE AF]
[AF/AE LO CK HOLD] [Fn BUTTON SET]
[AF+MF]
[FOCUS PRIORITY] [LONG SHTR NR]
F
[AF ASSIST LAMP] [SHOOT W/O LENS]
[AUTO REVIEW]
o
Press [MENU/SET] to enter the settings.
A Saving of the selected custom settings is displayed on the screen.
∫ When changing the menu settings
Even if the menu settings are changed temporarily with [ SET1], [ SET2] or
[ SET3] selected, what has been registered will remain unchanged.
To change what has been registered, overwrite the registered data using [CUST. SET
MEM.] (P96) on the [CUSTOM MENU] menu.
Note
•
You cannot register the settings of the following menu items as a custom mode. If they are
changed, other recording modes will also be affected.
– [CLOCK SET], [NO.RESET], [RESET] and [SCEN E MENU]
– [BABY1]/[BABY2] or [ PET] birthday settings in sc ene mode
VQT1U32
97
Page 98

Advanced (Recording pictures)
Advanced (Recording pictures)
Using the [REC] Mode Menu
? [ASPECT RATIO]
For details on [REC] mode menu settings, refer to P27.
This allows you to select the aspect ratio of the pictures to suit printing or the playback
method.
Applicable modes:
[X]: [ASPECT RATIO] of a 4:3 TV
[Y]: [ASPECT RATIO] of a 35 mm film camera
[W]: [ASPECT RATIO] of a high-definition TV, etc.
[X][Y][W]
Note
•
The ends of the recorded pictur es may be cut at printing so check before printing. (P151)
@ [PICTURE SIZE]
For details on [REC] mode menu settings, refer to P27.
Set the number of pixels. The higher the numbers of pixels, the finer the detail of the
pictures will appear even when they are printed onto large sheets.
Applicable modes:
∫ When the aspect ratio is [X].
4000k3000 pixels (12 million pixels)
2816k2112 pixels (5.9 million pixels)
2048k1536 pixels (3.1 million pixels)
∫ When the aspect ratio is [Y].
4000k2672 pixels (10.7 million pixe ls)
2816k1880 pixels (5.3 million pixels)
2048k1360 pixels (2.8 million pixels)
VQT1U32
98
Page 99

Advanced (Recording pictures)
∫ When the aspect ratio is [W].
4000k2248 pixels (9 million pixels)
2816k1584 pixels (4.5 million pixels)
1920k1080 pixels (2.1 million pixels)
Note
•
If you set [EX. OPT. ZOOM] (P102) to [ON], [ ] is
displayed on the scree n when th e picture si ze is se t to a siz e
other than the maximum picture size for each aspect ratio.
“EZ” is an abbreviation of “Extended optical Zoom”.
•A digital pictur e is made of numer ous do ts calle d pixel s. The
higher the numbers of pixels, the finer the picture will be
when it is printed on a large piece of paper or displayed on a
PC monitor.
A Many pixels (Fine)
B Few pixels (Rough)
¢ These pictures are examples to show the effect.
•If you change the aspect ratio, set the pic ture size again.
•Refer to P153 for information about the number of recordable pictures.
A [QUALITY]
For details on [REC] mode menu settings, refer to P27.
Set the compression rate at which the pictures are to be stored.
Applicable modes:
[A]: Fine (when giving priority to the picture quality)
[›]: Standard (when using the standard picture quality and increasing the number of
pictures to be recorded without changing the number of pixels)
[]:RAWiFine
simultaneously created.)
[]:RAWiStandard (In addition to the [RAW] settings, a standard-equivalent JPEG
image is simultaneously created.)
[]: RAW file (When the image is to be edited with a PC in high quality)
¢1 If you delete a RAW file from the camera, the corresponding JPEG image will also be
deleted.
¢2 It is fixed to maximum recordable pixels for each image aspect ratio.
Note
Refer to P153 for information about the number of recordable pictures.
•
•Y ou can enjoy more advanced picture edit ing if you us e RAW files. You can save RAW files in a
file format (JPEG, TIFF etc.) that can be displayed on your PC etc. , develop them and edit them
using the software “SILKYPIX Developer Studio” by Ichikawa Soft La boratory on the CD-ROM
(supplied).
•[ ] images are recorded with a smaller data volume than [ ] or [ ].
•[DPOF PRINT] and [FAVORITE] cannot be set to a picture taken by [ ].
(In addition to the [RAW] settings, a fine-equivalent JPEG image is
¢1
¢1
¢2
VQT1U32
99
Page 100

Advanced (Recording pictures)
C [METERING MODE]
For details on [REC] mode menu settings, refer to P27.
Type of optical measurement to measure brightness can be changed.
Applicable modes:
[C]: M ultiple
This is the method in which the camera measures the most
suitable exposure by judging the allocation of brightness on the
whole screen automatically. Usually, we recommend using this
method.
[ ]: Center weighted
This is the method used to focus on the subject on the center
of the screen and measure the whole screen evenly.
[Ù]: Spot
This is the method to measure the subject in the spot metering
target A.
Note
When the AF mode is set to [š] while [C] is selec ted, exposure is adjusted to the face of a
•
person, and when it is set to [ ], exposure is adjusted to the locked subject.
[STABILIZER]
For details on [REC] mode menu settings, refer to P27.
Using one of these modes, jitter during picture taking is detected, and the camera
automatically compensates the jitter, enabling jitter-free images to be taken.
Check that the [O.I.S.] switch on the lens is set to [ON].
Applicable modes:
[MODE1]: Jitter is always compensated during [REC] mode.
[MODE2]: The jitter is compensated for when the shutter button is pressed.
[MODE3]: Camera shake is corrected for up/down movements. This mode is ideal for
panning (a method of taking pictures which involves turning the camera to
track the movements of a subject which continues to move in a fixed
direction).
Note
The stabilizer function may not be effe ctive in the following cases.
•
–When there is a lot of jitter.
–When the zoom magnification is high.
–When using the digital zoom.
–When taking pictures wh ile following a moving subject.
–When the shutter speed bec omes slower to take pictures indoors or in dark places.
VQT1U32
100
 Loading...