

PANASONIC DMCG10KEB User Manual
EB
Operating Instructions
Web Site: http://www.panasonic-europe.com
Digital Camera/Lens Kit
Model No. DMC-G10K
Before use, please read these instructions completely.
Model number suffix “EB” denotes UK model.
VQT2S74
Dear Customer,
We would like to take this opportunity to thank you for purchasing this Panasonic Digital
Camera. Please read these Operating Instructions carefully and keep them handy for
future reference. Please note that the actual controls and components, menu items, etc. of
your Digital Camera may look somewhat different from those shown in the illustrations in
these Operating Instructions.
Carefully observe copyright laws.
•
Recording of pre-recorded tapes or discs or other published or broadcast material for purposes
other than your own private use may infringe copyright laws. Even for the purpose of private
use, recording of certain material may be restricted.
Information for Your Safety
WARNING:
TO REDUCE THE RISK OF FIRE, ELECTRIC SHOCK OR PRODUCT DAMAGE,
DO NOT EXPOSE THIS APPARATUS TO RAIN, MOISTURE, DRIPPING OR
•
SPLASHING AND THAT NO OBJECTS FILLED WITH LIQUIDS, SUCH AS VASES,
SHALL BE PLACED ON THE APPARATUS.
• USE ONLY THE RECOMMENDED ACCESSORIES.
• DO NOT REMOVE THE COVER (OR BACK); THERE ARE NO USER SERVICEABLE
PARTS INSIDE. REFER SERVICING TO QUALIFIED SERVICE PERSONNEL.
THE SOCKET OUTLET SHALL BE INSTALLED NEAR THE EQUIPMENT AND SHALL
BE EASILY ACCESSIBLE.
Product Identification Marking is located on the bottom of units.
∫ About the battery pack
CAUTION
Danger of explosion if battery is incorrectly replaced. Replace only with the same or
equivalent type recommended by the manufacturer. Dispose of used batteries
according to the manufacturer’s instructions.
Do not heat or expose to flame.
•
• Do not leave the battery(ies) in an automobile exposed to direct sunlight for a long period of
time with doors and windows closed.
Warning
Risk of fire, explosion and burns. Do not disassemble, heat above 60 xC or incinerate.
VQT2S74
2
Caution for AC mains lead
For your safety, please read the following
text carefully.
This appliance is supplied with a moulded
three pin mains plug for your safety and
convenience.
A 5-ampere fuse is fitted in this plug.
Should the fuse need to be replaced
please ensure that the replacement fuse
has a rating of 5-ampere and that it is
approved by ASTA or BSI to BS1362.
Check for the ASTA mark Ï or the BSI
mark Ì on the body of the fuse.
If the plug contains a removable fuse
cover you must ensure that it is refitted
when the fuse is replaced.
If you lose the fuse cover the plug must
not be used until a replacement cover is
obtained.
A replacement fuse cover can be
purchased from your local dealer.
CAUTION!
IF THE FITTED MOULDED PLUG IS
UNSUITABLE FOR THE SOCKET
OUTLET IN YOUR HOME THEN THE
FUSE SHOULD BE REMOVED AND
THE PLUG CUT OFF AND DISPOSED
OF SAFELY.
THERE IS A DANGER OF SEVERE
ELECTRICAL SHOCK IF THE CUT OFF
PLUG IS INSERTED INTO ANY 13AMPERE SOCKET.
If a new plug is to be fitted please
observe the wiring code as stated below.
If in any doubt please consult a qualified
electrician.
∫ IMPORTANT
The wires in this mains lead are coloured
in accordance with the following code:
Blue: Neutral, Brown: Live.
As these colours may not correspond with
the coloured markings identifying the
terminals in your plug, proceed as follows:
The wire which is coloured Blue must be
connected to the terminal which is marked
with the letter N or coloured Black or Blue.
The wire which is coloured Brown must be
connected to the terminal which is marked
with the letter L or coloured Brown or Red.
WARNING: DO NOT CONNECT EITHER
WIRE TO THE EARTH TERMINAL
WHICH IS MARKED WITH THE LETTER
E, BY THE EARTH SYMBOL Ó OR
COLOURED GREEN OR
GREEN/YELLOW.
THIS PLUG IS NOT WATERPROOF
-
KEEP DRY.
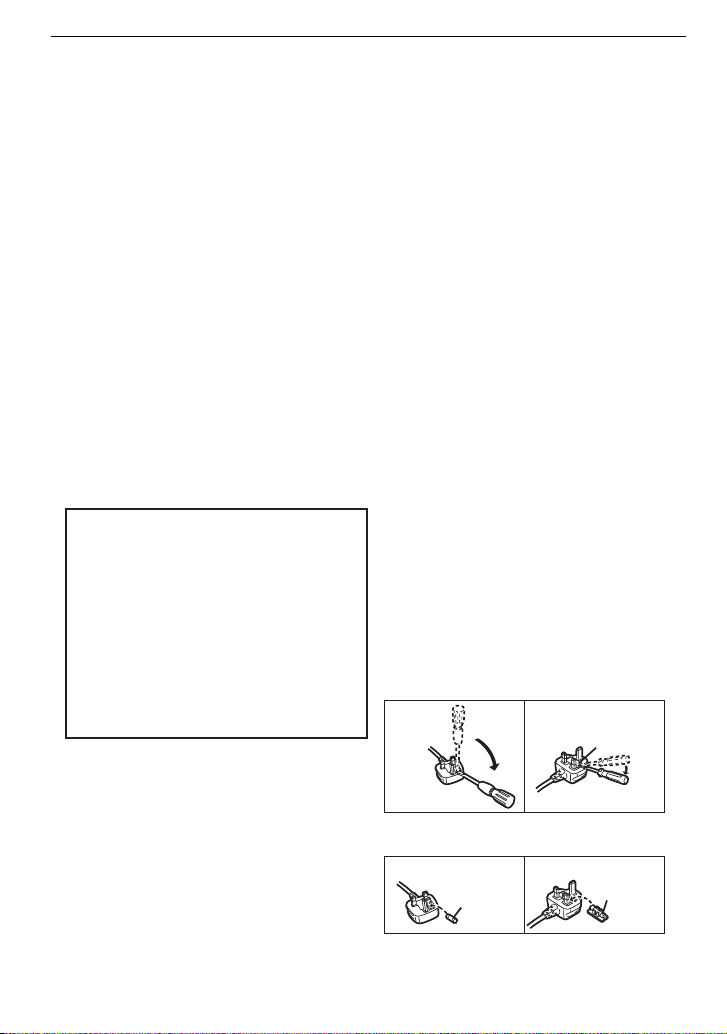
∫ Before use
Remove the connector cover.
∫ How to replace the fuse
The location of the fuse differ according to
the type of AC mains plug (figures A and
B). Confirm the AC mains plug fitted and
follow the instructions below.
Illustrations may differ from actual AC
mains plug.
1. Open the fuse cover with a screwdriver.
2. Replace the fuse and close or attach
the fuse cover.
Fuse cover
Figure A Figure B
Figure A Figure B
Fuse
(5 ampere)
Fuse
(5 ampere)
VQT2S74
3

∫ About the battery charger
CAUTION!
DO NOT INSTALL OR PLACE THIS UNIT IN A BOOKCASE, BUILT-IN CABINET OR IN
•
ANOTHER CONFINED SPACE. ENSURE THE UNIT IS WELL VENTILATED. TO
PREVENT RISK OF ELECTRIC SHOCK OR FIRE HAZARD DUE TO OVERHEATING,
ENSURE THAT CURTAINS AND ANY OTHER MATERIALS DO NOT OBSTRUCT THE
VENTILATION VENTS.
• DO NOT OBSTRUCT THE UNIT’S VENTILATION OPENINGS WITH NEWSPAPERS,
TABLECLOTHS, CURTAINS, AND SIMILAR ITEMS.
• DO NOT PLACE SOURCES OF NAKED FLAMES, SUCH AS LIGHTED CANDLES, ON
THE UNIT.
• DISPOSE OF BATTERIES IN AN ENVIRONMENTALLY FRIENDLY MANNER.
The battery charger is in the standby condition when the AC power supply cord is connected.
•
The primary circuit is always “live” as long as the power cord is connected to an electrical
outlet.
∫ Care of the camera
•
Do not strongly shake or bump the camera by dropping or hitting it. Do not subject to
strong pressure.
The camera may malfunction, recording pictures may become impossible, or the lens, the LCD
monitor or the external case may be damaged.
• Be particularly careful in the following places as they may cause this unit to
malfunction.
– Places with a lot of sand or dust.
– Places where water can come into contact with this unit such as when using it on a rainy day
or on a beach.
• Do not touch the lens or the sockets with dirty hands. Also, be careful not to allow
liquids, sand and other foreign matter to get into the space around the lens, buttons etc.
• This camera is not waterproof. If water or seawater splashes on the camera, use a dry
cloth to wipe the camera body carefully.
If the unit does not operate normally, please contact the dealer where you purchased the
camera or the repair service centre.
• Do not place your hands inside the mount of the digital camera body. Since the sensor
unit is a precision apparatus, it may cause a malfunction or damage.
∫ About Condensation (When the lens or the Viewfinder is fogged up)
•
Condensation occurs when the ambient temperature or humidity changes. Be careful of
condensation since it causes lens stains, fungus and camera malfunction.
• If condensation occurs, turn the camera off and leave it for about 2 hours. The fog will
disappear naturally when the temperature of the camera becomes close to the ambient
temperature.
∫ Read together with the “Cautions for Use”. (P167)
VQT2S74
4
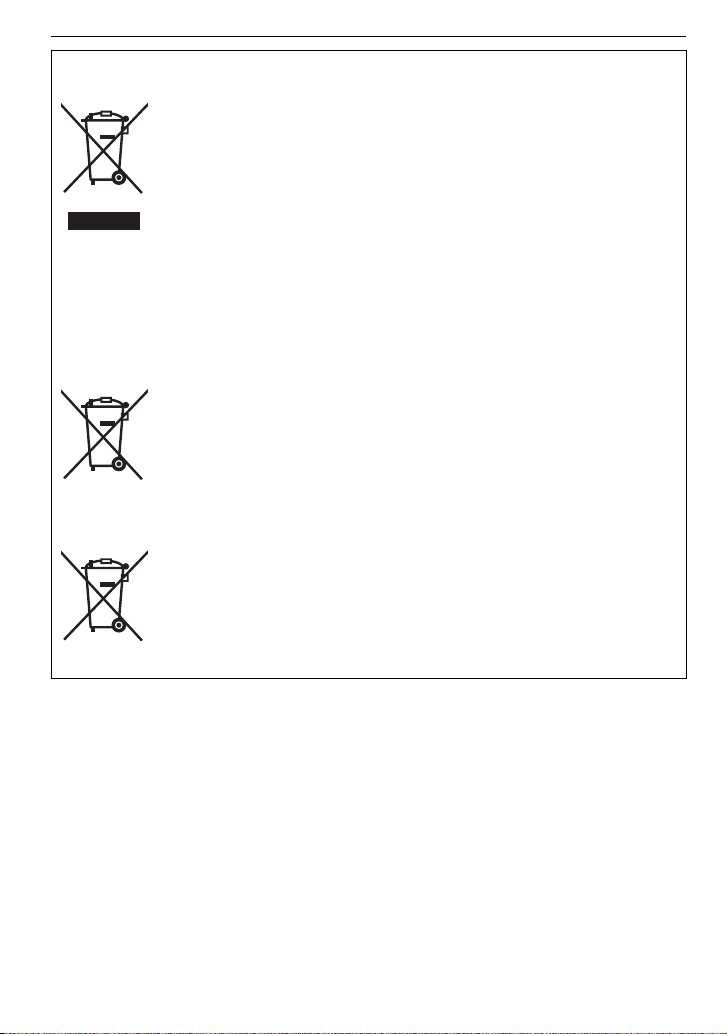
Information for Users on Collection and Disposal of Old Equipment and used
Cd
Batteries
These symbols on the products, packaging, and/or accompanying
documents mean that used electrical and electronic products and
batteries should not be mixed with general household waste.
For proper treatment, recovery and recycling of old products and used
batteries, please take them to applicable collection points, in accordance
with your national legislation and the Directives 2002/96/EC and 2006/
66/EC.
By disposing of these products and batteries correctly, you will help to
save valuable resources and prevent any potential negative effects on
human health and the environment which could otherwise arise from
inappropriate waste handling.
For more information about collection and recycling of old products and
batteries, please contact your local municipality, your waste disposal
service or the point of sale where you purchased the items.
Penalties may be applicable for incorrect disposal of this waste, in
accordance with national legislation.
For business users in the European Union
If you wish to discard electrical and electronic equipment, please contact
your dealer or supplier for further information.
[Information on Disposal in other Countries outside the European
Union]
These symbols are only valid in the European Union. If you wish to
discard these items, please contact your local authorities or dealer and
ask for the correct method of disposal.
Note for the battery symbol (bottom two symbol examples):
This symbol might be used in combination with a chemical symbol. In this
case it complies with the requirement set by the Directive for the
chemical involved.
VQT2S74
5

Contents
Information for Your Safety....................... 2
Before Use
Accessories .............................................. 9
Names of the Components..................... 12
Operating the Rear Dial.......................... 15
About the Lens ....................................... 16
Preparation
Attaching/Detaching the Lens................. 18
Attaching the Lens Hood ........................ 20
Attaching the Shoulder Strap.................. 21
Charging the Battery............................... 22
• Approximate operating time and
number of recordable pictures ......... 24
Inserting and Removing the Card
(optional)/the Battery .............................. 25
About the Card ....................................... 26
Setting Date/Time (Clock Set) ................ 27
• Changing the clock setting ............... 27
Setting the Menu .................................... 28
• Setting menu items........................... 29
Setting the Quick Menu .......................... 31
About the Setup Menu............................ 32
Holding and using your camera.............. 37
Selecting the [REC] Mode ...................... 38
Basic
Taking pictures using the automatic
function (Intelligent Auto Mode).............. 40
• Scene detection................................ 41
• AF Tracking Function ....................... 42
• Settings in Intelligent Auto Mode ...... 42
Taking pictures with your favourite
settings (Programme AE mode) ............. 44
• Setting the focus mode
(AFS/AFC/MF) ................................. 45
• Focusing........................................... 46
• When the subject is not in focus....... 46
• Preventing jitter (camera shake)....... 46
• Programme Shift............................... 47
Taking Pictures with the Zoom ............... 48
• Using the Optical Zoom/
Using the Extra Optical zoom (EZ)/
Using the Digital Zoom..................... 48
Playing back Pictures ............................. 50
• Changing the Information Displayed
on the playback screen .................... 51
• Displaying Multiple Screens
(Multi Playback)................................ 51
• Displaying Pictures by Recording
Date (Calendar Playback) ................ 52
• Using the Playback Zoom................. 52
Deleting Pictures .................................... 53
• To delete a single picture ................. 53
• To delete multiple pictures (up to 50)
or all the pictures.............................. 54
Advanced (Recording pictures)
Switching the display of the LCD
Monitor/Viewfinder.................................. 55
• Switching the Information Displayed
on the recording screen ................... 55
Taking Pictures using the Built-in
Flash....................................................... 58
• Switching to the appropriate flash
setting............................................... 58
• Adjust the flash output...................... 62
• Setting to the 2nd Curtain Synchro.......63
Compensating the Exposure .................. 64
Taking Pictures using Burst Mode.......... 65
Taking Pictures using Auto Bracket........ 67
Taking Pictures with the Self-timer ......... 69
Setting the method used to focus
(AF mode)............................................... 70
• Setting up [ ] (AF Tracking) .......... 72
• Setting the AF area........................... 73
Taking Pictures with Manual Focus........ 74
Fixing the Focus and the Exposure
(AF/AE Lock) .......................................... 76
Adjusting the White Balance................... 77
• Setting the white balance manually ......78
• Setting the colour temperature ......... 79
• Finely adjusting the white balance.... 79
• White Balance Bracket ..................... 80
Setting the Light Sensitivity .................... 80
Change tone of the colour for the picture
to be taken (Film Mode) ..............................82
• Adjusting each Film Mode to the
desired setting.................................. 83
VQT2S74
6
• Multi Film Bracket .............................84
Taking pictures by specifying
the aperture/shutter speed......................85
• Aperture-priority AE ..........................85
• Shutter-priority AE.............................85
Taking picture by setting the exposure
manually..................................................86
Confirm the effects of aperture and
shutter speed (Preview Mode) ................88
Taking expressive portraits and
landscape pictures
(Advanced scene mode) .........................89
• [PORTRAIT]......................................90
• [SCENERY].......................................91
• [SPORTS] .........................................91
• [CLOSE-UP]......................................92
• [NIGHT PORTRAIT]..........................93
Taking pictures that match the scene
being recorded (Scene mode) ................94
• ï [SUNSET]...................................94
• 2 [PARTY] .....................................95
• : [BABY1]/; [BABY2] ................. 95
• í [PET] .......................................... 96
• [PERIPHERAL DEFOCUS]........96
Taking pictures while adjusting colour
(My Colour Mode) ...................................97
• Adjusting the custom settings to
achieve desired effects.....................98
Registering Personal Menu Settings
(Registering custom settings) .................99
Taking pictures in Custom mode ..........100
Motion Picture Mode .............................101
Taking a picture with Face Recognition
function .................................................105
• Face Settings..................................106
• Setting Auto Registration/
Sensitivity .......................................109
• Auto Registration ............................110
Useful Functions at Travel
Destinations ..........................................111
• Recording which Day of the
Vacation You Take the Picture .......111
• Recording Dates/Times at Overseas
Travel Destinations (World Time) ...... 113
Using the [REC] Mode Menu ................114
• [FILM MODE] ...........................114
• ? [ASPECT RATIO] ..................... 114
• @ [PICTURE SIZE] ...................... 115
• A [QUALITY]................................116
• [FACE RECOG.] ...................... 116
• [STABILIZER]...........................117
• [FLASH]....................................117
• [RED-EYE REMOVAL].............118
• [FLASH SYNCHRO] .................118
• [FLASH ADJUST.] .................... 118
• C [METERING MODE].................119
• [I.RESOLUTION]......................119
• [I.EXPOSURE] (Intelligent
exposure adjustment)...............120
• [ISO LIMIT SET].......................120
• [ISO INCREMENTS] ................120
• [LONG SHTR NR] ....................121
• [EX. OPT. ZOOM] ....................121
• ) [DIGITAL ZOOM]......................121
• [BURST RATE].........................121
• [AUTO BRACKET] ...................122
• [SELF-TIMER] .......................... 122
• [COLOR SPACE] .....................122
• B [AUDIO REC.] ..........................123
Using the [MOTION PICTURE]
Mode Menu ...........................................124
• [REC QUALITY] .......................124
• [CONTINUOUS AF]..................124
• [WIND CUT] .............................124
Using the [CUSTOM] Menu ..................125
Entering Text.........................................130
Advanced (Playback)
Playing Back Motion Pictures/Pictures
with Audio .............................................131
• Motion pictures................................ 131
• Pictures with audio.......................... 132
Using the [PLAYBACK] mode menu.....132
• [SLIDE SHOW] ......................... 132
• [PLAYBACK MODE].................134
• Ü [FAVORITE] .............................135
• [TITLE EDIT] ............................136
• [TEXT STAMP].........................137
• Q [RESIZE] Reducing the picture
size (number of pixels) .............140
• [CROPPING] ............................ 141
• ? [ASPECT CONV.].....................142
• N
[ROTATE]/M [ROTATE DISP.]
• [PRINT SET].............................144
• P [PROTECT] ..............................145
• [FACE REC EDIT]....................146
....143
VQT2S74
7

Connecting to other equipment
Playing Back Pictures on a TV Screen .....147
• Playing back pictures using the AV
cable (supplied).............................. 147
• Playing back pictures on a TV with
an SD Memory Card slot ................ 148
• Playing back on the TV with HDMI
socket............................................. 148
Connecting to a PC .............................. 153
Printing the Pictures ............................. 156
• Selecting a single picture and
printing it......................................... 157
• Selecting multiple pictures and
printing them .................................. 157
• Print Settings.................................. 158
Others
Using an external flash (optional) ......... 160
Using the Protector/Filter (optional)...... 161
Using the Remote Shutter (optional) .... 162
Using the AC Adaptor........................... 163
LCD Monitor Display/Viewfinder
Display.................................................. 164
Cautions for Use................................... 167
Message Display .................................. 171
Troubleshooting.................................... 174
Number of Recordable Pictures and
Available Recording Time..................... 183
Specifications ....................................... 188
Sales and Support Information
Customer Care Centre
• For customers within the UK: 0844 844 3852
• For customers within the Republic of
Ireland: 01 289 8333
• Visit our website for product information
www.panasonic.co.uk
• E-mail: customer.care@panasonic.co.uk
Technical Support for AV Software
• For customers within the UK: 0844 844 3869
• For customers within the Republic of Ireland:
01 289 8333
Direct Sales at Panasonic UK
• For customers: 0844 844 3856
•
Order accessory and consumable items for
your product with ease and confidence by
phoning our Customer Care Centre
Monday– Thursday 9.00 a.m.– 5.30 p.m.,
Friday 9.30 a.m.– 5.30 p.m. (Excluding public
holidays)
• Or go on line through our Internet Accessory
ordering application at
www.pas-europe.com.
• Most major credit and debit cards accepted.
• All enquiries transactions and distribution
facilities are provided directly by Panasonic
UK Ltd.
• It couldn’t be simpler!
• Also available through our Internet is direct
shopping for a wide range of finished
products, take a browse on our website for
further details.
VQT2S74
8

Before Use
Before Use
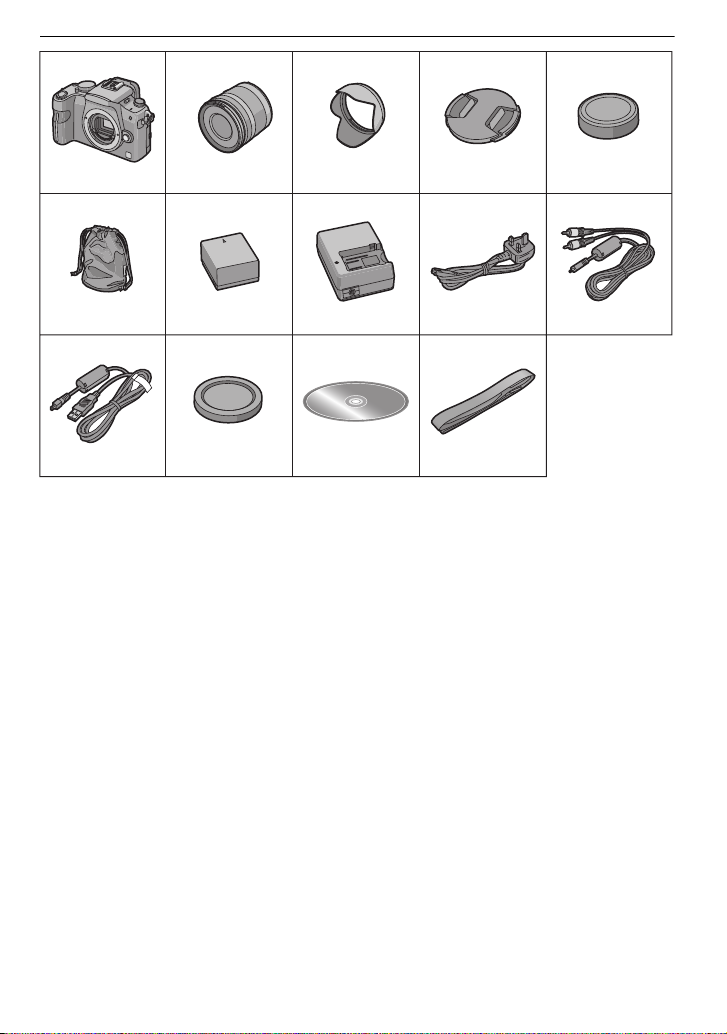
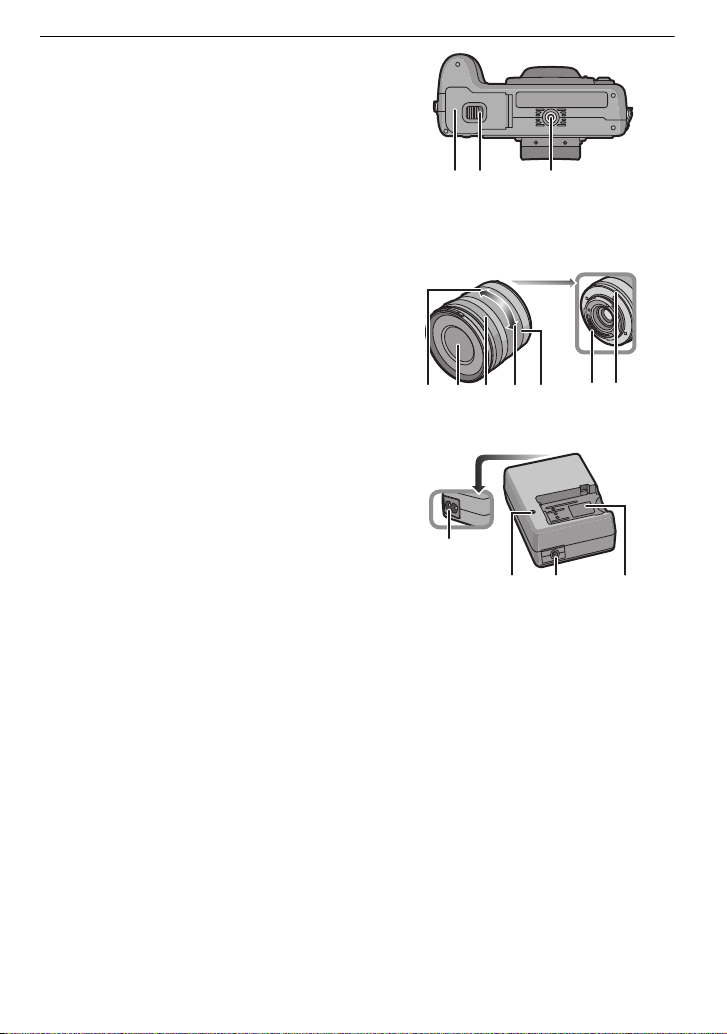
Accessories
Check that all the accessories are included before using the camera.
Product numbers correct as of April 2010. These may be subject to change.
1 Digital Camera Body
(This is referred to as camera body in these operating instructions.)
2 Interchangeable Lens
“LUMIX G VARIO 14 – 42 mm/F3.5–5.6 ASPH./MEGA O.I.S.”
(This is referred to as lens in these operating instructions.)
3 Lens Hood
4 Lens Cap
(This is attached to the interchangeable lens at the time of purchase.)
5 Lens Rear Cap
(This is attached to the interchangeable lens at the time of purchase.)
6 Lens Storage Bag
7 Battery Pack
(Indicated as battery pack or battery in the text)
Charge the battery before use.
8 Battery Charger/AC Adaptor
(Indicated as battery charger or charger in the text)
9 AC Mains Lead
10 AV Cable
11 USB Connection Cable
12 Body Cap
(This is attached to the camera body at the time of purchase.)
13 CD-ROM
•
Software:
Use it to install the software to your PC.
14 Shoulder Strap
SD Memory Card, SDHC Memory Card and SDXC Memory Card are indicated as card in the
•
text.
• The card is optional.
• Description in these operating instructions is based on the 14–42 mm/F3.5– 5.6 lens included
in DMC-G10K.
• Consult the dealer or your nearest Service Centre if you lose the supplied accessories. (You
can purchase the accessories separately.)
VQT2S74
9
Before Use
123 4 5
H-FS014042 VYC1009 VYF3201 VFC4315
678 9 10
DMW-BLB13EVFC4456 DE-A49C
K2CT39A00002 K1HA08CD0020
11 12 13 14
K1HA08AD0003
VKF4385
VFC4539
10
VQT2S74

∫ Optional Accessories
•
Battery Pack
DMW-BLB13E
• Flash
DMW-FL220
DMW-FL360
DMW-FL500
• Interchangeable Lens
H-H020
H-FS014045
H-FS045200
H-VS014140
H-F007014
H-ES045
(Read P16 for information about other lenses
that can be used.)
• MC Protector
DMW-LMC52
• ND Filter
DMW-LND52
• PL Filter (Circular Type)
DMW-LPL52
¢1
¢1
¢1
• Remote Shutter
DMW-RSL1
• DC Cable
DMW-DCC3
• Leather Bag
DMW-BAL1
• Soft Bag
DMW-BAG1
• Soft Case
DMW-CG1
DMW-CG2
¢2
• Shoulder Strap
DMW-SSTL1
DMW-SSTG1
DMW-SSTG2
DMW-SSTG3
• HDMI mini cable
RP-CDHM15
RP-CDHM30
• Mount Adaptor
DMW-MA1
DMW-MA2M
DMW-MA3R
• Tripod Adaptor
DMW-TA1
¢3
Before Use
• SDXC Memory Card
64 GB: RP-SDW64GE1K
48 GB: RP-SDW48GE1K
• SDHC Memory Card
32 GB: RP-SDW32GE1K/RP-SDP32GE1K
24 GB: RP-SDP24GE1K
16 GB: RP-SDW16GE1K/RP-SDP16GE1K
8 GB: RP-SDW08GE1K/RP-SDP08GE1K/
RP-SDR08GE1A
4 GB: RP-SDW04GE1K/RP-SDP04GE1K/
• SD Memory Card
RP-SDR04GE1A
2 GB: RP-SDP02GE1K/RP-SDR02GE1A
Some optional accessories may not be
available in some countries.
¢1 We recommend to use these filters for the
lenses included in DMC-G10K.
If you are using other lenses, please use
the filters compatible with that lens.
¢
2 When the 14– 42 mm/F3.5 – 5.6 lens
included in
¢
3 Use if the attached lens is in contact with
the tripod pedestal.
DMC-G10K is used
VQT2S74
11
Before Use
23
76 5 4
1
10 11
17 18
89
12 132114 15
16 19 20
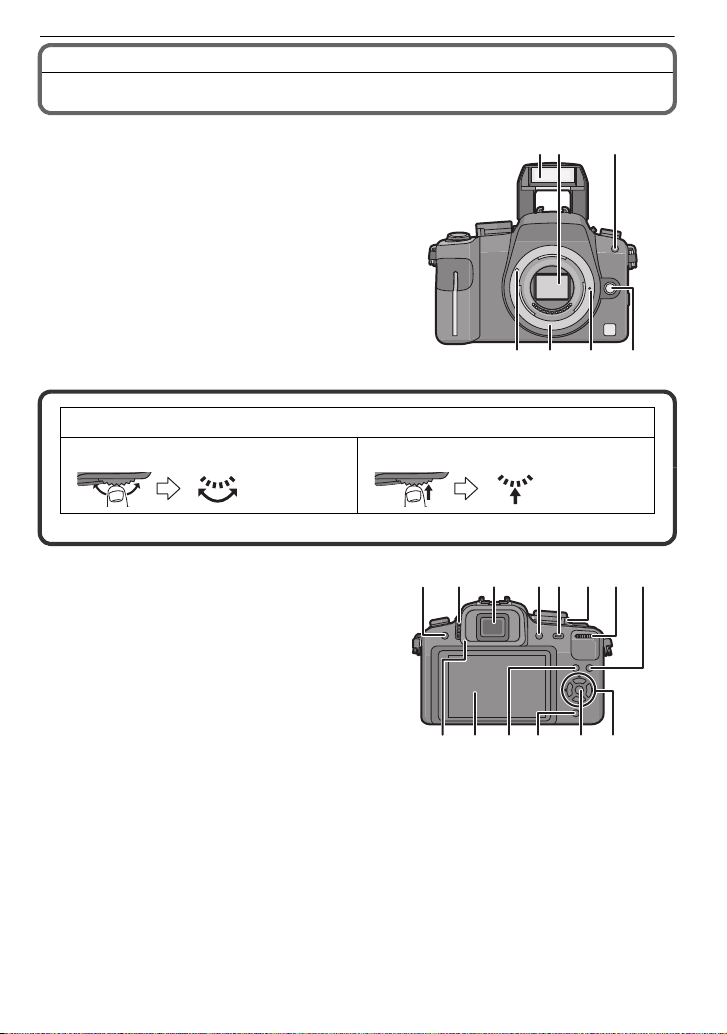
Names of the Components
∫ Camera body
1 Flash (P58)
2 Sensor
3 Self-timer indicator (P69)
AF assist lamp (P127)
4 Lens release button (P19)
5 Lens lock pin
6 Mount
7 Lens fitting mark (P18)
Rear dial is described as follows in these operating instructions.
e.g.: Rotating left or right e.g.: Pressing the rear dial
•
Refer to P15 for operation of the rear dial.
8 [LVF/LCD] button (P37)
9 Diopter adjustment dial (P38)
10 Viewfinder (P37, 56, 164)
11 Playback button (P50, 53, 131, 147, 148,
150)
12 [AF/AE LOCK] button (P76)
13 Camera ON/OFF switch (P27)
14 Rear dial (P47, 51, 52, 64, 73, 80, 85, 86,
132, 141)
15 [DISPLAY] button (P51, 55, 88)
16 Eye Cup (P168)
17 LCD monitor (P37, 55, 164)
18 [Q.MENU] button (P31)
19 Delete button (P53)/
20 [MENU/SET] button (P27)
21 Cursor buttons
Preview button (P88)/
Flicker reduction function (P102)
3/ISO (P80)
2/AF mode (P70)
4/Function button (P125)
VQT2S74
12
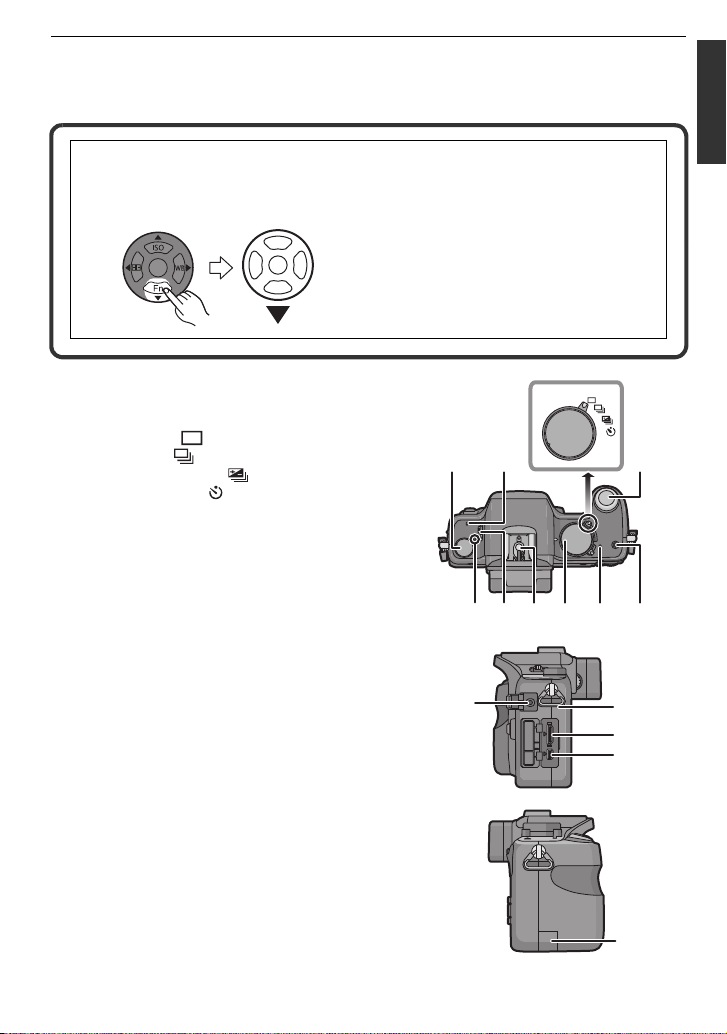
Assign Menu to 4 button. It is convenient to register a Menu that is used often.
MENU
/SET
2827
24
252322
31302926
34
33
32
35
36
[FILM MODE]/[ASPECT RATIO]/[QUALITY]/[METERING MODE]/[I.RESOLUTION]/
[I.EXPOSURE]/[EX. OPT. ZOOM]/[GUIDE LINE]
1/WB (White balance) (P77)
In these operating instructions, the cursor buttons are described as shown in the
figure below or described with 3/4/2/1.
e.g.: When you press the 4 (down) button
or Press 4
22 Focus mode dial (P40, 44, 45, 70, 74, 101)
23 Microphone (P101, 123)
24 Drive mode lever
Single (P44):
Burst (P65):
Auto Bracket (P67):
Self-timer (P69):
25 Shutter button (P40, 101)
26 Focus distance reference mark (P75)
27 Flash open lever (P58)
28 Hot shoe (P160)
29 Mode dial (P38)
30 Status indicator (P40)
31 Intelligent auto button (P40)
32 [REMOTE] socket (P162)
33 Shoulder strap eyelet (P21)
•
Be sure to attach the shoulder strap when
using the camera to ensure that you will not
drop it.
34 [HDMI] socket (P148, 150)
35 [AV OUT/DIGITAL] socket (P147, 153, 156)
Before Use
36 DC cable cover (P163)
VQT2S74
13
Before Use
393837
40 41 42 43 44 45 46
4948
47
50
37 Card/Battery door (P25)
38 Release lever (P25)
39 Tripod receptacle (P171)
•
When you use a tripod, make sure the tripod
is stable when the camera is attached to it.
∫ Lens
H-FS014042 (LUMIX G VARIO 14–42 mm/F3.5– 5.6 ASPH./MEGA O.I.S.)
40 Tele
41 Lens surface
42 Focus ring (P74)
43 Wide
44 Zoom ring (P48)
45 Contact point
46 Lens fitting mark (P18)
∫ Battery charger/AC adaptor (P22, 163)
47 Power input socket [AC IN]
48 [CHARGE] indicator
49 Power output socket [DC OUT]
50 Battery holder
VQT2S74
14
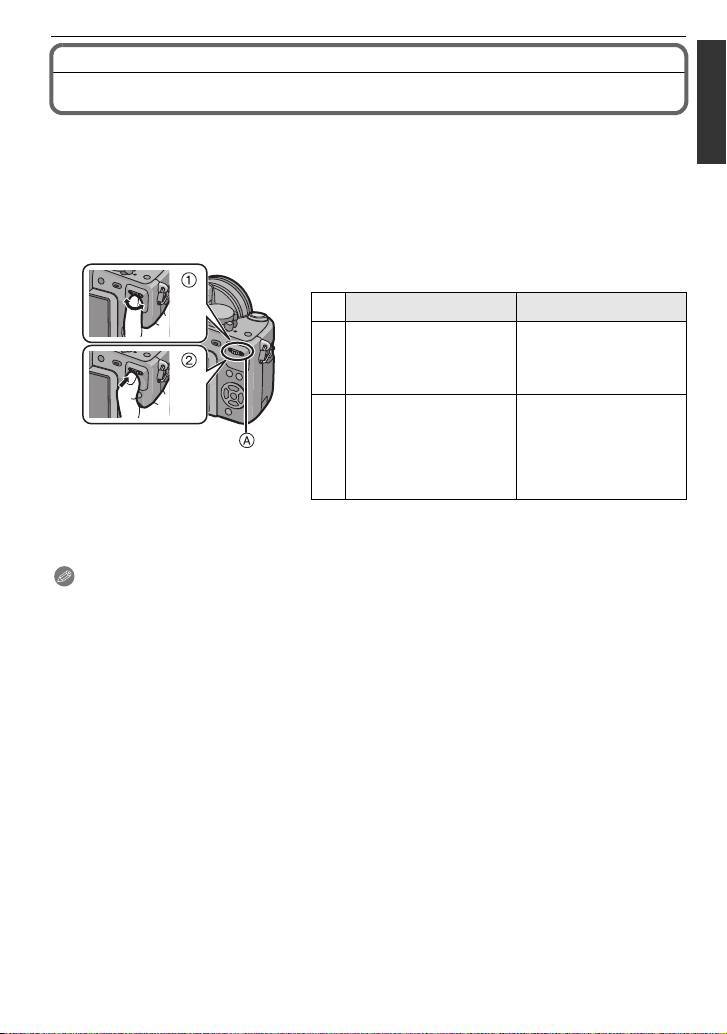
Before Use
Operating the Rear Dial
There are 2 ways to operate the rear dial, rotating left or right, and deciding by pressing.
Rotating:
Selection of items or setting of values is performed during the various settings.
Pressing:
Operations that are the same as [MENU/SET] button, such as selection of settings
and exiting the menu, are performed during the various settings.
Example of operation during recording/playback
screen
1 “Rotating” 2 “Pressing”
Adjustments of
Programme Shift (P47),
1
¢
Aperture (P85), Shutter
Speed (P85), etc.
Multi (calendar)
Playback (P52),
Playback Zoom (P52)
¢
2
A Rear dial
¢1 Recording
¢2 Playback
Note
•
The sound of the rear dial operation may be recorded when operated during motion picture
recording.
Switching to
compensating the
exposure (P64) etc.
Switching to normal
playback (during Multi
Playback), move
images while zoomed
(while using Playback
Zoom)
VQT2S74
15

Before Use
About the Lens
This unit can use the dedicated lenses compatible with the Micro Four Thirds™ System
lens mount specification (Micro Four Thirds mount).
Select a lens that matches the scene being recorded and your use of the pictures.
∫ “Micro Four Thirds Mount”
This is the lens mount standard for the
“Micro Four Thirds System”.
This was newly developed as
interchangeable lens mount dedicated for
digital cameras.
∫ About the functions of your lens
•
Depending on the type of lens, you may not be able to use some functions such as the direction
detection function (P37), [STABILIZER] (P117), Quick AF (P126) and Continuous AF (P126).
• The available flash range etc. differs depending on the aperture value of the lens you are using.
• Take some test pictures with the lens you are using.
• Lens with the Four Thirds™ mount
specification can be used by using the mount
adaptor (DMW-MA1; optional). Because of its
structure, Micro Four Thirds mount
specification lenses cannot be used on the
Four Thirds mount specification cameras. It
can only be used on the Micro Four Thirds
mount specification cameras.
• When you use the M mount adaptor or R mount adaptor (DMW-MA2M, DMW-MA3R; optional),
you can use Leica M Mount or Leica R Mount interchangeable lenses.
– For certain lenses, the actual distance at which the subject is in focus may differ slightly from
the rated distance.
– When using a Leica lens mount adaptor, set [SHOOT W/O LENS] (P130) to [ON].
• The focal distance of the employed lens is effectively doubled. (A 50 mm lens is equivalent to a
100 mm lens.)
16
VQT2S74

Before Use
Interchangeable lenses that can be used with this unit and Auto focus/Auto
Aperture Operation (As of April 2010)
(±: Usable, ¥: Some functions/features limited, —: Not usable)
Lens type
Micro Four Thirds
mount specification
lens
The Lens included
in DMC-G10K.
(H-FS014042)
Other Micro Four
Thirds mount
specification lens
when recording still
pictures
Auto
focus
±
([AFS],
[AFC])
¢3
Auto
aperture
setting
±¥
while recording
motion pictures
Auto
focus
¢4, 5
Auto
aperture
setting
¥
¢7
Micro Four Thirds
mount specification
lens compatible to
HD motion pictures
(LUMIX G VARIO
±
([AFS],
[AFC])
±±
¢4
±
HD)
Four Thirds mount
specification lens
Four Thirds mount
¢1
specification lens
compatible to
¥
([AFS])
±¥
¢6
¢7
¥
contrast AF
Four Thirds mount
specification lens
not compatible to
¢8
¥
([AFS])
±¥
¢6, 8
¢7
¥
contrast AF
Leica mount
specification lens
¢1 Mount adaptor (DMW-MA1; optional) is necessary to use with this unit.
¢2 A Leica lens mount adaptor (DMW-MA2M or DMW-MA3R; optional) is necessary.
¢3 This function is not supported by some Micro Four Thirds mount specification lenses.
For lens operations, please see our website.
¢4 When recording motion pictures, the focus is continuously adjusted for both [AFS] and [AFC]
(P45).
¢5 AF tracking is slower than the HD motion picture compatible lens (LUMIX G VARIO HD
lens), also the sound of auto focus operation may be recorded.
¢6 Auto focus is activated only when the shutter button is pressed halfway. The sound of Auto
Focus Operation may be recorded at this time.
¢7 The sound of aperture operation may be recorded.
¢8 AF performance may differ depending on the lens used. Refer to the website for details.
Interchangeable
¢2
lens for Leica
————
Refer to catalogues/Web pages for most current information regarding compatible
lenses.
http://panasonic.jp/support/global/cs/dsc/
(This Site is English only.)
VQT2S74
17
Preparation
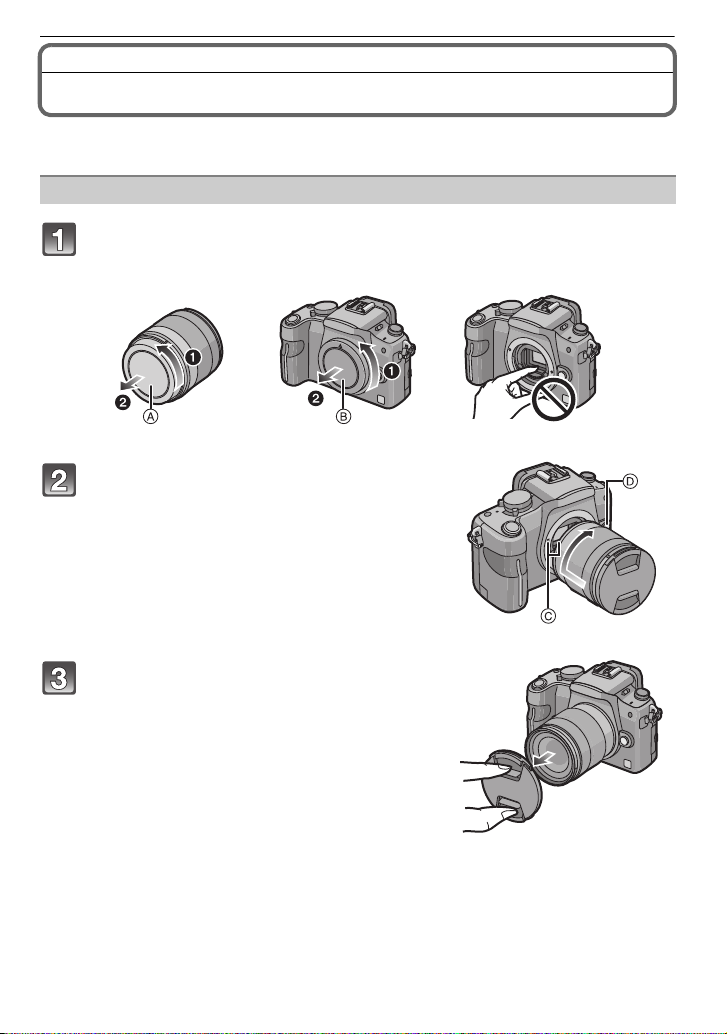
Preparation
Attaching/Detaching the Lens
• Check that the camera is turned off.
• Close the flash.
Attaching a lens to the camera body
Turn the lens rear cap A and the body cap B in the direction of the
arrow to detach them.
• Do not put your hands inside the mount.
Align the lens fitting marks C (red
marks) on the camera body and the lens
and then rotate the lens in the direction
of the arrow until it clicks.
• Do not press the lens release button D when you
attach a lens.
• Do not try to attach the lens when holding it at an
angle to the camera body as the lens mount may
get scratched.
• Check that the lens is attached correctly.
Detach the lens cap.
• Detach the lens cap before taking pictures.
18
VQT2S74
Preparation
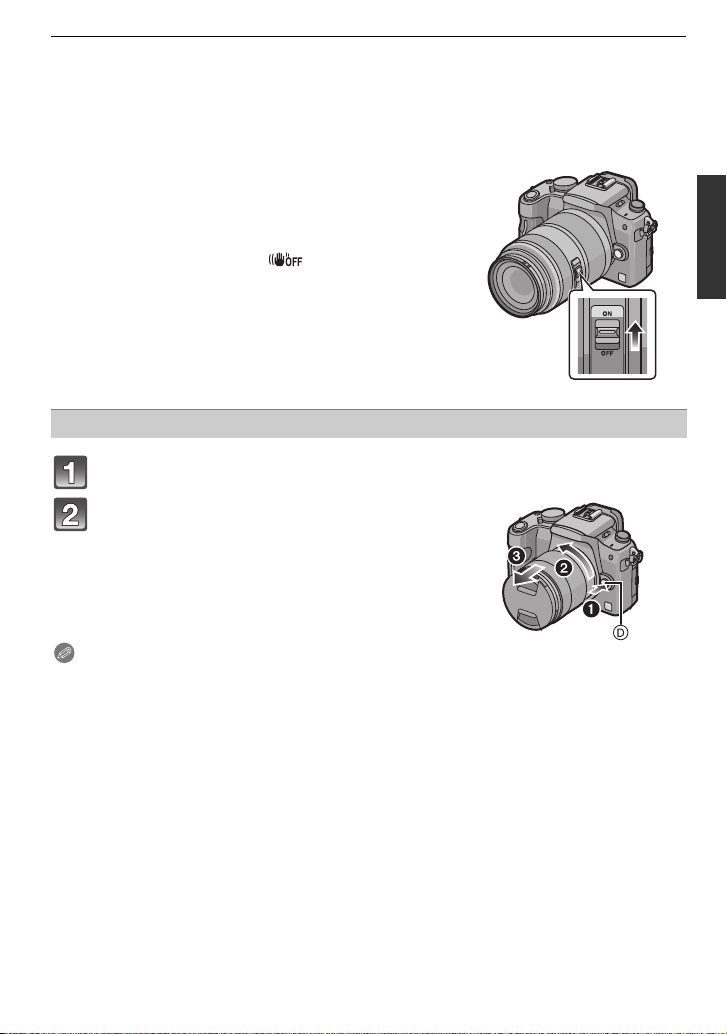
∫ Optical Image Stabilizer
The lens included in DMC-G10K has a stabilizer function.
There is no [O.I.S.] switch on the 14– 42 mm/F3.5 – 5.6 lens included in DMC-G10K. Set the
•
[STABILIZER] settings in the [REC] mode menu. (P117)
When using a lens with an [O.I.S.] switch, it is
possible to set to enable the Optical Image Stabilizer
Example when a lens with the
[O.I.S.] switch is mounted.
by switching the [O.I.S.] switch on the lens to [ON].
•
You can change the Optical Image Stabilizer mode in
the [REC] mode menu. (P117) It is set to [MODE1] at
the time of purchase.
• It is recommended to disable the Optical Image
Stabilizer when using a tripod. [ ] is displayed on
the screen at that time.
Detaching a lens from the camera body
Attach the lens cap.
Press the lens release button D while
turning the lens as far as possible in the
direction of the arrow to detach it.
• Always attach the body cap to the camera body so
that dirt or dust does not get inside.
• Attach the lens rear cap so that the lens contact
point does not get scratched.
Note
•
Change lenses where there is not a lot of dirt or dust. Refer to P168 when dirt or dust gets on
the lens.
• When you turn the camera off or carry the camera, attach the lens cap to protect the surface of
the lens.
• Be careful not to lose the lens cap, the lens rear cap and the body cap.
VQT2S74
19
Preparation
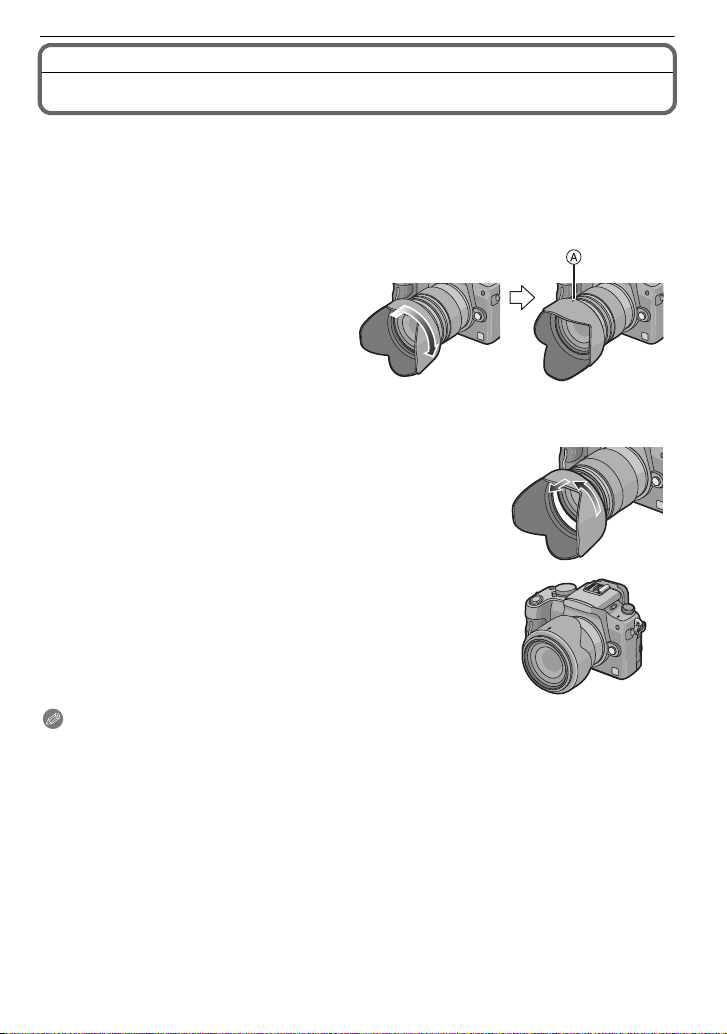
Attaching the Lens Hood
In bright sunlight or backlight, the lens hood will minimise lens flare and ghosting. The lens
hood cuts off excess lighting and improves the picture quality.
•
Check that the camera is turned off.
• Close the flash.
To attach the lens hood (flower shape) that came with the 14–42 mm/F3.5 – 5.6 lens
included in DMC-G10K
Insert the lens hood into the lens
with the short sides at the top and
bottom, and turn in the direction
of the arrow until it stops.
A Fitting to the mark.
∫ Temporarily storing the lens hood
1 Turn the lens hood in the direction of the arrow to
detach it.
2 Reverse the lens hood and then attach it in the same
way as shown previously.
Attach the lens cap.
•
• When temporarily storing the lens hood, check that it is firmly
attached and that it does not appear in the picture.
Note
Hold the short sides of the flower shaped lens hood when attaching or detaching it.
•
• When taking pictures with flash with the lens hood attached, the lower portion of the photo may
turn dark (vignetting effect) and the control of the flash may be disabled because the photo
flash may be obscured by the lens hood. We recommend detaching the lens hood.
• When using the AF assist lamp in the dark, detach the lens hood.
VQT2S74
20
Preparation
Attaching the Shoulder Strap
• We recommend attaching the shoulder strap when using the camera to prevent it from
dropping.
Pass the shoulder strap through the
shoulder strap eyelet on the camera body.
A: Shoulder strap eyelet
Pass the end of the shoulder strap through
the ring in the direction of the arrow and
then pass it through the stopper.
Pass the end of the shoulder strap through
the hole on the other side of the stopper.
Pull the other side of the
shoulder strap and then check
that it will not come out.
• Perform steps 1 to 4 and then attach
the other side of the shoulder strap.
Note
Attach the shoulder strap so that the “LUMIX” LOGO is on the outside.
•
• Use the shoulder strap around your shoulder.
– Do not wrap the strap around your neck.
– It may result in injury or accident.
• Do not leave the shoulder strap where an infant can reach it.
– It may result in an accident by mistakenly wrapping around the neck.
VQT2S74
21
Preparation
Charging the Battery
∫ About batteries that you can use with this unit
The battery that can be used with this unit is DMW-BLB13E.
It has been found that counterfeit battery packs which look very similar to the
genuine product are made available to purchase in some markets. Some of these
battery packs are not adequately protected with internal protection to meet the
requirements of appropriate safety standards. There is a possibility that these
battery packs may lead to fire or explosion. Please be advised that we are not
liable for any accident or failure occurring as a result of use of a counterfeit
battery pack. To ensure that safe products are used we would recommend that a
genuine Panasonic battery pack is used.
Use the dedicated charger and battery.
•
• The camera has a function for distinguishing batteries which can be used safely. The
dedicated battery (DMW-BLB13E) supports this function. The only batteries suitable for
use with this unit are genuine Panasonic products and batteries manufactured by other
companies and certified by Panasonic. (Batteries which do not support this function
cannot be used). Panasonic cannot in any way guarantee the quality, performance or
safety of batteries which have been manufactured by other companies and are not
genuine Panasonic products.
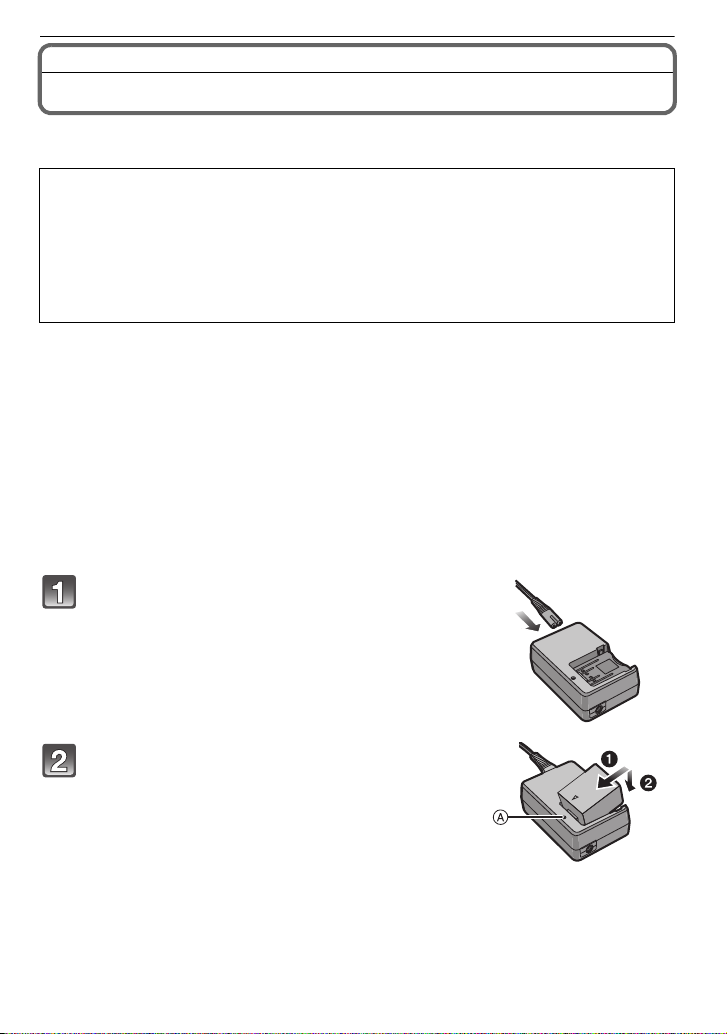
∫ Charging
•
The battery is not charged when the camera is shipped. Charge the battery before use.
• Charge the battery with the charger indoors.
• Charge the battery in a temperature between 10 oC to 30 oC (50 oF to 86 oF). (The battery
temperature should also be the same.)
Connect the AC mains lead.
• The battery cannot be charged when the DC cable
(DMW-DCC3; optional) is connected to the AC adaptor.
Attach the battery with attention to the
direction of the battery.
• Disconnect the charger from the electrical socket and
detach the battery after charging is completed.
VQT2S74
22
Preparation
∫ About the [CHARGE] indicator
The [CHARGE]
indicator turns on: The [CHARGE] indicator
A is turned on and charging will start.
The [CHARGE]
indicator turns off: The [CHARGE] indicator
A of the charger will turn off once the
charging has completed without any problem.
When the [CHARGE] indicator flashes
•
– The battery temperature is too high or too low. Please charge the battery again in a
temperature between 10 oC to 30 oC (50 oF to 86 oF).
– The terminals of the charger or the battery are dirty. In this case, wipe them with a dry cloth.
∫ Charging time
Charging time Approx. 155 min
The indicated charging time is for when the battery has been discharged completely.
•
The charging time may vary depending on how the battery has been used. The charging
time for the battery in hot/cold environments or a battery that has not been used for long
time may be longer than normal.
Charging time and number of recordable pictures with the optional battery pack
(DMW-BLB13E) are the same as above.
∫ Battery indication
The battery indication is displayed on the screen.
[It does not appear when you use the camera with the AC adaptor (P163) connected.]
•
The indication turns red and blinks if the remaining battery power is exhausted. (The status
indicator also blinks) Recharge the battery or replace it with a fully charged battery.
Note
Do not use any other AC mains leads except the supplied one.
•
• The battery becomes warm after using it and during and after charging. The camera also
becomes warm during use. This is not a malfunction.
• The battery can be recharged even when it still has some charge left, but it is not
recommended that the battery charge be frequently topped up while the battery is fully
charged. (Since characteristic swelling may occur.)
• Do not leave any metal items (such as clips) near the contact areas of the power plug.
Otherwise, a fire and/or electric shocks may be caused by short-circuiting or the
resulting heat generated.
VQT2S74
23
Preparation
Approximate operating time and number of recordable pictures
∫ Recording still pictures (when using the LCD monitor) (By CIPA standard in
Programme AE mode)
When the 14–42 mm/F3.5 – 5.6 lens included in DMC-G10K is
Number of recordable
pictures
Recording time Approx. 190 min
∫ Recording still pictures (when using the viewfinder) (By CIPA standard in
Programme AE mode)
When the 14–42 mm/F3.5 – 5.6 lens included in DMC-G10K is
Number of recordable
pictures
Recording time Approx. 205 min
Recording conditions by CIPA standard
CIPA is an abbreviation of [Camera & Imaging Products Association].
•
• Temperature: 23 oC (73.4 oF)/Humidity: 50% when LCD monitor is on.
• Using a Panasonic SD Memory Card (2 GB).
• Using the supplied battery.
• Starting recording 30 seconds after the camera is turned on.
• Recording once every 30 seconds with full flash every second recording.
• Turning the camera off every 10 recordings and leaving it until the temperature of the battery
decreases.
The number of recordable pictures varies depending on the recording interval time.
If the recording interval time becomes longer, the number of recordable pictures
decreases. [For example, if you were to take one picture every two minutes, then the
number of pictures would be reduced to approximately one-quarter of the number
of pictures given above (based upon one picture taken every 30 seconds).]
∫ Playback (when using the LCD monitor)
When the 14–42 mm/F3.5 – 5.6 lens included in DMC-G10K is
Playback time Approx. 350 min
used
Approx. 380 pictures
used
Approx. 410 pictures
used
Note
•
The operating times and number of recordable pictures will differ according to the
environment and the operating conditions.
For example, in the following cases, the operating times shorten and the number of recordable
pictures is reduced.
– In low-temperature environments, such as on ski slopes.
– When using [AUTO POWER LCD] or [POWER LCD] (P33).
– When flash is used repeatedly.
• When the operating time of the camera becomes extremely short even after properly charging
the battery, the life of the battery may have expired. Buy a new battery.
VQT2S74
24

Inserting and Removing the Card (optional)/the
Battery
• Check that this unit is turned off.
• Close the flash.
• We recommend using a Panasonic card.
Slide the release lever in the direction of
the arrow and open the card/battery
door.
• Always use genuine Panasonic batteries
(DMW-BLB13E).
• If you use other batteries, we cannot guarantee
the quality of this product.
Battery: Insert until it is locked by the
lever A being careful about the direction
you insert it. Pull the lever A in the
direction of the arrow to remove the
battery.
Card: Push it fully until it clicks being
careful about the direction you insert it.
To remove the card, push the card until it
clicks, then pull the card out upright.
B: Do not touch the connection terminals of the
card.
•
The card may be damaged if it is not fully inserted.
Preparation
1:Close the card/battery door.
2:Slide the release lever in the direction
of the arrow.
• If the card/battery door cannot be completely
closed, remove the card, check its direction and
then insert it again.
Note
Remove the battery after use.
•
• Do not remove the battery while the power is on as the settings on the camera may not be
stored properly.
• The supplied battery is designed only for the camera. Do not use it with any other equipment.
• The battery will be exhausted if left for a long period of time after being charged.
• Before removing the card or battery, turn the camera off, and wait until the status indicator has
gone off completely. (Otherwise, this unit may no longer operate normally and the card itself
may be damaged or the recorded pictures may be lost.)
VQT2S74
25

Preparation
About the Card
Access to the card
The access indication lights red when pictures are being recorded
on the card.
Card
The following cards which conform to the SD video standard can be used with this unit.
(These cards are indicated as card in the text.)
Type of card which can be
used with this unit
SD Memory Card
(8 MB to 2 GB)
SDHC Memory Card
(4 GB to 32 GB)
SDXC Memory Card
(48 GB to 64 GB)
•
Only cards bearing the SDHC logo (indicating that the card conforms to SD video standards)
may be used as 4 GB to 32 GB cards.
• SDHC Memory Card can be used with SDHC Memory Card
or SDXC Memory Card compatible equipment.
• SDXC Memory Card can only be used with SDXC Memory
Card compatible equipment.
• Check that the PC and other equipment are compatible when
using the SDXC Memory Cards.
http://panasonic.net/avc/sdcard/information/SDXC.html
• Only cards bearing the SDXC logo (indicating that the card conforms to SD video standards)
may be used as 48 GB to 64 GB cards.
• Use a card with SD Speed Class
¢ SD Speed Class is the speed standard regarding continuous writing.
¢
with “Class 6” or higher when recording motion pictures.
• Please confirm the latest information on the following website.
http://panasonic.jp/support/global/cs/dsc/
(This Site is English only.)
Note
•
Do not turn off the power or remove the battery, card, or the DC cable (DMW-DCC3;
optional) (when the AC adaptor is in use), while the access indicator is lit, while writing,
reading, or deleting the picture, formatting (P36), etc. Also, do not apply vibration,
shock, or static electricity to the unit.
The card or the data on the card may be damaged, and this unit may no longer operate
normally.
If operation fails due to vibration, impact or static electricity, perform the operation
again.
• Write-Protect switch A provided (When this switch is set to the [LOCK] position,
no further data writing, deletion or formatting is possible. The ability to write, delete
and format data is restored when the switch is returned to its original position.)
• The data on the card may be damaged or lost due to electromagnetic waves, static
electricity or breakdown of the camera or the card. We recommend storing
important data on a PC etc.
• Do not format the card on your PC or other equipment. Format it on the camera
only to ensure proper operation. (P36)
• Keep the Memory Card out of reach of children to prevent swallowing.
Remarks
A
2
26
VQT2S74
Setting Date/Time (Clock Set)
ON
OFF
:
:
• The clock is not set when the camera is shipped.
Turn the camera on.
A [MENU/SET] button
Press [MENU/SET].
Press 2/1 to select the items (year, month,
day, hour, minute, display sequence or time
display format), and press 3/4 to set.
A: Time at the home area
B: Time at the travel destination (P113)
‚: Cancel without setting the clock.
•
Select either [24HRS] or [AM/PM] for the time display
format.
• AM/PM is displayed when [AM/PM] is selected.
• When [AM/PM] is selected as the time display format, midnight is displayed as
AM 12:00 and noon is displayed as PM 12:00. This display format is common in the US
and elsewhere.
Press [MENU/SET] to set.
Preparation
Press [MENU/SET].
• Press [‚] to return to the settings screen.
• Turn the camera off after finishing setting the clock. Then turn it on and check that the
clock setting is correct.
• When [MENU/SET] has been pressed to complete the settings without the clock having
been set, set the clock correctly by following the
“Changing the clock setting” procedure.
Changing the clock setting
Select [CLOCK SET] in the [SETUP] menu, and press 1. (P29)
It can be changed in steps 3, 4 and 5 to set the clock.
•
• The clock setting is maintained for 3 months using the built-in clock battery even
without the battery. (Leave the charged battery in the unit for 24 hours to charge the
built-in battery.)
VQT2S74
27
Preparation
Note
•
The clock is displayed when [DISPLAY] is pressed several times during recording.
• You can set the year from 2000 to 2099.
• If the clock is not set, the correct date cannot be printed when you stamp the date on the
pictures with [TEXT STAMP] (P137) or order a photo studio to print the pictures.
• If the clock is set, the correct date can be printed even if the date is not displayed on the screen
of the camera.
Setting the Menu
This camera offers menu selections that allow you to customize its operation to maximise
your picture taking experience.
In particular, the [SETUP] menu contains some important settings relating to the camera’s
clock and power. Check the settings of this menu before proceeding to use the camera.
! [REC] mode menu (P114 to 123) [SETUP] menu (P32 to 36)
• This menu lets you
set the aspect ratio,
number of pixels and
other aspects of the
pictures you are
recording.
[MOTION PICTURE] mode menu
(P124)
• This menu lets you
set the setting for
motion pictures such
as recording quality.
–
The [MOTION PICTURE]
mode menu is only
displayed when in Motion
picture Mode.
[CUSTOM] menu (P125 to 130) ( [PLAYBACK] mode menu (P132 to 146)
• Operation of the unit,
such as displaying of
the screen and
button operations,
can be set up
according to your
preferences. Also, it
is possible to register the modified settings.
• This menu lets you
perform the clock
settings, select the
operating beep tone
settings and set
other settings which
make it easier for
you to operate the camera.
[MY MENU]
• Up to 5 menu items
used recently can be
memorised. Items
used a lot can be
recalled easily.
• This menu lets you
set the Protection,
Cropping or Print
Settings, etc. of
recorded pictures.
Note
•
There are functions that cannot be set or used depending on the modes or menu settings being
used on the camera due to the specifications.
VQT2S74
28
Preparation
ON
OFF
C
D
E
or
or
Setting menu items
This section describes how to select the [REC] mode menu settings, and the same setting
can be used for the [MOTION PICTURE] mode menu, [CUSTOM] menu, [SETUP] menu,
[MY MENU] menu and [PLAYBACK] mode menu as well.
•
If you set [MENU RESUME] (P129) in the [CUSTOM] menu to [ON], the screen shows the last
selected menu item when the camera was turned off.
It is set to [ON] at the time of purchase.
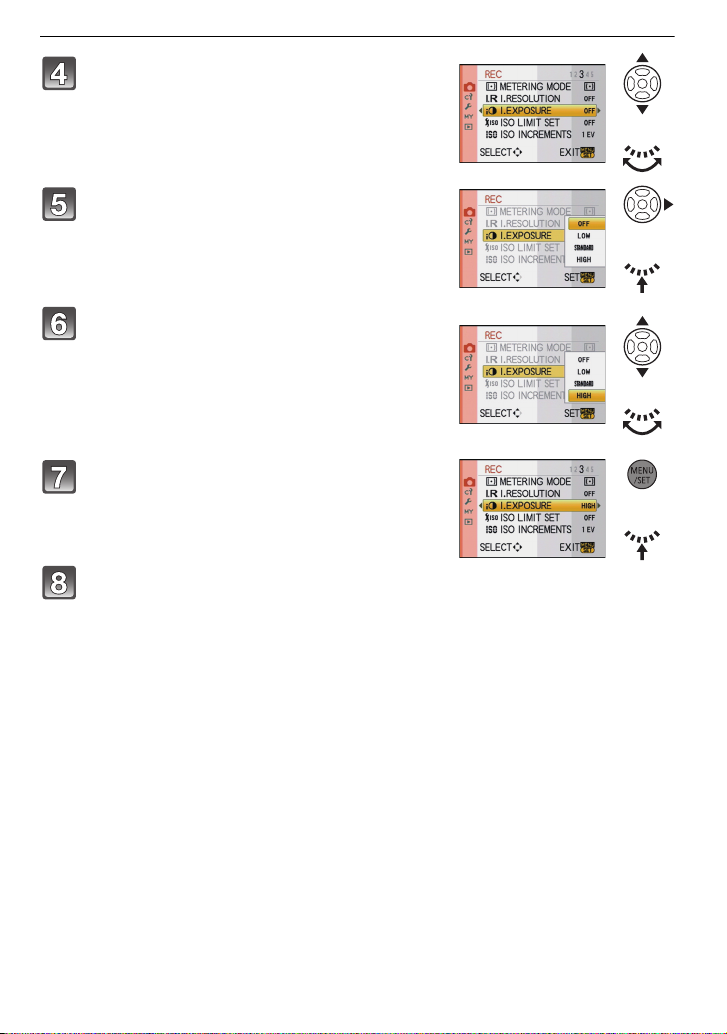
Example: Setting [I.EXPOSURE] from [OFF] to [HIGH] in the Programme AE mode
Turn the camera on.
A [MENU/SET] button
B Mode dial
Set the mode dial to [ ].
Press [MENU/SET] to display the menu.
C Menu toggle icon
D Menu item
E Settings
Switching to other menus
e.g.: Switching to the [SETUP] menu
1 Press 2.
2 Press 4 or rotate the rear dial
to select the [SETUP] menu icon [ ].
3 Press 1 or the rear dial.
•
Select a menu item next and set it.
VQT2S74
29
Preparation
or
or
or
or
Press 3/4 or rotate the rear dial to select
[I.EXPOSURE].
• Select the item at the very bottom, and press 4 or
rotate the rear dial right to move to the next screen.
Press 1 or the rear dial.
• Depending on the item, its setting may not appear or it
may be displayed in a different way.
Press 3/4 or rotate the rear dial to select
[HIGH].
Press [MENU/SET] or the rear dial to set.
Press [MENU/SET] to close the menu.
• You can also press the shutter button halfway to close the menu.
30
VQT2S74
 Loading...