

Panasonic DMC-FZ60 Owner's Manual

Owner’s Manual
for advanced features
Digital Camera
Model No. DMC-FZ200
DMC-FZ60
DMC-FZ200 DMC-FZ60
Before connecting, operating or adjusting this product,
please read the instructions completely.
(DMC-FZ200) (DMC-FZ60)
Register online at
www.panasonic.com/register
(U.S. customers only)
VQT4H64
F0712WT0

Contents
Before Use
Care of the camera...................................................................................................... 7
Standard Accessories.............................................................. .. .. .. .. .. .. .. .. ..... .. .. .. .. .. .. ..8
Names and Functions of Main Parts......... ........................................ .........................9
Preparation
Attaching the Lens Cap/Shoulder Strap.................................................................. 16
Attaching the Lens Hood (DMC-FZ200) ...................................................................17
Charging the Battery......................................... .................................................... .... 18
• Charging......................... ..................................................... ...............................18
• Approximate operating time and number of recordable pictures ........................ 20
Inserting and Removing the Card (optional)/the Battery....................................... 22
About the Built-in Memory/the Card........................................................................ 23
• Approximate number of recordable pictures and available recording time......... 25
Setting Date/Time (Clock Set)................. ........................................ .........................27
• Changing the clock setting.................................................................................. 28
Tips for taking good pictures...................................................................................29
• Preventing jitter (camera shake)............................................ ............................. 29
Basic
Selecting the Recording Mode...................... ..................................................... ...... 30
Taking Pictures with Your Favorite Settings
(Program AE Mode)................................................................................................... 31
• Program Shift..................................... ..................................................... ............32
Focusing .................................................................................................................... 33
Taking Pictures Using the Automatic Function
(Intelligent Auto Mode) ............................................................................................. 35
• Taking Pictur es with Def o cus Control Function................... ...............................37
• Changing the settings......................................................................................... 38
• Recording using Intelligent Auto Plus Mode....................................................... 39
Recording Motion Picture s... ..................................................... ............................... 41
• Recording still pictures while re cording motion pictures..................................... 44
Playing Back Pictures ([Normal Play]).................................................................... 45
• Selecting a picture........................................................... ...................................45
• Displaying Multiple Screens (Multi Playback)..................................................... 46
• Using the Playback Zoom..................................... .............................................. 46
Playing Back Motion Pictures .................................................................................. 47
• Creating Still Pictures from a Motion Picture ......................................................48
Deleting Pictures.......................................................................... ............................. 49
• To delete a single picture....................................................................................49
• To delete multiple pictures or all the pictures......................................................50
Setting the Menu ..................... ..................................................... ............................. 51
• Setting menu items..................................................................................... .... ....52
• Using the Quick Menu........................................................... ............................. 54
About the Setup Menu................................................................... ...........................55
- 2 -

Recording
About the LCD Monitor/Viewfinder.......................................................................... 69
Taking Pictures with the Zoom ................................................................................ 71
• Using the Optical Zoom/Using the Extended Optical Zoom (EZ)/Using the
Intelligent Zoom/Using the Digital Zoom.............................................................71
Tak ing Pictures using the Flas h...................................................................... ........ 75
• Switching to the appropriate flash setting........................................................... 76
Compensating the Exposure............................................ ........................................79
Taking Pictures Using Burst Mode..........................................................................80
Taking Pictures with the Self-Timer.........................................................................84
Setting the Light Sen si tivity........ ....................................... ......................................86
Adjusting the White Balance............................ .................................................... .... 88
Taking Pictures with Auto Focus............................................................................. 92
Tak ing Close-up Pictures................................. .................................................... .... 97
Taking Pictures with Manual Focus.........................................................................99
Fixing the Focus and the Expo su r e (AF/AE Lock)......... ......................................102
Using the function button.......................................................................................104
Taking Pictures by Specifying the Aperture/
Shutter Speed.......................................................................................................... 105
• Aperture-Priority AE Mode................................................................................ 105
• Shutter-Priorit y AE Mode.................................... ..............................................105
• Manual Exposure Mode......................................................... .... .... .. ......... .... .. ..106
Taking Pictures that Match the Scene Being Recorded (Scene Mode).............. 107
• [Portrait]................................. .................................................... .......................107
• [Soft Skin]................... ..................................................... .................................108
• [Scenery]......................................................................................................... ..108
• [Panorama Shot].......................... .. .... .... .. ......... .... .. .... ......... .... .. .... .... ....... .... ....109
• [Sports]......... ........................................ ..................................................... .........111
• [Panning].............................................. .. .. ..... .. .. .. .. .. .. .. .. ..... .. .. .. .. .. .. .... ..... .. .. .. .. .. .111
• [Night Portrait]............................................................................ ........................112
• [Night Scenery]....... .................................................... .......................................112
• [Handheld Night Shot]............................................... .. .. ..... .. .. .. .. .. .. .. .. ..... .. .. .. .. .. .113
• [HDR]....... ..................................................... .................................................... .113
• [Food]......................................... .. .. .. .. .. .. .. ..... .... .. .. .. .. .. .. ..... .. .. .. .. .. .. .. .. ....... .. .. .. .. .113
• [Baby1]/[Baby2]......................... .................................................... ....................114
• [Pet]................................ ..................................................... ..............................115
• [Sunset]........................................................... ...................................................115
• [High Sens.]......................................................................... ..............................115
• [Glass Through].............................................. ...................................................115
• [3D Photo Mode]................................................... .............................................116
Taking Pictures with different image effects
(Creative Control Mode)...........................................................................................117
• [Expressive].......................................................... .............................................118
• [Retro]............................................................... .................................................118
• [High Key]...................................... .................................................... ................118
• [Low Key]............................................... ..................................................... .......118
• [Sepia]................................. ..................................................... ..........................119
- 3 -

• [Dynamic Monochrome]........................................................... .... .. .... ......... .. .... .119
• [Impressive Art]........................................................... .......................................119
• [High Dynamic]................. ........................................ .........................................119
• [Cross Process].............. ..................................................... ............................. 120
• [Toy Effec t]........................................................ ................................................120
• [Miniature Eff ect]........................................................... ....................................120
• [Soft Focus]................................ .................................................... ...................122
• [St a r Filter]............................................................ ............................................ 122
• [One Point Color]...... .................................................... ....................................122
Recording Motion Picture with Manual Settings
(Creative Video Mode)............................................................................................. 123
• Recording the High Speed Motion Picture (DMC-FZ200) .................................125
Taking Pictures in Custom Mode........................................................................... 126
• Registering Personal Menu Settings (Registering custom settings)................. 127
• Recording using registe red custom set................................. ...........................127
Taking a Picture with Face Recognition Function ...............................................128
• Face Settings............ .................................................... ....................................129
Entering Text............................................................................................................ 132
Using the [Rec] menu ............................................... .............................................. 133
• [Photo Style]........ .................................................... .......................................... 133
• [Aspect Ratio]................. ..................................................... ............................. 134
• [Picture Size]..... .................................................... ............................................ 135
• [Quality]............................... ..................................................... .........................137
• [ISO Limit Set].............................. .................................................... ................. 138
• [ISO Increment s]...................... .................................................... .....................138
• [Extended ISO] (DMC-FZ200) ........................................................................... 138
• [Face Recog.]......................................................... .......................................... 138
• [AF Mode]..................................................................... ..... .. .. .. .. .. .. .. ....... .. .. .. .. ..138
• [AF Style ].............................................................. ............................................ 139
• [Quick AF].................................... .................................................... ................. 140
• [AF/AE Lock].............................................................................. .......................140
• [Metering Mode].................. ......... .... .. .... ......... .. .... .... .... ....... .... .... .. .... ......... .. ....140
• [i.Dynamic] (Intelligent dynamic range control).................................................141
• [Min. Shtr Speed]..............................................................................................141
• [i.Resolution]............................................ ......................................................... 142
• [Digital Zoom]............................. .................................................... ................... 142
• [St a bilizer]................................................................... ......................................143
• [AF Assist Lamp]... .................................................... ........................................144
• [Flash]............................................................... ................................................144
• [Flash Synchro].................................... ..................................................... ........144
• [Flash Adjust.]................... ..................................................... ...........................145
• [Red-Eye Removal].............................. .............................................................145
• [Conversion]............................. ................................................................. ........145
• [Auto Bracket]............................................... ....................................................146
• [Date Stamp].......................................................................... ...........................147
• [Clock Set]............................... .................................................... .....................147
- 4 -

Using the [Motion Pictur e ] menu............ ..................................................... ..........148
• [Rec Mode] .......................................................................................................148
• [Rec Quality]........... .................................................... ......................................149
• [High Speed Video] (DMC-FZ200) .....................................................................150
• [Continuous AF]................................. .. .. .. ..... .. .. .. .. .... .. .. ..... .. .. .. .. .. .. .. .. ..... .. .. .. .. ..150
• [Wind Cut]................... ..................................................... .................................151
• [Zoom Mic]................................... .................................................... ................. 151
Playback/Editing
Having Fun with Recorded Pictures.................................. ....................................152
• [Auto Retouch].................. ........................................ ........................................152
• [Creative Retouch].............................................. ..............................................153
Playing Back Burst Pictures (DMC-FZ200) ............................................................ 154
Editing Burst Pictures (DMC-FZ200) ...................................................................... 155
Various methods of playback................................................................................. 156
• [Slide Show]............................................................................. .........................156
• [Filtering Play]............................................... ....................................................159
• [Calendar].........................................................................................................160
Using the [Playback] menu .................................................................................... 161
• [Upload Set]................................. .. .. .. .. .. .. ..... .. .. .. .. .. .. .. .. ..... .. .. .. .. .. .. .. .. ..... .. .. .. ....161
• [Title Edit]....................................... ................................................................. ..163
• [Text S tamp]....................................................................................... ...............164
• [Video Divide]......................................... .. ..... .. .. .. .. .. .. .. .. ..... .. .. .. .. .. .. .. ....... .. .. .. .. ..166
• [Resize]................. .................................................... ........................................167
• [Cropping].........................................................................................................168
• [Leveling]................ ........................................ ..................................................169
• [Favorite]................................................................. .......................................... 170
• [Print Set]...................................................................... ....................................171
• [Protect]................ .................................................... ........................................173
• [Face Rec Edit]......... ................................................................. .......................174
• [Copy]......................................................................... ......................................175
- 5 -

Connecting to other equipment
Playing Back Pictures on a TV Screen..................................................................176
• Using VIERA Link (HDMI)..................................... ............................................ 178
Playing back 3D pictures . ....................................................................................... 180
Saving still picture s and motion pictures on your PC............ ......................... .... 182
• Uploading the images to sharing sites..............................................................185
Saving still picture s a nd m otion pictures on a Recorder....................................186
Printing the Picture s....... ........................................ ................................................188
• Selecting a single picture and printing it...........................................................190
• Selecting multiple pictures and printing them...................................................190
• Print Settings................................................................... .................................191
Others
Optional accessories .............................................................................................. 194
Screen Display.........................................................................................................200
Cautions for Use...................................................................................................... 203
Message Display ................................................................. ..... .. .. .. .. .. .. .. .. ..... .. .. .. .. ..207
Troubleshooting......................................................................................................210
- 6 -

Before Use
Care of the camera
Do not subject to strong vibration, shock, or pressure.
•
The lens, LCD monitor, or external case may be damaged if used in
following conditions.
It may also malfunction or image may not be recorded.
–Drop or hit the camera.
–Press hard on the lens or the LCD monitor.
•When camera is not in use or when using the playback feature,
ensure that the lens is in the stored position, with lens cap on.
•There are times when rattling sounds or vibrations will come from the
camera, but these are due to the motion of the apertur e, the zoom and
the motor and do not indicate a defect.
This camera is not dust/splash/water proof.
Avoid using t he cam e r a at location with a lot of dust, wate r, sand,
etc.
Liquid, sand and other foreign material may get into the space around the
•
lens, buttons, etc. Be par ticularly careful since it may not just cause
malfunctions, but it may become unrepairable.
–Places with a lot of sand or dust.
–Places where water can come into contac t with t his un it su ch as when u si ng it on a rain y day or on
the beach.
∫ About Condensation (When the lens or viewfinder is fogged up)
•
Condensation occurs when the ambient temperature or humidity changes.
Be careful of condensation since it causes lens stains, fungus and camera
malfunction.
•If condensation occurs, turn the camera of f and leave it for about 2 hours.
The fog will disappear naturally when the temperature of the camera
becomes close to the ambient temperature.
- 7 -

Before Use
Standard Accessories
Check that all the accessories are supplied before using the camera.
The accessories and their shape will differ dep ending on the country or area where the camera was
•
purchased.
For details on the accessories, refer to “Basic Owner’s Manual”.
•Battery Pack is indicated as battery pack or battery in the text.
•Battery Charger is indicated as battery charger or charger in the text.
•SD Memory Card, SDHC Memory Card and SDXC Memory Card are indicated as card in the text.
•The card is optional.
You can record or play back pictures on the built-in memory when you are not using a card.
•If any accessories are lost, customers in the USA and Puerto Rico s hould co nta ct Pan asonic ’ s p ar ts
department at 1-800-833-9626 and customers in Canada should contact 1-800-99-LUMIX
(1-800-995-8649) for further information about obtaining replacement parts.
- 8 -
Before Use
1
3 45 6
7
8
9
10
2
1112
13
14
15 16
17
22
19
20
21
23
18
24
25
26
27
282930
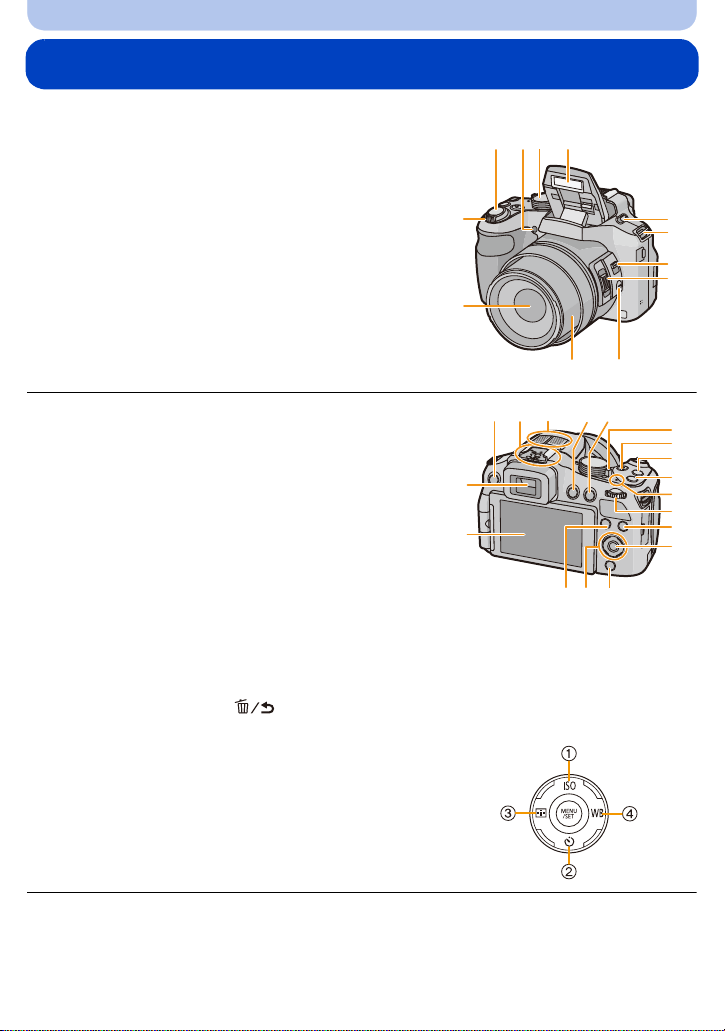
Names and Functions of Main Parts
(DMC-FZ200)
1 Lens (P7, 204)
2 Zoom lever (P71)
3 Shutter button (P31, 35)
4 Self-timer indicator (P84)/
AF Assist Lamp (P144)
5 Mode dial (P30)
6Flash (P75)
7 Flash open lever (P75)
8 Shoulder strap eyelet (P16)
9 Focus selector switch (P97, 99)
10 Side lever (P72, 100)
11 [FOCUS] button (P35, 96, 101)
12 Lens barrel
13 LCD monitor (P69, 200)
14 Viewfinder (P14, 200)
15 [EVF/LCD] button (P14)
16 Hot shoe (P196, 198)
17 Stereo microphone
18 [(] (Playback) button (P45)
19 [AF/AE LOCK] button (P102)/[Fn2] button (P104)
20 Camera ON/OFF switch (P27)
21 Motion picture button (P41)
22 [˜] (Burst Mode) button (P80)
23 [Fn1] button (P104)
24 Power lamp (P27)
25 Rear dial (P15)
26 [DISP.] button (P69)
27 [MENU/SET] button (P15, 52)
28 [Q.MENU] button (P54)/[ ] (Delete/Cancel) button (P49)
29 Cursor buttons (P15)
1 3/ISO (P86)
2 4/ Self-timer (P84)
3 2/AFMODE (P92)
4 1/ (WB) White Balance (P88)
30 [Fn3] button (P104)
- 9 -
Before Use
MIC
REMOTE
31
32
33
31 Diopter adjustment dial (P14)
32 [MIC/REMOTE] socket (P198)
33 Speaker (P57)
Be careful not to cover the speaker with your finger.
•
Doing so may make sound difficu l t to hear.
34 [HDMI] socket (P176)
35 [AV OUT/DIGITAL] socket (P176, 183, 186, 188)
34
35
36 Tripod mount (P206)
•
A tripod with a screw length of 5.5 mm (0.22 inch) or
more may damage this unit if attac hed.
37 Release lever (P22)
38 Card/Battery door (P22)
39 DC coupler cover (P199)
When using an AC adaptor, ensure that the
•
Panasonic DC coupler (optional) and AC adaptor
(optional) are used.
36
37
38
39
- 10 -

Before Use
1
3 456
7
8
2
9
10
11
12 13
18
15
16
17
19
14
20
21
22
23
242526
27
Fn2
(DMC-FZ60)
1 Lens (P7, 204)
2 Zoom lever (P71)
3 Shutter button (P31, 35)
4 Self-timer indicator (P84)/
AF Assist Lamp (P144)
5 Mode dial (P30)
6Flash (P75)
7 Speaker (P57)
Be careful not to cover the speaker with your finger.
•
Doing so may make sound difficu l t to hear.
8 Shoulder strap eyelet (P16)
9 Lens barrel
10 LCD monitor (P69, 200)
11 Viewfinder (P14, 200)
12 Flash open button (P75)
13 Stereo microphone
14 [EVF/LCD] button (P14)
15 [AF/AE LOCK] button (P102)/[Fn1] button (P104)
16 Camera ON/OFF switch (P27)
17 Motion picture button (P41)
18 [˜] (Burst Mode) button (P80)
19 [FOCUS] button (P35, 96, 101)
20 Power lamp (P27)
21 Rear dial (P15)
22 [DISP.] button (P69)
23 [MENU/SET] button (P15, 52)
24 [Q.MENU] button (P54)/[ ] (Delete/Cancel) button (P49)
25 Cursor buttons (P15)
1 3/ISO (P86)
2 4/ Self-timer (P84)
3 2/ Fn2 (P104)
4 1/ (WB) White Balance (P88)
26 [(] (Playback) button (P45)
27 [AF/AF#/MF] button (P97, 99)
- 11 -

Before Use
28
29
30
28 Diopter adjustment dial (P14)
29 [HDMI] socket (P176)
30 [AV OUT/DIGITAL] socket (P176, 183, 186, 188)
31 Tripod mount (P206)
•
A tripod with a screw length of 5. 5mm (0.22 inch) or
more may damage this unit if attac hed.
32 Release lever (P22)
33 Card/Battery door (P22)
34 DC coupler cover (P199)
When using an AC adaptor, ensure that the
•
Panasonic DC coupler (optional) and AC adaptor
(optional) are used.
31
32
33
34
- 12 -

Before Use
LCD Monitor (DMC-FZ200)
At the time when this camera is purchased, the LCD monitor is stowed in the camera body.
Bring out the LCD monitor as shown below.
1 Open the LCD monitor. (Maximum 180 o)
2 It can be rotated 180 o forwards.
3 Return the monitor to its original position.
Only rotate the LCD monitor after opening it wide enough, and be careful not to use
•
excessive force as it may be damaged.
The LCD monitor can be rotated to suit your needs. This is convenient as it allows you to take
pictures from various angles by adjusting the LCD monitor.
Do not cover the AF Assist Lamp with your fingers or other objects.
•
∫ Taki ng pictures at a high angle
•
This is convenient when ther e i s s omeone in front of you and you cannot get close to the subject.
•It can only be rotated 90 o towards you.
∫ Taking pictures at a low angle
•
This is convenient when taking pictures of flowers etc. that are in a low position.
•It can be rotated 180 o forward.
- 13 -

Before Use
EVF/LCD
(DMC-FZ200) (DMC-FZ60)
A
Note
•
Be careful as this unit may get scratched if you rotate the LCD monitor without opening the
LCD monitor fully.
•When not using the LCD monitor it is recommended that yo u close it with the screen facing inwards
to prevent dirt and scratches.
•Note that operating noise may be recorded when recording a motion picture with the LCD monitor
rotated.
Viewfinder
∫ Switching the LCD monitor/Viewfinder
Press [EVF/LCD].
•
You can switch between LCD monitor disp lay and Viewfinder display.
•Switching via the [EVF/LCD] button will be maintained even when this unit is turned off.
∫ Diopter adjustment
Adjust the diopter to suit your vision so that you can see the Viewfinder clearly.
Look at the display on the Viewfinder and rotate the diopter
adjustment dial to where the screen is in focus.
A Diopter adjustment dial
- 14 -

Before Use
Cursor buttons/[MENU/SET] button
Cursor butt on:
Selection of items or setting of values etc., is performed.
[MENU/SET] button:
Confirmation of sett ing contents, et c ., is pe rformed.
This document expresses the up , down , left, and rig ht of the cursor butt on as fol low s, or as 3/4/2/1.
•
e.g.: When you press the 4 (down) button
or Press 4
Rear Dial
There are 2 ways to operate the rear dial, rotating left or right, and deciding by pressing.
Rotating:
Selection of items or setting of values is performed during the various settings.
Pressing:
Operations that are the same as [MENU/SET] button, such as determine settings, etc.,
are performed during the various settings.
Rear dial is described as follows in this Owner’s Manual.
•
e.g.: Rotating left or right e.g.: Pressing the rear dial
- 15 -

Preparation
A
Attaching the Lens Cap/Shoulder Strap
∫ Attachin g the Le ns C a p
•
When you turn the camera off or carry the camera, attach the lens cap to protect the su rface of the
lens.
Pass the string through the hole on the camera.
1
Pass the same string
2
through the hole on the lens
cap.
Attach the lens cap.
3
• Do not hang or swing around this unit.
• Make sure to detach the lens cap when turning this unit
on.
• Be careful not to lose the lens cap.
• Be careful that the lens cap string does not become
entangled with the shoulder strap.
∫ Attaching the Shoulder Stra p
•
We recommend attaching the shoulder strap when using the camera to prevent it from
dropping.
Pass the shoulder strap through the hole at the
1
shoulder strap eyelet.
Pass the shoulder strap through the stopper and
2
fasten the shoulder strap.
A Pull the shoulder strap 2 cm (0.066 feet) or more.
• Attach the shoulder strap to the other si de of the camera being
careful not to twist it.
- 16 -

Preparation
A
Attaching the Lens Hood (DMC-FZ200)
In bright sunlight or backlight, the lens hood will minimize lens flare and ghosting. The lens
hood cuts off excess lighting and improves the picture quality.
Check that the camera is turned off.
•
•Close the flash.
Attach the lens hood into the lens with the short side
1
aligned with the bottom of the main unit.
• Do not hold the lens hood in a way that twists or bends it.
Rotate the lens hood in the
2
direction of the arrow.
You will feel some stiffness just before the mark, but
3
continue to rotate th e l ens hood to A where the marks
align.
(The lens hood will stop with a “click”.)
• Check that the lens hood is firmly attached and that it does not
appear in the picture.
Note
•
When taking pictures with flash with the lens hood attached, the lower portion of the photo may turn
dark (vignetting effect) and the control of the flash may be disabled because the photo flash may be
obscured by the lens hood. We recommend detaching the lens hood.
•When temporarily detaching and carrying the lens hood, attach the lens hood
to the lens in the reverse direction. Ret urn it to the normal direction when
taking pictures.
- 17 -

Preparation
90°
Charging the Battery
∫ About batteries that you can use with this unit
It has been found that counterfeit battery packs which look very similar to the
genuine product are made available for purchase in some markets. Some of these
battery packs are not adequately protected with internal protection to meet the
requirements of appropriate safety standards. There is a possibility that these battery
packs may lead to fire or explosion. Please be advised that we are not liable for any
accident or failure occurring as a result of use of a counterfeit battery pack. To
ensure that safe products are used, we recommend that a genuine Panasonic battery
pack is used.
Use the dedicated charger and battery.
•
Charging
•The battery is not charged when the camera is shi pped. Charge the battery before u se.
•Charge the battery with the charger indoors.
•Charge the battery in areas with an ambient temperature between 10 oC and 30 oC
(50 oF and 86 oF) (same as the battery temperature) is recommended.
Attach the battery paying attention to the
1
direction of the battery.
Connect the charger to th e e lec tr ica l o utlet.
2
• The [CHARGE] indicator A lights up and charging
begins.
plug-in type
inlet type
- 18 -

Preparation
∫ About the [CHARGE] indicator
The [CHARGE] indicator turns on:
The [CHARGE] indicator is turned on during charging.
The [CHARGE] indicator turns off:
The [CHARGE] indicator will turn off once the charging has completed without any problem.
(Disconnect the charger from the electrical socket and detach the battery after charging is
completed.)
When the [CHARGE] indicator flashes
•
–The battery temperature is too high or too lo w . It is recommended t o charge th e battery aga in in an
ambient tem p er a ture of between 10 oC and 30 oC (50 oF and 86 oF).
–The terminals of the charger or the battery are dirty. In this case, wipe them with a dry clot h.
∫ Charging time
(DMC-FZ200) (DMC-FZ60)
Charging time Approx. 140 min Approx. 155 min
•
The indicated charging time is fo r when the battery has been discharge d completely. The
charging time may vary depending on how the battery has been used. The charging time for
the battery in hot/cold environments or a battery that has not been used for long time may be
longer than normal.
∫ Battery indication
The battery indication is displayed on the screen.
The indication turns red and blinks if the remaining battery power is exhausted. (The power lamp
•
also blinks) Recharge the battery or replace it with a fully charged battery.
Note
•
Do not leave any metal items (such as clips) near the contact areas of the power p lu g .
Otherwise, a fire and/or electric shocks may be caused by short-circuiting or the resulting
heat generated.
•The battery becomes warm after using it and during an d after charging. The camera al so becomes
warm during use. This is not a malfunction.
•The battery can be recharged even when it still has some charge lef t, b ut it is not r ecommend ed tha t
the battery charge be freq uently topped up while the battery is fully charged. (Since characteristic
swelling may occur.)
- 19 -

Preparation
Approximate operating time and number of recordable pictures
∫ Recording still pictures (When using the LCD monitor)
(DMC-FZ200) (DMC-FZ60)
Number of recordable
pictures
Recording time Approx. 270 min Approx. 225 min
Recording conditions by CIPA standard
•
CIPA is an abbreviation of [Camera & Imaging Products Association].
•Temperature: 23 oC (73.4 oF)/Humidity: 50%RH when LCD monitor is on.
•Using a Panasonic SD Memory Card (32 MB).
•Using the supplied battery.
•Starting recording 30 seconds after the camera is turned on. (When the Optical Image Stabilizer
function is set to [ON].)
•Recording once every 30 seconds with full flash every second recording.
•Rotating the zoom lever from Tele to Wide or vice vers a in every recording.
•Turning the camera off every 10 recordings and leaving it until the temperature of the battery
decreases.
The number of recordable pictures varies depending on the recording interval time. If
the recording interval time becomes longer, the number of recordable pictures
decreases. [For example, if you were to take one picture every two minutes, then the
number of pictures would be reduced to approximately one-quarter of the number of
pictures given above (based upon one picture taken every 30 seconds).]
Approx. 540 pictures Approx. 450 pictures
(By CIPA standard in
Program AE Mode)
- 20 -

Preparation
∫ Recording motion pictures (When using the LCD monitor)
(DMC-FZ200)
[AVCHD]
(Recording with picture quality set to
[PSH])
Recordable time Approx. 160 min Approx. 200 min
Actual recordable time Approx. 80 min Approx. 100 min
(Recording with picture quali ty set to
[MP4]
[FHD])
(DMC-FZ60)
[AVCHD]
(Recording with picture quality set to
Recordable time Approx. 160 min Approx. 160 min
Actual recordable time Approx. 90 min Approx. 90 min
•
These times are for an ambient t emper ature of 23oC (73.4 oF) and a humidity of 50%RH. Please be
aware that these times are approximate.
[FSH])
(Recording with picture quali ty set to
[MP4]
[FHD])
•Actual recordable time is the time available fo r recording whe n repeating a ctions such as turning t his
unit on and off, starting/stopping recording, zoom operation etc.
•
Maximum time to record motion pictures continuously with [MP4] is 29 minutes 59 seconds or up to 4GB.
Y ou can ch eck the recordable time on the screen. (For [FHD] in [MP4] format, the file s ize i s large and so
the recordable time will drop below 29 minutes 59 seconds.)
∫ Playback (When using the LCD monitor)
(DMC-FZ200) (DMC-FZ60)
Playback time Approx. 440 min Approx. 330 min
Note
•
The operating times and number of recordable pictures will differ according to the
environment and the operating conditions.
For example, in the following cases, t he operating times shorten and the number of recordable
pictures is reduced.
–In low-temperature environments, such as on ski slopes.
–When using [LCD Mode].
–When [Live View Mode] is set to [NORMAL].
–When operations such as flash and zoom are used repeatedly .
•When the operating time of the camera becomes extremely short even after properly charging the
battery , the life of the battery may have expired. Buy a new battery.
- 21 -

Preparation
B
Inserting and Removing the Card (optional)/the Battery
•Turn this unit off and confirm that the lens barrel is retracted.
•We recommend using a Panasonic card.
Slide the release lever in the direction of the
1
arrow and open the card/battery door.
• Always use genuine Panasonic batteries.
• If you use other batteries, we cannot guarantee the
quality of this product.
Battery: Being careful about the battery
2
orientation, insert all the way until you hear a
locking sound and then check that it is
locked by lever A.
Pull the lever A in the direction of the arrow
to remove the battery.
Card: Push it securely all the way until you
hear a “click” while being careful about the
direction in which you insert it.
To remove the card, push the card until it
clicks, then pull the card out upright.
B:Do not touch the connection terminals of the card.
1: Close the card/battery door.
3
2: Slide the release lever in the direction of
the arrow.
Note
•
Remove the battery after use. (The battery will be exhausted if left for a long period of time after
being charged.)
•Remove the card or battery after turning this unit off, with the power lamp completely turned off and
the lens barrel retr acted completely. (The camera may not function properly, or the card or recorded
contents may be damaged.)
•When using an AC adaptor (optional) instead of the battery, refer to P199.
- 22 -

Preparation
About the Built-in Memory/the Card
The following operations can be performed using this unit:
When a card has not been
inserted
When a card has been inserted Pictures can be recorded on the card and played back.
Pictures can be recorded on the built-in memory and played
back.
•When using the built-in memory
>ð (access indicatio n
k
•When using the card
(access indication
¢ The access indication is displayed in red when pictures are being recorded on the
built-in memory (or the card).
¢
)
¢
)
Built-in Memory
•You can copy the recorded pictur es to a card. (P175)
•The access time for the built-in memory may be longer than the access time for a card.
(DMC-FZ200) (DMC-FZ60)
Memory size Approx. 70 MB Approx. 70 MB
- 23 -

Preparation
2
Card
The following cards which conform to the SD video standard can be used with this unit.
(These cards are indicated as card in the text.)
Remarks
SD Memory Card
(8 MB to 2 GB)
SDHC Memory Card
(4 GB to 32 GB)
•Use a card with SD Speed Class
when recording motion pictures.
•SDHC Memory Card can be used with SDHC Memory Card or
SDXC Memory Card compatible equipmen t.
•SDXC Memory Card can only be used with SDXC Memory Card
compatible equipment.
¢
with “Class 4” or higher
•Check that the PC and other equipment are compatible when
using the SDXC Memory Cards.
SDXC Memory Card
(48 GB, 64 GB)
http://panasonic.net/avc/sdcard/information/SDXC.html
(DMC-FZ200)
•
This unit is compatible with UHS-I standard SDHC/SDXC memory
cards.
•Only the cards with capacity listed left can be used.
¢ SD Speed Class is t he speed standard regarding cont inuous writing. Check via the label on the
card, etc.
e.g.:
•Please confirm the latest information on the following website.
http://panasonic.jp/support/global/cs/dsc/
(This Site is English only.)
Note
•
Do not turn this unit off, remove its battery or card, or disconnect the AC adaptor (optional)
when the access indicati on is lit (when pictures ar e being written, read or deleted, or the
built-in memory or the card is being formatted). Furthermore, do not subject the camera to
vibration, impact or static electricity.
The card or the data on the card may be damaged, and this unit may no longer operate
normally.
If operation fails due to vibration, impact or static electricity, perform the operation again.
•Write-Protect switch A provided (When this switch is set to the [LOCK] position, no
further data writing, deletion or formatting is possible. The ability to write, delete and
format data is restored when the switch is returned to its original pos ition.)
•The data on the built-in memory or the card may be damaged or lost due to
electromagnetic waves, static electricity or breakdown of the camera or the card. We
recommend storing important data on a PC etc.
•Do not format the card on your PC or other equipment. F ormat it on the camera only to ensure
proper operation. (P68)
•Keep the Memory Card out of reach of children to prevent swallowing.
- 24 -

Preparation
313
0+3
A
R
1m41
s
R
1m41
s
0+3
B
Approximate number of recordable pict ures and ava ilab l e recording time
∫ About the display of the number of recordable pictures and available recording time
•
Switching between the displa y of n umbe r of rec ordabl e pict ures a nd ava ilable recor ding time can be
performed in the [Remaining Disp.] (P61) in the [Setup] menu.
A Number of recordable pictures
B Available recording time
•The number of recordable pictures and the available recording time are an approximation. (These
vary depending on the recording conditions and the type of card.)
•The number of recordable pictures and the available recording time varies depending on the
subjects.
∫ Number of recordable pictures
•
[i99999] is displayed if there are more than 100,000 pictures remaining.
•Aspect ratio [X], Quality [A]
(DMC-FZ200)
[Picture Size]
12M 13 380 6260 12670
5M (EZ) 24 650 10620 21490
0.3M (EZ) 380 10050 162960 247150
(DMC-FZ60)
[Picture Size]
16M 11 300 4910 9880
5M (EZ) 24 650 10620 21490
0.3M (EZ) 380 10050 162960 247150
Built-in Memory
(Approx. 70 MB)
Built-in Memory
(Approx. 70 MB)
2GB 32 GB 64 GB
2GB 32 GB 64 GB
- 25 -

Preparation
∫ Available recording time (when recording motion pictures)
•
“h” is an abbreviation for hour, “m” for minute and “s” for second.
•[AVCHD]
(DMC-FZ200)
[Rec Quality]
PSH j 8m00s 2h31m00s 5h07m00s
FSH j 14m00s 4h10m00s 8h26m00s
SH j 14m00s 4h10m00s 8h26m00s
Built-in Memory
(Approx. 70 MB)
2GB 32 GB 64 GB
(DMC-FZ60)
Built-in Memory
(Approx. 70 MB)
2GB 32 GB 64 GB
•
[MP4]
[Rec Quality]
FSH j 15m00s 4h10m00s 8h27m00s
SH j 15m00s 4h10m00s 8h27m00s
(DMC-FZ200)
[Rec Quality]
FHD j 12m02s 3h22m58s 6h50m54s
HD j 22m59s 6h27m29s 13h04m28s
VGA 1m42s 50m36s 14h12m48s 28h46m30s
Built-in Memory
(Approx. 70 MB)
2GB 32 GB 64 GB
(DMC-FZ60)
[Rec Quality]
FHD j 12m23s 3h23m18s 6h51m18s
HD j 23m39s 6h28m09s 13h05m14s
VGA 1m44s 52m04s 14h14m15s 28h48m10s
Built-in Memory
(Approx. 70 MB)
2GB 32 GB 64 GB
Note
The recordable time is the to tal time of all the motion pictures whic h have been recorded.
•
•Number of recordable pictures/available recording time for the card may decrease when [Upload
Set] is performed.
•
Maximum time to record motion pictures continuously with [MP4] is 29 minutes 59 seconds or up to 4GB.
Y ou can ch eck the recordable time on the screen. (For [FHD] in [MP4] format, the file s ize i s large and so
the recordable time will drop below 29 minutes 59 seconds.)
•The maximum available continuous recording time is displayed on the screen.
- 26 -

Preparation
1
Setting Date/Time (Clock Set)
•The clock is not set when the camera is shipped.
Turn the camera on.
1
• The power lamp 1 lights when you turn this unit on.
• If the language select screen is not displayed, proceed to step 4.
Press [MENU/SET].
2
Press 3/4 to select the language, and press [MENU/SET].
3
Press [MENU/SET].
4
Press 2/1 to select the items (year, month,
5
day, hour, minute, display sequence or time
display format), and press 3/4 to set.
A: Time at the home area
B: Time at the travel destination
You can cancel without setti n g the clock by pressing
•
[].
Press [MENU/SET] to set.
6
Press [MENU/SET].
7
- 27 -

Preparation
Changing the clock setting
Select [Clock Set] in the [Rec] or [Setup] menu, and press 1. (P52)
•
The clock can be reset as shown in steps 5 and 6.
•The clock setting is maintained for 3 months using the built-in clock battery even without the
battery. (Leave the charged battery in the unit for 24 hours to charge the built-in battery.)
Note
•
If the clock is not set, the correct date cannot be printed when you order a photo studio to print the
picture, or when you stamp the date on the pictures with [DateStamp] (P147) or [Text Stamp]
(P164).
•If the c l ock is set, the correct dat e c a n be pr i n te d even if the date is not displ a y e d on the screen of
the camera.
- 28 -

Preparation
AB
Tips for taking good pictures
Hold the camera gently with both hands, keep
your arms still at your side and stand with
your feet slightly apart.
•Be careful not to put your fingers on the flash, AF
Assist Lamp A, microphone B, speaker or lens etc.
•Be careful not to cover the speaker with your finger. Doing
so may make sound difficul t to hear. (P10, 11)
•Be careful not to move the camera when you press the
shutter button.
•When taking pictures, make sure y our f oot ing is st able a nd
there is no danger of colliding with another person, an
object etc.
•Do not hold the lens barrel as you take pictures. Ther e is a
risk that your finger will be trappe d as the lens retracts.
∫ Direction Detection Function ([Rotate Disp.])
Pictures recorded with the camera held vertically are played back vertically (rotated). (Only
when [Rotate Disp.] (P67) is set)
When the camera is held v ertic ally a nd tilt ed up and down to reco rd p ictur es, th e Direct io n Detect ion
•
function may not work correctly.
•Motion pictures taken with the camera held vertically are not display ed vertically.
•You cannot record 3D pictures in vertical orientation.
Preventing jitter (camera shake)
When the Jitter alert [ ] appears, use [Stabilizer] (P143), a tripod or the Self-timer (P84).
•
Shutter speed will be slower particularly in the following cases. Keep the camera stil l from the
moment the shutter button is pr esse d until th e pic ture ap pear s on the sc reen . W e reco mmend using
a tripod.
–Slow sync./Red-E ye Reduction
–[Night Portrait]/[Night Scenery] (Scene Mode)
–When the shutter speed is slowed in [Min. Shtr Speed]
- 29 -

Basic
A
Selecting the Recording Mode
Switching the mode by rotating the
mode dial.
Align a desired mode with part A.
•
Rotate the mode dial slowly to sel ect the
desired mode.
∫ Basic
Program AE Mode (P31)
The subjects are recorded using your own settings.
Intelligent Auto Mode (P35)
The subjects are recorded using settings automatically selected by the camera.
∫ Advanced
Aperture-Priority AE Mode (P105)
The shutter speed is automatically determined by the aperture value you set.
Shutter-Priority AE Mode (P105)
The aperture value is automatically determined by the shutter speed you set.
Manual Exposure Mode (P106)
The exposure is adjusted by the aperture value and the shutter speed which are manually
adjusted.
Creative Video Mode (P123)
Record motion picture with manual settings.
Custom Mode (P126)
Use this mode to take pictures with previously registered settings.
Scene Mode (P107)
This allows you to take pictures that match the scene being recorded.
Creative Control Mode (P117)
Record while checking the image effect.
- 30 -
 Loading...