

Page 1
Basic
Operating Instructions
Digital Camera
Model No.
DMC-FX150/DMC-FX180
Before use, please read these instructions completely.
Please also refer to Operating
Instructions (PDF format)
recorded on the CD-ROM
containing the Operating
Instructions (supplied).
You can learn about advanced operation methods
and check the Troubleshooting.
VQT1T03
Page 2

Dear Customer,
We would like to take this opportunity to thank you for purchasing this Panasonic Digital
Camera. Please read these Operating Instructions carefully and keep them handy for
future reference.
Before Use
Information for Your Safety
WARNING:
TO REDUCE THE RISK OF FIRE, ELECTRIC SHOCK OR PRODUCT DAMAGE,
•
DO NOT EXPOSE THIS APPARATUS TO RAIN, MOISTURE, DRIPPING OR SPLASHING
AND THAT NO OBJECTS FILLED WITH LIQUIDS, SUCH AS VASES, SHALL BE
PLACED ON THE APPARATUS.
• USE ONLY THE RECOMMENDED ACCESSORIES.
• DO NOT REMOVE THE COVER (OR BACK); THERE ARE NO USER SERVICEABLE
PARTS INSIDE. REFER SERVICING TO QUALIFIED SERVICE PERSONNEL.
Carefully observe copyright laws.
Recording of pre-recorded tapes or discs or other published or broadcast material
for purposes other than your own private use may infringe copyright laws. Even for
the purpose of private use, recording of certain material may be restricted.
Please note that the actual controls and components, menu items, etc. of your Digital
•
Camera may look somewhat different from those shown in the illustrations in these
Operating Instructions.
• SDHC Logo is a trademark.
• Microsoft product screen shot(s) reprinted with permission from Microsoft Corporation.
• Other names, company names, and product names printed in these instructions are
trademarks or registered trademarks of the companies concerned.
THE SOCKET OUTLET SHALL BE INSTALLED NEAR THE EQUIPMENT AND SHALL
BE EASILY ACCESSIBLE.
CAUTION
Danger of explosion if battery is incorrectly replaced. Replace only with the same or
equivalent type recommended by the manufacturer. Dispose of used batteries
according to the manufacturer’s instructions.
Warn ing
Risk of fire, explosion and burns. Do not disassemble, heat above 60 xC or incinerate.
Product Identification Marking is located on the bottom of units.
VQT1T03 (ENG )
2
Page 3
-If you see this symbol-
Figure A Figure B
Fuse
(5 ampere)
Fuse
(5 ampere)
Information on Disposal in other Countries outside the European Union
This symbol is only valid in the European
Union.
If you wish to discard this product, please
contact your local authorities or dealer
and ask for the correct method of
disposal.
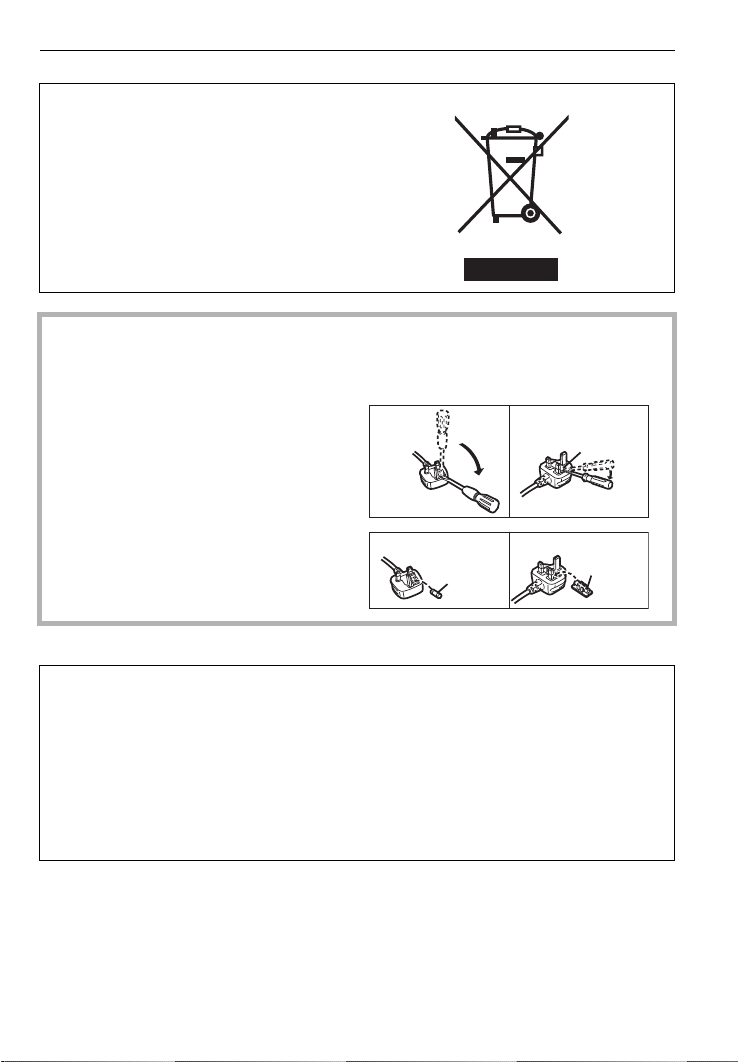
∫ How to replace the Fuse
The location of the fuse differ according to the type of AC cable (figures A and B).
Confirm the AC cable fitted and follow the instructions below.
Illustrations may differ from actual AC cable.
1 Open the fuse cover with a
screwdriver.
Figure A Figure B
Fuse cover
2 Replace the fuse and close or attach
the fuse cover.
∫ About the battery charger
CAUTION!
DO NOT INSTALL OR PLACE THIS UNIT IN A BOOKCASE, BUILT-IN CABINET OR IN
•
ANOTHER CONFINED SPACE. ENSURE THE UNIT IS WELL VENTILATED. TO
PREVENT RISK OF ELECTRIC SHOCK OR FIRE HAZARD DUE TO OVERHEATING,
ENSURE THAT CURTAINS AND ANY OTHER MATERIALS DO NOT OBSTRUCT THE
VENTILATION VENTS.
• DO NOT OBSTRUCT THE UNIT’S VENTILATION OPENINGS WITH NEWSPAPERS,
TABLECLOTHS, CURTAINS, AND SIMILAR ITEMS.
• DO NOT PLACE SOURCES OF NAKED FLAMES, SUCH AS LIGHTED CANDLES, ON
THE UNIT.
• DISPOSE OF BATTERIES IN AN ENVIRONMENTALLY FRIENDLY MANNER.
•
The battery charger is in the standby condition when the AC power supply cord is connected.
The primary circuit is always “live” as long as the power cord is connected to an electrical
outlet.
(ENG) VQT1T0 3
3
Page 4

∫ About the battery pack
Do not heat or expose to flame.
•
• Do not leave the battery(ies) in an automobile exposed to direct sunlight for a long period of
time with doors and windows closed.
∫ Cautions for Use
Do not use any other AV cables except the supplied one.
•
• Do not use any other cables except a genuine Panasonic component cable (DMW-HDC2;
optional).
Keep the camera as far away as possible from electromagnetic equipment (such as
microwave ovens, TVs, video games etc.).
If you use the camera on top of or near a TV, the pictures and sound on the camera may be
•
disrupted by electromagnetic wave radiation.
• Do not use the camera near cell phones because doing so may result in noise adversely
affecting the pictures and sound.
• Recorded data may be damaged, or pictures may be distorted, by strong magnetic fields
created by speakers or large motors.
• Electromagnetic wave radiation generated by microprocessors may adversely affect the
camera, disturbing the pictures and sound.
• If the camera is adversely affected by electromagnetic equipment and stops functioning
properly, turn the camera off and remove the battery or disconnect AC adaptor (DMW-AC5G;
optional). Then reinsert the battery or reconnect AC adaptor and turn the camera on.
Do not use the camera near radio transmitters or high-voltage lines.
If you record near radio transmitters or high-voltage lines, the recorded pictures and sound may
•
be adversely affected.
∫ Care of the camera
•
Do not strongly shake or bump the camera by dropping it etc.
This unit may malfunction, recording pictures may no longer be possible or the lens or the LCD
monitor may be damaged.
• We strongly recommend you do not leave the camera in your trousers pocket
when you sit down or forcefully insert it into a full or tight bag etc.
Damage to the LCD monitor or personal injury may result.
• Be particularly careful in the following places as they may cause this
unit to malfunction.
– Places with a lot of sand or dust.
– Places where water can come into contact with this unit such as when using
it on a rainy day or on a beach.
• Do not touch the lens or the sockets with dirty hands. Also, be careful
not to allow liquids, sand and other foreign matter to get into the space
around the lens, buttons etc.
• If water or seawater splashes on the camera, use a dry cloth to wipe the camera body
carefully.
∫ About Condensation (When the lens is fogged up)
•
Condensation occurs when the ambient temperature or humidity changes. Be careful of
condensation since it causes lens stains, fungus and camera malfunction.
• If condensation occurs, turn the camera off and leave it for about 2 hours. The fog will
disappear naturally when the temperature of the camera becomes close to the ambient
temperature.
VQT1T03 (ENG )
4
Page 5

∫ About cards that can be used in this unit
44
OK
You can use an SD Memory Card, an SDHC Memory Card and a MultiMediaCard.
When the term card is used in these operating instructions this refers to the following types of
•
Memory Cards.
– SD Memory Card (8 MB to 2 GB)
– SDHC Memory Card (4 GB, 8 GB, 16 GB, 32 GB)
– MultiMediaCard (still pictures only)
More specific information about memory cards that can be used with this unit.
You can only use an SDHC Memory Card if using cards with 4 GB or
•
more capacity.
• A 4 GB (or more) Memory Card without an SDHC logo is not based on
the SD Standard and will not work in this product.
Please confirm the latest information on the following website.
http://panasonic.
(This Site is English only.)
Keep the Memory Card out of reach of children to prevent swallowing.
•
co.jp/pavc/global/cs
(ENG) VQT1T0 3
5
Page 6

Contents
Information for Your Safety.................................................................................................2
Standard Accessories......................................................................................................... 7
Names of the Components ................................................................................................. 8
Charging the Battery......................................................................................................... 10
About the Battery (charging/number of recordable pictures) ............................................ 11
Inserting and Removing the Card (optional)/the Battery................................................... 12
Setting Date/Time (Clock Set) .......................................................................................... 13
• Changing the clock setting ......................................................................................... 13
Setting the Menu...............................................................................................................14
• Setting menu items..................................................................................................... 15
• Using the quick menu ................................................................................................. 16
Selecting the [REC] Mode ................................................................................................ 17
Taking pictures using the automatic function
(ñ: Intelligent Auto Mode) ................................................................................................ 18
• Scene detection .......................................................................................................... 19
• AF Tracking Function .................................................................................................19
Taking pictures with your favourite settings
(³: Program AE mode) .................................................................................................... 20
• Focusing..................................................................................................................... 20
Taking Pictures with the Zoom ......................................................................................... 21
• Using the Optical Zoom/Using the Extra Optical Zoom (EZ)/
Using the Digital Zoom ............................................................................................... 21
Taking Pictures using the Built-in Flash............................................................................ 22
• Switching to the appropriate flash setting ................................................................... 22
Taking Pictures with the Self-timer ...................................................................................22
Playing back Pictures ([NORMAL PLAY]) ........................................................................23
Deleting Pictures...............................................................................................................24
• To delete a single picture ........................................................................................... 24
• To delete multiple pictures (up to 50) or all the pictures.............................................24
Connecting to a PC...........................................................................................................25
Reading the Operating Instructions (PDF format) ............................................................27
Specifications.................................................................................................................... 28
VQT1T03 (ENG )
6
Page 7
Standard Accessories
3
12
45
67
89
DE-A42B
(DMC-FX180GC)
DE-A42A
(DMC-FX150SG)
K1HA08CD0007 K1HA08CD0008
VFC4320
: K2CT3CA00004
(DMC-FX180GC)
: K2CQ2CA00006
(DMC-FX180GC)
CGA-S005E
VYQ3509
VFF0434
K2CA2CA00019
(DMC-FX150SG)
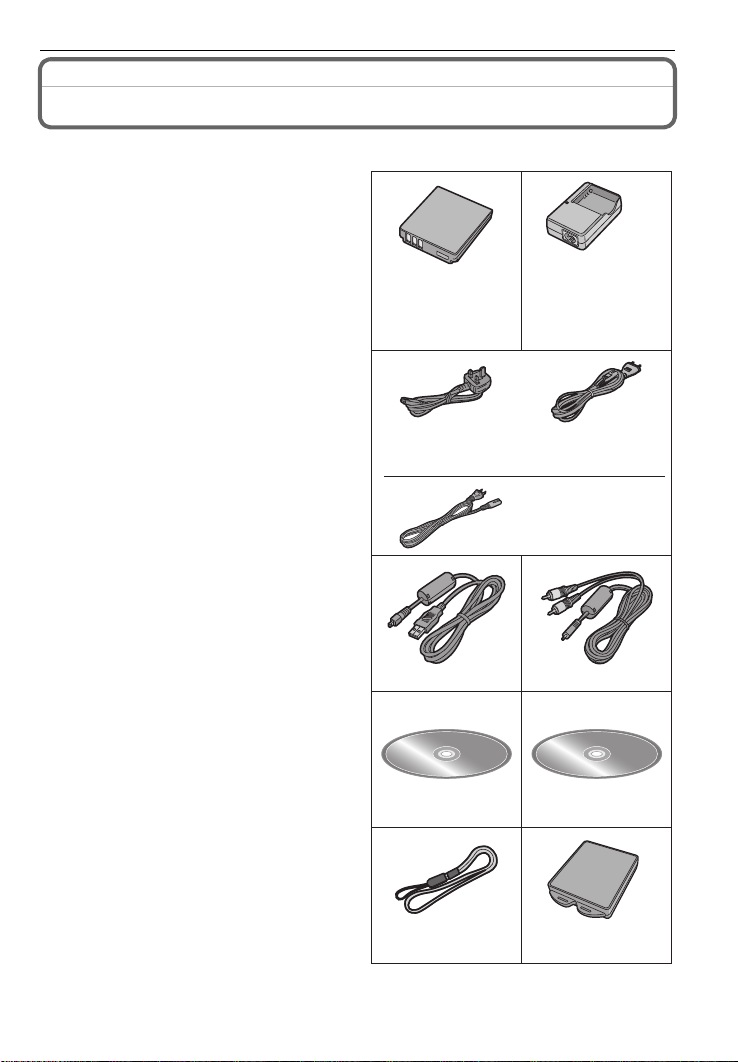
Check that all the accessories are included before using the camera.
1Battery Pack
(Indicated as battery in the text)
Charge the battery before use.
2 Battery Charger
(Indicated as charger in the text)
3 AC Cable
A: Hong Kong Special Administrative
Region of China and Saudi Arabia
B: Areas Other than Hong Kong
Special Administrative Region of China
and Saudi Arabia
4 USB Connection Cable
5 AV Cable
6 CD-ROM
Software:
•
Use it to install the software to your PC.
7 CD-ROM
•
Operating Instructions
8Strap
9 Battery Carrying Case
SD Memory Card, SDHC Memory Card and
•
MultiMediaCard are indicated as card in the
text.
• The card is optional.
You can record or play back pictures on the
built-in memory when you are not using a
card.
• Consult the dealer or your nearest Service
Centre if you lose the supplied accessories.
(You can purchase the accessories
separately.)
(ENG) VQT1T0 3
7
Page 8
Names of the Components
123
104
5786
9
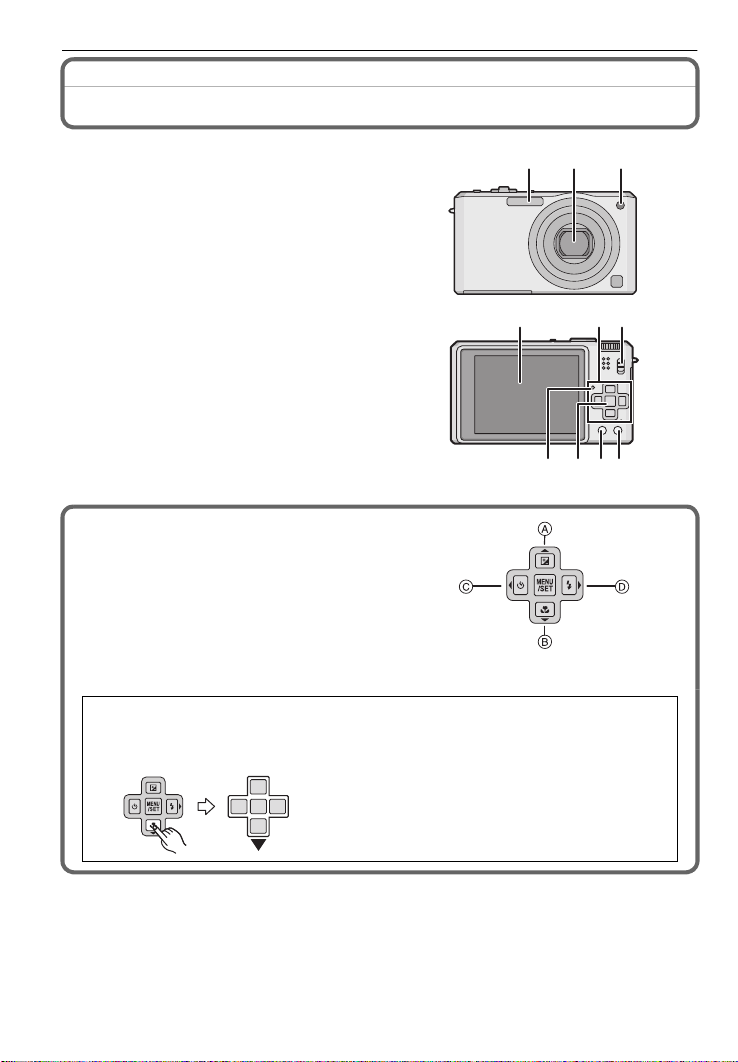
1Flash
2 Lens
3 Self-timer indicator
AF assist lamp
4 LCD monitor
5 Status indicator
6 [MENU/SET] button
7 [DISPLAY] button
8 [Q.MENU]/Delete button
9 [REC]/[PLAYBACK] selector switch
10 Cursor buttons
A: 3/Exposure compensation/Flash
output adjustment/Auto bracket/
Colour bracket
B: 4/Macro mode
AF Tracking
C: 2/Self-timer button
D: 1/Flash setting button/White balance
fine adjustment
In these operating instructions, the cursor buttons are described as shown in the
figure below or described with 3/4/2/1.
e.g.: When you press the 4 (down) button
VQT1T03 (ENG )
8
or Press 4
Page 9
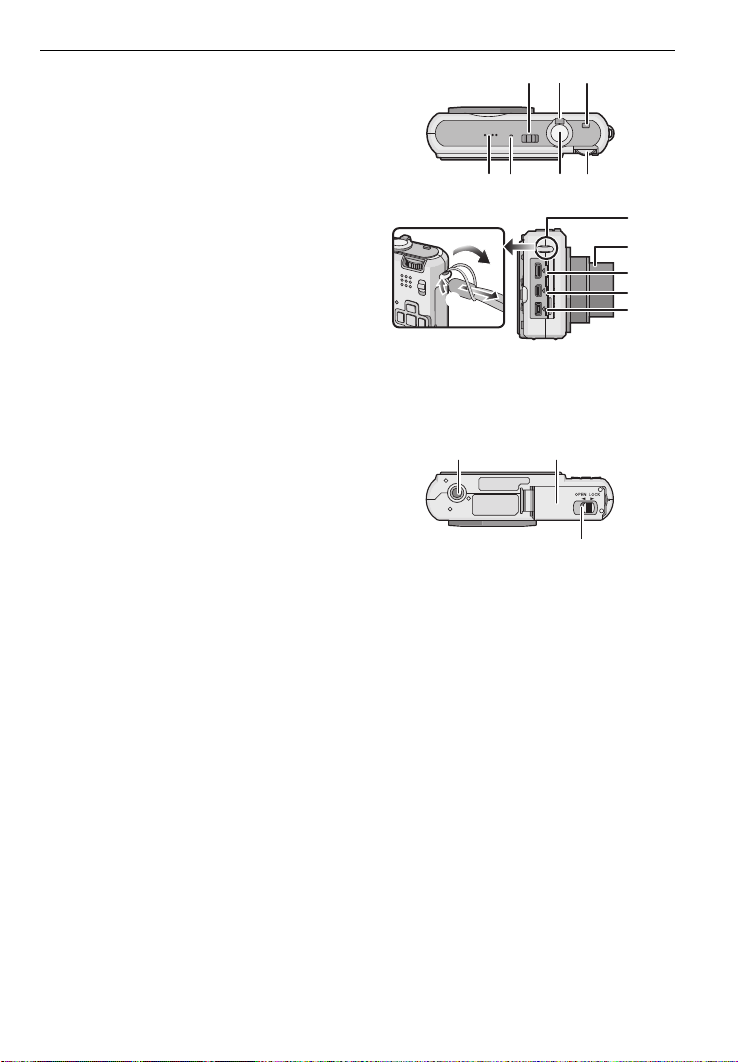
11 Camera ON/OFF switch
11 1312
14 15 1716
19
21
22
20
18
23 24
25
12 Zoom lever
13 [E.ZOOM] button
14 Speaker
15 Microphone
16 Shutter button
17 Mode dial
18 Strap eyelet
Be sure to attach the strap when using
•
the camera to ensure that you will not
drop it.
19 Lens barrel
20 [COMPONENT OUT] socket
21 [AV OUT/DIGITAL] socket
22 [DC IN] socket
Always use a genuine Panasonic AC
•
adaptor (DMW-AC5G; optional).
• This camera cannot charge the battery even when the AC adaptor (DMW-AC5G; optional)
is connected to it.
• The optional AC adaptor may not be available in some countries.
23 Tripod receptacle
•
When you use a tripod, make sure the
tripod is stable when the camera is
attached to it.
24 Card/Battery door
25 Release lever
(ENG) VQT1T0 3
9
Page 10
Preparation
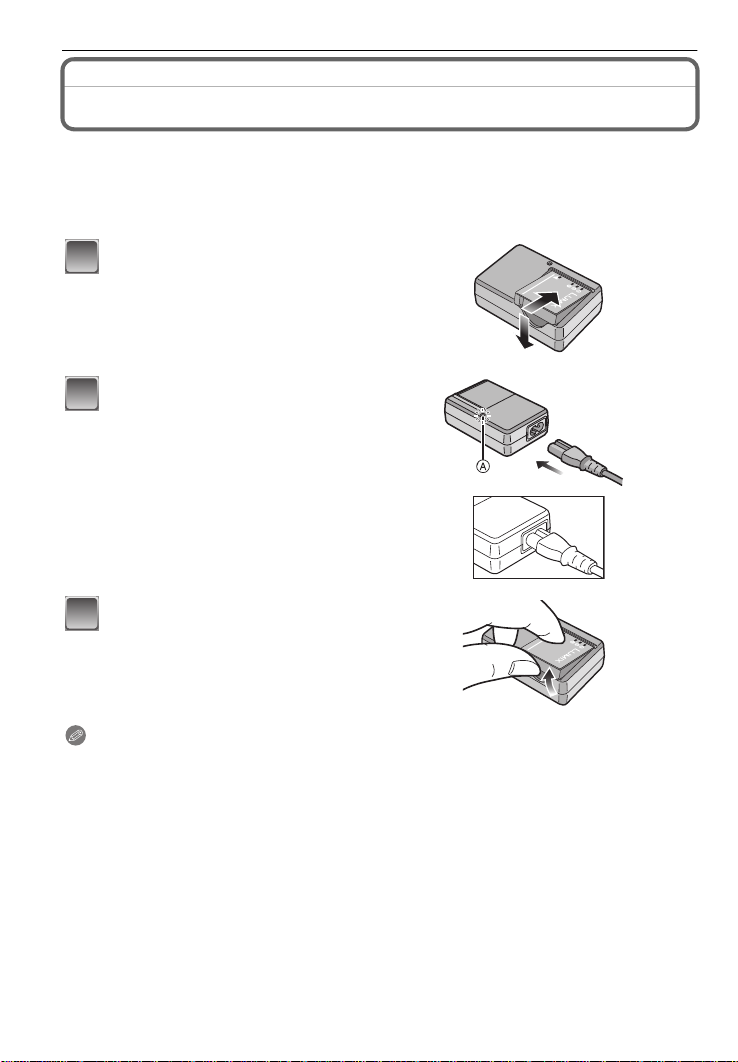
1
2
3
Charging the Battery
• Use the dedicated charger and battery.
• The battery is not charged when the camera is shipped. Charge the battery before use.
• Charge the battery with the charger indoors.
• Charge the battery in a temperature between 10 oC to 35 oC. (The battery temperature should
also be the same.)
Attach the battery with
attention to the direction of the
battery.
Connect the AC cable.
• The AC cable does not fit entirely into
the AC input terminal. A gap will remain
as shown below.
• Charging starts when the [CHARGE]
indicator A lights green.
• Charging is complete when the
[CHARGE] indicator A turns off (after
approx. 130 min maximum).
Detach the battery after
charging is completed.
Note
•
After charging is completed, be sure to disconnect the power supply device from the electrical
outlet.
• The battery becomes warm after using it and during and after charging. The camera also
becomes warm during use. This is not a malfunction.
• The battery will be exhausted if left for a long period of time after being charged.
• The battery can be recharged even when it still has some charge left, but it is not
recommended that the battery charge be frequently topped up while the battery is fully
charged. (The battery has characteristics that will reduce its operating duration and cause the
battery to swell up.)
• When the operating time of the camera becomes extremely short even after properly charging
the battery, the life of the battery may have expired. Buy a new battery.
• Do not leave any metal items (such as clips) near the contact areas of the power plug.
Otherwise, a fire and/or electric shocks may be caused by short-circuiting or the
resulting heat generated.
VQT1T03 (ENG )
10
Page 11

About the Battery (charging/number of recordable pictures)
∫ The battery life
Number of recordable
pictures
Recording time Approx. 165 min
Recording conditions by CIPA standard
CIPA is an abbreviation of [Camera & Imaging Products Association].
•
• Temperature: 23 oC/Humidity: 50% when LCD monitor is on.
• Using a Panasonic SD Memory Card (32 MB).
• Using the supplied battery.
• Starting recording 30 seconds after the camera is turned on. (When the optical image stabilizer
function is set to [AUTO].)
• Recording once every 30 seconds with full flash every second recording.
• Rotating the zoom lever from Tele to Wide or vice versa in every recording.
• Turning the camera off every 10 recordings and leaving it until the temperature of the battery
decreases.
¢ The number of recordable pictures decreases in Auto Power LCD mode and Power LCD
mode.
The number of recordable pictures varies depending on the recording interval time.
If the recording interval time becomes longer, the number of recordable pictures
decreases. [e.g. When recording once every 2 minutes, the number of recordable
pictures decreases to about 82.]
Playback time Approx. 450 min
The number of recordable pictures and playback time will vary depending on the
operating conditions and storing condition of the battery.
∫ Charging
Charging time Approx. 130 min maximum
Charging time and number of recordable pictures with the optional battery pack
(CGA-S005E) are the same as above.
The charging time will vary slightly depending on the status of the battery and the
conditions in the charging environment.
When the charging has been completed successfully, the [CHARGE] indicator turns off.
Approx. 330 pictures
By CIPA standard in programme AE
mode
¢
Note
The battery may swell and its operating time may become shorter as the number of times it is
•
charged increases. For long term battery use, we recommend you do not frequently charge the
battery before it is exhausted.
• The performance of the battery may temporarily deteriorate and the operating time may
become shorter in low temperature conditions (e.g. skiing/snowboarding).
(ENG) VQT1T0 3
11
Page 12

Inserting and Removing the Card (optional)/the
1
2
3
Battery
• Check that this unit is turned off.
• We recommend using a Panasonic card.
Slide the release lever in the direction of
the arrow and open the card/battery door.
• Always use genuine Panasonic batteries
(CGA-S005E).
• If you use other batteries, we cannot guarantee
the quality of this product.
Battery: Insert it fully being careful about
the direction you insert it. Pull the lever
A in the direction of the arrow to remove
the battery.
Card: Push it fully until it clicks being
careful about the direction you insert it.
To remove the card, push the card until it
clicks, then pull the card out upright.
B: Do not touch the connection terminals of the
card.
The card may be damaged if it is not fully inserted.
•
1:Close the card/battery door.
2:Slide the release lever in the direction
of the arrow.
• If the card/battery door cannot be completely
closed, remove the card, check its direction and
then insert it again.
Note
•
Remove the battery after use. Store the removed battery in the battery carrying case (supplied).
• Do not remove the battery until the LCD monitor and the status indicator (green) turn off as the
settings on the camera may not be stored properly.
• The supplied battery is designed only for the camera. Do not use it with any other equipment.
• Before removing the card or battery, turn the camera off, and wait until the status indicator has
gone off completely. (Otherwise, this unit may no longer operate normally and the card itself
may be damaged or the recorded pictures may be lost.)
VQT1T03 (ENG )
12
Page 13

Setting Date/Time (Clock Set)
1
2
3
4
:
:
5
6
• The clock is not set when the camera is shipped.
Turn the camera on.
A [MENU/SET] button
B Cursor buttons
Press [MENU/SET].
Press 3/4 to select the language, and press [MENU/SET].
• The [PLEASE SET THE CLOCK] message appears. (This message does not appear in
[PLAYBACK] mode.)
Press [MENU/SET].
Press 2/1 to select the items (year, month,
day, hour, minute, display sequence or time
display format), and press 3/4 to set.
A: Time at the home area
B: Time at the travel destination
‚: Cancel without setting the clock.
Select either [24HRS] or [AM/PM] for the time display
•
format.
• AM/PM is displayed when [AM/PM] is selected.
Press [MENU/SET] to set.
• After completing the clock settings, turn the camera off. Then turn the camera back on,
switch to recording mode, and check that the display reflects the settings that were
performed.
• When [MENU/SET] has been pressed to complete the settings without the clock having
been set, set the clock correctly by following the “Changing the clock setting” procedure
below.
Changing the clock setting
Select [CLOCK SET] in the [REC] or [SETUP] menu, and press 1.
•
It can be changed in steps 5 and 6 to set the clock.
• The clock setting is maintained for 3 months using the built-in clock battery even
without the battery. (Leave the charged battery in the unit for 24 hours to charge the
built-in battery.)
(ENG) VQT1T0 3
13
Page 14

Setting the Menu
The camera comes with menus that allow you to set the settings for taking pictures and
playing them back just as you like and menus that enable you to have more fun with the
camera and use it more easily.
In particular, the [SETUP] menu contains some important settings relating to the camera’s
clock and power. Check the settings of this menu before proceeding to use the camera.
[MODE] playback mode menu
• This menu lets you
select the setting of
the playback methods
such as playback or
slide show of only the
pictures set as
[FAVORITE] .
( [PLAYBACK] mode menu ! [REC] mode menu
• This menu lets you
make the rotation,
protection, trimming
or DPOF settings, etc.
of recorded pictures.
• This menu lets you perform the clock settings, select the operating
beep tone settings and set other settings which make it easier for you
to operate the camera.
• The [SETUP] menu can be set from either the [REC MODE] or
[PLAYBACK MODE].
A [REC]/[PLAYBACK] selector switch
• This menu lets you
set the colouring,
sensitivity, aspect
ratio, number of pixels
and other aspects of
the pictures you are
recording.
[SETUP] menu
VQT1T03 (ENG )
14
Page 15

Setting menu items
1
2
3
4
MENU
/SET
1
2
3
This section describes how to select the programme AE mode settings, and the same
setting can be used for the [PLAYBACK] menu and [SETUP] menu as well.
Example: Setting [AF MODE] from [
Turn the camera on.
A [MENU/SET] button
B [REC]/[PLAYBACK] selector switch
C Mode dial
Slide the [REC]/[PLAYBACK] selector
switch to [!].
• When selecting the [PLAYBACK] mode menu
settings, set the [REC]/[PLAYBACK] selector switch to
[(], and proceed to step
Set the mode dial to [³].
Press [MENU/SET] to display the menu.
• You can switch menu screens from any menu item by
rotating the zoom lever.
Press 2.
Ø] to [š] in the programme AE mode
4.
Switching to the [SETUP] menu
Press 4 to select the [SETUP] menu
icon [ ].
Press 1.
• Select a menu item next and set it.
(ENG) VQT1T0 3
15
Page 16

Press 3/4 to select [AF MODE].
5
6
7
8
MENU
/SET
9
1
2
A
• Select the item at the very bottom, and press 4 to
move to the second screen.
Press 1.
• Depending on the item, its setting may not appear or it
may be displayed in a different way.
Press 3/4 to select [š].
Press [MENU/SET] to set.
Press [MENU/SET] to close the menu.
Using the quick menu
By using the quick menu, some of the menu settings can be easily found.
•
Some of the menu items cannot be set by the modes.
• Advanced settings for the following items can be performed by pressing [DISPLAY]. [DISPLAY]
is displayed on the screen.
– [WHITE BALANCE]/[AF MODE]
16
Press and hold [Q.MENU] when recording.
Press 3
the setting and then press [MENU/SET] to
close the menu.
A The items to be set and the settings are displayed.
VQT1T03 (ENG )
/4/2/1 to select the menu item and
Q.MENU
Page 17

Mode switching
1
2
3
Selecting the [REC] Mode
When the [REC] mode is selected, the camera can be set to the Intelligent auto mode in
which the optimal settings are established in line with the subject to be recorded and the
recording conditions, or to the scene mode which enables you to take pictures that match
the scene being recorded.
Turn the camera on.
A [REC]/[PLAYBACK] selector switch
B Mode dial
Slide the [REC]/[PLAYBACK] selector
switch to [!].
Switching the mode by rotating the mode
dial.
Align a desired mode with part C.
Rotate the mode dial slowly and surely to adjust to each mode. (The part where
•
there is no mode will not turn.)
SCN
M
P
∫ List of [REC] modes
¦
Intelligent auto mode
The subjects are recorded using settings automatically selected by the camera.
»
Program AE mode
The subjects are recorded using your own settings.
º Manual exposure mode
The subjects are recorded with set aperture and shutter speed.
Û Scene mode
This allows you to take pictures that match the scene being recorded.
$ Motion picture mode
This mode allows you to record motion pictures with audio.
(ENG) VQT1T0 3
17
Page 18

[REC] mode: ñ
1
2
3
4
5
Basic
Taking pictures using the automatic function
(ñ: Intelligent Auto Mode)
The camera will set the most appropriate settings to match the subject and the recording
conditions so we recommend this mode for beginners or those who want to leave the
settings to the camera and take pictures easily.
The following functions are activated automatically.
•
– Scene detection /[STABILIZER] /[INTELLIGENT ISO]/Face detection / [QUICK AF]/
[I.EXPOSURE]/Digital Red-eye Correction/Backlight Compensation
• The status indicator 3 lights when you turn this
unit on 2. (It turns off after about 1 second.)
(1: Shutter button)
Slide the [REC]/[PLAYBACK] selector switch to [!].
Set the mode dial to [ñ].
Hold this unit gently with both hands, keep
your arms still at your side and stand with
your feet slightly apart.
A Flash
B AF assist lamp
VQT1T03 (ENG )
18
Press the shutter button halfway to focus.
• The focus indication 1 (green) lights when the subject
is focused.
• The AF area 2 is displayed around the subject’s face
by the face detection function. In other cases, it is
displayed at the point on the subject which is in focus.
• The focus range is 5 cm (Wide)/30 cm (Tele) to ¶.
Press the shutter button fully (push it in
further), and take the picture.
•
The access indication lights red when pictures are being
recorded on the built-in memory (or the card).
Page 19

Scene detection
When the camera identifies the optimum scene, the icon of the scene concerned is
displayed in blue for 2 seconds, after which its colour changes to the usual red.
¦
> [i-PORTRAIT]
[i-SCENERY]
[i-MACRO]
Only when [‡] is selected
[i-NIGHT PORTRAIT]
[i-NIGHT SCENERY]
[¦] is set if none of the scenes are applicable, and the standard settings are set.
•
• If a tripod is used, for instance, and the camera has judged that camera shake is minimal when
the scene mode has been identified as [ ], the shutter speed will be set to a maximum of
8 seconds.Take care not to move the camera while taking pictures.
• An optimum scene for the specified subject will be chosen when set to AF tracking.
•
•
Only when [Œ] is selected
∫ Face detection
When [ ] or [ ] is selected, the camera automatically detects a person’s face, and it will
adjust the focus and exposure.
Note
•
Due to conditions such as the ones below, a different scene may be identified for the same
subject.
– Subject conditions: When the face is bright or dark, The size of the subject, The distance to
the subject, The contrast of the subject, When the subject is moving, When zoom is used
– Recording conditions: Sunset, Sunrise, Under low brightness conditions, When the camera is
shaken
• To take pictures in an intended scene, it is recommended that you take pictures in the
appropriate recording mode.
∫ The Backlight Compensation
Backlight refers to when light comes from the back of a subject.
In this case, the subject will become dark, so this function compensates the backlight by
brightening the whole of the picture automatically.
AF Tracking Function
It is possible to set the focus to the specified subject. Focus will keep following the subject
automatically even if it moves.
Set the [AF TRACKING] in the [REC] mode menu to [ON].
•
([ ] is displayed on the screen.)
Bring the subject to the AF tracking frame, and
press 4 to lock the subject.
• AF tracking frame will turn yellow.
• An optimum scene for the specified subject will be chosen.
• Press 4 again to release.
(ENG) VQT1T0 3
19
Page 20

[REC] mode: ³
1
2
3
4
5
Taking pictures with your favourite settings
(³: Program AE mode)
Many more menu items can be set and you can take pictures with greater freedom than
when you take pictures in the Intelligent auto mode.
Slide the [REC]/[PLAYBACK] selector
switch to [!].
A Mode dial
B [REC]/[PLAYBACK] selector switch
Set the mode dial to [³].
Aim the AF area at the point you want to
focus on.
Press the shutter button halfway to focus.
• The focus indication (green) lights when the subject is
focused.
• The focus range is 50 cm to ¶.
Press the halfway pressed shutter button
fully to take a picture.
• The access indication lights red when pictures are
being recorded on the built-in memory (or the card).
Focusing
Aim the AF area at the subject, and then press the shutter button halfway.
Focus
Focus indication On Blinks
AF area White>Green White>Red
Sound Beeps 2 times Beeps 4 times
When the subject is
focused
When the subject
is not focused
A Focus indication
B AF area (normal)
C AF area (when using the digital zoom or when it is dark)
D Focus range
VQT1T03 (ENG )
20
Page 21

[REC] mode: 񳲿n
Taking Pictures with the Zoom
Using the Optical Zoom/Using the Extra Optical Zoom (EZ)/Using the
Digital Zoom
You can zoom-in to make people and objects appear closer or zoom-out to record
landscapes in wide angle. To make subjects appear even closer [maximum of 7.7k], do
not set the picture size to the highest setting for each aspect ratio (X/Y/W).
Even higher levels of magnification are possible when [DIGITAL ZOOM] is set to [ON] in
[REC] menu.
To make subjects appear closer use (Tele)
Rotate the zoom lever towards Tele.
To make subjects appear further away use (Wide)
Rotate the zoom lever towards Wide.
∫ Types of zooms
Feature Optical zoom Extra optical zoom (EZ) Digital zoom
14.3k [including optical zoom
Maximum
magnification
Picture
quality
3.6k 7.7k
No deterioration No deterioration
Conditions None
¢
[PICTURE SIZE] with
is selected.
3.6k]
30.8k [including extra optical
zoom 7.7k]
The higher the magnification
level, the greater the
deterioration.
[DIGITAL ZOOM] on the [REC]
menu is set to [ON].
T
T
Screen
display
W
T
W
A
[ ] is displayed.
T
W
W
B The digital zoom range is
displayed.
The AF area becomes larger
when the shutter button is
pressed halfway in the digital
zoom range.
¢ The magnification level differs depending on [PICTURE SIZE] and [ASPECT RATIO] setting.
(ENG) VQT1T0 3
21
Page 22

[REC] mode: 񳲿
1
231
2
3
4
Taking Pictures using the Built-in Flash
Switching to the appropriate flash setting
Set the flash to match the recording.
Press 1 [‰].
Press 3/4 to select a mode.
• You can also press 1 [‰] to select.
Press [MENU/SET].
• You can also press the shutter button halfway to finish.
• The menu screen disappears after about 5 seconds. At this
time, the selected item is automatically set.
[REC] mode: 񳲿
Taking Pictures with the Self-timer
Press 2 [ë].
Press 3/4 to select a mode.
• You can also press 2 [ë] to select.
Press [MENU/SET].
• You can also press the shutter button halfway to finish.
• The menu screen disappears after about 5 seconds. At this time, the selected item is
automatically set.
VQT1T03 (ENG )
22
Press the shutter button halfway to focus
and then press it fully to take the picture.
• The self-timer indicator A blinks and the shutter is
activated after 10 seconds (or 2 seconds).
• If you press [MENU/SET] while the self-timer is set, the
self-timer setting is cancelled.
Page 23

[PLAYBACK] mode: ¸
1
2
A
B
Playing back Pictures ([NORMAL PLAY])
Slide the [REC]/[PLAYBACK] selector
switch A
• Normal playback is set automatically in the
following cases.
– When the mode was switched from the [REC]
to [(].
to [PLAYBACK].
Press 2/1 to select the picture.
2: Play back the previous picture
1: Play back the next picture
• Speed of picture forwarding/rewinding changes depending on the playback status.
∫ Fast forwarding/Fast rewinding
Press and hold 2/1 during playback.
2:Fast rewind
1: Fast forward
The file number A and the picture number B only
•
change one by one. Release 2/1 when the number of
the desired picture appears to play back the picture.
• If you keep pressing 2/1, the number of pictures forwarded/rewound increases.
(ENG) VQT1T0 3
23
Page 24

[PLAYBACK] mode: ¸
1
2
MENU
/SET
1
2
3
4
5
Deleting Pictures
Once deleted, pictures cannot be recovered.
Pictures on the built-in memory or the card, which is being played back will be deleted.
•
To delete a single picture
Select the picture to be deleted, and then
press [‚].
A [DISPLAY] button
B [
‚] button
Press 2 to select [YES] and then press
[MENU/SET].
To delete multiple pictures (up to 50) or all the pictures
Press [‚].
Press 3/4 to select [DELETE MULTI] or [DELETE ALL] and then
press [MENU/SET].
• [DELETE ALL] > step 5.
24
Press 3/4/2/1 to select the picture, and
then press [DISPLAY] to set. (Repeat this
step.)
• [ ] appears on the selected pictures. If [DISPLAY] is
pressed again, the setting is cancelled.
Press [MENU/SET].
Press 3 to select [YES] and then press [MENU/SET] to set.
VQT1T03 (ENG )
DISPLAY
Page 25

Connecting to other equipment
1
DC IN
AV OUT/
DIGITAL
COMPONENT
OUT
Connecting to a PC
You can acquire recorded pictures to a PC by connecting the camera and the PC.
•
You can easily print out or mail the pictures you have imported. Use of the
“PHOTOfunSTUDIO-viewer-” bundled software on the CD-ROM (supplied) is a convenient
way of doing this.
• Read the separate operating instructions for the supplied software for more information about
the software in the CD-ROM (supplied) and how to install it.
Preparations:
Turn on the camera and the PC.
Remove the card before using the pictures in the built-in memory.
Connect the camera to a PC via the USB connection cable A
(supplied).
• Do not use any other USB connection cables except the supplied one.
Use of cables other than the supplied USB connection cable may cause malfunction.
A USB connection cable (supplied)
• Check the directions of the connectors, and plug them straight in or unplug them straight out.
(Otherwise the connectors may be bent out of shape which will cause trouble.)
B Align the marks, and insert.
C AC adaptor (DMW-AC5G; optional)
• Use a battery with sufficient battery power or the AC adaptor (DMW-AC5G; optional). If the
remaining battery power becomes low while the camera and the PC are communicating, the
status indicator blinks and the alarm beeps.
Refer to “Disconnecting the USB connection cable safely” before disconnecting the USB
connection cable. Otherwise, data may be destroyed.
(ENG) VQT1T0 3
25
Page 26

Press 3/4 to select [PC], and then press [MENU/
2
USB MODE
SELECT
SET
PLEASE SELECT
THE USB MODE
PictBridge(PTP)
PC
MENU
3
4
5
SET].
• If [USB MODE] is set to [PC] in the [SETUP] menu in advance,
the camera will be automatically connected to the PC without
displaying the [USB MODE] selection screen. Since there is no
need to set this each time you connect to the PC, it is convenient.
• When the camera has been connected to the PC with
[USB MODE] set to [PictBridge(PTP)], a message may appear
on the PC’s screen. Select [Cancel] to close the screen, and
disconnect the camera from the PC. Then set [USB MODE] to
[PC] again.
Double-click on [Removable Disk] in [My Computer].
• When using a Macintosh, the drive is displayed on the desktop. (“LUMIX”, “NO_NAME”
or “Untitled” is displayed.)
Double-click [DCIM] folder.
Using a drag-and-drop operation, move the pictures you want to
acquire or the folder storing those pictures to any different folder on
the PC.
∫ Disconnecting the USB connection cable safely
Proceed with the hardware removal using “Safely Remove Hardware” on the task tray of the
•
PC. If the icon is not displayed, check that [ACCESS] is not displayed on the LCD monitor of
the digital camera before removing the hardware.
26
VQT1T03 (ENG )
Page 27

Reading the Operating Instructions (PDF format)
1
2
3
1
2
3
• You have practised the basic operations introduced in these operating instructions and want to
progress to advanced operations.
• You want to check the Troubleshooting.
In these kinds of situations refer to Operating Instructions (PDF format) recorded on the
CD-ROM containing the Operating Instructions (supplied).
∫ For Windows
Turn the PC on and insert the CD-ROM containing the Operating
Instructions (supplied).
Select the desired language and then
click [Operating Instructions] to
install.
(Example: When an English language OS)
Double click the “FX150_FX180
Operating Instructions” shortcut
icon on the desktop.
∫ When the Operating Instructions (PDF format) will not open
You will need Adobe Acrobat Reader 4.0 or later to browse or print the Operating
Instructions (PDF format).
Download and install a version of Adobe Reader that you can use with your OS from the
following Web Site.
http://www.adobe.com/products/acrobat/readstep2_allversions.html
∫ To uninstall the Operating Instructions (PDF format)
Delete the PDF file from the “Program Files\Panasonic\Lumix\” folder.
When the contents in the Program Files folder cannot be displayed, click the [Show the
•
contents of this folder] to display them.
∫ For Macintosh
Turn the PC on and insert the CD-ROM containing the Operating
Instructions (supplied).
Open the “Manual” folder in “VFF0434” and then
copy the PDF file with the desired language
inside the folder.
Double click the PDF file to open it.
(ENG) VQT1T0 3
27
Page 28

Specifications
Digital Camera: Information for your safety
Power Source: DC 5.1 V
Power Consumption: 1.6 W (When recording)
Camera effective pixels
Image sensor: 1/1.72q CCD, total pixel number 15,000,000 pixels, Primary
Lens: Optical 3.6k zoom, fl6.0 mm to 21.4 mm (35 mm film camera
Digital zoom: Max. 4k
Extra
optical zoom: Max. 7.7k
Focus: Normal/Macro/Face detection/AF Tracking/Multi-area-focusing/
Focus range:
Shutter system:
Motion picture
recording: 1280k720 pixels (24 frames/second, only when using a Card)/
Burst recording
Burst speed:
Number of recordable
pictures: Max. 8 pictures (Standard), max. 4 pictures (Fine), Depends on
Hi-speed burst
Burst speed: Approx. 7 pictures/second (Speed priority)
Number of recordable
pictures:
ISO sensitivity: AUTO/100/200/400/800/1600
0.6 W (When playing back)
: 14,700,000 pixels
colour filter
equivalent: 28 mm to 100 mm)/F2.8 to F5.6
1-area-focusing (High speed)/1-area-focusing/Spot-focusing
Normal: 50 cm to ¶
Macro/Intelligent auto:
5 cm (Wide)/
Scene mode: There may be differences in the above settings.
Electronic shutteriMechanical shutter
848k480 pixels (30 frames/second, only when using a Card)/
640k480 pixels (30 frames/second, only when using a Card)/
320k240 pixels (30 frames/second, 10 frame/second)
With audio
2 pictures/second (
(Unlimited)
the remaining capacity of the built-in memory or the card
(Unlimited).
(Performance in burst recording is only with SD Memory Card/
SDHC Memory Card. MultiMediaCard performance will be
less.)
Approx. 5 pictures/second (Image priority)
(3M (4:3), 2.5M (3:2) or 2M (16:9) is selected as the picture
size.)
Approx. 30 to 100 (Speed priority)
Approx. 35 to 100 (Image priority)
[HIGH SENS.] mode: 1600 to 6400
30 cm (Tele) to ¶
Normal
), Approx. 1.5 pictures/second
VQT1T03 (ENG )
28
Page 29

Shutter speed: 60 seconds to 1/2000th of a second
[STARRY SKY] mode: 15 seconds, 30 seconds, 60 seconds
White balance: Auto white balance/Daylight/Cloudy/Shade/Incandescent lights/
White set 1/White set 2/Colour temperature setting
Exposure (AE):
Programme AE (P), Manual exposure (M)
Exposure compensation (1/3 EV Step, j2EV to i2EV)
Metering mode: Multiple/Centre weighted/Spot
LCD monitor: 2.7q TFT LCD
(Approx. 230,000 dots) (field of view ratio about 100%)
Flash: Flash range: [ISO AUTO]
Approx. 60 cm to 5.9 m (Wide)
AUTO, AUTO/Red-eye reduction, Forced flash ON (Forced ON/
Red-eye reduction), Slow sync./Red-eye reduction, Forced
flash OFF
Microphone: Monaural
Speaker: Monaural
Recording media: Built-in Memory (Approx. 50 MB)/SD Memory Card/SDHC
Memory Card/MultiMediaCard (Still pictures only)
Picture size
Still picture: When the aspect ratio setting is [X]
4416k3312 pixels, 3648k2736 pixels, 3072k2304 pixels,
2560k1920 pixels, 2048k1536 pixels, 1600k1200 pixels,
640k480 pixels
When the aspect ratio setting is [Y]
4416k2944 pixels, 3648k2432 pixels, 3072k2048 pixels,
2560k1712 pixels, 2048k1360 pixels
When the aspect ratio setting is [W]
4416k2480 pixels, 3648k2056 pixels, 3072k1728 pixels,
2560k1440 pixels, 1920k1080 pixels
Motion pictures: 1280k720 pixels (Only when using a Card)/
848k480 pixels (Only when using a Card)/
640k480 pixels (Only when using a Card)/
320k240 pixels
Quality: Fine/Standard/RAW/RAWiJPEG
Recording file format
Still Picture: RAW/JPEG (based on “Design rule for Camera File system”,
based on “Exif 2.21” standard)/DPOF corresponding
Pictures with audio: JPEG (based on “Design rule for Camera File system”, based
on “Exif 2.21” standard)
r“QuickTime” (pictures with audio)
Motion pictures: “QuickTime Motion JPEG” (motion pictures with audio)
Interface
Digital: “USB 2.0” (High Speed)
Analogue video/
audio: NTSC/PAL Composite (Switched by menu), Component
Audio line output (monaural)
Terminal
[COMPONENT OUT]: Dedicated jack (10 pin)
[AV OUT/DIGITAL]: Dedicated jack (8 pin)
[DC IN]: Dedicated jack (2 pin)
(ENG) VQT1T0 3
29
Page 30

Dimensions: Approx. 96.7 mm (W)k54.0 mm (H)k24.8 mm (D)
(excluding the projecting parts)
Mass: Approx. 151 g (excluding card and battery)
Approx. 179 g (with card and battery)
Operating temperature:
0 oC to 40 oC
Operating humidity: 10% to 80%
Battery Charger (Panasonic DE-A42B) (DMC-FX180GC)
(Panasonic DE-A42A) (DMC-FX150SG):
Information for your safety
Input: 110 V to 240 V 50/60 Hz, 0.2 A
Output: CHARGE 4.2 V 0.8 A
Battery Pack (lithium-ion) (Panasonic CGA-S005E):
Information for your safety
Voltage: 3.7 V
VQT1T03 (ENG )
30
Page 31

(ENG) VQT1T0 3
31
Page 32

Matsushita Electric Industrial Co., Ltd.
Web Site: http://panasonic.net
QuickTime and the QuickTime logo are trademarks or registered
trademarks of Apple Inc., used under license therefrom.
 Loading...