

Page 1
Operating Instructions
for advanced features
Digital Camera
Model No.
Before use, please read the instructions completely.
DMC-FS33
VQT2P26
Page 2

Contents
Before Use
Quick Guide .............................................. 4
Standard Accessories............................... 6
Names of the Components ....................... 7
How to Use the Touch Panel ..................... 9
Preparation
Charging the Battery .............................. 11
• About the battery life and
the playback time ............................. 14
Inserting and Removing the Card
(optional)/the Battery .......................... 15
About the Built-in Memory/the Card ....... 17
Setting Date/Time (Clock Set) ................ 19
• Changing the clock setting ............... 20
Setting the Menu .................................... 21
• Setting menu items ......................... 22
• Using the Quick Menu ...................... 24
About the Setup Menu ............................ 25
Selecting the [REC] Mode ...................... 33
Basic
Taking Pictures Using the Automatic
Function (4: Intelligent Auto Mode)
• Scene Detection ............................... 37
• Settings in Intelligent Auto Mode ...... 38
Taking Pictures with Your Favourite
Settings (1
• Focusing ........................................... 40
• When the subject is not in focus
(such as when it is not in the
centre of the composition of
the picture you want to take) ............ 40
• Preventing jitter (camera shake)....... 41
• Direction Detection Function ............ 41
Taking Pictures with the Zoom ................ 42
• Using the Optical Zoom/Using the
Extra Optical Zoom (EZ)/
Using the Digital Zoom ..................... 42
Playing Back Pictures
([NORMAL PLAY]) .............................. 44
: Normal Picture Mode
... 35
) ... 39
• Using the Playback Zoom ................ 45
• Displaying multiple pictures
([MULTI PLAYBACK]) ....................... 46
Deleting Pictures .................................... 47
• To delete a single picture ................. 47
• To delete multiple pictures
(up to 50) or all the pictures ............. 48
Advanced (Recording pictures)
About the LCD Monitor ........................... 49
Taking Pictures Using the Built-in Flash
• Switching to the appropriate ash
setting ............................................... 50
Taking Close-up Pictures ........................ 55
• [AF MACRO] .................................... 55
• [MACRO ZOOM] .............................. 56
Taking Pictures with the Self-timer ......... 57
Taking Pictures with the Touched Area in
Focus (Touch AF Area Selection) ....... 58
Compensating the Exposure .................. 60
Taking Pictures That Match the Scene
Being Recorded (Scene Mode) .......... 61
• Registering scenes in Scene Mode
(/ : My Scene Mode) ...................... 61
• Selecting the Scene Mode for each
recording (5: Scene Mode) ........... 62
• [PORTRAIT] ..................................... 63
• [SOFT SKIN] .................................... 63
• [TRANSFORM] ................................ 64
• [SELF PORTRAIT] ........................... 64
• [SCENERY] ...................................... 65
• [SPORTS] ........................................ 65
• [NIGHT PORTRAIT] ......................... 65
• [NIGHT SCENERY] .......................... 66
• [FOOD] ............................................. 66
• [PARTY] ............................................ 67
• [CANDLE LIGHT] ............................. 67
• [BABY1] / [BABY2] ........................... 68
• [PET] ................................................ 69
• [SUNSET] ......................................... 69
• [HIGH SENS.] .................................. 69
• [HI-SPEED BURST] ......................... 70
• [FLASH BURST] .............................. 71
.... 50
- 2 -
Page 3

• [STARRY SKY] ................................. 72
• [FIREWORKS] ................................. 72
• [BEACH] ........................................... 73
• [SNOW] ............................................ 73
• [AERIAL PHOTO] ............................. 73
• [FILM GRAIN] ................................... 74
• [PHOTO FRAME] ............................. 74
Motion Picture Mode ............................... 75
Useful Functions at Travel Destinations
• Recording which Day of the
Vacation You Take the Picture .......... 78
• Recording Dates/Times at Overseas
Travel Destinations (World Time) ..... 81
Using the [REC] Mode Menu .................. 83
• [FLASH] ............................................ 83
• [SELFTIMER] ................................... 83
• [PICTURE SIZE] .............................. 83
• [REC QUALITY] ............................... 84
• [SENSITIVITY] ................................. 85
• [AF MODE] ....................................... 86
• [MACRO MODE] .............................. 87
• [WHITE BALANCE] .......................... 88
• [EXPOSURE] ................................... 89
• [BURST] ........................................... 90
• [DIGITAL ZOOM] .............................. 91
• [COLOR MODE] ............................... 91
• [STABILIZER] ................................... 92
• [AF ASSIST LAMP] .......................... 93
• [RED-EYE REMOVAL] ..................... 93
• [CLOCK SET] ................................... 93
Entering Characters................................ 94
... 78
Advanced (Playback)
Playing Back Pictures in Sequence
(Slide Show) ....................................... 95
Displaying Pictures by Recording Date
([CALENDAR]) .................................... 97
Selecting Pictures and Playing them Back
([CATEGORY PLAY]/
[FAVORITE PLAY]) ............................. 98
• [CATEGORY PLAY] .......................... 98
• [FAVORITE PLAY] .......................... 100
Playing Back Motion Pictures ............... 101
Using the [PLAYBACK] Mode Menu ..... 103
• [TEXT STAMP] ............................... 103
• [RESIZE] Reducing the picture size
(number of pixels)........................... 105
• [CROPPING] .................................. 107
• [ROTATE DISP.] .............................. 108
• [FAVORITE] .................................... 109
• [PRINT SET] .................................. 110
• [PROTECT] .................................... 112
• [COPY] Copying pictures from the
built-in memory to a card ................ 113
Connecting to other equipment
Connecting to a PC .............................. 114
Printing the Pictures ............................. 117
• Selecting a single picture and
printing it......................................... 118
• Selecting multiple pictures and
printing them .................................. 119
• Print Settings .................................. 120
Playing Back Pictures on a
TV Screen ......................................... 123
• Playing back pictures using the
AV cable ......................................... 123
• Playing back pictures on a TV
with an SD Memory Card slot ........ 124
Others
Screen Display ..................................... 125
Cautions for Use ................................... 128
Message Display .................................. 134
Troubleshooting .................................... 137
Number of Recordable Pictures and
Available Recording Time ................. 146
- 3 -
Page 4
Before Use
Quick Guide
This is an overview of how to record and play back pictures with the camera. For each
step, be sure to refer to the pages indicated in brackets.
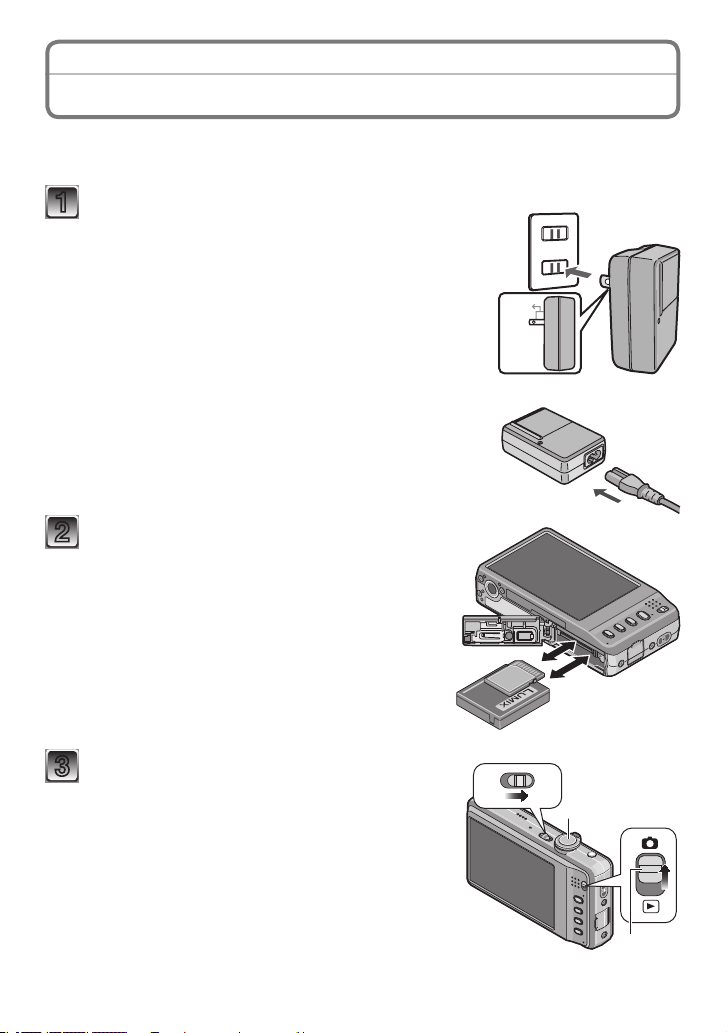
Charge the battery. (P11)
1
• The battery is not charged when the camera is
shipped. Charge the battery before use.
Insert the battery and the card. (P15)
2
• When you do not use the card, you can
record or play back pictures on the built-in
memory. (P17) Refer to P18 when you use a
card.
Plug-in type
90°
Inlet type
Turn the camera on to take pictures.
3
1Slide the [REC]/[PLAYBACK] selector switch
to [1].
2Press the shutter button to take pictures. (P35)
- 4 -
OFF ON
Page 5

Before Use
Play back the pictures.
4
1Slide the [REC]/[PLAYBACK] selector switch to
[5].
2Select the picture you want to view. (P44)
- 5 -
Page 6

Before Use
Standard Accessories
Check that all the accessories are included before using the camera.
• The accessories and their shape will differ depending on the country or area where the
camera was purchased.
For details on the accessories, refer to Basic Operating Instructions.
• Battery Pack is indicated as battery pack or battery in the text.
• Battery Charger is indicated as battery charger or charger in the text.
• SD Memory Card, SDHC Memory Card and SDXC Memory Card are indicated as card
in the text.
• The card is optional.
You can record or play back pictures on the built-in memory when you are not
using a card.
• Consult the dealer or your nearest Service Centre if you lose the supplied accessories.
(You can purchase the accessories separately.)
- 6 -
Page 7
Before Use
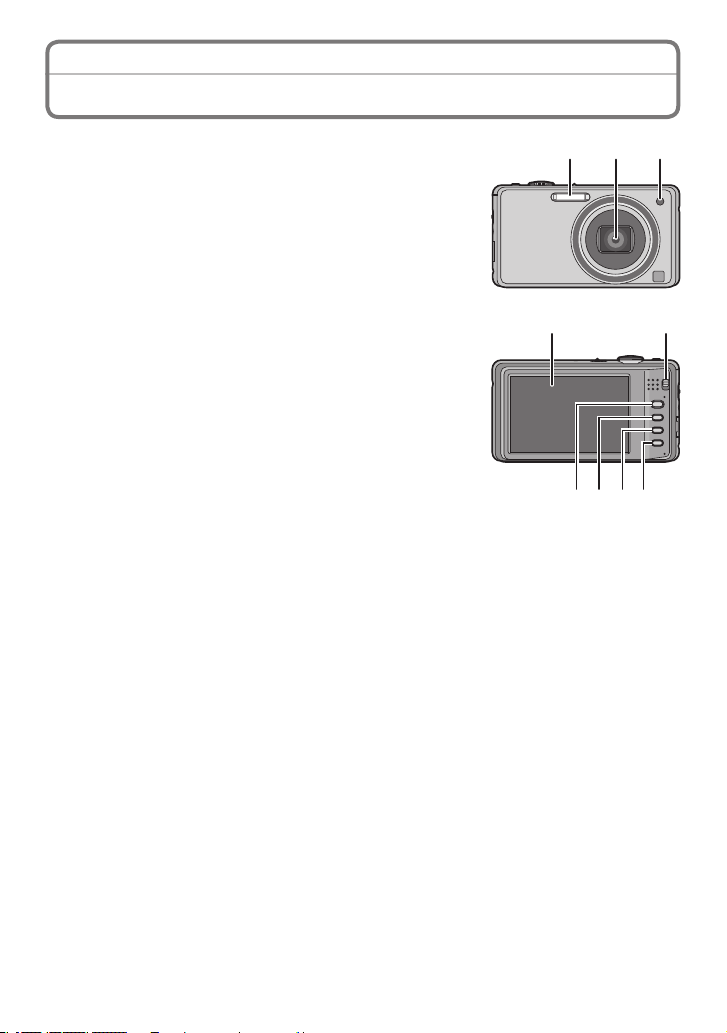
21 3
4 5
Names of the Components
1 Flash (P50)
2 Lens (P140)
3 Self-timer Indicator (P57)
AF Assist Lamp (P93)
4 Touch Panel/LCD Monitor (P9, 49, 125, 140)
5 [REC]/[PLAYBACK] selector switch (P21)
6 [MODE] button (P33)
7 [DISPLAY] button (P49)
8 [MENU] button (P22)
9 [Q.MENU] (P24)/Delete (P47) button
876 9
- 7 -
Page 8
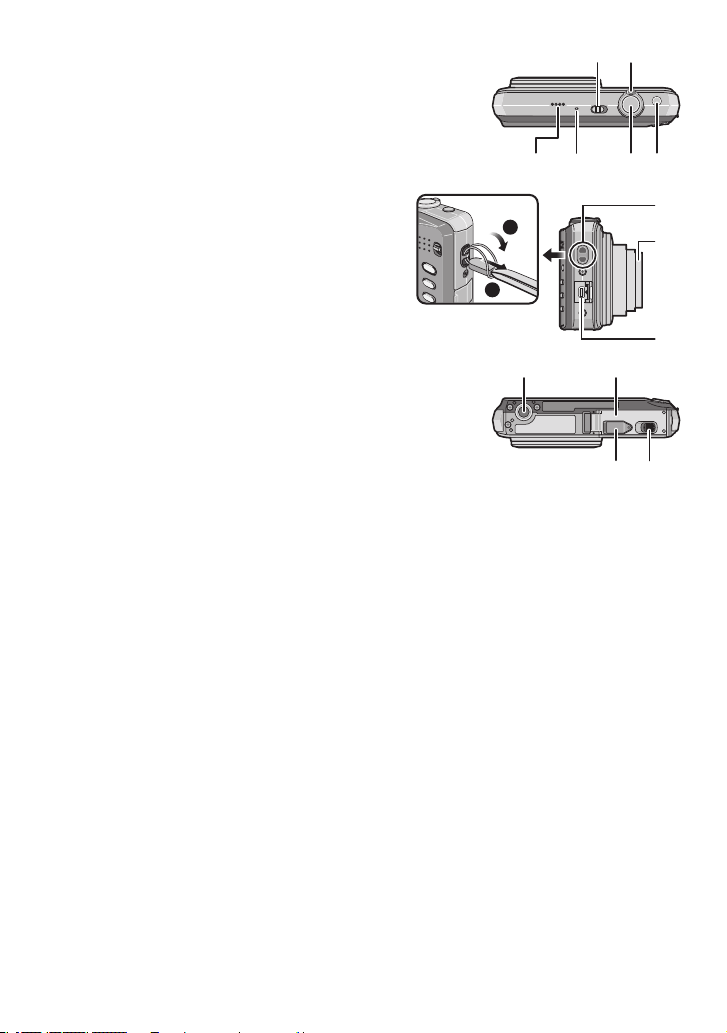
10
11
10 Camera ON/OFF switch (P19)
16
18
19 20
11 Zoom lever (P42)
12 Speaker (P101)
13 Microphone (P75)
14 Shutter button (P36, 75)
15 Intelligent auto button (P35)
Before Use
12 13 14 15
16 Hand strap eyelet
• Be sure to attach the hand strap when using
the camera to ensure that you will not drop
it.
17 Lens barrel
18 [AV OUT/DIGITAL] socket (P114, 117, 123)
19 Tripod receptacle
• When you use a tripod, make sure the tripod is stable
when the camera is attached to it.
20 Card/Battery door (P15, 16)
21 Release lever (P15)
22 DC coupler cover (P16)
• When using an AC adaptor, ensure that the Panasonic DC coupler (optional) and
AC adaptor (optional) are used. For connection details, refer to P16.
1
2
17
22 21
- 8 -
Page 9
Before Use
How to Use the Touch Panel
You can operate by directly touching the LCD Monitor (Touch Panel) with your nger.
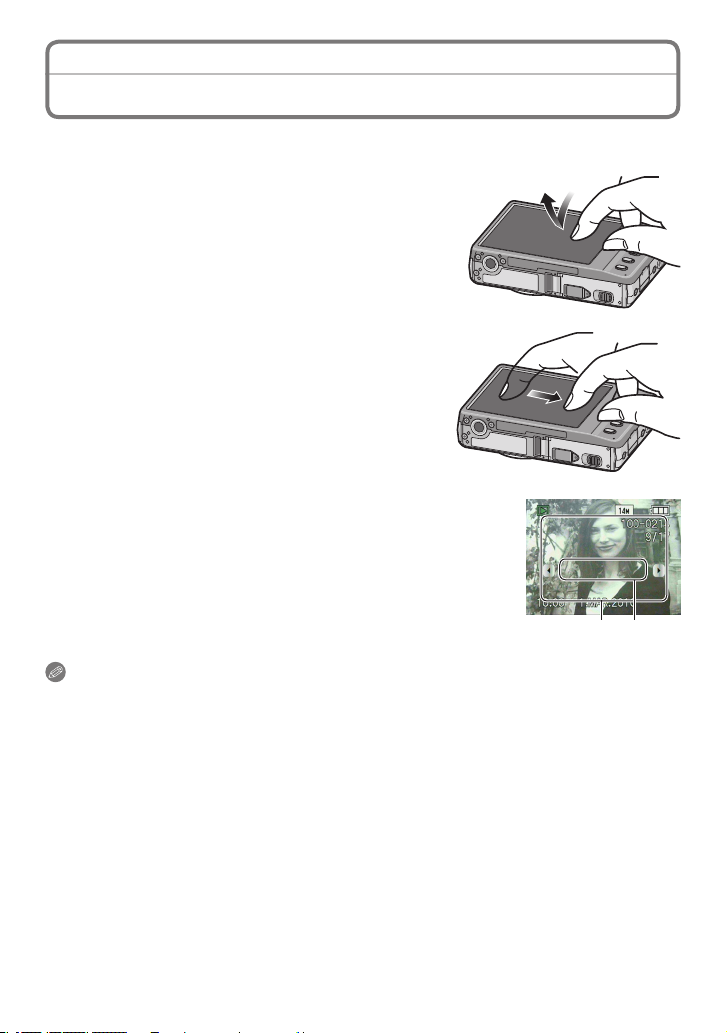
Touch
To touch and release the Touch Panel.
It is used to select icon or picture.
• It may not operate properly when multiple icons are
touched simultaneously, so try to touch the centre of
the icon.
Drag
A movement performed without releasing the Touch
Panel. It is used to forward or rewind the image during
playback.
• Drag horizontally on the centre area of the screen
(See below).
About the touch area of the screen
When touching or dragging the Touch Panel, be sure to touch or
drag the centre area of the screen.
Touch Panel may fail to detect the operation if you touch or drag
the edge of the screen that is out of the sensor area.
A Detection area of the sensor (approximation)
B The available area for drag operation (approximation)
A B
Note
• This Touch Panel detects the electrical properties of the human body (capacitive touch
panel). Touch the panel directly with your bare nger.
• Touch the panel with the clean and dry nger.
• The touch panel generally cannot be used:
– with a commercially available stylus pen or a gloved hand.
– with a wet hand or immediately after applying hand lotion
– when you use a commercially available liquid crystal protection sheet (it may impair
visibility and functionality.)
– when both hands or more than one nger are on the Touch Panel at the same time
• Do not press on the LCD Monitor with hard pointed tips, such as ball point pens.
• Do not operate with your ngernails.
• Wipe the LCD Monitor with a dry soft cloth when it gets dirty.
• Do not scratch or press the LCD Monitor too hard.
- 9 -
Page 10
Before Use
General information for Touch Panel operation icons
With some knowledge about frequently appearing icons, Touch Panel operation will
become easier. In addition, some of the buttons or controls on the camera can be used as
well as the icons.
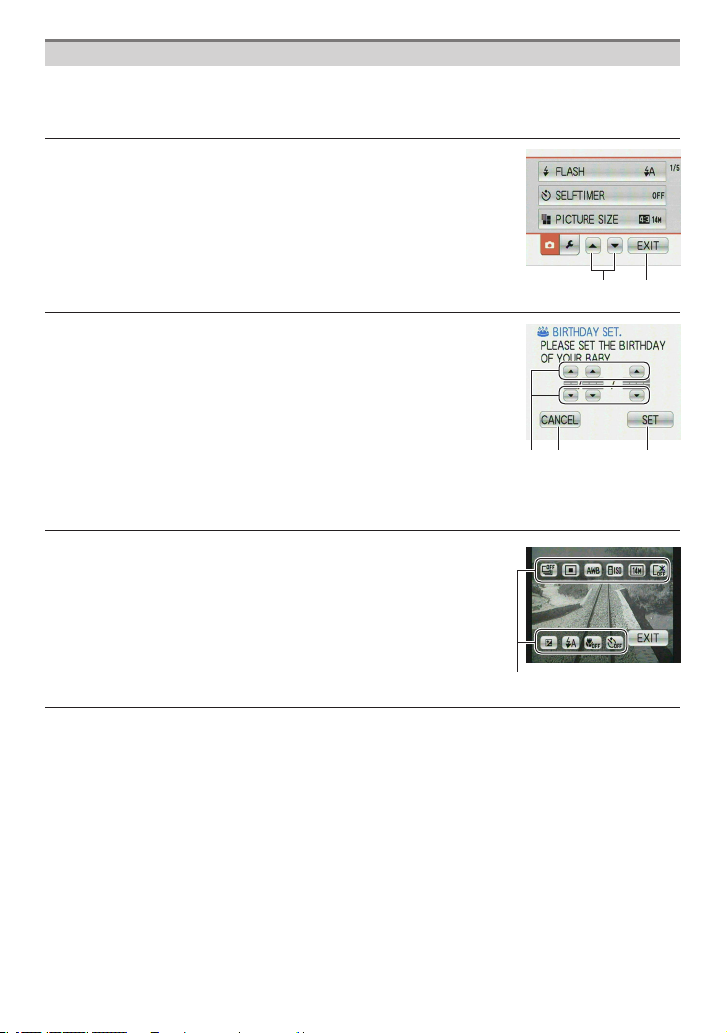
AMoves to the next or previous page for a menu screen etc.
when it has multiple pages.
• You can also use the zoom lever on the camera to move to
next or previous page.
BReturns to the previous menu screen or closes the menu.
A B
CUse these icons to change or adjust the value of a setting. You
may see [w]/[q] instead of [e]/[r] on some screens.
• Touch and release these icons repeatedly until the required
value is obtained. The value does not change in succession
when you keep touching the icons.
DAfter changing a value with [e]/[r]/[w]/[q], touch this icon to
set the new value.
EReturns to the previous screen without changing any setting.
• You can also use [4] button on the camera to cancel.
FThese icons are displayed on the Quick Menu (P24) or on the
recording/playback screen, and provide useful functions for
recording or playback.
• Depending on the LCD status, the icons may disappear
after a certain period of time when no operation is
performed. In this case, touch any point of the screen to
retrieve the icons.
C E D
F
To cancel the Touch Panel operation
Pressing the shutter button halfway cancels the Touch Panel operation and retrieves the
recording screen when the camera is in [REC] Mode.
- 10 -
Page 11
Preparation
Charging the Battery
About batteries that you can use with this unit
Supplied battery or dedicated optional batteries can be used with this camera.
Refer to Basic Operating Instructions about the accessory number of the available
optional batteries in your area.
It has been found that counterfeit battery packs which look very similar to the
genuine product are made available to purchase in some markets. Some of these
battery packs are not adequately protected with internal protection to meet the
requirements of appropriate safety standards. There is a possibility that these
battery packs may lead to re or explosion. Please be advised that we are not
liable for any accident or failure occurring as a result of use of a counterfeit
battery pack. To ensure that safe products are used we would recommend that a
genuine Panasonic battery pack is used.
• Use the dedicated charger and battery.
• The camera has a function for distinguishing batteries which can be used safely.
The dedicated battery supports this function. The only batteries suitable for use
with this unit are genuine Panasonic products and batteries manufactured by
other companies and certied by Panasonic. (Batteries which do not support this
function cannot be used.) Panasonic cannot in any way guarantee the quality,
performance or safety of batteries which have been manufactured by other
companies and are not genuine Panasonic products.
• The battery is not charged when the camera is shipped. Charge the battery before
use.
• Charge the battery with the charger indoors.
• Charge the battery in a temperature between 10
should also be the same.)
o
C to 35 oC. (The battery temperature
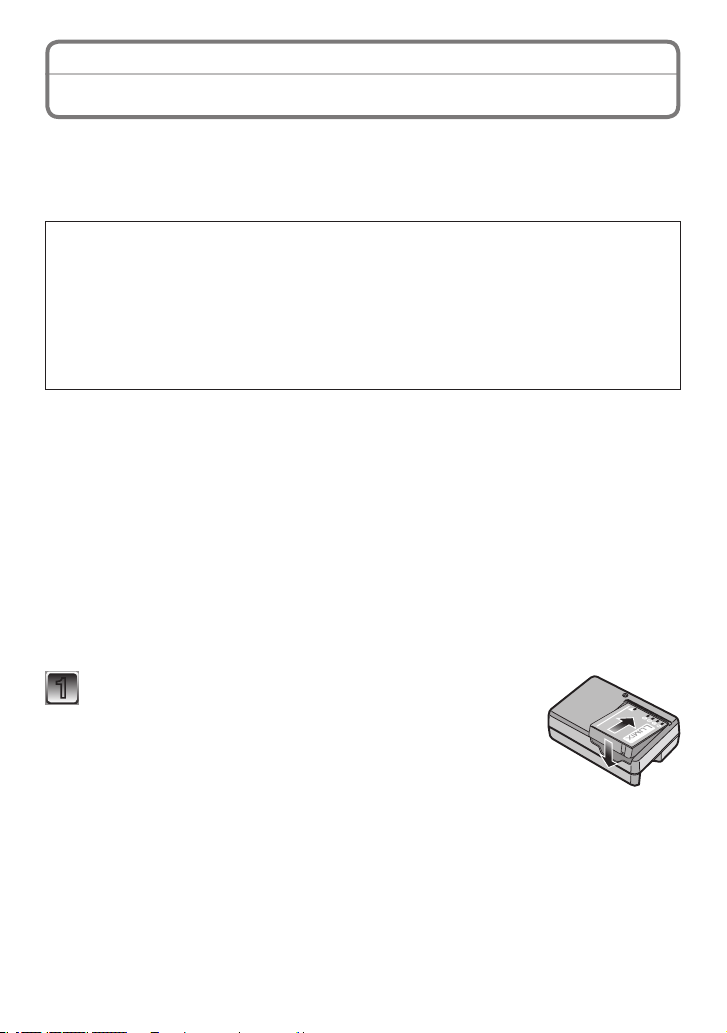
Attach the battery paying attention to the direction
1
of the battery.
- 11 -
Page 12

Preparation
Connect the charger to the electrical
2
outlet.
• The AC cable does not t entirely into the AC
input terminal. A gap will remain as shown on
the right.
• Charging star ts when the [CHARGE] indicator A
lights green.
Detach the battery after charging is completed.
3
• Charging is complete when the [CHARGE] indicator A
turns off.
• After charging is completed, be sure to disconnect the
power supply device from the electrical outlet.
Plug-in type
90°
A
Inlet type
A
- 12 -
Page 13
Preparation
Charging
Supplied battery Optional battery
Charging time
¼
with the supplied charger
Approx. 100 min Approx. 130 min
• The indicated charging time is for when the battery has been discharged
completely. The charging time may vary depending on how the battery has been
used. The charging time for the battery in hot/cold environments or a battery that
has not been used for long time may be longer than normal.
When the [CHARGE] indicator ashes
• The battery temperature is too high or too low. Please charge the battery again in a
temperature between 10 °C to 35 °C.
• The terminals of the charger or the battery are dirty. In this case, wipe them with a dry
cloth.
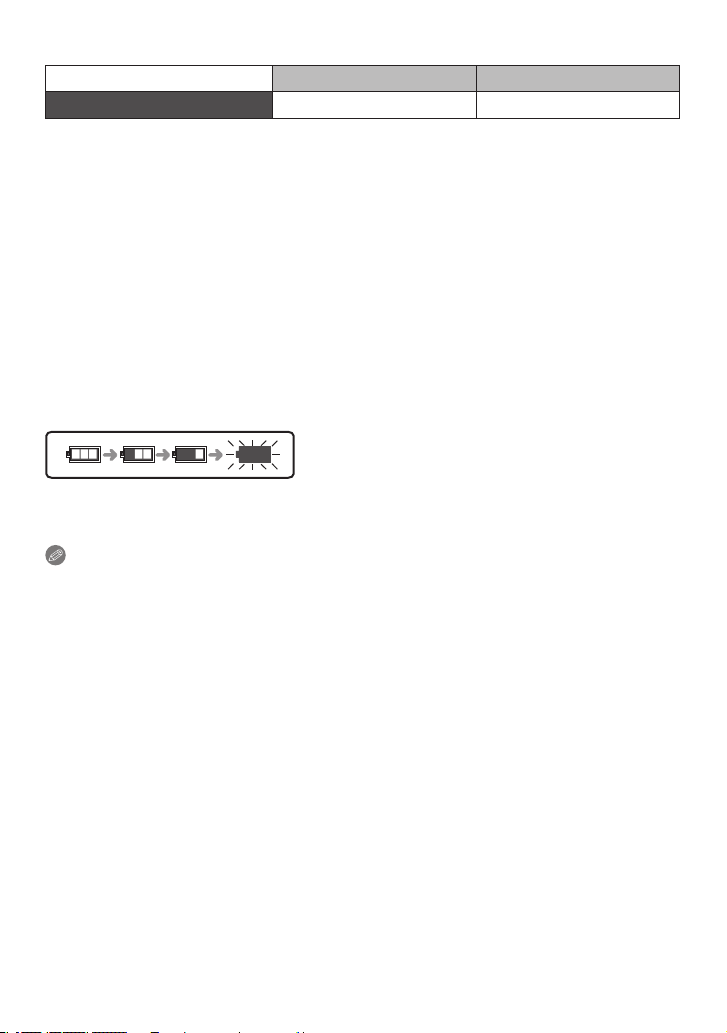
Battery indication
The battery indication is displayed on the LCD monitor.
[It does not appear when you use the camera with the AC adaptor (optional) connected.]
• The indication turns red and blinks if the remaining battery power is exhausted.
Recharge the battery or replace it with a fully charged battery.
Note
• The battery becomes warm after using it and during and after charging. The camera
also becomes warm during use. This is not a malfunction.
• The battery can be recharged even when it still has some charge left, but it is not
recommended that the battery charge be frequently topped up while the battery is fully
charged. (Since characteristic swelling may occur.)
• Do not leave any metal items (such as clips) near the contact areas of the power
plug. Otherwise, a re and/or electric shocks may be caused by short-circuiting or
the resulting heat generated.
- 13 -
Page 14

Preparation
About the battery life and the playback time
The battery life (By CIPA standard in Normal Picture Mode)
Supplied battery Optional battery
Capacity 740 mAh 940 mAh
Number of recordable
pictures
Recording time Approx. 150 min Approx. 190 min
Recording conditions by CIPA standard
• CIPA is an abbreviation of [Camera & Imaging Products Association].
• Temperature: 23 °C/Humidity: 50% when LCD monitor is on.
• Using a Panasonic SD Memory Card (32 MB).
• Star ting recording 30 seconds after the camera is turned on. (When the Optical Image
Stabilizer function is set to [AUTO].)
• Recording once every 30 seconds with full ash every second recording.
• Rotating the zoom lever from Tele to Wide or vice versa in every recording.
• Turning the camera off every 10 recordings and leaving it until the temperature of the
battery decreases.
The number of recordable pictures varies depending on the recording interval time.
If the recording interval time becomes longer, the number of recordable pictures
decreases. [e.g. When recording once every 2 minutes, the number of recordable
pictures decreases to a quarter.]
Playback time Approx. 280 min Approx. 360 min
Approx. 300 pictures Approx. 380 pictures
Supplied battery Optional battery
Note
• The operating time and the number of recordable pictures vary depending on the
camera’s environment or using conditions.
For example, the operating time and the recordable pictures are reduced when;
– you are in low temperature areas such as on ski slopes
– Auto Power LCD Mode, Power LCD Mode or High Angle Mode (P27) is used
– the ash or the zoom operation is frequently used.
• When the operating time of the camera becomes extremely short even after properly
charging the battery, the life of the battery may have expired. Buy a new battery.
- 14 -
Page 15
Preparation
OPEN LOCK
OPEN LOCK
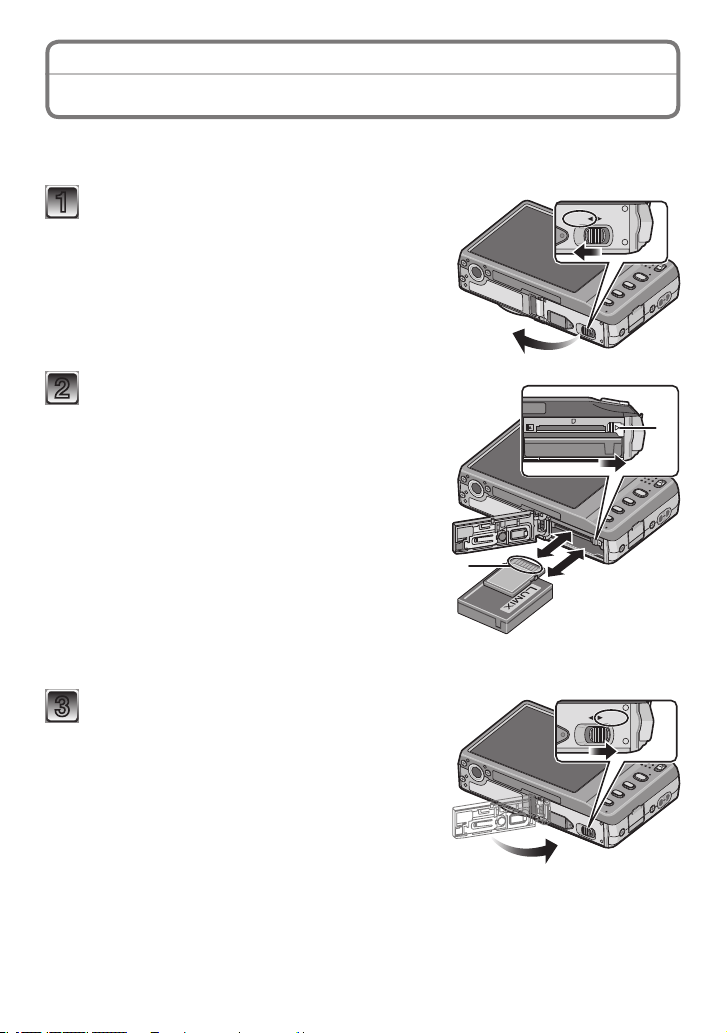
Inserting and Removing the Card (optional)/the Battery
• Check that this unit is turned off.
• We recommend using a Panasonic card.
Slide the release lever in the direction
1
of the arrow and open the card/battery
door.
• Always use genuine Panasonic batteries.
• If you use other batteries, we cannot
guarantee the quality of this product.
Battery: Insert until it is locked by
2
the lever A being careful about the
direction you insert it. Pull the lever A
in the direction of the arrow to remove
the battery.
Card: Push it fully until it clicks being
careful about the direction you insert it.
To remove the card, push the card until
it clicks, then pull the card out upright.
B: Do not touch the connection terminals of the
card.
• The card may be damaged if it is not fully
inserted.
B
CARDBATTERY
A
1: Close the card/battery door.
3
2: Slide the release lever in the
direction of the arrow.
• If the card/battery door cannot be completely
closed, remove the card, check its direction
and then insert it again.
2
1
- 15 -
Page 16
Preparation
Note
• Remove the battery after use. Store the removed battery in the battery case (supplied).
• Do not remove the battery until the LCD Monitor turns off as the settings on the camera
may not be stored properly.
• The supplied battery is designed only for the camera. Do not use it with any other
equipment.
• The battery will be exhausted if left for a long period of time after being charged.
• Before removing the card or battery, turn the camera off. (Otherwise, this unit may no
longer operate normally and the card itself may be damaged or the recorded pictures
may be lost.)
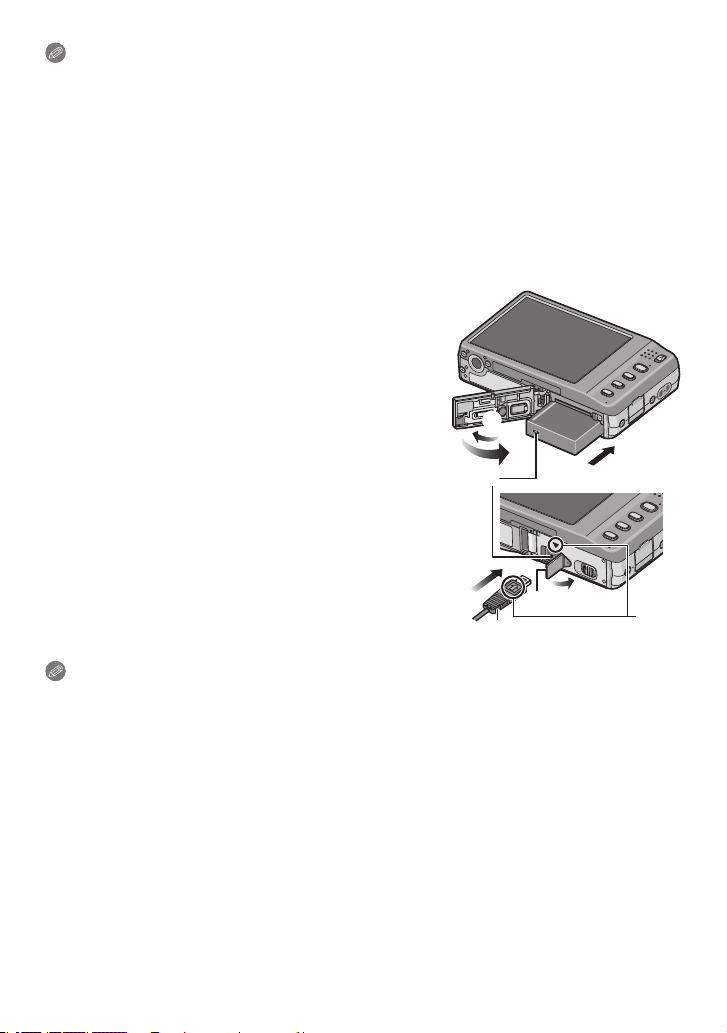
Using an AC adaptor (optional) and a DC coupler (optional) instead of the battery
Ensure that the AC adaptor (optional) and DC
coupler (optional) are purchased as a set. Do not
use if sold separately.
1Open the card/battery door.
2Insert the DC coupler, being careful of the direction.
3Close the card/battery door.
• Ensure that the card/battery door is closed.
4Open the DC coupler cover A.
• If it is difcult to open, push open the coupler cover
from the interior with the card/battery door in an
open state.
5Plug the AC adaptor into an electrical outlet.
6Connect the AC adaptor B to the [DC IN] socket C
of the DC coupler.
D Align the marks, and insert.
• Ensure that only the AC adaptor and DC coupler for
this camera are used. Using any other equipment
may cause damage.
3
6
1
C
B
A
2
4
D
Note
• Always use a genuine Panasonic AC adaptor (optional).
• When using an AC adaptor, use the AC cable supplied with the AC adaptor.
• Some tripods cannot be attached when the DC coupler is connected.
• This unit cannot stand upright when the AC adaptor is connected. When operating it on
a at surface, we recommend placing it on a soft cloth.
• Make sure to unplug the AC adaptor when you open the card/battery door.
• If the AC adaptor and DC coupler are not necessary, then remove them from the digital
camera. Also, please keep the DC coupler cover closed.
• Also read the operating instructions for the AC adaptor and DC coupler.
• We recommend you use a battery with sufcient battery power or the AC adaptor when
recording motion pictures.
• If while recording motion pictures using the AC adaptor the power supply is cut off
due to a power cut or if the AC adaptor is disconnected etc., the motion picture being
recorded will not be recorded.
- 16 -
Page 17

Preparation
About the Built-in Memory/the Card
The following operations can be performed using this unit.
• When a card has not been inserted: Pictures can be
recorded in the built-in memory and played back.
• When a card has been inserted: Pictures can be
recorded on the card and played back.
• When using the built-in memory
1 " 2 (access indication)
• When using the card
3 (access indication)
¼
The access indication lights red when pictures are being recorded on the built-in
memory (or the card).
Built-in Memory
• You can copy the recorded pictures to a card. (P113)
• Memory size: Approx. 40 MB
• Recordable motion pictures: QVGA (320 × 240 pixels) only
• The built-in memory can be used as a temporary storage device when the card being
used becomes full.
• The access time for the built-in memory may be longer than the access time for a card.
- 17 -
Page 18
Preparation
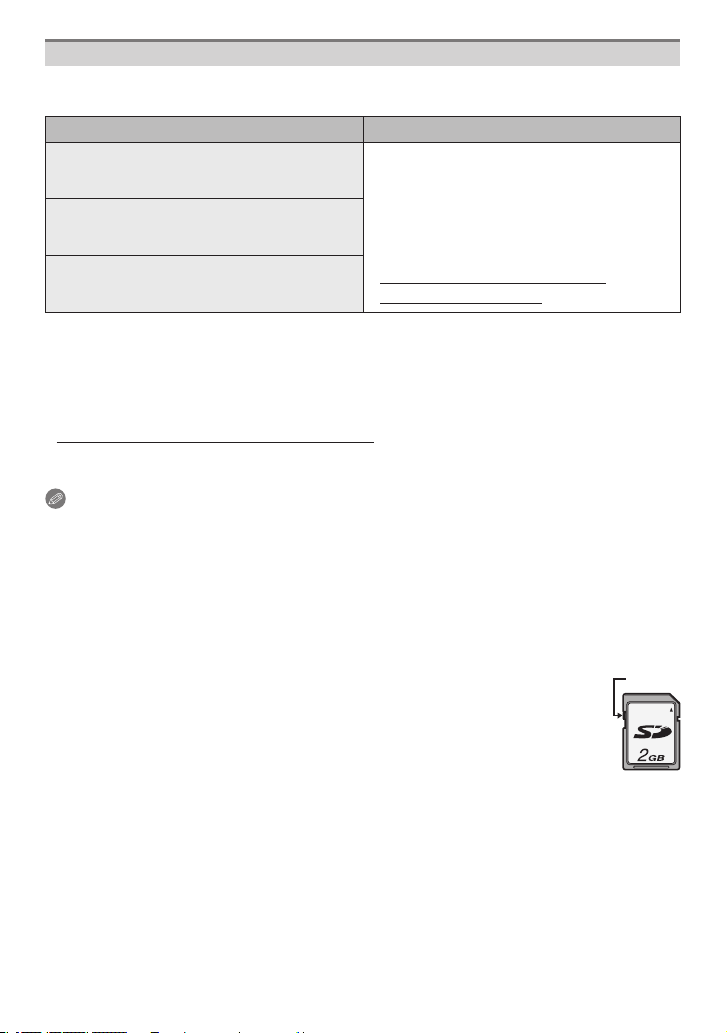
Card
The following types of cards can be used with this unit.
(These cards are indicated as card in the text.)
Type of card Remarks
SD Memory Card (8 MB to 2 GB)
SDHC Memory Card (4 GB to 32 GB)
SDXC Memory Card (48 GB to 64 GB)
• If you use cards between 4 GB and 32 GB capacity, conrm SDHC logo on the card
(indicating compliance with the SD standard).
• If you use cards between 48 GB and 64 GB capacity, conrm SDXC logo on the card
(indicating compliance with the SD standard).
• Please conrm the latest information on the following website.
http://panasonic.jp/support/global/cs/dsc/
(This Site is English only.)
Note
• Do not turn this unit off, remove its battery or card, or disconnect the AC adaptor
(optional) when the access indication is lit [when pictures are being written,
read or deleted, or the built-in memory or the card is being formatted (P31)].
Furthermore, do not subject the camera to vibration, impact or static electricity.
The card or the data on the card may be damaged, and this unit may no longer
operate normally.
If operation fails due to vibration, impact or static electricity, perform the
operation again.
• When the Write-Protect switch A is set to the [LOCK] position, no further
data writing, deletion or formatting is possible. The ability to write, delete and
format data is restored when the switch is returned to its original position.
• The data on the built-in memory or the card may be damaged or lost due to
electromagnetic waves, static electricity or breakdown of the camera or the
card. We recommend storing important data on a PC etc.
• Do not format the card on your PC or other equipment. Format it on the camera only to
ensure proper operation. (P31)
• Keep the Memory Card out of reach of children to prevent swallowing.
You can use an SDHC Memory Card or an
SDXC Memory Card in equipment that is
compatible with those cards.
• Before using SDXC Memory Cards,
check your computer and other devices
support this type of card.
http://panasonic.net/avc/sdcard/
information/SDXC.html
A
- 18 -
Page 19
Preparation
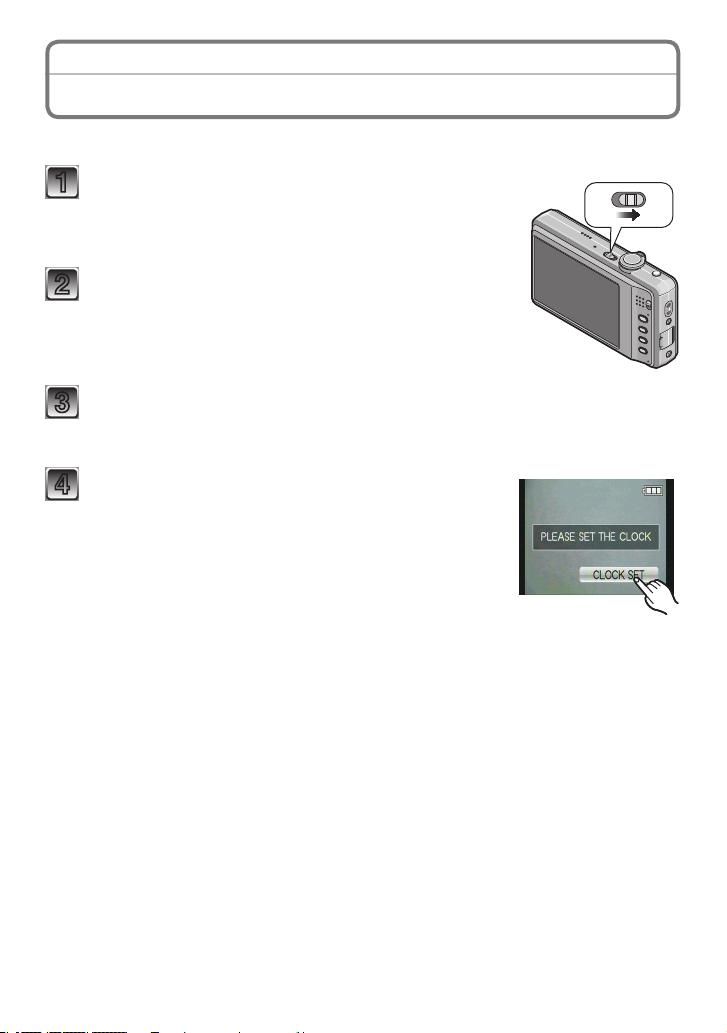
Setting Date/Time (Clock Set)
• The clock is not set when the camera is shipped.
Turn the camera on.
1
• If the language select screen is not displayed, proceed
to step 4.
Touch the language select icon on the screen.
2
Select the language.
3
• The [PLEASE SET THE CLOCK] message appears. (This message does not
appear in [PLAYBACK] Mode.)
Touch [CLOCK SET].
4
OFF ON
- 19 -
Page 20
Preparation
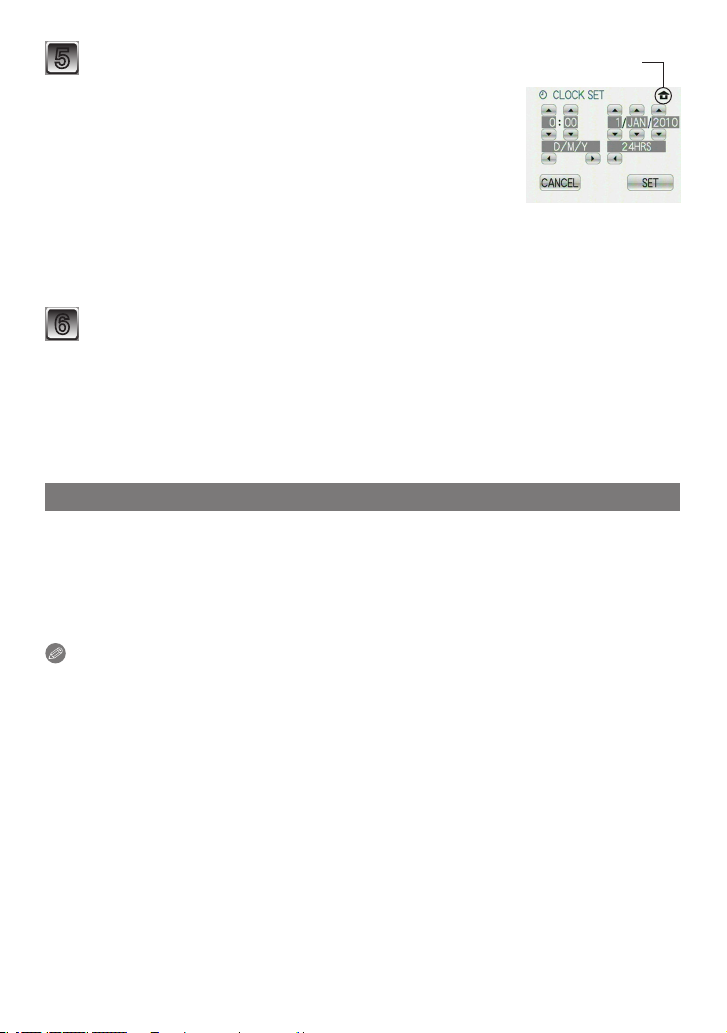
Touch [e]/[r]/[w]/[q] for each item to set year,
5
month, day, hour, minute, display sequence or
Aq
Bw
time display format, and touch [SET].
A: Time at the home area
B: Time at the travel destination (P81)
4: Cancel without setting the clock.
• Select either [24HRS] or [AM/PM] for the time display
format.
• AM/PM is displayed when [AM/PM] is selected.
• When [AM/PM] is selected as the time display format, midnight is displayed as
AM 12:00 and noon is displayed as PM 12:00. This display format is common in
North America and elsewhere.
Touch [SET] to set.
6
• After completing the clock settings, turn the camera off. Then turn the camera
back on, switch to Recording mode, and check that the display reects the
settings that were performed.
• When [SET] has been selected to complete the settings without the clock having
been set, set the clock correctly by following the “Changing the clock setting”
procedure below.
Changing the clock setting
Select [CLOCK SET] in the [REC] or [SETUP] menu. (P22)
• It can be changed in step 5 to set the clock.
• The clock setting is maintained for 3 months using the built-in clock battery even
without the battery. (Leave the charged battery in the unit for 24 hours to charge
the built-in battery.)
Note
• The clock is displayed when [DISPLAY] is pressed several times during recording.
• You can set the year from 2000 to 2099.
• If the clock is not set, the correct date cannot be printed when you stamp the date on
the pictures with [TEXT STAMP] (P103) or order a photo studio to print the pictures.
• If the clock is set, the correct date can be printed even if the date is not displayed on the
screen of the camera.
- 20 -
Page 21
Preparation
Setting the Menu
The camera comes with menus that allow you to set the settings for taking pictures and
playing them back just as you like and menus that enable you to have more fun with the
camera and use it more easily.
In particular, the [SETUP] menu contains some important settings relating to the camera’s
clock and power. Check the settings of this menu before proceeding to use the camera.
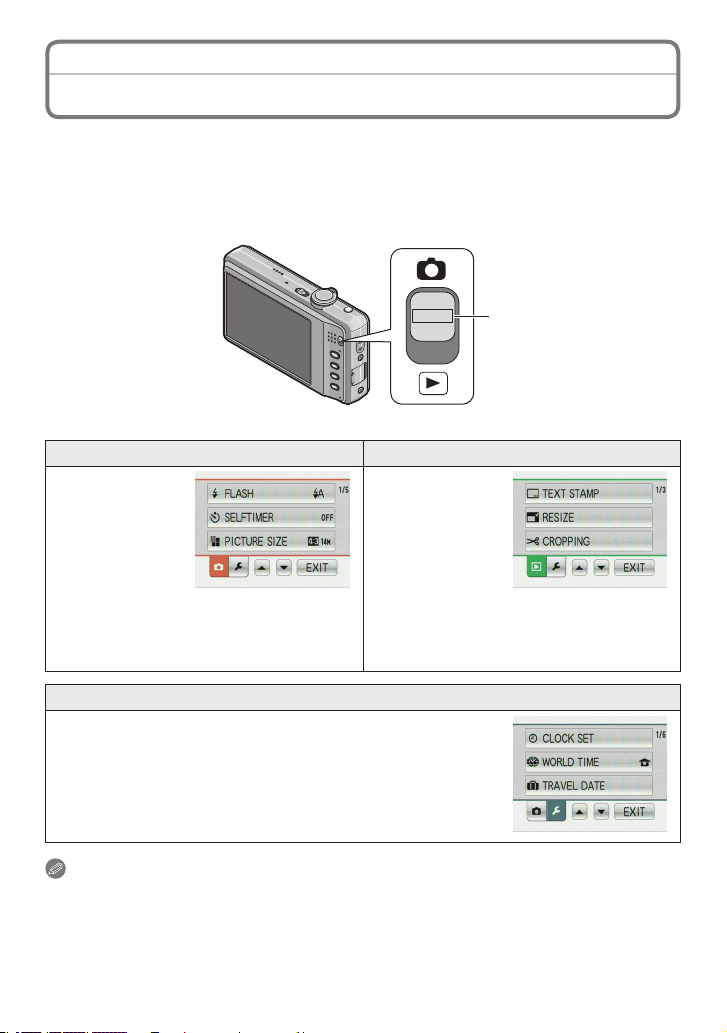
A[REC]/[PLAYBACK] selector switch
1[REC] Mode menu (P83 to 93)
• This menu
lets you set
the Colouring,
Sensitivity,
White Balance,
Number of
pixels and other
aspects of the
pictures you are
recording.
[PLAYBACK] Mode menu
5
• This menu
lets you set
the protection,
cropping or
print settings,
etc. of recorded
pictures.
(P103 to 113)
e[SETUP] menu (P25 to 32)
• This menu lets you perform the clock settings, select the
operating beep tone settings and set other settings which
make it easier for you to operate the camera.
• The [SETUP] menu can be set from either the [REC MODE]
or [PLAYBACK MODE].
Note
Due to the camera’s specications, it may not be possible to set some of the functions or
some functions may not work in some of the conditions under which the camera is used.
- 21 -
Page 22
Preparation
MENU
Setting menu items
This section describes how to select the Normal Picture Mode settings, and the same
setting can be used for the [PLAYBACK] menu and [SETUP] menu as well.
Example: Setting [AF MODE] from [2] to [3] in the Normal Picture Mode
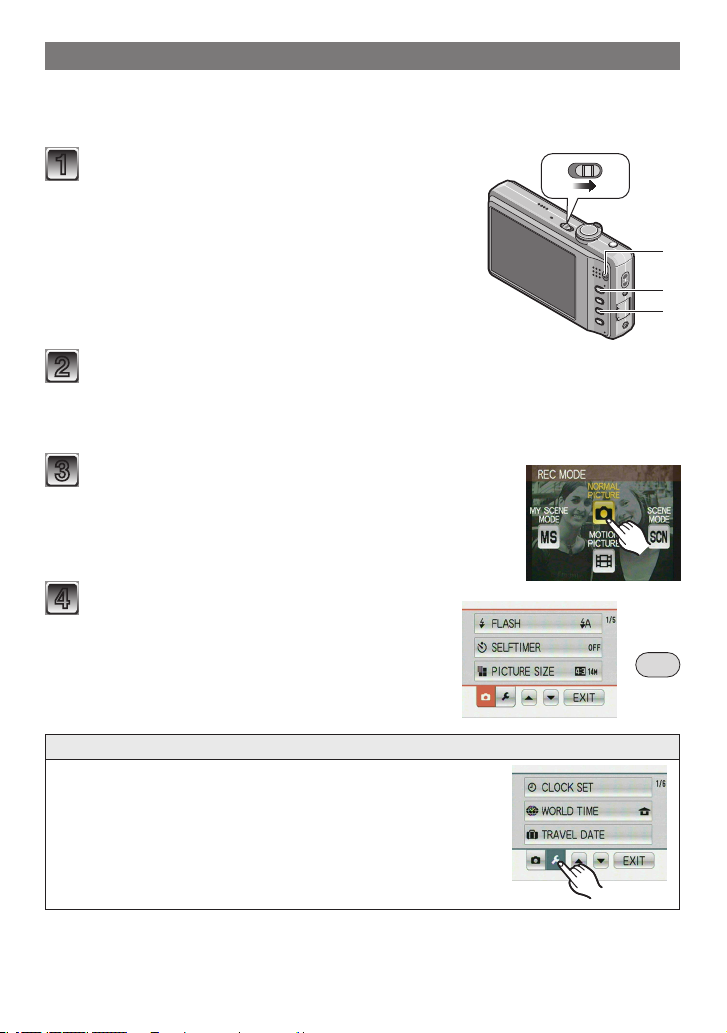
Turn the camera on.
1
A[REC]/[PLAYBACK] selector switch
B[MODE] button
C[MENU] button
Slide the [REC]/[PLAYBACK] selector switch to [1], and then press
2
[MODE].
• When selecting the [PLAYBACK] Mode menu settings, set the
[REC]/[PLAYBACK] selector switch to [5], and proceed to step 4.
Touch [NORMAL PICTURE].
3
OFF ON
Press [MENU] to display the menu.
4
• You can switch menu screens from any menu
item by rotating the zoom lever. (P10)
Touch the [SETUP] menu icon e.
Switching to the [SETUP] menu
- 22 -
Page 23

Preparation
Touch [AF MODE].
5
• Touch [r] to move to the second screen. (P10)
Touch [3].
6
• Depending on the item, its setting may not appear or it
may be displayed in a different way. (P10)
Touch [EXIT] to close the menu.
7
- 23 -
Page 24
Preparation
Q.MENU
Using the Quick Menu
By using the Quick Menu, some of the menu settings can be easily found.
In addition, various useful functions for recording can be used from the Quick Menu
screen.
• Some of the menu items cannot be set by the modes.
•
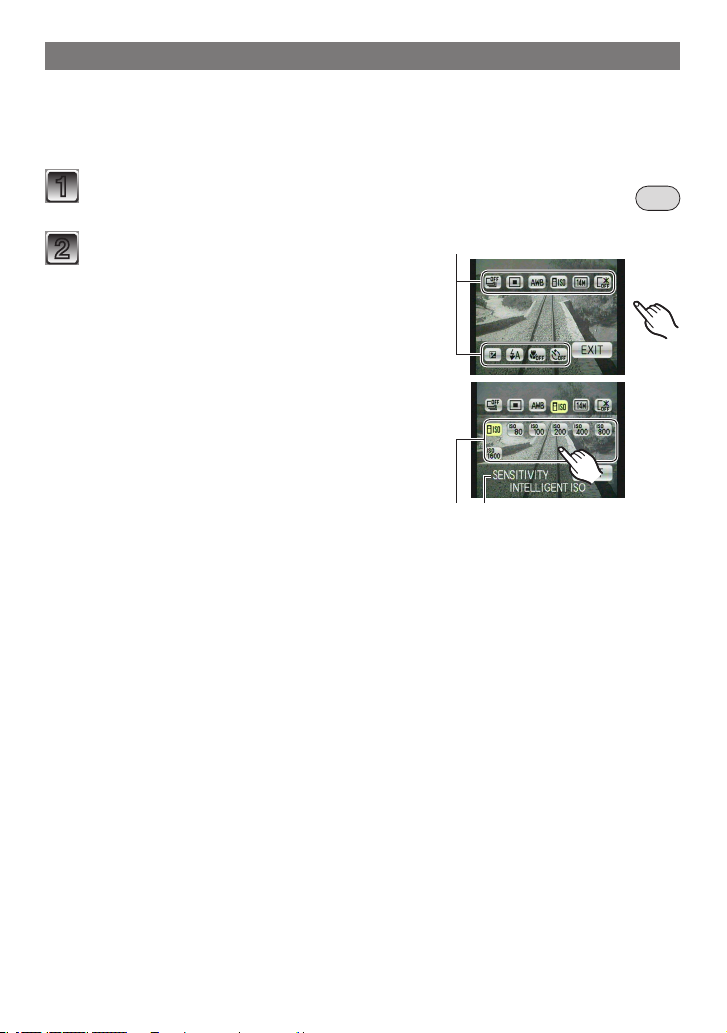
Press and hold [Q.MENU] when recording.
1
Touch the icon and then touch the
2
setting you want.
AItem
BSettings
CThe items to be set and the settings are
displayed.
• To exit the Quick Menu and retrieve the
recording screen, touch [EXIT].
A
B
C
- 24 -
Page 25

Preparation
Perform these settings if you need to.
About the Setup Menu
[CLOCK SET], [SLEEP MODE] and [AUTO REVIEW] are important items. Check their
settings before using them.
• In the Intelligent Auto Mode, only [CLOCK SET], [WORLD TIME], [BEEP], [LANGUAGE]
and [STABILIZER DEMO.] can be set.
For details on how to select the [SETUP] menu settings, refer to P22.
n [CLOCK SET]
• Refer to P19 for details.
r [WORLD TIME]
• Refer to P81 for details.
t [TRAVEL DATE]
• Refer to P78 for details.
Setting Date/Time.
Set the time in your home area and travel destination.
w [DESTINATION]:
Travel destination area
q [HOME]:
Your home area
Set the departure date and the return date of the
vacation.
[TRAVEL SETUP]:
[OFF]/[SET]
[LOCATION]:
[OFF]/[SET]
- 25 -
Page 26

! [BEEP]
Preparation
This allows you to set the beep and shutter sound.
! [BEEP LEVEL]:
["] (Muted)
[#] (Low)
[$] (High)
% [BEEP TONE]:
[&]/[']/[(]
1 [SHUTTER VOL.]:
[2] (Muted)
[3] (Low)
[4] (High)
5 [SHUTTER TONE]:
[6]/[7]/[8]
$ [VOLUME]
• When you connect the camera to a TV, the volume of the TV speakers does not change.
Adjust the volume of the speaker to any of 7 levels.
- 26 -
Page 27

Preparation
These menu settings make it easier to see the LCD
monitor when you are in bright places or when you are
holding the camera high above your head.
[OFF]
x [AUTO POWER LCD]:
- [LCD MODE]
• High Angle Mode is also cancelled if you turn the camera off or [SLEEP MODE] is
activated.
• The brightness of the pictures displayed on the LCD monitor is increased so some
subjects may appear differently from actuality on the LCD monitor. However, this does
not affect the recorded pictures.
• The LCD Monitor automatically returns to normal brightness after 30 seconds when
recording in Power LCD Mode. Press any button to make the LCD monitor bright again.
• If the screen is difcult to see because of light from the sun etc. shining on it, use your
hand or another object to block the light.
• The number of recordable pictures decreases in Auto Power LCD Mode, Power LCD
Mode and High angle Mode.
• [AUTO POWER LCD] and [HIGH ANGLE] cannot be selected in Playback mode.
The brightness is adjusted automatically depending on
how bright it is around the camera.
c [POWER LCD]:
The LCD monitor becomes brighter and easier to see
even when taking pictures outdoors.
y [HIGH ANGLE]:
The LCD monitor is easier to see when taking pictures
with the camera held high above your head.
g [FOCUS ICON]
Change the focus icon.
[h]/[i]/[j]/[k]/[l]/[m]
- 27 -
Page 28

Preparation
You can conserve the battery life.
P [SLEEP MODE]
• Press the shutter button halfway or turn the camera off and on to cancel
[SLEEP MODE].
• [SLEEP MODE] is set to [5MIN.] in the Intelligent Auto Mode.
• [SLEEP MODE] does not work in the following cases.
– When using the AC adaptor
– When connecting to a PC or a printer
– When recording or playing back motion pictures
– During a slide show
– [AUTO DEMO]
The camera is automatically turned off if the camera
has not been used for the time selected on the setting.
[OFF]/[2MIN.]/[5MIN.]/[10MIN.]
- 28 -
Page 29

Preparation
Set the length of time that the picture is displayed after
taking it.
s [AUTO REVIEW]
• [AUTO REVIEW] is activated regardless of its setting when using [HI-SPEED BURST]
(P70), [FLASH BURST] (P71) and [PHOTO FRAME] (P74) in Scene Mode and [BURST]
(P90).
• In Intelligent Auto Mode, the Auto Review function is xed to [2SEC.].
• [AUTO REVIEW] does not work in Motion Picture Mode.
[OFF]
[1SEC.]
[2SEC.]
[HOLD]: The pictures are displayed until one of the
buttons is pressed.
f [RESET]
• When the [RESET] setting is selected during recording, the operation that resets the
lens is also performed at the same time. You will hear the sound of the lens operating
but this is normal and not indicative of malfunctioning.
• When [REC] menu settings are reset, the following settings are also reset.
– The setting and registration for My Scene Mode (P61)
• When [SETUP] menu settings are reset, the following settings are also reset. In addition,
[FAVORITE] (P109) in [PLAYBACK] Mode menu is set to [OFF], and [ROTATE DISP.] (P108)
is set to [ON].
– The birthday and name settings for [BABY1]/[BABY2] (P68) and [PET] (P69) in Scene
Mode
– The settings of [TRAVEL DATE] (P78) (departure date, return date, location)
– The [WORLD TIME] (P81) setting
• The folder number and the clock setting are not changed.
The [REC] or [SETUP] menu settings are reset to the
initial settings.
- 29 -
Page 30

Preparation
Select the USB communication system after or before
connecting the camera to your PC or your printer with
the USB connection cable (supplied).
g [SELECT ON CONNECTION]:
^ [USB MODE]
• When [PC] is selected, the camera is connected via the “USB Mass Storage”
communication system.
• When [PictBridge(PTP)] is selected, the camera is connected via the “PTP (Picture
Transfer Protocol)” communication system.
k [VIDEO OUT]
• This will work when the AV cable is connected.
l [TV ASPECT]
Select either [PC] or [PictBridge(PTP)] if you connected
the camera to a PC or a printer supporting PictBridge.
h [PictBridge(PTP)]:
Set after or before connecting to a printer supporting
PictBridge.
j [PC]:
Set after or before connecting to a PC.
Set to match the colour television system in each
country.
(Playback Mode only)
[NTSC]: Video output is set to NTSC system.
[PAL]: Video output is set to PAL system.
Set to match the type of TV.
(Playback Mode only)
[}]: When connecting to a 16:9 screen TV
[+]: When connecting to a 4:3 screen TV.
• This will work when the AV cable (P123) is connected.
- 30 -
Page 31

Preparation
@ [VERSION DISP.]
v [FORMAT]
• Use a battery with sufcient battery power or the AC adaptor (optional) and DC coupler
(optional) when formatting. Do not turn the camera off during formatting.
• If a card has been inser ted, only the card is formatted. To format the built-in memory,
remove the card.
• If the card has been formatted on a PC or other equipment, format it on the camera
again.
• It may take longer to format the built-in memory than the card.
• If the built-in memory or the card cannot be formatted, consult your nearest Service
Centre.
It is possible to check which version of rmware is on
the camera.
The built-in memory or card is formatted. Formatting
irretrievably deletes all the data so check the data
carefully before formatting.
- 31 -
Page 32

Preparation
9 [LANGUAGE]
• If you set a different language by mistake, select [9] from the menu icons to set the
desired language.
. [DEMO MODE]
Set the language displayed on the screen.
Displays the amount of jitter the camera has detected
([STABILIZER DEMO.])
The camera’s features are displayed as Slide Shows.
([AUTO DEMO])
[STABILIZER DEMO.]
AAmount of jitter
BAmount of jitter after
correction
A
B
[AUTO DEMO]:
[OFF]
[ON]
• The stabilizer function is switched between [ON] and [OFF] every time [STABILIZER] is
touched during the [STABILIZER DEMO.].
• In Playback Mode, [STABILIZER DEMO.] cannot be displayed.
• [STABILIZER DEMO.] is an approximation.
• Touch [EXIT] to close [STABILIZER DEMO.].
• [AUTO DEMO] has no TV output capability even when it is in Playback Mode.
• Touch any point of the screen to close [AUTO DEMO].
- 32 -
Page 33

Preparation
Mode switching
Selecting the [REC] Mode
When the [REC] Mode is selected, the camera can be set to the Intelligent Auto Mode in
which the optimal settings are established in line with the subject to be recorded and the
recording conditions, or to the Scene Mode which enables you to take pictures that match
the scene being recorded.
Intelligent Auto Mode (P35)
4
The subjects are recorded using settings automatically selected by the camera.
To select a [REC] Mode from the [REC] Modes list
Turn the camera on.
1
A[REC]/[PLAYBACK] selector switch
B[MODE] button
Slide the [REC]/[PLAYBACK] selector
2
switch to [1].
Press [MODE].
3
OFF ON
Touch the Mode.
4
- 33 -
Page 34

Preparation
List of [REC] Modes
Normal Picture Mode (P39)
1
The subjects are recorded using your own settings.
My Scene Mode (P61)
/
Pictures are taken using previously registered recording scenes.
Scene Mode (P62)
5
This allows you to take pictures that match the scene being recorded.
Motion Picture Mode (P75)
6
This mode allows you to record motion pictures with audio.
Note
• When the mode has been switched from [PLAYBACK] Mode to [REC] Mode, the
previously set [REC] Mode will be set.
- 34 -
Page 35

Basic
[REC] Mode: 4
Taking Pictures Using the Automatic Function
(4: Intelligent Auto Mode)
The camera will set the most appropriate settings to match the subject and the recording
conditions so we recommend this mode for beginners or those who want to leave the
settings to the camera and take pictures easily.
• The following functions are activated automatically:
– Scene Detection/[STABILIZER]/Face Detection/Motion detection/Backlight
Compensation/Digital Red-Eye Correction
A [4] button
Slide the [REC]/[PLAYBACK] selector switch to [1].
1
Press [4].
2
• When the Intelligent Auto Mode is selected, [4] icon or an icon that is identied
with the Scene Detection function (P37) appears on the top left of the screen.
• Pressing [4] again takes you back to the previous mode.
Hold the camera gently with both hands, keep your
3
arms still at your side and stand with your feet
slightly apart.
B Flash
C AF Assist Lamp
- 35 -
B C
Page 36

Basic
Press the shutter button halfway to focus.
4
• The focus indication 1 (green) lights when the
subject is focused.
• The AF area 2 is displayed around the subject’s
face by the Face Detection function. In other cases,
it is displayed at the point on the subject which is
in focus.
• The focus range is 5 cm (0.17 feet) (Wide)/
1.0 m (3.28 feet) (Tele) to 7.
• The maximum close-up distance (the shortest distance at which the subject can
be taken) differs depending on the zoom magnication.
Press the shutter button fully (push it in further), and take
5
1
2
the picture.
• The access indication (P17) lights red when pictures are being recorded on the
built-in memory (or the card).
Note
• Be careful not to move the camera when you press the shutter button.
• Do not cover the ash or the AF Assist Lamp with your ngers or other objects.
• Do not touch the front of the lens.
When taking pictures using the ash (P50)
• When [w] is selected, [w], [e], [r] or [{] is set depending on the type of
subject and brightness.
• When [e] or [r] is set, Digital Red-Eye Correction is activated.
• The shutter speed becomes slower during [r] or [{].
When taking pictures using the zoom (P42)
- 36 -
Page 37

Basic
Scene Detection
When the camera identies the optimum scene, the icon of the scene concerned is
displayed in blue for 2 seconds, after which its colour changes to the usual red.
4
• [4] is set if none of the scenes are applicable, and the standard settings are set.
• When [3] or [5] is selected, the camera automatically detects a person’s face, and it
will adjust the focus and exposure (Face Detection) (P86).
• If a tripod is used, for instance, and the camera has judged that camera shake is
minimal when the Scene Mode has been identied as [1], the shutter speed will be
set to a maximum of 8 seconds. Take care not to move the camera while taking pictures.
• Most appropriate scene is selected for the touched subject during Touch AF Area
Selection (P58).
Note
• Due to conditions such as the ones below, a different scene may be identied for the
same subject.
– Subject conditions: When the face is bright or dark, the size of the subject, the
distance to the subject, the colour of the subject, the contrast of the subject, when the
subject is moving
– Recording conditions: Sunset, sunrise, under low brightness conditions, when the
camera is shaken, when zoom is used
• For the best results, it is recommended that you take pictures in the appropriate
Recording Mode.
• The Backlight Compensation
Backlight refers to when light comes from the back of a subject.
In this case, the subject will become dark, so this function compensates the backlight by
brightening the whole of the picture automatically.
3 [i-PORTRAIT]
"
4 [i-SCENERY]
2 [i-MACRO]
5 [i-NIGHT PORTRAIT]
1 [i-NIGHT SCENERY]
7 [i-SUNSET]
• Only when [w] is selected
- 37 -
Page 38

Basic
Settings in Intelligent Auto Mode
• Only the following functions can be set in this mode.
[REC] Mode menu
– [FLASH] (P50)/[SELFTIMER] (P57)/[PICTURE SIZE] (P83)/[BURST] (P90)/
[COLOR MODE] (P91)
¼
The settings which can be selected are different from when other [REC] Modes are
used.
[SETUP] menu
– [CLOCK SET]/[WORLD TIME]/[BEEP]/[LANGUAGE]/[STABILIZER DEMO.]
• The settings of the following items are xed.
Item Settings
[SLEEP MODE] (P28) [5MIN.]
[AUTO REVIEW] (P29) [2SEC.]
[FLASH] (P50)
[SENSITIVITY] (P85)
[WHITE BALANCE] (P88) [AWB]
[AF MODE] (P86)
[STABILIZER] (P92) [AUTO]
[AF ASSIST LAMP] (P93) [ON]
[RED-EYE REMOVAL] (P93) [ON]
• The following functions cannot be used.
– [EXPOSURE]/[DIGITAL ZOOM]
• The other items on the [SETUP] menu can be set in a mode such as the Normal Picture
Mode. What is set will be reected in the Intelligent Auto Mode.
w/o
[,]
3 (Set to [\] when a face cannot be detected)
- 38 -
Page 39

Basic
[REC] Mode: 1
Taking Pictures with Your Favourite Settings
(1: Normal Picture Mode)
The camera automatically sets the shutter speed and the aperture value according to the
brightness of the subject.
You can take pictures with greater freedom by changing various settings in the [REC]
menu.
Slide the [REC]/[PLAYBACK] selector
1
switch to [
A[MODE] button
B[REC]/[PLAYBACK] selector switch
Touch [NORMAL PICTURE].
2
• To change the setting while taking pictures,
refer to “Using the [REC] Mode Menu” (P83).
Aim the AF area at the point you want to
3
focus on.
Press the shutter button halfway to focus.
4
• The focus indication (green) lights when the
subject is focused.
• The focus range is 50 cm (1.64 feet) (Wide)/
2.0 m (6.57 feet) (Tele) to 7.
• If pictures are to be taken at an even closer
range, refer to “Taking Close-up Pictures” (P55).
1], and then press [MODE].
Press the halfway pressed shutter button fully to take a
5
picture.
• The access indication lights (P17) red when pictures are being recorded
on the built-in memory (or the card).
To adjust the exposure and take pictures when the image appears too dark (P60)
To adjust the colours and take pictures when the image appears too red (P88)
- 39 -
Page 40

Basic
Focusing
Aim the AF area at the subject, and then press the shutter button halfway.
A B
Focus
C
When the subject
is focused
When the subject
is not focused
Focus indication On Blinks
D
AF area
Sound
2
White"Green White"Red
Beeps 2 times Beeps 4 times
GFE
AFocus indication
BAF area (normal)
CAF area (when using the Digital Zoom or when it is dark)
DFocus range
EAperture value
FShutter speed
GISO sensitivity
1
If correct exposure cannot be achieved, it will be displayed in red.
(However, it will not be displayed in red when the ash is used.)
2
Sound volume can be set in [SHUTTER VOL.] (P26)
When the subject is not in focus (such as when it is not in the centre of
1 Aim the AF area at the subject, and then press the shutter button halfway to x the
focus and exposure.
2 Press and hold the shutter button halfway while moving the camera as you
compose the picture.
• You can repeatedly retry the actions
in step 1 before pressing the shutter
button fully.
1
1
the composition of the picture you want to take)
We recommend that you use the Face Detection function when taking pictures of
people. (P86)
Subject and recording conditions which are difcult to focus in
• Fast-moving subjects, extremely bright subjects or subjects without contrast
• When the recordable range display has appeared in red
• When recording subjects through windows or near shiny objects
• When it is dark or when jitter occurs
• When the camera is too close to the subject or when taking a picture of both distant and
near subjects
- 40 -
Page 41

Basic
Preventing jitter (camera shake)
When the jitter alert [0] appears, use [STABILIZER] (P92), a tripod or the self-timer (P57).
• Shutter speed will be slower particularly in the following cases. Keep the camera still
from the moment the shutter button is pressed until the picture appears on the screen.
We recommend using a tripod.
– Slow sync./Red-Eye Reduction
– In [NIGHT PORTRAIT], [NIGHT SCENERY], [PARTY], [CANDLE LIGHT],
[STARRY SKY] or [FIREWORKS] in Scene Mode (P62)
Direction Detection Function
Pictures recorded with the camera held vertically are played back vertically (rotated).
(Only when [ROTATE DISP.] (P108) is set to [ON])
• The Direction Detection function may not operate correctly if recording is performed with
the camera aimed up or down.
• Motion pictures taken with the camera held vertically are not displayed vertically.
- 41 -
Page 42

Basic
[REC] Mode: 4 1 MS 5 6
Taking Pictures with the Zoom
Using the Optical Zoom/Using the Extra Optical Zoom (EZ)/
Using the Digital Zoom
You can zoom-in to make people and objects appear closer or zoom-out to record
landscapes in wide angle. To make subjects appear even closer (maximum of 16.9×), set
the picture size to 10M or less.
Even higher levels of magnication are possible when [DIGITAL ZOOM] is set to [ON] in
[REC] menu.
To make subjects appear closer use (Tele)
W T
Rotate the zoom lever towards Tele (T).
To make subjects appear further away use (Wide)
W T
Rotate the zoom lever towards Wide (W).
Types of zooms
Feature Optical Zoom
Maximum
magnication
Picture
quality
8×
No deterioration No deterioration
Conditions None
Screen
display
• When using the Zoom function, an estimate of the focus range will appear in
conjunction with the zoom display bar. (Example: 0.5 m –7)
¼
The magnication level differs depending on [PICTURE SIZE] setting.
Extra Optical Zoom
(EZ)
16.9×
[PICTURE SIZE]
withP(P83) is
selected.
A[P] is displayed.
Digital Zoom
32× (including Optical Zoom 8×)
67.5× (including Extra Optical
Zoom 16.9×)
The higher the magnication
level, the greater the
deterioration.
[DIGITAL ZOOM] (P91) on the
[REC] menu is set to [ON].
BThe Digital Zoom range is
displayed.
- 42 -
Page 43

Basic
Extra Optical Zoom mechanism
When you set the picture size to [C] (3 million pixels), the 14M (14.1 million pixels) CCD
area is cropped to the centre 3M (3 million pixels) area, allowing a picture with a higher
zoom effect.
Note
• The Digital Zoom cannot be set when 4 has been selected.
• The indicated zoom magnication is an approximation.
• “EZ” is an abbreviation of “Extra optical Zoom”.
• The Optical Zoom is set to Wide (1×) when the camera is turned on.
• If you use the Zoom function after focusing on the subject, focus on the subject again.
• The lens barrel extends or retracts according to the zoom position. Take care not to
interrupt the motion of the lens barrel while the zoom lever is rotated.
• When using the Digital Zoom, [STABILIZER] may not be effective.
• When using the Digital Zoom, we recommend using a tripod and the self-timer (P57) for
taking pictures.
• The Extra Optical Zoom cannot be used in the following cases.
– In Macro Zoom Mode
– In [TRANSFORM], [HIGH SENS.], [HI-SPEED BURST], [FLASH BURST] or
[PHOTO FRAME] in Scene Mode
– In Motion Picture Mode
• [DIGITAL ZOOM] cannot be used in the following cases:
– In [TRANSFORM], [HIGH SENS.], [HI-SPEED BURST], [FLASH BURST],
[FILM GRAIN] or [PHOTO FRAME] in Scene Mode
- 43 -
Page 44

Basic
[PLAYBACK] Mode: 5
Playing Back Pictures ([NORMAL PLAY])
Slide the [REC]/[PLAYBACK] selector
1
switch A to [5].
• Normal playback is set automatically in the
following cases.
– When the mode was switched from [REC] to
[PLAYBACK]
– When the camera was turned on while the
[REC]/[PLAYBACK] selector switch was at
[5].
Forward or rewind the image by dragging (P9)
2
the screen horizontally.
Forward: drag from left to right
Rewind: drag from right to left
• It is also possible to forward or rewind the image by
touching [w]/[q].
BFile number
CPicture number
• Speed of picture forwarding/rewinding changes depending on the playback status.
B
C
- 44 -
Page 45

Basic
Using the Playback Zoom
Rotate the zoom lever towards [7] (T).
1
1"2"4"8"16
Move the position to be displayed by touching
2
[e]/[r]/[w]/[q].
• When you move the position to be displayed, the zoom
position indication A appears for about 1 second.
• Picture will return to the original size (1) by touching
[71.0].
• The magnication changes by touching [e] or [z].
Also, the zoom lever can be used.
Note
• This camera complies with the DCF standard “Design rule for Camera File system”
established by JEITA “Japan Electronics and Information Technology Industries
Association” and with Exif “Exchangeable Image File Format”. Files which do not comply
with the DCF standard cannot be played back.
• The lens barrel retracts about 15 seconds after switching from [REC] Mode to
[PLAYBACK] Mode.
• If you want to save the enlarged picture, use the Cropping function. (P107)
• The Playback Zoom may not operate if pictures have been recorded with other
equipment.
• Playback Zoom cannot be used during Motion Picture Playback.
A
- 45 -
Page 46

Basic
Switching the [PLAYBACK] Mode
1 Press [MODE] during playback.
2 Touch the mode.
[NORMAL PLAY] (P44)
All the pictures are played back.
[SLIDE SHOW] (P95)
The pictures are played back in sequence.
[CATEGORY PLAY] (P98)
The pictures grouped together in categories are played back.
[FAVORITE PLAY] (P100)
Your favourite pictures are played back.
¼
[FAVORITE PLAY] is not displayed when [FAVORITE] has not been set.
0 [CALENDAR] (P97)
Pictures are played back by the date recorded.
6 [MULTI PLAYBACK] (P46)
Multiple pictures are played back on one screen.
Displaying multiple pictures ([MULTI PLAYBACK])
Slide the [REC]/[PLAYBACK] selector switch to [5], and then press
1
[MODE].
Touch [MULTI PLAYBACK].
2
ANumber of the selected picture and the total number of recorded pictures
• You can also turn the zoom lever several times toward [6] (W) to switch to
multiple screen.
Touch the picture to select.
3
• The screen can be switched to 9 screens by touching
[n] and to 18 screens by touching [o].
• Pictures are not rotated for display.
• Pictures displayed [[] cannot be played back.
- 46 -
A
Page 47

Basic
[PLAYBACK] Mode: 5
Deleting Pictures
Once deleted, pictures cannot be recovered.
• Pictures on the built-in memory or the card, which are being played back will be deleted.
To delete a single picture
Select the picture to be deleted, and then press
1
[4].
A[4] button
Touch [DELETE SINGLE].
2
Touch [YES].
3
- 47 -
Page 48

Basic
To delete multiple pictures (up to 50) or all the pictures
Press [4].
1
Touch [DELETE MULTI] or [DELETE ALL].
2
• [DELETE ALL] " step 5.
Touch the picture to be deleted.
3
(repeat this step)
• [b] appears on the selected pictures. Touching
again cancels the setting.
Touch [OK].
4
Touch [YES].
5
When [DELETE ALL] has been selected with the [FAVORITE] (P109) setting
The selection screen is displayed again. Select [DELETE ALL] or
[ALL DELETE EXCEPTz], select [YES] and delete the pictures.
([ALL DELETE EXCEPTz] cannot be selected if no pictures have been set as
[FAVORITE].)
Note
• Do not turn the camera off while deleting. Use a battery with sufcient battery power or
the AC adaptor (optional) and DC coupler (optional).
• If you touch [CANCEL] while deleting pictures using [DELETE MULTI], [DELETE ALL] or
[ALL DELETE EXCEPTz], the deleting will stop halfway.
• Depending on the number of pictures to be deleted, it may take some time to delete
them.
• If pictures do not conform to the DCF standard or are protected (P112), they will not be
deleted even if [DELETE ALL] or [ALL DELETE EXCEPTz] is selected.
- 48 -
Page 49

Advanced (Recording pictures)
About the LCD Monitor
Press [DISPLAY] to change.
ALCD monitor
B[DISPLAY] button
• When the menu screen appears, the [DISPLAY] button is
not activated. During Playback Zoom (P45), while playing back
motion pictures (P101) and during a slide show (P95), you can
only select “Normal display F” or “No display H”.
In Recording Mode
CNormal display
DNo display
ENo display (Recording guideline)
In Playback mode
FNormal display
GDisplay with recording
information
HNo display
¼
If no operation is performed for a certain period of time, the touch icon may disappear.
Note
• In [NIGHT PORTRAIT], [NIGHT SCENERY], [STARRY SKY] and [FIREWORKS] in
Scene Mode, the guideline is grey. (P61)
• In [PHOTO FRAME] in Scene Mode, the guideline is not displayed. (P61)
C D E
14
M
30
F G H
14
1ST DAY
1month 10days
10:00 1.MAY. 2010
100 0001
1/30
10:00 1.MAY. 2010
F3.3 1/100
M14M
100 0001
AWB
1/30
ISO
100
Recording guideline
When you align the subject on the horizontal and vertical
guidelines or the cross point of these lines, you can take pictures
with well-designed composition by viewing the size, the slope
and the balance of the subject.
This is used when dividing the entire screen into 3×3 for taking
pictures with a well-balanced composition.
- 49 -
Page 50

Advanced (Recording pictures)
[REC] Mode: 4 1 / 5
Taking Pictures Using the Built-in Flash
Set the ash to match the recording.
Press and hold [Q.MENU] (P24).
1
Touch the icon B.
2
Touch the item.
3
• For information about ash settings that can
be selected, refer to “Available ash settings by
Recording Mode”. (P52)
• Touch [EXIT] to close the Quick Menu. You can
also press the shutter button halfway to nish.
APhoto ash
Do not cover the ash with your ngers or other objects.
Switching to the appropriate ash setting
B
- 50 -
Page 51

Advanced (Recording pictures)
Item Description of settings
q: AUTO
The ash is automatically activated when the recording conditions
make it necessary.
The ash is automatically activated when the recording conditions
make it necessary.
@:
AUTO/Red-Eye
Reduction
It is activated once before the actual recording to reduce the redeye phenomenon (eyes of the subject appearing red in the picture)
and then activated again for the actual recording.
• Use this when you take pictures of people in low lighting
conditions.
t:
Forced Flash ON
`:
Forced ON/
Red-Eye
Reduction
The ash is activated every time regardless of the recording
conditions.
• Use this when your subject is back-lit or under uorescent
light.
• The ash setting is set to [`] only when you set [PARTY]
or [CANDLE LIGHT] in Scene Mode. (P61)
If you take a picture with a dark background landscape, this feature
[:
Slow sync./
Red-Eye
Reduction
will slow the shutter speed when the ash is activated so that the
dark background landscape will become bright. Simultaneously it
reduces the red-eye phenomenon.
• The ash setting is set to [[] only when you set [NIGHT
PORTRAIT], [PARTY], [CANDLE LIGHT] in Scene Mode (P61).
o:
Forced Flash
OFF
¼
The ash is activated twice. The subject should not move until the second ash
The ash is not activated in any recording conditions.
• Use this when you take pictures in places where the use of
the ash is not permitted.
is activated. Interval until the second ash depends on the brightness of the
subject.
[RED-EYE REMOVAL] (P93) on the [REC] Mode menu is set to [ON], [:] appears
on the ash icon.
About the Digital Red-Eye Correction
When [RED-EYE REMOVAL] (P93) has been set to [ON] and Red-Eye Reduction ([y],
[u], [i]) is selected, Digital Red-Eye Correction is performed whenever the
ash is used. The camera automatically detects red-eye and corrects the picture. (Only
available when [AF MODE] is set to [3] and Face Detection is active)
• Under cer tain circumstances, red-eye cannot be corrected.
• In the following cases, Digital Red-Eye Correction does not work.
– When the ash setting is set to [q], [t] or [o]
– When [RED-EYE REMOVAL] is set to [OFF]
– When [AF MODE] is set to anything except [3]
- 51 -
Page 52

Advanced (Recording pictures)
Available ash settings by Recording Mode
The available ash settings depend on the Recording Mode.
(○: Available, —: Not available, ●: Scene Mode initial setting)
q @ t [ ` o q @ t [ ` o
4
1
q
w
l
e
r
t
y
u
i
o
p
a
¼
When [w] is selected, [w], [e] or [r] is set depending on the type of subject
— — — —
○
○
○
○
○
— —
— —
— —
— —
— —
○ ○ ○
●
○
●
○
●
○
●
○
— — — — —
—
●
— — —
○
— —
●
— — — — —
—
○
— — —
— — —
●
○
○
○
— —
●
○ ○
— —
—
○ ○
s
○
d
○
f
○
z
○
x
○
g
○
c
●
v
○
b
○
n
●
m
●
j
k
●
r
○
●
○
—
○
— — — — —
—
○
— — — — —
— —
— — — — —
— — — — —
— —
—
●
— — — — —
—
●
●
○ ○
— — — — —
○
○
○
●
●
○
○
— —
— —
— —
— — —
— —
— —
— —
— —
and brightness.
• The ash setting may change if the Recording Mode is changed. Set the ash setting
again if necessary.
• The ash setting is memorised even if the camera is turned off. However, the Scene
Mode ash setting is reset to the initial setting when the Scene Mode is changed.
○
●
●
●
●
●
●
○
○
●
○
○
○
- 52 -
Page 53

Advanced (Recording pictures)
The available ash range to take pictures
• The available ash range is an approximation.
ISO
sensitivity
,
ISO80
ISO100
ISO200
ISO400
ISO800
ISO1600
¼
The ash is effective for pictures recorded with zoom magnication of up to 3×. Pictures
60 cm (1.97 feet) to 5.8 m (19.03 feet) 1.0 m (3.28 feet) to 3.2 m (10.49 feet)
60 cm (1.97 feet) to 1.3 m (4.27 feet)
60 cm (1.97 feet) to 1.4 m (4.60 feet)
60 cm (1.97 feet) to 2.0 m (6.57 feet) 1.0 m (3.28 feet) to 1.1 m (3.60 feet)
60 cm (1.97 feet) to 2.9 m (9.52 feet) 1.0 m (3.28 feet) to 1.6 m (5.24 feet)
80 cm (2.63 feet) to 4.1 m (13.46 feet) 1.0 m (3.28 feet) to 2.3 m (7.54 feet)
1.15 m (3.78 feet) to 5.8 m (19.03 feet) 1.0 m (3.28 feet) to 3.2 m (10.49 feet)
Wide Tele
Available ash range
recorded with Tele may be darker than normal.
• In [HIGH SENS.] (P69) in Scene Mode, the ISO sensitivity automatically switches to
between [ISO1600] and [ISO6400] and the available ash range also differs.
Wide:
Approx. 1.15 m (3.78 feet) to approx. 11.6 m (38.06 feet)
Tele:
Approx. 1.0 m (3.28 feet) to approx. 6.5 m (21.32 feet)
• In [FLASH BURST] (P71) in Scene Mode, the ISO sensitivity automatically switches to
between [ISO100] and [ISO3200] and the available ash range also differs.
Wide:
Approx. 60 cm (1.97 feet) to approx. 3.4 m (11.16 feet)
Tele:
Approx. 1.0 m (3.28 feet) to approx. 1.9 m (6.23 feet)
- 53 -
Page 54

Advanced (Recording pictures)
Shutter speed for each ash setting
Flash setting Shutter speed (Sec.)
q
@
1/30 to 1/1600
Flash setting Shutter speed (Sec.)
[
o
1 or 1/8 to 1/1600
1 or 1/4 to 1/1600
1
2
t
`
1
The shutter speed changes depending on the [STABILIZER] (P92) setting.
2
When [SENSITIVITY] (P85) is set to [,].
• 1 2: The shutter speed becomes a maximum of 1 second in the following cases.
– When the Optical Image Stabilizer is set to [OFF].
– When the camera has determined that there is little jitter when the Optical Image
Stabilizer is set to [MODE1], [MODE2] or [AUTO].
• In Intelligent Auto Mode, shutter speed changes depending on the identied scene.
• In Scene Mode, shutter speed will be different from the above table.
Note
• If you bring the ash too close to an object, the object may be distorted or discoloured
by the heat or lighting from the ash.
• When you take a picture beyond the available ash range, the exposure may not be
adjusted properly and the picture may become bright or dark.
• When the ash is being charged, the ash icon blinks red, and you cannot take a picture
even when you press the shutter button fully.
• The white balance may not be properly adjusted if the ash level is insufcient for the
subject.
• When the shutter speed is fast, the ash effect may not be sufcient.
• It may take time to charge the ash if you repeat taking a picture. Take a picture after the
access indication disappears.
• The Red-Eye Reduction effect differs between people. Also, if the subject was far away
from the camera or was not looking at the rst ash, the effect may not be evident.
- 54 -
Page 55

Advanced (Recording pictures)
[REC] Mode: 1 6
Taking Close-up Pictures
Press and hold [Q.MENU] (P24).
1
Touch the icon A.
2
Touch the item.
3
• Touch [EXIT] to close the Quick Menu. You can
also press the shutter button halfway to nish.
Press the shutter button halfway to focus
4
and then press it fully to take the picture.
B Focus range
• [a] is displayed during AF Macro Mode and
[.] is displayed during Macro Zoom Mode.
• To cancel, select [OFF] in step 3.
• Zoom range, focus range, and zoom
magnication are displayed during zooming.
[AF MACRO]
This mode allows you to take close-up pictures of a subject, e.g. when taking pictures of
owers. You can take pictures of a subject as close as 5 cm (0.17 feet) from the lens by
rotating the zoom lever upmost to Wide (1×).
A
B
Focus range in AF Macro Mode
¼
The focus range changes in steps.
T
W
1.0 m (3.28 feet)
5 cm (0.17 feet)
- 55 -
Page 56

Advanced (Recording pictures)
[MACRO ZOOM]
You can take a picture with the Digital Zoom up to 3× while maintaining the distance to
the subject for the extreme Wide position [5 cm (0.17 feet)].
• Focus range will be 5 cm (0.17 feet) to 7 during Macro Zoom
Mode regardless of the zoom position.
• Zoom range will be displayed in blue. (Digital Zoom range C)
• The image quality is poorer than during normal recording.
• The following function is not activated.
– Extra Optical Zoom
C
Note
•
We recommend using a tripod and the self-timer.
•
We recommend setting the ash to [o] when you take pictures at close range.
•
If the distance between the camera and the subject is beyond the focus range of the
camera, the picture may not be properly focused even if the focus indication lights.
•
When a subject is close to the camera, the effective focus range is signicantly
narrowed. Therefore, if the distance between the camera and the subject is changed
after focusing on the subject, it may become difcult to focus on it again.
•
Macro Mode gives priority to a subject close to the camera. Therefore, if the distance
between the camera and the subject is far, it takes longer to focus on it.
•
When you take pictures at close range, the resolution of the periphery of the picture may
decrease slightly. This is not a malfunction.
- 56 -
Page 57

Advanced (Recording pictures)
[REC] Mode: 4 1 / 5
Taking Pictures with the Self-timer
Press and hold [Q.MENU] (P24).
1
Touch the icon A.
2
Touch the item.
3
• Touch [EXIT] to close the Quick Menu. You can
also press the shutter button halfway to nish.
Press the shutter button halfway to focus
4
and then press it fully to take the picture.
• The self-timer indicator B blinks and the shutter
is activated after 10 seconds (or 2 seconds).
• If you touch [CANCEL] while the self-timer is set,
the self-timer setting is cancelled.
A
B
Note
• When using a tripod etc., setting the self-timer to 2 seconds is a convenient way to avoid
the jitter caused by pressing the shutter button.
• When you press the shutter button once fully, the subject is automatically focused just
before recording. In dark places, the self-timer indicator will blink and then may turn on
brightly operating as an AF assist lamp (P93) to allow the camera to focus on the subject.
• We recommend using a tripod when recording with the self-timer.
• The number of pictures which can be taken in [BURST] is xed to 3.
• The number of pictures which can be taken in [FLASH BURST] in Scene Mode is xed
to 5.
• Self-timer cannot be set to 10 seconds in [SELF PORTRAIT] in Scene Mode.
• Self-timer cannot be used while in [HI-SPEED BURST] in Scene Mode.
- 57 -
Page 58

Advanced (Recording pictures)
[REC] Mode: 4 1 / 5
Taking Pictures with the Touched Area in Focus
(Touch AF Area Selection)
It is possible to set the focus area on the touched point of the screen.
Touch the subject on the screen where
1
you want to focus.
ATouch AF Area Selection
• AF area will be displayed when the area is
recognised.
A B
Press the shutter button halfway to focus and then press it
2
fully to take the picture.
• To cancel the Touch AF Area Selection, touch the icon B.
- 58 -
Page 59

Advanced (Recording pictures)
Note
• The most appropriate scene is selected for the touched area in the Intelligent Auto
Mode.
• Touch AF Area Selection will not work in the following cases.
– [STARRY SKY]/[FIREWORKS] in Scene Mode
– In Motion Picture Mode
- 59 -
Page 60

Advanced (Recording pictures)
[REC] Mode: 1 / 5 6
Compensating the Exposure
Use this function when you cannot achieve appropriate exposure due to the difference in
brightness between the subject and the background. Look at the following examples.
Underexposed Properly exposed Overexposed
Compensate the exposure
towards positive.
Press and hold [Q.MENU] (P24).
1
Touch the icon A.
2
Compensate the exposure by touching
3
[w]/[q].
• Select [0 EV] to return to the original exposure.
Touch [EXIT].
4
• Touch [EXIT] to close the Quick Menu. You can also press the shutter button
halfway to nish.
Note
• EV is an abbreviation of [Exposure Value]. It refers to the amount of light given to the
CCD by the aperture value and the shutter speed.
• The exposure compensation value appears on the lower left of the screen.
• The set exposure value is memorised even if the camera is turned off.
• The compensation range of the exposure will be limited depending on the brightness of
the subject.
• Exposure compensation cannot be used when in [STARRY SKY] in Scene Mode.
Compensate the exposure
towards negative.
A
- 60 -
Page 61

[REC] Mode: / 5
Advanced (Recording pictures)
Taking Pictures That Match the Scene Being Recorded
(Scene Mode)
When you select a Scene Mode to match the subject and recording situation, the camera
sets the optimal exposure and hue to obtain the desired picture.
Registering scenes in Scene Mode (/ : My Scene Mode)
In [MY SCENE MODE], you can register the Scene Mode you use most frequently as one
of the Recording Modes.
Slide the [REC]/[PLAYBACK] selector switch to [1], and then press
1
[MODE].
Touch [MY SCENE MODE].
2
• If you have already registered My Scene Mode,
the icon for the registered Scene Mode will be
displayed, rather than [MY SCENE MODE].
Touch the Scene Mode to select.
3
• The menu screen is switched to the recording
screen in the selected Scene Mode.
• The selected Scene Mode is registered as My
Scene Mode, so that the next time you are
recording, you can select it from [REC MODE].
About the information feature 8
• If [8] is highlighted, explanations about the selected Scene
Mode will be displayed when the Scene Mode is touched in
step 3.
Changing My Scene Mode
1 Touch [SCN] in the My Scene Mode recording screen.
2 Touch the Scene Mode.
- 61 -
Page 62

Advanced (Recording pictures)
Selecting the Scene Mode for each recording (5: Scene Mode)
In [SCENE MODE], you can select the Scene Mode each time you make a recording.
1 In step 2 (P61), touch [SCENE MODE].
2 Touch the Scene Mode.
• The recording screen for the selected Scene Mode will be displayed.
• Touching the [SCN] in the recording screen of the Scene Mode will return to the
menu screen of the Scene Modes.
Note
• The Scene Mode ash setting is reset to the initial setting when the Scene Mode is
changed.
• When you take a picture with a Scene Mode that is not adequate for the purpose, the
hue of the picture may differ from the actual scene.
• The following items cannot be set in Scene Mode because the camera automatically
adjusts them to the optimal setting.
– [SENSITIVITY]
– [COLOR MODE]
• Touch AF Area Selection can be used except for the following Scene Modes.
– [STARRY SKY]/[FIREWORKS]
• Shutter speed for Scene Modes, except [SPORTS], [NIGHT PORTRAIT],
[NIGHT SCENERY], [CANDLE LIGHT], [BABY1]/[BABY2], [PET], [FLASH BURST],
[STARRY SKY], [FIREWORKS] and [SNOW] will be from 1/8th of a second to 1/1600th
of a second.
- 62 -
Page 63

Advanced (Recording pictures)
[PORTRAIT]
When taking pictures of people outdoors during the day, this mode allows you to improve
their appearance and make their skin tones look healthier.
Technique for Portrait Mode
To make this mode more effective:
1Rotate the zoom lever as far as possible to Tele.
2Move close to the subject.
Note
• The initial setting for [AF MODE] is [3].
[SOFT SKIN]
When taking pictures of people outdoors during the daytime, this mode enables the
texture of their skin to appear even softer than with [PORTRAIT]. (It is effective when
taking pictures of people from the chest up.)
Technique for Soft Skin Mode
To make this mode more effective:
1Rotate the zoom lever as far as possible to Tele.
2Move close to the subject.
Note
• If a par t of the background etc. is a colour close to skin colour, this part is also
smoothed.
• This mode may not be effective when there is insufcient brightness.
• The initial setting for [AF MODE] is [3].
- 63 -
Page 64

Advanced (Recording pictures)
[TRANSFORM]
Subject can be recorded either slim or stretched, and at the same time, skin can appear
smoother.
1 Touch the level of transform.
• It can be set from the Quick Menu (P24).
2 Take pictures.
Note
• Picture size is xed as given below.
– [C] for [+], [M] for [*] and [U] for [}]
• You can take pictures suitable for 4˝×6˝/10×15 cm printing.
• The initial setting for [AF MODE] is [3].
• Transform Mode cannot be used without notifying the copyright owner, except for
personal use.
• Do not use the material against the public order and morals, or to offend someone.
• Do not use the material against the object’s interest.
[SELF PORTRAIT]
Select this to take pictures of yourself.
Technique for Self Portrait Mode
• Press the shutter button halfway to focus. The self-timer indicator
lights up when you are brought into focus. Making sure you hold the
camera still, press the shutter button fully to take the picture.
• The subject is not focused when the self-timer indicator is blinking.
Make sure to press the shutter button halfway again to focus.
• The recorded picture automatically appears on the LCD monitor for
reviewing.
• If the picture is blurry due to the slow shutter speed, we recommend using the 2 second
self-timer.
Note
• The focus range is about 30 cm (0.99 feet) to 1.2 m (3.93 feet) (Wide).
• The zoom magnication is automatically moved to Wide (1×).
• The self-timer can only be set to off or 2 seconds. If it is set to 2 seconds, this setting
will remain until the camera is turned off, the Scene Mode is changed or [REC] Mode or
[PLAYBACK] Mode is selected.
• The Stabilizer Function Mode is xed to [MODE2]. (P92)
• The initial setting for [AF MODE] is [3].
- 64 -
Page 65

Advanced (Recording pictures)
[SCENERY]
This allows you to take pictures of a wide landscape.
Note
• The ash setting is xed to [o].
• The focus range is 5 m (16.41 feet) to 7.
[SPORTS]
This mode allows you to take pictures of sports scenes or other fast-moving events.
Note
• When the camera is set to [STABILIZER] and there is very little jitter, or if [STABILIZER]
is set to [OFF], the shutter speed becomes a maximum of 1 second.
• This mode is suitable for taking pictures of subjects at distances of 5 m (16.4 feet) or
more.
• [,] is activated, and maximum ISO sensitivity level becomes [ISO1600].
[NIGHT PORTRAIT]
This allows you to take pictures of a person and the background with near real-life
brightness.
Technique for Night Portrait Mode
• Use the ash. (You can set to [[].)
• Ask the subject not to move while taking a picture.
• We recommend rotating the zoom lever to Wide (1×) and being about 1.5 m (4.92 feet)
from the subject when taking a picture.
Note
• The focus range is 60 cm (1.97 feet) (Wide)/1.2 m (3.94 feet) (Tele) to 5 m (16.4 feet).
• We recommend using a tripod and the self-timer for taking pictures.
• When the camera is set to [STABILIZER] and there is very little jitter, or if [STABILIZER]
is set to [OFF], shutter speed may slow down up to 8 seconds.
• The shutter may remain closed (max. about 8 sec.) after taking the picture because of
signal processing. This is not a malfunction.
• Noise may become visible when you take pictures in dark places.
• The initial setting for [AF MODE] is [3].
- 65 -
Page 66

Advanced (Recording pictures)
[NIGHT SCENERY]
This allows you to take vivid pictures of the nightscape.
Note
• The ash setting is xed to [o].
• The focus range is 5 m (16.41 feet) to 7.
• We recommend using a tripod and the self-timer for taking pictures.
• When the camera is set to [STABILIZER] and there is very little jitter, or if [STABILIZER]
is set to [OFF], shutter speed may slow down up to 8 seconds.
• The shutter may remain closed (max. about 8 sec.) after taking the picture because of
signal processing. This is not a malfunction.
• Noise may become visible when you take pictures in dark places.
[FOOD]
This mode allows you to take pictures of food with a natural hue without being affected by
the ambient light in restaurants etc.
Note
• The focus range is 5 cm (0.17 feet) (Wide)/1.0 m (3.28 feet) (Tele) to 7.
- 66 -
Page 67

Advanced (Recording pictures)
[PARTY]
Select this mode when you want to take pictures at a wedding reception, an indoor party
etc. This allows you to take pictures of people and the background with near real-life
brightness.
Technique for Party Mode
• Use the ash. (You can set to [[] or [`].)
• We recommend using a tripod and the self-timer for taking pictures.
• We recommend rotating the zoom lever to Wide (1×) and being about 1.5 m (4.92 feet)
from the subject when taking pictures.
Note
• The initial setting for [AF MODE] is [3].
[CANDLE LIGHT]
This mode allows you to take pictures with a candle-lit atmosphere.
Technique for Candle Light Mode
• This is more effective when taking pictures without using the ash.
Note
• The focus range is 5 cm (0.17 feet) (Wide)/1.0 m (3.28 feet) (Tele) to 7.
• We recommend using a tripod and the self-timer for taking pictures.
• When the camera is set to [STABILIZER] and there is very little jitter, or if [STABILIZER]
is set to [OFF], the shutter speed becomes a maximum of 1 second.
• The initial setting for [AF MODE] is [3].
- 67 -
Page 68

Advanced (Recording pictures)
[BABY1] / [BABY2]
This takes pictures of a baby with a healthy complexion. When you use the ash, the light
from it is weaker than usual.
It is possible to set different birthdays and names for [BABY1] and [BABY2]. You can
select to have these appear at the time of playback, or have them stamped on the
recorded image using [TEXT STAMP] (P103).
Birthday/Name setting
1 Touch [SET] of [AGE] or [NAME].
2 Enter the birthday or name.
Birthday: Touch [e]/[r] for each item to set year/month/day,
and touch [SET].
Name: For details on how to enter characters, read the
“Entering Characters” section on P94.
• When the bir thday or name is set, [AGE] or [NAME] is automatically set to [ON].
• If [ON] is selected when the bir thday or name has not been registered, the setting
screen appears automatically.
3 Touch [EXIT] to nish.
To cancel [AGE] and [NAME]
Select the [OFF] setting in step 1 of the “Birthday/Name setting” procedure.
Note
• The age and name can be printed out using the “PHOTOfunSTUDIO” bundled software
on the CD-ROM (supplied).
• If [AGE] or [NAME] is set to [OFF] even when the birthday or name has been set, the
age or name will not be displayed. Before taking pictures, set [AGE] or [NAME] to [ON].
• The focus range is 5 cm (0.17 feet) (Wide)/1.0 m (3.28 feet) (Tele) to 7.
• When the camera is set to [STABILIZER] and there is very little jitter, or if [STABILIZER]
is set to [OFF], the shutter speed becomes a maximum of 1 second.
• [,] is activated, and maximum ISO sensitivity level becomes [ISO1600].
• If the camera is turned on with [BABY1]/[BABY2] set, the age and name are displayed
at the lower left of the screen for about 5 seconds, along with the current date and time.
• If the age is not properly displayed, check the clock and birthday settings.
• The bir thday setting and name setting can be reset with [RESET].
• The initial setting for [AF MODE] is [3].
- 68 -
Page 69

Advanced (Recording pictures)
[PET]
Select this mode when you want to take pictures of a pet such as a dog or a cat.
You can set your pet’s birthday and name. You can select to have these appear at the time
of playback, or have them stamped on the recorded image using [TEXT STAMP] (P103).
For information about [AGE] or [NAME], refer to [BABY1]/[BABY2] on P68.
Note
• The initial setting for the AF Assist Lamp is [OFF].
• The initial setting for [AF MODE] is [2].
• Refer to [BABY1]/[BABY2] for other information about this mode.
[SUNSET]
Select this mode when you want to take pictures of a sunset view. This allows you to take
vivid pictures of the red colour of the sun.
Note
• The ash setting is xed to [o].
• ISO sensitivity is xed to [ISO80].
[HIGH SENS.]
This mode minimises the jitter of the subjects, and enables you to take pictures of these
subjects in dimly lit rooms. (Select this for high-sensitivity processing. The sensitivity
automatically switches to between [ISO1600] and [ISO6400].)
Picture size and aspect ratio
1 Touch the picture size and aspect ratio to select.
• 3M (4:3), 2.5M (3:2) or 2M (16:9) is selected as the picture size.
2 Take pictures.
Note
• You can take pictures suitable for 4˝×6˝/10×15 cm printing.
• The focus range is 5 cm (0.17 feet) (Wide)/1.0 m (3.28 feet) (Tele) to 7.
- 69 -
Page 70

Advanced (Recording pictures)
[HI-SPEED BURST]
This is a convenient mode for shooting rapid movement or a decisive moment.
Picture size and aspect ratio
1 Touch the picture size and aspect ratio to select.
• 3M (4:3), 2.5M (3:2) or 2M (16:9) is selected as the picture size.
2 Take pictures.
• Still pictures are taken continuously while the shutter button is pressed fully.
Maximum Burst speed approx. 4.6 pictures/second
Number of recordable
pictures
approx. 15 (built-in memory)/approx. 15 to 100
¼
the maximum is 100.
• The Burst speed changes according to the recording conditions.
• The number of Burst recording pictures are limited by the picture-taking conditions and
the type and/or status of the card used.
• The number of Burst recording pictures increases immediately after formatting.
Note
• The ash setting is xed to [o].
• You can take pictures suitable for 4˝×6˝/10×15 cm printing.
• The focus range is 5 cm (0.17 feet) (Wide)/1.0 m (3.28 feet) (Tele) to 7.
• The focus, zoom, exposure, White Balance, shutter speed and ISO sensitivity are xed
to the settings for the rst picture.
• The ISO sensitivity automatically switches to between [ISO500] and [ISO800]. However,
the ISO sensitivity is increased to make the shutter speed become high-speed.
• Depending on the operating conditions, it may take time to take the next picture if you
repeat taking a picture.
(card)
- 70 -
Page 71

Advanced (Recording pictures)
[FLASH BURST]
Still pictures are taken continuously with ash. It is convenient to take continuous still
pictures in dark places.
Picture size and aspect ratio
1 Touch the picture size and aspect ratio to select.
• 3M (4:3), 2.5M (3:2) or 2M (16:9) is selected as the picture size.
2 Take pictures.
• Still pictures are taken continuously while the shutter button is pressed fully.
Number of recordable
pictures
Note
• You can take pictures suitable for 4˝×6˝/10×15 cm printing.
• The shutter speed becomes 1/30th of a second to 1/1600th of a second.
• The focus range is 5 cm (0.17 feet) (Wide)/1.0 m (3.28 feet) (Tele) to 7.
• The focus, zoom, exposure, shutter speed, ISO sensitivity, and ash level are xed to
the settings for the rst picture.
• [,] is activated, and maximum ISO sensitivity level becomes [ISO3200].
• See the Note on P54 when using the ash.
max. 5 pictures
- 71 -
Page 72

Advanced (Recording pictures)
[STARRY SKY]
This allows you to take vivid pictures of a starry sky or a dark subject.
Setting the shutter speed
Select a shutter speed of [15 SEC.], [30 SEC.] or [60 SEC.].
1 Touch the number of seconds to select.
• It is also possible to change the number of seconds using the Quick Menu. (P24)
2 Take pictures.
• Press the shutter button fully to display the countdown
screen. Do not move the camera after this screen is
displayed. When countdown nishes, [PLEASE WAIT...]
is displayed for the same length of time as the set shutter
speed for signal processing.
• Touch [CANCEL] to stop taking the picture while the
countdown screen is displayed.
Technique for Starry Sky Mode
• The shutter opens for 15, 30 or 60 seconds. Be sure to use a tripod. We also
recommend taking pictures with the self-timer.
Note
• The ash setting is xed to [o].
• The Optical Image Stabilizer function is xed to [OFF].
• ISO sensitivity is xed to [ISO80].
[FIREWORKS]
This mode allows you to take beautiful pictures of reworks exploding in the night sky.
Technique for Fireworks Mode
• Since the shutter speed becomes slower, we recommend using a tripod.
Note
• The ash setting is xed to [o].
• This mode is most effective when the subject is 10 m (32.8 feet) or more away.
• The shutter speed becomes the following.
– When [OFF] is set on the Optical Image Stabilizer function: Fixed to 2 seconds
– When [AUTO], [MODE1] or [MODE2] is set on the Optical Image Stabilizer function:
1/4th of a second or 2 seconds (The shutter speed becomes 2 seconds only when the
camera has determined that there is little jitter such as when using a tripod etc.)
– You can change the shutter speed by compensating the exposure.
• The AF area is not displayed.
• ISO sensitivity is xed to [ISO80].
- 72 -
Page 73

Advanced (Recording pictures)
[BEACH]
This allows you to take even more vivid pictures of the blue colour of the sea, sky etc. It
also prevents underexposure of people under strong sunlight.
Note
• The initial setting for [AF MODE] is [3].
• Do not touch the camera with wet hands.
• Sand or seawater will cause the camera to malfunction. Make sure that sand or
seawater does not get into the lens or the terminals.
[SNOW]
This allows you to take pictures that show the snow as white as possible at a ski resort or
a snow-covered mountain.
[AERIAL PHOTO]
This mode allows you to take pictures through an airplane window.
Technique for Aerial Photo Mode
• We recommend using this technique if it is difcult to focus when taking pictures of
clouds etc. Aim the camera at something with high contrast, press the shutter button
halfway to x the focus and then aim the camera at the subject and press the shutter
button fully to take the picture.
Note
• The ash setting is xed to [o].
• The focus range is 5 m (16.41 feet) to 7.
• Turn the camera off when taking off or landing.
• When using the camera, follow all instructions from the cabin crew.
• Be careful about the reection from the window.
- 73 -
Page 74

Advanced (Recording pictures)
[FILM GRAIN]
Picture is taken with a grainy texture as though blasted with sand.
Note
• ISO sensitivity is xed to [ISO1600].
• The focus range is 5 cm (0.17 feet) (Wide)/1.0 m (3.28 feet) (Tele) to 7.
[PHOTO FRAME]
Record the image with a frame around it.
Setting the frame
1 Touch the frame to select.
• The number of pixels is xed to 2M (4:3).
2 Take pictures.
Note
• [AUTO REVIEW] is xed to [2SEC.].
• The colour of the frame displayed on the screen and the colour of the frame around the
actual image may differ, but this is not a malfunction.
- 74 -
Page 75

Advanced (Recording pictures)
[REC] Mode: 6
Motion Picture Mode
Slide the [REC]/[PLAYBACK] selector switch to [1], and then press
1
[MODE].
Touch [MOTION PICTURE].
2
Press the shutter button halfway to focus
3
and then press it fully to start recording.
AAudio recording
• The available recording time B is displayed on
the top right and the elapsed recording time C is
displayed on the bottom right of the screen.
• After pressing the shutter button fully, release it
straight away.
• When the subject is focused, the focus indication
lights.
• The focus and zoom are xed to the setting when recording starts (the rst
frame).
• The audio is also recorded simultaneously from the built-in microphone on this
unit. (Motion pictures cannot be recorded without audio.)
A
B
C
Press the shutter button fully to stop recording.
4
• If the built-in memory or the card becomes full in the middle of recording, the
camera stops recording automatically.
- 75 -
Page 76

Advanced (Recording pictures)
Changing the settings for the recording quality
Press [MENU].
1
Touch [REC QUALITY].
2
Touch the item.
3
Item Picture size fps Aspect ratio
a
w
x
y
¼
Cannot be recorded in the built-in memory.
Touch [EXIT] to close the menu.
4
• You can also press the shutter button halfway to close the menu.
1280 × 720 pixels 30
848 × 480 pixels 30
640 × 480 pixels 30
320 × 240 pixels 30
16:9
4:3
- 76 -
Page 77

Advanced (Recording pictures)
Note
• The ash setting is xed to [o].
• It is recommended to use a card with SD Speed Class
recording motion pictures.
¼
The SD Speed Class Rating is the speed standard for successive writes.
with “Class 6” or higher when
• Refer to P148 for information about the available recording time.
• The available recording time displayed on the screen may not decrease regularly.
• Depending on the type of the card, the card access indication may appear for a while
after recording motion pictures. This is not a malfunction.
• When motion pictures recorded with the camera are played back on other equipment,
the quality of the picture and sound may deteriorate and it may not be possible to play
them back. Also the recording information may not be displayed correctly.
• This camera has improved sound quality so motion pictures recorded on this camera
cannot be played back on a Panasonic Digital Camera (LUMIX models) that was sold
in July 2008 or before. (However, motion pictures recorded on previous models can be
played back on this camera.)
• In Motion Picture Mode, Direction Detection function cannot be used.
• In the Motion Picture Mode, [AF MODE] is xed to [\] and [STABILIZER] to [MODE1].
• [DIGITAL ZOOM] and [AF ASSIST LAMP] cannot be set in Motion Picture Mode. Setting
of other Recording Mode will be reected.
• Compared to still pictures, motion pictures may have a narrow angle of view.
• We recommend you use a battery with sufcient battery power or the AC adaptor when
recording motion pictures.
• If while recording motion pictures using the AC adaptor the power supply is cut off
due to a power cut or if the AC adaptor is disconnected etc., the motion picture being
recorded will not be recorded.
• The sound of the button operation may be recorded when it is operated during the
recording of a motion picture.
- 77 -
Page 78

Advanced (Recording pictures)
[REC] Mode: 4 1 MS 5 6
Useful Functions at Travel Destinations
Recording which Day of the Vacation You Take the Picture
For details on the [SETUP] menu settings, refer to P22.
If you set the departure date or the travel destination of the vacation in advance, the
number of days that have passed since the departure date (which day of the vacation
it is) is recorded when you take the picture. You can display the number of days that
have passed when playing back the pictures and stamp it on the recorded pictures with
[TEXT STAMP] (P103).
• The number of days that have passed since the departure date can be printed out using
the “PHOTOfunSTUDIO” bundled software on the CD-ROM (supplied).
• Select [CLOCK SET] to set the current date and time in advance. (P19)
Select [TRAVEL DATE] from the [SETUP] menu.
1
Touch [TRAVEL SETUP].
2
Touch [SET].
3
Touch [e]/[r] for each item to set the departure
4
date (year/month/day), and touch [SET].
Touch [e]/[r] for each item to set the return date
5
(year/month/day), and touch [SET].
• If you do not want to set the return date, touch [SET] while
the date bar is displayed.
- 78 -
Page 79

Advanced (Recording pictures)
Touch [LOCATION].
6
Touch [SET].
7
Enter the location.
8
• For details on how to enter characters, read the “Entering Characters” section on
P94.
Touch [CANCEL].
9
• Touch [EXIT] to close the menu.
Take a picture.
10
• The number of days that have passed since the departure date is displayed for
about 5 seconds if this unit is turned on etc. after setting the travel date or when
the travel date is set.
• When the travel date is set, [t] appears on the lower right of the screen.
Cancelling the travel date
The travel date is automatically cancelled if the current date is after the return date. If you
want to cancel the travel date before the end of the vacation, select [OFF] on the screen
shown in step 3 or 7. If the [TRAVEL SETUP] is set to [OFF] in step 3, [LOCATION] will
be also set to [OFF].
- 79 -
Page 80

Advanced (Recording pictures)
Note
• The travel date is calculated using the date in the clock setting and the departure
date you set. If you set [WORLD TIME] (P81) to the travel destination, the travel date is
calculated using the date in the clock setting and the travel destination setting.
• The travel date setting is memorised even if the camera is turned off.
• If [TRAVEL DATE] is set to [OFF], the number of days that have passed since the
departure date will not be recorded. Even if [TRAVEL DATE] is set to [SET] after taking
the pictures, the day of the vacation you took them on is not displayed.
• If you set a departure date and then take a picture on a date before this departure date,
[-] (minus) is displayed in orange and the day of the vacation that you took the picture is
not recorded.
• If the travel date is displayed as [-] (minus) in white, there is a time difference that
involves date change between the [HOME] and [DESTINATION]. (It will be recorded)
• [LOCATION] cannot be recorded when taking motion pictures.
• [TRAVEL DATE] cannot be set in the Intelligent Auto Mode. Setting of other recording
mode will be reected.
- 80 -
Page 81

Advanced (Recording pictures)
Recording Dates/Times at Overseas Travel Destinations (World Time)
For details on the [SETUP] menu settings, refer to P22.
You can display the local times at the travel destinations and record them on the pictures
you take.
• Select [CLOCK SET] to set the current date and time in advance. (P19)
Select [WORLD TIME] from the [SETUP] menu.
1
• When rst using the camera after purchasing it, the
[PLEASE SET THE HOME AREA] message appears. Set
the home area on the screen in step 3.
Touch [HOME].
2
Touch [w] or [q] to select the home area, and
3
touch [SET].
ACurrent time
BTime difference from GMT (Greenwich Mean Time)
• If daylight saving time [z] is used at the home area,
touch [z]. Touch [z] again to return to the original
time.
• The daylight saving time setting for the home area does not advance the current
time. Advance the clock setting by one hour.
B
A
- 81 -
Page 82

Advanced (Recording pictures)
Touch [DESTINATION].
4
CDepending on the setting, the time at the travel
destination area or the home area is displayed.
Touch [w] or [q] to select the area that the
5
C
travel destination is in, and touch [SET].
DCurrent time of the destination area
ETime difference
• If daylight saving time [z] is used at the travel
destination, touch [z]. (The time advances by one
hour.) Touch [z] again to return to the original time.
Touch [EXIT] to close the menu.
6
Note
• Return the setting to [HOME] when the vacation is nished by performing steps 1, 2 and
3.
• If [HOME] is already set, change only the travel destination, and use.
• If you cannot nd the travel destination in the areas displayed on the screen, set by the
time difference from the home area.
• The travel destination icon [w] appears when playing back pictures taken at the travel
destination.
E
D
- 82 -
Page 83

Advanced (Recording pictures)
Using the [REC] Mode Menu
[FLASH]
Refer to P50 for details.
[SELFTIMER]
Refer to P57 for details.
[PICTURE SIZE]
For details on [REC] Mode menu settings, refer to P22.
Set the number of pixels and aspect ratio of the pictures. The higher the number of pixels,
the ner the detail of the pictures will appear even when they are printed onto large
sheets.
Applicable modes: 4 1 / 5
+ =
+ EP
+ TP
+ CP
+ OP
* ~
} |
¼
This item cannot be set in the Intelligent Auto Mode.
4320 × 3240 pixels
3648 × 2736 pixels
2560 × 1920 pixels
2048 × 1536 pixels
640 × 480 pixels
4320 × 2880 pixels
4320 × 2432 pixels
[+]: Aspect ratio of a 4:3 TV
[*]: Aspect ratio of a 35 mm lm camera
[}]: Aspect ratio of a high-denition TV, etc.
• If [8] is highlighted, an explanation about the picture size (suitable print size, etc.) is
shown when an item is touched.
- 83 -
Page 84

Advanced (Recording pictures)
Note
• “EZ” is an abbreviation of “Extra optical Zoom”.
• A digital picture is made of numerous dots called pixels.
The higher the number of pixels, the ner the picture
will be when it is printed on a large piece of paper or
displayed on a PC monitor.
AMany pixels (Fine)
BFew pixels (Rough)
¼
These pictures are examples to show the effect.
• The Extra Optical Zoom does not work when [MACRO ZOOM] is set or in
[TRANSFORM], [HIGH SENS.], [HI-SPEED BURST], [FLASH BURST] and
[PHOTO FRAME] in Scene Mode so the picture size for [P] is not displayed.
• Pictures may appear mosaic depending on the subject and the recording conditions.
• Refer to P146 for information about the number of recordable pictures.
[REC QUALITY]
Refer to P76 for details.
A
B
- 84 -
Page 85

Advanced (Recording pictures)
[SENSITIVITY]
For details on [REC] Mode menu settings, refer to P22.
This allows the sensitivity to light (ISO sensitivity) to be set. Setting to a higher number
enables pictures to be taken even in dark places without the resulting pictures coming out
dark.
Applicable modes: 1
[,]/[80]/[100]/[200]/[400]/[800]/[1600]
ISO sensitivity
Recording location
(recommended)
Shutter speed Slow Fast
Noise Less Increased
Note
• When setting to [,], the camera detects movement of the subject (motion detection)
and then sets the optimal ISO sensitivity and shutter speed according to the movement
and brightness of the subject. ISO sensitivity is automatically adjusted to a maximum of
[ISO800] according to the brightness. (It can be adjusted to a maximum of [ISO1600]
when using the ash.)
• To avoid picture noise, we recommend that you either reduce the maximum ISO
sensitivity level or set [COLOR MODE] to [NATURAL], and then take pictures. (P91)
When it is light (outdoors) When it is dark
80
1600
- 85 -
Page 86

Advanced (Recording pictures)
[AF MODE]
For details on [REC] Mode menu settings, refer to P22.
This allows the focusing method that suits the positions and number of the subjects to be
selected.
Applicable modes: 1 / 5
The camera automatically detects the person’s face. The
[3]: Face Detection
[\]: 9-area-focusing
[2]: 1-area-focusing
Note
• The camera is focusing on all the AF areas when multiple AF areas (max. 9 areas) light
at the same time in [\]. If you want to determine the focus position to take pictures,
switch the AF Mode to [2].
• If the AF Mode is set to [\], the AF area is not displayed until the picture is brought
into focus.
• The camera may detect subjects other than a person as the face. In this case, switch
the AF Mode to any modes other than [3] and then take a picture.
• The AF Mode cannot be set in [FIREWORKS] in Scene Mode.
• It is not possible to set [3] in the following cases.
– In [NIGHT SCENERY], [FOOD], [STARRY SKY] and [AERIAL PHOTO] in Scene
Mode.
focus and exposure can then be adjusted to t that face no
matter what portion of the picture it is in. (max. 15 areas)
The camera focuses on any of 9 focus areas. This is
effective when the subject is not in the centre of the screen.
The camera focuses on the subject in the AF area on the
centre of the screen.
About [3] (Face Detection)
The following AF area frames are displayed when the camera
detects the faces.
Yellow:
When the shutter button is pressed halfway, the frame turns
green when the camera is focused.
White:
Displayed when more than one face is detected. Other faces that are the same distance
away as faces within the yellow AF areas are also focused.
- 86 -
Page 87

Advanced (Recording pictures)
• Under cer tain picture-taking conditions including the following cases, the Face Detection
function may fail to work, making it impossible to detect faces. [AF MODE] is switched to
[\].
– When the face is not facing the camera
– When the face is at an angle
– When the face is extremely bright or dark
– When there is little contrast on the faces
– When the facial features are hidden behind sunglasses, etc.
– When the face appears small on the screen
– When there is rapid movement
– When the subject is other than a human being
– When the camera is shaking
– When Digital Zoom is used
[MACRO MODE]
Refer to P55 for details.
- 87 -
Page 88

Advanced (Recording pictures)
[WHITE BALANCE]
For details on [REC] Mode menu settings, refer to P22.
In sunlight, under incandescent lights or in other such conditions where the colour of
white takes on a reddish or bluish tinge, this item adjusts to the colour of white which is
closest to what is seen by the eye in accordance with the light source.
Applicable modes: 1 / 5 6
[AWB] : Automatic adjustment
[l] : When taking pictures outdoors under a clear sky
[x] : When taking pictures outdoors under a cloudy sky
[c] : When taking pictures outdoors in the shade
[v] : When taking pictures under incandescent lights
[b] : Value set by using [n]
[n] : Set manually
Note
• The optimal White Balance will differ depending on the type of halogen lighting being
recorded under so use [AWB] or [n].
• The White Balance setting is memorised even if the camera is turned off. (However,
the White Balance setting for a Scene Mode returns to [AWB] when the Scene Mode is
changed.)
• In the Scene Modes listed below, White Balance is xed to [AWB]:
– [SCENERY]/[NIGHT PORTRAIT]/[NIGHT SCENERY]/[FOOD]/[PARTY]/
[CANDLE LIGHT]/[SUNSET]/[FLASH BURST]/[STARRY SKY]/[FIREWORKS]/
[BEACH]/[SNOW]/[AERIAL PHOTO]/[FILM GRAIN]
- 88 -
Page 89

Advanced (Recording pictures)
Auto White Balance
Depending on the conditions when pictures are taken, the pictures may take on a reddish
or bluish tinge. Furthermore, when a multiple number of light sources are being used
or there is nothing with a colour close to white, Auto White Balance may not function
properly. In this case, set the White Balance to a mode other than [AWB].
1 Auto white balance will work within this range.
2 Blue sky
3 Cloudy sky (Rain)
4 Shade
5 TV screen
6 Sunlight
7 White uorescent light
8 Incandescent light bulb
9 Sunrise and sunset
10 Candlelight
K=Kelvin Colour Temperature
10000 K
9000 K
8000 K
7000 K
6000 K
1)
5000 K
4000 K
3000 K
2000 K
1000 K
2)
3)
4)
5)
6)
7)
8)
9)
10)
Setting the White Balance manually
1 Select [n].
2 Aim the camera at a sheet of white paper or other white
object so that the frame in the centre is lled by the white
object only, and touch [SET].
• If the subject is too bright or too dark, the white balance
cannot be set properly. In this case, improve ambient light
and set it again.
[EXPOSURE]
Refer to P60 for details.
- 89 -
Page 90

Advanced (Recording pictures)
[BURST]
For details on [REC] Mode menu settings, refer to P22.
Pictures are taken continuously while the shutter button is pressed.
Select the ones you really like from the pictures you have taken.
Applicable modes: 4 1 / 5
[OFF]/[&]
Burst speed (pictures/second) approx. 1.5
Number of recordable pictures
• The Burst speed values given above apply when the shutter speed is 1/60 or faster.
Note
• The Burst speed becomes slower halfway. The exact timing of this depends on the
type of card, the picture size and the quality.
• You can take pictures until the capacity of the built-in memory or the card is full.
• The focus is xed when the rst picture is taken.
• The exposure and the White Balance are adjusted each time you take a picture.
• When the self-timer is used, the number of recordable pictures in Burst Mode is xed to
3.
• If you are following a moving subject while taking pictures in a place indoors, outdoors
(landscape) etc. where there is a large difference between the light and shade, the
exposure may not become optimal.
• The Burst speed (pictures/second) may become slower depending on the recording
environment such as in dark places, if the ISO sensitivity is high etc.
• Burst Mode is not cancelled when the camera is switched off.
• If you take pictures in Burst Mode with the built-in memory, it will take time to write the
picture data.
• [o] is set for the ash when Burst is set.
• Burst cannot be used in [TRANSFORM], [HI-SPEED BURST], [FLASH BURST],
[STARRY SKY], [FILM GRAIN] or [PHOTO FRAME] in Scene Mode.
Depends on the remaining capacity of the
built-in memory/card.
- 90 -
Page 91

Advanced (Recording pictures)
[DIGITAL ZOOM]
For details on [REC] Mode menu settings, refer to P22.
This can enlarge subjects even more than the Optical Zoom or Extra Optical Zoom.
Applicable modes: 1 / 5
[OFF]/[ON]
Note
• Refer to P42 for details.
• If camera shake (jitter) is a problem during zooming, it is recommended that
[STABILIZER] be set to [AUTO] or [MODE1].
• The setting is xed to [ON] in Macro Zoom Mode.
• [DIGITAL ZOOM] cannot be set in Motion Picture Mode. Setting of other Recording
Mode will be reected.
[COLOR MODE]
For details on [REC] Mode menu settings, refer to P22.
Using these modes, the pictures can be made sharper or softer, the colours of the
pictures can be turned into sepia colours or other colour effects can be achieved.
Applicable modes: 4 1 6
[STANDARD] : This is the standard setting.
[NATURAL] : The picture becomes softer.
[VIVID] : The picture becomes sharper.
[B/W] : The picture becomes black and white.
[SEPIA] : The picture becomes sepia.
[COOL] : The picture becomes bluish.
[WARM] : The picture becomes reddish.
Note
• When you take pictures in dark places, noise may become visible. To avoid noise, we
recommend setting to [NATURAL].
• You cannot set [NATURAL], [VIVID], [COOL] or [WARM] in Intelligent Auto Mode.
• In Intelligent Auto Mode, you can set this mode separately.
- 91 -
Page 92

Advanced (Recording pictures)
[STABILIZER]
For details on [REC] Mode menu settings, refer to P22.
Using one of these modes, jitter during picture taking is detected, and the camera
automatically compensates for the jitter, enabling jitter-free images to be taken.
Applicable modes: 1 / 5
[OFF]
[AUTO] : The optimum jitter compensation is selected depending on the condition.
[MODE1] : Jitter is always compensated during [REC] Mode.
[MODE2] : Jitter is compensated for when the shutter button is pressed.
Note
• The Stabilizer function may not be effective in the following cases.
– When there is a lot of jitter.
– When the zoom magnication is high.
– In Digital Zoom range.
– When taking pictures while following a moving subject.
– When the shutter speed becomes slower to take pictures indoors or in dark places.
Be careful of camera jitter when you press the shutter button.
• The setting is xed to [MODE2] with [SELF PORTRAIT] in Scene Mode and to [OFF] in
[STARRY SKY] in Scene Mode.
• The setting is xed to [MODE1] in Motion Picture Mode.
- 92 -
Page 93

Advanced (Recording pictures)
[AF ASSIST LAMP]
For details on [REC] Mode menu settings, refer to P22.
Illuminating the subject makes it easier for the camera to focus when recording in low light
conditions that make focusing difcult.
Applicable modes: 1 / 5
[OFF] : The AF Assist Lamp does not turn on.
[ON] : When taking pictures in dark places, the AF Assist Lamp lights while the shutter
button is pressed halfway. (Larger AF areas are now displayed.)
Note
• The effective range of the AF Assist Lamp is 1.5 m (4.92 feet).
• When you do not want to use the AF Assist Lamp A (e.g. when taking
pictures of animals in dark places), set the [AF ASSIST LAMP] to
[OFF]. In this case, it will become more difcult to focus on the subject.
• [AF ASSIST LAMP] is xed to [OFF] in [SELF PORTRAIT],
[SCENERY], [NIGHT SCENERY], [SUNSET], [FIREWORKS] and
[AERIAL PHOTO] in Scene Mode.
• [AF ASSIST LAMP] cannot be set in Motion Picture Mode. Setting of other Recording
Mode will be reected.
[RED-EYE REMOVAL]
For details on [REC] Mode menu settings, refer to P22.
When the ash is used with the Red-Eye Reduction ([y], [u], [i]) selected, it
will automatically detect and correct the red-eye in the image data.
Applicable modes: 1 / 5
[OFF]/[ON]
Note
• It may not be able to correct the red-eye depending on the recording conditions.
• When the Digital Red-Eye Correction is set to [ON], [
• Refer to P51 for details.
] appears on the ash icon.
[CLOCK SET]
For details on [REC] Mode menu settings, refer to P22.
To set the year, month, day and time.
It functions in exactly the same way as [CLOCK SET] (P19) in the [SETUP] menu.
- 93 -
Page 94

Advanced (Recording pictures)
Entering Characters
Names set in [BABY1]/[BABY2] and [PET] in Scene Mode or [LOCATION] in travel
date are also recorded as the titles. (Only alphabetical characters and symbols can be
entered.)
Display the text entry screen.
1
• For name setting in [BABY1]/[BABY2] or [PET] in Scene Mode (P61)
• For [LOCATION] setting in Travel Date (P78)
Enter characters.
2
• To enter the letter “E”, for example, touch [DEF] twice.
• Touch [s] to switch text between [A] (capitals), [a]
(small case), [1] (numbers) and [&] (special characters).
• The cursor at the entry position can be moved to the left
by touching [t], and to the right by touching [u].
• To enter a blank, touch [v], or to delete an entered
character, touch [DELETE].
• To stop editing at any time during text entry, touch [CANCEL].
• A maximum of 30 characters can be entered.
Touch [SET].
3
• Display will return to the appropriate setting screen.
Note
• Text can be scrolled if all of the registered text does not t on the screen.
- 94 -
Page 95

Advanced (Playback)
[PLAYBACK] Mode: 5
Playing Back Pictures in Sequence (Slide Show)
You can play back the pictures you have taken in synchronization with music, and you can
do this in sequence while leaving a xed interval between each of the pictures.
Furthermore, you can play back the pictures grouped together by category or play back
only those pictures you have set as favourites as a Slide Show.
This playback method is recommended when you have connected the camera to a TV to
view the pictures.
Slide the [REC]/[PLAYBACK] selector switch to [5], and then press
1
[MODE].
Touch [SLIDE SHOW].
2
Touch the item.
3
[ALL]: All pictures.
[CATEGORY SELECTION]
[FAVORITE]: Pictures with [z]
: Touch the category to be
played.
(favourites). [FAVORITE]
can be selected only when [FAVORITE] (P109) on the
[PLAYBACK] menu is [ON] and there are pictures already
set as favourites.
Touch [START].
4
Touch [g] to nish the Slide Show.
5
• Normal Playback resumes after the Slide Show nishes.
- 95 -
Page 96

Advanced (Playback)
Operations performed during slide show
1 Display control panel by touching screen.
• If no operation is done for 2 seconds, it will return to original status.
AControl panel
A
2 Operate control panel by touching.
CANCEL
#
–
$
+
Changing the Slide Show settings
You can change the settings for Slide Show Playback by
selecting [EFFECT] or [SETUP] on the Slide Show menu screen.
[EFFECT]
This allows you to select the screen effects or music effects
when switching from one picture to the next.
[NATURAL], [SLOW], [SWING], [URBAN], [OFF], [AUTO]
• When [URBAN] has been selected, the picture may appear in black and white as a
screen effect.
• [AUTO] can be used only when [CATEGORY SELECTION] has been selected. The
pictures are played back with the recommended effects in each category.
[SETUP]
[DURATION] or [REPEAT] can be set.
Item Settings
[DURATION] 1SEC./2SEC./3SEC./5SEC.
[REPEAT] OFF/ON
[MUSIC] OFF/ON
• [DURATION] can be set only when [OFF] has been selected as the [EFFECT] setting.
• [MUSIC] cannot be selected when [OFF] has been selected as the [EFFECT] setting.
Note
• Motion pictures cannot be played back as a Slide Show. When the motion picture in
[CATEGORY SELECTION] has been selected, the beginning image of each motion
picture is played back.
• It is not possible to add new music effects.
B Back to previous picture
C Play/Pause
D Forward to next picture
E Exit Slide show
F Return to slide show set screen
G Reduce volume level
H Increase volume level
¼
These operations can be performed only in the
Pause Mode.
- 96 -
Page 97

[PLAYBACK] Mode: 5
Advanced (Playback)
Displaying Pictures by Recording Date
You can display pictures by recording date.
Slide the [REC]/[PLAYBACK] selector switch to [5], and then press
1
[MODE].
Touch [CALENDAR].
2
• You can also rotate the zoom lever several times towards [6] (W) to display the
calendar screen.
Touch [e]/[r]/[w]/[q] to select the date to
3
be played back and touch [SET].
• If there were no pictures recorded during a
month, the month is not displayed.
• The multi playback screen will appear by
touching [o].
Touch the picture to select.
4
• The calendar screen will be retrieved by touching
[t].
Note
• The recording date of the picture selected in the playback screen becomes the date
selected when the calendar screen is rst displayed.
• If there are multiple pictures with the same recording date, the rst picture recorded on
that day is displayed.
• You can display the calendar between January 2000 and December 2099.
• If the date is not set in the camera, the recording date is set as the 1st January, 2010.
• If you take pictures after setting the travel destination in [WORLD TIME], the pictures are
displayed by the dates at the travel destination in Calendar Mode.
([CALENDAR])
- 97 -
Page 98

Advanced (Playback)
[PLAYBACK] Mode: 5
Selecting Pictures and Playing them Back
([CATEGORY PLAY]/[FAVORITE PLAY])
[CATEGORY PLAY]
This mode allows you to search images by Scene Mode or other categories (such as
[PORTRAIT], [SCENERY] or [NIGHT SCENERY]) and sort the pictures into each of the
categories. You can then play back the pictures in each category.
Slide the [REC]/[PLAYBACK] selector switch to [5], and then press
1
[MODE].
Touch [CATEGORY PLAY].
2
Touch the category to playback.
3
• A category can be played back only if it contains a
picture.
• It may take time to search the picture les if there are a
lot on the card or the built-in memory.
• If you touch [CANCEL] during searching, it will stop
halfway.
• Pictures are sor ted into the categories as follows.
- 98 -
Page 99

[CATEGORY]
q
r
y
Advanced (Playback)
Recording information
e.g. Scene Modes
[PORTRAIT],
[i-PORTRAIT],
[SOFT SKIN],
[TRANSFORM],
[SELF PORTRAIT],
[NIGHT PORTRAIT],
[i-NIGHT PORTRAIT],
[BABY1]/[BABY2]
[SCENERY],
[i-SCENERY],
[SUNSET],
[i-SUNSET],
[AERIAL PHOTO]
[NIGHT PORTRAIT],
[i-NIGHT PORTRAIT],
[NIGHT SCENERY],
[i-NIGHT SCENERY],
[STARRY SKY]
[CATEGORY]
q
w
d
i
e
r
Recording information
e.g. Scene Modes
[SPORTS], [PARTY],
[CANDLE LIGHT],
[FIREWORKS],
[BEACH], [SNOW],
[AERIAL PHOTO]
[BABY1]/[BABY2]
[PET]
[FOOD]
[TRAVEL DATE]
[MOTION PICTURE]
- 99 -
Page 100

Advanced (Playback)
[FAVORITE PLAY]
You can play back the pictures you have set as [FAVORITE] (P109) (Only when [FAVORITE]
is set to [ON] and there are pictures which have been set to [FAVORITE]).
Slide the [REC]/[PLAYBACK] selector switch to [5], and then press
1
[MODE].
Touch [FAVORITE PLAY].
2
Note
• You can use only [ROTATE DISP.], [PRINT SET] or [PROTECT] in the [PLAYBACK]
menu.
- 100 -
 Loading...