

Panasonic DC-GX880 Owner’s Manual
Operating Instructions
for advanced features
Digital Camera
Model No. DC-GX880
Please read these instructions carefully before using this product,
and save this manual for future use.
Message Display P309
Troubleshooting P312
Finding the information you need P2
Contents P4
Contents by Function P9
Menu list P182
DVQP2005ZA
F0619CT0
Finding the information you need
In this “Operating Instructions for advanced features”, you can find the information you
need from the following pages.
By clicking a page number, you can jump to the linked page and quickly find the
information.
Search from “Contents”
Click this icon to jump to “Contents”.
Search from the list of function names P9
Search from the list of buttons and dials P14
Search from the list of screens and icons P302
Search from “Message Display” P309
Search from “Menu list”
Click this icon to jump to “Menu list”.
Search from “Troubleshooting” P312
Click this icon to jump to “Finding the information you need”.
Click this icon to return to the previously displayed page.
For details on how to use this manual, see the next page.
P4
P182
P3
Wi-Fi® function
P245
2
How to use this manual
MENU
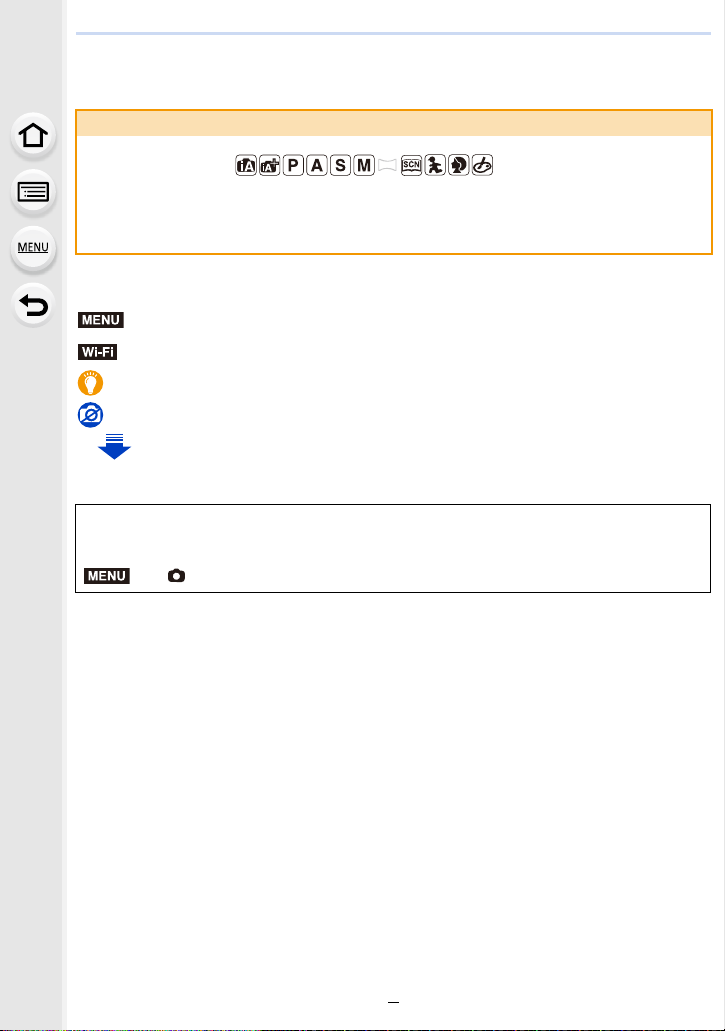
About the indication of the applicable mode
Applicable modes:
The icons indicate the modes available for a function.
• Black icons: Applicable modes
• Grey icons: Unavailable modes
∫ About the symbols in the text
: Indicates that the menu can be set by pressing [MENU/SET] button.
Wi-Fi
: Indicates that the Wi-Fi setting can be made by pressing [Wi-Fi] button.
: Tips for skilful use and points for recording.
: Conditions in which a particular function cannot be used.
: Continued to next page.
• Click a cross reference in the text to jump to the corresponding page.
In these operating instructions, steps for setting a menu item are described as follows.
Example: In the [Rec] menu, change [Quality] from [
MENU
> [Rec] > [Quality] > [›]
• Description in these operating instructions is based on the interchangeable lens (H-FS12032).
A] to [›]
3

Contents
Finding the information you need..............................................................................2
How to use this manual.............................................................................................3
Contents by Function ................................................................................................9
1. Before Use
Care of the camera .................................................................................................12
Standard Accessories .............................................................................................13
Names and Functions of Components....................................................................14
About the Lens........................................................................................................17
2. Getting Started/Basic Operations
Attaching the Shoulder Strap ..................................................................................18
Charging the Battery ...............................................................................................19
• Inserting the Battery .......................................................................................20
• Charging.........................................................................................................21
• Approximate operating time and number of recordable pictures....................24
Inserting and Removing the Card (optional) ...........................................................27
Card Information .....................................................................................................28
• Formatting the card (initialisation) ..................................................................29
• Approximate number of recordable pictures and available recording time ....30
Attaching/Removing the Lens .................................................................................32
Setting Date/Time (Clock Set).................................................................................36
• Re-adjusting the clock ....................................................................................37
Basic Operations.....................................................................................................38
• Tips for taking good pictures ..........................................................................38
• Extending/retracting the lens [when the interchangeable lens (H-FS12032/
H-FS35100) is attached] ................................................................................39
• Adjust the angle of the monitor.......................................................................40
• Shutter button (Taking pictures) .....................................................................41
• Motion picture button (Recording motion pictures).........................................41
• Mode dial (Selecting a Recording Mode) .......................................................42
• Control Dial.....................................................................................................43
• Cursor buttons/[MENU/SET] button ...............................................................43
• [DISP.] button (Switching the displayed information)......................................44
• Touch screen (Touch operations) ...................................................................46
• Taking Pictures Using the Touch Function .....................................................47
• [REC. SETTING RESET] button (Resetting the recording settings) ..............49
Setting menu items .................................................................................................50
Calling frequently-used menus instantly
(Quick Menu) ..........................................................................................................52
• Customising the Quick Menu settings ............................................................53
Assigning frequently used functions to the buttons (function buttons) ....................54
Entering Text ...........................................................................................................57
4

3. Recording Modes
Taking Pictures using the Automatic Function
(Intelligent Auto Mode)............................................................................................58
• Taking handheld shots of night scenes ([iHandheld Night Shot]) ...................61
• Combining pictures into a single picture with rich gradation ([iHDR]).............62
• Taking pictures with customised colour, defocus control, and brightness
settings...........................................................................................................63
Taking Pictures of Yourself ([Self Shot])..................................................................65
• Changing the way the shutter is released ......................................................74
Taking Pictures with Automatically Adjusted Aperture and Shutter Speed
(Programme AE Mode) ...........................................................................................76
Taking Pictures by Specifying the Aperture/
Shutter Speed .........................................................................................................78
• Aperture-Priority AE Mode .............................................................................79
• Shutter-Priority AE Mode................................................................................79
• Manual Exposure Mode .................................................................................80
• Confirm the Effects of Aperture and Shutter Speed (Preview Mode) .............82
• Easily set aperture/shutter speed for suitable exposure (One Push AE) .......83
Taking panorama pictures (Panorama Shot Mode).................................................84
Taking Pictures that match the Scene being recorded (Scene Guide Mode)..........87
Taking pictures of children or portraits with optimal settings ...................................90
• Child Mode .....................................................................................................90
• Portrait Mode ..................................................................................................91
Taking Pictures with different image effects
(Creative Control Mode)..........................................................................................92
4. Focus, Brightness (Exposure) and Colour tone Settings
Adjusting Focus Automatically ................................................................................98
• Focus Mode (AFS/AFF/AFC) .......................................................................100
• Auto Focus Mode .........................................................................................102
• Setting up position of the AF area/changing size of the AF area .................107
• Optimising the focus and brightness for a touched position .........................109
Adjusting Focus Manually .....................................................................................110
Fixing the Focus and the Exposure (AF/AE Lock) ................................................113
Compensating the Exposure.................................................................................114
Setting the Light Sensitivity................................................................................... 116
Adjusting the White Balance ................................................................................. 118
5. 4K Photo and Drive Settings
Recording 4K Photos............................................................................................122
Selecting pictures from 4K burst file and saving ...................................................126
• Notes on the 4K Photo function....................................................................129
Controlling Focus After Recording
(Post Focus/Focus Stacking) ................................................................................132
5

• Recording using [Post Focus] ......................................................................132
• Selecting the desired focus area and saving a picture .................................135
• Merging multiple pictures to widen the focus range (Focus Stacking)..........136
Select a Drive Mode..............................................................................................138
• Burst Mode...................................................................................................139
• Self-timer......................................................................................................141
Taking Pictures While Adjusting a Setting Automatically (Bracket Recording) .....142
• Exposure Bracket .........................................................................................143
Taking Pictures Automatically at Set Intervals ([Time Lapse Shot])......................144
Creating Stop Motion Pictures ([Stop Motion Animation]) .....................................147
6. Stabiliser, Zoom and Flash
Image Stabiliser.....................................................................................................150
Taking Pictures with the Zoom ..............................................................................152
• Raising the telescopic effect.........................................................................153
• Zooming using touch operations (Touch zoom) ...........................................157
Taking pictures by using the flash .........................................................................158
• Changing Flash Mode ..................................................................................160
• Setting to the 2nd Curtain Synchro...............................................................162
• Adjust the flash output..................................................................................163
• Synchronising the output of the flash to the Exposure Compensation .........163
7. Recording Motion Pictures
Recording Motion Picture/4K Motion Picture ........................................................164
• Setting the format, size and recording frame rate ........................................166
• How to set focus when recording a motion picture ([Continuous AF]) .........168
Recording still pictures while recording motion pictures .......................................169
Recording Snap Movies ........................................................................................171
8. Playing Back and Editing Images
Playing Back Pictures ...........................................................................................174
Playing Back Motion Pictures................................................................................175
• Creating Still Pictures from a Motion Picture ................................................176
Switching the Playback Method ............................................................................177
• Using the Playback Zoom ............................................................................177
• Displaying multiple screens (Multi Playback) ...............................................177
• Displaying Pictures by Recording Date (Calendar Playback) ......................178
Playing Back Group Pictures ................................................................................179
Deleting Pictures...................................................................................................181
9. Using Menu Functions
Menu list................................................................................................................182
• [Rec] menu...................................................................................................182
• [Motion Picture] menu ..................................................................................202
• [Custom] menu .............................................................................................204
6

• [Setup] menu................................................................................................213
• [Playback] menu...........................................................................................221
10. Using the Wi-Fi function
What you can do with the Wi-Fi® function.............................................................245
Wi-Fi function........................................................................................................246
Controlling with a Smartphone/Tablet ...................................................................248
• Installing the smartphone/tablet app “Image App ” .......................................248
• Connecting to a smartphone/tablet...............................................................249
• Taking images via a smartphone/tablet (remote recording)..........................253
• Playing back images in the camera..............................................................254
• Saving images stored in the camera ............................................................254
• Sending images in the camera to an SNS ...................................................255
• Adding location information to images stored in the camera from
a smartphone/tablet .....................................................................................255
• Combining motion pictures recorded with Snap Movie according to your
preference on a smartphone/tablet ..............................................................257
Displaying pictures on a TV ..................................................................................258
Sending images ....................................................................................................259
Sending images to a smartphone/tablet................................................................263
Printing Wirelessly.................................................................................................264
Sending images to AV device ...............................................................................265
Sending images to PC ..........................................................................................266
Using Web services ..............................................................................................268
• When sending images to web service ..........................................................268
• When sending images to [Cloud Sync. Service] ..........................................271
Registering to the “LUMIX CLUB”.........................................................................272
• About the [LUMIX CLUB] .............................................................................272
About Connections................................................................................................276
• Connecting via a wireless access point (via the network) ............................277
• Connecting the camera and another device directly (direct connection)......279
• Connecting quickly with the same settings as the previous ones ([Select a
destination from History]/[Select a destination from Favorite]).....................280
[Wi-Fi Setup] Menu ...............................................................................................282
11. Connecting to other equipment
Watching 4K motion pictures on a TV/ Saving 4K motion pictures on your PC or
recorder.................................................................................................................284
• Watching motion pictures in 4K....................................................................284
• Storing 4K motion pictures ...........................................................................285
Playing Back Pictures on a TV Screen .................................................................286
• Using VIERA Link (HDMI) ............................................................................288
Saving still pictures and motion pictures on your PC ............................................289
• Downloading software ..................................................................................290
• Transferring images to a PC.........................................................................292
7

Saving still pictures and motion pictures on a Recorder .......................................294
Printing the Pictures..............................................................................................295
Enjoying 3D pictures .............................................................................................298
12. Others
Optional accessories.............................................................................................301
Monitor Display .....................................................................................................302
Message Display...................................................................................................309
Troubleshooting ....................................................................................................312
Cautions for Use ...................................................................................................321
8

Contents by Function
Recording
Recording
Recording Mode.............................. P42
Self Shot Mode................................ P65
[Preview]..........................................P82
Panorama Shot Mode .....................P84
[4K PHOTO] ..................................P122
[Post Focus] ..................................P132
[Time Lapse Shot] .........................P144
[Stop Motion Animation] ................P147
[Multi Exp.].....................................P192
[Silent Mode] .................................P204
3D recording..................................P298
Focus (AF/MF)
[Focus Mode]................................. P100
[AF Mode]......................................P102
Adjusting the AF area position ......P107
Manual Focus................................P110
[AF/AE Lock] .................................P113
Drive
[Drive Mode] ..................................P138
[Self Timer]....................................P141
Picture Quality and Colour Tone
[Sensitivity] ....................................P116
[White Balance] .............................P118
[Photo Style]..................................P183
[Filter Settings] ..............................P185
[Picture Size] .................................P187
[Quality] .........................................P188
[i.Dynamic].....................................P190
[i.Resolution]..................................P190
[HDR].............................................P191
[Long Shtr NR]...............................P196
[Shading Comp.]............................P196
[Diffraction Compensation] ............P197
[Color Space].................................P197
Exposure
[Touch AE].......................................P48
[One Push AE] .................................P83
[AF/AE Lock]..................................P113
Exposure Compensation ...............P114
Exposure Bracket ..........................P143
[Metering Mode].............................P189
Flash
[Flash Mode] ..................................P160
2nd curtain synchro .......................P162
[Flash Adjust.] ................................P163
9

Motion Picture
Motion Picture
[Rec Format]..................................P166
[Rec Quality]..................................P166
Motion pictures in 4K ..................... P164
Recording still pictures while
recording motion pictures ..............P169
[Snap Movie] .................................P171
Setup/Custom
Basic settings
[Format]........................................... P29
[Clock Set].......................................P36
Display switching.............................P44
How to set menu items....................P50
[Q.MENU] ........................................P52
[Beep] ............................................P214
[Economy] .....................................P216
Playback
Playback
Picture playback ............................P174
Motion picture playback.................P175
Playback Zoom..............................P177
Multi Playback ...............................P177
Delete ............................................P181
[Auto Review] ................................P211
Playback/display settings
[Slide Show] ..................................P223
[Rotate]/[Rotate Disp.] ...................P241
Audio
[Mic Level Adj.] ..............................P202
[Wind Noise Canceller] ..................P203
Screen settings
[Mic Level Disp.] ............................P202
[Center Marker]..............................P208
[Zebra Pattern] ...............................P209
[Monochrome Live View] ...............P210
[Reset] (initialisation) .....................P219
[Sensor Cleaning] ..........................P220
Customisation
[CUSTOM] in the Quick Menu .........P53
Function buttons ..............................P54
[Custom] menu ..............................P204
Edit
Focus Stacking ..............................P136
[Beauty Retouch] ...........................P226
[RAW Processing]..........................P229
[4K PHOTO Bulk Saving]...............P231
[Light Composition]........................P232
[Clear Retouch]..............................P234
[Resize]..........................................P239
[Cropping] ......................................P240
Adding information
[Location Logging] .........................P225
[Title Edit].......................................P235
[Text Stamp] ..................................P236
Image settings
[Favorite]........................................P242
[Print Set].......................................P243
[Protect] .........................................P244
10

Wi-Fi
Connect
“Image App” ..................................P248
[WPS (Push-Button)] .............P277, 279
Direct connection........................... P279
Image App
Remote recording..........................P253
Saving images ...............................P254
Sending images..................... P255, 263
Sending and adding location
information.....................................P255
Combining motion pictures
recorded with [Snap Movie] ........... P257
Connections with other devices
PC
“PHOTOfunSTUDIO” ....................P290
“SILKYPIX Developer Studio” ....... P291
Transferring images to a PC .........P266
TV
Playing Back Pictures on a TV
Screen ...........................................P286
[VIERA Link]..................................P288
In combination with other devices
Playing back pictures on a TV .......P258
Printing images ..............................P264
Sending images to an AV
device ............................................P265
Sending images to a PC ................P266
Sending images to a web
service ...........................................P268
Using [Cloud Sync. Service] ..........P271
Recorder
Dubbing .........................................P294
Printer
PictBridge ......................................P295
11

1. Before Use
Care of the camera
Do not subject to strong vibration, shock, or pressure.
• The lens, monitor, or external case may be damaged if used in the following conditions.
It may also malfunction or image may not be recorded if you:
– Drop or hit the camera.
– Press hard on the lens or the monitor.
This camera is not dust/drip/water proof.
Avoid using the camera in places with a lot of dust, water, sand, etc.
• Liquid, sand and other foreign material may get into the space around the lens, buttons, etc. Be
particularly careful since it may not just cause malfunctions, but it may also become irreparable.
– Places with a lot of sand or dust.
– Places where water can come into contact with this unit, such as when using it on a rainy day
or at the beach.
If sand, dust, or liquids such as water droplets adhere to the monitor, wipe them off with a
dry soft cloth.
– Not doing so may cause the monitor to respond incorrectly to touch operations.
Do not place your hands inside the mount of the digital camera body. Since the
sensor unit is a precision apparatus, it may cause a malfunction or damage.
∫ About Condensation (When the lens or monitor is fogged up)
• Condensation occurs when the ambient temperature or humidity changes. Be careful of
condensation since it causes lens and monitor stains, fungus and camera malfunction.
• If condensation occurs, turn the camera off and leave it for about 2 hours. The fog will
disappear naturally when the temperature of the camera becomes close to the ambient
temperature.
12

1. Before Use
Standard Accessories
Check that all the accessories are supplied before using the camera.
• The accessories and their shape will differ depending on the country or area where the camera
was purchased.
For details on the accessories, refer to “Basic Operating Instructions”.
• Battery Pack is indicated as battery pack or battery in the text.
• microSD Memory Card, microSDHC Memory Card and microSDXC Memory Card are
indicated as card in the text.
• The card is optional.
13
1. Before Use
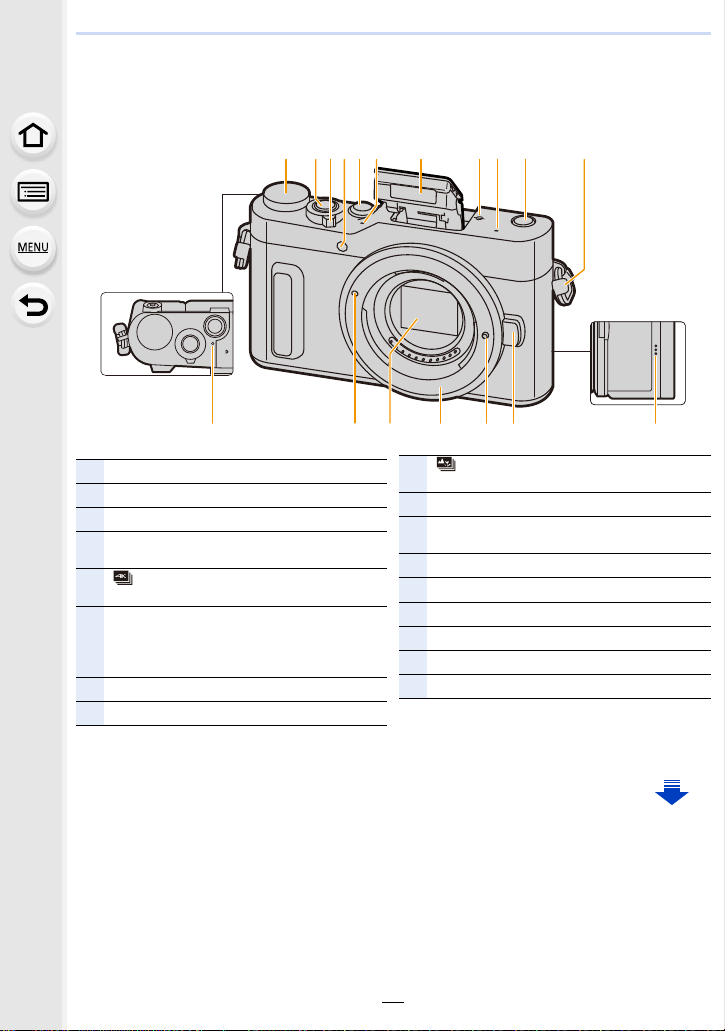
Names and Functions of Components
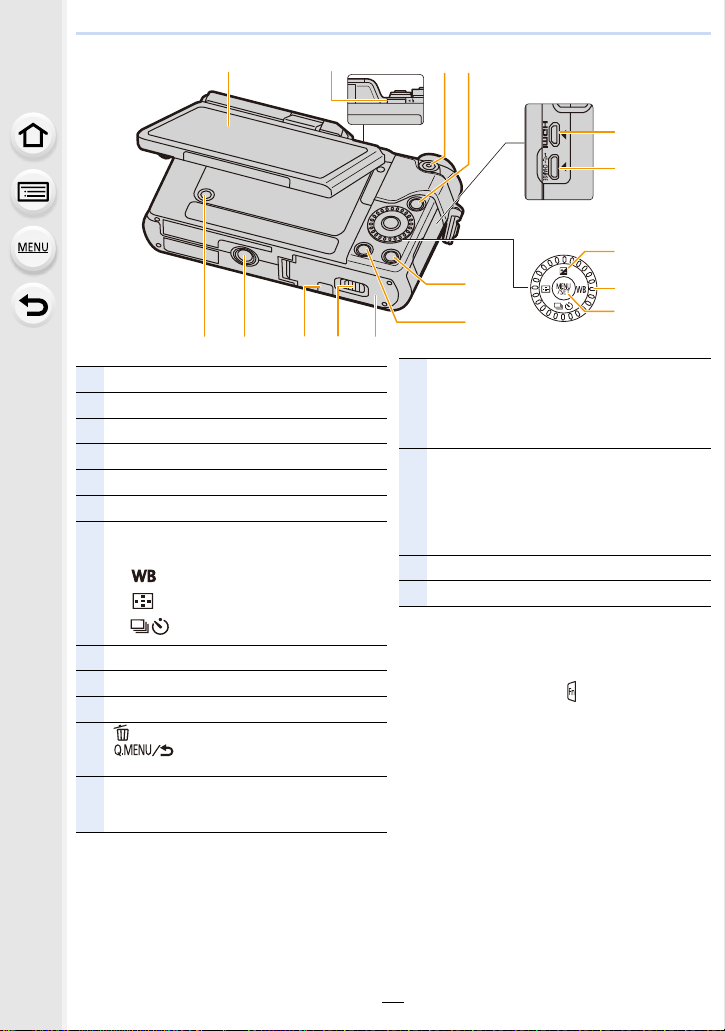
∫ Camera body
1 45 76632 8 9
Mode dial (P42)
1
Shutter button (P41)
2
Camera ON/OFF switch (P36)
3
Self-timer indicator (P141)/
4
AF Assist Lamp (P205)
[ ] (4K photo mode) button (P122)/
5
[Fn1] button (P54)
Stereo microphone (P202)
• Be careful not to cover the microphone with
6
your finger. Doing so may make sound difficult
to record.
Flash (P158)
7
Focus distance reference mark (P112)
8
15 1612 1413
[ ] (Post Focus) button (P132)/
9
[Fn3] button (P54)
Shoulder strap eyelet (P18)
10
Charging lamp (P22)/
11
®
connection lamp (P246)
Wi-Fi
Lens fitting mark (P32)
12
Sensor
13
Mount
14
Lens lock pin
15
Lens release button (P32)
16
Spe aker (P214)
17
10
1711
14
1. Before Use
18
31 33
Touch screen (P46)/monitor (P302)
18
Flash open lever (P158)
19
Motion picture button (P164)
20
[(] (Playback) button (P174)
21
[HDMI] socket (P286)
22
[USB/CHARGE] socket (P19, 292, 295)
23
Cursor buttons (P43)
3/[È] (Exposure Compensation) (P114)
1/[ ] (White Balance) (P118)
24
2/[ ] (Auto Focus Mode) (P102)
4/[ ] (Drive mode) (P138)
Control dial (P43)
25
[MENU/SET] button (P43, 50)
26
[DISP.] button (P44, 45)
27
[ ] (Delete) button (P181)/
[ ] (Quick Menu/Return) button (P52)/
28
[Fn2] button (P54)
[REC. SETTING RESET] button (P49)
• Use this button to restore the default recording
29
settings.
19
21
20
22
23
24
27
28
25
26
323029
Tripod mount (P327)
• It may not be possible to attach and securely
fasten a tripod with a screw length of 5.5 mm
30
(0.22 inch) or more to the camera. Doing so
may also damage the camera.
DC coupler cover (P301)
• When using an AC adaptor, ensure that the
Panasonic DC coupler (optional) and AC
31
adaptor (optional) are used.
• The optional DC coupler (DMW-DCC15)
cannot be used.
Release lever (P20, 27)
32
Card/Battery door (P20, 27)
33
∫ About the function button ([Fn4] to
[Fn8])
• Function buttons ([Fn4] to [Fn8]) (P54) are
touch icons. Touch the [ ] tab on the
recording screen to display them.
15
1. Before Use
2
34
1
4716 3
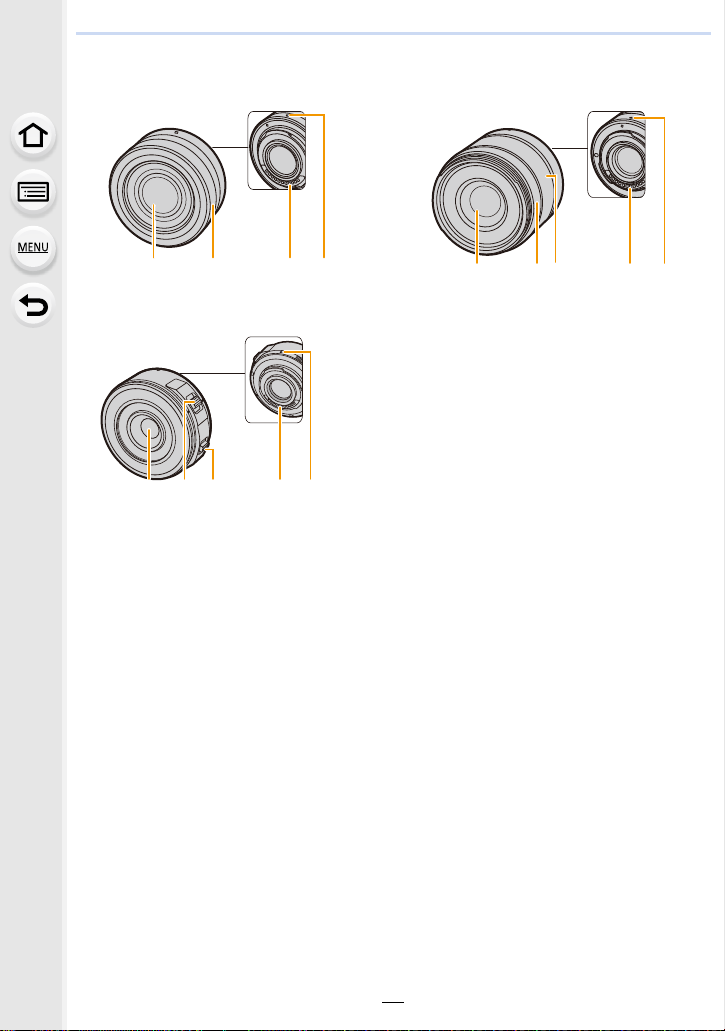
∫ Lens
H-FS12032 H-FS35100
512
H-PS14042
1 Lens surface
2 Zoom ring (P152)
3 Contact point
4 Lens fitting mark (P32)
5 Focus ring (P 111)
6 Zoom lever (P152)
7 Focus lever (P111 )
• The interchangeable lens (H-FS12032) does not have a focus ring, but you can use manual
focus by operating the camera. (P110)
34
16
1. Before Use
About the Lens
This unit can use the dedicated lenses compatible with
the Micro Four Thirds
TM
System lens mount specification
(Micro Four Thirds mount).
You can also use a lens of any of the following
standards by attaching a mount adaptor.
Lens Mount adaptor
Four Thirds™ mount specification
lens
Leica M Mount interchangeable lens M Mount Adaptor (DMW-MA2M: optional)
Leica R Mount interchangeable lens R Mount Adaptor (DMW-MA3R: optional)
• When using a Leica lens mount adaptor, set [Shoot w/o Lens] (P212) to [ON].
Mount Adaptor (DMW-MA1: optional)
About the lens and functions
Depending on the lens used, certain functions, such as Auto Focus, Image Stabiliser, and
zoom functions, may be disabled or operate differently.
For details on the lens used, refer to the website.
Refer to catalogues/Web pages for most current information regarding compatible
lenses.
https://panasonic.jp/support/global/cs/dsc/
(This Site is English only.)
• The focal length noted on the lens in use is equivalent to double when converted to the 35 mm
film camera.
(It will be equivalent to 100 mm lens when a 50 mm lens is used.)
About the firmware of your interchangeable lens
For smoother recording, we recommend updating the firmware of the interchangeable lens
to the latest version.
• To view the latest information on the firmware or to download the firmware, visit the
support site below:
https://panasonic.jp/support/global/cs/dsc/
(This Site is English only.)
• To check the firmware version of the interchangeable lens, attach it to the camera body and
select [Version Disp.] in the [Setup] menu.
17
2. Getting Started/Basic Operations
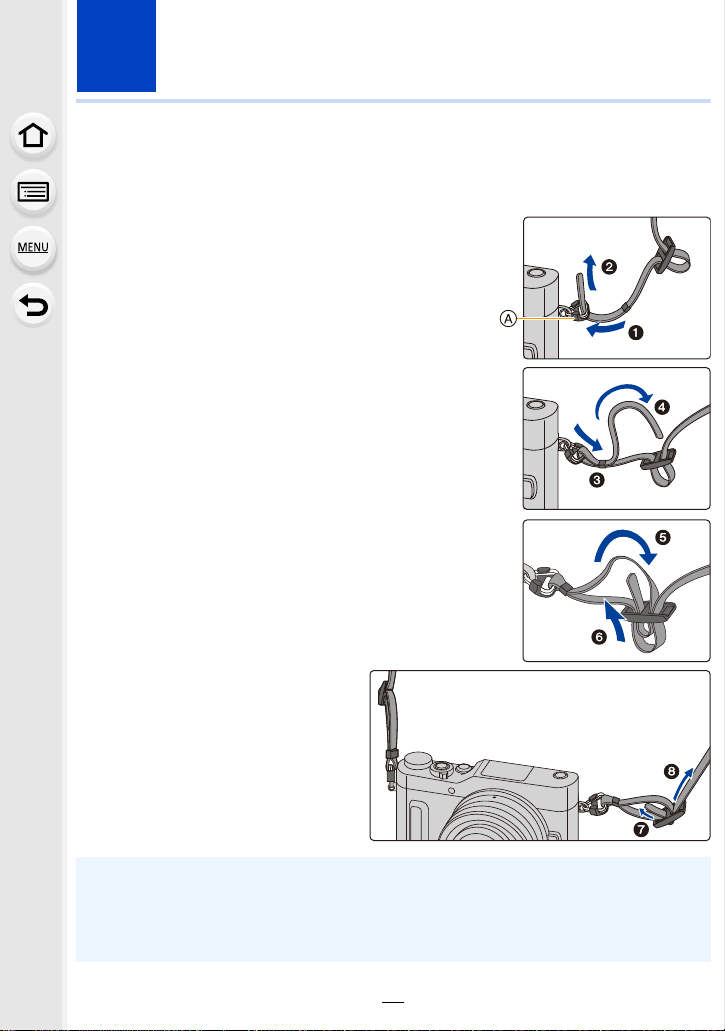
Attaching the Shoulder Strap
• We recommend attaching the shoulder strap when using the camera to prevent it from
dropping.
Pass the shoulder strap through the
1
shoulder strap eyelet on the camera body.
A: Shoulder strap eyelet
Pass the end of the shoulder strap
2
through the ring in the direction of the arrow
and then pass it through the stopper.
Pass the end of the shoulder strap
3
through the hole on the other side of the
stopper.
Pull the shoulder strap and
4
then check that it will not
come out.
• Perform steps 1 to 4 and then
attach the other side of the
shoulder strap.
• Use the shoulder strap around your shoulder.
– Do not wrap the strap around your neck.
It may result in injury or accident.
• Do not leave the shoulder strap where an infant can reach it.
– It may result in an accident by mistakenly wrapping around the neck.
18

2. Getting Started/Basic Operations
Charging the Battery
Use the dedicated AC adaptor (supplied), USB connection cable (supplied) and battery.
• The battery is not charged when the camera is shipped. Charge the battery before use.
• Charge the battery only when it is inserted in the camera.
Camera conditions Charge
Tur ned of f
Tur ne d on —
∫ About batteries that you can use with this unit
It has been found that counterfeit battery packs which look very similar to the
genuine product are made available for purchase in some markets. Some of
these battery packs are not adequately protected with internal protection to meet
the requirements of appropriate safety standards. There is a possibility that
these battery packs may lead to fire or explosion. Please be advised that we are
not liable for any accident or failure occurring as a result of use of a counterfeit
battery pack. To ensure that safe products are used, we recommend that a
genuine Panasonic battery pack is used.
±
19
2. Getting Started/Basic Operations
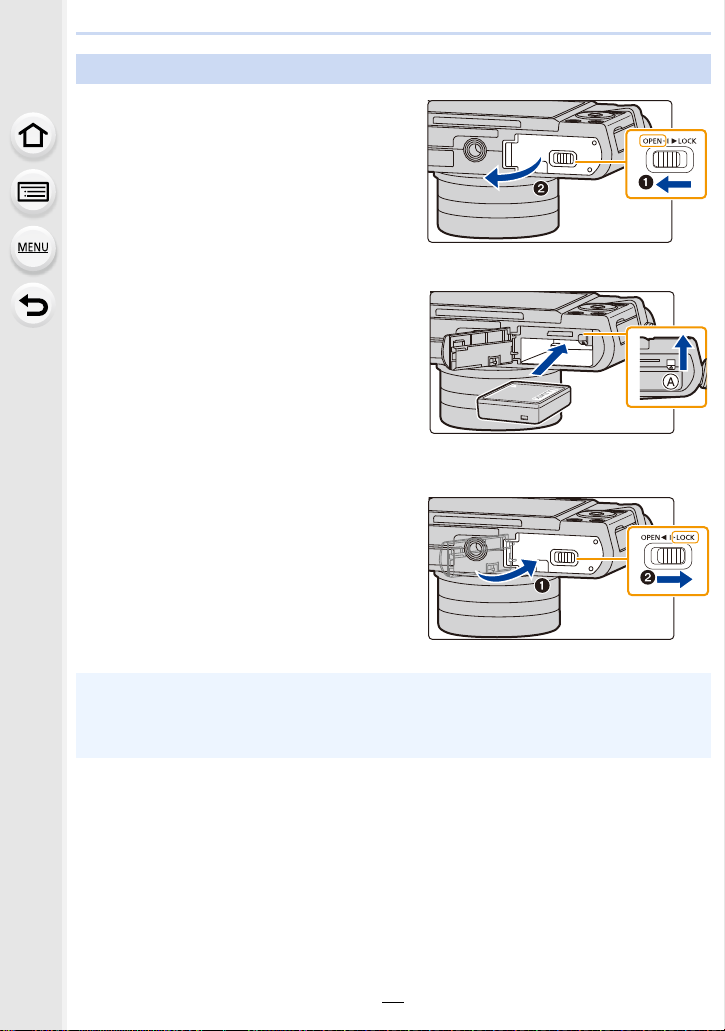
Inserting the Battery
1: Slide the release lever in the
1
direction of the arrow.
2: Open the card/battery door.
• Always use genuine Panasonic
batteries.
• If you use other batteries, we cannot
guarantee the quality of this product.
Being careful about the battery
2
orientation, securely insert it all
the way in, and then check that it
is locked by the lever A.
To remove the battery, move the
lever A in the direction of the
arrow.
1: Close the card/battery door.
3
2: Slide the release lever in the
direction of the arrow.
• Turn the camera off and wait for the “LUMIX” display on the monitor to clear before removing
the battery.
(Otherwise, this unit may no longer operate normally and the card itself may be damaged or
the recorded pictures may be lost.)
20
2. Getting Started/Basic Operations
Charging
• Charge the battery in areas with an ambient temperature, between 10 oC and 30 oC (50 oF and
86 oF) (same as the battery temperature), is recommended.
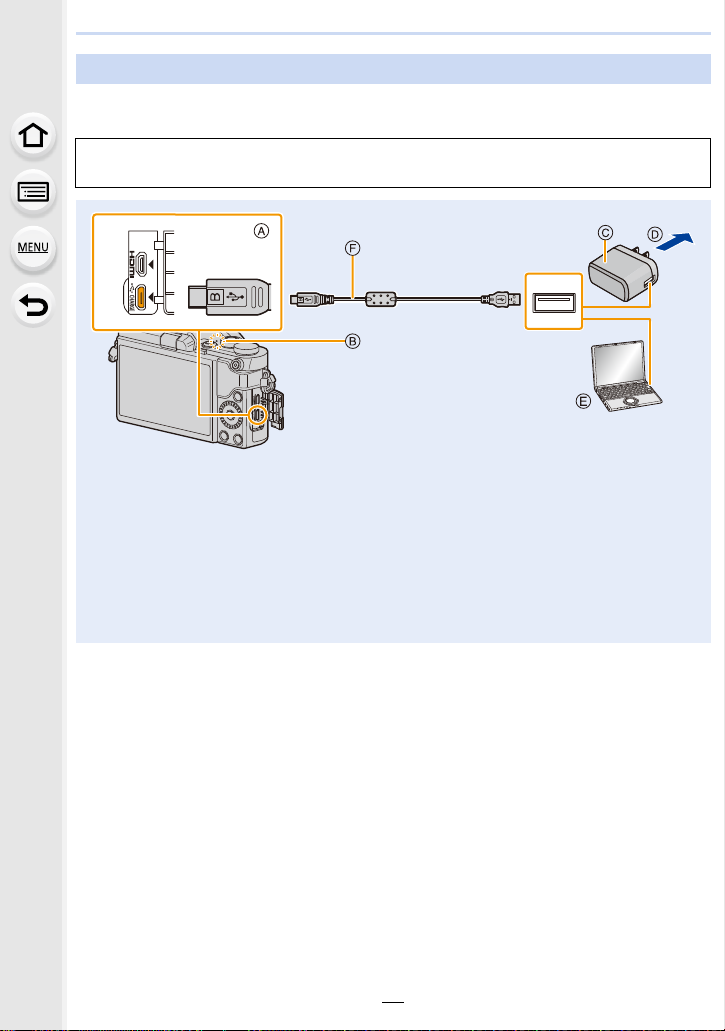
Insert the battery into this unit.
Check that this unit is turned off.
A Connect the USB connection cable
(supplied) to the [USB/CHARGE] socket.
• Place the camera in an upright position,
and find the terminal at the bottom.
B Charging lamp
C AC adaptor (supplied)
D To power outlet
E PC (Turned on)
F USB connection cable (supplied)
• Check the direction of the terminals and
plug in/out straight holding onto the plug.
(It may result in malfunction by the
deforming of the terminal if it is plugged in
obliquely or in wrong direction.)
Do not connect devices to incorrect
terminals. Doing so may cause
malfunction.
(Charging from the power outlet)
Connect the AC adaptor (supplied) and this camera with the USB connection cable
(supplied), and insert the AC adaptor (supplied) into the power outlet.
(Charging from a computer)
Connect the computer and this camera with the USB connection cable (supplied).
• If the computer enters a suspended state while charging the battery, charging will stop.
• Connecting this camera to a notebook computer that is not connected to a power outlet will
cause the notebook computer battery to drain faster. Do not leave the camera connected for
extended periods of time.
• Be sure to always connect the camera to a computer USB terminal.
Do not connect the camera to a monitor, keyboard or printer USB terminal, or a USB hub.
21
2. Getting Started/Basic Operations
AFSAFS
L
4:3
∫ About the charging lamp
Lit red: Charging.
Off: Charging has completed.
(When charging is complete, disconnect the camera from the power outlet
or computer.)
Blinking red: Charging error. (P312)
∫ Charging time
When using the AC adaptor (supplied)
Charging time Approx. 130 min
• The indicated charging time is for when the battery has been discharged completely.
The charging time may vary depending on how the battery has been used.
The charging time for the battery in hot/cold environments or a battery that has not been used
for a long time may be longer than normal.
• When power is supplied from a computer, the power supply capacity of the computer
determines the charging time.
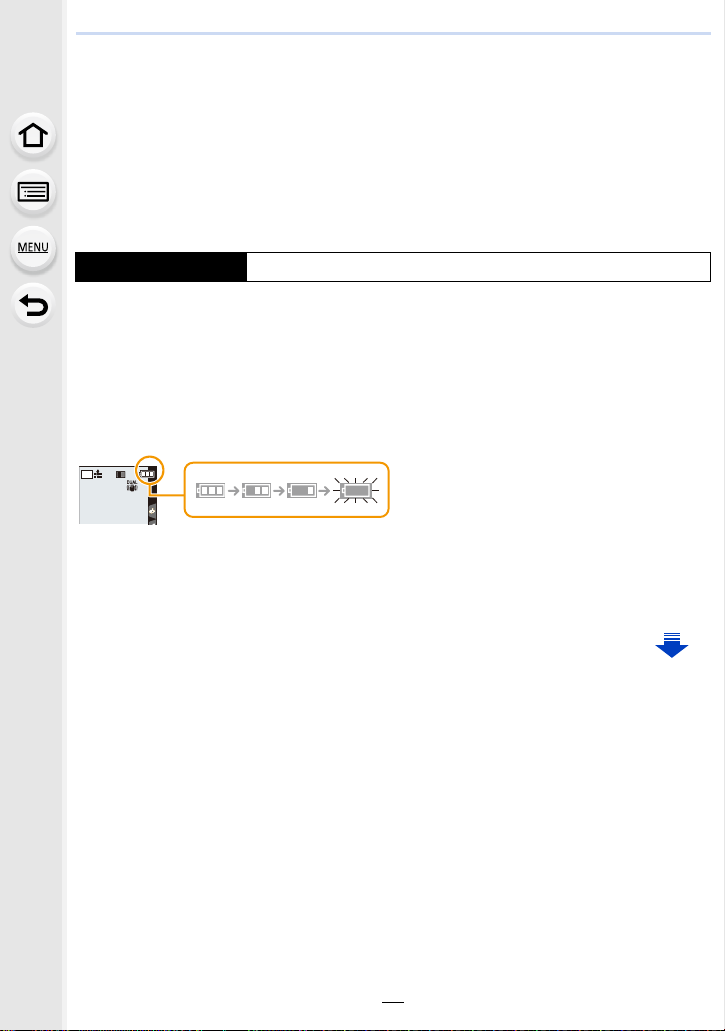
∫ Battery indication
• The indication turns red and blinks if the remaining battery power is exhausted.
Recharge the battery or replace it with a fully charged battery.
22

2. Getting Started/Basic Operations
• Do not leave any metal items (such as clips) near the contact areas of the power plug.
Otherwise, a fire and/or electric shocks may be caused by short-circuiting or the
resulting heat generated.
• Do not use any other USB connection cables except the supplied one.
This may cause malfunction.
• Do not use any other AC adaptors except the supplied one.
• Do not use a USB extension cable.
• The AC adaptor (supplied) and USB connection cable (supplied) are for this camera only. Do
not use them with other devices.
• Remove the battery after use.
(The battery will be exhausted if left for a long period of time after being charged.)
• The battery becomes warm after using it and during and after charging. The camera
also becomes warm during use. This is not a malfunction.
• The battery can be recharged even when it still has some charge left, but it is not
recommended that the battery charge be frequently topped up while the battery is fully
charged.
(Since characteristic swelling may occur.)
• If a problem occurs in the power outlet, such as a power outage, charging may not be
completed normally. If this happens, disconnect the USB connection cable (supplied) and
connect it again.
• When the charging lamp does not light even if you connect the camera to the AC adaptor
(supplied) or a PC, check if they are connected correctly.
23

2. Getting Started/Basic Operations
Approximate operating time and number of recordable pictures
By CIPA (Camera & Imaging Products Association) standard
When a Panasonic microSDHC memory card and the supplied battery are used
∫ Recording still pictures
When the interchangeable lens (H-FS12032) is used
Number of recordable pictures Approx. 210 pictures
Recording time Approx. 105 min
When the interchangeable lens (H-FS35100) is used
Number of recordable pictures Approx. 210 pictures
Recording time Approx. 105 min
When the interchangeable lens (H-PS14042) is used
Number of recordable pictures Approx. 200 pictures
Recording time Approx. 100 min
24

2. Getting Started/Basic Operations
∫ Recording motion pictures
[AVCHD] (Recording with picture quality set to [FHD/17M/50i])
When the interchangeable lens (H-FS12032) is used
Recordable time Approx. 60 min
Actual recordable time Approx. 30 min
When the interchangeable lens (H-FS35100) is used
Recordable time Approx. 60 min
Actual recordable time Approx. 30 min
When the interchangeable lens (H-PS14042) is used
Recordable time Approx. 60 min
Actual recordable time Approx. 30 min
[MP4] (Recording with picture quality set to [FHD/28M/50p])
When the interchangeable lens (H-FS12032) is used
Recordable time Approx. 60 min
Actual recordable time Approx. 30 min
When the interchangeable lens (H-FS35100) is used
Recordable time Approx. 60 min
Actual recordable time Approx. 30 min
When the interchangeable lens (H-PS14042) is used
Recordable time Approx. 60 min
Actual recordable time Approx. 30 min
25

2. Getting Started/Basic Operations
[MP4] (Recording with picture quality set to [4K/100M/25p])
When the interchangeable lens (H-FS12032) is used
Recordable time Approx. 40 min
Actual recordable time Approx. 20 min
When the interchangeable lens (H-FS35100) is used
Recordable time Approx. 40 min
Actual recordable time Approx. 20 min
When the interchangeable lens (H-PS14042) is used
Recordable time Approx. 40 min
Actual recordable time Approx. 20 min
• Actual recordable time is the time available for recording when repeating actions such as
turning this unit on and off, starting/stopping recording, etc.
∫ Playback
When the interchangeable lens (H-FS12032) is used
Playback time Approx. 130 min
When the interchangeable lens (H-FS35100) is used
Playback time Approx. 130 min
When the interchangeable lens (H-PS14042) is used
Playback time Approx. 120 min
• The operating times and number of recordable pictures will differ according to the
environment and the operating conditions.
For example, in the following cases, the operating times shorten and the number of
recordable pictures is reduced.
– In low-temperature environments, such as on ski slopes.
– When flash is used repeatedly.
• When the operating time of the camera becomes extremely short even after properly charging
the battery, the life of the battery may have expired. Buy a new battery.
26
2. Getting Started/Basic Operations
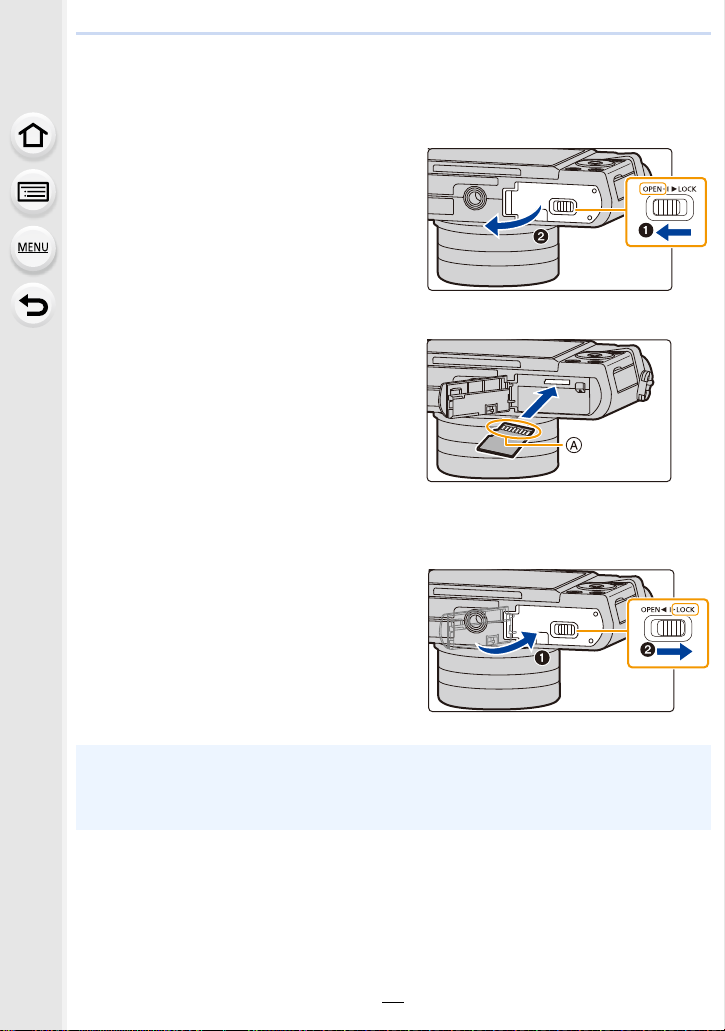
Inserting and Removing the Card (optional)
• Check that this unit is turned off.
1: Slide the release lever in the
1
direction of the arrow.
2: Open the card/battery door.
• Always use genuine Panasonic
batteries.
• If you use other batteries, we cannot
guarantee the quality of this product.
Push it securely all the way until
2
you hear a “click” while being
careful about the direction in
which you insert it.
To remove the card, push the card
until it clicks, then pull the card
out upright.
A: Do not touch the connection terminals of the card.
1: Close the card/battery door.
3
2: Slide the release lever in the
direction of the arrow.
• Turn the camera off and wait for the “LUMIX” display on the monitor to clear before removing
the card.
(Otherwise, this unit may no longer operate normally and the card itself may be damaged or
the recorded pictures may be lost.)
27
2. Getting Started/Basic Operations
Card Information
The following cards which conform to the SD standard can be used with this unit.
(These cards are indicated as card in the text.)
microSD Memory Card
(2 GB)
microSDHC Memory Card
(4 GB to 32 GB)
microSDXC Memory Card
(64 GB)
• This unit is compatible with UHSstandard microSDHC/microSDXC memory cards.
• Operation of the cards on the left has been confirmed with
Panasonic’s cards.
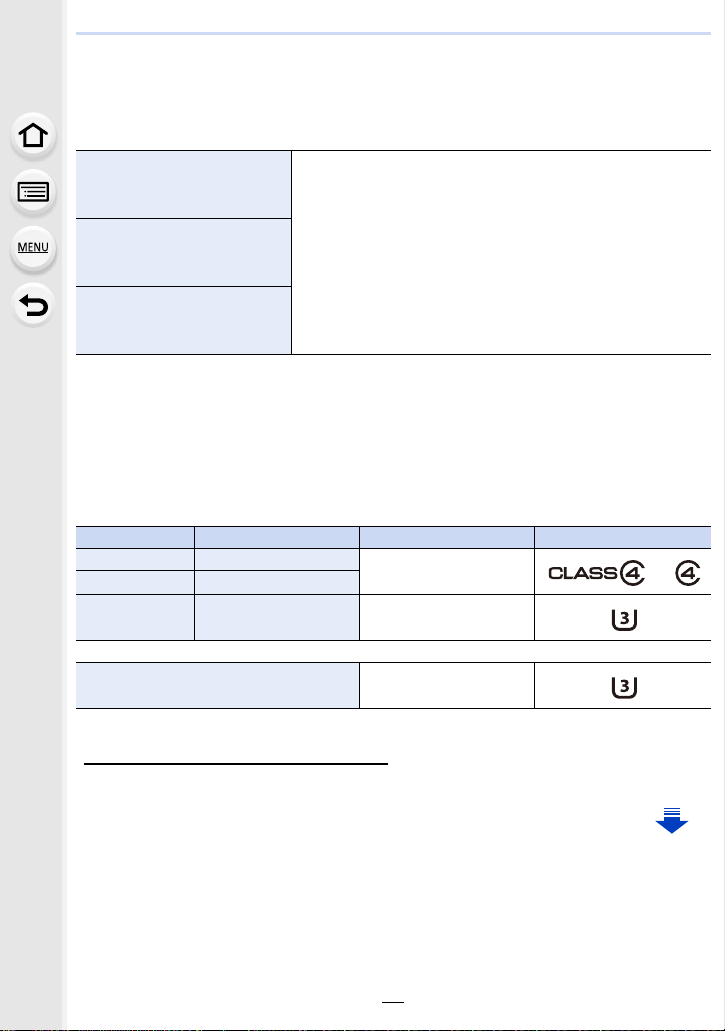
∫ About motion picture/4K photo recording and speed class ratings
According to the [Rec Format] (P166) and [Rec Quality] (P166) of a motion picture, the
required card differs. To record 4K photos, you need a card with a speed class rating that
supports 4K photo recording. Use a card that meets the following ratings of the SD Speed
Class or UHS Speed Class.
• SD Speed Class and UHS Speed Class are the speed standards regarding continuous writing.
To check the class, see the labelled side, etc. of the card.
[Rec Format] [Rec Quality] Speed class Label example
[AVCHD] All
[MP4] FHD/HD
Class 4 or higher
I UHS Speed Class 3
[MP4] 4K UHS Speed Class 3
When recording in 4K Photo /
[Post Focus]
• Please confirm the latest information on the following website.
https://panasonic.jp/support/global/cs/dsc/
(This Site is English only.)
UHS Speed Class 3
28
2. Getting Started/Basic Operations
Access to the card
The access indication displays red when pictures are being recorded on
the card.
• During access (image writing, reading and deleting, formatting etc.), do
not turn this unit off, remove the battery, card or disconnect the AC
adaptor (optional). Furthermore, do not subject the camera to vibration, impact or static
electricity.
The card or the data on the card may be damaged, and this unit may no longer operate
normally.
If operation fails due to vibration, impact or static electricity, perform the operation
again.
• The data on the card may be damaged or lost due to electromagnetic waves, static electricity
or breakdown of the camera or the card. We recommend storing important data on a PC etc.
• Keep the Memory Card out of reach of children to prevent swallowing.
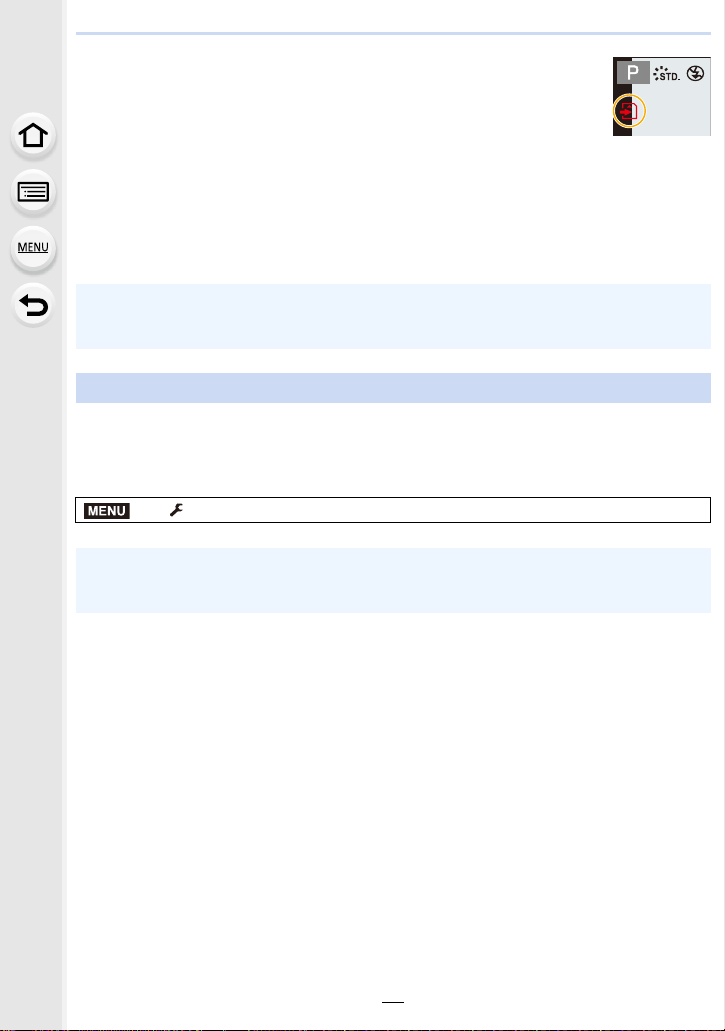
Formatting the card (initialisation)
Format the card before recording a picture with this unit.
Since data cannot be recovered after formatting, make sure to back up necessary
data in advance.
Select the menu. (P50)
MENU
> [Setup] > [Format]
• Use a battery with sufficient battery power or the AC adaptor (optional) when formatting. Do
not turn the camera off during formatting.
• If the card has been formatted on a PC or other equipment, format it on the camera again.
29
2. Getting Started/Basic Operations
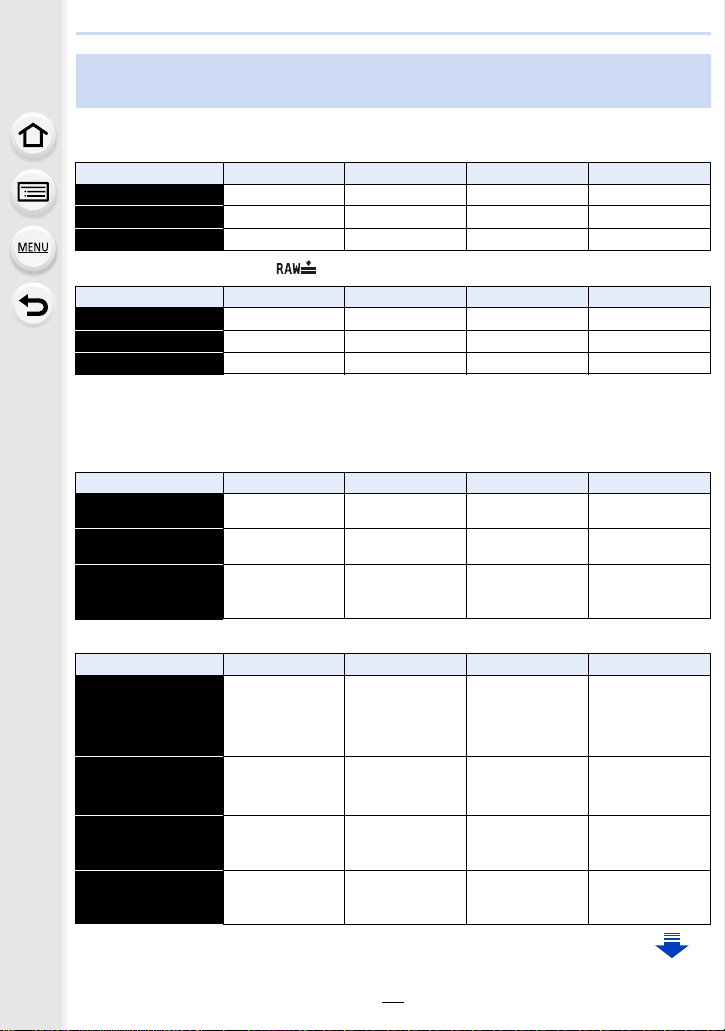
Approximate number of recordable pictures and available recording time
∫ Number of recordable pictures
• Aspect ratio [4:3], Quality [A]
[Picture Size] 8GB 16 GB 32 GB 64 GB
L (16M) 900 1810 3630 7190
M (8M) 1650 3320 6660 12880
S (4M) 2820 5670 11380 21280
• Aspect ratio [4:3], Quality [ ]
[Picture Size] 8GB 16 GB 32 GB 64 GB
L (16M) 270 550 1110 2210
M (8M) 320 640 1290 2560
S (4M) 340 700 1410 2780
∫ Available recording time (when recording motion pictures)
• “h” is an abbreviation for hour, “m” for minute and “s” for second.
• The recordable time is the total time of all the motion pictures which have been recorded.
• [AVCHD]
[Rec Quality] 8GB 16 GB 32 GB 64 GB
[FHD/28M/50p]
[FHD/17M/50i]
[FHD/24M/25p]
[FHD/24M/24p]
36m00s 1h10m 2h25m 4h55m
59m00s 2h00m 4h05m 8h10m
42m00s 1h25m 2h50m 5h45m
• [MP4]
[Rec Quality] 8GB 16 GB 32 GB 64 GB
[4K/100M/30p]
[4K/100M/25p]
[4K/100M/24p]
[FHD/28M/60p]
[FHD/28M/50p]
[FHD/20M/30p]
[FHD/20M/25p]
[HD/10M/30p]
[HD/10M/25p]
9m00s 20m00s 41m00s 1h20m
35m00s 1h10m 2h25m 4h55m
46m00s 1h35m 3h15m 6h35m
1h25m 3h05m 6h15m 12h40m
30
 Loading...