


Operating Instructions
for advanced features
Digital Camera
Model No. DC-GX800
Please read these instructions carefully before using this product,
and save this manual for future use.
Message Display P302
Troubleshooting P305
Finding the information you need P2
Contents P4
Contents by Function P9
Menu list P178
DVQP1194ZA
F0117HA0
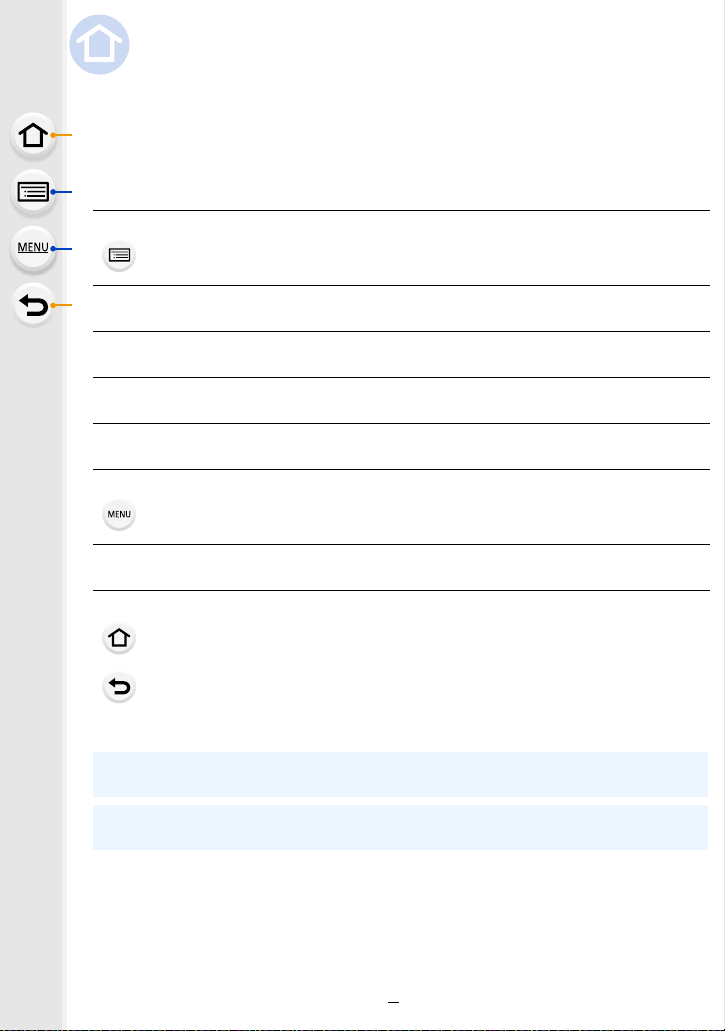
Finding the information you need
In this “Operating Instructions for advanced features”, you can find the information you
need from the following pages.
By clicking a page number, you can jump to the linked page and quickly find the
information.
Search from “Contents”
Click this icon to jump to “Contents”.
Search from the list of function names P9
Search from the list of buttons and dials P14
Search from the list of screens and icons P295
Search from “Message Display” P302
Search from “Menu list”
Click this icon to jump to “Menu list”.
Search from “Troubleshooting” P305
Click this icon to jump to “Finding the information you need”.
Click this icon to return to the previously displayed page.
For details on how to use this manual, see the next page.
P4
P178
P3
Wi-Fi® function
P238
2

How to use this manual
MENU
About the indication of the applicable mode
Applicable modes:
The icons indicate the modes available for a function.
• Black icons: Applicable modes
• Grey icons: Unavailable modes
∫ About the symbols in the text
: Indicates that the menu can be set by pressing [MENU/SET] button.
Wi-Fi
: Indicates that the Wi-Fi setting can be made by pressing [Wi-Fi] button.
: Tips for skilful use and points for recording.
: Conditions in which a particular function cannot be used.
: Continued to next page.
• Click a cross reference in the text to jump to the corresponding page.
In these operating instructions, steps for setting a menu item are described as follows.
Example: In the [Rec] menu, change [Quality] from [
MENU
> [Rec] > [Quality] > [›]
• Description in these operating instructions is based on the interchangeable lens (H-FS12032).
A] to [›]
3

Contents
Finding the information you need..............................................................................2
How to use this manual.............................................................................................3
Contents by Function ................................................................................................9
1. Before Use
Care of the camera .................................................................................................12
Standard Accessories .............................................................................................13
Names and Functions of Components....................................................................14
About the Lens........................................................................................................17
2. Getting Started/Basic Operations
Attaching the Shoulder Strap ..................................................................................18
Charging the Battery ...............................................................................................19
• Inserting the Battery .......................................................................................20
• Charging.........................................................................................................21
• Approximate operating time and number of recordable pictures....................24
Inserting and Removing the Card (optional) ...........................................................28
Card Information .....................................................................................................29
• Formatting the card (initialisation) ..................................................................30
• Approximate number of recordable pictures and available recording time ....31
Attaching/Removing the Lens .................................................................................33
Setting Date/Time (Clock Set).................................................................................37
• Re-adjusting the clock ....................................................................................38
Basic Operations.....................................................................................................39
• Tips for taking good pictures ..........................................................................39
• Extending/retracting the lens [when the interchangeable lens (H-FS12032/
H-FS35100) is attached] ................................................................................40
• Adjust the angle of the monitor.......................................................................41
• Shutter button (Taking pictures) .....................................................................42
• Motion picture button (Recording motion pictures).........................................42
• Mode dial (Selecting a Recording Mode) .......................................................43
• Control Dial.....................................................................................................44
• Cursor buttons/[MENU/SET] button ...............................................................44
• [DISP.] button (Switching the displayed information)......................................45
• Touch screen (Touch operations) ...................................................................47
• Taking Pictures Using the Touch Function .....................................................48
• [REC. SETTING RESET] button (Resetting the recording settings) ..............50
Setting menu items .................................................................................................51
Calling frequently-used menus instantly
(Quick Menu) ..........................................................................................................53
• Customising the Quick Menu settings ............................................................54
Assigning frequently used functions to the buttons (function buttons) ....................55
Entering Text ...........................................................................................................58
4

3. Recording Modes
Taking Pictures using the Automatic Function
(Intelligent Auto Mode)............................................................................................59
• Taking handheld shots of night scenes ([iHandheld Night Shot]) ...................62
• Combining pictures into a single picture with rich gradation ([iHDR]).............63
• Taking pictures with customised colour, defocus control, and brightness
settings...........................................................................................................64
Taking Pictures of Yourself ([Self Shot])..................................................................66
• Changing the way the shutter is released ......................................................72
Taking Pictures with Automatically Adjusted Aperture and Shutter Speed
(Programme AE Mode) ...........................................................................................74
Taking Pictures by Specifying the Aperture/
Shutter Speed .........................................................................................................76
• Aperture-Priority AE Mode .............................................................................77
• Shutter-Priority AE Mode................................................................................77
• Manual Exposure Mode .................................................................................78
• Confirm the Effects of Aperture and Shutter Speed (Preview Mode) .............80
• Easily set aperture/shutter speed for suitable exposure (One Push AE) .......81
Taking panorama pictures (Panorama Shot Mode).................................................82
Taking Pictures that match the Scene being recorded (Scene Guide Mode)..........85
Taking pictures of children or portraits with optimal settings ...................................88
• Child Mode .....................................................................................................88
• Portrait Mode ..................................................................................................88
Taking Pictures with different image effects
(Creative Control Mode)..........................................................................................89
4. Focus, Brightness (Exposure) and Colour tone Settings
Adjusting Focus Automatically ................................................................................95
• Focus Mode (AFS/AFF/AFC) .........................................................................97
• Auto Focus Mode ...........................................................................................99
• Setting up position of the AF area/changing size of the AF area .................104
• Optimising the focus and brightness for a touched position .........................106
Adjusting Focus Manually .....................................................................................107
Fixing the Focus and the Exposure (AF/AE Lock) ................................................110
Compensating the Exposure.................................................................................111
Setting the Light Sensitivity................................................................................... 113
Adjusting the White Balance ................................................................................. 115
5. 4K Photo and Drive Settings
Recording 4K Photos............................................................................................119
Selecting pictures from 4K burst file and saving ...................................................122
• Notes on the 4K Photo function....................................................................125
Controlling Focus After Recording
(Post Focus/Focus Stacking) ................................................................................128
5

• Recording using [Post Focus] ......................................................................128
• Selecting the desired focus area and saving a picture .................................131
• Merging multiple pictures to widen the focus range (Focus Stacking)..........132
Select a Drive Mode..............................................................................................134
• Burst Mode...................................................................................................135
• Self-timer......................................................................................................137
Taking Pictures While Adjusting a Setting Automatically (Bracket Recording) .....138
• Exposure Bracket .........................................................................................139
Taking Pictures Automatically at Set Intervals ([Time Lapse Shot])......................140
Creating Stop Motion Pictures ([Stop Motion Animation]) .....................................143
6. Stabiliser, Zoom and Flash
Image Stabiliser.....................................................................................................146
Taking Pictures with the Zoom ..............................................................................148
• Raising the telescopic effect.........................................................................149
• Zooming using touch operations (Touch zoom) ...........................................153
Taking pictures by using the flash .........................................................................154
• Changing Flash Mode ..................................................................................156
• Setting to the 2nd Curtain Synchro...............................................................158
• Adjust the flash output..................................................................................159
• Synchronising the output of the flash to the Exposure Compensation .........159
7. Recording Motion Pictures
Recording Motion Picture/4K Motion Picture ........................................................160
• Setting the format, size and recording frame rate ........................................162
• How to set focus when recording a motion picture ([Continuous AF]) .........164
Recording still pictures while recording motion pictures .......................................165
Recording Snap Movies ........................................................................................167
8. Playing Back and Editing Images
Playing Back Pictures ...........................................................................................170
Playing Back Motion Pictures................................................................................171
• Creating Still Pictures from a Motion Picture ................................................172
Switching the Playback Method ............................................................................173
• Using the Playback Zoom ............................................................................173
• Displaying multiple screens (Multi Playback) ...............................................173
• Displaying Pictures by Recording Date (Calendar Playback) ......................174
Playing Back Group Pictures ................................................................................175
Deleting Pictures...................................................................................................177
9. Using Menu Functions
Menu list................................................................................................................178
• [Rec] menu...................................................................................................178
• [Motion Picture] menu ..................................................................................198
• [Custom] menu .............................................................................................200
6

• [Setup] menu................................................................................................209
• [Playback] menu...........................................................................................217
10. Using the Wi-Fi function
What you can do with the Wi-Fi® function.............................................................238
Wi-Fi function........................................................................................................239
Controlling with a Smartphone/Tablet ...................................................................241
• Installing the smartphone/tablet app “Image App ” .......................................241
• Connecting to a smartphone/tablet...............................................................242
• Taking images via a smartphone/tablet (remote recording)..........................246
• Playing back images in the camera..............................................................247
• Saving images stored in the camera ............................................................247
• Sending images in the camera to an SNS ...................................................248
• Adding location information to images stored in the camera from
a smartphone/tablet .....................................................................................248
• Combining motion pictures recorded with Snap Movie according to your
preference on a smartphone/tablet ..............................................................250
Displaying pictures on a TV ..................................................................................251
Sending images ....................................................................................................252
Sending images to a smartphone/tablet................................................................256
Printing Wirelessly.................................................................................................257
Sending images to AV device ...............................................................................258
Sending images to PC ..........................................................................................259
Using Web services ..............................................................................................261
• When sending images to web service ..........................................................261
• When sending images to [Cloud Sync. Service] ..........................................264
Registering to the “LUMIX CLUB”.........................................................................265
• About the [LUMIX CLUB] .............................................................................265
About Connections................................................................................................269
• Connecting via a wireless access point (via the network) ............................270
• Connecting the camera and another device directly (direct connection)......272
• Connecting quickly with the same settings as the previous ones ([Select a
destination from History]/[Select a destination from Favorite]).....................273
[Wi-Fi Setup] Menu ...............................................................................................275
11. Connecting to other equipment
Watching 4K motion pictures on a TV/ Saving 4K motion pictures on your PC or
recorder.................................................................................................................277
• Watching motion pictures in 4K....................................................................277
• Storing 4K motion pictures ...........................................................................278
Playing Back Pictures on a TV Screen .................................................................279
• Using VIERA Link (HDMI) ............................................................................281
Saving still pictures and motion pictures on your PC ............................................282
• Downloading software ..................................................................................283
• Transferring images to a PC.........................................................................285
7

Saving still pictures and motion pictures on a Recorder .......................................287
Printing the Pictures..............................................................................................288
Enjoying 3D pictures .............................................................................................291
12. Others
Optional accessories.............................................................................................294
Monitor Display .....................................................................................................295
Message Display...................................................................................................302
Troubleshooting ....................................................................................................305
Cautions for Use ...................................................................................................314
8

Contents by Function
Recording
Recording
Recording Mode..............................P43
Self Shot Mode................................P66
[Preview]..........................................P80
Panorama Shot Mode .....................P82
[4K PHOTO] ..................................P119
[Post Focus] ..................................P128
[Time Lapse Shot] .........................P140
[Stop Motion Animation] ................P143
[Multi Exp.].....................................P188
[Silent Mode] .................................P200
3D recording..................................P291
Focus (AF/MF)
[Focus Mode]................................... P97
[AF Mode]........................................P99
Adjusting the AF area position ......P104
Manual Focus................................P107
[AF/AE Lock] .................................P110
Drive
[Drive Mode] ..................................P134
[Self Timer]....................................P137
Picture Quality and Colour Tone
[Sensitivity] ....................................P113
[White Balance] .............................P115
[Photo Style]..................................P179
[Filter Settings] ..............................P181
[Picture Size] .................................P183
[Quality] .........................................P184
[i.Dynamic].....................................P186
[i.Resolution]..................................P186
[HDR].............................................P187
[Long Shtr NR]...............................P192
[Shading Comp.]............................P192
[Diffraction Compensation] ............P193
[Color Space].................................P193
Exposure
[Touch AE].......................................P49
[One Push AE] .................................P81
[AF/AE Lock]..................................P110
Exposure Compensation ...............P111
Exposure Bracket ..........................P139
[Metering Mode].............................P185
Flash
[Flash Mode] ..................................P156
2nd curtain synchro .......................P158
[Flash Adjust.] ................................P159
9

Motion Picture
Motion Picture
[Rec Format]..................................P162
[Rec Quality]..................................P162
Motion pictures in 4K ..................... P160
Recording still pictures while
recording motion pictures ..............P165
[Snap Movie] .................................P167
Setup/Custom
Basic settings
[Format]...........................................P30
[Clock Set].......................................P37
Display switching.............................P45
How to set menu items....................P51
[Q.MENU] ........................................P53
[Beep] ............................................P210
[Economy] .....................................P212
Playback
Playback
Picture playback ............................P170
Motion picture playback.................P171
Playback Zoom..............................P173
Multi Playback ...............................P173
Delete ............................................P177
[Auto Review] ................................P207
Playback/display settings
[Slide Show] ..................................P219
[Rotate]/[Rotate Disp.] ...................P234
Audio
[Mic Level Adj.] ..............................P198
[Wind Noise Canceller] ..................P199
Screen settings
[Mic Level Disp.] ............................P198
[Center Marker]..............................P204
[Zebra Pattern] ...............................P205
[Monochrome Live View] ...............P206
[Reset] (initialisation) .....................P215
[Sensor Cleaning] ..........................P216
Customisation
[CUSTOM] in the Quick Menu .........P54
Function buttons ..............................P55
[Custom] menu ..............................P200
Edit
Focus Stacking ..............................P132
[RAW Processing]..........................P222
[4K PHOTO Bulk Saving]...............P224
[Light Composition]........................P225
[Clear Retouch]..............................P227
[Resize]..........................................P232
[Cropping] ......................................P233
Adding information
[Location Logging] .........................P221
[Title Edit].......................................P228
[Text Stamp] ..................................P229
Image settings
[Favorite]........................................P235
[Print Set].......................................P236
[Protect] .........................................P237
10

Wi-Fi
Connect
“Image App” ..................................P241
[WPS (Push-Button)] .............P270, 272
Direct connection........................... P272
Image App
Remote recording..........................P246
Saving images ...............................P247
Sending images..................... P248, 256
Sending and adding location
information.....................................P248
Combining motion pictures
recorded with [Snap Movie] ........... P250
Connections with other devices
PC
“PHOTOfunSTUDIO” ....................P283
“SILKYPIX Developer Studio” ....... P284
Transferring images to a PC .........P259
TV
Playing Back Pictures on a TV
Screen ...........................................P279
[VIERA Link]..................................P281
In combination with other devices
Playing back pictures on a TV .......P251
Printing images ..............................P257
Sending images to an AV
device ............................................P258
Sending images to a PC ................P259
Sending images to a web
service ...........................................P261
Using [Cloud Sync. Service] ..........P264
Recorder
Dubbing .........................................P287
Printer
PictBridge ......................................P288
11

1. Before Use
Care of the camera
Do not subject to strong vibration, shock, or pressure.
• The lens, monitor, or external case may be damaged if used in the following conditions.
It may also malfunction or image may not be recorded if you:
– Drop or hit the camera.
– Press hard on the lens or the monitor.
This camera is not dust/drip/water proof.
Avoid using the camera in places with a lot of dust, water, sand, etc.
• Liquid, sand and other foreign material may get into the space around the lens, buttons, etc. Be
particularly careful since it may not just cause malfunctions, but it may also become irreparable.
– Places with a lot of sand or dust.
– Places where water can come into contact with this unit, such as when using it on a rainy day
or at the beach.
If sand, dust, or liquids such as water droplets adhere to the monitor, wipe them off with a
dry soft cloth.
– Not doing so may cause the monitor to respond incorrectly to touch operations.
Do not place your hands inside the mount of the digital camera body. Since the
sensor unit is a precision apparatus, it may cause a malfunction or damage.
∫ About Condensation (When the lens or monitor is fogged up)
• Condensation occurs when the ambient temperature or humidity changes. Be careful of
condensation since it causes lens and monitor stains, fungus and camera malfunction.
• If condensation occurs, turn the camera off and leave it for about 2 hours. The fog will
disappear naturally when the temperature of the camera becomes close to the ambient
temperature.
12

1. Before Use
Standard Accessories
Check that all the accessories are supplied before using the camera.
• The accessories and their shape will differ depending on the country or area where the camera
was purchased.
For details on the accessories, refer to “Basic Operating Instructions”.
• Battery Pack is indicated as battery pack or battery in the text.
• microSD Memory Card, microSDHC Memory Card and microSDXC Memory Card are
indicated as card in the text.
• The card is optional.
13

1. Before Use
1 45 76632 8 9
15 1612 1413
1711
10
Names and Functions of Components
∫ Camera body
Mode dial (P43)
1
Shutter button (P42)
2
Camera ON/OFF switch (P37)
3
Self-timer indicator (P137)/
4
AF Assist Lamp (P201)
[ ] (4K photo mode) button (P119)/
5
[Fn1] button (P55)
Stereo microphone (P198)
• Be careful not to cover the microphone with
6
your finger. Doing so may make sound difficult
to record.
Flash (P154)
7
Focus distance reference mark (P109)
8
[ ] (Post Focus) button (P128)/
9
[Fn3] button (P55)
Shoulder strap eyelet (P18)
10
Charging lamp (P22)/
11
®
connection lamp (P239)
Wi-Fi
Lens fitting mark (P33)
12
Sensor
13
Mount
14
Lens lock pin
15
Lens release button (P33)
16
Spe aker (P210)
17
14

1. Before Use
18
31 33
Touch screen (P47)/monitor (P295)
18
Flash open lever (P154)
19
Motion picture button (P160)
20
[(] (Playback) button (P170)
21
[HDMI] socket (P279)
22
[USB/CHARGE] socket (P19, 285, 288)
23
Cursor buttons (P44)
3/[È] (Exposure Compensation) (P 111)
1/[ ] (White Balance) (P115)
24
2/[ ] (Auto Focus Mode) (P99)
4/[ ] (Drive mode) (P134)
Control dial (P44)
25
[MENU/SET] button (P44, 51)
26
[DISP.] button (P45, 46)
27
[ ] (Delete) button (P177)/
[ ] (Quick Menu/Return) button (P53)/
28
[Fn2] button (P55)
[REC. SETTING RESET] button (P50)
• Use this button to restore the default recording
29
settings.
19
21
20
22
23
24
27
28
25
26
323029
Tripod mount (P320)
• It may not be possible to attach and securely
fasten a tripod with a screw length of 5.5 mm
30
(0.22 inch) or more to the camera. Doing so
may also damage the camera.
DC coupler cover (P294)
• When using an AC adaptor, ensure that the
Panasonic DC coupler (optional) and AC
31
adaptor (optional) are used.
• The optional DC coupler (DMW-DCC15)
cannot be used.
Release lever (P20, 28)
32
Card/Battery door (P20, 28)
33
∫ About the function button ([Fn4] to
[Fn8])
• Function buttons ([Fn4] to [Fn8]) (P55) are
touch icons. Touch the [ ] tab on the
recording screen to display them.
15
1. Before Use
2
34
1
612
34
16 34
4817 3
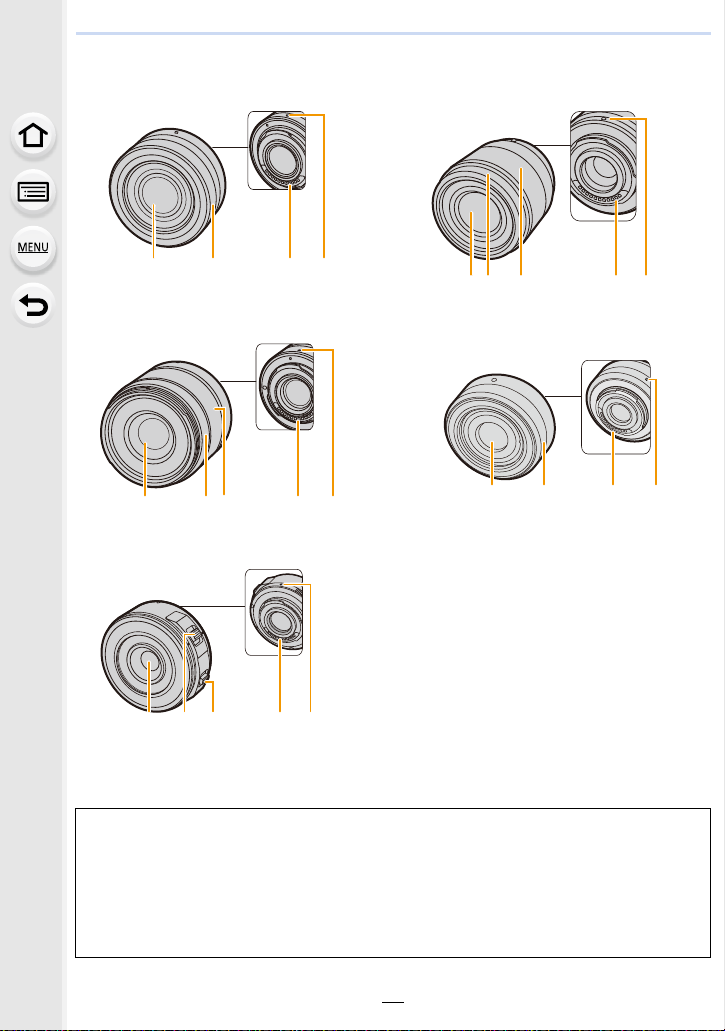
∫ Lens
H-FS12032 H-H025
15 6
43
H-FS35100 H-H020A
H-PS14042 1 Lens surface
2 Zoom ring (P148)
3 Contact point
4 Lens fitting mark (P33)
5 Decoration ring (P34)
6 Focus ring (P108)
7 Zoom lever (P148)
8 Focus lever (P108)
• The interchangeable lens (H-FS12032) does not have a focus ring, but you can use manual
focus by operating the camera. (P107)
• The interchangeable lens (H-H020A) utilises a lens drive system to realize a compact and
bright F1.7 lens. As a result, sound and vibration may occur during focus operation, but this is
not a malfunction.
• Operating sounds will be recorded when auto focus is performed during motion picture
recording. It is recommended to record with [Continuous AF] (P164) set to [OFF], if the sound
of operation bothers you. (P160) Also, it is not possible to set the Focus Mode to [AFC] or
[AFF]. (P97)
16

1. Before Use
About the Lens
This unit can use the dedicated lenses compatible with
the Micro Four Thirds
TM
System lens mount specification
(Micro Four Thirds mount).
You can also use a lens of any of the following
standards by attaching a mount adaptor.
Lens Mount adaptor
Four Thirds™ mount specification
lens
Leica M Mount interchangeable lens M Mount Adaptor (DMW-MA2M: optional)
Leica R Mount interchangeable lens R Mount Adaptor (DMW-MA3R: optional)
• When using a Leica lens mount adaptor, set [Shoot w/o Lens] (P208) to [ON].
Mount Adaptor (DMW-MA1: optional)
About the lens and functions
Depending on the lens used, certain functions, such as Auto Focus, Image Stabiliser, and
zoom functions, may be disabled or operate differently.
For details on the lens used, refer to the website.
Refer to catalogues/Web pages for most current information regarding compatible
lenses.
http://panasonic.jp/support/global/cs/dsc/
(This Site is English only.)
• The focal length noted on the lens in use is equivalent to double when converted to the 35 mm
film camera.
(It will be equivalent to 100 mm lens when a 50 mm lens is used.)
About the firmware of your interchangeable lens
For smoother recording, we recommend updating the firmware of the interchangeable lens
to the latest version.
• To view the latest information on the firmware or to download the firmware, visit the
support site below:
http://panasonic.jp/support/global/cs/dsc/
(This Site is English only.)
• To check the firmware version of the interchangeable lens, attach it to the camera body and
select [Version Disp.] in the [Setup] menu.
17
2. Getting Started/Basic Operations
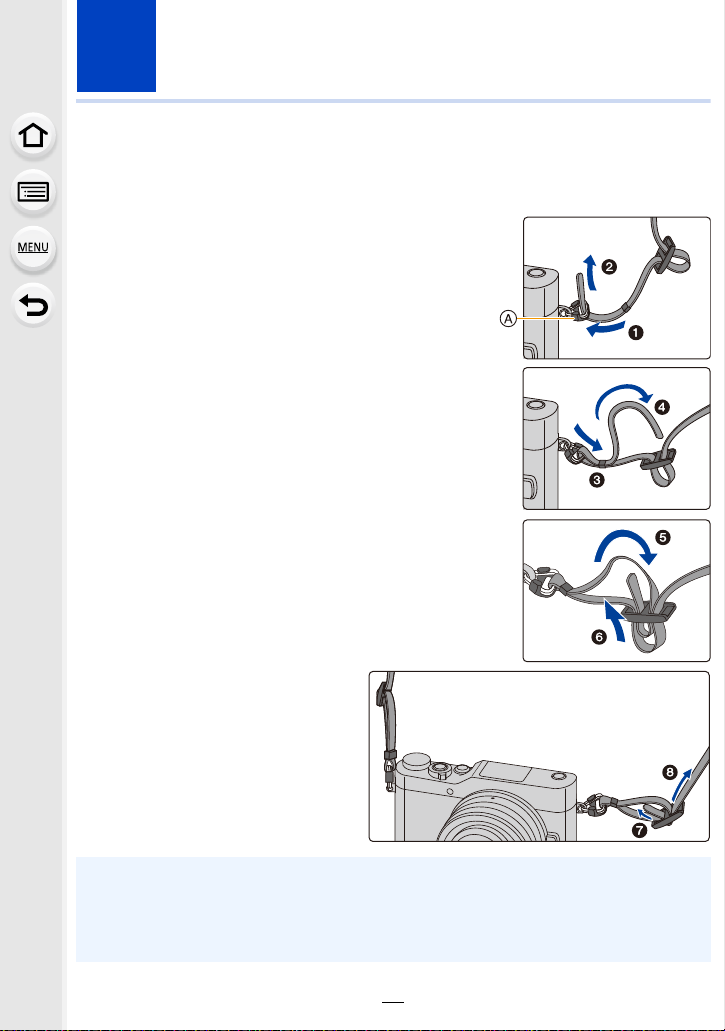
Attaching the Shoulder Strap
• We recommend attaching the shoulder strap when using the camera to prevent it from
dropping.
Pass the shoulder strap through the
1
shoulder strap eyelet on the camera body.
A: Shoulder strap eyelet
Pass the end of the shoulder strap
2
through the ring in the direction of the arrow
and then pass it through the stopper.
Pass the end of the shoulder strap
3
through the hole on the other side of the
stopper.
Pull the shoulder strap and
4
then check that it will not
come out.
• Perform steps 1 to 4 and then
attach the other side of the
shoulder strap.
• Use the shoulder strap around your shoulder.
– Do not wrap the strap around your neck.
It may result in injury or accident.
• Do not leave the shoulder strap where an infant can reach it.
– It may result in an accident by mistakenly wrapping around the neck.
18

2. Getting Started/Basic Operations
Charging the Battery
Use the dedicated AC adaptor (supplied), USB connection cable (supplied) and battery.
• The battery is not charged when the camera is shipped. Charge the battery before use.
• Charge the battery only when it is inserted in the camera.
Camera conditions Charge
Tur ned of f
Tur ne d on —
∫ About batteries that you can use with this unit
It has been found that counterfeit battery packs which look very similar to the
genuine product are made available for purchase in some markets. Some of
these battery packs are not adequately protected with internal protection to meet
the requirements of appropriate safety standards. There is a possibility that
these battery packs may lead to fire or explosion. Please be advised that we are
not liable for any accident or failure occurring as a result of use of a counterfeit
battery pack. To ensure that safe products are used, we recommend that a
genuine Panasonic battery pack is used.
±
19
2. Getting Started/Basic Operations
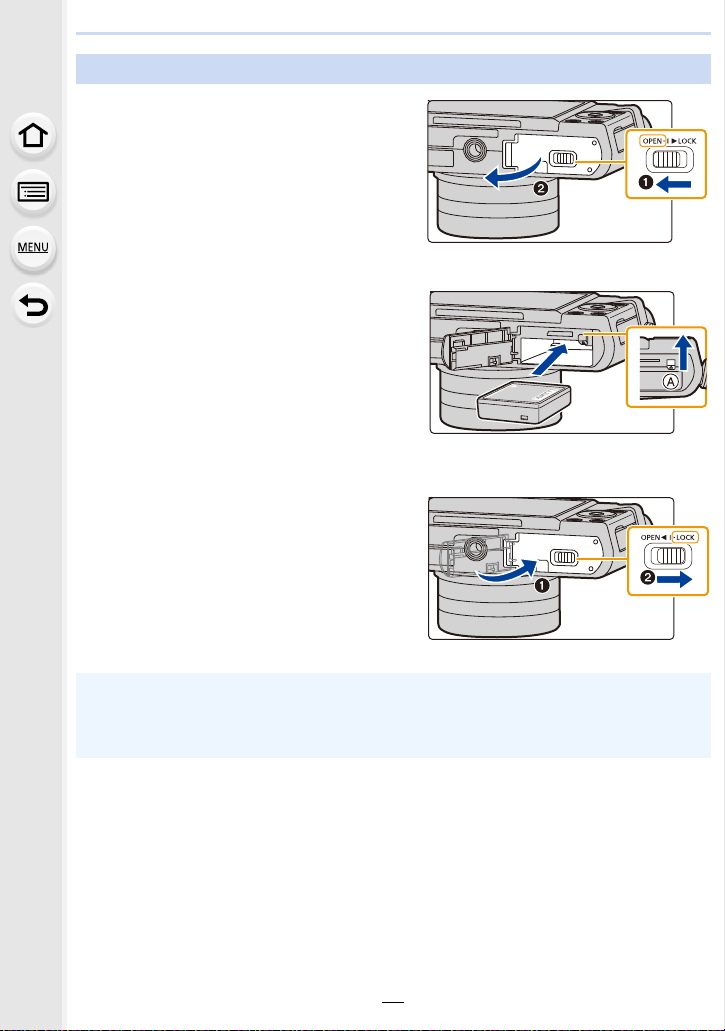
Inserting the Battery
1: Slide the release lever in the
1
direction of the arrow.
2: Open the card/battery door.
• Always use genuine Panasonic
batteries.
• If you use other batteries, we cannot
guarantee the quality of this product.
Being careful about the battery
2
orientation, securely insert it all
the way in, and then check that it
is locked by the lever A.
To remove the battery, move the
lever A in the direction of the
arrow.
1: Close the card/battery door.
3
2: Slide the release lever in the
direction of the arrow.
• Turn the camera off and wait for the “LUMIX” display on the monitor to clear before removing
the battery.
(Otherwise, this unit may no longer operate normally and the card itself may be damaged or
the recorded pictures may be lost.)
20

2. Getting Started/Basic Operations
Charging
• Charge the battery in areas with an ambient temperature, between 10 oC and 30 oC (50 oF and
86 oF) (same as the battery temperature), is recommended.
Insert the battery into this unit.
Check that this unit is turned off.
A Connect the USB connection cable
(supplied) to the [USB/CHARGE] socket.
• Place the camera in an upright position,
and find the terminal at the bottom.
B Charging lamp
C AC adaptor (supplied)
D To power outlet
E PC (Turned on)
F USB connection cable (supplied)
• Check the direction of the terminals and
plug in/out straight holding onto the plug.
(It may result in malfunction by the
deforming of the terminal if it is plugged in
obliquely or in wrong direction.)
Do not connect devices to incorrect
terminals. Doing so may cause
malfunction.
(Charging from the power outlet)
Connect the AC adaptor (supplied) and this camera with the USB connection cable
(supplied), and insert the AC adaptor (supplied) into the power outlet.
(Charging from a computer)
Connect the computer and this camera with the USB connection cable (supplied).
• If the computer enters a suspended state while charging the battery, charging will stop.
• Connecting this camera to a notebook computer that is not connected to a power outlet will
cause the notebook computer battery to drain faster. Do not leave the camera connected for
extended periods of time.
• Be sure to always connect the camera to a computer USB terminal.
Do not connect the camera to a monitor, keyboard or printer USB terminal, or a USB hub.
21

2. Getting Started/Basic Operations
AFSAFS
L
4:3
∫ About the charging lamp
Lit red: Charging.
Off: Charging has completed.
(When charging is complete, disconnect the camera from the power outlet
or computer.)
Blinking red: Charging error. (P305)
∫ Charging time
When using the AC adaptor (supplied)
Charging time Approx. 130 min
• The indicated charging time is for when the battery has been discharged completely.
The charging time may vary depending on how the battery has been used.
The charging time for the battery in hot/cold environments or a battery that has not been used
for a long time may be longer than normal.
• When power is supplied from a computer, the power supply capacity of the computer
determines the charging time.
∫ Battery indication
• The indication turns red and blinks if the remaining battery power is exhausted.
Recharge the battery or replace it with a fully charged battery.
22

2. Getting Started/Basic Operations
• Do not leave any metal items (such as clips) near the contact areas of the power plug.
Otherwise, a fire and/or electric shocks may be caused by short-circuiting or the
resulting heat generated.
• Do not use any other USB connection cables except the supplied one.
This may cause malfunction.
• Do not use any other AC adaptors except the supplied one.
• Do not use a USB extension cable.
• The AC adaptor (supplied) and USB connection cable (supplied) are for this camera only. Do
not use them with other devices.
• Remove the battery after use.
(The battery will be exhausted if left for a long period of time after being charged.)
• The battery becomes warm after using it and during and after charging. The camera
also becomes warm during use. This is not a malfunction.
• The battery can be recharged even when it still has some charge left, but it is not
recommended that the battery charge be frequently topped up while the battery is fully
charged.
(Since characteristic swelling may occur.)
• If a problem occurs in the power outlet, such as a power outage, charging may not be
completed normally. If this happens, disconnect the USB connection cable (supplied) and
connect it again.
• When the charging lamp does not light even if you connect the camera to the AC adaptor
(supplied) or a PC, check if they are connected correctly.
23
2. Getting Started/Basic Operations
Approximate operating time and number of recordable pictures
By CIPA (Camera & Imaging Products Association) standard
When a Panasonic microSDHC memory card and the supplied battery are used
∫ Recording still pictures
When the interchangeable lens (H-FS12032) is used
Number of recordable pictures Approx. 210 pictures
Recording time Approx. 105 min
When the interchangeable lens (H-H025) is used
Number of recordable pictures Approx. 210 pictures
Recording time Approx. 105 min
When the interchangeable lens (H-FS35100) is used
Number of recordable pictures Approx. 210 pictures
Recording time Approx. 105 min
When the interchangeable lens (H-H020A) is used
Number of recordable pictures Approx. 200 pictures
Recording time Approx. 100 min
When the interchangeable lens (H-PS14042) is used
Number of recordable pictures Approx. 200 pictures
Recording time Approx. 100 min
24
2. Getting Started/Basic Operations
∫ Recording motion pictures
[AVCHD] (Recording with picture quality set to [FHD/17M/50i])
When the interchangeable lens (H-FS12032) is used
Recordable time Approx. 60 min
Actual recordable time Approx. 30 min
When the interchangeable lens (H-H025) is used
Recordable time Approx. 60 min
Actual recordable time Approx. 30 min
When the interchangeable lens (H-FS35100) is used
Recordable time Approx. 60 min
Actual recordable time Approx. 30 min
When the interchangeable lens (H-H020A) is used
Recordable time Approx. 60 min
Actual recordable time Approx. 30 min
When the interchangeable lens (H-PS14042) is used
Recordable time Approx. 60 min
Actual recordable time Approx. 30 min
[MP4] (Recording with picture quality set to [FHD/28M/50p])
When the interchangeable lens (H-FS12032) is used
Recordable time Approx. 60 min
Actual recordable time Approx. 30 min
When the interchangeable lens (H-H025) is used
Recordable time Approx. 60 min
Actual recordable time Approx. 30 min
When the interchangeable lens (H-FS35100) is used
Recordable time Approx. 60 min
Actual recordable time Approx. 30 min
When the interchangeable lens (H-H020A) is used
Recordable time Approx. 60 min
Actual recordable time Approx. 30 min
When the interchangeable lens (H-PS14042) is used
Recordable time Approx. 60 min
Actual recordable time Approx. 30 min
25

2. Getting Started/Basic Operations
[MP4] (Recording with picture quality set to [4K/100M/25p])
When the interchangeable lens (H-FS12032) is used
Recordable time Approx. 40 min
Actual recordable time Approx. 20 min
When the interchangeable lens (H-H025) is used
Recordable time Approx. 40 min
Actual recordable time Approx. 20 min
When the interchangeable lens (H-FS35100) is used
Recordable time Approx. 40 min
Actual recordable time Approx. 20 min
When the interchangeable lens (H-H020A) is used
Recordable time Approx. 40 min
Actual recordable time Approx. 20 min
When the interchangeable lens (H-PS14042) is used
Recordable time Approx. 40 min
Actual recordable time Approx. 20 min
• Actual recordable time is the time available for recording when repeating actions such as
turning this unit on and off, starting/stopping recording, etc.
∫ Playback
When the interchangeable lens (H-FS12032) is used
Playback time Approx. 130 min
When the interchangeable lens (H-H025) is used
Playback time Approx. 130 min
When the interchangeable lens (H-FS35100) is used
Playback time Approx. 130 min
When the interchangeable lens (H-H020A) is used
Playback time Approx. 120 min
When the interchangeable lens (H-PS14042) is used
Playback time Approx. 120 min
26

2. Getting Started/Basic Operations
• The operating times and number of recordable pictures will differ according to the
environment and the operating conditions.
For example, in the following cases, the operating times shorten and the number of
recordable pictures is reduced.
– In low-temperature environments, such as on ski slopes.
– When flash is used repeatedly.
• When the operating time of the camera becomes extremely short even after properly charging
the battery, the life of the battery may have expired. Buy a new battery.
27
2. Getting Started/Basic Operations
Inserting and Removing the Card (optional)
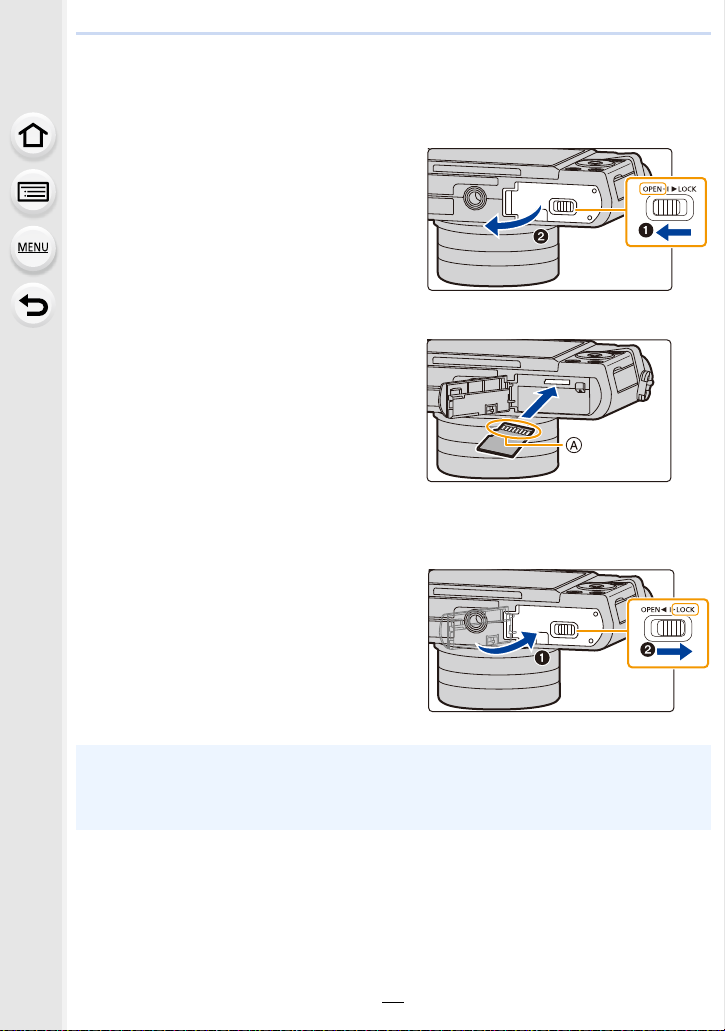
• Check that this unit is turned off.
1: Slide the release lever in the
1
direction of the arrow.
2: Open the card/battery door.
• Always use genuine Panasonic
batteries.
• If you use other batteries, we cannot
guarantee the quality of this product.
Push it securely all the way until
2
you hear a “click” while being
careful about the direction in
which you insert it.
To remove the card, push the card
until it clicks, then pull the card
out upright.
A: Do not touch the connection terminals of the card.
1: Close the card/battery door.
3
2: Slide the release lever in the
direction of the arrow.
• Turn the camera off and wait for the “LUMIX” display on the monitor to clear before removing
the card.
(Otherwise, this unit may no longer operate normally and the card itself may be damaged or
the recorded pictures may be lost.)
28
2. Getting Started/Basic Operations
Card Information
The following cards which conform to the SD standard can be used with this unit.
(These cards are indicated as card in the text.)
microSD Memory Card
(2 GB)
microSDHC Memory Card
(4 GB to 32 GB)
microSDXC Memory Card
(64 GB)
• This unit is compatible with UHSstandard microSDHC/microSDXC memory cards.
• Operation of the cards on the left has been confirmed with
Panasonic’s cards.
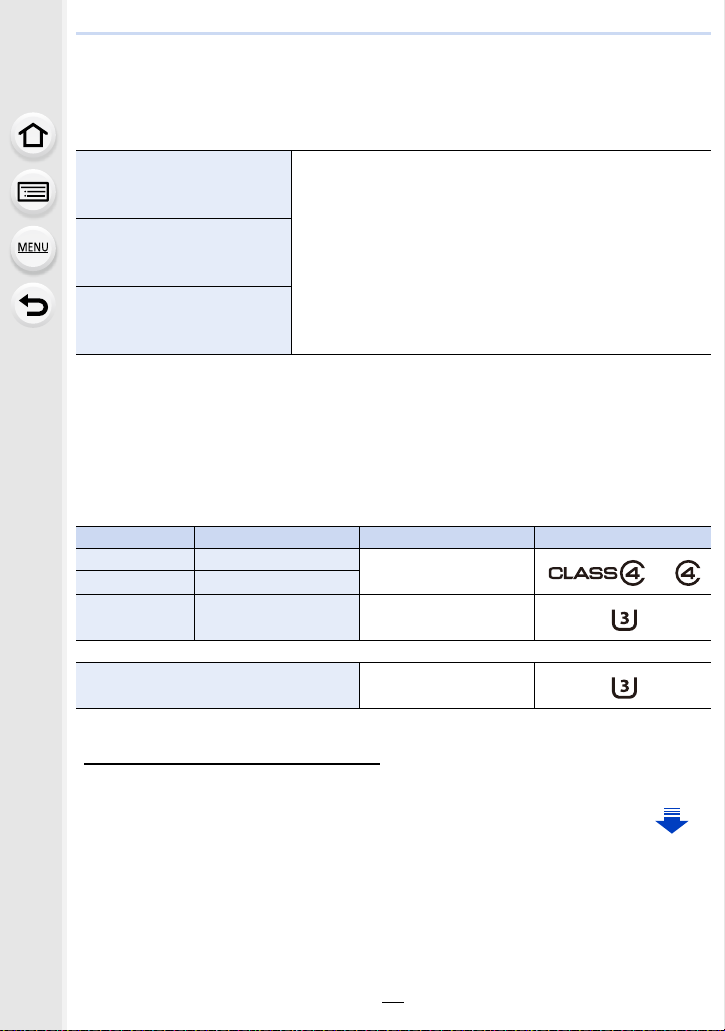
∫ About motion picture/4K photo recording and speed class ratings
According to the [Rec Format] (P162) and [Rec Quality] (P162) of a motion picture, the
required card differs. To record 4K photos, you need a card with a speed class rating that
supports 4K photo recording. Use a card that meets the following ratings of the SD Speed
Class or UHS Speed Class.
• SD Speed Class and UHS Speed Class are the speed standards regarding continuous writing.
To check the class, see the labelled side, etc. of the card.
[Rec Format] [Rec Quality] Speed class Label example
[AVCHD] All
[MP4] FHD/HD
Class 4 or higher
I UHS Speed Class 3
[MP4] 4K UHS Speed Class 3
When recording in 4K Photo /
[Post Focus]
• Please confirm the latest information on the following website.
http://panasonic.jp/support/global/cs/dsc/
(This Site is English only.)
UHS Speed Class 3
29
2. Getting Started/Basic Operations
Access to the card
The access indication displays red when pictures are being recorded on
the card.
• During access (image writing, reading and deleting, formatting etc.), do
not turn this unit off, remove the battery, card or disconnect the AC
adaptor (optional). Furthermore, do not subject the camera to vibration, impact or static
electricity.
The card or the data on the card may be damaged, and this unit may no longer operate
normally.
If operation fails due to vibration, impact or static electricity, perform the operation
again.
• The data on the card may be damaged or lost due to electromagnetic waves, static electricity
or breakdown of the camera or the card. We recommend storing important data on a PC etc.
• Keep the Memory Card out of reach of children to prevent swallowing.
Formatting the card (initialisation)
Format the card before recording a picture with this unit.
Since data cannot be recovered after formatting, make sure to back up necessary
data in advance.
Select the menu. (P51)
MENU
> [Setup] > [Format]
• Use a battery with sufficient battery power or the AC adaptor (optional) when formatting. Do
not turn the camera off during formatting.
• If the card has been formatted on a PC or other equipment, format it on the camera again.
30

2. Getting Started/Basic Operations
Approximate number of recordable pictures and available recording time
∫ Number of recordable pictures
• Aspect ratio [4:3], Quality [A]
[Picture Size] 8GB 16 GB 32 GB 64 GB
L (16M) 900 1810 3630 7190
M (8M) 1650 3320 6660 12880
S (4M) 2820 5670 11380 21280
• Aspect ratio [4:3], Quality [ ]
[Picture Size] 8GB 16 GB 32 GB 64 GB
L (16M) 270 550 1110 2210
M (8M) 320 640 1290 2560
S (4M) 340 700 1410 2780
∫ Available recording time (when recording motion pictures)
• “h” is an abbreviation for hour, “m” for minute and “s” for second.
• The recordable time is the total time of all the motion pictures which have been recorded.
• [AVCHD]
[Rec Quality] 8GB 16 GB 32 GB 64 GB
[FHD/28M/50p]
[FHD/17M/50i]
[FHD/24M/25p]
[FHD/24M/24p]
36m00s 1h10m 2h25m 4h55m
59m00s 2h00m 4h05m 8h10m
42m00s 1h25m 2h50m 5h45m
• [MP4]
[Rec Quality] 8GB 16 GB 32 GB 64 GB
[4K/100M/30p]
[4K/100M/25p]
[4K/100M/24p]
[FHD/28M/60p]
[FHD/28M/50p]
[FHD/20M/30p]
[FHD/20M/25p]
[HD/10M/30p]
[HD/10M/25p]
9m00s 20m00s 41m00s 1h20m
35m00s 1h10m 2h25m 4h55m
46m00s 1h35m 3h15m 6h35m
1h25m 3h05m 6h15m 12h40m
31

2. Getting Started/Basic Operations
• Depending on the recording conditions and the type of card, the number of recordable
pictures and available recording time vary.
• MP4 motion pictures with a [Rec Quality] size of [4K]:
Recording stops when the continuous recording time exceeds 5 minutes.
When using a microSDHC memory card, files are split into smaller motion picture files for
recording and playback if the file size exceeds 4 GB. (You can continue to record motion
pictures without interruption.)
If using a microSDXC memory card, you can record a motion picture in a single file even if the
size is greater than 4 GB.
• AVCHD motion pictures:
Files are split into smaller motion picture files for recording when the file size exceeds 4 GB.
– Motion pictures with [Rec Quality] setting of [FHD/28M/50p] or [FHD/17M/50i]:
Recording stops when the continuous recording time exceeds 20 minutes.
– Motion pictures with [Rec Quality] setting of [FHD/24M/25p] or [FHD/24M/24p]:
Recording stops when the continuous recording time exceeds 29 minutes and 59 seconds.
• Motion pictures with their file size set to [FHD] or [HD] in [MP4]:
Files are split into smaller motion picture files for recording and playback when the file size
exceeds 4 GB. (You can continue to record motion pictures without interruption.)
– Motion pictures with [Rec Quality] setting of [FHD/28M/60p] or [FHD/28M/50p]:
Recording stops when the continuous recording time exceeds 20 minutes.
– Motion pictures with [Rec Quality] setting of [FHD/20M/30p], [FHD/20M/25p], [HD/10M/30p]
or [HD/10M/25p]:
Recording stops when the continuous recording time exceeds 29 minutes and 59 seconds.
• When the camera temperature rises due to, for example, high ambient temperature or
continuous motion picture recording, the maximum available continuous recording
time may become shorter.
• The maximum available continuous recording time is displayed on the screen.
32

2. Getting Started/Basic Operations
Attaching/Removing the Lens
By changing the lens, you will increase your picture taking-options and further your
enjoyment of the camera.
• Check that the camera is turned off.
• When attaching or detaching the interchangeable lens (H-FS12032/H-FS35100), retract the
lens barrel.
• Change lenses where there is not a lot of dirt or dust. Refer to P315 when dirt or dust gets on
the lens.
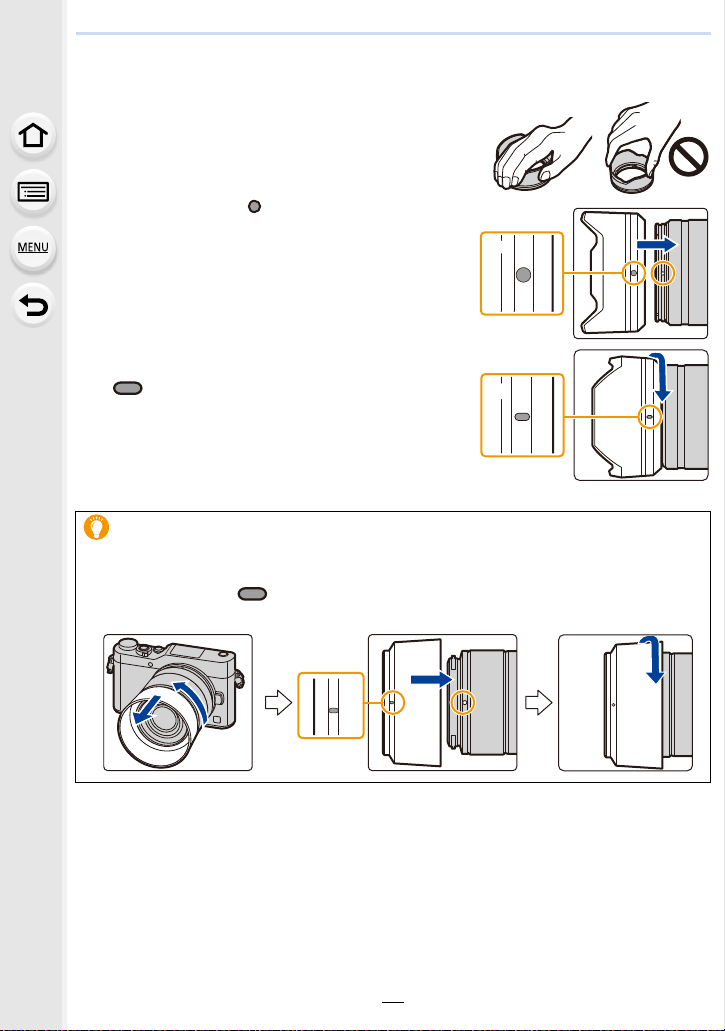
Detaching the lens
• Attach the lens cap.
While pressing on the lens release button A,
rotate the lens toward the arrow until it stops
and then remove.
• Hold the part around the base of the lens to rotate it.
• When the lens is removed from the camera body, make sure to attach the body cap to the
camera body and attach the lens rear cap to the lens.
Attaching the lens
• If the lens rear cap is fitted to the lens, remove it.
• If the body cap is fitted to the camera, remove it.
Align the lens fitting marks B and then rotate the lens in the direction of the arrow
until it clicks.
• Do not press the lens release button C when you attach a lens.
• Do not try to attach the lens when holding it at an angle to the camera body as the lens mount
may get scratched.
33

2. Getting Started/Basic Operations
Zoom operations
When using the interchangeable lens (H-FS12032/
H-FS35100)
Rotate the zoom ring of the lens.
When using the interchangeable lens (H-PS14042)
Move the zoom lever of the lens.
T
W
T side: Enlarges distant subject
W side: Widens angle of view
T
W
Attaching the Lens Hood
When recording into strong backlight, irregular reflection may occur within the lens. The
lens hood reduces the inclusion of unwanted light in the recorded images and lowers the
drop in contrast. The lens hood cuts off excess lighting and improves the picture quality.
• The interchangeable lens (H-FS12032/H-H020A/H-PS14042) does not have a lens hood.
To attach the lens hood (barrel-shaped) supplied with the interchangeable lens
(H-H025)
• Before attaching the lens hood, be sure to remove the lens cap. The lens hood cannot be
attached unless you remove the lens cap.
• When the lens hood is attached to this lens, you cannot attach a filter to it.
1 Rotate the decoration ring A in the direction of the arrow and
then remove.
34

2. Getting Started/Basic Operations
2 Align the mark B ( ) on the lens hood with
the mark on the tip of the lens.
3 Rotate the lens hood in the direction of the
arrow until it clicks and then align the mark C
( ) on the lens hood with the mark on the
tip of the lens.
∫ Attaching the decoration ring
• Before attaching the decoration ring, be sure to remove the lens cap.
1 Align the mark D ( ) on the
decoration ring with the
mark on the tip of the lens.
2 Rotate the decoration ring in
the direction of the arrow
until it clicks and then align
the mark E ( ) on the
decoration ring with the
mark on the tip of the lens.
35
2. Getting Started/Basic Operations
To attach the lens hood (flower shape) that came with the interchangeable lenses
(H-FS35100)
Hold the lens hood with your fingers placed as
shown in the picture (A).
• Do not hold the lens hood in a way that twists or bends it.
(B)
1 Align the mark C ( ) on the lens hood with the
mark on the tip of the lens.
2 Rotate the lens hood in the direction of the
arrow until it clicks and then align the mark D
( ) on the lens hood with the mark on the tip
of the lens.
Temporarily Storing the Lens Hood
Example: H-H025
1 Turn the lens hood in the direction of the arrow to detach it.
2 Align the mark E ( ) on the lens hood with the mark on the tip of the lens.
3 Turn the lens hood in the direction of the arrow until it clicks into place.
36

2. Getting Started/Basic Operations
Setting Date/Time (Clock Set)
• The clock is not set when the camera is shipped.
Turn the camera on.
1
• If the language select screen is not displayed, proceed to
4.
step
Press [MENU/SET].
2
Press 3/4 to select the language, and press
3
[MENU/SET].
Press [MENU/SET].
4
Press 2/1 to select the items (year, month,
5
day, hour, minute), and press 3/4 to set.
A: Time at the home area
B: Time at the travel destination
To set the display order and the time display
format.
• To display the setting screen of the order/time, select
[Style] and then press [MENU/SET].
Press [MENU/SET] to set.
6
37

2. Getting Started/Basic Operations
When [The clock setting has been completed.] is displayed, press
7
[MENU/SET].
When [Please set the home area] is displayed, press [MENU/SET].
8
Press 2/1 to select the home area, and then
9
press [MENU/SET].
• When an interchangeable lens (H-FS12032/H-FS35100)
is used and the lens barrel is retracted, recording is not
possible (a message will be displayed). Rotate the zoom
ring to extend the lens. (P40)
Re-adjusting the clock
Select [Clock Set] in the [Setup] menu. (P51)
• The clock can be reset as shown in steps 5 and 6 on P37.
• The clock setting is maintained for 3 months using the built-in clock battery even
without the battery.
(Leave the charged battery in the unit for 24 hours to charge the built-in battery.)
• If the clock is not set, the correct date cannot be printed when you stamp the date on the
pictures with [Text Stamp] or order a photo studio to print the pictures.
38

2. Getting Started/Basic Operations
Basic Operations
Tips for taking good pictures
Hold the camera gently with both hands, keep your arms still at your side
and stand with your feet slightly apart.
• Do not cover the flash, AF Assist lamp A, microphone B, or speaker C with your
fingers or other objects.
∫ Detects orientation of camera (Direction Detection Function)
This function detects the vertical orientation when you record
with the camera vertically orientated.
When you play back the recording, the recording is
automatically displayed in vertical orientation.
(Only available when [Rotate Disp.] (P234) is set to [ON].)
• When the camera is held vertically and tilted significantly up or down to record, the Direction
Detection Function may not work correctly.
• Motion pictures, 4K burst files, and pictures taken with [Post Focus] cannot be displayed
vertically.
39

2. Getting Started/Basic Operations
Extending/retracting the lens [when the interchangeable lens (H-FS12032/H-FS35100) is attached]
∫ How to Extend the Lens
Rotate the zoom ring in the direction of arrow 1 from position
A (the lens is retracted) to position B [12 mm to 32 mm
(H-FS12032), 35 mm to 100 mm (H-FS35100)] to extend the
lens.
• When the lens barrel is retracted, images cannot be recorded.
C
The lens is retracted
∫ How to Retract the Lens
Rotate the zoom ring in the direction of arrow 2 from position
B [12 mm to 32 mm (H-FS12032), 35 mm to 100 mm
(H-FS35100)] to position A to retract the lens.
• The zoom ring will seem to click into the 12 mm position
(H-FS12032) or 35 mm position (H-FS35100), but continue to
rotate the lens until it reaches position A.
• When you are not recording images, we recommend that you
retract the lens.
D The lens is extended
Example: H-FS12032
40

2. Getting Started/Basic Operations
Adjust the angle of the monitor
• Be careful not to catch your finger, etc. in the monitor.
• When rotating the monitor, be careful not to apply too much force. This may cause
scratches and malfunctions.
• When not using this unit, close the monitor completely back to the original position.
∫ Recording at various angles
The monitor can be rotated to suit your needs. This is convenient as it allows you to take
pictures from various angles by adjusting the monitor.
• Do not cover the AF Assist Lamp with your fingers or other objects.
Self shot Taking pictures at a low angle
• If the monitor is rotated as shown in the illustration,
the Self Shot Mode starts. (P66)
41

2. Getting Started/Basic Operations
6060603.53.53.5
Shutter button (Taking pictures)
The shutter button works in two steps. To take a picture, press it.
Press the shutter button halfway to focus.
A Aperture value
B Shutter speed
C Focus indication
• Aperture value and shutter speed are displayed.
(It will flash in red if the correct exposure is not achieved, except
when set to flash.)
• Once the subject is in focus, the focus indication is displayed.
(When the subject is not in focus, the indication flashes.)
Press the shutter button fully (push it in further),
and take the picture.
• When the image is correctly focused, the picture will be taken, since the [Focus/
Release Priority] (P202) is set initially to [FOCUS].
• Even during menu operation or image playback, if you press the shutter button halfway, you
can instantly set the camera ready for recording.
Motion picture button (Recording motion pictures)
Start recording by pressing the motion picture
button.
• Release the motion picture button right after you press it.
Stop the recording by pressing the motion picture
button again.
42

2. Getting Started/Basic Operations
Mode dial (Selecting a Recording Mode)
Select the mode by rotating the mode dial.
• Rotate the mode dial slowly to select the desired mode.
Intelligent Auto Mode (P59)
Intelligent Auto Plus Mode (P60)
Programme AE Mode (P74)
Aperture-Priority AE Mode (P77)
Shutter-Priority AE Mode (P77)
Manual Exposure Mode (P78)
Panorama Shot Mode (P82)
Scene Guide Mode (P85)
Child Mode (P88)
Portrait Mode (P88)
Creative Control Mode (P89)
43

2. Getting Started/Basic Operations
Control Dial
Rotating the control dial:
Selection of items or setting of values etc., is performed.
In these operating instructions, turning the control dial is indicated as follows.
Cursor buttons/[MENU/SET] button
Pressing the cursor button:
Selection of items or setting of values etc., is performed.
Pressing [MENU/SET]:
Confirmation of setting contents, etc., is performed.
• These operating instructions expresses the up, down, left, and
right of the cursor button as 3/4/2/1.
• By assigning [Cursor Button Lock] to a function button, you can disable the cursor buttons, the
[MENU/SET] button, and the control dial. (P55)
44

2. Getting Started/Basic Operations
50
p
989898
AFSAFS
L
4:3
0
50
p
989898
AFSAFS
L
4:3
0
[DISP.] button (Switching the displayed information)
Press [DISP.] to switch the information displayed on the
screen.
• If the information on the screen is not displayed any longer
because no operation was performed for some time, press the
[DISP.] button or touch the screen to display the information
again.
In Recording Mode
With information
Without
information
With information
(tilt sensor
display)
Without
information (tilt
sensor display)
∫ About the tilt sensor display
With the tilt sensor displayed, it is easy to correct the tilt of the camera etc.
A Horizontal direction: Correcting tilt to the left
B Vertical direction: Correcting downward tilt
• When the tilt of the camera is little, the indicator changes to green.
• Even after correcting the tilt, there may still be an error of approximately n1°.
• When tilted significantly upwards or downwards to record, the tilt sensor display may not be
displayed correctly, and the Direction Detection Function (P39) may not work correctly.
45

2. Getting Started/Basic Operations
60F3.5
0
AWBAWB
1/98981/98
2
00
L
4:3
100-0001
F3.5
60
P
s
RGB
AFS
200
0
WBWB
ISOISO
AWB
STD.STD.STD.
L
4:3
10:00 1.DEC.2017
F3.5
60
1/98
ISO
200
0
100-0001
In Playback Mode
Without
information
(Highlight
¢
display)
With information
Detailed
information
display
Histogram
display
Without
information
¢ This is displayed if [Highlight] (P205) in the [Custom] menu is set to [ON].
• Some of the screens cannot be displayed for certain files that you play back, such as motion
pictures and 4K burst files.
46

2. Getting Started/Basic Operations
Fn4
Fn6
Fn5
Fn7
SNAP
Fn8
AABBB
2.0X
Touch screen (Touch operations)
Touch screen of this unit is capacitive. Touch the panel directly with your bare finger.
∫ Touch
To touch and release the touch screen.
∫ Drag
A movement without releasing the touch screen.
∫ Pinch (enlarge/reduce)
Pinch the touch screen apart (enlarge) or together
(reduce) with two fingers.
2.0X2.0X
2.0X
• Touch the screen with the clean and dry finger.
• If you use a commercially available monitor protection sheet, please follow the instructions
that accompany the sheet.
(Some monitor protection sheets may impair visibility or operability.)
• The touch screen may not function normally in the following cases.
– When touched by a gloved hand
– When the touch screen is wet
Not available in these cases:
47

2. Getting Started/Basic Operations
AE
AE
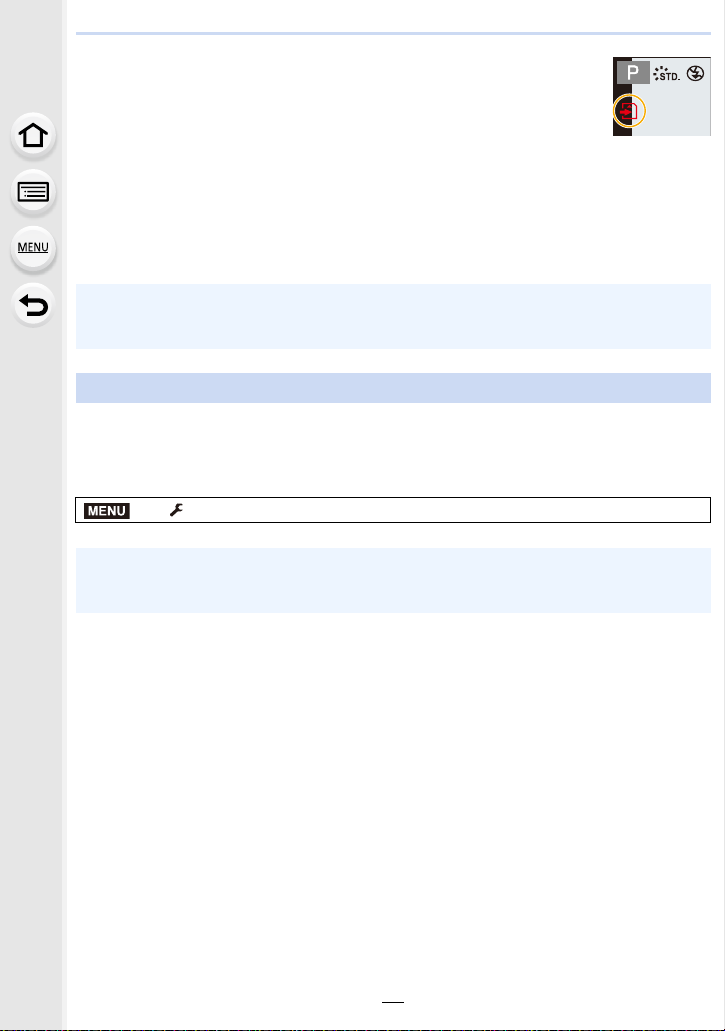
Taking Pictures Using the Touch Function
Taking pictures using the Touch Shutter function
Applicable modes:
Just by touching the subject you want as your point of focus, the camera will focus on the
subject and take the picture automatically.
Touch [ ].
1
Touch [ ].
2
• Icon will change to [ ], and taking a picture with the
Touch Shutter function becomes possible.
Touch the subject you wish to focus on, and
3
×
then take a picture.
• The picture is taken when the focus is achieved.
∫ To cancel the Touch Shutter function
Touch [ ].
• If shooting with the touch shutter fails, the AF area turns red and disappears.
48

2. Getting Started/Basic Operations
AE
6HW
5HVHW
ュリヴヱハ
Easily Optimising the Brightness for a Specified Area (Touch AE)
Applicable modes:
You can easily optimise the brightness for a touched position. When the face of the subject
appears dark, you can brighten the screen according to the brightness of the face.
Touch [ ].
1
Touch [ ].
2
• The setting screen for the brightness optimisation
position is displayed.
• [Metering Mode] is set to [ ] , which is used
exclusively for the Touch AE.
Touch the subject you want to optimise the
3
AE
brightness for.
• Touching [Reset] will bring the brightness optimisation
position back to the centre.
AE
Touch [Set].
4
∫ Cancelling the Touch AE function
Touch [ ].
• [Metering Mode] returns to the original setting, and the brightness optimisation position is
cancelled.
Not available in these cases:
• This function is not available in the following cases:
– In Self Shot Mode
– When using the Digital Zoom
– When [Touch AF] in [Touch Settings] of the [Custom] menu has been set to [AF+AE] (P106)
49

2. Getting Started/Basic Operations
[REC. SETTING RESET] button (Resetting the recording settings)
You can restore the default recording settings by pressing this button.
Try pressing this button when the function in use stops working or is not working as it
should.
While the recording screen is displayed:
Press [REC. SETTING RESET].
• When the recording settings are reset, the following
setting is also reset.
–Drive mode
• The [Face Recog.] and [Profile Setup] settings are not
reset.
• To reset the setup/custom settings and other settings as well as the recording settings, use
[Reset] in the [Setup] menu. (P215)
ンユヤハチヴユヵヵリワヨチンユヴユヵ
50

2. Getting Started/Basic Operations
Setting menu items
You can either operate the buttons or touch the monitor to set menu items.
Press [MENU/SET].
1
[Rec] (P178)
[Motion Picture]
(P198)
[Custom] (P200)
[Setup] (P209)
[Playback] (P217)
• The [Setup] menu contains some important settings relating to the camera’s clock and power.
Check the settings of this menu before proceeding to use the camera.
Press 3/4 of the cursor button to select
2
This menu lets you set the aspect ratio, number of pixels, 4K Photo
and other aspects of the pictures you are recording.
This menu lets you set the [Rec Format], [Rec Quality], and other
aspects for motion picture recording.
Operation of the unit, such as displaying of the screen and button
operations, can be set up according to your preferences.
This menu lets you perform the clock settings, select the operating
beep tone settings and set other settings which make it easier for
you to operate the camera.
You can also configure the settings of Wi-Fi related functions.
This menu lets you set the Protection, Cropping or Print Settings,
etc. of recorded pictures.
the menu item and press [MENU/SET].
• The menu item can also be selected by rotating the
control dial.
• You can also move to the next screen by pressing
[DISP.].
(In touch operation)
Touch the menu item.
• The page can be changed by touching [ ]/[ ].
51

2. Getting Started/Basic Operations
Press 3/4 of the cursor button to select
3
the setting and press [MENU/SET].
• The setting can also be selected by rotating the
control dial.
• Depending on the menu item, its setting may not
appear or it may be displayed in a different way.
(In touch operation)
Touch the Setting to set.
• There are functions that cannot be set or used depending on the modes or menu settings
being used on the camera.
∫ Switching to other menus
1 Press 2.
2 Press 3/4 to select a menu selector icon, such as
[].
• The menu toggle icon can also be selected by rotating
the control dial.
3 Press [MENU/SET].
(In touch operation)
Touch a menu selector icon, such as [ ].
∫ Close the menu
Press [ ] or press the shutter button halfway.
(In touch operation)
Touch [ ].
52

2. Getting Started/Basic Operations
AFSAFS
AU
TO
603.5
AWB
50
p
L
4:3
0
50
p
AFSAFS
AU
TO
603.5
AWB
L
4:3
0
Calling frequently-used menus instantly (Quick Menu)
By using the Quick Menu, some of the menu settings can be easily found.
• The features that can be adjusted using Quick Menu are determined by the mode or a display
style the camera is in.
Press [ ] to display the Quick Menu.
1
• You can also use the button as a function button. (P55)
Rotate the control dial to select the menu
2
item, and press 4 or 3.
• The menu item can also be selected by pressing 2/1.
Rotate the control dial to select the setting.
3
• The setting can also be selected with 2/1.
Press [ ] to exit the menu once the
4
setting is complete.
53

2. Getting Started/Basic Operations
L
4:3
AFS
Customising the Quick Menu settings
When [Q.MENU] (P207) in the [Custom] menu is set to [CUSTOM], the Quick Menu can
be changed as desired.
Up to 15 items can be set to the Quick Menu.
1 Press 4 to select [ ] and then press [MENU/SET].
2 Press 3/4/2/1 to select the menu item in the top
row and then press [MENU/SET].
3 Press 2/1 to select the empty space in the bottom
row and then press [MENU/SET].
12345
A Items that can be set
B Set items
4:3
L
AFS
• You can also set the menu item by dragging it from the top
row to the bottom row.
• If there is no empty space in the bottom row, you can
replace an existing item with a new select item by selecting the existing item.
• To cancel the setting, move to the bottom row by pressing 4 and select an item to cancel,
and then press [MENU/SET].
4 Press [ ].
• It will return to screen of step 1.
Press [MENU/SET] to switch to the recording screen.
54

2. Getting Started/Basic Operations
MENU
Assigning frequently used functions to the buttons (function buttons)
You can assign recording functions, etc. to specific buttons and icons.
• Some functions cannot be assigned depending on the function button.
• Some functions may not be available depending on the mode or displayed screen.
1 Select the menu. (P51)
> [Custom] > [Fn Button Set]>
[Setting in REC mode]/[Setting in PLAY mode]
2 Press 3/4 to select the function button you want to
assign a function to and then press [MENU/SET].
3 Press 3/4 to select the function you want to assign
and then press [MENU/SET].
• For details on the functions that can be assigned in [Setting
in REC mode], refer to P56.
• For details on the functions that can be assigned in [Setting
in PLAY mode], refer to P57.
• To restore the default function button settings, select [Restore to Default].
∫ Rapidly assigning functions
The assignment screen displayed in Step
button ([Fn1] to [Fn3]) for 2 seconds.
3 above can be displayed by holding a function
55

2. Getting Started/Basic Operations
Fn4
Fn6
Fn5
Fn7
SNAP
Fn8
Using the function buttons during recording
You can use assigned functions by pressing a function button when recording.
∫ Using function buttons with touch operations
1 Touch [ ].
2 Touch [Fn4], [Fn5], [Fn6], [Fn7] or [Fn8].
∫ Functions that can be assigned in [Setting in REC mode]
[Rec] menu/Recording functions
– [4K Photo Mode] (P119): [Fn1]
– [Post Focus] (P128): [Fn3]
–[Wi-Fi] (P239): [Fn4]
¢
– [Q.MENU] (P53): [Fn2]
– [AF/AE LOCK] (P110)
–[AF-ON] (P109, 110)
– [Preview] (P80): [Fn5]
– [One Push AE] (P81)
– [Touch AE] (P49)
– [Level Gauge] (P45): [Fn6]
– [Zoom Control] (P148)
– [Cursor Button Lock] (P57)
– [Photo Style] (P179)
– [Filter Effect] (P89, 181)
–[Aspect Ratio] (P183)
– [Picture Size] (P183)
– [Snap Movie] (P167): [Fn7]
– [Motion Pic. Set]
([Rec Format] (P162)/[Rec Quality] (P162))
¢
¢
¢
– [Quality] (P184)
– [Sensitivity] (P113)
– [Metering Mode] (P185)
– [Bracket] (P138)
– [Focus Mode] (P97)
¢
– [i.Dynamic] (P186)
– [i.Resolution] (P186)
– [HDR] (P187)
¢
– [Shutter Type] (P189)
– [Flash Mode] (P156)
– [Flash Adjust.] (P159)
– [Ex. Tele Conv.]
(still pictures/motion pictures) (P149):
¢
[Fn8]
– [Digital Zoom] (P151)
– [Stabilizer] (P146)
– [Restore to Default]
[Motion Picture] menu
¢
– [Picture Mode] (P165)
56

2. Getting Started/Basic Operations
1/981/981/981/98
[Custom] menu
– [Silent Mode] (P200)
– [Peaking] (P203)
– [Histogram] (P204)
– [Guide Line] (P204)
– [Zebra Pattern] (P205)
¢ Function button settings at the time of purchase.
• Operations of the cursor button, [MENU/SET], and the control dial are disabled when [Cursor
Button Lock] is set. Press the function button again to enable them.
– [Monochrome Live View] (P206)
– [Rec Area] (P207)
– [Step Zoom] (P152)
– [Zoom Speed] (P152)
– [Touch Screen] (P208)
Using the function buttons during playback
You can directly set an assigned function to a selected image by pressing the function
button during playback.
Example: When [Fn3] is set to [Favorite]
1 Press 2/1 to select the picture.
2 Press [Fn3], and then set the image as [Favorite].
∫ Functions that can be assigned in [Setting in PLAY mode]
• The following functions can be assigned to the button [Fn1] or [Fn3].
[Playback] Menu/Playback functions
–[Wi-Fi] (P239): [Fn1]
–[Favorite] (P235): [Fn3]
– [Print Set] (P236)
– [Protect] (P237)
¢ Function button settings at the time of purchase.
¢
¢
– [Delete Single] (P177)
–[Off]
– [Restore to Default]
57

2. Getting Started/Basic Operations
Entering Text
Press 3/4/2/1 to select text and then press
1
[MENU/SET] to register.
• Move the cursor to [ ] and then press [MENU/SET] to
switch text between [A] (capitals), [a] (lower case), [1]
(numbers) and [&] (special characters).
• To enter the same character again, rotate the control dial
right to move the cursor.
• The following operations can be performed by moving the cursor to the item and
pressing [MENU/SET]:
–[]]: Enter a blank
– [Delete]: Delete a character
– [ ]: Move the entry position cursor to the left
– [ ]: Move the entry position cursor to the right
• A maximum of 30 characters can be entered.
(Maximum of 9 characters when setting names in [Face Recog.])
• A maximum of 15 characters can be entered for [ ], [ ], [ ], [ ] and [ ].
(Maximum of 6 characters when setting names in [Face Recog.])
Press 3/4/2/1 to move the cursor to [Set] and then press
2
[MENU/SET] to end text input.
58

3. Recording Modes
Taking Pictures using the Automatic Function (Intelligent Auto Mode)
Recording Mode:
In this mode, the camera makes the optimal settings for the subject and scene, so we
recommend it when you wish to leave the settings to the camera and record without
thinking about them.
Set the mode dial to [¦].
1
• The camera will switch to either the most recently used
of Intelligent Auto Plus Mode or Intelligent Auto Mode.
At the time of purchase, the mode is set to Intelligent
Auto Plus Mode.
Align the screen with the subject.
2
• When the camera identifies the optimum scene, the icon
of the scene concerned is displayed in blue for 2 seconds,
after which its colour changes to the usual red. (Automatic
scene detection)
59

3. Recording Modes
The camera detects scenes automatically (Scene Detection)
( : When taking pictures, : When recording motion pictures)
[i-Portrait] [i-Scenery] [i-Macro] [i-Night Portrait]¢1[i-Night Scenery]
[iHandheld Night
Shot]
¢2
[i-Food] [i-Baby]
¢3
[i-Sunset] [i-Low Light]
¢1 Only displayed when the built-in flash is open.
¢2 Only displayed when [iHandheld Night Shot] is set to [ON]. (P62)
¢3 When [Face Recog.] is set to [ON], [ ] will be displayed for
birthdays of registered faces already set only when the Face/Eye of
a person younger than 3 years old is detected.
¦
•[¦] is set if none of the scenes are applicable, and the standard
settings are set.
• When recording 4K photos or when recording using [Post Focus],
Scene Detection works the same way as when recording motion
pictures.
∫ Switching between Intelligent Auto Plus Mode and Intelligent Auto Mode
Select the [ ] or [ ] tab on the menu screen, press 1 to select [ ] or [ ], and
press [MENU/SET].
It is also possible to display the selection
screen by touching the Recording Mode
icon in recording screen.
60

3. Recording Modes
Intelligent Auto Plus Mode allows you to adjust some settings such as the brightness and
colour tone while also using Intelligent Auto Mode for other settings so that you can record
images more suited to your preferences.
(±: possible, —: not possible)
Intelligent Auto Plus Mode Intelligent Auto Mode
Setting the colour tone ± —
Defocus Control ± —
Setting the brightness ± —
Menus that can be set Many Few
∫ Auto Focus, Face/Eye Detection, and Face Recognition
The Auto Focus Mode is automatically set to [š]. If you touch the subject, the AF tracking
function will work. The AF tracking function (P101) will also work if you press 2 and then
press the shutter button halfway.
• When [Face Recog.] is set to [ON], and the face similar to the registered
face is detected, [R] is displayed in the top right of [ ], [ ] and [ ].
∫ About the flash
When the flash is open, the camera automatically sets [ ], [ ] (AUTO/Red-Eye
Reduction), [ ] or [ ] to match the type of subject and brightness.
• Open the flash when the flash is to be used. (P154)
• When [ ] or [ ] is set, Red-Eye Removal is enabled.
• Shutter speed will be slower during [ ] or [ ].
∫ Scene Detection
• If a tripod is used, for instance, and the camera has judged that camera shake is minimal when
the scene detection has been identified as [ ], the shutter speed will be slower than normal.
Take care not to move the camera while taking pictures.
• Depending on recording conditions, different scene types may be selected for the same
subject.
The Backlight Compensation
• When there is a backlight, the subject appears darker and the camera will automatically
attempt to correct it by increasing the brightness of the picture.
In Intelligent Auto Plus Mode or Intelligent Auto Mode, backlight compensation works
automatically.
61

3. Recording Modes
Taking handheld shots of night scenes ([iHandheld Night Shot])
Recording Mode:
When [ ] is detected while taking handheld night shots, pictures of the night scenery will
be taken at a high burst speed and composed into a single picture.
This mode is useful if you want to take stunning night shots with minimal jitter and noise,
without using a tripod.
> [Rec] > [iHandheld Night Shot] > [ON]/[OFF]
MENU
• The angle of view will be slightly narrower.
• Do not move the camera during the continuous shooting after pressing the shutter button.
• Flash is fixed to [Œ] (forced flash off).
Not available in these cases:
• [iHandheld Night Shot] does not work for the pictures taken during a motion picture recording.
• This function is not available in the following cases:
– In Self Shot Mode
– When recording in Burst Mode
– When recording 4K photos
– When recording with [Post Focus]
– When recording with the Bracket function
– When using [Time Lapse Shot]
– When using [Stop Motion Animation] (only when [Auto Shooting] is set)
– When [Quality] is set to [ ], [ ] or [ ]
– When [Ex. Tele Conv.] in the [Rec] menu is set
62

3. Recording Modes
Combining pictures into a single picture with rich gradation ([iHDR])
Recording Mode:
When there is, for example, strong contrast between the background and the subject,
multiple still pictures are recorded with differing exposures and combined to create a
single still picture rich in gradation.
[iHDR] works automatically as needed. When it does, [ ] is displayed on the screen.
> [Rec] > [iHDR] > [ON]/[OFF]
MENU
• The angle of view will be slightly narrower.
• Do not move the camera during the continuous shooting after pressing the shutter button.
• You cannot take the next picture until the combination of pictures is complete.
• A moving subject may be recorded with unnatural blurs.
Not available in these cases:
• [iHDR] does not work for the pictures taken during a motion picture recording.
• This function is not available in the following cases:
– In Self Shot Mode
– When recording using the flash
– When recording in Burst Mode
– When recording 4K photos
– When recording with [Post Focus]
– When recording with the Bracket function
– When [Quality] is set to [ ], [ ] or [ ]
– When [Ex. Tele Conv.] in the [Rec] menu is set
– When using [Time Lapse Shot]
– When using [Stop Motion Animation] (only when [Auto Shooting] is set)
63

3. Recording Modes
A
B
F
Taking pictures with customised colour, defocus control, and brightness settings
Recording Mode:
∫ Setting colour
1 Press 1 to display the setting screen.
2 Rotate the control dial to adjust colour.
• Press [MENU/SET] to return to the recording screen.
• The colour setting will return to the default level (centre
point) when this unit is turned off or the camera is switched
to another Recording Mode.
AB
∫ Taking a picture with a blurred background (Defocus Control)
1 Press 3 to display the brightness setting screen.
2 Press [Fn1] to display the blurriness setting screen.
3 Rotate the control dial to set the blurriness.
• If you press [MENU/SET], you can return to the recording
screen.
• Pressing [ ] on the blurriness setting screen will
cancel the setting.
• Auto Focus Mode is set to [Ø].
The position of the AF area can be set by touching the
screen. (Its size cannot be changed)
• Depending on the lens used, you may hear a sound from the lens when the Defocus
Control is used, but this is due to operation of the aperture of the lens and it is not a
malfunction.
• Depending on the lens used, operational sound of the Defocus Control may be recorded
during the recording of a motion picture when the function is used.
SSSSSS
250500
F
4.0 5.6 8.0
B
3060125
64

3. Recording Modes
+1
OFF
∫ Setting brightness
1 Press 3 to display the setting screen.
2 Rotate the control dial to adjust brightness.
• You can adjust the Exposure Bracket setting by pressing
3/4 while the brightness setting screen is displayed.
(P139)
• Press [MENU/SET] to return to the recording screen.
Change the settings by using the touch screen
1 Touch [ ].
2 Touch the item you want to set.
[ ]: Colour tone
[ ]: Defocus level
[ ]: Brightness
3 Drag the slide bar to set.
• Press [MENU/SET] to return to the recording screen.
OFF
-5-5-4-4-3-3-2-2-1-
+1
+1+1 +2+2 +3+3 +4+4 +5+5
100
65

3. Recording Modes
OFFOFFOFF
OFFOFFOFF
No
Effect
OFFOFFOFF
Taking Pictures of Yourself ([Self Shot])
Applicable modes:
If you rotate the monitor, Self Shot Mode is activated.
You can easily take pictures of yourself while looking at the screen.
In Self Shot Mode...
• Deciding on a composition is easier because recording is
performed while looking at the screen.
• Pictures with different poses and facial expressions can
be taken at once by increasing the number of pictures to
be recorded.
• Automatically enables the touch operation.
• Settings for the respective Recording Modes are
maintained, except for the recording settings for Self
Shot Mode (P66).
Rotate the monitor as shown in the figure.
1
• When you rotate the monitor, a mirror image will be
displayed on the monitor.
Touch the item.
2
66

3. Recording Modes
OFFOFFOFF
OFF
OFF
ONONON
ONONON
OFF
OFF
OFF
OFF
OFF
OFF
OFF
OFF
No
Effect
OFF
EXPS
OFF
RETRRETR
OFF
HKEYHKEY
OFF
MONOMONO
OFF
TOYTOY
OFFOFFOFF
ONONON
ONONON
1
RKE2RKERKE
3
RKERKE
4
RKE
([Soft Skin])
No
([Filter Select])
Effect
Makes people’s faces look brighter and their skin tones look softer.
Adds an image effect (filter) suited for Self Shot Mode.
Changes the defocus setting for the background of detected faces.
([Background
OFF
Control])
[ ](Defocus): Defocuses the background of detected faces.
(Faces further from the camera, however, will be defocused in the
background.)
[ ](Clear): Records faces and the background with clarity.
([Slimming
OFF
Mode])
([Shutter])
([Countdown],
[Shots])
Touch the slide bar.
3
Makes people look slimmer.
Sets the way the shutter is released. (P72)
Sets the countdown setting ([Countdown]) and the number of
pictures to be taken in succession ([Shots]).
• You can select [OFF] or a value between [1] and [10].
Selecting the left end A allows you to set the item to
[OFF].
• If you have selected [Filter Select], [Background Control],
[Shutter] or [Shots], select the desired icon.
[Filter Select]
[Background
[ ] ([No Effect])/[ ] ([Expressive])/[ ] ([Retro])/
[ ] ([High Key])/[ ]([Monochrome])/[ ] ([Toy Effect])
[ ] (Off)/[ ] (Defocus)/[ ](Clear)
EXPS
Control]
[Shutter]
[Shots]
[ ] (Shutter button only)/[ ] (Touch)/
[ ] (Buddy)/[ ] (Face)
RKE
[ ] (1 picture)/[ ] (2 pictures)/[ ] (3 pictures)/[ ] (4 pictures)
OFF
No
Effect
OFF
OFF
Exit
RKE
Touch [Exit].
4
67

3. Recording Modes
Decide on your poses while looking at the monitor.
5
• The AF area is displayed around the subject’s face by the Face/Eye Detection function.
(If [š] in AF Mode is not available with the current Recording Mode, an available focus
setting for each Recording Mode will be used.)
Press the shutter button halfway to focus and
6
then press it fully to take the picture.
• Look at the lens when recording.
• Countdown starts, and recording takes place when it
ends.
If multiple pictures are set to be recorded, the recording
continues until the set number is reached.
• For information on how to start taking a picture using [Shutter], refer to P72.
Taking pictures with the [Fn3] button
The [Fn3] button works as a shutter button in Self Shot
Mode. (It can only be pressed fully.) The button allows you
to take pictures of yourself while holding the camera with
your right hand.
2
68

3. Recording Modes
MENU
Taking panorama pictures in Self Shot Mode
You can also take panorama pictures in Self Shot Mode.
By recording with Panorama Shot Mode, you can enjoy a variety of self-portraits, such as
those with your friends or those incorporating a wide background.
1 Set the mode dial to [ ].
2 Rotate the monitor to enable Self Shot Mode.
• Instructions explaining how to take a picture will be displayed.
3 Read the recording instructions, and touch [Next] or [Start].
• The instructions continue to the next page. Follow the steps until the recording screen is
displayed.
4 Point the camera at the front, and strike a pose while look at the monitor.
• The AF area is displayed around the subject’s face by the Face Detection function.
5 Press the shutter button halfway (or fully) to lock the focus and exposure.
• After pressing the shutter button halfway (or fully), release your finger from it completely.
• Touch [ ] to retry.
6 Point the camera to the position where you start recording, press the shutter
button fully, and pan the camera in the direction indicated on the screen in step
3 to take the picture.
7 Press the shutter button once again to end the picture recording.
• Recording can also be ended by keeping the camera still while recording.
• Recording can also be ended by moving the camera to the end of the guide.
∫ Changing the recording direction of panorama pictures
> [Rec]> [Panorama Settings] > [Direction]
• The [Picture Size] setting is disabled in Self Shot Mode.
• The number of recording pixels in the horizontal and vertical directions of the panorama image
vary depending on the recording direction and the number of combined pictures.
The maximum number of pixels is shown below.
Recording direction
Horizontal 4080 pixels 1920 pixels
Verti cal 2560 pixels 3840 pixels
Horizontal
Resolution
Vertical Resolution
69

3. Recording Modes
∫ Technique for Panorama Shot Mode
Swivel the camera around its centre when moving it in
Example:
the recording direction. Hold the camera with both
hands, taking care not to shake it.
• When the focal length is long, such as when a telephoto
lens is attached, move the camera slowly.
• If the camera shakes too much, pictures may not be able
to be recorded, or the recorded panorama picture may
become narrower (smaller).
• Move the camera towards the edge of the range you wish
to record.
(The edge of the range will not be recorded in the last
frame) (P83)
• If you change the facial expression or blink, the recorded
picture may look unnatural. Try to stay still.
• We recommend setting the zoom position to Wide when using Self Shot Mode.
• Since the distance between the camera and subject is close when you take panorama
pictures in Self Shot Mode, the edges of the pictures may appear significantly distorted.
70

3. Recording Modes
OFF
OFF
OFF
OFF
OFF
OFF
ONONON
Taking pictures of yourself in 4K Photo Mode
You can switch to 4K Photo Mode and take pictures of yourself.
Touch [ ].
• For information about the recording methods for 4K Photo
Mode, refer to steps
(P119, 120).
• When recording 4K photos, the angle of view is narrower.
• For 4K photo recording, only [Filter Select] can be set.
• Be careful not to look at the light from the flash and the AF Assist Lamp directly.
• When the [Soft Skin] is set
– If you set the effect level to [2] or higher, display of the recording screen will be delayed
more than usual and the screen will look as if frames are dropping.
– Since recording with this effect requires extra image processing, if you take a picture with
the effect level set to [2] or higher, it takes some time until you can take the next picture.
– The smoothing effect is applied to the part that has a similar tone to the complexion of a
subject, as well.
– This mode may not be effective under insufficient lighting.
• If you set [Defocusing] to [ ] (On), display of the recording screen will be delayed more than
usual and the screen will look as if frames are dropping. In addition, since recording with
[Defocusing] requires extra image-processing time, it takes some time until you can take the
next picture.
2 through 3 of “Recording 4K Photos”
OFF
No
Effect
OFF
OFF
71

3. Recording Modes
ONONON
ONONON
Not available in these cases:
• This function is not available in the following cases:
– When recording motion pictures
– When using [Multi Exp.]
– When using [Time Lapse Shot]
– When using [Stop Motion Animation]
• You cannot use [Soft Skin] and a [Background Control] setting of [ ] (Defocus) when using
one of the following settings:
– [Glistening Water]/[Clear Nightscape]/[Cool Night Sky]/[Warm Glowing Nightscape]/[Artistic
Nightscape]/[Glittering Illuminations]/[Handheld Night Shot]/[Soft Image of a Flower]/
[Appetizing Food]/[Cute Dessert] (Scene Guide Mode)
– Creative Control Mode
– Panorama Shot Mode
– Manual Focus
• You cannot use a [Background Control] setting of [ ] (Clear) when using one of the
following modes:
– Any mode for Scene Guide Mode other than [Silky Skin]/[Monochrome]
– Aperture-Priority AE Mode
– Shutter-Priority AE Mode
– Manual Exposure Mode
– Child Mode
– Portrait Mode
– Creative Control Mode
• You cannot use [Shots] and [Countdown] when using the following mode:
– Panorama Shot Mode
• If the distance to the subject is too close, the lens may fail to focus depending on the lens you
are using, such as a telephoto lens.
Changing the way the shutter is released
In [Shutter], you can select the way you start recording without pressing the shutter button.
We recommend that you avoid using the shutter button when, for example, jitter occurs
during shutter operation.
• You can start recording with the shutter button regardless of the [Shutter] setting.
When using [ ] (Shutter button only), only the shutter button can be used.
• For information on [ ] (Touch), refer to P48.
Not available in these cases:
• [ ] (Face) and [ ] (Buddy) are not available in the following cases:
– Recording Modes which do not allow setting to [š] of AF Mode (P101)
– Panorama Shot Mode
– In Manual Focus
72

3. Recording Modes
Face Shutter
The shutter is released when a face detected by the Face/Eye Detection function is
covered with a hand or other object and then detected again.
1 Display the yellow frame of Face/Eye Detection.
2 Cover your face with your hand or other object so that the yellow frame disappears for
a moment.
3 When you move your hand away and the yellow frame appears, the shutter is released.
Buddy Shutter
The shutter is released when two faces detected by the Face/Eye Detection function move
closer to each other.
1 Display two Face/Eye Detection frames.
• When [ ] (Buddy) is selected, even if several subjects are present, Face/Eye Detection
detects only a maximum of two faces.
2 The shutter is released when the two frames come within a certain distance of each
other.
73

3. Recording Modes
3.5
Taking Pictures with Automatically Adjusted Aperture and Shutter Speed (Programme AE Mode)
Recording Mode:
The camera automatically sets the shutter speed and the aperture value according to the
brightness of the subject.
You can take pictures with greater freedom by changing various settings in the [Rec]
menu.
Set the mode dial to [ ].
1
Press the shutter button halfway and display
2
the aperture value and shutter speed value
on the screen.
A Aperture value
B Shutter speed
• If the exposure is not adequate when the shutter button is pressed halfway, the aperture
value and shutter speed turn red and blink.
3.5
0
2
00
6060603.5
989898
989898
74

3. Recording Modes
4.0
F
Programme Shift
In Programme AE Mode, you can change the preset aperture value and shutter speed
without changing the exposure. This is called Programme Shift.
You can make the background more blurred by decreasing the aperture value or record a
moving subject more dynamically by slowing the shutter speed when taking a picture in
Programme AE Mode.
1 Press the shutter button halfway and display the aperture value and shutter
speed value on the screen.
2 While the values are displayed (about 10 seconds),
perform the Programme Shift by rotating the control
dial.
A Programme Shift indication
• To cancel Programme Shift, turn the camera off or rotate
the control dial until the Programme Shift indication
disappears.
Programme Shift can easily be cancelled by setting a function button to [One Push AE].
(P81)
Not available in these cases:
• Programme Shift is not available in the following cases:
– When recording 4K photos
– When recording with [Post Focus]
– When the ISO sensitivity is set to [ ]
250 15
SSSSSS
F
6060604.0
4.0
3060125
4.0 5.6 8.0
0
2
00
989898
75

3. Recording Modes
F
1258
5.64.0 8.0 11
603015
3030305.6
00
+3
SSSS
SSSS
Taking Pictures by Specifying the Aperture/ Shutter Speed
Recording Mode:
(Example: In Manual
Exposure Mode)
Aperture
value
A Exposure meter
B Aperture value
C Shutter speed
Shutter
speed
• The effects of the set aperture value and shutter speed will not be visible on the recording
screen. To check on the recording screen, please use [Preview]. (P80)
• The brightness of the screen and the recorded pictures may differ. Check the pictures on the
playback screen.
• Rotate the control dial to display the Exposure Meter. Unsuitable areas of the range are
displayed in red.
• If the exposure is not adequate, the aperture value and the shutter speed turn red and blink
when the shutter button is pressed halfway.
Small
It becomes easier to
defocus the
background.
Slow
It becomes easier to
express movement.
Large
It becomes easier to
maintain focus as far as
the background.
Fast
It becomes easier to
freeze movement.
76

3. Recording Modes
8.0
SSS
F
F
SS
250
Aperture-Priority AE Mode
When you set the aperture value, the camera automatically optimises the shutter speed
for the brightness of the subject.
Set the mode dial to [ ].
1
Rotate the control dial to set the aperture
2
value.
A Aperture value
B Exposure meter
• When using a lens having an aperture ring, set the position of the aperture ring to [A] to
activate the control dial setting. At positions other than [A], the ring setting will take priority.
60 4
SS
SSS
4.0 5.6 8.0 11 16
F
8.0
8.0
81530
Shutter-Priority AE Mode
When you set the shutter speed, the camera automatically optimises the aperture value
for the brightness of the subject.
Set the mode dial to [ ].
1
Rotate the control dial to set the shutter
2
speed.
A Shutter speed
B Exposure meter
• When the flash is activated, the fastest shutter speed that can be selected is 1/50th of a
second. (P158)
77
SS
SSSS
F
60
8.0 5.6 4.0
250
250
250 500125
1
000

3. Recording Modes
SS
000
++30+
30
000
−3−
3
Manual Exposure Mode
Determine the exposure by manually setting the aperture value and the shutter speed.
Set the mode dial to [ ].
1
Rotate the control dial to set the aperture
2
value and shutter speed.
A Exposure meter
B Aperture value
C Shutter speed
D Manual Exposure Assistance
• Each press of the cursor button 3 switches between
Aperture Setting and Shutter Speed Setting.
Available Shutter Speed (Sec.)
60 to 1/16000th (in [AUTO] shutter mode)
• Depending on the [Shutter Type] setting, the shutter speed range varies. (P189)
SS
SSSS
F
3030305.6
Optimising the ISO sensitivity for the shutter speed and aperture value
When the ISO sensitivity is set to [AUTO], the camera sets the ISO sensitivity
automatically so that the exposure will be appropriate for the shutter speed and aperture
value.
• Depending on recording conditions, an appropriate exposure may not be set or the ISO
sensitivity may become higher.
603015
5.64.0 8.0 11
00
+3
1258
Manual Exposure Assistance
The exposure is adequate.
Set to faster shutter speed or larger aperture value.
Set to slower shutter speed or smaller aperture value.
• The Manual Exposure Assistance is an approximation. We recommend checking the pictures
on the playback screen.
• When you use a lens with an aperture ring, the aperture ring setting takes priority.
• When the flash is activated, the fastest shutter speed that can be selected is 1/50th of a
second. (P158)
78

3. Recording Modes
∫ About [T] (Time)
If you set the shutter speed to [T] (Time) and fully press the shutter button, an exposure
starts. (Continues up to approximately 60 seconds.)
If you press the shutter button again, the exposure will end.
• It can only be used with Manual Exposure Mode.
• When taking pictures with the shutter speed set to [T], we recommend using a tripod
and taking pictures remotely by connecting the camera to a smartphone to prevent
camera shake. (P246)
• When you take pictures with the shutter speed set to [T], noise may become visible. To
avoid picture noise, we recommend setting [Long Shtr NR] in the [Rec] menu to [ON]
before taking pictures. (P192)
Not available in these cases:
• This function is not available in the following cases:
– When recording using the flash (only when [Flash Synchro] is set to [2ND])
– When recording 4K photos
– When recording with the Post Focus function
– When recording with the Bracket function
– When [HDR] is set to [ON]
– When using the electronic shutter
– When [Silent Mode] is set to [ON]
– When using [Time Lapse Shot]
– When using [Stop Motion Animation] (only when [Auto Shooting] is set)
79

3. Recording Modes
Fn8
Fn7
SNAP
Fn6
Fn5
Fn4
Confirm the Effects of Aperture and Shutter Speed (Preview Mode)
Applicable modes:
The effects of aperture and shutter speed can be checked by using the Preview Mode.
• Confirm the effects of aperture: You can check the depth of field (effective focus range)
before taking a picture by closing the diaphragm blades to the aperture value you set.
• Confirm the effects of shutter speed: Movement can be confirmed by displaying the actual
picture that will be taken with that shutter speed.
1 Set a function button to [Preview]. (P55)
• The following step is an example in which [Preview] is assigned to [Fn5].
2 Touch [ ].
3 Switch the effect preview screen by touching [Fn5].
• The screen switches each time [Fn5] is touched.
Normal recording screen
Aperture effect preview
screen
Aperture effect: ±
Shutter speed effect: —
Fn5
6KWU6SHHG(IIHFWDGGHG
Fn4
Fn5
Fn6
Fn7
SNAP
Fn8
Shutter speed effect
preview screen
Aperture effect: ±
Shutter speed effect: ±
Fn5
3UHYLHZFRPSOHWHG
Fn4
Fn5
Fn6
Fn7
SNAP
Fn8
Depth of field properties
Aperture value Small Large
¢1
Focus length of the lens Tel e Wide
Distance to the subject Near Distant
Depth of field (effective focus range) Shallow (Narrow)
¢2
Deep (Wide)
¢3
¢1 Recording conditions
¢2 Example: When you want to take a picture with a blurred background etc.
¢3 Example: When you want to take a picture with everything in focus including the background
etc.
• It is possible to record while in Preview Mode.
• Range for shutter speed effect check is 8 seconds to 1/16000th of a second.
Not available in these cases:
• Preview Mode is not available when recording with [ ] ([4K Pre-Burst]) of the 4K Photo
function.
80

3. Recording Modes
00-3-3
2
00
4000400040003.53.53.5
989898
SSS
F
Easily set aperture/shutter speed for suitable exposure (One Push AE)
Applicable modes:
When the exposure setting is too bright or too dark, you can use one push AE to achieve a
suitable exposure setting.
How to tell if the exposure is not adequate
• If the aperture values and shutter speed blink red when the shutter button is pressed
halfway.
• If the Manual Exposure Assistance (P78) is anything other than when in Manual
Exposure mode.
1 Set a function button to [One Push AE]. (P55)
2 (When exposure is not adequate)
Press function button .
Blink red
15 250
SS
S
SS
F
The exposure is changed to give a
suitable exposure.
6060603.5
1256030
4.0 5.6 8.0
0
2
00
• The exposure meter is displayed, and the aperture and shutter speed are changed to give
a suitable exposure.
• In the following cases, suitable exposure cannot be set.
– When the subject is extremely dark and it is not possible to achieve adequate exposure
by changing the aperture value or shutter speed
– When recording using the flash
– In Preview Mode (P80)
– When using a lens that includes an aperture ring
81

3. Recording Modes
Taking panorama pictures (Panorama Shot Mode)
Recording Mode:
Consecutive photos taken while the camera is moved are combined to form a panorama.
Set the mode dial to [ ].
1
• After the screen that asks you to check the recording direction is displayed, the
horizontal/vertical guidelines will be displayed.
Press the shutter button halfway to focus.
2
Press the shutter button fully and move the camera in a small circle
3
in the direction of the arrow on the screen.
Recording from left to right
Image size: [STANDARD] Image size: [WIDE]
• Move the camera at a constant speed.
Pictures may not be able to be recorded properly if the
camera is moved too fast or slow.
Press the shutter button once again to end the picture recording.
4
• Recording can also be ended by keeping the camera still while recording.
• Recording can also be ended by moving the camera to the end of the guide.
A Recording direction and
panning (Guide)
82

3. Recording Modes
MENU
∫ Changing the recording direction and angle of view (image size) of panorama
pictures
> [Rec]> [Panorama Settings]
[Direction] Sets the recording direction.
[Picture Size]
• The number of recording pixels in the horizontal and vertical directions of the panorama picture
varies depending on the image size, the recording direction and the number of combined
pictures.
The maximum number of pixels is shown below.
Image size Recording direction
[STANDARD]
[WIDE]
Sets the angle of view (image size).
[STANDARD]/[WIDE]
Horizontal
Resolution
Horizontal 8176 pixels 1920 pixels
Vertical 2560 pixels 7680 pixels
Horizontal 8176 pixels 960 pixels
Vertical 1280 pixels 7680 pixels
Vertical Resolution
∫ Technique for Panorama Shot Mode
A Move the camera in the recording direction
without shaking it.
If the camera shakes too much, pictures
may not be able to be recorded, or the
recorded panorama picture may become
narrower (smaller).
B Move the camera towards the edge of the
range you wish to record.
(The edge of the range will not be
recorded in the last frame)
83

3. Recording Modes
1/981/981/981/98
∫ About playback
Pressing 3 will start scrolling playback automatically in the
same direction as the recording.
• The following operations can be performed during scrolling
playback.
3 Start panorama playback/Pause
4 Stop
¢ When the playback is paused, you can scroll forwards and backwards by dragging the
screen.
When the scroll bar is touched, the playback position jumps to the touched position.
• When the focal length is long, such as when a telephoto lens is attached, move the camera
slowly.
• The focus, White Balance, and exposure are fixed at the optimum values for the first picture.
As a result, if the focus or brightness changes substantially during recording, the entire
panorama picture may not be recorded at the suitable focus or brightness.
• When multiple pictures are combined to create a single panorama picture, the subject may
appear distorted or the connection points may be noticeable in some cases.
¢
Not available in these cases:
• A panorama picture may not be able to be created, or the pictures may not be combined
properly when recording the following subjects or under the recording conditions below.
– Subjects with a single, uniform colour or repetitive pattern (such as the sky or a beach)
– Moving subjects (person, pet, car, waves, flowers blowing in the breeze, etc.)
– Subjects where the colour or patterns change in a short time (such as an image appearing
on a display)
– Dark places
– Locations with flickering light sources such as fluorescent lights or candles
84

3. Recording Modes
8
Taking Pictures that match the Scene being recorded (Scene Guide Mode)
Recording Mode:
If you select a scene to suit the subject and recording conditions with reference to the
example images, the camera will set optimal exposure, colour, and focus, allowing you to
record in a manner appropriate to the scene.
Set the mode dial to [ ].
1
Press 2/1 to select the scene.
2
• The scene can also be selected by dragging an example
image or the slide bar.
Press [MENU/SET].
3
• It is also possible to display the selection screen by touching the
Recording Mode icon in recording screen.
• To change the Scene Guide Mode, select the [ ] tab on the menu screen, select [Scene
Switch], and then press [MENU/SET]. You can return to step
• The following items cannot be set in Scene Guide Mode because the camera automatically
adjusts them to the optimal setting.
– Items other than the picture quality adjustment in [Photo Style]
– [Sensitivity]
– [Filter Settings]
– [Metering Mode]
– [HDR]
– [Multi Exp.]
– [Digital Zoom]
• Although White Balance is fixed to [AWB] for certain types of scene, you can fine tune the
White Balance (P117) or use White Balance bracketing (P118) by pressing the cursor button
1 on the recording screen.
• Depending on the scene, the recording screen may seem as if frames are missed.
85
2 on P85.

3. Recording Modes
Types of Scene Guide Mode
Displaying the description of each scene and recording tips
Press [DISP.] while the scene selection screen is displayed.
• When it is set to the guide display, detailed explanations and tips for each scene are displayed.
Normal display Guide display List display
[Silky Skin]
• The smoothing effect is
applied to the part that has a
similar tone to the complexion
of a subject, as well.
• This mode may not be
effective under insufficient
lighting.
[Relaxing Tone] [Distinct Scenery]
[Bright Blue Sky] [Romantic Sunset Glow]
[Vivid Sunset Glow] [Glistening Water]
[Clear Nightscape] [Cool Night Sky]
[Backlit Softness]
• Star filter used in this mode
may cause glistening effects
on the objects other than
water surface.
86

3. Recording Modes
[Warm Glowing Nightscape] [Artistic Nightscape]
[Glittering Illuminations] [Handheld Night Shot]
[Clear Night Portrait]
• We recommend using a tripod
• When [Clear Night Portrait] is
[Appetizing Food]
• For close-up recording, we
[Freeze Animal Motion]
• The initial setting for the AF
[Monochrome]
and the self-timer.
selected, keep the subject still
for about 1 second after taking
the picture.
recommend that you close the
flash and avoid using it.
assist lamp is [OFF].
• Do not move the unit during
the continuous shooting after
pressing the shutter button.
• The angle of view will be
slightly narrower.
[Soft Image of a Flower]
• For close-up recording, we
recommend that you close the
flash and avoid using it.
[Cute Dessert]
• For close-up recording, we
recommend that you close the
flash and avoid using it.
[Clear Sports Shot]
87

3. Recording Modes
Taking pictures of children or portraits with optimal settings
Recording Mode:
The camera optimises the exposure, colour tone, focus, and other settings for subjects.
• The following items cannot be set because the camera automatically adjusts them to the
optimal setting.
– Items other than the picture quality adjustment in [Photo Style]
– [Sensitivity]
– [Metering Mode]
– [HDR]
– [Multi Exp.]
– [Digital Zoom]
Child Mode
This mode lets you take clear pictures of moving children or
other similar subjects by minimising jitter with a faster shutter
speed.
Set the mode dial to [ ].
• Child Mode uses the following settings:
– Drive mode: Burst ([M])
– Touch shutter function: Enabled
– Focus mode: [AFF]
Portrait Mode
The brightness of the face is adjusted and the background is
defocused to create a clear portrait.
Set the mode dial to [ ].
• If you are using a lens with the zoom function, you
can enhance the effect by zooming in as much as
possible and closing the distance between the
camera and the subject.
88

3. Recording Modes
EXPSEXPS
Taking Pictures with different image effects (Creative Control Mode)
Recording Mode:
This mode records with additional image effects.
You can set the effects to add by selecting example images and checking them on the
screen.
Set the mode dial to [ ].
1
Press 3/4 to select the image effects
2
(filters).
A preview display
• You can also select the image effects (filters) by touching
the example images.
• It is also possible to display the
selection screen by touching the
Recording Mode icon in recording
screen.
Press [MENU/SET].
3
• If you select the [ ] tab on the menu screen, you can select
the following menu items:
– [Filter Effect]: Displays the image effect (filter) selection
screen.
– [Simultaneous record w/o filter]: Allows you to set the camera
to take a picture with and without an image effect
simultaneously. (P182)
• White Balance will be fixed to [AWB], and [Sensitivity] will be fixed to [AUTO].
• Depending on the image effect, the recording screen may seem as if frames are missed.
89

3. Recording Modes
Types of image effects
Displaying the description of each image effect
Press [DISP.] while the image effect selection screen is displayed.
• When it is set to the guide display, explanations for each picture effect are displayed.
Normal display Guide display List display
[Expressive] [Retro] [Old Days]
[High Key] [Low Key] [Sepia]
[Monochrome] [Dynamic
Monochrome]
[Silky
Monochrome]
[Cross Process] [Toy Effect] [Toy Pop]
[Bleach Bypass] [Miniature Effect] [Soft Focus]
[Fantasy] [Star Filter] [One Point Color]
[Sunshine]
[Impressive Art] [High Dynamic]
[Rough
Monochrome]
90

3. Recording Modes
∫ Setting the type of defocus ([Miniature Effect])
1 Touch [ ] , and then touch [ ].
2 Press 3/4 or 2/1 to move the in-focus portion.
• You can also move the in-focus portion by touching the
screen on the recording screen.
• Touching [ ] allows you to set the recording orientation
(defocus orientation).
3 Rotate the control dial to change the size of in-focus
portion.
• The portion can also be enlarged/reduced by pinching out/pinching in (P47) the screen.
• Pressing [DISP.] will return the in-focus portion setting back to the default setting.
4 Press [MENU/SET] to set.
• No sound is recorded in motion pictures.
• Approximately 1/8 of the time period is recorded.
(If you record for 8 minutes, the resulting motion picture recording will be approximately
1 minute long.)
The displayed available recording time is approximately 8 times.
Depending on the recording frame rate of the motion picture, the recording time of the motion
picture and the available recording time may differ from the values above.
• If you end motion picture recording after a short time, the camera may go on recording for a
certain period.
∫ Set the colour to leave in ([One Point Color])
1 Touch [ ] , and then touch [ ].
2 Select the colour you want to leave by moving the
frame with 3/4/2/1.
• You can also select the colour you want to leave by
touching the screen.
• Pressing [DISP.] will return the frame back to the centre.
3 Press [MENU/SET] to set.
• Depending on the subject, the set colour may not be left in.
91

3. Recording Modes
∫ Setting the position and size of the light source ([Sunshine])
1 Touch [ ], and then touch [ ].
2 Press 3/4/2/1 to move the centre position of the light source.
• The position of the light source can also be moved by touching the screen.
Point for when placing the centre of the light
source
A more natural appearance can be created by
placing the centre of the light source outside the
image.
3 Rotate the control dial to adjust the size of the light
source.
• The display can also be enlarged/reduced by pinching out/pinching in.
• Pressing [DISP.] will return the light source setting back to the default setting.
4 Press [MENU/SET] to set.
Adjust the effect to fit your preferences
The strength and colours of the effects can be easily adjusted to fit your preferences.
1 Press 1 to display the setting screen.
2 Rotate the control dial to set.
• Press [MENU/SET] to return to the recording screen.
Image effect Items that can be set
[Expressive] Freshness Understated colours Pop colours
[Retro] Colour Yellow emphasised Red emphasised
[Old Days] Contrast Low contrast High contrast
[High Key] Colour Pink emphasised
[Low Key] Colour Red emphasised Blue emphasised
[Sepia] Contrast Low contrast High contrast
Aquamarine
emphasised
92

3. Recording Modes
Image effect Items that can be set
[Monochrome] Colour
[Dynamic
Monochrome]
[Rough
Monochrome]
[Silky
Monochrome]
[Impressive Art] Freshness Black and white Pop colours
[High Dynamic] Freshness Black and white Pop colours
[Cross Process] Colour Green tone/Blue tone/Yellow tone/Red tone
[Toy Effect] Colour Orange emphasised Blue emphasised
[Toy Pop]
[Bleach Bypass] Contrast Low contrast High contrast
[Miniature Effect] Freshness Understated colours Pop colours
[Soft Focus] Extent of defocus Weak defocus Strong defocus
[Fantasy] Freshness Understated colours Pop colours
[Star Filter]
[One Point Color] Amount of colour left
[Sunshine] Colour Yellow tone/Red tone/Blue tone/White tone
Contrast Low contrast High contrast
Grittiness Less gritty Grittier
Extent of defocus Weak defocus Strong defocus
Area with reduced
peripheral brightness
Yellow
emphasised
Small Large
Length of the rays of light
Short Long
Number of the rays of light
Smaller Larger
Angle of the rays of light
Rotate to the left Rotate to the right
Small amount of
colour
Blue
emphasised
Large amount of
colour
93

3. Recording Modes
F
+1
OFF
EXPS
Taking a picture with a blurred background (Defocus Control)
1 Press 3 to display the brightness setting screen.
2 Press [Fn1] to display the blurriness setting screen.
3 Rotate the control dial to set.
• If you press [MENU/SET], you can return to the recording
screen.
• Pressing [ ] on the blurriness setting screen will
cancel the setting.
Not available in these cases:
• This function is not available in the following case:
– [Miniature Effect] (Creative Control Mode)
Setting brightness
1 Press 3 to display the setting screen.
2 Rotate the control dial to set.
• You can adjust the Exposure Bracket setting by pressing
3/4 while the brightness setting screen is displayed.
(P139)
• If you press [MENU/SET], you can return to the recording
screen.
∫ Change the settings by using the touch screen
1 Touch [ ].
2 Touch the item you want to set.
[ ]: Adjusts an image effect
[ ]: Defocus level
[ ]: Brightness
3 Drag the slide bar to set.
• Press [MENU/SET] to return to the recording screen.
SSSSSS
F
OFF
-5-5-4-4-3-3-2-2-1-
EXPS
250500
100
4.0 5.6 8.0
+1
+1+1 +2+2 +3+3 +4+4 +5+5
3060125
94

4. Focus, Brightness (Exposure) and
3.5
LOW
Colour tone Settings
Adjusting Focus Automatically
By setting the optimum Focus Mode or Auto Focus Mode for the subject or recording
condition, you can let the camera automatically adjust focus in various scenes.
Set the [Focus Mode] to [AFS], [AFF] or [AFC].
1
• The Focus Mode will be set. (P97)
Press 2 ().
2
Press 2/1 to select AF Mode and then press
3
[MENU/SET].
• The Auto Focus Mode will be set. (P99)
Press the shutter button halfway.
4
• Auto Focus will be activated.
6060603.5
3.5
Focus
Focus indication A On Blinks
AF area B Green —
Sound Beeps 2 times —
• The focus indication is displayed as [ ] in a dark environment, and focusing may take
longer than usual.
• If the camera detects stars in the night sky after displaying [ ], Starlight AF will be
activated. When focus is achieved, the focus indication [ ] and AF areas in focus are
displayed.
(Detection with Starlight AF works only for approximately 1/3 of the centre area of the
screen.)
When the subject is
focused
95
When the subject is not
focused
LOW
STAR

4. Focus, Brightness (Exposure) and Colour tone Settings
• If you zoom in/out after focusing on a subject, the focus may lose its accuracy. In that case,
re-adjust the focus.
Subjects and recording conditions which are difficult to focus
• Fast-moving subjects, extremely bright subjects or subjects without contrast.
• When recording subjects through windows or near shiny objects.
• When it is dark or when jitter occurs.
• When the camera is too close to the subject or when taking a picture of both distant and near
subjects.
96

4. Focus, Brightness (Exposure) and Colour tone Settings
Focus Mode (AFS/AFF/AFC)
Applicable modes:
The method for achieving focus when the shutter button is pressed halfway is set.
> [Rec] > [Focus Mode]
MENU
Item Scene (recommended)
Subject is still
[AFS]
(Auto Focus
Single)
[AFF]
(Auto Focus
Flexible)
[AFC]
(Auto Focus
Continuous)
[MF] Set the focus manually. (P107)
(Scenery, anniversary photograph, etc.)
“AFS” is an abbreviation of “Auto Focus Single”.
Focus is set automatically when the shutter button is
pressed halfway. Focus will be fixed while it is pressed
halfway.
Movement cannot be predicted
(Children, pets, etc.)
“AFF” is an abbreviation of “Auto Focus Flexible”.
In this mode, focusing is performed automatically when
the shutter button is pressed halfway.
If the subject moves while the shutter button is pressed halfway, the focus is
corrected to match the movement automatically.
Subject is moving
(Sport, trains, etc.)
“AFC” is an abbreviation of “Auto Focus Continuous”.
In this mode, while the shutter button is pressed halfway,
focusing is constantly performed to match the movement of the subject.
When the subject is moving, the focusing is performed by predicting the
subject position at the time of recording. (Movement prediction)
97

4. Focus, Brightness (Exposure) and Colour tone Settings
When recording using [AFF], [AFC]
• It may take time to focus on the subject when you operate the zoom from Wide to Tele or
suddenly change the subject from a distant one to a nearby one.
• Press the shutter button halfway again when it is difficult to focus on the subject.
• While the shutter button is pressed halfway, shake may be seen on the screen.
• Focus Mode settings of [AFF] and [AFC] work in the same manner as [AFS] in the following
situations:
– When recording with [ ] ([4K Burst(S/S)]) of the 4K Photo function
– In low light situations
• Even if you change the Focus Mode setting in Child Mode, the setting for other Recording
Modes stays the same. The Focus Mode setting for Child Mode works independently.
• In Panorama Shot Mode, [AFF] and [AFC] cannot be set.
• When the interchangeable lens (H-H020A) is used, [AFF] and [AFC] cannot be set.
• [AFF] is not available when recording 4K photos. [Continuous AF] works during recording.
• The Focus Mode cannot be set when recording using [Post Focus].
98

4. Focus, Brightness (Exposure) and Colour tone Settings
Auto Focus Mode
Applicable modes:
This allows the focusing method that suits the positions and number of the subjects to be
selected.
The camera automatically detects the person’s face
and eyes.
An eye closer to the camera will be in focus, while
the exposure will be optimised for the face.
([Face/Eye
Detection])
([Tracking])
([49-Area])
, etc.
([Custom Multi])
(When [Metering Mode] is set to [ ])
• Up to 15 faces can be detected. Eyes that can be
detected are only those of the face that is in focus.
• You can change the eye to be in focus. (P101)
• Position and size of the AF area can be changed. (P104)
The camera focuses on the subject you specify.
The exposure will be optimised for the subject.
(When [Metering Mode] is set to [ ].)
Focus and exposure will keep on following the
subject even if it moves. (Dynamic tracking) (P101)
Up to 49 AF areas can be focused.
This is effective when a subject is not in the centre
of the screen.
• You can select areas to be in focus. (P105)
From among 49 AF areas, you can freely set the
optimum shape of the AF area for the subject.
(P102)
([1-Area])
([Pinpoint])
The camera focuses on the subject in the AF area
on the screen.
• Position and size of the AF area can be changed.
(P104)
You can achieve a more precise focus on a point
that is smaller than [Ø].
If you press the shutter button halfway, the screen
that lets you check the focus will be enlarged.
• The focus position can be set on an enlarged
screen. (P105)
99

4. Focus, Brightness (Exposure) and Colour tone Settings
Pressing the shutter button halfway to adjust the composition
When the subject is not in the centre of the composition in [Ø], you can bring the
subject into the AF area, fix the focus and exposure by pressing the shutter button
halfway, move the camera to the composition you want with the shutter button pressed
halfway, and then take the picture.
(Only when the focus mode is set to [AFS].)
∫ Restrictions on Auto Focus Mode
• The AF Mode is fixed to [š] in the following cases.
– In Self Shot Mode
(If [š] is not available with the current Recording Mode, an available focus setting for each
Recording Mode will be used.)
• The AF Mode is fixed to [Ø] in the following cases.
– When using the Digital Zoom
– [Miniature Effect] (Creative Control Mode)
• The AF Mode is not available when recording with [Post Focus].
([Face/Eye Detection])
• It cannot be set to [š] in the following cases.
– [Clear Nightscape]/[Cool Night Sky]/[Warm Glowing Nightscape]/[Artistic Nightscape]/
[Glittering Illuminations]/[Handheld Night Shot]/[Appetizing Food]/[Cute Dessert] (Scene
Guide Mode)
([Tracking])
• [ ] cannot be used with [Time Lapse Shot].
• In the following cases, [ ] operates as [Ø].
– [Glistening Water]/[Glittering Illuminations]/[Soft Image of a Flower]/[Monochrome] (Scene
Guide Mode)
– [Sepia]/[Monochrome]/[Dynamic Monochrome]/[Rough Monochrome]/[Silky Monochrome]/
[Soft Focus]/[Star Filter]/[Sunshine] (Creative Control Mode)
– [Monochrome]/[L.Monochrome] ([Photo Style])
([Pinpoint])
• In the following cases, [ ] operates as [Ø].
– When recording motion pictures
– When recording 4K photos
• It cannot be set to [ ] in the following cases.
– [AFF]/[AFC] (focus mode)
100
 Loading...