

Page 1
DBS
Panasonic
®
Manager
User Guide
™
VB-43993
Please read these instructions completely
before using DBS Manager.
Section 550
Part Number 552X00201
Issued April 2000
Page 2

The contents of this manual are subject to change without notice and do not constitute a commitment on
the part of Panasonic Telecommunication Systems Company (PTSC). Every effort has been made to
ensure the accuracy of this document. However, due to ongoing product improvements and revisions,
Panasonic cannot guarantee the accuracy of printed material after the date of publication nor can it accept
responsibility for errors or omissions. Panasonic will update and revise this document as needed.
The software and hardware des cri be d in th is document may be used or copied only in acco rda nce with the
terms of the license pertaining to said software or hardware.
This document may be reproduced either electronically or in print as needed by certified dealers and
technicians of DBS products. However, the information contained in this document must not be altered,
copied, or changed in any way that misrep re sen ts the installati on, operation, or othe r function or feature of
the DBS product or Panasonic. Panasonic assumes no liability for any alternation or misrepresentation of
information contained herein.
© Copyright 2000 by Panasonic Telecommunication Systems Company
All rights reserved.
DBS Manager™ is a registered trademark of Panasonic Telecommunication Systems Company
Windows™ and Access™ are trademarks of Microsoft Corporation.
2 Issued April 2000 Panasonic
Page 3

Table of Contents
Chapter 1. Overview 5
Introduction. . . . . . . . . . . . . . . . . . . . . . . . . . . . . . . . . . . . . . . . . . . . . . . . . . . . . . . . 5
How DBS Manager works. . . . . . . . . . . . . . . . . . . . . . . . . . . . . . . . . . . . . . . . . . 5
Using this manual. . . . . . . . . . . . . . . . . . . . . . . . . . . . . . . . . . . . . . . . . . . . . . . . . . . 5
Conventions used in this manual . . . . . . . . . . . . . . . . . . . . . . . . . . . . . . . . . . . . . . . 6
Chapter 2. Installation Procedures 7
System requirements . . . . . . . . . . . . . . . . . . . . . . . . . . . . . . . . . . . . . . . . . . . . . . . . 7
Before you begin . . . . . . . . . . . . . . . . . . . . . . . . . . . . . . . . . . . . . . . . . . . . . . . . . . . 7
Installing the DBS Manager hardware key . . . . . . . . . . . . . . . . . . . . . . . . . . . . . . . . 8
Installing the DBS Manager software . . . . . . . . . . . . . . . . . . . . . . . . . . . . . . . . . . . . 8
DBS Manager Communications Addendum. . . . . . . . . . . . . . . . . . . . . . . . . . . . . . . 9
Introduction. . . . . . . . . . . . . . . . . . . . . . . . . . . . . . . . . . . . . . . . . . . . . . . . . . . . . . . . 9
Requirements. . . . . . . . . . . . . . . . . . . . . . . . . . . . . . . . . . . . . . . . . . . . . . . . . . . . . 10
DBS Manager PC Requirements: . . . . . . . . 10
DBS Requirements for Direct Communications: 10
DBS Requirements for Remote Communications: 10
DBS 824 Requirements for Direct Communications: 11
DBS 824 Requirements for Remote Communications: 11
Direct Connection. . . . . . . . . . . . . . . . . . . . . . . . . . . . . . . . . . . . . . . . . . . . . . . . . . 11
Customizing the Direct Connection Cables. 11
Operation . . . . . . . . . . . . . . . . . . . . . . . . . . . . . . . . . . . . . . . . . . . . . . . . . . . . . 12
Remote Communications. . . . . . . . . . . . . . . . . . . . . . . . . . . . . . . . . . . . . . . . . . . . 13
DBS Manager Modem Considerations . . . . . . . . . . . . . . . . . . . . . . . . . . . . . . . 13
RAI Considerations. . . . . . . . . . . . . . . . . . . . . . . . . . . . . . . . . . . . . . . . . . . . . . 14
DBS or DBS 824 External Modem Considerations. . . . . . . . . . . . . . . . . . . . . . 15
Configuring the DBS or DBS 824 External Modem using DBS Manager 15
Customizing the External Modem Cable . . . 16
Operation . . . . . . . . . . . . . . . . . . . . . . . . . . . . . . . . . . . . . . . . . . . . . . . . . . . . . 17
Operator-Assisted External Modem Connection 17
Unassisted External Modem Connection (DBS Only) 17
Unassisted RAI Connection (DBS Only) . . . 18
Operator Assisted RAI Connecti on (DBS Only) 18
Chapter 3. DBS Manager Quick Tour 21
The Main Window. . . . . . . . . . . . . . . . . . . . . . . . . . . . . . . . . . . . . . . . . . . . . . . . . . 21
The Menu Bar. . . . . . . . . . . . . . . . . . . . . . . . . . . . . . . . . . . . . . . . . . . . . . . . . . . . . 22
DBS Manager Issued April 2000 3
Page 4

Table of Contents
The File Menu . . . . . . . . . . . . . . . . . . . . . . . . . . . . . . . . . . . . . . . . . . . . . . . . . . 22
The Database Menu. . . . . . . . . . . . . . . . . . . . . . . . . . . . . . . . . . . . . . . . . . . . . . 22
The DBS Administration Menu. . . . . . . . . . . . . . . . . . . . . . . . . . . . . . . . . . . . . . 23
The Reports Menu . . . . . . . . . . . . . . . . . . . . . . . . . . . . . . . . . . . . . . . . . . . . . . . 24
The Help Menu. . . . . . . . . . . . . . . . . . . . . . . . . . . . . . . . . . . . . . . . . . . . . . . . . . 24
The Button Bar. . . . . . . . . . . . . . . . . . . . . . . . . . . . . . . . . . . . . . . . . . . . . . . . . . . . . 24
The DBS Administration Section . . . . . . . . . . . . . . . . . . . . . . . . . . . . . . . . . . . . . . . 25
The Information Bar. . . . . . . . . . . . . . . . . . . . . . . . . . . . . . . . . . . . . . . . . . . . . . . . . 25
Chapter 4. DBS Manager Basic Operations 27
Starting DBS Manager. . . . . . . . . . . . . . . . . . . . . . . . . . . . . . . . . . . . . . . . . . . . . . . 27
Exiting DBS Manager . . . . . . . . . . . . . . . . . . . . . . . . . . . . . . . . . . . . . . . . . . . . . . . 27
Modifying user accounts . . . . . . . . . . . . . . . . . . . . . . . . . . . . . . . . . . . . . . . . . . . . . 27
Setting communications parameters . . . . . . . . . . . . . . . . . . . . . . . . . . . . . . . . . . . . 28
Connecting to a DBS. . . . . . . . . . . . . . . . . . . . . . . . . . . . . . . . . . . . . . . . . . . . . . . . 28
Disconnecting from a DBS. . . . . . . . . . . . . . . . . . . . . . . . . . . . . . . . . . . . . . . . . . . . 30
Modifying system parameters . . . . . . . . . . . . . . . . . . . . . . . . . . . . . . . . . . . . . . . . . 30
Working with Databases . . . . . . . . . . . . . . . . . . . . . . . . . . . . . . . . . . . . . . . . . . . . . 30
Creating a new database. . . . . . . . . . . . . . . . . . . . . . . . . . . . . . . . . . . . . . . . . . 30
Opening an existing database . . . . . . . . . . . . . . . . . . . . . . . . . . . . . . . . . . . . . . 31
Modifying customer/site information in a database . . . . . . . . . . . . . . . . . . . . . . 31
Modifying a remote phone number in a database . . . . . . . . . . . . . . . . . . . . . . . 31
Modifying a remote programming password in a database . . . . . . . . . . . . . . . . 31
Copying a database. . . . . . . . . . . . . . . . . . . . . . . . . . . . . . . . . . . . . . . . . . . . . . 31
Closing a database. . . . . . . . . . . . . . . . . . . . . . . . . . . . . . . . . . . . . . . . . . . . . . . 32
Deleting a database. . . . . . . . . . . . . . . . . . . . . . . . . . . . . . . . . . . . . . . . . . . . . . 32
Uploading a database to a DBS. . . . . . . . . . . . . . . . . . . . . . . . . . . . . . . . . . . . . 32
Downloading data from a DBS to DBS Manager . . . . . . . . . . . . . . . . . . . . . . . . 32
Upgrading a database to a higher CPC version. . . . . . . . . . . . . . . . . . . . . . . . . 33
Databases and Connecting to a DBS - Special Considerations . . . . . . . . . . . . . . 33
Chapter 5. Using Help 35
Locating a Help Topic . . . . . . . . . . . . . . . . . . . . . . . . . . . . . . . . . . . . . . . . . . . . . . . 35
About Bookmarks . . . . . . . . . . . . . . . . . . . . . . . . . . . . . . . . . . . . . . . . . . . . . . . . . . 35
Creating Bookmarks. . . . . . . . . . . . . . . . . . . . . . . . . . . . . . . . . . . . . . . . . . . . . . 35
Using Bookmarks. . . . . . . . . . . . . . . . . . . . . . . . . . . . . . . . . . . . . . . . . . . . . . . . 36
Deleting Bookmarks. . . . . . . . . . . . . . . . . . . . . . . . . . . . . . . . . . . . . . . . . . . . . . 36
Copying and Annotating Help Topics . . . . . . . . . . . . . . . . . . . . . . . . . . . . . . . . . . . 36
Creating an Annotation. . . . . . . . . . . . . . . . . . . . . . . . . . . . . . . . . . . . . . . . . . . . 36
Copying an Annotation. . . . . . . . . . . . . . . . . . . . . . . . . . . . . . . . . . . . . . . . . . . . 36
Copying an entire Help topic into an Annotation . . . . . . . . . . . . . . . . . . . . . . . . 36
Deleting an Annotation. . . . . . . . . . . . . . . . . . . . . . . . . . . . . . . . . . . . . . . . . . . . 37
Printing Help Topics. . . . . . . . . . . . . . . . . . . . . . . . . . . . . . . . . . . . . . . . . . . . . . . . . 37
4 Issued April 2000 DBS Manager
Page 5

Overview
Introduction
Chapter 1
DBS Manager™
systems from a personal computer. With
direct connection and modify the DBS’ programming parameters from your PC or laptop. You can also
maintain programming databases for any number of different phone systems in your PC and make modifications to a database for uploading to that phone system at a later time.
for most on-site FF key programming procedures (you will still ne ed to use FF keys for programming new
features, "any keys", Call Forwarding ID digits, etc.).
is a Windows-ba sed software applic ation that let s you manage Panasonic DBS telephone
DBS Manager
, you can connect to a DBS system via modem or
DBS Manager
replaces the need
How DBS Manager works
DBS Manager
Microsoft Access™ format . Using
programming parameters
immediately or at a la te r time. You can also download a DBS’ programming parameters to
for analysis and modification, or for use as a system backup.
It is important to understand that a database for a particular phone system exists in
independently from the actual system programming for that DBS. If programming for the system is
changed in a DBS database, the phone system will be unaffected unless you are connected to the DBS at
the time the changes are made, or those changes are uploaded to it from your PC.
Likewise, if any s ystem par ameters a re chang ed via o n-site FF key pr ogramming, thos e chan ges will n ot be
reflected in the
your PC, or you open that database in
stores the programming information for a DBS system in
as stored in the database
DBS Manager
DBS Manager
database for that s ystem un til t he changes are do wnloaded from th e DBS to
DBS Manager
, you can easily view or modify a system’s
and then upload any changes to that DBS either
and make the same changes.
database files
DBS Manager
based on the
DBS Manager
Note:
It is not necessary that a database exist in
programming. If desired, you can connect to the DBS using
without maintaining a copy of its database in the
DBS Manager
DBS Manager
DBS Manager
in order to make changes to a DBS’
and modify its programming
application.
Using this manual
This manual is designed to assist you in getting started with
DBS Manager’s
Users should have a thorough working knowledge of Panasonic DBS programming procedures and
terminology and a good understanding of modem functionality. Users should also be familiar with basic
PC and Windows functionality and terminology.
DBS Manager Issued April 2000 5
extensive interactive On-line Help files.
DBS Manager
. It is not intended to replace
Page 6

Chapter 1
Conventions used in this manual
The following conventions are used throughout this manual:
1. Items to be selected from a menu are indicated as follows: Select
2. Names of menus and menu items are printed in
menu and menu item from the keyboard are underlined
3. Referen ce to
4. Words requiring special emphasis are
File > Exit
DBS Manager
to exit the application (Choose the
and its features appear in
italicized
boldface
.
File
menu, then click on
. Letters t hat you can use to access the
.
boldface
.
Exit
).
6 Issued April 2000 DBS Manager
Page 7

Chapter 2
Installation Procedures
System requirements
DBS Manager is a powerful application which requires a powerful PC in order to run effeciently. The
following are
• A 486-33 or higher IBM-compatible PC with a 3.5" floppy drive.
• 8 MB or more RAM.
• 20 MB or m ore free disk space - see Note 1.
• Windows-compatible Mouse.
• VGA or higher resolution Monitor.
• Hayes-compatible modem (required for remote connections - see Note 2).
• Microsoft Windows version 3.1 or higher.
minimum
system requirements.
Note 1:
10 MB free work space on your hard disk to be used during database conversions. In addition, each
phone system database to be administered through
disk space.
MB of disk space - 6.0 MB for
(3.0 MB each) for the three phone system databases being administered.
Note 2
the Dealer version but intend to do only direct (i.e., not remote) connections.
Installation of
Example:
. A modem is not required if you have the End-User version of DBS Manager, or if you have
DBS Manager
If you are administe ring thr ee d iff erent DBS datab ases, y ou wi ll nee d at leas t 2 5
DBS Manager
requires about 6 MB of disk space. You will also need at least
DBS Manager
, 10 MB to be used during database conver sions, and 9.0
requires an additional 3.0 MB of
Before you begin
Check the following before you begin installation of the
1. If running W indows 3. 1 or 3.1 1, make sure your v irtual memory ( swap file) is set t o Permanent (not
Temporary). The recommended size for virtual memory is 25 MB or greater.
2. For Windows 3.1 and 3.11, set the Buffers parameter in your
applications which require a higher setting).
3. If you are running Windows 3.1 (not 3.11), DBS Manager requires the presence on your system of
a file named
must manually edit your
share.exe
. DBS Manager will install this file during the installation process, but you
autoexec.bat
file to add the following line:
DBS Ma nager
config.sys
software.
file to 40 (unless you use
share.exe /L:500
Refer to your DOS and Windows user guides if you need help making the above changes.
DBS Manager Issued April 2000 7
Page 8

Chapter 2
Installing the DBS Manager hardware key
DBS Manager
connector. This hardware key must be installed in order to use
If using a printer, attach the hardware key to th e pa ral l el port, then plug the pri nt er cable into the hardwar e
key. (On some computers, if the printer is turned off when using
recognize the hardware key and will therefore not allow a communication session to be established.)
Figure 1. The DBS Manager Hardware Key
Note:
Two different versions of the hardware key are available: a dealer version and an end-user version.
The dealer version allows remote connections to a DBS. The end-user version is limited to local (on-site)
connections only (i.e., no external modem communications with a DBS are allowed). Both versions allow
full database functionality. The version type is displayed just above the phone graphic on the
Manager
is supplied with a hardware key which attaches to your PC’s parallel port via a 25-pin
DBS Manager
DBS Manager
to PC parallel port
Main window.
to connect to a DBS.
, the system will not
DBS
Installing the DBS Manager software
You should make backup copies of the
Use the backup disks for the installation.
1. Close out all other Windows applications.
2. Insert Disk 1 into floppy drive A or B.
3. For Windows 3.1, sel ect
Start,
(depending on which drive you placed the disk in), then press
confirm the directory
4. After the installation is complete, you should open
System
(
information on setting up and modifying user accounts.
Note 1:
above.
Note 2:
password (
default password is changed, there is no way to open
personal User ID and/or password.
Run
then
) and password (
The default User ID and passwo rd are c ase-se nsit ive and must be en te red exac tly as shown
T o pro tect ag ainst unauthor iz ed use of
from the Windows desktop. In the Command Line box, type
System
File,
DBS Manager
) after your new user account is established. Be aware however that once the
DBS Manager
then
System
disks before beginning the installation procedure.
Run
from the Program Manager scre en. For Windows 95, select
should be installed to.
DBS Manager
) and immediately set up a new user account. See page 27 for
DBS Manager
DBS Manager
a:setup
<ENTER>
, you may want to change the default
. You will be asked to
using the default User ID
should you forget your
or
b:setup
8 Issued April 2000 DBS Manager
Page 9
DBS M anager Communications Addendum
Introduction
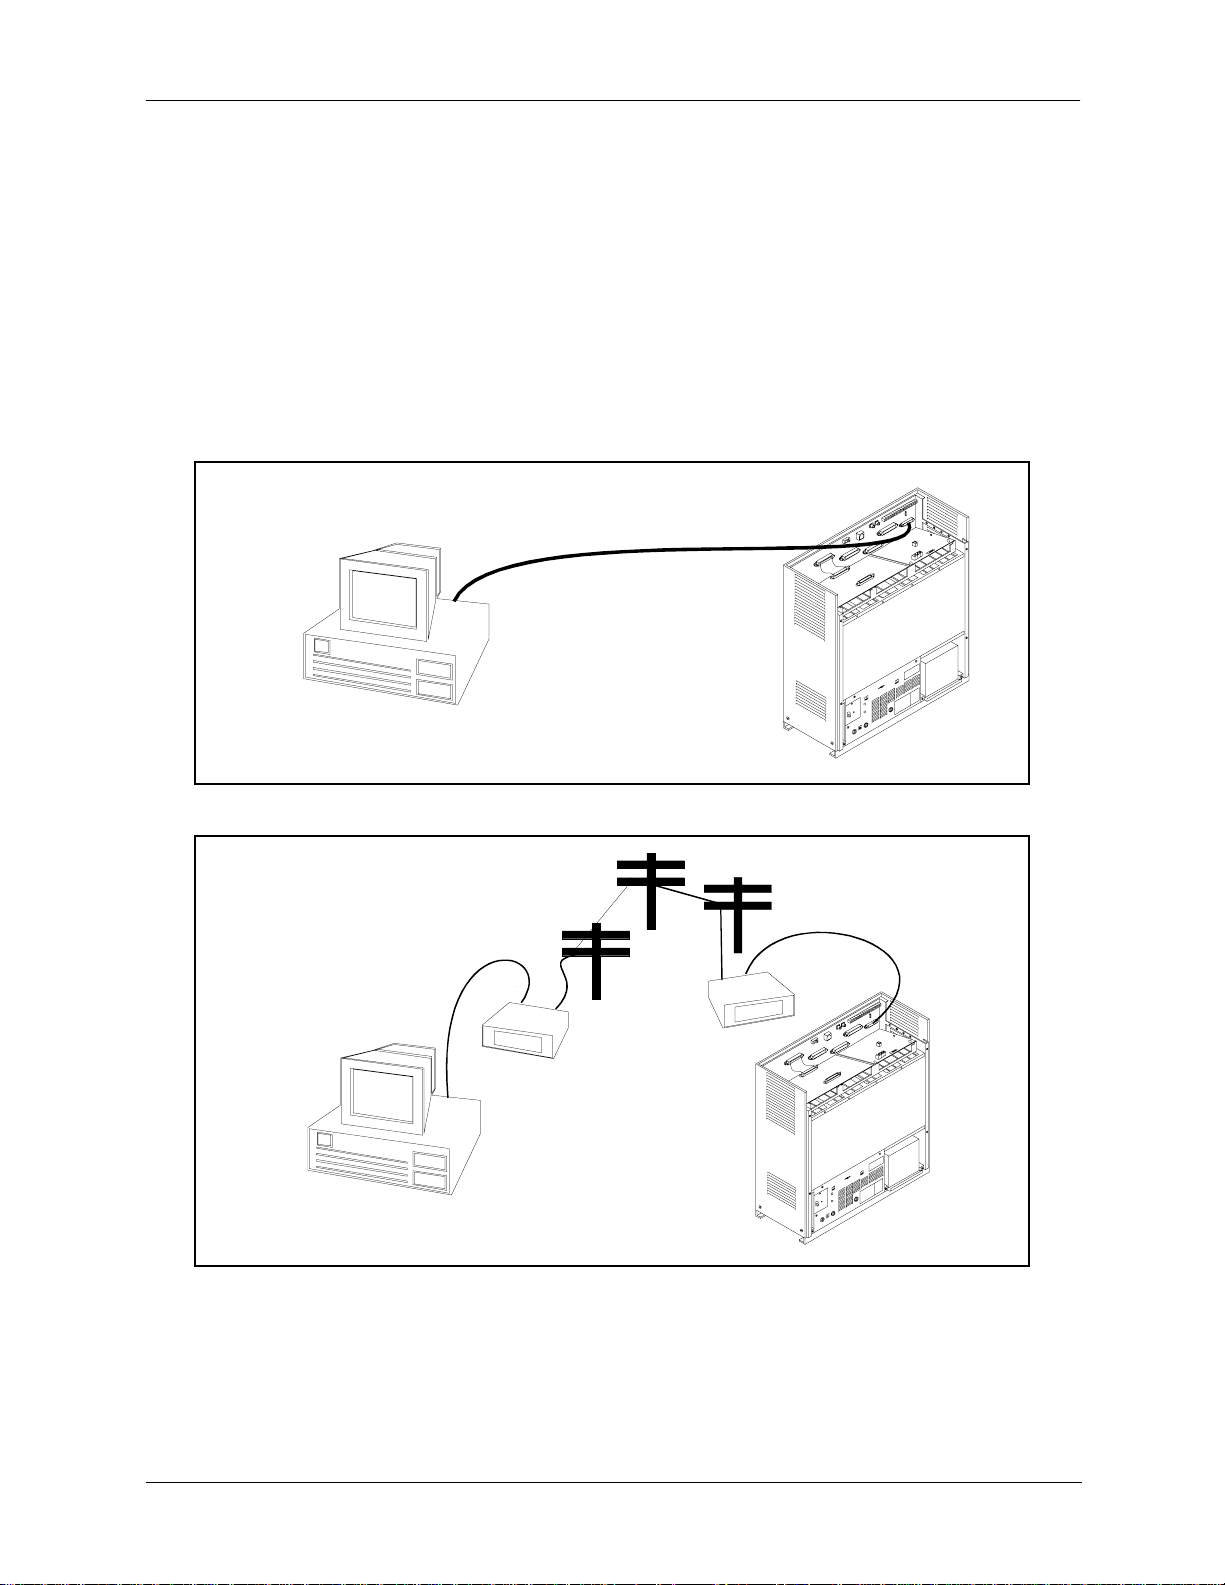
DBS Manager provides the ability to connect to the DBS and DBS 824 either
directly or by using modem connections. Modem connection allows for easy
remote maintenance without having to travel to the phone system site.
Figure 1. Direct Communications
Chapter 2
Figure 2. Remote Communications
DBS
M anager
PC
Modem
DBS
M anager
PC
DBS or
DBS 824
Modem
DBS or
DBS 824
Connecting remotely to the DBS or DBS 824 involves two modems; 1) a
modem at the DBS Manager PC and 2) a modem at the DBS or DBS 824.
With the DBS, the modem may be either the internal modem built into the
RAI card, or an external modem connected to the DBS external serial port
DBS Manager Issued April 2000 9
Page 10

Chapter 2
(CN6). With the DBS 824, an external modem must be connected to the SIU
“MAINT” connector CN2.
Regardless of your configuration,
properly configured to communicate
configuration commands between various modem models. Fortunately, DBS
Manager contains custom-tailored modem setup configurations to reduce or
eliminate modem-related problems. However, if you have a modem with dip
switches that control setup, they must be set to support DBS Manager
communications.
Note:
use. There are certain settings that must be correctly set to operate.
Connecting either directly or by an external modem to the DBS or DBS 824
requires special customized modem cables. These cables are described later
in this document.
Note:
cables listed here differ from previously defined cables.
Requirements
The following items are required for DBS Manager to communicate with the
DBS or DBS 824.
the modems at both ends must be
. There are often differences in
Make certain you have complete documentation on the modems you
Make sure to use cables configured as described in this document. The
DBS Manager PC Requirements:
DBS Manager Version 1.1 or later (with hardware key)
Internal, PCMCIA, or External Modem (if connecting remotely)
Standard Modem Cable (if using an external modem)
DBS Requirements for Direct Communications:
Customized Direct Connection Cable
DBS Requirements for Remote Communications:
RAI or External Modem
Customized Modem Cable (if using an external modem)
Trunk Access to Modem (if calling unassisted) (i.e, DISA trunk, dedicated
modem trunk, voice mail, automated attendant, etc.)
MFR (if using DISA)
10 Issued April 2000 DBS Manager
Page 11
DBS 824 Requirements for Direct Communications:
Serial Interface Unit (SIU)
Customized Direct Connect Cable
DBS 824 Requirements for Remote Communications:
Serial Interface Unit (SIU)
External Modem
Customized Modem Cable
Direct Connection
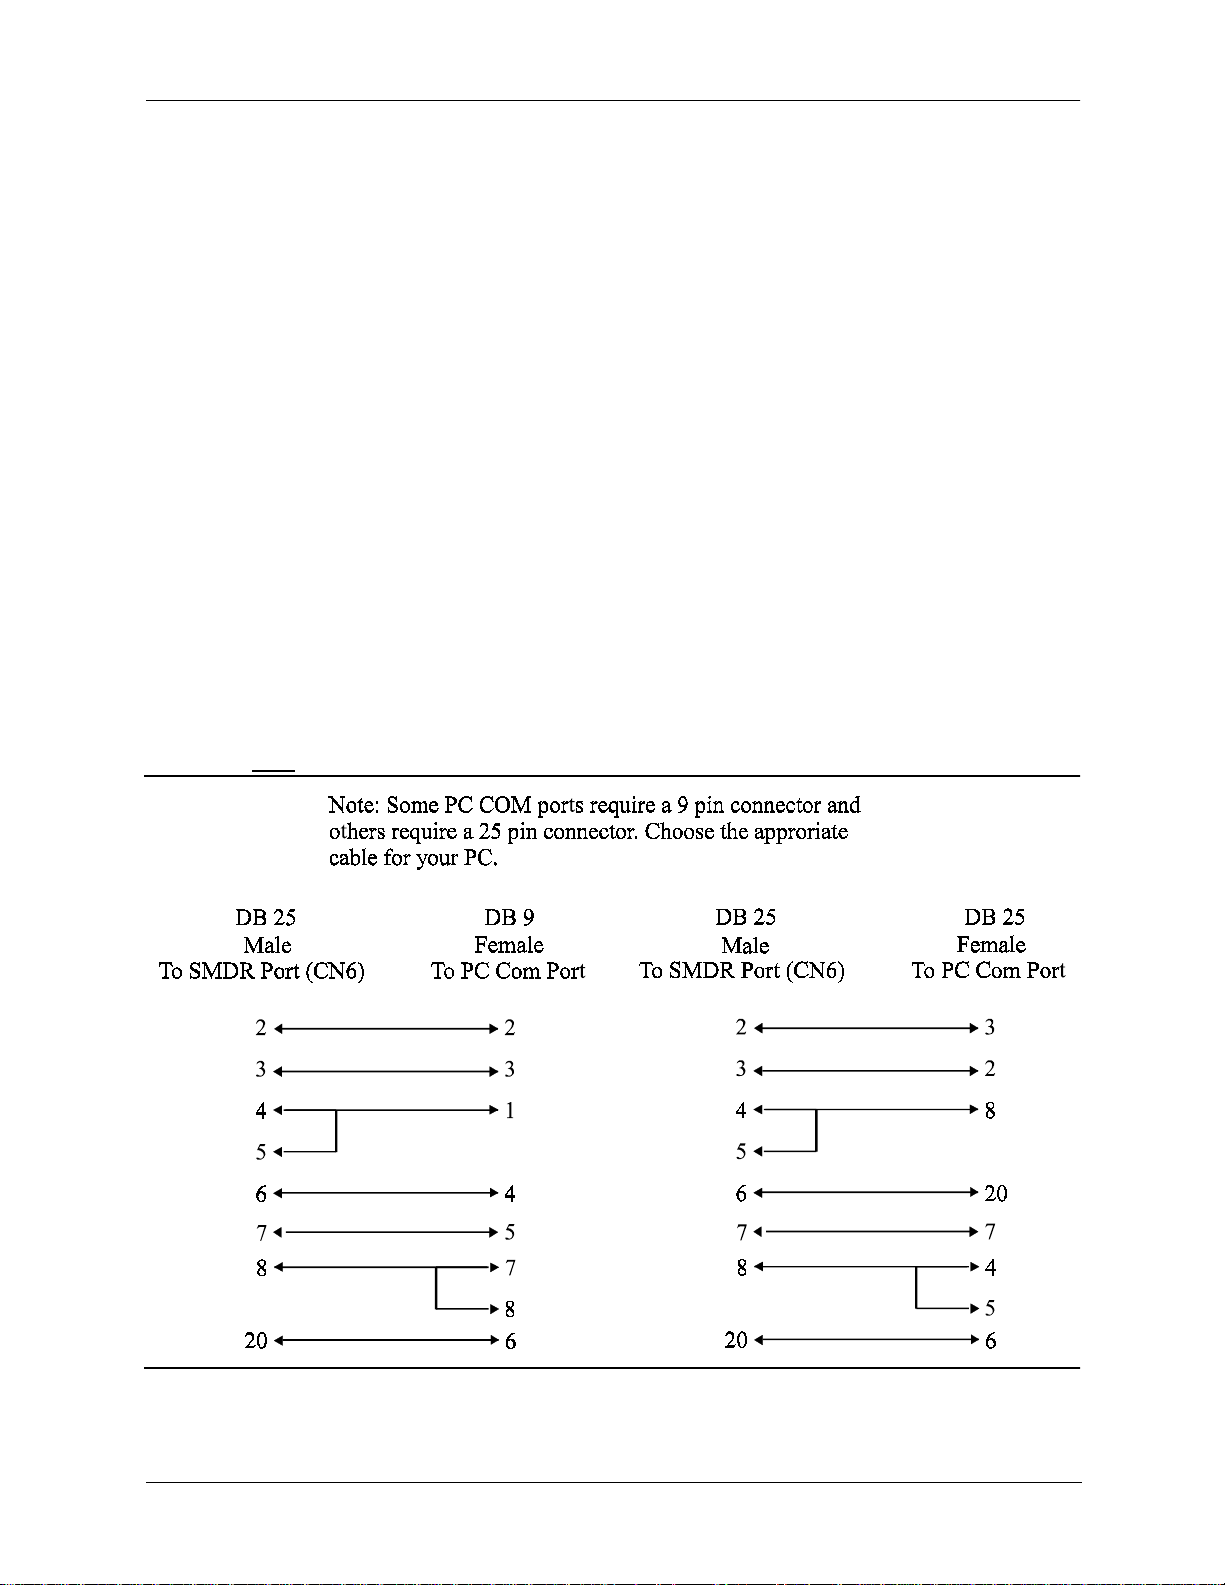
Customizing the Direct Connection Cables
Chapter 2
A customized cable must be used with a direct connection. The cable required
to connect to the DBS is shown in Figure 3. The cable required to connect to
the DBS 824 is shown in Figure 4.
Figure 3. DBS Customized Direct Connection Cable
DBS Manager Issued April 2000 11
Page 12
Chapter 2
8
d
Figure 4. DBS 824
DB 9
Male
To MAINT Port (CN2)
2
3
4
5
8
Operation
Customized Direct Connection Cable
Note: Some PC COM ports requirea9pin connector an
others require a 25 pin connector. Choose the approriate
cableforyourPC.
DB 9
Female
To PC Com Port
2
3
4
5
8
1
To MAINT Port (CN2)
DB 9
Male
2
3
4
5
8
Note: Prior to connecting to the DBS 824, dial
#91
at an attendant
DB 25
Female
To PC Com Port
telephone to disable SMDR and set the DBS 824 serial communications
port to CN2 - “Maint”.
3
2
20
7
5
1. Attach the appropriate direct connection cable to the DBS or DBS 824.
See “Customizing the Direct Connection Cables” on page -11.
2. Start DBS Manager and login.
3. Select
File
Communications
then
.
4. Select the PC COM Port for the direct connect cable.
5. Select
9600
Baud, 8 bit data length, 1 stop bit,
None
for parity.
Note: The above values MUST match the DBS FF1 2#,2#,1-4# or the
DBS 824 FF1 2#,9#,1-4# settings. The default settings in the DBS is
even
parity and should be changed if DBS Manager is set up for no parity.
6. Select
7. Select
8. Select
9. Select
10. Select
11. Select
RTS/CTS
Direct Connection
Save
Cancel
Connect to DBS
for Flow Control.
.
. DBS Manager will return to
to return to the main menu.
.
Connect.
Communication Setup.
12 Issued April 2000 DBS Manager
Page 13

Remote Communications
DBS Manager Modem Considerations
Before any remote connection to the phone system can be made, the DBS
Manager modem must be configured and installed. (This procedure is only
required before the first connection, it does not have to be repeated for each
connection.)
Chapter 2
Note:
to a DBS or DBS 824 with an external modem and another way for
connecting to a DBS with an RAI card. DBS Manager provides a way to
support two settings that may be used for the same modem -
Setup
modem requires both configurations, it is recommend that the following steps
be performed twice with
Modem #2 Setup
connecting to a DBS only requires selecting the correct Modem Setup before
connection.
1. If using an external modem, attach the DBS Manager Modem to a PC
2. If using an internal modem, follow the modem installation instruction to
3. Start DBS Manager and login.
4. Select
5. Select the PC COM Port for the modem.
6. If connecting to a DBS or DBS 824 external modem, select 9600 Baud, 8
The DBS Manager modem must be configured one way for connecting
Modem #1
Modem #2 Setup
and
used for connecting to an External Modem. Then
communication port (usually COM1 or COM2) using a standard modem
cable.
install the modem in the DBS Manager PC.
File
bit data length, 1 stop bit, none for parity. (These values MUST match the
DBS FF1 2#,2#,1-4# or the DBS 824 = FF1 2#,9#,1-4# settings. The
default settings in the DBS is
Manager is set up for no parity.)
Communications
then
(see step 10 below). If the DBS manager
Modem #1 Setup
even
used for connecting to an RAI and
.
parity and must be changed if DBS
or
If connecting to a DBS RAI, select the RAI Baud rate (1200 or 300 Baud
for RAI-B or 300 Baud for RAI-A), 8 bit data length, 1 stop bit and none
for parity. (The baud rate MUST match the DBS FF1 2#,2#,10# setting.
The default setting in the DBS is
7. Select
8. If connecting to a DBS with an external modem, select
Assisted External Modem
connecting to a DBS using the internal RAI, select either
or
DBS Manager Issued April 2000 13
RTS/CTS
Operator Assisted RAI
for Flow Control.
300
baud.)
Unassisted External Modem
or
.
Operator
. If
Unassisted RAI
Page 14

Chapter 2
9. Select
10. Select
11. Select the modem manufacturer from the modem manufacturer list.
12. Select the correct modem. (Make sure to check the entire list for your
modem. Some modems are not in alphabetical order.)
13. Select
14. Check the Initialization string. If necessary, make changes. It should not
be necessary to make changes unless you are setting up to connect to an
RAI modem and no preconfigured RAI setup is available. See
Considerations
15. Select OK.
16. Select
modem, it will display “
17. Select
18. Select
RAI Considerations
Save
.
Modem #1 Setup
Advanced Setup
Modem #2 Setup
or
.
below for more information.
Configure Modem
. When DBS Manager has configured the
Configuration completed successfully
OK.
DBS Manager will return to
Cancel
to return to the main menu.
.
RAI
”.
Communication Setup.
Unlike a DBS external modem, the RAI does not need to be configured.
However, the
DBS Manager modem
must be configured appropriately to
connect to a DBS with the RAI installed.
When configuring a DBS Manager modem to connect to an RAI, follow the
steps in “DBS Manager Modem Considerations” on page -13. When
Configurations - Advanced Setup
is chosen, the following parameters must
be set in the initialization string for the DBS Manager modem as described in
your modem manual:
• All data compression must be
• All error control must be
Note:
If using DBS Manager to connect to phone systems using DBS
disabled
disabled
.
external modems and RAIs, you must choose the correct modem setup for the
type of connection (either for DBS external modem or RAI), and then select
Configure Modem
before connecting.
14 Issued April 2000 DBS Manager
Page 15

DBS or DBS 824 External Modem Considerations
If using a external modem attached to the DBS or DBS 824, the modem must
be configured at the DBS Manager PC and then attached to the DBS or DBS
824 using the appropriate customized cable before the first remote
communication can be made.
Configuring the DBS or DBS 824 External Modem using DBS Manager
1. Attach the modem to be configured as the external modem to a DBS
Manager PC com port using a standard modem cable.
2. Start DBS Manager and login.
Chapter 2
3. Select
File
Communications
then
.
4. Select the PC COM port connected to the DBS external modem.
5. Select
Modem
6. Select
Operator Assisted External Modem
.
Ext Modem
.
Unassisted External
or
7. Select the modem manufacturer from the modem manufacture list.
8. Select the modem model.
9. Select
10. Check the
Advanced Setup.
Initialization
string. If necessary, make changes. (It should not
be necessary to make changes unless you have trouble connecting.)
11. Select OK.
12. Select
Configure Modem
. When DBS Manager displays “
The DBS Ext
modem was successfully configured, now connect it to the DBS
SMDR port...,
Setup
13. Select
.
Cancel
” click OK. The screen wi ll re turn to th e
to return to the main menu.
Communication
14. Attach the modem to the DBS SMDR port or the DBS 824 Maintenance port.
Note: VERY IMPOR TANT
! For the DBS, disable SMDR printing for every
installed port (FF3 # (Ext No.)# 14# 0#) when attaching an external modem.
DBS Manager Issued April 2000 15
Page 16

Chapter 2
2
m
5
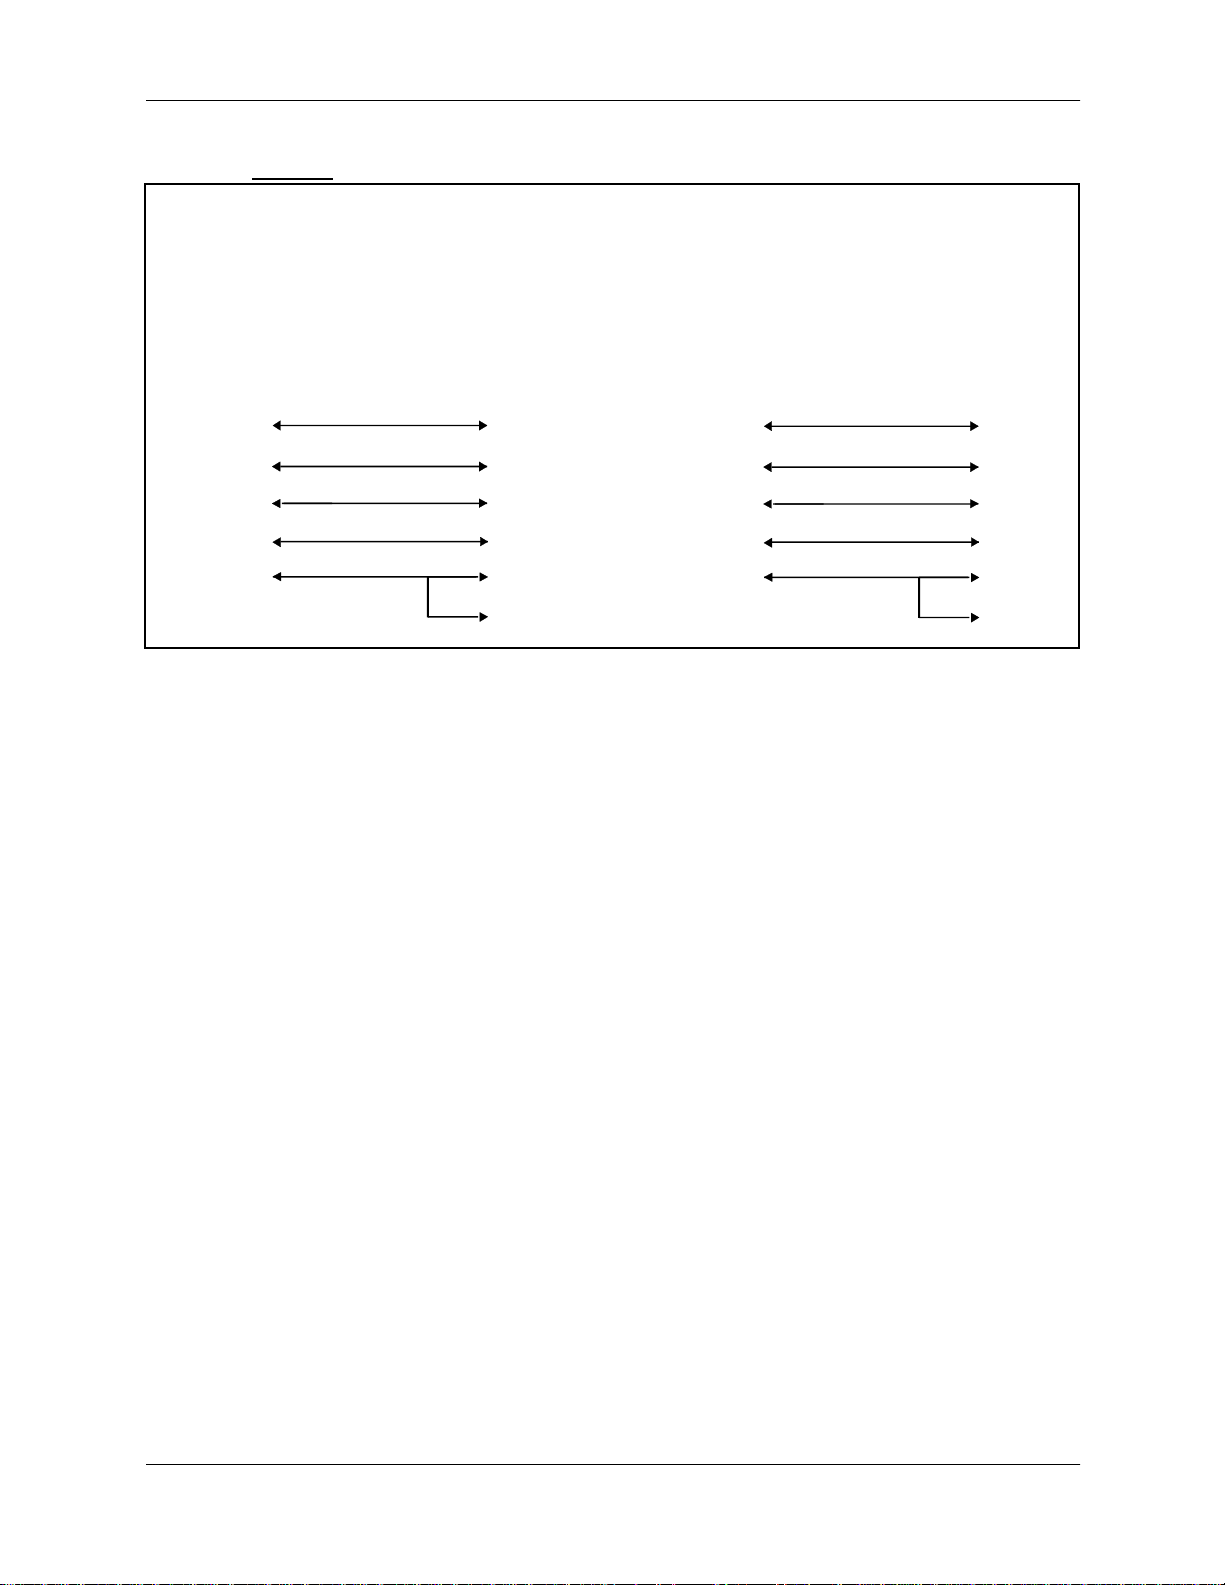
Customizing the External Modem Cable
A customized cable must be used with an external modem. The cable required
to connect to the DBS is shown in Figure 5. The cable required to connect to
the DBS 824 is shown in Figure 6.
Figure 5. DBS External Modem Customized Cable
Figure 6. DBS 824
DB25DB
Male Male
To SMDR Port (CN6)
22
33
44
55
66
20 20
77
External Modem Customized Cable
DB 9
Male
To MAINT Port (CN2)
5
To Modem
DB 25
Male
T o Mode
2
3
5
4
8
2
3
1
6
20
4
16 Issued April 2000 DBS Manager
Page 17

Operation
Chapter 2
Operator-Assisted External Modem Connection
1. Confirm under
Connection
is selected.
Communications
Operator Assisted Modem
that
2. Check all other communication parameters to make sure they are configured properly.
3. Return to the main menu.
4. Plug a phone into phone connector on the DBS manager modem.
5. Select
Connect to DBS
.
6. Enter the DBS remote password. (This must match the DBS setting in FF1 4#.)
7. Go off-hook on the phone and dial the DBS operator.
With the DBS
8.
, when the call is answered at the remote end, ask the
operator to place the call on hold and dial the extension of the external
modem.
With the DBS 824
, when the call is answered at the remote end, ask the
operator to place the call on hold, dial #91, dial the extension of the
modem and hang up.
When you are placed on hold
9.
, select
Connect
and hang up phone. The
far end modem answers and talks to the DBS manager modem.
Unassisted External Modem Connection (DBS Only)
Before an Unassisted External Modem Connection can be performed, the
DBS must be configured to allow unassisted transfer of an incoming call.
This can be accomplished in a number of ways including DISA access, Auto
Attendant, Voice Mail or VAU.
1. Confirm under
Communications
Unassisted External Modem
that
connection is selected.
2. Check all other communication parameters to make sure they are configured properly.
3. Return to the main menu.
4. Select
Connect to DBS
.
5. Enter the DBS Remote Phone number followed by commas (for pauses)
and the dial string required to transfer the call to the external mode m. For
instance,
5554000,1111,104
would dial a DBS DISA line (5554000),
pause 1 second (,) enter the DISA inbound ID code (1111), pause 1
second (,) and call the modem (104).
DBS Manager Issued April 2000 17
Page 18

Chapter 2
6. Enter the DBS Remote Password. (This must match the DBS setting.)
7. Select
Connect
. DBS Manager dials the phone number. The far end
modem answers and talks to the DBS Manager modem.
Unassisted RAI Connection (DBS Only)
Before an Unassisted RAI Connection can be performed, the DBS must be
configured to allow unassisted transfer of an incoming call. This can be
accomplished in a number of ways including DISA access, Auto Attendant,
Voice Mail or VAU.
1. Confirm under
Communications
Unassisted RAI
that
is selected.
2. Ensure DBS Manager modem is configured for RAI connection.
3. Check all other communication parameters to make sure they are configured properly.
4. Return to the main menu.
5. Select
6. Enter the
Connect to DBS
.
DBS Remote Password
(if different than the default). (This
must match the DBS setting.)
7. Enter the
transfer the call to the RAI. For instanc e,
DBS phone number
followed by the dial string required to
5554000,1111
would dial a DBS
DISA line (5554000), pause 1 second (,)and dial the DISA inbound ID
code (1111).
8. Select
Connect
. The far end RAI modem answers and talks to the DBS
manager modem.
Operator Assisted RAI Connection (DBS Only)
1. Confirm under
Connection
is selected.
Communications
Operator Assisted RAI
that
2. Check all other communication parameters to make sure they are configured properly.
3. Return to the main menu.
4. Plug a phone into the DBS manager modem.
5. Select
Connect to DBS
.
6. Enter the DBS remote password. (This must match the DBS setting.)
7. Go off-hook on the phone and dial the operator.
8. When the call is answered at the remote end, ask the operator to place the
call on hold and dial
#69999
.
18 Issued April 2000 DBS Manager
Page 19

Chapter 2
When you are placed on hold
9.
, select
answers and talks to the DBS manager modem.
Connect
. The far end modem
DBS Manager Issued April 2000 19
Page 20

Chapter 2
This page intentionally left blank.
20 Issued April 2000 DBS Manager
Page 21

DBS Manager Quick Tour
The Main Window
Chapter 3
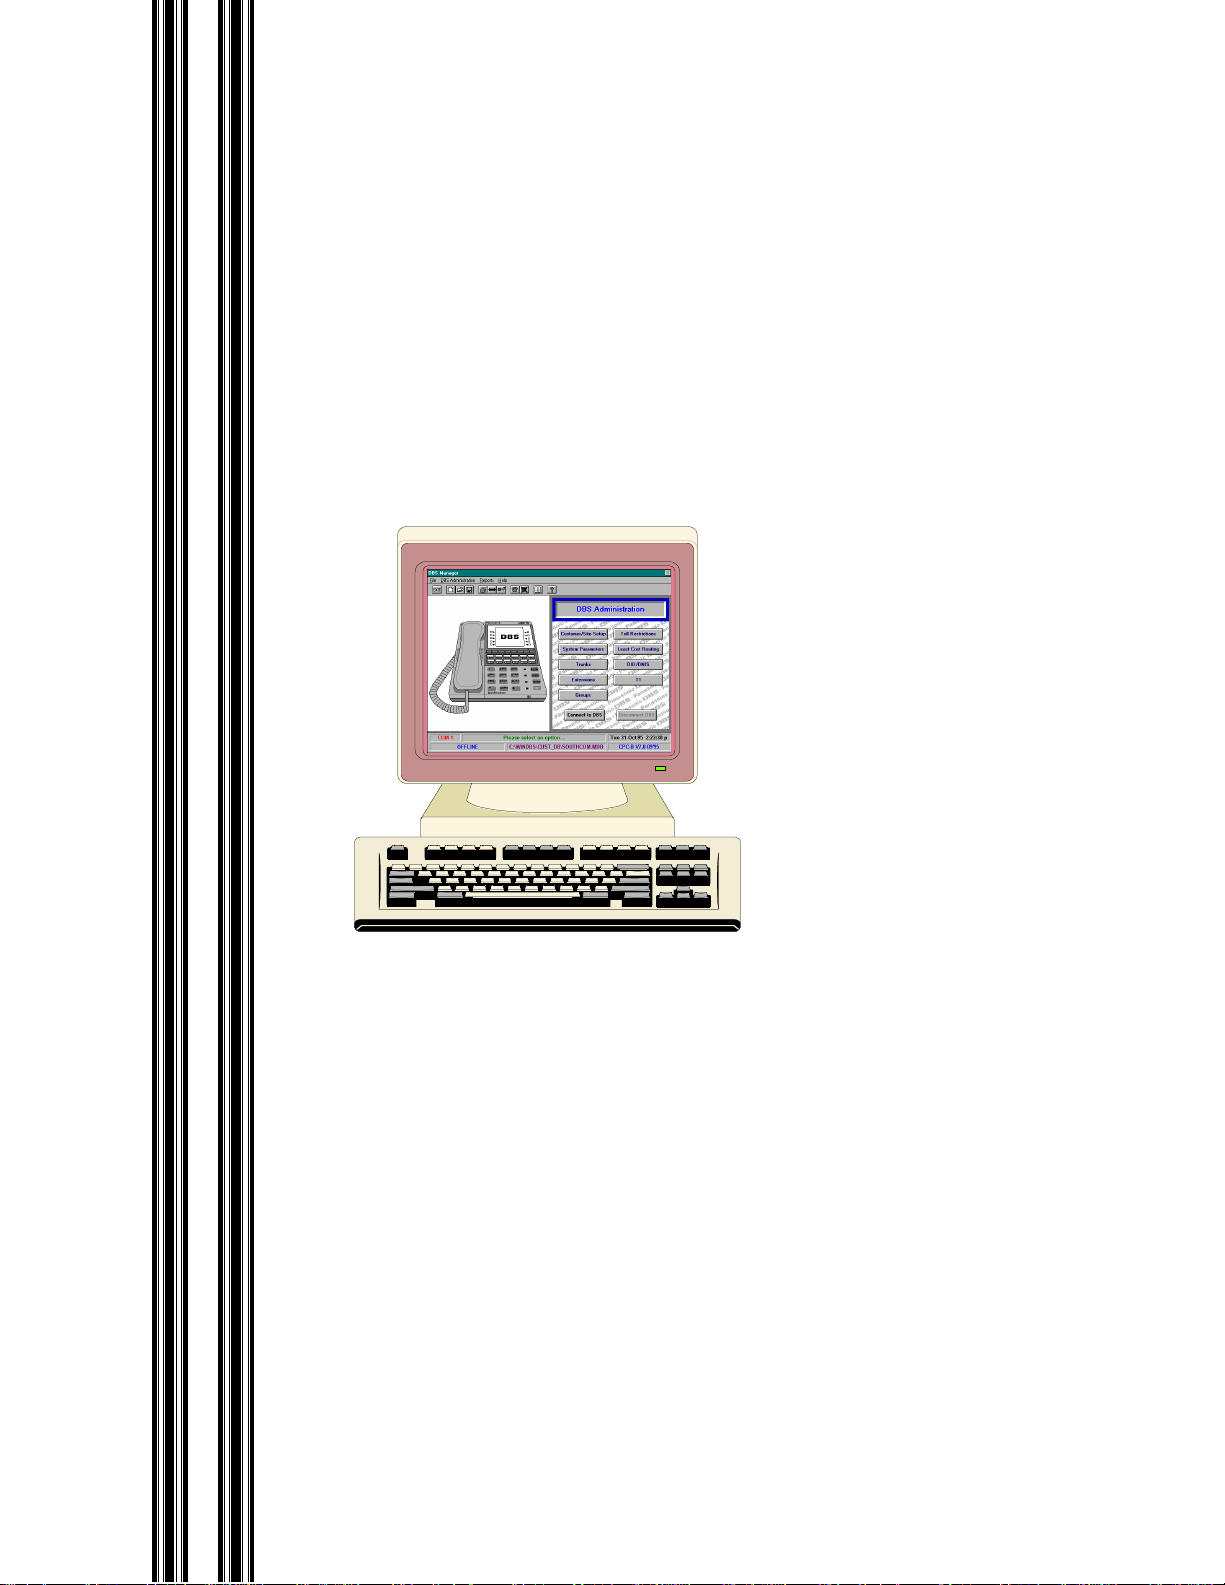
When you start
four sections: t he menu bar, the button bar, the
main window also shows what type of hardware key is connected to your PC (Dealer Key, End User Key,
or No Hardware Key.)
An example of the
Note:
Most items in the
unavailable until either a DBS database has been opened or a connection established to a DBS.
Figure 7. The DBS Manager Main Window
DBS Manager
DBS Manager
DBS Admin i stration
, you will see the main window s hown belo w. The main window consists of
DBS Administration
main window is shown below.
section of the main window will be dimmed and therefore
section, and th e i nf orma ti on b ar. The
DBS Manager Issued April 2000 21
Page 22

Chapter 3
The Menu Bar
DBS Manager provides four menus in the menu bar of the Main screen:
Administration, Reports
, and
Help
.
File, Database, DBS
The File Menu
The following menu items are available from the
Menu Item Description
New Creates a new customer database.
Open Opens an existing customer database.
Copy Copies an existing customer database.
Close Closes an open customer database.
Connect to DBS Connects to a DBS.
Disconnect DBS Disconnects from a DBS.
Communications Sets communication parameters.
External DBS Modem Configures the modem on the DBS system.
User Accounts Sets passwords and other access parameters for users of DBS
Manager.
Print (Not supported at this time.)
COM Status Monitors the connection session between DBS Manager and a
DBS phone system.
File
menu.
New Function Reset Initializes SRAM after upgrading CPC-B software to a new
release (such as from 5.0 to 6.0).
Exit Exits DBS Manager.
The Database Menu
The database menu contains items pertaining to database management. The following items are contained
Database Menu
in the
Menu Item Description
Download Raw Data from
DBS
Convert Raw Data to
Database
Upload Raw Data to DBS Transfers programming parameters from a
Convert Database to Raw
Data
Upgrade Database Upgrades a
.
Transfe rs pr ogramming parameters from a DBS to a
in DBS Manager.
Converts a
in DBS Manager.
Manager to the appropriate DBS.
Converts an existing
ing to a DBS.
.raw
data file to a
.mdb
.mdb
database to a newer CPC version.
.mdb
database file tha t can be opened
database to a
.raw
.raw
data file in DBS
.raw
data file for upload-
data file
22 Issued April 2000 DBS Manager
Page 23

Menu Item Description
Chaper 3
Repair Database Attempts to repair a
have been corrupted by an incorrect log-off procedure, power
interruption, etc. This option is unavailable if a database is open.
Compact Database Rebuilds a
pact Database should be run after a database has been repaired.
.mdb
.mdb
database file in DBS Manager that may
database file to reduce the file size.
Note:
Com-
The DBS Administration Menu
Items contained under the
Administration sect io n of t h e main window. These items are available only whe n a database file i s open or
when connected to a DBS.
The following items are contained in the
Item Description
Customer/Site Setup Contains customer name, address, DBS modem #, CPC type, etc.,
System Parameters Defines various DBS system-wide parameters, such as serial ports,
DBS Administration Menu
DBS Administration Menu
for a DBS.
paging relay, timing, absence messages, system speed dial, classes
of service, verified account codes, and call waiting/
OHVA.
are the same as those displayed in the DBS
:
DID/DNIS Defines DID/DNIS name and ringing assignments.
T1 Defines T1 trunk parameters, timing parameters, master/slave des-
ignations, alarm timer and relay parameters, etc.
Trunks Defines many CO trunk parameters for the DBS, such as trunk port
#, port usage, trunk operational status, trunk type, inbound ring pattern, etc.
Extensions Defines parameters for DBS extensions, including station port#,
extension #, Class of Service, call waiting, auto redial, paging
groups, call forward, Personal Speed Dial #s, Flexible Function
keys, etc.
Groups Defines parameters for Hunt Groups, Group Ringing Assignments,
and Coverage Groups
Toll Restrictions Defines Toll Restriction parameters for the DBS such as TRS types,
maximum dialed digits allowed, operator access, N11 restrictions,
etc.
Least Cost Routing Defines LCR trunk groups, time priority parameters, routing, and
other LCR parameters.
DBS Manager Issued April 2000 23
Page 24

Chapter 3
The Reports Menu
Not available at this time.
The Help Menu
This menu provides access to DBS Manager’s online help files. Help is described in detail in Chapter 5.
The Button Bar
The button bar on the main screen contains small icons which represent certain DBS Manager functions.
To perform a function, click on its corresponding button.
Exit
Exits DBS Manager. You will be asked to confirm before exiting.
New File
Creates a new file using system defaults. The
screen will appear.
Create New Customer File Using Defaults
Open File
Opens an existing database file. The
allowing you to select a file from any drive/directory. Each file represents an existing
customer database.
Open Existing Customer File
screen will appear,
Print
Not supported at this time.
Communications Setup
Sets the parameters of the communication link between the computer and the DBS phone
system. The
COM port, baud rate, modem, etc.
Communications Setup
screen will appear, with prompts for specifying the
ID Entry
Maintains user names and pa sswords for DBS Manager. The
will appear, which allows you to create, change, or delete User Accounts.
Maintain User Accounts
screen
Connect
Connects your PC to a DBS. The
opportunity to change the connection type, remote phone number and/or DBS password. A
customer database does not have to be loaded before connecting to a DBS.
Connect to DBS
screen will appear, allowing you the
Disconnect
Disconnects your PC from a DBS.
24 Issued April 2000 DBS Manager
Page 25

Reports
Chaper 3
Not available at this time
.
Help
Provides access to DBS Manager online help files.
The DBS Administration Section
This section of the DBS Manager main window contains the same items as those found in the
Administration Menu
a DBS. You can open a DBS Administration item by either selecting it from the drop-down menu or by
clicking on its corresponding button on the screen.
Items in this section are described under
. These items are avai lable onl y when a DBS dat abase is o pen or when c onnected t o
DBS Administration Menu
on page 23.
DBS
The Information Bar
The information bar l o cat ed at the bottom of the
and other data about
DBS Manager
. This section is described below.
DBS Manager
main window provides stat us i nformation
Item Description
designated com port The commmunications port on your PC. The com port is desig-
nated in the
item will display in black if you are set
system prompts &
messages
system date & time Indicates your PC’s date & time.
DBS Manager Issued April 2000 25
Contains various prompts & messages to help you with
Manager
when
File
menu, under
. For instance, may read "Please select an option..."
DBS Manager
needs you to indicate an option choice.
Communications
. Note: This
DBS
Page 26

Chapter 3
Item Description
connection status Indicates whether or not your PC is currently connected to a
DBS via modem.
customer database
name
CPC type & version Indicates the CPC type & software version for the currently
Indicates the name of the currently open DBS database. If no
database is open, this section will read "No customer database
selected..."
open DBS database. If no database is open, this section will
read "CPC version not set..."
26 Issued April 2000 DBS Manager
Page 27

DBS Manager Basic Operations
Chapter 4
This section contains information on performing basic
additional help at any point within
Note:
Items in this section are not necessarily in the same order in which they appear on the various
Manager
menus, or in the same order in which they are used.
DBS Manager
DBS Manager
by pressing F1 or by clicking on the
operations. You can obtain
Starting DBS Manager
To start
screen. To start
DBS Manager
You will be asked to enter your
depend on how your user account is configured.
DBS Manager
DBS Manager
.
in Windows 3.1, double-click on its icon on the Windows Program Manager
in Windows 95, click
DBS Manager
user ID and password. Available menu items and options
Start > Programs
, then choose
Panasonic DBS >
Exiting DBS Manager
To exit
button bar.
DBS Manager
, select
File,
then
Exit
, or click on the
Exit
button on the
Help
button.
DBS Manager
DBS
Modifying user accounts
User Accounts
als with a valid user ID and password can start
To add or modify a
button.
Maintain User Accounts
The
before you can make any modifications to user accounts.
To add a user, click the
enter the password twice to confirm it. Click OK to add the user. After the new user is added, you will
need to indicate which areas of
Maintain User Accounts
the
correct user i s highlighted in the
access to that area. Be sure to save the new user information before closing the
window.
DBS Manager Issued April 2000 27
are used to maintain user ID and password information for
DBS Manager
window will open. You will need to re-enter your
Add User
DBS Manager
window, click on each area the user will be allowed to access (be sure the
Select User
DBS Manager
user account, choose
button and enter the new user ID and password. You will be asked to
the user is allowed access to. In the
window). A check mark in the box indicates that the user has
.
File > User Accounts
DBS Manager
, or click on the
DBSManager
User Access
Maintain User Accounts
. Only individu-
ID Entry
log-in ID
section of
Page 28

Chapter 4
To delete a user, select the user ID from the
window and click on the desired user ID). Click the
deletion.
To change a user password, select the user ID from the
to open the window and click on the desired user ID). Click the
new password information. Be sure to click OK to save the new data.
Select User
Delete
window (click the down arrow button to open the
button. You will be asked to confirm the
Select User
window (click the down arrow button
Change Password
button and enter the
Setting communications parameters
To change your communications parameters, choose
cations Setup
Enter the appropr ia te settings for the communications session in the
Save
click
Notes:
1) The DBS Manager parity setti ng mus t mat ch that of the DBS before a communi cat io ns session can
be established. (The DBS’s default parity setting is Even. DBS Manager’s default parity setting is
None.)
button on the
.
DBS Manager
File > Communications
button bar.
Communications Setup
, or click on the
Communi-
window and
DBS Manager
2)
you have the right connection type and modem selected before attempting to initiate a connection.
3) Any changes made to communications parameters while a da tabase is open will be saved with that
database.
allows you to set communications parameters for two different modems. Be sure
Connecting to a DBS
Note:
You must have a
The dealer version hardware key allows remote connections. The end-user version is limited to local (onsite) connections only (i.e., no external modem communications with a DBS are allowed). The version
type is displayed just above the phone graphic on the
Before connecting to a DBS, be sure to check
communication parameters are set for the communications session. Information on setting
communications parameters can be found in the preceding section.
After verifying the commun ication parameters, us e any of t he followi ng metho ds to initi ate a con nection t o
a DBS.
• Choose
• Click on the
Connect to DBS
DBS Manager
from the
Connect to DBS
hardware key installed on your PC in order to connect to a DBS.
File,
DBS Manager File
button on the
DBS Manager
Communications
then
menu.
DBS Administration
Main window.
to verify that the correct
section of the main window.
• Click on the
28 Issued April 2000 DBS Manager
Connect
button on the
DBS Manager
menu bar.
Page 29

Chaper 4
Connect to DBS
The
Communications
You will need to enter the DBS’ remote programming password for the following connection types:
• Unassisted RAI
• Unassisted External Modem
• Operator Assisted External Modem
• Direct (i.e., without a modem)
You will also need to enter the remote phone number for the DBS for the following connection types:
• Unassisted RAI
• Unassisted External Modem
If a database is open, the remote programming password and phone number as specified in the database
will be displayed (see
If the connection type is
will not need to enter a phone number or password into
Attendant from your modem phone and ask him/he r to dial #6 and the Remote Pro gramming Pas sword for
the DBS.
window will open, showing the
.
Note 1
below).
Operator Assisted RAI
Connection Type
, you will need a modem phone attached to your PC. You
DBS Manager
as currently set under
, but you will need to dial the DBS
File -
Once the connection parameters are correct, click
connection status porti on of the in form ation bar on the
"On-line"
information bar.
Notes:
and various communication messages will flash across the system message portion of the
1) The remote phone number for a DBS is specified in the database under Customer/Site Setup. The
remote password for a DBS is specified in the Remote Programming Security Code field under
System Parameters - General Parameters - Security Codes.
2) If a database is open in
compare the software versi on of t he
If a mismatch is found, an error message will be displayed. You must then disconnect from the
DBS and open the correct database in
3) Any changes made to programming parameters while connected to a DBS will be transmitted
immediately to that DBS. If you do not wis h the DBS to be updat ed im mediate ly, enter the changes
into the database for that DBS
upload the changes later at a more convenient time.
4) Changes made to an open database while connected to the DBS will update both the database and
the DBS.
DBS Manager
without connecting
Connect
when a connection is established,
DBS Manager
DBS Manager
to initiate the connection process. The
DBS Manager
database with the sof tware version o f the DBS.
before re-establishing the connection.
to it. You can then establish the connection and
main window will change t o r ef le ct
DBS Manager
will
DBS Manager Issued April 2000 29
Page 30

Chapter 4
Disconnecting from a DBS
To disconnect from a DBS, choose
Manager
Disconnect.
main window. If a
DBS Manager
File > Disconnect
database was open, it will close automatically during a
, or click on the
Disconnect
button on the
DBS
Modifying system paramete rs
To modify system parameters, click on the appropriate button in the
main window, or select the desired item from the
containing additional buttons for the selected option. Click on the button for the area containing the
parameters to be modified. After modifying the appropriate parameter(s), click
Note:
Some screens require that you enter a trunk or extension port # or a hunt goup # in the first dialog
box, then click the
Display
button to display the settings for that port or group #.
DBS Administration
DBS Administration
menu. A new window will open
Save
section of the
to save your changes.
Working with Databases
Creating a new database
To create a new database for a DBS, choose
DBS Manager
button bar.
File > New
, or click on the
New File
button on the
Create New Customer Database Using Defaults
The
and software version for the new database, then select the directory the database will reside in and specify
a name for the database. Database names must be 8 characters or less and have
Typically the database name reflects the identity of the customer.
DBS Manager
Notes:
1) Each new database is based on a default database for the specified CPC type and software version.
These default databases are shipped in a raw format to save disk space and must be converted to a
.mdb
(approximately 15-30 mi nutes, d ependin g on the s peed an d power of your sy stem ). The con versi on
only occurs, however, the first time a new database is created for a part icula r CPC type and ve rsion
- additional new databases based on that CPC type and version will not need to go through the
conversion process.
2) It is not necessary that a database exist in
programming. If desired, you can connect to the DBS using
programming without maintaining a copy of its database in the
"Databases and Connecting to a DBS - Special Considerations"
information on databases.
will automatically open the new
format before a new database can be opened. This conversion process may take some time
window will open. Select the appr opriate CPC type
.mdb
for an extension.
.mdb
database after it has finished creating it.
DBS Manager
in order to make changes to a DBS’
DBS Manager
DBS Manager
on page 33 for additional
and modify its
application. See
30 Issued April 2000 DBS Manager
Page 31

Opening an existing database
Chaper 4
To open an existing database, choose
Manager
The
Note:
to the DBS.
See
information on databases.
menu bar.
Open Existing Customer File
You cannot open a database while connec ted t o a DBS. Open the d esire d data bas e fi rst, then c onnect
"Databases and Connecting to a DBS - Special Considerations"
File > Open
window will open. Select the appropriate database and click OK.
, or click on the
Open File
button on the
on page 33 for additional
Modifying customer/site information in a database
To modify general site information for a database, open the database and click on the
Setup
button in the
DBS Administration
the
modify the customer’s name, address, and remote phone #.
DBS Administration
menu. The
Customer Site Information
section of the main wi ndow, or select
window will open, allowing you to
Customer/Site
Cutomer/Site Setup
Modifying a remote phone number in a database
To modify the remote phone number in a DBS database, open the database, then click
Setup
. Enter the new phone number in the appropriate field and click
Save
.
Customer/Site
DBS
form
Note:
The remote phone number in a DBS datab ase mu st match tha t of th e modem at tached to the DBS in
order for a successful connection to occur.
Modifying a remote programming password in a database
To modify the remote programming password for a DBS database, open the database, then click
Parameters.
Programming Security Code
General Parameters
Select
, then
field and click
Security Codes
Save
.
. Enter the new password in the
System
Remote
Copying a database
To copy all parameters in one database to another database, choose
Copy Existing Customer File
The
source file (the file to be copied). In the To section, type in the name of the destination database (the
database to be copi ed t o). Be sure to indicate t he appropriate direct ory where the new d ata bas e wi ll reside.
Save
Click
Note:
database name is entered in the To section, a new database with that name will be automatically created.
when finished.
You can copy a database to either another existing database or a new database. If an unknown
window will open. In the
File > Copy
Copy From
from the main window.
section, select the appropriate
DBS Manager Issued April 2000 31
Page 32

Chapter 4
Closing a database
To close an open database, choose
Note:
You cannot close an open database while connected to a DBS. Disconnect from the DBS first, then
close the database.
File > Close
from the main window.
Deleting a database
DBS Manager
existing database, use Windows File Manager (if using Windows 3.1) or "My Computer" (if using
Windows 95).
does not provide a function for deleting a database. If you find it necessary to delete an
Uploading a database to a DBS
T o uplo ad a database fr om
file. In
database and click OK. The conversion process will take approximately 10-30 minutes, depending on the
speed and power of your PC.
After converting the database, connect to the DBS and choose
The
upload. It may take several minutes for the upload to finish, depending on the size of the database being
uploaded and the spee d of your mo dem - a n upl oad at 9600 bps, for instance, usually takes 10-12 min ute s.
Various messages will flash across the system message portion of the
information bar during the upload.
DBS Manager
Upload Database
DBS Manager
, choose
window will open. Select the
Database > Convert Database to Raw Data
to a DBS, you must first convert the
Database > Upload Raw Data to DBS
.raw
file to be uploaded and click OK to begin the
DBS Ma nager
.mdb
database file to a
. Select the appropriate
main window
.raw
.
Downloading data from a DBS to DBS Manager
T o downl oad progr amming data from a DBS to
connection is established, select
open.
.mdb
.raw
format.
Type in the name of the
be asked to confirm that the file should be overwritten by the new data. If the
be created during the download process.
It may take several minutes for the download to complete, depending on the size of the database being
downloaded and the speed of your modem - a download at 9600 bps, for instance, usually takes 10-12
minutes. Various messages will flash across the system message portion of the
window information bar during the download.
After the download is complete, you must convert the
opened. To convert the file, select
converted and click OK. The conversion process will take approximately 10-30 minutes. After the
conversion is finished, you can open the database in
Note:
If you are downloading a database just for backup purposes, it may not be necessary to convert the
.raw
database to a
Database > Download Raw Data
file the data should be downl oaded to. If the
Database > Convert Raw Data to Database
DBS Manager
.raw
file to a
DBS Manager
, you must first connect to the DBS. Once a
Download Data
. The
.raw
file already exis ts, you will
.raw
file does not exist, it will
DBS Manager
.mdb
file before the database can be
. Select the
.
window will
main
.raw
file to be
32 Issued April 2000 DBS Manager
Page 33

Upgrading a database to a higher CPC version
Chaper 4
To upgrade an existing database to a higher CPC version, select
Upgrad e Database CPC Version
the first window, then select the appropriate conversion from the second window. In the third window,
enter a new name for the database (
backup). Be sure to use a
Notes:
DBS Manager
1)
2) When upgrading to a new CPC version, new features added subsequent to your current CPC
version must be individually programmed into the DBS, either via
programming.
3) When upgrading CPC-B software to a new release, you must initialize the SRAM (Static Random
Access Memory) immediat el y af te r c hanging out the EPROMS on t he CPC- B ca rd. This clears out
unused registers and adds new programs, but retains all current DBS program settings. To
accomplish this using
• A RAMCLR is not needed at this point.
New Function Reset
•
B 6.0 to 7.0). It is not needed for minor upgrades from one "point" release to another (such as
from 6.0 to 6.1), nor is it needed for any other CPC other than CPC-B.
.mdb
does not support converting an existing database to an earlier software version.
window will open. Select the database to be upgraded from the list in
DBS Manager
extension for the new database.
DBS Manager
is needed only when a major CPC-B upgrade is done (such as from CPC-
keeps the old database under the original name as a
, choose
File > New Function Reset
Database > Upgrade Database
DBS Manager
.
or FF key
. The
4) If upgrading to CPCAII/B 7.0 or later from a version prior to 7.0, you must perform a RAMCLR
after the 7.x software is inst alled.
5) Any feature settings activated by a station set user (such as Background Music, Call Forwarding,
Do Not Disturb, Headset Mode, Extension Lock, Reminder Alarm, Absence Messages, Call
Forward ID, etc.) are lost when an upgraded CPC is installed in the system.
Databases and Connecting to a DBS - Special Considerations
It is possible that para meters in a DBS database may not always match t hose of the DBS. Thi s can o ccur i n
any of the following ways:
• Parameters in the DBS were modified by on-site FF key programming.
• Parameters in the DBS were modified by a connection through
being open.
• Parameters were modified in a
changes were never uploaded to the DBS.
To ensure that a database al ways matches its DBS, you shou ld therefore be sure to open the database
before connectin g t o t he DBS. It is also a good i dea to download a DBS’ p rog rammi ng pa rameters back to
DBS Manager
database without being c onnect ed to a DBS, b ut thos e
DBS Manager
without a database
DBS Manager Issued April 2000 33
Page 34

Chapter 4
your PC if you have reason to suspect that a DBS may have been modified independently of the
Manager
Remember that you can connect to a DBS either with or without a database being open. If a database is
open
the DBS and the open dat ab ase . I f a da tabase is
the DBS
later time, or you download the entire DBS programming to the database.
Furthermore, when you connect to a DBS while a database is open,
connected will be updated back to the database. If there are other parameters in the database that do not
match those in the DBS, these parameters
DBS Manager
entire DBS programming to the database.
database.
, any changes made to programming para meters while conne cted will be updated immedi ately to
not open
and will not be reflected in the database unless those same changes are made in the database at a
will not be updated
while connected, change the parameters in the database at a later time, or download the
, changes made while connected will update
only
those parameters changed while
in the database unless you reenter them in
DBS
both
only
34 Issued April 2000 DBS Manager
Page 35

Using Help
Chapter 5
DBS Manager
following means:
• by pressing
• by clicking the Help button on the screen
• by clicking on the
The Help system is structured the same way as
parameters and/or buttons, there is a corresponding Help screen that lists the parameters/buttons in green,
underlined text. These are called "jumps". Click on a jump - anywhere in the green underlined text - to
display either a Help window for the selected parameter or another list of jumps.
Help
Each
Trunks, Extensions, Groups, etc.), and the corresponding FF key programming for that topic.
contains extensive on-line help files. You can access Help at any time via any of the
F1
Help
button located on the
window reflects the name of the
Menu
bar.
DBS Manager
Help
topic, which area of
. For each
DBS Manager
DBS Manager
it pertains to (e.g.,
screen of
Locating a Help Topic
DBS Manager
topic by selecting the appropriate item from the
search function to he lp you locate a specific topic. Procedures for using
1. While in
first window. Notice that as you type, the second window scrolls up or down to display an
alphabetical list of topics.
follows standard Windows Help file conventions. You can either navigate to the desired
Help
, click on the
Search
Help Contents
button and enter the first few letters of the desired topic in the
screen, or you may use
Search
are as follows:
Help’
s powerful
2. Select the desired topic from the list in the second window and click
appears, select the appropriate topic and click
will then be displayed.
Display
again.The
Display
Help
. If a secondary list
file for the selected topic
About Bookmarks
DBS Manager’s Help
Bookmarks for them. This allows you to go directly to a desired topic without having to search for it. For
instance, suppose yo u fin d that you o ften need t o view
through several scree n levels to reach the
will take you straight to the appropriate section of
files allow you to quickly jump to commonly referenced
Help
System Speed Dial Help
DBS Manager Help
System Speed Dials
on
screen, you can cr eate a bookmar k that
with a click of your mouse.
Creating Bookmarks
Bookmarks are created as follows:
DBS Manager Issued April 2000 35
Help
topics by creating
. Instead of navigat ing
Page 36

Chapter 5
1. Go to the
2. From the
name shown in the window or enter a different name.
3. After entering a name for th e Bookmar k, clic k OK to save the Bookmark or
saving the Bookmark. If saved, the new Bookmark will be listed on the Bookmark menu.
DBS Manager Help
Menu
bar, clic k on
topic that you want to mark with a Bookmark.
Bookmark
, then
Define
. You can either acc ept the default Bookma rk
Using Bookmarks
To jump directly to a Help topic that already has a Bookmark, click on
desired Bookmark from the list.
Deleting Bookmarks
To delete a Bookmark, click on
displayed list and click
Delete
Bookmark
.
, then
Define
. Select the desired Bookmark from the
Copying and Annotati ng Hel p Topics
You can "edit" or expand on
you create to help you perform
clip icon next to them. To view an annotation, click on the paper clip.
Help
topics by attaching annotations to them. Annotations are notes which
DBS Manager
operations. Annotated items ar e indi ca te d by a small paper
Cancel
Bookmark
to exit without
, then click on the
Creating an Annotation
1. Click
2. Choose
3. Click
Edit
Save
from the
Annotate
to save your annotation or
Menu
bar (be sure the
and enter your notes in the annotation window.
Help
Cancel
topic you want to annotate is displayed).
to exit without saving your annotation.
Copying an Annotation
1. To copy an annotation, open the annotation window by clicking on the paper clip icon next to an
annotated item.
2. Select the desired text in the annotation window, then click
3. Close out that annot atio n wind ow and nav igate to the
copied to.
4. Choose
window. You can then edit the copied information if desired. Be sure to click
the Annotation window.
Edit
, then
Annotate
, then click
Paste
to insert the copied information into the annotation
Copy
.
Help
topic where you want the annota ted text
Save
before exiting
Copying an entire Help topic into an Annotation
1. To copy an entire
(be sure the Help topic you want to copy is displayed).
2. Navigate to where you want the information copied to and choose
Help
topic into an annotation, choose
Edit
, then
Copy
from the Help Menu bar
Edit,
then
Annotate
.
3. Click
36 Issued April 2000 DBS Manager
Paste
to insert the copied information into the annotation window. You can then edit the
copied information if desired. Be sure to click
Save
before exiting the Annotation window.
Page 37

Deleting an Annotation
Chaper 5
To delete an annotation, click on the paper clip icon next to the annotated item, then click
paper clip will disappear as the annotation is removed.
Printing Help Topics
You can print
Help
the
topics by clicking on this icon.
Help
topics either by selecting
button bar. Some
Help
items also display a printer icon in the
File
, then
Print Topic
, or by clicking on the
Help
window. You can print these
Delete
Print
. The
button on
DBS Manager Issued April 2000 37
Page 38

Chapter 5
This page intentionally left blank.
38 Issued April 2000 DBS Manager
Page 39

Index
A
Annotations
Copying. . . . . . . . . . . . . . . . . . . . . . . . . 36
Creating. . . . . . . . . . . . . . . . . . . . . . . . . 36
Deleting. . . . . . . . . . . . . . . . . . . . . . . . . 37
B
Basic Operations. . . . . . . . . . . . . . . . . . . . 27
Bookmarks . . . . . . . . . . . . . . . . . . . . . . . . 35
Creating. . . . . . . . . . . . . . . . . . . . . . . . . 35
Deleting. . . . . . . . . . . . . . . . . . . . . . . . . 36
Using . . . . . . . . . . . . . . . . . . . . . . . . . . . 36
Button Bar. . . . . . . . . . . . . . . . . . . . . . . . . 24
C
Closing a database . . . . . . . . . . . . . . . . . . 32
Communications parameters, setting . . . . 27
Communications Setup Button. . . . . . . . . 24
Compacting a Database . . . . . . . . . . . . . . 23
Connect Button . . . . . . . . . . . . . . . . . . . . . 24
Connecting to a DBS . . . . . . . . . . . . . . . . 28
Special Considerations . . . . . . . . . . . . . 33
Converting a database to raw format . . . . 32
Converting a raw database . . . . . . . . . . . . 30
Copying a database. . . . . . . . . . . . . . . . . . 31
Creating a new database . . . . . . . . . . . . . . 30
Creating Bookmarks . . . . . . . . . . . . . . . . . 35
D
Database Menu . . . . . . . . . . . . . . . . . . . . . 22
Databases
Closing . . . . . . . . . . . . . . . . . . . . . . . . . 32
Compacting . . . . . . . . . . . . . . . . . . . . . . 23
Converting from raw format . . . . . . . . . 30
Converting to raw format . . . . . . . . . . . 32
Copying. . . . . . . . . . . . . . . . . . . . . . . . . 31
Creating. . . . . . . . . . . . . . . . . . . . . . . . . 30
Deleting. . . . . . . . . . . . . . . . . . . . . . . . . 32
Downloading to DBS Manager. . . . . . . 32
Opening. . . . . . . . . . . . . . . . . . . . . . . . . 31
Repairing. . . . . . . . . . . . . . . . . . . . . . . . 23
Special Considerations . . . . . . . . . . . . . 33
Uploading to a DBS . . . . . . . . . . . . . . . 32
DBS Administration Menu. . . . . . . . . . . . 23
DBS Manager
Basic Operations . . . . . . . . . . . . . . . . . 27
Exiting . . . . . . . . . . . . . . . . . . . . . . . . . 27
Installation procedures . . . . . . . . . . . . . . 7
Introduction . . . . . . . . . . . . . . . . . . . . . . 5
Logging in . . . . . . . . . . . . . . . . . . . . 8, 27
Main Window. . . . . . . . . . . . . . . . . . . . 21
Quick Tour . . . . . . . . . . . . . . . . . . . . . . 21
User Accounts . . . . . . . . . . . . . . . . . . . 27
Deleting a database . . . . . . . . . . . . . . . . . 32
Disconnect Button . . . . . . . . . . . . . . . . . . 24
Downloading data to DBS Manager . . . . 32
E
Exit Button. . . . . . . . . . . . . . . . . . . . . . . . 24
Exiting DBS Manager . . . . . . . . . . . . . . . 27
F
File Menu. . . . . . . . . . . . . . . . . . . . . . . . . 22
H
Hardware key. . . . . . . . . . . . . . . . . . . . . . . 8
Help Button . . . . . . . . . . . . . . . . . . . . . . . 25
Help Menu . . . . . . . . . . . . . . . . . . . . . . . . 24
Help Topics
Copying and Annotating . . . . . . . . . . . 36
Copying into an Annotation. . . . . . . . . 36
Locating . . . . . . . . . . . . . . . . . . . . . . . . 35
Printing. . . . . . . . . . . . . . . . . . . . . . . . . 37
Help, using. . . . . . . . . . . . . . . . . . . . . . . . 35
I
ID Entry Button . . . . . . . . . . . . . . . . . . . . 24
Installation procedures
DBS Manager software . . . . . . . . . . . . . 8
Hardware key . . . . . . . . . . . . . . . . . . . . . 8
L
Logging in . . . . . . . . . . . . . . . . . . . . . . 8, 27
M
Main Window . . . . . . . . . . . . . . . . . . . . . 21
Manual Conventions . . . . . . . . . . . . . . . . . 6
Menu Bar . . . . . . . . . . . . . . . . . . . . . . . . . 22
Modifying user accounts . . . . . . . . . . . . . 27
DBS Manager Issued April 2000 39
Page 40

N
New File Button . . . . . . . . . . . . . . . . . . . . 24
O
Online Help. . . . . . . . . . . . . . . . . . . . . . . . 35
Open File Button. . . . . . . . . . . . . . . . . . . . 24
Opening an existing database . . . . . . . . . . 31
Overview. . . . . . . . . . . . . . . . . . . . . . . . . . . 5
P
Passwords
Remote programming . . . . . . . . . . . . . . 31
User . . . . . . . . . . . . . . . . . . . . . . . 8, 24, 27
Print Button. . . . . . . . . . . . . . . . . . . . . . . . 24
Q
Quick Tour . . . . . . . . . . . . . . . . . . . . . . . . 21
R
Remote password, modifying . . . . . . . . . . 31
Remote phone number, modifying . . . . . . 31
Repairing a Database . . . . . . . . . . . . . . . . 23
Reports Button . . . . . . . . . . . . . . . . . . . . . 25
Reports Menu . . . . . . . . . . . . . . . . . . . . . . 24
S
Setting communications parameters. . . . . 27
Starting DBS Manager . . . . . . . . . . . . . . . 27
System Requirements . . . . . . . . . . . . . . . . . 7
U
Uploading a database to a DBS . . . . . . . . 32
User Accounts. . . . . . . . . . . . . . . . . . . . . . 27
40 Issued April 2000 DBS Manager
Page 41

DBS Manager 41
Page 42

Panasonic
Telecommunication Systems Company
Business Telephone Systems Division
Two Panasoni c Way
Secaucus, NJ 07094
Part Number: 552X00201
© Copyright 2000
42 DBS Manager
®
 Loading...