

Page 1

8-Disc DVD Changer
Changeur de 8 disques DVD
Cambiador de 8 Discos de DVD
CX-DH801U
Operating Instructions
Manuel d’instructions
Manual de Instrucciones
CX-DH801U
®
®
TITLE
YFM284C437ZA TAMACO0205-0 Printed in Taiwan
Imprimé à Taïwan
Impreso en Taiwan
Panasonic Consumer Electronics
Company, Division of Panasonic
Corporation of North America
One Panasonic Way, Secaucus,
New Jersey 07094
http://www.panasonic.com
Panasonic Sales Company.
Division of Panasonic
Puerto Rico, Inc. (“PSC”)
Ave. 65 de Infanteria, Km. 9.5
San Gabriel Industrial Park, Carolina,
Puerto Rico 00985
http://www.panasonic.com
Panasonic Canada Inc.
5770 Ambler Drive,
Mississauga, Ontario
L4W 2T3
http://www.panasonic.ca
¡Please read these instructions (includes “Customer Services Directory”) carefully before using this product and keep this manual for
future reference.
¡Prière de lire attentivement ces instructions (y compris la Répertoire des services à la clientèle) avant d’utiliser le produit et garder
ce manuel pour l’utilisation ultérieure.
¡Lea con atención estas instrucciones antes de utilizar el producto y guarde este manual para poderlo consultar en el futuro.
SETUP
MENU
TRACK/SEARCH
STOP
PAUSE
RANDOM
RAND
SCAN
123
456
7
OSD
NTSC/PAL
R
E
T
N
E
PLAY
DISC/FOLDER
REPEAT
REP
SUBTITLE
SUB
AUDIO
ANGLE
809
TRACK
RETURN
GRP RET
TITLE/CHAPTER
CAR AV
Page 2
2 3
CX-DH801U CX-DH801U
Safety Information/Informations sur la sécurité/Información para su seguridad
Safety Information
Find the model number and serial number on either
the back or bottom of the unit. Please record them in
the space below and retain this booklet as a permanent record of your purchase to help with identification in case of theft.
MODEL NUMBER CX-DH801U
SERIAL NUMBER
DATE PURCHASED
FROM
Il est recommandé de noter, dans l’espace prévu cidessous, les numéros de modèle et de série inscrits soit
à l’arrière soit sous le fond de l’appareil, et de conserver
ce manuel comme mémorandum de l’achat afin de
permettre l’identification de l’appareil en cas de vol.
NUMÉRO DE MODÈLE CX-DH801U
NUMÉRO DE SÉRIE
DATE DE L’ACHAT
VENDEUR
Informations sur la sécurité
WARNING:
TO REDUCE THE RISK OF FIRE OR ELECTRIC
SHOCK, DO NOT EXPOSE THIS PRODUCT TO RAIN
OR MOISTURE.
TO REDUCE THE RISK OF FIRE OR ELECTRIC
SHOCK, AND ANNOYING INTERFERENCE, USE ONLY
THE INCLUDED COMPONENTS.
NOT FOR USE WHERE VIDEO MONITOR IS VISIBLE
TO DRIVER TO AVOID RISK OF SERIOUS INJURY OR
POSSIBLE VIOLATION OF STATE LAWS.
CAUTION:
THIS PRODUCT IS A CLASS
11
LASER PRODUCT. USE OF CONTROLS OR ADJUSTMENTS
OR PERFORMANCE OF PROCEDURES OTHER
THAN THOSE SPECIFIED HEREIN MAY
RESULT IN HAZARDOUS RADIATION EXPOSURE.
DO NOT OPEN COVERS AND DO NOT REPAIR
YOURSELF. REFER SERVICING TO QUALIFIED PERSONNEL.
Laser products:
Wave length: 650 nm
Laser power: No hazardous radiation is
emitted with safety protection.
AVERTISSEMENT:
POUR RÉDUIRE LES RISQUES D’INCENDIE OU
D’ÉLECTROCUTION, N’EXPOSEZ PAS CET APPAREIL
À LA PLUIE OU À L’HUMIDITÉ.
AFIN DE PRÉVENIR TOUT RISQUE D’INCENDIE OU
D’INTERFÉRENCES, UTILISER UNIQUEMENT LES
COMPOSANTS FOURNIS.
NON DESTINÉ A L’EMPLACEMENT OÙ L’ÉCRAN
VIDÉO EST VISIBLE PAR LE CONDUCTEUR AFIN
D’ÉVITER LE RISQUE DE BLESSURE GRAVE OU DE
VIOLATION POSSIBLE DES LOIS D’ÉTAT.
ATTENTION:
CET APPAREIL EST UN PRODUIT LASER DE LA
CLASSE
11
. L’UTILISATION DE COMMANDES OU
RÉGLAGES OU L’EXÉCUTION D’OPÉRATIONS
AUTRES QUE CELLES QUI SONT INDIQUÉES DANS
CE DOCUMENT PEUVENT RÉSULTER EN UNE
EXPOSITION À UN RAYONNEMENT DANGEREUX.
N’OUVREZ PAS LES COUVERCLES ET N’ESSAYEZ
PAS D’EFFECTUER VOUS-MÊME DES
RÉPARATIONS. ADRESSEZ-VOUS À UN
PERSONNEL QUALIFIÉ POUR TOUTE
RÉPARATION.
Appareils à laser:
Longueur d’onde: 650 nm
Puissance de laser: Aucun rayonnement
dangereux n’est diffusé
en présence de la
protection de sécurité.
Información para su seguridad
Busque el número del modelo y el número de serie ya
sea en la parte trasera o en el fondo de la unidad.
Sírvase anotar dichos números en el espacio
siguiente, y mantenga este librete como una anotación
permanente de su compra para ayudar en la
identificación en el caso de robo.
NÚMERO DEL MODELO CX-DH801U
NÚMERO DE SERIE
FECHA DE COMPRA
NOMBRE DE LA TIENDA
ADVERTENCIA:
PARA REDUCIR EL RIESGO DE INCENDIOS O
SACUDIDADS ELÉCTRICAS, NO EXPONGA ESTE
PRODUCTO A LA LLUVIA NI A ALA HUMEDAD.
PARA EDUCIR EL RIESGO DE INCENDIOS O
SACUDIDAS ELÉCTRICAS, Y PARA EVITAR LAS
INTERFERENCIAS MOLESTAS, UTILICE SOLAMENTE
LOS COMPONENTES INCLUIDOS.
NO DEBE UTILIZARSE DONDE EL MONITOR DE
VÍDEO SEA VISIBLE AL CONDUCTOR PARA EVITAR
EL PELIGRO DE HERIDAS GRAVES O LA POSIBLE
VIOLACIÓN DE LAS LEYES VIGENTES.
PRECAUCIÓN:
ÉSTE UN PRODUCTO LÁSER DE LA CLASE
11
. LA UTILIZACIÓN DE CONTROLES, EL
HASER AJUSTES O EL SEGUIR
PROCEDIMIENTOS DISTINTOS DE LOS
ESPECIFICADOS EN ESTE MANUAL PODRÍA
CAUSAR UNA EXPOSICIÓN PELIGROSA A LA
RADIACIÓN.
NO ABRA LAS CUBIERTAS NI HAGA
PERARACIONES USTED MISMO. SOLICITE LOS
TRABAJOS DE SERVICIO AL PERSONAL
CUALIFICADO.
Productos de láser:
Longitud de onda: 650 nm
Potencia láser: No se emite radiación
peligrosa con la
protección de seguridad.
Page 3
5
CX-DH801U
English
4
CX-DH801U
English
Safety Information
Warning
Observe the following warnings when using
this unit.
❑
The driver should neither watch the display nor
operate the system while driving.
Watching the display or operating the system will distract
the driver from looking ahead of the vehicle and can cause
accidents. Always stop the vehicle in a safe location and use
the parking brake before watching the display or operating
the system.
❑
Use the proper power supply.
This product is designed for operation with a negative
grounded 12 V DC battery system. Never operate this product with other battery systems, especially a 24 V DC battery
system.
❑
Keep batteries out of reach of infants.
Batteries can be ingested, so keep them out of the reach of
infants. If an infant ingests a battery, please seek immediate
medical attention.
❑
Protect the Deck Mechanism.
Do not insert any foreign objects into the slot of this unit.
❑
Do not disassemble or modify the unit.
Do not disassemble, modify the unit or attempt to repair the
product yourself. If the product needs to be repaired, consult
your dealer or an authorized Panasonic Servicenter.
❑
Do not use the unit when it is out of order.
If the unit is out of order (no power, no sound) or in an
abnormal state (has foreign matter in it, is exposed to water,
is smoking, or smells), turn it off immediately and consult
your dealer.
❑
The remote control unit should not lie about in the
car.
If the remote control unit lies about, it could fall on the floor
while driving, get wedged under the brake pedal, and lead to
a traffic accident.
❑
Refer fuse replacement to qualified service personnel.
When the fuse blows out, eliminate the cause and have it
replaced with the fuse prescribed for this unit by a qualified
service engineer. Incorrect replacement of the fuse may lead
to smoke, fire, and damage to the product.
Observe the following warnings when
installing.
❑
Disconnect the lead from the negative (–) battery
terminal before installation.
Wiring and installation with the negative (–) battery terminal
connected may cause electrical shock and injury due to a
short circuit.
Some cars equipped with the electrical safety system have
specific procedures of battery terminal disconnection.
FAILURE TO FOLLOW THE PROCEDURE MAY LEAD TO THE
UNINTENDED ACTIVATION OF THE ELECTRICAL SAFETY
SYSTEM RESULTING IN DAMAGE TO THE VEHICLE AND
PERSONAL INJURY OR DEATH.
❑
Never use safety-related components for installation, grounding, and other such functions.
Do not use safety-related vehicle components (fuel tank,
brake, suspension, steering wheel, pedals, airbag, etc.) for
wiring or fixing the product or its accessories.
❑
Installing the product on the air bag cover or in a
location where it interferes with airbag operation is
prohibited.
❑
Check for piping, gasoline tank, electric wiring, and
other items before installing the product.
If you need to open a hole in the vehicle chassis to attach or
wire the product, first check where the wire harness, gasoline tank, and electric wiring are located. Then open the hole
from outside if possible.
❑
Never install the product in a location where it interferes with your field of vision.
❑
Never have the power cord branched to supply other
equipment with power.
❑
After installation and wiring, you should check the
normal operation of other electrical equipment.
The continuation of their using in abnormal conditions may
cause fire, electrical shock or a traffic accident.
❑
In the case of installation to an airbag-equipping
car, confirm warnings and cautions of the vehicle
manufacturer before installation.
❑
Make sure the leads do not interfere with driving or
getting in and out of the vehicle.
❑
Insulate all exposed wires to prevent short circuiting.
This pictograph intends to alert you to the presence of important operating instructions and
installation instructions. Failure to heed the
instructions may result in severe injury or death.
■
Read the operating instructions for the unit and all other components of your car audio system carefully before using the
system. They contain instructions about how to use the system in a safe and effective manner. Panasonic assumes no
responsibility for any problems resulting from failure to
observe the instructions given in this manual.
■
This manual uses pictographs to show you how to use the
product safely and to alert you to potential dangers resulting
from improper connections and operations. The meanings of
the pictographs are explained below. It is important that you
fully understand the meanings of the pictographs in order to
use this manual and the system properly.
Warning
This pictograph intends to alert you to the presence of important operating instructions and
installation instructions. Failure to heed the
instructions may result in injury or material damage.
Caution
Caution
Observe the following cautions when using this
unit.
❑
Keep the sound volume at an appropriate level.
Keep the volume level low enough to be aware of road and
traffic conditions while driving.
❑
Do not insert or allow your hand or fingers to be
caught in the unit.
To prevent injury, do not get your hand or fingers caught in
moving parts or in the disc slot. Especially watch out for
infants.
❑
This unit is designed for use exclusively in automobiles.
❑
Do not operate the unit for a prolonged period with
the engine turned off.
Operating the audio system for a long period of time with the
engine turned off will drain the battery.
❑
Do not expose the unit to direct sunlight or excessive heat.
Otherwise these will raise the interior temperature of the
unit, and it may lead to smoke, fire, or other damage to the
unit.
❑
Do not use the product where it is exposed to water,
moisture, or dust.
Exposure of the unit to water, moisture, or dust may lead to
smoke, fire, or other damage to the unit. Make especially
sure that the unit does not get wet in car washes or on rainy
days.
❑
Be sure to keep the disc unit door closed to prevent
dirt and dust from getting into the unit and causing
possible malfunctions.
❑
The magazine cannot be inserted when a tray is not
loaded into place. In this situation, forced insertion
may cause damage to the unit and magazine.
❑
The driver should not wear headphones while driving.
Observe the following cautions when
installing.
❑
Refer wiring and installation to qualified service
personnel.
Installation of this unit requires special skills and experience.
For maximum safety, have it installed by your dealer.
Panasonic is not liable for any problems resulting from your
own installation of the unit.
❑
Follow the instructions to install and wire the product.
Not following the instructions to properly install and wire the
product could cause an accident or fire.
❑
Take care not to damage the leads.
When wiring, take care not to damage the leads. Prevent
them from getting caught in the vehicle chassis, screws, and
moving parts such as seat rails. Do not scratch, pull, bend or
twist the leads. Do not run them near heat sources or place
heavy objects on them. If leads must be run over sharp
metal edges, protect the leads by winding them with vinyl
tape or similar protection.
❑
Use the designated parts and tools for installation.
Use the supplied or designated parts and appropriate tools
to install the product. The use of parts other than those supplied or designated may result in internal damage to the unit.
Faulty installation may lead to an accident, a malfunction or
fire.
❑
Do not block the air vent of the unit.
Blocking this part will cause the interior of the unit to overheat and may result in fire or other damage.
❑
Do not install the product where it is exposed to
strong vibrations or is unstable.
Avoid slanted or strongly curved surfaces for installation. If
the installation is not stable, the unit may fall down while
driving and this can lead to an accident or injury.
❑
Installation Angle
The product should be installed in a horizontal position with
the front end up at a designated angle, 0°, 22.5°, 45°, 67.5°
or 90°.
The user should bear in mind that in some areas there may
be restrictions on how and where this unit must be installed.
Consult your dealer for further details.
❑
Wear gloves for safety. Make sure that wiring is
completed before installation.
❑
To prevent damage to the unit, do not connect the
power connector until the whole wiring is completed.
❑
Do not connect more than one speaker to one set of
speaker leads. (except for connecting to a tweeter)
Observe the following cautions when handling
the battery for the remote control unit.
●
Use only specified battery (CR2025).
●
Match the polarity of the battery with the (+) and (–) marks
in the battery case.
●
Replace dead battery as soon as possible.
●
Remove the battery from the remote control unit when not
using it for an extended period of time.
●
Insulate the battery (by placing it in a plastic bag or covering
it with vinyl tape) before disposal or storage.
●
Dispose of the battery according to the local regulations.
●
Do not disassemble, recharge, heat or short the battery. Do
not throw a battery into a fire or water.
In case of battery leakage
●
Thoroughly wipe the battery liquid off the battery case and
insert new battery.
●
If any part of your body or clothing comes into contact with
battery liquid, wash it with plenty of water.
●
If battery liquid comes into contact with your eyes, wash
them with plenty of water and get immediate medical attention.
Safety Information
Page 4
7
CX-DH801U
6
CX-DH801U
English
Contents
¢ Safety Information .......................................... 4
¢ Use This Product Safely ................................................................ 6
¢ Features .......................................................................................... 6
¢ Contents.......................................................................................... 7
¢ Discs that can be Played Back...................................................... 8
¢ System Combination...................................................................... 9
¢ Preparation .................................................... 10
¢ Names of Controls and Functions.............................................. 28
¢
DVD
Changer Basics..................................... 31
¢
OSD (On Screen Display) Change and Indications
.................................... 35
¢
DVD/VCD (Video CD) Playback
......................... 36
¢ CD
Playback
.................................................. 40
¢ Notes on MP3................................................................................ 42
¢ Settings ......................................................... 42
¢ Troubleshooting............................................ 48
¢ Maintenance.................................................................................. 53
¢ Corresponding Functions ........................................................... 54
¢ Language Code List ..................................................................... 55
¢ Definition of Terms....................................................................... 56
¢ Installation ..................................................... 58
¢ Electrical Connection................................................................... 63
¢ Specifications ............................................................................... 71
Principal Operation
Use the control unit with the ordinary operations
The basic functions of this DVD changer are also operable
with the control unit and remote control unit for the control
unit. You can operate the ordinary music CD by using the
control unit or its remote control unit.
Control unit
The control unit means a dependent Panasonic car audio
unit with CD/DVD changer control. The control unit can
operate only the basic functions of this DVD changer. For
ordinary DVD operations, we recommend the use of the
remote control supplied with this DVD changer. However,
the functions listed below can be operated only with the control unit. Some units do not enable the “PLAY” and/or
“PAUSE” function of this DVD changer.
• Power On/Off
• Source selection
• Volume Up/Down
The button assignment of function that can be operated with
the control unit varies with the control unit. For details,
please refer to “Corresponding Functions” on page 54.
Some old type car audio units cannot support a DVD changer. As for the changer compatibility, please consult your
local dealer or your nearest Panasonic servicenter.
Remote control unit for control unit
Some control units have a remote control unit or is supplied
the remote control unit as an option. The control units and
their remote control units can also operate the basic functions of a DVD changer. These operable functions vary with
the type of the control unit or the remote control unit to be
used. For details, please refer to “Corresponding Functions”
on page 54.
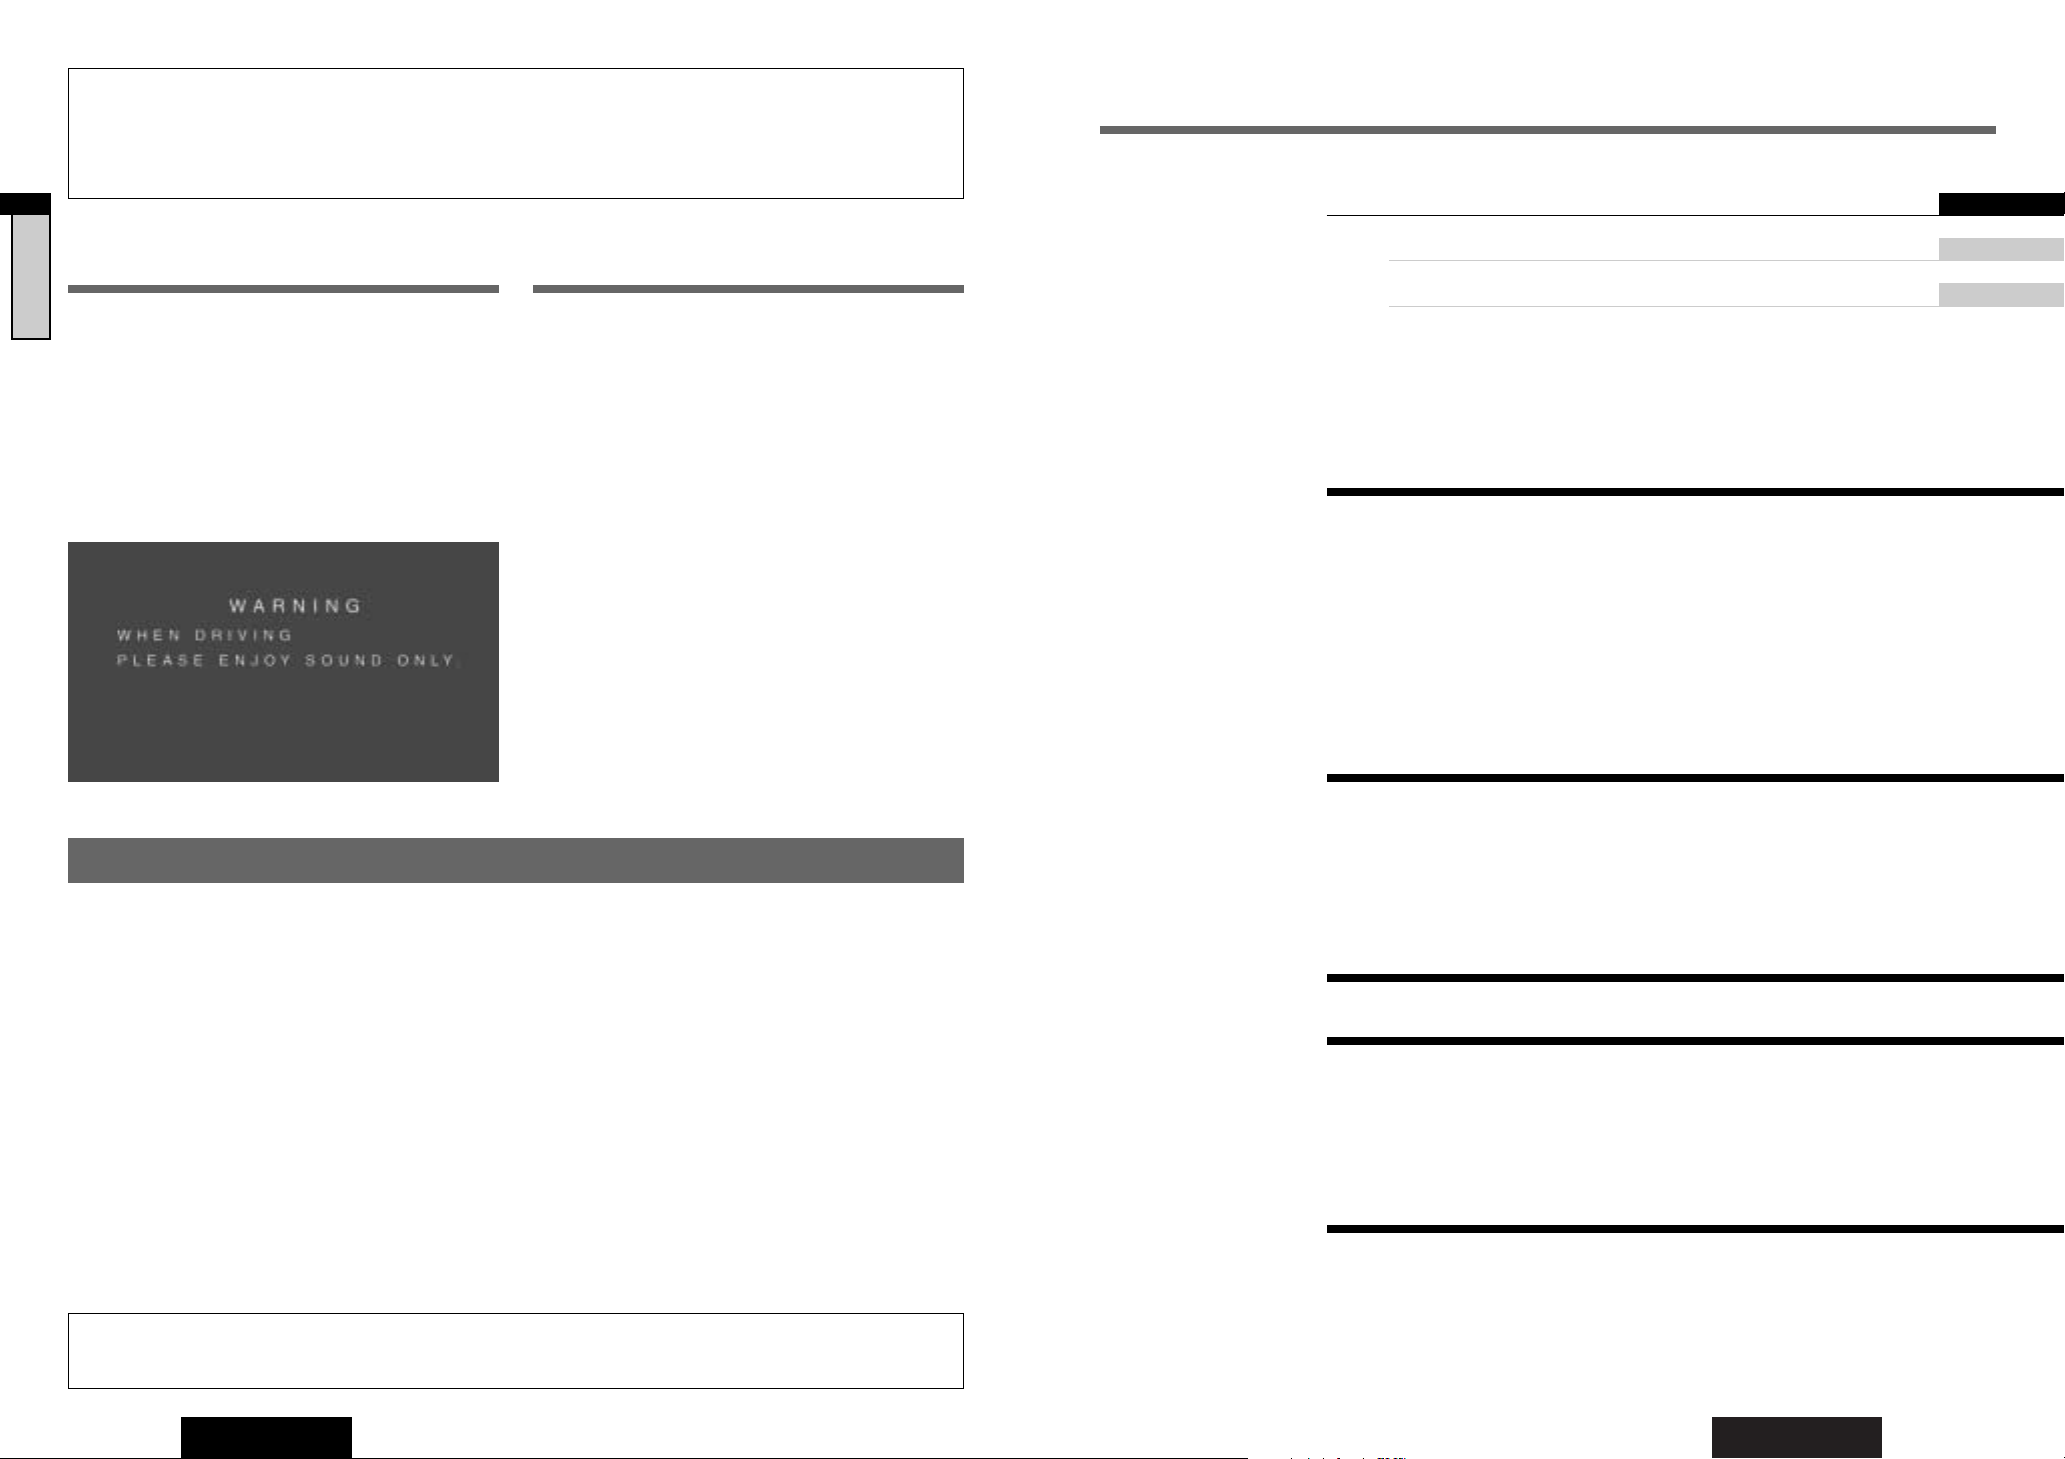
For your safety, this system is designed not to
see the moving picture while you are driving.
¡Park your car in a safe place and use the parking brake
lever before seeing the moving picture.
¡For your safety, you must ensure that the connection of
the parking brake lead is correct. (a page 64)
Use This Product Safely
Features
❑ DVD Video / Video CD / CD 8 Disc Changer
¡
DVD, Video CD and CD discs are changeable.
¡
Mixture of different type discs (DVD Video, Video CDs
and Audio CDs) is acceptable.* (a page 8)
❑ 5.1-channel system can be built up
¡
This unit has an optical digital output. To connect the
optional digital surround processor (CY-AC300) with this
unit, you can build the 5.1-channel system.
❑ Both NTSC and PAL format software are
playable (a page 44)
❑ Both NTSC and PAL video format can be
generated
¡
NTSC and PAL video formats output are always
changeable by the one touch. (a page 44)
* Discontinuous arrangement of the same type discs may take
a long time to change discs.
For a description of the functions, refer to the operating instructions for the control unit
as well (CQ-C9901U, CQ-VD7001U etc.).
English 28
Français 72
Español 116
CX-DH801U
8-Disc DVD Changer
Panasonic welcomes you to our constantly growing family of electronic products owners.
We endeavor to give you the advantages of precise electronic and mechanical engineering, manufactured with carefully
selected components, and assembled by people who are proud of the reputation their work has built for our company. We
know this product will bring you many hours of enjoyment, and after you discover the quality, value and reliability we have
built into it, you too will be proud to be a member of our family.
¢ DVD Changer Basics .................................... 31
¢ OSD (On Screen Display) Change and Indications................... 35
¢ DVD/VCD (Video CD) Playback.................... 36
¢ CD Playback ................................................. 40
Page 5
9
CX-DH801U
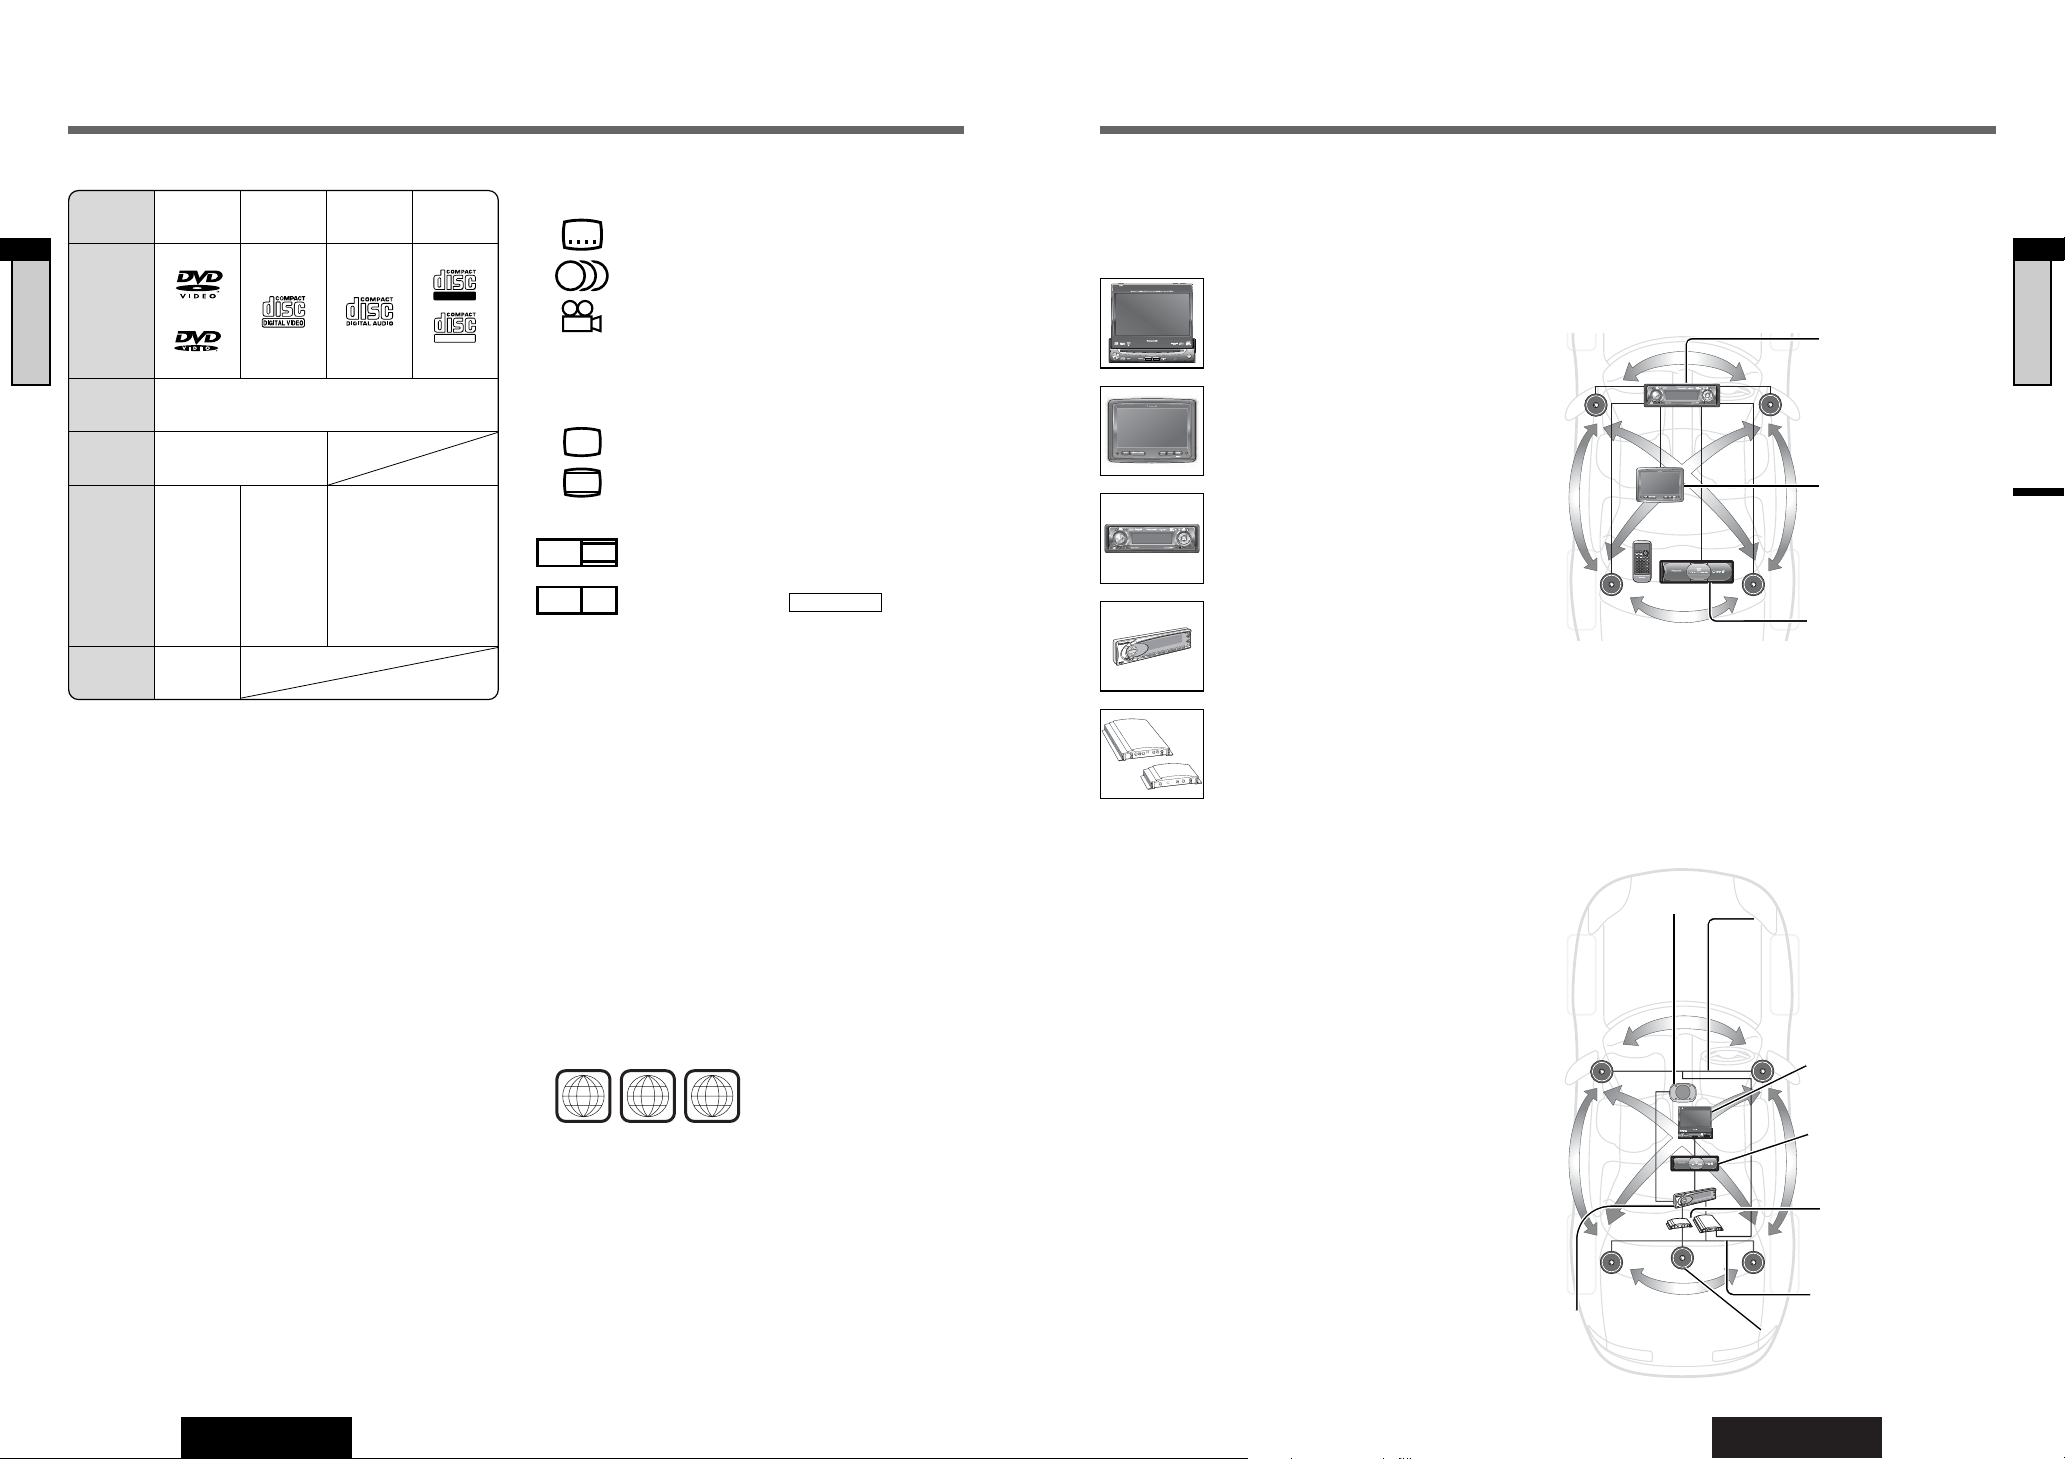
Discs that can be Played Back, System Combination
English
8
CX-DH801U
English
ENTER
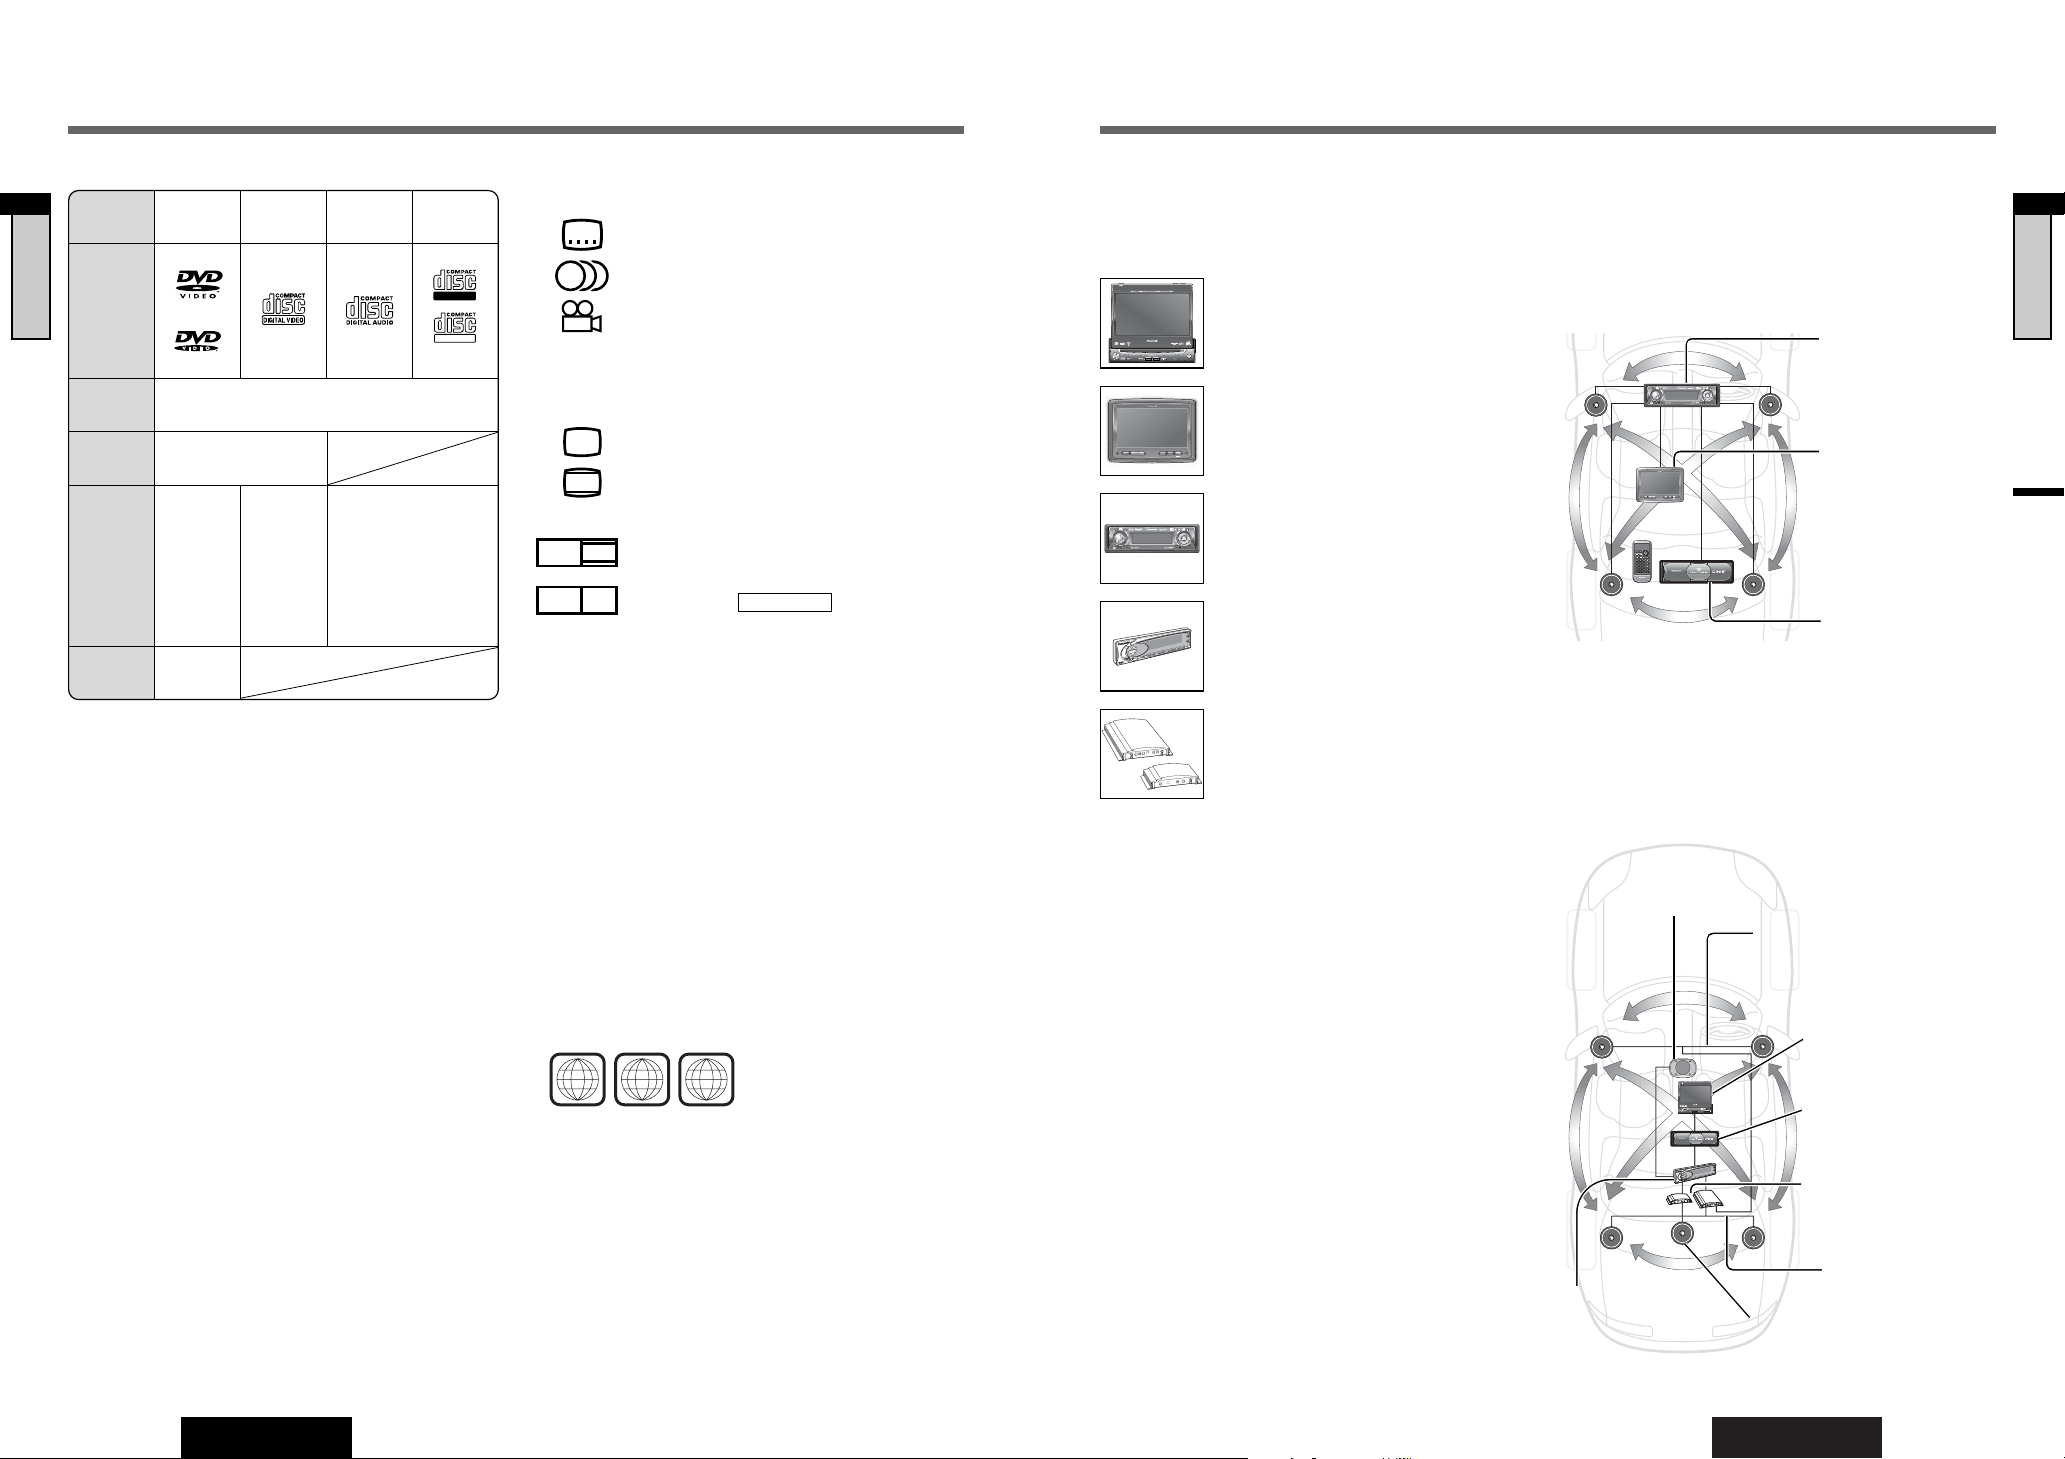
System Combination
❑ Basic System
Connecting with the display monitor and 1DIN
CD/Receiver with CD/DVD changer Control.
Just connecting a monitor display and this DVD
Changer with your basic 1 DIN audio system, you do
not only watch the DVD, but also listen to normal music
CDs discs.
❑ Optional system (Example)
This unit can be combined with other components like
shown below. For more details, refer to the operating
instructions for the connected devices.
❑ 5.1-channel Surround System
This unit has an optical digital output. To connect the
optional digital surround processor (CY-AC300) with
this unit, you can build the 5.1-channels surround system in order to play DVD software in a way that creates
“You are here” feel in a car.
Power amplifier
(option)
Surround Speakers:
CJ-DA6920
Subwoofer:
CJ-HD303
8-Disc DVD Changer:
CX-DH801U
In-Dash 7”
Widescreen Color LCD
Monitor/DVD Receiver:
CQ-VD7001U
Digital Surround
Processor:
CY-AC300
Center Speaker:
EAB-CF2
Front Speakers:
CJ-DA1600
TRACK/SEARCH
DISC/FOLDER
NTSC/PAL
TITLE/CHAPTER
TRACK
STOP
RANDOM
RETURN
PAUSE
PLAY
REPEAT
SUBTITLE
CAR AV
TITLE
E
N
T
E
R
SETUP
MENU
RAND
SCAN
REP
GRP RET
ANGLE
SUB
AUDIO
123
456
7
OSD
809
CX-DH801
CY-V7100U
PHONES
SRC
CS
WMA MP3 CD
Player/Receiver with
512 Color OEL
Display: CQ-C9901U
8-Disc DVD Changer:
CX-DH801U
Headrest Monitor:
CY-V7100U
Discs that can be Played Back
❒ Discs not supported
The following discs are not played back on this product.
¡DVD-Audio
¡DVD-ROM ¡DVD-R ¡DVD+R
¡DVD-RAM ¡DVD+RW ¡DVD-RW
¡SVCD ¡VSD ¡CVD
¡CD-G ¡CD-ROM
¡CD-RW (except CD-DA)
¡CD-R (except CD-DA)
¡SACD ¡Photo CD ¡CDV
¡Hybrid SACD (except CD-DA)
¡CD-TEXT (except for sound reproduction)
¡Divx Video Discs
¡CD-EXTRA (audio-only playback possible)
¡DVDs with a region number other than “1” or “ALL”
¡Playing back a photo CD disc with this unit could
damage the data that is recorded on the disc.
Note:
¡About CD-Rs and CD-RWs, refer to “Notes on CD-
Rs/RWs”. (a page 31)
¡Some copy-protected music CDs are not playable.
¡DTS only works with optical outputs.*
¡Even if you play a DTS DVD or a DTS CD, analog sound
cannot be reproduced. (Only digital output comes out)
¡WMA files are not playable.
¡This unit does not support 8 cm discs.
❒ Symbols used on jackets
(Examples of such symbols include)
¡
: Number of subtitle languages
¡ : Number of audio tracks
¡ : Number of angles
The numbers indicate the number of languages,
tracks, angles, etc., recorded on the disc.
Screen size (H:V aspect ratio)
¡ : 4:3 standard size
¡ : Letterbox (a page 44, 56)
¡ 16:9 wide size
: Playback in letterbox format on a stan-
dard screen (4:3).
: Playback in (pan and scan)
(a page 44, 56) format on a standard
screen (4:3).
Note: The size of the image that is displayed on the
screen depends on the screen mode (“TV MODE”
a
page 44), and on the screen size for the content on the
disc.
❒ Region Management Information
This product is designed and manufactured to
respond to the Region Management Information that
is recorded on a DVD disc. If the Region number
described on the DVD disc does not correspond to the
Region number of this product, this product does not
play the disc.
The Region number for this product is “1” or “ALL”.
PAN & SCAN
PS16:9
LB16:9
LB
4:3
3
2
2
1
ALL
13
46
Example:
LPCM (CD-DA), DTS*
❒ Disc Type
Recordable
ReWritable
DISC DVD
VCD
(Video CD)
CD CD-R/RW
Mark/logo
Disc Size 12 cm (5”)
Video
Format
NTSC / PAL
Audio
Format
LPCM,
MPEG1,
MPEG2,
DTS*,
Dolby
Digital
LPCM,
MPEG1
Region
No.
1
ALL
Digital Surround Processor: CY-AC300
ENTER
TILT O/C
ASP
MUTE
MODE MENU
CQ-VD7001U
NAVI
OPEN / CLOSE
EJECTNAVIGATION
ASPECT
POWER
VOL
P·MODE
DISC
TUNE
/TRACK
OPEN / CLOSE
CQ-VD7001U
TILT
TEXT
In-Dash 7” Widescreen Color LCD
Monitor/DVD Receiver:
CQ-VD7001U
WMA MP3 CD Player/Receiver with
512 Color OEL Display:
CQ-C9901U
External Power Amplifier
Headrest Monitor: CY-V7100U
❑ To CQ-VD7001U users
How to switch the DVD changer display
In the DVD changer mode, the DVD changer display will
appear automatically if you perform the following settings in the “INPUT/OUTPUT” menu previously.
q
Press/touch [MENU].
w
Press/touch [INPUT/OUTPUT]/[SELECT]
/
[INPUT SELECT].
e
Select [CH INPUT]/Select [VTR]. *
r
Press/touch [END] to exit from the menu.
* When connecting the DVD changer’s video output with VTR1
input of CQ-VD7001U.
CY-V7100U
PHONES
CS
SRC
TAL
GI
DI
PRO LOGIC
ROCESSOR
P
OUND
R
L SUR
A
DIGAT
SOURCE
ER
0
AC30
M
DIM
SPACE
DIM
POSITION
SPC
POSI
P
super bright multi-color display & 30w Power Amplifier for Center Speaker
DR COM
VOL
4
3
2
MUTE
1
PWR
L
E
C
R
S
U
O
E
S
Panasonic
OPEN
VOLUME
CX-DH801
0
0
C3
A
V
O
L
L
E
S
TILT
OPEN / CLOSE
OPEN / CLOSE
TILT
CQ-VD7500U
CQ-VD7700U
TRACK/
IN-DASH 7" WIDESCREEN COLOR LCD MONITOR TV / DVD / SD RECEIVER
CHANNEL
ENTER
DISC
SD CARD
·
P
MODE
MUTE NAVI DISP
MODE
ASP
POWER ASPECT
NAVIGATION
L
A
T
I
G
I
D
C
I
G
O
L
OR
O
S
R
S
P
E
C
O
R
P
D
N
U
O
R
R
U
S
L
A
T
A
G
I
D
E
C
R
U
O
S
r
e
k
a
e
p
S
r
e
R
t
E
n
M
e
M
C
I
r
D
o
f
r
e
i
f
i
l
E
p
C
A
m
A
SP
r
e
w
o
P
N
IM
w
O
D
I
0
T
3
SI
&
y
PO
a
l
p
s
i
C
d
P
r
S
o
l
o
c
i
t
l
u
I
m
S
t
O
h
P
g
i
r
P
b
r
M
e
O
p
C
u
s
DR
4
3
2
TE
U
M
1
R
W
P
E
C
R
S
U
O
Page 6
11
CX-DH801U
English
10
CX-DH801U
English
Preparation
Preparation
Battery Installation
(Inserting/Replacing the Battery)
It is convenient for you to check and set the following settings prior to initial use.
Operations vary according to the disc. For details, refer to
the guide provided with the disc.
TV TYPE (a page 44)
Setting:
Set the video format of your monitor display in “TV TYPE”.
Check:
Check if “TV TYPE” is set to “NTSC”(or “PAL”) when connecting an NTSC (or a PAL) monitor display.
TV MODE (a page 44)
Setting:
Choose the aspect ratio in “TV MODE”. The standard aspect
ratio of Panasonic is “WIDE”.
Check:
Check if the picture on the monitor is displayed naturally.
PREFERENCES (a page 46)
Setting:
Choose the first priority language of reproduction in “PREFERENCES”.
*This setting is valid only when the DVD software contains
the chosen language.
Check:
Check if the unit displays the subtitle or/and the disc menu
or reproduce the sound in a language chosen by you.
COMPRESSION (DR COMP: Dynamic Range
Compression)
(a page 45)
Setting:
Set the dynamic range of sound reproduction in “COMPRESSION” menu.
To prevent the sound from reaching peak suddenly, we recommend you to set this value to “MINIMUM”.
Check:
Check if you hear the low volume sound clearly when a DVD
software having the large dynamic range is playing.
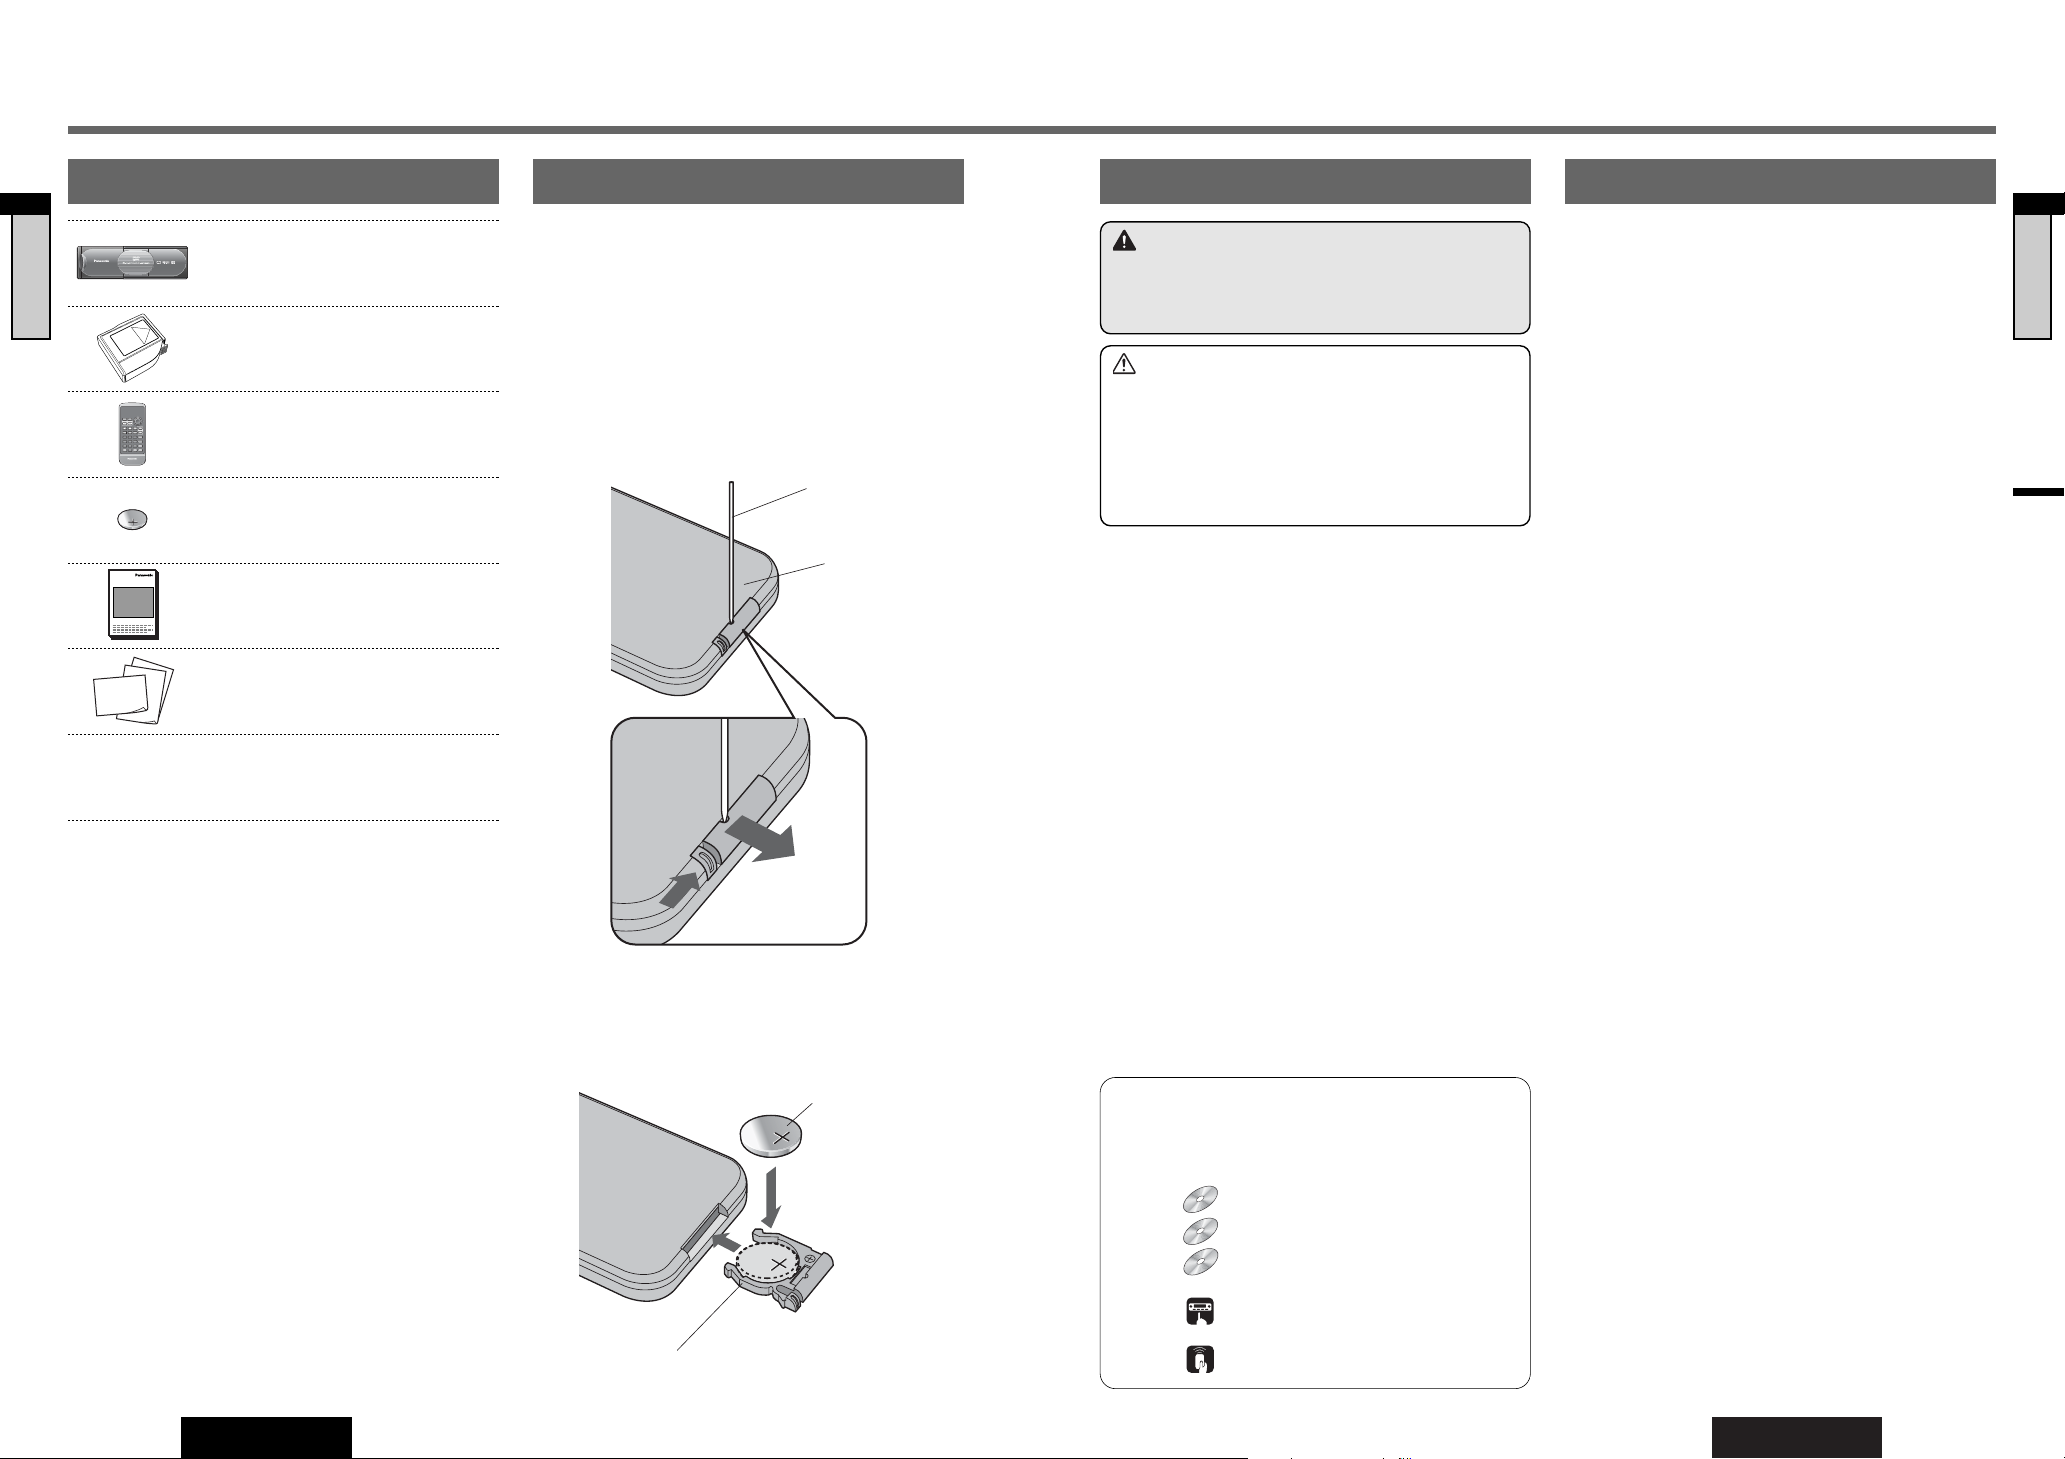
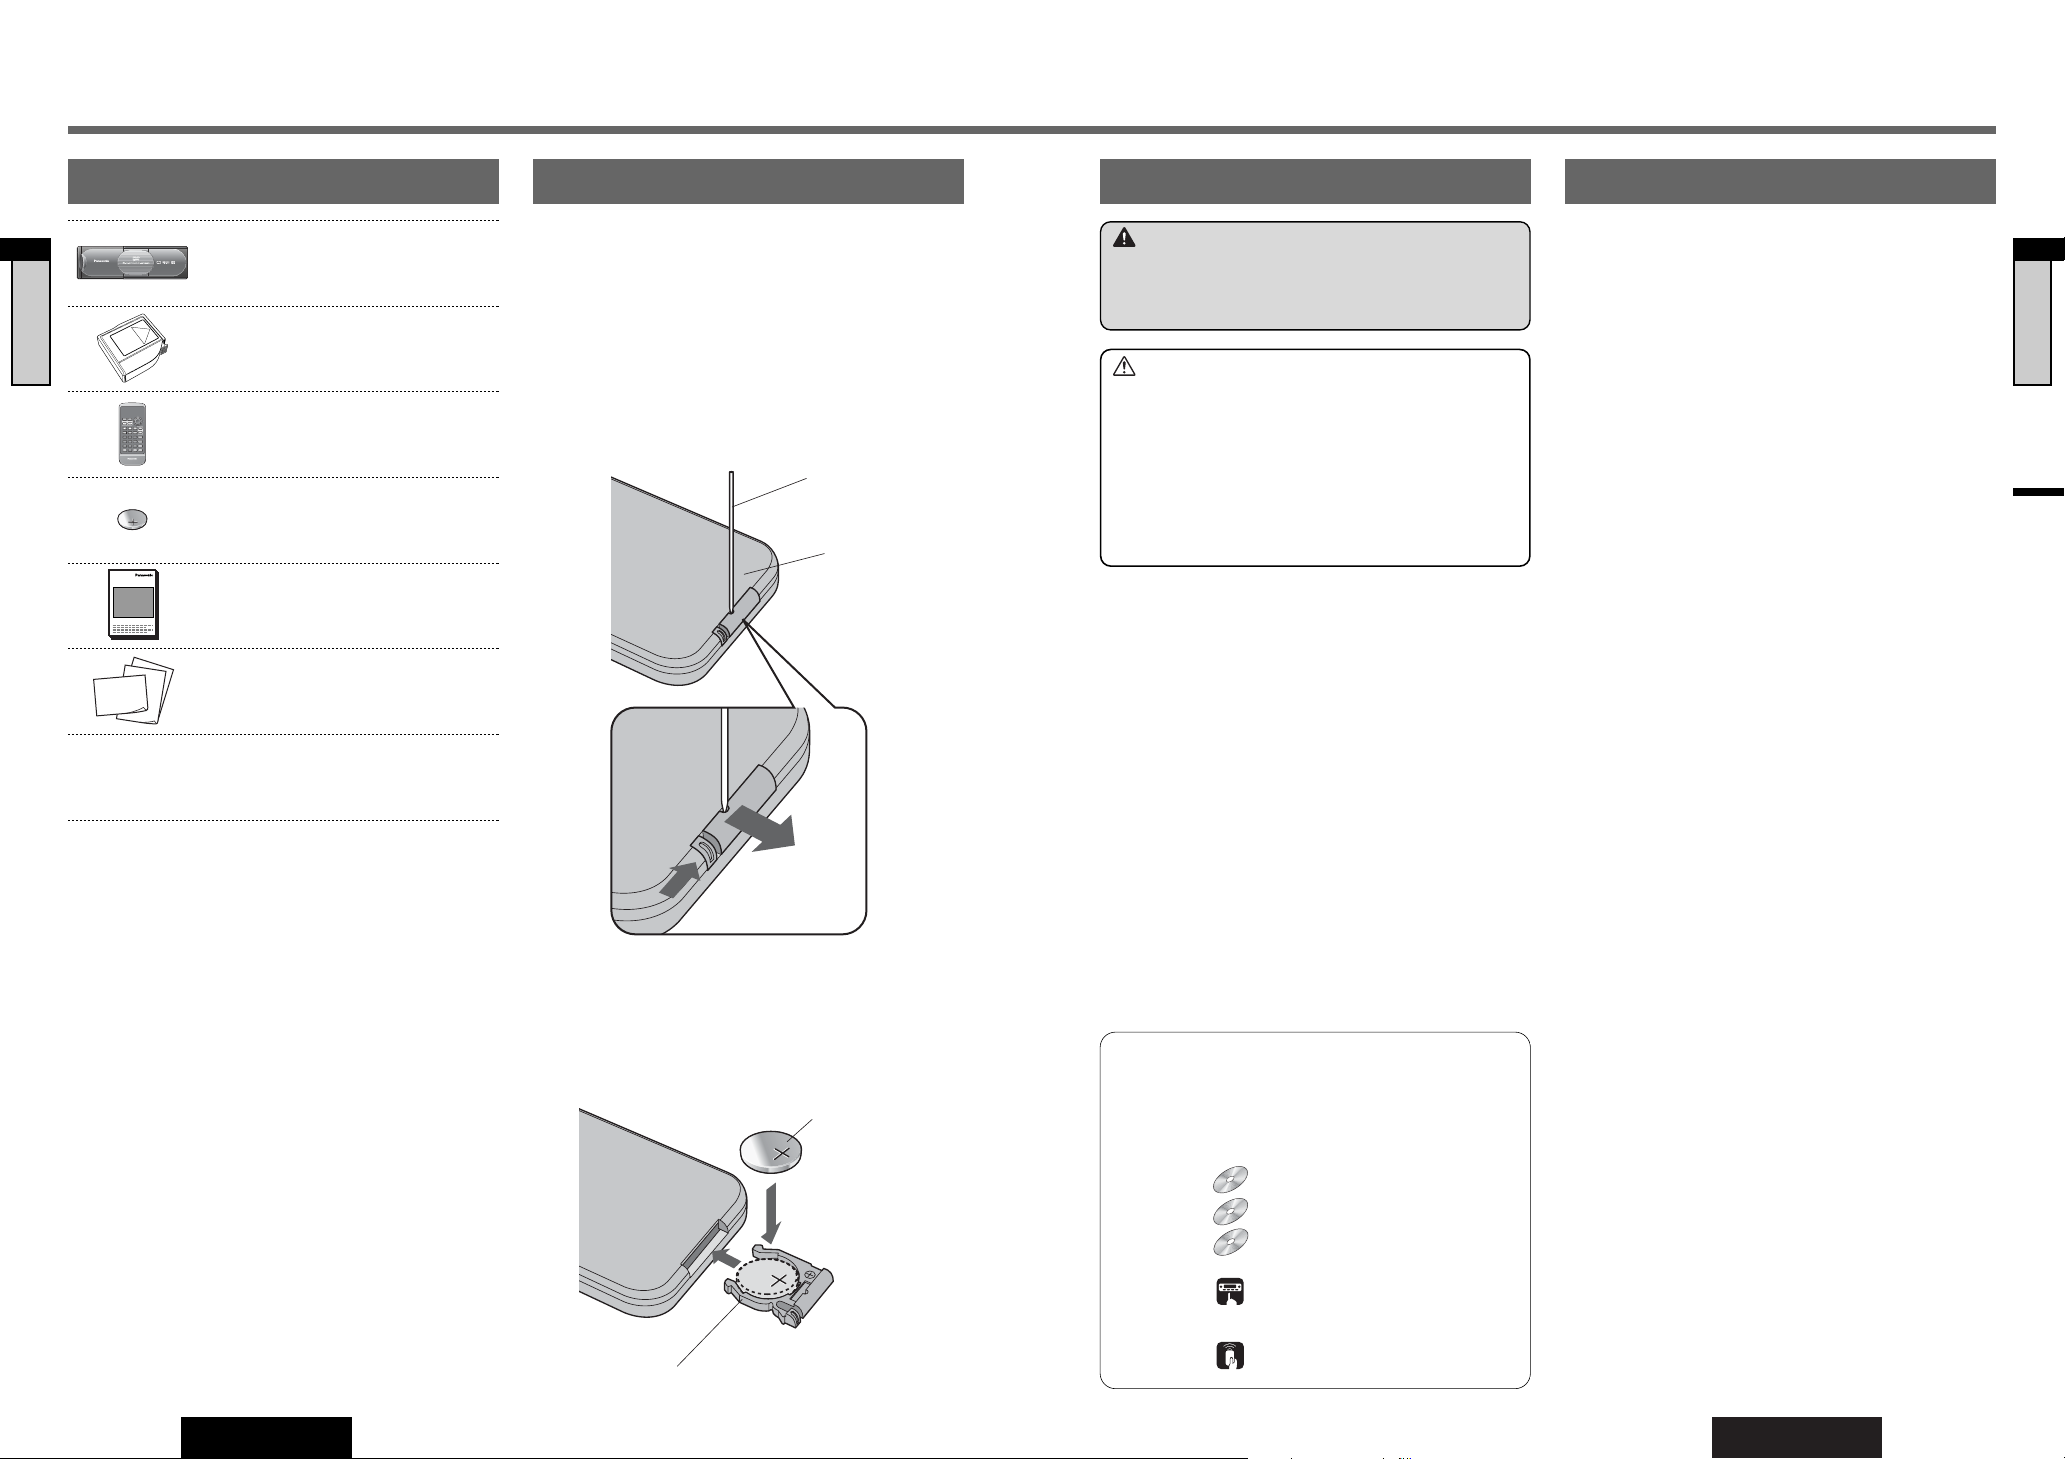
Components Remote Control Unit Battery Information Settings and Checks
Note:
¡The number in parenthesis underneath each accessory
part name is the part number for maintenance and service.
¡Accessories and their parts numbers are subject to modi-
fication without prior notice due to improvements.
7. Installation Hardware (screws, cords,
etc.) (a page 60)
6. Warranty Card, etc.
Q’ty: 1 set
5. Operating Instructions
<YFM284C437ZA>
Q’ty: 1
XXXXXXXXXXXXXXX
XXXXXXXXXXXXXXXXX
XXXXXXXXXXXXXX
XXXXXXXXXXXXXXXX
OO-OOOOO
4. Lithium Battery (CR2025)
Q’ty: 1
3. Remote Control Unit
<YEFX999256A>
Q’ty: 1
TRACK/SEARCH
DISC/FOLDER
NTSC/PAL
TITLE/CHAPTER
TRACK
STOP
RANDOM
RETURN
PAUSE
PLAY
REPEAT
SUBTITLE
CAR AV
TITLE
E
N
T
E
R
SETUP
MENU
RAND
SCAN
REP
GRP RET
ANGLE
SUB
AUDIO
123
456
7
OSD
809
2. Disc Magazine
<VYQ3174>
Q’ty: 1
1. DVD Changer
Q’ty: 1
CX-DH801U
q Remove the battery holder.
With the remote control unit placed on a flat surface.
q Stick your thumbnail into the groove, and push the
holder in the direction of the arrow, and at the same
time.
w Pull it out in the direction of the arrow using a tough
pointed object.
Lithium battery
(CR2025: supplied)
Battery holder
w Install the battery on the battery holder.
Set a new battery properly with its (+) side facing up as
shown in the figure.
e Insert the battery holder back into its original position.
Back side
Tough pointed object
Warning
¡Keep a battery away from children to avoid the risk of
accidents. If an infant ingests a battery, please seek
immediate medical attention.
Cautions
¡Remove and dispose of an old battery immediately.
¡Do not disassemble, heat or short a battery. Do not
throw a battery into a fire or water.
¡Follow local regulations when disposing of a battery.
¡Improper use of a battery may cause overheating, an
explosion or ignition, resulting in injury or a fire.
Note: Battery Information:
Battery Type: Panasonic lithium battery (CR2025)
Battery Life: Approximately 6 months under normal use (at
room temperature)
Pictographs
In this manual, the pictographs shown below are used to
indicate compatible types of discs and operating units.
Discs : DVD video
: VCD (video CD)
: CD
Control : Control unit or remote control for the
control unit.
: DVD changer’s remote control
DVDDVDDVD VCD CD MP3 CH-C
w
q
e
w
Page 7
13
CX-DH801U
12
CX-DH801U
Français
Informations sur la sécurité
Informations sur la sécurité
■
Lire attentivement les instructions pour le fonctionnement de l’appareil
et de tous les autres composants du système audio de la voiture avant
d’utiliser le système. Elles contiennent des instructions sur la manière
d’utiliser le système en toute sécurité et de façon efficace. Panasonic
n’assume aucune responsabilité pour tout problème résultant d’un
manque à observer les instructions stipulées dans ce mode d’emploi.
■
Ce mode d’emploi comprend des pictogrammes qui indiquent la
manière d’utiliser le produit en toute sécurité et qui alertent l’utilisateur
de dangers potentiels résultant de connexions et d’opérations incorrectes. La signification des pictogrammes est expliquée ci-dessous. Il
est important d’assimiler complètement la signification de ces pictogrammes afin d’utiliser ce mode d’emploi et le système de façon correcte.
Avertissement
Attention
Avertissement
Veuillez respecter les avertissements suivants
lors de l’utilisation de cet appareil.
❑
Le conducteur ne devrait pas regarder l’écran d’affichage ni actionner le système tout en conduisant.
L’utilisation du système distraira le conducteur et
l’empêchera de regarder devant lui et ceci peut provoquer
des accidents. Toujours arrêter le véhicule dans un lieu sûr
et utiliser le frein de stationnement avant d’actionner le
système.
❑
Utiliser l’alimentation électrique appropriée.
Ce produit est conçu pour fonctionner à partir d’une source
d’alimentation de batterie de 12 V de courant continu avec le
négatif à la masse. Ne jamais mettre ce produit en fonction
avec d’autres systèmes de batterie, particulièrement des
systèmes de batterie de 24 V de courant continu.
❑
Maintenez les piles hors de la portée des enfants.
Les piles sont susceptibles d’être avalées, c'est pourquoi il
faut les conserver hors de la portée des enfants. Au cas où
l’enfant avalerait une pile, consultez immédiatement un
médecin.
❑
Protéger le mécanisme de platine.
N’insérer aucun objet étranger dans la fente de cette unité.
❑
Ne pas désassembler ni ne modifier l’unité.
Ne pas désassembler, ne pas modifier l’unité ni essayer de
réparer le produit vous-même. Si le produit doit être réparé,
consulter votre distributeur ou un centre de dépannage
autorisé Panasonic.
❑
Ne pas utiliser l’unité quand il est en panne.
Si l’unité est en panne (aucune alimentation électrique,
aucun son) ou dans un état anormal (des corps étrangers se
sont infiltrés dedans, est exposé à l’eau, dégage de la fumée
ou une odeur), l’arrêter immédiatement et consulter votre
distributeur.
❑
La télécommande ne doit pas être laissée posée
dans le véhicule.
Sinon, elle pourrait tomber sur le plancher pendant le voyage, se coincer sous la pédale de frein et conduire à un accident de circulation.
❑
Confier le remplacement du fusible à un personnel
de dépannage qualifié.
Quand le fusible a sauté, éliminer la cause et le remplacer
par le fusible prescrit pour cette unité par un technicien qualifié. Un remplacement incorrect du fusible peut favoriser un
dégagement de fumée, enflammer l’appareil et des provoquer des dommages importants au produit.
Veuillez respecter les mises en garde suivantes lors de l’installation de cet appareil.
❑
Débrancher le câble (–) de la borne négative de la
batterie avant de procéder à l’installation.
Le câblage et l’installation avec la borne (–) négative de la
batterie connectée peuvent provoquer une électrocution et
des blessures dus à un court circuit.
Certains véhicules équipés d’un système électrique de sûreté
ont des procédures particulières de débranchement des
bornes de la batterie.
LE NON-RESPECT DE LA MARCHE À SUIVRE PEUT ENGENDRER
L’ACTIVATION FORTUIT DU SYSTÈME ÉLECTRIQUE DE SÛRETÉ,
CECI AYANT POUR RÉSULTAT DES DOMMAGES AU VÉHICULE ET
DES BLESSURES VOIRE LA MORT.
❑
Ne jamais se servir de composants relatifs à la
sécurité pour effectuer l’installation, faire la mise à
la terre et d’autres fonctions du même type.
Ne jamais se servir de composants relatifs à la sécurité du
véhicule (réservoir d’essence, frein, suspension, volant de
direction, pédales, sac gonflable, etc.) pour effectuer le
câblage ou fixer le produit ou ses accessoires.
❑
L’installation du produit sur le couvercle de sac gonflable ou à un emplacement pouvant constituer une
gêne au fonctionnement du sac gonflable est interdite.
❑
Vérifier la tuyauterie, le réservoir d’essence, le
câblage électrique et d’autres éléments avant d’installer le produit.
S’il est nécessaire de faire une ouverture dans le châssis de
véhicule pour attache ou câbler le produit, vérifier d’abord où
le faisceau de fils électriques, le réservoir d’essence et le
câblage électrique sont localisés. Découper l’ouverture de
l’extérieur dans la mesure du possible.
❑
Ne jamais installer le produit dans un emplacement où
il peut constituer une gêne au champ visuel.
❑
Ne jamais permettre que le cordon d’alimentation soit divisé
pour fournir une alimentation électrique à un autre matériel.
❑
Après l’installation et le câblage, contrôler si un fonctionnement normal des autres appareils électriques est obtenu.
Le faire de continuer à utiliser ces appareils dans des conditions anormales peut causer un incendie, une électrocution
voire un accident de circulation.
❑
Dans le cas d’une installation dans un véhicule équipé de
sacs gonflables, confirmer avec le contenu des mises en
garde et des rappels fournis par le constructeur du véhicule
avant de procéder à l’installation.
❑
S’assurer que les fils de sortie ne gênent pas la conduite ou
les entrées-sorties du véhicule.
❑
Isoler tous les fils exposés pour empêcher tout court-circuit.
Ce pictogramme a pour effet d’alerter l’utilisateur de la
présence d’instructions opératoires importantes et d’instructions de montage. Le fait d’ignorer ces instructions
peut se traduire par une blessure grave, voire la mort.
Ce pictogramme a pour effet d’alerter l’utilisateur de la
présence d’instructions opératoires et d’instructions de montage importantes. Le fait d’ignorer ces instructions peut
résulter en une blessure ou en l’endommagement du matériel.
Attention
Veuillez respecter les précautions suivantes
lors de l’utilisation de cet appareil.
❑
Maintenir le volume à un niveau approprié.
Maintenir le niveau du volume assez bas pour être attentif à la
route et aux conditions de la circulation tout en conduisant.
❑
Ne pas introduire ni ne permettre à votre main ou
vos doigts d’être pris par l’unité.
Pour éviter tout risque de blessure, ne pas se faire prendre la
main ou les doigts par les pièces mobiles ni les introduire
dans la fente chargement du disque. Faire plus
particulièrement attention aux enfants en bas âge.
❑
Cette unité est conçue pour un usage exclusivement
dans des automobiles.
❑
Ne pas mettre l’unité en fonction pendant une
période prolongée avec le moteur arrêté.
Le fonctionnement du système audio pendant une longue période
avec le moteur arrêté aura pour effet d’épuiser la batterie.
❑
Ne pas exposer directement l’unité à la lumière du
soleil ou à une chaleur excessive.
Sinon, ceci élèvera la température intérieure de l’unité, ce qui
peut aboutir à un dégagement de fumée, une inflammation
ou provoquer d’autres dommages à l’unité.
❑
Ne pas utiliser le produit où il serait exposé à l’eau,
à l’humidité ou à la poussière.
L’exposition de l’unité à l’eau, à l’humidité ou à la poussière
peut aboutir à un dégagement de fumée, une inflammation
ou provoquer d’autres dommages à l’unité. S’assurer tout
particulièrement que l’unité ne devient pas humide dans des
lavages automatiques de voiture ou les jours pluvieux.
❑
Maintenez la porte de l’unité de disque fermée afin
d’éviter que les saletés et les poussières ne rentrent
dans l’appareil, provoquant éventuellement un
mauvais fonctionnement.
❑
Le chargeur ne peut être inséré quand un plateau
n’est pas mis en place. Dans ce cas, une insertion
forcée peut endommager l’appareil ou le chargeur.
❑
Le conducteur ne doit pas porter de casque d’écoute
pendant la conduite.
Observer les précautions suivantes lors de
l’installation de l’appareil.
❑
Confier le câblage et l’installation à un personnel de
dépannage qualifié.
L’installation de cette unité exige des qualifications et une
expérience spéciales. Pour obtenir une sécurité maximum,
confier l’installation à votre distributeur. Panasonic ne
pourra pas être tenu pour responsable des problèmes
résultant d’une installation faite par vos propres moyens.
❑
Suivre les instructions indiquées pour installer et
câbler le produit.
Le fait de ne pas se conformer aux directives d’installation et
de câblage du produit qui sont mentionnées peut provoquer
un accident voire un incendie.
❑
Veiller à ne pas endommager les fils de sortie.
Lors du câblage, veiller à ne pas endommager les fils de
sortie. Faire en sorte qu’ils ne soient pas coincés dans le
châssis de véhicule, s’accrochent dans les vis ou pris par les
pièces mobiles telles que des rails de siège. Ne pas rayer,
tirer, plier ou vriller les fils de sortie. Ne pas les acheminer
près de sources de chaleur ni poser des objets lourds
dessus. Si les fils doivent être acheminés en passant sur des
bords métalliques tranchants, protéger les fils de sortie en
les enrobant de bande vinylique ou en utilisant un mode de
protection semblable.
❑
Utiliser les pièces et les outils spécifiés pour
effectuer l’installation.
Utiliser les pièces fournies ou spécifiées et les outils
appropriés pour installer le produit. L’utilisation de pièces
autres que celles fournies ou spécifiées peut avoir comme
conséquence de provoquer des dommages internes à l’unité.
Une installation défectueuse peut provoquer un accident,
favoriser une panne voire provoquer un incendie.
❑
Ne pas obstruer l’ouverture d’aération de l’appareil.
L’obstruction de cette partie provoquerait une surchauffe de
l’intérieur de l’appareil, pouvant produire du feu ou d’autres
dommages.
❑
Ne pas installer le produit à un endroit où il serait
exposé à des vibrations intenses ou serait instable.
Éviter les surfaces inclinées ou fortement incurvées pour
effectuer l’installation. Si l’installation n’est pas stable, l’unité
risque de tomber par terre tandis que cela peut favoriser un
accident voire provoquer des blessures.
❑
Angle d’installation
L’appareil doit être installé dans une position horizontale
avec l’extrémité avant relevée d’un angle désigné de 0 °, de
22,5 °, de 45 °, de 67,5 ° ou de 90 °.
L’utilisateur devrait considérer que dans certains zones il
peut y avoir des restrictions imposées sur la façon dont et
où cette unité peut être installée.
Consulter votre distributeur pour obtenir de plus amples détails.
❑
Porter des gants par mesure de sécurité. S’assurer
que le câblage est terminé avant d’effectuer
l’installation.
❑
Afin de ne pas endommager l’unité, ne pas brancher
le connecteur d’alimentation électrique tant que la
totalité du câblage n’est pas terminée.
❑
Ne pas raccorder plus d’un haut-parleur à un
ensemble de fils de sortie de haut-parleur. (Excepté
pour un raccordement à un tweeter)
En ce qui concerne les piles pour la télécommande,
respectez les instructions suivantes :
●
Utilisez absolument la pile spécifiée (CR2025).
●
Conformer la polarité de la pile aux repères (+) et (–) sur le
porte-pile.
●
Remplacez la pile épuisée le plus tôt possible.
●
Déposez la pile de la télécommande quand vous ne l’utilisez pas
pendant une période prolongée.
●
Isolez la pile (en la mettant dans un sac plastique ou en la
recouvrant avec un ruban de vinyle) avant son rejet ou stockage.
●
Rejetez la pile selon les règlements locaux.
●
Ne démontez pas, ni rechargez, ni réchauffez, ni court-circuitez
la pile. De même, ne jetez pas la pile dans le feu ou dans l’eau.
En cas de fuite électrolytique de la pile
●
Eliminez complètement le liquide électrolytique du porte-pile
et y placez une pile neuve.
●
En cas du contact de votre corps ou vêtement avec le liquide
électrolytique, nettoyez la portion affectée à l’eau courante.
●
En cas du contact de vos yeux avec le liquide électrolytique, nettoyezles à l’eau courante et consultez immédiatement le médecin.
Français
Page 8

15
CX-DH801U
14
CX-DH801U
Français
Table des matières
¢ Informations sur la sécurité......................... 12
¢ Utilisez ce produit en toute sécurité........................................... 14
¢ Caractéristiques ........................................................................... 14
¢ Table des matières ....................................................................... 15
¢ Les disques que vous pouvez lire .............................................. 16
¢ Combinaisons diverses ............................................................... 17
¢ Préparation .................................................... 18
¢ Nom des commandes et des fonctions...................................... 72
¢
Opérations de base pour le changeur de DVD
.......... 75
¢ Changement de type d’affichage sur l’écran et indications..... 81
¢ Lecture DVD/VCD (Vidéo CD) ...................... 82
¢ Lecture de CD................................................ 86
¢ Remarques sur MP3..................................................................... 88
¢ Paramétrage ................................................. 86
¢ En cas de difficulté ....................................... 92
¢ Entretien........................................................................................ 97
¢ Fonctions correspondantes ........................................................ 98
¢ Liste des codes de langues......................................................... 99
¢ Définition des termes................................................................. 100
¢ Installation ................................................... 102
¢ Branchements électriques ........................................................ 117
¢ Spécifications ............................................................................. 115
Opérations principales
Utilisez l’unité de commande pour les commandes ordinaires.
Les fonctions de base de ce changeur de DVD peuvent être
activées à partir de l’unité de commande et de sa
télécommande. Vous pouvez commander les CD musicaux
ordinaires en utilisant l’unité de commande ou sa
télécommande seulement.
Unité de commande
L’appareil de commande signifie un appareil audio dépendant de
Panasonic pour voitures muni d’une commande de changeur
CD/DVD. L’appareil de commande ne peut commander que les
fonctions de base de ce changeur DVD. Pour les opérations
ordinaires sur DVD, nous vous recommandons d’utiliser la
télécommande fournie avec ce changeur DVD. Cependant, les
fonctions indiquées ci-dessous ne peuvent être commandées
qu’avec l’appareil de commande. Certains appareils ne prennent
pas en charge les fonctions de lecture ou de pause de ce
changeur de DVD.
• Marche/arrêt
• Sélection de source
• Réglage de volume
L’affectation des touches de fonction qui peuvent être
opérées à partir de l’unité de commande varie selon l’unité
de commande. Pour les détails, veuillez vous référer à la
section “Fonctions correspondantes” page 98.
Certains appareils audio pour voiture de type ancien ne supportent pas de changeur de DVD.
Pour connaître la compatibilité du changeur, contactez le
magasin où vous avez fait l’achat de l’appareil ou le centre
de service après-vente Panasonic le plus proche.
Télécommande pour l’unité de commande
Certaines unités de commande sont dotées d’une
télécommande ou bien sont fournies avec une télécommande
en option. Ces télécommandes peuvent aussi activer les fonctions de base d’un changeur de DVD. Ces fonctions utilisables
varient selon le type d’unité de commande ou de télécommande
à mettre en service. Veuillez vous référer à la section “Fonctions
correspondantes”, page 98, pour les détails.
Pour votre sécurité, ce système est conçu de
manière à ne pas vous laisser voir de film
pendant que vous conduisez.
¡Garez votre voiture dans un endroit sûr et mettez votre
frein à main avant de regarder le film.
¡Pour votre sécurité, vous devez vous assurer que la
connexion du câble de frein à main est correcte.
(a page 108)
Utilisez ce produit en toute sécurité
Caractéristiques
❑ Changeur à 8 disques de DVD-Vidéo / Vidéo
CD / CD
¡
Les disques DVD-Vidéo, CD Vidéo et CD audio sont
changeables.
¡
Une combinaison des disques de types différents
(DVD-Vidéo, CD Vidéo et CD audio) est acceptable.*
(a page 16)
❑ Configuration d’un système 5,1 canaux.
¡
Cet appareil est doté d’une sortie optique numérique.
En raccordant le processeur ambiophonique
numérique en option (CY-AC300) à cet appareil, il est
possible de configurer un système 5,1 canaux.
❑ Les logiciels formatés NTSC et PAL peuvent
être reproduits. (a page 88)
❑ Les sorties vidéos formatées NTSC et PAL
peuvent être créées.
¡
La bascule entre les sorties vidéo formatées NTSC et
PAL peut être réalisée toujours par une seule touche.
(a page 88)
* Un classement discontinu des disques de même type peut
augmenter sensiblement le temps de changement des disques.
Pour une description de ces fonctions, référez-vous aussi aux manuels d’instructions des
unités de commande (CQ-C9901U, CQ-VD7001U etc.).
Français 72
English 28
Español 116
La société Panasonic est heureuse de vous accueillir parmi le nombre grandissant des utilisateurs de ses appareils électroniques.
Nous nous efforçons sans cesse de vous faire bénéficier des avantages de l’ingénierie électronique et mécanique de haute
précision laquelle préside à la fabrication d’appareils ne comportant que des composants soigneusement sélectionnés et
assemblés par un personnel soucieux de la bonne réputation acquise par la qualité de son travail. Nous savons que cet appareil
vous procurera de longues heures de plaisir dès que vous découvrirez la qualité, la fiabilité et la valeur que nous avons intégrées
dans cet appareil et vous aussi serez fier de faire partie des utilisateurs de nos produits.
CX-DH801U
Changeur de 8 disques DVD
¢
Opérations de base pour le changeur de DVD
.......... 75
¢
Changement de type d’affichage OSD (affichage sur l’écran) et indications
........ 79
¢ Lecture DVD/VCD (Vidéo CD) ...................... 80
¢ Lecture de CD................................................ 84
Page 9
17
CX-DH801U
16
CX-DH801U
Français
Les disques que vous pouvez lire, Combinaisons diverses
Français
LPCM (CD-DA), DTS*
Les disques que vous pouvez lire
❒ Les disques qui ne sont pas pris en charge
Cet appareil ne prend pas en charge les disques suivants.
¡DVD-Audio ¡DVD-ROM ¡DVD-R
¡DVD+R ¡DVD-RAM ¡DVD+RW
¡DVD-RW ¡SVCD ¡VSD
¡CVD ¡CD-G
¡CD-ROM ¡CD-RW (sauf CD-DA)
¡CD-R (sauf CD-DA) ¡SACD
¡CD Photos ¡CDV
¡SACD hybride (sauf CD-DA)
¡CD-TEXT (sauf pour la reproduction du son)
¡Disques vidéo Divx
¡CD-EXTRA (lecture audio seule possible)
¡
DVD avec un numéro de région autre que “1” ou “ALL (TOUS)”
¡Si vous tentez de lire un disque CD de photos sur
cet appareil, vous pouvez endommager les
données qui sont enregistrées sur le disque.
Remarques:
¡Référez-vous à
“
Remarques sur les CD-R/RWӈ propos
des CD-R et des CD-RW (a page 75).
¡Certains CD musicaux protégés contre les copies et ne
sont pas lisibles.
¡DTS ne fonctionne qu’avec les sorties optiques.
*
¡Même si vous voulez lire un DVD DTS ou un CD DTS, le
son analogique ne peut être reproduit. (Seule la sortie
numérique sort)
¡Les fichiers WMA ne sont pas pris en charge.
¡Cet appareil ne prend pas en charge les disques de 8 cm.
❒ Symboles utilisés sur les couvertures
(Des exemples de ces symboles comprennent)
¡
: Nombre de langues de sous-titrage
¡ : Nombre de plages audio
¡ : Nombre d’angles
Les chiffres indiquent le nombre de langues, de
plages, d’angles, etc., enregistrés sur le disque.
Formats d’écran (rapport de format H:V)
¡ : Écran standard 4:3
¡ : Boîte aux lettres (a pages 88, 100)
¡ Grand écran 16:9
: Lecture en format Boîte aux lettres sur
un écran standard (4:3).
: Lecture en format (a
pages 88, 100) sur un écran standard
(4:3).
Remarque:
La taille de l’image qui est affichée à l’écran
dépend du mode d’écran (“TV MODE” a page 88) et du
format d’écran pour le contenu du disque.
❒ Informations sur la gestion de régions
Ce produit est conçu et fabriqué pour se conformer
aux informations sur la gestion de régions qui sont
enregistrées sur les disques DVD. Si le numéro de
région mentionné sur le DVD ne correspond pas au
numéro de région de cet appareil, cet appareil ne
pourra pas lire le disque.
Le numéro de région de cet appareil est “1” ou
“ALL (TOUS)”.
PAN & SCAN
PS16:9
LB16:9
LB
4:3
3
2
2
❒ Types de disques
Recordable
ReWritable
Exemple :
DISQUES DVD
VCD
(Vidéo CD)
CD CD-R/RW
Marque/
logo
Dimension
de disque
12 cm (5 po.)
Standard
vidéo
NTSC / PAL
Format
AUDIO
LPCM,
MPEG1,
MPEG2,
DTS*,
Dolby
Digital
LPCM,
MPEG1
N° de
région
1
ALL (TOUS)
ENTER
Combinaisons diverses
❑ Système de base
Connexion de l’écran et du récepteur/CD 1 DIN
avec commande de changeur de CD/DVD.
Il suffit de connecter un écran et ce changeur de DVD à
votre système audio de base 1 DIN pour pouvoir
regarder non seulement le DVD, mais aussi écouter les
CD musicaux ordinaires.
❑ Système optionnel (exemple)
Cet appareil peut être associé avec d’autres composants
comme indiqué ci-dessous. Référez-vous aux manuels
d’instructions des dispositifs connectés pour plus de
détails.
❑ Système ambiophonique 5,1 canaux
Cet appareil dispose d’une sortie numérique optique.
Pour connecter le processeur ambiophonique
numérique en option (CY-AC300) à cet appareil, vous
pouvez implanter un système ambiophonique 5,1
canaux afin de lire le logiciel de DVD d’une manière qui
donne la sensation “d’y être” dans une voiture.
Amplificateur de
puissance externe:
(option)
Haut-parleurs ambiophonique : CJ-DA6920
Extrêmes-graves :
CJ-HD303
Changeur de 8 disques
DVD: CX-DH801U
Moniteur couleur
grand-écran à écran à
cristaux liquides de
7 po. intégré en tableau
de bord/récepteur DVD:
CQ-VD7001U
Processeur ambiophonique numérique:
CY-AC300
Haut-parleur central :
EAB-CF2
Haut-parleurs avant :
CJ-DA1600
TRACK/SEARCH
DISC/FOLDER
NTSC/PAL
TITLE/CHAPTER
TRACK
STOP
RANDOM
RETURN
PAUSE
PLAY
REPEAT
SUBTITLE
CAR AV
TITLE
E
N
T
E
R
SETUP
MENU
RAND
SCAN
REP
GRP RET
ANGLE
SUB
AUDIO
123
456
7
OSD
809
CX-DH801
CY-V7100U
PHONES
SRC
CS
Récepteur/lecteur CD
avec écran OEL de
512 couleurs et lecture WMA/MP3:
CQ-C9901U
Changeur de 8 disques
DVD: CX-DH801U
Écran sur l’appuietête: CY-V7100U
Processeur ambiophonique numérique :
CY-AC300
Amplificateur de puissance externe
Écran sur l’appuie-tête: CY-V7100U
❑ Aux utilisateurs de CQ-VD7001U
Comment sélectionner l’écran du changeur de DVD
En mode changeur de DVD, l’affichage du changeur de
DVD apparaît automatiquement si les réglages suivants
sont préalablement paramétrés au menu “INPUT/OUTPUT” (entrée/sortie).
q
Pressez/touchez [MENU].
w
Pressez/touchez [INPUT/OUTPUT]
/
[SELECT]/[INPUT SELECT].
e
Sélectionnez [CH INPUT]/Sélectionnez [VTR].*
r
Pressez/touchez [END] pour quitter le menu.
* Lors de la connexion de la sortie vidéo du changeur de DVD
et de l’entrée VTR1 de CQ-VD7001U.
ENTER
TILT O/C
ASP
MUTE
MODE MENU
CQ-VD7001U
NAVI
OPEN / CLOSE
EJECTNAVIGATION
ASPECT
POWER
VOL
P·MODE
DISC
TUNE
/TRACK
OPEN / CLOSE
CQ-VD7001U
TILT
TEXT
Moniteur couleur grand-écran à écran à
cristaux liquides de 7 po. intégré en tableau
de bord/récepteur DVD:
CQ-VD7001U
Récepteur/lecteur CD avec écran OEL
de 512 couleurs et lecture WMA/MP3:
CQ-C9901U
13
1
46
ALL
CY-V7100U
PHONES
CS
SRC
TAL
GI
DI
PRO LOGIC
ROCESSOR
P
OUND
R
L SUR
A
DIGAT
SOURCE
0
AC30
super bright multi-color display & 30w Power Amplifier for Center Speaker
VOL
MUTE
1
PWR
L
E
C
R
S
U
O
E
S
ER
M
DIM
SPACE
DIM
POSITION
SPC
POSI
P
DR COM
4
3
2
Panasonic
CQ-VD7500U
CQ-VD7700U
IN-DASH 7" WIDESCREEN COLOR LCD MONITOR TV / DVD / SD RECEIVER
OPEN
VOLUME
MUTE NAVI DISP
MODE
POWER ASPECT
NAVIGATION
CX-DH801
P
D
N
U
O
R
UR
S
L
A
T
A
G
I
D
E
C
R
OU
S
0
0
3
C
A
l
o
c
-
i
t
l
u
m
t
h
g
i
r
b
r
e
p
u
s
V
O
L
2
TE
U
M
1
R
W
P
L
E
C
R
S
U
O
E
S
TILT
OPEN / CLOSE
OPEN / CLOSE
TILT
TRACK/
CHANNEL
ENTER
DISC
SD CARD
·
P
MODE
ASP
L
A
T
I
G
I
D
C
I
G
O
L
OR
O
S
R
S
P
CE
O
R
r
e
k
a
e
p
S
r
e
R
t
E
n
e
MM
C
I
r
D
o
f
r
e
i
f
i
l
E
p
C
A
m
P
A
S
r
e
w
o
P
ON
DIM
I
0w
T
3
I
S
&
y
PO
a
l
p
s
i
C
d
P
r
S
o
I
S
O
P
P
M
O
C
R
D
4
3
Page 10
19
CX-DH801U
Préparation
Français
18
CX-DH801U
Français
Préparation
Installation de la pile
(Insertion/remplacement de la pile)
Il est conseillé de vérifier et de spécifier les réglages suivants avant d’utiliser l’appareil pour la première fois.
Les opérations varient selon le disque. Pour de plus
amples détails, référez-vous à la notice fournie avec le
disque.
TV TYPE (Type télé) (a page 88)
Réglage :
Réglez le format vidéo de votre écran dans “TV TYPE”.
Vérification :
Vérifiez si “TV TYPE” est réglé à “NTSC” (ou “PAL”) lors de
la connexion d’un écran NTSC (ou PAL).
TV MODE (Mode télé) (a page 88)
Réglage :
Sélectionnez le rapport de format en “TV MODE”. Le rapport
de format standard de Panasonic est “WIDE”.
Vérification :
Vérifiez si l’image sur l’écran est affichée d’une manière
naturelle.
PREFERENCES (a page 90)
Réglage :
Sélectionnez la langue ayant la première priorité de reproduction dans “PREFERENCES”.
*Ce réglage est valide lorsque le DVD contient la langue
sélectionnée.
Vérification :
Vérifiez si l’appareil affiche le sous-titre et/ou le menu de
disque ou reproduit le son en langue sélectionnée.
COMPRESSION (DR COMP: Compression de
la gamme dynamique)
(a page 89)
Réglage :
Réglez la gamme dynamique de reproduction du son dans le
menu “COMPRESSION”.
Afin d’empêcher le son d’atteindre la pointe brusquement, il
est recommandé de régler cette valeur à “MINIMUM”.
Vérification :
Vérifiez si vous entendez nettement le son de volume bas
lors de la lecture d’un DVD ayant une large gamme
dynamique.
Composantes
Télécommande
Réglages et vérifications
Remarques:
¡Le nombre entre parenthèses figurant sous chaque pièce
accessoire est le nom de la pièce, destiné à la maintenance et au service.
¡Dans le cadre d’améliorations, les accessoires et leur
numéro de pièce peuvent changer sans notice préalable.
7. Matériel d’installation (vis, cordons,
etc.) (a page 104)
6. Carte de garantie, etc.
Q’té : 1 ensemble
5. Manuel d’instructions
<YFM284C437ZA>
Qté : 1
XXXXXXXXXXXXXXX
XXXXXXXXXXXXXXXXX
XXXXXXXXXXXXXX
XXXXXXXXXXXXXXXX
OO-OOOOO
4. Pile au lithium (CR2025)
Qté : 1
3. Télécommande
<YEFX999256A>
Qté : 1
TRACK/SEARCH
DISC/FOLDER
NTSC/PAL
TITLE/CHAPTER
TRACK
STOP
RANDOM
RETURN
PAUSE
PLAY
REPEAT
SUBTITLE
CAR AV
TITLE
E
N
T
E
R
SETUP
MENU
RAND
SCAN
REP
GRP RET
ANGLE
SUB
AUDIO
123
456
7
OSD
809
2. Chargeur de disques
<VYQ3174>
Qté : 1
1. Changeur de DVD
Qté : 1
CX-DH801U
q Retirez le porte-pile.
Avec la télécommande placée sur une surface plane.
q Insérez l’ongle du pouce dans la rainure et appuyez
simultanément sur le support dans le sens de la
flèche.
w Tirez dessus dans le sens de la flèche avec un objet à
pointe dure.
Pile au lithium
(CR2025 fournie)
Porte-pile
w Installez la pile dans le porte-pile.
Mettez correctement en place une pile neuve avec sa
face (+) dirigée vers le haut, comme indiqué sur la
figure.
e Remettez le porte-pile en position initiale.
Face arrière
Objet à pointe dure
Remarques sur la pile
Avertissement
¡Pour éviter des risques d’accidents, conserver les piles
hors de portée des enfants. Si un enfant avalait une pile,
consulter immédiatement un médecin.
Précaution
¡Retirer et éliminer immédiatement la pile épuisée.
¡Ne pas démonter, recharger, chauffer la pile ou
provoquer un court-circuit. Ne pas jeter de pile dans le
feu ou de l’eau.
¡Éliminer la pile selon les règlements locaux en vigueur.
¡L’utilisation incorrecte de la pile peut provoquer une
surchauffe, une explosion ou l’ignition, résultant en
des blessures ou un incendie.
Remarque: Informations sur la pile :
Sorte de pile : Pile au lithium Panasonic (CR2025)
Durée de vie de la pile : 6 mois environ dans des conditions
normales d’utilisation (à température ambiante normale)
Pictogrammes
Les pictogrammes présentés ci-dessous sont utilisés
dans ce manuel pour indiquer les types compatibles de
disques et d’appareils.
Disques : DVD vidéo
: VCD (vidéo CD)
: CD
Commande : Unité de commande ou
télécommande pour l’unité de commande.
: Télécommande du changeur DVD
DVDDVDDVD VCD CD MP3 CH-C
w
q
w
e
Page 11
21
CX-DH801U
20
CX-DH801U
Español
Información de seguridad
Información de seguridad
Español
Advertencia
Observe las advertencias siguientes cuando
utilice esta unidad.
❑
El conductor no deberá mirar el visualizador ni
operar el sistema mientras esté conduciendo.
La operación del sistema distraerá al conductor que no
podrá mirar lo que hay delante del vehículo, y puede ser
causa de accidentes. Pare siempre el vehículo en un lugar
que sea seguro y aplique el freno de estacionamiento antes
de operar el sistema.
❑
Emplee la alimentación adecuada.
Este producto está diseñado para funcionar con un sistema
de batería de 12 V CC, con el negativo a tierra. No haya
funcionar nunca este aparato con otras baterías,
especialmente con baterías de 24 V CC.
❑
Mantenga las pilas fuera del alcance de los niños.
Las pilas pueden ser ingeridas, por lo que deberá
mantenerlas fuera del alcance de los niños. Si un niño se
traga una pila, llévelo inmediatamente al médico.
❑
Proteja el mecanismo de carga.
No inserte ningún objeto extraño en la ranura de esta
unidad.
❑
No desmonte ni modifique la unidad.
No desmonte ni modifique la unidad, ni intente repararla por
sí mismo. Si es necesario reparar el aparato, consulte a su
distribuidor o a un centro de servicio técnico Panasonic
autorizado.
❑
No emplee la unidad cuando no funcione con
normalidad.
Si la unidad no funciona con normalidad (no se enciende o
no hay sonido) o si está en un estado anormal (se ha
introducido algún objeto dentro, se ha mojado, sale humo, o
produce olor), apáguela inmediatamente y consulte a su
distribuidor.
❑
No deberá dejarse tirando el mando a distancia por
el interior del automóvil.
Si se deja tirado el mando a distancia, podría caerse al suelo
durante la circulación, atascarse debajo del pedal del freno, y
ocasionar un accidente de tráfico.
❑
Solicite el reemplazo del fusible a personal de
servicio cualificado.
Cuando se queme el fusible, solucione la causa y solicite a
un técnico de servicio cualificado que reemplace el fusible
por otro del tipo indicado para esta unidad. El reemplazo
incorrecto del fusible puede ocasionar humo, fuego, y daños
en la unidad.
Observe las advertencias siguientes durante la
instalación.
❑
Desconecte el cable del terminal negativo (–) de la
batería antes de efectuar la instalación.
Las conexiones y la instalación con el terminal negativo (–)
de la batería conectado puede causar descargas eléctricas y
heridas debidas a cortocircuitos.
Algunos automóviles que están provistos de un sistema de
seguridad eléctrica tienen unos procedimientos específicos
para la desconexión del terminal de la batería.
SI NO SIGUE EL PROCEDIMIENTO INDICADO PUEDE
RESULTAR EN LA ACTIVACIÓN IMPREVISTA DEL SISTEMA
DE SEGURIDAD ELÉCTRICA, RESULTANDO EN DAÑOS EN
EL VEHÍCULO Y HACIÉNDOLE CORRER EL PELIGRO DE
HERIDAS PERSONALES O DE MUERTE.
❑
No emplee nunca los componentes relacionados
con la seguridad para la instalación, puesta a
tierra, ni otras funciones semejantes.
No emplee componentes del vehículo relacionados con la
seguridad (depósito de combustible, frenos, suspensión,
volante, pedales, airbag, etc.) para efectuar las conexiones o
la fijación de la unidad o de sus accesorios.
❑
Está prohibida la instalación de la unidad en la cubierta
de un airbag o en lugares en los que pueda causar
interferencias con el funcionamiento de un airbag.
❑
Compruebe los tubos, el depósito de gasolina, las
conexión eléctricas, y otros elementos antes de
instalar la unidad.
Si tiene que perforar un orificio en el chasis del vehículo para montar
o conectar la unidad, compruebe primero la ubicación de los mazos
de cables, depósito de gasolina, y de las conexiones eléctricas.
Entonces, perfore el orificio desde el exterior si es posible.
❑
No instale nunca la unidad en un lugar en el que pueda
causar interferencias con su campo de visión.
❑
No bifurque nunca el cable de alimentación ni lo
utilice para suministrar alimentación a otro equipo.
❑
Después de la instalación y de las conexiones
eléctricas, deberá comprobar el funcionamiento
normal de los demás dispositivos eléctricos.
Si se sigue utilizando en condiciones anormales se correrá el
peligro de incendio, descargas eléctricas o de un accidente
de tráfico.
❑
Cuando se instale en un automóvil provisto de airbags,
confirme las advertencias y las precauciones del
fabricante del vehículo antes de efectuar la
instalación.
❑
Asegúrese de que los cables no causen
interferencias durante la conducción no la entrada y
salida del vehículo.
❑
Aísle todos los conductores expuestos para evitar
cortocircuitos.
Este pictograma tiene el propósito de avisarle
sobre la presencia de instrucciones de operación y
de instrucciones de instalación importantes. Si no
se siguen las instrucciones se correrá el peligro de
heridas graves o de muerte.
■
Lea detenidamente las instrucciones de operación de la unidad
y de todos los otros componentes de su sistema de audio
para automóvil antes de utilizar el sistema. Contienen
instrucciones sobre la utilización del sistema de forma segura
y eficaz. Panasonic no asume ninguna responsabilidad por
ningún problema que pueda surgir debido a no haber
observado las instrucciones dadas en este manual.
■
Este manual emplea pictogramas para mostrarse la forma de
utilizar el producto con seguridad y para avisarle sobre los
peligros potenciales que pueden acontecer debido a
conexiones y operaciones incorrectas. A continuación se
explica el significado de los pictogramas. Es importante que
comprenda bien los significados de los pictogramas para
poder utilizar este manual y el sistema de la forma adecuada.
Advertencia
Este pictograma tiene el propósito de avisarle
sobre la presencia de instrucciones de operación y
de instrucciones de instalación importantes. Si no
se siguen las instrucciones se correrá el peligro de
heridas o de daños materiales.
Precaución
Precaución
Observe las precauciones siguientes cuando
utilice esta unidad.
❑
Mantenga el volumen del sonido a un nivel adecuado.
Mantenga el nivel de volumen lo suficientemente bajo para
poder ser consciente de las condiciones del tráfico mientras
esté conduciendo.
❑
No inserte ni se pille un dedo o la mano en la unidad.
Para evitar heridas, no ponga la mano ni los dedos en las
partes móviles ni en la ranura del disco. Vigile especialmente
a los niños.
❑
Esta unidad está diseñada para ser utilizada
exclusivamente en automóviles.
❑
No opere la unidad durante períodos prolongados
con el motor parado.
La operación del sistema de audio durante períodos
prolongados con el motor parado descargará la batería.
❑
No exponga la unidad a la luz directa del sol ni a
calor excesivo.
De lo contrario, aumentaría la temperatura del interior de la
unida, pudiéndose ocasionar humo, fuego, u otros daños en
la unidad.
❑
No emplee la unidad en lugares en los que pueda
quedar expuesta al agua, a la humedad, o al polvo.
La exposición de la unidad al agua, a la humedad, o al polvo
puede ocasionar humo, fuego, y otros daños en la unidad.
Especialmente, asegúrese de que la unidad no se moje
cuando lave el automóvil o en días de lluvia.
❑
Asegúrese de mantener cerrada la puerta de la
unidad del disco para evitar la entrada de suciedad y
polvo en la unidad y un posible mal funcionamiento.
❑
El cartucho no puede insertarse cuando hay una
bandeja que no está cargada en su lugar. En esta
situación, la inserción forzada puede ocasionar
daños en la unidad y en el cartucho.
❑
El conductor no deberá ponerse los auriculares
mientras conduce.
Observe las precauciones siguientes durante
la instalación.
❑
Solicite a personal de servicio cualificado que le
efectúe las conexiones y la instalación.
La instalación de esta unidad requiere conocimientos
especiales y experiencia.
Para mayor seguridad, pida a su distribuidor que se la instale.
Panasonic no se hace responsable de los problemas que
puedan surgir debido a la instalación de la unidad.
❑
Siga las instrucciones para instalar y conectar la
unidad.
Si no se siguen las instrucciones para instalar y conectar
correctamente la unidad, se correrá el peligro de accidentes
o incendios.
❑
Tenga cuidado para no dañar los cables.
Cuando efectúe las conexiones, tenga cuidado para no dañar
los cables. Evite que queden pellizcados en el chasis del
vehículo, en tornillos, y en parte móviles tales como los
rieles del asiento. No raspe, tire con fuerza ni retuerza los
cables. No los ponga cerca de fuentes de calor ni coloque
objetos pesados encima. Si deben ponerse cables por
encima de bordes metálicos afilados, proteja los cables con
cinta aislante u otra protección similar.
❑
Emplee las partes y las herramientas designadas
para la instalación.
Emplee las partes suministradas o designadas y las
herramientas apropiadas para instalar la unidad. El empleo
de partes que no sean las suministradas o las designadas
puede ser causa de daños internos en la unidad.
La instalación incorrecta puede originar un accidente, un mal
funcionamiento o un incendio.
❑
No bloquee la rejilla de ventilación de la unidad.
Si se bloquea esta parte, se producirá sobrecalentamiento en
el interior de la unidad y se correrá el peligro de incendio u
otros daños.
❑
No instale la unidad en lugares en los que pueda
quedar expuesta a fuertes vibraciones ni en lugares
inestables.
Evite superficies inclinadas o muy curvadas para la
instalación. Si la instalación no es estable, la unidad puede
caerse durante la circulación, lo cual puede ser causar de un
accidente o de heridas.
❑
Ángulo de instalación
La unidad debe instalarse en posición horizontal con el
extremo frontal arriba al ángulo designado, 0°, 22,5°, 45°,
67,5° o 90°.
El usuario deberá tener presente que en algunos lugares
pueden haber restricciones sobre el modo y la posición de
instalación de esta unidad.
Para obtener más detalles, consulte a su distribuidor.
❑
Póngase guantes para mayor seguridad. Asegúrese
de haber completado las conexiones antes de
efectuar la instalación.
❑
Para evitar daños en la unidad, no conecte el
conector de la alimentación hasta haber completado
todas las conexiones.
❑
No conecte más de un altavoz un mismo juego de
cables de altavoz. (excepto para la conexión de un
altavoz de agudos)
Observe las precauciones siguientes cuando
manipule las pilas del mando a distancia.
●
Emplee sólo el tipo de pila especificado (CR2025).
●
Haga corresponder las polaridades de la pila con las marcas
(+) y (–) de la caja de la pila.
●
Reemplace la pila gastada tan pronto como sea posible.
●
Extraiga la pila del mando a distancia cuando no lo utilice
durante períodos prolongados de tiempo.
●
Aísle la pila (poniéndola en una bolsa de plástico o
cubriéndola con cinta de vinilo) antes de tirarla o de guardarla.
●
Tire la pila de acuerdo con las regulaciones locales.
●
No desmonte, recargue, caliente ni cortocircuite las pilas. No
tire las pilas al fuego ni al agua.
En caso de fugas de líquido de las pilas
●
Frote bien el líquido de la pila que pueda haber en la caja de
la pila, e inserte una pila nueva.
●
Si alguna parte de su cuerpo o de su ropa se ha puesto en
contacto con el líquido de la pila, lávela con gran cantidad de
agua.
●
Si el líquido de la pila se pone en contacto con los ojos,
láveselos con gran cantidad de agua y vaya inmediatamente
al médico.
Page 12

22
CX-DH801U
23
CX-DH801U
Español
Contenido
¢ Información de seguridad............................ 20
¢ Emplee este aparato con seguridad........................................... 22
¢ Características.............................................................................. 22
¢ Contenido...................................................................................... 23
¢ Discos que pueden reproducirse ............................................... 24
¢ Combinaciones del sistema ........................................................ 25
¢ Preparación ................................................... 26
¢ Nomenclatura y funciones de los controles............................ 116
¢
Operación básica del cambiador de discos DVD
..... 119
¢ Cambio e indicaciones de OSD (Visualización en pantalla)...... 127
¢
Reproducción de discos DVD/VCD (Vídeo CD)
.. 128
¢ Reproducción de discos CD/MP3.............. 132
¢ Notas sobre los archivos MP3 .................................................. 134
¢ Ajustes ......................................................... 130
¢ Soluci
ón de problemas
................................................ 136
¢ Mantenimiento ............................................................................ 141
¢ Funciones correspondientes .................................................... 142
¢ Lista de códigos de idiomas ..................................................... 143
¢ Definición de términos............................................................... 144
¢ Instalación ................................................... 146
¢ Conexiones eléctricas ............................................................... 151
¢ Especificaciones ........................................................................ 159
English 28
Français 72
Español 116
Operación principal
Para ver la descripción de las funciones, consulte también el manual de instrucciones
de la unidad de control (CQ-C9901U, CQ-VD7001U etc.).
Emplee la unidad de control para las
operaciones normales
Las funciones básicas de este cambiador de discos DVD
también pueden realizarse con la unidad de control y el
mando a distancia para la unidad de control. Podrá operar los
discos CD musicales normales con la unidad de control o
con su mando a distancia solamente.
Unidad de control
La unidad de control es una unidad dependiente de audio
para automóvil Panasonic con control de cambiador de
discos CD/DVD. La unidad de control sólo puede operar las
funciones básicas de este cambiador de discos DVD. Para
las operaciones normales con discos DVD, le
recomendamos emplear el mando a distancia suministrado
con este cambiador de discos DVD. Sin embargo, las
funciones enumeradas a continuación pueden operarse sólo
con la unidad de control. Algunas unidades no permiten la
función “PLAY” y/o “PAUSE” de este cambiador de discos
DVD.
• Conexión/desconexión de la alimentación
• Selección de fuentes
• Subida/baja del volumen
La asignación de los botones que pueden operarse con la
unidad de control varía según la unidad de control. Para
encontrar más detalles, consulte el apartado “Funciones
correspondientes” en la página 142.
Algunas unidades de audio para automóvil de tipos más
antiguos no son compatibles con los cambiadores de discos
DVD. Para saber la compatibilidad, consulte a su distribuidor
local o al centro de servicio Panasonic más cercano.
Mando a distancia para la unidad de control
Algunas unidades de control se sirven con un mando a distancia
o tienen un mando a distancia disponible a modo opcional.
Estos mandos también pueden operar las funciones básicas de
un cambiador de discos DVD. Las funciones que pueden
operarse varían con el tipo de unidad de control o mando a
distancia que se utilicen. Para encontrar más detalles, consulte
el apartado “Funciones correspondientes” en la página 142.
Para su propia seguridad, este sistema está
diseñado para que no se pueda ver la imagen
en movimiento mientras se está conduciendo.
¡Estacione el automóvil en un lugar que sea seguro y
aplique el freno de estacionamiento para ver las imágenes
en movimiento.
¡Por su propia seguridad, deberá asegurarse de que la
conexión del cable del freno de estacionamiento sea
correcta. (a página 152)
Emplee este aparato con seguridad
Características
❑ Cambiador de 8 discos DVD Vídeo / Vídeo
CD / CD
¡
Los discos DVD, Vídeo CD y CD pueden
intercambiarse.
¡
La mezcla de discos de tipos distintos (discos DVD
Vídeo, Vídeo CD y Audio CD) es aceptable.*
(a página 24)
❑ Puede instalarse un sistema de 5,1 canales
¡
Este aparto tiene una salida óptica digital. Conectando
el procesador de sonido Surround digital opcional
(CY-AC300) a esta unidad, podrá instalar un sistema
de 5,1 canales.
❑ Pueden reproducirse programas de los
formatos NTSC y PAL. (a página 132)
❑ Pueden generarse los formatos de vídeo
NTSC y PAL
¡
La salida en los formatos de vídeo NTSC y PAL
siempre pueden cambiarse con una sola pulsación.
(a página 132)
* La colocación de forma discontinua de discos del mismo tipo
puede hacer que se tarde más tiempo en cambiar de discos.
Panasonic les da la bienvenida a su familia en constante crecimiento de propietarios de productos electrónicos.
Nuestro propósito es el de proporcionarle las ventajas de la electrónica de precisión y de la ingeniería mecánica, fabricación con
componentes cuidadosamente seleccionados, y montados por personas que se sienten orgullosas de la reputación que su trabajo
ha otorgado a nuestra empresa. Sabemos que este producto le proporcionará muchos años de entretenimiento y, después de que
usted descubra la calidad, el valor y la fiabilidad que hemos incorporado, usted también se sentirá orgulloso de ser un miembro
de nuestra familia.
CX-DH801U
Cambiador de 8 Discos de DVD
¢
Operación básica del cambiador de discos DVD
..... 119
¢ Cambio e indicaciones de OSD (Visualización en pantalla)...... 123
¢
Reproducción de discos DVD/VCD (Vídeo CD)
.. 124
¢ Reproducción de discos CD...................... 128
Page 13

25
CX-DH801U
24
CX-DH801U
Español
Discos que pueden reproducirse, Combinaciones del sistema
Español
Combinaciones del sistema
❑ Sistema opcional (Ejemplo)
Esta unidad puede combinarse con otros componentes
como se muestra a continuación. Para más detalles al
respecto, consulte el manual de instrucciones de lis
dispositivos conectados.
Procesador ambiental digital:
CY-AC300
ENTER
Reproductor de DVD/receptor con pantalla LCD a color de 7 pulgadas:
CQ-VD7001U
Reproductor de CD, WMA y
MP3/receptor con pantalla OEL de 512
colores: CQ-C9901U
Amplificador de potencia exterior
Monitor del apoyacabezas: CY-V7100U
❑ Para los usuarios del CQ-VD7001U
Cómo cambiar la visualización del cambiador de
discos DVD
En el modo de cambiador de discos DVD, la
visualización del cambiador de discos DVD aparecerá
automáticamente si se efectúan previamente los ajustes
siguientes en el menú “INPUT/OUTPUT”.
q
Presione/pulse [MENU].
w
Presione/pulse [INPUT/OUTPUT]/[SELECT]
/
[INPUT SELECT].
e
Seleccione [CH INPUT]/Seleccione [VTR]. *
r
Presione/pulse [END] para cerrar el menú.
* Cuando se conecte la salida de vídeo del cambiador de
discos DVD a la entrada VTR1 del CQ-VD7001U.
ENTER
❑Sistema básico
Conexión del monitor de visualización y del
reproductor de discos CD/receptor con control de
cambiador de discos CD/DVD 1DIN.
Meramente conectando un monitor de visualización y
este cambiador de discos DVD a su sistema de audio
básico 1 DIN, no sólo podrá mirar los DVD, sino que
también podrá escuchar discos CD normales.
❑
Sistema de sonido ambiental de 5,1 canales
Este aparto tiene una salida óptica digital. Conectando el
procesador ambiental digital (CY-AC300) a esta unidad,
podrá formar un sistema de sonido ambiental de 5,1
canales para poder reproducir los programas de DVD
creando una sensación “de estar ahí” dentro del
automóvil.
Amplificador de
potencia
Altavoces de scnido
ambiental:
CJ-DA6920
Altavoz de subgraves:
CJ-HD303
Cambiador de 8 Discos
de DVD: CX-DH801U
Reproductor de
DVD/receptor con
pantalla LCD a color
de 7 pulgadas:
CQ-VD7001U
Procesador
ambiental digital:
CY-AC300
Altavoz central:
EAB-CF2
Altavoces delanteros:
CJ-DA1600
TRACK/SEARCH
DISC/FOLDER
NTSC/PAL
TITLE/CHAPTER
TRACK
STOP
RANDOM
RETURN
PAUSE
PLAY
REPEAT
SUBTITLE
CAR AV
TITLE
E
N
T
E
R
SETUP
MENU
RAND
SCAN
REP
GRP RET
ANGLE
SUB
AUDIO
123
456
7
OSD
809
CX-DH801
CY-V7100U
PHONES
SRC
CS
Reproductor de CD,
WMA y MP3/receptor
con pantalla OEL de
512 colores:
CQ-C9901U
Cambiador de 8 Discos
de DVD: CX-DH801U
Monitor del
apoyacabezas:
CY-V7100U
Discos que pueden reproducirse
❒ Discos que no son compatibles
Los discos siguientes no podrán reproducirse en este aparato.
¡DVD-Audio
¡DVD-ROM ¡DVD-R ¡DVD+R
¡DVD-RAM ¡DVD+RW ¡DVD-RW
¡SVCD ¡VSD ¡CVD
¡CD-G ¡Discos CD-ROM
¡CD-RW (excepto CD-DA) ¡CD-R (excepto CD-DA)
¡SACD ¡Discos Photo CD ¡CDV
¡SACD híbridos (excepto CD-DA)
¡CD-TEXT (excepto para la reproducción del sonido)
¡Discos con vídeo Divx
¡CD-EXTRA (sólo es posible la reproducción del audio)
¡Discos DVD con un número de región que no sea
“1” o “ALL”.
¡La reproducción de un disco Photo CD con este
aparato puede ocasionar daños en los datos
grabados en el disco.
Nota:
¡
Para más información sobre los discos CD-R y CD-RW, consulte
las “Notas sobre los discos CD-R/RW”. (
a
página 119)
¡Algunos discos CD protegidos contra copia no pueden
reproducirse.
¡La función DTS sólo funciona con salidas ópticas.*
¡Aunque reproduzca un disco DVD con DTS o un disco CD
con DTS, no podrá reproducirse el sonido analógico.
(Sólo se emite por la salida digital)
¡Los archivos WMA no pueden reproducirse.
¡Este aparato no es compatible con discos de 8 cm.
1
ALL
13
46
Ejemplo:
LPCM (CD-DA), DTS*
❒ Tipo de disco
Recordable
ReWritable
DISCO DVD
VCD
(Vídeo CD)
CD CD-R/RW
Marca/
logotipo
Tamaño
del disco
12 cm (5”)
Formato
de vídeo
NTSC / PAL
Formato
de audio
LPCM,
MPEG1,
MPEG2,
DTS*,
Dolby
Digital
LPCM,
MPEG1
N.° de
región1TODOS
❒ Símbolos utilizados en los estuches
(Ejemplos de estos símbolos)
¡
: Número de idiomas de los subtítulos
¡ : Número de pistas de audio
¡ : Número de ángulos
Los números indican el número de idiomas, pistas,
ángulos, etc. grabados en el disco.
Tamaño de la pantalla (relación del aspecto H:V)
¡ : 4:3 tamaño normal
¡ : Letterbox (a páginas 132, 144)
¡ 16:9 tamaño panorámico
: Reproducción en formato “Letterbox”
(buzón) en una pantalla normal (4:3).
: Reproducción en formato
(panorámico y exploración) (a página
132, 144) en una pantalla normal (4:3).
Nota: El tamaño de la imagen visualizada en la pantalla
depende del modo de pantalla (“TV MODE” apágina
132), y del tamaño de la pantalla para el contenido del
disco.
❒ Información de la gestión de regiones
Este aparato está diseñado y fabricado para responder
a la información de la gestión de regiones que está
grabada en los discos DVD. Si el número de región
indicado en el disco DVD no corresponde con el
número de región de este aparato, no podrá
reproducirse el disco con este aparato.
El número de región de este aparato es “1” o
“ALL”.
PAN & SCAN
PS16:9
LB16:9
LB
4:3
3
2
2
TILT
OPEN / CLOSE
OPEN / CLOSE
TILT
CQ-VD7500U
CQ-VD7700U
TRACK/
IN-DASH 7" WIDESCREEN COLOR LCD MONITOR TV / DVD / SD RECEIVER
CHANNEL
MUTE NAVI DISP
ENTER
DISC
SD CARD
·
P
MODE
MODE
ASP
POWER ASPECT
NAVIGATION
CY-V7100U
OPEN
VOLUME
PHONES
CQ-C9800N
BAND
TAL
GI
DI
PRO LOGIC
ROCESSOR
P
OUND
R
L SUR
A
DIGAT
SOURCE
ER
0
AC30
M
DIM
SPACE
DIM
POSITION
SPC
POSI
P
super bright multi-color display & 30w Power Amplifier for Center Speaker
DR COM
VOL
4
3
2
MUTE
1
PWR
L
E
C
R
S
U
O
E
S
Panasonic
CQ-VD7500U
CQ-VD7700U
IN-DASH 7" WIDESCREEN COLOR LCD MONITOR TV / DVD / SD RECEIVER
OPEN
VOLUME
MUTE NAVI DISP
NAVIGATION
CX-DH801
R
U
S
L
A
AT
G
I
D
E
RC
OU
S
0
0
C3
A
h
g
i
r
b
r
e
p
u
s
V
O
L
TE
U
M
1
R
W
P
L
E
C
R
S
U
O
E
S
MODE
POWER ASPECT
P
D
N
U
O
R
l
o
c
i
t
l
u
m
t
2
TILT
OPEN / CLOSE
OPEN / CLOSE
TILT
TRACK/
CHANNEL
ENTER
DISC
SD CARD
·
P
MODE
ASP
L
A
T
I
G
I
D
C
I
G
O
L
OR
O
S
R
S
P
OCE
R
r
e
k
a
e
p
S
r
e
R
t
E
n
M
e
M
C
I
r
D
o
f
r
e
i
f
i
l
E
p
C
A
m
P
A
S
r
e
w
o
P
IM
w
ON
D
I
0
T
I
3
&
y
POS
a
l
p
s
i
C
d
P
r
S
o
I
S
O
P
P
M
CO
DR
4
3
Page 14

27
CX-DH801U
Preparación
Español
26
CX-DH801U
Español
Preparación
Instalación de las pilas
(inserción/reemplazo de la pila)
Componentes Mando a distancia
Nota:
¡Los números entre paréntesis de debajo del nombre de
cada parte accesoria son los números de parte para el
mantenimiento y el servicio técnico.
¡Los accesorios y sus números de parte están sujetos a
cambios sin previo aviso por razones de mejoras del
producto.
7. Accesorios de instalación (tornillos,
cables, etc.) (a página 148)
6. Tarjeta de garantía, etc.
Cantidad: 1 juego
5. Manual de instrucciones
<YFM284C437ZA>
Cantidad: 1
XXXXXXXXXXXXXXX
XXXXXXXXXXXXXXXXX
XXXXXXXXXXXXXX
XXXXXXXXXXXXXXXX
OO-OOOOO
4. Pila de litio (CR2025)
Cantidad: 1
3. Mando a distancia
<YEFX999256A>
Cantidad: 1
TRACK/SEARCH
DISC/FOLDER
NTSC/PAL
TITLE/CHAPTER
TRACK
STOP
RANDOM
RETURN
PAUSE
PLAY
REPEAT
SUBTITLE
CAR AV
TITLE
E
N
T
E
R
SETUP
MENU
RAND
SCAN
REP
GRP RET
ANGLE
SUB
AUDIO
123
456
7
OSD
809
2. Cartucho de discos
<VYQ3174>
Cantidad: 1
1. Cambiador de discos DVD
Cantidad: 1
CX-DH801U
q Extraiga el portapilas.
Con el mando a distancia puesto sobre una superficie
plana.
q Ponga la uña en la ranura y empuje el portapilas en la
dirección de la flecha, y al mismo tiempo.
w Extráigalo en la dirección de la flecha empleando un
objeto puntiagudo duro.
Pila de litio
(CR2025:
suministrada)
Portapilas
w Instale la pila en el portapilas.
Inserte correctamente una pila nueva con el lado
(+) arriba como se muestra en la ilustración.
e Inserte el portapilas en su posición original.
Lado posterior
Objeto puntiagudo duro
Es conveniente comprobar y realizar los ajustes siguientes
antes de empezar a utilizarlo.
Las operaciones pueden variar según el disco. Para más
detalles, consulte la guía suministrada con el disco.
TV TYPE (a página 132)
Ajuste:
Ajuste el formato de vídeo de su monitor de visualización en
“TV TYPE”.
Compruebe:
Compruebe si se ha ajustado “TV TYPE” en “NTSC” (o
“PAL”) cuando conecte un monitor de visualización NTSC (o
PAL).
TV MODE (a página 132)
Ajuste:
Seleccione la relación de aspecto en “TV MODE”. La relación
de aspecto estándar de Panasonic es “WIDE”.
Compruebe:
Compruebe si la imagen se visualiza con naturalidad en el
monitor.
PREFERENCES (a página 134)
Ajuste:
Seleccione el idioma de reproducción de primera prioridad
en “PREFERENCES”.
*Este ajuste sólo es válido cuando el programa del DVD
contiene el idioma seleccionado.
Compruebe:
Compruebe si la unidad visualiza los subtítulos o/y el menú
del disco o si reproduce el sonido en el idioma que usted
haya seleccionado.
COMPRESSION (DR COMP: Compresión de
la gama dinámica)
(a página 133)
Ajuste:
Ajuste la gama dinámica de reproducción del sonido en el
menú “COMPRESSION”.
Para evitar que el sonido llegue al nivel pico súbitamente, le
recomendamos que lo ajuste en “MINIMUM”.
Compruebe:
Compruebe si se escucha el sonido con claridad a bajo nivel
de volumen cuando se reproduce un programa de DVD con
una gran gama dinámica.
Información sobre las pilas Ajustes y comprobaciones
Advertencia
¡Mantenga las pilas alejadas de los niños para evitar el
peligro de accidentes. Si un niño se traga una pila,
llévelo inmediatamente al médico.
Precauciones
¡Extraiga y tire inmediatamente la pila gastada.
¡No desmonte, caliente ni cortocircuite las pilas. No tire
las pilas al fuego ni al agua.
¡Siga las regulaciones de su localidad para tirar las
pilas.
¡El empleo inadecuado de las pilas puede causar
sobrecalentamiento, explosión o fuego, pudiendo
ocasionar heridas o un incendio.
Nota: Información sobre las pila:
Tipo de pila: Pila de litio Panasonic (CR2025)
Vida útil de servicio de la pila: Aproximadamente 6 meses
bajo utilización normal (a temperatura de interior)
Pictogramas
En este manual se emplean los pictogramas mostrados a
continuación para indicar los tipos de discos y las
unidades de operación que son compatibles.
Discos : DVD Vídeo
: VCD (Vídeo CD)
: CD
Control : Unidad de control o mando a distancia
para la unidad de control.
:
Control remoto del cambiador de discos DVD
DVDDVDDVD VCD CD MP3 CH-C
w
q
w
e
Page 15

29
CX-DH801U
2
English
28
CX-DH801U
1
English
Names of Controls and Functions
Names of Controls and Functions
DVD Changer, Disc Magazine and Tray Remote Control Unit
❑ General
Aim the remote control at the remote control sensor and operate it (see below note).
H
A
C
B
V
❑ DVD Changer Unit
❑ Disc Magazine Tray
Door
Keep this door closed
except when loading or
unloading a magazine. Dust
can cause malfunction.
Disc Magazine Slot
Reset Switch
(a page 53)
Eject Button (u)
(a page 33)
Angle Adjust Screw
Screw to adjust mounting angle.
One each on the right and left sides.
(a page 61 for details.)
Note: Do not use 8 cm Discs.
Shutter for the deck
mechanism protection
Push the magazine
straightforward into the
slot to make this shutter
drawn properly.
Tray
Push these trays into the
magazine until click is
felt after putting a disc
on the tray.
Notes on Remote Control and connections:
¡Aim the DVD changer’s remote control unit at the remote control sensor on the monitor display (In the case of connect-
ing its Remote-Out with DVD changer’s Remote-In) or the included remote control sensor and operate it.
¡If the control unit equips with the remote control sensor and forwards the remote control data to the DVD changer, you
can operate it with aiming at the control unit.
¡Never use both Remote-Ins (One is mini-pin, the other is RCA) at the same time. Failure to observe this may cause mis-
operation.
¡Misoperation may occur if the remote control sensor is near other infrared equipment (Example: Infrared Headphone
system). In this case, install the remote control sensor of your DVD Changer apart from other infrared equipment.
Note: Do not touch
this shutter.
Magazine Inserting
Direction Arrow
Be sure to use the magazine and the trays supplied with the
unit as an accessory (VYQ3174). Any other magazines can
not be used.
[0] to [9]
¡Sets the language code. (a page 55)
[MENU]
¡Shows the menu screen. (a page 37)
[SETUP]
¡Shows the SETUP menu. (a page 42)
[OSD]
¡Displays information about each source
on the screen. (a page 35)
¡Toggles NTSC/PAL. (a page 44)
[}] [{]
¡Selects (vertically) or adjusts
an operation or item.
[]] [[]
¡Selects (horizontally) or adjusts
an operation or item.
[ENTER]
¡Determines an operation or item.
TRACK/SEARCH
DISC/FOLDER
NTSC/PAL
TITLE/CHAPTER
TRACK
STOP
RANDOM
RETURN
PAUSE
PLAY
REPEAT
SUBTITLE
CAR AV
TITLE
E
N
T
E
R
SETUP
MENU
RAND
SCAN
REP
GRP RET
ANGLE
SUB
AUDIO
123
456
7
OSD
809
[DISC}] [DISC{] (DISC/FOLDER)
¡Selects a disc. (a page 34)
[}]
[{]
[]][[]
[ENTER]
Page 16

31
CX-DH801U
4
English
30
CX-DH801U
3
English
Names of Controls and Functions
Names of Controls and Functions (Continued)
❑ Discs (DVD/VCD/CD)
DVD Changer Basics
Notes on Discs
How to hold the disc
¡Do not touch the underside of the disc.
¡Do not scratch the disc.
¡Do not bend disc.
¡When not in use, keep disc in the case.
Do not use discs that fit any of the descriptions given
below. Using these discs may damage the discs or cause
the unit to malfunction.
¡Special discs in a shape which is not round
¡Discs with adhered labels, etc. on them
¡Damaged or deformed discs
Discs with burrs
Please remove the burrs
before use.
Discs with cracks, scratches
or parts missing
Shoddily made discs
disc accessories (stabilizers,
etc.)
Protective films or sheets
Labels created by a printerDisc with adhered stickers
or tape
Do not leave discs in the following places:
¡Direct sunlight
¡Near car heaters
¡Dirty, dusty and damp areas
¡On seats and dashboards
Disc cleaning
Use a dry, soft cloth to wipe from the center outward.
Do not attach any seals or labels to your discs.
Do not write on the disc label in a heavy pen or ballpoint
pen.
Notes on CD-Rs/RWs
¡You may have trouble playing back some CD-R/RW discs
recorded on CD recorders (CD-R/RW drives), either due
to their recording characteristics or dirt, fingerprints,
scratches, etc. on the disc surface.
¡CD-R/RW discs are less resistant to high temperatures
and high humidity than ordinary music CDs. Leaving
them inside a car for extended periods may damage and
make playback impossible.
¡The unit may not successfully playback a CD-R/RW that
was made by the combination of writing software, a CD
recorder (CD-R/RW drive) and a disc if they are incompatible with one another.
¡This unit does not play CD-R/RW discs if the session is
not closed.
¡This player does not play CD-R/RW discs which contain
other than CD-DA data (Video CD, etc.).
¡Be sure to observe the handling instructions of CD-R/RW
discs.
<Wrong><Right>
Label side
DVD Changer Basics
[RET] (RETURN)
¡Returns to the previous status. (a page 37)
¡Displays the VCD (Video CD)’s menu.
(a page 37)
DVDDVDDVD VCDVCDVCD CD MP3 CH-C
TRACK/SEARCH
DISC/FOLDER
NTSC/PAL
TITLE/CHAPTER
TRACK
STOP
RANDOM
RETURN
PAUSE
PLAY
REPEAT
SUBTITLE
CAR AV
TITLE
E
N
T
E
R
SETUP
MENU
RAND
SCAN
REP
GRP RET
ANGLE
SUB
AUDIO
123
456
7
OSD
809
[s] [d]
¡Goes to beginning. (a page 36, 40)
¡Fast forward/fast reverse
(a page 36, 40)
[d]
¡Slow playback (a page 36)
[■] (STOP)
¡Stops playback. (a page 36, 40)
[❚❚] (PAUSE)
¡Pause (a page 36, 41)
[B] (PLAY)
¡Playback (a page 34)
[RAND] (RANDOM)
¡Random play (a page 41)
[REP] (REPEAT)
¡Repeat play (a page 36, 41)
[SCAN] (SCAN)
¡Scan play (a page 41)
DVDDVDDVD VCDVCDVCD CDCDCD MP3 CH-C
DVDDVDDVD VCDVCDVCD CDCDCD MP3 CH-C
DVDDVDDVD VCDVCDVCD CDCDCD MP3 CH-C
DVDDVDDVD VCDVCDVCD CDCDCD MP3 CH-C
DVDDVDDVD VCDVCDVCD CD MP3 CH-C
DVDDVDDVD VCDVCDVCD CDCDCD MP3 CH-C
[MENU] (TITLE)
¡Displays the DVD menu. (a page 37)
¡Displays the Title menu. (a page 37)
DVDDVDDVD VCD CD MP3 CH-C
[GRP] (TRACK) (TITLE/CHAPTER)
¡Title/chapter selection (a page 37)
¡Direct track selection (a page 37, 40)
DVDDVDDVD VCDVCDVCD CDCDCD MP3 CH-C
[SUB] (SUBTITLE)
¡Switching the subtitle language
(a page 38)
[AUDIO]
¡Switching the audio language
(a page 38)
[ANGLE]
¡Switching the angle (a page 38)
[AUDIO]
¡Switches between stereo or monaural sound.
(a page 38)
DVDDVDDVD VCD CD MP3 CH-C
DVDDVDDVD VCD CD MP3 CH-C
DVDDVDDVD VCD CD MP3 CH-C
[}] [{] []] [[]
¡Selects an operation or item. (a page 37)
[ENTER]
¡Determines an operation or item.
(a page 37, 40)
DVDDVDDVD VCDVCDVCD CDCDCD MP3 CH-C
DVDDVDDVD VCD CD MP3 CH-C
[0] to [9]
¡Selects an item on the menu.
(a page 37)
[0] to [9]
¡Title/chapter selection (a page 37)
[0] to [9]
¡Direct track selection
(a page 37, 40)
DVDDVDDVD VCD CD MP3 CH-C
Note: Operations vary according to the disc.
Page 17

33
CX-DH801U
6
English
32
CX-DH801U
5
English
DVD Changer Basics
DVD Changer Basics (Continued)
Loading and Removing a Disc
❑ To Load a Disc
q Place the disc magazine with the direction arrow facing
upward, and pull out trays fully one after another from
the magazine.
w Place a disc on the tray.
e Push the tray straightforward into the magazine until it
clicks in position (See caution above).
Note:
¡Be careful not to insert more than one disc on a single
tray to protect the unit from any unexpected troubles.
¡Please insert discs so that the same types of discs are
arranged successively, as far as possible. Discontinuous
arrangement of the same type discs may cause the unit to
take a long time to change discs.
¡Be sure to use the magazine and the trays supplied with
the unit as an accessory (VYQ3174). Any other maga-
zines can not be used.
¡Never use protection film or stabilizer commercially avail-
able as a disc accessory for the unit because it may cause
trouble.
¡Do not use irregularly-shaped discs. Failure to observe
this may cause malfunction.
❑ To Remove a Disc
Pull out trays from the magazine to the stopper position, and
take a disc from each of them by hand.
Be careful not to allow the disc to drop to the ground while taking it out.
Note: Carefully handle the magazine since discs may be disengaged and come out, if the magazine is placed with its discinserting port facing downward.
Magazine Tray
Disc with the labeled side
q
w
e
❑To Load the Magazine
q Slide the door to the right until it is fully open with a click.
❑To Remove the Magazine
q Open the door.
w Press the eject button (u).
The magazine will eject automatically.
e Pull the magazine straight in the arrow direction until it comes off
the unit.
r Close the door.
q
w
q
w
e
e
r
Eject button (u)
Loading and Removing the Magazine
Magazine Inserting
Direction Arrow
Caution: Insert disc trays into the magazine firmly until they click. Failure to do so may cause disc clogging in
the DVD changer unit or a malfunction of your DVD changer.
e Close the door fully until you hear a click.
w Check the unit for its top and magazine inserting direction, and
carefully push the magazine straightforward into it until you hear a
click.
Note:
• When inserting the magazine, follow the sign marked on the magazine for the inserting direction.
• Make sure that all disc trays are loaded into place before magazine
insertion.
Caution:
• Be sure to keep the disc unit door closed to prevent dirt and dust
from getting into the unit and causing possible malfunctions.
• The magazine cannot be inserted when a tray is not loaded into
place. In this situation, forced insertion may cause damage to the
unit and magazine.
Note: The disc trays of the DVD changer are
easy to remove from the magazine. Please watch
out the trays are not slipped out from the magazine when installing a disc.
If one of the trays is slipped out and removed,
insert the disc tray into the magazine gently until
a click is felt.
Note: Please wait for 10 seconds or more after connecting the battery cord to insert the disc magazine. Failure to observe
this may cause a disc loading error.
Page 18

35
CX-DH801U
8
English
34
CX-DH801U
7
English
DVD Changer Basics, OSD (On Screen Display) Change and Indications
CD/DVD Changer Mode
POWER
Turn your car’s ignition switch to ACC or ON position, and
then press the control unit’s power key to turn on the control unit and the DVD changer.
Press [POWER] to turn on the monitor display as well when
you watch the DVD software.
As for power on/off, please refer to the operating instructions of each unit.
Note: The remote control of the DVD changer has no power
key. Use the power key on the control unit or the
remote control for the control unit instead.
CD/DVD Changer Mode
(Source selection)
Press [SRC] (Source)/[POWER] to change to CD/DVD
changer mode and playback starts.
(Example: CQ-C9901U, CQ-VD7001U etc.)
Note: If you have not changed to the CD/DVD changer
mode, you cannot listen to the sound of DVD changer
when you press the [5] (PLAY) key on the DVD
changer’s remote control.
Disc Selection
(Example: CQ-C9901U, CQ-VD7001U etc.)
[}] or [8]: Next disc
[{] or [0]: Previous disc
[DISC }] : Next disc
[DISC {] : Previous disc
Volume
Turn your control unit volume knob or press volume keys.
(Example: CQ-C9901U, CQ-VD7001U etc.)
[}] (Volume): Up
or [{] (Volume): Down
Play
Press [5] (PLAY) to start playback or resume from Pause or
Stop.
Note:
¡Because playback will not start automatically when your
DVD changer is working alone, press [5] (PLAY) to start
playback.
¡Some control units do not have the “Play” function.
DVDDVDDVD VCDVCDVCD CDCDCD MP3 CH-C
[}] [{]
(DISC/FOLDER)
Down
Up
[5] (PLAY)
DVD Changer Basics (Continued)
[OSD]
(On Screen Display)
OSD (On Screen Display) Change and Indications
Note: Displaying contents and their positions partly vary with each mode. Refer to the description of each mode for details.
This unit has 7 types OSDs. The following operations allows you to change among OSDs.
❑ CD
¡Playing time is displayed. (CD) (cannot
turn off)
NTSC/PAL
TITLE/CHAPTER
TRACK
RETURN
SUBTITLE
RAND
SCAN
REP
GRP RET
ANGLE
SUB
AUDIO
123
456
7
OSD
809
OSD
❑ DVD/VCD (Video CD)
PHONES
Example: CY-V7100U Display unit
[POWER]
For a description of the functions, refer to the operating instructions for the control unit
as well (CQ-C9901U, CQ-VD7001U etc.).
Prohibition
Input is not possible because a soundtrack, subtitle language or angle number which was not recorded on the disc
has been selected or because the user has attempted to perform an operation which is not supported by the unit.
[VOLUME]
[}] [{] (DISC)
[SRC] (PWR: Power)
Example: CQ-C9901U Control unit
SELSEL
SRCSRC
BANDBAND MUTEMUTE
2 31
5
8
0
64
97
#
VOLVOL
DISPDISP
CAR AUDIO
MENU
SEL
POWER
SOURCE
SRC
SET
BAND MUTE
231
5
8
0
64
97
#
VOL
RANDOM
NUMBER
TUNE TUNE
SCAN REPEAT
DISP
SRC
8
0
VOL
[VOL }]
[VOL {]
(Volume)
[SRC]
(POWER)
[}] [{]
(DISC)
Example: EUR7641010 (option)
Remote Control for control unit
• Title elapsed time display (DVD) (default)
• Chapter elapsed time
display (DVD)
Press [OSD].
•
No OSD (On Screen
Display) is displayed (VCD)
• Total time display
(VCD) (default)
Press [OSD].
•
No OSD (On Screen Display) is
displayed during playback (DVD)
• Track time display
(VCD)
Press [OSD].
On Screen Display (OSD) is
available only when Play
Back Control (PBC) is “OFF”.
(VCD)
SRCCSSRC
TITLE
SETUP
MENU
TRACK/SEARCH
STOP
PAUSE
RANDOM
RAND
SCAN
123
REPEAT
R
E
T
N
E
PLAY
DISC/FOLDER
REP
SUBTITLE
SUB
Page 19

37
CX-DH801U
10
English
36
CX-DH801U
9
English
DVD/VCD (Video CD) Playback
DVD Menu/VCD (Video CD)
Menu
Selection of content, audio, subtitle, etc.
q Press [MENU] (TITLE ) during DVD playback.
(For the VCD (Video CD) menu, press [RET] (RETURN)
during playback.)
w Press []], [[], [}] or [{] to select the preferred
menu.
For the VCD (Video CD) with playback control (a page
47, 56), press [0] to [9] on the remote control.
e Press [ENTER]
To return to the previous status, press [RET] (RETURN).
Title Menu
Selection of the title to start playback.
q Press and hold [MENU] (TITLE ) for more than 2 sec-
onds during playback.
w Press []], [[], [}] or [{] to select the preferred
title.
e Press [ENTER].
To return to the previous status, press [RET] (RETURN)
.
Title/Chapter Selection
Starting playback from a specific title/chapter.
q Press [GRP] (TITLE/CHAPTER) to select the input
mode. The mode changes every time []]/[[] is
pressed.
w Press [0] to [9] to input preferred title/chapter number.
e Press [ENTER]. Playback will start.
Direct Track Selection
q Press [GRP] during playback.
w Press [0] to [9] (Track number) to select a Track.
e Press [ENTER].
Note:
¡If no operation is performed for 10 seconds after [GRP]
(TITLE/CHAPTER) has been pressed, the display returns
to the regular mode.
¡If the title/chapter number is entered and no operation is
performed for 10 seconds, the display returns to the regular mode.
¡The direct track selection is available only when PBC is
“OFF”.
DVDDVDDVD VCD CD MP3 CH-C
DVDDVDDVD VCD CD MP3 CH-C
DVDDVDDVD VCDVCDVCD CD MP3 CH-C
Chapter/Title Selection
DVD/VCD (Video CD) Playback
Basic Operation
Title number,
Chapter number,
Playing time, Disc
number and etc.
Regular Mode
Title Number Input
Chapter Number Input
Go to Beginning
[d]: next track/chapter
[s]: beginning of the current track/chapter
Previous track/chapter (Press twice.)
Note: When playing a DVD, there are cases where it is not
possible to return to the start of a chapter that spans 2 titles.
(a page 57)
Fast Forward/Fast Reverse
Press and hold
[d]: fast forward
[s]: fast reverse
Release to resume playback.
The speed gradually increases if the button is held down.
Stop
Press [3] (STOP).
Press [5] (PLAY) again, and play will resume from the point
where [3] (STOP) is pressed. (Continued playback function)
To cancel continued playback, press and hold [3] (STOP)
for more than 2 seconds in the stop mode.
Pause
Press [y] (PAUSE).
To resume playback, press [5](PLAY) again.
Note: Some control units do not have the “Pause” function.
Slow Playback
Press and hold [d] in the pause.
To resume normal playback, press [5](PLAY).
To pause, press [y](PAUSE) again.
Note: Reverse slow playback is not possible.
Repeat Play
Press [REP] (REPEAT) to repeat current chapter/track.
Press [REP] (REPEAT) again to cancel.
Press and hold [REP] (REPEAT) for more than 2 seconds to
repeat current title/disc.
Press and hold [REP] (REPEAT) again to cancel.
Frame to Frame Play
Press [y](PAUSE) to go to next frame in the pause.
To resume normal playback, press [5](PLAY).
DVDDVDDVD VCDVCDVCD CD MP3 CH-C
DVDDVDDVD VCDVCDVCD CD MP3 CH-C
DVDDVDDVD VCDVCDVCD CD MP3 CH-C
DVDDVDDVD VCDVCDVCD CD MP3 CH-C
DVDDVDDVD VCDVCDVCD CD MP3 CH-C
[RET] (RETURN)
[GRP]
(TITLE/CHAPTER)
[]] [[] [}] [{]
(Select)
[ENTER]
[0] to [9]
(Title/chapter
Number)
[3] (STOP)
[y] (PAUSE)
[s][d]
[5] (PLAY)
[MENU] (TITLE)
*For the detail display, please refer
to the next page.
DVD/VCD mode display
[GRP]
Chapter Selection
Title Selection
lights in yellow
lights in yellow
[]]/[[]
[ENTER]
[REP] (REPEAT)
DVDDVDDVD VCDVCDVCD CD MP3 CH-C
DVDDVDDVD VCDVCDVCD CD MP3 CH-C
¡Operations vary according to the disc. For details, refer to the guide provided with the disc.
¡The pictographs and indicate the compatible types of disc.
DVDDVDDVD VCDVCDVCD CD MP3 CH-C
Note: Refer to “DVD Changer Basics” as well. (a page 31)
DVD mode display
(Title time display)
Playing time
Title number is revised.
Chapter number is revised.
Disc No. / Disc type
VCD (Video CD) mode display
Disc No. / Disc type
Playing time
(Chapter time display)
(During operation)Chapter No.
Play time
Disc No.
(Total time display)
Playing time
Playing time is revised.
Track number is revised.
Disc No. / Disc type
Disc No. / Disc type
Playing time
(Track time display)
(During operation)
(On Screen Display (OSD) is available only when Play Back Control
(PBC) is “OFF”.)
(Control unit LCD display example: After 2005
(ex. CQ-C9901/C9801U) type 1 DIN receiver)
[OSD]
Displays information about each
source on the
screen.
(a page 35)
PLAY
REPEAT
REP
REP
TRACK
GRP RET
GRP RET
TITLE/CHAPTER
DISC/FOLDER
SUBTITLE
SUB
AUDIO
ANGLE
RETURN
R
E
T
N
E
TITLE
SETUP
MENU
MENU
TRACK/SEARCH
STOP
PAUSE
RANDOM
RAND
SCAN
123
123
456
456
7
7
809
809
OSD
OSD
NTSC/PAL
CAR AV
OSD
OSD
Page 20

39
CX-DH801U
12
English
38
CX-DH801U
11
English
DVD/VCD (Video CD) Playback
¡Operations vary according to the disc. For details, refer to the guide provided with the disc.
¡The pictographs and indicate the compatible types of disc.
DVDDVDDVD VCDVCDVCD CD MP3 CH-C
TRACK/SEARCH
DISC/FOLDER
NTSC/PAL
TITLE/CHAPTER
TRACK
STOP
RANDOM
RETURN
PAUSE
PLAY
REPEAT
SUBTITLE
CAR AV
TITLE
E
N
T
E
R
SETUP
MENU
RAND
SCAN
REP
GRP RET
ANGLE
SUB
AUDIO
123
456
7
OSD
809
ANGLE
SUB
AUDIO
[SUB] (SUBTITLE)
[ANGLE]
[AUDIO]
DVD/VCD (Video CD) Playback (Continued)
Useful Function
About DVD Video
Wide Dynamic
Range
Caution: The sound of
DVD audio/video covers a
wide dynamic range of more
than 100 dB. Thus, the
reproduced sound volume of
some DVD discs may be significantly low. When you
increase the volume in this
case, the sound may reach
the peak level suddenly and
it may lead to a traffic accident. To avoid such an accident, you can use the DR
COMP (Dynamic Range
Compression) function. This
function can be set by the
following procedure.
DR COMP (Dynamic Range Compression)
q Turn the volume back to the previous level (
decrease the volume
).
w Press [SETUP].
e Press [}] or [{] to select .
r Press [}], [{], []] or [[] to select a [ENTER].
t Press []] or [[] to select .a [ENTER]
y Readjust the volume level.
(a page 45)
MINIMUM
COMPRESSION
AUDIO SETUP
Conversation
level
OFF STANDARD MINIMUM
Switching the Subtitle
Language
Press [SUB] (SUBTITLE) during playback.
It is possible to change the subtitle language during play if
the multiple languages are recorded on the disc.
Note: There may be a brief delay before the subtitles
appear.
Switching the Audio Language
Press [AUDIO] during playback.
It is possible to change the audio language during play if
multiple audio languages are recorded on the disc.
Switching the Angle
Press [ANGLE] during playback.
For DVDs which contain scenes which have been shot
simultaneously from a number of different angles, the
same scene can be viewed from each of these different
angles during play.
Stereo and Monaural
Press [AUDIO]
It is possible to switch the audio between stereo sound
and monaural sound (L or R).
Note:
¡If no operation is performed for 2 seconds, the display
returns to the regular mode.
¡The language on the DVD settings take priority when the
power is turned on or the disc is loaded. (a page 46)
¡The number of languages depends on the disc. Some
discs have only one language or have no language.
DVDDVDDVD VCD CD MP3 CH-C
DVDDVDDVD VCD CD MP3 CH-C
Current language number
Total language number
Language name
DVDDVDDVD VCD CD MP3 CH-C
Current audio number
Total audio number
Audio name
Audio format
: the left channel audio is output on both
the left and right speakers.
: the right channel audio is output on
both the left and right speakers.
: stereo sound
STEREO
MONO RIGHT
MONO LEFT
Current angle
Total angle number
Page 21

41
CX-DH801U
14
English
40
CX-DH801U
13
English
CD Playback
¡The pictographs and indicate the compatible types of disc.
¡In some functions, operations of the DVD changer may be different from those of the control unit (Example,
CQ-C9901U, CQ-VD7001U etc.)
DVDDVDDVD VCDVCDVCD CD MP3 CH-C
(Monitor display example: CD playback)
Go to Beginning
[d]: next track
[s]: beginning of the current track
Previous track (Press twice.)
Fast Forward/Fast Reverse
Press and hold
[d]: fast forward
[s]: fast reverse
Release to resume playback.
Direct Track Selection
q Press [GRP] during playback.
w Press [0] to [9] (Track number) to select a Track.
e Press [ENTER].
Stop
Press [3] (STOP).
Press [5](PLAY) again, and play will resume from the point
where [3] (STOP) is pressed. (Continued playback function)
To cancel continued playback, press and hold [3] (STOP)
for more than 2 seconds in the stop mode.
Pause
Press [y] (PAUSE).
To resume playback, [5] (PLAY) or [y](PAUSE) again.
Note: Some control units do not have the “Pause” function.
Repeat Play
¡Current Track:
Press [REP] (REPEAT).
Press [REP] (REPEAT) again to cancel.
¡Current Disc:
Press and hold [REP] (REPEAT) for more than 2 seconds.
Press and hold [REP] (REPEAT) again to cancel.
Random Play
¡All Tracks:
Press [RAND] (RANDOM).
Press [RAND] (RANDOM) again to cancel.
SCAN Play
Press [SCAN] to scan all the tracks in the current CD-DA
Disc.
Press [SCAN] again to cancel.
(Control unit LCD display example: Before 2004
(ex. CQ-R253U, CQ-C3400U etc.) type 1 DIN CD/cassette
receiver)
Disc type (CDDA: Normal music CD)
Playing time
Track No.
Play time
(Control unit LCD display example: After 2005
(ex. CQ-C9901/C9801U) type 1 DIN receiver)
Disc type
CD Playback
Playing time
Disc No.
Track No.
TRACK/SEARCH
DISC/FOLDER
NTSC/PAL
TITLE/CHAPTER
TRACK
STOP
RANDOM
RETURN
PAUSE
PLAY
REPEAT
SUBTITLE
CAR AV
TITLE
E
N
T
E
R
SETUP
MENU
RAND
SCAN
REP
GRP RET
ANGLE
SUB
AUDIO
123
456
7
OSD
809
RAND
SCAN
REP
GRP
123
456
78
0
9
[ENTER]
[RAND]
(RANDOM)
[REP] (REPEAT)
[SCAN]
[3] (STOP)
[y] (PAUSE)
[s][d]
[5] (PLAY)
[0] to [9]
[GRP] (TRACK)
Page 22

43
CX-DH801U
16
English
42
CX-DH801U
15
English
Settings: Setup Menu Overview, Setup Operation
COMPRESSION
(DR COMP)
Dynamic Range Compression Level
MID
MIN
Settings: Setup Menu Overview
TV TYPE Select a TV Type.
44
44
44
TV MODE
Select a screen size.
44
44
44
MULTI. SYSTEM
NTSC
PAL
PAN & SCAN
LETTER BOX
WIDE
MINIMUM 45
STANDARD 45
OFF 45
OUTPUT LEVEL
MAX 45
45
Minimum compression level
Standard compression level
Compression off
Maximum audio output level
Auto detection
NTSC Standard
PAL Standard
Pan & Scan size screen
Letter Box size screen
Wide screen
Tree 1 Tree 2
Description
Tree 3
Description
page
Minimum audio output level
45
Medium audio output level
Audio Output Level
AUDIO
SETUP
GENERAL
SETUP
Settings: Setup Operation
❏ MENU Operation
Note:
• To go back to the previous menu, select and
[ENTER].
¡To exit setup, press [RET].
RETURN
Press
[SETUP]
.
q
Setup Menu screen.
Press
[}], [{], []]
or
[[]
to select
an item.
w
Selection (or adjustment).
Press
[ENTER]
.
e
Determination.
[]][[]
[}]
[{]
TRACK/SEARCH
DISC/FOLDER
NTSC/PAL
TITLE/CHAPTER
TRACK
STOP
RANDOM
RETURN
PAUSE
PLAY
REPEAT
SUBTITLE
CAR AV
TITLE
E
N
T
E
R
SETUP
MENU
RAND
SCAN
REP
GRP RET
ANGLE
SUB
AUDIO
123
456
7
OSD
809
RET
SETUP
[}] [{] []] [[]
[ENTER]
(Select/adjustment)
[SETUP]
[RET] (RETURN)
OTHER
AUDIO
46
ENGLISH
Audio language
SUBTITLE
PBC
SPANISH
DISC MENU
FRENCH
Audio Language
JAPANESE
46
46
46
CHINESE
GERMAN
ITALIAN
OTHER
ENGLISH
JAPANESE
FRENCH
SPANISH
CHINESE
GERMAN
ITALIAN
OTHER
ENGLISH
JAPANESE
FRENCH
SPANISH
CHINESE
GERMAN
ITALIAN
ON
OFF
46
46
46
46
46
46
46
46
46
46
46
46
47
47
47
47
47
47
47
47
47
47
Audio language
Audio language
Audio language
Audio language
Audio language
Audio language
Audio language
Subtitle language
Subtitle language
Subtitle language
Subtitle language
Subtitle language
Subtitle language
Subtitle language
Subtitle language
Disc Menu language
Disc Menu language
Disc Menu language
Disc Menu language
Disc Menu language
Disc Menu language
Disc Menu language
Disc Menu language
Playback Control On
Playback Control Off
PREFERENCES
Subtitle Language, Subtitle ON/OFF
Disc Menu Language
Playback Control On/Off
OFF
46Subtitle off
Page 23

45
CX-DH801U
18
English
44
CX-DH801U
17
English
Settings: GENERAL, AUDIO
Settings: GENERAL Settings: AUDIO
(Letter Box display aspect)
Display aspect is set to Letter Box.
(a page 56)
LETTER BOX
(Wide Display aspect)
Display aspect is set to Wide.
(a page 57)
Default:
WIDE
WIDE
(Standard audio dynamic range)
Compression level recommended by the software manufacturer for listening at low volume.
STANDARD
(Dynamic range compression off)
Dynamic range compression is set to off.
A movie theater dynamic range with no compression.
Default:
Note: This function is effective for playback of Dolby
Digital/Dolby Surround DVD. The words of an actor hardly
audible during playback at a low volume, for example, will
become easier to listen to by selecting “MINIMUM”.
OFF
OFF
Conversation
level
OFF STANDARD MINIMUM
(Medium)
Audio output level will be set to Medium.
MID
(Minimum)
Audio output level will be set to Minimum.
Default:
Note: This setting should be performed only when audio
output distortion occurs.
MAX
MIN
GENERAL
PREFERENCE
AUDIO
PREFERENCE
AUDIO
GENERAL
(NTSC)
The unit transmits the NTSC formatted signal in either case,
playing an NTSC formatted video or a PAL formatted video.
(a page 8, 56)
Press and hold [OSD] (NTSC/PAL) for more than 6 seconds
to toggle between NTSC and PAL forcibly.
NTSC
(PAL)
The unit transmits the PAL formatted signal in either case,
playing an NTSC formatted video or a PAL formatted video.
(a page 8, 56)
Press and hold [OSD] (NTSC/PAL) for more than 6 seconds
to toggle between NTSC and PAL forcibly.
Default:
NTSC
PAL
Note:
• The use of NTSC as “TV TYPE” is recommended.
• Make the video format of the DVD changer correspond to
the video format of the monitor display.
:
Previous menu
[}][{][]][[]:
Select
[ENTER]:
Determine
[RET]:
Exit
RETURN
:
Previous menu
[}][{][]][[]:
Select
[ENTER]:
Determine
[RET]:
Exit
RETURN
TV TYPE (TV standard format setting)
(Auto selection of a TV standard format)
The unit will transmit the same TV standard formatted signal
as the output of playing video software.
(a page 8, 56)
Press and hold [OSD] (NTSC/PAL) for more than 6 seconds
to toggle between NTSC and PAL forcibly.
Press and hold [OSD] (NTSC/PAL) for more than 6 seconds
twice when the current mode is “NTSC”. (When NTSC formatted software is playing.)
MULTI. SYSTEM
TV MODE (Display aspect setting)
(Pan & Scan display aspect)
Display aspect is set to Pan & Scan.
(a page 56)
PAN & SCAN
COMPRESSION
(DR COMP: Dynamic range Compression)
(Minimum audio dynamic range)
Greatest compression level, roughly equivalent to a TV
broadcast.
MINIMUM
OUTPUT LEVEL (Output Level setting)
(Maximum)
Audio output level will be set to Maximum.
MAX
Page 24

AUDIO (Audio Language Setting)
Audio Language during the DVD video playback is set to
English.
Audio Language during the DVD video playback is set to
Japanese.
Audio Language during the DVD video playback is set to
French.
Audio Language during the DVD video playback is set to
Spanish.
Audio Language during the DVD video playback is set to
Chinese.
Audio Language during the DVD video playback is set to
German.
Audio Language during the DVD video playback is set to
Italian.
Audio Language will be set to other language shown above.
Input the 4-digit language code with referring to page 55.
Default:
Note: These adjustments being executed, playback will start
from the beginning of a disc.
ENGLISH
OTHER
ITALIAN
GERMAN
CHINESE
SPANISH
FRENCH
JAPANESE
ENGLISH
47
CX-DH801U
20
English
46
CX-DH801U
19
English
Settings: PREFERENCES
Settings: PREFERENCES
GENERAL
AUDIO
PREFERENCES
GENERAL
AUDIO
PREFERENCES
GENERAL
AUDIO
PREFERENCES
GENERAL
AUDIO
PREFERENCES
:
Previous menu
[}][{][]][[]:
Select
[ENTER]:
Determine
[RET]:
Exit
RETURN
:
Previous menu
[}][{][]][[]:
Select
[ENTER]:
Determine
[RET]:
Exit
RETURN
SUBTITLE (Subtitle Language Setting)
Subtitle Language during the DVD video playback is set to
English.
Subtitle Language during the DVD video playback is set to
Japanese.
Subtitle Language during the DVD video playback is set to
French.
Subtitle Language during the DVD video playback is set to
Spanish.
Subtitle Language during the DVD video playback is set to
Chinese.
Subtitle Language during the DVD video playback is set to
German.
Subtitle Language during the DVD video playback is set to
Italian.
Subtitle Language will be set to other language shown
above. Input the 4-digit language code with referring to page
55.
Subtitle is not displayed.
Default:
Note:
• These adjustments being executed, playback will start from
the beginning of a disc.
• A disc supporting closed captioning and subtitles may
overlap each other on the screen. In this case, turn the
subtitle off.
ENGLISH
OFF
OTHER
ITALIAN
GERMAN
CHINESE
SPANISH
FRENCH
JAPANESE
ENGLISH
PBC (Playback Control On and Off)
Playback control is set to On.
Playback control is set to Off.
Default:
Note: To enable the menu function on a VCD (Video CD),
select ON in this setting.
ON
OFF
ON
DISC MENU (Disc Menu Language Setting)
Disc Menu Language used in the DVD video Menu is set to
English.
Disc Menu Language used in the DVD video Menu is set to
Japanese.
Disc Menu Language used in the DVD video Menu is set to
French.
Disc Menu Language used in the DVD video Menu is set to
Spanish.
Disc Menu Language used in the DVD video Menu is set to
Chinese.
Disc Menu Language used in the DVD video Menu is set to
German.
Disc Menu Language used in the DVD video Menu is set to
Italian.
Disc Menu Language will be set to other language shown
above. Input the 4-digit language code with referring to page
55.
Default:
Note:
• These adjustments being executed, playback will start from
the beginning of a disc.
• This menu is not for selecting the menu language of this
unit itself. This unit can support only English.
ENGLISH
OTHER
ITALIAN
GERMAN
CHINESE
SPANISH
FRENCH
JAPANESE
ENGLISH
Page 25

49
CX-DH801U
22
English
48
CX-DH801U
21
English
Troubleshooting
If You Suspect Something Wrong
Check and take steps as described in the tables below.
If the suggestions below do not solve the problems, it is recommended to take the unit to your nearest authorized Panasonic Servicenter.
The product should be serviced only by qualified personnel. Please
refer checking and repair to professionals. Panasonic shall not be
liable for any accidents arising out of neglect of checking the unit or
your own repair after your checking.
Troubleshooting
■ Common
A mobile phone is used near the unit.
aKeep the mobile phone away from the unit.
The unit’s grounding wire is not connected securely.
aCheck the metal areas of the car chassis (body), and connect the ground-
ing wire more securely.
Noise
Picture is not clear.
Parking brake (side brake) lead is not correctly connected.
aConnect the side brake connection lead correctly.
You did not pull the parking brake (side brake) lever.
aPull the parking brake (side brake) lever.
Only sound,
no picture.
The volume is adjusted to zero. (Control unit)
aRaise the volume.
Mute is set to ON. (Control unit)
aSet it to OFF.
Cables are not correctly connected.
aConnect cables correctly.
Condensation (dew)
aWait for a while before use.
No sound
Car’s ignition switch is not on.
aTurn your car’s ignition switch to ACC or ON.
Cables are not correctly connected.
aConnect cables correctly.
Battery cable is not correctly connected.
aConnect the battery cable to the terminal that is always live.
Accessory cable is not correctly connected.
aConnect the accessory cable to your car’s ACC source.
Grounding wire is not correctly connected.
aConnect the grounding wire to a metal part of your car.
Fuse is burnt.
aCall the store where you purchased the unit, or your nearest Panasonic
Servicenter and ask for fuse replacement.
No power
Problem
Possible causeaPossible solution
■
DVD, VCD (Video CD), CD, CD-R, CD-RW
■
DVD
■
CD
This unit does not support CD-TEXT display. This is normal.
CD text is not
displayed.
If audio or subtitles in the languages are not recorded on the disc, the audio or
subtitles do not switch to that language. (Some discs permit switching through
a menu screen. Refer to the guide provided with your disc.)
The audio/subtitle
language selected in
the DVD settings is not
used.
¡It is not possible to switch if the disc does not have multiple audio lan-
guages/subtitle languages/angles recorded on it. (Refer to the guide provided
with your disc.)
¡Some discs permit switching through a menu screen.
¡Sometimes, switching angles is possible only with certain scenes.
Cannot switch the
audio language/subtitle
language/angle.
¡Disc is defective.
¡Mechanical trouble.
aPress [u]. If failure persists, press the reset switch (a page 53). If nor-
mal operation is not restored, call the store where you purchased the unit
or the nearest Panasonic Servicenter.
The magazine is not
ejected.
Some operations are not permitted with certain discs.
(Refer to the guide provided with your disc.)
The buttons do not
work.
Unstable mounting.
aMount the unit securely with the mounting parts, referring to the section
on installation.
Sound skip due to
vibration.
The disc is dirty.
aClean the disc, referring to the section on “Notes on Discs” (a page 31).
CD sound skips, tone
quality is low.
The disc is upside down.
aPlace the disc in the correct direction, the label side up.
The disc is dirty.
aClean the disc, referring to the section on “Notes on Discs” (a page 31).
The unit can only play the following types of discs: DVD, VCD (Video CD) and
music CD.
The disc is inside but
no sound.
Warnings:
¡Do not use the unit in an irregular condition,
for example, no sound, or if it is emitting
smoke or foul smell, as this may cause electric shock. Immediately stop using it and
call the store where you purchased it.
¡Never try to repair the unit by yourself due
to risk of electrical injury and potential damage to electrical safety equipment.
Page 26

51
CX-DH801U
24
English
50
CX-DH801U
23
English
Troubleshooting (Continued)
■
Remote Control
■
Sound Settings
■
Display Setting
The video format of the DVD changer does not correspond to the video format
of the monitor display.
aMake the video format of the DVD changer correspond to the video for-
mat of the monitor display.
The display screen is
not stable and/or colored, or rotates
improperly.
The speaker leads are connected in reverse between right and left.
aConnect the speaker wires to the correct one.
Left and right sounds
are reversed.
Cables are not correctly connected.
aConnect the cables correctly.
No sound from left,
right, front, or rear
speaker.
Battery poles (+) (–) are reversed.
aInsert the battery correctly.
Wrong battery.
aCheck the battery.
Battery has run down.
aReplace the battery.
Remote control is in the wrong direction.
aDirect the remote control at remote control sensor on the display unit.
Direct sunlight disturbs the transmission of remote control.
aMove your car to prevent the car from being exposed to direct sunlight, or
install the remote control sensor on another place to keep it out of direct
sunlight.
Buttons are invalid for
operation.
Troubleshooting
Error Display Messages
■ DVD Changer (Control unit / Monitor display)
Problem
Possible causeaPossible solution
No magazine is in the changer.
aLoad the changer with disc-loaded magazine.
NO MAGAZINE
No disc is in the changer.
aInsert disc into the disc tray.
NO DISC
An attempt was made to play a disc with a region number other than “1” or
“ALL”. Or, the unknown error related with discs occurs.
aCheck the disc.
- E 6 -
(Control unit display)
(REGION ERROR etc.)
(Next disc will be selected
automatically after 5 seconds.)
No operation by some cause.
aOnce turn the ACC switch off, and turn it on again. And, push the reset
switch (a page 53). If these operations fail, call the store where you purchased the unit or the nearest Panasonic Servicenter.
- E 3 -
(Control unit display)
(Next disc will be selected
automatically after 5 seconds.)
Disc has scratches.
aCheck the disc.
- E 2 -
(Control unit display)
(Next disc will be selected
automatically after 5 seconds.)
Disc is dirty, or is upside down.
aCheck the disc.
- E 1 -
(Control unit display)
(Next disc will be selected
automatically after 5 seconds.)
Note: There may be cases when the disc numbers affected by an error are displayed before E1 and E2.
Page 27

53
CX-DH801U
26
English
52
CX-DH801U
25
English
52
Troubleshooting (Continued) Maintenance
Product Servicing
If the suggestions in the charts do not solve the problem, we
recommend that you take it to your nearest authorized
Panasonic Servicenter. The product should be serviced only
by a qualified technician.
If the Unit Begins to
Malfunction...
Reset switch
Insert a hard, slender stick straightforward into the hole and
push the switch.
Important
Push the switch only when the unit fails to operate with any
buttons. (Stored settings and adjustments are not cleared.)
If the unit fails to return to normal condition, call the nearest
Panasonic Servicenter and ask for repairs.
Caution on Cleaning
Your product is designed and manufactured to ensure a
minimum of maintenance. Use a dry soft cloth for routine
exterior cleaning. Never use benzine, thinner or other solvents.
Alcohol
Pesticide
Wax
Benzine
Thinner
Product Servicing
Use fuses of the same specified rating (5 A). Using different
substitutes or fuses with higher ratings, or connecting the
unit directly without a fuse, could cause fire or damage to
the unit.
If the fuse blows frequently, there may be something
wrong with the unit. Consult your nearest Panasonic
Servicenter for service.
H
A
M4X5mmMAX
B
C
V
H.A
H
C
V.A.B
V
B
C
Reset Switch
Troubleshooting, Maintenance
■ DVD Changer (Monitor display)
An attempt was made to play a disc with a region number other than “1” or
“ALL”.
aCheck the disc.
REGION ERROR
(Next disc will be selected
automatically after 5 seconds.)
The type of disc that is selected is not supported.
aCheck the disc.
THIS TYPE OF DISC
CANNOT BE PLAYED.
(Next disc will be selected
automatically after 5 seconds.)
The mechanism of DVD changer has failed.
aOnce turn the ACC switch off, and turn it on again. And, push reset switch
(a next page). If these operations fail, call the store where you purchased the unit or the nearest Panasonic Servicenter.
MECHANICAL ERROR
Disc is dirty, or is upside down, or has scratches.
aCheck the disc.
PLAYBACK ERROR
(Next disc will be selected
automatically after 5 seconds.)
Fuse (5 A)
Error Display Messages
Page 28

55
CX-DH801U
28
English
54
CX-DH801U
27
English
Language Code List
8277 Rhaeto-Romance
8279 Romanian
8285 Russian
8365 Sanskrit
8368 Sindhi
8372 Serbo-Croatian
8373 Singhalese
8375 Slovak
8376 Slovenian
8377 Samoan
8378 Shona
8379 Somali
8381 Albanian
8382 Serbian
8385 Sundanese
8386 Swedish
8387 Swahili
8465 Tamil
8469 Telugu
8471 Tajik
8472 Thai
8473 Tigrinya
8475 Turkmen
8476 Tagalog
8479 Tonga
8482 Turkish
8484 Tatar
8487 Twi
8575 Ukrainian
8582 Urdu
8590 Uzbek
8673 Vietnamese
8679 Volapük
8779 Wolof
8872 Xhosa
8979 Yoruba
9072 Chinese
9085 Zulu
Code Language Name
In “OTHER” cases... (a page 46, 47)
q Input the 4 digits language code by pressing the buttons [0] to [9] on the
remote control.
w Press [ENTER] to set.
Note: To exit setup, press [RET]. (The setting is not reflected when [ENTER] is
not pressed.)
Preferences menu
7289 Armenian
7365 Interlingua
7378 Indonesian
7383 Icelandic
7384 Italian
7387 Hebrew
7465 Japanese
7473 Yiddish
7487 Javanese
7565 Georgian
7575 Kazakh
7576 Greenlandic
7577 Cambodian
7578 Kannada
7579 Korean
7583 Kashmiri
7585 Kurdish
7589 Kirghiz
7665 Latin
7678 Lingala
7679 Laothian
7684 Lithuanian
7686 Latvian, Lettish
7771 Malagasy
7773 Maori
7775 Macedonian
7776 Malayalam
7778 Mongolian
7779 Moldavian
7782 Marathi
7783 Malay
7784 Maltese
7789 Burmese
7865 Nauru
7869 Nepali
7876 Dutch
7879 Norwegian
7982 Oriya
8065 Panjabi
8076 Polish
8083 Pashto, Pushto
8084 Portuguese
8185 Quechua
Code Language Name
6565 Afar
6566 Abkhazian
6570 Afrikaans
6577 Ameharic
6582 Arabic
6583 Assamese
6589 Aymara
6590 Azerbaijani
6665 Bashkir
6669 Byelorussian
6671 Bulgarian
6672 Bihari
6678 Bengali; Bangla
6679 Tibetan
6682 Breton
6765 Catalan
6779 Corsican
6783 Czech
6789 Welsh
6865 Danish
6869 German
6890 Bhutani
6976 Greek
6978 English
6979 Esperanto
6983 Spanish
6984 Estonian
6985 Basque
7065 Persian
7073 Finnish
7074 Fiji
7079 Faroese
7082 French
7089 Frisian
7165 Irish
7168 Scots Gaelic
7176 Galician
7178 Guarani
7185 Gujarati
7265 Hausa
7273 Hindi
7282 Croatian
7285 Hungarian
Code Language Name
Corresponding Functions
[REPEAT] (6)
[RANDOM] (4)
[MODE] / [SRC] [BAND]
(PAUSE/PLAY)
Corresponding keys among the DVD changer remote control, the control unit, and its remote
control.
Corresponding Functions, Language Code List
Example: WMA MP3 CD Player/Receiver with 512 Color OEL Display CQ-C9901U
ENTER
TILT O/C
ASP
MUTE
MODE MENU
CQ-VD7001U
NAVI
OPEN / CLOSE
EJECTNAVIGATION
ASPECT
POWER
VOL
P·MODE
DISC
TUNE
/TRACK
OPEN / CLOSE
CQ-VD7001U
TILT
TEXT
Example: In-Dash 7” Widescreen Color LCD Monitor/DVD Receiver CQ-VD7001U
SEL
SRC
BAND
MUTE
VOL
DISP
Example:
Remote Control EUR7641010
Note: Some operations are not allowed in some units.
CS
SRC
POWER
SOURCE
MENU
SEL
SEL
SRC
SRC
VOL
VOL
SET
BAND MUTE
BAND
MUTE
2 31
231
RANDOM
SCAN REPEAT
5
64
5
64
97
97
8
8
TUNE TUNE
0
0
DISP
DISP
#
#
NUMBER
CAR AUDIO
Page 29

57
CX-DH801U
30
English
56
CX-DH801U
29
English
Definition of Terms
Definition of Terms
Digital audio output connector (Optical)
The digital audio output connector (optical) converts
electrical signals into optical signals and transfers
them to the amplifier. Consequently, it has a number
of features including its immunity from electrical interference from external sources and its ability to prevent
the generation of noise and its minimal effect on the
external environment.
Dolby Digital
This fully discrete format divides the music signals
into 5.1 channels: Front Left (L), Front Right (R),
Center (C), Left Surround (LS), Right Surround (RS)
and Subwoofer (SW: 0.1 channel) for recording and
playback. The number of channels that are recorded
depends on the software. (1 to 5.1 channels)
Dolby Pro Logic
This format records signals from four channels [Front
Left (L), Front Right (R), Center (C), and Monaural
Surround (S)] in two channels, decodes those channels through a Dolby Pro Logic decoder, and then outputs the resulting signals in four channels.
DTS
This format requires more data than Dolby Digital, and
provides higher quality surround playback.
Similar to Dolby Digital, this fully discrete format
divides the music signals into 5.1 channels: Front Left
(L), Front Right (R), Center (C), Left Surround (LS),
Right Surround (RS) and Subwoofer (SW: 0.1 channel) for recording and playback.
Interactive DVD
An interactive DVD is DVD software which includes
multiple angles, multiple plot endings, etc.
Letterbox screen
This refers to a screen on which the playback picture
of wide-screen DVDs or VCD (Video CD)s appears
with black bands running along the top and bottom.
LPCM (Linear PCM audio)
In this format, the audio signal is converted to digital
data and recorded in two channels without compression. Because the capacity of a DVD disc is large, it
can store more data with better accuracy than a CD.
NTSC
NTSC (National Television Standard Committee format) is a color television-broadcasting format for
ground waves proposed by National Television
Standard Committee in 1953. This format is popular in
North America, Middle-South America and Japan. The
resolution of horizontal trace line is 525 and frame
number per second is 30.
PAL
PAL (Phase Alternation by Line) is a color televisionbroadcasting format for ground waves developed in
Germany on 1967. This format is popular in Western
Europe, South America, Africa, China and other Asian
countries. The resolution of horizontal trace line is 625
(525 in Brazil) and frame number per second is 25.
Pan & Scan screen
This refers to a screen on which the playback picture
of wide-screen DVDs or VCD (Video CD)s is cut off at
the left and right sides.
Playback control (VCD (Video CD))
If the VCD (Video CD) has “With Playback Control” or
others written on the disc surface or on the jacket, the
scenes or information to be viewed (or listened to) can
be selected interactively with the screen by looking at
the menu shown on the screen.
In these instructions, playback using the menu screen
is referred to as the “menu play” for video CDs. This
player supports Video CDs with playback control.
Manufactured under license from Digital Theater
Systems, Inc. US Pat. No. 5,451,942 and other
world-wide patents issues and pending. “DTS”
and “DTS Digital Out” are trademarks of Digital
Theater Systems, Inc. © 1996 Digital Theater
Systems, Inc. All rights reserved.
Manufactured under license from Dolby
Laboratories. “Dolby” and the double-D symbol
are trademarks of Dolby Laboratories.
Confidential unpublished works. Copyright
1992–1997 Dolby Laboratories. All rights
reserved.
Chapter 1
Chapter 2
……
Chapter 1
……
Title 1 Title 2
Track 1 Track 3
Track 2
……
Track
Title, Chapter (DVD)
DVDs are divided into some large sections (titles) or
some small sections (chapters). Each section is numbered; these numbers are called “Title number” or
“Chapter number”.
Track (Video CD/CD)
Video CDs or CDs are divided into some sections
(tracks). Each section is numbered; these numbers are
called “Track number”.
WIDE
“WIDE” means a 16 : 9 ratio screen. The standard size
of Panasonic Car AV equipment adopts this ratio
screen. Therefore, this unit sets the default value to
“WIDE“ in “TV MODE”.
“DTS” and “DTS Digital Out” are trademarks of Digital
Theater Systems, Inc.
U.S. Patent Nos. 4,631,603; 4,577,216; 4,819,098;
4,907,093; 5,315,448; and 6,516,132.
This product incorporates copyright protection technology that is protected by U.S. patents and other intellectual property rights. Use of this copyright protection
technology must be authorized by Macrovision, and is
intended for home and other limited viewing uses only
unless otherwise authorized by Macrovision. Reverse
engineering or disassembly is prohibited.
Recordable
ReWritable
Page 30

59
CX-DH801U
32
English
58
CX-DH801U
31
English
Installation
Installation
WARNING
❐ This installation information is designed for professional installers with knowledge of
automobile electrical safety systems and is not intended for non-technical, do-it-yourself
individuals. It does not contain instructions on the electrical installation and avoidance of
potential harm to air bag, anti-theft and ABS braking or other systems necessary to install
this product.
Any attempt to install this product in a motor vehicle by anyone other than a professional installer could cause damage to the electrical safety systems and could result in
serious personal injury or death.
❐ If your car is equipped with air bag and/or anti-theft systems, specific procedures may
be required for connection and disconnection of the battery to install this product.
Before attempting installation of this electronic component against the manufacturer’s
recommendation, you must contact your car dealer or manufacturer to determine the
required procedure and strictly follow their instructions.
FAILURE TO FOLLOW THE PROCEDURE MAY RESULT IN THE UNINTENDED DEPLOYMENT OF AIR BAGS OR ACTIVATION OF THE ANTI-THEFT SYSTEM RESULTING IN DAMAGE TO THE VEHICLE AND PERSONAL INJURY OR DEATH.
❏ Overview
This product should be installed by a professional. However,
should you decide to install the product against the manufacturer’s recommendation, these operating Instructions do
not contain electrical installation instructions. You must contact your car dealer or manufacturer for electrical connection
instructions to avoid possible damage to your electrical safety systems and resulting injury or death. (Please refer to
the “WARNING” statement above).
Your next step is to decide where to install the unit. The
instructions in these pages will guide you through the
remaining steps:
¡Identify and label the car wires.
¡Connect the car wires to the wires of the power connec-
tor.
¡Install the unit.
¡Check the operation of the unit.
If you encounter problems, please consult your nearest professional installer.
Before you begin installation, look for the following items
which are packed with your unit.
¡Warranty Card …… Fill this out promptly.
¡Installation Hardware …… Needed for installation.
Warning: This product is designed for operation
with a negative grounded 12 V DC battery system. Never
operate this product with other battery systems, especially a 24 V DC battery system.
❏ Precautions
¡Disconnect the cable from the negative (–) battery termi-
nal (see caution at right).
¡The product should be installed in a horizontal position
with the front end up at a designated angle, 0°, 22.5°,
45°, 67.5° or 90°.
Warning: If your car is equipped with air bag
and/or anti-theft systems, specific procedures may
be required for connection and disconnection of
the battery to install this product.
Before attempting installation of this electronic
component against the manufacturer’s recommendation, you must contact your car dealer or manufacturer to determine the required procedure and
strictly follow their instructions.
FAILURE TO FOLLOW THE PROCEDURE MAY
RESULT IN THE UNINTENDED DEPLOYMENT OF
AIR BAGS OR ACTIVATION OF THE ANTI-THEFT
SYSTEM RESULTING IN DAMAGE TO THE VEHICLE AND PERSONAL INJURY OR DEATH.
Cautions:
¡We strongly recommend that you wear gloves for
installation work to protect yourself from injuries.
¡When bending the mounting tab of the mounting col-
lar with a screwdriver, be careful not to injure your
hands and fingers.
This unit should be professionally installed. In case of difficulty, please consult with your nearest professional installer.
1. This unit only operates in a 12 V DC negative ground system.
2. Follow the Electrical Connections carefully (a page 63-
70). Failure to do so may result in damage to the unit.
3. Connect the power lead after all other connections are
made.
4. Be sure to connect the battery lead (yellow) to the positive
terminal (+) of the battery or fuse block (BAT) terminal.
5. Insulate all exposed wires to prevent short circuiting.
6. Secure all loose wires after installing the unit.
7. Please carefully read the operating and installation
instructions of the respective equipment before connecting it to this unit.
Caution: Please follow the laws and regulations of
your state, province or country for installation of the
unit.
Caution: Various settings that have been stored in
the memory in other on-board equipment (car navigation
etc.) may be lost if the battery terminals are disconnected.
Therefore, we recommend you to make a record of or to
back up the settings before disconnecting the terminals.
After completing installation of the main unit, set up the
equipment again according to the settings.
Page 31

61
CX-DH801U
34
English
60
CX-DH801U
33
English
Installation (Continued)
QtyDiagramItemNo.
H
A
B
C
V
H
A
B
C
V
Installation Location
Avoid installing the unit in the following locations.
¡In areas hit by direct sunlight, hot air from the heater, or any other high-temperature location.
¡In an area where you cannot firmly secure the unit, or in high-vibration areas.
¡In areas with high humidity or high dirt and dust levels.
Use a screwdriver to set the angle-adjusting screw to the position “V” or “H”, depending on the mounting angle selected.
This unit can be set in the five directions: horizontal, vertical, and the positions A
(22.5°), B (45°), and C (67.5°). Mount the unit by referring to the figures below.
Select the mounting angle
Default: H
Adjust the angle with a screw driver
(L) (R) (L) (R) (L) (R) (L) (R) (L) (R)
Please check that all installation hardware listed below are included.
❑ Installation Hardware (For Mounting)
q
w
e
r
t
y
4
2
4
1
1
2
Hex. Bolt with Double Washers (4 mmφx 8 mm)
YJT034C707ZA
Base Bracket
YFG014C920ZC
Hex. Nut (5 mmφ)
YJN014C703ZA
Mounting Bracket (L)
YFX214C387ZA
Mounting Bracket (R)
YFX214C386ZA
Double-Faced Adhesive Tape
YFX9994C725ZA
QtyDiagramItemNo.
❑ Installation Hardware (For wiring)
u
i
o
!0
!1
!2
1
1
1 set
1
2
1
P
O
W
E
R
Extension Cord (5 m)
(BRAKE / VIDEO-CONT / ACC / BATT/ DIN / RCA / GND)
YAJ024C107ZA
Clip Connector
YEAT034C012
Remote Control Sensor (cable length 3 m)
YEFX9991540
Note:
¡The number in parenthesis underneath each accessory part name is the part number for maintenance and service.
¡Accessories and their parts numbers are subject to modification without prior notice due to improvements.
Remote Control Sensor Extension Cord (3 m)
YAJ074C024ZA
Cord Clamp
(for Remote Control Sensor)
YEFX007570
Double-Faced Adhesive Tape
(for Remote Control Sensor)
YFX994C124ZA
Cautions:
¡Set the angle-adjusting screw to the same angle as the unit is installed.
¡Set the holes to the same positions for both left and right.
Note: For installation, use the screws shorter than 5 mm if you should use the screw other than above Hex. Bolt with Double
Washers
q.
Installation
Horizontal:Vertical:
Installation Angle
Selecting a mounting angle
(Normal) (Up-side down)
(Normal) (Up-side down)
Typical horizontal installation
Typical vertical installation
Set the screw to the
same positions for
both left and right.
Set the screw to the
same positions for
both left and right.
Do not tilt in this
direction.
Limit to less than
10 degrees.
Limit to less than 10 degrees.
Limit to less
than 10
degrees.
(90˚)
(0˚)
H
A
B
A
V
C
H
M
H
4
×
5
45°
m
mM
A
V
C
×
B
V.
H
A.B
C
B
A
V
R
A
H
H
A
H
B
22.5°
V
C
C
V
B
H
H
A
C
B
A
V
H
V
M
B
4
×
5
m
C
m
M
A
R
×
V.
A.B
A
C
V
C
B
V
H
C
H
B
A
A
B
B
C
V
C
R
V
A
M4×5mmMA×
HA
C
V.A.B
H
H
A
M
4
V
C
B
×
A
5
H
m
H
m
M
A
×
V
.A
V
C
.B
C
B
A
V
67.5°
H
H
A
M
HA
4
×
V
5
C
m
M4×5mmMAX
B
m
A
M
H
A
V
×
V
C
H
B
.
A
V
C
A
.
B
H
R
A
B
B
H
H
C
B
A
VAB
H
V
R
A
C
VBC
H
A (22.5°)
H (0°) V (90°)
H
A
B
C
V
H
A
B
C
V
A (22.5°)
H
A
B
C
V
H
A
B
C
V
H
B (45°)
B (45°)
A
B
C
V
C (67.5°)
H
A
B
C
V
H
A
B
C
VV
A
B
C
H
H
A
B
C
V
V
H
A
H
A
C
B
B
B
C
C
H
A
V
V
Page 32

63
CX-DH801U
36
English
62
CX-DH801U
35
English
Electrical Connection
Overview
Cautions:
• This unit is designed for use in a car having a 12 V negative ground battery system.
• Be sure to insulate any exposed wires from the car chassis. Bundle all cables and keep cable terminals free from
any metal parts.
• Note that if your car has a driving computer or a navigation computer, disconnecting the cable from the battery may
clear the memory.
• Run the cords avoiding the spots where the temperature can be extremely high.
Note:
• To prevent from damage to the unit, be sure to follow the wiring diagrams below.
• Be sure to fully plug in the connectors. Secure them with clamps and tapes.
• All other installation methods require the use of dedicated metal fittings. Consult with a qualified servicing engineer
or your dealer if other methods are required.
DVD Changer
CX-DH801U
u
Extension Cord
(BRAKE/VIDEO-CONT/ACC/BATT/DIN/RCA/GND)
Remote Control Sensor
o
Ground Lead
To a clean, bare metallic part
of the car chassis
Parking brake connection lead
Be sure to wire the parking
brake for safety and preventing
Accident.
Video control lead (output)
To Video control lead (input) of
other equipment
Power Lead
To ACC power, + 12 V DC.
Battery Lead
To the car battery, continuous
+ 12 V DC.
(Black)
(Blue/yellow stripe)
(Green/yellow stripe)
(Red)
(Yellow)
Remote-In (Mini. Pin)
To the remote control sensor or
Remote-out of other equipment
Remote-Out (RCA)
To Remote-In of other equipment
such as TV tuner
Remote-In (RCA)
To Remote-out of other equipment
DIN Cable
To the changer connector
Video output
RCA Cable
Audio output (R)
Audio output (L)
(Black)
(Black)
(Black)
(Black)
(Yellow)
(Red)
(White)
Fuse 5 A
Attaching the remote control sensor
o
Double-Faced Adhesive
Tape
!2
Attach the
receiver.
Use the remote control
sensor extension cord
!0 if the original
remote control sensor
cord cannot reach the
DVD changer unit.
Note: The remote control sensor should be installed where
it is not exposed to direct sunlight and where it does not
interfere with driver’s operations.
Installation (Continued)
Typical horizontal installation
1
Mount a mounting bracket (L) or (R) on either side of
the control unit with a hex. bolt together with double
washers (4 mmφx 8 mm).
Mounting bracket (L) r
Mounting bracket (R) t
Hex. bolt with double
washers (4 mmφx 8 mm) q x 4
Typical vertical installation
Mount the unit with the mounting bracket on either side
with a hex. bolt with double washers (4 mmφx 8 mm).
Mounting bracket (L) r
Mounting bracket (R) t
Hex. bolt with double
washers (4 mmφx 8 mm) q x 4
2
Select a location where the unit should be mounted.
Fix the base brackets with a double-faced adhesive
tape.
Base bracket w x 2
Double-faced adhesive tape y x 2
3
Use a cutter to cut a small cross in the carpet in
accordance with the locations of the 5 mmφ bolts of
the base brackets.
Base bracket w x 2
Carpet
Fix both the base brackets and the double-faced adhesive
tape to a mounting surface below the carpet.
4
Mount the unit on the carpet with four hex. nuts
(5 mmφ).
Hex. nut (5 mmφ) e x 4
Carpet
Relationship between mounting
holes and angles
The relationship between mounting holes and angles of the
mounting brackets (L and R) is illustrated above. Symbols
corresponding to the mounting angles are marked near the
respective holes. Select the correct holes in accordance
with the mounting angles to be used.
Mounting bracket (L) Mounting bracket (R)
A
A
C
B
B
V
V
R
C
H
H
A
A
C
B
B
V
V
L
C
H
H
Fix the Remote Control
Sensor Cord with1 Cord
Clamp
!1
Installation, Electrical Connection
PARKING BRAKE
H
V
B
H
A
V.A.B
B
C
M4X5mmMAX
REMOTE-IN
REMOTE-OUT
REMOTE-IN
C
C
POWER
V
H.A
VIDEO-CONT
ACC
BATTERY 5A
Page 33

65
CX-DH801U
38
English
64
CX-DH801U
37
English
Electrical Connection (Continued)
Connection with DVD/monitor receiver (CQ-VD7001U)
Connection with DVD/monitor receiver with CD/DVD changer control (option, CQ-VD7001U)
Note: Refer to the operating instructions for the connected devices, in addition.
Electrical Connection
Caution: For safety, be sure to ask your nearest professional installer to do this connection.
Connecting the Parking Brake (Side Brake) Connection Lead
–
+
The parking brake (side brake) switch position varies with the car model.
For details on the exact location of the parking brake (side brake) switch in
your car, contact your dealer.
Parking Brake (Side Brake) Connection Lead
(Blue/yellow stripe)
When the parking brake (side brake) lever is
engaged, the unit is grounded by the chassis.
Parking brake
(Side brake)
switch
Car chassis
Battery
Brake light
Clip Connector
i
q Attach a Clip Connector i to the end of the parking
brake (side brake) connection lead.
w The Clip Connector i is connected to the power
source side lead of the parking brake (side brake)
lever.
Parking Brake (Side Brake) Connection Lead
(Blue/yellow stripe)
Comes up to this point.
Power source side lead
Parking (side) brake Foot brake
Ground
Lead
To a clean, bare metallic part of the car chassis
Battery Lead
To the car battery, continuous + 12 V DC.
Video control Lead (output)
(Green/yellow stripe)
Not used.
Extension Cord
u
(BRAKE/VIDEO-CONT/ACC/BATT/DIN/RCA/GND)
(Black)
(Red)
(Yellow)
DVD Changer
CX-DH801U
RCA Cable
Video Output (Yellow)
CQ-VD7001U
(option)
RCA Cable (option) Remote-out
(Black)
Be sure to wire the parking brake for safety and
preventing accident.
Fuse 5 A
Not used.
Parking Brake Lead
(Blue/yellow stripe)
DIN Cable
(Black)
To the changer
connector.
DIN Connector
Audio Output (L)
(White)
Audio Output (R)
(Red)
(R) (Red)
(L) (White)
Changer/AUX/XM receiver
Input Connector
(Yellow)
Video Input Terminal
Power
Lead Not used. Do not connect the Power Lead
(ACC) if the control unit is equipped.
Note: Never use both Remote-Ins
(one is mini-pin jack, the other is RCA
jack) at the same time. Failure to
observe this may cause misoperation.
Note: Select [VTR] in [CH INPUT] of the [INPUT/OUTPUT] menu in advance if you would like to watch the display of the
DVD changer with CQ-VD7001U (a page 9).
Remote-In
(RCA) (Black)
H
V
B
H
A
B
C
V
M4X5mmMAX
H.A
V.A.B
REMOTE-IN
PARKING BRAKE
VIDEO-CNT
ACCACC
BATTERY 5A
C
C
CH/AUX IN
VTR IN
Page 34

67
CX-DH801U
40
English
66
CX-DH801U
39
English
Electrical Connection (Continued)
Connection without Control Unit
Connections for the minimum combination (CY-V7100U, option)
Notes:
• Refer to the operating instructions for the connected devices, in addition.
• Connect the included remote control sensor to Remote-In in the case of no remote control sensor on the display unit.
DVD Changer
CX-DH801U
Extension Cord
u
(BRAKE/VIDEO-CONT/ACC/BATT/DIN/RCA/GND)
Ground Lead
To a clean, bare metallic
part of car chassis
Parking Brake Lead
Be sure to wire the parking
brake for safety and preventing accident.
Power Lead
To ACC power, + 12 V DC.
DIN Cable Not Used
(Black)
(Red)
(Black)
(Yellow)
(Blue/yellow stripe)
Video Control Lead (output)
(Green/yellow stripe)
Video control lead (input)
(Green/yellow stripe)
Remote-In (Not used)
Remote-Out (Not used)
Remote-In
(RCA)
(Black)
(Black)
(Black)
RCA Cable
Audio Output
(R)
(Red)
(L)
(White)
Video Output
(Yellow)
Remote Out Lead
(Black)
RCA Cable
(option)
Fuse 5 A
Battery Lead
To the car battery, continuous + 12 V DC.
Display Unit
CY-V7100U
(option)
Hide-away Unit (rear)
CY-V7100U
(option)
Hide-away Unit
(front)
CY-V7100U (option)
DIN Connector
Electrical Connection
Note: Never use both Remote-Ins (one
is mini-pin jack, the other is RCA jack)
at the same time. Failure to observe this
may cause misoperation.
Headphones
(option)
Caution: The driver should not wear headphones while driving.
Connection with CD/Receiver (CQ-C9901U)
Connection with CD/Receiver with CD/DVD changer control (option, CQ-C9901U/CY-V7100U)
Note: Refer to the operating instructions for the connected devices, in addition.
DVD Changer
CX-DH801U
Extension Cord
u
(BRAKE/VIDEO-C0NT/ACC/BATT/DIN/RCA/GND)
Ground
Lead
To a clean, bare metallic part of the car chassis
Battery Lead
To the car battery, continuous + 12 V DC.
(Black)
(Red)
(Yellow)
Parking Brake Lead
(Blue/yellow stripe)
Display Unit
CY-V7100U
(option)
Be sure to wire the parking brake for
safety and preventing accident.
Video control Lead (output)
(Green/yellow stripe)
Video Control Lead (input)
(Green/yellow stripe)
Video Output (Yellow)
Remote Out Lead (Black)
Video-IN
RCA Cable
Audio Output
Audio Output
(R) (Red)
(L) (White)
CD/DVD Changer
/AUX/XM receiver
Input Connector
DIN Cable
(Black)
Changer Control
Connector
CQ-C9901U (option)
Power Connector
Fuse 5 A
Remote Control Sensor
Extension Cord (option)
Hide-away Unit
(rear)
CY-V7100U
(option)
Hide-away Unit
(front)
CY-V7100U (option)
VTR-1
VTR-2
DIN Connector
Not used.
Power
Lead
Not used. Do not connect the Power Lead
(ACC) if the control unit is equipped.
Note: Never use both Remote-Ins (one is mini-pin
jack, the other is RCA jack) at the same time.
Failure to observe this may cause misoperation.
Remote-In
(RCA) (Black)
ACC
BATTERY 5A
CH/AUX2-IN
H
V
B
H
A
V.A.B
B
C
V
M4X5mmMAX
REMOTE-IN
H.A
C
C
PARKING BRAKE
VIDEO-CNT
VIDEO・CNT
H
V
B
H
A
B
M4X5mmMAX
V.A.B
REMOTE-IN
REMOTE-OUT
REMOTE-IN
C
V
H.A
CY-V7100U
PARKING BRAKE
BATTERY 5A
VIDEO-CNT
ACC
C
C
CY-V7100U
PHONES
VIDEO・CNT
PHONES
Page 35

69
CX-DH801U
42
English
68
CX-DH801U
41
English
DVD Changer
CX-DH801U (rear)
DVD Changer
CX-DH801U (left)
Electrical Connection (Continued)
Connection with Digital Surround Processor (CY-AC300, option) and Power Amplifiers (option).
Note: Refer to the operating instructions for the connected devices, in addition.
Connection with Digital Surround Processor (CY-AC300)
Digital Surround Processor
CY-AC300 (option)
External Power
Amplifier
(option)
External Power
Amplifier
(option)*
Battery Lead
To the car battery,
continuous +12 V DC
Center Speaker Cord
External
Amplifier
Control Power
Lead
(Blue/white stripe)
(Connect to AMP-CONT)
Center Speaker
EAB-CF2
(option)
Sub-Woofer
(option)
Left
Speaker
(Rear)
* For use as a monaural amplifier (Bridge connection)
Right
Speaker
(Rear)
Left
Speaker
(Front)
Right
Speaker
(Front)
ACC (or IGN) Power Lead
To ACC power,
+12 V DC
Amplifier Control
Power Lead
(Blue/white stripe)
Amplifier Control Power Lead
(Blue/white stripe)
Ground Lead
To a clean, bare metallic part of the
car chassis
Operating Unit/Main Unit
Connecting DIN Cord
(Supplied with CY-AC300)
SUB•W (MONO)
ANALOG-IN
DIGITAL-IN
Optical Fiber Cable
(CA-LRD60, option)
(R)
(R) (R)
(L)
(L)
(L)
(L) (L)(R) (R)
REAR
FRONT
CY-AC300
Main Unit (Rear)
Power
Connector
(Supplied with
CY-AC300)
RCA Cable (option)
RCA Cable
(option)
(Front)
(Black)
Resistor (220 Ω)
(When a Y-shaped
cord is used)
Fuse (5 A)
(Yellow)
(Black/green stripe)
(Black)
(Red)
(L)
(R)
RCA Cable
(option)
Note on handling optical fiber cable:
¡Do not allow the cable to be damaged by getting it caught in the door,
placing a heavy object on it, etc.
¡Make sure that the cable is not strained when it is connected.
¡Do not bend the cable sharply.
¡Install the DVD changer in where it prevents the optical fiber connector
from hitting its surroundings.
25 mm or more
(option)
Electrical Connection
Extension Cord
u
(BRAKE/VIDEO-CONT/ACC/BATT/DIN/RCA/GND)
Ground
Lead
To a clean, bare metallic part of
the car chassis
Battery Lead
To the car battery, continuous + 12 V DC.
(Black)
(Red)
(Yellow)
Parking Brake Lead
(Blue/yellow stripe)
Display Unit
CY-V7100U (option)
Be sure to wire the parking brake for
safety and preventing accident.
Video control Lead (output)
(Green/yellow stripe) Not used.
RCA Cable
Audio Output
Fuse 5 A
Not used.
(R) (Red)
(L) (White)
Pre-out Connector (Front)
Video Output (Yellow)
CQ-VD7001U
(option)
DIN Cable (Black)
To the changer
connector.
DIN Connector
Audio Output (L) (White)
Audio Output (R) (Red)
(R) (Red)
(L) (White)
Changer/AUX/XM
receiver Input Connector
(Yellow)
Video Input Terminal
RCA Cable (option)
Remote-out
(Black)
RCA Cable
(option)
Video Output
Terminal
(R) (Red)
(L) (White)
(Yellow)
(R) (Red)
(Yellow)
(L) (White)
Hide-away Unit (rear)
CY-V7100U (option)
Hide-away Unit (front)
CY-V7100U (option)
DIN
Connector
Power
Lead Not used. Do not connect the Power Lead
(ACC) if the control unit is equipped.
Note: Select [VTR] in [CH INPUT] of the [INPUT/OUTPUT] menu in advance if you would like to watch the display of the
DVD changer with CQ-VD7001U (a page 9).
Note: Never use
both Remote-Ins
(one is mini-pin
jack, the other is
RCA jack) at the
same time. Failure
to observe this may
cause misoperation.
Remote-In
(RCA) (Black)
SOURCE
AC300
VOL
E
C
S
R
O
U
SEL
L
GITA
DI
GIC
O
Am
r
e
w
4
r
e
t
n
Ce
r
fo
r
ie
f
i
l
p
ION
POSIT
POSI
P
DR COM
PRO L
r
e
k
a
e
p
S
ER
DIMM
SPACE
DIM
SPC
DIGATAL SURROUND PROCESSOR
& 30w Po
y
la
p
s
i
d
r
o
l
o
c
ilt
u
m
t
h
ig
r
b
r
e
p
u
s
3
2
MUTE
1
PWR
ACC
BATTERY 5A
AMP-CONT MAX 0.1A
CENTER
LL
RR
L
R
ACCACC
V
B
C
C
H
V.A.B
M4X5mmMAX
H
A
B
C
V
H.A
REMOTE-IN
PARKIN G BRAKE
BATTERY 5A
VIDEO-CNT
CH/AUX IN
VTR IN
PRE-OUT FRONT
VIDEO OUT
PHONES
CY-V7100U
Page 36

71
CX-DH801U
44
English
70
CX-DH801U
43
English
Digital audio output
Disc
DVD
Video CD
Sound
recording
format
Optical digital audio output
from connector
Dolby Digital
Dolby Digital bitstream
(1 – 5.1 ch)
DTS*
DTS bitstream (1 – 5.1 ch)
(The analog portion is not output.)
Linear PCM
(44.1/48/88.2/96
kHz 16/20/24 bit)
Linear PCM (2 ch)
(44.1/48/88.2/96 kHz
16/20/24 bit)
MPEG 1 MPEG 1 bitstream
Linear PCM
Linear PCM (2 ch)
(44.1 kHz sampling/16 bit)
CD
Linear PCM
Linear PCM (2 ch)
(44.1 kHz sampling/16 bit)
DTS*
DTS bitstream (1 – 5.1 ch)
(The analog portion is not output.)
MPEG 2 LPCM (48 kHz/16 bit)
General
Power Supply : 12 V DC (11 V – 16 V) test
voltage 14.4 V, negative ground
Current Consumption : Less than 2.0 A (play mode)
Dimensions (W x H x D)
DVD Changer Unit : 231 x 73 x 168 mm
{9-1/8” x 2-7/8” x 6-5/8”}
Disc Magazine Unit : 121 x 35 x 128 mm
{4-3/4” x 1-3/8” x 5-1/16”}
Weight
DVD Changer Unit : 1.5 kg (3 lbs, 5 oz)
Disc Magazine Unit : 0.2 kg (6 oz)
Disc Magazine Unit : VYQ3174 (included) holds 8
discs
DVD Changer Unit
Load Impedance : More than 10 kΩ
Output Voltage : 2 V rms (1 kHz, 0 dB, at max.)
Output Impedance : 600 Ω
Channel : 2 channels
Frequency Response : 5 – 20,000 Hz ±1 dB
Signal to Noise Ratio : 95 dB
Total Harmonic Distortion
: 0.006 % (1,000 Hz)
Wow and Flutter : Below measurable limit
Light Source : Semiconductor laser
Wavelength : 650 nm
Video section
Video Output : Video composite signal, 1,0 V
[p-p], 75 Ω
Note:
¡Above specifications comply with EIA standards.
¡Specifications and the design are subject to modification
without notice due to improvements in technology.
¡Some figures and illustrations on this manual may be dif-
ferent from real ones.
Specifications
*DTS only works with optical outputs.
Electrical Connection (Continued)
Connection with Overhead Monitor (CY-VH9300U)
Connection with CD/Receiver with CD/DVD changer control and the overhead monitor (option, CQ-C9901/C9801U,
CY-VH9300U).
Note: Refer to the operating instructions for the connected devices, in addition.
DVD Changer
CX-DH801U
Extension Cord
u
(BRAKE/VIDEO-C0NT/ACC/BATT/DIN/RCA/GND)
To a clean, bare metallic part of the car chassis
To the car battery, continuous + 12 V DC.
(Black)
(Red)
(Yellow)
Parking Brake Lead
(Blue/yellow stripe)
Be sure to wire the parking
brake for safety and preventing
accident.
Video control Lead (output)
(Green/yellow stripe)
(R) (Red)
(L) (White)
Front
speaker
leads
Fuse 5 A
CY-VH9300U
(option)
Not used.
(Green/yellow stripe)
Audio Output (L) (White)
Audio Output (R) (Red)
Video Output (Yellow)
(L) (White)
Video (Yellow)
(R) (Red)
Remote-In
(Black)
RCA Cable
(option)
DIN Cable (Black)
To the changer
connector
CQ-C9901U
(option)
(R) (Red)
(L) (White)
Rear
speaker
leads
Front speakers
(option)
Rear speakers
(option)
Electrical Connection, Specifications
MPEG 1 LPCM (48 kHz/16 bit)
Not used. Do not connect the Power Lead
(ACC) if the control unit is equipped.
Ground Lead
Power Lead
Battery Lead
Note: Never use both
Remote-Ins (one is
mini-pin jack, the other
is RCA jack) at the same
time. Failure to observe
this may cause misoperation.
RCA Cable
(option)
Copyright © 2005 Matsushita Electric Industrial Co., Ltd. All right reserved.
Remote-In
(RCA) (Black)
VIDEO CONT
VTR1-IN
VTR OUT
VIDEO-CNT
ACC
BATTERY 5A
H
V
B
C
C
V.A.B
H
A
B
C
V
M4X5mmMAX
H.A
REMOTE-IN
FRONT SP
PARKING BRAKE
REMOTE-OUT
CH/AUX2-IN
REAR SP
 Loading...