

Page 1
F564890
Operating Instructions
Air Conditioner
CS-MC12DKU CU-2C24DKU
ENGLISH Before operating the unit, read these operating instructions thoroughly and keep them for future reference. 2 ~ 7 ESPAÑOL Antes de utilizar la unidad, sírvase leer atentamente estas instrucciones de funcionamiento y conservarlas como futuro elemento
de consulta.
Please register your product at : www.panasonic.com/register
For assistance, please call : (866)-292-7292, for Hawaii residents call (808)-488-7779.
Manufactured by:
Panasonic HA Air-Conditioning (M) Sdn. Bhd.
Lot 2, Persiaran Tengku Ampuan, Section 21, Shah Alam Industrial Site, 40300 Shah Alam, Selangor, Malaysia.
8 ~ 13
Page 2
Thank you for purchasing a Panasonic Air Conditioner
■ Important notice
To prevent personal injury, injury
to others and property damage,
the following instructions must
be followed.
Incorrect operation due to
failure to follow instructions
will cause harm or damage,
the seriousness of which is
classified as below:
Warning
This sign warns of death or
serious injury.
Caution
This sign warns of injury or
damage to property.
The instructions to be followed
are classified by the following
symbols:
This symbol denotes an
action that is PROHIBITED.
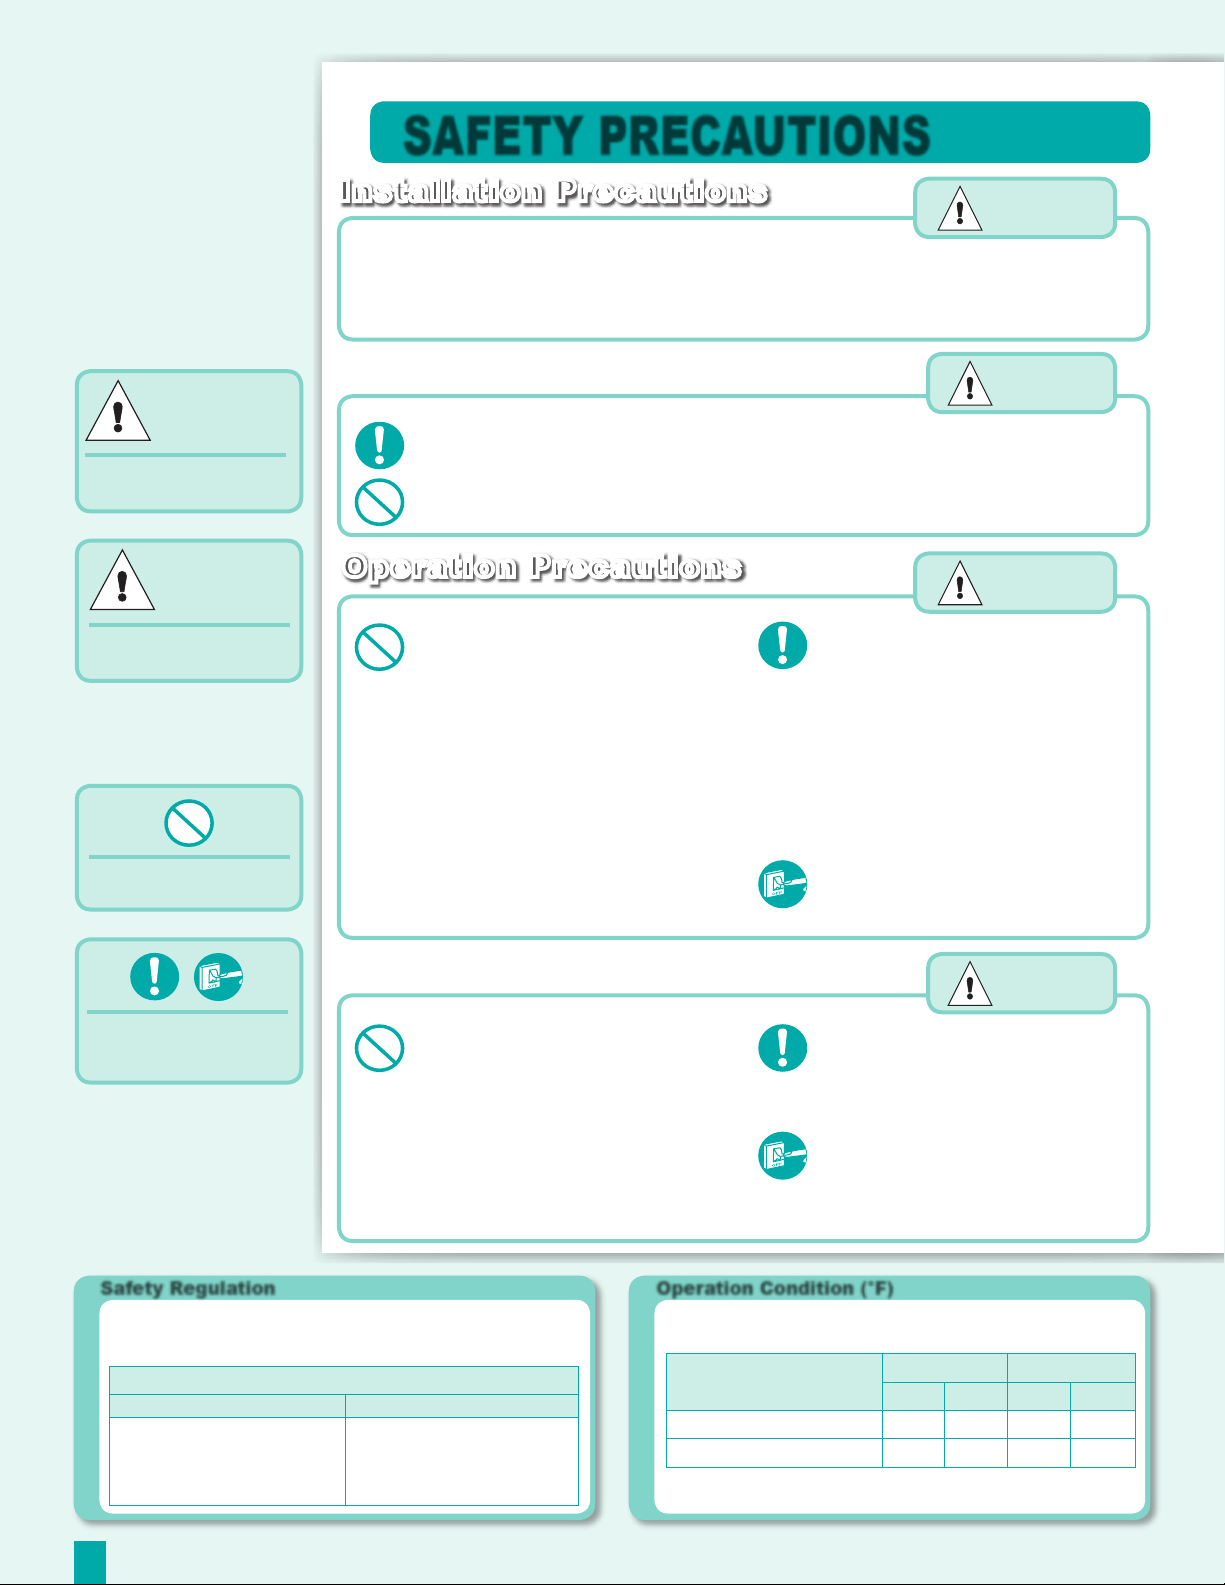
SAFETY PRECAUTIONS
Installation Precautions
Do not install, remove or reinstall the unit by yourself.
• Improper installation will cause leakage, electric shock or fire. Please consult an authorized dealer or
specialist for the installation work.
• This equipment must be earthed and installed with ELCB. It may cause electrical shock or fire in case of
malfunction.
• This air conditioner must be grounded. Improper grounding will cause electric shock.
• Ensure that the drainage piping is connected properly. Otherwise, water will leak.
• Do not install the unit in a potentially explosive environment.
Operation Precautions
• Do not share power outlet.
• Do not modify power cord.
• Do not use an extension cord.
• Do not operate with wet hands.
• Do not insert fingers or other objects into
the indoor or outdoor unit.
• Do not attempt to repair the unit by
yourself.
• Do not use rechargeable (Ni-Cd) batteries.
• Keep the remote control away from infants
and small children to prevent them from
accidentally swallowing the batteries.
• Use specified supply cord.
• If the supply cord is damaged or needs
replacement, it must be replaced by the
manufacturer or its service agent or a
similarly qualified person in order to avoid
a hazard.
• Remove the batteries if the unit is not
going to be used for a long period of time.
• New batteries of the same type must be
inserted following the polarity stated to
prevent malfunction of the remote control.
• In case of emergency or if an abnormal
condition (burnt smell, etc) occurs, turn off
the power supply.
Warning
Caution
Warning
These symbols denote
actions that are
COMPULSORY.
• Do not wash the unit with water, benzene,
thinner or scouring powder.
• Do not use for other purposes such as
preservation of food.
• Do not store or use any combustible
equipment in the airflow direction.
• Do not sit on or place anything on the
indoor or outdoor unit.
• Do not expose directly to cold air for a long
period.
Safety Regulation
The appliance is not intended for use by young children or infirm
people without supervision. Young children should be supervised to
ensure that they do not play with the appliance.
Power Supply
Time Delay Fuse Rated Volts
20 Amps
CS-MC12DKU/CU-2C24DKU
208/230 V
2
Caution
• Ventilate the room regularly.
• Pay attention as to whether the
installation rack is damaged after a long
period of usage.
• Switch off the power supply before
cleaning or servicing.
• Turn off the power supply if the unit is
not going to be used for a long period of
time.
Operation Condition (°F)
Use this air conditioner under the following temperature range.
DBT: Dry Bulb Temperature
WBT: Wet Bulb Temperature
Maximum Temperature 89.6 73.4 109.4 78.8
Minimum Temperature 60.8 51.8 60.8 51.8
Indoor Outdoor
DBT WBT DBT WBT
Page 3
ECONOMY
O
P
E
N
Note: The illustrations in this manual are for explanation purposes only and may differ from the
actual unit. It is subject to change without notice for future improvement.
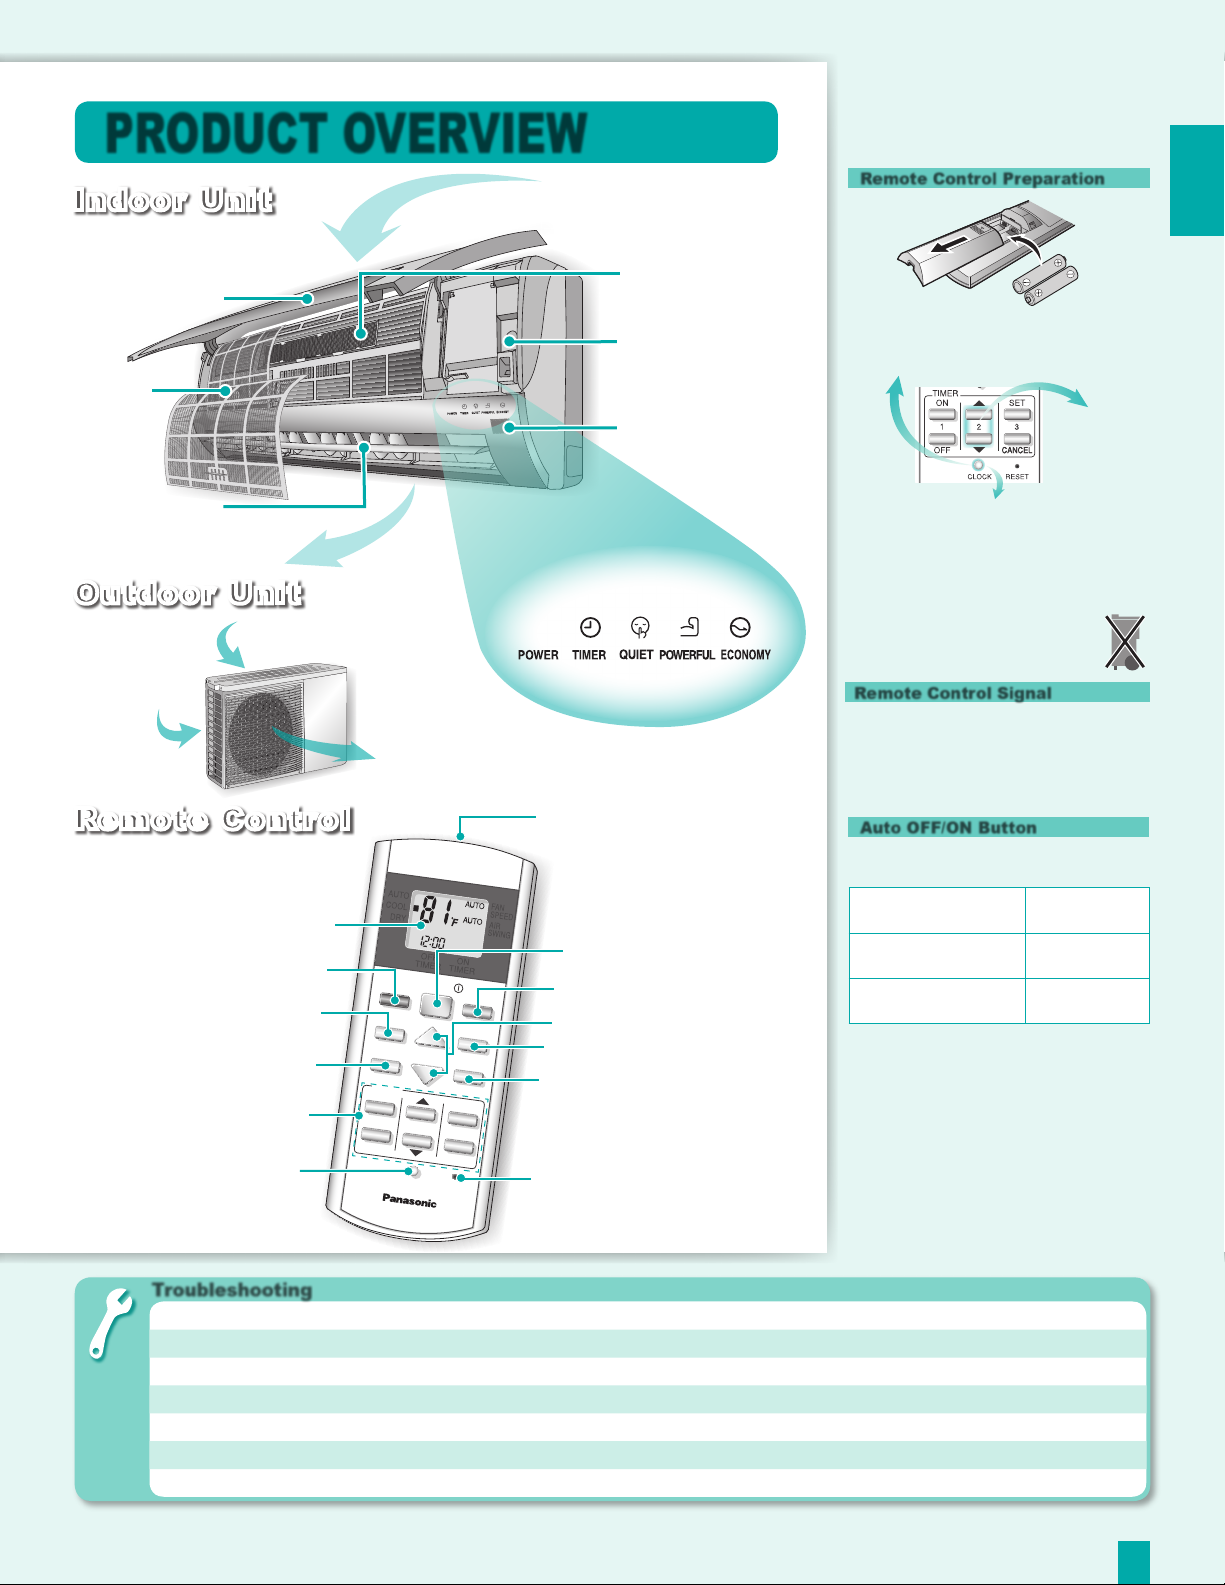
PRODUCT OVERVIEW
Indoor Unit
Front panel
Air filter
Airflow direction
louver
Discharged air
Outdoor Unit
Air inlet (rear)
Air inlet (side)
Air outlet
Remote Control
LCD display
Operation mode
Powerful operation
Quiet operation
Timer setting
Clock setting
Troubleshooting
● Operation delayed for a few minutes after restart.
● Sound like water flowing during operation.
● Mist emerges from indoor unit.
● Noisy during operations.
● Remote control/display does not work.
● The unit cannot operate.
● Outdoor unit emits water/steam.
■ About
Air intake
Remote Control Preparation
1. Pull out
Air Purifying filter
Auto OFF/ON
button
3. Press CLOCK button
2. Insert batteries
(AAA or R03)
Receiver
5. Press again to confirm
• Timer operation will be based on current
time set.
Indicator
Transmitter
Off/On
Economy operation
Temperature setting
Fan speed selection
Airflow direction
adjustment
Memory reset
➤ This is a normal self protection function.
➤ Caused by refrigerant flow inside.
➤ Condensation effect due to cooling process.
➤ Installation work could be slanted or front panel isn’t closed properly.
➤ Check whether batteries are correctly inserted or need replacement.
➤ Check whether circuit breaker is tripped or timer is being used correctly.
➤ Condensation or evaporation has occurred at piping surface.
• The batteries can be used for
approximately 1 year.
• The batteries must be recycled or
disposed of properly.
Remote Control Signal
• Make sure it is not obstructed.
• Maximum distances : 32.8 ft (10 m).
• Certain fluorescent lights may interfere
with signal transmission. Consult your
dealer.
Auto OFF/ON Button
• To operate the unit if the remote
control is misplaced or malfunctioning.
Action
Press once
Press until “beep”
sound
• To turn OFF, press the Auto OFF/ON
button again.
• To switch the remote control signal
receiving sound off or on.
1. Press until you hear a “beep” sound
and release.
2. Press again until you hear a “beep-
beep” sound and release.
3. Press to switch the sound off or on.
(Long “beep” - OFF; short “beep”
- ON)
ENGLISH
4. Set
current
time
Operation
mode
Automatic
Operation
Cooling
Operation
3
Page 4
ECONOMY
■ Operation Details
OFF/ON
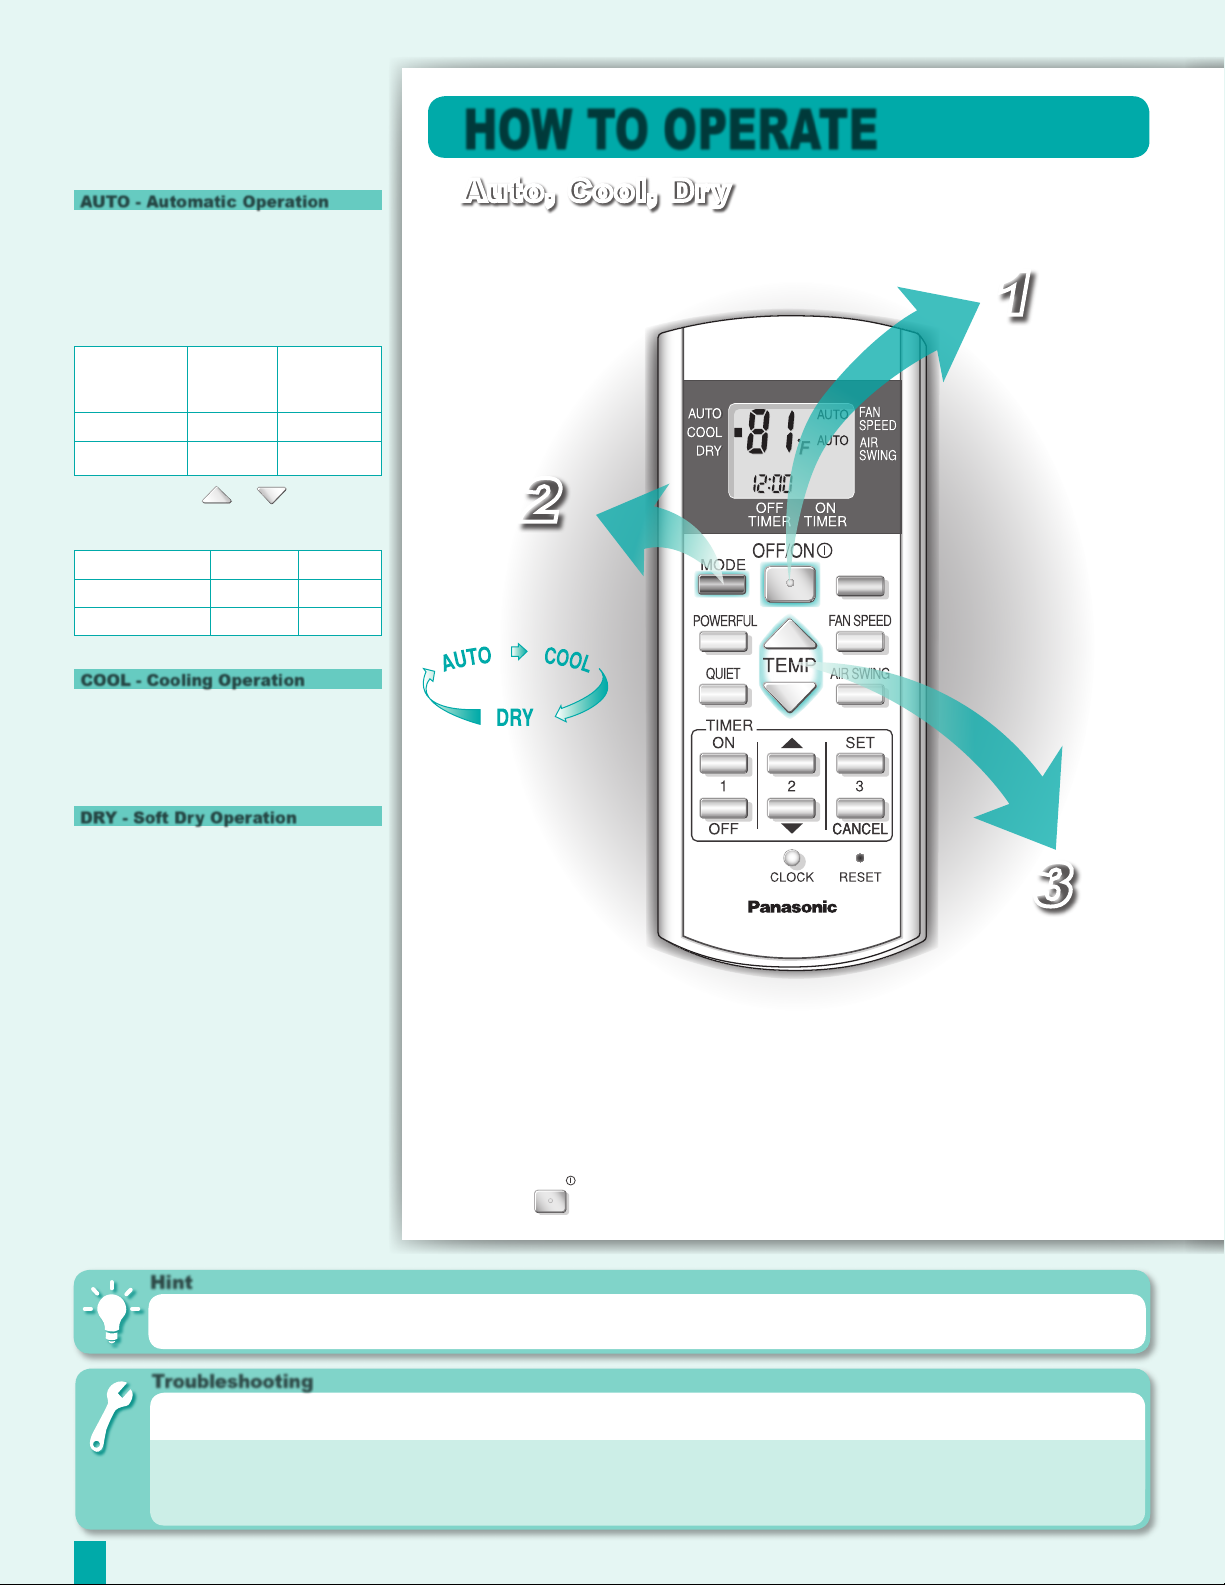
HOW TO OPERATE
AUTO - Automatic Operation
• The unit will automatically select the
operation mode according to the room
temperature.
• Once the operation mode is selected,
the unit will operate at the standard
setting temperature as shown:
Room
temperature
73.4°F & above Cool 77°F
Below 73.4°F Dry 72°F
• You may press or button to
change the standard setting temperature
to “HI” or “LO” as shown:
Operation mode HI LO
Cool 81°F 73°F
Dry 75°F 68°F
COOL - Cooling Operation
• Enables you to enjoy the cooling effect
at your preferred setting temperature.
• The range of temperature can be
selected from 60°F ~ 86°F.
Operation
mode
Standard
setting
temperature
Auto, Cool, Dry
1
Start the
operation.
2
Select the
desired
operation.
DRY - Soft Dry Operation
• Allows you to set the desired
temperature at low fan speed which
enables you to dehumidify your
surroundings.
• The range of temperature can be
selected from 60°F ~ 86°F.
Hint
● To save electricity, close the curtains when using air conditioner to prevent sunlight and heat from coming in.
Troubleshooting
● The room has a peculiar odour.
● Air conditioner does not cool efficiently.
3
Set the
temperature.
● Powerful, Quiet and Economy operations can be activated in
all operation modes.
● Press
button again to stop the operation.
➤ This may be a damp smell emitted by the wall, carpet, furniture or
clothing in the room.
➤ Ensure the temperature has been set correctly.
➤ Ensure windows and doors have been closed properly.
➤ Ensure filters are cleaned or replaced when necessary.
➤ Ensure inlet and outlet vents of the unit have not been obstructed.
4
Page 5
ECONOMY
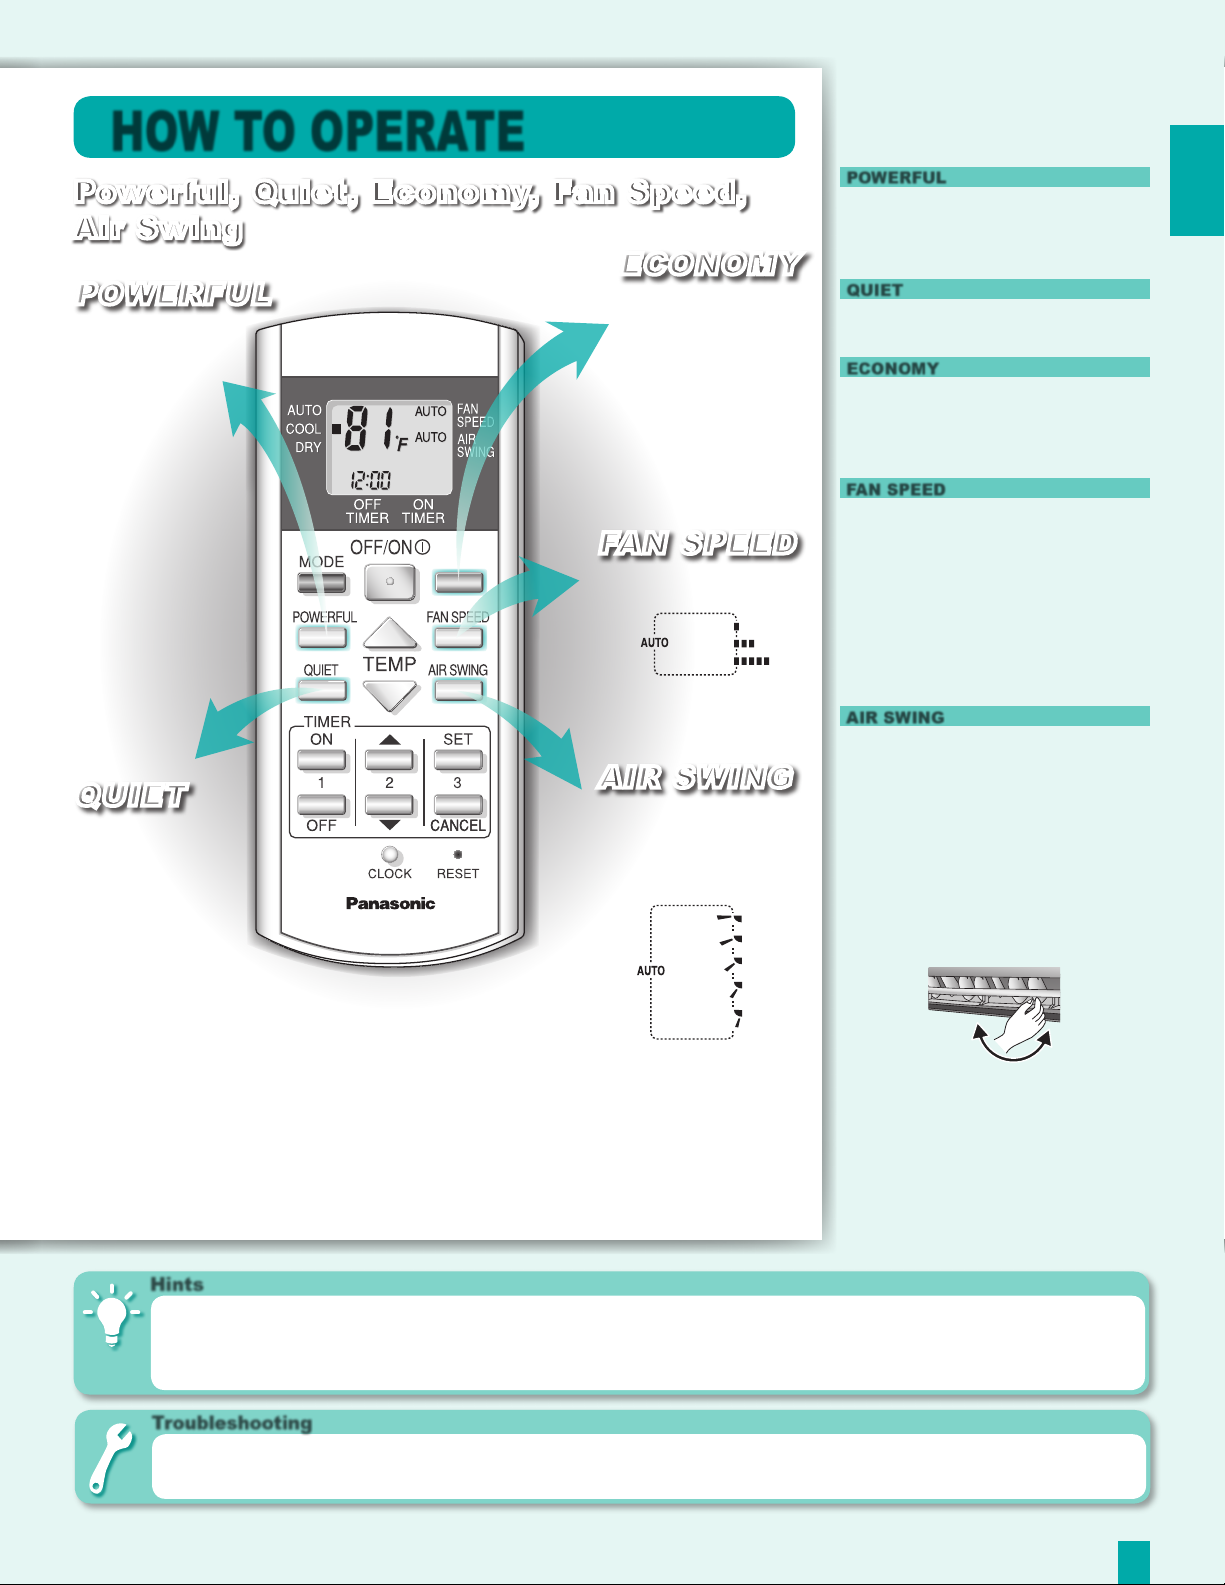
HOW TO OPERATE
Powerful, Quiet, Economy, Fan Speed,
Air Swing
ECONOMY
POWERFUL
Enables
powerful
operation.
QUIET
Enables
quiet
operation.
Enables
economy
operation.
FAN SPEED
Select fan speed.
AIR SWING
Adjust the
vertical airflow
direction louver.
■ Operation Details
POWERFUL
• To achieve setting temperature quickly. It
will operate for 15 minutes and return to
the previous setting.
QUIET
• To provide a quiet environment.
ECONOMY
• To save electrical power consumption.
• Use when desired room temperature is
reached.
FAN SPEED
• To provide you with various fan speed
selections.
• There are 3 levels of fan speed in
addition to automatic fan speed.
• Automatic fan speed:
The speed of the indoor fan is
automatically adjusted according to the
operation.
AIR SWING
• To ventilate air in the room.
• There are 5 settings in addition to
automatic vertical airflow direction.
• If automatic vertical airflow direction has
been set, the louver swings up and down
automatically.
• Please do not adjust the vertical airflow
direction louver manually.
• Horizontal airflow direction louver can be
adjusted manually.
ENGLISH
● Powerful, Quiet or Economy operations cannot be activated
at the same time.
● Powerful, Quiet or Economy operations can be cancelled by
pressing the respective button again.
Hints
● If you wish to have the cool air blowing directly on you, set the airflow direction downward but not for an excessive length of time, as it
may harm your health.
● Electricity use can be reduced by approximately 10% if you set the temperature 1°F higher than the desired temperature during cooling
operation.
Troubleshooting
● Indoor fan stops occasionally during Automatic Fan
Speed setting.
➤ This is an advanced feature that helps to remove smell from the
surrounding area during operation.
5
Page 6

ECONOMY
■ Operation Details
HOW TO OPERATE
TIMER
• Use the ON timer to turn on the air
conditioner at the desired time. This
will give you a cooled environment, e.g.
when you return from work or wake up.
• When the ON timer is set, operation will
start 15 minutes before the actual set
time.
• Use the OFF timer to stop air conditioner
operation at the desired time. This can
save electricity while you are going out
or sleeping.
• The set timer will repeat daily once it is
set.
• If there is a power failure, you can press
the SET button to restore the previous
setting once the power resumes.
• If the timer is cancelled, you can restore
the previous setting by pressing SET
button.
Timer
1
Select ON or
OFF timer.
2
Set the
desired time.
3
Confirm the
setting.
CANCEL
Cancel the
selected timer.
● Ensure the clock on the remote control has been set
correctly.
● You can set both the ON and OFF timers at the same time.
Hints
● Press CLOCK button for more than 10 seconds to change the time format - from AM/PM format to 24 hour format.
● For your convenience, you can set the air conditioner to operate automatically by using both ON and OFF timer.
Troubleshooting
● TIMER indicator always on.
● POWER indicator is blinking 15 minutes before ON
timer is activated.
● To cancel either the ON or OFF timer, press or ,
then press .
➤ Timer is activated and the setting will repeat itself daily.
➤ The unit is determining the operation mode by sensing the room
temperature. This happens when it has been set to AUTO operation
mode.
6
Page 7

CARE & CLEANING
Switch off the power supply
before cleaning
FRONT PANEL
Raise and pull to remove.
Wash and dry.
AIR FILTER
Vacuum, wash and dry.
Remove
■ Washing Instructions
• Do not use benzene, thinner or scouring
powder.
• Use soaps or neutral household
detergent ( pH7) only.
• Do not use water warmer than 104°F.
INDOOR UNIT
• Wipe the unit gently with a soft, dry cloth.
AIR FILTER
• It is recommended that you clean the air
filter once every 2 weeks.
• Purchase the replacement filter if it is
damaged.
Part no.: CWD001144
AIR PURIFYING FILTER
• It is recommended to clean the filter
every 6 months.
• Replace the filter every 3 years or
purchase the replacement filter if it is
damaged.
Part no.: CZ-SA20P
ENGLISH
Remove
AIR PURIFYING FILTER
Vacuum the Air Purifying filter.
INDOOR UNIT
Wipe gently.
■ Pre-season Inspection
• This inspection is recommended before
operating the air conditioner in every
season.
• Check if the remote control batteries
need to be replaced.
• Ensure there is no obstruction at all air
intake and outlet vents.
• After the unit has been operating for 15
minutes, it is normal if the temperature
difference between air intake and outlet
vents at indoor unit is:
Operation Temperature
Cooling 14°F
Hints
● Clean the filter regularly as dirty filters will cause unpurified air, low cooling capacity, unpleasant smells and higher energy
consumption.
● The unit will become dirty and the performance of the unit will decrease after being used for several seasons. Please consult an
authorized dealer to perform seasonal inspections in addition to regular cleaning.
● This air conditioner is equipped with a built-in surge protective device. However, in order to further protect your air conditioner from
being damaged by abnormally strong lightning activity, you may switch off the power supply.
7
Page 8

Muchas gracias por elegir la climatizador de aire Panasonic
■ Definición
Para prevenir heridas
personales, heridas a otras
personas y daños de la
propiedad, se deben seguir las
siguientes instrucciones.
El uso incorrecto por no seguir
las instrucciones puede causar
daños o averías; su gravedad
se clasifica con las indicaciones
siguientes:
Advertencia
Esta indicación muestra
la posibilidad de causar
muerte o daños serios.
Cuidado
Esta indicación advierte
sobre la posibilidad de
daños a la propiedad.
Las instrucciones a seguir
están clasificadas mediante los
símbolos siguientes:
Este símbolo denota una
acción que está
PROHIBIDA.
MEDIDAS DE SEGURIDAD
Precauciones al instalar
No instale ni desinstale ni reinstale la unidad usted mismo.
• Una instalación incorrecta puede causar fugas de agua, descargas eléctricas o incendios. Por favor
consulte al distribuidor autorizado o a un especialista para el trabajo de instalación.
• Este equipo debe estar conectado a tierra e instalado con interruptor de circuito con toma de tierra. En
caso de mal funcionamiento puede provocar descargas eléctricas o un incendio.
• Este climatizador de aire debe ser conectado a tierra. Causará una sacudida eléctrica si el
contacto a tierra no es perfecto.
• Compruebe que las tuberías de drenaje están conectadas adecuadamente. Si no, habrá pérdidas
de agua.
• No instale la unidad en una atmósfera potencialmente explosiva.
Precauciones al Operar
• No conecte otros aparatos a la misma
salida de corriente.
• No modifique el cable eléctrico.
• No utilice un cable de extensión.
• No opere la unidad con las manos
mojadas.
• No inserte los dedos ni ningún tipo de
objetos en las unidades interna o externa.
• No repare la unidad usted mismo.
• No use pilas recargables (Ni-Cd).
• No deje el control remoto a mano de
niños y bebes para que no absorben las
baterías.
• Utilice el cable de alimentación
especificado.
• Si el cable de alimentación está dañado
o es necesario cambiarlo, el cambio
debe hacerlo el fabricante o su servicio
técnico asociado o una persona de
cualificación equivalente para evitar
riesgos.
• Retire las pilas si no piensa utilizar la
unidad durante un largo tiempo.
• Nuevas baterías del mismo tipo tienen
que ser insertas de acuerdo con la
polaridad mencionada para que el
control remoto funcione bien.
• En caso de emergencia o de
funcionamiento extraño (olor a
quemado, etc.), desconecte la fuente de
alimentación.
Advertencia
Cuidado
Advertencia
• No lave la unidad con agua, benceno,
Estos símbolos denotan
una acción que es
OBLIGATORIA de hacer.
disolvente o limpiador en polvo.
• No utilice el aparato para otros fines como
la conservación de alimentos.
• No utilice ningún equipo combustible en la
dirección del flujo de aire.
• No se siente o coloque objetos sobre la
unidad interior o exterior.
• No se exponga directamente al aire frío
por mucho tiempo.
Normas de seguridad
Este dispositivo no debe ser utilizado por niños ni personas
discapacitadas sin supervisión. Se debe vigilar que los niños no
jueguen con este aparato.
Suministro De Poder
Fusible de retardo Voltaje asignado
20 Amps
CS-MC12DKU/CU-2C24DKU
208/230 V
8
Cuidado
• Ventile la habitación regularmente.
• Compruebe si el bastidor de instalación
está dañado después de haber usado el
aparato durante un largo período.
• Desconecte la alimentación antes
de proceder a la limpieza o al
mantenimiento.
• Desconecte la alimentación si no va
a utilizar la unidad durante un periodo
largo de tiempo.
Condiciones de funcionamiento (°F)
Utilice este climatizador de aire dentro del siguiente intervalo
de temperaturas.
DBT: Temperatura de bulbo seco
WBT: Temperatura de bulbo húmedo
Temperatura máxima 89,6 73,4 109,4 78,8
Temperatura mínima 60,8 51,8 60,8 51,8
Interior Exterior
DBT WBT DBT WBT
Page 9

ECONOMY
O
P
E
N
Nota: Las ilustraciones de este manual se incluyen únicamente con fines explicativos y pueden ser
diferentes de la unidad real. Están sujetas a cambios sin previo aviso para futuras mejoras.
■ Acerca de
DESCRIPCIÓN FUNCIONAL DEL PRODUCTO
Unidad interior
Panel frontal
Filtro de
aire
Persiana
de dirección
del flujo de
aire
Corriente
de aire
Unidad exterior
Entrada de aire
(posterior)
Entrada de
aire (lateral)
Mando a distancia
Pantalla LCD
Modo de funcionamiento
Funcionamiento potente
Funcionamiento silencioso
Ajuste del temporizador
Ajuste del reloj
Localización de averías
●
El funcionamiento se retarda unos minutos tras reiniciar.
●
Se escucha un sonido como de agua corriendo durante el
funcionamiento.
●
Sale neblina de la unidad interior.
●
Funcionamiento ruidoso.
●
El mando a distancia/pantalla no funciona.
●
La unidad no funciona.
●
Sale agua o vapor de la unidad exterior.
Salida de aire
Entrada de aire
Filtro de
Purificador
de aire
Botón de
apagado/
encendido
automático
Receptor
Indicador
Transmisor
Botón “Off/On”
(Desconexión/
conexión)
Funcionamiento en
modo econόmico
Ajuste de temperatura
Selección de la
velocidad del ventilador
Ajuste de la dirección del
flujo de aire
Borrado de memoria
➤
Es un control de autoprotección normal.
➤
Es el paso del refrigerante en el interior de la unidad.
➤
Efecto de condensación producido durante el proceso de enfriamiento.
➤
La unidad puede haberse instalado inclinada o el panel frontal no se cerró bien.
➤
Compruebe si las baterias están instaladas correctamente o es necesario cambiarlas.
➤
Verifique que los interruptores están desconectados y que el temporizador se utiliza
correctamente.
➤
Se produce condensación o evaporación en la superficie de las tuberías.
Preparación del mando a
distancia
1. Quite la tapa
2. Inserte las pilas
(AAA o R03)
3. Presione el botón “CLOCK”
ESPAÑOL
4. Ajuste
la hora
actual
5. Presione para confirmar
• El temporizador funcionará según la
hora ajustada actual.
• Las pilas se pueden utilizar durante
aproximadamente 1 año.
• Las pilas se deben reciclar o
desechar correctamente.
Señal del mando a distancia
• Asegúrese de que el paso de la señal
no está obstruido.
• Distancia máxima: 32,8 ft (10 m).
• Algunos tipos de lámparas fluorescentes
pueden afectar a la transmisión de la
señal. Consulte al distribuidor.
Botón de apagado/encendido
automático
• Para hacer funcionar la unidad si el
mando a distancia está mal colocado o
no funciona correctamente.
Acción
Presione una vez.
Pulsar hasta que
suene el pitido.
• Para apagar, presione de nuevo
el botón de apagado/encendido
automático.
• Para activar o desactivar el sonido
de recepción de señal del mando a
distancia.
1. Pulse hasta que suene el pitido y,
después, suelte.
2. Pulse hasta que suene el doble
pitido y, después, suelte.
3. Pulse para activar o desactivar el
sonido.
(Pitido largo - OFF; pitido corto - ON
Modo de
funcionamiento
Funcionamiento
autom
ático
Función de
enfriamiento
)
9
Page 10

ECONOMY
■ Detalles de
OFF/ON
funcionamiento
AUTO - Funcionamiento automático
• La unidad seleccionará automáticamente
el modo de funcionamiento de acuerdo
con la temperatura ambiente.
• Una vez seleccionado el modo de
funcionamiento, la unidad funcionará a
la temperatura estándar como se indica:
Temperatura
ambiente
73,4°F o
más
Menos de
73,4°F
Modo de
funcionamiento
Enfriamiento 77°F
Secado 72°F
Temperatura
estándar
CÓMO HACERLO FUNCIONAR
Automático, Enfriamiento, Secado
1
Inicie el
funcionamiento.
• Puede presionar el botón o
para cambiar la temperatura estándar a
“HI” o “LO” tal como se indica:
Modo de
funcionamiento
Enfriamiento 81°F 73°F
Secado 75°F 68°F
COOL - Función de enfriamiento
• Permite disfrutar del efecto de
enfriamiento a la temperatura deseada.
• Puede seleccionar una temperatura en
el intervalo de 60°F ~ 86°F.
DRY - Función de secado suave
• Deshumidifica el ambiente fijando la
temperatura deseada con una velocidad
lenta del ventilador.
• Puede seleccionar una temperatura en
el intervalo de 60°F ~ 86°F.
HI LO
2
Seleccione el
funcionamiento
deseado.
3
Ajuste la
temperatura.
10
●
Los funcionamientos Potente, Silencioso y de Económico
pueden activarse en todos los modos de funcionamiento.
Sugerencia
● Cuando utilice el climatizador de aire, cierre las cortinas para evitar que entre la luz y el calor del sol y así ahorrar electricidad.
Localización de averías
● Hay un olor extraño en la habitación.
● El climatizador de aire no enfría eficazmente.
●
Presione el botón
➤ Puede tratarse del olor a humedad producido por las paredes, las alfombras, los
muebles o las telas de la habitación.
➤ Compruebe que la temperatura se ha ajustado correctamente.
➤ Compruebe que las ventanas y las puertas están bien cerradas.
➤ Compruebe que los filtros se han limpiado o cambiado en caso de ser necesario.
➤ Asegúrese de que las tomas de entrada y salida de aire de las unidades no están
obstruidas.
otra vez para detener el funcionamiento.
Page 11

ECONOMY
CÓMO HACERLO FUNCIONAR
Potente, Silencioso, Económico,
Velocidad del ventilador, Circulación
de aire
ECONÓMICO
Activa el
funcionamiento
POTENTE
Activa el
funcionamiento
a plena
potencia.
económico.
VELOCIDAD DEL
VENTILADOR
Selecciona la
velocidad del
ventilador.
■ Detalles de
funcionamiento
POTENTE
• Para alcanzar la temperatura ajustada
rápidamente. Funcionará durante 15
minutos y volverá al ajuste anterior.
SILENCIOSO
• Para un funcionamiento sin ruido.
ECONÓMICO
• Para ahorrar en el consumo de energína.
• A usar una vez alcanzada la temperatura
ambiente pretendida.
VELOCIDAD DEL VENTILADOR
• Para seleccionar la velocidad del
ventilador deseada.
• Hay 3 niveles de velocidad del ventilador
además de la velocidad automática.
• Velocidad automática del ventilador:
La velocidad del ventilador interior se
ajusta automáticamente de acuerdo con
el funcionamiento seleccionado.
ESPAÑOL
CIRCULACIÓN
DE AIRE
SILENCIOSO
Activa el
funcionamiento
silencioso.
● Los modos de funcionamiento Potente, Silencioso y de
Económico no se pueden activar al mismo tiempo.
● Los modos de funcionamiento Potente, Silencioso y de
Económico se pueden cancelar presionando los botones
respectivos por segunda vez.
Sugerencia
● Si desea recibir el aire frío directamente, ajuste la dirección del flujo de aire hacia abajo pero no durante un tiempo excesivo, ya que
puede ser perjudicial para su salud.
● Se puede ahorrar aproximadamente el 10% de electricidad si ajusta la temperatura 1°F por encima de la temperatura deseada durante
el funcionamiento de enfriamiento.
Ajusta la persiana
vertical de
direcciòn del flujo
de aire.
CIRCULACIÓN DE AIRE
• Para ventilar la habitación.
• Hay 5 selecciones además de la
dirección vertical del flujo de aire
automática.
• Si está ajustada la dirección vertical del
flujo de aire automática, la persiana sube
y baja automáticamente.
• No ajuste la persiana vertical de
dirección del flujo de aire manualmente.
• La persiana horizontal de dirección
del flujo de aire se puede ajustar
manualmente.
Localización de averías
● El ventilador interior se para de vez en cuando con
la velocidad del ventilador automática.
➤ Se trata de una función avanzada que elimina los malos olores del
ambiente durante el funcionamiento.
11
Page 12

ECONOMY
■ Detalles de
funcionamiento
TEMPORIZADOR
• Use el temporizador “ON” para encender
el climatizador de aire a la hora
deseada. Así tendrá un ambiente fresco,
por ejemplo, cuando vuelva del trabajo o
al despertar.
• Con el temporizador “ON”, el
funcionamiento comenzará 15 minutos
antes de la hora ajustada real.
• Use el temporizador “OFF” para
apagar el climatizador de aire a la hora
deseada. De esta manera ahorrará
electricidad cuando salga de casa o se
vaya a dormir.
• El temporizador ajustado se pondrá
en marcha diariamente a la hora
establecida.
• Si hay un corte de electricidad, puede
presionar el botón “SET” para recuperar
el ajuste anterior una vez que se
reanude el suministro eléctrico.
• Si se cancela el temporizador, puede
recuperar el ajuste anterior presionando
el botón “SET”.
CÓMO HACERLO FUNCIONAR
Temporizador
1
Seleccione el
temporizador
“ON” o “OFF”.
2
Ajuste
la hora
deseada.
3
Confirme el
CANCELAR
ajuste.
Cancelar el
temporizador
seleccionado.
● Compruebe que el reloj del mando a distancia está ajustado
correctamente.
● Puede utilizar los temporizadores “ON” y “OFF” al mismo
tiempo.
● Para cancelar el temporizador “ON” o el temporizador
“OFF”, presione o , y luego presione .
Sugerencia
● Presione “CLOCK” durante más de 10 segundos para cambiar el formato de hora de AM/PM a 24 horas.
● Para su comodidad, puede ajustar el climatizador de aire para que funcione automáticamente utilizando los temporizadores “ON”
y “OFF” al mismo tiempo.
12
Localización de averías
● Indicador “TIMER” siempre encendido.
● El indicador “POWER” parpadea 15 minutos antes
de que se active el temporizador “ON”.
➤ El temporizador se activa y la función ajustada se repite diariamente.
➤ La unidad está determinando el modo de funcionamiento adecuado
según la temperatura ambiente. Esta operación se realiza cuando está
ajustado el modo de funcionamiento “AUTO”.
Page 13

CUIDADO Y LIMPIEZA
Apague la unidad antes de limpiar
PANEL FRONTAL
Eleve y tire para quitarla.
Lave y séquelo.
FILTRO DE AIRE
Limpiar con aspiradora,
lavar y secar.
Quitar
■ Instrucciones de lavado
• No utilice benceno, disolvente o
limpiador en polvo.
• Utilice sólo jabones o detergentes
domésticos neutros ( pH7).
• No utilice agua con una temperatura
superior a 104°F.
UNIDAD INTERIOR
• Limpie la unidad suavemente con un
paño suave y seco.
FILTRO DE AIRE
• Se recomienda limpiar los filtros de aire
cada 2 semanas.
• Si el filtro está deteriorado, adquiera el
filtro de recambio.
Núm. ref.: CWD001144
FILTRO DE PURIFICADOR
DE AIRE
• Se recomienda limpiar el filtro cada 6
meses.
• Cambie el filtro cada 3 años o, si
está deteriorado, adquiera el filtro de
recambio.
Núm. ref.: CZ-SA20P
ESPAÑOL
Quitar
■ Inspección de
pretemporada
• Se recomienda realizar esta inspección
cada temporada antes de empezar a
utilizar el climatizador de aire.
• Compruebe si es necesario cambiar las
pilas del mando a distancia.
• Compruebe que no están obstruidas las
entradas y salidas de aire.
• El funcionamiento es normal si 15
minutos después de poner en marcha el
climatizador de aire, la diferencia entre
las temperaturas de entrada y salida de
aire en la unidad interior es de:
Funcionamiento Temperatura
Enfriamiento
FILTRO DE
PURIFICADOR DE
AIRE
UNIDAD
INTERIOR
Limpiar
suavemente.
Limpiar con aspiradora el
filtro de purificador de aire.
Sugerencia
● Limpie el filtro regularmente, ya que los filtros sucios contaminan el aire, reducen la capacidad de enfriamiento, producen olores
desagradables y aumentan el consumo de energía.
● Después del uso durante varias temporadas, la unidad acumula suciedad y por eso reduce su rendimiento. Consulte a un distribuidor
autorizado para realizar una revisión estacional además de la limpieza regular.
● Este aparato de aire acondicionado dispone de un dispositivo incorporado de protección frente a sobrecargas. Sin embargo, y para
evitar posibles averías provocadas por tormentas eléctricas, la fuente de alimentación se puede desconectar por completo.
14°F
13
Page 14

MEMO
Page 15

MEMO
Page 16

NON SERVICEABLE CRITERIAS
TURN OFF POWER SUPPLY and CALL Authorized Distributor under the following conditions:
• Abnormal noise during operation • Circuit breaker switches off frequently
• Water/foreign particles have entered the Remote Control • Power cord becomes unnaturally warm
• Water leak from Indoor unit • Switches or buttons are not functioning properly
NO UTILICE LA UNIDAD SI
Si se dan las siguientes circunstancias, CORTE LA ALIMENTACIÓN y LLAME al distribuidor
autorizado:
• Si escucha ruidos extraños durante el funcionamiento • Si el interruptor del circuito salta frecuentemente
• Si entra agua o elementos extraños en el mando a distancia • El cable de alimentación se calienta de manera anormal
• Si hay escapes de agua de la unidad interior • Los interruptores o los botones no funcionan
correctamente
F564890
Matsushita Electric Industrial Co., Ltd.
Web Site: http://www.panasonic.co.jp/global/
Printed in Malaysia
F0505-1
 Loading...