

Panasonic CU-2C14BKP5G, CU-3C20BKP5G, CU-2C18BKP5G, CS-C7BKPG, CU-2C19BKP5G Operating Instructions Manual
...
OPERATING INSTRUCTIONS
Room Air Conditioner
or/and
ou/e
oder/und
ou/et
of/en
o/a
Þ/êáé
o/y
Ë/ËÎË
MATSUSHITA AIR-CONDITIONING CORP.
LOT 2, PERSIARAN TENGKU AMPUAN, SECTION 21, SHAH ALAM
INDUSTRIAL SITE, SELANGOR, MALAYSIA
MATSUSHITA INDUSTRIAL CORP.
NO. 2, JALAN SS8/1, SUNGEI WAY FREE INDUSTRIAL ZONE,
SELANGOR, MALAYSIA
Before using your air-conditioner, please read this operating instructions
carefully and keep it for future reference.
C
OOLING MODEL
:-
(Refrigerant : R22)
Indoor Outdoor
CS-C9BKPG CU-2C14BKP5G
CS-C9BKPG CU-2C18BKP5G
CS-C9BKPG CU-3C20BKP5G
CS-C7BKPG CU-2C19BKP5G
CS-C12BKPG
ENGLISH ...................... P. 1 – P. 10
PORTUGUÊS ............... P. 11 – P. 20
DEUTSCH ..................... P. 21 – P. 30
FRANÇAIS ....................P. 31 – P. 40
NEDERLANDS..............P. 41 – P. 50
ITALIANO ...................... P. 51 – P. 60
ЕллзнйкЬ ................... P. 6 1 – P. 70
ESPAÑOL ......................P. 71 – P. 80
кмллдав ................... P. 81 – P. 9 2
Before using your air-conditioner, please read
this operating instructions carefully and keep it
for future reference.
F563436
1
Thank you for purchasing our Panasonic Room Air
Conditioner.
CONTENTS
: Features..................................................... 1
: Safety Precautions ................................... 2
■ Installation Precautions
■ Operation Precaution
: Name of Each Part ................................ 3~4
■ Indoor Unit
■ Outdoor Unit
■ Accessories
■ Remote Control
: Preparation Before Operation ................. 5
■ Indoor Unit
■ Remote Control
: How to Operate ..................................... 5~6
: Setting the Timer ...................................... 7
: Convenience Operation ........................... 7
■ Sleep Mode Operation
■ Economy Mode Operation
■ Powerful Mode Operation
: Care and Maintenance ............................. 8
■ Cleaning the Indoor Unit and Remote Control
■ Cleaning the Air Filter
■ Cleaning the Front Panel
■ Air Purifying Filters
■ Pre-season Inspection
■ When the Air Conditioner is Not Used for an
Extended Period of Time
■ Recommended Inspection
: Helpful information................................... 9
: Energy Saving and Operation Hints ....... 9
: Troubleshooting ..................................... 10
■ Normal Operation
■ Abnormal Operation
■ Call the Dealer Immediately
Note:
Before using your air conditioner, please read
this operating instructions carefully and keep it
for future reference.
FEATURES
● Self-illuminating Button
For your convenience to operate in the dark.
(Refer page 4)
● Automatic Operation
Sense indoor temperature to select the optimum
mode.
(Refer page 5)
● Sleep Mode
Prevent the room from getting too hot or too cold
while you are sleeping.
(Refer page 7)
● Economy Mode
To reduce electrical power consumption.
(Refer page 7)
● Powerful Mode
Reaches the desired room temperature quickly.
(Refer page 7)
● Removable Front Panel
For quick and easy cleaning. (washable)
(Refer page 8)
● Catechin Air Purifying Filter
Filter that can trap dust, tobacco smoke and tiny
particles in the room. It can also prevent growth of
bacteria and viruses trapped in this filter.
(Refer page 8)
● Solar Refreshing Deodorizing Filter
Used to remove unpleasant odour and deodorize the
air in the room.
(Refer page 8)
● Auto Restart Control
Restart the unit automatically after power failure.
(Refer page 9)
● Blue Coated Condenser At Outdoor Unit
This is the most advanced anti-rust coating.
! Warning
1) If the supply cord is damaged or needed to be
replaced, it must be replaced by the manufacturer or
its service agent or a similarly qualified person in order
to avoid a hazard.
2) Do not repair by yourself.
In case of malfunction of this appliance, do not repair
by yourself. Contact the sales dealer or service dealer
for a repair.
3) Turn off the power (Isolation from main power supply).
Switch off the breaker, or switch off the power
disconnecting mean to isolate the equipment from the
main power supply in case of an emergency.
! Caution
Airborne noise.
A-weighted sound pressure level of this appliance is less
than
70dB (A) under the JIS C 9612 test conditions.
Maximum cooling operation
1 m from the unit
ENGLISH
2
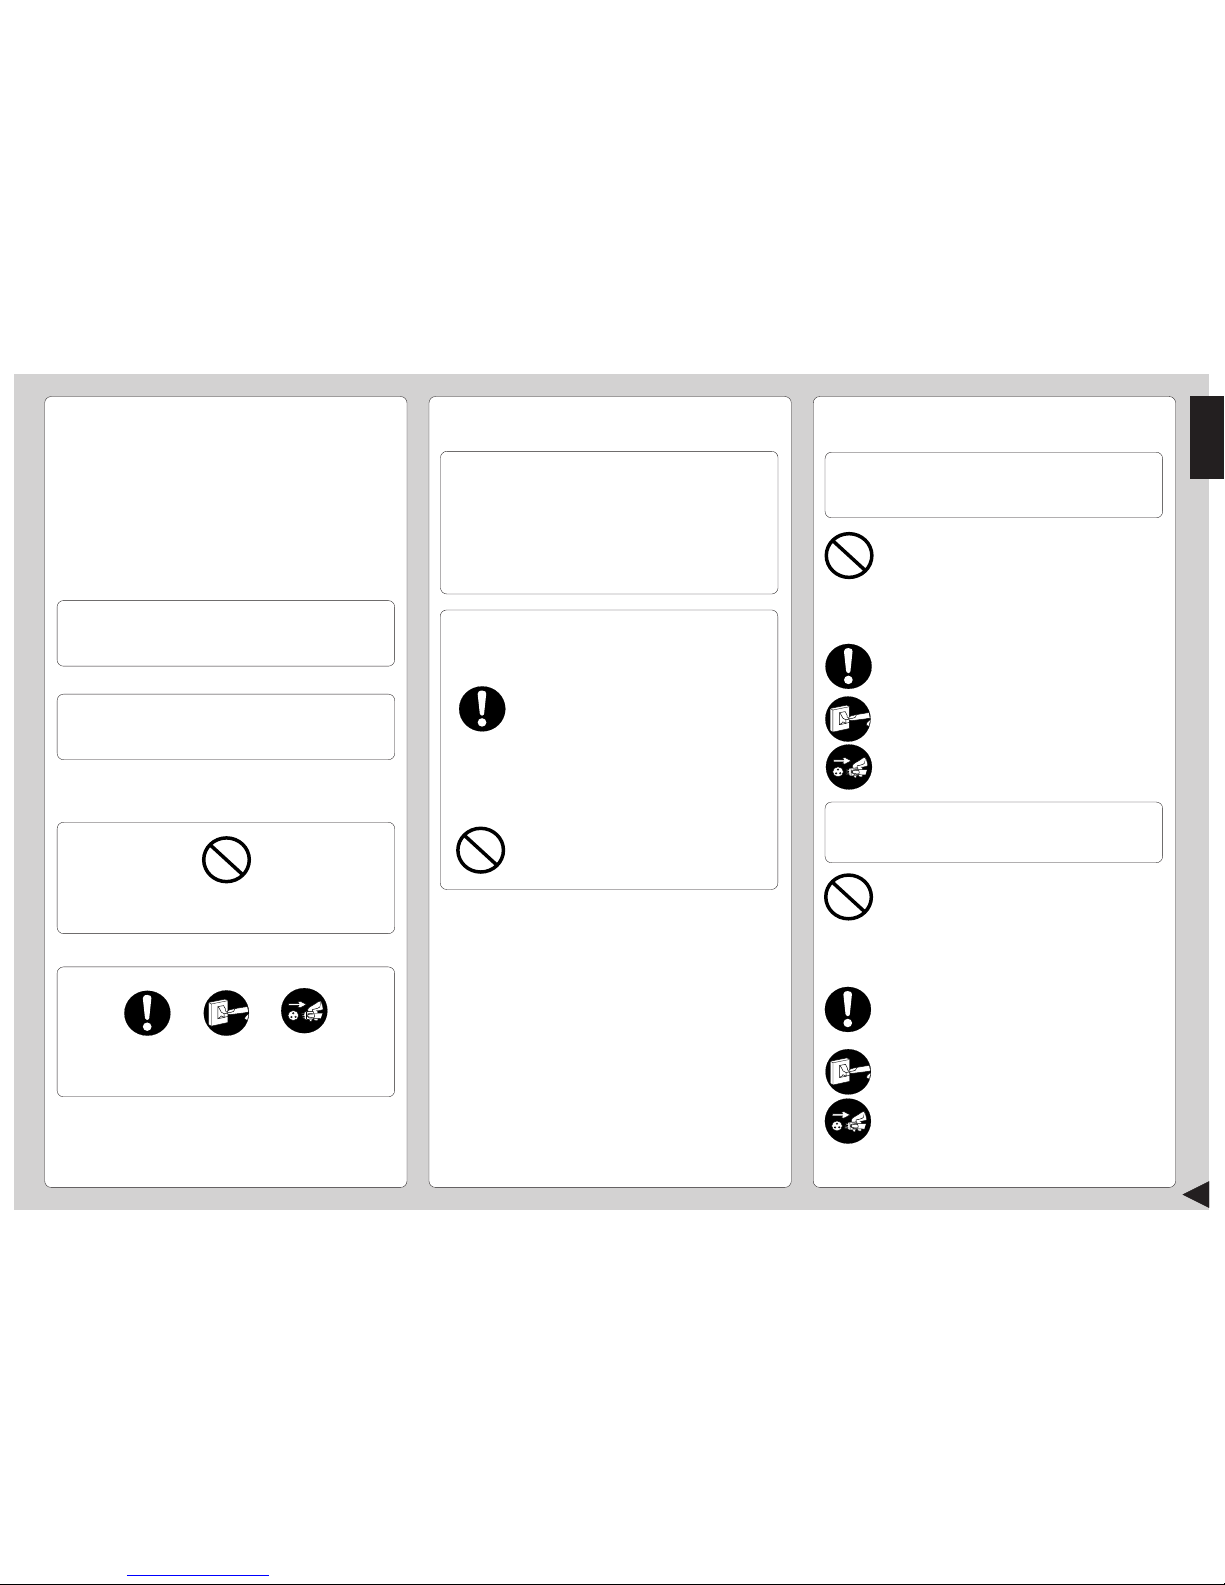
SAFETY PRECAUTIONS
Before operating, please read the following
“Safety Precautions” carefully.
● To prevent personal injury, injury to others and
property damage, the following instructions must be
followed.
● Incorrect operation due to failure to follow instructions
will cause harm or damage, the seriousness of which
is classified as follow:
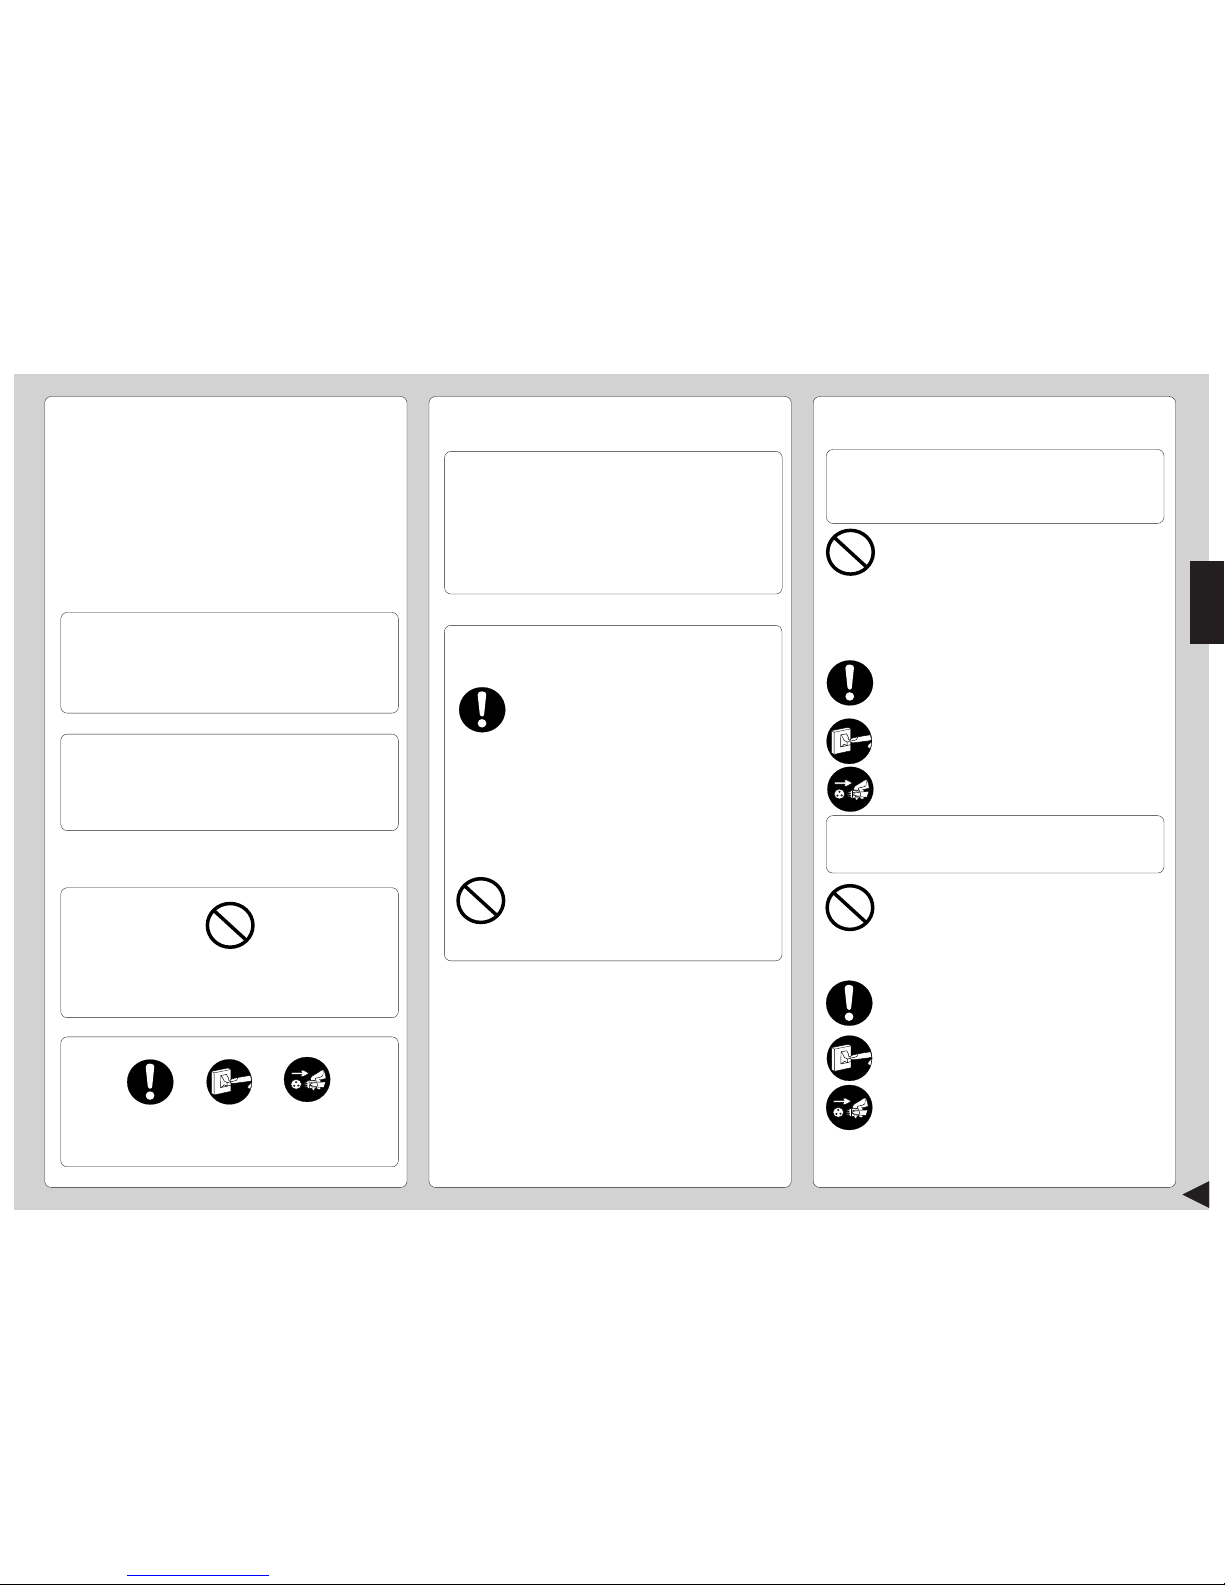
! Warning
This sign warns of death or serious injury.
! Caution
This sign warns of damage to property.
● The instructions to be followed are classified by the
following symbols:
This symbol (with a white background) denotes an
action that is PROHIBITED.
These symbols (with a black background) denote
actions that are COMPULSORY.
■ Installation Precautions
! Warning
● This room air conditioner must be
earthed.
Improper grounding could cause
electric shock.
● Ensure that the drainage piping is
connected properly.
Otherwise, water will leak out.
● Do not install the unit in a
potentially explosive atmosphere.
Gas leak near the unit could cause
fire.
● Do not install, remove and reinstall the unit by
yourself.
Improper installation will cause leakage, electric
shock or fire. Please engage an authorized dealer
or specialist for the installation work.
! Caution
■ Operation Precautions
! Warning
This sign warns of death or serious injury.
● Do not share outlet.
● Do not operate with wet hands.
● Do not damage or modify the power cord.
● Do not insert finger or other objects into the
indoor or outdoor units.
● Do not expose directly to cold air for a long
period.
● Use specified power cord.
● If abnormal condition (burnt smell, etc.)
occurs, switch off the power supply.
! Caution
This sign warns of injury.
● Do not wash the unit with water.
● Do not use for other purposes such as
preservation.
● Do not use any combustible equipment at
airflow direction.
● Do not sit or place anything on the outdoor
unit.
● Switch off the power supply before cleaning.
● Ventilate the room regularly.
● Pay attention as to whether the installation
rack is damaged after long period of usage.
● Switch off the power supply if the unit is not
used for a long period.
O
F
F
OFF
OFF

3
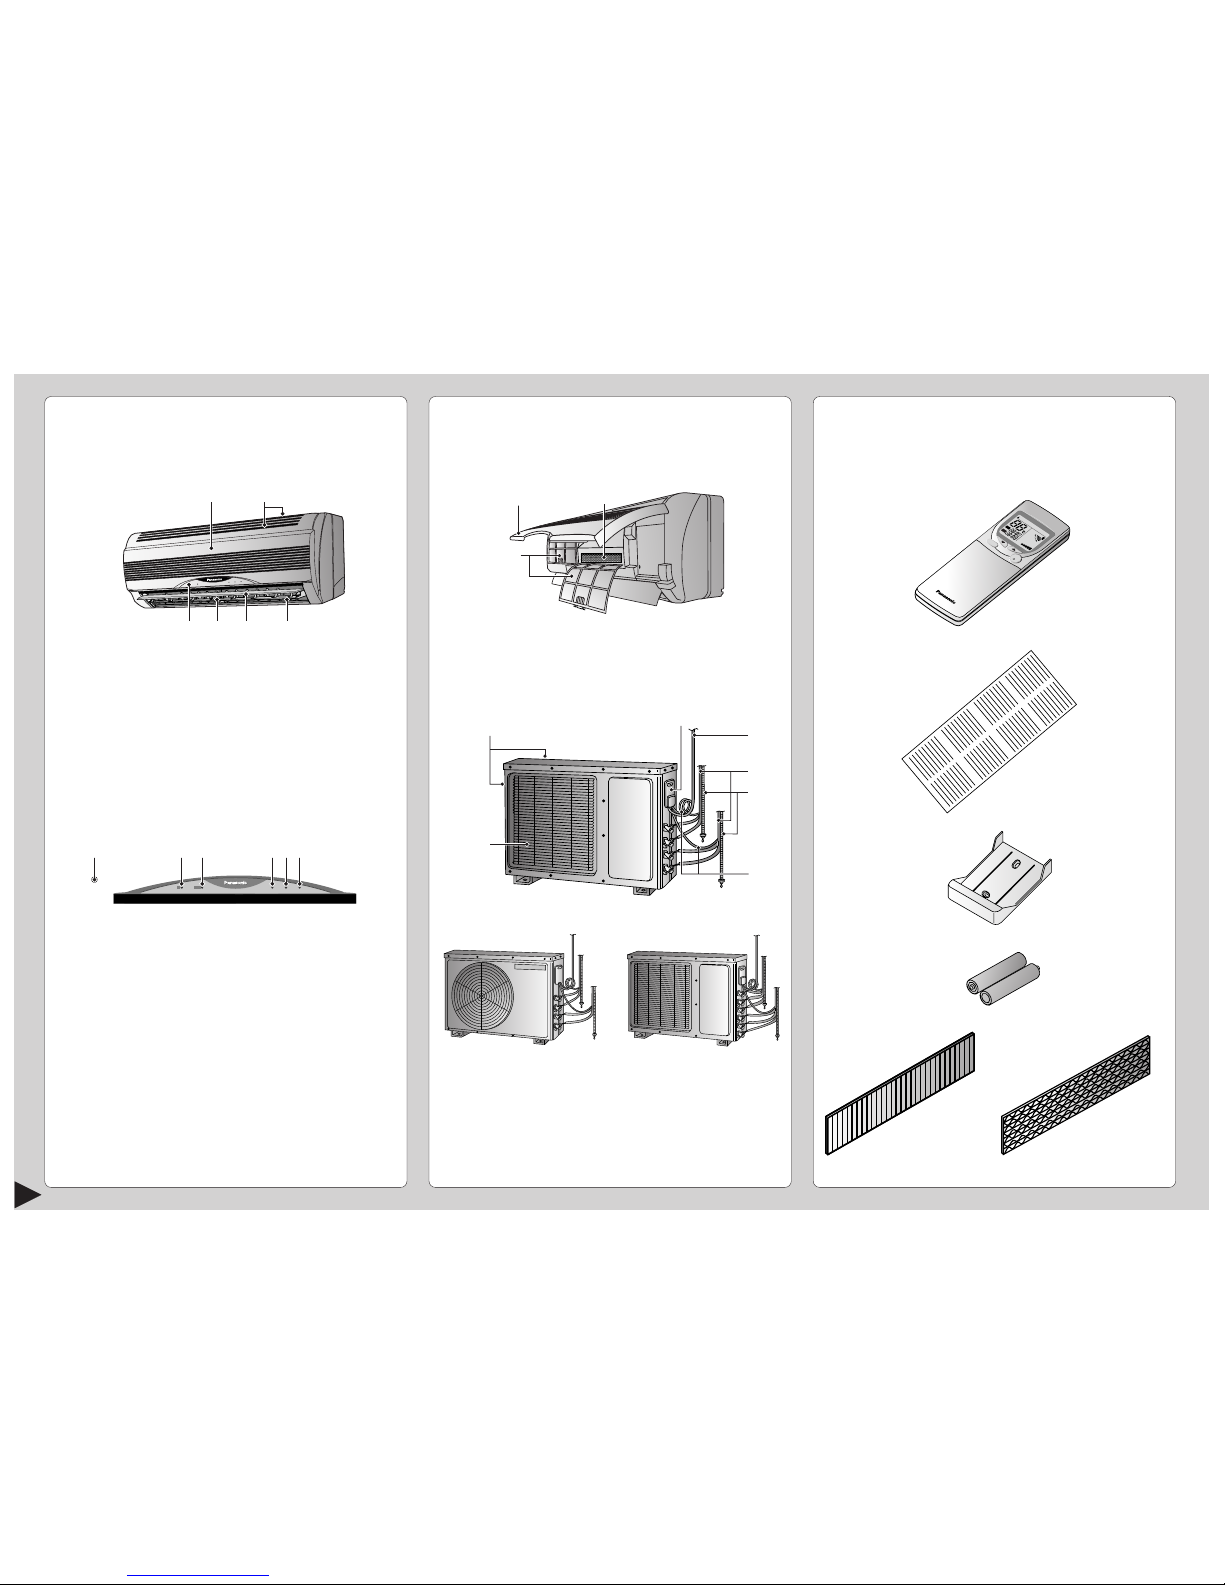
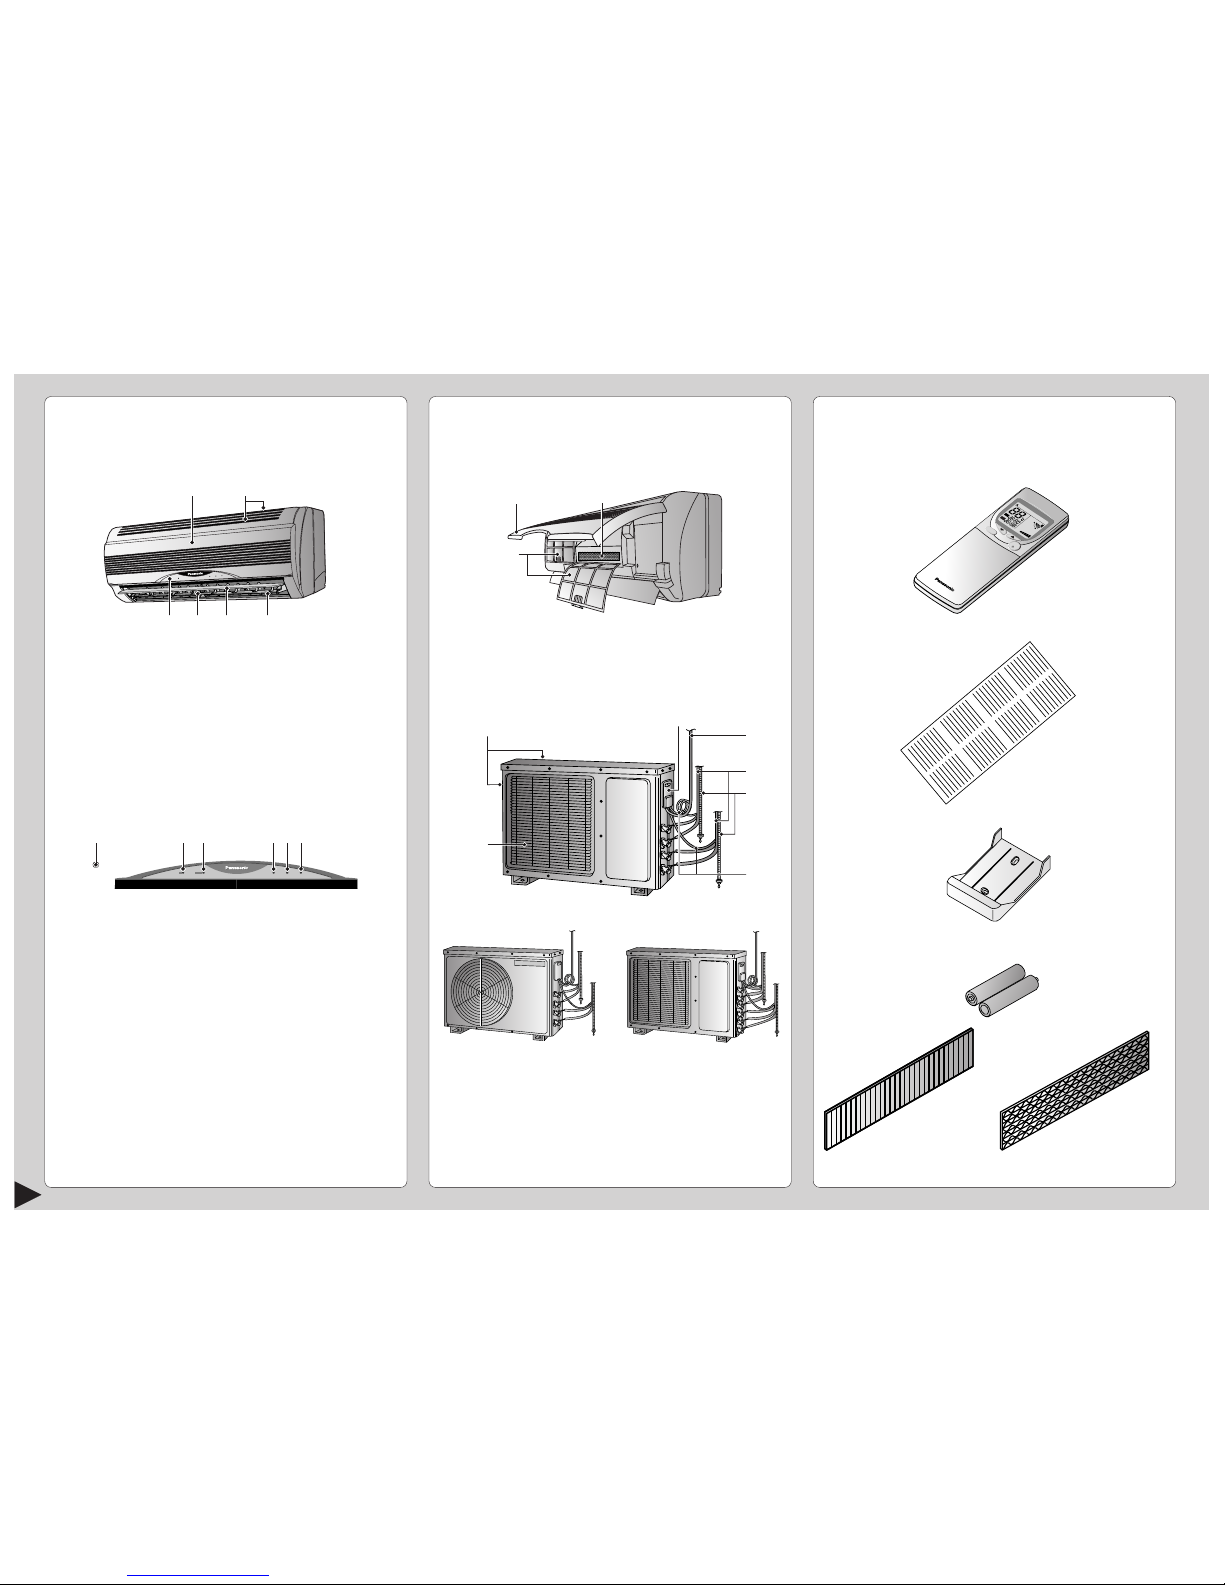
NAME OF EACH PART
■ Indoor Unit
1 Front Panel
2 Air Intake Vent
3 Air Outlet Vent
4 Vertical Airflow Direction Louver
5 Horizontal Airflow Direction Louver
(manually adjusted)
6 Indicator Panel
1 Auto Operation Button
(when the front panel is opened)
2 Economy Mode Indicator – GREEN
3 Powerful Mode Indicator – ORANGE
4 Power Indicator – GREEN
5 Sleep Mode Indicator – ORANGE
6 Timer Mode Indicator – ORANGE
● Indoor Unit
(when the front panel is opened)
1 Front Panel 2 Air Filters 3 Air Purifying Filter
■ Outdoor Unit
CU-2C18BKP5G
CU-2C19BKP5G
CU-2C14BKP5G CU-3C20BKP5G
1 Air Intake Vents
2 Ground Terminal
(Inside cover)
3 Power Supply Cord
4 Piping
■ Accessories
● Remote Control
● Remote Control Indication Sticker
● Remote Control Holder
● Two RO3 (AAA) dry-cell batteries or equivalent
● Air Purifying Filter
C
H
E
C
K
TEMP
AU
T
UT
O
O
N
OFF
FA
N
AN
AU
T
UT
O
R
E
S
E
T
B
A
T
T
E
R
Y
C
L
O
C
K
M
O
DE
SLEEP
ECONOMY
FAN SPEED
A
IR
S
W
IN
G
O
F
F
CANCEL
O
N
SET
S
t
e
p
1
2
3
T
IM
E
R
+
POWERFUL
OFF/ON
AUT
UT
O
DR
DR
YFAN
AN
COOL
COOL
1
2
3465
2
1
3
1
2
7
3
4
5
6
POWERFULPOWERFULECONOMYECONOMY POWERPOWER
TIMERTIMER
SLEEPSLEEP
POWERFULPOWERFULECONOMYECONOMY POWERPOWER
TIMERTIMER
SLEEPSLEEP
123 654
(Catechin Air
Purifying Filter)
(Solar Refreshing
Deodorizing Filter)
5 Drain Hose
6 Connecting Cable
7 Air Outlet Vents

ENGLISH
4
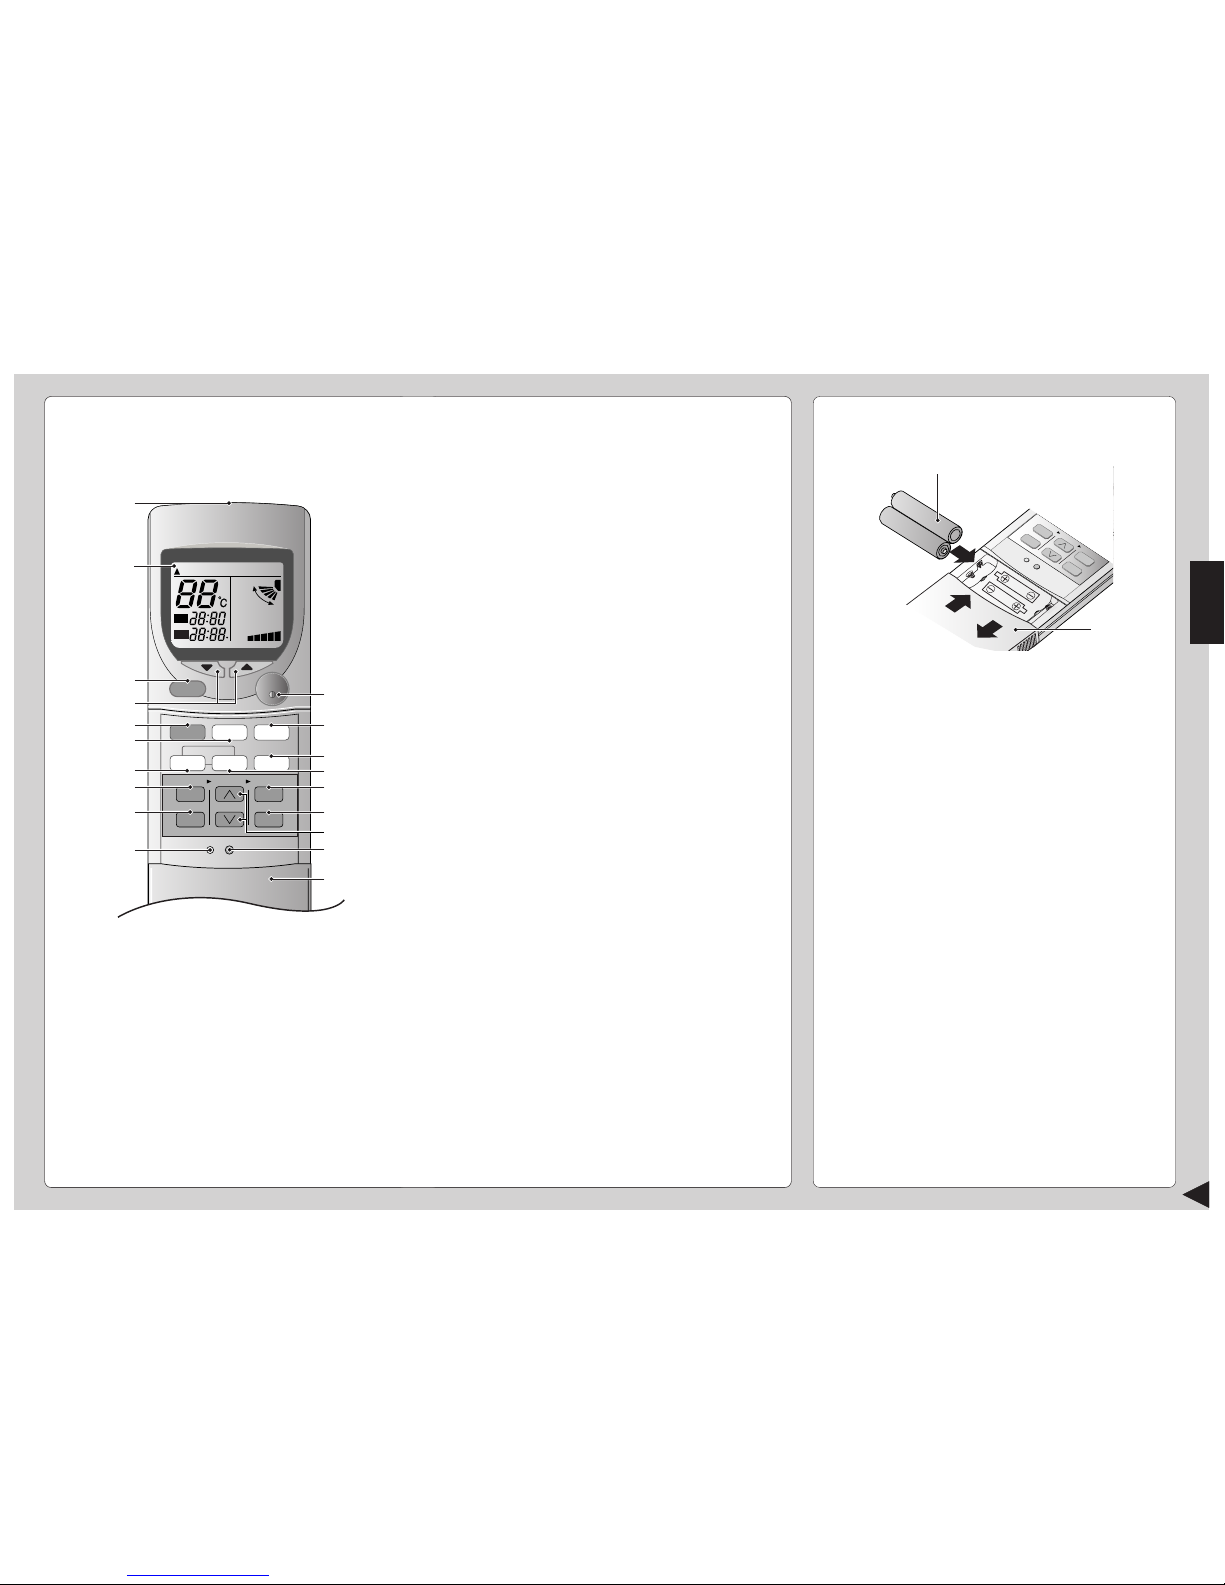
NAME OF EACH PART
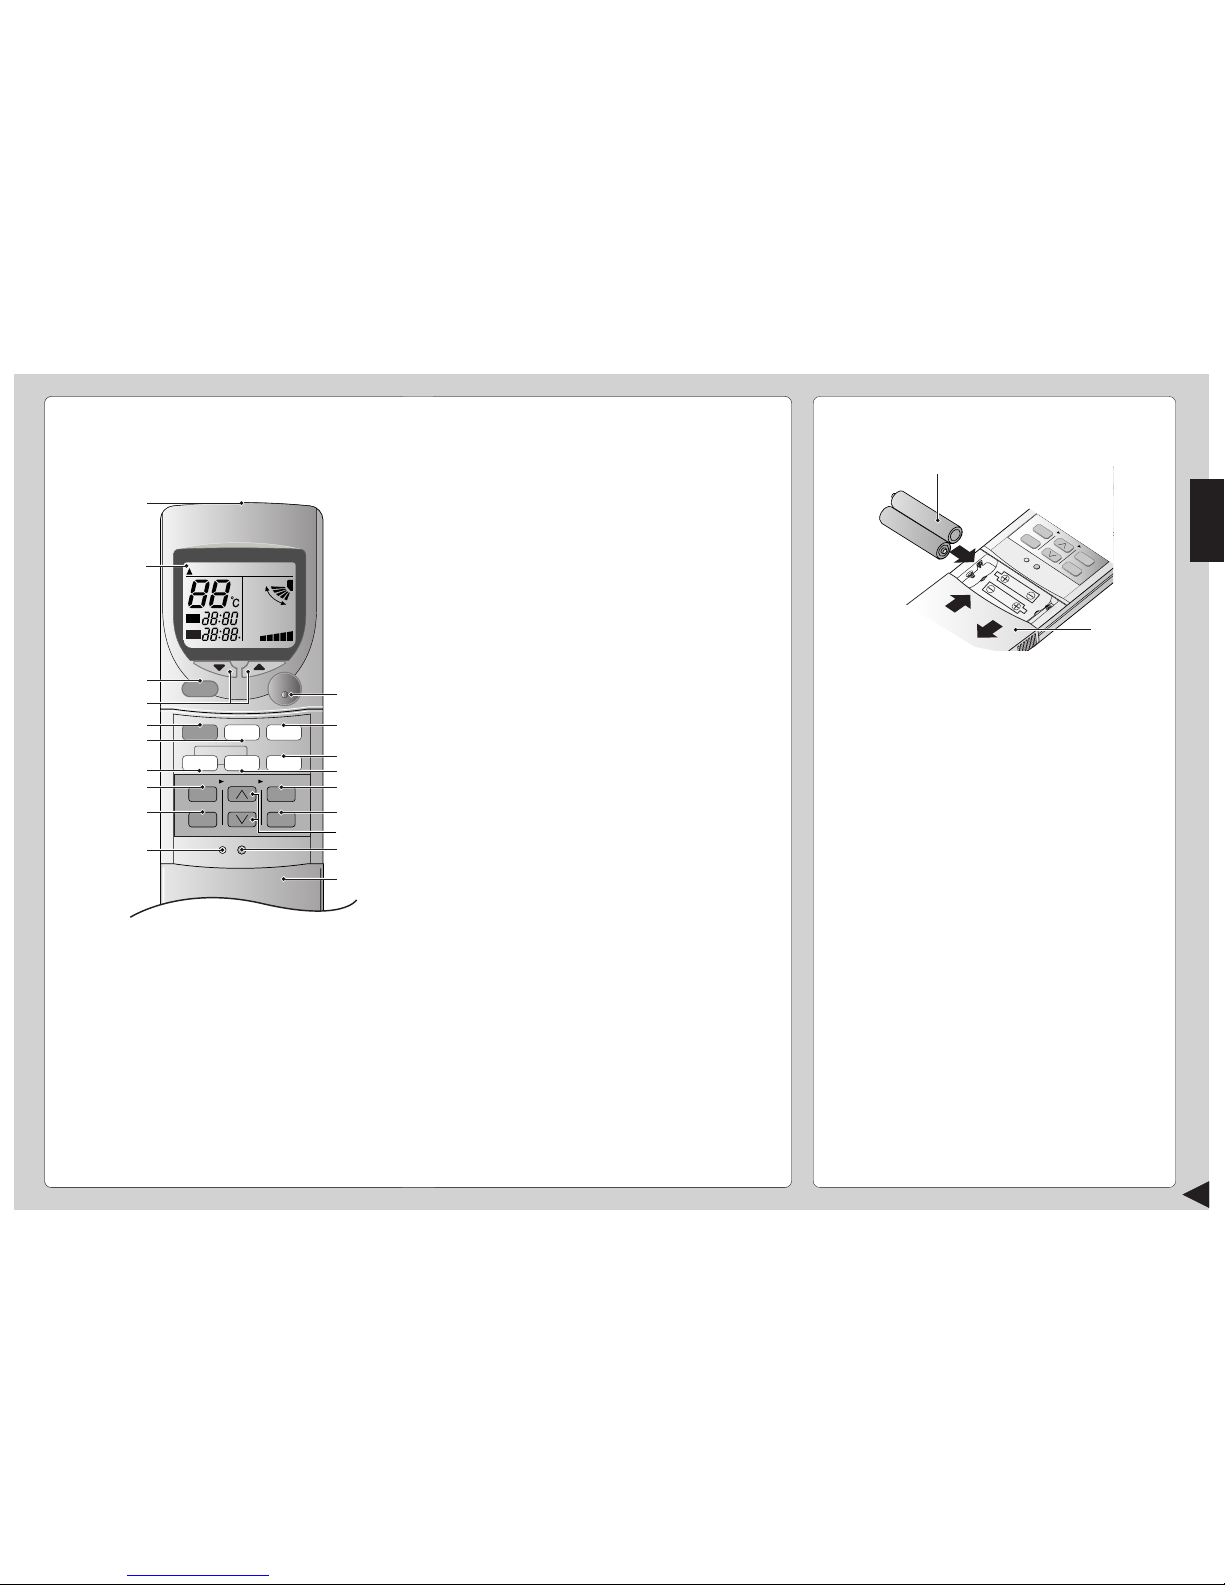
■ Remote Control
● Remote Control Signal.
• Make sure it is not obstructed.
• Maximum distance : 10 m.
• Signal received sound.
One short beep or one long beep.
● Notes for Remote Control.
• Do not throw or drop.
• Do not get it wet.
• Certain type of fluorescent lamps may affect
signal reception. Consult your dealer.
CHECK
TEMP
AUTO
ON
OFF
FAN
AUTO
RESET CLOCK
MODE
SLEEP
ECONOMY
FAN SPEED
AIR SWING
OFF
CANCEL
ON
SET
1
2
3
TIMER
OFF/ON
POWERFUL
AUTO
MANUAL
#
!
$
%
^
$
*
&
3
5
8
7
9
0
6
4
(
2
1
AUTO DRYFANCOOL
COOL
● How to Insert the Batteries
1 Slide down the remote control cover completely
2 Insert the batteries
– Be sure the direction is correct
– 12.00 at display - flashing
• Set the current time (CLOCK) immediately to
prevent battery exhaustion.
● About the batteries
• Can be used for approximately one year.
● Observe the following when replacing the
batteries
• Replace with new batteries of the same type.
• Do not use rechargeable batteries (Ni-Cd).
• Remove the batteries if the unit is not going to be
used for a long period.
1 Signal Transmitter
2 Operation Display
3 Powerful Mode Operation Button
4 Room Temperature Setting Button
(self-illuminating button)
5 Operation Mode Selection Button
6 Economy Mode Operation Button
7 Auto Airflow Direction Button
8 ON-Timer Button
9 OFF-Timer Button
0 Reset Point
(Press with fine-tipped object to clear the memory)
! OFF/ON Button
(self-illuminating button)
@ Sleep Mode Operation Button
# Fan Speed Selection Button
$ Manual Airflow Direction Selection Button
% Timer Set Button
^ Timer Cancellation Button
& Time-Setting Button
* Clock Button
( Remote Control Cover
CHECK
AUTO
OF
AUTOHEAT
DRY
FANCOOL
FAN
AUTO
AUTO
RESET
CLOCK
AIR SWING
OFF
CANCEL
1
2
3
TIMER
PO
W
ERFU
L
AUTO
MANUAL
ECONOMY
SLE
ON
SET
FAN SPEED
MODE
2
1
1.5V
1.5V
5
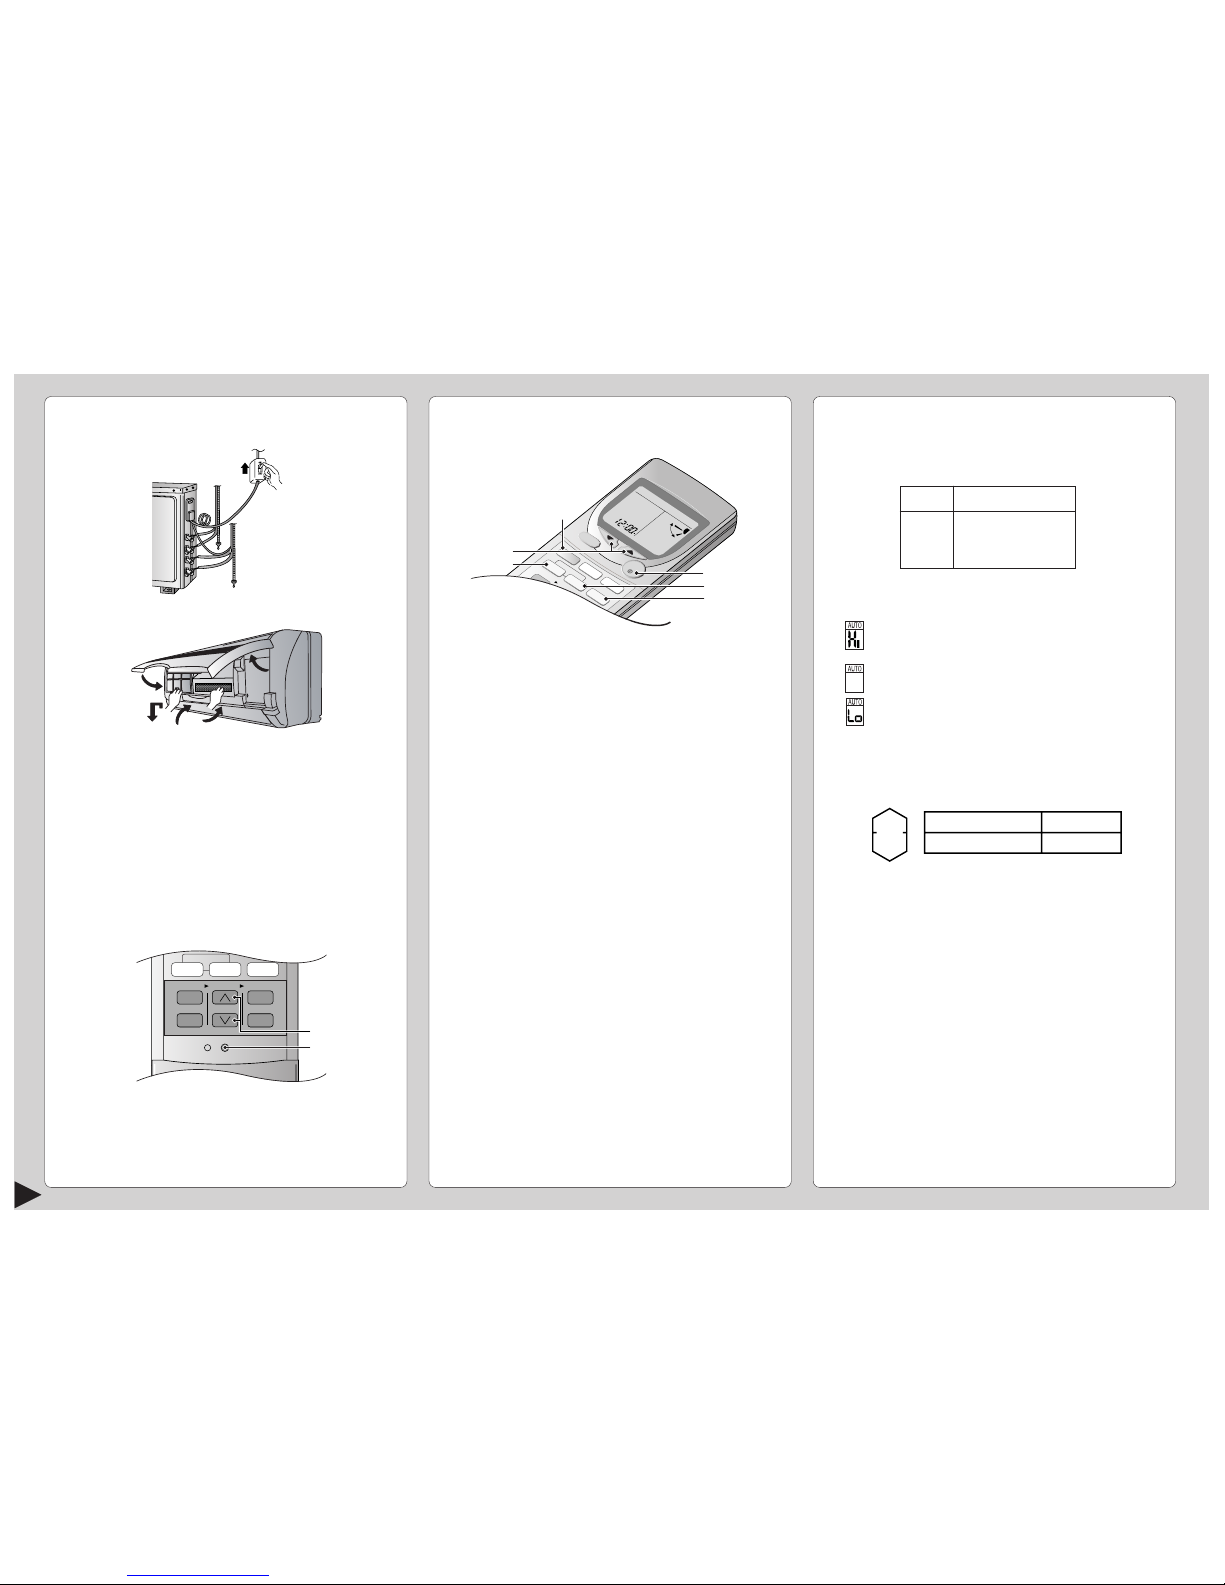
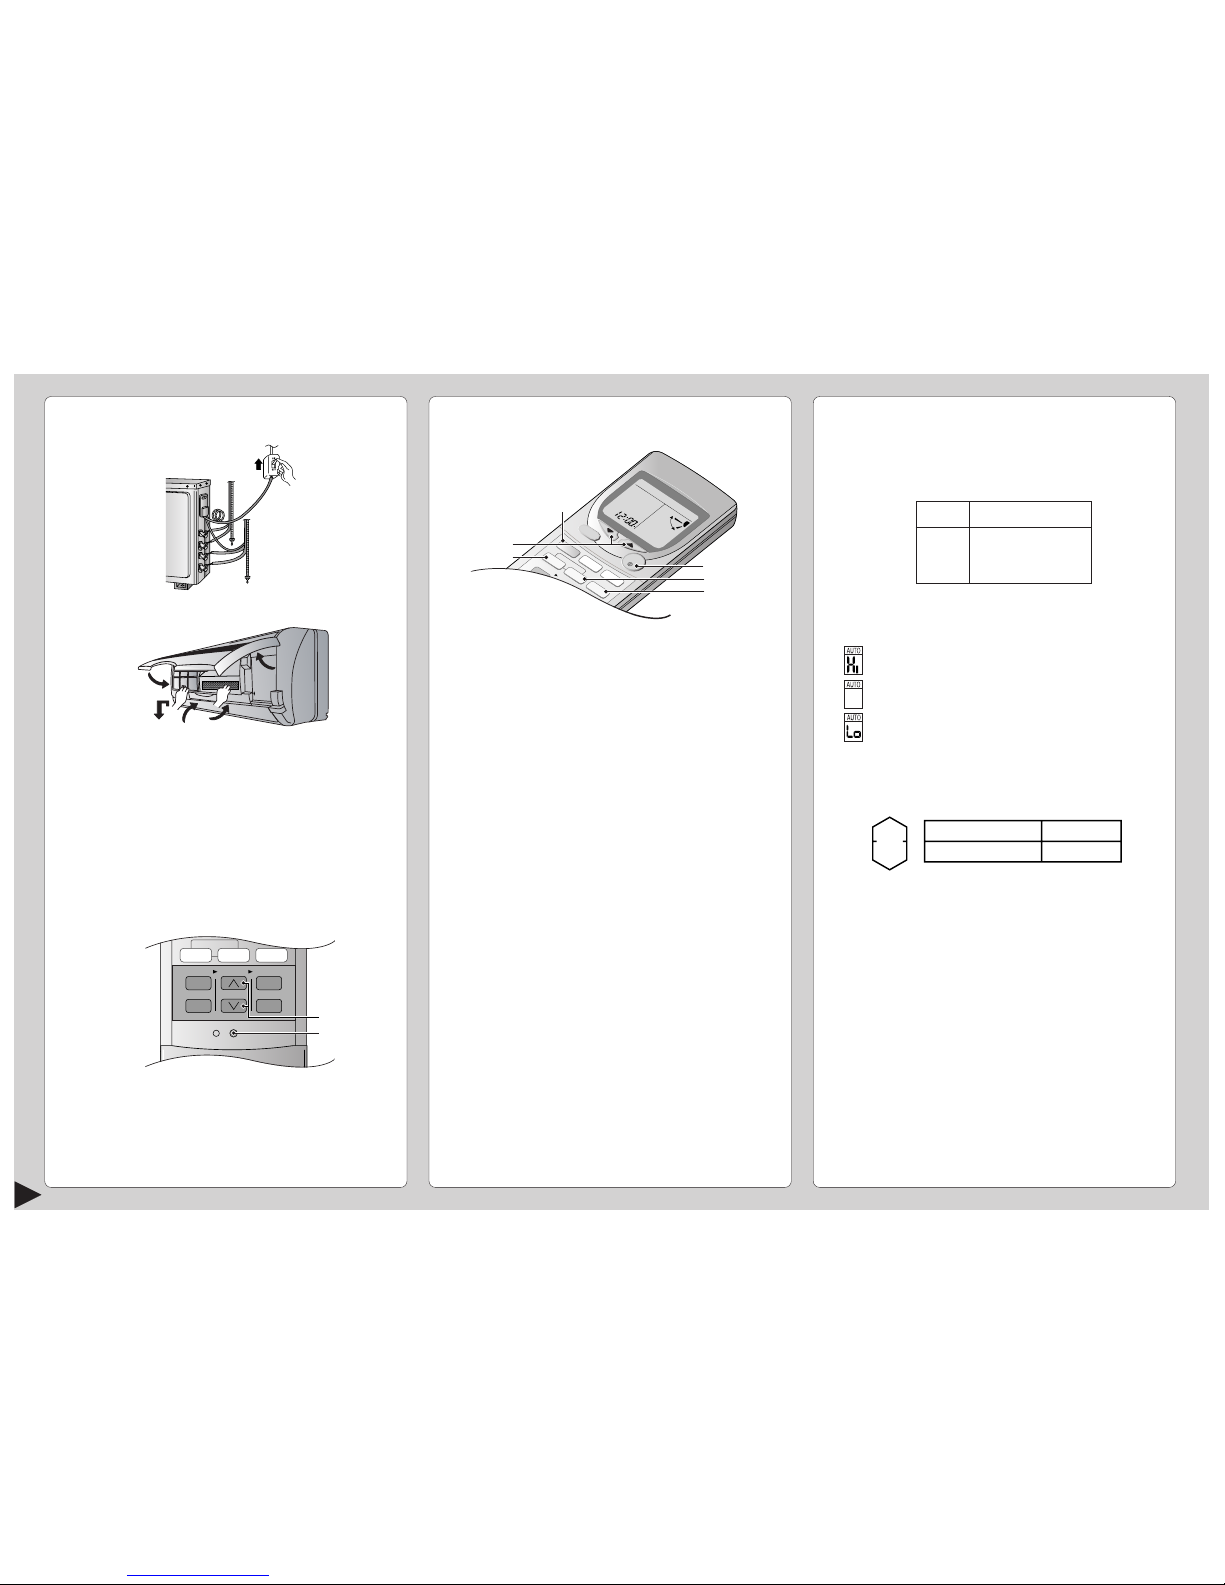
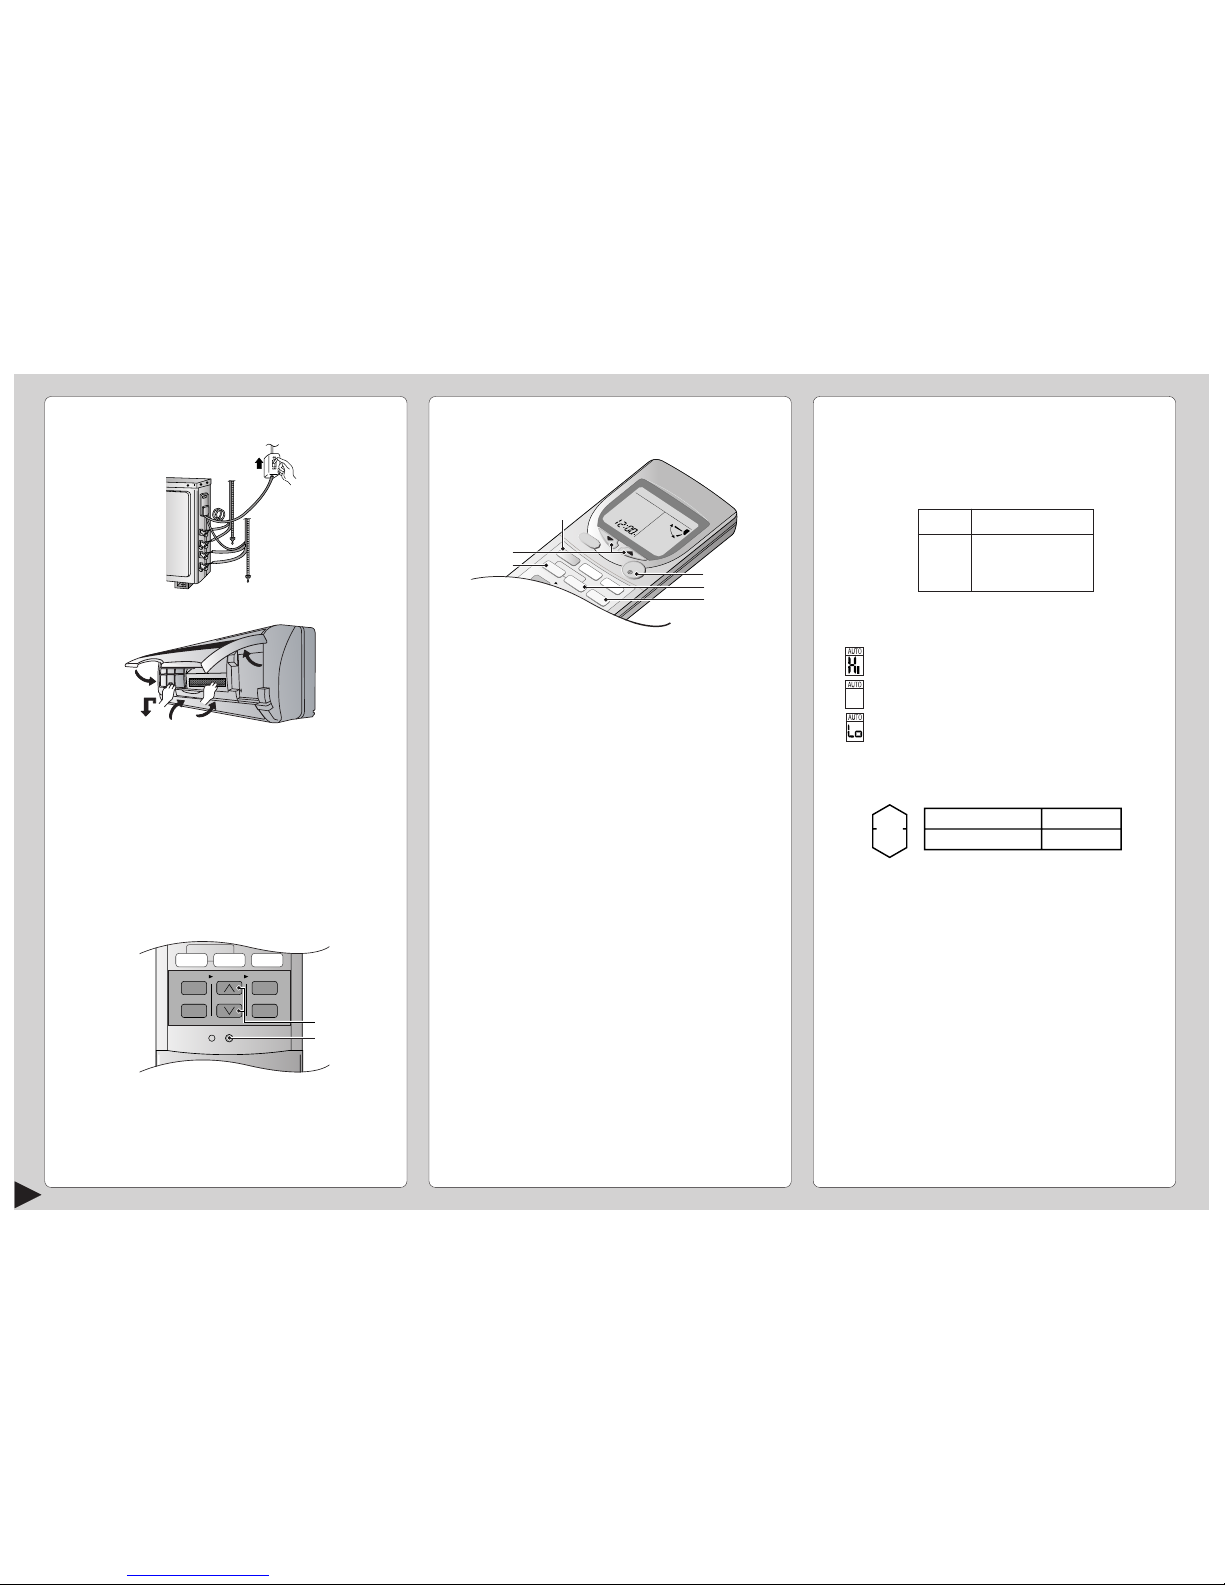
PREPARATION BEFORE OPERATION
■ Indoor Unit
1 Set the knife switch to “ON”
2 Open the front panel
3 Remove the air filters
4 Fit the air purifying filters in place
5 Insert the air filters
6 Close the front panel
■ Remote Control
– To set the current time
1 Press 1.
2 Then press 2 to increase or decrease the time.
3 Press 1 again.
Set time at display will light up.
CHECK
AUTO
AUTO HEAT DRY FANCOOL
FAN
AUTO
RESET CLOCK
FAN SPEED
AIR SWING
OFF
CANCEL
ON
SET
1
2
3
TIMER
AUTO
MANUAL
1
2
6
2
4
5
3
■ Setting Temperature
• Press 3 to increase or decrease the temperature.
• The temperature can be set between 16°C ~ 30°C.
• Recommended temperature:
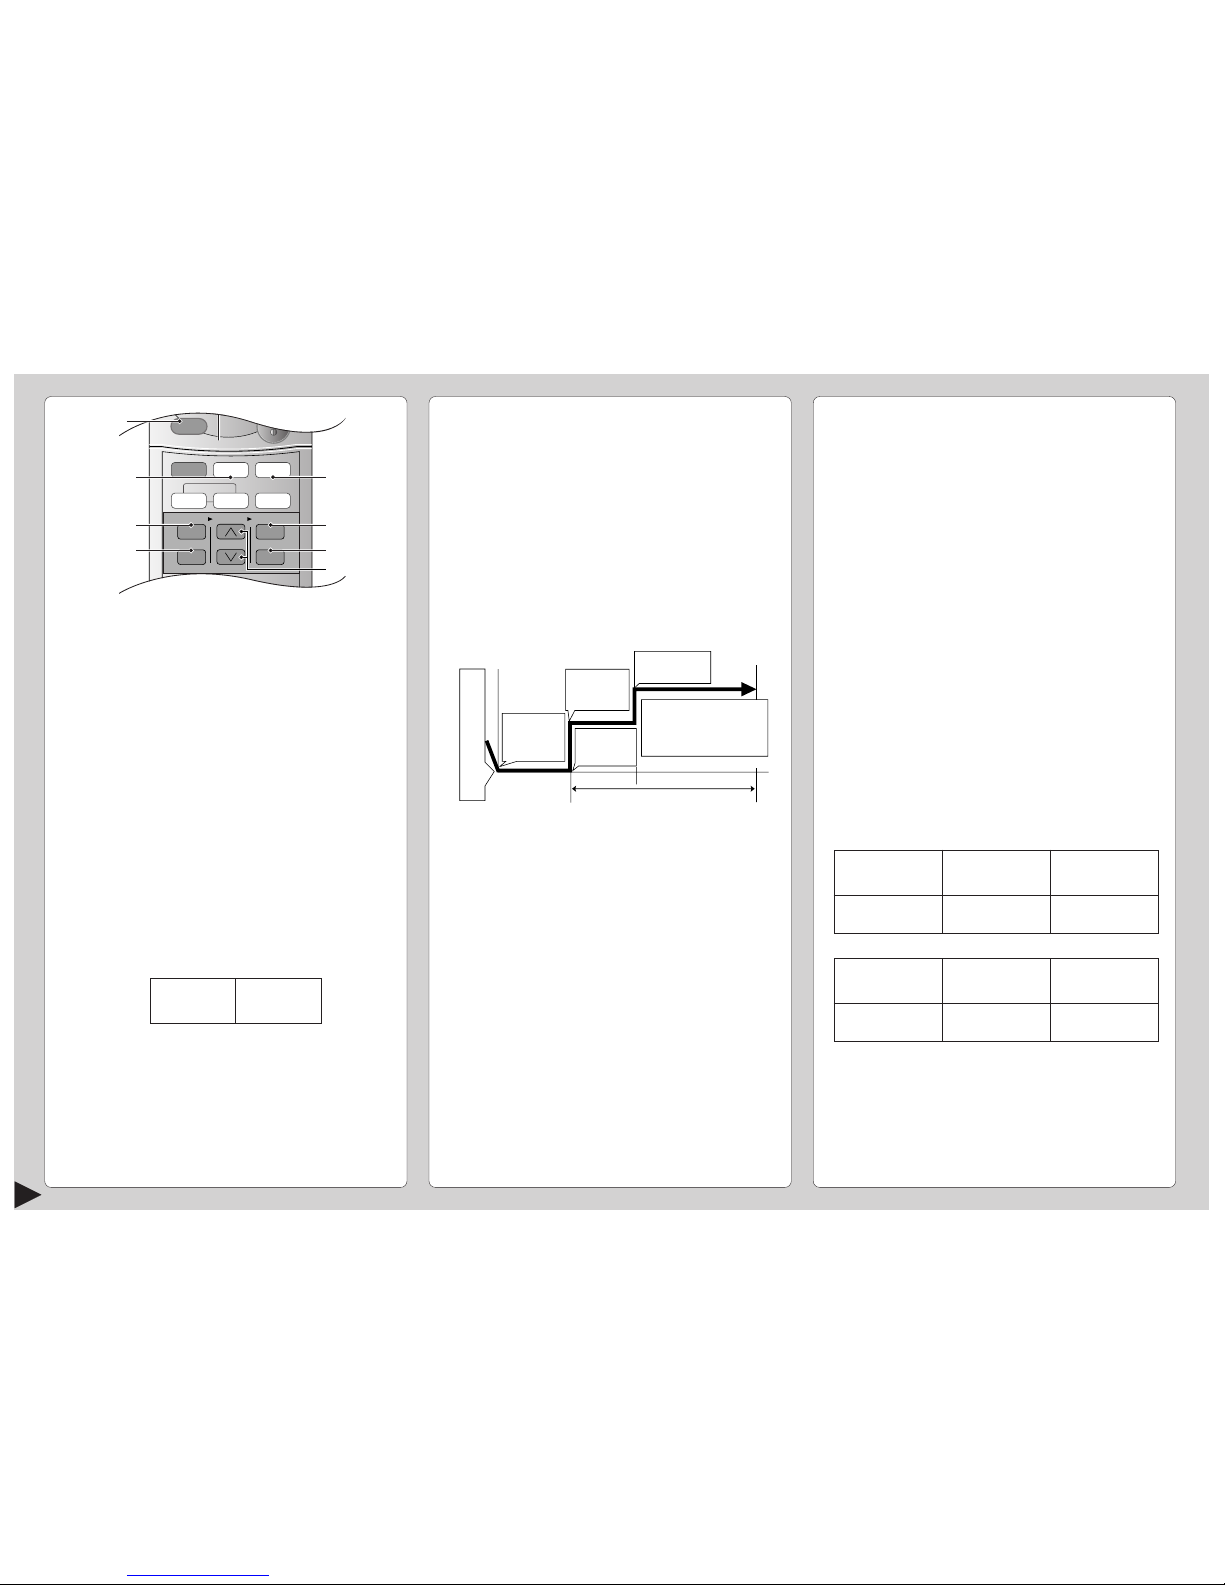
• During AUTO Operation, press 3 to select:-
• Operation with 2°C higher than the standard
temperature.
• Operation with the standard temperature.
• Operation with 2°C lower than the standard
temperature.
● Standard Temperature
• Once the Automatic Operation is selected, the indoor
temperature sensor operates automatically to select
the desired operation mode with Cooling or Soft Dry.
• After the operation mode has been selected, the
mode does not change.
HOW TO OPERATE
■ To start the operation
• Press 1.
• POWER indicator (green) on the indoor unit will light
up.
• To stop, press once more.
■ Setting Mode
• Press 2 to select:-
AUTO – Automatic Operation
COOL – Cooling Operation
DRY – Soft Dry Operation
FAN – Air Circulation Operation
OFF
ON
HEAT
DRY
FANCOOL
CHECK
TEMP
AUTO
AU
T
UTO
FA
N
AN
AU
T
UTO
R
ESET
CLO
C
K
AIR SWING
OFF
CANCEL
1
2
3
TIMER
OFF/ON
POW
ERFUL
AUTO
MANUAL
ECONOMY
SLEEP
ON
SET
FAN SPEED
MODE
2
3
5
1
6
4
COOL 26°C ~ 28°C
1°C ~ 2°C
DRY lower than the
room temperature
Operation
Cooling
Soft Dry
Standard
temperature
25°C
22°C
Indoor
temperature
23°C
1
Knife switch
ENGLISH
6
● Operation Details
COOL – Cooling Operation
• To set the room temperature at your preference
cooling comfort.
AUTO – Automatic Operation
• Sense indoor temperature to select the optimum
mode.
• Temperature is not displayed on the remote control
during AUTO operation.
DRY – Soft Dry Operation
• A very gentle Cooling Operation, prior to
dehumidification. It does not lower the room
temperature.
• During Soft Dry operation, the indoor fan operates at
Low fan speed.
FAN – Air Circulation Operation
• When the room temperature reaches the set
temperature, operation commences at Low airflow
volume. It stops when the room temperature drops to
2°C below the set temperature.
(It is useful when using a heater).
■ Setting the Fan Speed
• Press 4 to select:-
FAN – Low Fan Speed
FAN – Medium Fan Speed
FAN – High Fan Speed
AUTO
FAN – Automatic Fan Speed
The speed of the indoor fan is adjusted
automatically according to the operation.
The indoor fan stops occasionally during
cooling operation.
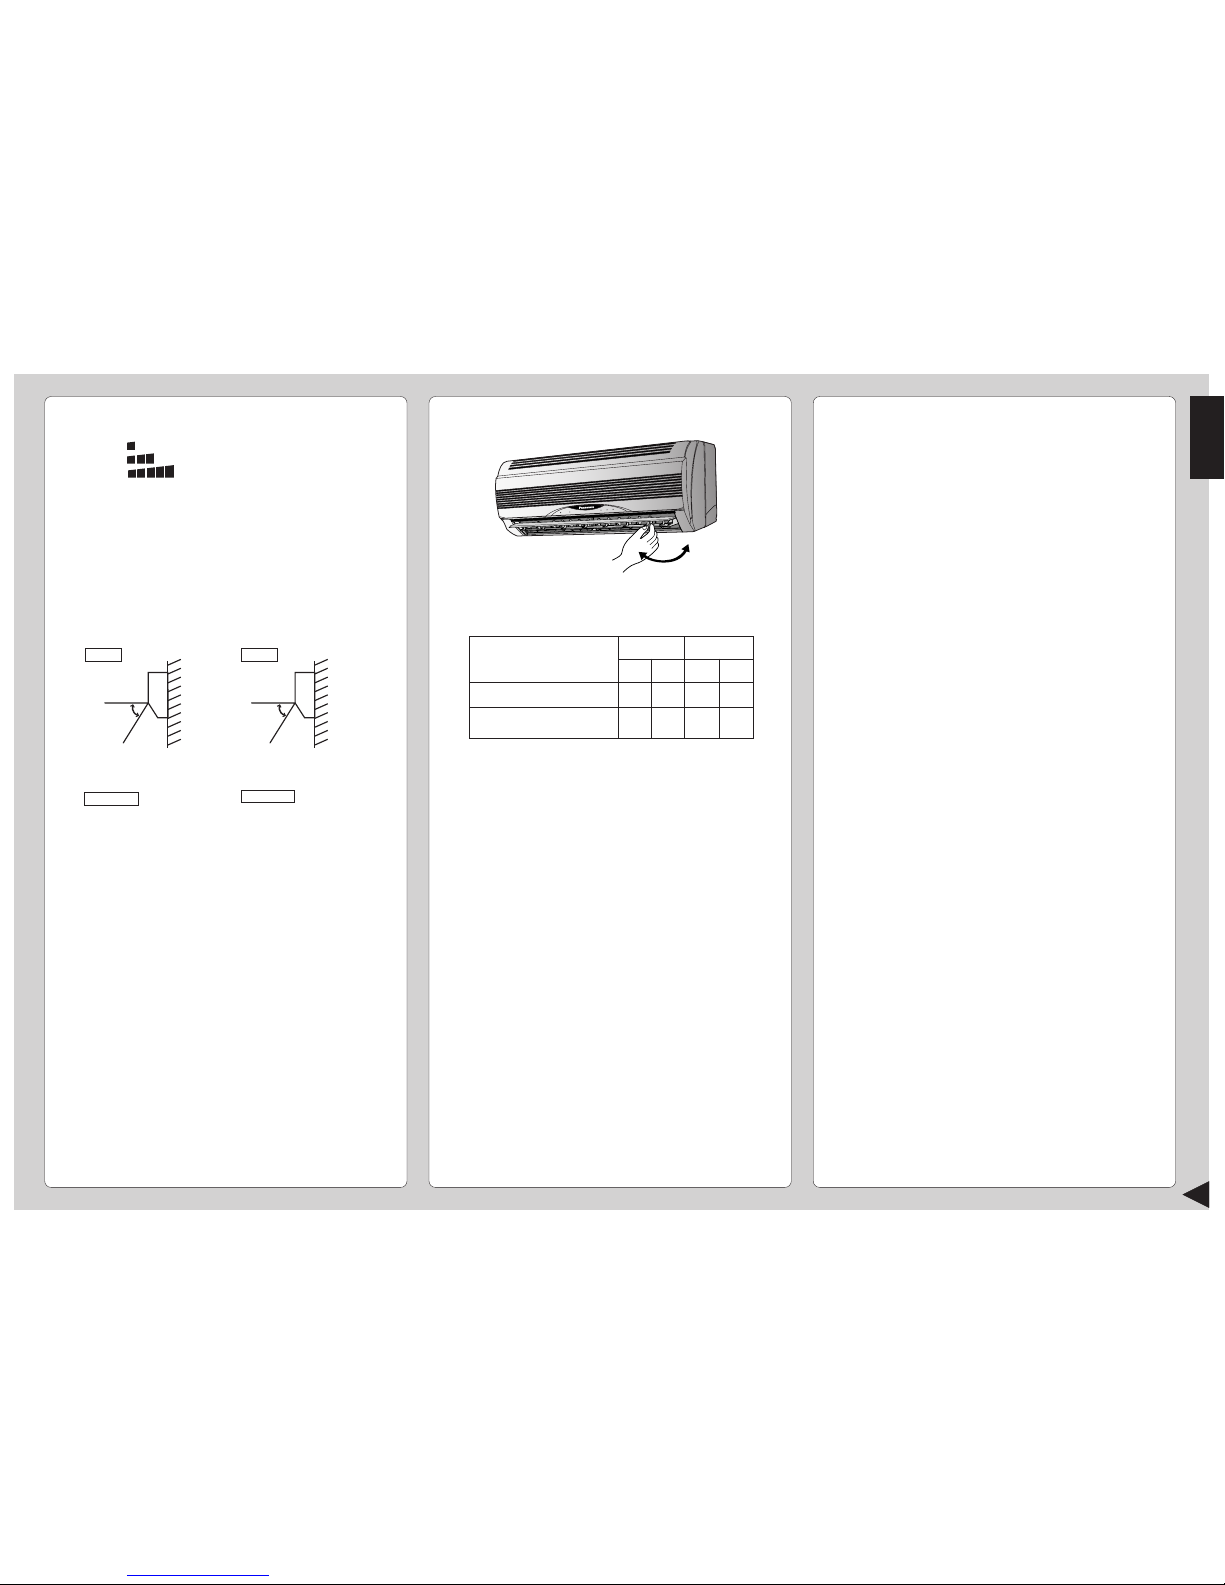
■ Setting the Vertical Airflow Direction
• Press 5 or 6 to select:-
■ Setting the Horizontal Airflow Direction
● Use this air conditioner under the following
conditions:
• Adjust it manually
● Notes
• If the unit is not going to be used for an extended
period of time, turn off the main power supply. If it is
left at the ON position, approximately 2.5 W of
electricity will be used even if the indoor unit has been
turned off with the remote control.
• If operation is stopped, then restart immediately, the
unit will resume operation only after 3 minutes.
MANUAL
Five stages of adjustment
can be made between
14° ~ 36°.
Swing up/down
Automatically
Swing up/down
Automatically
MANUAL
Five stages of adjustment
can be made between
0° ~ 61°.
36° 61°
COOL / DRY Operation
AUTO
FAN Operation
AUTO
DBT: Dry Bulb Temp
WBT: Wet Bulb Temp
Maximum Temperature
Minimum Temperature
WBT
23
11
DBT
43
16
WBT
26
11
Indoor Outdoor
Unit in °C
DBT
32
16
7
SETTING THE TIMER
Ensure that the current time is correct before setting the
timer. The timer cannot be set if the time display is
flashing.
■ ON-TIMER Operation
To start the air conditioner operation automatically.
• Press 1 to set the operation.
• Press 2 to increase or decrease the time.
• Then press 3.
• To cancel this operation, press 4.
■ OFF-TIMER Operation
To stop the air conditioner operation automatically.
• Press 5 to set the operation.
• Press 2 to increase or decrease the time.
• Then press 3.
• To cancel this operation, press 4.
● Timer Mode Operation Details
• When the ON-Timer is set, operation will start
before the actual set time. This is to enable the
room temperature reaches the set temperature at
the set time.
• Once the ON-Timer is set, operation will start at
the set time everyday.
• The current time is not displayed when the timers
are set.
• When both timers are used together, the TIMER
mode indicator on the indoor unit remains lit even
when the operation is stopped by the OFF-TIMER.
CONVENIENCE OPERATION
■ Sleep Mode Operation
To obtain a comfortable room temperature while
sleeping:-
• Press 6.
• Sleep mode indicator on the indoor unit will light up.
• To cancel this operation, press once more.
● Sleep Mode Operation Details
• When the room temperature reaches the set
temperature, the airflow volume will change to low
automatically.
• Sleep Mode Operation time is 8 hours.
• When used together with the timer, the timer has a
priority.
■ Economy Mode Operation
To save electrical power consumption.
Please use this mode when the room has reached
your desired temperature.
• Press 7.
* Economy mode indicator (green) on the indoor unit
will light up.
• Press once more to cancel this operation.
■ Powerful Mode Operation
To obtain the set temperature quickly.
• Press 8.
* Powerful mode indicator (orange) on the indoor
unit will light up.
* Powerful mode will operate for 15 minutes only.
• To cancel this operation, press once more.
●
Economy / Powerful Mode Operation Details
• Economy and Powerful operation cannot be
selected simultaneously.
• The changes of the temperature and airflow volume
are automatic.
• The remote control display remains unchanged.
• If sleep button or operation mode button is pressed,
economy or powerful operation will be cancelled.
• During FAN – Air circulation operation, the powerful
and economy operation are not available.
AUTO
AUTO HE AT D RY FANCOOL
FAN
AUTO
MODE
SLEEP
ECONOMY
FAN SPEED
AIR SWING
OFF
CANCEL
ON
SET
1
2
3
TIMER
OFF/ON
POWERFUL
AUTO
MANUAL
3
6
4
1
7
5
2
8
Airflow
volume
Super Low
Economy Mode
Operation
COOL / DRY
Temperature
0.5°C higher
than set temp.
Airflow
volume
Super High
Powerful Mode
Operation
COOL / DRY
Temperature
3°C lower
than set temp.
COOL,DRY, 15 minutes
AUTO in advance
Time
Approx. 0.5°C
increase.
Temperature
Sleep
Operation
button is
pressed.
Sleep shift
operation
starts.
0~1 hour
after approx. 8 hours of sleep shift
operation, it will stop automatically.
Approx.
0.5°C
increase.
• Cooling or Soft Dry
Operation for sleep shift
operation will start to
avoid overcooling.
S
e
t
t
i
n
g
T
e
m
p
e
r
a
t
u
r
e
← 1 hour →
ENGLISH
8
■ Pre-season Inspection
● Is the discharged air cold?
Operation is normal if 15 minutes after the start of
operation, the difference between the air intake and
outlet vents temperature is:-
● Are the air intake or outlet vents of the indoor or
outdoor units obstructed?
● Are the remote control batteries weak?
If the remote control display appears weak, replace
the batteries.
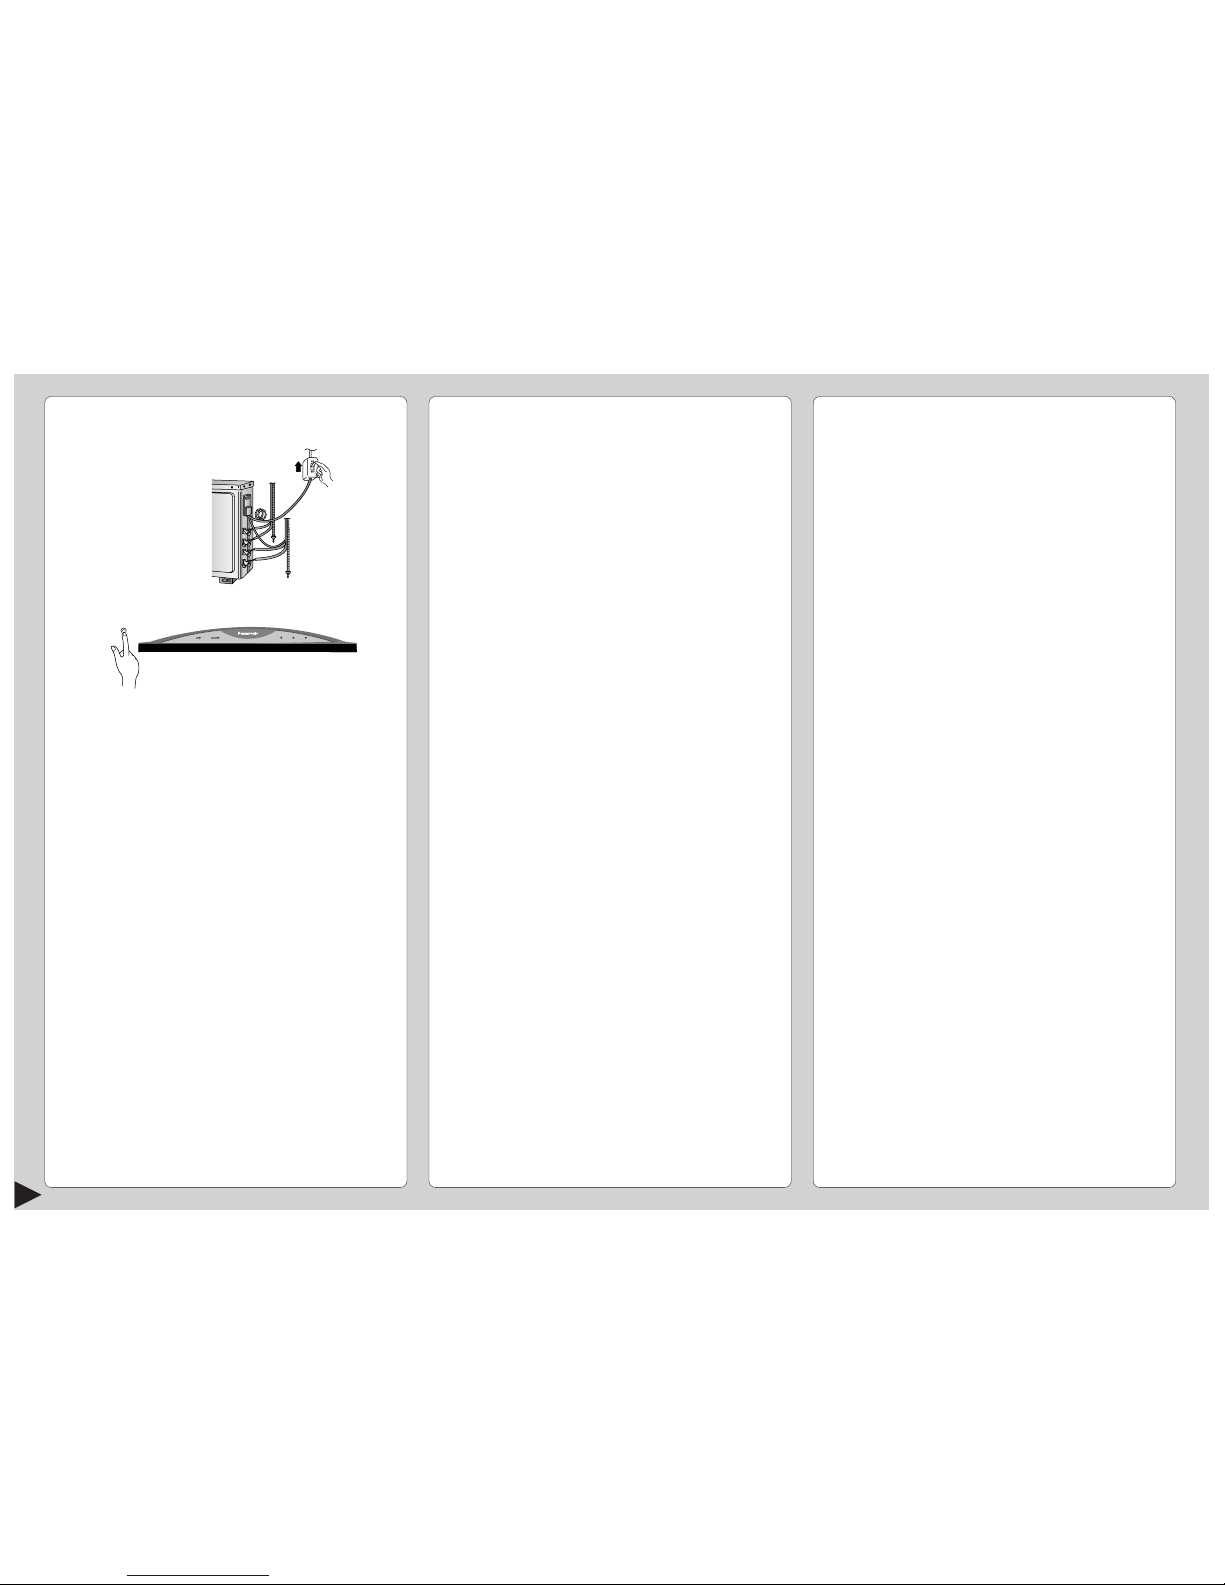
■ When the Air Conditioner is Not Used
for an Extended Period of Time
1 To dry the internal parts of the indoor unit, operate
the unit for 2 - 3 hours using:-
2 Stop the operation by remote control and switch off
the knife switch.
Note: If the unit is not switched off by the remote
control, it will start operating when the knife switch
is switched to ON (because the unit is equipped
with Auto Restart Control).
3 Remove the remote control batteries.
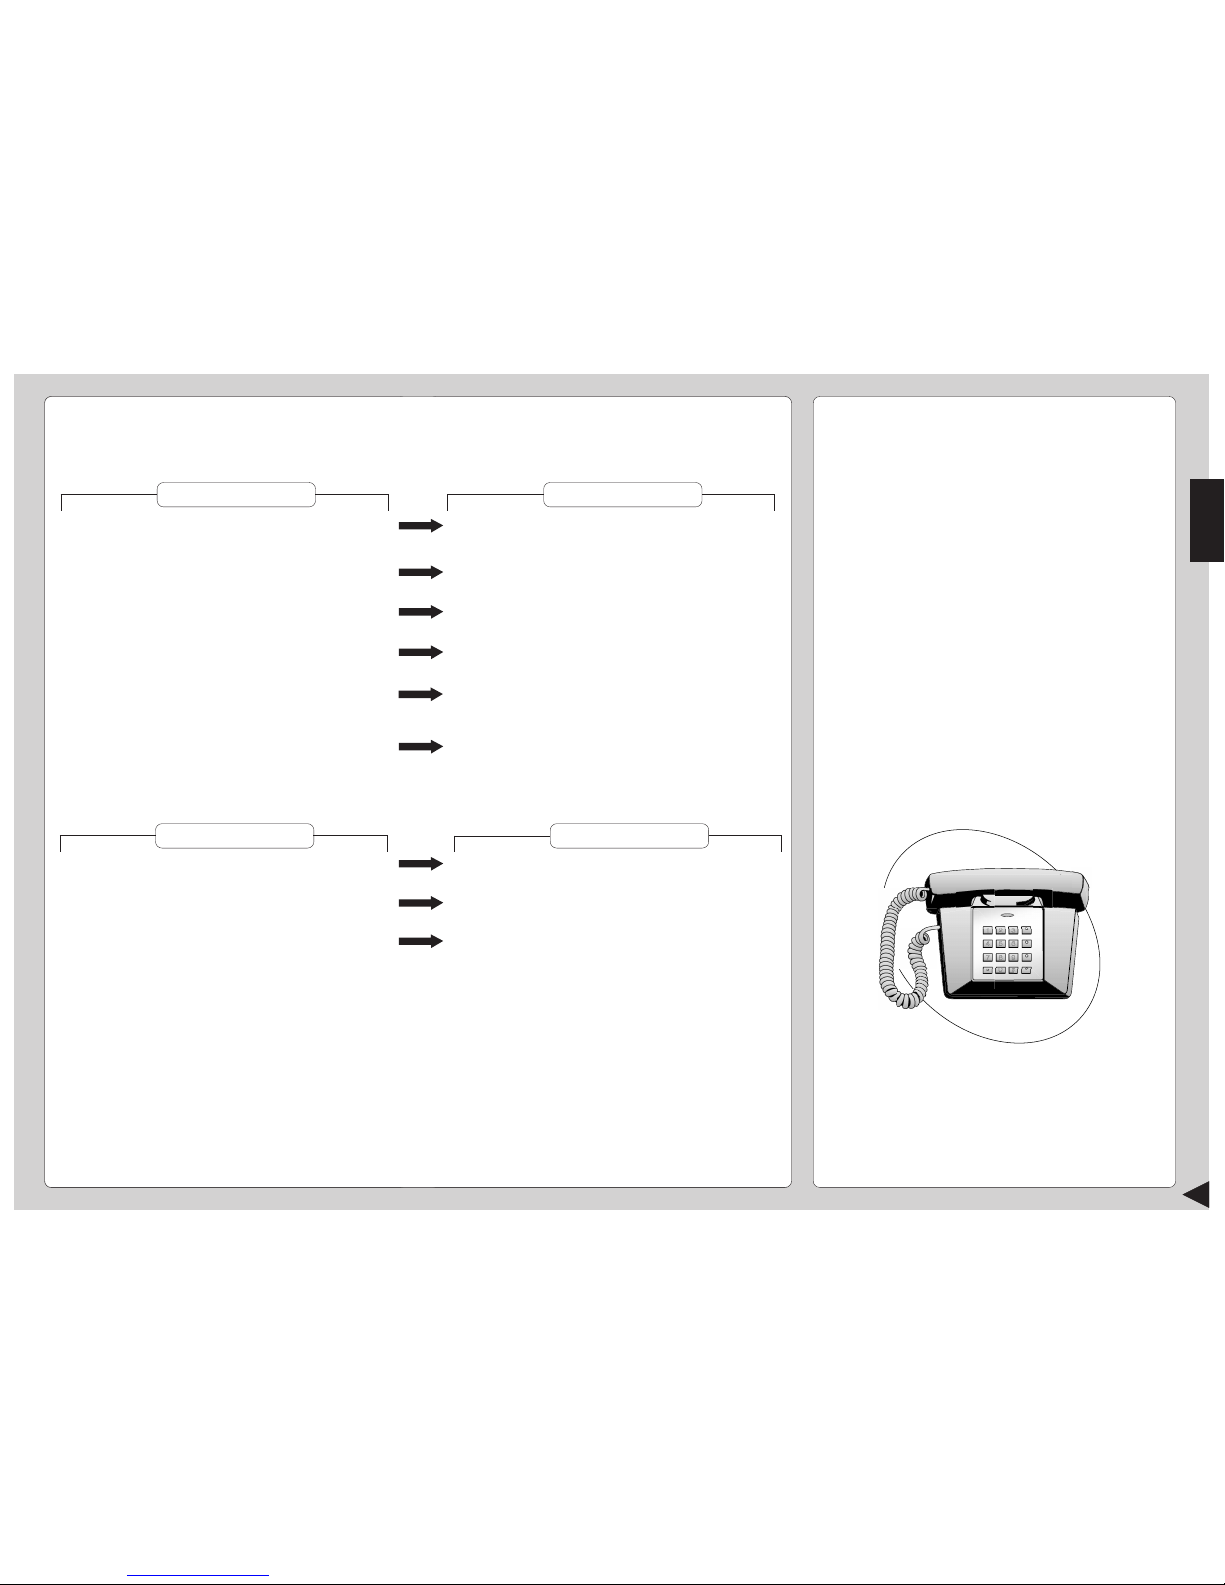
■ Recommended Inspection
• After used over several seasons, the unit will
become dirty and thus decreases the unit’s
performance. Depending on the operation
conditions, a dirty unit may produce odour and dust
may pollute dehumidification system. Therefore, a
seasonal inspection is recommended in addition to
regular cleaning. (Consult an authorized dealer).
CARE AND MAINTENANCE
■ Cleaning the Indoor Unit and Remote
Control
• Wipe gently with a soft, dry cloth.
• Do not use water hotter than 40˚C or polishing fluid
to clean the unit.
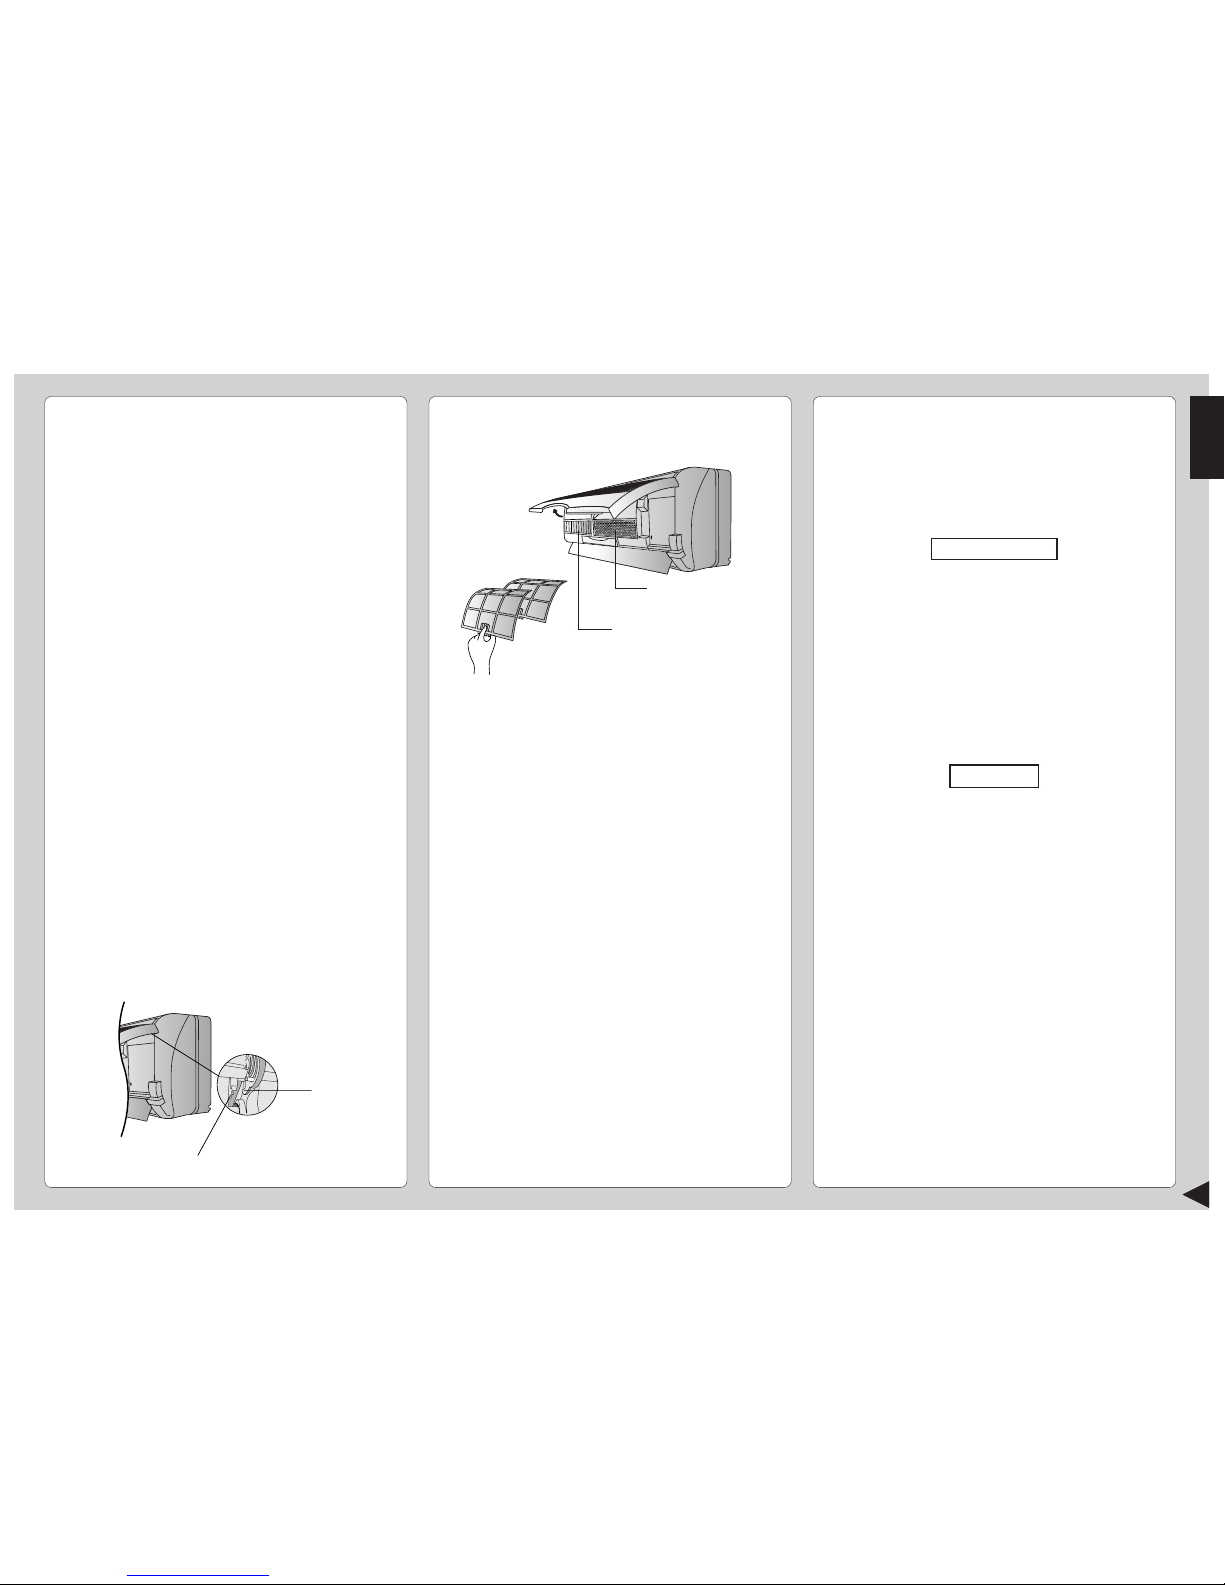
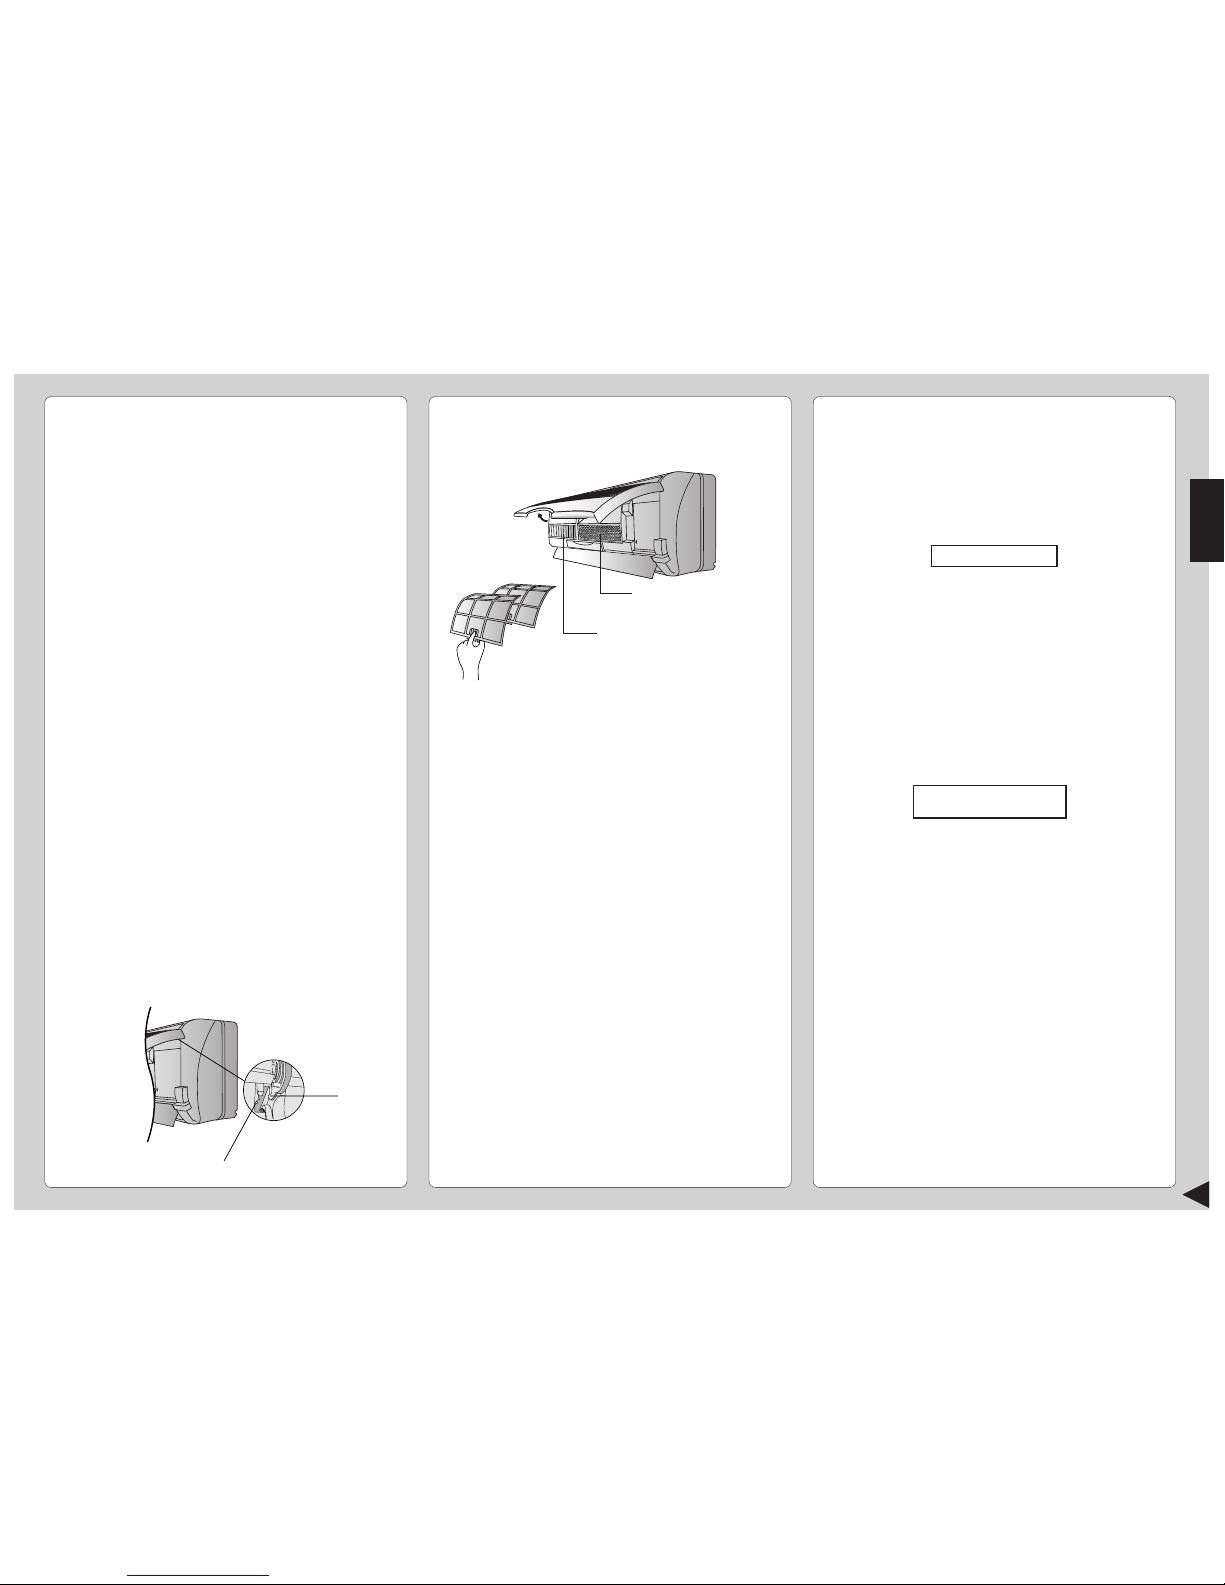
■ Cleaning the Air Filter
(Recommendation:- If the unit is operated in a dusty
environment, clean the filters every two weeks,
continuous use of this dirty filters will reduce cooling
efficiency)
1 Remove dirt using a vacuum cleaner.
2 Wash back of the air filter with water.
3 If badly soiled, wash it with soap or a mild household
detergent.
4 Let it dry and reinstall it.
Be sure the “FRONT” mark is facing you.
* Damaged air filter.
Consult the nearest authorized dealer.
Part No.: CWD001047.
•
Do not use benzene, thinner, scouring powder or
clothes soaked in caustic chemical to clean the unit.
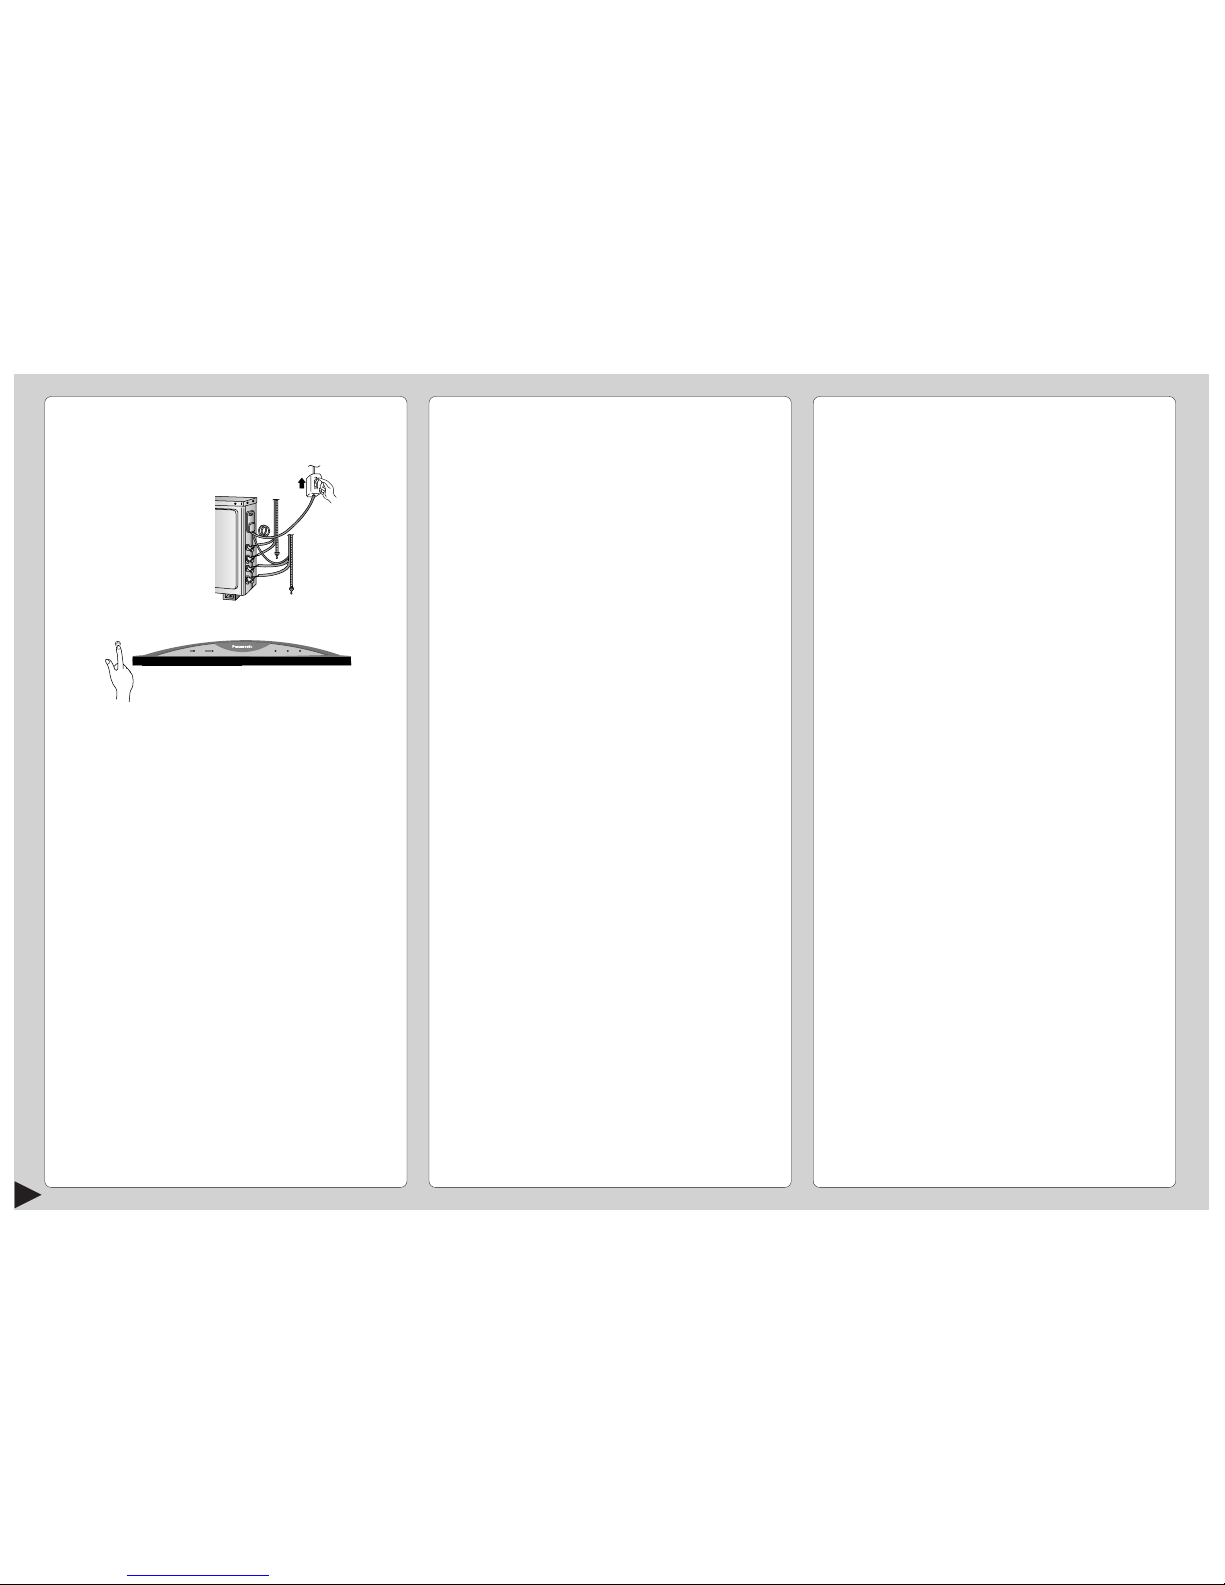
■ Cleaning the Front Panel
(Must be removed before washing)
1 Raise the front panel higher than the horizontal and
pull to remove it.
2 Gently wash with water and a sponge.
• Do not press the front panel too hard when washing.
• When use kitchen cleaning fluid (neutral detergent),
rinse throughly.
• Do not dry the front panel under direct sunlight.
3 To fix the front panel, raise the front panel
horizontally, match the protruding portion on the
indoor unit to the fulcrum and push into place.
■ Air Purifying Filters
● Solar Refreshing Deodorizing Filter
• Used to remove unpleasant odour and deodorize
the air in the room.
• Reusable.
• Vacuum, place under direct sunlight for 6 hours and
fit it back in place.
(Recommended: every 6 months)
● Catechin Air Purifying Filter
• The filter is coated with catechin to prevent growth
of bacteria and viruses.
• Reusable.
• Vacuum and fit it back in place
(Recommended: every 6 months)
• Recommended to change these filters every 3 years.
Do not reuse damaged filters.
Consult the nearest authorized dealer to purchase a
new filter.
Catechin Air Purifying Filter No.: CZ-SF70P
Solar Refreshing Deodorizing Filter No.: CZ-SFD70P
• If you operate the air conditioner with dirty filters:-
– Air is not purified
– Cooling capacity decreases
– Foul odour is emitted
Fulcrum
Protruding portion on indoor unit
COOL – 8°C or above
FAN operation
2
Remove the air filters
1
Raise the
front panel
Catechin Air Purifying
Filter
Solar Refreshing
Deodorizing Filter
9
HELPFUL INFORMATION
■ Auto Operation Button
● Automatic Operation
• If the remote control fails to function or has been
misplaced, press the Auto Operation button to start
the Automatic operation.
• The Automatic operation will be activated
immediately once the Auto operation button is
pressed. However, temperature cannot be adjusted
in this operation.
• The power indicator on the indoor unit will blink until
the operation mode is selected automatically.
• To cancel this operation, press once more.
● Remote Control Signal Receiving Sound
• To switch off the beep (Signal Receiving Sound),
press the Auto Operation button for 10 seconds
continuously or longer.
“Beep”, “beep” sound will be heard at the tenth
seconds.
Note: “Beep” sound will be heard at the fifth
seconds;
However please press continuously until you
heard “beep”, “beep” sound.
• Repeat the above steps if you want to switch on the
Signal Receiving Sound.
● (This is for Servicing purposes only)
Note: If you press this button continuously for 5 to 10
seconds, Test Run operation will be performed.
A “beep” sound will be heard at the fifth seconds
indicating the Test Run starts to operate.
■ Auto Restart Control
• If power is resumed after a power failure, the
operation will restart automatically after 3 - 5 1/2
minutes.
• Operation will be restarted automatically under the
previous operation mode and airflow direction when
power is resumed as the operation is not stopped
by the remote control.
■ Timer Setting
• When power failure occurs, the timer setting will be
cancelled. Once power is resumed, reset the timer.
■ Thunder and Lightning
• This air conditioner is equipped with a built-in surge
protective device. However, in order to further
protect your air conditioner from being damaged by
abnormally strong lightning activity, you may switch
off the knife switch.
ENERGY SAVING AND OPERATION
HINTS
■ Setting the Temperature
• Approximately 10% of electricity can be saved.
• Set the temperature 1°C higher than the desired
temperature.
■ Air Filters and Air Purifying Filters
• Clean the air filters every 2 weeks and the Air
Purifying Filters every 6 months.
• Dirty filters may reduces cooling efficiency.
■ Keep All Doors and Windows Closed
• Otherwise, cooling performance will be reduced and
electricity cost is wasted.
■ Outdoor Unit
• Do not block the air outlet vents. Otherwise, it will
lower the cooling performance.
■ Timer and Sleep Mode
• To prevent wastage of electricity, use sleep mode
when sleeping or Timer when going out.
■ Avoid Direct Sunlight
• Keep curtains or drapes closed to avoid direct
sunlight during cooling operation.
POWERFULPOWERFULECONOMYECONOMY POWERPOWER
TIMERTIMER
SLEEPSLEEP
POWERFULPOWERFULECONOMYECONOMY POWERPOWER
TIMERTIMER
SLEEPSLEEP
• Raise the front panel and press
• Confirm the knife switch at “ON”
ENGLISH
10
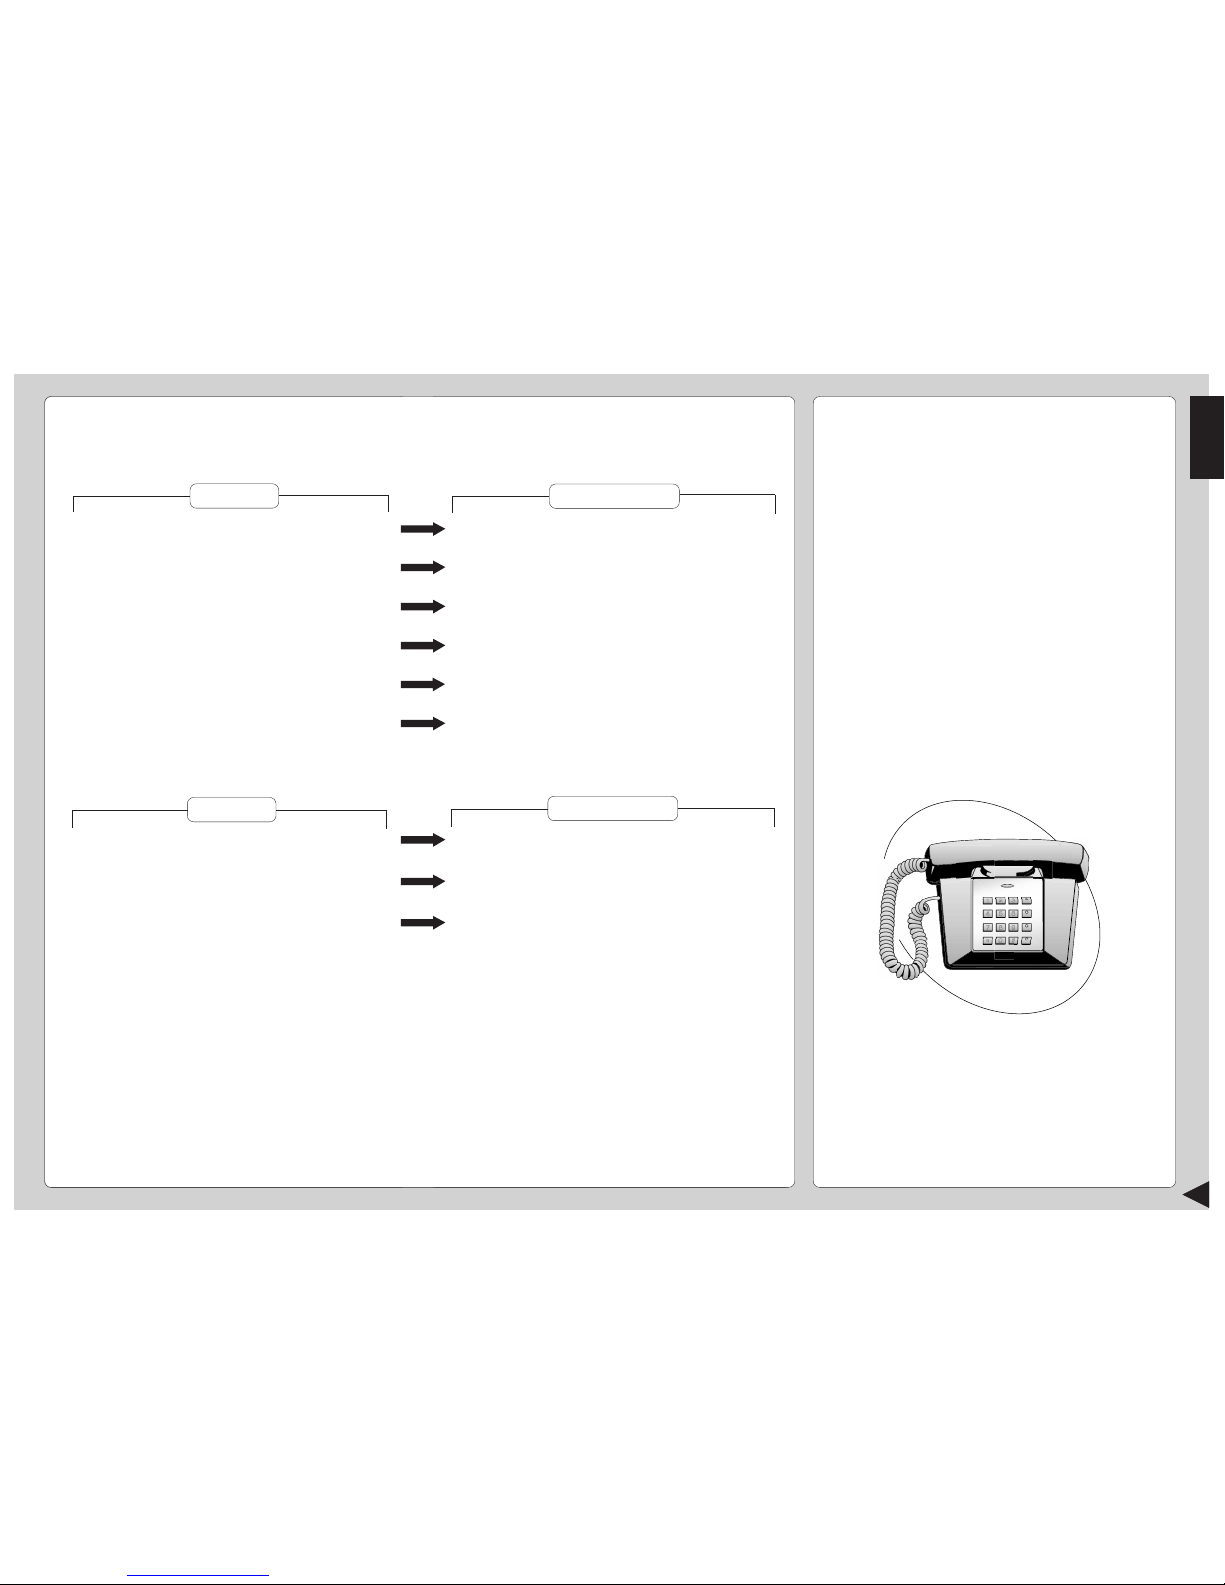
TROUBLESHOOTING
■ Normal Operation
Is it okay?
• Air conditioner has been restarted, but does not
operate for 3 minutes.
• A sound like water flowing can be heard.
• It seems that fog is coming out from the air
conditioner.
• The room has a peculiar odour.
• During Automatic Airflow setting, indoor fan
stops occasionally.
• The outdoor unit emits water or steam.
■ Abnormal Operation
Is it okay?
• The air conditioner does not operate.
• Air conditioner produces loud noise during
operation.
• The air conditioner does not cool effectively.
This is the answer
• This is to protect the air conditioner. Wait until the air
conditioner begins to operate.
• This is the sound of refrigerant flowing inside the air
conditioner.
• Condensation occurs when the airflow from the air
conditioner cools the room.
• This may be a damp smell emitted by the wall,
carpet, furniture or clothing in the room.
• This is to remove smell emitted by the surroundings.
• In COOL/DRY operation, moisture in the air
condenses into water on the cool surface of outdoor
unit piping that causes dripping.
Please check
• Has the circuit breaker been tripped?
• Is the timer being used correctly?
• Is the installation work slanted?
• Is the front grille closed properly?
• Has the temperature been set incorrectly?
• Are the filters dirty?
• Are the intake or outlet vents of the outdoor unit
obstructed?
• Are all windows and doors closed?
■ Call the Dealer Immediately
If the following conditions occur, turn off the main power
supply, and then call the dealer immediately.
• Abnormal noise is heard during operation.
• Water or foreign material gets into the remote
control by mistake.
• Water leak from the indoor unit.
• Switches or buttons do not operate properly.
• The circuit breaker switches off frequently.
• Power supply cord become unusually warm.

11
Obrigado por ter adquirido o nosso Aparelho de Ar
Condicionado Panasonic.
ÍNDICE
: Características........................................ 11
: Recomendações de Segurança ............ 12
■ Recomendações de Instalação
■ Recomendações de Funcionamento
: Descríção das Peças........................ 13~14
■ Unidade Interior
■ Unidade Exterior
■ Acessórios
■ Controlo Remoto
: Preparação Antes de Utilizar................. 15
■ Unidade Interior
■ Controlo Remoto
: Como Utilizar o Aparelho ................ 15~16
: Programar o Temporizador ................... 17
: Utilização Prática.................................... 17
■ Funcionamento em modo de sono
■ Funcionamento em modo económico
■ Funcionamento em modo plena potência
: Cuidados e Manutenção ........................ 18
■ Limpeza da Unidade Interior e do Controlo
Remoto
■ Limpeza do Filtro de Ar
■ Limpeza do Painel Frontal
■ Filtros purificadores do ar
■ Inspecção Pré-temporada
■ Quando o aparelho Ar Condicionado não é
utilizado por um período de tempo prolongado
■ Inspecção recomendada
: Informações Úteis .................................. 19
: Sugestões Para Poupar Energia e Obter
Um Funcionamento Mais Eficaz ........... 19
: Detecção de Avarias .............................. 20
■ Funcionamento Normal
■ Funcionamento Anormal
■ Contactar o Serviço de Assistência
imediatamente
Nota:
Antes de usar o seu aparelho de ar condicionado,
leia estas instruções de uso com muita atenção e
tenha-as à mão para futuras consultas.
CARACTERÍSTICAS
● Botão Auto-lluminãvel
Para facilitar a sua manipulação na escuridão.
(Pág 14)
● Operação Automática
Tire a temperatura interior para seleccionar o modo
mais apropriado.
(Pág 15)
● Modo Sleep
Evita que a temperatura do quarto aqueça ou
arrefeça demasiado enquanto dorme.
(Pág 17)
● Modo Económico
Reduz o consumo de energia eléctrica.
(Pág 17)
● Modo Potente
Atinge rapidamente a temperatura pretendida da sala.
(Pág 17)
● Painel Frontal AmovÍvel
Para uma limpeza mais rápida e fácil. (lavável)
(Pág 18)
● Filtro Purificador do Ar "CATECHIN"
É um filtro que pode reter o pó, o fumo do tabaco e as
partículas microscópicas do ar da sala. Também pode
evitar o crescimento das bactérias e dos vírus retidos
nele.
(Pág 18)
● Filtro solar desodorizante e refrescante
Serve para eliminar o odor desagradável e para
desodorizar o ar da sala.
(Pág 18)
● Rearme Automático Da Operação
Depois de um corte de corrente arranca
automaticamente o aparelho.
(Pág 19)
● Condensador Da Unidade Exterior Revestido De
Azul
É o revestimento anti-óxido mais avançado.
! Perigo
1) Se o cabo de alimentação está danificado ou é
necessário trocá-lo, a troca deve ser feita pelo
fabricante ou pelo seu serviço técnico associado ou
uma pessoa de qualificação equivalente para evitar
riscos.
2) Não tente reparar o aparelho.
Em caso de funcionamento defeituoso do aparelho,
não o repare você mesmo. Contacte com o
representante de vendas ou com o serviço técnico
para a sua reparação.
3) Desligue a alimentação eléctrica (Isolamento da
corrente principal).
Em caso de emergência, retire a ficha da tomada, ou
desligue o interruptor, ou desligue a fonte de
alimentação de forma a isolar o equipamento da
corrente principal.
! Cuidado
Ruídos aéreos
O nível na escala A deste aparelho é inferior a 70 dB,
sob as
condições de teste JIS C 9612:
Operação máxima de arrefecimento
1 m do aparelho

12
PORTUGUÊS
RECOMENDAÇÕES DE SEGURANÇA
Antes de pôr em funcionamento este aparelho, leia
atentamente as seguintes Recomendações de
Segurança.
● Para evitar danos pessoais, de terceiros ou danos
materiais, deve seguir as seguintes instruções.
● A operação incorrecta, devido ao incumprimento
destas instruções, poderá causar danos ou avarias.
A gravidade das mesmas é classificada como se
segue:
! Perigo
Este sinal significa perigo de morte ou de
ferimentos graves.
! Cuidado
Este sinal significa perigo de danificar o aparelho.
● As instruções que deve seguir estão classificadas
conforme os símbolos seguintes:
Este símbolo (com um fundo branco) significa
uma acção PROÍBIDA.
Estes símbolos (com um fundo negro)
significam acções OBRIGATÓRIAS.
■ Recomendações de Instalação
! Perigo
● Este aparelho de ar condicionado
deve ser ligado a uma tomada com
ligação à terra.
A ligação inadequada poderá causar
risco de choque eléctrico.
● Certifique-se de que a tubagem de
drenagem está devidamente ligada.
Caso contrário, poderá ocorrer uma
fuga de água.
● Não instale a unidade numa
atmosfera potencialmente
explosiva.
As fugas de gás próximo do aparelho
poderão causar risco de incêndio.
● Não instale, retire a instalação, nem reinstale
o aparelho você mesmo.
A instalação inadequada poderá causar fugas,
choques eléctricos ou risco de incêndio. É favor
consultar um representante autorizado, ou um
técnico especializado para proceder a estes
trabalhos.
! Cuidado
■ Recomendações de Funcionamento
! Perigo
Este sinal significa perigo de morte ou de ferimentos graves.
● Não ligue outros aparelhos à mesma tomada.
● Não ponha o aparelho em funcionamento com
as mãos molhadas.
●
Não danifique, nem altere, o cabo de alimentação.
● Não introduza os dedos, nem outros objectos,
nas unidades interior ou exterior.
● Não se exponha directamente ao ar frio
durante muito tempo.
● Não ponha o aparelho em funcionamento com
as mãos molhadas.
● Se ocorrer uma situação de funcionamento
anormal (cheiro a queimado, etc.), desligue a
alimentação eléctrica.
! Cuidado
Este sinal significa perigo.
● Não lave o aparelho com água.
● Não utilize o aparelho para outros fins como a
conservação de alimentos.
● Não utilize qualquer equipamento combustível
na direcção do fluxo de ar do aparelho.
● Não se sente nem coloque nenhum objecto
em cima da unidade exterior.
● Desligue o aparelho antes de limpá-lo.
● Ventile regularmente a sala.
● Comprove se o bastidor de instalação está
danificado depois de ter usado o aparelho
durante um longo período.
● Desligue a alimentação eléctrica do aparelho,
caso não tencione utilizá-lo por um período de
tempo prolongado.
OFF
OFF
OFF
13
DESCRÍÇÃO DAS PEÇAS
■ Unidade Interior
1 Painel Frontal
2 Entrada de Ar
3 Saída de Ar
4 Deflector para Fluxo de Ar Vertical
5 Deflector para Fluxo de Ar Horizontal
(ajustável manualmente)
6 Painel indicador
1 Botão de Operação Automática
(quando o painel frontal está aberto)
2 Indicador do modo económico – VERDE
3 Indicador do modo de plena potência – LARANJA
4 Indicador de energia – VERDE
5 Indicador do modo de sono – LARANJA
6 Indicador do modo de temporizador – LARANJA
● Unidade Interior
(quando o painel frontal está aberto)
1
Painel Frontal2Filtros de Ar3Filtro Purificador do Ar
■ Unidade Exterior
CU-2C18BKP5G
CU-2C19BKP5G
CU-2C14BKP5G CU-3C20BKP5G
1 Entrada de Ar
2 Terminal de Terra
(Cobertura Interior)
3 Cabo de Alimentação
4 Tubagem
1
2
3465
2
1
3
1
2
7
3
4
5
6
POWERFULPOWERFULECONOMYECONOMY POWERPOWER
TIMERTIMER
SLEEPSLEEP
POWERFULPOWERFULECONOMYECONOMY POWERPOWER
TIMERTIMER
SLEEPSLEEP
123 654
■ Acessórios
● Controlo Remoto
● Etiqueta Bilingue do Controlo Remoto
● Soporte do controlo remoto
● Duas pilhas secas RO3 (AAA) ou equivalentes
● Filtros Purificador Do Ar
C
H
E
C
K
TEMP
AU
T
UT
O
O
N
OFF
FA
N
AN
AU
T
UT
O
R
E
S
E
T
B
A
T
T
E
R
Y
C
L
O
C
K
MO
D
E
SLEEP
ECONOMY
FAN SPEED
A
IR
S
W
IN
G
O
F
F
CANCEL
O
N
SET
S
te
p
1
2
3
T
IM
E
R
+
POWERFUL
OFF/ON
AUT
UT
O
DR
DR
YFAN
AN
COOL
COOL
(Filtro solar
desodorizante e refrescante)
(Filtros Purificador
do Ar "Catechin”)
5 Mangueira de Dreno
6 Cabo de Ligação
7 Saida de Ar
14
PORTUGUÊS
DESCRÍÇÃO DAS PEÇAS
■ Controlo Remoto
● Sinal do comando à distância.
• Certifique-se de que não existe nenhum obstáculo
entre o comando e o receptor de infravermelhos.
• Distãncia máxima: 10 m.
• Som de recepção do sinal.
Um Bip curto ou longo.
● Notas para o comando à distância.
• Não deixe cair nem atire ao chão o controlo
remoto.
• Não molhe o controlo remoto.
• Alguns tipos de lâmpadas fluorescentes
poderão afectar a recepção do sinal. Consulte
o seu revendedor.
● Como inserir as pilhas
1 Deslize até ao fundo a tampa do comando à
distância
2 Instalar as pilhas
– Comprove se é a posição correcta
– 12.00 no visor – piscando
• Acerte a hora actual (CLOCK) imediatamente, para
evitar desgaste das pilhas.
● Sobre as pilhas
• Podem ser utilizadas durante cerca de um ano.
● Siga as seguintes indicações, ao substituir as
pilhas.
• Substitua as pilhas antigas por outras novas do
mesmo tipo.
• Não utilize pilhas recarregáveis (Ni-Cd).
• Remova as pilhas, caso não tencione utilizar o
aparelho por um período de tempo prolongado.
1 Emissor de Infravermelhos
2 Visor de Operação
3 Botão de Operação do Modo Potente
4 Botão de Regulação da Temperatura Ambiente
(botão auto-iluminãvel)
5 Botão de Selecção do Modo de Operação
6 Botão de Operação do Modo Económico
7 Botão de Selecção Automática da Direcção do Fluxo
de Ar
8 Botão de Operação do Modo Sleep
9 Botão de Selecção da Velocidade do Ventilador
0 Pontos de Reinício
(Premir com um objecto de ponta fina para eliminar a
memória)
! Botão ON/OFF
(botão auto-iluminãvel)
@ Botão para Ligar o Temporizador
# Botão para Desligar o Temporizador
$
Botão de Selecção Manual da Direcção do Fluxo de Ar
% Botão de Programação do Temporizador
^ Botão de Cancelamento do Temporizador
& Botão de Acerto da Hora
* Botão do Relógio
( Tampa do comando à distância
CHECK
TEMP
AUTO
ON
OFF
FAN
AUTO
RESET CLOCK
MODE
SLEEP
ECONOMY
FAN SPEED
AIR SWING
OFF
CANCEL
ON
SET
1
2
3
TIMER
OFF/ON
POWERFUL
AUTO
MANUAL
#
!
$
%
^
$
*
&
3
5
8
7
9
0
6
4
(
2
1
AUTO DRYFANCOOL
COOL
CHECK
AUTO
OF
AUTOHEAT
DRY
FANCOOL
FAN
AUTO
AUTO
RESET
CLOCK
AIR SWING
OFF
CANCEL
1
2
3
TIMER
PO
W
ERFU
L
AUTO
MANUAL
ECONOMY
SLE
ON
SET
FAN SPEED
MODE
2
1
1.5V
1.5V
15
PREPARAÇÃO ANTES DE UTÍLIZAR
■ Unidade Interior
1 Mude o botão de operação para a posição “ON”
2 Abra o painel frontal
3 Remova os filtros de ar
4 Coloque no seu lugar os filtros purificadores de ars
5 Introduza os filtros de ar
6 Feche o painel frontal
■ Controlo Remoto
– Para acertar a hora
1 Prima 1.
2 Depois prima 2 para mudar a hora em sentido
ascendente ou descendente.
3 Prima de novo 1.
A hora actual iluminar-se-á no visor.
■ Ajuste da Temperatura
• Prima 3 para aumentar ou diminuir a temperatura.
• A temperatura pode ser regulada entre os 16°C ~
30°C
• Temperatura recomendada:
• Durante o funcionamento em AUTO, prima 3 para
seleccionar:-
• Funcionamento a 2°C acima da temperatura
ambiente.
• Funcionamento a temperatura ambiente.
• Funcionamento a 2°C abaixo da temperatura
ambiente.
● Temp. Standard
• Caso seleccione este modo, o sensor de temperatura
interior será activado automaticamente, hora a hora,
para seleccionar o modo óptimo de operação.
• Depois de seleccionar o modo de funcionamento, o
mesmo não muda.
COMO UTILIZAR O APARELHO
■ Para iniciar o funcionamento
• Prima 1.
• O indicador POWER (energia) (verde) da unidade
interior acender-se-á.
• Para parar, prima uma vez mais.
■ Ajuste do modo
• Prima 2 para seleccionar:-
AUTO – Funcionamento em modo
automático
COOL – Funcionamento em modo
refrigeração
DRY – Funcionamento em modo
secagem suave
FAN – Funcionamento em modo
circulação de ar
CHECK
AUTO
AUTO HEAT DRY FANCOOL
FAN
AUTO
RESET CLOCK
FAN SPEED
AIR SWING
OFF
CANCEL
ON
SET
1
2
3
TIMER
AUTO
MANUAL
1
2
6
2
4
5
3
OFF
ON
HEAT
DRY
FANCOOL
CH
ECK
TEMP
AUTO
AU
T
UTO
FA
N
AN
AU
T
UTO
R
ESET CLO
C
K
AIR SWING
OFF
CANCEL
1
2
3
TIMER
OFF/ON
POW
ERFUL
AUTO
MANUAL
ECONOMY
SLEEP
ON
SET
FAN SPEED
MODE
2
3
5
1
6
4
1
Botão de
operação
COOL 26°C ~ 28°C
1°C ~ 2°C
DRY
abaixo da temperatura
ambiente
Operação
Arrefecimento
Desum. Suave
Temp.
Standard
25°C
22°C
Temperatura
de interior
23°C

16
PORTUGUÊS
● Detalhes de Funcionamento
COOL – Função de Arrefecimento
• Para fixar a temperatura ambiente no nível de frio que
lhe seja mais agradável.
AUTO – Operação Automática
• Tire a temperatura interior para seleccionar o modo
mais apropriado.
• No modo de funcionamento AUTO não aparece a
temperatura no comando à distância.
DRY – Operação Desumidificação Suave
• Uma refrigeração muito suave antes da
desumidificação não reduz a temperatura ambiente.
• Durante o funcionamento de Secagem Suave, o
ventilador do interior funcionará a baixa velocidade.
FAN – Operação de Circulação do Ar
• Quando a temperatura ambiente alcança o nível
estabelecido, o funcionamento inicia-se com um
volume baixo de fluxo de ar. Pára quando a
temperatura se reduz 2°C abaixo da estabelecida.
(É útil quando se usa o aquecimento).
■ Ajuste da velocidade do ventilador
• Prima 4 para seleccionar:-
FAN – Velocidade baixa do ventilador
FAN – Velocidade média do ventilador
FAN – Velocidade alta do ventilador
AUTO
FAN – Velocidade automática do ventilador
A velocidade do ventilador interno é
regulado automaticamente, de acordo
com a operação. O ventilador interno
pára temporariamente durante a
operação de arrefecimento.
■ Ajuste da direcção vertical do fluxo de ar
• Prima 5 ou 6 para seleccionar:-
COOL/ DRY Funcionamento
AUTO
FAN Funcionamento
AUTO
MANUAL
Podem estabelecer-se cinco
etapas de ajuste entre
14° ~ 36°.
Mude automaticamente
para cima/baixo
Mude automaticamente
para cima/baixo
MANUAL
Podem estabelecer-se
cinco etapas de ajuste
entre 0° ~ 61°.
■ Ajuste da direcção horizontal do fluxo do ar
● Utilize este aparelho de ar condicionado nas
seguintes condições:
• Regule-a manualmente
● Notas
• Caso não tencione utilizar o aparelho por um período
de tempo prolongado, desligue o interruptor de
potência. Caso o deixe na posição ON, irá consumir
cerca de 2,5 W, mesmo que a unidade interior tenha
sido desligada com o controlo remoto.
• Caso interrompa o seu funcionamento e depois o
ligue imediatamente, o aparelho só retomará o
funcionamento passados 3 minutos.
DBT:
Temperatura de bolbo seco
WBT:
Temperatura de bolbo húmido
Temperature Máxima
Temperatura Mínima
DBT
32
16
WBT
23
11
DBT
43
16
WBT
26
11
Interior Exterior
(Unidade em °C)
36°
61°

17
PROGRAMAR O TEMPORIZADOR
Certifique-se de que a hora actual está certa antes de
programar o temporizador. O temporizador não poderá
ser programado se o visor estiver a piscar.
■ Funcionamento ON-TIMER
(Temporizador de ligação)
Para arrancar automaticamente o aparelho de ar
condicionado.
• Prima 1 para programar o funcionamento.
• Prima 2 para aumentar ou diminuir o tempo.
• Depois prima 3.
• Para cancelar esta operação, prima 4.
■ Funcionamento OFF-TIMER
(Temporizador de desligação)
Para parar automaticamente o funcionamento do
aparelho de ar condicionado.
• Prima 5 para programar o funcionamento.
• Prima 2 para aumentar ou diminuir o tempo.
• Depois prima 3.
• Para cancelar esta operação, prima 4.
● Detalhes sobre o funcionamento em modo
temporizador
• Quando se ajusta o temporizador em ON (ligado),
o aparelho começará a funcionar antes da hora
real estabelecida. Isto permite que a temperatura
da sala atinja os valores estabelecidos na hora
marcada.
• Quando se estabelece o ON-TIMER, o aparelho
começará a funcionar diariamente à hora marcada.
• A hora actual não poderá ser visualizada enquanto
está a programar o temporizador.
• Quando se usam simultaneamente os dois
temporizadores, o indicador de modo TIMER
(temporizador) da unidade interior continua ligado
quando o OFF-TIMER pára o aparelho.
UTILIZAÇÃO PRÁTICA
■ Funcionamento em modo de sono
Para conseguir uma temperatura ambiental confortável
enquanto dorme.
• Prima 6.
• Acender-se-á o indicador de modo de sono da unidade
interior.
• Prima novamente o botão para cancelar esta
operação.
● Detalhes do funcionamento em modo sono
• Quando a temperatura ambiente atinge o nível
estabelecido, o volume da corrente de ar mudará
abaixo automaticamente.
• O tempo de operação do Modo Sleep é de 8 horas.
• Quando se usa em conjunto com o temporizador, o
mesmo tem prioridade.
■ Funcionamento em modo económico
Para poupar energia.
Convém usar este modo quando a sala atingiu a
temperatura desejada.
• Prima 7.
* o indicador do modo económico (verde)
acende-se na unidade interior.
• Prima novamente o botão para cancelar esta
operação.
■ Funcionamento em modo plena potência
Para conseguir rapidamente a temperatura estabelecida.
• Prima 8.
* O indicador do modo de plena potência (laranja)
acende-se na unidade interior.
* O modo Potente funciona apenas durante 15
minutos.
• Prima novamente o botão para cancelar esta
operação.
●
Detalhes sobre o funcionamento do modo
económico/plena potência
• A operação do Modo Económico e do Modo Potente
não pode ser seleccionada em simultâneo.
• As alterações da temperatura e do volume de fluxo
de ar são automáticas.
• O visor do comando à distância continua sem
alterações.
• Se se prime o botão de sono ou de funcionamento, o
modo de economia ou de máxima potência ficará
cancelado.
• Durante a operação de ventilação - circulação de ar,
os modos económico e potente não estão disponíveis.
AUTO
AUTO HEAT DRY FANCOOL
FAN
AUTO
MODE
SLEEP
ECONOMY
FAN SPEED
AIR SWING
OFF
CANCEL
ON
SET
1
2
3
TIMER
OFF/ON
POWERFUL
AUTO
MANUAL
3
6
4
1
7
5
2
8
COOL,DRY,
15 minutos em
AUTO
progressão
in advance
Tempo
Aumenta 0,5°C
aprox.
Temperatura
Tecla
SLEEP é
pressionada.
Inicia-se o
período de
funcionamento
SLEEP.
0~1 hora ← 1 hora→
depois de aproximadamente 8 horas
da operação de mudança a sono,
parará automaticamente.
Aumenta
0,5°C
aprox.
• Começará a funcionar a
refrigeração ou a secagem
suave para a operação de
mudança a sono para evitar
o excessivo aquecimento.
P
r
o
g
r
a
m
a
ç
ã
o
d
e
t
e
m
p
e
r
a
t
u
r
a
Volume de fluxo
de ar
Super baixo
Funcionamento em
modo económico
COOL / DRY
Temperatura
0,5°C acima da
temperatura
estabelecida.
Volume de fluxo
de ar
Super Alto
Funcionamento em
modo plena potência
COOL / DRY
Temperatura
3°C acima da
temperatura
estabelecida.
18
PORTUGUÊS
■ Inspecção Pré-Temporada
● O sopro de ar é frio?
Será considerado funcionamento normal se, passados
15 minutos do início do funcionamento, a diferença entre
a temperatura das entradas de ar e a temperatura das
saídas de ar for de:-
● As entradas ou saídas de ar das unidades interior
e exterior estão obstruidas?
● As pilhas do controlo remoto estão gastas?
Caso o visor do controlo remoto pisque, ou o visor pareça
fraco, substitua as pilhas.
■ Quando o aparelho de ar condicionado
não é utilizado por um período de
tempo prolongado
1 Para secar as partes internas da unidade de interior faça
funcionar a unidade durante 2-3 horas usando:-
2 Interrompa o funcionamento através do telecomando e
desligue o botão.
Nota: se a unidade não tiver sido desligada pelo
telecomando, a mesma começará a trabalhar assim que
o botão de operação for mudado para ON (porque a
unidade está equipada com controlo de nova ligação
automático).
3 Retire as pilhas do controlo remoto.
■ Inspecção Recomendada
• Depois do uso durante várias temporadas, a unidade
acumula sujidade e por isso reduz o seu rendimento.
Consoante as condições de funcionamento, uma unidade
com sujidade acumulada pode contaminar o sistema
desumidificador. Portanto, recomenda-se uma revisão por
estação além da limpeza regular. (Consulte vendedor
autorizado).
CUIDADOS E MANUTENÇÃO
■ Limpeza da Unidade Interior e do Controlo
Remoto
• Limpe cuidadosamente, com um pano macio e seco.
• Não use água acima de 40°C nem líquidos para dar
brilho para limpar a unidade.
■ Limpeza do Filtro de Ar
(Recomendação: Caso o aparelho seja utilizado num
ambiente com pó, deve limpar os filtros quinzenalmente.
A utilização contínua de filtros sujos irá reduzir a eficácia de
arrefecimento.)
1 Remova a sujidade utilizando um aspirador.
2 Lave a parte posterior dos filtros de ar com água.
3 Caso os filtros estejam muito sujos, lave-os com água e
sabão ou com uma solução suave de detergente.
4 Deixe secar os filtros e reinstale-os. Certifique-se de que a
indicação “FRONT” está virada para si.
* Filtros de ar danificados
Consulte o revendedor da sua área. Ref.: CWD001047.
• Não use benzina, thinner, desengordurantes nem panos
impregnados com produtos cáusticos para limpar a
unidade.
■ Limpeza do painel frontal
(Deve ser removido antes de lavar)
1 Levante o painel frontal por cima do horizontal e puxe para
retirá-lo.
2 Lave cuidadosamente com água e uma esponja.
• Não pressione demasiado o painel frontal durante a
limpeza.
• Quando usar produtos de limpeza de cozinha
(detergente neutro), enxagúe bem.
• Não seque o painel frontal debaixo da luz directa do sol.
3 Para fixar o painel frontal, levante o painel frontal
horizontalmente, faça coincidir a parte sobressaliente da
unidade de interior com o ponto de apoio e faça pressão
para fixá-lo.
■ Filtros Purificadores do Ar
● Filtro solar desodorizante e refrescante
• Serve para eliminar o odor desagradável e para
desodorizar o ar da sala.
• Reutilizável
• Aspire-o, coloque-o à luz do sol perante 6 horas e
coloque-o de novo no seu lugar.
(Recomendado: de 3 em 6 mese
s)
● Filtro purificador do ar de catequina
• O filtro está revestido com catequina para impedir o
crescimento das bactérias e vírus.
• Reutilizável
• Aspire-o, e coloque-o de novo no seu lugar
(Recomendado: de 3 em 6 meses)
• Recomendado cambiar os filtros de 3 en 3 anos. Não
reutilize os filtros danificados.
Contacte com o vendedor autorizado mais próximo e
compre um novo filtro.
Filtro purificador do ar de catequina N° : CZ-SF70P
Filtro solar desodorizante e refrescante N° :CZ-SFD70P
• Caso o ar condicionado tenha os filtros sujos:
– O ar não é purificado
– A capacidade de arrefecimento diminui
– São libertados odores desagradáveis
Saliente
Suporte da unidade interior
Funcionamento em modo
FAN (ventilador)
COOL – 8°C ou mais
Tire os filtros do ar
Filtro solar desodorizante
e refrescante
Levante o
painel frontal
Filtro purificador
do ar de catequina
2
1
19
INFORMAÇÕES ÚTEIS
■ Botão de funcionamento automático
● Funcionamento automático
• Se o comando à distância deixa de funcionar ou
ficou mal colocado, prima o botão de
funcionamento automático para arrancar o
aparelho.
• O funcionamento automático activa-se ao premer o
botão Auto de funcionamento. Porém, a
temperatura não pode ajustar-se nesta operação.
• O indicador de alimentação da unidade interior
piscará até que se seleccione automaticamente o
modo de funcionamento.
• Para cancelar esta operação, prima outra vez.
● Som de recepção do sinal do comando à distância
• Para desactivar o bip (som de recepção do sinal),
prima o botão de funcionamento automático
durante 10 segundos ou mais.
Nota:
O som “bip” ouvir-se-á passados 5 segundos;
mas deve continuar a apertar até ouvir o som
“bip”, “bip”.
• Repita os mesmos passos se quer activar o som de
recepção do sinal.
● (Só para fins de serviço técnico)
Nota: Se prime este botão sem soltá-lo entre 5 e 10
segundos, começará a ser executada a operação de
Test Run (comprovação automática). Aos 5
segundos ouvir-se-á um som “bip”, para identificar o
início da operação de Test Run.
■ Controlo de Rearme Automático
• Caso ocorra uma falha eléctrica, o aparelho
retomará automaticamente o funcionamento 3 a 5
1/2 minutos depois de ser reposta a alimentação
eléctrica.
• O funcionamento retomará automaticamente no
modo de funcionamento prévio e na mesma
direcção do fluxo de ar quando se restabeleça a
corrente eléctrica, salvo se se interrompeu esse
funcionamento desde o comando à distância.
■ Programação do Temporizador
• Quando surgem cortes de corrente, a configuração
do temporizador cancela-se. Reajuste o
temporizador logo que volte a corrente.
■ Trovoadas
• Este acondicionador de aire está equipado con un
mecanismo protector incorporado de subidas de
tensión. Sin embargo, para protegerlo de daòos
causados por una subida anormalmente del flujo
elëctrico, pode desligar o botão.
SUGESTÕES PARA POUPAR ENERGIA
E OBTER UM FUNCIONAMENTO MAIS
EFICAZ
■ Ajuste da temperatura
• Pode-se poupar aproximadamente 10% de
electricidade.
• Regule a temperatura 1°C acima do desejado.
■ Filtro de Ar e Filtro Purificador do Ar
• Limpe o filtro de ar quinzenalmente e mude o filtro
purificador de ar trimestralmente.
• Os filtros sujos reduzem a eficácia do
arrefecimento.
■ Mantenha as portas e janelas fechadas
• Caso contrário, a performance de arrefecimento
será reduzida e serão desperdiçados custos de
electricidade.
■ Unidade Exterior
• Não bloqueie as saídas de ar. Caso contrário,
reduzirá a eficácia do arrefecimento.
■ Modo de Dormir e Temporizador
• Para evitar o desperdício de electricidade, use o
modo dormir quando estiver deitado ou o
temporizador quando saia de casa.
■ Evite a luz solar directa
• Mantenha os cortinados ou estores fechados para
evitar a luz directa do sol enquanto funciona o
refrigerador.
POWERFULPOWERFULECONOMYECONOMY POWERPOWER
TIMERTIMER
SLEEPSLEEP
POWERFULPOWERFULECONOMYECONOMY POWERPOWER
TIMERTIMER
SLEEPSLEEP
• Levante o painel frontal e prima
• Confirme se o botão está em “ON”
20
PORTUGUÊS
■ Contactar o serviço de Assistência
imediatamente
Caso se verifiquem as seguintes condições, desligue a
alimentação principal e retire a respectiva ficha da
tomada de alimentação, e contacte de imediato o
concessionário.
• São audíveis ruídos anormais durante a operação.
• Por distracção, entrou água ou outro líquido no
controlo remoto.
• Existe uma fuga de água na unidade interior.
• Os interruptores ou os botões não funcionam
correctamente.
• O interruptor dispara com frequência.
• O cabo de alimentação fica quente, o que não é
normal.
Esta é a resposta
•É para proteger o aparelho de ar condicionado.
Espere até que o aparelho comece a a funcionar.
•É o barulho da passagem do refrigerante pelos
tubos do aparelho de ar condicionado.
• A condensação realiza-se quando o fluxo de ar do
aparelho de ar condicionado arrefece a sala.
• Pode tratar-se do cheiro a humidade provocado
pelas paredes, tapetes ou estofos da sala.
•É para tirar o cheiro provocado pelo ambiente.
• Em funcionamento COOL/DRY (FRIO/SECO), a
humidade do ar condensa-se em água sobre a superfície
fria da canalização da unidade exterior e goteja.
Comprove
• O disjuntor saltou?
• O temporizador está a ser devidamente utilizado?
• A base de instalação está inclinada?
• A grelha frontal está devidamente fechada?
• A temperatura foi bem regulada?
• Os filtros estão sujos?
• As entradas ou saída de ar da unidade exterior estão
obstruidas?
• As portas e janelas estão devidamente fechadas?
DETECÇÃO DE AVARIAS
■ Funcionamento Normal
Será normal quando ... ?
• O aparelho de ar condicionado foi reactivado,
mas não funciona durante três minutos?
•É audível um som semelhante a água a correr?
• Parece que sai uma neblina do aparelho de ar
condicionado?
• A divisão onde está o aparelho tem um odor
estranho?
• Durante a configuração automática do fluxo de ar,
a ventoinha interna pára ocasionalmente.
• Da unidade exterior sai água ou vapor.
■ Funcionamento Anormal
Será normal quando ... ?
• O aparelho de ar condicionado não funciona.
• O aparelho de ar condicionado faz muito
barulho enquanto funciona.
• O aparelho de ar condicionado não arrefece
eficazmente.
21
Wir danken Ihnen für den Kauf unseres PanasonicRaumklimageräts.
INHALT
:Besondere Merkmale .............................. 21
:Sicherheitshinweise................................ 22
■ Montagehinweise
■ Wichtige Betriebshinweise
:Bezeichnung Der Geräteteile ........... 23~24
■ Innengerät
■ Außengerät
■ Zubehör
■ Fernbedienung
:Betriebsvorbereitungen.......................... 25
■ Innengerät
■ Fernbedienung
:Bedienung .......................................... 25~26
:Einstellen Des Timers ............................. 27
:Komfortbetrieb ........................................ 27
■ SLEEP-Betrieb
■ Sparbetrieb
■ Leistungsbetrieb
:Pflege und Wartung ................................ 28
■ Reinigen des Innengeräts und der
Fernbedienung
■ Reinigen der Grobstaubfilter
■ Reinigen des Frontgitters
■ Feinfilter
■ Kontrollen vor Beginn der Kühlsaison
■ Längere Nichtbenutzung des Klimageräts
■ Empfohlene Inspektionen
:Nützliche Hinweise .................................. 29
:
Tips Zu Betrieb Und Energieeinsparung .....
29
:Störungssuche ........................................ 30
■ Normaler Betrieb
■ Betriebsstörungen
■ Wenden Sie Sich direkt an Ihren Händler
Hinweis:
Bevor Sie Ihr Klimagerät in Betrieb nehmen, sollten
Sie diese Betriebsanleitung aufmerksam durchlesen
und für den späteren Bedarf aufbewahren.
BESONDERE MERKMALE
● Leuchttaste
Einfachere Bedienung im Dunkeln.
(Siehe Seite 24)
● Automatikbetrieb
Optimale Betriebsart anhand der Raumtemperatur
ermitteln.
(Siehe Seite 25)
● Nachtbetrieb
Verhindert, daß der Raum zu warm oder zu kalt wird,
während Sie schlafen.
(Siehe Seite 27)
● Sparbetrieb
Verringert die Stromaufnahme.
(Siehe Seite 27)
● Turbobetrieb
Sorgt für ein schnelles Erreichen der gewünschten
Raumtemperatur.
(Siehe Seite 27)
● Abnehmbares Frontgitter
Zum schnellen und einfachen Reinigen. (waschbar)
(Siehe Seite 28)
● Catechin-Feinfilter
Dient der Abscheidung von Staub, Tabakrauch und
feinste Partikel aus der Raumluft. Zudem lässt sich der
Verbreitung von Viren und Bakterien, die in diesem Filter
abgeschieden werden, vorbeugen.
(Siehe Seite 28)
● Solar-Auffrisch- und Deodorierfilter
Zur Entfernung von unangenehmen Gerüchen und
Deodorierung der Raumluft.
(Siehe Seite 28)
● Automatischer Wiederanlauf
Zur automatischen Wiederinbetriebnahme des Geräts
nach einem Netzausfall.
(Siehe Seite 29)
● Blaue Beschichtung Des Verflüssigers im
aussengerät
Diese hochmoderne Beschichtung dient dem
Korrosionsschutz.
! Warhinweise
1) Bei Beschädigung des Netzkabels muss das Kabel
durch den Hersteller, seinen Kundendienst oder eine
entsprechend autorisierte Person ausgewechselt
werden, um Verletzungsgefahren zu vermeiden.
2) Im Falle von Störungen, die einer Reparatur bedürfen,
wenden Sie sich bitte an Ihren Händler oder den
Kundendienst. Führen Sie auf keinen Fall
Reparaturen selbst aus!
3) Im Notfall ist die Stromzufuhr zum Gerät wie folgt zu
unterbrechen: Ziehen Sie den Netzstecker aus der
Steckdose oder betätigen Sie den
Sicherungsautomaten bzw. einen anderen, eventuell
vorhandenen Trennschalter.
! Achtung
Der A-bewertete Schalldruckpegel dieses Geräts beträgt
entsprechend den Prüfbedingungen nach JIS C 9612
weniger als 70 dB(A). Dabei gelten folgende
Meßbedingungen:
Das Gerät arbeitet bei maximaler Kühlleistung,
die Meßentfernung vom Gerät beträgt 1 m.
HINWEISE
Der maximale Schalldruckpegel beträgt 70 dB(A) oder
weniger gemäß “Maschinenlärm-lnformationsverordnung
3. GSGV, 18. Januar 1991”.
BESCHEINIGUNG
Es wird bestätigt, daß der im Gerät enthaltene
Druckbehälter einer Druckprüfung nach §9 der
Druckbehälterverordnung und vom Sachkundigen einer
Abnahmeprüfung unterzogen wurde. Dichtheit und
ordnungsgemäßer Zustand der Kälteanlage gemäß VGB
20 wurden ebenfalls überprüft (siehe Typenschild). Das
Ergebnis der Prüfungen entsprach den gestellten
Forderungen.
(H.S. LIM) (SILVARAJU)
Produktionsleiter Sachkundiger
22
DEUTSCH
SICHERHEITSHINWEISE
Bitte lesen Sie die folgenden Sicherheitshinweise vor
der Inbetriebnahme sorgfältig durch!
● Eine unsachgemäße Bedienung infolge Mißachtung
der Bedienungsanleitung kann zu Verletzungen und
Beschädigungen führen. Um dies zu vermeiden, sind
die folgenden Hinweise unbedingt zu beachten.
● Die Warnhinweise untergliedern sich entsprechend
ihrer Wichtigkeit wie folgt:
! Vorsicht
Dieser Hinweis deutet darauf hin, daß seine
Nichtbeachtung zu schweren Verletzungen oder
gar zum Tod führen kann.
! Achtung
Dieser Hinweis deutet darauf hin, daß seine
Nichtbeachtung zu Verletzungen oder zu
Beschädigungen führen kann.
● Bei den folgenden Symbolen handelt es sich um
Verbote bzw. Gebote:
Dieses Symbol auf weißem Grund weist darauf hin,
daß eine bestimmte Tätigkeit NICHT
durchgeführt werden darf.
Diese Symbole auf schwarzem Grund weisen
darauf hin, daß bestimmte Tätigkeiten
durchgeführt werden MÜSSEN.
■ Montagehinweise
! Vorsicht
● Das Raumklimagerät muß geerdet
werden.
Eine unsachgemäße Erdung kann
elektrische Schläge zur Folge haben.
● Gerät nicht in
explosionsgefährdeten Bereichen
installieren.
Wenn sich in direkter Nähe des
Klimageräts brennbare Gase
ansammeln, könnten diese durch das
Gerät entzündet werden.
● Die Kondensatleitung muß korrekt
angeschlossen sein.
Bei unsachgemäß angeschlossener
Kondensatleitung kann
Kondenswasser austreten.
● Nehmen Sie den Ein- und Ausbau bzw. die
Neuinstallation dieses Geräts nicht selbst vor.
Eine unsachgemäße Installation kann elektrische
Schläge oder Brände verursachen oder dazu
führen, daß Wasser aus dem Gerät tropft.
! Achtung
■ Wichtige Betriebshinweise
! Vorsicht
Dieses Symbol warnt vor schweren Verletzungen mit
eventueller Todesfolge.
● Benutzen Sie keinen Mehrfachstecker.
● Das Klimagerät darf nicht mit nassen oder
feuchten Händen bedient werden.
● Das Netzkabel darf nicht beschädigt oder
verändert werden.
● Versuchen Sie nicht, den Finger oder andere
Gegenstände in die Geräte zu stecken.
● Gerät nicht über längere Zeiträume direkt einem
kalten Luftstrom aussetzen.
● Es darf nur das vorgeschriebene Netzkabel
verwendet werden.
● Bei Störungen (z. B. verbrannter Geruch) ist das
Klimagerät auszuschalten und der Netzstecker
zu ziehen.
! Achtung
Dieses Symbol warnt vor Verletzungen.
●
Das Klimagerät darf nicht mit Wasser gereinigt werden.
● Gerät nicht für andere Zwecke (z.B.
Konservierung) verwenden.
● Stellen Sie keine Verbrennungsgeräte im
direkten Zuluftstrom des Klimageräts auf.
● Ne pas s’asseoir ou placer quoi que ce soit sur
l’appareil d’extérieur.
●
Netzschalter vor jeder Reinigung auf AUS stellen.
● Lüften Sie den Raum regelmäßig.
● Nach längerer Verwendung die
Montagehalterung auf Schäden kontrollieren.
● Unterbrechen Sie die Stromversorgung, wenn
das Gerät längere Zeit nicht benutzt wird.
OFF
OFF
OFF
23
BEZEICHNUNG DER GERÄTETEILE
■ Innengerät
1 Frontgitter
2 Lufteinlaß
3 Luftauslaß
4 Luftlenklamelle für vertikale Zuluftrichtung
5 Manuelle Luftlenklamelle für horizontale Zuluftrichtung
6 Anzeigetafel
1 Funktionstaste für Betrieb ohne Fernbedienung
(Innengerät bei geöffnetem Frontgitter)
2 Anzeige “Sparbetrieb”–GRÜN
3 Anzeige “Leistungsbetrieb”–ORANGE
4 Netzanzeige – GRÜN
5 Anzeige “SLEEP-Betrieb”–ORANGE
6 Anzeige “Timer-Betrieb”–ORANGE
● Innengerät
(Innengerät bei geöffnetem Frontgitter)
1 Frontgitter 2 Grobstaubfilter 3 Feinfilter
■ Außengerät
CU-2C18BKP5G
CU-2C19BKP5G
CU-2C14BKP5G CU-3C20BKP5G
1 Luftansaugöffnungen
2 Anschlußkasten
3 Netzkabel
4 Rohrleitungen
1
2
3465
2
1
3
1
2
7
3
4
5
6
POWERFULPOWERFULECONOMYECONOMY POWERPOWER
TIMERTIMER
SLEEPSLEEP
POWERFULPOWERFULECONOMYECONOMY POWERPOWER
TIMERTIMER
SLEEPSLEEP
123 654
■ Zubehör
● Fernbedienung
● Mehrsprachiger Aufkleber für Fernbedienung
● Fernbedienungshalter
● Zwei (AAA) R03-Trockenbatterien oder
gleichwertige Batteriendry.
● Feinfilter
C
H
EC
K
TEMP
AUT
UT
O
ON
O
F
F
FAN
AN
AUT
UT
O
RESET
BA
TT
ER
Y
C
LO
C
K
MODE
SLEEP
E
CO
N
O
M
Y
FAN SPEED
AIR
SWIN
G
OFF
C
A
N
C
E
L
ON
S
ET
Step
1
2
3
TIMER
+
P
O
W
E
R
F
U
L
O
F
F
/O
N
AUT
UT
O
DR
DR
YFAN
AN
COOL
COOL
(Solar-Auffrisch-und
Deodorierfilter)
(Catechin-Feinfilter)
5 Kondensatleitung
6 Anschlußkabel
7 Luftauslaß
24
DEUTSCH
BEZEICHNUNG DER GERÄTETEILE
■ Fernbedienung
● Fernbedienungssignal.
• Zwischen der Fernbedienung und dem Klimagerät
dürfen sich keine Hindernisse befinden.
• Maximale Entfernung: 10 m
• Bei Signaleingang ertönt ein kurzer oder ein langer
Piepton.
● Hinweise zur Verwendung der Fernbedienung.
• Lassen Sie die Fernbedienung nicht fallen.
• Die Fernbedienung darf nicht naß werden.
• Manche fluoreszierende Lampen können den
Signalempfang beeinträchtigen. Wenden Sie sich in
diesem Fall bitte an Ihren Fachhändler.
● Einlegen der Batterien
1 Deckel der Fernbedienung ganz hinunterschieben
2 Batterien einlegen
– Auf korrekte Einbaurichtung achten
– Display-Anzeige 12.00 - blinkend
• Stellen Sie nun die aktuelle Uhrzeit ein, um zu
verhindern, daß sich die Batterien zu schnellen
entladen. (CLOCK)
● Hinweise zu den Batterien
•
Die Betriebsdauer der Batterien beträgt etwa ein Jahr.
● Beim Ersetzen der Batterien ist folgendes zu
beachten
• Die Batterien sind jeweils durch zwei neue Batterien
des gleichen Typs zu ersetzen.
• Es sollten keine wiederaufladbaren Ni-Cd-Akkus
verwendet werden.
• Die Batterien sind zu entfernen, wenn das
Klimagerät längere Zeit nicht benutzt wird.
1 Sender
2 Anzeigefeld
3 Taste für Turbobetrieb
4 Tasten zum Einstellen der Raumtemperatur
(leuchttaste)
5 Betriebsarten-Wahltaste
6 Taste für Sparbetrieb
7 Taste für Lamellenschwenkbetrieb
8 Taste für Nachtbetrieb
9 Taste zum Einstellen der Ventilatordrehzahl
0 Reset-Kontakte zum
(Mit spitzem Gegenstand eindrücken, um den
Speicher zu löschen)
! Ein/Aus-Taste
(leuchttaste)
@ Programmiertaste für Einschaltfunktion
# Programmiertaste für Ausschaltfunktion
$ Taste zum manuellen Einstellen der Zuluftrichtung
% Timer-Programmiertaste
^ Timer-Löschtaste
& Zeit- bzw. Timereinstelltasten
* Taste zum Einstellen der Uhrzeit
( Deckel des Fernbedienungsgeräts
CHECK
TEMP
AUTO
ON
OFF
FAN
AUTO
RESET CLOCK
MODE
SLEEP
ECONOMY
FAN SPEED
AIR SWING
OFF
CANCEL
ON
SET
1
2
3
TIMER
OFF/ON
POWERFUL
AUTO
MANUAL
#
!
$
%
^
$
*
&
3
5
8
7
9
0
6
4
(
2
1
AUTO DRYFANCOOL
CHECK
AUTO
OF
AUTOHEAT
DRY
FANCOOL
FAN
AUTO
AUTO
RESET
CLOCK
AIR SWING
OFF
CANCEL
1
2
3
TIMER
PO
W
ERFU
L
AUTO
MANUAL
ECONOMY
SLE
ON
SET
FAN SPEED
MODE
2
1
1.5V
1.5V
25
BETRIEBSVORBEREITUNGEN
■ Innengerät
1 Stellen Sie den Messerschalter auf “ON”.
2 Öffnen Sie das Frontgitter
3 Entnehmen Sie den Grobstaubfilter
4 Luftreinigungsfilter einsetzen
5 Setzen Sie den Grobstaubfilter ein
6 Schließen Sie das Frontgitter
■ Fernbedienung
– Zur Einstellung der aktuellen Uhrzeit
1 Taste 1 drücken.
2 Nun Taste 2 drücken, um die Zeit vor- oder
zurückzustellen.
3 Taste 1 erneut drücken.
Die eingestellte Zeit erscheint leuchtend im Display.
BEDIENUNG
■ Inbetriebnahme
• Taste 1 drücken.
• Die grüne Netz-Anzeigeleuchte (POWER) am
Raumgerät leuchtet auf.
• Zum Abschalten Taste erneut drücken.
■ Einstellmodus
• Taste 2 drücken, um die Auswahl vorzunehmen:-
AUTO – Automatikbetrieb
COOL – Kühlbetrieb
DRY – Betriebsart Mildes Trocknen
FAN – Luftumwälzbetrieb
■ Einstellen der Temperatur
• Taste 3 drücken, um die Temperatur zu erhöhen bzw. zu
senken.
• Die Solltemperatur kann zwischen 16°C ~ 30°C
eingestellt werden.
• Empfohlene Temperaturbereiche:
• Bei AUTO-Betrieb Taste 3 drücken, um die Auswahl
vorzunehmen:-
• Regelung auf 2°C über Standardtemperatur.
• Regelung auf Standardtemperatur.
• Regelung auf 2°C unter Standardtemperatur.
● Standardtemperatur
• In der Betriebsart AUTO (Automatik) ermittelt das
Klimagerät die aktuelle Raumtemperatur und stellt
entsprechend die erforderliche Betriebsart ein (Kuhlen,
Mildes Trocknen).
• Eine einmal gewählte Betriebsart verändert sich nicht
mehr.
CHECK
AUTO
AUTO HEAT DRY FANCOOL
FAN
AUTO
RESET CLOCK
FAN SPEED
AIR SWING
OFF
CANCEL
ON
SET
1
2
3
TIMER
AUTO
MANUAL
1
2
6
2
4
5
3
OFF
ON
HEAT
DRY
FANCOOL
CHECK
TEMP
AUTO
AU
T
UTO
FA
N
AN
AU
T
UTO
R
ESET CLO
C
K
AIR SWING
OFF
CANCEL
1
2
3
TIMER
OFF/ON
POW
ERFUL
AUTO
MANUAL
ECONOMY
SLEEP
ON
SET
FAN SPEED
MODE
2
3
5
1
6
4
Standard-
temperatur
25°C
22°C
Raumtemperatur
23°C
Betrieb
Kühlen
Heizen
1
Messerschalter
COOL 26°C ~ 28°C
1°C ~ 2°C
DRY unter
Raumtemperatur
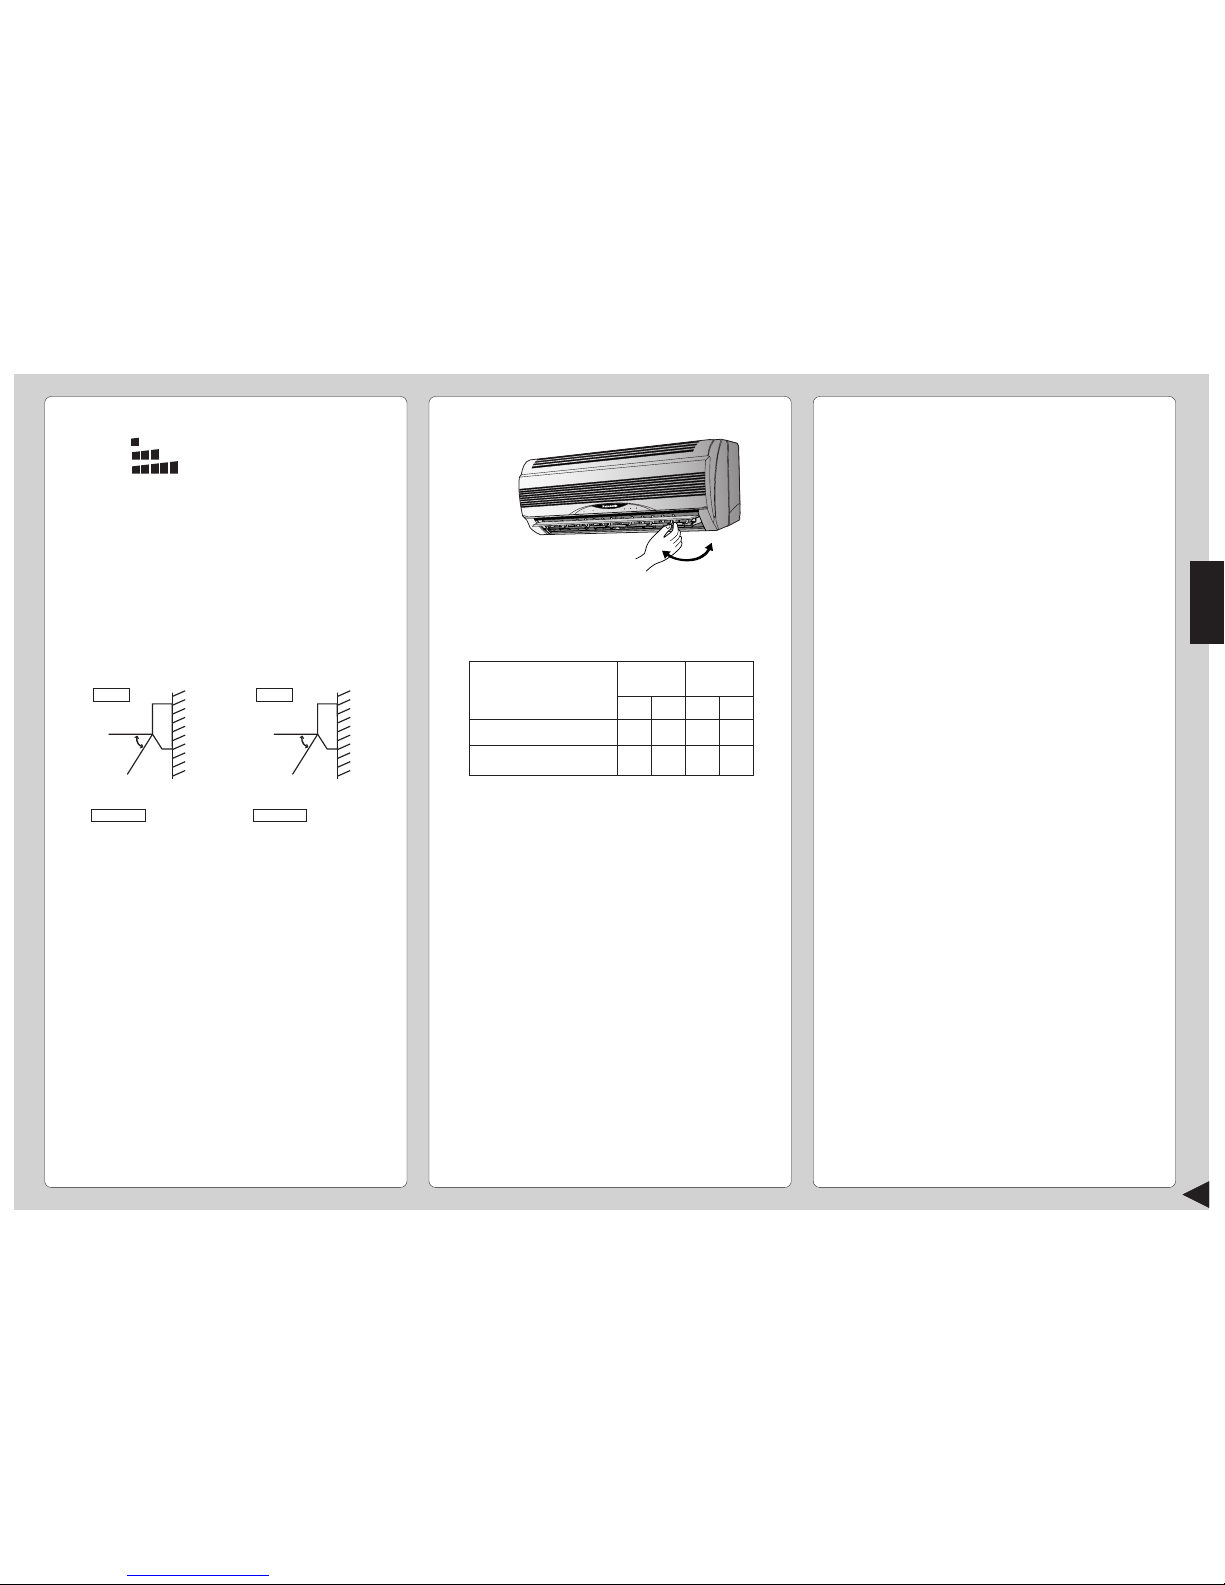
26
DEUTSCH
● Hinweise zu den Betriebsarten
COOL – Kühlbetrieb
• Zur Regelung der Raumtemperatur auf Ihr
bevorzugtes Komfortniveau.
AUTO – Automatikbetrieb
• Optimale Betriebsart anhand der Raumtemperatur
ermitteln.
• Im Automatikbetrieb erfolgt keine Temperaturanzeige
auf der Fernbedienung.
DRY – Betriebsart Mildes Trocknen
• Sehr schonender Kühlbetrieb mit anschließender
Entfeuchtung. Die Raumtemperatur wird dadurch
nicht verringert.
• In der Betriebsart Mildes Trocknen läuft der Ventilator
mit niedriger Drehzahl.
FAN – Luftumwälzbetrieb
• Sobald die Raumtemperatur den eingestellten Wert
erreicht hat, schaltet das Gerät auf reduzierten
Luftstrom, bis die Raumtemperatur den eingestellten
Wert um 2°C unterschreitet (sinnvoll bei Kombination
mit einer Heizung).
■ Einstellung der Ventilatordrehzahl
• Taste 4 drücken, um die Auswahl vorzunehmen:
FAN – Niedrige Drehzahl
FAN – Mittlere Drehzahl
FAN – Hohe Drehzahl
AUTO
FAN – Automatische Drehzahl
Bei eingestellter Ventilatorautomatik wird
die Ventilatordrehzahl automatisch an
die jeweils herrschenden Bedingungen
angepaßt. Im Kühlbetrieb wird der
Ventilator gelegentlich abgeschaltet.
■
Einstellung der senkrechten Luftströmungsrichtung
•
Taste 5 oder 6 drücken, um die Auswahl
vorzunehmen:-
■
Einstellung der waagerechten Luftströmungsrichtung
● Verwenden Sie dieses Klimagerät unter folgenden
Bedingungen:
● Hinweise
• Wenn das Gerät für längere Zeit nicht benutzt wird,
sollte die Stromversorgung abgeschaltet werden.
Ansonsten werden auch dann etwa 2,5 W Strom
verbraucht, wenn das Innengerät mit der
Fernbedienung abgeschaltet wurde.
• Wenn das Gerät abgeschaltet und sofort wieder
eingeschaltet wird, geht es erst nach 3 Minuten
wieder in Betrieb.
DBT:
Trockenkugeltemperatur
WBT:
Feuchtkugeltemperatur
Höchsttemperatur
Mindesttemperatur
DBT
32
16
WBT
23
11
DBT
43
16
WBT
26
11
Kühlen Heizen
(°C)
MANUAL
Es sind fünf
Einstellungsstufen von
14° ~ 36° wählbar.
Automatisches
Auf/Abschwenken
MANUAL
Es sind fünf
Einstellungsstufen von
0° ~ 61° wählbar.
36°
Automatisches
Auf/Abschwenken
COOL/ DRY
Kühl-/Entfeuchtungsbetrieb
AUTO
FAN
Gebläsebetrieb
AUTO
61°
• Die horizontale Zuluftrichtung wird
von Hand am Gerät eingestellt.

27
EINSTELLEN DES TIMERS
Vor dem Programmieren des Timers muß die aktuelle
Uhrzeit korrekt eingestellt werden. Der Timer kann nicht
programmiert werden, wenn die Zeitanzeige blinkt.
■ Funktion des Einschalt-Timers (ON-TIMER)
Zur automatischen Inbetriebnahme des Klimageräts.
• Taste 1 drücken, um Betrieb zu aktivieren.
• Taste 2 drücken, um Zeit zu erhöhen bzw. zu
verringern.
• Taste 3 drücken.
• Zur Deaktivierung dieser Betriebsart Taste 4 drücken.
■ Funktion des Ausschalt-Timers (OFF-TIMER)
Zum automatischen Abschalten des Klimageräts.
• Taste 5 drücken, um Betrieb zu aktivieren.
• Taste 2 drücken, um Zeit zu erhöhen bzw. zu
verringern.
• Taste 3 drücken.
• Zur Deaktivierung dieser Betriebsart Taste 4 drücken.
● Funktionsdetails Timerbetrieb
• Bei Programmierung des Einschalt-Timers geht das
Gerät bereits vor Erreichen der eingestellten Zeit in
Betrieb, um die gewünschte Raumtemperatur bis zu
dem eingestellten Zeitpunkt herzustellen.
• Bei programmiertem Einsschalt-Timer geht das Gerät
täglich zur gleichen Zeit in Betrieb.
• Die aktuelle Uhrzeit wird nicht angezeigt, wenn der
Timer programmiert wurde.
• Bei gleichzeitiger Verwendung beider Timer leuchtet
die TIMER-Anzeigeleuchte am Raumgerät weiter,
nachdem das Gerät durch den Ausschalt-Timer
abgeschaltet wurde.
KOMFORTBETRIEB
■ SLEEP-Betrieb
Zur komfortablen Raumtemperatur-Regelung
während des Schlafs.
• Taste 6 drücken.
• Die SLEEP-Anzeigeleuchte am Raumgerät leuchtet
auf.
• Um diese Betriebsart zu beenden, ist die Taste
erneut zu drücken.
● Funktionsdetails SLEEP-Betrieb
• Sobald die Raumtemperatur den eingestellten Wert
erreicht hat, schaltet das Gerät automatisch auf
reduzierten Luftstrom.
• Die Dauer des Nachtbetriebs beträgt 8 Stunden.
• Wenn diese Funktion gleichzeitig mit dem Timer
verwendet wird, hat der Timer Vorrang.
■ Sparbetrieb
Im Sparbetrieb wird der Stromverbrauch
herabgesetzt.
Verwenden Sie bitte diese Betriebsart, sobald die
Raumtemperatur den gewünschten Wert erreicht hat.
• Drücken 7.
* Sparbetrieb-Anzeigeleuchte (grün) am Raumgerät
leuchtet auf,
• Um diese Betriebsart zu beenden, ist die Taste
erneut zu drücken.
■ Leistungsbetrieb
Zum schnellen Erreichen des Einstellwerts.
• Drücken 8.
* Leistungsbetrieb-Anzeigeleuchte (orange) am
Raumgerät leuchtet auf.
* Der Turbobetrieb ist nur 15 Minuten lang aktiv.
• Um diese Betriebsart zu beenden, ist die Taste
erneut zu drücken.
●
Funktionsdetails Sparbetrieb / Leistungsbetrieb
• Spar- und Turbobetrieb können nicht gleichzeitig
eingestellt werden.
• Die Änderungen der Temperatur und der
Ventilatordrehzahl erfolgen automatisch.
• Im Display der Fernsteuerung wird keine Änderung
angezeigt.
• Bei Betätigung der SLEEP- oder BetriebsmodusTaste wird die Einstellung “Sparbetrieb” oder
“Leistungsbetrieb” storniert.
• Turbo-und Sparbetrieb stehen im Umluftbetrieb
nicht zur Verfügung.
AUTO
AUTO HEAT DRY FANCOOL
FAN
AUTO
MODE
SLEEP
ECONOMY
FAN SPEED
AIR SWING
OFF
CANCEL
ON
SET
1
2
3
TIMER
OFF/ON
POWERFUL
AUTO
MANUAL
3
6
4
1
7
5
2
8
Zeit
Temperaturerhöhung
um ca. 0,5°C.
Temperatur
Nachtbetrieb
wird
eingeschaltet.
Beginn der
Temperaturverschiebung.
0 bis 1 stunde
← 1 stunde →
Temperaturerhöhung um ca.
0,5°C.
• Gerät geht im SLEEPModus auf Kühl- bzw.
Betriebsart Mildes Trocknen,
um eine zu starke
Abkühlung zu vermeiden.
E
i
n
g
e
s
t
e
l
l
t
e
t
e
m
p
e
r
a
t
u
r
Nach etwa 8-stündigem SLEEP-Betrieb
schaltet das Gerät automatisch ab.
Ventilatordrehzahl
Extrem gering
Sparbetrieb
COOL / DRY
Temperatur
0,5°C über
Einstelltemperatur
COOL,DRY,
15 min. Vorlauf
AUTO
Ventilatordrehzahl
Superhoch
Leistungsbetrieb
COOL / DRY
Temperatur
3°C unter
Einstelltemperatur
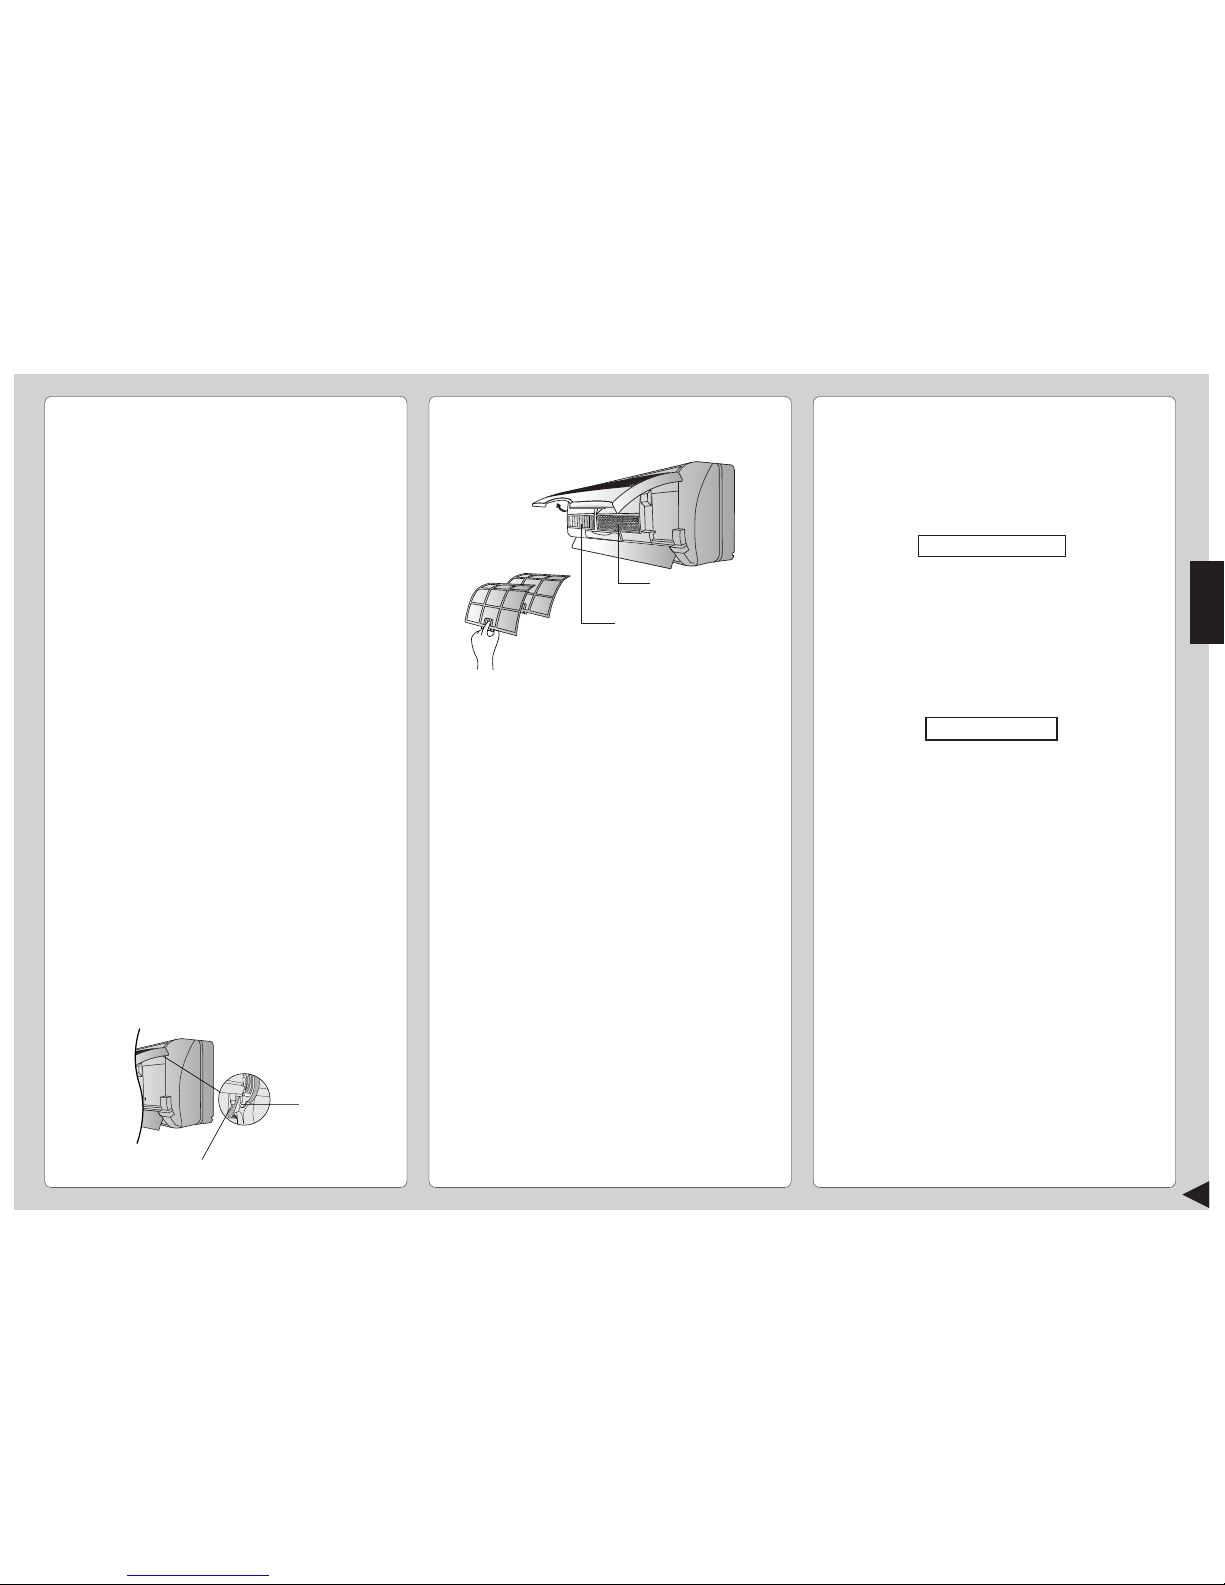
28
DEUTSCH
■ Kontrollen vor Beginn der Kühlsaison
● Ist die ausgeblasene Luft kalt?
Eine normale Funktion liegt vor, wenn 15 Minuten nach
Betriebsbeginn folgende Temperaturdifferenz zwischen der
Lufteinlass und Luftauslassöffnung feststellbar ist:-
● Sind Lufteintritt und Luftaustritt blockiert?
● Sind die Batterien der Fernbedienung erschöpft?
Wenn die Anzeige auf dem Display der Fernbedienung
schwach erscheint, sind die Batterien auszuwechseln.
■ Längere Nichtbenutzung des Klimageräts
1 Zur inneren Trocknung des Raumgeräts ist das System 2
- 3 Stunden lang unter folgenden Bedingungen zu
betreiben:-
2 Den Betrieb mit der Fernbedienung stoppen und den
Messerschalter in Ausschaltstellung bringen.
Hinweis: Wenn das Gerät nicht per Fernbedienung
ausgeschaltet wird, beginnt es zu arbeiten, wenn der
Messerschalter auf “ON” gestellt wird (bedingt durch die
automatische Wiedereinschaltfunktion).
3 Nehmen Sie die Batterien aus der Fernbedienung.
■ Empfohlene Inspektionen
• Nach Betrieb über mehrere Jahreszeiten verschmutzt das
Gerät und seine Leistung lässt nach. Ein verschmutztes
Gerät kann je nach Einsatzbedingungen einen
unangenehmen Geruch abgeben, zudem besteht die
Gefahr der Verunreinigung des Entfeuchtungssystems mit
Staub. Neben der regelmäßigen Reinigung sollte daher
eine saisonale Inspektion durchgeführt werden (wenden
Sie sich bitte an Ihren Vertragshändler).
PFLEGE UND WARTUNG
■
Reinigen des Innengeräts und der Fernbedienung
•
Wischen Sie das Klimagerät mit einem weichen, trockenen
Tuch ab.
•
Gerät nur mit handwarmem Wasser (max. 40°C) reinigen.
Keine flüssigen Reinigungsmittel verwenden.
■ Reinigen der Grobstaubfilter
(Es wird empfohlen, die Grobstaubfilter alle 2 Wochen zu
reinigen, wenn das Gerät in einer staubigen Umgebung
eingesetzt wird, da sich bei verstaubten Filtern der
Wirkungsgrad des Geräts verringert.).
1
Entfernen Sie den Staub mit einem Staubsauger.
2
Waschen Sie die Rückseite des Filters mit Wasser ab.
3
Stark verschmutzte Filter können Sie mit Wasser und Seife
oder einem milden Haushaltsreiniger abwaschen.
4
Lassen Sie die Filter trocknen, und setzen Sie sie wieder ein.
Achten Sie darauf, daß der Hinweis “FRONT” nach vorne zeigt.
*
Beschädigte Grobstaubfilter.
Ersatzfilter erhalten Sie bei Ihrem Klimageräte-Fachhändler
unter der Bestellnummer: CWD001047
•
Zur Reinigung des Geräts niemals Benzin, Verdünnung,
Scheuerpulver oder mit Lauge bzw. ätzenden Flüssigkeiten
getränkte Lappen verwenden.
■ Reinigen des Frontgitters
(Das Frontgitter ist zum Reinigen abzunehmen).
1
Frontplatte über die waagerechte Stellung hinaus anheben und
herausziehen.
2
Waschen Sie das Frontgitter vorsichtig mit Wasser und einem
Schwamm.
•Üben Sie beim Waschen keinen zu festen Druck auf das
Frontgitter aus, da es sonst brechen könnte.
• Bei Verwendung eines flüssigen
Küchenreinigungsmittels (Neutralreiniger) müssen die
bearbeiteten Flächen anschließend gründlich abgespült
werden.
• Frontplatte des Geräts nicht in direktem Sonnenlicht
trocknen.
3
Zur Montage der Frontplatte diese waagerecht ansetzen, so
dass der vorstehende Teil am Raumgerät mit dem Drehpunkt
übereinstimmt. Frontplatte dann eindrücken.
■ Feinfilter
● Solar-Auffrisch- und Deodorierfilter
• Zur Entfernung von unangenehmen Gerüchen und
Deodorierung der Raumluft.
• Wiederverwendbar
• Mit Staubsauger reinigen, 6 Stunden an der Sonne
trocknen lassen und wieder montieren.
(Empfohlener Zeitabstand: alle 6 Monate)
● Catechin-Feinfilter
• Dieser Filter ist mit Katechin beschichtet, um
Bakterien- bzw. Viruswachstum zu verhindern.
• Wiederverwendbar
• Mit Staubsauger reinigen, dann wieder montieren
(Empfohlener Zeitabstand: alle 6 Monate)
• Es empfiehlt sich, diese Filter alle drei Jahre zu
erneuern. Gebrauchte Filter nicht wiederverwenden.
Wenden Sie sich wegen Ersatzfiltern an Ihren
nächstgelegenen Vertragshändler.
Catechin-Feinfilter Nr: CZ-SF70P
Solar-Auffrisch- und Deodorierfilter. Nr: CZ-SFD70P
• Bei Betrieb des Klimageräts mit verschmutztem Filter
drohen folgende Gefahren:-
– Keine Luftreinigung
– Verminderte Kühlleistung
– Geruchsbelästigung
Zapfen
Vorspringender Teil des Klimageräts
Gebläsebetrieb (FAN)
COOL – mindestens 8°C
Demontage der Luftfilte
Frontplatte
anheben
Solar-Auffrischund Deodorierfilter
Catechin-Feinfilter
2
1
 Loading...