

Page 1
Page 2

WARNING
A
WARNING: To reduca the risk of electric shock do not remove cover or back.
No user-serviceable parts inside. Refer servicing to qualified service personnel.
Ths lightning flash with arrow
head within a triangle is
intended to tell the user that
A
VVARNING; To prevent fire or shock hazard, do not expose this appliance to
rain or moisture.
Read these instructions compietely before operating TV.
Contents are subject to change without notice or obligation.
Copyright 1999 by Matsushita Electric Corporation of America. AN rights reserved.
Unauthorized copying and distribution is a violation of taw.
parts inside the product are a
risk of electric shock to persons.
ES)EIg)ggg[ia
A
The exclamation point within a
triangle is intended to tell the
user that important operating
and servicing instmctions are in
the papers with the appliance.
A
Page 3

Table of Contents
Congratulations.......................................................2
Customer Record....................................................................2
Care and Cleaning..................................................................2
Specifications..........................................................................2
Installation................................................................3
Television Location..................................................................3
Optional Cable Connections
AC Power Supply Cord
Cable / Antenna
Cable Connection....................................................................3
Antenna Connection................................................................3
Optional Equipment Connections
To Audio Amplifier...................................................................4
Audio Adjustments..................................................................4
...................................................
...........................................................
......................................................................
...........................................
Table of Contents
3
3
3
4
Picture In Picture (PIP) Operation
With / Without a VCR and Cable Box
With a VCR - No Cable Box...................................................6
.........................
....................................
Main Menu................................................................7
ACTION Button.......................................................................7
CH/VOL Buttons
Main Menu Feature Chart
...................................................................
.......................................
Special Features....................................................10
Languages
Timer.....................................................................................10
Sleep Timer...........................................................................10
Program Timer......................................................................10
CH CAP (Channel Caption)..................................................11
LOCK
Game Guard Lock and Unlock..............................................12
............................................................................
....................................................................................
10
12
Troubleshooting Chart........................................ 13
5
5
7
8
Page 4

Conor A tula tions
Congratulations
Your new TV features a solid state chassis that is designed to give you many years of
enjoyment. It was thoroughly tested and tuned at the factory for best performance.
Customer Record
The model and serial number of this product are located on the back of the TV. You should note
the model and serial number in the space provided and retain as a permanent record of your
purchase. This will aid in identification in the event of theft or loss. Product registration is
available to U.S. customers at
Care and Cleaning
Screen (Turn TV Off)
Cabinet and Remote Control
O For plastic cabinets and Remote Control, use a soft cloth dampened with water or a mild
□ For wooden cabinets, use a soft cloth and an occasional coat of furniture polish to preserve
□ Do not use benzene, thinner or other petroleum based products.
www.prodreg.com/panasonic.
Model
Number
Serial
Number
• Use a mild soap solution or window cleaner with a soft clean cloth. DO NOT USE
ABRASIVE CLEANERS.
• Avoid excessive moisture and wipe dry.
detergent solution. Avoid excessive moisture and wipe dry.
the finish.
Specifications
Power Source
s
CT-27G34 CT-32G34
CT-36G34
Channel Capability -181
2 Video Input Jacks
2 Audio Input Jacks
To Audio AMP Jack
S-VHS Input Jack
Specifications are subject to change without notice or obligation.
1 Vp-p, 75 Ohm, Phono Jack Type
120V AC, 60Hz
VHF-12; UHF-56; Cable-113
500mV RMS 47K Ohm
0-2.0V RMS 4.7K Ohm
S-Video (Y-C) Connector
Page 5
Installation
Television Location
This unit is intended to be used with an optional stand or entertainnnent center. Consult your
dealer for available options.
□ Avoid excessive sunlight or bright lights, including reflections.
□ Keep away from excessive heat or moisture. Inadequate ventilation may cause internal
component failure.
□ Fluorescent lighting may reduce remote control transmitting range.
□ Avoid magnetic equipment, including motors, fans, or external speakers.
Optional Cable Connections
Shielded audio and video cables should be used between components. For best results:
n Use 75-ohm coaxial shielded cables.
O Use appropriate input and output connectors that match your component connectors,
n Avoid long cables to minimize interference.
AC Power Supply Cord
CAUTION: TO PREVENT ELECTRIC SHOCK, MATCH WIDE BLADE OF PLUG TO
WIDE SLOT OF AC OUTLET AND FULLY INSERT. DO NOT USE A PLUG WITH A
RECEPTACLE OR OTHER OUTLET UNLESS THE BLADE CAN BE FULLY
INSERTED TO PREVENT BLADE EXPOSURE. FOR SOME MODELS THAT ARE
NON-POLARIZED, THE USE OF AN AC ADAPTOR CONNECTOR MAY
BE NECESSARY.
Installation
41:
Polarized plug
Cable/Antenna
For proper reception, either a cable or antenna connection is required.
Cable Connection
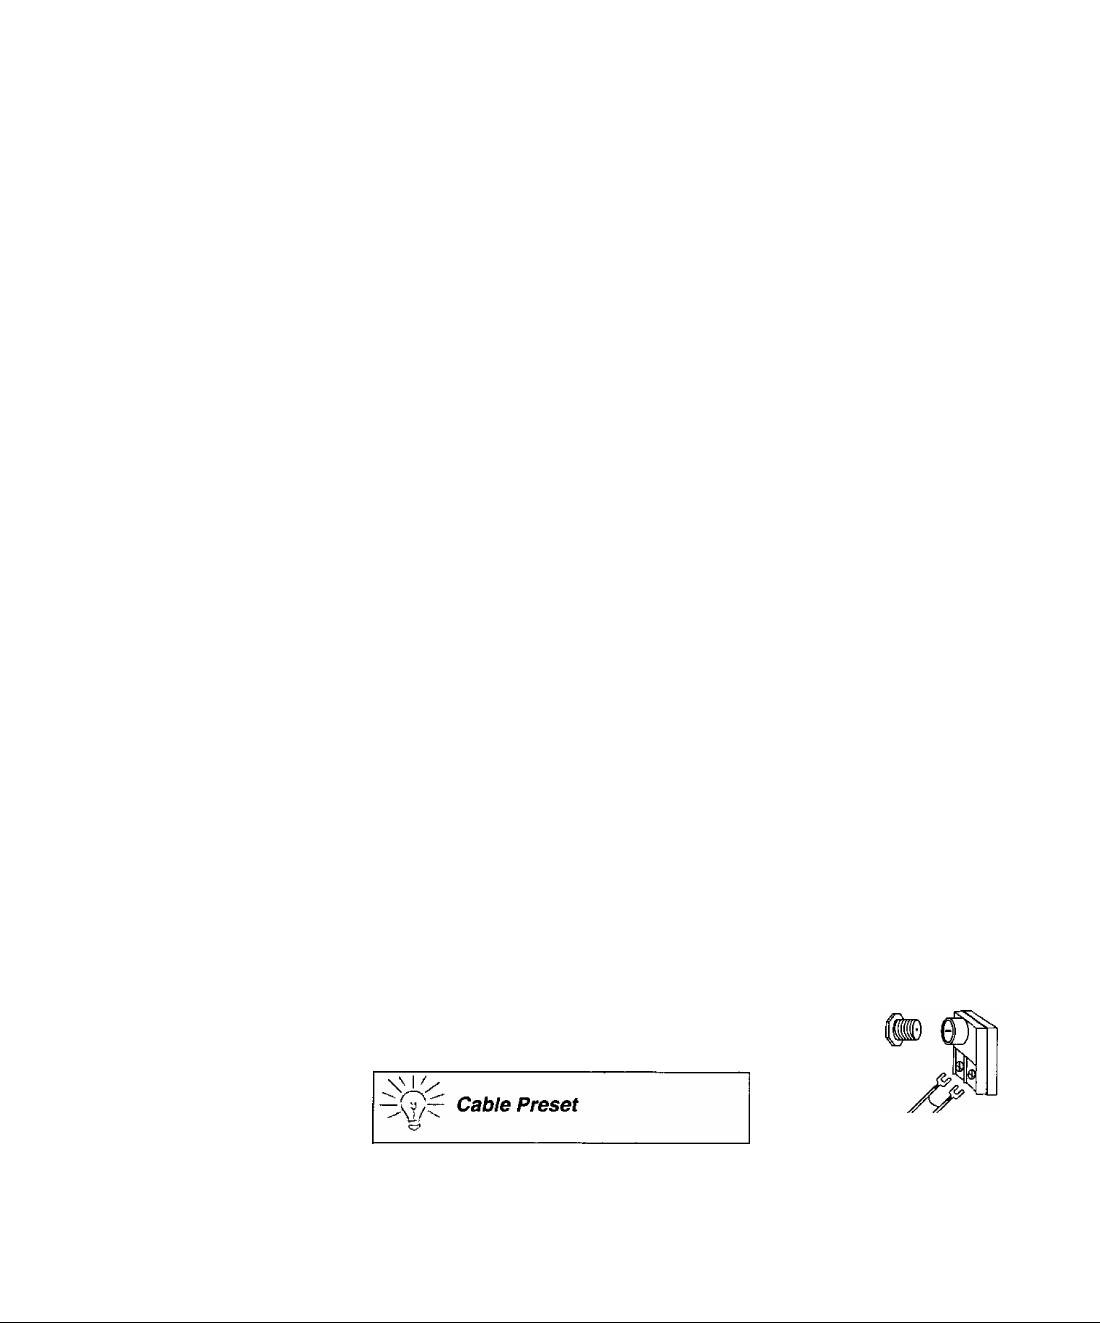
Connect the cable supplied by your local cable company.
Note: A cable converter box may be required for proper reception.
Check with your locai cable company for compatibility
requirements.
Antenna Connection
For proper reception of VHF/UHF channels, an external antenna is required. For
best reception an outdoor antenna is recommended.
Antenna Mode must be set to TV in the SETUP menu. incoming cable from
Cable Mode is preset at the factory.
Antenna users must change to Antenna
Mode in the Setup Menu.
Incoming Cable from
Cable Company
75 Ohm VHF/UHF
on back of TV
Home Antenna
S
Page 6
Installation
Optional Equipment Connections
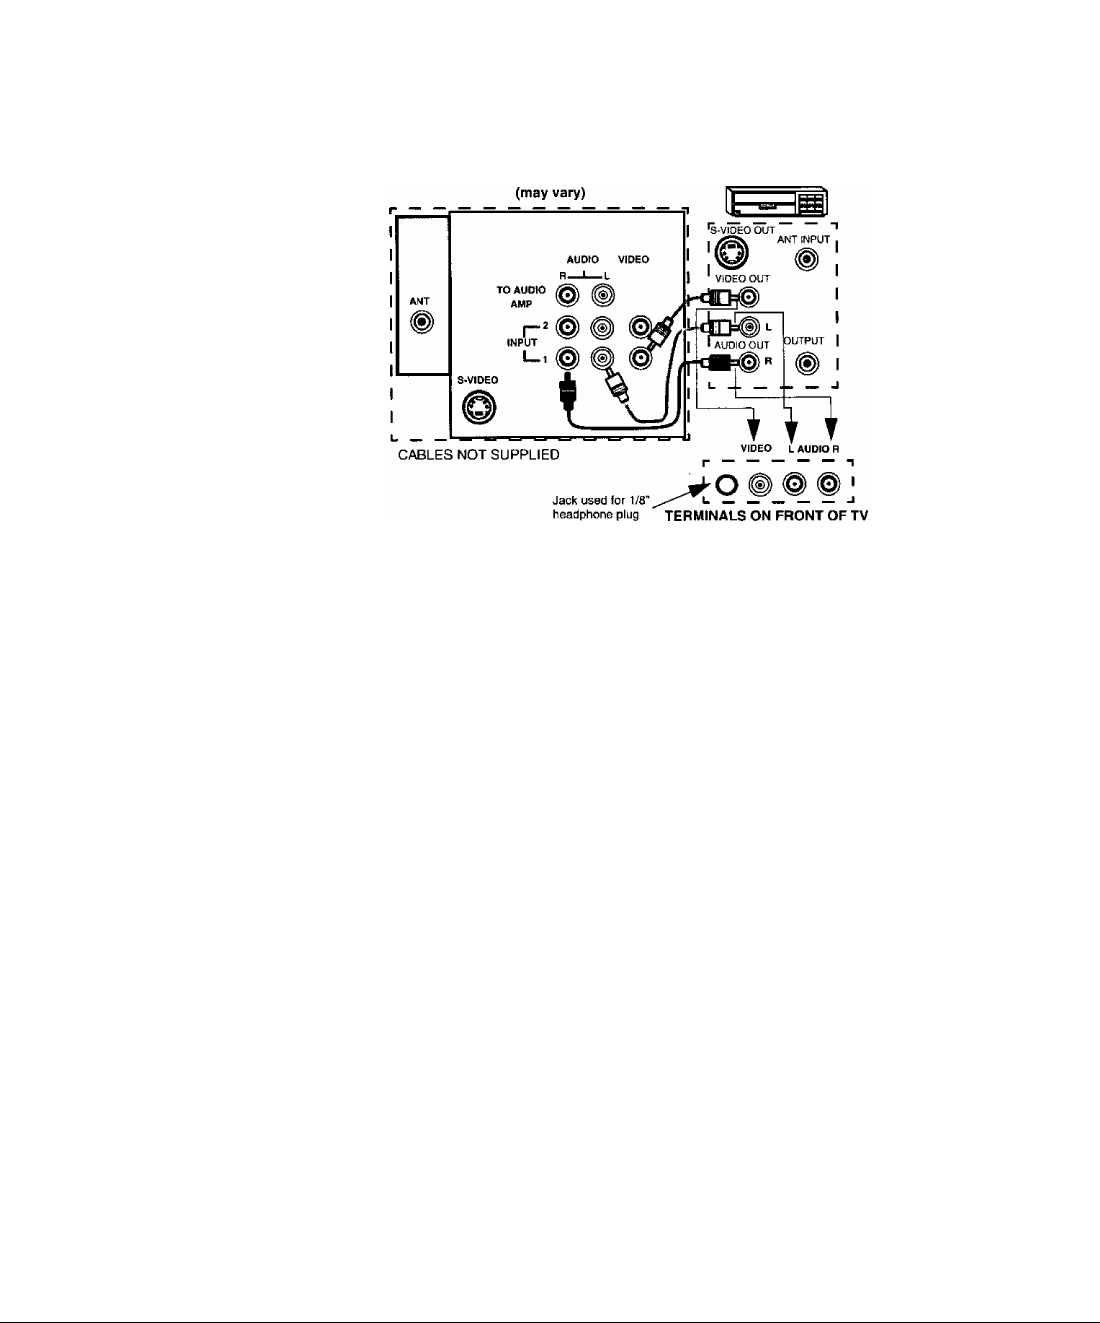
VCRs, video disc players, video game equipment, and DSS equipment can also be connected
to the video inputs. See the optional equipment manual for details.
Procedure
1. Connect equipment as shown to front or rear AudioA/ideo input jacks.
Note: Front and rear AudioA/ideo connectors cannot be operated at the same time.
2. Select the Video mode by pressing TV/VIDEO button.
3. Operate optional equipment as instructed in equipment manual.
Note: If S-VIDEO and VIDEO input are used at the same time, two images will
appear on the TV screen.
TERMINALS ON BACK OF TV
VCR
TO AUDIO AMPlifier
Connect to an external audio amplifier input for listening to a stereo system.
Audio Adjustments
Note: In OFF&FAO the volume is controlled by the external amplifier.
<3
Note: TO AUDIO AMP terminals cannot be connected directly to external speakers.
1. Select TV SPEAKERS ON from AUDIO menu.
2. Set amplifier volume to minimum.
3. Adjust TV volume to desired level.
4. Adjust amplifier volume to match the TV.
5. Select TV SPEAKERS OFF&VAO from AUDIO menu.
6. Volume, mute, bass, treble and balance are now controlled from the TV.
Page 7
Picture In Picture (PIP) Operation
With / Without A VCR And Cable Box
This television includes a two tuner Picture In Picture (PIP) feature. This allows watching two
(2) live broadcasts at the same time without or with an external video source (VCR).
Without A VCR (External Video Source)
Procedure
• Connect incoming cable to antenna (ANT) input on back of TV.
• Press the PIP button on the Remote Control to display the PIP frame.
Note: The audio is for the Main Picture, only.
• Choose channels for the PIP frame by pressing the Remote Control PIP
CHANNEL up/down buttons.
• Choose channels for the Main Picture by pressing the Remote Control
CH up/down buttons or by using the numeric keypad.
With A VCR (External Video Source) And Cable Box
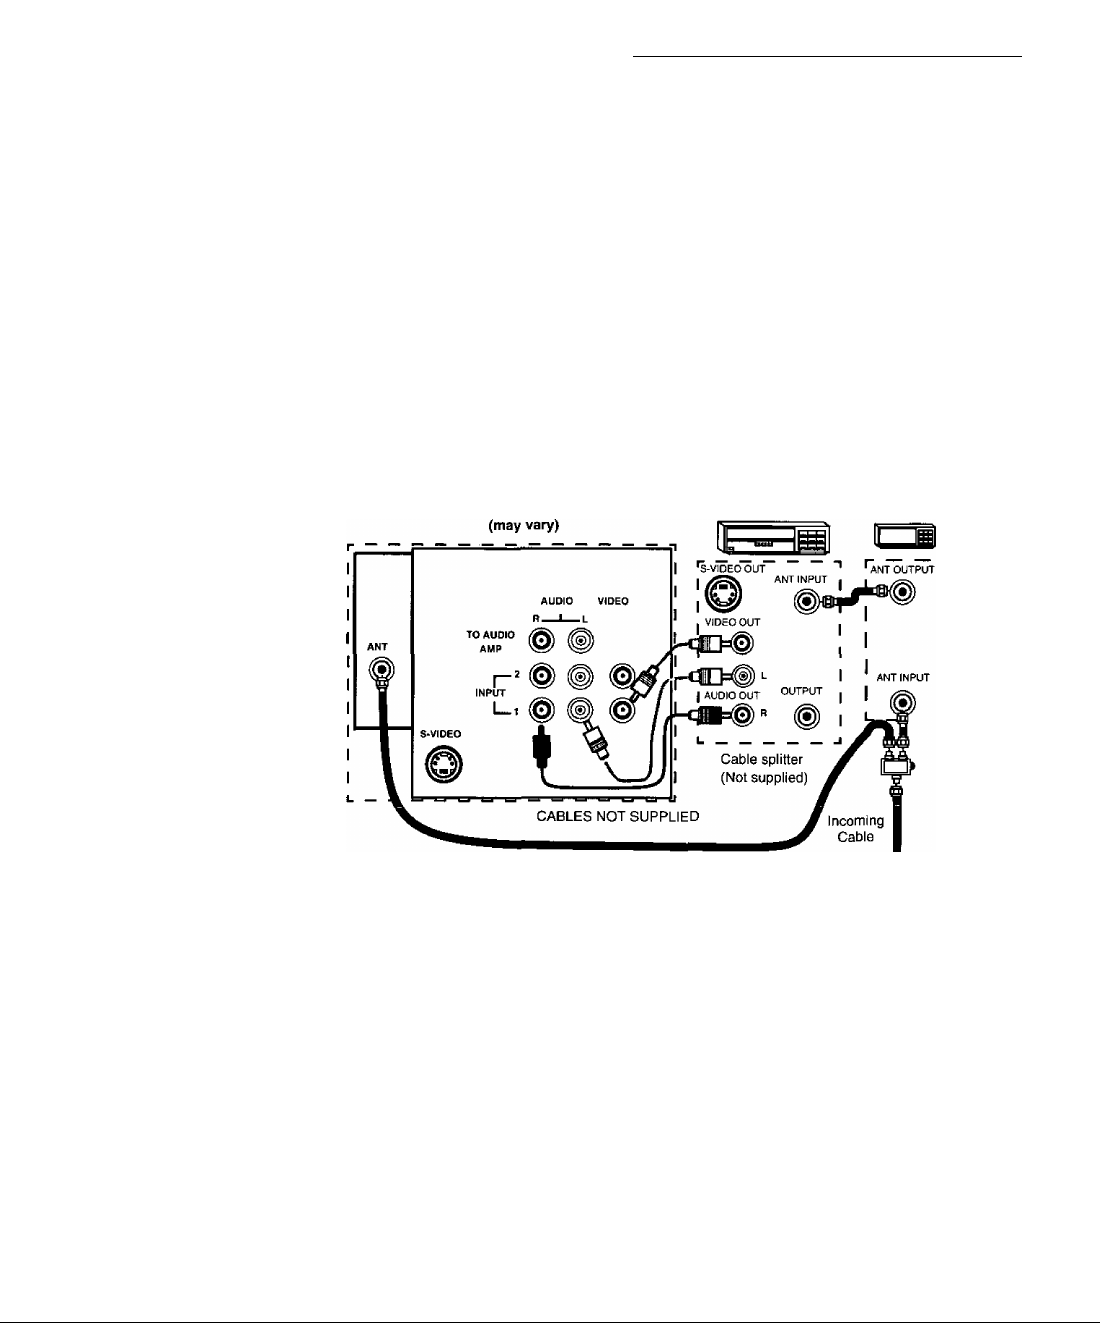
Connect your television to a VCR and Cable Box, as shown.
TERMINALS ON BACK OF TV VCR
Picture In Picture (P\P) Operation
CABLE BOX
I— J
Note:
The Remote Control must be programmed with supplied codes to operate the VCR
and Cable Box. See Programming the Remote Control in the Remote Control Quick
Reference Guide.
Procedure
Press the PIP button on the Remote Control to display the PIP frame.
Note: The audio is from the Main Picture only.
To view scrambled channels through your Cable Box in the PIP frame;
• Press the TV/VIDEO button on the Remote Control to select the same video
input to which your cable box is connected.
• Verify the CABLE BOX and VCR are ON and the VCR tuned to channel 3.
• Choose channels for the PIP frame by pressing the CBL button on the Remote
Control and using the numeric keypad or PIP CHANNEL up/down buttons.
• Choose channels for the Main Picture by pressing the TV button on the Remote
Control and using the numeric keypad or CH up/down buttons.
Note: The SWAP button switches the on screen PIP and Main Picture source. Press the
RECALL button for PIP and Main Picture source status.
_
___
_
rr
Page 8
Picture In Picture (PIP) Operation (Cont.)
Picture In Picture (PIP) Operation (Cont)
With a VCR - No Cable Box
This television includes a two tuner Picture In Picture (PIP) feature. This allows watching two
(2) live broadcasts at the same time without or with an external video source (VCR).
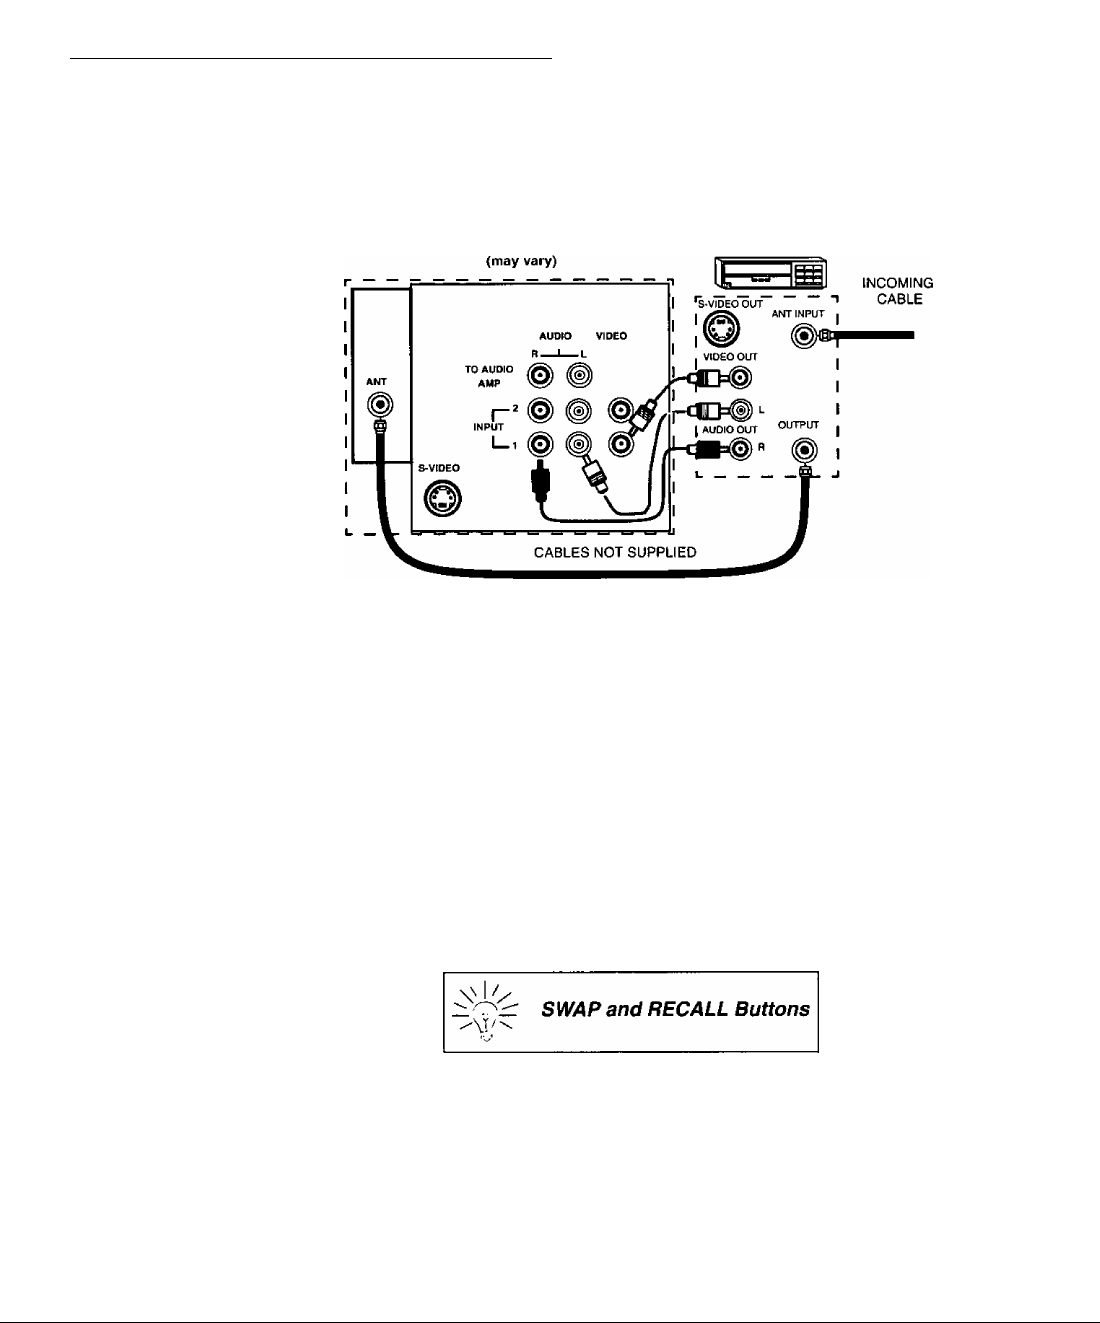
Connect your television to a VCR, as shown
TERMINALS ON BACK OF TV VCR
Note:
The Remote Control must be programmed with the supplied codes to operate the
VCR, See Programming the Remote Control in the Remote Control Quick
Reference Guide.
Procedure
Press the PIP button on the Remote Control to display the PIP frame on screen.
Note: The audio is from the Main Picture only.
To view an external video source in the PIP frame:
• Press the TV/VIDEO button on the Remote Control to select the same video
input to which your VCR is connected.
• Verify the VCR is on.
• Choose channels for the Main Picture by pressing the TV button on the Remote
Control and using the numeric keypad or CH up/down button.
• Choose channels for the PIP frame by pressing the TV button on the Remote
Control and using the PIP Channel up/down buttons.
The SWAP button switches the PIP and
Main Picture source. Press the RECALL
button for on screen PIP and Main Picture
source status.
©
Page 9
Main Menu
ACTION Button
Main Menu
Main Menu
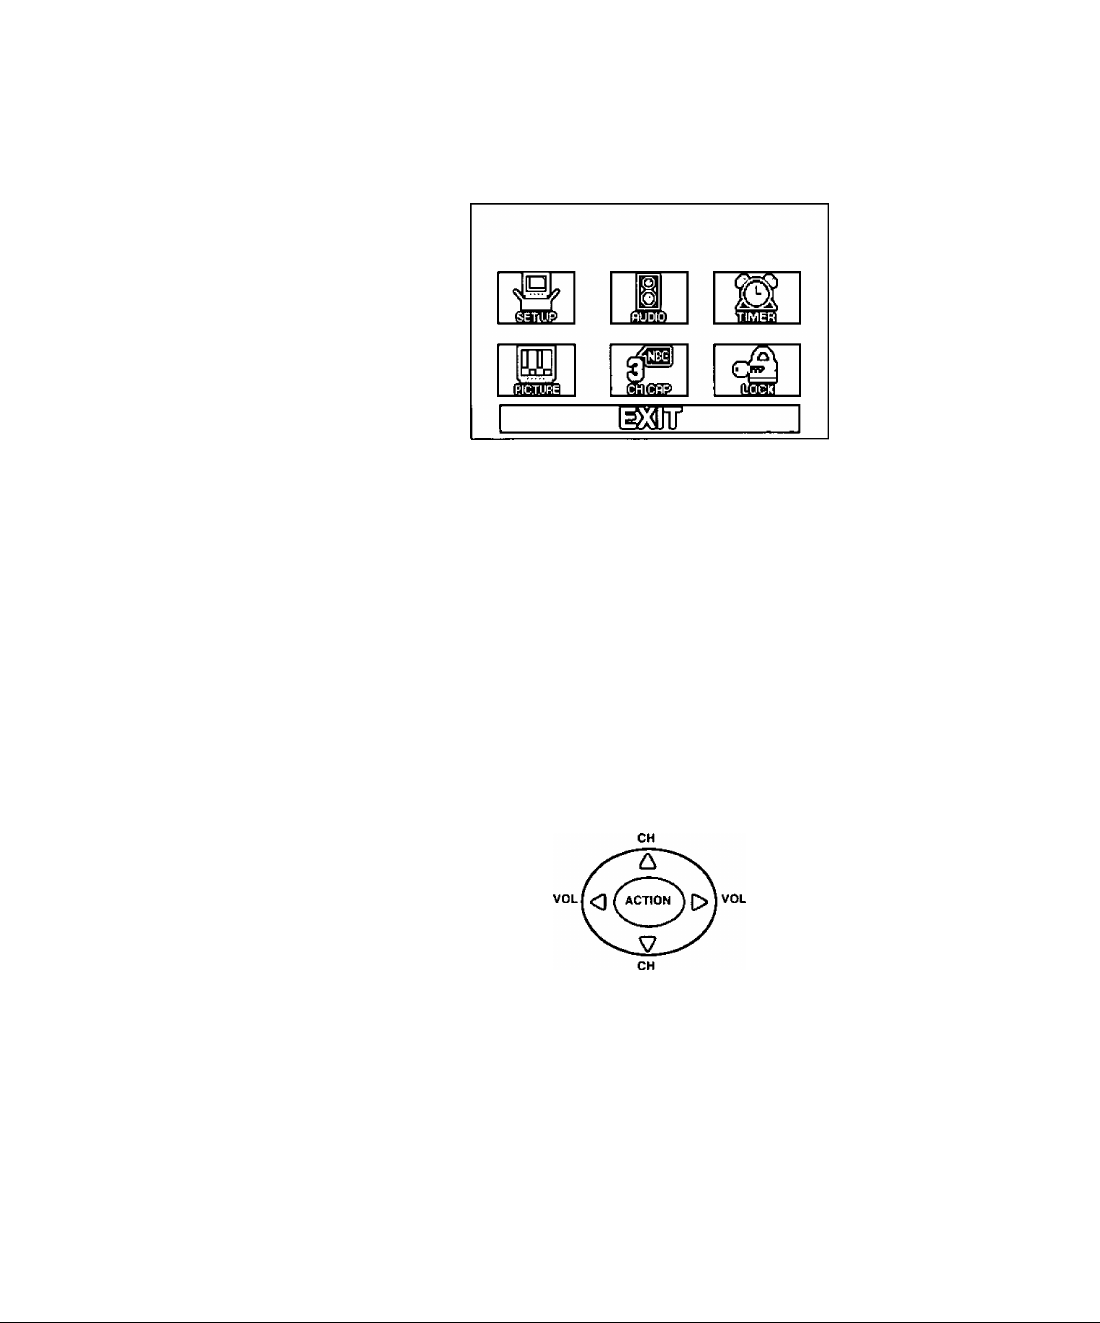
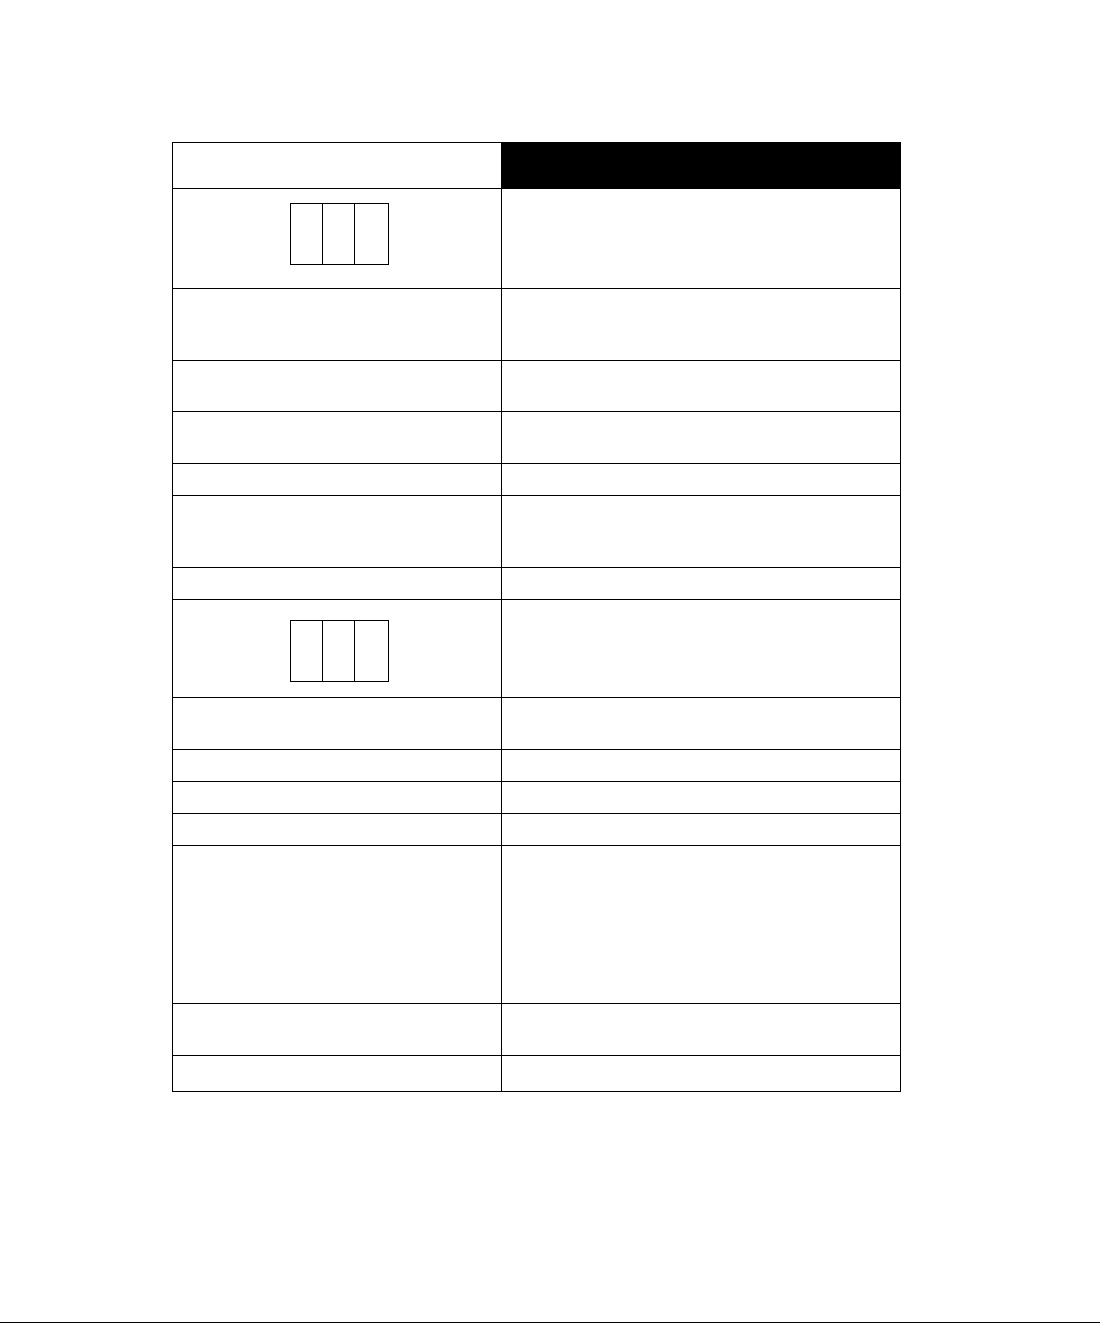
Press the ACTION button to display the Main Menu and submenus. Press the ACTION button
repeatedly to exit.
CH/VOL Buttons
Press the CH (channel) or VOL (volume) buttons to select an icon. Use the CH buttons to
highlight the desired features. Use VOL buttons to select and adjust features.
Remote Control
The Remote Control Quick Reference Guide is located within the package provided with
this TV.
Remote Action / Navigation Buttons
Page 10
Main Menu Feature Chart
Main Menu Feature Chart
asam)
fi
i
SET TIME
ANT
AUTO PROG
MANUAL PROG
CC MODE
LANGUAGES
cwlj)
AUDIO NORM
BASS
TREBLE
BALANCE Emphasize the left/right speaker volume.
MODE
Al SOUND
SURROUND
When entered, TIME will display on screen after
pressing POWER button, RECALL button, or
changing channels.
Choose CABLE or TV to match the signal at your
antenna input.
Automatically program channels with a signal
into memory.
Manually add or delete channels from memory.
Select Cl or C2 for Closed Captioning display. Select
OFF to display closed captioning when MUTE button
is pressed.
Select English, Spanish, or French menu.
Reset BASS, TREBLE and BALANCE to factory
default.
Increase or decrease the bass response.
Increase or decrease the treble response.
Select the audio mode:
□ STEREO - Two channel audio reception.
□ SAP - (Second Audio Program) Tune to the
alternate audio channel if available In your area
(bilingual or descriptive audio).
□ MONO - One channel audio. Use when stereo
signal is weak.
Automatically maintain constant volume between
programs and commercials.
Enhances audio response when listening to stereo.
SETUP
AUDIO
Ll
Page 11
Main Menu Feature Chart (Cent)
Main Menu Feature Chart
asms
TV SPEAKERS
SLEEP TIMER
PROGRAM TIMER
DESCRIfiTION.
AUDIO
Select TV SPEAKERS:
□ ON - TV SPEAKERS operate normally.
□ OFF&VAO (Variable Audio Output) - TV
Speakers off — audio adjustable by TV.
□ OFF&FAO (Fixed Audio Output) - TV
SPEAKERS off — audio adjustable only by the
external amplifier.
TIMER
Program TV to automatically turn off in 30, 60, or
90 minutes. Select NO to turn timer off.
Program TV to automatically turn on and off at
selected time on a selected channel, daily or only one
day.
PICTURE
PICTURE NORM
COLOR
TINT
BRIGHTNESS
PICTURE
SHARPNESS
CHANNEL CAPTION
GAME GUARD
Reset all picture adjustments to factory default
settings.
Adjust desired color intensity.
Adjust natural flesh tones.
Adjust dark areas for crisp detail.
Adjust white areas of picture.
Adjust clarity of outline detail.
CH CAP
Provide labels for up to 30 stations using up to four
characters for each station.
LOCK
Program to prevent video games, cable box, and
VCRs from being viewed.
©
Page 12

Special Features
Special Features
Languages
In SETUP menu, select ENGLISH, ESPAÑOL, or FRANÇAIS to change the menu language.
Timer
Sleep Timer
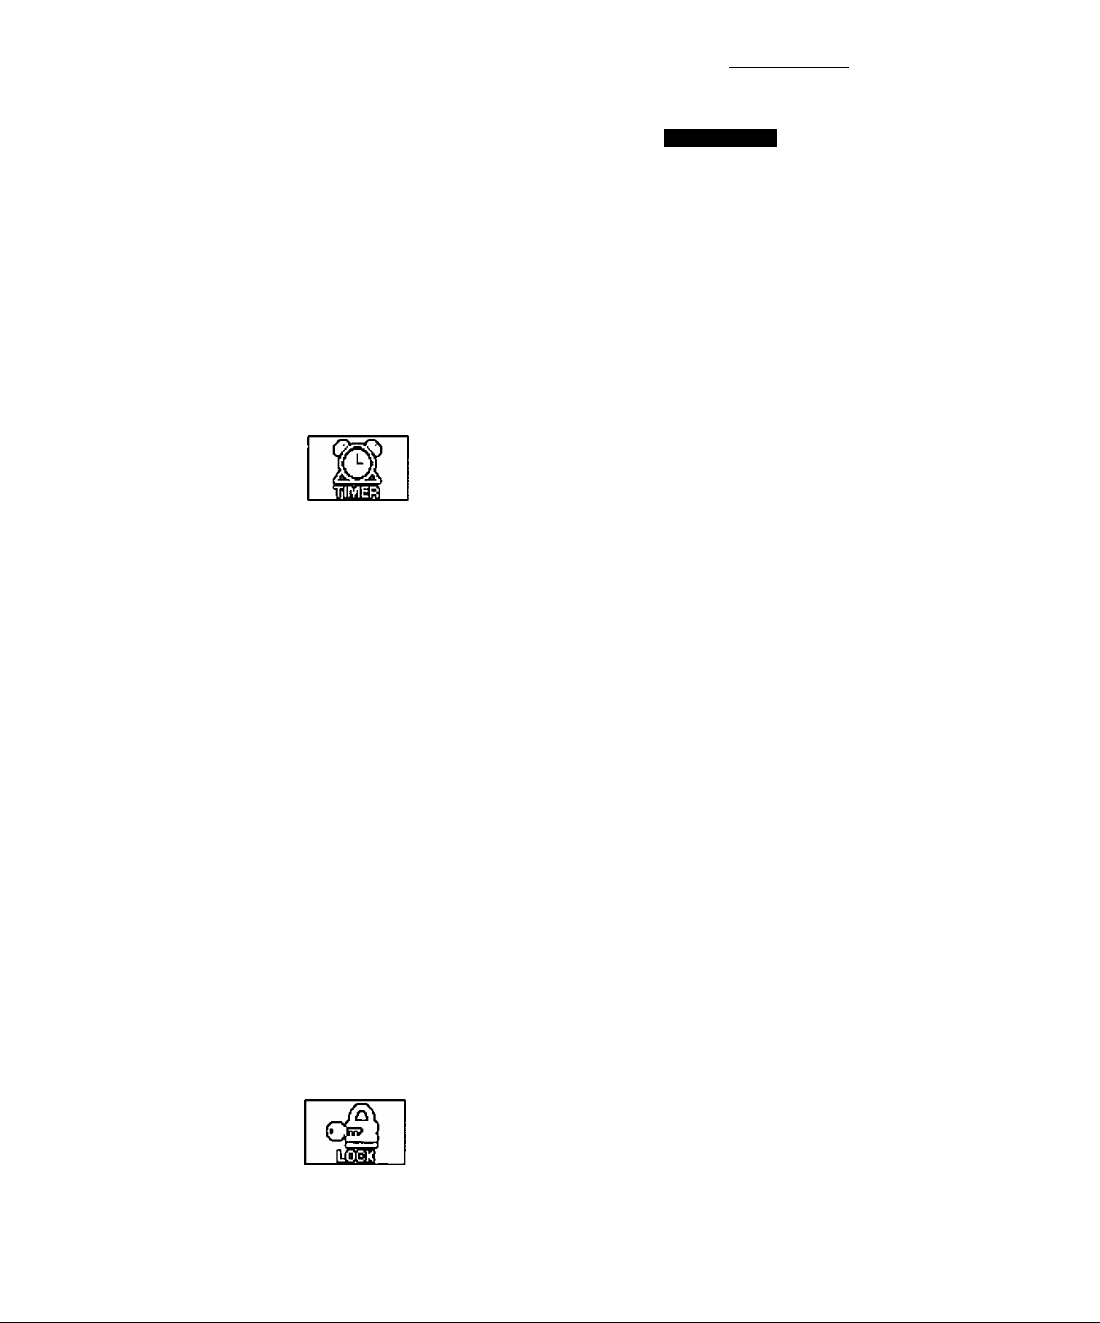
In TIMER menu, program to turn TV OFF in 30, 60, or 90 minutes. Select NO to turn off timer.
SET-UP
SET TIME AM
ANT CABLE
AUTO PROG NO
MANUAL PROG NO
MODE OFF
; ENGLISH ESPAÑOL FRANÇAI^^
TIMER CONTROL
r SLEEPTIMER " “NO!
PROGRAM TIMER
ON
OFF
CHANNEL 3
SET
TIME FIRST
Program Timer
In Timer menu, program TV to automatically turn on and off at selected time on a selected
channel, daily or one day.
TIMER CONTROL
SLEEP TIMER NO
IPROGRAM TIMER1
Note: TIME must be entered in the SETUP menu to operate PROGRAM TIMER.
ON
OFF
CHANNEL 3
SET
TIME FIRST
Page 13

CH CAP (Channel Caption)
Program channel captions (station labels) for 30 stations using up to four characters. Use the
numeric keypad for entering numbers unavailable with the select arrows.
Special Features
The TV automatically turns OFF after 90 minutes
when turned on by the PROGRAM TIMER. If the
OFF time is programmed or if a key is pressed,
the automatic OFF after 90 minutes wiil
be canceiied.
The PROGRAM TiMER is active when the TV is
OFF iiE ON. The TV wiil switch to the selected
channel at the selected time set by the
PROGRAM TIMER.
CHANNEL CAPTION
I
ENTERCHANNECNUM8ER
TnJ
ENTER CAPTION
K £ g S
A TO MOVE TO SELECT
▼ CURSOR CHANNEL
1
Note: Delete channel captions by entering dashes {-) in all four character slots.
w
Page 14

Special Features
LOCK
Game Guard Lock and Unlock
Select GAME GUARD to prevent video games and videotapes from being viewed.
Lock Channel 3, Channel 4, and video inputs for 12, 24, or 48 hours by entering a four-digit
secret code, then selecting GAME GUARD ON.
OFF.
Note: Understand how to unlock GAME GUARD before using it. Use a code that is easy to
remember or record it in a safe piace.
Unlock GAME GUARD by reentering your four-digit secret code, then selecting GAME GUARD
Note:
LOCK
GAME GUARD
MOTION PICT. STATUS
CHANGE SETTINGS
TV PARENTAL STATUS
CHANGE SETTINGS ►
HOW LONG?
LE^g^ ;rapE_FiRST31;
OFF
OFF
►
OFF
12 HRS
' ■ ■ _lJ
If GAME GUARD is ON, and if a biocked channel or video input is selected, the
message GAME GUARD ON displays in the upper right corner of the TV screen.
If you do not remember your code, the LOCK will
unlock in 12, 24, or 48 hours depending on the
current setup. Be cautious when selecting
ALWAYS. If ALWAYS is selected, and you forget
your secret code, the TV must be serviced by a
qualified technician in order to clear the
LOCK setup.
VS
Page 15
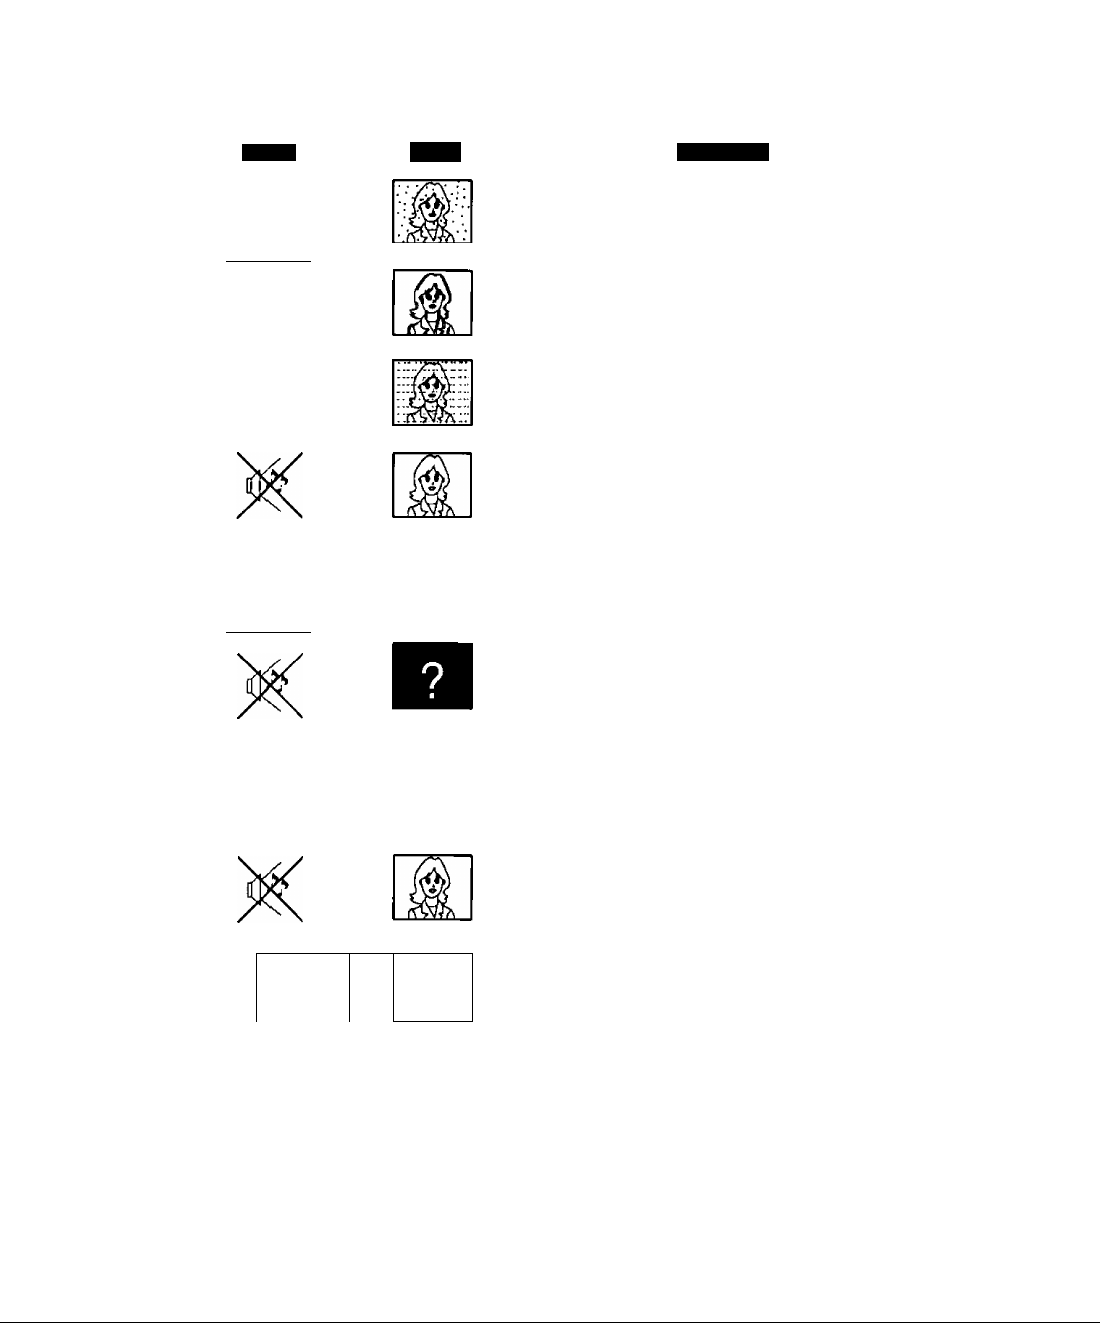
Troubleshooting Chart
Before calling for service, determine the symptoms and follow suggested solutions.
Troubleshooting Chart
mJDiQ
Noisy Audio
Noisy AuOlO
S
Noisy Audio
No Audio
Noisy Audio
No Audio
Video
Snowy Video
Multiple Image
Interference
Normal viaeo
No Video
No Video
NoPiP
Solutions
Adjust Antenna Location and Connection
Adjust Antenna Location and Connection
Check Antenna Lead-in Wire
Move TV from Electricai Appiiances, Lights, Vehicies,
and Medicai Equipment
Increase Volume
Check Mute
Check TV SPEAKERS on/off
Change Channel
Set TV or Cable Mode Properly
Check Antenna Cables
Check Power Cord is Plugged into Active Outlet
Adjust Brightness and Audio Controls
Change Channel
Check Cable Connections
Program the Remote Control Again
Check Second Video Source Operation
(P'J<
Normal Audio
Wrong Audio
d
X
Normal Audio
Intermittent Remote Controi Operation
No Color
Normal Video
Normal Video
Adjust Color Settings
Change Channel
Check Audio Is Set To Stereo Or Mono, Not SAP
Replace Remote Control Batteries
Page 16

Notes
Page 17

Notes
W
Page 18

Notes
Panasonic Consumer Electronics
Company, Division ot Matsushita
Electric Corporation of America
One Panasonic Way
Secaucus, New Jersey 07094
WWW.panasonic.com
(800) 222-4213
Panasonic Sales Company, Division of
Matsushita Electric of Puerto Rico Inc.
("PSC")
Ave. 65 de Infantería, Km 9.5
San Gabriel Industrial Park Carolina,
Puerto Rico 00985
Tel. (787) 750-4300
Fax (787) 768-2910
Panasonic de Mexico, S.A, de C.V.
Amores No. 1120
Col. Del Valle C.P. 03100
México, D.F,
Tel. (915Ó 015) 488-1000
Fax (915 6 015) 575-6763, 575-6765
Page 19

Page 20

PRECAUCION: A lin de reducir el riesgo de sacudidas eléctricas, no
deberán quitarse ni la cubierta ni la tapa posterior. No hay en el interior pieza
alguna que el usuario tenga que reparar. Todo servicio habrá de brindarte
personal de reparación capacitado.
El propósito dpi relámpago con
punta de flecha dentro de un
triángulo es el de advertir al
usuario de que existen piezas
internas del producto que
A
PRECAUCION; Con el objeto de prevenir el riesgo de incendio o de sacudida
eléctrica, este aparato no deberá verse expuesto a la lluvia ni a la humedad.
representan riesgo de que las
personas reciban sacudidas
eléctricas.
A
El propósito del signo de
exclamación dentro de un
triángulo es el de advertir al
usuario de que los
documentos que acompañan
al aparato incluyen
importantes instruccíortes de
funcionamiento y reparación.
Lea estas instrucciones compietamente antes de operar la Televisión.
Ei contenido está sujeto a cambios sin previo aviso u obiigación.
Derechos reservados 1999 por Matsushita Electric Corporation of América.
Todos los derechos reservados. La copia y distribución sin autorización es violación de ley.
Page 21

indice
Felicidades...............................................................2
Registro del Usuario................................................................2
Cuidado y limpieza..................................................................2
Especificaciones
.....................................................................
Instalación................................................................3
Ubicación de la Televisión
Conexiones de Cable Opcional...............................................3
Cable de Suministro de Corriente Alterna
Cable / Antena.........................................................................3
Conexión de cable...................................................................3
Conexión de Antena................................................................3
Conexiones de Equipo Opcional
Para el Amplificador de Sonido...............................................4
Ajustes de Audio (Sonido)
......................................................
..............................
.............................................
.......................................................
Operación de la Imagen en la Imagen (PIP)..........5
operación de PIP (Imagen en la Imagen) con una
Videocasetera y una Caja del Cable
(Televisión por Cable)
Operación de PIP con una Videocasetera -
Sin Caja del Cable...................................................................6
.............................................................
Menú Principal.........................................................7
Botón ACTION
Botones CH/VOL
Tabla de Características del Menú Principal
........................................................................
..................................................................
........
Funciones Especiales...........................................10
Idiomas..................................................................................10
Apagado Automático (Cronómetro)
Programación del Cronómetro..............................................10
CH CAP (Título de Canal)
LOCK (BLOQUEO)...............................................................12
Activación y Desactivación de Bloqueo de Juegos
....................................................
......................................
..............
10
11
12
Cuadro de Localización de Fallas........................13
ÍNDICE
2
3
3
4
4
5
7
7
8
Page 22

Felicitaciones
Felicitaciones
Su nueva Televisión se caracteriza por un chasis de estado sólido que está diseñado para brindarle
satisfacción por muchos años. Ha sido comprobada completamente en la fábrica para su mejor desempeño.
Registro del Usuario
Los números de modelo y de serie de esta unidad se encuentran en la parte posterior. Se recomienda que
anote dichos números en los espacios que se proporcionan y se conserven como registro permanente de
su compra. Esto le ayudará en su identificación en caso de robo o pérdida. Los consumidores en los
Estados Unidos de América pueden registrar su producto en la siguiente dirección electrónica;
www.prodreg.com/panasonic.
Cuidado y limpieza
Pantalla (Apagar la Televisión)
Estante y Control Remoto
Número de
Modelo
Número de
Serie
• Use una solución de jabón suave o limpiador de vidrio con un paño suave y limpio. NO USE
LIMPIADORES ABRASIVOS.
• Evite la humedad excesiva y seque bien.
• Use un paño suave humedecido con agua o una solución de detergente suave. No use
benceno, diluyentes (thinner) u otros productos de limpieza a base de petróleo.
• Seque con un paño suave y limpio. Evite la humedad excesiva.
Especificaciones
Q
Fuente de Potencia
CT-G2977 (2.1A) CT-G3377 (2,2A)
CT-G2977X (2,1A) CT-G3377X (2,2A)
CT-G2987L (2,i A) CT-G3387L (2,2A)
Capacidad de Canales -181
Terminales de Entrada de Vídeo
Terminales de Entrada de Audio
Terminal para el Amplificador de Audio
Terminal de Entrada S-VHS (algunos modelos)
Las especificaciones están sujetas a cambio sin previo aviso ni obligación alguna.
120Vca; 60Hz
VHF-12; UHF-56;
Cable-113
1 Vp.p, 75 ohmios
estilo fonográfico
500mV rms
47 Kilo Ohmios
0-2.0V rms
4.7 Kilo Ohmios
Conectar S-Video (Y-
C)
Page 23
Instalación
Ubicación de la Televisión
Esta unidad puede ser usada como centro de entretenimiento. Consulte a su distribuidor para obtener las
opciones disponibles.
□ Evite el exceso de luz del sol u otras luces brillantes, incluyendo reflejos.
□ Mantenga alejada la unidad del exceso de calor o humedad. Ventilación inadecuada puede causar
fallas en componentes internos.
□ Iluminación fluorescente puede reducir la amplitud de transmisión del Control Remoto.
□ Evite equipo magnético, incluyendo motores, ventiladores o bocinas externas.
Conexiones de Cable Opcional
Cables blindados de audio y vídeo deben usarse entre los componentes. Para mejores resultados:
□ Use cable coaxial, blindado, de 75 ohmios.
□ Use los conectores de entrada y salida apropiados, iguales a los conectores de su componente.
□ Evite el uso de cables largos para minimizar interferencia.
Cable de Suministro de Corriente Alterna
PRECAUCION: PARA PREVENIR UNA DESCARGA ELECTRICA, BUSQUE LA
HOJA ANCHA DEL ENCHUFE E INSERTELA POR COMPLETO EN LA RENDIJA
ANCHA CORRESPONDIENTE DE LA TOMA DE CORRIENTE ALTERNA. NO
USE ESTE ENCHUFE CON UN RECEPTACULO U OTRA TOMA DE CORRIENTE
SALVO QUE LA HOJA SE PUEDA INSERTAR POR COMPLETO PARA PREVENIR LA EXPOSICION DE
LA HOJA. PARA ALGUNOS MODELOS NO POLARIZADOS, PUEDE REQUERIRSE EL USO DE UN
CONECTOR DE ADAPTADOR DE CORRIENTE ALTERNA.
iNSTALACiÓN
Enchufe polarizado
Cable / Antena
Para una recepción adecuada, se requiere una conexión de cable o de antena.
Conexión de cable
Conecte el cable suministrado por su compañía local de cable.
Nota: Se requiere de una caja convertidora de cable para una recepción
adecuada. Verifique con su compañía de Cable sobre los requisitos de
compatibilidad.
Conexión de Antena
‘ • Para una recepción adecuada de canales VHF/UHF, se requiere de una antena externa.
Para la mejor recepción posible, se recomienda una antena al exterior.
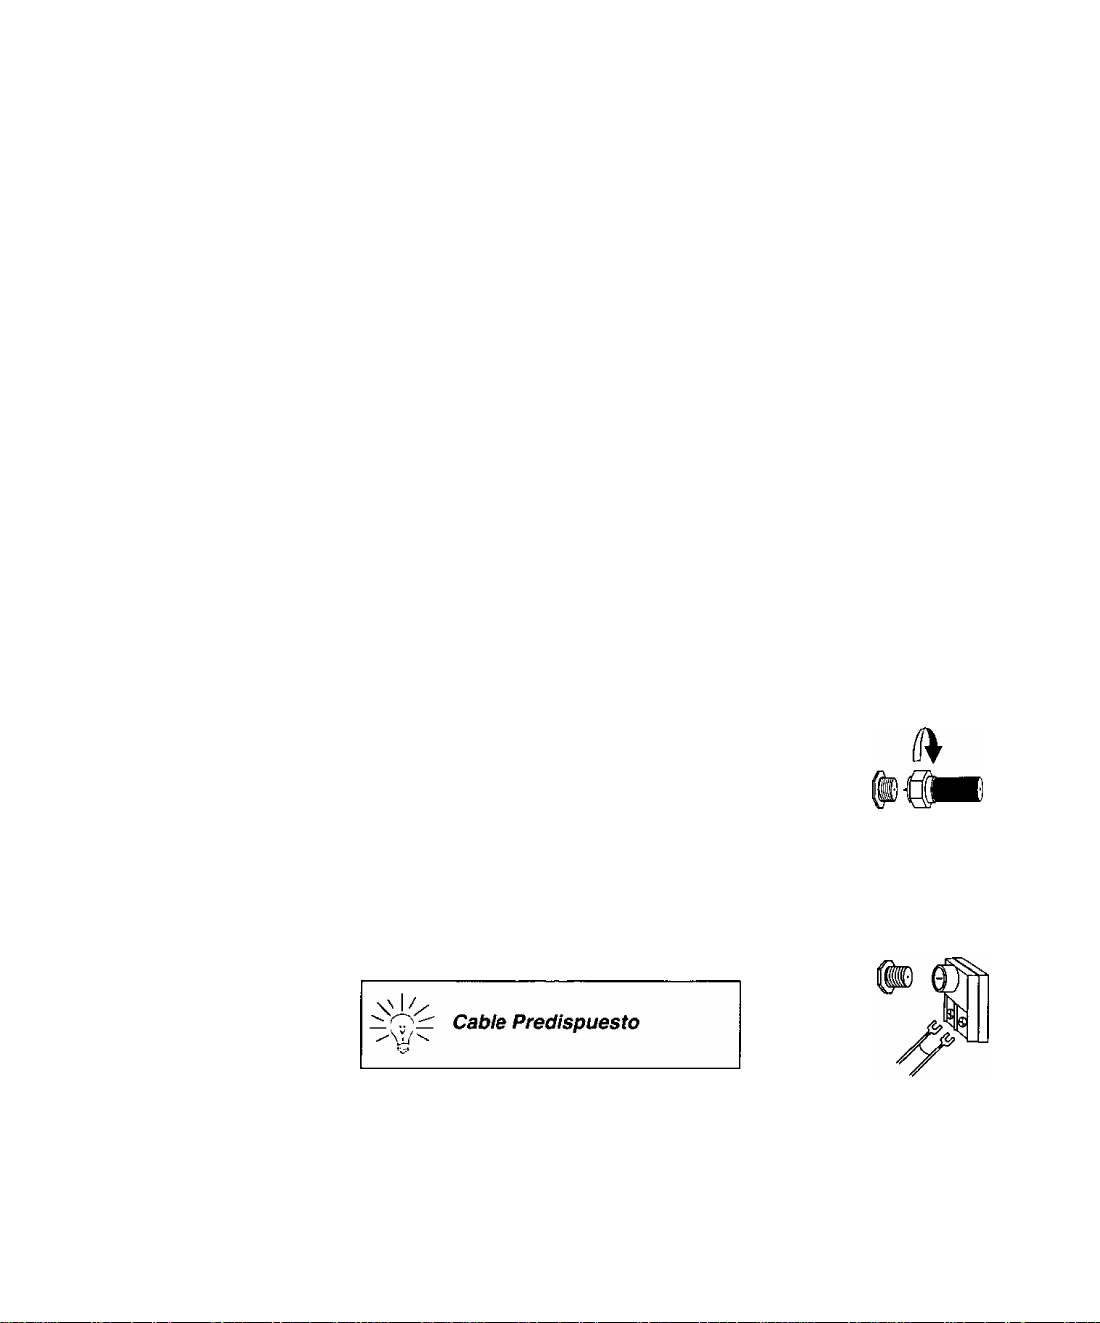
• La Modalidad de Antena debe estar ajustada en Televisión en el c ы d e t d d
menú de Ajuste (SET-UP). Antena de Casa
La Modalidad de Cable está predispuesta de
fábrica. Usuarios de Antena deberán cambiar a
Modalidad de Antena en el Menú de Ajuste
(SETUP).
Cable de Entrada de
la Compañía del Cable
75 Ohmios VHF/UHF
en la parte posterior de la '
a
Page 24
Menu Principal
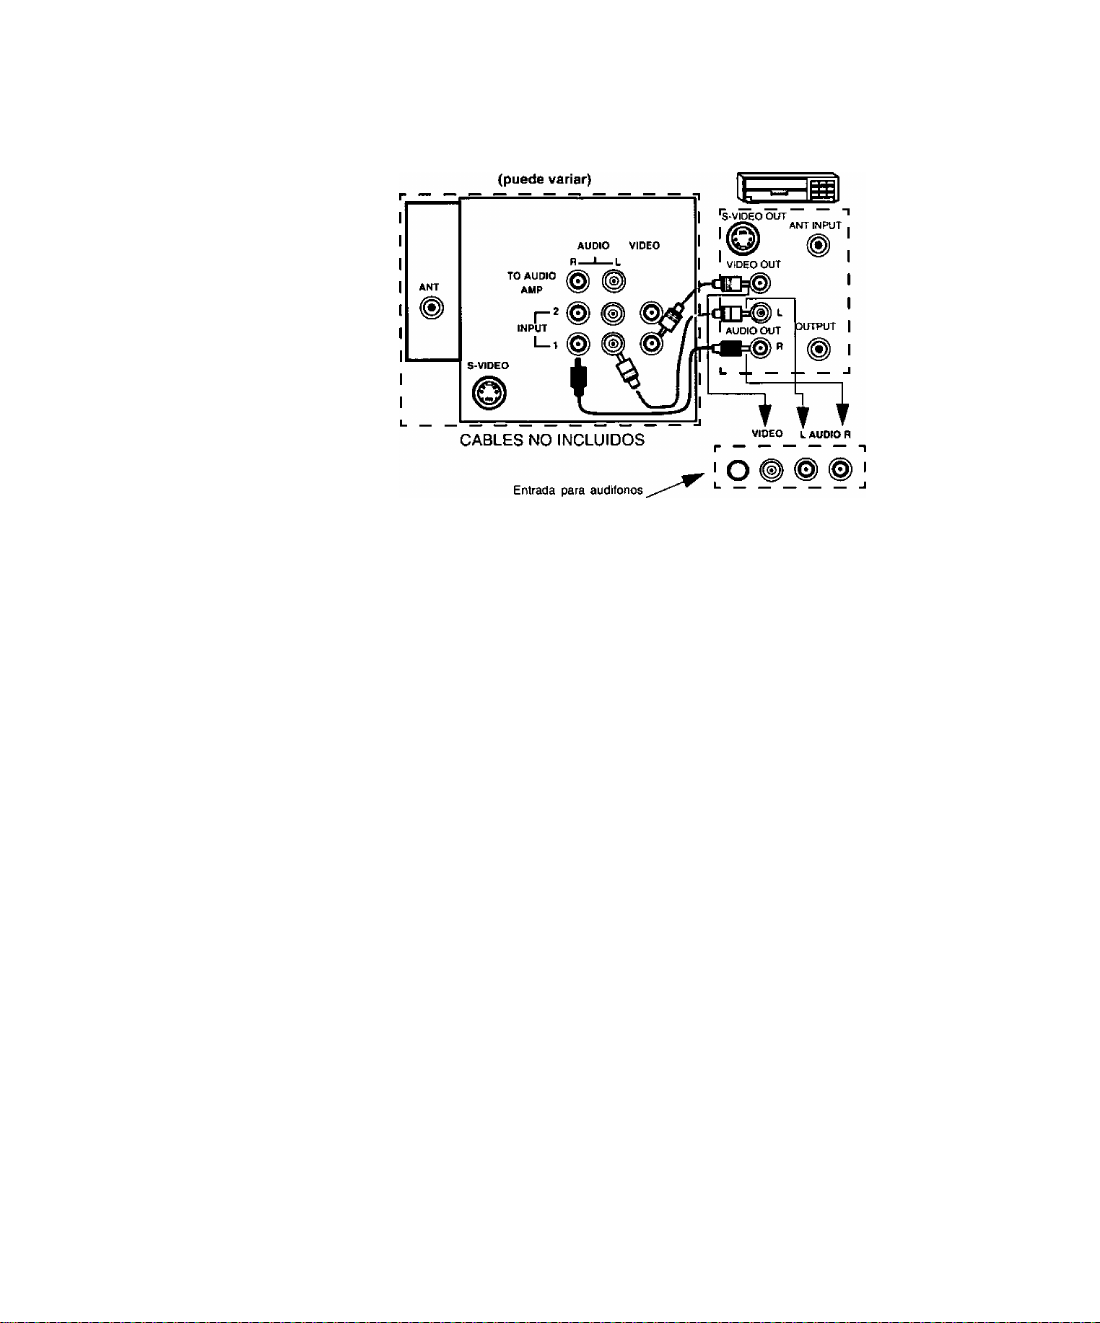
Conexiones de Equipo Opcional
Videocaseteras, equipo de videodiscos, equipo de videojuegos y teletexto pueden también ser conectados
a la entrada de conexión de vídeo. Vea el manual de su equipo opcional para más información,
TERMINALES EN LA PARTE
POSTERIOR DE LA TELEVISION VIDEOCASETERA
con conector de 1/B"
Procedimiento
1. Conecte el equipo como se muestra a la parte frontal o posterior de la entrada de Audio/Vídeo.
Nota: Conexiones de AudioA/ideo frontales y de la parte posterior no pueden usarse al
mismo tiempo.
2. Seleccione la Modalidad de Vídeo presionando el botón de TV/VIDEO.
3. Opere el equipo opcional tal como se instruye en el manual del equipo.
Nota: Si las entradas S-VIDEO y VIDEO son utilizadas al mismo tiempo, dos imágenes
aparecerán en la pantalla de la televisión.
Para el Amplificador de Sonido / TO AUDIO AMP
Conecte a la terminal de entrada del AMP {amplificador) de sonido externo para escuchar el sonido en
sistema estéreo.
Nota: Las terminales TO AUDIO AMP no pueden ser usadas directamente para bocinas
externas.
Ajustes de Sonido (Audio)
1. Seleccionar ALTAVOCES SI en el menú de SONIDO (AUDIO).
2. Ajuste el volumen del AMP (amplificador) al mínimo.
3. Ajuste el volumen de la Televisión al nivel deseado.
4. Ajuste el volumen del AMP hasta igualar el de la Televisión.
5. Seleccionar ALTAVOCES NO&VAO en el menú de SONIDO (AUDIO).
6. Ahora puede seleccionar el volumen, y el silencio, usando los controles de la Televisión.
Nota: El NO&FAO audio se controla mediante el control de volumen del sistema del amplificador
externo.
TERMINALES EN LA PARTE
FRONTAL DE LA TELEVISION
Page 25

Operación de la ímagen en la îmagen (PiP)
Operación de la Imagen en la Imagen (PIP)
PIP Con o Sin una Videocasetera (VCR) - Con Caja del Cable
Esta Televisión incluye una característica de sintonizador dual para Imagen en la Imagen (PIP). Esto
permite ver dos (2) canales en vivo al mismo tiempo, ya sea con o sin una fuente de vídeo externa (VCR).
Sin una Fuente de Vídeo Externa
Procedimiento
• Conecte el cable de entrada a la terminal de antena (ANT) de la parte posterior del TV.
• Presione el botón PIP en el Control Remoto para visualizar el recuadro PIP.
Nota: £1 sonido es para la Imagen Principal, únicamente.
• Seleccione los canales para el recuadro de PIP presionando los botones PIP CHANNEL
arriba/abajo del control remoto.
• Seleccione los canales de la Imagen Principal presionando el botón de TV en el Control
Remoto y utilizando el teclado numérico o los botones de CH (Canal) arriba/abajo.
Con una Fuente Externa de Vídeo (VCR y Caja del Cable)
Conecte su televisión a una VCR y Caja del Cable, como se muestra.
TERMINALES EN LA PARTE
VIDEOCASETERA CAJA DEL CABLE
Nota: El Control Remoto debe programarse con los códigos que se incluyen para operar la
Videocasetera y la Caja del Cable. Vea Programación del Control Remoto en la Guía de
Referencia Rápida para ei Control Remoto.
Procedimiento
Presione el botón PIP en el Control Remoto para visualizar el recuadro PIP.
Nota: El sonido es de la Imagen Principal, únicamente.
Para visualizar una imagen diferente en el recuadro PIP:
• Presione el botón de TV/VIDEO en el Control Remoto para seleccionar la misma entrada
de vídeo a la que su Caja del Cable está conectada.
• Verifique que la Caja del Cable y VCR estén ENCENDIDAS y que la VCR esté sintonizada
en el canal 3.
• Seleccione los canales para el recuadro PIP presionando el botón CBL y usando los
botones PIP CHANNEL arriba/abajo del Control Remoto.
• Seleccione los canales de la Imagen Principal presionando el botón de TV en el Control
Remoto y utilizando el teclado numérico o los botones de CH (Canal) arriba/abajo.
Nota: El botón de SWAP (CAMBIO) intercambia la fuente de tas imágenes PIP y la Principal. Presione
el botón RECALL para que aparezca en pantalla el estado de la fuente de las imágenes PIP y la
Principal.
§
Page 26

Operación de Imagen en la Imagen (PIP Cont.)
Operación de Imagen en la Imagen (PIP Cont)
PIP Con una Videocasetera (VCR) - Sin Caja del Cable
Esta Televisión incluye una característica de sintonizador dual para Imagen en la Imagen (PIP). Esta
permite ver dos (2) canales en vivo al mismo tiempo, ya sea con o sin una fuente de vídeo externa (VCR).
Conecte su Televisión a una Videocasetera, como se muestra.
TERMINALES EN LA PARTE
VIDEOCASETERA
Nota:
El Control Remoto debe programarse con los códigos que se incluyen para operar la
Videocasetera. Vea Programación del Control Remoto en la Guía de Referencia Rápida para
el Control Remoto.
Procedimiento
Presione el botón PIP en el Control Remoto para visualizar el recuadro PIP.
Presione el botón de PIP en el Control Remoto para visualizar en la pantalla el recuadro PIP.
Para visualizar una fuente de vídeo externa en el recuadro de PIP:
• Presione el botón de TV/VIDEO en el Control Remoto para seleccionar la misma imagen a
la que su VCR está conectada.
• Verifique que la VCR esté ENCENDIDA.
• Seleccione los canales de la Imagen Principal presionando el botón de TV en el Control
Remoto y utilizando el teclado numérico o los botones de CH (Canal) arriba/abajo
• Seleccione los canales para el recuadro de PIP presionando el botón de TV y usando los
botones los botones PIP CHANNEL arriba/abajo del Control Remoto..
El botón de SWAP (CAMBIO) intercambia la
fuente de tas imágenes PIP y la Principal.
Presione el botón RECALL para que aparezca en
pantalla el estado de la fuente de las imágenes
PIP y la Principal.
Page 27

Menú Principal
Botón ACTION
Presione el botón ACTION (Acción) para obtener el Menú Principal y tos sub menús. Presione el botón
ACTION repetidamente para salir.
Botones CH / VOL
Menu Principal
Menú Principal
Control Remoto
Botones para Accasar Opciones
VOL
Presione los botones de Canal (CH) o Volumen (VOL) para seleccionar un icono. Use los botones CH para
destacar las especificaciones deseadas. Use los botones de VOL para seleccionar o ajustar las
especificaciones.
La Guía de Referencia Rápida para el Control Remoto, se encuentra en el paquete proporcionado con
la TV.
Page 28
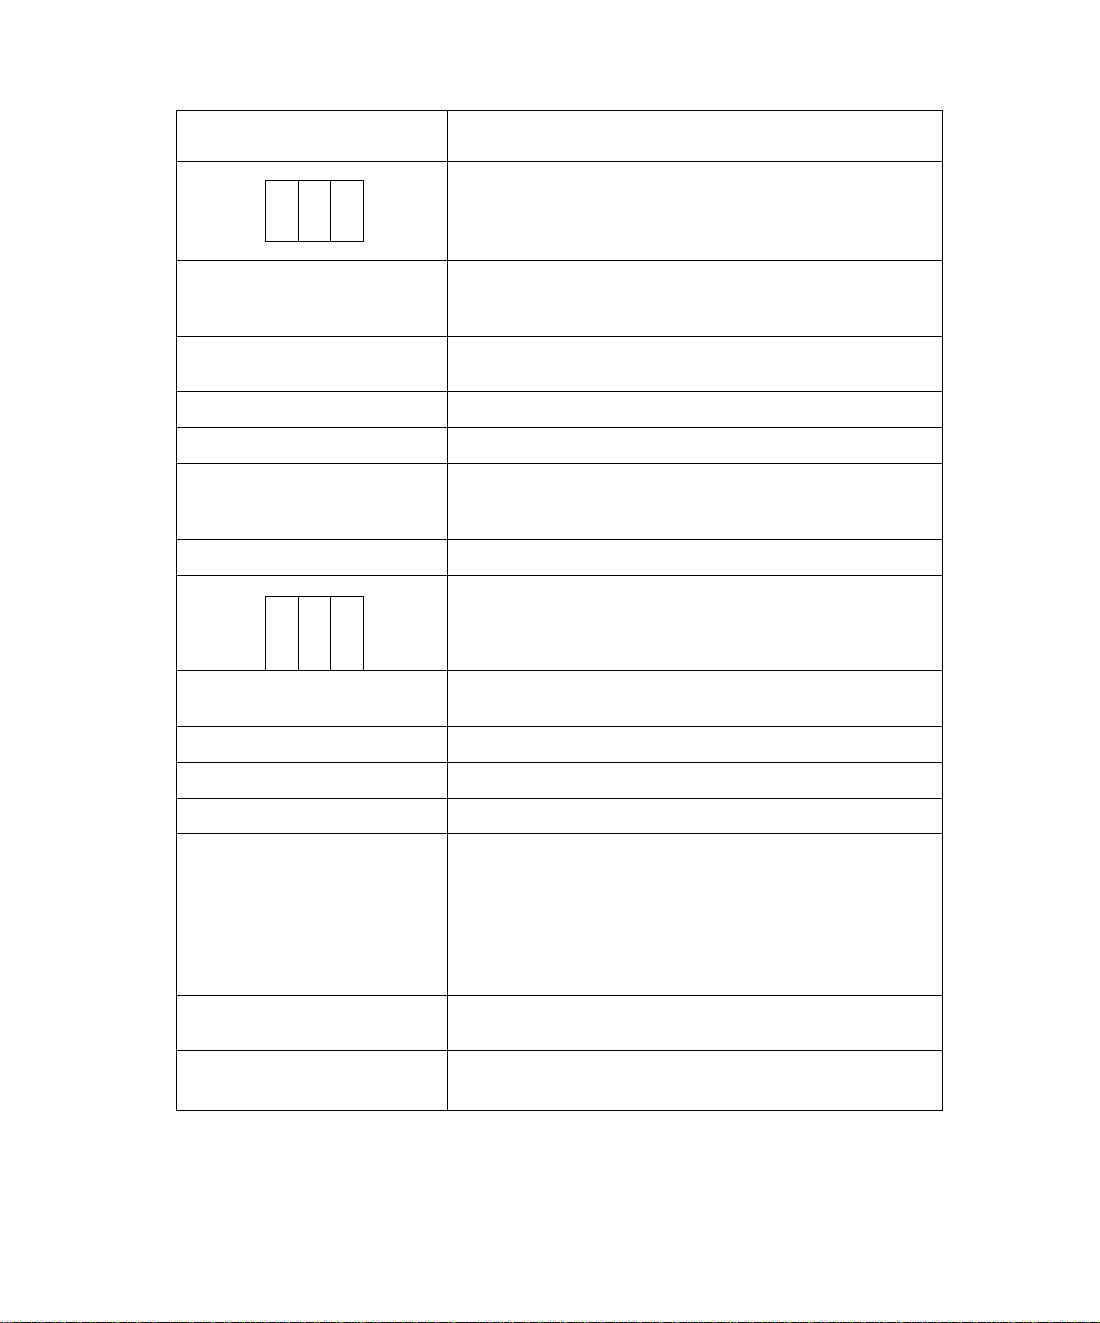
Tabla de Características del Menu Principal
Tabla de Características del Menú Principal
H
AJUSTE DE LA HORA
ANTENA
PROG AUTOMATICA
PROG MANUAL
MODO CC
IDIOMAS
isJ
AUDIO NORMAL
BAJOS
ALTOS
AJUSTE
Una vez ajustada, la HORA (TIME) aparecerá en pantalla al
presionar ON (ENCENDIDO), RECALL (LLAMADA) o al cambiar
de canal.
Escoja CABLE 0 TV para igualar la señal de entrada de su
antena.
Programa automáticamente los canales con señal en la memoria.
Manualmente incluye o anula canales en memoria.
Permite que el espectador lea el diálogo de un programa de
televisión u otra información. Los subtítulos aparecerán al
presionar MUTE (SILENCIO).
Seleccione menú en Inglés, Español, o Francés.
SONIDO
Para reajustar BAJOS, ALTOS y BALANCE a los niveles de
preajuste de fábrica.
Para aumentar o disminuir el sonido de los bajos.
Para aumentar o disminuir el sonido de los altos.
BALANCE
MODO
SONIDO lA
SONIDO EVOLVENTE
Q
Para enfatizar el volumen de las bocinas DERECHA/IZQUIERDA.
Seleccione la modalidad de sonido:
n STEREO - Receptor de sonido de dos canales.
□ SPA - Programa Secundario De Sonido. Sintonizo un
segundo sonido si está disponible en su área (sonido
bilingüe 0 descriptivo).
G MONO - Un sólo canal de sonido. Utilícelo cuando la señal
de estéreo es débil.
Mantiene constante y de manera automática el volumen entre
programas y comerciales.
Use la función de sonido ambiental para mejorar la respuesta
auditiva cuando se escucha una transmisión en estéreo.
Page 29

Tabla de Características del Menu Principal
Tabla de Características del Menú Principal (Cont)
asmíi
Seleccione ALTAVOCES DE TV:
n SI (Encendido) - Los altavoces de TV funcionan
normalmente.
ALTAVOCES
(Bocinas)
□ NO&VAO (Salida de audio variable) - Altavoces de TV
apagados, el sonido es ajustable mediante la TV,
□ NO&FAO (Salida de audio fija) - Altavoces de TV apagados,
el sonido es solamente ajustable mediante el amplificador
externo.
CRONOMETRO
AUTO APAGADO
CRONOMETRO
PROGRAMABLE
Ш
IMAGEN NORMAL
COLOR
TINTE
BRILLO
CONTRASTE
NITIDEZ
TITULO DE CANAL
Programe a la Televisión para que automáticamente se apague en
30, 60, ó 90 minutos. Seleccione NO para apagar el cronómetro.
Programe a la Televisión para que automáticamente se encienda
y apague en la hora seleccionada del canal seleccionado, diario o
en un día únicamente.
IMAGEN
Reajusta todas las modificaciones de la imagen a los
predispuestos de fábrica.
Ajusta la intensidad del color deseada.
Ajusta los tonos naturales de la piel.
Ajusta las áreas oscuras para detalles más nítidos.
Ajusta las áreas blancas de la imagen.
Ajusta para dar mejor claridad a los detalles de la silueta.
TITULOS DE CANAL
Programe hasta 30 emisoras usando un máximo de 4 siglas por
cada emisora.
BLOQUEO DE JUEGOS
BLOQUEO
Programe para prevenir el uso de juegos de vídeo, caja del cable,
y videocaseteras.
©
Page 30

Funciones Especiales
Funciones Especiales
Idiomas
En el menú de AJUSTE (SETUP), seleccione el idioma para el menú ENGLISH (INGLES), ESPAÑOL o
FRANÇAIS (FRANCES).
Cronómetro
AJUSTE
AJUSTE MORA
ANTENA CABLE
PROG AUTOMATICA
PROG MANUAL NO
MODOiCCl
ENGLISH ESPAÑOL FRANÇAIS!
NO
NO
AM
Apagado Automático (Cronómetro)
En el menú del Cronómetro (TIMER) programe para APAGAR la Televisión en 30 minutos, 60 minutos, 90
minutos. Seleccione NO para apagar el cronómetro.
CONTROL DEL CRONOMETRO
TOTOAPAGADO ' "
CRONOMETRO PROGRAMABLE
ENCENDER
APAGAR
CANAL 3
ACTIVAR
~ NOn
HORA PRIMERO
Programación del Cronómetro
En menú del Cronómetro programe la Televisión para que automáticamente se encienda y apague en la
hora seleccionada del canal seleccionado, diario o en un'día únicamente.
Wl
CONTROL DEL CRONOMETRO
AUTOAPAGADO NO
f CRONOMETRO PROGRAMABLE
ENCENDER
APAGAR
CANAL 3
ACTIVAR
Nota: Se debe poner la hora TIME en el menú de AJUSTE antes de que PROGRAMACION DEL
CRONOMETRO (PROGRAM TIMER) opere.
HORA PRIMERO
Page 31

Funciones Especiales
Apagado (OFF) Después de
90 Minutos
La Televisión se aoaaa automáticamente después
de 90 minutos cuando se enciende por el
PROGRAMADOR DEL CRONOMETRO. Si se
programa el APAGADO o sí se presiona una tecla,
el APAGADO automático de después de 90
minutos se cancela.
Para Activar el
PROGRAMADOR DEL
CRONOMETRO
El PROGRAMADOR DEL CRONOMETRO se
activa cuando la Televisión está APAGADA o
ENCENDIDA. La Televisión cambiará al canal
seleccionado a la hora seleccionada que se
configuró en el PROGRAMADOR DEL
CRONOMETRO.
CH CAP (Título de Canal)
Programe hasta 30 emisoras usando un máximo de 4 siglas por cada emisora. Use el teclado numérico
para introducir los canales no disponibles con las flechas de selección.
Nota: Anule títulos de canal poniendo guión (-) en todos tos cuatro lugares indicados para tas siglas.
TITULOS DE CANAL
ELlÜA" NÚMERO' DECÄNAin
123
I
ELIJA TITULO
K £ S S
A PARA MOVER
▼ CURSOR
PARA ESCOGER
CANAL
1W
Page 32

Funciones Especiales
LOCK (BLOQUEO)
Activación y Desactivación de Bloqueo de Juegos
Seleccione el BLOQUEO DE JUEGO para prevenir videojuegos y videocasetes de ser vistos.
Active el Bloqueo en el Canal 3, Canal 4, y entradas de vídeo por 12, 24 ó 48 horas introduciendo una
código secreto de cuatro dígitos y seleccionando BLOQUEO DE JUEGO SI.
Nota: Entienda como desactivar el Bloqueo de Juegos antes de usarlo. Use un código que sea fácil de
Desactive el BLOQUEO DE JUEGO introduciendo nuevamente el mismo código secreto de cuatro dígitos
y seleccionando BLOQUEO DE JUEGO NO.
Nota: Si el BLOQUEO DE JUEGO está activado, y se selecciona alguna de las entradas de vídeo o
recordar y escríbalo en un lugar seguro.
BLOQUEO
BLOQUEO DE JUEGO NO
CLASIFICACION
CAMBIAR PROGRAMA
CONTROL PATERNAL NO
CAMBIAR PROGRAMA
TIEMPO? 12HRS
BEQUIERE COpJGp .17
canales bloqueados, el mensaje BLOQUEO DE JUEGO SI aparecerá en la esquina superior
derecha de la pantalla de la Televisión.
NO
►
►
~ш\
Si usted no recuerda su código, el bloqueo se
desactivará en 12, 24 o 48 horas dependiendo del
ultimo ajuste. Sea cuidadoso al seleccionar
SIEMPRE. Si SIEMPRE está seleccionado, y
olvida su código secreto, la televisión debe ser
atendida por un técnico calificado para limpiar el
ajuste de BLOQUEO.
Page 33

Cuadro de Localización de Fallas
Cuadro de Localización de Fallas
Antes de solicitar servicio, establezca los síntomas y lleve a cabo las sencillas pruebas de soluciones
que se indican a continuación.
§mss)
d
%
Sonido Ruidoso
Sonido Ruidoso
Sonido Ruidoso
Sin Sonido
d
Sonido Ruidoso
Sin Sonido
Qmsas
Imagen Moteada
Imagen Múltiple
Interferencia
Imagen Normal
Sin Imagen
Sin Imagen/PIP
Qsmsmum
Ajuste la Ubicación y/o Conexión de la Antena
Ajuste la Ubicación y/o Dirección de la Antena
Revise el Cable de Entrada de la Antena
Aleje su Televisión de Aparatos Electrodomésticos,
Iluminación, Automóviles, Camiones y Equipo
Médico.
Aumente el Volumen
Cambie de Canal
Revise el control del silencio (MUTE)
Revise que la opción ALTAVOZ SI esté seleccionada
Seleccione la modalidad de TV o Cable
apropiadamente
Revise los cables de la antena
Revise que el Cable de Corriente Alterna esté
Enchufado Correctamente al Tomacorriente
Ajuste los controles de Audio y Brillo
Cambíe de Canal
Revise las conexiones de cable
Programe nuevamente el Control Remoto
Revise el Origen del Segundo Vídeo
d
%
Sonido Normal
Sonido Erróneo
Sin Color
Imagen Normal
d
Sonido Normal
Operación Intermitente del Control Remoto
Imagen Normal
Cambie de Canal
Ajuste Color
Seleccione AUDIO (sonido) en modalidad de
ESTEREO o MONO. Sin SPA
Cambie las Pilas del Control Remoto
Page 34

Notas
m
Page 35

Notas
m
Page 36

Notas
Panasonic Consumer Electronics
Company, Division ot Matsushita
Electric Corporation of America
One Panasonic Way
Secaucus, New Jersey 07094
WWW.panasonic.com
(800) 222-4213
Panasonic da Mexico, S.A, de C.V.
Amores No. 1120
Col. Del Valle C.R 03100
México, D.F.
Tel, (9150015) 488-1000
Fax (915 ó 015) 575-6763, 575-6765
Panasonic Sales Company, Division of
Matsushita Electric of Puerto Rico Inc.
(“PSC”)
Ave. 65 de Infantería, Km 9.5
San Gabriel Industrial Park Carolina,
Puerto Rico 00985
Tel. (787) 750-4300
Fax (787) 768-2910
 Loading...