

Page 1
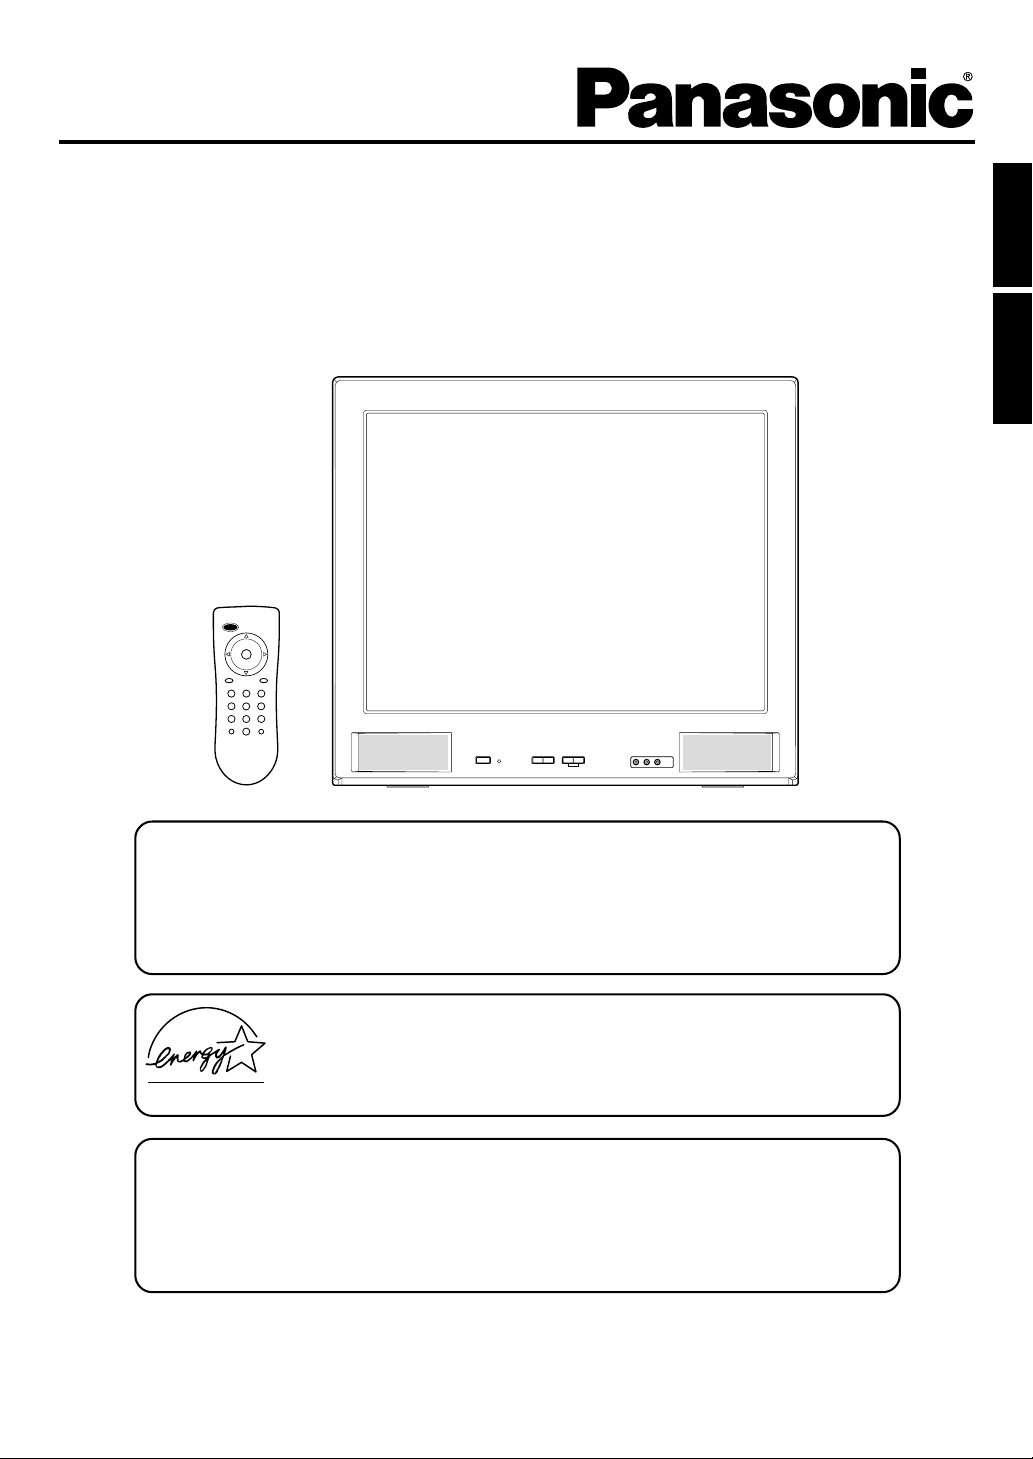
OWNER'S MANUAL
MANUAL DE USUARIO
27” MTS STEREO COLOR TELEVISION
27” TELEVISOR COLOR ESTEREO MTS
CT-2701
ENGLISH
ESPAÑOL
CAUTION
PRECAUCION
Changes or modifications not expressly approved by the party responsible for compliance
with the FCC Rules could void the user's authority to operate this equipment.
Cambios o modificaciones que no sean expresamente aprobadas por el grupo responsable de
conformidad con las reglas de la FCC puede invalidar la autoridad del usuario para operar este equipo.
As an ENERGY STAR® Partner, Matsushita Electric Corporation of America has determined that
this product or product model meets the ENERGY STAR® guidelines for energy efficiency.
Como un socio ENERGY STAR®, Matsushita Electric Corporation of America a determinado que
este producto o modelo cumple con los lineamientos de ENERGY STAR® para la eficiencia de
energía.
TV/CATV MODE SELECTION
SELECCION DEL MODO TV/CATV
When shipped from the factory, the TV/CATV menu option is set to the "CATV" (Cable Television) mode. If not using CATV, set this menu option to "TV " mode.
Cuando el set sale de fábrica, la opción de TV/CATV está en modo CATV (Televisión por
Cable). Si usted no está usando CATV, cambie esta opción a modo “TV”.
Before operating the unit, please read this manual thoroughly.
Antes de utilizar su aparato favor de leer las siguientes instrucciones.
Nota: La información acerca de la garantía y centro de servicio se encuentra en la sección en
ingles de este manual.
Page 2
ENGLISH
The lightning flash with arrowhead symbol, within an equilateral triangle
is intended to alert the user to the presence of uninsulated dangerous
voltage within the product's enclosure that may be of sufficient
magnitude to constitute a risk of electric shock.
CAUTION:
TO REDUCE THE RISK OF ELECTRIC
SHOCK, DO NOT REMOVE COVER
(OR BACK). NO USER-SERVICEABLE
PARTS INSIDE. REFER SER VICING
TO QUALIFIED SERVICE PERSONNEL.
The exclamation point within an equilateral triangle is intended to alert
the user to the presence of important operating and maintenance
(servicing) instructions in the literature accompanying the appliance.
WARNING: TO PREVENT FIRE OR SHOCK HAZARD, DO NOT EXPOSE THIS APPLIANCE TO RAIN OR MOISTURE.
IMPORTANT SAFEGUARDS
1. READ INSTRUCTIONS
All the safety and operating instructions should be read before the unit is operated.
2. RETAIN INSTRUCTIONS
The safety and operating instructions should be retained for future reference.
3. HEED WARNINGS
All warnings on the unit and in the operating instructions should be adhered to.
4. FOLLOW INSTRUCTIONS
All operating and use instructions should be followed.
5. CLEANING
Unplug this unit from the wall outlet before cleaning. Do not use liquid cleaners or aerosol cleaners. Use a damp cloth for cleaning
the exterior cabinet only.
6. ATTACHMENTS
The manufacturer of this unit does not make any recommendations for attachments, as they may cause hazards.
7. WATER AND MOISTURE
Do not use this unit near water. For example, near a bathtub, washbowl, kitchen sink, laundry tub, in a wet basement, or near a
swimming pool.
8. ACCESSORIES
Do not place this unit on an unstable cart, stand, tripod, bracket, or table.
The unit may fall, causing serious injury, and serious damage to the unit.
8A. An appliance and cart combination should be moved with care. Quick stops, excessive
force, and uneven surfaces may cause the appliance and cart combination to overturn.
9. VENTILATION
Slots and openings in the cabinet back or bottom are provided for ventilation, to ensure reliable operation of the unit and to
protect it from overheating. These openings must not be blocked or covered. The openings should never be blocked by placing
the unit on a bed, sofa, rug, or other similar surface. This unit should never be placed near or over a radiator or heat source.
This unit should not be placed in a built-in installation, such as a bookcase, or rack unless proper ventilation is provided or the
manufacturer's instructions have been adhered to.
10. POWER SOURCE
This unit should be operated only from the type of power source indicated on the rating plate. If you are not sure of the type of
power supply to your home, consult your appliance dealer or local power company. For units intended to operate from battery
power, or other sources, refer to the operating instructions.
11. GROUNDING OR POLARIZATION
This unit is equipped with a polarized alternating current line plug (a plug having one blade wider than the other). This plug will
fit into the power outlet only one way. This is a safety feature. If you are unable to insert the plug fully into the outlet, try
reversing the plug. If the plug should still fail to fit, contact your electrician to replace your obsolete outlet. Do not defeat the
safety purpose of the polarized plug. If your unit is equipped with a 3-wire grounding-type plug, a plug having a third (grounding) pin, this plug will only fit into a grounding-type power outlet. This too, is a safety feature. If you are unable to insert the plug
into the outlet, contact your electrician to replace your obsolete outlet. Do not defeat the safety purpose of the grounding-type plug.
12. POWER-CORD PROTECTION
Power-supply cords should be routed so that they are not likely to be walked on or pinched by items placed upon or against
them, paying particular attention to cords at plugs, convenience receptacles, and the point where they exit from the appliance.
PORTABLE CART WARNING
(symbol provided by RETAC)
S3126A
2
Page 3
13. LIGHTNING
To protect your unit during a lightning storm, or when it is left unattended and unused for long periods of time, unplug it from the
wall outlet and disconnect the antenna or cable system. This will prevent damage to the unit due to lightning and power line
surges.
14. POWER LINES
An outside antenna system should not be located in the vicinity of overhead power lines, other electric light or power circuits, or
where it can fall into such power lines or circuits. When installing an outside antenna system, extreme care should be taken to
keep from touching such power lines or circuits as contact with them might be fatal.
15. OVERLOADING
Do not overload wall outlets and extension cords as this can result in a risk of fire or electric shock.
16. OBJECT AND LIQUID ENTRY
Do not push objects through any openings in this unit as they may touch dangerous voltage points or short out parts that could
result in fire or electric shock. Never spill or spray any type of liquid into the unit.
17. OUTDOOR ANTENNA GROUNDING
If an outside antenna or cable system is connected to the unit, be sure the antenna or cable system is grounded to provide
some protection against voltage surges and built-up static charges. Section 810 of the National Electrical Code, ANSI/NFPA
70, provides information with respect to proper grounding of the mast and supporting structure, grounding of the lead-in wire to
an antenna discharge unit, size of grounding conductors, location of antenna discharge unit, connection to grounding electrodes, and requirements for the grounding electrode.
18. SERVICING
Do not attempt to service this unit yourself as opening or removing covers may expose you to dangerous voltage or other
hazards. Refer all servicing to qualified service personnel.
19. DAMAGE REQUIRING SERVICE
Unplug this unit from the wall outlet and refer servicing to qualified service personnel under the following conditions:
a. When the power-supply cord or plug is damaged.
b. If liquid has been spilled, or objects have fallen into the unit.
c. If the unit has been exposed to rain or water.
d. If the unit does not operate normally by following the operating instructions. Adjust only those controls that are covered
by the operating instructions, as an improper adjustment of other controls may result in damage and will often require
extensive work by a qualified technician to restore the unit to its normal operation.
e. If the unit has been dropped or the cabinet has been damaged.
f. When the unit exhibits a distinct change in performance, this indicates a need for service.
20. REPLACEMENT PARTS
When replacement parts are required, be sure the service technician uses replacement parts specified by the manufacturer or
those that have the same characteristics as the original part.
Unauthorized substitutions may result in fire, electric shock or other hazards.
21. SAFETY CHECK
Upon completion of any service or repairs to this unit, ask the service technician to perform safety checks to determine that the
unit is in proper operating condition.
22. HEAT
The product should be situated away from heat sources such as radiators, heat registers, stoves, or other products (including
amplifiers) that produce heat.
23. NOTE TO CATV SYSTEM INSTALLER
This reminder is provided to call the CATV system installer's attention to Article 820-40 of the NEC that provides guidelines for
proper grounding and, in particular, specifies that the cable ground shall be connected to the grounding system of the building,
as close to the point of cable entry as practical.
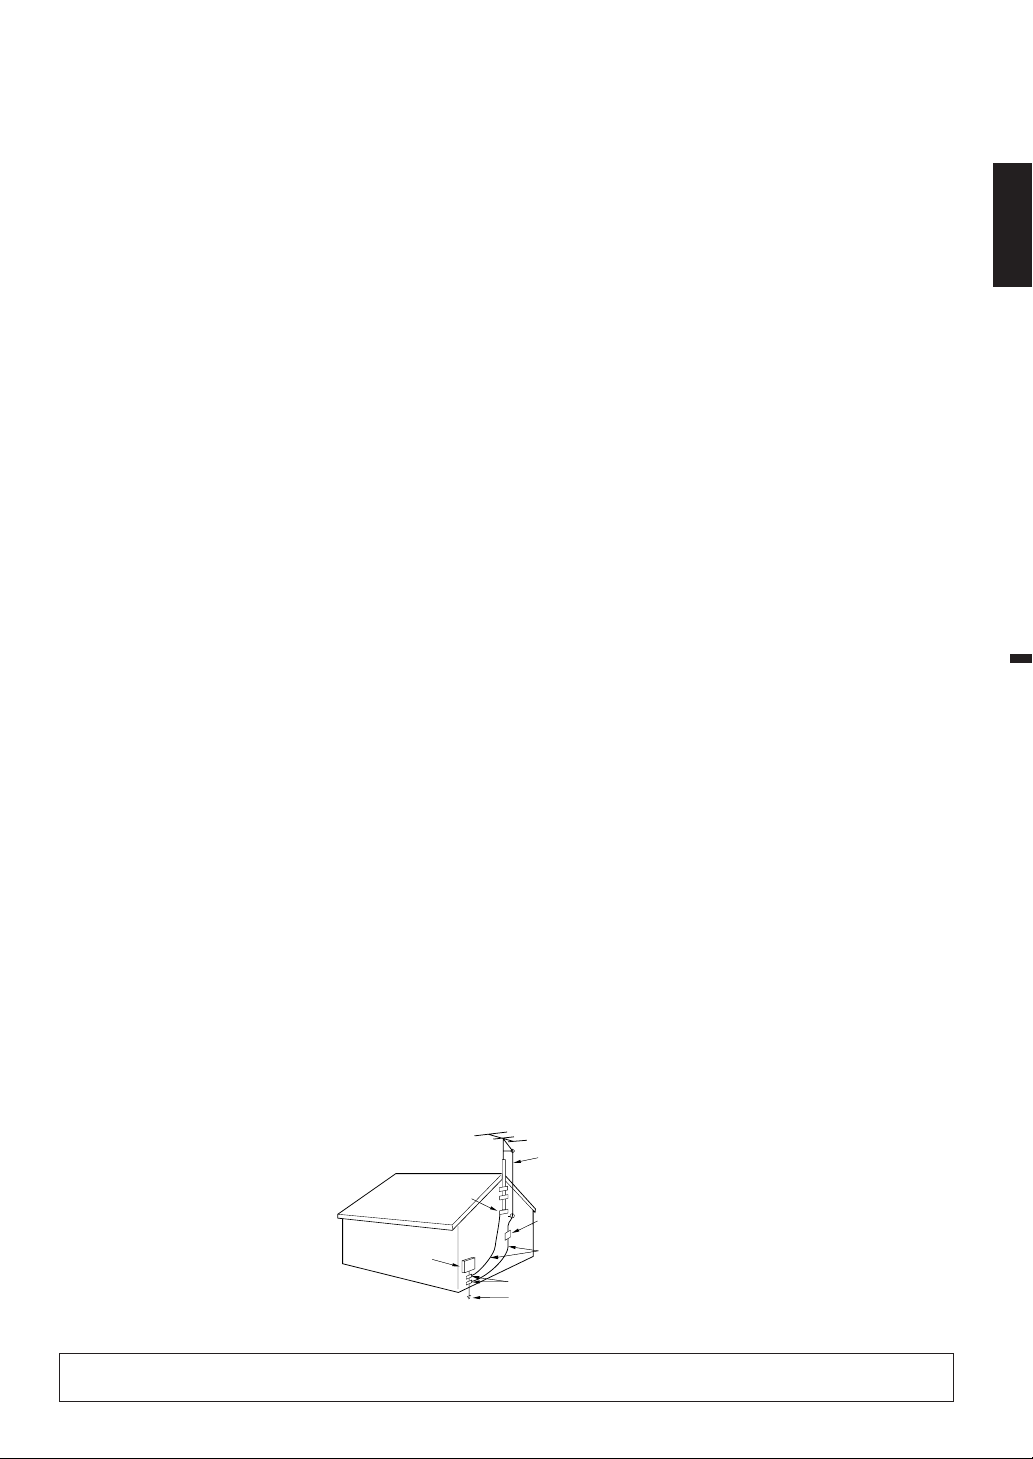
EXAMPLE OF ANTENNA GROUNDING AS PER NATIONAL ELECTRICAL CODE
ENGLISH
ANTENNA LEAD IN WIRE
GROUND CLAMP
ELECTRIC
SERVICE
EQUIPMENT
NEC-NATIONAL ELECTRICAL CODE
S2898A
This product utilizes both a Cathode Ray Tube (CRT) and other components that contain lead. Disposal of these materials may be regulated in your community due to
environmental considerations. For disposal or recycling information please contact your local authorities, or the Electronics Industries Alliance: <http://www.eiae.org.>
ANTENNA DISCHARGE UNIT (NEC SECTION 810-20)
GROUNDING CONDUCTORS (NEC SECTION 810-21)
GROUND CLAMPS
POWER SERVICE GROUNDING ELECTRODE SYSTEM (NEC ART 250, PART H)
3
Page 4
FEATURES
• 181 Channel Tuner - The tuning system is capable of receiving all 68 VHF/UHF standard broadcast channels that
are available in your area. When operating on a cable system, it can tune to the standard VHF channel frequencies
plus up to 113 cable channel frequencies. The actual number of channels received depends upon channel
reception in your area or your cable system.
• On-Screen 3 Language Display - This TV can display the on screen language in English, Spanish or French.
• Sleep Timer - Operable from the remote control, this TV can be programmed up to 120 minutes to turn off automatically.
• Memory Back Up - This system prevents loss of memorized channel selections in case a power interruption to the
TV should occur.
• V-Chip - The V-Chip function can read the rating of a TV program or movie content if the program is encoded with
this information.The V-Chip will allow you to set a restriction level.
•
Picture Control Adjustments - The On-Screen display allows precise remote control adjustment of BRIGHTNESS,
COLOR, PICTURE, SHARPNESS and TINT.
• Closed Captioned Decoder - Displays text captions or 1/2 of full screen text on the screen for hearing impaired viewers.
• Stereo/SAP Reception - This TV is designed to receive stereo and second audio program (SAP) broadcasts
where available.
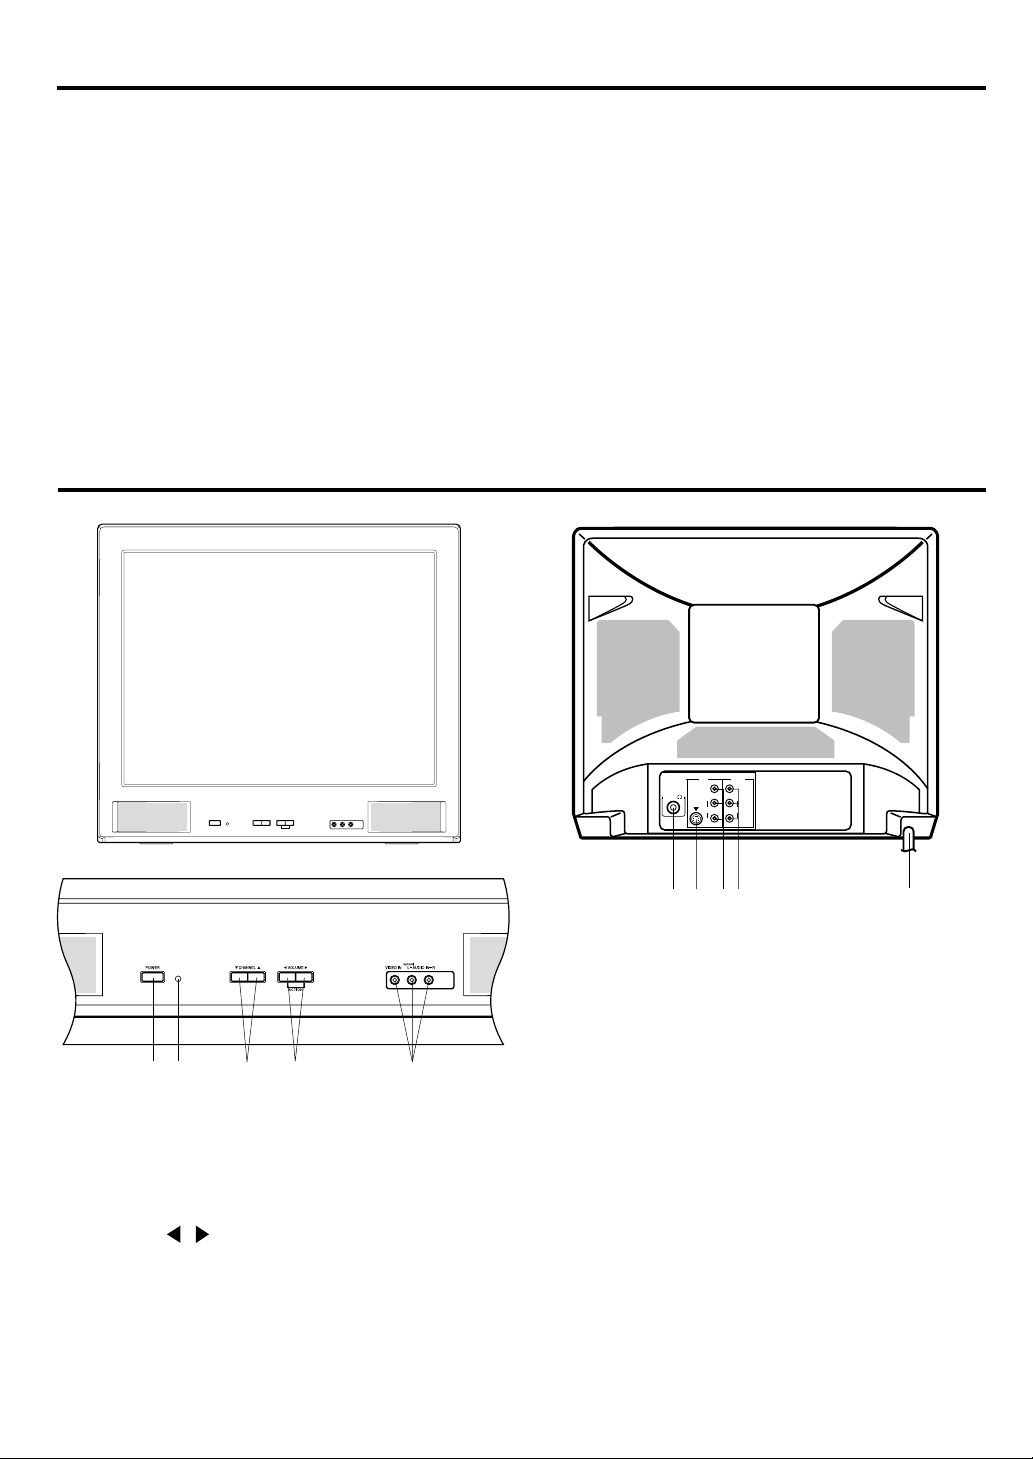
LOCATION OF CONTROLS
FRONT BACK
1
2
34
5
1. POWER - Press to turn the TV on or off.
2. REMOTE Sensor - Signals from the Remote Control
unit are received here.
3. CHANNEL ▼ / ▲ - Press to select a higher or lower
numbered channel set into memory. And also, press
to select the desired setting during On-Screen
operations.
4. VOLUME
/ - Press to raise or lower the level of
the sound. And also, press to select the desired
setting during On-Screen operations.
ACTION - Press to display the On-screen menu
function. And also, press to enter or select information
for On-Screen operations.
IN OUT
VIDEOVIDEO
L/MONO
ANT(75 )
6
L/MONO
S-VIDEO
AUDIO
AUDIO
R
R
7
9
810
5. FRONT AUDIO (L/R)/VIDEO IN Jacks (AUX2) -
Audio and video signal cables from an external
source can be connected here.
6. VHF/UHF IN (ANT) Jack - Connect a VHF/UHF
antenna or CATV cable to this jack.
7. S-VIDEO IN Jack - S-Video signal cable from an
external source can be connected here.
8. REAR AUDIO (L / R) / VIDEO IN Jacks (AUX1) -
Audio and video signal cables from an external
source can be connected here.
9. REAR AUDIO (L / R) / VIDEO OUT Jacks - Used
to output audio and video signals to a TV, amplifier
or VCR.
10. AC Power Cord - Plug into an outlet having 120V,
60 Hz AC power only.
4
Page 5
REMOTE CONTROL
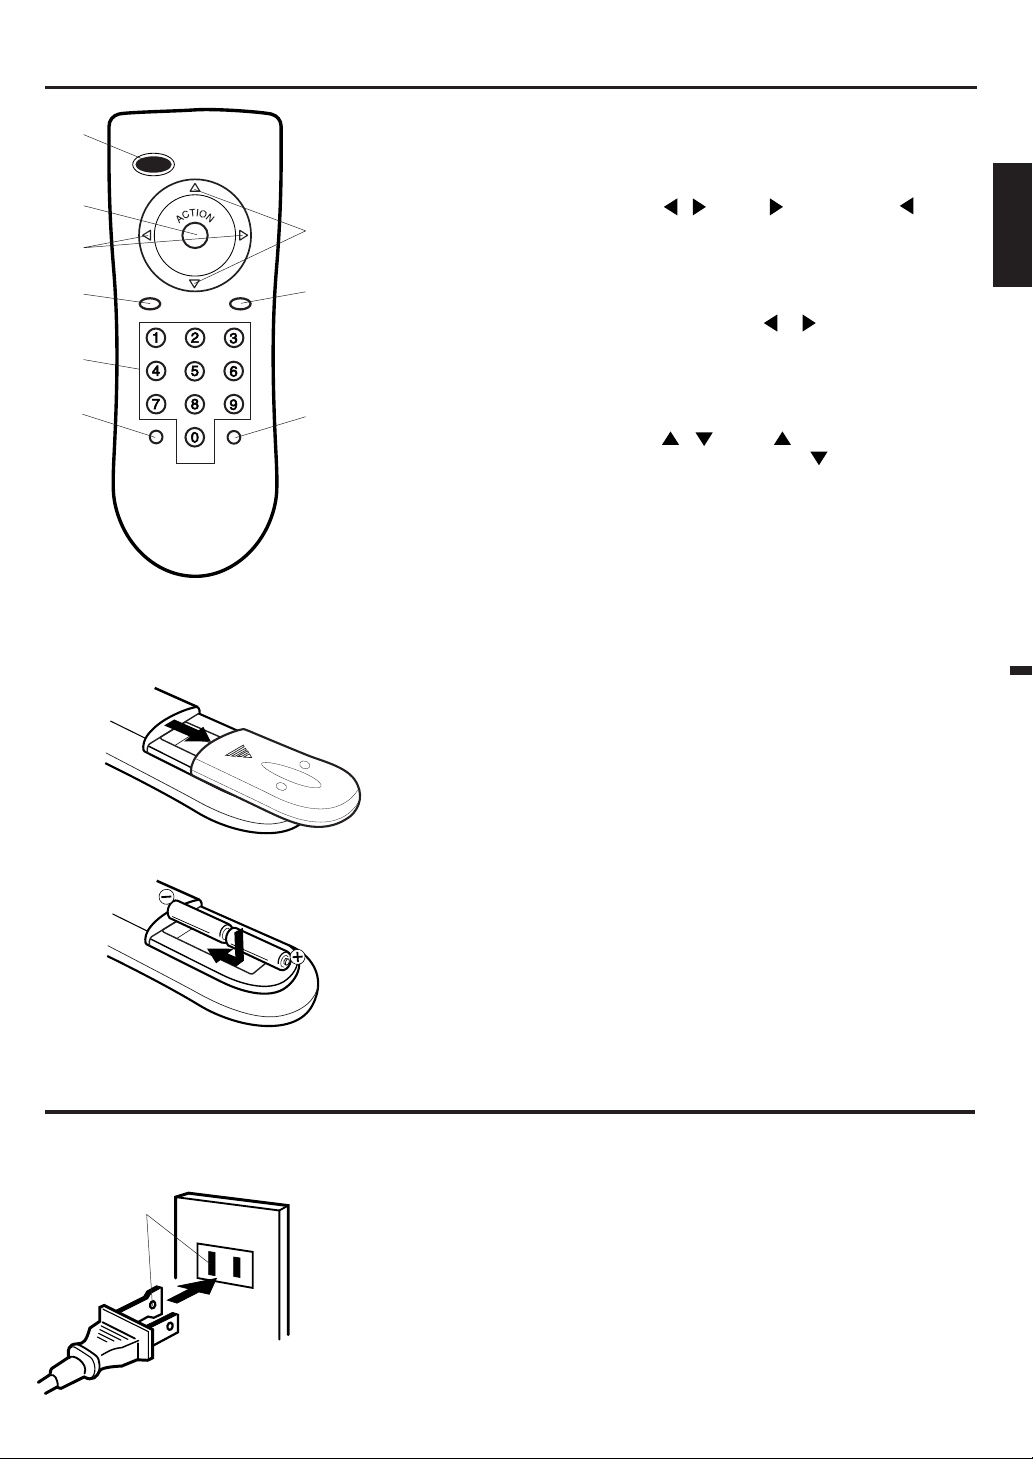
1. POWER - Press to turn the TV on. Press again to turn the
1
POWER
VOL
R-TUNE
CH
VOL
CH
TV/VIDEOMUTE
RECALL
7
8
9
Remote control
Part No. EUR7713020
2
3
4
5
6
Before using the remote control transmitter, batteries must first be installed.
HOW TO INSTALL BATTERIES
1. Slide the battery compartment cover.
TV off.
2. ACTION - Press to display the On-screen menu function.
And also, press to enter or select information for On-Screen
operations.
3. VOL (VOLUME) / - Press to increase, or to
decrease the volume level. And also, press to select the
desired setting during On-Screen operations.
4. MUTE - To turn off the sound, press this button once. The
TV will be silenced and the symbol "MUTE" will appear on
the screen. The muting feature can be released by pressing
MUTE again or one of the VOL or .
5. Direct Channel Selection (0-9) - Allows direct access to
any channel.
6. R-TUNE - This button allows you to go back to the previous
channel selected by just pressing R-TUNE. Press this button
again to return to the channel you were watching.
7. CH (CHANNEL) / - Press to change to a higher num-
bered channel set into memory. Press to change to a lower
numbered channel set into memory. And also, press to select
the desired setting during On-Screen operations.
8. TV/VIDEO - Switches between TV and external input.
9. RECALL - When you press this button, the channel number
will appear in the upper right corner of the screen. Press the
button again to remove display from the screen.
Use two "AA" size penlight batteries (supplied) for the
transmitter. The batteries may last approximately one year
depending on how much the remote control is used. For best
performance, it is recommended that batteries should be replaced
on a yearly basis, or when the remote operation becomes erratic.
Do not mix old and new batteries or different types.
ENGLISH
BATTERY PRECAUTIONS
These precautions should be followed when using batteries in
this device:
2. Install two "AA" (penlight size) batteries.
3. Replace the battery compartment cover.
1. Use only the size and type of batteries specified.
2. Be sure to follow the correct polarity when installing the
batteries as indicated in the battery compartment. Reversed
batteries may cause damage to the device.
3. Do not mix different types of batteries together (e.g. Alkaline
and Carbon-zinc) or old batteries with fresh ones.
4. If the device is not to be used for a long period of time,
remove the batteries to prevent damage or injury from
possible battery leakage.
5. Do not try to recharge batteries not intended to be recharged;
they can overheat and rupture.
(Follow battery manufacturer's directions.)
POWER SOURCE
TO USE AC POWER SOURCE
Use the AC polarized line cord provided for operation on AC. Insert the AC cord plug into a standard 120V 60Hz polarized AC outlet.
AC outlet
Wider Hole
and Blade
Polarized AC Cord Plug
(One blade is wider than
the other)
NOTES:
1. Never connect the AC line cord plug to other than the specified voltage (120V 60Hz).
Use the attached power cord only.
2. If the polarized AC cord does not fit into a nonpolarized AC outlet, do not attempt to file
or cut the blade. It is the user's responsibility to have an electrician replace the obsolete
outlet.
3. If you cause a static discharge when touching the unit, and the unit fails to function,
simply unplug the unit from the AC outlet, wait a few minutes, and plug it back in.
The unit should return to normal operation.
5
Page 6
ANTENNA/CATV CONNECTIONS
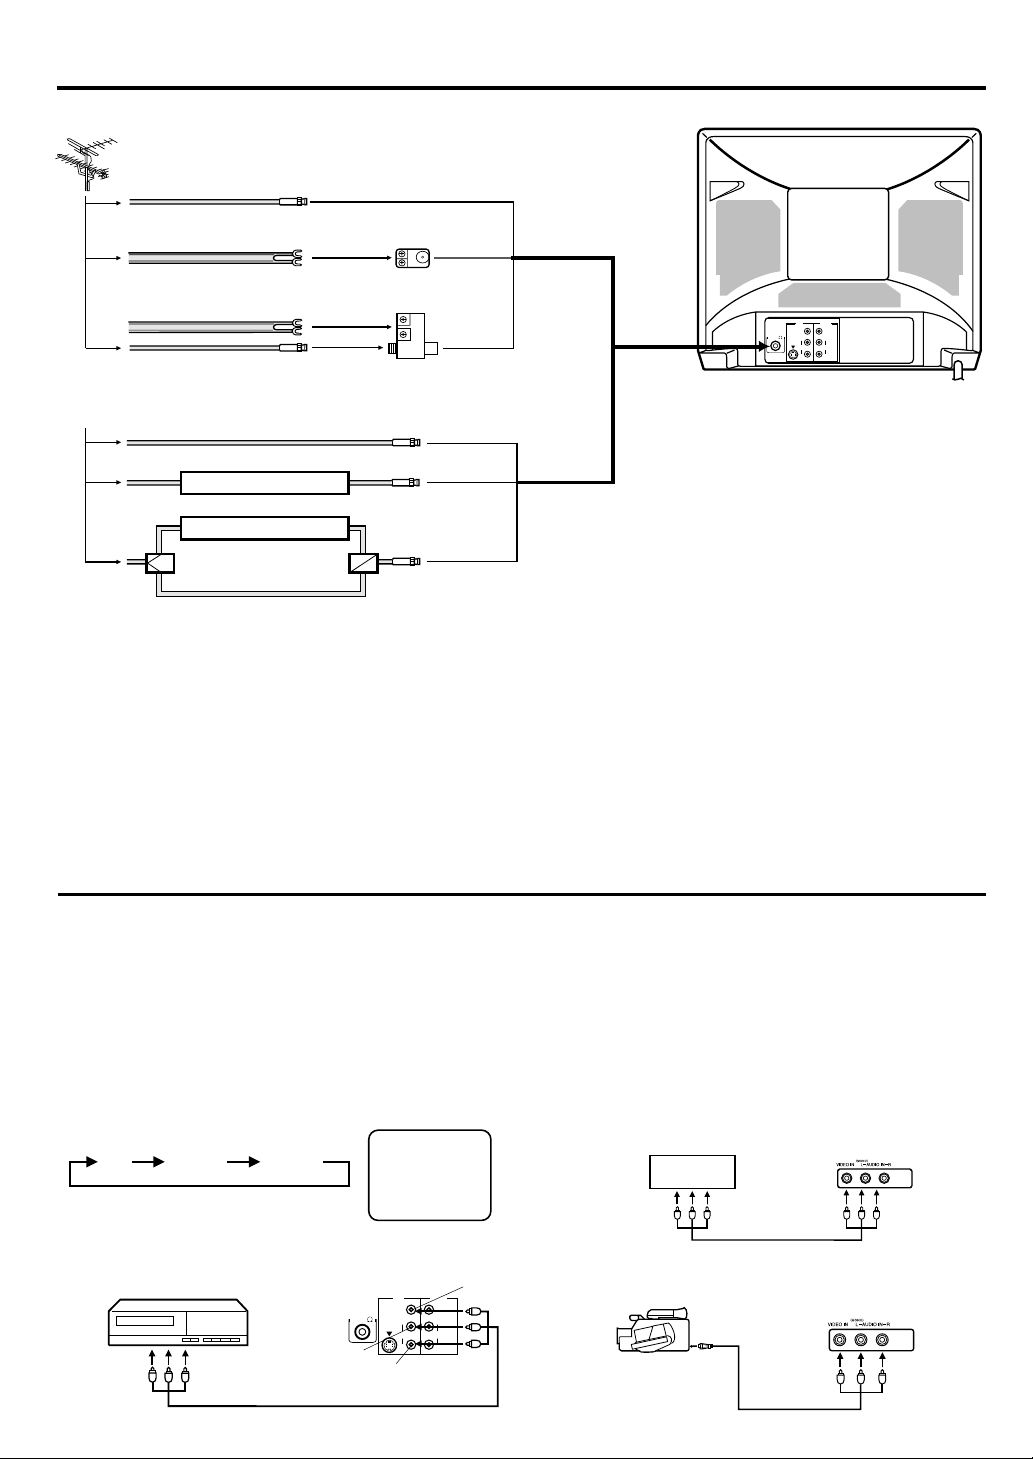
ANTENNA CONNECTIONS
from Antenna
Single 75 ohm cable
300 ohm twin-lead wire
300-75 OHM MATCHING
TRANSFORMER
Switch
(not supplied)
COMBINER
(not supplied)
A
B
IN OUT
VIDEOVIDEO
L/MONO
L/MONO
ANT(75 )
S-VIDEO
AUDIO
AUDIO
R
R
This television has an extended tuning range
and can tune most cable channels without
using a cable company supplied converter
box. Some cable companies offer "premium
pay channels" in which the signal is
scrambled. Descrambling these signals for
normal viewing requires the use of a
descrambler device which is generally
provided by the cable company.
300 ohm twin-lead wire
Single 75 ohm cable
CATV CONNECTIONS
Incoming CATV
Converter/Descrambler
Converter/Descrambler
Splitter
For Subscribers to Basic Cable TV Service
For basic cable service not requiring a converter/descrambler box, connect the CATV 75 ohm coaxial cable directly to the antenna jack on the
back of the television.
For Subscribers to Scrambled Cable TV Service
If you subscribe to a cable service which requires the use of a converter/descrambler box, connect the incoming cable to the converter/
descrambler box and connect the output of the box to the antenna jack on the back of the television. Follow the connections shown left. Set the
television to the output of the converter/descrambler box (usually channel 3 or 4) and use the converter/descrambler box to select channels.
For Subscribers to Unscrambled Basic Cable with Scrambled Premium Channels
If you subscribe to a cable service in which basic cable channels are unscrambled and premium channels require the use of a converter/
descrambler box, you may wish to use a two-set signal splitter (sometimes called a "two-set coupler") and an A/B switch box from the cable
installer or an electronics supply store. Follow the connections shown left. With the switch in the "B" position, you can directly tune any
nonscrambled channels on your TV. With the switch in the "A" position, tune your TV to the output of the converter/descrambler box (usually
channel 3 or 4) and use the box to tune scrambled channels.
CONNECTION TO OTHER EQUIPMENT
The exact arrangement you use to interconnect various video and audio components to the TV is dependent on the model and features of each
component. Check the Owner's Manual provided with each component for the location of video and audio inputs and outputs.
The connection diagrams below are offered as suggestions. You may need to modify them to accommodate your particular assortment of components. The diagrams are intended to show component video and audio interconnections only.
NOTE: If using a monaural video and audio components, connect AUDIO IN (L/MONO) jack to AUDIO OUT using only one audio cable.
TV/AV SELECTION
If you connect the TV to a VCR, camcorder or TV game, through the
audio/video in jacks, use the TV/VIDEO to make your selection.
Press the TV/VIDEO repeatedly to select the desired mode.
“AUX1” or “AUX2” will display on the screen for 4 seconds.
NOTE: TV/VIDEO button only exists in the remote control.
TV AUX 1 AUX 2
1. To connect the TV to a VCR
Set the TV/AV selection for this connection, to AUX1.
Rear of TV
IN OUT
L/MONO
ANT(75 )
S-VIDEO
AUDIO (R)
AUDIO
R
VIDEOVIDEO
L/MONO
AUDIO
R
To Audio/Video
OUT
VCR
AUDIO (L)
(not supplied)
AUX1
VIDEO
2. To connect the TV to a TV Game
Set the TV/AV selection for this connection, to AUX2.
The TV can also be used as a display device for many video games.
However, due to the wide variety of different types of signal generated
by these devices and subsequent hook-up variations required, they
have not all been included in the suggested connection diagrams.
You'll need to consult each component's Owner's Manual for additional
information.
To Audio/Video OUT
TV GAME
Front of TV
(not supplied)
3. To connect the TV to a camcorder
Set the TV/AV selection for this connection, to AUX2.
To playback from the camcorder, connect the camcorder to the TV as
shown.
To AV OUT jack
Front of TV
(not supplied)
6
Page 7
CONNECTION TO OTHER EQUIPMENT
(CONTINUED)
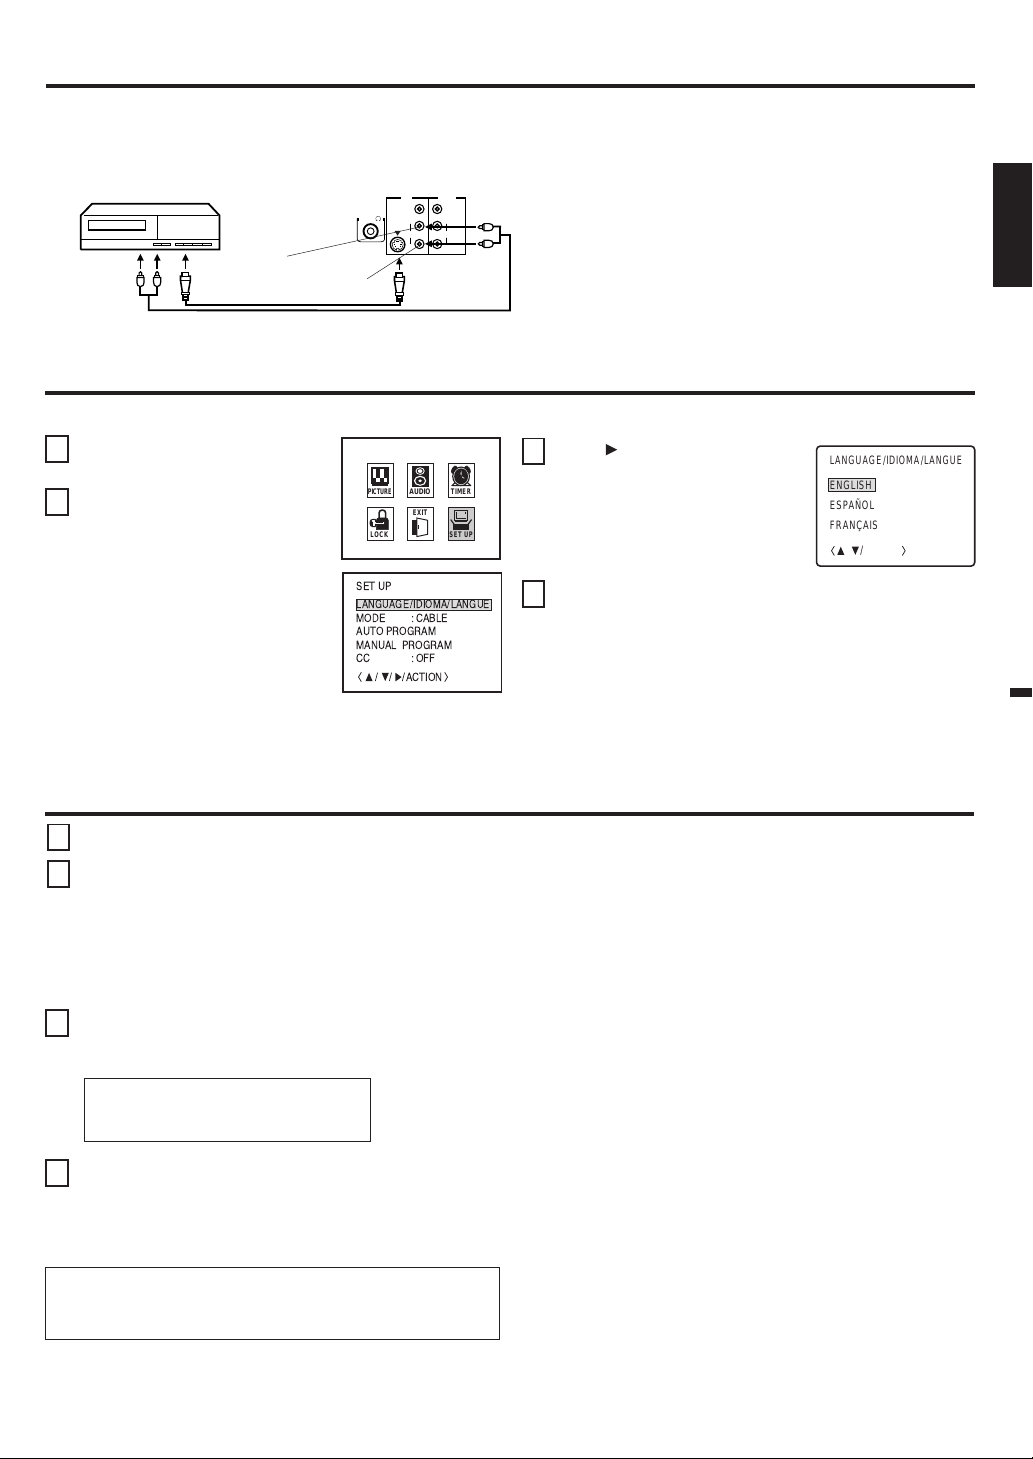
4. To connect the TV to a VCR with an S-VIDEO jack
Set the TV/AV selection for this connection, to AUX1.
If you connect a VCR with an S-video cable to the S-VIDEO jack on the rear of TV, you must also connect the audio cables to
the AUDIO IN jacks on the rear of the TV. The S-video cable only carries the video signal. Audio signal is separate.
VCR
AUDIO (L)
(not supplied) AUDIO (R)
(not supplied)
Rear of TV
ANT(75 )
S-VIDEO
IN OUT
L/MONO
AUDIO
R
VIDEOVIDEO
L/MONO
AUDIO
R
NOTE: When the S-video cable and the video cable
are connected to each jack at the same time,
the S-video cable takes precedence over the
video cable.
SETTING LANGUAGE
This TV can display the channel number, on screen displays and picture adjustments on the screen in English, Spanish or French.
ENGLISH
Press ACTION.
1
Press B to select the SET UP
2
mode, then press ACTION.
NOTE:
All four arrows can be used to select
the SET UP mode, not just B.
PICTURE
AUDIO
TIMER
EXIT
LOCK
SET UP
LANGUAGE/ IDIOMA/LANGUE
MODE
AUTO PROGRAM
MANUAL PROGRAM
CC
//
SET UP
: CABLE
: OFF
/ACTION
Press and then press ▲ or ▼ to
3
select desired language (e.g.
English), then press ACTION.
Press ACTION to select the EXIT mode, then press
4
ACTION again.
LANGUAGE/ IDIOMA/LANGUE
ENGLISH
ESPAÑOL
FRANÇAIS
/ACTION
/
NOTE:
If Spanish or French is chosen, the Closed Caption indicators will be in the selected language, but the Closed Caption text will not
be affected by the language selection.
TV OPERATION
To turn on the TV, press POWER.
1
The VOLUME can be adjusted to a desired level by
2
pressing VOL (VOLUME) B or A .
The sound level will be indicated on the TV screen by
GREEN BARS AND A NUMBER. As the sound level
increases, so do the number of BARS AND THE NUMBER
on the screen. The same is true for decreasing the level.
Set the TV/CATV menu option to the appropriate position.
3
When shipped from the factory, this menu option is in the
CATV setting. See "To Memorize Channels".
TV - VHF/UHF channels
CABLE - CABLE TV channels
CH (CHANNEL) ▲ and ▼
4
Press and release the CH (CHANNEL) ▲ or ▼ . The
channel automatically stops at the next channel set into
memory. Press and hold the button down to change
channels more quickly.
For proper operation, before selecting channels, they
should be set into the TV's memory. See "To Memorize
Channels".
DIRECT CHANNEL SELECTION (0-9) - Press these buttons to
select a channel.The channel number will appear on the upper
right corner of the TV screen. If an invalid channel number is
selected, the display will revert to the previous channel.
TV MODE DIRECT CHANNEL SELECTION - When the TV/
CATV menu option is in the TV position, all channels can be
instantly selected by using two buttons (For example, to select
channel 2, press "0", then "2". If you press only "2", channel
selection will be delayed for a few seconds). For channels 10
and above, press the 2 digits in order.
CATV mode direct channel selection
When the TV/CATV menu option is in the CATV position,
channels can be selected as follows:
1-9
Press "0" twice, then 1-9 as needed.
Example, to select channel 2, press "002".
10-12
Press "0", then remaining 2 digits.
Example, to select channel 12, press "012".
13-99
Press the 2 digits in order.
Example, to select channel 36, press "36".
100-125
Press the 3 digits in order.
Example, to select channel 120, press "120".
NOTE:
If the station being viewed stops broadcasting, the TV
will automatically shut off after 15 minutes.
7
Page 8

TO MEMORIZE CHANNELS
This TV is equipped with a channel memory feature which
allows channels to skip up or down to the next channel set into
memory, skipping over unwanted channels.
Before selecting channels, they must be programmed into the
TV's memory. In addition to normal VHF and UHF channels,
this TV can receive up to 113 Cable TV channels. To use this
TV with an antenna, set the TV/CATV menu option to the TV
setting. When shipped from the factory, this menu option is in
the CATV setting.
TV/CATV SELECTION
Press ACTION and press to
1
select the SET UP mode, then press
ACTION.
Press ▼ to select MODE mode and
2
then press . Then press or to
select the TV or CABLE mode, then
press ACTION.
Press ACTION twice.
3
NOTE:
Contact your cable company to determine the type of cable system
used in your area.
PICTURE
AUDIO
TIMER
EXIT
LOCK
SET UP
LANGUAGE/IDIOMA/LANGUE
MODE : TV CABLE
AUTO PROGRAM
MANUAL PROGRAM
CC
/ACTION
/
SET UP
: OFF
MANUAL CHANNEL MEMORY
Press ACTION and press to select
1
the SET UP mode, then press
ACTION.
Press ▲ twice to select MANUAL
2
PROGRAM mode and then press .
Select the desired channels to be
3
added or deleted using Direct
Channel Selection (10 keys. 0-9),
CH ▲ or ▼.
Press or to select ADD or
4
DELETE.
If an unmemorized channel was
selected (step 3), the channel
indicator will be yellow. Press or
if you wish to ADD the
unmemorized channel. The channel
indicator will change from yellow to
blue when a channel is added and
the channel will be memorized.
If a memorized channel was selected (step 3), the channel
indicator will be blue.
Press or if you wish to DELETE the channel from
memory. The channel indicator will change from blue to yellow
when a channel is deleted.
Repeat Steps 3 and 4 for each channel to be added or
deleted.
PICTURE
AUDIO
EXIT
LOCK
SET UP
LANGUAGE/ IDIOMA/LANGUE
: CABLE
MODE
AUTO PROGRAM
MANUAL PROGRAM
CC
: OFF
/ACTION
//
ADD CH 012
TIMER
SET UP
AUTOMATIC CHANNEL MEMORY
Press ACTION and press to
1
select the SET UP mode, then
press ACTION.
Press ▼ twice to select AUTO
2
PROGRAM mode and then press
. The TV will begin memorizing all
the channels available in your area.
Press ACTION twice.
3
PICTURE
AUDIO
TIMER
EXIT
LOCK
SET UP
LANGUAGE/ IDIOMA/LANGUE
MODE
AUTO PROGRAM
MANUAL PROGRAM
CC
//
SET UP
: CABLE
: OFF
/ACTION
Press ACTION three times.
5
SETTING TIMER
You can set the TV to turn off after a preset amount time.
Press ACTION and press to select the TIMER mode, then press ACTION.
1
Press and then press or to select desired time, then press ACTION.
2
After the timer is programmed, the display will disappear then reappear momentarily every ten minutes to
operating.
To confirm the timer setting, repeat
To cancel the
timer setting, select the OFF.
step 1. The remaining time will be displayed.
TIMER
SLEEP
/
:10
/ACTION
remind you the timer
function is
8
Page 9

SETTING LOCK
This TV is fitted with a V-CHIP controller which provides you with channel viewing access controls and restrictions. This function
allows adult screening of TV programs based upon ratings.
Press ACTION.
1
Press ▼ to select the LOCK mode, then press ACTION.
2
Enter your password (4 digits) using Direct channel
3
selection (0-9).
In the event of entering an incorrect password, press
then re-enter the correct password.
4
Enter the same password for confirmation only for the
first time.
5
Press ▲ or ▼ to select the V-CHIP option, then press
or to select the ON, then press ACTION.
Press
Press ▲ or ▼ to select the TV RATING or MOVIE
6
RATING option, then press
7
Press
or to select the desired rating for the
applicable video or TV channel, then press ACTION.
NOTES:
• If you forget your password, turn on the TV. Reduce the volume to a minimum level. Press and hold VOLUME
front of the TV and press the 0 button on the remote control simultaneously. Select the LOCK mode, then enter a new
password.
• If you want to change the password, follow steps 1-3 and select the "CHANGE PASSWORD" option then enter your new
password.
• The V-Chip function is activated only on programs and tapes that have the rating signal.
• Once you block a program using the V-Chip function, the blocked program cannot be watched based on the content of the
show. When the program starts, the "INPUT PASSWORD" will appear on the screen. When you want to release the VChip temporarily, enter the password.
If you change the channel or turn off the TV while the V-Chip function was temporarily released, the original setting will be
resumed. If you return to the channel you were watching you must re-enter your password to temporarily release your VChip function again.
• If you are changing channels using a VCR or a cable box, while the TV remains on channel 3 or 4, the V-Chip operates
differently. When you enter your password to temporarily release the block on any channel, you have completely disabled
the V-Chip function for all stations. To reset the V-Chip turn your TV off and back on.
• Some cable boxes are built with a delay feature, in some cases it can take up to 10 seconds for a program to appear after
the password has been input.
.
TV RATING
TV–Y TV-PG TV-MA
OFF
TV-Y
: all children
TV-Y7
: 7 years old and above
TV-G
: children’s program
When you select TV-Y7, TV-PG, TV-14 or TV-MA, press RECALL to
explain the rating.
Press ▲ or ▼ to select the desired rating you want. Press to
select the setting ON or OFF, then press ACTION.
.
TV-Y7 TV-G TV-14
TV-PG
: parental guidance
TV-14
: 14 years old and above
TV-MA
: 17 years old and above
MOVIE RATING
OFF
G
PG
PG-13
PG PG-13 R NC-17G X
: all ages
: parental guidance
: parental guidance
for under 13 years old
R
NC-17
X
: Parental guidance for
under 17 years old
: 17 years old and above
: adult only
on the
ENGLISH
CLOSED CAPTION
WHAT IS CLOSED CAPTIONING?
This television has the capability to decode and display
Closed Captioned television programs. Closed Captioning will
display text on the screen for hearing impaired viewers or it
will translate and display text in another language.
TO VIEW CLOSED CAPTIONS
Press ACTION and press to
1
select the SET UP mode,
then press ACTION.
2
Press ▲ to select CC mode and
then press , then press ▲ or ▼
to select desired Closed Caption
(e.g. CAPTION CH1), then press
ACTION.
3
Press ACTION twice.
• When activating the Closed Captioned Decoder, there will be a short delay before the Closed Captioned text appears on the screen.
• Closed Captioned text is only displayed in locations where it is available.
• If no caption signal is received, no captions will appear, but the television will remain in the Caption Mode.
• Misspellings or unusual characters may occasionally appear during Closed Captioning. This is normal with Closed Captioning,
especially with live programs. This is because during live programs, captions are also entered live. These transmissions do not allow
time for editing.
• When Captions are being displayed, on-screen displays, such as volume and mute may not be seen or may interfere with Closed
Captions.
• Some cable systems and copy protection systems may interfere with the Closed Captioned signal.
• If using an indoor antenna or if TV reception is very poor, the Closed Caption Decoder may not appear or may appear with strange
characters or misspelled words. In this case, adjust the antenna for better reception or use an outdoor antenna.
OFF
CAPTION CH1
CAPTION CH2
TEXT CH1
TEXT CH2
/ACTION
/
Captions: This Closed Caption Mode will display text on the
screen in English or another language (depending on the setting
of the Closed Captions ). Generally, Closed Captions in English
are transmitted on Captions Channel 1 and Closed Captions in
other languages are transmitted on Captions Channel 2.
Text: The Text Closed Caption Mode will usually fill 1/2 of full
screen with a programming schedule or other information. After
selecting a Closed Caption Mode, it will stay in effect until it is
changed, even if the channel is changed. If the Captions signal
is lost due to a commercial or a break in the signal, the Captions
will reappear when the signal is received again. If the channels
are changed, the Captions will be delayed approximately 10
seconds.
For television programs broadcasting with Closed Captions, look
in your TV guide for the Closed Captions symbol (CC).
9
Page 10

SOUND ADJUSTMENTS
You can adjust the setting for bass, treble, balance and AI
sound.
Press ACTION and press to select the AUDIO mode,
1
then press ACTION.
AUDIO
Press ▲ or ▼ to select the item
2
you want to adjust, then
Press or to adjust the setting.
3
BASS
TREBLE
BALANCE
AI SOUND
Press ACTION three times.
4
stronger
stronger
right speaker stronger
ON
press
BASS
TREBLE
.
BALANCE
: NO
NORMAL
MODE
: STEREO
: ON
AI SOUND
/ACTION
//
weaker
weaker
left speaker stronger
OFF
AI SOUND FEATURE
When a loud sound is broadcast the AI sound feature
assists in balancing the volume to a more comfortable
listening level.
TO RETURN TO INITIAL SETTING
Select the NORMAL then select SET as in step 2.
STEREO AND SECOND AUDIO PROGRAM (SAP)
The TV is equipped with a feature known as Multi-channel TV
Sound or MTS. MTS broadcasts greatly enhance TV viewing
by bringing you programs with high fidelity stereo sound.
MTS also provides an extra channel called the Second
Audio Program or SAP which broadcasters can use to
transmit a second language for bilingual transmission or for
other purposes.
TO SELECT DESIRED SOUND
Press ACTION and press to select the AUDIO mode,
1
then press ACTION.
AUDIO
or
BASS
TREBLE
BALANCE
NORMAL
MODE
: STEREO SAP MONO
AI SOUND
/ACTION
/
: NO
: ON
Press ▼ to select MODE mode
2
and then
MONO mode, then press ACTION.
Press ACTION twice.
3
press . Then press
to select the STEREO, SAP or
LISTENING TO STEREO SOUND
When the TV is turned on or a channel selection is made,
make certain that the word “STEREO” appears on the
screen. This means that "Stereo" broadcasting is available.
You can enjoy stereo sound from the left and right speakers.
• When the "Mono" broadcasting is received, no indication
is displayed.
• If the broadcast signal is not strong enough or clear stereo
sound is not available, select the MONO as in step 2 to
change to mono sound. The noise should be eliminated.
LISTENING TO SAP (SECOND AUDIO PROGRAM)
When the TV is turned on or a channel selection is made,
make certain that the letters “SAP” appear on the screen.
This means that the "Second Audio Program" broadcasting is
available.
ADJUSTING PICTURE
You can adjust the settings for color, sharpness, picture,
brightness and tint.
Press ACTION twice to select the PICTURE mode
1
press ACTION
Press ▲ or ▼ to select desired item, then press
2
Press
3
COLOR
TINT
BRIGHTNESS
PICTURE
SHARPNESS
Press ACTION three times.
4
10
.
or to adjust the setting.
more vibrant color
greenish hue
increase brightness
increase contrast
makes picture
clearer
.
reduces color
reddish hue
decrease brightness
decrease contrast
makes picture softer
TO RETURN TO INITIAL SETTING
Select the NORMAL then select SET as in step2.
, then
Page 11

TROUBLESHOOTING GUIDE
Before requesting service, please refer to the following chart for the symptom and possible solution.
SYMPTOMS
TV does not operate
Poor sound or No sound
Poor picture or No picture
Poor reception on some channels
Poor color or no color
Picture wobbles or drifts
No CATV reception
Horizontal or diagonal bars on screen
No reception above channel 13
No Remote operation
TV shuts off
Cannot see closed caption
Display is not shown in your language
POSSIBLE SOLUTIONS
• Make sure the power cord is plugged in.
• Try another AC outlet.
• Power is off, check fuse or circuit breaker.
• Unplug unit for an hour, then plug it back in.
• Station or CATV experiencing problems, tune to another station.
• Check sound adjustments (VOLUME and MUTE).
• Check for sources of possible interference.
• Station or CATV experiencing problems, tune to another station.
• Make sure channels are set into memory.
• Check antenna or CATV connections, adjust antenna.
• Check for sources of possible interference.
• Check picture control adjustments.
• Station or CATV experiencing problems, tune to another station.
• Make sure channels are set into memory.
• Station is weak, adjust antenna to receive desired station.
• Check for sources of possible interference.
• Station or CATV experiencing problems, tune to another station.
• Make sure channels are set into memory.
• Check picture control adjustments.
• Check antenna or CATV connections, adjust antenna.
• Check for sources of possible interference.
• Station or CATV experiencing problems, tune to another station.
• Make sure channels are set into memory.
• CATV company is scrambling signal.
• Adjust antenna.
• Check all CATV connections.
• Set TV/CATV menu option to the CATV mode.
• Station or CATV system problems, try another station.
• Check antenna connections, adjust or re-direct antenna.
• Check for sources of possible interference.
• Make sure TV/CATV menu option is in the appropriate mode.
• If using antenna, check UHF antenna connections.
• Batteries are weak, dead or inserted incorrectly.
• Remote is out of range, move closer to TV (within 15 feet).
• Make sure Remote is aimed at sensor.
• Confirm there are no obstructions between the Remote and the TV.
• Make sure the power cord is plugged in.
• No broadcast on station tuned.
• Timer is set.
• Power interrupted.
•
TV station experiencing problems or program tuned is not closed
captioned.
•
Check CATV connection or VHF/UHF antenna, reposition or rotate
antenna.
• Select the Closed caption.
• Select proper language in the SET UP mode.
Try another channel.
ENGLISH
SPECIFICATIONS
AC Power Input:
AC Power Consumption:
Chassis Construction:
Picture Tube:
Horizontal resolution:
Audio Power Output Rating:
Speaker:
Tuner Type:
Remote Control:
ACCESSORIES
Remote Control
Batteries (AA) x 2
2" x 3-1/2" Full Range, 8 ohms x 2
181 Channel, Quartz PLL Frequency
Infrared, Direct Access, 2 x AA batteries
120V, 60Hz
125 Watts
IC Solid state
27" (measured diagonally)
260 lines
1.5 + 1.5 Watts
Synthesized
(supplied)
Receiving Channels:
Antenna Input Impedance:
Inputs/Outputs: S-Video:
Dimensions:
Weight:
VHF 2-13
UHF 14-69
CATV 1-125
C-Input:
Video:
Audio:
Antenna:
25-9/16" (W) x 19-11/16" (D) x 22-1/2" (H)
75 Ohm (VHF/UHF/CATV) Coaxial Input
Y-Input:
In(RCA) 1.0 Vp-p/75 ohms
Out(RCA) 1.0 Vp-p/75 ohms
In(RCA)-8 dBm/50 K ohms
Out(RCA)-8 dBm/1 K ohms
VHF/UHF IN 75 ohms coaxial
1.0 Vp-p/75 ohms
0.3 Vp-p/75 ohms
80.5 Ibs
11
Page 12

PANASONIC CONSUMER ELECTRONICS COMPANY, PANASONIC SALES COMPANY,
DIVISION OF DIVISION OF
MATSUSHITA ELECTRIC CORPORATION OF AMERICA MATSUSHITA ELECTRIC OF PUERTO RICO,
One Panasonic Way INC., Ave. 65 de Infanteria, Km. 9.5
Secaucus, New Jersey 07094 San Gabriel Industrial Park
Carolina, Puerto Rico 00985
Panasonic Color Television
Limited Warranty
Limited Warranty Coverage
If your product does not work properly because of a defect in materials or workmanship, Panasonic Consumer Electronics Company
or Panasonic Sales Company (collectively referred to as “the warrantor”) will, for the length of the period indicated on the chart below,
which starts with the date of original purchase ("warranty period"), at its option either (a) repair your product with new or refurbished
parts, or (b) replace it with a new or a refurbished product. The decision to repair or replace will be made by the warrantor .
TV CATEGORIES ALL PARTS EXCEPT CRT LABOR CRT SERVICE
22”-27” diagonal 1 (ONE) YEAR 90 DAYS 2 (TWO) YEARS IN-HOME or CARRY-IN
During the "Labor" warranty period there will be no charge for labor. During the "Parts" warranty period, there will be no charge for
parts. You must carry-in your product or arrange for in-home service (in-home service available only for 22” [diagonal] and larger
screen), as applicable, during the warranty period. If non-rechargeable batteries are included, they are not warranted. This warranty
only applies to products purchased and serviced in the United States or Puerto Rico. This warranty is extended only to the original
purchaser of a new product which was not sold "as is". A purchase receipt or other proof of the original purchase date is required for
warranty service.
Carry-in or In-Home Service
For Carry-In or In-Home Service (as applicable) in the United States call 1-800-21 1-PANA(7262) or visit Panasonic Web Site: http://
www.panasonic.com
For assistance in Puerto Rico call Panasonic Sales Company (787)-750-4300 or fax (787)-768-2910.
In-Home service, if applicable, requires clear, complete and easy access to the product by the authorized servicer and does not
include removal or re-installation of an installed product. It is possible that certain in-home repairs will not be completed
will require that the product, or parts of the product, be removed for shop diagnosis and/or repair and then returned.
Limited Warranty Limits And Exclusions
This warranty ONLY COVERS failures due to defects in materials or workmanship, and DOES NOT COVER normal wear and tear or
cosmetic damage, nor does it cover markings or retained images on the picture tube resulting from viewing fixed images (including,
among other things, letterbox pictures on standard 4:3 screen TV’s, or non-expanded standard 4:3 pictures on wide screen TV’ s, or
onscreen data in a stationary and fixed location). The warranty ALSO DOES NOT COVER damages which occurred in shipment, or
failures which are caused by products not supplied by the warrantor, or failures which result from accidents, misuse, abuse, neglect,
mishandling, misapplication, alteration, faulty installation, set-up adjustments, misadjustment of consumer controls, improper maintenance, power line surge, lightning damage, modification, or commercial use (such as in a hotel, office, restaurant, or other business),
rental use of the product, service by anyone other than a Factory Servicenter or other Authorized Servicer, or damage that is
attributable to acts of God.
THERE ARE NO EXPRESS W ARRANTIES EXCEPT AS LISTED UNDER "LIMITED W ARRANTY COVERAGE". THE W ARRANTOR IS NOT LIABLE FOR INCIDENT AL OR CONSEQUENTIAL DAMAGES RESULTING FROM THE USE OF THIS PRODUCT ,
OR ARISING OUT OF ANY BREACH OF THIS WARRANTY. (As examples, this excludes damages for lost time, cost of having
someone remove or re-install an installed unit if applicable, or travel to and from the servicer. The items listed are not exclusive, but
are for illustration only.) ALL EXPRESS AND IMPLIED WARRANTIES, INCLUDING THE WARRANTY OF MERCHANTABILITY,
ARE LIMITED TO THE PERIOD OF THE LIMITED WARRANTY.
Some states do not allow the exclusion or limitation of incidental or consequential damages, or limitations on how long an implied
warranty lasts, so the exclusions may not apply to you.
This warranty gives you specific legal rights and you may also have others rights which vary from state to state. If a problem
product develops during or after the warranty period, you may contact your dealer or Servicenter. If the problem is not handled to your
satisfaction, then write to the warrantor's Consumer Affairs Department at the addresses listed for the warrantor.
in-home, but
with this
PARTS AND SERVICE (INCLUDING COST OF AN IN-HOME SERVICE CALL, WHERE APPLICABLE) WHICH ARE NOT COVERED BY THIS LIMITED WARRANTY ARE YOUR RESPONSIBILITY.
12
Page 13

For Product Information, Operating Assistance, Literature Request, Dealer Locations, and
all Customer Service inquiries please contact:
1-800-211-PANA (7262), Monday-Friday 9am - 9pm; Saturday-Sunday 10am - 7pm, EST.
Web Site: http://www.panasonic.com
You can purchase parts, accessories or
locate your nearest servicenter by visiting
our Web Site.
Accessory Purchases:
1-800-332-5368 (Customer Orders Only)
Panasonic Services Company 20421 84th Avenue South, Kent, WA 98032
(6 am to 5 pm Monday - Friday; 6 am to 10:30 am Saturday; PST)
(Visa, MasterCard, Discover Card, American Express, Check)
ENGLISH
Matsushita Electric of Puerto Rico, Inc. Panasonic Sales Company/Factory Servicenter:
Ave. 65 de Infanteria, Km. 9.5, San Gabriel Industrial Park, Carolina, Puerto Rico 00985
Phone (787) 750-4300 Fax (787) 768-2910
Service in Puerto Rico
13
Page 14

ESPAÑOL
El propósito del relámpago con punta de flecha dentro de un
triángulo es el de advertir al usuario de que existen piezas internas
del producto que representan riesgo de que las personas reciban
descargas eléctricas.
ADVERTENCIA:
A fin de reducir el riesgo de descargas eléctricas, no deberán
quitarse ni la cubierta ni la tapa posterior. No hay en el in terior pieza
alguna que el usuario tenga que reparar. Todo servicio habrá de
brindarlo personal de reparación capacitado.
El propósito del signo de exclamación dentro de un triángulo es el de
advertir al usuario de que los documentos que acompañan al aparato
incluyen instrucciones importantes de funcionamiento y reparación.
ADVERTENCIA: CON EL OBJETO DE PREVENIR EL RIESGO DE INCENDIO O DE DESCARGA ELÉCTRICA, ESTE
APARATO NO DEBERÁ VERSE EXPUESTO A LA LLUVIA NI A LA HUMEDAD.
INSTRUCCIONES IMPORTANTES DE
SEGURIDAD
1. LEA LAS INSTRUCCIONES- Todas las instrucciones de seguridad y de operación deben ser leídas antes de operar la unidad.
2. GUARDE ESTAS INSTRUCCIONES- Las instrucciones de seguridad y operación deben conservarse para su uso posterior.
3. PRESTE ATENCION A TODAS LAS ADVERTENCIAS- Todas las advertencias en la unidad y en las instrucciones de
operación deben ser seguidas.
4. SIGA TODAS LAS INSTRUCCIONES- Todas las instrucciones de uso y operación deben ser aplicadas.
5. LIMPIEZA- Desenchúfese del tomacorriente de la pared el televisor antes de limpiarlo. No deberán utilizarse limpiadores
líquidos ni en aerosol. Use un paño húmedo para limpiar el gabinete exterior solamente.
6. ACCESORIOS- No deberán emplearse accesorios que el fabricante del televisor no recomiende, puesto que éstos podrían
resultar peligrosos.
7. AGUA Y HUMEDAD- No use esta unidad cerca de agua. Por ejemplo, cerca de una bañera, tina, lavadero, en un sótano
húmedo, o cerca de una alberca.
8. ACCESORIOS- No deberá ponerse este televisor en un carrito, soporte, tripie o mesa que
no sean estables.
El televisor podría caerse, provocando lesiones graves y daños importantes al aparato en sí.
Todo el conjunto de aparato y carrito deberá desplazarse con cuidado. Las paradas repentinas,
8A.
la fuerza excesiva y las superficies no uniformes podrían ser la causa de que dicho conjunto
de aparato y carrito se vuelque.
9. VENTILACION- Las ranuras y aberturas de la parte posterior e inferior se proveen a fin de que el televisor disponga de
ventilación, para garantizar el buen funcionamiento del mismo y protegerlo contra el sobrecalentamiento. Dichas ranuras y
aberturas jamás deberán bloquearse o taparse.
Las aberturas jamás deberan ser bloqueadas por colocar el televisor en una cama, sofá, alfombra ni demás superficies
similares. Jamás habrá de ponerse este televisor sobre radiadores o rejillas de salida de calefacción ni cerca de estos. Este
televisor no deberá colocarse en muebles empotrados, tales como libreros, a menos que se proporcione la ventilación
correspondiente.
10. FUENTE DE PODER- Hágase funcionar el aparato exclusivamente a partir de la fuente de energía que se indique en la fuente
de identificación. Si no está seguro del tipo de energía que abastece a la residencia, consulte con el distribuidor del aparato o
con la compañía eléctrica local. Con respecto a televisores diseñados de modo que trabajen con pilas, consúltense las
instrucciones de operación pertinentes.
11. ATERRIZAJE O POLARIZACION- Este televisor está equipado con un enchufe polarizado de línea alternadora de corriente
(un enchufe que tiene una hoja más ancha que la otra). Este enchufe cabrá solamente de una forma en el tomacorriente. Esta
es una característica de seguridad. Si no puede insertar por completo el enchufe en el tomacorriente, intentelo invirtiendo el
enchufe. Si el enchufe todavia no cabe, llame a su electricista para que reemplace su toma de corriente que probablemente es
obsoleto. No elimine el propósito de seguridad del enchufe polarizado.
12. PROTECCION DEL CABLE DE CA- El cable de CA debe ser colocado de manera que no sea pisado o prensado por otros
artículos colocados encima o contra de ellos. Ponga especial cuidado en los conectores de CA y el extremo que llega al
aparato.
AVISO PARA CARRO PORTATIL
(símbolo provisto por RETAC)
S3126A
2
Page 15

13. TORMENTAS ELECTRICAS- Para mayor protección de su aparato durante tormentas eléctricas o cuando se deje
desatendido o inactivo por largos períodos de tiempo, desconecte la antena y el televisor del tomacorriente de la pared. Esto
prevendrá que los rayos o las sobretensiones transitorias dañen el mencionado receptor.
14. LINEAS DE CORRIENTE- Los sistemas de antena al aire libre no deberán ser colocados cerca de cables elevados de
corriente ni de demás circuitos de energía eléctrica, ni donde pueda caer sobre tales cables o circuitos de corriente. Cuando se
instale un sistema de antena al aire libre, se debe tener extrema precaución de tocar semejantes cables o circuitos de
corriente, ya que el contacto con los mismos podría ser fatal.
15. SOBRECARGADO- No sobrecargue los tomacorrientes o extensiones eléctricas ya que se corre el riesgo de incendio o
descarga eléctrica.
16. ENTRADA DE OBJETOS Y LIQUIDOS- Jamás deberá meterse objeto alguno por las ranuras del televisor ya que pueden
tocar puntos de voltaje peligrosos o poner en partes en corto circuito, lo cual podría causar incendios o sacudidas eléctricas.
Nunca derrame o rocíe líquido alguno sobre el televisor.
17. ATERRIZAMIENTO DE ANTENA EXTERNA- Si ha conectado al televisor una antena al aire libre, cerciorese que dicha antena
tenga una toma de tierra de modo que brinde cierta protección contra las sobretensiones transitorias y cargas estáticas
acumuladas. Consúltese al distribuidor o a un técnico de servicio para obtener información relativa a la debida conexión a tierra
del mástil y toda la estructura de soporte, del cable de acometida a una unidad de descarga de antena, medidas de los
conductores de toma de tierra, al emplazamiento de la citada unidad de carga de descarga de antena, a la conexión a los
electrodos de toma de tierra, y a los requisitos referentes a tales electrodos de toma de tierra. Véase la figura.
18. SERVICIO- El usuario no deberá tratar de reparar él mismo este televisor, puesto que abrir o quitar las tapas quizá exponga a
dicho usuario a voltajes peligrosos o a otros riesgos. Para el servicio acúda al personal de reparación calificado.
19. DAÑOS QUE REQUIEREN SERVICIO- Si se diera cualquiera de las siguientes circunstancias, deberá desenchufarse el
televisor del tomacorriente de la pared, procurándose el servicio de éste por personal de reparación calificado:
a. Cuando el cordón o el enchufe alimentadores se encuentren deteriorados o deshilachados.
b. Si se ha derramado líquido u objetos en el interior del televisor.
c. Si el televisor se ha visto expuesto a la lluvia o al agua.
d. Si el televisor no funciona normalmente obsevándose las respectivas instrucciones. Ajústense exclusivamente aquellos
controles que abarquen las instrucciones de funcionamiento, dado que el ajuste indebido de otros controles podría
ocasionar daños y con frecuencia, exigirá el enorme trabajo de un técnico calificado a fin de reestablecerse el
funcionamiento normal del televisor en cuestión.
e. Si se ha dejado caer el televisor o si se ha dañado el mueble de este.
f. Cuando el televisor muestre una visible alteración en su rendimiento. Esto indicará que hace falta que reciba servicio.
20. PARTES DE REEMPLAZO- Cuando se precisen piezas de repuesto, cerciorarse de que el técnico que lleve a cabo las
reparaciones emplee piezas de repuesto que el fabricante estipule, las cuales tengan las mismas características que las
originales. Las sustituciones no autorizadas podrían dar como resultado incendios, sacudidas eléctricas o demás peligros.
21. REVISION- Al concluirse todo servicio o reparación de este televisor, pídase al técnico que efectúe comprobaciones rutinarias
de seguridad destinadas a establecer que el estado de funcionamiento del televisor es el correcto.
22. CALOR- El televisor deberá colocarse lejos de fuentes de calor como radiadores, salidas de calefacción, estufas u otros
productos que generen calor.
23. OBSERVACION A LOS ENCARGADOS DE LA INTALACION DE LA RED CATV- Este recordatorio se ofrece con el objeto
de llamar la atención de los encargados de la instalación de la red CATV, para que suministren las pautas relativas a la
adecuada conexión a tierra, y en particular, estipula que la toma de tierra de cables habrá de quedar conectada al sistena de
toma de tierra del edificio, tan próxima como resulte práctico al punto de entrada de dicho cable.
ESPAÑOL
EJEMPLO DE CONEXION A TIERRA DE LA ANTENA SEGUN EL CODIGO NACIONAL DE ELECTRICIDAD (NEC)
CABLE DE ENTRADA DE LA ANTENA
ABRAZADERA DE
TIERRA
EQUIPO DE
SERVICIO
ELECTRICO
NEC - CODIGO NACIONAL DE
ELECTRICIDAD
S2898A
Este producto utiliza tanto un tubo de rayos catódicos (TRC) como otros componentes que contienen plomo. La disposición de estos materiales puede estar controlada
en su comunidad debida a consideraciones ambientales. Para información de disposición o reciclaje favor de contactar a sus autoridades locales, o a la Alianza de
Industrias Electrónicas: <http://www.eiae.org.>
UNIDAD DE DESCARGA DE LA
ANTENA (SECCION 810-20 DE
NEC)
CONDUCTORES DE CONEXION A TIERRA
(SECCION 910-21 DE NEC)
ABRAZADERAS DE TIERRA
SISTEMA DE ELECTRODOS PARA CONEXION A TIERRA DEL
SERVICIO DE POTENCIA
3
Page 16

CARACTERISTICAS
• 181 canales de TV cable - El sistema de sintonización es capaz de recibir los 68 canales de VHF/UHF de emisión estándar
disponibles en su área. Al ser usado con un sistema de TV cable, este sistema puede sintonizar las frecuencias de VHF estándar
y 113 frecuencias de TV cable. El número real de canales recibidos dependerá de la recepción de canales en su área y del
servicio de TV cable al que usted esté suscrito.
• Indicaciones en la pantalla en 3 idiomas - Indica el canal, temporizador para dormir, nivel de volumen, silenciamiento, indicadores
de texto/subtítulos y ajustes de control de imagen. Pueden aparecer en inglés, español o francés.
• Temporizador de desactivación automática - Controlando esta función desde la unidad de control remoto, usted podrá
programar el televisor para que se apague automáticamente después de un período de hasta 120 minutos.
• Protección de la memoria - En caso de interrupciones en el suministro de energía al televisor, este sistema evita la pérdida de
los canales memorizados.
• V-Chip - La función de prohibición para menores con Chip V puede leer la clasificación de un programa de TV o película, si el
programa tiene codificada esta información. El Chip V permite seleccionar el nivel de prohibición.
• Ajustes de imagen usando la unidad de control remoto - La indicación en pantalla permite realizar ajustes precisos de
BRILLO, COLOR, CONTRASTE, DEFINICION y TINTE desde la unidad de control remoto.
• Decodificador de subtítulos - Exhibe subtítulos de texto en una tercera parte de pantalla completa de TV para personas con
problemas de audición.
• Recepción estéreo/SPA - Este TV fue diseñado para recibir programas de estéreo y segundo programa de sonido (SPA).
LOCALIZACION DE CONTROLES
DELANTERA
1
2
1. POWER - Presione para encender o apagar el televisor.
2. Sensor del control remoto - Las señales del control
remoto son recibidas aqui.
3. CHANNEL (Canal) ▲ / ▼ - Presione para seleccionar el
siguiente canal, asi como hacer selecciones en el menú.
4. VOLUME (Volúmen) / - Presione para ajustar el nivel
de audio del televisor, asi como
seleccionar opciones en el menú en pantalla.
ACTION - Presione para accesar el menú en pantalla.
También presione para seleccionar información en los
menús en pantalla.
5. Conectores FRONT AUDIO/VIDEO IN (AUX2) - Los cables
de audio y video de una fuente externa se pueden conectar
aquí.
34
5
TRASERA
IN OUT
VIDEOVIDEO
L/MONO
S-VIDEO
7
L/MONO
AUDIO
AUDIO
R
R
9
8
10
ANT(75 )
6
6. Conector de entrada de ANTENA VHF/UHF -
Conecte una antena VHF/UHF o un TV cable a este
conector.
7. Conector S-VIDEO IN - Aquí puede conectar el cable de
señal S-Video desde una fuente externa.
8. Conectores REAR AUDIO (L/R) VIDEO IN (AUX1) - Aquí
pueden conectar desde una fuente externa los cables de
señales de audio y video.
9. Conectores REAR AUDIO (L/R) VIDEO OUT - Se usa
para la salida de señales de audio y video a un TV,
amplificador o VCR.
10. Cordón de CA - Conéctelo a un enchufe de 120V, 60Hz.
4
Page 17

CONTROL REMOTO
1
2
3
4
5
6
Antes de usar la unidad de control remote deben ser instaladas las
pilas.
COMO INSTALAR LAS PILAS
1. Deslice la tapa del compartimiento de las pilas.
POWER
R-TUNE
CH
VOL
VOL
CH
TV/VIDEOMUTE
RECALL
7
8
9
Número de parte del
control remoto:
EUR7713020
1. POWER - Presione para encender y apagar el televisor.
2. ACTION - Presione para accesar el menú en pantalla.
También presione para seleccionar información en los menús
en pantalla.
3. VOL (VOLUMEN) / - Presione para ajustar el nivel de
audio del televisor, asi como seleccionar opciones en el
menú en pantalla.
4. MUTE - Presione para desactivar el sonido. Presione de
nuevo para re-activar el sonido.
5. Teclado numérico (0-9) - Presione para seleccionar
cualquier canal.
6. R-TUNE - Presione para regresar al canal previamente visto.
7. CH (CANAL) ▲ / ▼ - Presione para seleccionar el siguiente
canal, asi como hacer selecciones en el menú.
8. TV/VIDEO - Presione para seleccionar la modalidad de
televisión o video.
9. RECALL - Presione para visualizar el canal en la esquina
superior derecha de la pantalla.
Use dos pilas “AA” (incluidas). Las pilas pueden durar hasta un
año dependiendo de que tanto se use el control remoto. Para
mejores resultados se recomienda que las pilas se cambien
una vez al año o cuando la operación del control remoto se
vuelva errática.
ESPAÑOL
2. Instale dos pilas “AA”.
3. Coloque nuevamente la tapa de las pilas.
FUENTE DE PODER
USO DE FUENTE DE PODER DE CA
Utilice el enchufe polarizado para uso en CA. Introduzca el
enchufe polarizado en un tomacorrientes de CA polarizado de
120V 60 Hz.
Toma corrientes
Clavija y orificio
más anchos
PRECAUCIONES
1. Use solo pilas del tamaño y tipo especificado.
2. Instale las pilas igualando las marcas de polaridad. La
instalación incorrecta puede causar daños al control remoto.
3. No mezcle tipos de pilas diferentes (carbono de zinc con
alcalina) ni pilas usadas con nuevas.
4. Si el control remoto no va a ser usado por un largo período
de tiempo, quite las pilas para evitar daños por el posible
derrame y corrosión.
5. No trate de recargar pilas no recargables, pueden
sobre calentarse. (Siga las instrucciones del fabricante de
las pilas).
NOTAS:
1. Nunca conecte el cable de AC a un tomacorriente que no sea
el especificado (120V 60Hz). Use solo el cable de AC
suministrado.
2. Si el enchufe polarizado no entra en un tomacorrientes no
polarizado, no trate de cortar o rebajar la clavija ancha.
Es responsabilidad del usuario llamar a un electricista para
que cambie el tomacorrientes obsoleto.
3. Si causa una descarga estática al tocar la unidad y esta
no funciona, desconecte el enchufe del tomacorriente, espere
unos minutos y vuelva a conectarlo. La unidad debe de
funcionar normalmente.
Enchufe polarizado
(Una clavija es más ancha que la otra)
5
Page 18

CONEXION DE CABLE/ANTENA
CONEXION DE ANTENA
Antena
Cable de 75 ohmios
Cable de 300 ohmios
Acoplador de
300-75 ohmios
Cable de 300 ohmios
Cable de 75 ohmios
CONEXION DE CABLE
Cable de entrada de la compañía de cable
Convertidor/Decodificador
Convertidor/Decodificador
Splitter
Para suscriptores de servicio básico de cable y canales de paga.
Si usted esta suscrito a un servicio de cable en donde los canales básicos no estan codificados y los canales de paga requieren de
un convertidor/decodificador, usted puede usar un separador de señal (splitter) y un switch. Siguiendo las conexiones mostradas
en la ilustración, cuando el switch este en la posición “B” usted prodrá sintonizar directamente los canales básicos en su televisor.
Cuando el switch este en la posición “A” usted podrá sintonizar los canales de paga a través de su convertidor/decodificador.
Para suscriptores de servicio básico de cable
Para el servicio básico de cable que no requiera de un convertidor/decodificador, conecte el cable coaxial de 75 ohmios
directamente a el conector ANT en la parte posterior del televisor.
Para suscriptores de servicio de cable codificado
Si usted esta suscrito a un servicio de cable que requiera del uso de un convertidor/decodificador, conecte el cable de entrada de
la compañía de cable al convertidor/decodificador y conecte la salida de este a el conector ANT en la parte posterior del televisor.
Seleccione el canal requerido por su convertidor/decodificador (usualmente es el canal 3 o 4) y utilice el convertidor/decodificador
para cambiar los canales.
Switch
(no incluido)
Multiplexor análogo
(no incluido)
A
A
B
B
IN OUT
VIDEOVIDEO
L/MONO
L/MONO
ANT(75 )
S-VIDEO
AUDIO
AUDIO
R
R
Este televisor tiene la capacidad de
sintonizar canales de servicio de cable
sin necesidad de un convertidor/
decodificador. Algunas compañías de
cable ofrecen “canales de paga” en
donde la señal esta codificada. Para
poder ver estos canales es necesario el
uso de un dispositivo decodificador que
generalmente es proporcionado por la
compañía de cable.
CONEXION DE EQUIPOS OPCIONALES
Las conexiones exáctas necesarias para conectar varios tipos de componentes de audio y video al televisor dependen del modelo
y características de cada componente. Consulte el manual de usuario de cada componente para localizar los conectores de
entrada y salida de audio y video.
Los diagramas de conexión mostrados abajo se ofrecen como sugerencias. Puede que sea necesario modificarlos para el
componente específico que quiera conectar. Los diagramas son para mostrar las conexiones de audio y video solamente.
NOTA:
If using a monaural video and audio components, connect AUDIO IN (L/MONO) jack to AUDIO OUT using only one audio cable.
SELECCION DE TV/AV
Si conecta su televisor a una videocasetera, video
consola de juego a través de los conectores de audio/video, use
el botón de TV/VIDEO para hacer su selección.
Presione el botón TV/VIDEO hasta seleccionar el modo
deseado. “AUX1” o “AUX2” será desplegado en imagen por 4
segundos.
NOTA: El botón de TV/VIDEO solo se encuentra en el control
remoto.
TV AUX 1 AUX 2
1. Para conectar el televisor a una videocasetera.
Ajuste a AUX1 la selección de TV/AV para esta conexión.
VCR
ANT(75 )
AUDIO
A Video y
Audio OUT
(Izquierda)
AUDIO (Derecha)
(no incluidos)
cámara o
Atrás del TV
IN OUT
VIDEOVIDEO
L/MONO
L/MONO
S-VIDEO
AUDIO
R
AUDIO
R
AUX 1
VIDEO
6
2. Para conectar el televisor a una consola de video juego.
Ajuste a AUX2 la selección de TV/AV para esta conexión.
Este televisor también puede ser usado como monitor de una
consola de video juegos. Sin embargo, debido a la gran
variedad de tipos de señal generadas y tipos de conexiones
requeridas por estas consolas, no todas se han incluido en
las conexiones sugeridas. Necesita consultar el manual de
usuario de su consola para información adicional.
A Video y Audio OUT
Consola de
TV GAME
video juego
Frente del TV
(no incluidos)
3. Para conectar el televisor a una video cámara.
Ajuste a AUX2 la selección de TV/AV para esta conexión.
Para ver el contenido de una video cámara, conecte esta al
televisor como se indica.
Frente del TV
A AV OUT
(no incluidos)
TR
Page 19

CONEXION DE EQUIPOS OPCIONALES
(CONTINUACIÓN)
4.Para conectar el televisor a una videocasetera con una toma S-VIDEO
Ajuste a AUX1 la selección de TV/AV para esta conexión.
Si conecta un VCR con una toma S-video a la toma S-VIDEO de la parte posterior del TV , también debe conectar los cables
de audio a las tomas AUDIO IN de la parte posterior del TV. El cable S-video sólo transporta la señal de vídeo. La señal de
audio es independiente.
VCR
AUDIO (Izquierda)
(no incluidos)
(no incluidos)
Atrás del TV
IN OUT
L/MONO
ANT(75 )
S-VIDEO
AUDIO
R
VIDEOVIDEO
L/MONO
AUDIO
R
AUDIO
(Derecha)
NOTA: Cuando el cable S-video y el cable de vídeo
estándar se conectan al mismo tiempo, el
cable de S-vídeo tiene preferencia sobre el
cable de vídeo.
SELECCION DE IDIOMA
Este televisor puede desplegar el número del canal, los desplegados y ajustes de imágen en pantalla en inglés, español y
francés.
Presione ACTION.
1
3
Presione
seleccionar el idioma deseado,
PICTURE
AUDIO
2
Presione
para seleccionar el
modo de AJUSTE (SET UP),
LOCK
TIMER
EXIT
SET UP
luego presione ACTION.
luego presione ACTION.
NOTA:
Las cuatro flechas pueden ser
utilizadas para seleccionar en el modo
de AJUSTE (SET UP), no solo
.
SET UP
LANGUAGE/ IDIOMA/LANGUE
MODE
: CABLE
AUTO PROGRAM
MANUAL PROGRAM
CC
: OFF
/ACTION
//
Presione ACTION para seleccionar el modo de
4
SALIDA (EXIT), luego presione ACTION de nuevo.
NOTA:
Si se selecciona español o francés, los indicadores de subtítulos cambiaran al idioma seleccionado, pero el texto de los
subtítulos no se vera afectado por esta selección.
y luego ▲ o ▼ para
LANGUAGE/IDIOMA/LANGUE
ENGLISH
ESPAÑOL
FRANÇAIS
/ACTION
/
ESPAÑOL
OPERACION DEL TV
Para encender el televisor presione POWER.
1
El volumen puede ser ajustado al nivel deseado
2
presionando VOL
El nivel de sonido será indicado en pantalla por medio
de una barra verde y un número.
Al aumentar el sonido, tambien aumentan la barra
verde y el número. Lo mismo sucede al disminuir el
sonido.
Ajuste la opción de TV/CATV a la posición deseada.
3
Cuando el televisor sale de fábrica, sale con CATV
seleccionado. Ver “GRABANDO CANALES EN
MEMORIA”.
TV - canales VHF/UHF
CATV - canales de cable
CH (Canales) ▲ y ▼
4
Presione y suelte los botones de CH ▲ o ▼. El canal
se detiene automáticamente en el siguiente canal en
memoria. Presione y mantenga presionado el botón
para cambiar canales más rápido.
Para una operación adecuada, antes de seleccionar
canales estos deberían ser programados a la memoria del
televisor. Ver “GRABANDO CANALES EN MEMORIA”.
o .
SELECCION DIRECTA DE CANALES (0-9) Presione estos botones para seleccionar un canal. El número
del canal será mostrado en la esquina superior derecha de
la pantalla. Si un canal invalido es seleccionado, la pantalla
mostrará de nuevo el número del canal anterior.
SELECCION DIRECTA DE CANALES EN MODO TV Cuando la opción de TV/CATV se encuentra en TV, todos
los canales pueden ser seleccionados inmediatamente
usando dos botones (por ejemplo, para seleccionar el canal
2 presione “0” y luego “2”. Si presiona solamente “2” el
cambio tardará unos segundos). Para los canales del 10 en
delante, presione los dos digitos en órden.
SELECCION DIRECTA DE CANALES EN MODO CATV Cuando la opción de TV/CATV se encuentra en CATV, los
canales pueden seleccionarse de la siguiente manera:
1-9
Presione “0” dos veces y luego del 1-9 según
sea necesario.
10-12
13-99
100-125
Presione “0” y luego los dos digitos restantes.
Presione los dos digitos en órden.
Presione los tres digitos en órden.
NOTA:Si el canal seleccionado deja de transmitir, el
televisor se apagará automáticamente en 15 minutos.
7
Page 20

GRABANDO CANALES EN MEMORIA
Este televisor cuenta con una función de memoria para canales
que le permite avanzar o retroceder al siguiente canal en
memoria, brincando canales no deseados.
Antes de seleccionar los canales, estos deben ser programados
en la memoria del televisor.
“GRABANDO CANALES EN MEMORIA” no puede ser
seleccionado si el modo AV está seleccionado.
ELECCION DE TV/CATV
Presione ACTION y luego
1
presione para seleccionar el
modo AJUSTE (SET UP), luego
presione ACTION.
Presione ▼ para seleccionar el
2
modo MODO y luego presione
. Después presione o
para seleccionar el modo TV o
CABLE.
Presione ACTION tres veces.
3
NOTA:
Comuniquese con su compañía de cable para determinar el
tipo de sistema de cable utilizado en su área.
PICTURE
AUDIO
TIMER
EXIT
LOCK
AJUSTE
LANGUAGE/IDIOMA/LANGUE
MODO : TV CABLE
PROG AUTOMATICA
PROG MANUAL
CC
/ACTION
/
SET UP
: NO
MEMORIZACION MANUAL DE CANALES
Presione ACTION seguido de para
1
seleccionar el modo AJUSTE (SET
UP), luego presione ACTION.
Presione ▲ dos veces para seleccionar
2
PROG MANUAL seguido de .
Seleccione el canal que desee agregar
3
o remover por medio de los botones 09 o CH ▲ o ▼.
Presione o para seleccionar
4
AGREGAR o BORRAR.
Si el canal seleccionado no está en
memoria (paso 3), el indicador de canal
estará en amarillo. Este indicador
cambiará de amarillo a azúl cuando el
canal sea grabado en memoria.
Presione o si desea BORRAR el
canal de la memoria. El indicador de
canal cambiará de azúl a amarillo
cuando el canal sea removido de la
memoria.
Repita los pasos 3 y 4 para cada canal
que desee agregar o remover de
memoria.
Presione ACTION tres veces.
5
PICTURE
AUDIO
TIMER
EXIT
LOCK
AJUSTE
LANGUAGE/ IDIOMA/LANGUE
MODO
PROG AUTOMATICA
PROG MANUAL
CC
//
AGREGAR CAN 125
SET UP
: CABLE
:NO
/ACTION
MEMORIZACION AUTOMATICA DE CANALES
Presione ACTION, luego
1
para seleccionar en modo
AJUSTE (SET UP) y luego
ACTION.
2
Presione ▼ dos veces para
PICTURE
LOCK
AUDIO
EXIT
TIMER
SET UP
seleccionar PROG
AUTOMATICA y luego presione
.
El televisor empezará a grabar
en memoria todos los canales
disponibles en su área.
Presione ACTION dos veces.
3
AJUSTE
LANGUAGE/ IDIOMA/LANGUE
MODO
: CABLE
PROG AUTOMATICA
PROG MANUAL
CC
:NO
/ACTION
//
CRONOMETRO
Programe el televisor para que se apague después de un tiempo determinado.
Presione ACTION y luego presione para seleccionar el modo CRONOMETRO (TIMER). Presione
1
ACTION.
Presione seguido de o para seleccionar el tiempo deseado, luego presione ACTION.
2
Una vez que el cronómetro es programado, una pantalla aparecerá y desaparecerá cada 10 minutos para recordarle que la
función de cronómetro está activa. Para confirmar el cronómetro repita el paso 1. El tiempo restante aparecerá en pantalla. Para
cancelar el cronómetro seleccione NO.
CRONOMETRO
DORMIR
:10
/ACTION
/
8
Page 21

BLOQUEO
Este televisor cuenta con un controlador de V-Chip que provee control de acceso y restricciones para los canales. Esta función le
permite controlar que tipo de programas pueden ser vistos a través de clasificaciones.
Presione ACTION.
1
Presione ▼ para seleccionar el modo de BLOQUEO
2
(LOCK), luego presione ACTION.
Ingrese una clave de 4 digitos usando los botones del 0-
3
9.
En caso de ingresar un código incorrecto presione o
espere unos segundos para borrar el código incorrecto.
4
Ingrese el mismo código para confirmación solo la
primera vez.
Presione ▲ o ▼ para seleccionar la opción de V-Chip y
5
luego presione .
Presione o para seleccionar SI y luego presione
ACTION.
Presione ▲ o ▼ para seleccionar la opción de
6
“CLASIFIQUE TV” (clasificación de TV) ó la opción de
“CLASIF PELICULA” (clasificación de PELICULAS) y
luego presione .
Presione o para seleccionar la clasificación deseada
7
para el canal en una entrada de video deseada y luego
presione ACTION.
NOTAS:
• Si olvida su código baje el volumen al mínimo, presione y mantenga VOLUMEN en el panel frontal y presione el “0” en el control
remoto simultaneamente. Seleccione el modo BLOQUEO (LOCK) e ingrese un nuevo código.
• Si desea cambiar su código, siga los pasos 1-3 y seleccione la opción de “CAMBIAR CLAVE”, luego ingrese su nuevo código.
• La función de V-Chip funciona solo con programas y videocasets que tienen la señal de clasificación.
• Una vez que bloquea un programa usando la función del V-Chip, este no puede ser visto. Cuando el programa comiense el texto
“PONER CLAVE” aparecerá en pantalla. Si desea cancelar temporalmente el V -Chip ingrese el codigo. Si cambia de canal o apaga
el televisor mientras el V-Chip ha sido cancelado temporalmente, este se re-activará automáticamante.
• Si usted está cambiando los canales por medio de una videocasetera o una caja de cable, mientras el televisor este en el canal 3 o
4 el V-Chip funciona un poco diferente. Cuando ingresa el código para cancelar temporalmente el V-Chip, usted está cancelando
temporalmente todos los canales, no solo el 3 ó 4. Para reactivar el V-Chip solo apague y vuelva a prender el televisor.
• Algunas cajas de cable fueron diseñadas con una función de retardo, en algunos casos puede demorar unos 10 segundos para
que un programa aparezca después de entrar una contraseña.
Clasificación de TV
TV–Y
NO
TV-Y
: Todos los niños
TV-Y7
: Dirigido a niños de 7
TV-G
: Audiencia general
Cuando selecciona TV-Y7, TV-PG, TV-14 ó TV-MA presione
RECALL para obtener una explicación de la clasificación.
Presione ▲ o ▼ para seleccionar la clasificación deseada.
Presione para seleccionar SI ó NO y luego presione ACTION.
TV-Y7 TV-G TV-14
años o más
TV-PG TV-MA
TV-PG
:Guía de los padres sugerida
TV-14
: Dirigido a mayores de 14
TV-MA
años
: Sólo para adultos
Clasificación de películas
NO
: Audiencia general
G
:Guía de los padres
PG
PG-13
sugerida
:Guía de los padres
sugerida para menores
de 13 años
Presione ACTION dos veces.
8
PG PG-13 R NC-17GX
:Guía de los padres
R
NC-17
X
sugerida para
menores de 17 años
: 17 años en adelante
:sólo adultos
ESPAÑOL
SUBTÍTULO CERRADO
QUE SON LOS SUBTITULOS?
Este televisor tiene la capacidad de decodificar y desplegar
programas de televisión con subtítulos. Subtítulos desplegará
un texto en pantalla para personas con problemas de escucha
o traducirá y desplegará texto en otro idioma.
PARA VER LOS SUBTITULOS
Presione ACTION y luego para seleccionar el modo
1
AJUSTE (SET UP), luego presione ACTION de nuevo.
Presione ▲ para seleccionar el modo
2
CC y luego presione , después
presione ▲ o ▼ para seleccionar el
subtítulo deseado.
Presione ACTION tres veces.
3
• Cuando active el decodificador de subtítulos, habrá un pequeño retraso antes de que los subtítulos aparescan en pantalla.
• Los subtítulos son desplegados solo en lugares donde estos están disponibles.
• Si no se recibe señal de subtítulos, estos no se verán pero el televisor seguirá en modo de subtítulos.
• Errores de ortografía o caractéres raros pueden aparecer ocasionalmente durante los subtítulos. Esto es normal, especialmente
con programas en vivo. En estos programas debido a que los subtítulos son creados en ese mismo momento no hay tiempo para
editarlos.
• Cuando los subtítulos son desplegados, el despliegue en pantalla tal como volúmen y canales pueden no ser desplegados o
causar interferencia con los subtítulos.
• Algunos sistemas de cable y sistemas de protección contra copia pueden interferir con la señal de los subtítulos.
• Si se usa una antena interna o si la señal es muy débil, el decodificador de subtítulos puede no aparecer o aparecer con
caractéres extraños o palabras mal escritas. En este caso, ajuste la antena o utilice una antena al aire libre.
NO
LEYENDA CANAL1
LEYENDA CANAL2
TEXTO CANAL1
TEXTO CANAL2
/ACTION
/
Subtitulos: Este modo de subtítulos desplegará un texto en
pantalla en inglés o en otro idioma (dependiendo del ajuste de
los subtítulos). Por lo general los subtítulos en inglés son
transmitidos en el canal 1 de subtítulos y otros idiomas son
transmitidos en el canal 2 de subtítulos.
Texto: El modo de texto de subtítulos usualmente usará la mitad
de la pantalla con un calendario de eventos u otra información.
Después de seleccionar el modo de subtítulos, este
permanecerá hasta que sea cambiado. Si los subtítulos se
pierden debido a comerciales o pérdida de señal, estos
reaparecerán cuando la señal sea recibida de nuevo. Si se
cambia de canal, los subtítulos tardarán aproximadamente 10
segundos en volver a aparecer.
Para programas de televisión que transmiten con subtítulos,
busque en su guía local de TV por el símbolo de subtítulos (CC).
9
Page 22

AJUSTES DE SONIDO
Se pueden hacer los ajustes de graves, agudos, balance y
sonido IA.
Presione ACTION y luego presione A para selecionar el
1
modo de AUDIO, luego presione ACTION.
FUNCIÓN SONIDO IA
Cuando se emite un sonido de alto volumen, la función de
sonido IA contribuye a equilibrar el volumen hasta un nivel de
escucha más confortable.
Presione ▲ o ▼ para seleccionar el
2
punto que desea ajustar y luego .
Presione o para hacer el ajuste.
3
GRAVES
AGUDOS
BALANCE
SONIDO IA
Presione ACTION tres veces.
4
más
más
más en el altavoz
derecho
SI
AUDIO
GRAVES
AGUDOS
BALANCE
: NO
NORMAL
MODO
: ESTEREO
: SI
SONIDO IA
/ACTION//
menos
menos
más en el altavoz
izquierdo
NO
PARA VOLVER AL AJUSTE INICIAL
Seleccione NORMAL y luego seleccione AJUSTE como en el
paso 2.
SEGUNDO PROGRAMA DE SONIDO (SPA) Y ESTEREO
El aparato de TV está equipado con una función conocida
como sonido de TV multicanal o MTS. Las transmisiones MTS
permiten disfrutar mejor de la TV ya que sus programas tienen
un sonido en estéreo de alta fidelidad. MTS también tiene un
canal adicional llamado segundo programa de sonido o SAP
que los canales de TV pueden utilizar para transmitir un
segundo idioma en las transmisiones bilingües o para otros
propósitos.
P ARA SELECCIONAR SONIDO DESEADO
1
Presione ACTION y luego presione para seleccionar el
modo de AUDIO, luego presione ACTION.
Presione para seleccionar el modo
2
MODO y luego presione .
Después presione o para
seleccionar el modo ESTEREO,
SPA o MONO.
Presione ACTION dos veces.
3
AUDIO
GRAVES
AGUDOS
BALANCE
NORMAL
MODO
: ESTEREO SPA MONO
SONIDO IA
/ACTION
/
: NO
: SI
PARA ESCUCHAR SONIDOS EN ESTEREO
Cuando el aparato de TV está encendido o se hace una
selección de canal, asegúrese de que aparece "STEREO" en la
pantalla. Esto significa que se pueden recibir transmisiones en
"Estéreo". Puede disfrutar de los sonidos en estéreo utilizando
las altavoces izquierdo y derecho.
• Cuando se reciben transmisiones "MONO" no aparece
ninguna indicación.
• Si la señal transmisora no es lo suficientemente fuerte o
no puede escuchar nítidamente los sonidos en estéreo,
seleccione MONO como en el paso 2 para cambiar a un
sonido monoaural. Con este deberán eliminarse los ruidos.
PARA ESCUCHAR EN SPA (SEGUNDO
PROGRAMA DE SONIDO)
Cuando el aparato de TV está encendido o se hace una
selección de canal, asegúrese de que aparece SPA en la
pantalla. Esto significa que se puede recibir transmisiones en
"Segundo programa de sonido".
AJUSTE DE IMAGEN
Usted puede ajustar los niveles de color, tinte, brillo, contraste y
nitidez.
Presione ACTION dos veces para seleccionar el modo
1
de IMAGEN (PICTURE), luego presione ACTION.
Presione ▲ o ▼ para seleccionar el ajuste deseado y luego
2
presione .
Presione o para cambiar el ajuste.
3
COLOR
TINTE
BRILLO
CONTRASTE
DEFINICION
Presione ACTION tres veces.
4
color más vibrante
tonalidad verde
aumentar brillo
aumentar contraste
hacer la imágen
más clara
10
reduce el color
tonalidad rojiza
reducir brillo
reducir contraste
hacer la imagen
más suave
PARA VOLVER A LA CONFIGURACION INICIAL
Seleccione NORMAL y luego seleccione AJUSTE como en el
paso 2.
Page 23

CUADRO DE LOCALIZACION DE FALLAS
Antes de solicitar servicio, por favor verifique la siguiente tabla:
SINTOMA POSIBLES SOLUCIONES
• Asegurese de que el enchufe esté conectado.
TV no funciona
Sonido ruidoso o sin
sonido
Imagen con ruido o sin
imagen
Mala recepción en
algunos canales
Sin color
• Pruebe en otro tomacorrientes.
• No hay energía eléctrica, revise los fusibles o botadores de luz.
• Desconecte la unidad por una hora y vuelva a conectar.
• Problemas de origen (televisora o sistema de cable), pruebe con otro canal.
• Revise los ajustes de audio.
• Problemas de origen (televisora o sistema de cable), pruebe con otro canal..
• Verifique la conexión de la antena o sistema de cable. Ajuste la antena.
• Verifique los ajustes de imagen.
• Problemas de origen (televisora o sistema de cable), pruebe con otro canal..
• Señal es débil, ajuste la antena para recibir el canal deseado.
• Problemas de origen (televisora o sistema de cable), pruebe con otro canal..
• Verifique los ajustes de imagen.
• Verifique la conexión de la antena o sistema de cable. Ajuste la antena.
ESPAÑOL
Corrimiento de imagen
No recepción del
sistema de cable
Barras horizontales o
diagonales en imagen
No se reciben canales
más arriba del13
Control remoto no
funciona
El televisor se apaga
No se pueden ver los
subtítulos
La información en
pantalla no aparece en
su idioma
• Problemas de origen (televisora o sistema de cable), pruebe con otro canal.
• El sistema de cable está codificando la imagen.
• Ajuste la antena.
• Verifique las conexiones del sistema de cable.
• Elija la opción de CATV.
• Problemas de origen, pruebe con otro canal.
• Verifique la conexión de antena, ajuste la antena.
• Verifique si hay fuentes de interferencia cerca.
• Asegurese de que la opción de TV/CATV es la correcta.
• Si está usando antena, verifique las conexiones de UHF.
• Las pilas están gastadas, no sirven o están mal colocadas.
• El control está fuera de rango, acérquese al televisor.
• Asegurese de que el control está apuntado hacia el televisor.
• Verifique que no existan obstrucciones entre el control y el televisor.
• Asegurese que el televisor esté conectado.
• No hay señal.
• El cronómetro está activado.
• No hay energía en el tomacorrientes.
• El programa visto no contiene subtítulos.
• Verifique las conexiones de antena o cable.
• Seleccione la opción de subtítulos.
• Seleccione su idioma en el modo de AJUSTE.
ESPECIFICACIONES
Alimentación de CA: 120 V, 60 Hz
Consumo de CA: 125 watts
Construcción del chasis: CI de estado sólido
Tubo de imagen: 27" (medido diagonalmente)
Resolución horizontal: 260 líneas
Potencia nominal de salida de audio:
Altavoz:
Tipo de sintonizador: Sintetizador de frecuencias PLL a
Unidad de control remoto: Infrarroja, de acceso directo,
ACCESORIOS:
Unidad de control remoto
Pilas (AA) x 2
2" x 3-1/2", gama completa, 8 ohmios x 2
cuarzo para 181 canales
1,5 + 1,5 watts
2 pilas AA (incluido)
Canales de recepción:
Impedancia de antena: 75 ohmios de entrada coaxial
Entradas/Salidas: S-Video: Y-Entrada: 1,0 Vp-p/75 ohms
Video:
Audio: Entrada:In(RCA)-8 dBm/50 K ohms
Dimensiones: 25-9/16"(ancho) x 19-11/16"(prof)x 22-1/2"(alto.)
Peso: 80,5 Ibs
VHF 2-13
UHF 14-69
CATV 1-125
C-Entrada: 0,3 Vp-p/75 ohms
Entrada:
Antenna: VHF/UHF IN 75 ohms coaxial
In(RCA) 1,0 Vp-p/75 ohms
Out(RCA) 1,0 Vp-p/75 ohms
Out(RCA)-8 dBm/1 K ohms
11
Page 24

03/08
Printed in Thailand
U
Impreso en Tailandia
TQB2AA0494
 Loading...