

Page 1
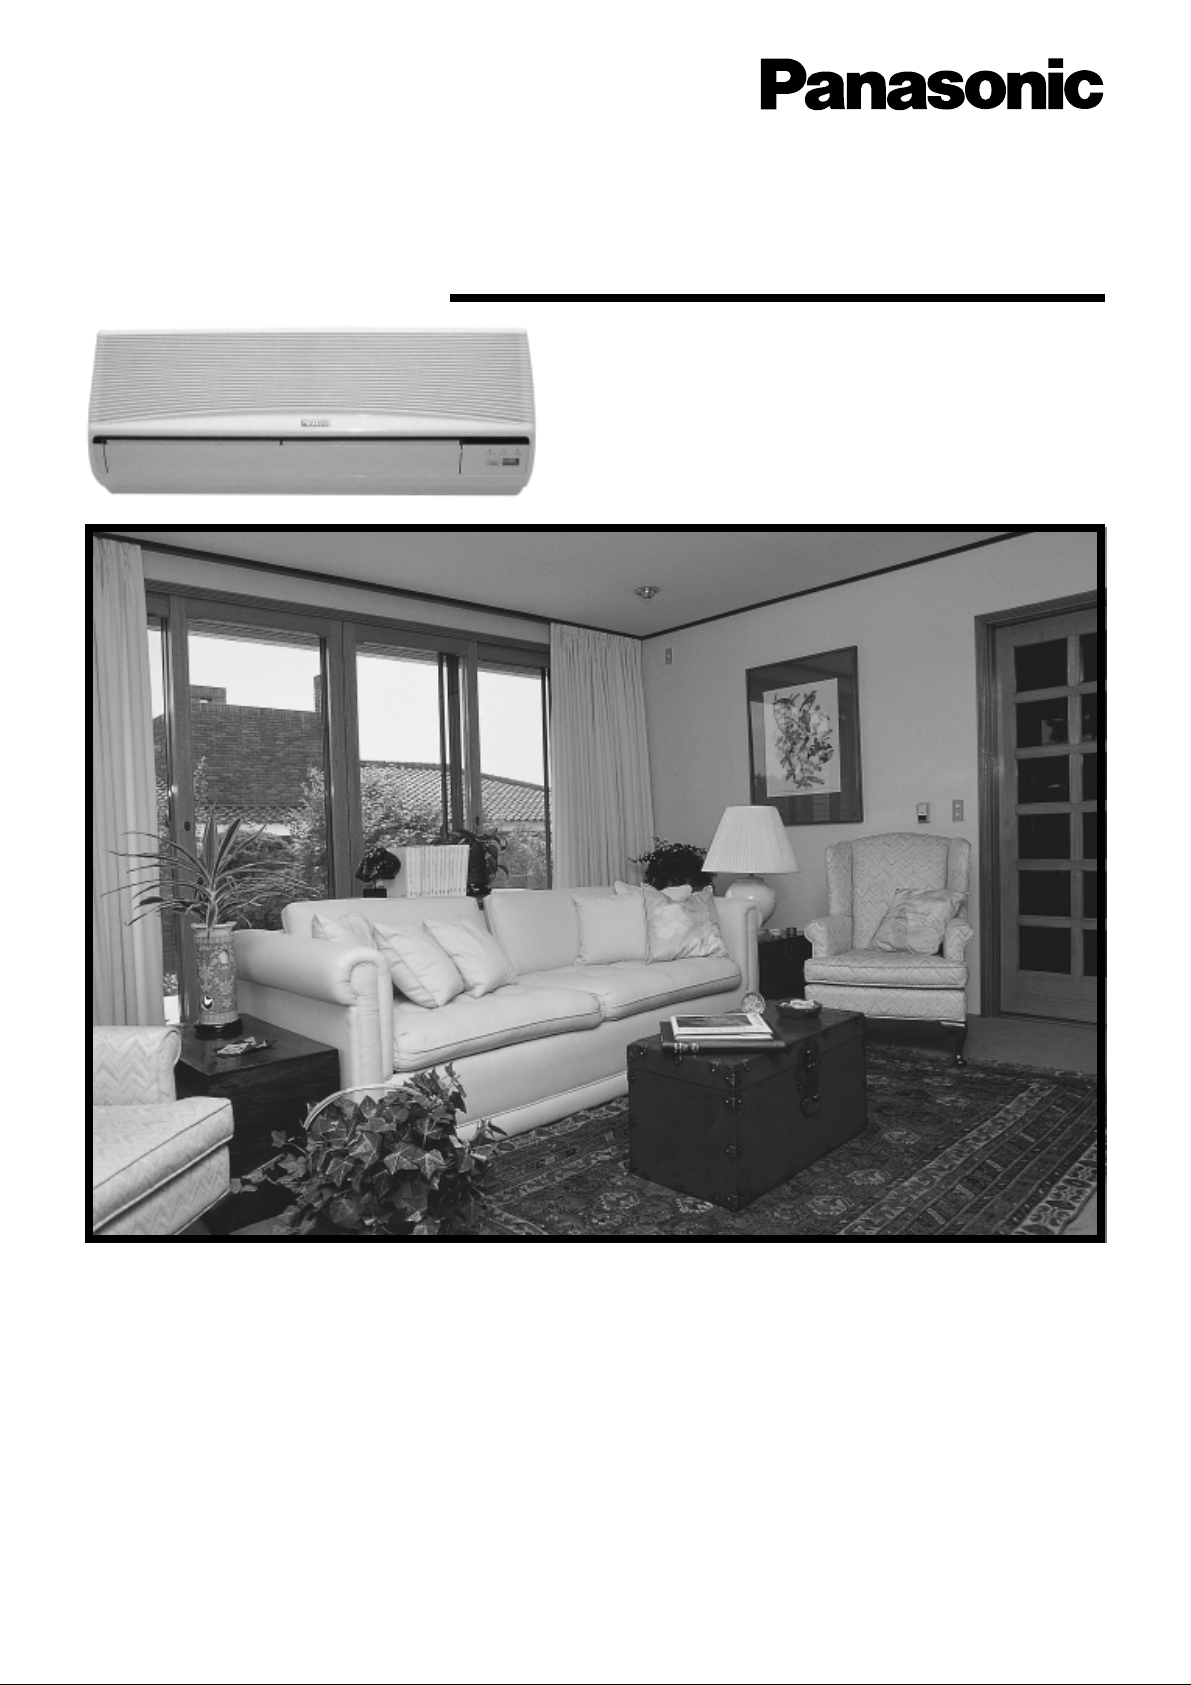
Room Air Conditioner
OPERATING INSTRUCTIONS
Indoor Outdoor
Model
CS-A75KR Model CU-A75KR
CS-A95KR CU-A95KR
CS-A125KR CU-A125KR
Before using your air-conditioner, please
read this operating instructions carefully
and keep it for future reference.
ENGLISH
................................
P. 1–P. 28
F563254
Page 2

CONTENTS
Before use
1
: FEATURES ...................................................................... 3
: SAFETY PRECAUTIONS .......................................... 4 – 6
● Installation Precautions
● Operation Precautions
: NAME OF EACH PART ........................................... 7 – 10
● Indoor Unit
■ When the front panel is opened
● Outdoor Unit
● Accessories
● Remote Control
■ When the remote control is opened
■ How to use the remote control
■ When the back cover is opened
: PREPARATION BEFORE OPERATION............... 11 – 12
● Indoor unit
● Remote Control
■ Inserting batteries
■ Setting the clock
■ About the batteries
How to use
2
: HOW TO OPERATE...............................................13 – 14
● Automatic • Heating • Cooling • Soft Dry
■ Operation details
● Adjusting Airflow Direction and Fan Speed
■ Operation details
: SETTING THE TIMER............................................ 15 – 16
● Recommended Setting of Timer
: CONVENIENCE OPERATION ...............................17 – 18
● Sleep Mode
■ Operation details
● Economy or Powerful Mode
■ Operation details
1
Page 3

ENGLISH
If necessary
3
: CARE AND MAINTENANCE ................................. 19 – 22
● Cleaning the Indoor Unit and Remote Control
● Cleaning the Air Filter
● Cleaning the Front Panel
■ Removing the front panel
■ Fixing the front panel
■ Cleaning the front panel
● Replacing the Air Purifying Filters
■ Removing the air purifying filters
■ Reinstalling the air purifying filters
● Pre-season Inspection
● When the Air Conditioner is Not Used for an Extended
Period of Time
● Recommended Inspection
: TROUBLESHOOTING ........................................... 23 – 24
● Normal Operation
● Abnormal Operation
● Call the Dealer Immediately
: HELPFUL INFORMATIONS .......................................... 25
: ENERGY SAVING AND OPERATION HINTS............... 26
2
Page 4
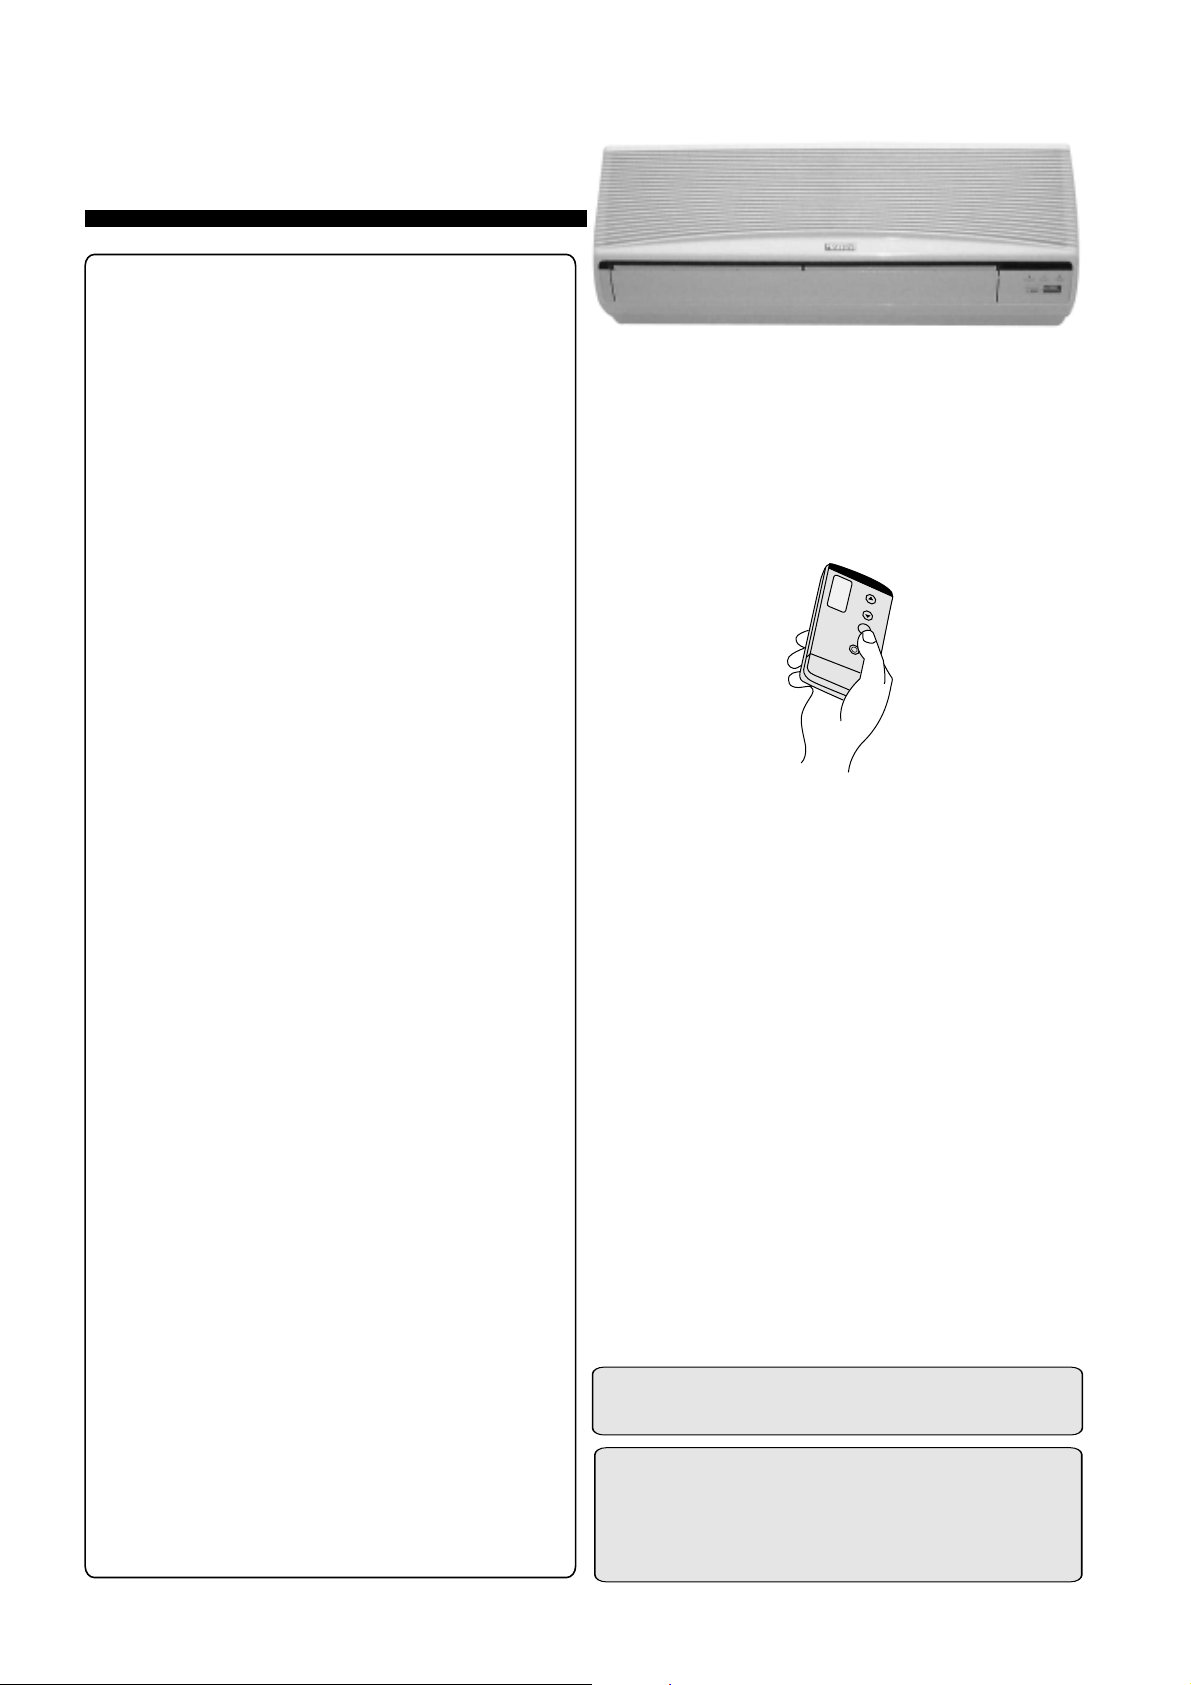
FEATURES
● SELF-ILLUMINATING BUTTON
For your convenience to operate in the dark.
(Refer page 9)
● AUTOMATIC OPERATION
Sense intake air temperature every hour to
select the optimum mode.
(Refer page 13)
● SLEEP MODE
Prevent the room from getting too hot or too cold
while you are sleeping.
(Refer page 17)
● ECONOMY MODE
To reduce electrical power consumption.
(Refer page 18)
● POWERFUL MODE
Reaches the desired room temperature quickly.
(Refer page 18)
● REMOVABLE FRONT PANEL
For quick and easy cleaning (washable).
(Refer page 20)
● CATECHIN AIR PURIFYING FILTER.
Filter that can trap dust, tobacco smoke and tiny
particles in the room. It can also prevent the
growth of bacteria and viruses trapped in this
filter.
(Refer page 21)
● DEODORIZING FILTER
Used to remove unpleasant odours and
deodorize the air in the room.
(Refer page 21)
Thank you for purchasing a Panasonic Room
Air Conditioner.
● AUTO RESTART CONTROL
Automatically restart the unit after power failure.
(Refer page 25)
3
Note:
Before using your air-conditioner, please read
this operating instructions carefully and keep it
for future reference.
Page 5
SAFETY PRECAUTIONS
OFF
Before operating, please read the f ollowing “Saf ety Precautions” carefully.
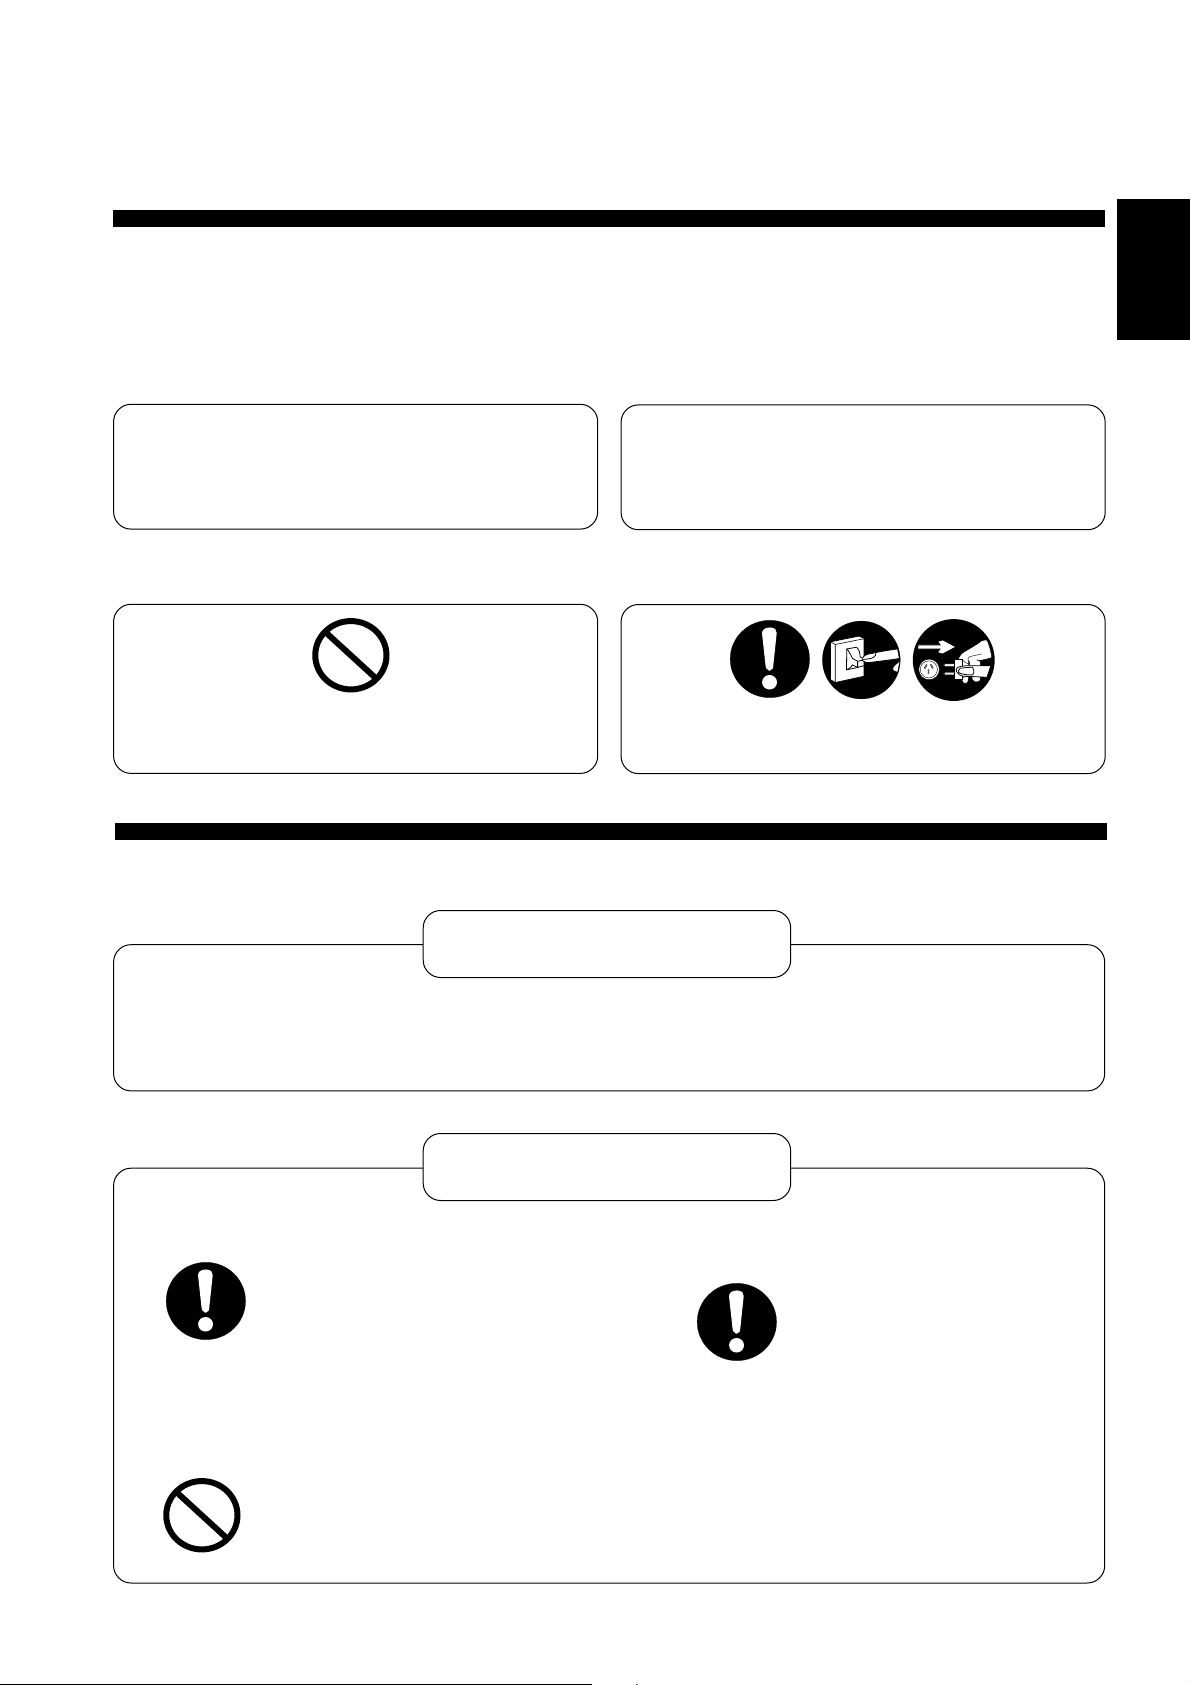
To prevent personal injury, injury to others and property damage, the following instructions must be followed.
■ Incorrect operation due to failure to follow instructions will cause harm or damage, the seriousness of which is
classified as follows:
ENGLISH
! Warning
This sign warns of death or serious injury.
■ The instructions to be followed are classified by the following symbols:
This symbol (with a white background) denotes
an action that is PROHIBITED.
This sign warns of damage to property.
These symbols (with a black background)
denote actions that are COMPULSORY.
! Caution
● Installation Precautions
! Warning
■ Do not install, remove and reinstall the unit yourself.
Improper installation will cause leakage, electric shock or fire. Please engage an authorized dealer or specialist for
the installation work.
! Caution
■ This room air conditioner must be earthed.
Improper grounding could cause electric
shock.
■ Do not install the unit in a place where there
may be explosive gas leaks.
Gas leaks near the unit could cause
fires.
■ Ensure that the drainage piping is
connected properly.
Otherwise, water will leak out.
4
Page 6
● Operation Precautions
! Warning
This sign warns of death or
serious injury.
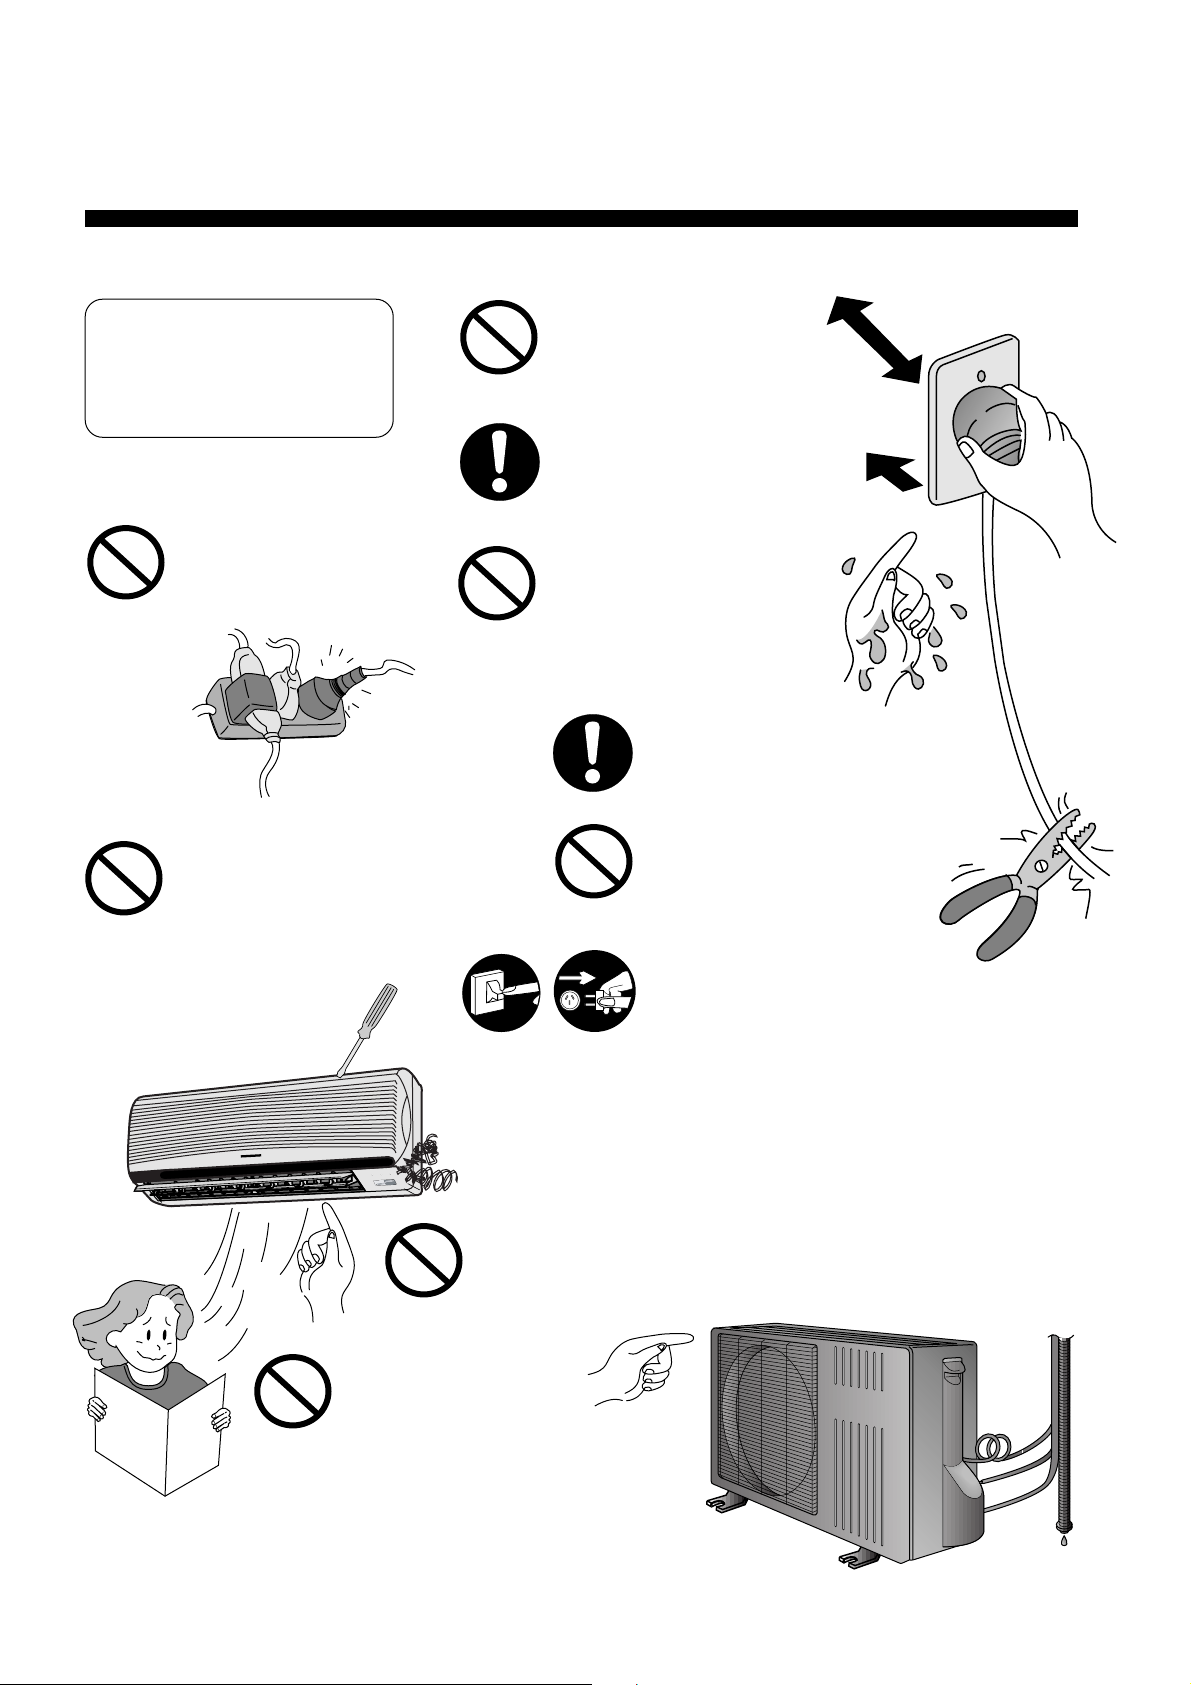
Do not insert plug to operate
the unit. Do not pull out plug
to stop the unit.
Plug in properly.
Do not share outlet.
Do not repair by yourself.
Do not operate with wet
hands.
Use specified power cord.
Do not damage or modify
the power cord.
OFF
If abnormal condition (burnt smell, etc) occurs, switch off
and unplug the power supply.
R
E
IM
T
P
E
E
L
S
R
E
W
O
P
ECONOMY
POWERFUL
Do not insert finger or other objects into the indoor or
outdoor units.
Do not exposed directly to cool air
for a long period.
5
Page 7
ENGLISH
POWER
E
C
O
N
O
M
Y
P
O
W
E
R
F
U
L
SLEEP
TIMER
OFF
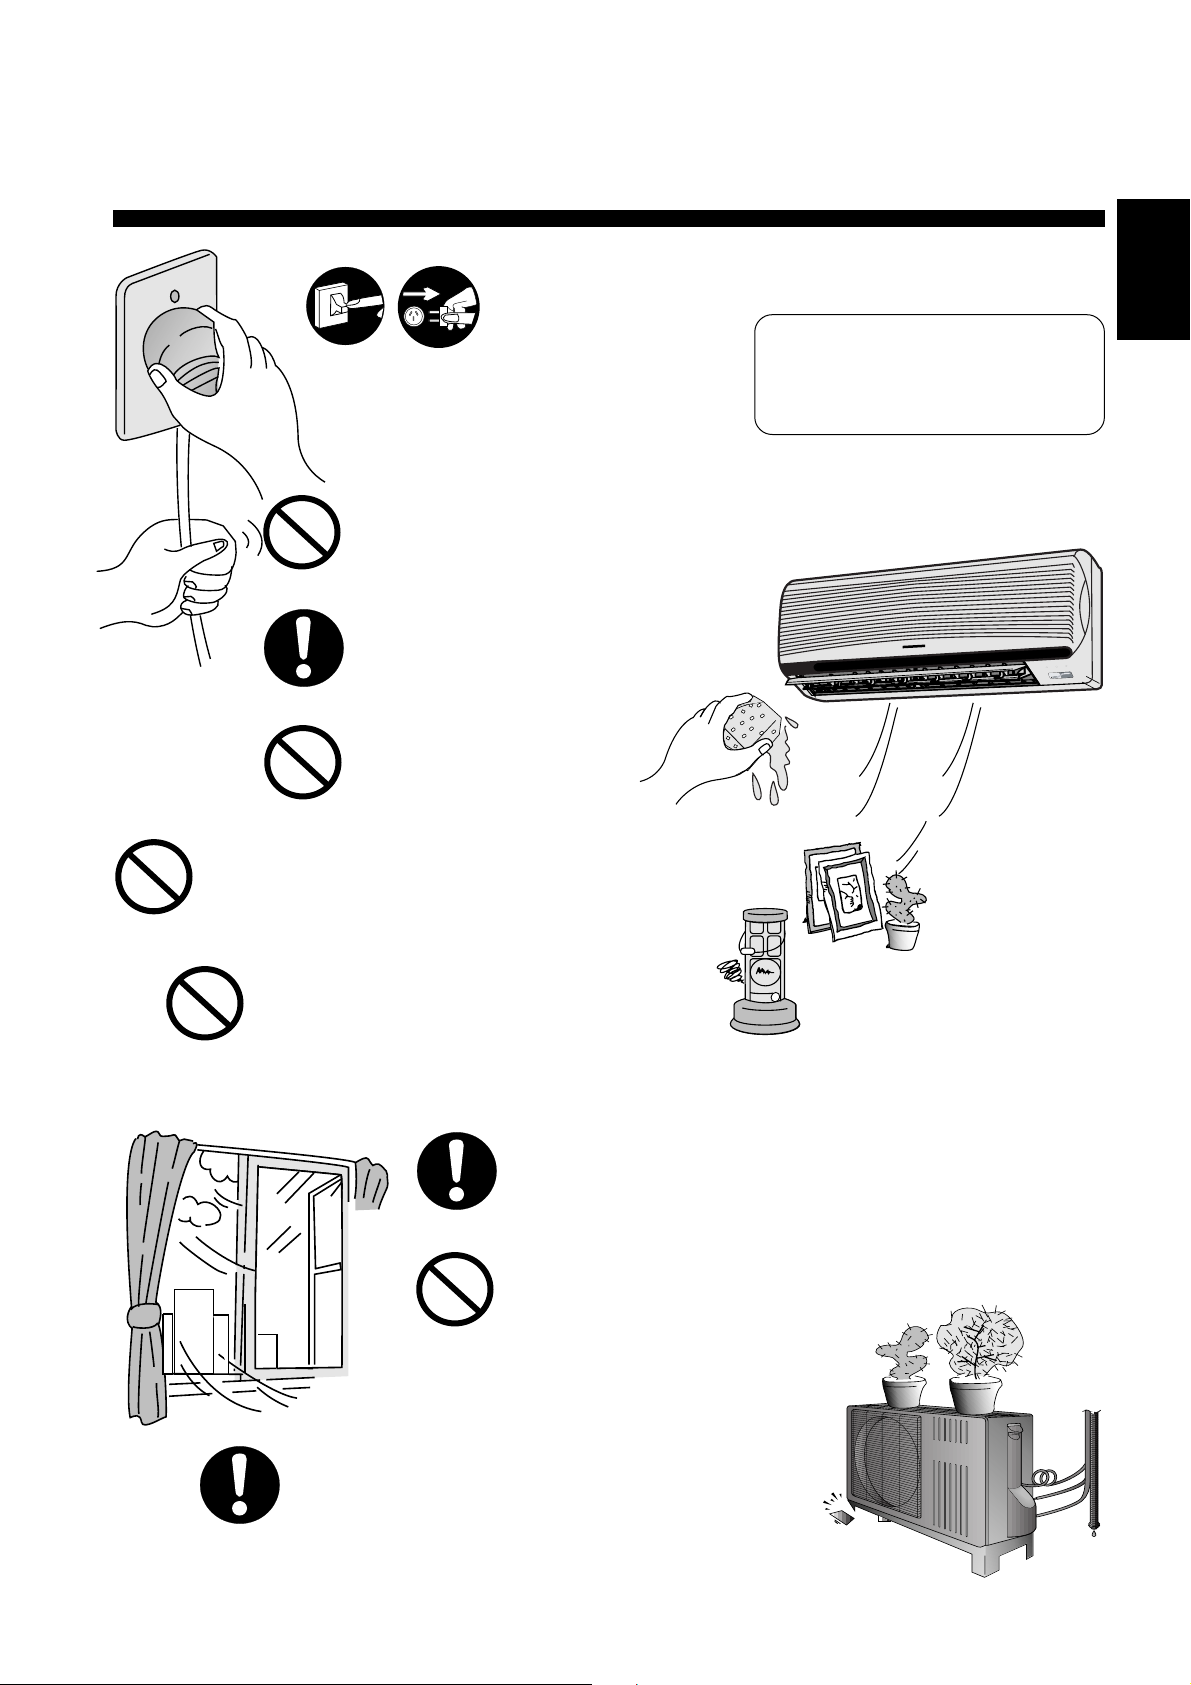
Switch off the power supply if the unit is not
used for a long period.
Do not pull the cord to disconnect the plug.
Switch off the power supply before cleaning it.
Do not wash the unit with water.
Do not use for other purpose such as preservation or etc.
! Caution
This sign warns of injury.
Do not use any combustible equipment at
airflow direction.
Ventilate the room regularly.
Do not sit or place anything on the outdoor unit.
Pay attention as to whether the installation rack is
damaged due to long period of usage.
6
Page 8
NAME OF EACH PART
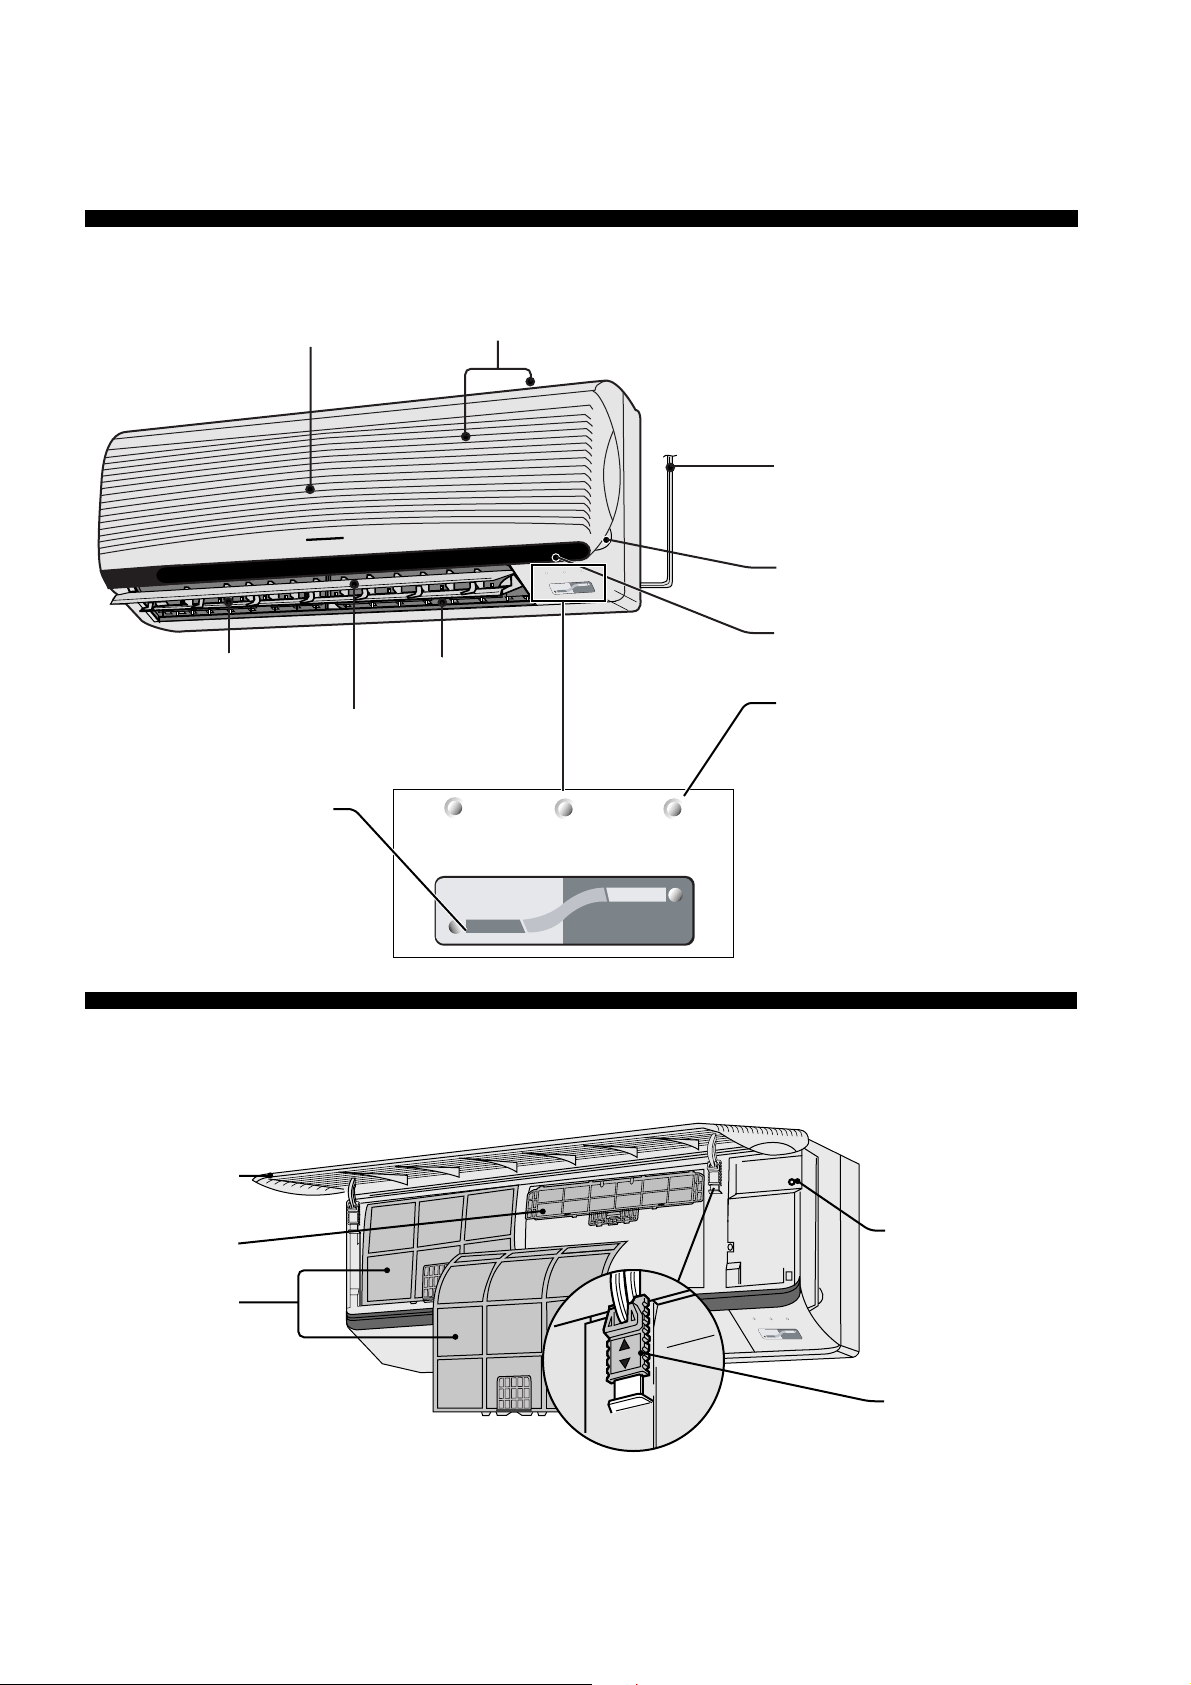
● Indoor Unit
Front Panel
Horizontal Airflow Direction
Louver (Manually adjusted)
Economy/Powerful Indicators
Economy - Green
Powerful - Orange
Air Intake Vents
Air Outlet Vents
Vertical Airflow Direction
Louver
POWER
ECONOMY
TIMER
SLEEP
POWER
ECONOMY
POWERFUL
SLEEP
POWERFUL
Power Supply Cord
Panel Opener
Signal Receptor
Operation Indicators
● POWER : Green
● SLEEP : Orange
● TIMER : Orange
TIMER
■ When the front panel is opened
Front Panel
Air Purifying Filter
Air Filters
Auto Operation Button
TIMER
POWER
SLEEP
ECONOMY
POWERFUL
Tab for Front Panel
7
Page 9
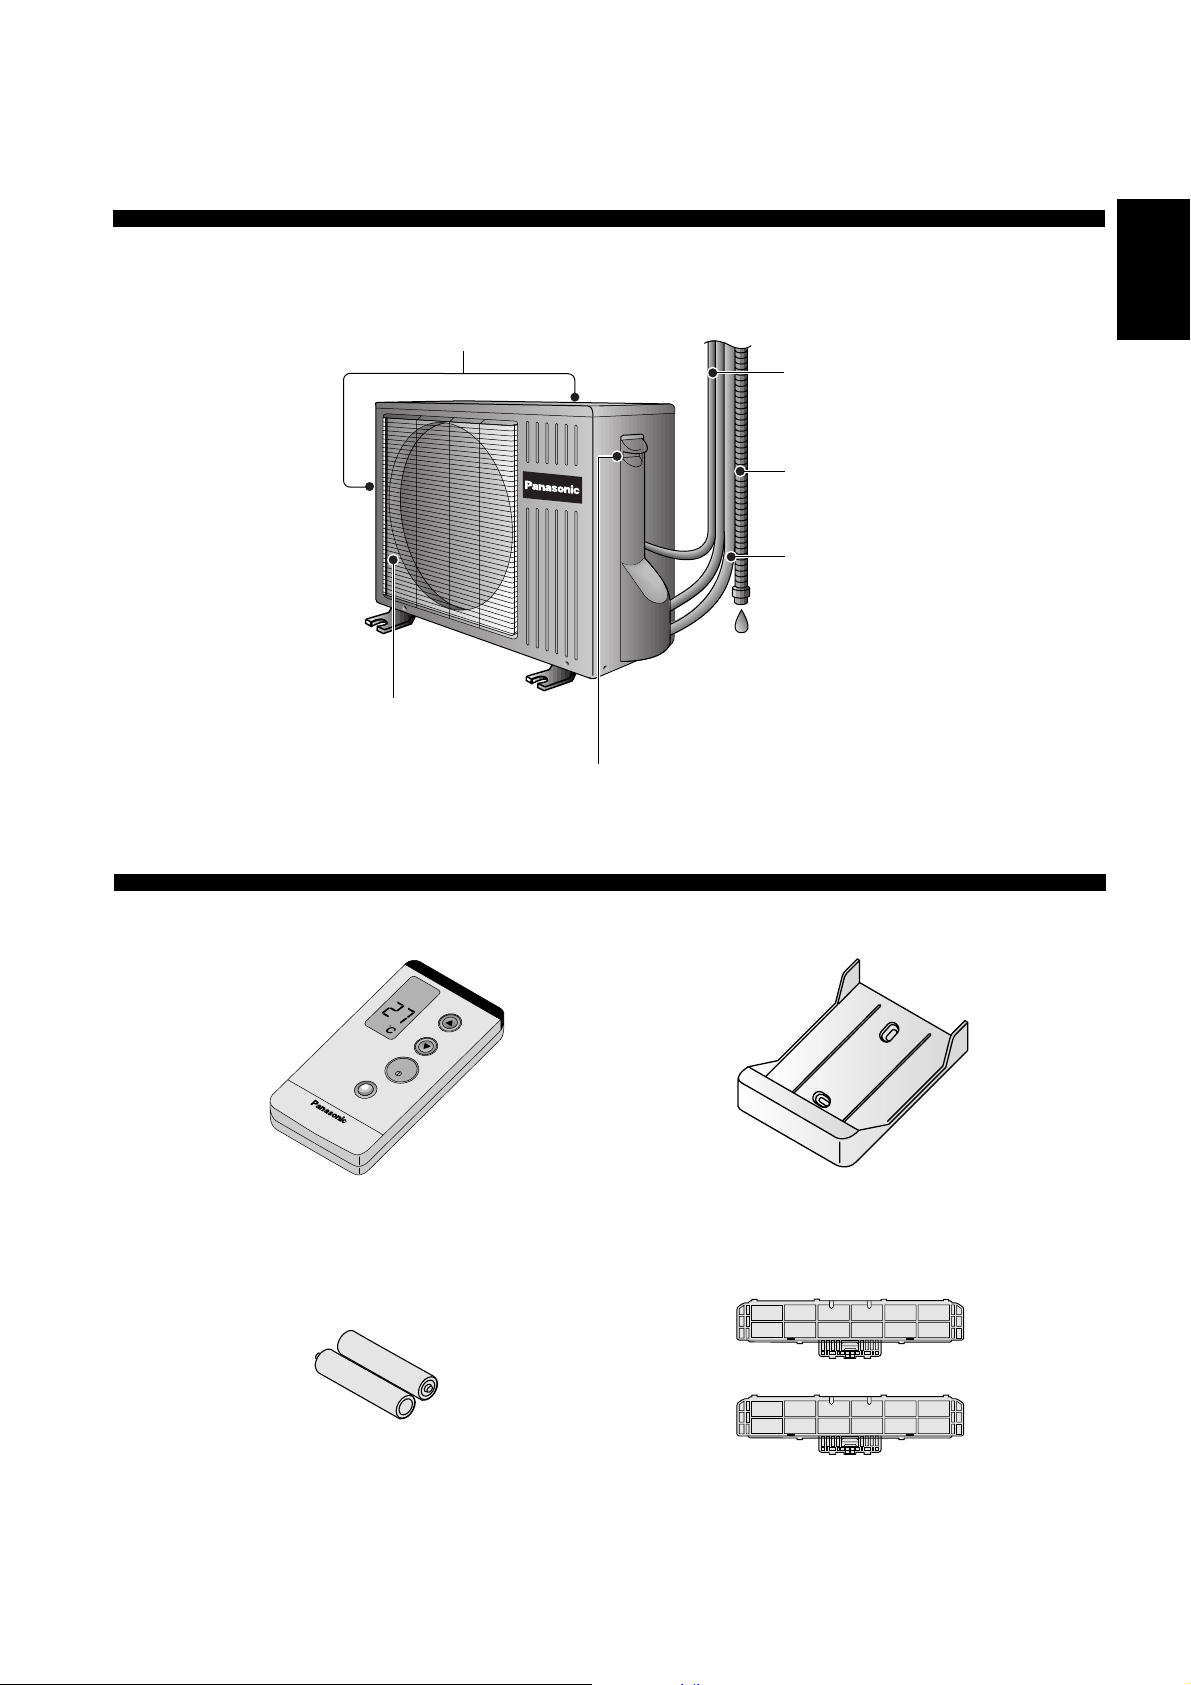
● Outdoor Unit
(Side)
Air Outlet Vents
ENGLISH
Air Intake Vents
(Rear)
Connecting cable
Drain Hose
Piping
Ground Terminal (Inside Cover)
● Accessories
POWERFUL
Two RO3 (AAA) dry-cell batteries
or equivalent
COOL
OFF/ON
AUTO
TEMP
Remote Control HolderRemote Control
Air Purifying Filters
(Catechin Air Purifying Filters and
Deodorizing Filters)
8
Page 10
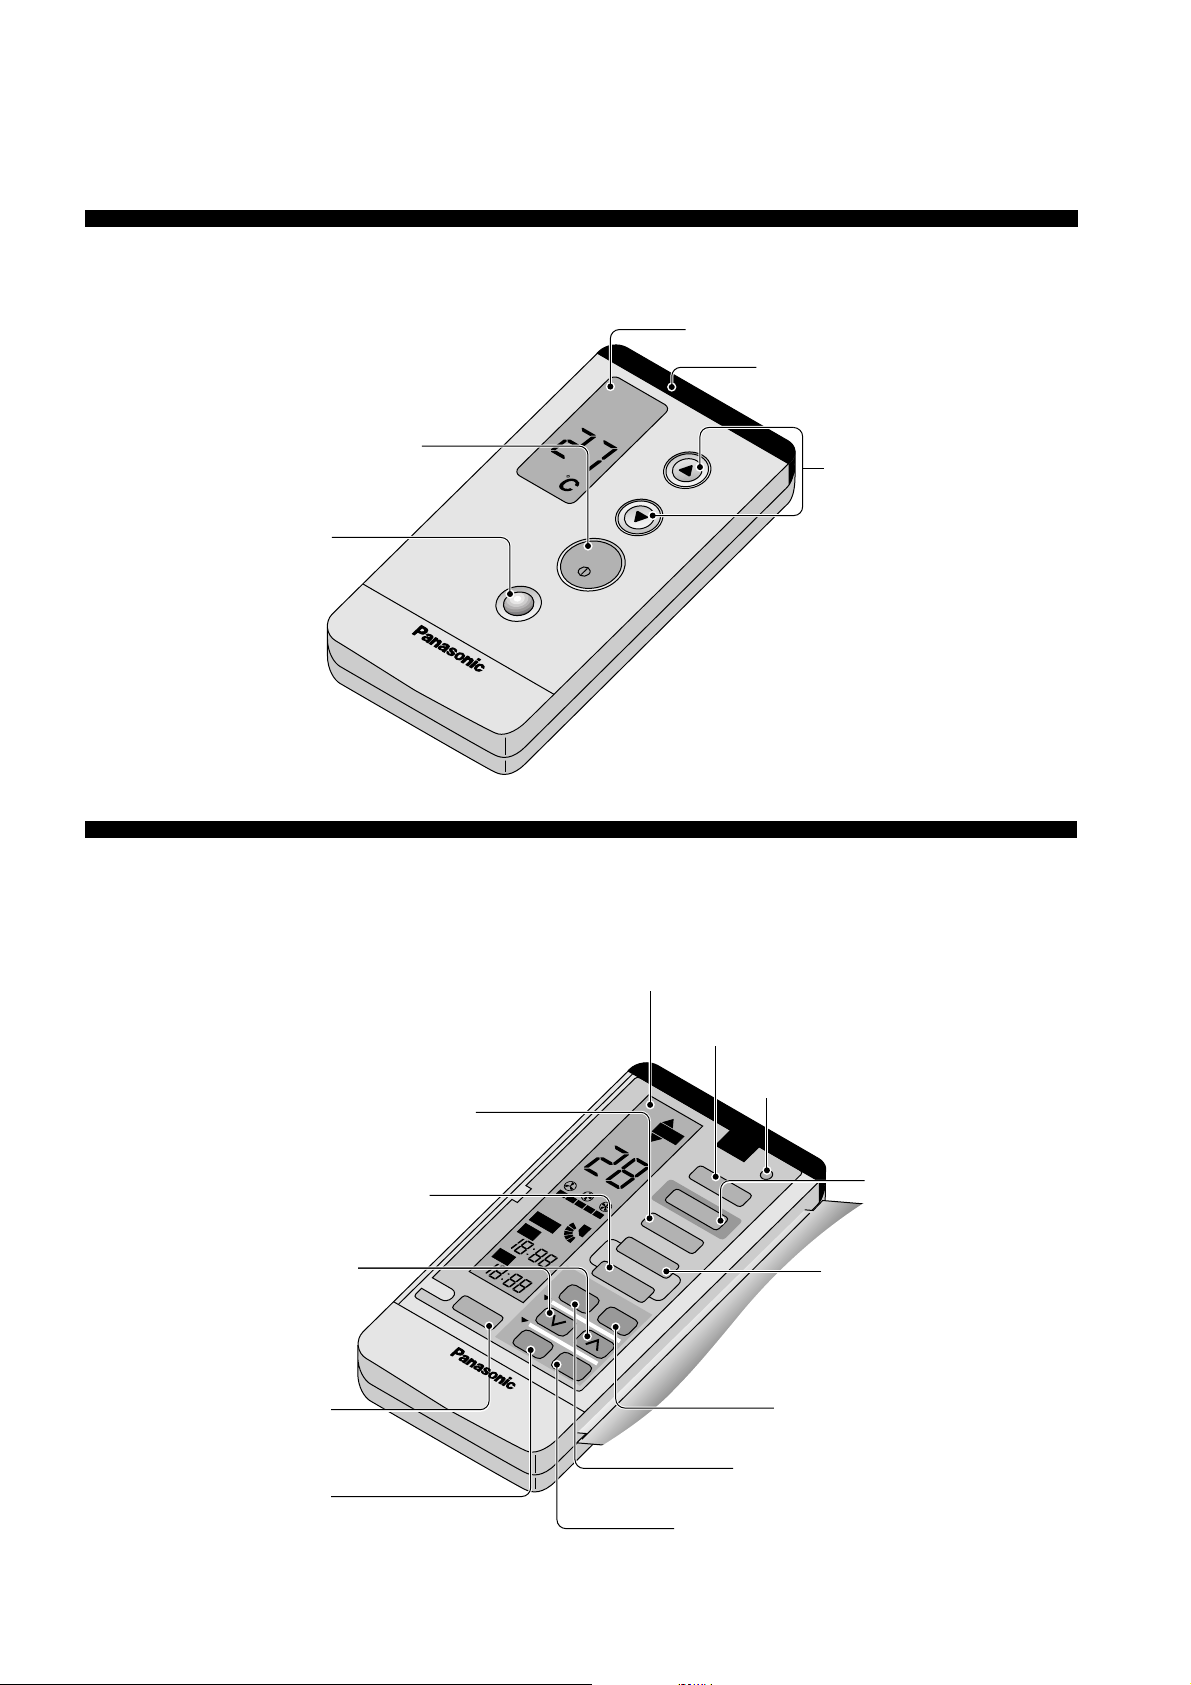
● Remote Control
OFF/ON Button
(self-illuminating Button)
COOL
AUTO
Operation Display
TEMP
Signal Transmitter
Room Temperature
Setting Button
(self-illuminating Button)
Powerful Mode
Operation Button
POWERFUL
OFF/ON
■ When the remote control cover is opened
Operation Display
Fan Speed Selection Button
Manual Airflow Direction
Selection Button
Time-Setting Button
OFF
SLEEP
ON
AM PM
3
CANCEL
SWING
AUTO
AM PM
2
AIR
1
SET
COOL
AUTO FAN
AIR SWING
MANUAL
TIMER
ON OFF
HEAT
DRY
FAN SPEED
AUTO
Operation Mode Selection Button
Clock Button
HI
AUTO
LO
MODE
ECONOMY
CLOCK
Economy Mode
Operation Button
Auto Airflow Direction Button
Sleep Mode Operation Button
Timer Cancellation Button
9
OFF-TIMER Button
ON-TIMER Button
Timer Set Button
Page 11
ENGLISH
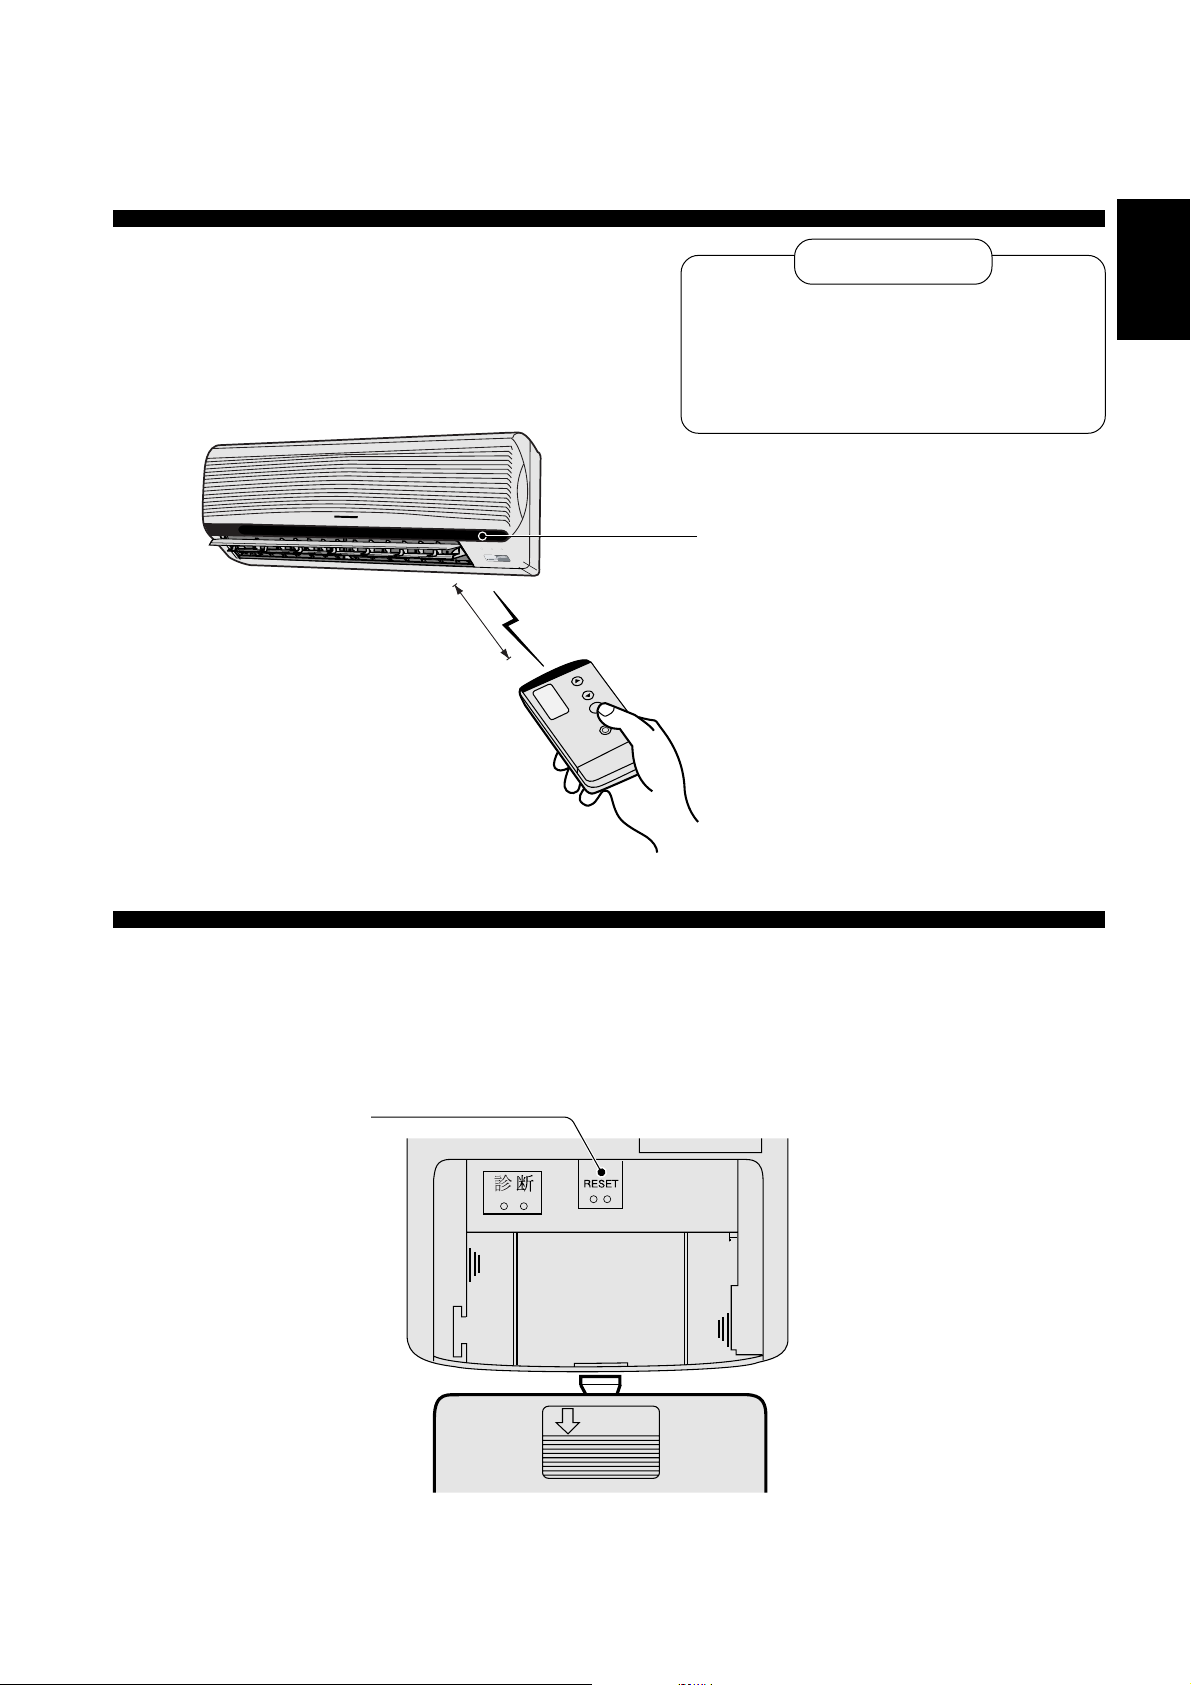
■ How to use the remote control
POWER
SLEEP
TIMER
ECONOMY
POWERFUL
• Maximum distance : 10 m
• Make sure it is not obstructed.
Notes
• Do not throw or drop
• Do not get it wet
• Certain type of flourescent lamps may
affect signal reception. Consult your
dealer.
Signal receptor
• Signal received sound.
One short beep or one long beep.
• Aim at the signal receptor.
■ When the back cover is opened
Reset points
• short to clear the
memory
OPEN
10
Page 12
PREPARATION BEFORE OPERATION
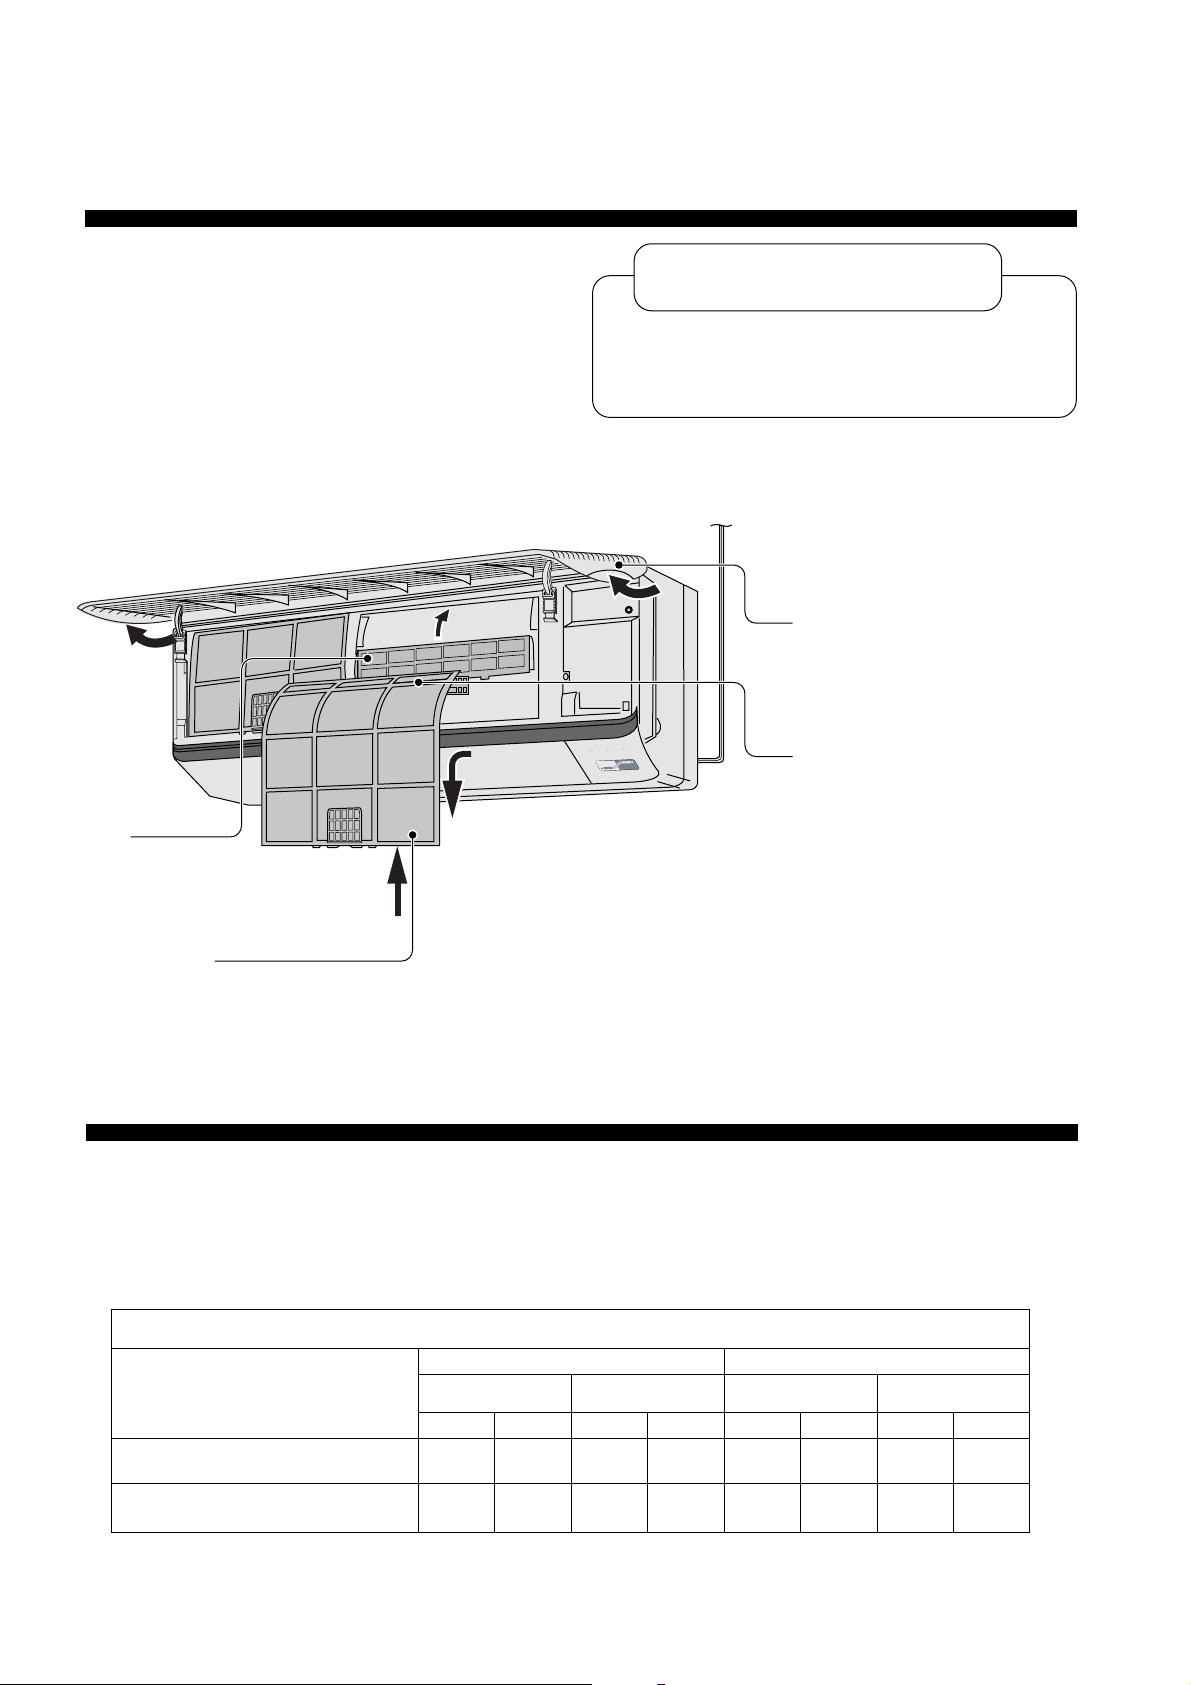
● Indoor Unit
! Warning
■ Ensure the power plug is securely inserted.
A loose plug may cause a fire or an electric
shock.
4
Insert the air purifying filters
5
Insert the air filters
1
2
TIMER
SLEEP
POWER
ECONOMY
POWERFUL
3
Connect the power
supply cord to an
independent power
supply.
Open the front panel
Remove the air filters
6
Close the front panel
■ Notes
• If the unit is not going to be used for an extended period of time, turn off the main Power supply. If it is left
at the ON position, approximately 2.5 W of electricity will be used even if the indoor unit has been turned off
with the remote control.
• If operation is stopped, then restart immediately, the unit will resume operation only after 3 minutes.
DBT
24
-5
(Unit in °C)
Outdoor
WBT
18
-6
Use under the following conditions
DBT: Dry Bulb Temp
WBT:Wet Bulb Temp
Maximum Temperature
Minimum Temperature
DBT
32
16
Indoor
Cooling Heating
WBT
23
11
DBT
43
16
Outdoor
WBT
26
11
DBT
30
16
Indoor
WBT
_
_
11
Page 13
● Remote Control
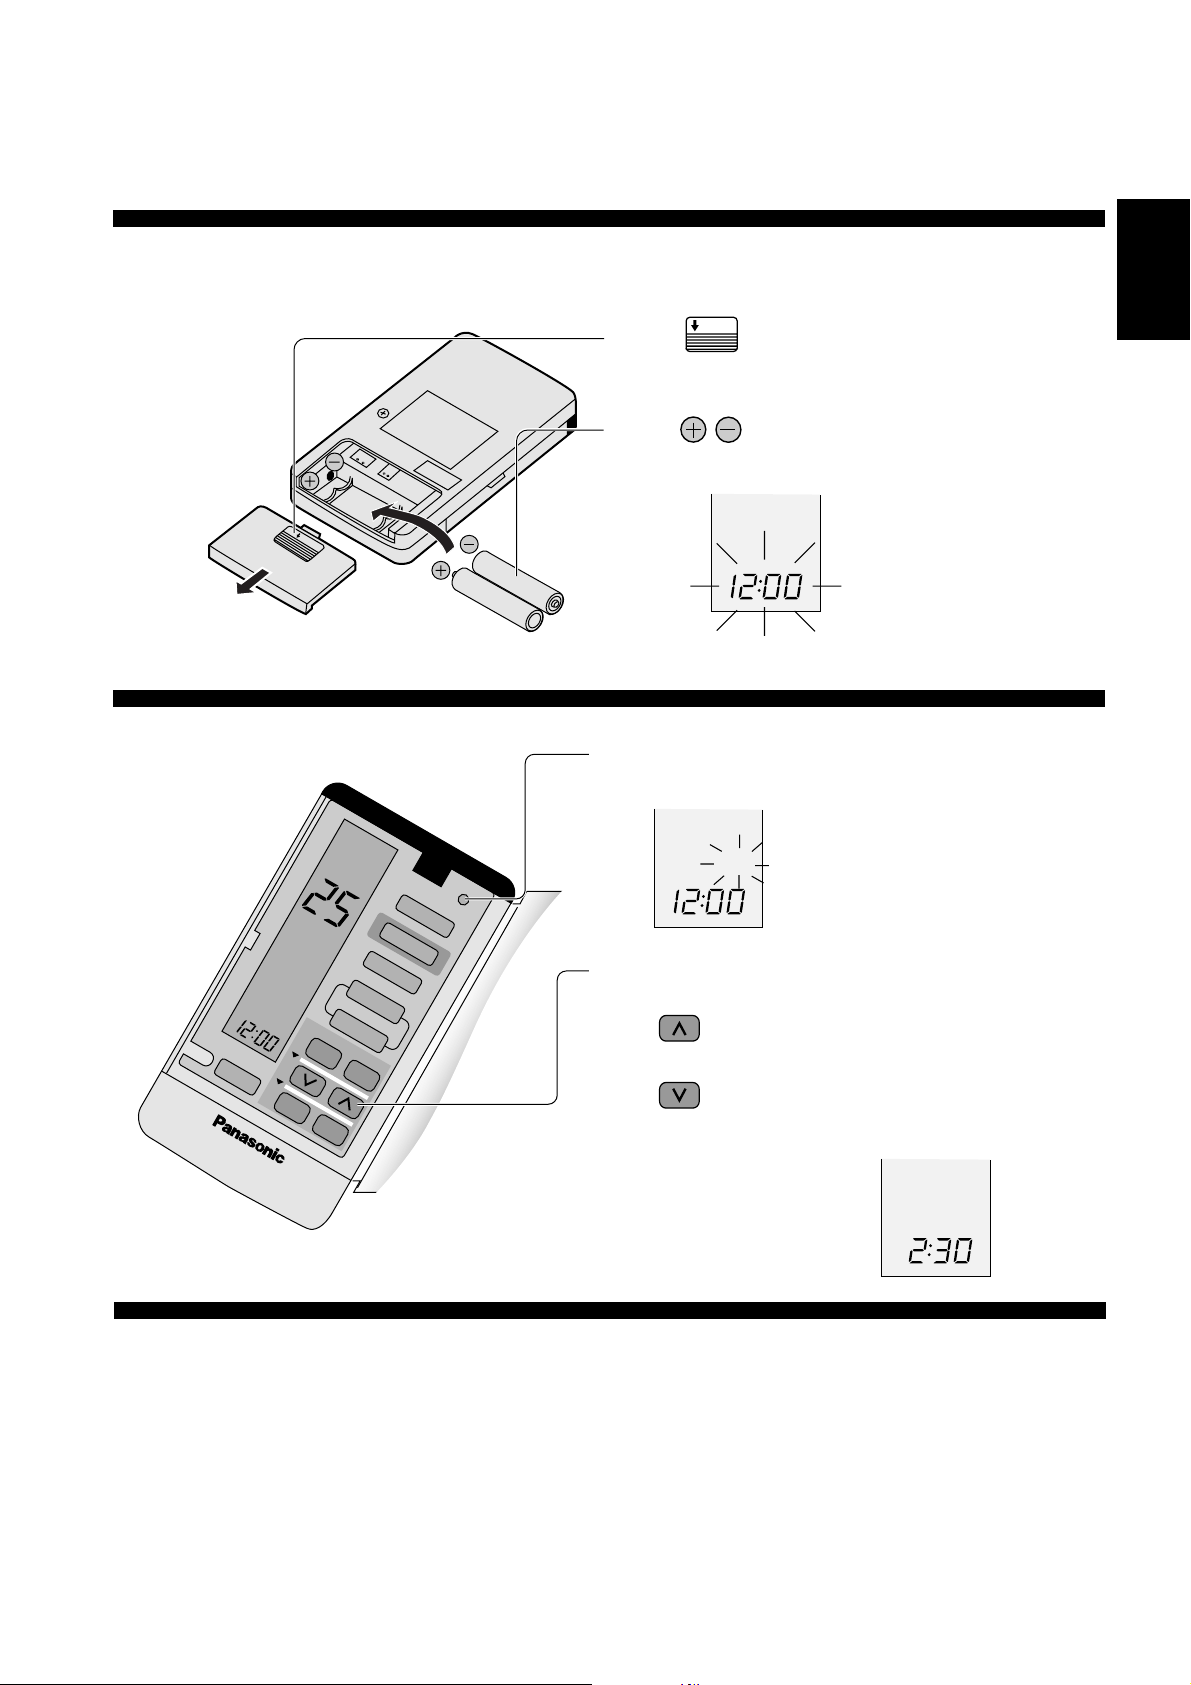
■ Inserting batteries
OPEN
1
2 Be sure the directions are correct
OPEN
* Set the current time (Clock) immediately to prevent battery exhaustion.
■ Setting the clock
1 Press the clock button
Slide the cover to open
• Open the remote control
cover and confirm the
PM
display 12:00 PM
is flashing.
ENGLISH
SLEEP
PM
3
1
2
CANCEL
COOL
AUTO
AIR SWING
MANUAL
TIMER
ON OFF
SET
ECONOMY
FAN SPEED
CLOCK
MODE
■ About the batteries
• Can be used for approximately one year.
Observe the following when replacing the batteries
• Replace with new batteries of the same type .
• Do not use rechargeable batteries (Ni-Cd).
• Remove the batteries if the unit is not going to be
used for a long period.
PM
← flashes
← lights up
2 Press to set the current time
Press continuously for fast forwarding.
Press continuously for fast reversing.
3
Press the clock button
← lights up
PM
← lights up
12
Page 14
HOW TO OPERA TE
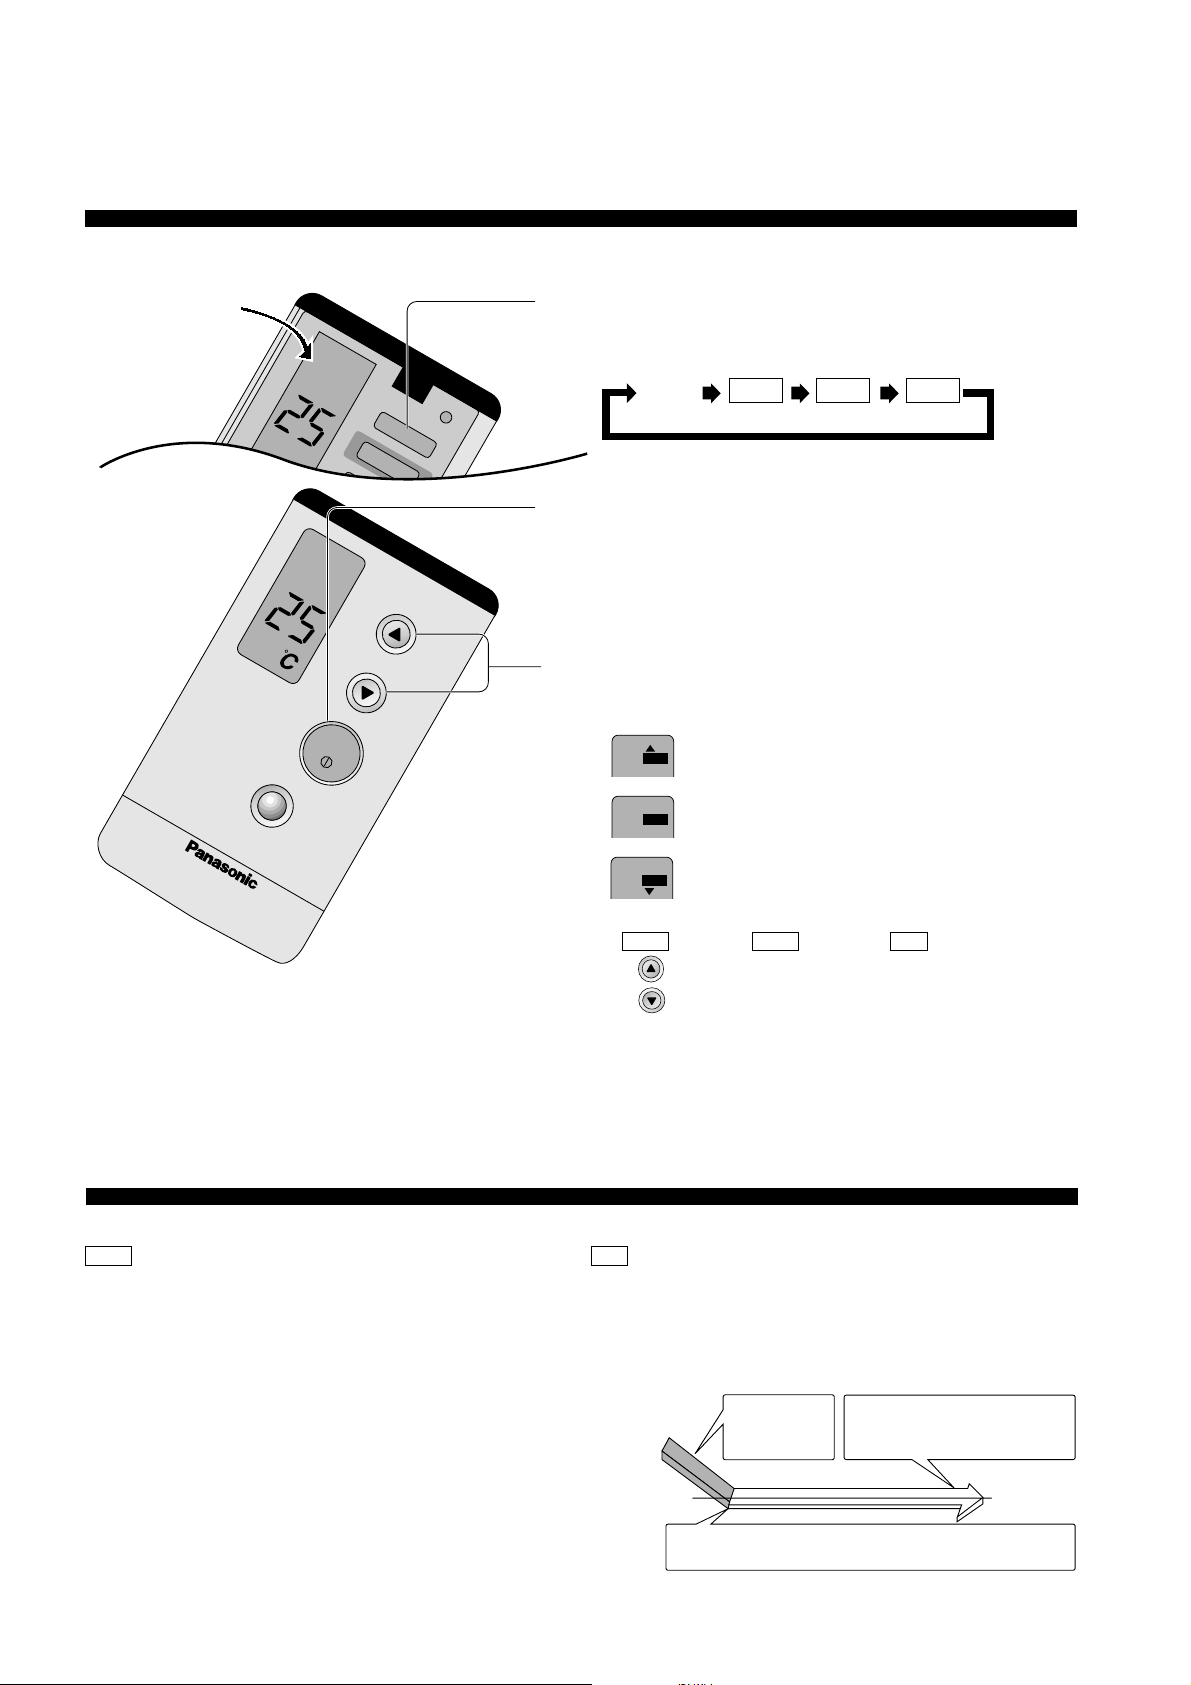
● Automatic, Heating, Cooling, Soft Dry
Display
Close the Cover
SLEEP
POWERFUL
3
1
2
CANCEL
COOL
AUTO
AIR SWING
MANUAL
TIMER
ON OFF
COOL
SET
OFF/ON
MODE
ECONOMY
FAN SPEED
TEMP
CLOCK
1
2
3
Press to select the desired operation mode
When pressed, the display changes in this order.
a
Press to start the operation
POWER indicator LED (Green) on indoor unit will light up.
Press once more to stop operation.
Press to select room temperature
• a Automatic Operation
Display
HI
AUTO
AUTO
AUTO
LO
HEAT
- Operation with 2°C higher than standard
temperature.
- Operation with standard temperature.
(see operation details below)
- Operation with 2°C lower than standard
temperature.
COOL
DRY
■ Operation details
Cooling Operation
COOL
• To set room temperature to your preference of cooling
comfort.
a – Automatic Operation
• At the start of the automatic operation, Heating, Cooling
or Soft Dry is automatically selected according to the
indoor temperature.
• The operation mode changes every hour, when
necessary.
• Temperature is not displayed on remote control during
Auto mode operation
• Heating, Cooling, Soft Dry operation
HEAT
Press to increase temperature by 1°C.
Press to decrease temperature by 1°C.
– The temperature can be set between
16°C and 30°C.
– Recommended temperature
For Heating: 20°C - 24°C
For Cooling: 26°C - 28°C
For Soft Dry: 1°C - 2°C lower than room temperature.
DRY
– Soft Dry Operation
• A very gentle Cooling Operation. Consisting primarily of
dehumidifying. It does not lower the room temperature.
• During Soft Dry operation, the indoor fan operates at Low
fan speed.
Cooling
Operation
Setting
temperature
Switch to Soft Dry when setting temperature is reached.
DRYCOOL
Soft Dry operation with Low
fan speed
13
Page 15
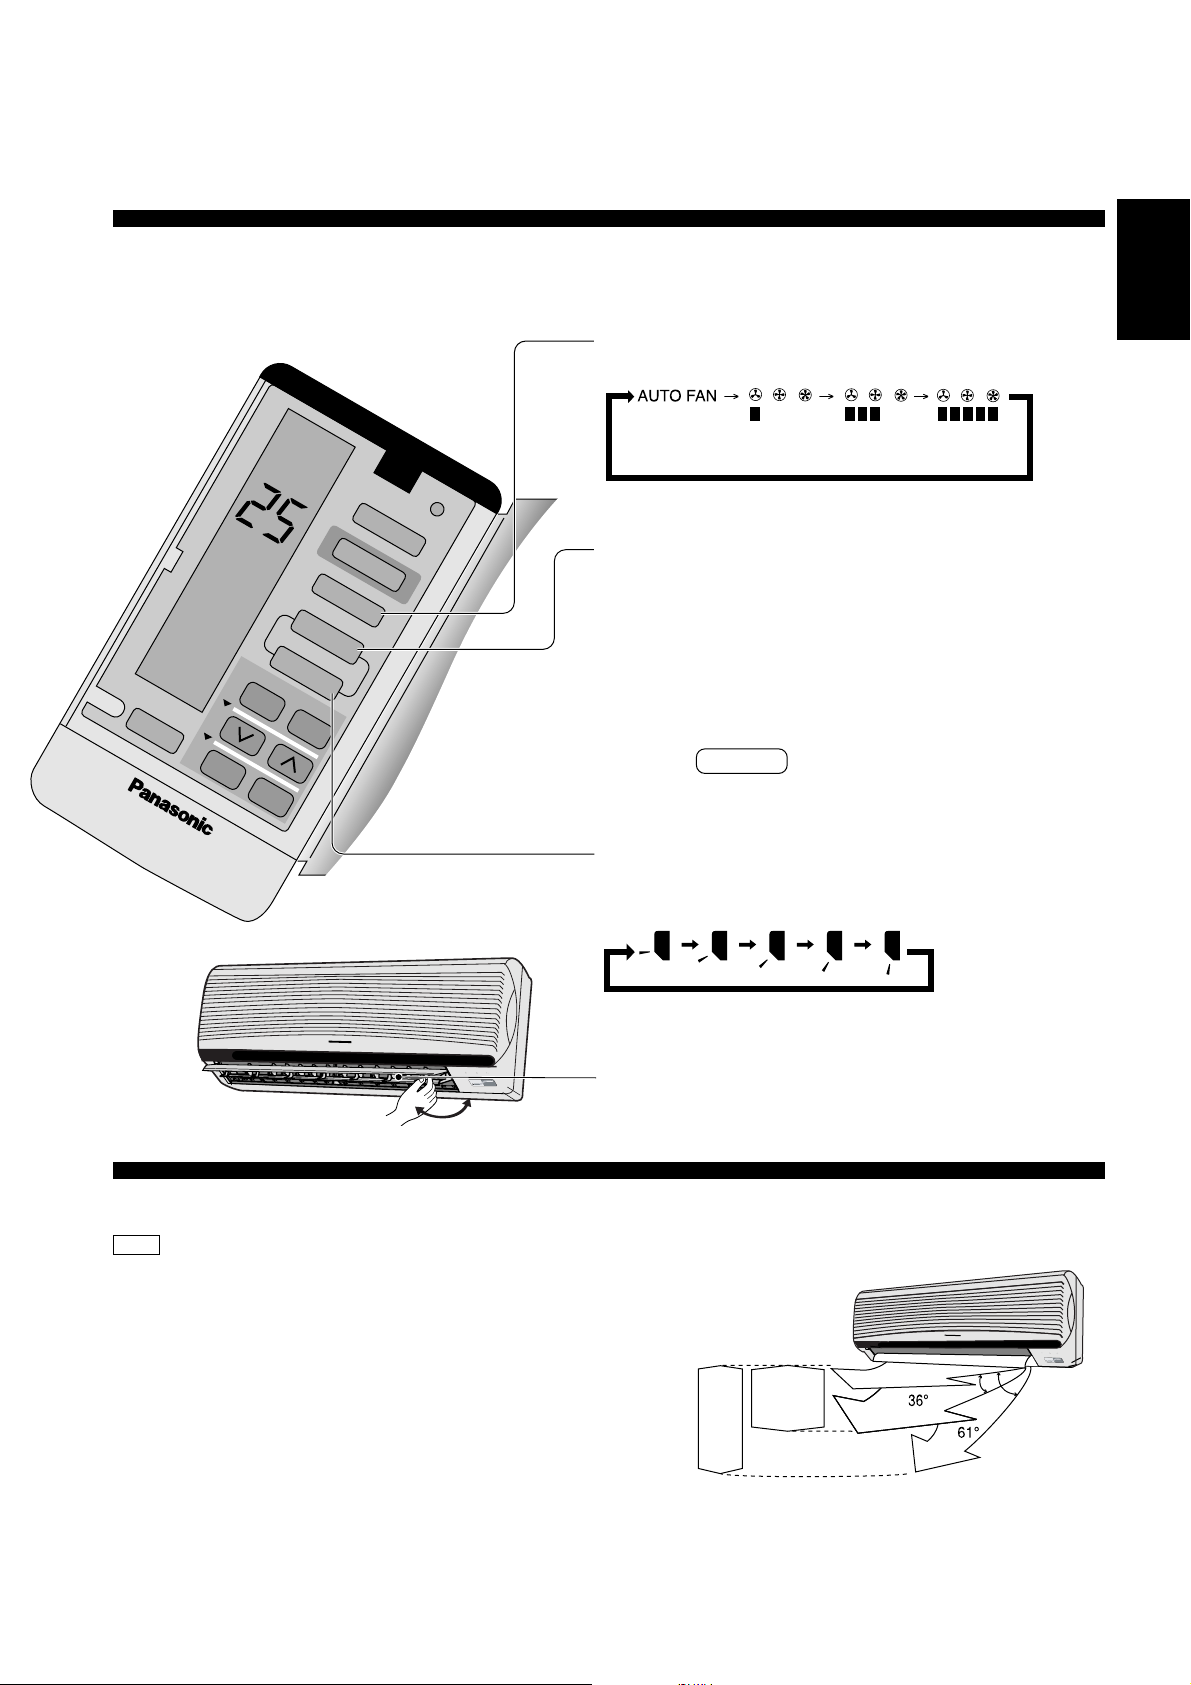
● Adjusting Airflow Direction And F an Speed
Press to select Fan speed
• The display changes in this order
Automatic Low Medium High
COOL
CLOCK
MODE
ECONOMY
FAN SPEED
Selecting Vertical Airflow Direction
Press AUTO,
• Cooling and Soft Dry – The louver swing up and
down automatically.
• Heating – When the discharge air temperature is low
such as at the start of heating operation, the air
blows at horizontal level. As the temperature rises,
the hot air blows in a downwards direction.
• To stop the automatic airflow direction operation,
press MANUAL button.
SLEEP
3
CANCEL
2
AUTO FAN
MANUAL
1
TIMER
ON OFF
SET
AUTO
AIR SWING
ENGLISH
Press MANUAL
• Manual selection of Vertical Airflow Direction Louver.
• The display changes in this order,
TIMER
POWER
SLEEP
ECONOMY
POWERFUL
Horizontal Airflow Direction
• Adjust it manually.
■ Operation details
HEAT
– Heating Operation
• Defrosing Operation
Depend on the outdoor temperature, the operation
occasionally stops to melt the frost on the outdoor unit.
• Heat is obtained from outdoor air to warm up the room. When
the outdoor ambient air temperature falls, the heating capacity
of the unit might be reduced.
Automatic Airflow Volume
• The speed of the Indoor fan is adjusted automatically
according to the operation. The Indoor fan stops occasionally
during cooling operation.
Louver adjustment range
POWER
E
C
Cooling
Soft Dry
Heating
* Five stages of adjustments can be made in
this range.
SLEEP
TIMER
O
N
O
M
Y
P
O
W
E
R
F
U
L
14
Page 16
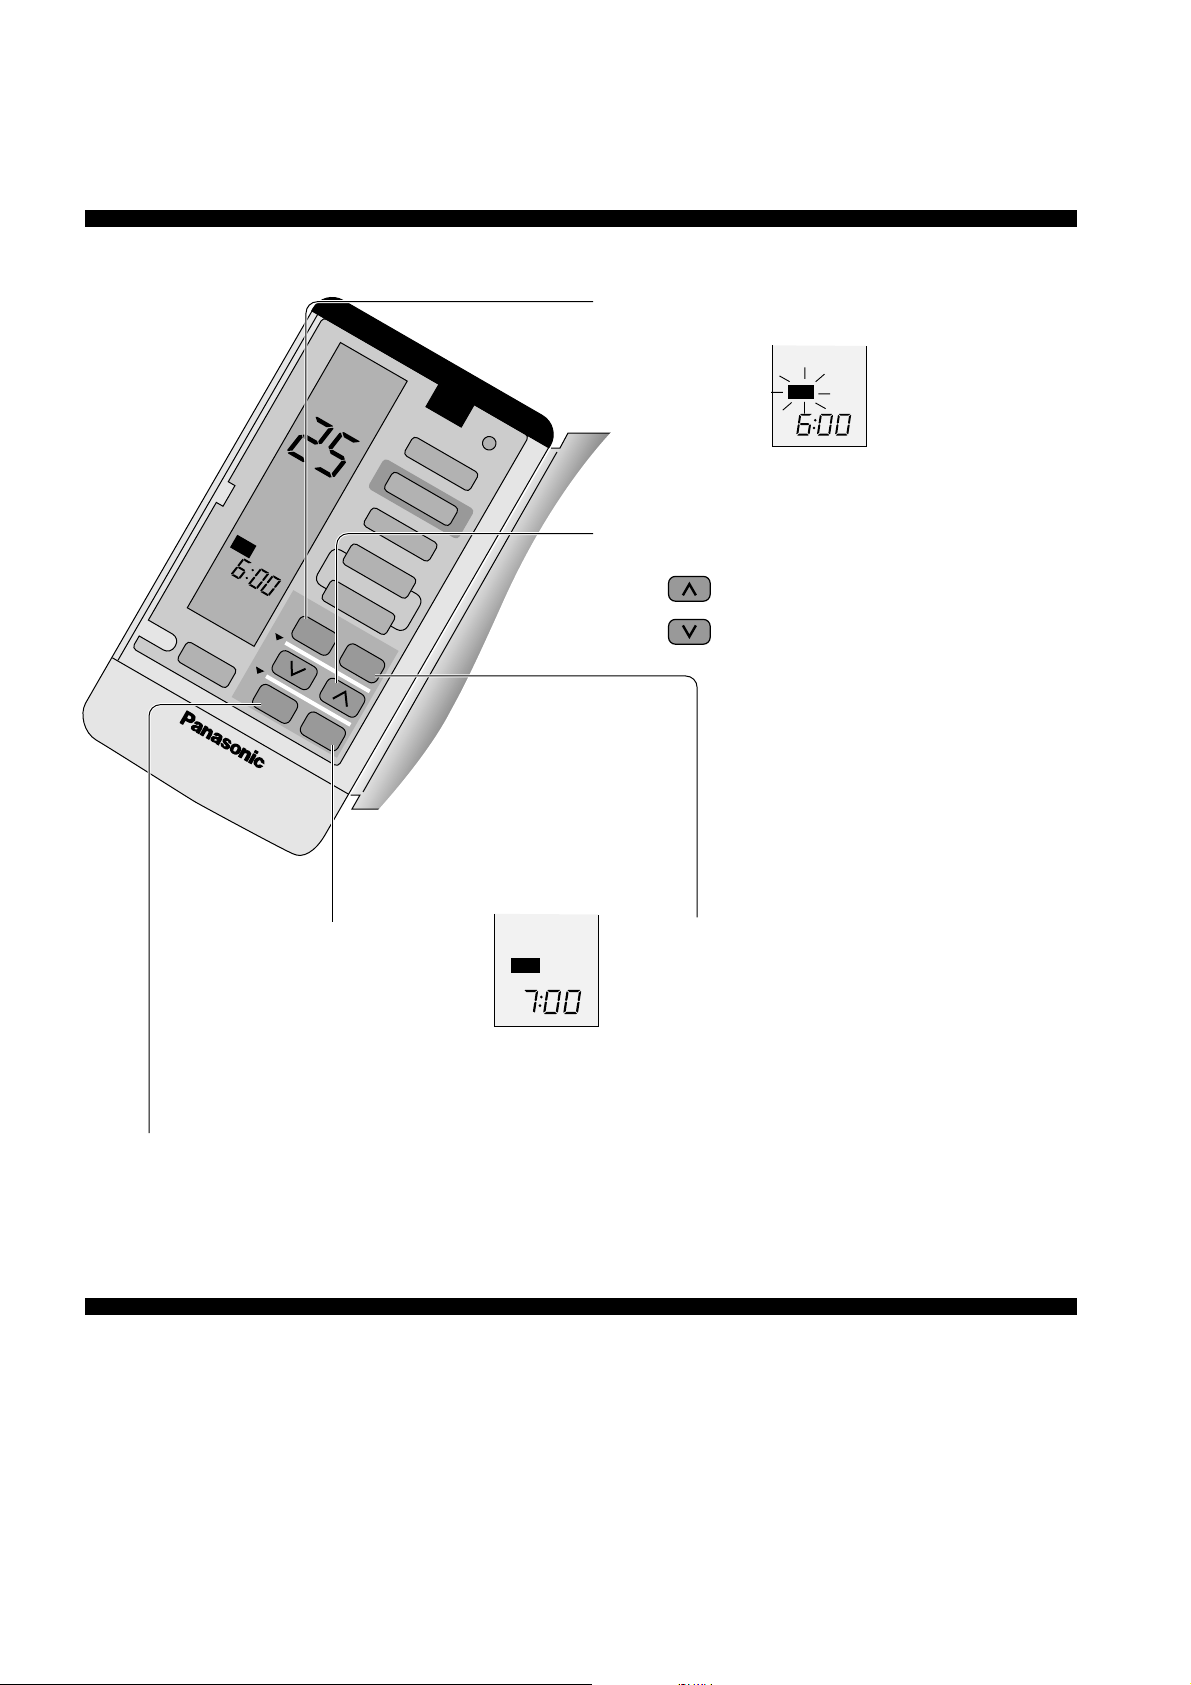
SETTING THE TIMER
Ensure that the current time is correct before setting the timer. The timer cannot be set if the time display is flashing.
1 Press ON-TIMER
ON
SLEEP
AM
3
COOL
AIR SWING
MANUAL
1
TIMER
ON OFF
2
CANCEL
SET
3 Press SET
MODE
ECONOMY
FAN SPEED
AUTO
Lights up →
CLOCK
Flashes →
Example: Set the ON-TIMER to 7:00AM
2 Press to set the time
Increase by 10 minutes
Decrease by 10 minutes
* Press continuously for quick setting.
AMON
4 To set the OFF-TIMER
Press the OFF-TIMER then follow
steps 2 and 3 as above.
AMON
* The timer indicator (orange) on
the indoor unit will light up.
■ Timer Cancellation Button
(To cancel the Timer)
Press the ON-TIMER or OFF-TIMER then press
CANCEL.
* The timer indicator on the indoor unit will go off.
Timer details
• When the ON-Timer is set, operation will start
before the actual set time. This is to allow the
room temperature to reach the setting temperature
by the setting time (Cooling and Soft dry, 15
minutes in advance. Heating and Automatic,
30 minutes in advance).
■ To change the setting time, follow the above
steps.
• Once the ON-Timer is set, operation will start at
the setting time everyday.
15
Page 17
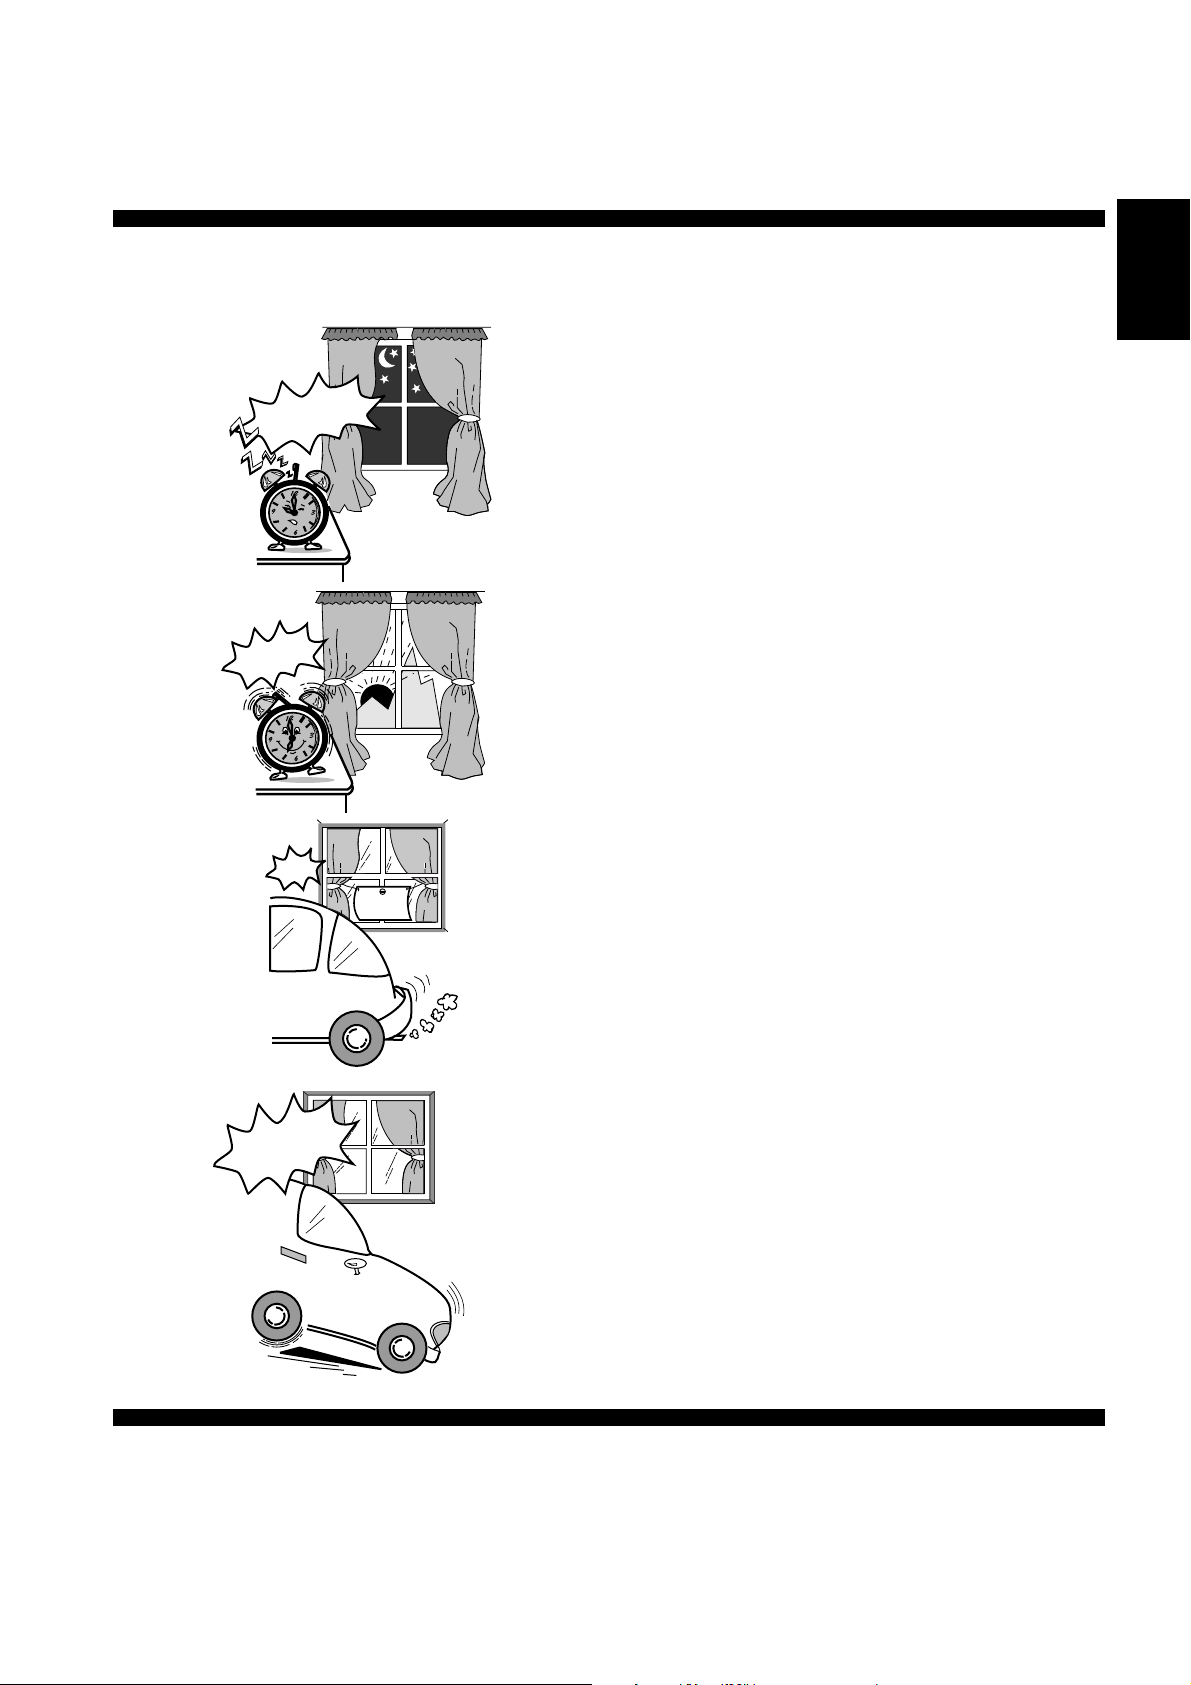
● Recommended Setting of Timer
■ When you sleep
• Set the time at which you will go to sleep with the
OFF-TIMER. This prevent wastage of electricity.
Good Night!
■ When you wake up
• Set the time at which you will wake up with the
Good
Morning!
Bye
RING...
RING...
Not at
Home
ON-TIMER. You can start the new day at a
comfortable temperature.
Note:
(The above is an example of how you can used the
OFF-TIMER and ON-TIMER mode. However it is
recommended to use the sleep mode function for
sleeping)
■ When going out
• Set the time at which you will go out with the
OFF-TIMER. Set the time at which you will come
back with the ON-TIMER.
• This will prevent the air conditioner from being left
on while you are out, and the temperature will be
pleasant when you return.
ENGLISH
Hi! I’m home
Timer details
• The current time is not displayed when the timers
are set.
■ When you return
• Set the time at which you will return with the
ON-TIMER.
• This will make the temperature pleasant when you
return, and it will prevent the air conditioner from
being left on.
• When both timers are used together, the TIMER
LED on the indoor unit remains lit even if the
operation is stopped by the OFF-TIMER.
16
Page 18
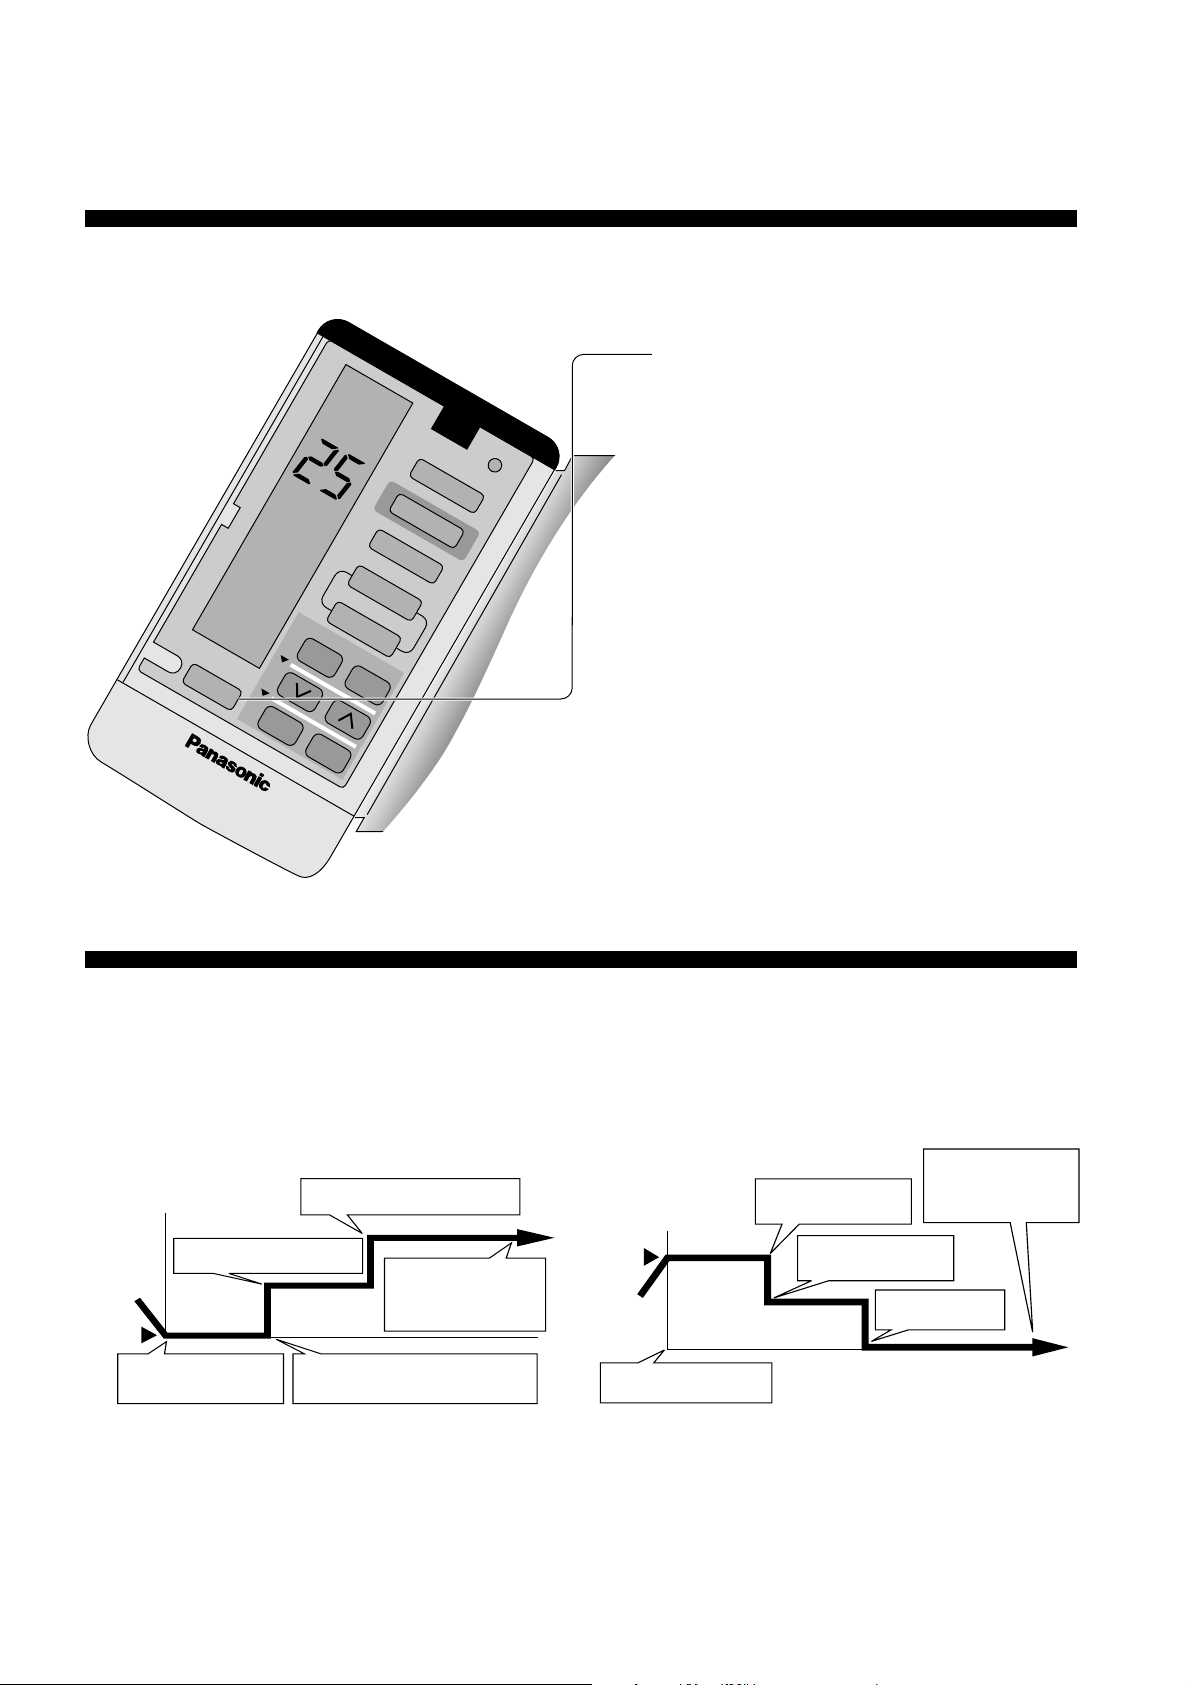
CONVENIENCE OPERATION
● Sleep Mode
This is to obtain a comfortable room temperature while sleeping.
■ To set the sleep mode, press SLEEP.
* The sleep indicator on the indoor unit
will light up.
■ To cancel the sleep mode, press once
more.
SLEEP
3
1
2
CANCEL
COOL
AUTO
AIR SWING
MANUAL
TIMER
ON OFF
SET
CLOCK
MODE
ECONOMY
FAN SPEED
■ Operation details
• When the room temperature reaches the setting
temperature, the airflow volume will automatically
change to low.
• Sleep Mode Operation time is 8 hours.
• When used together with the timer, the timer has priority.
Temperature
Approx. 0.5°C increase.
Setting temperature
Sleep Operation button
is pressed.
0-1 hour
• Cooling or Soft Dry Operation for sleep mode movement
will start to avoid overcooling.
Approx. 0.5°C increase.
Approx. 8 hours after
1 hour
Sleep shift operation starts.
sleep shift operation
starts, stops
automatically.
Time
Approx. 8 hours after
sleep shift operation
starts, stops
automatically.
Approx. 3°C
decrease.
Time
Temperature
0-1 hour
Setting temperature
Sleep Operation button
is pressed.
Sleep shift operation
starts.
Approx. 2°C decrease.
1 hour
• Heating operation for sleep mode movement will start to
avoid overheating.
17
Page 19
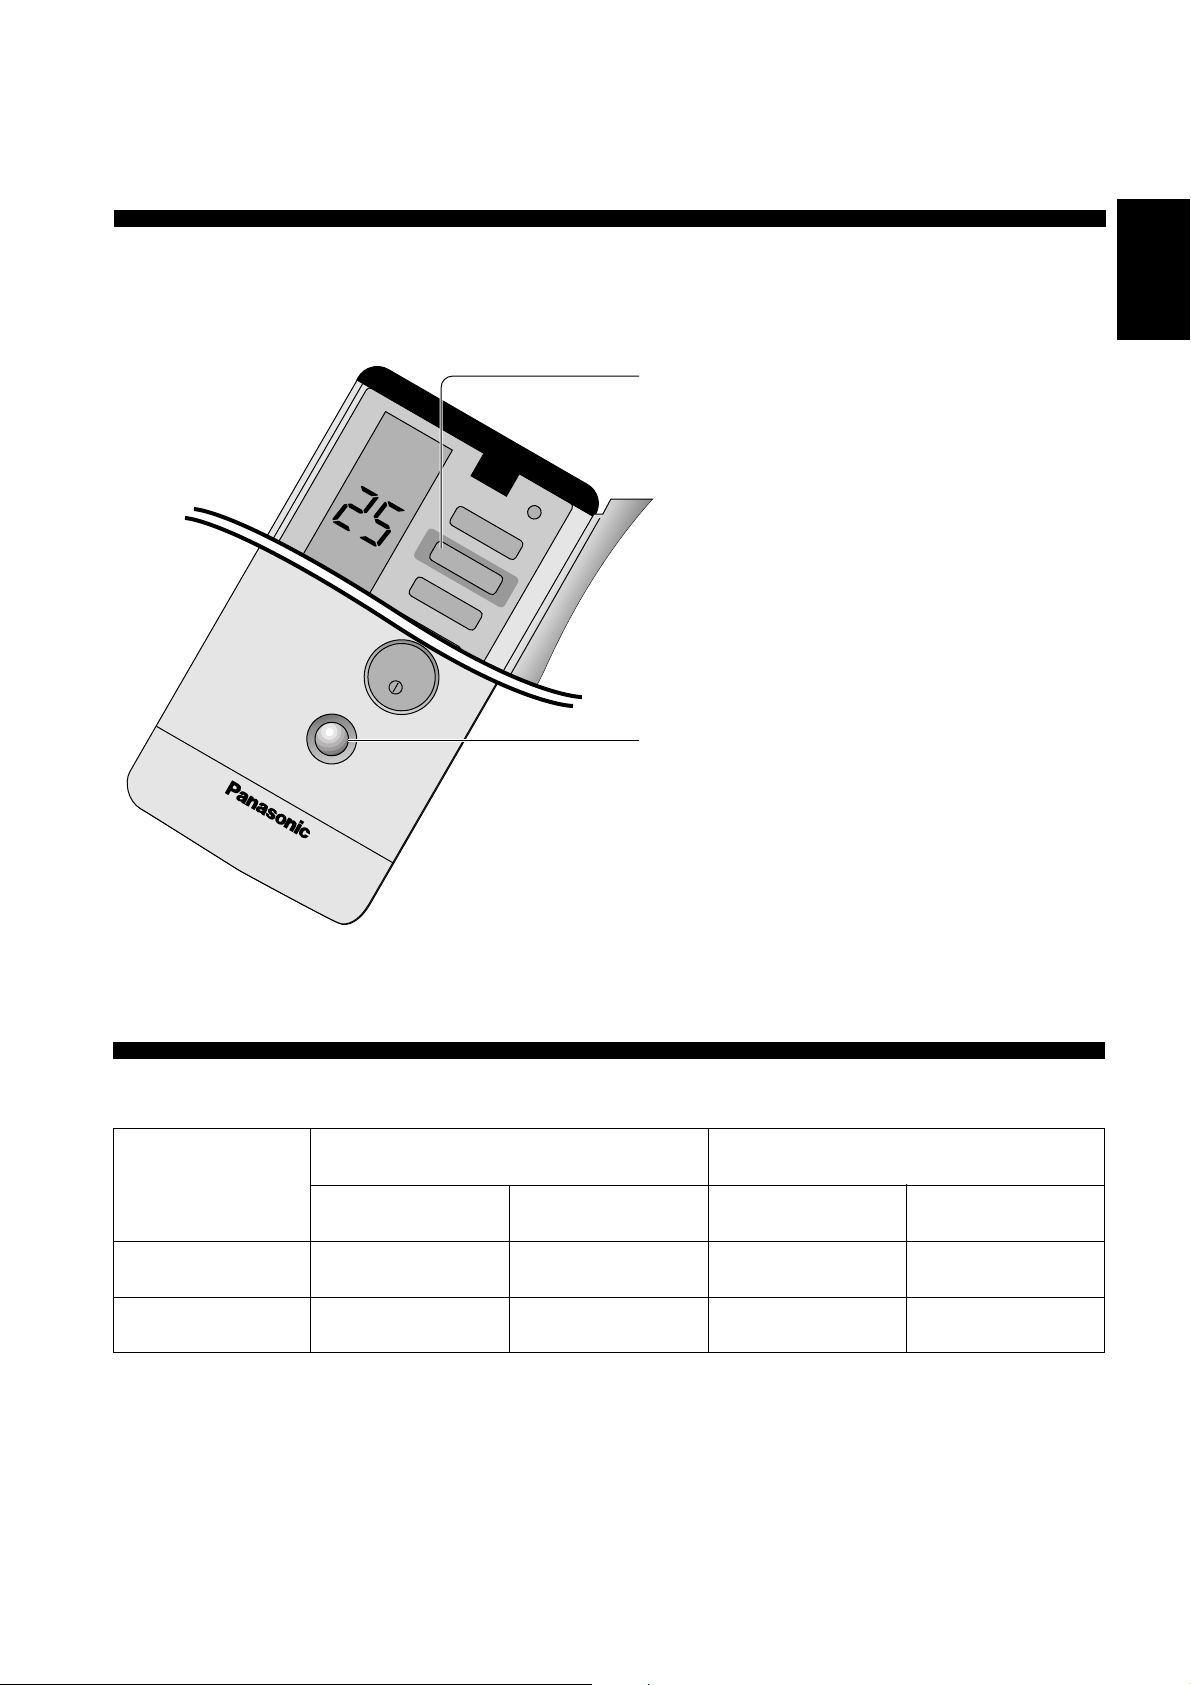
● Economy or Powerful Mode
Economy and Powerful operation cannot be selected simultaneously.
COOL
CLOCK
MODE
Cover is closed
POWERFUL
SLEEP
3
1
2
CANCEL
MANUAL
TIMER
ON OFF
SET
ECONOMY
FAN SPEED
AUTO
AIR SWING
OFF/ON
ENGLISH
Economy Mode
To save electrical power consumption.
However, please use this mode when the room have
reached your desired temperature.
• Press ECONOMY
* Economy indicator (Green) on indoor unit
lights up.
• Press once more to cancel this operation.
Powerful Mode
To obtain the setting temperature quickly.
• Press POWERFUL
* Powerful indicator (Orange) on indoor unit
lights up.
* Powerful mode will operate for 15 minutes only.
• To cancel this operation, press once more.
■ Operation details
Economy operation Powerful operation
Temperature
Cooling/Soft Dry
Heating
* • The changes of the temperature and airflow volume are automatic.
• The remote control display remain unchanged.
• If sleep button or operation mode button is pressed, economy or powerful operation is cancelled.
• During Economy mode, indoor fan operates on and off at Low speed.
0.5°C higher than set temp.
0.5°C lower than set temp.
Airflow volume
Low (on and off)
Low (on and off)
Temperature
3°C lower than set temp.
3°C higher than set temp.
Airflow volume
Super High
Automatic
18
Page 20
CARE AND MAINTENANCE
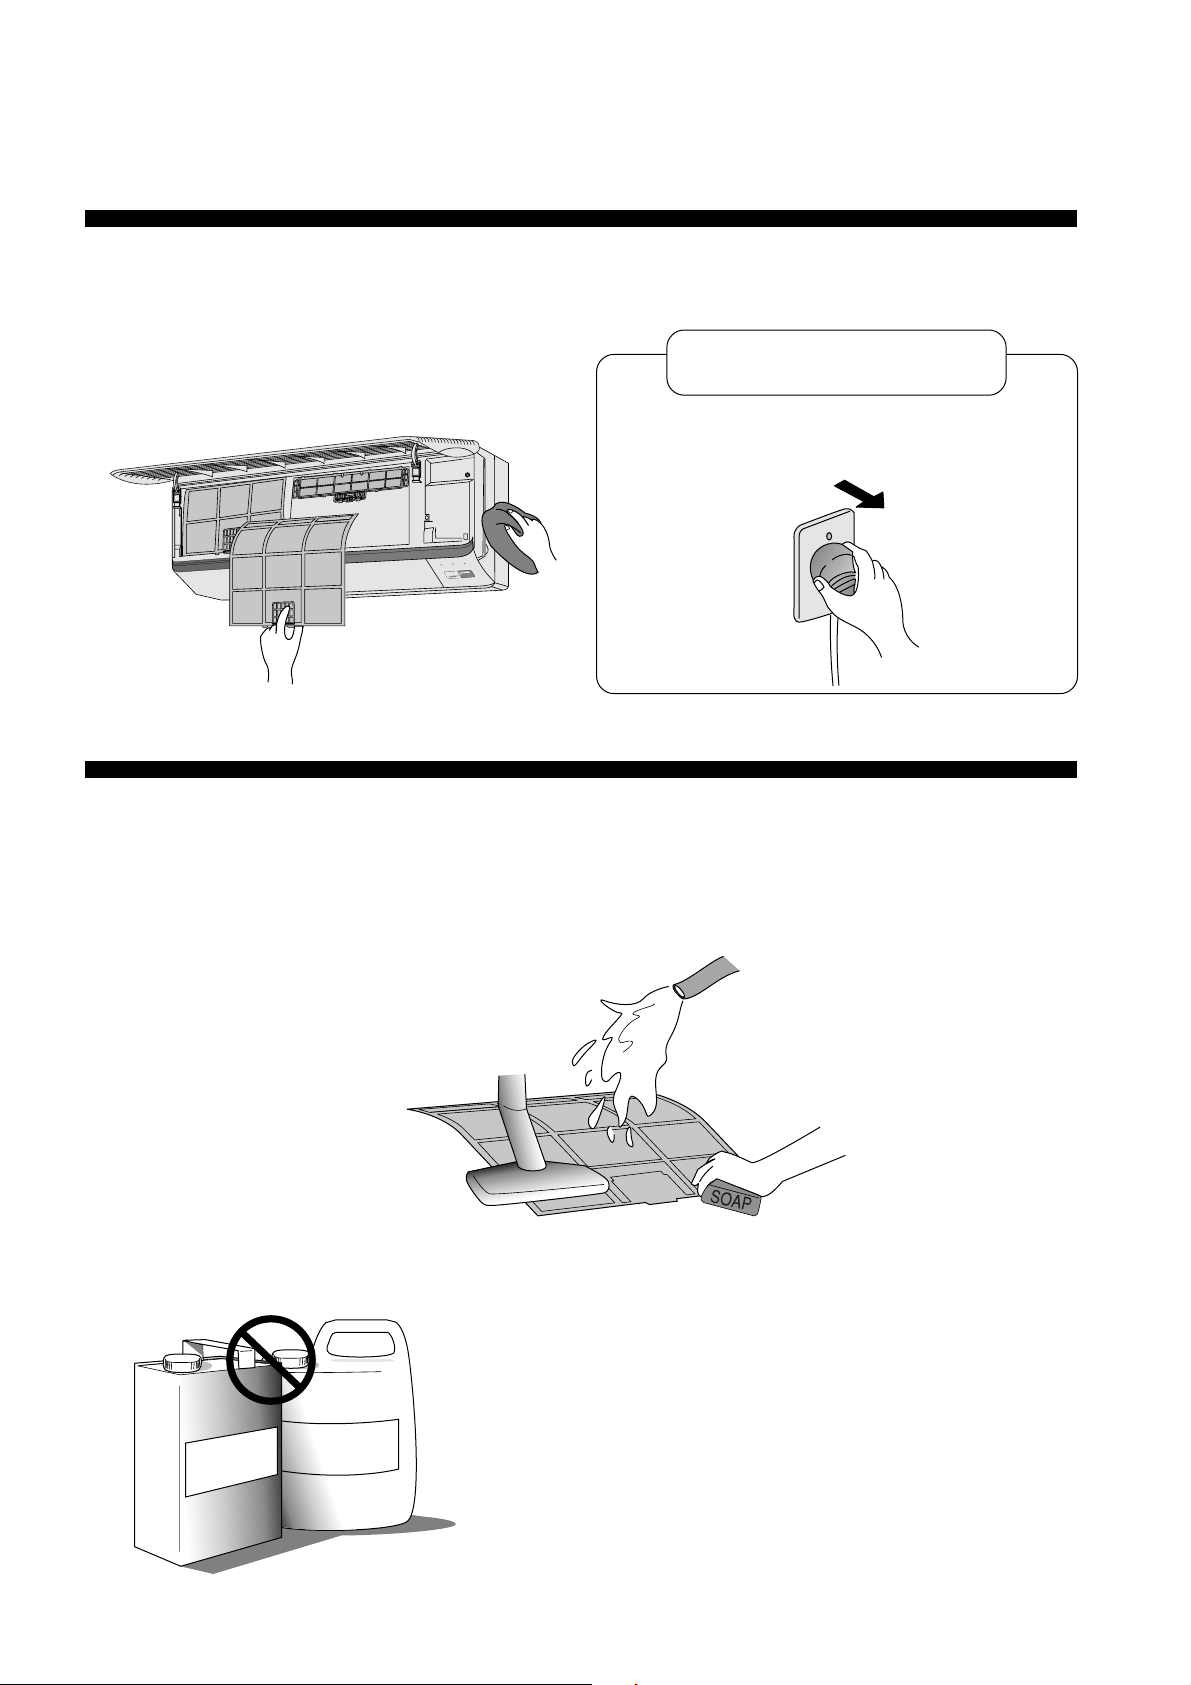
● Cleaning the Indoor Unit and Remote Control
• Wipe gently with a soft, dry cloth.
• Do not clean with water hotter than 40°C or with
polishing fluids.
• The front panel can be removed and cleaned with
water.
TIMER
SLEEP
POWER
ECONOMY
POWERFUL
Switch OFF and unplug the power cord before
cleaning the air conditioner.
!
Caution
● Cleaning the Air Filter
(Recommendation:- If the unit is operated in a dusty environment, clean the filters every two weeks,
continuous use of this dirty filters will reduce cooling efficiency)
Wash back of the air filter
with water.
4
If badly soiled, wash it
with soap or a mild
household detergent.
1
2
Open the front grille and remove the two air
filters. Hold the tab, lift up slightly then pull down.
Remove dirt using a
vacuum cleaner.
Let it dry and reinstall it.
Be sure the “FRONT” mark is facing you.
* Damaged air filter.
Consult the nearest authorized dealer.
Part No.: CWD00240.
T
h
5
r
e
i
n
n
Benzene
3
19
• Do not clean using benzene, thinner, scouring powder or cloths
soaked in caustic chemicals.
Page 21
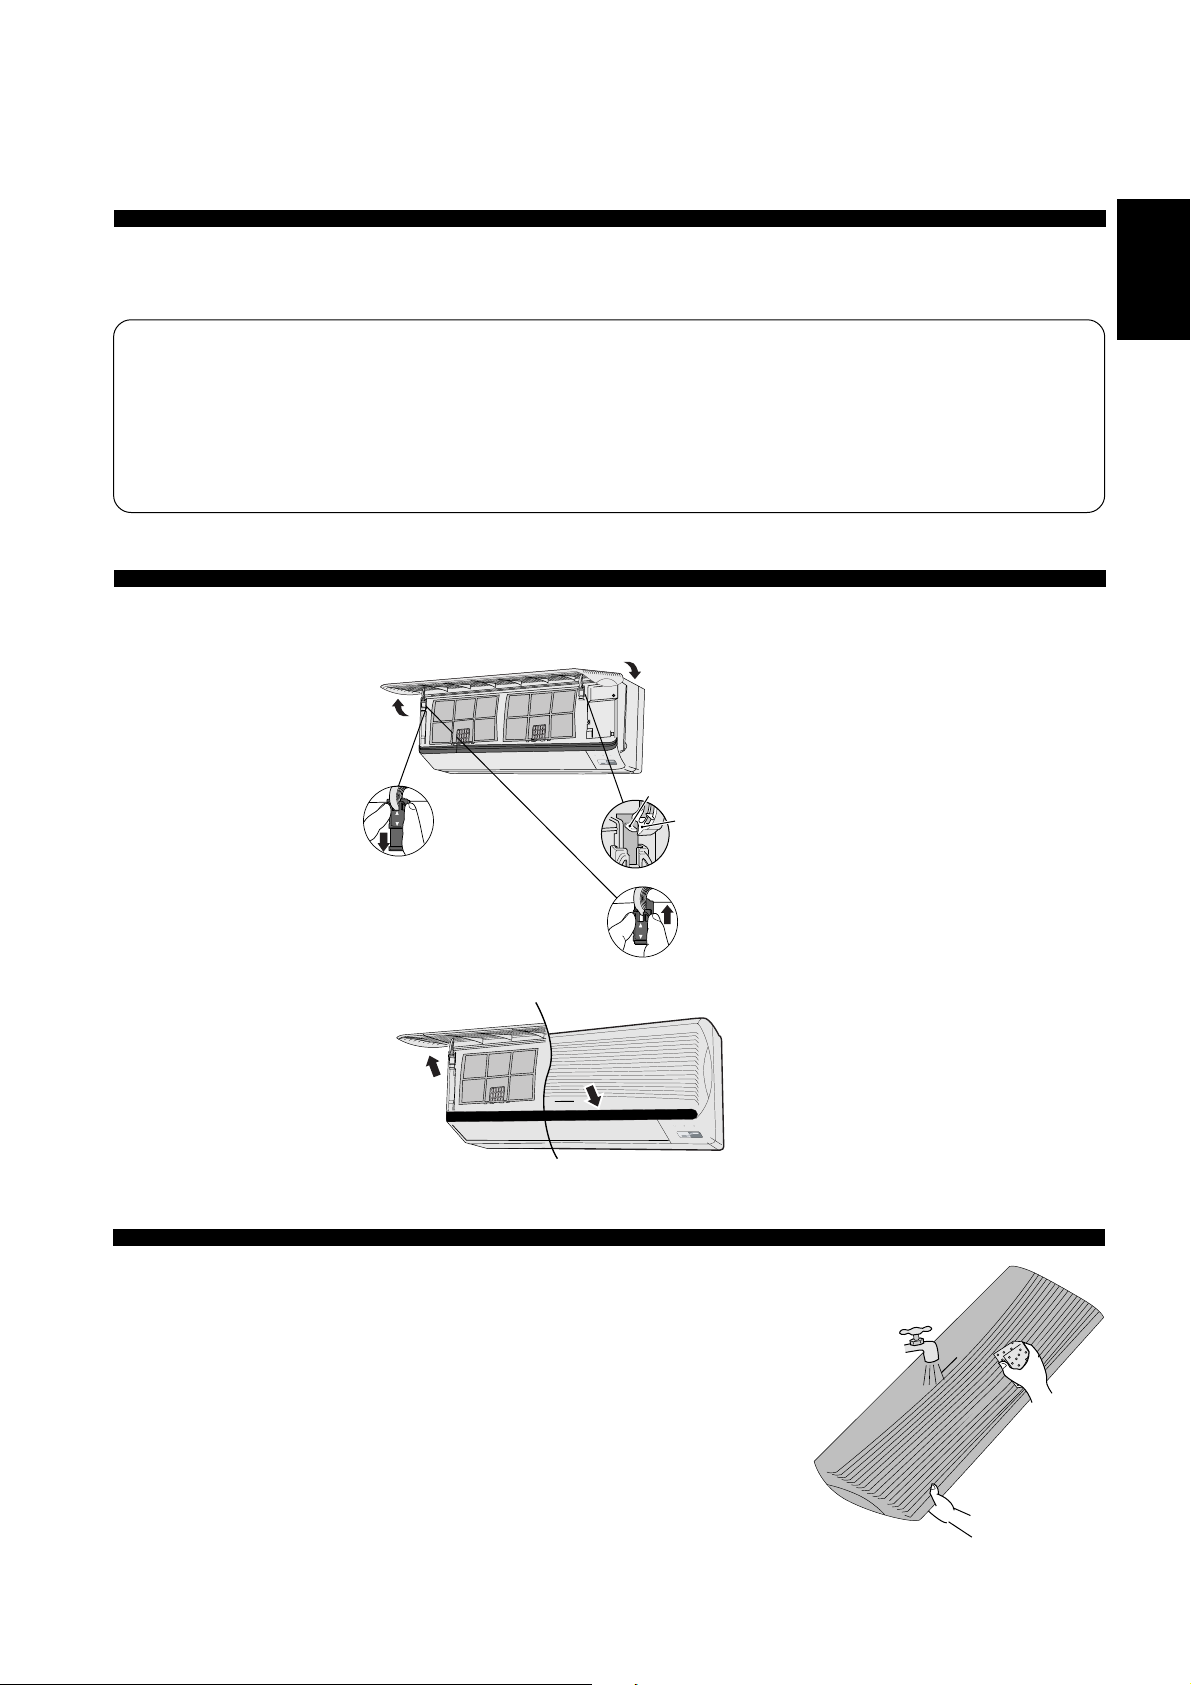
● Cleaning the Front Panel
(Must be removed before washing)
!
Caution
ENGLISH
• Stand on a level surface when
removing the front panel.
• Do not touch the metal parts in
the indoor unit after removing
the front panel.
• Do not leave water on the
panel after cleaning. Dry
thoroughly to prevent electric
shock.
■ Removing the front panel ■ Fixing the front panel
1 Raise the front panel
to its full extent.
2 Slide the two tabs
(left and right) to the
UNLOCK position.
•
LOCK
UNLOCK
•
1 Raise the front panel horizontally,
match the protruding portion on the
TIMER
POWER
SLEEP
ECONOMY
POWERFUL
Protruding portion
on indoor unit
Fulcrum
indoor unit to the fulcrum and push
into place.
2 Slide the two tabs up to the Lock
position. (Click sound)
Note:If the tabs are left in the
UNLOCK position, the front
panel will not close.
* If the panel does not close
completely, check the tabs
positions and try again.
3 Raise the front panel
to a position slightly
higher than horizontal
and pull to remove.
LOCK
UNLOCK
TIMER
POWER
SLEEP
ECONOMY
POWERFUL
■ Cleaning the front panel
• Gently wash with water and a sponge. (Do not use a scrubbing brush
or other hard cleaning aids).
• Do not press the front panel too hard when washing. (Excess pressure
may damage the panel).
• When cleaning with kitchen cleaning fluids (neutral detergents), rinse
thoroughly. (Do not use non neutral detergents)
• Do not dry the front panel in direct sunlight. (Exposure to direct
sunlight may discolor or deform the panel).
20
Page 22
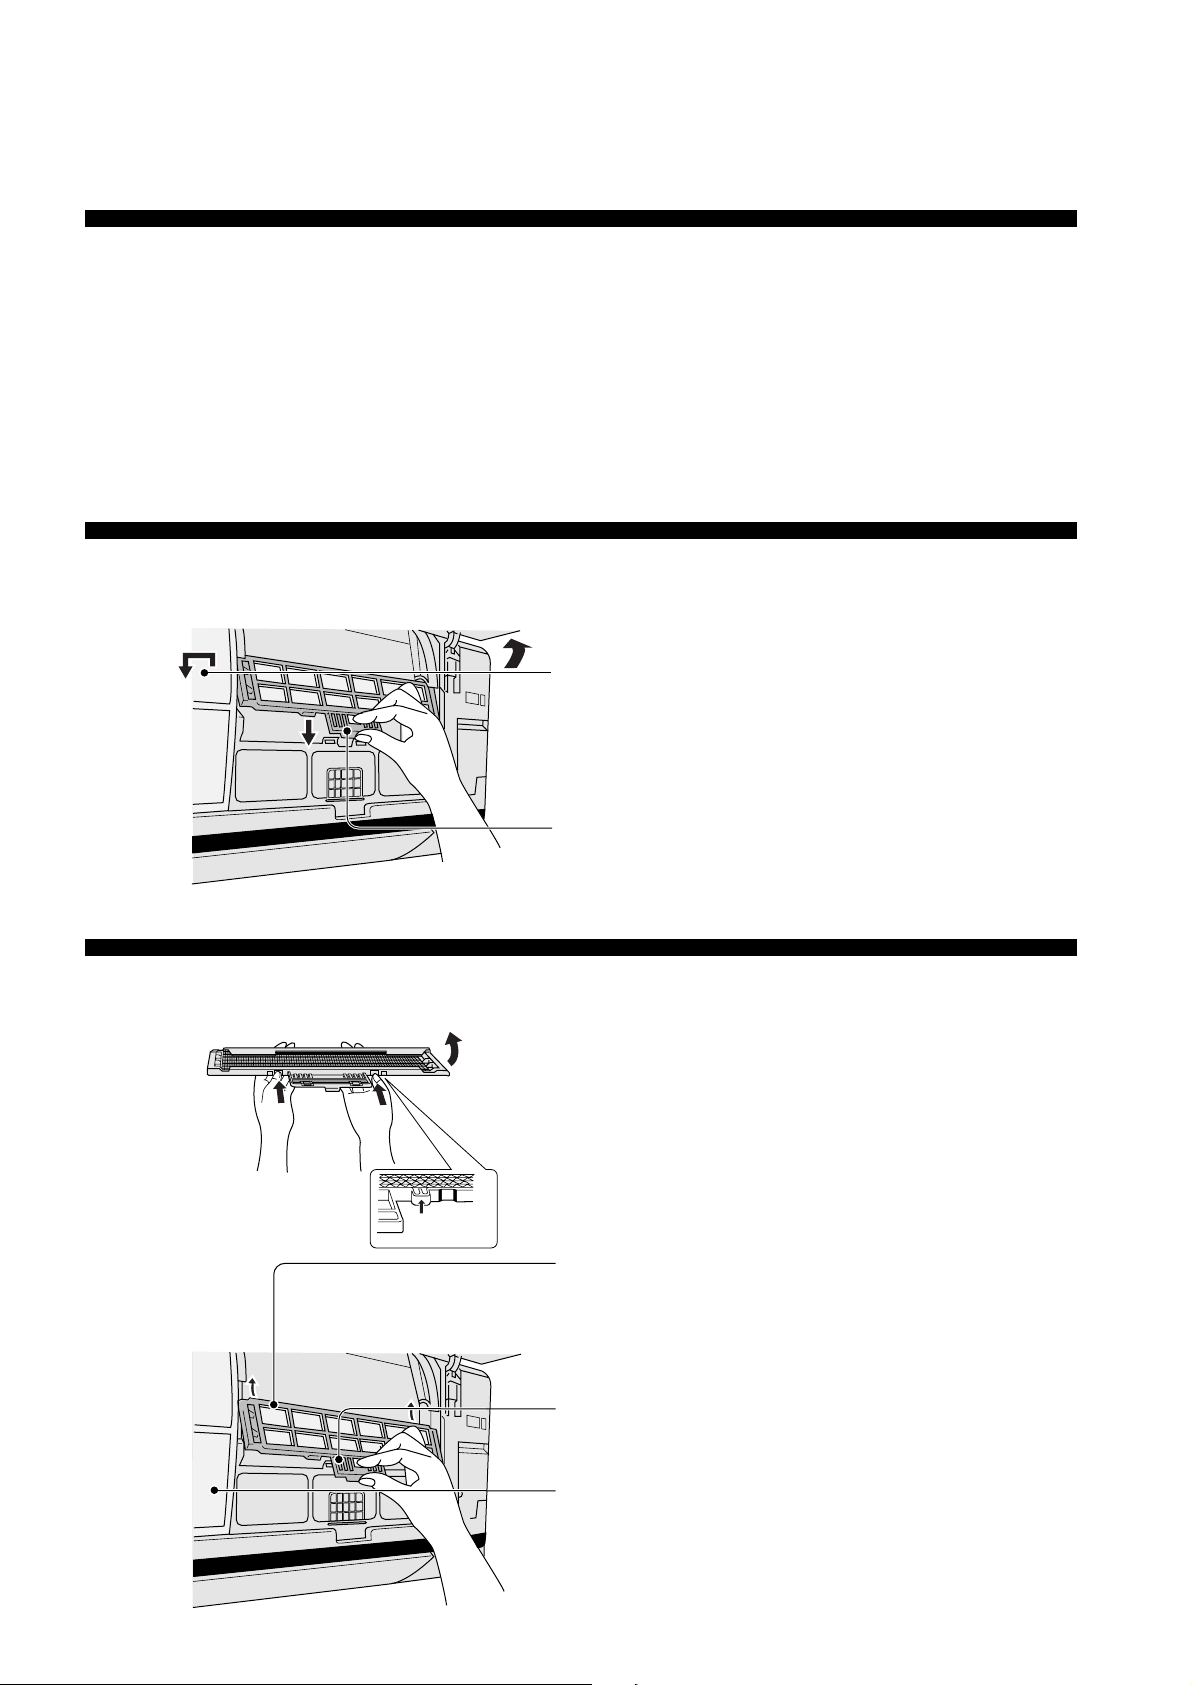
● Replacing the Air Purifying Filters
(Once every 3 month)
• Do not reuse dirty filters. Consult the nearest
authorized dealer.
(Air Purifying filter No. CZ-SFD50N)
• These filters function effectively for not more than
three months.
■ Removing the air purifying filters
1
2
3
• If the air conditioner operates with dirty filters:-
- Air is not purified
- Cooling capacity decreases
- Foul odours are emitted
• Note:
Catechin is natural brown element. The filter
is coated with catechin in order to prevent the
growth of bacteria and viruses.
Raise the front panel to its full extent.
Remove the air filters (left and right).
• Lift up slightly then pull down
Hold the tabs of the air purifying filters and pull.
!
Caution - Be careful not to hurt your hands on metal parts.
■ Reinstalling the air purifying filters
1
Press here
2
3
4
Open the filter frame to insert the new filters.
- Deodorizing Filter (Black in colour)
- Catechin Air Purifying Filter (Brown in colour)
Insert the new air purifying filter.
(Be sure the “FRONT” mark is facing you)
Push until you hear a click.
Reinsert the air filters.
21
5
Close the front panel .
Page 23
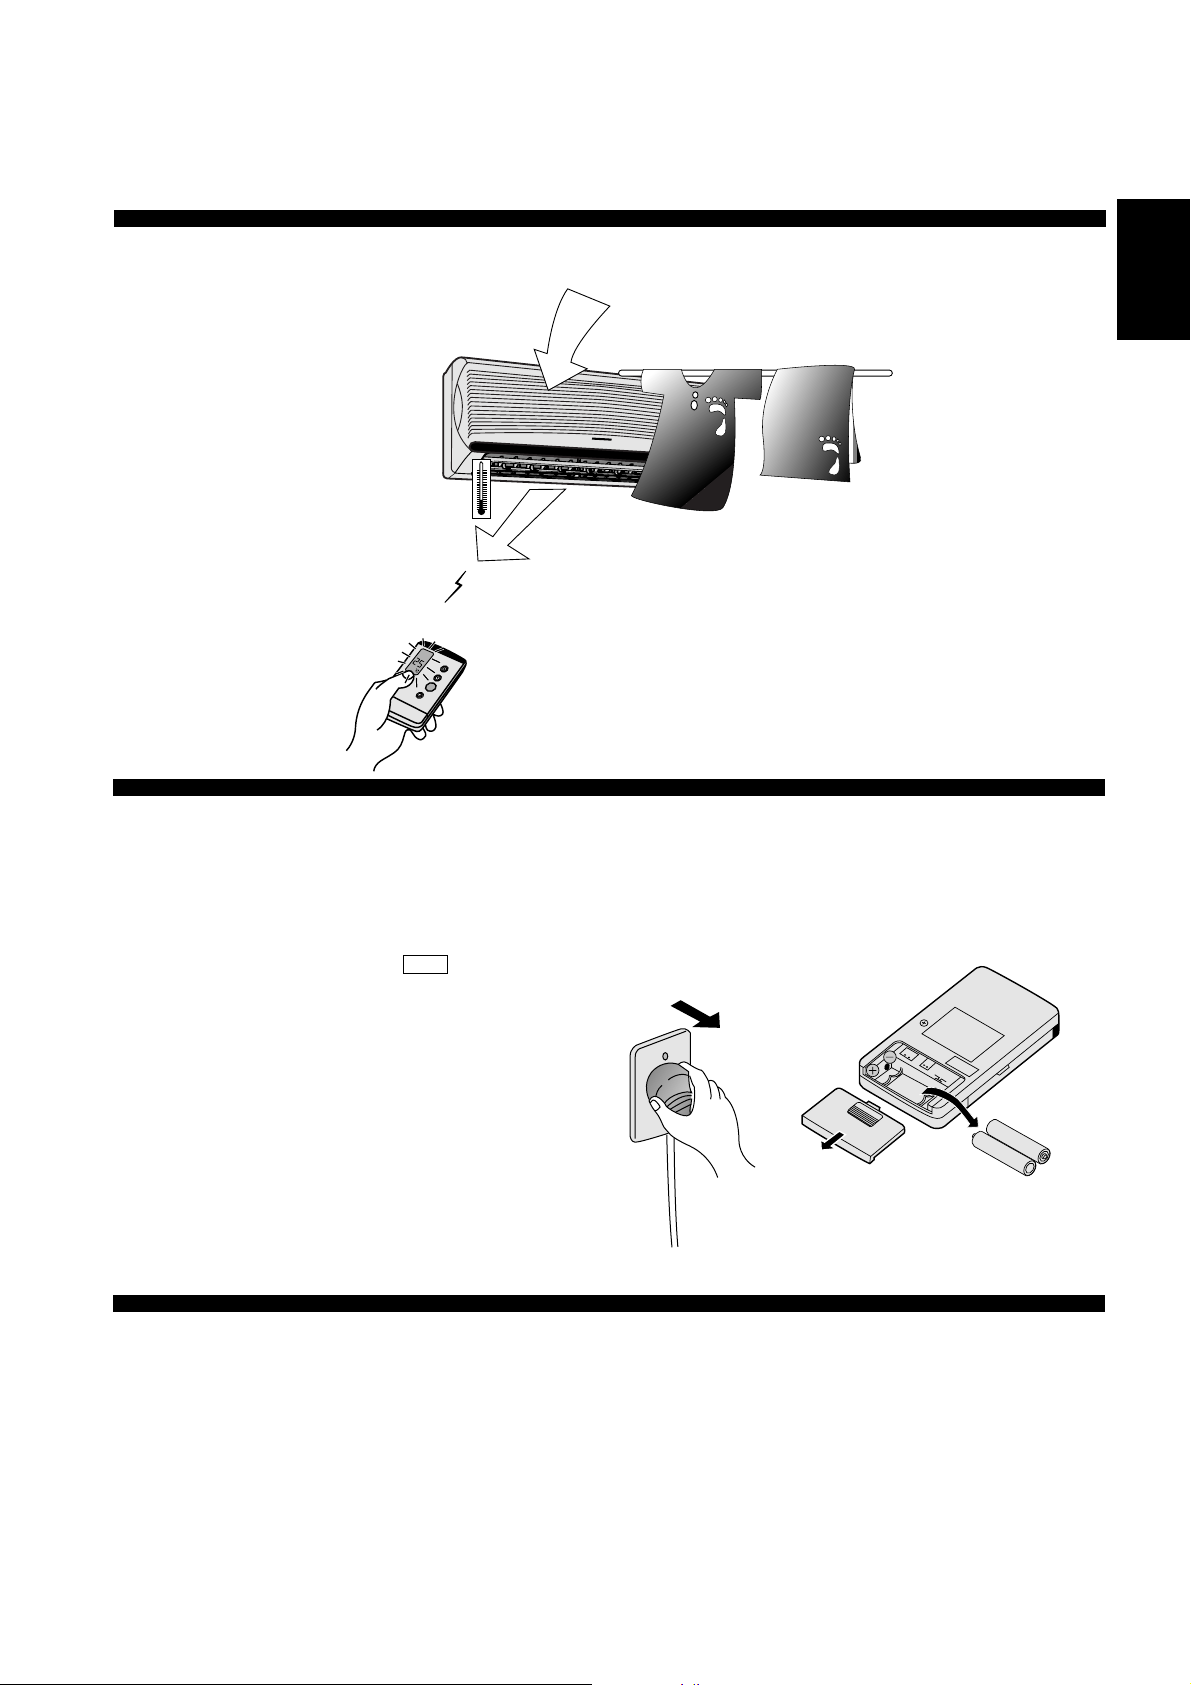
● Pre-season Inspection
• Is the discharge air cold
(warm)?
Operation is normal if, 15
minutes after the start of
operation, the temperature
difference between the air
intake and outlet vents is 8°C
or above for cooling and 14°C
or above for heating.
• Are the remote control batteries weak?
ENGLISH
• Are the air intake or outlet
vents of the indoor or
outdoor units obstructed?
If the remote control display appears weak, replace the
batteries (page 12).
●
When the Air Conditioner is Not Used For an Extended
P eriod of Time
1To dry the internal parts of the indoor unit, operate
the unit for 2 - 3 hours using operation with
30°C setting temperature.
COOL
3Remove the remote control batteries.
2Turn off the power switch and remove the power
supply plug.
Note:If the unit is not switched off by the remote
control, it will start operating when you plug in
(because a Auto Restart Control is provided).
● Recommended Inspection
• The unit will become dirty after use over several seasons, reducing performance.
Depending on the operation condition, a dirty unit may produce foul odours and dust may pollute the
dehumidifying drainage.
Seasonal inspection is recommended, in addition to regular cleaning. Consult an authorized dealer.
22
Page 24
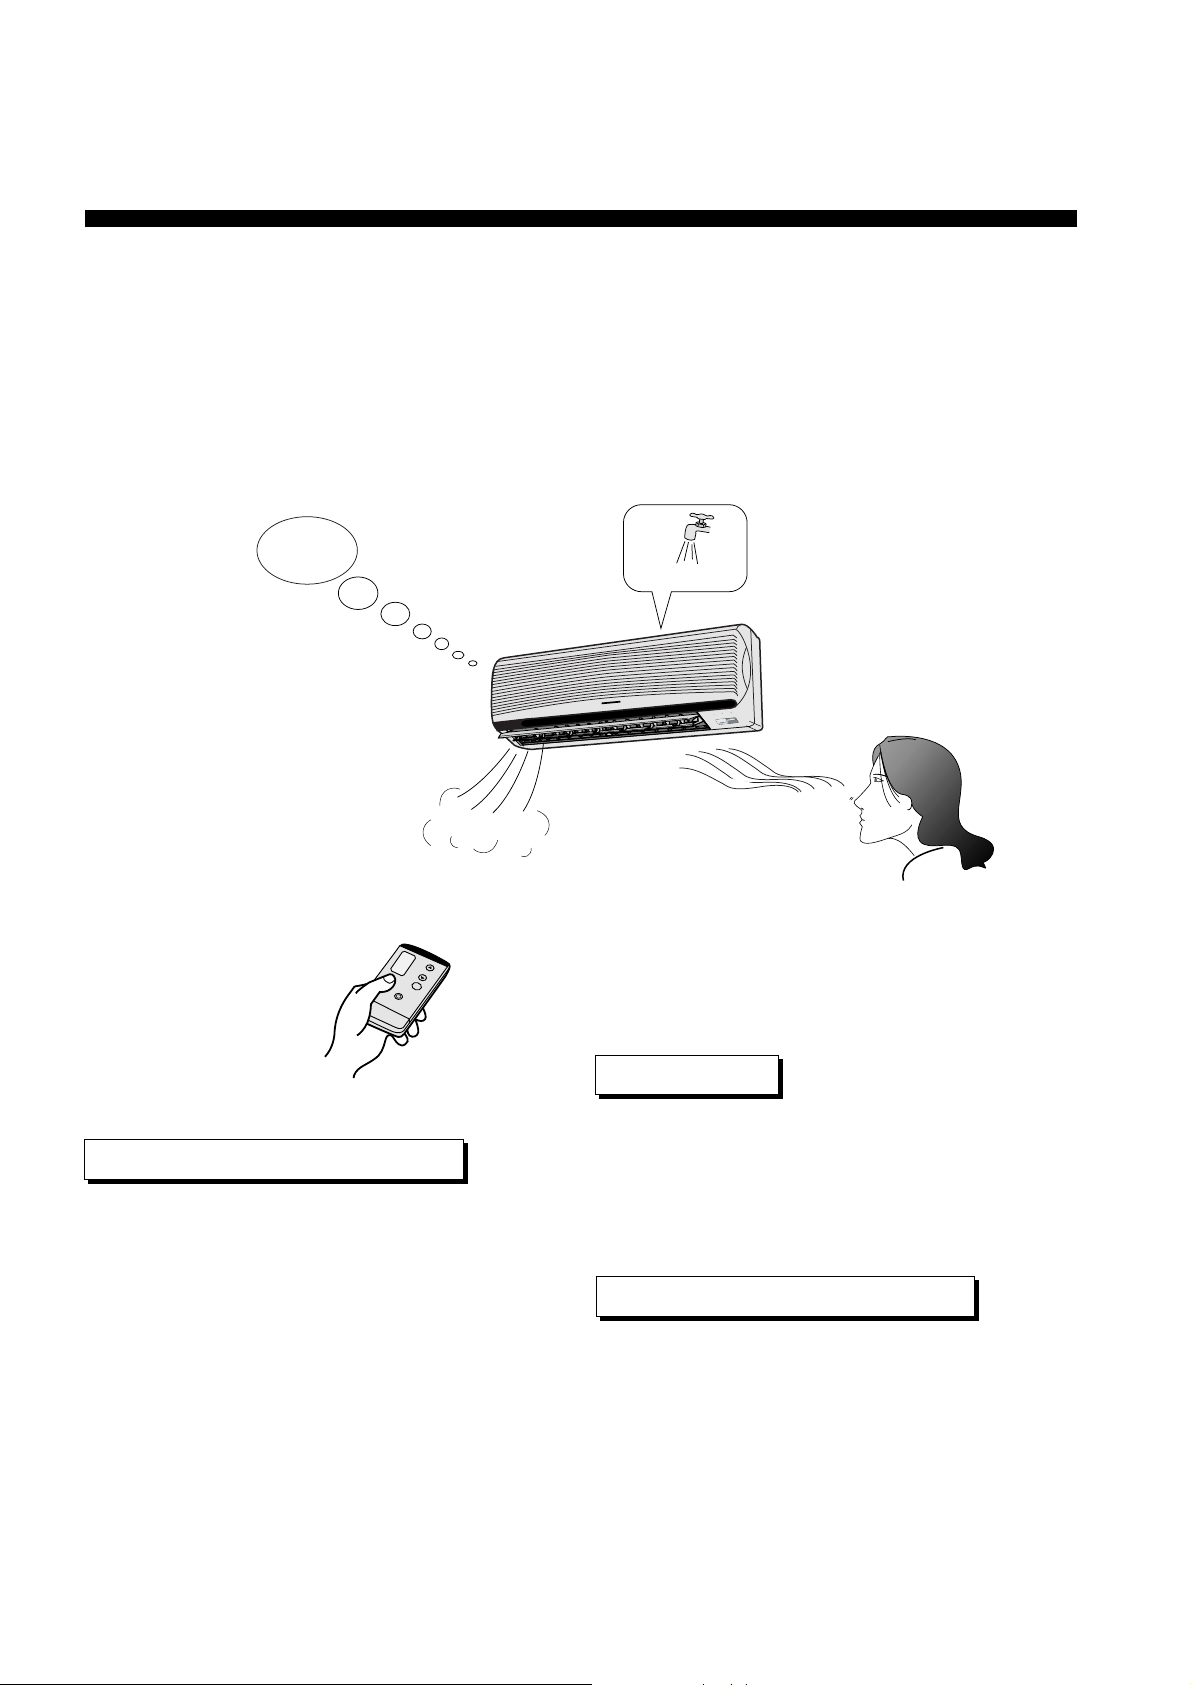
TROUBLESHOOTING
● Normal Operation
Q - Is it okay? A- This is the answer.
Q - Air conditioner has been restarted, but does not
operate for 3 minutes.
A - This is to protect the air conditioner. Wait until the air
conditioner begins operating.
Q - It seems that fog is coming
out from the air conditioner.
A - Condensation occurs when
the airflow from the air
conditioner cools the room air.
Q - A sound like water flowing can
be heard.
A - This is the sound of refrigerant
flowing inside the air conditioner unit.
Ssshh
TIMER
SLEEP
POWER
Y
M
O
N
L
O
EC
ERFU
W
PO
Q - The room has a peculiar odour.
A - This may be a damp smell emitted by the walls,
carpet, furniture or clothing in the room.
HEATING OPERATION
Q - Operation stops for about 12 minutes during
heating. (The operation lamp blinks)
A - This is to melt the frost which has accumulated
on the outdoor unit (defrosting operation). This
will take no longer than about 12 minutes, so
wait for operation. (Frost accumulates on the
outdoor unit when the outdoor temperature is
low and humidity is high.) Water comes out
from the outdoor unit.
23
AUTO FAN
Q - During Automatic Vertical Airflow setting, indoor
fan stops occasionally.
A - This is to remove the smell emitted by the
surroundings.
HEATING OPERATION
Q - During heating operation, indoor fan may run at
on and off conditions.
A - This to prevent undesired cooling effect during
heating operation.
Page 25
● Abnormal Operation
The air conditioner does not operate.
• Has a circuit breaker been tripped?
• Has the power plug been removed
from the wall outlet?
• Is the timer being used correctly?
The air conditioner does not cool (warm) effectively.
• Has the temperature been set incorrectly?
• Are the filters dirty?
• Are the intake or outlet vents of the outdoor unit obstructed?
• Are all windows and doors closed?
ENGLISH
Hmmm!
TIMER
SLEEP
POWER
ECONOMY
POWERFUL
Air conditioner operation noise
too loud.
• Is the installation work slanted?
• Is the front grille closed
properly?
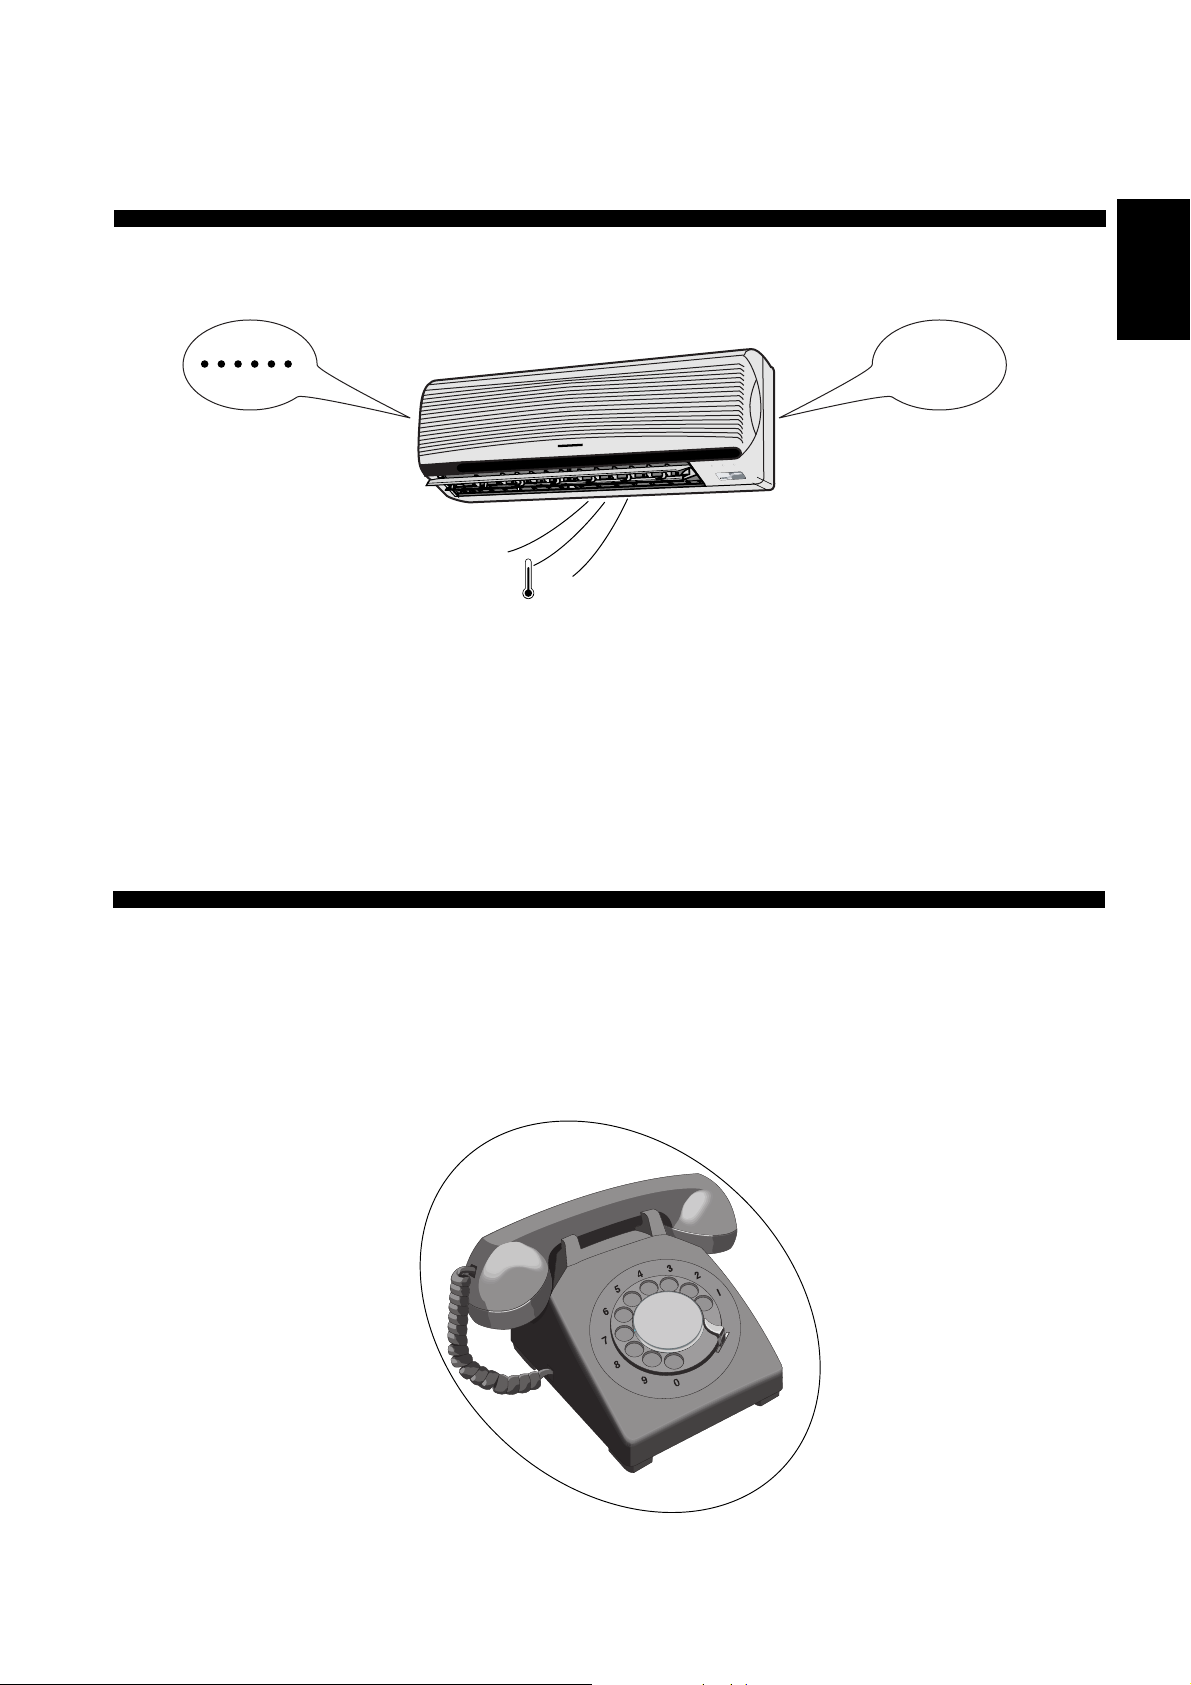
● Call the Dealer Immediately
If the following conditions occur, immediately turn off the main power supply and unplug.
• Abnormal noise is heard during
operation.
• Water or foreign material
gets into the remote control
by mistake.
• Water leaks from the indoor unit.
• Switches or buttons do not
operate properly.
• The circuit breaker
switches off frequently.
• Power supply cord and plug
become unusually warm.
24
Page 26
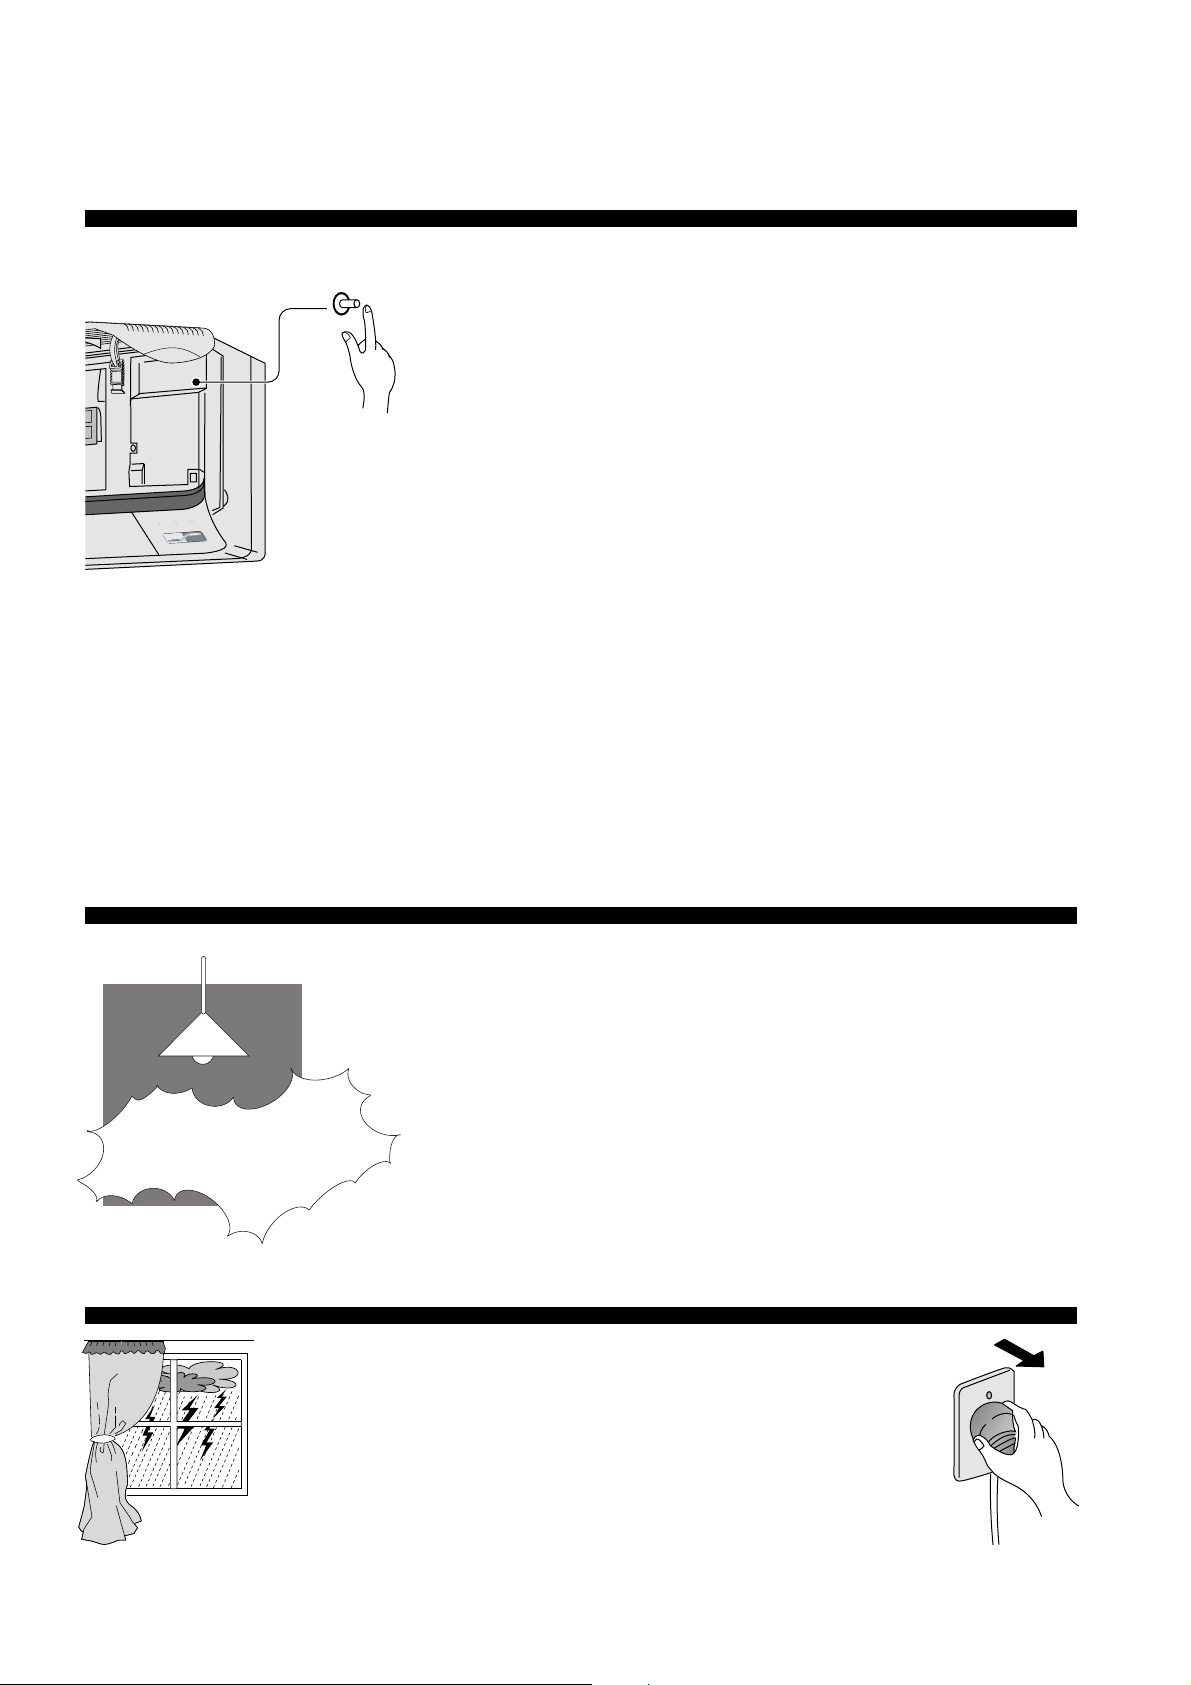
HELPFUL INFORMATION
Auto Operation Button
■ Automatic Operation
• If the remote control fails to function or misplaced,
press Auto Operation button for Automatic operation.
• The Automatic operation will be activated immediately once the
Auto operation button is pressed. However, temperature cannot
be adjusted in this operation.
• The power LED on the indoor unit blinks until the operation mode
is selected automatically.
TIMER
SLEEP
POWER
ECONOMY
POWERFUL
• To cancel this operation, press once more.
■ Remote Control Signal Receiving Sound
• To switch off the beep (Signal Receiving Sound), press this Auto
Operation button for 10 seconds continuously or longer. “Beep”,
“beep” sound will be heard at the tenth seconds.
Note: “Beep” sound will be heard at the fifth seconds;
However please press continuously until you heard “beep” ,
“beep” sound.
• Repeat this, if you want to switch on the Signal Receiving Sound.
* Note: If you press this button continuously for 5 to 10 seconds, Test
Run operation will be performed. A “beep” sound will be heard at the
fifth seconds, to identify the starting of Test Run operation.
(This is for Servicing purpose only.)
POWER FAILURE
Auto Restart Control
• If power is resumed after a power failure, the operation will restart
automatically after 3 - 5
1/2 minutes.
• Operation will be automatically restart under the previous operation
mode and airflow direction when power is resumed as the operation is
not stopped by remote control.
Timer Setting
• When power failure occurs, the timer setting is cancelled. Once power
is resumed, reset the timer.
Thunder and Lightning
• This air conditioner is equipped with a built-in surge
protective device. However, in order to further protect
your air conditioner from being damaged by
abnormally strong lightning activity, you may switch off
the main power supply and unplug from power socket.
25
Page 27
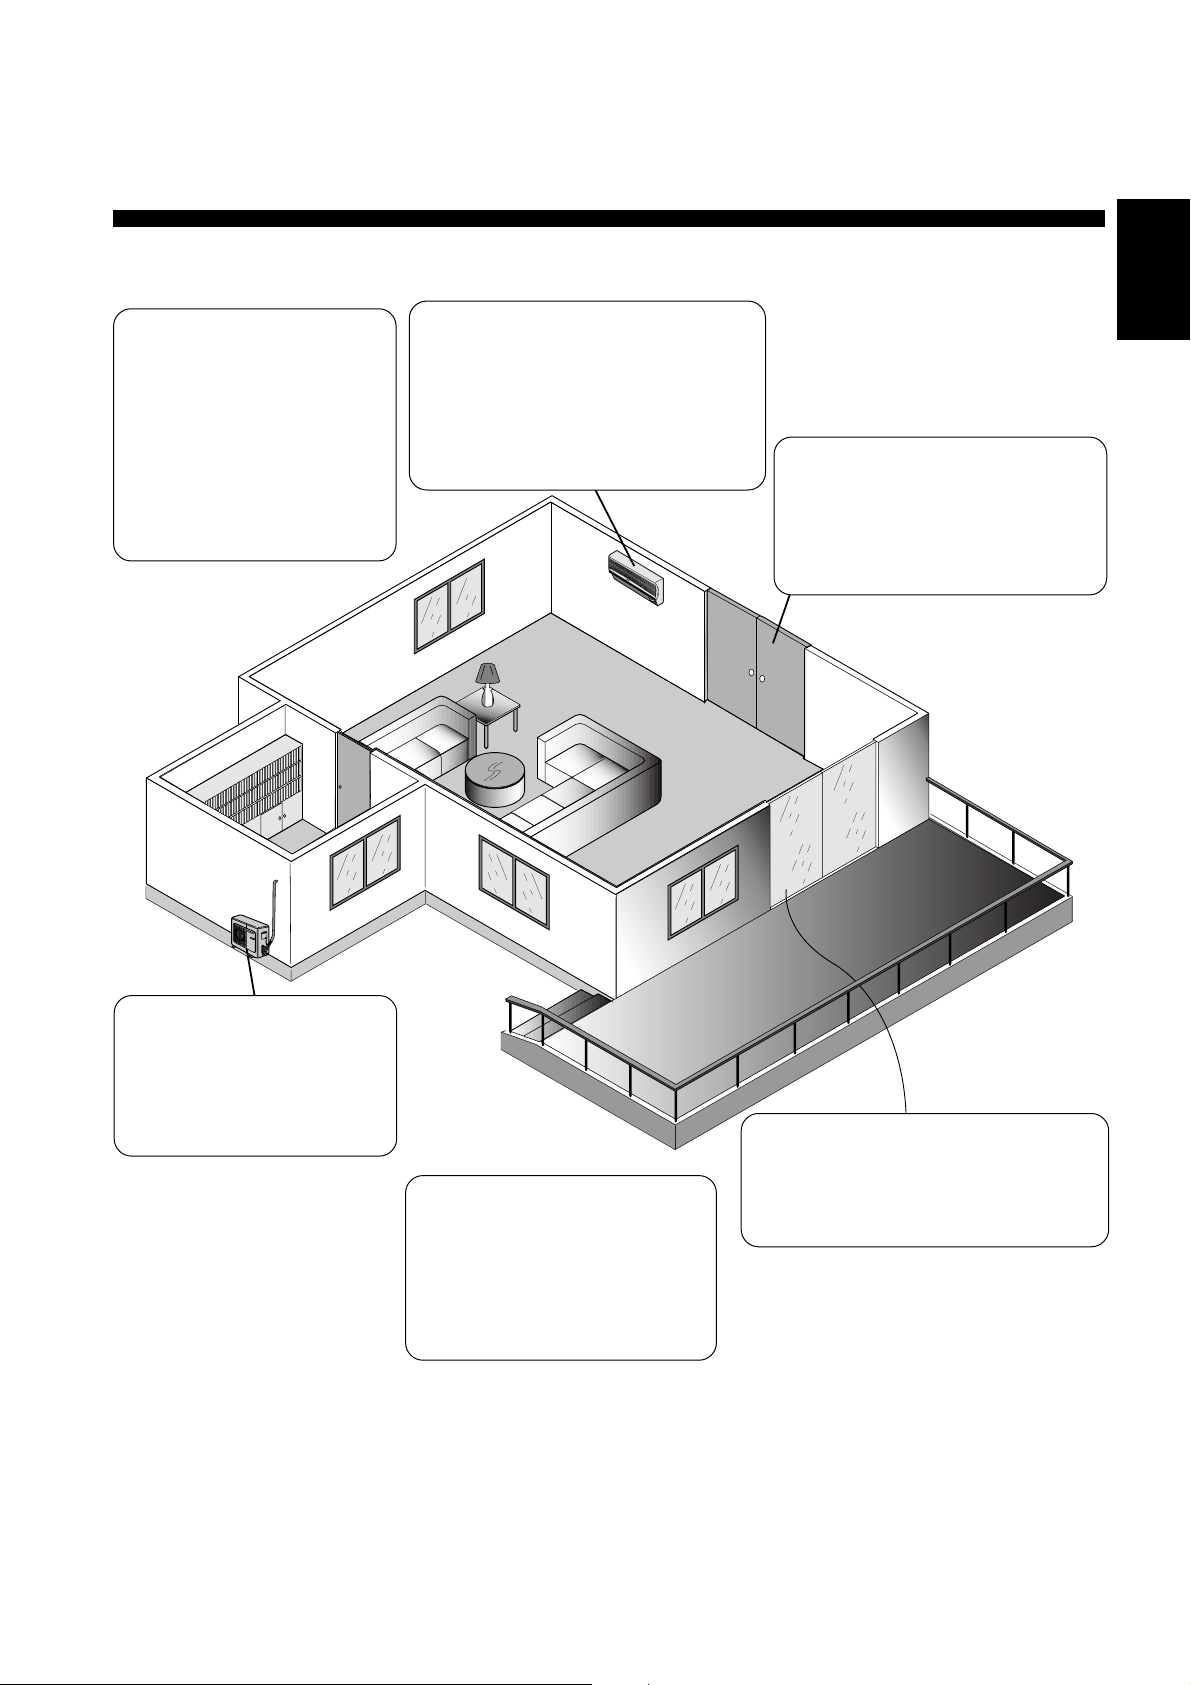
ENERGY SAVING AND OPERATION HINTS
ENGLISH
Setting Temperature
Set the temperature 1°C
higher (Cooling operation) or
2°C lower (Heating
operation) than actually
desired.
Approximately 10% of
electricity costs can be
saved.
Air Filter and Air Purifying
Filter
Clean the air filter every 2 weeks and
change the Air Purifying Filter every
3 months. Dirty filter may reduces
cooling or heating efficiency.
Keep All Doors and Windows
Closed
Otherwise, cooling and heating
performance will be reduced and
electricity costs is wasted.
Outdoor Unit
Do not block the air outlet
vents. Otherwise, it will lower
the cooling or heating
performance.
Timer and Sleep Mode
To prevent wastage of
electricity, use sleep mode
when sleeping or Timer when
going out to save electricity
cost.
Avoid Direct Sunlight
Keep curtains or drapes closed to
keep out direct sunlight during cooling
operation.
26
Page 28

! Warning
1) If the supply cord is damaged or need to be replaced, it must be replaced by the manufacturer or its service agent
or a similarly qualified person in order to avoid a hazard.
2) Remove power plug or disconnect from the mains before servicing this appliance.
3) Do not repair by yourself.
In case of malfunction of this appliance, do not repair by yourself.
Contact to the sales dealer or service dealer for a repair.
4) The appliance is not intended for use by young children or infirm persons without supervision.
5) Young children should be supervised to ensure that they do not play with the appliance.
6) Turn off the power (Isolation from main power supply).
Pull off the power plug from the receptacle, or switch off the breaker, or switch off the power disconnecting mean
to isolate the equipment from the main power supply in case of an emergency.
! Caution
DISCONNECT THE MAINS PLUG FROM THE SUPPLY SOCKET WHEN NOT IN USE, WHERE SUPPLY
CONNECTION IS VIA MAINS PLUG.
IMPORTANT
1. WHEN THE POWER CORD IS CONNECTED TO THE MAINS THROUGH A MULTI POLAR SWITCH
THERE MUST BE A MULTI POLAR SWITCH (DISCONNECTING MEANS) WITH A MINIMUM 3 mm
CONTACT GAP IN THE FIXED INSTALLATION CIRCUIT.
WHEN THE POWER PLUG IS CONNECTED TO THE RECEPTACLE
2.
Replacement or installation of power plugs shall be performed only by authorised/qualified personnels.
The wires in this main lead are coloured in accordance with the following code :
Green-and-yellow : Earth
Blue : Neutral
Brown : Live
If the colours of the wires in the main lead of this appliance do not correspond with the coloured markings
indentifying the terminals in your plug, proceed as follows :
The green-and-yellow wire must be connected to the terminal in the plug which is marked with letter E or by
the earth symbol ! or coloured green or green-and-yellow.
The blue wire must be connected to the terminal which is marked with the letter N or coloured black.
The brown wire must be connected to the terminal which is marked with the letter L or coloured red.
27
Page 29
Note
Please remember to record the following:
● Model Number
● Serial Number
● Dealer’s Name
● Date Purchased
ENGLISH
28
Page 30

F563254
Matsushita Electric Industrial Co., Ltd.
Osaka 542-8588, Japan
Printed in Malaysia
P0103-0
 Loading...