

Panasonic CQ-HX2083U User Manual
E
N
G
L
I
S
H
22
CQ-HX2083U
49
E
N
G
L
I
S
H
21
CQ-HX2083U
48
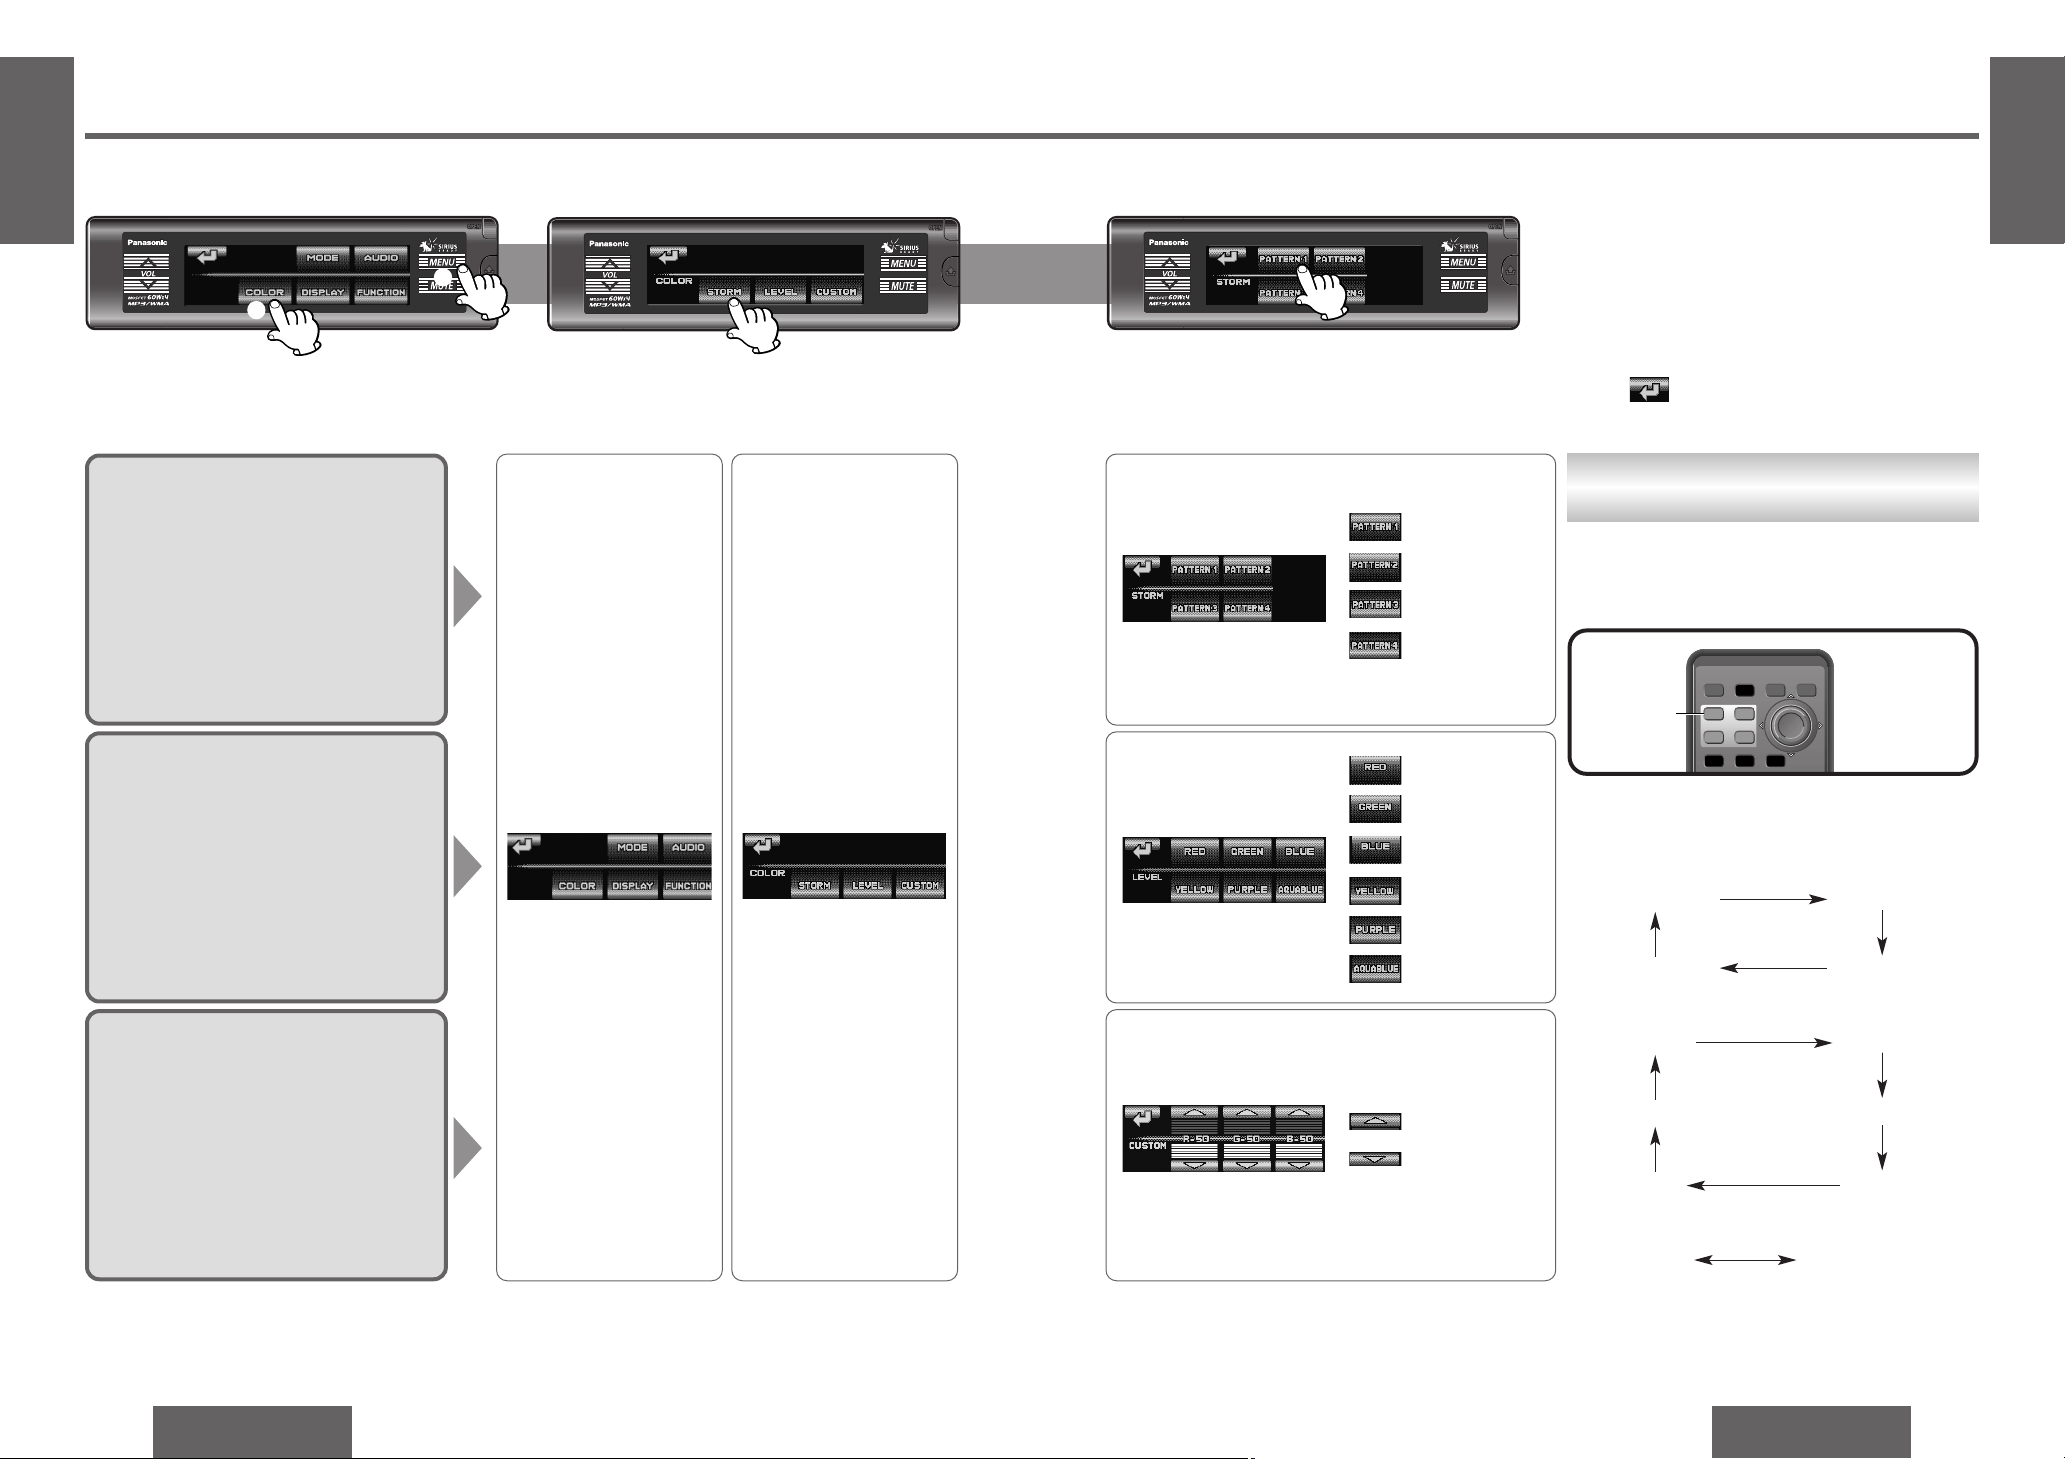
Front Panel Settings [COLOR]
Display Color Changing
Pattern (STORM)
This is used to select the pattern that
changes the colors of the display area.
Default: PATTERN 1
Setting range: PATTERN 1 to PATTERN 4
Base Color Selection
(LEVEL)
This is used to select the display colors
which are to be changed in line with the
variations in the music level.
Default: PURPLE
Display Color Customize
(CUSTOM)
This enables the display colors to be set
by adjusting the R (red), G (green) and B
(blue) levels.
Default: ALL 50
Setting range: 0 to 100
2 Submenu 3 Set1 Menu
2
1
Direct Operation
S
E
T
S
E
T
PWRPWR BANDBANDBAND
FACEFACE SS
•AS•
A
DISPDISP DIMDIMDIM
MENUMENU
RETRET
11222333
DIMMERDIMMER
RETURNRETURNSOURCESOURCE
[FACE]
In the case of remote control, as an alternative to
performing operations from the menu, the operations can be performed directly using the buttons
shown below.
The following transition will be made by each
[FACE] pressing.
When set to STORM
PATTERN 1 PATTERN 2
PATTERN 4 PATTERN 3
When set to LEVEL
PURPLE AQUA BLUE
YELLOW RED
BLUE GREEN
When set to CUSTOM
Current setting Complementary color
12 3
Press.
Press.
(Example: STORM) (Example: PATTERN 1)
Press.
Press.
For details on how to perform menu operations
using the remote control, refer to page 28.
Note:
≥ Press [MENU] or [DISP] (display) on the remote
control to return to the regular mode.
≥ Press /[RET] (RETURN) to return to the pre-
vious display.
: PATTERN 1
: PATTERN 2
: PATTERN 3
: PATTERN 4
: Red
: Green
: Blue
: Yellow
: Purple
: Aqua blue
: Up
: Down
Red Green
Blue
E
N
G
L
I
S
H
24
CQ-HX2083U
51
E
N
G
L
I
S
H
23
CQ-HX2083U
50
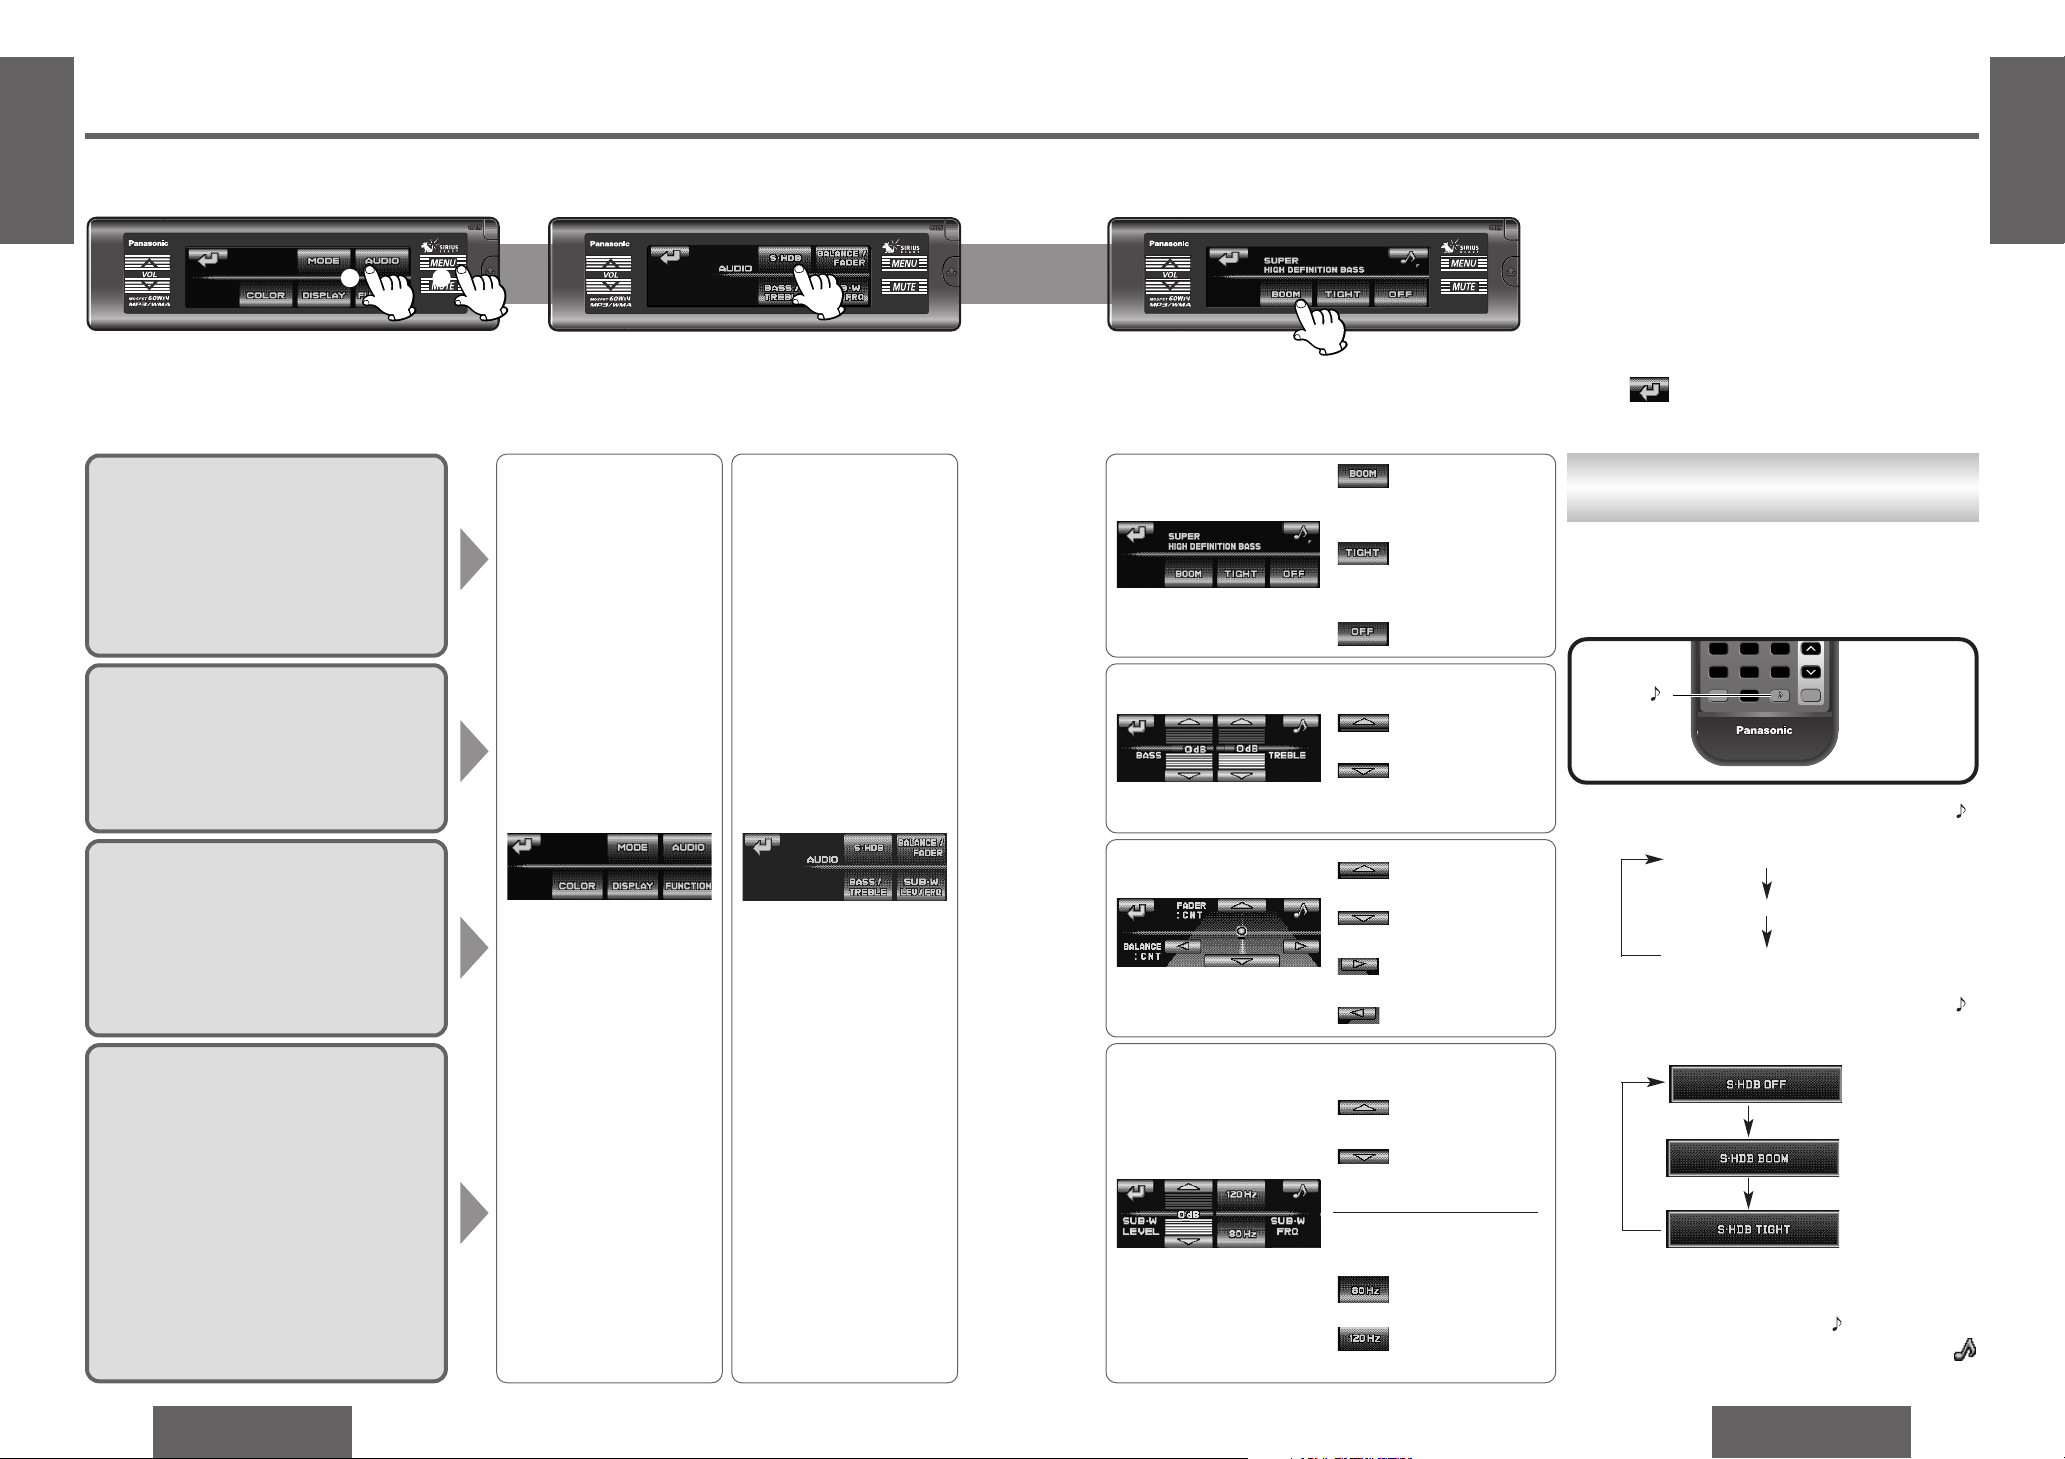
Audio Settings [AUDIO]
Bass and Treble
You can adjust the bass and treble sound.
Default: BAS (Bass) 0 dB
TRE (Treble) 0 dB
Setting range: j12 dB to i12 dB (by 2 dB)
Balance and Fader
You can adjust the sound balance among
the front, rear, right and left speakers.
Default: BAL (Balance) CNT (Center)
FAD (Fader) CNT (Center)
Setting range: 15 levels each
Subwoofer setting
(LEVEL)
You can change the subwoofer volume level.
Default: 0 dB
Setting range: j∞ (subwoofer mute),
j6 dB to i6 dB (by 2 dB)
(FRQ: Frequency)
Select the upper limit frequency of the
sound from subwoofer.
Default: 120 Hz
Setting range: 120 Hz/80 Hz
S·HDB (Super High Definition Bass)
With music genres like rock music, the
bass-sound will be more powerful.
Default: S·HDB OFF
Setting range: S·HDB OFF, TIGHT, BOOM
2 1
Direct Operation
S
E
T
PWR BAND
FACE S
•
A
DISP DIM
MENU
RET
123
44555666
778880099
##
MUTEMUTEMUTE
SCANSCAN
DIMMER
RANDOMRANDOMRANDOM
NUMBERNUMBERNUMBER
REPEATREPEAT
RETURNSOURCE
VOLVOL
Car AudioCar Audio
[ ]
In the case of remote control, as an alternative to
performing operations from the menu, the operations can be performed directly using the buttons
shown below.
12 3
2
Submenu 3 Set1 Menu
Press. Press.
(Example: S.HDB) (Example: BOOM)
Press. Press.
For details on how to perform menu operations
using the remote control, refer to page 28.
Note:
≥ Press [MENU] or [DISP] (display) on the remote
control to return to the regular mode.
≥ Press /[RET] (RETURN) to return to the pre-
vious display.
: The bass sounds of
the speakers are
strongly emphasized.
: The bass sounds of
the speakers are moderately emphasized.
: S·HDB is non-active.
: Enhanced
: Decrease
:
Front
enhanced
:
Rear
enhanced
: Right enhanced
:
Left
enhanced
:Up
: Down
: No more than 80 Hz
: No more than 120 Hz
Subwoofer level
Subwoofer frequency
The following transition will be made by each [ ]
pressing.
Bass/Treble setting display
Balance/Fader setting display
Sub-woofer setting display
The following transition will be made by each [ ]
pressing and holding for more than 2 seconds.
(page 33)
Note:
≥ The same operations as the [ ] operations de-
scribed above can also be performed using
on the main unit.
BOOM indicator
lights.
TIGHT indicator
lights.
E
N
G
L
I
S
H
26
CQ-HX2083U
53
E
N
G
L
I
S
H
25
CQ-HX2083U
52
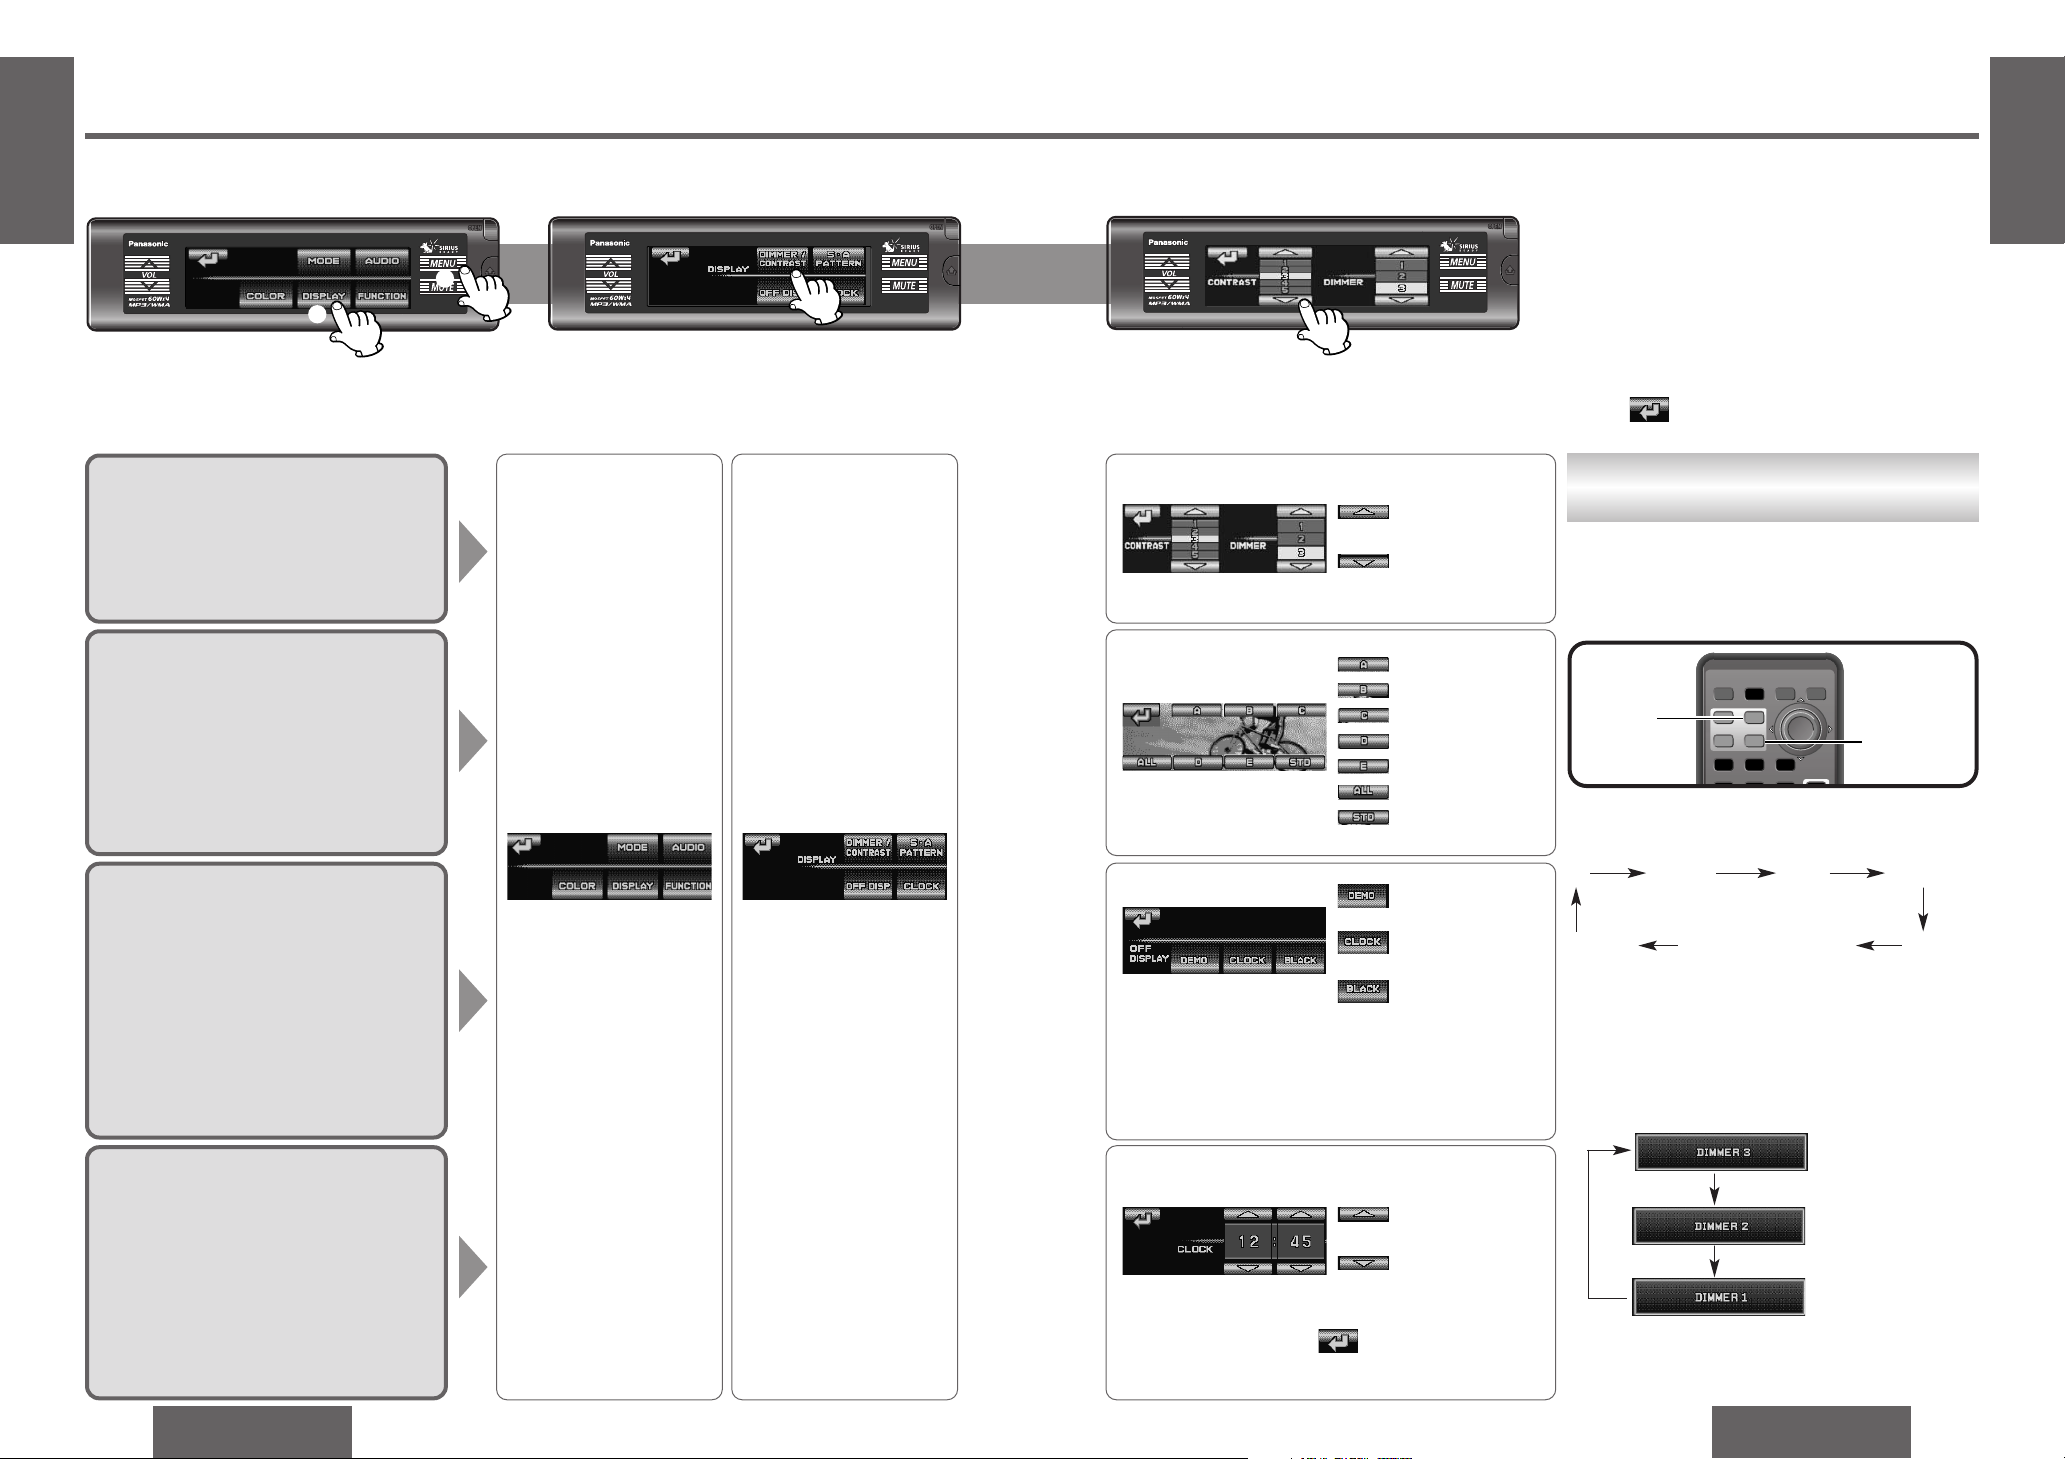
Display Settings [DISPLAY]
Dimmer/Contrast
Default: DIMMER 3/CONTRAST 3
Setting range: DIMMER 1 to 3/
CONTRAST 1 to 5
Spectrum Analyzer (S·A)
Display Pattern
Default: ALL
Setting range: A to E, ALL, STD (standard)
Off Display setting
You can select display pattern on the unit
off.
Default: BLACK
Setting range: DEMO, CLOCK, BLACK
Clock Adjustment
You can adjust the clock.
The clock uses 12-hour system.
F1
Car race
Space
Snow boad
MTB
All of A to E (random)
Standard
Direct Operation
S
E
T
S
E
T
PWRPWR BANDBANDBAND
FACEFACE SS
•AS•
A
DISPDISP DIMDIMDIM
MENUMENU
RETRET
11222333
DIMMERDIMMER
RETURNRETURNSOURCESOURCE
[S.A]
(spectrum
analyzer)
[DIM]
(DIMMER)
In the case of remote control, as an alternative to
performing operations from the menu, the operations can be performed directly using the buttons
shown below.
:Up
:Down
(Example: DIMMER/CONTRAST)
2
1
12 3
2
Submenu 3 Set1 Menu
For details on how to perform menu operations
using the remote control, refer to page 28.
Note:
≥ Press [MENU] or [DISP] (display) on the remote
control to return to the regular mode.
≥ Press /[RET] (RETURN) to return to the pre-
vious display.
Press.
Press.
Press.
Press.
:Demonstration display
:Clock display is on
:Black display
:Up
:Down
The following transition will be made by each [S.A]
pressing.
F1 Car race
Space Snow boad
Standard All of A to E (random) MTB
Note:
The background takes effect only with the spectrum
analyzer display.
The following transition will be made by each [DIM]
pressing.
After the time has been adjusted, it is entered only when
the screen is exited using /[RET] (RETURN).
The same setting can be performed by pressing the
[DISP] (display) key on the remote control during
power OFF.
(This appears for 2 seconds.)
(This appears for 2 seconds.)
(This appears for 2 seconds.)

E
N
G
L
I
S
H
28
CQ-HX2083U
55
E
N
G
L
I
S
H
27
CQ-HX2083U
54
Function Settings [FUNCTION]
Mute/Attenuation
You can select MUTE or ATTENUATION
when [MUTE] is pressed.
Default: MUTE
Setting range: MUTE, ATT
Button Operation Sound
(BEEP)
Default: ON
Security Function
The security indicator (LED) blinks when the
removable face plate is removed from the unit.
Default: ON
Excluding Sirius from
Source Selection
Default: OFF
: No sound.
:
Decrease the volume by 10 steps.
(Attenuation)
: Security function
is active.
: Security function
is non-active.
Security function
When the key in the ignition is turned OFF.
≥ Security message will be displayed.
≥ The panel removable alarm will be active.
When the removable face plate is removed.
≥ The security indicator blinks. (page 69)
(Example: MUTE/ATT) (Example: ATT)
2
1
12 3
2
Submenu 3 Set1 Menu
For details on how to perform menu operations
using the remote control, refer to page 28.
Note:
≥ Press [MENU] or [DISP] (display) on the remote
control to return to the regular mode.
≥ Press /[RET] (RETURN) to return to the pre-
vious display.
≥ Refer to Operating guide for Sirius about Sirius.
Press. Press.
Press.
Press.
: Operation sound
(beep) is on.
:
Operation sound
(beep) is off.
:
Sirius mode is selectable as a source.
: Sirius mode is
not selectable as
a source even if
the Sirius receiver
is connected.
E
N
G
L
I
S
H
30
CQ-HX2083U
57
E
N
G
L
I
S
H
29
CQ-HX2083U
56
Troubleshooting
Preliminary Steps
Check and take steps as described in the tables
below.
If You Suspect Something Wrong
Immediately switch power off.
Disconnect the power connector and check that
there is neither smoke nor heat from the unit before
asking for repairs. Never try to repair the unit by
yourself because it is dangerous to do so.
No power.
Trouble
Car’s engine switch is not on.
➡Turn your car’s ignition switch to ACC or ON.
Troubleshooting Tips
❐ Common
Fuse is burnt.
➡Call the store where you purchased the unit, or your nearest
Servicenter (see the attached sheet) and ask for fuse replacement.
No sound.
Mute is set to ON.
➡Set it to OFF.
Cables are not correctly connected.
➡Connect cables correctly.
Condensation (dew).
➡Wait for a while before use.
Caution:
≥ Do not use the unit if it malfunctions or if there
is something wrong.
≥ Do not use the unit in abnormal condition, for
example, without sound, or with smoke or foul
smell, which can cause ignition or electric
shock. Immediately stop using it and call the
store where you purchased it.
Cause/Step
Sound skips, bad sound
quality (e.g. caused by
noise).
Disc is in the CD compartment but no sound is
made, or disc is ejected
automatically.
Disc is upside down.
➡Place disc in the correct direction with the label side up.
❐ CD/MP3/WMA
≥ Disc is dirty.
≥ Disc has scratches.
➡Clean disc, referring to the section on “Notes on CD/CD Media
(CD-ROM, CD-R, CD-RW)
”
.
≥ Disc is dirty.
≥ Disc has scratches.
➡Clean disc, referring to the section on “Notes on CD/CD Media
(CD-ROM, CD-R, CD-RW)”.
Trouble Cause/Step
❐ Radio
Trouble Cause/Step
A disc that has data other than CD-DA or MP3/WMA type is played.
➡Discs that have CD-DA or MP3/WMA type data should be used.
➡The unit may not successfully play back a CD-R/RW that is made in
combination of writing software, a CD recorder (CD-R/RW drive)
and a disc which are incompatible one another. Refer to instructions for the concerned devices for details.
➡The unit may not successfully play back a CD-R/RW that is made in
combination of writing software, a CD recorder (CD-R/RW drive)
and a disc which are incompatible one another. Refer to instructions for the concerned devices for details.
Cables are not correctly connected.
➡Connect cables correctly.
➡Connect the battery cable to the terminal that is always active.
➡Connect the accessory cable to your car’s ACC source.
➡Connect the grounding wire to a metal part of the car.
A mobile phone is used near the unit.
➡Keep the mobile phone away from the unit.
The unit’s grounding wire is not connected securely.
➡Check the metal areas of the car body (chassis), and connect the
grounding wire more securely.
Noise.
Demonstration mode is ON.
➡Press [DISP] (display) to cancel demonstration mode.
The display shows
demonstration message.
The safety devices has been triggered by some apparent reason.
➡Call the store where you purchased the unit, or your nearest
Servicenter (see the attached sheet).
The power goes off suddenly without apparent
reason.
Too much noise in FM
stereo and monaural
(AM) broadcasts.
Station is too far, or signals are too weak.
➡Select other stations of higher signal level.
The radio antenna is not extended enough.
➡Fully extend the radio antenna.
Battery cable is not correctly connected.
➡Connect the battery cable to the terminal that is always active.
Preset station is reset.
The motor antenna relay control lead is not connected correctly.
➡If there is a motor antenna in the car, connect the antenna control
lead to the motor antenna lead that is installed in the car correctly.
The ground connection of the radio antenna is not secure enough.
➡Check the ground connection of the mounted base part of the
antenna, and tighten up the screw.
 Loading...