

Page 1
Panasonic
Removable Full Front CD Player/Tuner with DSP and
Changer Control
Lecteur de CD avec façade amovible/Poste récepteur
avec DSP et commande de changeur
Reproductor de CD/SintonIzador DSP y control de
cambiador con panel frontal completamente extraible
CQ-DRX900U
Please read these instructions carefully before using this product and save this manual for future use.
Prière de lire ces instructions attentivement avant d'utiliser le produit et garder ce manuel pour l'utilisation ultérieure.
Lea con atención estas instrucciones ames de utilizar el producto y guarde este manuai para poderlo consultar en el tuturo.
Page 2

Panasonic welcomes you to our ever growing family of electronic product owners. We know that this product
wiil bring you many hours of enjoyment. Our reputation is built on precise electronic and mechanical engineer
ing, manufactured with carefully selected components and assembled by people who take pride in their work.
Once you discover the quality, reliability, and value we have built into this product, you too will be proud to be
a member of our family.
□ Use This Product Safely
When Driving
Keep the volume level low enough to be aware of road and traffic conditions.
When Car Washing
Do not expose the product, including the speakers and CDs, to water or excessive moisture. This could cause
electrical shorts, fire, or other damage.
When Parked
Parking in direct sunlight can produce very high temperatures inside your vehicle. Give the interior a chance to
cool down before switching the unit on.
Use the Proper Power Supply
This product is designed to operate with a 12 volt, negative ground battery system (the normal system in a
North American car.)
Disc Mechanism
Do not insert coins or any small objects. Keep screwdrivers and other metallic objects away from the disc
mechanism and disc.
Use Authorized Servicenters
Do not attempt to disassemble or adjust this precision product. Please refer to the Servicenter list included
with this product for service assistance.
For Installation
The product should be installed in a horizontal position with the front end up at a convenient angle, but not
more than 30‘.
Note: This manual explains mainly remote control operations. However, some operations are not functioned
with a remote control. In such cases, the manual gives you how to operate the functions using main unit
buttons.
Find the model number and serial number on either the back or bottom of the unit. Please record them in the
space below and retain this booklet as a permanent record of your purchase to help with identification in case
of theft.
MODEL NUMBER
DATE PURCHASED
CQ-DRX900U
CQ-DRX900U
SERIAL NUMBER
Page 3
Contents
Use This Product Safely ...................................................................Page 2
Part 15 of the FCC Rules ......................................................................... 8
Label Indication and Location................................................................... 8
□ Components/Remote Control Preparation
□ General
□ CD Changer
□ Useful Functions
□ Sound Settings and Sound Space
Q Other Settings 28
□ Installation Guide
10
16
18
20
32
□ Anti - Theft System 37
□ Electrical Connections 38
□ Troubleshooting 40
□ Maintenance
□ Specifications
45
46
CQ-DRX900U
o o o o o
Page 4

Panasonic est heureuse de vous compter parmi les utilisateurs de ses appareils électroniques.
Nous pouvons vous assurer que cet appareil vous procurera de longues heures d’agrément. Notre réputation
est fondée sur une ingénierie électronique et mécanique de haute précision laquelle préside à la fabrication
d’appareils ne comportant que des composants de choix assemblés par un personnel soucieux de la bonne
réputation acquise par la qualité de son travail. Après avoir découvert la qualité, la valeur et la fiabilité de cet
appareil, vous aussi serez fier d’être un client Panasonic.
□ Précautions à prendre
Au volant
Régler le volume à un niveau qui ne risque pas de masquer les bruits ambiants.
Lavage de la voiture
Afin de prévenir tout risque de court-circuit ou d’incendie, ne pas exposer l'équipement, y compris les hautparleurs et CDs, à l’eau ni à une humidité excessive.
Voiture stationnée
L’habitacle d’une voiture immobile exposée au soleil toutes vitres fermées devient rapidement très chaud.
Laisser rafraîchir l’intérieur du véhicule avant d’utiliser l’appareil.
Source d’alimentation
Cet appareil est conçu pour fonctionner sur un système d’alimentation avec batterie de 12V avec négatif à la
masse (système standard sur les voitures de construction nord-américaine).
Méchanisme d’entrainement du disque
Ne pas introduire de pièce de monnaie ou tout autre petit object. Eloigner les aimants, tournevis et autres
objets métalliques du mécanisme d’entraînement et du disque.
Réparation
Ne pas tenter de démonter ou d’ajuster l’appareil soi-même. Confier toute réparation à un centre de service
agréé.
Installation
L’appareil doit être installé en position horizontale avec son extrémité avant inclinée vers le haut à un angle
conventionnel et jamais supérieur à 30°.
Remarque: Ce manuel décrit principalement les opérations effectuées avec le boîtier de télécommande.
Cependant, il faut savoir que certaines fonctions ne peuvent pas être commandées à partir du boîtier de
télécommande. Dans ce cas, le manuel indique la façon de commander ces fonctions avec les touches de
l'appareil.
Il est recommandé de noter, dans l’espace prévu ci-dessous, les numéros de modèle et de série inscrits soit à
l’arrière soit sous le fond de l’appareil, et de conserver ce manuel comme mémorandum de l’achat afin de
permettre l’identification de l’appareil en cas de vol.
Numéro de modèle: CQ-DRX900U Numéro de série:
Date de l’achat: Vendeur:
CQ-DRX900U
Page 5
Table des matières
□ Elements Constitutifs/Préparatif du boîtier de télé commande . 47
□ Généralités ............................................................................................. 48
□ Récepteur radio........................................................................................50
□ Fonctions utiles........................................................................................56
□ Rélages acoustiques et d’ambiapnonie
□ Autres types de réglages
□ Branchements électriques......................................................................76
□ En cas de difficulté
□ Entretien....................................................................................................83
□ Données techniques ...............................................................................84
..................................................................................
................................................
58
78
66
O O O Q O
CQ-DRX900U
Page 6

Panasonic le da la bienvenida a la familia constantemente en aumento de poseedores de productos
electrónicos. Nos esforzamos en proporcionarle las ventajas de la ingeniería mecánica y electrónica de
precisión, de una fabricación con componentes cuidadosamente seleccionados, y de un montaje realizado
por personas orgullosas de la reputación que su trabajo ha cimentado para nuestra empresa. Estamos
seguros de que este producto le proporcionará muchas horas de distracción y, una vez comprobada la
calidad, el valor y la fiabilidad incorporados, usted también se sentirá orgulloso de pertenecer a nuestra fami
lia.
□ Use este equipo de manera segura
Cuando esté conduciendo
Mantenga el nivel del volumen suficiente bajo para poder darse cuenta de las condiciones de tráfico de la
carretera.
Cuando esté lavando el auto
No exponga el equipo, incluso los altavoces y los discos compactos, a la agua o a la humedad excesiva. Eso
podría causar cortocircuitos, incendio u otros daños.
Cuando haya estacionado
El estacionar bajo ta luz solar directa produce temperaturas muy altas dentro de su vehículo. Asegúrese de
enfriar el interior del vehículo antes de encender la unidad.
Use la fuente de alimentación apropiada
Este equipo está diseñado para funcionar con un sistema de 12 voltios, de polo negativo puesto a tierra (el
sistema normal en los autos norteamericanos).
Mecanismo de disco
No inserte monedas ni otros objetos pequeños. Evite acercar imanes, destornilladores u otros objetos
metálicos al mecanismo de disco y al disco mismo.
Use los centros de servicio autorizados
No intente desmontar o ajustar este equipo de precisión. Para solicitar ayuda relativa a los servicios de
mantenimiento, refiérase a la lista de los centros de servicio.
Para la instalación
El producto deberá instalarse en una posición horizontal con el extremo frontal levantado a un ángulo
conveniente, pero que no sea de más de 30°.
Nota: Este manual explica las principales operaciones de control remoto. Sin embargo, algunas operaciones
no funcionan con el control remoto. En tales casos, el manual le muestra cómo operar las funciones con los
botones de la unidad principal.
Busque el número del modelo y el número de serie ya sea en la parte trasera o en el fondo de la unidad.
Sírvase anotar dichos números en el espacio siguiente, y mantenga este líbrete como una anotación
permanente de su compra para ayudar en la identificación en el caso de robo.
NÚMERO DEL MODELO
FECHA DE COMPRA
CQ-DRX900U
CQ-DRX900U
NÚMERO DE SERIE
NOMBRE DE LA TIENDA
Page 7
Indice
□ Componentes/Operación de control remoto
□ Generalidades......................................................................................... 86
□ Radio..........................................................................................................88
□ Funciones útiles ......................................................................................94
□ Ajustes del sonido y Espacio sonoro....................................................96
□ Otros ajustes
..........................................................................................
.....................................
85
104
□ Guía de instalación
□ Sistema antirrobo ..................................................................................113
□ Conexiones eléctricas
□ Solución de problemas .........................................................................116
□ Mantenimiento .......................................................................................121
□ Especificaciones ...................................................................................122
................................................................................
...........................................................................
108
114
nn\i
o o o Û o
CQ-DRX900U
Page 8
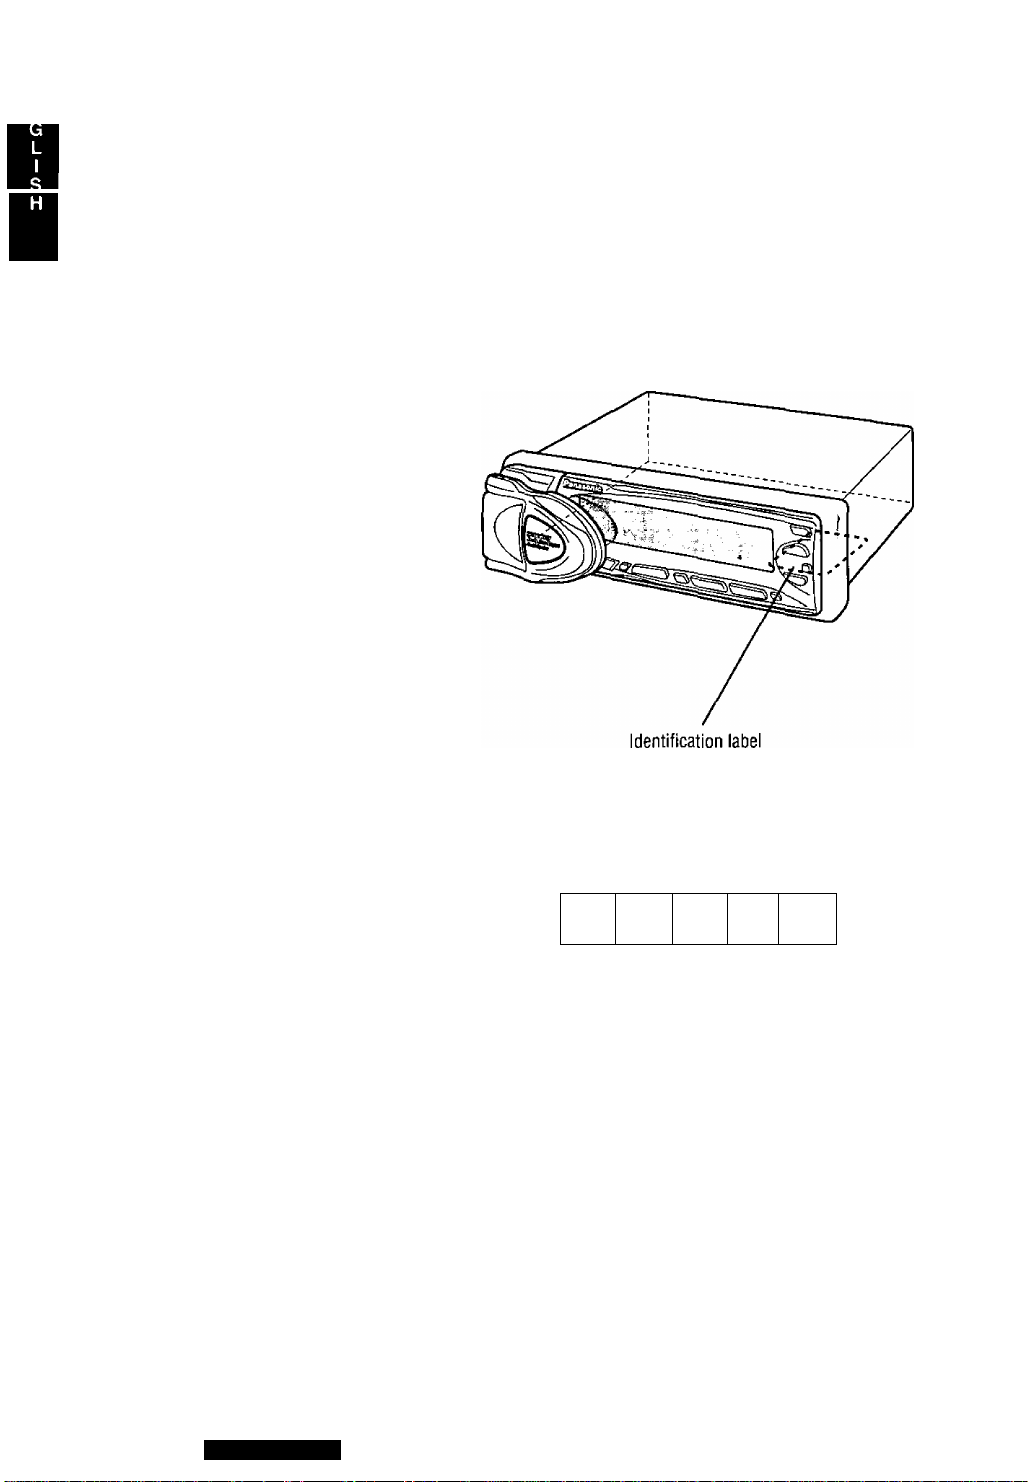
Part 15 of the FCC Rules
Label Indication and
Location
This unit has been manufactured under the part 15 of the FCC Rules.
Do not attempt to make any changes or modifications to this unit.
Panasonic
Model No. CQ-DRX900U
N= De Module
Manufactured by Matsushita Communication
industrial Co., Ud.
Yokohama Japan Made in Japan
Serial No.
N° De S6rie
f
------------------------------
i
1 2 V
■B-
X
This device complies with Part 15 of the
FCC Rules, Operation is subject to the
condition that this device does not cause
harmful interierence.
3 A
i
FM75il
T
CQ-DRX900U
Page 9
Components/Remote Control Preparation
Components
1. Operating Instruction
2. Supplied Hardware
3. Power Connector
4. Remote Control Unit
5. Lithium battery (CR2025).
6. Warranty Card
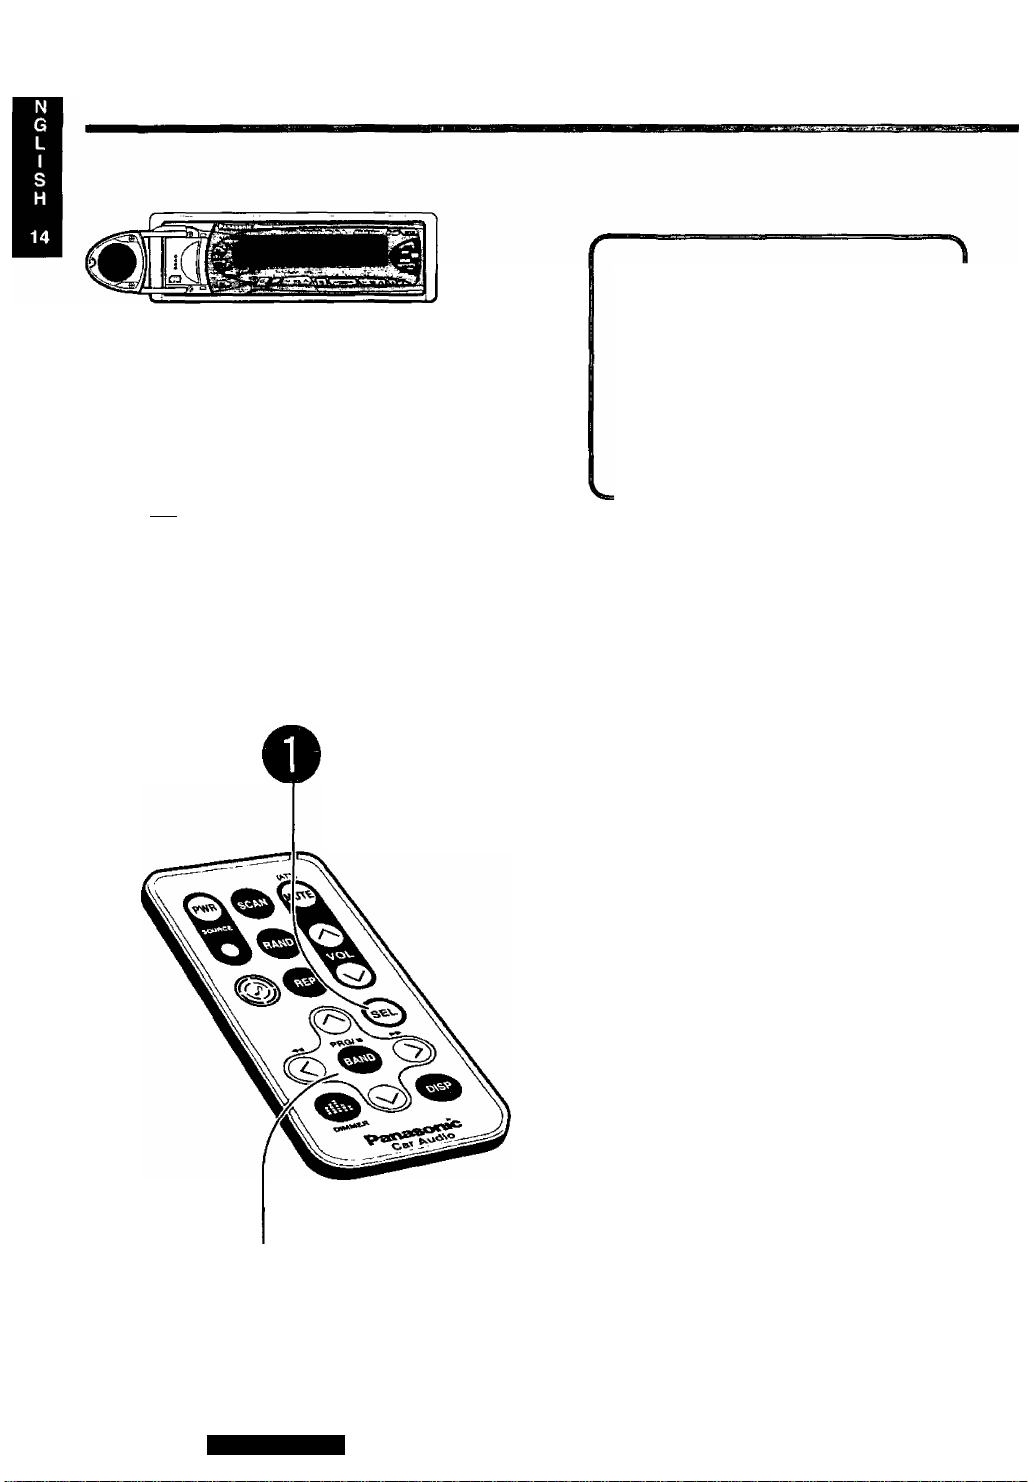
Remote Control Preparation
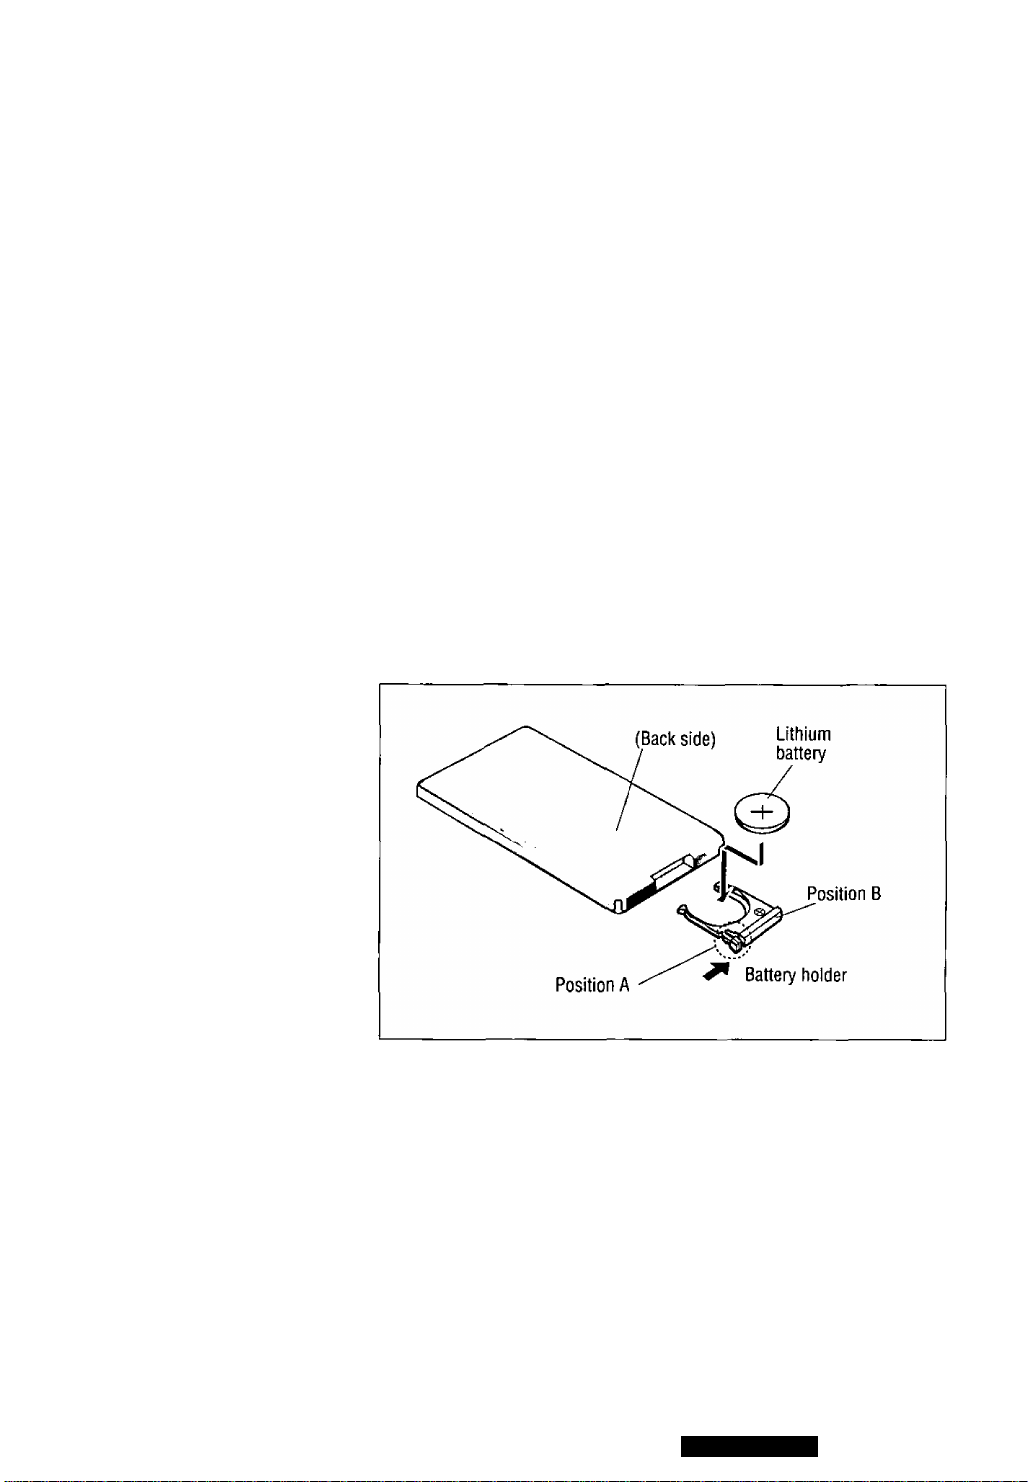
Battery Installation
1. Remove the battery hoider.
Take hold of the holder at position B and pull it out to remove the battery by
pushing position A in the direction shown by the arrow,
2. Install the battery on the battery holder.
Set a new battery properly with its {+) side facing up as shown in the figure.
3. Insert the battery holder.
Push in the battery holder back into its original position.
..........
..............
......-........
............
.................
................................
1 set page 32}
..........-................................
- 1
- 1
..................... 1
................
-
.............................-.........................
1
1
Battery Notes
Remove and dispose of an old battery immediately.
Battery Information:
• Battery type: Panasonic lithium battery {CR2025)
• Battery Life; Approximately 6 months under normal use {at room
temperature)
Caution; Improper use of batteries may cause overheating, an explosion or
ignition, resulting in injury or a fire. Battery leakage may damage the unit.
• Do not disassemble or short the battery. Do not throw a battery into a fire.
• Keep batteries away from children to avoid the risk of accidents.
• Be careful to the disposal rules when you dispose of batteries.
•
CQ-DRX900U
Page 10
General
This manual explains mainly remote control operations. However, some operations are not functioned with a remote con
trol. In such cases, the manual gives you how to operate the functions using main unit buttons.
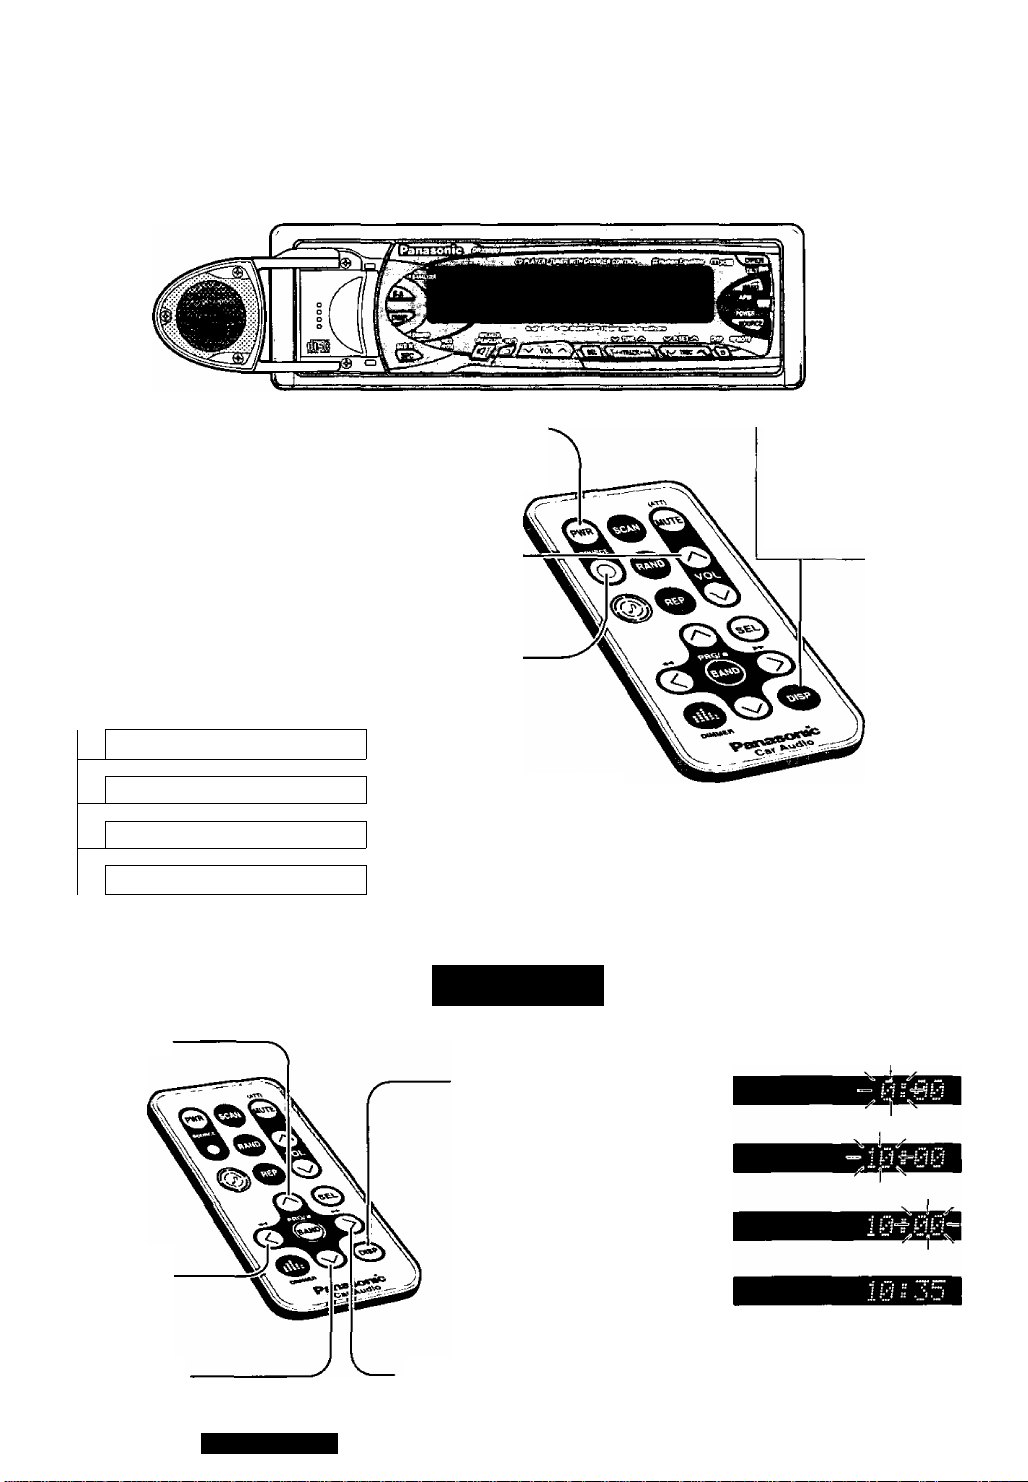
Power---------------------------------------
Turn the key in the ignition until the accessory indicator lights.
On: Press [PWR].
Off: Press again.
Volume
[A]: Up Note; The sound levels are respectively
[V] : Down stored in the memory for each source mode.
Source
Press [SOURCE]
to change the source.
—>■
------------------------------------
------------------------------------
Radio
1
CD Player
1
CD Changer
AUXIn
{When a CD is connected)
(When CD Changer is connected)
(When AUX-IN setting is activated)
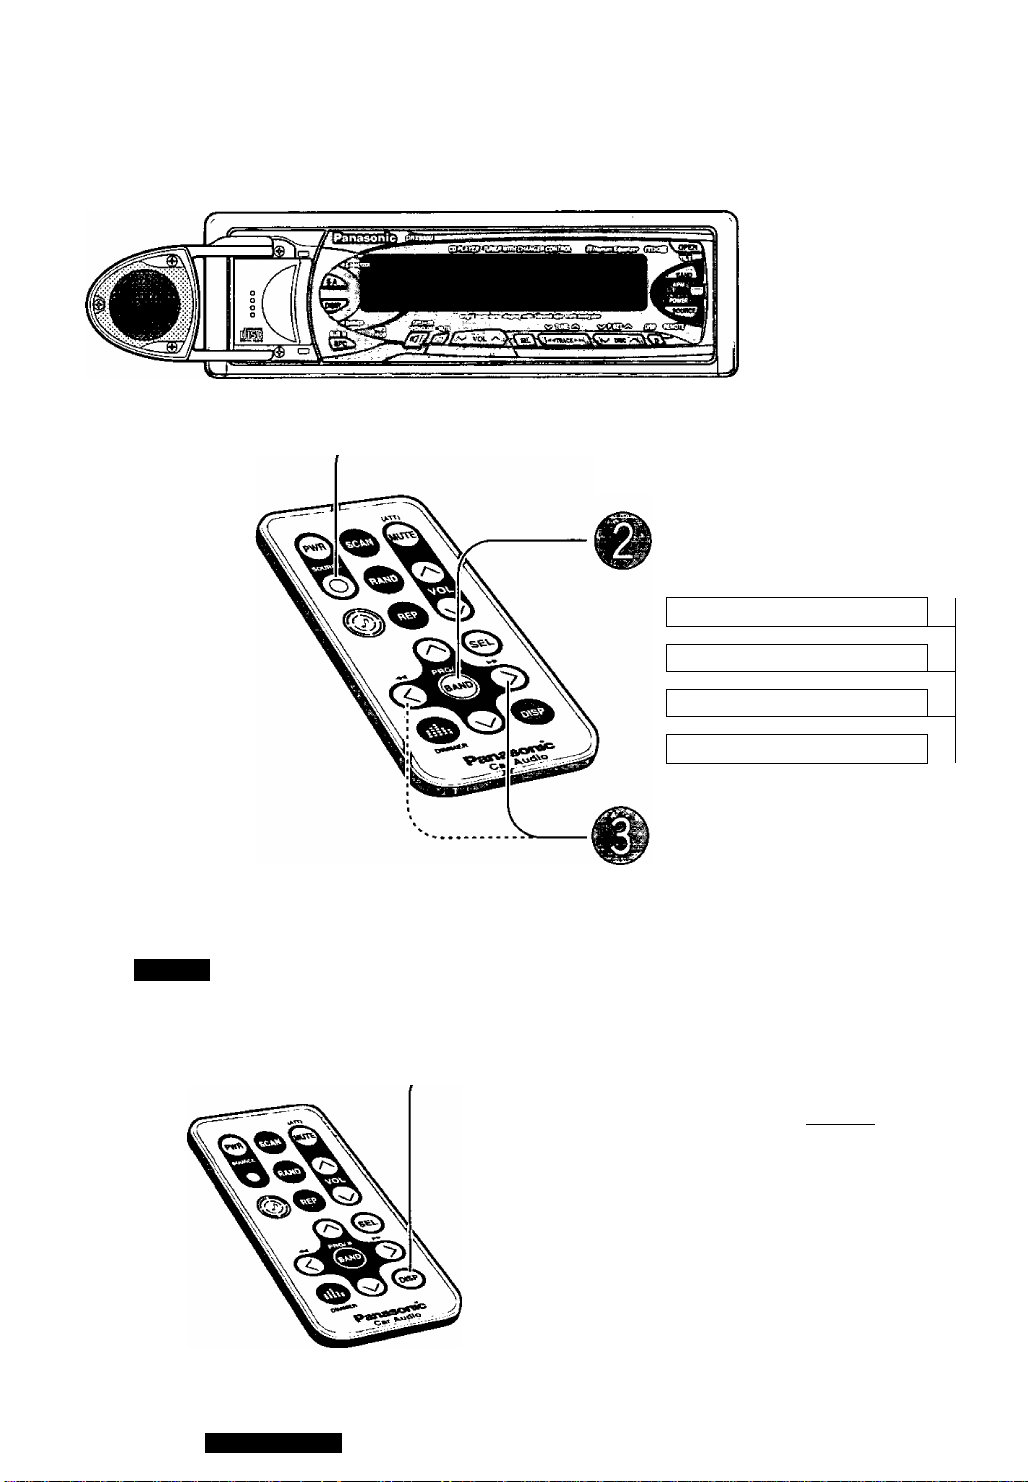
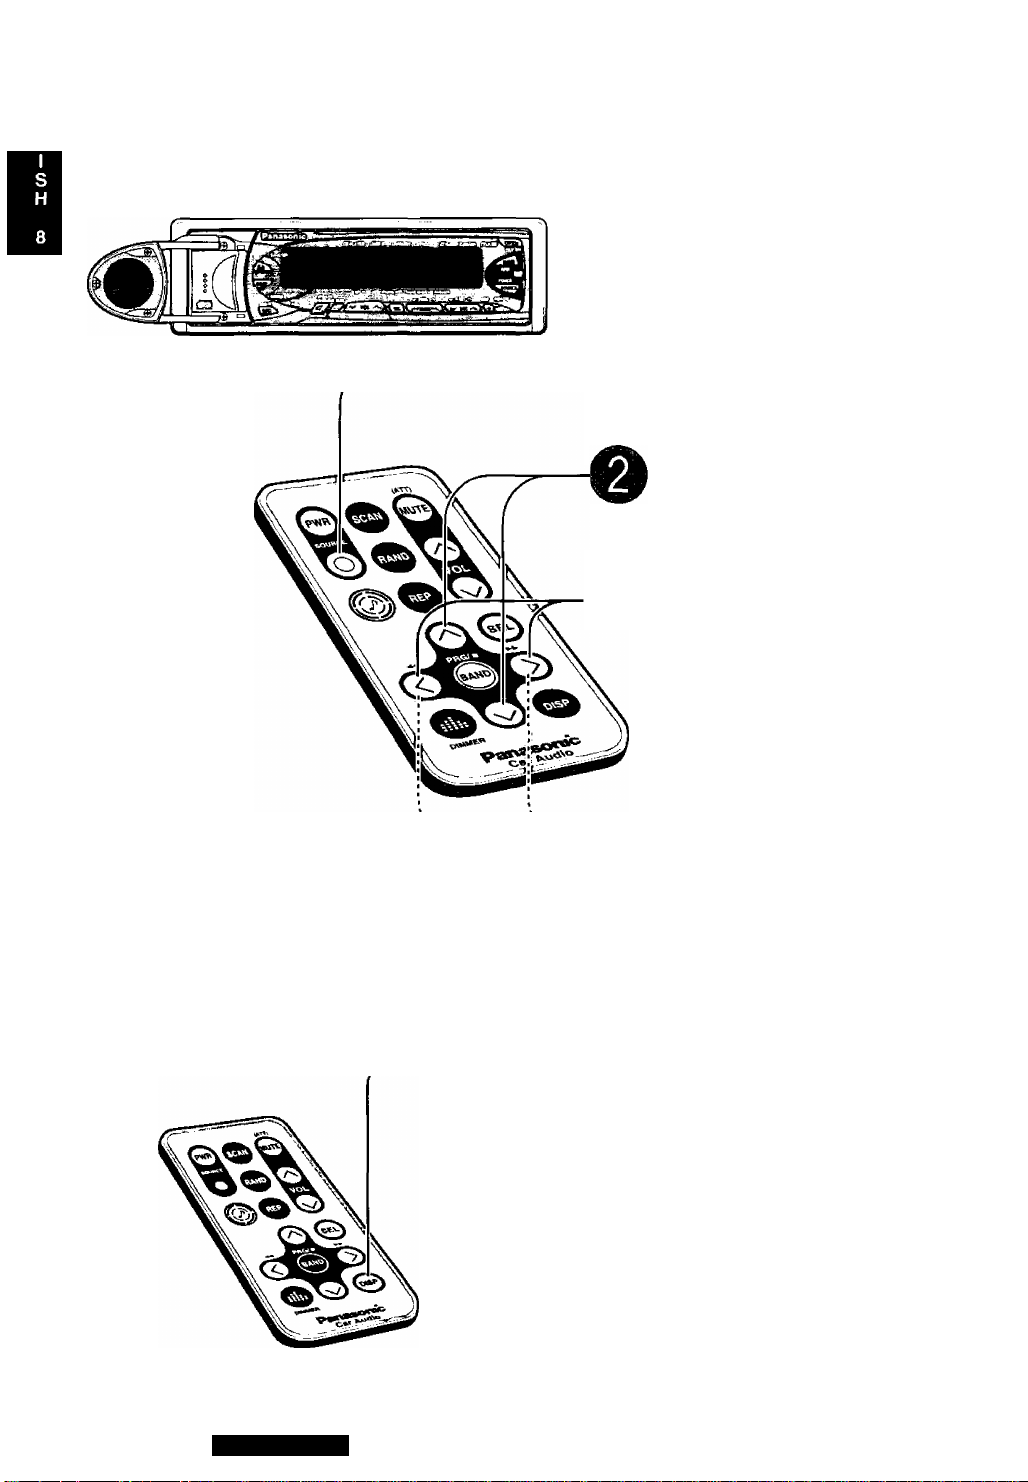
Clock Set
Note: When the power
is switched on for the
first time, a demonstra
tion message appears on
the display. To cancel
this display, press
[DISP].
10
Advance
Hour adjust
(ft Press and hold [DISP] for
more than 2 seconds.
Press [<]: Hour adjustment
[A]: Advance [V]: Back
0 Press [>]: Minute adjustment
[A]: Advance [V]; Back
(ft Press [DISP]; end
Back Minute adjust
CQ.DRX900U
Page 11
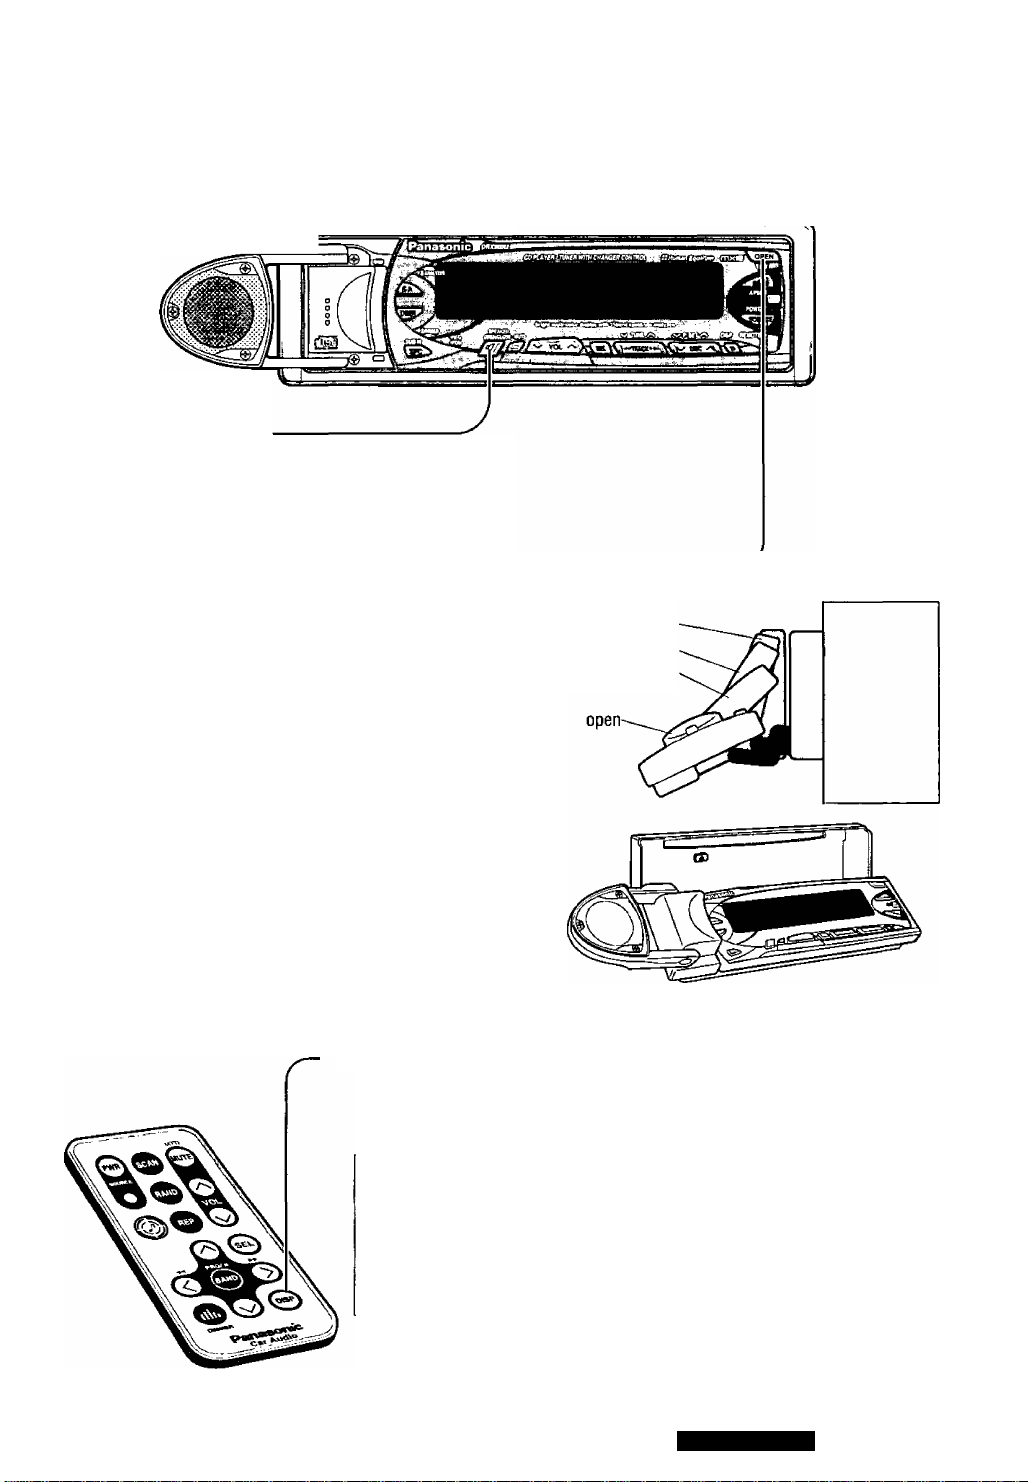
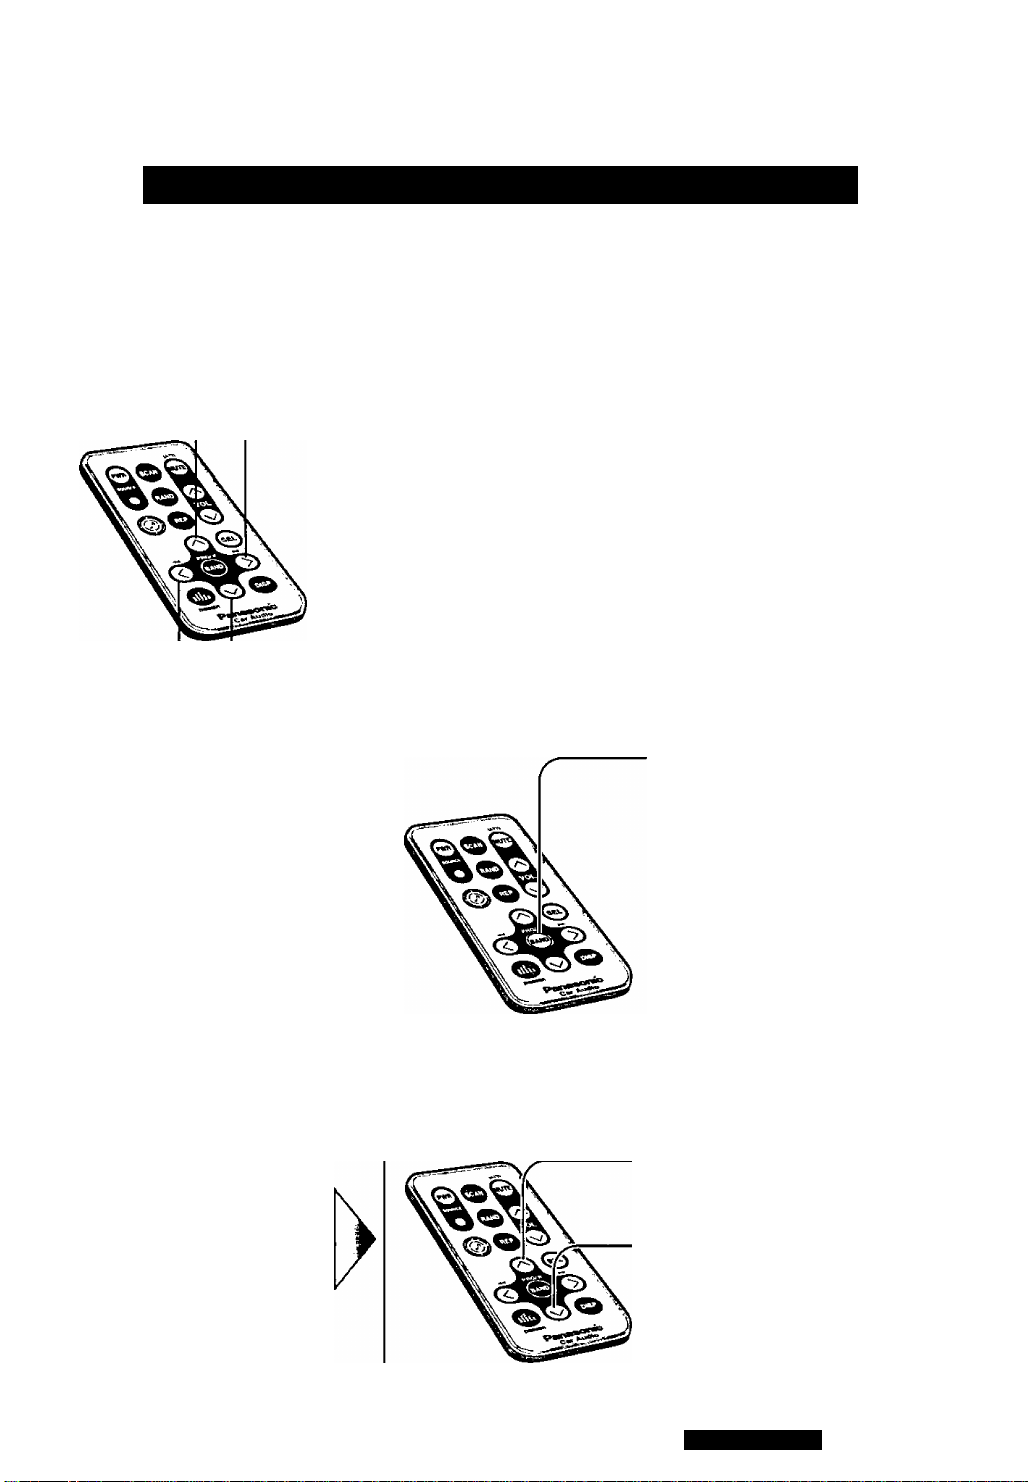
Because the following oprations are not functioned with a remote control, use main unit buttons.
Open the Center Speaker
Open; Press r/^1.
Close: Press again.
Note: The center speaker can not be opened or closed
while the front panel is opened completely.
Panel Angle (Tilt)
Press and hold [OPEN] (TILT) for more than 1 second
until signal sound is heard, then release.
Each time the button is pressed for 1 second and
release it, the panel angle is changed (in 3 steps).
--------------------------
Open/Close the Front Panel
• Press [OPEN] to open the front panel.
Note: If nothing is changed for 20 seconds, the original panel
position will be recovered.
• To close the front panel completely, press [OPEN] again.
• To recover the original panel position, press [OPEN] again
and hold it for more than 1 second, then release.
Notes:
• When the ignition switch is turned OFF, the panel
and the center speaker are closed.
• When the ignition switch is turned ON, the panel and the
center speaker are open to secure their former positions.
Display Change
Press [DISP] to change the dispay.
When the power is on
(Example: CD Player mode)
Tiltl
Tilt 2
Tilts
When the power is off
Regula^Display
Dot Spectrum Analyzer Display
i
Clock Time Display
Note: Displays differ from each source mode.
Clock Time Display
No Display
CQ-DRX900U
I
11
Page 12
D
Radio
#
Radio Mode
Press [SOURCE] to change to radio
mode.
Band
Press [BAND).
FM1
FM2
Note: The stereo indicator lights during reception of an
FM stereo broadcast.
STEREO
Display Change
FM3
AM(MW)
Tuning
[>]: Up
[<]: Down
Press and hold [>] or [<] for more
than 0.5 seconds, then release. Seeking
will start.
Press [DISP] to change the display.
Band Frequency
Regular Display
i
Dot Spectrum Analyzer Display
i
12
Clock Time Display
CQ-DRX900U
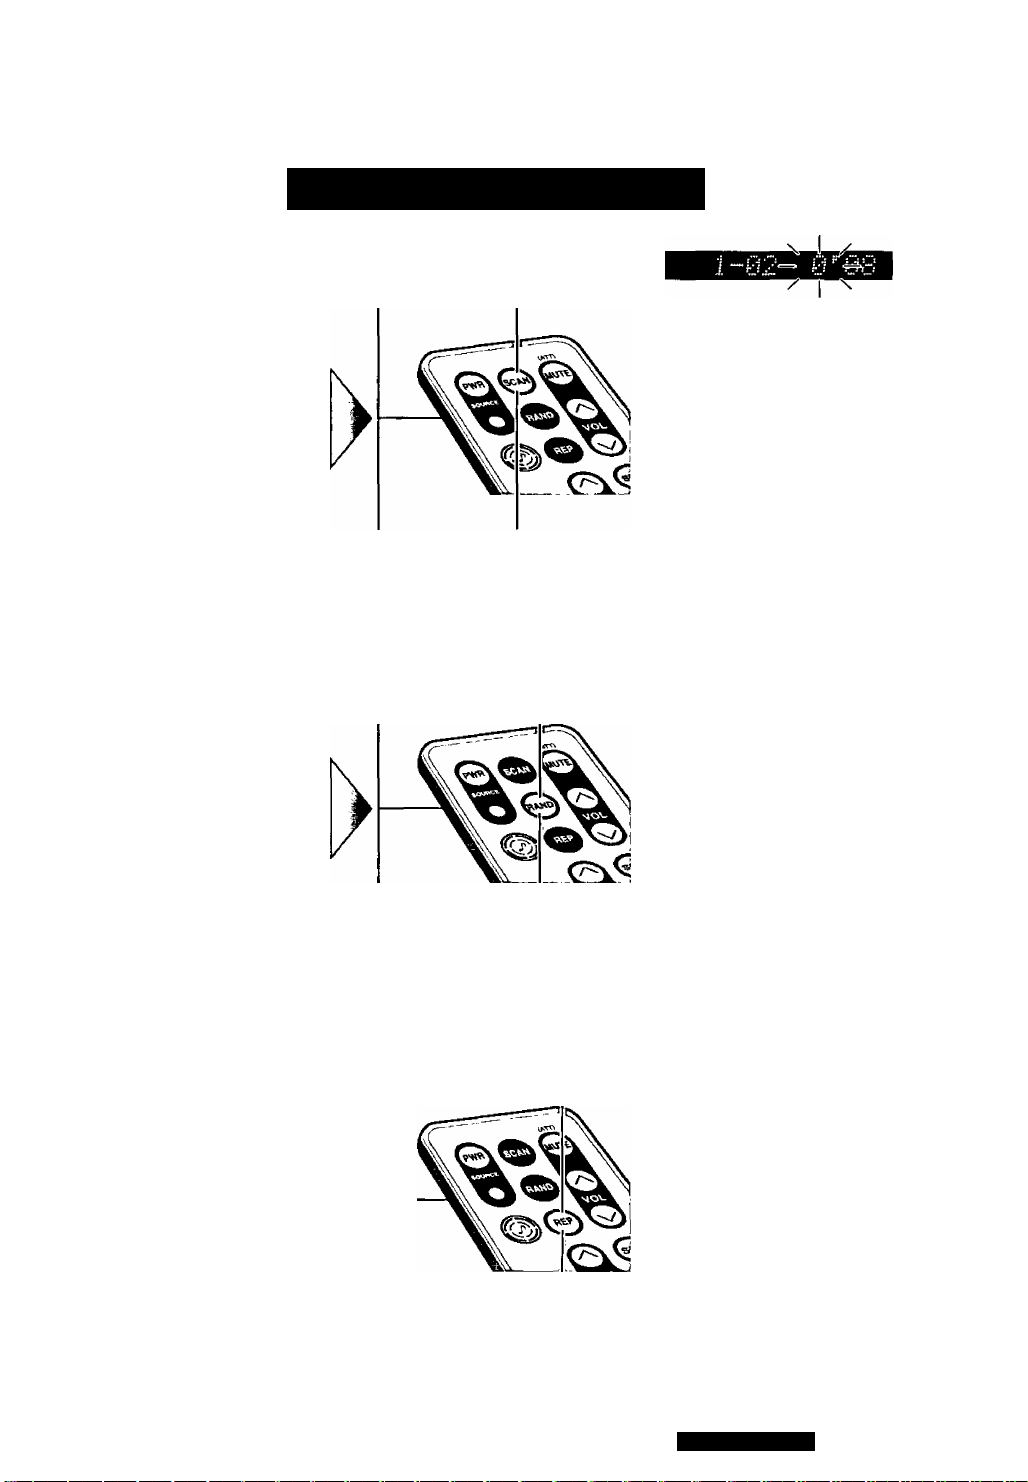
Page 13
Selection of a preset station in a one-touch action
Up to 6 stations each can be saved in the FM1, FM2, FM3 and AM (MW) preset station memories.
Manual Preset
Memory
Save the desired staion in
preset memory manually
Preset Number Frequency
Frequency Preset Number
V____________________J
Auto Preset
Memory
Save stations in good
receiving condition in preset
memory automatically
Select a band (step O, O on the previous page)
Press and hold [A] or [V] for
more than 2 seconds.
Press [A] or [V].
Press [>] or [<].
Press and hold [A] or [V] for
more than 2 seconds.
Select a band (step O, O on the previous page)
Press and hold [BAND] for more
than 2 seconds.
• The 6 strongest available stations
will be automatically saved in the
memory under preset numbers 1
to 6.
• Once set, the preset stations are
sequentially scanned for 5 sec
onds each.
• To stop the scanning, press [A]
or[V],
preset number blinks
^selkt^ preset number
A.
Station frequency
blinks once
Preset Station Calling
Note: The stations manually preset on the selected band will be deleted.
Select a band (step O, © on the previous page)
Press [A] to select the preset
number to tune in the preset staion.
[V]: opposite direction
CQ-DRX900U
13
Page 14
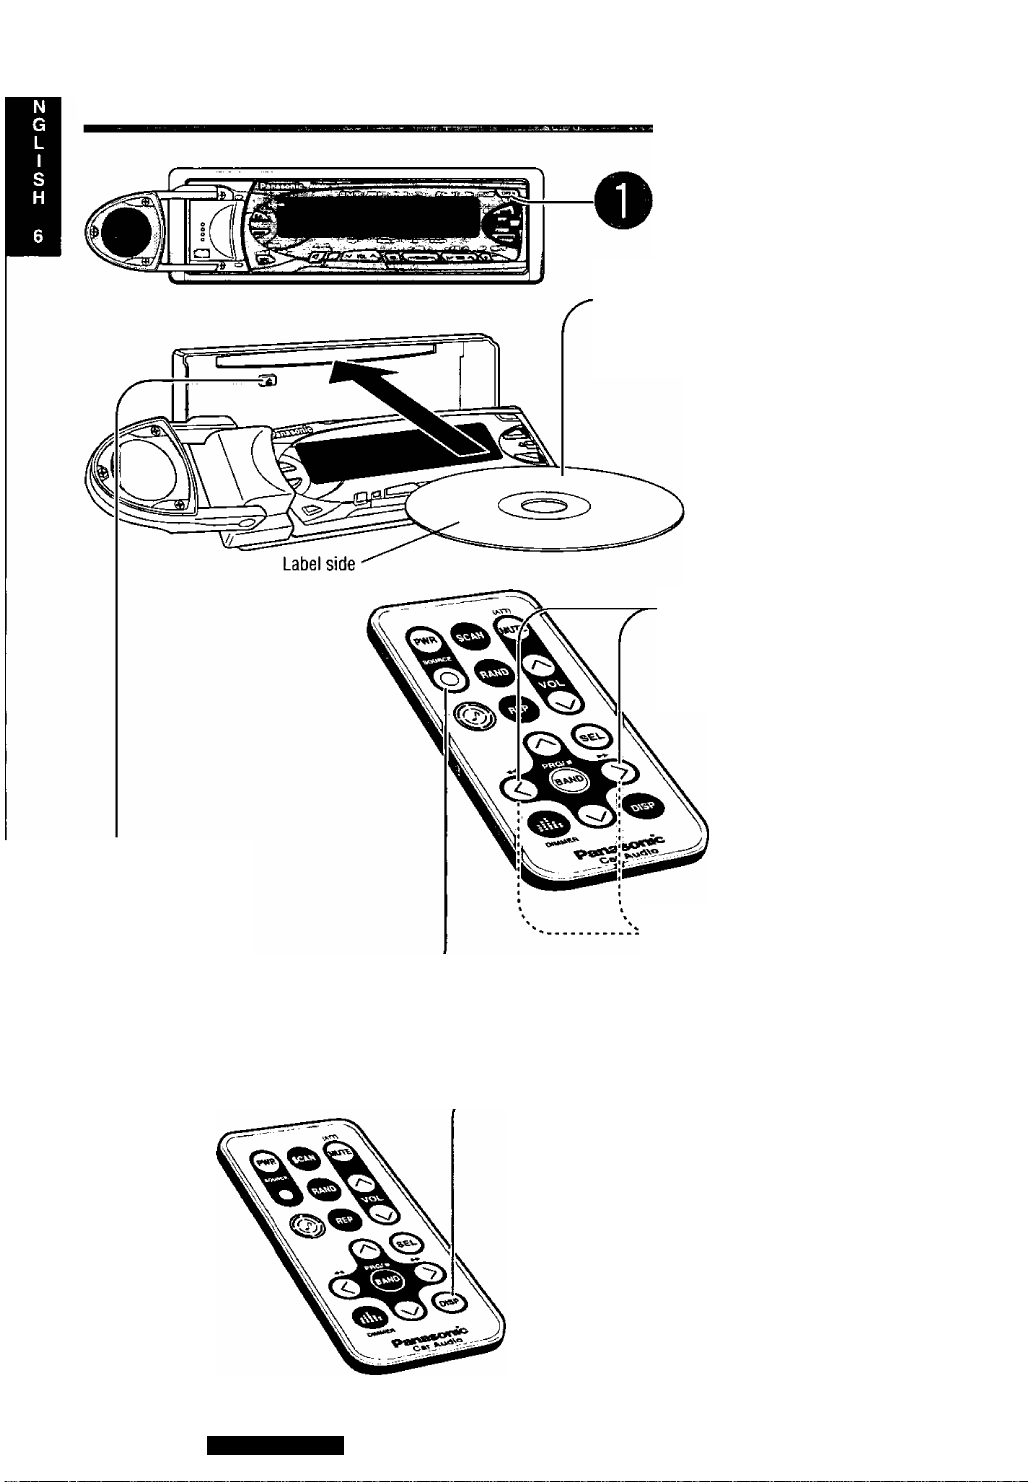
CD Player
Open the front panel
Press [OPEN] on the front panel.
^8 Disc Insert
Close the front panel automatically, then
playback starts.
Track Selection
[► ► ]: Next track.
[<^]: Beginning of the current track.
Previous track. (Press twice)
To eject the disc
press [A]
When CD is in the player —
Press [SOURCE] to change to CD player
mode.
Display Change
14
CQ-DRX900U
Track Search
Press and hold
[► ► ]: fast forward
[-♦ ^]: fast backward
Press [DISP] to change the display.
Track Number Playing time
Regular Display
Dot Spectrum Analyzer Display
Clock Time Display
Page 15
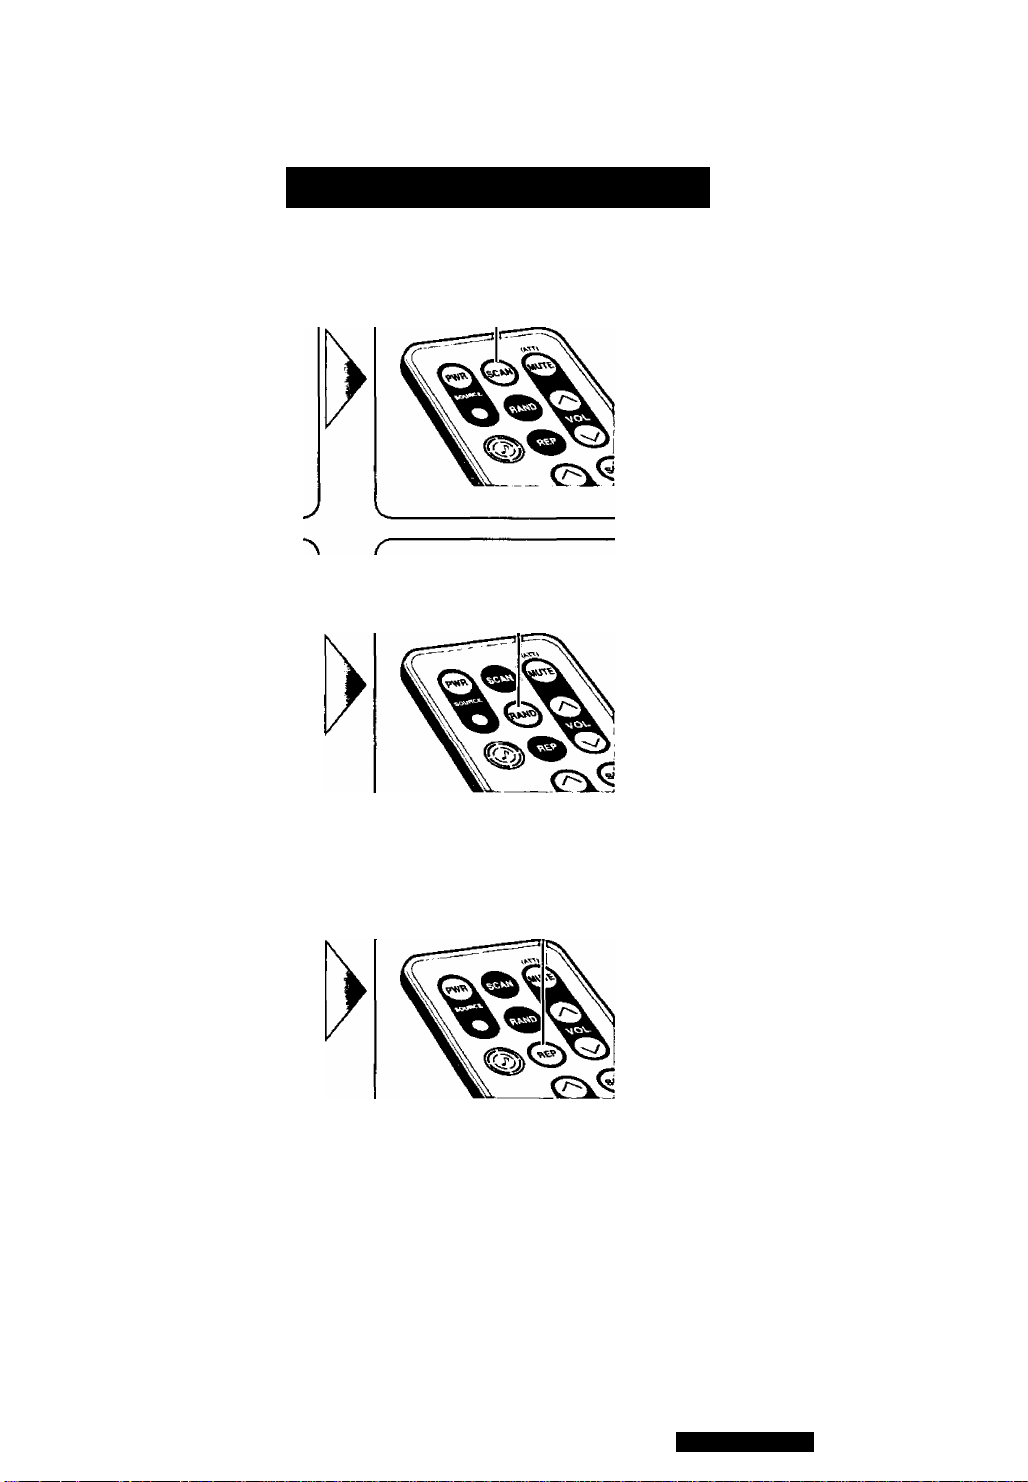
Scan Play
The first 10 seconds of each
track plays in sequence.
r
Various Way of Listening
Press [SCAN]
With the scanning of ail tracks over,
the original program starts playing
from the beginning.
Press [SCAN] again to cancel.
Press [RAND]
Random Play
All the available tracks are
played in a random sequence.
Repeat Play
Repeat the current selection.
Press [RAND] again to cancel.
Press [REP]
Press [REP] again to cancel.
J V
Cautions:
• Do not apply a strong downward force onto the face plate and do not put anything on it while it is open, or it might be
damaged.
• Do not use irregularly shaped CDs (Heart-Shaped, Octagon, etc)
CQ-DRX900U
15
Page 16
CD Changer
Notes :
CD changer functions are designed for optional Panasonic CD changer unit.
O CD Changer Mode
Press [SOURCE] to change to CD
changer mode.
Disc Selection
[A]: Next disc.
[V] : Previous disc,
& Track Selection
[► ► ]: Next track.
['♦ <]: Beginning of the current track.
Previous track. (Press twice)
Display Change
Press [DISP] to
change the display.
Track Search
Press and hold
[► ► ]: fast forward
: fast backward
Disc Number Track Number Playing Time
Regular Display
i
Dot Spectrum Analyzer
Clock Time Display
16
CQ-DRX900U
Page 17
Various Way of Listening
Track Scan
The first 10 seconds of each
track on the discs plays in
sequence.
Disc Scan
The first track of all the discs in
the magazine is playedforlO
seconds each.
Track Random
All the available tracks on all
discs in the magazine are
played in a random sequence.
Disc Random
All the available tracks on
current disc are played in a
random sequence.
Press [SCAN]
Press and hold [SCAN]
for more than 2 seconds.
Press [RAND]
Press and hold [RAND]
for more than 2 seconds,
With the scanning of all tracks over,
the original program starts playing
from the beginning.
Press [SCAN] again to cancel.
zn
With the scanning of all tracks over,
the original disc starts playing from
the beginning.
Press and hold [SCAN] again to
cancel.
Press [RAND] again to cancel.
Press and hold [RAND] again to
cancel.
Track Repeat
Repeat the current selection
Disc Repeat
Repeat the current disc
selection
Press [REP]
Press and hold
for more than 2 seconds. cancel.
REP] [REP] again to
Press [REP] again to cancel.
*i
CQ-DRX900U
17
Page 18
Useful Functions
Spectrum Analyzer
Display
Default; WAVE
Variety: 11 types
Display Brightness Setting range (Dimmer)
Press
and hold
Default:
DIMMER LEV 2: at side maker lamp on
DIMMER LEV 3: at side maker lamp off
Setting range : LEV 1 to LEV 3
Volume Down (Mute/Attenuator)
The volume decreases depending on
\which setting you selected Mute or
ATT. {<=> page28)
Default; off
18
CQ-DRX900U
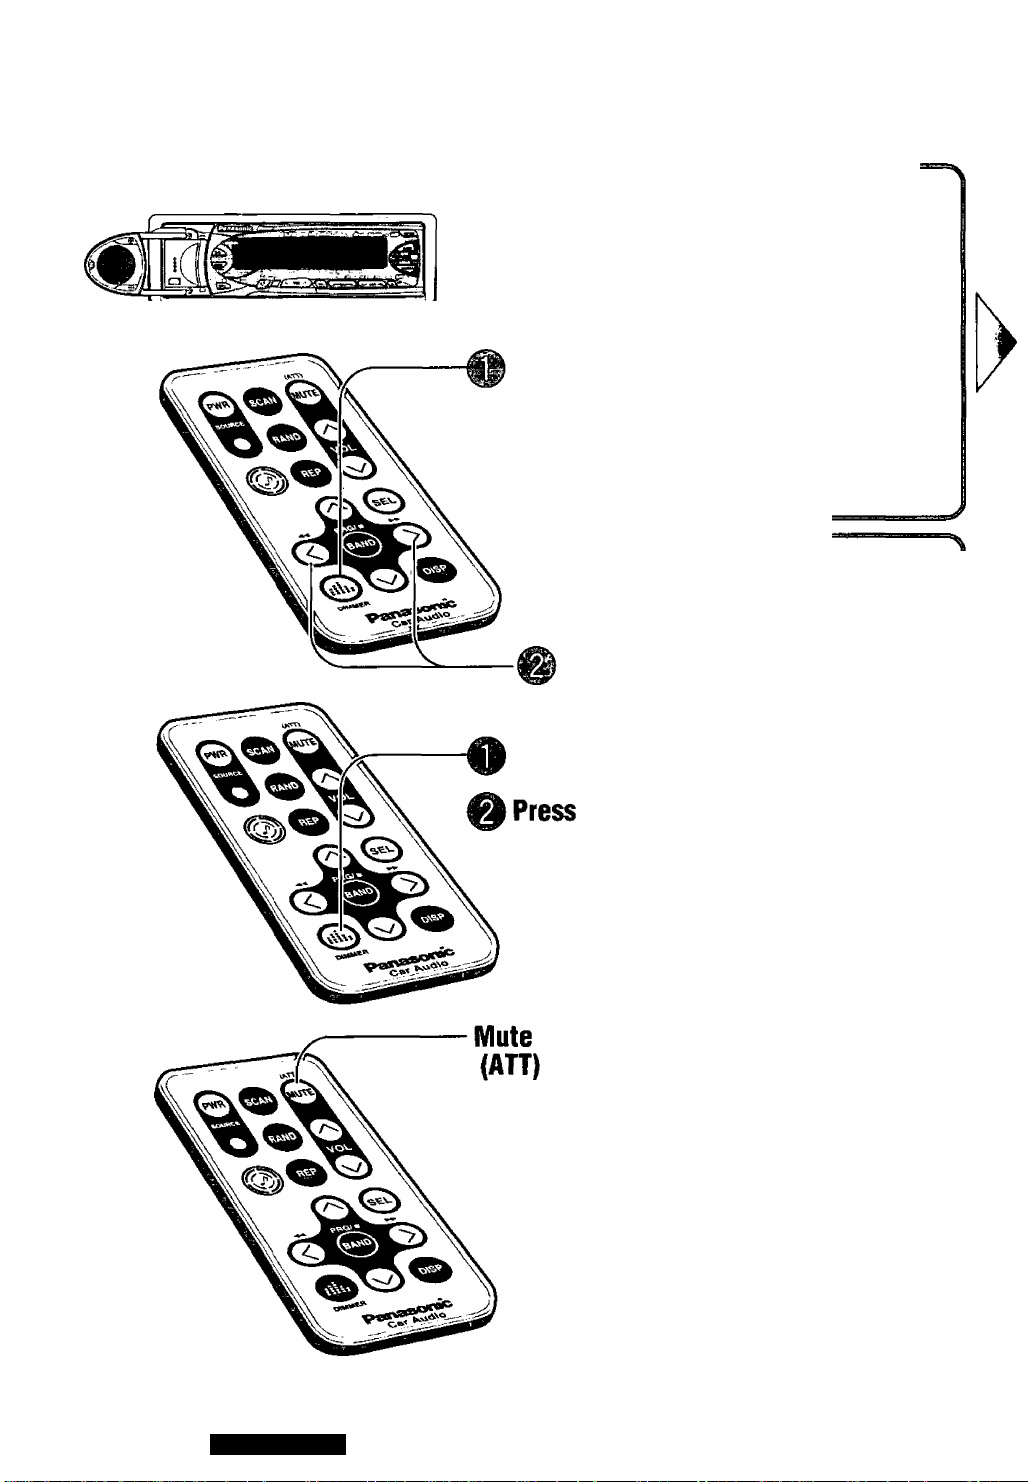
Page 19

O Press [@]
SPEANA SEL
"V
O Press [>] to change the spectrum analyser display.
([<): opposite direction)
WAVE, AURORA, —, BUNK SPEANA, ALL DISP OFF, etc.
Note:
BLANK SPEANA
Turn off the Spectrum Analyzer
display only.
ALL DISP OFF
Turn off the whole display. (The
display is turned on during operations.
Then the display is turned off 5 seconds
after operations.
A
O Press and hold
[0
] (DIMMER)
for more than 2 seconds.
DIMIVIER SEL
Q Press i@i (DIMMER) to change the dimmer level as follows.
DIMMER LEVS
Brighter
i
DIMMER LEV 2
' Center
I
DIMMER LEV1
Press [MUTE] (ATT) to switch the MUTE mode (ATT mode) between on and off.
When MUTE is set
Darker
MUTE off
MUTE on
When ATT is set______________________________________________________________
ATT off
..................
.................
....................
Regular volume level l
No sound '
Regular volume level
ATT on .....................Decrease the volume to 1/10 of previous level.
CQ-DRX900U
19
Page 20
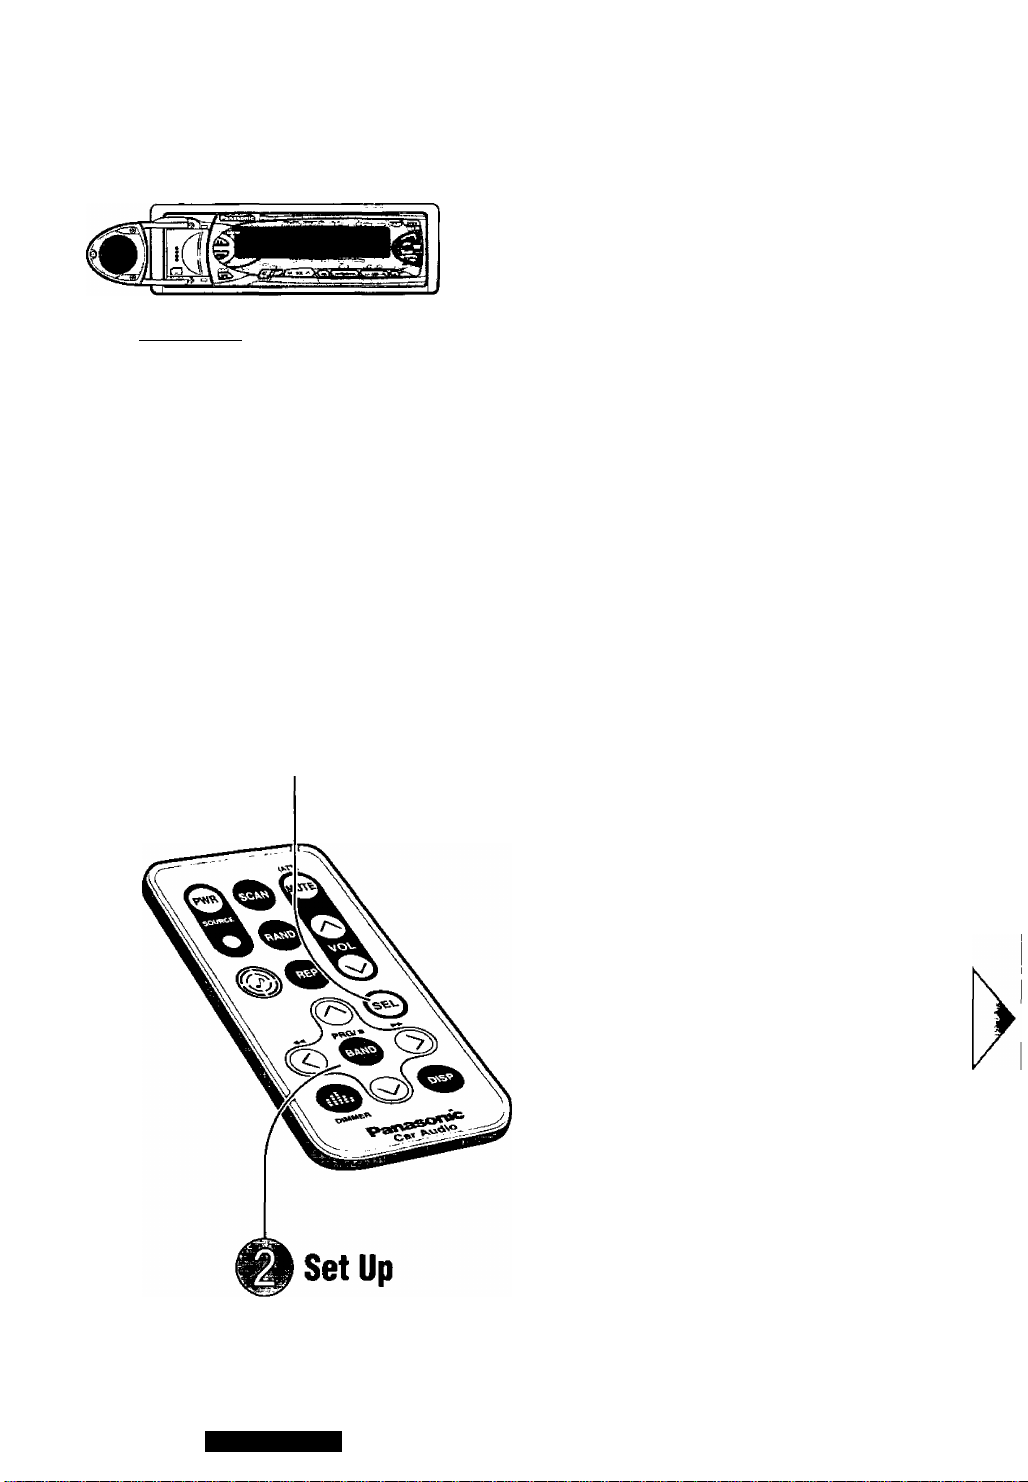
Sound Settings and Sound Space
r
Regular Mode
HUMAN EQ
T
GRAPHIC EQ
-------1-------
BAL//FAD
T
POSITION SEE
SUPER BASS
i
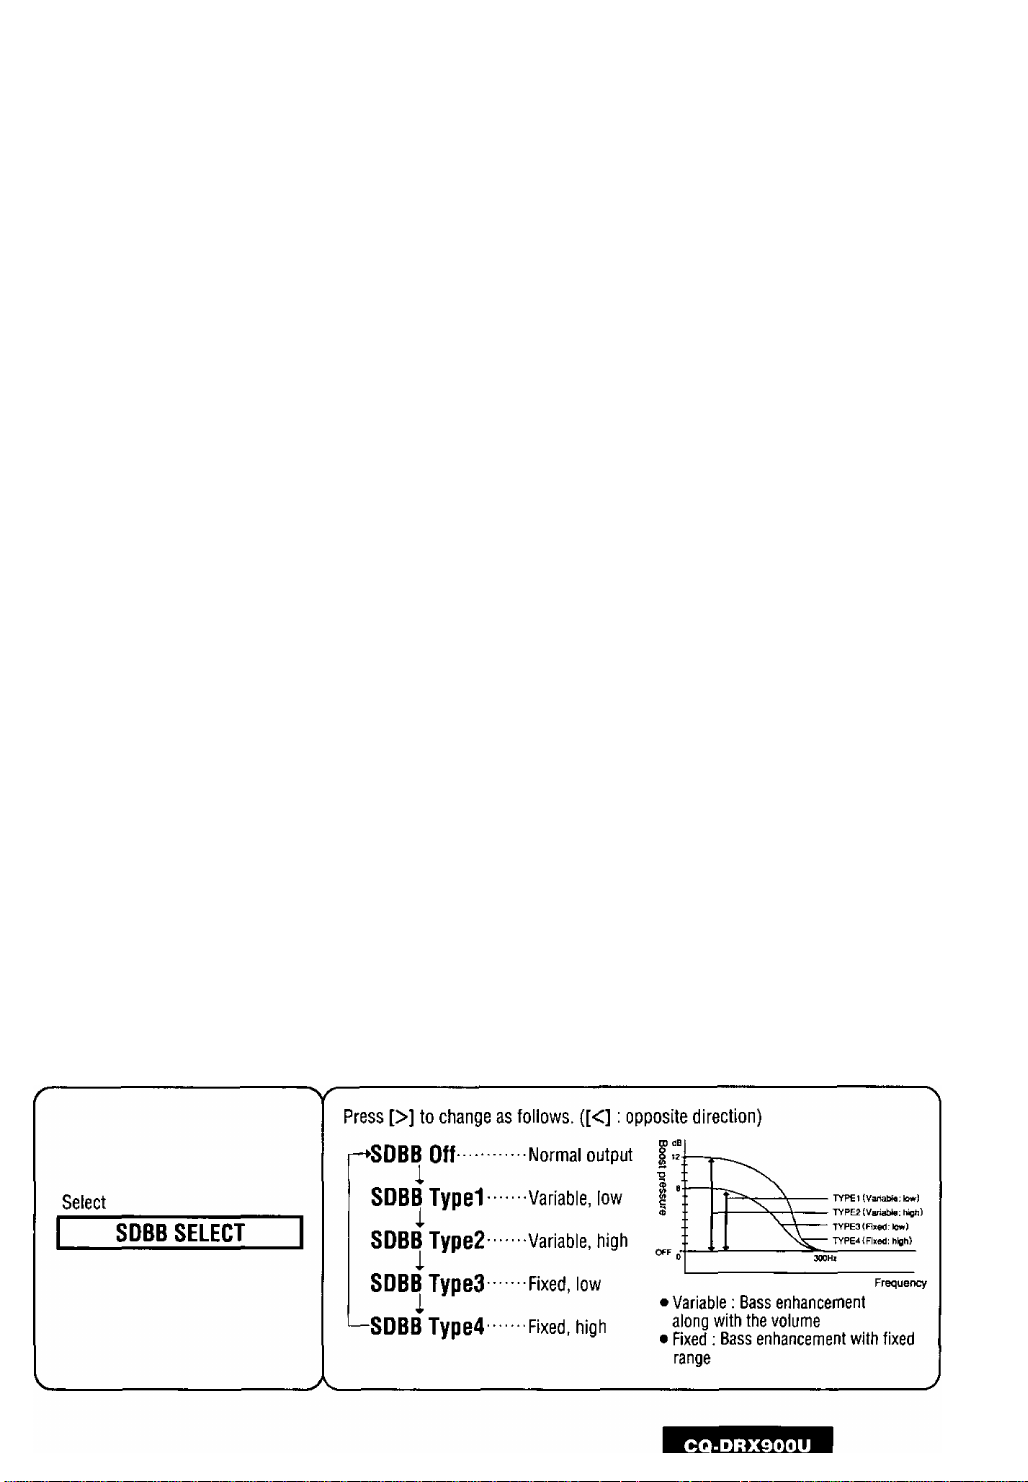
SDBB SELECT
i
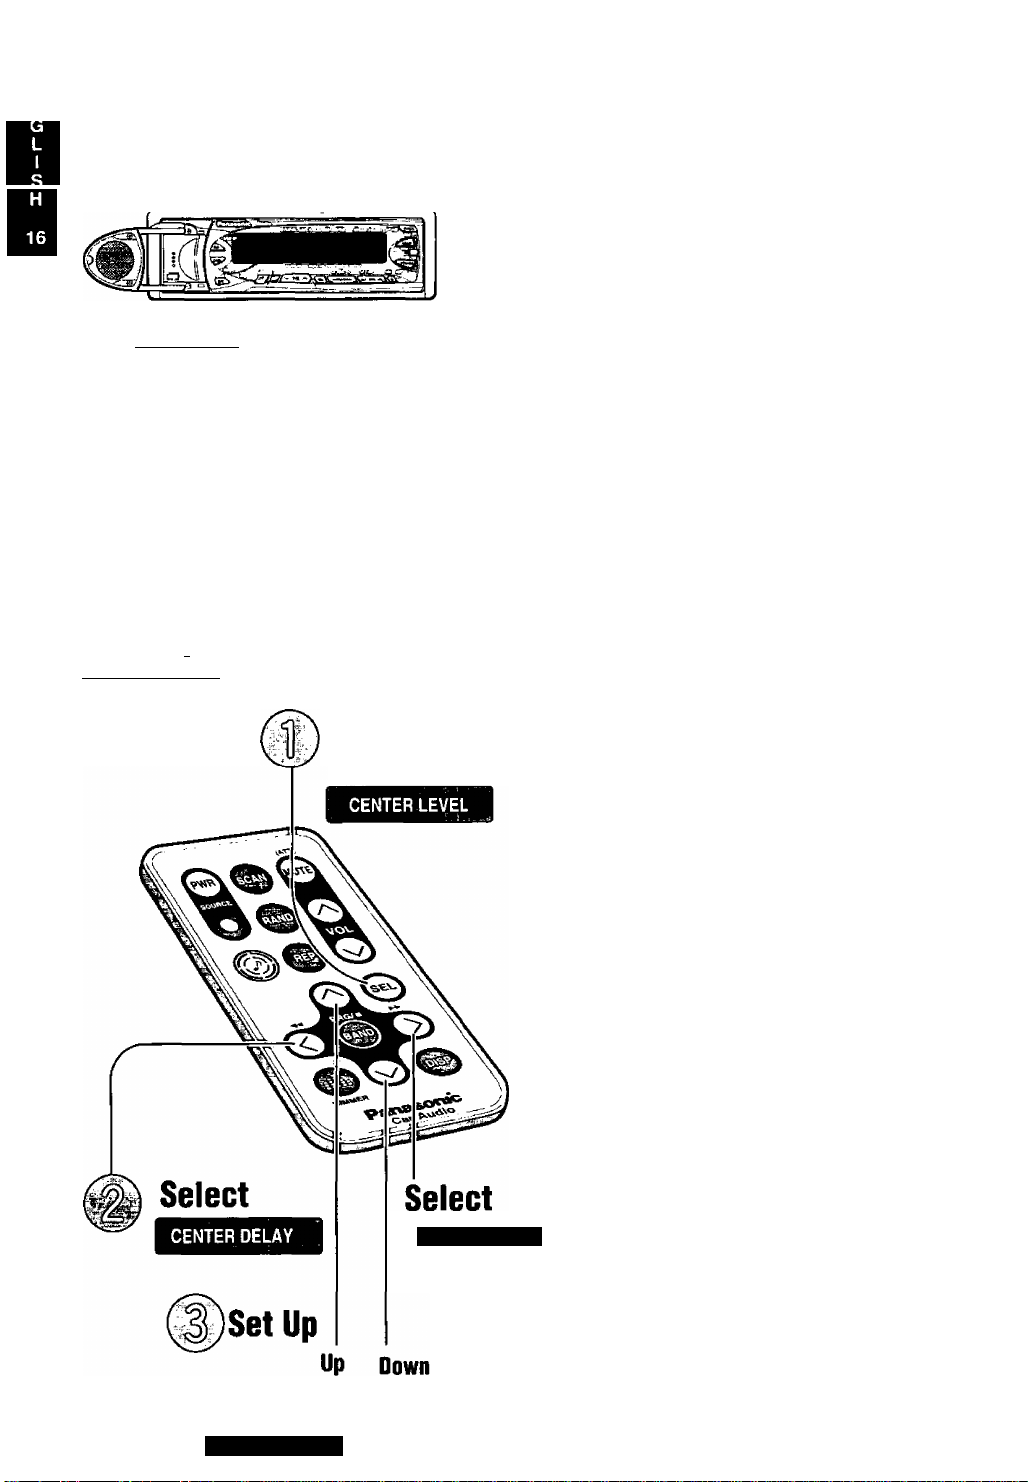
CENTER LEVEL
#
Tone Quality
(Human Equalizer/HEQ)
49 patterns are already prepared, so that you
can make complicated adjustment easily.
Default : FLAT{0)
Setting range •' 1 - 3 for each patterns (49 pat
terns)
r
Press [SEL] to
select an
operation
Registering Your Desired Tone Quality
(Graphic Equalizer/GEQ)
20
The level in each of 7 frequency bands from
bass to treble can be adjusted. Up to 5 kinds
of adjusted tone quality can be saved in the
memory, (preset memory 1 to 5)
Default: 0 for each frequency
Setting range : -12 to +12 by 2 dB step
CQ-DRX900U
Page 21
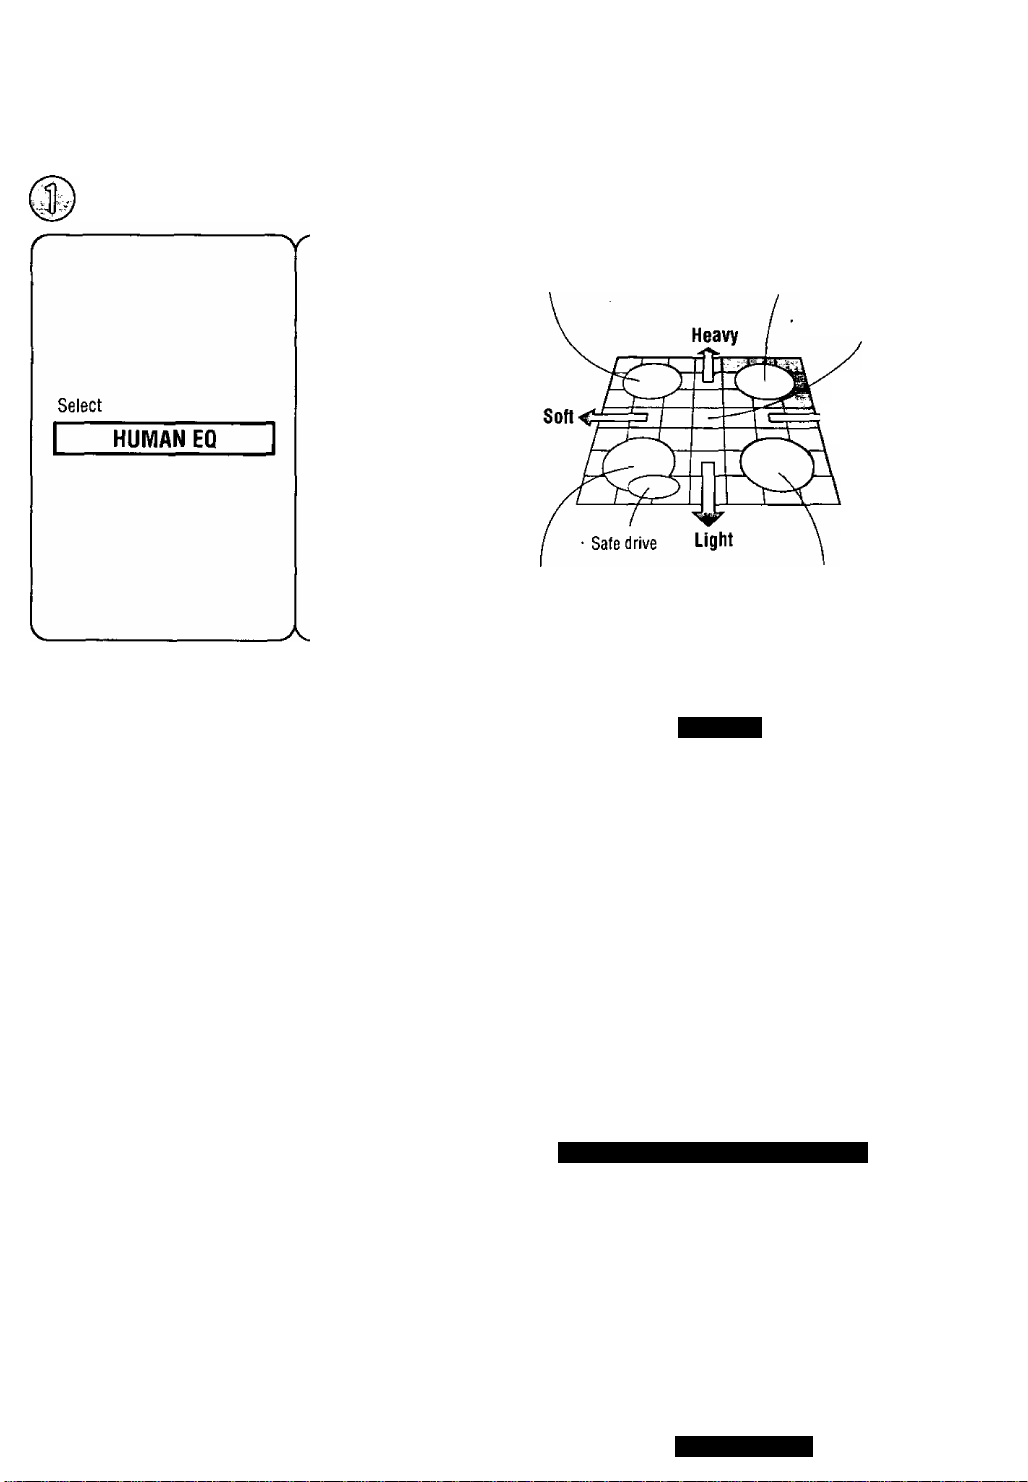
Press [SEL]
Set up
[A]: Heavy bass
[V]: Light bass
[>3 : Sharp treble
[<] : Soft treble
'V
Recreation
Enjoyable drive
Untie stress
Refresh
Listen to the music
> Sharp
Calm down
Concentration
Memorize
After selecting one of the preset numbers 1 - 5,
© Press and hold [SEL] for more then 2 seconds to
change to graphic equalizer preset mode.
■ Rhythmical
- Awakening
Select
GRAPHIC EQ
Press [A] to select one
of the preset numbers
1 -5, and the preset tone
quality is recalled.
([V] : opposite
direction)
.-A.
@ Adjust the level for each frequency.
Press [>] to change the frequency.
80 160 320 640 -> 1.6k 4k -> 10k (Hz)
t
______________________________________
( Kl ■ opposite direction)
[A] : Upper level
[V]: Lower level
© Press [SEL] to save the level.
Calling Back the Recommended Setting
A tone quality that excludes blurred bass and is
comfortable to listen to is already saved in the preset
number 6.
Press [A] or [V] to select preset number 6.
Note: You can not save in the preset number 6.
I
CQ-DRX900U
21
Page 22
Sound Settings and Sound Space
Balance and Fader
(Balance/Fader)
Regular Mode
T
HUMAN EQ
GRAPHIC EQ
T
BAiy/FAD
~r~
POSITION SEL
You can adjust the sound balance among
the front, rear, right and left speakers.
Default: B(Balance); CNT(Cenfer)
F(Fader): CNT(Center)
Setting range • 15 levels for each
SUPER BASS
' j—
SDBB SELECT
CENTER LEVEL
Sound Image
(Position)
You can adjust the sound image in
accordance with a listener position.
Default: POSI OFF
Press [SEL] to select an operation
Rear Speakers for Sub-Woofer
(Super base Control Sub-Woofer/SBC-SW)
You can utilize the rear speaker connected to
the built-in amplifier as sub-woofer that
outputs only bass.
Default : Off
Bass Enhancement
(Super Dynamic Bass Boost/SDBB)
22
CQ-DRX900U
Set Up
Enhanced bass comes out from the 4
speakers connected to the built-in amplifier,
so that you can enjoy heavy bass sound.
Default: Off
Page 23
Press [SEL] 0 Set Up
[A] : Front enhanced
Select
Select
POSITION SEL
Select
SUPER BASS
BAL//FAD
[V]: Rear enhanced
[>] : Right enhanced
[<] : Left enhanced
Press [>] to change as follows. ([<]: opposite direction)
r-^OFF
.............
All seats
i
RIGHT
..............
Front right
i
LEFT
..............
Front left
i
FRONT
.............
i
REAR
[>] : On- -Bass Enhancement {Monaural)
[<] : Off—Regular Output (Stereo)
.............
L
• Adjust the Sub-Woofer output level (<=> page 26)
It is also interlocked with the preout (rear speaker output).
• 8A17FAD, POSITION, SDBB and Space settings for rear speaker output will
be invalid.
Front
Rear
SBC-SW ON
A.
23
Page 24
Sound Settings and Sound Space
Regular Мойе
HUMAN EQ
GRAPHIC EQ
T
BAL//FAD
POSITION SEL
T
SUPER BASS
SDBB SELECT
I
I CENTER LEVEL |
Press [SEL] to select
Center Speaker Output
Sound image is raised and oriented toward
the center forward.
Adjust the Center Speaker Volume
(Center Speaker Volume Level)
Default: 0
Setting range : -oo, -10 to+10
by 2dB(decibel) step
24
CQ-DRX900U
CENTER LEVEL
J
=4
Adjust the Sense of Distance
(Center Speaker Delay Time)
Default: 0
Setting range: -10 to +10
1 step = 0.0003 seconds
Page 25

Press [SEL]
"V
Adjustment Procedure
Open the center speaker. ('=>pageii)
Select
CENTER LEVEL
1. Adjust the center speaker volume.
Adjust the volume so that middle tone such as vocal is oriented tovi/ard the
center forward without adding DSP effect to the center speaker. (Center
speaker delay time ;0, sound space: Space off)
2. AdJust the sound space and the center speaker delay time.
S.Adjust the center speaker volume again.
Adjust the volume to suit with the sound space setting.
Press [<] or [>] @ Set Up : Press [A] or [V]
~v
Press [>] to select
CENTER LEVEL
[A]: Up
[V] • Down
-oo : No sound from the center speaker
Press [<] to select
CENTER DELAY
[A] : Longer delay time, farther sound image
(center speaker output gets later)
[V]; Shorter delay time, closer sound image.
(center speaker output gets earlier)
0 : Both outputs between other speakers and center speaker get
synchronized.
CQ-DRX900U
"A
25
Page 26

Sound Settings and Sound Space
Sound Space
Reproduction
(Space)
Concert hall presence in your car
Default: Off
Select
_____
____
Sub-Woofer Output (Digital Dynamic Bass Control/DDBC)
This adjustment is effective when Sub-woofer is connected or when the rear speakers are used as Sub-Woofer.
(«=> page 22)
Press and hold [ @ ]
for more than 2 seconds.
Sub-Woofer Volume
(ODBC Volume Level)
Default : 0
Setting range-<», -10 to+10
by 2dB step
0 Pressoi to
select an Operation
Sense of Distance
(ODBC Delay Time)
There is no delay time between speaker sound
and Sub-Woofer, so that you can enjoy dynamic
heavy bass.
Default : 0
Setting range : -10 to+10
1 step = 0.0003 seconds
- ^
26
0 Set Up
Bass Control
(ODBC Cut off Frequency)
By controlling the upper limit of bass cutoff
frequency, you can enjoy clear sound.
Default: OFF
CQ.DRX900U
Page 27

■V
Press [ 0] to change to
Space mode.
SPACE OFF
Press [<] or [>]
Select
ODBC LEVEL
Press [>] to change space as follows. ([<] : opposite direction)
SPACE OFF
I
CONCERT HALL
Note: Space settings are respecively stored in the memory for each source
-A.
~V
mode.
[A] : Up
[V] : Down
-«> : No Sub-Woofer sound
STADIUM
1
VOCAL
Select
ODBC DELAY
Select
FREO. SELECT
"V
[A] : Delay time longer {Sub-Woofer output gets later.)
[V] : Delay time shorter (Sub-Woofer output gets earlier.)
0 : Both outputs between speakers and Sub-woofer get synchronized
V"
Press [A] to change the cut off frequency. ([V]: opposite direction)
OFF 100
t
____________
OFF : Regular output, high tone included
150 200 (Hz)
_J
-A.
CQ-DRX900U
27
Page 28
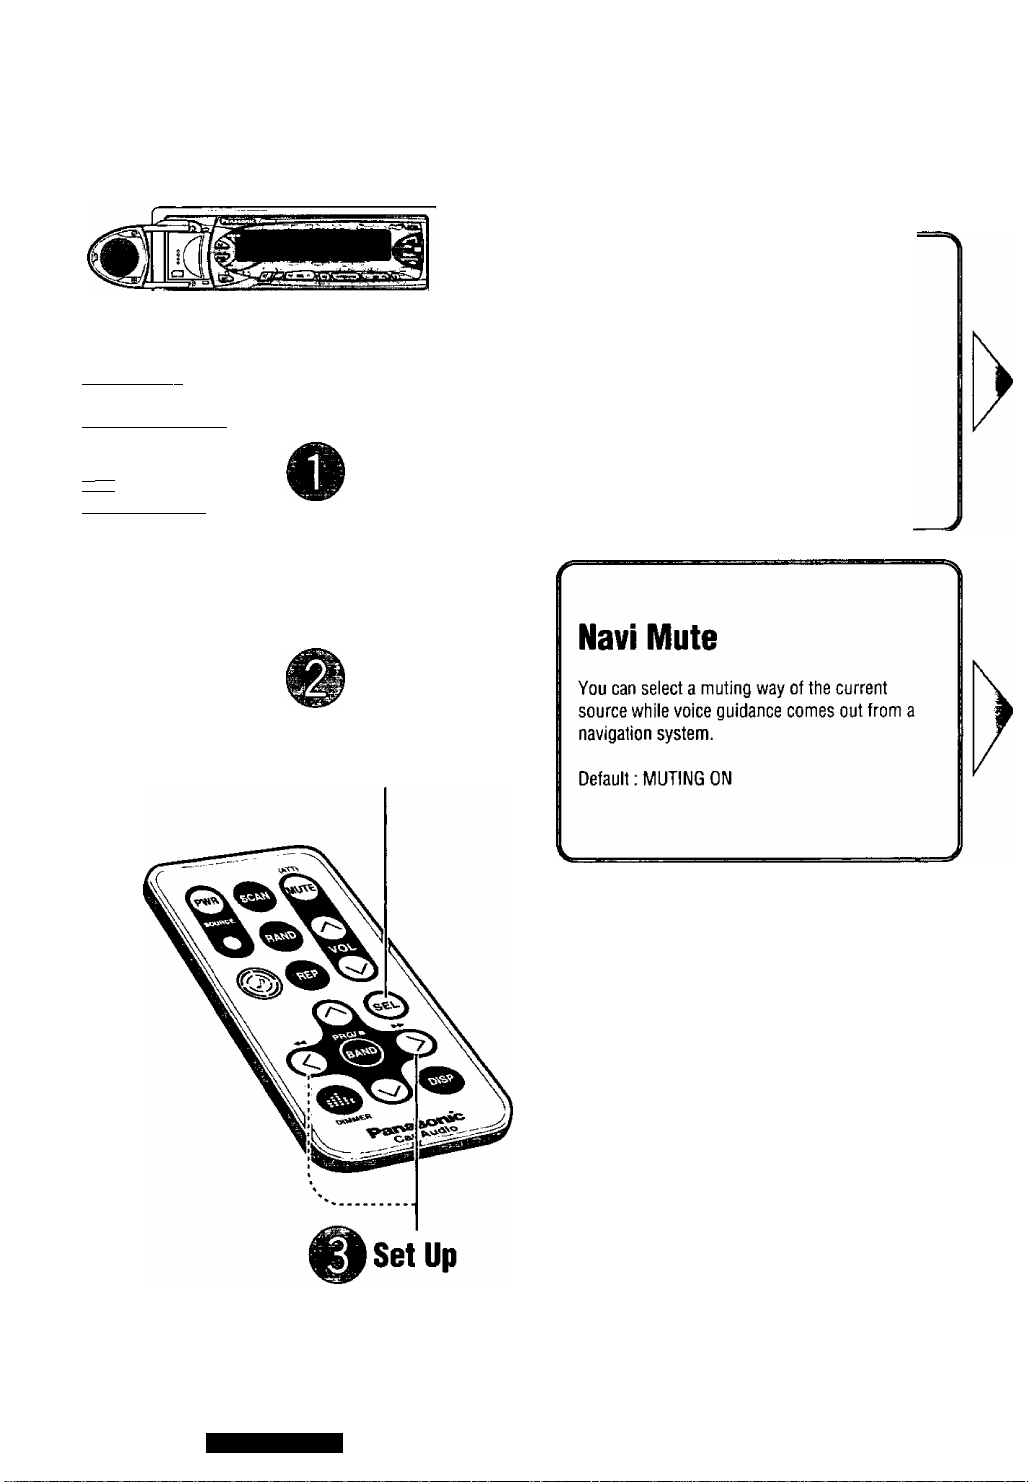
other Settings
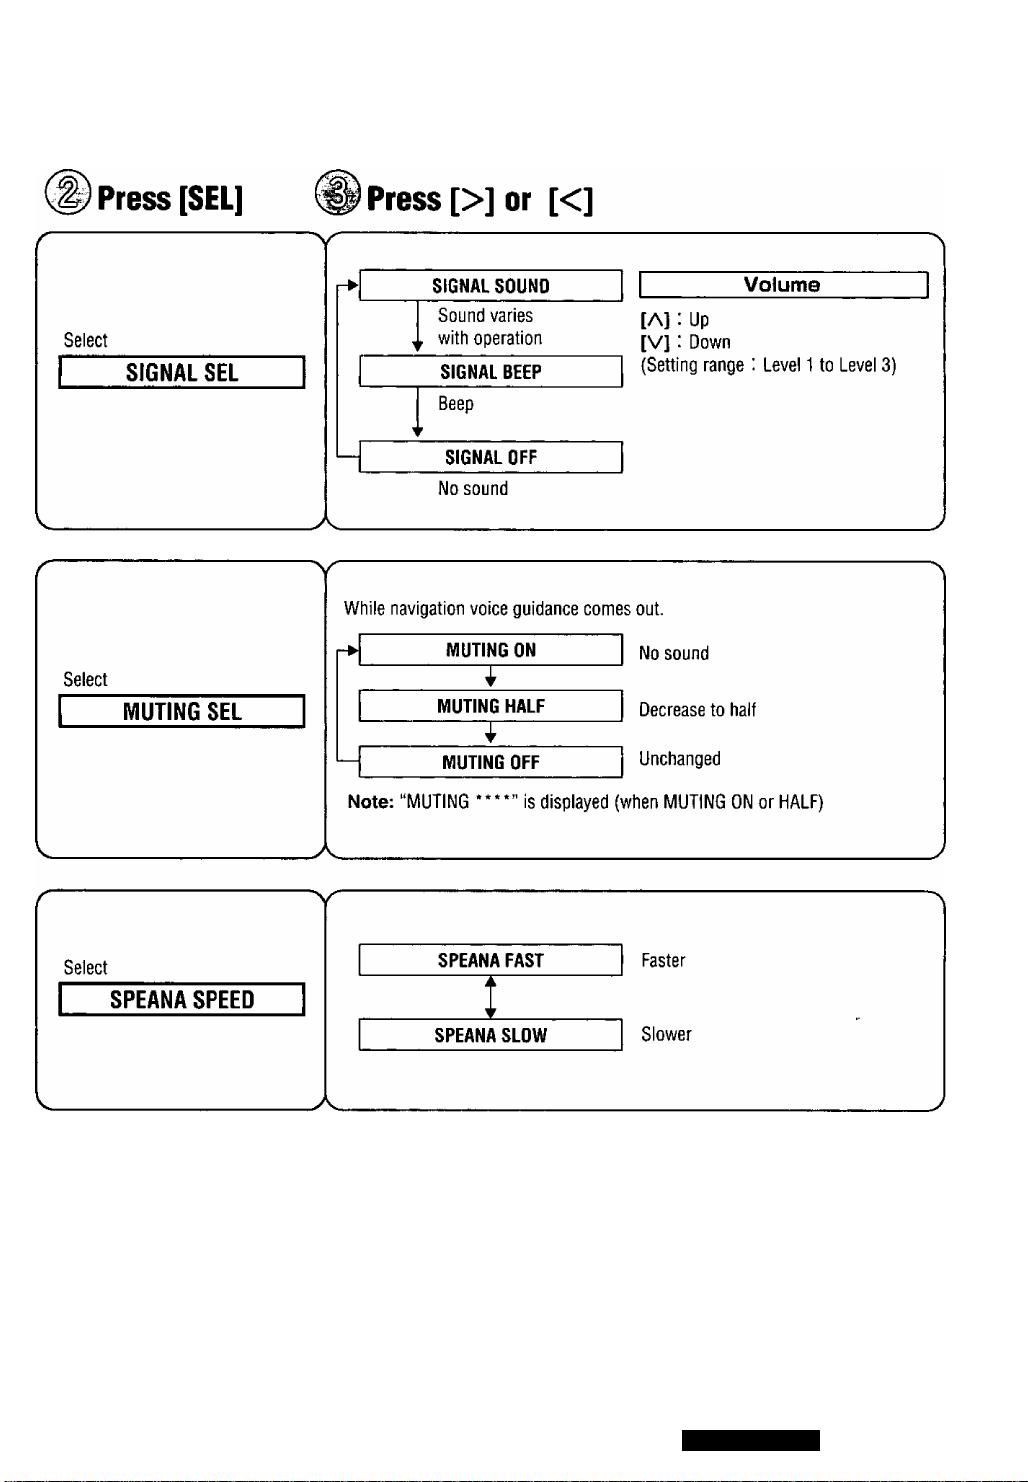
Operation Sound
(Signat/beep sound)
I SIGNAL SeT
I MUTING SEL~~|
I SPEANA SPEED |
' V
I MUTE KEY SeH
CONTRAST SEL
----------------------^
----------------------
AUX IN SET
S'LED SEL
---------------
^
TILT SELECT
You can select a sound (operation sound) that
comes from the center speaker when pressing
the buttons and adjust the volume.
Default: SIGNAL SOUND
SIGNAL Levels
Press and hold [SEL] for more than 2 seconds
Press [SEL] to select an operation
28
CQ-DRX900U
Spectrum Analyzer Speed
Default : SPEANA FAST
Mute/ATT
Default : MUTE KEY
I>
[>
Page 29
Select
When [MUTE] is pressed
MUTE KEY
No sound
MUTE KEY SEL
-A
I
ATT KEY
Decrease to 1/10
CQ-DRX900U
29
Page 30
other Settings
SIGNAL SEL
★
MUTING SEL
SPEANA SPEED
1
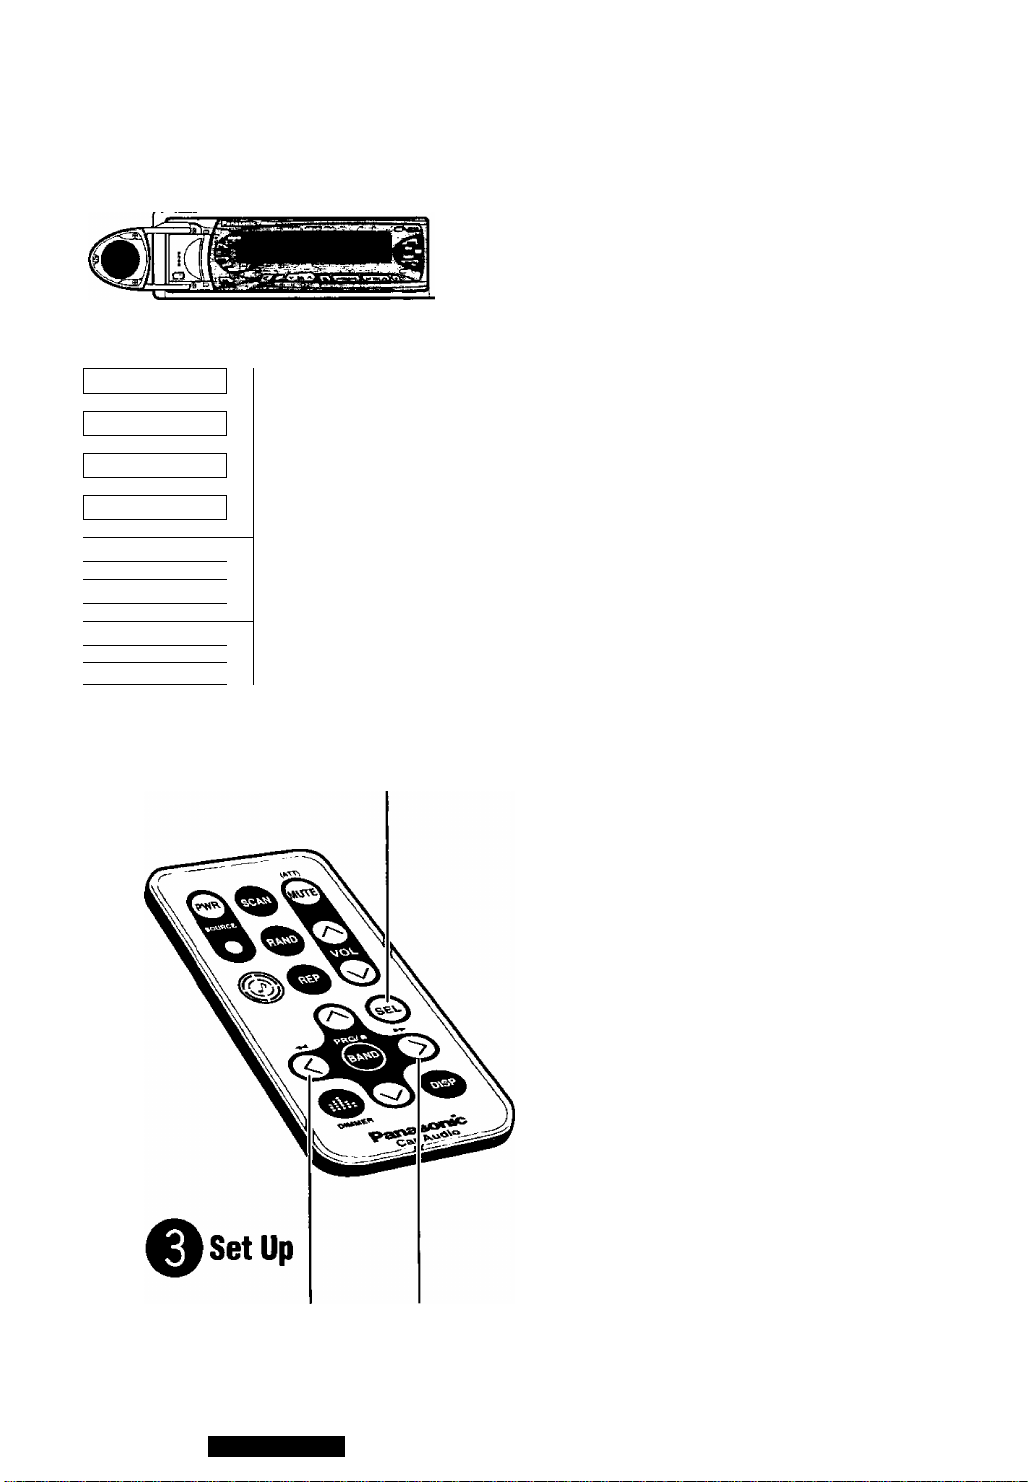
Contrast
Contrast adjustment makes it easier to watch the
display.
Default: Level 3
Setting range : Level 1 to Level 5
MUTE KEY SEL
1 CONTRASTSEL |
1 AUX IN SET
1
1 S-LED SEL 1
1 TILT SELECT
o
Press and hold
[SEL] for more than
2 seconds
Removing AUX-IN from
_
O
Press [SEL] to select
an operation
Source Selection
AUX will be excluded not to be selected.
Default : On
Security Indicator
The security indicator blinks while the removable
face plate is removed from this unit.
Default : On
>
30
Using Without Changing
Panel Angle (Tilt On/Off)
(<=> page 11 about tilt setting)
Default; On
Down/Off Up/On
CQ-DRX900U
Page 31

o Press [SEL] o Press [>] or [<]
"V
Select
CONTRASTSEL
Select
[>]: Up
[<]: Down
Select a level for easy watch.
-A.
[>]: AUX-IN On External input (AUX-IN) is an object of source
seiection
[<]: AUX-iN Off External input (AUX-IN) is not an object of
source selection.
With AUX-IN set to OFF, AUX-IN will not be selected when [SOURCE] is
pressed.page 10 about source select)
"V
[>] : S-LED On
The indicator blinks when the panel is removed.
S-LED SEL
/-------------------------------------------
Select
TILT SELECT
V
____________________________
__
[<] ; S-LED Off
-A.
>
[>]:TILT0n
[<] : TILT Off
Jk
____________________
The indicator does not blink when the panel is
removed.
---------------
Panel angle can be adjusted.
Panel angle cannot be adjusted.
__________
CQ'DRXSOOU
>>
>
31
Page 32

Installation Guide
A
WARNING
This installation information is designed for experienced installers
and is not intended for non-technicaJ individuals. It does not contain
warnings or cautions of potential dangers involved in attempting to
install this product.
Any attempt to install this product in a motor car by anyone other
than qualified installer could cause damage to the electrical system
and could result in serious personal injury or death.
□ Overview
This product should be installed by a professional.
However, if you plan to install this product yourself,
your first step is to decide where to install it. The
instructions in these pages will guide you through
the remaining steps: (Please refer to the “WARN
ING” statement above).
• Identify and label the car wires.
• Connect the car wires to the wires of the power
connector.
• Install the unit in the dash.
• Check the operation of the unit.
□ Installation Hardware
No.
Mounting Collar
®
Mounting Boll (5 mmo)
(2)
Power Connector
Removable Face Plate Case
®
Trim Plate
Item
Diagram
Q’ty
1
1
1
1
1
If you encounter problems, please consult your
nearest professional installer.
Caution: This unit operates with a 12 volt DC nega
tive ground auto battery system only. Do not attempt
to use it in any other system. Doing so could cause
serious damage.
Before you begin installation, look for the items on
the right which are packed with your unit.
• Warranty Card
.......
Fill this out promptly.
•
• Panasonic Servicenter for Service Directory
......
Keep for future reference in case the product
needs servicing.
• Installation Hardware
........
Needed for in-dash
installation
Rear support strap
Tapping screw
Hex. Nut
1
1
1
32
CQ-DRX900U
Page 33

□ Required Tools
You’ll need a screwdriver, a 1.5 volt AA battery, and
the following:
12 VDC
Test Bulb
(æ)
Electrical
Tape
Side-Cut
Pliers
□ Dashboard Specifications
ThicKness
□ Identify All Leads
The first step in installation is to identify all the car
wires you’ll use when hooking up your sound sys
tem.
As you identify each wire, we suggest that you label
it using masking tape and a permanent marker. This
will help avoid confusion when making connections
later.
Note: Do not connect the power connector to the
stereo unit until you have made all connections. If
there are no plastic caps on the stereo hooking
wires, insulate all exposed leads with electrical tape
until you are ready to use them. Identify the leads in
the following order.
Power Lead
If your car has a radio or is pre-wired for one :
Cut the connector wires one at a time from the plug
(leaving the leads as long as possible) so that you
can work with individual leads.
Turn the ignition on to the accessory position, and
ground one lead of the test bulb to the chassis.
Touch the other lead of the test bulb to each of the
exposed wires from the cut radio connector plug.
Touch one wire at a time until you find the outlet that
causes the test bulb to light.
Now turn the ignition off and then on. If the bulb also
turns off and on, that outlet is the car power lead.
If your car is not wired for an audio unit:
Go to the fuse block and find the fuse port for radio
(RADIO), accessory (ACC), or ignition (IGN).
Battery Lead
If your stereo unit has a yellow lead, you will need to
locate the car's battery lead. Otherwise you may
ignore this procedure. (The yellow battery lead pro
vides continuous power to maintain a clock, memory
storage, or other function.)
If your car has a radio or is pre-wired for one:
With the ignition and headlights off, identify the car
battery lead by grounding one lead of the test bulb
to the chassis and checking the remaining exposed
wires from the cut radio connector plug.
If your car is not wired for an audio unit:
Go to the fuse block and find the fuse port for the
battery, usually marked BAT.
Antenna Motor
If your car is equipped with an automatic power
antenna, identify the car motor antenna lead by con
necting one bulb tester lead to the car battery lead
and touching the remaining exposed wires from the
cut radio connector plug one at a time. You will hear
the antenna motor activate when you touch the cor
rect wire.
Antenna
The antenna lead is a thick, black wire with a metal
plug at the end.
CQ-DRX900U
33
Page 34

Installation Guide
(continued)
□ Connect All Leads
Now that you have identified all the wires in the car,
you're ready to begin connecting them to the stereo
unit wires. The connection diagram {■=> Page 38)
shows the proper connections and color coding of
the leads.
We strongly recommend that you test the unit
before making a final installation.
You can set the unit on the floor and make tempo
rary connections to test the unit. Use electrical tape
to cover all exposed wires.
Important: Connect the red power lead last, after
you have made and insulated all other connections.
Ground
Connect the black ground lead of the power connec
tor to the metal car chassis.
Motor Antenna
Connect the car motor antenna lead to the blue
motor antenna relay control lead.
Battery
Connect the yellow battery lead to the correct radio
wire or to the battery fuse port on the fuse block.
Antenna
Connect the antenna by plugging the antenna lead
into the antenna receptacle.
□ Final Installation
Lead Connections
Connect all wires, making sure that each connection
is insulated and secure. Bundle all loose wires and
fasten them with tape so they won't fall down later.
Now insert the stereo unit into the mounting collar.
Congratulations! After making a few final checks,
you’re ready to enjoy your new auto stereo system.
□ Final Checks
1. Make sure that all wires are properly connect
ed and insulated.
2. Make sure that the stereo unit is securely held
in the mounting collar.
3. Turn on the ignition to check the unit for prop
er operation.
If you have difficulties, consult your nearest autho
rized professional installer for assistance.
□ Precautions
• We strongly recommend that you wear gloves
for installation work to protect yourself from inju
ries.
• When bending the mounting tab of the mount
ing collar with a screwdriver, be careful not to
injure your hands and fingers.
Equipment
Connect any optional equipment such as an amplifi
er, according to the instructions furnished with the
equipment. Leave about 12 inches {30 cm) of dis
tance between the speaker cords/amplifier unit and
the antenna/antenna extension cord. Read the oper
ating and installation instructions of any equipment
you will connect to this unit.
Power
Connect the red power lead to the correct car radio
wire or to the appropriate fuse port on the fuse
block.
If the stereo unit functions properly with all these
connections made, disconnect the wires and pro
ceed to the final installation.
34
CQ-DRX900U
• Disconnect the cable from the negative (-) battery
terminal (see caution below).
• Unit should be installed in a horizontal position with
the front end up at a convenient angle, but not
more than 30°.
less than 30°
Caution : Do not disconnect the battery terminals
of a car with trip or navigational computer since all
user settings stored in memory will be lost.
Instead take extra care with installing the unit to
prevent shorts.
Page 35

CQ-DRX900U
35
Page 36

Installation Guide
(continued)
To Remove the Unit
Remove the removable face plate.
(a) Switch off the pow
er of the unit
(b) Press the release
button.
(c) Pull on the right side of the unit
O Remove the trim plate (D with a screwdriver.
Main Unit
©Trim Plate
Screwdriver
36
CQ-DRX900U
Page 37

Anti-Theft System
This unit is equipped with a removable face plate, Remov
ing this face plate makes the radio totally inoperable. The
security indicator will blink.
Place Removable Face Plate into Case
O Switch off the power of the unit.
O Remove the remobable face plate.
Page 36)
O Gently press the bottom of the case and open the cov
er. Place the face plate into the case and take it with
you when you leave the car.
Cautions:
• This face plate is not water-proof. Do not expose it to water or excessive moisture.
• Do not remove the face plate while driving your car.
• Do not place the face plate on the dashboard or nearby areas where the temperature rises to high levels.
Install Removable Face Plate
O Slide the left side of the removable face plate in place.
O Press the right end of removable face plate until “click”
is heard.
Security Indicator
The security indicator blinks when the removable face
plate is removed from the unit. (<=> Page 30.)
O Press and hold [SEL]. For more than 2 seconds to
change to function control mode.
O Press [SEL] to select “S-LED SEL”.
O Press [>] to turn the security indicator (S-LED) on.
( [<] : off)
Display
CQ-DRX900U
Security
Indicator
Security
Indicator
Blinks
OFF
37
Page 38

Electrical Connections
• For wiring, carefully read the Operating Instructions for the devices connected.
• Consult the store where you purchased the unit for the wide range of speakers available there.
Remember, if your car has a drive computer or a navigation computer, the data of its memory may be erased when the
battery terminals are disconnected.
Supplied Hardware
Item
Power Connector 1
Q’ty
Note: If your car does not have a power line connected to the clearance lights of the car, leave the illumination lead unconnected.
38
CQ-DRX900U
Page 39

System Upgrade Example
Combination
• CD changer {CX-DP88U)
CD Changer
CX-DP88U
[
Caution:
• Ask a qualified service person for installation and wiring.
The installation and wiring of this unit requires special skills and experience. For safety, ask the store where you
purchased it for its installation and wiring.
• Do Not Disassemble or Modify.
Do not disassemble or modify the unit. Do not remove the coverings from the ends of cables and wires to take
power for other devices. Because it may generate smoke or fire, and cause electric shock or trouble.
CQ-DRX900U
39
Page 40

Troubleshooting
Preliminary Steps
Check and take steps as described in the tables below.
If You Suspect Something Wrong
Immediately switch power off.
Disconnect the power cable and check that there is neither
smoke nor heat from the unit before asking for repairs. Never
try to repair the unit yourself because it is dangerous to do so.
Common
Trouble
Car’s engine switch is not on.
Cables are not correctly
connected.
Battery cable is not correctly
connected.
No power
Accessory cable is not correctly
connected.
Cause Step
Caution:
Do Not Use the Unit If It Malfunctions or
Is Something Wrong.
Do not use the unit in abnormal condition,
for example, without sound, or with
smoke or foul smell, can cause ignition or
electric shock. Immediately stop using it
and cail the store where you purchased it.
Turn your car’s ignition switch to ACC or ON.
Connect cables correctly.
Connect the battery cable to the terminal that is always
live.
Connect the accessory cable to your car’s ACC source.
No sound
Buttons unusable
Grounding wire is not correctly
connected.
Fuse is burnt.
Mute is set to ON Set it to OFF.
Cables are not correctly
connected.
External-mute cable is not
correctly connected (The word
MUTING is shown.)
Condensation (dew)
Spectrum analyzer is in demo
mode.
Connect the grounding wire to a metal part of the car.
Call the store where you purchased the unit, or your
nearest service station (see the attached sheet) and
ask for fuse repiacement.
Connect cabies correctly.
Connect the Navi-mute cable correctly.
Wait fora while before use.
Press [DISP] to cancel demo mode.
40
CQ-DRX900U
Page 41

Panel
Trouble Cause Step
Panel angle
unadjustable
Panel angle is set fixed.
SRadio
Trouble
Much noise in FM
stereo and monaural
broadcasts
Preset station is reset. Battery cable is not correctly
Station is too far, or signals are
too weak.
connected.
Cause
HCD
Trouble
CD is inside but no
sound
CD sound skips, tone
quality is low.
Sound skips due to
vibration.
CD is upside down.
CD is dirty. Clean CD, referring to the section on Care of Discs.
CD is dirty. Clean CD, referring to the section on Care of Discs.
Mounting angle is over 30
degrees.
Instable mounting
Cause
Change tilt setting to ON.
Step
Select other stations of higher signal level.
Connect the battery cable to the terminal that is always
live.
Step
Place CD in the correction direction, the label side up.
Adjust mounting angle to less than 30 degrees.
Mount the unit securely with the mounting parts,
referring to the section on Installation.
CD is not ejected.
• CD is defective.
• Mechanical trouble
Open the panel and press [^]. If failure persists,
press the reset switch. If normal operation is not
restored yet, call the store where you purchased the
unit or the nearest service station to ask for repairs.
CQ-DRX900U
41
Page 42

Troubleshooting
Sound Setting
(continued)
Trouble
No sound from left,
right, front, or rear
speaker
Left and right sounds
are reversed in stereo
listening.
No sound from center
speaker
Only bass or monaural
sound from rear
speaker
No sound from rear
speaker preout (rear)
Cause Step
Left and right balance, or front
and rear balance is off on one
side.
Cables are not correctly
connected.
The right speaker vi/ire is
connected to the left speaker and
the left speaker \wire to the right
speaker.
Center speaker is closed.
Center Speaker volume is set to
SBC-SW is set to ON. Set SBC-SW to OFF.
SBC-SW is set to ON and ODBC
volume to -«i.
Adjust BAUFAD as appropriate.
Connect the cables correctly.
Connect the speaker wires to the correct ones.
Open the center speaker.
Set Center spekaer volume to other than -oo.
Set ODBC volume to other than
“OO,
Remote Control
Trouble
Buttons are invalid for
operation.
42
Battery polarities (+) (-) are
reversed.
Wrong batteries
Batteries have run down.
Remote control is in the wrong
direction.
CQ-DRX900U
Cause Step
Insert the batteries correctly.
Check the batteries.
Replace the batteries.
Direct the remote controller at REMOTE (sensor) on
the panel.
Page 43

Error Display Messages
Example of Display
CD -El-
CD -E2-
CD -E3-
OPLS EJECT
EiChanger
Cause
Disc is dirty, or is upside
down. May be
Disc has scars.
No operation by some
cause
Action was taken to start
playing before disc is
fully ejected.
Operation Check/Step
automatically
ejected.
Check disc.
Open the panel and press [±]. If failure
—
persists, press the reset switch. If
normal operation is not restored yet, call
and ask for repairs.
1
Open the panel and press [A],
Example of Display
CD-CH -El-
CD-CH -E2-
CD-CH -E3-
NO DISC
Cause
Disc is dirty, or is upside
down.
Disc has scars.
No operation by some
cause
No disc in the changer
{magazine)
Operation Check/Step
May be
automatically
ejected.
—
—
Check disc.
Open the panel and press [^]. If failure
persists, press the reset switch. If normal
operation is not restored yet, call and ask
for repairs.
Insert discs into the changer (magazine).
Notes:
• There may be cases where the disc numbers affected by an error are displayed before E1 and E2.
• Displays and the steps to be taken for errors vary in part from changer to changer. For details, refer to the Operating
Instructions for the changer used.
CQ-DRX900U
43
Page 44

Troubleshooting (continued)
Mainte nance
Your product is designed and manufactured to ensure a minimum of maintenance. Use a soft cloth for routine exterior
cleaning. Never use benzine, thinner or other solvents.
Produc t Se rvic ing
If the suggestions in the charts don’t solve the problem, we recommend that you take it to your nearest authorized
Panasonic Servicenter. The product should be serviced only by a qualified technician.
Replace the Fus e
Use fuses of the same specified rating (3 amps). Using different substitutes or fuses with higher ratings, or connecting
the product directly without a fuse, could cause fire or damage to the stereo unit.
If the replacement fuse fails, contact your nearest Panasonic Servicenter for service.
Reset switch
•Reset switch
Insert a hard slender stick into the hole and push the switch.
• The unit returns to the default state when the trouble is reset.
Remember, the data and settings stored in the memory are
deleted.
Important
Push the switch only when the unit fails to operate with any
buttons.
If the panel cannot be opened, or if the unit fails to return to
normal condition, call the nearest service station and ask for
repairs.
44
CQ-DRX900U
Page 45

Maintenance
' 'tr'Trr'nni'ir
Care of the Unit
Cleaning this unit
• Use a dry, soft cloth to wipe.
ONLY USE DISCS CARRYING THE LABEL
How to hold the CD
• Do not touch the underside of the disc.
• Do not make scratches on the disc.
• Do not bend disc.
• When not in use, keep CD in the case.
Do not use irregularly shaped CDs
Do not leave discs in the following places:
• Direct sunlight
• Near car heaters
• Dirty, dusty and damp areas
• Seats and dashboards
Caution on cieaning
Never use solvents such as benzine, thinner as they may
mar the surface of the unit
Notes on CD
Heart-shaped
Label side
[oloii
DIGITAL AUDIO
Octagoned
Disc Cleaning
Use a dry, soft cloth to wipe from the center
outward.
Caution on New Discs
A new disc may have rough edges on its inner
and outer perimeter. These may cause malfunc
tion.
Remove the rough edges using a pencil, etc.
<Right>
Rough edge
<Wrong>
CQ-DRX900U
45
Page 46

Specifications
General
Power Supply
Current Consumption
Center Speaker Output
External Input Impedance
External Input Sensitivity
Pre-Amp Output Voltage
Pre-Amp Output Impedance
Sub-Wooter Output Voltage
Dimensions (Wx H x D)
Weight
DSP
Number of Channels
Space mode
Equalizer Center Frequency
Variable Range of Equalizer
FM Stereo Radio
Frequency Range
Usable Sensitivity
Stereo Separation
60 a
6V
7" X 1-15/16" X 6-1/8" (178 X 50 X 155 mm)
3lbs. 12oz. (1.7 kg)
6 output channels
3 modes
80,160, 320, 640,1.6 k, 4 k, 10 k (Hz)
-12 to +12 dB (13 steps)
87.9- 107.9 MHz
II.OdBf. (1.25 |iV, 75ii)
35 dB(at 1 kHz)
DC 12 V (11 V -16 V), test voltage 14.4 V, negative ground
Less than 0.8 A (CD mode)
5W
10 kn (AUXIN)
2 V (AUX IN)
6V
AM Radio
Frequency Range
Usable Sensitivity
530- 1,710 kHz
28dB/^iV (25 fiV. S/N 20 dB)
CD Player
Sampling Frequency
DA Converter
Error Correction System
Pick-Up Type
Light Source
Wave Length
Frequency Response
Signal to Noise Ratio
Total Harmonic Distortion
Wow and Flutter
Channel Separation
8 times oversampling
MASH‘1 bit/4 DAC System
Panasonic Super Decoding Algorithm
Astigma 3-beam
Semiconductor Laser
780 nm
20 Hz - 20 kHz (±1 dB)
90 dB
0.01 % (1 kHz)
Below measurable limits
75 dB
Note: Specifications and the design are subject to modification without notice due to improvements in technology.
46
CQ-DRX900U
Page 47

Él é m e n t s c o n s t i t u t i f s/Piépara tif du b oîti e r d e t é l é c o m m a n d e
Eléments
constitutifs
1. Manuel d’instructions
2. Matériel d’installation
3. Connecteur d'alimentation
4. Télécommande
5. Pile au lithium (CR2025) ..
6. Carte de garantie -
............
............
.....................
...............
Préparatif du boîtier de télécommande
Mise en place
de la pile
1. Retirer le porte-pile.
Saisir le porte-pile par la partie B et le dégager tout en repoussant la partie A
dans le sens indiqué par la flèche.
2. Placer une pile dans le porte-pile.
Placer une pile neuve avec son côté marqué {+) dirigé vers le haut comme
illustré.
3. Introduire le porte-pile.
Faire glisser le porte-pile pour le remettre en place.
.
................
1 ensemble(=> page 70)
.
.......-................
..............................1
-.............1
1
..........................
..............................
1
1
Remarque sur les
piles
Retirer immédiatement la pile lorsqu'elle est usée et la jeter.
Informations sur les piles:
• Pile recommandée : Pile au lithium Panasonic (CR2025)
• Durée de service de la pile: 6 mois environ dans les conditions d’utilisation
normales (à la température ambiante).
Précaution: Lorsque la pile n’est pas utilisée correctement, l’appareil risque de
s’échauffer, d’exploser, ou de s’enflammer, ce qui peut provoquer des blessures
ou un incendie. La fuite du liquide de batterie peut endommager l’appareil.
• Ne pas essayer de démonter, ni de court-circuiter l’appareil. Ne pas mettre
la pile dans le feu.
• Maintenir les piles hors de la portée des enfants afin d’éviter le risque
d’accidents.
• Lors du rejet des piles, observer les règlements y afférents.
CQ-DRX900U
•
47
Page 48

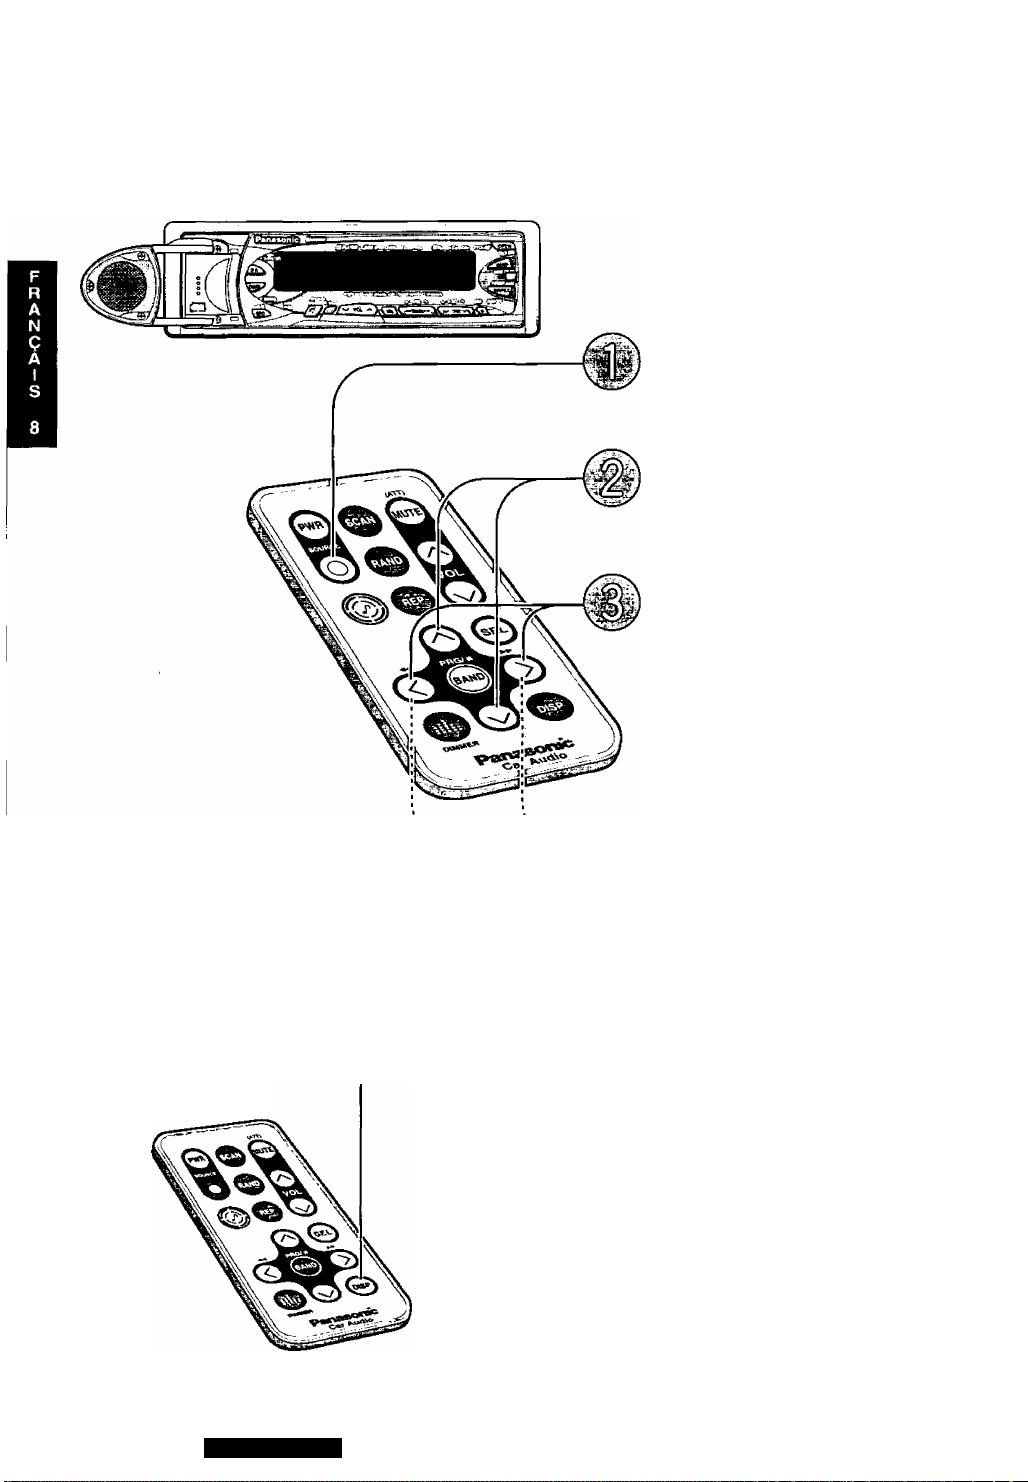
Généralités
Ce manuel décrit principalement les opérations effectuées avec le boîtier de télécommande. Cependant, il faut savoir
que certaines fonciions ne peuvent pas être commandées à partir du boîtier de télécommande. Dans ce cas, le manuel
indique la façon de commander ces fonctions avec les touches de l'appareil.
Remarque: Lorsque l'appareil
Interrupteur d’alimentation—
Tourner la de de contact du barillet d’allumage pour que
les voyants des accessoires électriques s’allument.
Mise sous tension: Appuyer sur la touche [PWR],
Arrêt - Pressez encore une fois.
Volume -
[A] : Augmente
[V] : Diminue
Remarque : Les niveaux de sortie sont r
espectivement conservés dans la mémoire
de chaque mode de source.
est mis sous tension pour la
première fois, un message de
démonstration apparaît dans
l'afficheur. Pour faire
disparaître le message,
appuyer sur la touche [DISP].
Signalquelle
Appuyer sur [SOURCE] pour changer la
source de la manière suivante.
Autoradio
Lecteur de CD
(Quaud un disque est introduit)
~ i
Commande de changeur de CO j (Quand un changeur de CD est branché)
AUX
(Lorsque le réglage AUX IN est activé)
Réglage de l'horloge
pour avancer
Appuyer sur
la touche
Appuyer sur la touche [DISP]
et la maintenir enfoncée plus
de 2 secondes.
Appuyer sur la touche [<] ;
Réglage des heures
[A] : pour avancer
[V] : pour régresser
Appuyer sur la touche [>] :
Réglage des minutes
[A] : pour avancer
[V] : pour régresser
48
pour
régresser
^'<^1 Appuyer sur la touche [DISP],
(fin des opérations)
Appuyer sur
la touche
CQ-DRX900U
Page 49

Etant donné que les opérations suivantes sont inopérantes à partir du boîtier de télécommande, utilisez les
touches de commande de l’appareil.
Ouverture du panneau de façade
Ouverture ; Appuyer sur la touche f/^1
Fermeture : Appuyer sur la touche
Remarque : Le haut-parleur centrée peut pas être ouvert ni
fermé pendant l'ouverture ou la fermeture du panneau de façade.
Inclin aison du pan neau de f açade (in clin ais on)
Appuyer sur la touche [OPEN] et la maintenir enfoncée pendant
au moins 1 seconde jusqu’à ce qu’un signal sonore soit émis,
puis la relâcher.
A chaque fois que la touche est pressée pendant une seconde,
puis relâchée, l'inclinaison du panneau de façade change (sur 3
positions différentes).
inclinaison 1
inclinaison 2
inclinaison 3
Ouverture
Ouvert ure o u fe rmet ure du pannea u de fa çade
• Appuyer sur la touche [OPEN] pour ouvrir le panneau de façade.
Remarque : Si aucune commande de l'appareil n'est faite pendant les
20 secondes qui suivent son ouverture, le panneau de façade retournera
automatiquement sur sa position d'origine.
• La fermeture totale du panneau de façade s'opère en appuyant encore
une fois sur la touche [OPEN],
• Pour que le panneau de façade retourne sur sa position d'origine,
appuyer encore une fois sur la touche [OPEN] et l'immobiliser en
position basse pendant au moins 1 seconde, puis la relâcher.
Remarques :
• Lorsque le contacteur d’allumage de la voiture est tourné en position
OFF, le panneau de façade et le haut-parleur se ferment.
• Lorsque le contacteur d'allumage de la voiture est tourné en position
ON, le panneau de façade et le haut-parleur s'ouvrent et se règlent sur
les positions sur lesquelles ils se trouvaient avant leur fermeture.
Changement d’affichage
Appuyer sur [DISP] pour changer l’affichage de la manière suivante.
Lorsque l'alimentation est appliquée
(Exemple : mode de lecteur de CD)
Affichage normal
Lorsque l'alimentation est coupée.
Affichage de l'heure
1
Affichage de spectre des fréquences à points
■i
Affichage de l'heure
Remarque : L'affichage varie suivant le mode de source.
CQ-DRX900U
Aucun affichage
49
Page 50

Récepteur radio
Mode autoradio
Appuyer sur la touche [SOURCE]
pour changer de mode de réception
radio.
Gamme d’onde
Appuyer sur la touche [BAND] pour
changer de gamme d’onde.
Remarque: Le témoin stéréo s’allume pendant la
réception d’une émission FM stéréophonique.
STEREO
Changement
d’affichage
50
CQ-DRX900U
Accord
[>] : Fréquence supérieure
[<] : Fréquence inférienre
Appuyer et immobiliser la touche [>]
ou [<] en position basse pendant au
moins une demi-seconde et la relâcher.
L'exploration commence
immédiatement.
Appuyer sur [DISP] pour changer l'affichage de la
manière suivante.
Gamme d'onde
Affichage normal
Affichage de spectre des frégueiices à points
Alfichage de iréquence
1
Affichage de l'heure
Page 51

Sélection d'une station enregistrée en une seule commande
Un nombre maximum de 6 stations peuvent être mises dans les mémoires de présyntonisation des stations respectives
FM1,FM2, FM3 et AM (PO).
Mise en mém oir e manuell e de s st atio ns
Mettre la station sélectionnée
en mémoire de
présyntonisation manuelle.
Numéro Affichage de
présytonisé fréquence
Affichage de
fréquence
Numéro
présytonisé
en mém oire
automa tique de s st ation s
Les stations offrant de
bonnes conditions de
réception sur la gamme
d'onde reçue peuvent être
automatiquement
présyntonisées.
Choisir une gamme d’onde de réception {étapes 0,0 comme indiqué
à la page précédente)
Appuyer sur la touche [Al ou la
touche [V] et la maintenir enfoncée
pendant au moins 2 secondes.
Appuyer sur la touche [A] ou
[V],
Appuyer sur la touche [>] ou
le numéro de présélection clignote
choisir"un ndhéro^ présélection
T'
[<].
fréquence de station
Appuyer sur la touche [A] ou
la touche [V] et la maintenir
enfoncée pendant au moins 2
secondes.
Choisir une gamme d'onde de réception (étapes O, © comme indiqué
à la page précédente)
-----------------
Appuyer et immobiliser la touche
clignote une fois
[BAND] en position basse pendant
plus de 2 secondes.
• Les 6 stations dont les signaux
sont les plus puissants seront
automatiquement présyntonisées
dans chacune les mémoires de
présyntonisation de station
• Une fois mémorisées, les stations
présyntonisées sont recherchées
successivement pendant 5
secondes chaque.
• Appuyer sur la touche [A] [V]
pour interrompre l'exploration.
1
à 6.
Remarque: Les stations présyntonisées manuellement sur la gamme
d'onde sélectionnée seront supprimées.
Rappel de
station
présyntonisée
Choisir une gamme d’onde de réception (étapes O, © comme indiqué
à la page précédente)
Appuyer sur la touche [A] pour
sélectionner une des numéros de
présyntonisation pour accorder la
station présyntonisée.
[V]: Dirección opuesta
CQ-DRX900U
51
Page 52

ut i l i s a t i o n d u l e c t e ur d e d i sque c ompa c t
Ouvrit le panneau de façade
Appuyer sur la touche [OPEN] pour ouv
rir la façade.
Introduction d’un disque
Ferme automatiquement le panneau de
façade, puis commande la lecture.
Sélection de plage
[► ► ] : Passe à la plage suivante.
[’♦ ^1 : Revient au début de la plage
sélectionnée. Retourne à la page
précédente. (Appuyer deux fois)
Pour éjecter le disque
appuyer sur la touche [A]
Quand un disque CD se
trouve dans le lecteur
Appuyer sur [SOURCE] pour changer la
source de la manière suivante.
Changement d’affichage r
52
CQ-DRX900U
-------------
“Recherche de plage
Appuyer et immobiliser la touche
[► ► ] : Avance rapide
[-4^] : Retour rapide
Appuyer sur [DISP] pour changer l’affichage de la
manière suivante.
Numéro de plage Durée de lecture de plage
Affichage normal
Affictiage de spectre des fréquences à points
Affichage de l'heure
Page 53

Divers modes d'écoute
Appuyer sur la
touche [SCAN]
Lecture par
balayage des plages
Les dix premières secondes de
chaque plage des disques sont
lues en séquence.
Lecture aléatoire
Les pistes de tous les CD sont
reproduites aléatoirement.
Appuyer sur la
touche [RAND]
Appuyer sur la
touche [REP]
Lorsque l'exploration de toutes les '
plages est terminée, la lecture du
programme d'origine reprend depuis
le début.
Appuyer de nouveau sur la touche
[SCAN] pour désactiver.
Appuyer de nouveau sur la touche
[RAND] pour désactiver.
D
Appuyer de nouveau sur la touche
[REP] pour désactiver.
Attention:
• Ne pas appuyer fortement vers le bas sur la plaque de façade et ne rien poser dessus quand elle est ouverte car ceci
risque de l'endommager.
• Ne pas se servir de disques CD dont les formes ne sont pas normalisées (CD en forme de cœur, CD de forme
octogonale).
CQ-DRX900U
53
Page 54
utilisation du changeur de disque compact
Remarques:
Les fonctions du changeur de CD ont été conçues pour un changeur de CD Panasonic optionnel.
Mode de changeur de CD
Appuyer sur la touche [SOURCE] pour
passer en mode de changeur de CD.
Sélection d'un disque
[A] : Disque précédent.
[V] : Disque suivant.
Sélection de plage
[► ► ] : Passe à ia piage suivante.
[’♦ <] : Revient au début de la plage
sélectionnée. Retourne à la page
précédente. (Appuyer deux fois)
Changement
d’affichage
Appuyer sur [DISP]
pour changer
l’affichage de la
manière suivante.
Recherche de plage
Appuyer et immobiliser la touche
[► ► ] ; Avance rapide
[-♦ <] : Retour rapide
Numéro de Numéro de Durée de lecture
disque plage de plage
Affichage normal
Affichage de spectre des
fréquences à points
Affichage de l'heure
54
CQ-DRX900U
Page 55

Divers modes d'écoute
Balayage des
pistes
Les dix premières secondes de
chaque plage des disques sont
lues en séquence.
Balayage de
disques
Les 10 premières secondes de
la première plage de chacun
des disques qui se trouvent
dans le magasin sont lues.
r
Lecture aléatoire
de plage
Un morceau sélectionné au
hasard parmi toutes les pistes
disponibles de tous les disques
dans le magasin est reproduit.
Appuyer sur la
touche [SCAN]
Appuyer et immobiliser la
touche [SCAN] pendant
plus de 2 secondes.
Appuyer sur la
touche [RAND]
Lorsque l'exploration de toutes les
plages est terminée, la lecture du
programme d'origine reprend
depuis le début.
Appuyer encore une fois sur la
touche [SCAN] pour annuler.
Lorsque l'exploration de toutes les plag
es est terminée, la lecture du disque
d'origine reprend depuis le début.
Appuyer encore une fois sur la
touche [SCAN] et la maintenir
enfoncée pour annuler.
Appuyer encore une fols sur la
touche [RAND] pour annuler.
Lecture aléatoire
de disque
Un morceau sélectionné parmi
toutes les pistes disponibles du
disque en cours de lecture est
reproduit.
Répétition d’une
piste
Ceci a pour effet de répéter la
lecture de la plage actuellement
sélectionnée.
Répétition d’un
disque
Répète la sélection du disque
en cours de lecture.
Appuyer et immobiliser la
touche [RAND] pendant
plus de 2 secondes.
Appuyer sur la
touche [REP]
Appuyer et immobiliser la
touche [REP] pendant
plus de 2 secondes.
Appuyer encore une fois sur la
touche [RAND] et la maintenir
enfoncée pour annuler.
Appuyer encore une fois sur la
touche [REP] pour annuler.
1
Appuyer encore une fois sur la
touche [REP] et la maintenir enfon
cée pour annuler.
CQ-DRX900U
55
Page 56

Fonctions utiles
“%
Affichage du spectre
des fréquences
Valeur par défaut : WAVE
Variété : 11 types
Limites de réglage
de luminosité de
Maintenir
enfoncée
Appuyer
sur la
touche
Coupure du
son ou
atténuateur
l'affichage
(Gradateur)
Valeur par défaut :
DIMMER LEV 2 : au niveau de l’indicateur
latéral allumé
DIMMER LEV 3 : au niveau de l'indicateur
latéral éteint
^ Limites de réglage: LEV 1 a LEV 3 j
Réduction du son
(Coupure du son ou
atténuateur)
Le volume diminue en fonction du
réglage choisi, Mute ou ATT.
{>=> page 66)
Valeur par défaut : Désactivé
56
CQ-DRX900U
Page 57

O Appuyer sur la touche [@]
SPEANA SEL
O Appuyer sur la touche [>] pour changer de l'affichage du spectre
des fréquences.
( [<] : Action dans le sens opposé)
WAVE, AURORA, -, BLANK SPEANA, ALL DISP OFF, etc.
Remarque:
BLANK SPEANA
Désactive uniquement l’affichage du
spectre des fréquences.
Désactive complètement l'affichage.
(L'affichage est remis en service pendant
les commandes. Ensuite, l'affichage est
arrêté pendant 5 secondes après les
commandes.)
Plus lumineux
O Appuyer et immobiliser la
touche [
0
position basse.
] (DIMMER) en
-A.
© Appuyer sur la touche [
réglage du gradateur comme suit.
«^DIMMER LEVS
ALL DISP OFF
0
] (DIMMER) pour modifier le niveau de
;
DIMMER SEL
DIMMER LEV 2
Réglage moyen
I
DIMMER LEV1
Appuyer sur la touche MUTE (ATT) pour activer ou désactiver le mode MUTE (mode ATT).
Lorsque le mode MUTE est sélectionné
____________________________________________
Plus sombre
MUTE off
.................
Niveau de sortie son normal i
MUTE on ..................Absence de son I
Lorsque le mode ATT est sélectionné______________________________________________
ATT off
AH on
...................
......................
Niveau de sortie son normal
Le son est diminué jusqu'à 1/1 Oe par rapport au niveau précédent.
CQ-DRX900U
57
Page 58

Réglages acoustiques et d'ambiophonie
r
Mode normal
—ï—
HUMAN EQ
T
GRAPHIC EQ
——
BAL//FAO
----
POSITION SEL
T
SUPER BASS
--------î----------
SDBB SELECT
---------1---------
CENTER LEVEL
Qualité acoustique
(Human Equalizer - Correcteur sensitif
humain/HEQ)
49 styles sont pré mémorisés de sorte que
vous pouvez faire aisément tes réglages les
plus complexes.
Valeur par défaut : FLAT (0)
Limites de réglage : 1 - 3 pour chaque style
(49 styles)
Appuyer sur la
touche [SEL]
pour choisir
une commande.
Mise en mémoire de la
qualité acoustique de
votre choix
(Graphie Equalizer - Correcteur graphique/
GEQ)
58
Le niveau de chacune des sept plages de
fréquences, des graves aux aigus, peut être
ajusté. Jusqu'à cinq sortes de qualités
acoustiques ajustées peuvent être mises en
mémoire, (mémoire de présélection 1 à 5)
Valeur par défaut : 0 pour chaque fréquence
Limites de réglage ; -12 à + 12 dB par paliers
de2dB
Configuration
CQ-DRX900U
Page 59

Appuyer sur la tou che [SEL] O C onf igura tio n
Sélectionner
r
HUMAN EQ
■V
[A] : Graves renforcés
[V] : Graves modérés Enveloppé ^
[>] : Aigus accentués
[<] : Aigus atténués
-A.
Détente
Conduite agréable
Libère le stress
Rafraîchit
Écouter la musique
Accentué
* Conduite Très clair
en toute
Calme
Concentration
sécurité
Rythmique
Réveille
Mémorisation
Après sélection d'un des numéro de présélection 1 - 5,
(D Appuyer sur la touche [SEL] et la maintenir
enfoncée pendant au moins 2 secondes en position
basse pour changer de mode de présélection
d'égaliseur graphique.
Sélectionner
GRAPHIC EQ
Appuyer sur la touche
[A] pour choisir un des
numéros de présélection
1 - 5et pour que la
qualité acoustique
présélectionnée soit
rappelée.
{[V] : direction opposée)
-A.
CD Ajuster le niveau de chaque fréquence.
Appuyer sur la touche [>] pour changer la
fréquence.
801_160 -> 320 -» 640 -» 1,6k -> 4k -H Ok (Hz)
([<] : Action dans le sens opposé)
[A] ; Niveau supérieur
[V] ; Niveau inférieur
(D Appuyer sur la touche [SEL] pour sauvegarder le
niveau.
Rappel d'un réglage spécifique
Une qualité acoustique excluant les sons graves
étouffés et agréable à écouter est conservée dans la
mémoire de présélection numéro 6.
Appuyer sur la touche [A] ou sur la touche [V] pour
sélectionner le numéro présélectionné 6.
Remarque: Il n'est pas possible de sauvegarder
dans la mémoire de présélection numéro 6.
CQ-DRX900U
59
Page 60

Réglages acoustiques et d'ambiophonie
Réglage d' équi libra ge et
d'équil ibr e av ant - ar rière
Mode normal
T
HUMAN EQ
GRAPHIC EQ
' i
BAL//FAD
T
POSITION SEL
T
SUPER BASS
T
SDBB SELECT
T
CENTER LEVEL
(Équilibrage / équiiibre avant - arrière)
Vous pouvez ajuster l'équilibrage sonore du
niveau de sortie des haut-parleurs avant,
arrière, gauche et droit.
Valeur par défaut :
B (équilibrage) : CNT (centre)
F (équilibre avant - arrière) : CNT (centre)
Limites de réglage : 15 niveaux de chaque
Positionnement de i'image sonore
Vous pouvez ajuster l'image sonore dans
l'espace suivant votre goût en fonction de la
position de l'auditeur.
Appuyer sur la
O
touche [SEL]
pour choisir
une commande.
O Configuration
Valeur par défaut : POSI OFF
Haut-p arle urs arrière comme
woofer seco nda ire
(Woofer secondaire à contrôle de super
graves/ SBC-SW)
Vous pouvez utiliser le haut-parleur arrière
raccordé à un amplificateur incorporé
comme un woofer secondaire pour délivrer
uniquement les graves.
Valeur par défaut ; désactivé
Accentuation des graves
(Super graves dynamiques poussés/ SDBB)
Rehausse les graves délivrés par les 4 hautparleurs raccordés à l'amplificateur
incorporé de manière à obtenir une sonorité
grave renforcée.
60
Valeur par défaut : désactivé
CQ-DRX900U
Page 61

Appuyer sur la touche [SEL]
Configuration
-----------------------------------------V
Sélectionner
BAL//FAD
Sélectionner
POSITION SEL
------------------
[A] : Avant rehaussé
[V] : Arrière rehaussé
[>] : Droit rehaussé
[<] : Gauche rehaussé
-A.
Appuyer sur la touche t>] pour modifier comme suit.
([<]: Action dans le sens opposé)
► OFF
.............
Tous les sièges
i
RIGHT
.........
Avant droit
i
LEFT
FRONT
.........
........
Avant gauche
Avant
i
REAR
.........
Arrière
Sélectionner
SUPER BASS
Sélectionner
SDBB SELECT
[>] : activé — Rehausse les graves (monaural)
[<] : désactivé — Sortie normale (stéréo)
SBC-SW ON
• Ajuste le niveau de sortie du woofer secondaire (<=> page 64)
Le réglage est également interconnecté à la sortie préampli (sortie hautparleur arrière)
• Les réglages BAL7FAD, POSITION, SDBB et Space de la sortie des hautparleurs arrière est invalidé.
V'
Appuyer sur la touche [>] pour modifier comme suit.
([<] : Action dans le sens opposé)
(->SDBB désactivé - Sortie normale
I
SDBB Type1
i
SDBBType2
SDBB Types
^SDBB Type4
-A.
■ Variable, faible
■ Variable, élevé
•Fixe, faible
■ Fixe, élevé
• Variable ; Les graves sont rehaussés
avec le volume.
• Fixe : Les graves sont rehaussés
suivant la profondeur définie.
TYPE 1 : tmt*«)
TVPE2(VBriaUa : élevé)
TYPE 3 <Rx» : ^9ÈÉm\
TYPE 4 (Fixe : éi*vé)
FrôQuence
CQ-DRX900U
61
Page 62

Réglages acoustiques et d'ambiophonie
Mode normal
HUMAN EQ
T
GRAPHIC EQ
l
BAL//FAD
~~r~
POSITION SEL
SUPER BASS
SDBB SELECT
CENTER LEVEL
Appuyer sur la
touche [SEL] pour
sélectionner
CENTER LEVEL
Sortie haut-parleur
central
L'image acoustique est relevée et orientée
afin qu'elle se stabilise proche de la région
centrale avant.
Faire un réglage de
niveau de sortie du
haut-parleur central
(Niveau de sortie de haut-parleur central)
Valeur par défaut : 0
Limites 10 à +10
par tranche de2dB
„ (décibel)
J
62
Sélectionner
CENTER DELAY
Configuration
Vers le haut Vers le bas
CQ-DRX900U
Sélectionner
CENTER LEVEL
Régler la sensation de
distance
(Durée de temporisation de haut-parleur
central)
Valeur par défaut : 0
Limites de réglage : -10 à + 10
1 palier = 0,0003 seconde
Page 63

Appuyer sur la touche [SEL]
-v
Procédure de réglage
Ouvrir le haut-parleur central page 49)
1. Ajuster le niveau de sortie du haut-parleur central
Sélectionner
CENTER LEVEL
Régler le niveau de sortie pour que la sonorité intermédiaire telle que les
voix soit orientée ver le centre avant sans ajouter d'effet DSP au haut-
parleur central.
{Durée de temporisation de haut-parleur central : 0 et ambiophonie sur
désactivé)
2. Faire un réglage ambiophonique et le réglage de durée de
temporisation de haut-parleur central.
3. Refaire un réglage de niveau de sortie du haut-parleur central.
Faire un réglage de niveau de sortie adapté au réglage ambiophonique.
Appuyer sur la touche [<] ou [>] O Configuration ; [A] ou [V]
r >
-----------------------------------------------------------------------------------
Appuyer sur la touche [>] pour
sélectionner.
CENTER LEVEL
Appuyer sur la touche [<] pour
sélectionner.
CENTER DELAY
[A] : Vers le haut
[V] ; Vers le bas
-oo : Aucun son délivré par te haut-parleur central
-A.
[A] : Accroissement de la durée de temporisation, éloigne l'image
acoustique (la sortie du haut-parleur central est retardée)
[V] ; Diminue la durée de temporisation, rapproche l'image acoustique (la
sortie du haut-parleur central se produit plus tôt)
0 : Les sorties son délivrées par le haut-parleur central et les autres haut-
parleurs sont synchronisées.
CQ-DRX900U
63
Page 64

Réglages acoustiques et d'ambiophonie
Représentation
ambiophonique
(Ambiophonie)
Ambiance d'une salle de concert dans votre
voiture
Valeur par défaut : désactivé
Réglage de sortie de woofer secondaire (Contrôle de graves dynamiques numériques/DDBC)
Ce réglage n’est possible que lorsqu'un woofer secondaire est raccordé ou lorsque les haut-parleurs arrière sont utilisés
comme woofer secondaire. (=> page 60) .«====^^^^=====r==^===^^^^==^
Appuyer et immobiliser la touche [ 0 ]
O
pendant plus de 2 secondes.
^ Appuyer sur la touche
[>] pour choisir
une commande.
Volume de woofer secondaire
(Niveau de sortie ODBC)
Valeur par défaut : 0
Limites de réglage 10 à f 10
par tranche de2d8
---------------------------------------------^
Sensation de distance
(Durée de temporisation ODBC)
Aucune temporisation n'a lieu entre la sonorité de
haut-parleur et le woofer secondaire, ce qui vous
permet de bénéficier d'une reproduction de
graves accentués dynamiques,
Valeur par défaut : 0 ‘
Limites de réglage ; -10 à +10
1 palier = 0,0003 seconde
V ^
f —
Réglage de qualité des graves
(Fréquence de coupure ODBC)
64
Configuration
CQ-DRX900U
Vous pouvez bénéficier d'une sonorité plus claire
en ajustant la limite supérieure de la fréquence de
coupure.
Valeur par défaut ; OFF
VJ
Page 65

'V'
Appuyer sur la touche [ © ]
pour changer le mode Space.
SPACE OFF
Appuyer sur la touche [<] ou I>],
—
Sélectionner
ODBC LEVEL
Appuyer sur la touche [>] pour modifier comme suit ([<]: Action dans le
sens opposé)
SPACE OFF
CONCERT HALL
Remarque: Les réglages d'ambiophonie sont respectivement conservés
dans la mémoire de chaque mode de source.
STADIUM
VOCAL
-A
'V'
[A] : Vers le haut
[V] : Vers le bas
-oo : Aucun son délivré par le woofer secondaire
Sélectionner
ODBC DELAY
Sélectionner
FREQ. SELECT
■V"
[A] : Accroissement de la durée de temporisation (la sortie du woofer
secondaire est retardée)
[V] : Diminue la durée de temporisation (la sortie du woofer secondaire se
produit plus tôt)
0 : Les sorties son délivrées par le woofer secondaire et les autres haut-
parleurs sont synchronisées.
AA"
Appuyer sur la touche [A] pour changer la fréquence de coupure,
{[V] ; Action dans le sens opposé)
OFF
OFF : Sortie normale, fréquences élevées comprises.
100
150 200 (Hz)
_J
-A
CQ-DRX900U
65
Page 66

Autres types de réglages
1 SIGNAL SeUI^
I MUTING SEL I
I SPEANA SPEED |
I MUTE KEY SEL I
--------™
------------
fl
CONTRAST SEL
AUX IN SET
S'LED SEL
TILT SELECT
Appuyer et immobiiiser
ia teuche [SEL]
pendant plus de 2
secondes.
&
Appuyer sur ia touche
[SEL] pour choisir
une commande.
Sonorité de touche
(Sonorité de touche )
(Sonorité de signal / Bip sonore)
Les bips sonores produits par le haut-parieur cen
trai peuvent être choisis lorsque ies touches sont
pressées et que le niveau de sortie est ajusté.
Valeur par défaut : SIGNAL SOUND
SIGNAL Niveau 3
Coupure de son du guide
vocal de système de
radionavigation
Vous pouvez choisir la façon de couper le son de
la source actuelle pendant que le guide vocal du
système de radionavigation est entendu.
Valeur par défaut : MUTING ON
J
66
CQ-DRX900U
Configuration
Vitesse d'affichage du spectre des fréquences
Sélectionner : SPEANA FAST
Coupure du son ou
atténuateur
Valeur par défaut ; MUTE KEY
Page 67

Appuyer sur la touche [SEL]
-------------------------------------V
Sélectionner
SIGNAL SEL
Appuyer sur la touche [>] ou [<]
-------------------
SIGNAL SOUND
Le son variant
, suivant la commande
1
SIGNAL BEEP
Bip
SIGNAL OFF
Aucun son
Pendant que le guide vocal du système de radionavigation est entendu.
[A]: Accroissement
[V] : Réduction
(Limites de réglage : Niveau 1 à
Niveau 3)
Volume
Sélectionner
MUTING SEL
Sélectionner
SPEANA SPEED
Sélectionner
MUTE KEY SEL
MUTING ON
MUTING HALF Le niveau de sortie diminue de moitié
1
MUTING OFF
Coupe le son
Le niveau de sortie ne varie pas
Remarque: "MUTING ***’’ apparaît dans l'affichage {avec MUTING ON ou HALF)
SPEANA FAST
SPEANA SLOW
Accroissement de la vitesse
Réduction de la vitesse
"V
Lorsque [MUTE] est pressé.
MUTE KEY
Coupure du son
i
AH KEY
Réduction du niveau de sortie de 1/10
-A.
CQ-DRX900U
67
Page 68

Autres types de réglages
SIGNAL SEL
MUTING SEL
SPEANA SPEED
I
MUTE KEY SEL
I CONTRAST SËT
I AUX IN SET I
I S-LED SEL I
I TILT SELECTT—
Appuyer et immo bil iser
la touc he [SEL ]
pendant plu s d e 2
second es.
Appuyer sur la tou che
[SEL] pour cho isir
une com mand e.
Contraste
1
Le réglage de contraste permet de regarder
l'affichage sans fatigue.
Valeur par défaut ; Niveau 3
Limites de réglage ; Niveau 1 à Niveau 5
Elimination de AUX-IN de
la sélection de source
AUX sera exclus de la sélection.
Valeur par défaut : activé
68
Configuration
Vers le haut
CQ-DRX900U
Vers le bas
Indicateur de sécurité
L'indicateur de sécurité clignote lorsque la façade
amovible est retirée de l'appareil.
Valeur par défaut : activé
Utilisation sans modifica
tion de l'inclinaison de
f aÇadeiAclivaliofl ou OésactlvaUoo de l'Ioclinaisoa)
{>^page 49 à propos du réglage d'inclinaison)
Valeur par défaut : activé
J
Page 69

Appuyer sur la touche [SEL] w Appuyer sur la touche [>] ou [<]
"V'
Sélectionner
CONTRAST SEL
Sélectionner
AUX-IN SET
Sélectionner
S-LED SEL
[>] : Accroissement
[<] : Réduction
Choisir un niveau pour que la visibilité des images soit confortable.
-A.
"V
t>] : AAUX-IN activé Entrée externe (AUX-IN) est un sujet de sélection de
source.
[<] : AUX-IN désactivé Entrée externe (AUX-IN) n'est pas un sujet de
sélection de source.
Avec AUX-IN sur oFF, AUX-IN ne sera pas sélectionné lorsque [SOURCE]
sera pressé. (>=> page 48 à propos de la sélection de source)
~V
[>] ; S-LED activé L'indicateur clignote lorsque la façade est retirée.
[<] : S-LED désactivé L'indicateur ne clignote pas lorsque la façade est
retirée.
Sélectionner
TILT SELECT
-A,
■V
[>] : TILT activé
[<j : TILT désactivé
L'angle d'inclinaison de la façade peut être ajusté.
L’angle d’inclinaison de la façade ne peut pas être
ajusté.
CQ'DRXSOOU
69
Page 70

Guide d’installation
A
AVERTISSEMENT
Les informations reiatives à i’instaiiation sont prévues uniquement
pour des techniciens quaiifiés et ne concernent pas les personnes
sans connaissance technique. Elles ne contiennent pas de mises en
garde ou d’avis quant aux dangers potentiels pouvant être encourus
lors de l’installation de cet appareil.
Toute tentative d’installation de cet appareil dans un véhicule
motorisé par une personne sans qualification technique peut causer
des dommages importants au système électrique du véhicule voire
provoquer des blessures graves ou même mortelles.
□ Généralités
Cet appareil devrait installé par un technicien
qualifié. Si l'utilisateur décide de le faire par ses
propres moyens, la première étape consiste au
choix de remplacement. Les instructions données
dans ce manuel décrivent les étapes suivantes. {Se
référer à la notice intitulé "AVERTISSEMENT” cidessus.)
• Identifier et étiqueter les fils du véhicule.
• Raccorder les fils du véhicule à ceux du
connecteur d’alimentation.
• Installer l’appareil dans le tableau de bord.
• Vérifier le fonctionnement de l’appareil.
En cas de difficultés, ne pas hésiter à communiquer
avec un installateur professionnel.
□ Matériel d’installation
No.
Cadre de montage
©
Boulon de fixation (5 mm e)
®
Connecteur d'alimentation
@
Plaque frontale amovible
©
Plaque décoratrice
Barrette de support arrière
Article
Schéma
%i
Onantiti
1
1
1
1
1
1
Précaution: Cet appareil ne peut fonctionner qu’à
partir d’une source d’alimentation à courant continu
de 12 volts et système de batterie automobile avec
négatif à la masse. Ne pas essayer de l’utiliser avec
tout autre type de système. En effet, cela pourrait
occasionner de graves dommages.
Avant de procéder à l’installation de l’appareil,
vérifier si les éléments mentionnés ci-dessous se
trouvent bien dans l’emballage de votre appareil.
• Carte de garantie
• Liste des centres de service agréés Panasonic
.....
La conserver à des fins de consultation
........
La remplir sans délai.
ultérieure si l'appareil doit être réparé.
• Matériel d’installation
..........
Indispensable pour
effectuer l’installation dans le tableau de bord.
70
CQ-DRX900U
Vis autotaraudeuses
Écrou six pans
1
1
Page 71

□ Outils nécessaires
Un tournevis, une pile AA de 1,5 V et les acces
soires ci-dessous sont nécessaires:
Vérificateurde
continuité 12 V c.c.
Ruban
d’électricien
Pinces
à sectionner
□ Spécifications du tableau de
bord
Épaisseur
Minimum; 4,75 mm p/ie po)
Maximum: 5,56 mm (V32 po)
53 mm (2^/32 po)
□ Identification des fils de con
nexion
La toute première étape consiste à identifier tous les
fils de connexion du véhicule qui seront utilisés pour
effectuer te raccordement de votre équipement
audio.
Après avoir identifié chacun des fils de connexion,
nous vous conseillons de les étiqueter avec du
chatterton et un marqueur indélébile. Cela évitera
tout risque de confusion et d’erreur si des
branchements sont effectués ultérieurement.
Remarque: Ne pas raccorder le connecteur
d’alimentation à l’appareil stéréo avant effectué tous
les raccordements. Si les fils de raccordement
stéréo ne sont pas équipés de capuchons en
plastique, isoler provisoirement tous les fils de
connexion dont les conducteurs sont exposés avec
du ruban d’électricien jusqu'à ce que leur
raccordement soit effectué. Identifier les fils de
connexion dans l’ordre suivant.
Fils d’alimentation
Si votre voiture est équipée d’une autoradio ou si le
câblage permettant son raccordement a été fait à
l’avance;
Sectionner l’un après l’autre les fils de connexion du
connecteur près de la prise (en prenant soin de
laisser les fils les plus longs possibles) de manière à
pouvoir faire aisément le branchement de chacun
des fils de connexion.
m
Tourner la clé de contact sur la position accessoires,
puis relier l’un des fils de la lampe de contrôle au
châssis du véhicule.
Relier l’autre fil de la lampe de contrôle à chacun
des fils de connexion exposés de la prise de
raccordement de l’autoradio qui a été coupée.
Toucher un fil à la fois jusqu'à ce que le fil qui fait
allumer la lampe de contrôle ait été repéré.
Tourner maintenant la clé de contact sur la position
OFF, puis sur la position ON. Si l’ampoule s'éteint et
s'allume en même temps, le fil identifié est bien le fil
d’alimentation du véhicule.
Si le câblage pour recevoir une autoradio n’a pas
été fait à l’avance dans votre véhicule;
Vérifier dans la boîte de servitude et chercher le
réceptacle du fusible de l’autoradio (RADIO), des
accessoires (ACC) ou de l’allumage (IGN).
Fil de la batterie
Si votre appareil stéréo possède un fil jaune, il sera
nécessaire de repérer le câble de la batterie du
véhicule. Sinon, il est possible d’omettre cette
étape. (Le fil jaune de la batterie procure l’alimen
tation continue nécessaire au circuit d’alimentation
de l’horloge, de la mémoire ou à d’autres circuits.)
Si votre véhicule est équipé d’une autoradio ou si le
câblage permettant son raccordement a été fait à
l’avance:
Alors que la clé de contact est en position OFF et
que les phares sont éteints, repérer le fil de la
batterie du véhicule en reliant un fil de la lampe de
contrôle au châssis et en vérifiant les autres fils de
connexion exposés provenant de la prise dont les
fils ont été sectionnés au moyen de l’autre fil.
Si le câblage pour recevoir une autoradio n’a pas
été fait à l’avance dans votre véhicule :
Vérifier dans la boîte de servitude et chercher le
réceptacle du fusible de la batterie habituellement
identifié par BAT.
Moteur d'antenne
Si le véhicule est équipé d'une antenne à
commande électrique, identifier le fil d'alimentation
du moteur d'antenne en reliant un fil du contrôleur à
ampoule au fil de la batterie du véhicule et en
touchant un à un les fils exposés du connecteur
radio sectionné. Le fil recherché est celui qui
actionne le moteur d'antenne quand il est touché.
Antenne
Le fil d'antenne est le fil noir épais à capuchon
métallique fixé à son extrémité.
CQ-DRX900U
71
Page 72

Guide d’installation
(suite)
□ Raccorder tous les fils
Après avoir identifié tous les fils de connexion du
véhicule, il est possible de les raccorder aux fils de
connexion de l’appareil stéréo. Le schéma de
câblage électrique (Page 76) représente les
branchements appropriés et le code de couleur
utilisés pour les fils.
Il est vivement recommandé de vérifier le
fonctionnement de l’appareil avant de procéder à
son installation définitive.
Pour ce faire, poser l’appareil dans le véhicule et
faire des raccordements provisoires afin de vérifier
le fonctionnement de l’appareil. Se servir de ruban
d’électricien pour protéger tous les fils exposés.
Important; Raccorder le fil d’alimentation de
couleur rouge en dernier après avoir réalisé tous les
raccordements et isolés tous les fils.
Mise à la terre
Raccorder le fil de mise à la terre de couleur noire
de la prise d’alimentation à une partie métallique du
châssis du véhicule.
Moteur d'antenne
Raccorder le fil d’antenne électrique du véhicule au
fil d’amenée bleu de l’antenne électrique.
Batterie
Raccorder le fil jaune de la batterie du véhicule au
bon fil d’amenée de l’autoradio ou au réceptacle de
fusible de batterie du véhicule.
Antenne
Raccorder l’antenne en branchant le fil d’antenne
dans la prise d’antenne.
Équipement auxiliaire
Raccorder tout équipement auxiliaire tel qu’un
amplificateur conformément aux instructions de ta
notice de l’équipement. Séparer les fils de hautparleur/d’amplificateur de l’antenne/du fil d’antenne
d’au moins 30 cm. (12 po). Relire les instructions
d’utilisation et d’installation de tout équipement
supplémentaire à raccorder à cet appareil.
□ Installation finale
Raccordement des fils de connexion
Raccorder tous les fils en prenant soin de vérifier
que tous les fils sont parfaitement isolés et
solidement retenus. Attacher tous les fils ensemble
et les retenir au chatterton pour qu’ils ne se
détachent pas par la suite. Introduire maintenant
l’appareil stéréo dans le cadre d’installation.
Félicitations ! Après avoir pris soin de faire quelques
vérifications finales d’usage, vous allez pouvoir pro
fiter de votre nouveau système stéréo automobile.
□ Vérifications finales
1. Vérifier que tous les fils de connexion sont
branchés et isolés correctement.
2. Vérifier que l’appareil stéréo est solidement
fixé dans son cadre d’installation.
3. Mettre le contact et vérifier que l’appareil
fonctionne normalement.
En cas de difficulté, faire appel aux services de
l’installateur professionnel agréé le plus proche.
□ Mesures de précaution
• (I est vivement recommandé de porter des
gants pendant les travaux d’installation afin de
ne pas se blesser.
• Faire très attention de ne pas se blesser les
mains ou les doigts au moment de replier la lan
guette de fixation du cadre d’installation avec
un tournevis.
Débrancher le câble de la borne négative de la batter
ie (-) (voir les précautions indiquées ci-dessous).
L'appareil doit être installé en position horizontale
et sa façade pouvant être inclinée suivant un angle
approprié mais n'excédant pas 30“.
Alimentation
Raccorder le fil d’alimentation rouge au bon fil
d’autoradio du véhicule ou au réceptacle de fusible
approprié de la boîte de servitude du véhicule.
Si l’appareil stéréo fonctionne normalement après
avoir effectué tous ces raccordements, débrancher
les fils et procéder à l’installation finale.
72
CQ-DRX900U
ou moins
Précautions: Ne pas débrancher les bornes de la
batterie dans un véhicule équipé d’un ordinateur
de croisière ou de radionavigation parce que tous
les réglages électroniques mémorisés de l’utilisa
teur seraient effacés. Prendre toutes les précau
tions nécessaires pour ne pas provoquer de
courts-circuits au moment d’effectuer l’installation
de l’appareil.
Page 73

□ Procédure d’installation
Levier de verrouillage (îîî)
Connecteur d'alimentation CD
Introduire le cadre de montage 0 dans
le tableau de bord et replier les
languettes de fixation vers l'extérieur
avec un tournevis.
Vérifier que le levier de verrouillage C-^-)
affleure la surface du cadre de
montage (ne dépasse à l'extérieur), :
Levier de verrouillage
(a) En utilisant la barrette de support arrière ®
'Paroi ignifuge du véhicule
® Vis autotaraudeuses ^
CD Écrou six pans
D Barrette de support arrière
(D Boulon de fixation
(i) Cadre de montage
Fixer l'arrière de l'appareil.
Après avoir fixé le boulon de fixation CD et branché
le connecteur d'alimentation ®,, fixer l'arrière de
l'appareil dans le véhicule en utilisant l'une des
méthodes indiquées (a) ou (b) ci-contre.
Introduire le plaque décoratrice ®.
Brancher le Câble
à la borne négative (-)
de la batterie quand l'in
stallation est complète
ment terminée.
(b) En utilisant le coussinet en caoutchouc (option)
Plaque de support arrière
(déjà en place dans le véhicule)
Coussinet en \
caoutchouc) \
'option) \
CD Boulon de fixation
© Cadre de montage
CQ-DRX900U
73
Page 74

Guide d’installation
(suite)
Comment déposer l'appareil
Retirer la plaque de façade amovible.
(a) Couper
ralimentation de
l'appareil.
(b) Enfoncer la
touche de
libération.
(c) Repousser la plaque de façade vers la
droite de l'appareil.
Retirer le plaque décoratrice (D avec
un tournevis.
Appareil principal
© Plaque décoratrice
Tournevis
74
CQ.DRX900U
Page 75

Système antivol
Cet appareil est équipé d'une plaque de façade amovible. En
retirant la plaque de façade, l'autoradio est complètement
inopérant. L'indicateur de sécurité se mettra à clignoter.
Comment retirer la plaque de façade
O Couper l'alimentation de l'appareil.
O Retirer la plaque de façade amovible.
{<=> page 74.)
e Presser légèrement la partie inférieure du boîtier de
rangement et ouvrir le couvercle. Conserver la plaque
de façade amovible dans le boîtier et l’emporter avec
vous lorsque vous quittez la voiture.
Précautions;
• Noter que cette plaque de façade amovible n'est pas étanche à l'eau. Ne pas l'exposer à l'eau ni la laisser en
présence d'une humidité excessive.
• Ne jamais essayer de retirer la plaque de façade amovible en conduisant.
• Ne pas laisser la plaque de façade amovible sur le tableau de bord ou dans un endroit susceptible de devenir
excessivement chaud.
Comment remonter la plaque de façade amovible
O Remettre en place le côté gauche de la plaque frontale
amovible en te faisant glisser.
O Presser l’extrémité droite de la plaque frontale amovi
ble jusqu’à entendre un cliquetis.
Indicateur de sécurité
L'indicateur de sécurité clignote lorsque la plaque de
façade amovible est retirée de rappareil.(<=> Page 68.)
O Appuyer sur la touche [SEL]et la maintenir enfoncée
pendant au moins 2 secondes pour passer en mode de
commande de fonction.
O Appuyer sur la touche [SEL] pour choisir l'option
"S-LED SELECT".
O Appuyer sur la touche [>] pour allumer l'indicateur de
sécurité (S-LED). ([<] : éteint)
CQ-DRX900U
75
Page 76

Branchements électriques
• Pour effectuer le câblage, lire attentivement la notice d’instructions des appareils à raccorder.
• Demander conseil au magasin qui vous a vendu l’appareil pour savoir quels sont les haut-parleurs qui peuvent être utilisés.
Ne pas oublier que si votre voiture est équipée d'un ordinateur de bord ou d'un ordinateur de radionavigation, les données
sauvegardées en mémoire risquent d'être effacées lorsque les bornes de batterie seront débranchées.
Matériel fourni
Article Quantité
Connecteur d'alimentation 1
(R)(Rouge)
(L) (Blanc)
Cordon d’entrée AUX
CQ-DRX900U
Antenne
-O
Câble de l'éclairage
Connecter le câble d'éclairage au
câble d’alimentation connecté aux
feux de position de la voiture.
(Orange avec rayures blanches)
Câble d’alimentation,
de l'antenne électrique
Raccorder au câble d'alimentation
de l'antenne électrique du véhicule.
I f=fÂHT-CONT MAX o.iÂ>=
(Bleu)
(R)(Rouge)
(L) (Blanc)
(R)(Rouge)
(L) (Blanc)
(R)(Rouge)
(L) (Blanc)
(R)(Rouge)
(L) (Blanc)
Fq-
Connecteur de
commande
de changeur
Connecteur
d’alimentation
(Supplied)
(Orange) Reccorder le fil de connexion Navi Mute du
(Rouge) Résistance (1 kO)
Inavimlìtè]—Fil nave mute (pour utilisation ultérieure)
système de radionavigation Panasonic
Remarque: Isoler le te fil de connexion Navi Mute
à l'aide de bande vinylique isolante s'il n’est pas
raccordé.
T3=fÀCCf:
riTIts Fil de connexion
d'alimentation ACC
À raccorder à l'alimentation ACC,
+ 12 V c.c.
Tg Fil de mise à la masse
Reliera une partie métallique propre
et à nue du châssis du véhicule.
Cordon d'entrée de
changeur de CD
Cordon de sortie
préampli
(avant)
Cordon de sortie
préampli
(arrière)
Woofer secondaire
Fil d'alimentation de commande
d’amplificateur extérieur
Câble d’alimentation de I’ampiificateur
externe
Le raccorder à un ampli externe
i h=l AMP-CONT MAX 0.1 A \=^
(Bleu avec rayures blanches)
>lBAnERY3A~HID^ Câble de connexion
Fusible (2 A) de batterie
Remarque: Si la voiture n’est pas dotée d’un câble d’alimentation connecté aux feux de position de la voiture, laisser le câble
d’éclairage non connecté.
76
CQ-DRX900U
À raccorderà la batterie
automobile, + 12 V c.c.
Page 77

Exemple 1 de système amélioré : 9 haut-parleurs
Combinaison
• Changeur de CD (CX-DP88U)
O O
®
^ Ol
Changeur de CD
CX-DP88U
Précaution:
• Demander à un installateur professionnel qualifié de faire les travaux d'installation et le câblage.
L'installation et le câblage de cet appareil nécessitent des connaissances spéciales et l'habitude de manipuler ce
genre d'appareil. Par mesure de sécurité, il est préférable de demander au mgasin qui vous a vendu l'appareil de
faire les travaux d'installation et de câblage.
• Ne pas démonter ni modifier.
Ne pas démonter ni modifier l'appareil. Ne pas retirer les éléments de protection montés au bout des câbles et des
fils de connexion destinés à assurer l'alimentation d'autres appareils. Ceci risque de provoquer le dégagement
d'une fumée ou favoriser un amorçage électrique voire provoquer une électrocution ou des pannes.
CQ-DRX900U
77
Page 78

En cas de difficulté
Etapes préliminaires
Vérifier les indications mentionnées dans les tableaux
ci-dessous et prendre les dispositions indiquées.
Lorsqu'on soupçonne que quelque chose est défectueux
Couper immédiatement l’alimentation.
Débrancher le câble d’alimentation et vérifier que l’appareil ne
dégage ni de la fumée ni de la chaleur avant d’exiger un
dépannage. Ne jamais essayer de faire des réparations parce
que cela peut s’avérer dangereux.
9 Problèmes communs
Panne Origine
La clé de contact de la voiture n’est
pas tournée en position ON.
Les fils ne sont pas branchés
correctement
Le câble de la batterie n’est pas
branché correctement.
Absence d’alimentation
Le câble de l'accessoire n’est
pas branché correctement.
Précaution:
Ne pas mettre l’appareil en service s’il ne
fonctionne pas normalement ou si
quelque chose est défectueux.
Le fait d’utiliser l’appareil dans des
conditions anormales, par exemple
lorsqu’au son n’est délivré, s’il dégage de
la fumée ou une odeur anormale, peut
favoriser un amorçage électrique ou une
électrocution. L’arrêter immédiatement et
demander au magasin qui vous l’a vendu
de le vérifier.
Disposition à prendre
Tourner la clé de contact de la voiture sur ACC ou sur ON.
Brancher les fils correctement.
Raccorder le câble de la batterie à la borne délivrant le
courant.
Raccorder le câble de l'accessoire à la source ACC de
la voiture.
Absence de son
Les touches sont inutilisables
Le fil de mise à la masse n’est
pas branché correctement.
Fusible détruit.
La fonction de coupure du son
est appliquée.
Les fils ne sont pas branchés
correctement
Le câble de coupure du son extérieur
n'est pas branché correctement
(MUTING apparaît dans l’affichage)
Condensation (buée)
L’affichage de spectre des fréquences est
réglé en mode de démonstration
Raccorder le fil de mise la masse à une partie
métallique de la voiture.
Demander l’assistance du magasin qui vous a vendu
l'appareil ou du service après vente le plus proche
(voir la fiche fournie) pour que le fusible soit remplacé.
Arrêter la fonction de coupure du son.
Brancher les fils correctement.
Brancher le câble Navi-mute correctement.
Attendre un moment avant d’utiliser l’appareil.
Le régler sur un mode autre que le mode de
démonstration
78
CQ-DRX900U
Page 79

Panneau de façade
Panne
Impossibilité d'orienter
le panneau de façade
Autoradio
Panne
Les programmes FM
stéréo et mono sont
fortement parasités.
Remise à zéro de
station présyntonisée
Disque CD
Panne
Un disque CD est
chargé mais aucun son
n'est délivré.
Des passages du disque CO
sont sautés, la qualité
acoustique est médiocre.
Des passages du son
sont sautés en
présence de vibrations.
Le disque CD n'est pas
éjecté
Origine
Le réglage d'orientation du
panneau de façade est fixe.
Origine
La station émettrice est trop
éloignée ou si les signaux reçus
sont trop faible.
Le câble de la batterie n'est pas
branché correctement.
Origine
Le disque CD est à l'envers.
Le disque CD utilisé est sale.
Le disque CD utilisé est sale.
L'angle d'installation de l'appareil
est supérieur à 30 degrés.
Installation instable
• Le disque CD utilisé est
défectueux
• Panne d'ordre mécanique
Disposition à prendre
Choisir ON pour le paramètre de réglage
d’inclinaison.
Disposition à prendre
Accorder d'autres stations dont le niveau des signaux
est plus élevé,
Raccorder le câble de la batterie à la borne délivrant le
courant.
Disposition à prendre
Introduire le disque CD en l'orientant dans le bon sens, étiquette
vers le haut.
Nettoyer le disque CD conformément aux instructions de la
section traitant de l'entretien des disques CD.
Nettoyer le disque CD conformément aux instructions de la
section traitant de l'entretien des disques CD.
Faire en sorte que l'angle d’installation de l'appareil ne dépasse
pas 30 degrés.
Installer fermement l'appareil en utilisant les accessoires
d'installation tout en se référant à la section traitant des travaux
d'installation.
Ouvrir le panneau de façade et appuyer sur la touche [£]. Si la
panne persiste, appuyer sur l'interrupteur de remise à zéro. Si
cela ne permet toujours pas de rétablir le fonctionnement
normal de l'appareil, demander l'assistance du magasin qui
vous a vendu l'appareil ou du service après vente le plus proche
pour qu'il effectue les réparations nécessaires.
CQ-DRX900U
79
Page 80

En cas de difficulté
Réglage du son
(suite)
Panne Origine
Aucun son n'est délivré
par le haut-parleur
gauche, droit, avant ou
arrière
Le son délivré à gauche et
à droite est inversé
pendant i'écoute d'un
programme stéréo.
Aucun son n'est délivré
par le haut-parleur
central
Seuls les graves ou un son
monaural est délivré par le
haut-parleur arrière.
Aucun son n'est délivré
par l'entrée-sortie pré
ampli (arrière) de hautparleur arrière principal
L'équilibrage gauche et droit ou
avant et arrière est coupé d'un
côté.
Les fils ne sont pas branchés
correctement
Les fils du haut-parleur droit sont
raccordés au haut-parleur gauche et
les fils du haut-parleur gauche sont
raccordés au haut-parleur droit.
Le haut-parleur central est fermé.
Le réglage de volume du hautparleur central est réglé sur -«>.
La fonction SBC-SW est réglée
sur ON.
La fonction SBC-SW est réglée
sur ON et le réglage de volume
ODBC est réglé sur -c«.
Disposition à prendre
Régler BAL7FAD de la façon appropriée.
Brancher les fils correctement.
Brancher les fils de haut-parleur aux haut-parleurs
correspondants.
Ouvrir le haut-parleur central.
Régler le volume du haut-parleur central sur une
position autre que -^o.
Régler la fonction SBC-SW sur OFF.
Régler le volume ODBC sur une position autre que la
position
80
Boîtier de télécommande
Panne
Les commandes par
touche ne sont pas
validées.
CQ-DRX900U
Les polarités (+) (-) des piles
sont inversées.
Les piles utilisées ne sont pas
adaptées.
Les piles sont épuisées.
Le boîtier de télécommande
n’est pas orienté correctement.
Origine
Disposition à prendre
Introduire les piles correctement.
Vérifier les piles.
Remplacer les piles.
Diriger le boîtier de télécommande vers REMOTE
(capteur) du panneau de façade.
Page 81

Messages d’erreur affichés
■Disque CD
Exempte d'affichage
Origine
Opération
Vérification/Disposition à prendre
CD “El-
CD -E2-
CD -E3-
OPLS EJECT
Changeur de CD
Exemple d’affichage
Le disque CD est sale ou
à l'envers.
Le disque est rayé.
Aucun fonctionnement
pour une raison
quelconque
Une action a été
entreprise pour
commander ta lecture
Origine
Est
éventuellement
éjecté
automatiqueme
nt.
—
—
Opération
Vérifier le disque
Ouvrir le panneau de façade et appuyer
sur la touche [A]. Si la panne persiste,
appuyer sur l'interrupteur de remise à
zéro.
Si cela ne permet toujours pas de rétablir
le fonctionnement normal, demander
une assistance et faire réparer l'appareil.
Ouvrir le panneau de façade et appuyer
sur la touche [±],
Vérification/Disposition à prendre
CD*CH -El-
CD-CH -E2-
CD-CH -E3-
l\10 DISC
Le disque CD est sale ou
à l'envers.
Le disque est rayé.
Aucun fonctionnement
pour une raison
quelconque
Absence de disque dans
le changeur de CD
{magasin de disques)
Est
éventuellement
éjecté
automatiqueme
nt. î
—
—
Vérifier le disque
Ouvrir le panneau de façade et appuyer
sur la touche [A]. Si la panne persiste,
appuyer sur l'interrupteur de remise à
zéro.
Si cela ne permet toujours pas de rétablir
le fonctionnement normal, demander une
assistance et faire réparer l'appareil.
Introduire des disques dans le magasin.
Remarques:
• Il peut arriver que les numéros de disque affectés par une erreur soient affichés avant E1 et E2.
• Les indications affichées et les dispositions à prendre pour les cas d'erreur peuvent être partiellement différentes d'un modèle de changeur
de CD à l'autre. Se reporter à la notice d'instructions du changeur de CD utilisé pour obtenir des explications plus détaillées à ce sujet.
CQ-DRX900U
81
Page 82

En cas de difficulté
(suite)
Entretien
Votre appareil a été conçu et fabriqué de manière à n'exiger qu’un minimum d’entretien. Nettoyer régulièrement les
surfaces extérieures de l'appareil avec un morceau de tissu souple. Ne jamais se servir d’essence, de diluant chimique ou
autres solvants.
Service après-vente de l’appareil
Si les suggestions indiquées dans les tableaux de dépannage ne permettent pas de résoudre le problème, Il est
recommandé de confier l’appareil à un centre de service après-vente Panasonic agréé. Confier toute réparation de
l’appareil uniquement à un technicien qualifié.
Remplacement d’un fusible
Utiliser les fusibles spécifiés à ampérage de 3 ampères. L’utilisation de substituts ou de fusibles différents dont
l’ampérage est supérieur ou le raccordement direct de l’appareil sans passer par l'intermédiaire d’un fusible risque de
provoquer un incendie voire endommager sérieusement l'appareil stéréo.
Si le fusible de remplacement saute, se renseigner auprès du centre de service de service après-vente Panasonic
agréé le plus proche.
Interrupteur de remise à zéro
Interrupteur de remise à zéro
Introduire une tige suffisamment robuste dans le trou indiqué et
enfoncer l’interrupteur.
• Ceci a pour effet de ramener l'appareil sur ses réglages par
défaut après remise à zéro de la panne. Noter cependant que
les données et les réglages conservés en mémoire seront
également supprimés.
Notice importante
Cet interrupteur ne doit être pressé que si l’appareil refuse
complètement de fonctionner avec l'une ou l'autre touche.
S'il est impossible d'ouvrir le panneau de façade ou de rtablir le
fonctionnement normale de l'appareil, demander l'assistance du
service après vente le plus proche pour qu'il effectue les
réparations nécessaires.
82
CQ-DRX900U
Page 83

Entretien
Entretien de l'appareil
Nettoyage de l'appareil
• Se servir d’un chiffon sec et souple pour essuyer
l'appareil.
Précautions à prendre lors du nettoyage de l'appareil
Ne pas utiliser de benzine de diluant ou d’autres solvants.
Remarques relatives aux disques CD
UTILISER UNIQUEMENT DES DISQUES PORTANT UNE ETIQUETTE
TELLE QUE REPRÉSENTÉE SUR LA FIGURE CI-CONTRE
Comment saisir un disque CD
• Ne iamais toucher la surface inférieure du disque.
• Veiller à ne pas rayer la surface du disque.
• Ne pas plier le disque.
• Remettre le disque CD dans son boîtier
après utilisation.
Ne pas se servir de disques CD
dont ies formes ne sont pas
normalisées
Face étiquetée
I
DIGITAL AUDIO
Ne pas laisser les disques dans ies endroits
suivants:
• En plein soleil
• Dans des endroits sales, poussiéreux et humides
• Près des appareils de chauffage de la voiture
• Sur ies sièges ou la planche de bord
Nettoyage des disques
Se servir d'un morceau d'étoffe sèche et souple
pour nettoyer en partant du centre du disque.
Précautions à prendre avec les disques neufs
Le bord d'un disque neuf risque de présenter de
minuscules imperfections autant à la périphérie
que sur le bord du trou intérieur. Ceci peut être à
l'origine d'un fonctionnement anormal.
Abattre ies imperfections avec un crayon, etc.
CD en forme
de cœur
<Procédé correct> <Procédé incorrect>
Bord présentant des
imperfections
CD de forme
octogonale
CQ-DRX900U
83
Page 84

Données techniques
Généralités
Alimentation
Consommation du courant
Sortie de haut-parleur central
Impédance d'entrée externe
Sensibilité d'entrée externe
Tension de sortie préamp
Impédance de sortie préamp
Tension de sortie de woofer
secondaire
Dimensions (L x H x P)
Poids
DSP
Nombre de canaux
Mode ambiophonique
Fréquence charnière d'egaliseur
Gamme variable d'égaliseur
Radio FM stéréo
Gamme de fréquence
Sensibilité utilisable
Séparation stéréo
12 Vc.c. (11 V-16 V), Tension d'essai 14,4 V, Masse négative
Moins de 0,8 A (mode d’écoute CD)
5W
10 ka (AUXIN)
2 V (AUX IN)
6V
60
6V
7 po x 1-15/16 po X 6-1/8 po (178 X 50 x 155 mm)
3lbs, 12oz(1,7 kg)
6 canaux de sortie
3 modes
80,160, 320, 640,1,6 k,4k, 10 k (Hz)
-12 à + 12 dB (13 paliers)
87,9 - 107,9 MHz
11.0 dBf. (1.25 pV, 75Q)
35 dB (à 1 kHz)
Radio PO (AM)
Gamme de fréquence
Sensibilité utilisable
: 530 - 1 710 kHz
; 28 dB/pV (25 pV, S/N 20 dB)
Lecteur CD
Fréquence d’échantillonnage
Convertisseur numérique-analogique
Système de correction d’erreur
Type de lecture
Source lumineuse
Largeur d’onde
Réponse de fréquence
Rapport signal/bruit
Distorsion harmonique totale
Pleurage et scintillement
Séparation des canaux
: Sur-échantillonnage de 8 fois
: Système MASH-1 bit/4 DAC
: Algorithme super décodeur Panasonic
: 3 faisceaux
: Laser semi-conducteur
: 780 nm
: 20 Hz - 20 kHz (±1 dB)
:90 dB
: 0,01 % (1 kHz)
: En-dessous de la limite mesurable
;75 dB
Remarque: Aux fins d’améliorations, les caractéristiques et la conception sont susceptibles de modification sans
préavis.
84
CQ-DRX900U
Page 85

Componentes/Operación de control remoto
Componentes
1 Operación de control remoto
Instalación de la pila
1, Manual de Instrucciones
2. Accesorios suministrados
3. Conector de alimentación......................
4. Unidad del Controlador Remoto................
5. Pila de litio (CR2025)............................
6. Tarjeta de garantía
1. Quite el soporte de pila
Retenga el soporte en la posición B y tire del mismo hacia fuera empujando
la parte A en la dirección indicada por la flecha.
2. Instale la pila en el soporte de la pila.
Inserte la pila de manera correcta, con el lado (+) hacia arriba, como se
muestra en la ilustración,
3. Inserción del soporte de pila
Empujar el soporte de pila a la posición original.
...............
.......................
..............................
..........
.....................................
-
..........
-1 juego{=> página 108)
...................................
................................... 1
..................................
....-.................................
1
1
1
1
Nota sobre las pilas
Las pilas viejas deben ser quitadas y desechadas inmediatamente.
Informaciones sobre las pilas:
• Pila recomendada: Pila de litio Panasonic {CR2025)
• Vida útil de la pila: Aproximadamente 6 meses en utilización normal {a
temperatura ambiental)
Precaución: El uso incorrecto de ias pilas puede causar el
sobrecalentamiento, explosión o ignición, resuitando en heridas o incendios.
La fuga del electrólito de la pila puede causar daños en el aparato.
• No desmonte ni ponga en cortocircuito las pilas. No deseche las pilas en el
fuego.
• Mantenga las pilas apartadas de los niños para evitar el peligro de
accidentes.
• Respete las normas vigentes para tirar las pilas.
•
CQ-DRX900U
85
Page 86

Generalidades
Este manual explica las principales operaciones de control remoto. Sin embargo, algunas operaciones no funcionan con
el control remoto. En tales casos, el manual le muestra cómo operar las funciones con los botones de la unidad
principal.____________________________________________________________________________________
Nota: Cuando se conecta la
Alimentación
Gire la llave de encendido hasta que se encienda el indicador
de los accesorios.
Alimentación conectada: Presione [PWR].
Desconectar: Presiónelo de nuevo.
-----------------------------
Volumen-----------------------------------
[A] : Arriba Nota: Los niveles de sonido se almacenan
[V]: Abajo respectivamente en la memoria para cada modo
de fuente.
alimentación por primera vez,
aparece un mensaje de
demostración en el visualizador.
Para cancelar este mensaje,
presione [DtSP].
Fuente---------------------------------------
Presione [SOURCE] para cambiar la fuente del modo siguiente.
—►
Control del cambiador de CD
Radio
Reproductor de CD
i
AUX
(Cuando hay insertado un disco)
(Cuando hay conectado un cambiador de
discos compactos)
(Cuando se activa el ajuste AUX-IN)
Ajuste de la hora
Avance
Presione y mantenga
presionado [DISP] durante
®
más de 2 segundos.
Presione [<]: Ajuste de las
horas
[A] : Avance [V]: Retroceso
Presione [>]: Ajuste de los
Ajuste de
las horas
minutos
[A] : Avance [V]: Retroceso
Presione [DISP] (fin)
86
Retroceso
Ajuste de
los minutos
CQ-DRX900U
Page 87

Puesto que las operaciones siguientes no pueden realizarse con el controlador remote, deberá emplear los
botones de la unidad principal.
Abra el
altavoz central
Abrir: Presione \/Щ\
Cerrar: Presiónelo de nuevo.
Nota: El altavoz central no puede abrirse ni cerrarse
mientas el panel frontal está completamente abierto.
Ángulo del panel (inclinación)
Presione y mantenga presionado [OPEN] (TILT) durante más de
1 segundo hasta que se oiga el sonido de la señal, y entonces
suéltelo.
Cada vez que se presione el botón durante 1 segundo y se suelte,
se cambia el ángulo del panel (en 3 pasos).
-------------
Abertura/cierre del panel frontal
• Presione [OPEN] para abrir el panel frontal.
Nota: Si no se cambia nada durante 20 segundos, se vuelve a la
posición original del panel.
• Para cerrar por completo el panel frontal, presione de nuevo
[OPEN],
• Para volver a la posición original, presione de nuevo [OPEN] y
manténgalo presionado durante más de 1 segundo, y luego
suéltelo.
Notas:
• Cuando se pira el interruptor de encendido a la posición OFF, se
cierran el panel y el altavoz central.
• Cuando se gira el interruptor de encendido a la posición ON, se
abren el panel y el altavoz central a sus posiciones anteriores.
Cambio de visualización
Presione [DISP] para conmutar la indicación de la pantalla como sigue.
Cuando la alimentación está conectada
(Ejemplo: Modo del reproductor de CD)
inclinación 1
inclinación 2
inclinación 3
Abertura
Cuando la alimentación está desconectada.
Visualización de la hora
Visualización normal
i
Visualización del analizador de espectro de puntos
i
Visualización de (a bora
Nota: La visualización es distinta para cada modo de fuente.
CQ-DRX900U
Sin visualización
t
87
Page 88

Radio
Modo de radio
Presione [SOURCE] para cambiar el
modo de radio.
Banda
Presione [BAND] para cambiar las
bandas.
Note: El indicador de estéreo se enciende durante la
recepción de difusiones de FM en estéreo.
STEREO
Cambio de visuaiización
FM1
I
FM2
i
FM3
♦
AM(MW)
Sintonización
[>] : Frecuencias más altas
[<] : Frecuencias más bajas
Presione y mantenga presionado [>] o
[<] durante más de 0,5 segundos, y
luego suéltelo. Se iniciará la búsqueda.
Presione [DISP] para conmutar la indicación de la pantalla
como sigue.
Banda de la frecuencia
Visuaiización normal
Visuaiización
I
^—1
88
Visuaiización del anaiiza|Qr de espectro de puntos
Visuaiización de la hora
CQ-DRX900U
Page 89

Selección de una emisora registrada con una sola pulsación
Podrán memorizarse hasta 6 emisoras en las memorias de emisoras preajustadas FM1, FM2, FM3 y AM (MW).
Preajuste manual de emisoras
Almacene la emisora deseada
manualmente en la memoria
de preaiustes.
Número de Visualización
preajuste de la frecuencia
Visualización
de la frecuencia
Número de
preajuste j
Preajuste automático de emisoras
Almacene automáticamente
emisoras con buenas
condiciones de recepción en
la memoria de preajustes.
Seleccione la banda (pasos O y O de la página anterior)
Presione y mantenga presiona
do [A] o [V] durante más de 2
segundos.
s I X
el número preajustado parpadea
\ i ^
Presione [A] o [V].
selecciorieuni n^ero preajustado
Presione [>] o [<].
Presione y mantenga presiona
do [A] o [V] durante más de 2
segundos.
Seleccione la banda (pasos O y 0 de la página anterior)
Presione y mantenga presionado
' ^
frecuencia de la emisora
parpadea una vez
[BAND] durante más de 2 segun
dos.
• Las 6 emisoras disponibles más
potentes se almacenarán automáti
camente en la memoria en los
números de preajuste 1 al 6.
• Una vez ajustadas, las emisoras
preajustadas se exploran en
secuencia durante 5 segundos
cada una.
• Para detener la exploración, pre
sione [A] [V].
Nota: Se borrarán las emisoras manualmente preajustadas en la banda
seleccionada.
Llamada de una emisora registrada
Seleccione la banda (pasos O y 9 de la página anterior)
Presione [A] para seleccionar el
número de preajuste y sintonizar la
emisora preajustada.
[V]: direction opposée
CQ-DRX900U
89
Page 90

Reproductor de CD
Abra el panel frontal
Presione [OPEN] para abrir el panel
delantero.
Inserción del disco
Cierre el panel frontal automáticamente,
y entonces se iniciará la reproducción.
Selección de canciones
[►► ] : Avanza a la canción siguiente.
[«] : Retrocede al principio de la
canción actual. (Presiónelo dos
veces)
Para expulsar el disco
presione [^]
Cuando el disco CD está
dentro del reproductor.
Presione [SOURCE] para cambiar la fuente de
la forma siguiente.
Cambio de visualización
90
CQ-DRX900U
--------------
Búsqueda de canciones
Presione y mantenga presionado
^
Presione [DISP] para conmutar la indicación de
la pantalla como sigue.
Número de canción Tiempo de reproducción
[►► ] : Avance rápido
[-♦^] : Inversión rápida
Visualización normal
Visualización del analizador de espectro de puntos
Visualización de la hora
Page 91

Varias formas de audición
Reproducción de
exploración
Se reproducen los primeros 10
segundos de cada canción del
disco en secuencia.
Presione SCAN]
^1"
Cuando termine la exploración de
todas las canciones, el programa
original empezará a reproducirse
desde el principio.
Presione [SCAN] nuevamente para
cancelar.
i
Precauciones:
• No empuje con fuerza hacia abajo la placa del panel extraíble y no ponga nada mientras esté abierta, porque podría
dañarse.
• No emplee discos CD con formas irregulares (En forma de corazón, Octagonal).
CQ-DRX900U
91
Page 92

Cambiador de CD
Nota :
Las funciones del cannbiador de CD están diseñadas para el cambiador de CO Panasonic opcional.
Modo del cambiador de CD
Presione [SOURCE] para cambiar al
modo del cambiador de CD.
Selección de discos
[A] : Disco anterior.
[V] : Disco siguiente.
Seiección de canciones
[►► ] : Avanza a la canción siguiente.
: Retrocede al principio de la
canción actual. (Presiónelo dos
veces)
Cambio de
visualización
Presione [DISP] para
conmutar la indicación de
la pantalla como sigue.
Búsqueda de canciones
Presione y mantenga presionado
[►► ]: Avance rápido
[-♦^i: Inversión rápida
Número Número Tiempo de
de disco de canción reproducción
Visualización normal
M ^ M ™ £3
Visualización del analizador de espectro de puntos
Visualización de la hora
92
CQ-DRX900U
Page 93

Varias formas de audición
Exploración de
cancións
Se reproducen los primeros 10
segundos de cada canción del
disco en secuencia.
Exploración de
discos
Se reproduce la primera can
ción de todos los discos de los
cartuchos durante 10 segundos
cada una.
Reproducción aleatoria
de canciones
Se reproducirá una selección
aleatoria de música de todas las
canciones disponibles de todos
los discos que hay en el car
tucho.
Reproducción aleatoria
Presione [SCAN]
Presione y mantenga
presionado [SCAN] durante
más de 2 segundos.
Presione [RAND]
Cuando termine la exploración de
todas las canciones, el programa
original empezará a reproducirse
desde el principio.
Presione de nuevo [SCAN] para
cancelarlo.
Cuando termine la exploración de
todas las canciones, el disco
original empezará a reproducirse
desde el principio.
Presione y mantenga presionado
I
[SCAN] otra vez para cancelarlo.
Presione de nuevo [RAND] para
cancelarlo.
del disco
Se reproducirá una selección
aleatoria de música de todas las
canciones disponibles en el dis
co actual.
Cómo repetir
una canción
Se repite la canción actual.
Repetición de
un disco
Repita la selección del disco
actual.
Presione y mantenga
presionado [RAND] durante
más de 2 segundos.
Presione [REP]
Presione y mantenga
presionado [REP] durante
más de 2 segundos.
1
Presione y mantenga presionado
[RAND] otra vez para cancelarlo.
Presione de nuevo [REP] para
cancelarlo.
1
Presione y mantenga presionado
[REP] otra vez para cancelarlo.
CQ-DRX900U
93
Page 94

Funciones útiles
Visualización del
analizador de
especto
Ajuste inicial; WAVE
Variedad; 11 tipos
Visualice el margen
de ajuste del brillo
Mantenga
Presione
silenciamiento/
atenuador
(intensidad luminosa)
Ajuste inicial;
DIMMER LEV2; Cuando las luces de
paso laterales están encendidas
pase
DIMMER LEVS; Cuando las luces de
I DIM
paso laterales están apagadas
I pase
Margen de ajuste; LEV 1 a LEV 3
B Man
Reducción del
volumen
(silenciamiento/
atenuador)
El volumen se reduce dependiendo de
si usted ha ajustado MUTE
(silenciamiento) o ATT (atenuador).
(*=> página 104)
94
Ajuste inicial: Desactivado
J
CQ-DRX900U
Page 95

o Presione [@]
SPEANA SEL
"V
O Presione [>] para cambiar la visualización del analizador de espectro.
([<]: Dirección opuesta)
WAVE, AURORA, —, BLANK SPEANA. ALL DISP OFF, etc.
Nota:
BLANK SPEANA
Desactive sólo la visualización del
analizador de espectro.
Desactive toda la visualización.
(El visualizador se activa durante las o
peraciones. Luego, el visualizador se
desactiva 5 segundos después de las
operaciones.
Más claro
o Presione y mantenga presionado
[0] (DIMMER)
ALL DISP OFF
O Presione [
0
] (DIMMER) para cambiar el nivel de la intensidad
luminosa de la forma siguiente.
DIMMER LEVS
i
DIMMER SEL
DIMMER LEV 2
intermedio
I
DIMMER LEVI
Presione [MUTE] (ATT) para activar y desactivar el modo MUTE (modo ATT).
Cuando MUTE está ajustado_________________________________________________________
Más oscuro
MUTE desactivado
A —
I
........
Nivel de volumen normal I
MUTE activado Sin sonido i
Cuando ATT está ajustado
ATT desactivado
ATT activado................. Reducción de volumen a 1/10 parte del nivel anterior.
__________________________________________________________
.............
Nivel de volumen normal
---1--
__
—:::—I—^
CQ-DRX900U
95
Page 96

Ajustes del sonido y Espacio sonoro
Mode normal
T
HUMAN EQ
GRAPHIC EQ
-------î---------
BAL//FAD
POSITION SEL
SUPER BASS
-------
1
SOBB SELECT
CENTER LEVEL
h
Presione [SEL]
para seleccionar
una operación
Calidad del tono
(ecualizador humano/HEQ)
Ya hay preparados 59 patrones, por lo que
podrá realizar con facilidad ajustes
complicados.
Ajuste inicial: FLAT(O)
Margen de ajuste: 1 - 3 para cada patrón (49
patrones)
Registro de su calidad de tono deseada
(ecualizador gráfico/GEO)
96
Puede ajustarse el nivel de cada una de las 7
bandas de frecuencias, desde graves a
agudos. Pueden almacenarse hasta 5 tipos de
ajustes de la calidad del tono en la memoria.
(Memoria de préajustes 1 a 5)
Ajuste inicial; 0 para cada frecuencia
Margen de ajuste: -12 a +12 dB en pasos de 2
dB
Configuración
CQ-DRX900U
Page 97

Presione [SEL]
Configuración
[A] ; Graves fuertes
[V]: Graves ligeros
[>] : Agudos nítidos
[<] : Agudos suaves
Recreación
Conducción agradable
Suave ^
Tranquilizarse
Concentrarse
• Para relajarse
■ Para renovarse
Escuchar música
Nítido
Rítmico
Despertarse
Memorización
Después de haber seleccionado uno de los números
de preajuste 1 - 5,
© Presione y mantenga presionado [SEL] durante
más de 2 segundos para cambiar el modo de
preajuste del ecualizador gráfico.
Elija
GRAPHIC EQ
Presione [A] para
seleccionar uno de los
números de preajuste
1 - 5, y se activará la
calidad del tono p
reajustada.
([V]; Dirección opuesta)
@ Ajuste el nivel para cada frecuencia.
Presione [>] para cambiar la frecuencia.
80-> 160->320
Î
____________
([<] : Dirección opuesta)
[A] : Nivel superior
[V] : Nivel inferior
© Presione [SEL] para almacenar el nivel.
640 -♦ 1,6k -> 4k -♦ 10k (Hz)
Llamada del ajuste recomendado
En el número de preajuste 6 ya se ha almacenado una
calidad de tono sin graves distorsionados y de cómoda
audición.
Presione [A] o [V] para seleccionar el número de
preajuste 6.
Nota: No podrá almacenar nada en el número de
preajuste 6.
CQ-DRX900U
97
Page 98

Ajustes del sonido y Espacio sonoro
Balance izquierdo/der-
echo Y delanteroArasero
uz
CENTER LEVEL
Mode normal
HUMAN EQ
GRAPHIC EQ
BAL7/FAD
POSITION SEL
SUPER BASS
l
SDBB SELECT
t;
.
Presione [SEL]
para seleccionar
una operación
Podrá ajustar el balance del sonido entre los
altavoces delanteros, traseros, derechos e
izquierdos.
Ajuste inicial:
B (Balance): CNT (Centro)
F (balance dei/tr.: CNT (Centro)
Margen de ajuste: 15 niveles para cada uno
Imagen sonora
(posición)
Podrá ajustar la imagen sonora de acuerdo
con la posición de audición.
Ajuste inicial: POSI OFF
Altavoces traseros
para el altavoz de
98
Configuración
CQ-DRX900U
graves secundario
(altavoz de control de súper graves/SBC-SW)
Podrá utilizar el altavoz trasero conectado al
amplificador incorporado como altavoz de
graves secundario que emite sólo graves.
Ajuste inicial: Desactivado
Acentuación de graves
(Graves súper dinámicos/SDBB)
Los graves acentuados salen por los 4
altavoces conectados a! amplificador
incorporado, para poder disfrutar de un
sonido con graves fuertes.
Ajuste inicial: Desactivado
J
K
1
Ì
Page 99
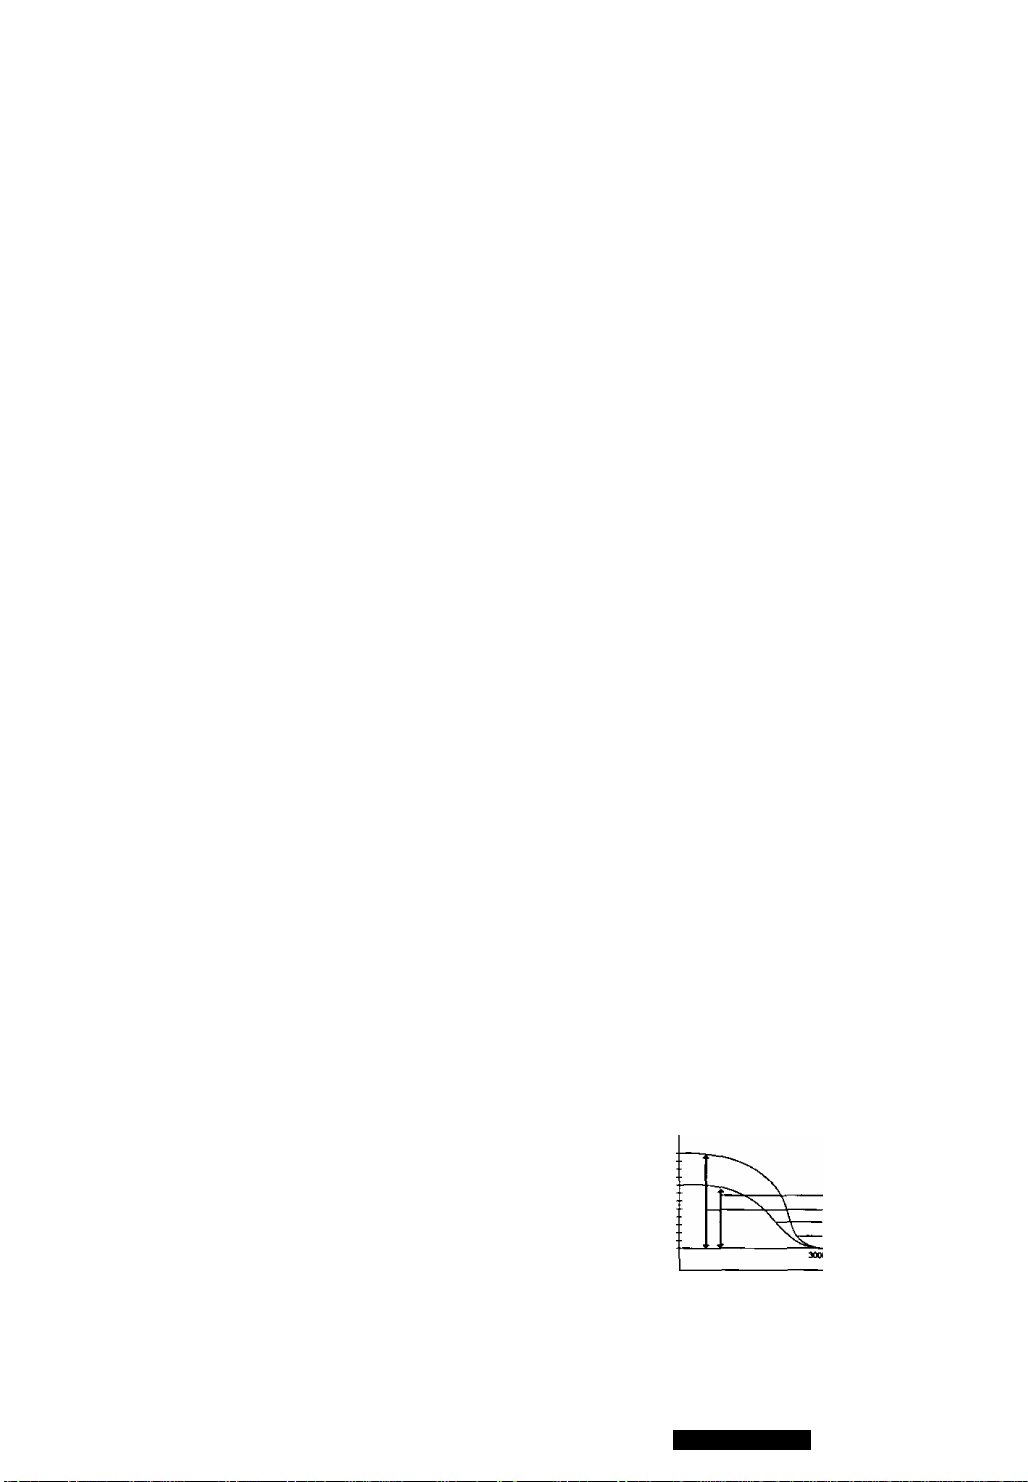
Presione [SEL]
Configuración
"V
[A]: Acentuación frontal
Elija
[V]; Acentuación trasera
BAL//FAD
[>] : Acentuación derecha
[<] : Acentuación izquierda
L
'V
Presione [>] para cambiar de la forma siguiente. (Kl Dirección opuesta)
Elija
Elija
POSITION SEL
SUPER BASS
r->OFF
i
RIGHT
i
LEFT
i
FRONT
i
REAR
-A.
'V'
[>] : Activado. Acentuación de graves (Monofònico)
[<] ; Desactivado... Salida normal (Estéreo)
• Ajuste el nivel de salida del altavoz de graves secundario página 102).
Está también interconectado con la salida de preamplificador (salida de
altavoz trasero).
• Serán inválidos los ajustes de BAL7FAD, POSITION, SDBB y de Space
(espacio) para cada salida de altavoz trasero.
.............
..............
..............
.............
.............
Todos los asientos
Delantero derecho
Delantero izquierdo
Delanteros
Traseros
SBC-SW ON
Elija
SDBB SELECT
■V"
Presione [>] para cambiar de la forma siguiente. ([<]: Dirección opuesta)
>SDBB desactivado
Salida normal
1
SDBB Tipo 1
i
SDBB Tipo 2
i
SDBB Tipo 3
i
SDBB Tipo 4
A-
Variable, bajo s
Variable, alto
Fijo, bajo
Fijo, alto
£
3
• Variable: Acentuación de graves junto
con el volumen
• Fi¡o: Acentuación de graves con
margen fijo
CQ-DRX900U
Tipo 1 (Variable: bajo)
Tipo 2 (Variabl«: alto)
Tipo 3 (Rio: bajo)
Tipo 4 (Fijo: ano)
Frecuencia
99
Page 100

Ajustes del sonido y Espacio sonoro
Mode normal
HUMAN EQ
l
GRAPHIC EQ
T
BAL//FAD
POSITION SEL
---------Ì
SUPER BASS
I
SDBB SELECT
' i ' "
I CENTER LEVEL ~ |
Presione [SEL]
para seleccionar
CENTER LEVEL
Salida de altavoz
central
La imagen del sonido se acentúa y orienta
hacia ei centro tirando hacía delante.
Ajuste el volumen del altavoz central
(nivel de volumen del altavoz central)
Ajuste inicial: 0
Margen de ajuste: -po, -lo a +10
en pasos de 2 dB
(decibelios)
100
Configuración
Hacía arriba Hacia abajo
CQ-DRX900U
Ajuste la sensación de distancia
(tiempo de retardo del altavoz central)
Ajuste inicial: 0
Margen de ajuste: - 10a + 10
1 paso = 0,0003 segundos
J
 Loading...