

Page 1
Wireless Display
Drahtloses Display
Ecran Déporté Sans Fil
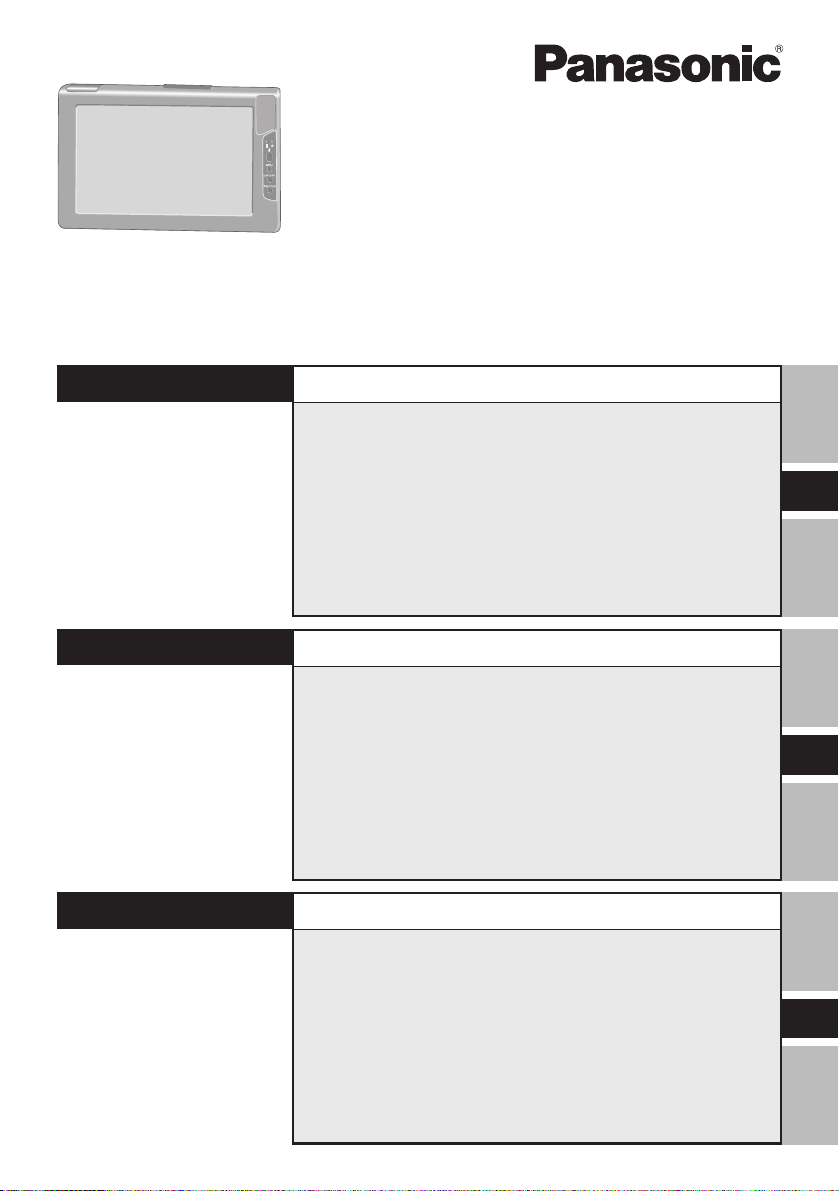
CF-VDW07BH
OPERATING INSTRUCTIONS
BEDIENUNGSANLEITUNG
MODE D’EMPLOI
ENGLISH
DEUTSCH
FRANÇAIS
OPERATING INSTRUCTIONS
First-time Operation ........................................... 14
Starting Up/Shutting Down ................................ 20
Touchscreen ....................................................... 22
Software Keyboard ............................................ 25
Battery Power ..................................................... 27
Setting the Wireless Display ............................. 31
Changing the Wireless Display Settings .......... 35
Capturing the Screen ......................................... 38
Troubleshooting ................................................. 39
Specifications ..................................................... 41
BEDIENUNGSANLEITUNG
Erste Inbetriebnahme......................................... 44
Starten/Abschalten ............................................ 51
Berührungsempfindlicher Bildschirm .............. 53
Software-Tastatur............................................... 56
Batteriestrom ...................................................... 58
Einstellen des drahtlosen Displays .................. 62
Änderung der Einstellungen des drahtlosen Displays .
Bildschirmerfassung.......................................... 69
Störungsbeseitigung ......................................... 70
Technisch Daten ................................................ 72
66
MODE D’EMPLOI
Première utilisation ............................................ 74
Mise en marche/Arrêt ......................................... 81
Ecran tactile ........................................................ 83
Clavier logiciel .................................................... 86
Alimentation par batterie ................................... 88
Configuration de l'écran déporté sans fil ......... 92
Modification des paramètres de l’écran déporté sans fil ...
Capture de l’écran .............................................. 99
Dépannage ........................................................ 100
Spécifications ................................................... 102
E
G
F
96
Page 2

Information to the User
This product and your Health
This product, like other radio devices, emits radio frequency electromagnetic energy. The
level of energy emitted by this product however is far much less than the electromagnetic
energy emitted by wireless devices like for example mobile phones.
Because this product operates within the guidelines found in radio frequency safety standards and recommendations, we believe this product is safe for use by consumers. These
standards and recommendations reflect the consensus of the scientific community and result
from deliberations of panels and committees of scientists who continually review and interpret the extensive research literature.
In some situations or environments, the use of this product may be restricted by the proprietor of the building or responsible representatives of the organization. These situations may
for example include:
Using this product on board of airplanes, or
In any other environment where the risk of interference to other devices or services is
perceived or identified as harmful.
If you are uncertain of the policy that applies on the use of wireless devices in a specific
organization or environment (e.g. airports), you are encouraged to ask for authorization to
use this product prior to turning on the product.
Regulatory Information
We are not responsible for any radio or television interference caused by unauthorized modification of this product. The correction of interference caused by such unauthorized modification will be the responsibility of the user. We and its authorized resellers or distributors are
not liable for damage or violation of government regulations that may arise from failing to
comply with these guidelines.
Declaration of Conformity (DoC)
“Hereby, we and Panasonic Service Europe GmbH (PSE), declares
that this Personal Computer is in compliance with the essential re-
quirements and other relevant provisions of the Directive 1999/5/EC.”
Hint:
If you want to get a copy of the original DoC of our products which relates to the R&TTE,
please contact to our web address: http://doc.panasonic-tc.de
-------------------------------------------------------------------------------------------------------------
Compliance Notice - CE Mark
This equipment is in conformance with the requirements of the European Council Directive
listed below:
73/23/EEC Low Voltage Directive with amendment 93/68/EEC
89/336/EEC EMC Directive with amendments 92/31/EEC and 93/68/EEC
1999/5/EC
-------------------------------------------------------------------------------------------------------------
2
Page 3

Informationen für den Benutzer
Dieses Produkt und Ihre Gesundheit
Wie viele andere Radiogeräte strahlt auch dieses Gerät hochfrequente elektromagnetische
Energie aus. Jedoch ist der Pegel der von diesem Gerät ausgestrahlten Energie viel niedriger
als die elektromagnetische Energie, die von drahtlosen Geräten, wie zum Beispiel
Mobiltelefonen, ausgestrahlt wird.
Da dieses Gerät die Richtlinien für die Sicherheitsnormen und Empfehlungen für Geräte mit
Hochfrequenzausstrahlung beachtet, sind wir der Überzeugung, dass das Gerät kein
Gesundheitsrisiko für die Benutzer darstellt. Die erwähnten Normen und Empfehlungen
spiegeln den Konsensus der wissenschaftlichen Gemeinschaft (Scientific Community) wider
und resultieren aus den Erörterungen von wissenschaftlichen Gremien und Konferenzen,
die die umfangreiche Forschungsliteratur kontinuierlich durchforsten. In gewissen Situationen
oder Umgebungen kann die Verwendung dieses Produktes durch den Hauseigentümer oder
den verantwortlichen Stellvertreter einer Organisation eingeschränkt werden. Dies gilt
möglicherweise in den folgenden Situationen:
Bei Verwendung dieses Produktes an Bord von Flugzeugen, oder
In anderen Umgebungen, in denen der Gebrauch des Gerätes das Risiko von Funkstörungen
anderer Geräte in sich birgt oder in denen der Gebrauch des Gerätes störend wirken kann.
Falls Sie nicht sicher sind, welche Regelungen in den einzelnen Fällen und Umgebungen
(beispielsweise auf einem Flughafen) für den Gebrauch von drahtlosen Geräten gelten,
erkundigen Sie sich hierüber bei den zuständigen Stellen, bevor Sie dieses Gerät einschalten.
Regulative Information
Wir sind unter keinen Umständen für Radio- und Fernsehstörungen verantwortlich, die auf
die nicht genehmigte Abänderung dieses Produkts zurückzuführen sind. Die Behebung der
Störungen, die durch die nicht genehmigte Abänderung dieses Produktes verursacht werden,
fallt in den Verantwortungsbereich des Benutzers. Weder wir selbst noch die von uns
autorisierten Verkäufer bzw. Vertriebe haften für Schäden oder Verstöße gegen die gesetzlichen
Verordnungen, die auf die Nichtbefolgung dieser Vorschriften zurückzuführen sind.
Konformitätserklärung (Declaration of Conformity, DoC)
“Wir und die Panasonic Service Europe GmbH (PSE) erklären hiermit,
dass dieser Personal Computer den Anforderungen und anderen
relevanten Bedingungen der EG-Richtlinie 1999/5/EG entspricht.”
Hinweis:
Wenn Sie eine Kopie der Original-Konformitätserklärung in Bezug auf die R & TTERichtlinie erhalten möchten, besuchen Sie unsere Webseite: http://doc.panasonic-tc.de
-------------------------------------------------------------------------------------------------------------
Konformitätserklärung - CE-Zeichen
Dieses Gerät erfüllt die Anforderungen der unten aufgeführten Richtlinien des Europäischen Rates:
73/23/EWG Niederspannungsrichtlinie (revidiert durch 93/68/EWG)
89/336/EWG Richtlinie über die elektromagnetische Verträglichkeit (revidiert durch 92/31/
EWG und 93/68/EWG)
1999/5/EC
-------------------------------------------------------------------------------------------------------------
3
Page 4

Informations destinées à l’utilisateur
Cet appareil et votre santé
Cet appareil, comme les autres dispositifs radio, émet une énergie électromagnétique de fréquence
radio. Le niveau d’énergie émis par cet appareil est cependant bien inférieur à l’énergie électromagnétique
émise par certains dispositifs sans fil comme, par exemple, les téléphones portables.
Cet appareil fonctionnant dans les limites des directives concernant les normes et
recommandations de sécurité des fréquences radio, nous pensons que l’utilisation de cet
appareil ne pose aucun risque pour les consommateurs. Ces normes et recommandations
reflètent le consensus de la communauté scientifique et découlent des délibérations de commissions et comités de scientifiques qui examinent continuellement et interprètent les documents de travaux approfondis. Dans certaines situations ou certains lieux, l’utilisation de cet
appareil peut être restreinte par le propriétaire du bâtiment ou les responsables de
l’organisation. Par exemple, ces situations peuvent inclure :
L’utilisation de cet appareil à bord d’un avion, ou
Dans un autre milieu où le risque d’interférence avec d’autres dispositifs ou services est
perçu ou identifié comme nuisible.
Si vous n’êtes pas sûr de la politique qui s’applique à l’utilisation de dispositifs sans fil dans
une organisation ou lieu spécifique (un aéroport, par exemple), il est conseillé de demander
l’autorisation d’utiliser cet appareil avant de le mettre sous tension.
Informations sur la réglementation
Nous ne serons pas tenus responsables de parasites radioélectriques ou de télévision provoqués par
une modification non autorisée de cet appareil. La rectification des parasites provoqués par une telle
modification non autorisée sera la responsabilité de l’utilisateur. Nous, et les revendeurs ou distributeurs
mandatés de l’appareil ne seront pas tenus responsables de dommages ou violations de règlements
gouvernementaux qui peuvent se produire du fait du non respect de ces directives.
Déclaration de conformité
“Par le présent document, nous et le Panasonic Service Europe GmbH (PSE),
déclarons que cet ordinateur personnel est conforme aux prescriptions
fondamentales et aux autres dispositions appropriées de la Directive 1999/5/EC.”
Suggestion:
Si vous souhaitez obtenir une copie de l’exemplaire original de la Déclaration de Conformité
de nos produits qui ont un rapport avec les R&TTE, veuillez vous rendre sur notre site Web
à l’adresse: http://doc.panasonic-tc.de
-------------------------------------------------------------------------------------------------------------
Avis de conformité - Marque CE
Cet équipement est conforme aux spécifications des Directives de la Commission Européenne
mentionnées ci-dessous:
73/23/EEC Directive sur la basse tension y compris la modification 93/68/EEC
89/336/EEC Directive CEM y compris les modifications 92/31/EEC et 93/68/EEC
1999/5/EC
-------------------------------------------------------------------------------------------------------------
Pour la France
Bande de fréquences restreinte: Lors de l’utilisation de cet appareil sur le territoire français,
vous ne pouvez le faire qu’en utilisant les bandes de fréquences 10 et 11 (respectivement
2.457 MHz et 2.462 MHz). L’utilisation de cet appareil sur une autre bande prise en charge
par celui-ci est interdite. Une utilisation à l’extérieur n’est pas autorisée.
4
Page 5

For U.S.A.
Federal Communications Commission
Radio Frequency Interference Statement
Note: This equipment has been tested and found
to comply with the limits for a Class B digital
device, pursuant to Part 15 of the FCC Rules.
These limits are designed to provide reasonable
protection against harmful interference in a
residential installation. This equipment generates,
uses and can radiate radio frequency energy and,
if not installed and used in accordance with the
instructions, may cause harmful interference to
radio communications. However, there is no
guarantee that interference will not occur in a
particular installation. If this equipment does cause
harmful interference to radio or television
reception, which can be determined by turning the
equipment off and on, the user is encouraged to
try to correct the interference by one or more of
the following measures:
Reorient or relocate the receiving antenna.
Increase the separation between the equipment and receiver.
Connect the equipment into an outlet on a
circuit different from that to which the receiver is connected.
Consult the Panasonic Service Center or an
experienced radio/TV technician for help.
Warning
To assure continued compliance, use only
shielded interface cables when connecting to a
computer or peripheral. Also, any changes or
modifications not expressly approved by the
party responsible for compliance could void the
user’s authority to operate this equipment.
This device complies with Part 15 of the FCC
Rules. Operation is subject to the following
two conditions:
(1) This device may not cause harmful
interference, and
(2) This device must accept any interference
received, including interference that may
cause undesired operation.
Responsible Party: Matsushita Electric
Corporation of America
One Panasonic Way
Secaucus, NJ 07094
Tel No: 1-800-LAPTOP-5
(1-800-527-8675)
FCC RF Exposure Warning:
This equipment complies with FCC radiation
exposure limits set forth for an uncontrolled
environment.
This equipment must be installed and operated in accordance with provided instructions.
This transmitter must not be co-located or
operated in conjunction with any other antenna or transmitter.
Notice for the products using LCD
This product uses one or more fluorescent
lamps containing a small amount of mercury.
It also contains lead in some components.
Disposal of these materials may be regulated
in your community due to environmental
considerations. For disposal or recycling information please contact your local authorities, or the Electronics Industries Alliance:
<http://www.eiae.org.>
For Canada
Industry Canada
This product complies with RSS210 of Industry Canada.
Operation is subject to the following two conditions:
(1) this device may not cause interference, and
(2) this device must accept any interference, including interference that may cause undes-
ired operation of the device.
5
Page 6

For U.K.
FOR YOUR SAFETY PLEASE READ THE FOLLOWING TEXT CAREFULLY
This appliance is supplied with a moulded three pin mains plug for your safety and convenience.
A 3 amp fuse is fitted in this plug.
Should the fuse need to be replaced please ensure that the replacement fuse has a rating of 3
amps and that it is approved by ASTA or BSI to BS 1362.
Check for the ASTA mark
If the plug contains a removable fuse cover you must ensure that it is refitted when the fuse
is replaced.
If you lose the fuse cover the plug must not be used until a replacement cover is obtained.
A replacement fuse cover can be purchased from your local Panasonic Dealer.
IF THE FITTED MOULDED PLUG IS UNSUITABLE FOR THE SOCKET OUTLET IN
YOUR HOME THEN THE FUSE SHOULD BE REMOVED AND THE PLUG CUT OFF
AND DISPOSED OF SAFELY.
THERE IS A DANGER OF SEVERE ELECTRICAL SHOCK IF THE CUT OFF PLUG IS
INSERTED INTO ANY 13 AMP SOCKET.
If a new plug is to be fitted please observe the wiring code as shown below.
If in any doubt please consult a qualified electrician.
Important
The wires in this mains lead are coloured in accordance with the following code:
Blue: Neutral
Brown: Live
As the colours of the wires in the mains lead of this apparatus may not correspond with the
coloured markings identifying the terminals in your plug, proceed as follows:
The wire which is coloured Blue must be connected to the terminal which is marked with the
letter N or coloured BLACK.
The wire which is coloured Brown must be connected to the terminal which is marked with
the letter L or coloured RED.
Under no circumstances should either of these wires be connected to the earth terminal of
the three pin plug, marked with the letter E or the Earth Symbol
The mains plug on this equipment must be used to disconnect the mains power.
Please ensure that a socket outlet is available near the equipment and shall be easily accessible.
How to replace the fuse
Open the fuse compartment with a screwdriver and replace the fuse.
Warnings
This equipment is not designed for connection to an IT power system.
(An IT system is a system having no direct connections between live parts and Earth; the
exposed-conducive-parts of the electrical installation are earthed.
An IT system is not permitted where the computer is directly connected to public supply
systems in the U.K.)
Disconnect the mains plug from the supply socket when the computer is not in use.
This equipment is produced to BS800/1983.
6
A S A
or the BSI mark on the body of the fuse.
.
Page 7
Precautions (Battery Pack)
Care should be exercised with regard to the
following in order to avoid the possibility
of overheating, fire, or damage.
Avoid Heat
Do not throw the battery pack
into a fire or expose it to excessive heat.
Keep Articles Away
Do not place the battery pack together with articles such as necklaces or hairpins when carrying or
storing.
Do Not Disassemble
Do not insert sharp objects into the
battery pack, expose it to bumps
or shocks, deform, disassemble, or
modify it.
Do Not Short
Do not short the positive (+) and
negative (-) contacts.
Avoid Extreme Heat, Cold and
Direct Sunlight
Do not charge, use or leave the
battery pack for extended periods
where it will be exposed to direct
sunlight, in a hot place (in an automobile on a sunny day, for example), or in a cold place.
Do Not Use With Any Other
Equipment
The battery pack is rechargeable
and was intended for the specified
equipment or charger. Do not use
it with a equipment other than the
one for which it was designed.
Do Not Put into a Microwave
Do not put the battery pack into a
microwave oven or a pressurized
chamber.
Stop Using
Should the battery emit an abnormal odor, become hot to the touch,
become discolored, change shape,
or become in any way different
from normal, remove it from the
equipment and stop using it.
Do not touch the terminals on the battery
pack. The battery pack may no longer function properly if the contacts are dirty or
damaged.
Do not expose the battery pack to water, or
allow it to become wet.
If the battery pack will not be used for a
long period of time (a month or more),
charge or discharge (use) the battery pack
until the remaining battery level becomes
30% to 40% and store it in a cool, dry place.
This equipment prevents overcharging of
the battery by recharging only when the
remaining power is less than approx. 95%
of capacity.
The battery pack is not charged when the
equipment is first purchased. Be sure to
charge it before using it for the first time.
When the AC adaptor is connected to the
equipment, charging begins automatically.
Should the battery leak and the fluid get into
your eyes, do not rub your eyes. Immediately flush your eyes with clear water and
see a doctor for medical treatment as soon
as possible.
7
Page 8
NOTE
The battery pack may become warm during recharging or normal use. This is completely normal.
Recharging will not commence outside of the allowable temperature range (0 °C to
45 °C {32°F to 113 °F})
satisfied, charging begins automatically. Note that the recharging time varies based
on the usage conditions. (Recharging takes longer than usual when the temperature is
10 °C {50 °F} or less.)
If the temperature is low, the operating time is shortened. Only use the equipment
within the allowable temperature range.
The battery pack is a consumable item. If the amount of time the equipment can be run
off a particular battery pack becomes dramatically shorter and repeated recharging do
not restore its performance, the battery pack should be replaced with a new one.
When a spare battery pack is to be carried in a pocket or bag, it is recommended that
it be placed in a plastic bag so that its contacts are protected.
Always power off the equipment when it is not in use. Leaving the equipment on
when the AC adaptor is not connected will exhaust the remaining battery capacity.
page 27. Once the allowable range requirement is
Precaution
Avoiding low-temperature burns
Avoid more than casual contact with any heat producing area of the equipment,
AC adaptor, and any option or accessory you use with it. Even low heat, if
warmer than body temperature, can cause a burn, if the skin is exposed to the
heat source for a long enough period of time.
[Illustration in this manual]
Windows XP indicates Microsoft® Windows® XP Professional Operating System.
Windows 2000 indicates Microsoft® Windows® 2000 Professional Operating System.
The “CD/DVD drive” is a description about drives, such as DVD-ROM, CD-ROM, CDR/RW, and DVD-ROM & CD-R/RW drives.
Windows XP screens are used in this manual when no specific OS notes are required.
Windows XP
The procedure in this manual uses the method or view of the Windows XP default setting
(not Classic view or Classic Start menu etc.).
®
Microsoft
in the United States and/or other countries.
RSA BSAFE Crypto-C of RSA Security Inc. has been installed.
BSAFE and RSA are registered trademarks of RSA Security Inc. in the United States and
other countries.
Panasonic® is a registered trademark of Matsushita Electric Industrial Co., Ltd.
8
, MS-DOS® and Windows® are registered trademarks of Microsoft Corporation
Page 9
Vorsichtsmaßnahmen (Batteriepackung)
In Bezug auf Folgendes ist mit Vorsicht
vorzugehen, um die Möglichkeit einer
Überhitzung des Gerätes, eines Brandes bzw.
einer Beschädigung des Gerätes zu vermeiden.
Hitze vermeiden
Batteriepackungen nicht in ein
offenes Feuer werfen oder
übermäßiger Hitze aussetzen.
Von Metallartikeln fernhalten
Die Batteriepackungen nicht
zusammen mit Artikeln wie
beispielsweise Halsbändern oder
Haarnadeln aufbewahren oder tragen.
Nicht zerlegen
Keine scharfen Objekte in die
Batteriepackung ein-führen oder die
Batteriepackung Stößen oder
ruckartigen Bewegungen aussetzen,
die Batteriepackung verformen,
zerlegen oder modifizieren.
Keinen Kurzschluß verursachen
Keinen Kurzschluß an den
positiven (+) und negati-ven (-)
Kontakten verursachen.
Extreme Hitze, Kälte und
direkte Sonnenein-wirkung
vermeiden
Die Batteriepackung nicht für längere
Zeitspannen dort aufbewahren,
verwenden oder lagern, wo sie direktem
Sonnenlicht ausgesetzt ist, oder an
einem warmen Ort (z.B. in einem
Kraftfahrzeug an einem warmen Tag)
oder an einem kalten Ort.
Mit keinem anderen Gerät
verwenden
Die Batteriepackung ist aufladbar
und ist für das spezifizierte Gerät
oder das Ladegerät vorge-sehen.
Nicht für ein Gerät abgesehen von
dem Gerät, für das die
Batteriepackung konzipiert wurde,
verwenden.
Nicht in einen Mikrowellenofen
legen
Die Batteriepackung nicht in einen
Mikrowellenofen oder eine
Druckkammer legen.
Verwendung unterbrechen
Sollte die Batterie einen
ungewöhnlichen Geruch abgeben,
sich warm anfühlen, sich
verfärben, ihre Form ändern oder
auf irgendeine andere Art und
Weise vom normalen Zustand
abweichen, ist sie aus dem Gerät
zu entfernen und nicht weiter zu
verwenden.
Die Anschlußklemmen der Batteriepackung
nicht berühren. Die Batteriepackung
funktioniert ggf. nicht vorschriftsmäßig,
wenn die Kontakte schmutzig oder
beschädigt sind.
Die Batteriepackung keinem Wasser aussetzen
und ebenfalls vermeiden, daß sie naß wird.
Falls die Batteriepackung für längere Zeit
nicht verwendet wird (einen Monat oder
mehr), die Batteriepackung aufladen oder
entleeren (benutzen), bis der verbleibende
Batterieladestand 30 bis 40% beträgt, dann
an einem kühlen, trockenen Ort
aufbewahren.
Dieses Gerät verhindert, daß die Batterie
überladen wird, indem nur dann aufgeladen
wird, wenn die verbleibende Ladeleistung
weniger als ca. 95% beträgt.
Die Batteriepackung ist beim Kauf Ihres Gerätes
nicht aufgeladen. Sicherstellen, daß die Batterie
aufgeladen wird, bevor sie zum ersten Mal
benutzt wird. Wenn der Wechselstromadapter
an das Gerät angeschlossen ist, wird automatisch
aufgeladen.
Sollte ein Leck an der Batterie auftreten und
Flüssigkeit gerät in Ihre Augen, die Augen
nicht reiben. Die Augen sofort mit sauberem
Wasser ausspülen und umgehend ärztliche
Hilfe ersuchen.
9
Page 10
HINWEIS
Die Batteriepackung wird ggf. während des Aufladens oder der normalen Verwendung
warm. Dies ist vollkommen normal.
Das Aufladen wird außerhalb des erlaubten Temperaturbereiches nicht erfolgen (0 °C
bis 45 °C)
beginnt das Aufladen automatisch. Es wird darauf hingewiesen, daß die Aufladezeit
je nach den Benutzungsbedingungen unterschiedlich ist. (Das Aufladen dauert länger
als normal, wenn die Temperatur 10 °C oder weniger beträgt.)
Wenn die Temperatur niedrig ist, wird die Betriebszeit gekürzt. Das Gerät nur innerhalb
des erlaubten Temperaturbereiches benutzen.
Die Batteriepackung ist ein Verbrauchsartikel. Wenn die Zeitspanne, innerhalb der
das Gerät anhand einer spezifischen Batteriepackung betrieben werden kann, besonders
kurz wird und wiederholtes Aufladen die Leistung nicht verbessert, dann muß die
Batteriepackung durch eine neue ersetzt werden.
Wenn eine Ersatzbatteriepackung in einer Jacken- oder Brieftasche getragen werden
soll, dann wird empfohlen, diese Packung in einem Kunststoffbeutel aufzuheben, so
daß ihre Kontakte geschützt sind.
Das Gerät, wenn es nicht verwendet wird, stets ausschalten. Falls das Gerät
eingeschaltet bleibt, während der Wechselstromadapter nicht angeschlossen ist, wird
die übrige Batterieleistung aufgebraucht.
Seite 58. Nachdem die erlaubte Bereichsanforderung erfüllt wurde,
Vorsichtsmaßnahme
Niedertemperatur-Verbrennungen vermeiden
Mehr als vorübergehenden Kontakt mit jeglichen wärmeerzeugenden Bereichen
des Gerätes, des Wechselstromadapters und jeglichen Optionen oder Zubehör,
das hiermit verwendet wird, vermeiden. Selbst geringe Wärme, wenn diese
wärmer als die Körpertemperatur ist, kann Verbrennungen verursachen, wenn
die Haut einer solchen Wärmequelle lange genug ausgesetzt wird.
[Illustration im Manual]
Windows XP steht fur das Microsoft® Windows® XP Professional Betriebssystem.
Windows 2000 steht fur das Microsoft® Windows® 2000 Professional Betriebssystem.
Der Begriff „CD/DVD-Laufwerk“ bezieht sich auf Laufwerke wie DVD-ROM, CDROM, CD-R / RW; kurz: Auf Laufwerke mit optischen Datenträgern.
Wenn keine betriebssystemspezifischen Angaben erforderlich sind, werden Windows
XP-Bildschirmabbildungen (Screenshots) verwendet.
Windows XP
Die Abläufe in diesem Handbuch beziehen sich auf Standard-Verfahren bzw. die StandardAnsicht von Windows XP (nicht klassische Ansicht oder klassisches Startmenü etc.).
Microsoft
poration in den USA und/oder anderen Landern.
Die Anwendung RSA BSAFE Crypto-C der Firma RSA Security Inc. ist in diesem Gerät installiert.
BSAFE und RSA sind eingetragene Warenzeichen der Firma RSA Security Inc. in den USA
und in anderen Ländern.
®
, MS-DOS® und Windows® sind eingetragene Warenzeichen von Microsoft Cor-
Panasonic® ist ein eingetragenes Warenzeichen der Firma Matsushita Electric Industrial Co., Ltd.
10
Page 11
Précautions concernant la batterie
Respectez attentivement les consignes
suivantes afin d’éviter la possibilité de
surchauffe, d’incendie ou de dégât.
Tenez la batterie à l’ácart de la
chaleur
Ne jetez pas la batterie au feu ou
ne la soumettez pas à une chaleur
excessive.
Tenez à l’ácart d’objets divers
Ne placez pas la batterie avec des
objets tels que des colliers ou des
épingles à cheveux pendant le
transport ou le rangement.
Ne démontez pas la batterie
N’insérez pas d’objets pointus
dans la pile. Ne la soumettez pas
aux secousses ou aux chocs. Ne la
démontez pas et n’y apportez
aucune modification.
Ne pas court-circuiter
Ne mettez pas la borne positive (+)
en court-circuit avec la borne
negative (-).
Evitez la chaleur et le froid
extrêmes ainsi que la lumière
directe du soleil
Ne chargez pas, n’utilisez pas ou
ne laissez pas la batterie pendant
des périodes prolongées à des emplacements où elle sera exposée à
la lumière directe du soleil, dans
un endroit chaud (par ex. dans une
voiture par temps ensoleillé), ou
dans un endroit froid.
N’utilisez pas la batterie sur un
autre appareil
La batterie est rechargeable et est
conçue pour un appareil ou
chargeur spécifique. Ne l’utilisez
pas sur un appareil différent de
celui qui lui est attribué.
Ne mettez pas la batterie dans
un four à micro-ondes
Ne mettez pas la batterie dans un
four à micro-ondes ou dans une
chambre de compression.
En cas de problème, arrêtez
d’utiliser la batterie
Si la batterie émettait une odeur
anormale, devenait chaude au
toucher, se décolorait, se déformait
ou changeait d’aspect, enlevez-la
de l’appareil et ne l’utilisez plus.
Ne touchez pas les bornes de la batterie.
La batterie risque de ne pas fonctionner
normalement si les bornes sont sales ou
endommagées.
N’exposez pas la batterie à l’eau et ne la
mouillez pas.
Si vous n’utilisez pas la batterie pendant
une période prolongée, (un mois voire
plus), chargez ou déchargez (utilisez) la
batterie jusqu’à ce que sa capacité restante
se situe entre 30% et 40% et gardez-la dans
un endroit frais et sec.
Cet appareil protège la batterie d’une
éventuelle surchage en commençant la
charge uniquement lorsque la capacité de la
batterie tombe en dessous de 95% environ.
Au moment de l’achat de l’appareil, la
batterie n’est pas chargée. Veillez à la
charger avant d’utiliser l’appareil pour la
première fois. Lorsque l’adaptateur secteur
est branché sur l’appareil, la charge démarre
automatiquement.
Suite à une fuite de la batterie, si du liquide
entrait dans vos yeux, ne frottez pas vos
yeux. Rincez immédiatement vos yeux à
l’eau claire et consultez un docteur le plus
vite possible pour recevoir des soins
médicaux.
11
Page 12
REMARQUE
La batterie peut devenir chaude pendant la charge ou l’utilisation normale. Il s’agit
d’un phénomène tout à fait normal.
La batterie ne se chargera pas si la température ne se situe pas entre 0 °C et 45 °C (
page 88). Lorsque la température retourne dans les limites autorisées, la charge commence automatiquement. Il est important de noter que le temps de charge varie en
fonction des conditions d’utilisation. (La charge dure plus longtemps lorsque la
température est de 10 °C ou moins.)
Lorsque la température est basse, le temps de fonctionnement est plus court. N’utilisez
l’appareil que dans les limites de températures autorisées.
La batterie est un produit à durée de vie limitée. Si le temps d’utilisation de la batterie
par l’appareil se réduit considérablement et si les performances ne sont pas améliorées
même après avoir rechargé à plusieurs reprises la batterie, elle devra être remplacée
par une nouvelle batterie.
Lorsque vous transportez des batteries de rechange dans un bagage, nous vous
recommandons de les mettre dans un sac plastique pour protéger les bornes.
Mettez toujours l’appareil hors tension lorsque vous ne l’utilisez pas. Si vous laissez
l’appareil sous tension alors que l’adaptateur secteur n’est pas branché, vous utiliserez
la capacité restante de la batterie.
Précaution
Evitez les brûlures à basse température
Evitez tout contact prolongé avec des zones de l’appareil dégageant de la chaleur
comme l’adaptateur secteur et tout autre option ou accessoire que vous utilisez
avec l’appareil. Même les basses températures (si supérieures à la température
corporelle) peuvent provoquer des brûlures si la peau est exposée à une source
de chaleur pendant une période suffisamment longue.
[Illustrations de ce manuel]
WindowsXP représente le système d’exploitation Microsoft® Windows® XP Professional.
Windows 2000 représente le système d’exploitation Microsoft® Windows® 2000 Professional.
“Lecteur CD/DVD” est une description sur les lecteurs tels que le lecteur de DVD-ROM, le
lecteur de CD-ROM, le lecteur de CD-R/RW, les lecteurs de DVD-ROM & CD-R/RW.
Les écrans qui sont représentés dans ce manuel, lorsqu’ aucune remarque spécifique sur
les écrans affichés n’est nécessaire, sont ceux de Windows XP.
Windows XP
La procédure dans ce manuel utilise la méthode ou visualisation des réglages par défaut
de Windows XP (Pas Visualisation normale ou menu Démarrer Normal, etc.).
Microsoft
aux États-Unis et/ou dans d’autres pays.
RSA BSAFE Crypto-C de RSA Security Inc. a été installé.
BSAFE et RSA sont des marques déposées de RSA Security Inc. aux Etats-Unis et dans
d’autres pays.
®
, MS-DOS® et Windows® sont des marques déposées de Microsoft Corporation
Panasonic® est une marque déposée de Matsushita Electric Industrial Co., Ltd.
12
Page 13
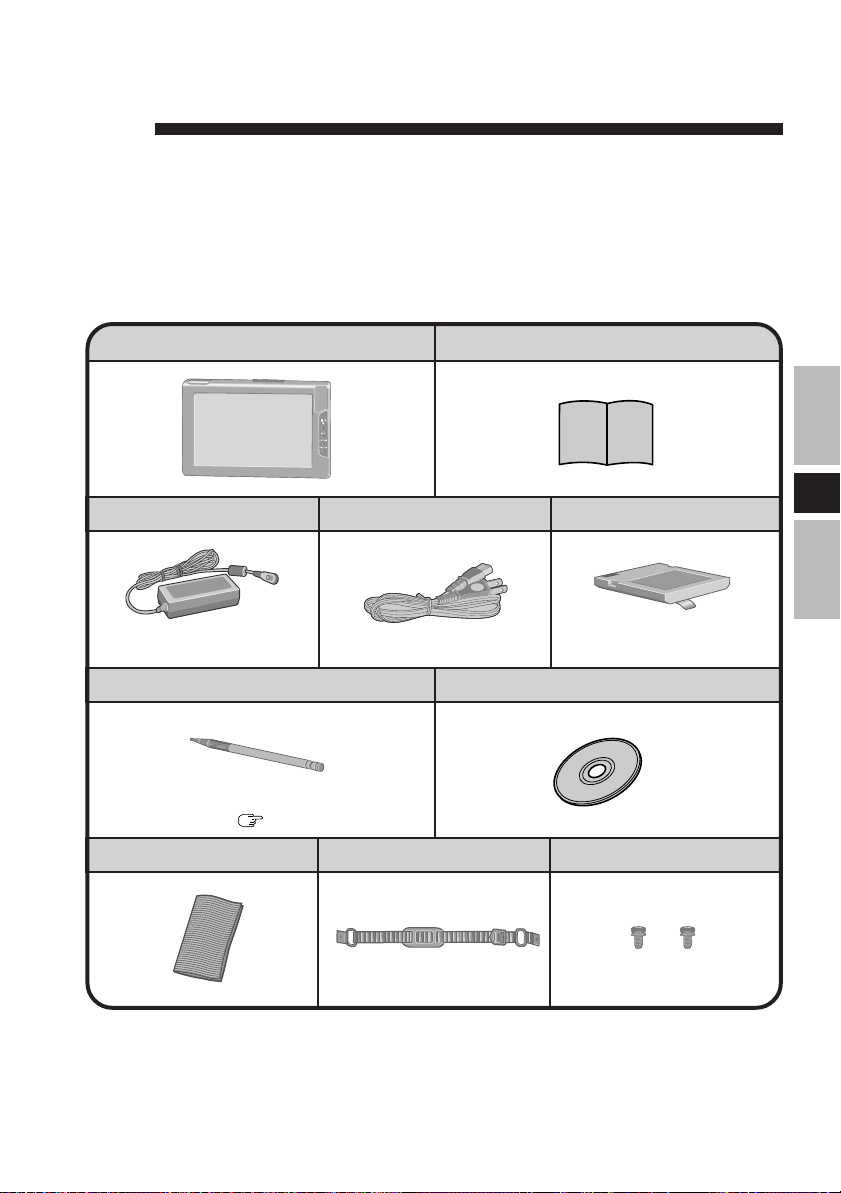
ENGLISH
Thank you for purchasing the wireless display for the Panasonic toughbook computer series.
This wireless display features a touchscreen function, which makes computer operation
possible by simply touching the surface of the wireless display.
Operating Instructions ............ 1Wireless Display........................ 1
AC Adaptor ........... 1
Stylus ......................................... 1
The stylus is in the wireless display at the
time of purchase. (
Soft Cloth .............. 1
page 22)
AC Cord ................ 1
Strap...................... 1
Battery Pack ......... 1
E
Model No : CF-VZSU21Model No : CF-AA1639A
CD-ROM ..................................... 1
Screws .................. 2
13
Page 14
First-time Operation
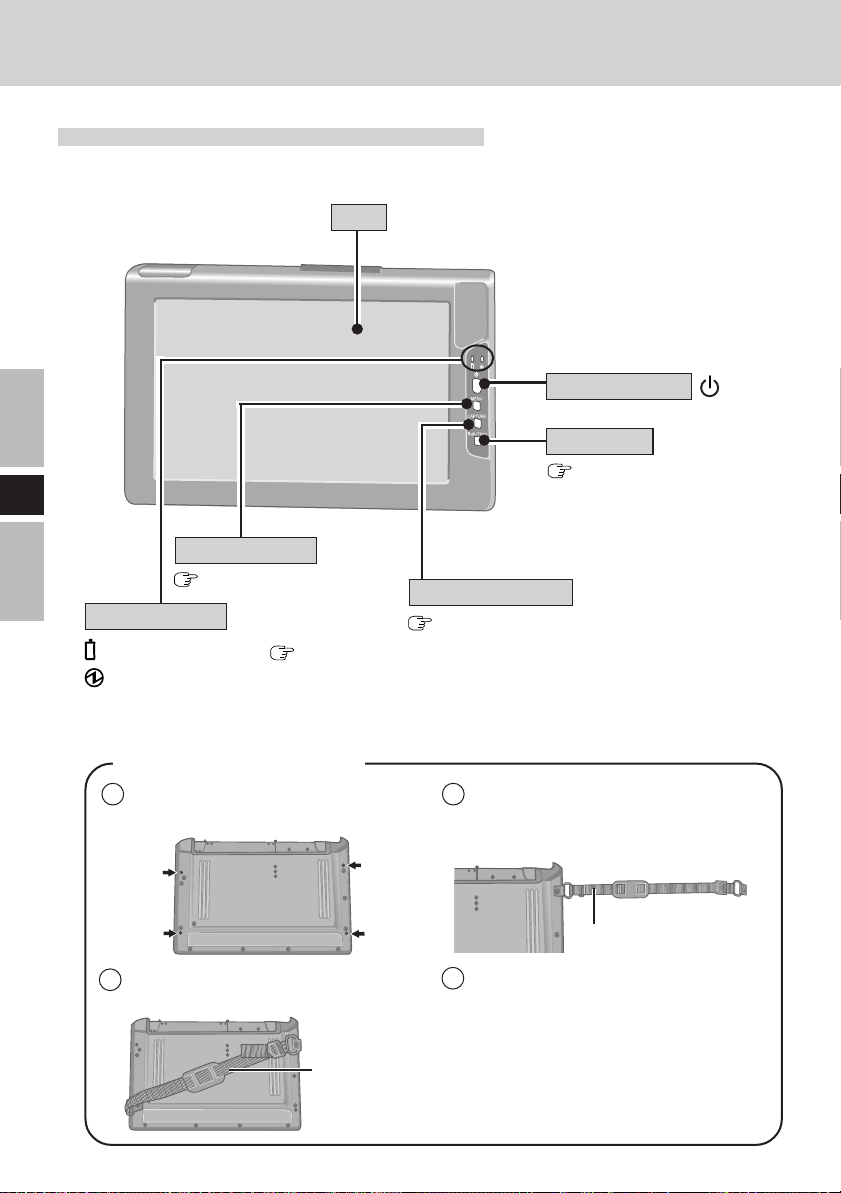
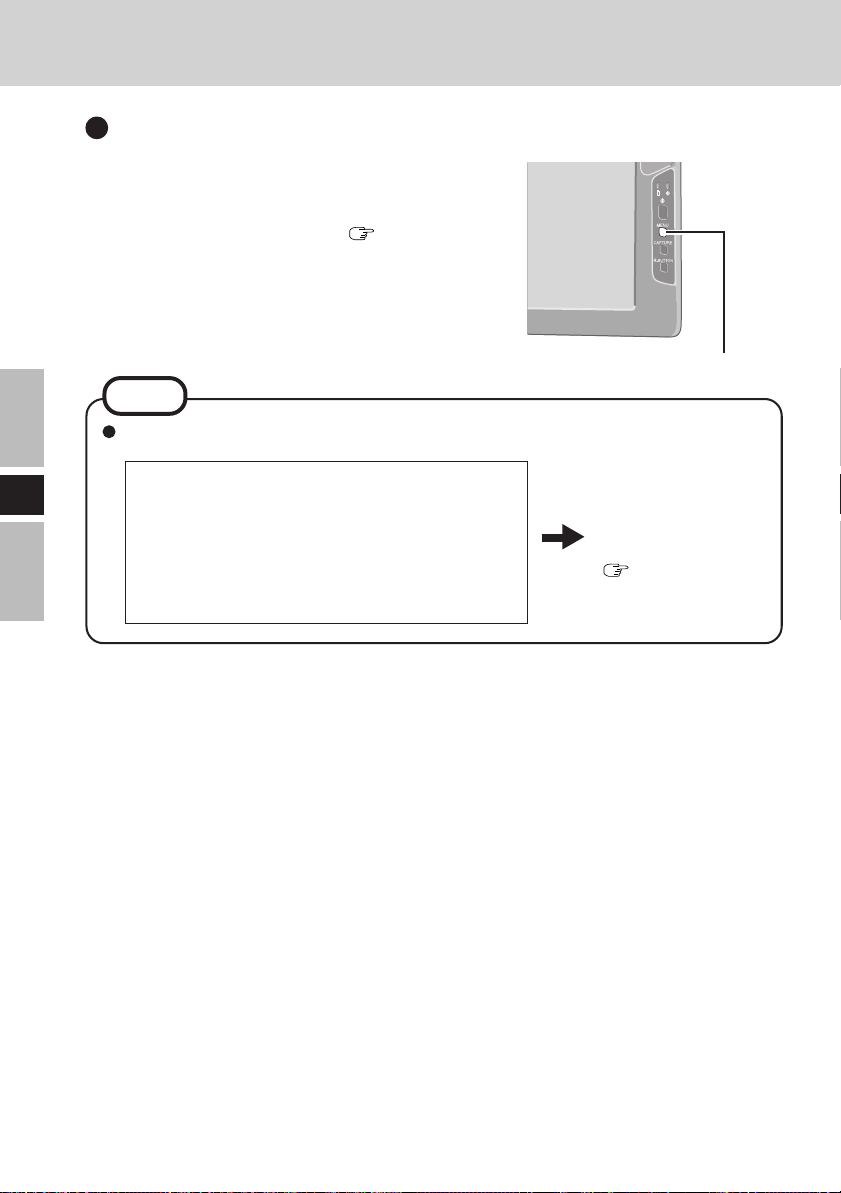
Names and Functions of Parts
<Front>
LCD
Power Switch
E
Menu Button
page 31
LED Indicator
Battery pack status page 27
Power status
Not lit: Power off
Green: Power on
MENU
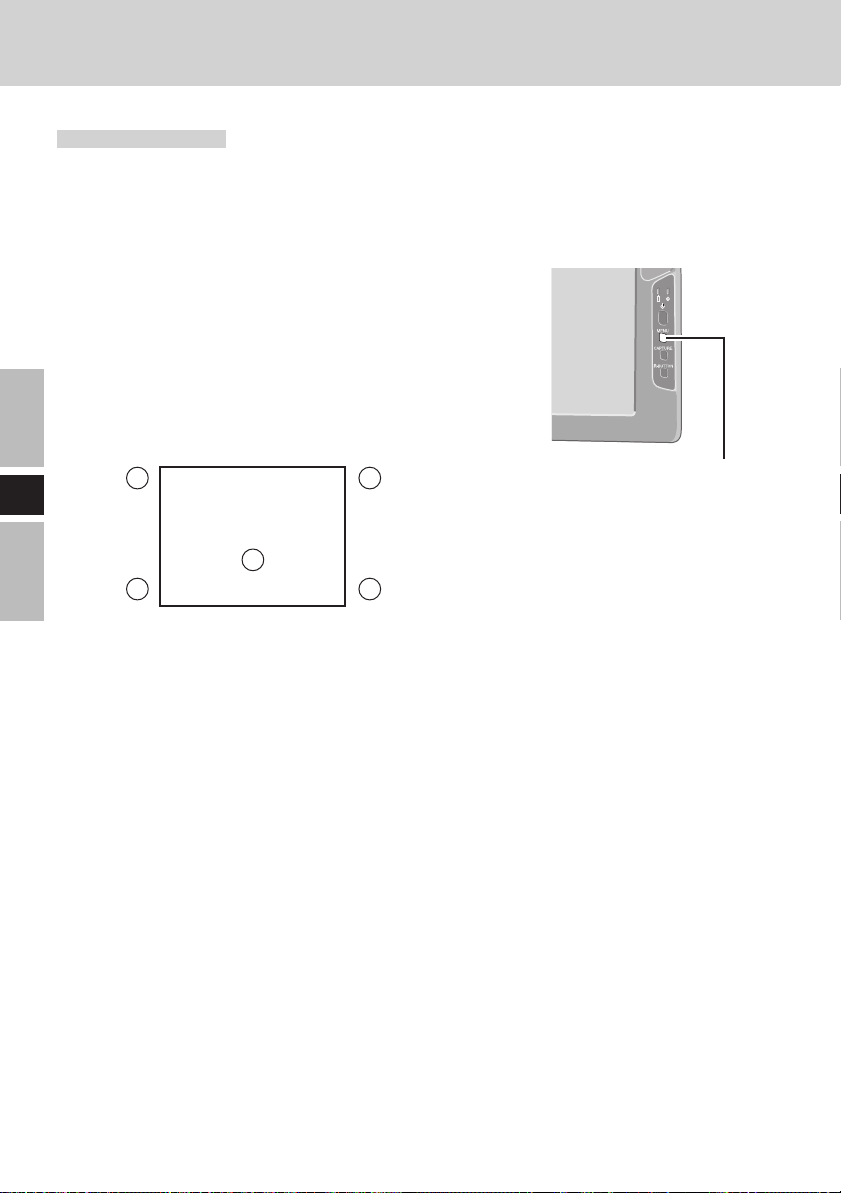
<Attaching the strap>
1 Select two screw holes from the fol-
lowing four holes.
3 Attach the other side of the strap and
fasten the screw.
R-Button
page 23
Capture Button
page 38
2 Adjust the strap to its maximum
length. Attach one side of the strap and
fasten the screw.
4 Adjust the length of the strap as de-
sired.
CAPTURE
inside part of the strap
R-BUTTON
14
outside part of
the strap
Page 15
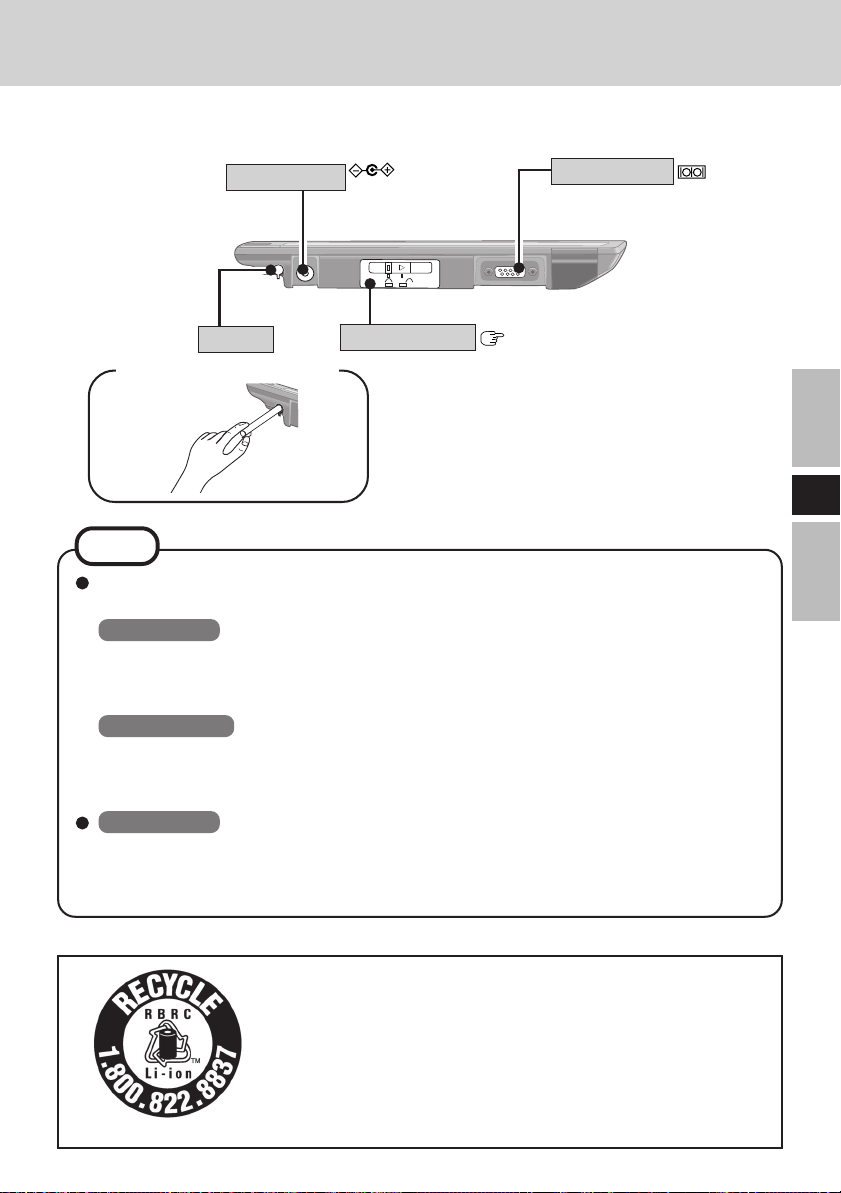
<Bottom>
DC-IN Jack
Stylus
<Removing the stylus>
DC-IN 15.6V
Battery Pack
Serial Port
page 29
NOTE
<When using the CF-07 series computer>
Select [Disabled] with the following procedure.
Windows XP
[Start] - [Control Panel] - [Performance and Maintenance] - [System] - [Hardware] [Device Manager] - [Network adapters] - [PRISM2 IEEE 802.11 PC CARD Adapter]
- [Advanced] - [Driver based IBSS]
Windows 2000
[Start] - [Settings] - [Control Panel] - [System] - [Hardware] - [Device Manager] [Network adapters] - [PRISM2 IEEE 802.11 PC CARD Adapter] - [Advanced] [Driver based IBSS]
Windows XP
When you are using the computer with Windows XP Service Pack 2, select [Off (not
recommended)] in [start] - [Control Panel] - [Network and Internet Connections] [Change Windows Firewall settings] - [General] and then turn Windows Firewall off.
E
<For U.S.A. and Canada>
A lithium ion battery that is recyclable powers the product you
have purchased. Please call 1-800-8-BATTERY for information
on how to recycle this battery.
L’appareil que vous vous êtes procuré est alimenté par une batterie
au lithium-ion. Pour des renseignements sur le recyclage de la
batterie, veuillez composer le 1-800-8-BATTERY.
15
Page 16

First-time Operation
Install MeiWDS Program/Software Keyboard
CAUTION
Prepare the CD-ROM, which is attached to the wireless display, and the CD/DVD drive.
Install the software to the computer compatible to the wireless LAN.
Install MeiWDS program:
1 Place the CD-ROM attached to the wireless display into the CD/DVD drive.
2 Windows XP
Select [start] - [Run], input [L:\meiwds\setup.exe]*
screen instructions.
Windows 2000
Select [Start] - [Run], input [L:\meiwds\setup.exe]*
screen instructions.
E
3 Restart the computer.
4 After restart, the Wireless Display Setup Utility (MeiWDS) icon will appear on
the taskbar.
For information on how to use MeiWDS:
Install Software Keyboard:
1 Place the CD-ROM attached to the wireless display into the CD/DVD drive.
2 Windows XP
Select [start] - [Run], input [L:\softkb\setup.exe]*
screen instructions.
Windows 2000
Select [Start] - [Run], input [L:\softkb\setup.exe]*
screen instructions.
For information on how to use software keyboard:
*1 “L:” is the drive letter of the CD/DVD drive. Change this to match the drive letter on your own
computer.
page 37
1
and select [OK]. Follow the on-
1
and select [OK]. Follow the on-
1
and select [OK]. Follow the on-
1
and select [OK]. Follow the on-
page 25
16
NOTE
Windows XP
The Fast User Switching function is not supported.
If the Fast User Switching function is turned on, the [MeiWDS] screen will appear
when starting the computer. When the screen appears, select [OK], and remove
the check mark from [Use Fast User Switching] in [start] - [Control Panel] - [User
Accounts] - [Change the way users log on or off] and then select [Apply Options].
The screen will not appear, and the Fast User Switching function will be turned
off.
Page 17
Install the Serial Port Driver of the Wireless Display
When using the serial port of the wireless display, install the driver by following steps.
Windows XP
1
Select [start] - [Control Panel] - [Printers and Other Hardware].
2
Select [Add Hardware] from [See Also], then select [Next].
3
Select [Yes, I have already connected the hardware], then select [Next].
4
Select [Add a new hardware device], then select [Next].
5
Select [Install the hardware that I manually select from a list (Advanced)], then select [Next].
6
Select [Ports (COM & LPT)], then select [Next].
7
Select [Have Disk...], then select [Browse...].
8
Select [c:\Program Files\Panasonic\WLserial\wdserial], then select [Open], and then select [OK].
9
Select [WDSP COM Port], then select [Next].
10
Select [Next], then select [Finish].
11
Restart the computer.
12
Confirm [WDSP COM Port (COMx)] is displayed under [Ports (COM & LPT)] in [Device Manager].
Windows 2000
1
Select [Start] - [Settings] - [Control Panel] - [Add/Remove Hardware], then select [Next].
2
Select [Add/Troubleshoot a device], then select [Next].
3
Select [Add a new device], then select [Next].
4
Select [No, I want to select the hardware from a list], then select [Next].
5
Select [Ports (COM & LPT)], then select [Next].
6
Select [Have Disk...], then select [Browse...].
7
Select [c:\Program Files\Panasonic\WLserial\wdserial], then select [Open], and then select [OK].
8
Select [WDSP COM Port], then select [Next].
9
Select [Next], then select [Finish].
10
Restart the computer.
11
Confirm [WDSP COM Port (COMx)] is displayed under [Ports (COM & LPT)] in [Device Manager].
E
NOTE
When uninstalling the driver for the serial port of the wireless display, follow the
steps below.
Windows XP
Select [start] - [Control Panel] - [Performance and Maintenance] - [System] - [Hardware] - [Device Manager] - [Ports (COM & LPT)], right-click [WDSP COM Port
(COMx)] and then select [Uninstall].
Windows 2000
Select [Start] - [Settings] - [Control Panel] - [Add/Remove Hardware], then remove
[WDSP COM Port (COMx)] by following the on-screen instructions.
(To next page)
17
Page 18

First-time Operation
Limitation when using the serial port
When the wireless display is not connected to the computer, the serial port of the wireless
display cannot be used.
There are some serial devices and applications that will not work. This is because the
serial port of the wireless display operates through a virtual serial port.
• Devices or device drivers that start up and carry out port operation confirmation before
connection establishment of the wireless display
For example: Serial mouse devices
• Non-virtual port applications
For example: MS-DOS applications
When a device driver is not automatically installed, follow the instructions of the operations manual included with the device (e.g., insert a disc and install the driver).
Match the COM port number to the number that is displayed in [WDSP COM Port (COMx)]
with the following procedure. For example, if [WDSP COM Port (COM6)] is displayed,
set the serial port to [COM6].
E
Windows XP
[start] - [Control Panel] - [Performance and Maintenance] - [System] - [Hardware] [Device Manager] - [Ports (COM & LPT)]
Windows 2000
[Start] - [Settings] - [Control Panel] - [System] - [Hardware] - [Device Manager] [Ports (COM & LPT)]
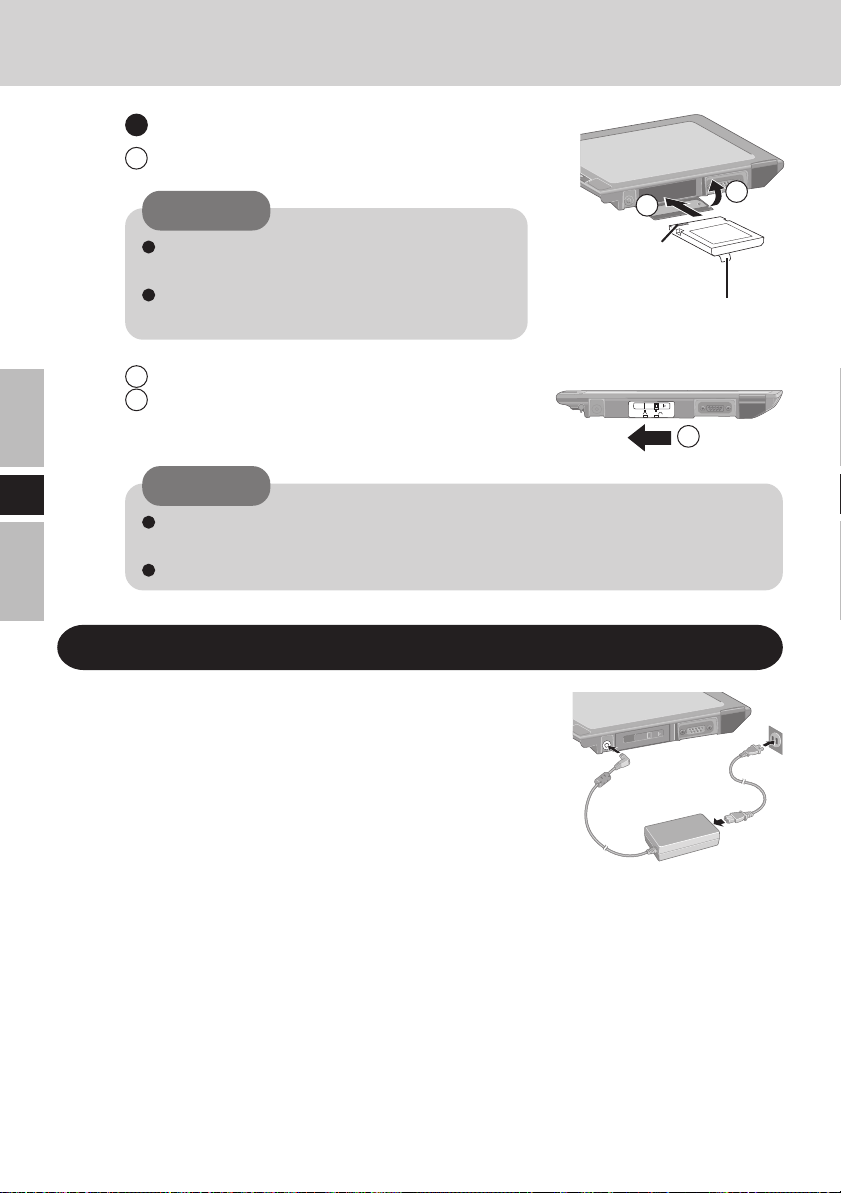
Setup the Wireless Display
1 Slide the latch to the right, and open the cover, then in-
sert the battery pack in the wireless display. After inserting the battery pack, close the cover, then slide the
latch to the left.
CAUTION
Be sure to insert the battery pack as illustrated.
18
Latch
Connector
Tab
Page 19
2 Connect the wireless display to a power outlet and turn on
the wireless display. (
3
This screen should appear.
page 21)
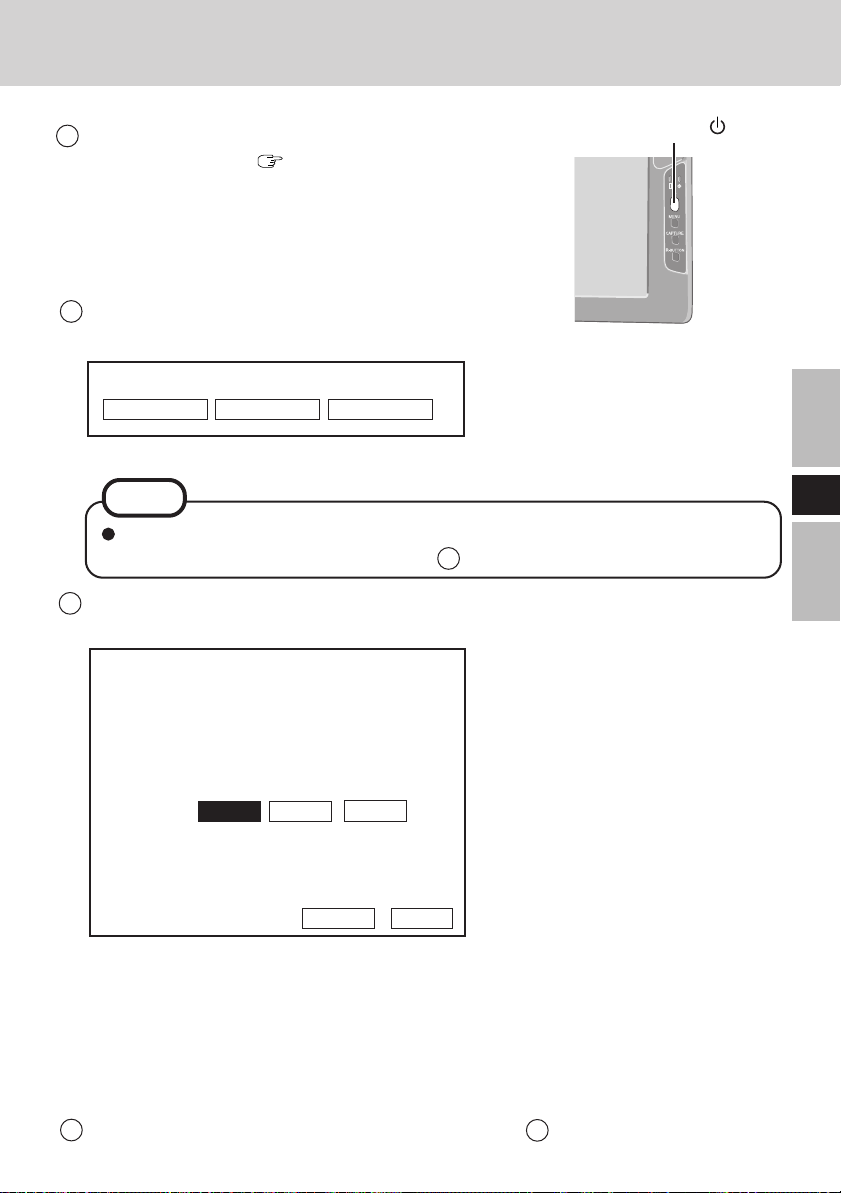
<Wireless display screen>
Select network type.
AdHoc Infrastructure Cancel
Select [AdHoc].
Power Switch
NOTE
The wireless display will turn off automatically after 10 minutes have elapsed. In
this case, start the procedure from step 2 .
4 This screen should appear.
<Wireless display screen>
Change setting on host PC to the following
value, reboot the host PC, then select
"Connect" below.
Wireless LAN card
Network Type : AdHoc
SSID : cfvdw07-17498
WEP Encryption : disable
TCP/IP Class A Class B Class C
IP Address : 10. 98.185.105
NetMask : 255. 0. 0. 0
MeiWDS
AES Encryption : disable
Password : wdsp
AES : Advanced Encryption Standard
Set the computer’s parameters for wireless LAN functions and TCP/IP.
Set Network Type, SSID, WEP Encryption, IP Address, and NetMask according to the
above screen. (In the above settings, Network Type is shown as “AdHoc” in some cases,
while a term such as “Peer-to-Peer Group” is used here.)
Connect Cancel
This screen is a sample.
E
5 Select [Connect] on <Wireless display screen> of step 4 .
19
Page 20
Starting Up/Shutting Down
Starting Up
CAUTION
Do not maximize the Command Prompt screen. Once maximized, the connection
with the wireless display is interrupted and the screen cannot be returned to its original size.
<When using the CF-07 series computer>
1 Turn off the computer, then connect the port replicator, external display and
external keyboard.
2 Turn on the computer and then press Alt + Enter in the MS-DOS mode to
return the window to its original size.
<When using a laptop other than the CF-07 series computer>
Press Alt + Enter on the computer.
If a computer establishes a connection with the wireless display while operating in
E
a display mode other than that shown below, the display mode of the computer
will change to 800 x 600 (16-bit). The wireless display cannot connect to a computer with no 800 x 600 (16-bit) setting.
Resolution: 800 x 600
Color Mode: 16-bit color
If the connection with the wireless display is cut, the computer will return to its
original display mode. In this case, the colors displayed on the screen may change
if the color mode is changed (from 16-bit to 24-bit or vice versa).
If a change is made to the display mode of a computer connecting to the wireless display,
the connection will be cut, so we recommend not using software such as a screen saver.
All of the contents displayed on the wireless display may not be the same as what
was displayed on the LCD of the computer.
Some applications that use hardware-based drawing functions, etc., might not be displayed.
Some applications that perform frequent screen updating (such as video playback applications) might not be shown on the wireless display or might be shown as static images.
Some 16-bit applications may not work properly.
The screen display might be unable to reflect a change in the cursor's shape.
The handwritten input of characters or pictures (via drawing) is not possible on
the wireless display. (The wireless display will be unable to keep up with the
processing speed and the picture data will differ from the expected output.)
Windows XP
If many user accounts are created, some of accounts may not be displayed on the
logon screen if the screen size is changed. We recommend not using the Welcome
screen, and removing the check mark from [Use the Welcome screen] in [Start] [Control Panel] - [User Accounts] - [Change the way users log on or off].
20
Page 21
1
Turn on your computer. ( Operating Instructions of the computer)
2
<When using the CF-07 series computer>
After confirming the “DISPLAY
READY” indicator has lit, turn
on the wireless display.
<When using a laptop other than the
CF-07 series computer>
After has been displayed on
the taskbar, turn on the wireless
display.
Press the power switch and hold it down for approximately three seconds until the
power indicator turns on before releasing it.
3
Select your application.
Power
Indicator
Power
Switch
Shutting Down
1
Display the shut down screen.
Windows XP
After saving important data and closing each application, select [Turn Off Computer] from [start].
Windows 2000
After saving important data and closing each application, select [Shut Down] from [Start].
E
2
Confirm shut down.
Windows XP
Select [Turn Off].
Windows 2000
Select [OK] after selecting [Shut down].
3
When [Windows is shutting down] is displayed, select [Ok].
Your computer and the wireless display will power off automatically.
NOTE
When your computer and the wireless display do not power off using the above procedure, “PC in standby” may be displayed though the computer is not in standby mode.
In this case, select [Ok]. The wireless display will power off automatically.
21
Page 22
Touchscreen
The wireless display is equipped with a touchscreen function allowing you to perform the
same operations as the mouse by touching the surface of the display with the stylus.
Moving the cursor Clicking
E
Cursor
One tap
Double-clicking Dragging
Two quick
taps
NOTE
The double-clicking speed can be set in the following procedure.
Windows XP
[start] - [Control Panel] - [Printers and Other Hardware] - [Mouse] - [Buttons]
- [Double-click Speed]
Windows 2000
[Start] - [Settings] - [Control Panel] - [Mouse] - [Buttons] - [Double-click
Speed]
Touch and hold the object
(i. e. file or icon), move your
stylus on the surface (dragging the object to the desired location), then release
your stylus.
22
Page 23
Right-Clicking
Press R-button.
1 2
When “R” is
R-Button
One tap
R
displayed on
the rightlower corner
NOTE
If the R-button is pressed again when setting right-clicking function to be enabled,
the right-clicking function will be set to be disabled.
CAUTION
The touchscreen function can not be used in the MS-DOS mode and when using
the full screen in [Command Prompt].
Handling the Touchscreen
Use the stylus included with the wireless display. Do not use an implement other
than the stylus that comes with the wireless display.
Do not place any object on the surface or press down forcefully with sharp-pointed
objects (e.g., nails), or hard objects that can leave marks (e.g., pencils and ball
point pens).
Do not operate the computer when such things as dust are on the screen. Do not
allow substances such as oil to contact the LCD. The cursor may not work properly in such cases.
When the touchscreen becomes dirty:
Wipe lightly to remove dirty areas by using a dry soft cloth (included).
Do not use benzene or thinner, or disinfectant-type alcohol.
(For more information, refer to “Suggestions About Cleaning the LCD Surface”
that comes with the soft cloth.)
E
Handling the Stylus
Clean the stylus tip and screen prior to operation. Foreign particles can scratch the
screen and impede the operation of the stylus.
Use the accessory stylus only on the wireless display screen. Using it for any other
purpose may damage the stylus and scratch the screen.
Do not use pencils, implements with sharp tips or hard objects for screen operations. The screen may be damaged as a result.
23
Page 24
Touchscreen
Calibration
Run the calibration setup when the cursor and the stylus touches do not appear to agree.
1
Press Menu button.
2
Select [Option].
3
Select [Calibration].
Touch the five “×” marks on the calibration screen.
E
1 2
××
×
5
3 4
××
Menu Button
24
Page 25
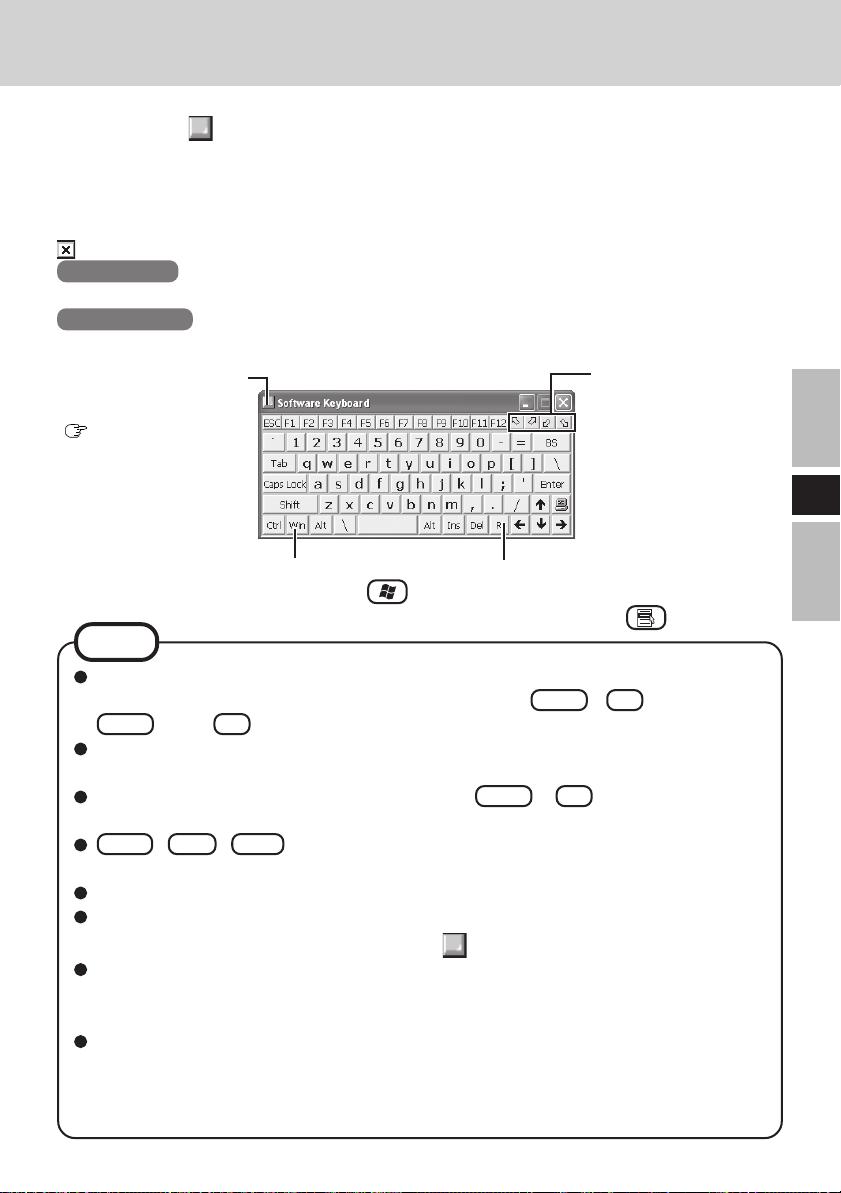
Software Keyboard
When selecting [ Software Keyboard] on the taskbar or when the character input box of an
application is selected, the software keyboard shown below automatically starts up, and char-
acters can be input by using the software keyboard.
We recommend leaving the software keyboard as an icon instead of closing the software keyboard when it is not being used. The software keyboard will no longer start up automatically if
is selected to close the keyboard. In this case, it can be restarted in the following procedure.
Windows XP
[start] - [All Programs] - [Panasonic] - [Software Keyboard]
Windows 2000
[Start] - [Programs] - [Panasonic] - [Software Keyboard]
The system menu is displayed.
(
page 26)
The software keyboard
will be moved to the
four corners of the
screen.
E
One tap : Use as the short cut key.
Two quick taps : The same function as .
The action is the same as a right mouse
button click.
(The same function as .)
NOTE
If you want to press short cut key, after pressing one key, press the second key in a
continuous manner. For example, if you want to type Ctrl + C , after pressing
Ctrl , press C .
If a keyboard is connected to the computer, all operations on the keyboard are not
reflected on the software keyboard.
When using two or more keys in combination ( Ctrl + C etc.), use the internal
keyboard or the software keyboard alone.
Ctrl + Alt + Del cannot be input through the software keyboard. (Except when
logging on).
Characters cannot be input through the software keyboard in the MS-DOS mode.
For some applications, the software keyboard remains as an icon even when the charac-
ter input box is selected. In this case, select [
If you want to use the keyboard for a non-text-input application (e.g., Windows ex-
plorer), first display the software keyboard and then select the application. Following
these steps, you can use the keys of the software keyboard.
Before shutting down and then restarting Windows, be sure to save all data. If an
attempt is made to shut down the computer while data is being edited, a message will
appear asking whether to save the current data or not. In such cases, return to Windows, save all data, and then shut down the computer.
Software Keyboard] on the taskbar.
25
Page 26
Software Keyboard
Changing the Settings
You can change the keyboard size, switch the keyboard to the numeric keypad, or change
other settings using the system menu.
1
Select (on the top left corner of the software keyboard).
2
Add a check mark to the function you want to use.
E
The software keyboard moves automatically so as not to hide
the window currently selected. (It will not move if there is
no place that it can move to.) Also, the software keyboard
will move to the topmost position on the display when the
computer changes to input mode.
If the software keyboard has been minimized on the taskbar,
it will automatically be restored and will move to the topmost position on the display when the computer changes to
input mode. Depending on the application, this function
may not work.
Set the software keyboard to the topmost position on the
display.
Set the software keyboard to transparent display.
26
Select the keyboard/keypad.
NOTE
The currency symbols displayed on the numeric keypad are set using the following menu.
Windows XP : [start] - [Control Panel] - [Date, Time,
Language, and Regional Options] [Regional and Language Options] [Regional Options] - [Customize] [Currency] - [Currency symbol]
Windows 2000 : [Start] - [Settings] - [Control Panel] -
[Regional Options] - [Currency] [Currency symbol]
Page 27
Battery Power
Battery Status
Use the Battery Indicator to Check on the Battery Status
Battery Indicator
Orange*
Green*
Red
Blinking red*
Blinking orange*
Blinking green
Not lit
*1 When the AC adaptor is connected.
1
1
1
Battery Status
Charging
Fully-charged
Battery charge is low (the charge is less than approx. 9%
capacity)
Battery pack or charger may not be working properly.
Quickly remove the battery pack and disconnect the AC
adaptor, then connect them again. If the problem persists,
contact Panasonic Technical Support.
1
Unable to recharge due to violation of temperature limits.
(The ambient temperature is outside the allowable range. Once
the allowable range requirement is satisfied, charging begins
automatically.)
Battery is discharging to prescribed charging level in high
temperature mode.
Battery pack is not connected or charging not being performed.
NOTE
This wireless display prevents overcharging of the battery by recharging only when
the remaining power is less than approx. 95% of capacity after the battery is fully
charged.
E
27
Page 28
Battery Power
Getting a detailed reading
1
Press Menu button.
2
Select [Battery]. ( page 32)
NOTE
The actual remaining battery capacity and the displayed indication may differ.
• The battery indicator light remains red.
E
• The battery remaining displays 99% and the
indicator light is orange for a long period of
time.
• Low battery warning appears after a short period of time.
Menu Button
Perform the “Refresh
Battery” utility.
(
page 32)
28
Page 29

Replacing the Battery Pack
When the charge provided by your battery pack is supplied for only a short period of
time, even after fully charging according to the instructions, it may be time to replace
your battery pack. The battery pack is a consumable item and therefore will require
replacement (CF-VZSU
CAUTION
Do not touch the terminals on the battery pack. The battery pack may no longer
function properly if the contacts are dirty or damaged.
The battery pack is not charged when the wireless display is first purchased. Be
sure to charge it before using it for the first time. When the AC adaptor is connected to the wireless display, charging begins automatically.
Use only the specified battery pack (CF-VZSU21) with your wireless display.
Be sure the power has been turned off before proceeding.
1
Power off your wireless display. ( page 21)
CAUTION
Replace the battery pack with another one while the AC adaptor is connected,
and do not disconnect the AC adaptor until the new battery has been fully
charged. Image data saved on the wireless display may be lost.
21).
E
2
Taking out the battery pack
1 Slide the latch.
2 Open the cover.
3 Pull the tab on the battery pack and remove it
from the wireless display.
1
2
3
29
Page 30
Battery Power
Inserting a battery pack
1 Firmly attach the battery pack to the connector.
CAUTION
1
2
E
Be sure to insert the battery pack as illustrated.
Be sure to the battery pack is properly connected to the connector.
2 Close the cover.
3 Slide the latch to the left.
CAUTION
For an improperly attached cover, your battery pack may fall out while you
are carrying around your wireless display.
Be sure the tab does not get caught when closing the cover.
Charging the Battery Pack
Connect the wireless display to a power outlet.
Charging begins automatically.
Connector
Tab
3
30
Page 31

Setting the Wireless Display
You can establish the settings for the wireless display.
Press Menu button.
The setting menus are displayed.
Menu Button
General Menu
By selecting [General], you can change the mode setting, the backlight setting and the
profile setting.
Default settings
General Wireless Battery Option Version
The saved screen is displayed.
page 38)
(
The profile name will be displayed.
Mode : Connect OfflineView
Backlight : LOW MID HIGH
Profile : Profile 1
When setting a profile, a wireless
display can be connected to another computer. Up to four profiles
can be set. (
page 33)
After selecting the profile, select
[Connect], and the connection will
be taken place using the profile.
100% Excellent
OK Cancel
Electronic wave conditions (Excellent, Good, Poor, Associated, Scanning)
Remaining battery charge
Wireless Menu
E
By selecting [Wireless], the wireless settings (for connection with the computer) and
current state are displayed (cannot be changed). To change the settings shown on this
menu:
page 35
General Wireless Battery Option Version
Network Type : AdHoc
SSID : cfvdw07-17498
Channel : 11
TxRate mode : Fully Automatic
WEP Encryption : disable
Rate (Tx/Rx) : 11Mbps / 11Mbps
Display IP : 10. 98. 185. 106
PC IP : 10. 98. 185. 105
Net Mask : 255. 0. 0. 0
AES Encryption : disable
100% Excellent
OK Cancel
The display will indicate whether
AES Encryption is set to be enabled or disabled.
This screen is a sample.
31
Page 32

Setting the Wireless Display
Battery Menu
By selecting [Battery], the battery status will be displayed.
E
General Wireless Battery Option Version
Status : Full Charge
Voltage : 8154mV
Current : 0mA
Temperature : 26.2 °C (79.2 °F)
Remain : 100%
Error : None
Refresh Battery : Execute
Environment : Normal temperature
100% Excellent
OK
Cancel
This screen is a sample.
Run the refresh battery.
When the confirmation message is
displayed, select [Yes].
Once the battery indicator turns green,
the battery pack will be completely
discharged, the computer will power
off automatically, and then charging
will commence. It takes approximately
2 hours until the power automatically
goes off through the complete discharge of the battery from the fully
charged state.
Allow the battery pack to charge until the battery indicator turns green.
(While charging, the backlight is
turned off automatically.)
Set the high temperature mode function to [Normal temperature] or
[High temperature].
When using the wireless display in a
high-temperature environment, be
sure to set the wireless display in the
high-temperature mode.
32
NOTE
The battery will not be refreshed correctly in the following cases.
• When the power of the wireless display is cut.
• When the electric power becomes disconnected (e.g., electrical outage, accidental removal of the AC adaptor, etc.).
Page 33

Option Menu
By selecting [Option], you can establish the individual settings for the wireless display.
Change the settings of the wireless
Default settings
General Wireless Battery Option Version
Wireless Connection : Setup
Power on Password : Change
Supervisor Password : Change
Touchscreen : Calibration
LCD Off Timer : 30 min
LCD Off Mode : Normal resume
Power Off Timer : disable
100% Excellent
OK Cancel
Set or change the Supervisor Password.
If there is no input from the
touchscreen or button for a certain interval of time, the power may be
turned off.
Set the interval of time to [30 sec],
[1 min], [2 min], [5 min], [10 min],
[20 min], [30 min] or [disable], then
select [OK].
Set the resume function to [Normal
resume] or [Quick resume], then select [OK].
Normal Resume:
The wireless connection is disabled during display off.
Quick Resume:
Only the screen is turned off during display off.
connection in the following procedure.
1
Select [Setup].
<If the Supervisor password has been set>
Enter the Supervisor Password,
then select [Enter].
2
Select the profile that has been set
on the following screen, then select [OK].
<Wireless display screen>
Select profile.
Profile 1 Profile 2
Profile 3 Profile 4
This screen is a sample.
3
Set the network by the same procedure as
3 , 4 and 5 of “Setup
the Wireless Display” (
19).
Change the password that is input to
run the wireless display.
If there is no input from the
touchscreen or button for a certain interval of time, the display may be
turned off.
Set the interval of time to [30 sec],
[1 min], [2 min], [5 min], [10 min],
[20 min], [30 min] or [disable], then
select [OK].
E
page
33
Page 34

Setting the Wireless Display
Version Menu
By selecting [Version], the version information will be displayed.
General Wireless Battery Option Version
Model No. : CF-VDW07Bxx
Firmware : Vx.xxLxxx
Wireless Controller : xx. xx. xx. xx
Serial No. : xxxxxxxxxx
E
100% Excellent
OK Cancel
“x” will change depending on the configura-
tion of the wireless display.
34
Page 35

Changing the Wireless Display Settings
Wireless Display Setup Utility
You can set the wireless display properties as follows.
1
Select [Wireless Display Setup Utility] in the following
procedure.
Windows XP [start] - [All Programs] - [Panasonic]
Windows 2000 [Start] - [Programs] - [Panasonic]
2
Enter the Supervisor Password.
The Supervisor Password is not set at the time of the purchase.
Press the Menu button, select [Option], then set the Supervisor Password. (
3
Set the wireless display settings, TCP/IP and WEP.
You can set them for each profile.
Change the profile name.
Change AES Encryption.
<When setting AES Encryption to something other than
[Disable]>
Select [Key], and set AES Key using phrase or binary,
then select [OK].
Change WEP Encryption.
<When setting WEP to something other than [Disable]>
Select [Key(s)], and set WEP Key(s), then select [OK].
page 33)
E
When adding the check mark here, the MeiWDS profile
setting (one profile only), such as the password or AES
Encryption, is also set to the computer connected to the
wireless display.
After finalizing the settings, select [Next], then select
[OK].
(If another screen is displayed after selecting [OK], select [OK].)
(To next page)
35
Page 36

Changing the Wireless Display Settings
4
At the confirmation screen, select [Next].
The message “These settings will be sent to your display”
will then be displayed. Select [OK].
5
<When adding the check mark for [Use this profile now]
3
( page 35)>
3
>
NOTE
The MeiWDS and the wireless display cannot simultaneously make settings. (
E
in step
[Set up your PC] screen will be displayed.
Enter the Wireless LAN and TCP/IP settings shown on
the screen to your computer, then select [Finish].
<When removing the check mark from [Use this profile
now] in step
[Completed] screen will be displayed.
Select [Finish].
page 37)
36
Page 37

MeiWDS Setup Utility
1
Select [MeiWDS Setup Utility] in the following procedure.
Windows XP [start] - [All Programs] - [Panasonic]
Windows 2000 [Start] - [Programs] - [Panasonic]
2
Enter the Supervisor Password, then select [OK].
In the default setting, the Supervisor Password is set to
“supervisor”.
3
Set the password and AES Encryption settings, then select [Next].
If the setting between the computer and wireless display does not confirm (e.g., the display has changed to
another one.), set it again in the following procedure.
Set AES Key Length.
<When setting AES Encryption to something other than
[Disable]>
Select [AES Key], and set the AES Key(s) using phrase
or binary, then select [OK].
Set AES Key Lifetime.
4
On the confirmation screen, select [Finish].
On the confirmation screen, select [OK] and then restart
the computer.
E
NOTE
The MeiWDS and the wireless display cannot simultaneously make settings.
Set the AES Key setting after setting the wireless display. (
When selecting on the taskbar, the menu is displayed.
[Password] and [Exit MeiWDS] are enabled when
adding the check mark for [Enable tray menu] in the
MeiWDS Setup Utility.
·Password : Set the same password as that is
·About MeiWDS : The software version and copy-
·Exit MeiWDS : Exit the program.
page 35)
set in [Option] menu.
right are displayed.
37
Page 38

Capturing the Screen
If you want to playback the currently displayed screen later,
you can save the screen data onto the memory (up to 100
images)*
*1The number of the data that can be saved is different according
1
.
to the image.
Press Capture button.
The currently displayed screen is saved, and is added at the
end of the already-saved images.
Displaying Saved Images
1
Press Menu button.
2
Select [General] - [OfflineView], then
E
select [OK].
The saved image and the following panel will be
displayed.
Moving to the four corners of the screen
Displaying the previous
image (high-speed mode)
Displaying the previous image
(The same operation is possible by pressing the R-Button.)
<Panel>
No 016
Total 038
Delete
<< >>
< >
Displaying the next image
(The same operation is possible by pressing the
Capture button.)
Capture Button
Menu Button
Image number
The number of images saved
Delete the image data
Displaying the next image
(high-speed mode)
38
NOTE
When the power is cut by an operation other than pressing the power switch (e.g.,
when the wireless display is running on battery and the battery is inadvertently
taken out, or when the AC adaptor is accidentally pulled out from the power outlet
and no battery is in the wireless display), all saved images are lost.
Only the screen image is displayed, and operations such as input and selection
cannot be performed on the screen.
To close an image that has been saved and display the previous screen:
1 Press Menu button.
2 Select [General] - [Connect], then select [OK].
Page 39

Troubleshooting
When a problem occurs, refer to this page. If a problem appears to be related to a software
application, read the software related manual. If you still cannot troubleshoot the problem,
contact Panasonic Technical Support.
No display after
powering on
An afterimage appears
“Connection timeout” is
displayed
“No server found” is
displayed
“Authentication failed” is
displayed
“Too many clients” is
displayed
Has the computer or wireless display been set to the
power-saving mode?
To resume operation of your computer from the
condition the power of the display is off (for energy
conservation purposes), touch the screen.
If an image is displayed for a prolonged period of time,
an afterimage may appear. Set the screensaver.
Confirm the IP address, subnet mask, network type,
and SSID settings on both the computer and the
wireless display.
Confirm the operation of the wireless LAN on the
computer.
If your computer and the wireless display do not power
off normally due to a reason such as a network error, it
may take two or three minutes to reconnect.
Wait for a moment, then connect again.
Put the wireless display close to the computer.
Confirm that is on the taskbar.
Confirm the IP address of the computer that has been
set on the wireless display.
Confirm the password for both the computer and the
wireless display.
Disconnect the wireless display during operation and
reestablish the connection.
E
(To next page)
39
Page 40

Troubleshooting
E
“Illegal data received” or
“Initial image receiving
timeout” is displayed
Software keyboard has
been closed
An afterimage appears
(i.e., green, red, and blue
dots remain on the
display) or there are dots
not displaying the correct
colors
Confirm whether the network is working properly or
not.
Confirm the AES key length setting with the following
procedure.
<Computer side>
Windows XP
[start] - [All Programs] - [Panasonic] - [MeiWDS Setup
Utility]
Windows 2000
[Start] - [Programs] - [Panasonic] - [MeiWDS Setup
Utility]
<Display side>
Press the Menu button, select [Wireless], and confirm
the AES Encryption setting.
Restart the computer.
Select [Software Keyboard] with the following
procedure.
Windows XP
[start] - [All Programs] - [Panasonic]
Windows 2000
[Start] - [Programs] - [Panasonic]
High-precision and advanced technologies are
necessary in the production of color liquid crystal
displays (color LCDs). Therefore, if 0.002% or less of
the picture elements either fail to light or remain
constantly lit (that is, more than 99.998% of elements
are functioning properly), no defect is considered to
exist.
40
Page 41

Specifications
Model No.
LCD Type
Displayed Colors
Touchscreen
Interface Serial Port
Battery Packs
Operating Time*
Charging Time*
AC Adaptor*2Input
Output
Power Consumption*
3
Environment Operation
Storage
Physical Dimensions
(W × H × D)
Weight
CF-VDW07BH
8.4 Type (TFT)
256 colors (800 × 600 dots)
Anti-Reflection, Stylus (included) touch capable
Dsub 9-pin male
Li-ion 7.4 V, 1.7 Ah
1
Approx. 1.5 h - 2.5 h
1
Power On: Approx. 5.0 h
Power Off: Approx. 2.0 h
100 V - 240 V AC, 50 Hz / 60 Hz
15.6 V DC, 3.85 A
Approx. 12 W*4 / Approx. 20 W*
5
Temperature: 5 °C to 35 °C {41 °F to 95 °F}
Humidity: 30% to 80% RH
(No condensation)
Temperature: -20 °C to 60 °C {-4 °F to 140 °F}
Humidity: 30% to 90% RH
(No condensation)
222 mm × 162 mm × 12.5 mm - 29.5 mm
{8.7 " × 6.4 " × 0.5 " - 1.2 "}
Approx. 710 g {1.57 lb.}
E
*1Varies depending on the usage conditions.
2
*
<Only for North America>
The AC adaptor is compatible with power sources up to 240 V AC adaptor.
This computer is supplied with a 125 V AC compatible AC cord.
3
*
Approx. 1.5 W when the battery pack is fully charged (or not being charged) and the computer is
off.
4
*
Rated power consumption.
5
*
Maximum when recharging.
41
Page 42

Memo
E
42
Page 43

DEUTSCH
Vielen Dank für den Kauf des drahtlosen Displays für den Computer der Reihe Panasonic
Toughbook.
Dieses drahtlose Display bietet eine Touchscreen-Funktion, die die Bedienung des Computers einfach durch die Berührung des berührungsempfindlichen Bildschirms des drahtlosen
Displays ermöglicht.
Bedienungsanleitung .............. 1Drahtloses Display .................... 1
Netzadapter .......... 1
Stift ............................................. 1
Der Stift befindet sich bei der Auslieferung
im drahtlosen Display. (
Tuch ...................... 1
Netzkabel ..............1
Seite 53)
Gurt .......................1
Batteriepackung ...1
Modell-Nr. : CF-VZSU21Modell-Nr. : CF-AA1639A
CD-ROM ..................................... 1
G
Schrauben ............ 2
43
Page 44

Erste Inbetriebnahme
Bezeichnungen und Funktionen der Teile
<Vorderseite>
LCD-Bildschirm
Ein/Aus- Schalter
G
Menü-Taste
Seite 62
Betriebs-LED
Batteriepackungs-Status Seite 58
Spannungs-Status
Leuchtet nicht: Ausschaltzustand
Grün: Einschaltzustand
MENU
<Anbringen des Gurtes>
1 Wählen Sie die gewünschten zwei
Schraubenlöchern aus den folgenden
vier Löchern aus.
3 Befestigen Sie die andere Seite des
Gurtes, und ziehen Sie die Schraube
fest.
R-Taste
Seite 54
Erfassungstaste
Seite 69
2 Stellen Sie den Gurt auf seine
maximale Länge ein. Befestigen Sie
eine Seite des Gurtes, und ziehen Sie
die Schraube fest.
4 Stellen Sie die Gurtlänge wie
gewünscht ein.
CAPTURE
Innenseite des Gurtes
R-BUTTON
44
Außenseite
des Gurtes
Page 45

<Unterseite>
Gleichstrom-Eingangsbuchse
DC-IN 15.6V
Stift
Batteriepackung
Seite 60
Serieller Anschluß
<Entfernen des Stifts>
HINWEIS
<Bei Verwendung eines Computers der Reihe CF-07>
Wählen Sie im [Disabled] im folgenden Verfahren.
Windows 2000
[Start] - [Einstellungen] - [Systemsteuerung] - [System] - [Hardware] - [Geräte-Manager] - [Netzwerkadapter] - [PRISM2 IEEE 802.11 PC CARD Adapter] - [Erweiterte
Einstellungen] - [Driver based IBSS]
Windows XP
Wenn Sie einen Computer mit dem Windows XP Service Pack 2 verwenden, wählen
Sie [Inaktiv (nicht empfohlen)] in [Start] - [Systemsteuerung] - [Nezwerk- und
Internetverbindungen] - [Windows-Firewalleinstellungen ändern] - [Allgemein], und
schalten Sie den Windows-Firewall dann aus.
G
45
Page 46

Erste Inbetriebnahme
Installation des MeiWDS-Programms/der Software-Tastatur
CAUTION
Bereiten Sie die mit dem drahtlosen Display mitgelieferte CD-ROM und das CD/
DVD-Laufwerk vor.
Installieren Sie die Software auf einem Computer, der mit dem drahtlosen Netzwerk
kompatibel ist.
Installation des MeiWDS-Programms:
1 Legen Sie die mit dem drahtlosen Display mitgelieferte CD-ROM in das CD/DVD-
Laufwerk ein.
2 Wählen Sie [Start] - [Ausführen], geben Sie [L:\meiwds\setup.exe]*
Sie [OK]. Folgen Sie den Anweisungen auf dem Bildschirm.
3 Führen Sie einen Neustart des Computers durch.
4 Nach dem Neustart wird das Symbol des Installations-Dienstprogramms für das
drahtlose Display (MeiWDS)
Informationen zur Verwendung des MeiWDS-Programms finden Sie auf Seite 68.
Installation der Software-Tastatur:
1 Legen Sie die mit dem drahtlosen Display mitgelieferte CD-ROM in das CD/DVD-
Laufwerk ein.
2 Wählen Sie [Start] - [Ausführen], geben Sie [L:\softkb\setup.exe]*
Sie [OK]. Folgen Sie den Anweisungen auf dem Bildschirm.
Informationen zur Verwendung der Software-Tastatur finden Sie auf Seite 56.
G
*1 „L:“ bezeichnet das Laufwerk. Sie können das Laufwerk nach Belieben ändern.
in der Taskleiste angezeigt.
1
ein, und wählen
1
ein, und wählen
HINWEIS
Windows XP
Die Benutzer-Schnellumschaltungsfunktion wird nicht unterstützt.
Wenn die Benutzer-Schnellumschaltungsfunktion eingeschaltet ist, erscheint der
Bildschirm [MeiWDS] beim Einschalten des Computers. Wenn dieser Bildschirm
erscheint, wählen Sie [OK] und entfernen Sie das Kontrollzeichen aus [Schnelle
Benutzerumschaltung verwenden] in [Start] - [Systemsteuerung] - [Benutzerkonten] [Art der Benutzeranmeldung ändern], und wählen Sie dann [Optionen übernehmen].
Der Bildschirm wird nicht angezeigt, und die Benutzer-Schnellumschaltungsfunktion
wird ausgeschaltet.
46
Page 47

Installieren Sie den seriellen Anschlusstreiber des drahtlosen Displays
Führen Sie die folgenden Schritte durch, um den Treiber bei Verwendung der seriellen
Schnittstelle des drahtlosen Displays zu installieren.
Windows XP
1
Wählen Sie [Start] - [Systemsteuerung] - [Drucker und andere Hardware].
2
Wählen Sie [Hardware] aus [Siehe Auch] und dann [Weiter].
3
Wählen Sie [Ja, die Hardware wurde bereits angeschlossen] und dann [Weiter].
4
Wählen Sie [Neue hardware hinzufügen] und dann [Weiter].
5
Wählen Sie [Hardware manuell aus einer Liste wählen und installieren (für fortgeschrittene
Benutzer)] und dann [Weiter].
6
Wählen Sie [Anschlüsse (COM und LPT)] und dann [Weiter].
7
Wählen Sie [Datenträger…] und dann [Durchsuchen…].
8
Wählen Sie [c:\Programme\Panasonic\WLserial\wdserial] dann [Öffnen] und dann [OK].
9
Wählen Sie [WDSP COM Port] und dann [Weiter].
10
Wählen Sie [Weiter] und dann [Fertig stellen].
11
Führen Sie einen Neustart des Computers durch.
12
Bestätigen Sie, daß [WDSP COM Port (COMx)] unter [Anschlüsse (COM und LPT) ] in
[Geräte-Manager] angezeigt wird.
Windows 2000
1
Wählen Sie [Start] - [Einstellungen] - [Systemsteuerung] - [Hardware] und dann [Weiter].
2
Wählen Sie [Gerät hinzufügen bzw. Problem beheben] und dann [Weiter].
3
Wählen Sie [Neues Gerät hinzufügen] und dann [Weiter].
4
Wählen Sie [Nein, die Hardwarekomponenten selbst in der Liste auswählen] und dann
[Weiter].
5
Wählen Sie [Anschlüsse (COM und LPT) ] dann [Weiter].
6
Wählen Sie [Datenträger…] und dann [Durchsuchen…].
7
Wählen Sie [c:\Program Files\Panasonic\WLserial\wdserial] dann [Öffnen] und dann [OK].
8
Wählen Sie [WDSP COM Port] und dann [Weiter].
9
Wählen Sie [Weiter] und dann [Fertig stellen].
10
Führen Sie einen Neustart des Computers durch.
11
Bestätigen Sie, daß [WDSP COM Port (COMx)] unter [Anschlüsse (COM und LPT)] in
[Geräte-Manager] angezeigt wird.
G
(Fortsetzung auf der nächsten Seite)
47
Page 48

Erste Inbetriebnahme
HINWEIS
Führen Sie die folgenden Schritte durch, um den Treiber bei Verwendung der seriellen
Schnittstelle des drahtlosen Displays zu entfernen.
Windows XP
Wählen Sie [Start] - [Systemsteuerung] - [Leistung und Wartung] - [System] - [Hardware] - [Geräte-Manager] - [Anschlüsse (COM und LPT)], rechtsklicken Sie auf
[WDSP COM Port (COMx)], und entfernen Sie dann [Deinstallieren].
Windows 2000
Wählen Sie [Start] - [Einstellungen] - [Systemsteuerung] - [Hardware], und löschen
Sie dann [WDSP COM Port (COMx)], indem Sie die Anleitungen auf dem Bildschirm
befolgen.
Einschränkungen bei der Verwendung der seriellen Schnittstelle
Wenn das drahtlose Display nicht an einen Computer angeschlossen ist, kann die serielle
Schnittstelle des drahtlosen Displays nicht verwendet werden.
Es gibt Geräte mit seriellem Anschluß sowie Anwendungen, die nicht mit diesem Gerät
funktionieren. Dies ist der Fall, weil die serielle Schnittstelle des drahtlosen Displays über
eine virtuelle serielle Schnittstelle funktioniert.
• Geräte und Geräte-Treiber, die den Betrieb starten und die Bestätigung des
Anschlußstellenbetriebs durchführen, bevor der Anschluß des drahtlosen Displays
hergestellt ist
Zum Beispiel: Mäuse mit seriellem Anschluß
• Anwendungen mit nicht virtuellen Anschlußstellen
G
Zum Beispiel: MS-DOS-Anwendungen Anwendungen
Wenn ein Geräte-Treiber nicht automatisch installiert wird, führen Sie die Anweisungen
durch, die in der mit dem Gerät mitgelieferten Bedienungsanleitung aufgelistet sind (z.B.,
setzen Sie die Disc ein und installieren Sie den Treiber).
Wählen Sie die Nummer des COM-Ports so, dass sie der in [WDSP COM Port (COMx)]
angezeigten Nummer gleich ist, indem Sie das folgende Verfahren durchführen. Falls
beispielsweise [WDSP COM Port (COM6)] angezeigt wird, wählen Sie den seriellen
Anschluß [COM6].
Windows XP
[Start] - [Systemsteuerung] - [Leistung und Wartung] - [System] - [Hardware] - [GeräteManager] - [Anschlüsse (COM und LPT)]
Windows 2000
[Start] - [Einstellungen] - [Systemsteuerung] - [Hardware]- [Geräte-Manager] [Anschlüsse (COM und LPT)]
48
Page 49

Einstellen des drahtlosen Displays
1 Schieben Sie die Sperrvorrichtung nach rechts, öffnen
Sie die Abdeckung und setzen Sie die Batteriepackung
in das drahtlose Display ein. Nach Einsetzen der
Batteriepackung, schließen Sie die Abdeckung und
schieben Sie die Sperrvorrichtung nach links.
CAUTION
Achten Sie darauf, die Batteriepackung wie
gezeigt einzufuhren.
Anschlussstecker
2 Schließen Sie das drahtlose Display an eine Netzsteckdose
an und schalten Sie das drahtlose Display ein. (
3 Dieser Bildschirm sollte angezeigt werden.
<Drahtloser Displaybildschirm>
Select network type.
AdHoc Infrastructure Cancel
Seite 52)
Sperrvorrichtung
Lasche
Ein/Aus- Schalter
G
Wahlen Sie [AdHoc].
HINWEIS
Nach Verstreichen von 10 Minuten schaltet sich das drahtlose Display automatisch
aus. In einem solchen Fall beginnen Sie das Verfahren dann ab Schritt 2 .
(Fortsetzung auf der nächsten Seite)
49
Page 50

Erste Inbetriebnahme
4 Dieser Bildschirm sollte angezeigt werden.
<Drahtloser Displaybildschirm>
Change setting on host PC to the following
value, reboot the host PC, then select
"Connect" below.
Wireless LAN card
Network Type : AdHoc
WEP Encryption : disable
TCP/IP Class A Class B Class C
MeiWDS
AES Encryption : disable
AES: Advanced Encryption Standard (erweiterter Verschlüsselungsstandard)
Stellen Sie die Parameter des Computers für die Funktionen des drahtlosen lokalen
Netzwerks und TCP/IP ein.
Stellen Sie Network Type (Netzwerkart), SSID, WEP Encryption (WEP-Verschlüsselung),
IP Address (IP-Adresse) und NetMask (Netzmaske) entsprechend dem obigen Bildschirm
ein. (In den obigen Einstellungen wird die Netzwerkart als „AdHoc“ angezeigt, und in
einigen Fällen wird der Begriff „Peer-to-Peer-Group“ (Gruppe von Gleichwertigen)
verwendet.)
SSID : cfvdw07-17498
IP Address : 10. 98.185.105
NetMask : 255. 0. 0. 0
Password : wdsp
Dieser Bildschirm dient als Muster.
Connect Cancel
5 Wählen Sie [Connect] in <Drahtloser Displaybildschirm> von Schritt 4 .
G
50
Page 51

Starten/Abschalten
Starten
VORSICHT
Maximieren Sie den Eingabeaufforderung (Conmmand Prompt)-Bildschirm nicht. Wenn
der Bildschirm maximiert wird, wird die Verbindung des drahtlosen Displays unterbrochen
und der Bildschirm kann nicht auf seine Ausgangsgröße zurückgestellt werden.
<Bei Verwendung eines Computers der Reihe CF-07>
1 Schalten Sie den Computer aus, und schließen Sie dann den Portreplikator, das externe
Display und der externen Tastatur an.
Schalten Sie den Computer ein, und drücken Sie dann die Tasten Alt +
2
Eingabe im MS-DOS-Modus, um das Fenster auf seine Ausgangsgröße
zurückzustellen.
<Bei Verwendung eines Computers, der nicht zur Reihe CF-07 gehört>
Drücken Sie die Tasten Alt + Eingabe auf dem Computer.
Falls der Computer eine Verbindung mit dem drahtlosen Display herstellt, während ein
Displaymodus verwendet wird, der von dem unten aufgelisteten Modus verschieden ist,
wechselt der Displaymodus des Computers auf eine Auflösung von 800 x 600 Bildpunkten
(16 Bit). Das drahtlose Display kann nicht an einen Computer angeschlossen werden, der
die Auflösung von 800 x 600 Bildpunkten (16 Bit) nicht ermöglicht.
Auflösung: 800 x 600 Bildpunkte
Farbmodus: 16-Bit-Farbe
Falls die Verbindung mit dem drahtlosen Display unterbrochen wird, schaltet der Computer auf den ursprünglichen Displaymodus zurück. In diesem Fall können die auf dem
Bildschirm angezeigten Farben sich ändern, falls der Farbmodus (von 16 Bit auf 24 Bit
und umgekehrt) wechselt.
Falls der Displaymodus des Computers geändert wird, während dieser mit dem drahtlosen
Display verbunden ist, wird die Verbindung unterbrochen, weshalb wir empfehlen, keine
Software wie etwa einen Bildschirmschoner zu verwenden.
Unter Umständen werden einige Anwendungen, die eine Zeichnungsfunktion auf Hardware-Basis verwenden usw., nicht angezeigt.
Unter Umständen werden einige Anwendungen, die eine Zeichnungsfunktion auf Hardware-Basis verwenden usw., nicht angezeigt.
Einige Anwendungen, die die Bildschirmauffrischung häufig durchführen (beispielsweise
Videowiedergabe-Anwendungen) werden unter Umständen nicht auf dem drahtlosen Display angezeigt, oder sie werden als statische Bilder angezeigt.
Einige 16-Bit-Anwendungen funktionieren möglicherweise nicht einwandfrei.
Das Display kann eine Änderung in der Form des Cursors unter Umständen nicht anzeigen.
Die Eingabe von handschriftlichen Buchstaben oder von Zeichnungen (über die
Zeichnungsfunktion) ist auf diesem drahtlosen Display nicht möglich. (Das drahtlose Display kann mit der Verarbeitungsgeschwindigkeit nicht Schritt halten, und die Bilddaten
sind von der erwarteten Ausgabe verschieden.)
Windows XP
Falls viele Benutzerkontos erstellt wurden, werden einige davon u. U. nicht auf dem
Anmeldungsbildschirm angezeigt, falls die Bildschirmgröße geändert wird. Wir empfehlen
daher, den Willkommensbildschirm nicht zu verwenden und das Kontrollzeichen aus
[Willkommenseite verwenden] in [Start] - [Systemsteuerung] - [Benutzerkonten] - [Art
der Benutzeranmeldung ändern] löschen sollten.
G
51
Page 52

Starten/Abschalten
1
Schalten Sie Ihren Computer ein. ( Bedienungsanleitung des
Computers)
2
<Bei Verwendung eines Computers der Reihe CF-07>
Nachdem Sie sich davon überzeugt
haben, dass die Displaystatusanzeige
leuchtet, schalten Sie das drahtlose Display ein.
<Bei Verwendung eines Computers, der
nicht zur Reihe CF-07 gehört>
Nachdem im Aufgabenbalken angezeigt wurde, schalten
Sie das drahtlose Display ein.
Drücken Sie den Ein/Aus-Schalter und halten Sie ihn ungefähr drei Sekunden lang
gedrückt, bis sich die Stromanzeige einschaltet. Lassen Sie den Schalter dann los.
3
Wählen Sie die gewünschte Anwendung.
Abschalten
1
Bringen Sie den Ausschalt-Bildschirm zur Anzeige.
Windows XP
Nachdem Sie die wichtigen Daten gespeichert und die einzelnen Anwendungen
geschlossen haben, wählen Sie [Ausschalten] im [Start]-Menü.
G
Windows 2000
Nachdem Sie die wichtigen Daten gespeichert und die einzelnen Anwendungen
geschlossen haben, wählen Sie [Beenden] im [Start]-Menü.
Stromanzeige
Ein/Aus- Schalter
52
2
Bestätigen Sie die Abschaltung.
Windows XP
Wählen Sie [Ausschalten].
Windows 2000
Wählen Sie [OK], nachdem Sie [Herunterfahren] gewählt haben.
3
Wenn [Windows is shutting down] angezeigt wird, wählen Sie [Ok].
Ihr Computer und das drahtlose Display schalten sich automatisch aus.
HINWEIS
Wenn sich der Computer und das drahtlose Display nicht mit Hilfe des obigen
Verfahrens ausschalten, kann „PC in standby“ angezeigt werden, obwohl sich der
Computer nicht im Bereitschaftsmodus befindet. Wählen Sie in diesem Fall [Ok].
Das drahtlose Display schaltet sich automatisch aus.
Page 53

Berührungsempfindlicher Bildschirm
Das drahtlose Display ist mit einem berührungsempfindlichen Bildschirm ausgestattet, der
Ihnen die Durchführung der selben Bedienungsvorgänge wie eine Maus ermöglicht, indem
Sie statt dessen die Display-Oberfläche mit dem Stift berühren.
Bewegen des Cursors Klicken
Cursor
Einmal antippen
Doppelklicken Ziehen und Ablegen
Zweimal kurz
antippen
HINWEIS
Die Doppelklick-Geschwindigkeit kann mit Hilfe des folgenden Verfahrens
eingestellt werden.
Windows XP
[Start] - [Systemsteuerung] - [Drucker und andere Hardware] - [Maus] - [Tap and
Buttons] - [Double-click Speed]
Windows 2000
[Start] - [Einstellungen] - [Systemsteuerung] - [Maus] - [Tap and Buttons] - [Doubleclick Speed]
Den Stift auf das gewünschte Objekt
(z.B. Datei oder Symbol) legen, den
Stift über die Bildschirmoberfläche
ziehen (um das Objekt in die
gewünschte Position zu bringen) und
dann loslassen.
G
53
Page 54

Berührungsempfindlicher Bildschirm
Klicken mit der rechten Maus
Drücken Sie die R-Taste.
1
R-Taste
HINWEIS
Falls Sie die R-Taste bei der Einstellung des „Aktiviert“-Zustands der
Rechtsklickfunktion erneut drücken, wird die Rechtsklickfunktion deaktiviert.
VORSICHT
Die Touchscreen-Funktion kann im MS-DOS-Modus und bei Wahl des vollen
Bildschirms im Fenster [Eingabeaufforderung](Command Prompt) nicht verwendet
werden.
2
Wenn “R” in
der unteren
R
rechten Ecke
angezeigt wird
Einmal antippen
Hinweise zur Handhabung des berührungsempfindlichen Bildschirms
Den mitgelieferten Stift für das drahtlose Display verwenden. Für dieses Display sollte
G
54
nur der mit dem drahtlosen Display mitgelieferte Stift verwendet werden.
Keinerlei Gegenstände auf die Oberfläche des Bildschirms legen und nicht mit spitzen
Gegenständen (z.B. Nägeln) oder harten Gegenständen, die Kratzer verursachen können
(z.B. Bleistift oder Kugelschreiber), Druck auf die Bildschirmoberfläche ausüben.
Den Computer nicht betreiben, wenn sich Staub auf dem Bildschirm angesammelt hat,
und Kontakt mit Substanzen vermeiden, die den berührungsempfindlichen Bildschirm
verunreinigen können, z.B. Öl. Anderenfalls arbeitet der Cursor u.U. nicht einwandfrei.
Bei einer Verschmutzung des berührungsempfindlichen Bildschirms:
Die Schmutzflecken mit einem trockenen, weichen Tuch oder einem Stück Gaze
abreiben.
Auf keinen Fall Benzin, Farbverdünner oder Desinfektionsmittel-Alkohol zum Reinigen
verwenden.
(Für weitere Informationen siehe die Anleitungen unter „Empfehlungen zur Reinigung
der LCD-Oberfläche“, die mit dem weichen Tuch mitgeliefert werden.)
Page 55

Hinweise zur Handhabung des Stifts
Die Stiftspitze und den Bildschirm vor der Verwendung reinigen. Fremdkörper können
zu Kratzern auf dem Bildschirm führen und den Betrieb des Stifts beeinträchtigen.
Den mitgelieferten Stift nur auf dem Bildschirm des drahtlosen Displays verwenden.
Falls der Stift auch für andere Zwecke verwendet wird, kann er beschädigt werden und
den Bildschirm zerkratzen.
Auf keinen Fall Bleistifte, Stifte mit einem spitzen Ende oder harte Gegenstände für
die Bildschirm-Bedienungsvorgänge verwenden. Anderenfalls könnte der Bildschirm
zerkratzt werden.
Kalibrierung
Bestimmen Sie die Kalibrierungseinstellung, wenn der Cursor und die Berührung durch
den Stift nicht übereinstimmen.
1
Drücken Sie die Menü-Taste.
2
Wählen Sie [Option].
3
Wählen Sie [Calibration].
Berühren Sie die fünf “x” Markierungen auf dem
Kalibrierungsbildschirm.
1 2
××
Menü-Taste
G
×
5
3 4
××
55
Page 56

Software-Tastatur
Bei der Wahl von [ Software Keyboard] im Aufgabenbalken, oder wenn der SchriftzeichenEingabekasten einer Anwendung gewählt wird, erscheint die unten gezeigte Software-Tastatur
automatisch, mit deren Hilfe die Schriftzeichen eingegeben werden können.
Wir empfehlen Ihnen, die Software-Tastatur als Symbol eingeschaltet zu lassen, anstatt sie
wieder zu schließen, wenn sie nicht verwendet wird. Das Software-Tastatur wird nämlich
nicht mehr automatisch gestartet, falls sie durch Berühren von
diesem Fall kann ein Neustart mithilfe des folgenden Verfahrens durchgeführt werden.
Windows XP
[Start] - [Alle Programme] - [Panasonic] - [Software Keyboard]
Windows 2000
[Start] - [Programme] - [Panasonic] - [Software Keyboard]
Das System-Menü
wird angezeigt.
Seite 57)
(
Einmal antippen : Verwendung als eine Kurzverfahrens-Taste.
Zweimal kurz antippen : Dieselbe Funktion wie die Taste .
HINWEIS
Falls Sie die Kurzverfahrens-Taste drücken möchten, nachdem Sie eine Taste gedrückt
haben, drücken Sie die zweite Taste in Aufeinanderfolge. Falls Sie beispielsweise
Ctrl + C tippen möchten, drücken Sie die Taste C nach dem Drücken der
Taste Ctrl .
G
Falls eine externe Tastatur an den Computer angeschlossen ist, werden nicht alle
Bedienungsvorgänge auf dieser externen Tastatur auch auf der Software-Tastatur angezeigt.
Wenn Sie zwei oder mehrere Tasten gemeinsam verwenden ( Ctrl + C usw.),
verwenden Sie nur die interne Tastatur oder die Software-Tastatur.
Ctrl + Alt + Del kann nicht über die Software-Tastatur eingegeben werden
(außer beim Anmelden).
Die Schriftzeichen können im MS-DOS-Modus nicht über die Software-Tastatur
eingegeben werden.
Bei einigen Anwendungen bleibt die Software-Tastatur als Symbol angezeigt, selbst
wenn der Schriftzeichen-Eingabekasten gewählt wird. Wählen Sie in diesem Fall [
Software Keyboard] im Aufgabenbalken.
Falls Sie die Tastatur für andere Anwendungszwecke als die Schriftzeicheneingabe
verwenden möchten (z.B. für Windows Explorer), bringen Sie zuerst die SoftwareTastatur zur Anzeige, und wählen Sie dann die Anwendung. Unter Durchführung dieser
Schritte können Sie die Tasten der Software-Tastatur verwenden.
Bevor Sie das Betriebssystem Windows ausschalten und dann erneut einschalten, speichern
Sie zuerst alle Daten. Falls Sie versuchen, den Computer auszuschalten, während die Daten
bearbeitet werden, erscheint eine Meldung, die Sie fragt, ob Sie die aktuellen Daten speichern
möchten. Schalten Sie in diesem Fall auf das Betriebssystem Windows zurück, speichern Sie
alle Daten, und schalten Sie den Computer dann aus.
56
geschlossen wurde. In
Die Software-Tastatur wird an
die vier Ecken des Bildschirm
verschoben.
Das Berühren dieser Taste hat
dieselbe Wirkung wie ein Klick
auf die rechte Maustaste.
(Dieselbe Funktion wie die
Taste .)
Page 57

Ändern der Einstellungen
Mit Hilfe des System-Menüs können Sie die Tastaturgröße ändern, die Tastatur auf die
numerische Tastatur umschalten oder andere Einstellungen ändern.
1
Wählen Sie (in der oberen linken Ecke der SoftwareTastatur).
2
Versehen Sie die zu verwendende Funktion mit einem
Kontrollzeichen.
Die Software-Tastatur wird automatisch verschoben, so dass
sie das gegenwärtig gewählte Fenster nicht verdeckt. (Sie
wird nicht verschoben, falls kein Platz vorhanden ist, an
den sie verschoben werden kann.) Außerdem wird die Software-Tastatur auf dem Display in den Vordergrund gehoben,
wenn der Computer auf den Eingabemodus umschaltet.
Falls die Software-Tastatur in der Taskleiste minimiert
wurde, wird sie automatisch auf ihre ursprüngliche Größe
zurückgesetzt und auf dem Display in den Vordergrund
gehoben, wenn der Computer auf den Eingabemodus
umschaltet. Je nach der Anwendung kann es vorkommen,
dass diese Funktion nicht verwendet werden kann.
Heben Sie die Software-Tastatur auf dem Display in den
Vordergrund.
Stellen Sie die Software-Tastatur auf die transparente
Anzeige ein.
Wählen Sie die Tastatur/Zifferntasten.
G
HINWEIS
Die auf der Zifferntastatur angezeigten
Währungssymbole werden mithilfe des folgenden
Menüs eingestellt.
Windows XP : [Start] - [Systemsteuerung] - [Datums-,
Zeit-, Sprach- und Reigionaleinstellungen]
- [Regions- und Sprachoptionen] [Regionale Einstellungen] - [Anpassen] [Währung] - [Währungssymbol]
Windows 2000 : [Start] - [Einstellungen] -
[Systemsteuerung] - [Ländereinstellungen]
- [Währung] - [Währungssymbol]
57
Page 58

Batteriestrom
Batterie-Status
Verwenden Sie die Batterie-Anzeige, um den BatterieStatus zu überprüfen
G
Batterie-Anzeige
Orange*
Grün*
Rot
Blinkt rot*
Blinkt orange*
Blinkt grün
Leuchtet nicht
*1 Wenn der Netzadapter angeschlossen ist.
1
1
1
1
Batterie-Status
Wird geladen
Voll geladen
Die Batterie ist erschöpft (die Ladung beträgt weniger als ca.
9% der vollen Ladung)
Die Batteriepackung oder das Ladegerät funktioniert
möglicherweise nicht richtig. Entfernen Sie die
Batteriepackung umgehend, und trennen Sie den Netzadapter
ab. Schließen Sie sie dann wieder an. Falls das Problem
weiterhin besteht, wenden Sie sich an eine PanasonicKundendienststelle.
Die Batteriepackung kann nicht geladen werden, da die
Temperatur die zulässigen Grenzwerte überschritten hat. (Die
Umgebungstemperatur liegt außerhalb des zulässigen
Bereichs. Sobald sich die Temperatur wieder innerhalb des
zulässigen Bereichs befindet, beginnt der Ladevorgang
automatisch.)
Im Hochtemperaturmodus wird die Batterie auf die
vorgeschriebene Ladungsstufe entladen.
Die Batteriepackung ist nicht angeschlossen, oder der
Ladevorgang findet nicht statt.
58
HINWEIS
Dieses drahtlose Display verhindert ein Überladen der Batterie, da der Ladevorgang
nur durchgeführt wird, wenn die restliche Leistung weniger als ca. 95% der Leistung
der Batterie, die voll geladen wurde, beträgt.
Page 59

Um ein genaues Ablesen zu ermöglichen.
1
Drücken Sie die Menü-Taste.
2
Wählen Sie [Battery] ( Seite 63)
Menü-Taste
HINWEIS
Die tatsächlich verbleibende Batterieladung und die angezeigte Ladung können
verschieden sein.
• Die Batterie-Anzeigeleuchte bleibt rot.
• Die restliche Batterieladung wird über einen
längeren Zeitraum als 99% angezeigt, und die
Lampe leuchtet orangefarben.
• Nach einem kurzen Zeitraum erscheint eine
Warnanzeige für geringe Batterieladung.
Führen Sie das
Verfahren “Refresh
Battery” durch.
Seite 63)
(
59
G
Page 60

Batteriestrom
Ersetzen der Batteriepackung
Wenn die Batteriepackung nach kurzer Zeit nicht mehr ausreichend Strom liefert, selbst
nachdem es vorschriftsgemäß voll geladen wurde, muss es möglicherweise ersetzt werden.
Die Batteriepackung ist ein Verbrauchsteil und muss daher von Zeit zu Zeit durch eine
andere Batteriepackung (CF-VZSU21) ersetzt werden.
VORSICHT
Achten Sie darauf, die Klemmen der Batteriepackung nicht zu berühren. Die
Batteriepackung funktioniert möglicherweise nicht mehr, falls die Kontakte
schmutzig oder beschädigt sind.
Beim ursprünglichen Erwerb des drahtlosen Displays ist die Batteriepackung nicht
geladen. Achten Sie daher darauf, die Batteriepackung vor der ersten
Inbetriebnahme des Computers zu laden. Wenn ein Netzadapter an das drahtlose
Display angeschlossen wird, beginnt der Ladevorgang automatisch.
Verwenden Sie nur die angegebene Batteriepackung (CF-VZSU21) mit Ihrem
drahtlosen Display.
Vergewissern Sie sich, dass der Strom ausgeschaltet ist, bevor Sie fortfahren.
1
Schalten Sie das drahtlose Display aus ( Seite 52)
G
60
VORSICHT
Ersetzen Sie die Batteriepackung durch eine andere, während der Netzadapter
angeschlossen ist, und trennen Sie den Netzadapter nicht ab, bis die neue
Batteriepackung vollständig geladen ist. Anderenfalls können die auf dem
drahtlosen Display gespeicherten Bilddaten verloren gehen.
2
Herausnehmen der Batteriepackung
1 Verschieben Sie Sperrvorrichtung.
2 Öffnen Sie dann die Abdeckung.
3 Ziehen Sie die Batteriepackung an der Lasche
aus dem drahtlosen Display heraus.
1
2
3
Page 61

Einsetzen einer Batteriepackung
1 Befestigen Sie die Batteriepackung sicher an der
Anschlussklemme an.
VORSICHT
2
1
Achten Sie darauf, die Batteriepackung wie
gezeigt einzuführen.
Achten Sie darauf, dass die Batteriepackung
richtig an die Anschlussklemme
angeschlossen ist.
2 Schließen Sie die Abdeckung.
3 Schieben Sie die Sperrvorrichtung nach links.
VORSICHT
Falls die Abdeckung nicht angebracht ist, kann die Batteriepackung
herausfallen, während Sie das drahtlose Display an einen anderen Ort tragen.
Achten Sie darauf, dass die Lasche nicht eingeklemmt wird, wenn Sie die
Abdeckung schließen.
Laden der Batteriepackung
Schließen Sie das drahtlose Display an eine
Netzsteckdose an.
Der Ladevorgang beginnt automatisch.
Anschlussstecker
Lasche
3
G
61
Page 62

Einstellen des drahtlosen Displays
Sie können die Einstellungen für das drahtlose Display durchführen.
Drücken Sie die Menü-Taste.
Die Einstellungsmenüs werden angezeigt.
Menü-Taste
„General“-Menü
Nach Wahl von [General] können Sie die Einstellungen von Modus,
Hintergrundbeleuchtung und Profil ändern.
Einstellungsvorgaben
General Wireless Battery Option Version
Mode : Connect OfflineView
Backlight : LOW MID HIGH
Profile : Profile 1
100% Excellent
„Wireless“-Menü
G
Indem Sie [Wireless] wählen, werden die Einstellung für den drahtlosen Anschluss (an
den Computer) und der aktuelle Zustand angezeigt (dies kann nicht geändert werden).
Um die in diesem Menü gezeigten Einstellungen zu ändern:
General Wireless Battery Option Version
Network Type : AdHoc
TxRate mode : Fully Automatic
WEP Encryption : disable
Rate (Tx/Rx) : 11Mbps / 11Mbps
Display IP : 10. 98. 185. 106
AES Encryption : disable
100% Excellent
62
Dieser Bildschirm dient als Muster.
OK Cancel
SSID : cfvdw07-17498
Channel : 11
PC IP : 10. 98. 185. 105
Net Mask : 255. 0. 0. 0
OK Cancel
Der Speicherungsbildschirm wird
angezeigt. (
Seite 69)
Der Profilname wird angezeigt.
Beim Einstellen eines Profils kann ein
drahtloses Display an einen anderen
Computer angeschlossen werden. Bis
zu vier Profile können eingestellt
werden (
Seite 64).
Wählen Sie [Connect] nach der Wahl des
Profils, dann erfolgt der Anschluss unter
Verwendung des gewählten Profils.
Zustand der elektronischen Wellen
(Excellent, Good, Poor, Associated,
Scanning)
Restliche Batterieladung
Seite 66
Das Display zeigt an, ob die AESVerschlüsselung aktiviert oder
deaktiviert ist.
Page 63

Einstellen des drahtlosen Displays
„Battery“-Menü
Indem Sie [Battery] wählen, wird der Batterie-Status angezeigt.
General Wireless Battery Option Version
Status : Full Charge
Voltage : 8154mV
Current : 0mA
Temperature : 26.2 °C (79.2 °F)
Remain : 100%
Error : None
Refresh Battery : Execute
Environment : Normal temperature
100% Excellent
OK
Cancel
Dieser Bildschirm dient als Muster.
Verwenden Sie die Auffrischbatterie.
Wenn die Bestätigungsmeldung
angezeigt wird, wählen Sie [Yes].
Nach Wechseln der BatterieAnzeigeleuchte auf Grün, die
Batteriepackung wird vollständig
entladen, der Computer schaltet sich
automatisch aus, und der
Ladevorgang beginnt. Es dauert
ungefähr zwei Stunden, bis die
Batterie infolge ihrer vollständigen
Entladung keinen Strom mehr
liefert, nachdem Sie voll geladen
wurde.
Setzen Sie den Ladevorgang der
Batterie fort, bis die BatterieAnzeigeleuchte auf Grün wechselt.
(Während des Ladevorgangs wird
die Hintergrundbeleuchtung
automatisch ausgeschaltet.)
Stellen Sie die Funktion für hohe
Temperatur auf [Normal temperature] oder auf [High temperature] ein.
Wenn Sie das drahtlose Display in
einer Umgebung mit hoher
Temperatur verwenden, stellen Sie es
immer auf den Modus für hohe
Temperatur ein.
G
HINWEIS
Die Batterie wird in den folgenden Fällen nicht richtig aufgefrischt.
• Wenn die Stromversorgung des drahtlosen Displays unterbrochen wird.
• Wenn die Netzstromversorgung unterbrochen wird (z.B. Stromausfall,
versehentliches Abtrennen des Netzadapters usw.)
63
Page 64

Einstellen des drahtlosen Displays
„Option“-Menü
Indem Sie [Option] wählen, können Sie die einzelnen Einstellungen für das drahtlose
G
Display durchführen.
Einstellungsvorgaben
General Wireless Battery Option Version
Wireless Connection : Setup
Power on Password : Change
Supervisor Password : Change
Touchscreen : Calibration
LCD Off Timer : 30 min
LCD Off Mode : Normal resume
Power Off Timer : disable
100% Excellent
Stellen Sie das Supervisor-Passwort ein bzw.
ändern Sie es ab.
Falls für eine gewisse Zeit kein Eingang
vom Berührungsfeld oder von einer Taste
erfolgt, kann sich das Display
automatisch ausschalten.
Wählen Sie die Zeit, bis zum Ausschalten
des Displays unter den folgenden
Einstellungen aus: [30 sec], [1 min], [2
min], [5 min], [10 min], [20 min], [30
min] bzw. [disable], wählen Sie [OK].
Stellen Sie die Fortsetzungsfunktion auf
[Normal resume] oder [Quick resume] ein,
wählen Sie [OK].
Normal Resume:
Der drahtlose Anschluss wird
unterbrochen, wenn keine Anzeige
erfolgt.
Quick Resume:
Nur der Bildschirm wird
ausgeschaltet, wenn keine Anzeige
erfolgt.
64
OK Cancel
Ändern Sie die Einstellungen des
Funkanschlusses, indem Sie das
folgende Verfahren durchführen.
1
2
<Drahtloser Displaybildschirm>
3
Ändern Sie das Passwort, das
eingegeben wurde, um das drahtlose
Display zu verwenden.
Falls für eine gewisse Zeit kein
Eingang vom Berührungsfeld oder von
einer Taste erfolgt, kann sich das Display automatisch ausschalten.
Wählen Sie die Zeit, bis zum
Ausschalten des Displays unter den
folgenden Einstellungen aus: [30 sec], [1
min], [2 min], [5 min], [10 min], [20 min],
[30 min] bzw. [disable], wählen Sie
[OK].
Wählen Sie [Setup].
<Falls Supervisor-Passwort
eingestellt wurde>
Geben Sie das SupervisorPasswort ein, und wählen Sie dann
[Enter].
Wählen Sie das Profil, das im
folgenden Bildschirm eingestellt
wurde, und wählen Sie dann [OK].
Select profile.
Profile 1 Profile 2
Profile 3 Profile 4
Dieser Bildschirm dient als Muster.
Stellen Sie das Netzwerk durch
dasselbe Verfahren ein, wie in 3 ,
4 und 5 im Abschnitt „Einstellen
des drahtlosen Displays“
beschrieben (
Seite 49).
Page 65

„Version“-Menü
Indem Sie [Version] wählen, wird die Versions-Information angezeigt.
General Wireless Battery Option Version
Model No. : CF-VDW07Bxx
Firmware : Vx.xxLxxx
Wireless Controller : xx. xx. xx. xx
Serial No. : xxxxxxxxxx
100% Excellent
OK Cancel
„x“ ändert sich entsprechend der
Konfiguration des drahtlosen Displays.
G
65
Page 66

Änderung der Einstellungen des drahtlosen Displays
Wireless Display Setup Utility
Sie können die Eigenschaften des drahtlosen Displays wie
folgt einstellen.
1
Wählen Sie im [Wireless Display Setup Utility] im
folgenden Verfahren.
Windows XP [Start] - [Alle Programme] - [Panasonic]
Windows 2000 [Start] - [Programme] - [Panasonic]
2
Geben Sie das Supervisor-Passwort ein.
Das Supervisor-Passwort ist bei Erwerb des Displays nicht
eingestellt.
Drücken Sie die Menü-Taste, wählen Sie [Option], und
stellen Sie dann das Supervisor-Passwort ein. (
64)
3
Führen Sie die Einstellungen für das drahtlose Display,
TCP/IP und WEP durch.
Sie können diese Einstellungen für jedes Profil
durchführen.
Ändern Sie den Profilnamen.
Ändern Sie die AES-Verschlüsselung.
<Wenn Sie beim Einstellen der AES-Verschlüsselung eine
andere Einstellung als [Disable] wählen>
Wählen Sie [Key], stellen Sie den AES-Schlüssel mit Hilfe
einer Wort- oder Zahlengruppe ein, und wählen Sie dann
[OK].
G
Ändern Sie die WEP-Verschlüsselung.
<Wenn Sie beim Einstellen der WEP-Verschlüsselung
eine andere Einstellung als [Disable] wählen>
Wählen Sie [Key(s)], stellen Sie die WEP-Schlüssel ein,
und wählen Sie dann [OK].
Wenn Sie hier ein Kontrollzeichen setzen, wird die
Einstellung des MeiWDS-Profils (nur ein Profil), wie etwa
das Passwort oder die AES-Verschlüsselung, auch im
Computer, der an das drahtlose Display angeschlossen
ist, eingestellt.
Nachdem Sie die Einstellungen abgeschlossen haben,
wählen Sie [Next] und dann [OK].
(Falls nach der Wahl von [OK] ein anderer Bildschirm
angezeigt wird, wählen Sie [OK].)
Seite
66
Page 67

4
Wählen Sie [Next] im Bestätigungsbildschirm.
Die Meldung „These settings will be sent to your display“ wird angezeigt. Wählen Sie [OK].
5
<Beim Hinzufügen des Kontrollzeichens für [Use this
3
profile now] in Schritt
Der Bildschirm [Set up your PC] wird angezeigt.
Geben Sie die LAN- und TCP/IP-Einstellungen des
drahtlosen Displays, die auf dem Bildschirm angezeigt
werden, in Ihrem Computer ein, und wählen Sie dann
[Finish].
<Beim Entfernen des Kontrollzeichens für [Use this profile now] in Schritt
Der Bildschirm [Completed] wird angezeigt.
Wählen Sie [Finish].
( Seite 66)>
3
>
HINWEIS
Die Einstellungen für MeiWDS und für das
drahtlose Display können nicht gleichzeitig
durchgeführt werden. (
Seite 68)
67
G
Page 68

Änderung der Einstellungen des drahtlosen Displays
MeiWDS Setup Utility
1
Wählen Sie im [MeiWDS Setup Utility] im folgenden
Verfahren.
Windows XP [Start] - [Alle Programme] - [Panasonic]
Windows 2000 [Start] - [Programme] - [Panasonic]
2
Geben Sie das Supervisor-Passwort ein, und wählen Sie [OK].
In der Vorgabeeinstellung ist das Supervisor-Passwort auf
„supervisor“ eingestellt.
3
Geben Sie das Passwort und die Einstellungen für die AESVerschlüsselung ein, und wählen Sie [Next].
Falls die Einstellungen zwischen dem Computer und
dem drahtlosen Display nicht übereinstimmen (z. B.,
weil das Display gewechselt wurde), stellen Sie sie mit
Hilfe des folgenden Verfahrens erneut ein.
Stellen Sie die Länge des AES-Schlüssels ein.
<Wenn Sie beim Einstellen der AES-Verschlüsselung eine
andere Einstellung als [Disable] wählen>
Wählen Sie [AES Key], stellen Sie die AES-Schlüssel mit
Hilfe einer Wort- oder Zahlengruppe ein, und wählen Sie
dann [OK].
G
68
Stellen Sie die Lebensdauer des AES-Schlüssels ein.
4
Wählen Sie [Finish] im Bestätigungsbildschirm.
Wählen Sie [OK] im Bestätigungsbildschirm, und führen
Sie dann einen Neustart des Computers durch.
HINWEIS
Die Einstellungen für MeiWDS und für das drahtlose Display können nicht
gleichzeitig durchgeführt werden.
Stellen Sie den AES-Schlüssel ein, nachdem Sie die Einstellungen für das drahtlose
Display durchgeführt haben (
Nachdem Sie in der Startleiste gewählt haben, wird das Menü angezeigt.
[Password] und [Exit MeiWDS] werden aktiviert, wenn Sie das Kontrollzeichen
für [Enable tray menu] im Installations-Dienstprogramm für MeiWDS hinzufügen.
· Password : Stellen Sie dasselbe Passwort ein, das im Menü [Option]
eingestellt wurde.
· About MeiWDS : Die Software-Version und die Urheberrechte werden
angezeigt.
· Exit MeiWDS : Verlassen Sie das Programm.
Seite 66).
Page 69

Bildschirmerfassung
Falls Sie den gegenwärtig angezeigten Bildschirm später
wiedergeben möchten, können Sie die Bildschirmdaten
speichern (bis zu 100 Bilder)*
*1Die Anzahl der Daten, die gespeichert werden können, ist je
nach Bild verschieden.
1
.
Drücken Sie die Erfassungstaste.
Der gegenwärtig angezeigte Bildschirm wird gespeichert und
an das Ende der bereits gespeicherten Bilder angehängt.
Anzeigen von gespeicherten Bildern
1
Drücken Sie die Menü-Taste.
2
Wählen Sie [Genaral] - [OfflineView],
und wählen Sie dann [OK].
Das gespeicherte Bild und die folgende Schalttafel
werden angezeigt.
Verschiebung in die vier
Ecken des Bildschirms
Anzeige des vorherigen Bildes
(Hochgeschwindigkeitsmodus)
Anzeige des vorherigen Bildes
(Der gleiche Vorgang kann auch durch
Drücken der R-Taste durchgeführt
werden.)
<Schalttafel>
No 016
Total 038
Delete
<< >>
< >
Anzeige des nächsten Bildes
(Der gleiche Vorgang kann auch durch
Drücken der Erfassungstaste durchgeführt
werden.)
Bildnummer
Anzahl der gespeicherten Bilder
Löschen der gespeicherten Daten
Anzeige des nächsten Bildes
(Hochgeschwindigkeitsmodus)
Erfassungstaste
Menü-Taste
G
HINWEIS
Wenn die Stromversorgung durch einen anderen Vorgang als dem Drücken des
Netzschalters unterbrochen wurde (beispielsweise, falls das drahtlose Display mit
Strom von der Batterie betrieben wurde und die Batterie versehentlich
herausgenommen wurde, oder wenn ein Netzadapter versehentlich aus der
Steckdose gezogen wurde und sich keine Batterie im drahtlosen Display befindet),
gehen alle gespeicherten Bilder verloren.
Nur das Bildschirmbild wird angezeigt, und die Betriebsvorgänge wie Eingabe
und Wahlvorgänge können nicht auf dem Bildschirm durchgeführt werden.
Um ein gespeichertes Bild zu schließen und auf die Anzeige des vorherigen
Bildschirms zurückzukehren:
1 Drücken Sie die Menü-Taste.
2 Wählen Sie [General] - [Connect], und wählen Sie dann [OK].
69
Page 70

Störungsbeseitigung
Bei Auftreten einer Störung bitte die nachstehende Tabelle konsultieren. Falls die Störung
mit einem Anwendungsprogramm in Verbindung steht, bitte auch im Handbuch des
betreffenden Programms nachschlagen. Lässt sich eine Störung anhand der Hinweise der
Tabelle nicht beseitigen, bitte Kontakt mit dem Panasonic-Kundendienst aufnehmen.
G
Keine Bildschirmanzeige
nach dem Einschalten
Ein Nachbild erscheint
„Connection timeout“
wird angezeigt
„No server found“ wird
angezeigt
„Authentication failed“
wird angezeigt
„Too many clients“ wird
angezeigt
Wurde der Computer oder das drahtlose Display auf
Energiesparmodus geschaltet?
Um den Betrieb Ihres Computers fortzusetzen, wenn
die Display-Stromversorgung ausgeschaltet ist (um
Strom zu sparen), berühren Sie einfach den Bildschirm.
Wenn ein Bild lange Zeit über auf dem Bildschirm
verbleibt, erscheint u.U. ein Nachbild. Stellen Sie den
Bildschirmschoner ein.
Bestätigen Sie die IP-Adresse, die Subnet-Maske, den
Netzwerk-Typ und die SSID-Einstellungen sowohl auf
dem Computer als auch auf dem drahtlosen Display.
Bestätigen Sie den Betrieb des lokalen Netzwerks auf
dem Computer.
Falls sich Ihr Computer und das drahtlose Display nicht
normal ausschalten, z. B. auf Grund eines
Netzwerkfehlers, kann es zwei oder drei Minuten
dauern, um den Anschluss erneut herzustellen.
Warten Sie einen Moment, und führen Sie den
Anschluss dann erneut durch.
Stellen Sie das drahtlose Display näher zum Computer
auf.
Bestätigen Sie, dass im Aufgabenbalken angezeigt
ist.
Bestätigen Sie die IP-Adresse des Computers, der an
das drahtlose Display angeschlossen ist.
Bestätigen Sie das Passwort sowohl für den Computer
als auch für das drahtlose Display.
Trennen Sie das drahtlose Display während des
Betriebs ab, und schließen Sie es dann erneut an.
70
Page 71

„Illegal data received“
oder „Initial image
receiving timeout“ wird
angezeigt
Die Software-Tastatur
wurde geschlossen
Ein Nachbild erscheint
(grüne, rote und blaue
Punkte bleiben auf dem
Bildschirm zurück),
oder m a n c h e B i l d p
u n k t e erscheinen in
den falschen Farben
Überprüfen Sie, ob das Netzwerk richtig funktioniert
oder nicht.
Bestätigen Sie die Einstellungen der Länge des AESSchlüssels, indem Sie das folgende Verfahren
durchführen.
<Am Computer>
Windows XP
[Start] - [Alle Programme] - [Panasonic] - [MeiWDS
Setup Utility]
Windows 2000
[Start] - [Programme] - [Panasonic] - [MeiWDS Setup
Utility]
<Am Display>
Drücken Sie die Menü-Taste, wählen Sie [Wireless]
und bestätigen Sie die Einstellung der AESVerschlüsselung.
Führen Sie einen Neustart des Computers durch.
Wählen Sie im [Software Keyboard] im folgenden
Verfahren.
Windows XP
[Start] - [Alle Programme] - [Panasonic]
Windows 2000
[Start] - [Programme] - [Panasonic]
Bei der Hochpräzisions-Fertigung von Farb-
Flüssigkristallbildschirmen (Farb-LCD-Monitoren)
werden fortschrittliche Technologien eingesetzt. Als
Faustregel gilt, dass keinerlei Defekt vorliegt, wenn
mehr als 99,998 % aller Bildpunkte einwandfrei
funktionieren (d.h. 0,002 % oder weniger der
Bildpunkte entweder nicht aufleuchten oder ständig
leuchten).
G
71
Page 72

Technisch Daten
G
Modell-Nr.
LCD- Typ
Bildschirm
Angezeigte Farben
Berührungsempfindlicher
CF-VDW07BH
8,4-Typ (TFT)
256 Farben (800 x 600 Bildpunkte)
Antireflex, berührbar mit dem Stift (mitgeliefert)
Bildschirm
Schnittstelle Serieller Port
Batteriepackung
Betriebszeit
Ladezeit
1
*
Netzdapter*2Eingang
Ausgang
Leistungsaufnahme*
Zulässige
3
Betrieb
Umgebungsbedingungen
Lagerung
Abmessungen
9-polige D-sub-Stiftbuchse
Li-Ion 7,4 V, 1,7 Ah
1
*
Ca. 1,5 bis 2,5 Stunden
Stromzufuhr Ein: Ca. 5,0 Stunden
Stromzufuhr Aus: Ca. 2,0 Stunden
100 V - 240 V Netzstrom, 50/60 Hz
15,6 V Gleichstrom, 3,85 A
Ca. 12 W*4 / Ca. 20 W*
5
Temperatur : 5 °C bis 35 °C
Luftfeuchtigkeit : 30% bis 80% RH (ohne
Kondensation)
Temperatur : -20 °C bis 60 °C
Luftfeuchtigkeit: 30% bis 90% RH (ohne
Kondensation)
222 mm × 162 mm × 12,5 mm - 29,5 mm
(Breite × Höhe × Tiefe)
Gewicht
*1Ist je nach den Verwendungsbedingungen verschieden.
2
*
<Nur für Nordamerika>
Das Netzteil kann mit Spannungsquellen bis 240 VAC verwendet werden. Der Computer wird mit
einem Netzkabel für 125 VAC ausgeliefert.
3
*
Ca 1,5 W, wenn die Batteriepackung voll geladen ist (oder nicht geladen wird) und der Computer
ausgeschaltet ist.
4
*
Nennleistungsaufnahme
5
*
Maximal während des Ladevorgangs
Ca. 710 g
72
Page 73

FRANÇAIS
Nous vous remercions d’avoir porté votre choix sur l’écran déporté sans fil pour la série
d’ordinateurs Toughbook Panasonic.
Cet écran déporté sans fil comporte une fonction d’écran tactile qui permet une utilisation de
l’ordinateur en touchant simplement la surface de l’écran déporté sans fil.
Mode d’emploi.......................... 1Ecran Déporté Sans Fil ............ 1
Adaptateur Secteur ..
Stylet .......................................... 1
Au moment de l’expédition, le stylet se trouve
dans l’écran déporté sans fil. (
Chiffon doux.........1
Cordon Secteur ....1
1
page 84)
Courroie ................ 1
Batterie ................. 1
N° de modèle : CF-VZSU21N° de modèle : CF-AA1639A
CD-ROM ..................................... 1
Vis ......................... 2
F
73
Page 74

Première utilisation
Noms et fonctions des pièces
<Deavant>
Écran LCD
Commutateur d’alimentation
MENU
page 92
Témoin à DEL
Etat de la batterie page 88
Etat d’alimentation
Eteint: Appareil hors tension
Vert : Appareil en marche
<Fixation de la courroie>
1 Sélectionnez deux des quatre orifices
de vis suivants.
3 Mettez en place l’autre côté de la
courroie et serrez la vis.
Bouton CaptureBouton Menu
page 99
Bouton R
page 84
2 Ajustez la courroie à sa longueur
maximum. Mettez en place un côté de
la courroie et serrez la vis.
4 Ajustez la courroie sur la longueur
désirée.
R-BUTTON
CAPTURE
Partie intérieure de la
courroie
F
Partie
extérieure de
la courroie
74
Page 75

<Dessous>
Prise DC-IN
Stylet
DC-IN 15.6V
Port Série
Batterie
page 90
<Retrait du stylet>
REMARQUE
<Lors de l’utilisation d’un ordinateur de la série CF-07>
Sélectionnez [Disabled] dans la procédure qui suit.
Windows 2000
[Démarrer] - [Paramètres] - [Panneau de configuration] -[Système] - [Matériel] [Gestionnaire de périphériques] - [Network adapters] - [PRISM2 IEEE 802.11 PC
CARD Adapter] - [Avancé] - [Driver based IBSS]
Windows XP
Si vous avez installé Windows XP Service Pack 2 sur l’ordinateur utilisé, sélectionnez
[Désactivé (non recommandé)] dans [démarrer] - [Panneau de configuration] [Connexions réseau et Internet] - [Modifier les paramètres du Pare-feu Windows] [Général] puis désactivez le coupe-feu de Windows.
<Pour U.S.A. et Canada>
A lithium ion battery that is recyclable powers the product you
have purchased. Please call 1-800-8-BATTERY for information
on how to recycle this battery.
L’appareil que vous vous êtes procuré est alimenté par une batterie
au lithium-ion. Pour des renseignements sur le recyclage de la
batterie, veuillez composer le 1-800-8-BATTERY.
F
75
Page 76

Première utilisation
Installez le programme MeiWDS et le clavier logiciel
ATTENTION
Préparez le CD-ROM qui accompagne l’écran déporté sans fil, et le lecteur CD/DVD.
Installez le logiciel sur un ordinateur compatible avec le réseau local (LAN) sans fil.
Installez le programme MeiWDS :
1 Placez le CD-ROM qui accompagne cet écran déporté sans fil dans le lecteur CD/DVD.
2 Windows XP
Sélectionnez [démarrer] - [Exécuter], saisissez [L:\meiwds\setup.exe]*
sélectionnez [OK]. Suivez les instructions à l’écran.
Windows 2000
Sélectionnez [Démarrer] - [Exécuter], saisissez [L:\meiwds\setup.exe]*
sélectionnez [OK]. Suivez les instructions à l’écran.
3 Redémarrez l’ordinateur.
4 Après le redémarrage, l’icône de l’utilitaire de configuration de l’écran déporté sans
fil (MeiWDS)
Pour plus de détails sur l’utilisation de MeiWDS:
Installez le clavier logiciel :
1 Placez le CD-ROM qui accompagne cet écran déporté sans fil dans le lecteur CD/DVD.
2 Windows XP
Sélectionnez [démarrer] - [Exécuter], saisissez [L:\softkb\setup.exe]*
[OK]. Suivez les instructions à l’écran.
Windows 2000
Sélectionnez [Démarrer] - [Exécuter], saisissez [L:\softkb\setup.exe]*
[OK]. Suivez les instructions à l’écran.
Pour plus de détails sur l’utilisation du clavier logiciel:
*1 “L:” est la lettre du lecteur. Vous pouvez changer cette lettre selon vos préférences.
apparaîtra sur la barre des tâches.
page 98
page 86
1
et sélectionnez
1
et sélectionnez
1
1
et
et
F
REMARQUE
Windows XP
La fonction Bascule rapide utilisateur n’est pas prise en charge.
Si la fonction Bascule rapide utilisateur est activée, l’écran [MeiWDS] apparaîtra
au démarrage de l’ordinateur. Lorsque l’écran apparaît, sélectionnez [OK] et
décochez [Utiliser la Bascule rapide utilisateur] dans [démarrer] - [Panneau de
configuration] - [Comptes d’utilisateurs] - [Modifier la manière dont les utilisateurs
ouvrent et ferment une session], puis sélectionnez [Appliquer les options]. L’écran
n’apparaîtra plus et la fonction Bascule rapide utilisateur sera désactivée.
76
Page 77

Installez le pilote de port série de l’écran déporté sans fil
Pour utiliser le port série de l’écran déporté sans fil, installez le pilote en procédant comme suit:
Windows XP
1
Sélectionnez [démarrer] - [Panneau de configuration] - [Imprimantes et autres
périphériques].
2
Sélectionnez [Ajout de matériel] dans [Voir aussi], puis [Suivant].
3
Sélectionnez [Oui, j’ai déjà connecté le matériel], puis [Suivant].
4
Sélectionnez [Ajouter un nouveau périphérique matériel], puis [Suivant].
5
Sélectionnez [Installer le matériel que je sélectionne manuellement dans la liste (utiliseur
expérimenté)], puis [Suivant].
6
Sélectionnez [Ports (COM et LPT)], puis [Suivant].
7
Sélectionnez [Disque fourni...], puis [Parcourir...].
8
Sélectionnez [c:\Program Files\Panasonic\WLserial\wdserial], puis [Ouvrir] et [OK].
9
Sélectionnez [WDSP COM Port], puis [Suivant].
10
Sélectionnez [Suivant], puis [Terminer].
11
Redémarrez l’ordinateur.
12
Assurez-vous que [WDSP COM Port (COMx)] est affiché sous [Ports (COM et LPT)]
dans [Gestionnaire de périphériques].
Windows 2000
1
Sélectionnez [Démarrer] - [Paramètres] - [Panneau de configuration] - [Ajout/Suppression de matériel], puis [Suivant].
2
Sélectionnez [Ajouter/Dépanner un périphérique], puis [Suivant].
3
Sélectionnez [Ajouter un nouveau périphérique], puis [Suivant].
4
Sélectionnez [Non, je veux choisir le matériel à partir d’une liste], puis [Suivant].
5
Sélectionnez [Ports (COM et LPT)], puis [Suivant].
6
Sélectionnez [Disque fourni...], puis [Parcourir...].
7
Sélectionnez [c:\Program Files\Panasonic\WLserial\wdserial], puis [Ouvrir] et [OK].
8
Sélectionnez [WDSP COM Port], puis [Suivant].
9
Sélectionnez [Suivant], puis [Terminer].
10
Redémarrez l’ordinateur.
11
Assurez-vous que [WDSP COM Port (COMx)] est affiché sous [Ports (COM et LPT)]
dans [Gestionnaire de périphériques].
(Suite page suivante)
F
77
Page 78

Première utilisation
REMARQUE
Pour désinstaller le pilote pour le port série de l’écran déporté sans fil, procédez
comme suit:
Windows XP
Sélectionnez [démarrer] - [Panneau de configuration] - [Performances et maintenance] - [Système] - [Matériel] - [Gestionnaire de périphériques] - [Ports (COM et
LPT)], cliquez avec le bouton droit de la souris sur [WDSP COM Port (COMx)],
puis supprimez [Désinstaller].
Windows 2000
Sélectionnez [Démarrer] - [Paramètres] - [Panneau de configuration] - [Ajout/Suppression de matériel], puis supprimez [WDSP COM Port (COMx)] en suivant les
instructions à l’écran.
Limitations lors de l’utilisation du port série
Lorsque l’écran déporté sans fil n’est pas connecté à un ordinateur, le port série de l’écran
déporté sans fil ne peut pas être utilisé.
Certains périphériques série et applications ne fonctionneront pas. Cela parce que le port
série de l’ecran déporté sans fil fonctionne par un port série virtuel.
• Périphériques ou pilotes de périphériques qui démarrent et effectuent une confirmation de fonctionnement du port avant d’etablir la connexion de l’ecran déporté sans fil.
Par exemple: Souris série
• Applications à port non virtuel
Par exemple: MS-DOS applications
Lorsque le pilote de périphérique n’est pas installé automatiquement, suivez les instructions du mode d’emploi fourni avec le périphérique (c’est-à-dire introduisez la disquette
et installez le pilote).
Procédez comme suit pour faire correspondre le numéro de port COM avec le numéro qui
s’affiche dans [WDSP COM Port (COMx)]. Par exemple, si [WDSP COM Port (COM6)]
est affiché, réglez le port série sur [COM6].
Windows XP
[démarrer] - [Panneau de configuration] - [Performances et maintenance] - [Système] [Matériel] - [Gestionnaire de périphériques] - [Ports (COM et LPT)]
Windows 2000
[Démarrer] - [Paramètres] - [Panneau de configuration] - [Système] - [Matériel] [Gestionnaire de périphériques] - [Ports (COM et LPT)]
F
78
Page 79

Configuration de l’écran déporté sans fil
1 Faites glisser le verrou vers la droite, ouvrez le couvercle,
puis insérez la batterie dans l’écran déporté sans fil.
Après avoir inséré la batterie, fermez le couvercle, puis
faites glisser le verrou vers la gauche.
ATTENTION
Assurez-vous d’introduire la batterie comme
illustré.
2 Raccordez l’écran déporté sans fil à une prise électrique et
mettez l’écran déporté sans fil sous tension. (
3 Cet écran apparaît.
<Écran déporté sans fil (affichage)>
Select network type.
AdHoc Infrastructure Cancel
Selectionnez [AdHoc].
page 82)
Verrou
Connecteur
Languette
Commutateur
d’alimentation
REMARQUE
L’écran déporté sans fil se met automatiquement hors tension au bout de 10 minutes. Dans ce cas, commencez la procédure à l’étape 2 .
(Suite page suivante)
F
79
Page 80

Première utilisation
4 Cet écran apparaît.
<Écran déporté sans fil (affichage)>
Change setting on host PC to the following
value, reboot the host PC, then select
"Connect" below.
Wireless LAN card
Network Type : AdHoc
WEP Encryption : disable
TCP/IP Class A Class B Class C
MeiWDS
AES Encryption : disable
AES : Advanced Encryption Standard (norme avancée de chiffrement)
Spécifiez les paramètres de l’ordinateur pour les fonctions de réseau local sans fil et pour
TCP/IP.
Spécifiez les réglages pour Network Type (type de réseau), SSID, WEP Encryption
(cryptage WEP), IP Address (adresse IP) et NetMask (masque réseau) conformément à
l’écran ci-dessus. (Dans les réglages ci-dessus, “AdHoc” est indiqué pour le réglage de
Network Type, mais dans certains cas le terme “Peer-to-Peer Group” est utilisé ici.)
SSID : cfvdw07-17498
IP Address : 10. 98.185.105
NetMask : 255. 0. 0. 0
Password : wdsp
Connect Cancel
Cet écran est un exemple.
5 Selectionnez [Connect] dans <Écran déporté sans fil (affichage)> a l’étape 4 .
F
80
Page 81

Mise en marche/Arrêt
Mise en marche
ATTENTION
Ne passez pas en plein écran Invite de commandes (Command Prompt). Une fois
en plein écran, la connexion avec l’écran déporté sans fil est interrompue et l’écran
ne peut pas être ramené à sa taille d’origine.
<Lors de l’utilisation d’un ordinateur de la série CF-07>
1 Mettez l’ordinateur hors tension, puis connectez le duplicateur de ports, l’écran
externe et le clavier externe.
Mettez l’ordinateur sous tension, puis appuyez sur Alt + Entrée en mode MS-
2
DOS pour ramener la fenêtre à sa taille d'origine.
<Lors de l’utilisation d’un ordinateur autre que de la série CF-07>
Appuyez sur Alt + Entrée de l’ordinateur.
Si un ordinateur établit une connexion avec l’écran déporté sans fil alors qu’il
fonctionne dans un mode d’affichage autre que celui indiqué ci-dessous, le mode
d’affichage de l’ordinateur change en 800 x 600 (16 bits). L’écran déporté sans fil
ne peut pas se connecter à un ordinateur n’ayant pas de réglage 800 x 600 (16 bits).
Résolution: 800 x 600
Mode couleur: Couleur 16 bits
Si la connexion avec l’écran déporté sans fil est interrompue, l’ordinateur revient
à son mode d’affichage d’origine. Dans ce cas, les couleurs affichées sur l’écran
peuvent changer si le mode couleur est changé (de 16 bits à 24 bits ou vice versa).
Si un changement est apporté au mode d’affichage d’un ordinateur connecté à
l’écran déporté sans fil, la connexion s’interrompt. Il est donc recommandé de ne
pas utiliser un logiciel tel q’un écran de veille.
Il se peut que le contenu affiché sur l’écran déporté sans fil ne soit pas toujours
identique à celui qui était affiché sur l’écran à cristaux liquides de l’ordinateur.
Certaines applications qui utilisent des fonctions de dessin basées sur matériel,
etc. peuvent ne pas s’afficher.
Certaines applications qui effectuent fréquemment une mise à jour d’écran (comme
des applications de lecture vidéo) peuvent ne pas s’afficher sur l’écran déporté
sans fil ou peuvent être affichées comme images statiques.
Certaines applications 16 bits peuvent ne pas fonctionner correctement.
Il peut être impossible de refléter un changement de la forme du curseur sur
l’affichage de l’écran.
L’introduction manuscrite de caractères ou d’images (par dessin) n’est pas possible sur l’écran déporté sans fil. (L’écran déporté sans fil ne peut pas prendre en
charge la vitesse de traitement et les données d’image seront différentes de la
sortie attendue.)
Windows XP
Si plusieurs comptes d’utilisateurs ont été créés, il se peut que certains comptes
ne s’affichent pas sur l’écran d’ouverture de session si la taille de l’écran a été
modifiée. Il est recommandé de ne pas utiliser l’écran d’accueil, et de décocher la
case [Utiliser l’écran d’accueil] dans [démarrer] - [Panneau de configuration] [Comptes d’utilisateurs] - [Modifier la manière dont les utilisateurs ouvrent et
ferment une session].
F
81
Page 82

Mise en marche/Arrêt
1
Mettez votre ordinateur sous tension. ( Mode d’emploi de
l’ordinateur)
2
<Lors de l’utilisation d’un ordinateur de la série CF-07>
Après avoir vérifié que le
témoin d’état d’écran est
allumé, mettez l’écran déporté
sans fil sous tension.
<Lors de l’utilisation d’un ordinateur
autre que de la série CF-07>
Après que s’est affiché sur la barre de tâches, mettez
l’écran déporté sans fil sous tension.
Appuyez sur le commutateur d’alimentation et maintenez-le enfoncé pendant environ
trois secondes jusqu’à ce que le témoin d’alimentation s’allume avant de le relâcher.
3
Sélectionnez l'application.
Arrêt
1
Affichez l’écran d’arrêt.
Windows XP
Après avoir enregistré les données importantes et fermé toutes les applications,
sélectionnez [Arrêter l’ordinateur] dans le menu [démarrer].
Windows 2000
Après avoir enregistré les données importantes et fermé toutes les applications,
sélectionnez [Arrêter] dans le menu [Démarrer].
Témoin
d’alimentation
Commutateur
d’alimentation
F
82
2
Confirmez l’arrêt.
Windows XP
Sélectionnez [Arrêter].
Windows 2000
Sélectionnez [OK] après avoir sélectionné [Arrêter le système].
3
Lorsque [Windows is shutting down] est affiché,
sélectionnez [Ok].
Votre ordinateur et l’écran déporté sans fil se mettent automatiquement hors tension.
REMARQUE
Lorsque l’ordinateur et l’écran déporté sans fil ne se mettent pas hors tension au
moyen de la procédure ci-dessus, “PC in standby” peut s’afficher bien que
l’ordinateur ne soit pas en mode de veille.
Dans ce cas, sélectionnez [Ok]. L’écran déporté sans fil se met automatiquement
hors tension.
Page 83

Ecran tactile
L’écran déporté sans fil est équipé d’une fonction d’écran tactile qui vous permet d’effectuer
les mêmes opérations que la souris en touchant la surface de l’écran avec le stylet.
Déplacement du curseur Cliquage
Curseur
Double-clic
Deux tapotements
rapides
Glisser
Tapotement simple
Touchez l’objet (c.-à-d. un fichier
ou une icône) sans retirer le
stylet et déplacez le stylet sur
la surface (ceci déplace l’objet
à l’emplacement voulu), puis
retirez le stylet.
REMARQUE
La vitesse du double-clic peut être réglée en procédant comme suit.
Windows XP
[démarrer] - [Panneau de configuration] - [Imprimantes et autres périphériques]
- [Souris] - [Tap and Bottons] - [Double-click Speed].
Windows 2000
[Démarrer] - [Paramètres] - [Panneau de configuration] - [Souris] - [Tap and
Bottons] - [Double-click Speed]
F
83
Page 84

Ecran tactile
Clic droit
Appuyez sur le bouton R.
1 2
R
Lorsque “R”
est affiché
dans le coin
droit
inférieur
Bouton R
Tapotement simple
REMARQUE
Si vous appuyez à nouveau sur le bouton R pendant l’activation de la fonction de
clic droit, ladite fonction sera désactivée.
ATTENTION
La fonction d’écran tactile ne peut pas être utilisée en mode MS-DOS et lors de
l’utilisation du plein écran dans [Invite de commandes](Command Prompt).
Manipulation de l’écran tactile
Utiliser le stylet fourni avec l’écran déporté sans fil. Ne pas utiliser d’objet autre
que le stylet qui est fourni avec l’écran déporté sans fil.
Ne pas placer d’objets sur la surface de l’écran et ne pas appuyer avec force avec
des objets pointus (p. ex., des clous), ou des objets durs susceptibles de laisser des
marques (p. ex., crayons et stylos).
Ne pas utiliser l’ordinateur quand de la poussière séjourne sur l’écran et éviter le
contact de toute substance salissante, telle que de l’huile, sur l’écran tactile. Le
curseur risque alors de ne pas fonctionner correctement.
Quand l’écran tactile est sale :
Nettoyer les parties souillées au moyen d’un chiffon doux sec tel que de la gaze.
Ne pas utiliser de benzène, de diluant ou d’alcool du type désinfectant.
(Pour plus d’informations, se reporter à “Suggestions pour nettoyer la surface de
l’affichage à cristaux liquides (LCD)” fourni avec le chiffon doux.)
F
Manipulation du stylet
Nettoyer la pointe du stylet et l’écran avant l’utilisation. Des particules étrangères
peuvent rayer l’écran et gêner le fonctionnement du stylet.
N’utiliser le stylet accessoire que sur l’écran déporté sans fil. Une utilisation à
d’autres fins peut endommager le stylet et rayer l’écran.
Ne pas utiliser de crayons, d’objets durs ou à pointe affilée pour les opérations sur
l’écran. Cela pourrait endommager l’écran.
84
Page 85

Etalonnage
Définissez la configuration d’étalonnage lorsque le curseur et les touchers du stylet
paraissent ne pas coïncider.
1
Appuyez sur le bouton Menu.
2
Sélectionnez [Option].
3
Sélectionnez [Calibration].
Touchez les cinq marques “x” sur l’écran d’étalonnage.
1 2
××
×
5
3 4
××
Bouton Menu
F
85
Page 86

Clavier logiciel
Lors de la sélection de [ Software Keyboard] sur la barre de tâches ou lorsque la zone de
texte d’une application est sélectionnée, le clavier logiciel illustré ci-dessous s’affiche
automatiquement et les caractères peuvent être introduits au moyen de ce clavier.
Nous recommandons de laisser le clavier logiciel sous forme d’icône au lieu de le fermer
lorsqu’il n’est pas utilisé. Le clavier logiciel ne démarre plus automatiquement si
sélectionné pour le fermer. Dans ce cas, il peut être redémarré en procédant comme suit.
Windows XP
[démarrer] - [Tous les Programmes] - [Panasonic] - [Software Keyboard].
Windows 2000
[Démarrer] - [Programmes] - [Panasonic] - [Software Keyboard].
est
Le menu de système
est affiché.
(
page 87)
Tapotement simple : Utilisez comme touche de raccourci.
Deux tapotements rapides : La même fonction que la touche .
REMARQUE
Si vous voulez appuyer sur une touche de raccourci, après avoir appuyé sur une
touche, appuyez sur la seconde de manière continue. Par exemple, si vous voulez
utiliser Ctrl + C , appuyez sur Ctrl puis sur C .
Si un clavier externe est connecté à l’ordinateur, toutes les opérations sur le clavier
externe ne sont pas reflétées sur le clavier logiciel.
Lorsque vous utilisez une combinaison de deux touches ou plus ( Ctrl + C etc.),
utilisez uniquement le clavier interne ou le clavier logiciel.
Ctrl + Alt + Del ne peuvent pas être introduits par le clavier logiciel. (Sauf lors
de l’ouverture de session).
Des caractères ne peuvent pas être introduits par le clavier logiciel en mode MS-DOS.
Pour certaines applications, le clavier logiciel reste comme icône même lorsque la
zone de texte est sélectionnée. Dans ce cas, sélectionnez [
la barre de tâches.
Si vous voulez utiliser le clavier pour une application d’introduction autre que de texte
(Explorateur Windows par exemple), affichez tout d’abord le clavier logiciel, puis
F
sélectionnez l’application. Vous pouvez alors utiliser les touches du clavier logiciel.
Avant d’arrêter puis de redémarrer Windows, enregistrez toujours toutes les données.
Si vous essayez d’arrêter l’ordinateur pendant que des données sont en cours d’édition,
un message apparaît demandant l’enregistrement ou non des données actuelles. Dans
ce cas, retournez dans Windows, enregistrez toutes les données puis arrêtez
l’ordinateur.
Le clavier logiciel est déplacé
aux quatre coins de l’écran.
L’action est la même qu’un clic
droit de la souris.
(La même fonction que la touche .)
Software Keyboard] sur
86
Page 87

Modification des paramètres
Vous pouvez changer la taille du clavier, commuter entre le clavier et le pavé numérique,
ou changer d’autres paramètres au moyen du menu système.
1
Sélectionnez (dans le coin supérieur gauche du clavier
logiciel).
2
Cochez la fonction que vous désirez utiliser.
Le clavier logiciel se déplace automatiquement de façon à
ne pas cacher la fenêtre actuellement sélectionnée. (Il ne
se déplace pas s’il n’y a aucun espace libre.) De plus, le
clavier logiciel se déplace à l’avant-plan de l’écran lorsque
l’ordinateur change en mode d’entrée.
Si le clavier logiciel a été réduit sur la barre des tâches, il
est alors automatiquement rétabli et se déplace à l’avantplan de l’écran lorsque l’ordinateur change en mode
d’entrée. Avec certaines applications il se peut que cette
fonction soit inopérante.
Réglez le clavier logiciel pour qu’il soit à l’avant-plan sur
l’écran.
Réglez le clavier logiciel pour qu’il soit transparent.
REMARQUE
Sélectionnez le clavier/pavé.
La spécification des symboles de monnaie affichés sur
le pavé numérique s’effectue au moyen du menu
suivant.
Windows XP : [démarrer] - [Panneau de configura-
tion] - [Options régionales, date, heure
et langue] - [Options régionales et
linguistiques] - [Options régionales]
- [Personnaliser] - [Symbole
monétaire] - [Symbole monétaire]
Windows 2000 : [Démarrer] - [Paramètres] - [Panneau
de configuration] - [Options
régionales] - [Symbole monétaire] [Symbole monétaire]
F
87
Page 88

Alimentation par batterie
Etat de la batterie
Utilisez le témoin de batterie pour vérifier l’état de la batterie
Témoin de batterie
Orange*
Vert*
Rouge
Rouge clignotant*
Orange clignotant*
Vert clignotant
Eteint
*1 Lorsque l’adaptateur secteur est connecté.
1
1
Etat de la batterie
En charge
Entièrement chargée
La charge de la batterie est faible (la charge est inférieure à
environ 9% de la capacité)
1
La batterie ou le chargeur peut ne pas fonctionner
correctement.
Retirez la batterie et déconnectez l’adaptateur secteur
rapidement, puis connectez-les de nouveau. Si le problème
persiste, contactez le Support technique Panasonic.
1
Recharge impossible du fait d’une violation des limites de
température.
(La température ambiante est hors de la plage admissible.
Une fois que la condition de plage admissible est satisfaite,
la charge commence automatiquement.)
La batterie se décharge jusqu’au niveau de charge prescrit
en mode température élevée.
La batterie n’est pas connectée ou la charge n’est pas en cours.
REMARQUE
Cet écran déporté sans fil empêche une surcharge de la batterie en ne rechargeant
que lorsque la charge restante est inférieure à environ 95% de la capacité après
que la batterie est complètement chargée.
F
88
Page 89

Pour obtenir une indication détaillée
1
Appuyez sur le bouton Menu.
2
Sélectionnez [Battery]. ( page 93)
Bouton Menu
REMARQUE
La capacité de batterie réelle restant et l’indication affichée peuvent être différentes.
• Le témoin de batterie reste allumé en rouge.
• L’affichage de batterie restante est de 99% et
la couleur du témoin est orange pendant une
période de temps prolongée.
• Un avertissement de batterie faible apparaît
après une courte période de temps.
Exécutez le programme
utilitaire “Refresh Battery”.
page 93)
(
89
F
Page 90

Alimentation par batterie
Remplacement de la batterie
Lorsque la charge fournie par votre batterie n’est disponible que pendant une courte
période de temps, même après une charge complète conformément aux instructions, il
peut être temps de remplacer votre batterie. La batterie est un élément consommable et il
est donc nécessaire de la remplacer (CF-VZSU21).
ATTENTION
Ne touchez pas les bornes de la batterie. La batterie peut ne plus fonctionner
correctement si les contacts sont sales ou endommagés.
La batterie n’est pas chargée lors de l’achat de l’écran déporté sans fil. Chargezla toujours avant de l’utiliser pour la première fois. La charge commence
automatiquement lorsque l’adaptateur secteur est connecté à l’écran déporté sans
fil.
N’utilisez que la batterie spécifiée (CF-VZSU21) avec l’écran déporté sans fil.
Assurez-vous que l’alimentation a été coupée avant de continuer.
1
Mettez hors tension votre écran déporté sans fil. ( page 82)
ATTENTION
F
90
Remplacez la batterie par une autre pendant que l’adaptateur secteur est
connecté et ne déconnectez pas l’adaptateur secteur avant que la batterie
neuve soit complètement chargée. Les données d’image enregistrées sur
l’écran déporté sans fil pourraient être perdues.
2
Retrait de la batterie
1 Faites glisser le verrou.
2 Ouvrez le couvercle.
3 Tirez la languette sur la batterie et retirez-la de
l’écran déporté sans fil.
1
2
3
Page 91

Introduction d’une batterie
1 Fixez fermement la batterie au connecteur.
ATTENTION
Assurez-vous d’introduire la batterie comme
illustré.
Assurez-vous que la batterie est
correctement raccordée au connecteur.
2 Fermez le couvercle.
3 Faites glisser le verrou vers la gauche.
ATTENTION
Si vous fermez mal le couvercle, la batterie peut tomber pendant que vous
transportez l’écran déporté sans fil.
Faites attention de ne pas coincer la languette en fermant le couvercle.
Charge de la batterie
Raccordez l’écran déporté sans fil à une prise électrique.
La charge commence automatiquement.
2
1
Connecteur
Languette
3
91
F
Page 92

Configuration de l’écran déporté sans fil
Vous pouvez régler les paramètres pour l’écran déporté sans fil.
Appuyez sur le bouton Menu.
Les menus de configuration s’affichent.
Bouton Menu
Menu General
En sélectionnant [General], vous pouvez modifier le paramètre de mode, le paramètre
d’éclairage arrière et le paramètre de profil.
Paramètres par défaut
General Wireless Battery Option Version
Mode : Connect OfflineView
Backlight : LOW MID HIGH
Profile : Profile 1
100% Excellent
OK Cancel
Menu Wireless
L’écran enregistré est affiché.
(
page 99)
Le nom de profil s’affiche.
Lors du réglage d’un profil, un
écran déporté sans fil peut être
connecté à un autre ordinateur. Il
est possible de régler jusqu’à
quatre profils. (
page 94)
Après avoir sélectionné le profil,
sélectionnez [Connect], et la
connexion s’établira avec le profil.
Conditions de l’onde électronique
(Excellent, Good, Poor, Associated, Scanning)
Charge restante de la batterie
F
En sélectionnant [Wireless], les paramètres de la fonction sans fil (pour la connexion à
l’ordinateur) et l’état actuel sont affichés (ne peuvent pas être changés). Pour modifier
les paramètres indiqués sur ce menu:
General Wireless Battery Option Version
Network Type : AdHoc
SSID : cfvdw07-17498
Channel : 11
TxRate mode : Fully Automatic
WEP Encryption : disable
Rate (Tx/Rx) : 11Mbps / 11Mbps
Display IP : 10. 98. 185. 106
PC IP : 10. 98. 185. 105
Net Mask : 255. 0. 0. 0
AES Encryption : disable
100% Excellent
92
Cet écran est un exemple.
OK Cancel
page 96
L’affichage indiquera que le
cryptage AES est activé ou
désactivé.
Page 93

Menu Battery
En sélectionnant [Battery], l’état de la batterie est affiché.
General Wireless Battery Option Version
Status : Full Charge
Voltage : 8154mV
Current : 0mA
Temperature : 26.2 °C (79.2 °F)
Remain : 100%
Error : None
Refresh Battery : Execute
Environment : Normal temperature
100% Excellent
OK
Cancel
Cet écran est un exemple.
Rafraîchissez la batterie.
Lorsque le message de confirmation
est affiché, sélectionnez [Yes].
Une fois le témoin de batterie
devenu vert, la batterie sera
complètement déchargée,
l’ordinateur se mettra hors tension
automatiquement, puis la charge
commencera. Il faut environ 2
heures avant que l’alimentation se
coupe automatiquement par
décharge complète de la batterie
depuis l’état de charge complète.
Laissez la batterie se charger jusqu'à ce
que le témoin de batterie devienne vert.
(Pendant la charge, l’éclairage
arrière est automatiquement
désactivé.)
Réglez la fonction du mode de
température élevée sur [Normal temperature] ou [High temperature].
Lors de l’utilisation de l’écran
déporté sans fil dans un milieu
ambiant où la température est élevée,
réglez toujours l’écran déporté sans
fil en mode de température élevée.
REMARQUE
La batterie ne sera pas rafraîchie correctement dans les cas suivants.
• Lorsque l’alimentation de l’écran déporté sans fil est coupée.
• Lorsque l’alimentation électrique est déconnectée (par exemple, panne de courant, retrait accidentel de l’adaptateur secteur, etc.).
F
93
Page 94

Configuration de l’écran déporté sans fil
Menu Option
En sélectionnant [Option], vous pouvez régler les paramètres individuels pour l’écran
déporté sans fil.
Paramètres par défaut
General Wireless Battery Option Version
Wireless Connection : Setup
Power on Password : Change
Supervisor Password : Change
Touchscreen : Calibration
LCD Off Timer : 30 min
LCD Off Mode : Normal resume
Power Off Timer : disable
100% Excellent
OK Cancel
Spécifiez ou changez
le mot de passe de
superviseur.
S’il n’y a pas d’introduction depuis
l’écran tactile ou un bouton pendant
un certain temps, l’alimentation peut
être coupée.
Réglez le temps sur [30 sec], [1 min],
[2 min], [5 min], [10 min], [20 min],
[30 min] ou [disable], sélectionnez
[OK].
Procédez comme suit pour modifier
les paramètres de la connexion sans
fil.
1
Sélectionnez [Setup].
<Si le mot de passe de superviseur
a été spécifié>
Saisissez le mot de passe de
superviseur, puis sélectionnez
[Enter].
2
Sélectionnez le profil spécifié sur
l’écran suivant, puis sélectionnez
[OK].
<Écran déporté sans fil (affichage)>
Select profile.
Profile 1 Profile 2
Profile 3 Profile 4
Cet écran est un exemple.
3
Réglez le réseau en suivant la
même procédure qu’en 3 , 4 et
5 de “Configuration de l’écran
déporté sans fil” ( page 79).
Changez le mot de passe à saisir pour
utiliser l’écran déporté sans fil.
F
Réglez la fonction de reprise sur
[Normal resume] ou [Quick resume],
sélectionnez [OK].
Normal Resume:
La connexion sans fil est mise
hors service pendant que
l’affichage est désactivé.
Quick Resume:
Seul l’écran est éteint pendant
que l’affichage est désactivé.
94
S’il n’y a pas d’introduction depuis
l’écran tactile ou un bouton pendant
un certain temps, l’affichage peut
s’éteindre.
Réglez le temps sur [30 sec], [1 min],
[2 min], [5 min], [10 min], [20 min],
[30 min] ou [disable], sélectionnez
[OK].
Page 95

Menu Version
En sélectionnant [Version], les informations de version s’afficheront.
General Wireless Battery Option Version
Model No. : CF-VDW07Bxx
Firmware : Vx.xxLxxx
Wireless Controller : xx. xx. xx. xx
Serial No. : xxxxxxxxxx
100% Excellent
OK Cancel
“x” varie selon la configuration de l’écran
déporté sans fil.
F
95
Page 96

Modification des paramètres de l’écran déporté sans fil
Wireless Display Setup Utility
Vous pouvez régler les propriétés de l’écran déporté sans fil
comme suit.
1
Sélectionnez [Wireless Display Setup Utility] dans la
procédure qui suit.
Windows XP [démarrer] - [Tous les Programmes] -
[Panasonic]
Windows 2000 [Démarrer] - [Programmes] - [Panasonic]
2
Saisissez le mot de passe de superviseur.
Le mot de passe de superviseur n’est pas spécifié au moment de l’achat.
Appuyez sur le bouton Menu, sélectionnez [Option], puis
spécifiez le mot de passe de superviseur. (
3
Réglez les paramètres de l’écran déporté sans fil, TCP/IP
et WEP.
Vous pouvez les régler pour chacun des profils.
Changez le nom de profil.
Changez le cryptage AES.
<Lors du réglage du cryptage AES sur autre chose que
[Disable]>
Sélectionnez [Key], et réglez la clé AES avec “phrase”
ou “binary”, puis sélectionnez [OK].
Changez le cryptage WEP.
<Lors du réglage du cryptage WEP sur autre chose que
[Disable]>
Sélectionnez [Key(s)], et réglez la (les) clé(s) WEP, puis
sélectionnez [OK].
page 94)
F
Lorsque cette case est cochée, le réglage de profil
MeiWDS (un profil seulement), tel que le mot de passe
ou le cryptage AES, est également appliqué à l’ordinateur
connecté à l’écran déporté sans fil.
Après la finalisation des paramètres, sélectionnez [Next],
puis sélectionnez [OK].
(Si un autre écran s’affiche après la sélection de [OK],
sélectionnez [OK].)
96
Page 97

4
Dans l’écran de confirmation, sélectionnez [Next].
Le message “These settings will be sent to your display”
s’affichera alors. Sélectionnez [OK].
5
<Si vous cochez [Use this profile now] à l’étape 3 (
page 96)>
L’écran [Set up your PC] s’affichera.
Saisissez les paramètres de Wireless LAN et TCP/IP
affichés sur l’écran de l’ordinateur, puis sélectionnez [Finish].
<Si vous décochez [Use this profile now] à l’étape
L’écran [Completed] s’affichera.
Sélectionnez [Finish].
REMARQUE
Il n’est pas possible de régler en même temps le
MeiWDS et l’écran déporté sans fil. (
page 98)
3
>
97
F
Page 98

Modification des paramètres de l’écran déporté sans fil
MeiWDS Setup Utility
1
Sélectionnez [MeiWDS Setup Utility] dans la procédure
qui suit.
Windows XP [démarrer] - [Tous les Programmes] -
[Panasonic]
Windows 2000 [Démarrer] - [Programmes] - [Panasonic]
2
Saisissez le mot de passe de superviseur, puis sélectionnez
[OK].
Le mot de passe de superviseur est réglé par défaut sur
“supervisor”.
3
Spécifiez le mot de passe et les paramètres du cryptage
AES, puis sélectionnez [Next].
Si le réglage effectué entre l’ordinateur et l’écran
déporté sans fil n’est pas confirmé (p. ex. l’affichage a
été remplacé par un autre), procédez comme suit pour
recommencer le réglage.
Spécifiez la longueur de la clé AES.
<Lors du réglage du cryptage AES sur autre chose que
[Disable]>
Sélectionnez [AES Key], et réglez la (les) clé(s) AES avec
“phrase” ou “binary”, puis sélectionnez [OK].
F
98
Spécifiez la durée de vie de la clé AES.
4
Dans l’écran de confirmation, sélectionnez [Finish].
Dans l’écran de confirmation, sélectionnez [OK] puis
redémarrez l’ordinateur.
REMARQUE
Il n’est pas possible de régler en même temps le MeiWDS et l’écran déporté sans fil.
Spécifiez le paramètre de la clé AES après avoir réglé l’écran déporté sans fil.
(
page 96)
Si vous sélectionnez sur la barre de tâches, le menu s’affiche.
[Password] et [Exit MeiWDS] sont activés si vous cochez [Enable tray menu]
dans l’utilitaire de configuration de MeiWDS.
· Password : Spécifiez le même mot de passe que celui spécifié dans le
menu [Option].
· About MeiWDS : La version du logiciel et le copyright s’affichent.
· Exit MeiWDS : Pour quitter le programme.
Page 99
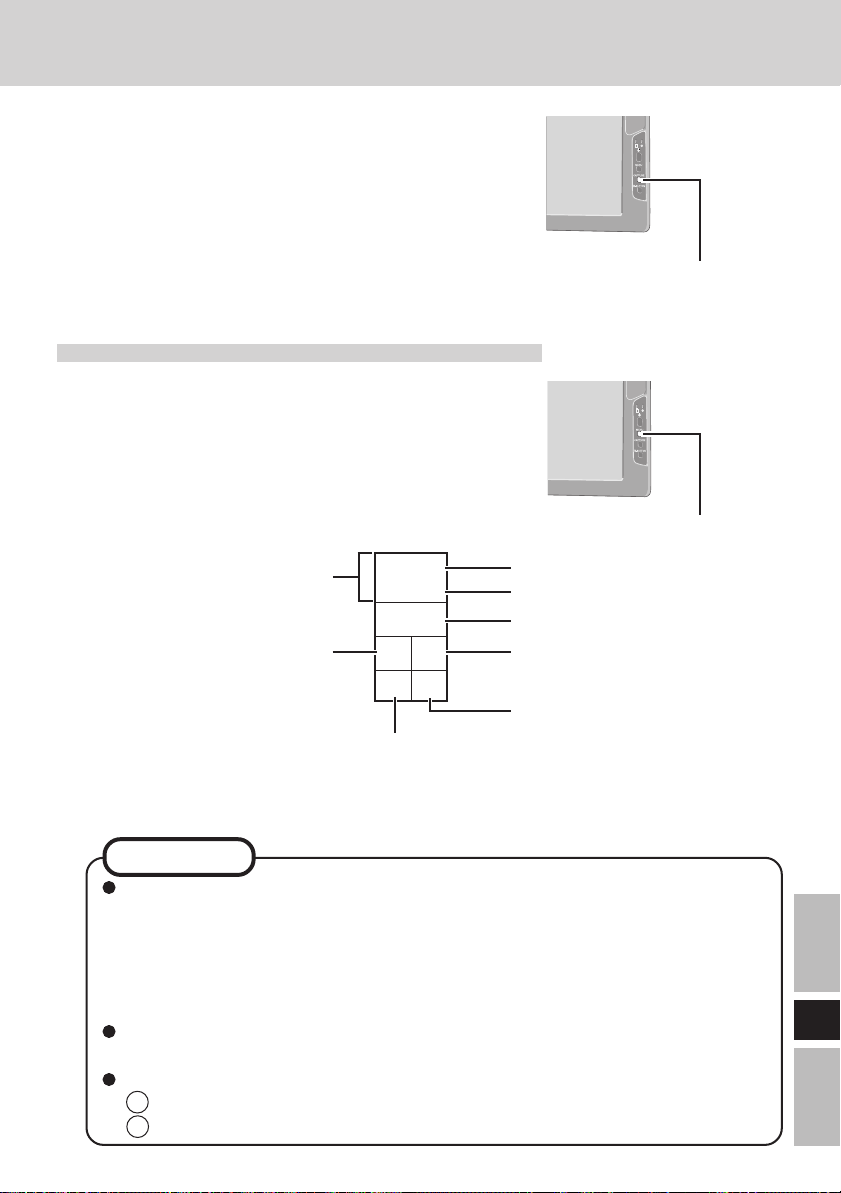
Capture de l’écran
Si vous voulez voir plus tard l’écran actuellement affiché,
vous pouvez enregistrer les données d’écran dans la mémoire
(jusqu’à 100 images)*
*1Le nombre de données qui peut être enregistré est différent selon
les images.
1
.
Appuyez sur le bouton Capture.
L’écran actuellement affiché est enregistré et est ajouté à la
fin des images déjà enregistrées.
Affichage des images enregistrées
1
Appuyez sur le bouton Menu.
2
Sélectionnez [General] – [OfflineView],
puis sélectionnez [OK].
L’image enregistrée et le panneau suivant seront
affichés.
Déplacement aux quatre
coins de l'écran
Affichage de l’image
précédente (mode grande
vitesse)
Affichage de l’image précédente
(La même opération est possible en
appuyant sur le bouton R.)
<Panneau>
No 016
Total 038
Delete
<< >>
< >
Bouton Capture
Bouton Menu
Numéro de l’image
Nombre d’images enregistrées
Effacement des données d’image
Affichage de l’image suivante
(mode grande vitesse)
Affichage de l’image suivante
(La même opération est possible
en appuyant sur le bouton Capture.)
REMARQUE
Lorsque l’alimentation est coupée par une opération autre qu’une pression sur le
commutateur d’alimentation (par exemple, lorsque l’écran déporté sans fil
fonctionne sur batterie et que la batterie est retirée par inadvertance, ou lorsque
l’adaptateur secteur est débranché accidentellement de la prise électrique et
qu’aucune batterie ne se trouve dans l’écran déporté sans fil), toutes les images
enregistrées sont perdues.
Seule l’image d’écran est affichée et des opérations comme l’introduction et la
sélection ne peuvent pas être effectuées sur l’écran.
Pour fermer une image qui a été enregistrée et afficher l’écran précédent:
1 Appuyez sur le bouton Menu.
2 Sélectionnez [General] - [Connect], puis sélectionnez [OK].
F
99
Page 100

Dépannage
En cas de problème, référez-vous à cette page. Si le problème semble lié à une application
logicielle, lisez le manuel se rapportant au logiciel. Si vous n’arrivez toujours pas à remédier
au problème, contactez le Support technique Panasonic.
Aucun affichage après
la mise sous tension
Une image latente
apparaît
“Connection timeout”
est affiché
“No server found” est
affiché
“Authentication failed”
est affiché
“Too many clients” est
affiché
L’ordinateur ou l’écran déporté sans fil a-t-il été réglé
en mode économie d’énergie ?
Pour utiliser l’ordinateur depuis l’état d’affichage
désactivé (à des fins de conservation d’énergie),
touchez l’écran.
Si une image est affichée pendant une période de temps
prolongée, il est possible qu’une image latente
apparaisse. Activez l’écran de veille.
Confirmez l’adresse IP, le masque de sous-réseau, le
type de réseau et les paramètres SSID de l’ordinateur
et de l’écran déporté sans fil.
Confirmez le fonctionnement du LAN sans fil de
l’ordinateur.
Si l’ordinateur et l’écran déporté sans fil ne se mettent
pas hors tension de façon normale pour une raison telle
qu’une erreur de réseau, le rétablissement de la
connexion peut prendre deux ou trois minutes.
Patientez un moment, puis connectez à nouveau.
Placez l’écran déporté sans fil près de l’ordinateur.
Confirmez que se trouve sur la barre de tâches.
Confirmez l’adresse IP de l’ordinateur qui a été réglée
sur l’écran déporté sans fil.
Confirmez le mot de passe pour l’ordinateur et l’écran
déporté sans fil.
Déconnectez l’écran déporté sans fil pendant le
fonctionnement et rétablissez la connexion.
F
100
 Loading...