

®
DVD-ROM & CD-R/RW Drive
CF-VDRRT2
ENGLISH
Names and Functions of Parts ............
Introduction..........................................
Usage Precautions ..............................
Connections to the Computer ...........
Placing and Removing Discs ............
Installing the Software .......................
DEUTSCH
Anordnung und Funktion der Teile ............
Einleitung ..........................................
Vorsichtshinweise zum Gebrauch ..........
Anschluss an den Computer .............
Einlegen und Entfernen von Discs ..........
Installieren der Software ...................
FRANÇAIS
Noms et fonctions des pièces .............
Introduction........................................
Précautions d’utilisation ....................
Raccordement à l’ordinateur .............
Introduction et retrait des disques ...........
Installation des logiciels ....................
OPERATING INSTRUCTIONS
BEDIENUNGSANLEITUNG
MODE D’EMPLOI
5
B’s Recorder/B’s CLiP .......................
8
WinDVD .............................................
9
Using the Drive ..................................
11
Troubleshooting ................................
13
Specifications ....................................
14
5
B’s Recorder/B’s CLiP .......................
28
WinDVD .............................................
29
Gebrauch des Laufwerks ..................
31
Störungsbeseitigung .........................
33
Technische Daten .............................
34
5
B’s Recorder/B’s CLiP .......................
48
WinDVD .............................................
49
Utilisation du lecteur ..........................
51
Dépannage ........................................
53
Fiche technique .................................
54
E
17
20
23
24
26
D
37
40
43
44
46
F
57
60
63
64
66
CAUTION!
THIS PRODUCT UTILIZES A LASER.
USE OF CONTROLS, ADJUSTMENTS OR PERFORMANCE OF PROCEDURES OTHER THAN THOSE
SPECIFIED HEREIN MAY RESULT IN HAZARDOUS
RADIATION EXPOSURE.DO NOT OPEN COVERS
AND DO NOT REPAIR YOURSELF.
REFER SERVICING TO QUALIFIED PERSONNEL
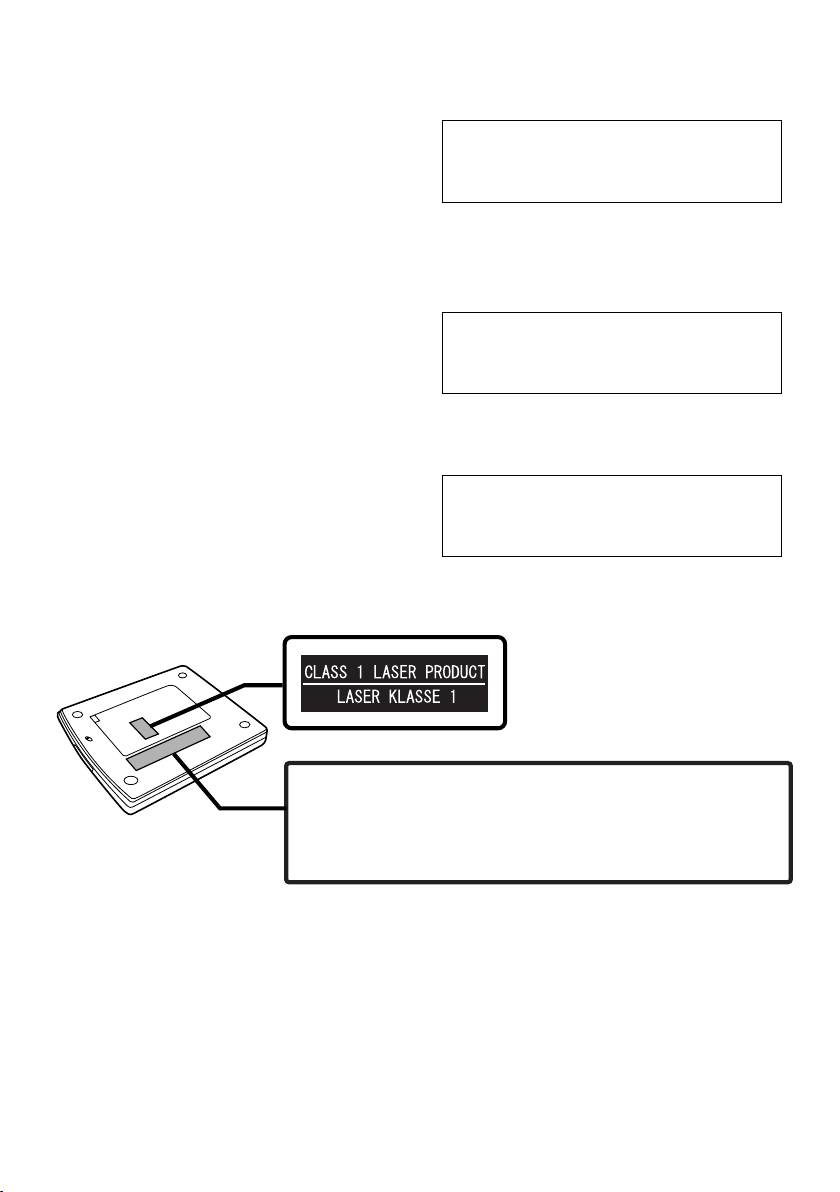
Laser properties of the Drive
Laser Class Class 1 (HHS and IEC 60825-1)
Wavelength for CD 780-789 nm
for DVD 655-668 nm
WARNUNG!
DIESES PROUKT ERZEUGT LASERSTAHLUNG.
DURCHFÜHRUNG ANDERER VORGÄNGE ALS DER HIER ANGEGEBENEN KANN ZU GEFÄHRLICHER
STRAHLUNG FÜHREN.REPARATUREN DÜRFEN
NUR VON QUALIFIZIERTEM FACHPERSONAL
DURCHGEFÜHRT WERDEN.
Lasereigenschaften des Laufwerks
Laserklasse:
Wellennäge für CD:
Klasse 1 (HHS und IEC
780-789
nm
60825-1
)
für DVD: 655-668 nm
AVERTISSEMENT!
CET APPAREIL UTILISE UN LASER.
L’UTILISATION DE COMMANDES OU DE RÉGLAGES OU L’EXÉCUTION DE PROCÉDURES AUTRES QUE
CELLES SPÉCIFIÉES ICI PEUVENT PROVOQUER UNE
EXPOSITION À DES RADIATIONS DANGEREUSES.
NE PAS OUVRIR LES COUVERCLES NI ESSAYER
DE RÉPARER SOI-MÊME.CONFIER TOUT TRAVAIL
D'ENTRETIEN À UN PERSONNEL QUALIFIÉ.
Propriétés du faisceau laser de ce lecteur
Faisceau laser : Classe 1 (HHS et IEC 60825-1)
Longueur d’onde
Pour les CD 780-789 nm
Pour les DVD 655-668 nm
CAUTION
CLASS 3B VISIBLE AND INVISIBLE LASER RADIATION WHEN OPEN. AVOID EXPOSURE TO BEAM.
ATTENTION
CLASSE 3B RAYONNEMENT LASER VISIBLE ET INVISIBLE EN CAS D’OUVERTURE.
EXPOSITION DANGEREUSE AU FAISCEAU.
VORSICHT
KLASSE 3B SICHTBARE UND UNSICHTBARE LASERSTRAHLUNG, WENN ABDECKUNG GEÖFFNET.
NICHT DEM STRAHL AUSSETZEN.
ADVARSEL
KLASSE 3B SYNLIG OG USYNLIG LASERSTRÅLING VED ÅBNING UNDGÅ UDS/ETTELSE FOR STRÅLING.
ADVARSEL
KLASSE’3B SYNLIG OG USYNLIG LASERSTRÅLING NÅR DEKSEL ÅPNES UNNGÅ EKSPONERING FOR STRÅLEN.
VARNING
KLASS 3B SYNLIG OCH OSYNLIG LASERSTRÅLNING NÄR DENNA DEL ÄR ÖPPNAD. STRÅLEN ÄR FARLIG.
VAR O!
KURSSI 3B NÄKYVÄ JA NÄKYMÄTÖN AVATTAESSA OLET ALTTIINA LASERSÄTEILYLLE, ÄLÄ KATSO SÄTEESEN.
2

For U.S.A.
Federal Communications Commission Radio Frequency Interference Statement
Note: This equipment has been tested and found to comply with the limits for a Class B
digital device, pursuant to Part 15 of the FCC Rules. These limits are designed to provide
reasonable protection against harmful interference in a residential installation. This equipment generates, uses and can radiate radio frequency energy and, if not installed and used in
accordance with the instructions, may cause harmful interference to radio communications.
However, there is no guarantee that interference will not occur in a particular installation. If
this equipment does cause harmful interference to radio or television reception, which can be
determined by turning the equipment off and on, the user is encouraged to try to correct the
interference by one or more of the following measures:
Reorient or relocate the receiving antenna.
Increase the separation between the equipment and receiver.
Connect the equipment into an outlet on a circuit different from that to which the receiver
is connected.
Consult the Panasonic Service Center or an experienced radio/TV technician for help.
Warning
To assure continued compliance, use only shielded interface cables when connecting to a
computer or peripheral. Also, any changes or modifications not expressly approved by the
party responsible for compliance could void the user’s authority to operate this equipment.
This device complies with Part 15 of the FCC Rules. Operation is subject to the following
two conditions:
(1) This device may not cause harmful interference, and
(2) This device must accept any interference received, including interference that may cause
undesired operation.
Responsible Party: Matsushita Electric Corporation of America
One Panasonic Way
Secaucus, NJ 07094
Tel No:1-800-LAPTOP-5 (1-800-527-8675)
For Canada
This Class B digital apparatus complies with Canadian ICES-003.
Cet appareil numérique de la classe B est conforme à la norme NMB-003 du Canada.
3

Compliance Notice - CE Mark
This equipment is in conformance with the requirements of the European Council Directive
listed below:
73/23/EEC Low Voltage Directive with amendment 93/68/EEC
89/336/EEC EMC Directive with amendments 92/31/EEC and 93/68/EEC
Übereinstimmungserklärung - CE-Marke
Diese Ausrüstung erfüllt die Anforderungen der unten angegebenen EC-Direktive:
73/23/EEC Niederspannungsdirektive mit Abänderung 93/68/EEC
89/336/EEC EMC-Direktive mit Abänderungen 92/31/EEC und 93/68/EEC
Avis de comformité - Marque CE
Cet équipement est conforme aux conditions des Directives de la Commission européenne
mentionnées ci-dessous:
73/23/EEC Directive sur la basse tension y compris la modification 93/68/EEC
89/336/EEC Directive CEM y compris les modifications 92/31/EEC et 93/68/EEC
■ Discs bearing any of the following logos can be used with this drive.
■ Mit diesem Laufwerk konnen alle Discs abgespielt werden, die mit den unten
abgebildeten Logos gekennzeichnet sind.
■ Les disques qui portent l’un ou l’autre des logos suivants peuvent être utilisés
avec ce lecteur.
DVD-RAM DVD-ROM DVD-R DVD-RW
VIDEO CD CD-R CD-RW CD-ROM
VIDEO CD
Recordable
DVD-VIDEO
CD DIGITAL AUDIO
4
■ Names and Functions of Parts
■ Anordnung und Funktion der Teile
■ Noms et fonctions des pièces
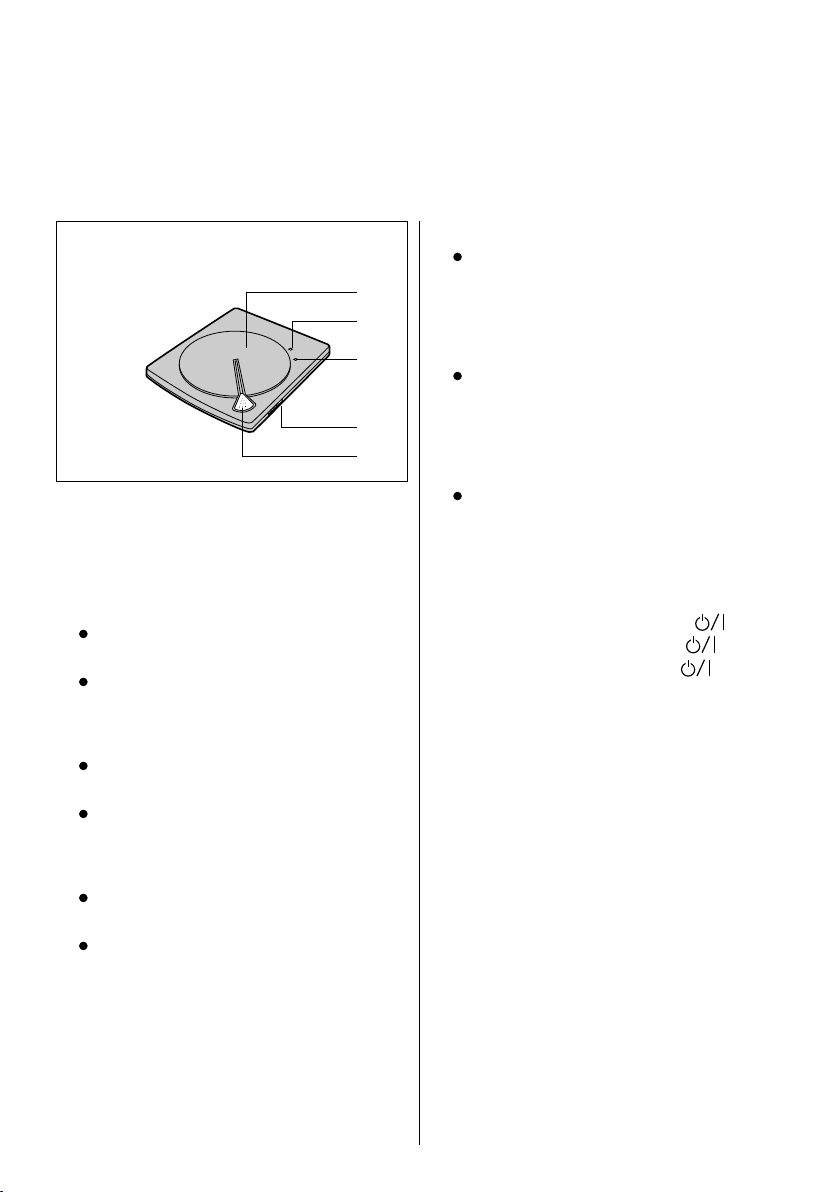
■ Top panel
■ Oberseite
■ Panneau supérieur
(A)
■ Disc cover
(A)
(B)
(C)
(D)
(E)
■ Disc-Fachdeckel
■
Couvercle du logement à disque
(B)■ POWER/BUSY indicator lamp
Green:
Drive’s power is on.
Blinking orange:
Date is being read.
■ POWER/BUSY-Lampe
Leuchtet grün:
Das Laufwerk ist eingeschaltet.
Blinkt orangefarben:
Lesevorgang findet statt.
■ Témoin de MARCHE/ACCES
Vert:
Le lecteur est allumé
Clignotement en orange:
Les données sont en cours de lecture.
(C)■ WRITE indicator lamp
Orange:
Data is being written.
It goes off temporarily when the
*
Smooth Link function is used.
■ WRITE-Anzeige
Leuchtet orangefarben:
Schreibvorgang findet statt.
Bei Verwendung der Smooth Link-Funktion
*
erlischt diese Anzeige vorübergehend.
■ Témoin d’écriture
Orange:
Les données sont en cours d’écriture
S’éteint temporairement lorsque la
*
fonction Smooth Link est utilisée.
(D)■ Power switch [POWER ]
■ Netzschalter [POWER ]
■ Interrupteur [POWER ]
(E)■ Open button [OPEN]
■ Öffnungstaste [OPEN]
■ Touche d’ouverture [OPEN]
5
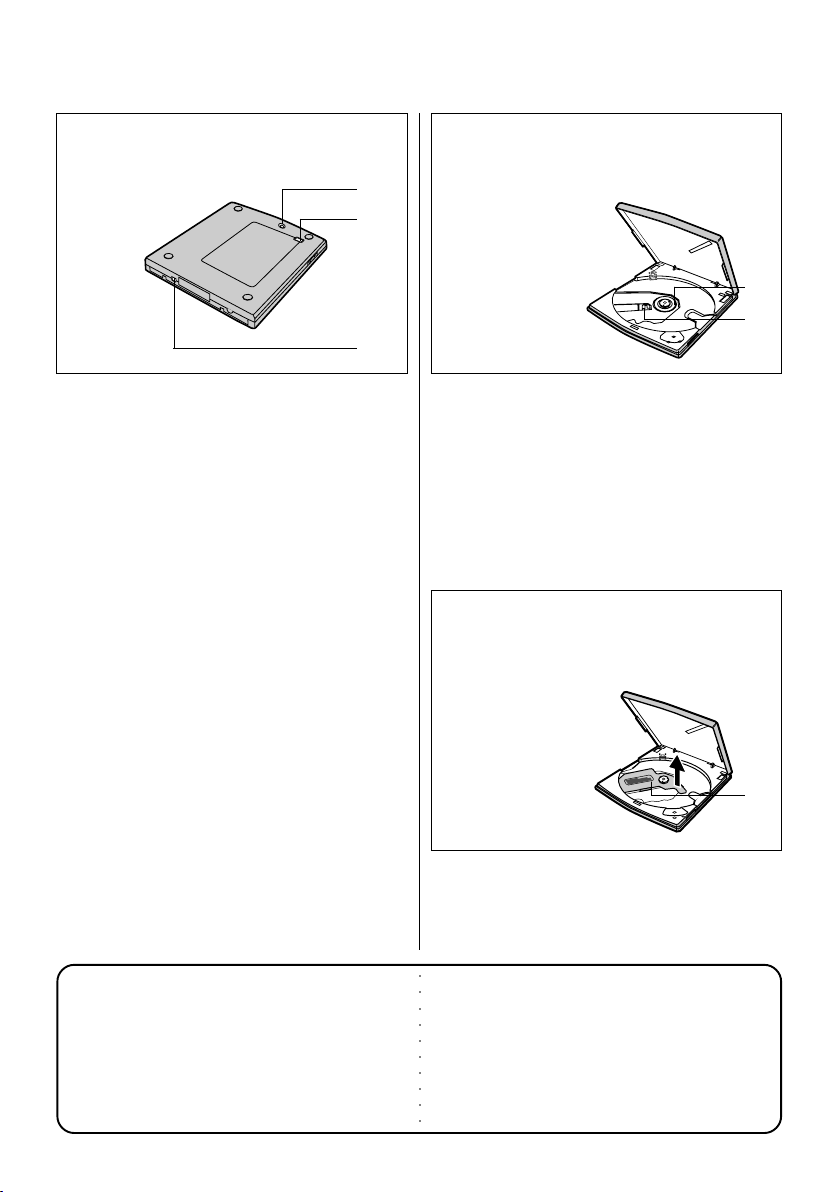
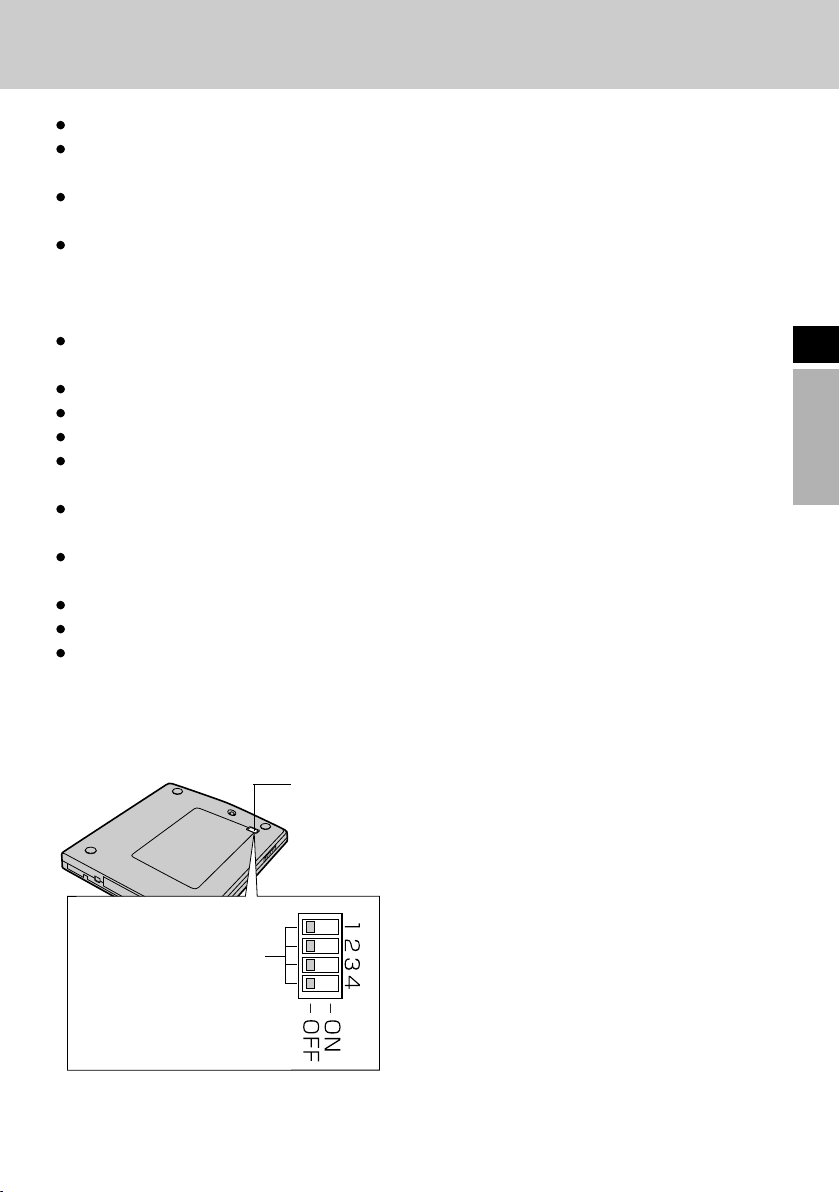
■ Bottom panel
■ Unterseite
■ Panneau inférieur
(F)
(G)
(H)
■ When disc cover is open
■ Bei geoffnetem Disc-Fachdeckel
■ Lorsque le couvercle du logement à
disque est ouvert
(I)
(J)
(F) ■ Emergency open lever
■ Notöffnungshebel
■ Loquet d’ouverture de secours
(G)■ Mode switch
■ Betriebsartenschalter
■ Commutateur de mode
(H)■ Interface connector
■ Schnittstellenanschluss
■ Connecteur d’interface
■ Before use, be sure to remove
the lens protective sheet.
■ Achten Sie vor der erstmaligen
Inbetriebnahme des Laufwerks
unbedingt darauf, diese
Schutzfolie zu entfernen.
(I)■ Turntable
■ Drehteller
■ Plateau
(J) ■ Lens
■ Abtasterlinse
■ Lentille
■ When used for the first time
■ Bei der erstmaligen Inbetriebnahme
■ Au moment de la première utilisation
(K)■ Lens protective sheet
■ Schutzfolie für Abtasterlinse
■ Feuille protectrice de la lentille
○○○○○○○○○○
Avant d’utiliser le lecteur,
■
assurez-vous d’avoir retiré la
feuille protectrice de la lentille.
(K)
6

■ Applicable models
This drive is an option which is specially designed to be used with the following Panasonic
personal computers. No guarantees are made for its operation if it is connected to any
other personal computer.
CF-18 series*
1
CF-T1 and CF-T2 series
CF-R1 series*
2
CF-M34C, CF-M34V, CF-M34U, CF-M34R
*1 The drive cannot be used together with a port replicator (CF-VEB181).
*2 The USB ports on the right side of the CF-R1 series body cannot be used for connecting
the drive.
■ Zutreffende Modelle
Dieses Laufwerk ist eine Option, die speziell für die Verwendung mit der folgenden
Panasonic-Personalcomputern konzipiert wurde. Wir übernehmen keine Garantie, falls
das Laufwerk an andere Personalcomputer angeschlossen wird.
Serie CF-18*
3
Serien CF-T1 und CF-T2
Serie CF-R1*
4
CF-M34C, CF-M34V, CF-M34U, CF-M34R
*3 Das Laufwerk kann nicht zusammen mit einem Portreplikator (CF-VEB181) verwendet
werden.
*4 Die USB-Anschlüsse auf der rechten Seite der Geräte der Serie CF-R1 können nicht für
den Anschluss des Laufwerks verwendet werden.
■ Modèles applicables
Ce lecteur est une option et il est spécialement conçu pour être utilisé avec les ordinateurs
personnels Panasonic suivants. Son fonctionnement n’est pas garanti s’il est raccordé à
un autre ordinateur personnel.
Série CF-18*
5
Séries CF-T1 et CF-T2
Série CF-R1*
6
CF-M34C, CF-M34V, CF-M34U, CF-M34R
*5 Le lecteur ne peut pas être utilisé avec un duplicateur de port (CF-VEB181).
*6 Les ports USB sur le côté droit du boîtier de la série CF-R1 ne peuvent pas être utilisés
pour raccorder le lecteur.
7

Introduction
Thank you for purchasing the DVD-ROM & CD-R/RW Drive for the Panasonic notebook
computer series.
This drive connects to the computer through the USB Interface.
Store this manual in a safe place after reading it.
DVD-ROM & CD-R/RW Drive ........... 1
E
Utility Disc
(CD-ROM)
B’s Recorder GOLD 7 Basic(hereafter,
B’s Recorder),
B’s CLiP5(hereafter, B’s CLiP),
WinDVD4(hereafter, WinDVD)
[Illustration in this manual]
Windows XP
Windows 2000
Microsoft and Windows are registered trademarks of Microsoft Corporation in the United States
and/or other countries.
WinDVD
...................................... 1
Interface Cable
(USB)
Operating Instructions
(This book)
indicates Microsoft® Windows® XP Professional Operating System.
indicates Microsoft® Windows® 2000 Professional Operating System.
™
is a trademark of InterVideo, Inc.
............................. 1
............... 1
8
Usage Precautions
Do not place items other than discs in the drive.
Do not leave the disc cover in the open position or touch the lens area. Should the
lens become soiled by dust or dirt, the drive may not read discs properly.
Under some conditions, dust may build up on the optical lens or disc, possibly resulting
in malfunction.
Do not open the drive or move the computer while the drive is being accessed. Doing so
could cause it to malfunction. In addition, after running an application involving access
to a disc, do not open the drive or remove the disc until after the application has been
closed.
Do not expose the drive to oily or tobacco smoke. Doing so could shorten the service
life of the lens.
Cleaning the drive using a blower is recommended if it malfunctions.
Never insert foreign objects such as paper clips into the drive.
Do not use discs that have become deformed (warped, not completely round, etc.).
Do not touch the interface cable while the drive is being accessed. Doing so may cause
the drive and/or computer to malfunction.
Keep the drive away from magnets. Its operation may become unstable due to the effects of magnetism.
Do not place the drive near a television or radio receiver. If the radio or TV is sharing
the same power outlet as the drive, connect it to a different outlet.
If the computer has both USB2.0 and USB1.1 ports, use the USB2.0 port.
When connection is made to the USB1.1 port, the drive functions as a USB1.1 drive.
When the drive is used as a USB1.1 drive, the picture and sound playback of DVD-Video
discs may be interrupted.
E
Bottom panel
Initial setting:
Mode Switches
Set all Mode Switches to OFF
when the drive is in use.
9
Usage Precautions
To avoid damaging discs:
Do not touch the surface as it can cause the disc to become dirty or scratched.
Do not allow discs to become dirty or scratched.
Do not place or store discs in locations exposed to heat, direct sunlight, humidity or
dust.
Do not write on the surface of the disc with a ball-point pen or other writing instrument.
If the disc is brought from a cold into a warm environment, moisture may form on the
disc. Wipe this moisture off with a soft, dry, lint-free cloth before using the disc.
Do not drop, bend, or place heavy objects on top of discs.
Cleaning the disc using a CD cleaner is recommended once every 2 or 3 months.
E
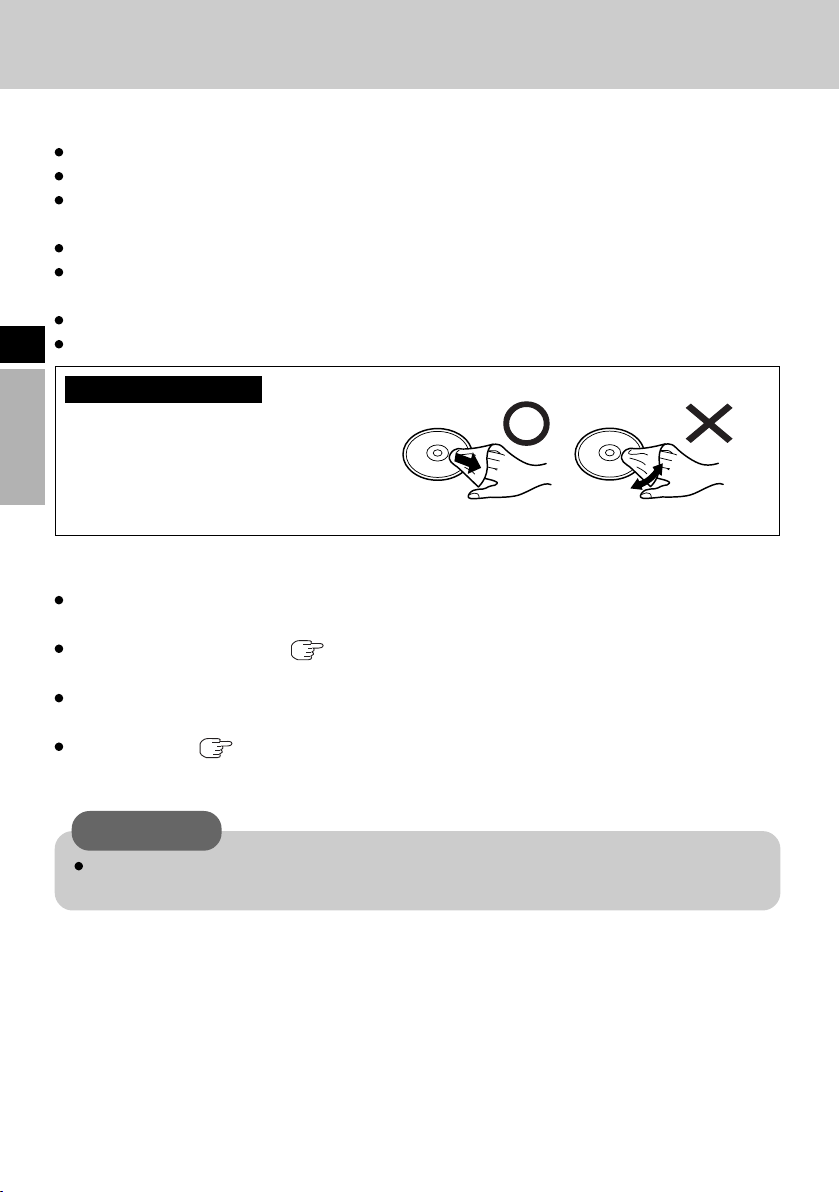
If the disc gets dirty
After wiping the disc with a moist,
soft cloth, wipe it with a dry cloth.
Always wipe from the center
toward the edge.
When the Drive’s top surface is dirty:
Wipe it with a soft cloth.
When the turntable is dirty:
Gently wipe the turntable ( page 6 ( I )) by applying a cotton swab (available on the
market) in a circular motion.
Do not touch the lens.
When the lens is dirty:
Clean the lens ( page 6 (J)) with a blower (available on the market) used for camera
lenses.
10
CAUTION
Do not use record cleaners, anti-static sprays or chemicals (such as benzine, paint
thinners or alcohol) since they may deform or discolor the drive.
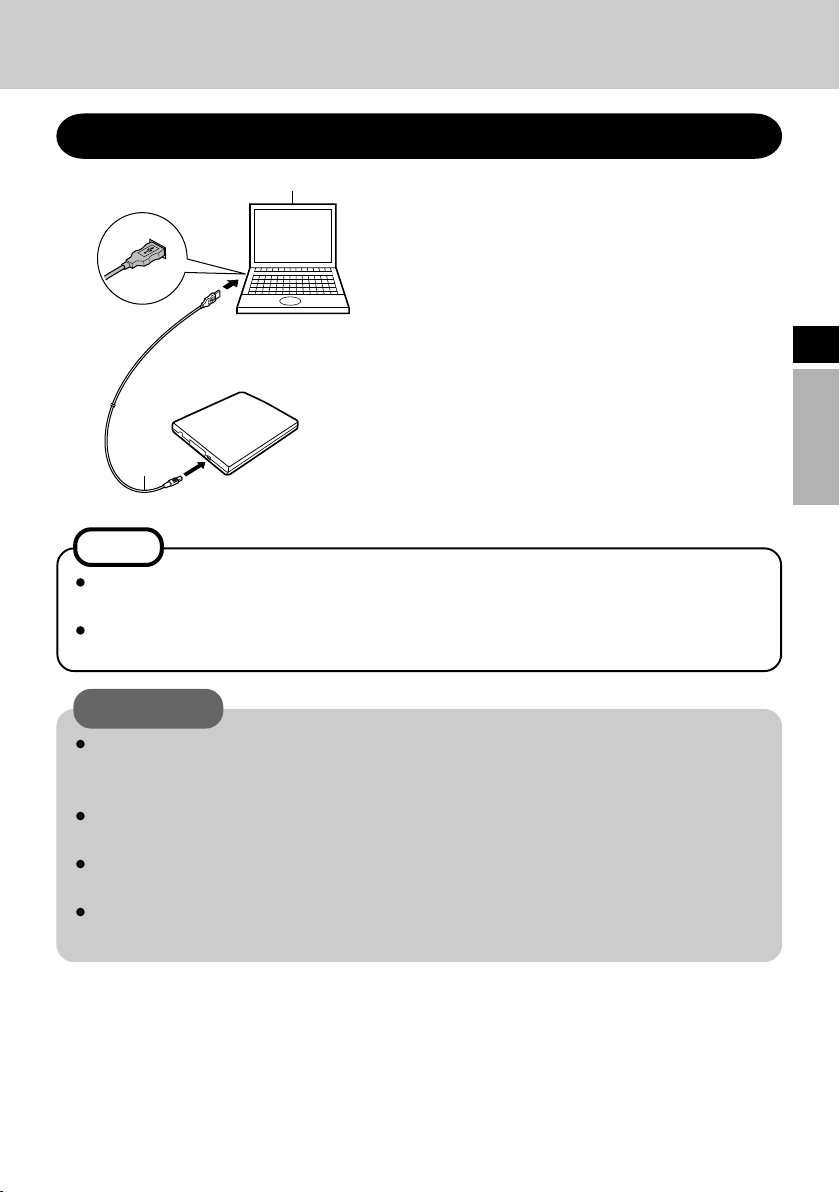
Connections to the Computer
Connection
1
3
(Example of connections)
2
1
Turn your computer on.
2
Connect the end of the interface
cable (included) with the smaller
of the two plugs to the drive’s
interface connector.
3
Connect the end of the interface
cable with the larger of the two
plugs to the Computer’s USB
port.
The drive’s power is now turned on
automatically, and the POWER/BUSY
indicator lamp lights up in green.
NOTES
The drive’s ON/OFF power operations are coupled to the computer so that when
the computer is turned on or off, the drive will be automatically turned on or off.
The drive’s power is automatically turned on or off by connecting or disconnecting the interface cable.
CAUTION
Do not connect any other cable in place of the interface cable which is supplied
with the drive.
(Doing so may damage the drive and/or Computer.)
Connect the drive directly to the Computer.
No guarantees can be made for the operation if it is connected via a USB hub.
While the drive is still connected to the Computer, do not turn off the drive’s
power when the Computer is operating.
When using this drive with USB bus power, we recommend using this drive alone
(other than USB mouse,USB keyboard,etc.).
E
11

Connections to the Computer
Disconnecting the cable
Before disconnecting the interface cable, complete the data writing using the writing software and the data reading as well as the music playback and other operations, and remove
the disc (media) from the drive.
CAUTION
When using a CD-RW disc with “B's CLiP,” move the cursor to the “B’s CLiP”
E
icon on the tasktray and right-click it, select [Eject,] and then disconnect the
interface cable.
Be sure follow the procedure below. Unless the correct procedure is observed, it
may not be possible to use the drive when the drive is connected next time.
1
Double-click on the tasktray and select [USB Mass Storage Device],
then select [Stop].
(When the USB device has been removed after the computer is turned off, this step is
not necessary.)
2
Select [GENERIC CDRCB04 USB Device], then select [OK].
3
Remove the USB device.
Select [Close].
12
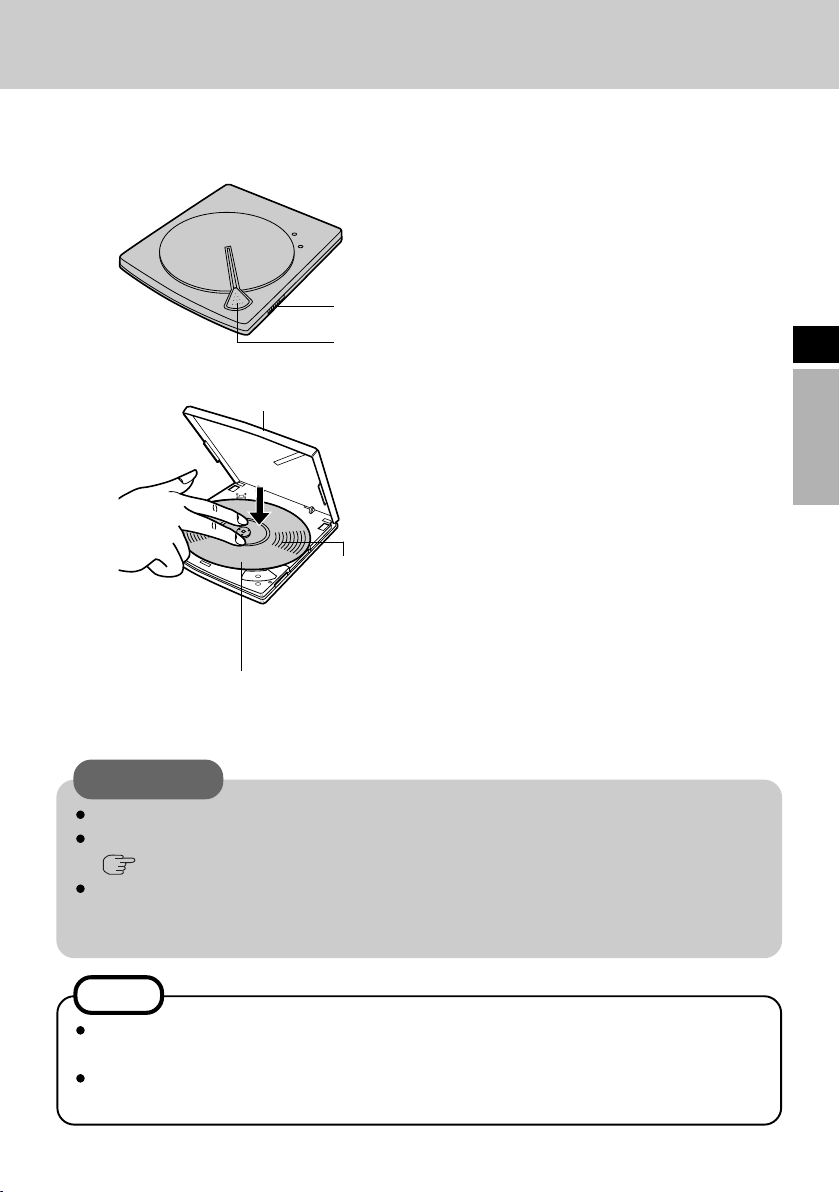
Placing and Removing Discs
This drive’s disc cover is designed to be opened electrically. When power is not supplied
to the drive, the disc cover will not open even when the open button is pressed.
1
Turn on the drive’s power.
The drive’s ON/OFF power operations
are coupled to the Computer so that
when the PC is turned on or off, the
1
2
3
4
Title-side up
drive will be automatically turned on or
off.
2
Press the open button.
The disc cover opens slightly.
(The disc cover can also be opened by
selecting [Eject] from the application
software.)
3
Open the disc cover fully.
4
Insert the disc.
Use your fingers to press the part near
the disc center down until the disc is
secured in place.
<Removing the disc>
Check that the disc has stopped turning
completely, and remove it by pressing
down on its center part while clasping
its outer edge and lifting it free.
5
Close the disc cover.
E
CAUTION
Set the disc correctly. (Otherwise, it may spin off and be damaged as a result.)
If power is not supplied to the drive, slide the emergency open lever.
( page 6(F)).
When a program is being used with the drive connected to a computer, exit the
program, and check that the drive's POWER/BUSY indicator lamp is not blinking in orange and that its WRITE indicator lamp has not lighted up in orange.
NOTES
Since the disc cover is locked while a B’s CLiP formatted disc is being used,
select [Eject] from the icon displayed on the tasktray to release the lock.
While data is being written, the WRITE indicator lamp lights up and the disc
cover is locked: therefore, the disc cover cannot be opened during data writing.
13

Installing the Software
This drive is provided with the following software. Install it from the Utility disc.
If the software program’s license agreement screen appears during the installation process,
carefully read the agreement, and proceed with the installation.
Recording software (B’s Recorder GOLD)
Using operations similar to those used with Explorer, this software enables data to be
written on CD-R and CD-RW discs. (Manufacturer: BHA)
Packet writing software (B’s CLiP)
E
This system-resident writing software enables data to be moved, saved and deleted by
means of drag & drop operations, which are just like those performed with floppy
disks, without having to start up any other software. (Manufacturer: BHA)
DVD-Video play software (WinDVD)
This easily operated DVD player is used to play DVD titles or video CDs.
(Manufacturer: InterVideo, Inc)
NOTE
It may not be possible to play the titles or discs smoothly if this software is used
with USB1.1.
If an old version of the writing software or DVD-Video play software or writing
software made by other companies or software with the same functions is already installed on your computer, delete it before proceeding to install the software.
If the accessory packet writing software is installed alongside existing packet
writing software made by another company, the software may not work properly.
Do not use Acrobat Reader which is in the setup file. Instead, use Acrobat Reader
pre-installed in the computer.
14

Before installing the software (B's Recorder/B's CLiP)
Windows XP
Select [(x:)]*1 in [start] - [My Computer] with the right button, select [Properties] - [Recording], then delete the check mark for [Enable CD recording on this drive].
(Delete the check mark for [Enable CD recording on this drive] every time a new user is
added.)
*1 “x” is the drive letter of the drive. Change this to match the drive letter on your own
computer.
Windows 2000
Uninstall Adaptec CD-Burning Plug-in.(When installing Media Player 7)
1
Select [Start] - [Settings] - [Control Panel] - [Add/Remove Programs].
2
Select [Windows Media Player 7] - [Change/Remove].
3
Select [Remove Windows Media components] and select [Next].
4
Select [Adaptec CD-Burning Plug-in] from the components list, and select [Next].
5
If the [Windows Media setup is now ready to uninstall] message appears, select [Next].
6
Select [Finish] and restart the computer.
Before installing the software (WinDVD)
Take steps to ensure that no other player software is allowed to coexist with WinDVD.
It may not be possible to play images properly if any player software other than WinDVD
is installed. There are some DVD-Videos available on the market that work by installing their own player software when they are played. In the case of such a DVD, be
absolutely sure to abort the installation of the player software as soon as the installation
start screen appears. If the software is installed by mistake and the images cannot be
played properly, take the following action and see if it remedies the situation.
• Specify WinDVD if the DVD’s player software settings enable WinDVD to be
specified for playing the DVD.
• Uninstall the DVD’s player software which has been installed.
(Refer to the DVD-Video’s instructions for the name of the player software which is
to be uninstalled.)
E
Windows XP
Uninstall the player software by selecting [start] - [Control Panel] - [Add or Remove Programs].
Windows 2000
Uninstall the player software by selecting [Start] - [Settings] - [Control Panel] - [Add/
Remove Programs].
15

Installing the Software
Installation
CAUTION
Make absolutely sure that the software is installed under the authority of the administrator. Similarly, ensure that B’s Recorder will be started up for the first time
after installation under the authority of the administrator.
See page 15 before using Media Player 7.
E
1
Insert the accessory utility disc into the drive.
(Setup starts up automatically, and the startup screen (setup menu) appears.)
NOTE
When the setup program will not run automatically, input [x:\asmenu] in [Start]
- [Run] and select [OK].
(“x” is the drive letter of the drive. Change this to match the drive letter on your
own computer.)
2
Install [B’s Recorder GOLD] and [B’s CLiP] by selecting [BHA Recording
Software]; similarly, install WinDVD by selecting [InterVideo DVD Player].
(The installer of the selected software now starts so follow the on-screen instructions.)
During the course of the installation process, you will be asked to input your name and
company and a serial number. Input any name and company and the serial number
(marked on the case). (Watch out for characters that have a similar format.)
Unless you input these three items correctly, you cannot proceed to the next step.
3
Upon completion of the installation, click [END (X)] , and restart the
computer.
(The accessory software can now be used.)
CAUTION
Do not perform the standby or hibernation operation or connect or disconnect the USB
port while the WinDVD, B's Recorder or B's CLiP software program are running. Be
absolutely sure to perform these operations after the program or programs have been
exited.
16
B’s Recorder/B’s CLiP
Here, explanations are given on general information about B’s Recorder and B’s CLiP ,
and how to access the online manual. Refer to the online manual concerning the detailed
use of the software application (
page 18 ) .
Applicable Media
• CD-R*
• CD-RW (rewritable CD media)
*1 Applicable only for B’s Recorder. It cannot be used for B’s CLiP.
1
(one-time recordable CD media)
Running B’s Recorder/B’s CLiP
B’s Recorder
Windows XP
Select [start] - [All Programs] - [B.H.A] - [B’s Recorder GOLD BASIC] - [B’s Recorder
GOLD BASIC] or select on the desktop.
Windows 2000
Select [Start] - [Programs] - [B.H.A] - [B’s Recorder GOLD BASIC] - [B’s Recorder GOLD
BASIC] or select on the desktop.
B’s CLiP
B’s CLiP runs when the computer starts up, and or is displayed on the taskbar.
CAUTION
Even when the data saving has been finished by B’s CLiP, data will continue to be
saved on the drive for another 15 seconds. (The write indicator will light several
times.) Before proceeding with the next operation, check that the write indicator no
longer lights and that the POWER/BUSY indicator has lighted up green.
You cannot eject the disc by using the eject button on the drive while the indicator
( ) is displayed on the taskbar. To eject the disc in this case, move the cursor to the
indicator and right-click it to select [Eject].
Do not eject discs in any other way except the one described above.
When formatting a disc with B’s CLiP, right-click or to select [Format].
Do not select [My computer].
After formatting the disc, eject it then re-insert before using it.
When B’s Recorder finishes writing, the disc cover opens automatically. (If you
close the opened disc cover and press [OK] after completing a copy operation, the
disc cover will open again.)
E
17

B’s Recorder/B’s CLiP
CAUTION
Be sure to shut down B’s Recorder before logging off Windows.
Windows XP
Do not use the Fast User Switching function.
If this function is used, or will no longer be shown on the taskbar after the
switching is complete. (If this happens, return to the original user without using the
Fast User Switching function, and then log on with the user you want to use.)
Windows 2000
E
If CD-RW media with B’s CLiP format is removed while the content of that media is
displayed in Explorer, the contents of the media may remain displayed in Explorer
even after the media is removed. This will not affect the computer’s operation.
When another media is inserted, the Explorer display will be updated.
How to access the Online Manual
B’s Recorder
Windows XP
Select [start] - [All Programs] - [B.H.A] - [B’s Recorder GOLD BASIC] - [Doc] [User’s Manual].
Windows 2000
Select [Start] - [Programs] - [B.H.A] - [B’s Recorder GOLD BASIC] - [Doc] - [User’s
Manual].
B’s CLiP
Windows XP
Select [start] - [All Programs] - [B.H.A] - [B’s CLiP] - [User’s Manual].
Windows 2000
Select [Start] - [Programs] - [B.H.A] - [B’s CLiP] - [User’s Manual].
18
Information
If B’s Recorder and B’s CLiP do not operate properly, we recommend carefully reading
the online help file first for problems with the operating environment or operations.
If you still cannot troubleshoot the problem, contact B.H.A ( described below).
About Copies
When writing to discs, make sure that you are not infringing any copyrights.
It is illegal to copy audio CDs for non-personal use.
When backing up software, make sure that you are not infringing any software copyrights for that product.
E
SUPPORT INFORMATION
Inquires about B’s Recorder and B’s CLiP should be made to B.H.A.
URL : http://www.bhacorp.com/
area
U.S./Canada/Australia
Europe
language
English, French (Canada)
English, German, French
e-mail
BHAxpsupport@bhacorp.com
eurosupport@bhacorp.com
19

WinDVD
WinDVD is a software application for DVD playback.
Here, you will find explanations and general information on the installation procedure and
how to access the online manual.
Refer to the online manual concerning the detailed use of the software application (
page 22) .
Running WinDVD
E
Windows XP
Select [Start] - [All Programs] - [InterVideo WinDVD] - [InterVideo WinDVD] or select
on the desktop.
Windows 2000
Select [Start] - [Programs] - [InterVideo WinDVD] - [InterVideo WinDVD] or select
on the desktop.
Usage Precautions
Do not enter the standby or hibernation mode, or switch the display by pressing [Fn] +
[F3] while WinDVD is running.
Do not start WinDVD while the hard disk drive indicator is blinking immediately after
the computer was started up.
If you maximize the video display window, you can return to the original window size by
double-clicking over the images.
During video playback, do not perform the following.
• Ejecting the disc
• Using other applications or the Command Prompt
• Changing the settings of the screen properties
While WinDVD is running, the volume setting may return to the volume adjusted with
the WinDVD when you pause, fast-forward, fast-reverse or skip between chapters since
priority is given to the volume adjusted by WinDVD, even if the volume is adjusted
using [Fn] + [F5] / [F6] or the taskbar icon.
Immediately after resuming from a pause, frame dropping may occur depending on the
operating environment or DVD video (images or sounds are disrupted).
If you cannot play the disc contents smoothly, right-click on the WinDVD screen, select
[Setup]-[Video], and confirm that the check mark is added to [Use Hardware Decode
Acceleration] and [Use Hardware Color Acceleration].
The display may flicker, depending on the disc. In this case, delete the check mark for
[Use Hardware Decode Acceleration].
20

In some cases, when the number of display colors is increased, a message appears and
the DVD cannot be played. If this happens, reduce the number of display colors.
In the Extended Desktop or simultaneous (internal/external) display mode, there are
times when images or video are not displayed correctly.
During a prolonged period of rapid advance, the pause mode may be established at some
point. If this happens, exit WinDVD, and restart.
About Region Setting
The DVD-Video has a region code that is fixed according to the region where it is sold. In
order to play a DVD-Video, the region code of the player software and of the drive must
match that of the DVD-Video.
<Example>
For U.S.A. and Canada: “1”
For Europe: “2”
This drive’s region code is not set at the time of shipment from the factory. Therefore,
operations will differ depending on the first DVD-Video played.
In the case of a DVD-Video with a specific region code:
The drive will automatically be set with the same region code as the DVD-Video.
In the case of any other DVD-Video:
[Confirm Region] appears. Select region code and select [OK]. Play now begins.
([Confirm Region] may not be displayed for some DVD-Videos. To confirm the current
region code and the number of settings remaining, right-click on the WinDVD screen
and select [Setup]-[Region].)
CAUTION
The region code can be set a total of five times, including the initial setting. Proceed
very carefully, because after the fifth change has been made, the region code set last
is fixed and no further changes can be made.
The user must take responsibility for any trouble that results from illegally changing
or altering the region code.
E
NOTE
[Confirm Region] will also be displayed if a DVD-Video with one region code is
inserted into a drive for which another region code has already been set.
21

WinDVD
About Playback of a DVD Created the DVD recorder
Playable DVD media: DVD-Video, DVD-RAM, DVD-R, DVD-RW
However, the following restrictions apply.
In order to play DVD-R and DVD-RW, it must be finalized (a process that enables it to
play on other DVD players etc.). For information on the finalizing method used by your
DVD recorder, refer to its operating instructions.
The following media recorded in the VR format can be played only by the user with the
administrator’s authority:
E
• DVD-RW
• DVD-RAM
DVD-RAM formatted in FAT 32 cannot be played.
Depending on the DVD recorder or the manufacturer of the media used for creation, it
may not be playable.
How to access the Online Manual
Select “?” of the WinDVD control panel.
SUPPORT INFORMATION
If WinDVD does not operate properly, we recommend carefully reading the online
help file first for problems with the operating environment or operations.
If you still cannot troubleshoot the problem, contact InterVideo, Inc.
• URL : http://www.intervideo.com/
• E-mail: support@intervideo.com
22

Using the Drive
Information
To play DVD-Video or MPEG2 files, install the DVD playback software (included).
For information on how to install the software.( page 22)
If you are using CD-R or CD-RW discs, read the descriptions written on the packages
of the discs.
CD-RW discs cannot be read with other drives*1 unable to accommodate CD-RW discs.
*1
Consult with the manufacturer of each drive.
The playback of CDs containing moving pictures (Video CDs, CDs including MPEG
data, etc.) may not be smooth.
<When writing to CD-R/RW discs>
Using the CD-ROM of the CD-R/RW writer software (included), install the application
software on your computer. For information on how to install the software, refer to the
manual of the CD-R/RW writer software. ( page 18)
Be sure to use discs conforming to the proper write speeds. ( page 26)
If the write operation is to involve a long period of time, be sure to connect the AC
adaptor. If the battery power runs low and the power of the computer is cut, the write
operation may end in failure.
Depending on the disc, the quality of the write operation may not be so good. We
recommend using any of the following discs.
Recommended Discs:
E
<CD-R>
TAIYOYUDEN Co., Ltd.
MITSUI CHEMICALS, Inc.
RICOH Co., Ltd.
MITSUBISHI CHEMICAL Co., Ltd.
HITACHI MAXELL, Ltd.
<CD-RW/High-Speed CD-RW>
RICOH Co., Ltd.
MITSUBISHI CHEMICAL Co., Ltd.
<Ultra-Speed CD-RW>
MITSUBISHI CHEMICAL Co., Ltd.
23

Troubleshooting
Disc cannot be removed.
(Disc cover will not
open.)
E
The drive is not recognized
by writing software other
than the one provided.
How to add data using
multiple CD-R/CD-RW
drives or multiple kinds of
writing software?
DVD-R or DVD-RW
discs cannot be read.
Is the drive still operating?
While data is being written on the CD-R or CD-RW disc,
the disc cover will not open even when the open button
is pressed. Wait until the data writing is completed.
When [B’s CLiP] is used, move the cursor to the indicator displayed on the taskbar and right-click to select
[Eject].
If the disc cover fails to open even when [Eject] has been
selected, operate the emergency open lever (
(F)).
It is not possible to use writing software that does not support the drive.
Use the same drive and same writing software to write data.
Otherwise, it may not be possible to either read the data
before it is added or read or write the data correcting using
the drive or another drive.
Is the media format or writing system of the DVD disc used
the correct one?
The DVD-R discs that can be used with this drive must
support 4.7 GB (For General/Authoring) and 3.95 GB
version 1.1; similarly, the DVD-RW discs that can be
used must support 4.7 GB version 1.1.
Furthermore, only discs with data recorded using the Discat-Once system as the writing system can be read. Check
the media format and writing system of the discs used.
page 6
B’s Recorder and B’s
CLiP does not operate
properly (When installing
Media Player 7 under
Windows 2000)
If data is written with B's
Recorder using USB1.1
port, the "XX transmission speed error, but were
circumvented" message
appears.
24
Uninstall Adaptec CD-Burning Plug-in (
This means that transmission failed but that the error was
circumvented so no problems are posed.
page 15).

You cannot play DVDVideo discs.
Check the manual of the DVD-Video play software and the
points listed below.
The drive may not have been selected if more than one
drive has been connected.
Play is not possible unless the region codes of the DVDVideo disc, this drive and the play software match.
Check whether the region codes match.
DVD-Video sound and
images are not played
smoothly.
Depending on the DVD recording system, some discs may
not be played automatically.
In this case proceed as follows.
First, start WinDVD, and insert the disc into the drive.
Select File from the WinDVD play menu, and play the
disc.
DVD-RAM and DVD-RW in the VR format can be played
only by the user with the administrator’s authority.
In order to play DVD-R and DVD-RW, it must be finalized
(a process that enables it to play on other DVD players etc.).
The PC must meet certain system requirements in order for DVDVideo discs to be played smoothly. Check the manual of the
DVD-Video play software and the points listed below.
If USB1.1 is used for the interface, the images and/or
sound may break up.
If another program has been started, exit it. When many
programs are started, the CPU may not have enough
capacity to handle all the ensuing operations.
Change the settings for the display area and colors. If
the display area and/or display colors are reduced, the
CPU capacity can be used more efficiently.
Check the CPU’s speed setting. Some PCs may be set to the
power-saving mode in which the CPU has a low capacity.
Has the sound setting been set to muting?
E
25

Specifications
Power consumption
Interfaces supported
Data baud rate
(for USB2.0)
E
Access time
(measured using our
own software)
Formats supported
(for data reading)
Media supported
(for data writing)
Recording systems
Approx. 5 W
USB2.0 and USB1.1 supported
2 MBBuffer size
■ Writing
• CD-R: 4 x, 8 x
■ Rewriting
• CD-RW: 4 x, 8 x
■ Reading
• CD-ROM/CD-R/CD-RW/CD-DA: Max 20 x
• DVD-ROM: Max 6 x
• DVD-R/DVD-RW/DVD-Video: Max 4 x
• DVD-RAM(4.7 GB*3): 2 x
• DVD-RAM(2.6 GB*3): 1 x
DVD-ROM: 200 ms
CD-ROM: 240 ms
CD-DA, CD TEXT, CD Extra, CD-ROM, Photo CD
supported), Video CD, DVD-ROM, DVD-Video, DVD-RAM (2.6 GB,
4.7 GB)*3, DVD-R (3.95 GB, 4.7 GB)*3, DVD-RW
CD-R (63 minutes, 74 minutes, 80 minutes)
CD-RW, high-speed CD-RW, Ultra-speed CD-RW (74 minutes, 80 minutes)
Track-at-Once, Disc-at-Once, packet writing, Multisessions
*1
*2
*4
(multisessions
Interface cable
Dimensions
(width × depth × height)
Weight
Operating temperature/Humidity range
Storage temperature/
Humidity range
Operating systems
supported
26
Cable length: Approx. 0.5 m {20"} (including connector)
Mass: Approx. 22 g {0.049 lb.}
130 mm × 157 mm × 18.5 mm {5.1" × 6.2" × 0.7"}
Approx. 305 g {0.67 lb.}
5 ºC to 35 ºC {41 ºF to 95 ºF} /20% RH to 80% RH
(no condensation)
-20 ºC to 55 ºC {-4 ºF to 131 ºF} /15% RH to 85% RH
(no condensation)
Microsoft® Windows® XP Professional Operating System.
Microsoft® Windows® 2000 Professional Operating System.

Memory
64 MB or more (128 MB or more recommended)
(128 MB or more is recommended for the operating system
when Windows XP is used.)
Free space on hard
At least 100 MB (800 MB or more recommended)
disk drive
*1
Rated power consumption.
*2
The data baud rate may be lower depending on the PC’s performance.
*3
1 GB = 1,000,000,000 bytes. Your operating system or some application software will
report as fewer GB.
*4
Play software available on the market is required when photo CDs are used.
E
27

Einleitung
Wir danken Ihnen, dass Sie sich fur das DVD-ROM & ECD-R/RW-Laufwerk für Panasonic
Notebook-Computer entschieden haben.
Dieses Laufwerk wird über die USB-Schnittstelle an den Computer angeschlossen.
Bitte bewahren Sie diese Bedienungsanleitung nach der Lektüre griffbereit auf.
DVD-ROM & CD-R/RW-Laufwerk ..... 1
Dienstprogramm-Disc
D
(CD-ROM)
B’s Recorder GOLD 7 Basic(nachfolgend
B’s Recorder genannt),
B’s CLiP5(nachfolgend B’s CLiP genannt),
WinDVD4(nachfolgend WinDVD genannt)
[Betriebssystem-Kennzeichnungen in diesem Handbuch]
Windows XP
Windows 2000
Microsoft und Windows sind eingetragene Warenzeichen von Microsoft Corporation in den Vereinigten
Staaten und/oder anderen Ländern.
WinDVD™ ist ein Warenzeichen von InterVideo, Inc.
bedeutet Microsoft® Windows® XP Professional Operating System.
bedeutet Microsoft® Windows® 2000 Professional Operating System.
................. 1
Schnittstellenkabel
(USB)
...................... 1
Bedienungsanleitung
(dieses Handbuch)
.................. 1
28

Vorsichtshinweise zum Gebrauch
B Legen Sie keine anderen Gegenstände als Discs in das Laufwerk ein.
B Lassen Sie den Disc-Fachdeckel nicht in der geöffneten Stellung, und vermeiden Sie
eine Berührung des Abtasterlinsen-Bereichs. Falls Staub oder Schmutz auf die
Abtasterlinse gelangt, kann das Laufwerk Discs u.U. nicht einwandfrei lesen.
B Unter bestimmten Bedingungen kann sich Staub auf der Abtasterlinse oder Disc
ansammeln, wodurch eine Funktionsstorung verursacht werden kann.
B Das Laufwerk darf nicht geöffnet und der Computer nicht bewegt werden, während ein
Zugriff auf das Laufwerk ausgeführt wird. Achten Sie nach Ausführung einer Anwendung
außerdem darauf, das Laufwerk erst dann zu öffnen und die Disc zu entfernen, nachdem
die Anwendung beendet worden ist.
B Setzen Sie das Laufwerk weder ölhaltigem Rauch noch Zigarettenrauch aus. Anderenfalls
verkürzt sich u.U. die Lebensdauer der Abtasterlinse.
B Bei Auftreten einer Funktionsstörung empfiehlt es sich, das Laufwerk mit einem
Blasepinsel zu reinigen.
B Führen Sie keinerlei Fremdgegenstände, z.B. Büroklammern, in das Laufwerk ein.
B Verwenden Sie keine deformierten (verwellte, unrunde usw.) Discs in diesem Laufwerk.
B Vermeiden Sie eine Berührung des Schnittstellenkabels, während ein Zugriff auf das
Laufwerk ausgeführt wird. Anderenfalls kann eine Funktionsstörung des Laufwerks und/
oder des Computers verursacht werden.
B Halten Sie Magnete vom Laufwerk fern. Elektromagnetische Einstreuungen können einen
unstabilen Betrieb des Laufwerks verursachen.
B Stellen Sie das Laufwerk nicht in der Nähe eines Fernsehgerätes oder Radios auf. Schließen
Sie das Laufwerk nicht gemeinsam mit einem Fernsehgerät oder Radio an die gleiche
Netzsteckdose an.
B Wenn Ihr Computer sowohl einen USB2.0- als auch einen USB1.1-Anschluss besitzt,
verwenden Sie den USB2.0-Anschluss.
B Wenn der Anschluss am USB 1.1-Anschluss hergestellt wird, arbeitet das Laufwerk als
ein USB 1.1-Laufwerk.
B Bei Einsatz des Laufwerks als ein USB 1.1-Laufwerk konnen Unterbrechungen der Bild-
und Tonwiedergabe von DVD-Video-Discs auftreten.
Unterseite
Betriebsartenschalter
D
Anfangseinstellung:
Stellen Sie alle Betriebsartenschalter
auf “OFF” ein, wenn sich das
Laufwerk in Betrieb befindet.
29

Vorsichtshinweise zum Gebrauch
Zur Vermeidung einer Beschädigung von Discs:
B Vermeiden Sie eine Berührung der Oberfläche, da die Disc dadurch verschmutzt oder
zerkratzt werden kann.
B Schützen Sie Discs vor Schmutz und Kratzern.
B
Bewahren Sie Discs nicht an sehr heißen, feuchten oder staubigen Orten auf, und schützen
Sie Discs vor direkter Sonneneinstrahlung.
B Beschriften Sie Discs nicht mit einem Kugelschreiber oder anderen Schreibutensil.
B Wenn eine Disc von einem kalten an einen warmen Ort gebracht wird, kann sich
Kondensation auf der Oberfläche niederschlagen. In einem solchen Fall reiben Sie die
Disc vor dem Gebrauch mit einem weichen, trockenen, flusenfreien Tuch ab.
B Lassen Sie Discs nicht fallen, verbiegen Sie sie nicht, und stellen Sie keine schweren
Gegenstände auf Discs ab.
B Es empfiehlt sich, Discs alle zwei bis drei Monate mit einem CD-Reiniger zu reinigen.
Bei einer Verschmutzung der Disc
Wischen Sie die Disc mit einem feuchten,
D
weichen Tuch ab, und reiben Sie anschließend
mit einem trockenen Tuch nach.
Führen Sie das Tuch in einer geraden
Bewegung vom Mittelloch zum Rand hin.
Bei einer Verschmutzung der Oberseite des Laufwerks:
B Reiben Sie die Oberseite mit einem weichen Tuch ab.
Bei einer Verschmutzung des Drehtellers:
B Reinigen Sie den Drehteller (
( I ) auf Seite 6), indem Sie ein handelsübliches
Wattestabchen in einer kreisförmigen Bewegung über den Drehteller führen.
B Achten Sie dabei darauf, die Abtasterlinse nicht zu berühren.
Bei einer Verschmutzung der Abtasterlinse:
B Reinigen Sie die Abtasterlinse (
(J) auf Seite 6) mit einem im Fotofachhandel
erhältlichen Blasepinsel für Kameraobjektive.
ACHTUNG
C Verwenden Sie auf keinen Fall Schallplatten-Reinigungsmittel, Antistatik-Sprays
oder Lösungsmittel (z.B. Benzol, Farbverdünner, Alkohol) zur Reinigung des
Laufwerks, da derartige Substanzen eine Verformung oder Verfärbung der
Ausenflächen verursachen können.
30

Anschluss an den Computer
Anschließen
1
3
(Anschlussbeispiel)
2
1
Schalten Sie den Computer ein.
2
Schliesen Sie das Ende des
Schnittstellenkabels (im Lieferumfang) mit
dem kleineren der beiden Steckverbinder
an den Schnittstellenanschluss des
Laufwerks an.
3
Schliesen Sie das Ende des
Schnittstellenkabels (im
Lieferumfang) mit dem größeren der
beiden Steckverbinder an den USBAnschluss des Computers an.
Die Stromzufuhr des Laufwerks wird
automatisch eingeschaltet, und die POWER/
BUSY-Anzeige leuchtet grün auf.
HINWEISE
C Der Ein/Aus-Zustand des Laufwerks ist mit dem des Computers verkoppelt, so
dass das Laufwerk automatisch gemeinsam mit dem Computer ein- und
ausgeschaltet wird.
C Durch Anschließen und Abtrennen des Schnittstellenkabels wird die Stromzufuhr
des Laufwerks automatisch ein- und ausgeschaltet.
ACHTUNG
C Schließen Sie ausschließlich das Schnittstellenkabel im Lieferumfang des
Laufwerks an.
(Bei Verwendung eines anderen Schnittstellenkabels können Laufwerk und/oder
Computer beschädigt werden.)
C Schließen Sie das Laufwerk direkt an den Computer an.
Bei Anschluss des Laufwerks über eine USB-Buchse ist kein einwandfreier Betrieb
gewährleistet.
C Bei Anschluss des Laufwerks an den Computer darf der Netzschalter des Laufwerks
nicht ausgeschaltet werden, während der Computer in Betrieb ist.
C Wenn die Stromversorgung dieses Laufwerks über den USB-Bus erfolgt, empfehlen
wir, dass nur dieses Laufwerk an den Bus angeschlossen wird (außer USB-Maus,
USB-Tastatur usw.).
D
31

Anschluss an den Computer
Abtrennen des Schnittstellenkabels
Achten Sie vor dem Abtrennen des Schnittstellenkabels stets darauf, den jeweiligen
Betriebsvorgang zu beenden (z.B. das Schreiben von Daten unter Verwendung der SchreibSoftware, das Einlesen von Daten, Musikwiedergabe oder eine andere Operation) und die
Disc (den Datenträger) aus dem Laufwerk zu entfernen.
ACHTUNG
C Bei Verwendung einer CD-RW-Disc in Verbindung mit B’s CLiP fuhren Sie den
Cursor auf das Symbol von B’s CLiP in der Taskleiste, klicken Sie mit der rechten
Maustaste auf das Symbol, wählen Sie [Eject] aus, und trennen Sie dann das
Schnittstellenkabel ab.
C Achten Sie darauf, das folgende Verfahren genau wie unten beschrieben auszuführen.
Falls das Verfahren nicht korrekt ausgeführt wird, kann das Laufwerk nach dem
nächsten Anschließen u.U. nicht mehr verwendet werden.
D
1
Doppelklicken Sie auf in der Taskleiste, wählen Sie [USB Mass Storage
Device] (USB-Massenspeicher) aus, und wählen Sie dann [Beenden] aus.
(Wenn das USB-Gerät bei ausgeschaltetem Computer entfernt wurde, kann dieser Schritt
ausgelassen werden.)
2
Wählen Sie [GENERIC CDRCB04 USB Device] (GENERISCHES CDRCB04
USB-GERÄT) aus, und wählen Sie dann [OK] aus.
3
Entfernen Sie das USB-Gerät.
Klicken Sie auf die Schaltfläche [Schließen].
32

Einlegen und Entfernen von Discs
Der Disc-Fachdeckel des Laufwerks wird elektrisch geöffnet. Daher kann der Disc-Fachdeckel bei
ausgeschalteter Stromzufuhr des Laufwerks nicht durch Drücken der [OPEN]-Taste geöffnet werden.
1
Schalten Sie das Laufwerk ein.
Der Ein/Aus-Zustand des Laufwerks ist mit
dem des Computers verkoppelt, so dass das
Laufwerk automatisch gemeinsam mit dem
1
2
3
4
Abzuspielende Seite
nach oben weisend
Computer ein- und ausgeschaltet wird.
2
Drücken Sie die [OPEN]-Taste.
Der Disc-Fachdeckel öffnet sich geringfügig.
(Der Disc-Fachdeckel kann auch durch
Auswahl von [Eject] in der Anwendung
geöffnet werden.)
3
Klappen Sie den Disc-Fachdeckel vollständig auf.
4
Legen Sie die Disc ein.
Drücken Sie auf die Mitte der Disc, um sie
im Disc-Halter des Drehtellers zu sichern.
<Entfernen der Disc>
Vergewissern Sie sich, dass die Disc
zum Stillstand gekommen ist, und
drücken Sie dann mit einem Finger auf
die Mitte der Disc, während Sie sie am
Rand halten, und heben Sie sie heraus.
5
Schließen Sie den Disc-Fachdeckel.
D
ACHTUNG
C Achten Sie stets darauf, die Disc sicher einzulegen. (Anderenfalls kann sie sich beim
Drehen lösen und beschädigt werden.)
C Wenn das Laufwerk nicht mit Strom versorgt wird, verschieben Sie den
Notöffnungshebel (
C
Wenn eine Anwendung läuft, während das Laufwerk an einen Computer angeschlossen ist,
beenden Sie die Anwendung, vergewissern Sie sich, dass die POWER/BUSY-Anzeige des
Laufwerks nicht orangefarben blinkt und die WRITE-Anzeige nicht orangefarben leuchtet.
(F) Seite 6), um den Disc-Fachdeckel zu öffnen.
HINWEISE
C Da der Disc-Fachdeckel bei Verwendung einer mit B’s CLiP formatierten Disc
verriegelt ist, klicken Sie auf das Symbol in der Taskleiste und wählen Sie dann
[Eject] aus, um die Verriegelung freizugeben.
C Während Daten auf die Disc geschrieben werden, leuchtet die WRITE-Anzeige,
und der Disc-Fachdeckel ist verriegelt. Daher kann der Disc-Fachdeckel nicht
geöffnet werden, während ein Schreibvorgang stattfindet.
33

Installieren der Software
Die folgende Software gehört zum Lieferumfang dieses Laufwerks. Installieren Sie diese
Software von der Dienstprogramm-Disc.
Wenn die Anzeige der Benutzer-Lizenzvereinbarung während der Installation auf dem
Bildschirm erscheint, lesen Sie die Bestimmungen dieser Vereinbarung bitte aufmerksam
durch, bevor Sie mit der Installation fortfahren.
C Aufnahme-Software (B’s Recorder GOLD)
Mit Hilfe von ähnlichen Operationen wie denen, die im Windows-Explorer verwendet
werden, ermöglicht diese Software (Hersteller: BHA) das Schreiben von Daten auf CDR- und CD-RW-Discs.
C Paketschreib-Software (B’s CLiP)
Diese speicherresidente Software (Hersteller: BHA) gestattet das Verschieben,
Speichern und Löschen von Daten anhand der gleichen Drag & Drop-Operationen wie
bei Verwendung von Disketten, ohne dass eine andere Anwendung dazu gestartet
werden muss.
C DVD-Video-Wiedergabe-Software (WinDVD)
Diese benutzerfreundliche DVD-Player-Software (Hersteller: InterVideo, Inc) dient
D
zum Abspielen von DVD-Titeln oder Video-CDs.
HINWEISE
C Bei Verwendung dieser Software in Verbindung mit der Schnittstelle USB1.1 ist
keine einwandfreie Wiedergabe von Titeln und Discs gewährleistet.
C
Falls eine ältere Version der Schreib-Software oder der DVD-Video-WiedergabeSoftware bzw. die Schreib-Software eines anderen Herstellers oder Software mit den
gleichen Funktionen bereits auf dem Computer installiert ist, muss diese gelôscht
werden, bevor die Software im Lieferumfang dieses Laufwerks installiert wird.
Falls die Paketschreib-Software im Lieferumfang zusätzlich zur Paketschreib-Software eines anderen Herstellers installiert wird, arbeitet sie u.U. nicht einwandfrei.
C Verwenden Sie nicht den in der Setup-Datei enthaltenen Acrobat Reader, sondern
den auf dem Computer vorinstallierten Acrobat Reader.
34

Bevor Sie die Software installieren (B’s Recorder/B’s CLiP)
Windows XP
Wählen Sie mit der rechten Maustaste [(X:)]*1 in [start] - [Arbeitsplatz], wählen Sie
[Eigenschaften] - [Aufnahme], und löschen Sie dann das Häkchen für [CD-Aufnahme für
dieses Laufwerk aktivieren].
(Löschen Sie das Kontrollzeichen für [CD-Aufnahme für dieses Laufwerk aktivieren] jedes
Mal, wenn ein neuer Benutzer hinzugefügt wird.)
*1 “x” bezeichnet den Buchstaben für das Laufwerk. Wählen Sie diesen Buchstaben so, dass
er dem Buchstaben entspricht, der dem Laufwerk in Ihrem Computer zugeordnet ist.
Windows 2000
Deinstallieren Sie das Adaptec CD-Burning Plug-in. (Beim Installieren von Media Player 7)
1
Wählen Sie [Start] - [Einstellungen] - [Systemsteuerung] - [Software] aus.
2
Wählen Sie [Windows Media Player 7] - [Ändern/Entfernen] aus.
3
Wählen Sie [Remove Windows Media components.] aus, und wählen Sie dann auf [Weiter].
4
Wählen Sie [Adaptec CD-Burning Plug-in] in der Komponentenliste, und wählen Sie
dann auf [Weiter].
5
Falls die Meldung [Windows Media setup is now ready to uninstall] erscheint, wählen
Sie auf [Weiter].
6
Wählen Sie auf [Fertig stellen], und fuhren Sie dann einen System-Neustart aus.
Vor dem Installieren der Software (WinDVD)
Treffen Sie alle erforderlichen Schritte, um sicherzustellen, dass keine andere Player-Software als WinDVD installiert ist. Falls eine andere Player-Software als WinDVD installiert
ist, kann es vorkommen, dass die Bildwiedergabe nicht richtig erfolgt. Es gibt auf dem Markt
einige DVD-Videodiscs, die bei der Wiedergabe ihre eigene Player-Software installieren.
Achten Sie bei der Wiedergabe einer solchen DVD unbedingt darauf, die Installation der
Player-Software abzubrechen, sobald der Installationsstart-Bildschirm erscheint. Falls die
Software versehentlich installiert wird und die Bildwiedergabe nicht richtig durchgeführt
werden kann, treffen Sie die folgenden Abhilfemaßnahmen, um das Problem zu beheben.
• Wählen Sie WinDVD, falls Ihnen Software-Einstellungen des DVD-Players die Wahl
von WinDVD für die Wiedergabe einer DVD ermöglichen.
• Deinstallieren Sie die installierte DVD-Player-Software.
(Beachten Sie bitte die Bedienungsanleitung der DVD-Videodisc, um den Namen der
Player-Software, die deinstalliert werden soll, ausfindig zu machen.)
D
Windows XP
Deinstallieren Sie die Player-Software, indem Sie [start] - [Systemsteuerung] [Software] auswählen.
Windows 2000
Deinstallieren Sie die Player-Software, indem Sie [Start] - [Einstellungen] [Systemsteuerung] - [Software] auswählen.
35

Installieren der Software
Installation
ACHTUNG
Stellen Sie unbedingt sicher, dass die Software unter der Autorität des Administrators
installiert wurde. Achten Sie außerdem darauf, dass der B’s Recorder zum ersten Mal gestartet
wird, nachdem die Installation unter der Autorität des Administrators durchgeführt wurde.
Beachten Sie bitte Seite 35, bevor Sie den Media Player 7 verwenden.
1
Legen Sie die Dienstprogramm-Disc im Lieferumfang in das Laufwerk ein.
(Das Setup-Programm startet automatisch, und das Startfenster (Setup-Menü) erscheint
auf dem Bildschirm.)
HINWEIS
Wenn das Einstellungsprogramm nicht automatisch läuft, geben Sie [x:\asmenu]
D
in [Start]-[Ausführen] und wählen Sie [OK].
(
“x” bezeichnet den Buchstaben für das Laufwerk. Wählen Sie diesen Buchstaben so,
dass er dem Buchstaben entspricht, der dem Laufwerk in Ihrem Computer zugeordnet ist.
)
2
Installieren Sie [B’s Recorder GOLD] und [B’s CLiP], indem Sie [BHA Recording Soft-ware] auswählen; um WinDVD zu installieren, wählen Sie
[InterVideo DVD Player] aus.
(Das Installationsprogramm der ausgewählten Software startet; folgen Sie den Anweisungen
zur Installation, die auf dem Bildschirm erscheinen.)
Wahrend des Installationsvorgangs werden Sie zur Eingabe Ihres Namens, Ihrer Firma und
der Seriennummer aufgefordert. Geben Sie jeden gewunschten Namen und Firmennamen
sowie die auf der Verpackung der Dienstprogramm-Disc angegebene Seriennummer ein.
(Achten Sie dabei darauf, die Seriennummer genau wie auf der Verpackung angegeben
einzugeben, ohne Groß- und Kleinschreibung zu verwechseln.) Diese drei Eingaben müssen
korrekt vorgenommen werden, bevor der nächste Schritt ausgefuhrt werden kann.
3
Nach beendeter Installation klicken Sie auf [END (X)], und führen Sie dann
einen System-Neustart aus.
(Danach kann die soeben installierte Software verwendet werden.)
ACHTUNG
Aktivieren Sie weder die Bereitschafts- noch die Stillegungs-Funktion des Computers, und achten Sie darauf, das USB-Kabel weder anzuschließen noch abzutrennen,
während WinDVD, B’s Recorder oder B’s CLiP läuft.
36

B’s Recorder/B’s CLiP
Hier finden Sie allgemeine Informationen zu den Anwendungen “B’s Recorder” und “B’s
CLiP”, Erklärungen zum Installationsverfahren und Hinweise zum Zugriff auf das OnlineHandbuch. Beziehen Sie sich für ausführliche Erklärungen zur Verwendung der SoftwareAnwendung auf das Online-Handbuch (
Seite 38).
Geeignete Medien
• CD-R*
• CD-RW (wiederbeschreibbares CD-Medium)
*1 Gilt nur für B’s Recorder. Kann für B’s CLiP nicht verwendet werden.
1
(einmal bespielbare CD-Medium)
B’s Recorder/B’s CLiP starten
B’s Recorder
Windows XP
Wählen Sie [start] - [Alle Programme] - [B.H.A] - [Bs Recorder GOLD BASIC] - [Bs Re-
corder GOLD BASIC] oder doppelklicken Sie auf auf dem Desktop.
Windows 2000
Wählen Sie [Start] - [Programm] - [B.H.A] - [Bs Recorder GOLD BASIC] - [Bs Recorder
GOLD BASIC] oder doppelklicken Sie auf auf dem Desktop.
B’s CLiP
B’s CLiP startet beim Hochfahren des Computers, oder wird in der Taskleiste angezeigt.
VORSICHT
Selbst wenn die Datenspeicherung mit B’s CLiP abgeschlossen wurde, werden die
Daten für weitere 15 Sekunden auf dem Laufwerk gespeichert. (Die WRITE-Anzeige
leuchtet mehrmals auf.) Bevor Sie mit dem nächsten Bedienungsschritt fortfahren,
vergewissern Sie sich, dass die WRITE-Anzeige nicht mehr leuchtet und dass die
POWER/BUSY-Anzeige des Laufwerks grün leuchtet.
Sie können die Disc nicht mit Hilfe der Auswurftaste am Laufwerk auswerfen, während
die Anzeige ( ) in der Taskleiste angezeigt wird. Um die Disc in diesem Fall
auszuwerfen, führen Sie den Cursor auf die Anzeige und klicken Sie mit der rechten
Maustaste darauf, um [Auswerfen] zu wählen.
Versuchen Sie die Discs nicht auf andere Weise als oben beschrieben auszuwerfen.
Beim Formatieren einer Disc mit B’s CLiP klicken Sie mit der rechten Maustaste auf
oder , um [Formatieren] zu wählen. Wählen Sie nicht [Arbeitsplatz].
Wenn B’s Recorder das Beschreiben beendet, öffnet sich die Disc-Abdeckung automatisch.
(Im Falle einer “Kopie” öffnet sich die Disc-Abdeckung erneut, wenn Sie die DiscAbdeckung nach Abschluss eines Kopiervorgangs schließen und auf [OK] klicken.)
D
37

B’s Recorder/B’s CLiP
VORSICHT
Schalten Sie den B’s Recorder immer aus, bevor Sie sich von Windows abmelden.
Windows XP
Verwenden Sie die schnelle Benutzerumschaltung nicht.
Wenn diese Funktion genutzt wird, so wird oder nach dem Umschalten nicht
mehr in der Taskleiste angezeigt. (Falls dies geschieht, schalten Sie auf den
Ursprungsbenutzer züruck, ohne die schnelle Benutzerumschaltung zu ver-wenden
und melden sich dann mit dem gewünschten Benutzernamen an.)
Windows 2000
Falls das Format einer CD-RW entfernt wird, während der Inhalt der entsprechende
Disc in Explorer angezeigt wird, kann es vorkommen, dass der Inhalt der Disc in
Explorer angezeigt bleibt, selbst nachdem die Disc ausgeworfen wurde. Der Betrieb
des Computers wird davon nicht beeinflusst. Wenn eine andere CD-RW eingelegt
wird, wird die Explorer-Anzeige aktualisiert.
D
Zugriff auf das Online-Handbuch
B’s Recorder
Windows XP
Wählen Sie [start] - [Alle Programme] - [B.H.A] - [B’s Recorder GOLD BASIC] [User’s Manual].
Windows 2000
Wählen Sie [Start] - [Programme] - [B.H.A] - [B’s Recorder GOLD BASIC] - [User’s
Manual].
B’s CLiP
Windows XP
Wählen Sie [start] - [Alle Programme] - [B.H.A] - [B’s CLiP] - [User’s Manual].
Windows 2000
Wählen Sie [Start] - [Programme] - [B.H.A] - [B’s CLiP] - [User’s Manual].
38

Information
Falls die Anwendungen “B’s Recorder” und “B’s CLIP” nicht richtig funktionieren,
empfehlen wir Ihnen, zuerst die Online-Hilfedatei zu lesen, um Probleme mit der
Betriebsumgebung oder den Betriebsvorgängen ausfindig zu machen.
Falls das Problem auf diese Weise nicht behoben werden kann, wenden Sie sich bitte an
die Firma B.H.A (
Über die Kopien
Vor der Vervielfältigung einer Datei, prüfen Sie bitte stets, ob Urheberrechte Dritter
diesem entgegenstehen.
unten beschrieben).
D
TECHNISCHE UNTERSTÜTZUNG
Bitte wenden Sie sich mit Anfragen zu B’s Recorder und B’s CLiP direkt an BHA unter
einer der folgenden Internet-Adressen:
URL : http://www.bhacorp.com/
Gebiet
USA/Kanada/Australien
Europa
Sprache
Englisch, Französisch (Kanada)
Englisch, Deutsch, Französisch
e-mail
BHAxpsupport@bhacorp.com
eurosupport@bhacorp.com
39

WinDVD
WinDVD ist eine Softwareanwendung zum Abspielen von DVDs.
Hier finden Sie Erläuterungen und allgemeine Informationen zur Bedienung und zum Aufrufen des Online-Handbuches.
Detaillierte Informationen zum Einsatz der Softwareanwendung finden Sie im Online-Handbuch (
WinDVD starten
Windows XP
Wählen Sie [start] - [Alle Programme] - [InterVideo WinDVD] - [InterVideo WinDVD]
oder wählen Sie auf dem Desktop.
Windows 2000
Wählen Sie [Start] - [Programme] - [InterVideo WinDVD] - [InterVideo WinDVD] oder
wählen Sie auf dem Desktop.
D
Wichtige Gebrauchshinweise
Wechseln Sie nicht in den Standbymodus oder den Ruhezustand, schalten Sie das Display nicht mit [Fn] + [F3] um, wahrend WinDVD läuft.
Starten Sie WinDVD nicht, solange die Festplatten-Zugriffsleuchte kurz nach dem
Computerstart blinkt.
Bei maximiertem Video-Anzeigefenster können Sie die Original-Bildgröße wiederherstellen, indem Sie auf das Bild doppelklicken.
Während der Videowiedergabe, vermeiden Sie Folgendes:
• Auswerfen der Disc.
• Verwendung anderer Anwendung oder der Eingabeaufforderung.
• Ändern der Bildschirmeigenschaften.
Einstellen der Lautstärke mit dem WinDVD-Bedienfeld. Wenn Sie die Lautstärke mit
[Fn] + [F5] / [F6] oder mit dem Taskleistensymbol einstellen, kann beim Pausieren,
schnellen Vorlauf, schnellen Rücklauf oder beim Springen zwischen Kapiteln wieder die
Ausgangslautstärke eingestellt werden.
Lautstärke- und Stummschaltungseinstellungen, die angepasst wurden, während WinDVD
läuft, nehmen wieder die alten Einstellungswerte an, wenn WinDVD beendet wird.
Je nach der Betriebsumgebung und der DVD-Videodisc kann es vorkommen, dass
unmittelbar nach der Fortsetzung der Wiedergabe aus dem Pausenzustand Vollbilder
übersprungen werden (Bild- und Tonaussetzer treten auf).
Wenn Sie eine Disc nicht ruckelfrei abspielen können, rechtsklicken Sie im WinDVD-Bildschirm,
wählen [Setup] – [Video] und vergewissern sich, dass ein Häkchen bei [Use Hardware Decode
Acceleration] und bei [Use Hardware Color Acceleration] gesetzt ist. Je nach Disc kann die Anzeige
flackern.In diesem Fall löschen Sie das Häkchen bei [Use Hardware Decode Acceleration].
40
Seite 42).

In einigen Fällen erscheint eine Warnmeldung und die DVD kann nicht wiedergegeben
werden, wenn Sie die Anzahl der Farben für die Anzeige erhöhen. Verringern Sie in
diesem Fall die Anzahl der Farben für die Anzeige.
Im Extended Desktop- oder im Simultananzeigemodus (intern / extern) kann es vorkommen, dass Bilder oder Videos nicht korrekt angezeigt werden.
Nach längeren Phasen schnellen Vorlaufs kann automatisch der Pausenmodus aktiviert
werden. Falls dies geschieht, beenden Sie WinDVD und starten die Anwendung erneut.
Über Ländercode-Einstellungen (Region Codes)
Ein DVD-Video hat je nach Verkaufsgebiet einen fest eingestellten Ländercode. Um ein
DVD-Video abzuspielen, müssen der Ländercode der Player-Software und des Laufwerks
mit dem des DVD-Videos übereinstimmen.
<Beispiel>
Für U. S. A. und Kanada: “1”
Für Europa: “2”
Der Ländercode des Laufwerks wird werksseitig nicht voreingestellt. Daher hängt der Betrieb von der ersten abgespielten Video-DVD ab.
Im Falle eines DVD-Videos mit einem bestimmten Ländercode:
Das Laufwerk stellt sich automatisch auf den Ländercode des DVD-Videos ein.
Im Falle jedes anderen DVD-Videos:
[Confirm Region] erscheint. Wählen Sie den Ländercode und klicken Sie auf [OK]. Die
Wiedergabe beginnt nun.
([Confirm Region] wird bei manchen DVD-Videos eventuell nicht angezeigt. Um den
aktuellen Ländercode zu bestätigen und die Anzahl verbleibender Umstellungen (diese
sind begrenzt) anzuzeigen, rechtsklicken Sie im WinDVD-Bildschirm und wählen [Setup]
– [Region].)
VORSICHT
Der Ländercode kann insgesamt fünfmal eingestellt werden, einschließlich der ersten Einstellung. Gehen Sie sehr umsichtig vor, denn nachdem die fünfte Änderung
durchgeführt wurde, wird die letzte Einstellung fixiert und es sind keine weiteren
Änderungen mehr möglich.
Der Benutzer übernimmt die volle Verantwortung für jegliche Probleme, die sich aus
illegaler Änderung oder Modifizierung der Ländercode-Einstellungen ergeben.
HINWEIS
[Confirm Region] wird auch angezeigt, wenn ein DVD-Video mit einem Ländercode in ein Laufwerk eingelegt wird, für das bereits ein anderer Ländercode eingestellt wurde.
D
41

WinDVD
Über die Wiedergabe einer DVD, die mit dem DVD-Recorder erstellt wurde
DVDs, die wiedergegeben werden können: DVD-Videodiscs, DVD-RAM-Discs, DVD-RDiscs, DVD-RW-Discs.
Jedoch gelten die folgenden Einschränkungen:
Um eine DVD-R- oder DVD-RW-Disc wiedergeben zu können, muss sie finalisiert sein.
(Bei der Finalisierung handelt es sich um einen Vorgang, der die Wiedergabe einer solchen
Disc auf anderen DVD-Playern usw. ermöglicht.) Informationen zur
Finalisierungsmethode, die von Ihrem DVD-Recorder verwendet wird, finden Sie in der
Bedienungsanleitung des DVD-Recorders.
Die folgenden im VR-Format aufgezeichneten Medien können nur von einem Benutzer
mit Admininstrator-Autorität wiedergegeben werden:
• DVD-RW-Discs
• DVD-RAM-Discs
Eine im Format FAT 32 formatierte DVD-RAM-Disc kann nicht wiedergegeben werden.
Je nach dem DVD-Recorder und dem Hersteller einer DVD kann es vorkommen, dass
eine Disc nicht wiedergegeben werden kann.
D
Zugreifen auf das Online-Handbuch
Wählen Sie “?” im WinDVD-Bedienfeld.
KUNDENDIENST-INFORMATIONEN
Falls WinDVD nicht korrekt arbeiten sollte, empfehlen wir zunächst das gründliche
Lesen der Online-Hilfedateien, die sich mit Problemen der Betriebsumgebung oder beim
Betrieb befassen.
Wenn sich das Problem danach immer noch nicht beheben lässt, wenden Sie sich bitte
an InterVideo, Inc.
• URL : http://www.intervideo.com/
• E-mail: support@intervideo.com
42

Gebrauch des Laufwerks
Allgemeine Informationen
Installieren Sie die DVD-Video-Wiedergabe-Software (im Lieferumfang), um DVDVideo-Discs oder MPEG2-Dateien abzuspielen. Einzelheiten zur Installation finden Sie
in der Bedienungsanleitung der Software. (
Lesen Sie bei Verwendung von CD-R- oder CD-RW-Discs stets die Hinweise auf der
Verpackung.
CD-RW-Discs können nicht mit anderen Laufwerken*1 gelesen werden, wenn diese nicht
mit CD-RW-Discs kompatibel sind.
*1 Bitte wenden Sie sich an den Hersteller des jeweiligen Laufwerks.
Beim Abspielen von Discs, die Laufbilder enthalten (Video-CDs, CDs mit MPEG-Daten
usw.) ist keine einwandfreie Bildwiedergabe gewährleistet.
<Beim Schreiben auf CD-R/RW-Discs>
Verwenden Sie die CD-ROM der CD-R/RW-Schreib-Software (im Lieferumfang), um
diese Anwendung auf dem Computer zu installieren. Einzelheiten zur Installation der
Software finden Sie in der Bedienungsanleitung der CD-R/RW-Schreib-Software.
(
Seite 38).
Achten Sie darauf, ausschließlich Discs zu verwenden, die mit der Schreibgeschwindigkeit
dieses Laufwerks kompatibel sind(
Wenn ein längerer Schreibvorgang ausgeführt werden soll, achten Sie darauf, den
Netzadapter anzuschließen. Falls die Akkuspannung nicht ausreicht oder die Stromzufuhr
des Computers unterbrochen wird, kann der Schreibvorgang sonst nicht erfolgreich
abgeschlossen werden.
Die beim Schreibvorgang erzielte Qualität richtet sich nach der verwendeten Disc. Die
folgenden Discs werden zum Gebrauch empfohlen.
Empfohlene Discs:
Seite 46).
Seite 42).
D
<CD-R>
TAIYOYUDEN Co., Ltd.
MITSUI CHEMICALS, Inc.
RICOH Co., Ltd.
MITSUBISHI CHEMICAL Co., Ltd.
HITACHI MAXELL, Ltd.
<CD-RW/Hochgeschwindigkeits-CD-RW>
RICOH Co., Ltd.
MITSUBISHI CHEMICAL Co., Ltd.
<Superschnelle CD-RW-Disc>
MITSUBISHI CHEMICAL Co., Ltd.
43

Störungsbeseitigung
Die Disc kann nicht
entfernt werden.
(Der Disc-Fachdeckel
lasst sich nicht öffnen.)
Das Laufwerk wird von einer
anderen Schreib-Software als der
im Lieferumfang nicht erkannt.
Können einer Disc weitere Daten unter
Verwendung mehrerer CD-R/CD-RW-
D
Laufwerke oder mehrerer Arten von
Schreib- Software hinzugefügt werden?
Eine DVD-R- oder DVDRW-Disc kann nicht
gelesen werden.
Ist das Laufwerk noch in Betrieb?
Während Daten auf eine CD-R- oder CD-RW-Disc
geschrieben werden, kann der Disc-Fachdeckel nicht
durch Drücken der [OPEN]-Taste geoffnet werden. Bitte
warten Sie, bis der Schreibvorgang beendet ist.
Bei Verwendung von B’s CLiP führen Sie den Cursor auf das
Symbol von B's CLiP in der Taskleiste, und klicken Sie mit der
rechten Maustaste auf das Symbol, und wählen Sie [Eject] aus.
Falls sich der Disc-Fachdeckel auch nach Klicken auf [Eject] nicht
öffnet, betätigen Sie den Notöffnungshebel (
Es ist nicht möglich, Schreib-Software zu verwenden, die
das Laufwerk nicht unterstützt.
Nein. Verwenden Sie stets das gleiche Laufwerk und die gleiche Schreib-Software
zum Schreiben von Daten auf die gleiche Disc. Anderenfalls ist es u.U. nicht möglich,
die Daten mit diesem oder einem anderen Laufwerk entweder vor dem Hinzufügen
oder nach der Aufzeichnung einwandfrei zu lesen oder Daten auf die Disc zu schreiben.
Besitzt die verwendete DVD das korrekte Datenträger-Format,
oder wurde sie mit dem korrekten Schreibsystem aufgezeichnet?
DVD-R-Discs, die mit diesem Laufwerk verwendet werden, müssen das Format
4,7 GB (Für General/Authoring) und 3,95 GB Version 1.1 unterstützen; verwendete
DVD-RW-Discs mussen das Format 4,7 GB Version 1.1 unterstutzen.
Außerdem können nur solche Discs gelesen werden, bei denen die
Datenaufzeichnung anhand des Disc-at-Once-Verfahrens als Schreibsystem
erfolgte. Überprüfen Sie das Datenträger-Format und Schreibsystem der
verwendeten Disc.
(F) auf Seite 6)
B’s CLiP funktioniert
nicht einwandfrei.
(Beim Installieren von
Media Player 7 unter Windows 2000)
Beim Schreiben von Daten
unter Verwendung von B’s Recorder über die Schnittstelle
USB1.1 erscheint die Meldung
“XX transmission speed error,
but were circumvented”.
44
Deinstallieren Sie das Adaptec CD-Burning Plug-in.
(
Seite 35).
Diese Meldung weist darauf hin, dass ein Übertragungsfehler
aufgetreten ist, der jedoch umgangen werden konnte, so dass
kein Problem vorliegt.

DVD-Video-Discs
können nicht abgespielt
werden.
Schlagen Sie in der Bedienungsanleitung der DVD-VideoWiedergabe-Software nach, um die folgenden Punkte zu überprüfen.
Wenn mehrere Laufwerke angeschlossen sind, wurde
dieses Laufwerk u.U. nicht ausgewählt.
Die Wiedergabe ist nur dann möglich, wenn die Regionalcode-Einstellung der
DVD-Video-Disc, dieses Laufwerks und der Wiedergabe-Software übereinstimmt.
Überprüfen Sie, ob alle drei auf den gleichen Regionalcode eingestellt sind.
Je nach dem verwendeten DVD-Aufzeichnungssystem startet
die Wiedergabe bei bestimmten Discs nicht automatisch.
In einem solchen Fall gehen Sie wie folgt vor.
Starten Sie zunächst WinDVD, und legen Sie die Disc in das Laufwerk ein.
Wählen Sie “File”im Wiedergabemenü von WinDVD aus,
und starten Sie die Wiedergabe der Disc.
DVD-RAM- und DVD-RW-Discs im VR-Format können nur von
einem Benutzer mit Admininstrator-Autorität wiedergegeben werden.
D
Um eine DVD-R- oder DVD-RW-Disc wiedergeben zu können, muss sie
finalisiert sein. (Bei der Finalisierung handelt es sich um einen Vorgang, der
die Wiedergabe einer solchen Disc auf anderen DVD-Playern usw. ermöglicht.)
Beim Abspielen einer
DVD-Video-Disc ist die
Ton- und Bildwiedergabe
gestört.
Um DVD-Video-Discs störungsfrei abspielen zu können,
muss der Computer die minimalen Systemvoraussetzungen
erfüllen. Überprufen Sie die Bedienungsanleitung der DVDVideo-Wiedergabe-Software und die folgenden Punkte.
Falls USB1.1 als Schnittstelle verwendet wird, können
Bild- und/oder Tonaussetzer auftreten.
Wenn eine andere Anwendung momentan läuft, beenden
Sie diese. Falls mehrere Anwendungen gleichzeitig aktiviert
sind, reicht die Verarbeitungskapazität der Zentraleinheit
u.U. nicht für alle erforderlichen Operationen aus.
Ändern Sie Einstellungen von Auflösung und Anzahl der
angezeigten Farben.
Nach einer Reduzierung der Auflösung und der Anzahl
der Farben wird die Zentraleinheit weniger stark belastet.
Überprüfen Sie die VerarbeitungsgeschwindigkeitsEinstellung der Zentraleinheit.
Falls der Energiesparmodus am Computer aktiviert ist,
arbeitet die Zentraleinheit mit reduzierter
Verarbeitungsgeschwindigkeit.
Wurde die Stummschaltung am Computer aktiviert?
45

Technische Daten
Leistungsaufnahme
Unterstützte Schnittstellen
Datenübertragungsgeschwindigkeit
(für USB2.0)
Zugriffszeit
(Messung mit
D
Panasonic-Software)
Unterstützte Formate
(für Auslesen von
Daten)
Unterstützte Datenträger
(für Schreiben von Daten)
Unterstützte Aufzeichnungssysteme
Ca. 5 W
USB2.0 und USB1.1
2 MBZwischenspeichergröße
■ Schreiben
■ Überschreiben
■ Lesen
DVD-ROM: 200 ms
CD-ROM: 240 ms
CD-DA, CD TEXT, CD Extra, CD-ROM, Photo CD
Unterstützung), Video CD, DVD-ROM, DVD-Video, DVD-RAM (2.6
GB, 4.7 GB)*3, DVD-R (3.95 GB, 4.7 GB)*3, DVD-RW
CD-R-Discs (63, 74 und 80 Minuten)
CD-RW-, schnelle CD-RW-, superschnelle CD-RW-Disc (74
Minuten, 80 Minuten)
Track-at-Once, Disc-at-Once, Paketschreiben, Multisession
*1
• CD-R: 4x, 8x
• CD-RW: 4x, 8x
*2
• CD-ROM/CD-R/CD-RW/CD-DA: Max 20 x
• DVD-ROM: Max 6 x
• DVD-R/DVD-RW/DVD-Video: Max 4 x
• DVD-RAM(4.7 GB*3): 2 x
• DVD-RAM(2.6 GB*3): 1 x
*4
(mit Multisession-
Schnittstellenkabel
Abmessungen
(Breite x Tiefe x Höhe)
Masse
Temperatur-/Luftfeuchtigkeitsbereich
beim Betrieb
Temperatur-/Luftfeuchtigkeitsbereich
bei Lagerung
Unterstützte
Betriebssysteme
46
Kabellänge: Ca. 0,5 m {20"} (einschließlich Steckverbinder)
Masse: Ca. 22 g {0,049 lb.}
130 mm × 157 mm × 18.5 mm {5.1" × 6.2" × 0.7"}
Ca. 305 g{0,67 lb.}
5 ºC bis 35 ºC{41 ºF to 95 ºF} /20 % bis 80 % rel. Feuchte
(ohne Kondensatbildung)
-20ºC bis 55 ºC {-4 ºF to 131 ºF} 15 % bis 85 % rel. Feuchte
(ohne Kondensatbildung)
Microsoft® Windows® XP Professional Operating System.
Microsoft® Windows® 2000 Professional Operating System.

Arbeitsspeicher
Mindestens 64 MB (Empfehlung: Mindestens 128 MB)
(Bei Betrieb unter Windows XP werden mindestens 128 MB
empfohlen.)
Freier Speicherplatz
Mindestens 100 MB (Empfehlung: Mindestens 800 MB)
auf Festplatte
*1
Nennleistungsaufnahme.
*2
Je nach Leistung des Computers wird u.U. eine niedrigere
Datenübertragungsgeschwindigkeit erhalten.
*3
1 GB = 1.000.000.000 Bytes. Ihr Betriebssystem oder manches Anwendungsprogramm
wird für diesen Wert eine kleinere Zahl anzeigen.
*4
Zur Verwendung von Photo-CD ist eine handelsübliche Wiedergabe-Software
erforderlich.
D
47

Introduction
Merci d’avoir acheté le Lecteur DVD-ROM & CD-R/RW pour ordinateur portable Panasonic.
Ce lecteur se raccorde à l’ordinateur via une interface USB.
Veuillez ranger ce mode d’emploi dans un endroit sûr après l’avoir lu.
Lecteur DVD-ROM & CD-R/RW ...... 1
Disque d’utilitaires
(CD-ROM)
B’s Recorder GOLD 7 Basic(ci-après
dénommé B’s Recorder),
B’s CLiP5(ci-après dénommé B’s CLiP),
WinDVD4(ci-après dénommé WinDVD)
F
[Illustrations de ce manuel]
Windows XP
Windows 2000
Microsoft et Windows sont des marques déposées de Microsoft Corporation aux États-Unis et/ou dans
d’autres pays.
WinDVD
représente le système d’exploitation Microsoft® Windows® XP Professionnel.
représente le système d’exploitation Microsoft® Windows® 2000 Professionnel.
™
est une marque de commerce d’InterVideo, Inc.
...................... 1
Câble d’interface
(USB)
Mode d’emploi
(Ce document)
............................... 1
.......................... 1
48

Précautions d’utilisation
Ne placez aucun autre objet que des disques dans le lecteur.
Ne laissez pas le couvercle du logement à disque ouvert, et évitez de toucher la zone
de la lentille. Si la lentille est maculée de poussière ou de saletés, l’appareil ne pourra pas
lire les disques correctement.
Dans certaines conditions, de la poussière peut s’accumuler sur la lentille ou sur le disque
et éventuellement entraîner un mauvais fonctionnement.
N’ouvrez pas le lecteur et ne déplacez pas l’ordinateur pendant l’accès au lecteur. Cela
pourrait entraîner un mauvais fonctionnement. De plus, après avoir fait fonctionné une
application qui requiert un accès au disque, n’ouvrez le lecteur et ne retirez le disque
qu’une fois l’application fermée.
N’exposez pas le lecteur à la fumée dégagée par de l’huile ou par du tabac. Cela pourrait
réduire la durée de vie de la lentille.
Si le lecteur ne fonctionne pas bien, il est recommandé de le nettoyer avec une poire
soufflante.
N’insérez jamais de corps étrangers tels que des trombones dans le lecteur.
N’utilisez pas de disques déformés (qui sont gondolés, ne sont pas parfaitement ronds,
etc.).
Ne touchez pas le câble d’interface pendant l’accès au lecteur. Cela pourrait entraîner un
mauvais fonctionnement du lecteur et/ou de l’ordinateur.
Maintenez le lecteur à l’écart des aimants. Son fonctionnement peut devenir instable sous
l’effet du magnétisme.
Ne placez pas le lecteur près d’un téléviseur ou d’un poste de radio. Si la radio ou le
téléviseur partage la même prise de courant que le lecteur, branchez-les sur des prises
différentes.
Si l’ordinateur est équipé de ports USB 2.0 et USB 1.1, utilisez le port USB 2.0.
Une fois raccordé au port USB 1.1, ce lecteur fonctionne commun un lecteur USB 1.1.
Lorsque le lecteur est utilisé comme un lecteur USB 1.1, il se peut que la lecture de
l’image et du son des disques DVD vidéo soit interrompue.
F
Panneau inférieur
Réglage initial :
Commutateur de mode
Réglez tous les commutateurs
de mode sur OFF lors de
l’utilisation du lecteur.
49

Précautions d’utilisation
Afin d’éviter d’endommager les disques:
Ne touchez pas la surface du disque pour éviter de la salir ou de la rayer.
Faites en sorte que les disques demeurent propres et sans égratignure.
Ne posez pas et ne rangez pas les disques dans un endroit exposé à la chaleur, à la lumière
directe du soleil, à l’humidité ou à la poussière.
N’écrivez pas sur la surface du disque avec un stylo à bille ou tout autre crayon à pointe
dure.
Si le disque est déplacé d’un endroit froid à un endroit plus chaud, de l’humidité risque de
se déposer sur le disque. Essuyez l’humidité avec un chiffon doux, sec et sans peluches
avant d’utiliser le disque.
Prenez garde d’échapper ou plier le disque, et ne placez aucun objet lourd sur les disques.
Le nettoyage du disque à l’aide d’un nettoyant pour CD est recommandé à intervalles de
2 ou 3 mois.
Si le disque est sale
Après avoir nettoyé le disque avec
un chiffon doux et humide, essuyezle avec un chiffon sec. Essuyez-le
toujours du centre vers l’extérieur.
Lorsque la surface supérieure du lecteur est sale:
Essuyez-la avec un chiffon doux.
Lorsque le plateau est sale:
Essuyez doucement le plateau (
sur le marché) en appliquant un mouvement circulaire.
F
Ne touchez pas la lentille.
Lorsque la lentille est sale:
Nettoyez la lentille (
d’appareil photographique.
page 6 (J)) avec une poire soufflante (disponible sur le marché)
page 6 (I)) avec une tige de coton ouaté (disponible
ATTENTION
N’utilisez aucun nettoyant à disque, vaporisateur antistatique ou produit chimique
(tel que benzine, diluant à peinture ou alcool). Cela risquerait de déformer ou de
décolorer le lecteur.
50

Raccordement à l’ordinateur
Raccordement
1
3
(Exemple de raccordement)
2
1
Allumez l’ordinateur.
2
Raccordez au connecteur
d’interface du lecteur l’extrémité
du câble d’interface (fourni) dont
la fiche est la plus petite.
3
Raccordez au port USB de
l’ordinateur l’extrémité du câble
d’interface dont la fiche est la plus
grosse.
Le lecteur se met alors automatiquement
sous tension et le témoin de MARCHE/
ACCES s’allume en vert.
REMARQUES
L’alimentation du lecteur est associée au statut de l’ordinateur, de sorte que lorsque
ce dernier est allumé ou éteint, le lecteur s’allume ou s’éteint lui aussi
automatiquement.
Le lecteur s’allume ou s’éteint automatiquement lors du raccordement ou de la
déconnexion du câble d’interface.
ATTENTION
Ne raccordez aucun autre câble à la place du câble d’interface fourni avec le lecteur.
(Cela risquerait d’endommager le lecteur et/ou l’ordinateur.)
Raccordez le lecteur directement à l’ordinateur.
Le fonctionnement ne peut pas être garanti s’il est raccordé via un concentrateur
HUB USB.
Si le lecteur est encore raccordé à l’ordinateur, n’éteignez pas le lecteur pendant
que l’ordinateur fonctionne.
Lorsque ce lecteur est utilisé avec une alimentation bus USB, nous recommandons
de l’utiliser tout seul (sauf avec une souris USB, un clavier USB, etc.).
F
51

Raccordement à l’ordinateur
Déconnexion du câble
Avant de déconnecter le câble d’interface, arrêtez toute opérations d’écriture de données au
moyen du logiciel d’écriture, de lecture de données et de lecture de musique, puis retirez le
disque (support) du lecteur.
ATTENTION
Si vous utilisez un disque CD-RW avec “B’s CLiP”, déplacez le curseur sur l’icône
de “B’s CLiP” sur la barre de tâches puis cliquez dessus avec le bouton droit de la
souris, sélectionnez [Eject] puis déconnectez le câble d’interface.
Assurez-vous de suivre la procédure ci-dessous. Si la bonne procédure n’est pas suivie,
il se peut que le lecteur soit inutilisable la prochaine fois que vous le raccorderez.
1
Double-cliquez sur dans la barre de tâches, sélectionnez [USB Mass
Storage Device] (Périphérique d’enregistrement de masse USB), puis
sélectionnez [Arrêter].
(Cette étape n’est pas nécessaire si le périphérique a été retiré une fois l’ordinateur éteint.)
2
Sélectionnez [GENERIC CDRCB04 USB Device] (Périphérique USB
CDRCB04 GENERIQUE), puis sélectionnez [OK].
F
3
Retirez le périphérique USB.
Sélectionnez [Fermer].
52

Introduction et retrait des disques
L’ouverture du couvercle du logement à disque de ce lecteur est contrôlée par un circuit électrique. Lorsque
le lecteur n’est pas alimenté, le couvercle ne s’ouvre pas même si vous appuyez sur la touche d’ouverture.
1
Allumez le lecteur.
L’alimentation du lecteur est associée au statut
de l’ordinateur, de sorte que lorsque ce dernier
est allumé ou éteint, le lecteur s’allume ou
1
2
3
4
Côté titre orienté
vers le haut
s’éteint lui aussi automatiquement.
2
Appuyez sur la touche d’ouverture.
Le couvercle du logement à disque s’entrouvre.
(Vous pouvez également ouvrir le
couvercle du logement à disque en
sélectionnant [Eject] dans le logiciel.)
3
Ouvrez complètement le
couvercle du logement à disque.
4
Insérez le disque.
Appuyez avec le doigt près du centre du
disque jusqu’à ce que ce dernier se
mette en place.
<Retrait du disque>
Assurez-vous que le disque ne tourne plus,
puis retirez-le en appuyant dessus au centre
et en le soulevant par le bord pour le libérer.
5
Fermez le couvercle du logement
à disque.
ATTENTION
Mettez le disque en place correctement. (Sinon, il risque de ne pas tourner avec le
plateau et d’être endommagé.)
Si le lecteur n’est pas alimenté, faites glisser le loquet d’ouverture de secours. (
Lorsqu’un programme est utilisé avec le lecteur raccordé à un ordinateur, quittez
le programme et vérifiez que le témoin de MARCHE/ACCES ne clignote pas en
orange et que le témoin d’écriture n’est pas allumé en orange.
page 6 (F)).
REMARQUES
Le couvercle du logement à disque est verrouillé pendant l’utilisation d’un disque
formaté avec B’s CLiP. Pour le déverrouiller vous devez sélectionner [Eject] depuis
l’icône qui s’affiche sur la barre de tâches.
Pendant l’écriture des données le témoin d’écriture s’allume et le couvercle du
logement à disque se verrouille. Par conséquent, il n’est pas possible d’ouvrir le
couvercle du logement à disque pendant l’écriture des données.
F
53

Installation des logiciels
Ce lecteur est fourni avec les logiciels suivants. Installez-les depuis le disque Utilitaire.
Si l’écran du contrat de licence logiciel apparaît au cours de la procédure d’installation, lisez
attentivement le contrat avant de poursuivre l’installation.
Logiciel d’enregistrement (B’s Recorder GOLD)
Ce logiciel permet l’écriture des données sur des disques CD-R ou CD-RW au moyen
d’opérations similaires à celles d’Explorer. (Fabricant : BHA)
Logiciel d’écriture par paquets (B’s CLiP)
Ce logiciel d’écriture résident en mémoire permet de déplacer, sauvegarder et effacer
les donner par glisser-déposer, tout comme avec les disquettes, sans avoir à lancer
aucun autre logiciel. (Fabricant : BHA)
Logiciel de lecture DVD vidéo (WinDVD)
Ce logiciel DVD facile à utiliser permet de faire la lecture des titres de DVD et des
vidéo CD. (Fabricant : InterVideo, Inc.)
REMARQUE
Il se peut que la lecture des titres ou des disques ne s’effectue pas bien si ce
logiciel est utilisé avec une interface USB 1.1.
Si une vieille version du logiciel d’écriture du logiciel de lecture DVD vidéo, un
logiciel d’écriture fabriqué par une autre firme, ou encore un logiciel possédant
les mêmes fonctions que celui-ci est déjà installé sur l’ordinateur, supprimez-le
avant d’installer le présent logiciel.
F
Si le logiciel d’écriture par paquets fourni est installé parallèlement à celui d’une
autre firme, il risque de ne pas fonctionner correctement.
N’utilisez pas le logiciel Acrobat Reader qui se trouve dans le fichier d’installation.
Utilisez plutôt celui qui est préinstallé sur l’ordinateur.
54

Avant d’installer le logiciel (B’s Recorder/B’s CLiP)
Windows XP
Sélectionnez avec le bouton droit de la souris sur [(X:)]*1 dans [démarrer] - [Poste de travail], sélectionnez [Propriétés] - [Enregistrement], puis retirez la coche de [Activer l’écriture
de CD sur ce lecteur].
(Effacez la coche de [Activer l’écriture de CD sur ce lecteur] chaque fois qu’un nouvel
utilisateur est ajouté.)
*1 “x” représente la lettre désignant le lecteur. Indiquez la lettre qui correspond au lecteur
sur votre ordinateur.
Windows 2000
Désinstallez le Plug-in de gravure CD Adaptec. (Lors de l’installation de Media Player 7)
1
Sélectionnez [Démarrer] - [Paramètres] - [Panneau de configuration] - [Ajout/Suppres-
sion de programmes].
2
Sélectionnez [Windows Media Player 7] - [Modifier/Supprimer].
3
Sélectionnez [Remove Windows Media components] puis [Suivant].
4
Sélectionnez [Adaptec CD-Burning Plug-in] dans la liste des composants, puis sélectionnez
[Suivant].
5
Si le message [Windows Media setup is now ready to uninstall] apparaît, sélectionnez
[Suivant].
6
Sélectionnez [Terminer] et redémarrez l’ordinateur.
Avant d’installer le logiciel (WinDVD)
Vérifiez qu’aucun autre logiciel de lecture ne coexiste avec WinDVD. Il peut ne pas être
possible d’obtenir des images correctes si un logiciel de lecture autre que WinDVD est
installé. Certains DVD vidéo en vente dans le commerce installent leur propre logiciel de
lecture lorsqu’ils sont utilisés. Dans le cas d’un DVD de ce type, abandonnez absolument
l’installation du logiciel de lecture aussitôt que l’écran de début d’installation apparaît. Si
le logiciel est installé par erreur et qu’il n’est pas possible d’obtenir des images correctes,
procédez comme suit pour essayer de remédier au problème.
• Spécifiez WinDVD si les paramètres du logiciel de lecture du DVD permettent de
spécifier WinDVD pour lire le DVD.
• Désinstallez le logiciel de lecture du DVD qui a été installé.
(Reportez-vous aux instructions du DVD vidéo pour le nom du logiciel de lecture qui
doit être désinstallé.)
Windows XP
Désinstallez le logiciel de lecture en sélectionnant [démarrer] - [Panneau de configuration] - [Ajouter ou supprimer des programmes].
Windows 2000
Désinstallez le logiciel de lecture en sélectionnant [Démarrer] - [Paramètres] - [Panneau
de configuration] - [Ajout/Suppression de programmes].
F
55

Installation des logiciels
Installation
ATTENTION
Vous devez ouvrir une session en tant qu’administrateur lors de l’installation du
logiciel. De même, vous devez ouvrir une session en tant qu’administrateur la
première fois que vous lancez B’s Recorder après l’avoir installé.
Avant l’utilisation de Media Player 7, voir page 55.
1
Insérez dans le lecteur le disque d’utilitaires fourni.
(Le programme d’installation démarre automatiquement et l’écran de départ (menu
d’installation) apparaît.)
REMARQUE
Si le programme d’installation ne s’execute pas automatiquement, saisissez
[x:\asmenu] dans [Démarrer]-[Exécuter], puis sélectionnez [OK].
(“x” représente la lettre désignant le lecteur. Indiquez la lettre qui correspond au
lecteur sur votre ordinateur.)
2
Installez [B’s Recorder GOLD] et [B’s CLiP] en sélectionnant [BHA Recording Software]; de même, installez WinDVD en sélectionnant [InterVideo DVD
Player].
(Le programme d’installation du logiciel sélectionné démarre. Suivez les instructions
F
qui apparaissent à l’écran.)
Au cours de la procédure d’installation vous serez invité à saisir votre nom, celui de
votre firme et le numéro de série. Saisissez le nom de votre choix, le nom de la firme et
le numéro de série (indiqué sur le boîtier du disque). (Faites attention aux caractères qui
se ressemblent.)
Si ces trois éléments ne sont pas saisis correctement, vous ne pourrez pas passer à l’étape
suivante.
3
Une fois l’installation terminée, cliquez sur [END (X)] et redémarrez
l’ordinateur.
(Le logiciel fourni peut maintenant être utilisé.)
ATTENTION
Pendant le fonctionnement du logiciel WinDVD, B’s Recorder ou B’s CLiP, ne
mettez pas l’ordinateur en mode de veille ou d’hibernation, et ne connectez/
déconnectez pas le port USB.
56

B’s Recorder/B’s CLiP
Les explications données ici sont des informations générales sur B’s Recorder et B’s CLiP,
la procédure d’installation et la façon d’accéder au manuel en ligne. Reportez-vous au manuel
en ligne en ce qui concerne l’utilisation détaillée de l’application logicielle (
page 58).
Supports applicables
• CD-R*
• CD-RW (support CD réinscriptible)
*1 Ne s’applique qu’à B’s Recorder. L’utilisation n’est pas possible avec B’s CLiP.
1
(support CD à enregistrement unique)
Lancement de B’s Recorder/B’s CLiP
B’s Recorder
Windows XP
Sélectionnez [Démarrer] - [Tous les programmes] - [B.H.A] - [B’s Recorder GOLD BASIC] - [B’s Recorder GOLD BASIC] ou sélectionnez sur le bureau.
Windows 2000
Sélectionnez [Démarrer] - [Programmes] - [B.H.A] - [B’s Recorder GOLD BASIC] - [B’s
Recorder GOLD BASIC] ou sélectionnez sur le bureau.
B’s CLiP
B’s CLiP se lance lorsque l’ordinateur démarre et ou est affiché sur la barre de
tâches.
ATTENTION
Même lorsque l’enregistrement de données a été terminé par B’s CLiP, des données
continuent à être enregistrées sur le lecteur pendant encore 15 secondes. (Le témoin d’écriture
s’allume plusieurs fois.) Avant de passer à l’opération suivante, vérifiez que le témoin
d’écriture ne s’allume plus et que le témoin de MARCHE/ACCES s’est allumé en vert.
Le bouton d’éjection du lecteur ne peut pas être utilisé pour retirer le disque lorsque
l’icône ( ) est affichée sur la barre des tâches. Pour retirer le disque dans ce cas,
déplacez le curseur sur l’icône et cliquez avec le bouton droit de la souris pour
sélectionner [Éjecter].
Pour éjecter le disque procédez uniquement de la façon décrite.
Pour formater un disque avec B’s CLiP, cliquez avec le bouton droit de la souris sur
ou pour sélectionner [Formater]. Ne sélectionnez pas le [Poste de travail].
Avant d’utiliser un disque formaté, éjectez-le, attendez un moment puis réinsérez-le.
Lorsque B’s Recorder termine l’écriture, le plateau s’ouvre automatiquement. (Si
vous fermez le plateau et appuyez sur [OK] après avoir terminé une opération de
copie, le plateau se rouvrira.)
F
57

B’s Recorder/B’s CLiP
ATTENTION
Assurez-vous d’avoir fermé B’s Recorder avant de fermer la session dans Windows.
Windows XP
N’utilisez pas la fonction de Bascule rapide utilisateur.
Si cette fonction est utilisée, ou ne sera plus indiqué sur la barre de tâches
après que la bascule est terminée. (Si cela se produit, retournez à l’utilisateur initial
sans utiliser la fonction de Bascule rapide utilisateur, puis ouvrez la session avec
l’utilisateur désiré.)
Windows 2000
Si un support CD-RW de format B’s CLiP est retiré pendant que son contenu est
affiché dans Explorateur, il se peut que le contenu de ce support demeure affiché
dans Explorateur même après le retrait du support. Cela n’a aucun effet sur le
fonctionnement de l’ordinateur. L’affichage d’Explorateur sera actualisé lors de
l’insertion d’un autre support CD-RW.
Comment accéder au manuel en ligne
B’s Recorder
Windows XP
Sélectionnez [démarrer] - [Tous les programmes] - [B.H.A] - [B’s Recorder GOLD
BASIC] - [User’s Manual].
Windows 2000
F
Sélectionnez [Démarrer] - [Programmes] - [B.H.A] - [B’s Recorder GOLD BASIC] [User’s Manual].
B’s CLiP
Windows XP
Sélectionnez [démarrer] - [Tous les programmes] - [B.H.A] - [B’s CLiP] - [User’s
Manual].
Windows 2000
Sélectionnez [Démarrer] - [Programmes] - [B.H.A] - [B’s CLiP] - [User’s Manual].
58

Informations
Si B’s Recorder et B’s CLiP ne fonctionnent pas correctement, nous recommandons de
lire tout d’abord attentivement le fichier d’aide en ligne décrivant les problèmes avec le
contexte d’exploitation ou des opérations.
Si vous ne pouvez toujours pas remédier au problème, prenez contact avec B.H.A (
décrit ci-dessos).
Sur les copies
<Pour la France>
Panasonic rappelle que le logiciel B.H.A fourni avec le présent produit Panasonic est
conçu pour vous aider à reproduire des œuvres dont vous êtes titulaires des droits d’auteur,
ou pour lesquelles vous avez obtenu une autorisation auprès du titulaire des droits d’auteur.
Dans le cas contraire, toute reproduction sera considérée comme une infraction à la
législation sur les droits d’auteur et sera sanctionnée par des amendes ou le paiement de
dédommagements.
<Pour le Canada>
Avant d’enregistrer du matériel sur un disque, s’assurer que l’enregistrement n’enfreint
pas de droits de propriété intellectuelle.
Il est illégal de copier des disques compacts audio pour un usage autre que strictement
personnel.
Lors de la réalisation d’une copie de sauvegarde d’un logiciel, s’assurer de ne pas déroger
aux droits d’auteur sur le produit.
SERVICE D’INFORMATION
Veuillez adresser toute demande d’information sur B’s Recorder et B’s CLiP à la firme
B.H.A.
URL : http://www.bhacorp.com/
Zone
États-Unis/Canada/Australie
Europe
Langues
Anglais, Français (Canada)
Anglais, Allemand, Français
Courrier électronique
BHAxpsupport@bhacorp.com
eurosupport@bhacorp.com
F
59

WinDVD
WinDVD est un logiciel d’application pour la lecture de DVD.
Cette section donne des explications et informations générales sur la procédure d’installation
et la manière d’accéder au manuel en ligne.
Reportez-vous au manuel en ligne en ce qui concerne l’utilisation détaillée du logiciel
d’application (
Lancement de WinDVD
Windows XP
Sélectionnez [démarrer] - [Tous les programmes] - [InterVideo WinDVD] - [InterVideo
WinDVD] ou sélectionnez sur le bureau.
Windows 2000
Sélectionnez [Démarrer] - [Programmes] - [InterVideo WinDVD] - [InterVideo WinDVD]
ou sélectionnez sur le bureau.
Précautions d’utilisation
Ne passez pas en mode de veille ou d’hibernation, ni ne changez l’affichage en appuyant
sur [Fn] + [F3] pendant l’utilisation de WinDVD.
Ne lancez pas WinDVD pendant que le témoin du disque dur clignote immédiatement
après le démarrage de l’ordinateur.
Si vous agrandissez en plein écran la fenêtre d’affichage vidéo, vous pouvez retourner à
F
la taille de fenêtre initiale en double-cliquant sur les images.
Pendant la lecture vidéo, n’effectuez pas les opérations suivantes.
• Ejection du disque
• Utilisation d’autres applications ou invite de commande
• Modification des paramètres des propriétés de l’écran
Pendant l’utilisation de WinDVD, le réglage du volume peut revenir au volume réglé
avec WinDVD lorsque vous faites une pause, avance rapide, recul rapide ou saut entre
des chapitres car la priorité est donnée au volume réglé par WinDVD, même si le volume
est réglé au moyen de [Fn] + [F5] / [F6] ou l’icône de la barre de tâches.
Immédiatement après reprise de la lecture depuis une pause, une perte de cadres peut se
produire suivant la configuration de l’ordinateur ou le DVD vidéo utilisé (il y a perturbation des images ou des sons).
Si vous ne pouvez pas lire correctement le contenu du disque, faites un clic droit sur
l’écran WinDVD, sélectionnez [Paramètres] - [Vidéo] et vérifiez qu’une coche est ajoutée
à [Use Hardware Decode Acceleration] et [Use Hardware Color Acceleration].
L’affichage peut scintiller, suivant le disque. Dans ce cas, retirez la coche pour [Use
Hardware Decode Acceleration].
60
page 62).

Dans certains cas, lorsque le nombre de couleurs de l’affichage est augmenté, un message
apparaît et la lecture du DVD n’est pas possible. Si cela se produit, réduisez le nombre de
couleurs de l’affichage.
En mode d’affichage bureau étendu ou simultané (interne/externe), il arrive que les images ou la vidéo ne s’affichent pas correctement.
Pendant une utilisation prolongée de l’avance rapide, le mode de pause peut s’activer. Si
cela se produit, quittez WinDVD et redémarrez-le.
A propos du réglage de zone
Un DVD vidéo comporte un code de zone qui est fixé en fonction de la zone où il est vendu.
Afin de lire un DVD vidéo, le code de zone du logiciel de lecture et du lecteur doit
correspondre à celui du DVD vidéo.
<Exemple>
Pour les Etats-Unis et le Canada : “1”
Pour l’Europe : “2”
Le code de zone de ce lecteur n’est pas réglé au moment de sa sortie d’usine. Les opérations
seront donc différentes selon le premier DVD vidéo utilisé.
Cas d’un DVD vidéo avec code de zone spécifique :
Le lecteur se règle automatiquement avec le même code de zone que le DVD vidéo.
Cas d’un autre DVD vidéo :
[Confirmer la zone] apparaît. Sélectionnez le code de zone, puis sélectionnez [OK]. La
lecture commence.
([Confirmer la zone] peut ne pas s’afficher pour certains DVD vidéo. Pour vérifier le
code de zone actuel et le nombre de paramètres restants, faites un clic droit sur l’écran
WinDVD et sélectionnez [Paramètres] - [Zone].)
F
ATTENTION
Le code de zone peut être réglé un total de cinq fois, y compris le réglage initial.
Procédez très prudemment, car après que le cinquième changement a été effectué, le
code de zone réglé en dernier est fixé et aucun autre changement ne peut être effectué.
L’utilisateur sera tenu responsable de tout problème résultant d’un changement ou
modification illégal du code de zone.
REMARQUE
[Confirmer la zone] s’affichera aussi si un DVD vidéo ayant un code de zone est
introduit dans un lecteur pour lequel un autre code de zone a déjà été réglé.
61

WinDVD
Lecture d’un DVD créé avec l’enregistreur de DVD
Supports DVD utilisables : DVD vidéo, DVD-RAM, DVD-R, DVD-RW
Les restrictions suivantes s’appliquent toutefois.
Afin de pouvoir effectuer la lecture de DVD-R et DVD-RW, ils doivent être finalisés (un
procédé qui permet de les lire sur d’autres lecteurs DVD, etc.). Pour plus d’informations
sur la méthode de finalisation utilisée par votre enregistreur de DVD, reportez-vous à son
mode d’emploi.
Les supports suivants enregistrés en format VR ne peuvent être lus que par un utilisateur
ayant des privilèges d’administrateur :
• DVD-RW
• DVD-RAM
La lecture de DVD-RAM formatés en FAT 32 n’est pas possible.
Suivant le l’enregistreur de DVD ou le fabricant du support utilisé pour la création, la
lecture d’un DVD peut être impossible.
Comment accéder au manuel en ligne
Sélectionnez “?” sur le panneau de contrôle de WinDVD.
F
SERVICE D’INFORMATION
Si WinDVD ne fonctionne pas correctement, nous recommandons de lire tout d’abord
attentivement le fichier d’aide en ligne pour des problèmes de configuration de
l’ordinateur ou d’opérations.
Si vous ne pouvez pas résoudre le problème, contactez InterVideo, Inc.
• URL : http://www.intervideo.com/
• Courrier électronique: support@intervideo.com
62

Utilisation du lecteur
Informations
Pour faire la lecture des fichiers DVD vidéo ou MPEG2, installez le logiciel de lecture
DVD (fourni). Pour plus d’informations concernant l’installation du logiciel, référezvous au mode d’emploi du logiciel. (
Si vous utilisez un disque CD-R ou CD-RW, lisez les informations inscrites sur son
boîtier.
La lecture des disques CD-RW n’est pas possible sur les lecteurs*1 qui ne prennent pas
en charge ce type de disque.
*1 Informez-vous auprès du fabricant du lecteur.
Il se peut que la lecture des CD qui contiennent des images animées (vidéo CD, CD
comprenant des données MPEG, etc.) ne se déroule pas bien.
<Lors de l’écriture sur un disque CD-R/RW>
En utilisant le CD-ROM du logiciel d’écriture CD-R/RW (fourni), installez l’application
sur votre ordinateur. Pour plus d’informations sur l’installation du logiciel d’écriture
CD-R/RW, consultez son mode d’emploi. (
Assurez-vous d’utiliser des disques conformes à la vitesse d’écriture spécifiée.
(
page 66)
Si l’écriture doit prendre une longue période de temps, assurez-vous que l’adaptateur
secteur est branché. L’affaiblissement de la batterie et la coupure de l’alimentation
risqueraient de faire échouer l’écriture.
Suivant le disque utilisé, la qualité de l’écriture peut êre plus ou moins bonne. L’utilisation
des disques suivants est recommandée.
Disques recommandés:
page 62)
page 58)
F
<CD-R>
TAIYOYUDEN Co., Ltd.
MITSUI CHEMICALS, Inc.
RICOH Co., Ltd.
MITSUBISHI CHEMICAL Co., Ltd.
HITACHI MAXELL, Ltd.
<CD-RW/CD-RW haute vitesse>
RICOH Co., Ltd.
MITSUBISHI CHEMICAL Co., Ltd.
<CD-RW ultra vitesse>
MITSUBISHI CHEMICAL Co., Ltd.
63

Dépannage
Le disque ne peut pas être
retiré. (Le couvercle du
logement à disque ne
s’ouvre pas.)
Le lecteur est uniquement
reconnu par le logiciel
d’écriture fourni.
L’ajout de données est-il
possible sur plusieurs
lecteurs CD-R/RW ou
avec plusieurs types de
logiciels d’écriture ?
La lecture des disques
DVD-R ou DVD-RW
n’est pas possible.
F
Le lecteur est-il encore en cours d’utilisation ?
Le couvercle du logement à disque ne s’ouvre pas même
si vous appuyez sur la touche d’ouverture pendant
l’écriture des données sur un disque CD-R ou CD-RW.
Attendez que l’écriture des données soit terminee.
Lors de l’utilisation de [B’s CLiP], déplacez le curseur
sur l’icône affichée sur la barre des tâches et cliquez avec
le bouton droit de la souris pour sélectionner [Eject].
Si le couvercle du logement à disque ne s’ouvre pas après la sélection
de [Eject], utilisez le loquet d’ouverture de secours (
Il n’est pas possible d’utiliser un logiciel d’écriture qui ne
prend pas en charge ce lecteur.
L’écriture des données doit se faire sur le même lecteur et avec le
même logiciel d’écriture.
Sinon, il se peut que la lecture des données avant leur ajout ne soit
pas possible, ou encore que la lecture ou l’écriture des données sur
ce lecteur ou un autre lecteur ne s’effectue plus correctement.
Le format du support ou le système d’écriture du disque DVD
utilisé est-il correct ?
Pour être utilisables sur ce lecteur les disques DVD-R doivent
être de type 4,7 Go (pour utilisation générale/création) ou
3,95 Go version 1.1. De même, les disques DVD-RW
utilisables doivent être de type 4,7 Go version 1.1.
De plus, seule la lecture des disques enregistrés avec le
système d’écriture Disc-at-Once est possible. Vérifiez le
format du support et le système d’écriture du disque utilisé.
page 6 (F)).
B’s CLiP ne fonctionne pas
correctement. (Lors de
l’installation de Media Player
7 sous Windows 2000)
Si l’écriture des données
s’effectue dans B’s Recorder
avec une interface USB 1.1,
le message “XX transmission speed error, but were
circumvented” apparaît.
64
Désinstallez le Plug-in de gravure CD Adaptec.
(
page 55).
Cela signifie que la transmission a échoué mais que l’erreur
a été corrigée et ne pose aucun problème.

Je n’arrive pas à faire la
lecture des disques DVD
vidéo.
Consultez le mode d’emploi du logiciel de lecture DVD vidéo
et vérifiez les points listés ci-dessous.
Il se peut qu’un lecteur différent soit sélectionné si vous
avez raccordé plus d’un lecteur.
La lecture n’est pas possible si les codes de zone du disque DVD
vidéo, du lecteur et du logiciel de lecture ne sont pas identiques.
Assurez-vous que les codes de zone sont identiques.
Suivant le système d’enregistrement DVD utilisé, il se peut
que la lecture de certains disques ne démarre pas
automatiquement.
Dans ce cas procédez comme suit.
D’abord, lancez WinDVD, puis insérez le disque dans le
lecteur.
Sélectionnez Fichier dans le menu de lecture de WinDVD
et lancez la lecture du disque.
Des DVD-RAM et DVD-RW en format VR ne peuvent être lus
que par un utilisateur ayant des privilèges d’administrateur :
Afin de pouvoir effectuer la lecture de DVD-R et DVDRW, ils doivent être finalisés (un procédé qui permet de les
lire sur d’autres lecteurs DVD, etc.).
La lecture du son et de
l’image du DVD vidéo ne
s’effectue pas bien.
Pour que la lecture des disques DVD vidéo s’effectue
correctement, une certaine configuration système est
nécessaire. Consultez le mode d’emploi du logiciel de lecture DVD vidéo et vérifiez les points listés ci-dessous.
Si l’interface utilisée est USB 1.1, il peut y avoir des
coupures de son et/ou d’image.
Si vous avez lancé un autre programme, quittez-le. Lorsque
plusieurs programmes sont lancés, l’unité centrale peut
être incapable d’exécuter toutes les opérations.
Modifiez les paramètres de la zone d’affichage et des
couleurs.
La réduction de la zone d’affichage et/ou la diminution
du nombre de couleurs permettent une utilisation plus
efficace de l’unité centrale.
Vérifiez le réglage de la vitesse de l’unité centrale. Il se
peut que l’ordinateur soit réglé en mode d’économie
d’énergie, et la capacité de l’unite centrale est alors basse.
Le son est-il réglé sur l’option de coupure du son ?
F
65

Fiche technique
Consommation d’énergie
Interfaces prises en charge
Débit en bauds
(pour USB 2.0)
Temps d’accès
(mesuré avec votre
logiciel)
Formats pris en charge
(pour la lecture des
données)
Supports pris en charge
(pour l’écriture des
données)
F
Systèmes d’enregistrement
Environ 5 W
USB 2.0 et USB 1.1
2 MoMémoire tampon
■ Ecriture
• CD-R : 4x, 8x
■ Réécriture
• CD-RW : 4x, 8x
■ Lecture
• CD-ROM/CD-R/CD-RW/CD-DA: Max 20 x
• DVD-ROM: Max 6 x
• DVD-R/DVD-RW/DVD-Video: Max 4 x
• DVD-RAM(4.7 Go*3): 2 x
• DVD-RAM(2.6 Go*3): 1 x
DVD-ROM: 200 ms
CD-ROM: 240 ms
CD-DA, CD TEXT, CD Extra, CD-ROM, Photo CD
prise en charge), Video CD, DVD-ROM, DVD-Video, DVD-RAM
(2.6 Go, 4.7 Go)*3, DVD-R (3.95 Go, 4.7 Go)*3, DVD-RW
CD-R (63 minutes, 74 minutes, 80 minutes)
CD-RW, CD-RW haute vitesse, CD-RW ultra vitesse (74 minutes, 80 minutes)
Track-at-Once, Disc-at-Once, écriture par paquets, multisession
*1
*2
*4
(multisession
Câble d’interface
Dimensions
(largeur × profondeur × hauteur)
Poids
Plage de température/
humidité de fonctionnement
Plage de température/
humidité de rangement
Systèmes d’exploitation
compatibles
66
Longueur du câble : environ 0,5 m {20 po} (incluant les connecteurs)
Poids: environ 22 g {0.049lb}
130 mm × 157 mm × 18,5 mm {5,1 po × 6,2 po × 0,7 po}
Environ 305 g {0,67 lb}
5º C à 35º C {41º F à 95º F} /20% HR à 80% HR
(sans condensation)
-20º C à 55º C {-4º F à 131º F} /15% HR à 85% HR
(sans condensation)
Système d’exploitation Microsoft® Windows® XP Professionnel.
Système d’exploitation Microsoft® Windows® 2000 Professionnel.

Mémoire
64 Mo ou plus (128 Mo ou plus recommandé)
(128 Mo ou plus est recommandé dans le cas du système
d’exploitation Windows XP.)
Espace disponible sur
Au moins 100 Mo (800 Mo ou plus recommandé)
le disque dur
*1
Consommation nominale.
*2
Le débit en bauds peut être plus bas suivant la puissance de l’ordinateur.
*3
1 Go = 1.000.000.000 d’octets. Votre système d’exploitation ou certains logiciels
d’application indiqueront moins de Go.
*4
Un logiciel de lecture commercial est nécessaire lors de l’utilisation d’un CD photo.
F
67

© Matsushita Electric Industrial Co., Ltd. 2004
Printed in Japan
SS0204-0
DFQX5447ZA
 Loading...