

Page 1
Personal Computer
OPERATING INSTRUCTIONS
CF-M32 Series
Contents
Getting Started
Read Me First
Names of Parts
^ First-time Operation
Operation
Starting Up/Shutkr^ Down_ 15
Creating Backup OisKs.......
Compubr>g On The Road
Usmg the Battery Pack
Security Measures
Infrared Data Communications.40
Add-ons/Peripherals
.........................
........................
..........
........
....
____
................
.............
4
8
11
21
24
30
36
42
Troubleshooting
List of Error Codes
Dealir>g With Problems
Remstal«>g Software...»
Appendix
UUTTEO USE LICENSE AGREEMENT . . ee
WMows 95 Setup Procedure_70
Creeang a H*errwbon Data Arae 71
Setup Uteiy
Key Combinations
LED Indicators ..................... 82
Specif)catior)s
Index.......................................84
.......................... 73
...............
.......
......
................
......................
52
53
56
80
83
Page 2

Customer's Record
Model
No.*—
Serial
No. _
or
Code
No. —
Date
of
Purchase
CF-M32W5M Dea\er's
-----------------------------------
Nanne
Dealer's
Address
-------
Introduction
Thank you for purchasing the Panasonic computer. Please read the Operating Instructions
thoroughly for proper operation of your new computer.
Illustrations in this Manual
NOTE
CAUTION
WARNING
[Start]-[Shut Down]
(Enter)
(Ed)+(ED
NOTE provides a useful fact or helpful information.
CAUTION indicates a condition that may result in minor or
moderate injury.
WARNING indicates a hazard that may result in moderate or
serious injury, or even death.
This illustration means to click [Start], then to click [Shut Down]
(For some applications, you may need to double-click.)
This illustration means to press the [Enter] key.
This illustration means to press [Fn], and while holding down
on [Fn], to press [F2].
Copyright
This manual is copyrighted by Matsushita Electric Industrial Co., Ltd. with all rights re
served. No part of this manual may be reproduced in any form without the prior written
permission of Matsushita Electric Industrial Co., Ltd.
No patent liability is assumed with respect to the use of the information contained herein.
©Matsushita Electric Industrial Co., Ltd. 1998. All Rights Reserved.
Disclaimer
Computer specifications and manuals are subject to change without notice. Matsushita
Electric Industrial Co., Ltd. assumes no liability for damage incurred directly or indirectly
from errors, omissions or discrepancies between the computer and the manuals.
Trademarks
Microsoft®, MS-DOS® and Windows® are registered trademarks of Microsoft
Corporation of the United States and/or other countries.
PS/2TM jg a trademark of International Business Machines Corporation.
Pentium® is a registered trademark, and MMX"^^ is a trademark of Intel Corporation.
Panasonic® is a registered trademark of Matsushita Electric Industrial Co., Ltd.
Page 3

Federal Communications Commission Radio Frequency Inter
ference Statement
Note: This equipment has been tested and found to comply with the limits for a Class B
digital device, pursuant to Part 15 of the FCC Rules. These limits are designed to provide
reasonable protection against harmful interference in a residential installation. This equip
ment generates, uses and can radiate radio frequency energy and, if not installed and used
in accordance with the instructions may cause harmful interference to radio communica
tions. However, there is no guarantee that interference will not occur in a particular instal
lation. If this equipment does cause harmful interference to radio or television reception,
which can be determined by turning the equipment off and on, the user is encouraged to
try to correct the interference by one or more of the following measures:
• Reorient or relocate the receiving antenna.
• Increase the separation between the equipment and receiver.
• Connect the equipment into an outlet on a circuit different from that to which the re
ceiver is connected.
• Consult the Panasonic Service Center or an experienced radio/TV technician for help.
Warning
To assure continued compliance, use only shielded interface cables when connecting to a
computer or peripheral. Also, any changes or modifications not expressly approved by
the party responsible for compliance could void the user's authority to operate this equip
ment.
I
This device complies with Part 15 of the FCC Rules. Operation is subject to the following
two conditions:
(1) This device may not cause harmful interference, and
(2) This device must accept any interference received, including interference that may
cause undesired operation.
Responsible Party: Matsushita Electric Corporation of America
One Panasonic Way
Secaucus, NJ 07094
Tel No:l-800-LAPTOP-5 (1-800-527-8675)
Lithium Battery!
This computer contains a lithium battery to enable the date, time, and other data to be
stored in it.
The battery should only be exchanged by service personnel.
Warning! Risk of explosion from incorrect installation or misapplication!
Page 4

Read Me First
Precautions
Usage
Avoid Extreme Heat and Cold
Do not store or use the computer in locations exposed to heat, direct
sunlight, or extreme cold.
Avoid moving the computer between locations with large temperature
differences.
Operation: 5 “C to 35 °C (41 ”F to 95 "F)
I
Storage: -20 °C to 60 °C (-4 “F to 140 ®F)
Avoid Direct Sunlight on the LCD Panel
The display should not be exposed to direct sunlight or ultraviolet
light.
Avoid Humidity, Liquids and Dust
Do not store or use the computer in locations exposed to high humid
ity, liquids (including rain) or dust.
Prevent Shock
Avoid subjecting the computer to severe vibrations or impact. Do not
place the computer inside a car trunk.
Handling
Avoid Radio Frequency Interference
Do not place the computer near a television or radio receiver.
Avoid Magnetic Fields
Keep the computer away from magnets.
Avoid Stacking
Do not place heavy objects on top of the computer.
Keep Small Objects Away
Do not insert paper clips or other small objects into the computer.
Page 5

Do Not Disassemble the Computer
Do not attempt to disassemble your computer.
Avoid Excessive Force to the LCD Panel
Do not apply excessive downward force on the LCD Panel.
i Peripherals
Incorrectly using peripheral devices may lead to a decrease in performance, an
increase in temperature and/or damage your computer. For more information on
peripheral devices, please refer to "Add-ons / Peripherals" (cépage 42)
i Cables
Use of an interface cable longer than 3 m (9.84 feet) is not recommended.
Transporting
It is a good idea to make backup copies on floppy disks and carry them with you.
The external FDD (floppy disk drive; CF-VFDUOl) and Port Replicator (CF-
VEBM31) are required to use floppy disks.
Do not carry your computer when it is ON.
Remove ail cables before transporting your computer.
We recommend preparing a fully charged battery.
When transporting spare batteries inside a package, briefcase, etc., it is recom
mended that the batteries be stored in a plastic bag.
Do not carry the computer while the display is open, or carry it by gripping the
display.
Do not put anything (e.g., a piece of paper) between the display and keyboard.
Do not drop or hit your computer against solid objects.
I
When flying
Always carry your computer with you. Never cheek it with luggage. For use of the
computer inside an aircraft, we recommend asking the airlines regarding their policy
on this issue.
Page 6

Read ¡Vie First
^Maintenance
Display area
Use a soft dry cloth like gauze to lightly wipe the display.
All other areas
Wipe these areas with a soft cloth, after applying water or detergent diluted with
water to the soft cloth and firmly wringing it.
(miifuiiEra}
I
# Do not use benzene or thinner, or disinfectant-type alcohol.
• Do not directly use water, liquid detergents or spray-type cleaners. If liquid
enters the computer, this may cause the computer to malfunction or become
defective.
Saving Data on the Hard Disk
Do not expose your computer to shock.
Please use care when handling your computer, shock may damage your hard disk or
make your software applications and data unusable.
Do not power down your computer while software applications are running
or HDD indicator is on.
Properly shut Windows* down to avoid problems ([Start]-[Shut Down]).
Save all valuable data to floppy disks.
Backing up data to floppy disks will limit damage should trouble occur to your
computer or should you inadvertently change or erase data.
The external FDD (CF-VfDUOl) and Port Replicator (CF-VEBM31) are required
to use floppy disks.
Use the security function for all important data.
page 36 - Security Measures
* This computer uses Microsoft® Windows® 95 Operating System.
Page 7
Saving Data on Floppy Disks
The external FDD (CF-VFDUOl) and Port Replicator (CF-VEBM31) are required to use
floppy disks.
• Do not power down your computer or press the floppy disk drive eject button
while the FDD indicator is on.
Doing .so may damage the data on the floppy disk and render the disk useless.
# Use care when handling floppy disks.
To protect the data on your floppy disks or to prevent a floppy disk from becoming
stuck in your computer, avoid the following:
• Sliding the shutter on the floppy disk manually.
• Exposing the disk to a magnetic field.
• Storing the disk in locations prone to high temperatures, low pitched noise, dampness,
or dust.
• Applying more than one label on the disk.
9 Confirm the contents of a floppy disk before formatting it.
Confirm that no important data is on the disk,
because all data on the disk will be erased.
Use the write-protect tab.
This is a must for preserving important data.
This prevents your data from being erased
or overwritten.
Write Enable Write Disable
Write-protect Tab
'i
Computer Viruses
Users are advised to purchase the latest versions of virus protection software
and use them regularly.
We recommend you run the software:
• When booting your computer.
• After receiving data.
We recommend that you check data received on floppy disks or from external
sources, such as data downloaded from the Internet, e-mail, etc. (For compressed
files, please uncompress them before running a check).
I
Page 8
Names of Parts
Top Side
Panel SwitchV
When the LCD panel is closed, this
button is depressed; causing the screen
to automatically shut down or be
suspended(C3^Cautionbeiow). When
the LCD panel is opened, the screen
is turned on or resumes.
I
I Trackball
A built-in pointing device
that works like a mouse. As
you spin the ball with your
fingertip, the cursor moves in
accordance with the speed
and direction of the ball’s mo
tion.
Open Latch
Open the Display
8
LCP(Display)
Brightness Adjustment
Click B^utto^n^l
When pressed while the trackball is
in use, the buttons select items or per
form other operations (o page 17).
(myijaa«!))
To suspend the screen, I Panel Switch] must be set to {Suspend] (page 26) in
(Panasonic Power Management], Do not reopen the LCD panel until the power
indicator is blinking green. If the LCD pane] is reopened before this happens, it may
remain suspended and resuming may not be possible. In such cases, close the LCD
panel again and wait a few seconds before reopening it.
Page 9
Front / Right Side
—I
Speaker
Volume Control: O + |[^ or
Speaker on/off: [FnJ +
0
I
Power Switch
POWER ►
(Q=page 15)
^-1-
Microphone Jack
Connect a monaural dy
namic microphone which
has a mini-jack.
(©ayMM)}
Using an input source other than a
monaural dynamic microphone may
not allow audio to be input or may dam
age the equipment.
PC Card Slots
Set the PC Cards that conform to the PC
Card standard. (Qppage 46)
Headphone Jack
Use this connector to connect headphones or
amplifier-equipped speakers. Audio output
from the internal speaker is disabled when
headphones or outside speakers connected.
Left Side
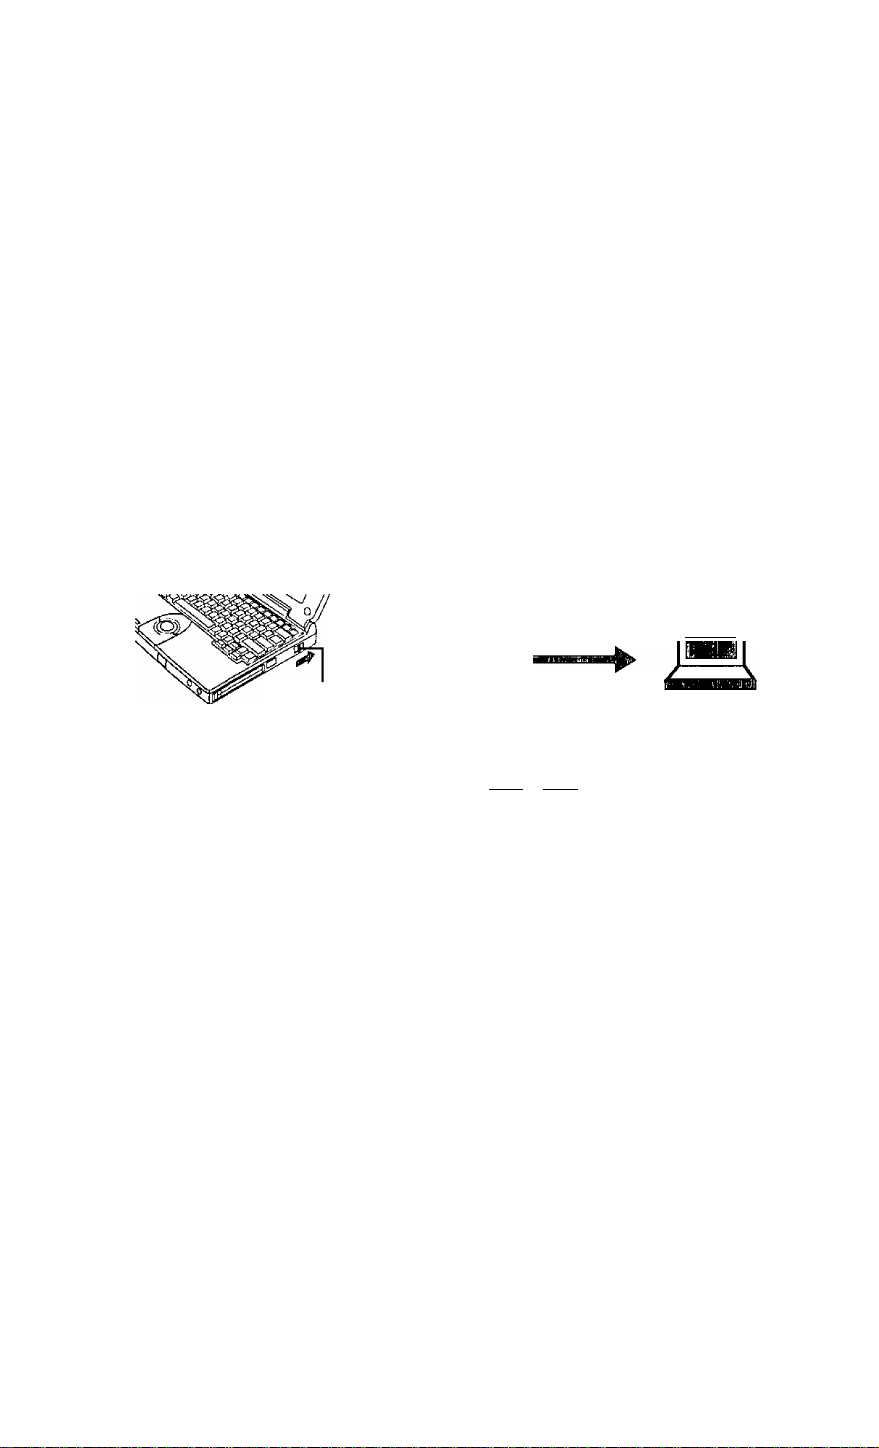
The USB port allows the mouse, modem, printer, and other
peripheral devices to be connected while the power is on.
To use the USB port, you may need to install a driver for
your USB devices and [USB Port] must be set to [En
abled], (O’page 78, 79)
Infrared Communication
Port
(Q=page 40)
n
% t
Page 10
Names of Parts
Rear / Bottom Side
Battery Pack Release Lever | ^
Slide this lever when removing the battery pack.
— Remove this screw when installing
or removing a RAM module.
Reset Button
When restarting your computer, use
a dull pointed object like a ball point
pen.
Do not use a pencil. Pencil lead can
break off inside the computer and
damage the computer’s circuit.
{©scMisca}
10
Battery Pack Connector
Install the battery pack. (c?page 30)
r,
Do not install a battery pack other than
the battery pack (CF-VZSU05) or the
optional Extended life Battery Pack (CFVZSU06).
If a problem occurs but your
computer does not lock, we rec
ommend not pressing the reset
button, it will cause you to lose
data if an application is open.
Page 11
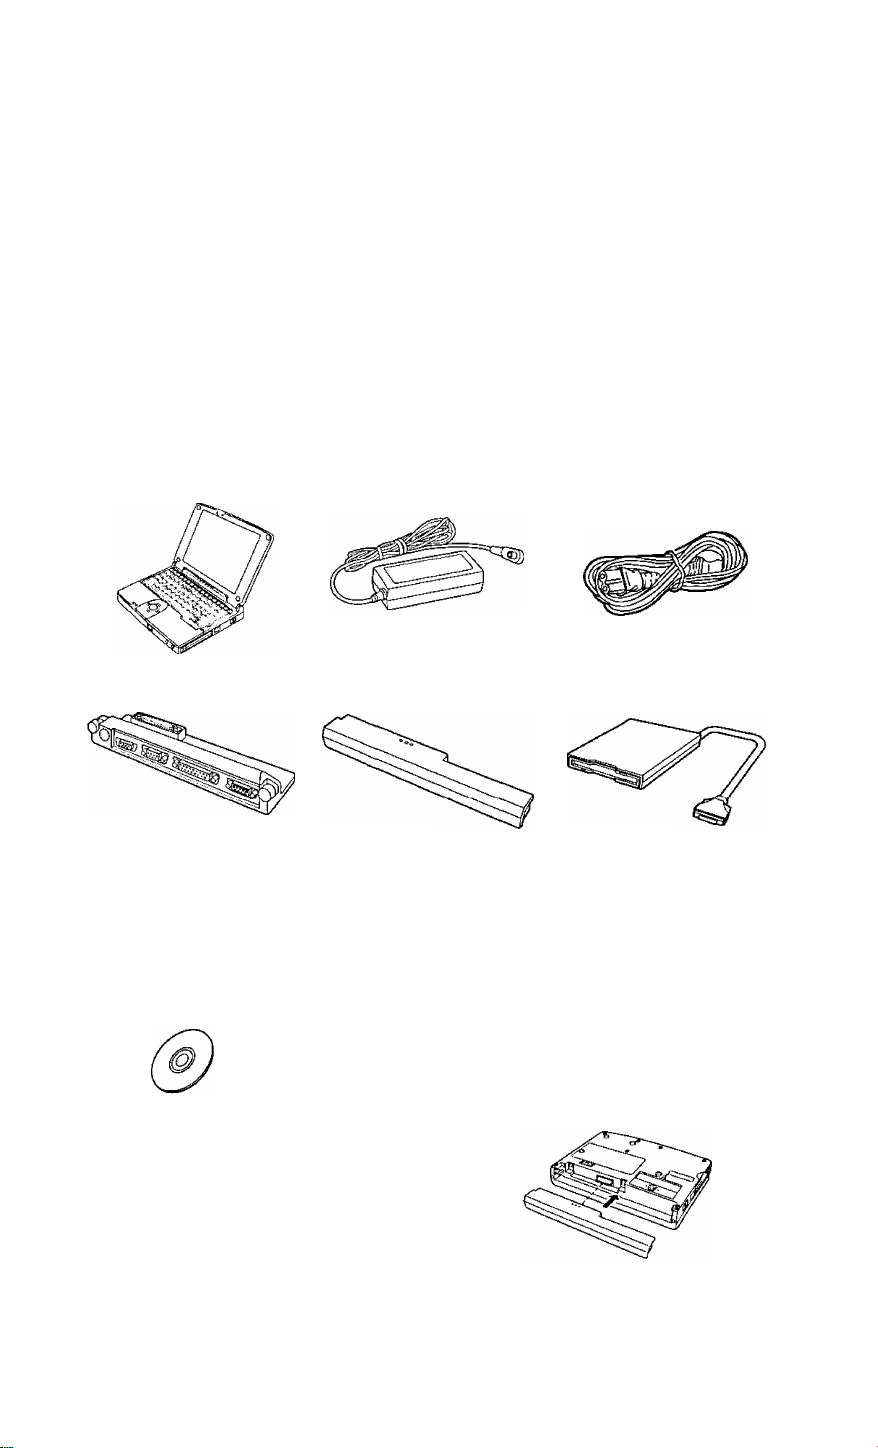
Please read the steps below to help you learn what items are included, and to gain an
understanding of some basic computer-related operations.
t Confirm the inclusion of all parts
Make sure the parts shown in the figure have been supplied. If any of these items
are missing or is not working properly, please contact Panasonic Technical Sup
port.
Connputer
AC Adapter AC Cord
CF-AA1527
.........................
1
I
Port Replicator.
CF-VEBM31 CF-VZSU05 CF-VFDU01
Operating Instructions.. 1
FIRSTAID CD
Battery Pack. External FDD
Windows 95 System Pack
(Microsoft Corporation)
..............................................
(g) []
Windows 95 CD-ROM Registration Floppy disk label
book card
2 Turn your computer over,
install the battery pack
{O’page 32)
1
□
11
Page 12
First-time Operation
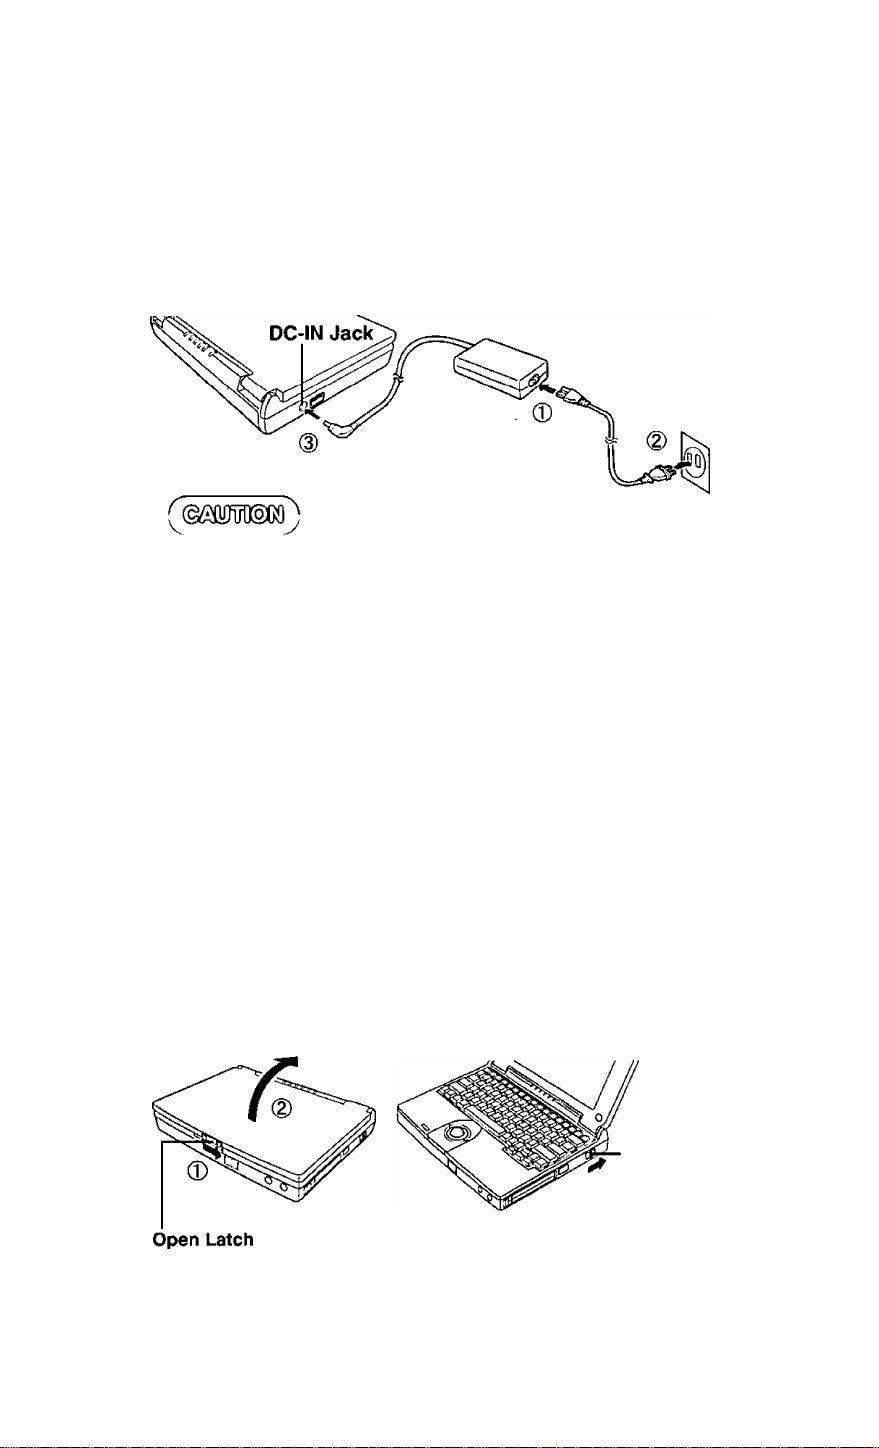
3 Connect your computer to a power outlet
I
Handling the AC adapter
• Do not twist or pull the AC power cord forcefully. Doing so may dam
age the connections.
• Use only the specified AC adapter with your computer. Using an AC
adapter other than the one supplied or car adapter might damage the
battery and/or the computer.
• When the DC plug is not connected to the computer, disconnect the AC
cord from your AC wall outlet.
(If the cord is kept connected, a very low level of power equivalent to approx. 0.6 W will
be consumed.)
• Problems such as sudden voltage drops or surges may arise during pe
riods of thunder and lightning. Since this could adversely affect your
computer, an uninterruptible power source (UPS) is highly recom
mended unless a battery pack is installed.
12
4 Read the LIMITED USE LICENSE AGREEMENT (cs-page 69)
To open the display, slide the latch located at the front and lift open the display.
Before removing the seal covering the power switch, please read the LIMITED
USE LICENSE AGREEMENT. Removal of this seal indicates agreement to the
temris specified. After you have agreed to the terms, you may turn your computer
on.
Slide the power switch
toward the rear of the
computer and hold it
for approximately one
second until the power
indicator (^) turns on
before releasing it.
(0=next page "CAU
TION")
Page 13

(©fiffiMsM)
H if the power switch is held for more than four seconds at the ON position,
the power goes OFF. Do not slide the power switch and hold it for more than
four seconds.
0 After confirming that the power indicator has turned on, do not touch the
power switch until Windows setup has started.
Q Once the computer is powered off, you must wait at least five seconds be
fore powering it on again.
I
note}-
The computer will not power on when the LCD panel is closed.
5 Setup Windows
The [Windows 95 Setup Wizard] will run after the computer is turned on. Simply
follow the on-screen instructions.
When the setup procedure is completed, the Windows screen appears.
Xnote)-
Please read the supplemental “Windows 95 Setup Procedure” for a more
detailed explanation (Q^page 70).
Moving the cursor or selecting items can be done through the trackball
and click buttons. (CFpage 17).
If the display is dim or the sound quality is not right, you can adjust the
brightness and volume, (cépage 8, 9, 80).
The power saving function is factory set to remove power from the display
if the computer is not operated or no access is made to a device for two
minutes (Battery) or thirty minutes (AC). The display will resume normal
operation if the trackball is moved or if a key on the keyboard is depressed.
I
13
Page 14

FSrsMim© ©peraiiooDi
Internet Explorer
Internet Explorer 4.01 places a tremendous load on the system in order to execute the
wide variety of functions that it provides. As a result, some unexpected faults may
occur.
If any of these faults occurs, try using the software with some Internet Explorer 4.01
functions turned off. (See Internet Explorer Help for more details.)
O It takes a long time to reboot or the computer locks up.
Delete the check mark for [Internet Explorer Channel Bar] in [Control Panel] -
[Display] - [Web], then press [OKj.
O A system module error occurs.
Set 10 (None)] for [Wallpaper] in [Control Panel] - [Display] - [Background].
© Performing the above steps does not solve tbe problem.
Uninstall Internet Explorer 4.01 with the following step.
Select [Microsoft Internet Explorer 4.0] in [Start] - [Settings] - [Control Panel] [Add/Remove Programs] - [Install/Uninstall] and press [Add/Remove], Follow the
on-screen instructions.
O If a window with tbe message [Version Conflict] appears during the installa
tion process (network card and application installation), select [Yes].
Proper operation may not be possible if [No] is selected.
14
Page 15
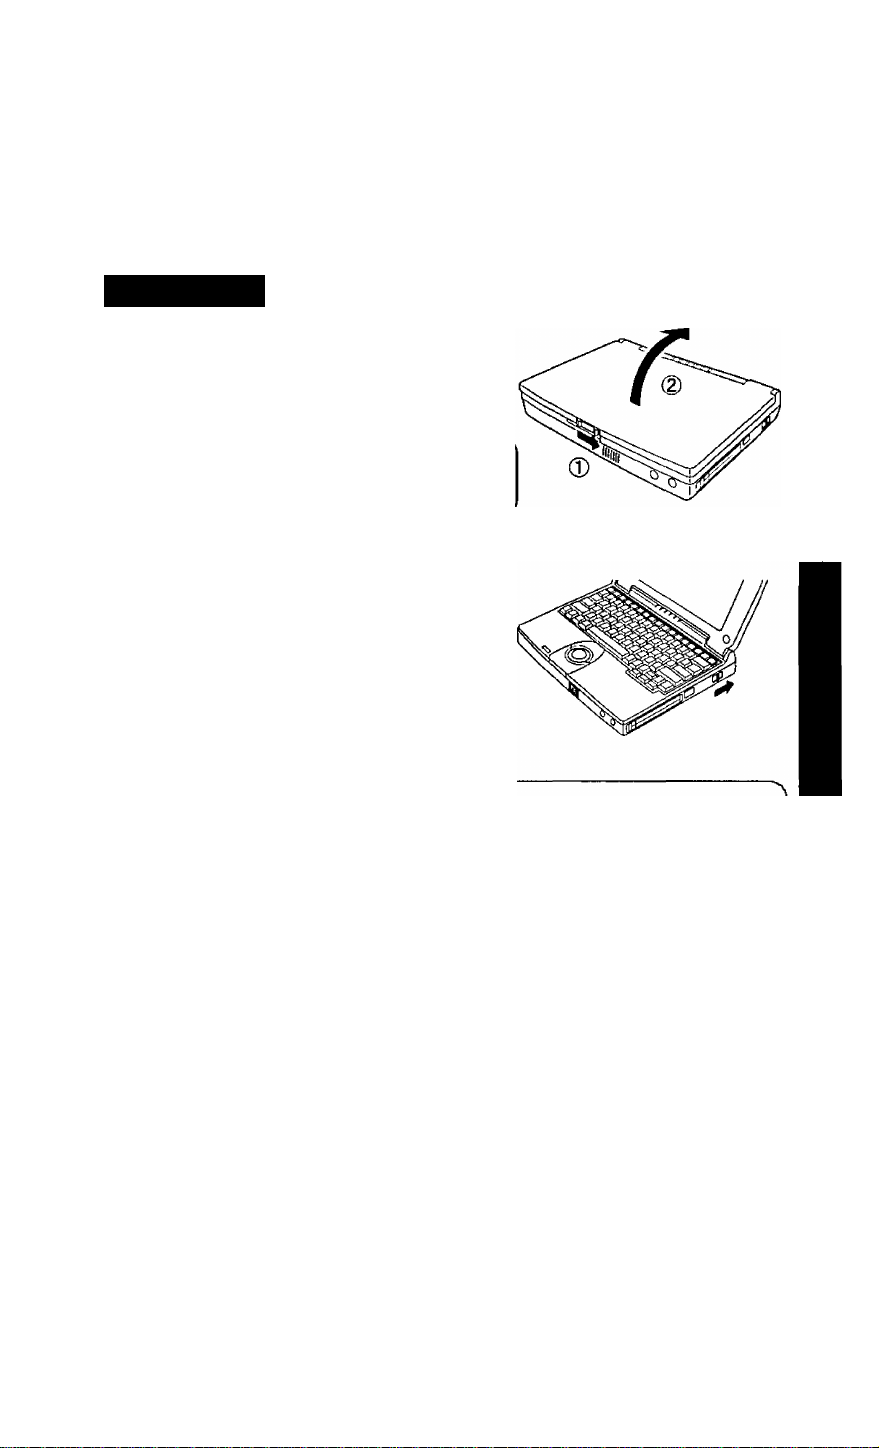
starting Up/Shutting Down
Starting Up
7 open the display
Slide the latch as shown and lift open the dis
play.
Xii2IE>
The computer will not power on when the
LCD Panel is closed.
2 Turn your computer on
Slide the power switch toward the rear of the
computer and hold it for approximately one
second until the power indicator (^) turns
on before releasing it.
If the power switch is held for more than four seconds at the ON position,
the power goes OFF. Do not slide the power switch and hold it for more
than four seconds.
After confirming that the power indicator has turned on, do not touch the
power switch until Windows has completely started up. Also do not per
form any keyboard or trackball operations.
Once the computer is powered off, you must wait at least five seconds
before powering it on again.
When the CPU temperature rises, the computer does not power on to pre
vent the CPU from overheating. Should this happen, allow the computer to
cool down then switch the power on again.
If the computer still does not turn on, please contact Panasonic Technical
Support.
15
Page 16

If H is displayed,
you must first enter your User Password (cépage 36).
Upon entering your
User Password and
pressing [Enter],
If the correct password is input,
1
Over three incorrect attempts,
* If you are starting from the suspend mode (q> page 18), if
after three attempts the correct password is not input, or if no
password is entered for about a minute, the computer returns
to the suspend mode.
Xnote>
If the display on the right appears«
The network password has been
set. To read and write data to
other computers, the correct
password must be entered.
When an application or file that was previously displayed appears on your screen,
this means the suspend or hibernation mode (C3*page 18) has been set.
3 Select your application
You are able to start working on your computer.
[note)---------------------------------
Eri^Ci 9COI p«t*MOfd 1« KoomK HnvekriQ
------------------------------------
^ Will Not Starts
(Power off),
jm
>
16
The power saving function is factory .set to remove power from the display if
the computer is not operated or no access is made to a device for two minutes
(Battery) or thirty minutes (AC). The display will resume normal operation if
the trackball is moved or if a key on the keyboard is depressed.
Page 17
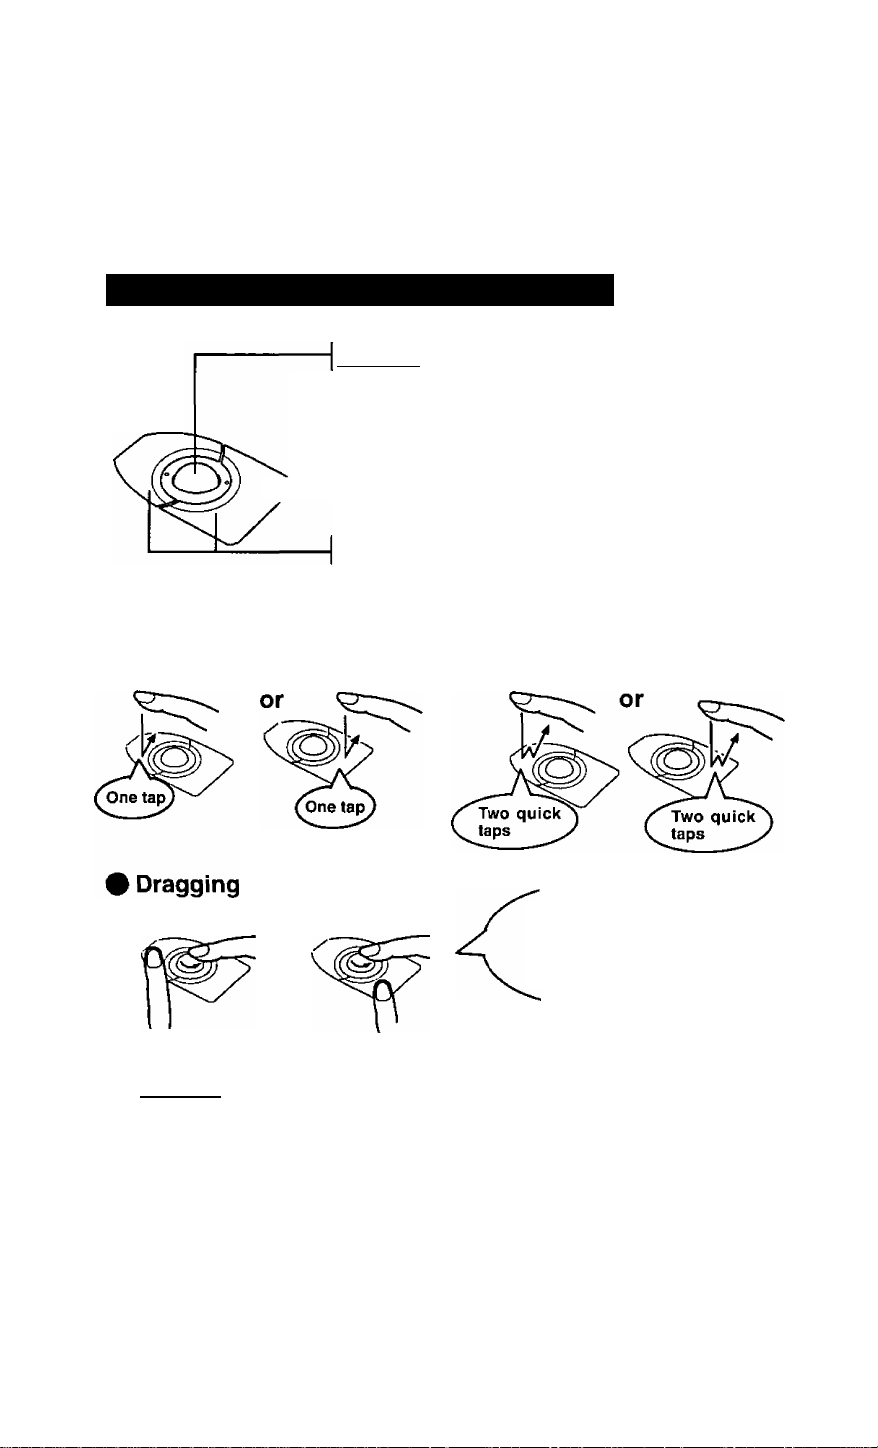
Using the Trackball and Click Buttons
Trackball
A built-in pointing device that works like a mouse. As
Rear Button
Front Button
you spin the ball with your fingertip, the cursor moves in
accordance with the speed and direction of the ball's mo
tion.
Click Buttons
When pressed while the trackball is in use, the buttons select
items or perform other operations.
Clicking
or
Double-clicking
While holding
down the button,
spinning the
trackball with
your fingertips
NOTE>
The actions of the two buttons vary according to the software application being
used. Normally the rear button is used to perform actions.
To change the settings for the front and rear buttons of the trackball, and the left
and right buttons of the mouse, select [Start] - [Settings] - [Control Panel] -
[Mouse],
17
Page 18

mwn
ShiJttjn^IPp^ (p b we rj; of f iy b u rj cp iTi P ute f)
This procedure is shutting down without using the suspend or hibernation function.
1 To shut down, save all data and select [Shut Down] from
the [Start] menu
note)-
From the keyboard,
You may choose to press down on
i^l then select [Shut Down].
I WbaT tio you war* the ccmpcief to <kP
C Pe^ri ift^S DOS
GK
^Confirm shutdown
Select [Shut down], then click [OK].
Your computer will power off automatically.
# Restarting your computer (without shutting down)
Select [Restart], then click [OK].
^NOTE>
To quickly resume computer operation after shutting down,
The suspend or hibernation functions is available. (Q= below)
(mMMi!))
• Do not power off your computer while the HDD indicator is on.
It may damage data on the hard disk.
• If the computer will not be used for a long period of time, power off and
disconnect the AC adapter.
(If the cord is kept connected, a very low level of power equivalent to approx. 0,6 W will be
consumed.)
Cancel
id«t
18
Starting Up Your Computer Quickly
If you want to immediately start up and continue an application after shutting down
your computer, you can do so by using the suspend or hibernation function.
# Differences between suspend and hibernation function
Function Suspend function Hibernation function
Where data is saved to
Speed Fast
Requires power supplyYes (if power is cut,
Memory
all data is lost)
Hard disk
Somewhat slow
Power not required to
maintain data
Page 19
Shutting Down
O Using the suspend or hibernation function
It is necessary to set the suspend or hibernation function using the Panasonic Power
Management Setting.
^ Click [Start] - [Settings] - [Control Panel]
2 Double-click [Panasonic Power Management] 3 Click [Operation Setting], then set [Suspend] or [Hiber
nation] for [Power Switch]
4 Click [OK]
Power Switch
Xnote>
O If the internal speaker is off by pressing [FnJ + [F8J, the "beep" sound will
not be heard.
® You can also run [Power Management] from the Setup Utility (G’page 76).
• Save all data before powering off your computer.
• If the power switch is held for more than four seconds at the ON position,
the "beep" sound will come out again and the power will go OFF without
activation of the suspend or hibernation function. Do not slide the power
switch and hold it for more than four seconds.
• When restarting from or shutting down to the suspend or hibernation mode,
do not touch the trackball (or move the mouse (serial or PS/2 type) if one is
connected). There are cases where these devices will fail to operate; you
will have to restart your computer using the keyboard 18 "NOTE").
• Do not use the suspend or hibernation function during the following peri
ods (you may corrupt your data or file):
• While the FDD, HDD or CD-ROM is being u.sed.
• While playing/recording audio files.
• While communications software is being u.sed.
• While PC Cards (a SCSI card or ATA card etc.) are being used.
Do not touch the power switch
while your computer is entering
the suspend or hibernation mode.
At the "beep" sound, release your finger.
Suspend Mode or
Hibernation Mode
I' IMIMIUI i
* •
19
Page 20

starting Up/Shutting Down
(muMiigca}
# Do not use the suspend or hibernation function when using an OS other than
Windows 95, the Setup Utility, or when experiencing static electricity or noise.
® If you hold down on the fÄi^ ¿Ctrl] or (shiftl to enter the suspend or hibernation
mode, after resuming operation, you must press the same key. For example,
if you hold down on the [Shiiil key while sliding the power switch, upon
resuming, if you do not press the [Shift) key again, only capital letters will
result from typing.
0 If your computer locks up, press the reset button. All data not saved is lost
when this button is pressed.
# In the suspend mode, power is consumed. If PC Cards (e.g., a modem card)
are inserted, more power is consumed. When all power has been consumed,
all data at shut down is lost since it is retained in memory. We therefore
recoinmend plugging in the AC adapter when using the suspend function.
0 Set [USB Port] of [Supervisor Setup] to [Disabled] in the Setup Utility when
using the suspend or hibernation function.
0
A fixed memory data writing area is needed on the hard disk to use the
hibernation function. This area is already created on the hard disk at the
time of purchase. It will be necessary to create the area again if you change
the hard disk partitions (C?page 71).
Resuming Operation
If is displayed upon sliding the power switch,
your password has been set (C3>page 16).
( ©5MJD®0il>
If the power switch is held for more than four seconds at the ON position,
the power goes OFF. Do not slide the power switch and hold it for more
than four seconds.
Do not perform any keyboard operations or move the mouse until Win
dows has completely started up.
When operation resumes, serial devices such as a mouse or modem, or
your PC Cards may not work. In such cases, you will need to restart your
computer or reinitialize the individual devices.
Power Switch
Page 21

Creating Backup Disks
Create the backup disks (total of 2 disks), listed below, in case you need to reinstall the
software (e.g., if the hard disk contents are erased).
1. Windows 95 CD-ROM Setup Boot Disk (1 disk)
2. FIRSTAID FD(1 disk)
Backup disks may be created repeatedly, however, they cannot be recreated
after reinstallation.
V
_________________________________________________________________
/
-—The following items are necessary:
• Port Replicator
• External floppy disk drive
• Two 2HD floppy disks (Not included)
® Floppy disk label "Microsoft Windows 95 CD-ROM Setup Boot Disk"
• One floppy disk label (Not included)
----------------------
1 Power off your computer (cépage 18) and disconnect the
AC adapter
Do not shut down using the suspend or hibernation mode.
2 Turn over the computer 3 If an Extended life Battery Pack (CF-vzsuo6) is connected
to your computer, remove it (cépage 32)
If you are using the included battery pack, it does not need to be removed.
21
Page 22
Creating Backup Disks
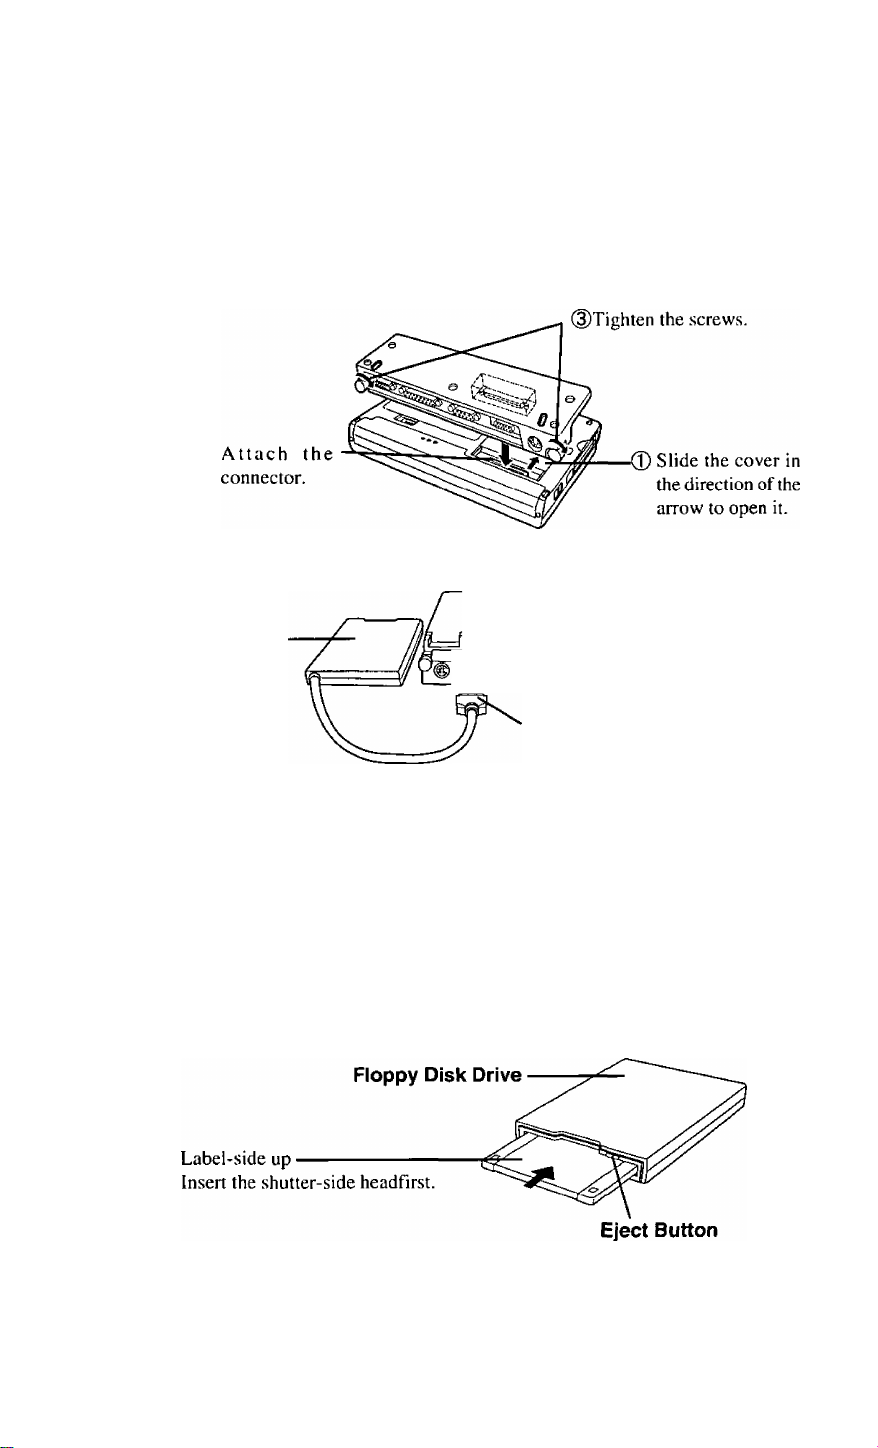
4 Attach the Port Replicator (cépage 42)
5 Attach the external floppy disk drive (o^-page 45)
Floppy Disk
Drive
Push in the connector until both
sides lock, making sure that the con
nector position and orientation are
correct.
22
6 Connect the AC adapter, then open the display panel and
turn on the power
The Windows screen will be displayed.
7 Click [Start], then move the cursor to [Programs]-
[Panasonic],then click [Create FIRSTAID FD]
Follow the instructions on the display. After this, place a label on each disk for
identification purposes.
Page 23

Make a copy of the CD-ROM driver
Copy the necessary drivers, from the floppy disk included with your CD-ROM
drive, to the Windows 95 CD-ROM Setup Boot Disk. It will be necessary to
edit the CONHG.SYS file and AUTOEXEC.BAT file on the Windows 95 CDROM Setup Boot Disk. When editing the AUTOEXEC.BAT file, be careful
not to delete lines containing settings for CAB files to be copied to the C drive
on the hard disk.
Some CD-ROM drives require card managers (card and socket service). See
the manual included with your CD-ROM drive for further details.
(©afiiiuw}
It may take several minutes to reboot the computer.
Please store the floppy disks in a safe place. They will enable you to return
your computer to close to the condition at the time of purchase should any
problems occur.
Do not remove the floppy disk while the FDD indicator is on, power down
your computer or use the suspend or hibernation function.
When creating floppy disks, do not run any other application program.
When creating floppy disks and the message [Insufficient files to copy] is
displayed, click [OK] and then contact Panasonic Technical Support.
23
Page 24

Computing On The Road
One of the main features of notebook-type computers is that you have the power of com
puting away from your home or office. In the following, information is provided on how
to maximize use of the battery pack which is necessary for such computing.
Four Important Points
< POINT 7> Be sure to charge your battery before and after use.
, POINT 2 To get the maximum use of your battery, set the power
management mode.
. POINT 3 Check to see that you have your AC adapter with you
before leaving your home or office.
Purchasing an extra battery (CF-VZSU05W/06W) is highly rec
ommended.
POINT 4 Always watch your battery level!
Conserving Power
Things to Remember
24
( Leave your computer off when it is not in use (cépage 18) P Adjust the brightness (dark) with(^+(F2| (cépage so)
> Before stepping away from your computer, press ^n\+
[FIO] to put your computer in the standby mode(a=page 81)
The standby mode helps you conserve power by cutting off power to the harddi
drive’s motor and display. To resume, you may press any key other than [Fn)
move the trackball.
isk
In the power management mode, the setting of [Power
Saving] is recommended (cépage 26)
or
Page 25

Enter the following settings under [Operation Setting] in
[Panasonic Power Management] (cépage 26)
* Panel Switch: Suspend
The system will enter suspend mode and the power indicator will blink green
when the LCD panel is closed. The system will resume when the LCD panel is
opened.
• Automatic Hibernation: Enabled
After the system enters the suspend mode, it will automatically change to hiber
nation mode when a preset length of time, set in the [Operation Setting], has
elapsed.
Tiirn Off PC Card in Suspend Mode: Enabled
The PC Card power is turned off in suspend mode.
NOTE>
If you plan to use only the battery pack or set the power management, it is
necessary to check [Allow Windows to manage power use on this com
puter] in [Start] - [Settings] - [Control Panel] - [Power]. If the check is
removed, the time may not be displayed properly when operation is re
sumed from the suspend or hibernation mode or the operating time with
the battery pack may become short (the power management function of
Windows does work).
When the modem is connected through a PC Card, [Wake up the computer
when the phone rings] in [Control Panel ¡-[Power] is disabled.
25
Page 26

Computing On The Road
Setting Panasonic Power Management
(How to set [Power Saving] and [Operation Setting])
y Click [Start] - [Settings] - [Control Panel], then double
click [Panasonic Power Management]
Or, double-click the icon in the task bar.
(The icon is not displayed, if (Show settings icon on the task bar] in [Panasonic
Power Management] is not set.
2 Click [Power Saving] tab, then set [Power Saving] under
[Battery] or [AC]
Xnote>
• When this command is used, if the AC adapter is connected, the [AC] set
ting will be enabled. If the AC adapter is not connected, the [Battery] set
ting will be enabled.
• The [pn] and |P6| keys can be pressed together to toggle the mode in the
following sequence; Standard -> Power Saving —> User Setting.
26
3 Click [Operation Setting] tab, then set [Suspend] under
[Panel Switch]
4 Enter a check next to [Enable Automatic Hibernation], and
set the time which must elapse before the change takes
place
5 Select [Turn Off PC Card in Suspend Mode]
6 Click [OK]
Xnote)
-----------------------------------
You can also run [Power Management] from the Setup Utility (Cépage 76).
^----------------------------------s
Page 27

Panasonic Power Management Settings
The settings are the same for [AC] and for (Battery).
Setting
Function
Standard Power
Saving
CPU Speed (%) 100 25
Standby Timeout (min) 30 2
Suspend Timeout (min) Disabled 10
LCD Backiight Bright Power
Saving
• Standby Timeout
Suspend Timeout
LCD Backlight
: When the computer is idle or a device is not ac
cessed, the computer enters the standby mode af
ter a preset interval of time.
When [USB Port] of [Supervisor Setup] is set to
[Enabled] in Setup Utility, this function is disabled.
: When the computer is idle or a device is not ac
cessed, the computer enters the suspend mode af
ter a preset interval of time.
When [USB Port] of [Supervisor Setup] is set to
[Enabled] in Setup Utility, this function is disabled.
: [Bright] [Medium] [Dark] [Power Saving]
Bright <
-------------
User Setting
100, 75,50, 25, 12.5
I, 2, 5, 10, 15, 30, Disable
1,2, 5, 10, 15,30, Disable
Bright, Medium, Dark,
Power Saving
---------------------> Dark
When installed in a network environment.
After resuming operation from the hibernation mode, the network connection may be
severed or the computer will not work properly.
When a device like a high-speed modem or ISDN terminal adapter is con
nected to the serial port, etc., or if the infrared communications port is
being used for data transfer.
There are times when high-speed communication is adversely affected If the power
management function is enable. Please disable the power management function.
Key operation and music playback.
When the power management function is running, the keyboard and trackball opera
tions may feel sluggish. Also, music may not play correctly when entering the standby
mode during operation.
27
Page 28

Computing On The Road
Battery Status
Use the Battery Indicator (Q) to check on the battery status
Battery Indicator Battery Status
Orange Charging
Green Fully-charged
Red Battery charge is low
The battery must be charged. A beeping sound will be heard
after the battery indicator has changed to red.
Connect the AC adapter immediately.
If the AC adapter is not available, quit all programs being
run and turn off the power.
The battery cannot be charged
Blinking orange
The battery pack cannot be charged since its temperature is
outside the 5°C to 35°C (41°F to 95°F ) range. Return the
battery pack to a temperature at which it can be charged
and try charging again.
28
The battery or AC adapter may not have been connected
Blinking red
properly. Make the proper connections. If the problem
persists, contact Panasonic Technical Support.
Getting a detailed reading |Fn]+|F9
Xnote)
• The value displayed may differ somewhat from the actual remaining capac
• When the battery pack is not in the computer, is displayed.
• This computer prevents overcharging of the battery by recharging only when
----------------------------
ity.
the remaining power is less than approx. 95% of capacity.
If it seems that the battery status has not been checked
properly {O"Accurately Displaying Battery Capacity" on page 34)
Page 29

When the remaining battery charge becomes low
Perform the following:
• Plug in the AC adapter, and fully charge your battery.
• Use a spare battery, if available.
• If you have neither the AC adapter nor an extra battery, save your data and power
off your computer.
# If the suspend function is set under [Battery Setting] in
[Panasonic Power Management]
Red indicator lights
Beep sounds*
Suspend Mode
If the hibernation function is set under [Battery Setting] in
[Panasonic Power Management]
Red indicator lights
Beep sounds*
* When disabling the speaker by prcssingl
Hibernation Mode
, the warning beep is also disabled.
Xnote>
• The battery operating time is approximately 2.5 hours with the included
battery pack, and approximately 8 hours with the Extended life Battery Pack
(CF-VZSU06).
29
Page 30

Using the Battery Pack
Precautions
® Handling precautions
® Care should be exercised with regard to the following in order to avoid the
possibility of liquid leakage, overheating, or bursting.
• Do not throw the battery pack into a fire or expose it to excessive heat.
• Do not place the battery pack together with articles such as necklaces or hair
pins when carrying or storing it.
• Do not insert shaip objects into the battery pack, expose it to bumps or shocks,
deform it, disassemble it, or modify it.
• Do not short the positive (+) and negative (-) contacts.
• The battery pack is rechargeable and is designed for use with the CF-M32
series or the specified charger. Do not use it with a computer or charger other
than the one for which it was designed.
• Do not charge, use or leave the battery pack for extended periods where it will
be exposed to direct sunlight, in a hot place (in an automobile on a sunny day,
for example), or in a cold place.
• Do not put the battery into a microwave oven or a pressurized chamber.
• Should the battery emit an abnormal odor, become hot to the touch, become
discolored, change shape, or become in any way different from normal, re
move it from the unit and discontinue use.
• When transporting spare batteries inside a package, briefcase, etc., it is recom
mended that the batteries be stored in a plastic bag.
• Do not expose the battery to water or allow it to become wet.
The terminals may corrode.
• Do not touch the terminals on the battery pack. Dirt on the terminals may impair
contact and/or make it impossible for the battery to be charged adequately.
• if, due to damage, battery electrolyte comes in contact with skin or clothing,
wash it off immediately and thoroughly with water. Consult your physician if
you feel any physical discomfort.
• Should the battery leak and some of the fluid get into your eyes, do not rub your
eyes. Immediately flush your eyes with clear water and see a doctor for medical
treatment as soon as possible.
• Keep batteries out of the reach of children.
• Do not carry the computer by gripping the optional Extended life Battery Pack
(CF-VZSU06).
30
Page 31

Notice concerning operating temperature
e The recommended environment, operating temperature of the computer is be
tween 5°C and 35°C (41°F and 95°F). The battery's operating time will de
crease if the operating temperature is low.
• The battery pack will become somewhat warm during normal use. This is not a
malfunction.
Notice concerning charging
• Since the battery pack is not charged when the computer is purchased, be cer
tain to charge the battery before using the computer.
Charging commences automatically when the battery pack is inserted into the
computer and the AC adapter is connected.
• If the battery pack is not used for an extended period of time, be sure to charge
it before use. In such cases, the charging process may not be completed in the
normal length of time, but this is not an indication that the battery is malfunc
tioning,
• Charge the battery pack in the usage temperature range (5“C to 35°C (41'^F to
95°F)). It may not be possible to charge the battery pack if the temperature is
outside the usage temperature range, or is in the usage temperature range but the
battery pack becomes too hot or cold due to usage conditions. (If this happens,
the battery indicator will blink orange.) In such cases, take steps such as adjust
ing the room temperature or refrain from using the computer for a period of
time. Charging will start automatically once the battery pack temperature re
turns to the specified temperature range.
• If the battery pack is attached and detached repeatedly and is charged each time,
an overcurrent will result, generating heat. This should not be done as it will
cause the battery pack to age.
• The battery pack is not a permanent part. If the battery pack operating time
shortens significantly, and if its capabilities are not restored after repeated charg
ing, then the battery pack has reached the end of its service life. Replace it with
a new battery pack.
• If the battery indicator blinks red when charging is commenced or when it is
underway, it may mean that the internal protection circuit has been activated
and charging has been suspended. In such cases, disconnect the AC adapter and
battery pack from the computer, then re-install them. If this problem persists,
contact Panasonic Technical Support.
31
Page 32

Using the Battery Pack
Installing/Removing the Battery Pack
n
Do not install a battery pack other than the battery pack (CF-VZSU05) or the
optional Extended life Battery Pack (CF-VZSU06).
Xnote>
The installing, removing and charging procedures for the optional Extended
life Battery Pack (CF-VZSU06) are the same as the included battery pack.
*/ Power off your computer (o-page 18)
Do not shut down using the suspend or hibernation mode.
(mutuosca)
In the suspend mode, do not remove/change the battery pack. Removing the
pack in the suspend mode will erase your data and may damage the computer.
32
2 # Installing the battery pack # Removing the battery pack
Battery Pack Connector Battery Pack Release Lever
Page 33

Charging
Since the battery pack is not charged when the computer is purchased, be absolutely
sure to charge the battery before using the computer.
Proceed with the charging while the battery pack is installed in the computer.
1 Connect the AC adapter
Charging commences automatically.
While the battery pack is being charged, the battery indicator will light orange.
2 Check the charging status
When the battery pack has finished charging,
the battery indicator will change to green.
(O’page 28)
Battery Indicator
Charging Time
CF-VZSU05 CF-VZSU06
Power On
Power Off Approx. 2.5 hours Approx. 6.5 hours
(Varies depending on the usage conditions)
NOTE
Approximately 80 mW of power is consumed even when the computer’s power
is off. This means that after a full charge the battery pack will discharge in
approximately a week. Recharge it prior to use.
Approx. 5 hours Approx. 13 hours
l>
33
Page 34

Using the Battery Pack
Accurately Displaying Battery Capacity
The battery pack has a function for measuring, storing, and learning about battery capac
ity. Using this function properly to accurately display remaining battery capacity requires
that the battery pack be fully charged (charged to 100%), then fully discharged, and then
fully charged again.
Use the procedure presented below to fully charge the battery pack, then discharge it, then
charge it again. This procedure should be performed once after you purchase the com
puter. As you use the battery pack over a long period of time, the remaining capacity
display may become inaccurate due to aging of the battery pack and other factors. The
procedure described below should be repeated.
1 Attach the battery pack, then connect the AC adapter
In some cases, the remaining capacity display (shown through key actions)
may give a reading of 100% capacity even though the battery indicator remains
onmge. Simply continue charging the battery pack until the indicator turns green.
2 Once the battery indicator turns green, remove the AC
adapter (full charge)
34
3 Use the discharge tool to fuiiy discharge the battery pack.
(full discharge)
1. Choose [Start] - [Shut Down] - [Restart in MS-DOS mode], and then click [OK],
2. Type the following after the MS-DOS prompt (C:\WINDOWS>).
c:\panaapp\battref /G [[lEntejj
3. At the confirmation message, press [ Y J.
The battery pack will be discharged fully and the computer will power off auto
matically.
(©ayMtsca)
Between when the above operation is perfomied and when the computer pow
ers off, do not connect the AC adapter or turn the computer off.
Doing .so will make it impossible to measure the battery capacity.
Page 35

note)-
If the discharge tool is used when the battery is fully charged, approximately
two hours must elapse before the computer powers off automatically.
^ Connect the AC adapter and charge the battery pack until
the battery indicator turns green (full charge)
After fully discharging the battery pack, immediately connect the AC adapter
to recharge it.
35
Page 36

Security Measures
When you do not want your computer to be used without permission
Set the User Password.
Without the password, access to your computer is impossible.
When the user password is set
Upon entering your
User Password and
pressing (Enter)*
If the correct password is input,
Over three incorrect attempts.
* If you are starting from the suspend mode (q> page 18), if
after three attempts the correct password is not input, or if no
password is entered for about a minute, the computer returns
to the suspend mode.
SGttiny tho USGt pGSSWOrd (enabling, changing, disabling)
^ Will Not starts
(Power off)
1 Run the Setup Utility (c^ page 73)
2 Using Q and QJ , select [System Setup] then press
[Enter]
3 Using Q and Q , select [User Password], then press
[Enterl
^ # To enable or change your password
1. Enter your password at the [Enter User Password], then press
2. Re-enter your password at the [Enter User Password Again).
(This is for confirmation purposes.)
[T],
36
3. Using O and 0 , select [Set User Password] then press [Enter].
Page 37

• Your password will not be displayed on the screen.
• Please limit your password to seven characters. Note that there is no
distinction between upper and lower case letters.
• White colored keys can be used. Note that space bar, V J and function
keys cannot be used.
• Do not input your password while holding down on the Shif^ or m
• Use only the upper horizontal row of numeric keys to input u.ser pass
words.
• Do not forget your password. If a password is forgotten, you will be
unable to use your computer.
#To disable your password
Using thefT)and| T ]keys, select [Delete User Password] then press[Ent^.
5 At the confirmation screen, press ¡Enter) S Press [escI to end the password setting procedure
7 Close the Setup Utility (q* page 74)
To prevent the changing of your password without permission
When running the Setup Utility program, do not leave your computer even
for a short time.
37
Page 38

Security Measures
When you do not want your Supervisor Setup changed without permission
Set the Supervisor Password.
After it has been set, no changes can be made to the Supervisor settings unless the
password is entered.
I When the supervisor password is set in the setup utility (o-page 78),
if^is displayed,
Input the correct supervisor password and press
fEnterl.
Supervisor Setup
May be
Opened
Supervisor Setup
When the supervisor password is incorrect or
when the user password is entered, (Or, even when
the correct supervisor password is entered ¡^page
(There are cases in which ihe Supervisor Setup
does not appear on the main screen), (^page 73
Can not be
Opened
Xnote>
I You mayYou may wish to protect the User Password (cépage 39).
Setting the supervisor password (enabling, changing, disabling)
7 Run the Setup Utility (q> page 73)
2 Using Q and 0 , select [Supervisor Setup] then press
[Enter]
3 Using Q and Q , select [Supervisor Password], then
press (Enter]
^ # To enable or change your supervisor password
1. Enter your password at the [Enter Supervisor Password], then press [T].
2. Re-enter your password at the [Enter Supervisor Password Again].
(This is for confirmation purposes.)
3. Using 0 and [ Î ], select [Set Supervisor Password] then press [Enter].
38
Page 39

• Your password will not be displayed on the screen.
• Please limit your password to seven characters. Note that there is no
distinction between upper and lower case letters.
• White colored keys can be used. Note that space bar. [ \ ] and function
keys cannot be used. '
• Do not input your password while holding down on the fshift|^ or
• Use only the upper horizontal row of numeric keys to input user pass
words.
• Do not forget your password. If a password is forgotten, you will be
unable to use your computer.
#To disable your password
Using thefT) andf T^keys, select [Delete U.ser Password] then press fEnter].
5 At the confirmation screen, press [Enter] 6 Press [Esc] to end the password setting procedure
{^note)-----------------------------------------------------------------------------------------
When you do not want the User Password enabled, changed, or disabled
without permission,
use
0
and[^]to select [U.ser Password protection by user], then set [Enable]
with [ -> ] ■
N
_________________________________________________________________
_
7 Close the Setup Utility (c5= page 74)
39
Page 40

Infrared Data Communications
Your computer is equipped with an infrared communication port enabling you to transfer
data without a cable.
1 Set the address of your infrared communications port to
enable
Run the Setup Utility, then set infrared address for [Infrared Port] and set [Dis
abled] for [ASK Mode] in [Supervisor Setup]. (G’pageTS)
2 Install the Windows 95 infrared communication driver
To install the infrared communication driver after reinstallation;
You must insert the Windows 95 CD-ROM (included) after Step 8. below.
Therefore a PC Card-compatible CD-ROM drive should be connected. (See the
manual included with your CD-ROM drive for details on how to connect it,)
1. Click [Start], then [Settings], then [Control Panel], Double-click the [Add New
Hardware],
2. When the [Add New Hardware Wizard] opens, click [Next].
3. The following message will be displayed: "Do you want Windows to .search for
your new hardware?". Select [Nol, then click [Next],
4. Under [Hardware types], select [Infrared], then click [Next],
5. When the [Add Infrared Device Wizard] opens, click [Next].
6. Under [Manufacturers], .select [Standard infrared devices], then click [Next],
7. In the port selection window, select [Generic Ir Serial Port (COM2)], then click
[Next],
8. Select [Use default ports], then click [Next].
The infrared communication driver will be set up.
9. Click [Finish],
40
Page 41

3 Prepare for Infrared Data Communications
• Position your computer so that the port is face-to-face with the port of another
computer.
• A port-to-port distance of 20 to 50 cm (8 to 20 inches) is recommended.
Xnote>
Problems with infrared data
communications
• An object is located between
both ports.
• There are other electronic de
vices nearby causing interfer
ence, such as, a television, VCR,
wireless headphone, etc.
• Direct sunlight or white glowing
light, such as fluorescent light
ing; can cause interference with
communications between the
ports.
4 Perform infrared communications
Perform communications using a store-bought infrared communications software
application or [Direct Cable Connection] in Windows.
note)-
• To process at a transfer speed of 4 Mbps, separate application software is
necessary.
• When you select [Start]-[Settings]-[Control Panel], and then select [In
frared], this will give you the conditions for infrared data communica
tions.
• Please refer to Windows help on how to use Direct Cable Connection.
41
Page 42

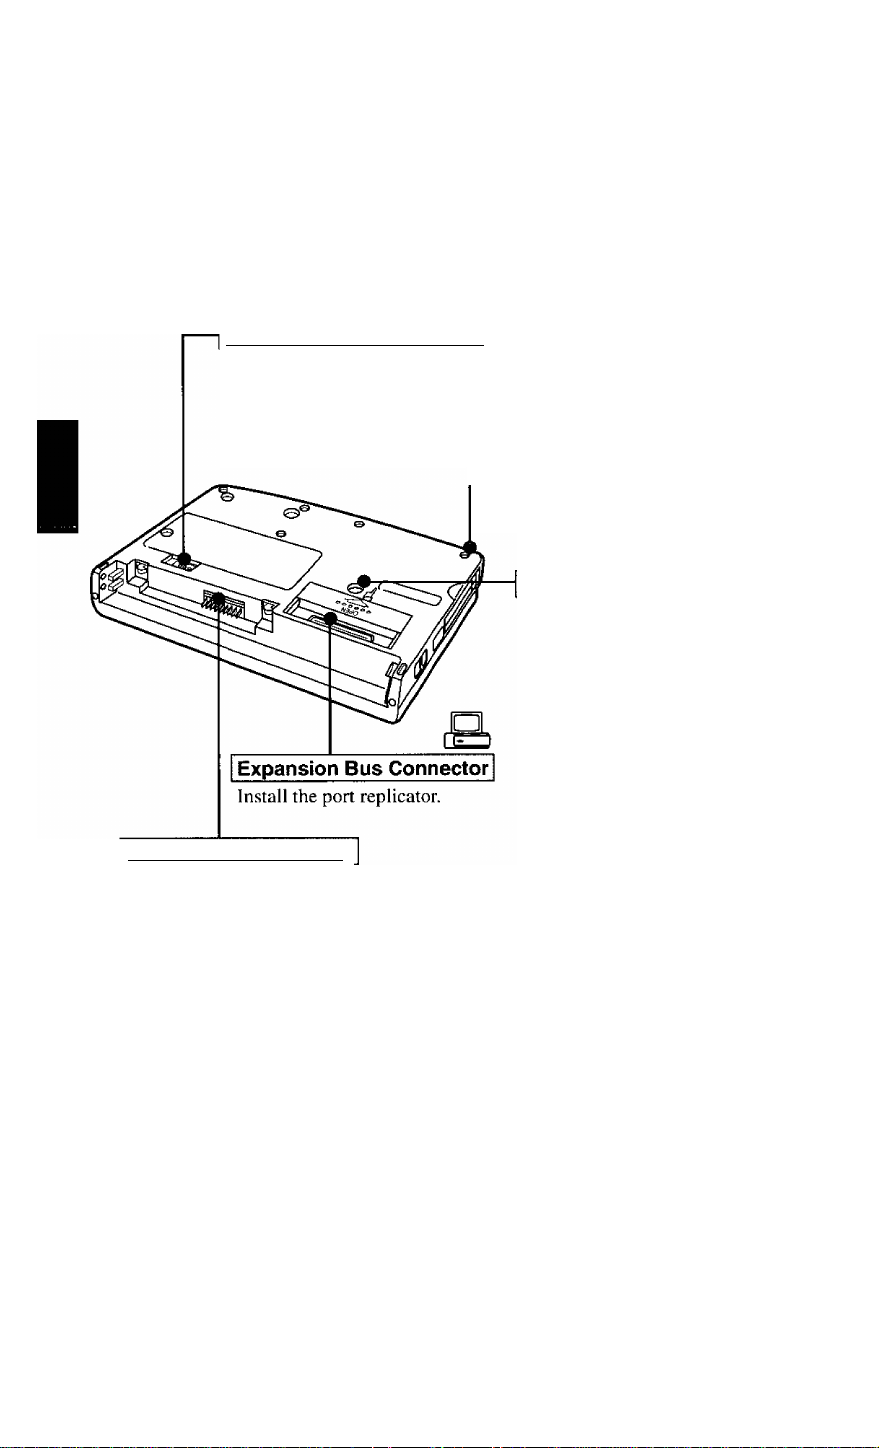
Add-ons/Peripherals
Devices capable of being used by your computer are listed in the table below.
Device(s) Where to connect
Port Replicator
External Floppy Disk
PC Cards (Modern, LAN, SCSI, etc.)
Serial Devices (Mouse, Modem, etc.)
Extra Memory
External Display
Printer
Keyboard, External Mouse [Type PS/2], etc.
Speaker/Headphone
Microphone
n
Do not install or remove peripherals while your computer is in the suspend or
hibernation mode; abnormal operation may result.
Expansion Bus Connector
FDD Port
PC Card Slots
Sérial Port
RAM Module Slot
Ext. Display Port
Parallel Port
Ext. Keyboard/Mouse Port
Headphone Jack
Microphone Jack
Reference
below
Q=page 45
(3^pagc 46
Q^page 44
Q^page 48
Cépage 50
(3>page 51
Q=page 44
Q=page 9
G^page 9
Connecting/Disconnecting the Port Replicator
Connect the port replicator to the computer before connecting devices such as an ex
ternal floppy disk drive or an external display.
1 Power off your computer (G’page 18)
Do not shut down using the suspend or hibernation mode.
42
2 Disconnect the AC adapter
3 Close the display, then turn your computer over
4 If an Extended life Battery Pack (CF-vzsuoe) is connected
to your computer, remove it (cépage 32)
If you are using the included battery pack, it does not need to be removed.
Page 43

cover
ibe
of
onr»c
ctWQ
(^Cotrrrer^
the
sofeWOP«"
• Be
hand.
• Do not remove any of the
tted near the cover.
tbe scre'^^'
conrvecto’^'
;llbe
port
0Y.ooser^
conu
(he eov«
nS'O’f'
lectoY
cteviS*
the S'
bV
scte^'VS
BUS
^Olscotr’
ibe
S\\de
dijechon*
close 'h
cover
oftVre
vO
arrovi
ibe
to
43
Page 44

Add-ons/Peripherals
Port Replicator Attachment Diagram
Serial Port ||oioi|
Parallel Pori] ^
page 51
Ext. Display Port | 1
Q’page 50
44
FDD Port I [3
Opage 45
Ext. Keyboard/Mouse Port| 01
Use this port to connect PS/2 external mouse or external keyboard.
Page 45

Using the External Floppy Disk Drive (FDD)
To use floppy disks, connect the included external floppy disk drive.
Connecting/Disconnecting the External FDD
7 Connect the Port Replicator {o^page 42)
2 # Connecting the External FDD
Push in the connector until both sides
lock, making sure that the connector
position and orientation are correct.
Disconnecting the External FDD
tion indicated by the arrow while
holding down the unlock levers.
45
Page 46

Add-ons/Peripherals
Using PC Cards
Your computer has two PC Card slots.
These slots conform to the PC Card
Standard; therefore, communications
and SCSI devices may be utilized. The
slot allows you to use two Type I or
Type II cards (or one Type I and one
Type II), or one Type III card.
PC Card Slots
►Type I or II
Two cards can be used simultaneously.
( mMto«!))
• Please check the PC Cards’ specifications. Be sure the total operating cur
rent does not exceed the specified limit. Damage may result otherwise.
Allowable Current (total for two slots): 3.3 V: 800 mA, 5 V; 600 mA
• PC Cards which require a 12 V power supply cannot be used.
• There are times when both a Type I card and a Type II card will not work at
the same time.
• Using ZV Port Compatible PC Cards
• Some ZV port compatible PC Card driver software may not be compat
ible with this PC Card controller of this computer. Check with your
Panasonic dealer when making your purchase. See the manual included
with the PC Card for information on how to operate the ZV port compat
ible PC Card.
• Some PC Cards may not work if installed in slot 2.
• Using CardBus compatible PC cards
• When using a CardBus type card, no other types of cards can be used,
• When removing a CardBus type card (e.g., to insert a non-CardBus type
card), be sure to restart the computer after pressing (STOP] (Q* next
page "To remove a PC Card").
After that, follow the procedure on installing/removing a PC card.
►Type III
One card can be used only in the
46
Page 47

Installing/Removing the PC Card
To remove a PC Card
Before removing a PC Card, go to [Socket Status) (in (Start] - [Settings] [Control Panel] - (PC Card (PCMCIA)]), select the PC Card slot and press
[Stop], When removing a CardBus type card, be sure to restart the computer.
1 Power off your computer (o-page 18)
Do not shut down using the suspend or hibernation mode.
. (©SQPvIM)}
Do not install or remove peripherals while your computer is in the suspend or
hibernation mode; abnormal operation may result.
2 9 Removing the PC Card (or the dummy card)
0 Pull the button out and then press it.
Pull the PC Card the rest of the way out.
Xnote)-
Dummy cards are provided at the time of
purchase. They provide protection for the
PC Card slots against such things as dust.
9 Installing the PC Card (or the dummy card)
0 Simply slide the PC Card in until it snaps into 0
place.
(1) Pull the button out and return it to the original
position.
Please refer to the manual for each card on
how to install the card (insertion is typically
label-side up).
3 Turn your computer on
There are some PC Cards that require a special or updated device driver be in
stalled. Follow the instructions on the screen and read any related manuals on
how to install device drivers.
47
Page 48

Add-ons/Peripherals
Adding Memory
(ШУЖШ))
RAM modules are extremely sensitive to static electricity There are cases where
static electricity generated by the human body has adversely affected such mod
ules In addition It IS easy to damage the RAM modules or internal components of
the computer Therefore, when installing or removing a RAM module, handle the
module with extreme care
Installing/Removing the RAM Module
1 Power off your computer (o-page 18)
Do not shut down using the suspend or hibernation mode
(©aijuos«!)}
Do not install or remove peripherals while your computer is in the suspend or
hibernation mode, abnormal operation may result
RAM module specifications
144 pins, SO-DIMM, Non-Parity
60 ns, 3 3 V, EDO, Self refresh
48
2 Disconnect your computer from the power outlet 3 Remove the battery pack (cépage 32)
4 Turn your computer over and use a screwdriver to remove
the screw shown in the illustration
There are many screws on the bottom of
the computer When removing the screw
to add memory, be sure to remember the
proper position (,^)
Do not remove a screw other than the one
shown in the illustration
Page 49

5 Open the display and remove the memory cover
Do not touch the terminals or internal components, insert objects other than the
module, or allow foreign particles to enter. Doing so may cause damage, fire
or electric shock.
6 9 Installing the RAM module
® Slide the module in at an angle.
Snap the module into place by pushing
it down.
1 Removing the RAM module
® Open the left and right hooks.
(1) Gently remove the RAM module from
the slot.
Hooks
7 Put the cover back into place, then close the display
8 Turn your computer over and use a screwdriver to fasten
the screw
49
Page 50

Add-ons/Peripherals
Using an External Display
1 Power off your computer (a=page 18)
Do not shut down using the suspend or hibernation mode.
2 Connect the external display to your computer
Xnote)-------------
For more detailed information,
please refer to the operation
manual of the external display.
3Turn on the display, then turn on your computer with the
LCD panel opened
1 Run the Setup Utility (opage 73).
2 Using(i|andfî), select [System Setup], then press
(Êntë^
50
3 Using QandQ, select [Video Setup], then press
[Enterl
4 UsingfnandQ, select [Display], select the display
with ¡then press[Esc]
5 Close the Setup Utility (cépage 74).
4Select your external display
Set your external display for [Monitor] in [Start] - [Settings] - [Control
Panel] - [Display] - [Settings] - [Advanced Properties].
When a monitor that does not conform to the Plug & Play standards is
connected, select [Change] and make the monitor settings.
Xnote>
By pressing you can choose to select either an external display or
the LCD, or simultaneous.
Page 51

Using a Printer
1 Power off your computer (o*page 18)
Do not shut down using the suspend or hibernation mode.
2 Connect the printer to your computer
3 Turn on the printer, then turn on your computer with the
LCD panel opened
4 Setting your printer
Go to [My Computer] - |PrintersJ. Find your printer’s icon, click on it, and click
[File] - [Set As Default], If no icon is available, select [Add Printer] and install
the driver program.
Xnote>
You may need to install a driver for your printer. Simply follow the on-screen
instructions and refer to the operation manual for the printer on how to install the
driver.
51
Page 52

List of Error Codes
If a problem occurs with your hardware, [POST Start up Error(s)] is displayed along with
the error code(s), follow the on-screen instructions.
Setup: Setup Utility (Cépage 73) is started. Run [Load Default Settings (Non-PnP)].
Rerun the Setup Utility to input the appropriate operating environment
settings.
Exit: Ignore the error message(s), and restart the computer.
Code
062 Boot failure-default configuration used
101 System Board Failure
102 System Board Failure
106 System Board Failure
151 System Board Failure
161 Bad CMOS Battery
162 Configuration Change Has Occurred
162 Configuration Error
163 Date and Time Incorrect
164 Memory Size Error Memory size error
201 Memory Size Error
1780 Hard Disk Error
Default configuration in use
Interrupt controller failure
Timer 2 test failure
Diskette controller failure
Real-time clock failure
Dead battery
Configuration error
CMOS checksum error
Real-time clock is not updating
Memory data error
Fixed disk 0 failure
Description
52
Page 53

Dealing With Problems
When a problem occurs, please refer to this page. If a problem appears to be related to a
software application, read the software related manual. If you still cannot troubleshoot
the problem, please contact Panasonic Technical Support.
# Starting Up
The computer
doesn't work
Information on
the display screen
isn't visible.
• Check that connections are secure between the computer and
the AC adapter, and between the AC power cord and AC wall
outlet.
• The power will not turn on if the LCD panel is closed (i.e., if
the panel switch is depressed). Turn on the power after open
ing the LCD panel.
• Confirm that a fully charged battery pack is installed properly.
• Press the reset button on the computer's bottom side to reboot
the computer.
• Remove the AC adapter and battery pack, then reattach them
and start the computer again.
• Have the hard disk contents been corrupted?
In the Setup Utility, select [Supervisor Setup] and then change
the [Boot up Drive] in setting [FDD -> HDD]. Insert the Win
dows 95 Boot Disk in the floppy disk drive and restart the
computer. Check the hard disk contents.
The display may have automatically turned off due to the
power-saving function. Move the power switch to restore the
screen.
Has an [External display) been selected by the Video Setup in
the Setup Utility and connected to an external monitor?
If your computer is connected to an external display and the
internal LCD has been set to off, and the computer is placed in
the hibernation or suspend mode, the internal LCD will re
main in the off mode if the external display is not connected
when the computer is restarted. In this case, reconnect the ex
ternal display and reboot the computer.
is Displayed
The date and time
are incorrect.
Please input your password. If you have forgotten it, contact
Panasonic Technical Support.
You can set the date and time, through [Date/Time] in [Start] [Settings) - jContro) Panel] or the Date and Time Setup in the
Setup Utility.
If you continue to experience problems, the internal battery
maintaining the clock may need to be replaced. Please contact
Panasonic Technical Support.
53
Page 54

DeaìtngWith Problems
During Operation
The computer
suddenly stops
operating.
The battery indi
cator is red, or a
0% reading is dis
played by pressing|Fnl+(ra).
The battery indi
cator blinks red.
The battery indi
cator blinks or
ange.
The beeper
sounded.
The battery indi
cator not lit dur
ing charging.
• When operating the computer with a battery pack, the power
may become depleted. You must connect the AC adapter.
• The system may have locked up due to a problem in the appli
cation software you are using. Stop using the application soft
ware and reboot the computer by pressing the reset button.
• Battery is low. Connect the AC adapter to charge the battery.
• The AC adapter may not have been connected properly.
Make the proper connection.
® There is a possibility that the battery capacity measuring func
tion is not functioning properly. Follow the steps listed under
"Accurately Displaying Battery Capacity" (C?page 34).
• The battery may not have been connected properly. Make the
proper connection.
• If the problem persists, contact Panasonic Technical Support.
• The battery pack temperature may be outside the 5°C to 35°C
(41°F to 95°F) range. Return the battery pack to a tempera
ture at which it can be charged.
• The battery is nearly discharged. Connect the AC adapter to
charge or install a fully charged battery pack.
• The battery or AC adapter may not been connected properly.
Make the proper connections.
• It the problem persists, contact Panasonic Technical Support.
A 100% reading
is displ^ed by
pressing@}+@,
but the orange in
dicator lights for
an extended pe
riod of time
Operations are
slow.
54
® Simply continue charging the battery pack until the indicator
turns green.
• There is a possibility that the battery capacity measuring func
tion is not functioning properly. Follow the steps listed under
"Accurately Displaying Battery Capacity" (Q*page 34).
• There may not be enough memory. Add a RAM module
(□’■page 48).
Page 55

Display
No display after
powering on;
The display
screen is cleared.
An afterimage
appears.
Green, red or
blue dots remain
on the display.
• The brightness can be adjusted with(^+(^.
• At the time of purchase, the display setting is preset for an
external display. If you connect an external display, the screen
is displayed on the external display.
• When there is no display on an external display,
• Check your cable connection to the external display.
• Confirm your display is powered on.
• If your computer is connected to an external display and the
internal LCD has been set to off, and the computer is placed in
the hibernation or suspend mode, the internal LCD will re
main in the off mode if the external display is not connected
when the computer is restarted. In this case, reconnect the ex
ternal display and reboot the computer.
The standby or suspend/hibemation mode may have been estab
lished by the power-saving function. When press any key or slid
the power switch in either of these scenarios, the display screen
returns.
If an image is displayed for a prolonged period of time, an after
image may appear. This is not a malfunction. The afterimage will
disappear when a different screen is displayed.
As a characteristic of color display's, these dots are known to
appear, but it does not indicate any malfunction.
# Disk Operations
The computer
• If the cause is unknown, contact Panasonic Technical Support.
won't access the
hard disk drive.
The computer
• Ensure that you have connected the external floppy disk drive
won't access the
floppy disk drive.
The computer
won't format the
• Ensure that you have inserted the floppy disk securely into the drive.
• Did you attempt to write to or read from a non-formatted disk?
• Ensure that the write-protect tab is in the write-enable position.
• Ensure that the write-protect lab is in the write-enable position.
• Select [3 1/2 Floppy(A:)J in [My Computer], then click [File]
floppy disk.
securely.
Floppy disks must be formatted before they can be used.
- [Format]. After confirming the disk volume and format type,
start formatting.
55
Page 56

Dealing With Problems
Setup Utility
^ is displayed
1 Supervisor Setup]
is not displayed in
the menu
[User Password]
cannot be selected
Enter the User Password. If you have forgotten it, contact
Panasonic Technical Support.
At the start of the computer when is displayed, you have to
enter the Supervisor Password.
and Supervisor Password have been set, if you enter the User
Password, [Supervisor Setup] will not be displayed.
If [Supervisor Setup] is not displayed even after entering the
Supervisor Password, you have to delete the User Password.
Run the Setup Utility again, and input the Supervisor Password.
[User Password protection by user] in [Supervisor Setup] may
be enabled.
Connecting Peripherals
Your peripheral
does not work
(An error occurs
while installing
the driver)
Unable to print
You need to use drivers conforming to OS*. Some earlier driv
ers will no longer work.
For more information, please ask the manufacturer of the driver
in question.
* Windows® 95 Version 4.00.950C (OSR-2.5)
• Check the computer-printer connection.
• Make sure the printer is on.
• Make sure the printer is in the on-line state.
• Make sure paper is in the printer tray and there is no paper
jam.
• Has the Setup Utility been used to set [Parallel Port] to [378],
1278] or [3BC|?
When
both the User Password
The cursor does
not move from
mouse operations
56
• Check the connection.
• Confirm that the device driver for the mouse works.
Please refer to the reference manual of the device.
• Try setting the [Track Ball] to disable in the Setup Utility.
• Has the Setup Utility been used to set [Serial Port] to [2F8]
or [3F8]?
• Check your mouse connection, then reboot the computer from
the keyboard.
From the keyboard, you may choose to press down on [ jiffl ]
then select [Shut Down).
Page 57

The cursor does
not move from
trackball opera
tions
• Confirm that the device driver for the mouse works.
Please refer to the reference manual of the device.
• Try setting the [Track Ball] to enable in the Setup Utility.
• Has the Setup Utility been used to set [Serial Port] to [2F8]
or [3F8]?
The device con
nected to the se
rial port does not
work
A PC Card does
not work
You do not know
the available
RAM module
Tbe RAM module
has not been rec
ognized
• Check the connection.
• Confirm that the device driver for the serial port works. Please
refer to the reference manual for the device.
• Confirm that two mouse devices are not connected, one
through the ext. keyboard/mouse port and the other through
the serial port.
• Try setting the [Track Ball] to disable in the Setup Utility.
• Make sure the card is properly inserted.
• Confirm that the card conforms to the PC Card Standard.
• A driver for Windows 95 may need to be installed.
• Note that after a driver is installed, the computer must be
rebooted.
• Check that the proper port settings have been made.
• Read the PC Card’s manual. Or, you may need to call the
source of the PC Card.
• When using a CardBus type card, no other types of cards can
be used.
• Some ZV Cards may not work if installed in slot 2.
O page 46
Make sure the RAM module has been properly inserted.
The address map
for IRQ, I/O
port address, etc.
is unclear
A USB device
does not work
Click [Start] - [Settings] - [Control Panel]. Double-click [Sy.stem]. Check the address map by going to [View Resources] in
[Device Manager] - [Computer) - [Properties].
• Has the Setup Utility been used to set [USB Port] to [En
abled]?
• Make sure a driver is installed.
• Contact the manufacturer of the product.
57
Page 58

Reinstalling Software
Software programs can be reinstalled in cases where, for example, the hard disk fails,
information is lost, etc. However, Create FIRSTAID FD program cannot be reinstalled.
Reinstalling Preparations
1 Prepare the following:
• 2 Backup disks created in advance (C^ page2l)
• Windows 95 CD-ROM (included)
•FIRSTAID CD (included)
• Port Replicator (included)
• External floppy disk drive (included)
• PC Card-compatible CD-ROM drive
Prepare the CD-ROM drive used in "Make a copy of the CD-ROM driver" (C3=
page 23) of the backup disk creation procedure.
2 If data on your hard disk is compressed, the data should
be uncompressed.
3 Power off your computer (c^ page 18) and disconnect the
AC adapter
Do not shut down using the suspend or hibernation mode.
58
4 Attach the external floppy disk drive (a* page 45)
Remove all other peripheral devices.
5 Connect your computer to a power outlet.
Page 59

Reinstallatibn Procedure
— If the hard disk partitions have been changed since the computer was purchased
• To leave the current partition settings
Proceed to Procedure 1 on next page,
• To restore the partition settings to factory default
(1) Insert the FIRSTAID FD, which you made earlier, into the floppy disk drive.
Then turn the computer on.
(2) Select [2. Return hard disk partitions and hibernation data area to factory de
fault.)
(3) In response to the confirmation message, press ©
(4) When the message [Hibernation data area created.[ is displayed, confirm that
the FIRSTAID FD is in the floppy disk drive then press any key.
The computer will reboot. Then continue with step 2. of Procedure 1 on next
page.
• To change the partition settings
(1) Insert the FIRSTAID FD, which you made earlier, into the floppy disk drive.
Then turn the computer on.
(2) Use the FDISK command to delete all partitions.
(3) Use the HBUTIL command to create the hibernation data area (CT page 71).
(4) Use the FDISK command to create MS-DOS partitions.
(5) Press ^it| + |ctrl]] + [Pel| to reboot the computer,
(6) Formal each of the MS-DOS partitions.
Next, proceed to Procedure 2 on next page.
(©styrausca)
Make sure to reinstall the Windows 95 operating system on the C: drive.
59
Page 60

Reinstalling Software
Format the C drive
1. Insert the FIRSTAID FD which you made earlier in the floppy disk drive,
then turn the computer on.
The following screen will be displayed.
Main Menu I
1. Restart in MS-DOS mode. '
2. Return hard disk partitions and the hibernation data area to
factory default.
3. Format C drive.
Enter a choice:
2. Select (3. Format C drive.]
3. At the confirmation message, press ( Y |.
After the formatting process is completed, press any key. The computer will
power off automatically.
2. Install Windows 95
1. Attach the CD-ROM drive. Turn on the CD-ROM drive.
Insert the Windows 95 CD-ROM Setup Boot Disk which you made earlier in
2.
the floppy disk drive, then turn the computer on.
When the message [Press FI for Setup] is displayed, press ^ F1 ) to run the
3.
Setup Utility.
Select [Load DefaultSettings (Non-PnP)], then press ^Ent^. At the confirma
4.
tion message, press [Enter j.
Save the settings then close the Setup Utility.
5.
The computer will reboot.
When the message [Press any key to continue...] is displayed, press any key.
6.
When the message [Perform reinstallation?] is displayed, press 0
7.
When the computer prompts you to insert FIRSTAID CD , please set the speci
8.
fied CD in the CD-ROM drive and press any key.
When the computer prompts you to insert Windows 95 CD-ROM, please set
9.
the specified in the CD-ROM drive and press any key.
10. When the message [To continue, press ENTER....] is displayed, press [Ente r|.
After Microsoft ScanDisk completes, the computer will automatically return
to the Windows 95 setup.
Simply follow the on-screen instructions.
60
Page 61

To restore the settings which were set at the time of purehase, set the options as
shown below.
Option
Choose Directory
Setup Options Typical
Select Components Windows Messaging (select all)
11. When [Choose Directory] window is displayed, seleet [C:\WINDOWS] then
click [Next].
Xnote>
If the previous operating system or data are still on the hard disk, a directory
other than [C:\WINDOWSJ may be displayed. In this case, restore the hard
disk partitions to the way they were when the computer was purchased and
then perform Procedure 1 on page 60 once again.
C:\WINDOWS
Microsoft FAX
Accessories (select all)
Disk Tools (select all)
Multimedia (select all)
Accessibility Options
For communications, do not change the de
fault settings.
Settings
12. When [Setup Options] window is displayed, select [Typical] and click [Next].
13. When [Certificate of Authenticity] window is displayed, enter the number
printed on the front of the included Windows 95 book, then click [Next],
14. When [User Information] window is displayed, enter your name and your
company's name then click [Next].
15. When [Analyzing Your Computer] window is displayed, click the check box
to the left of [Sound, MIDI, or Video Capture Card] to check it then click
[Next].
16. When [Windows Components] window is displayed, click the circle to the left
of [Show me the list of components so I can choose] to check it then click
[Next].
17. When [Select Components] window is displayed, select the required
applications.
61
Page 62

Reinstalling Software
18. After completing this selection, click [Next],
19. When IStartup Disk] window is displayed, check the circle to the left of [Yes]
to create a startup disk, or check the circle to the left of [No] then click [Next]
to skip this step.
20. When [Start Copying Files] window is displayed, click [Next], Follow the
screen messages to continue with the installation process.
21. When [Finishing Setup] window is displayed, remove the floppy disk and
CD-ROM and click [Finish].
22. When [Date/Time Properties] window is displayed, insert the correct time,
data and time zone and click [Close j.
23. If you have installed Windows Messaging, the [Inbox Setup Wizard] will run
then next time you start Windows. When this happens, select [Cancel] and
proceed. (Set up the Inbox later.)
24. When I Add Printer Wizard] window is displayed, click [Cancel],
25. When [Setup has finished configuring your system.] is displayed, click [OK],
The computer will reboot.
62
Page 63

3 Reset the system
<lnstail the files>
1. Click [Start], then click [Run]. Type "c:\panaapp\install.exe" under [Open],
then click [OKj.
2. When [Starting "Panasonic Reinstall Program".] is displayed, click [OK],
3. When ["Panasonic Reinstall Program" is finished.] is displayed, click [OK].
The computer will power off automatically.
4. Remove the CD-ROM drive.
5. Turn the computer on.
Tnote>
Various devices are recognized during the Windows 95 startup process. Follow
the steps below to install the drivers while paying close attention to the messages
that appear on the screen.
<Copy the windows 95 files>
1. When the computer prompts you to insert Windows 95 CD-ROM, click [OK],
2. Type "c:\cabs" under [Copy files from], then click ]OK].
<lnstall the YAMAHA sound card driver>
1. When [Unknown Device] is displayed, under [Update Device Driver Wizard]
window, click [Next].
2. When [Windows was unable to locate a driver for this device] is displayed,
click [Other Locations].
3. Type "c:\util\drivers\sound" under [Location], then click [OK].
4. Check whether [YAMAHA OPL3-SAx Sound System] has been found, then
click [Finish].
5. Click [OK] when the insert disk message is displayed.
6. Type "c:\util\drivers\sound" under [Copy files from], then click [OK].
63
Page 64

Reinstalling Software
<lnstall the hard disk controller(IDE)>
1. When [Intel 82371 AB/EB PCI Bus Master IDE Controller] is displayed, un
der [Update Device Driver Wizard] window, click [Next].
2. Check whether [Intel 82371 AB/EB PCI Bus Master IDE Controller] has been
found, then click [Finish],
<USB detection>
1. When [PCI Universal Serial Bus] is displayed, under [Update Device Driver
Wizard] window, click [Next],
2. When [Windows was unable to locate a driver for this device] is displayed,
click [Finished],
(The USB function settings are performed later. page 67)
<lnstall the video driver>
1. When [Standard PCI Graphics Adapter (VGA)] is displayed, under [Update
Device Driver Wizard] window, click [Next].
2. Check whether [Standard PCI Graphics Adapter (VGA)] has been found, then
click [Other Locations],
3. Type "c:\util\drivers\video" under [Location], then click [OK],
4. Check whether [NeoMagic MagicGraph 128XD] has been found, then click
[Finish].
5. Click [OK] when the insert disk message is displayed.
6. Type "c;\utiMrivers\video" under [Copy files from], then click [OKj.
64
<Change the system settings>
1. After changing system settings, [Do you want to restart your computer now?]
is displayed. Click [No].
• The message [Do you want to restart your computer now?] will appear
several times before the computer is restarted. In each case, click [No].
< Rests rt>
1. When Windows 95 reopens, click [Start]-[Shut Down], then select [Restart
the computer?] and click [Yes],
• Do not launch any programs or leave the computer unattended for a long
period of time before restarting it.
Page 65

4 Setting power management
1. Click [Start], then [Run].
2. Type "c:\panaapp\powerman\setup.exe" under [Open], then click [OK],
3. Follow the on-screen instructions to continue installation.
4. The display will ask you to restart Windows, then click [Yes] and [Finish].
5. Click [Start]-[Settings]-[Control Panel], then double-click [Power].
6. Click [Advanced], click the check box to the left of [Wake up the computer
when the phone rings] to uncheck it then click [OK],
7. Click [OPL3-SAx power management] and set [Intermediate level of power
save] for [Level of power consumption].
8. Click [OK].
5 Setting display
1. Double-click [Display] in [Control Panel].
2. Click [Settings] under [Display Properties], then click on [Advanced Proper
ties].
3. Click [Monitor] under [Advanced Display Properties] then click [Change],
4. Under [Model], select [SuperVGA 1024x768], then click [OK].
5. Confirm that there is a check mark for [Automatically detect Plug & Play
monitor] in [Options] for the [Monitor].
6. Click [Performance], then select [Apply the changes without restarting].
7. Click [Adapter], select [Adapter default] under [Refresh rate], click [Close].
8. At the confirmation message, click [OK] and click [Yes],
9. Enter the following settings in [Settings] window under [Display Properties].
Parameter
Color palette
Desktop area
Show settings icon on task bar
10. After entering the settings, click [OK].
11. At the confirmation message, click [OK] and click [Yes].
High Color (16 bit)
800 by 600 pixels
Enabled (enter a check mark)
Setting
65
Page 66

Reinstalling Software
6 Setting PC Card
1. Double-click [PC Card (PCMCIA)) in [Control Panel].
2. The [Welcome to the PC Card (PCMCIA) Wizard] window will be displayed.
Select [No], then click [Next].
3. Select [No], then click [Next] and [Finish].
4. The following message will be displayed: [Would you like to shut down your
computer now ?]. Click [Yes].
The computer will power off automatically.
7 Attach the CD-ROM drive
A CD-ROM drive is required in order to perform the installation procedure de
scribed below. After connecting the CD-ROM drive, turn on the computer and
wait for it to be recognized by Windows 95.
See the manual included with the CD-ROM drive for information on how to attach
it.
8 Change the system properties
1. Double-click [System] in [Control Panel].
2. Click [Device Manager] under [System Properties].
3. Click the mark El to the left of [CDROM], then select CD-ROM drive and
click [Properties].
4. Click [Settings]. Set [Start drive letter] and [End drive letter] to [L;] in [Re
served drive letters], then click [OK].
5. Click the mark S to the left of [Disk drivers], then select [GENERIC IDE
DISK TYPE<7] and click [Properties],
6. Click [Settings], then add the check mark for [DMA] in [Option]. Click
[OK].
7. Click [OK] in [System Properties].
8. The display will ask you to restart Windows, click [Yes].
The computer will reboot.
66
Page 67

9 Setting USB function
I. Set Windows 95 CD-ROM in the CD-ROM drive.
Click [Start], then click [Run]. Type "L:\other\updates\usb\usbsupp.exe", then
2.
click [OK].
At the confirmation message, click [ YesJ.
Read the [END-USER LICENSE AGREEMENT] and click [Yes].
3.
• Installation will be aborted if [NO] is pressed.
4.
After Microsoft ScanDisk completes, installation will start. At the confirma
tion message, click jOK).
The computer will reboot.
Click [Start], then click [Run]. Type "L:\other\updates\usb\usbupd2.exe", then
5.
click [OK].
Click [Start], then click [Run]. Type "c:\util\usb\usbcopy.bat", then click [OK].
6.
When [Finished-usbcopy] is displayed in the title bar of the DOS window,
7.
click the [X]-mark in the upper right corner of the DOS window to close it.
Double-click [System] in [Control Panel],
8.
9.
Click [Device Manager], then select [PCI Universal Serial Bus] for [Other
device]. Click [Remove] and [OK].
10. Click [Close] in [System Properties].
II. Click [Start], then click [Shut Down]. Select [Restart the computer?], then
click [Yes].
When using a USB device, set [Enabled] for [USB Port] in [Supervisor Setup],
[Disabled] is the default setting, page 78, 79)
67
Page 68

Reinstailing Software
10 Install the applications
<lnstall the DirectX5>
1. Set Windows 95 CD-ROM in the CD-ROM drive.
2. Click [Start], then click [Run].
3. Type "L:\other\updates\dx5\setupdx5.exe" under [Open], then click [OK],
4. When installation is finished, click [Start]-[Shut Down]. Select [Restart the
computer], then click [Yes].
<lnstall the Internet Explorer 4.01 >
Reinstalling Windows causes an older version of Internet Explorer to be installed.
To return the computer to the state it was in when you purchased it, follow the
steps below to install the newer version of Internet Explorer.
1. Set Windows 95 CD-ROM in the CD-ROM drive.
2. Click [Start], then click [Run].
3. Type "L:\win95\ie4setup.exe" under [Open], then click [OK].
4. Follow the on-screen instructions.
• [Installation Option] will be displayed, select [Full Installation],
68
Page 69

LIMITED USE LICENSE AGREEMENT
THE SOFTWARE PROGRAM(S) ("PROGRAMS") FURNISHED WITH THIS PANASONIC® PROD
UCT ("PRODUCT") ARE LICENSED ONLY TO THE END-USER ("YOU"), AND MAY BE USED BY
YOU ONLY IN ACCORDANCE WITH THE LICENSE TERMS DESCRIBED BELOW. YOUR USE OF
THE PROGRAMS SHALL BE CONCLUSIVELY DEEMED TO CONSTITUTE YOUR ACCEPTANCE
OF THE TERMS OF THIS LICENSE.
Matsushita Electric Industrial Co., Ltd. ("MEI") has developed or otherwise obtained the Programs
and hereby licenses their use to you. You assume sole responsibility for the selection of the Product
(including the associated Programs) to achieve your intended results, and for the installation, use
and results obtained therefrom.
A. MEI hereby grants you a personal, non-transferable and non-exclusive right and license to
use the Programs in accordance with the terms and conditions stated in this Agreement. You
acknowledge that you are receiving only a LIMITED LICENSE TO USE the Programs and
related documentation and that you shall obtain no title, ownership nor any other rights in or
to the Programs and related documentation nor in or to the algorithms, concepts, designs
and ideas represented by or incorporated in the Pro^ams and related documentation, all of
which title, ownership and rights shall remain with Mtl or its suppliers.
B. You may use the Programs only on the single Product which was accompanied by the Pro
grams.
C. You and your employees and agents are required to protect the confidentiality of the Pro
grams. You may not distribute or otherwise make the Programs or related documentation
avajiable to any third party, by time-sharing or otherwise, without the prior written consent of
D. You may not copy or reproduce, or permit to be copied or reproduced, the Programs or
related documentation for any purpose, except that you may make one (1) copy of the Pro
grams for backup purposes only in support of your use of the Programs on the single Product
which was accompanied by the Programs. You shall not modify, or attempt to modify, the
Programs.
E. You may transfer the Programs and license them to another party only in connection with
your transfer of the single Product which was accompanied by the Programs to such other
party. At the time of such a transfer, you must also transfer all copies, whether in printed or
machine readable form, of every Program, and the related documentation, to the same party
or destroy any such copies not so transferred.
F. You may not remove any copyright, trademark or other notice or product identification from
the Programs and you must reproduce and include any such notice or product identification
on any copy of any Program.
YOU MAY NOT REVERSE ASSEMBLE, REVERSE COMPILE, OR MECHANICALLY OR ELEC
TRONICALLY TRACE THE PROGRAMS, OR ANY COPY THEREOF, IN WHOLE OR IN PART.
YOU MAY NOT USE, COPY, MODIFY, ALTER, OR TRANSFER THE PROGRAMS OR ANY COPY
THEREOF, IN WHOLE OR IN PART, EXCEPT AS EXPRESSLY PROVIDED IN THE LICENSE.
IF YOU TRANSFER POSSESSION OF ANY COPY OF ANY PROGRAM TO ANOTHER PARTY,
EXCEPT AS PERMITTED IN PARAGRAPH E ABOVE, YOUR LICENSE IS AUTOMATICALLY TER-
MrNATED.
This license is effective only for so long as you own or lease the Product, unless earlier terminated.
You may terminate this license at any time by destroying, at your expense, the Programs and related
documentation together with all copies thereof in any form. This license will also terminate effective
immediately upon occurrence of the conditions therefor set forth elsewhere in this Agreement, or if
you fail to comply with any term or condition contained herein. Upon any such termination, you agree
to destroy, at your expense, the Programs and related documentation together with all copies thereof
in any form.
YOU ACKNOWLEDGE THAT YOU HAVE READ THIS AGREEMENT. UNDERSTAND IT AND AGREE
TO BE BOUND BY ITS TERMS AND CONDITIONS. YOU FURTHER AGREE THAT IT IS THE COM
PLETE AND EXCLUSIVE STATEMENT OF THE AGREEMENT BETWEEN US, WHICH SUPER
SEDES ANY PROPOSAL OR PRIOR AGREEMENT, ORAL OR WRITTEN, AND ANY OTHER COM
MUNICATIONS BETWEEN US, RELATING TO THE SUBJECT MATTER OF THIS AGREEMENT.
_
______
LICENSE
69
Page 70

W\\M©w
This procedure explains step 5 on page 13 in more detail.
0)
1 Enter your name and your company’s name, then click
[Next]
The License Agreement will be displayed.
2 After reading the agreement, select [I accept the agree
ment] or [I don't accept the agreement] then click [Next]
If the former is selected, the [Certificate of Authenticity] will appear. If the latter
is selected, the Windows setup will be aborted.
3 Input the Product Number written on the “Certificate of
Authenticity” located in the Windows 95 book that comes
with this computer then ciick [Next]
4 Click [Finish]
5 Input the correct time, date and time zone and ciick [Close]
You can also complete these settings at a later time.
70
6 If you wish to complete the printer settings, click [Next]
Simply follow the on-screen instructions.
If not, click [Cancel]
You can also complete these settings at a later time.
7 Click [Next] to install Internet Explorer. Simply follow the
on-screen instructions.
Page 71

□
□ n
M
o
(When you have changed the hard disk partitions)
A data area for storing memory data on the hard disk must be created in order to use the
hibernation function.
Required disk space: Main memory capacity + 2 MB
At the time of purchase, this area is created approximately 98 MB in size. It must be
created again if you have changed the hard disk partitions.
The HBUTIL command on the FIRSTAID FD is used to create the hibernation data area.
The procedure for using the HBUTIL command is explained below.
Oita Aril
How to use HBUTIL.EXE
• Run HBUTIL.EXE from the FIRSTAID FD. It will not run properly if you
run it from the Windows 95 MS-DOS prompt.
• Restart the computer immediately after actions such as creating or deleting a
data area.
HBUTIL command has the options listed below.
Enter a single space between the command and the options.
Option
P [size]
I
/?
Description
With this option, the hibernation data area is created as a Partition.
Specify the main memory capacity in megabytes for [size]. If (size]
is omitted, the partition will be created based on the current in
stalled memory size. If [size] is set to zero, the hibernation Parti
tion can be deleted.
(Example) HBUTIL P 96
A partition will be created for executing hibernation
when the main memory consists of 96 MB or less
(when on-board memory and 64 MB RAM module
are installed).
With this option, information regarding the hibernation data area
is displayed.
With this option, information regarding this HBUTIL command is
displayed.
71
Page 72

Creating a Hibernation Data Area
Error Messages
Message on Screen
Partition management information still not
written to disk.
Empty partition with sufficient space not
found.
Causes and Steps to Take
There ¡s no partition management infor
mation. The partition management infor
mation must be initialized with the FDISK
command.
First run the FDISK/MBR command, then
run the FDISK command again to delete
the existing primary MS-DOS partition.
Restart the computer, then run the
HBUTIL command again.
An empty area with sufficient space is
needed to create a hibernation data area as
a Partition. Take steps such as deleting
currently filled areas to free up space.
72
Page 73

Setup Utility
Running the Setup Utility
To run the Setup Utility, you ^ Upon seeing
need to restart your computer. this message
Xnote>
The Setup Utility will not be run if[Flj is not pressed soon after the com
puter restarts. In this case, you need to restart your computer again.
If is displayed, enter your password.
If both the [User Password] and [Supervisor Password] have been set, after
entering the User Password, [Supervisor Setup] and [Load Default Setting...]
will not be displayed on the main screen.
To display the [Supervisor Setup] and [Load Default Setting...], enter the
Supervisor Password.
<Main Screen>
Setup Utility
•System Summary
•System Setup
•Power Management
•Supervisor Setup
Press FI for Setup press 0
C>*page 74
C^page 75
C^page 76
C5>page 78
Save Settings
Restore SettingsLoad Default Settings(PnP)
Load Default Settings(Non-PnP)
Exit Setup
Return to the state existing at the time of
Setup Utility startup, or to the settings
saved with [Save Setting.s],
Set default setting.s.
• (PnP) Plug & Play is set.
• (Non-PnP) Plug & Play is not set.
• When the Supervisor Password has been set,
input of the password is necessary.
73
Page 74

itlyp UfiDlDi^
Xnote)
---------------
Key Operations
10
:To display the correspond- CDO ;To move among the items.
ing “help” file.
.....
I 1 [ —> I :To move among the values
Enter :To make a selection.
:To display previous screen
(To exit the program at the
main screen).
;:"bp ' ;;rn
W&c
j f 1 1^
Exit
Settings were changed.
Do you want to save them?
Yes, save and exit the Setup Utility.
No, exit the Setup Utility without saving.
No, return to the Setup Utility.
(The disphiy may be clitTerent if no changes to the settings arc made.)
iii. t
of each item.
FJ)
:To return to the setting be
fore a change.
pToii
:To set the default values.
ii-i --t.
■ rtilll.l'-' H.:l
u'-: j'fi
Xnote)-
If the User Password has been
.set, the password must be entered
before Windows can start.
h"V ,:if: ■ ;['
System Summary
This can be used to check the current memory capacity and the BIOS version.
System Summary
System Memory 640 KB
Extended Memory
BIOS Version
(The version number is displayed in place of the asterisks (*).)
31 MB
74
Page 75

Select (Enable! to display graphics mode
screens with a resolution of 640 x 480 ex
panded so that they fill the LCD screen.
75
Page 76

Setup Utility
Power Management
Power Management
•Power Saving (Battery)' Power Saving (AC)----------
•Resume Timer-
Operation Setting
Power Switch
Panel Switch
PC Card Power
Automatic Hibernation
Battery Setting
when remaining capacity is low [ Suspend
This setting specifies whether the computer will
enter suspend or hibernation mode when the re
maining battery capacity is low.
----------------[ Suspend ]
[ LCD Off ]
[ON ]
[ Never ]
If it is enabled, the system will
resume from suspend mode at a
specified time.
Power Switch
Select the power switch function while
the computer is turned on.
Select [Suspend], [Hibernation] or
[Power Off]-
Panel Switch
Set the action to take place when the
panel is closed. Select [LCD Off] or
[Suspend].
PC Card Power
Set the power supply for the PC Card
during Suspend mode. Select [ON] or
[OFF],
Automatic Hibernation
Set the amount of time that must
elapse from when the computer enters
suspend status until it automatically
switches to hibernation status. Select
[Never], [5 min], [10 min], [30 min],
[60 min] or [ 120 min].
76
Page 77

Power Saving (Battery)
Power Management Mode
[ Power Saving]
CPU Speed
Standby Timeout 2 min
Suspend Timeout
LCD Back Light
Power Saving (AC)
Power Management Mode
CPU Speed
Standby Timeout 30 min
Suspend Timeout
LCD Back Light
25%
10 min
Power Saving
[ Standard ]
100%
Disable
Bright
The settings are the same for [AC] and for [Battery],
Setting
Function
CPU Speed (%)
Standby Timeout (min)
Suspend Timeout (min)
LCD Backlight
Standard Power
Saving
100 25
30 2
Disabled 10
Bright Power
Saving
User Setting
100, 75, 50,25, 12.5
1, 2, 5, 10, 15, 30, Disable
1,2,5, 10, 15, 30, Disable
Bright, Medium, Dark, Power
Saving
77
Page 78

Setup Utility
Supervisor Setup
If a supervisor password has been set, the password input screen will appear. Input the
supervisor password.
Supervisor Setup
Parallel Port
Mode [ Bidirectional ]DMA None
Infrared Port [ Port 2F8, IRQ i
ASK Mode
DMA [DMA 0 ]
Serial Port
Sound Port
Sound Blaster compatible I/O
WSS CODEC I/O
IRQ
DMA-A
DMA-B {Sound Blaster) [DMA 1 ]
USB Port
Boot up Drive t FDD -> HDD
'Supervisor Password
User Password protection by user [Disable ]■
PCI clock control* [ Enable ] ■
-----------------------------------------------
[Port378, IRQ /
-----------------
[ Disabled ]
[ Port3F8, IRQ^
[ Enabled
[220h ]
[530h ]
[ IRQ 5 ]
[DMA 7 ]
[ Disabled
n
i]
n
]
]
]
Q=page 38
78
(To display the items marked with an asterisk (*), move the cursor to the
bottom of the screen to cause it to scroll down.)
[Sound Port]
Select the sound chip operation setting. If [Disabled] is selected, all sound related
settings are disabled.
[Sound Port: Sound Blaster compatible I/O]
Set the I/O address for the Sound Blaster compatibility mode.
[Sound Port: WSS CODEC I/O]
Set the I/O address for WSS CODEC.
[Sound Port: IRQ]
Set the IRQ for the sound chip.
It is not possible to select the same IRQ as that selected for the parallel port.
[Sound Port: DMA-A] [Sound Port: DMA-B]
Set the DMA for the sound chip. Make sure that the settings for DMA-A and DMAB do not overlap, and that neither of them overlaps with the DMA setting for the
parallel port or the infrared port.
Page 79

Set the parallel port IRQ.
If the setting conflicts with the sound port IRQ setting, the sound port is
automatically set to a different IRQ.
Set the operation mode of the parallel port.
The [EPP] and [ECP] mode settings can be selected only if the parallel
port setting is [278] or [378].
If [Parallel Port Mode] is set to [ECP], set the DMA channel.
Make sure that the setting does not conflict with the DMA setting for [Sound
Port; DMA-A), [Sound Port; DMA-B], or the infrared port.
[Infrared Port]
Set the infrared port IRQ.
If the setting conflicts with IRQ set for the serial port, the serial port is
automatically set to a different IRQ.
[Infrared Port: ASK Mode]
Selecting [Enabled] activates the ASK mode.
Select [Disabled] for the IrDA or FIR mode.
[Infrared Port: DMA]
Set the DMA for the infrared port. Make sure that the setting does not
conflict with the DMA setting for the sound port or the parallel port.
Set the serial port IRQ.
If the setting conflicts with IRQ set for the infrared port, the infrared port is
automatically set to a different IRQ.
Select [Enabledl in order to use the USB port.
Select [Disabled] if you will be using the suspend or hibernation function.
Set the drive to be used to boot the computer.
Select [Enable] if you want to prevent someone from setting the user
password without your knowing it.
Select whether or not to use PCI clock control.
Note that if [Enable] is selected, some CardBus cards may not be detected
properly.
79
Page 80

Key Combinations
Do not press the following key combinations repeatedly in (quick) succession.
Do not press the following key combinations while using the trackball (mouse) or other
keys.
Some keys cannot be used during system startup, or while executing the suspend or
hibernation process.
Communication errors may occur if keys are used during processes such as high speed
serial communications. Do not use the keys during communications.
Pressing a key during audio playback or recording may cause the audio to be disrupted.
Settings changed using [pn) + (P2|, [pn] + [P3] and [pn] + [pS] only remain in effect
temporarily. The settings defined using the Setup Utility are restored the next time the
computer is restarted.
LCD brightness control
F?il + lO
Display change
Fnl + S
Volume control
[[Fnl-«-R(down),iP5j(up)
Power Management switch
Rii + iP^
Hold down the W key and press to change the
brightness. Each press advances the setting one step
through the following sequence; Dark-Medium-Bright-
Power Saving.
When the brightness is at its maximum value, the fol
lowing icon is displayed.
-o"-
By pressing this key combination, you can select ei
ther an external display , LCD or simultaneous.
Pressing this key combination adjusts the volume of
the internal speaker.
The following icon is displayed.
Cd'llll
Minimum Maximum
By pressing this key combination, you can change the
power management feature of the Setup Utility.
The following icon is displayed.
80
Power
Saving
User
Setting
Standard
Page 81

Power off using the hiberna
tion function
Fn + F7
Pressing this combination causes the current screen on
the display to be saved to hard disk drive, and powers
off the computer. When the computer is powered on
again, this same screen will be displayed.
Speaker on/ofT switch
R^ + iFsl
Remaining capacity of the
battery pack
Fn + F9
Standby mode for conserv
ing power
Fnl+ F10
Pressing this key combination turns off audio from the
internal speaker. Pressing it again turns audio back on.
Also, the speaker automatically turns on when
[Fnl + (f^ or © + |[F^ is pressed.
The following icon is displayed.
^4
On Off
Pressing this key combination displays the remaining
battery capacity on the screen.
The following icon is displayed.
cu
Remaining capacity
display
Pressing this key combination cuts off power to the
motor of the hard disk drive and the display until op
eration is resumed by pressing any key.
Battery pack is not
installed.
81
Page 82

LED Indicators
Caps Lock
m
(U
e
D
©
NumLK
(Numeric key)
ScrLK
(Scroll lock)
Hard disk status This indicator lights when the hard disk drive is accessed.
Battery pack
status
Power status (Not lit) • Power off
This indicator lights green when Caps Lock is pressed.
Subsequent non-shifted input is capitalized.
This 0 indicator lights green when NumLK is pressed. This
causes a portion of the keyboard to function as a numeric
keypad.
This indicator lights green when ScrLK is pressed. Scroll
lock functions differently depending on the application.
(Not lit) :AC adapter not connected or
charging not being performed.
(Lit constantly orange) :Charging in progress,
(Lit constantly green ) iCharging is finished.
(Lit constantly red) : Battery is low
(Blinking red) :Battery pack or charging
malfunction.
(Blinking orange) iCharging on standby. (The
ambient temperature is outside the
allowable range.)
• When the computer enters the
hibernation mode.
(Blinking green) • When the computer enters the
suspend mode.
(Lit constantly green) • Power on
• When the computer enters the
standby mode.
82
Page 83

Specificatioos
Model No.
CPU Pentium® Processor with MMX™ technology 166 MHz
Cache Memory
(second cache memory)
EDO Memory
Video Memory 2 MB
LCD
Hard Disk Drive
Input DeviceKeyboard
Ext. Floppy Disk Drive
Card Slots PC Card Slots
Interface
Sound
Software
Battery
AC Adapter
Power Consumption
Physical Dimensions (WxDxH)
Weight
Usage Condition
Separate communications software is necessary.
Varies depending on the usage conditions.
' Approx. 0.6 W when the battery pack is fult/ charged (or not being charged) and the computer is OFF
Type 8.4” (TFT)
Displayed Colors 262,144 colors (800 X 600 dots)
Pointing Device
RAM Module Slot
<Port Replicator>
Parallel Port
Ext. Display Port
Serial Port
Ext. Keyboanj/Mouse Port
FDD Port
Microphone Jack
Headphone Jack
IrDA Port
USB Port
Operating SystemMicrosoft® Windows® 95
Utility Programs Setup Utility
Battery Pack
Operating Time
Charging Time
Clock Battery
CF-M32W5M
32 KB
(256 KB)
32 MB (96 MB Max.)
2.1 GB (1 GB=103 bytes)
84 keys
16mm Optical Trackball (Logitech Marble)
720 KB/1.44 MB (two-mode)
Two Type I or Type II, or one Type III
Allowable current (total for two slots) 3.3 V :800 mA
5 V :600 mA
144-pin, SO-DIMM, 60 ns, 3.3 V, EDO, Self refresh
Dsub 25-pin female
Mini Dsub 15-pin female
Dsub 9-pin male
Mini DIN 6-pin female (PS/2 type)
26-pin female. For External Floppy Disk Drive (CF-VFDU01)
Dynamic Microphone
Miniature jack, 3.5 DIA
IrDA 1.1 compliant, 4 Mbps data transmission speedVASK
Universal Serial Bus
16 bits, 44.1 kHz PCM/FM sound (Sound Blaster PRO Compatible)
Mono Speaker X 1
Lithium Ion 10.8 V, 1500 mAh
Approx. 2.5 hours"
Power On :Approx. 5 hours" Power Off :Approx. 2.5 hours"
Coin type lithium battery 3.0 V
Input 100-240 V AC, 50/60 Hz Output ;15.1 V DC, 2.6 A
Approx. 26 W"*(maximum when charging in the ON state)
225 mm X 172 mm X 36 mm (8.86” X 6.77” X1.42")
Approx. 1.0 kg (2.2 lbs)(With the battery pack installed)
Temperature :5 “C to 35 ®C (41 °F to 95 “F)
Humidity :30 % to 80 % RH (No condensation)
83
Page 84

Index
C A )
AC adapter.....................................11,12,83
AC cord
..............................................
11,12
C B )
Backup disks.......................................21,58
Battery indicator
Battery pack
Battery pack connector
Battery pack release lever
Battery status
Brightness adjustment
............................
.............................
......................................
..........................
11,30,83
.......................
..................
28,33,54
10,32
10,32
28,82
8,80
( c )
CD-ROM drive
Charging
Click buttons.........................................8,17
Computer viruses.........................................7
CPU.....................................................15,83
..............................
.............................................
23,40,58
31,33
C D )
DC-INJack
Display.............................................8,50,55
Displayed colors
Double-clicking
Dragging
............................................
......................................
.......................................
.................................................
9,12
83
17
17
C E )
Error codes ..............................................52
Expansion bus connector....................10,43
Ext. display port.............................44,50,83
Ext. keyboard/mouse port
Extended life Battery Pack
External display
.............................
..................
.................
50,53,55
44,83
30,32
C F )
FIRSTAIDFD
Floppy disk
Floppy disk drive
Format................................................55,60
( H )
Hard disk..............................................6,59
Hard disk drive (HDD)
HDD indicator
Headphone jack
Hibernation data area
Hibernation function................18-20,29,81
(■ )
Infrared communication port
Infrared data communications
I/O port address.......................................57
IRQ..........................................................57
( K )
Keyboard ........................................8,44,83
Key combinations
Cl"
LED indicators.....................................8,82
Limited use license agreement...........12,69
Load default settings..........................52,73
( M )
Microphone jack
..............................
..................................
.....................
........................
.............................
..............................
........................
..........
................
...................................
.............................
21,59,71
5,7,21,55
22,45,55,83
6,83
6,8,18,82
9,42,83
59,71
9,41,83
40
80
9,42,83
C N )
Network password
..................................
16
84
Page 85

CE
Parallel port
Password
PC Card.........................................42,46,57
PC Card slots
Peripherals
Port Replicator..............................11,42,83
Power indicator...............................8,12,82
Power management
Power switch..............................9,12,19,76
Printer
..................................
.......................................
..................................
......................................
.................
...........................................
19,26,76,80
44,51,83
16,36,56
9,46,83
5,42,56
42,51,56
3 Cu
User password
USB............................................9,57,64,78
d
Video setup
Volume
C~w
Windows 95 setup
Write-protect tab..................................7,55
....................................
.........................................
.................................................
..............................
3
16,36
3
50,75
9,80
3
13,70
CK
RAM module
RAM module slot
Reinstalling software
Reset button
Restarting...........................................10,18
................................
.........................
..............................
..................................
42,48,83
42,49,83
58
10,53,54
d 3
Saving data
Security measures ....
Serial port
Setup utility
Shutting down............
Speaker
Standby function
Standby timeout.........
Starting up
Supervisor password
Suspend function
Suspend timeout
System setup
................
..................
...............
.....................
........
.................
.......
.........
..............
...............
...............
44,56,78,83
..........
56,73
..........
18,19
......
9,80,83
..........
24,81
..........
27,77
..........
15,53
...............
....
18-20,29
..........
27,77
..............
36
38
75
d
Trackball....................................8,17,56,75
J
6
3
85
Page 86

Memo
86
Page 87

87
Page 88

As an ENERGY STAR® Partner, Panasonic has determined that this
product meets the ENERGY STAR® guidelines for energy efficiency.
Outline of the International ENERGY STAR® Office Equipment Program
The international ENERGY STAR® Office Equipment Program is an international
program that promotes energy saving through the use of computers and other office
equipment. The program backs the development and dissemination of products
with functions that effectively reduce energy consumption. It is an open system in
which business proprietors can participate voluntarily. The targeted products are
office equipment such as computers, displays, printers, facsimiles, and copiers. Their
standards and logos are uniform among participating nations.
Printed in Japan
FJ0798-0
DFQX2566ZA
 Loading...