

Reference Manual (Cover)
1
Reference Manual
Personal Computer
Model No. CF-H1 Series
We recommend that this Reference Manual be printed.
Introduction
2
Terms and illustrations in this manual
Î : Page in this Manual.
: Conditions that may result in minor or moderate injury.
: Useful and helpful information.
Click : Touch the screen with the digitizer pen or finger.
Right-click :
Touch and hold with the digitizer pen.
You can also perform “Right-click” by pressing and holding the button of the digitizer pen, and then tapping the
object.
[start] - [All Programs] :
Click [start], and then click [All Programs].
<Only when connected to Cradle and keyboard>
: Press [ ] (Enter) key.
Ctrl
+ F7 :
Ctrl
Press and hold
z The display of the key may be different from this manual according to the keyboard used. (e.g. “Delete” instead of
“Del”)
<For flash memory model>
Read the term “hard disk” as “flash memory” whenever it appears in this manual.
key, and then press F7 key.
Regarding Windows XP
z Do not set [Command Prompt] to “Full Screen”.
Touch Screen Operation
You can use Windows by touching the screen in the same way as you use a mouse.
The screen of this computer has following two pointing device functions.
z Digitizer: can be operated with the digitizer pen (included)
z Touchscreen: can be operated with your finger etc.
If you touch the screen with the digitizer pen and your finger at the same time, the operation by the digitizer pen is enabled.
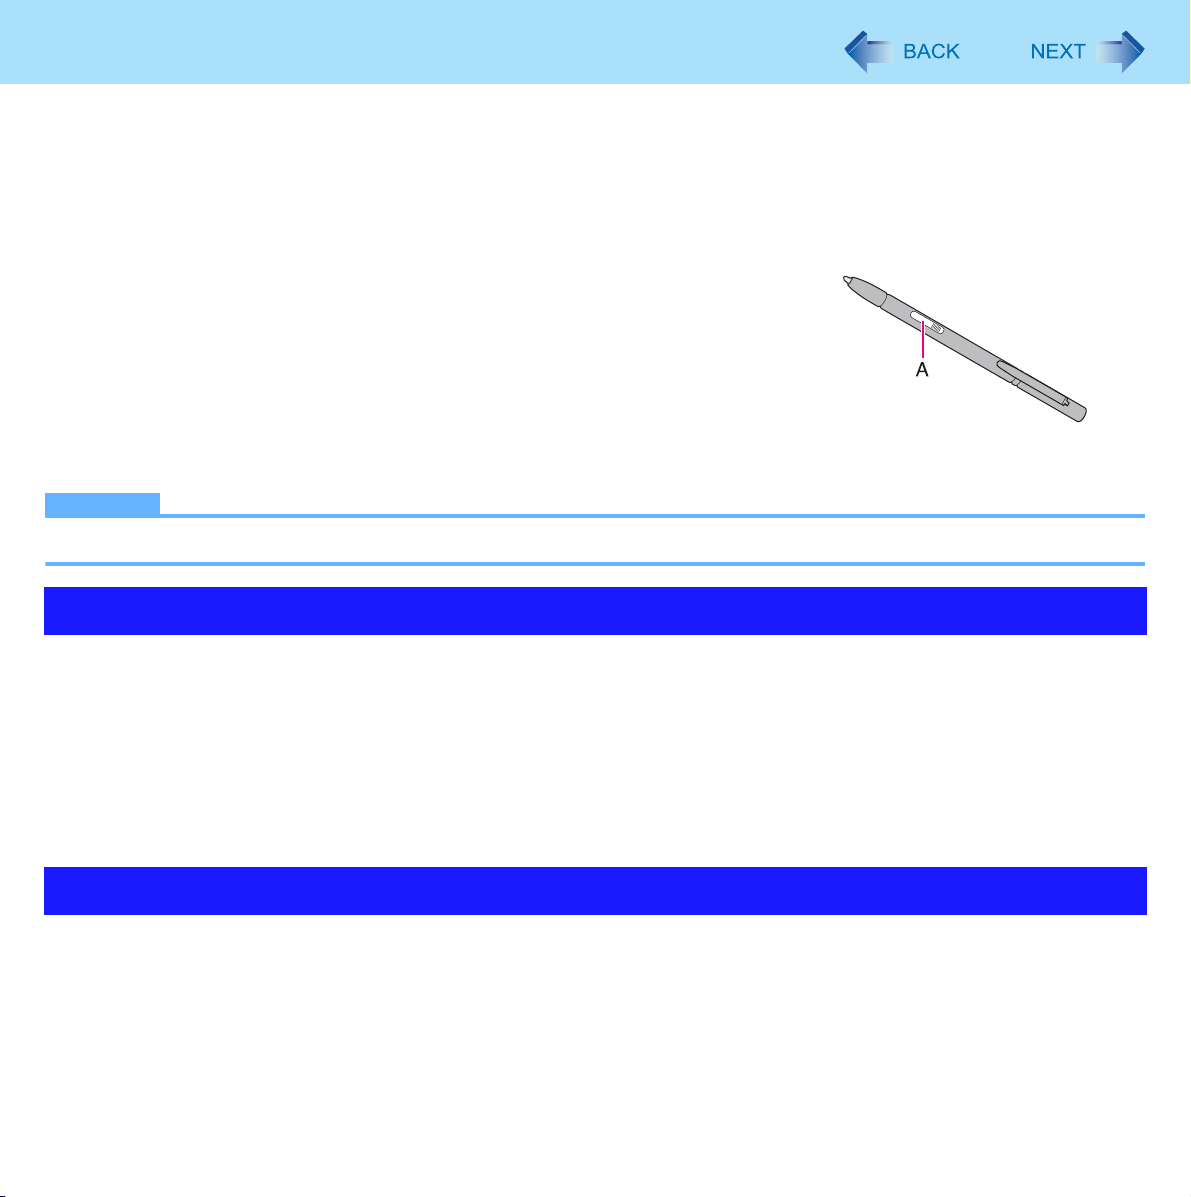
z To right-click
<When using the digitizer pen (included)>
You can perform “Right-click” with either of operation below.
z Touch and hold with the digitizer pen.
z Press and hold the button (A) of the digitizer pen, and then touch the object.
<When not using the digitizer pen>
You can perform “Right-click” with either of operation below.
z Touch and hold with the digitizer pen.
NOTE
z The operation by touching the screen does not work in the Setup Utility.
3
Operation by touching the screen
z Touch the screen with the digitizer pen (included) or your finger
When touching the screen, use only the digitizer pen (included) or your finger on the surface.
Touching the screen with an object other than the digitizer pen (included) or your fingertip may scar or stain the surface,
causing the malfunction.
z Do not apply too much pressure when touching the screen
Only a light touch is required to touch the screen. Applying too much pressure may damage the surface.
Maintaining the performance of the screen
z When the screen becomes dirty, wipe it with a soft cloth
The screen is specially treated to prevent dirt from adhering to the surface, so dirt can be removed easily using a dry
cloth. If the dirt does not come off easily, breathe on the surface and try again.
Do not apply water or solvents to the soft cloth.
Touch Screen Operation
4
z Check the following to prevent the surface of the screen from being scratched
z Are you using the digitizer pen or your finger to operate the screen?
z Is the surface clean?
z Is the cloth clean?
z Is the tip of the digitizer pen clean?
z Is your finger clean?
Things to keep in mind when using the screen
z Do not touch the screen outside of the LCD display area
The input area is defined by the LCD display screen. Touching the screen outside of the display area may result malfunctions or damage to the screen.
z Do not apply excessive force to the screen
Do not lift the computer while holding the LCD screen, or allow the screen to be twisted. Do not place any objects on the
LCD screen. Any of the above may cause the screen glass to break, or may damage the LCD screen.
z Operation response may be slower in low temperature environments
The screen may respond to operations more slowly when using the computer in temperatures less than 5°C, but this is
not a malfunction. Response time will return to normal when the computer is returned to room temperature.
z If the cursor jumps to a location other than where the screen was touched, or if the LCD reso-
lution changes, perform the calibration
Perform the procedure of “Calibration” (Î page 5).
Suggestions About Cleaning the LCD Surface
To improve the outdoor visibility of the display, a low reflection coating has been added. In order to avoid scratches and peeling of this coating, an approved soft cloth has been included to wipe the LCD surface of the computer. Before using the computer, be sure to read the instructions provided below.
z Be sure to wipe the LCD display to remove fingerprints, etc., with the soft cloth.
z Do not wipe areas other than the LCD display with the soft cloth.

Touch Screen Operation
<How to use the soft cloth>
• Use the soft cloth when it is dry. Do not apply water or solvents to the soft cloth.
• First, lightly wipe foreign particles and dust adhering to the LCD display on one side of the soft cloth. Do not use force,
since the LCD surface may be damaged with the foreign particles or dust.
Next, wipe off fingerprint, etc., with the other side of the soft cloth.
After wiping off foreign particles and dust, wash the soft cloth (refer to the following) to remove the foreign particles and
dust from the soft cloth.
• When the soft cloth becomes dirty, wash it with neutral detergent. Do not use bleach or a fabric conditioner (softener), or
carry out sterilization by boiling.
• If the LCD gets wet, wipe the surface lightly with the soft cloth.
• While wiping the LCD display, the computer must be turned off.
5
Calibration
Digitizer Calibration
To calibrate the digitizer, use the digitizer pen and follow the steps below.
1 Click [start] - [Control Panel] - [Printers and other Hardware].
2 Click [Tablet and Pen Settings].
3 Click [Calibrate...] in [Settings].
4 Using the digitizer pen, touch each of 4 “+” target marks one by one, and then click [OK].
Touchscreen Calibration
z To calibrate the touchscreen, do not use the digitizer pen (included). Use your finger or other objects.
z Perform the calibration for the orientation to be used.
1 Click [start] - [Control Panel] - [Other Control Panel Option] - [Touch Settings].
2 Click [Calibrate].
3 Using your finger or other object, touch of the 4 "+" target one by one, and then click [Fin-
ished].
4 Restart the computer.
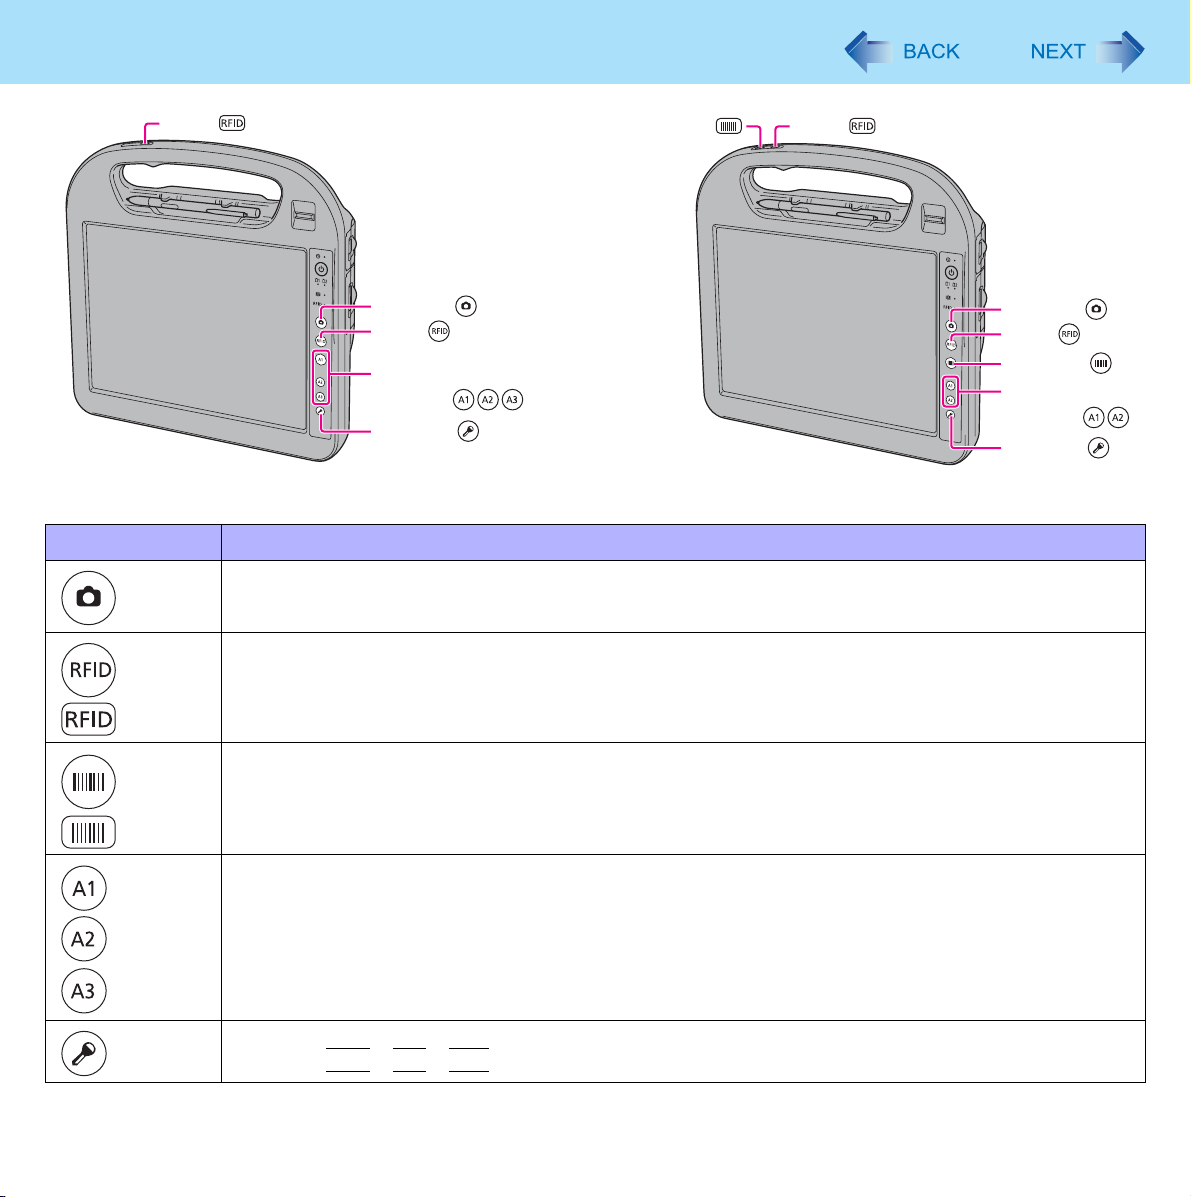
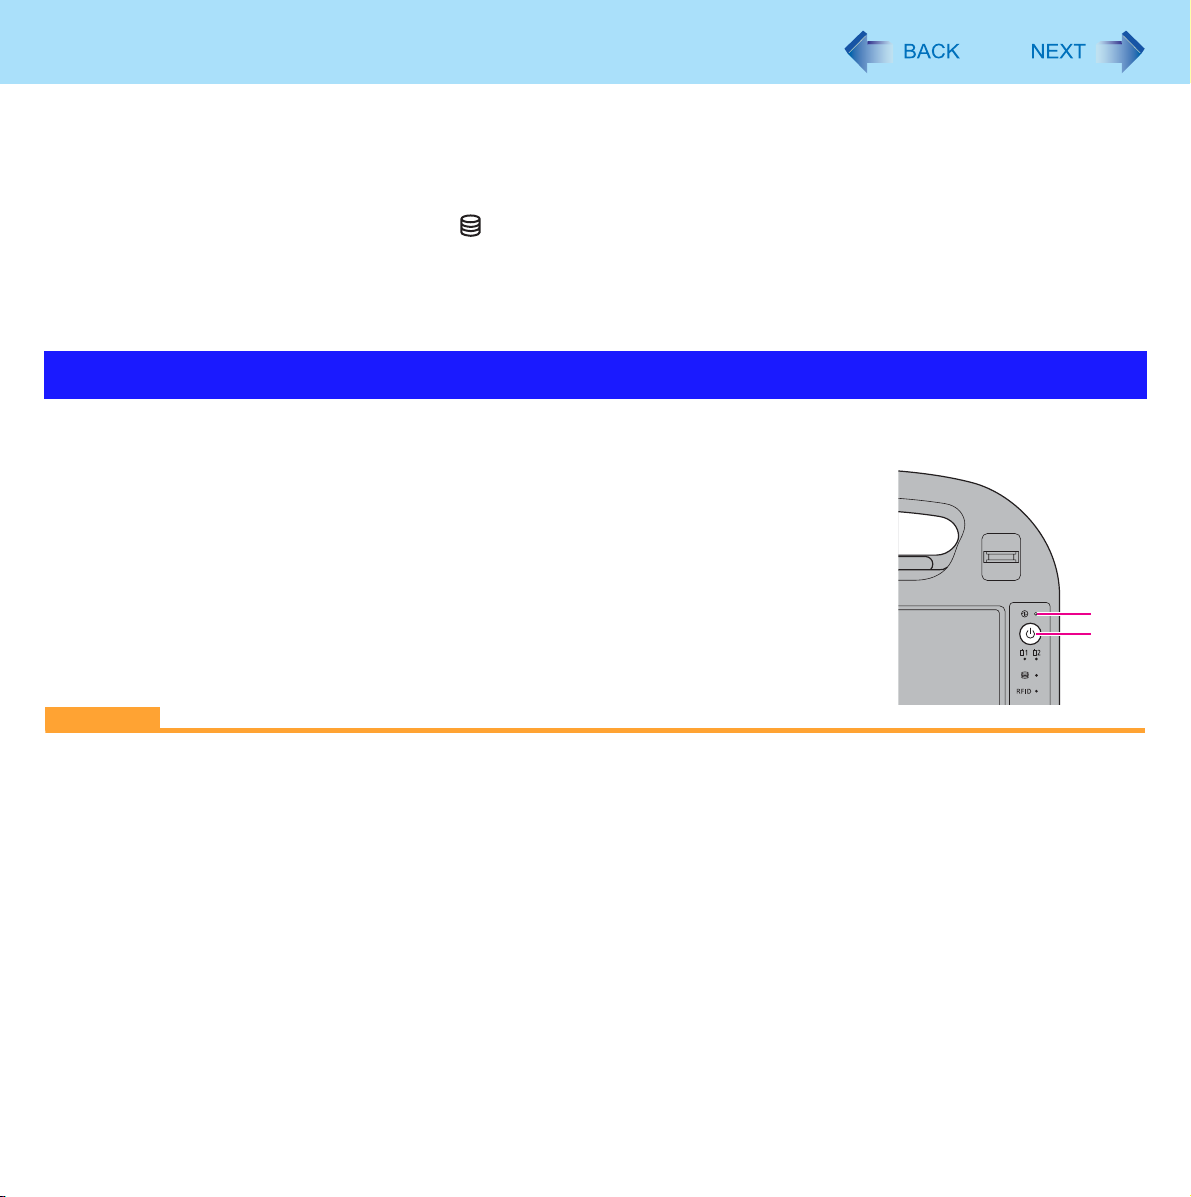
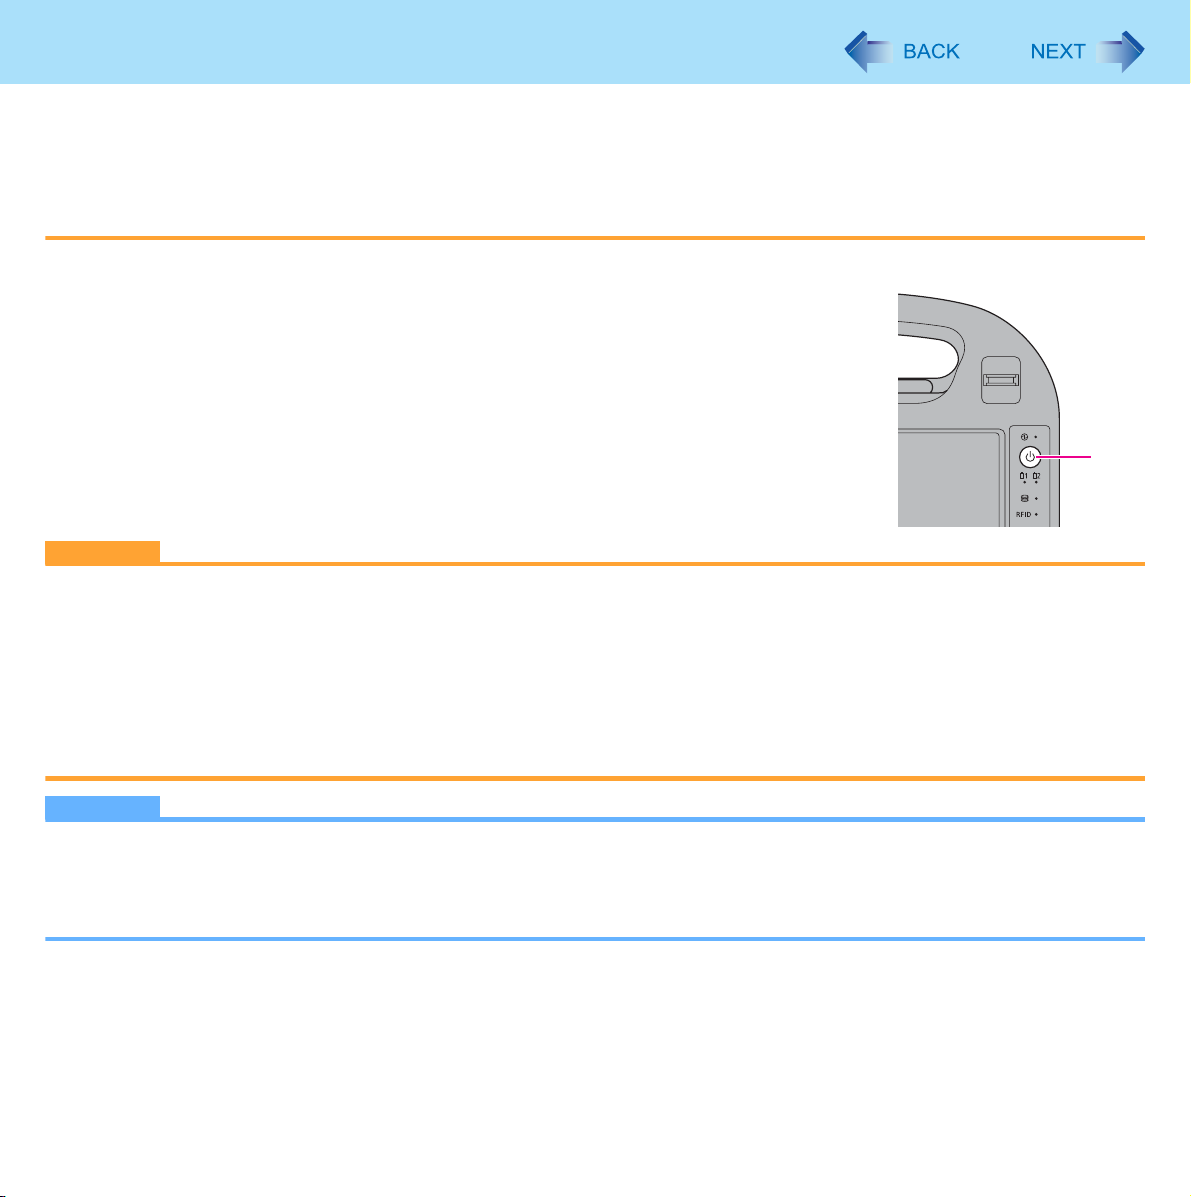
Hardware Buttons
6
RFID
Barcode RFID
Camera
RFID
Application
Buttons
Security
<Model without Barcode Reader> <Model with Barcode Reader>
Button Function
Camera Button
Take still pictures. (Î page 38)
RFID Reader Button
Read the data from RFID tags. (Î page 47)
Camera
RFID
Barcode
Application
Buttons
Security
*1
*1
*2
*1
Only for model with the Barcode Reader
*2
Only for model without the Barcode Reader
Barcode Reader Button
Read the barcode. (Î page 49)
Application Buttons
Start the registered function or application. (Î page 15)
Security Button
Works as
Ctrl
+
Alt
+
Del
.
Hardware Buttons
NOTE
z The Hardware buttons work when the Windows screen is displayed.
z The Hardware buttons may not work immediately after Windows is started up or the Windows logon screen (or the
Welcome screen) is displayed.
z The Hardware buttons may not work after time zone is changed. In this case, restart the computer.
7
To assign different functions to the Security Button
The Security button functions as
Also, at the time of purchase, the Security button functions as
screen is displayed).
You can configure the button to function as buttons
Ctrl
+
Alt
+
Del
at the time of purchase.
F2
while you start up the computer (while [Panasonic] boot
F1
to
F12
while you start up the computer.
1 Start up the Setup Utility (Î page 78).
2 Select [Main].
3 Select [SAS Button] and press (Enter).
4 Press Ï Ð to select the desired button (
F1
to
F12
5 Press F10, and then select [Yes] and press (Enter).
NOTE
z When the computer has started up, the Security button functions as
setting.
) and press (Enter).
Ctrl
+
Alt
+
Del
, regardless of the [SAS Button]

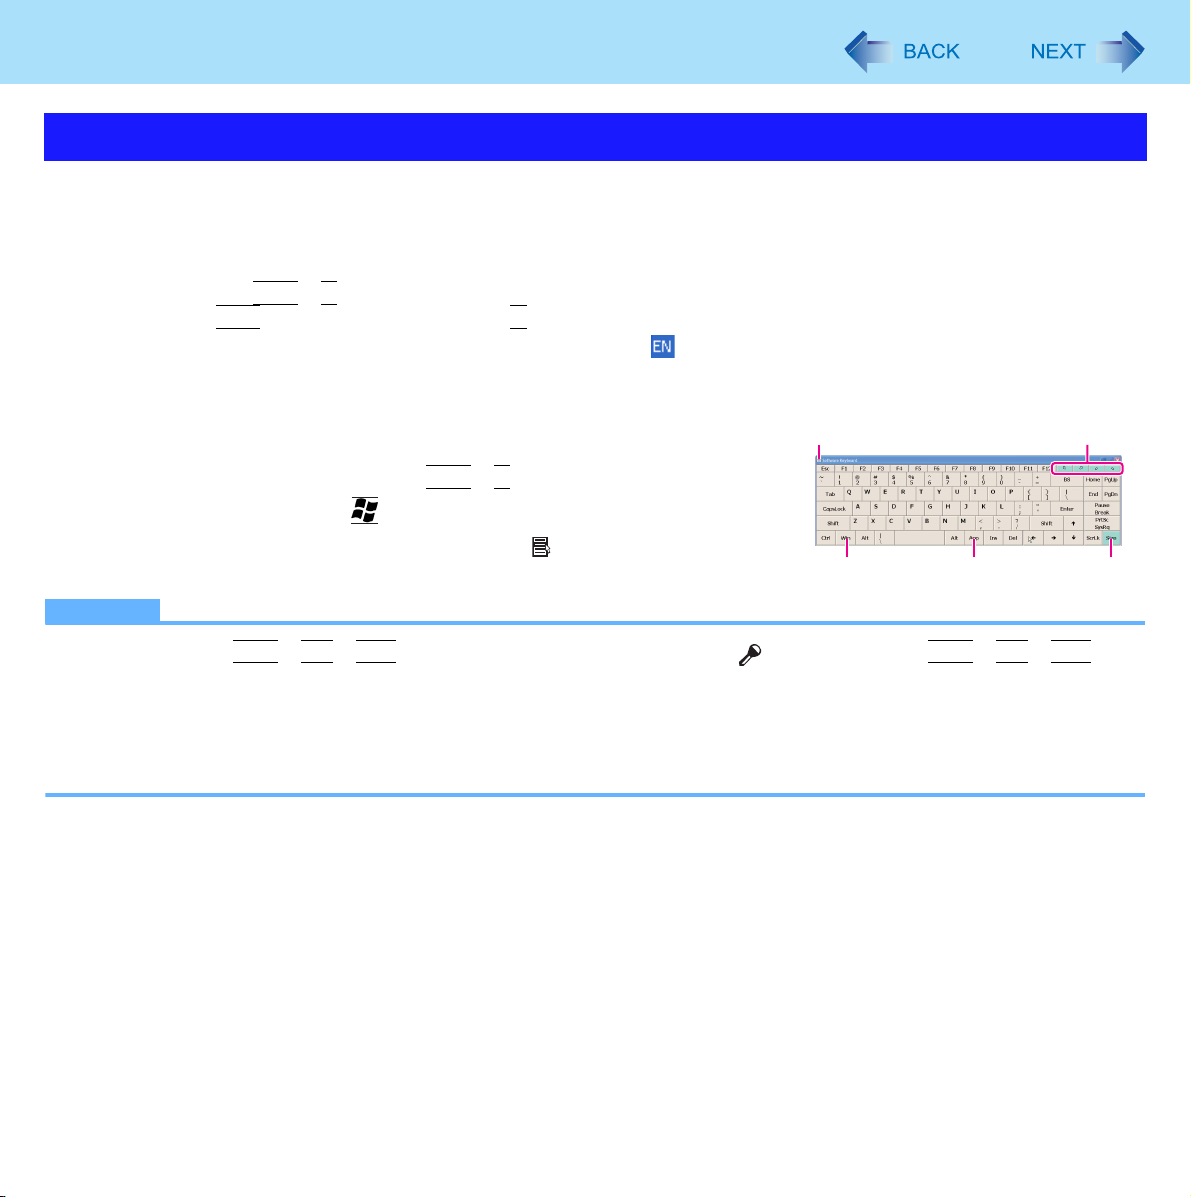
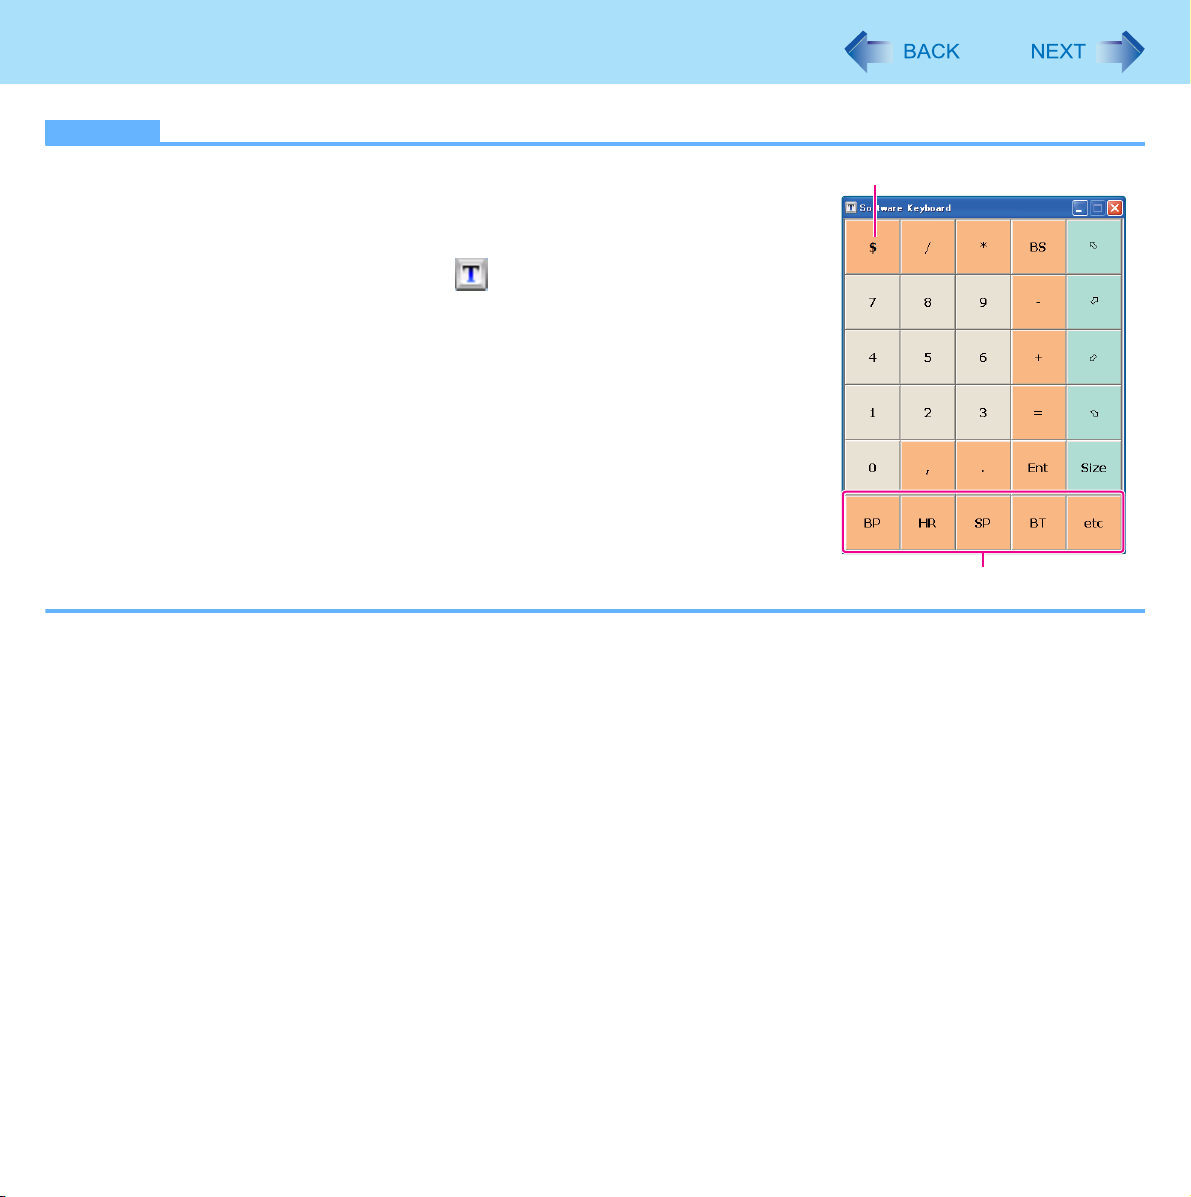
Software Keyboard
You can use the Software Keyboard instead of the on-screen keyboard of Tablet PC Input Panel. By using the Software Keyboard, you can change the size of the Software Keyboard, and can use the numeric keypad.
NOTE
z You cannot uninstall Tablet PC Input Panel. When you enter text, select either the Software Keyboard or Tablet PC
Input Panel.
8
Installing the Software keyboard
1 Log on to Windows as an administrator.
2 Click [start] - [Run] and input [c:\util\meiskb\setup.exe], and click [OK].
Follow the on-screen instructions.
3 Add a check mark for [Yes, I want to restart my computer now.] and click [Finish].
Software Keyboard
Starting the Software keyboard
1 Click [start] – [All Programs] – [Panasonic] – [Software Keyboard].
2 Touch the software keyboard.
z To use shortcut key
Example :
Press
z If you added the input language, the language bar (e.g. ) is displayed on the notification area. To select the
keyboard language, use the language bar on the notification area. If the keyboard language does not change,
click the title bar of the software keyboard and then click on the application.
A. Software keyboard menu (Î page 10)
B. Moves the software keyboard to a corner of the screen.
C. One tap : Works as shortcut key (
Two taps : Works as the key.
D. Works as a right-click. (Same function as the key)
E. Switches between QWERTY keyboard and numeric keypad.
NOTE
Ctrl
+ C
Ctrl
(turns blue) and then press C.
Ctrl
+ C etc.).
9
BA
DC E
z You cannot use
z You cannot use the software keyboard when the [Command Prompt] screen is set to “Full Screen”.
z You can set a different language to each application (⇒ Windows help), and the keyboard layout switches according to
the application.
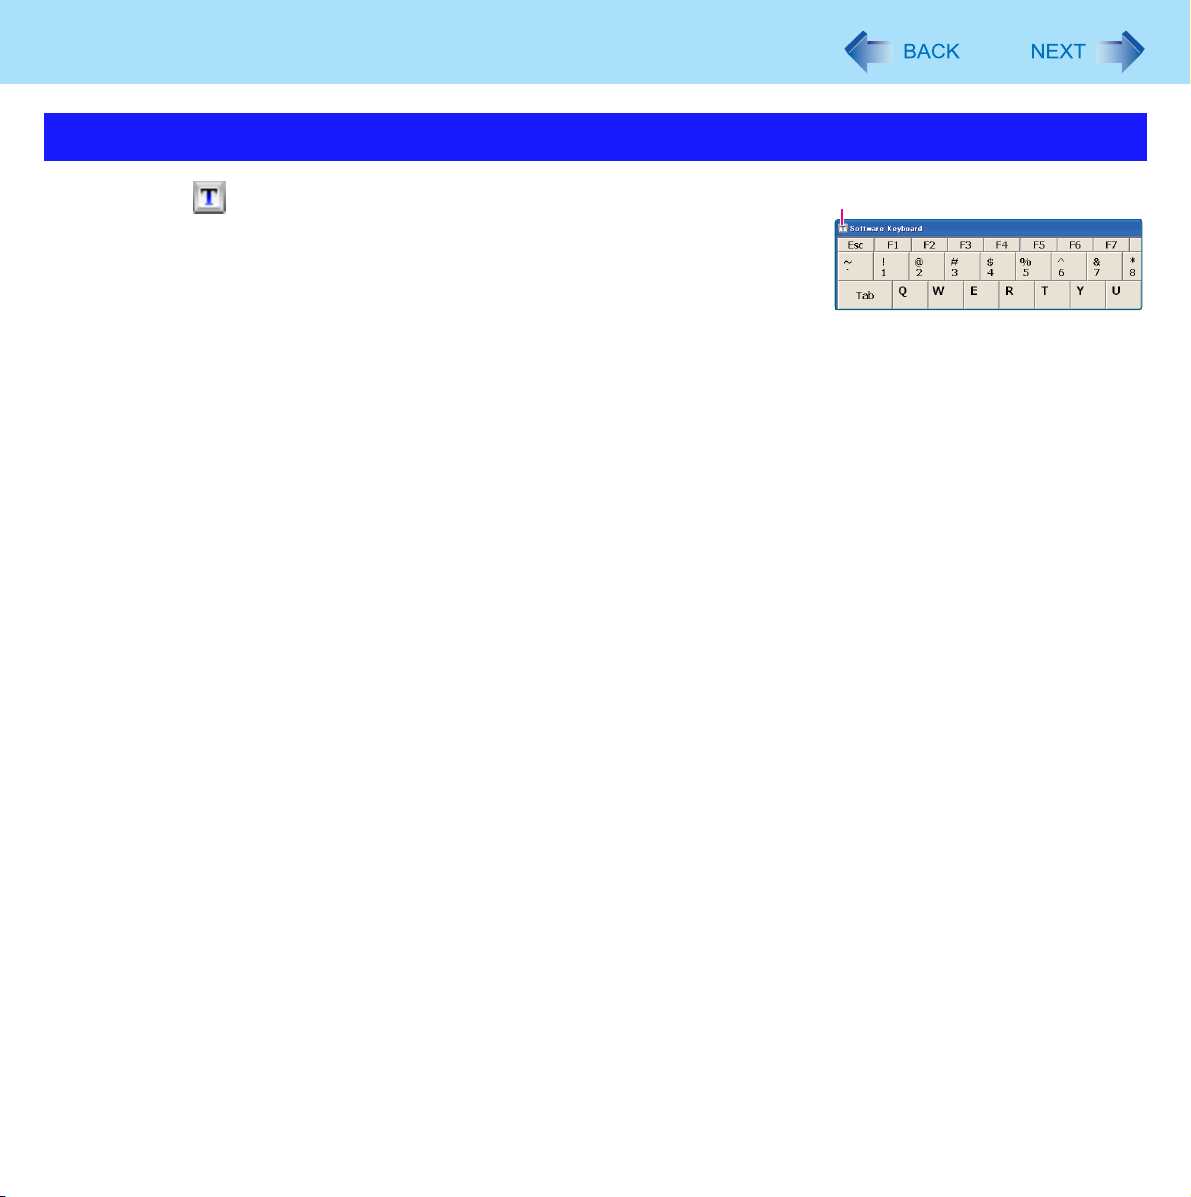
z Depending in the language, some keys are displayed in orange. You can use them to input characters such as ë and
ö.
Ctrl
+
Alt
+
Del
on the software after logging on. Use [ ] button instead of
Ctrl
+
Alt
+
Del
.
Software Keyboard
Software Keyboard Menu
10
1 Click (A).
2 Add a check mark to the function you want to use.
z [Minimize To Left]
When clicking the close button, the Software Keyboard is hidden in the
left side.
z [Auto Move]
The software keyboard moves automatically to avoid overlapping the selected window.
z [Auto Restore]
The software keyboard minimized on the notification area will be restored when you change the input mode. This
may not work on some applications.
z [Always On Top]
The software keyboard appears on the top.
z [Transparent]
The software keyboard appears semi-transparent.
z [Big Size]/[Medium Size]/[Small Size]
Select the size of the software keyboard.
z [Ten key (Big)]/[Ten key (Medium)]/[ten key (Small)]
Select the size of the numeric keypad.
z [Change Size Automatically (Big ↔ Medium)]
The size changes according to the angle of the screen display.
A
Software Keyboard
NOTE
11
z You can change the currency symbol (B) of the numeric keypad.
Click [start] - [Control Panel] - [Date, Time, Language and Regional Options] [Regional and Language Options] - [Regional Options] - [Customize] - [Currency] [Currency symbol]
z After changing the currency symbol, click (A), and then change the size of the
numeric keypad so that the selected currency symbol is shown.
z You can input the unit by using (C).
B
C
Panasonic Dashboard
You can perform the following operations by using Panasonic Dashboard.
z Check the remaining battery charge
z Change the LCD brightness
z Change the camera light settings
z Change the screen color of Cleaning Utility
z Enable or disable the touchscreen operation
z Start the application software which you registered
z Change the settings of cleaning reminder, RFID, touchscreen, button assignment of Panasonic Dashboard and applica-
tion buttons
12
1 Press the application button [A2]
You can also start Panasonic dashboard by clicking icon on the
notification area and click [Settings...].
Panasonic Dashboard starts up.
*1
You can change the setting of application button (Î page 15).
*1
(A).
2 Make the operation.
[Battery] (B)
You can check the remaining battery charge and battery operating time.
Battery operating time is for reference. The operation time may
increase and/or decrease by the state of the computer. This is not a
malfunction.
[Brightness] (C)
You can change the LCD brightness.
The brightness can be changed by clicking the desired position of the bar.
The brightness for battery operation and AC power operation can be set
separately.
[Camera Light] (D)
z To display the light switch while using the camera, add a check mark
for [Automatically display the light switch while using the camera].
z To turn on the light when the preview starts, add a check mark for
[Always turn the light ON when the preview starts].
[Cleaning Utility] (E)
You can change the screen color of Cleaning Utility. When a check
mark for [Half transparent] is added, Windows screen seems to be transparent of the screen color.
<Model without Barcode Reader>
B
C
D
F
G
H
A
E
Panasonic Dashboard
[Touchscreen] (F)
When a check mark for [Enable digitizer pen only] is added, you can use only the digitizer pen (included) to operate
by touching the screen. You cannot use the other stylus or the finger. We recommend to add a check mark for this,
when you place the palm on the screen and touch the screen by using the digitizer pen.
This setting is stored for each user.
Software buttons (G)
You can start the application software which you registered. You can change the registered application by using
[Advanced] menu. (Î below)
13
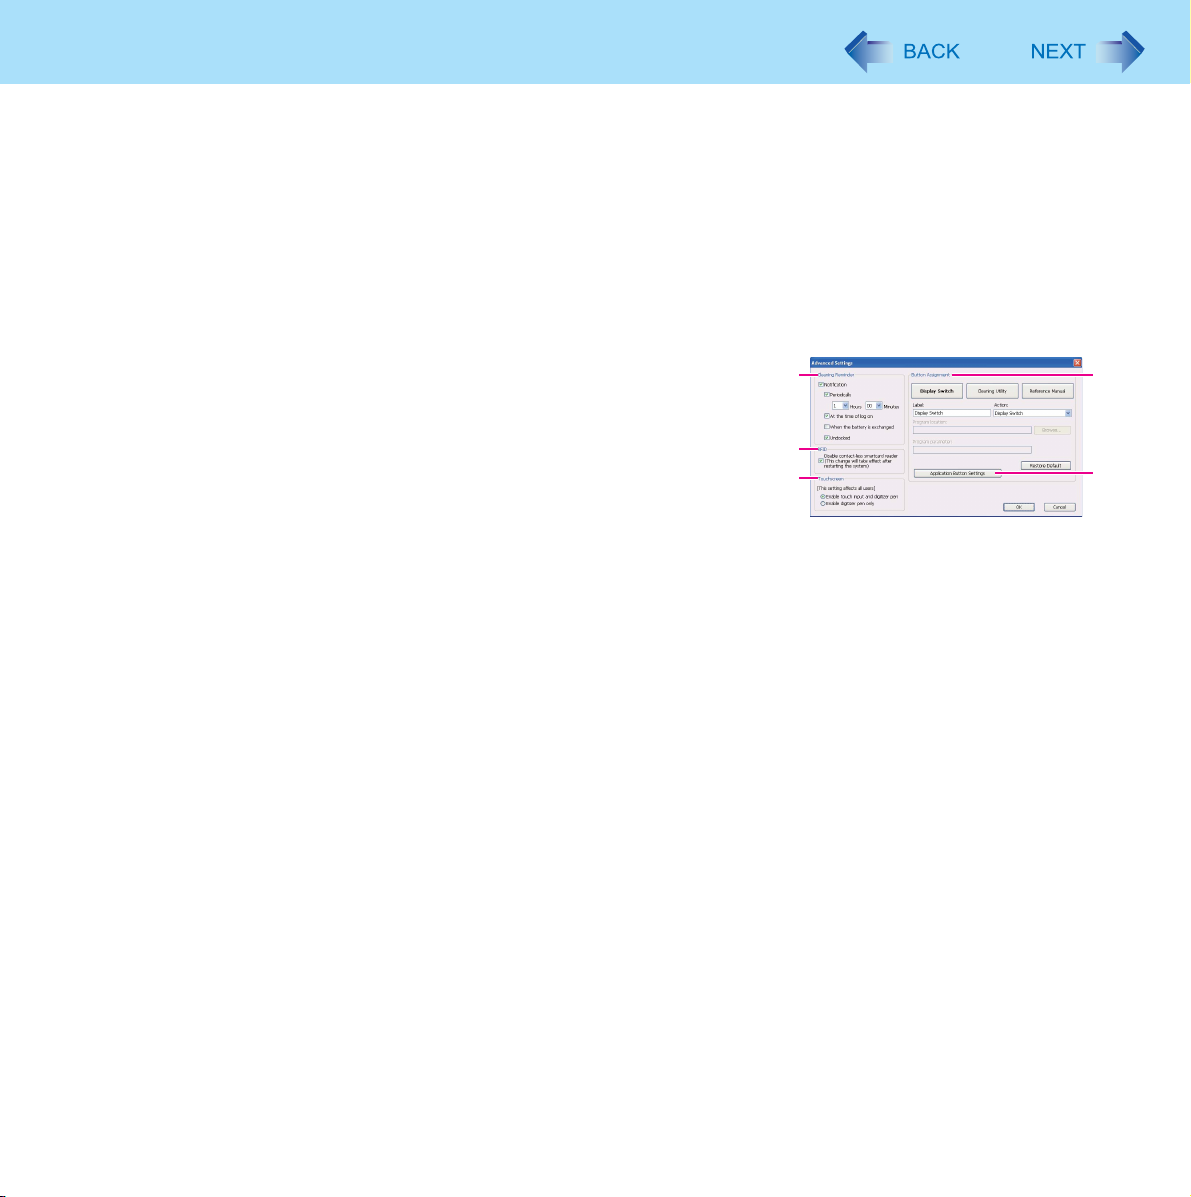
[Advanced...] (H)
You can select [Advanced] only if you logged on to Windows as an
administrator.
[Advanced Settings] menu is displayed. You can change the following
settings.
After making settings in [Advanced Settings], click [OK] to exit
[Advanced Settings].
[Cleaning Reminder] (I)
You can regularly display the message to remind cleaning. Some of following conditions can be selected.
z [Periodically]
When the defined time has passed since the last cleaning was performed.
z [At the time of log on]
When you log on to Windows.
z [When the battery is exchanged]
When you change the battery.
z [Undocked]
When you undock this computer from the Cradle.
[RFID] (J)
For saving power, add a check mark when you do not use the wireless smartcard function.
When a check mark is added, the data will be read only when RFID reader button is pressed.
[Touchscreen] (K)
When a check mark for [Enable digitizer pen only] is added, you can use only the digitizer pen (included) to operate
by touching the screen. You cannot use the other stylus or the finger. We recommend to add a check mark for this,
when you place the palm on the screen and touch the screen by using the digitizer pen.
This setting affects all users.
I
J
K
L
M
[Button Assignment] (L)
You can register the executable files or the applications to the buttons displayed on Panasonic Dashboard screen.

Panasonic Dashboard
A Click any button.
B Select the application from [Action].
You can select [Display Rotation], [Cleaning Utility] / [Loupe Utility], [Reference Manual] or [Launch Application].
To restore the default setting, click [Restore Default].
When you select [Launch Application], input the label to [Label] box, and select a file you wish to execute.
z You can also select files with extensions .pdf, .jpeg, .wma, etc. other than .exe.
z When you select a file with extension .exe, you can specify the parameter into [Program parameter].
z To disable the application, make the text box blank.
[Application Button Settings] (M)
“Application Button Setting” (Î page 15)
3 Click [OK] to close Panasonic Dashboard.
14
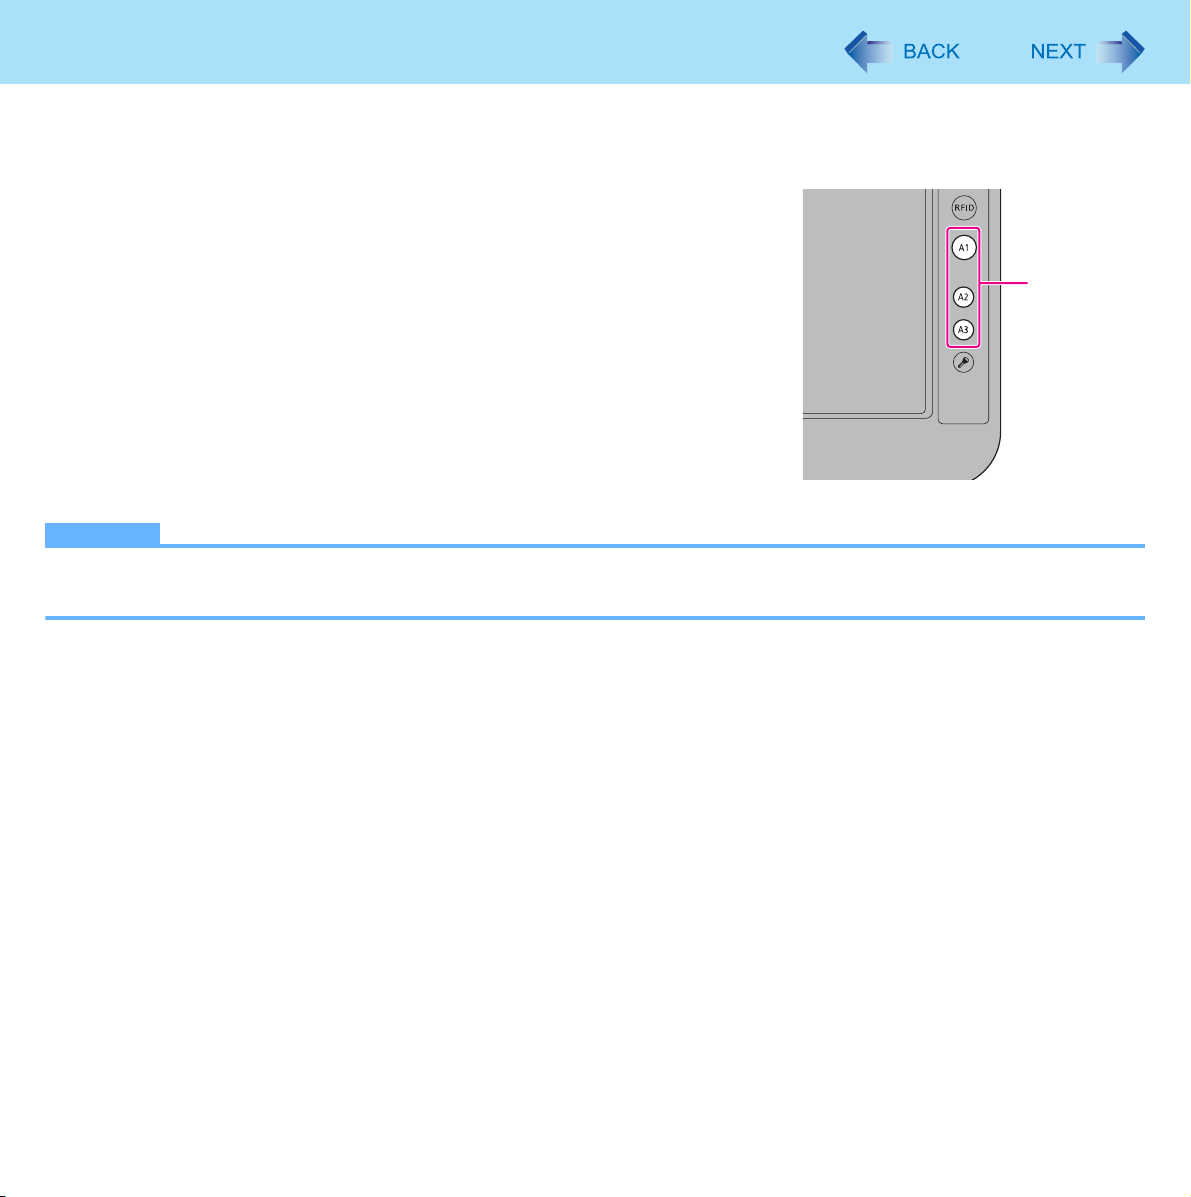
Application Button Setting
You can assign the startup functions of your favorite applications to the Applications Buttons.
1 Click [start] - [All Programs] - [Panasonic] - [Application
Button Setting].
You can also start up Application Button Setting Utility from Panasonic
Dashboard (Î page 12).
2 Make the settings.
You can register the execute files of the applications.
<Model without Barcode Reader>
NOTE
z <Only for model with Barcode Reader>
Button [A3] is not displayed.
15
Application
Buttons
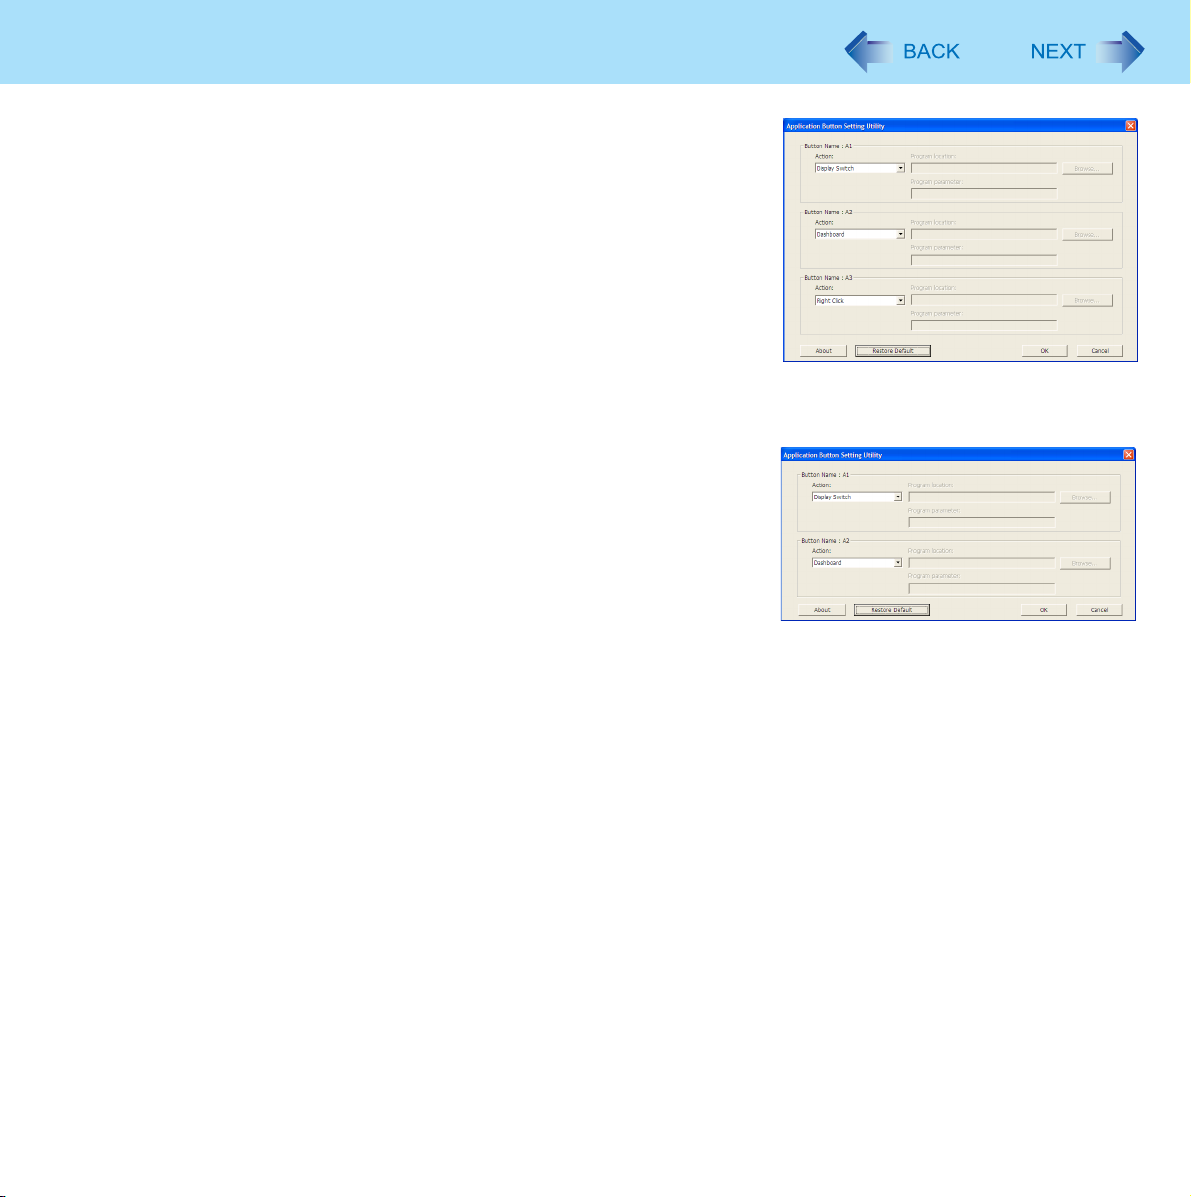
Application Button Setting
1 Select the action from [Action] of each button.
You can select [<none>], [Dashboard], [Display Switch], [Right Click],
[Cleaning Utility] / [Loupe Utility], [Reference Manual] or [Launch an
Application]. To restore the default setting, click [Restore Default].
When you select [Launch an Application], input the label to [Label]
box, and select a file you wish to execute.
z You can also select files with extensions .pdf, .jpeg, .wma, etc.
other than .exe.
z When you select a file with extension .exe, you can specify the
parameter into [Program parameter].
z To disable the application, select [<none>].
2 Click [OK].
16
<Model without Barcode Reader>
<Model with Barcode Reader>
Panasonic Hand Writing
You can make a bitmap file (.bmp) of a simple character and a figure such as signature by handwriting on the screen.
CAUTION
z Do not use the Fast User Switching function while Panasonic Hand Writing is active.
z If you install other pointing devices (e.g., commercially available mouse driver), Panasonic Hand Writing will not work.
NOTE
z The display of Panasonic Hand Writing may be distorted if the number of display colors is changed. Right-click on
the notification area and click [Exit Panasonic Hand Writing], and then restart Panasonic Hand Writing.
z Panasonic Hand Writing may not work properly if another application software is active. In this case, close the applica-
tion software and try handwriting again.
17
Starting Panasonic Hand Writing
1 Double-click on the notification area.
Alternatively you can click [start] - [All Programs] - [Panasonic] - [Panasonic Hand Writing].
NOTE
z Select the image size before handwriting by clicking [Option] - [Window size]. If you change the size after handwriting,
the image quality will become lower.
z You can copy the bitmap image by clicking [Edit] - [Copy], and paste it in another application software that supports bit-
map format.

Display Rotation
18
Rotating the Display
1 Press the application button [A1] (A).
Each time you press the button, the screen display rotates counter-clock-
*1
wise by 90°
When the computer is set to the Cradle, the screen display does not
rotate. If you want to rotate the screen display even if the computer is set
to the Cradle, follow the step below.
A Click on the notification area and click one of the display angles.
*1
You can change the order of the display rotation. (Î page 19)
NOTE
z Alternatively you can rotate the display by the following procedure.
Click [start] - [Control Panel] - [mobile PC] - [Change screen orientation].
z While the display is rotated:
• Do not use the Extended Desktop. The touchscreen or digitizer may not work properly.
• Do not set the resolution larger than that of the internal LCD.
• The computer's performance is slightly lowered.
z When the display is rotated, the motion video may not be displayed correctly or the sound may be distorted. Return the
display angle to [Primary Landscape].
z When you start up Windows and rotate the display right after logging on, the display may return to the previous state in
approximately 1 minute. In this case, rotate the display again.
.
<Model without Barcode Reader>
A
Display Rotation
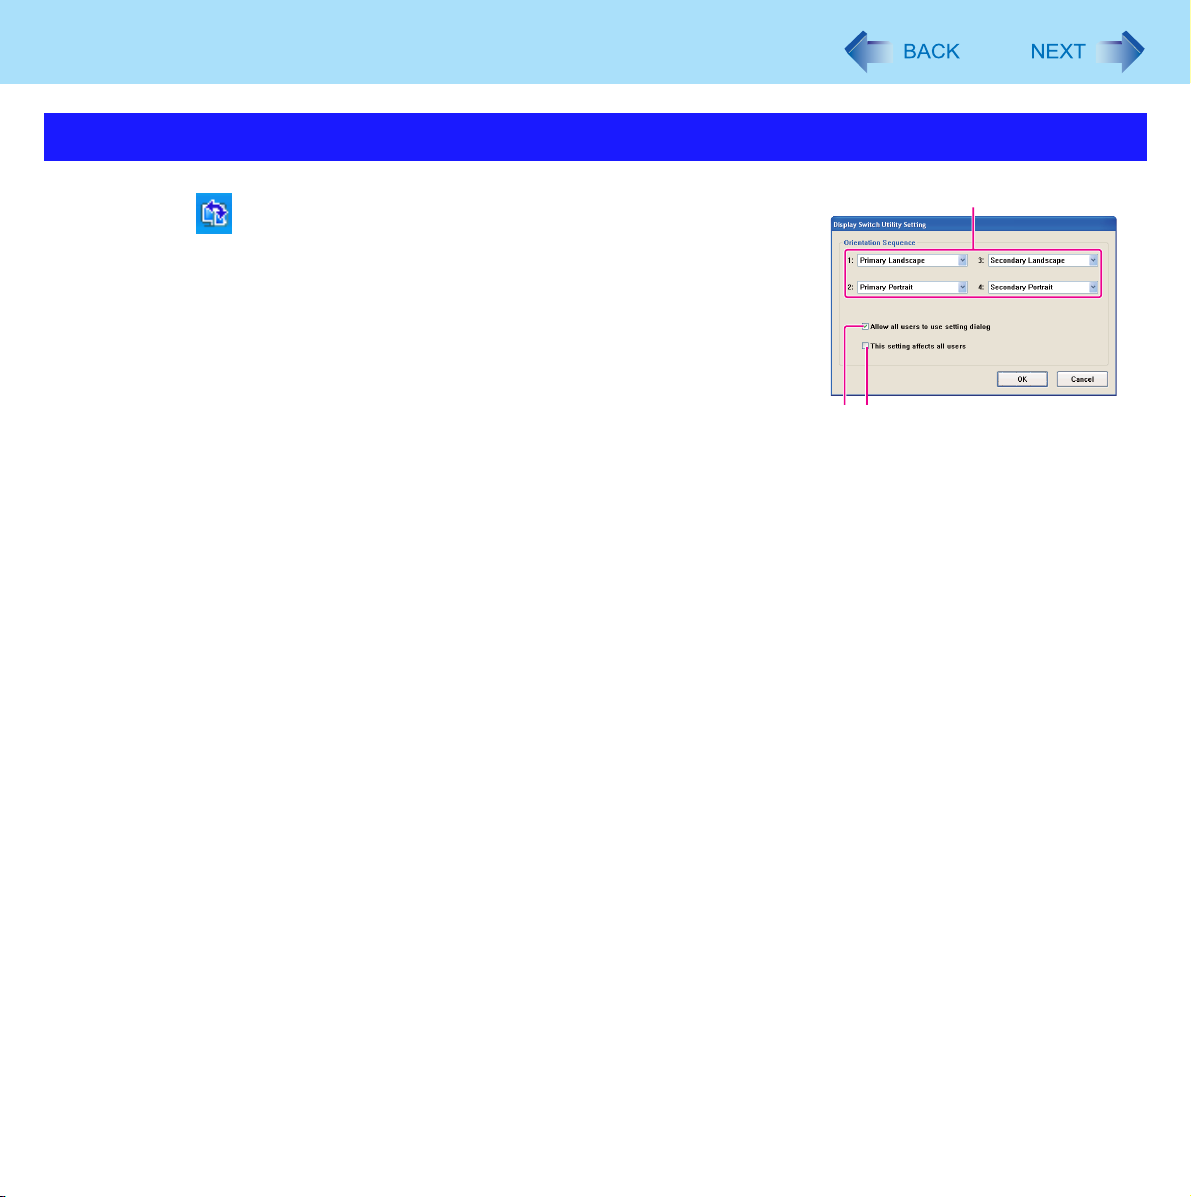
Changing the Settings
19
1 Click on the notification area and click [Settings].
2 Change the settings.
A. You can choose the order of the display rotation. If you choose [None],
the order is skipped.
You can change the following settings only if you logged on to Windows
as an administrator.
B. When a check mark for [Allow all users to use setting dialog] is added,
each user can choose the order.
C. When a check mark for [This setting affects all users] is added, the
order which you chose is set to all users. To use the same setting for
all users, remove the check mark to [Allow all users to use setting dia-
log] and add the check mark for [This setting affects all users].
3 Click [OK].
A
CB

Standby and Hibernation Functions
20
Starting Up Your Computer Quickly
The standby or hibernation functions allow you to shut off the computer without closing programs and documents. You can
quickly return to the programs and documents that you were working on before standby or hibernation.
Function Data is saved to Recovery time Power supply
Standby Memory Short Required. (If power is not supplied, all data will be lost.)
Hibernation Hard disk Rather long Not required. (However power is slightly consumed to
keep the hibernation.)
Setting Standby or Hibernation
1 Click [start] - [Control Panel] - [Performance and Maintenance] - [Power Options] -
[Advanced].
2 Select [Stand by] or [Hibernate] for [When I press the power button on my computer], and
then click [OK].
NOTE
z You need to make the setting if you want to use hibernation function.
Precautions
z Connect the AC adaptor if the computer will be in standby for a long period of time. If you cannot use the AC adaptor, use
hibernation instead.
z Using standby or hibernation repeatedly may cause malfunction of the computer. To stabilize computer operation, restart
Windows regularly (about once a week) without using standby or hibernation.
z Save the necessary data.
z Close files you have opened from removable disks and network drives.
z It may take 1 or 2 minutes to enter hibernation. Do not touch any key though the screen becomes dark.
z The password you set in the Setup Utility is not requested at resuming. You can use the Windows password for security in
standby or hibernation.
A Click [start] - [Control Panel] - [User Accounts], and select the account.
B Click [Create a password] and set the password.
Standby and Hibernation Functions
C Click [start] - [Control Panel] - [Performance and Maintenance] - [Power Options] - [Advanced], and add a check
mark in [Prompt for password when computer resumes from standby].
z Do not enter standby or hibernation in the conditions below, otherwise the data or file may be corrupted, standby or hiber-
nation may not work, or malfunction may occur in the computer or the peripheral devices.
• When any of the hard disk drive indicator and the RFID indicator is on.
• When playing/recording audio files or displaying motion video such as MPEG files.
• When using communication software or network functions.
• When using peripheral devices.
(If peripheral devices fail to work normally, restart the computer.)
21
Entering/Resuming from Standby or Hibernation
To enter standby or hibernation
1 Press the power switch (A) until a beep
Standby: The power indicator (B) blinks green.
Hibernation: The power indicator (B) goes off.
z To enter standby, you can click [start] - [Turn Off Computer] - [Stand By] instead
of pressing the power switch.
*1
If the speakers are muted, beeps do not sound.
CAUTION
*2
z At the beep
the computer will forcibly shut down and unsaved data will be lost even if you have set [Shut down] in [When I press
the power button on my computer] (Î page 20 “Setting Standby or Hibernation”).
*2
According to circumstances, beeps may not sound.
z While the computer is entering standby or hibernation, do not touch the computer.
For example, do not:
• Touch the screen, hardware buttons or power switch.
• Use an external mouse or other peripheral devices.
• Connect or disconnect the AC adaptor.
• Set to or remove from the Cradle.
Wait until the power indicator blinks green (standby) or goes off (hibernation).
z It may take 1 or 2 minutes to enter standby or hibernation.
, immediately release the power switch. If you press and hold the power switch for longer than 4 seconds,
*1
sounds.
B
A
Standby and Hibernation Functions
In standby or hibernation
z Do not attach or remove a peripheral device (including the Cradle). Doing so may cause malfunction.
z Power is consumed in standby. When power is exhausted, the data retained in memory will be lost. Connect the AC
adaptor when using the standby function.
22
To resume from standby or hibernation
1 Press the power switch (A).
CAUTION
z Do not perform the following operations until resuming is complete. After the display is resumed, wait approximately
30 seconds (normally) or 60 seconds (when the computer is on a network).
• Touch the screen, hardware buttons or power switch.
• Use an external mouse or other peripheral devices.
• Connect or disconnect the AC adaptor.
• Shut down or restart Windows.
• Enter standby or hibernation (Wait approximately 1 minute).
• Set to or remove from the Cradle.
A
NOTE
z After resuming from standby or hibernation, the message “TosBtMng has stopped working” may appear.
Click [Close program].
If Bluetooth connections are cut off, click [start] - [All Programs] - [Bluetooth] - [Bluetooth Settings], and connect to the
Bluetooth devices again.

Saving Power
You can extend battery life and save power also during AC adaptor usage.
23
Reducing Power Consumption
Use the methods below to reduce power consumption.
z Change [Power Options]
Click [start] - [Control Panel] - [Performance and Maintenance] - [Power Options] to select [Max Battery] under [Power
schemes].
While [Portable/Laptop] is selected under [Power Options] as the factory default, selecting [Max Battery] will further reduce
power consumption.
Also, make detailed settings such as reducing the time entered in the [Turn off monitor] setting.
z Reduce LCD brightness by using Panasonic Dashboard
Reducing internal LCD brightness will reduce power consumption.
z Turn off the computer when it is not in use
You can also turn off only the wireless LAN, wireless WAN (only for model with wireless WAN) or Bluetooth power.
z Disconnect external devices (USB devices, external mice, etc.) that are not being used
z Use Standby/Hibernation
Enter to standby or hibernation when you have to leave the computer. This shuts down computer operation to reduce
power consumption.
Security Measures
Use these features to protect your data.
Setting the Supervisor Password/User Password
Set the Supervisor Password before setting the User Password.
Preparation
z Set the computer to the Cradle and connect an external keyboard to the Cradle.
1 Start up the Setup Utility (Î page 78).
2 Select [Security].
3 Select [Set Supervisor Password] or [Set User Password], and press (Enter).
4 Enter your password in [Enter New Password] and press (Enter).
z When the password has been set, you need to enter your password in [Enter Current Password] and press
(Enter).
z To disable the password, leave the input field empty and press (Enter).
5 Enter your password again in [Confirm New Password] and press (Enter).
24
6 In [Setup Notice], press (Enter).
7 Press
CAUTION
z Do not forget your password. If you forget your Supervisor Password, you will not be able to use your computer. Con-
tact Panasonic Technical Support.
z When running the Setup Utility, do not leave and go away from your computer even for a short time, since other people
may set or change the password.
NOTE
z The password will not be displayed on the screen.
z You can use up to 32 alphanumeric characters (including spaces).
• The case (upper/lower) is ignored.
• Use only the upper horizontal row of numeric keys to input your password.
• You cannot use
z Disabling the Supervisor Password also disables the User Password.
F10
, and then select [Yes] and press (Enter).
Shift
and
Ctrl
to input a password.

Security Measures
25
Preventing Your Computer from Unauthorized Use
You can set a start-up password to protect your computer from unauthorized use.
1 Set the password (Î page 24), and select [Enabled] in [Password on Boot] in the [Secu-
rity] menu of the Setup Utility (Î page 83).
NOTE
z To enter the password, you need to set the computer to the Cradle and connect an external keyboard to the Cradle.
z If the Supervisor Password or User Password has been set, the password input screen will be displayed on starting-up
of the Setup Utility even though [Password on Boot] is set to [Disabled].
Preventing Your Hard Disk Data from Being Read or Written
The hard disk lock function protects the hard disk data from being read or written when the hard disk is attached to another
computer. The data can be read/written when the hard disk is returned to the original computer.
1 Select [Enabled] in [Hard Disk Lock] in the [Security] menu of the Setup Utility (Î page
83).
CAUTION
z For the data being read/written on the original computer, the Setup Utility settings must be the same as when the hard
disk was removed.
z You cannot use the hard disk lock function without setting the Supervisor Password. Set the Supervisor Password
beforehand (Î page 24).
z When you have your hard disk drive repaired
• Contact Panasonic Technical Support.
• Before sending back the hard disk drive, be sure to set the [Hard Disk Lock] to [Disabled].
NOTE
z The hard disk lock function works with the built-in hard disk. It does not work with the external hard disk.
z Note that the hard disk lock does not guarantee complete protection of the data
.
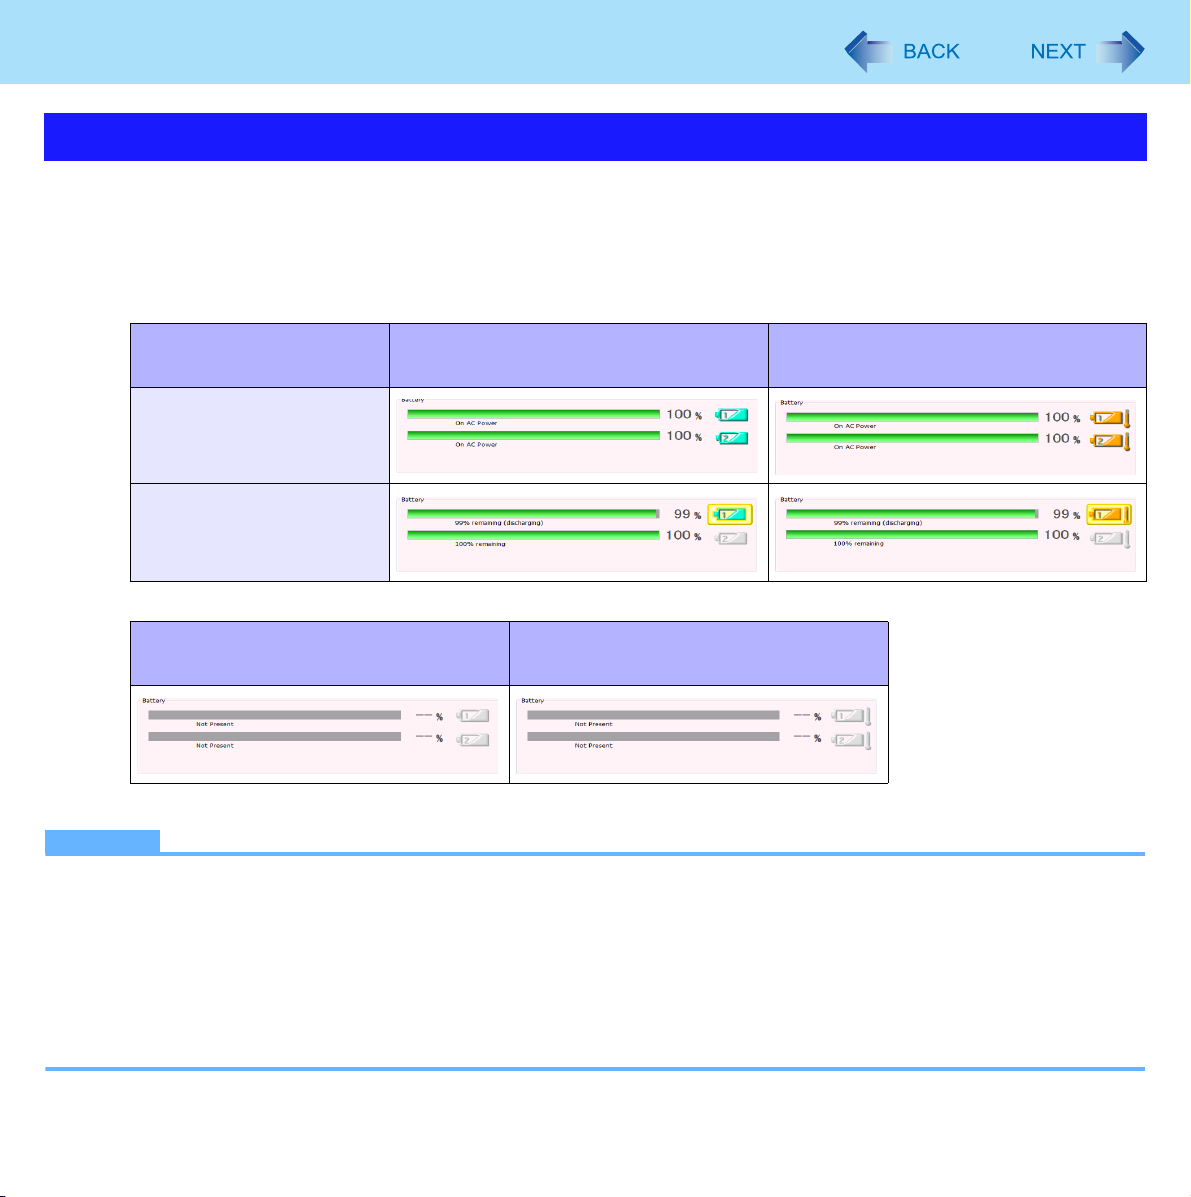
Battery Power
Battery Indicator
You can attach 2 battery packs to this computer. The battery indicators are prepared for
each battery.
A : Battery 1 indicator
B : Battery 2 indicator
Battery indicator Battery status
Not lit The battery pack is not inserted or not being charged.
• You can check presence of the battery pack by using Panasonic Dashboard
(Î page 12)
Orange Charging is in progress.
26
A
B
Green The battery is fully-charged.
Blinking green When you close the battery cover with the battery pack already inserted:
• You can check the battery level by blinking times
Blinking times Battery level
5 times 95 % to 100 %
4 times
3 times
2 times
1 time
Except for the operations stated above:
In high temperature mode, the battery pack is discharging the power to 80%
temperature mode (Î page 29).
Do not remove the battery pack since the power is not supplied even if you connect the
AC adaptor in this status. If remove the battery pack, the computer will be turned off and
lose data.
*1
In high temperature mode, the 100% battery level is equivalent to 80% level of the normal temperature mode.
50 % to 94 %
25 % to 49 %
5 % to 24 %
0 % to 4 %
*1
of normal

Battery Power
Battery indicator Battery status
Red The remaining battery is approximately 9% or less.
Blinking red When blinking approx. every 1 second:
The battery pack or the charging circuit is not operating properly.
When blinking approx. every 4 second:
The battery cover is open.
You can remove the battery pack in this case.
When blinking approx. every 0.5 second:
The battery cover is open.
If you remove the battery pack in this case, the power supply is cut off and the computer
is shut down. Close the battery cover immediately.
Blinking orange The battery cannot be charged temporarily due to the following reasons:
• Its internal temperature is out of the acceptable range.
• The power supply is not enough because software applications or peripheral
devices are consuming a large amount of power.
27
Blinking green and
orange alternately
NOTE
z Once the battery is fully charged, the computer performs recharging only when the battery level becomes less than
approximately 95%, so overcharging is avoided.
The temperature is low and the computer is warming up to prevent the hard disk drive or
flash memory from malfunctioning. The computer will start automatically after warmingup.
Battery Power
Checking the Remaining Battery Charge
You can check the remaining battery charge on the screen.
(After logging on to Windows)
1 Start up Panasonic Dashboard.
z When the battery pack is inserted (example)
Normal temperature mode
(Î page 29)
In charging
In discharging
(The battery pack in the
frame is discharging)
z When the battery pack is not inserted
Normal temperature mode
(Î page 29)
High temperature mode
(Î page 29)
28
High temperature mode
(Î page 29)
NOTE
z The battery display may not correspond to the actual remaining battery charge in the cases as below. To correct the
display, perform the Battery Recalibration (Î page 31).
• The battery indicator remains red.
• The indicator lights orange and the display shows 99% for a long time.
• Low battery warning appears soon after a short time of use.
This can occur when the computer is in standby for a long time without power supply from the AC adaptor.
z The battery display may not be the same as that of notification area or of [Power Meter] in [Power Options Properties].
This is not a malfunction.

Battery Power
29
High temperature mode
The high temperature mode can prevent the battery from deteriorating when the computer is used in high-temperature environment or used for a long time with its battery fully charged.
Select [Auto] (default) or [High Temperature] in [Environment] of the [Main] menu of the Setup Utility (Î page 80).
NOTE
z Note that a level corresponding to a 100% charge for high temperature mode is approximately equivalent to an 80%
charge level for normal temperature mode.
z After switching from [Normal Temperature] to [High Temperature] or vice versa, the remaining battery capacity will not
be displayed correctly until the battery pack is completely discharged or fully charged.
z In the [Auto] mode:
Once the computer has automatically switched from the normal temperature mode to the high temperature mode, the
computer will not switch back to the normal temperature mode until the battery has been used and recharged to a total
charge level of about 5 times as much as that of the fully-charged state. This is to avoid battery deterioration.
In [Auto] mode, mode switching is possible only for the battery pack in operation. The other battery’s [Environment]
mode remains the same.

Battery Power
30
Computer behavior with low battery
The default settings are as follows.
z This computer automatically switches from Battery 1 to Battery 2 and vice versa when either remaining battery change
becomes less than 10%. When both batteries are not sufficiently charged, the computer operates as below.
When the battery level becomes 10%
[Low battery alarm]
z Displays a message that the battery level is low. z The computer enters hibernation.
↓↓
Charge the battery. Connect the AC adaptor or replace the battery to start up
z Connect the AC adaptor immediately. If you do not
have the AC adaptor, close the application and turn off
the computer, then confirm that the power indicator is
off.
z If you have a fully charged spare battery, turn off the
computer, replace the battery and turn the computer on
again.
When the battery level becomes 5%
[Critical battery alarm]
the computer.
z Connect the AC adaptor and charge the battery.
z If you have a fully charged spare battery, replace the
battery and turn the computer on again.
Do not resume from hibernation until the battery is
charged or replaced.

Battery Power
31
Correcting the Battery Display (Battery Recalibration)
The “Battery Recalibration” function measures and memorizes the battery capacity. To correct the battery display, use this
function to fill the battery and then discharge it completely. Perform the procedure at least once immediately after purchasing
the computer. Normally the interval of battery recalibration is 3 months. The battery display may not be correct when the battery pack deteriorates after a long time use. In this case, perform the procedure again.
1 Connect the AC adaptor.
2 Close all the applications.
3 Perform “Battery Recalibration”.
A Click [start] - [All Programs] - [Panasonic] - [Battery] - [Battery Recalibration].
B When the confirmation message appears, click [Start].
z Frequent recalibration of the battery can degrade the battery. A caution message appears when the battery
recalibration is performed at the shorter interval than approximately a month. In this case, cancel the battery
recalibration.
C When the message requests shut down of Windows, click [Yes].
The battery recalibration starts.
After the battery pack is fully charged, discharging starts. When the discharging is completed, the power goes off
automatically.
After the battery recalibration is finished, normal charging starts.
NOTE
z The temperature range should be 10
z The battery recalibration may take a long time due to the large battery capacity. This is not a malfunction.
• Full charge: Approx. 5.5 hours with 2 batteries
• Complete discharge: Approx. 4 hours with 2 batteries
z If the computer is turned off during the battery recalibration (e.g., due to power failure, or accidental removal of the AC
adaptor and battery pack), the battery recalibration will not be completed.
z You can also perform the battery recalibration with the following procedure.
A Set the computer to the Cradle and connect an external keyboard to the Cradle.
B Restart the computer.
C Press and hold
dure.
D When the remaining battery capacity is displayed, press (Enter).
E Follow the on-screen instructions.
F9
while the [Panasonic] boot screen is displayed just after the computer starts the startup proce-
°C to 30°C {50°F to 86°F}.

Battery Power
32
Replacing the Battery Pack
If you have a battery charger (optional), you can remove one battery pack to charge while the other battery pack is operating.
The battery pack is a consumable item so the replacement will be necessary. If the battery operation time becomes noticeably
short and not recovered even after recalibrating the battery, replace with a new battery.
CAUTION
z The battery pack is not charged when you first purchase it. Be sure to charge it before using for the first time. Charging
starts automatically when the AC adaptor is connected to the computer.
z Use only the specified battery pack with your computer.
Checking the battery pack that can be replaced/removed
Remove/replace the battery pack under the right conditions according to the chart below because if the computer is mistakenly shut down, this may cause data to be lost and the computer to malfunction.
When the computer is ON or in
Standby/Hibernation
When the computer is OFF Both battery packs can be removed/replaced.
When the AC adaptor
is not connected
When the AC adaptor
is connected
Only one battery pack can be removed/replaced.
To check if the battery pack can be removed/replaced:
When you open the battery cover, the blinking (red) of battery indicator
tells.
• When blinking approx. every 4 seconds: Can be replaced
• When blinking approx. every 0.5 second: Cannot be replaced
Both battery packs can be removed/replaced.

Battery Power
1 Open the battery cover.
A Slide the battery cover and open the cover.
B Open the cover.
z Check the blinking (red) status of battery indicator (Î page 27).
2 Pull the tab to remove the battery pack.
3 Insert the new battery pack until it securely fits the connec-
tor.
33
1
2
4 Close the battery cover.
A Close the battery cover.
B Slide the battery cover until it clicks.
2
1
CAUTION
z Make sure the battery cover is securely locked, otherwise the battery pack may fall when you carry the computer.

Smart Card
<For model with Smart Card slot>
You need software to use a Smart Card.
CAUTION
z Do not:
• Hit, bend, or drop the card.
• Touch the contact part with fingers or metal object.
• Place the card in very hot location for a long time.
• Remove the card immediately after inserting it.
Inserting/Removing the Smart Card
To insert the card
1 Open the cover.
A Slide the cover to the direction of the arrow.
B Open the cover.
34
1
2
2 Insert the Smart Card to the slot (A) with the contact part (B)
facing upward.
z Insert the card until it securely fits into the slot.
A
B

Smart Card
To remove the card
35
1 Open the cover.
2 Press the eject button (C) so the card comes out of the slot.
3 Draw the card straight out.
NOTE
z When a Smart Card is inserted, RFID reading time (Î page 47) becomes longer.
C

USB Devices
Connecting/Removing USB Devices
You can connect USB devices to the USB ports on the Cradle.
When you use the USB devices, connect the AC adaptor to the DC-IN jack on the Cradle.
To connect the USB device
36
1 Connect the USB device to the USB port.
When using the cable specifically designed for this Cradle,
you can tighten screws at position (A).
For further information, refer to the instruction manual of the
USB device.
A
To remove the USB device
1 Disable the USB device.
A Double-click on the notification area and select the USB device, then click [Stop].
B Follow the on-screen instructions.
z This step is not necessary when;
• Removing the device after turning off the computer.
• is not displayed.
• The device does not appear in the list in step A.
2 Remove the USB device.
NOTE
z You may need to install the driver for the USB device. Follow the on-screen instructions or refer to the instruction man-
ual of the USB device.
z You may need to install the driver again when connecting the device to another port.
z When a USB device is connected, standby and hibernation may not function normally. If the computer does not start
up normally, remove the USB device and restart the computer.
z When the USB device is removed and then inserted, may appear in the Device Manager and the device may not be
correctly recognized. In this case, remove and connect the device again.
z When a USB device is connected, power consumption increases. Remove the USB device when it is not in use, espe-
cially when operating by battery power.

USB Devices
To deactivate USB ports
You can deactivate USB ports on the Cradle.
Select [Disabled] in [Cradle USB Port] of the [Advanced] menu of the Setup Utility (Î page 81).
37

Camera
<Only for model with Camera>
You can take still pictures.
1 Hold the side of the computer to aim the cam-
era.
38
2 Press the Camera button (A) to activate the
camera.
Preview window is displayed.
3 Press the Camera button (A) to take a picture.
A picture is displayed in the window.
z Save the picture
A Click [Save] and specify the destination to save and file
name, then click [Save].
z Copy the picture to clipboard
A Click [Copy to Clipboard].
z Delete the picture
A Click [Delete], and then click [Yes].
4 Click [Close] to close the picture window.
Camera lens
(rear side)
A

Camera
39
Installing Panasonic Camera Utility
The Camera is ready to use without any other settings at the time of purchase.
You can use the Panasonic Camera Utility that allows you to change the settings for taking picture and record video, together
with the MCA Configuration Editor (Î page 53) that allows you to change parameters for the Camera.
To use the Panasonic Camera Utility, first install it.
1 Log on to Windows as an administrator.
2 Click [start] - [Run], enter [c:\util\pcam\setup.exe], and click [OK].
Follow the on-screen instructions.
3 Click [start] - [Run], enter [c:\util\lightsw\setup.exe], and click [OK].
Follow the on-screen instructions.
Starting up Panasonic Camera Utility
Start up the Panasonic Camera Utility to take pictures and videos.
1 Click [start] - [All Programs] - [Panasonic] - [Panasonic Camera Utility].
NOTE
z If you use this utility and other multi-media software at the same time, an error may occur. Close all multi-media
software including this utility and restart this utility.
z If an error message appears and nothing is displayed, restart this utility.
z Two or more users cannot use this utility with Windows Fast User Switching function.
z When the computer has resumed from standby or hibernation, an error may appear and the connection with the cam-
era device may be lost. If this occurs, restart this utility.

Camera
Taking Pictures
Taking Pictures
40
Switch the Light On and Off
(See below)
Tak e Ph o to
(Î page 41)
Burst Shooting
(Î page 42)
Recording Video
(Î page 43)
Zoom In
(Î page 41)
Photo Library
Video Library
Switch the Light On and Off
To switch the light on and off.
1 Click or click [Control] - [Camera Light], then click [ON] or [OFF].
z When the camera light is on, the icon changes to .
z You can assign the Light function to an application button.
(Î page 46 “Assigning the Light/Zoom In/Take Photo Functions to an Application Button”)
z The light turns off automatically after a certain period of time. Click [Control] - [Camera Light] - [Settings] to set
your lighting duration preferences.
z To maximize battery and LED life, it is not recommended to keep the light on for a long period of time.

Camera
41
Zoom In
To enlarge or reduce the camera image.
1 Click or click [Control] - [Zoom] and select [x 1.0], [x 1.5], [x 2.0], [x 2.5], or [x 3.0].
z You can assign the Zoom In function to an application button.
(Î page 46 “Assigning the Light/Zoom In/Take Photo Functions to an Application Button”)
z Each time you click
To return to [x 1.0], click
z You can zoom in/out by dragging the screen up-and-down.
the zoom magnification goes up in the order of [x 1.0], [x 1.5], [x 2.0], [x 2.5], [x 3.0].
when the zoom is [x 3.0].
Take Photo
You can record the camera image as a picture.
1 Adjust the direction of camera, zoom (See above), picture quality (Î page 42), etc..
2 Click or click [Photos] - [Take photo].
z While taking photos, the icon changes to indicating the photo is being captured.
z You can assign the Take Photo function to an application button.
(Î page 46 “Assigning the Light/Zoom In/Take Photo Functions to an Application Button”)
NOTE
z You can view pictures by clicking or through Windows Explorer (default location is my pictures folder).
z When the distance between the camera and subject is too close, the image may be out of focus.
z When you take photos while the light is on, the light-up duration is reset to the time setting for the “Auto Off Setting”
(Î page 40).

Camera
Burst Shooting
You can take pictures in fixed intervals.
1 Click or click [Photos] - [Start Burst Shooting].
z During Burst shooting, the icon changes to .
2 Click or click [Photos] - [Stop Burst Shooting].
NOTE
z During Burst shooting, naming, saving or canceling photos is not available.
The default name for saving photos is the date and time the picture was taken.
Changing the Settings for Taking Pictures
1 Click [Photos] - [Settings].
C
2 Change to preferred settings and click
[OK].
z When the following boxes are checked,
42
D
• Box (A) only: Select to save or cancel, after the photo is
taken
Save (
) and delete icons (
photo is taken. Photo will be saved using default name
(date/time).
• Box (B) only: Name the taken photo
Photo can be named (and saved) using the windows File
Name box that appears after photo is taken. Photo can be
deleted by selecting “cancel”.
• Boxes (A) and (B): Select to save or cancel, after the photo is taken & Name the taken photo
Save (
) and delete icons (
selected using the windows File Name box.
) will appear after the
A
B
) will appear after the photo is taken. Photo can be named after save icon (
) is

Camera
NOTE
z At (C), if you specify an externally connected storage device as the save destination, the camera software may
operate slowly. In this case, specify the hard disk as the save destination.
z High-quality pictures can be obtained by checking (D). Also, regardless of the display screen size, you can take
pictures with the selected resolution.
• When this feature is enabled, photos may take more time to load.
• When this feature is disabled, photos will be saved with the resolution selected for the [Video Format] (Î page 45).
43
Recording Video
Recording Video
1 Click or click [Video] - [Start Recording].
While recording, the icon changes to .
2 Click or click [Video] - [Stop Recording].
NOTE
z You cannot zoom or display the date/time stamp while recording.
z When the distance between the camera and subject is too close, the image may be out of focus.
z If you specify an externally connected storage device as the save destination, the camera software may operate
slowly. In this case, specify the hard disk as the save destination.
z The file is saved with the resolution set for [Video Format] (Î page 45).
z Only video is recorded. To record audio, please attach an external microphone.
z If you rotate the display, pictures may not be displayed correctly. Do not rotate the display while recording.

Camera
Changing the Settings for Recording Video
1 Click [Video] - [Settings].
2 Change to preferred settings and click [OK].
z When the following boxes are checked,
•
Box (A) only: Select to save or cancel, after the video is recorded
Save (
) and delete icons (
is taken. Video will be saved using default name (date/time).
• Box (B) only: Name the recorded video
Video can be named (and saved) using the windows File
Name box that appears after stopping the video. Video can be
deleted by selecting “cancel”.
• Boxes (A) and (B): Select to save or cancel, after the video is
recorded & Name the recorded video
Save (
) and delete icons (
selected using the windows File Name box.
) will appear after the video
) will appear after the video is taken. Video can be named after save icon (
Settings
44
A
B
) is
Setting Audio
You need to connect an audio device to the compute via the Cradle.
Set your sound preferences on the [Audio Control] screen.
1 Click [Settings] - [Audio Control].
NOTE
z To set sound preference, please attach an external microphone.
z Some items cannot be set depending on the device.

Camera
Setting Image Quality
Set your image quality preferences on the [Image Control] screen.
1 Click [Settings] - [Image Control].
z Setting Night Mode
A Click [Settings] - [Image Control] - [General Setting].
B Add a check mark for [Night Mode].
Setting the Compressed Data Format/Resolution for the Image
1 Click [Settings] - [Video Format].
z [Color Space / Compression]
Set the compressed data format for the image.
z [Output Size]
Set the image resolution.
NOTE
45
z Make sure the image resolution is within the range of the display resolution of this computer (Refer to “Specifications -
Display Method” in OPERATING INSTRUCTIONS).
z If you set [Output Size], the [Frame Rate] is automatically determined.
z The setting items depend on the device, some items cannot be selected.

Camera
46
Assigning the Light/Zoom In/Take Photo Functions to an Application Button
You can assign the Light/Zoom In/Take Photo functions to the application buttons (A).
1 Start up Application Button Setting Utility.
Click [start] - [All Programs] - [Panasonic] - [Application Button Setting].
2 For the application button you want to assign the Light/
Zoom In or Take Photo function, select [Launch an
Application] and input the following.
<When assigning the Light function> (Î page 40)
In the [Program location:] box
c:\program files\panasonic\lightsw\lightsw.exe
<When assigning the Zoom In function> (Î page 41)
In the [Program location:] box
c:\program files\panasonic\panasonic camera utility\pcam.exe
In the [Program parameter:] box
/zoom_in
<When assigning the Take Photo function> (Î page 41)
In the [Program location:] box
c:\program files\panasonic\panasonic camera utility\pcam.exe
In the [Program parameter:] box
/shutter
<When assigning the Name function> (Î page 42)
In the [Program location:] box
c:\program files\panasonic\panasonic camera utility\pcam.exe
In the [Program parameter:] box
/shutter_name
3 Click [OK].
A
<Model without Barcode Reader>
NOTE
z When the Panasonic Camera Utility is not running, and if you press the buttons to which these functions are assigned,
the Panasonic Camera Utility is activated.
z If you operate the Utility after assigning the “Take Photo” function, the same operation will be performed as the one
when the check marks both for [Select to save or cancel, after the photo is taken] and [Name the taken photo] are not
added in “Changing the Settings for Taking Pictures” (Î page 42).
z If you operate the Utility after assigning the “Take Photo” function by specifying the file name, the same operation will
be performed as the one when the check mark for [Select to save or cancel, after the photo is taken] is added and
check mark for [Name the taken photo] is not added in “Changing the Settings for Taking Pictures” (Î page 42).

RFID Reader
<Only for model with RFID Reader>
You can read the data from RFID (Radio Frequency Identification) tags.
NOTE
z RFID Reader is typically used with specialized applications. For further information, ask the system administrator.
47
1 Aim the RFID Reader (A) at the center of RFID tag.
2 Press the RFID button (B).
The application which supports the RFID authentication is run, or read data
is displayed.
B
A
A
B

RFID Reader
NOTE
z Operation distance depends on RFID tag.
z When a Smart Card is inserted, RFID reading time becomes longer.
48
To prevent unintended operation
If you press the RFID button on the handle accidentally, the computer may operate in a manner that you do not intend. You
can set the RFID button so that it does not function.
Select [Disabled] in [Handle Button] of the [Main] menu of the Setup Utility (Î page 80).

Barcode Reader
<,Only for model with Barcode Reader>
CAUTION
z Do not look directly into the reading window.
DO NOT LOOK DIRECTLY AT THE LED LIGHT.
49
Decode Capabilities
Aztec, Codabar, Code11, Code39, Code93, Code128/GS1-128, DataMatrix, GS1Composite, I2 of 5, Maxicode, MSI Code,
PDF417, MicroPDF417, Plessey Code, QR Code, GS1 Databar, Telepen, TLC39, UPC/EAN
Reading Barcodes
1 Aim the Barcode Reader (A) at the barcode.
2 Press one of the Barcode Reader buttons (B).
The LED lights red to indicate the reading position.
B
A
When reading a barcode on a
horizontal surface.
B
When reading a barcode on a
vertical surface.
A
To prevent unintended operation
If you press the Barcode Reader button on the handle accidentally, the computer may operate in a manner that you do not
intend. You can set the Barcode Reader buttons so that they do not function.
Select [Disabled] in [Handle Button] of the [Main] menu of the Setup Utility (Î page 80).

Barcode Reader
To Correctly Read a Barcode with This Computer, Observe the Following
50
z The reading angle is important factor.
Perform reading at the angle indicated in the figure. We recommend you
to set at approximately 2° to 3° angle from the perpendicular position.
z Hold the reader farther away when reading a larger barcode, and closer in when reading a smaller barcode or a thinner
barcode.
z Perform reading so that the entire symbol falls within the center of the red LED light.
Right
z The reader can still read a barcode even if the barcode is not in the center of the red LED light. However, if a part of the
barcode lies outside the LED light, the barcode cannot be read. Make sure the entire barcode is inside the LED light.
Right
Right
LED light
2° to 3°
Right
Right
Wrong
LED light

Barcode Reader
51
Selecting Software Mode or Hardware Mode
This computer supports two barcode reading modes; software mode and hardware mode.
If you are using an application program that has its own barcode reading function, set the computer to hardware mode.
If your application program does not have a barcode reading function, set the computer to software mode, as this allows the
application program to use the computer's barcode reading function.
To switch the modes
1 Start up the Setup Utility (Î page 78).
2 Select [Advanced].
3 Select [Serial Port Configuration], and press (Enter).
The sub-menu appears.
4 Confirm that [Barcode Reader] is set to [Enabled].
If not, set it to [Enabled].
5 Set [Trigger Mode] to [Software] to set the computer to the software mode, or [Hardware]
to set the computer to the hardware mode.
6 Press (Enter).
7 Press
If the computer is set to undesired mode
If you execute [Load Default Values] and then [Save Values and Reboot] in the [Exit] menu of the Setup Utility, for example,
the computer may be set to a mode that does not match your usage environment.
In this case, one of the following messages appears.
- [The barcode reader and the setup utility are now set to the hardware mode. Do you want to change them?]
- [The barcode reader and the setup utility are now set to the software mode. Do you want to change them?]
If this happens, proceed as follows.
F10
, and then select [Yes] and press (Enter).
1 Click [Yes].
The mode is changed, and [The setting was changed] is displayed.
2 Click [OK].

Barcode Reader
NOTE
52
z If you click [No] in step
reader might not work correctly. Please confirm the setup utility setting.] appears, and the computer restarts.
Start up the Setup Utility (Î page 78), and set the computer to the desired mode.
Î page 51, To switch the modes
z If the computer fails to change the setting, [Barcode setting failed. Please end the barcode-related application and
then retry.] appears.
Exit the running barcode-related application program, and click [Retry].
If the problem still persists, restart the computer.
z If [Initialization failed.] appears, restart the computer.
1, [The barcode reader setting and the setup utility setting are inconsistent. The barcode
Cleaning the Reading Window
If the reading window is dirty, gently wipe the reading window with a cloth or a cotton swab moistened with water.
Do not allow materials that can easily scratch the reading window to touch the window, such as sandpaper or metal object.
For parts other than the reading window, please read “Handling and Maintenance” in the OPERATING INSTRUCTIONS.

MCA Configuration Editor
The MCA Configuration Editor allows you to change various settings for the Camera, RFID Reader, and the Barcode Reader.
53
Using MCA Configuration Editor
1 Click [start] - [All Programs] - [Intel] - [MCA Plat-
form Driver] - [MCA Configuration Editor].
2 In the [MCA Configuration Editor] screen, select
the desired item, read the explanation that
appears, and change the setting as required.
Explanation
NOTE
z If changing settings results in undesired operation, reset them to the previous ones.

Fingerprint Reader
r
NOTE
z Enrollment and authentication is unavailable to an extremely minority of people including those whose fingerprints give
little data for personal identification.
54
Fingerprint
Reader
How to Use the Fingerprint Reader
This section explains how your fingerprints are enrolled and authenticated.
1 Slide your finger.
z To prevent a reading error.
A Set the first joint of your index finger on the sensor as illustrated to the right.
B Slide your finger until it completely crosses.
• You can slide your finger from both sides.
z When the fingerprint sensor does not enroll or authenticate your fingerprint properly:
• You slid your finger too fast or too slow.
• Your finger was soiled or it has a scar on the surface.
• Your finger was wet or extremely dry.
• Your fingerprint does not have sufficient data for personal identification.
For further information, refer to “Fingerprint Reader” (Î page 97).
Fingerprint senso
CAUTION
z We shall not be liable for any loss or damage whatsoever resulting from your Fingerprint device or neglect of Finger-
print device use, or any data loss resulting from such developments as Fingerprint authentication device malfunctioning.

Fingerprint Reader
55
Overview
Fingerprint’s Outline
The conventional security systems use ID/passwords and token devices such as IC cards to authenticate users. Therefore
the passwords and token devices are exposed to the risk of being lost, stolen and hacking.
The Fingerprint authentication method uses user’s fingerprints instead of passwords for security authentication. You can use
your fingerprints to start up your computer and log on Windows.
We recommend you use the Fingerprint Reader in combination with the TPM (Trusted Platform Module) to increase the security level of your computer.
Recommended Installation Procedure
Performed by the Computer Administrator
Step 1
TPM Installation ( Installation Manual of TPM)
(If the TPM is not being used, skip this step.)
Step 2
Fingerprint Utility Installation
Step 3
TPM Fingerprint Utility Initialization
(If the TPM is not being used, skip this step.)
To access the online manual
This manual describes Step 2, 3 and the initial part of Step 4.
For further information, refer to the UPEK Protector Suite QL Help menu.
z Click [start] - [All Programs] - [Protector Suite QL] - [Help].
Performed by each user
Step 4
User Fingerprint Enrollment
User’s Data
• Windows Logon Password
• Fingerprint
• Fingerprint Backup Password
• Power-on Password

Fingerprint Reader
56
Precautions
Security Functions
Q
Fingerprint Authentication Technology does not guarantee complete authentication and individual identification. Please
acknowledge we shall not be liable for any loss or damage whatsoever resulting from the use of, or inability to use your
Fingerprint device.
z The Fingerprint authentication method uses multiple fingerprints, encryption keys, credentials data and passwords. You
might not be able to use your data if you lose fingerprints, keys, credentials and passwords. Back up the Fingerprint
authentication data in a safe place. For further information, refer to “Backup” (Î page 59).
z General interaction with third-party applications: There is no guarantee that there will not be any negative interaction with
any third-party software, and will not accept any responsibility for such an interaction.
Installation
1 TPM Installation
Refer to the Installation manual of “Trusted Platform Module (TPM)”.
z Click [start] - [Run], enter “c:\util\drivers\tpm\readme.pdf”, and click [OK].
2 Fingerprint Utility Installation
A Log on to Windows as an Administrator.
B Close all other programs.
C Click [start] - [Run], enter “c:\util\drivers\fngprint\autorun.exe”, and click [OK].
D Click [Next].
Installation starts. Follow the on-screen instructions.
E When the “Protector Suite *.* has been successfully installed.” message appears, click [Finish].
At the confirmation message, click [Yes].
The computer restarts.
F Log on to Windows as an Administrator.
The “Protector Suite QL Icon” appears in the notification area.
3 TPM Fingerprint Utility Initialization
Preformed by the Computer Administrator.
The “Invalid TPM status” message is displayed by the “Protector Suite QL Icon” in the notification area.
z If the TPM is not being used, skip this step.
A Click in the “Invalid TPM status” message to start [Advanced Security Initialization Wizard].
• Follow the on-screen instructions.

Fingerprint Reader
NOTE
z If the “Invalid TPM status” message is not displayed
• Click [start] - [All Programs] - [Protector Suite QL] - [Control Center] - [Settings] - [System Settings] - [TPM] - [Initialize TPM].
57
4 User Fingerprint Enrollment
Performed by each user.
A Click [start] - [All Programs] - [Protector Suite QL] - [User Enrollment].
Carefully read the License Agreement, select [I Accept the terms of the License Agreement] and click [OK].
B Click [Next].
C Select an enrollment mode, and click [Finish].
z Enrollment mode
You can make the configuration for the enrollment only once during this initialization phase.
• Enrollment to the biometric device
All enrolled fingerprints are stored directly in the fingerprint sensor. The user data will be secured by the
hardware protection keys obtained by the fingerprint sensor. The number of the available fingerprints
appears in the display.
• Enrollment to the hard disk
All enrolled fingerprints are stored on the hard disk. Hardware protection of the user data is not possible, but
multiple users can enroll their fingerprints.
z When the [Finish] screen appears, read the description carefully.
z [User Enrollment] wizard starts. Follow the on-screen instructions.
NOTE
z Enroll at least 2 fingers. Even if one of them is injured, you can use another one to access your account and secret
data. For further information about the enrollment, refer to “How to Use the Fingerprint Reader” (Î page 54) and [Fin-
gerprint Tutorial].
• Click [start] - [All Programs] - [Protector Suite QL] - [Fingerprint Tutorial].
z We recommend you use the Power-on Security feature. This feature prevents unauthorized access to the user’s
computer at the BIOS level.
After first finger enrollment, [Power-on Security] message appears. Select [Yes].
A When the [Power-on Security] screen appears, click [Manage Passwords].
B Select [Power-On] in [Password Types], and click [Set password].
C Enter the password for [Power-on Security], and click [OK].
D Click [Close].

Fingerprint Reader
E Add a check mark for [Power-On] in [Password Types].
F Enter the password (step C), and click [OK].
G Click [Next].
• Follow the on-screen instructions.
NOTE
z When you use the Power-on-Security feature, the fingerprints are stored in the fingerprint sensor regardless of the
selected enrollment mode. The number of the available fingerprints appears in the display.
58
More Advanced Security
You can increase your computer’s security level by setting the BIOS level described in this section.
When you use this security function, you need to set the computer to the Cradle and connect an external keyboard to the Cradle whenever computer starts.
Preparation
z Set the computer to the Cradle and connect an external keyboard to the Cradle.
1 Register the Supervisor Password.
You have to register the Supervisor Password to proceed to the next step.
If you have already registered the Supervisor Password, you can skip this step, and move on to step
If you have not done this, have enrolled your fingerprint using Protector Suite QL, and have already made Power-on
Security effective, after step B, your fingerprint authentication will be necessary.
A Turn on or restart the computer.
B Press
C Select the [Security] menu.
D Select [Setup Supervisor Password], and press (Enter).
E Enter your password in the [Create New Password], and press (Enter).
F Enter your password again in [Confirm New Password], and press (Enter).
F2
or
Del
while [Panasonic] boot screen is displayed soon after the computer starts the startup proce-
dure.
• The password will not be displayed on the screen.
• You can use up to 32 alphanumeric characters (including spaces).
• The case (upper/lower) is ignored.
• You cannot use
Shift
and
Ctrl
to input a password.
2.

Fingerprint Reader
59
2 Set the High Security Level.
A Select [Fingerprint Security], and press (Enter).
B Select [Security mode], and select [High].
• Default setting: Simple
C Press
D Press
NOTE
z In the [High] security mode, you have to enter the Supervisor or User Password even after fingerprint authentication.
In the [Simple] security mode, you do not have to enter the Supervisor or User password after fingerprint authentication.
Esc
to close the sub-menu.
F10
, select [Yes], and press (Enter) to exit the Setup Utility.
Useful Information
Backup
The file described below is necessary for recovering the Fingerprint authentication data. Back up this file periodically in a safe
location such as removable disk to avoid data loss resulting from some accidents. We recommend you to store the file in a
removable disk or network drive because the benefit of Fingerprint authentication security can be reduced if you keep the file
in the internal hard disk drive.
The backup password described below is necessary for bypassing the Fingerprint authentication. We recommend you to set
the backup password using the [User Enrollment] wizard. If you do not define the backup password, you may lose your data
in case of authentication hardware failure.
z File used by each user
• Backup user passport data
(Default name: <UserAccount>.vtp)
You need this file when you replace the embedded fingerprint chip, or the hard disk drive, or when reinstalling Windows.
This file contains the fingerprints, encryption keys, and logon authentication data.
NOTE
z How to Backup:
Select [Export] in [Import or Export User Data] to save the user data.
• Click [start] - [All Programs] - [Protector Suite QL] - [Control Center] - [Fingerprints].
For further information, refer to the software’s online manual (Î page 55).

Fingerprint Reader
z Password used by each user
• Backup Password for Enrollment
This backup password can be used in case of hardware failure to bypass the fingerprint authentication.
CAUTION
z The passwords other than those explained above are also used for security, so do not lose them. For further informa-
tion, refer to the software’s online manual (Î page 55).
60
Limitations in Use
z Password Bank*1 limitations: The following web pages cannot be supported.
Web pages which are created by the following technologies:
• Web forms created on the fly using java script.
• Web forms which looks as one form (e.g. login field, password field), but internally created with 2 independent forms.
• There can be auto submit problems with web forms which do not have Submit button. All forms that you cannot submit
with (Enter) will be entered by Password Bank, but not submitted.
z Password Bank
• Applications which do not use standard Windows controls and draw controls by their own.
• This includes any Java based application.
*1
For information of these functions, refer to the software’s online manual (Î page 55).
*1
limitations: The following Windows applications cannot be supported.
Handling & Maintenance
z The enrolling and authentication sensitivity may decline under the conditions below. Wipe off stains or moisture on the
sensor surface with a soft cloth.
• The surface of the fingerprint sensor is soiled with dust, skin oil, or sweat.
• The surface of the fingerprint sensor is wet as a result of moisture or condensation.
z Static electricity may also cause the sensor to malfunction. To make your finger static-free, touch a metal surface before
placing it on the fingerprint sensor. Exercise caution against static electricity in winter and other dry conditions.
z Malfunction or damage may occur when:
• The fingerprint sensor surface was damaged by the strong rubbing of a solid material, scratches, or being pecked with a
pointed item.
• The sensor was touched with a finger soiled with mud, damaging the sensor surface with a tiny substance, and staining
the surface.
• The sensor surface was covered with a seal, or soiled with ink.

Fingerprint Reader
61
Deleting (Initializing) Owner’s Data
When you dispose of the computer or transfer the ownership, delete (initialize) the owner’s data to avoid unauthorized
access.
NOTE
z The data enrolled in the fingerprint sensor is not image data. You cannot restore fingerprint image data from the data
enrolled in the fingerprint sensor.
1 Disable Power-on Security
Performed by the Computer Administrator.
A Click [start] - [All Programs] - [Protector Suite QL] - [Control Center].
• The [Fingerprint Control Center] screen appears.
B Click [Settings], and click [Power-on Security].
C Remove the check mark from [Enable power-on security using fingerprints], and click [OK].
D Click [Fingerprints], and click [Enroll or Edit Fingerprints].
• [User Enrollment] wizard starts. Follow the on-screen instructions.
E When the [User’s Fingers] screen appears, click [Next] without deleting fingerprint samples.
F Click [Manage Passwords].
G Select [Power-On] in [Password Types], and click [Unset password].
H Enter the password for Power-on Security, and click [OK].
I Click [Close].
• Confirm that there is no item in [Password Types].
J Click [Next] - [Next].
K Click [Finish].
• Follow the on-screen instructions.
2 Delete Fingerprint Data.
Performed by each user.
A Click [Fingerprints], and click [Delete].
The [Swipe finger] screen will appear.
B Swipe user’s finger.
• If the authentication is successfully completed, the confirmation message appears.
C Click [Yes].
• Confirm that all users’ data was deleted.

Fingerprint Reader
NOTE
z If the enrollment mode is set to “Enrollment to the hard disk” (Î page 57), you need to remove the fingerprints data
after step
A Click [start] - [All Programs] - [Protector Suite QL] - [Control Center].
B Click [Settings], and click [Power-on Security].
C Select the fingerprint, and click [Remove].
• Surely remove all of the fingerprints.
2. Performed by the Computer Administrator.
62
3 Uninstall Protector Suite
Performed by the Computer Administrator.
A Log on to Windows as an Administrator.
B Close all programs.
C Click [start] - [Control Panel] - [Add or Remove Programs].
D Click [Protector Suite *.*], and click [Change].
E Select [Remove].
F Select [Remove all Protector Suite *.* data], and click [Next].
• Uninstallation starts. Follow the on-screen instructions.
G When the “Protector Suite *.* has been successfully uninstalled.” Message appears, click [Finish].
• If the confirmation message appears, click [Yes].
• The computer restarts.

Fingerprint Reader
63
Starting Over
If the specific solutions for your problem in Fingerprint Reader (Î page 97) do not work, you can use these instructions as
the last measure and start over. However, please note that you can lose your data - passwords, secret keys and fingerprints.
A Log on to Windows as an Administrator.
• You can always access the computer by using your Windows log on password.
In convenient mode, any user can access the computer by using the Windows log on password.
B Try to export your passport to a file if you are planning to use your passwords, secret keys or enrolled fingers in the
future.
• If you exported your passport recently, this step is not required.
• If biometrics authorization works and your finger are recognized, use [Import or Export User Data] wizard, swipe
your finger and continue according to wizard’s instructions.
• If biometrics authorization works, but your finger is not recognized, you can start the [Import or Export User Data]
wizard and export the passport even without using your fingerprint. You need to cancel fingerprint dialog, and you
will be prompted for a password. If you do not use [Advanced Security], enter your Windows log on password.
Otherwise, enter your [Advanced Security] backup password.
CAUTION
z If you used [Advanced Security] without a backup password. There is no way to backup your data.
• If biometrics authorization does not work, there is no way to backup your data.
C Deleting the passport.
• Use the [Delete] wizard. Please note that all your stored secret data (passwords, [File Safe] encryption keys) will be
lost. If you backed up the data, you can restore it in the next step; otherwise it will be lost permanently. To perform
the delete operation it is necessary to cancel the fingerprint verification operation to get to the password dialog, then
enter your Windows log on password or backup password.
D Make sure your fingerprint sensor is working.
• Use the Tutorial wizard to verify that the fingerprint sensor works. If not, reboot and try again. If it still does not work,
please contact Panasonic Technical Support.
E Restore or create passport.
• If you have a backup of your data, you can now use [Import or Export User Data] wizard to restore your data. Otherwise you can create a new passport by using the [Enroll or Edit Fingerprints] wizard.

Cradle
You can connect external equipment in variety by attaching the computer to the Cradle (optional).
For further information, read the operating instructions that comes with the Cradle.
Setting the computer to the Cradle
1 Turn off the computer.
z Do not use standby or hibernation function.
2 Connect the AC adaptor to the DC-IN jack on the Cradle.
3 Insert the computer to the Cradle from the top, facing the
LCD panel to your side.
64
1
2
CAUTION
z Hot or warm docking/undocking is not possible with the Cradle.
z If connector contacts become dirty brush off the dirt. Wipe off the water if attached. Contact failure may occur.
To deactivate USB ports
You can deactivate USB ports on the Cradle.
Select [Disabled] in [Cradle USB Port] of the [Advanced] menu of the Setup Utility (Î page 81).

External Display
<Only when connected to Cradle>
You can switch the output destination to an external display.
Before switching the computer on, connect the external display to the
external display port (A) and the AC adaptor to the DC-IN jack (B) on
the Cradle.
NOTE
z After resuming from standby or hibernation, or restarting the computer, the output destination may not be the same as
the one selected in the previous status.
z When you change the display after Windows starts up, do not press any button, key and screen until switching is com-
plete.
z Until Windows startup is completed (during Setup Utility, etc.), the switching function between the internal LCD and the
external display.
z “Full Screen” of [Command Prompt] is not supported.
z Do not connect or remove the external display during standby or hibernation.
z It may take some time to switch between displays depending on the displays used.
z When you use high resolution displays, the display color, resolution or refresh rate may be changed, switching to [MID]
in [Intel(R) Graphics Media Accelerator Driver for ultra mobile].
We recommend you to switch the output destination by pressing [A1] button.
z When you use the external display only, set the suitable number of colors, resolution, or refresh rate separately from
when you use the internal LCD only or when you use the simultaneous display. When you switch the display from the
internal LCD to the external display, the resolution of the external display become same as that of the internal LCD.
Set the resolution again.
Depending on the settings, some external displays may be distorted or may not display the mouse cursor correctly. In
this case, set the settings to lower value.
z When you use the simultaneous display, DVD-Video, MPEG files and other motion image files may not be played back
smoothly.
z Carefully read the instruction manual of the external display.
z When connecting an external display that does not conform to the Plug & Play standards, select the display driver
accordingly in the following menu, or use the driver disc supplied with the monitor.
[start] - [Control Panel] - [Appearance and Themes] - [Display] - [Settings] - [Advanced] - [Monitor] - [Properties] [Driver] - [Update Driver]
z If a picture is not displayed normally, lower the level of [Hardware acceleration] in the following menu.
[start] - [Control Panel] - [Appearance and Themes] - [Display] - [Settings] - [Advanced] - [Troubleshoot]
65
AB

External Display
CAUTION
z Before disconnecting the external display, switch to the internal LCD. Otherwise the displayed image quality may
become different after disconnection (e.g., wrong resolution).
z The screen may become distorted due to the following operations. In this case, restart the computer.
• Disconnecting an external display for which you have set high resolution or high refresh rate.
• Connecting/disconnecting an external display during computer operations.
66
Switching the Display
1 Press [A1] button
Each time you press the button:
Internal LCD Simultaneous display External display
z When the display cannot be switched, right-click on the desktop and click [Graphic Properties] to switch the dis-
play.
*1
You can change the setting of application buttons. (Î page 15)
*1
.

LAN
<Only when connected to Cradle>
Connecting LAN
1 Turn off the computer.
z Do not use standby or hibernation function.
2 Connect the AC adaptor to the DC-IN jack (A) on
the Cradle.
67
3 Set the computer to the Cradle.
4 Connect the LAN port (B) and the network sys-
tem (server, HUB, etc.) by using a LAN cable.
5 Turn on the computer.
BA

Disabling/Enabling Wireless Communication
There are 3 ways of disabling and enabling wireless communication.
z Wireless Switch Utility (Î below )
z Settings in the [Advanced] menu of the Setup Utility (Î page 81)
z Setting in the Wireless Communication Disable Utility (Î page 69)
NOTE
z For further information about Wireless LAN: Î page 71
z For further information about Bluetooth: Î page 74
z For further information about Wireless WAN: Refer to the instruction manual of the wireless device.
z To use wireless communication, set the wireless devices ([Wireless LAN] / [Bluetooth] / [Wireless WAN]) to [Enabled]
(default) in the [Advanced] - [Wireless Configuration] menu of the Setup Utility (Î page 81).
z It may take some time to turn off wireless communication after switching the wireless switch off.
z If the IEEE802.11a setting is changed in [Device Manager] (Î page 73), the display will be changed accordingly.
z You can check the wireless LAN communication status in Intel
lowing procedure.
• Double-click , , , or on the notification area.
• Click [start] - [All Programs] - [Intel PROSet Wireless] - [WiFi Connection Utility]
®
PROSet/Wireless Software. Perform either of the fol-
68
Wireless Switch Utility
This utility allows you to enable or disable wireless devices from a pop-up menu in the notification area. In the default setting,
all wireless devices are enabled.
The Wireless Switch Utility icon
The icon appears in the notification area when the computer is turned ON. It shows the status of wireless devices.
• : Indicates that the wireless devices are enabled.
• : Indicates that the wireless devices are off.
• : Indicates that the wireless devices have been disabled in the Setup Utility.
To enable or disable particular wireless devices
1 Click the Wireless Switch Utility icon to show the pop-up menu.
2 Select ON or OFF for the device you want to enable or disable.

Disabling/Enabling Wireless Communication
69
Wireless Connection Disable Utility
You can automatically disable the wireless LAN/wireless WAN connection when a LAN cable is connected to the Cradle and
your computer is set to the Cradle. You need to install the Wireless Connection Disable Utility to use this function.
Installing the utility
1 Log on to Windows as an administrator.
2 Click [start] and input [c:\util\wdisable\setup.exe] in [Start Search], and press (Enter).
3 Follow the on-screen instructions to install the Wireless Connection Disable Utility.
Checking the status of the wireless connection
NOTE
z The Wireless Switch Utility should also be installed so that the Wireless Connection Disable Utility works. The Wire-
less Switch Utility has already been installed at the factory.
z The utility does not automatically disable the Bluetooth connection.

Disabling/Enabling Wireless Communication
70
Status indication
After installation, the Wireless Connection Disable Utility is automatically started after a user is logged in. An icon appears on
the notification area.
: Indicates that
• the utility is enabled, and
• the wireless connection is disabled since a LAN cable is connected.
: Indicates that
• the utility is enabled, and
• the wireless connection is enabled since no LAN cable is connected.
: Indicates one of the following statuses;
• the utility does not monitor the LAN port status,
• the Wireless Switch Utility has not been started, or
• LAN is disabled in the device manager.
Menu
Right-clicking the utility icon in the notification area opens a menu as follows.
Clicking the menu item causes the following utility action.
Monitoring LAN Cable: ON
Enables the Wireless Connection Disable Utility to monitor the LAN port and disables wireless connection when a LAN cable is connected.
Monitoring LAN Cable: OFF
Disables the Wireless Connection Disable Utility, and enables wireless connection regardless of whether a LAN cable is connected or not.
Exit
Exits the Wireless Connection Disable Utility and enables wireless connection.

Wireless LAN
CAUTION
z To avoid unauthorized access to the computer through wireless LAN
We recommend you to make security settings such as encryption before using wireless LAN. Otherwise the hard disk
data such as the shared files can be exposed to the risk of unauthorized access.
NOTE
z Communication is established through the wireless LAN antenna (A). Do not
block the antenna area with your hand or body.
z You cannot use the wireless LAN function together with the Fast User Switching
function.
z The transmission rate will be lower when a microwave oven is used near by.
z To use wireless LAN, set [Wireless LAN] to [Enabled] (default) in the [Advanced] -
[Wireless Configuration] menu of the Setup Utility (Î page 81).
A
71
To turn on/off wireless LAN
Î page 68, Disabling/Enabling Wireless Communication
To check the wireless LAN communication status
1 Place the cursor over the Wireless Switch Utility icon ( or ) on the notification area.
A tooltip appears.
NOTE
z The Wireless Switch Utility icons ( and ) indicate the on/off status of wireless communication, not the
IEEE802.11a setting.
z If the setting is changed in [Device Manager], the display will be changed accordingly.
z Perform either of the following procedures to check the status in Intel
• Double-click , or on the notification area.
• Click [start] - [All Programs] - [Intel PROSet Wireless] - [WiFi Connection Utility].
®
PROSet/Wireless Software.

Wireless LAN
Setting the Profiles
1 Double-click / / on the notification area.
The [Intel® PROSet/Wireless WiFi Connection Utility] screen appears.
72
z When or is displayed, skip step
2.
2 When you double-clicked in step 1, slide the wireless switch to turn on.
3 Click [Profiles] at the lower right corner of the window, and click [Add].
4 Enter the profile name and WiFi Network Name (SSID), and make other necessary
changes, then click [Next].
5 Make necessary settings and click [OK].
6 Select the profile you set and click [Connect].
7 Click [Close].
NOTE
z You need to set the profile for each user.
z The settings depend on the network environment. For further information, ask the system administrator or the person
in charge of the network.
®
z For further information of Intel
PROSet/Wireless software, refer to [Help] in the menu bar.

Wireless LAN
73
Enabling/Disabling the Wireless LAN Standard IEEE802.11a (802.11a)
1 Click or on the notification area.
2 Click [802.11a Enabled] or [802.11a Disabled].
NOTE
z In some countries, communication using IEEE802.11a (5 GHz wireless LAN) standard is restricted by law.
z The Wireless Switch Utility icon ( or ) indicates the on/off status of wireless LAN and/or Bluetooth and/or wire-
less WAN, not the setting of IEEE802.11a.
z If IEEE802.11a is enabled or disabled while the computer is connected to an IEEE802.11b/g access point, the connec-
tion will be temporarily interrupted.
z You can also change the IEEE802.11a setting in [Device Manager].
A Click [start] - [Control Panel] - [Performance and Maintenance] - [System] - [Hardware] - [Device Manager].
B Double-click [Network adapters] and double-click [Intel(R) WiFi Link 5100].
C Click [Advanced], and then select [Wireless Mode] in [Property].
D Remove the check mark from [Use default value] in [Value], and select the settings (e.g., [802.11a and 802.11g]).
E Click [OK].
If you enable or disable 802.11a using the pop-up menu of Wireless Switch Utility, the setting in [Device Manager] will be
accordingly changed as below.
Settings in Device Manager
[802.11a, 802.11b and 802.11g]
[802.11b and 802.11g]
[802.11g only]
[802.11a and 802.11g]
[802.11a only]
[802.11b only]
When 802.11a is enabled When 802.11a is disabled
a+b+g is enabled b+g is enabled
a+g is enabled g is enabled
a is enabled b is enabled
Settings in Wireless Switch Utility

Bluetooth
You can access internet and other Bluetooth devices without connecting cables.
NOTE
74
z Communication is established through the Bluetooth antenna (A). Do not block the
antenna area with your hand or body.
z To use Bluetooth, set [Bluetooth] to [Enabled] (default) in the [Advanced] - [Wireless
Configuration] menu of the Setup Utility (Î page 81).
z The transmission rate will be lower when a microwave oven is used near by.
To turn on/off Bluetooth
Î page 68, Disabling/Enabling Wireless Communication
To check the Bluetooth communication status
A
Î page 68, The Wireless Switch Utility icon
To access the online manual
1 Click [start] - [All Programs] - [Bluetooth] - [User’s Guide].

Icon Enlarger
You can enlarge the screen items such as characters, icons, title bars and cursor.
CAUTION
z “Icon Enlarger” will not start up if the display resolution is set lower than 1024 x 768 dots.
NOTE
z A part of the enlarged menu or some screen items may be hidden. In this case, overlay the cursor to display pop-ups,
scroll the screen, or use other functions to display the hidden items.
z The Icon Enlarger setting affects the website characters displayed by Internet Explorer and the e-mail characters in
Outlook Express. Some characters of website and e-mail may not be enlarged.
Preparation
Close all of the applications before using “Icon Enlarger”.
75
1 Click [start] - [All Programs] - [Panasonic] - [Icon
Enlarger].
2 Select the size.
3 Click [OK].
The screen will be displayed in the selected size.
Normal Size Large Size
Extra Large Size

Loupe Utility
You can magnify the specific part of the screen.
Activating the Loupe Utility
1 Click [start] - [All Programs] - [Panasonic] - [Loupe Utility].
2 Click [OK].
z appears on the notification area.
Using the Loupe Utility
1 Point the cursor at the part of the screen you want to magnify.
2 Double-click , or right-click and click [Show Loupe].
z The part pointed by the cursor is magnified.
z Alternatively you can press and hold
, and right-click.
Alt
76
3 Drag the loupe window (A) to move the magnified part.
z To hide the loupe window, click the Hide button (B).
Alternatively you can click any part out of the loupe window, or press and hold
Alt
and right-click.
z To change the loupe window size, drag the bottom-right corner (C).
The size range you can enlarge/shrink depends on the screen’s resolution.
NOTE
z The magnified text or image in the loupe window is fixed at the moment that the part is magnified (e.g., at the moment
you double - click ). To reflect the change you made on the original screen to the loupe window, click the loupe
window.
z The Loupe Utility does not work with some applications.

Loupe Utility
Setting the Loupe Utility
1 Right-click on the notification area.
2 Click [Settings].
[Show/hide shortcuts assignment]
z When using the external mouse/touch pad
A Click [Mouse/Touch pad]
B Click a combination of
keys can be combined; for example,
C Click either [Right click] or [Left click] to use in combination with the key(s)
selected in step B above.
z When using the keyboard
A Click [Keyboard].
B Click the text box and then press the key used for the shortcut.
(e.g.,
Alt
+ Z,
Ctrl
Alt, Ctrl
+
Alt
, and
+ Z, etc.)
Shift
Ctrl
, and add the check mark. (Multiple
+
Alt
)
77
NOTE
When using shortcut function, set the computer to the Cradle and connect an external keyboard to the Cradle.
[Window shape]
Select the shape of the loupe window.
[Autorun]
You can turn on/off autorun of the Loupe Utility and the explanation window.
[Restore Defaults]
Click to restore the default settings.
3 Click [OK].

Setup Utility
You can make the settings of the computer’s operating environment (password settings, startup drive selection, etc.)
Preparation
z Set the computer to the Cradle and connect an external keyboard to the Cradle.
78
Starting the Setup Utility
1 Turn on or restart the computer.
2 Press
F2
or
Del
several times while [Panasonic] boot screen is displayed soon after the
computer starts the startup procedure.
When [Enter Password] is displayed, input your password.
When you start the Setup Utility with Supervisor Password
z You can make the settings of all items of the Setup Utility.
When you start the Setup Utility with User Password
z Note the following:
• In the [Advanced] and [Boot] menus, you cannot make the settings of all items.
• In the [Security] menu, you can change only the User Password when [User Password Protection] is set to
[No Protection]. You cannot delete the User Password.
• In the [Exit] menu, you cannot make the setting of [Load Default Values] and [Boot Override].
•
F9
(Setup Defaults) does not function.

Setup Utility
79
Information Menu
Underlined items are the factory presets.
Language English
Japanese
Product Information Computer information
Model No
Serial No
System Information
Processor Type
Processor Speed
Memory Size
Available Memory
Hard Disk
BIOS Information
BIOS
Embedded Controller
Accumulative Operating Time
Access Level
(cannot be changed.)

Setup Utility
80
Main Menu
Underlined items are the factory presets.
System Date
• Week/Month/Day/Year.
• You can use
System Time
• 24-hr. style.
• You can use
Main Configuration
SAS Button F1
Handle Button Disabled
Display
• The display during the Windows start-up process. When an external display is not connected,
the information appears on the internal LCD even though the [External Monitor] is selected.
Battery Charging Indicator
• When set to [Flashing], the battery charging indicator flashes at relatively long intervals while the
battery is being charged.
Environment Normal Temperature
Battery 1 Current Status
• Only when [Environment] is set to [Auto].
Tab
to move the cursor.
Tab
to move the cursor.
[xx x/xx/xxxx]
[xx:xx:xx]
F2
F3
F4
F5
F6
F7
F8
F9
F10
F11
F12
Enabled
External Monitor
Internal LCD
On Continuous
Flashing
High Temperature
Auto
Depending on the battery status, either
“Normal Temperature” or “High Temperature” is displayed.

Setup Utility
81
Battery 2 Current Status
• Only when [Environment] is set to [Auto].
Depending on the battery status, either
“Normal Temperature” or “High Temperature” is displayed.
Advanced Menu
Underlined items are the factory presets.
CPU Configuration
Execute-Disable Bit Capability Disabled
Enabled
Hyper Threading Technology Disabled
Enabled
Intel (R) Virtualization Technology Disabled
Enabled
Peripheral Configuration
Legacy USB Support Disabled
Enabled
Cradle USB Port Disabled
Enabled
Camera Disabled
Enabled
XWireless Configuration
XSerial Port Configuration
• Used to configure the GPS and Barcode Reader
Enter the sub-menu*1.
Enter the sub-menu*2.
*1
The sub-menu that appears when [Wireless Configuration] is selected:
Wireless LAN. Disabled
Enabled
Wireless WAN
• Only for model with Wireless WAN
Bluetooth Disabled
Disabled
Enabled
Enabled

Setup Utility
*2
The sub-menu that appears when [Serial Port Configuration] is selected:
GPS
• Only for model with GPS
Barcode Reader Disabled
Trigger Mode
• Only when [Barcode Reader] is set to [Enabled].
Disabled
Enabled
Enabled
Software
Hardware
82
Boot Menu
Underlined items are the factory preset
Boot Option Priorities
Boot Option # 1
Boot Option # 2 Hard Disk
Boot Option # 3 USB CD/DVD Drive
Boot Option # 4
Boot Option #5
USB Floppy Disk
*4
LAN
USB Hard Disk
*3
To change the boot order
The default order is [USB Floppy Disk*3] - [Hard Disk] - [USB CD/DVD Drive] - [LAN] - [USB Hard Disk].
z Press (Enter) on the boot device you want to change and select the boot device from the following menu.
• When a selected boot device in the following menu already exists in either of the [Boot Option (#1 to #4)], the boot
device appears at the newly selected position by switching the positions with the original boot device that existed before
at the position.
• When you select [Disabled] in the following menu, the disabled [Boot Option] is ignored and the boot device in the next
[Boot Option] operates.
[USB Floppy Disk]
[Hard Disk]
*4
[LAN]
[USB Hard Disk]
[USB CD/DVD Drive]
Disabled
*3
It is recommended to use the Panasonic USB floppy disk drive (optional: CF-VFDU03U)
*4
Only when connected to CF-VEBH11AU
*3

Setup Utility
NOTE
z To boot from the following devices, make the settings as below.
To boot from You need to set
• USB connected device : [Legacy USB Support] to [Enabled] (Î page 81)
83
Security Menu
Underlined items are the factory presets.
Boot Prompt Configuration
Setup Utility Prompt
*5
• When [Setup Utility Prompt] is set to [Disabled], the message “Press F2 for Setup”
played on [Panasonic] boot screen. However
is not displayed.
Password on Boot Disabled
Set Supervisor Password Enter the sub-menu.
Hard Disk Lock
• Can be changed only when [Set Supervisor Password] is set.
User Password Protection No Protection
Set User Password
• Can be changed only when [Set Supervisor Password] is set.
XEmbedded Security (TPM) Enter the sub-menu.
XFingerprint Security Enter the sub-menu.
F2, F12*6 and
Del
will work even if the message
is not dis-
Disabled
Enabled
Enabled
Disabled
Enabled
Protected
Enter the sub-menu.
*7
*5
Only when connected to CF-VEBH11AU : “Press F2 for Setup / F12 for LAN”
*6
Only when connected to CF-VEBH11AU
*7
You need to set the computer to the Cradle and connect an external keyboard to the Cradle, when the computer starts.

Setup Utility
Exit Menu
84
Save Values and Reboot
Reboot Without Saving Changes
Save Options
Save Current Values Save the changes for all Setup options.
Load Previous Values Load previous values for all Setup options.
Load Default Values Load default values for all Setup options.
Boot Override
(Device Information) To select a boot device which operates only in the next boot-
Reboot the system after saving the changes.
Reboot the system without saving the changes.
ing.

Hardware Diagnostics
If it appears that the hardware installed in this computer is not operating properly, you can use the PC-Diagnostic Utility to
determine whether or not there is a problem.
If the utility discovers a problem in the hardware, contact Panasonic Technical Support.
Software cannot be checked using this utility.
Preparation
z Set the computer to the Cradle and connect an external keyboard and a mouse to the Cradle.
85
Hardware that can be checked using the PC-Diagnostic Utility
z CPU/Systems (check CPU)
z RAM XXX MB (check Memory)
z HDD XXX GB (check Hard Disk)
z Video (check Video Controller)
z Sound
z Wireless LAN
z Wireless WAN
z Bluetooth
z GPS
z Touchscreen
*1
*2
*3
z When the video diagnostic check is running, the display may be distorted, and when the audio diagnostic check is running,
*1
*2
*3
When the diagnostic utility is running, a loud beep will sound. (The beep will not sound if mute is using Windows.)
Only for model with wireless WAN
Only for model with GPS
sounds may be generated from the speaker. These are not malfunctions.

Hardware Diagnostics
86
Regarding the PC-Diagnostic Utility
NOTE
z For the hard disk drive and memory only, you can select standard diagnostic check or extended diagnostic check.
When the PC-Diagnostic Utility starts up, it will run the standard diagnostic check.
z You cannot operate the PC-Diagnostic Utility by touching the screen.
Operations External mouse operations Keyboard operations
Select icon Place the cursor above the icon
Press
((
Space
. and then press
close) cannot be selected)
Click the icon Click (right click cannot be used)
Complete the PC-Diagnostics
Utility and then restart the computer
Click
(close)
Press
Press
Space
Ctrl
above the icon
+
Alt
,
Del
.
Running the Diagnostic Check
Run this utility using the default settings in the Setup Utility.
If the Setup Utility or other settings will not allow hardware to be executed, the hardware icon will be displayed in gray.
1 Connect the AC adaptor.
During the diagnostic check, do not remove the AC adaptor, or attach any peripheral devices.
2 Turn on or restart the computer, and press
played.
The Setup Utility starts up.
z If the password is requested, enter the Supervisor Password.
z If you are using the computer after changing the settings from the status at the time of purchase, we recommend
that you make a note of the settings that are changed.
3 Press
At the confirmation message, select [Yes] and press (Enter).
F9
.
F2
or
Del
while [Panasonic] boot screen is dis-

Hardware Diagnostics
87
4 Press
At the confirmation message, select [Yes] and press (Enter).
The computer will restart.
5 Press and hold
When the PC-Diagnostic Utility starts up, it will automatically begin the diagnostic check for all hardware components.
z If the password is requested, enter the password.
z Do not touch the screen.
z The keyboard cannot be used until alternating blue and yellow colors are displayed on the left side of the hard-
z By clicking the icon, you can execute the following operations:
z You can check the status of the diagnostic check by the display color on the left side of the hardware icon
F10
.
Ctrl
+ F7 while [Panasonic] boot screen is displayed.
ware icon (A).
•
: Start the diagnostic check from the beginning
: Stop the diagnostic check (You cannot restart the check partway through by clicking )
•
•
: Display help (click the screen or press
(A).
• Aqua: Not running diagnostic check
• Alternating blue and yellow: Currently running diagnostic check. The interval of the alternating colors
differs depending on the type of diagnostic check currently running.
During memory diagnostic check, the display may freeze for a long period of time. Wait until the process is
complete.
• Green: No problems discovered
• Red: Problems discovered
Space
to return to the original diagnostic check screen)
A
NOTE
z Using the following procedure, you can run a diagnostic check on a specified hardware component, or run an
extended diagnostic check on the memory or the hard disk (The extended diagnostic check is only for the memory
and the hard disk). The extended diagnostic check is more detailed, and so requires a longer period of time to run.
A Click
B Click the icon for the hardware that is not to be checked, so that the icon is displayed in gray (B).
When running a check on the memory or the hard disk, clicking the icon once will turn on the
extended diagnostic check (“FULL” (C) will be displayed below the icon); click again, and the icon
will be displayed in gray (D).
C Click
to stop the diagnostic check.
to start the diagnostic check.
B
e.g. hard disk
C
D

Hardware Diagnostics
6 When all the hardware has been checked, confirm the diagnostic check results.
If the display is red and the message “Check Result TEST FAILED” is displayed, you can assume that there is a
problem with the computer’s hardware. Confirm which hardware component is displayed as red, and contact
Panasonic Technical Support.
If the display is green and the message “Check Result TEST PASSED” is displayed, the computer’s hardware is
operating normally. Continue using the computer as it is. If the computer still does not operate properly, reinstall the
software. (
7
After the diagnostic check is complete, click (close), or press
the computer.
⇒ OPERATING INSTRUCTIONS “Reinstalling Software”)
Ctrl
+
Alt
+
88
Del
to restart

Hard Disk Data Erase Utility
When disposing the computer or transferring the ownership, erase all hard disk data in order to avoid data leakage.
Even if you erase the data or initialize the hard disk using normal Windows commands, the data can be read with some special software. Use the hard disk data erase utility to erase the data completely.
Note that transferring of the ownership without uninstalling the commercial software will be a violation of the software’s
license agreement.
The hard disk data erase utility erases data using an overwriting method, but there is a possibility that due to malfunctions
or other operational errors, data may not be completely erased. There are also specialized devices that may be able to read
data that has been erased using this method. If you need to erase highly confidential data, we recommend that you contact
a company that specializes in this process. Panasonic Corporation will bear no responsibility for losses or damages suffered as a result of the use of this utility.
NOTE
z You cannot choose a specific partition to erase data.
<Only for flash memory model>
z While performing the Hard Disk Data Erase Utility, read the term "hard disk" as "flash memory" whenever it appears on
the screen.
Preparation
z Prepare the following items:
• The Product Recovery DVD-ROM for Windows 7 (included)
• USB CD/DVD drive (optional) (refer to recent catalogs and other sources for information about the products available)
• Set the computer to the Cradle and connect an external keyboard and mouse to the Cradle.
z Remove all peripherals (except for the CD/DVD drive, the keyboard, and mouse).
z Connect the AC adaptor and do not remove it until hard disk data erase is complete.
z Use the external keyboard and the mouse to operate the following steps.
89
1 Turn off the computer and connect the CD/DVD drive to the USB port on the Cradle.
2 Turn on the computer, and press and hold
played.
The Setup Utility starts up.
z If the password is requested, enter the Supervisor Password.
3 Press
z At the confirmation message, select [Yes] and press (Enter).
F9
.
F2
or
Del
while [Panasonic] boot screen is dis-
4 Set the Product Recovery DVD-ROM into the CD/DVD drive.
5 Select the [Exit] menu, then select your CD/DVD drive in [Boot Override].

Hard Disk Data Erase Utility
90
6 Press (Enter).
z The computer will restart.
z If [Enter Password] is displayed during the following procedures, input the Supervisor Password or the User
Password.
7 Click [Erase the whole data on the Hard Disk for security] and click [Next].
8 At the confirmation message, click [YES].
9 Click [Continue].
10 Click [Continue] again.
11 Click [YES].
Erasing the hard disk data status.
12 After erasing is completed, remove the Product Recovery DVD-ROM and click [OK].

Error Code / Message
Follow the instructions below when an error message or code appears. If the problem persists or if the error code/message is
not shown here, contact Panasonic Technical Support.
Error Code/Message Solution
Bad System CMOS An error has occurred in the memory of system settings. This occurs when the memory
System CMOS Checksum
Error
Invalid Year. System date
restored to 01/01/2009
Press <F2> to enter setup z Write down the error details and press
content is changed by an unexpected program operation, etc.
z Start the Setup Utility and return the settings to the default values, and then change the
settings as necessary.
z If the problem persists, the internal clock battery may need to be replaced. Contact
Panasonic Technical Support.
The date and time settings are not correct.
z Start the Setup Utility and set the correct date and time.
z If the problem persists, the internal clock battery may need to be replaced. Contact
Panasonic Technical Support.
F2
or
Del
to start the Setup Utility.
Change the settings if necessary. (Î page 78)
91

Technical Information
92
Network Connections and Communications Software
Close the communications software before using the power saving function.
z If the power saving function (standby or hibernation) is activated while communications software is used, the network con-
nection may be interrupted, or the performance may be adversely affected. In this case, restart the computer.
z In a network environment, set the [System standby] and [System hibernates] settings to [Never].
Click [start] - [Control Panel] - [Performance and Maintenance] - [Power Options] - [Power Schemes].
Regarding Windows XP
You can select the Classic view of Control Panel or the Classic Start menu. You can also change the way a user logs on or off.
This manual explains using the Windows XP default setting (not Classic view or Classic Start menu etc.).
z Windows Update
You can update to the latest patches and service packs for Windows with the following menus.
Click [start] - [All Programs] - [Windows Update].
Do not apply “Driver Updates” even if a message to update a driver appears. If a driver update is required, contact your
technical support office.
z If the message “Your computer might be at risk” is displayed
Select (red icon) on the notification area and make the appropriate settings. The Windows Security Center regularly
gives you notice so that you can make the optimum settings. This is not an error message and you can use the computer.
However, making appropriate measures is recommended to reduce the risk of virus and other attacks.
Using the Windows Associated Files
The Windows files included in the retail version of the Windows CD-ROM for OS are contained in the following folders:
c:\windows\docs, c:\windows\dotnetfx, c:\windows\i386, c:\windows\support, c:\windows\valueadd

Troubleshooting (Advanced)
Refer to the following instructions when a problem occurs. If the remedies indicated in the chart do not solve the problem,
contact Panasonic Technical Support. For a software problem, refer to the instruction manual of the software.
• To check the computer’s usage status (Î page 102).
93
Shut Down
Cannot shut down or restart Windows. z Remove USB devices.
z It may take 1 or 2 minutes to shut down.
Standby or Hibernation
Cannot enter standby or hibernation. z Remove USB devices temporarily. If the problem persists, restart the computer.
z It may take 1 or 2 minutes to enter standby or hibernation.
z The computer does not enter standby or hibernation immediately after resum-
ing. Wait approximately 1 minute.
Cannot enter standby or hibernation
automatically.
z Disconnect peripheral devices.
z If you connect to a network using wireless LAN function, select the profile and
connect to the access point (Î page 72).
z If you do not use wireless LAN function, turn off wireless LAN function (Î page
68). If you use wireless LAN function, refer to “To enter standby or hibernation”
(Î page 21) to enter sleep on hibernation.
z Make sure that you are not using any software that regularly accesses the hard
disk. Check that the software which constantly access to the hard disk or place
burden on CPU are not used.
Sound
No sound.
Distorted sound. z Stop and restart playback.
"There was an error updating the registry" appears when Sound Recorder
is started.
z Click or on the notification area and change the volume.
z Restart the computer.
z Sound Recorder is started by a limited account user whose language setting is
not the same as the administrator user who last started Sound Recorder. This
does not affect the operation.
Keyboard
Cannot enter special characters (ß, à,
ç, etc.) and symbols.
z Use the character map. Click [start] - [All Programs] - [Accessories] - [System
Tools] - [Character Map].

Troubleshooting (Advanced)
94
Network
Cannot connect to network. z Set LAN (Î page 67).
Cannot check the computer’s MAC
address.
z Follow the steps below.
A Click [start] - [All Programs] - [Accessories] - [Command Prompt].
B Input “ipconfig/all”, and press (Enter).
C Write down the 12-digit string of alphanumeric displayed in the “Phys-
ical Address” line of the LAN or the wireless LAN (only for model with
wireless LAN).
D Input [exit], and press (Enter).
Wireless Communication
Cannot connect to a network. z Set the device ([Wireless LAN] / [Bluetooth] / [Wireless WAN]) to [Enabled] in
the [Advanced] menu of the Setup Utility (Î page 81).
z Disable the Wireless Communication Disable Utility (Î page 69).
z Restart the computer.
Access point is not detected.
z Confirm that / / is displayed on the notification area.
If / / is not displayed on the notification area, turn on the wireless
communication (Î page 68).
Connecting Peripherals
An error occurs while installing the
driver.
z When you install a driver of card or peripheral device, make sure that the driver
is compatible with the operating system. If it is not compatible, malfunction may
occur. For information about the driver, contact the manufacturer of the peripheral device.

Troubleshooting (Advanced)
95
Connecting Peripherals
A peripheral device does not work. z When you use the Cradle, connect the AC adaptor to the DC-IN jack on the
Cradle.
z Install the driver.
z Contact the manufacturer of the device.
z When operation resumes from standby or hibernation, devices such as a
mouse may not function properly. In this case, restart the computer or reinitialize the device.
z When is displayed in the Device Manager, remove and insert the device. If
the problem persists, restart the computer.
z The computer may not recognize the connection/removal of some devices, or
may not operate normally with some devices.
Operate the following steps.
A Click [start] - [Control Panel] - [Performance and Maintenance] -
[System] - [Hardware] - [Device Manager].
B Select the device and remove the check mark for [Allow the computer
to turn off this device to save power.] in [Power Management]. (This
item may be unavailable for some types of devices.)
USB floppy disk drive does not work
as a boot drive.
You do not know the address map for
IRQ, I/O port address, etc.
z Depending on the floppy disk drive you are using, the computer may not boot
properly. The performance is confirmed by Panasonic USB floppy disk drive
(optional : CF-VFDU03U) when the computer boots from the floppy disk.
z Set [Legacy USB support] to [Enabled] in the [Advanced] menu of the Setup
Utility (Î page 81).
z Set [Boot Option #1] in [Boot] menu of the Setup Utility to [USB Floppy Disk].
(Î page 82).
z Turn off the computer and connect the USB floppy disk drive, and then restart
the computer.
z To check the current address map, click [start] - [Control Panel] - [Performance
and Maintenance] - [System] - [Hardware] - [Device Manager] - [View] [Resources by type].

Troubleshooting (Advanced)
Connecting Peripherals
96
LAN transmission speed slows down
noticeably.
Wireless LAN connection is cut.
Touch Screen Operation
Cannot point the correct position using
the included stylus.
Barcode Reader
z These problems may occur due to performance loss that results from the CPU
power-saving function. Log on to Windows as an administrator and follow the
steps below.
A Click [start] - [Run] and input [c:\util\cpupower\setup.exe], and click [OK].
Follow the on-screen instructions.
B Click [start] - [All Programs] - [Panasonic] - [CPU Idle Setting].
C Click [Performance] and click [OK], then click [Yes].
The computer will restart.
z If the problem persists, click [start] - [Control Panel] - [Performance
and Maintenance] - [Power Options] - [Power schemes], select
[Always On] in [Power schemes], and click [OK].
• The above remedy is effective for performance loss resulting from the CPU
power saving function, but not for other causes (e.g., noise generated by high
CPU load such as video playback).
• The above remedy slightly reduces the battery operation time. Normally it is
recommended to select [Battery (Windows XP Standard)] in [CPU Idle Setting] and to select [Portable/Laptop] in [Power schemes].
z Perform the calibration (Î page 5).
Reading is not possible. z Confirm that the barcode is readable (without damage, etc.).
z Confirm the area for reading.
The distance from the reader to the barcode is important.
As a rule of thumb, a farther distance should be used for a larger symbol to
allow the LED light to cover the symbol. In addition, a closer distance should be
used for a thinner symbol.
z Be sure the barcode is not placed closer than necessary to the reader.

Troubleshooting (Advanced)
Fingerprint Reader
97
The sensor does not enroll or authenticate my fingerprint.
Sensor does not work. z Exported passport can help you if you need to replace the sensor.
z Slide your finger correctly. For further information about enrollment and authen-
tication, refer to “How to Use the Fingerprint Reader” (Î page 54) and [Finger-
print Tutorial].
• Click [start] - [All Programs] - [Protector Suite QL] - [Fingerprint Tutorial].
z The sensor enrolls or authenticates no fingerprint, or performs authentication
poorly, despite the correct way of finger sliding when your finger is in any of the
conditions stated below:
• Rough skin, or injured finger (with a cut or a skin inflammation)
•Extremely dry
• Soiled with mud or oil
• Fingerprint has been worn and has faded
• Wet with water or sweat
<You can improve enrolling and authentication sensitivity by taking the following steps when any of the conditions described above exists>
• Wash your hands or wipe them dry.
• Use a different finger for registration or authentication.
• Treat your finger with a hand cream when it is rough skin or dry.
z Clean the fingerprint sensor. For further information, refer to “Handling & Main-
tenance” (Î page 60).
z The fingerprint sensor may be malfunctioning when it continues to perform
poorly after the steps described above have been performed. Contact
Panasonic Technical Support.
• Log on to Windows as an Administrator.
You can always access the computer by using your Windows log on password. In convenient mode, any user can access the computer by using your
Windows log on password.
• To access [File Safe]
[File Safe] can be always accessed by using the [File Safe] backup password.
• Other functions
Replace/Repair the sensor, then follow the instructions in section “Replacing
sensor.” (Î page 98).
Some limited functions (e.g. deleting passport) is available without a functional sensor. In case of deleted operation, it is necessary to cancel the fingerprint verification operation to get to the password dialog.

Troubleshooting (Advanced)
Fingerprint Reader
98
User cannot use enrolled finger. (e.g.
injury)
Replacing sensor. z If you need to replace a non-functioning Fingerprint Reader, follow this proce-
z It is strongly recommended to enroll at least 2 fingers to avoid this problem.
If you enrolled multiple fingers, simply use other finger. If you only enrolled one
finger that can be used, we recommend to use the [Enroll or Edit Fingerprints]
wizard and enroll additional fingerprints.
If none of your enrolled fingers can be used, follow this procedure:
A Log on to Windows as an Administrator.
You can always access the computer by using your Windows log on password. In convenient mode, any user can access the computer by using
your Windows log on password.
B Update the enrolled fingerprints.
To be able to fully use Protector Suite QL, you need to have usable
enrolled fingerprints. Enter the [Enroll or Edit Fingerprints] wizard.
• If you do not use [Advanced Security], you can still enter using the Windows
password.
• If you use [Advanced Security] with backup password, you can enter using
the backup password.
• If you use [Advanced Security] without backup password, there is no other
way to add a different fingerprint. In this case we recommend either to wait
until your finger is usable again (e.g. the injury heals), or to delete the passport (Use [Delete] wizard) and then reenroll new fingerprints.
Please note that in the latter case all your stored secret data (passwords, [File
Safe] encryption keys) will be lost. To perform the delete operation it is necessary to cancel the fingerprint verification operation to get to the password dialog, then enter your Windows log on password.
• To access [File Safe]
If you did not perform the procedure in step B or it did not work, you can still
access [File Safe] by using the [File Safe] backup password.
dure.
Enrollment to the hard disk:
If enrollment to hard disk is used, “Protector Suite QL” has not stored any data
on the device and therefore has no problem to continue after you replaced the
sensor. However, in case you use the Power-on security (Preboot Authentication), you may need to use the [Enroll or Edit Fingerprints] wizard to update the
related data.
Enrollment to the device:
If the fingerprint has been enrolled to the device, a new passport will be
required. Follow the procedure in the section “Starting Over”.

Troubleshooting (Advanced)
Fingerprint Reader
99
Lost [Advanced Security] backup
password.
Protector Suite QL reinstallation. z During Protector Suite QL uninstallation, you can select whether to delete the
Lost [File Safe] backup password. z It is necessary to change the backup password for [File Safe], refer to the soft-
Accessing [File Safe] after Protector
Suite QL uninstallation.
Accessing [File Safe] after computer
crash.
Removing data from the Reader. z When enrollment to the device is used, passport data is stored to the device. To
z To change the [Advanced Security] backup password, go to the [Enroll or Edit
Fingerprints] wizard and swipe your finger and go through the Fingerprint
enrollment. On the Advanced Security page you can change the backup password.
Protector Suite Data - including passports.
z If you want to reinstall the product, select button to leave the Protector Suite QL
data on the computer.
After the new installation, you will be able to use your data again.
z If the Protector Suite QL was uninstalled including the passports, then in case
of enrollment to device the fingerprints will still be stored in the device and the
user can use them reenrollment.
ware’s online manual (Î page 55).
z [File Safe] data can be accessed only using Protector Suite QL. If you acciden-
tally uninstalled Protector Suite QL, you have to reinstall it. If passport data was
not removed during uninstallation, everything will work automatically including
[File Safe]. If the passport data was removed during uninstallation the [File
Safe] will recognize that the installation was changed and will offer to use the
backup password, instead.
z If you have an exported passport, import it now so you can access [File Safe]
directly using fingerprints. Otherwise you can access [File Safe] using the [File
Safe] backup password: [File Safe] will recognize that the installation was
changed and will offer to use the backup password, instead.
remove it, go to the [Delete] passport wizard and delete existing passports, and
then use the [Fingerprint Storage Inspector] to remove remaining fingerprints
(e.g. left over from previous installations).
z In convenient mode, the [Fingerprint Storage Inspector] does not allow deleting
the last fingerprint for an existing passport and only user's own fingerprints can
be deleted. Therefore it is necessary to delete passports first.

Troubleshooting (Advanced)
Fast User Switching Function
100
Some applications do not work properly.
Screen Saver
“Could not find any compatible
Direct3D devices” appears.
Others
No response.
z When switching to a different user with the Fast User Switching function, the
following problems may occur. We recommend you not to use the Fast User
Switching function.
• Some applications may not work properly.
• The display settings may not be possible.
• Wireless LAN cannot be used.
• Bluetooth cannot be used.
z In these cases, log off all users without using Fast User Switching function and
perform the operation once more. If the problem persists, restart the computer.
z Do not use a 3D screen-saver.
z Press [ ] button to open Task Manager, then close the software application.
z An input screen (e.g., password input screen at startup) may be hidden behind
another window. Use
z Shut down by pressing and holding the power switch for 4 seconds or longer,
and turn on the computer and open the application again. If Windows runs correctly, but the application software does not start, click [start] - [Control Panel] [Add or Remove Programs] and remove the failing application software, then
reinstall the application software.
Alt +Tab
to check.
 Loading...